How to create content for the Workshop
Introduction
tl;dr You can skip the introduction if you want to get to the meaty stuff.
Welcome to this guide on how to utilize the Steam Workshop for Coffee Stain Studios' Goat Simulator. First of: thanks for buying the game and thanks for taking an interest in producing content for the Steam Workshop.
Secondly a bit of a disclaimer. The Workshop implementation in Goat Simulator is not perfect. It's was done during the very limited development time that Goat Simulator had as a whole. We hope it will suffice for now and if enough crazy user created content surfaces on the Workshop we will try to improve support over time.
Goat Simulator is made in the Unreal Engine 3. Some of you might be familiar with making mods for it in the past, some of you won't. No worries, it's quite easy and there are huge amounts of information on the internet to help out.
We here at Coffee Stain Studios do not have extensive experience in making mods, just games. So we don't know what is possible to make, but we're sure you will be able to create some mind blowing goat bending content.
Creating a Map
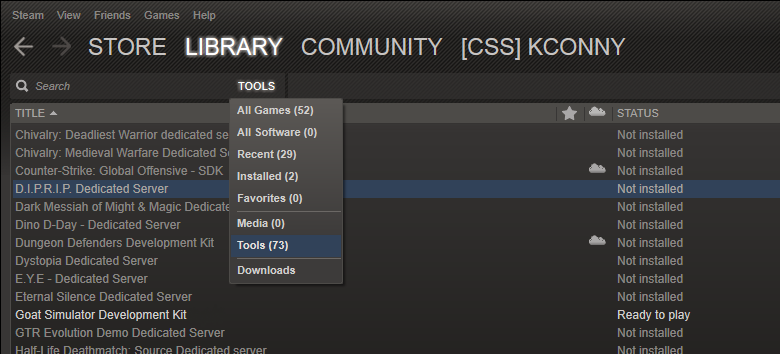 First, go to your Steam Library and filter it by Tools. If you haven't already, download the Goat Simulator Development Kit and start it up.
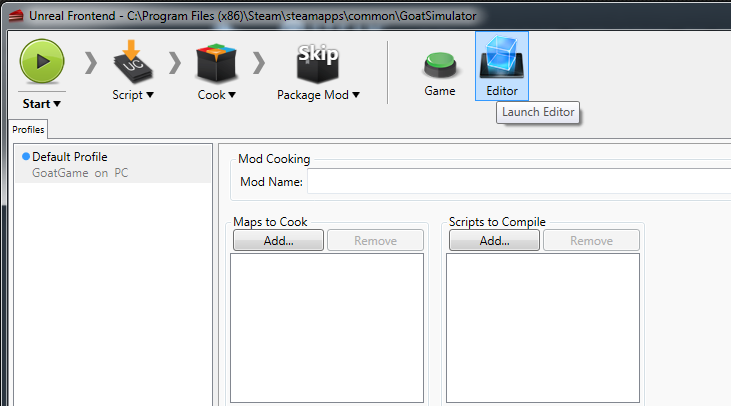 This will start up the Unreal Frontend, from here you can open the Unreal Editor.
This guide won't go into detail about how to use the Editor here because the subject is too vast to cover here. Google "udk tutorial" or something like that.
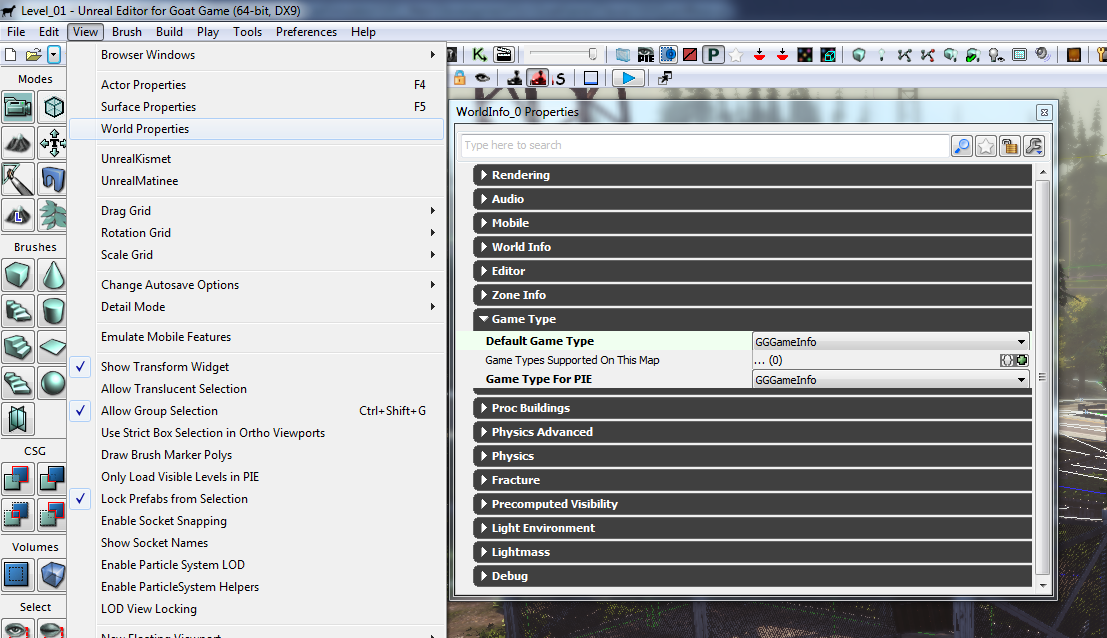 When you are satisfied with your map, make sure to select GGGameInfo or a subclass of it in world properties. World properties can be found under "view". And then under game type you should be able to select the appropriate Game Info.
 Important!
Don't use spaces in your mapname!
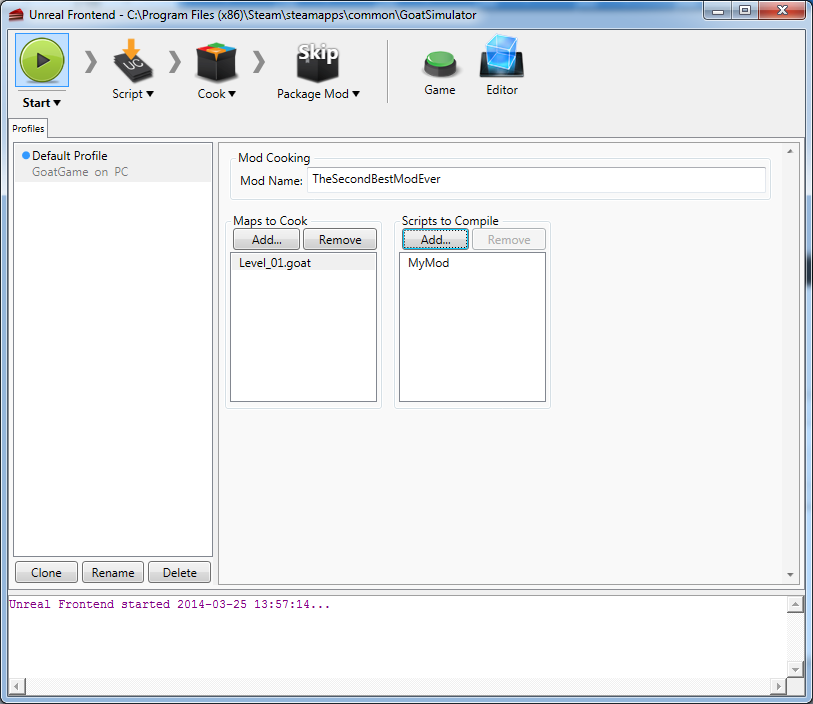
After saving your map, use the Unreal Frontend. Here you need to name your mod something appropriate. Be sure to select your map to cook as well. If it doesn't locate your map it may be because you have named the map wrong. It needs to have .goat as an ending. If the map is named correctly but does still not show up make sure it is placed in the correct folder. The correct folder is ..\GoatSimulator\GoatGame\Content\Maps\. After this is done just click the green start button.
If everything finishes successfully you can press the "Package Mod" button. This will put your stuff at the right place, in ..\GoatSimulator\GoatGame\Mods\MyMods\%modname%\.
Almost finished! Check out the other tutorial on how to add it to the game.
Creating a Mutator
A mutator is basically a textfile with some code in it. We have provided GGMutator as a base class for your mutators with some Goat Simulator specific hooks.
A hook is what we call a function that get's called when something specific happens in the game so that you can modify what should happen. Or "mutate" the behaviour.
First you need to set up a directory in your development\src folder located int the root of the game. This is usually something like "C:\Program Files (x86)\Steam\SteamApps\common\GoatSimulator\". This should be named something like "mymutators" but you can name it whatever.
Inside of that you create yet another folder. This must be named classes. So now you should have a working directory with this layout: "..\Development\Src\MyMutators\classes"
This is where you are going to create your own mutators!
So go ahead and create one now. You can do this by creating a regular text document. Name the file the same as the mutator is going to be called. And set the ending to .uc. So in this example we create a file called MyMutator.uc.
Now you can edit this file in whichever editor you prefer. You can even use notepad. Open up the file and add this to the beginning:
"class MyMutator extends GGMutator;"
Now you just need to start coding!
To see which hooks are available you can check out:
"Development\Src\Engine\classes\Mutator.uc" and "Development\Src\GoatGame\classes\GGMutator.uc".
If you don't do this it might break other mutators, and that wouldn't be very polite of you!
I won't go into more detail about how you actually code, that is up to you to go and find out!
When you are satisfied with your mutator you need to compile the script. Start the Goat Simulator Development Kit from Steam.
Add your mutator folder from the "scripts to compile"-drop down list. Now you can hit the big green button at the top left corner.
If that completes withour errors, you can hit "Package Mod". This will take all your compiled script files located in "..\GoatSimulator\GoatGame\Mods\" and put them in a new folder inside MyMods named after your Mod.
You will probably see some yellow text warning you about files you don't have yet, as well as some red text telling you about GoatMod.ini. Go check out "Adding a map or mutator to the game" guide to fix that issue!
Adding the Map or Mutator to the game
In order for your Map or Mutator to be selectable in game, from the Play menu of the Main Menu you will need to create a "GoatMod.ini". Place that file in the root of your mod.
This should be something like "GoatSimulator\GoatGame\Mods\MyMods\%modname%"
Where FileName is the name you have given the file for your Map. Display Name is what is going to be displayed in the games Play menu. The Description will be displayed when your item is moused over in the Play Menu.
MyStuff is the name of the package and FastGoat is the name of the actual mutator.
Uploading content to the Workshop
First off, start Goat Simulator, and enter the Workshop menu of the Main Menu. There you can open the My Mods sub menu, select a mod and upload it to the workshop. To successfully do this, you will need a couple of files. These are to be placed in the root of your mod, i.e. "GoatSimulator\GoatGame\Mods\MyMods\%myModName%".
Updating content on the Workshop
Downloading Content from the Workshop
If something goes wrong with the download or if it gets stuck, try restarting the game and it should start/resume the download.
Further Reading
- Goat Simulator - Achievements Guide (2026 Up to date, BFF help)★ 5 (1.2k)42k views2k ♥49 minUpdated Jun 24
- Получаем все достижения в игре Goat Simulator [127/127]★ 5 (1.5k)24k views2.2k ♥41 minRussianUpdated Aug 11, 2025
- Старое руководство по Goat Simulator★ 5 (1k)19k views840 ♥5 minUpdated Nov 25, 2025
- All golden collectibles guide [PAYDAY DLC]★ 5 (539)15k views463 ♥3 minUpdated May 20, 2023
- How to get the Builder Goat achievement★ 5 (242)14k views196 ♥1 minUpdated Nov 8, 2015
- 100% Guide and more!★ 4 (263)13k views327 ♥7 minUpdated Dec 4, 2014




- Upgrading to PremiumTeam Fortress 2★ 5 (20k)1441k views11k ♥6 minUpdated May 11, 2022
- No More Room in Hell Official ManualNo More Room in Hell★ 5 (2.8k)569k views2.1k ♥29 minUpdated Apr 22, 2019
- NMRiH Community Hosting GuidesNo More Room in Hell★ 5 (526)351k views653 ♥1 minUpdated Aug 10, 2022
- How to 'Git Gud' Soon™MORDHAU★ 5 (2k)318k views3k ♥68 minUpdated Nov 16, 2024
- Лучшие кооперативные игры SteamPAYDAY 2★ 5 (1.5k)315k views2.1k ♥56 minRussianUpdated Apr 27, 2025
- Desert Eagle Heat Treated | Blue GemCounter-Strike 2★ 5 (1.6k)293k views1.5k ♥2 minUpdated Jan 16





This guide was created by its original author on the Steam Community. Are you the author and want it removed? Request removal.