Tomb Raider: Complete All Optional Tombs
List of Optional Tombs
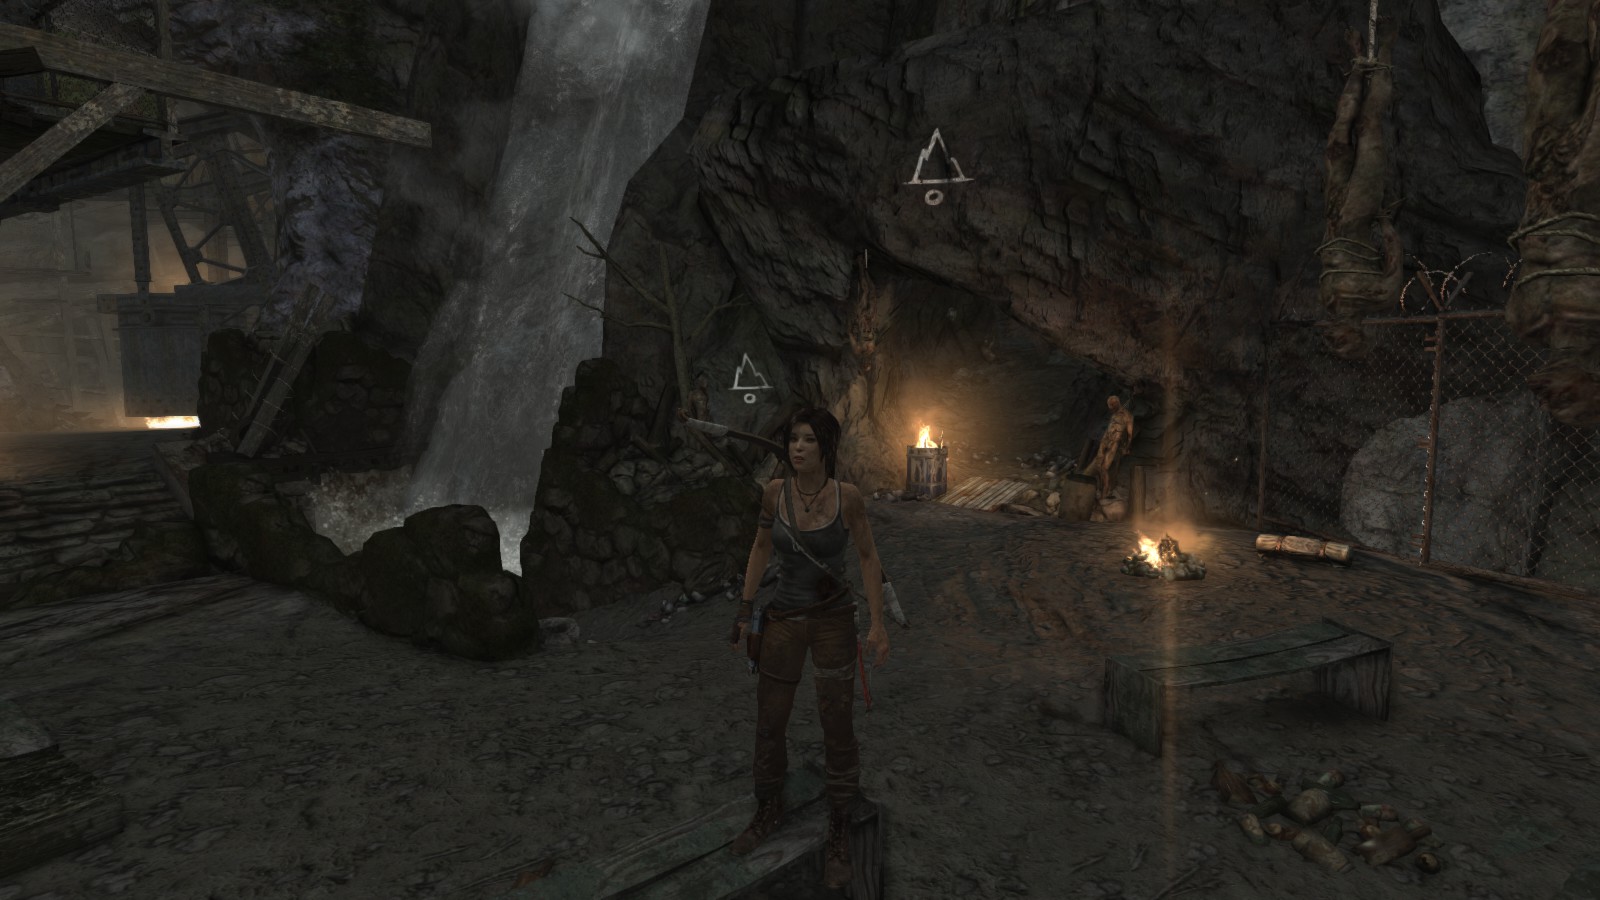
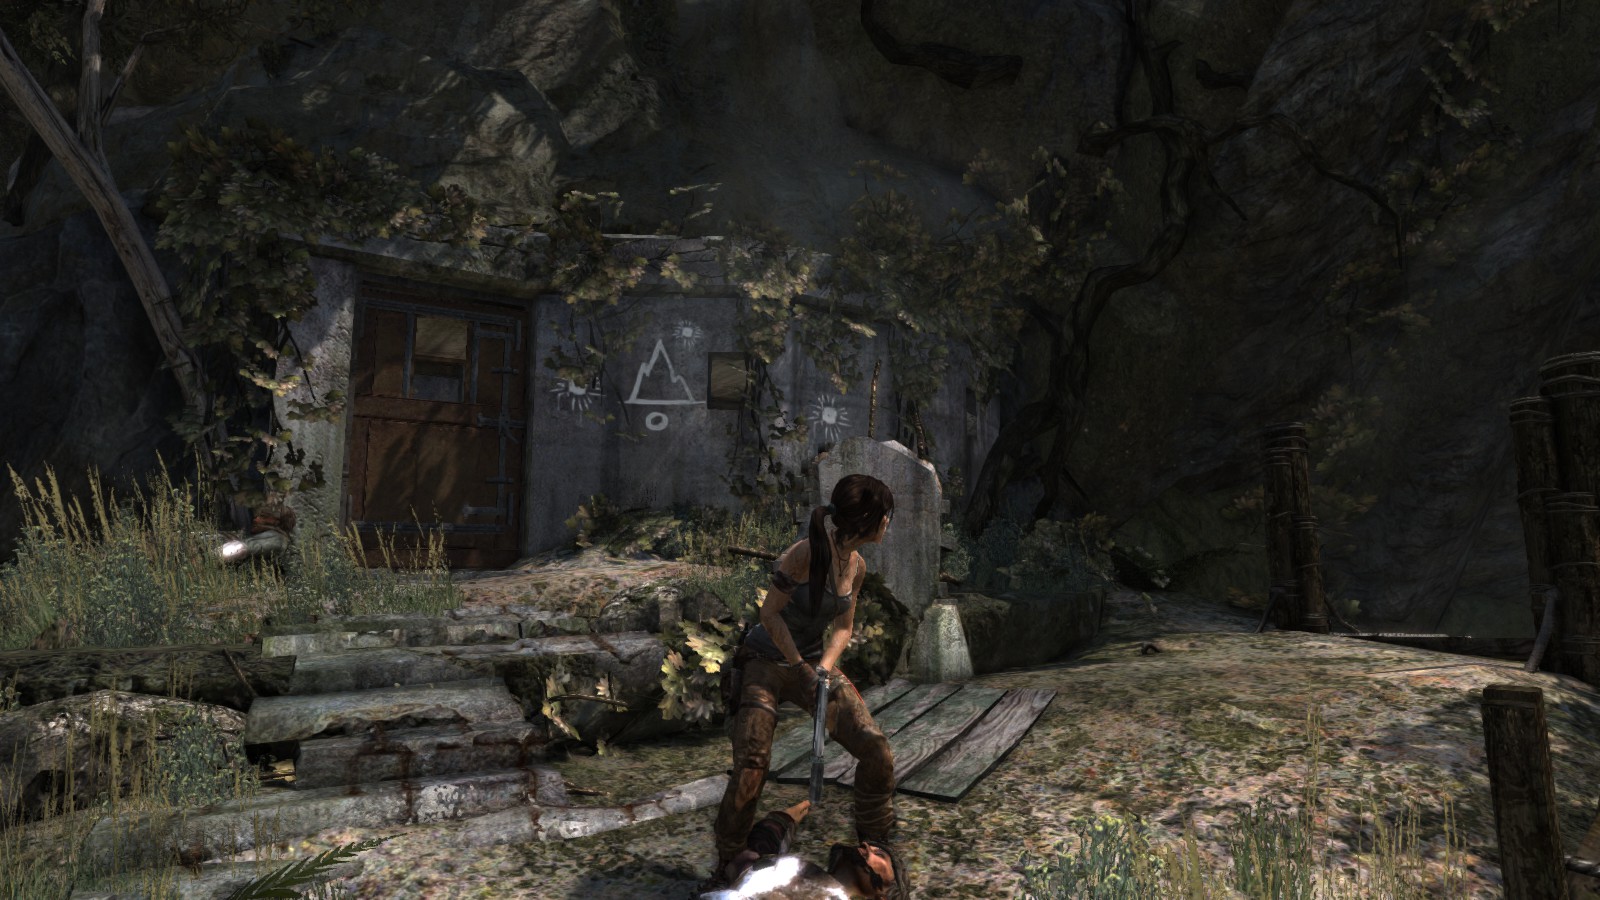
1. TOMB OF THE UNWORTHY (Mountain Village)
2. HALL OF ASCENSION (Mountain Village)
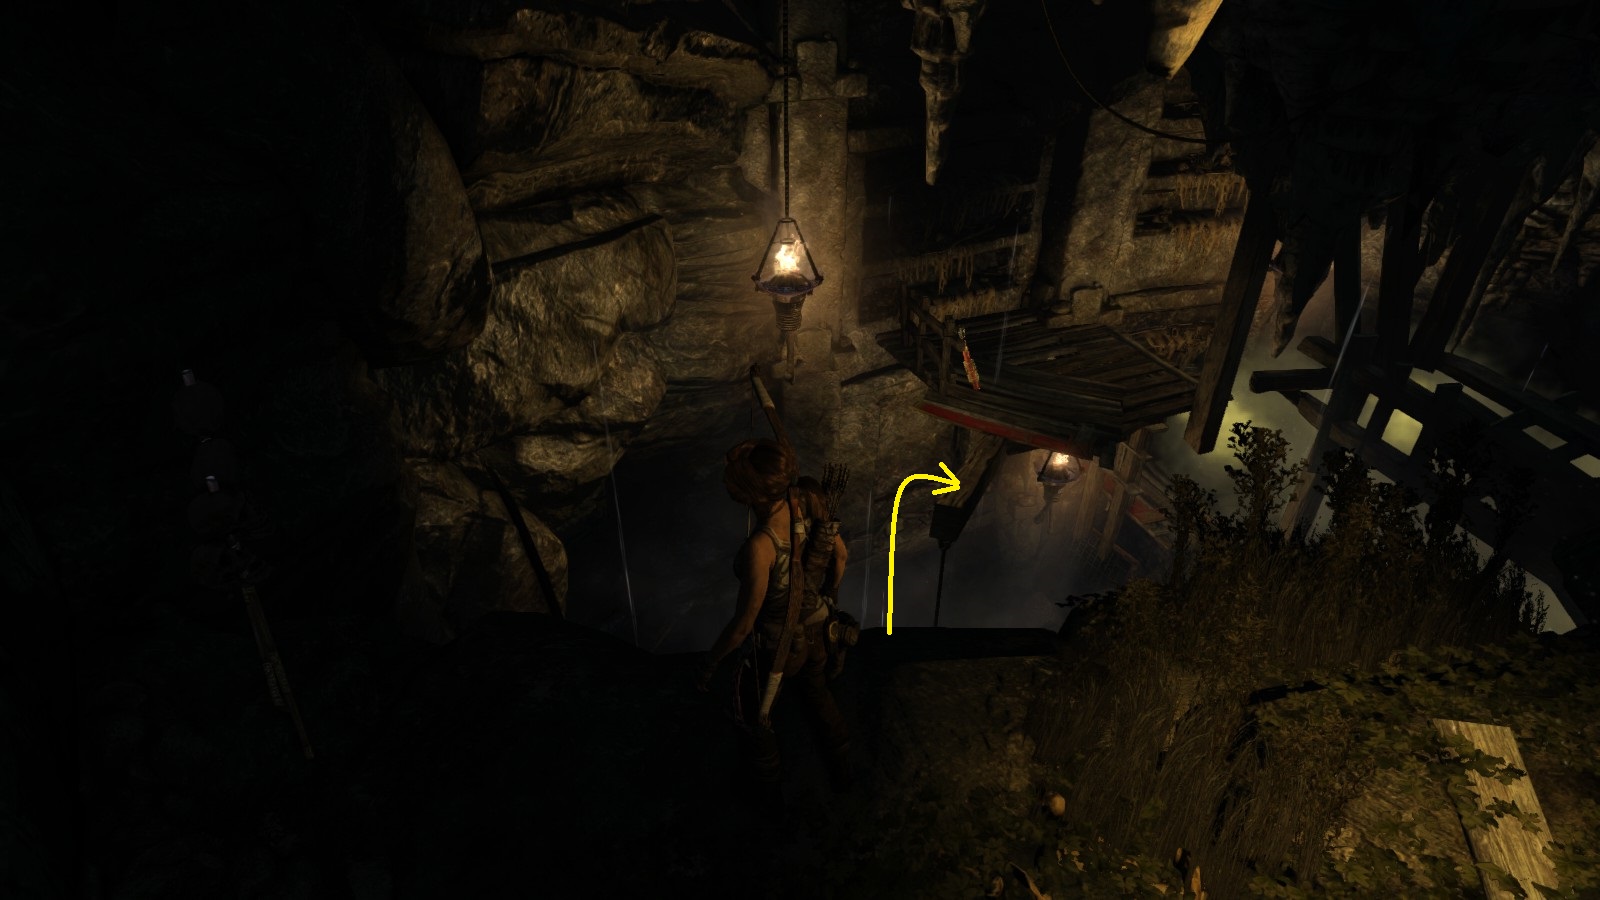
3. WELL OF TEARS (Shantytown)
4. CHAMBER OF JUDGMENT (Shantytown)
5. STORMGUARD SANCTUM (Summit Forest)
6. TEMPLE OF THE HANDMAIDENS (Shipwreck Beach)
7. THE FLOODED VAULT (Shipwreck Beach)
Extra (DLC)
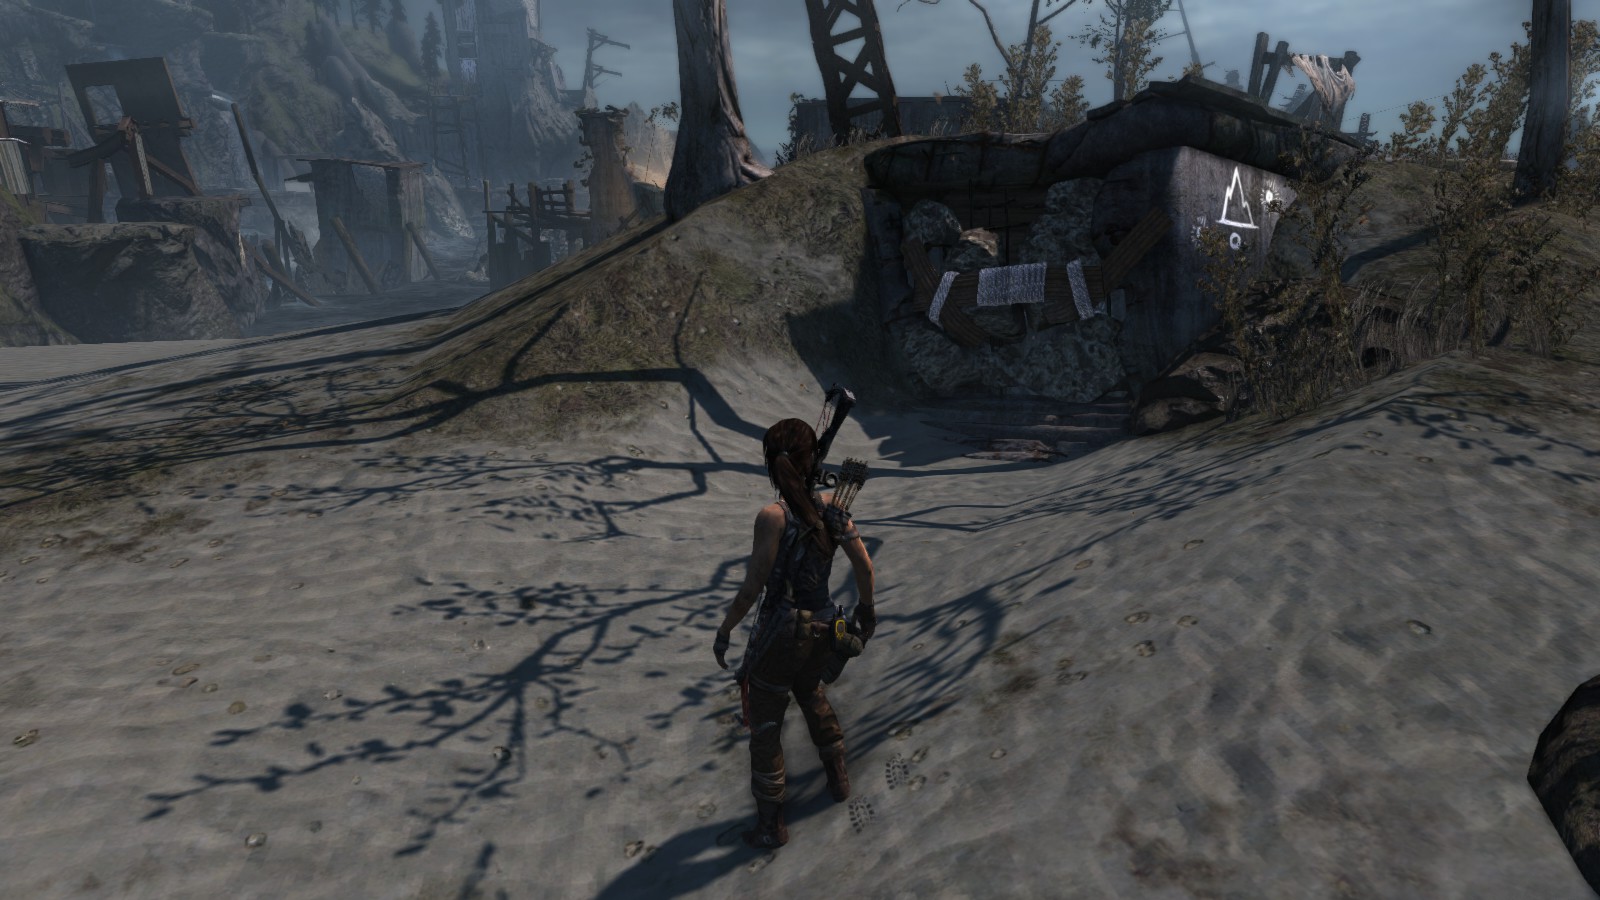
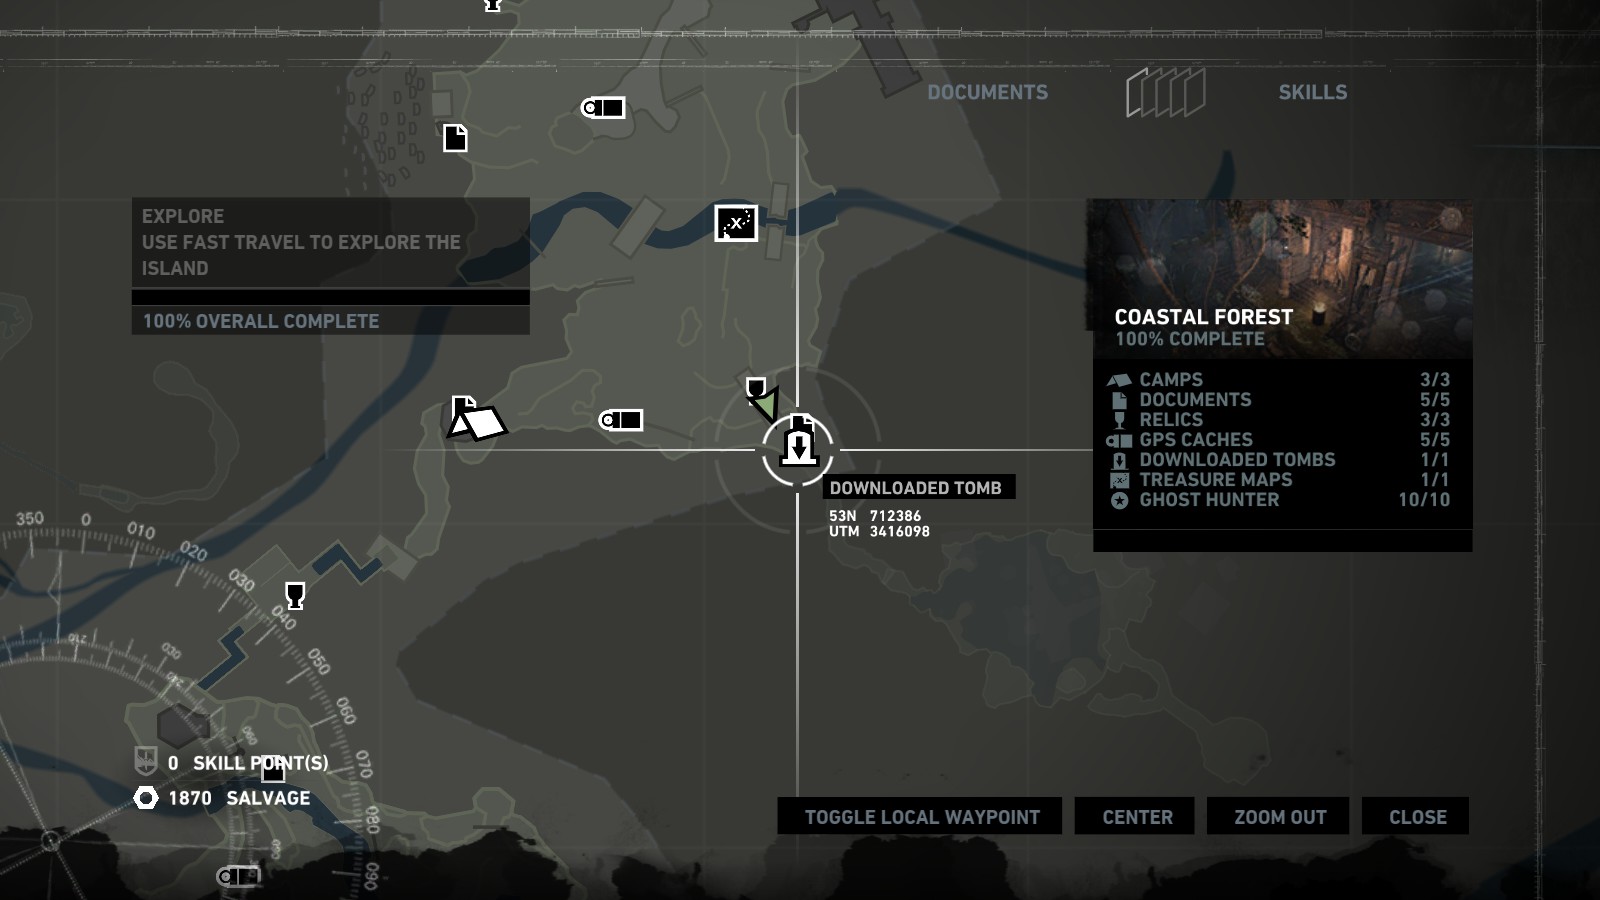
TOMB OF THE LOST ADVENTURER (Coastal Forest)
2. HALL OF ASCENSION (Mountain Village)
3. WELL OF TEARS (Shantytown)
4. CHAMBER OF JUDGMENT (Shantytown)
5. STORMGUARD SANCTUM (Summit Forest)
6. TEMPLE OF THE HANDMAIDENS (Shipwreck Beach)
7. THE FLOODED VAULT (Shipwreck Beach)
Extra (DLC)
TOMB OF THE LOST ADVENTURER (Coastal Forest)
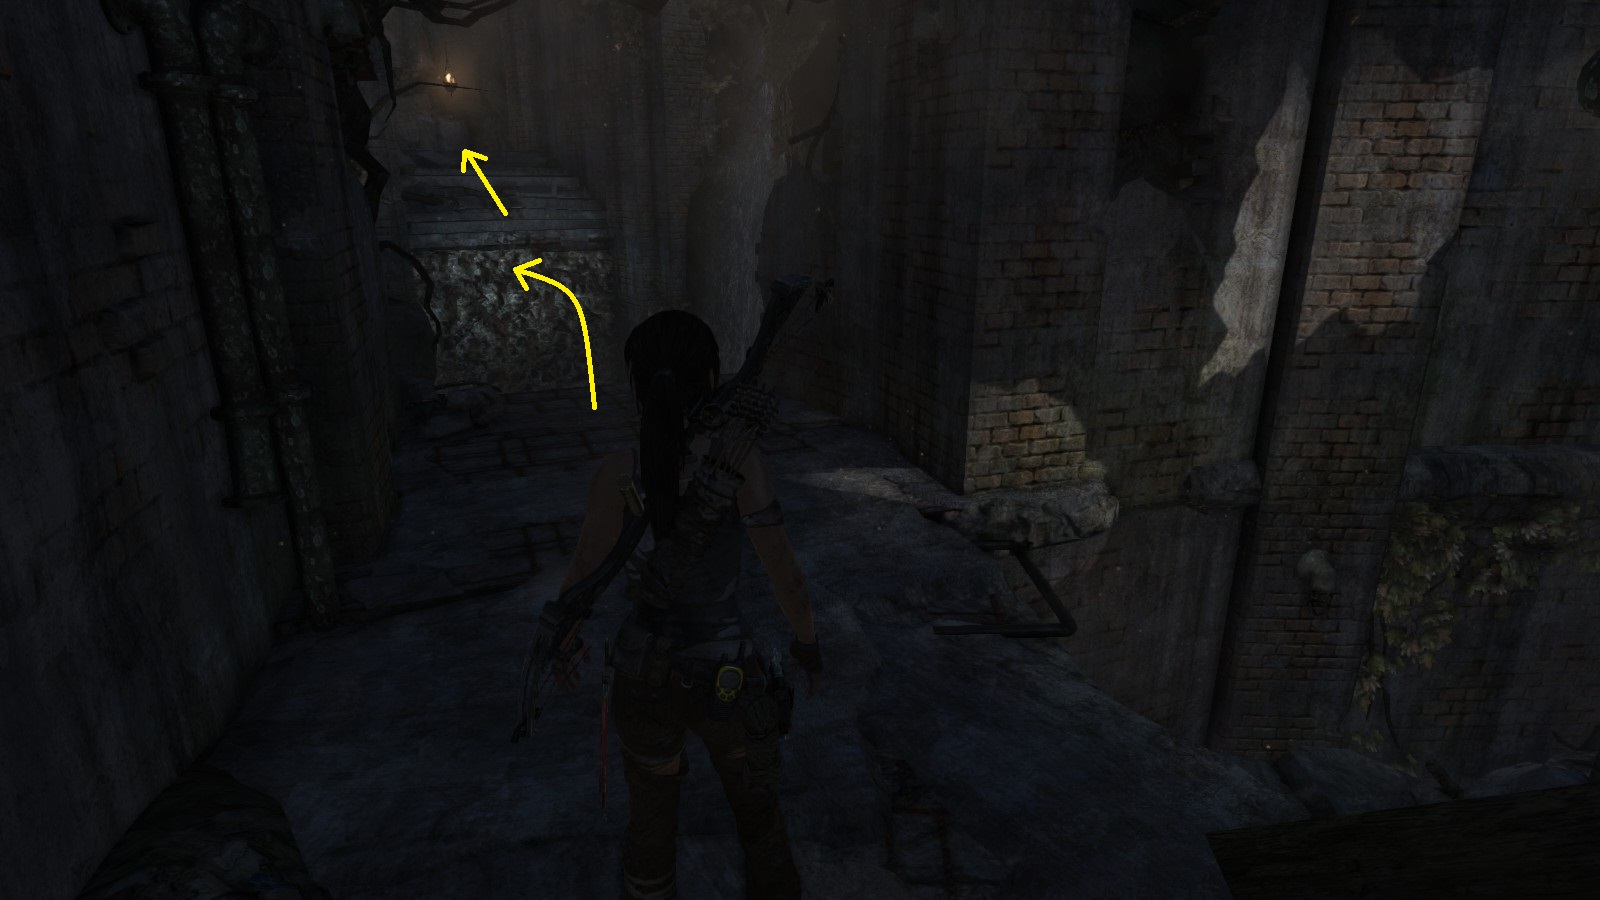
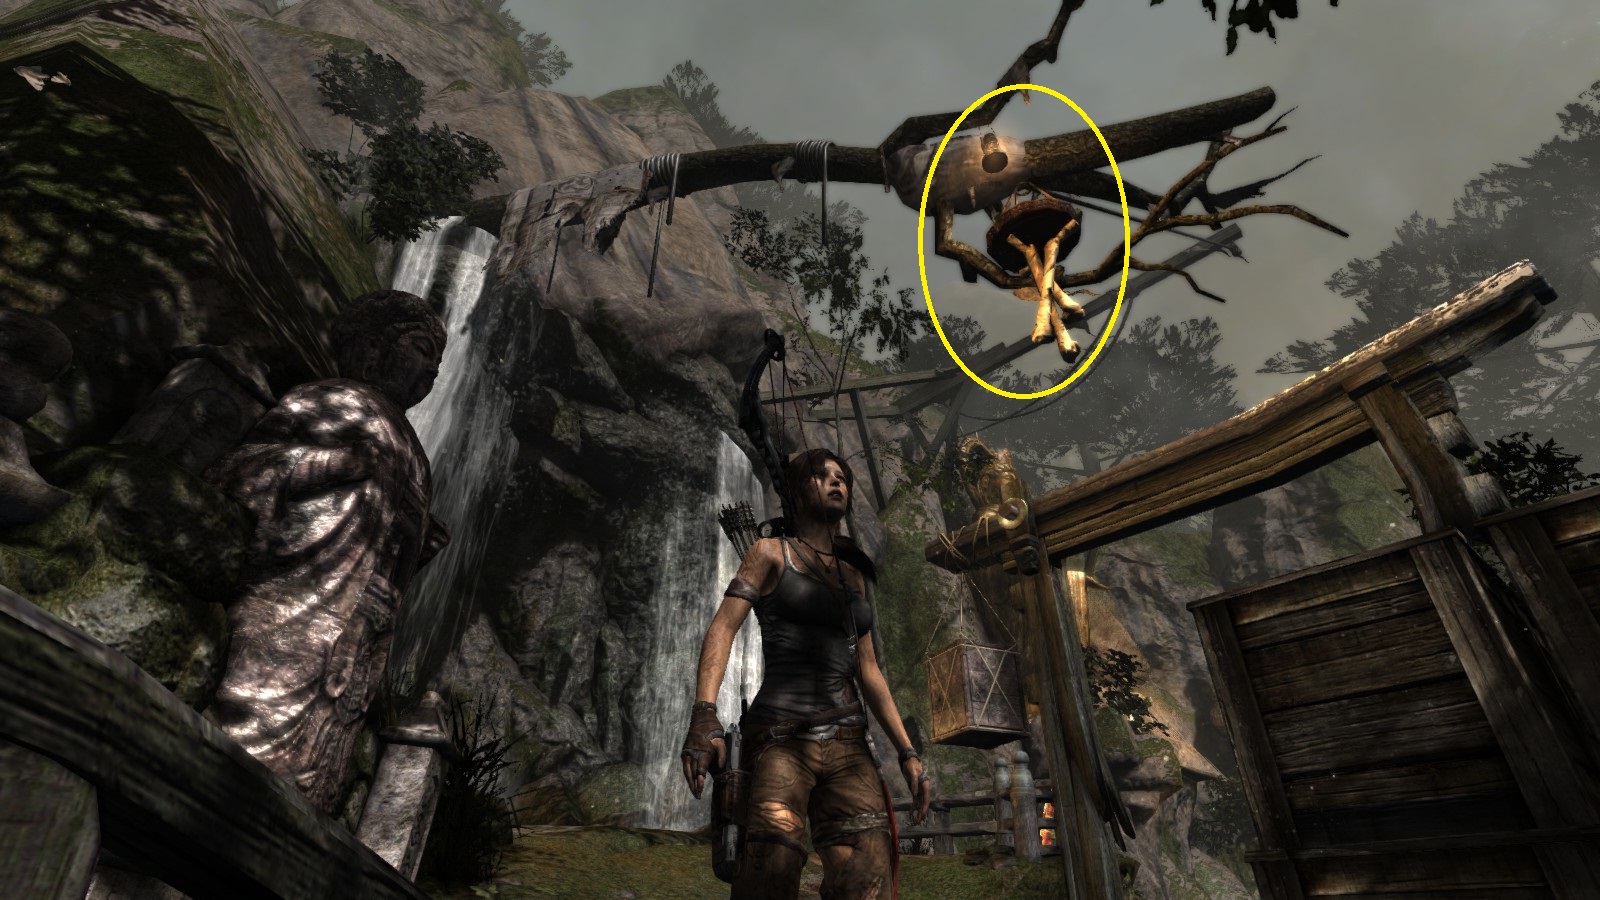
1. TOMB OF THE UNWORTHY (Mountain Village)
Closest Base (Fast-Travel) Camp:
Village Plateau
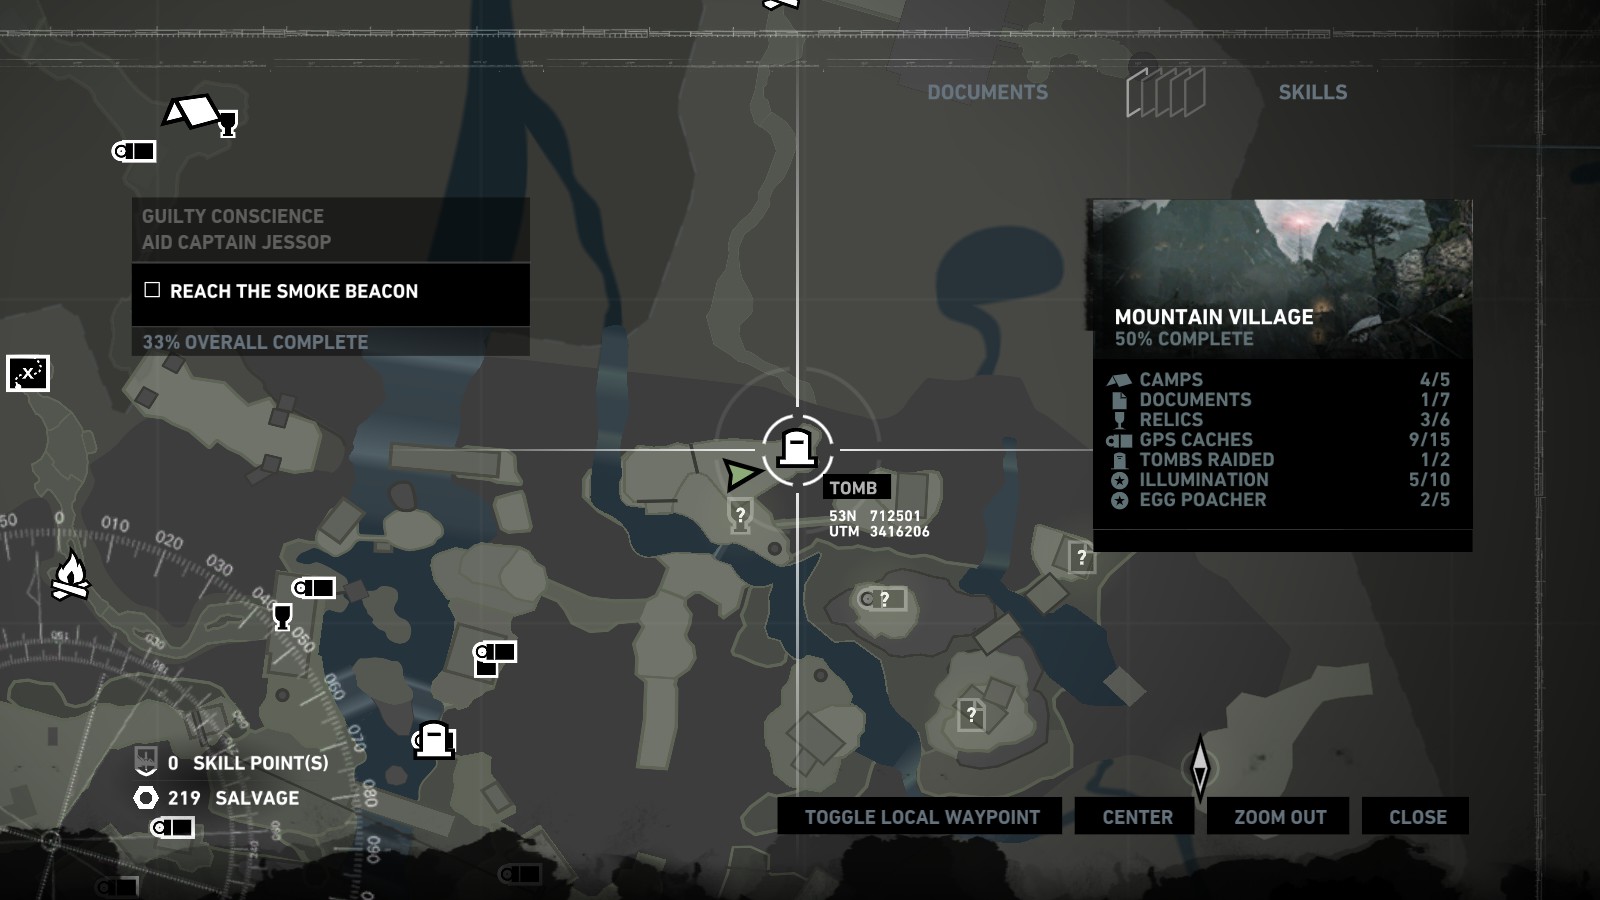
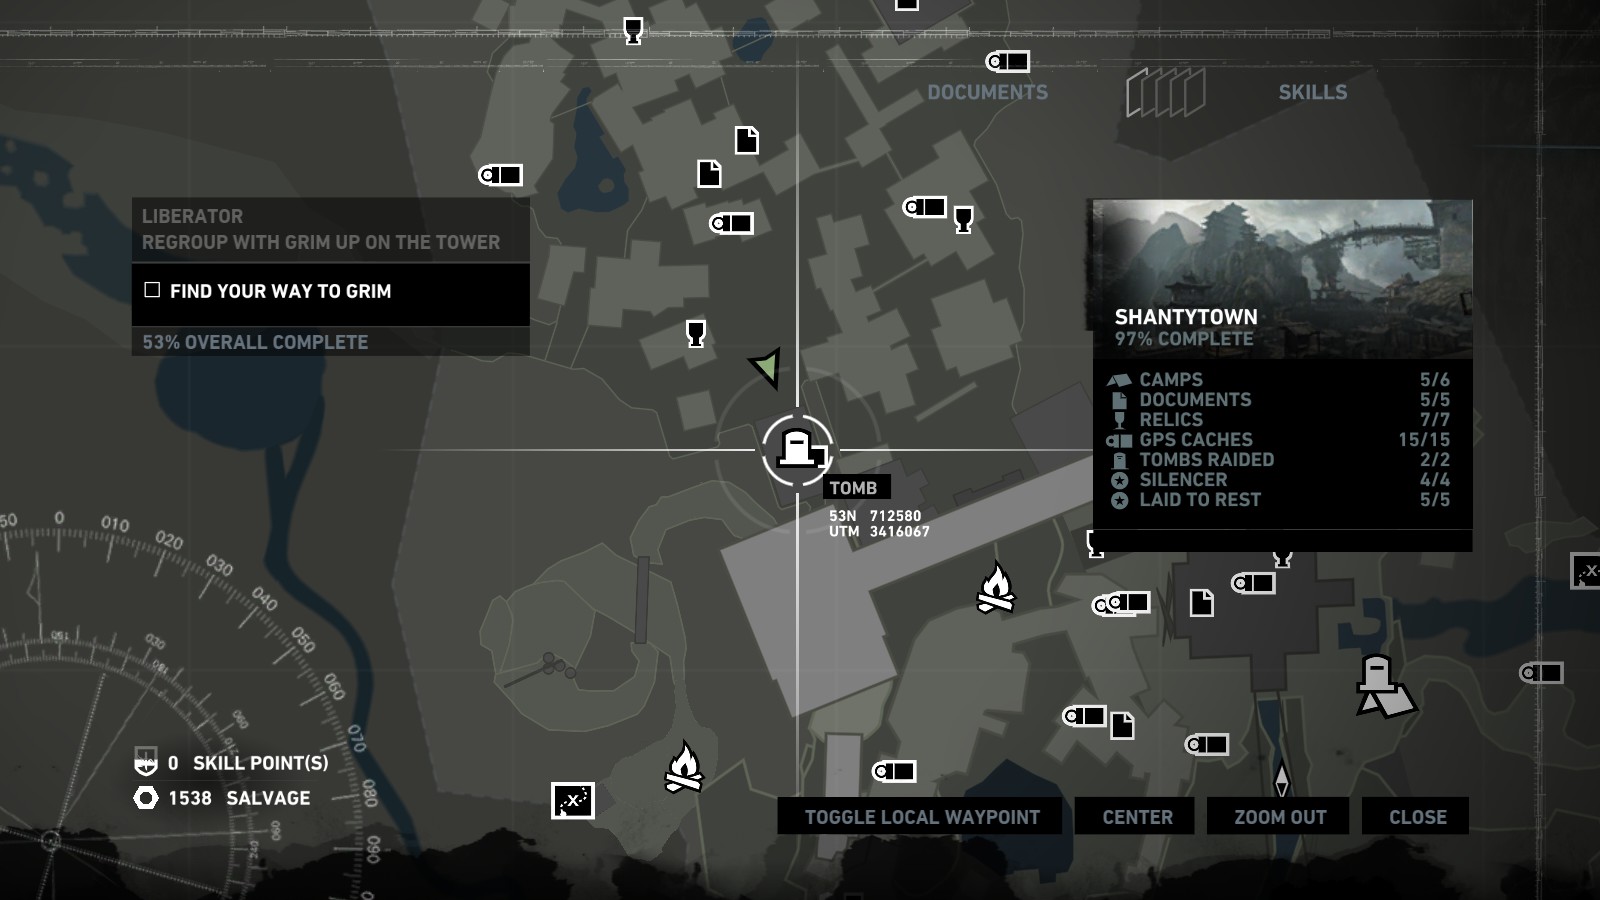
Location on the Map
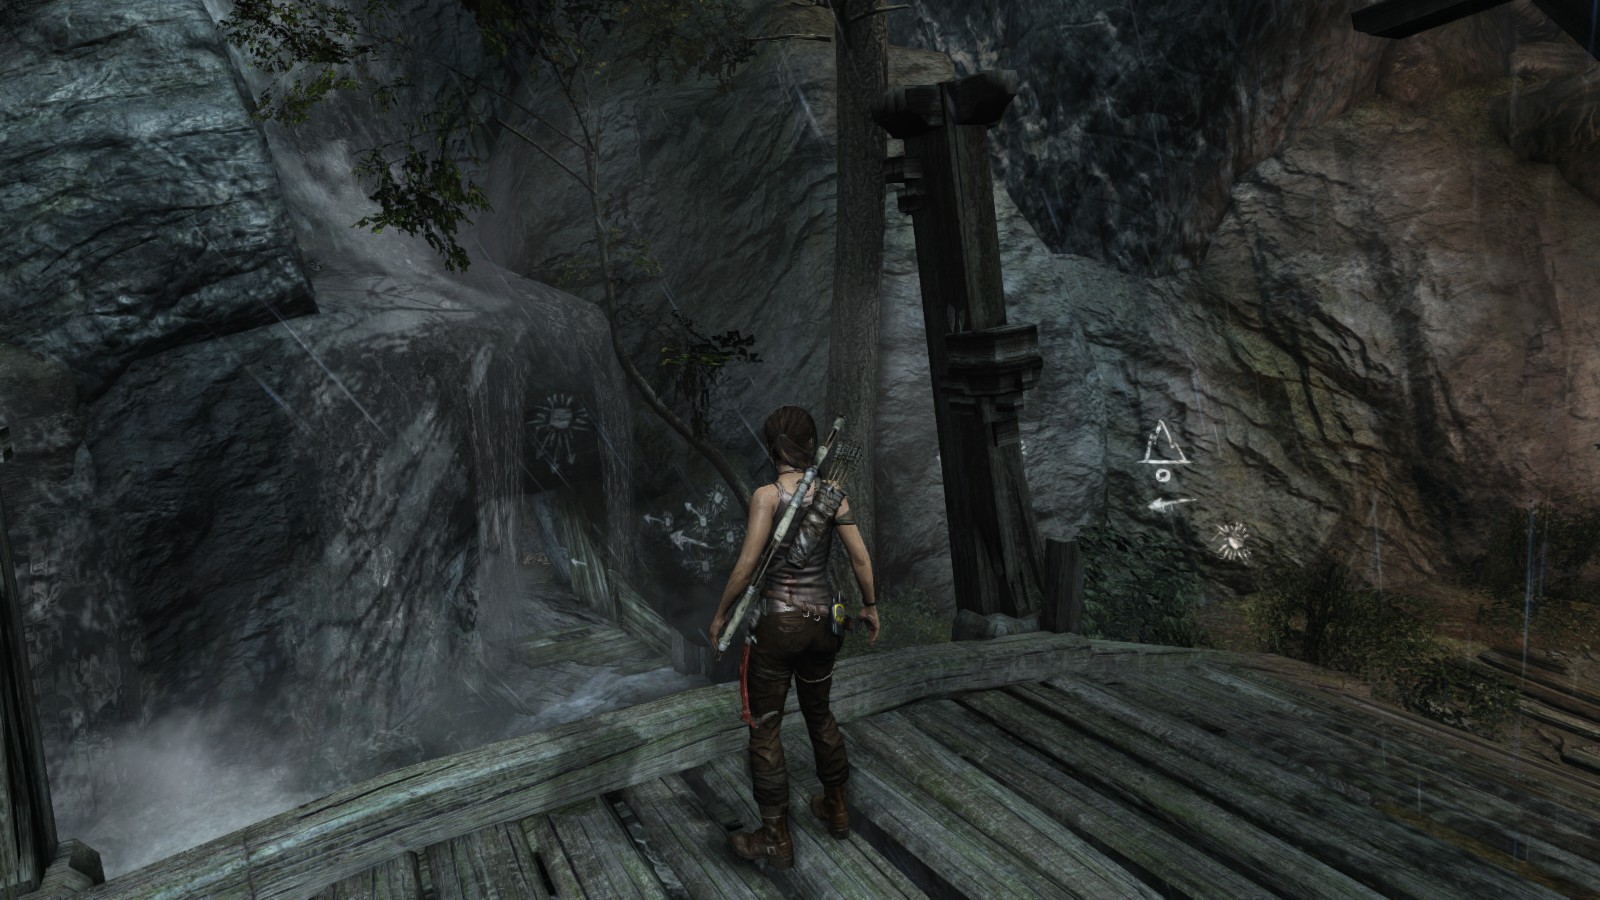
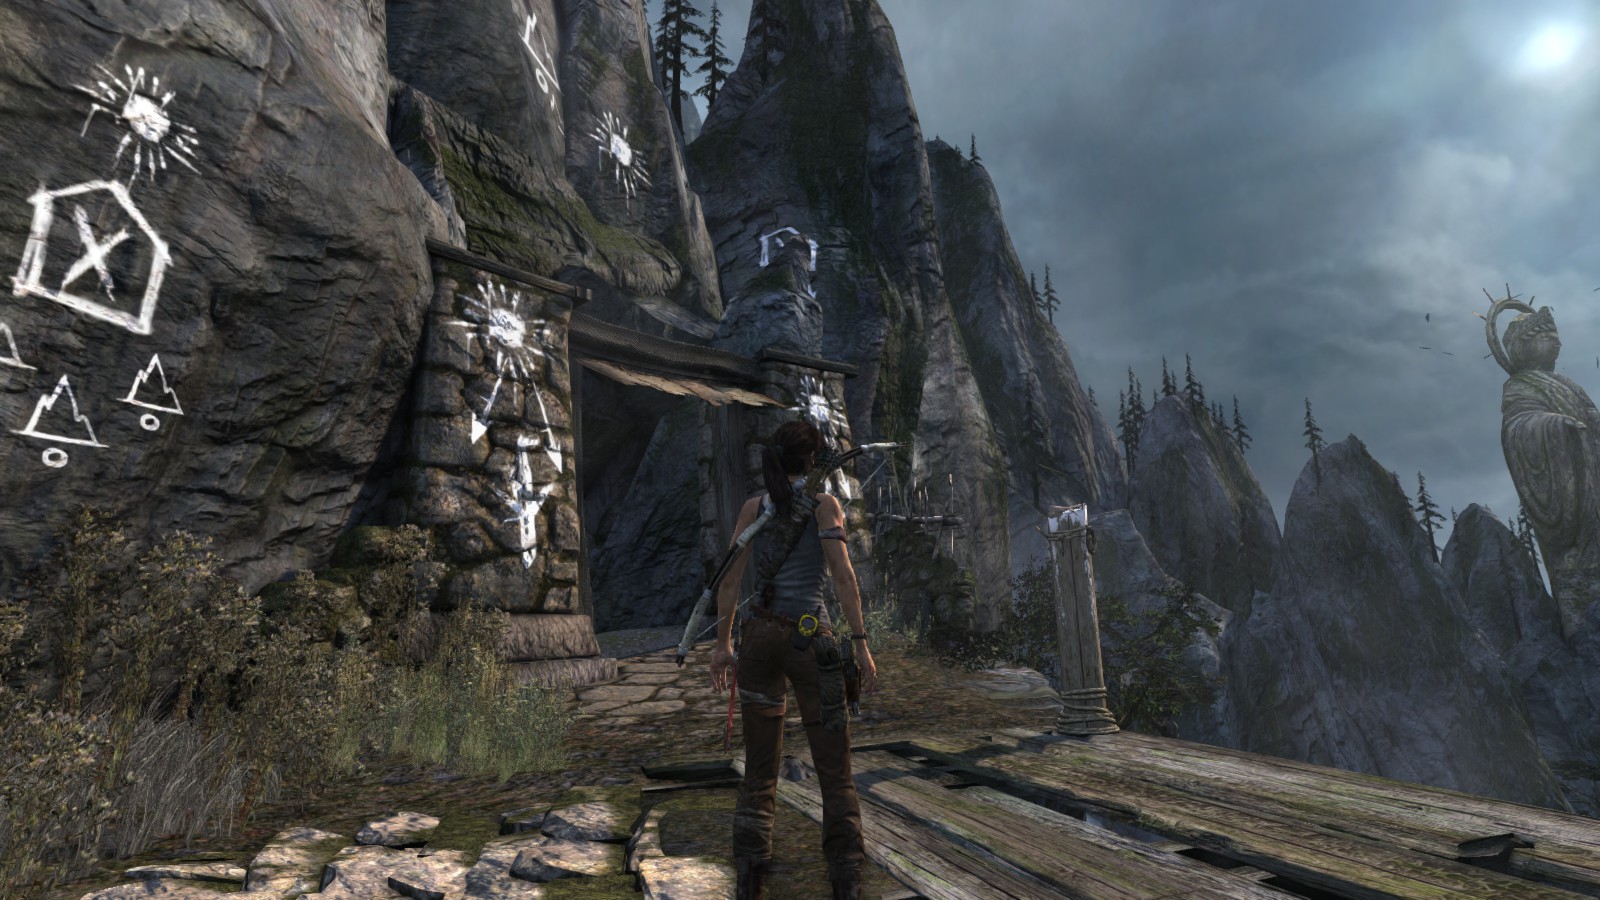
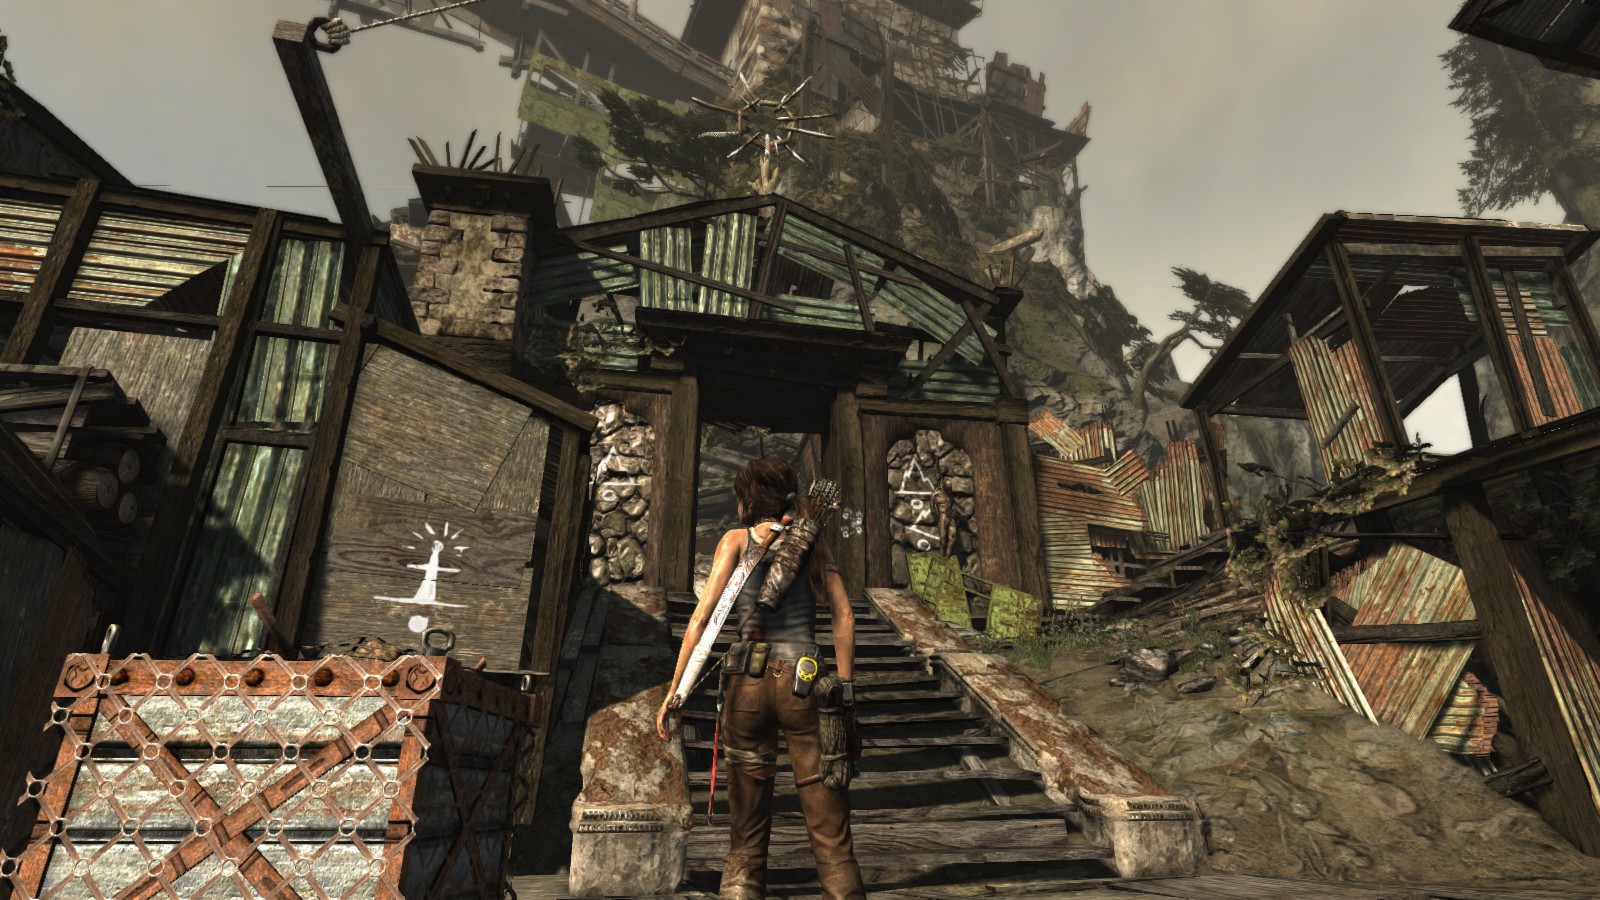
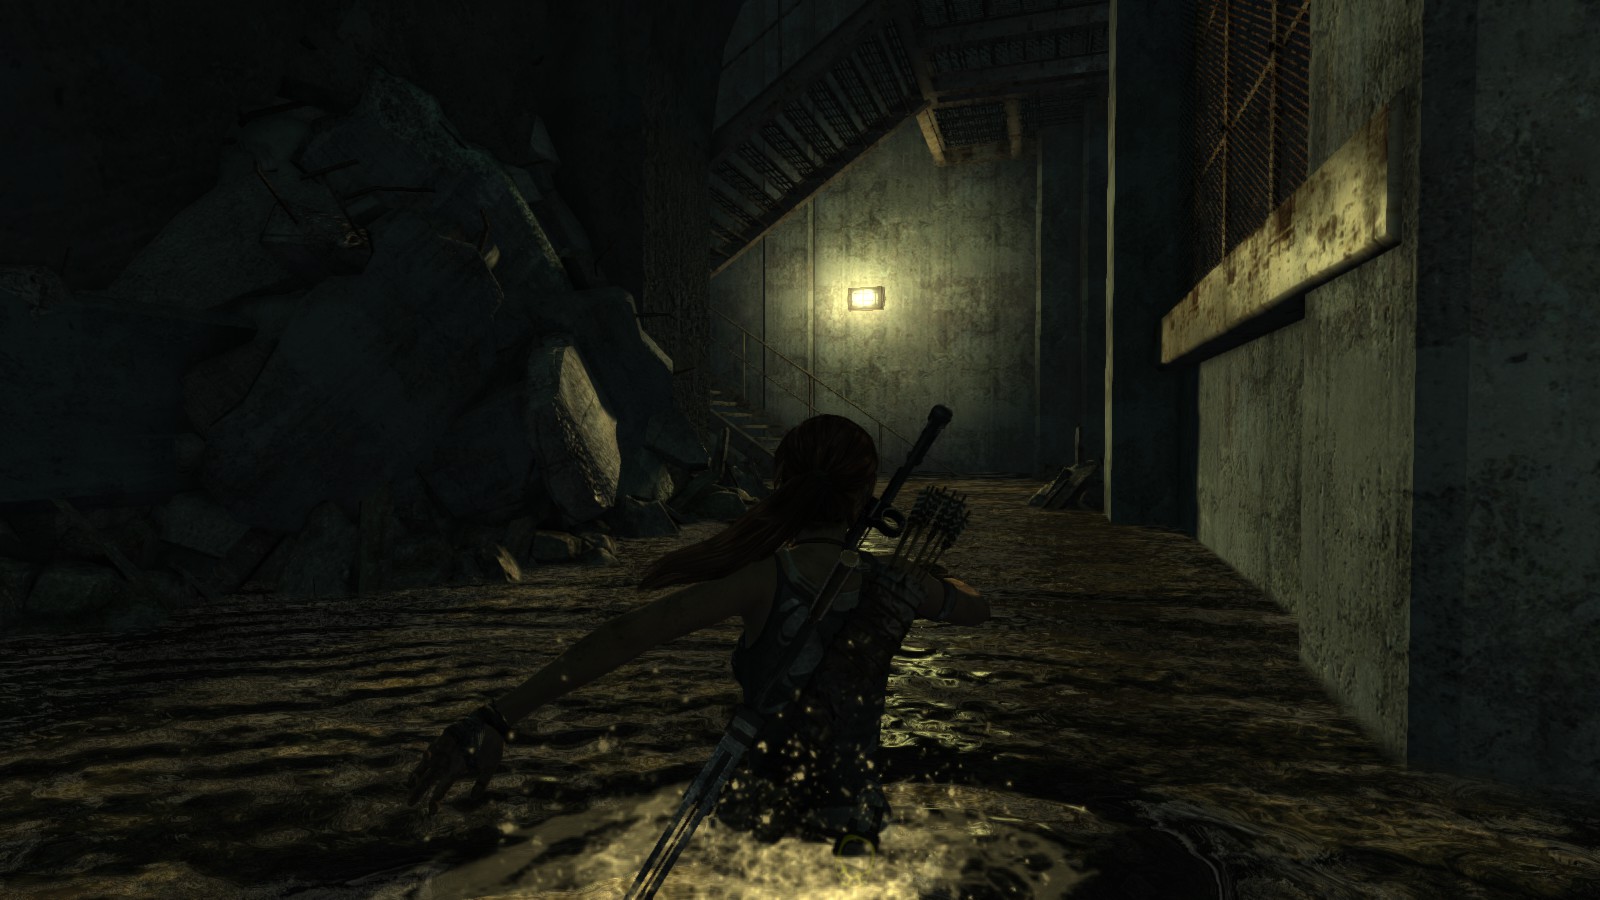
Screenshot of the Entrance
Completing the Tomb
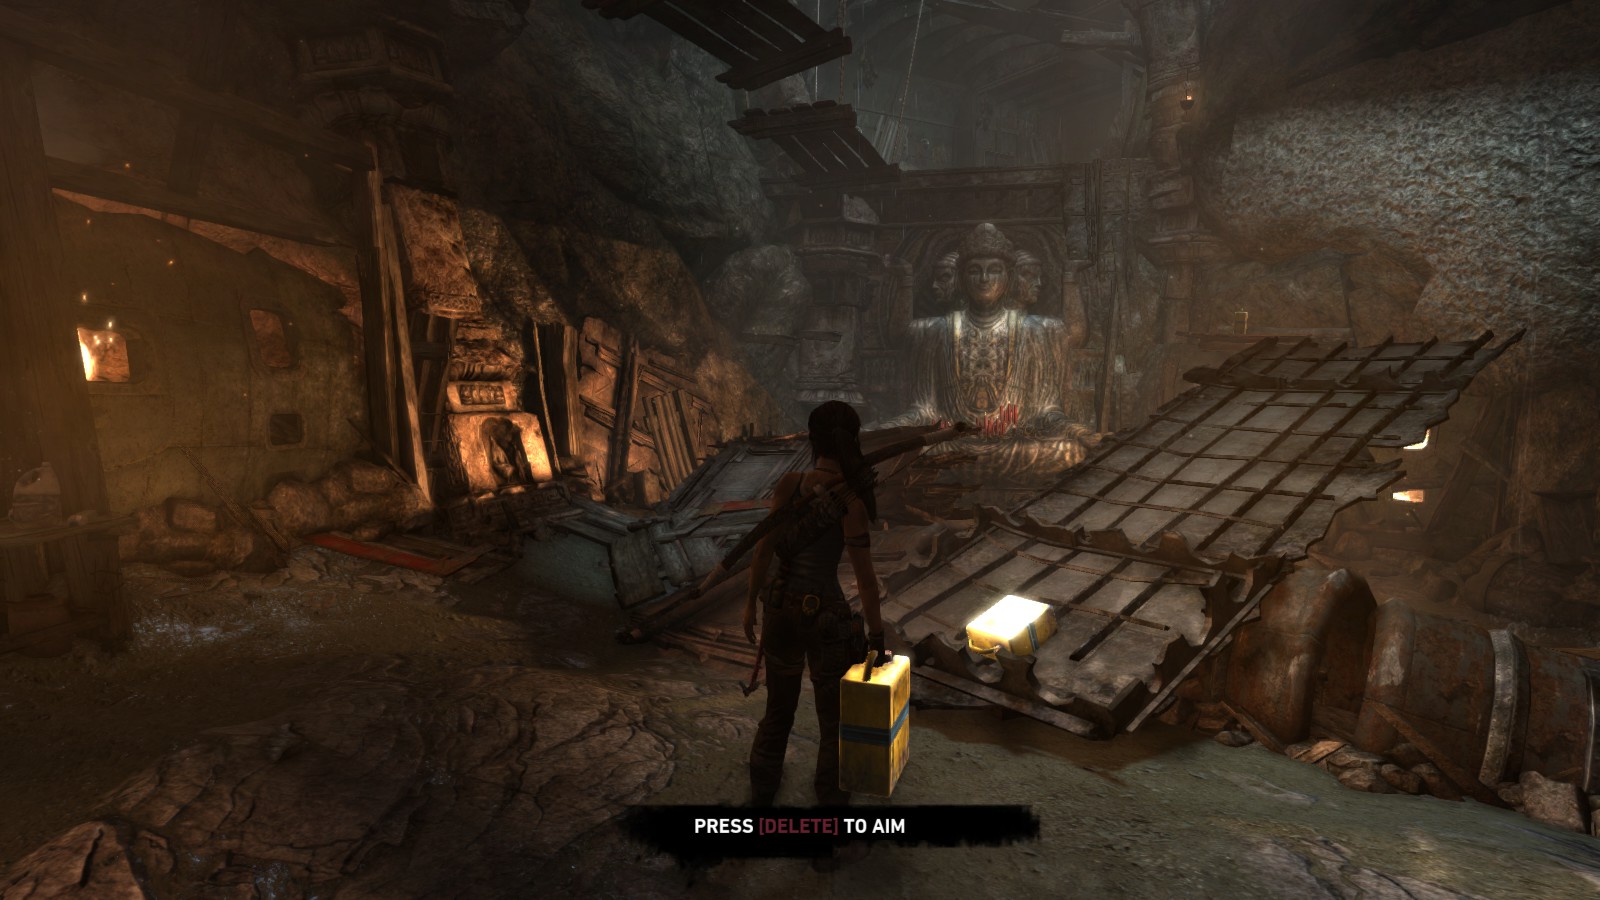
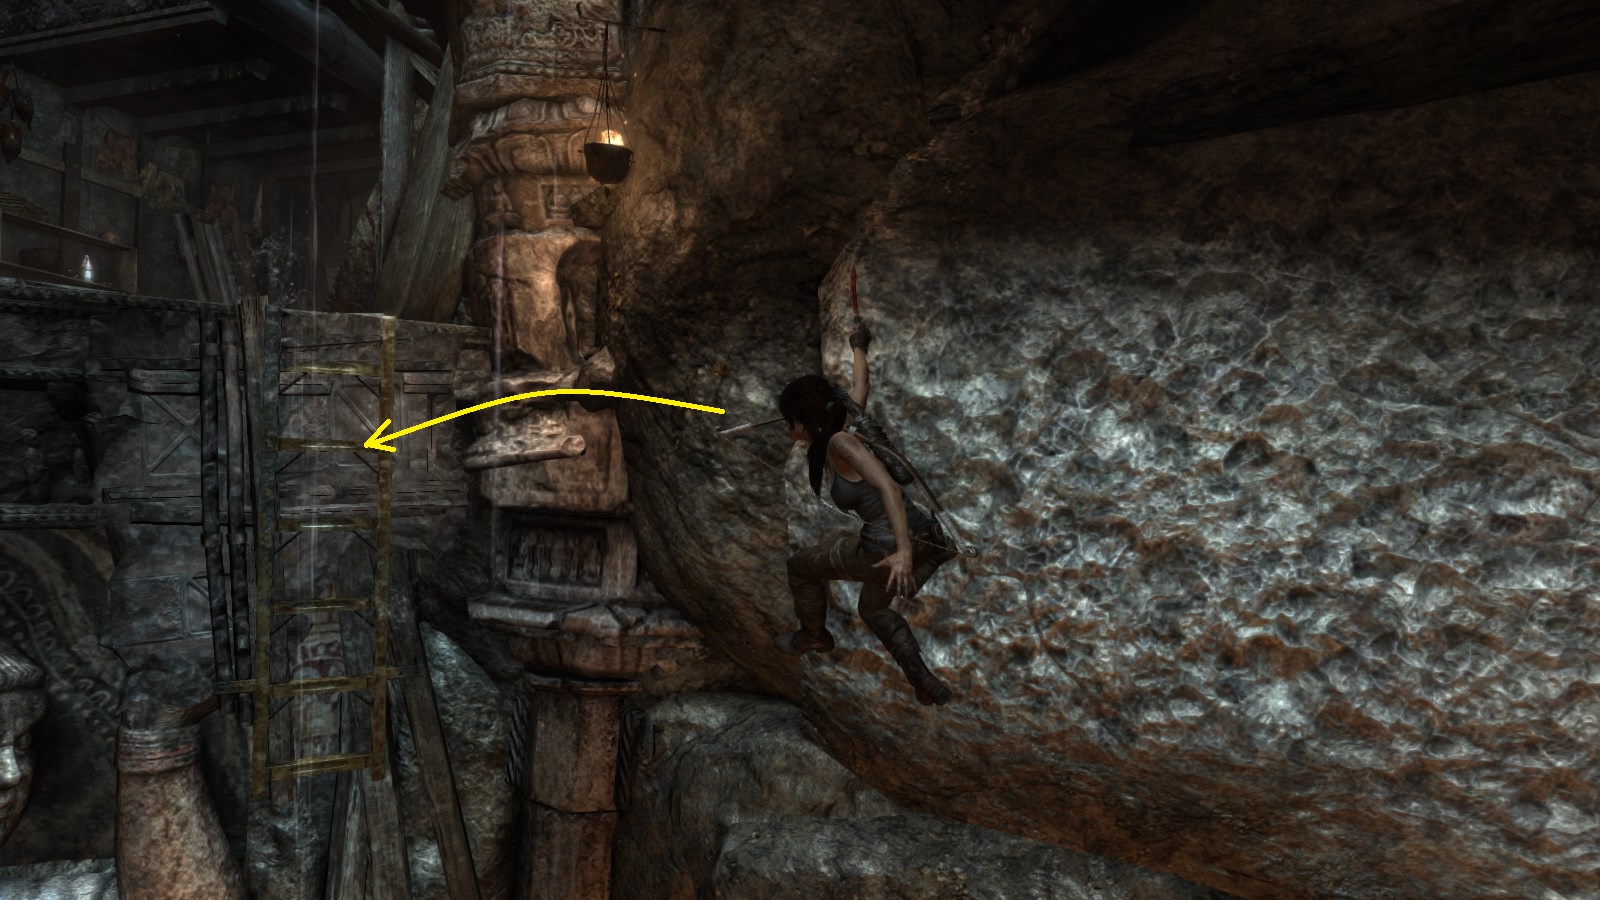
This tomb is only accessible after Lara acquires the climbing axe from Roth at the Village Plateau base camp. She then uses the axe to climb the wall beyond the entrance that would have been an obstruction otherwise.
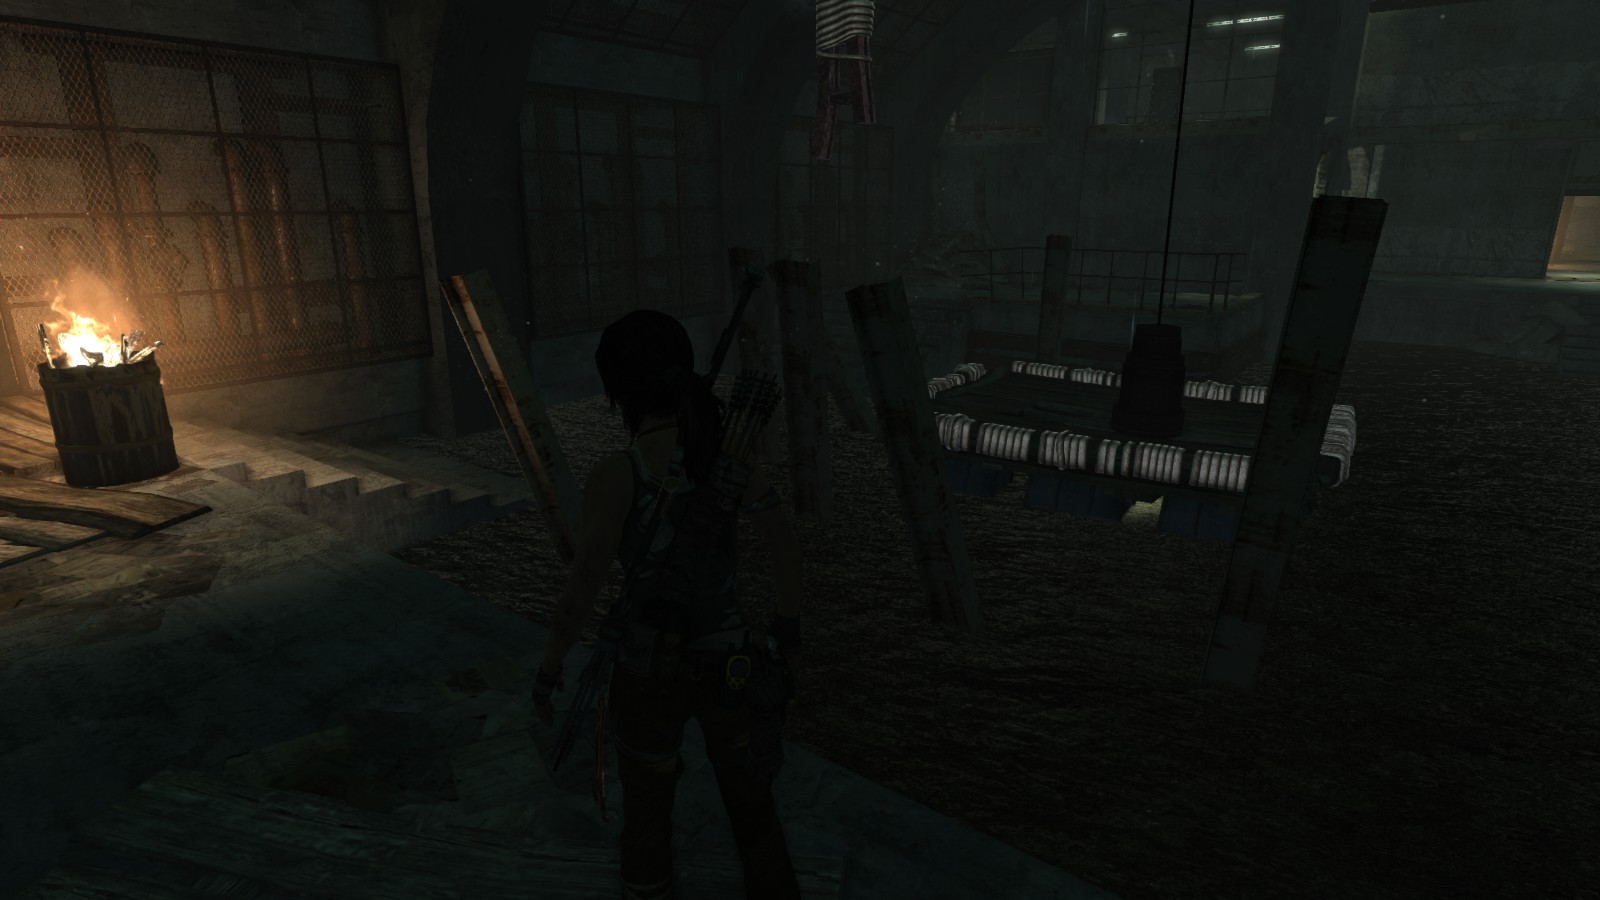
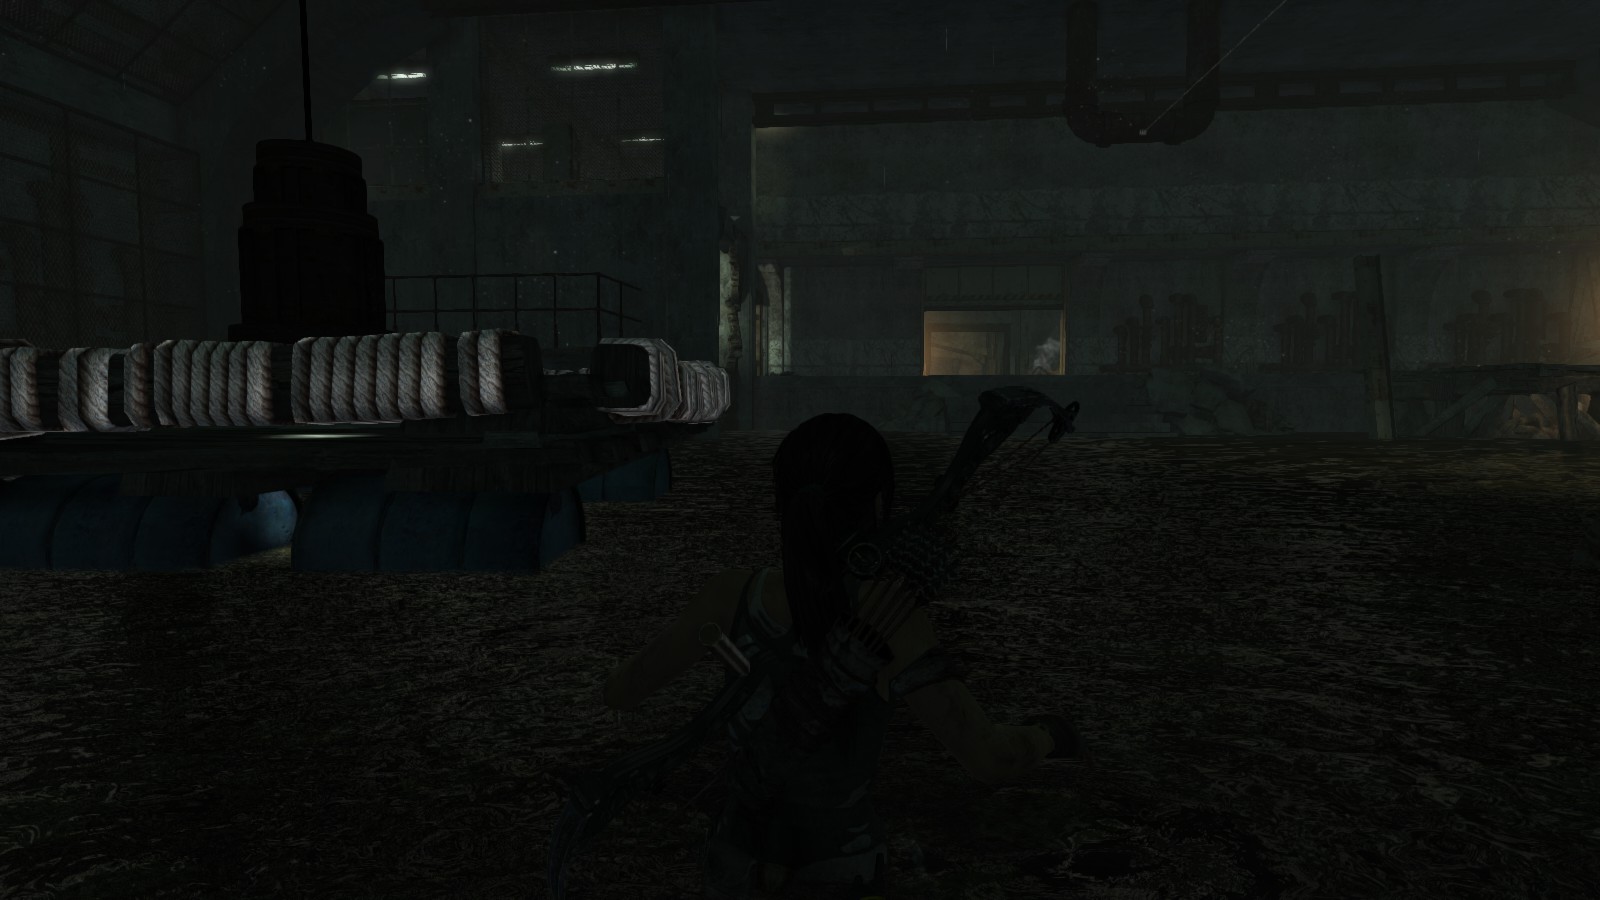
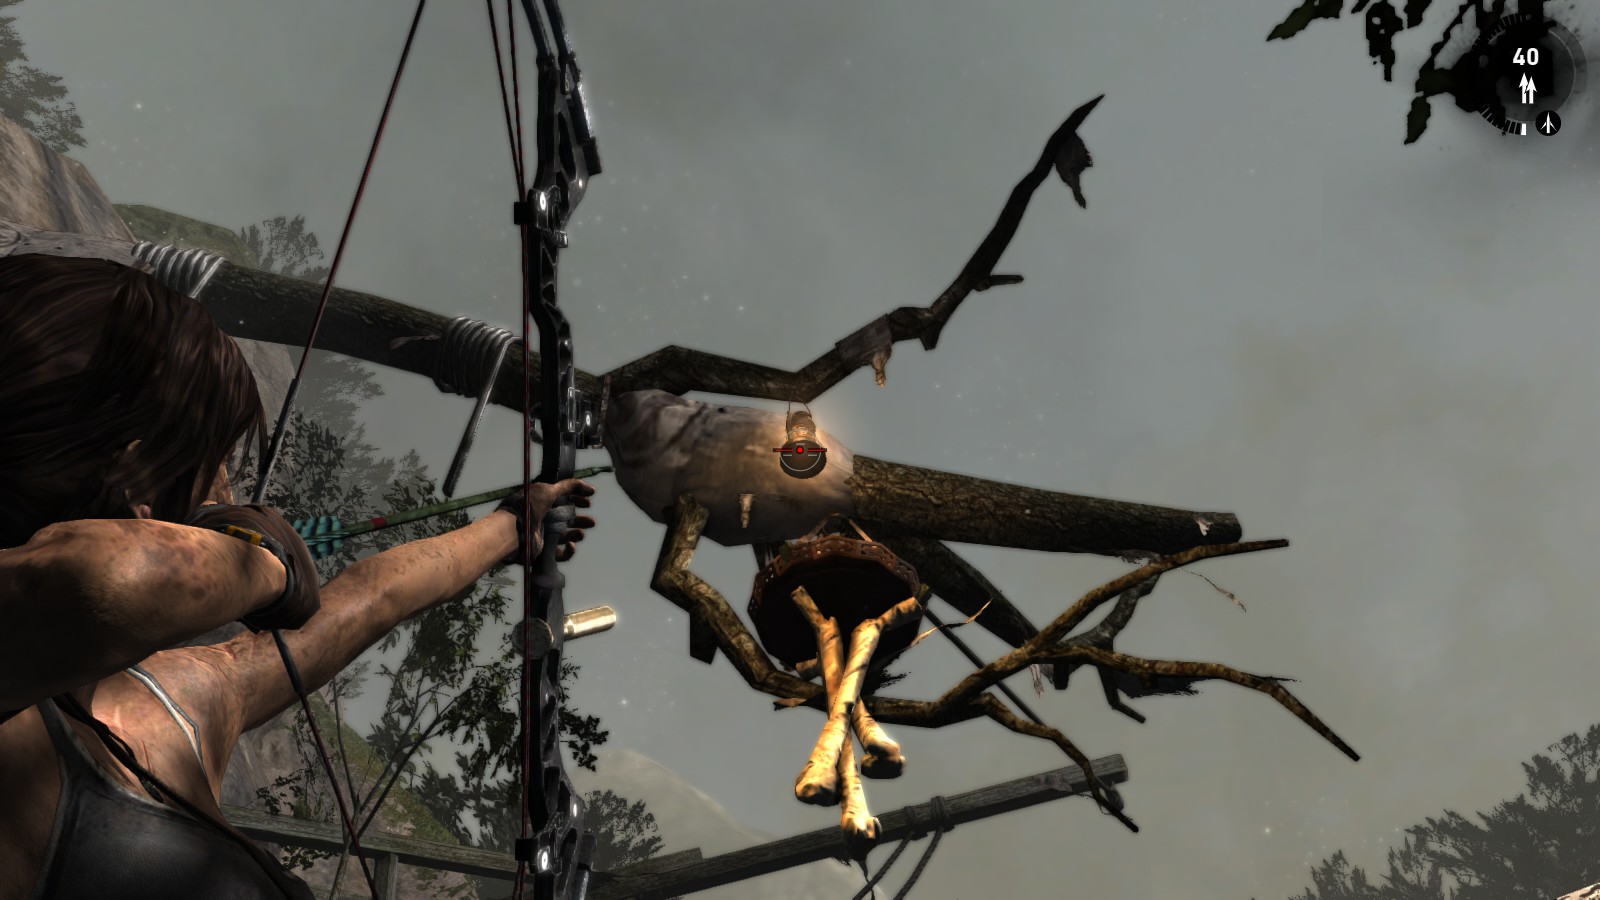
The main chamber:
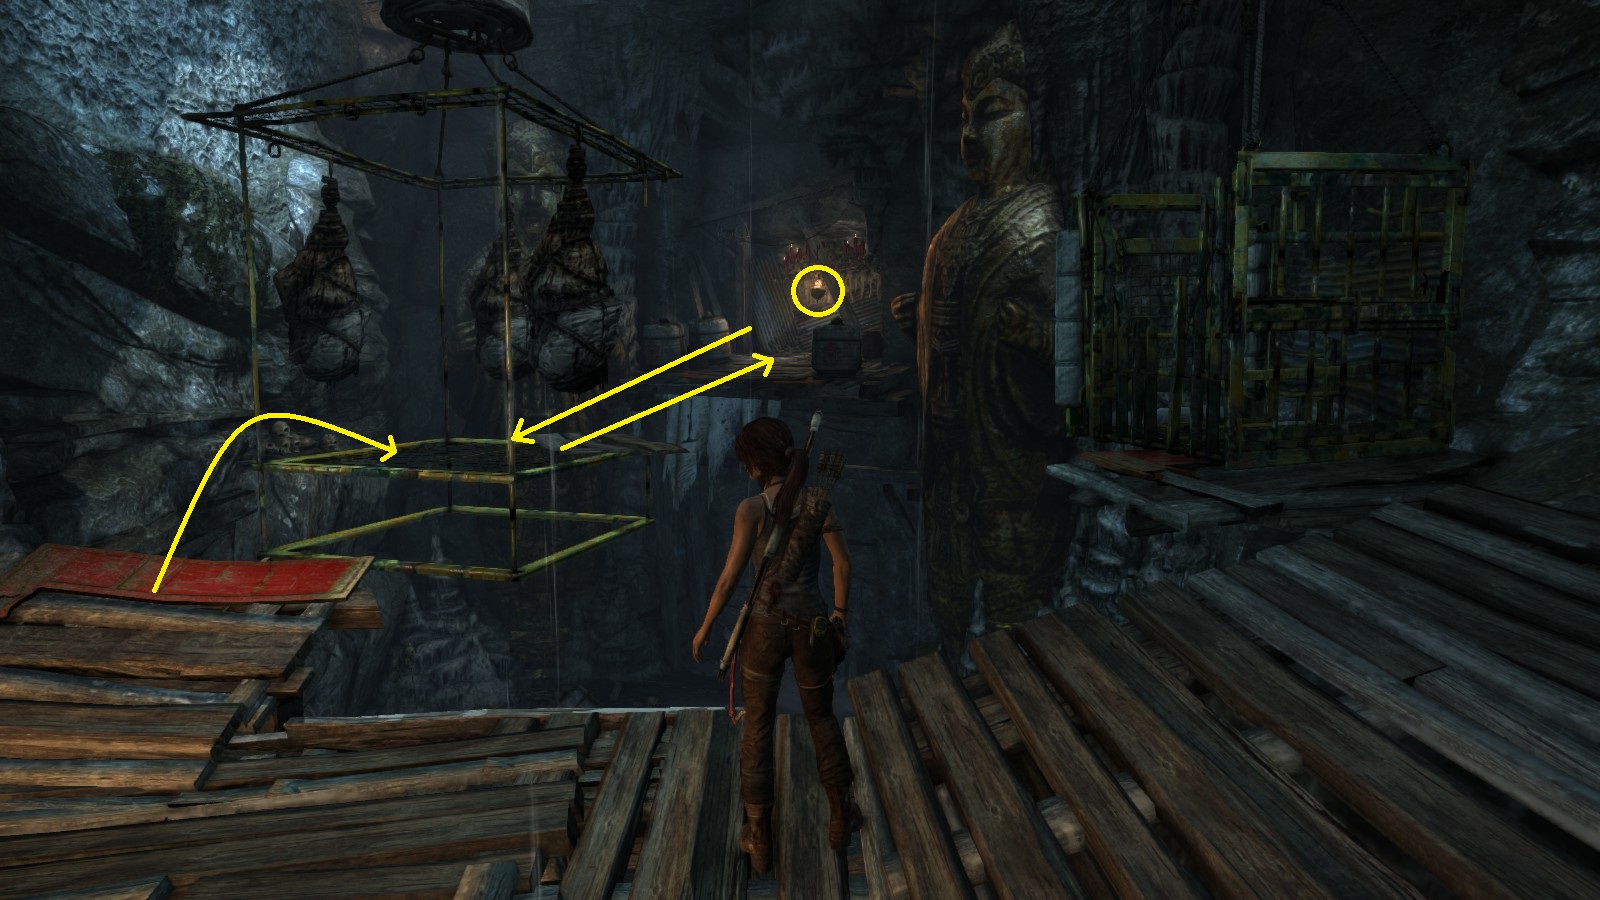
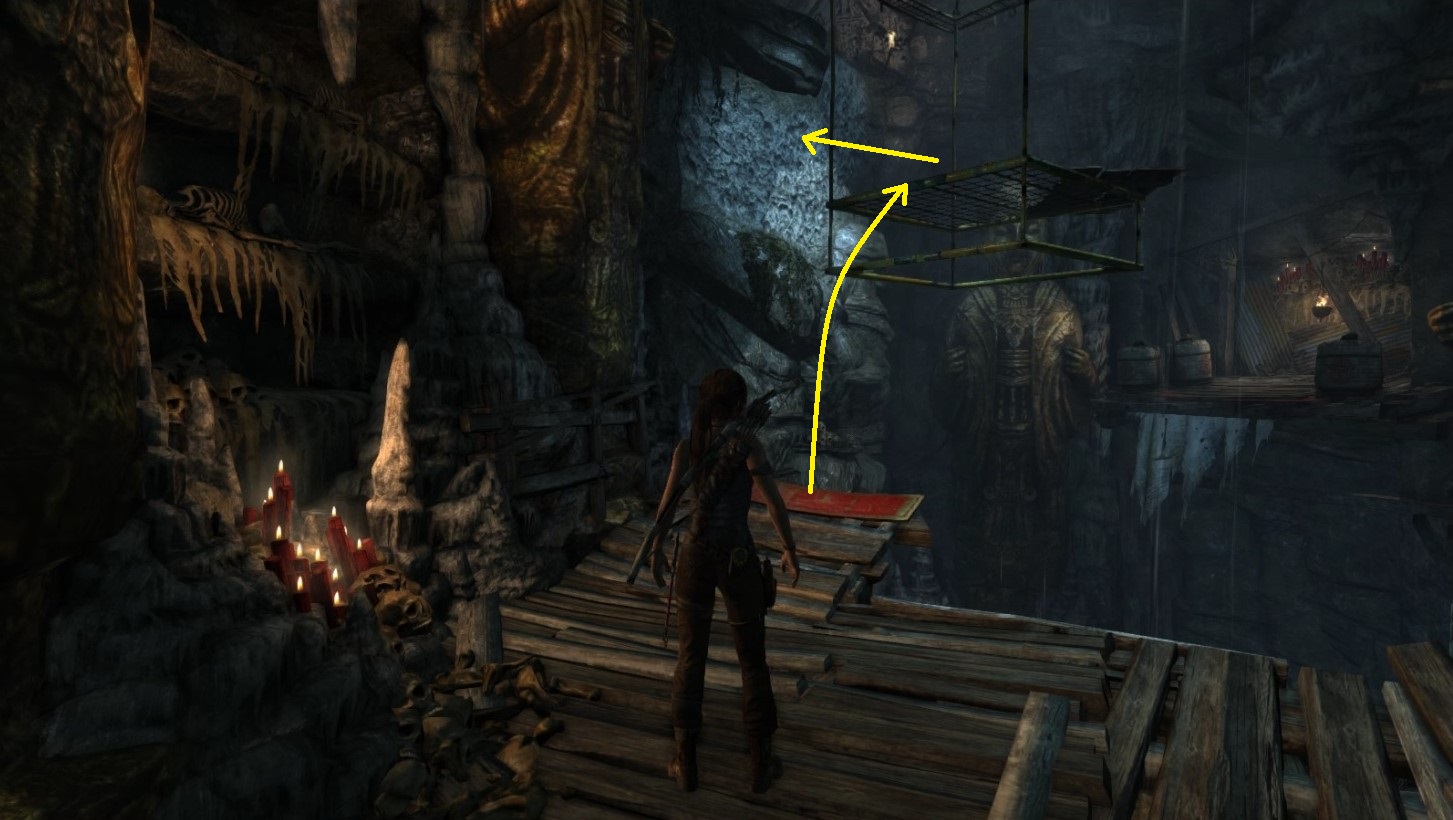
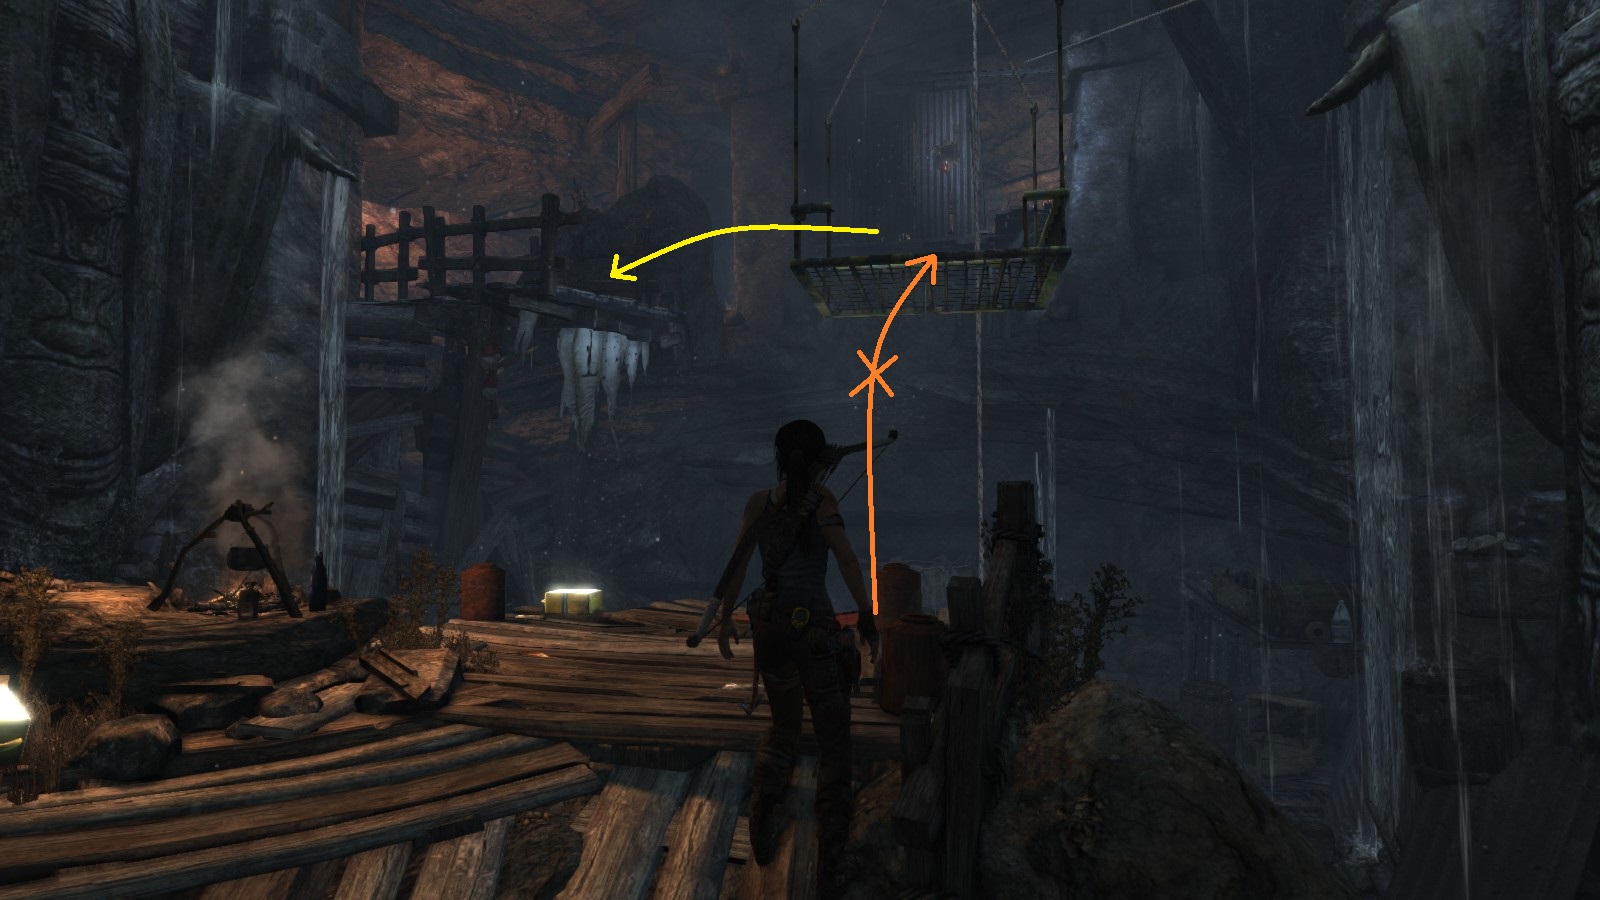
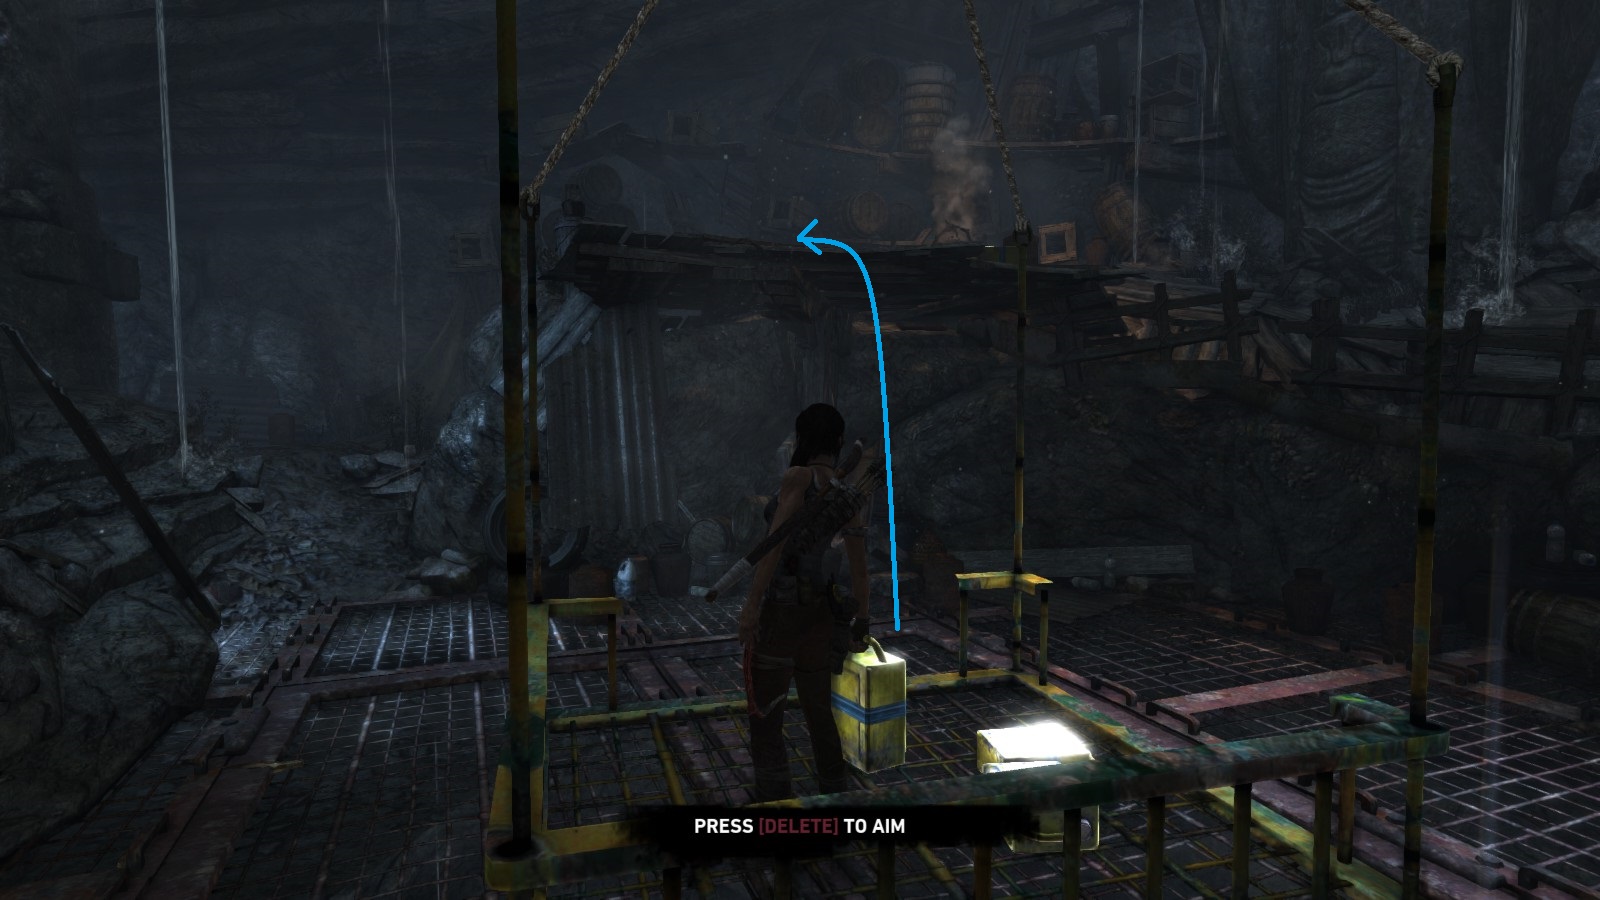
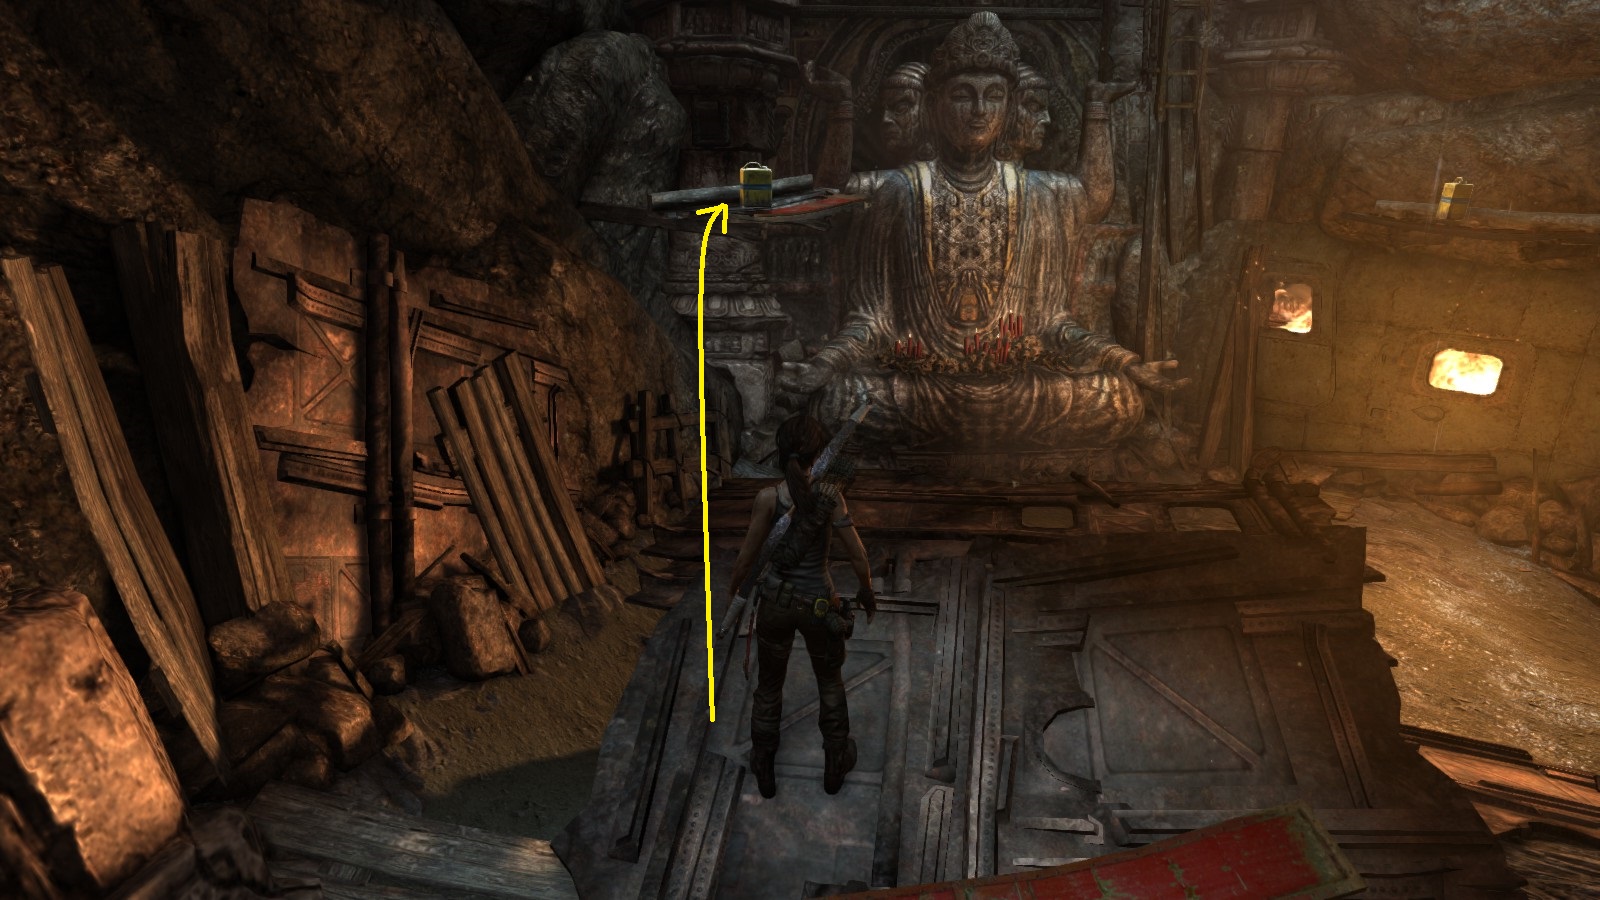
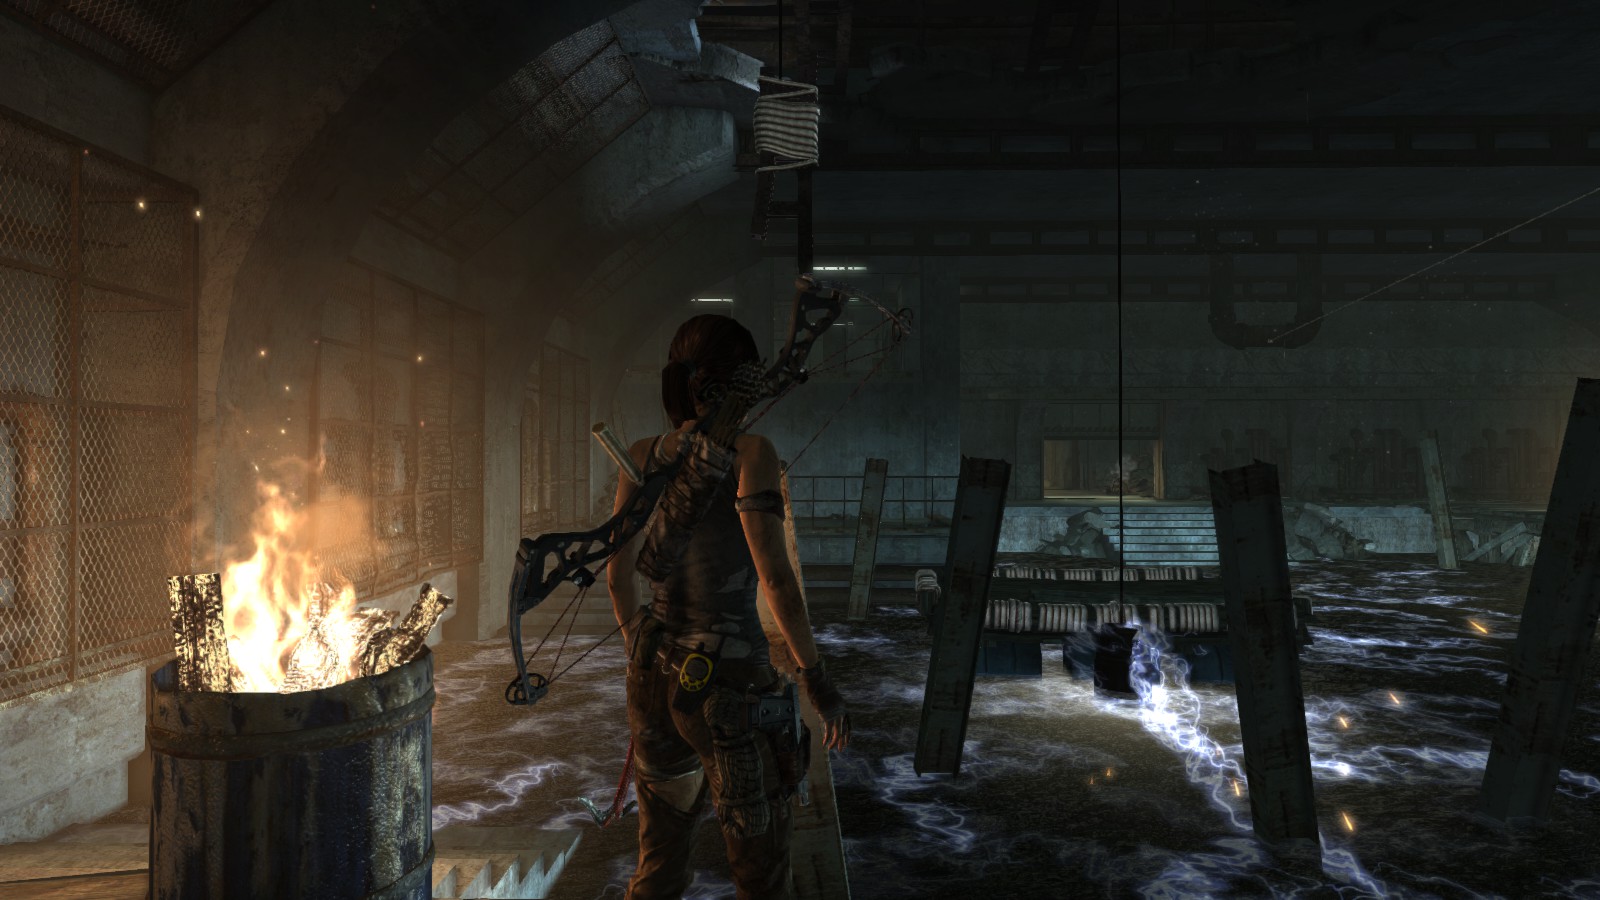
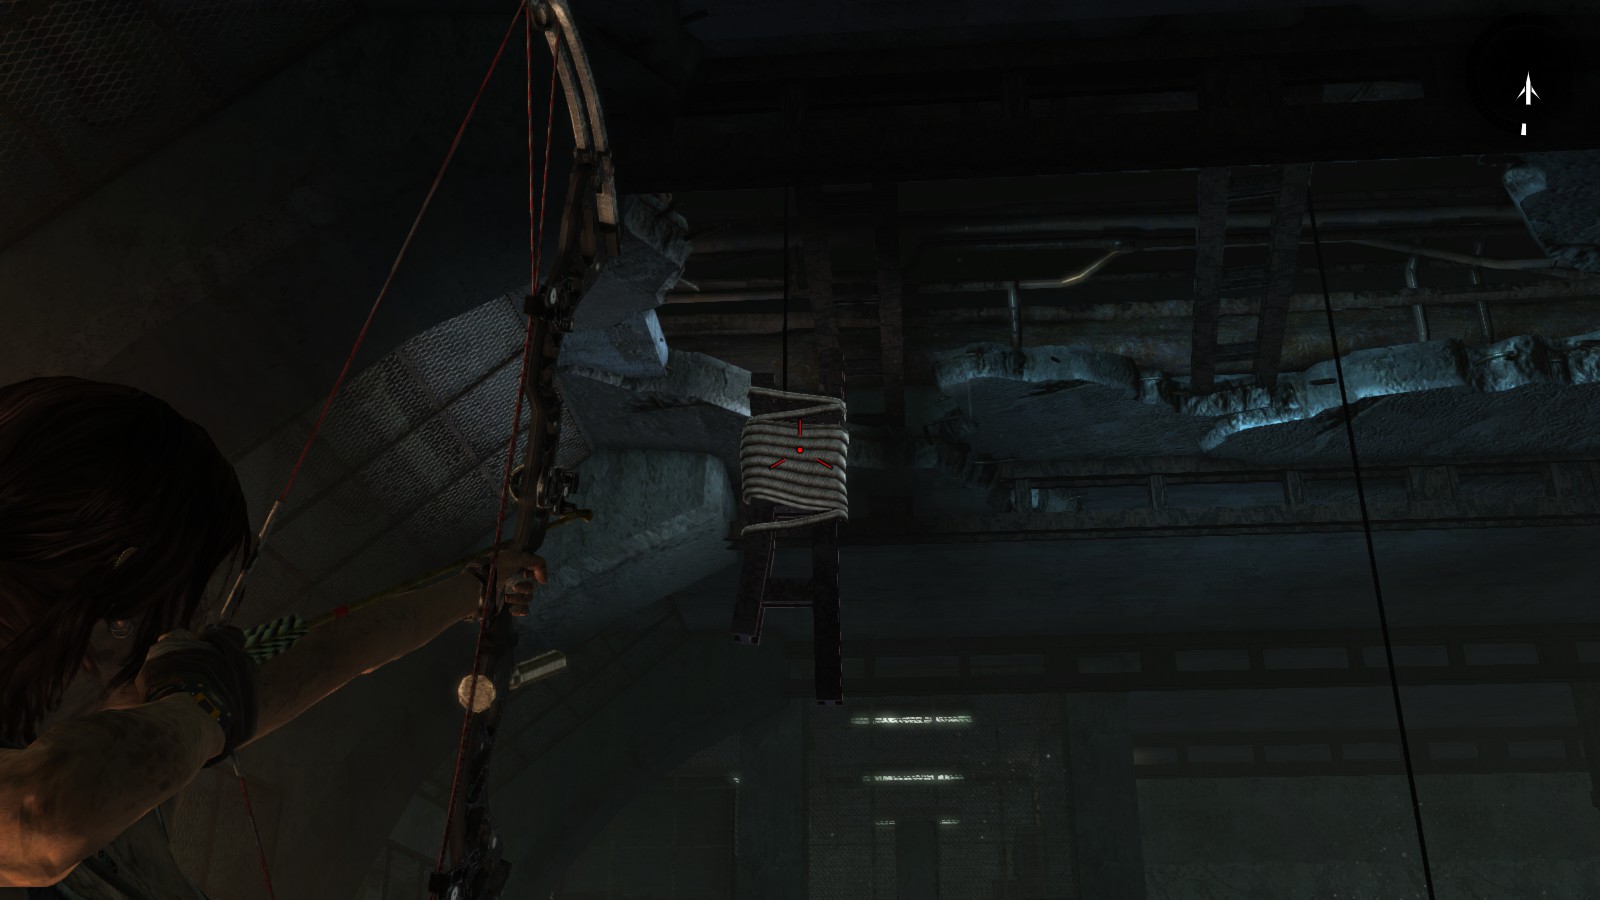
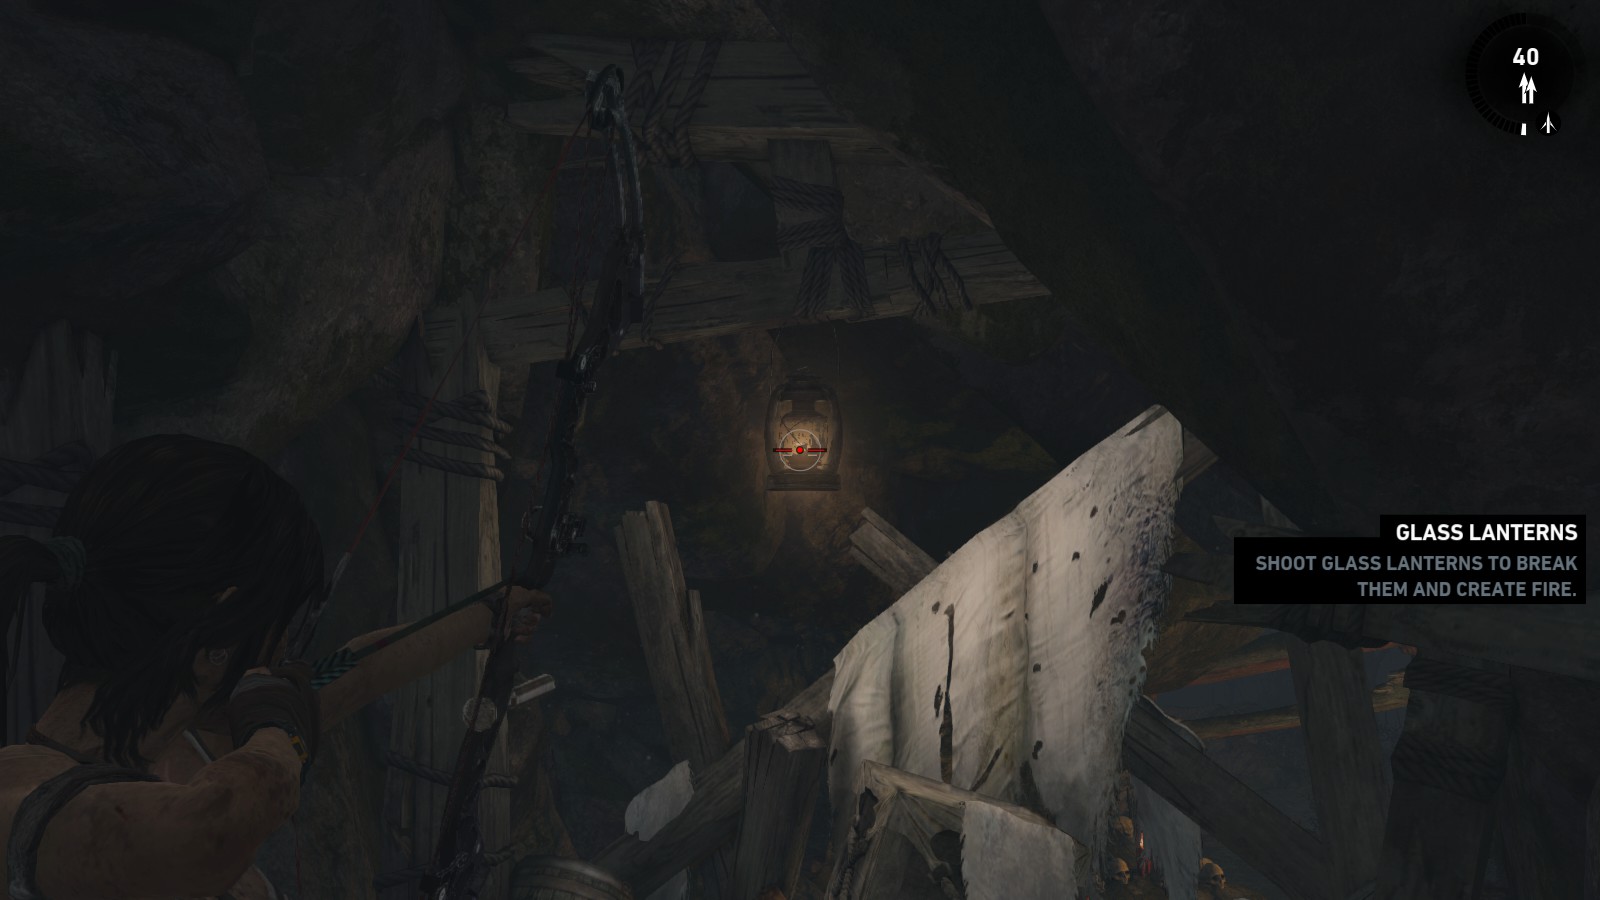
First of all, Lara needs fire. Since she entered this chamber by going through a small waterfall, the torch she had was extinguished there and then. Luckily, fire is available, but it is located on a platform beyond the lift-cage with sacks hanging inside.
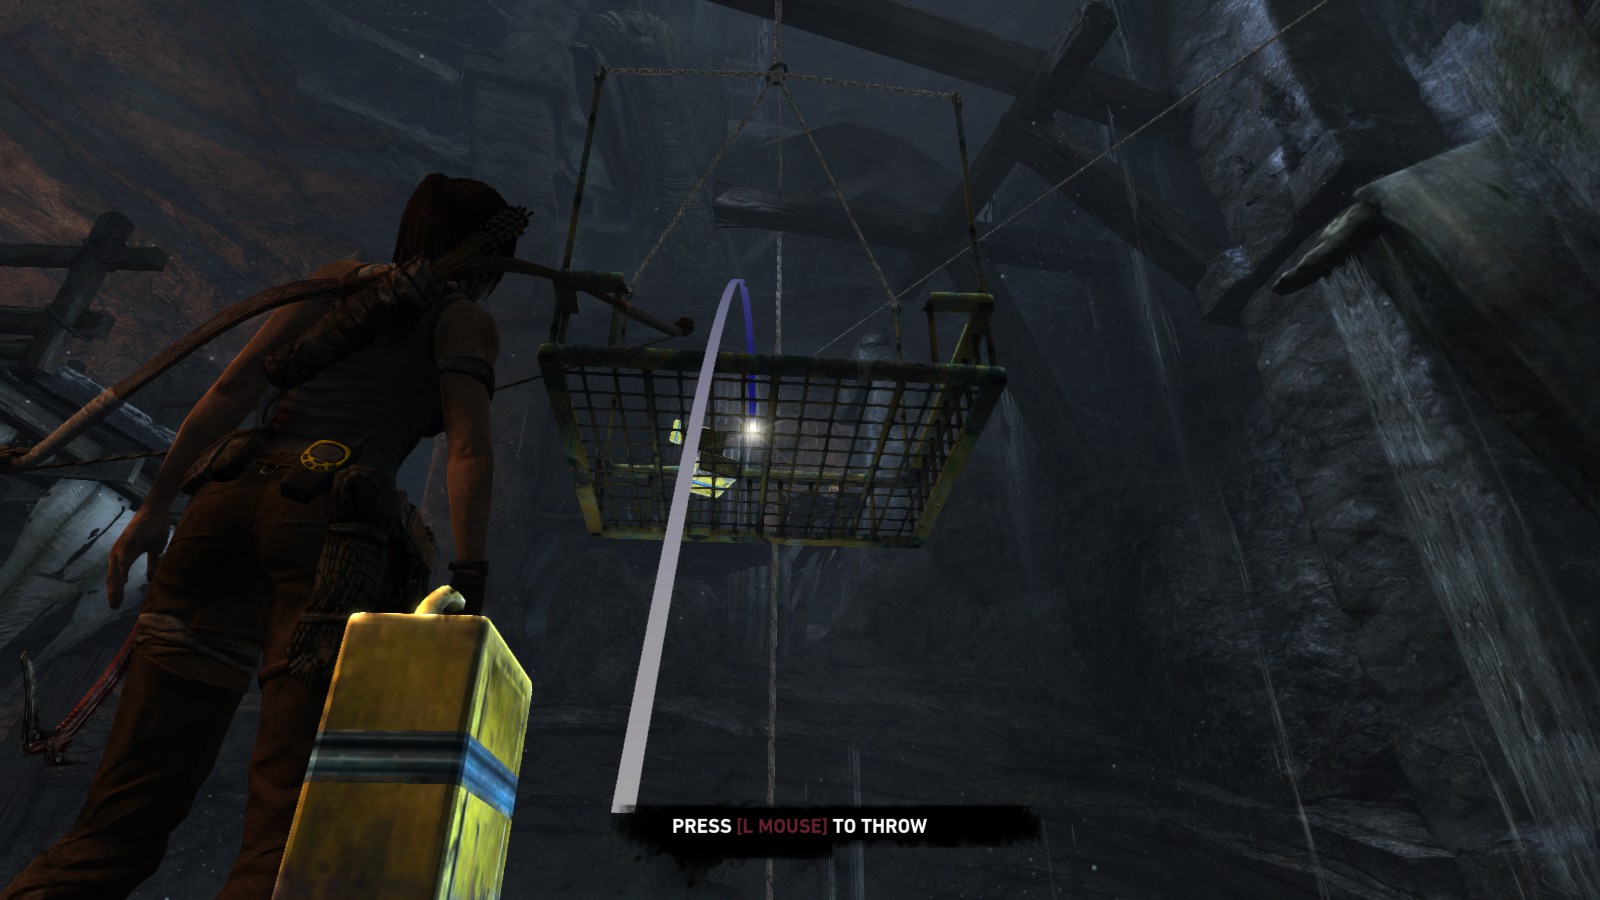
Jump onto the cage, but don’t stop, because the cage will start moving down as soon as Lara jumps onto it and if you wait too long, she won’t make the jump to the platform with the fire. So, quickly jump from the cage to the platform behind it. Light Lara’s torch. Now jump back to the cage - it will move down to the ground, but that doesn’t matter. Burn the three sacks.
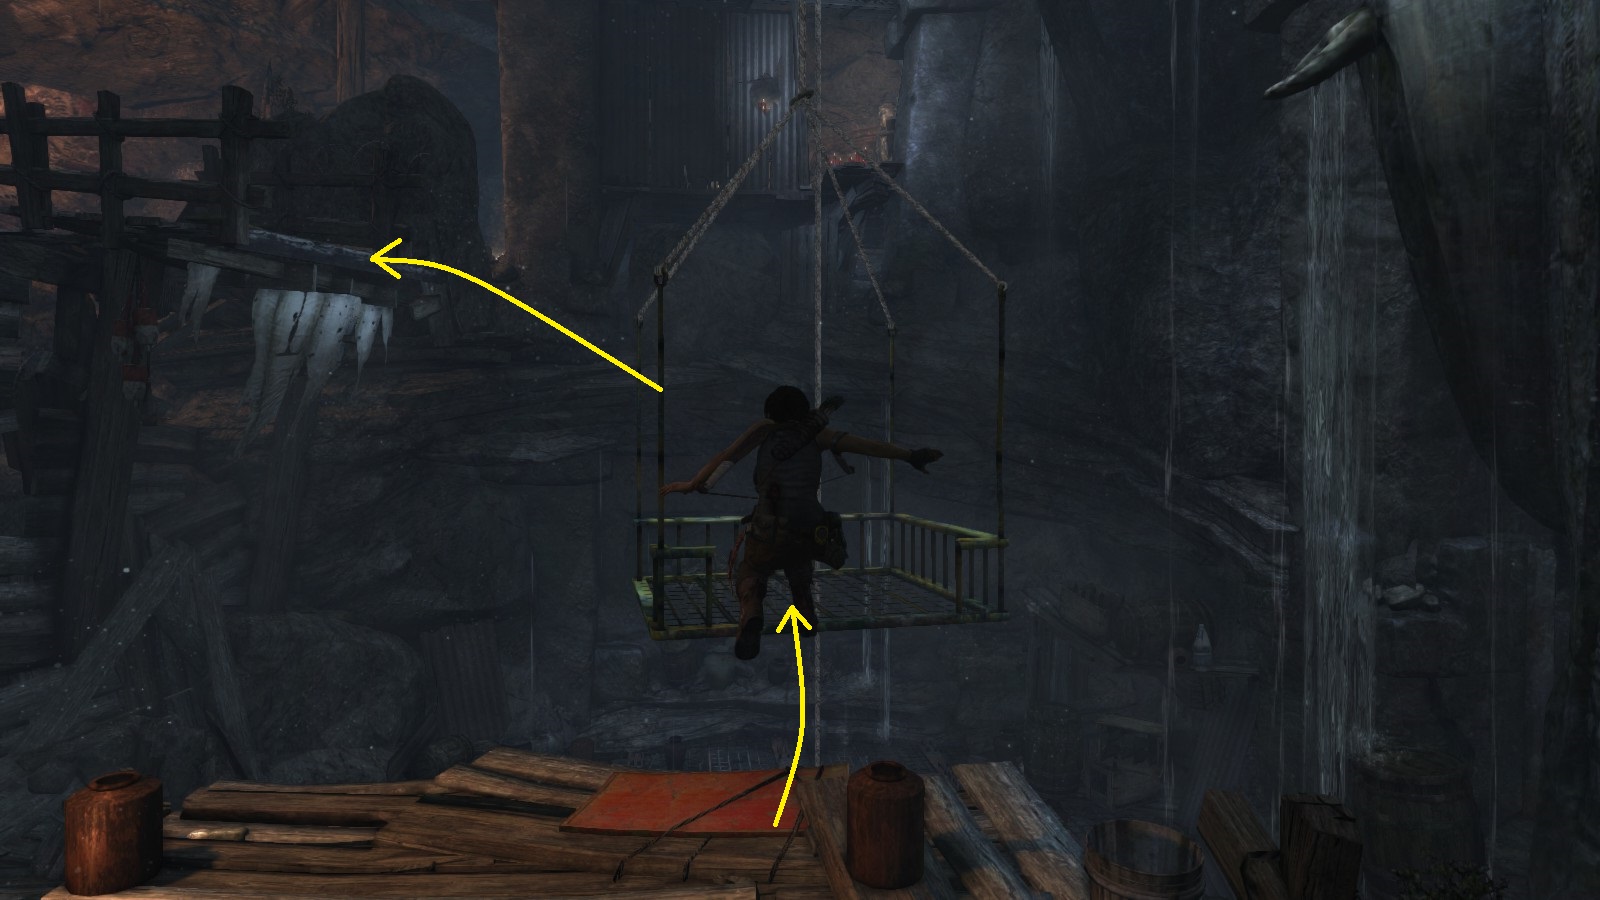
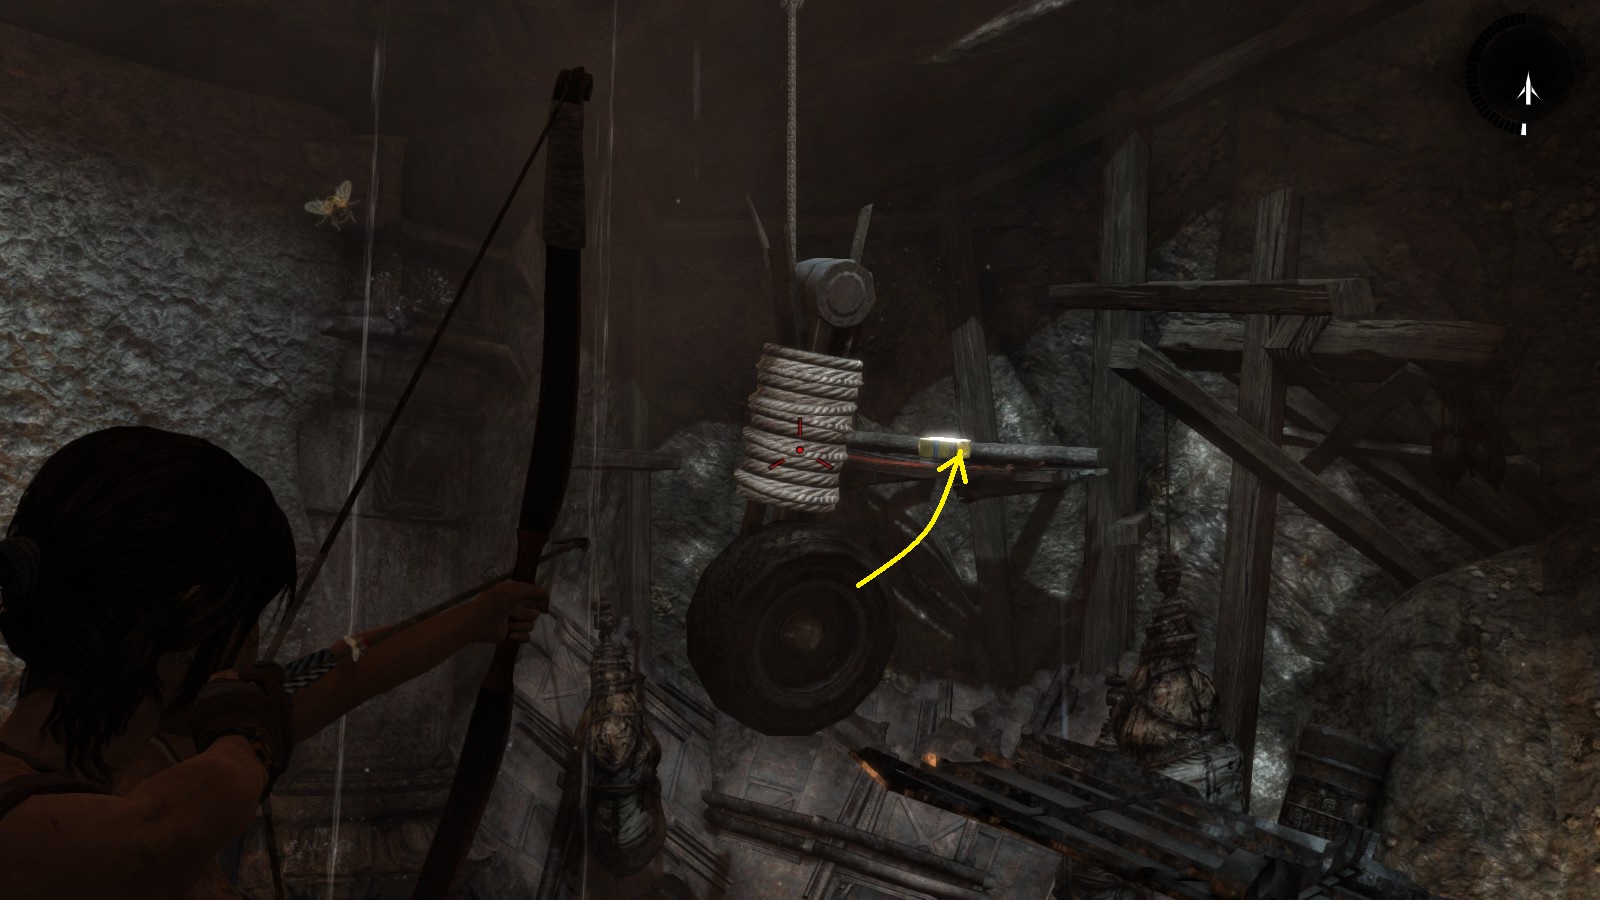
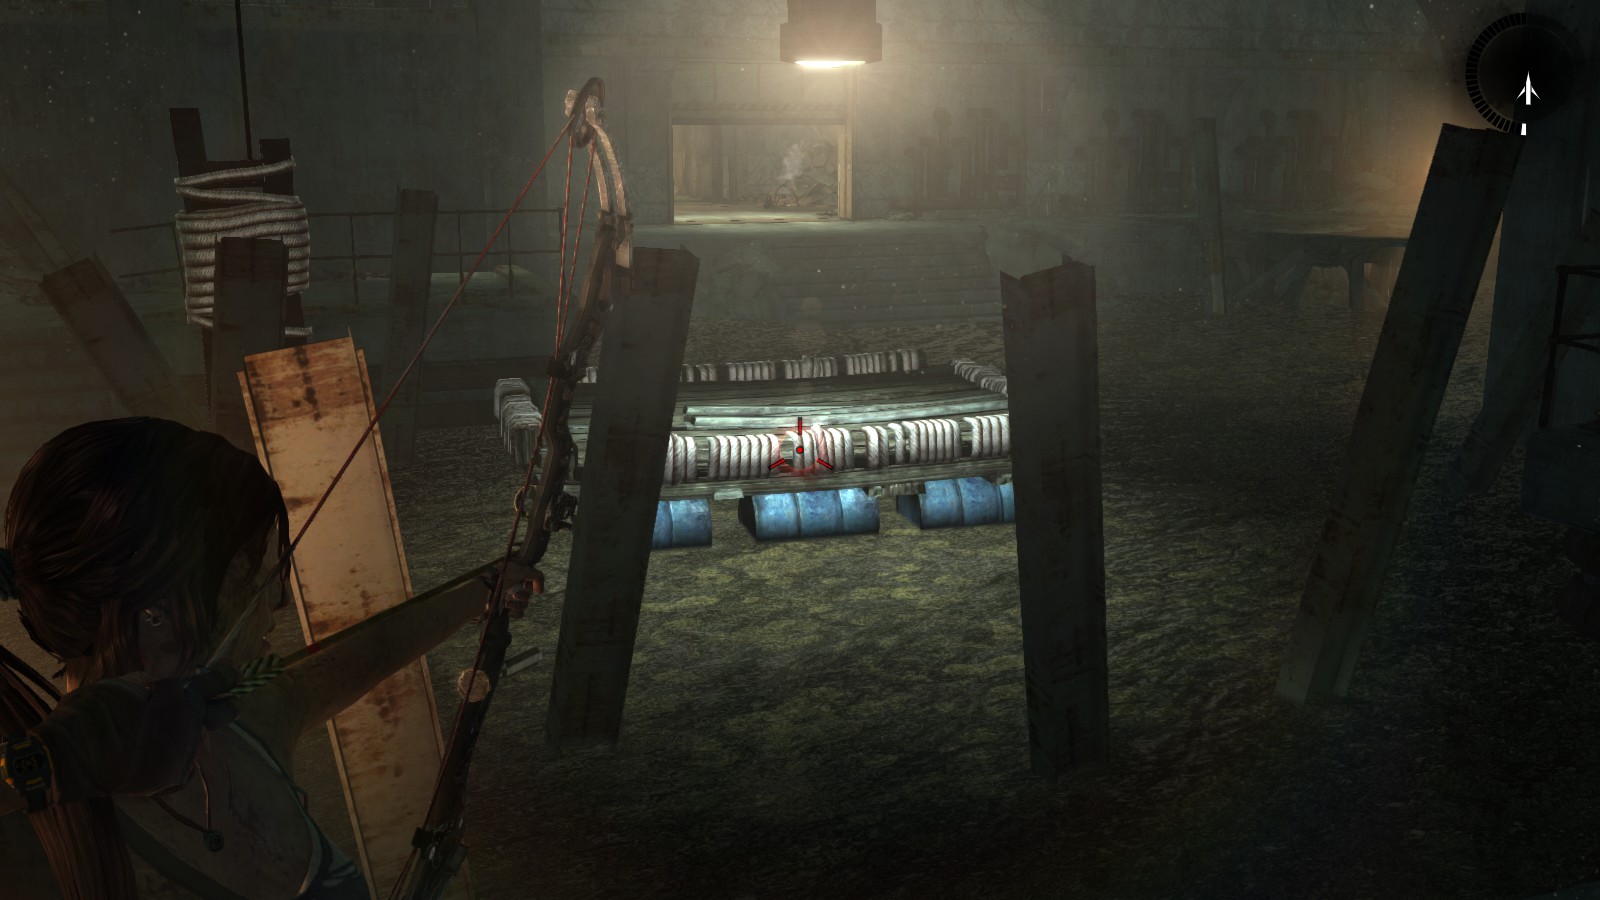
Burning the sacks raises the lift again and, at the same time, makes another cage drop back to the ledge. Jump back to the ledge (or if you got off the lift into the hole, just climb back up). Go to the right-hand side of the chamber (as you entered) to the other cage that is attached to the lift-cage by means of rope. You need to use the weight of this object to raise the lift a bit higher. Make Lara shove it over the side into the hole.
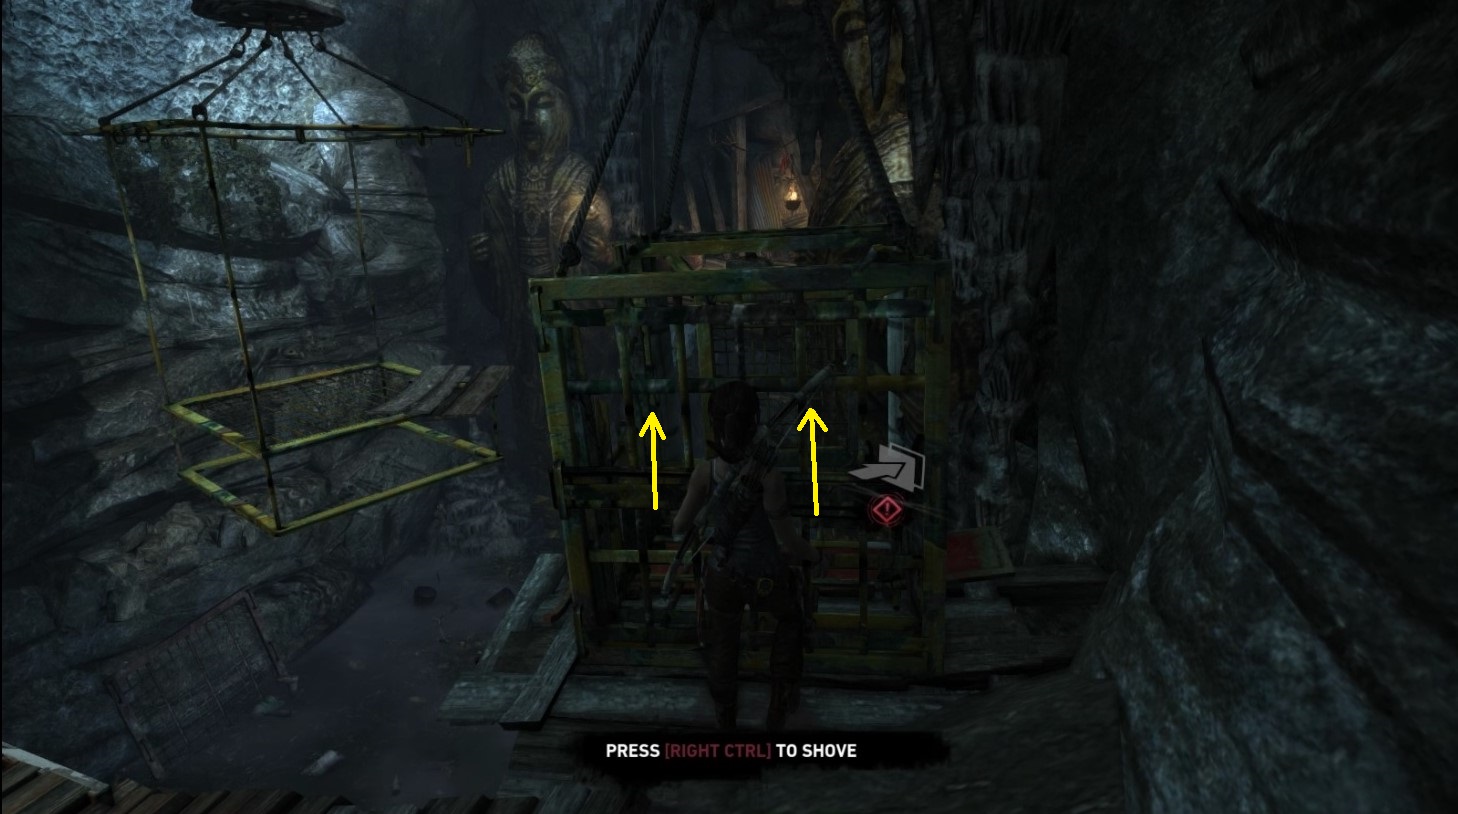
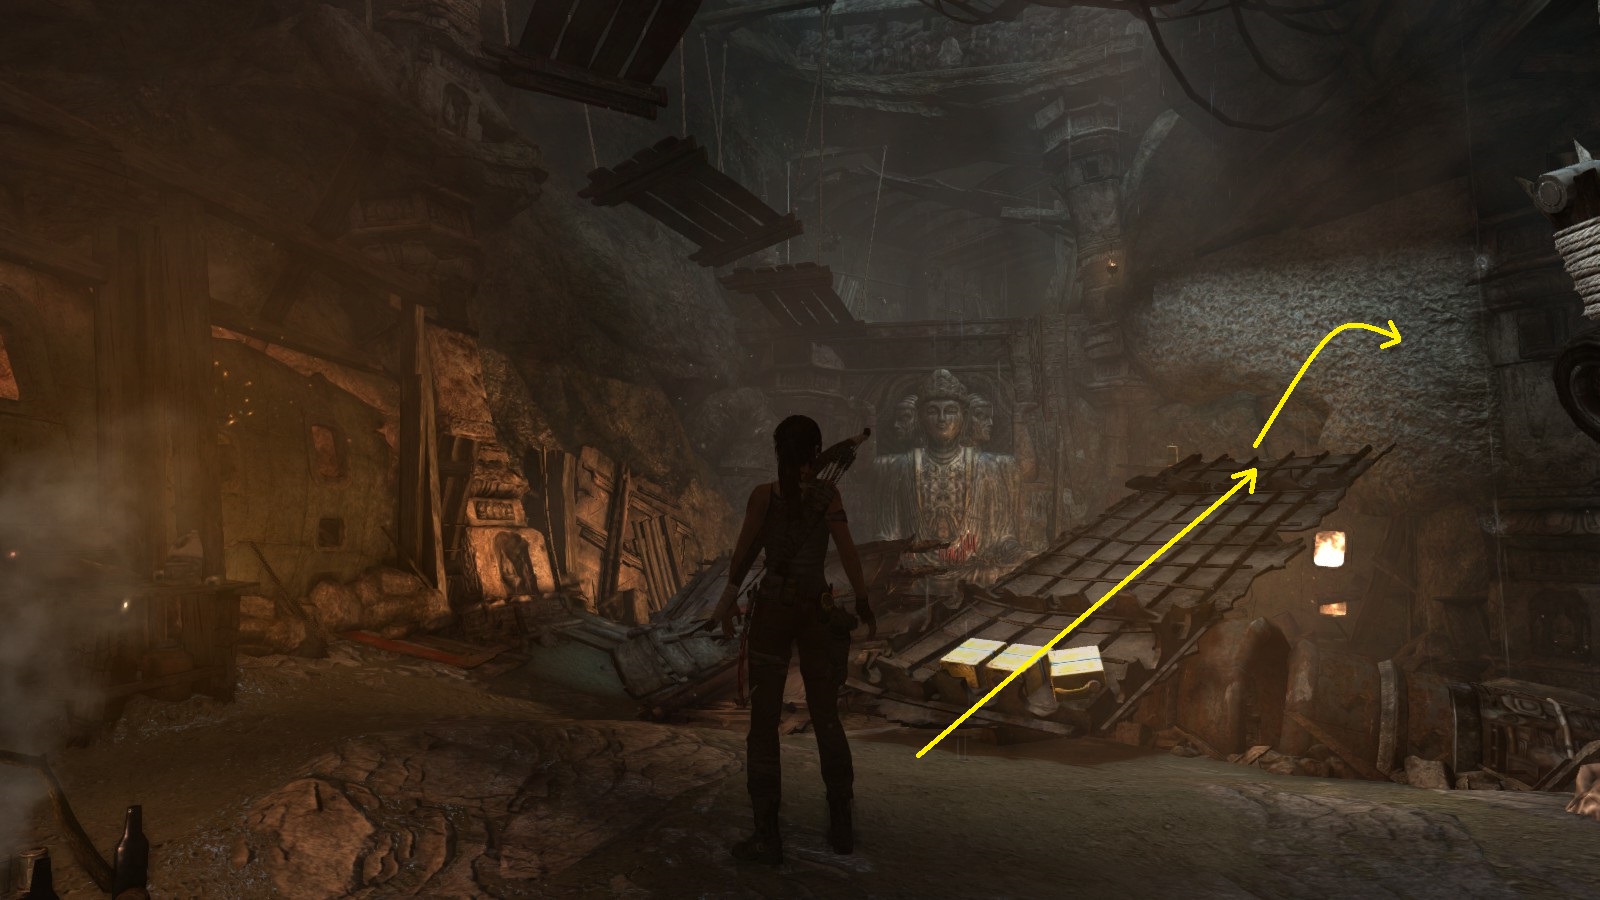
The lift-cage will now be higher than before. Jump back onto it, from which Lara will be able to make the jump to the climbable wall. This time the lift-cage will not sink down to the floor again. Jump and press the action key to hit the wall with the axe just as Lara reaches it.
Climb to the top and claim the treasure.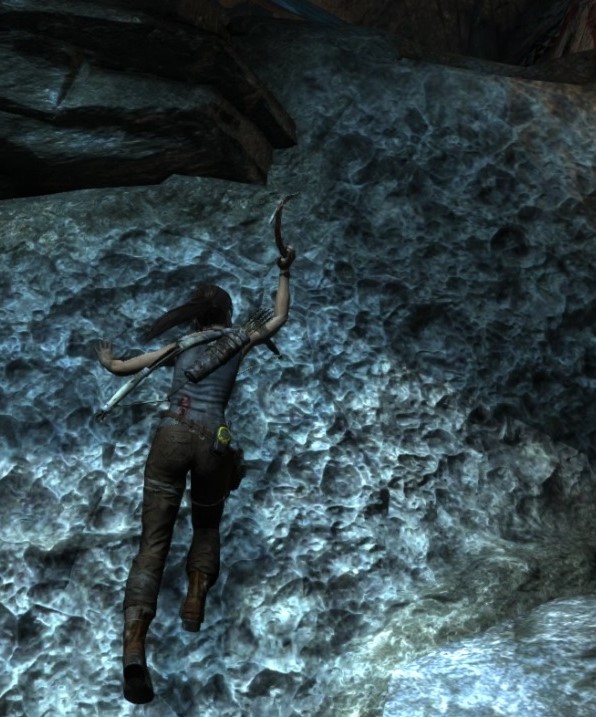 Take the zip line down and exit the tomb.
*** You have completed Tomb of the Unworthy. ***
Village Plateau
Location on the Map
Screenshot of the Entrance
Completing the Tomb
This tomb is only accessible after Lara acquires the climbing axe from Roth at the Village Plateau base camp. She then uses the axe to climb the wall beyond the entrance that would have been an obstruction otherwise.
The main chamber:
First of all, Lara needs fire. Since she entered this chamber by going through a small waterfall, the torch she had was extinguished there and then. Luckily, fire is available, but it is located on a platform beyond the lift-cage with sacks hanging inside.
Jump onto the cage, but don’t stop, because the cage will start moving down as soon as Lara jumps onto it and if you wait too long, she won’t make the jump to the platform with the fire. So, quickly jump from the cage to the platform behind it. Light Lara’s torch. Now jump back to the cage - it will move down to the ground, but that doesn’t matter. Burn the three sacks.
Burning the sacks raises the lift again and, at the same time, makes another cage drop back to the ledge. Jump back to the ledge (or if you got off the lift into the hole, just climb back up). Go to the right-hand side of the chamber (as you entered) to the other cage that is attached to the lift-cage by means of rope. You need to use the weight of this object to raise the lift a bit higher. Make Lara shove it over the side into the hole.
The lift-cage will now be higher than before. Jump back onto it, from which Lara will be able to make the jump to the climbable wall. This time the lift-cage will not sink down to the floor again. Jump and press the action key to hit the wall with the axe just as Lara reaches it.
Climb to the top and claim the treasure.
Take the zip line down and exit the tomb.*** You have completed Tomb of the Unworthy. ***
2. HALL OF ASCENSION (Mountain Village)
Closest Base (Fast-Travel) Camp
Village Overlook
Location on the Map
Screenshot of the Entrance
Completing the Tomb
Inside the hall:
When you enter the puzzle room, press Q (survival instinct mode) to see which objects you’re going to work with. Leave the contraption with the cranking wheel directly in front of you alone for now - it controls the lift. To the left there is a similar-looking but longer contraption at the bottom of the window through which a strong wind is blowing. Your goal is to get to the ledge high up on the wall on the opposite side of the room. You do this by getting onto the lift at the first contraption, from where you then jump to the high ledge. However, in order to do that successfully, you must first cut off the wind temporarily and then, when the wind comes back again, use its force to get closer to the ledge on the wall before you jump from the lift.
So, timing is important, especially when jumping from the lift to the ledge on the wall.
The procedure:
1) First go to the contraption by the window and make Lara turn the crank wheel until it can’t go any further. This will close the window boards.
2) Then quickly run to the contraption (near the door) and also crank that wheel until it doesn’t go any further. This will raise the lift platform. While you are doing this, the first board on the window will give way, but don’t worry, you still have enough time.
3) Now quickly get onto the high table-like structure to the left of the lift and from there jump onto the lift itself. If you were quick, you’ll have a few seconds more to position Lara for the jump (preferably, don’t stand too close to the edge of the lift closest to the target wall).
(Unlike in the screenshot, at this point, the lift would have been raised from the floor somewhat more.)
4) Meanwhile, the other boards on the window collapse and the lift (with Lara on it) is forced by the fierce wind to swing towards the wall on the opposite side of the hall. There’s an initial jolt as the cage starts to move and then a weaker one as it moves closer to the wall. This is the most difficult part. You need to time it just right. Use the second action as the moment Lara needs to jump. There’s an area on the wall where Lara can scramble up to the ledge.

5) Once Lara has made it onto the wall and is holding onto the ledge, shimmy to the left and around the corner until she gets near the doorway to the treasure room.
6) Jump over to the wooden balcony and go through the door.
Go straight on and claim the treasure.
To get back, simply hang from the wooden balcony and drop down to the floor of the puzzle room. Exit the tomb the same way you came in.
*** You have completed Hall of Ascension. ***
Village Overlook
Location on the Map
Screenshot of the Entrance
Completing the Tomb
Inside the hall:
When you enter the puzzle room, press Q (survival instinct mode) to see which objects you’re going to work with. Leave the contraption with the cranking wheel directly in front of you alone for now - it controls the lift. To the left there is a similar-looking but longer contraption at the bottom of the window through which a strong wind is blowing. Your goal is to get to the ledge high up on the wall on the opposite side of the room. You do this by getting onto the lift at the first contraption, from where you then jump to the high ledge. However, in order to do that successfully, you must first cut off the wind temporarily and then, when the wind comes back again, use its force to get closer to the ledge on the wall before you jump from the lift.
So, timing is important, especially when jumping from the lift to the ledge on the wall.
The procedure:
1) First go to the contraption by the window and make Lara turn the crank wheel until it can’t go any further. This will close the window boards.
2) Then quickly run to the contraption (near the door) and also crank that wheel until it doesn’t go any further. This will raise the lift platform. While you are doing this, the first board on the window will give way, but don’t worry, you still have enough time.
3) Now quickly get onto the high table-like structure to the left of the lift and from there jump onto the lift itself. If you were quick, you’ll have a few seconds more to position Lara for the jump (preferably, don’t stand too close to the edge of the lift closest to the target wall).
(Unlike in the screenshot, at this point, the lift would have been raised from the floor somewhat more.)
4) Meanwhile, the other boards on the window collapse and the lift (with Lara on it) is forced by the fierce wind to swing towards the wall on the opposite side of the hall. There’s an initial jolt as the cage starts to move and then a weaker one as it moves closer to the wall. This is the most difficult part. You need to time it just right. Use the second action as the moment Lara needs to jump. There’s an area on the wall where Lara can scramble up to the ledge.
5) Once Lara has made it onto the wall and is holding onto the ledge, shimmy to the left and around the corner until she gets near the doorway to the treasure room.
6) Jump over to the wooden balcony and go through the door.
Go straight on and claim the treasure.
To get back, simply hang from the wooden balcony and drop down to the floor of the puzzle room. Exit the tomb the same way you came in.
*** You have completed Hall of Ascension. ***
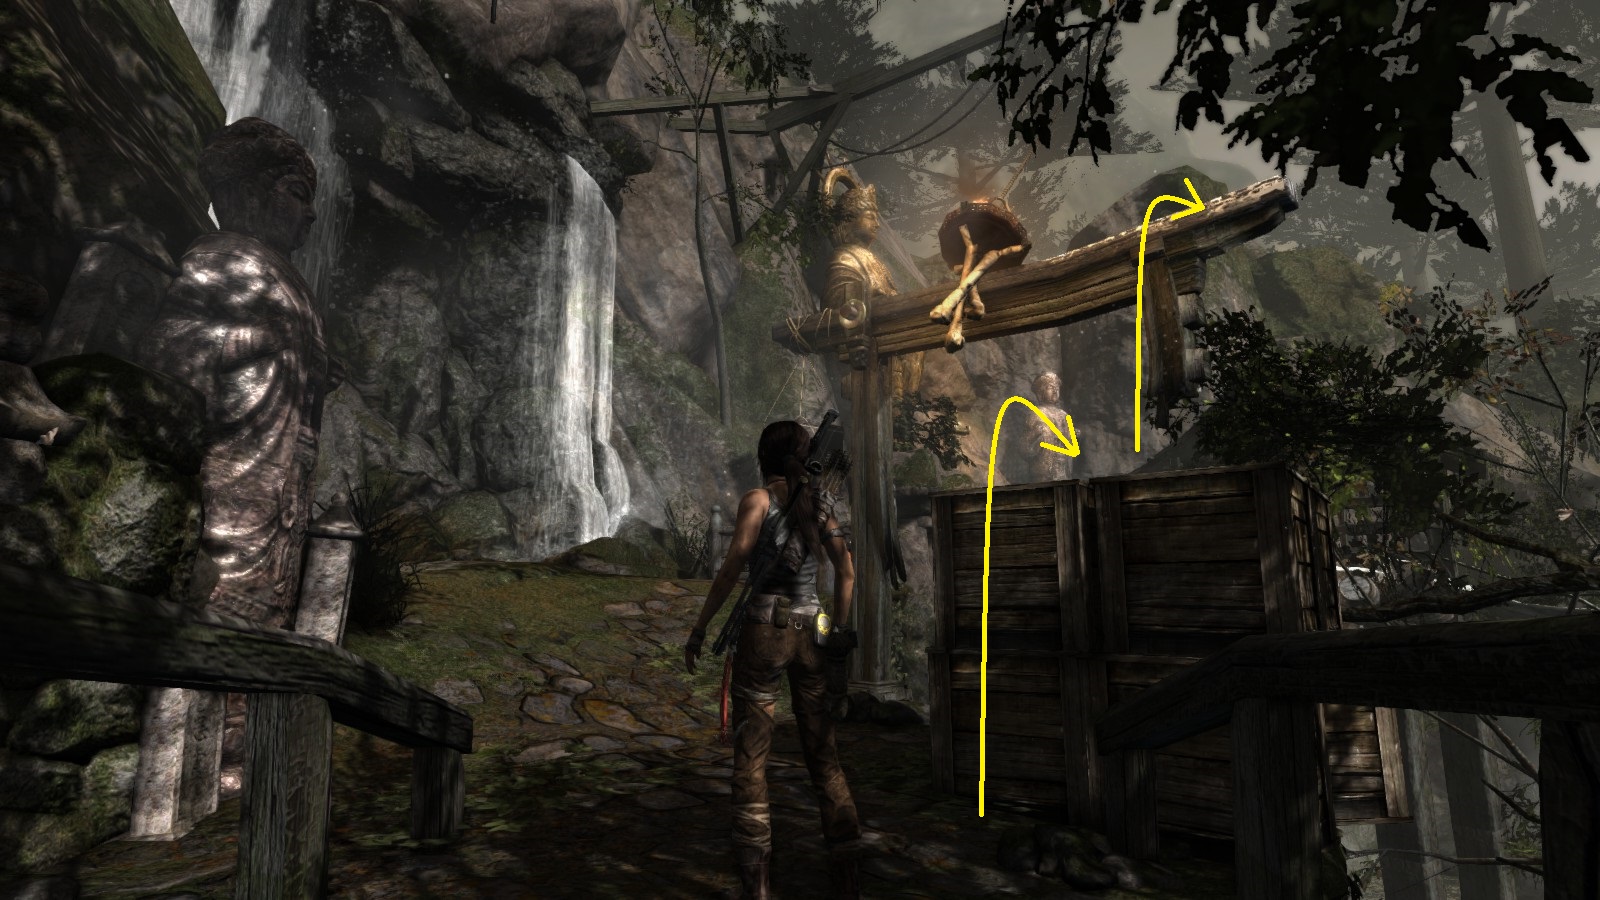
3. WELL OF TEARS (Shantytown)
Closest Base (Fast-Travel) Camp
Helicopter Hill
Location on the Map
Screenshot of the Entrance
Completing the Tomb
If this is your first visit here: Beware! It is an ambush!
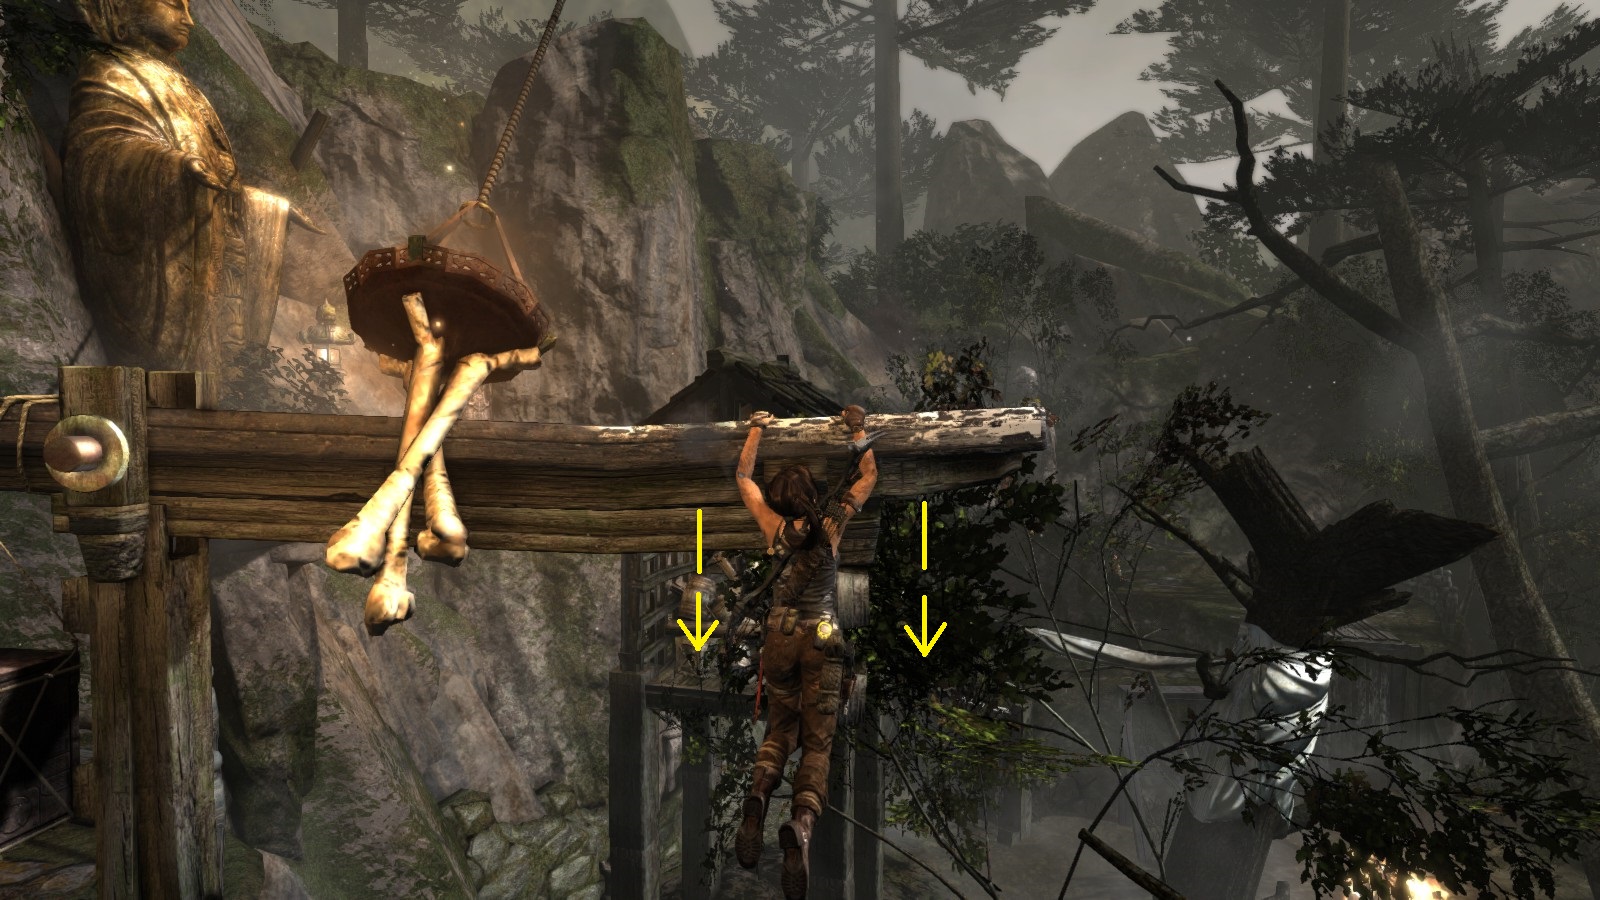
Getting inside:
Use rope arrow to pull out the roped floor boards. Jump down the hole (pick up the GPS cache) and proceed down the tunnel, over the narrow bridge, down the ladder and the climbable wall (you can just simply drop down both ledges), getting all the salvage on the way. Squeeze into the main chamber.
The puzzle chamber:
Lara needs to get onto the lift so she can jump from there to the wooden platform on the left. However, the lift is too high.
Firstly, she needs to weigh the lift down to get onto it and then, secondly, she must get rid of the weight so the lift can rise to the correct height again for the jump.
1) Pick up the yellow containers scattered about and throw them onto the lift. You only need three of them to bring the lift down to the floor.
2) Go down and get onto the lift. Now pick up the containers and throw them back to the campfire area above from where you’re going to jump in a moment - you can throw them wherever you like, really, but this way you save some time if your first attempt fails and you have to get the containers back onto the lift. With only Lara left on the lift, it will still be on the floor.
3) You now have to run back up to the campfire area from where you’re going to jump onto the lift as it rises towards the ceiling. Keep in mind that you don’t want to jump too early or too late, because you want the lift to be at a level from where you can reach the wooden platform above. So, run from the lift, up the slope to the edge and jump. (The lift will start moving up the moment Lara starts running. If you're taking too long to make the jump, run-jump up the slope to save some time.) Quickly pull up and jump from the lift to the wooden platform before the lift sinks too low.
Once you're on top, go and claim the treasure.
The way out:
Use the zip line close to the treasure chest to get down to the floor again. Exit the puzzle chamber, proceed up the climbable wall and the ladder to the top, negotiate the narrow bridge and exit the tomb.
*** You have completed Well of Tears. ***
Helicopter Hill
Location on the Map
Screenshot of the Entrance
Completing the Tomb
If this is your first visit here: Beware! It is an ambush!
Getting inside:
Use rope arrow to pull out the roped floor boards. Jump down the hole (pick up the GPS cache) and proceed down the tunnel, over the narrow bridge, down the ladder and the climbable wall (you can just simply drop down both ledges), getting all the salvage on the way. Squeeze into the main chamber.
The puzzle chamber:
Lara needs to get onto the lift so she can jump from there to the wooden platform on the left. However, the lift is too high.
Firstly, she needs to weigh the lift down to get onto it and then, secondly, she must get rid of the weight so the lift can rise to the correct height again for the jump.
1) Pick up the yellow containers scattered about and throw them onto the lift. You only need three of them to bring the lift down to the floor.
2) Go down and get onto the lift. Now pick up the containers and throw them back to the campfire area above from where you’re going to jump in a moment - you can throw them wherever you like, really, but this way you save some time if your first attempt fails and you have to get the containers back onto the lift. With only Lara left on the lift, it will still be on the floor.
3) You now have to run back up to the campfire area from where you’re going to jump onto the lift as it rises towards the ceiling. Keep in mind that you don’t want to jump too early or too late, because you want the lift to be at a level from where you can reach the wooden platform above. So, run from the lift, up the slope to the edge and jump. (The lift will start moving up the moment Lara starts running. If you're taking too long to make the jump, run-jump up the slope to save some time.) Quickly pull up and jump from the lift to the wooden platform before the lift sinks too low.
Once you're on top, go and claim the treasure.
The way out:
Use the zip line close to the treasure chest to get down to the floor again. Exit the puzzle chamber, proceed up the climbable wall and the ladder to the top, negotiate the narrow bridge and exit the tomb.
*** You have completed Well of Tears. ***
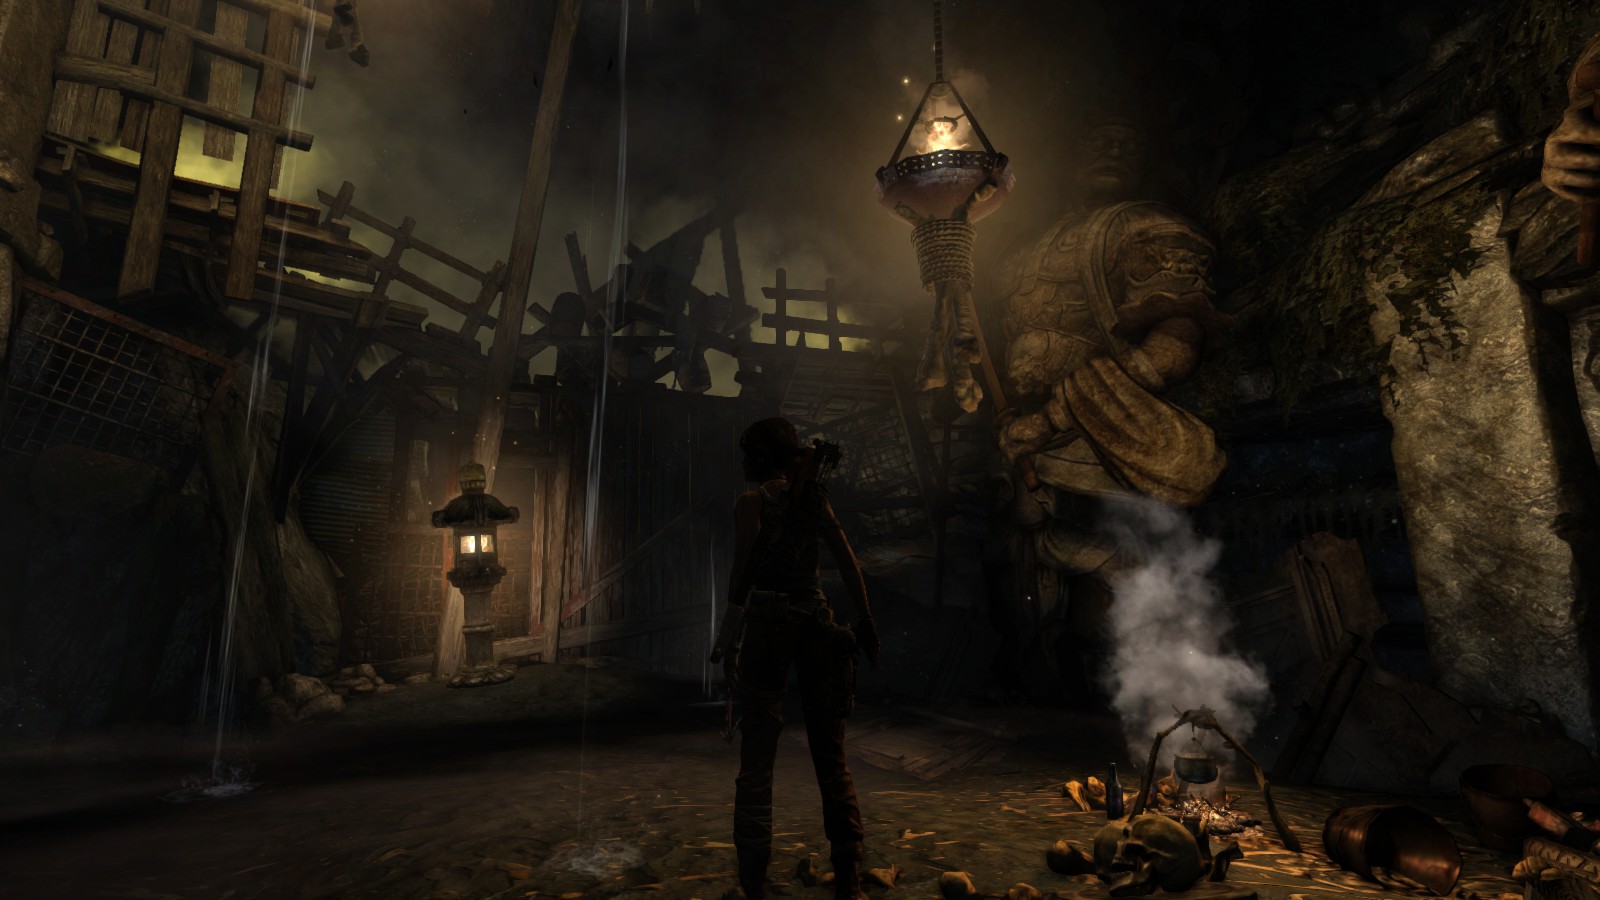
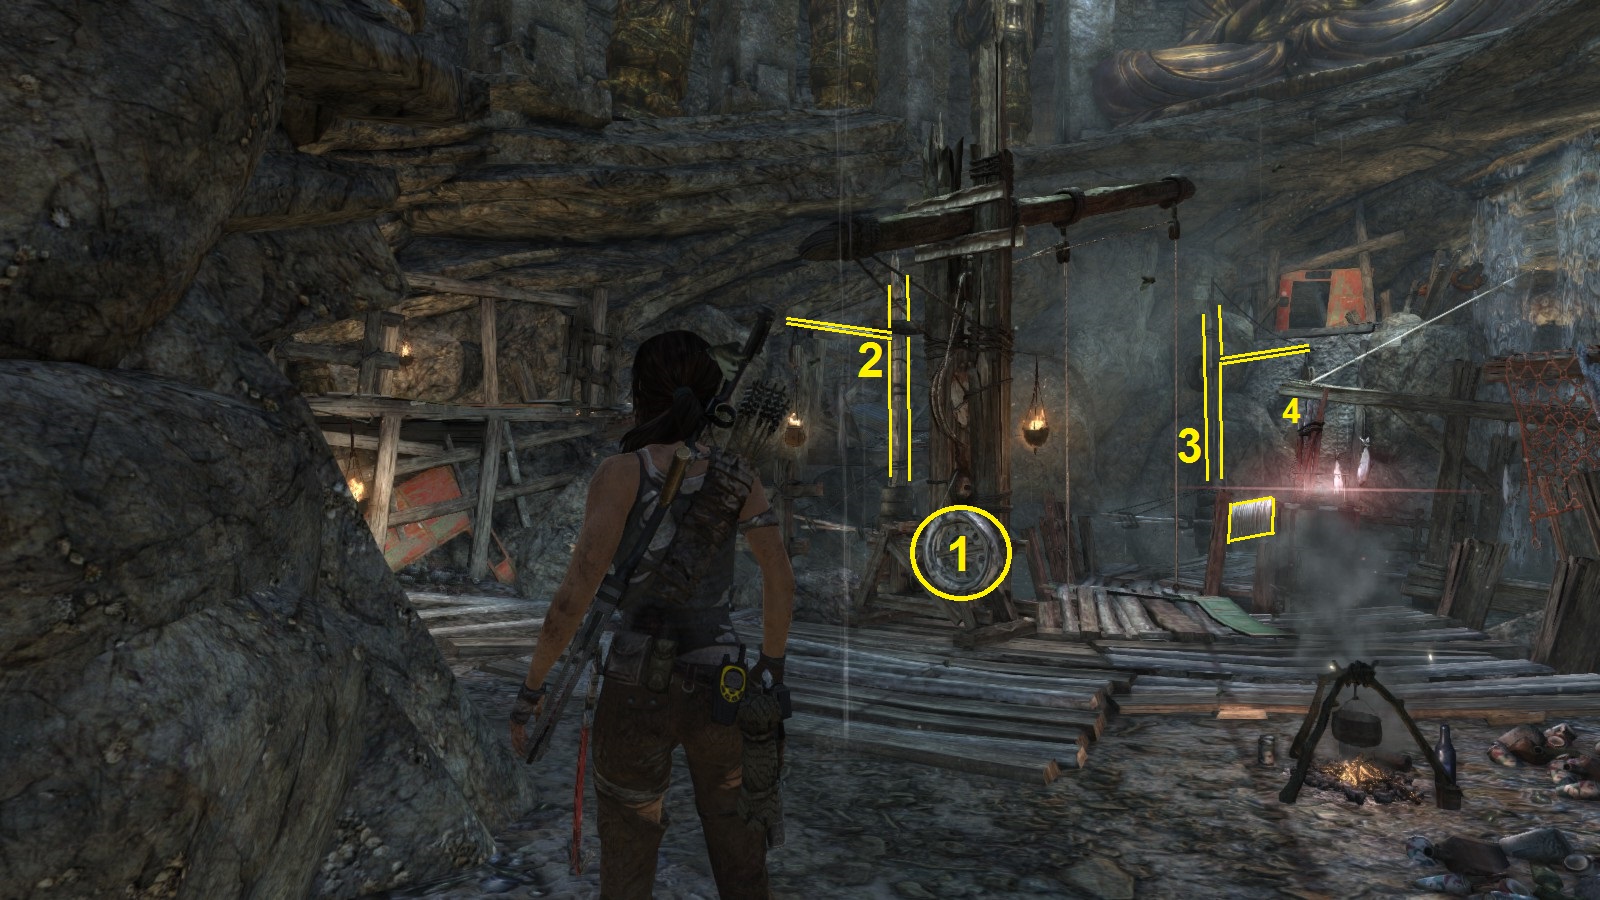
4. CHAMBER OF JUDGMENT (Shantytown)
Closest Base (Fast-Travel) Camp
Windmill
Location on the Map
Entrance located right by the Windmill base camp.
Screenshot of the Entrance
Completing the Tomb
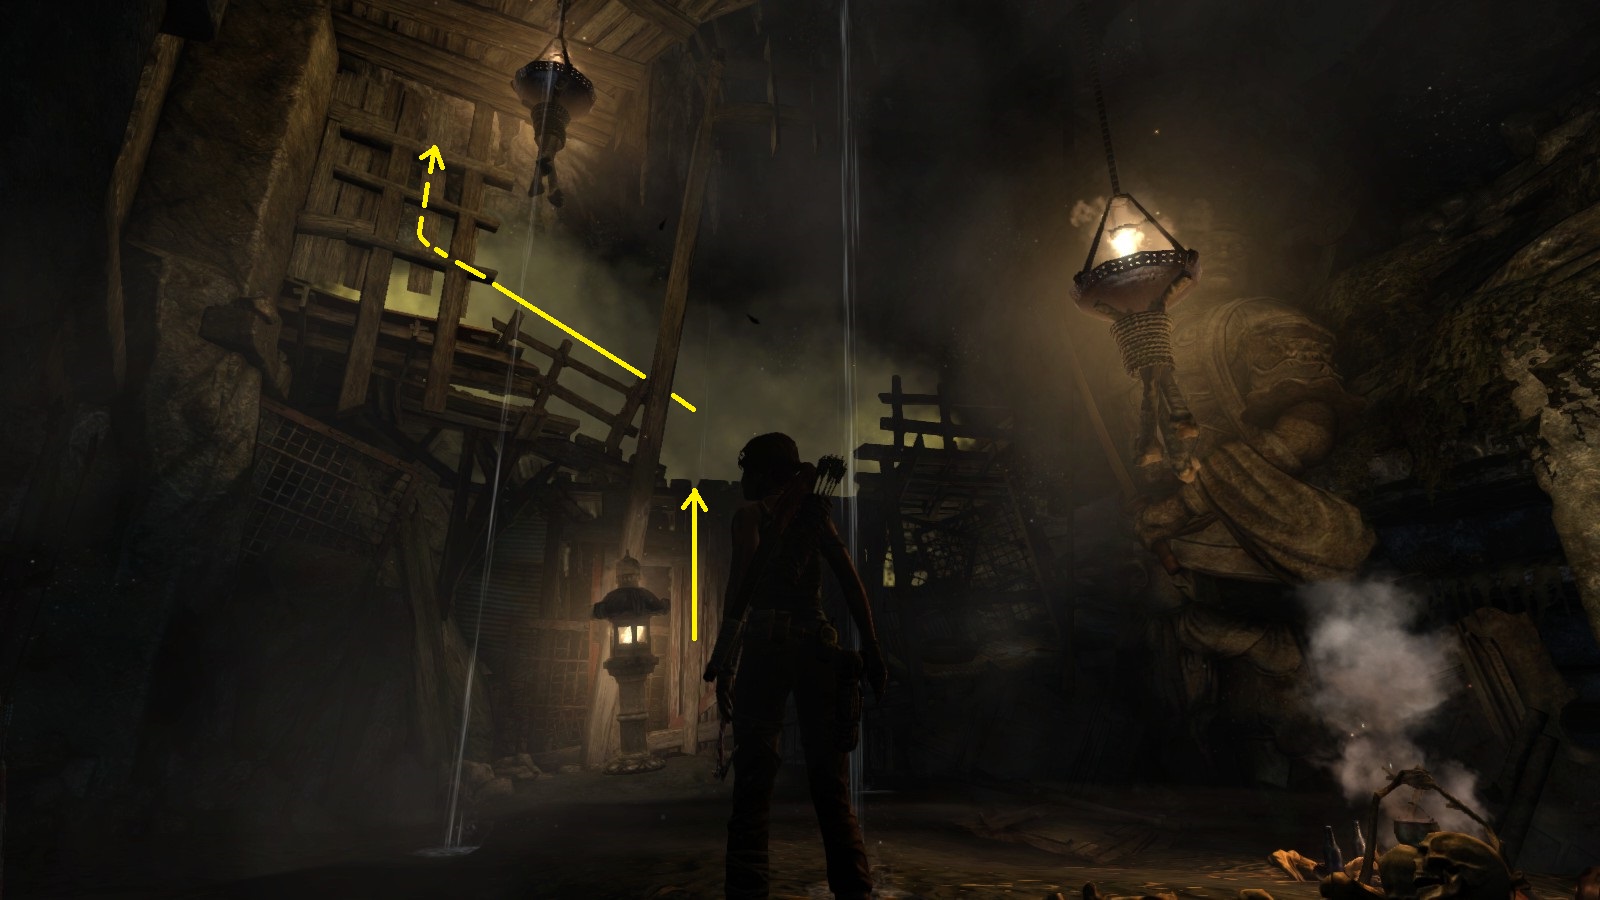
On the way in:
Lara will get to a slippery slope, lose her footing and slide down. Grab the ledge at the bottom of the slope when prompted, shimmy right and climb up out of this dangerous situation. At the T-junction in the path turn right (left takes you back to the entrance). Cross over a single-plank bridge and continue until Lara reaches the main chamber.
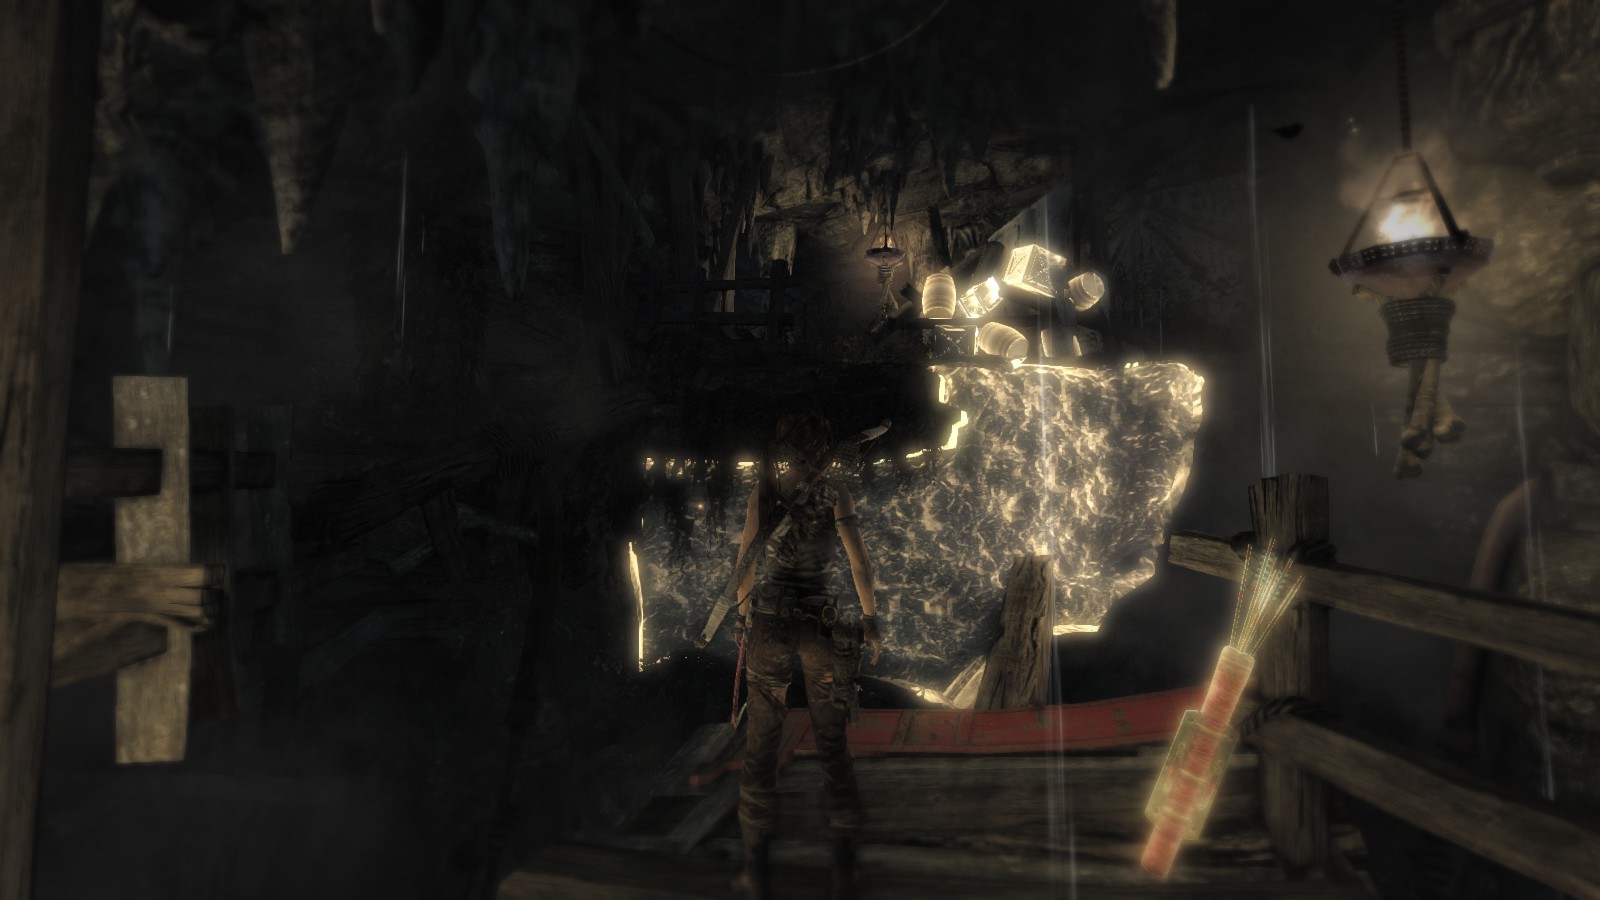
Inside the chamber:
After entering, notice the large rectangular sheet of metal. The side facing you is angled into the air. To continue you need to change it around so that the side facing the climbable wall is off the ground, forming a ramp for Lara to run on. You need something to weigh down the metal sheet in order to have a stable, working ramp.
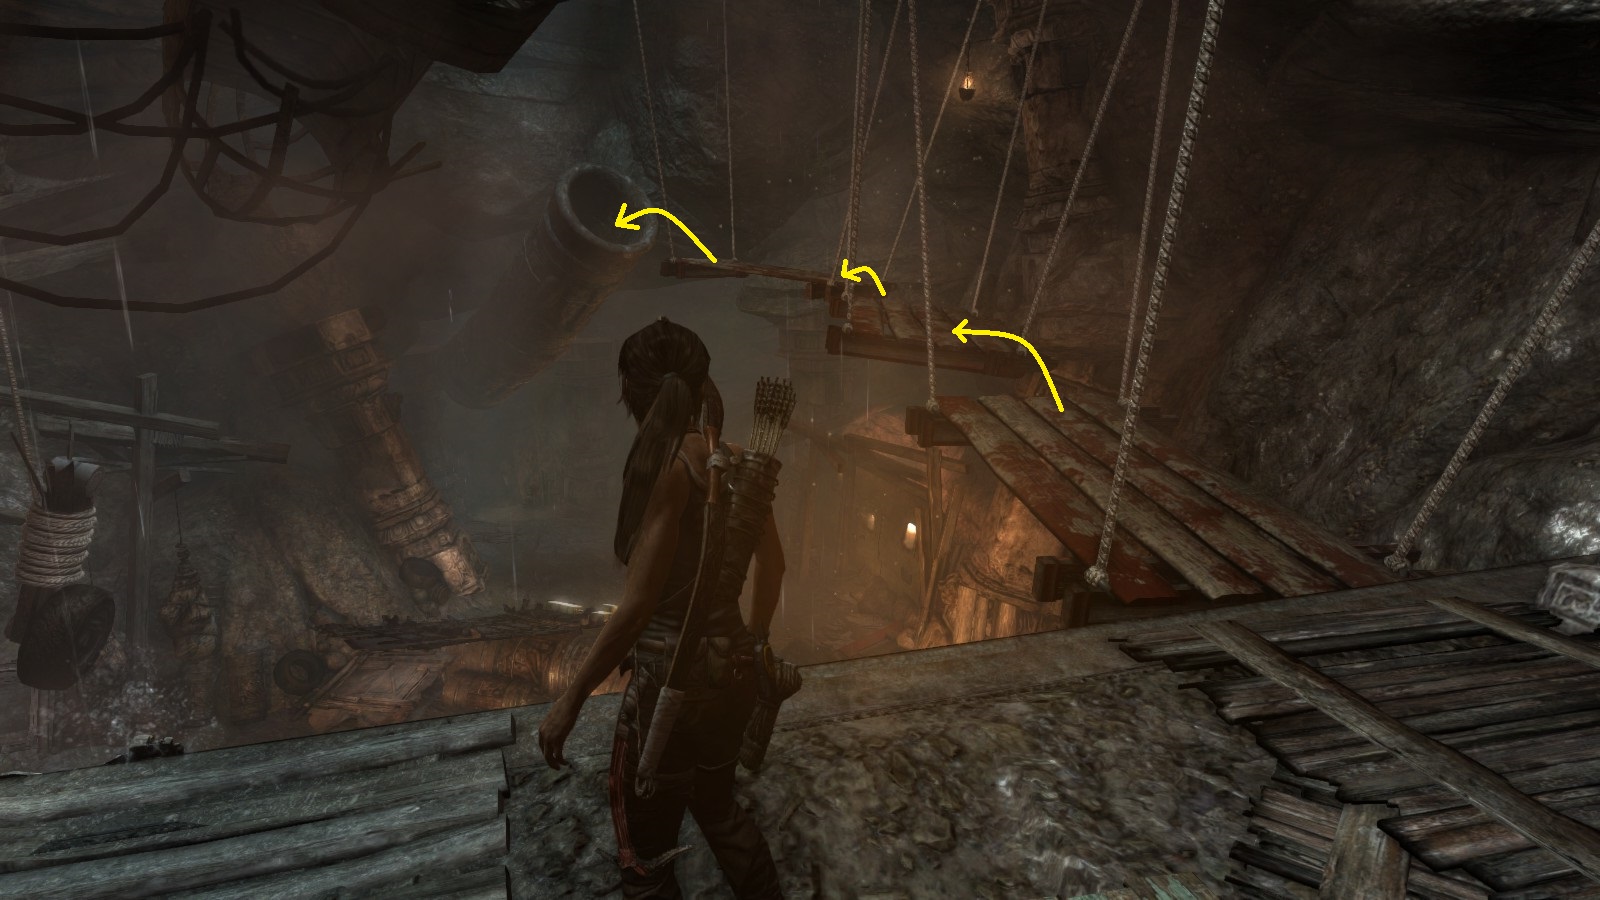
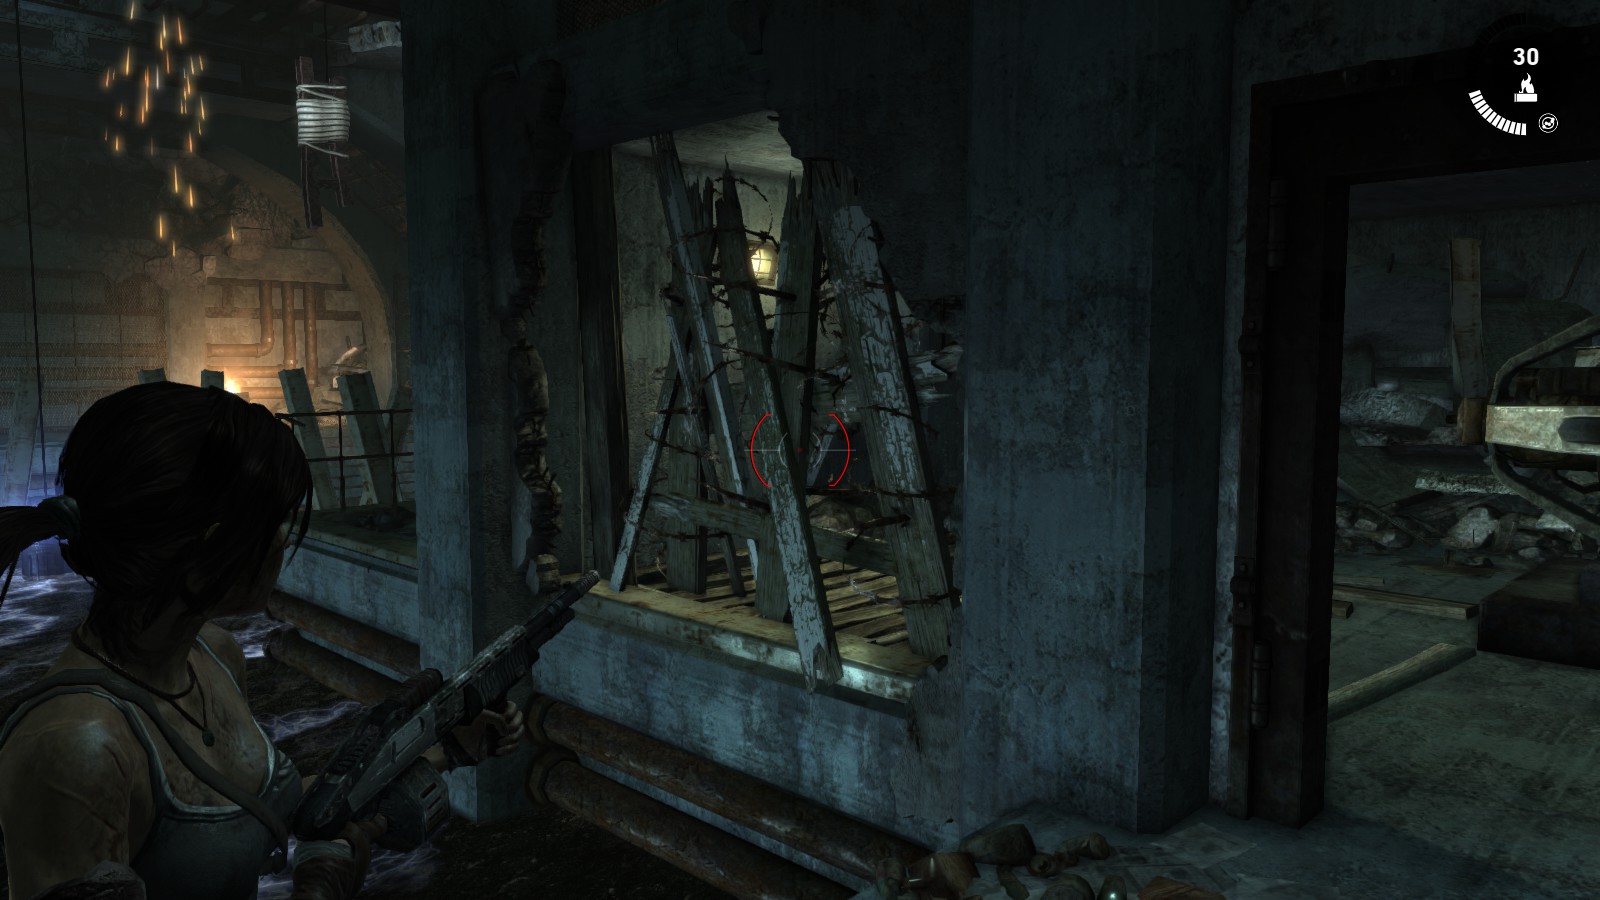
Notice the yellow container on the floor. In total there are four of these cans in the chamber. You will need at least three to successfully weigh down the makeshift ramp and make the jump, but four will give the ramp more stability. You need to place them on the ramp’s edge at the side facing the entrance, as shown in this screenshot:
1st container:
Pick up the container from the ground and get onto the metal sheet until it balances over to the side the entrance is on. Drop the container onto the sheet (use the key for making Lara drop down from ledges). You may also aim and throw the containers onto the ramp if you like.
2nd container (on the wooden platform left of the statue):
To get to this one, run up the short ramp on the left-hand side of the chamber, jump and grab the ledge. The platform will break as Lara tries to climb onto it, letting the container fall to the ground. Put it on the ramp with the first container.
3rd container (on the wooden platform on the far right-hand side of the chamber):
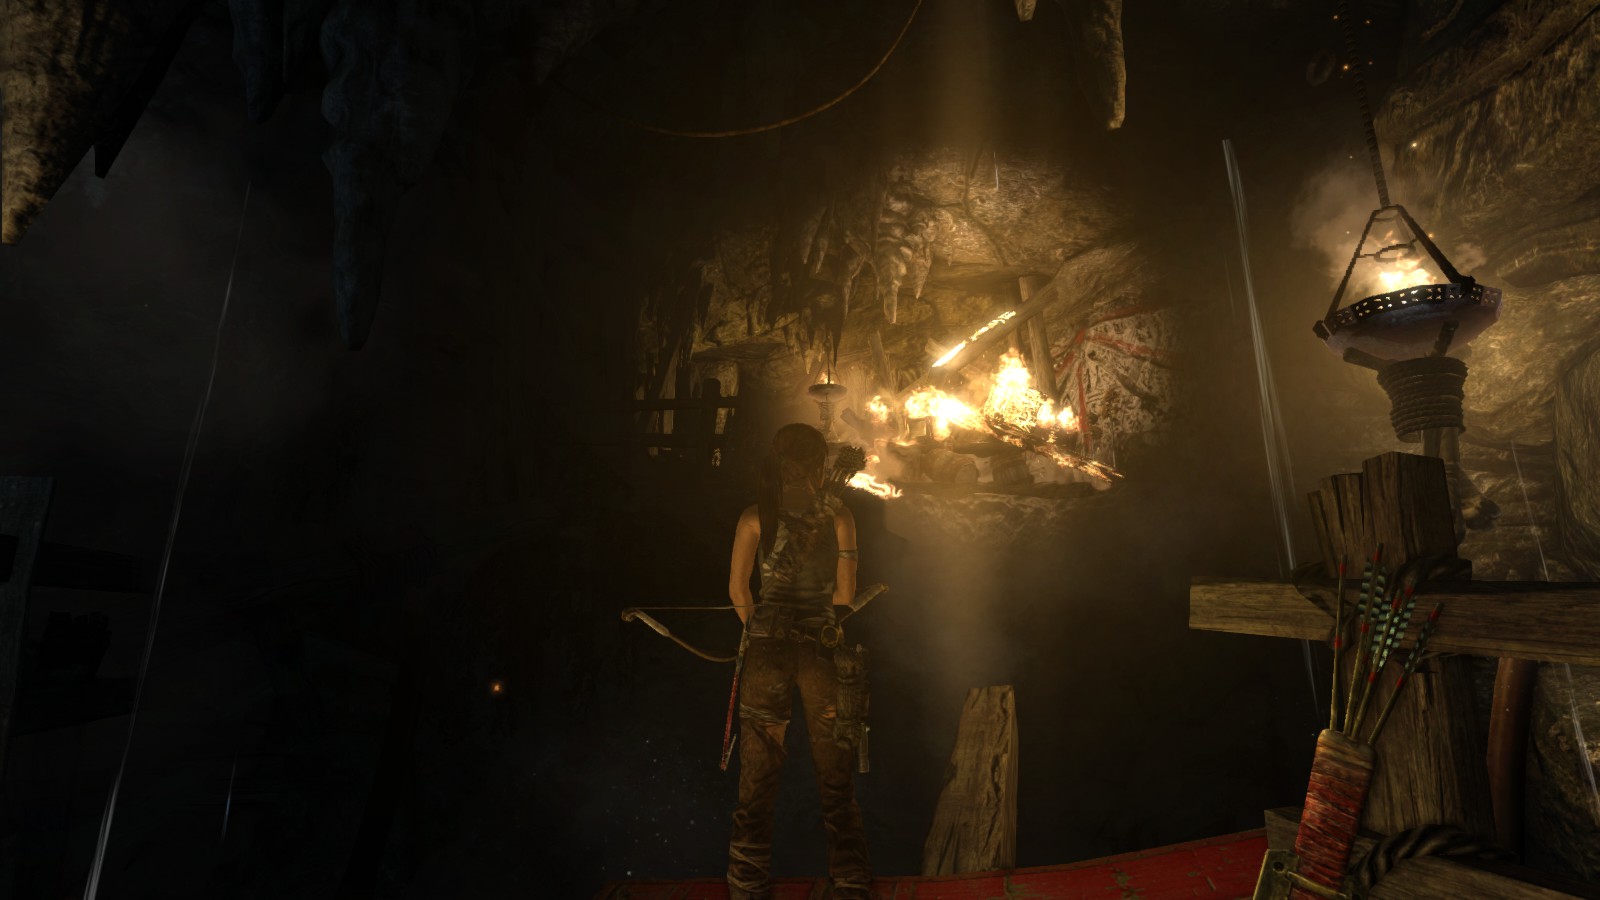
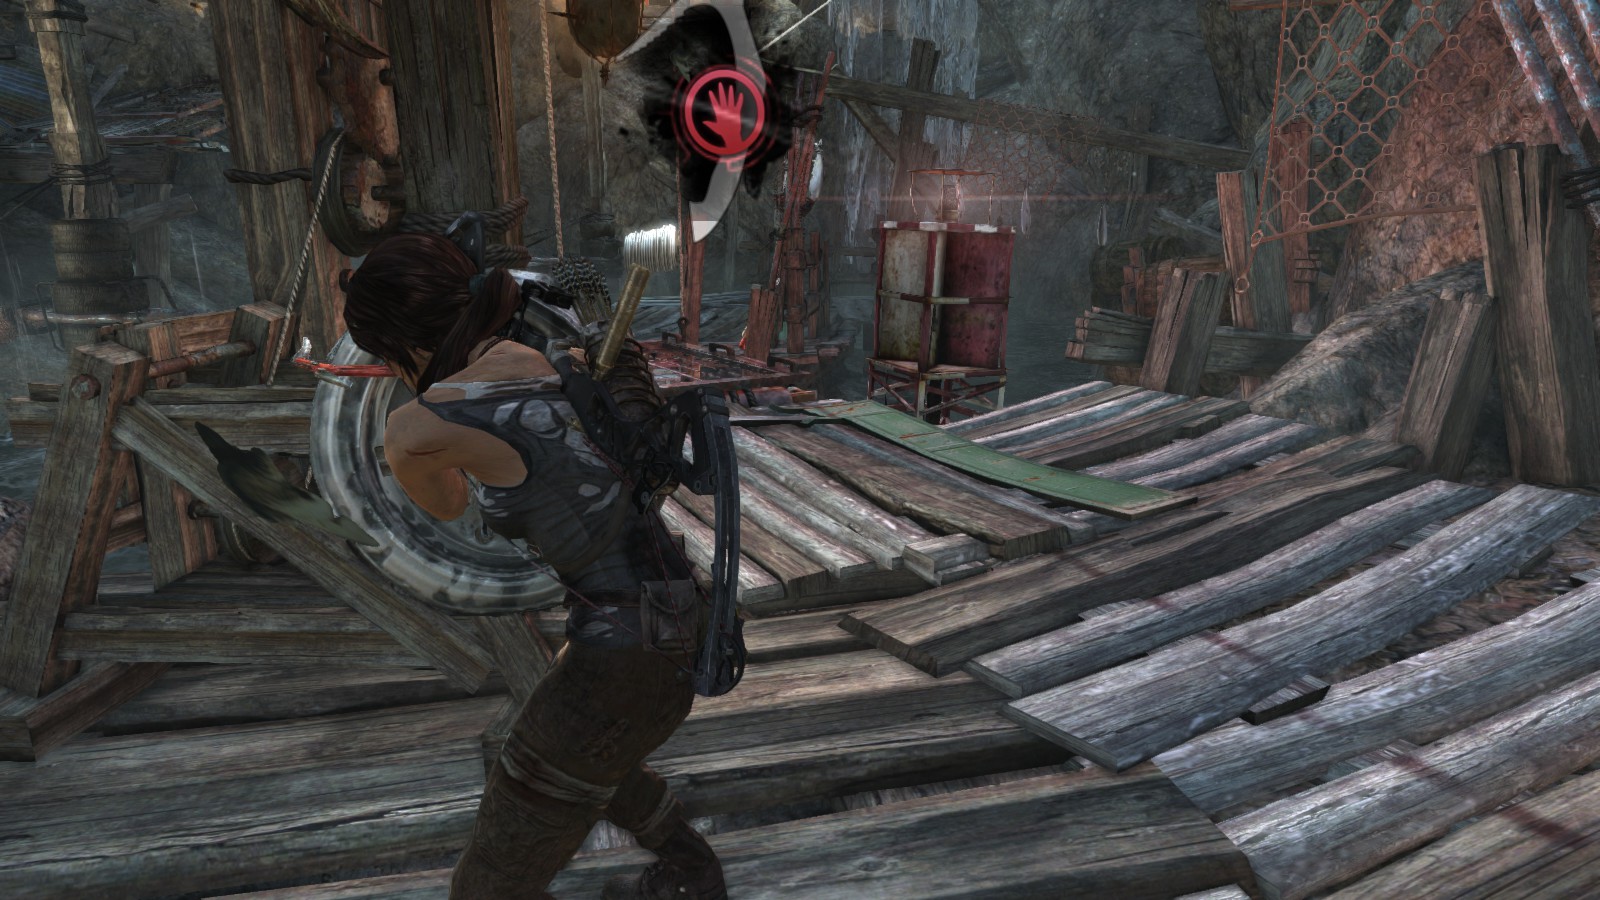
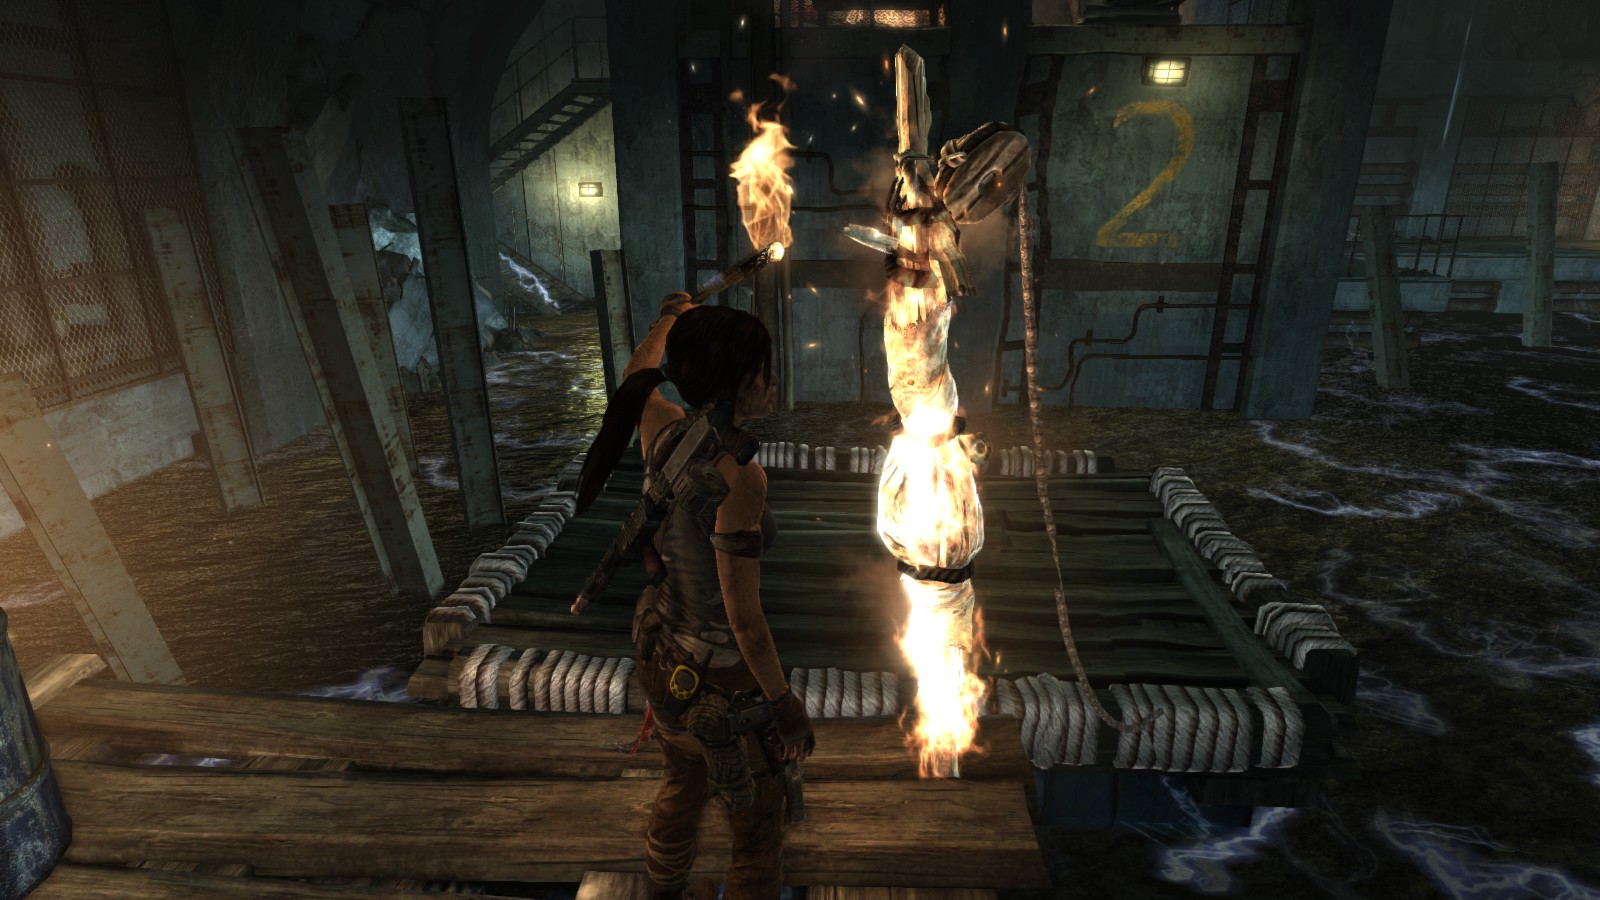
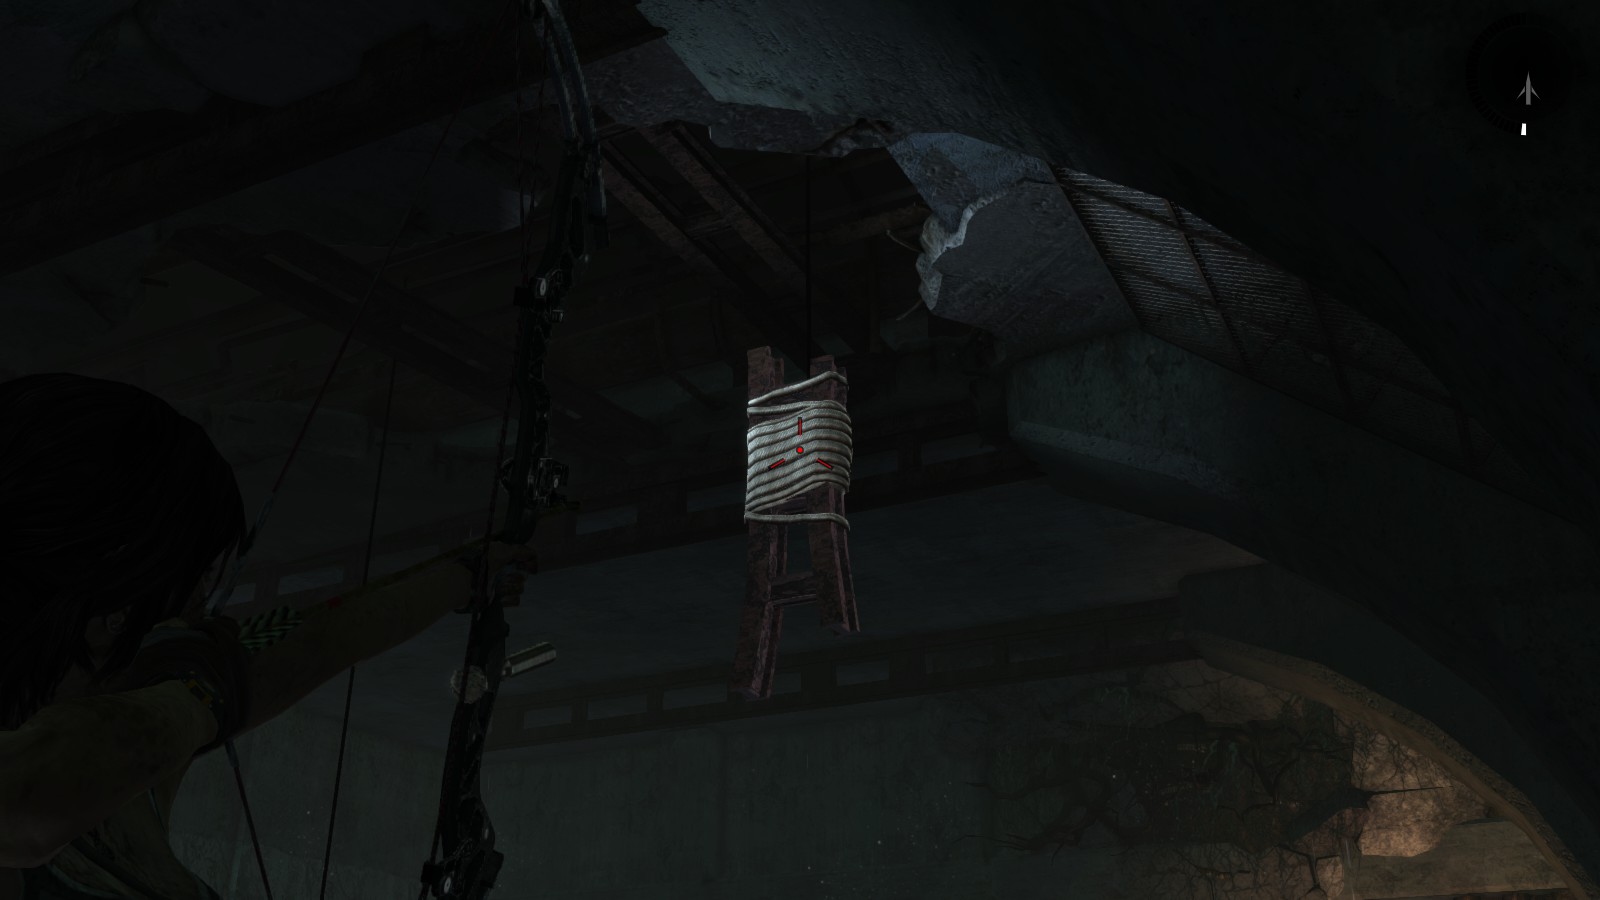
Turn your attention to the wheel dangling on a rope from the ceiling - part of a plane’s landing gear. Use this to crush the wooden platform on the far right. Position Lara in such a way that she is in a straight line with both the dangling wheel and the platform. Now use rope arrow to shoot the rope part on the landing gear and make it swing. As it swings away from Lara, it crushes the platform and she has another container to work with. (You can burn the three sacks hanging close by, but they do not contain pickups.)
4th container (on the wooden platform right of the statue):
Lara can now successfully make the jump onto the wall, but for a better chance at making it, get the last container down as well. You can now use the combined weight of the three containers you already have to make the fourth one fall to the ground. Simply pick up the containers one by one, aim and throw them up to the wooden platform. The wood will start to crack, but the structure will only give way once there are at least three containers on it (sometimes all four).
The jump:
With all four (or only three) containers weighing down the ramp on the side of the entrance, run to the top of the ramp, jump and press the action key to make Lara hit the wall with her axe.
Climb to the very left until Lara aims for the ladder. Jump and climb up. (Press the action key when prompted to not fall off the ladder.)
Climb up and go claim the treasure.
The way back:
As you return from the treasure chest you will notice the line of wooden boards suspended from the right-hand side of the ceiling. They lead to a pipe that slants down to the chamber’s floor. You can use this to get down, but you don’t have to do it correctly or even use it to get down. Run and jump across these suspended boards and then into the pipe to get back to the floor.
Once more cross the narrow single-plank bridge and head forwards until Lara gets to the T-junction in the path. She must continue on straight ahead to get back to the entrance (left goes to the slippery slope). Lara will get to another plank. This one ends in mid-air. She must walk to the end and then jump down (forwards) into the darkness to the ground. Once on the ground (the slippery slope lies directly at Lara’s back), continue straight ahead to the entrance/exit.
*** You have completed Chamber of Judgment ***
Windmill
Location on the Map
Entrance located right by the Windmill base camp.
Screenshot of the Entrance
Completing the Tomb
On the way in:
Lara will get to a slippery slope, lose her footing and slide down. Grab the ledge at the bottom of the slope when prompted, shimmy right and climb up out of this dangerous situation. At the T-junction in the path turn right (left takes you back to the entrance). Cross over a single-plank bridge and continue until Lara reaches the main chamber.
Inside the chamber:
After entering, notice the large rectangular sheet of metal. The side facing you is angled into the air. To continue you need to change it around so that the side facing the climbable wall is off the ground, forming a ramp for Lara to run on. You need something to weigh down the metal sheet in order to have a stable, working ramp.
Notice the yellow container on the floor. In total there are four of these cans in the chamber. You will need at least three to successfully weigh down the makeshift ramp and make the jump, but four will give the ramp more stability. You need to place them on the ramp’s edge at the side facing the entrance, as shown in this screenshot:
1st container:
Pick up the container from the ground and get onto the metal sheet until it balances over to the side the entrance is on. Drop the container onto the sheet (use the key for making Lara drop down from ledges). You may also aim and throw the containers onto the ramp if you like.
2nd container (on the wooden platform left of the statue):
To get to this one, run up the short ramp on the left-hand side of the chamber, jump and grab the ledge. The platform will break as Lara tries to climb onto it, letting the container fall to the ground. Put it on the ramp with the first container.
3rd container (on the wooden platform on the far right-hand side of the chamber):
Turn your attention to the wheel dangling on a rope from the ceiling - part of a plane’s landing gear. Use this to crush the wooden platform on the far right. Position Lara in such a way that she is in a straight line with both the dangling wheel and the platform. Now use rope arrow to shoot the rope part on the landing gear and make it swing. As it swings away from Lara, it crushes the platform and she has another container to work with. (You can burn the three sacks hanging close by, but they do not contain pickups.)
4th container (on the wooden platform right of the statue):
Lara can now successfully make the jump onto the wall, but for a better chance at making it, get the last container down as well. You can now use the combined weight of the three containers you already have to make the fourth one fall to the ground. Simply pick up the containers one by one, aim and throw them up to the wooden platform. The wood will start to crack, but the structure will only give way once there are at least three containers on it (sometimes all four).
The jump:
With all four (or only three) containers weighing down the ramp on the side of the entrance, run to the top of the ramp, jump and press the action key to make Lara hit the wall with her axe.
Climb to the very left until Lara aims for the ladder. Jump and climb up. (Press the action key when prompted to not fall off the ladder.)
Climb up and go claim the treasure.
The way back:
As you return from the treasure chest you will notice the line of wooden boards suspended from the right-hand side of the ceiling. They lead to a pipe that slants down to the chamber’s floor. You can use this to get down, but you don’t have to do it correctly or even use it to get down. Run and jump across these suspended boards and then into the pipe to get back to the floor.
Once more cross the narrow single-plank bridge and head forwards until Lara gets to the T-junction in the path. She must continue on straight ahead to get back to the entrance (left goes to the slippery slope). Lara will get to another plank. This one ends in mid-air. She must walk to the end and then jump down (forwards) into the darkness to the ground. Once on the ground (the slippery slope lies directly at Lara’s back), continue straight ahead to the entrance/exit.
*** You have completed Chamber of Judgment ***
5. STORMGUARD SANCTUM (Summit Forest)
Closest Base (Fast-Travel) Camp
Hunting Lodge
Location on the Map
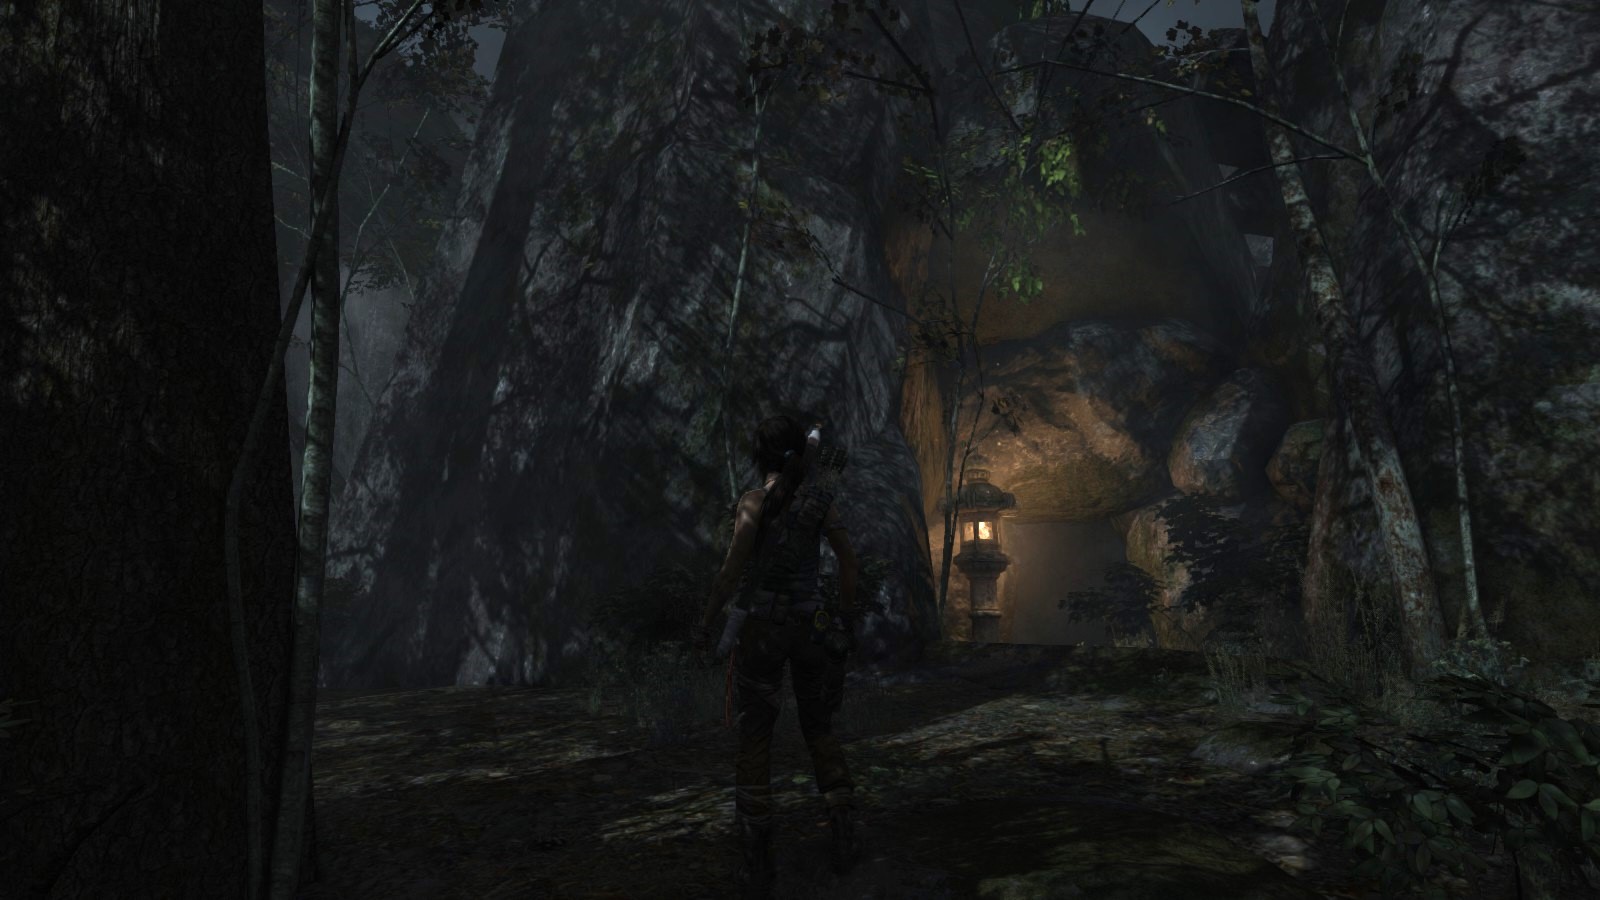
 Entrance located a short distance north of the base camp.
Screenshot of the Entrance
Completing the Tomb
On the way in:
Just continue down the path.
Inside:
As you enter the dark main chamber, you find a day camp on the floor and, further in, a place where Lara can climb onto a second level, but the way is barricaded. The area behind the barricade is filled with clouds of noxious, flammable gas leaking from vents in the cave wall.
Since the cave is dark, light it up a bit. Right next to the spot where Lara can scramble up the wall you’ll find a lamp, so use the torch to light it. Also, located in the cave are five bowl-like lamps that you can light using fire arrows. Look towards the ceiling to find them (the top one may not be visible from the bottom).

The Procedure:
1) The barricade is flammable, so shoot it with a fire arrow to get it burning. The gas behind the barricade will explode, opening the way.
2) Quickly scramble up to the second level and immediately run to the left and climb up a wooden structure, avoiding the noxious gas before it returns. (If you’re too slow and the gas has returned before you could climb onto this level, just aim a fire arrow at the gas clouds (move the mouse until the crosshair turns red), then shoot to cause an explosion that will temporarily make the area gas free. You can actually get to the wooden structure without shooting a fire arrow, but Lara will have to move quickly in and out of the gas clouds to not suffocate.)
3) This platform has a single beam pointing to a climbable wall. Use survival mode (Q) to see the area more clearly. There is another flammable barricade at the top of the climbable wall. Aim and shoot a fire arrow at it to once more clear the way. (If you haven’t yet done so, you may now light the last bowl-lamp visible where it hangs towards the left above this barricade.)
4) Run to the end of the beam and jump, pressing the action key to make Lara use her axe and drive it into the dark wall as she reaches it. Climb to the top.
Go and claim the treasure.
The way back:
To get down again, take a standing jump from the top level back onto the protruding beam at the wooden platform.
Shoot one last fire arrow into the gas-filled area and quickly get down the platform and return to the floor below. Go outside by following the dark tunnel back to the entrance.
*** You have completed Stormguard Sanctum ***
Hunting Lodge
Location on the Map
Entrance located a short distance north of the base camp.Screenshot of the Entrance
Completing the Tomb
On the way in:
Just continue down the path.
Inside:
As you enter the dark main chamber, you find a day camp on the floor and, further in, a place where Lara can climb onto a second level, but the way is barricaded. The area behind the barricade is filled with clouds of noxious, flammable gas leaking from vents in the cave wall.
Since the cave is dark, light it up a bit. Right next to the spot where Lara can scramble up the wall you’ll find a lamp, so use the torch to light it. Also, located in the cave are five bowl-like lamps that you can light using fire arrows. Look towards the ceiling to find them (the top one may not be visible from the bottom).
The Procedure:
1) The barricade is flammable, so shoot it with a fire arrow to get it burning. The gas behind the barricade will explode, opening the way.
2) Quickly scramble up to the second level and immediately run to the left and climb up a wooden structure, avoiding the noxious gas before it returns. (If you’re too slow and the gas has returned before you could climb onto this level, just aim a fire arrow at the gas clouds (move the mouse until the crosshair turns red), then shoot to cause an explosion that will temporarily make the area gas free. You can actually get to the wooden structure without shooting a fire arrow, but Lara will have to move quickly in and out of the gas clouds to not suffocate.)
3) This platform has a single beam pointing to a climbable wall. Use survival mode (Q) to see the area more clearly. There is another flammable barricade at the top of the climbable wall. Aim and shoot a fire arrow at it to once more clear the way. (If you haven’t yet done so, you may now light the last bowl-lamp visible where it hangs towards the left above this barricade.)
4) Run to the end of the beam and jump, pressing the action key to make Lara use her axe and drive it into the dark wall as she reaches it. Climb to the top.
Go and claim the treasure.
The way back:
To get down again, take a standing jump from the top level back onto the protruding beam at the wooden platform.
Shoot one last fire arrow into the gas-filled area and quickly get down the platform and return to the floor below. Go outside by following the dark tunnel back to the entrance.
*** You have completed Stormguard Sanctum ***
6. TEMPLE OF THE HANDMAIDENS (Shipwreck Beach)
Closest base (fast-travel) camp
Survivors’ Camp
Location on the Map
 Entrance located not too far from the Survivors' Camp.
Screenshot of Entrance
Completing the Tomb
This tomb is only accessible after Lara acquires the rope ascender by killing the large Russian on the deck of the stricken Endurance.
On the way in:
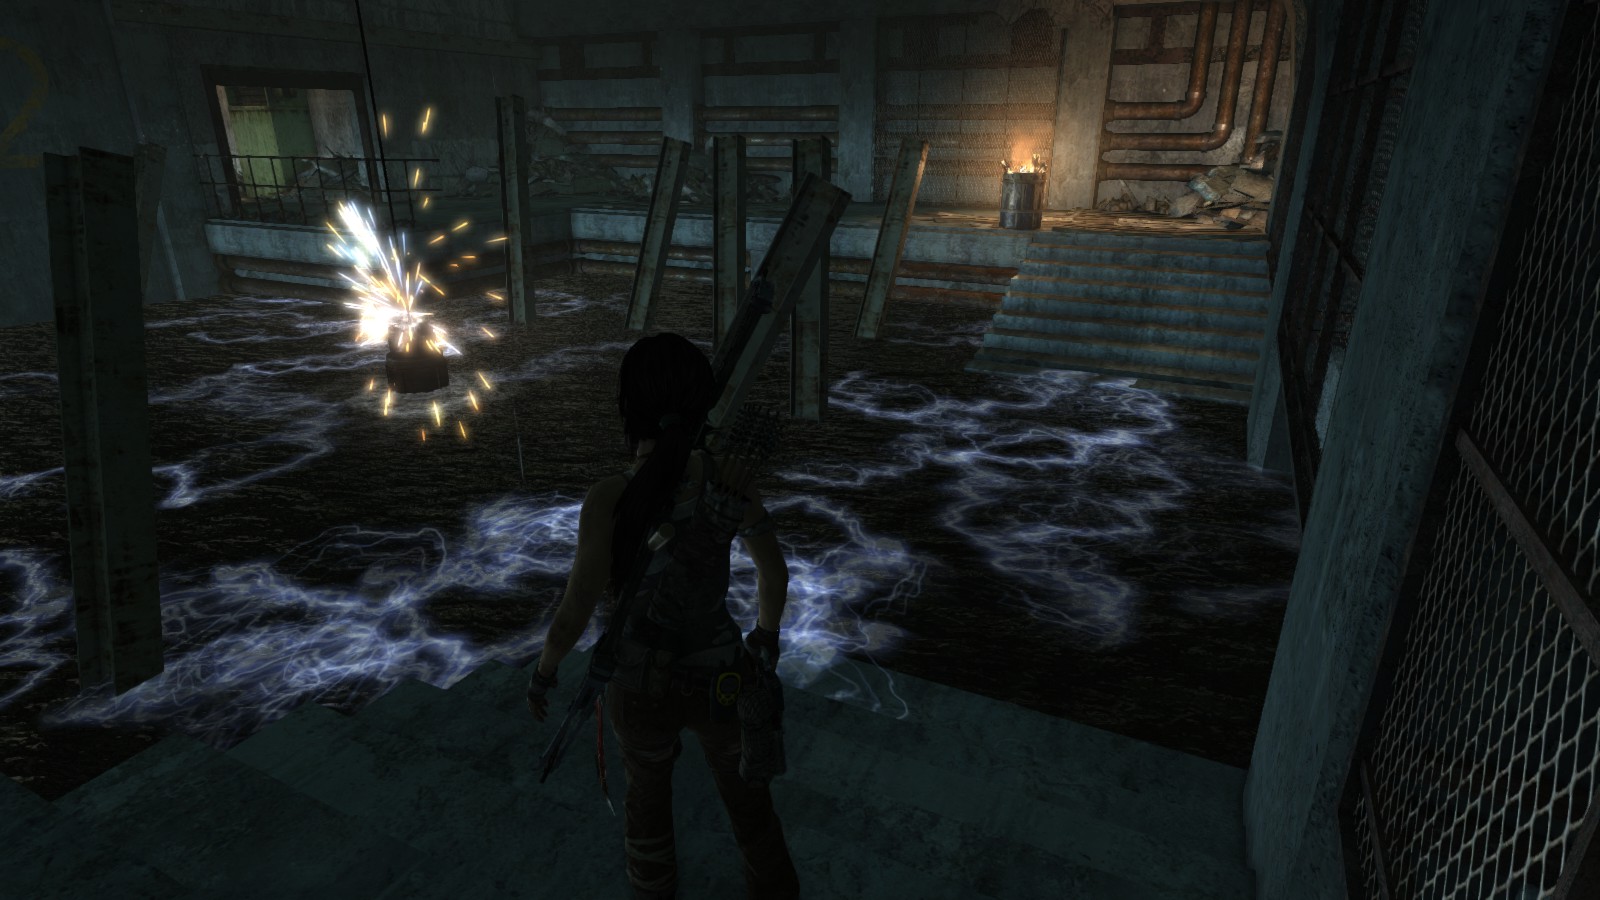
Use rope arrow and the rope ascender to pull down the barricade on the entrance and go inside. Notice the small opening immediately to the left as Lara enters. Crawl through there and continue until Lara gets to a stream with a broken bridge. Standing next to the pole, use rope arrow on the rope-wrapped part of the bridge on the opposite side. Cross the stream and continue to the day camp area (puzzle room).
The puzzle room / main chamber:
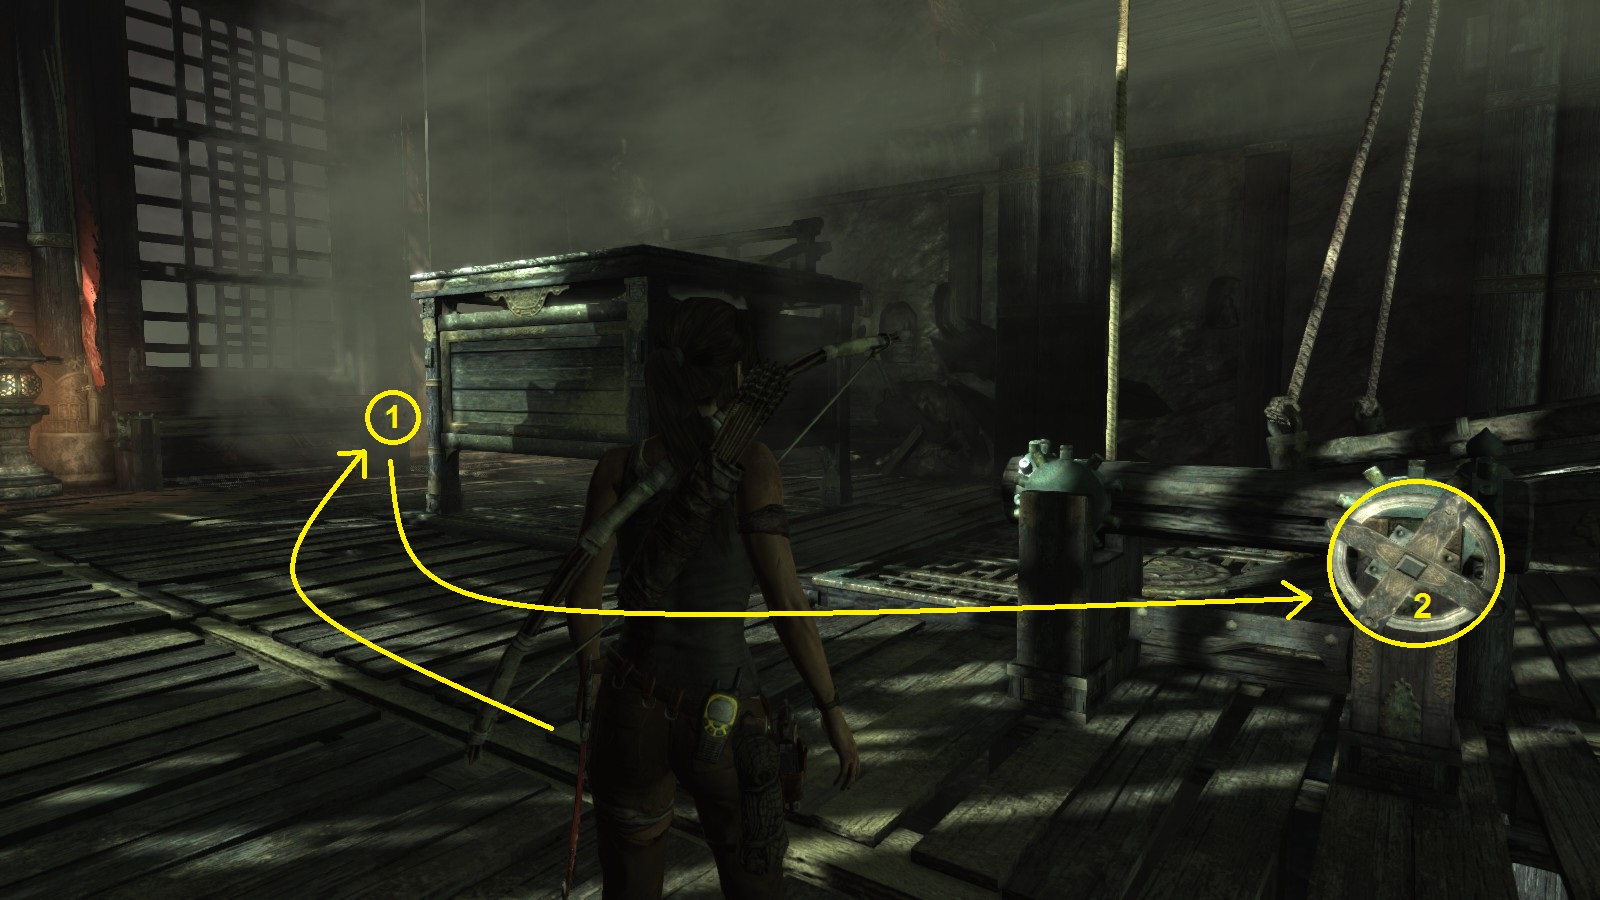
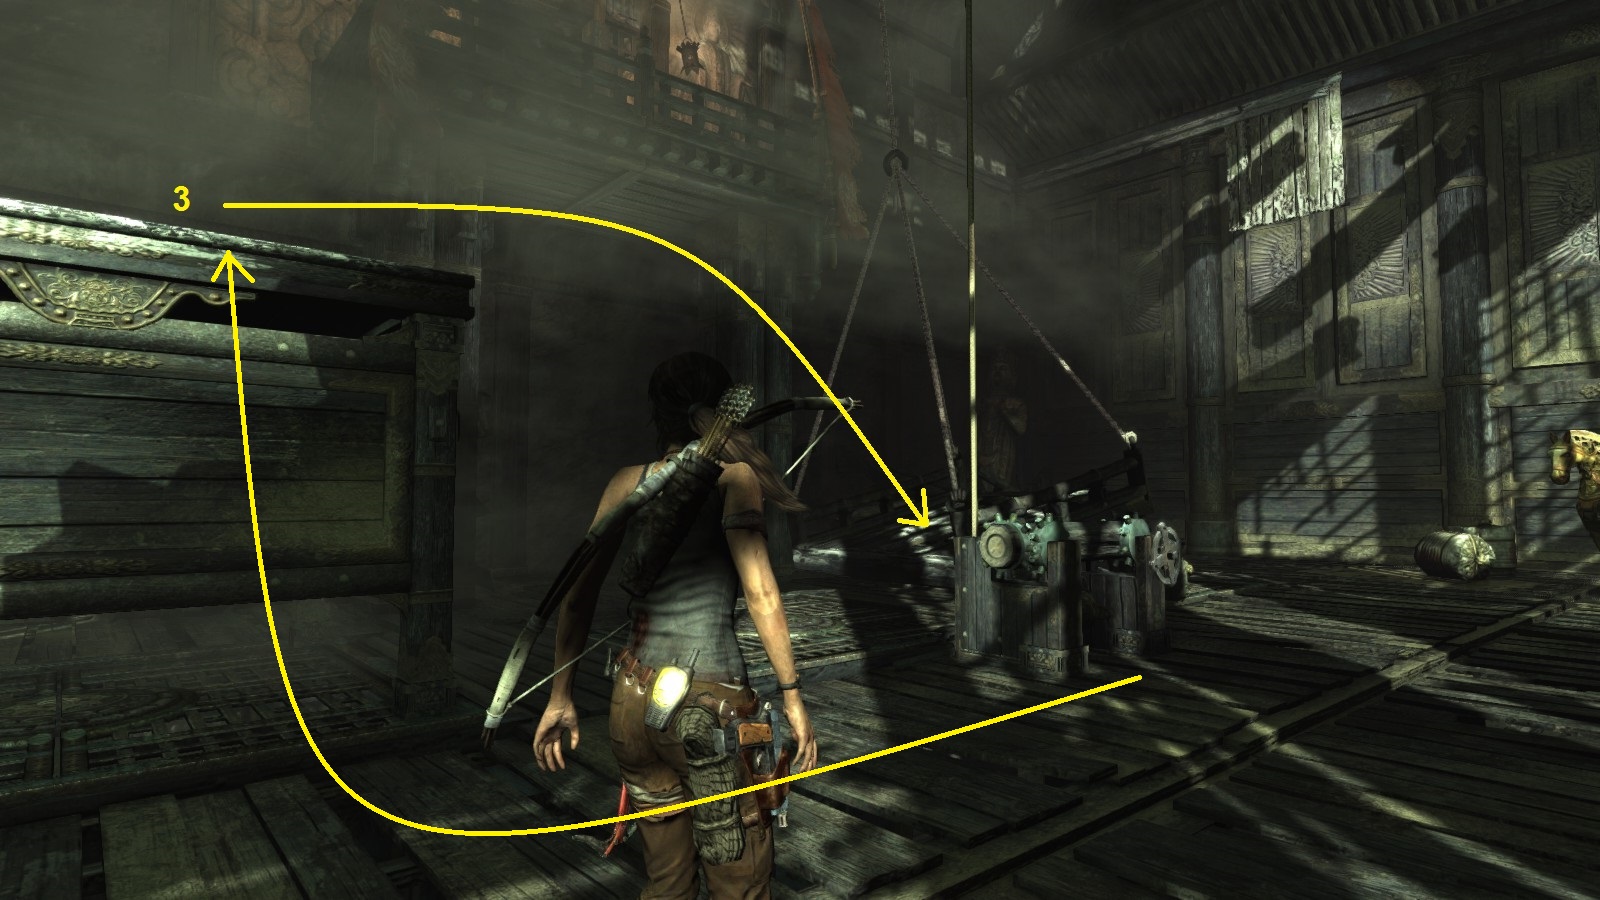
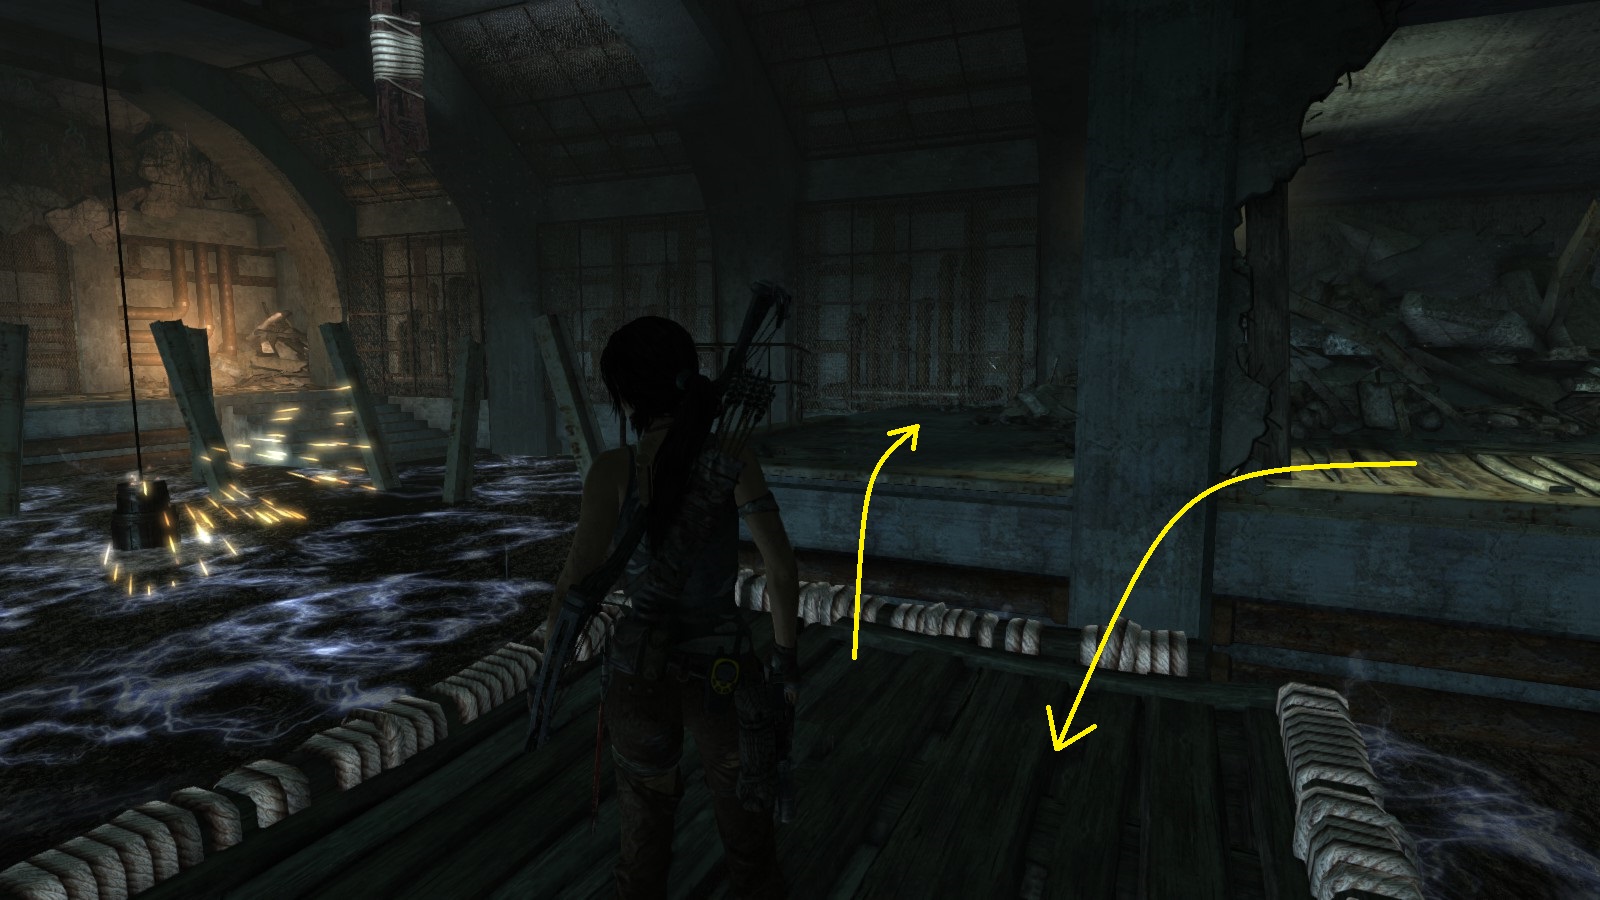
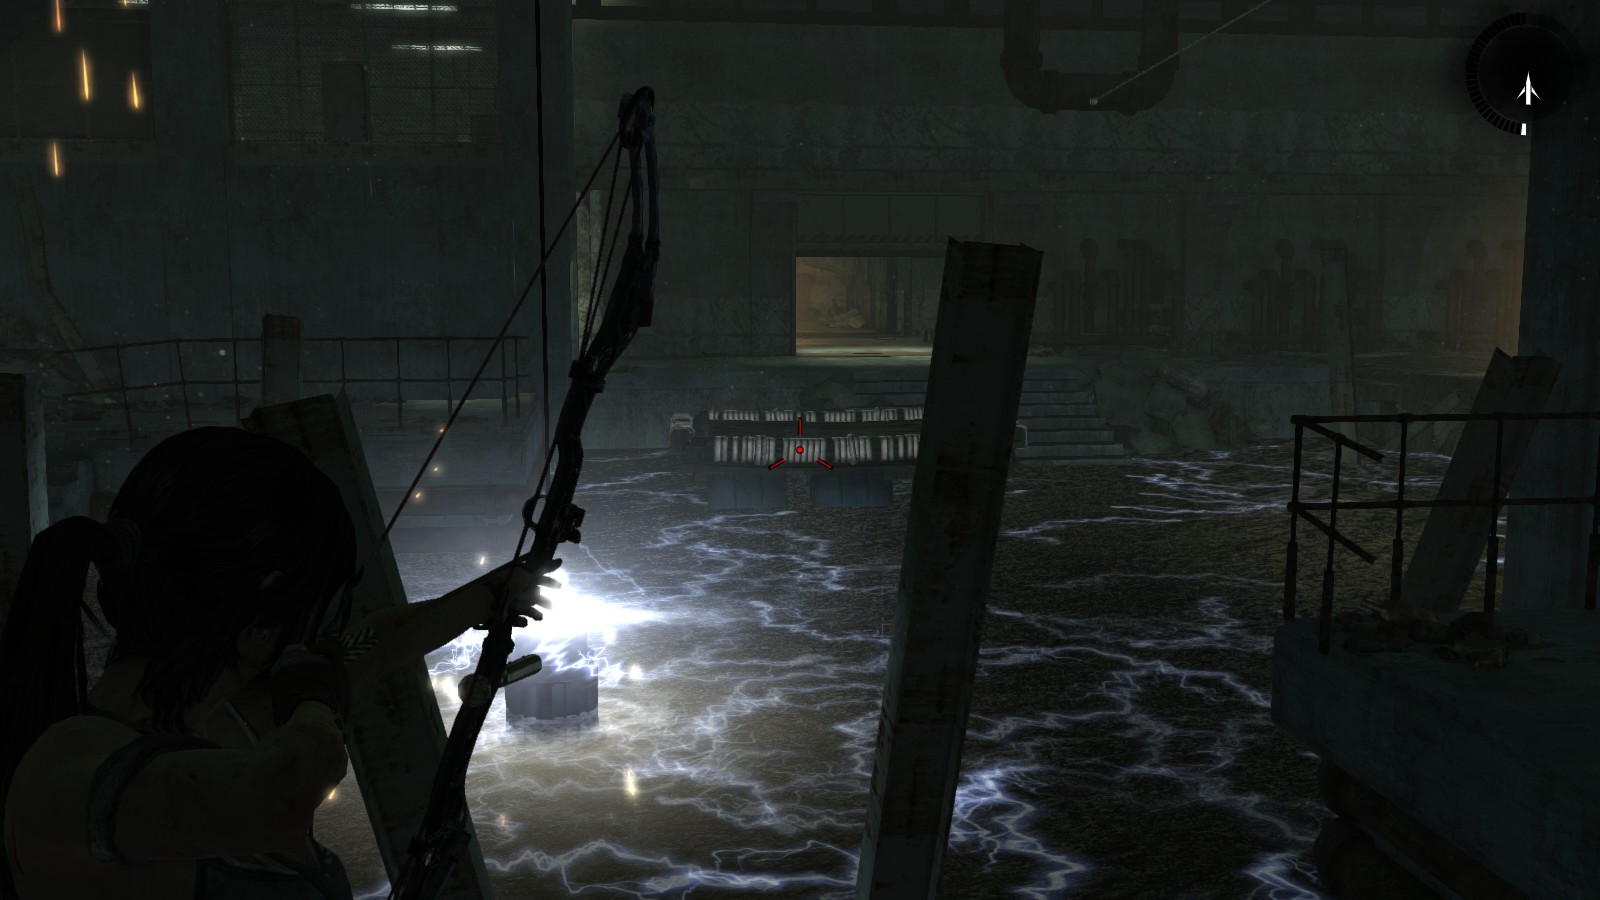
The deal: A cranking wheel releases a buoy that then floats with the current, activating two contraptions by turning them temporarily into a position that Lara can use to get to the climbable wall on the far side of the cave.
Timing plays an important role as the horizontal sticks on these contraptions will only be in the right position for a short while. If Lara fails at any stage, she has to get back to her starting position at the cranking device and wait for the buoy to complete its circular route back to its starting point. To complicate things, Lara has to use rope arrow to turn the second contraption (item 3 in the screenshot immediately below) before the buoy gets there, otherwise that contraption will not be activated by the buoy.
The procedure
1) Turn the cranking wheel until it stops and the buoy is released.
2) Quickly run to the left and get up on the platform. Wait for the buoy to activate the first contraption which will turn to position a horizontal stick that Lara can jump to. Run and jump, grabbing the stick as you go to land on the next platform.
3) Quickly get out the rope arrow and shoot down to the roped part of the second contraption in order to pull and turn it into the correct position for the drifting buoy that will get there shortly.
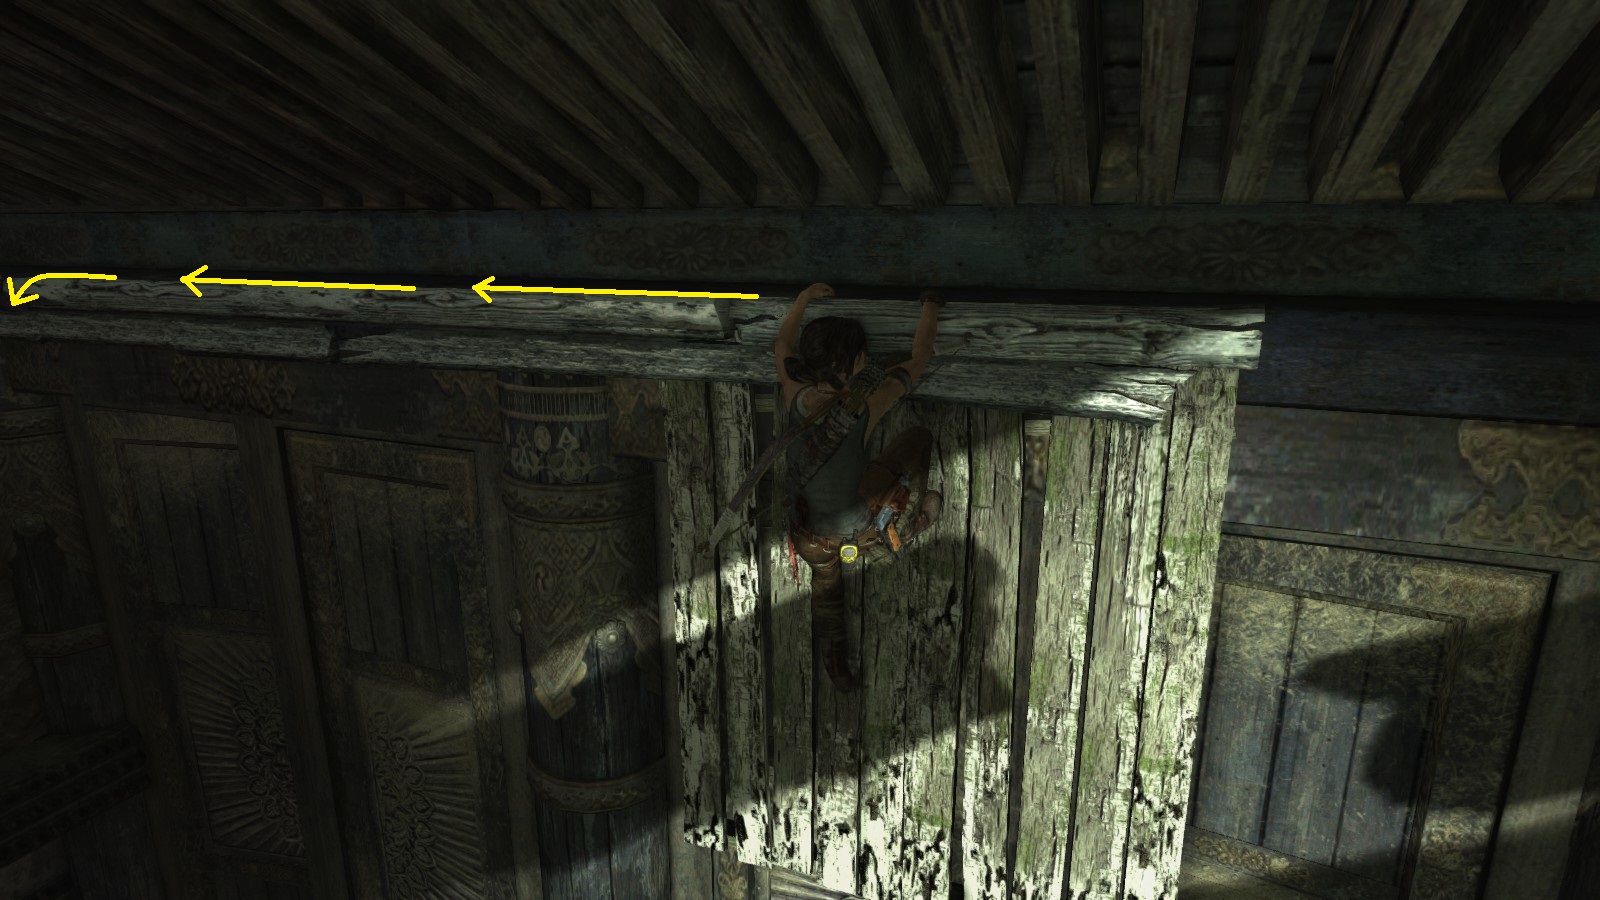
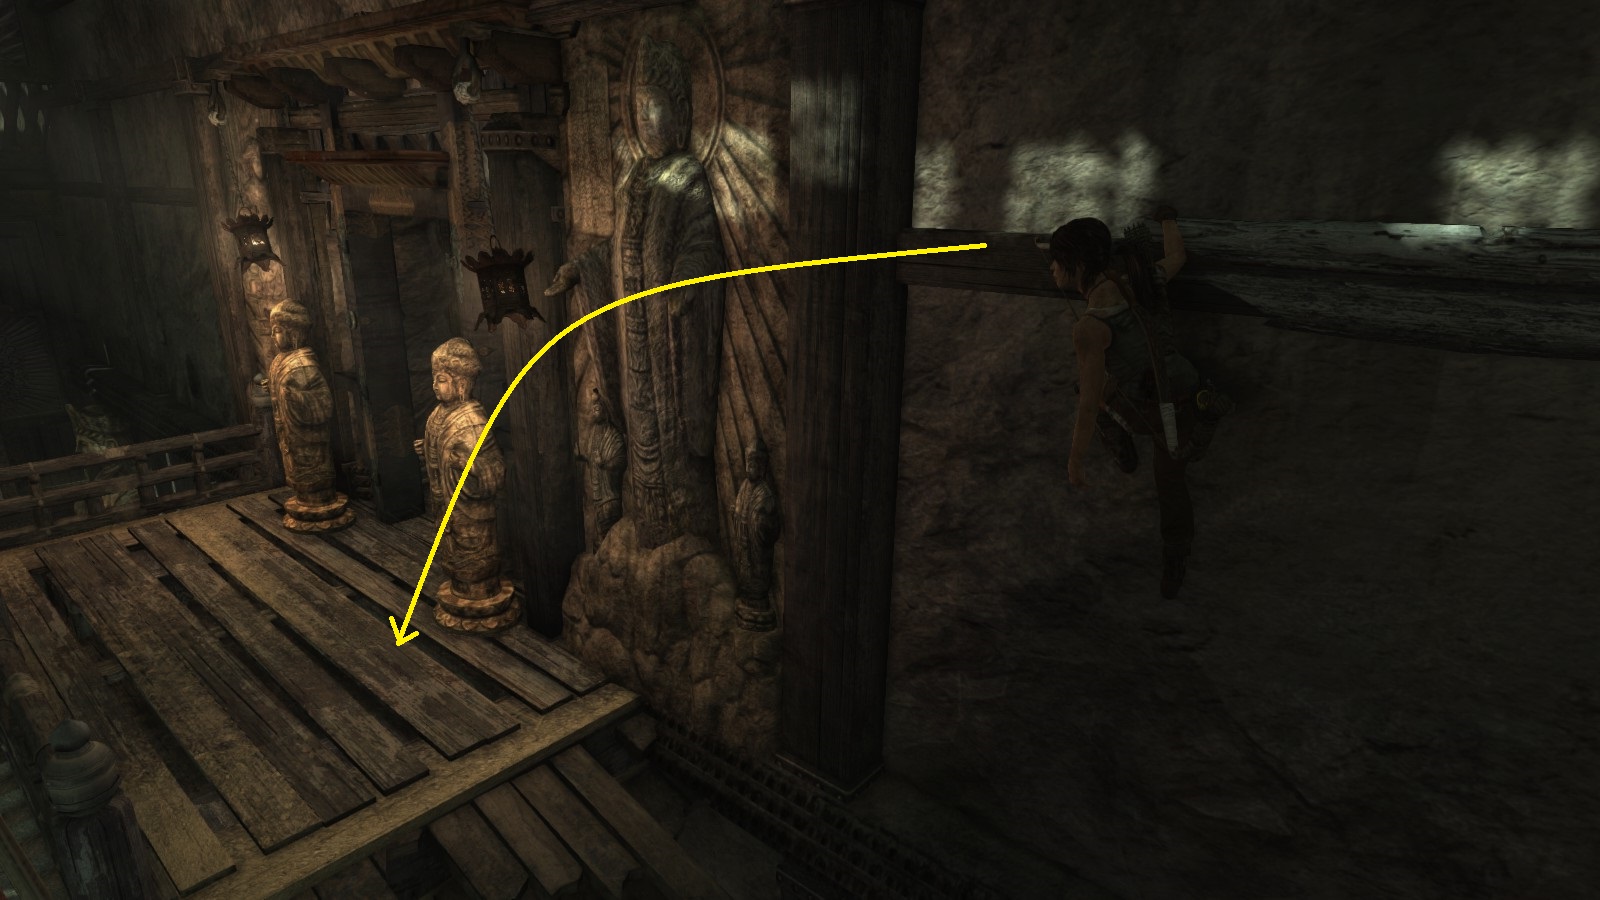
4) Once the buoy has activated the second contraption, turning another horizontal stick into its correct position for Lara to use, run and jump for that stick, then quickly hit the action key after she releases the stick and swings close to the climbable wall, so she can drive her axe into the wall. (As Lara releases the stick, you may have to aim her a bit to the left, otherwise she could miss the wall.) Climb to the top.
Go and claim the treasure.
The way out:
Use the nearby zipline to get down and exit the main chamber. At the broken bridge simply jump into the stream and wade across. Get out on either side of the bridge and follow the path out.
*** You have completed Temple of the Handmaidens ***
Survivors’ Camp
Location on the Map
Entrance located not too far from the Survivors' Camp.Screenshot of Entrance
Completing the Tomb
This tomb is only accessible after Lara acquires the rope ascender by killing the large Russian on the deck of the stricken Endurance.
On the way in:
Use rope arrow and the rope ascender to pull down the barricade on the entrance and go inside. Notice the small opening immediately to the left as Lara enters. Crawl through there and continue until Lara gets to a stream with a broken bridge. Standing next to the pole, use rope arrow on the rope-wrapped part of the bridge on the opposite side. Cross the stream and continue to the day camp area (puzzle room).
The puzzle room / main chamber:
The deal: A cranking wheel releases a buoy that then floats with the current, activating two contraptions by turning them temporarily into a position that Lara can use to get to the climbable wall on the far side of the cave.
Timing plays an important role as the horizontal sticks on these contraptions will only be in the right position for a short while. If Lara fails at any stage, she has to get back to her starting position at the cranking device and wait for the buoy to complete its circular route back to its starting point. To complicate things, Lara has to use rope arrow to turn the second contraption (item 3 in the screenshot immediately below) before the buoy gets there, otherwise that contraption will not be activated by the buoy.
The procedure
1) Turn the cranking wheel until it stops and the buoy is released.
2) Quickly run to the left and get up on the platform. Wait for the buoy to activate the first contraption which will turn to position a horizontal stick that Lara can jump to. Run and jump, grabbing the stick as you go to land on the next platform.
3) Quickly get out the rope arrow and shoot down to the roped part of the second contraption in order to pull and turn it into the correct position for the drifting buoy that will get there shortly.
4) Once the buoy has activated the second contraption, turning another horizontal stick into its correct position for Lara to use, run and jump for that stick, then quickly hit the action key after she releases the stick and swings close to the climbable wall, so she can drive her axe into the wall. (As Lara releases the stick, you may have to aim her a bit to the left, otherwise she could miss the wall.) Climb to the top.
Go and claim the treasure.
The way out:
Use the nearby zipline to get down and exit the main chamber. At the broken bridge simply jump into the stream and wade across. Get out on either side of the bridge and follow the path out.
*** You have completed Temple of the Handmaidens ***
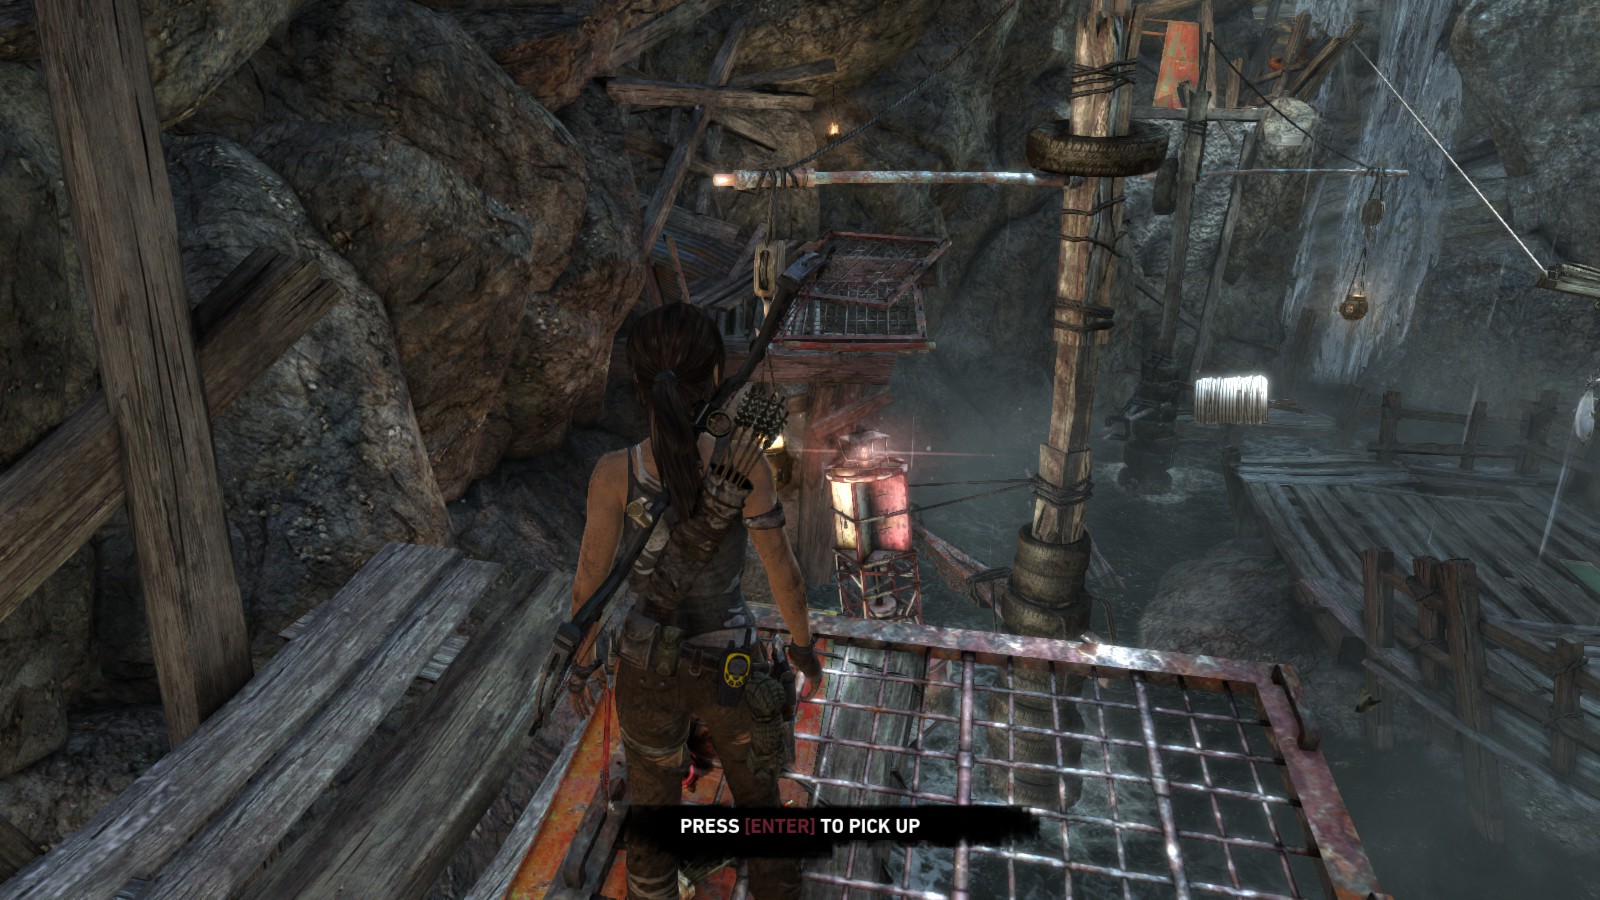
7. THE FLOODED VAULT (Shipwreck Beach)
Closest base (fast-travel) camp
Survivors’ Camp
Location on the Map
Screenshot of Entrance
Entrance located high up on a ledge where Lara (on her first visit here) encounters two Solarii brothers who are talking about the killing of a fellow brother.
Completing the Tomb
On the way in:
Open the door with the axe and enter. Go through a doorway and up a ladder. There is a small room to your left with pickups. To the right is a deep pit. Take a run-up and jump, using the action key to hit the climbable wall with the axe. Climb up, go up some stairs and squeeze through the hole following a tunnel.
Scramble up a wall and go up some stairs. Follow the path to enter an artillery nest missing a cannon. After getting some goodies continue through a doorway and into another tunnel, ending up in the secret tomb’s day camp area. Go up the stairs and activate the console (it is glowing green) to get the electricity back on. Go back down the stairs to the console on the previous level, which now is also glowing green. Activate it to open the sliding doors.
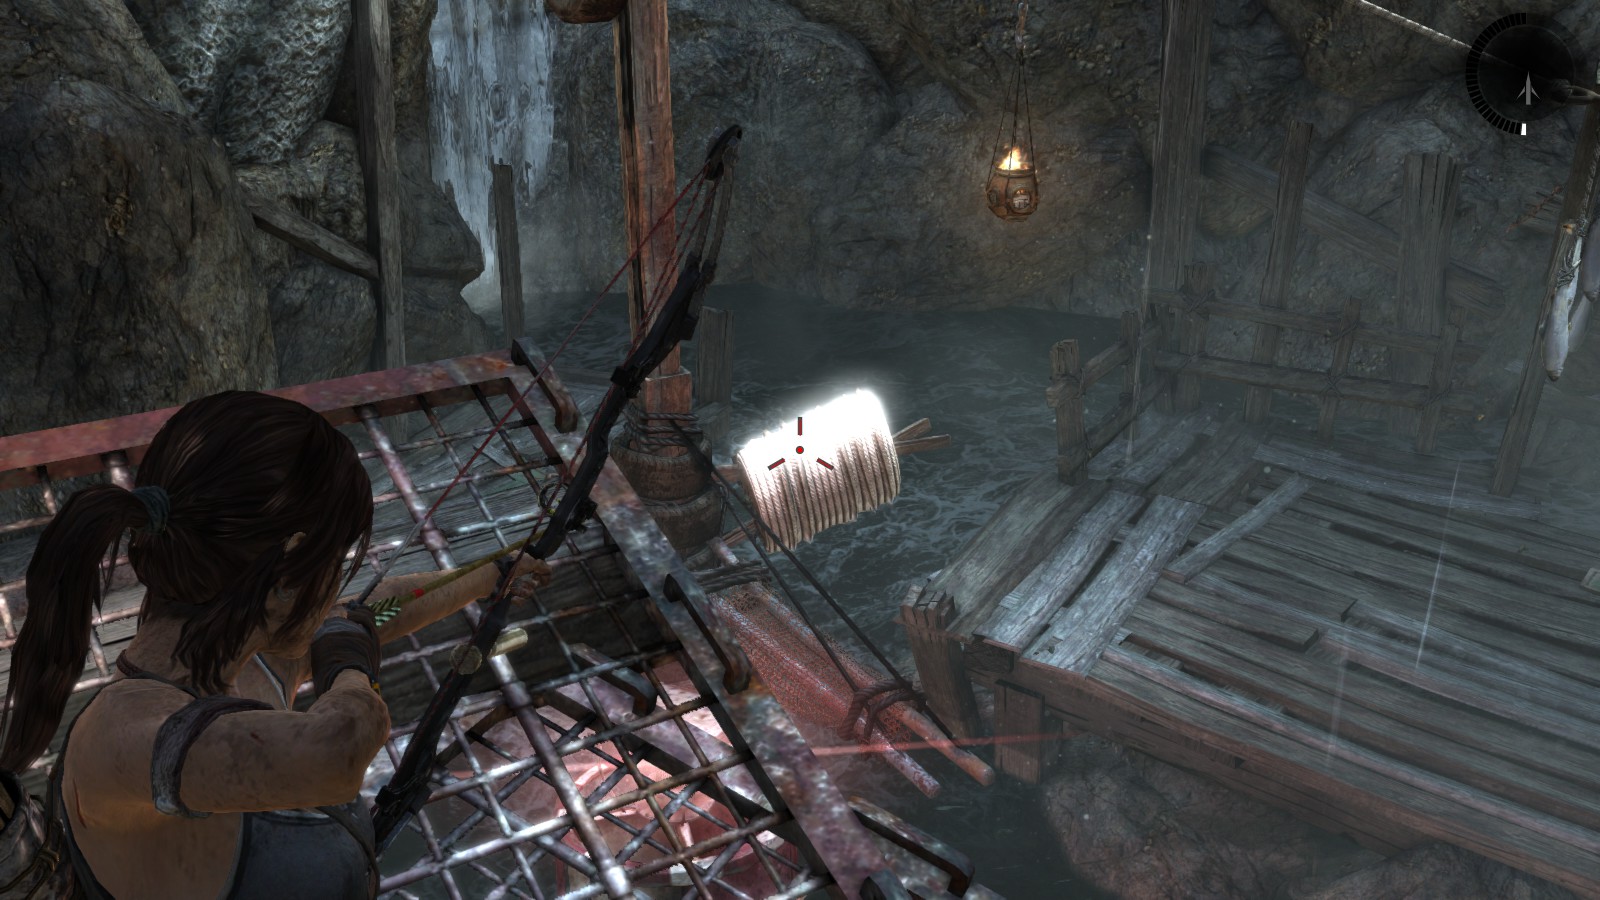
The main area (puzzle room):
To the left is a raft, to the right is a doorway blocked up with planks. An electrical fixture hangs from the ceiling. It fell down when Lara got the electricity running. Getting into the water at this stage will get her electrocuted. However, she must find a way to get across to the stairway on the other side (you will see it glowing in survival instinct mode (Q) on the left side of the flooded room).
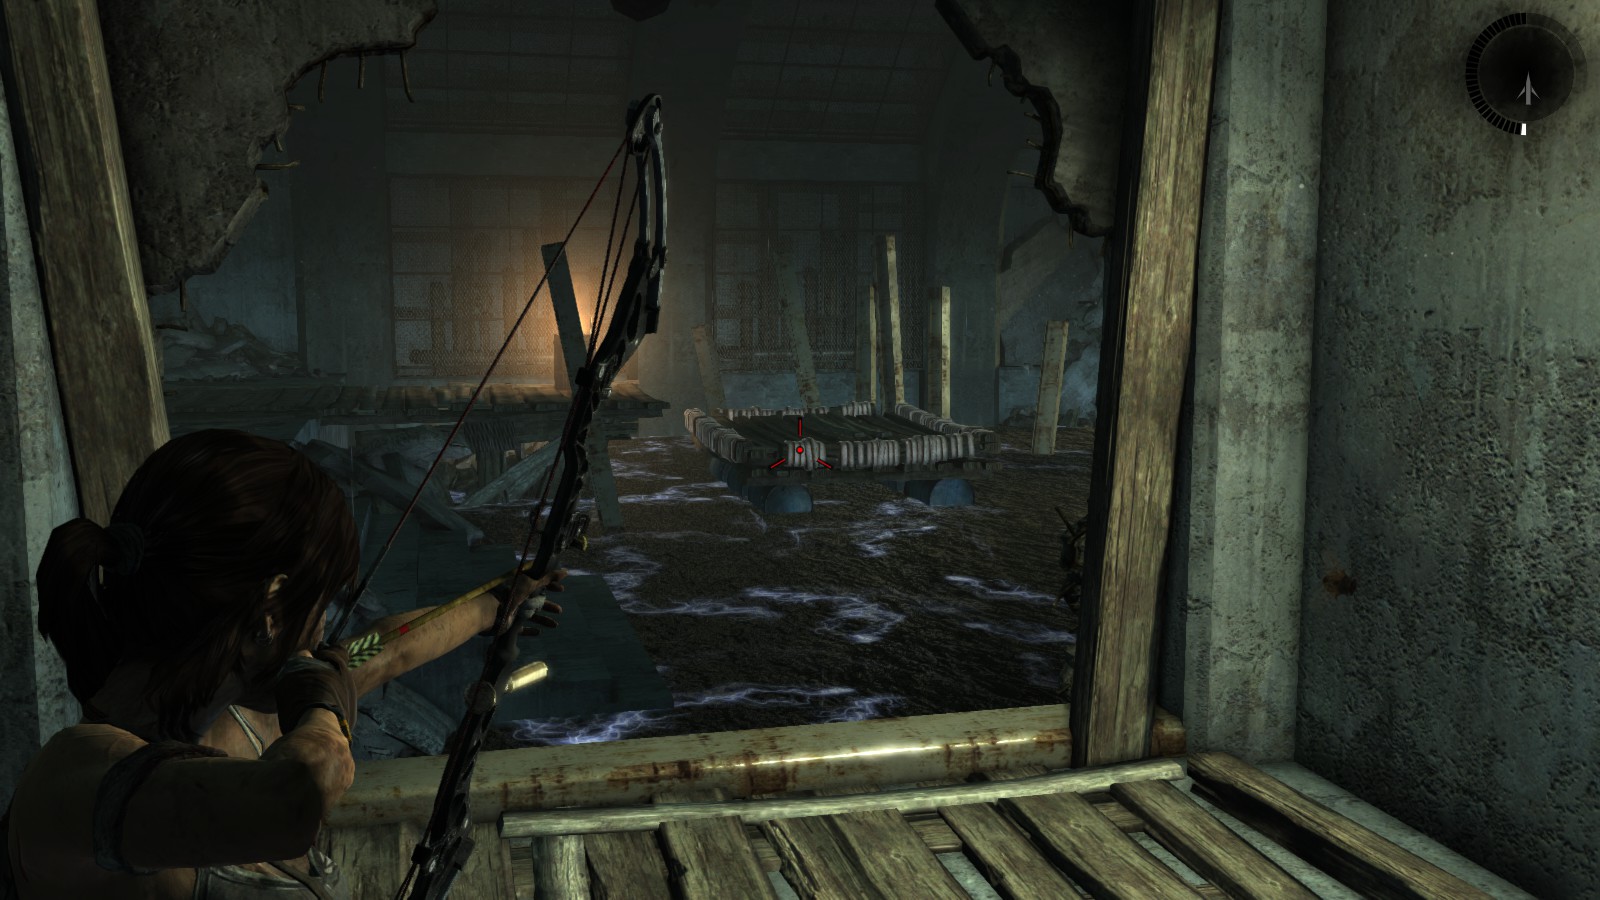
1) The raft is tied to the side. Walk up to it and burn the roped material when prompted. The raft can now move around in the water. Don’t get on it yet.
2) Go to the right-hand side of the room and shoot out the planked-up doorway. Go and stand in that doorway and from there shoot rope arrows to the rope on the raft to pull it closer to your position in the doorway. Once close enough, jump onto the raft and then around the wall to the small area that's a bit closer to the opposite side - you are now on the very right-hand side of the room with steps leading into the water and out the other side.
3) You have to cross over without getting electrocuted. There is an object above that you can shoot that lifts the electrical object from the water (but it always falls back down again into the water after some seconds). Shoot this object with rope arrow to pull it from the water and quickly run through the shallow water to the other side. By the time you have crossed, the water will be dangerous again.
4) You may be on the other side now, but you need to enter the water again to get to the stairway that leads to the upper floor. Aim your rope arrows at the raft and gradually pull it close to the object that hangs in the water.
5) When the raft is next to the electrical fixture, shift your aim back to the previous object and shoot it with rope arrow so that the fixture once again lifts out of the water into the air. Now quickly shoot at the raft again and pull it towards you one more time so that the fixture falls right onto the raft when it comes back down.
6) Once you've succeeded in doing this, Lara can move around the area freely without getting electrocuted. Jump into the water and go around to the stairway and continue up to the next level.
On Lara’s left is the small treasure room, to her right a ramp and zipline to quickly get back to the day camp area. Go and claim the treasure first though.
The way out:
Use the zipline and continue past the day camp back to the entrance. Carefully negotiate the jump over the pit - take a run-up and jump. Exit the building as you came.
*** You have completed The Flooded Vault. ***
Survivors’ Camp
Location on the Map
Screenshot of Entrance
Entrance located high up on a ledge where Lara (on her first visit here) encounters two Solarii brothers who are talking about the killing of a fellow brother.
Completing the Tomb
On the way in:
Open the door with the axe and enter. Go through a doorway and up a ladder. There is a small room to your left with pickups. To the right is a deep pit. Take a run-up and jump, using the action key to hit the climbable wall with the axe. Climb up, go up some stairs and squeeze through the hole following a tunnel.
Scramble up a wall and go up some stairs. Follow the path to enter an artillery nest missing a cannon. After getting some goodies continue through a doorway and into another tunnel, ending up in the secret tomb’s day camp area. Go up the stairs and activate the console (it is glowing green) to get the electricity back on. Go back down the stairs to the console on the previous level, which now is also glowing green. Activate it to open the sliding doors.
The main area (puzzle room):
To the left is a raft, to the right is a doorway blocked up with planks. An electrical fixture hangs from the ceiling. It fell down when Lara got the electricity running. Getting into the water at this stage will get her electrocuted. However, she must find a way to get across to the stairway on the other side (you will see it glowing in survival instinct mode (Q) on the left side of the flooded room).
1) The raft is tied to the side. Walk up to it and burn the roped material when prompted. The raft can now move around in the water. Don’t get on it yet.
2) Go to the right-hand side of the room and shoot out the planked-up doorway. Go and stand in that doorway and from there shoot rope arrows to the rope on the raft to pull it closer to your position in the doorway. Once close enough, jump onto the raft and then around the wall to the small area that's a bit closer to the opposite side - you are now on the very right-hand side of the room with steps leading into the water and out the other side.
3) You have to cross over without getting electrocuted. There is an object above that you can shoot that lifts the electrical object from the water (but it always falls back down again into the water after some seconds). Shoot this object with rope arrow to pull it from the water and quickly run through the shallow water to the other side. By the time you have crossed, the water will be dangerous again.
4) You may be on the other side now, but you need to enter the water again to get to the stairway that leads to the upper floor. Aim your rope arrows at the raft and gradually pull it close to the object that hangs in the water.
5) When the raft is next to the electrical fixture, shift your aim back to the previous object and shoot it with rope arrow so that the fixture once again lifts out of the water into the air. Now quickly shoot at the raft again and pull it towards you one more time so that the fixture falls right onto the raft when it comes back down.
6) Once you've succeeded in doing this, Lara can move around the area freely without getting electrocuted. Jump into the water and go around to the stairway and continue up to the next level.
On Lara’s left is the small treasure room, to her right a ramp and zipline to quickly get back to the day camp area. Go and claim the treasure first though.
The way out:
Use the zipline and continue past the day camp back to the entrance. Carefully negotiate the jump over the pit - take a run-up and jump. Exit the building as you came.
*** You have completed The Flooded Vault. ***
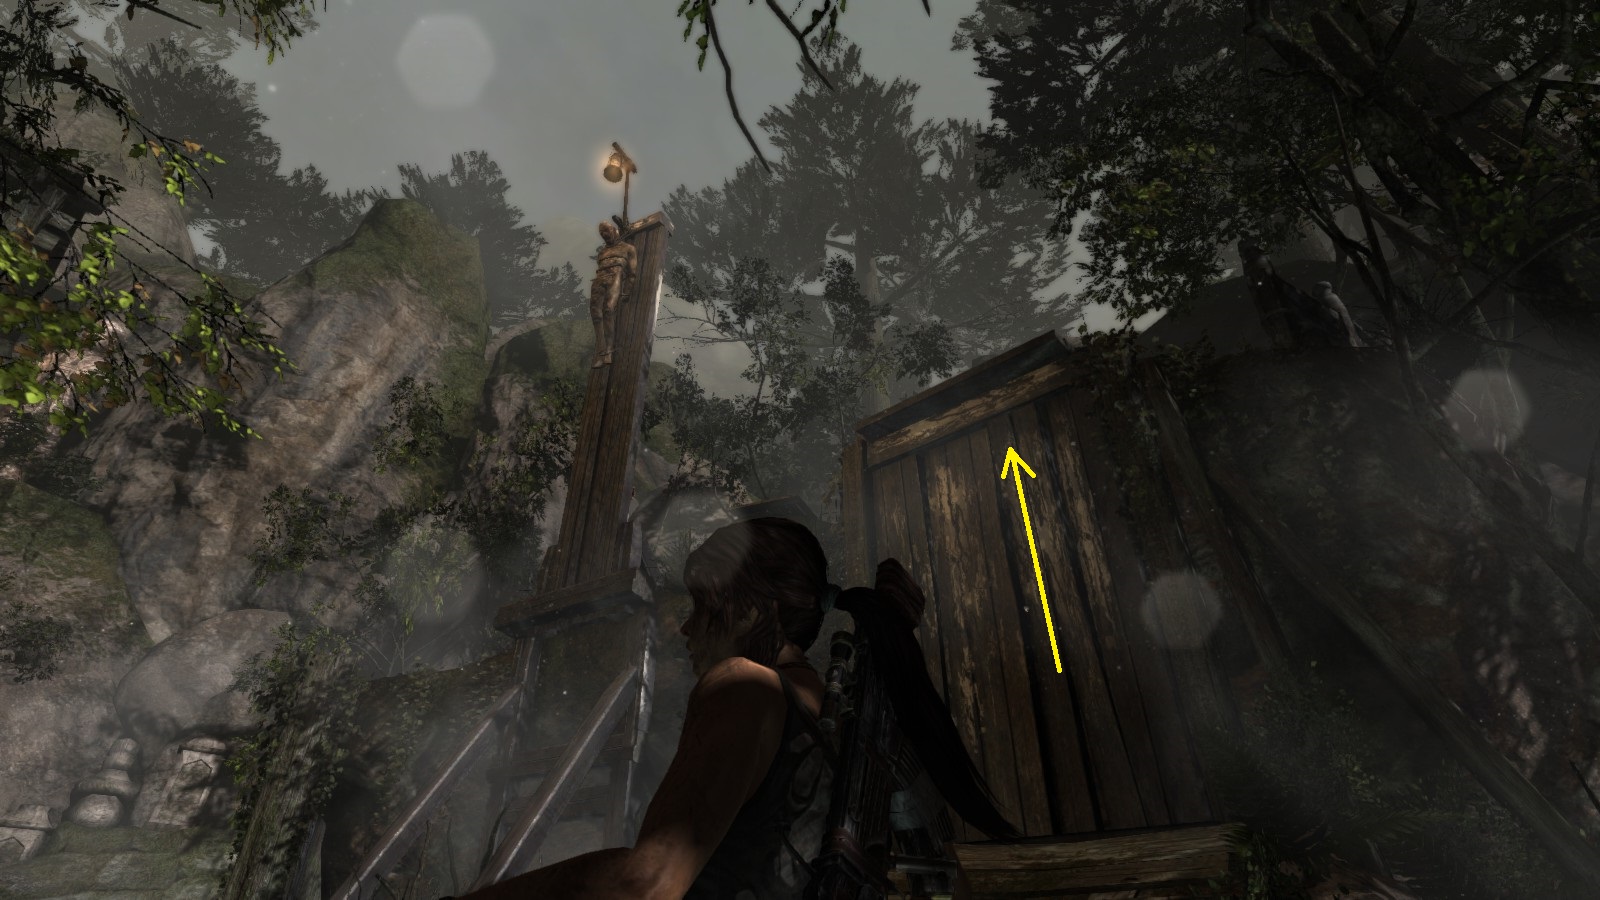
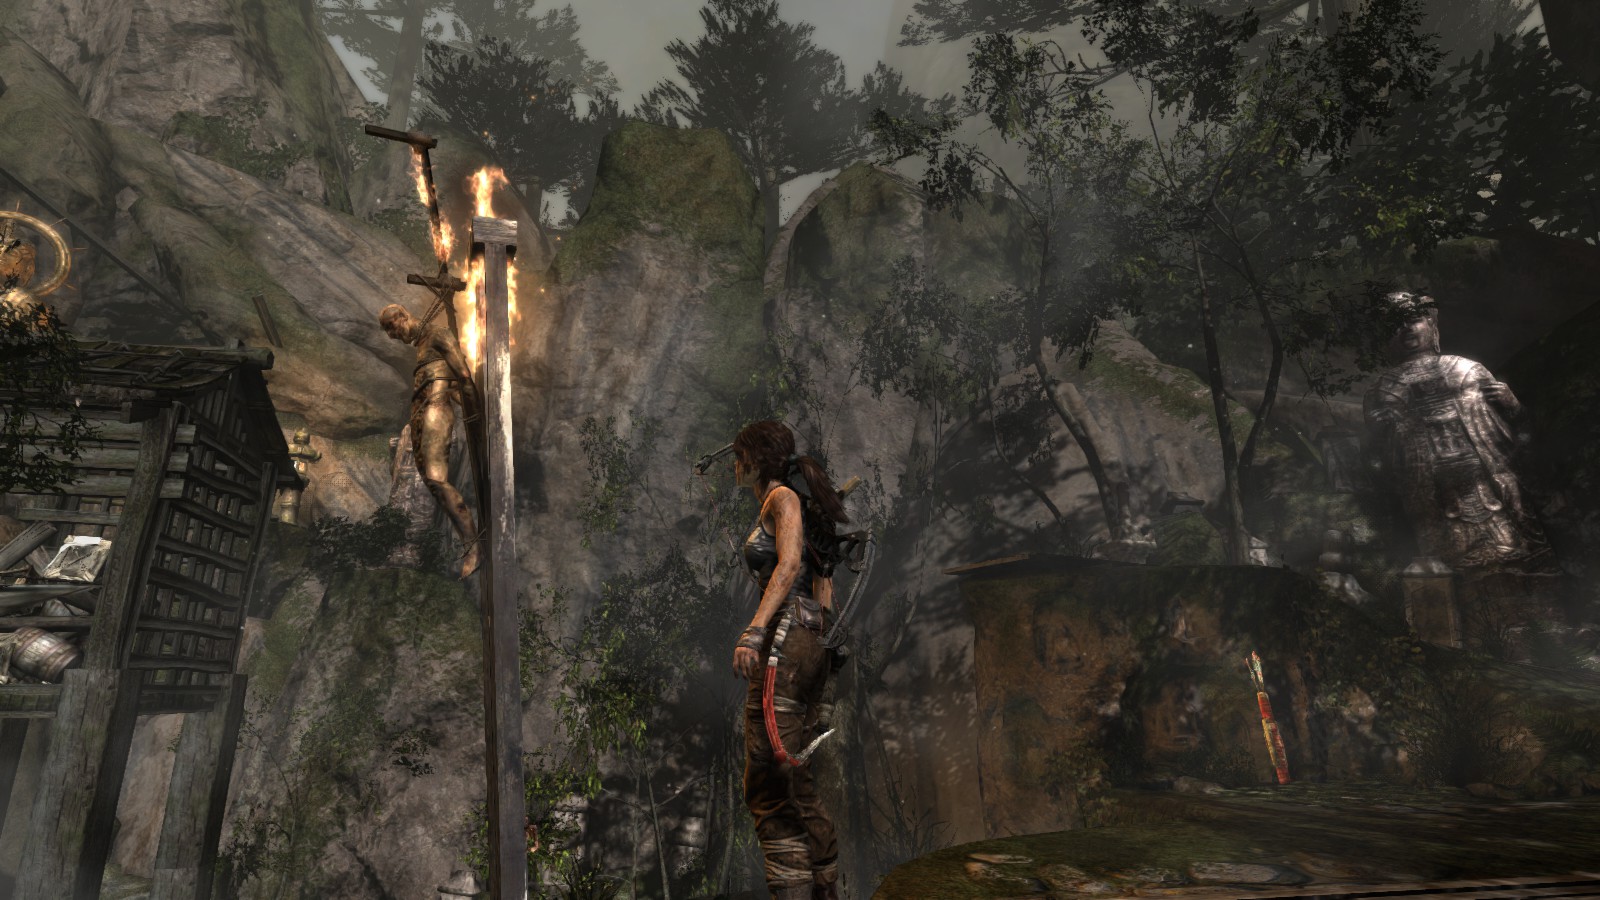
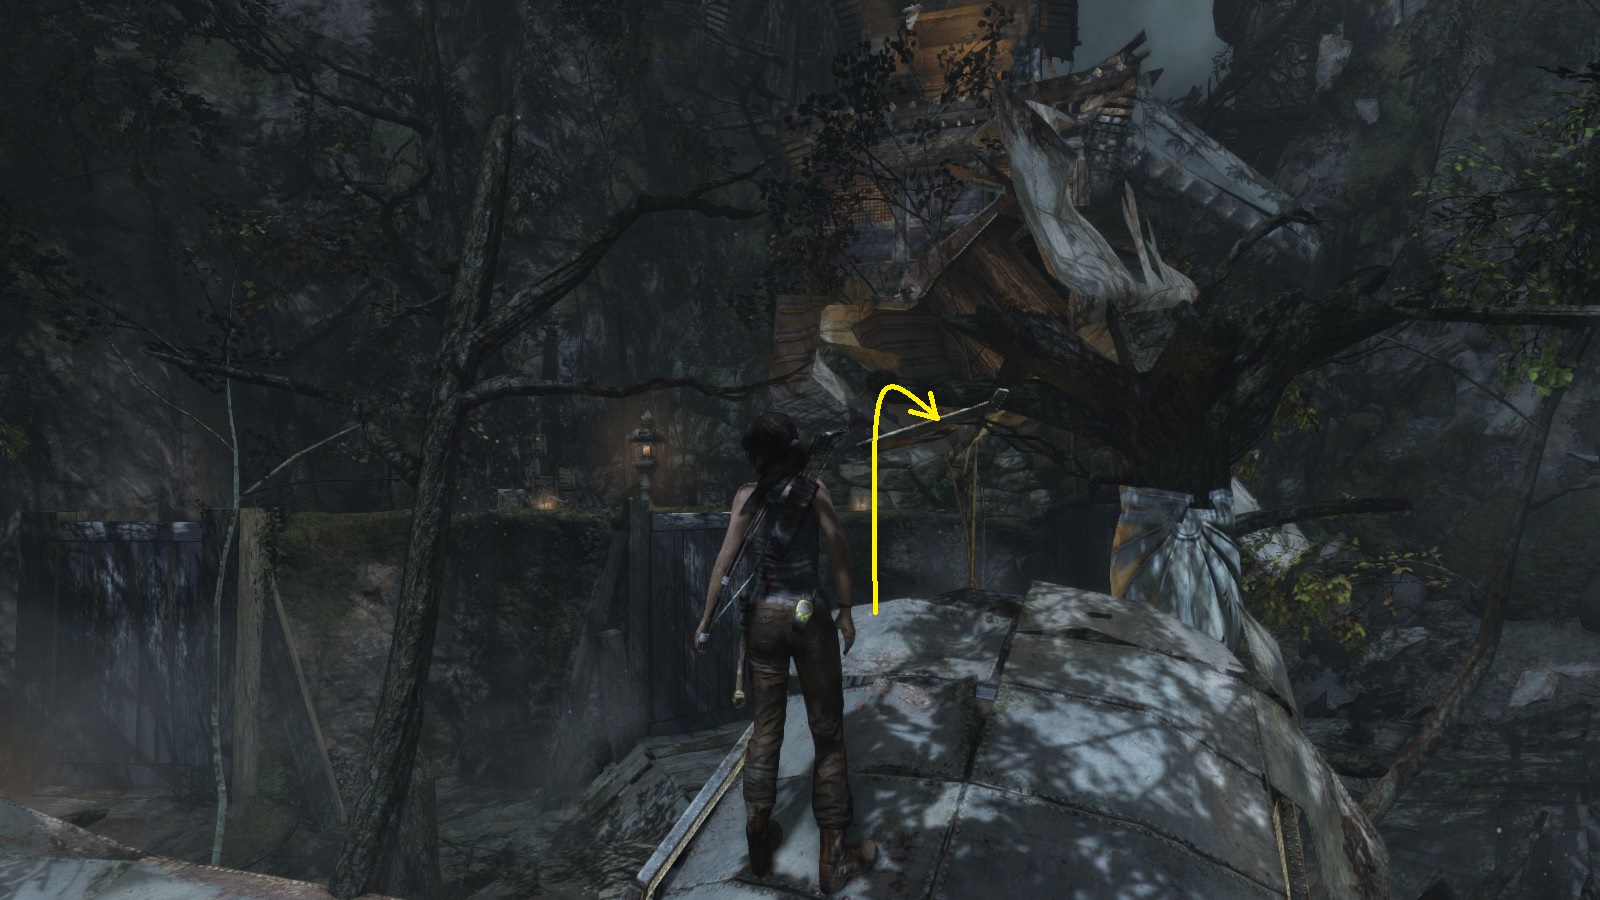
DLC: TOMB OF THE LOST ADVENTURER (Coastal Forest)
Closest base (fast-travel) camp
Forest Ruins
Location on the Map
Screenshot of Entrance
IMPORTANT NOTE:
Whether you do this tomb on your first visit to the Coastal Forest or after the game has been completed does not matter - you will still be able to complete it. However, there is a section beyond the furthest left-hand ledge in the main area that is barricaded off with steel. To access this part (it contains a lot of salvage) you need the grenade launcher (attached to the assault rifle) which, of course, is only accessible much later in the game. So if you want to explore this area you will have to come back to this tomb later in the game.
Completing the tomb
On the way in:
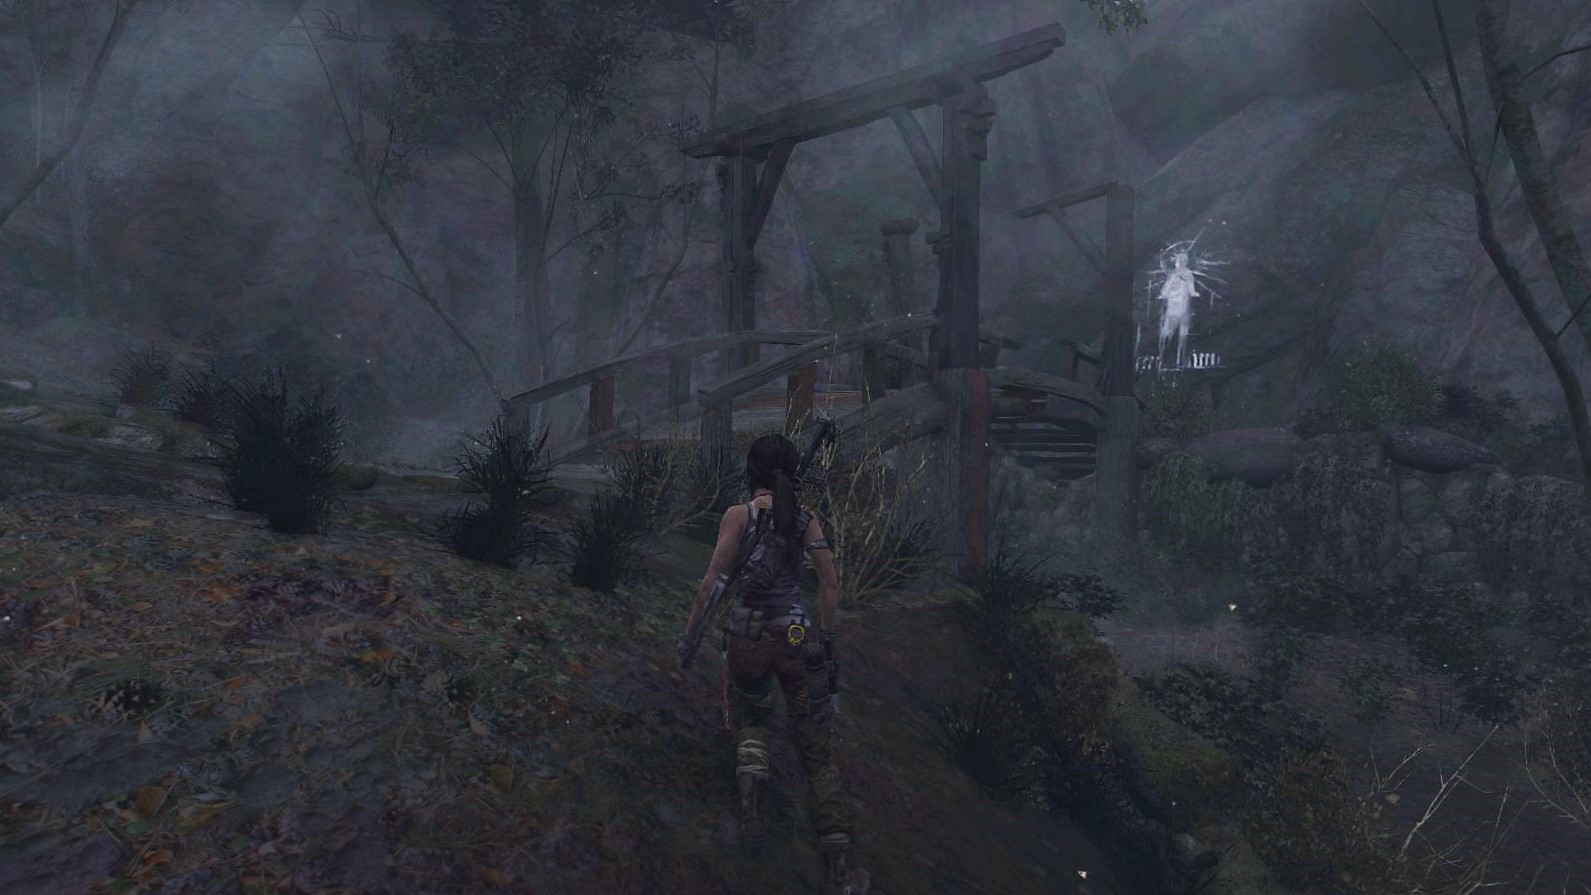
Lara will stop to light a torch, but shortly after it will be extinguished when she goes through a waterfall. The way is blocked by flammable material, so shoot the burning lantern to ignite it. Lara gets to the main area where a plane wreck is stuck in the trees.
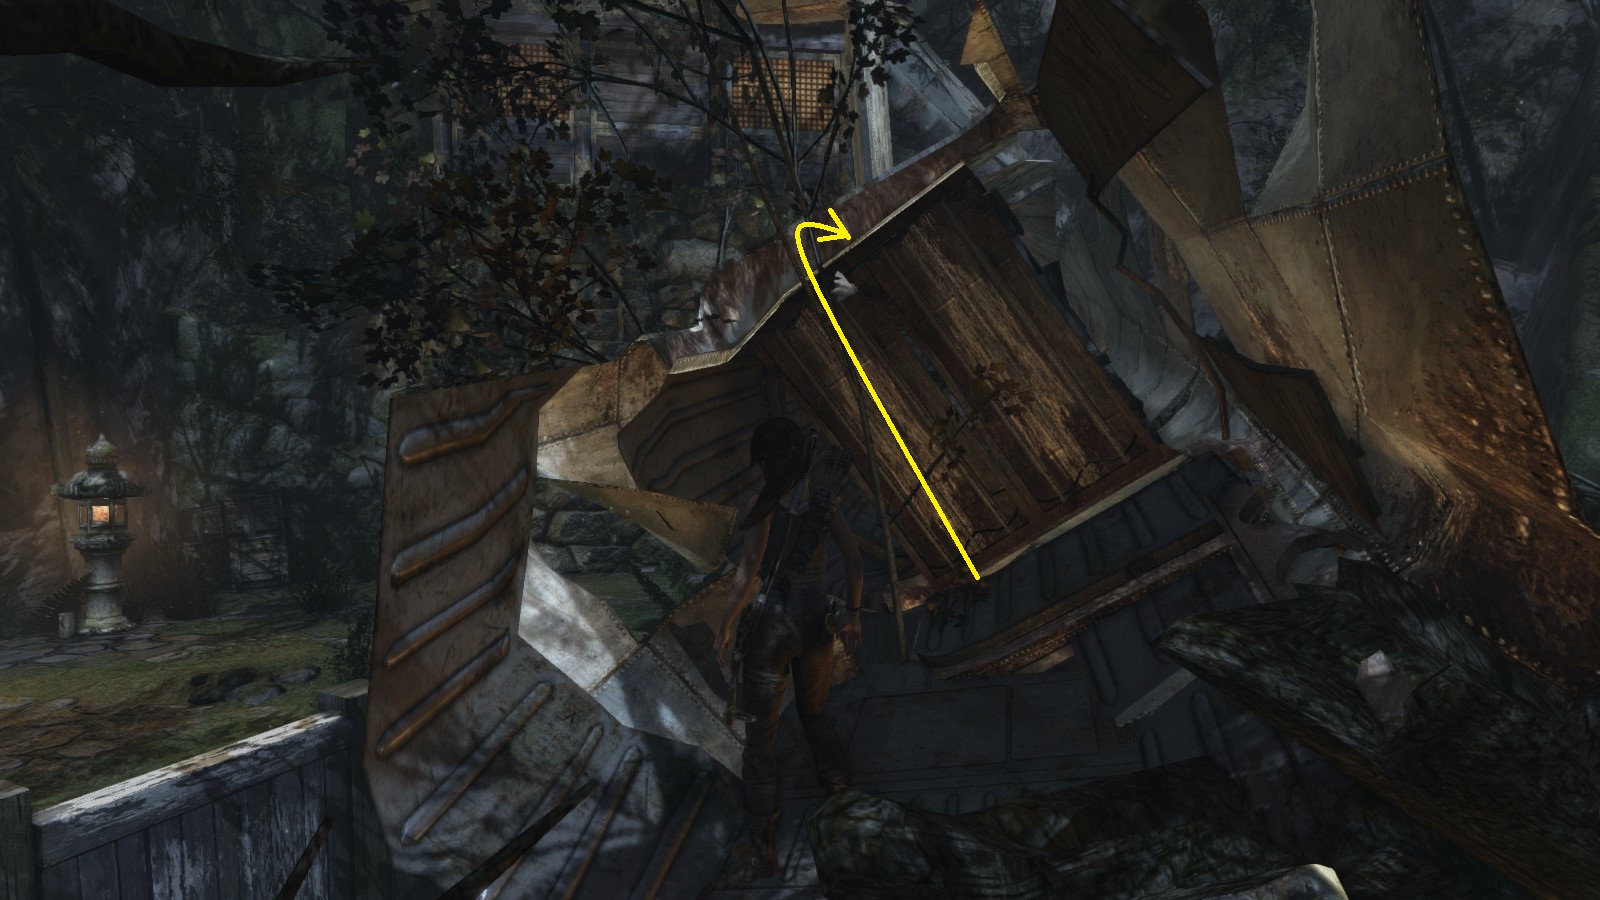
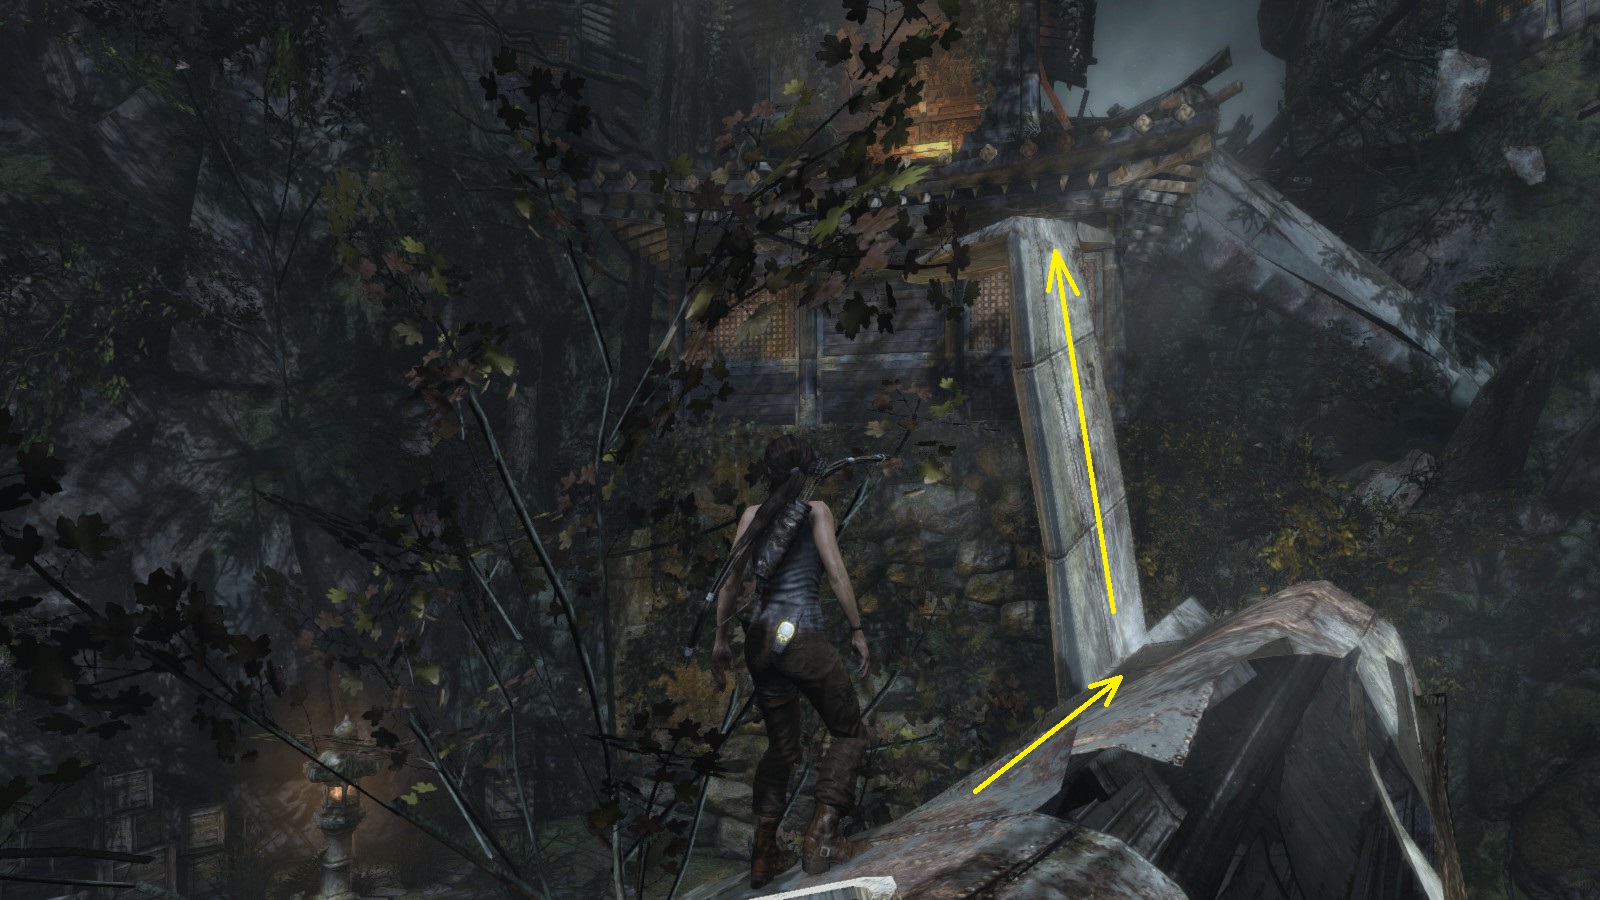
The main area:
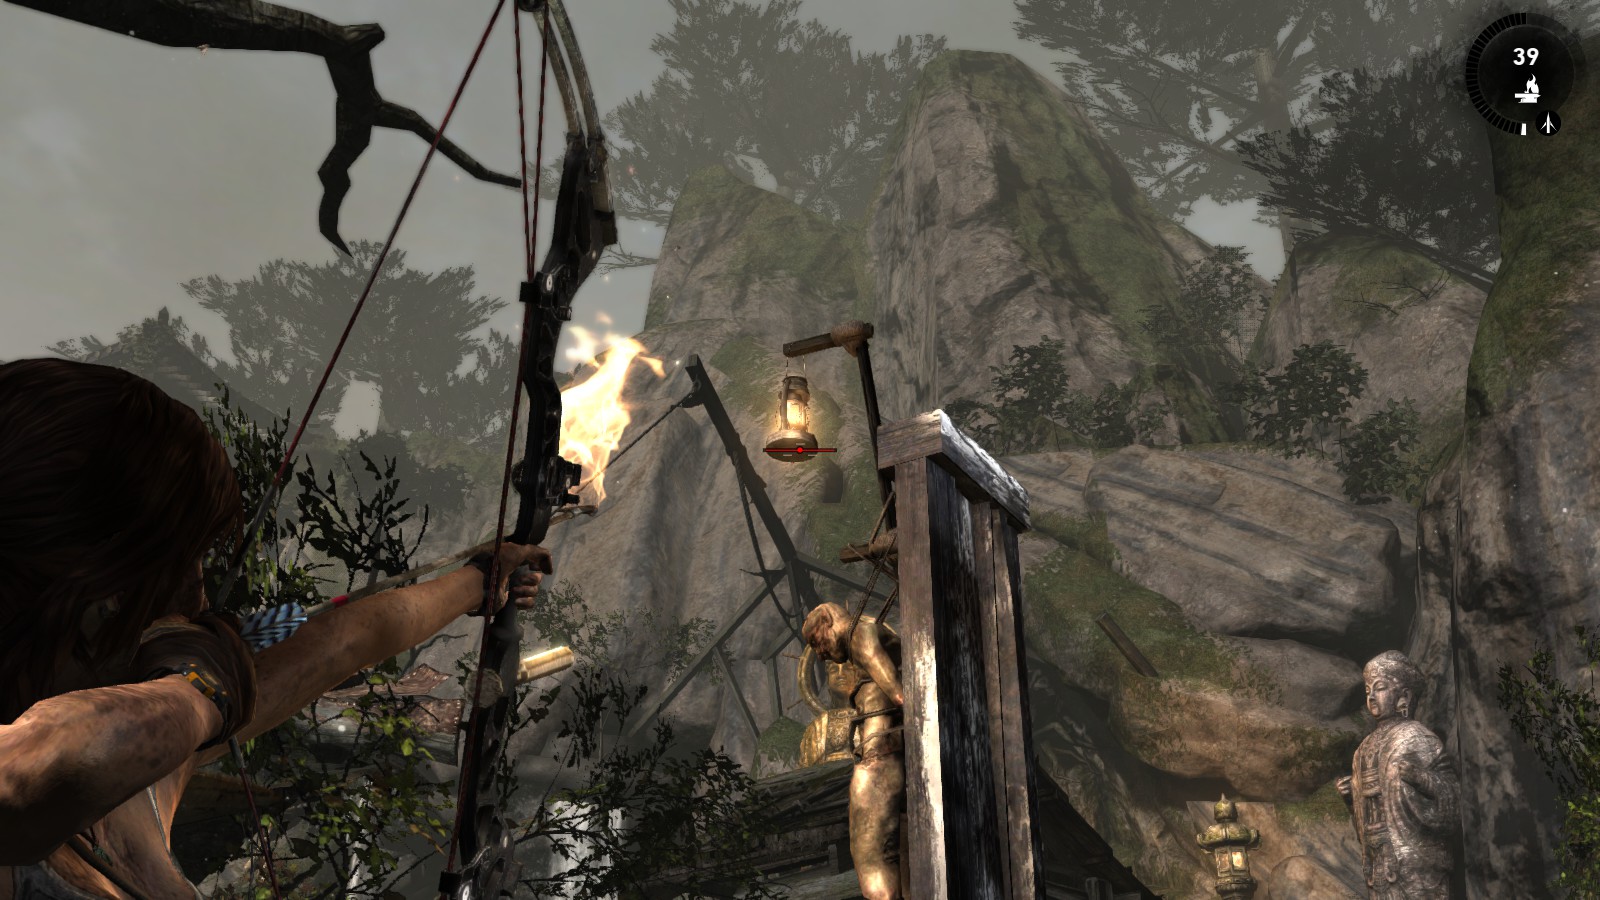
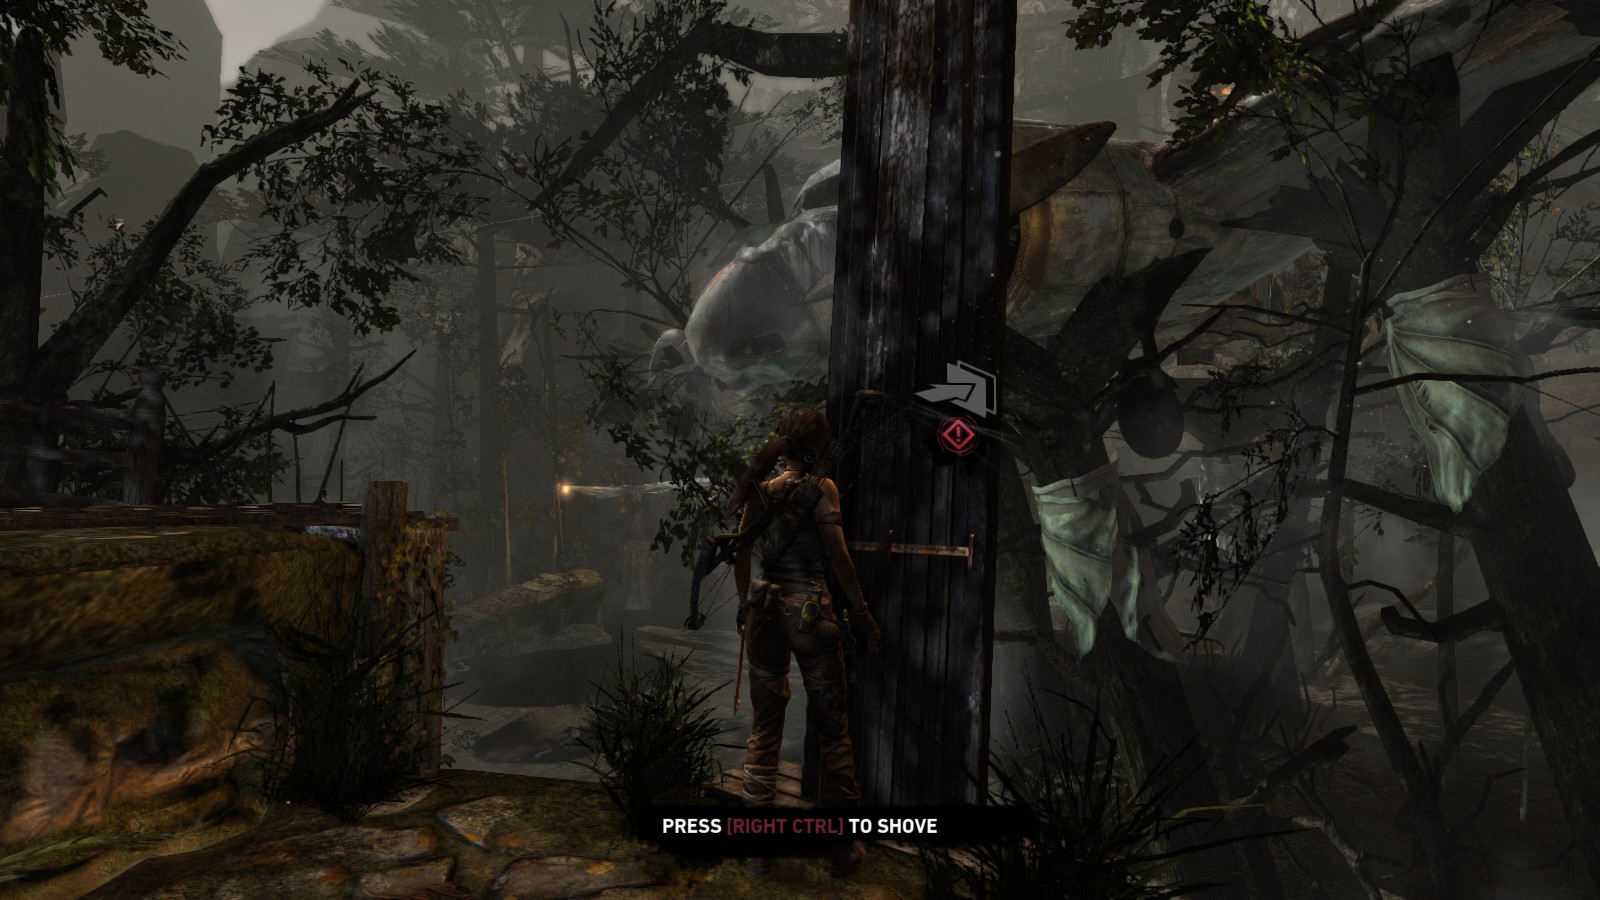
1) Get up onto the ledges on the right-hand side of the area, where the corpse hangs from the planks. Ignite the lantern that is hanging above it by shooting it with an arrow. This will make the planks burn and tilt it a bit towards the plane. Go to the base of the planks-with-corpse and shove it, making it fall onto the plane. Lara: "There has got to be a way to raise [the tail section] up higher. One more should do it."
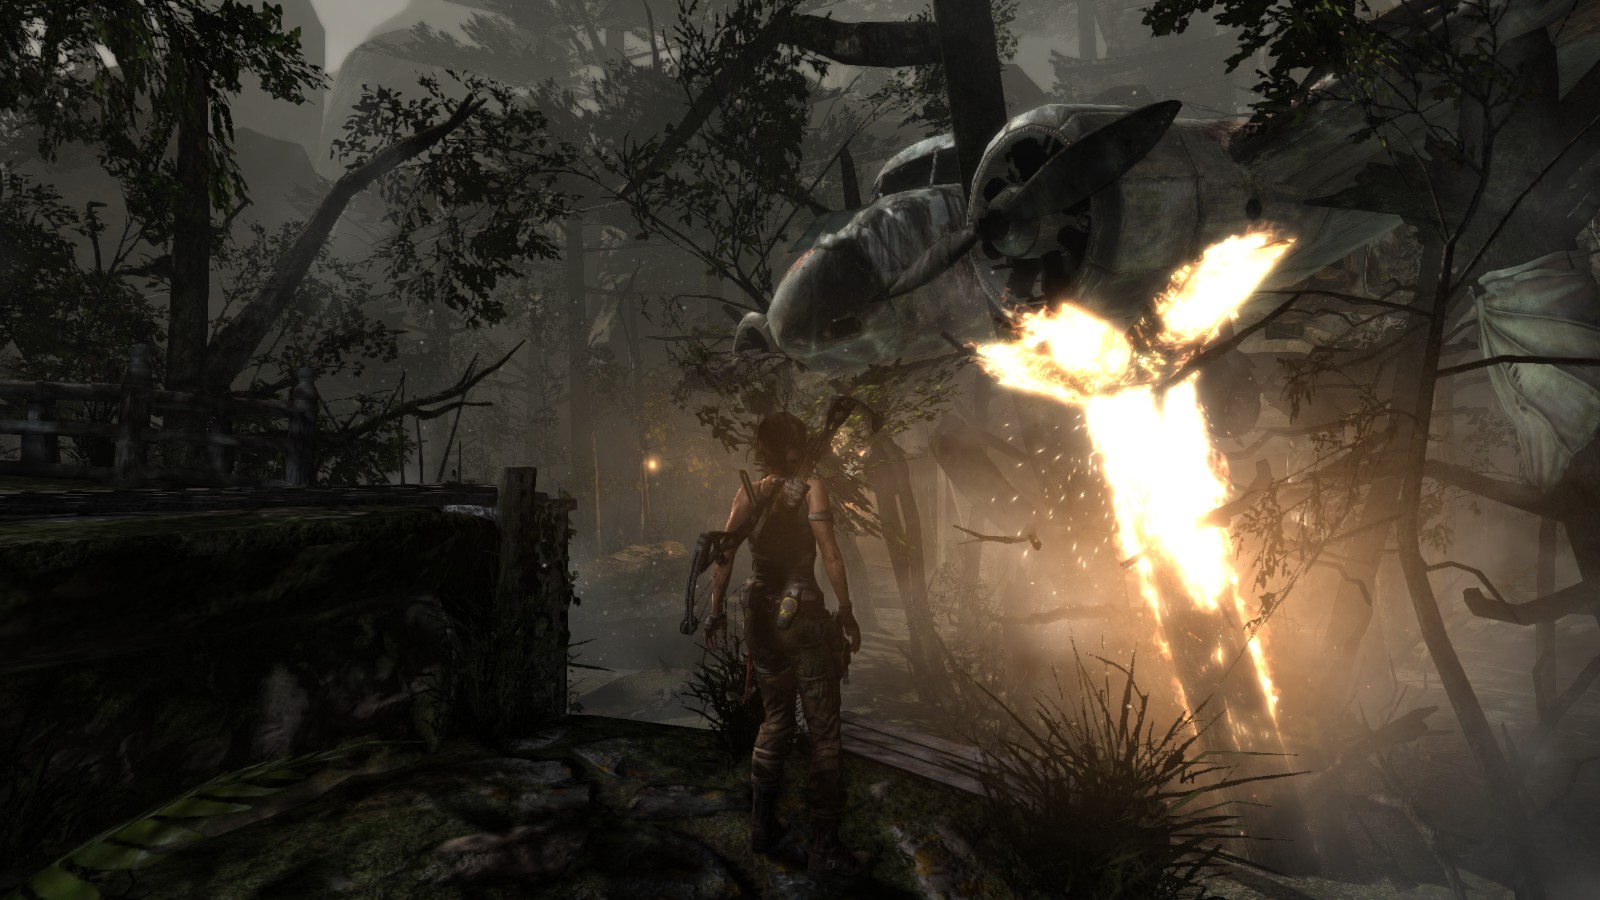
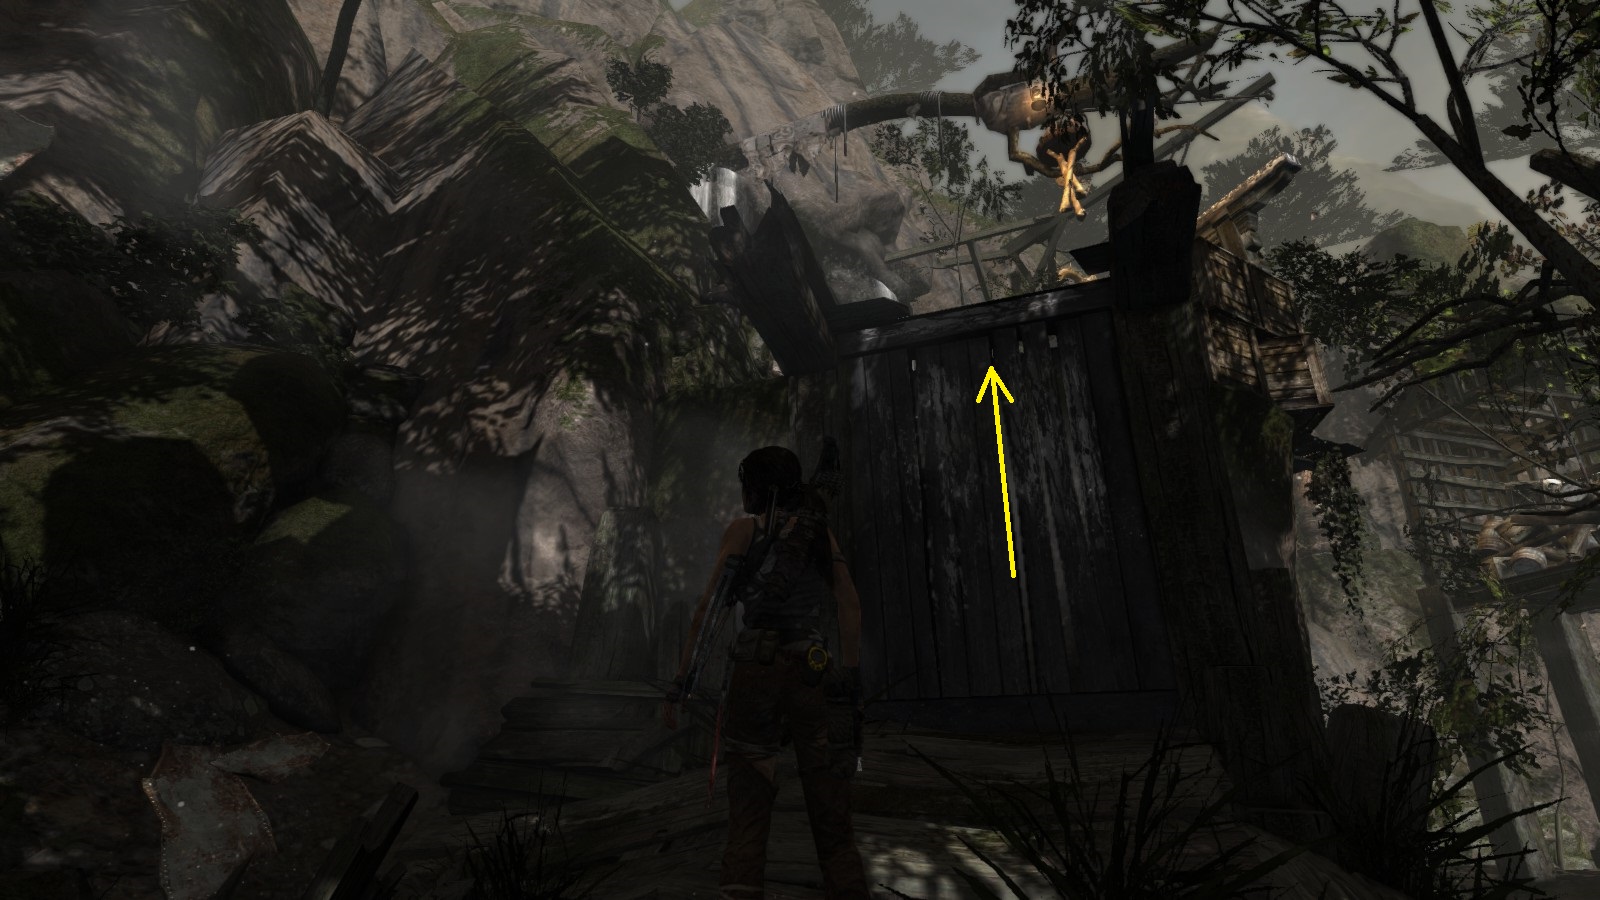
2) Now go to the ledges on the left-hand side of the area furthest away from where you entered the area. This is where a wooden crate is suspended from a beam. An unlit brazier hangs above it. Ignite the brazier by shooting the lantern that hangs near it. The brazier will come down but get stuck on the wooden beam. Get onto the stack of crates nearby and jump up to that beam to release the lit brazier. The brazier will then swing towards the wooden tower igniting the flammable material in it, which in turn will ignite a cloth-wrapped tree that will fall over, resulting in the tail section breaking off from the front of the plane. Lara: "What now?"
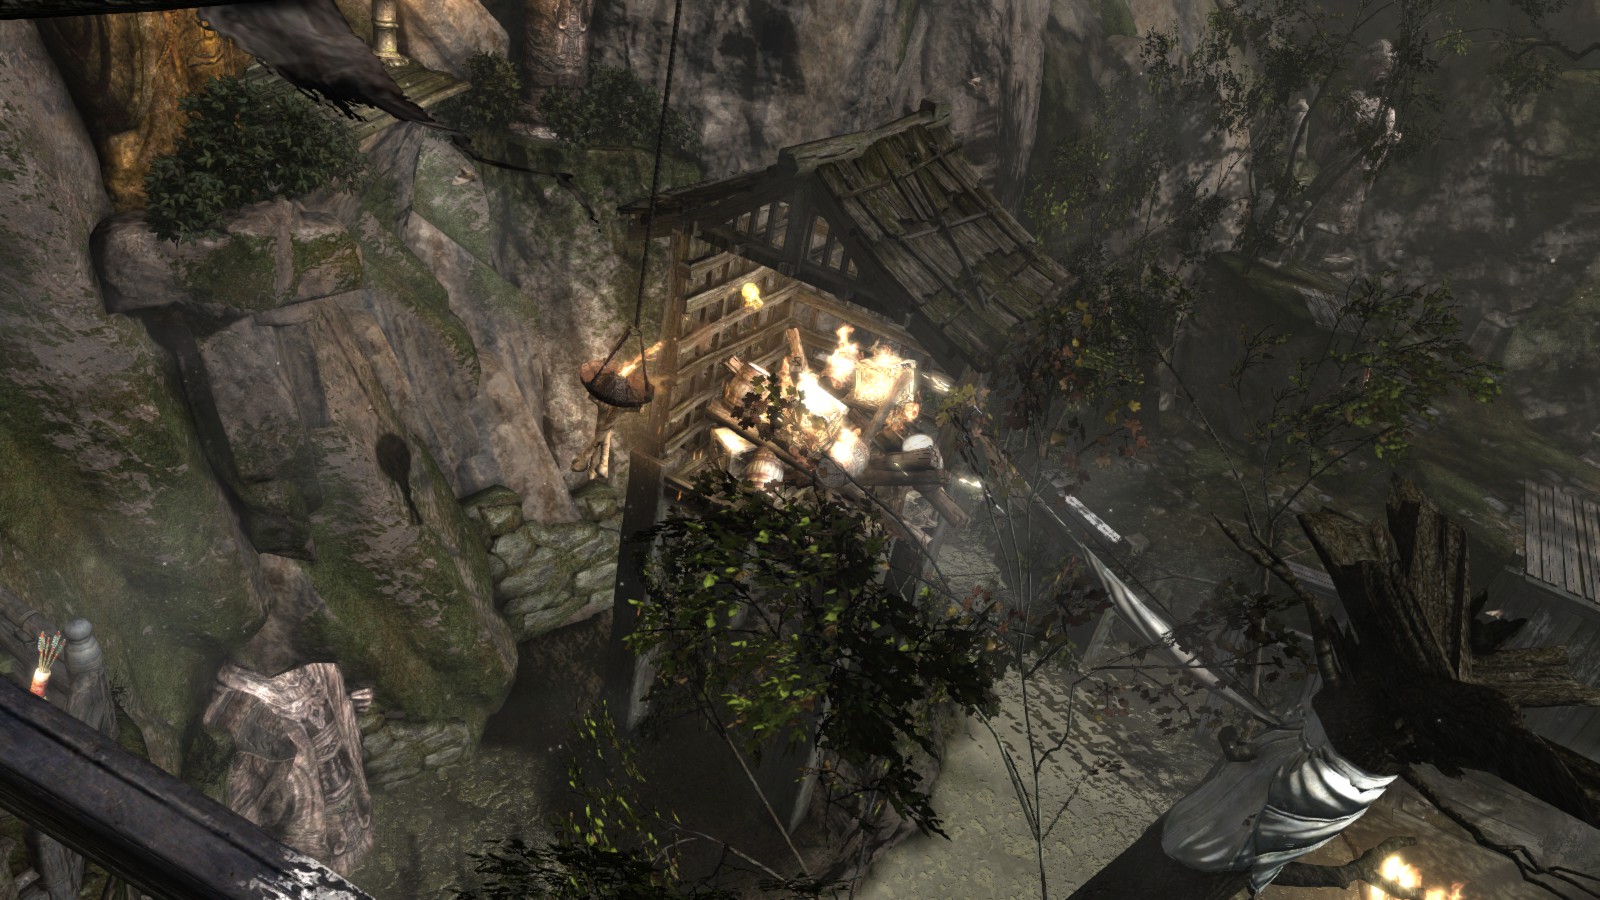
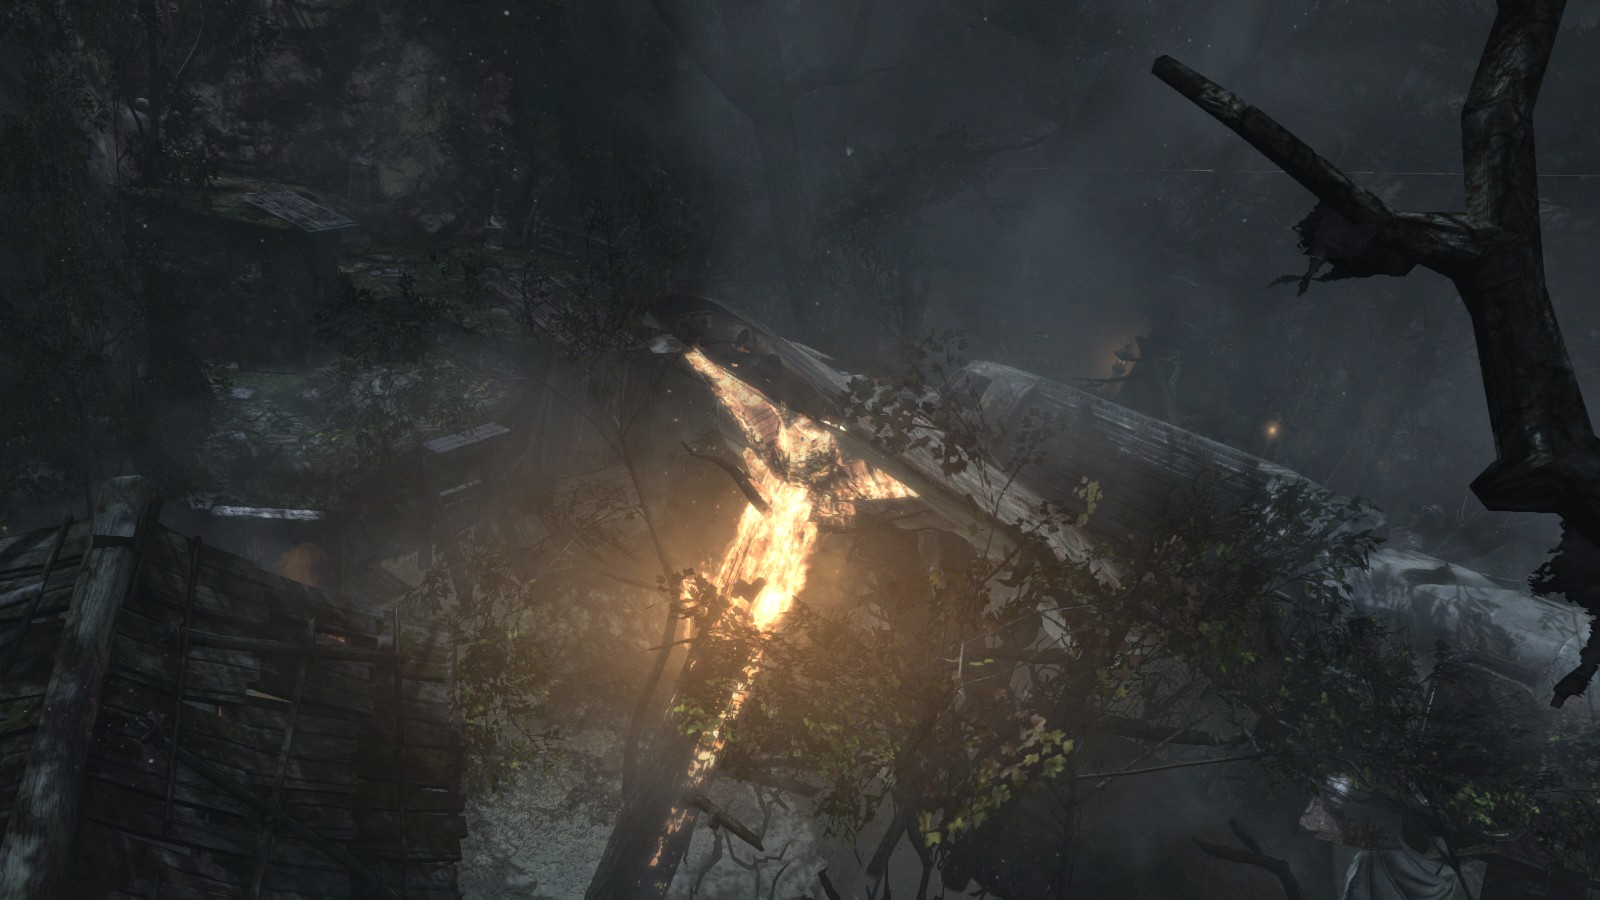
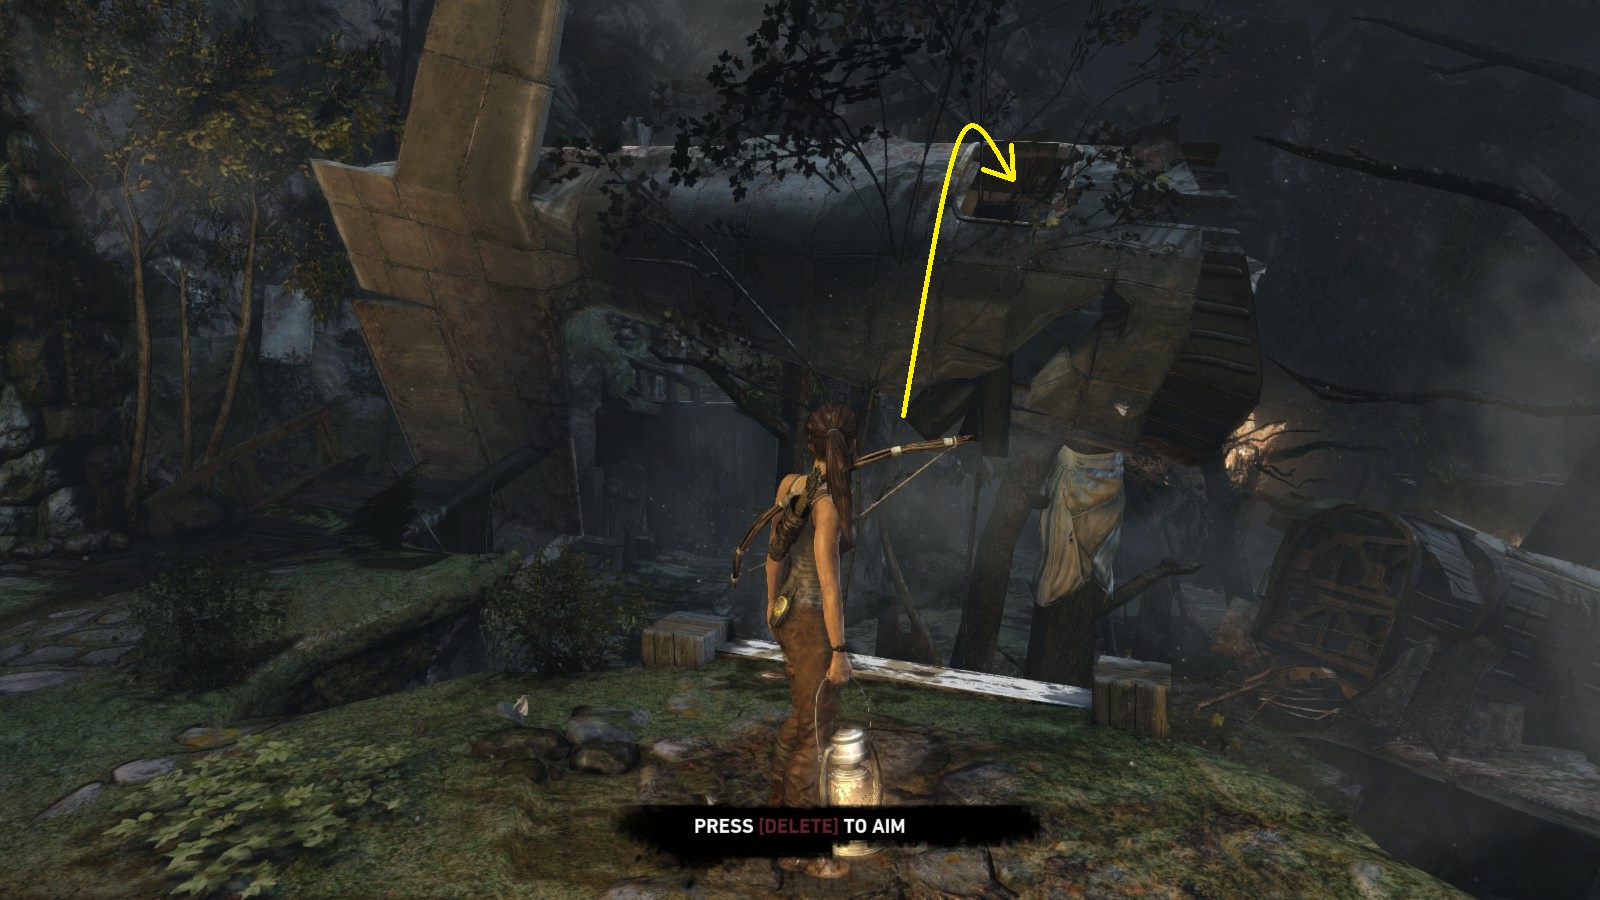
3) Go to the part of the ledges on the left-hand side where the three lanterns are. Pick one up and throw it into the tail section of the plane to burn the flammable stuff in it. (Aim the lantern through the square-like doorway on the tail section). Lara: "That did it!"

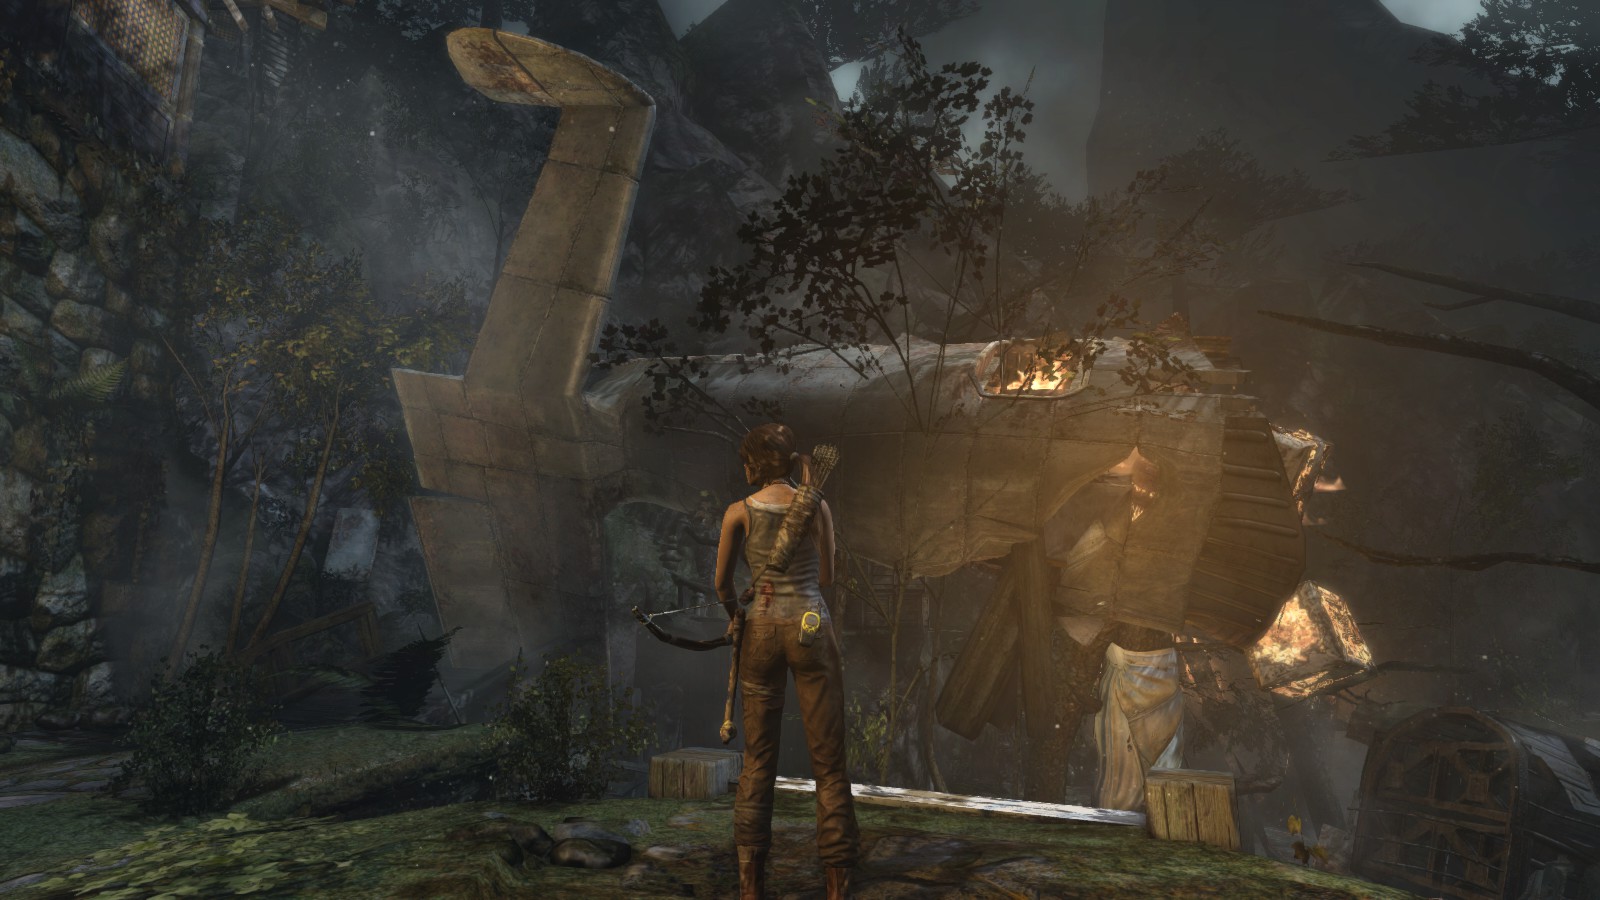
4) Get down from the ledge and get onto the front part of the plane. Jump up to the tail section and climb up. Continue to the back wing sticking vertically into the air and scramble up it. Then jump to the building with the treasure chest and open it.
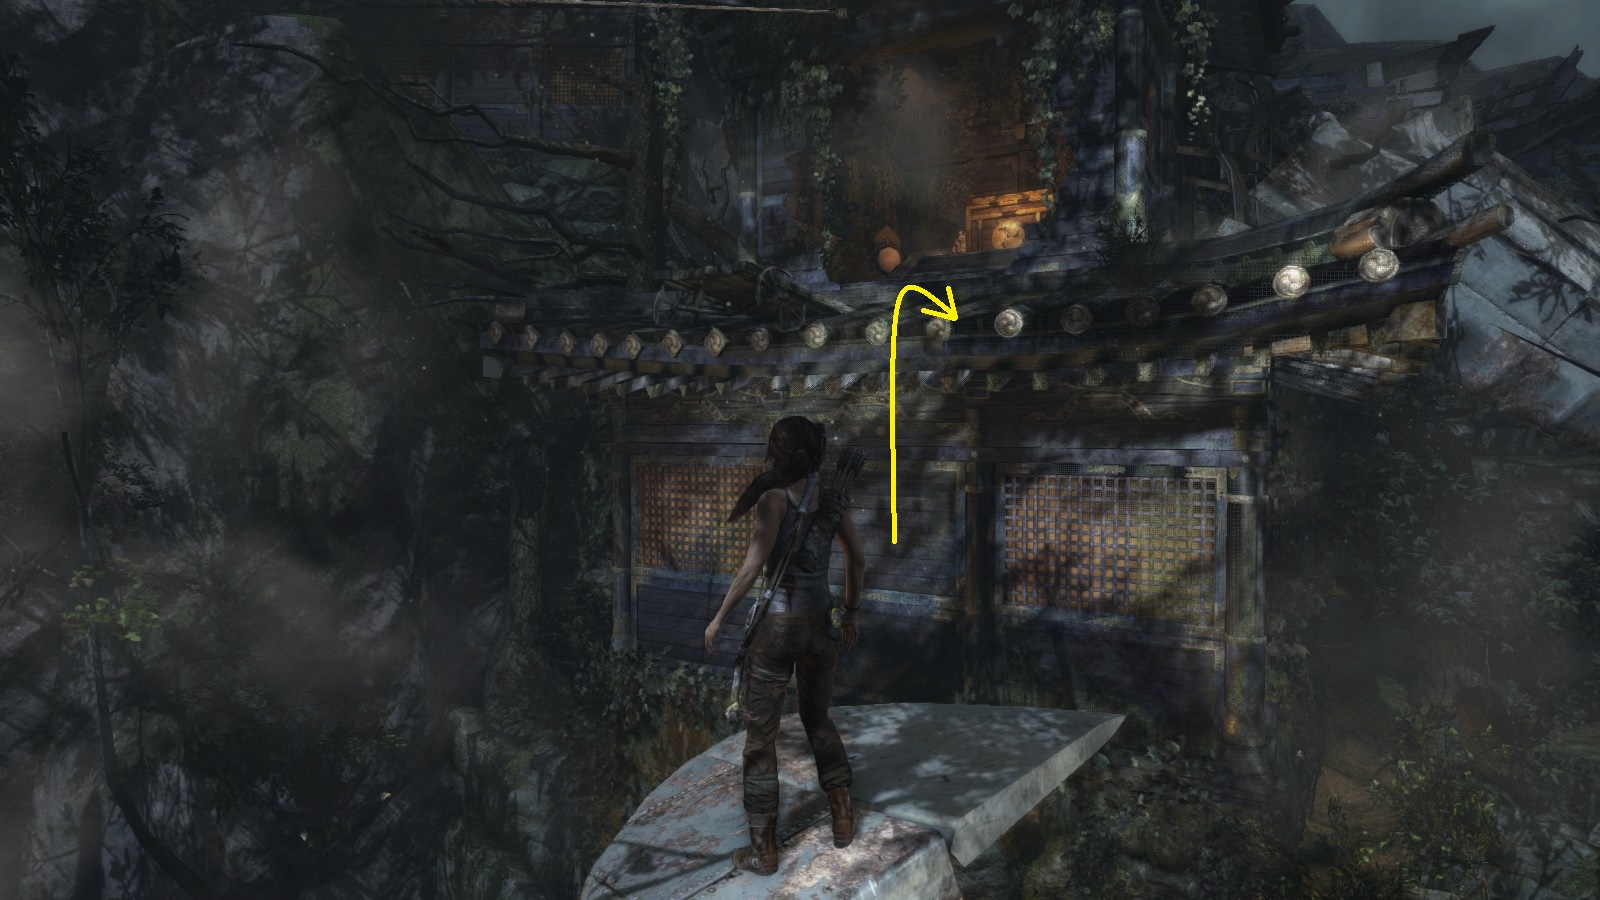
The way out:
To get down from the building quickly, use the zipline. Exit the area the same way you came in.
***You have completed the Tomb of the Lost Adventurer***
Forest Ruins
Location on the Map
Screenshot of Entrance
IMPORTANT NOTE:
Whether you do this tomb on your first visit to the Coastal Forest or after the game has been completed does not matter - you will still be able to complete it. However, there is a section beyond the furthest left-hand ledge in the main area that is barricaded off with steel. To access this part (it contains a lot of salvage) you need the grenade launcher (attached to the assault rifle) which, of course, is only accessible much later in the game. So if you want to explore this area you will have to come back to this tomb later in the game.
Completing the tomb
On the way in:
Lara will stop to light a torch, but shortly after it will be extinguished when she goes through a waterfall. The way is blocked by flammable material, so shoot the burning lantern to ignite it. Lara gets to the main area where a plane wreck is stuck in the trees.
The main area:
1) Get up onto the ledges on the right-hand side of the area, where the corpse hangs from the planks. Ignite the lantern that is hanging above it by shooting it with an arrow. This will make the planks burn and tilt it a bit towards the plane. Go to the base of the planks-with-corpse and shove it, making it fall onto the plane. Lara: "There has got to be a way to raise [the tail section] up higher. One more should do it."
2) Now go to the ledges on the left-hand side of the area furthest away from where you entered the area. This is where a wooden crate is suspended from a beam. An unlit brazier hangs above it. Ignite the brazier by shooting the lantern that hangs near it. The brazier will come down but get stuck on the wooden beam. Get onto the stack of crates nearby and jump up to that beam to release the lit brazier. The brazier will then swing towards the wooden tower igniting the flammable material in it, which in turn will ignite a cloth-wrapped tree that will fall over, resulting in the tail section breaking off from the front of the plane. Lara: "What now?"
3) Go to the part of the ledges on the left-hand side where the three lanterns are. Pick one up and throw it into the tail section of the plane to burn the flammable stuff in it. (Aim the lantern through the square-like doorway on the tail section). Lara: "That did it!"
4) Get down from the ledge and get onto the front part of the plane. Jump up to the tail section and climb up. Continue to the back wing sticking vertically into the air and scramble up it. Then jump to the building with the treasure chest and open it.
The way out:
To get down from the building quickly, use the zipline. Exit the area the same way you came in.
***You have completed the Tomb of the Lost Adventurer***
More Tomb Raider guides
- JOIN a Multiplayer★ 5 (560)44k views277 ♥1 minBulgarian
- Tomb Raider. 100% получение всех достижений★ 5 (2.3k)42k views2.6k ♥26 minRussianUpdated Jun 20, 2016
- Achievements and Multiplayer XP Boost★ 5 (1.3k)40k views1.7k ♥15 minUpdated Feb 12, 2025
- Tomb Raider: Complete All Challenges★ 5 (1.9k)40k views2.7k ♥34 minUpdated Mar 4, 2018
- Как найти все секреты и пройти испытания.★ 5 (1.8k)36k views2.2k ♥8 minRussianUpdated Dec 22, 2013
- 100% достижений в Tomb Raider [RU]. ВНИМАНИЕ: спойлеры.★ 5 (974)33k views1.1k ♥11 minRussianUpdated Feb 29, 2020


This guide was created by its original author on the Steam Community. Are you the author and want it removed? Request removal.