Ultimate RE4 Modding Guide (HD Project 1.1 Installation + Fixes & Optional Mods)
Resident Evil 4 HD Project
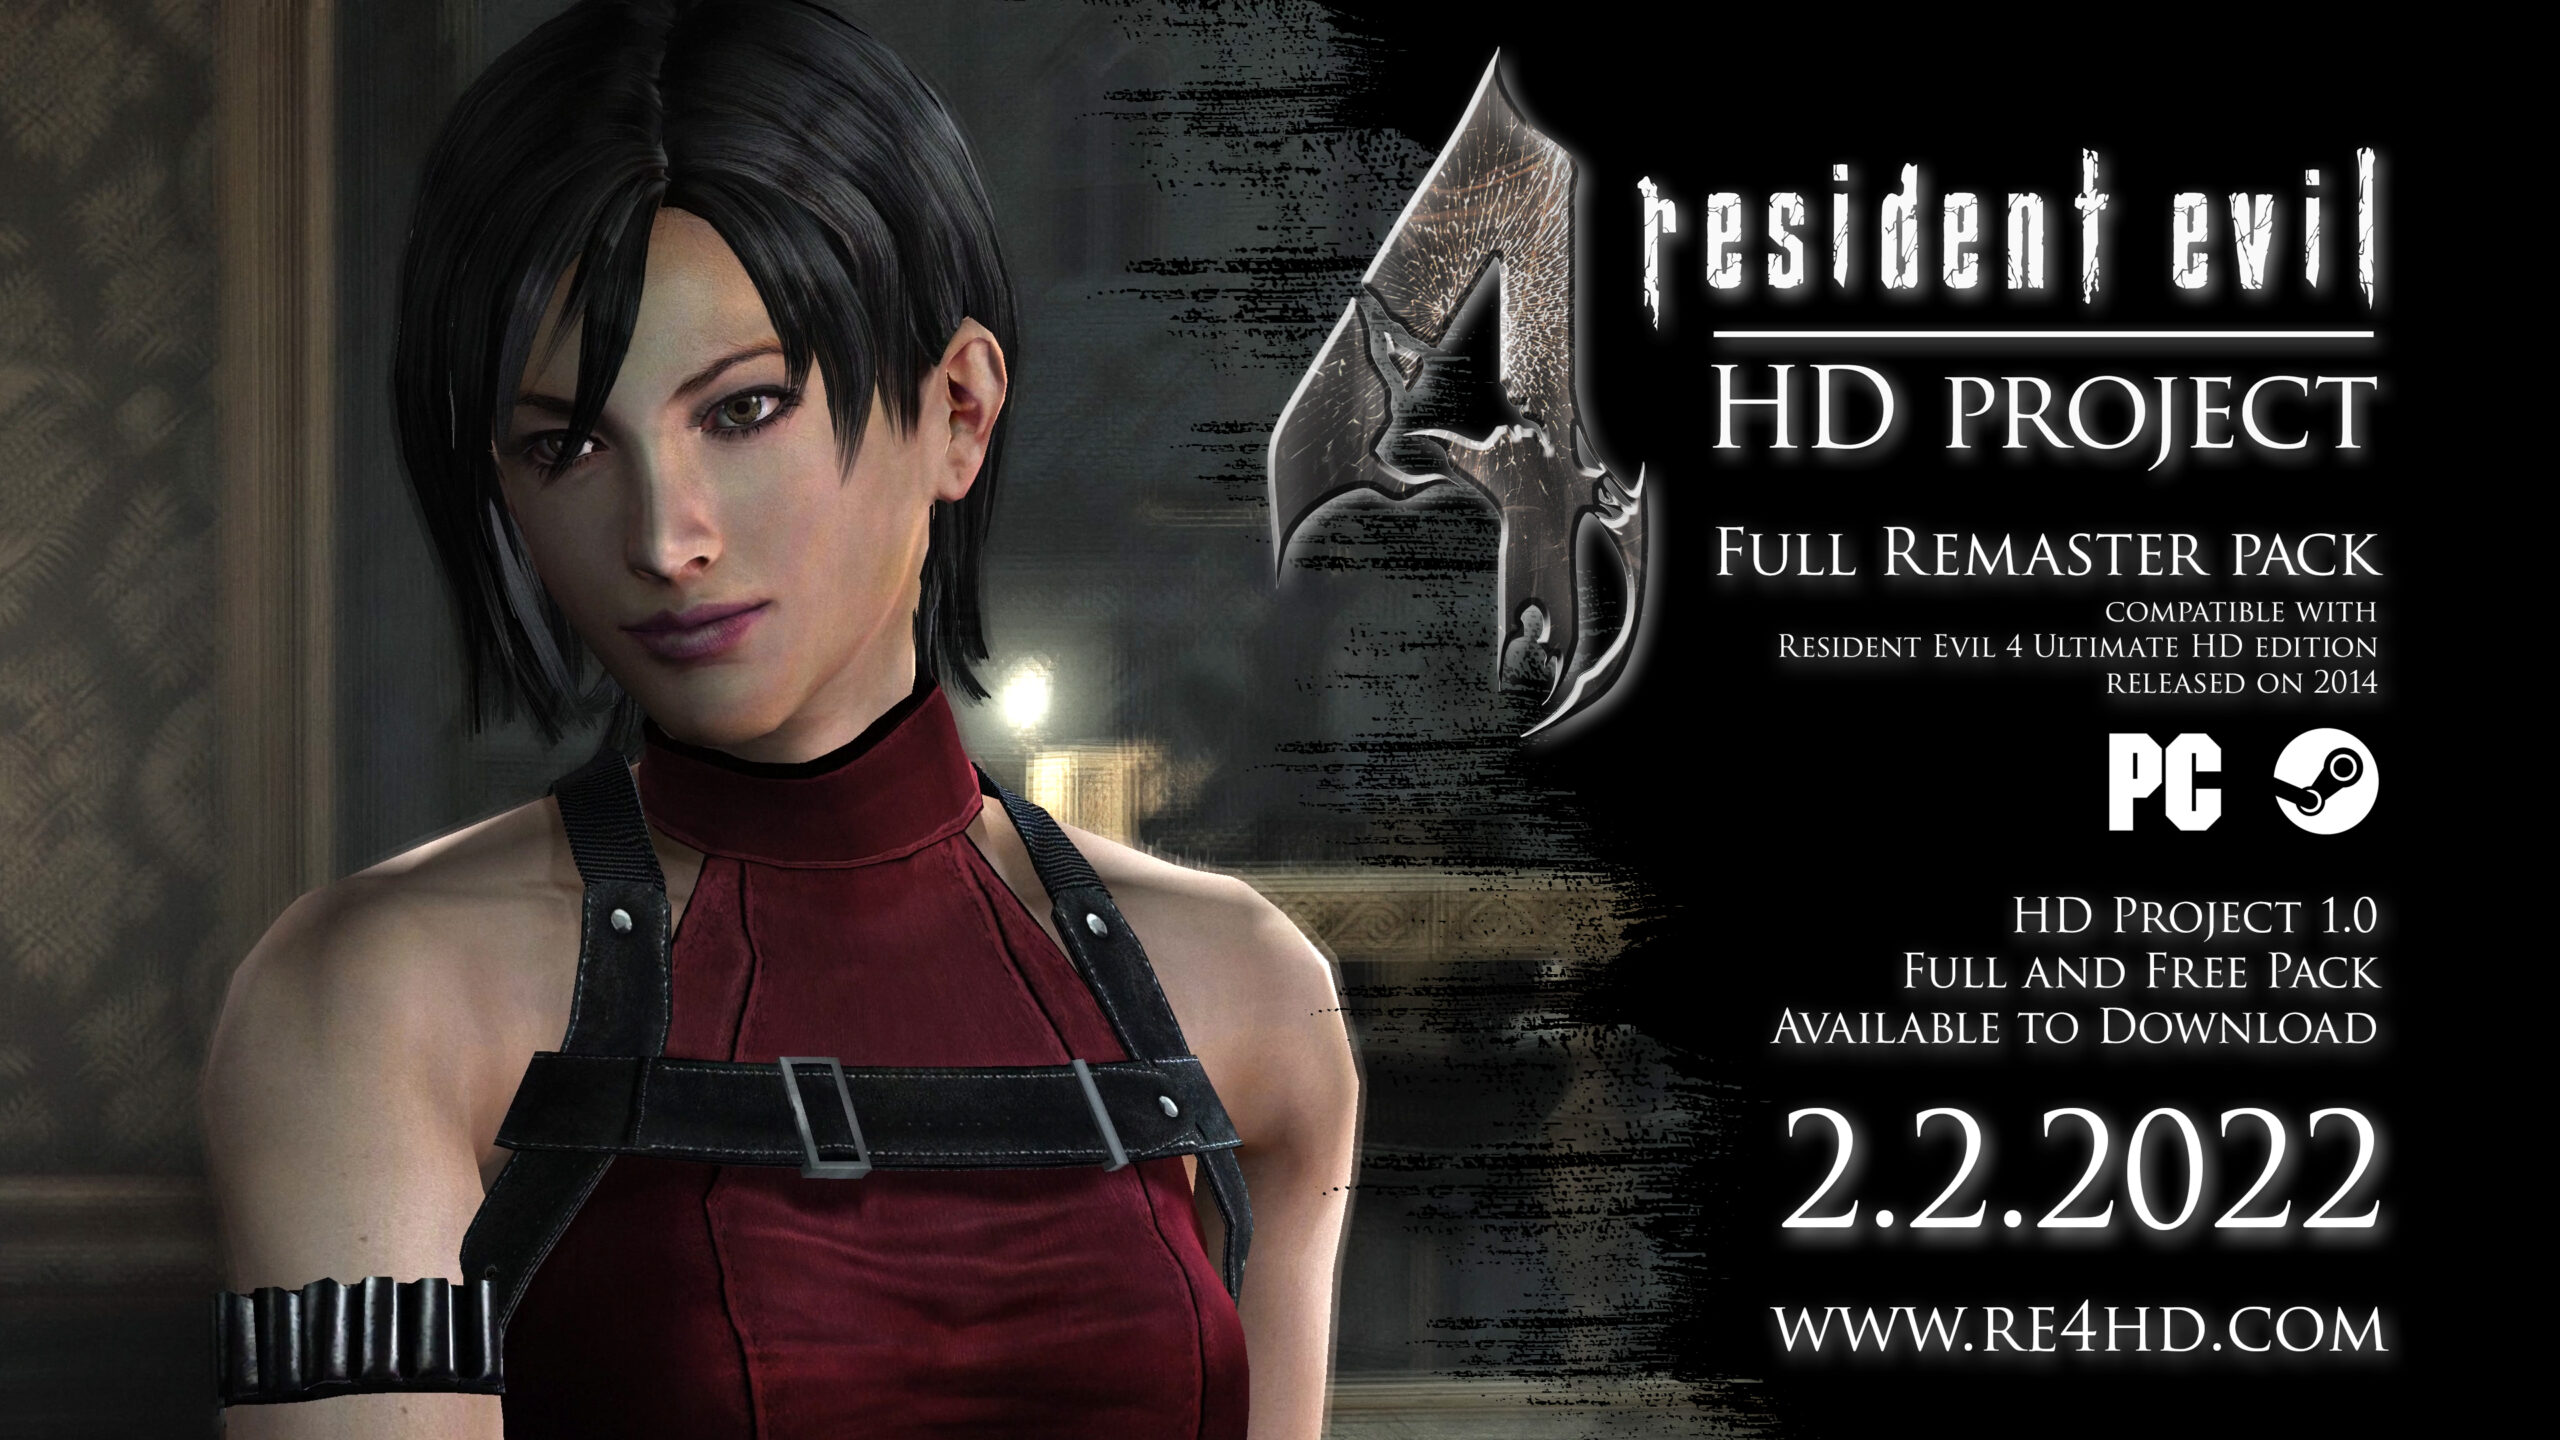
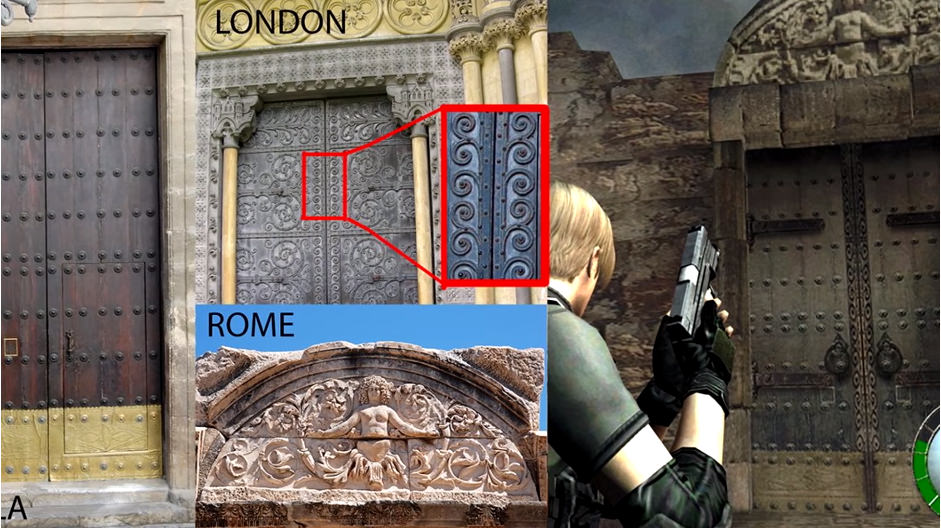
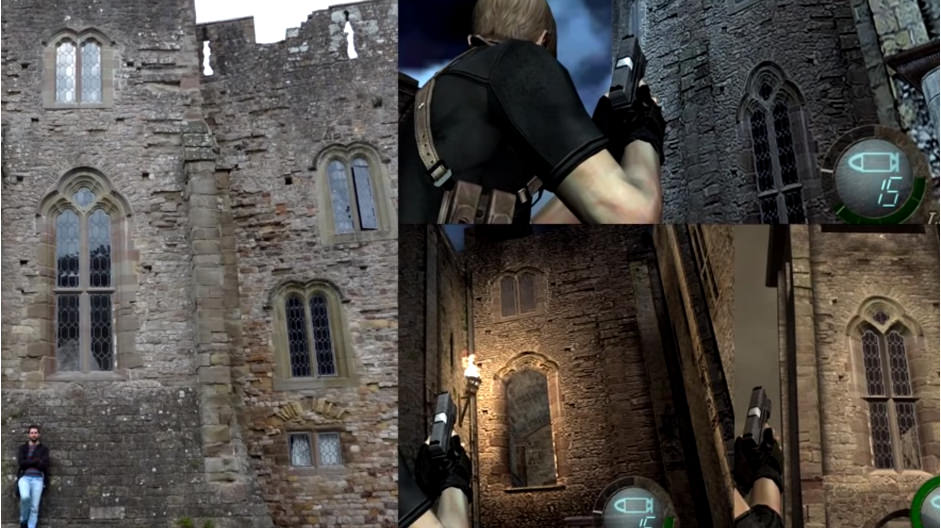
Creators Albert and Cris have done an amazing job restoring the OG texture artists' work, and puts Capcom’s “Ultimate HD Edition” to shame. They truly went above and beyond with this project, using the real-life locations where the original textures were sourced wherever possible. Alongside its graphical improvements, it will also finally have full HD videos, adjustable FOV, the original 'depth of field' blurring effect from the GC/Wii versions as well as the option to have the fixed camera-angles in Ashley's section, being previously exclusive to the Japanese version. All of this is thanks to the re4_tweaks mod by nipkow and emoose included with the HD Project.
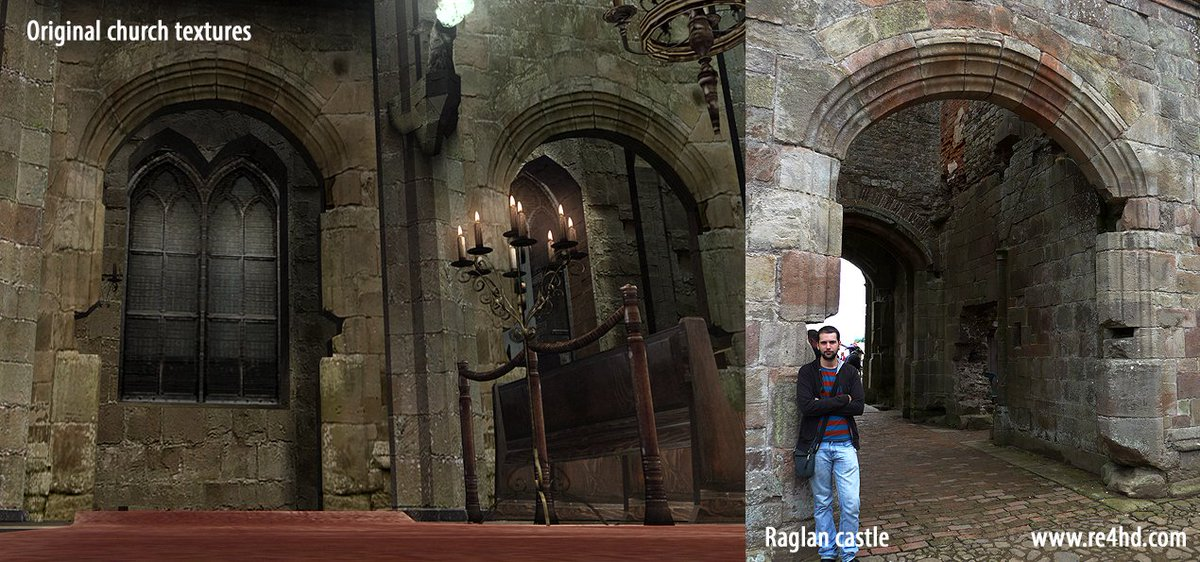 In all honesty, this feels like the best remaster of the OG RE4 we could have possibly asked for. There's really no reason NOT to play the game like this from now on. It's one of greatest port remasters a game has gotten, let alone a fan project and it's free!. I do however encourage donating what you would've spent on an official remaster to their PayPal, which is available on their website.
While Capcom has reimagined a modern version of the game, a few dedicated fans have taken it upon themselves to enhance and preserve the original RE4's legacy in a way befitting of such a beloved game.
Thanks to both the 2023 remake and the HD Project, we now have (in a way) the best of both worlds. Diehard fans of the original get a beautifully crafted update in the form of the HD Project while old and new fans alike get a beatifically crafted modern experience which fleshes out and builds upon what made the original so great!
─────────────────────────────────────────────────────
Huge shoutout to Jacob Geller, whose RE4 Art Restoration video first introduced me to this project as I watched with deep fascination and eagerly awaited the final release. It gives some incredible insight into the history of the mod, and the gargantuan amount of work done by Albert and Cris, check it out!
Special mention to Nerrel, whose own Majora's Mask HD pack which I have looked upon with similar admiration, for his excellent video on the RE4 HD Project (and other RE mods!). Similar to Jacob's video, it gives a great overview of the mod and its legacy, while being examined through the lens of a fellow texture artist. Link to that video here.
It's videos like these that make me thankful for the amount of documentation there is for this breathtaking mod and I implore you to watch both to get a full understanding of the history and work that went into it.
-Instructions and Download
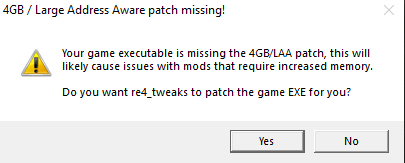
- The HD Project uses the "4GB patch tool", which alleviates random crashes you may experienced from the pack and other mods. It is set up to automatically patch the game for you. As soon as you launch the game with the mod installed, you’ll get a message that will warn you about the EXE file not being patched with the 4GB tool. Click on “YES” to patch the EXE and restart the game. It may be a bit laggy at first, but should launch without issue.
- ─────────────────────────────────────────────────────
- This package does NOT include the entire game, only the necessary files to enhance the game.
- The HD project is compatible with ALL languages, including the Japanese version and is tested for versions 1.0.6 & 1.1.0.
- The total download size for the mod is: 34.2 GB (compressed). The mod will then take up approximately 38 GB on your HDD/SSD when uncompressed.
- The HD project won’t work on most pirated copies of the game, so if you are trying to install this mod on an illegal copy, just take the €5 plunge and buy the game for god's sake.
- If you have any other mods already installed, it is recommended that you reinstall a clean copy of the game, as the HD project files may clash with some mods. That doesn't mean some aren't compatible, but the creators of the HD pack can't guarantee anything. Please ask the modders who created your favourite mods to adapt them to the HD project if needed.
- This HD pack does not affect achievements or progress. Your game saves will also remain 100% usable after installing the pack.
 Since February of 2022, Albert and Cris have done a lot in this update. Over the 1.0 release, they have continuously been listening to people's feedback, releasing patches and fixing issues. Here are just some of the improvements made from that feedback (not including the 1.0.1 patch) for this new 1.1 release...
► Hundreds of graphical edits based on people’s feedback. (Textures, stage and character models, items, weapons, UI etc.).
► The “Press Any Button”, “How to Play”, “Options” and “Xbox controls” UI textures and text have been remastered for all languages.
► Titles screen UI font has been replaced to match the original GameCube font.
► Some corrections have been made to Spanish subtitles.
► English subtitles during all cutscenes have finally been included, being noticeably missing in this PC port since release.
► Inclusion of latest version of re4_tweaks by the incredibly talented "nipkow" and "emoose". Check out all of the latest and greatest re4_tweaks features HERE[github.com].
Go to the official website[www.re4hd.com]and download the required files. Albert and Cris have hosted the 1.1 release on multiple file sharing sites such as mediafire and MEGA, but it can also be pulled down via Torrenting.
This update has been handled so that people that already installed the 1.0 version of the HD Project (and any patches released BEFORE July, 2022) can also update their install to the latest 1.1 version (released on July 26th, 2022).
Note: You’ll need to use a BitTorrent client in order to download the pack via torrenting. Once the download is finished, use programs such as 7-Zip[www.7-zip.org] or WinRAR[www.win-rar.com] to extract the archive.
-Installation
Albert and Cris have included an auto-installer (also courtesy of nipkow) with the download of 1.1 release to further streamline installation.
- First, have a clean install of RE4 and all the required files for the HD project 1.1 downloaded from the official website. If you have the 1.0 version (or patch released before July 26th, 2022), scroll down for instructions on how to update your version to the 1.1 release instead.
- Unpack the “HDProject1.1-Installer.rar”
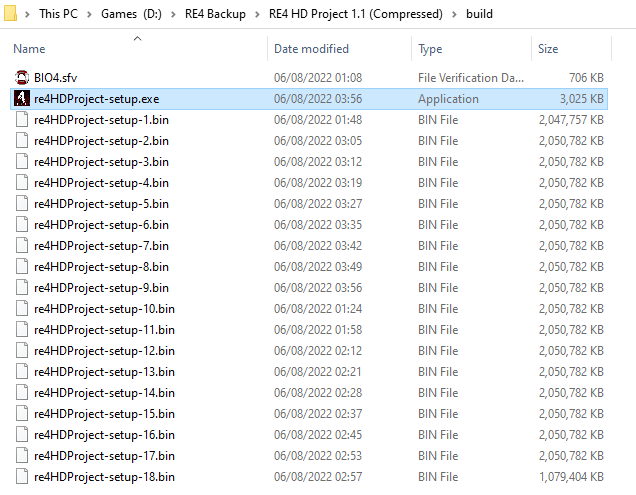
PASSWORD: re4hdproject. (Not needed for the Torrent download method). As you can see, I have acquired the files via the torrenting method, and am left with a folder complete with all the files labelled “build”. - Run the “re4HDProject-setup.exe”. Read and follow the installer steps.
If asked, find your game installation path. The usual path is....
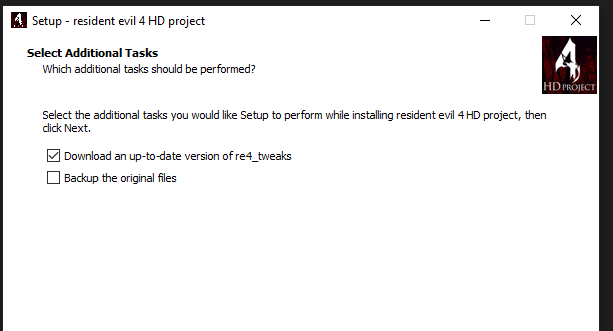
C:\Program Files (x86)\Steam\steamapps\common\Resident Evil 4. You’ll then receive an optional prompt to download the latest release of the re4_tweaks mod, and another to make a backup of the vanilla game. The first box is already ticked, so you can leave it. Tick the second one if you wish to have a backup. - Finally click “Install” and wait until the installation is finished.
- Run the game. You’ll get a message that will warn you about the EXE file not being patched with the 4GBpatch. Click on “YES” to patch the EXE and restart the game.
- BRIGHTNESS (in game Options when the game is running) should be set to the MAX in order to get the best visuals.
- Download the update file for 1.0 users here[www.re4hd.com]. The update file is 10.6 GB unfortunately. Due to technical reasons, a single texture edit entails that an entire room texture pack has to be replaced…
Note that this update file MUST be downloaded via Mediafire or MEGA, no torrent file unfortunately... You should be able to download PARTS 1-6 just fine on one site, if a bit slowly. Set them all to download simultaneously and you should have all parts downloaded within 40-60 minutes. If you receive a message saying you reached a download cap, just hop back and forth between the two sites until all the parts are downloaded.
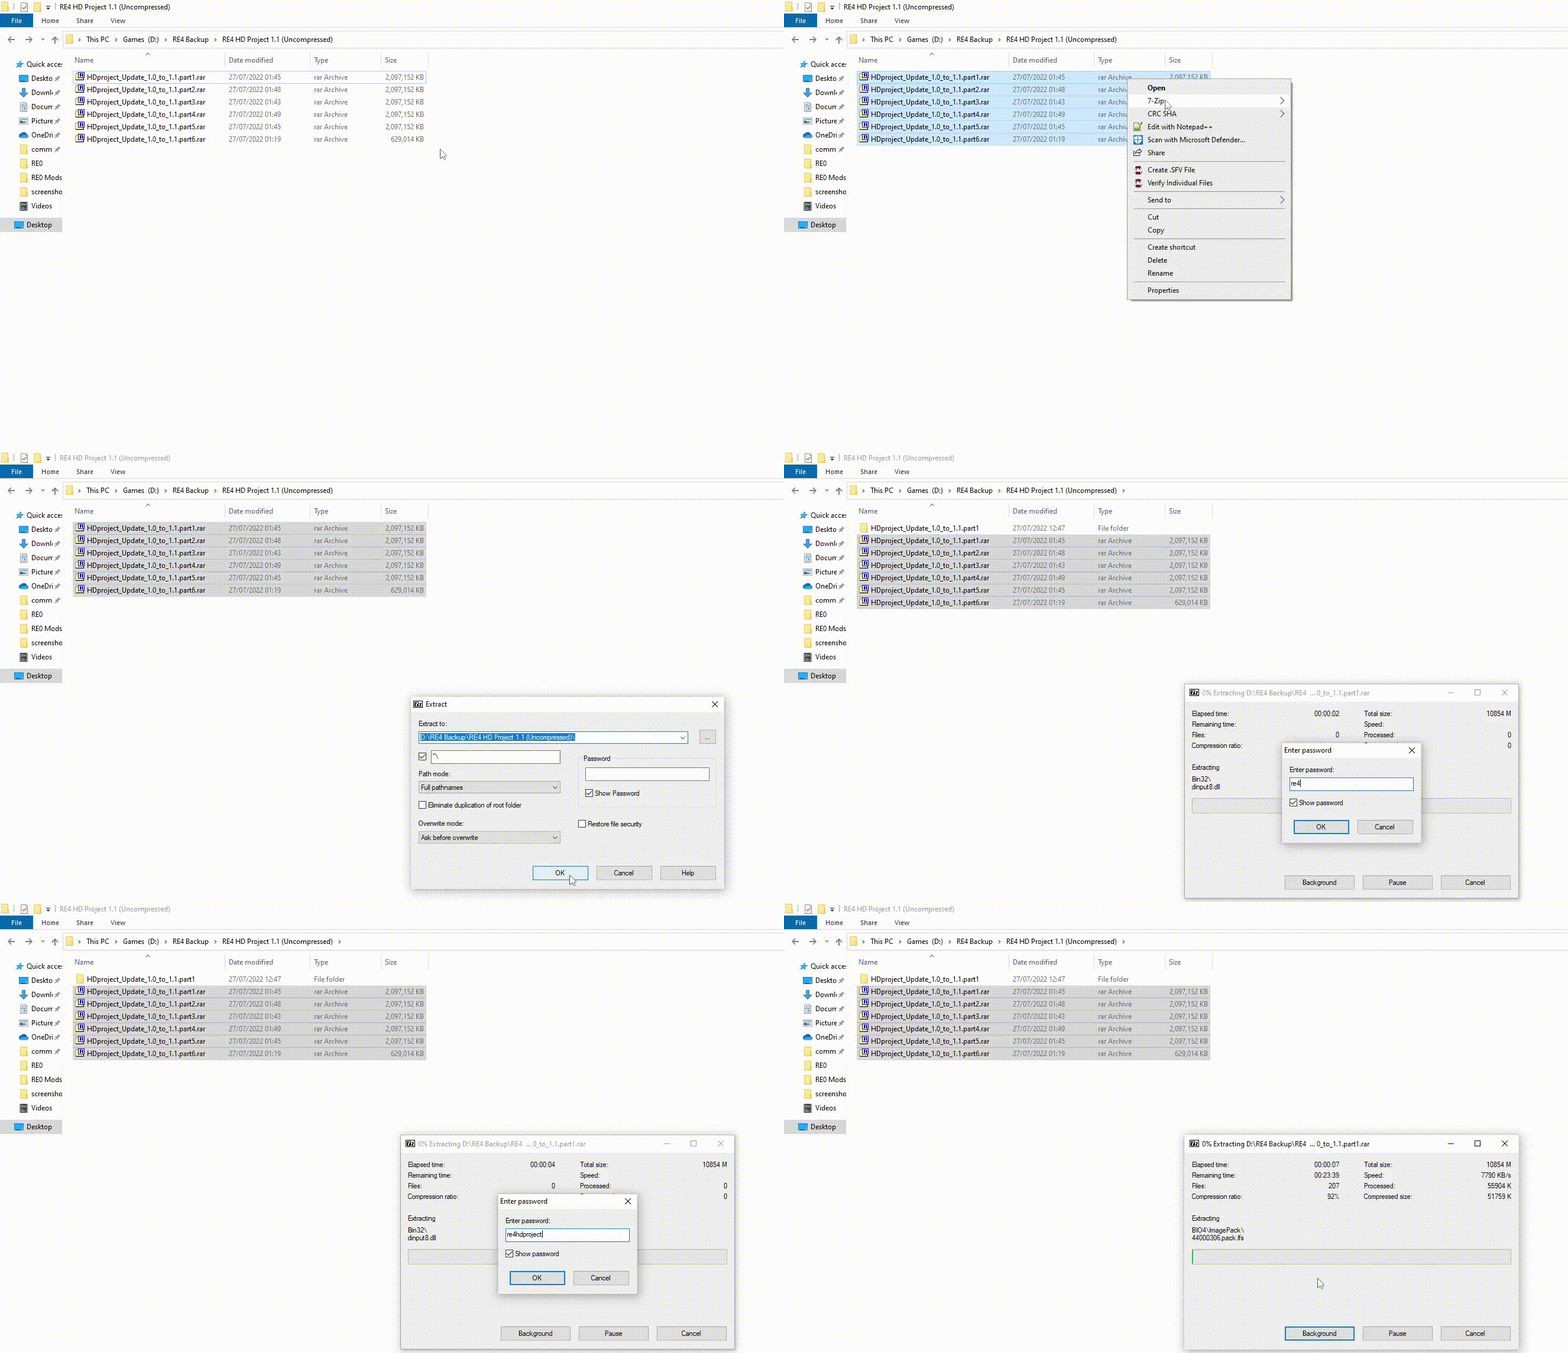
- Extract all files (parts 1-6). I'm using 7-Zip but you can also use Winrar for this.
PASSWORD: re4hdproject (Click on GIF for higher resolution)
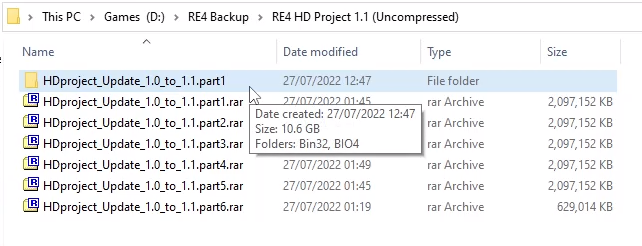
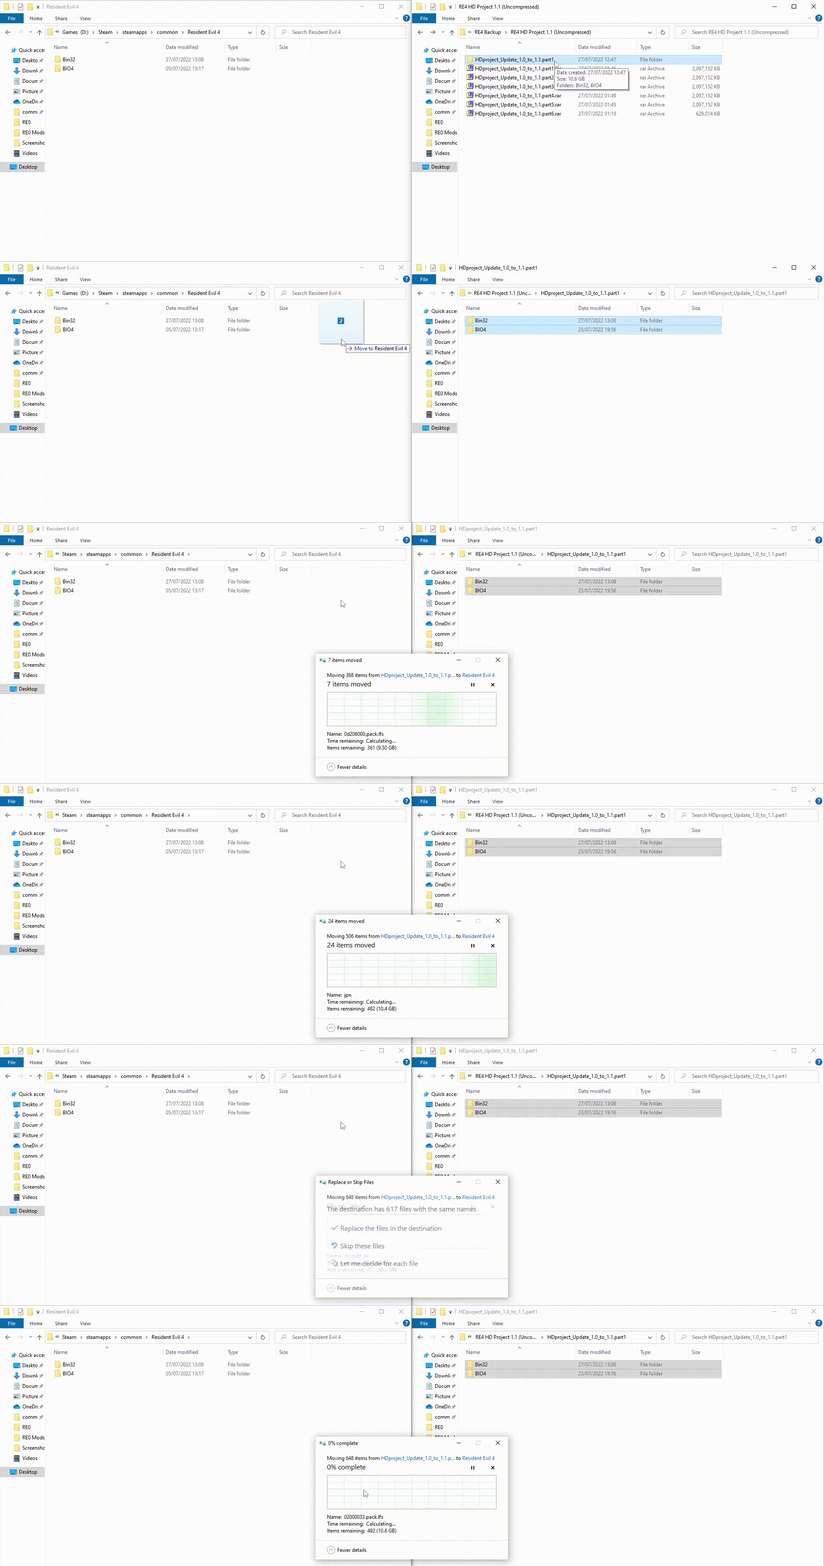
You should then have 1 uncompressed folder containing all the parts (10.6 GB) - Now copy or cut the BIN32 and BIO4 folder from that folder and paste them inside your game's installation folder. The usual path is...:
C:\Program Files (x86)\Steam\steamapps\common\Resident Evil 4
Overwrite any existing files when asked. That's it!
Check to ensure things are working as expected. If you are encountering issues with the mod, go to the Technical Issues[www.re4hd.com] page on their website to see if it has been addressed. If there isn't any info on your issue, I'm sure they'll appreciate any bugs reported so that they may fix them during this new release.
Troubleshooting
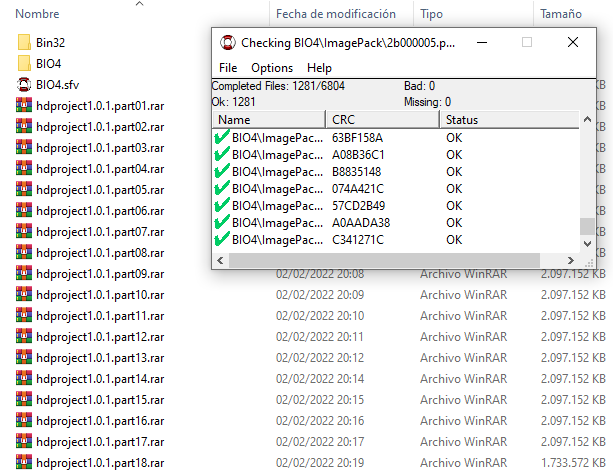
If you happen to experience some crash at some point of the game, please, take the time to check the files’ integrity using the BIO4.sfv file (included in the download folder of the 1.1 release) and QuickSFV tool.
- If for some reason you don’t have the "BIO4.sfv" file, you can download it here[www.re4hd.com]
- Install the QuickSFV[www.quicksfv.org] tool (CURRENT VERSION).
- Put the BIO4.svf file into the RE4 install folder (next to the BIN32 and BIO4 folders)
- Run QuickSFV and Open BIO4.SFV.
BIO4.SFV MUST be in the same folder the BIO4 folder is.In the screenshot below, I’m showing the program running with 18 parts, note that you can also run this diagnostic with the files installed from the auto-installer.
- If you don’t get the “All files OK” message, that means some file(s) are missing/corrupt or some other mod you may have installed has overwritten files it's searching for. In that case the HD Project files may need to be downloaded again on a fresh install.
- You are running a non-legal/non-official/cracked copy of the game.
- The version of the game is not 1.0.6 or 1.1.0.
- You didn’t follow the installation steps exactly as described in the DOWNLOAD page.
- If the file size of the BIO4 folder is not 37.9 GB (6802 for 1.1 Version), something went wrong.
- Try Installing the Visual C++ 2022 Redistributable https://github.com/abbodi1406/vcredist/releases
- Install directx 9.0 offline version for better game stability.
- Update the video and sound drivers of your pc or laptop.
- SLOWDOWNS TIP: If the game suffer from fps drops, especially during the cutscenes, deactivate the “EnableGCBlur” option in the re4_tweaks .DLL menu (by pressing "F1" in-game).
- If your PC isn't beefy enough to hold a solid 60 or is experiencing mad slowdown, you may want to read this thread on performance optimization for RE4.
I would recommend activating the "UseVulkanRenderer" option in the F1 menu with the latest re4_tweaks mod. This should greatly improve performance for modern systems whose multi-threaded CPU cores are not utilised by this port.
You can also try some of the fixes listed in this guide by 𝙼𝚎𝚙𝚑𝚒𝚜𝚝𝚘 to see if that improves your performance:
https://steamcommunity.com/sharedfiles/filedetails/?id=892346667 You may still experience slowdown in some areas, but it'll hopefully be noticeably better than before.
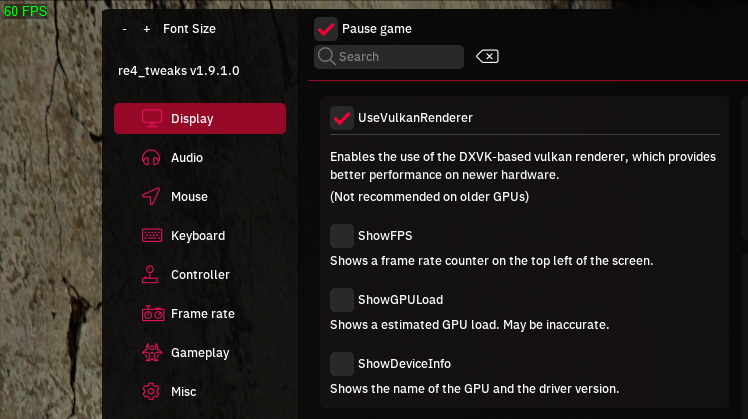
RE4_Tweaks Mod
 Thanks to some extremely talented modders and the combined efforts of the community, the RE4HD project has been taken to another level by fixing some infamous issues previous HD ports have had. Using nipkow’s “re4_tweaks” mod, (which is still in development) he's been able to fix a lot of things, while simultaneously adding entirely new features and QOL improvements never before seen. All of which can be enabled or disabled by simply pressing "F1" in-game or by editing a .ini file that comes along with a .dll file. You can find the complete list of current improvements under each release at the mod’s GitHub page[github.com].
If you dn'y want to bother with the HD project, this mod can be installed standalone and is absolutely essential to anyone looking to improve the experience of the vanilla game.
- Download the latest release of the RE4_tweaks mod here[github.com]at Nipkow's Github page.
- Extract the contents, dinput8.dll, dinput8.ini and the “re4_tweaks” folder to "Steam\steamapps\common\Resident Evil 4\Bin32".
*Note for updating the tweaks mod*
If you download a new version, DON’T DELETE the old “re4_tweaks” folder inside the BIN32 one, just overwrite it. This is because there’s a file called HDproject.ini inside the “re4_tweaks\setting_overrides” folder that’s needed to run the HD project properly.

And voilà, you've successfully installed the re4_tweaks mod. I've included a link to a Steam thread regarding the project here if you need any assistance with it. Huge thanks to nipkowix and emoose for their incredible work in implementing these fixes.
120Hz/144Hz+ Monitor Fix
 You may find that the game no longer launches, no picture is being displayed, or it simply crashes as soon as it's launched. This is due to using a high refresh rate monitor and the conflict it causes with the game itself. Nipkow's re4_tweaks mod[github.com] has us covered once again, allowing the game to use non-60Hz refresh rates in fullscreen, fixing the black screen issue people have when starting it...
The Steam guide that already exists for this tells you to simply go to Windows settings-->Display-->Advanced display settings-->and set your refresh rate manually to 60hz. Restart your computer and hope the game works. While this may work for some people, it won't work for the majority so you're going to have to use the re4_tweaks mod [github.com] or dxvk tool[github.com] to fix it.
- With the re4_tweaks mod 1.8 (or newer) installed, enable the "UseVulkanRenderer" option under "display" in the F1 menu while in-game. This should make the game get on a lot nicer with newer hardware and hopefully improve performance.
If nothing works, you may need to update your video drivers, especially if you’re on AMD.
Nvidia/GeForce driver: https://www.nvidia.com/en-gb/geforce/drivers/
AMD/Radeon driver: https://www.amd.com/en/support
Smaller and Simplified HUD
During this time Albert of the HD Project has been working on editing UWF files, those used mostly to contain the attributes of the game's UI elements. After some painstaking fiddling, he has brought us this! A mod that gives us a smaller classic HUD.
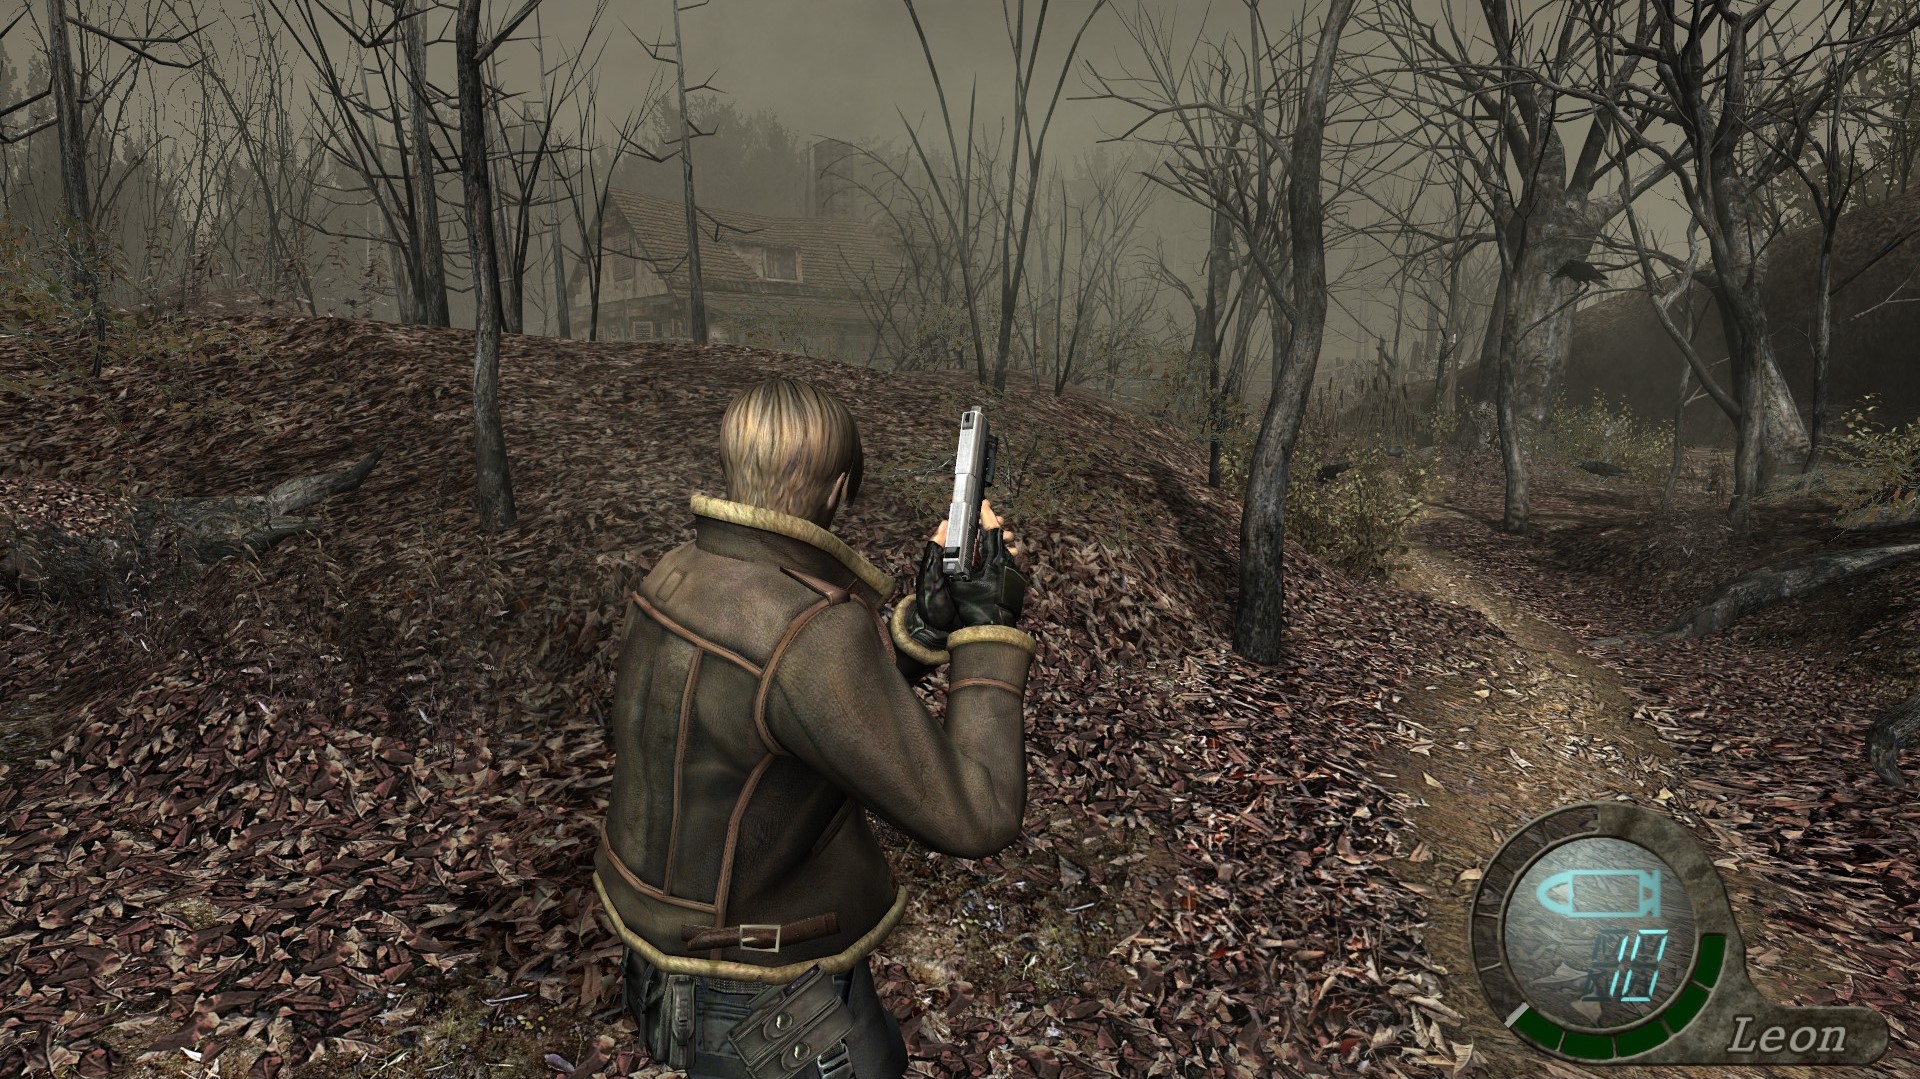
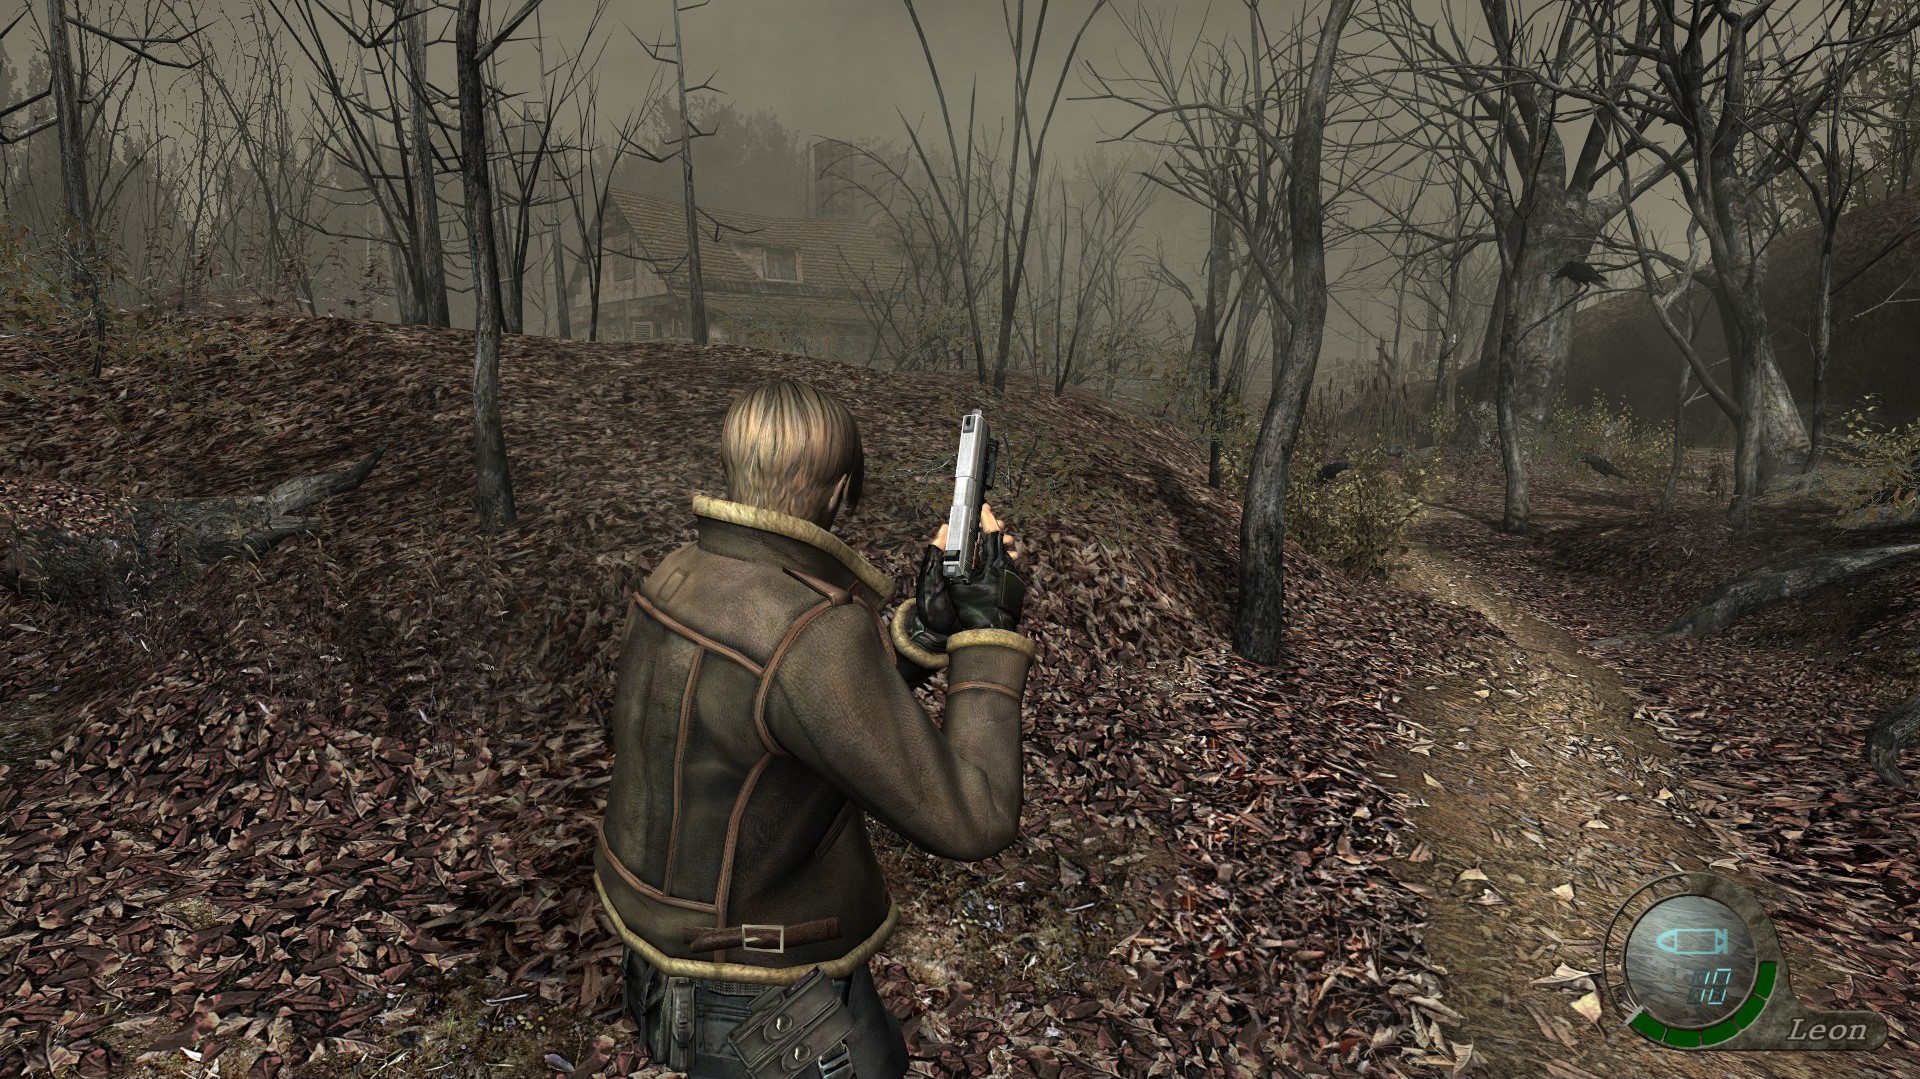
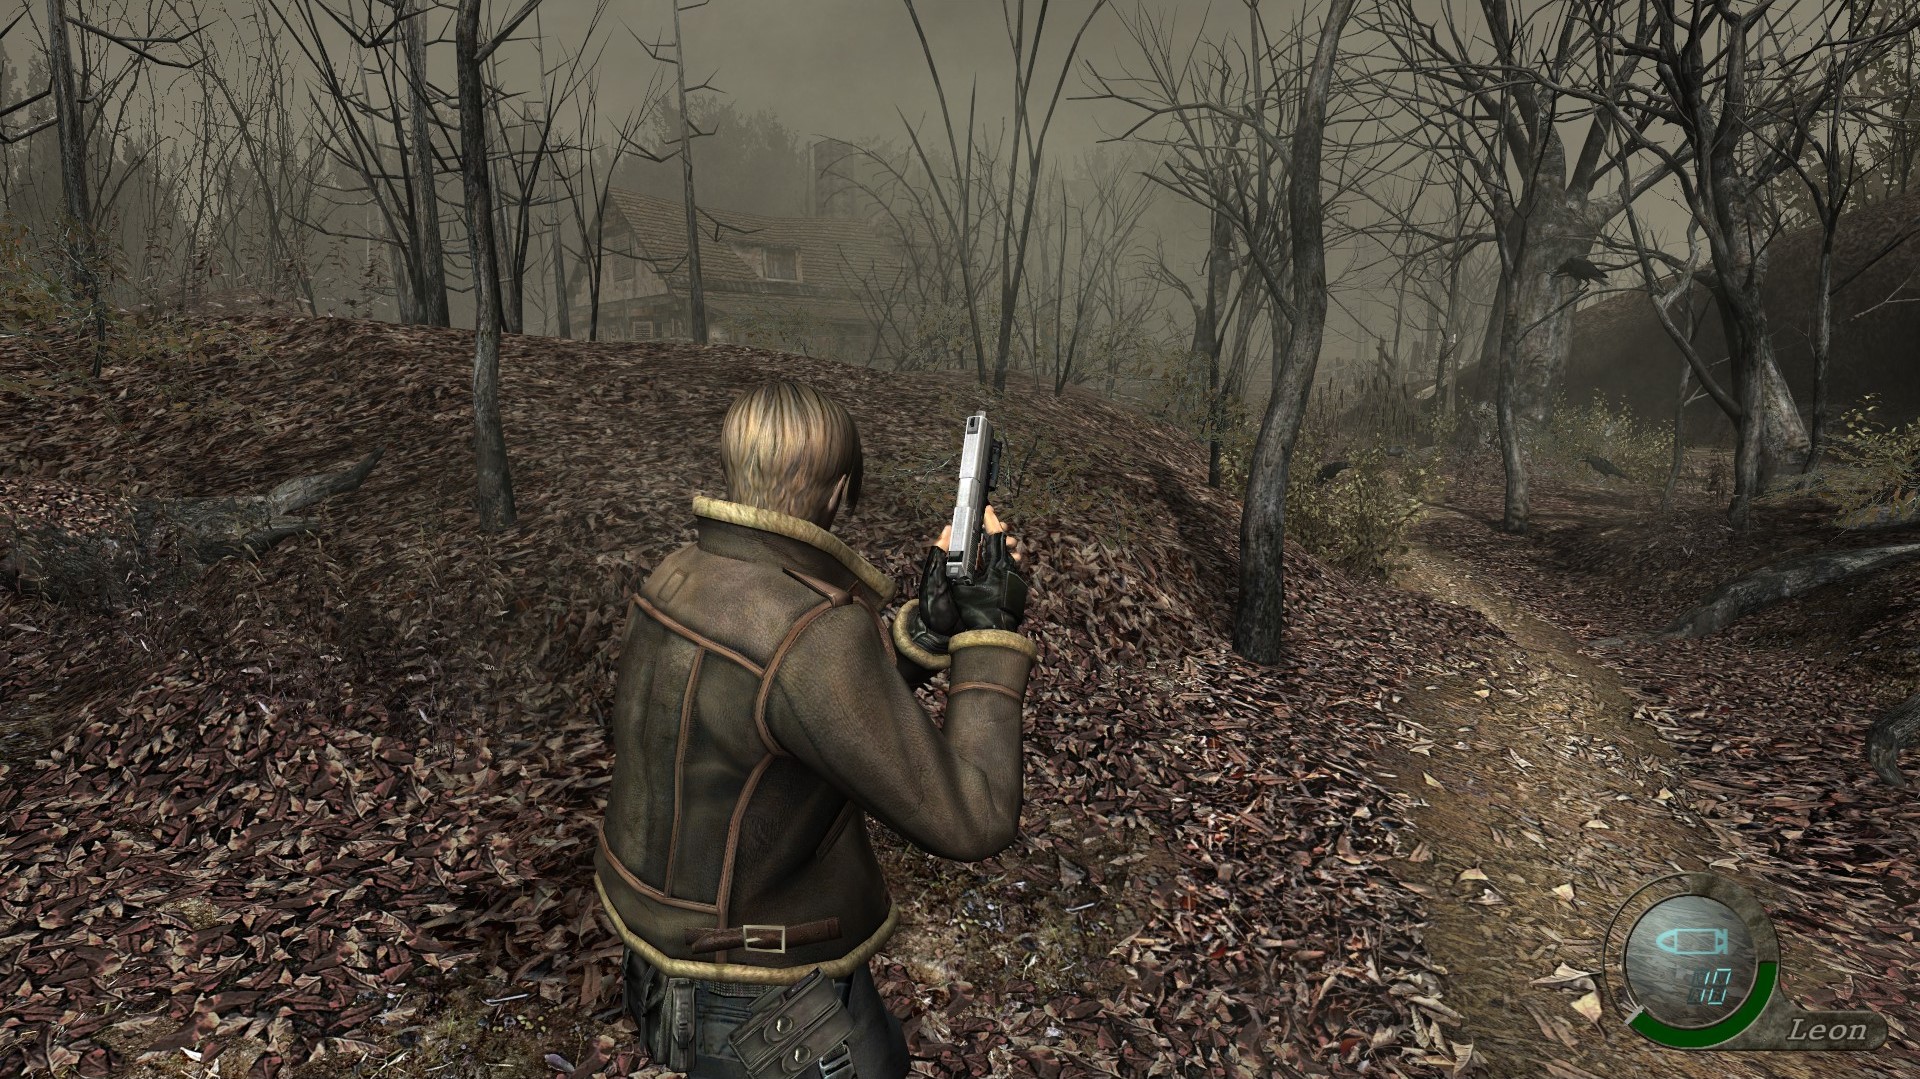
After playing with this and going back to the original I can agree with Albert when people say this game’s HUD is massive!
Thanks to the recent 1.9.1 version of the re4_tweaks mod, this previously manual installation can now be easily done in the option menu by pressing F1 in-game. Simply tick "SmallerHUD" and you're done. You can even change its position around the screen.
PS4 / XONE / Switch Button Prompts
I've made sure to choose buttons mods below that are compatible with the latest releases of the HD Project. If you're having any issues playing with them on any future HD Project updates, let me know.
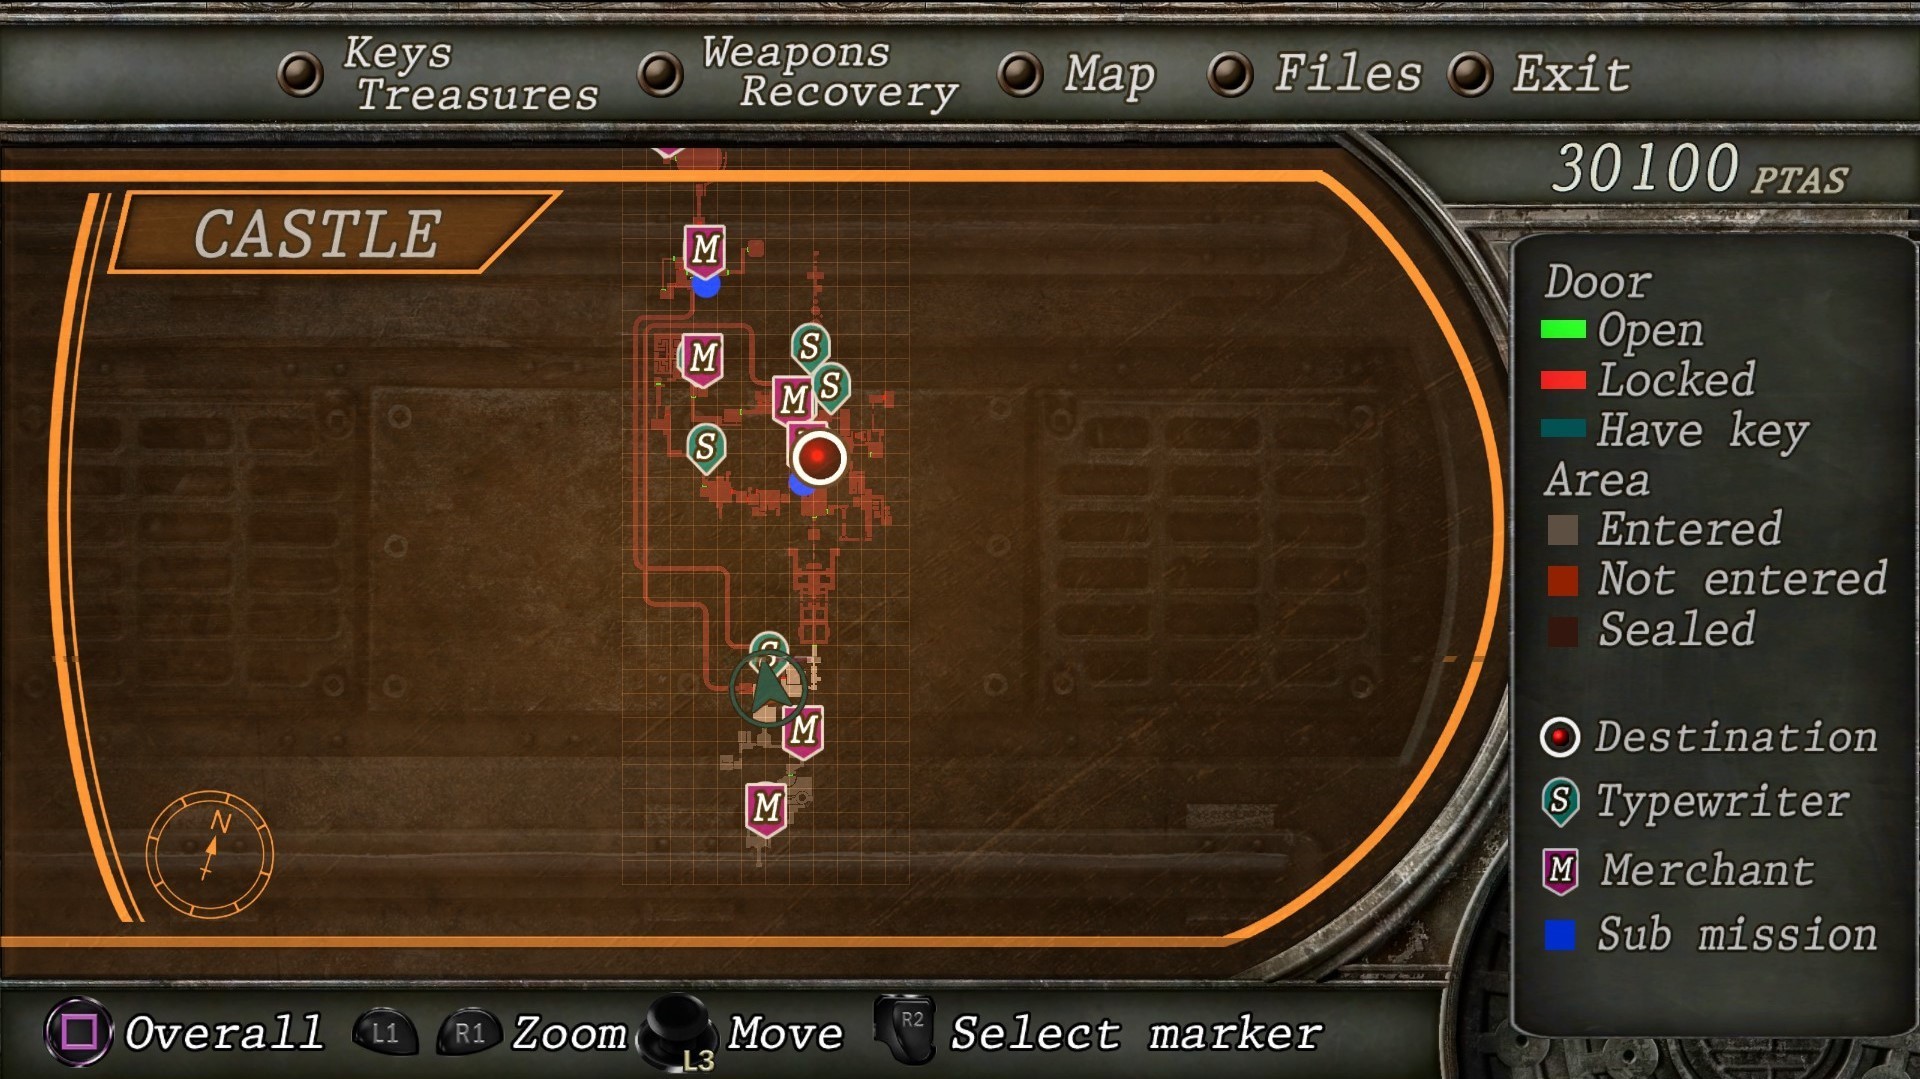
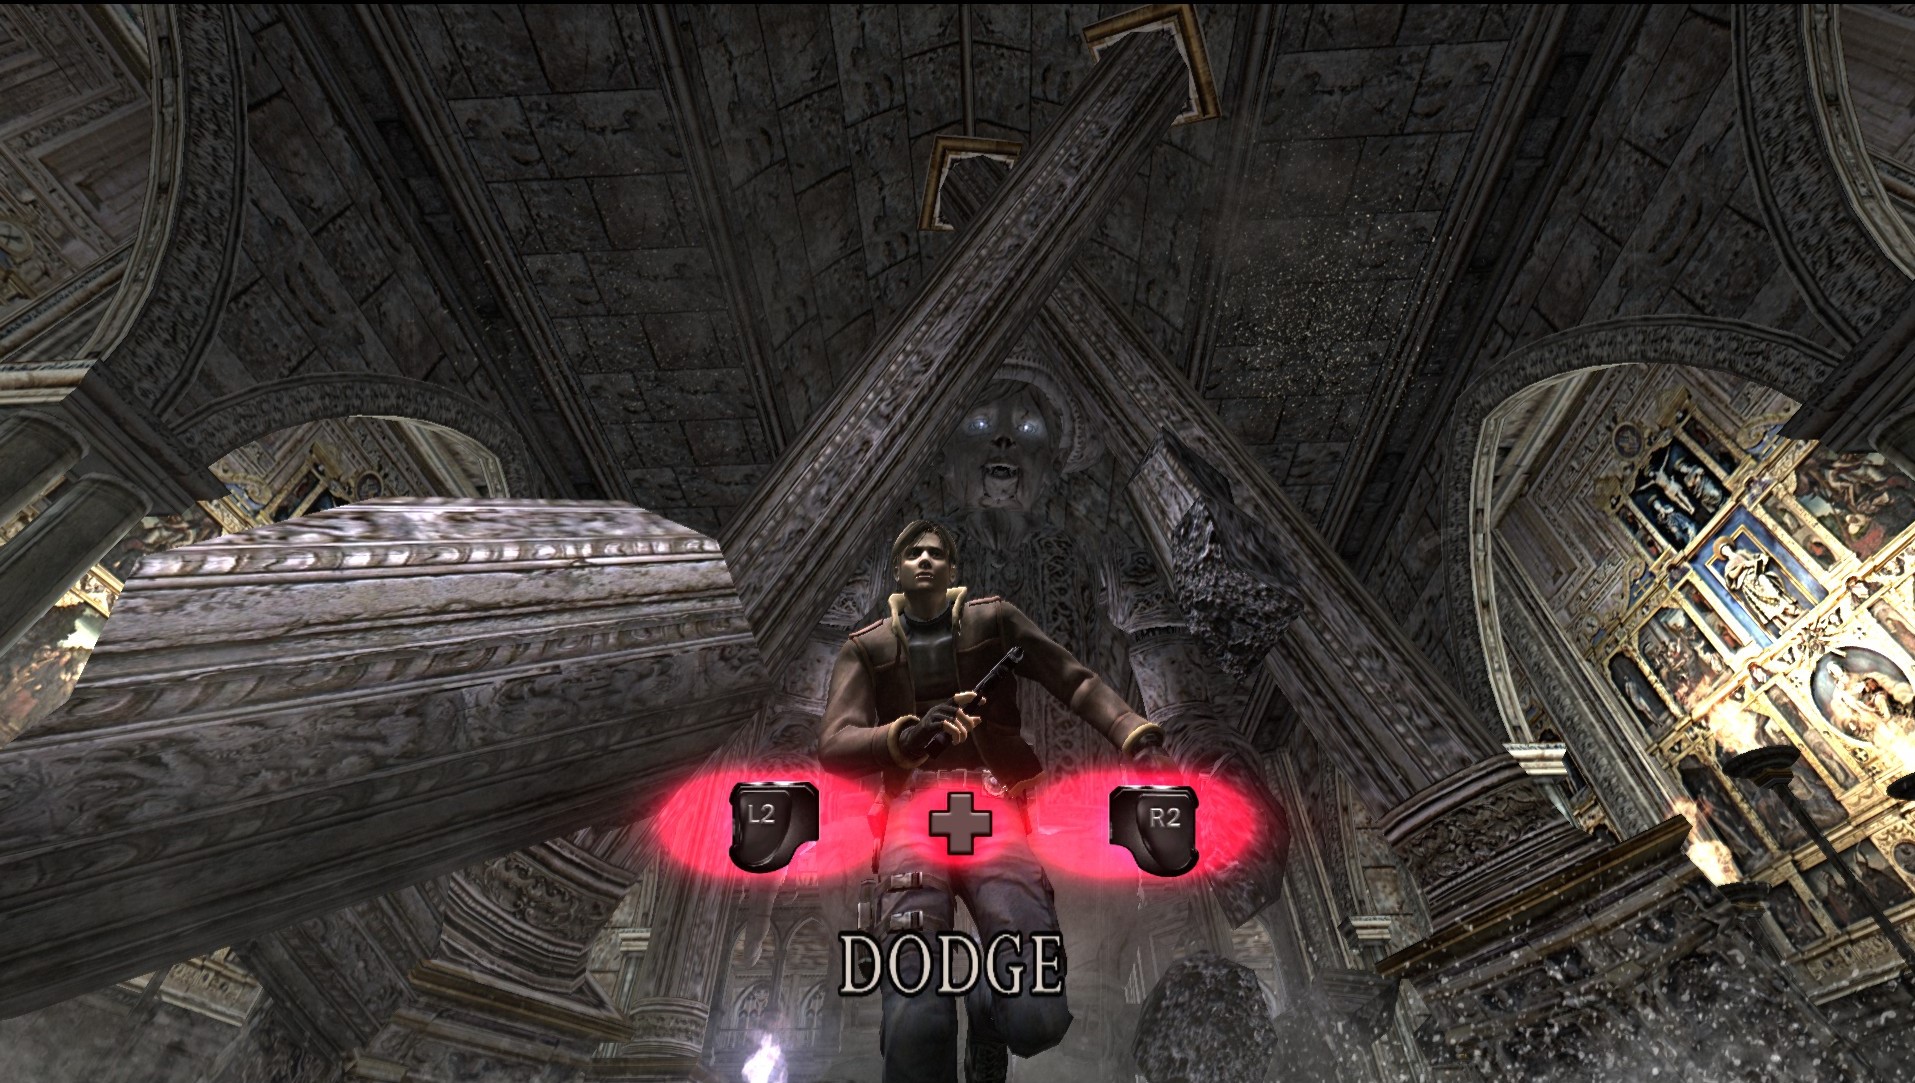
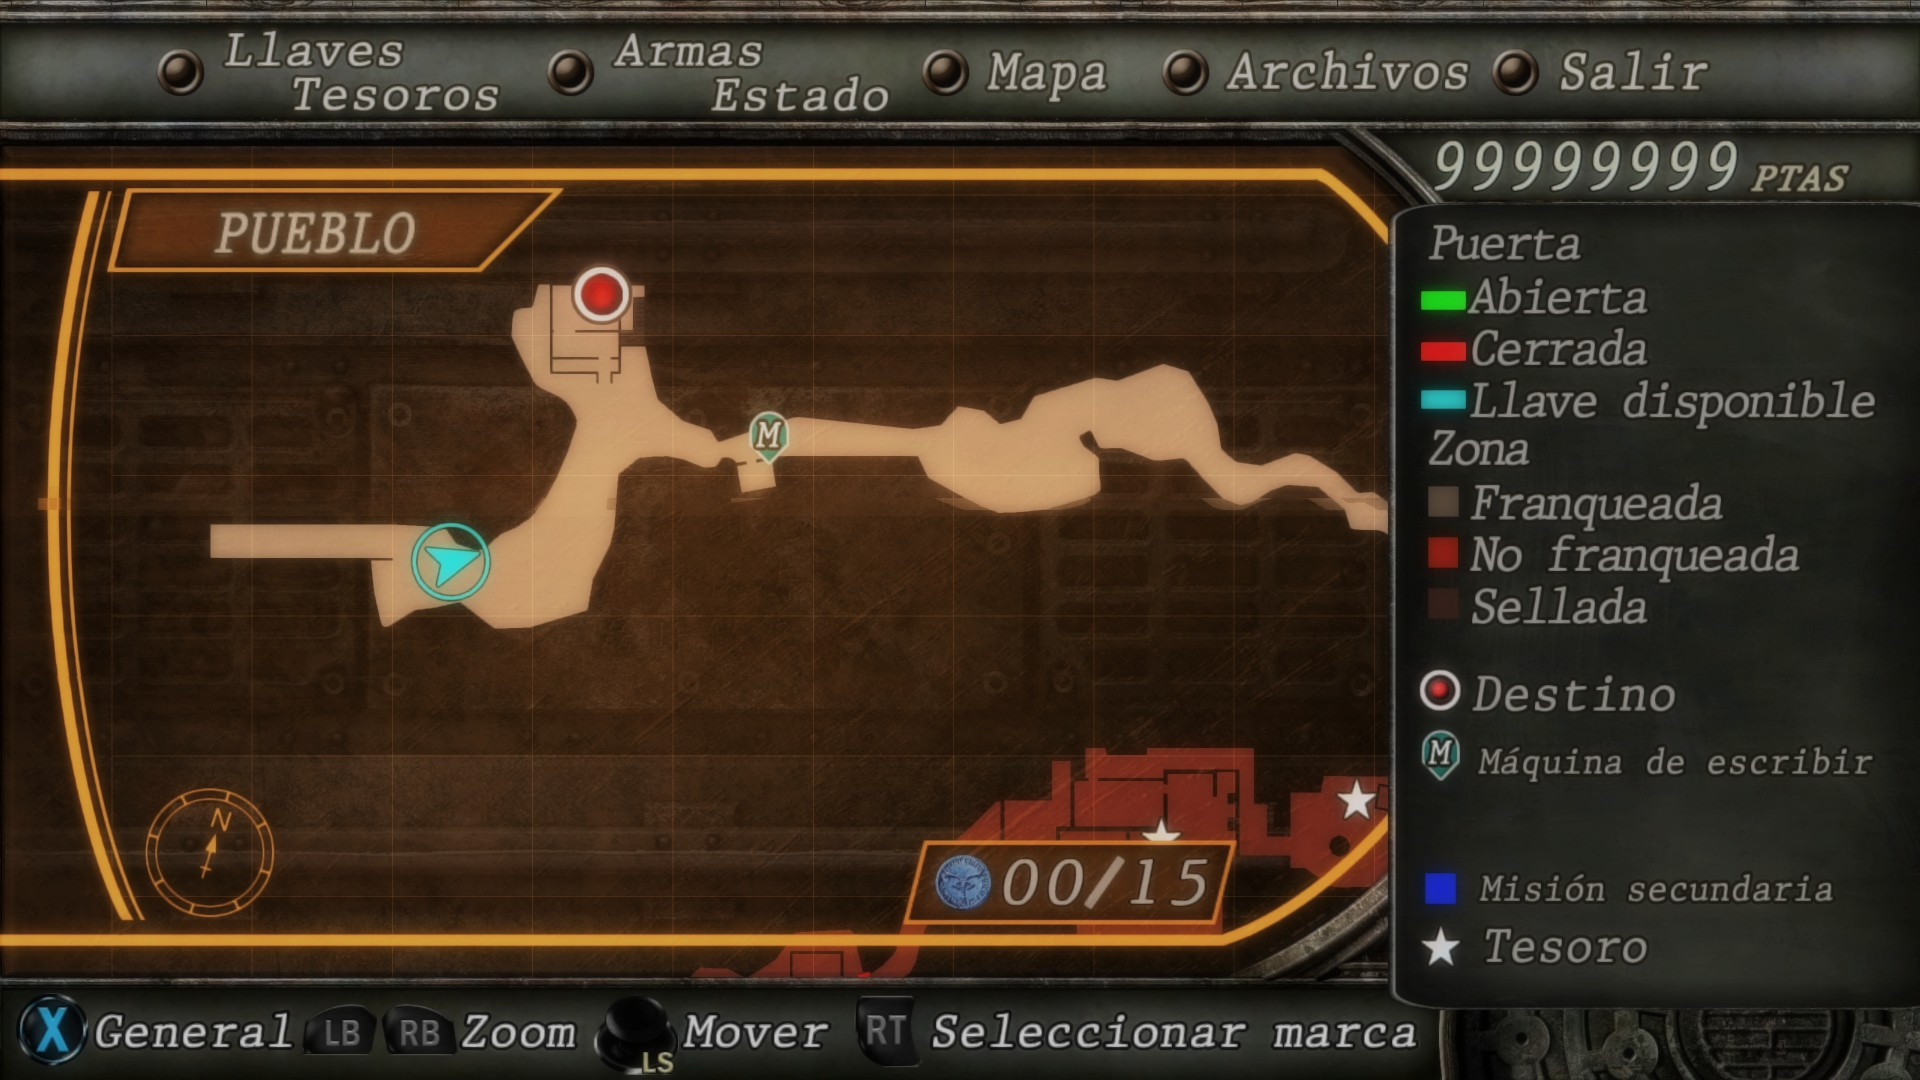
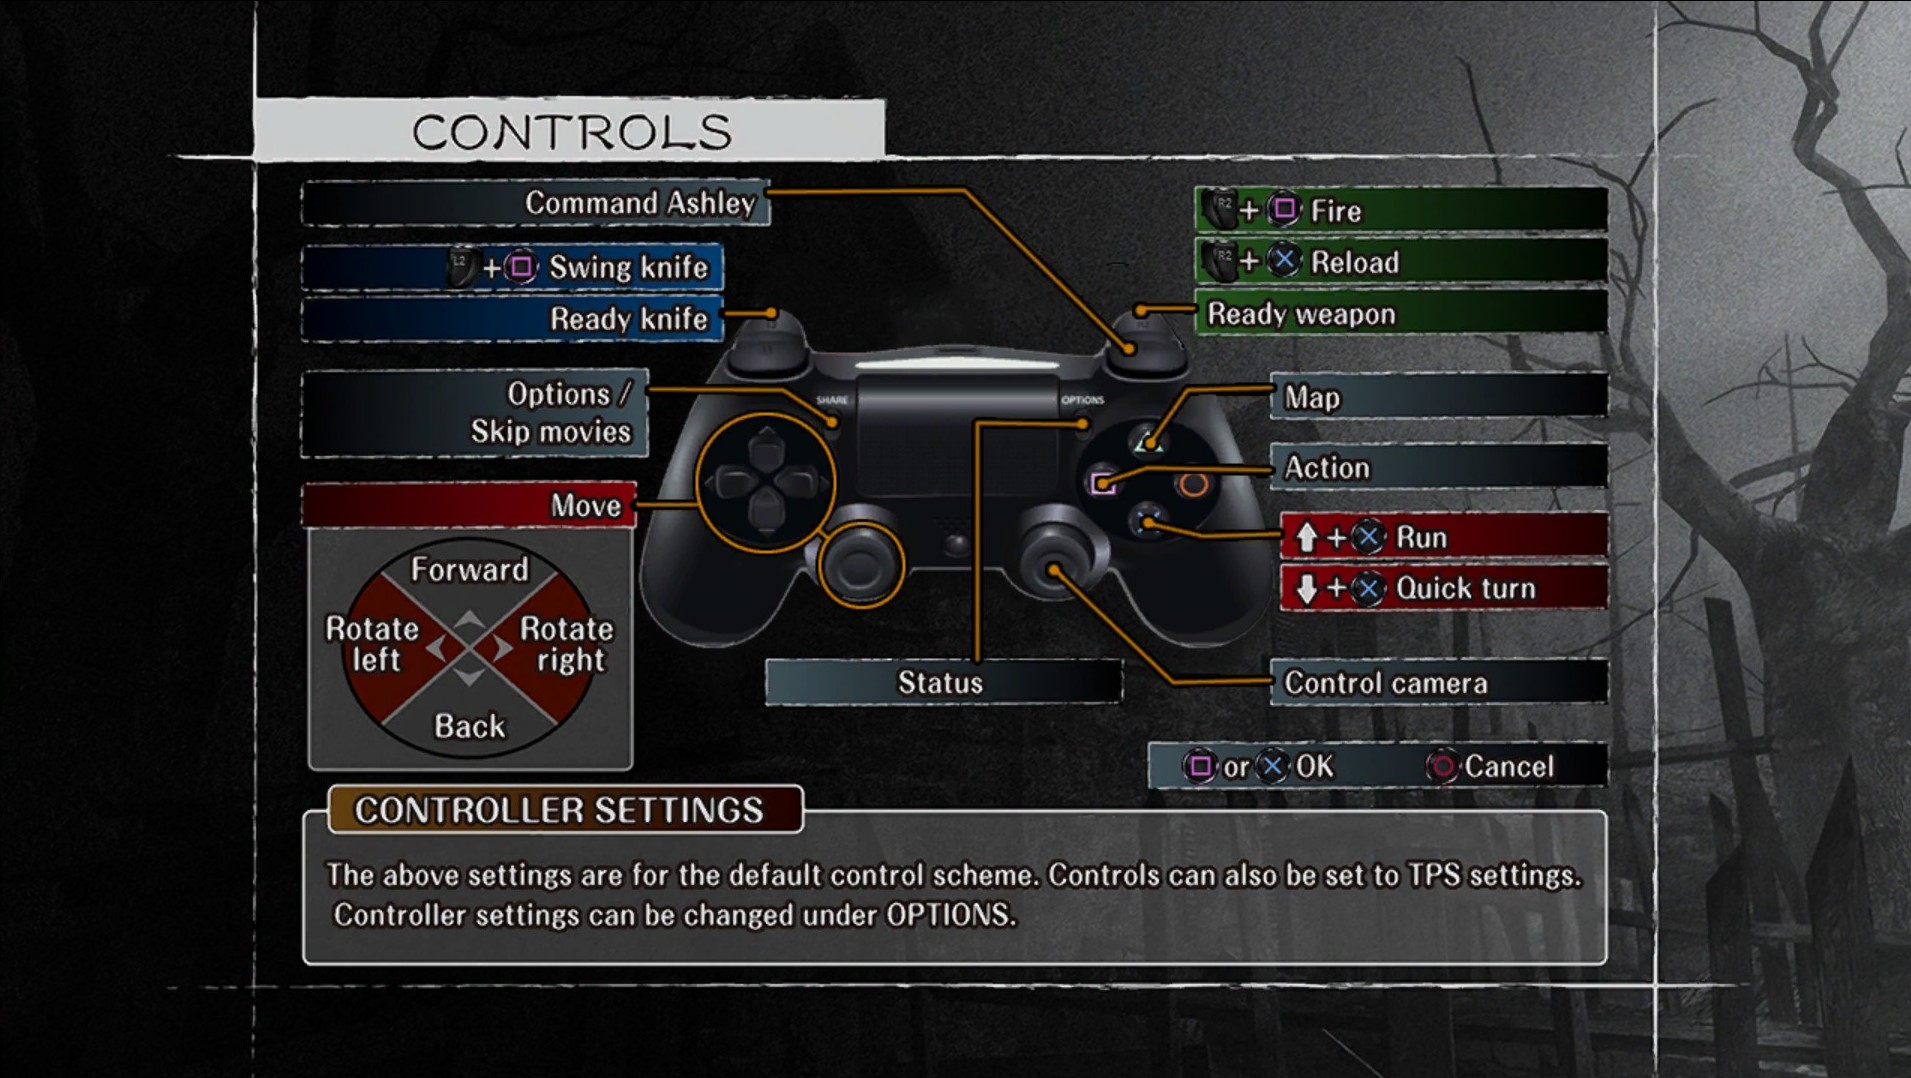 This essential mod by NEGAARMAX adds the PlayStation 4 prompts we've been asking Capcom to bring for YEARS to the game. What's also great is that he managed to include the tutorial and configuration menus too, which is a great touch. This mod is compatible with all languages. This mod has also been updated by NEGAARMAX to be compatible with RE4HDP 1.1 and re4_tweaks 1.7.7.3 or newer.
- Download the PS4 Buttons (1.6GB)
here[www.nexusmods.com]
- This mod is ONLY compatible with the HD Project. Before continuing, make sure you have the 1.1 version of the HD Project installed and working properly prior to installing this mod..
 Manual Installation
- Paste the included BIO4 folder from the mod archives into the Steam\steamapps\common\Resident Evil 4 folder. Overwrite any files when prompted.
- Play the game and enjoy!
Automatic Installation
- Download FluffyQuack's Mod Manager 5000 here[residentevilmodding.boards.net]
(if you don't have it already) - Simply drag and drop the .rar file into the mod manager while it's running and install it from the list.
Huge thanks to NEGAARMAX for another excellent mod! As you can see below, this isn't his only controller mod!
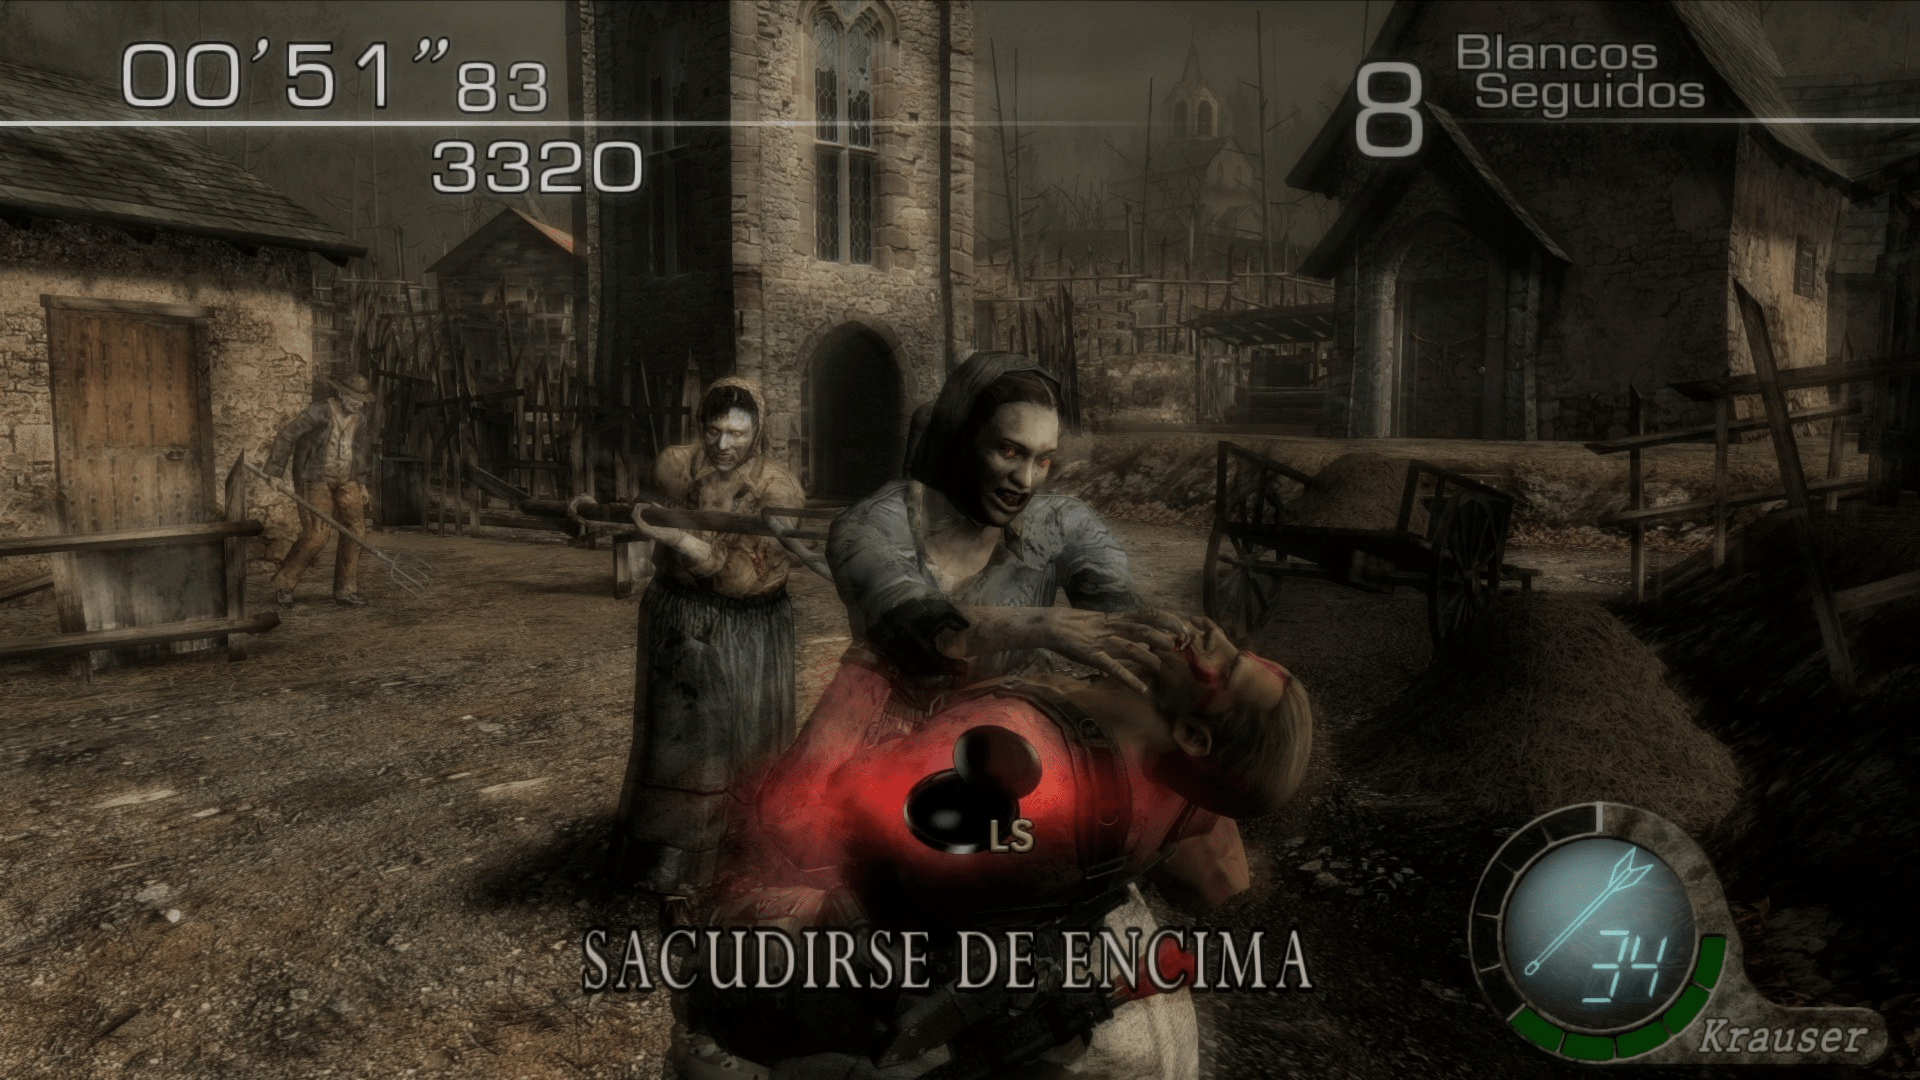
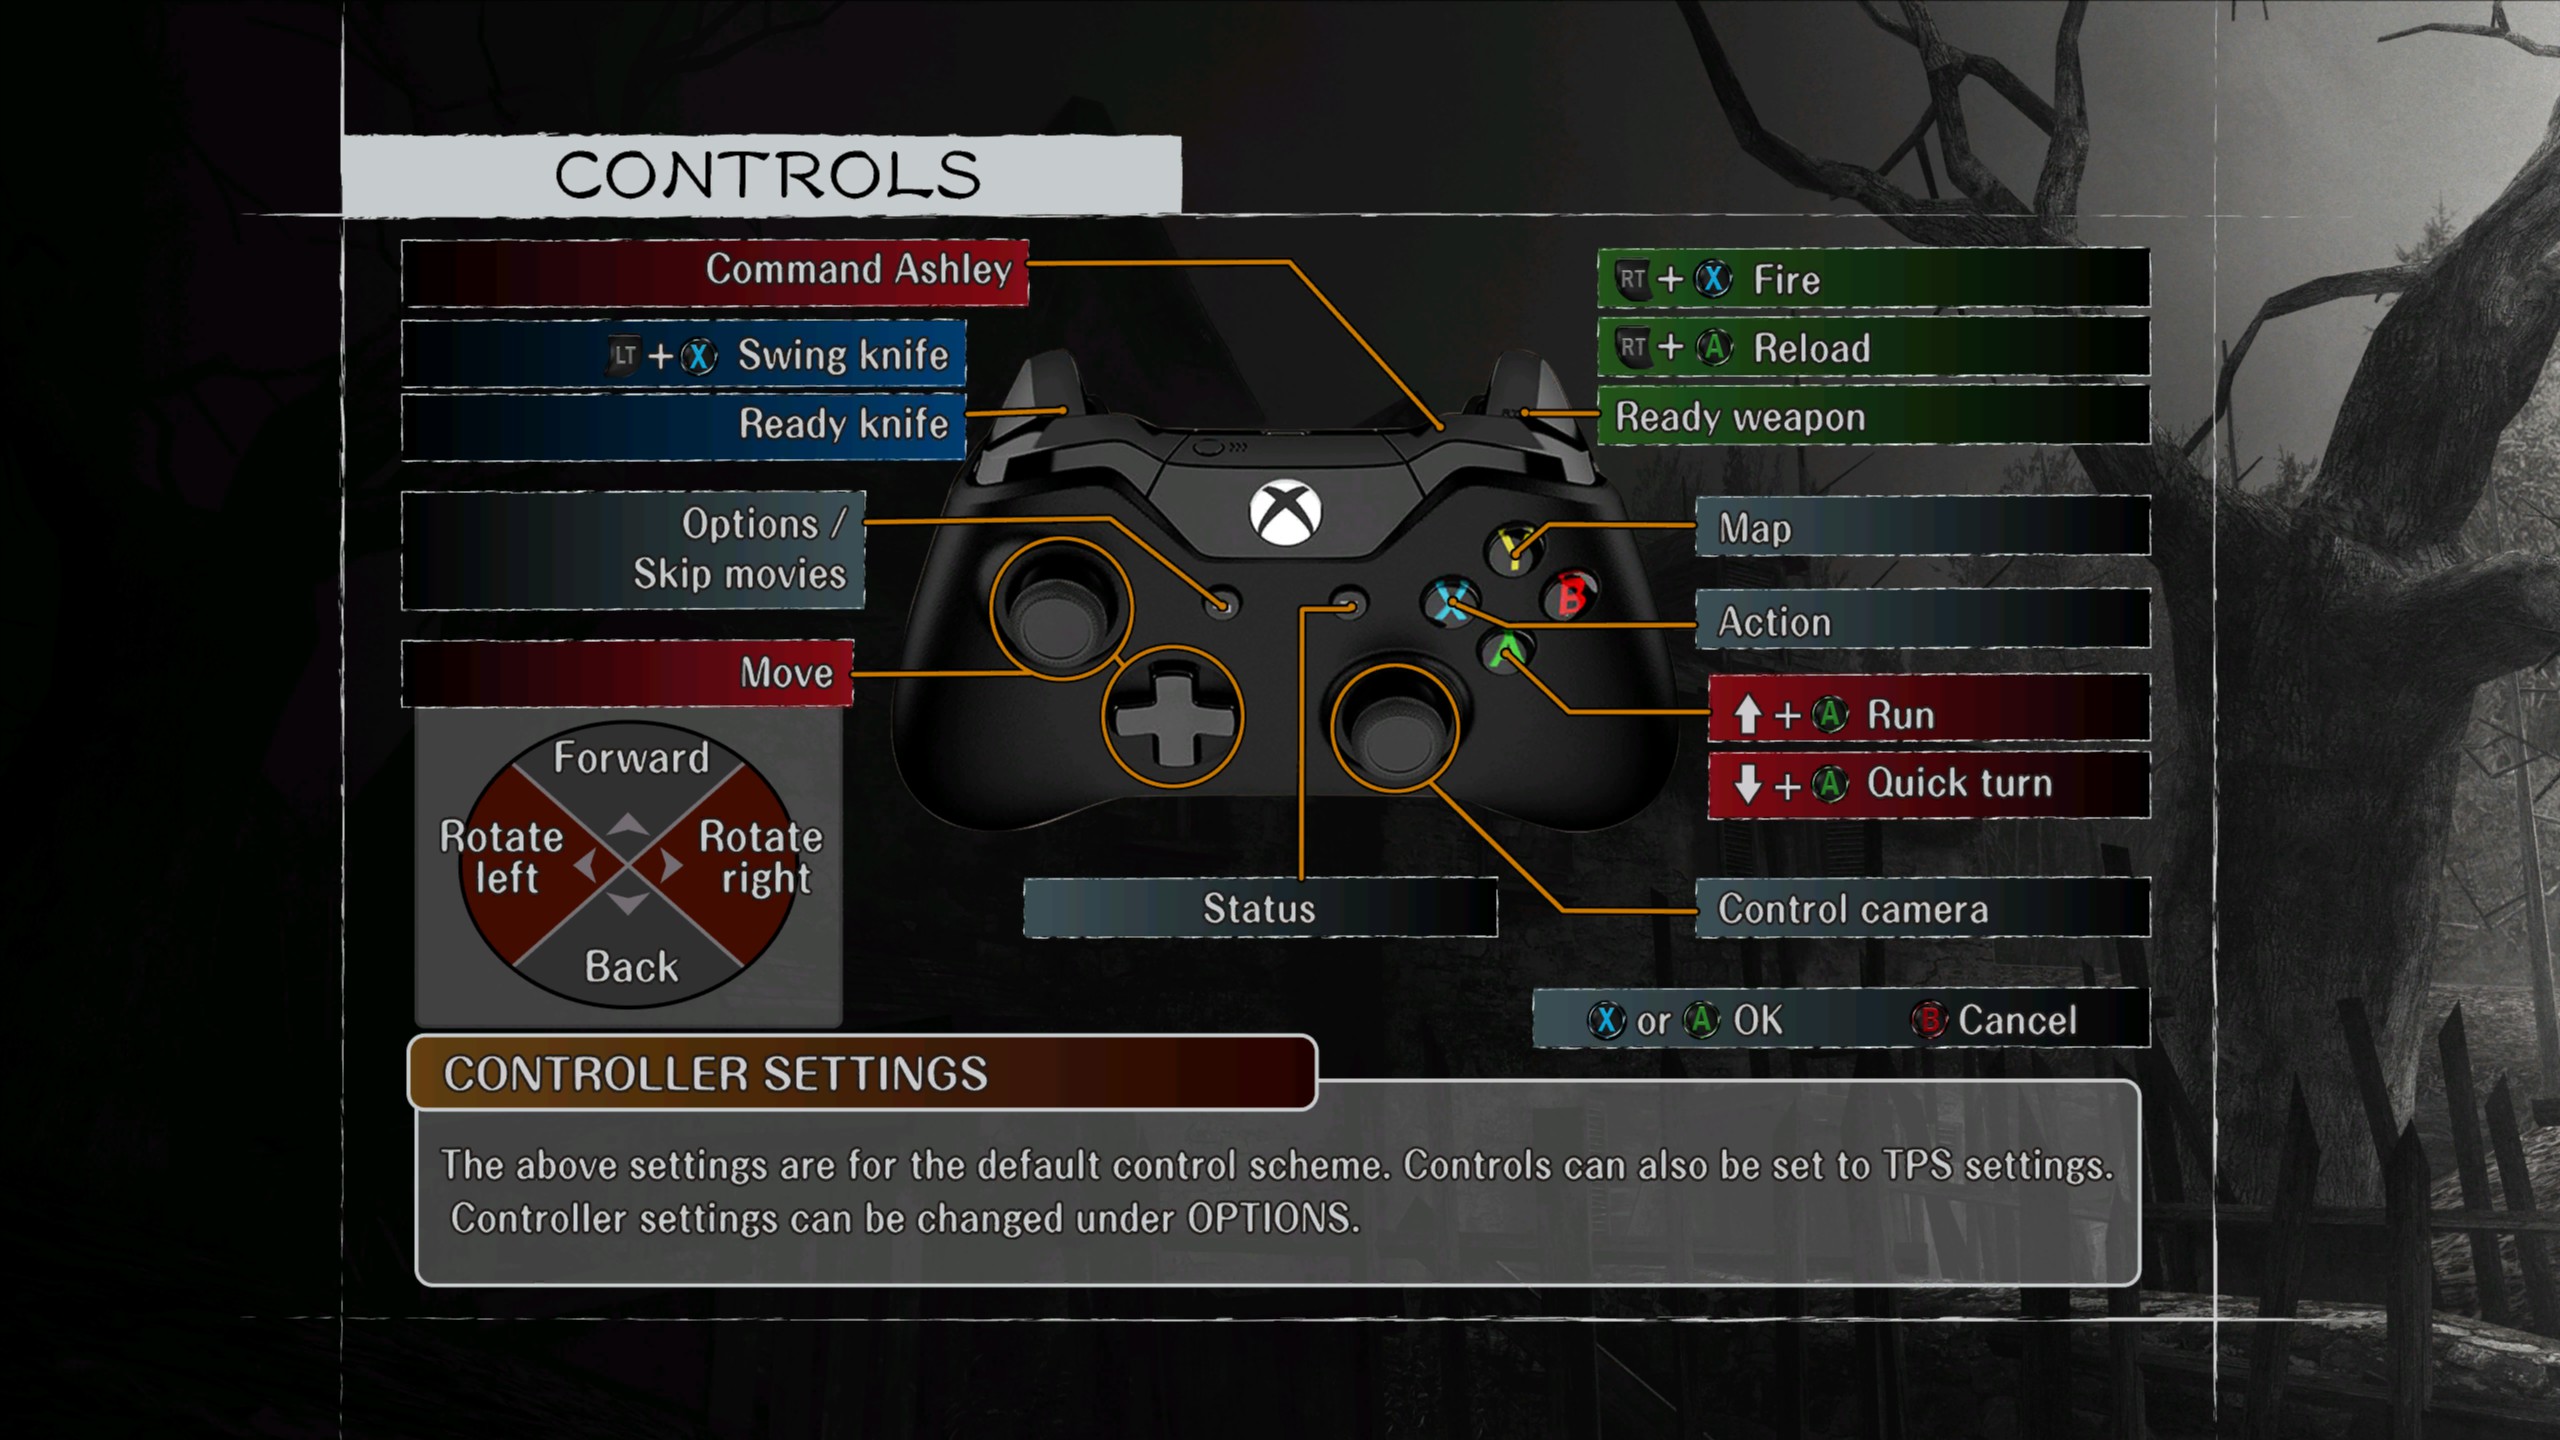 This mod by NEGAARMAX adds the XBOX ONE buttons to the game. Similar to the PS4 mod, he's managed to include the tutorial and configuration menus as well. This mod is compatible with all languages. It has also been recently updated to be compatible with the 1.1 release of the HD Project and re4_tweaks 1.7.7.3 or newer.
- Download the Xbox One Buttons (1.4GB)
here[www.nexusmods.com]
- This mod is ONLY compatible with the HD Project. Before continuing, make sure you have the 1.1 version of the HD Project installed and working properly prior to installing this mod.
Manual Installation
- Paste the included BIO4 folder from the mod archives into the Steam\steamapps\common\ResidentEvil4 folder. Overwrite any files when prompted.
- Play the game and enjoy!
Automatic Installation
- Download FluffyQuack's Mod Manager 5000 here[residentevilmodding.boards.net]
(if you don't have it already) - Simply drag and drop the .rar file into the mod manager while it's running and install it from the list.
Huge thanks to NEGAARMAX for another excellent mod! Follow his networks here[linktr.ee].
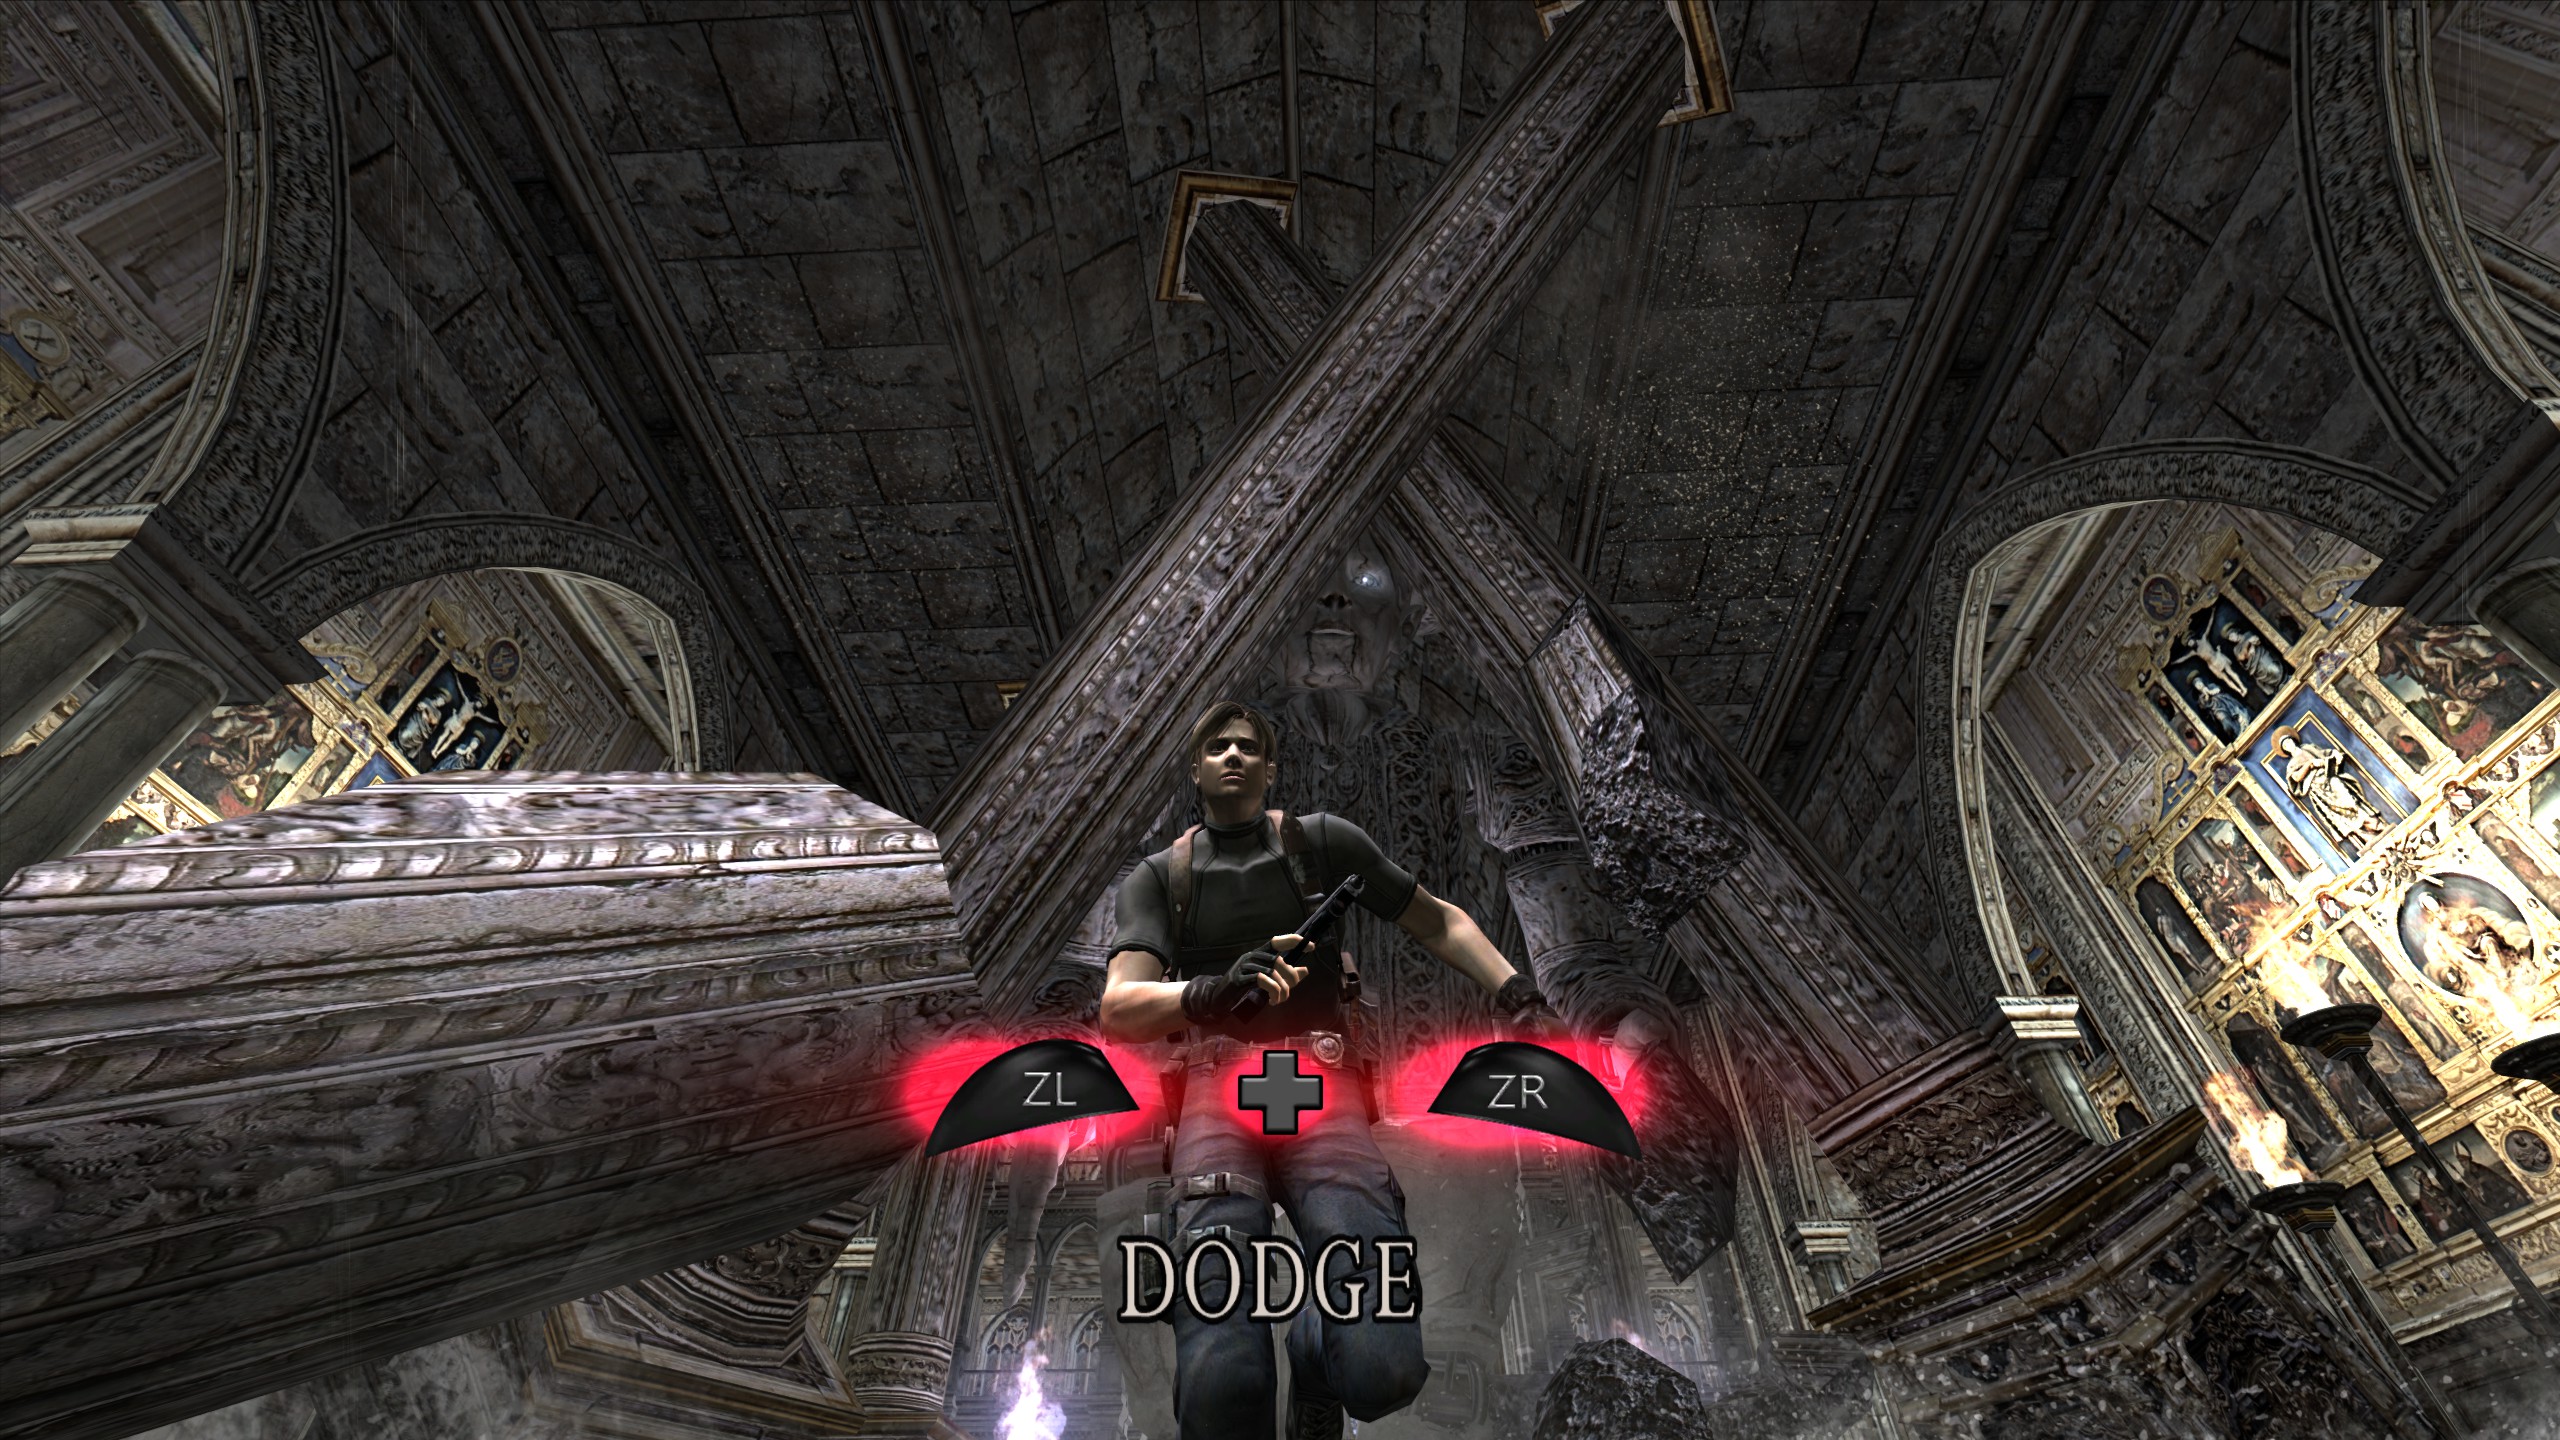
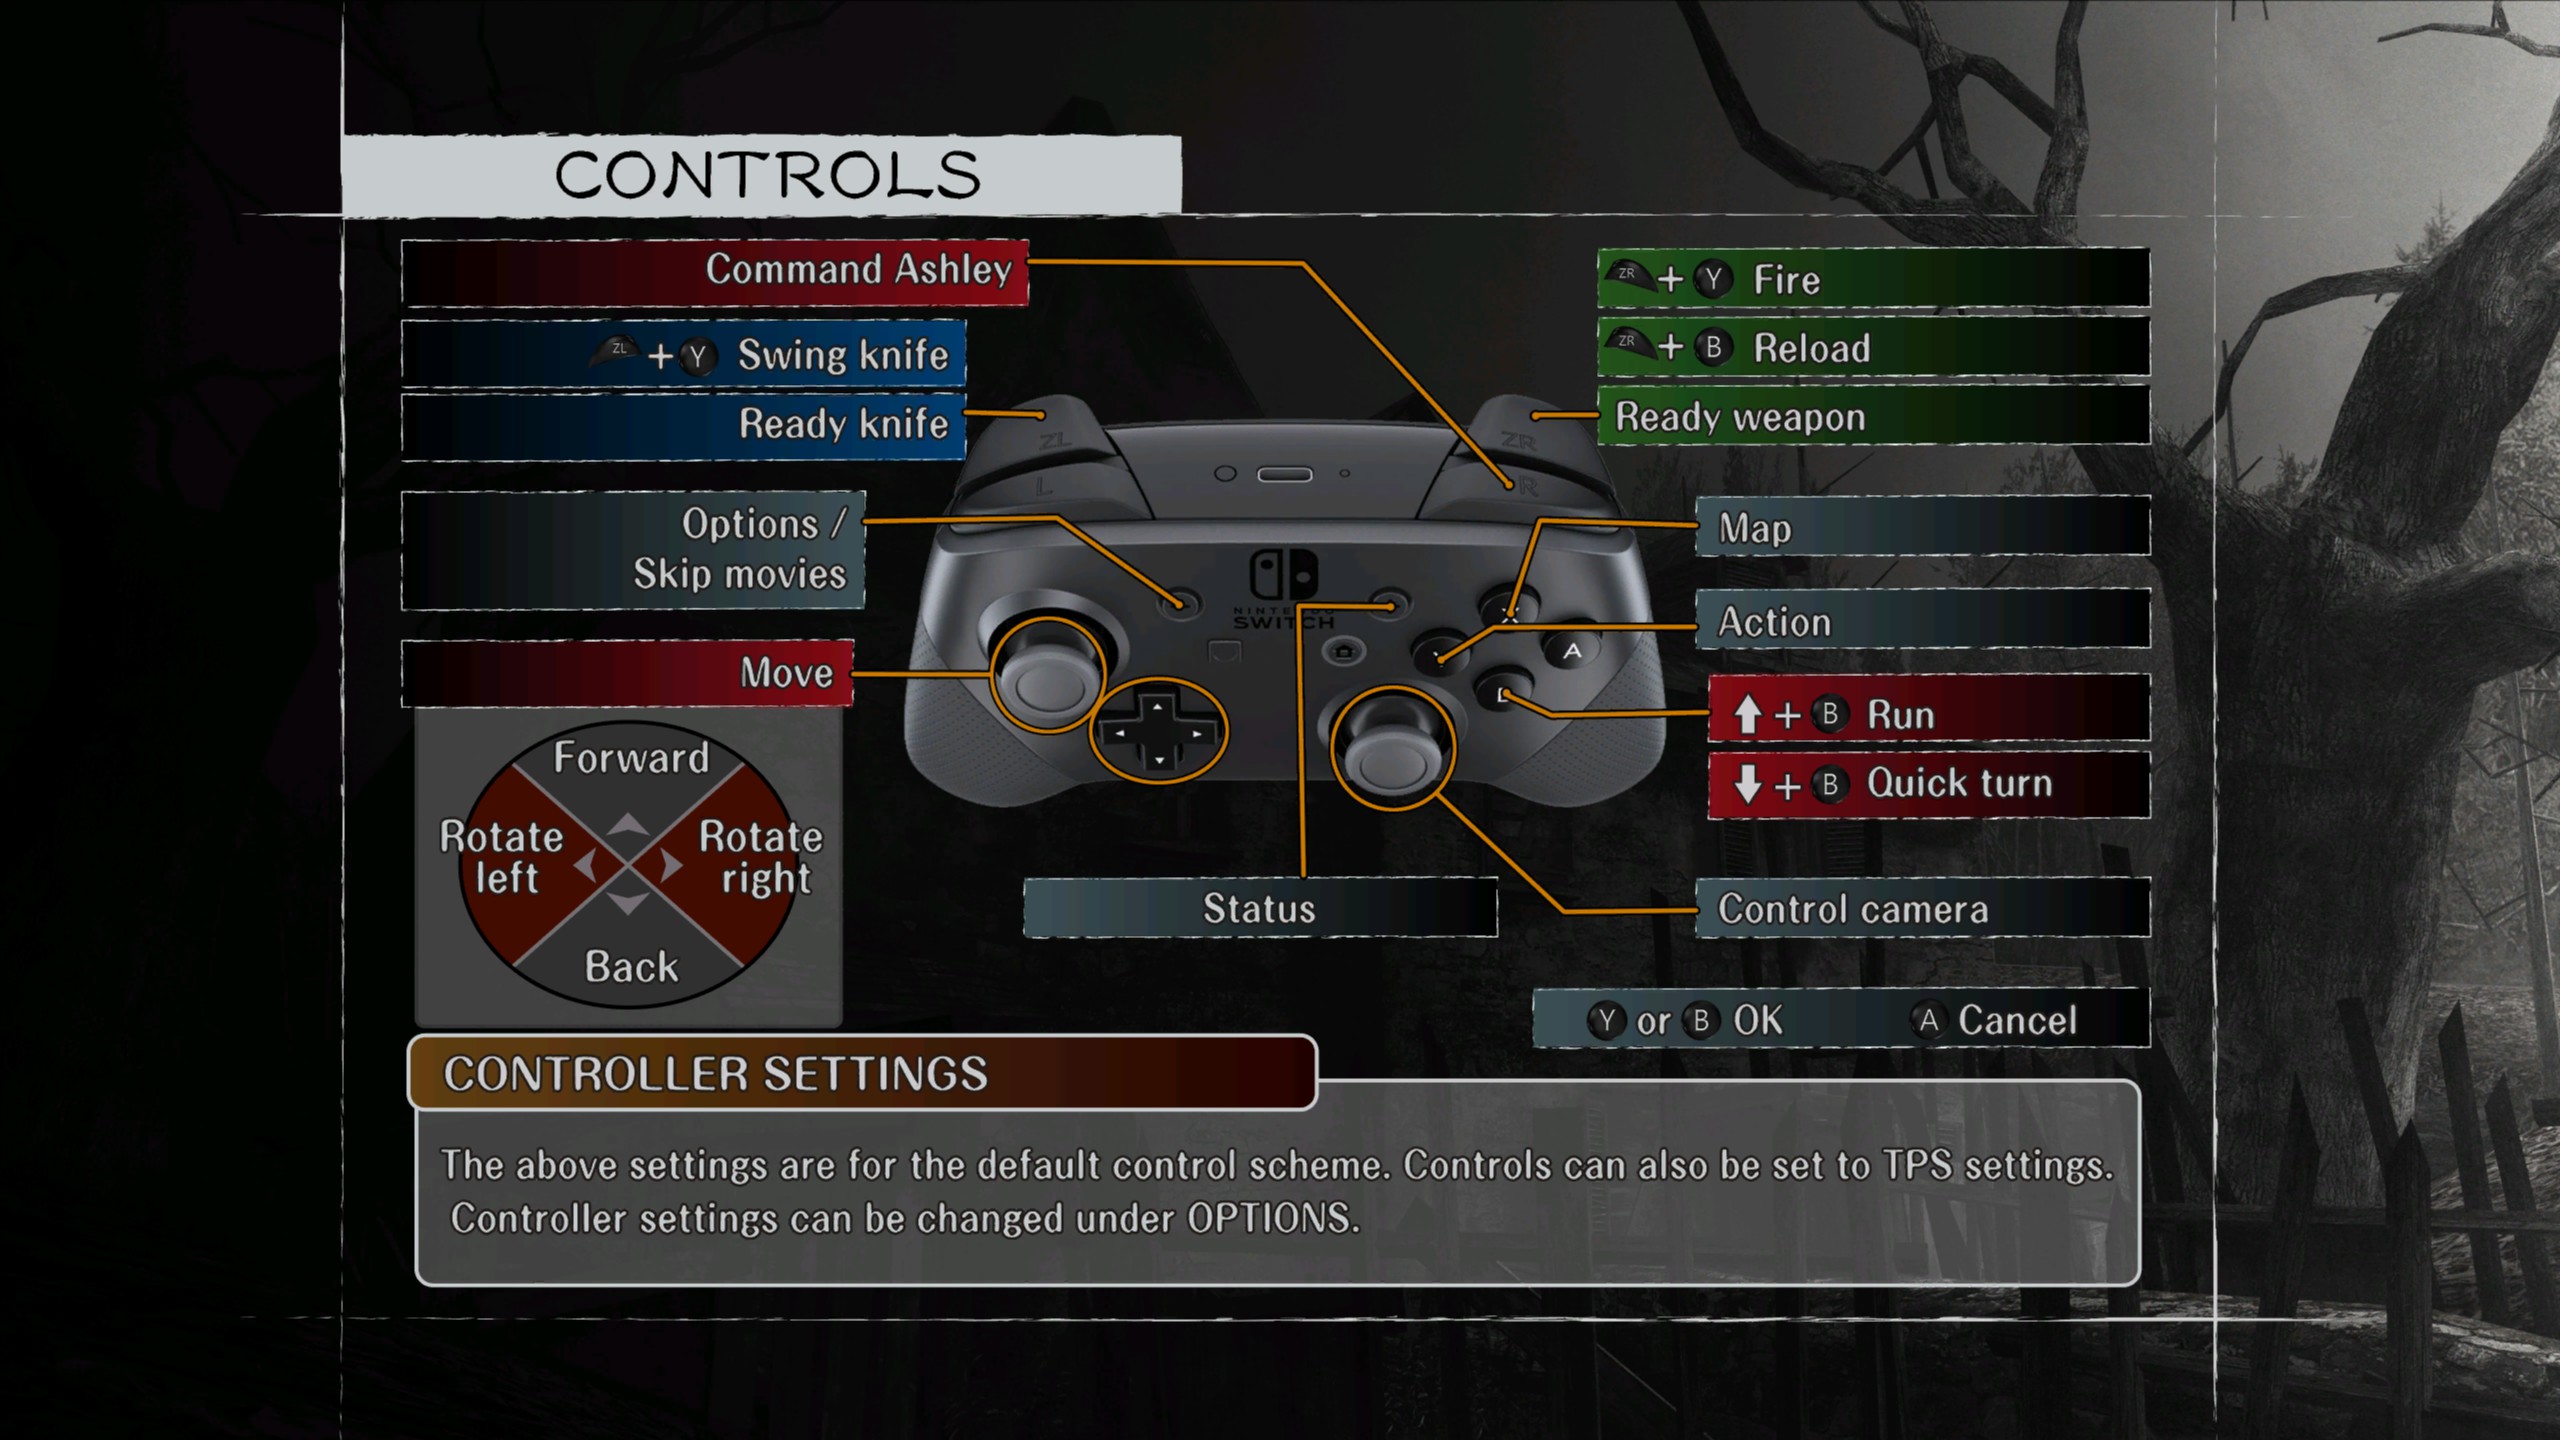 Here's yet another essential mod by NEGAARMAX that adds the Switch Pro Controller button prompts. It of course includes the tutorial and configuration menus and is compatible with all languages. This mod is also compatible with the latest RE4HDP 1.1 release and re4_tweaks 1.7.7.3 or newer.
- Download the Pro Controller Buttons (1.8GB)
here[www.nexusmods.com]
- This mod is ONLY compatible with the HD Project. Before continuing, make sure you have the 1.1 version of the HD Project installed and working properly prior to installing this mod..
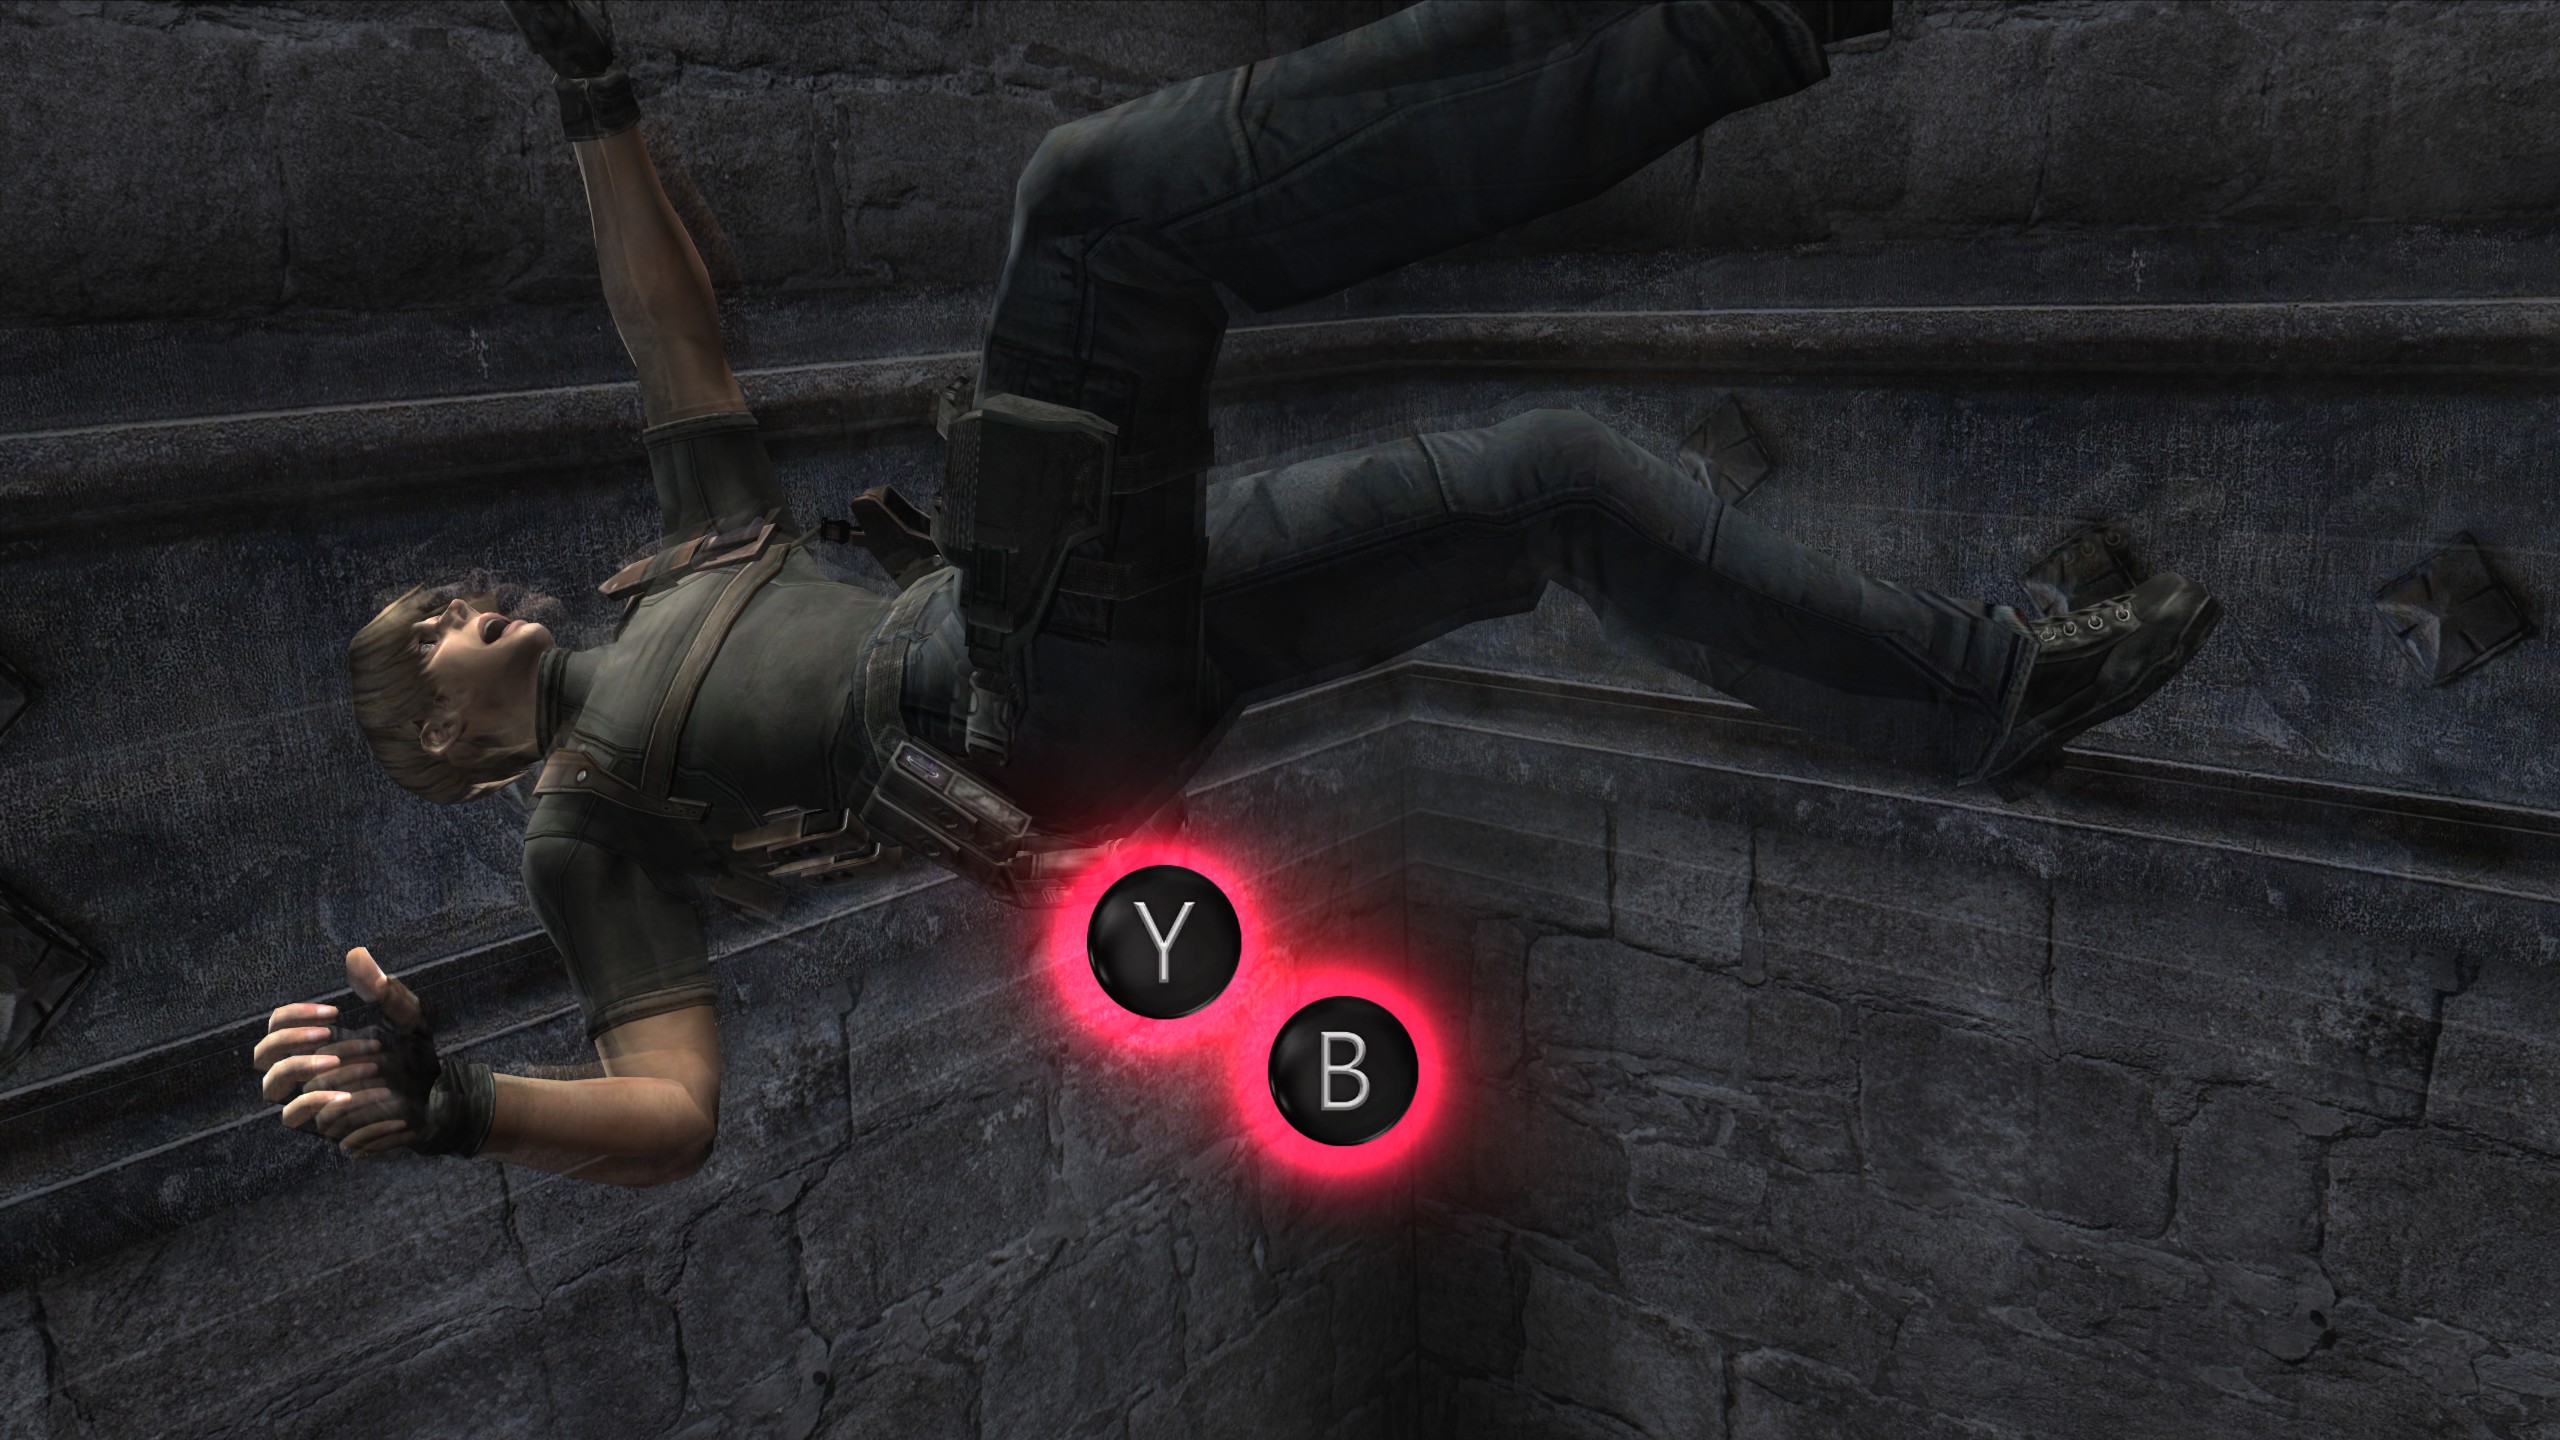 Manual Installation
- Paste the included BIO4 folder from the mod archives into the Steam\steamapps\common\Resident Evil 4 folder. Overwrite any files when prompted.
- Play the game and enjoy!
Automatic Installation
- Download FluffyQuack's Mod Manager 5000 here[residentevilmodding.boards.net]
(if you don't have it already) - Simply drag and drop the .rar file into the mod manager while it's running and install it from the list.
- Download the PlayStation buttons (either for the 'original/default' or 'PS2 layout') here[residentevilmodding.boards.net]
- Paste the included files into the "Resident Evil 4" folder
- Run the included "Install Buttons.bat" file and wait for it to do its thing.
- Play the game and enjoy!
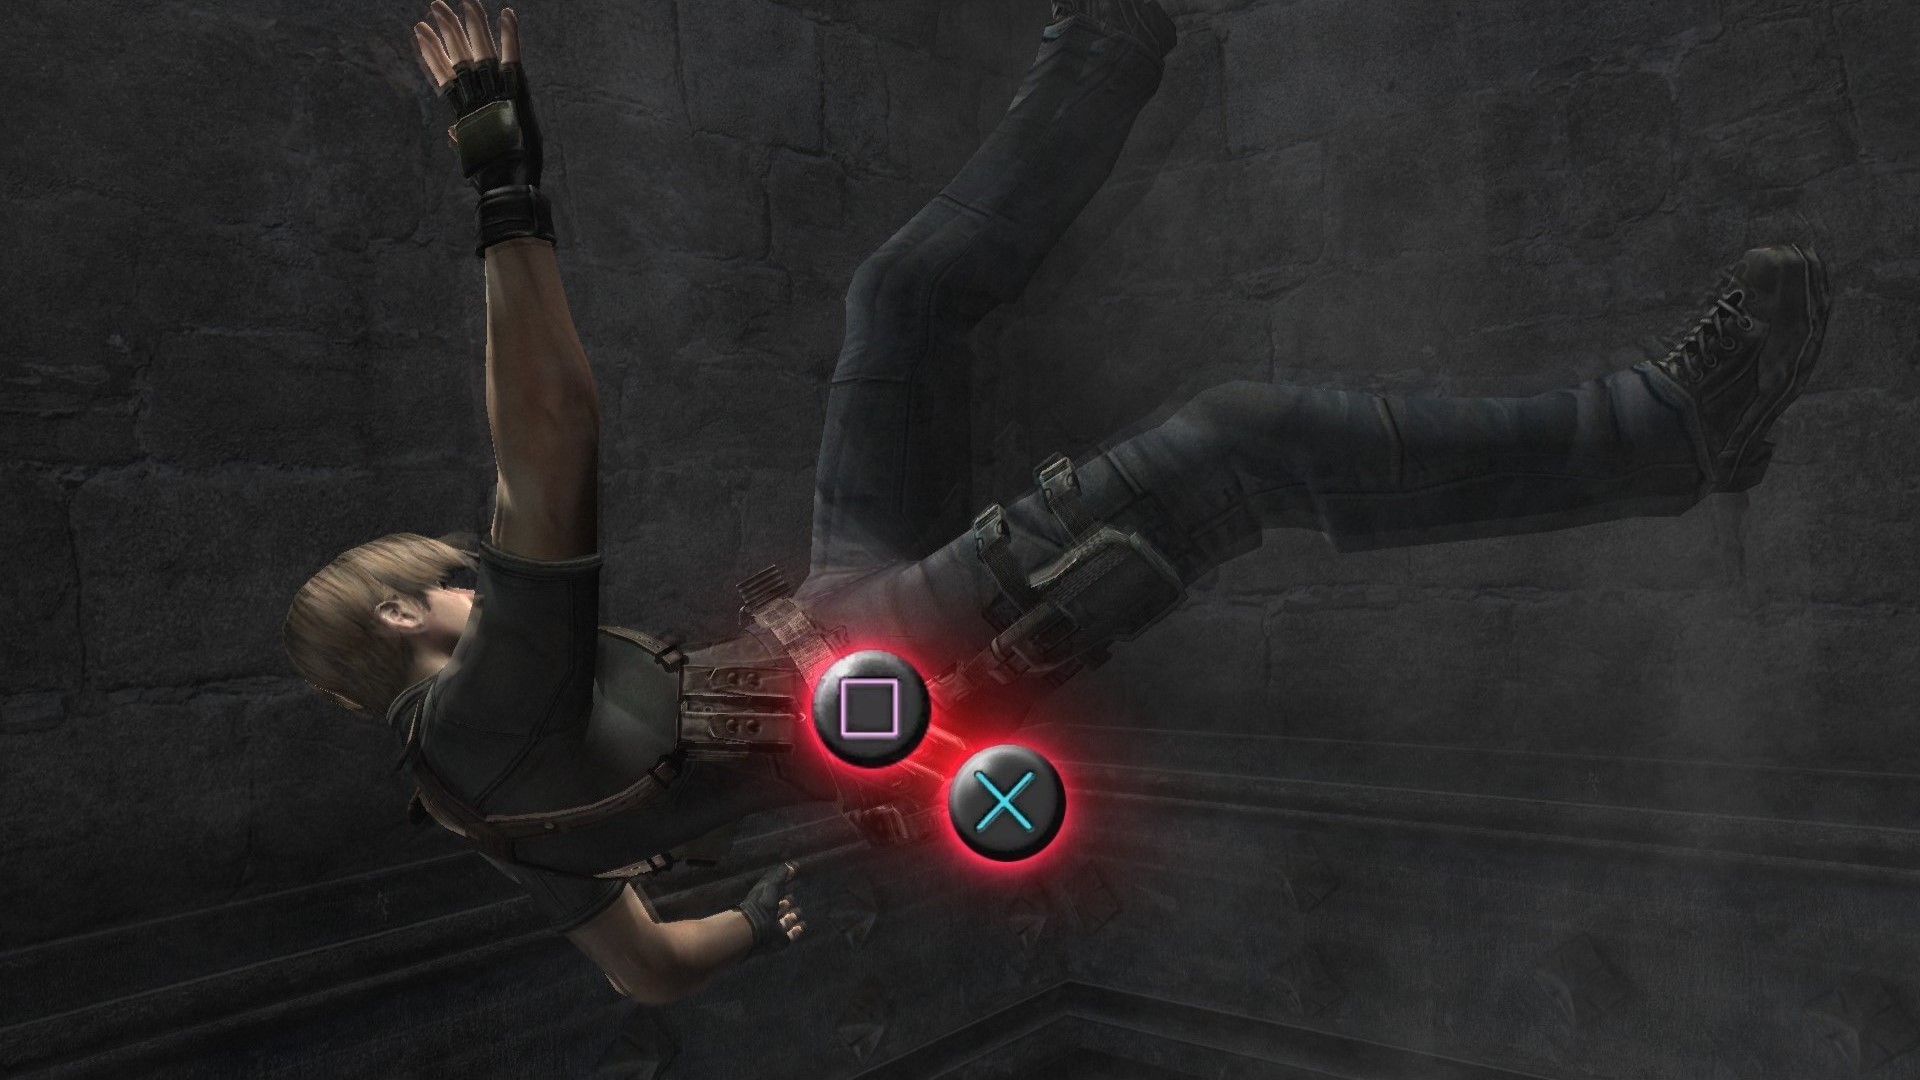
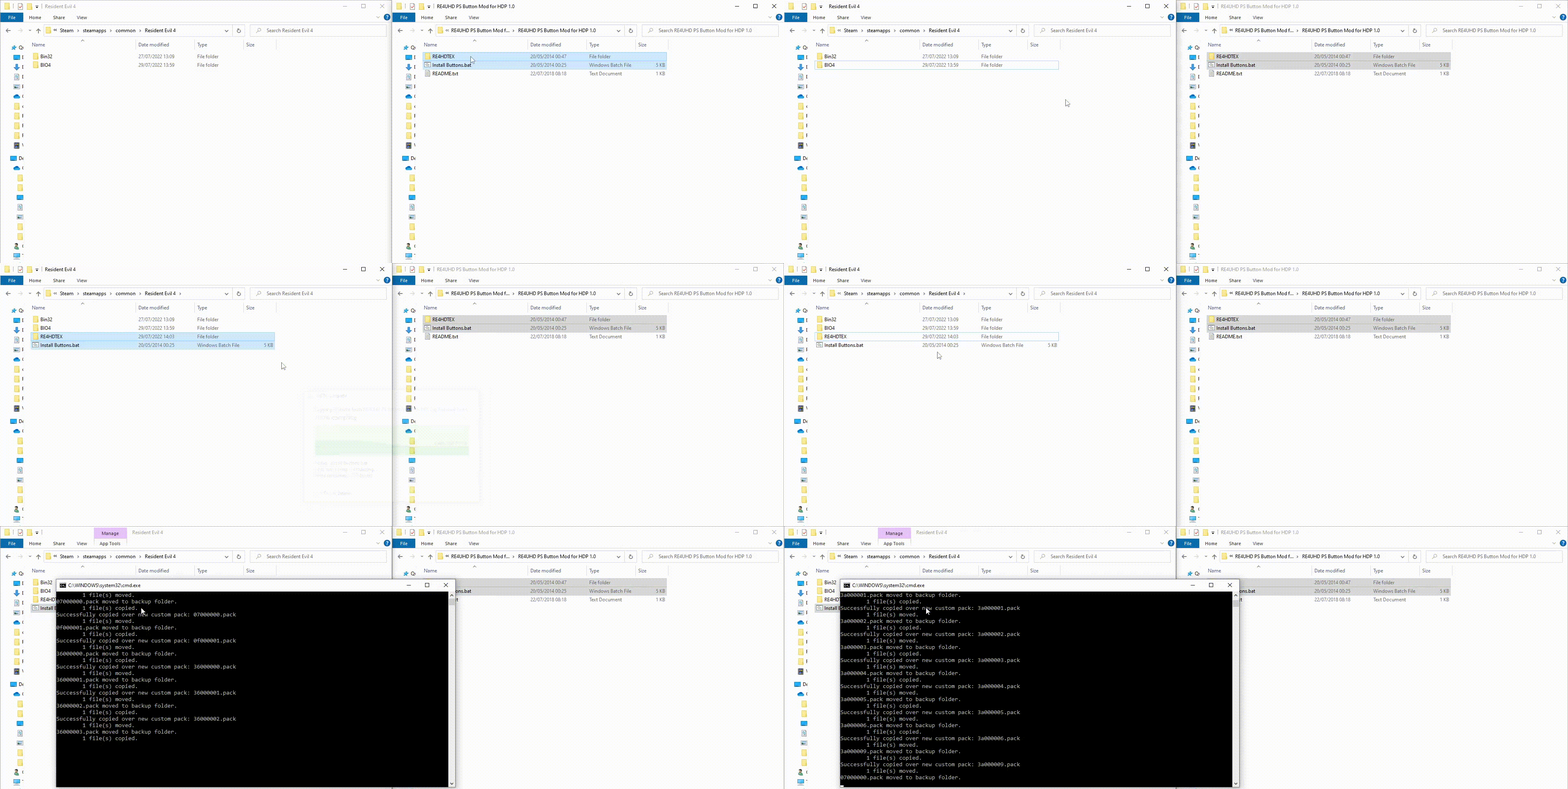
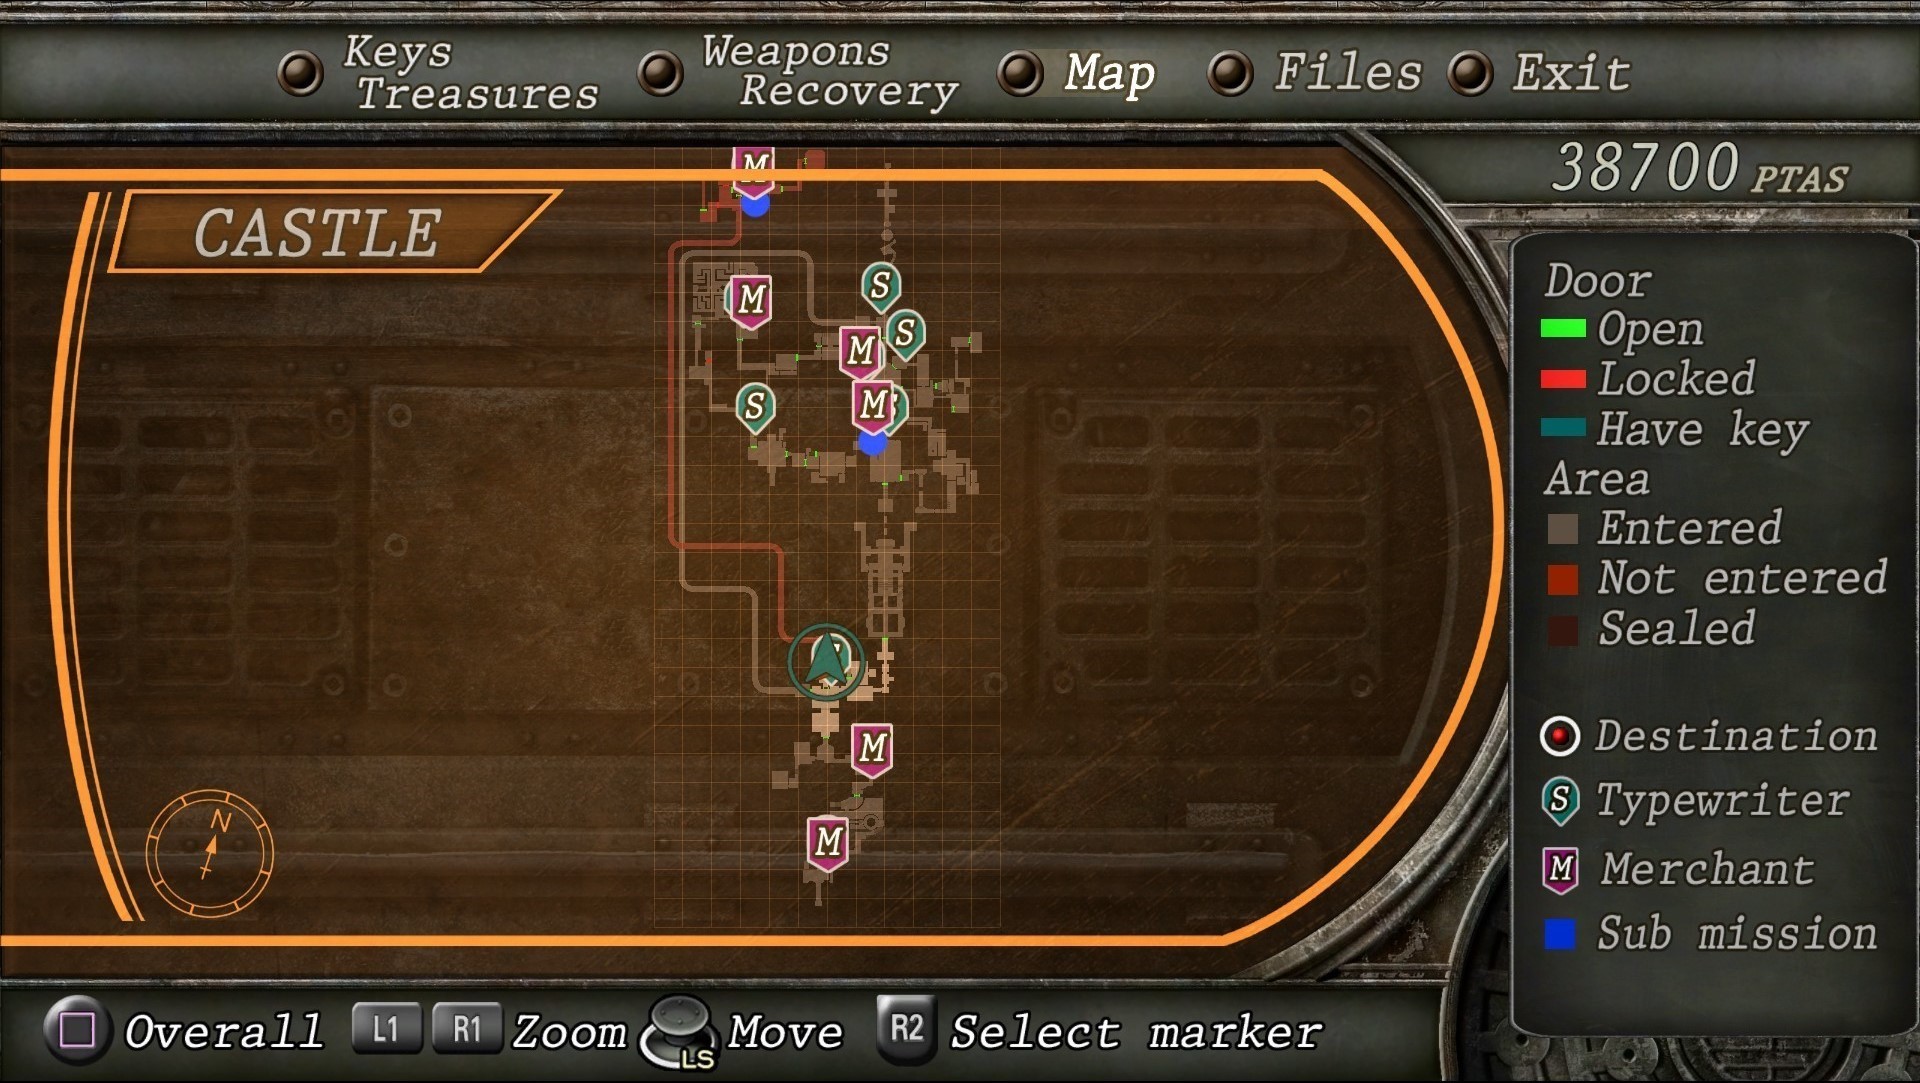
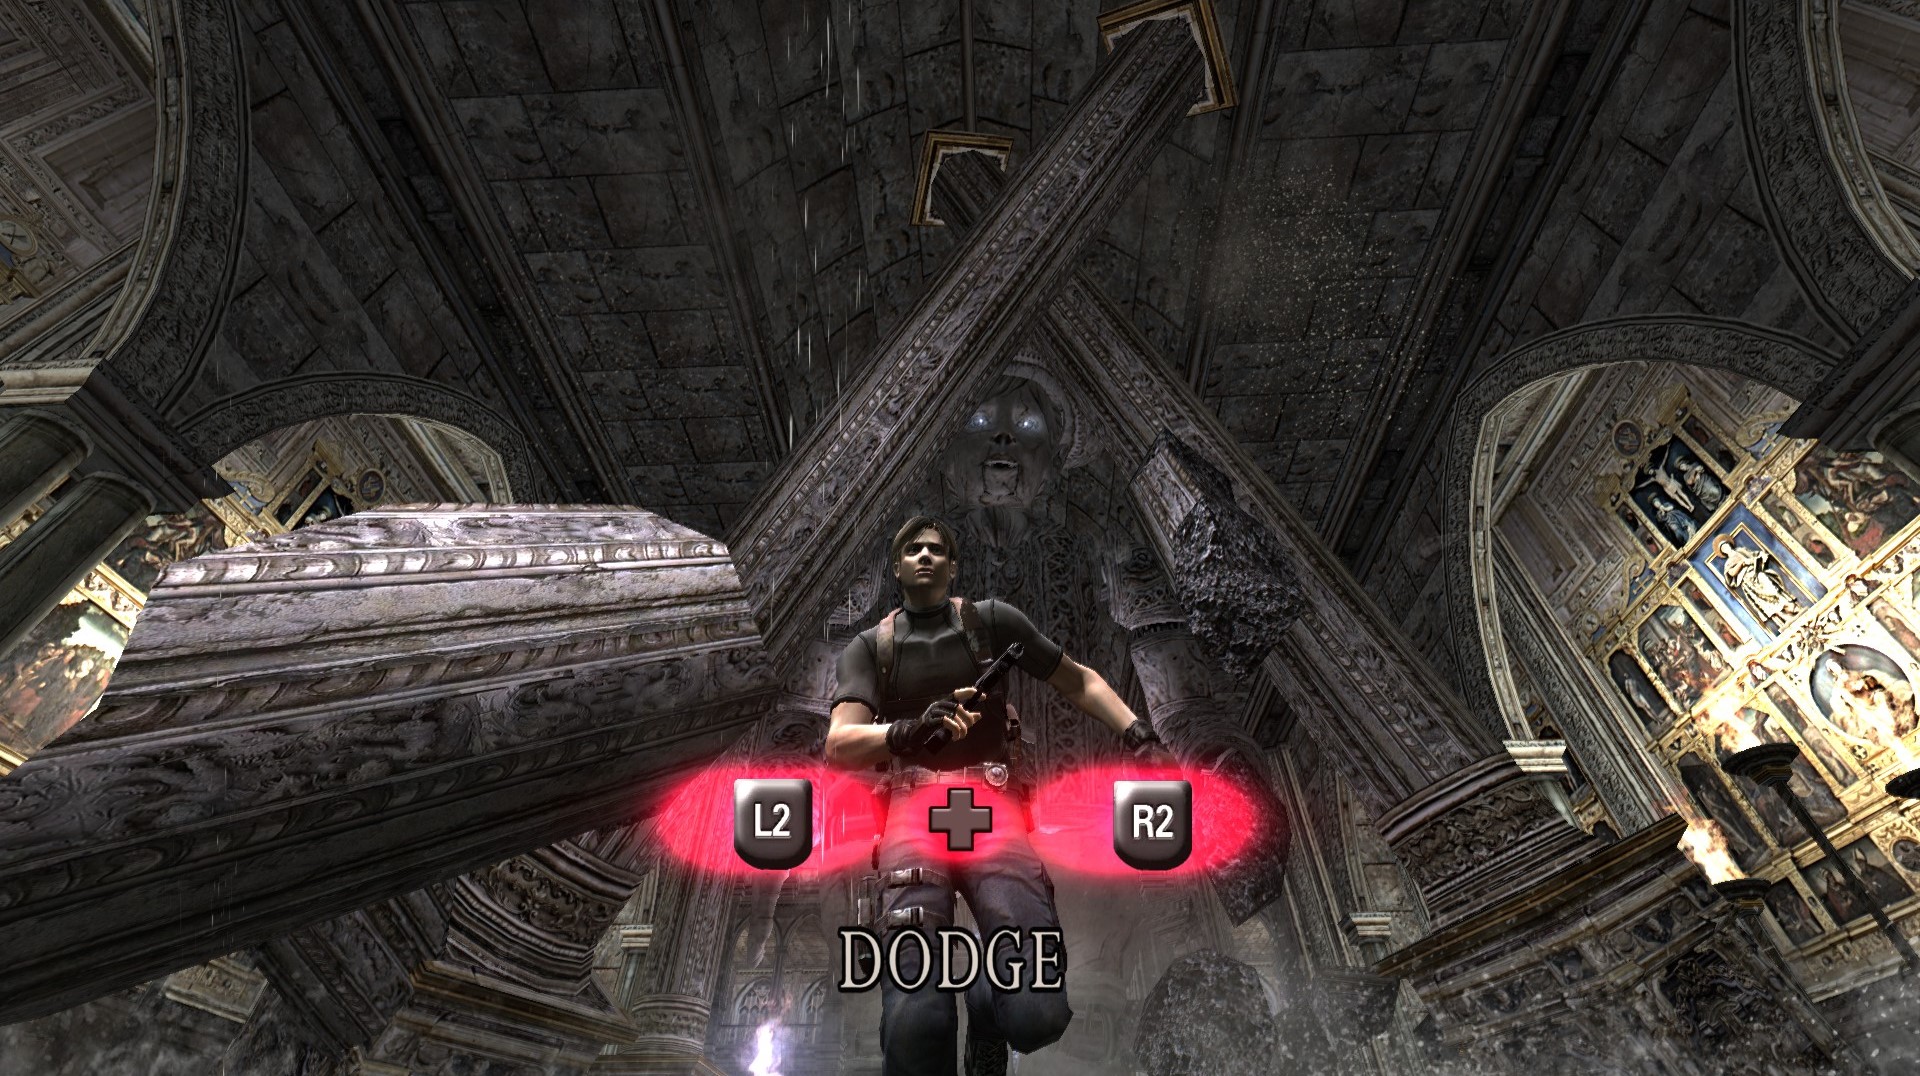
Thanks to Bingo from the residentevilmodding forums for this mod!
Leon's Laser Sight Colour
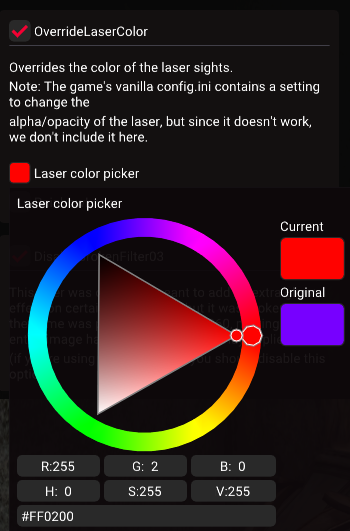 In the recent 1.7.7 release of the re4_tweaks mod, while adding even more features and a fancier UI, also added an "OverrideLaserColor" option, allowing for custom RGB laser colours (with a bonus "rainbow" option) to be set on the fly. No more going into the config.ini file and manually editing in RGB values, then having to restart the game!
Making sure that you have the 1.7.7 release[github.com] (or newer) installed, press “F1” while in-game and simply navigate to the "OverrideLaserColor" option and check the box. You may then edit the RGB values to your heart's content! These settings also apply for all other playable characters (Ada, Hunk, Wesker, etc) as well as all of the player's weapons.
Even when the tweaks mod was already amazing as is, Nipkow and emoose have still been continuously adding so many fantastic features such as this to the game. They have really went above and beyond in improving this port along with the folks behind the HD Project, so we should thank them for continuing to enhance and support RE4 to this day.
RE4 Randomiser - V1.92
This incredible mod by @re_duke randomises your loadout, enemy spawns, boss fights and also changes what's available to buy at the Merchant shop. If you've seen any of Bawkbasoup's streams of the randomiser then you'll be familiar with re_duke's amazing RE randos. It's not meant to be some Super Kaizo, Inferno, Welcome to Hell mod like other RE4 difficulty mods, but the challenge will depend mostly on what enemies you get and the player's skill and knowledge of the game. So it certainly has more variance in the difficulty, compared to the classic RE randos.
This is an excellent way to add some replayability to game after 17 or so years! Re_duke has spent multiple months working on this rando alone, so please do support him on his patreon[www.patreon.com] and Twitch[www.twitch.tv].
Download the latest version of the mod here. Detailed instructions and more information are included in the Read me.pdf file.
- The first thing you should do is back a backup of your game. First, find the RE4 installation folder typically located at…
C:\Program Files (x86)\Steam\steamapps\common\Resident Evil 4.You can also go to your Steam Library, right click on Resident Evil 4 > Manage > Browse Local Files. Make a backup of both the “bin32” folder and “bio4\etc” folder before continuing. Make sure to place them in a labelled folder and somewhere you’ll remember.
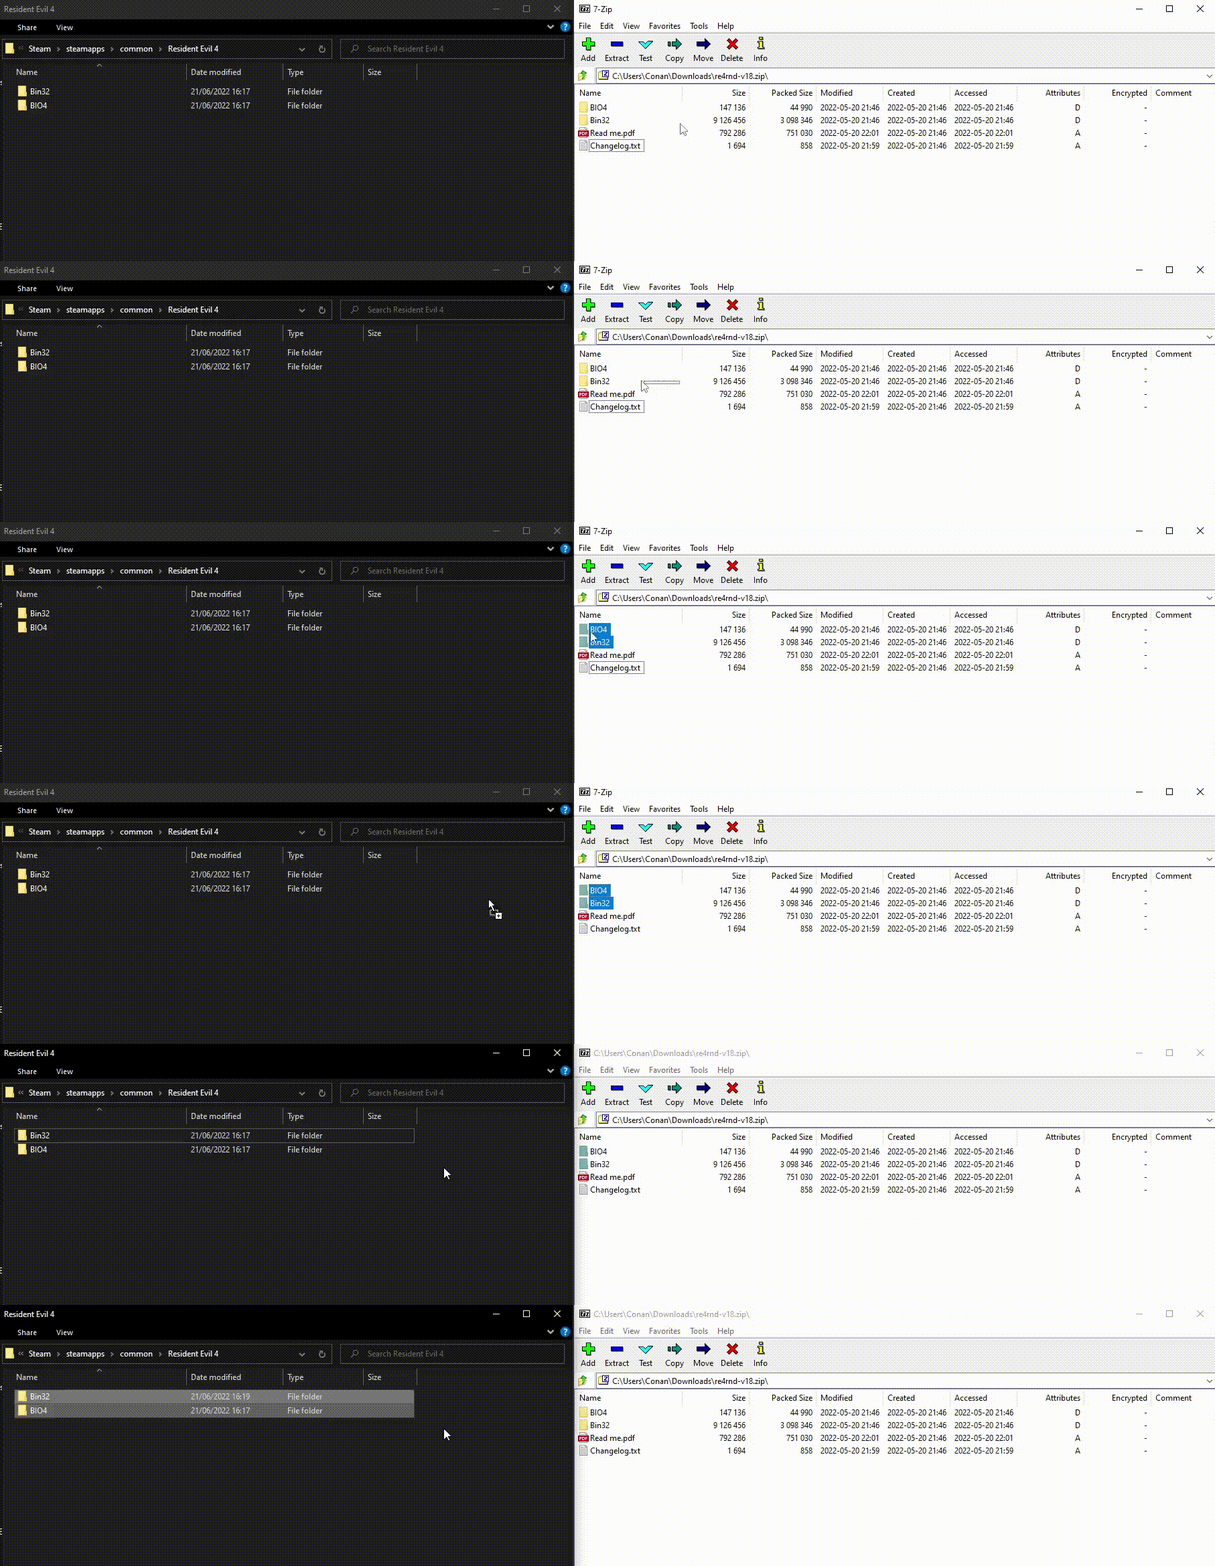
- Now extract the contents of RE4RND .zip file into the “Resident Evil 4” folder (the same one that contains "BIN32" and "BIO4". If it asks to overwrite files, accept.
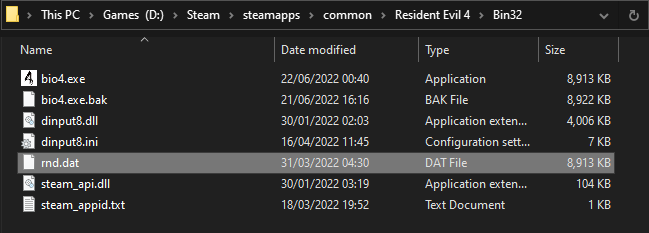
It should look like this after extracting the files BIN32 folder (with HD mod or re4_tweaks patch):
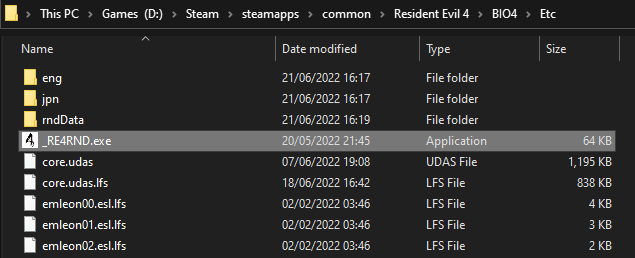
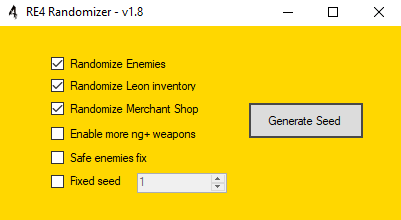
BIO4\ETC folder (this has to contain the randomiser program “_RE4RND.exe” and a folder labelled "rndData"): - Close the game, if it’s open, then run _RE4RND.exe and generate your seed.
Once you see "Done and ready to play" hit OK then launch the game!
Some recommended settings for re4_tweaks include:
-Under Memory tab, all options enabled.
-Under Display tab disable both “EnableGCBlur” and “EnableGCScopeBlur”
-Enable “DisableFilmGrain” and “FixBlurryImage”
-FOV Slider: go nuts 😉
-Help and Tips
- Double check that the randomiser files are in the folders shown above (rnd.dat inside BIN32 and _re4rnd.exe + rndData folder inside BIO4\etc).
- Close the game. The seed randomisation does not work while the game is open.
- Run the Rando as Admin (required if the game is installed in Program files).
- Norton antivirus may block/delete some randomised files, so you’ll have to add an exception to the Resident evil 4 folder or disable its protection before playing. No issues were reported with other antivirus yet.
Seed numbers only work for the same version of the game with the same settings used.
It’s recommended to SAVE often. The game can randomly crash, and not necessarily because of the randomiser itself. If the game crashes consistently for you please report it asap, you can find the creator of the mod on Twitter @re_duke, or ModDB.
- emleon00.esl.lfs
- emleon01.esl.lfs
- emleon02.esl.lfs
- emleon03.esl.lfs (not included in HD mod)
- emleon04.esl.lfs
- emleon05.esl.lfs
- emleon06.esl.lfs
- emleon07.esl.lfs
- emleon03.esl (HD mod only)
- omake01.esl.lfs
- omake02.esl.lfs
4PRE4C (Accurate Weapon Names/ Descriptions mod)
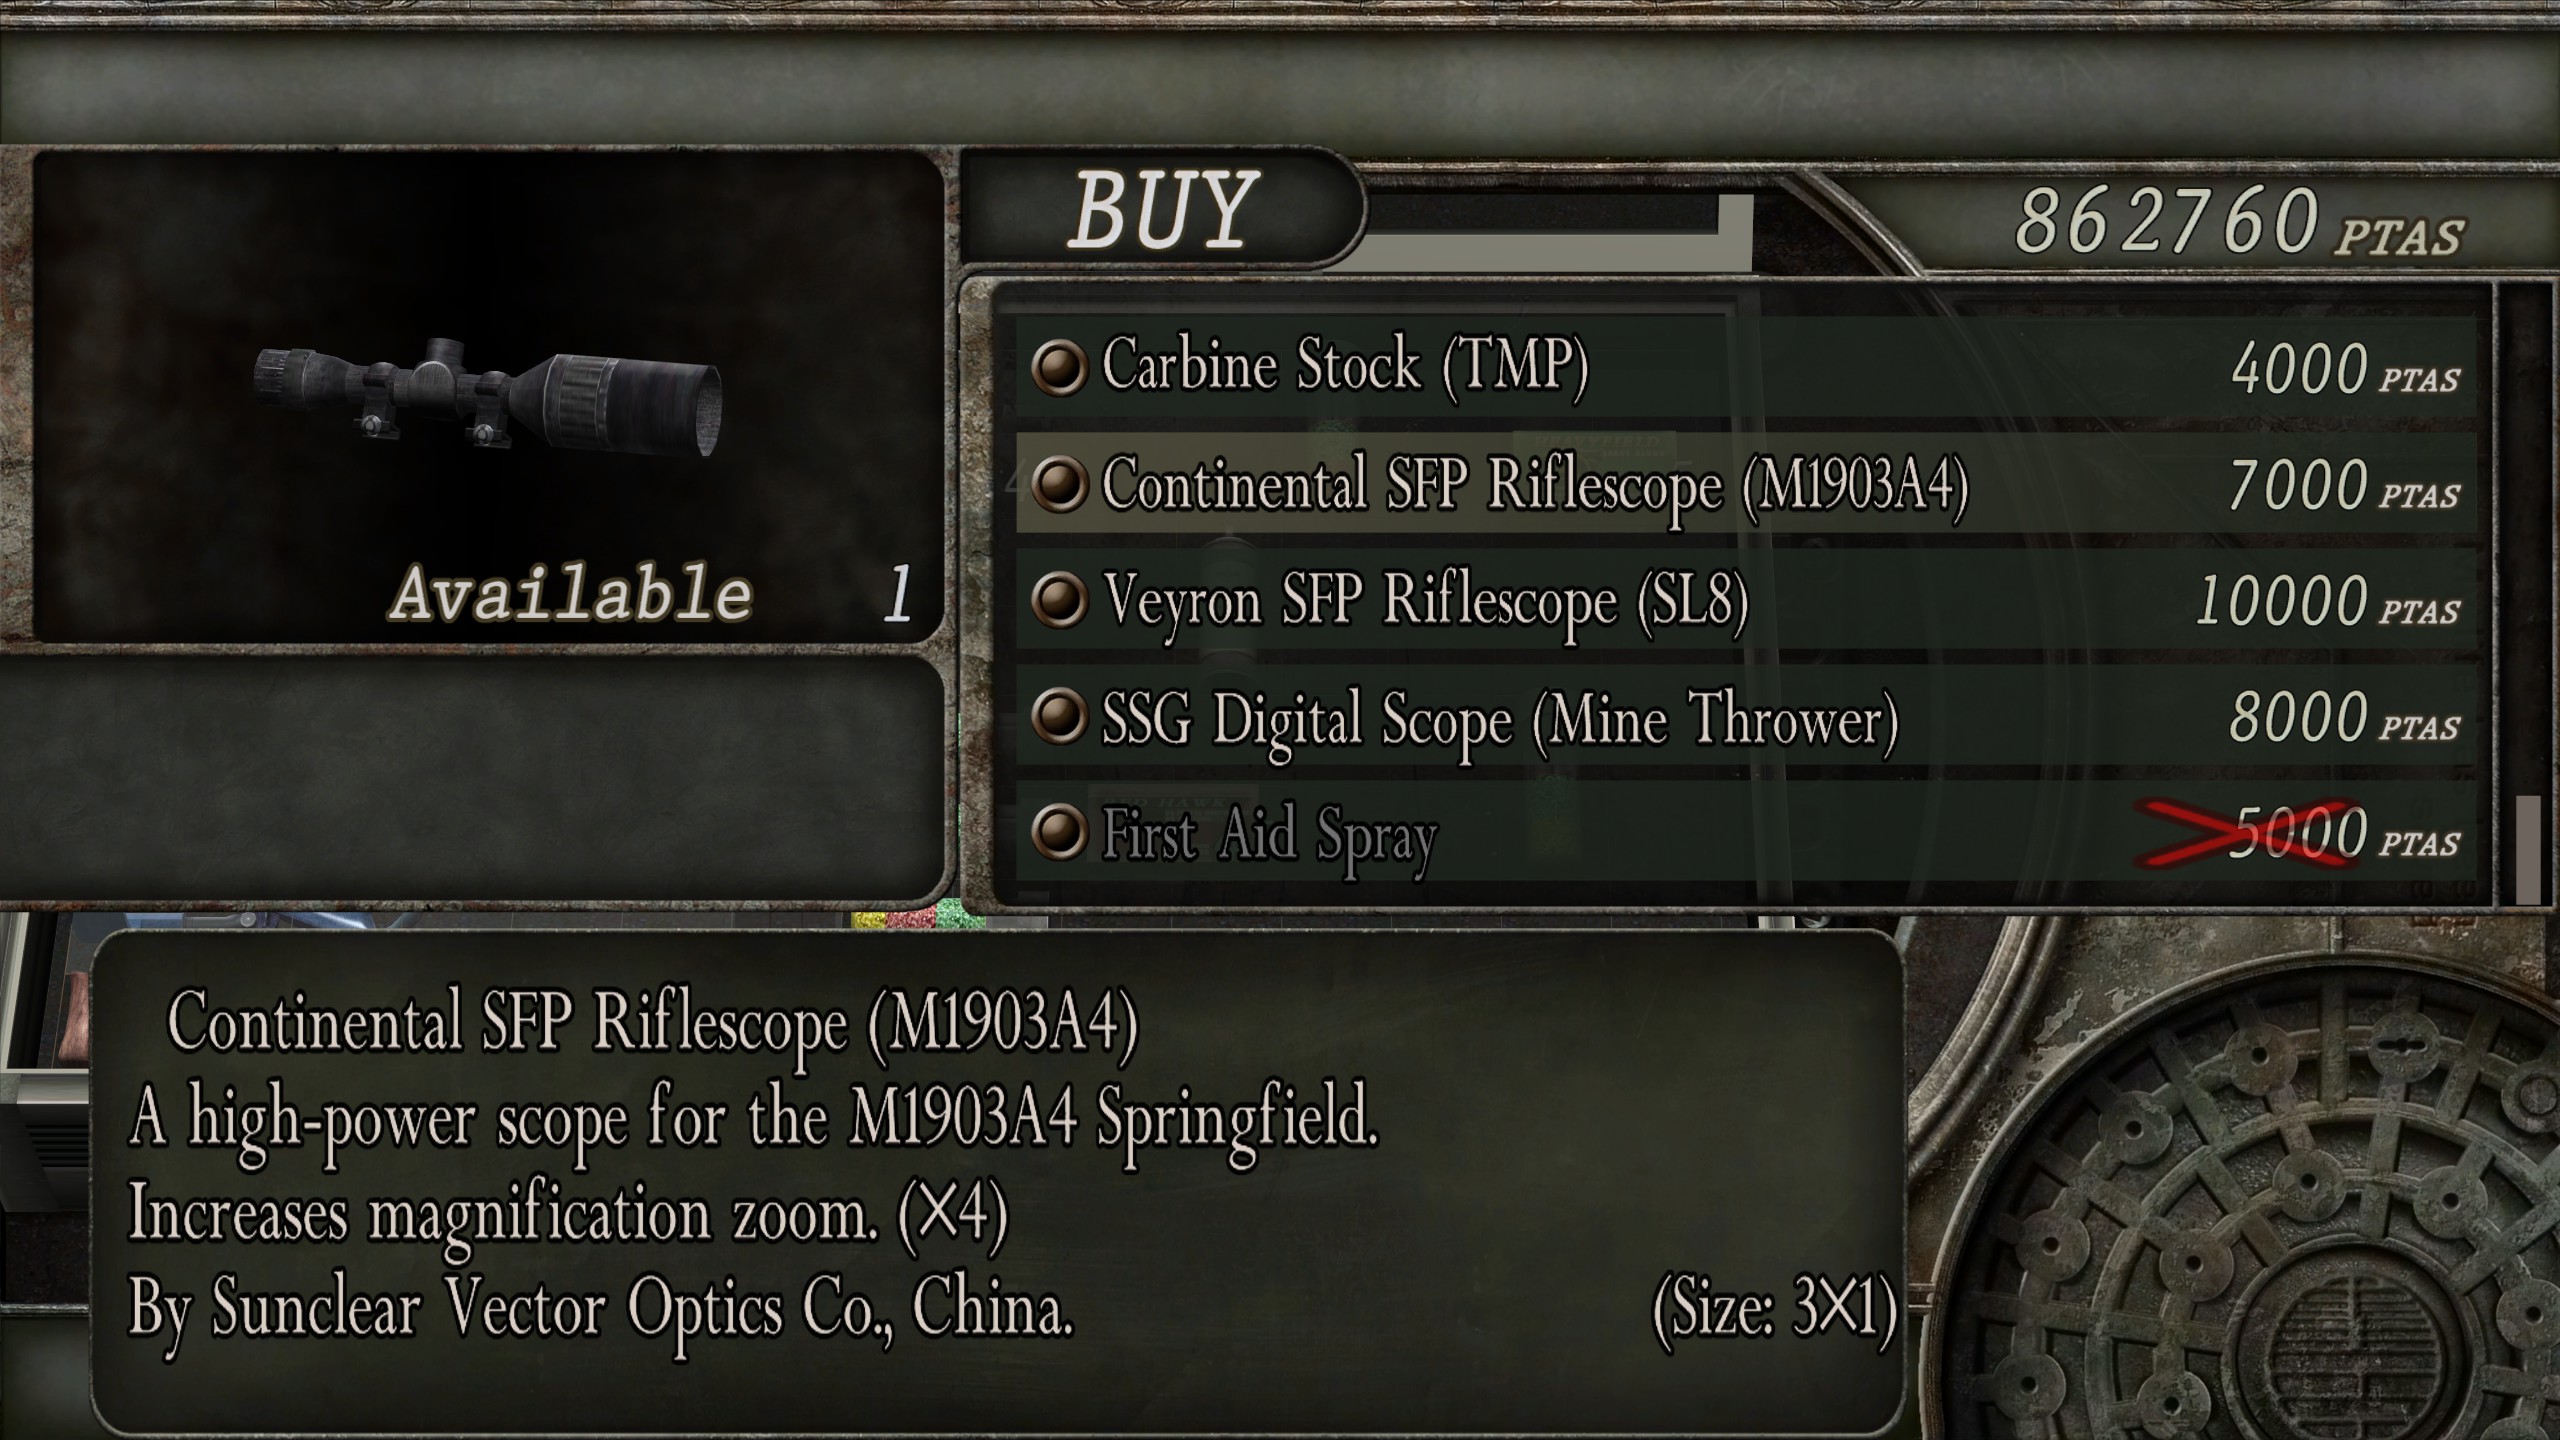
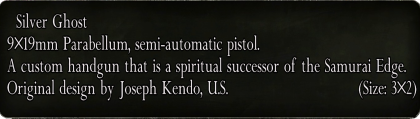
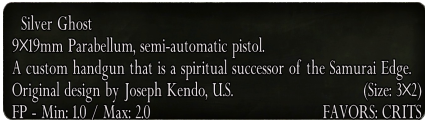
 This mod by ReapMcMuffins changes the names of weapons to their real-world counterparts, aiming to make RE4's iconic firearms that more realistic and lore accurate. It also adds more detailed descriptions for each weapon, as well as for ammo and weapon parts to match. It's the little details in small mods like this that really add that sense of connection within the RE lore. I rate this mod KendoGunShop approved!
The mod is also compatible with the HD project, but only the ENGLISH version of the game, as far as I can tell. A full list of changes can be found in the changelogs on the mod's Nexus page or within the "documentation" folder included in the mod archive.
This mod by ReapMcMuffins changes the names of weapons to their real-world counterparts, aiming to make RE4's iconic firearms that more realistic and lore accurate. It also adds more detailed descriptions for each weapon, as well as for ammo and weapon parts to match. It's the little details in small mods like this that really add that sense of connection within the RE lore. I rate this mod KendoGunShop approved!
The mod is also compatible with the HD project, but only the ENGLISH version of the game, as far as I can tell. A full list of changes can be found in the changelogs on the mod's Nexus page or within the "documentation" folder included in the mod archive.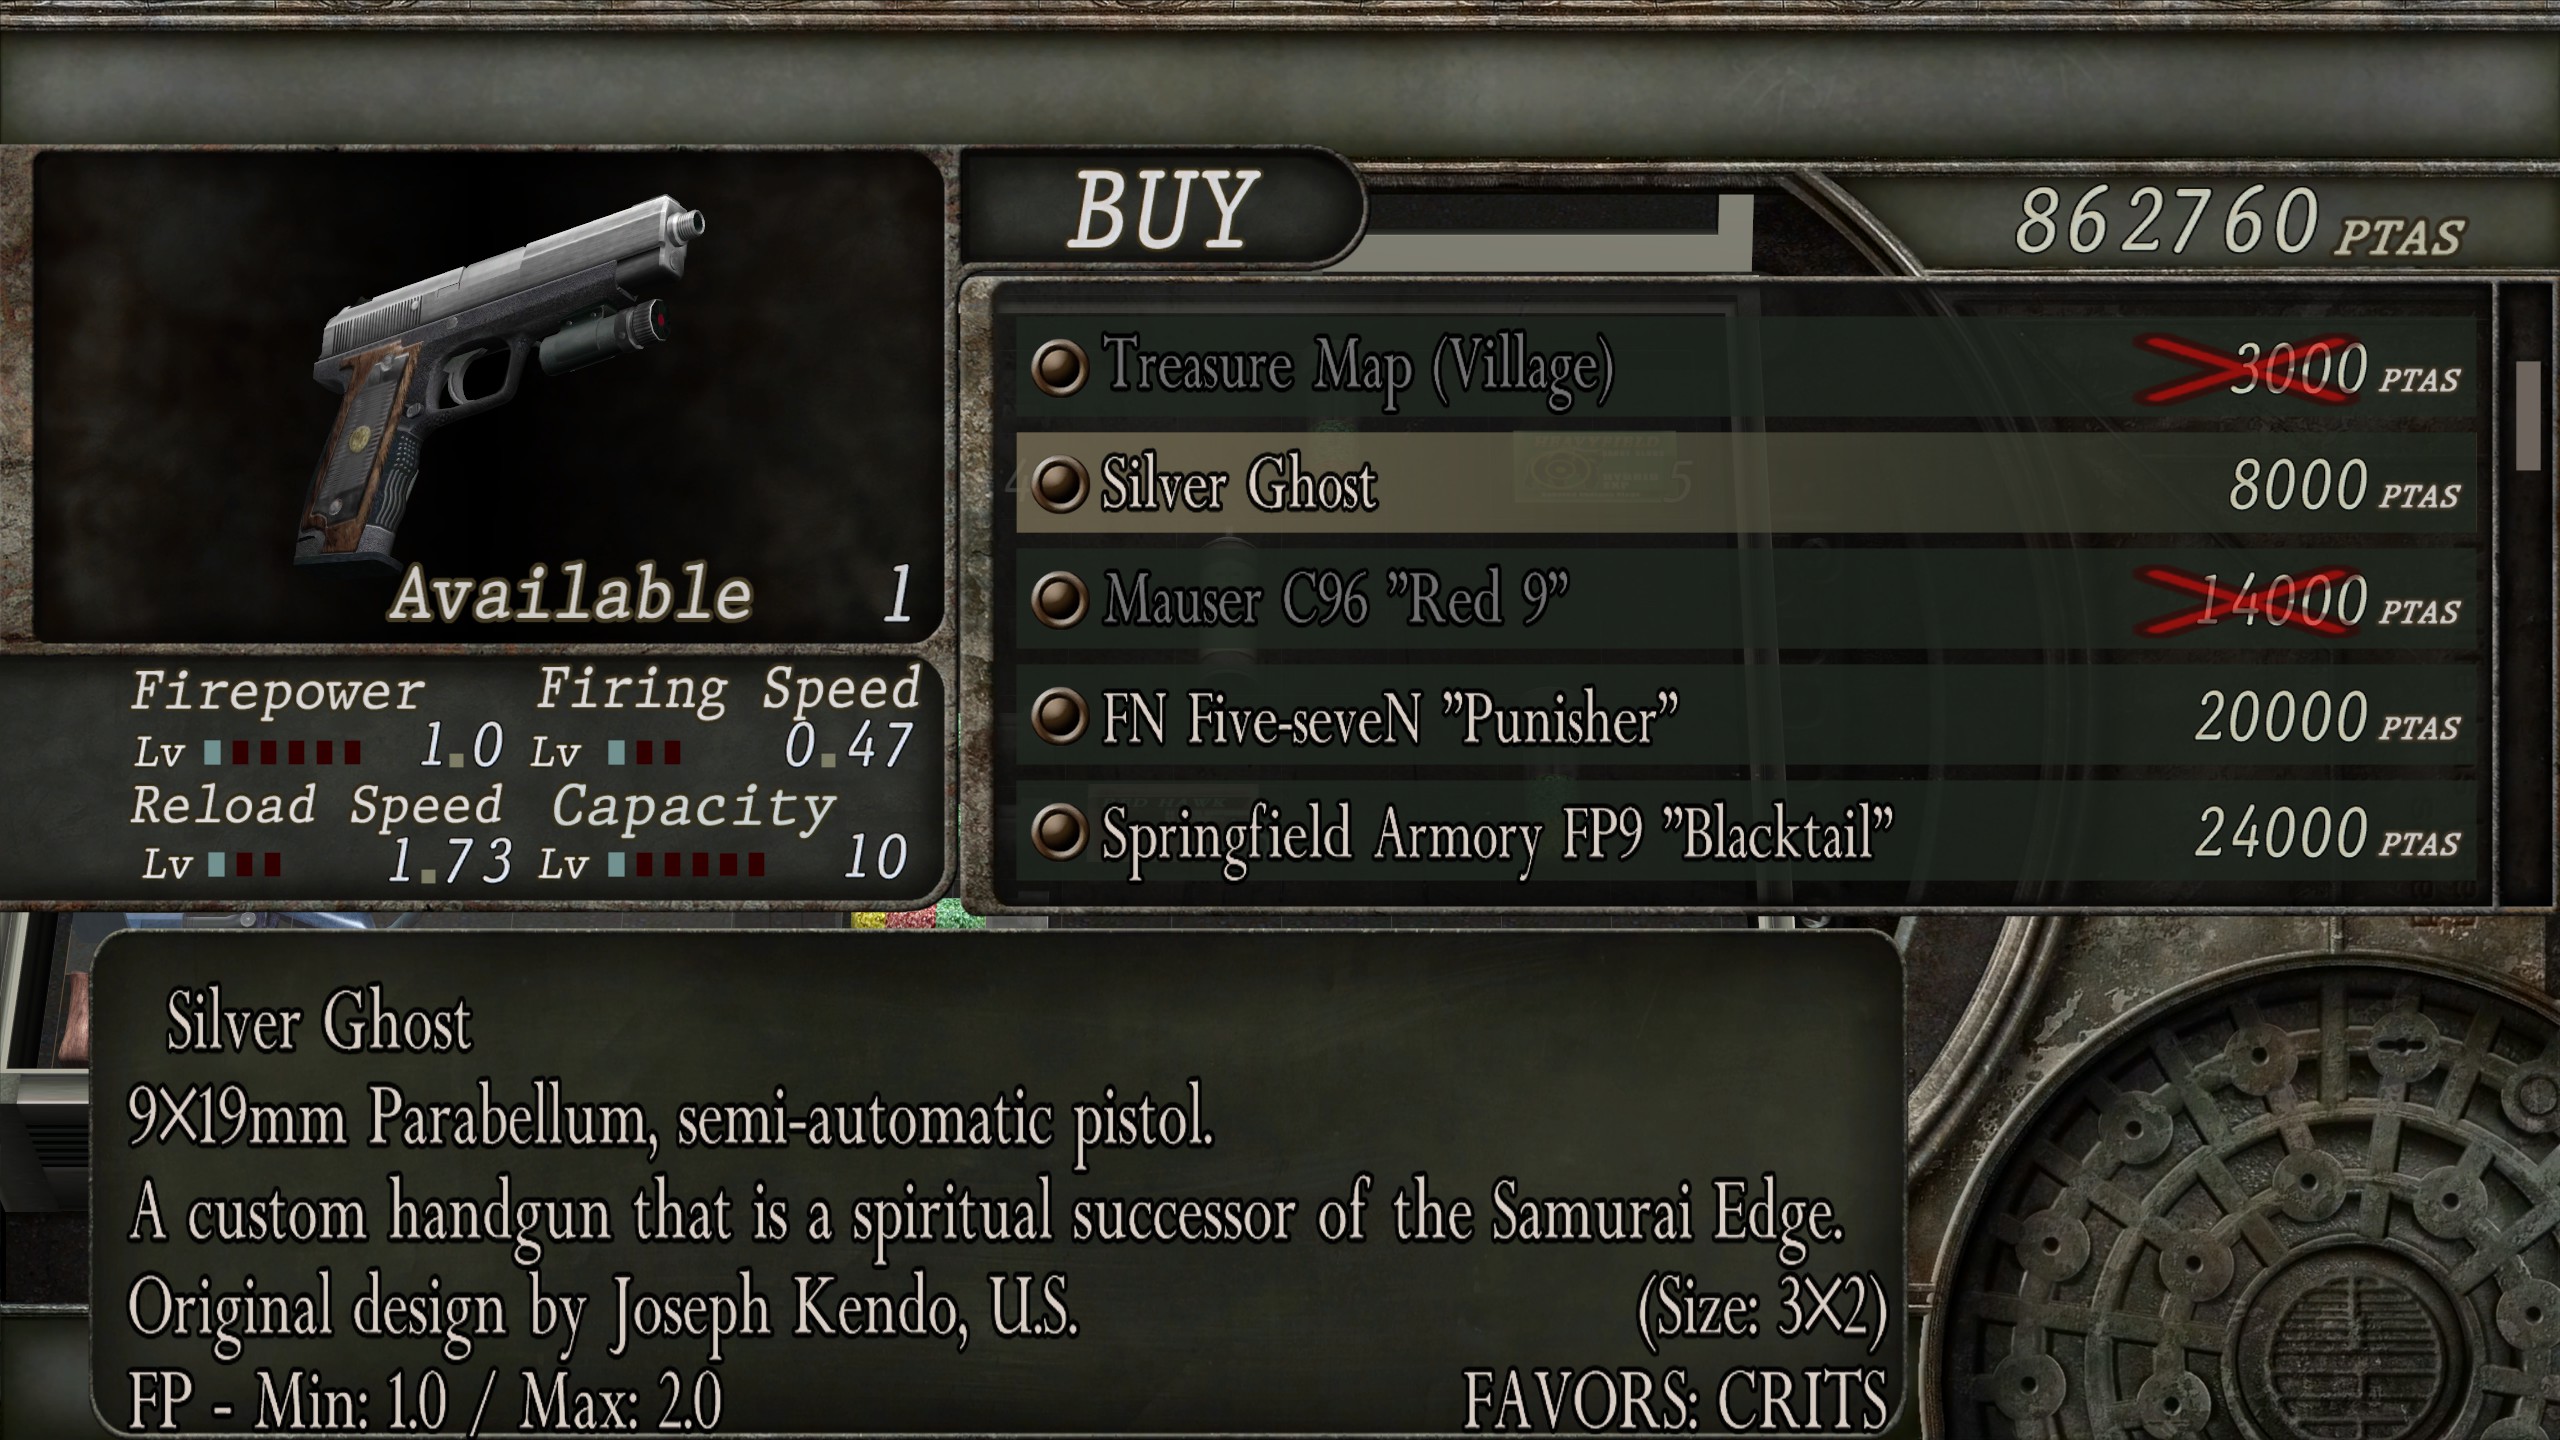
- The 4GB Patch[ntcore.com] for RE4 installed.
- The RE4_Tweaks[github.com]mod (preferably the latest version) installed.
- Download FluffyQuack's Mod Manager 5000 here[www.nexusmods.com]
(if you don't have it already) - Download the 4PRE4C mod here[www.nexusmods.com]
- Simply drag and drop .rar file into the manager window while running or...
Place the .rar file in the"..ModManager\Games\RE4\Mods" folder located where you installed the manager. - If it doesn't appear hit "Refresh mod list" and install it from the list.
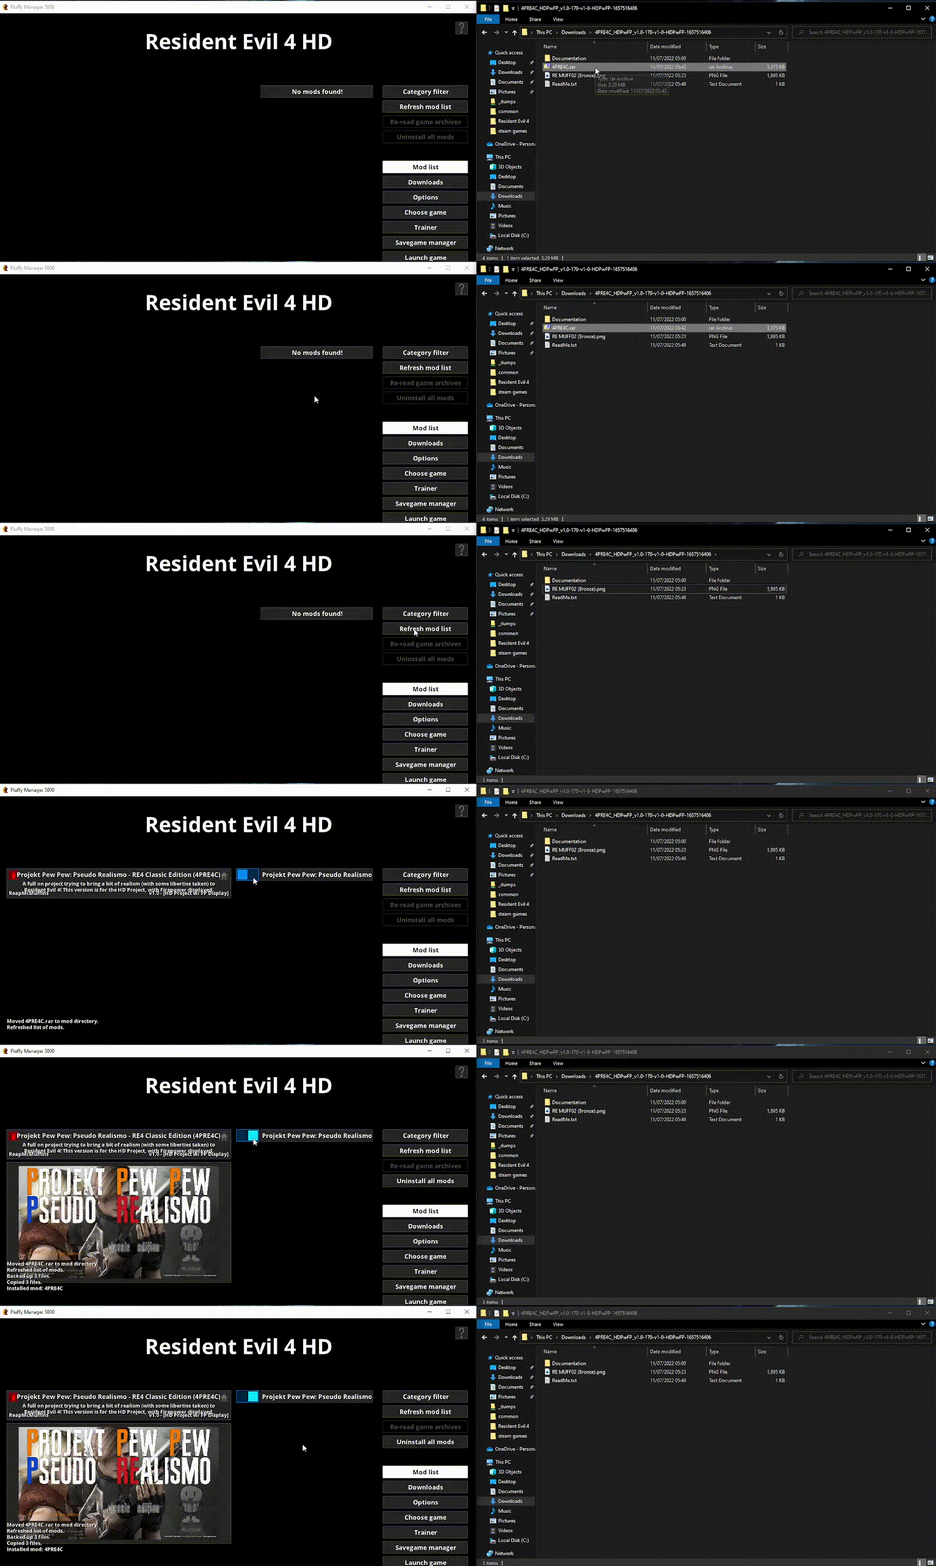 If you're updating from an older version, first uninstall then delete the old version, replace with the new updated version and you're done! For more information, updates or have a query for Muffin, check the mod's Nexus page[http//hhttps].
Huge thanks again to Muffins for this mod, and for asking if I wanted it in this guide! Definitely go over to his profile and give it and their guides some kind awards. 👏👏👏
Devil May Cry × Resident Evil 4
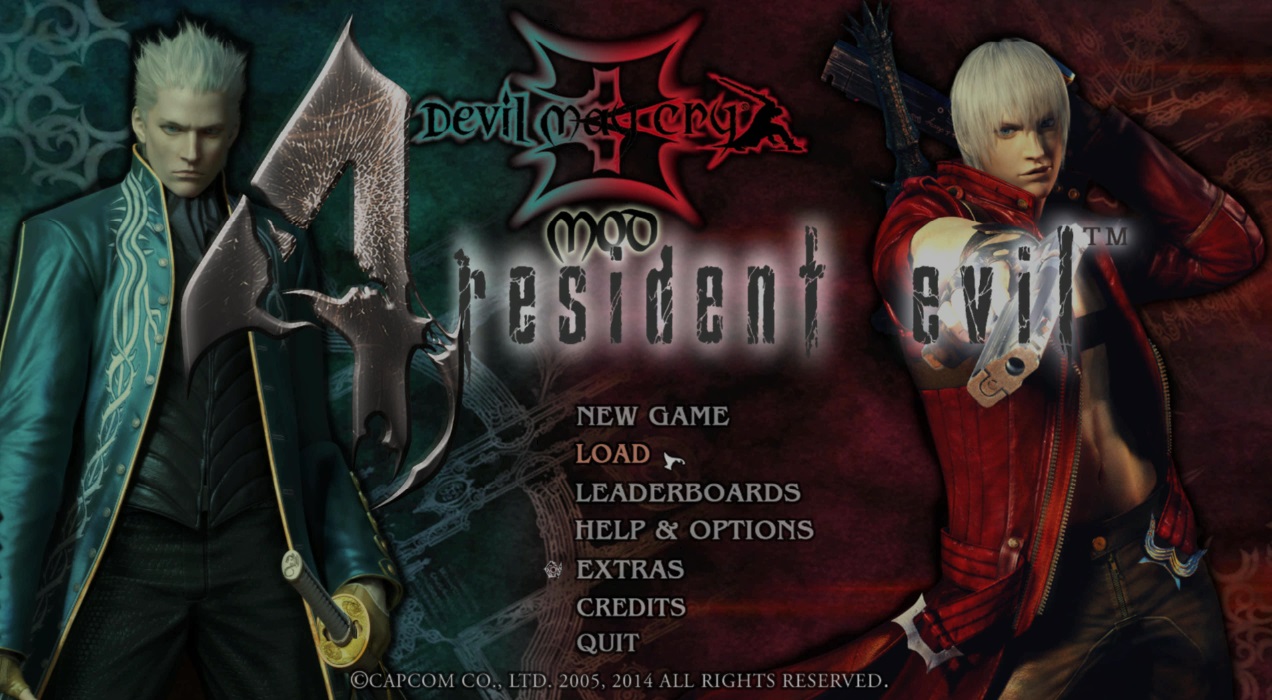
All I can say is visit the forum page[residentevilmodding.boards.net] of this mod to fully appreciate the work on display here, my screenshots certainly won't do it justice. Modder LegalSoul has truly transformed this game into something else and I implore you to download it IMMEDIATELY and try it for yourself. Funny how we have come full circle, given that the first DMC was a spin-off Capcom created out of RE4's development. Not convinced by his forum post? Tell me this gameplay video doesn't hype you up.
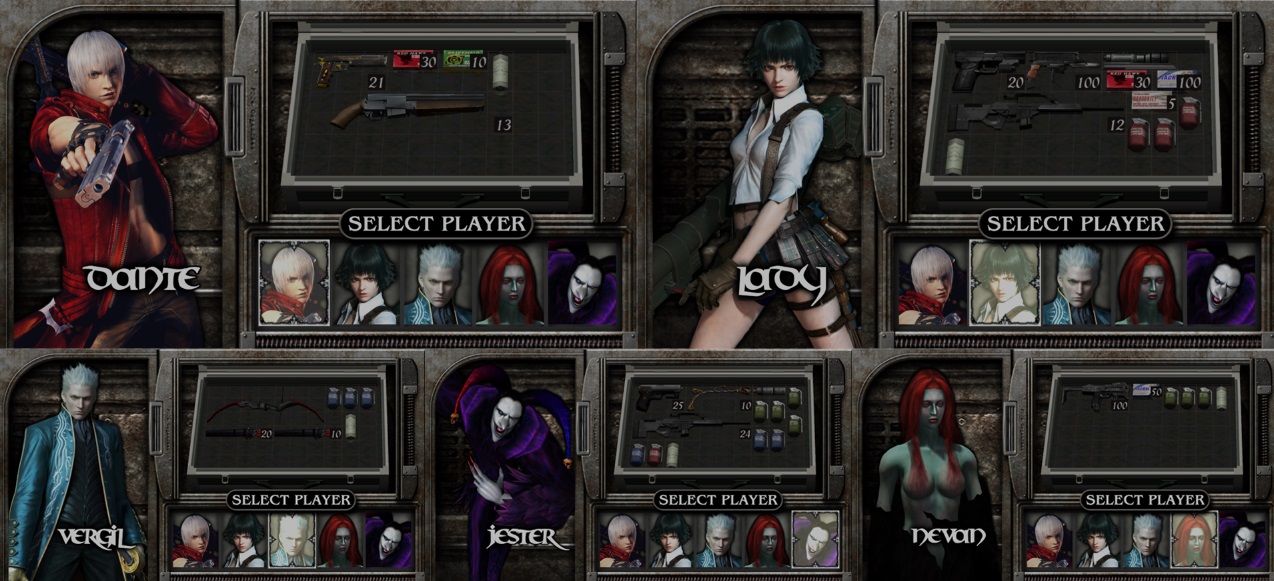
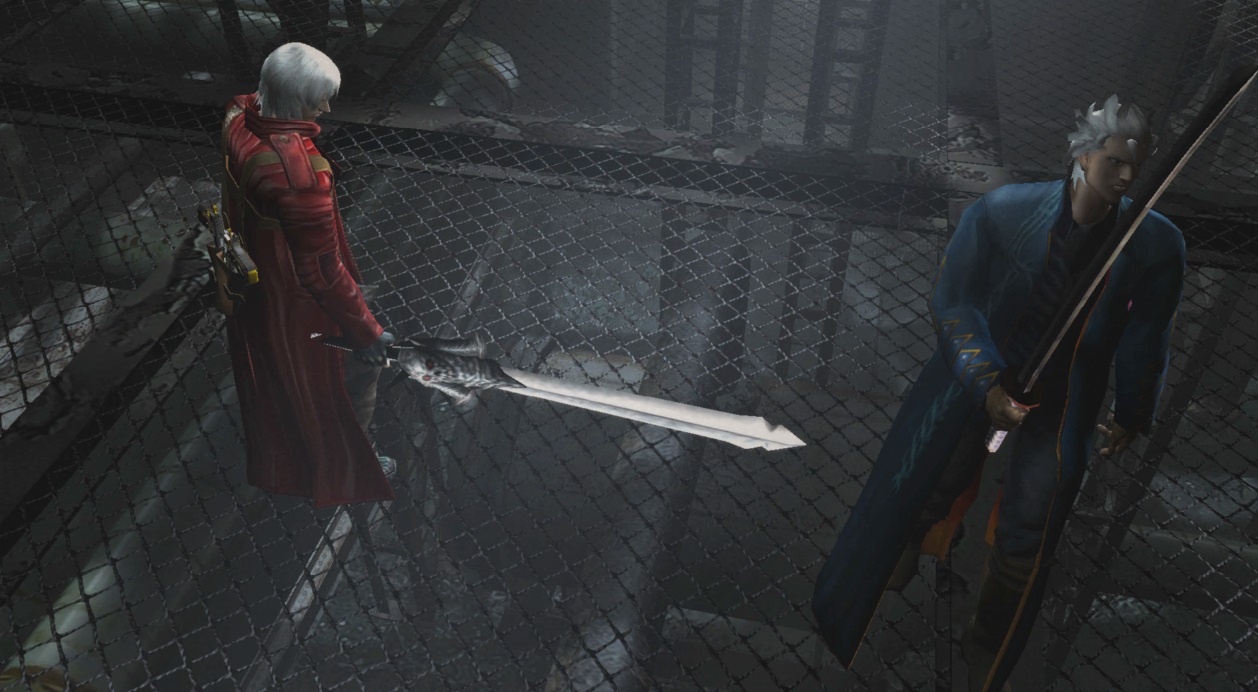
It boasts FULL character model swaps, replacing
- Leon with Dante
- Ashley/Hunk (for mercenaries) with Nevan
- Luis Sera, Salazar & Wesker with Jester
- Ada with Lady
- Krauser with Vergil
- All the characters are present in cutscenes. You are able to watch both from gameplay or from the movie browser, though you must wear the normal costume and NOT a tactical vest. Otherwise the textures will be black because of technical reasons. DMC3 dialogues are not extractable, so that's why most voices aren't replaced in cutscenes. LegalSoul has managed to do it in one or two though :)
- Select weapon models are fully replaced, using those seen in both DMC 3 and 4.
- The entire soundtrack is replaced with the one, extracted from DMC3. LegalSoul has also replaced players voices and core sounds like the menu and inventory ones as well. Regular enemies' voices aren't replaced to keep the original Spanish charisma.
- All pesetas are now orbs like they should be in the DMC universe.
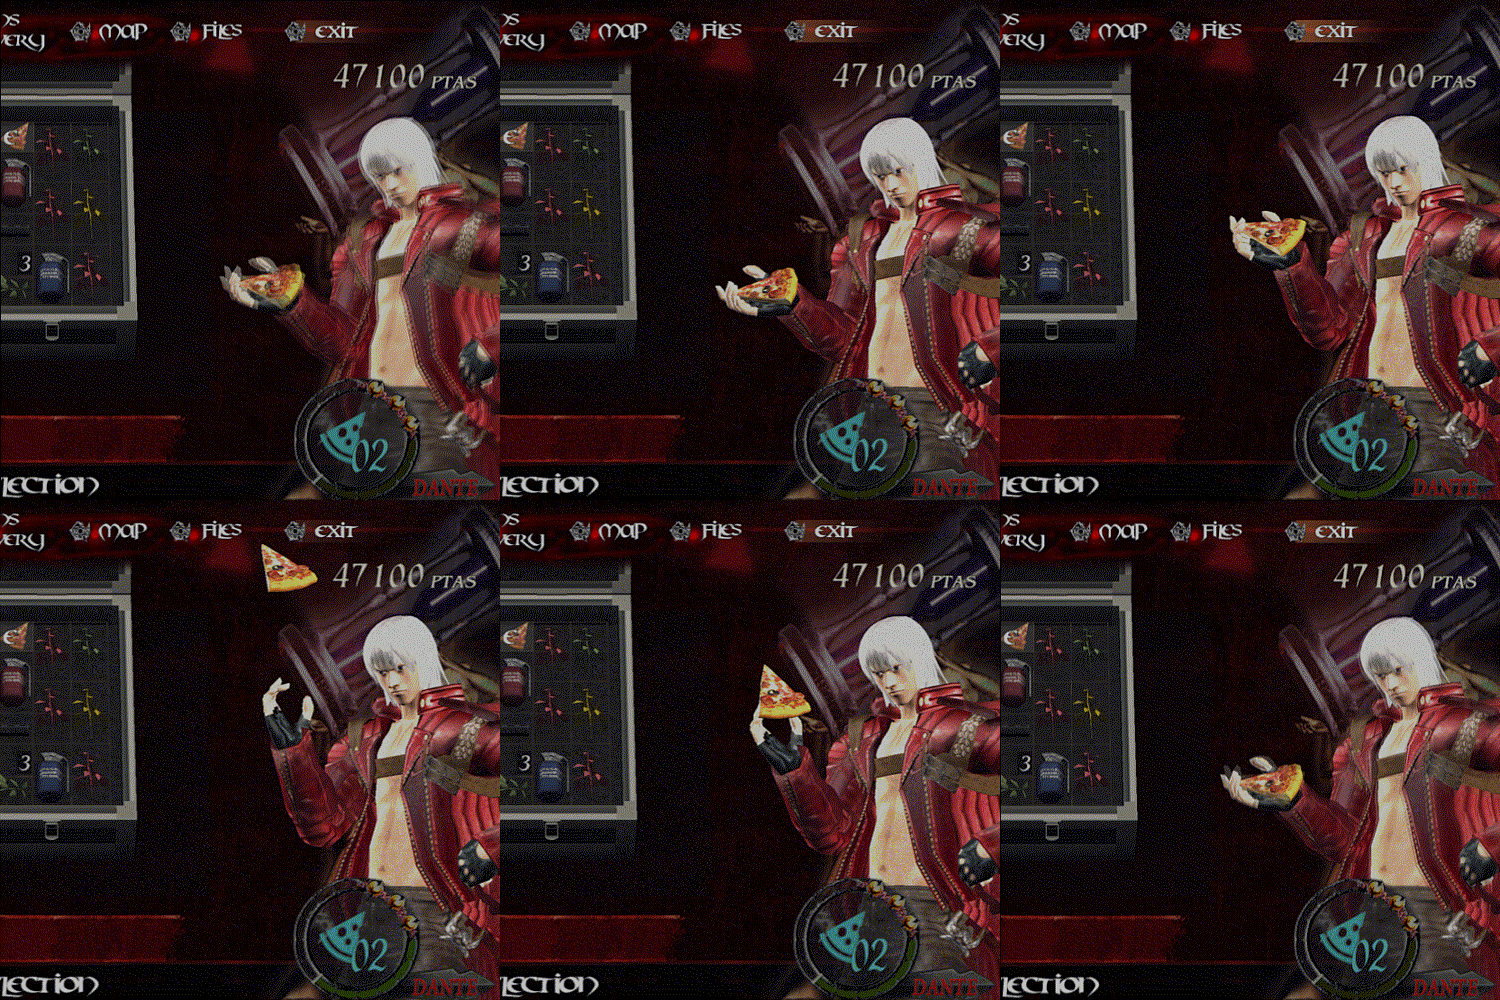
- PIZZA TIME. All types of eggs are replaced with pizza. A must.
- Almost every regular enemy and boss is REPLACED with a new model (excluding the garradors, machinegun guys, plaga knights and maybe a few others)
-7 Hells replace villagers
-Chess enemies replace zealots, abyss (red demons)
-Gigapede replaces De Lago
-Saddler by Arkham
-Beowulf replaces all El Gigantes
-Geryon (the horse) replaces Salazar's giant statue
-Spiders replace novistadors, etc. - Title menus and inventory are all jazzed up, being decorated in the style of DMC.
-
BottlecapSSS! All bottle caps awarded from the merchant's shooting range are now DMC characters with unique sound effects.
- Animations have also been edited. Very few gameplay animations mind you, mostly just the inventory-screen animations. Note: depending on you setup, performance may be unstable at 60 fps, so stick with 30 fps settings if you see visual bugs with the custom animations.
-Instructions and Download
The mod contains a whopping 550 files in total, with the largest version taking up a sizeable 2.26 GB (compressed .rar). Legal souls has kindly made 3 different size options for the mod, with ones removing, music, SFX, cutscenes and menu images.



- Download the mod size of your choice here[residentevilmodding.boards.net] and unzip the .rar file.
- Copy "backup.bat" file from the mod archive in your BIO4\ folder and RUN it. It creates a "BACKUPS" folder and MOVES all your 550 original files with subfolders from their location into that "BACKUPS" folder.
*If you don't want to reinstall the game and HD Project mod again, simply move your RE4 (with HD Project installed) folder OUTSIDE the steamapps\common folder. Replace with SD RE4 and install the DMC mod.
- Now just copy and replace all the folders from the mod .rar file (Em, Etc, Evd, ImagePackHD, snd, SS, St1, St2) to your BIO4\ folder. If you want the add-on (which include more items replacements, sounds etc.), then run 2 bat files below in the add-on links section and copy & paste the add-on files the same way you did for the main mod. Be sure to MAKE backups of all the files you are replacing.
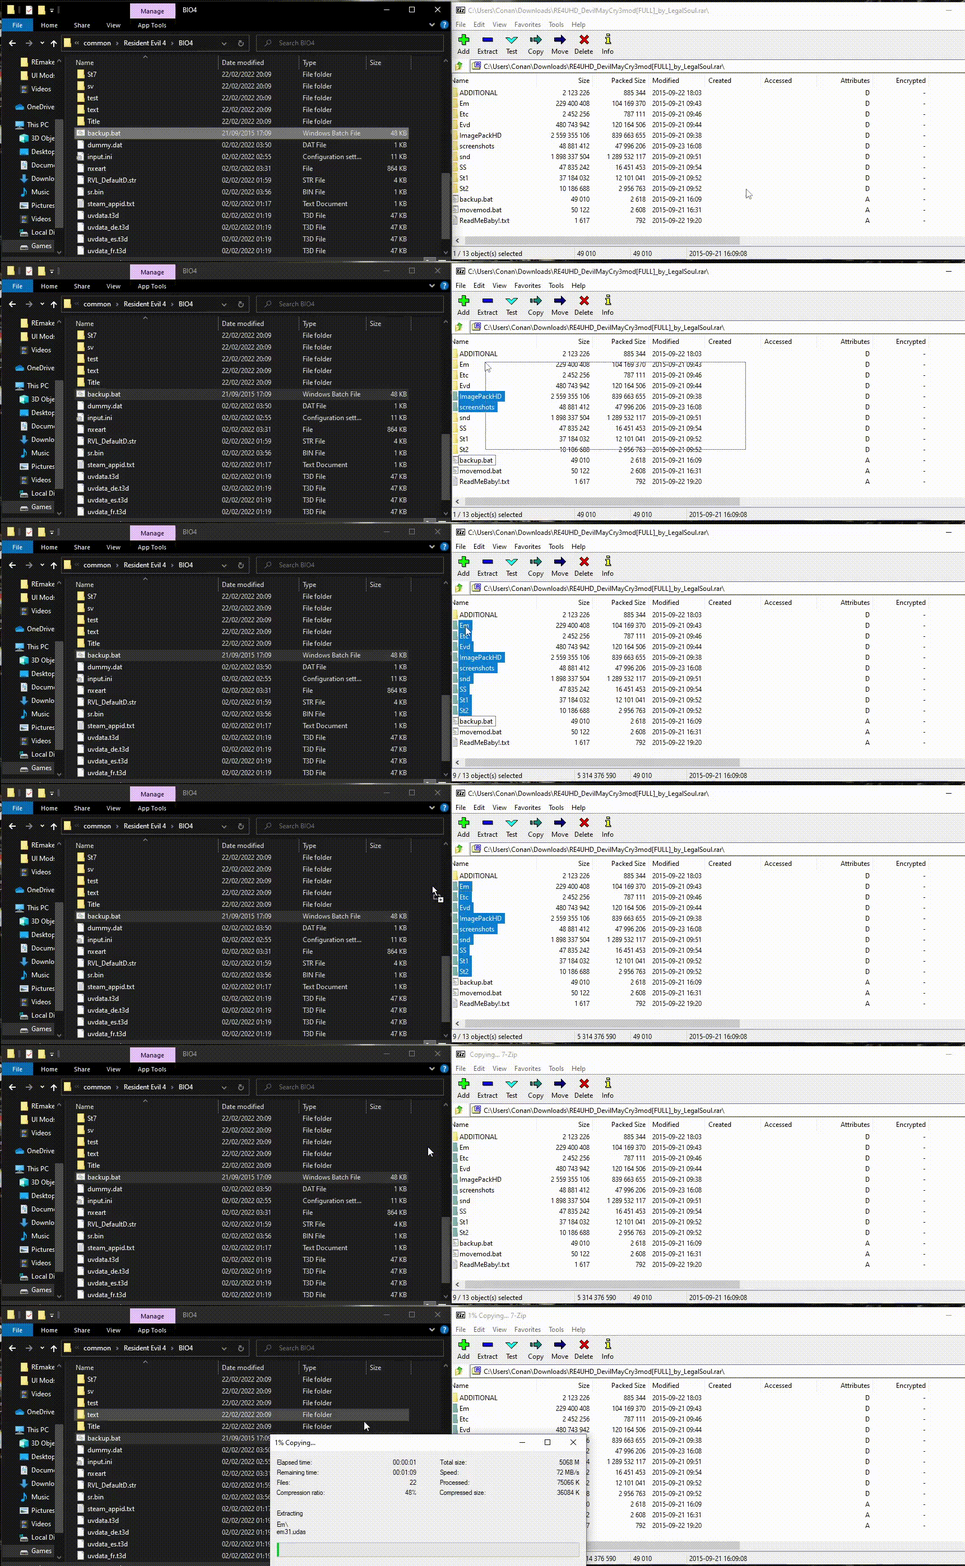
Note: The ADD-ON 1 archive is a sizeable enough one (900+ MB archive).
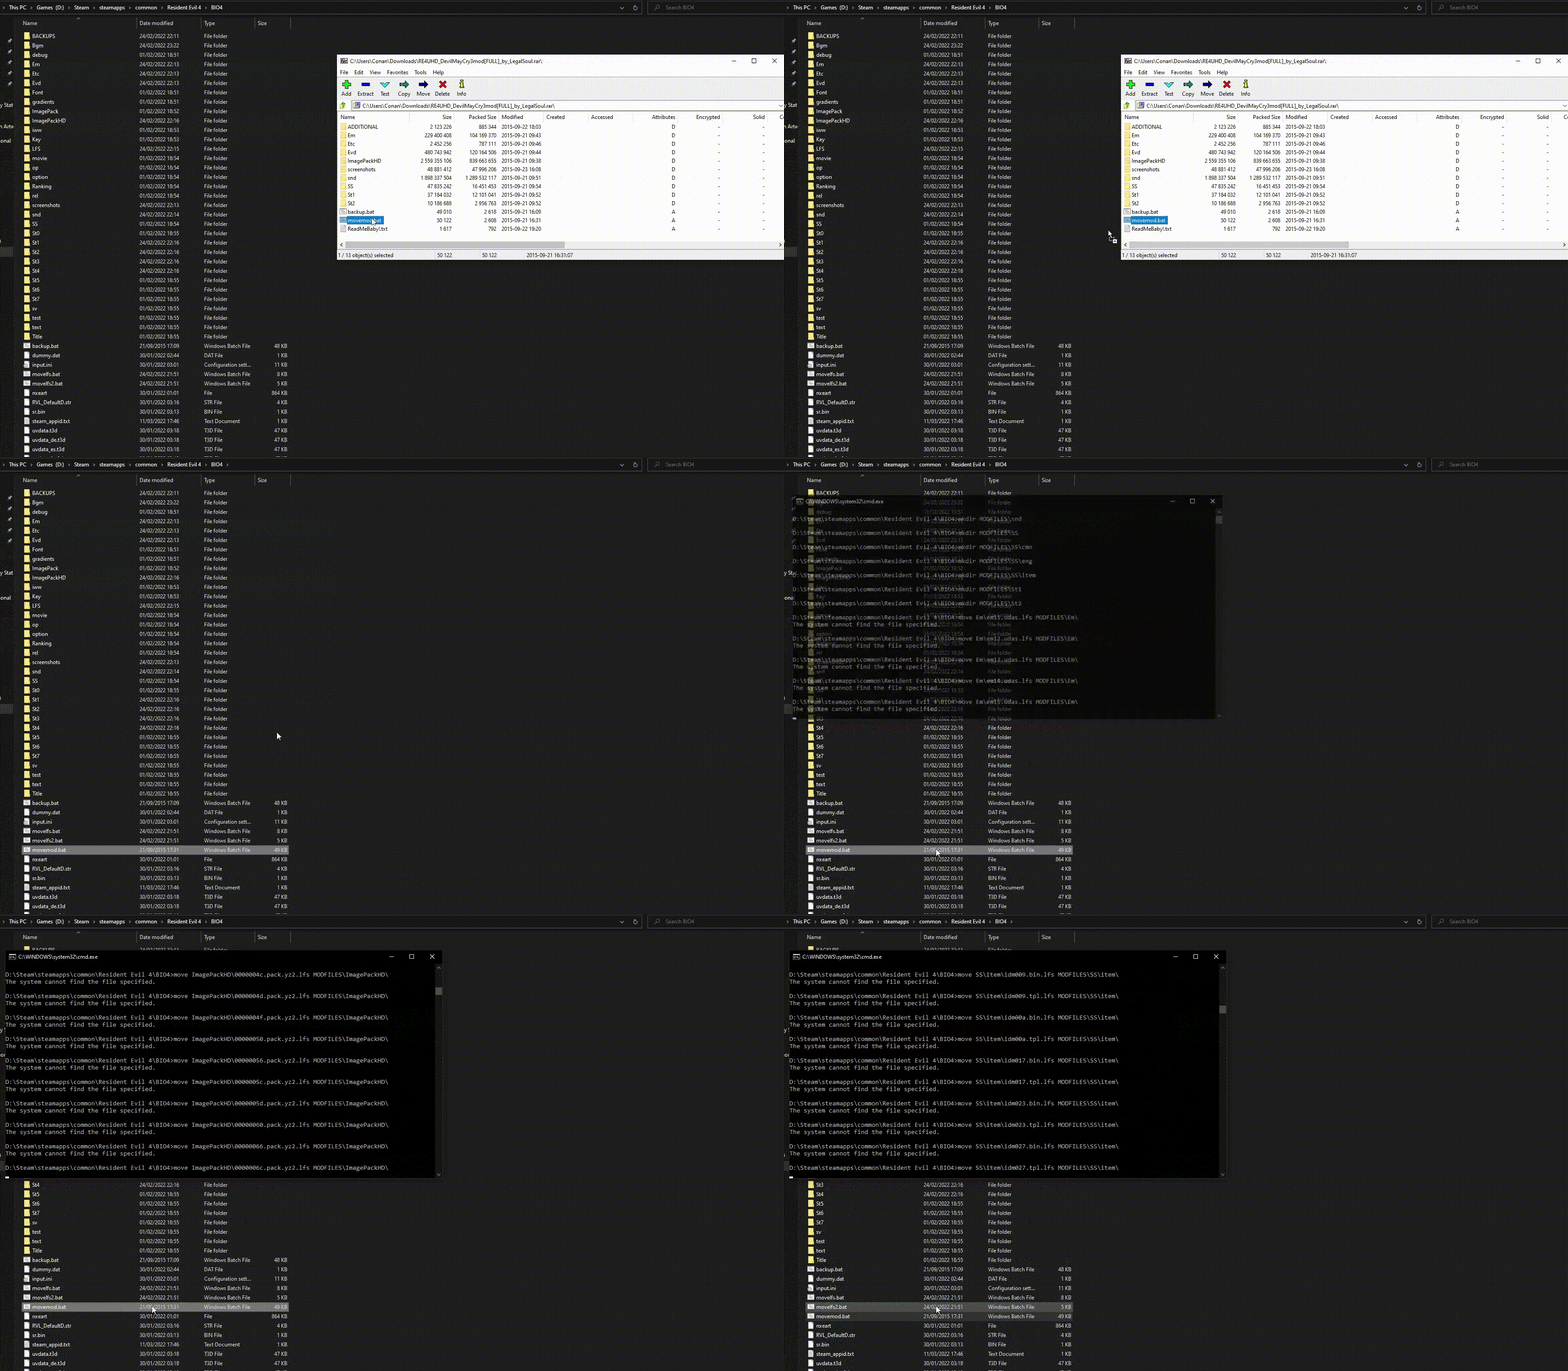
- Copy "movemod.bat" file from the mod archive to your BIO4\ folder and RUN it. It creates a "MODFILES" folder and moves all 550 MODDED files from their location to "MODFILES" folder.
- Then you just need to copy and replace all your original folders from your "BACKUPS" (created earlier during installation) to the BIO4\ folder. If you have the add-on also installed you simply need to copy back all your back-upped files.
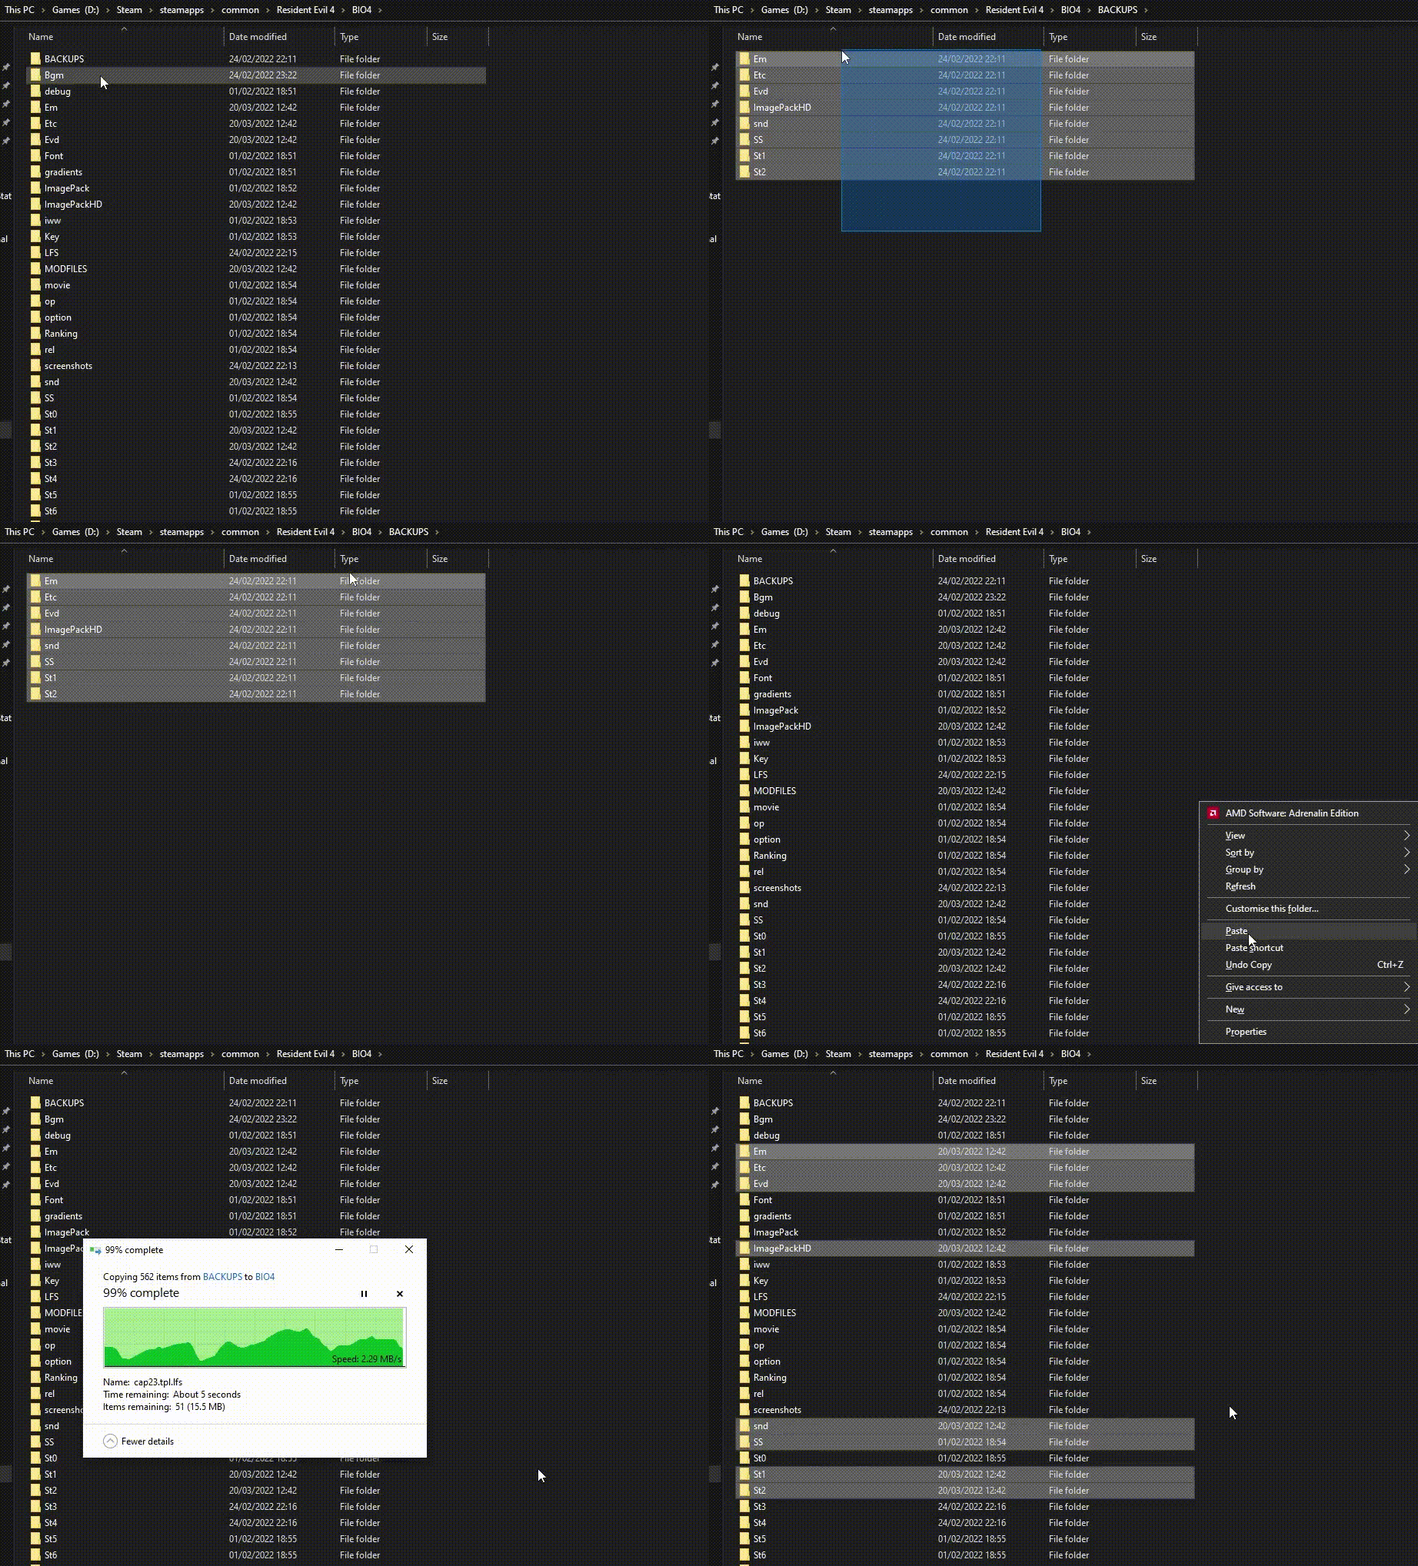
- The mod was made for the English version of the game, so please play with this language.
- It is recommended that you use this mod with a clean install of RE4 (SD). There are literally thousands of things that could make this mod incompatible and reports suggest that the HD project makes the mod crash the game more often. Trust me, I tried. The game only got to the main menu before crashing when loading a save file with the HD project installed. Unfortunate, but it's a sacrifice worth making for this mod.
- One cutscene may be unstable from the gameplay (it runs well from the movie browser, but can crash the game from the gameplay for some reason), it's r203s00, the first cutscene with Luis in the castle near the end of chapter 2-3. If that happens - just replace the original one from the "BACKUP" folder or download the original below in LegalSoul's forum. The directory you need to replace it in is located at D:\Steam\steamapps\common\Resident Evil 4\BIO4\Evd.
- The original knife animation has been changed to the Drive animation from DMC4. The hitboxes are shifted a bit so you need to aim about 20-30 degrees more to the right than usual. If you are not comfortable with that just replace it with the original knife animation (OriginalKnifeAnim.rar) which can be downloaded below in the forum as well. Be sure to put it in the BIO4\Em folder.
- Unfortunately custom animations may show glitches when played at the 60 FPS setting. If 60 FPS is critical to you, you can copy and replace files with original animations from "ADDITIONAL\ORIGINAL_ANIMATIONS_FOR_60_FPS\" folder from the mod archive. It's a much better experience playing with 30 FPS in general, as 60 can cause some slowdown.
- To play Separate Ways also check the "ADDITIONAL" folder to replace the original Blacktail sounds, otherwise you will be hearing Dante's voice when he reloads.
- Don't forget to set HD textures in Options menu.
God of War × RE4
Once again LegalSoul has done god's work by modding in Kratos, Aphrodite, Zeus and much much more into one large package of epicness! After his fantastic Devil May Cry 3 Mod I just HAD to load this bad boy up, and you should too. This section is currently under construction but all you really need to do is visit his forum page to learn about and install this one ;)
Link: https://residentevilmodding.boards.net/thread/3467/kratos-aphr-zeus-titans-cutscenes
Overview video
Mod Auto Installer
Since a lot of these further mods require backing up original files and manually swapping between them, this Auto-Installer Tool developed by @DarkSamus instead makes modding RE4 take seconds rather than minutes, even for a noob like me. It includes an installer and uninstaller .bat file to make your life a lot easier. I will still include manual instructions for each mod below if you want to do that too. It certainly made testing out a few of these next mods much easier for me.
Note: Many mods below use a combination of .pack (texture) and .udas (model) files so follow the instructions below and place all of your desired mod's files in their respective folders, then run the .bat file.
- Download the tool here: https://residentevilmodding.boards.net/thread/1740/re4uhd-installer-supports-model-swapping
- Unpack the .rar file containing "RE4HDTEX" folder, "RE4UHD Mod Installer.bat" and "RE4UHD Mod Un-Installer.bat" into your Resident Evil 4 UHD folder located at
Program Files(x86)\Steam\SteamApps\common\Resident Evil 4 (or wherever you keep your Steam installations)
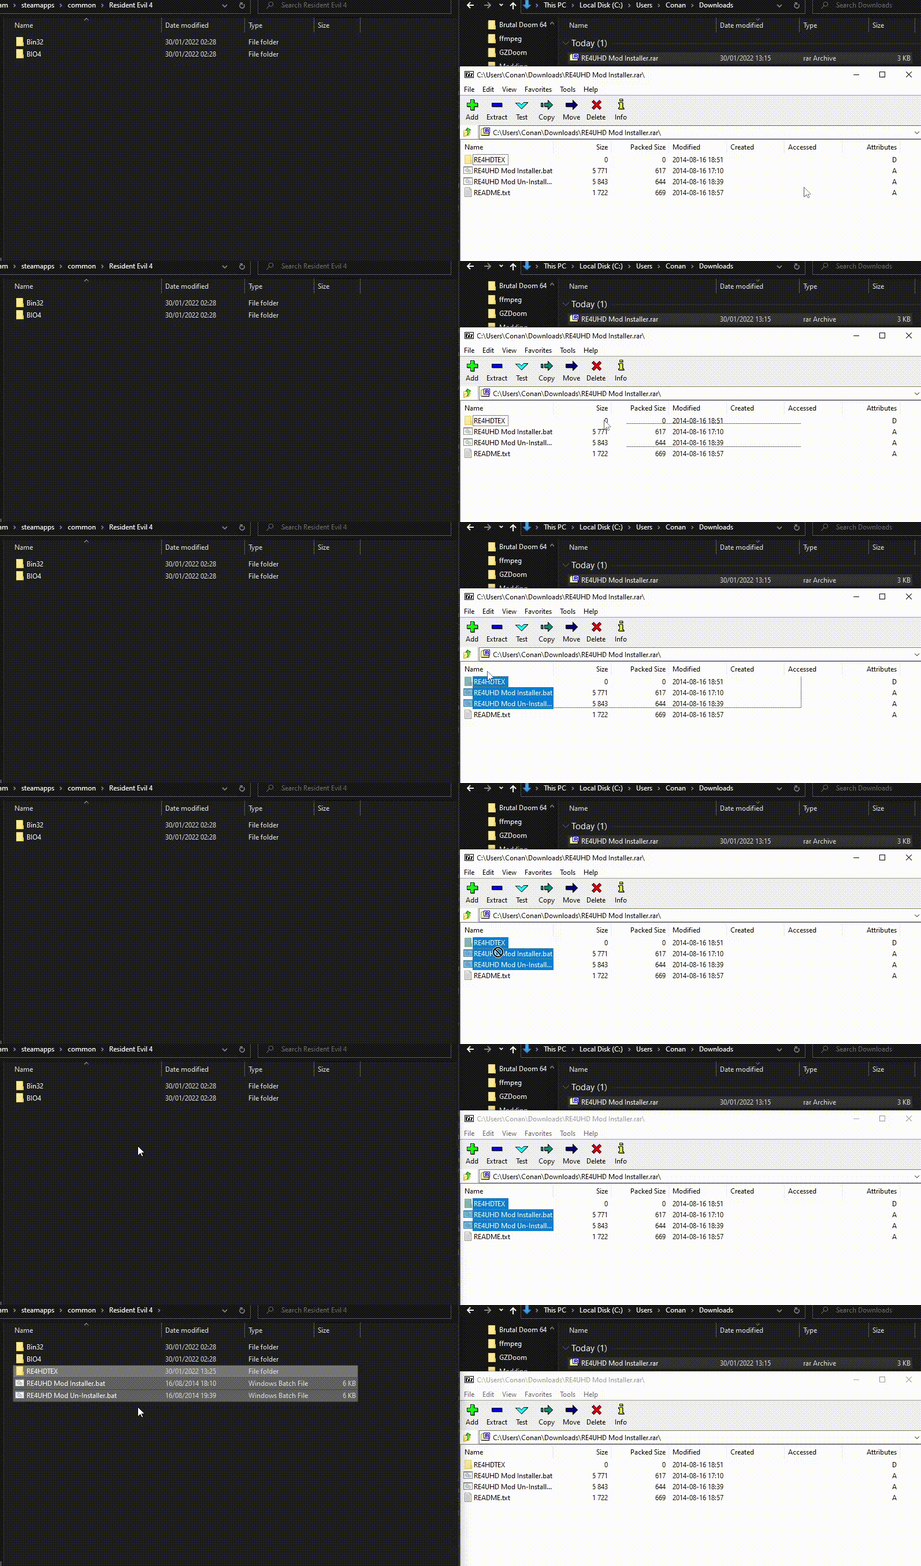
Follow the steps below to easily install the following types of mods:
- Take any texture mod you downloaded and place it in...
- a) To swap the HD mode textures... RE4HDTEX > TexturePacksHD
b) To swap the SD mode textures... RE4HDTEX > TexturePacks - Go back to your "Resident Evil 4" folder and run the included installer.bat file


- Take any Model mod you downloaded and place it in... RE4HDTEX > EmMod
- Go back to your "Resident Evil 4" folder and run the included installer .bat file. Easy

- If you wish to swap the fix files in the Ranking Folder (Optional)
- Place your edited "Ranking" .fix mods in... RE4HDTEX > RankingMod
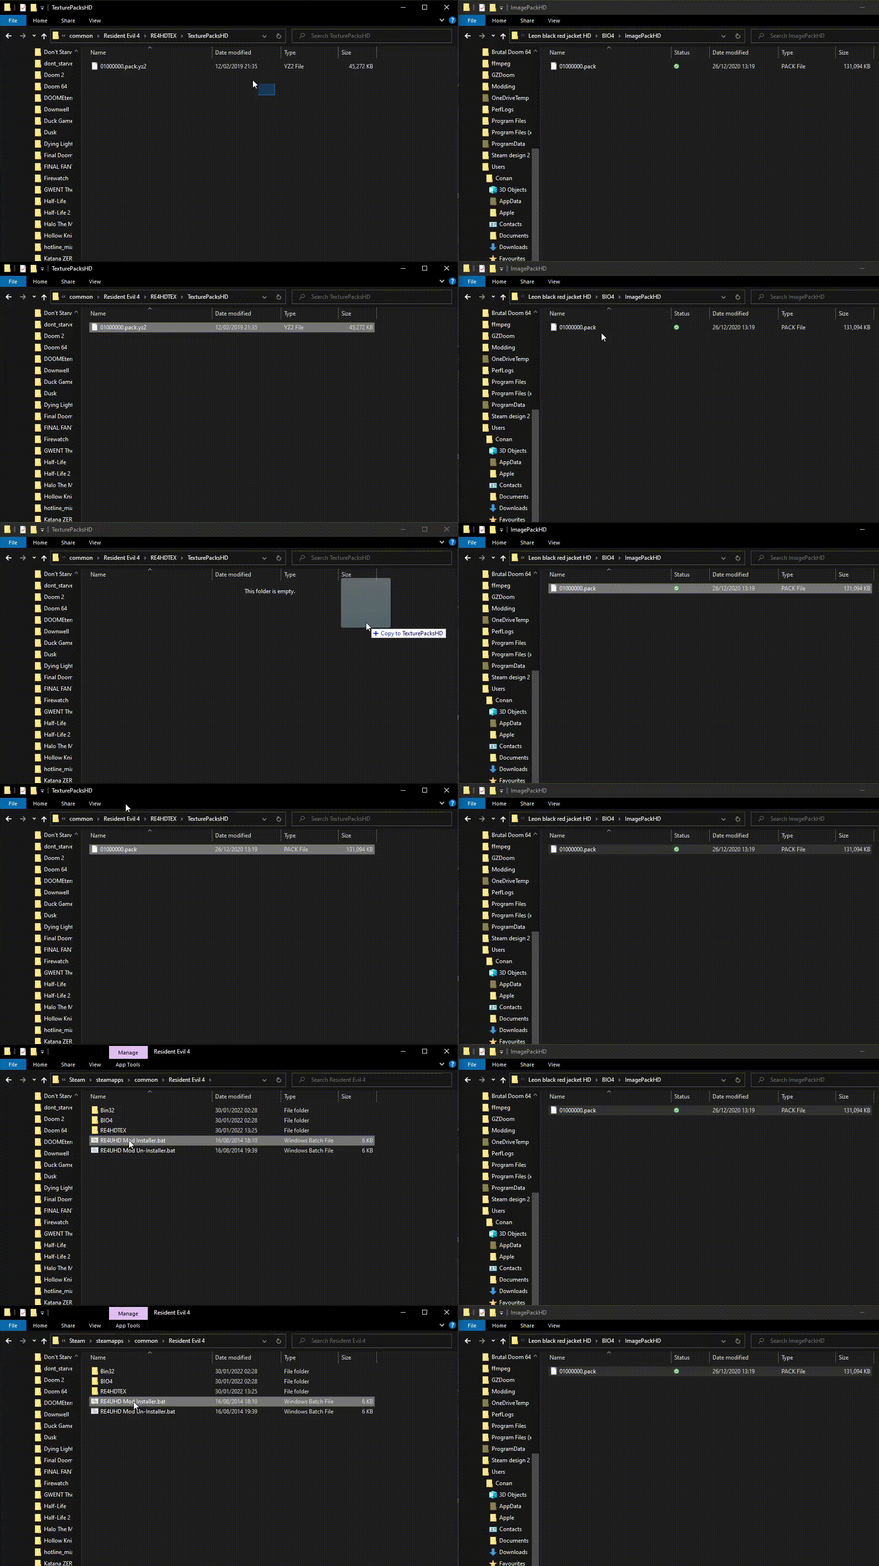
Huge thanks to DarkSamus once again for this tool! If you want to follow a much more detailed guide about the tool here is a link to his fantastic guide:
https://steamcommunity.com/sharedfiles/filedetails/?id=304251350
Additional Mods
 is dedicated to all the fun and wacky mods, varying from simple model and cosmetics changes, to full fan games and gameplay mods. This is really for those who have already experienced RE4 countless times and want something fresh from the vanilla experience. Keep in mind most of these mods probably won't work with the HD project so it's best to probs stick with SD RE4 for these...
I've labeled each mod with a specific category if you're using the auto-installer[residentevilmodding.boards.net] mentioned above, and if they're compatible with the HD Project.


─────────────────────────────────────────────────────
Use these tags as a guide to placing files into there respective folders for the auto installer to handle. Gameplay mods will have to be installed manually though. Note that I'm still testing each mod out for compatibility so bear with me.
Remember any and all...- Textures (.pack/yz2 files)--> RE4HDTEX > TexturePacksHD
- Models (.udas files files)--> RE4HDTEX > EmMod
- Fixes (.fix files files)--> RE4HDTEX > RankingMod
But enough jabbering let's dive in and see what's in store for us shall we?
-Cosmetic Mods (Skin/Model edits)
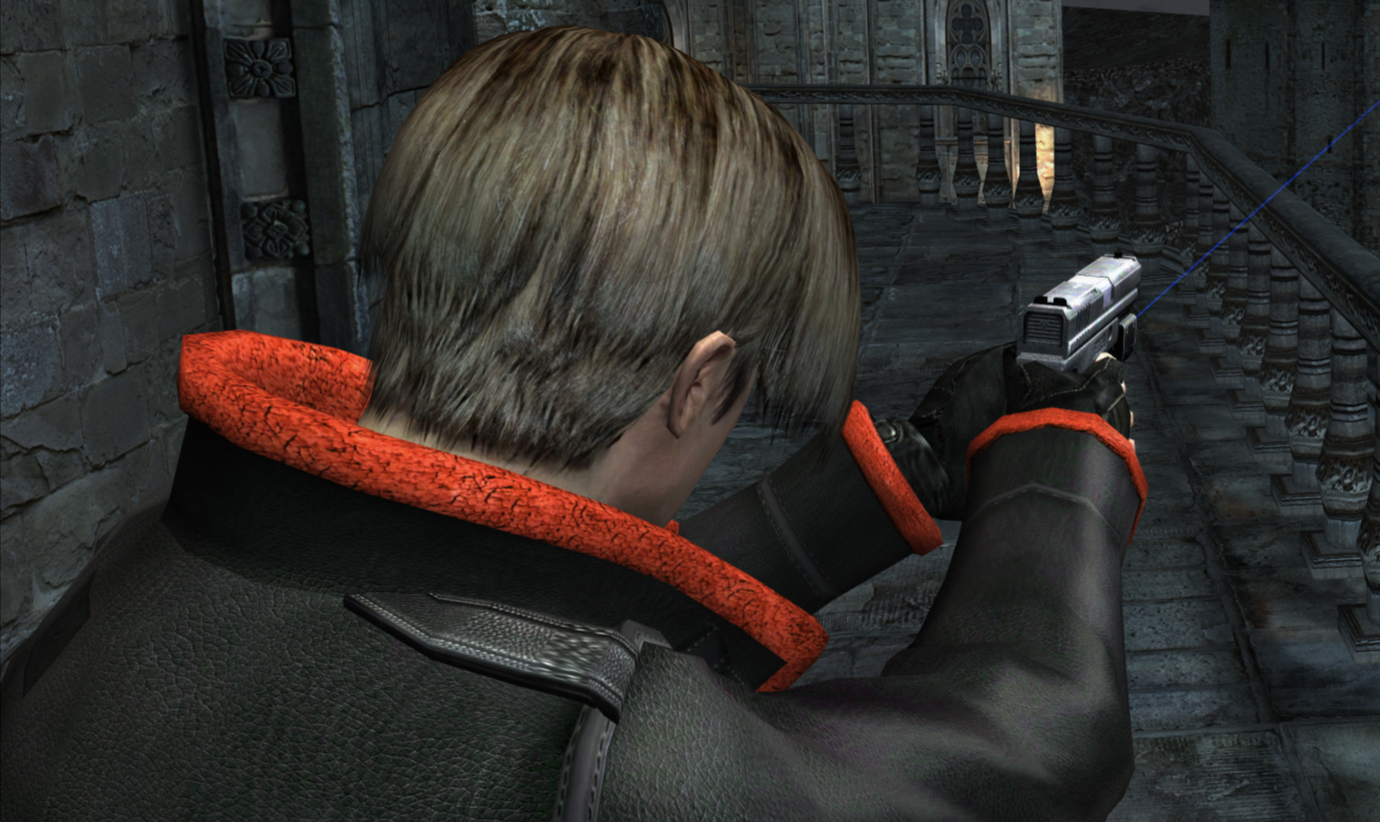
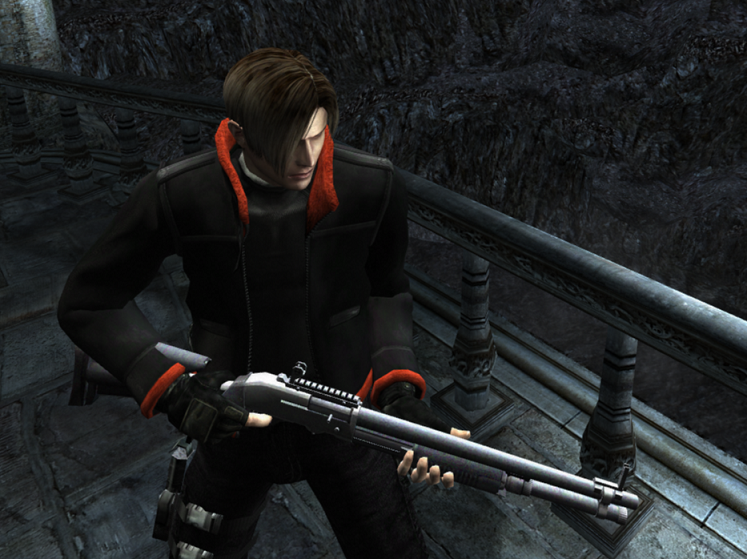
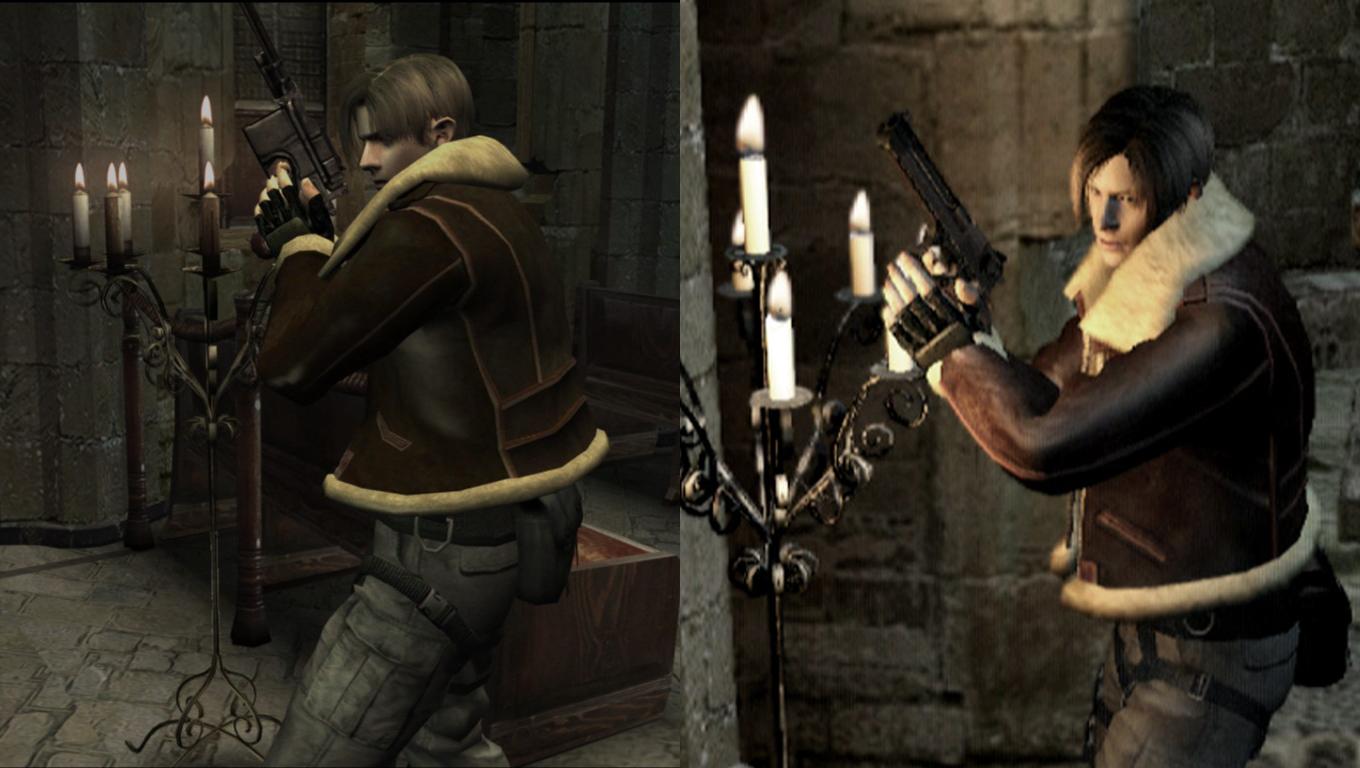 Brings back the original jacket Leon can be seen wearing in the 'Biohazard 4' Beta trailers. I actually prefer this one over the the original. What do you think?
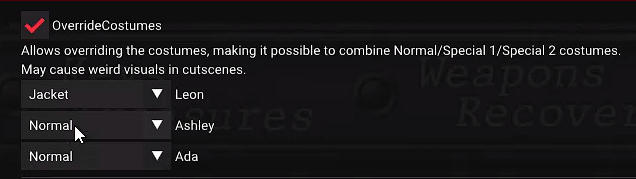
- To play with this in Leon's campaign, follow the install instructions. If you want to keep it throughout the entire game when Leon inevitably loses it after getting captured, download the latest release (Ver 1.7.6 or above) of the RE4_tweaks mod here[github.com]. Press "F1" and go to the Misc section. Enable the OverrideCostumes feature, set Leon's outfit to Jacket, then reload your last save/checkpoint if you’re not wearing it and you should see it loaded.
- Be sure to load a new game with the 'normal' outfit and not from a save where you bought the Tactical Vest, as it carries over from game clears.
For more screenshots here’s the forum thread for the mod here:[residentevilmodding.boards.net].
- If his original jacket model appears during cutscenes use this fix[residentevilmodding.boards.net]. Unfortunately as of this writing, the link to actually download the mod is dead. I'm guessing the modder was waiting for the HD project to be released to reupload it? Luckily I had an old file of it on my computer so I reuploaded it to Moddb in the meantime. Here is a link to it on my profile: https://www.moddb.com/downloads/re4uhd-35leon-mod-01
- Navigate to "Resident Evil 4/BIO4/Em"
- Locate the file named “PL00.udas.lfs”
- Rename it to PL00.udas.lfs.bak (renaming it to .bak for 'backup' so the game won't load this file) Now you'll have a backup copy if you ever want to revert back to the original Leon model.
- Drag and drop the pl00.udas file from the .rar file, replacing your backup with the mod file.
- Go back and make your way to "Resident Evil 4/BIO/ImagePackHD". If you're not using the HD project, go to "Resident Evil 4/BIO/ImagePack"
- Now locate the file called “01000000.pack.yz2.lfs” and rename it to 01000000.pack.yz2.lfs.bak (once again making a backup of the original)
- Replace it with the file 01000000.pack.yz2 from the mod archive and you're DONE!
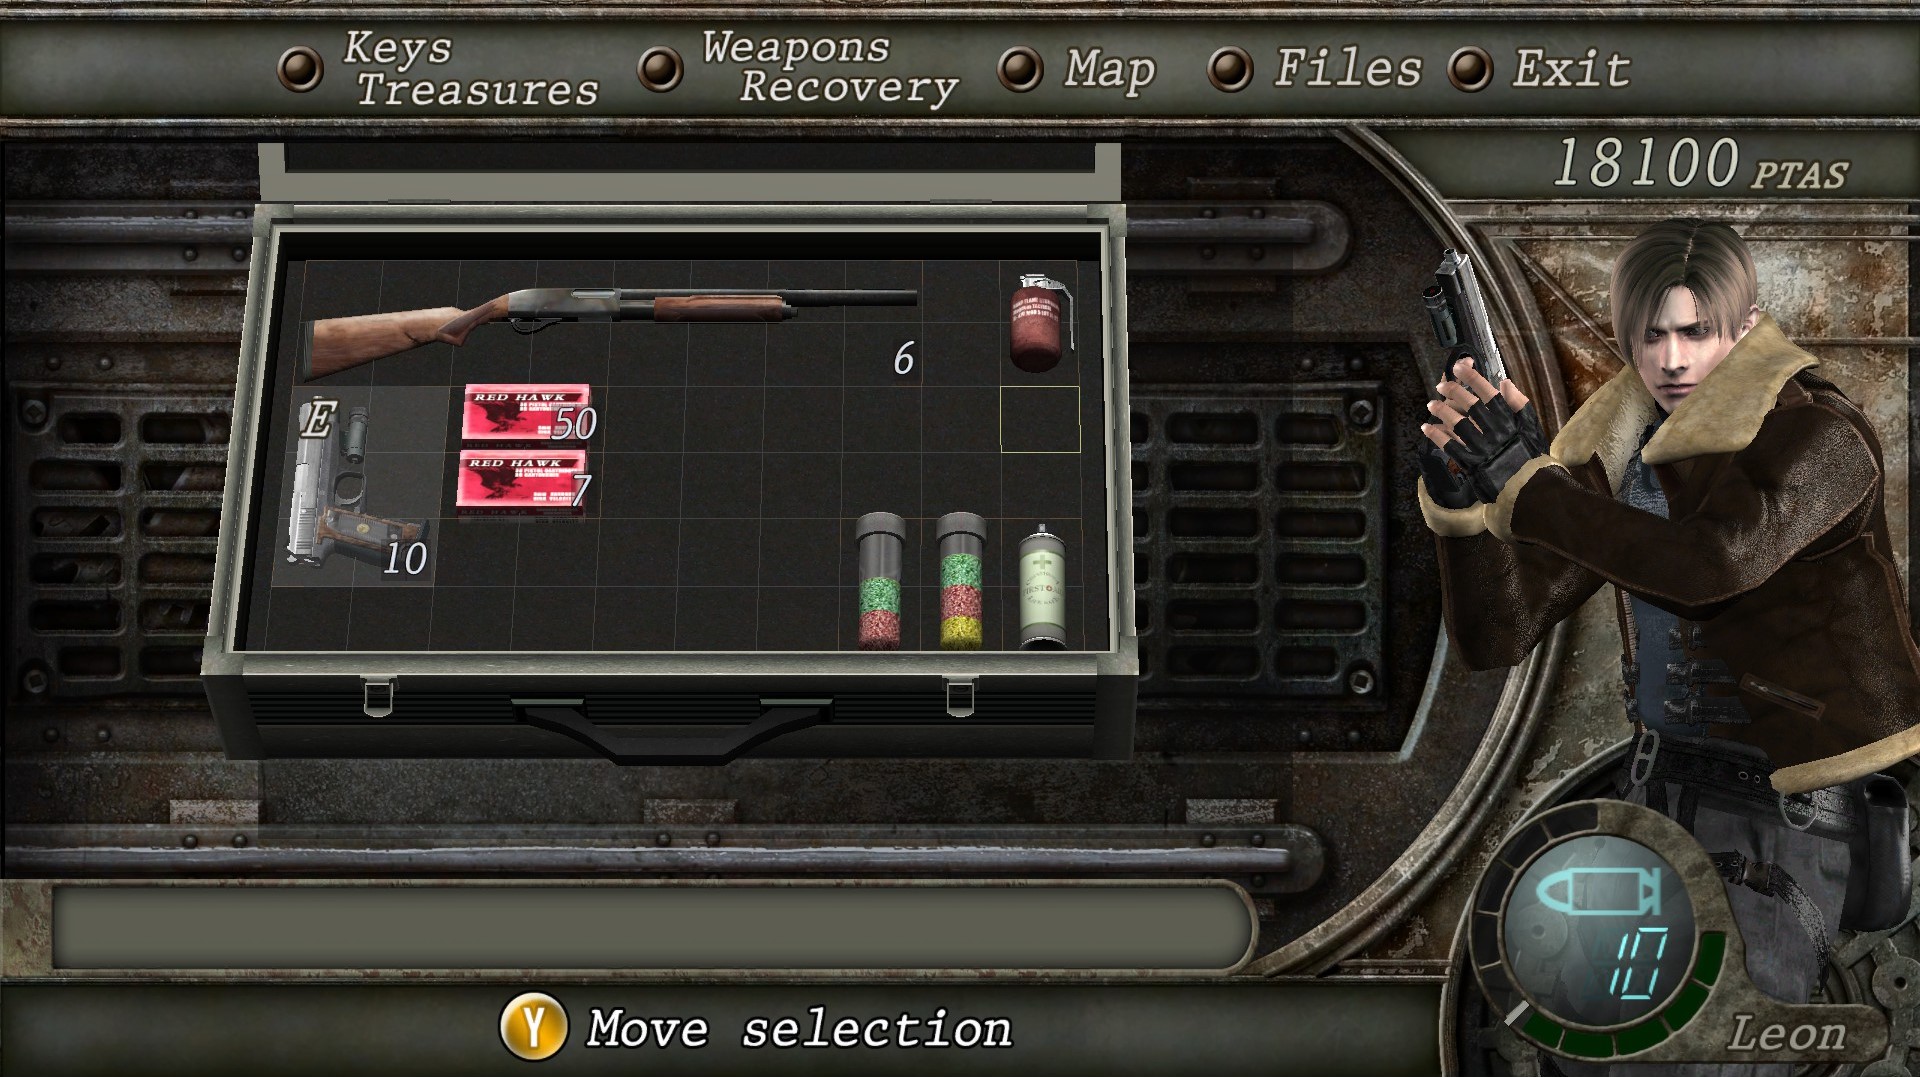
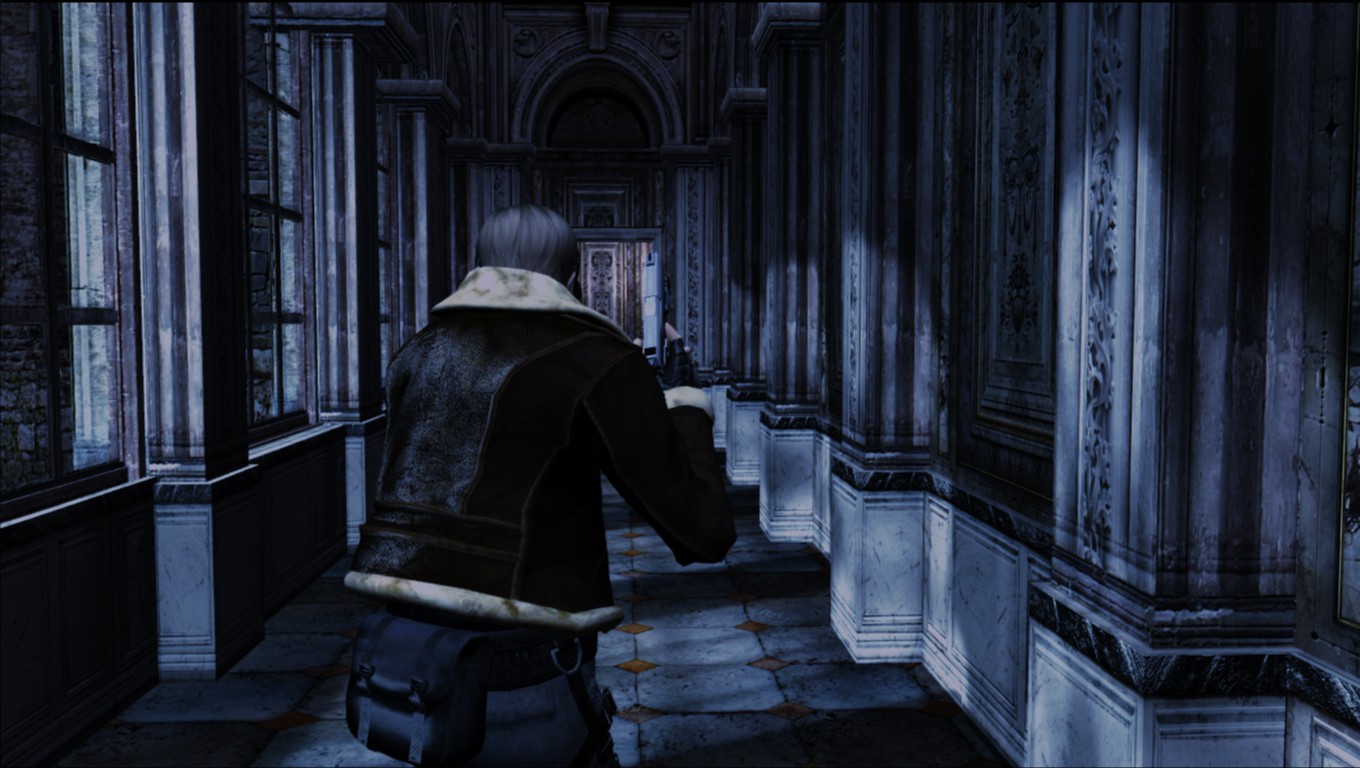 Video showcase of the mod
https://www.youtube.com/watch?v=kywOeEyFwgw&t=17s
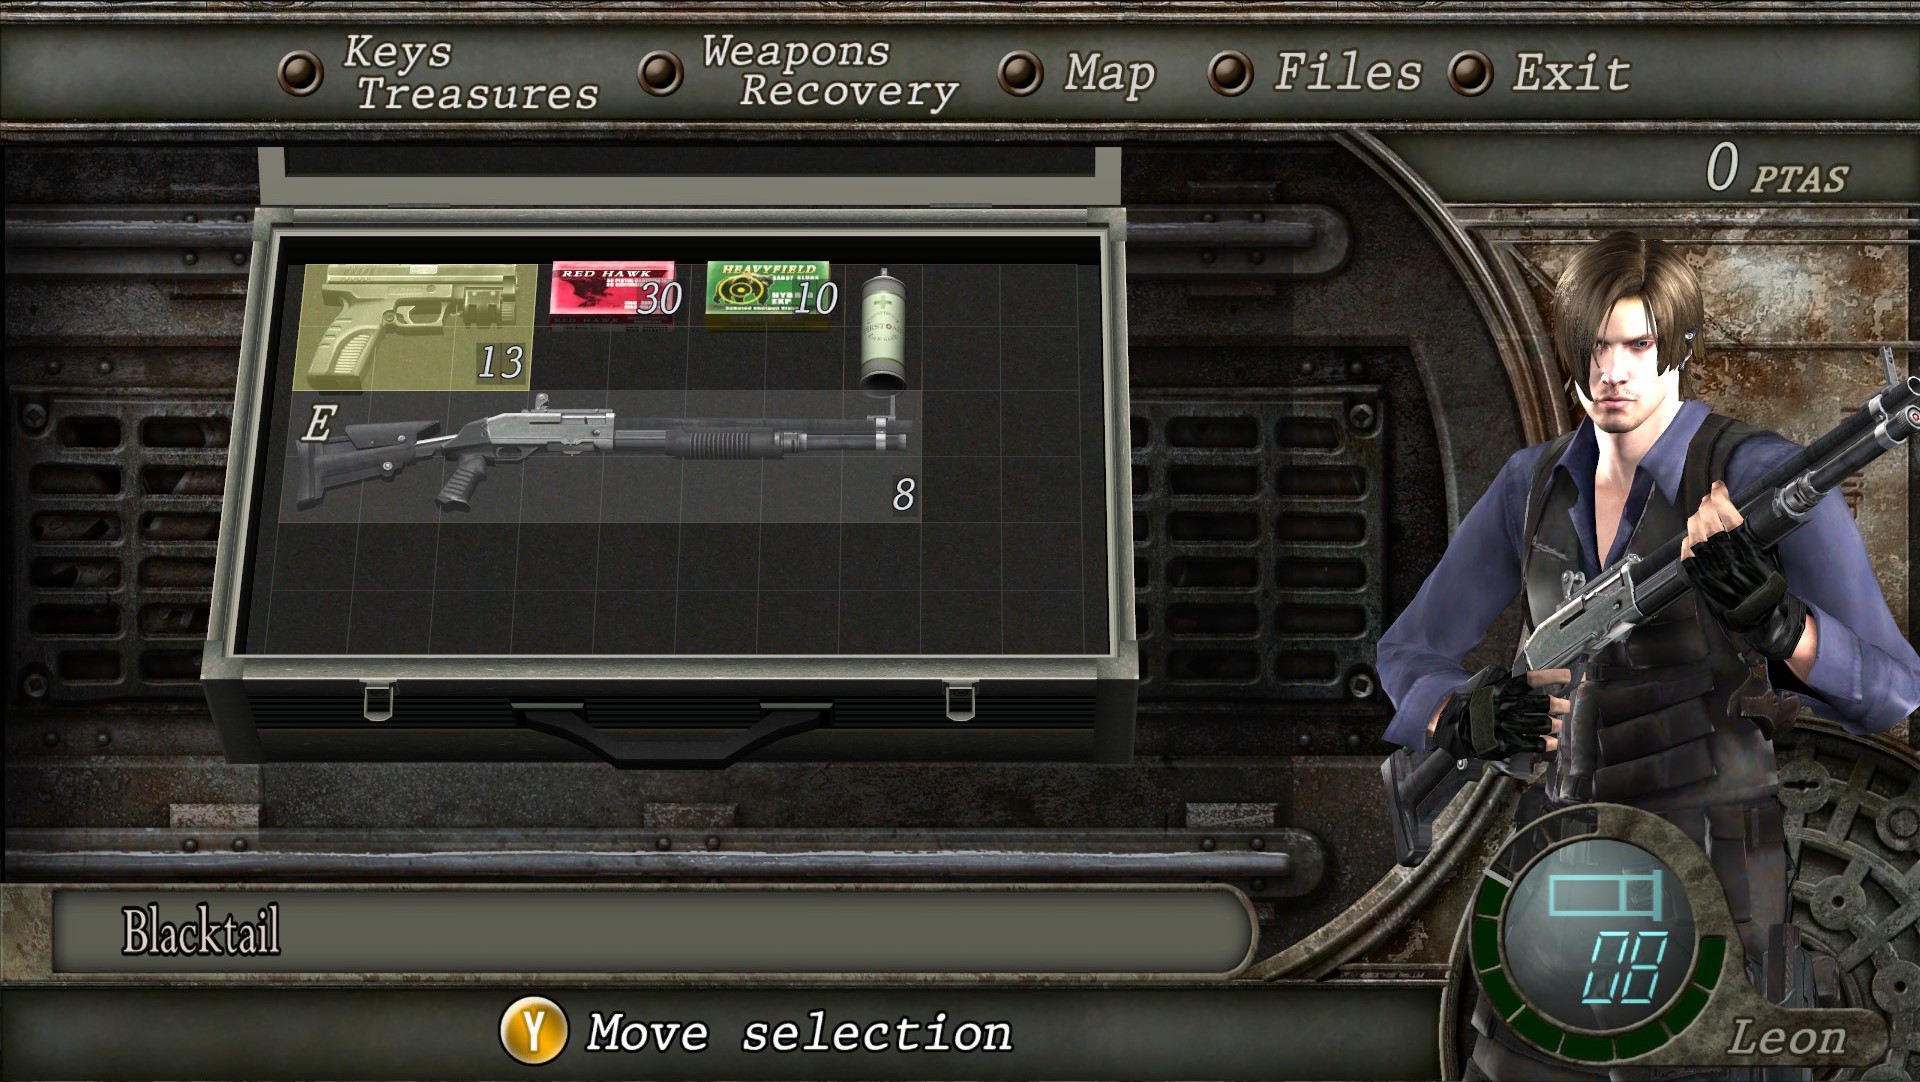
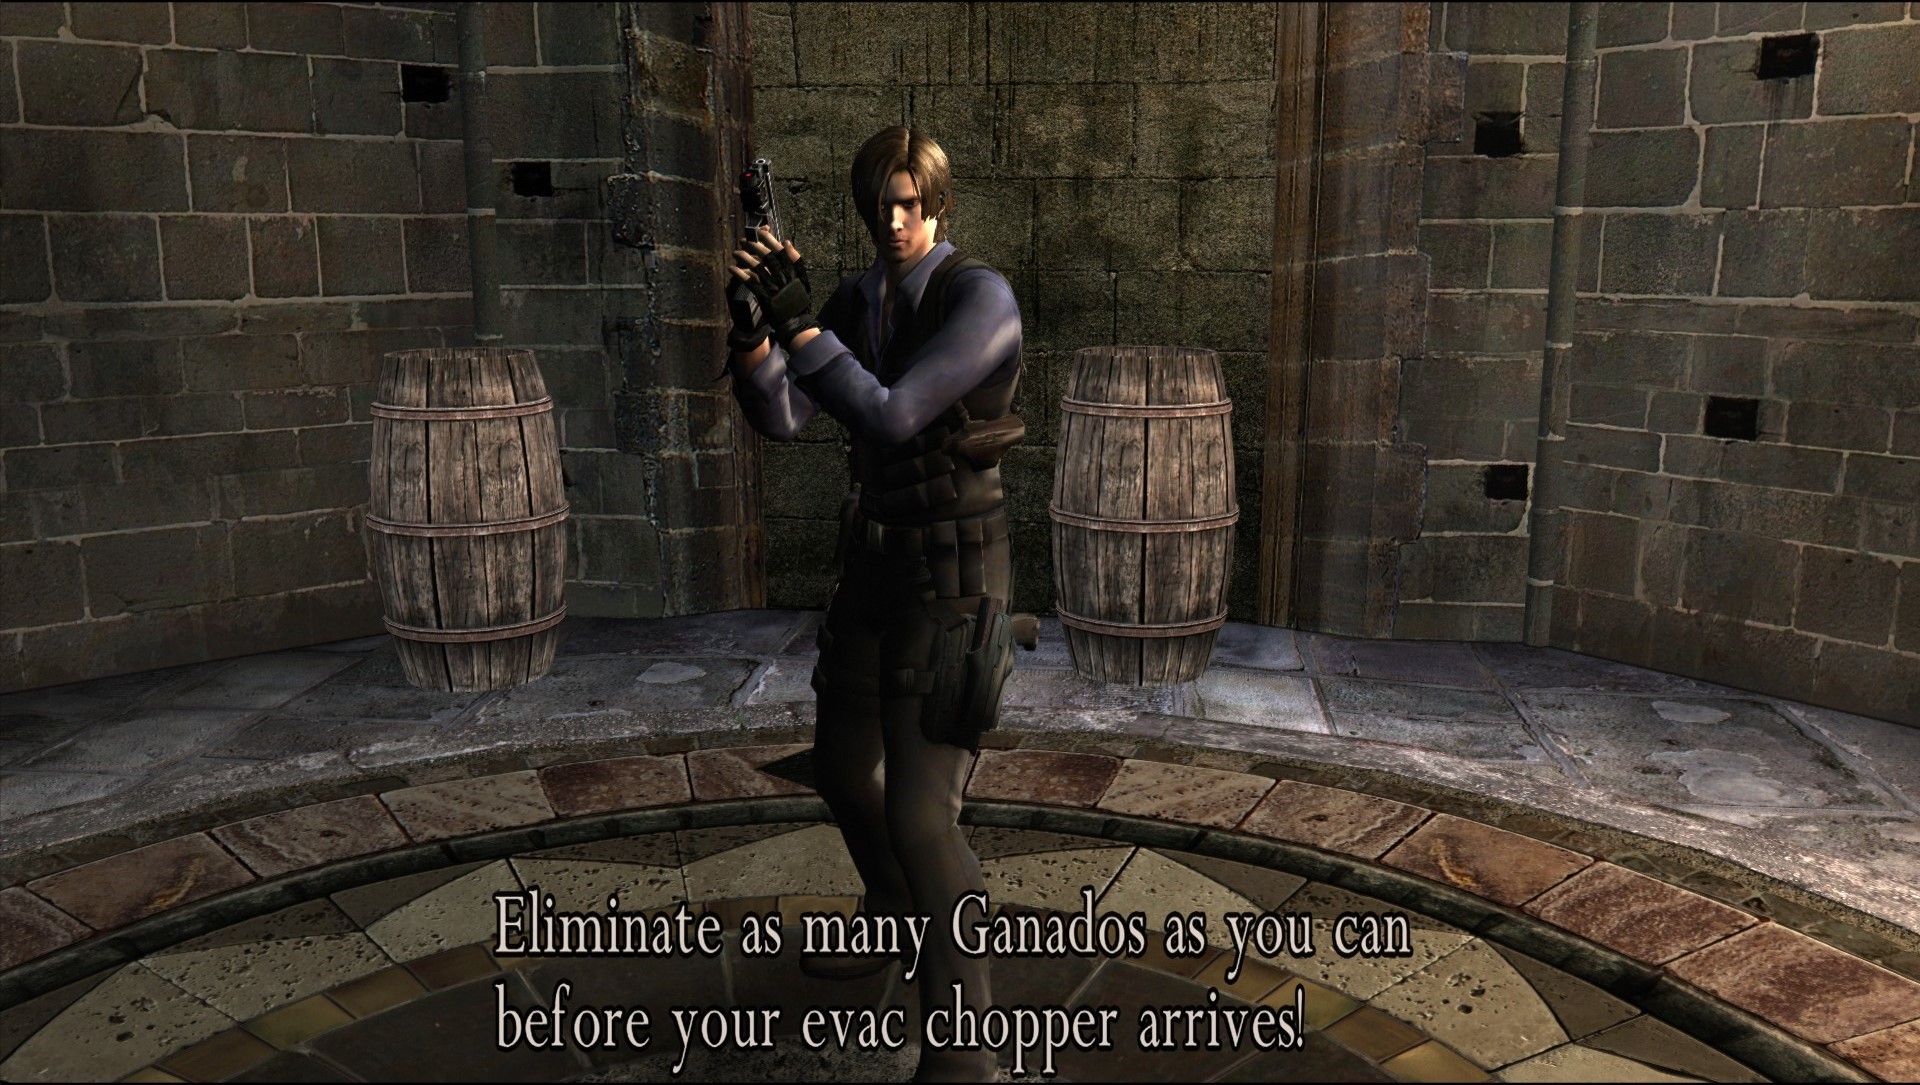
This mod requires a bit of prep, but is well worth the effort. Firstly, this mod MUST require a .DLL file (UltimateTrainerCompanionByRaz0r) or the game will crash. Cutscenes may look a little buggy but during actual gameplay, this mod works flawlessly.
- Download the Raz0r .dll first here[www.nexusmods.com].
- Copy-paste the dinput8.dll and dinput.ini files from the Bin32 folder within the mod archive to your Bin32 folder (where bio4.exe is).
* Note about conflict with RE4_Tweaks DLL*
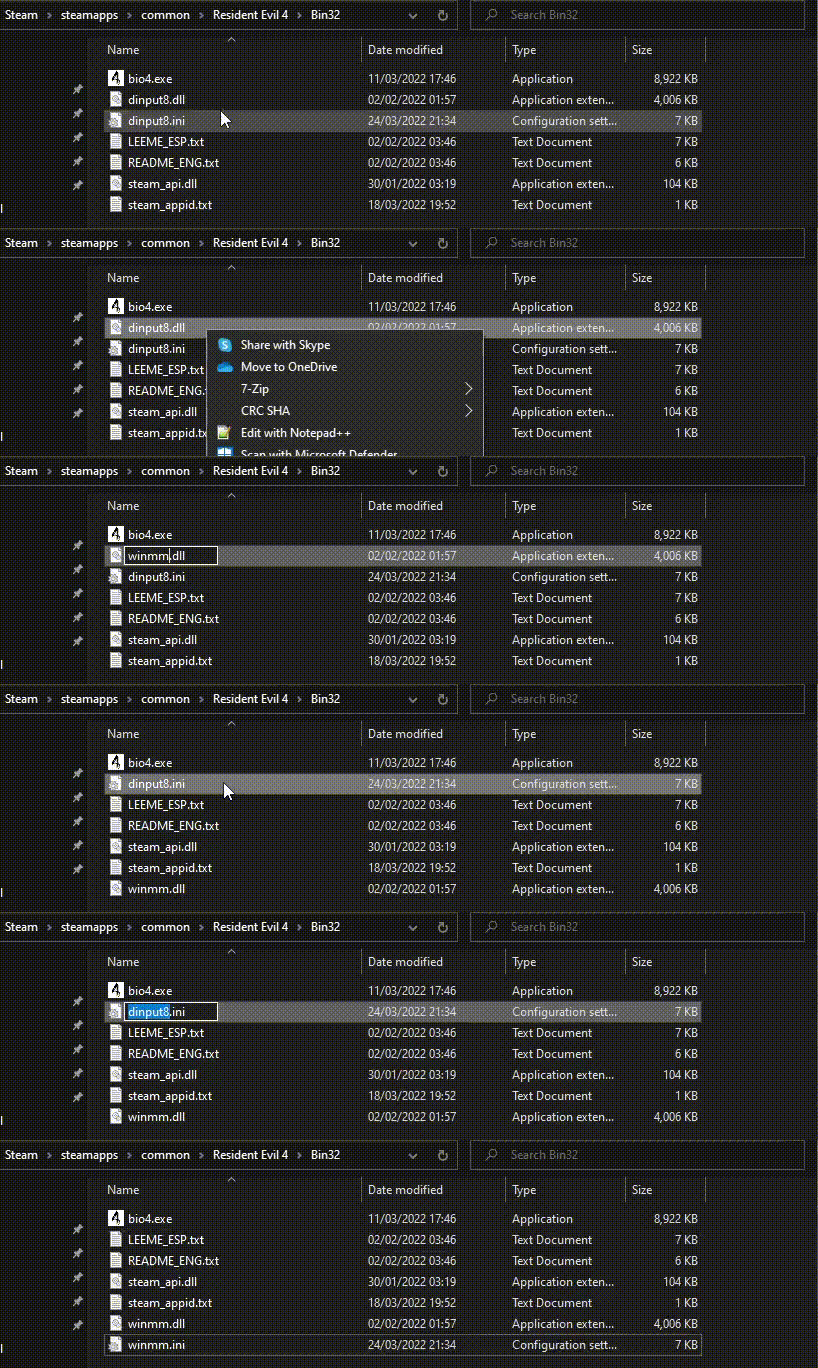
The re_tweaks mod provides a .DLL that uses the same name as the Raz0r DLL. If you are using both together (which is most likely), rename RE4 Tweaks's files to either "winmm" or "xinput1_3". If you have crashes with the inventory while using both DLL's, be sure to set RaiseInventoryAlloc = False in the RE4 Tweaks .ini file. - Download the RE6 Leon Model mod here[residentevilmodding.boards.net].
- Install the RE6 Leon model and texture files as normal and enjoy!

Credit: CORAZON
- Download the .RAR file and open it
- Navigate to C:\Program Files (x86)\Steam\steamapps\common\Resident Evil 4
- From the .RAR file, copy BIO4 folder and paste it in the game folder .....steamapps\common\Resident Evil 4
- Go to C:\Program Files (x86)\Steam\steamapps\common\Resident Evil 4\BIO4\ImagePackHD
- Search for 01000000.pack.yz2.lfs (or might be 01000000.pack.yz2)
- Copy it and paste it anywhere else as a backup. NOTE: (This is the original texture, it's OPTIONAL to backup or just delete it without doing that)
- Delete 01000000.pack.yz2.lfs
Now run the game and enjoy
-Cosmetic Mods (continued)
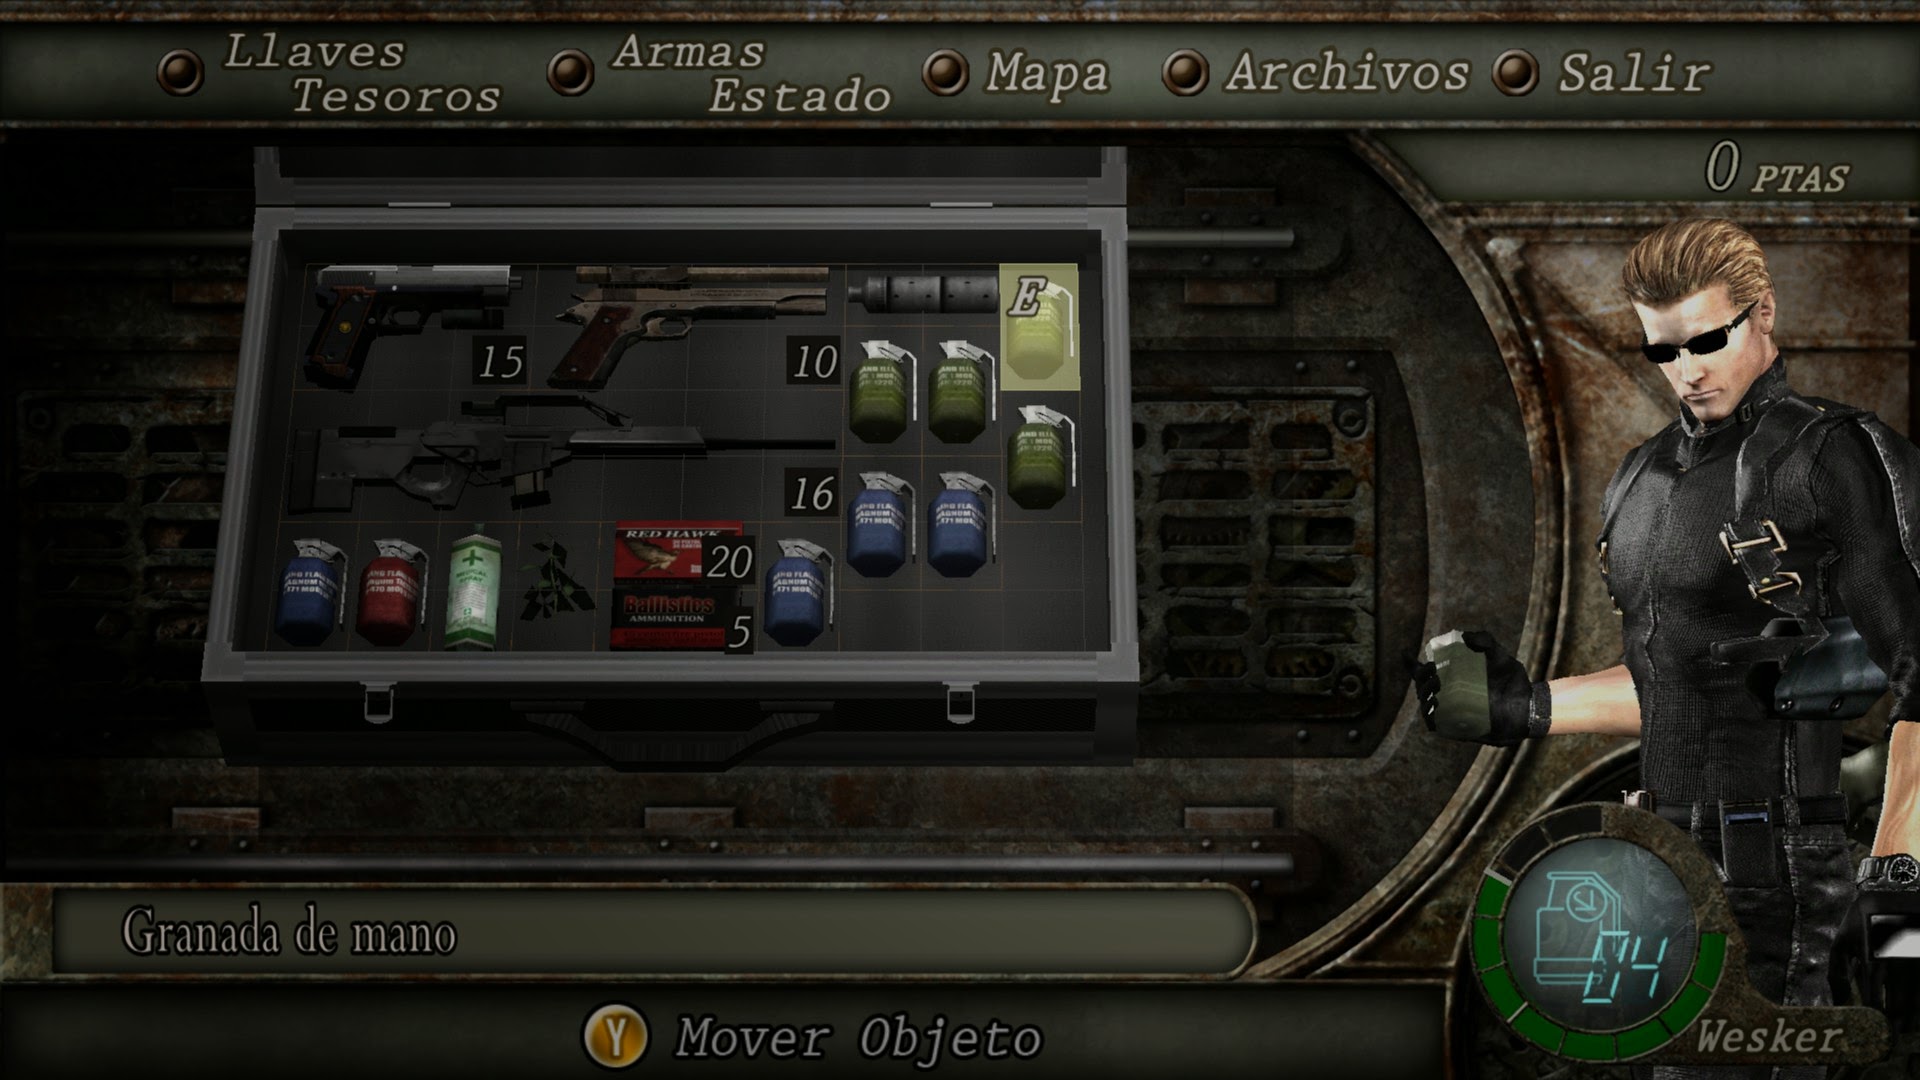 Replaces Wesker in Mercenaries mode with the version seen in RE5.
 Download here: https://residentevilmodding.boards.net/thread/4308/albert-wesker-re5-hd
- Move 0100000d.pack to folder ImagePackHD.
- Move pl0d.udas to folder Em
- Delete (or backup) the files with the same name ending with lfs and yz2. (0100000d.pack.yz2.ifs & pl0d.udas.ifs)
-Gameplay Mods

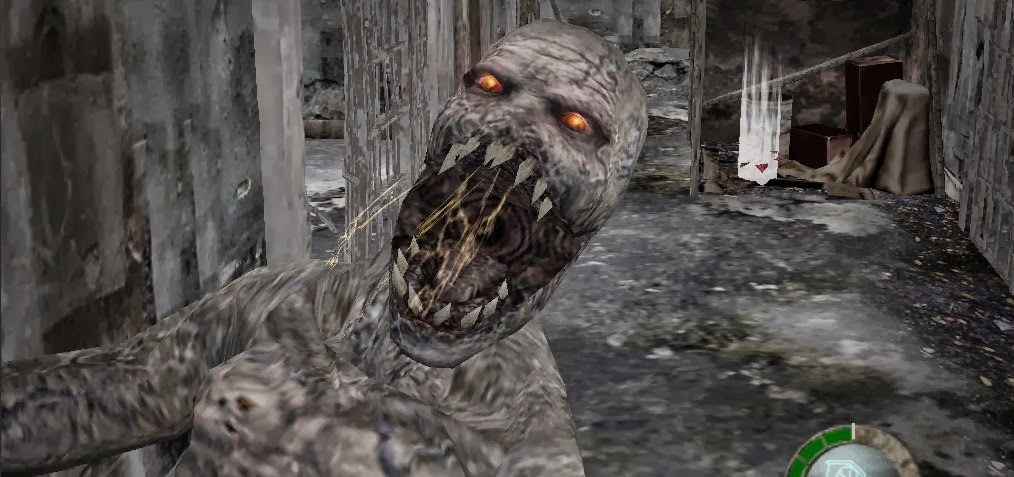 If it isn't obvious enough, Re4generators Mod adds a Regenerator to every room in the game. You’ll need to start a new game for it to work too, so no cheesing. This mod is more for players who want a challenge run of the game above any difficulty level and would go quite well with the Silent Hill Atmosphere Mod. This was a mod originally created by Inferno for the original 2007 PC port but fortunately there is a recreation based on Infernal's idea. In this version there are MUCH MORE regenerators, with them even being present in the Separate Ways scenario, Assignment Ada and Mercenaries.
This mod requires 'Raz0rs Ultimate Trainer'[www.nexusmods.com], which isn't ideal. You don't need to use any cheats though, just run this trainer. This is because the program removes in-game system limits that the UHD edition puts to prohibit these kind of shenanigans .
Credit to both Infernal & DeXiaZ
Download link here: https://www.moddb.com/mods/reign-of-the-regenerators-uhde
2007 Mod link: https://www.nexusmods.com/residentevil4/mods/21
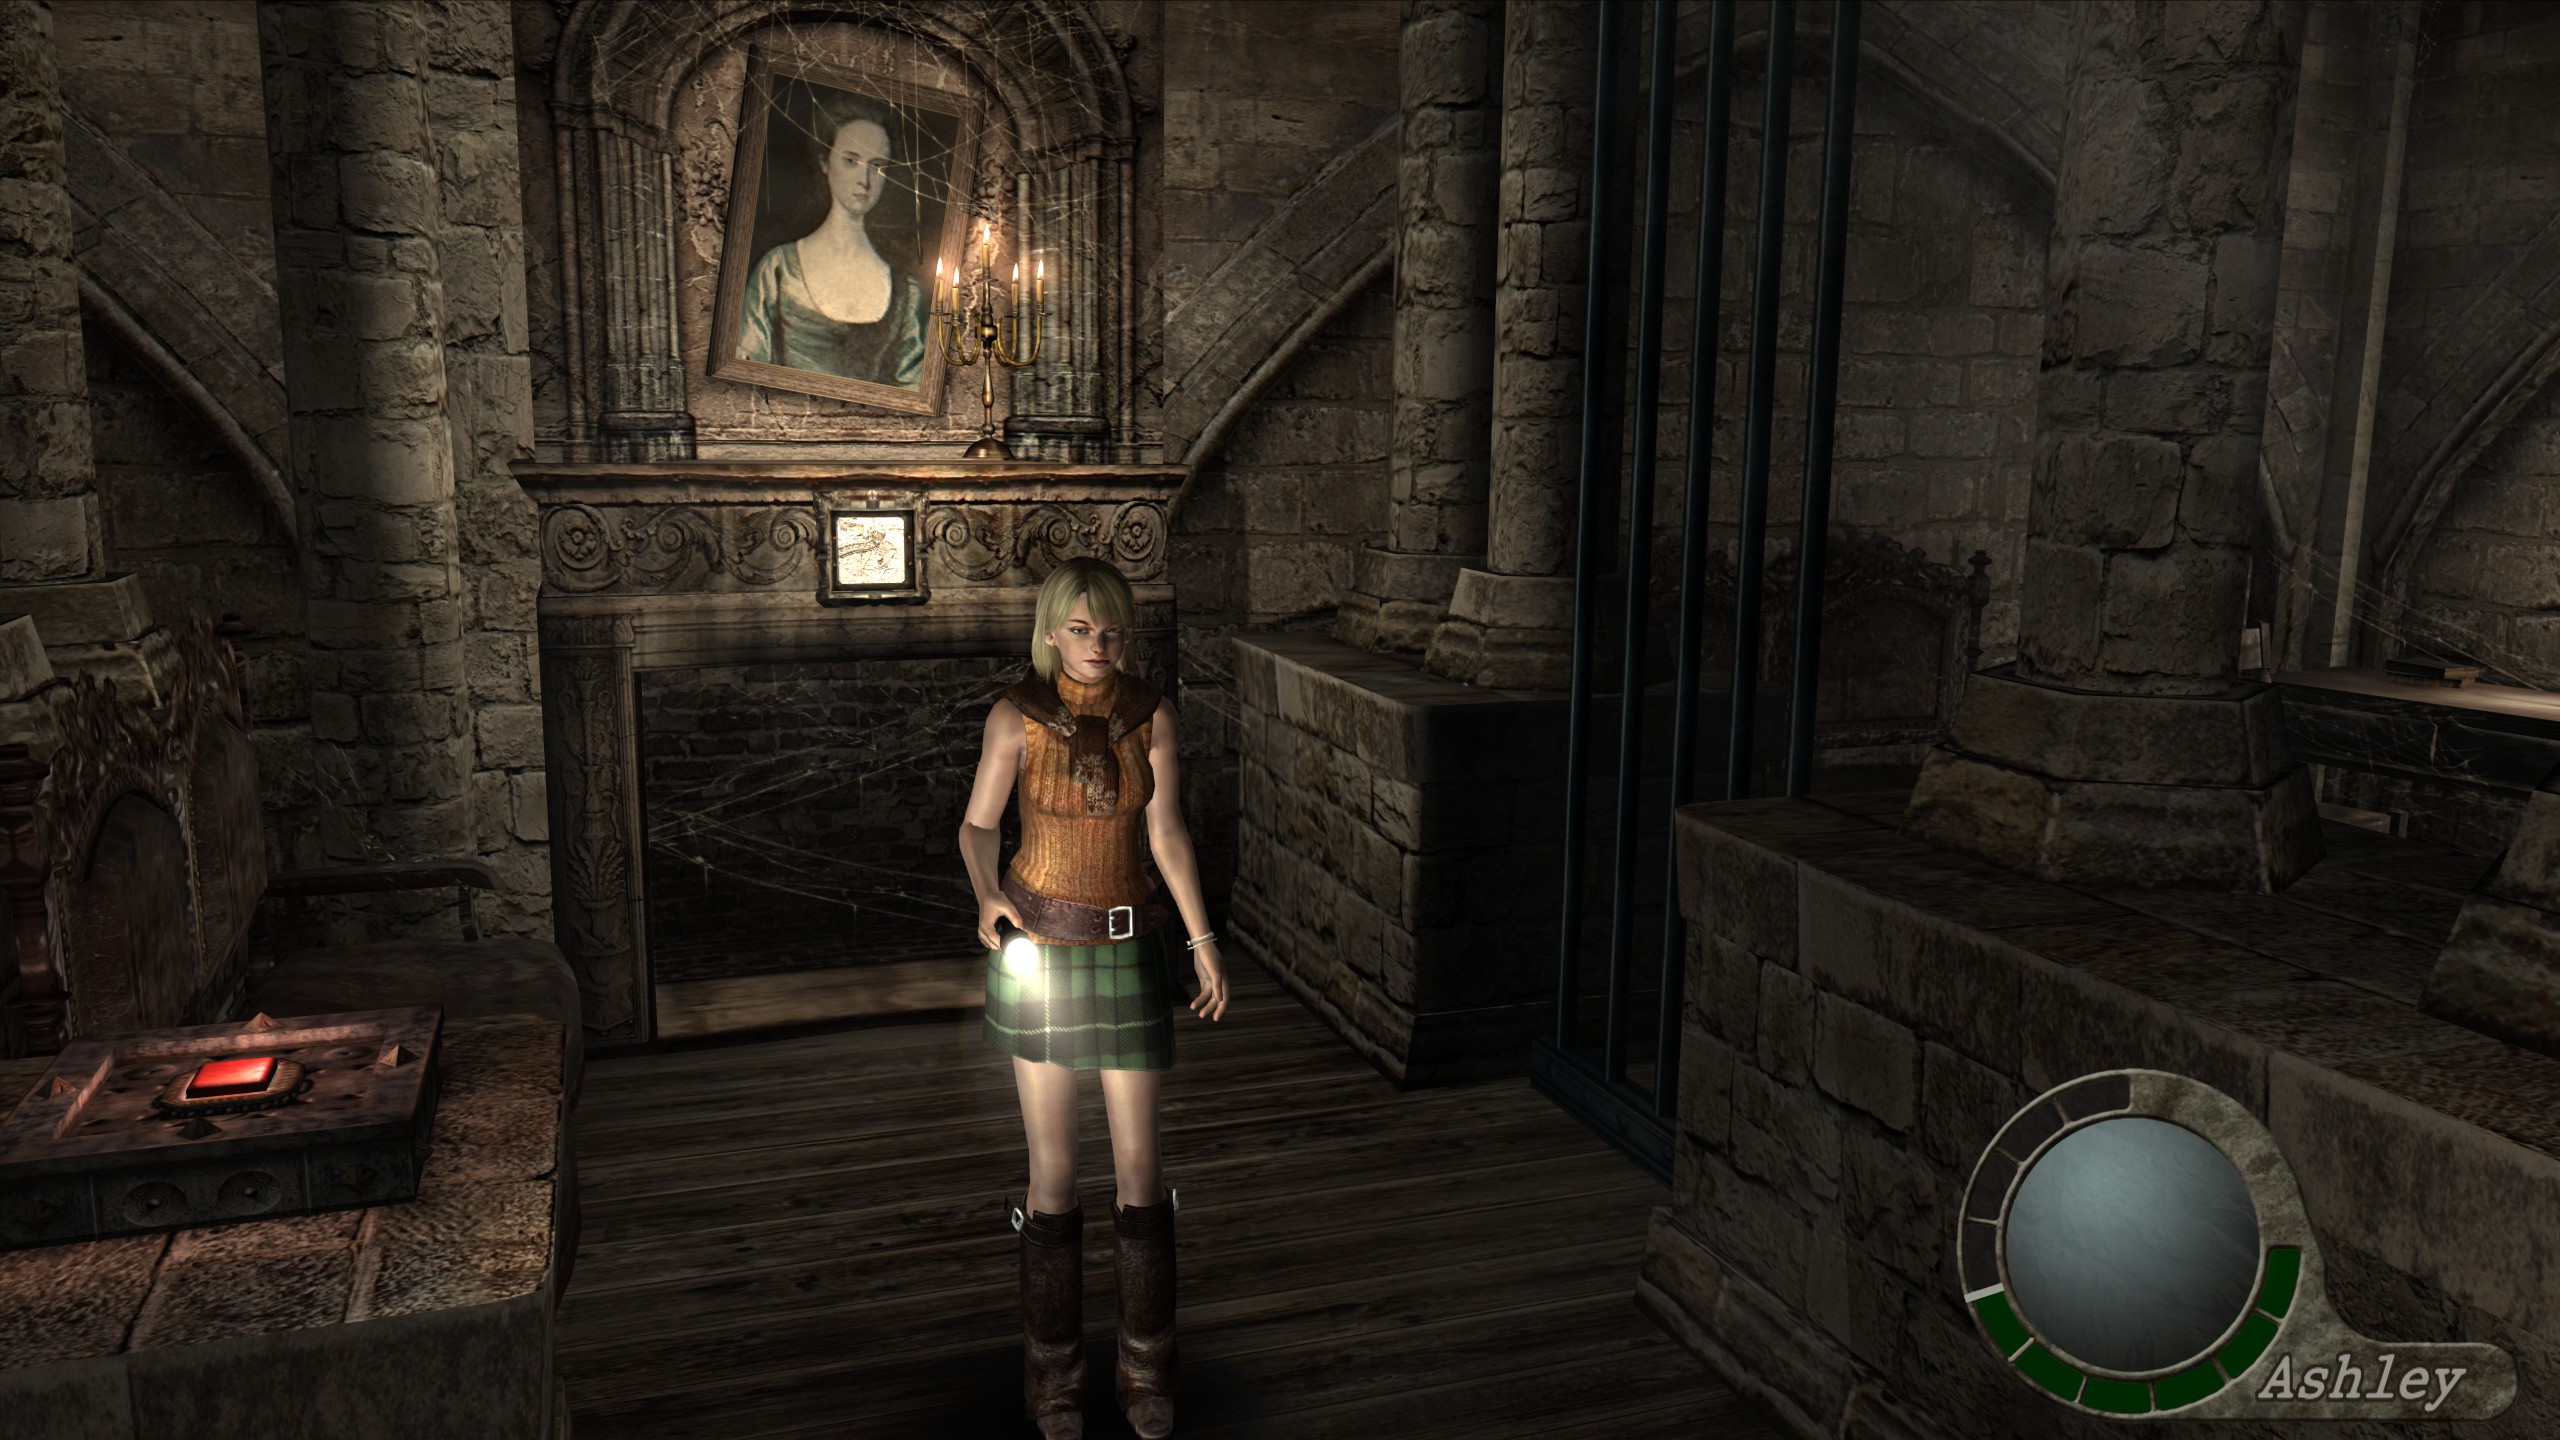
In the Japanese version 'Biohazard 4', Ashley's section actually has fixed camera angles like the classic games! I would have loved the option to turn this on for the western release. Thankfully Nipkow's re4_tweaks mod (like most things) has implemented the feature into ALL versions of RE4.
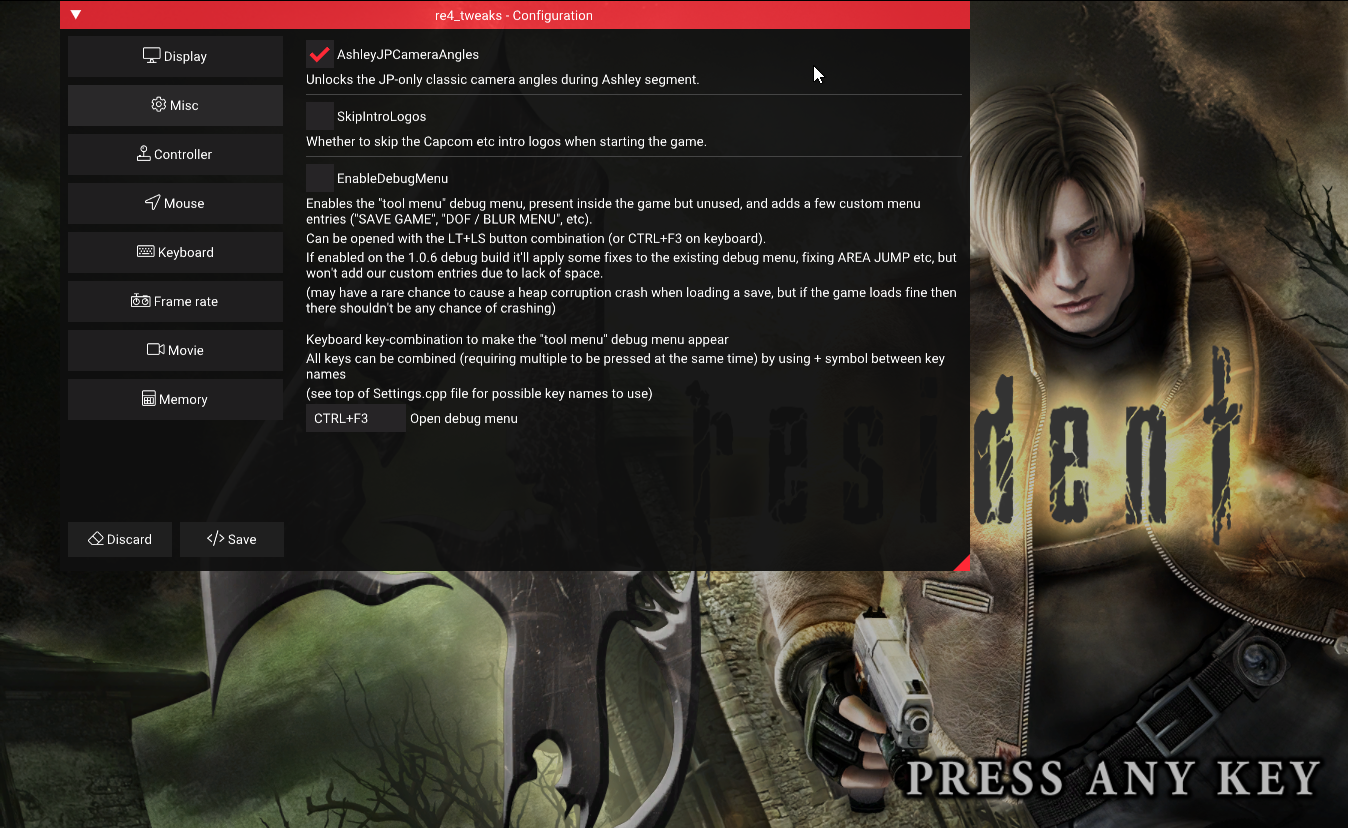
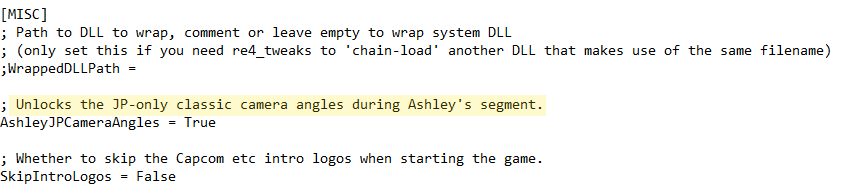
Simply press "F1" in-game when the re4_tweaks mod is installed. Go to the Misc section then tick the box labelled "AshleyJPCameraAngles".You can also locate the dinput8.ini file which should be in steamapps\common\Resident Evil 4\Bin32 and open it. Find the value "AshleyJPCameraAngles" shown below and set in to True.
I must give credit where credit is due to the folks over at Team Survival who created the mod first, granting us a previously exclusive part of RE4's history. If you want to see their standalone mod, here is a video of them demonstrating the mod.
-Misc
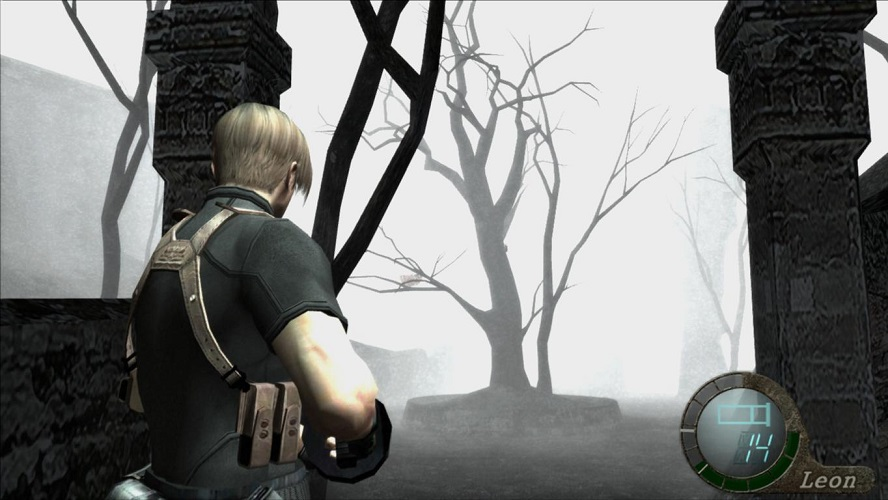
No other horror series is as iconic as Silent Hill, with the first four(ish) being some of the best horror experiences in gaming. While Resident Evil is another franchise that contains some of the best in the genre, the two couldn't be more different. This mod brings the atmosphere, that creepy fog which restricts your view in the Silent Hill franchise to Resi 4. It also changes the game’s music, and adds some other surprises. It's not for me personally, but it's there.
Download link : https://www.moddb.com/mods/silent-hill-atmosphere-hd
(updated UHD version. Multiple files for selection of areas)
Forum Link: https://residentevilmodding.boards.net/thread/2454/silent-hill-atmosphere-hd
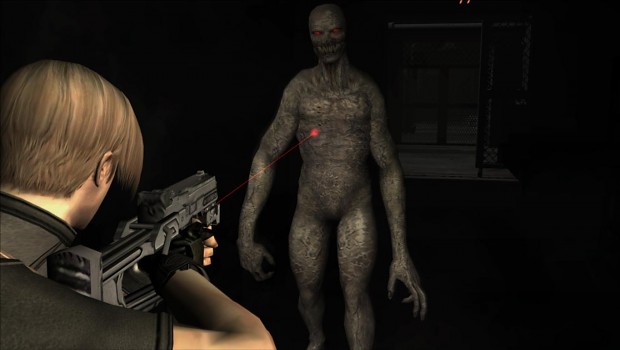
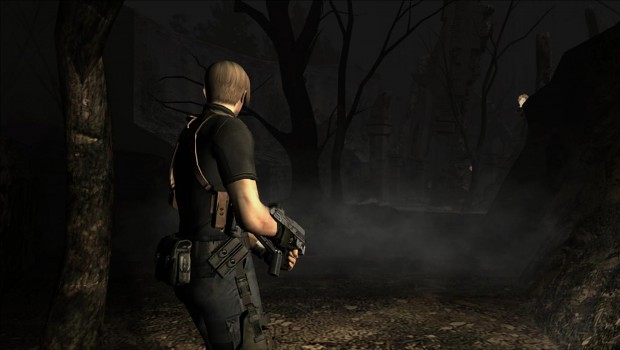 want that. This mod (like many for RE4) was originally made for the 2007 port by Wizard which unfortunately doesn't work with the UHD version. Luckily DeXiaZ from Team Survival has made a new version based off Wizard's idea. Again, Silent Hill kinda vibes, but basically makes it extremely hard to see anything.
Download link here: https://www.moddb.com/mods/the-rise-of-darkness-re4-2014-uhde
want that. This mod (like many for RE4) was originally made for the 2007 port by Wizard which unfortunately doesn't work with the UHD version. Luckily DeXiaZ from Team Survival has made a new version based off Wizard's idea. Again, Silent Hill kinda vibes, but basically makes it extremely hard to see anything.
Download link here: https://www.moddb.com/mods/the-rise-of-darkness-re4-2014-uhdeNote: The mod is split into three parts the Village,
Castle and Island so download and install
the areas you want this mod in.
To install: Extract into "Steam\SteamApps\common\Resident Evil 4 \BIO4" Don't forget to do a BACKUP of your base game!
 If you want a new take on the original's OST, this could be a nice soundtrack to try. Check out some of Elijah's music on his YT channel, there's some cool stuff there.
Download here[residentevilmodding.boards.net]
Credits to renzk for the mod and Elijah for the tunes :)
Download here[residentevilmodding.boards.net]
Download here[residentevilmodding.boards.net]
Download here[residentevilmodding.boards.net]
- Go to the Resident Evil 4\BIO4\snd folder.
- Create a backup copy of the original files to uninstall the mod if wanted
- Copy and paste the core.xwb from the mod archive to the "snd" folder.
-World S Mod (Pre-Alpha)
If you are really eager to play the pre-alpha release with the 1.0 build of the HD Project right now, you can make the mod compatible yourself.
- First go to the World S mod folder.
- Then open up /bio4/ImagePackHD in another window. There you will find multiple files, make a note of these files names.
- In the World S mod folder go to /bio4/st1, /bio4/st2 and /bio4/st3. Doing the same thing (taking notes of files names).
- Now go to bio4/ImagePackHD, and delete all files with the same names you notes.
This applies to your /bio4/st1 and /bio4/st2 and /bio4/st3
By doing this you are preventing the World S mod files from interfering with the new HD project ones.
Things currently in development include map models, collisions, lighting & sound effects events, messages, enemy path lines etc.
Extras include:
- New items
- New treasures
- Weapons capacity and firepower modification
- Balanced difficulty for all different skills of players
Note: Keep in mind that this is still in pre-alpha with features like the merchant missing and contains only a few levels. So this really is only a taste of what's to come from Corazon but I'll keep you posted when further versions are released.
- First you have to install the RE4 HD project, otherwise the game will crash (follow the installation instructions on the re4HD.com website or the ones found in this guide)
- Download the Pre-alpha file, links on Corazon's forum page[residentevilmodding.boards.net] and unpack everything in: C:\Program Files\Steam\SteamApps\common\Resident Evil 4 (Or wherever you keep your Steam installations)
You will require a password to do this, that of which isPassword: Corazon - Accept any requests to overwrite. Note that some files WILL BE DELETED so keep a backup of your Vanilla or HD project base versions of the game.
- Then go to: Steam\SteamApps\common\Resident Evil 4\BIO4\ImagePackHD and delete only this exact file: (both name and format)
- pack.yz2.lfs
Note: Errors or glitches are expected to be frequent so please report to his forum so that he may fix any.
Corazon's Installation Guide
https://www.youtube.com/watch?v=nVfSAkLHMZc
Pre-Alpha Gameplay by Bawkbasoup
https://www.youtube.com/watch?v=kdEnJ7ddr2s
Conclusion
 Thank you so much for reading my guide! I hope you found some
  mods interesting, and that you tried a few out for yourself. I know this may seem like a lot of mods, but I'm only scratching the surface when it comes the the amount that can be found on the RE modding forums[residentevilmodding.boards.net]. It's where I found most of the ones in this guide.
Finally I want to thank the real 'STARS' of this community, those of whom are the modelers, coders and artists who have kept the game alive after so many years. To Albert and Cris and their unwavering commitment to the game, I wish them the best in their endeavors after the HD project. They will definitely be engraved in gaming history as some of the most loyal fans ever.
¡Hasta luego!
My Other Guides
- Player rotation with mouse★ 5 (1k)61k views1.3k ♥1 minBulgarianUpdated Aug 23, 2016
- re4 HD Project★ 5 (1.5k)52k views1.4k ♥1 minUpdated Feb 1, 2022
- Re4: All Possible Treasure Combinations★ 5 (1k)52k views2.1k ♥7 minUpdated Jan 9, 2023
- 100% Achievement Guide★ 5 (789)28k views1.5k ♥3 minUpdated Jul 8, 2020
- Русификатор для "Resident Evil 4: Ultimate HD Edition"★ 5 (1.5k)28k views680 ♥1 minRussianUpdated May 23, 2017
- RE4 - РУСИФИКАТОР ОТ WHISKAS TEAM + ENG SUBS★ 5 (467)26k views1k ♥4 minRussianUpdated Jan 16, 2023




- Upgrading to PremiumTeam Fortress 2★ 5 (20k)1441k views11k ♥6 minUpdated May 11, 2022
- No More Room in Hell Official ManualNo More Room in Hell★ 5 (2.8k)569k views2.1k ♥29 minUpdated Apr 22, 2019
- NMRiH Community Hosting GuidesNo More Room in Hell★ 5 (526)351k views653 ♥1 minUpdated Aug 10, 2022
- ULTIMATE GUIDE FOR GAME DEV TYCOONGame Dev Tycoon★ 5 (5.8k)326k views10k ♥4 minUpdated 23 Jan, 2014
- How to 'Git Gud' Soon™MORDHAU★ 5 (2k)318k views3k ♥68 minUpdated Nov 16, 2024
- Лучшие кооперативные игры SteamPAYDAY 2★ 5 (1.5k)315k views2.1k ♥56 minRussianUpdated Apr 27, 2025






This guide was created by its original author on the Steam Community. Are you the author and want it removed? Request removal.