(2K/4K) DOOM: Eternal OBS (Nvidia) Recording Guide for YouTube
Introduction
This guide covers how to record your DOOM: Eternal Battle Mode matches with OBS in 60/120 FPS for YouTube specifically.
Unfortunately, just hitting the record button in your favorite screen recording tool isn't enough to upload your DOOM: Eternal multiplayer videos with good quality to YouTube. It requires specific recording settings to pull off a smooth 60/120 FPS video upload when it comes to DOOM: Eternal multiplayer games.
After countless weeks of experimenting with the right settings, I found that the settings in this guide work perfectly for me. Take the information presented here as a baseline and tweak it as you see fit.
The beauty of this method is that it allows players to play on a 1920x1080 resolution, while outputting a 2K / 4K recording without any performance hits while playing the game. You don't need to play in 2K / 4K to record a 2K / 4K video for YouTube.
Unfortunately, just hitting the record button in your favorite screen recording tool isn't enough to upload your DOOM: Eternal multiplayer videos with good quality to YouTube. It requires specific recording settings to pull off a smooth 60/120 FPS video upload when it comes to DOOM: Eternal multiplayer games.
After countless weeks of experimenting with the right settings, I found that the settings in this guide work perfectly for me. Take the information presented here as a baseline and tweak it as you see fit.
The beauty of this method is that it allows players to play on a 1920x1080 resolution, while outputting a 2K / 4K recording without any performance hits while playing the game. You don't need to play in 2K / 4K to record a 2K / 4K video for YouTube.
Step 1 - Configuring OBS Recording Settings
Open OBS and press the "+" button under the "Sources" section and select "Game Capture".
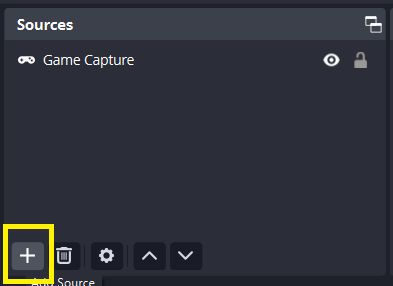
Press OK.
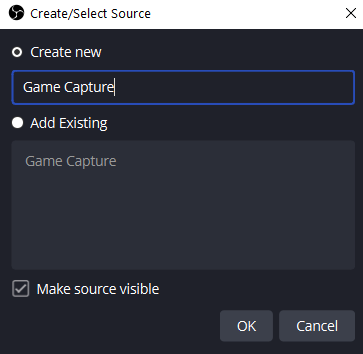
In the Game Capture window, set your settings as follows:
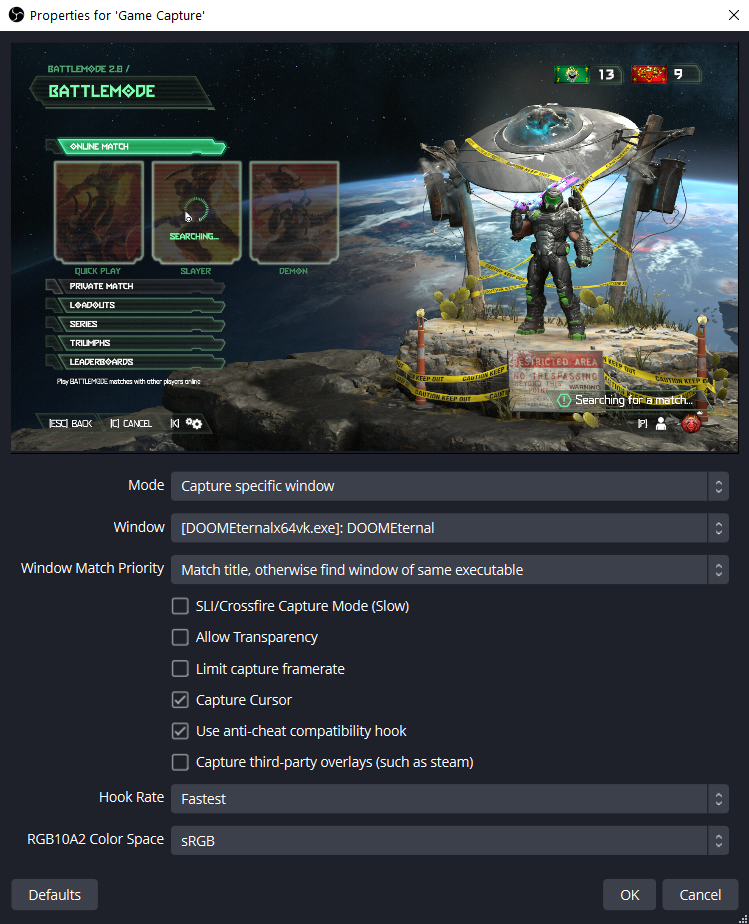
Press OK.
Under the "Controls" section, press "Settings".
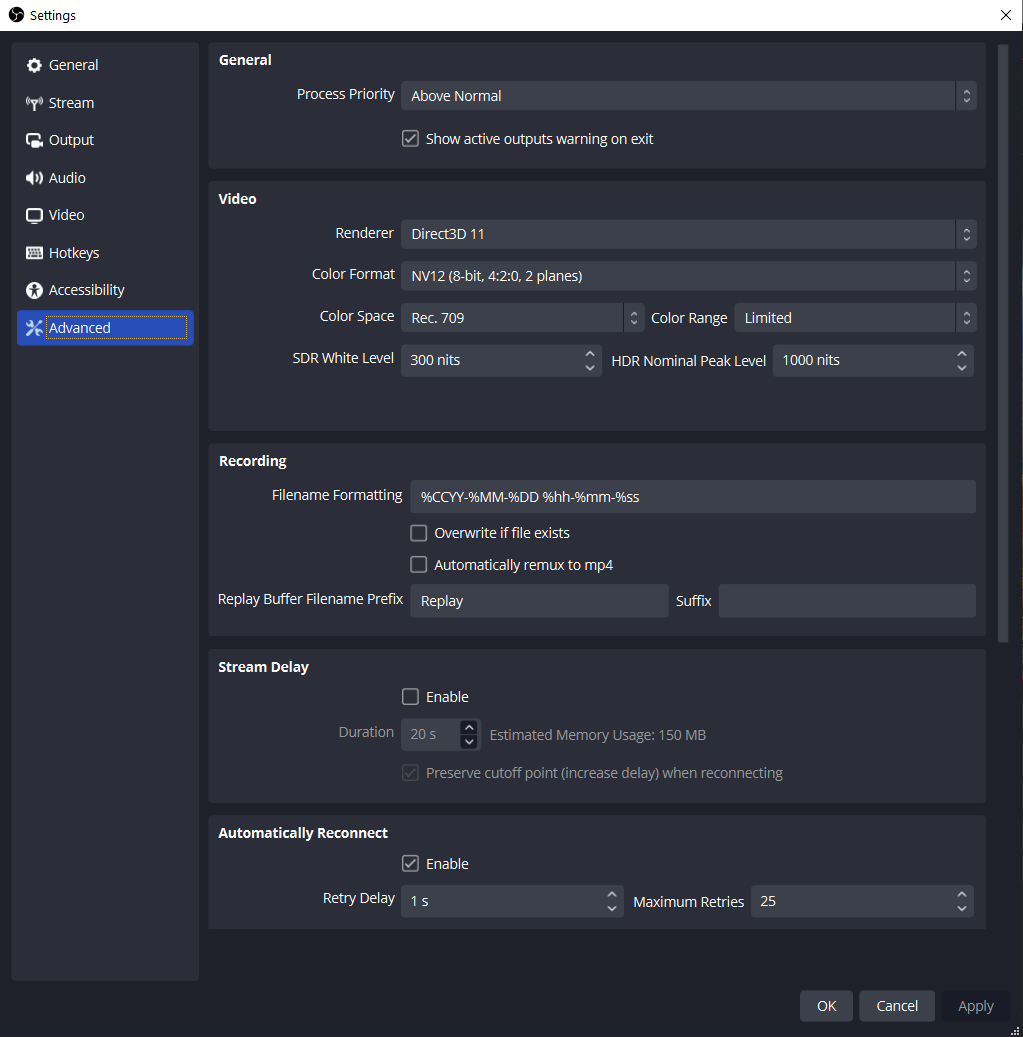
Press "Advanced" and set your setting as follows:
Press "Video" and set your settings as follows:
Note: There is no option "2560x1440" in the list of options underneath "Output (Scaled) Resolution". You have to click the text in the box and manually type this value.
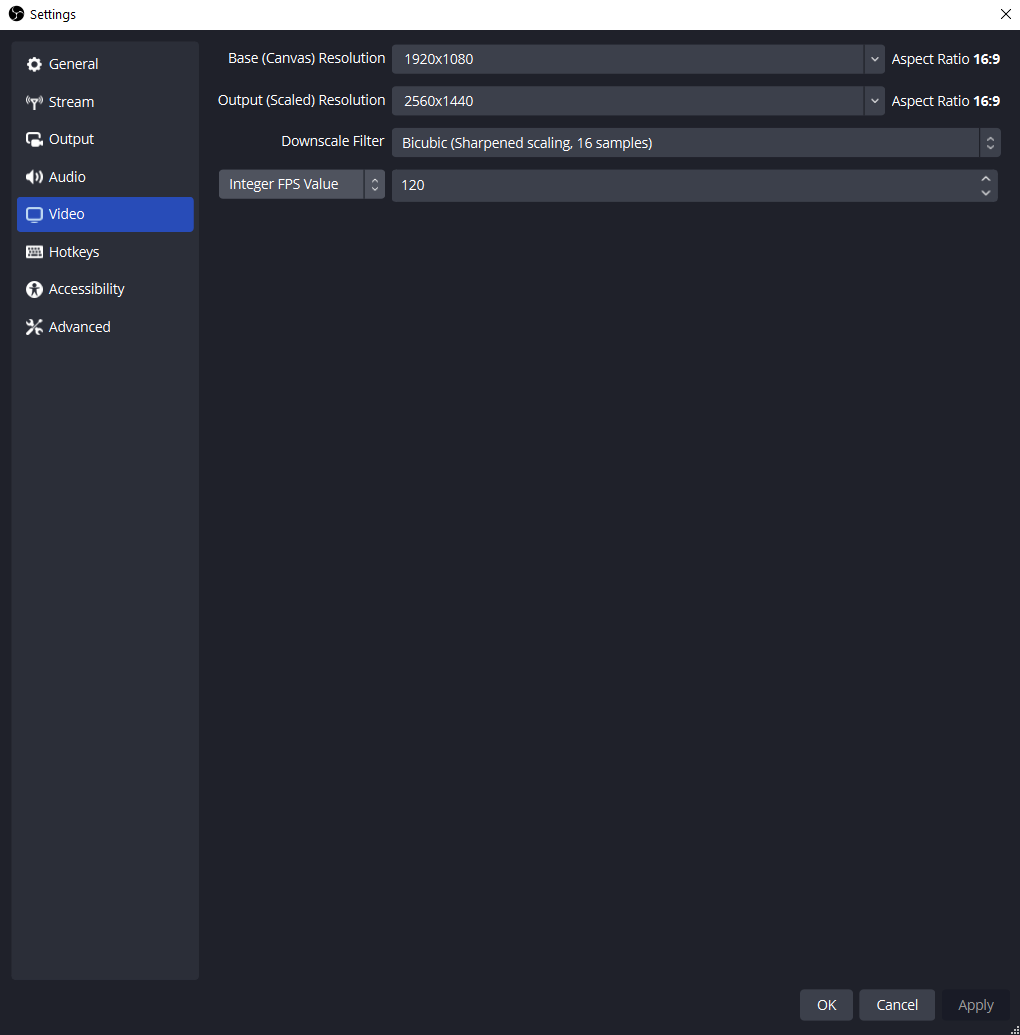
If you want to record your videos in 60 FPS instead, change the "120" value in this screenshot to "60".
Press "Output", then go to the "Recording" tab on the right. At the top of the window under "Output Mode" select the "Advanced" option.
Then set your settings as follows:
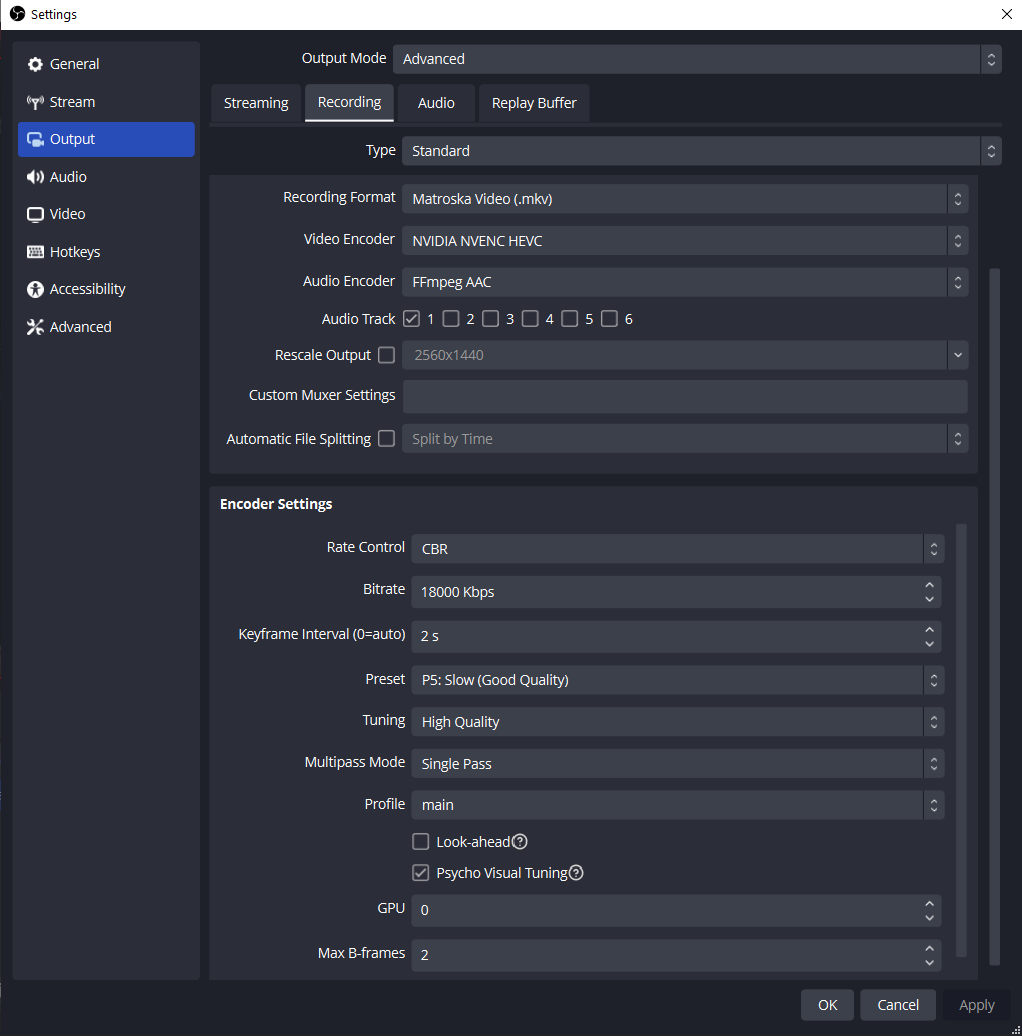
That's it for the recording part! If you want to increase the quality of the recording, the two settings you want to increase/decrease are:
Everything else you should pretty much leave the way it's set up here.
I found that a bitrate of 18000 is just right for YouTube recordings, but feel free to experiment with this setting too. The higher I set this option, the laggier my game became and sometimes my recordings would even have entire moments that are just frozen for seconds on end.
Press OK.
In the Game Capture window, set your settings as follows:
Press OK.
Under the "Controls" section, press "Settings".
Press "Advanced" and set your setting as follows:
Press "Video" and set your settings as follows:
Note: There is no option "2560x1440" in the list of options underneath "Output (Scaled) Resolution". You have to click the text in the box and manually type this value.
If you want to record your videos in 60 FPS instead, change the "120" value in this screenshot to "60".
Press "Output", then go to the "Recording" tab on the right. At the top of the window under "Output Mode" select the "Advanced" option.
Then set your settings as follows:
That's it for the recording part! If you want to increase the quality of the recording, the two settings you want to increase/decrease are:
- Output > Recording > Encoder Settings > Preset
- Output > Recording > Encoder Settings > Multipass Mode
Everything else you should pretty much leave the way it's set up here.
I found that a bitrate of 18000 is just right for YouTube recordings, but feel free to experiment with this setting too. The higher I set this option, the laggier my game became and sometimes my recordings would even have entire moments that are just frozen for seconds on end.
Step 2 - Configuring Video Editor Encoding Settings
Just because you have a good recording that doesn't mean that the final product after editing it in your favorite editing tool is gonna be good as well without changing any settings.
I personally use VSDC Video Editor. It's very easy to use and only costs $40 per year. I highly recommend this video editor to everyone.
If you decide to use VSDC too, you can use the free version just as effectively as the paid version. The key difference between the free and paid version is that the paid version allows you to use the full power of your Nvidia GPU and use Hardware Acceleration during the encoding process. This simply means: it takes less time to save the final product.
Without Hardware Acceleration
With Hardware Acceleration
Regardless of which video editor you use, you want to use these basic settings when starting a new project:
- Resolution: 2560 x 1440
- Frame Rate: 120 FPS
- Audio Frequency: 44100 Hz
When outputting your final product, you want to use these basic settings for the output file:
- Codec: NVIDIA H.265 HEVC
- Encoder Mode: CRF (Constant Rate Factor)
- Width: 2560
- Height: 1440
- Quality: 100%
- Frame Rate: Original (or: 120 FPS)
- Audio Codec: AAC MPEG 2/4
- Audio Bit Rate: 320 kbps
- Audio Frequency: 44100 Hz
- Audio Channels: Stereo
If you're also using VSDC like me, but you want to use the free version instead, the only difference is that you need to select "H.264/AVC" under "Profile" instead of "Nvidia H.265 HEVC".
I personally use VSDC Video Editor. It's very easy to use and only costs $40 per year. I highly recommend this video editor to everyone.
If you decide to use VSDC too, you can use the free version just as effectively as the paid version. The key difference between the free and paid version is that the paid version allows you to use the full power of your Nvidia GPU and use Hardware Acceleration during the encoding process. This simply means: it takes less time to save the final product.
Without Hardware Acceleration
- 3-minute video in 2K : about 6 minutes to encode
- 3-minute video in 4K : about 12 minutes to encode
With Hardware Acceleration
- 3-minute video in 2K : about 3 minutes to encode
- 3-minute video in 4K : about 6 minutes to encode
Regardless of which video editor you use, you want to use these basic settings when starting a new project:
- Resolution: 2560 x 1440
- Frame Rate: 120 FPS
- Audio Frequency: 44100 Hz
When outputting your final product, you want to use these basic settings for the output file:
- Codec: NVIDIA H.265 HEVC
- Encoder Mode: CRF (Constant Rate Factor)
- Width: 2560
- Height: 1440
- Quality: 100%
- Frame Rate: Original (or: 120 FPS)
- Audio Codec: AAC MPEG 2/4
- Audio Bit Rate: 320 kbps
- Audio Frequency: 44100 Hz
- Audio Channels: Stereo
If you're also using VSDC like me, but you want to use the free version instead, the only difference is that you need to select "H.264/AVC" under "Profile" instead of "Nvidia H.265 HEVC".
Proof Of Claims
This video was recorded using the settings and methods described in this guide:
https://www.youtube.com/watch?v=56PhBl8pKG4
Thanks for reading everyone, and I hope to see u in queue :)
https://www.youtube.com/watch?v=56PhBl8pKG4
Thanks for reading everyone, and I hope to see u in queue :)
More DOOM Eternal guides
- DOOM Eternal 100% Achievement Guide★ 5 (677)39k views1.6k ♥15 minUpdated Apr 9, 2024
- DOOM Eternal Written Guide/Walkthrough for all collectables and secrets inc DLC.★ 5 (1.7k)36k views3.9k ♥129 minUpdated May 22, 2025
- Секреты Doom Eternal★ 5 (874)32k views1.7k ♥23 minRussianUpdated Apr 17, 2023
- Console Commands for DOOM Eternal★ 5 (213)29k views502 ♥18 minUpdated Mar 30, 2021
- Collectibles and Secrets Guide 100% DOOM Eternal★ 4 (370)26k views589 ♥1 minBulgarianUpdated Apr 2, 2021
- DOOM for Dummies [Tweaks, Fixes, Problem solving] [EN]★ 5 (720)23k views878 ♥15 minUpdated Jun 18, 2020




This guide was created by its original author on the Steam Community. Are you the author and want it removed? Request removal.