[9.00] X4 In-Depth FAQ
Foreword - Version 9.00
Introduction
This guide is not aimed at brand new players looking to start the game for the first time. Much of the information here requires some general game knowledge that may not make sense to someone just starting out. I would strongly recommend playing X4 at least enough to understand the general game-play basics before digging into this guide.
This guide is aimed at intermediate/experienced players - those that already have some knowledge of the core game-play loop(s) to use as a reference or help clarify some of the more in-depth mechanics in X4 that either aren't well explained in the game itself, or simply aren't explained at all.
The contents of this guide will eventually be mirrored in the official wiki, but I will keep this up to date until I'm satisfied with my work on the wiki.
Station Traders - Standard Trader
Standard traders (those on non-pirate stations) will buy and sell the following, with stock being randomly chosen between the min and max amounts. Additionally items will have a chance on whether they will be stocked at all.
Station Traders - Black Marketeer
Black Marketeers will buy and sell the following, with stock being randomly chosen between the min and max amounts. Additionally items will have a chance on whether they will be stocked at all.
Note: The Security Bypass System, Security Decryption System, and Security Slicer all require the player to have a relation of +30 with the faction of the trader to be able to sell to them. These are the only items in the game with such a restriction.
Station Traders - Pirate
Pirate traders (those on pirate stations) will buy and sell the following, with stock being randomly chosen between the min and max amounts. Additionally items will have a chance on whether they will be stocked at all.
Note: The Security Bypass System, Security Decryption System, and Security Slicer all require the player to have a relation of +30 with the faction of the trader to be able to sell to them. These are the only items in the game with such a restriction.
Station Traders - Civilian
Civilian traders (those on select civilian owned stations listed below) will buy and sell the following, with stock being randomly chosen between the min and max amounts. Additionally items will have a chance on whether they will be stocked at all.
Note: The Security Bypass System, Security Decryption System, and Security Slicer all require the player to have a relation of +30 with the faction of the trader to be able to sell to them. These are the only items in the game with such a restriction.
Radar Ranges
Some objects have unique radar ranges outside of the default 40km. The following table lists the various radar ranges (in meters).
Note: The laser tower radar does not show up as a typical radar on the map, but are used for targeting.
Diplomacy - Restricted Blueprints
A small selection of blueprints have the restriction that they cannot be obtained through agent actions. The following table lists the blueprints restricted in this way.
Scanning - Information Unlocked
There are two primary places where we can see the information we unlock.
The Information Panel - This is the panel on the map screen accessible by clicking the 'i' button on the left or right side of the screen, or pressing the relevant keybind (default 'i').
The Logical Overview - Only accessible for stations. Accessible by right clicking on the station and selecting "Logical Overview".
There is also the ship HUD, but the information presented there is limited, and also available on the info panel.
Below is a list of the information that is unlocked and at what percentages.
- Storage amounts (Info Panel / Logical Overview)
- Ware/production types (Logical Overview)
- Storage on info panel shows current amounts, as well as max total storage
- Storage on logical overview shows only max storage per ware
- All production information excluding time to resource depletion (Logical Overview)
- Full ware storage and production information (Logical Overview)
- Workforce numbers (Info Panel / Logical Overview)
- Basic defensive values (Info Panel)
- Pilot/Manager name (Info Panel)
- Basic defensive information includes cruising speed, radar range, max hull/shield values, crew amount and capacity, max countermeasures, as well as current and max deployables (with no breakdown of types given)
- Pilot/Manager skill values (Info Panel)
- Max drone capacity (Info Panel / Logical Overview)
- Detailed defensive values (Info Panel)
- Current orders (Info Panel)
- Current drone amounts (Info Panel / Logical Overview)
- Detailed defensive values include: current hull/shield, weapon damage output, boarding strength, as well as all loadout information with the exception of active drone numbers and installed modifications
- Drone activity (Info Panel)
- Modifications installed (Info Panel)
- This reveals the remaining loadout information
Notes and curiosities: There is nothing gained by going above 90% information unlocked, no further information is given. You can safely stop at 90% so long as you're able to overcome your inner completionist.
In the script file, there are entries for docked ships (at 80%) and managed ships/subordinates (90%). These appear to go unused as both are in fact visible on the info panel without requiring any scanning.
Scanning - Scanners and Secrecy Levels
To understand exactly how scan percentages work, we need to know several things:
- Scanner levels
- Secrecy levels
- Scanning methods
- The station information calculation
Note: For a list of all entities with their secrecy levels - see here.[pastebin.com]
Anything that has no secrecy level (not in the list linked above) will have 100% of its information unlocked the moment it is discovered (namely: the Erlking).
Active scanning is when you put your suit or ship into scan mode, and while near your target activate your scanner (ctrl+f by default, or select scan by right clicking on the target and selecting "Scan").
Proximity scanning is when you gain information simply by being in close proximity to the target, such as flying near station modules.
They behave slightly differently depending on what you are trying to scan.Note: For scanning L/XL ships proximity scans are always level 0. Even being in a suit with no scanner (scanner level -1) will still result in being able to proximity scan at scan level 0.
This is actually really simple. Each station is made up of a number of modules, and each of those modules represents an equal amount of information for the station.
So if a station has 8 modules, then each module is worth 100%/8 = 12.5% of the overall information for the station.
If you scan a station module and you do not get the amount you were expecting, then it's likely that the module has a secrecy level higher than the scanner used. Try again with a higher level scanner to get more information.
Additionally, approaching a station in a ship will reveal the information for all storage modules simultaneously, removing the need to fly close to them.
While it doesn't reveal information like the regular scanners, the long range scanner also has levels:
- The mk1 long range scanner is level 1
- The mk2 long range scanner is level 3.
The only real circumstance where this matters is when searching for lockboxes, which require the mk2 scanner to show up.
Additionally, lockboxes will only show up within 50km when scanning, rather than the full 200km range.
Scanning - Signal Leak Overview
Scan insufficient. Scan from Spacesuit
Attempting to scan a leak in your spacesuit without a scanner installed will fail with the message:
Scan insufficient. Acquire improved Spacesuit Scanner
Outside of these scenarios, scanning signal leaks gives the same results regardless of the scanner used.
- First the game detemines the number of possible leak locations on a station. Locations on modules that are not operational are excluded.
- Then with a bias towards the maximum value, it will set a possible signal leak amount between 1 and either 8 or half the number of possible leak locations, whichever is lower.
- Once this number is determined, half of these (rounded down) will be reserved for data leaks.
- Then a number between 1 and the remaining amount (the maximum possible leaks minus those already reserved for data leaks) are reserved for mission leaks, also with a bias towards the maximum.
- The station will then attempt to spawn the reserved number of each leak type, ignoring any that would be invalid for any reason (possibly resulting in less than the reserved amount spawning).
- Finally, the leaks are removed when the station has been in low attention somewhere between 60 and 90 seconds (chosen at random).
So for example:
- Lets saw we approach a station and the game calculates the amount of leak locations on that station as 22.
- The maximum number of leak locations will be somewhere between 1 and 8. As 8 is the lower number between 8 and half of the amount of leak locations (22/2 = 11). Lets say that it picks 7 as the maximum number of possible leaks.
- Half of those rounded down are reserved for data leaks, so we get 3 reservations for data leaks (7/2 = 3.5).
- Then the amount of mission leak reservations are chosen between 1 and the maximum number of possible leaks minus the number of reserved data leaks (7-3 = 4). So there will be between 1 and 4 mission leaks. Lets say due to the bias it chooses 4.
- The game will then attempt to spawn 3 data leaks, and 4 mission leaks.
Scanning - Data Leaks
Min-Max
Min-Max
Min-Max
meat
spices
spaceweed
siliconwafers
graphene
superfluidcoolant
spacefuel
microchips
quantumtubes
scanningarrays
ore
silicon
methane
helium
meat
spices
spaceweed
siliconwafers
superfluidcoolant
graphene
antimattercells
microchips
quantumtubes
scanningarrays
Min-Max
Min-Max
Min-Max
meat
spices
spaceweed
siliconwafers
graphene
superfluidcoolant
spacefuel
microchips
quantumtubes
scanningarrays
ore
silicon
methane
helium
meat
spices
spaceweed
siliconwafers
superfluidcoolant
graphene
antimattercells
spacefuel
microchips
quantumtubes
scanningarrays
* Note: blueprints can only be obtained from non SCA stations the player has positive reputation with.
- Name = Name of the bonus.
- Type = Type of bonus. Discount reduces the price of sold wares. Commission increases prices of bought wares. Blueprint unlocks the blueprint of the attached module.
- Weight = Relative chance this reward will be chosen from the table when weighed against all valid rewards. An invalid reward cannot be chosen.
- Station Wares = Wares that the station must offer for a bonus to be applicable. Wares must either be sold to be applicable for discounts, or bought to be applicable for commissions.
- Bonus Min-Max = The value of the discount bonus chosen at random within the given range. See the "Scanning - Data Leaks - Continued" section for details.
- Duration Min-Max = The length of the time bonus stays active, chosen at random within the given range.
- Cooldown Min-Max = The length of the time before you can scan the same bonus again on the station, chosen at random within the given range.
Scanning - Data Leaks - Continued
- Scanning all 4 EMP data leaks on a station module will unlock the module blueprint for the player provided:
- the player doesn't already have that blueprint
- the relevant research has been completed (if necessary)
- the blueprint is not only accessible to AI factions
- the player doesn't already have that blueprint
- If a player scans EMP generated data leaks on a module for which the blueprint is ineligible, then they will instead unlock a permanent trade subscription for that station, provided:
- the player does not already have a permanent trade subscription
- the player is not an enemy to the station owner
- the player does not already have a permanent trade subscription
- If the above aren't available scanning will instead have a station the player has not yet discovered within the sector added to their map with the message "Trade partner added to database".
- If all stations in the sector are already known, then scanning will instead show the message "Out of info to unlock from this module".
- * Note: While scanning an EMP leak group you may obtain a blueprint before the final data leak in the group is scanned, this is simply because the randomly chosen reward for one of the EMP leaks was a blueprint. It is still worth scanning the remaining leaks as the group reward isn't generated when you create the leaks, but when you finish the last scan. So scanning the other remaining leaks in the group will still grant you either the trade subscription, or reveal a station (where possible).
Discounts do not apply to prices of ship/equipment fabrication (wharf/shipyard/equipment docks), only wares.
If you scan a data leak and it says "SUCCESS! Data decrypted.", but gives no bonus, then the leak bonus was invalid for some reason - usually one of the following:- All applicable leaks are on cooldown.
- The bonus it would grant you is less than one that is currently active on the station.
- No discount or commission bonuses are applicable, and you either have negative relations with the station owner, or you already own the blueprint for the module it was on.
If you get a bonus that is the same or higher, it will override your current bonus. This is not always a good thing, as it can result in a new bonus with the same discount, but shorter duration.
When the VIP bonus granted from hacking the Trade Terminal on a station is combined with the above trade station bug - both discount and commission bonuses end up canceling each other out. This essentially removes all existing discounts/commissions bonuses obtained from non-EMP data leaks, and prevents any bonuses from non-EMP data leaks being obtained.
If you get a bonus from an EMP leak that is higher than the Trade Terminal VIP bonus, it will replace any VIP bonus you might have - replacing a permanent bonus with a temporary one.
If a high value bonus obtained from an EMP data leak is active and you then attempt to hack the Trade Terminal on the station, you use up a Security Decryption System without the panel being registered as being hacked, and there will be no change to any discounts or commissions.
Scanning - Mission Leaks
When a mission leak is generated the type and parameters are chosen at random from a small list of possible missions.
If a black marketeer is on board the station, instead of a random mission the first mission leak generated will always be a "Bring Items" mission to unlock access to the black marketeer.
Note: If there are no valid targets for the mission, the leak will fail to generate.
- Mission Titles:
- A Lucrative Opportunity
- Opportunity Knocks
- A Lucrative Opportunity
- Can request the following items:
- 2 to 6 units of AGI Heuristic Cores
- 2 to 6 units of Decryption Modules
- 1 to 3 units of Security Decryption Systems
- 2 to 6 units of Unstable Crystals
- 2 to 6 units of AGI Heuristic Cores
All other mission leaks will generate randomly mission from the following mission types:
- Transport Passenger
- Assassinate
- Sabotage
- Hack Panel
- Board Ship
- If the mission leak station is owned by TEL, missions will be given by VIG 75% of the time, and SCA the rest of the time (25%).
- If the mission leak station is owned by FRF, missions will be given by FAF.
- If the mission leak station is owned by PAR or HOP, missions will be given by BUC.
- If the mission leak station is owned by ARG or ANT, missions will be given by HAT.
- Duke's Buccaneers
- Fallen Families
- Hatikvah Free League
- Scale Plate Pact
- Vigor Syndicate
- Yaki
- The default mission giver faction will be civilian.
- Start location is on the mission leak station.
- Destination is on a station with the following criteria:
- Is in the same sector as the mission leak station.
- Owner is not an enemy to the player or mission leak station.
- Is in the same sector as the mission leak station.
- Note: At the time of signal leak generation, if the player does not have sufficient relations to dock on the mission leak station the signal leak will fail to generate.
- The default mission giver faction will be criminal.
- The target ship is picked from ships matching the following criteria:
- Located within 2 gates/large hexes.
- Not located near to the mission leak station.
- Belong to the same faction as the mission leak station.
- Purpose is trading, building, or mining.
- Located within 2 gates/large hexes.
- The default mission giver faction will be criminal.
- The default target faction will be randomly chosen between TEL and ARG.
- The sabotage target will always be station turrets.
- The target station is picked from those matching the following criteria:
- Located within 2 gates/large hexes.
- Belong to the target faction
- Located within 2 gates/large hexes.
- If the mission was given by a pirate faction instead of the default faction the target faction will also change:
- Missions given by VIG or SCA will target TEL.
- Missions given by FAF will choose a target at random between ZYA and FRF.
- Missions given by BUC will choose a target at random between PAR and HOP.
- Missions given by HAT will choose a target at random between ARG and ANT.
- Missions given by VIG or SCA will target TEL.
- The default mission giver faction will be criminal.
- The default panel to hack is randomly chosen between the Turret Control Panel, Repair Terminal, Shield Control Panel, Storage System Control Panel, and Security Control Panel.
- The target station is picked from those matching the following criteria:
- Located within 2 gates/large hexes.
- Has an S sized dock.
- The player has high enough relations to dock.
- The chosen panel type on the station is not currently hacked.
- The station doesn't belong to the player, Xenon, or Kha'ak.
- Located within 2 gates/large hexes.
- If the mission was given by a pirate faction, some panel types will not be eligible targets:
- Missions given by VIG, SCA, FAF, or BUC will not target Repair Terminals or Storage System Control Panels.
- Missions given by HAT will not target Repair Terminals.
- Missions given by VIG, SCA, FAF, or BUC will not target Repair Terminals or Storage System Control Panels.
- The default mission giver faction will be criminal.
- The target ship will be:
- Any trader matching a given ship type - 50% of the time.
- A specific mining ship - 37.5% of the time.
- A specific trading ship - 12.5% of the time.
- Any trader matching a given ship type - 50% of the time.
- If the mission was given by FAF, then the target ship will instead be:
- A specific mining ship - 50% of the time.
- A specific trading ship - 50% of the time.
- A specific mining ship - 50% of the time.
- The target ship/ship type is picked from ships matching the following criteria:
- Located within 2 gates/large hexes.
- Matches the chosen purpose.
- Is L sized.
- Is not docked.
- Located within 2 gates/large hexes.
- Note: The generic non-pirate version of this mission has a bug where any standard faction can be the target/enemy faction, including the faction offering the mission.
- Notes: The above assumes that you own all DLC. Without the DLCs pirate factions added in DLCs are unavailable for signal leak missions, and the SCA hack panel mission can target the Storage System Control Panel.
If a faction is renamed (ZYA>RHA, BUC>TEM, CUB>CAB) they will still give pirate missions/be targeted by factions as they would have before. The exception is HOP/PAR > TRI, as it's not a simple rename but a separate faction.
Tides of Avarice - The Tide
For ships that are caught in the open, the Tide deals a variable amount every second - with a maximum damage of 500 damage per second to their shields, or 220 damage per second to their hull if the ship has run out of shields.
This gives us an upper bound of 30,000 shield damage / 13,200 hull damage over the 60 seconds of damage the Tide deals. Though due the variation it will do a little less in practice as the first second quickly ramps up to full damage, with the full damage lasting 38 seconds, ajd then the last 21 seconds of damage slowly ramping down to 0. You can typically expect to get roughly ~82% of the upper bound value - around 24,500 shields or 10,800k hull damage.
Note: If the simulation update rate of the game is reduced (such as when using SETA) then the damage applied will have greater variance and may rise closer to the upper limit of 30,000 shields / 13,200 hull damage as the damage fall-off isn't calculated smoothly.
Wreck Scrap Values
- Even if an object was built with something other than the default method, it will only consider the default build method when calculating scrap value.
Raw Kha'ak scrap uses an alternative calculation using a separate scalar combined with the maximum hull value in place of the material value of the destroyed object.
Note: Both scrap calculations suffer from floating point precision errors. This will cause wrecks to be worth 1 less scrap if the max hull is divisible by 80 for Kha'ak scrap, or if the material value is divisible by 1800 for all other scrap.
For reference, here is a table showing the average price of all wares used in objects that create scrap currently in game:
Prices of materials used in scrap-able objectsAnd here is one showing KHA hull values: KHA Hull Values
- Large KHA ships and stations are marked as un-scrappable.
- Several KHA turrets, shield, and weapons would also give scrap values - but there are no situations where they can be scrapped.
- The Protector and Queen's Guard both give 1 less scrap than they should due to a floating point precision error.
Simple Object Example:
An Advanced Satellite leaves behind a wreckage that can be scrapped. To find out what the scrap value is without blowing one up we need to know the average cost of the materials required to build one.
If a ship or station module is destroyed while it is still being built it will give a percentage of the scrap proportional to how far through the build process it was. So if a ship was destroyed while it was 60% built, it would give 60% of the scrap of the same ship fully built.
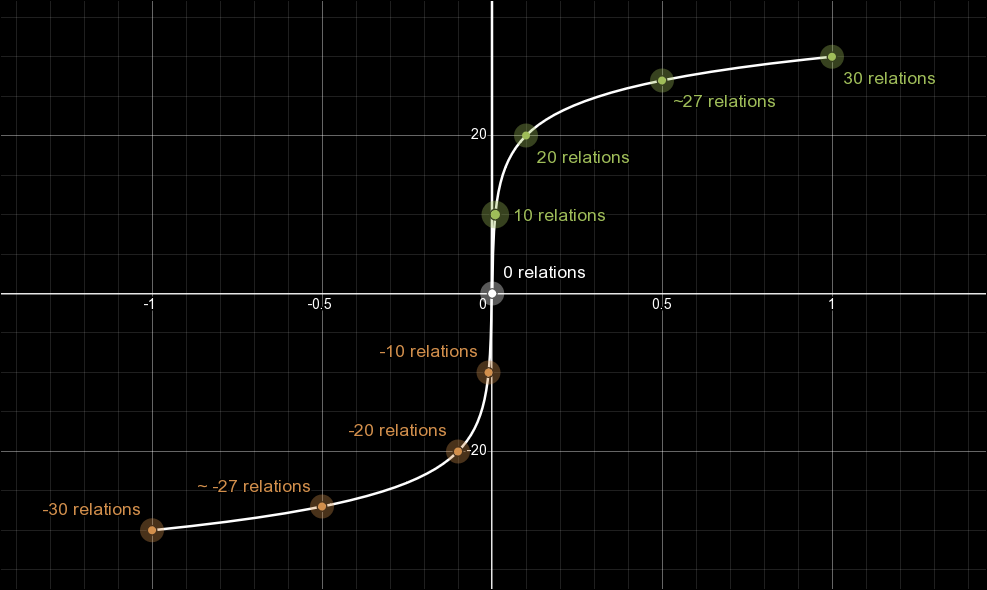
Faction Reputation / Relations
- This is mirrored for relations less than 0.
Which gives us the following: Notable relation values:
Relation value graph:
Teleport to stations
Use faction paint modification
Can take ally ceremony
(TER only) Grants innercore access
Can take friend ceremony
(TER only) Grants outercore access
Can no longer purchase general use modules/ships/equipment
(HAT/SCA) Can no longer purchase illegal modules
- Friend Ceremony Benefits:
- Guild membership
- Intermediate station modules
- Military ships and equipment
- Police license
- (MIN/TEL only) Illegal station modules
- (TER only) General use ships and equipment
- Can purchase:
- Ally Ceremony Benefits:
- Faction can order ships from player wharfs/shipyards
- Can purchase:
- Capital ships and equipment
- Advanced and ship building station modules
- Trade subscription
- Capital ships and equipment
Faction Crew Statistics
While crew skills are somewhat random - with each value being randomly selected between a minimum value and maximum value when created, crew belonging to different factions will have a bias towards or away from particular skills. This includes the crew that you can hire from talking to them in-person on stations, as well as those you hire en-masse when filling a purchased/upgraded ship.
For basic recruits (those you get when purchasing/upgrading a ship), you can refer to either of the handy-dandy charts below:
Poorly formatted table with star values: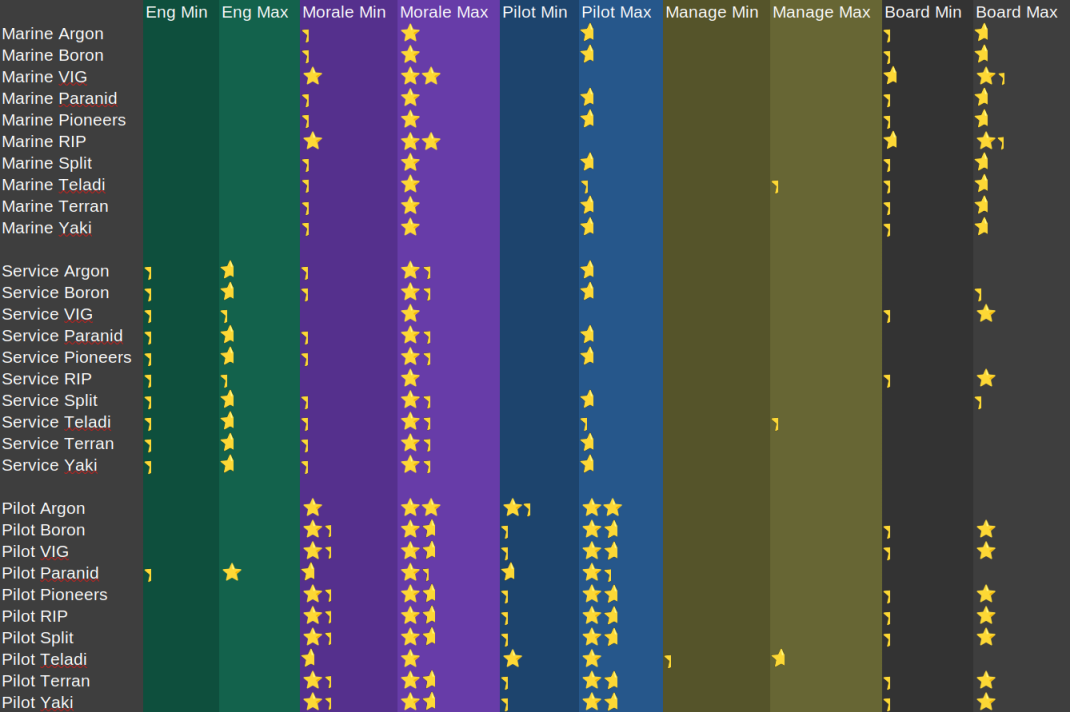 Raw data with black-white heatmap (lighter is better):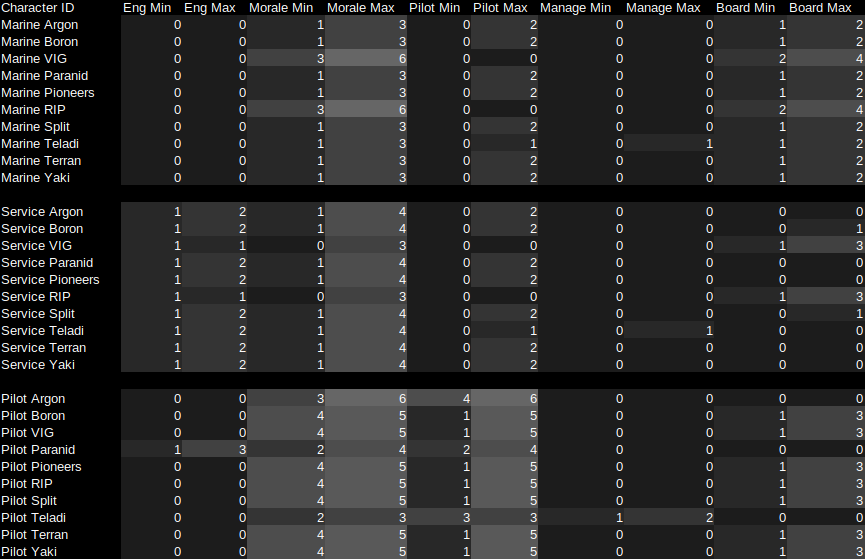
For the raw data, each 1 point = 1/3rd of a star.
So:
1 = 1/3rd of a star
4 = 1 and 1/3rd stars
6 = 2 stars
In Summary: For basic recruits:
- Argon have the best pilots.
- Both RIP and VIG equally have the best marines.
- Everyone has equal service crew apart from RIP and VIG - who have the worst.
Crew Skills - Overview
Without getting into the finer details - below is an outline of all the things crew skill influences sorted by crew member type.
Marines
- Boarding operations (offense and defense)
- Claiming abandoned ships
Managers
- Distance to target before station launches defense drones
- Amount of defense drones a station can launch at a time
- Max gate distance (travel between big hexes on the map) for mining/trading/salvaging subordinates (alternatively uses the skill of subordinate pilot, if higher)
Pilots (alone)
- Which ship orders/formations they can use
- When to deploy countermeasures
- Amount of defense drones a ship can launch at a time
- Wait time (in seconds) between buy/sell orders when trading
- Wait time (in seconds) before moving for non-capital ships
- Max gate distance (travel between big hexes on the map) when mining/trading/salvaging (alternatively uses the skill of their assigned trade manager, if higher)
Service Crew (alone)
- Act as last line defenders when their ship is boarded (NPC faction only - as player ships do not get boarded)
Pilots and Service Crew (both)*:
- Ship repairs
- Mining efficiency
- Ship attacked response
- Finding/opening lockboxes
- Mining profitability decisions
- Exploration/Patrol/Policing efficiency
- Ship evasion
- Ships moving into boarding operation range
- Attack <target> behaviour (various influences depending on ship and target)
- Crew abandoning ship (NPC only, crew aboard player ships never bail)
- Fleeing ships dropping cargo (NPC faction only - player owned ships do not drop cargo)
- Pirate plundering (NPC faction only - player owned ships cannot use the plunder order)
- Police/Pirate interception response (NPC faction only - player owned ships always obey global orders)
- AUX/Carrier automatic resupplying (NPC faction only - player owned ships obey the player directly rather than making assumptions)
* while all the outlined behaviours here are influenced by both pilot and service crew - pilots have more influence over the outcomes, and many behaviours have pilot specific interactions.
Crew Skills - In-Depth Primer
If the crew skill summary above wasn't enough and you really want to dive into the exact influences skill has, or you just enjoy gigantic walls of text, the following sections are for you. If not (more than understandable) feel free to skip the insanely lengthy "Crew Skills" section.
In the "Crew Skills" sections below I will not be covering the unlocking of orders or formations with star level prerequisites - they are easily visible in the in-game UI, and I wouldn't be able to add any additional insights. Nor will I cover the full behaviours of the scripts mentioned, only what relates to skill checks - so don't expect a full breakdown of things like how the AI mining or combat scripts work.
Finally, before we get into the nitty gritty calculations of the sections below, we need to know a few things first:
- Pilots - piloting
- Service Crew - engineering
- Marines - boarding
- Managers - management
*(With some minor exceptions, all crew will use their primary and/or secondary skill for any checks they use.)
Each of these skills is represented by a whole number value between 0 and 15. Every 1 point increase is represented by 1/3rd of a star in-game. So a crew member with a piloting value of 7 will show up as 2 and 1/3rd stars in the game UI.
In some rare instances, the game will use a value called potentialskill instead, this is a very similar calculation, but calculates as if the crew member was of a different role. So a service crew member might calculate their fighting ability using "potentialskill (marine)" - where rather than using engineering and morale as they would for combinedskill, they instead use their boarding and morale skills, essentially acting as if they were a marine.
Ships themselves also have a combinedskill score, dependent upon the crew on board.
A ship's combinedskill score is calculated as 70% of the pilot's combinedskill plus 30% of the average combinedskill of all service crew members on board, where an empty seat or marine counts as a crew member with 0 skill. So a ship with a 5 star pilot, a full allotment of marines and no service crew will have a combinedskill of 70 (3 and 1/3rd stars), as marines - even ones with engineering skill - do not add to the combinedskill of a ship.
Note: Do be aware that combinedskill values can only be whole numbers and will round down/remove values after the decimal place. Star values shown in the in-game UI are also rounded down to the nearest 1/3rd of a star.
Because combinedskill shows up as star values which have a range of 0 to 15, each star value increment is one fifteenth of the maximum value combinedskill can have. We can calculate this to get "100 / 15 = 6.666..." - so each 1/3rd of a star represents a combinedskill of about 6.667.
This means that if we were to see a crewmember or ship with a star value of 1 and 2/3rd stars (5 out of 15), we know that the combinedscore value is at or above the lower bound of 33.33 for 1 and 2/3rd stars, but below the upper bound value of 40.00 which represents the next increment at 2 stars. However in practice the value must actually be at or above 34 and below 40, due to rounding.
Example 1 - Crew skill rounding:
A pilot has a piloting skill of 10 and a morale of 3. Calculated as:
10÷15×80 + 3÷15×20 = 57.33
Next we put the pilot in a ship with no service crew, so the total star level of the ship is 70% of that of the pilot.
If we weren't to round down the combinedskill of the pilot, then we would get:
57.33×0.7 = 40.1
This is above 40, the ship should be 2 stars.
However, if you replicate this scenario in-game, you will see that it is only 1 and 2/3rds.
Because the actual calculation uses the rounded down value from the pilot, we get this:
57x0.7 = 39.9
(Which we round again to get 39.) This correctly reflects what we see in-game.
Example 2 - Ship skill rounding:
A pilot has a piloting skill of 7 and a morale of 8. Calculated as:
7÷15×80 + 8÷15×20 = 48
Perfect! A whole number - no rounding needed.
Next we again put the pilot in a ship with no service crew - calculated as:
48×0.7 = 33.6
This is above 33.33, which should be the threshold for a 1 and 2/3rd star ship.
However if we replicate this scenario in-game, you will see that it is only a 1 and 1/3rd star ship.
This is because the combinedscore of the ship is rounded down to 33, which is below the 33.33 threshold.
Crew Skills - Combat: Small vs Small
High Attention
1. If the ship has a combinedskill of 30 or more and its remaining boost is above 50% then it will boost between attack runs with a chance based on the combinedskill of the ship.- Both combinedskill checks are skipped if the race of the pilot is Terran.
2. If the main (non-turret) weapons of a ship are all missile based, or it has no main weapons at all, and it can fire missiles - then there is an additional delay for firing volleys based on piloting skill of the pilot.
- Note: A ship with mixed missile and non-missile main weapons will follow the same missile firing logic set out in the attack script, but ignores the volley delay - so pilot skill does not matter in this case.
- When first engaging the target - start firing missiles after an initial delay. Scaling down the delay based on the piloting skill of the pilot.#initial volley delay min_delay= 10 * (6 - (piloting / 3)) max_delay= 20 * (6 - (piloting / 3))
- the final value is picked at random between the min and max values
- measured in seconds
initial volley delayPilotingDelay MinDelay Max060s120s1510s20s - the final value is picked at random between the min and max values
- After firing a volley, recalculate new delay for the next missile volley (with a lower max value to the initial volley). Scaling down the delay based on the piloting skill of the pilot.#subsequent volley delay min_delay= 10 * (6 - (piloting / 3)) max_delay= 15 * (6 - (piloting / 3))
- the final value is picked at random between the min and max values
- measured in seconds
subsequent volley delayPilotingDelay MinDelay Max060s90s1510s15s - the final value is picked at random between the min and max values
Crew Skills - Combat: M (Defense)
High Attention
1. Time between re-evaluating new targets is inversely proportional to the combinedskill of the ship.- measured in seconds
- if set to disable target, the minimum time is set to 5s to allow for turrets to aim and fire on surface elements.
time between target re-evaluation
2. If the ship has defense drones and is allowed to launch them:
- Maximum drone squad size is determined by the piloting skill of the pilot.max_squad_size = min( max( (piloting / 3), 1), available_drones)
- the max squad size can never be lower than 1, or higher than the available number of drones.
The final number of drones to assign to a squad is a random amount between 80 and 100% of the max squad size calculated above (rounded down).numdrones_min= max( (max_squad_size * 0.8)i, 1 ) numdrones_max= max( (max_squad_size)i, 1 )- the "i" means that the value will only be a whole number (rounded down) - no sending out half a drone
drone squad sizePilotingSquad Size01 drone154-5 drones
- The amount of time before it can launch the next squad is based on the combinedskill of the ship, with the time starting from the first launch of the previous squad.min_time_between_squad_launches = 0.5 + ((1.0 - (combinedskill / 100.0)) * 60)
- measured in seconds
- for crew with a combinedskill of 50 or more, you can basically ignore this value, as the time the S dock animations take to launch the 2+ ships from the first squad will be longer than the timer
minimum time between drone squad launchescombinedskillMin Launch Time060.5s1000.5s - measured in seconds
Low Attention 3. If the ship is attacking and in Low Attention:
- If the ship has more than 1 possible target, set the number of maximum targets it can fire upon based on the combinedskill of the ship, the number of possible targets, and the number of operational turrets the ship has.min( operational_turret_count, target_number, max( (combinedskill / 5), 3))
- for M ships with 3 or less turrets, skill does not matter for picking the number of targets, as the minimum contribution from the skill check is floored at 3.
- the maximum possible targets an M ship can target is 20, but no M ship has enough turrets to actually take advantage of this.
- for M ships with 3 or less turrets, skill does not matter for picking the number of targets, as the minimum contribution from the skill check is floored at 3.
- Then pick a number of targets to attack between 1 and the maximum targets determined above, weighted towards higher values.
- Fire upon each target (including the case of having only a single target) with a chance between the higher of 90 and combinedskill.
- only M ships with higher than a 90 combinedskill (~4.5 stars), will have less than a 10% chance to miss in low attention.
Crew Skills - Combat: Capital vs Target
Much of the relevant behaviour here is identical to that of a Medium ship, but with some small adjustments.
High Attention:
1. Time between re-evaluating new targets is inversely proportional to the combinedskill of the ship. (Same as Medium ship logic)- measured in seconds
- if set to disable target, the minimum time is set to 5s to allow for turrets to aim and fire on surface elements.
time between target re-evaluation
2. If the ship has defense drones, is allowed to launch them
- If the drones are set to "attack my target" the ship will set the max number of drones per squad to the number of launch tubes, or the number of S docks if it does not have launch tubes.
- Otherwise if the drones are set to an attack order other than "attack my target", the number of drones per squad is set based on a combination of the piloting skill of the ships pilot and the number of launch tubes, or S docks if it does not have launch tubes.max_drone_squad_size = min( max( num_launch_tubes_or_pads * min( 1.2 - (piloting / 15.0), 1.0), 1), num_defense_drones)
- once again the squad size can never be lower than 1, or higher than the available number of drones.
numdrones_min= max ( (max_squad_size * 0.8)i, 1 ) numdrones_max= max ( (max_squad_size)i, 1 )- the "i" means that the value will only be a whole number (rounded down) - no sending out half a drone
drone squad sizePilotingSquad Size080-100% of the amount of launch tubes/pads1516-20% of the amount of launch tubes/pads - Otherwise if the drones are set to an attack order other than "attack my target", the number of drones per squad is set based on a combination of the piloting skill of the ships pilot and the number of launch tubes, or S docks if it does not have launch tubes.
- Then the ship also determines the minimum squad launch speed based on combinedskill.min_time_between_squad_launches = 0.5 + ((1.0 - (combinedskill / 100.0)) * 60)
- measured in seconds
minimum time between drone squad launchescombinedskillMin Launch Time060.5s1000.5s
Low Attention 3. If the ship is attacking and in Low Attention:
- Pick a number of targets to attack between 1 and the minimum of: operational turrets, possible targets, and 5. With the resulting value weighted towards higher values.
- unlike medium ships, capital ships don't determine max targets with crew skill, and can only select a maximum of 5 targets.
- Fire upon each target (including having only a single target) with a chance between the higher of 90 and combinedskill.
- only capital ships with higher than a 90 combinedskill (~4.5 stars), will have less than a 10% chance to miss in low attention.
Crew Skills - Combat: Station vs Target
Once again, shares a lot of similar (but tweaked) logic with Medium and Capital ships, particularly in regards to defense drones and Low Attention target calculations.
High Attention
1. A station's drone engagement range is the lesser between 15km and a value based on a combination of the maximum weapon range of all weapons on the station, and the station manager's combinedskill.
- the combinedskill value used here is that of the station manager, so it takes into account their management and morale values.
- drone engagement range
- Note: The weapon ranges for missile turrets are based on the target range for the default missile type of that turret. All L Dumbfire default to Heavy Dumbfire Mk1 (9km), M Dumbfire to Light Dumbfire Mk1 (7km), L Tracking to Heavy Guided Mk1 (6km), and M Tracking to Light Guided Mk1 (4.5km).
- The station calculates the number of drones per squad based on the number of launch tubes, and the management skill of the station manager.
- once again the squad size can never be higher than the available number of drones - though it can be 0, which can happen if the station has less than 10 launch tubes. This means that small stations might not defend themselves if the station manager has a low management skill
- Provided that drone squad size calculated above is at least 1, the number of drones that will actually be sent out is a random amount between 80 and 100% of the squad size (rounded down). With a minimum set to at 3, or the number of launch tubes the station has - whichever is the lesser value. Additionally, the number of active defense drones for the station is capped at 100, so any value that would exceed this is reduced to obey this limit.
- the "i" means that the value will only be a whole number (rounded down) - no sending out half a drone
- drone squad size
- Then the station also determines the minimum squad launch speed based on the management skill of the station manager.
- measured in seconds
- minimum time between drone squad launches
Note: If your station is not sending out defense drones, or you want it to send out more at a time, build additional administration modules.
Drone launch tubes per admin module:
Argon, Boron, and Paranid - 12
Split, Terran - 8
Teladi - 6
This means that a single Argon, Boron, or Paranid admin module is enough to hit the minimum value for even the worst manager to launch defense drones, while the other factions need at least 2. However, a manager with even a single star in management will be able to send out drones regardless of which admin module is used
Low Attention
3. If the station is attacking and in Low Attention:- If the station has more than 1 possible target, set the number of maximum targets it can fire upon based on the combinedskill of the station, the number of possible targets, and the number of operational turrets the station has.
- as above - the combinedskill value used here is that of the station manager, so it takes into account their management and morale values
- unlike a medium ship, a station can have 20 turrets, so it can actually target 20 different enemies at once
- Then pick a number of targets to attack between 1 and the maximum targets determined above.
- this is not weighted towards higher values, unlike ships
- also unlike ships, stations do not have a chance to miss in Low Attention
- while defense drones aren't 'launched' in low attention, they are considered when calculating damage, however they don't rely on manager skill like they do in high attention
- this is not weighted towards higher values, unlike ships
Crew Skills - Combat: Small vs Large
High Attention
After the ship has finished an attack run on the target, it attempts to move away in preparation for another run.- If the ship hasn't yet boosted this run, and meets the following criteria:
- The ship has a combinedskill of 30 or more, or the race of the pilot is Terran
- It passes a random chance check equal to the combinedskill of the ship in percent, or the race of the pilot is Terran
- The ship has a remaining boost amount above 50%
- remaining_boost is the remaining amount of boost in seconds
- boost_max_speed has a minimum value of 1
- Then it will boost away for a length of time determined by a combination of the weapon, radar, and boost values of the ship.
- If it hasn't gained a great enough distance from the target after the boost duration ends, it will fall back to the non-boost method below.
- If the ship has boosted already, or otherwise fails the boost check. The time it spends trying to gain distance is instead based on the combinedskill of the ship.
- the final value is picked at random between the min and max values
- measured in seconds
- getaway time
Note: If the total time spent moving this way in a single attack run exceeds 30s, it will be cut short and begin the next attack run. This can happen if the ship initially boosted away but failed to reach the target distance, and then continued without boosting.
Crew Skills - Combat: Capital Movement
IMPORTANT: The following section mostly applies to NPC faction ships. Player owned ships and crew are considered to have maximum stats for these calculations. So while it can help you understand why your capital ships move a certain way, increasing your crew's skills will not affect the behaviours outlined below.
Ship with a main battery
1a. If the ship has at least one main battery, and the target is not small (XS/S/M) - set the the range at which the ship will try to sit to fire upon the target to a distance based on a combination of the maximum range of the main weapons on the ship (not taking turrets into account), and the piloting and morale of the ship's pilot.- this distance the pilot attempts to place the ship is a random value between the min and max
- this distance is halved if the target is attempting to flee, or is in travel drive
firing range
1b. For larger targets and/or small firing ranges (determed as the physical size of the target being larger than half the firing range of the ship) the combat range will be adjusted to compensate.
- Counter-intuitively, rather than increasing the firing range, this actually reduces it - down to a potential 10% of the normal firing range.
1c. Once the ship is in firing position, it will remain there until it re-evaluates the firing position after a period of time. This time depends on the size and speed of the target. For capital ships with no boost available this time is a random value between 30 and 90 seconds, otherwise it is based on the size and speed of the ship with possible values ranging between 1 and 15 seconds. A pilot with poor morale will "lose their nerve" and will reposition early instead. They may also reposition early with a chance based on the difference between their piloting and morale values.
- where reeval_time is the normal wait time as descibed above
- an NPC pilot with morale of 12 or above (4+ stars) will never reposition early
- measured in seconds
- if the above statement is true then the ship will reposition early
- this means an NPC pilot with equal piloting and morale skills will have a chance to lose their nerve inversly related to their skill level, with a full 5 star pilot having no chance
- measured in seconds
Ship without a main battery 2a. If the ship does not have a main battery, it uses a value between between 60 and 90% of the maximum range of all turrets to calculate its firing range, without any regard to crew skill. It will attempt to face its best quadrant towards the enemy - where its turrets are best positioned to do the most amount of damage. The ship has a chance to consider whether it takes into account vertical quadrants when trying to best position itself with a chance relative to the combinedskill of the ship.
- If it is a carrier with a fleet, it does not attempt to close in - instead using radar range as its combat range - sending its fleet rather than using its turrets. It will also never consider vertical quadrants when repositioning.
- Note: The weapon ranges for missile turrets are based on the target range for the default missile type of that turret. All L Dumbfire default to Heavy Dumbfire Mk1 (9km), M Dumbfire to Light Dumbfire Mk1 (7km), L Tracking to Heavy Guided Mk1 (6km), and M Tracking to Light Guided Mk1 (4.5km).
consider vertical quadrants
2b. The ship has a chance equal to the combinedskill of the ship to determine the best (non-vertical) quadrant each time it repositions. If the ship passed the earlier chance to consider vertical quadrants - it also determines the best vertical quadrant without requiring another check - allowing for the ship to best position itself above or below its target.
2c. The ship also attempts to determine the target's weakest quadrant so that it can reposition to the safest quadrant of the target ship in an attempt to take less damage. It does this with a chance equal to the combinedskill of the ship. It also has an inversely proportional chance to pick a target quadrant at random as the perceived weakest quadrant. If it fails both checks, it will use the last quadrant it determined to be the weakest.
All (AI Faction) capital ships
3. If the ship's desired position is determined to be more than 120s away, and the ship has a combinedskill of 80 or higher, then the ship will engage its travel drive to get there with a chance equal to the combinedskill of the ship.
Crew Skills - Orders: Move
If the ship is not a capital, when performing a basic move order it has a small delay based on the piloting skill of the pilot.
- measured in seconds
initial move delay
Crew Skills - Orders: Claim
- to clarify: potentialskill here is the same calculation as combinedskill for a marine (taking into account boarding and morale) - this might seem odd given that ships can only be claimed by marines, however the damage is calculated after the ship is claimed and the marine has changed role to pilot, so the game uses this to reference their old marine skills
- only a marine with a combinedskill above 70 can reduce the damage the ship takes.
- the ship will always be left with at least 1% hull.
hull damage percent
2. When a ship is claimed, a number of non-critical components (turrets, shields, weapons) are targeted for destruction, then those components each have a chance to be destroyed equal to the inverse of the potentialskill (marine) of the claiming crew member.
- rounds down to the nearest whole number
Note: This can be read to mean that the number of components saved any chance of being destroyed is equal to the skill of the marine, while those remaining have the inverse chance at being destroyed.
For example: If a claiming marine has a combinedskill of 80 - 80% of the components will not be at risk while the remaining 20% each have a 20% chance to be destroyed.
Crew Skills - Orders: Open Lockbox
Low Attention
If the ship is S/M and has at least one forward mounted weapon, then it can attempt to open a lockbox. A ship attempting to open a lockbox in Low Attention has a chance equal to the combinedskill of the ship, with a floor of 70%.open chance
Crew Skills - Orders: Mimic
If a subordinate ship is tasked with mimicking their leader's behaviour, that behaviour must either have zero skill requirements, or the pilot of the subordinate ship must have a combinedskill equal or greater to the requirement of the task.
- order_requiredskill doesn't have a value of 0 for orders that have no requirement, the value simply doesn't exist, so the code checks whether or not it is a valid value instead of comparing it.
Crew Skills - Orders: Prospecting
The maximum number of gates (big hexes) the ship can travel when prospecting is equal to the highest star level between the piloting skill of the ship pilot and the management skill of the commanding station manager.
gate distance
Crew Skills - Orders: Salvaging
The maximum number of gates (big hexes) the ship can travel when salvaging is equal to the highest star level between the piloting skill of the ship pilot and the management skill of the commanding station manager.
gate distance
Crew Skills - Orders: Trading
gate distance
- these values are in seconds
- wait times
- the lower bound value is 4 here because a pilot can't perform the fill shortages behaviour unless they are 2 stars - the minimum piloting skill needed is 1 and 1/3rd stars in piloting (4 points out of 15), provided they have 5 stars in morale to make up the rest required to reach 2 stars overall
Crew Skills - Orders: Mining
gate distance
- If the ship meets the requirements above, it then has a chance equal to the combinedskill of the ship to prioritize the list of wares it compiled by highest relative price. Allowing it to attempt to mine the material that will get the most profit.
- a mining ship that is not mining for a commander is likely a ship using one of the automine behaviours, their commanding station is not yet operational, or the station is simply not requesting any mined materials
- a buy order's "relative price" is defined as the difference from the average price of the ware. This means that expensive wares will often be prioritized over cheaper wares, even if they would make a smaller profit due to taking up more storage on your ship.
- one of the rare behaviours that use a skill outside a crew member's normal skill set.
Ships that don't meet the required skill checks pick a ware of their minable wares at random without regard for price or if anyone is even buying it.
3. When mining, each ware has an efficiency calculation based on the ware being mined, and the combinedskill of the mining ship. The gather rate of liquid mining ships is directly scaled by this value.
Efficiency calculation- this value has a range between the "ware_efficiency" and 1.0
- crew skill make up the difference between the ware_efficiency value and 100% efficiency - this means that low efficiency wares rely more heavily on crew skill to speed up mining
- because crew skill contribution here is non-linear, even a combinedskill as high as 80 (4 stars) results in having only ~41% of the contribution that a ship with a combinedskill of 100 (5 stars) will have, so you need very high skill crews to have a noticeable impact on mining efficiency
The efficiency value calculated above is used to scale the delay between the material gathering cycles of solid mining ships.
- this value is in seconds
- ware efficiency
- relative mining efficiency
- silicon is almost 34x more efficient at 5 stars compared to 0 stars
- everything apart from silicon has fairly marginal gains at roughly 5.5%
Author's note: ship_scan_time appears to have a default of 3 seconds for ships in low attention.
Assuming this is a fairly standard value, we can see that for all wares except Silicon - even a low skilled crew will have a delay of only about 5 seconds, while for Silicon this value is 60x larger (around 5 minutes).
I still need to do research into this section to give a better idea of the range of values for ship_scan_time, but this should hopefully give you a ballpark idea of the delay times you should expect.
Crew Skills - Orders: Board
If the ship is set to maintain distance, and has moved into position (somewhere between 70-90% of the ship's radar range), it will wait before deciding if it needs to reposition. The length of time the ship waits is based on the combinedskill of the ship.
- measured in seconds
wait time
Crew Skills - Orders: Recon
- If it fails this check or there are no nearby unexplored locations, it will fallback to trying to find the closest unexplored area in the area to explore, with no concern for the sector center.
NPC Faction Only
2. If a non-police NPC ship is scanning a player owned object, the time it takes is inversely proportional to the combinedskill of the ship.
- measured in seconds
time to scan
3. When an NPC police ship scans a target that it deems to be "trouble":
- For all factions barring PAR, HOP, or TRI, the chance to report the target is based on a combination of the combinedskill of the police ship, and the relations between the factions of it and the target. If the faction of the police ship is either PAR, HOP, or TRI the report chance calculation is skipped and instead set to 100%.report_chance = combinedskill * (1.0 - max( faction_relation, 0) )
- The faction_relation value uses the internal (logarithmic scale) value, where 10 = 0.01, 20 = 0.10, and 30 = 1.00 (with the same scale for negative values)
- If the scanned target is a ship carrying illegal wares, the (police) ship will attempt to find the illegal wares and cause the target to lose their cover if they were masking their identity with a chance equal to the report_chance calculated above.
- This check does not happen if the scanned ship hides its illegal cargo with ship modifications.
- If the scanned target is a station it is reported to the ship's faction with a chance equal to the report_chance calculated above unless the police ship is not owned by PAR, HOP, or TRI and the station is owned by SCA, or HAT then the report chance is set to 10% instead.
- If it fails this check, it will ignore previously found targets and start searching for new targets again.
Crew Skills - Orders: Restock
The distance an Aux/Carrier can travel when resupplying itself with wares needed to resupply other ships. The maximum number of gates (big hexes) it can travel is equal to the star value of the piloting skill of the pilot.
gate distance
Note: By default Aux/Carrier ships will restock by creating trade offers. This behaviour only applies if the ship needs to restock itself.
Crew Skills - Orders: Plunder
NPC Faction Only
When a pirate ship requests that a ship drop their cargo (including the player), the amount of cargo dropped to satisfy the pirate ship is a percentage of the cargo based on the combinedskill of the pirate ship, or enough to fill the plunderer's remaining cargo space, whichever is less.
- if the target is the player and they drop less than the amount to appease the pirate, the pirate will give the player a second chance to drop more
- if the pirate ship is not appeased, it will attack the target
appease amount
Crew Skills - Orders: Supply
NPC Faction Only
Whenever an NPC ship stops fighting, and that ship has subordinates assigned to supply it (likely an Auxiliary ship), they will each have a chance based on the combinedskill of their ships to attempt to get supplies for it, provided that the ship they are supplying has more than 20% of it's storage space free.
appease amount
Crew Skills - Response: Evade
High Attention
When attempting evasive maneuvers, a ship with a remaining boost amount above 50% can use boost to aid their evasive maneuvers (where appropriate) with a chance equal to the combinedskill of the ship.- The combinedskill random chance check is skipped if the race of pilot of the ship is Terran. Terran pilots will always attempt to boost where allowed.
Crew Skills - Response: Flee
NPC Faction Only
If an NPC ship is attempting to flee via a method other than evasive maneuvers, and has cargo on board - they will have a 0-90% chance to drop their cargo, with a chance inversely proportional to the pilot's morale.
- The valid fleeing options are via highway, boosting away, leaving the cluster, or docking on a station.
- Ships fleeing after being halted by police or pirates will not drop cargo, as dropping cargo is handled by the 'comply' response - as fleeing in that scenario reflects the pilot wanting to keep their cargo.
- Ships with missile weapons that flee because they have run out of missiles will not drop wares.
- Ships fleeing the tide will not drop wares.
- Plunderers (pirates) fleeing after collecting booty dropped by the ship they halted will not drop wares.
- If the fleeing ship has multiple wares on board, it will attempt to drop their least valuable ware with a chance equal to the combinedskill of the ship. Otherwise the type of ware they drop will be randomly picked from all wares on board.
drop chance
Crew Skills - Response: Missile Lock
- And the ship's pilot has a piloting skill of 3 stars, the will deploy countermeasures even after already being locked on to.
- If the ship's pilot has a piloting skill above 4 stars, the will deploy countermeasures even after already being locked on to, but only if they have more than 50% of their countermeasures left (in an effort to conserve countermeasures).
Note: all ships will deploy countermeasures regardless of skill if they're being targeted by missiles, but not locked on to.
Crew Skills - Response: Attacked
- fight_bonus is 20 if the ship is a military ship, and 0 otherwise.
- the developer comments in the code state that 5 star morale pilots in military ships will never fail the morale check, but the math shows that they will fail it at 5% shields.
shield% to flee in a non-combat ship
shield% to flee in a combat ship
flee at estimated time to live
Crew Skills - Response: Inspected
NPC Faction Only
(player faction ships will always do the set response defined in global orders.)
- drop_amount has a minimum value of 1
drop amountmoraledrop amount0100% of ware1550% of ware
NPC Faction Only
2. If an NPC ship is halted by a player-owned pirate, and the race of the AI ship's pilot is Paranid or Split, there is a chance equal to the combinedskill of the target ship that they become more likely to retaliate instead of flee or comply.
(player faction ships will always do the set response defined in global orders.)- When Split and Paranid pilots are halted by an NPC faction pirate, they will always attack the pirate, other races will always flee.
Note: the pirate in this scenario will only ever be the player themselves, as the plunder order is not available to player ships. AI behaviour chance for given response orders.DefaultPilotAttack %Flee %Comply %Paranid/Split502525Other05050Attack Response OrdersPilotAttack %Flee %Comply %Paranid/Split66.716.716.7Other502525Flee Response OrdersPilotAttack %Flee %Comply %Paranid/Split404020Other066.733.3NPC Faction Only
3. If an AI ship with illegal wares is halted by police, they have a chance equal to the combinedskill of the ship to attempt to flee instead of complying.
(player faction ships will always do the set response defined in global orders.)- If the morale of the smuggler ship's pilot is 4 stars or higher, passing the combinedskill check will cause them to attack the police rather than fleeing.
NPC Faction Only
(player faction ships will always do the set response defined in global orders.)4. If an NPC combat ship is halted by a pirate and their pilot's morale is 2 stars or less they have a chance equal to the inverse of the combinedskill of the ship to flee instead of fighting back, even if their orders are to retaliate.
Note: with the exception of the player's ship, NPC pirates will never target combat ships, so this really only applies when the player themselves decides to pirate a combat ship.
Crew Skills - Misc: Strafing & Steering
A ship piloted by an NPC has both steering speed and acceleration as well as strafing speed and acceleration scaled down based on the piloting skill of the NPC.
For all NPC pilots with less than 5 stars in the piloting skill the scaled strafing speed value has a lower bound of 10 and an upper bound of 50. If the pilot has 5 stars in piloting it is not limited.
- Steering and strafing scale
Crew Skills - Misc: Reaction Time
Ships in combat have a small delay in reaction based on the piloting skill of the pilot.
- Ship reaction time
Note: Where reaction time plays a role is not defined in the game scripts. It may be used for many situations, or might only be used in a single scenario like dodging projectiles - it is unfortunately not easy to verify.
Crew Skills - Misc: Repairs
- used for calculations below - does nothing on it's own
- if a ship has no pilot assigned then this line of code is skipped and repair_modifier is instead set to 0 - the player sitting in the pilot seat does not count as the ship having a pilot for this check
- A ship will start repairing the hull and components once their hull percentage is below a certain threshold, and will stop repairing above that amount. The threshold is dependent on the combinedskill of the ship, as calculated for repair_modifer above.hull_damage_limit = 60 + (40 * repair_modifier / 100)
- this value represents the hull value as a percentage
- if a ship has no assigned pilot repair_modifier is set to 0, causing it to only be able to repair up to 60% hull
- hull value above which a ship will cease repairs
combinedskillhull%No pilot60%064%100100%- A station will not do this calculation and this value will instead be set to 100, allowing it to always repair back to 100%.
- this value represents the hull value as a percentage
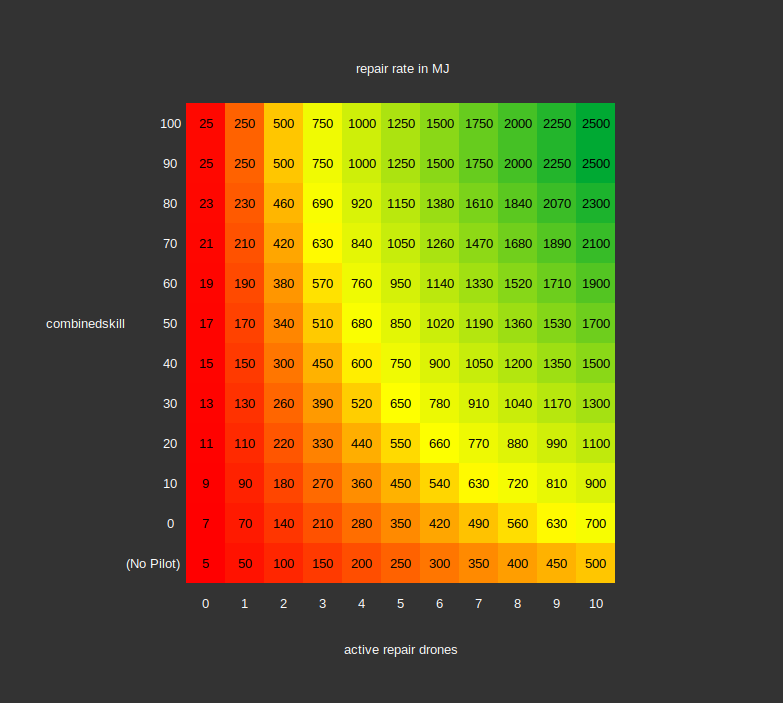
- The amount of hull repaired each cycle is based on a combination of the available repair drones, and the combinedskill of the ship or station as calculated in repair_modifier above.repair_rate = 50 * max( active_repair_drones, 0.1) * (1 + repair_modifier / 25)
- this value is the repair rate per tick in MJ
- the resulting hull value can exceed the limit set by hull_damage_limit above, but not the maximum hull of the ship
- a ship with no assigned pilot, or station with no manager will have the repair_modifier set to 0, causing it to repair at a reduced rate, but will still benefit from repair drones
- even with no repair drones or crew (of any type) the repair rate will still be 5MJ per tick - spooky
Repair rate chart - this value is the repair rate per tick in MJ
- If a ship is repairing a module, and it has been repaired to operational status, then the ship has a chance to start work on a different module that is not yet operational with a chance based on the combinedskill of the ship as calculated in repair_modifier above. Stations will skip the skill check and do this automatically.
Notes: The repair time of destroyed modules is based only on the physical size of the module, and not on the repair speeds calculated above. Destroyed modules have a minimum repair time (from destroyed to 1% hull) of 1 minute, and a maximum of 20 minutes. In my digging, I found that even the Erlking's main battery is not big enough to hit the 20 minute threshold, while every M sized component I tested was small enough to be below the 1 minute threshold (and thus have a repair time of exactly 1 minute).
A ship will attempt to prioritize destroyed engines first, but has a 5% chance to randomly pick from all destroyed ship components instead.
Crew Skills - Misc: Spawn Lockbox
- the final value is rounded down to the nearest whole number - so 75.8% becomes just 75%
- avg_lockbox_distance is dependent upon the sector the ship is in. If the sector does not have a defined value for this, it is set to -1, and no lockboxes can be spawned.
- To begin with spawn_factor is set to 0, then it will add the following values:
- If the ship has orders, and those orders are not "wait" or "wait for signal" - add 10
- If the ship has no commander or subordinates - add 10
- If the ship is set to explore - add 30
- If the ship is not a capital ship - add 10
- If the ship is a scout ship - add 20
- If there are no stations within radar range of the ship - add 10
- Also add an additional 1 for each kilometer outside of radar range it is to thee nearest station, capped at 10 - for a maximum of 20 total.
- if the ship's orders are set to "wait" or "wait for signal" it will force spawn_factor to 0 ignoring any other additions, so no lockboxes will be spawned.
lockbox spawn chance
(for a sector with the most common avg_lockbox_distance of "79370.062")
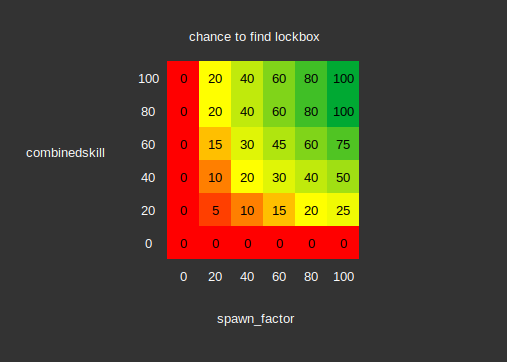
Note: For the full list of sectors with their average lockbox distance - see here.[pastebin.com]
Crew Skills - Misc: Bail/Abandon Ship
Just happens to be responsible for abandon ship logic. When a player-owned ship attacks another ship, the targeted ship's crew have a chance to bail based on a number of prerequisite conditions, the combinedskill of the target ship, and the morale of its pilot.
- Prerequisite Conditions:
- the target's shields are below 20%, or it has no shield modules.
- the target's hull is below 75%
- the target isn't attempting to dock somewhere
- the target is either an S/M sized ship, or if larger - that it has crew other than the pilot
- it has been at least 30 seconds since the last time this check was done, or this check has not been done before
- If the above checks all pass, then we can calculate the crew eject chance
- the result is an integer (whole number)
- not_player_reduction is 1 if the attacker is the player's ship, or 4 if not
- big_target_reduction is 1 if the target ship (being attacked) is S/M sized, or 2 if larger
- xenon_reduction is 3 if the target is xenon owned and 1 if not
- ~This code is hard to make readable and quite lengthy, so I will break it down~
- eject_chance starts at 46%, then subtract up to 20% based on the combinedskill of the target ship
- then multiply it by the ratio of the target's max hull, over the attacker's max hull. Limiting it to a max of 1 - this means that you can't increase the chance, but it can lower
- then multiply it again by the ratio of the attacker's current "health" (a value between 0 and 200 based on shield+hull percentages) over the bailing ships current "health" - again with a max of 1, so you can't increase the chance, but it can lower
- then round down the value to the closest whole number.
- then quarter the chance if the attacking ship is not the player's currently occupied ship (rounding down)
- then halve the chance if the target ship is a capital (L/XL) ship (still rounding down)
- then third the chance if xenon owned
- If the check based on the chance calculated above succeeds then we can finally cause some crew to abandon ship, with the number of crew bailing based on the crew capacity of the bailing ship, and the morale of the pilot.
- If the check was triggered by the player requesting the ship to surrender, then we need to pass an additional check based on the target ship's current number of crew, the max crew capacity, and the morale of the pilot.
- this tells us how full the ship can be as a percentage before they will agree to surrender
- every point (1/3rd of a star) of morale the pilot represents 6.25% of the ship's crew space that needs to be empty - so if you want to target a pilot with a 3 star morale value, you need the ship to be over half (56.25%) empty before they will surrender
- if you ask the ship to surrender and they don't meet the requirements above - you will still have to wait the 30 seconds before trying to get them to bail again
- max percentage of filled crew slots under which a pilot will agree to surrender
- Otherwise if the check was triggered by weapons fire, then the number of crew that will abandon ship will be based on the crew capacity, and pilot's morale of the target ship. The crew will abandon ship in order: Service crew first, then marines, and finally pilot if the target is not a capital ship.
- this value has a minimum of 1, and a max of 3 (or the current number of crew if lower)
- the 'i' next to the brackets ensures the value is a whole number, so you don't have half a crew member attempt to bail
- If the target ship is not a capital ship, and the number of crew that are bailing (as calculated above) are the last remaining crew members - then the pilot will abandon ship, scuttling the ship's hull, components, and cargo on his way out with the amounts being based on the combinedskill of the pilot. 5 star pilots will always destroy their ship.
- this is the percentage hull that the pilot can leave the ship with - so a pilot with a combinedskill of 30 will only be able to damage the ship down to 70% hull, if the ship is lower than this value, then no damage will be done to it's hull
- if this is 0 then the below is ignored and the ship simply destroyed
- Hull damage:
- value is randomly picked between min and max
- this acts as a sort of fail-safe so that your weapons fire doesn't unexpectedly destroy the ship immediately the moment it is abandoned
- the value is a whole number - no destroying half a component
- the pilot can destroy anywhere between 0 and 10 components (or the amount the ship has if lower)
- Destroyed components:
- this value represents the percentage (1.0 = 100%) of cargo the pilot will destroy
- the amount is chosen randomly between the min and max values
- if the ship has multiple cargo types on board, this value is determined separately for each type
- Cargo destroyed:
Note: Pilots will never abandon a capital ship. You will need to board the ship with marines to claim it.
For the best chance to get your target's to bail:
- The attacker to be the player
- The attacker to have a lower max hull than the target
- The attackers combined shield and hull percentage to be above the target
- The target to have a low skilled crew
- The target to be an S or M sized ship
- Additionally, if you want them to surrender:
- The target to have many empty crew slots
- The target pilot to have low morale
Crew Skills - Misc: Boarding Ops
1a. Once a boarding pod attaches to a target ship the attached marines begin making progress towards completing the infiltration stage based on a a combination of the combinedskill of the boarding marines, and the hull percentage of the target ship. Each marine starts with their infiltration progress at 0 and finish infiltrating once this value reaches 100. Infiltration can only finish once all marines reach a progress of 100.
- Base Infiltration Progress Rate:
- speed relative to 100% target hull
- Every 2 seconds infiltrating marines will make individual progress towards the infiltration stage using the following calculation:
- relative marine infiltration speed
- The total (individual) progress of the marine is then updated with respect to the maximum allowed by a progress cap. The progress cap is set to '15' if stage 1 is still ongoing and not all boarding pods have attached to the target ship, otherwise it will be set to '100'.
- The table below shows the time it takes in seconds for an individual marine to reach 100% infiltration progress.
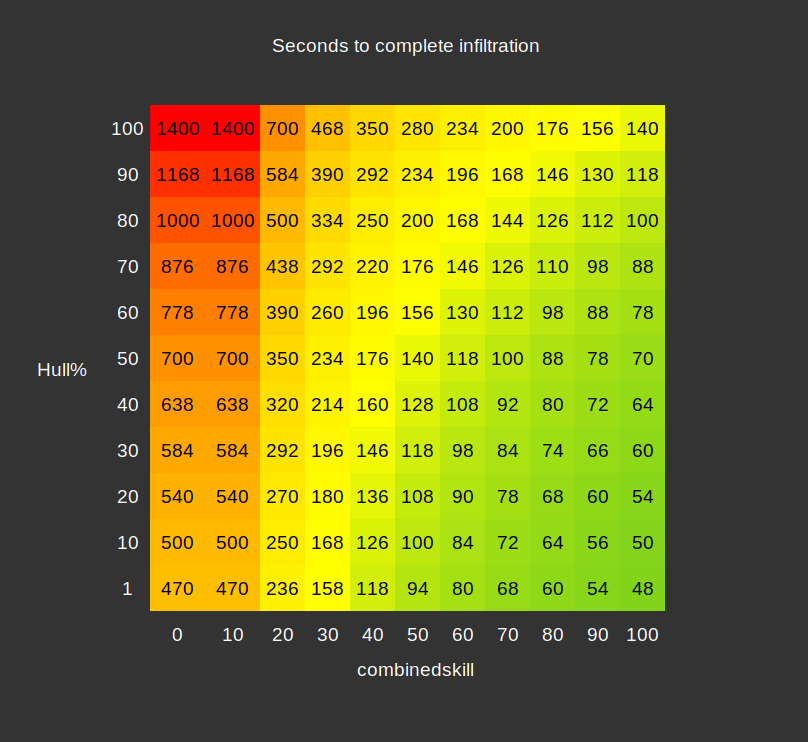
- If you consider the lowest skilled marine sent, the values here will be your worst case scenario for infiltration time. That is the lowest time it will take should they fail to get any bonus progress from assisting marines (as described below).
1b. Bonus Progress
- If stage 1 is complete, then in addition to the above, a random marine is chosen from all infiltrating marines. If the chosen marine has already finished infiltrating, the unfinished marine gets bonus progress equal to 30% of the progress rate of the chosen marine. If the chosen marine has not yet finished, then no bonus is given.
- Assisting Bonus
- A finished marine can be chosen to assist any number of unfinished marines.
- Note: This was introduced in version 7.00. Previously infiltration time was limited to the speed of the slowest infiltrating marine. The addition of bonus progress mitigates this - allowing you to benefit from sending marines of varying skill levels, and lowers the barrier to ranking up lower skilled marines.
2. For stage 3 - attackers and defenders are given health and damage values based on their combinedskill if they are marines, or potentialskill (marine) if they are service crew.
- Health:
- Damage:
- damage for each attack from a marine is a random value between 1 and their max damage with a skew towards higher values.
- damage for each attack from service crew is a random value between 0 and the max damage with an even distribution of values.
- Note: This means that ships that have better boarding skills can be tougher to capture. Because RIP and VIG have a bias towards higher boarding skills (even for their service crew), their ships are harder to board than other factions.
The FAQ FAQ.
For now, the short and dirty description of attention levels in X4 is: if the player is able to see a ship then it is in high attention, if it is too far away it is in low attention.
If you're not a programmer, don't worry - I have done some rough translation for most of the code for the sake of simplicity and readability. You don't need to understand any coding language to get the basic overview of the code sections - for the most part it's just mathematical formulas.
When calculating things such as the allowed travel distances for station subordinates - travel between the individual smaller hexes that fit within a larger hex (sectors within a cluster) on the game map do not count towards distance. I use the term "gates" or "big hexes" to indicate this difference.
Closing Remarks / Contact
Some information I have purposely omitted where I've deemed it basically inconsequential to know. For example: A script that changes a delay based on crew skill, but only changes it by a fraction of a second. This is essentially invisible to the player. It is not intended as a game mechanic, but is instead there to allow the game logic to properly function.
I've done my best to cover things as accurately as I can, and fix any errors I've made along the way, but I'm not perfect. This guide covers rather a lot of information, so there will almost certainly be some errors in it that I've missed.
If you do find any issues with this guide, be it inconsistent terminology, math/coding errors, poor spelling, grammatical mistakes, or you simply have some helpful feedback - please let me know and I will attempt to address it. You can leave a comment on the guide here, or contact me on discord (details below).
If you have your own questions (even basic ones), or just want to chat about X4, you can chat with me (or any of the community members) on the discord server[discord.com]. My discord username is "kittenwithmittens", or alternatively simply "KittenMittens".
If you do leave me a message. I will do my best to respond in a timely manner. It won't bother me at all if you wish to ping/@me on discord to discuss anything X4 related, and is in fact the only way to ensure that I will see your message.
- A Guide to Game Starts★ 5 (209)28k views437 ♥27 minUpdated Jan 7
- X4 Beginner Guide 5.1★ 5 (393)27k views1.2k ♥22 minUpdated Mar 7, 2023
- All Ownerless Ships in X4: Foundations (9.00 Base Game + All DLCs)★ 5 (453)27k views1.1k ♥10 minUpdated Jun 10
- X4 Ultimate Weapons Guide. [NOW ON THE WIKI]★ 5 (343)23k views767 ♥104 minUpdated Jul 8, 2024
- [9.0] A Scrappy Guide on Scrap★ 5 (216)20k views478 ♥16 minUpdated Jun 15
- Production Chain Simplified with Pictures★ 5 (471)16k views1.1k ♥7 minUpdated Mar 7, 2024




- Upgrading to PremiumTeam Fortress 2★ 5 (20k)1441k views11k ♥6 minUpdated May 11, 2022
- No More Room in Hell Official ManualNo More Room in Hell★ 5 (2.8k)569k views2.1k ♥29 minUpdated Apr 22, 2019
- NMRiH Community Hosting GuidesNo More Room in Hell★ 5 (526)351k views653 ♥1 minUpdated Aug 10, 2022
- Лучшие кооперативные игры SteamPAYDAY 2★ 5 (1.5k)315k views2.1k ♥56 minRussianUpdated Apr 27, 2025
- Desert Eagle Heat Treated | Blue GemCounter-Strike 2★ 5 (1.6k)292k views1.5k ♥2 minUpdated Jan 16
- Treasure Hunt Puzzle SolutionsTotal War: WARHAMMER II★ 5 (6.9k)281k views15k ♥3 minUpdated Aug 19, 2021






This guide was created by its original author on the Steam Community. Are you the author and want it removed? Request removal.