A Guide to Future Suffering: Paradise Lost Ludicrous
Forward
Well, it's been some time hasn't it?
For those of us just joining, POSTAL 2's Ludicrous difficulty is probably the hardest challenge you can possible get out of the game, it's also one that's officially only available for the first week of Postal 2, not including the Paradise Lost Week.
If you're interested in doing the previous week on Ludicrous, check out my previous guides!
Here's the first Monday to Friday:
https://steamcommunity.com/sharedfiles/filedetails/?id=2994223301
And here's for Apocalypse Weekend!
https://steamcommunity.com/sharedfiles/filedetails/?id=3233075398
However, come March 2024 and the patch that introduced Ludicrous (alongside many more fixes) got another update, xPatch 3.1, and with it includes support for the Paradise Lost and a few more fixes/changes. Since it's been nearing 2 years since the last official update, it's unclear if it'll ever get pushed into Steam sometime soon, but this guide should still work out if that happens. Maybe at the 30th anniversary, who knows. If you're looking to try it out for yourself, either because you've already pulled through the first week, or would like further support/fixes for Postal 2, you can find xPatch here
Now then, a few important details to lay out for those who won't be using xPatch 3.1 for this run: This guide was made with 3.1 in mind, you are on your own for 3.0 (or vanilla Postal 2, using the Workshop game workaround to play Paradise Lost on the older xPatch version). 3.1 has the same They Hate Me+ skips for certain day tasks implemented, so the workarounds you would need to do to trigger them are not needed here. xPatch is also set to it's default settings, so no headshot bonuses. I also have my Bystander Population set to 15, so there will occasionally be cases where I'll get more/less spawns when going task-to-task that might not line-up on your playthrough. You can't cheese it and set it to 0 for no bystanders though, they thought of that detail years ago.
Monday Map
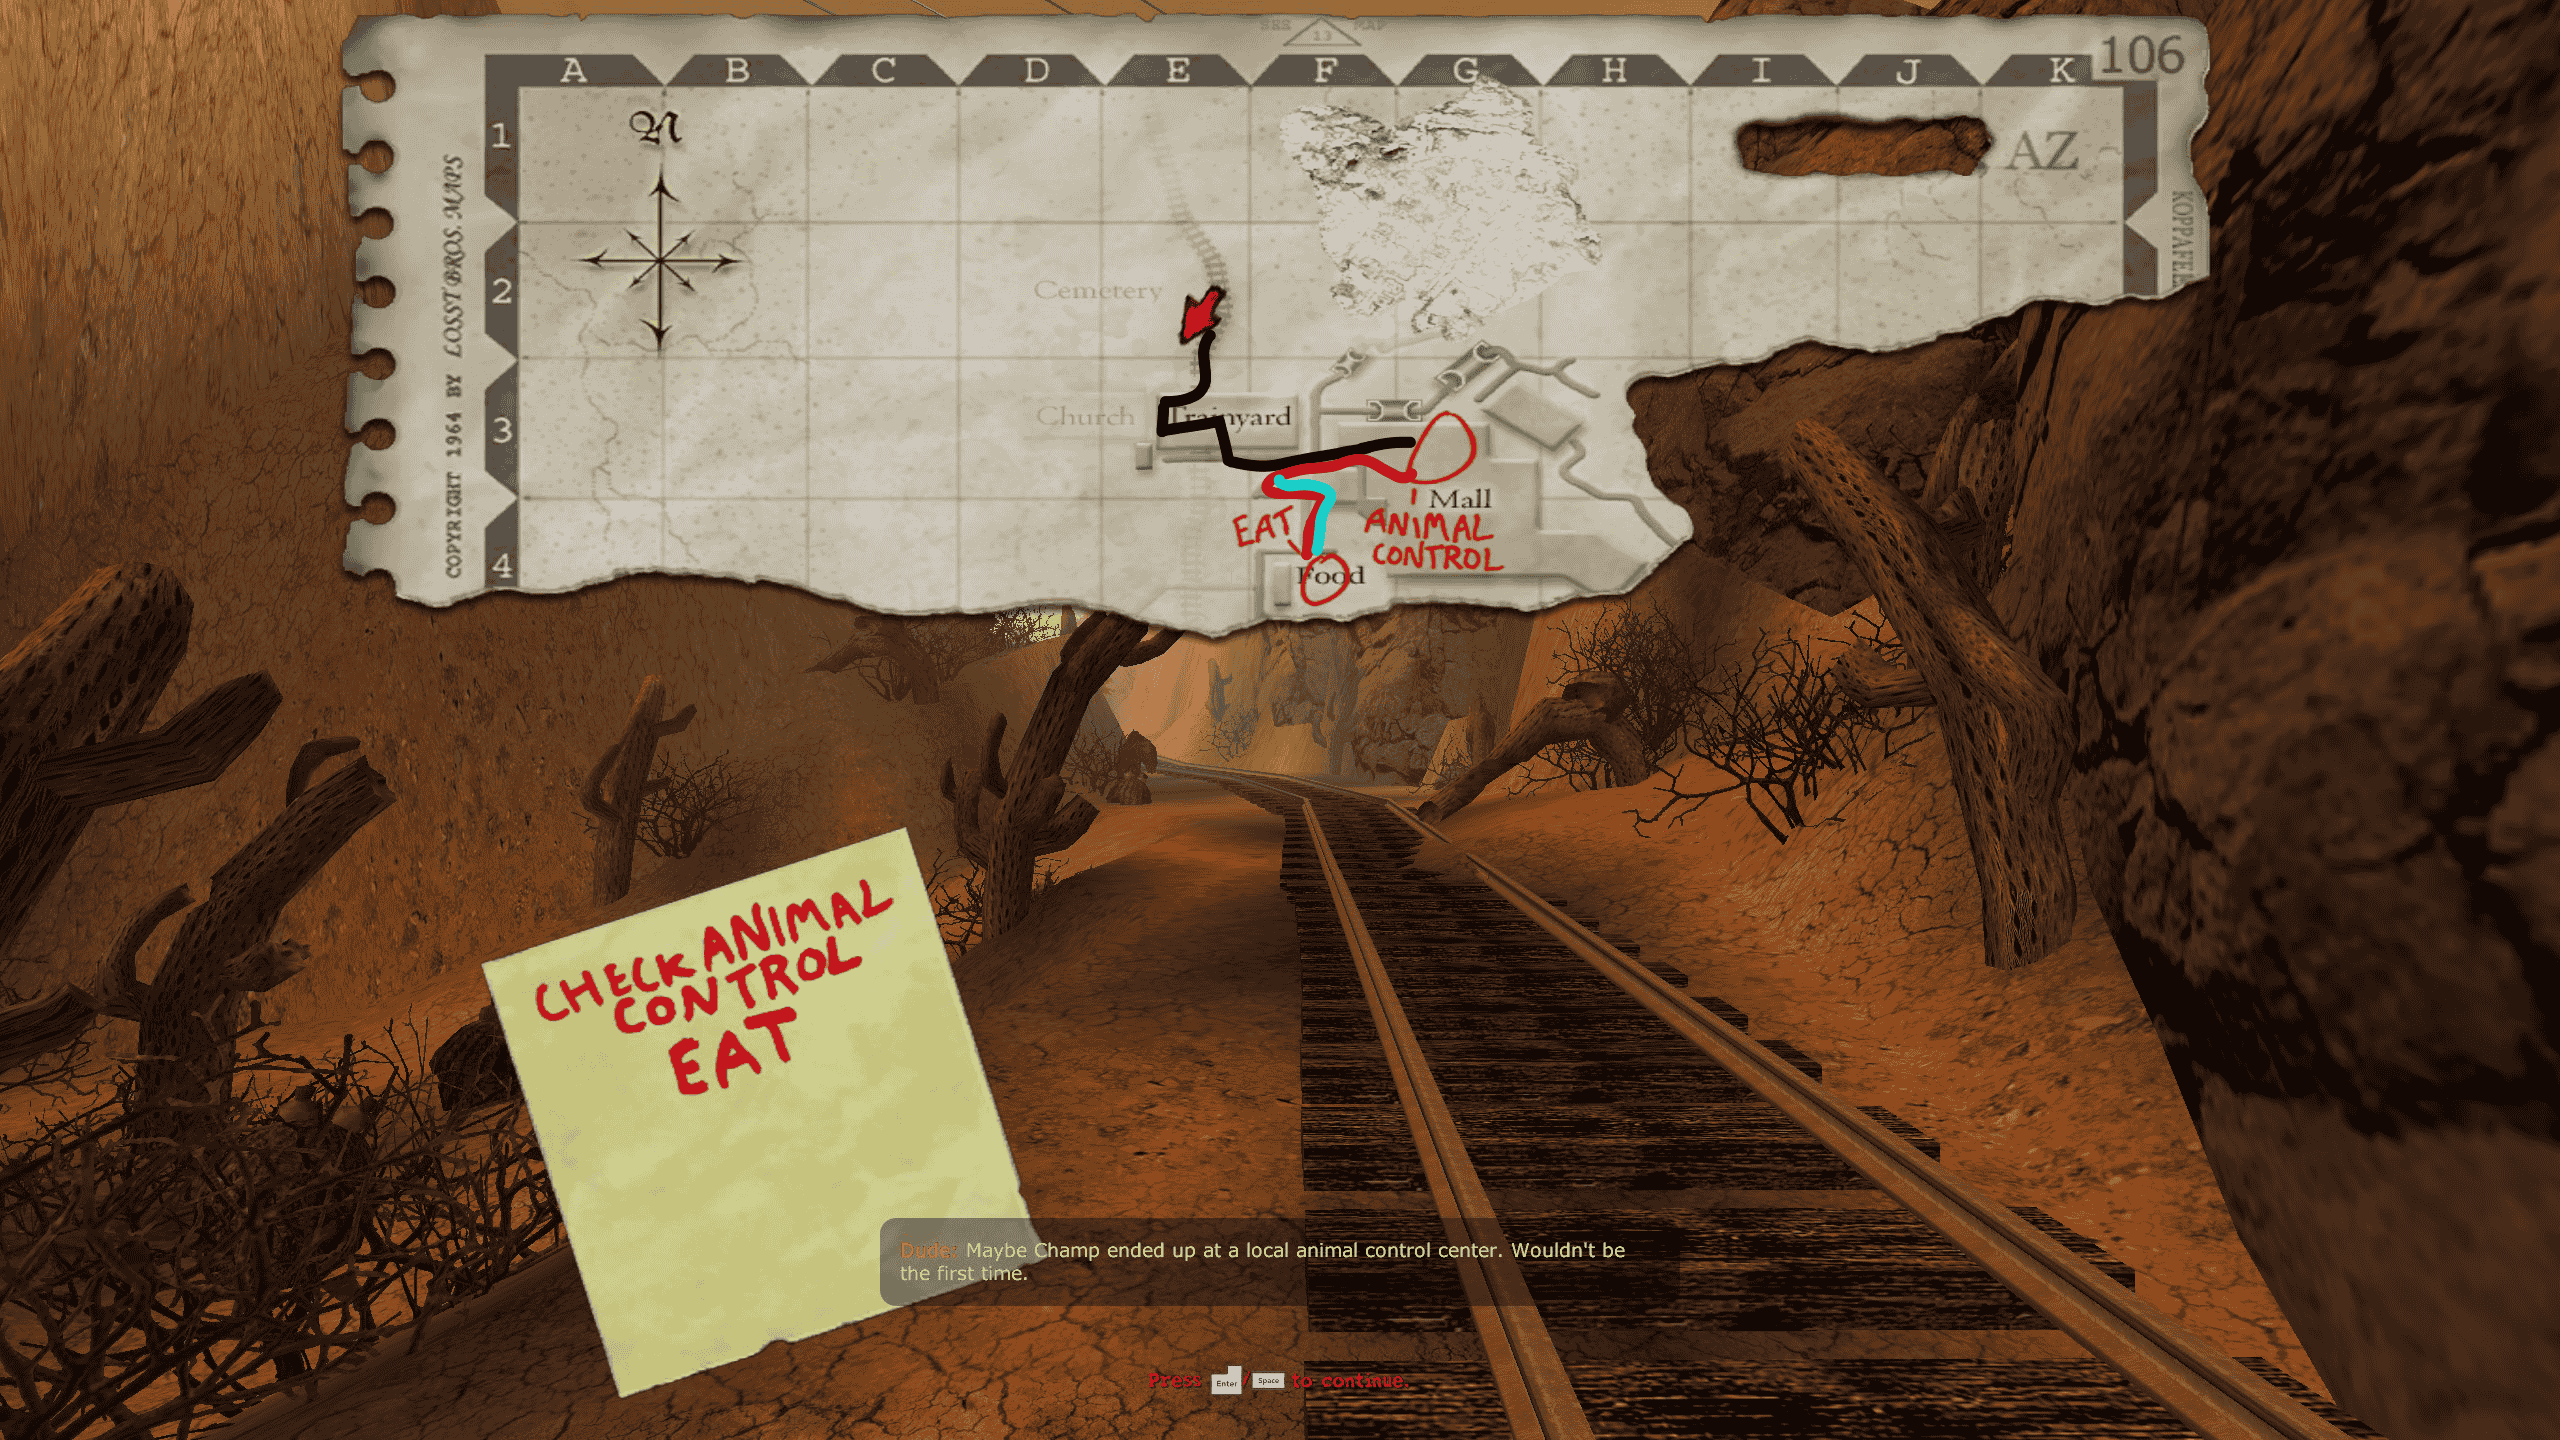
Monday - Animals gotta Eat
 TASKS
TASKS- Animal Control (1)
- Eat (2)
First, once you cross the bridge take a right and go up the stairs (collect any ammo you see along the way too, should be a given). If you jump up to the level above, you can get the stock shotgun and some armor. Cross the walkway and into the small room, there's a pistol and some ammo to collect. As soon as you get spotted by the first npc in this area, all hell will break loose. So I used my save here and crossed into the nearby warehouse to collect the revolver in the top room. If you've ran though this dlc before, you'll know this weapon will do you many favors, so be spare with the ammo and use it when you really need to. If you have to make the decision between the machine pistol or the revolver, revolver takes priority, and the standard pistol's high accuracy and decent ammo economy makes it still viable as a long-distance engager or to pepper someone to death.
Remember that you can flip off npcs who've just discovered you by holstering your weapons and using left click. Use this aggressively to cross streets with many pedestrians to save up on ammo. It also helps disengage any melee enemy as they'll laugh, then forget about chasing you. I used this to cross into the nearest loading zone, then to double back into the mall. Afterwards, I combed the small part of the food hall to grab an assault rife (with about 160~ rounds to use), and a Molotov. The idea is to throw this into the protesters, and hide out in the arcade whist the madness is happening.
Also introduced is the vending machines! Prioritize Health first, and then any gun you haven't picked up naturally, then ammo itself. As of now you can get the pistol and shotgun here. Nab any/all cash you see, these machines make life much easier! I also would recommend getting flashbangs on the occasion, any way to stop groups from all shooting at you, the better. Once you've inspected all the dogs, get ready for the escape sequence. Grab the hunting rife here from the vents, and shoot through any grates you come across with enemies on the other side. I got lucky with with a wmd usage that I could chain thought the area. Once you make it to the storage room and see the elephant again, I'd save here.
After escaping the mall, I flipped off most people on the street and made a break for the loading zone that heads to the Eat task. Crossing over into the restaurant is pretty tricky, but this is where those flashbangs come in to help. After dealing with the two npcs (one right outside the loading zone and the other who goes into the back of the clothing store), pistol out the npc inside and prep a flashbang to throw into the street. It won't stun everyone, but it should give you enough space to get to the front door and spawn all the inside npcs. If you can aggro them and get them to kill each other, do so and take a right as soon as you leave the building into the alleyway.
Something I didn't know when writing the two previous guides: If you see any weed stalks (they look similar to the ones you cut down for Dave's task later this week), light it with a match! This will boost or heal you up for more then a medkit, albeit it's a one-time use per map. If you come into it with full hp, it can double your heath, but if you're less it'll at least let you survive a few more shots.
Assuming the chaos inside is over (or if not, throw a grenade / fire a shot inside), try to arrange either a cow head or a wmd body near the door that'll take you into the escape sequence. Ideally, during the cutscene the npcs that spawn in to stop you (and the dogs) will get infected and kill each other. There's a stock-up room with pistol ammo, dog treats, and two medkits. Afterwards the npc spawns go like this:
2 - 8 - 4, 2 in the kitchen, eight in the freezer, and four more upstairs. You'll hear them spawn in generally (look out for the sound of either the gernade launcher, or fire a pistol shot to wake them up), so you can use this to setup a flashbang or a stock grenade to get across. Once you go outside, there will still be a few npcs on the streets to worry about, but if you hide behind the air conditioning unit behind the fence, you can jump out of cover and pistol the street npcs to death. It's still possible you'll have more when trying to go back the way you came in (the load zone), but I cut back into the clothing store to stay safe. Afterwards we get a long cutscene we can't skip, and the day's over!
The good news is, the RWS guys in the church don't shoot you on site like every other npc. Something nice we get for all our efforts, though that could just be xPatch 3.1 speaking.
Tuesday Map
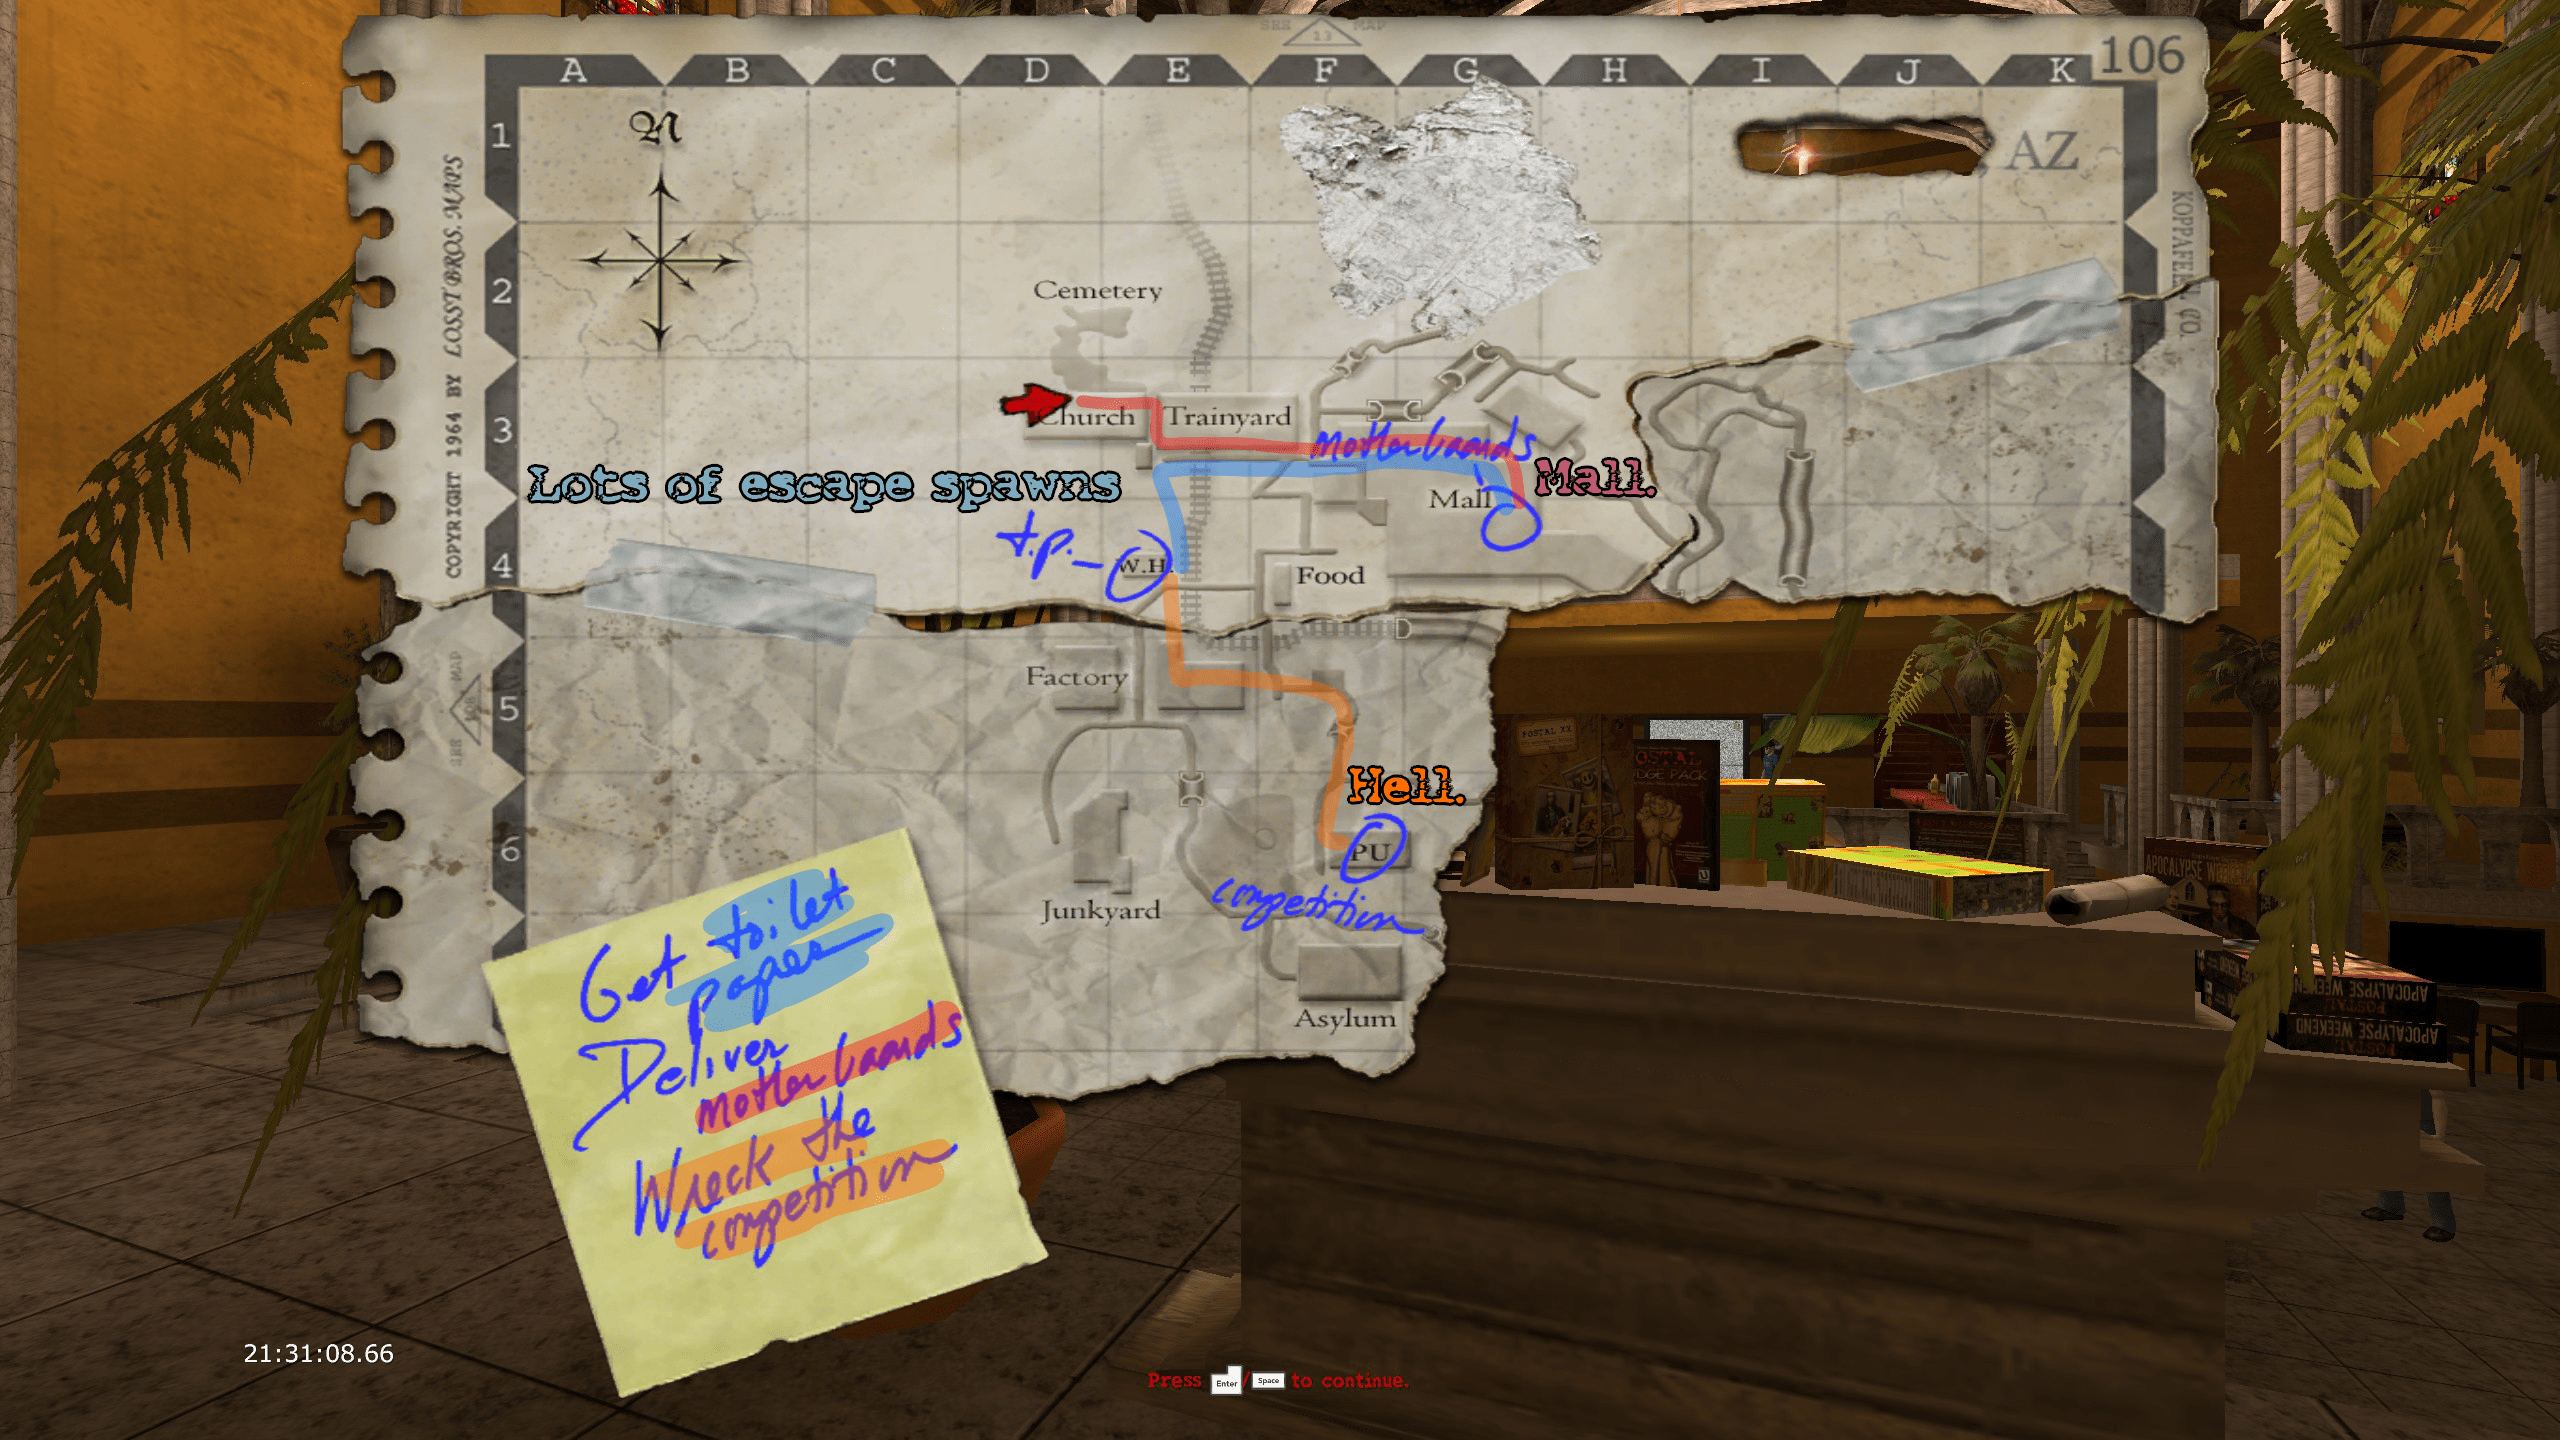
Tuesday - Get, Drop, Destroy.

TASKS
- Get Tp (2)
- Drop off motherboards (1)
- Destroy the competition (3)
- Escape the church (4)
Woof, this day's a rough one. Both in getting from place to place, and the tasks we have to do. I elected to return to the mall first; same way we went in on Monday, then get the tp, and lastly destroy the rivals at the former bank for the end. The destruction can either solve itself or be a rough patch getting through, and the tp escape sequence has a lot of security spawns that proved trouble for me on my Postal/Impossible runs. The motherboards as well, but to a lesser extent since the mall is restocked, and we can take advantage of that.
Mall madness (again)
Head back into the arcade for some dog treats, and then into the food court. The food stall closest to the restrooms has a catnip tin we can use later in the day. There's also some spare ammo, cash from the Phony's den, and a good amount of medkits to get you to the other side of the court and at the old map transition. Mine was full of npcs, so I hid and saved in one of the nearby rooms, chucked a few grenades in there and hoped for the best.
Something funny about Ludicrous here is we can actually speak with the arcade manager and go to the backroom with him pretty peacefully. Doing this also grants us a checkpoint! Though if you walk into the back room with the weapon drop-offs, he will go back to normal and try to kill you. So shotgun 'em while he's doing his intro and you're all good. The arcade map has a pretty odd quirk, in that I've had cases where going up and down the stairs despawns bodies. This poses an issue since the best strat I found was to bait a wmd bystander to shoot, then infect the bodies lying around. And by putting these bodies in key spots in the arcade (at the stairs and the entrances), you have a high chance of infecting anyone who tries to chase after you, as two guards spawn at the top and at the bottom of the arcade whilst you put in the motherboards.
What's really nice about this too is if you setup bodies in the backroom too, you can break into the manager's office and steal his gold too! With the bodies, it'll help at least force several guards back outside, letting you deal with whoever still went in. After they're done, walk around for some armor, and see the sights. The wmd went far in my run, so I had no issue running to vending machines to stock up (and buy a rocket launcher for myself!). Take the return trip back the way we came through the mall though, the next task's map isn't too far away. And honestly, the less time I get to spend on the clinic map again, the better.
An extra detail btw, I don't know in specific if it's xPatch, but I didn't get my head blown off kicking any wmd bystanders to death who still have weapons in their hands. Either I'm getting luckier, or xPatch 3.1 resolves this issue.
Roll 'em up
Instead of going back the the clinic/restaurant map, I elected to follow the tracks and take the underground map transition. There's generally one npc in this alleyway, though I would pick them off closer to where you came in rather then further out. We'll want to kick in the windows from the outside here to bait out everyone in, then fire off a rocket to damage most of them. Once you bait them out, generally you can go into the back and grap the tp yourself. In my run, most enemies here we packing Tier 1-2 weapons, so very few wmds, rockets, double barrels, etc. Don't discount the sub-machine or the glock though, the auto on those things can kill you quick.
It's worth noting that in the warehouse with all the toilets, if you parkor up to the motor there's a catnip tin you can pickup. I'd grab it since we're going to use this in the escape sequence to skip the fight back. Once you grab the tp, you can use the catnip as you round the corner and escape early via the opening garage doors. Ending this task with relative ease. Go back through the level transition to deload the event, then come back.
Fortified Rivals
Getting to the industrial park was pretty rough, it's a long trip to wrap around towards the bank/rival, and after some bad street fights I had to kick the boarded up door down to take the less direct way to the bank. Before you pass the burning barrels into the map transition, look for the Sub-machine gun in this area, since we can pick it up and put it to use here. On the plus side though, from this entrance we can nab both the sledgehammer and the Axe, and if you can get a wmd chain going you're able to escape down the parking garage over to the bank/rival map with little issue (baring the low health, though that's a staple at this point)!
Ugh... Okay so you don't need to break every little machine. You can just head all the way to the back for the supercomputer. There's a few tins of catnip around here to use, and I had to make use of one to get in to the computer, another for the escape, and a final one to make a break for the level transition. Make use of the shotgun (akimbo or not) to bust heads, and the sub-machine you should've gotten when we crossed that boarded area to the level transition. If you get a wmd spawn, try to use it in conjunction with the bodies to save yourself a few catnip tins. You can technically do this area slow and steady, but my spawns were just not playing right. And since I came into this map with low health, I was in a bit of a rut.
At the level transition, I chucked a flash grenade into the street and went for the old health-pipe dealer building. Using the axe to chop off the two bandits inside. There was also a bystander with a mini nuke launcher, so I made use of that by baiting his shot then shooting the rocket behind cover. This cleared the street enough that I crossed into the vent escape building to nab the extra catnip tin after you walk up the ladder, then saved and prepped to wrap around the building to get inside.
Bystanders kept giving me trouble and spawning on the stairs before getting inside, so I use my catnip and made a break for the super computer. Shooting off heads until I got inside and shotguned the computer down. After the cutscene, you're given a checkpoint in a relatively safe spot. So before crossing the second tunnel out back into the normal hallway, I catnipped and cleared out the manager and the rest to get back outside. And since I had a few rival employees still roaming outside alongside lawmen, I had to use my last catnip tin to escape with 1 hp to spare. Terrifying.
A Postal 4 Preview
The church escape isn't too painful really. The sledgehammer we got from the industrial park serves well if you want to preserve ammo, but there's also a lot of shotgun ammo to go around if you need it. Something else that can be of use if the projectiles are giving you trouble is to strafe the opposite direction of where you're going to bait their shot (They start their attack animation, tap either left or right, see the shot go out, then do the opposite). This helps a lot on any difficulty and makes them more of a joke to fight, but you can still get swarmed and lose out on hp if you're carelessly getting surrounded.
After the closing cutscene, we get picked up by Mike J. and get to start probably the... strangest (and toughest) Wednesday we'll ever face.
- Postal 2 & Paradise Lost Achievements Guide★ 5 (3.1k)56k views4.5k ♥23 minUpdated Jun 5, 2022
- Достижения на русском языке★ 5 (2.8k)39k views3.1k ♥6 minRussianUpdated Mar 5, 2017
- location of rare items and weapons★ 5 (1k)39k views2.3k ♥25 minBulgarianUpdated Oct 4, 2021
- Достижения POSTAL 2 и Paradise Lost DLC★ 5 (1.7k)34k views2.9k ♥26 minRussianUpdated May 23
- Postal 2 Achievements Guide★ 5 (1.3k)34k views2.1k ♥21 minUpdated Nov 20, 2014
- Cheat Codes for Postal 2★ 5 (379)19k views796 ♥2 minUpdated Oct 9, 2023


- Upgrading to PremiumTeam Fortress 2★ 5 (20k)1441k views11k ♥6 minUpdated May 11, 2022
- No More Room in Hell Official ManualNo More Room in Hell★ 5 (2.8k)569k views2.1k ♥29 minUpdated Apr 22, 2019
- NMRiH Community Hosting GuidesNo More Room in Hell★ 5 (526)351k views653 ♥1 minUpdated Aug 10, 2022
- ULTIMATE GUIDE FOR GAME DEV TYCOONGame Dev Tycoon★ 5 (5.8k)326k views10k ♥4 minUpdated 23 Jan, 2014
- How to 'Git Gud' Soon™MORDHAU★ 5 (2k)318k views3k ♥68 minUpdated Nov 16, 2024
- Лучшие кооперативные игры SteamPAYDAY 2★ 5 (1.5k)315k views2.1k ♥56 minRussianUpdated Apr 27, 2025






This guide was created by its original author on the Steam Community. Are you the author and want it removed? Request removal.