All Achievements/Ghosts Explained Beginners Guide - Phasmophobia
Introduction
- Difficulty: Medium
- Total achievements: 54 (Subject To Change)
- Online and/or Offline achievements: 53/54
- Online Only Achievements: 1/54
- Estimated time to complete all achievements: Unknown
- Minimum Playthroughs Needed: 3 (Prestiges)
- Glitchy achievements: Unknown
- Missable Achievements: None
Helpful Resourses
Note: I do not own any of these guides or links I post here, although they are great resources to help you on your Ghost Hunting Journey!
Official Phasmophobia Discord[discord.gg]
The official discord is the best way to get any help or to learn more about the game. Head to #ghost-huntin-resources in the server to find where a lot of the information from this guide comes from!
Tyban's Phasmophobia Cheat Sheet[tybayn.github.io]
There are some extremely helpful resources here that you won't find anywhere else, such as a footstep BPM tester to help narrow down ghosts. Visual representations of abilities, and more!
'Prestige' Achievements
These range from Prestige 1-3. You can prestige every 100 levels.
During this time, you should unlock nearly all other achievements in the time it takes to reach prestige 3, with only having to go out of your way for a few others.
Note: These will automatically unlock when you open the game, relative to if you have completed them before the achievements were added.
 -Prestige 1:
"Reach Prestige I"
-Prestige 1:
"Reach Prestige I"
 -Prestige 2:
"Reach Prestige II"
-Prestige 2:
"Reach Prestige II"
 -Prestige 3:
"Reach Prestige III"
-Prestige 3:
"Reach Prestige III"
The casual approach to getting these achievements is simply by playing the game at your own pace. Although getting Prestige 3 will take a good amount of regular playtime.
- Find the correct ghost type
- Complete all 3 Optional Objectives
- Collect the Bone (You can get an easy 3 star Photo of the Bone too)
- Perfect game bonus (see Flawless Execution section)
- Photos
- Daily and Weekly quest rewards
The weekly challenges requires you to beat a specified map 3 times with special requirements.
These requirements and maps change each week, of which, some are much easier to complete than others. Hence, I suggest checking and attempting the Challenge Mode each week if you're able to as it is a massive boost in XP for a casual approach.
Challenge Mode is great thanks to not having to spend any in-game money on items, and not losing anything if you die! You are also still able to complete optional objectives and take photos (if you're supplied with the correct items) for extra XP and money. But your main goal is to complete the Challenge 3 times on the specified map. This will grant you $5000 and 5000XP, which is a huge jump in earlier levels and usually the quickest way to get XP as a casual player!
If you're struggling, you can usually find videos on YouTube and written guides on how to complete each week!
Please also see the 'Challenge Mode' Achievements for more information.
(This also counts towards the 'Challenge' Achievements)
The casual approach to getting these achievements will take many hours of playing to reach prestige 3. But, luckily, there is a somewhat 'fast' way to earn XP and Money.
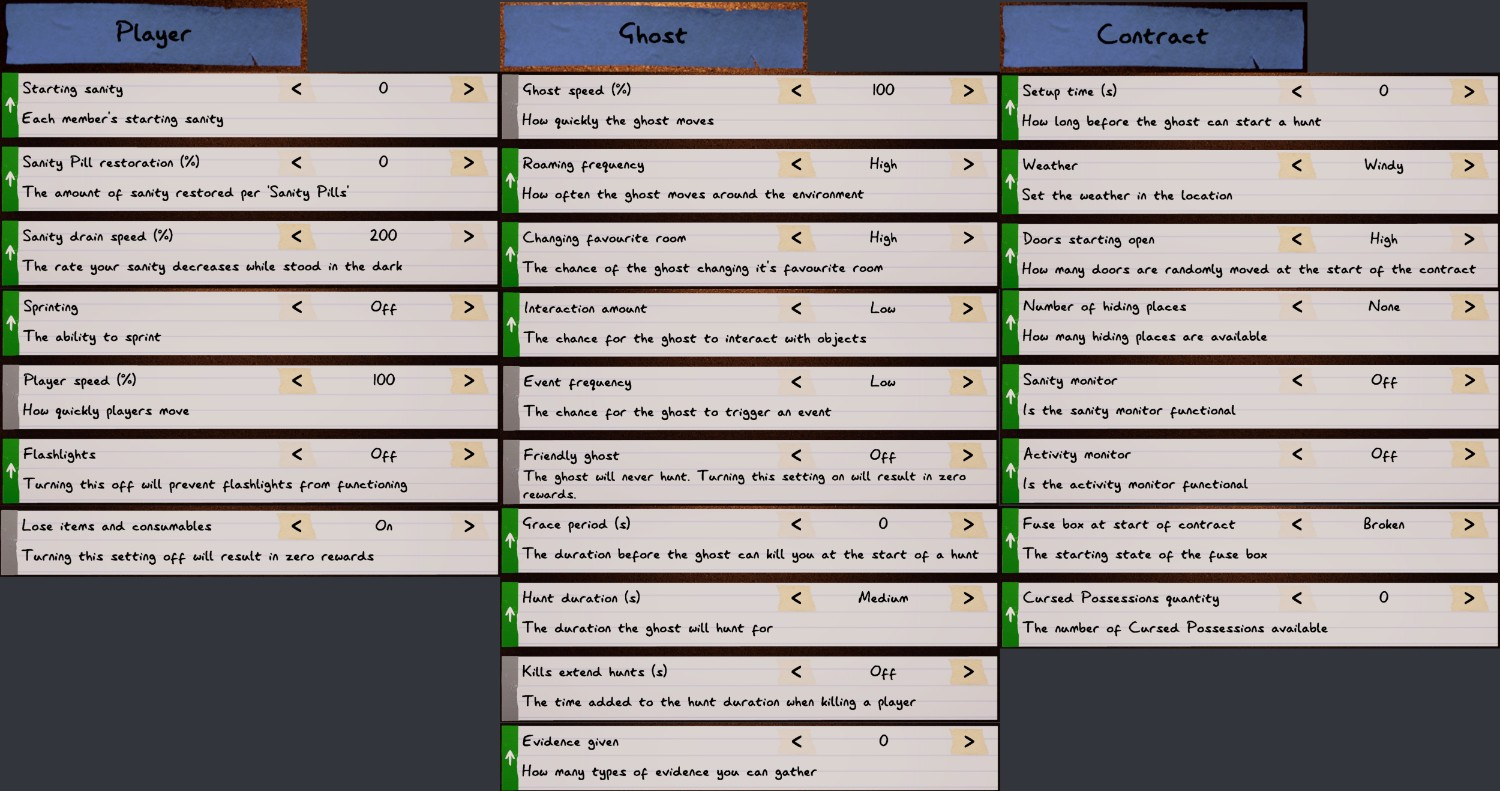
The premise of this strategy is to use a high multiplier on a custom difficulty (x12.97), get in and out as quickly as possible, while finding the correct ghost type. This strategy can be very tough, and you'll need to know a lot about each ghost, their different tells while hunting, and footstep speed to be able to decipher which ghost you're up against.
The premise of this strategy is to use a high multiplier on a custom difficulty (x12.97), get in and out as quickly as possible and while finding the correct ghost type. This strategy can be very tough and you'll need to know a lot about each ghost, such as: their different tells while hunting, footstep speed and any other characteristics may help you to be able to decipher which ghost you're up against.
(Information about each ghost and everything you'd need to know can be found in the "Ghost" Section near the end of this guide)
Down below are the exact settings you'll want to copy:
https://www.youtube.com/watch?v=RCx_rqSUnNI
This video from Maggstor is an incredible guide showcasing exactly what to do during this XP Grind Method from level 1 to 50. I will have this here for anyone to watch, and I highly recommend watching this video along with other guides from Maggstor. This will give you a great understanding of the strategy, and an insight on how to approach the method.
'Equipment' Achievements
 -Bare Essentials:
"Unlock all tier one equipment (Level 16)"
-Bare Essentials:
"Unlock all tier one equipment (Level 16)"
 -Tools of the Trade:
"Unlock all tier two equipment (Level 49)"
-Tools of the Trade:
"Unlock all tier two equipment (Level 49)"
 -Fully Loaded:
"Unlock all tier three equipment (Level 90)"
-Fully Loaded:
"Unlock all tier three equipment (Level 90)"
Note: These will automatically unlock when you open the game, relative to if you have completed them before the achievements were added.
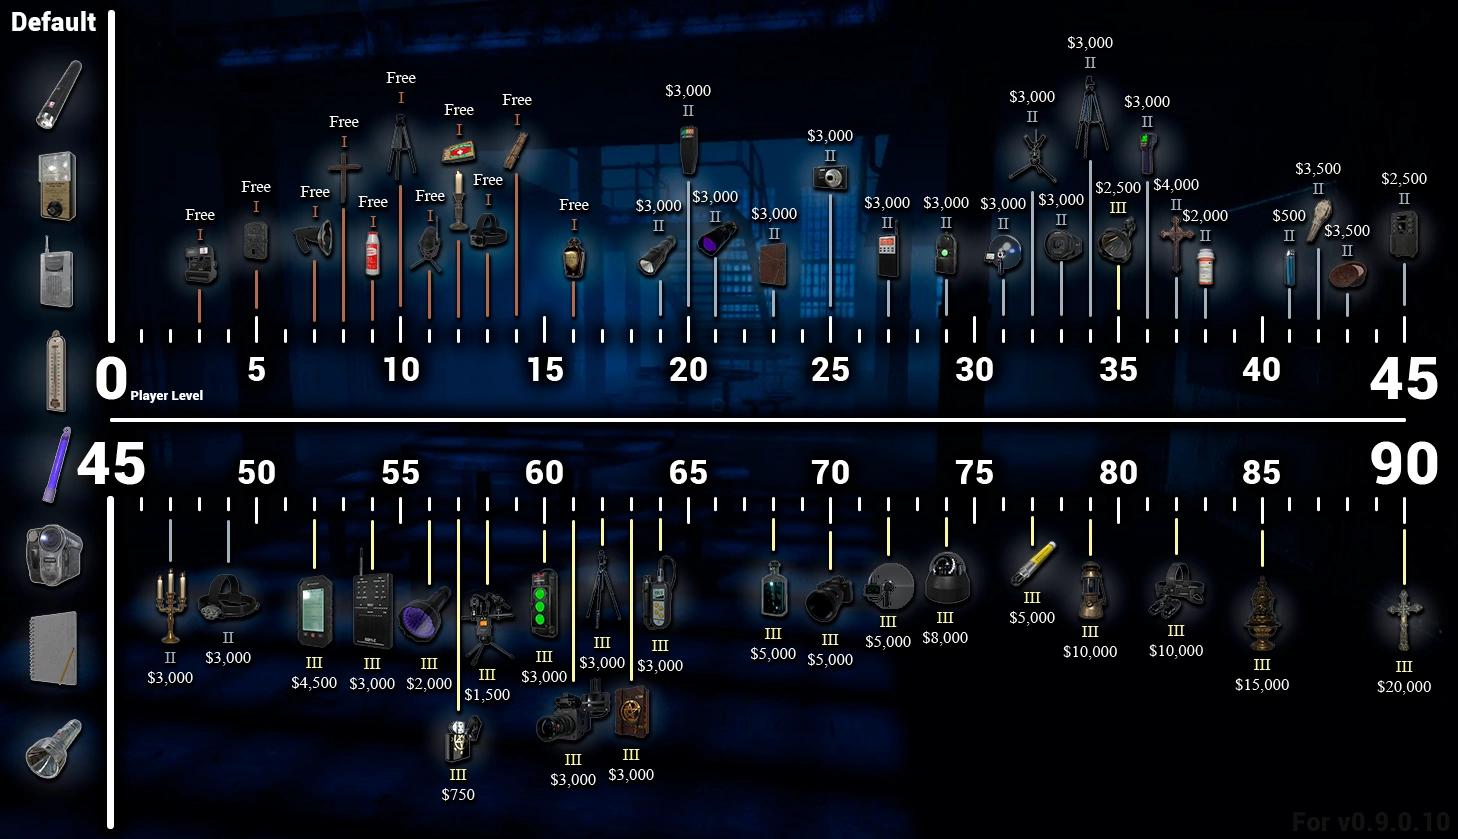
These 'Equipment' achievements require you to unlock all Tier 1, 2 and 3 items. These will be done easily while going for the 'Prestige' achievements!
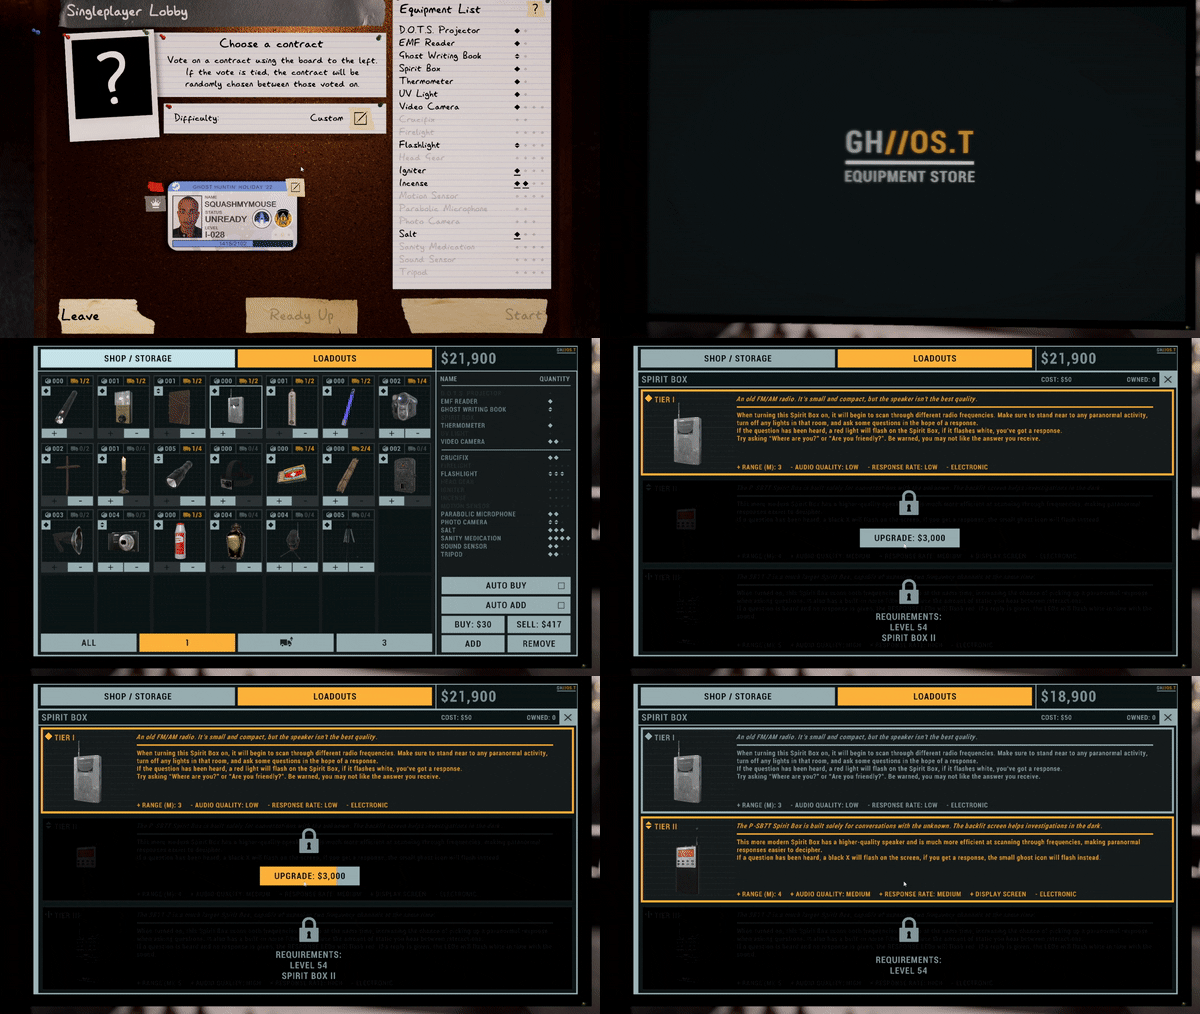
To upgrade equipment, you must reach a certain level (respective to each piece of equipment), to then have the option to upgrade your that piece of equipment with in-game money. (This DOES count towards all 'Spend' achievements)
At level 16, you will have unlocked all Tier 1 items. (Bare Essentials)
At level 49, you will have unlocked all Tier 2 items. (Tools of the Trade)
At level 90, you will have unlocked all Tier 3 items. (Fully Loaded)
(These are the earliest chances to get each achievement)
Please see below for an image detailing what level exactly each item is unlocked and for how much it costs to upgrade. As well as a demonstration as how to upgrade an item.
'Contract' Achievements
A contract, or otherwise known as an investigation, is the core gameplay of Phasmophobia.
"Completing" a contract means successfully guessing the ghost type and leaving.
If you're in a multiplayer lobby, AT LEAST one of the players - whether it be you or your teammate(s) - must be alive and leave the map from the van. You must also have the correct ghost inputted into the journal - no matter if you're alive or not - for it to count as 'completing a contract'.
These achievements, similar to the prestige achievements, will unlock over time just by playing the game.
Note: If you have completed any of the milestones before the achievements were released, complete a contract for them to update, and receive the achievements automatically.
 -Work Experience:
"Complete 1 contract"
-Work Experience:
"Complete 1 contract"
 -Rookie:
"Complete 10 contracts"
-Rookie:
"Complete 10 contracts"
 -Professional:
"Complete 50 contracts"
-Professional:
"Complete 50 contracts"
 -Boss:
"Complete 100 contracts"
-Boss:
"Complete 100 contracts"
'Spend' Achievements
These achievements are for simply spending in-game money in the Shop/Storage menu. You'll find it to the right of the lobby board.
Please see 'Prestige Achievements' to find the $/XP Grinding method'
 -Chump Change
"Spend $1"
-Chump Change
"Spend $1"
 -Fat Stack
"Spend $10,000"
-Fat Stack
"Spend $10,000"
 -Cash Cow
"Spend $50,000"
-Cash Cow
"Spend $50,000"
 -Break The Bank
"Spend $100,000"
-Break The Bank
"Spend $100,000"
'Task' Achievements
These tasks are the Daily and Weekly tasks you get and can see in the main menu, and on a clipboard in-game. NOT the optional objectives!
Here is an example of each, one in the game lobby and the other in-game respectively:
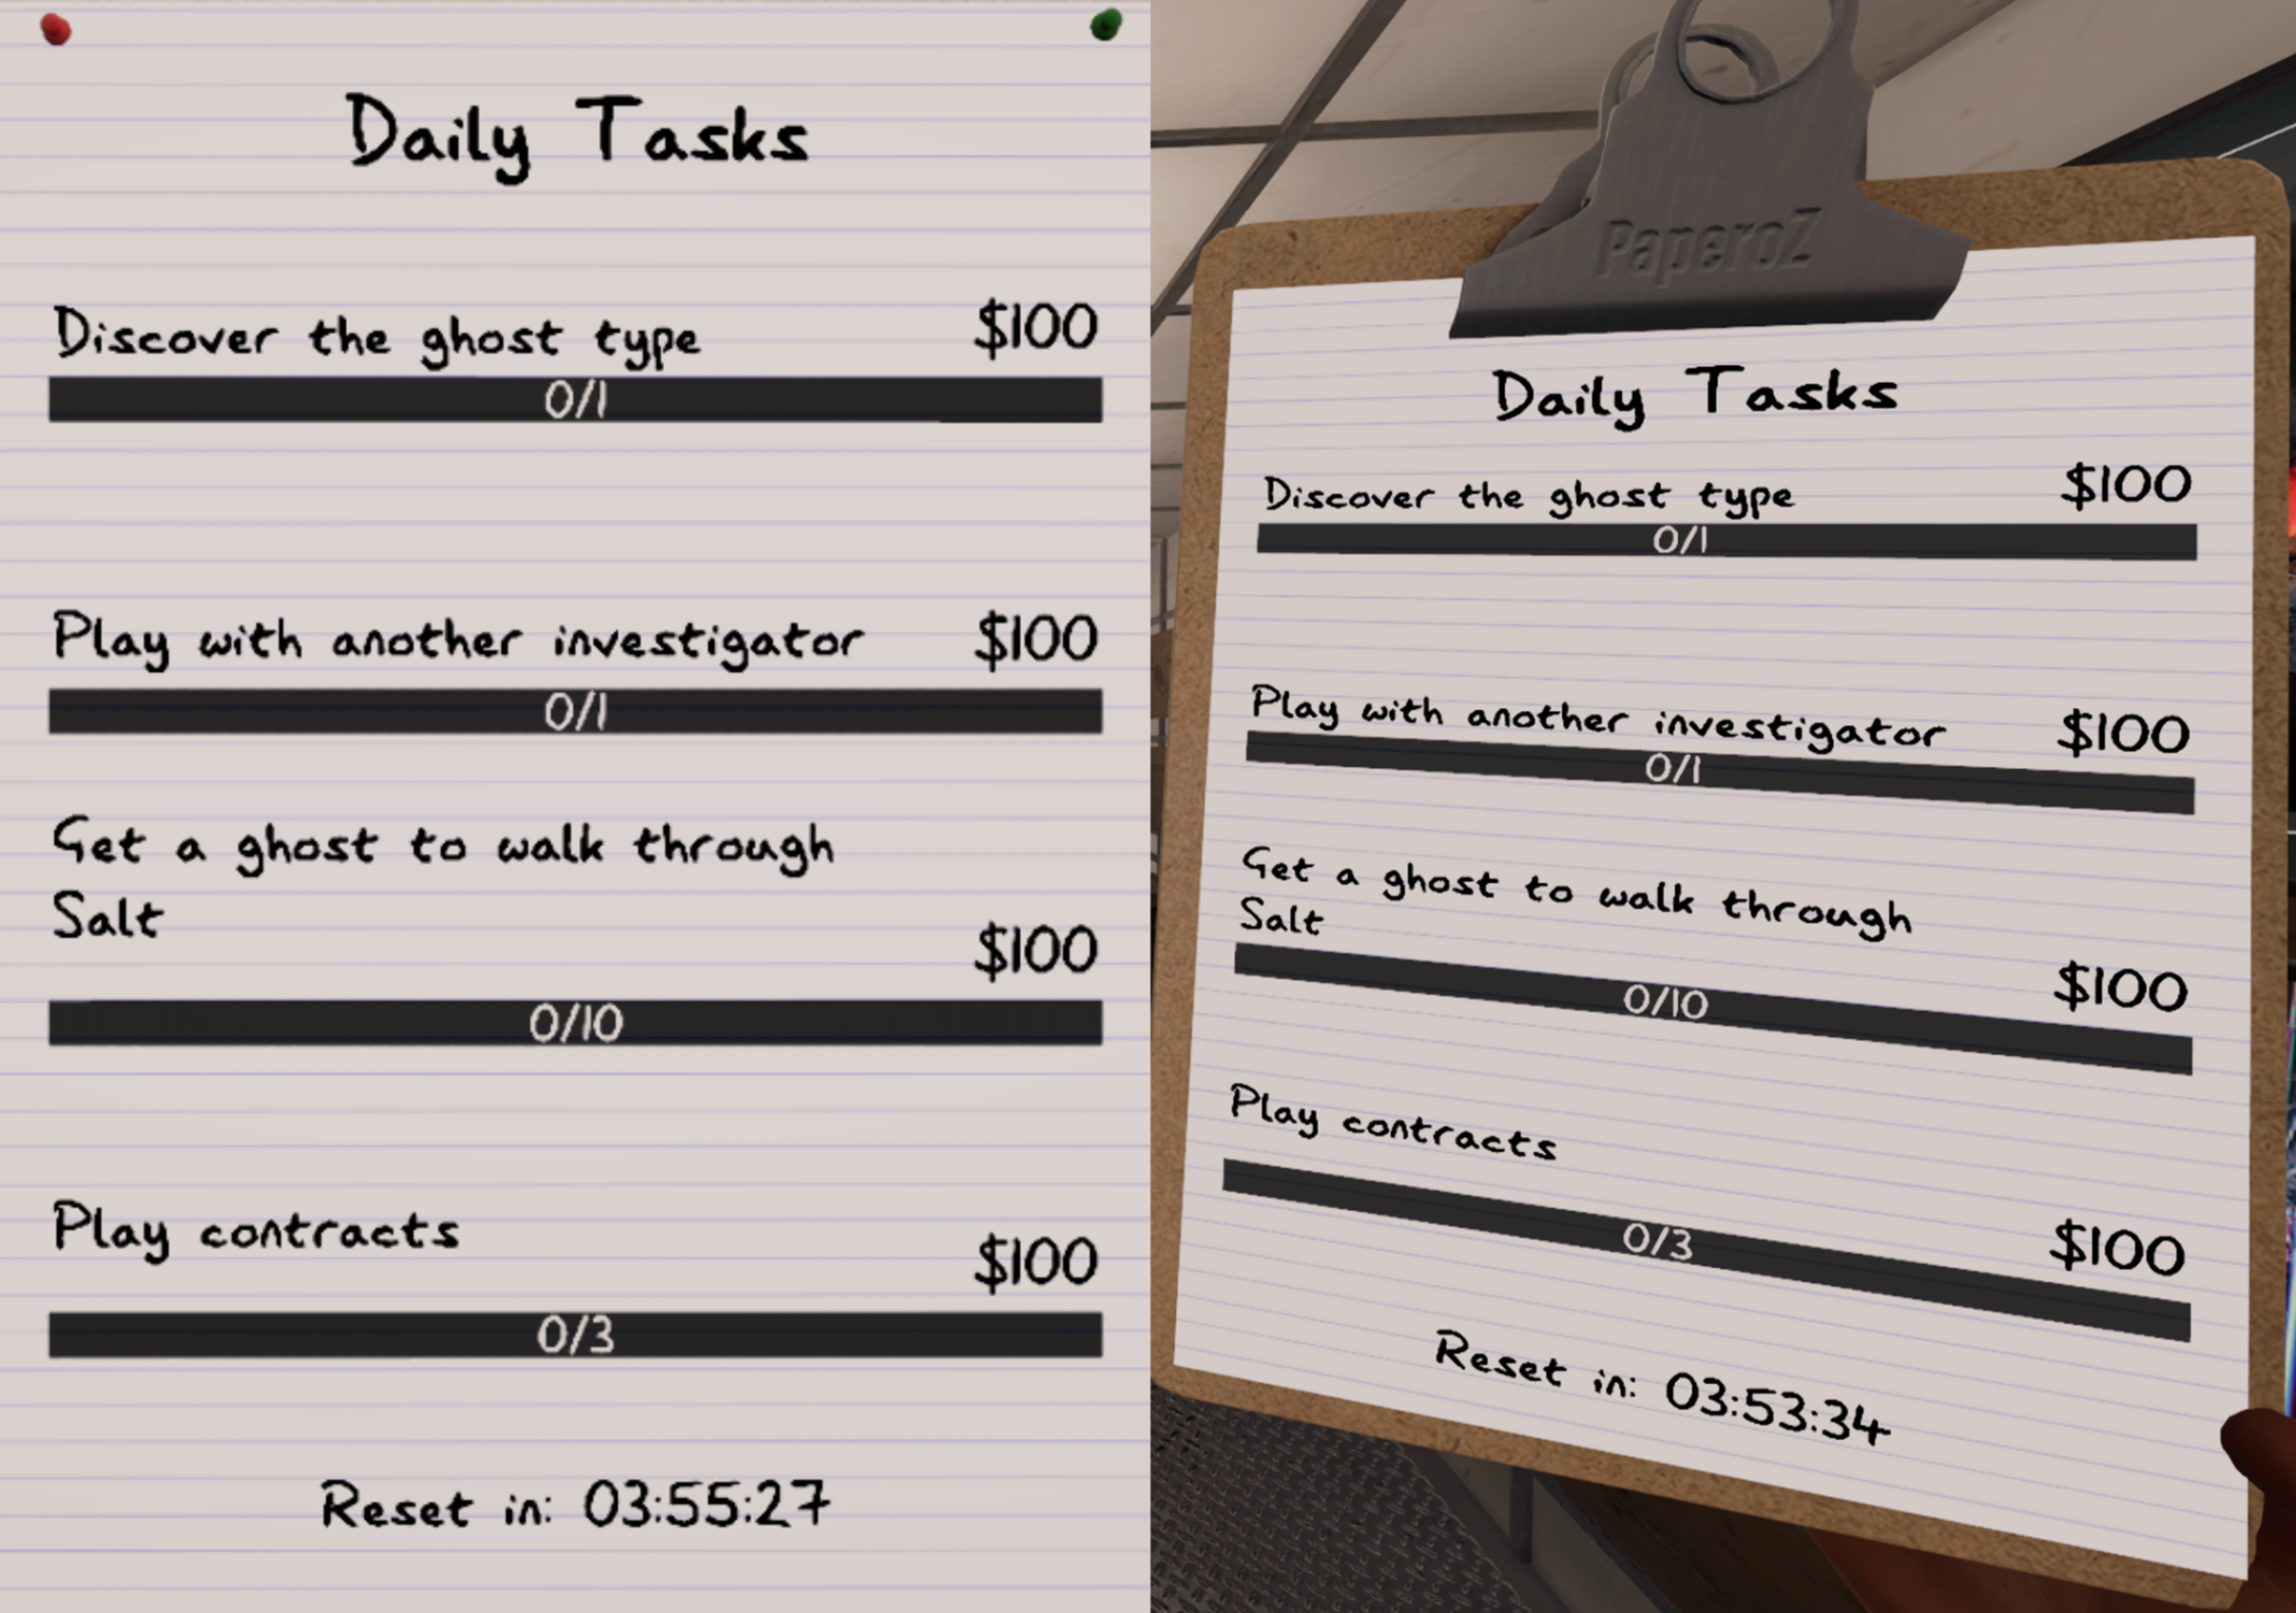
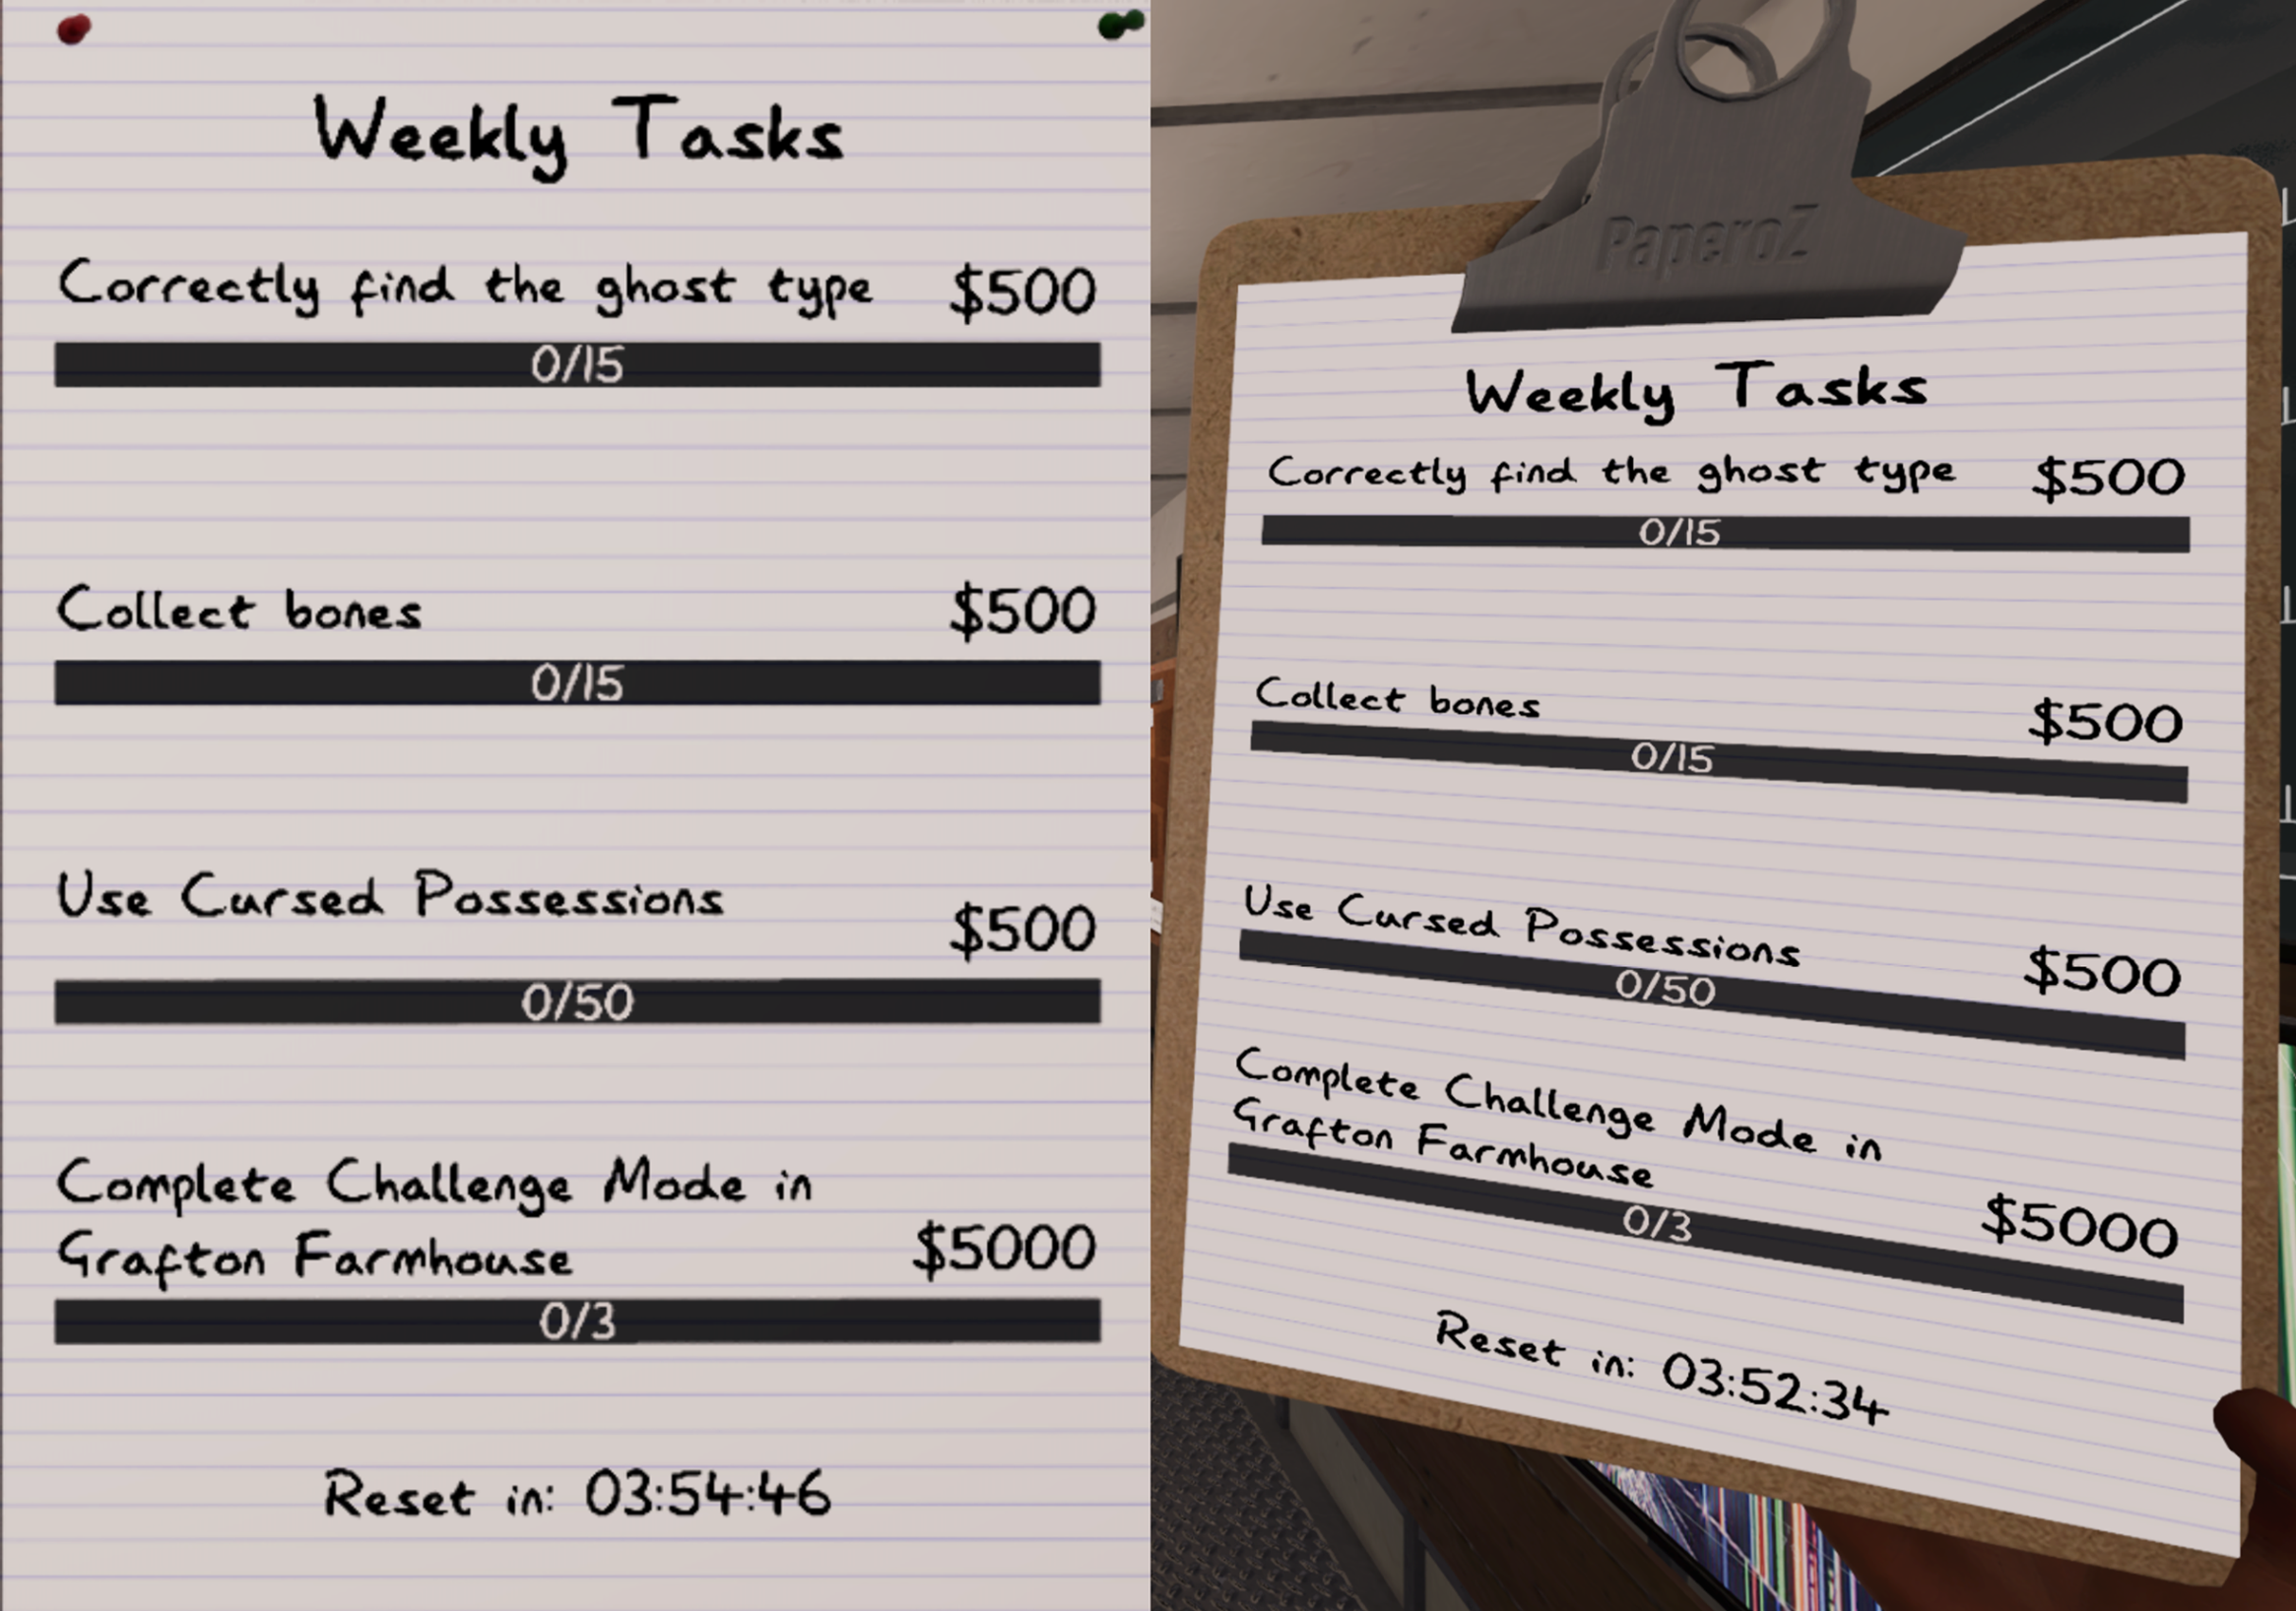
(You can find the clipboard to the left of the 'case' board in the van/to the right of the monitor/keyboard and mouse, and in the main menu before you enter a game lobby)
For these achievements, you must simply complete enough of each as they show up daily/weekly.
 -Dedicated:
"Complete 30 daily tasks"
-Dedicated:
"Complete 30 daily tasks"
 -Devoted:
"Complete 10 weekly tasks"
-Devoted:
"Complete 10 weekly tasks"
Below, I will list all possible Daily/Weekly Tasks and requirements to complete them. To avoid clutter, I will not be listing rewards, please see the Phasmophobia Wiki[phasmophobia.fandom.com] for them!
If you do a daily/weekly task that is not on your task sheet, it will not count. Be sure to complete your daily/weekly tasks as they appear in-game.
'Challenge Mode' Achievements
 -Challenger Approaching:
"Complete the weekly challenge mode"
-Challenger Approaching:
"Complete the weekly challenge mode"
 -Rise to the Challenge:
"Complete the weekly challenge mode 5 times"
-Rise to the Challenge:
"Complete the weekly challenge mode 5 times"
 -Taking All Challenges:
"Complete the weekly challenge mode 10 times"
-Taking All Challenges:
"Complete the weekly challenge mode 10 times"
Every week, there is a new Challenge that is set as a difficulty, which has you complete a certain challenge on a given map. This will also reward you with $5000 and XP so is great for casual level grinding, and another reason to complete these every week.
You also will not lose any in-game money or equipment when playing as equipment is supplied for free, sometimes at a higher or lower tier than you may be used to depending on the challenge and your level. This makes it easy and fun to participate in, and gives everyone more of a reason to at least give it a try each week!
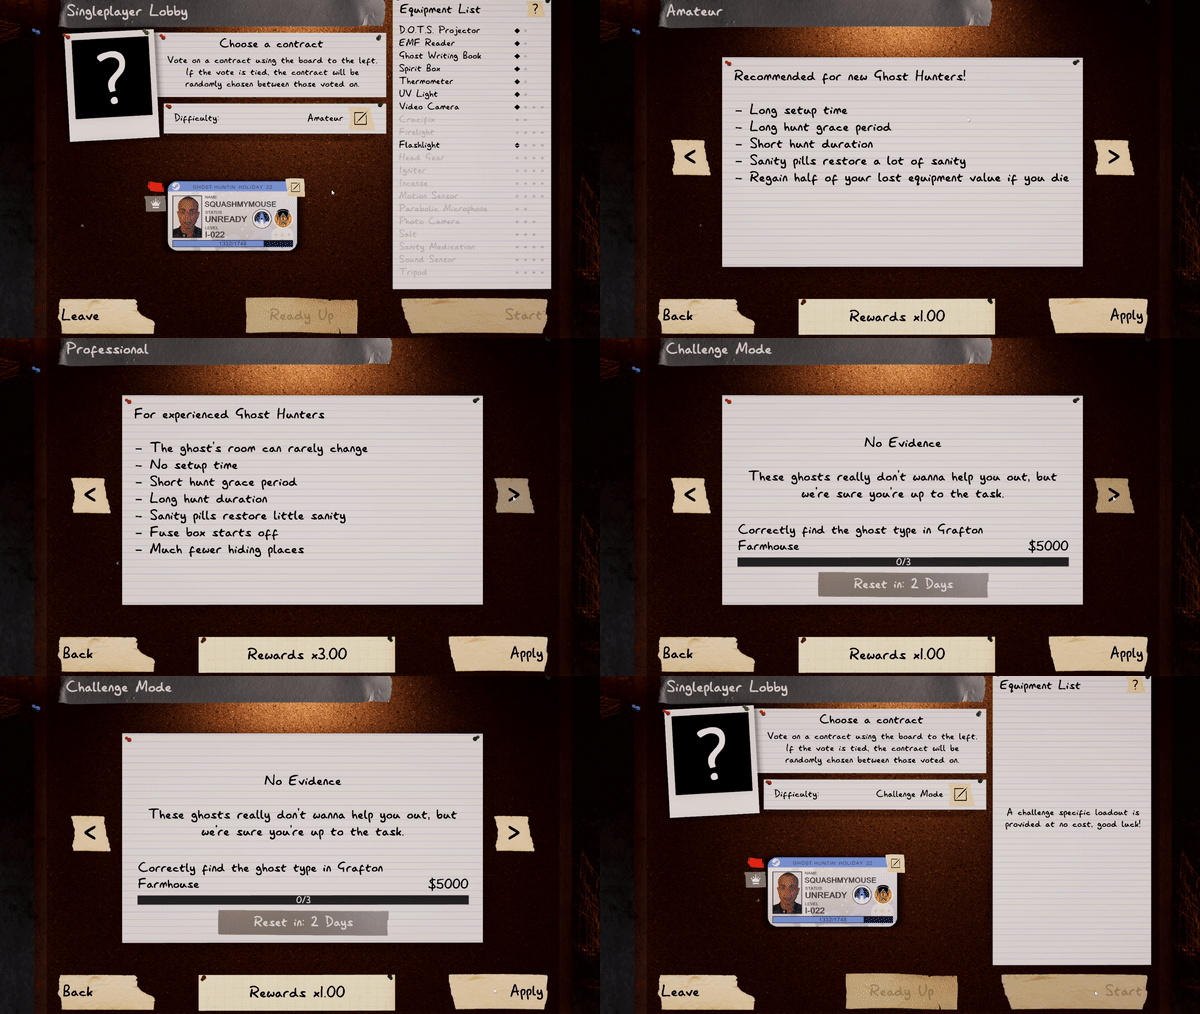
Head into either a singleplayer or multiplayer lobby. When on the board and selecting a difficulty. Press the arrow to the right to cycle through the difficulties until you come across 'Challenge Mode' (It's after Insanity but before your Custom Difficulties). Select this difficulty and pay attention to the map it mentions, as the challenge must be completed on that map! After selecting the difficulty, head to the map board and select the map it mentioned. After that, you don't need to worry about equipment, just ready up and head in.
'Apocalypse Trophy' Achievements
 -Bronze Hunter:
"Obtain the Bronze Apocalypse Trophy"
-Bronze Hunter:
"Obtain the Bronze Apocalypse Trophy"
 -Silver Hunter:
"Obtain the Silver Apocalypse Trophy"
-Silver Hunter:
"Obtain the Silver Apocalypse Trophy"
 -Gold Hunter:
"Obtain the Gold Apocalypse Trophy"
-Gold Hunter:
"Obtain the Gold Apocalypse Trophy"
The Apocalypse Trophies are very difficult trophies to get. They require you to play on a custom difficulty (netting you the 'Director' achievement) at high difficulty multipliers and with specific requirements.
These can be extremely difficult, especially for newcomers. You can complete these at any time, so it's suggested to attempt this challenge when you have most/all Tier 3 items (especially Tier 3 Para-mic and Tier 3 Head-cam. Especially for Gold), and a good understanding and knowledge of the game.
The requirements for the challenge are as follows:
To earn each Challenge trophy, you must:
- Have a 6x/10x/15x Custom difficulty multiplier
- Be in Singleplayer mode
- On the map Sunny Meadows (Un-Restricted)
- Complete all 4 Objectives (includes 3 optional objectives + correctly identifying the ghost)
- Get a Ghost photo
Silver requires you to find the ghost and complete all requirements on a 10x multiplier or higher.
Gold requires you to find the ghost and complete all requirements on a 15x multiplier or higher.
Note: Earning a higher level trophy will reward the lower level trophy. Meaning you dont have to worry about doing all 3 separately, and can get all 3 trophies in 1 complete run, as long as you complete a x15 run (for the gold trophy). This is the easiest way to unlock all the trophies as quick as possible.
Hence, if you are going for all achievements or all 3 trophies in the first place, I suggest SKIPPING Bronze and Silver, and focusing on Gold immediately, it will save you time. And get you more accustomed to the Gold difficulty quicker.
For simplicity, I will only outline the Gold Trophy strategy, as the same strategy would similarly apply to Bronze and Silver, or you would simply achieve both Bronze and Silver trophies after Gold. Each difficulty also has an in-game preset.
(The way the arrow is pointing is which is better for that scenario.)
- Sprinting ON in Insanity <--- OFF in Apocalypse I
- Ghost Speed 100% in Insanity <--- 150% in Apocalypse I
- Event frequency high in Insanity <---> low in Apocalypse I
- Hiding spaces low in Insanity <--- none in Apocalypse I
- 1 Evidence Given in Insanity ---> 2 in Apocalypse I
- Sanity, Activity and Fuse Box start off in Insanity ---> All on in Apocalypse I
- No Cursed Possession in Insanity ---> Cursed Possession in Apocalypse I
As you can see, there are many differences between the 2, and a reason to use either. I'd still suggest leaving the Bronze and Silver run alone and going directly for the gold either way to make your hunting life easier. But it's your choice if you choose to do Bronze and which preset you choose based on the type of player you are!
I suggest not attempting Silver and moving straight to gold, although you can use the recommended preset in-game 'Apocalypse II' if you'd like to give it a go!
For more information about the challenge, please read below!
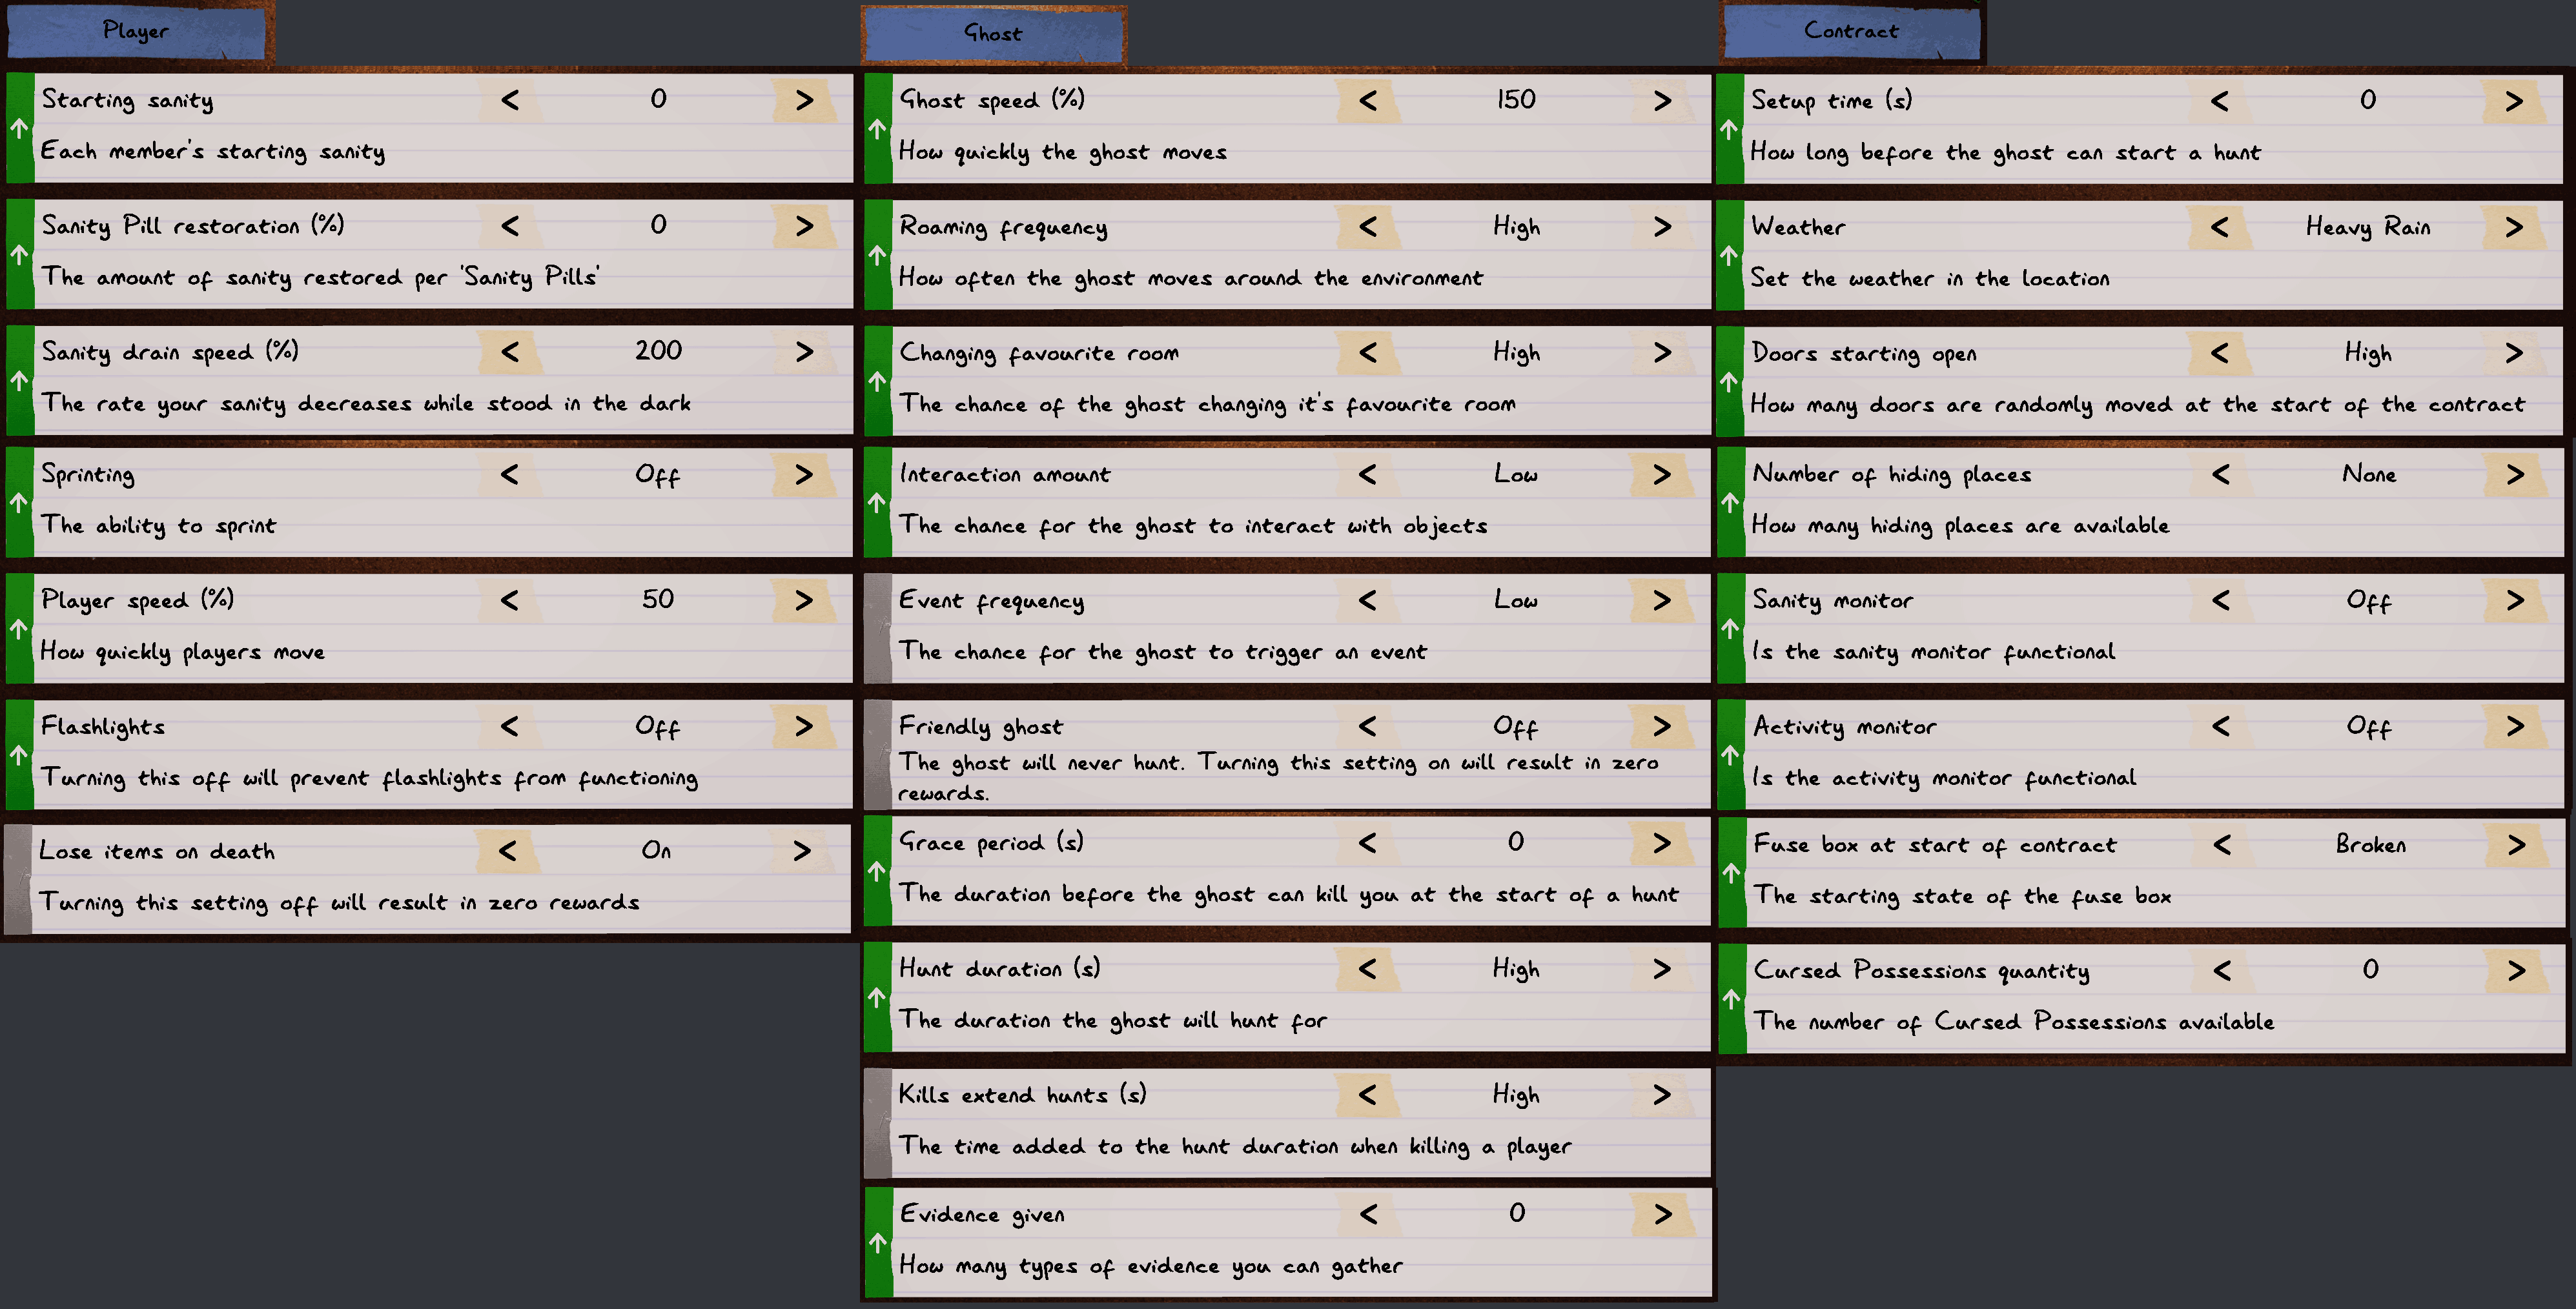
Here are the recommended settings that are given by the Phasmophobia Discord[discord.gg]. And are the exact same as 'Apocalypse III'
IMPORTANT NOTE: You are able to change 1 small setting somewhere in this preset to make your life slightly easier while still keeping that 15x multiplier. My recommendation is putting 'Event frequency' up to Medium rather than low. This can make the optional objective 'Witness a ghost event', and capturing a ghost photo much easier! (although this is mainly used to get an easier ghost photo)
Please see the next section for more information, tips and resources!
'Apocalypse Trophy' Achievements pt.2
The gold Apocalypse trophy is the hardest achievement/challenge in Phasmophobia and will take a lot of practice, patience and knowledge about the game before you can even attempt it. Hence, I suggest leaving these achievements till last, or at least until you've prestiged once or more.
When attempting the challenge, you're probably going to have many failed attempts, but your main priority is making sure you get easy/do-able optional challenges as you'll have to complete all 3 as a part of the challenge.
I will list all the challenges here, although I will list them from top to bottom, from easiest to impossible. If you get any hard-impossible challenges, head back to the lobby and re-enter to re-roll your challenges. These are what make or break an apocalypse run!
This is a rough guide on which optional objectives are worth going for, are harder, or which to avoid entirely. Your best bet is resetting until you get 3 easy, or 2 easy and 1 hard. They are ordered from easiest (top) to hardest (bottom), so if you settle for a harder one, getting one higher up on the list is better.
The 'Find evidence of paranormal activity with an EMF Reader' is on both hard and reset, although id suggest resetting if you see it in most cases. But for isn't the end of the world if you have it as one of you objectives, you can definitely complete the challenge with it, although it is dangerous and usually just worth skipping.
Most of the time, packing everything you can isn't the best idea, plus we are playing as a solo player so I'm here to guide you with what items you should be bringing into the contract with you, and at what preferable tier!
There are a few items that are practically necessary to complete a full run, I will list those at the top.
Note: dashes (-) mean any tier or a lower can be used and all have different use cases, although if there is a ✓, make sure to try prioritize that tier.
These items here should be all you need. Please do take into account that this is a small outline, you can definitely take in more items, but this is the bare minimum you should be taking in with you if you're trying to save money, but taking in 1 extra of each (where you can) can help you from losing important items. You can always ignore any of the items i've got an ✗ next to, as they are useless on this difficulty and would be a waste of money if you died.
'Apocalypse Trophy' Achievements pt.3
Here is a video by Insym, an amazing player and content creator, explaining the challenge and how to complete it - Please use this as a video guide, it is a great resource and will evidently help you get a grip of the challenge and includes a lot of what i have written in Part 2, just in video form! https://www.youtube.com/watch?v=FM-CGtFat3o
Director
 -Director:
"Create a custom difficulty"
-Director:
"Create a custom difficulty"
Simply create a custom difficulty, to do this. Head into a game lobby, either Singleplayer or Multiplayer (as long as you're the host). Press the button to change the difficulty and head all the way to the right (past Challenge Mode). Here, you can edit the difficulty to your liking.
No More Training Wheels
 -No More Training Wheels
"Complete Training"
-No More Training Wheels
"Complete Training"
No More Training Wheels is extremely simple.
Simply beat Phasmophobia's tutorial at any time.
To find the Training, in the very first menu (before entering a lobby), select training and follow through the tutorial.
You can also find it first thing when opening the game.
Flawless Execution
 -Flawless Execution
"Complete a perfect game"
-Flawless Execution
"Complete a perfect game"
A perfect game consists of a few slightly tough requirements. These being:
- Find all pieces of evidence possible
(3 on Amateur, Intermediate and Professional. 2 on Nightmare. 1 on Insanity) - Complete all 3 optional objectives
- Find the correct ghost type
- Collect the Bone
- Fill up the entire journal with 3 Star Photos
These can be of anything, the ghost, interactions, salt, ghost writing, it doesn't matter. But ALL photos must be 3 star, if one photo is 2 star, the run is void. if all photos are 3 star but 1 photo hasn't counted as anything, the run is void.
The most difficult requirement here is filling up your book with 3 star photos. The easiest way to get all 3 star photos is with the Tier 3 Salt (and when the ghost isn't wraith)
You'll want to place all the salt on-top of each other/in a line. And you'll be able to take a 'Disturbed Salt' picture for each salt pile you've placed down after the ghost has walked in it. For example, take three pictures of the same salt pile, if you have stacked three salt lines on top of each other.
This will also work with Tier 1 and 2 Salt, you just won't have as many pictures and may be harder to achieve the same results, but is still a great way to fill up the book.
Just focus on taking safe and easy 3 star photos (these will usually be interactions, or the ghost interacting with equipment), and try to avoid panic pictures of the ghost during events.
Although this will come naturally when playing, and become easier the better player you become!
Extra Mile
 -Extra Mile:
"Complete 50 optional objectives"
-Extra Mile:
"Complete 50 optional objectives"
This one will come naturally from playing. Although here are some tips for each Optional Objective in the game. Please do refer to this whenever you may be struggling with one.
You can check if you have completed each objective by going to 'Overview' in your journal.
- Capture a photo of the ghost
Capturing a photo of the ghost can sometimes be very tough depending on the Ghost you're dealing with.
If you still have your Cursed Object available, use it to try to trigger a hunt, or ghost event near you. Although be weary, and have Incense and an Igniter ready in-case a hunt happens.
A hunt may also be a blessing in disguise, as if it is a slow/normal speed ghost, its not too difficult to take a photo, then use your Incense to run away to hide. Give it a go if you're confident!
- Cleanse the area near the ghost using Incense
Grab an Incense, and use it in the ghost's favourite room, don't forget to walk around the room a bit, and if you have time, walk slightly outside the room, as the ghost may have wandered. If you have tried this and it's still not triggered the objective. The ghost has most likely moved room entirely. Go search for it and give it another go!
- Detect a ghost's presence with a Motion Sensor
Usually your best option is to bring in 2 Motion Sensors, if you're in a room with 1 exit, stick one Motion Sensor on the door, and one in the middle of the room where you feel the ghost may wander. If you only have 1, I'd recommend putting it near the exit, but facing in and towards the main room, rather than the small area where the door may be. This gives the ghost more of a chance to walk into it, while still catching it if it tried to leave.
- Detect a paranormal sound with a Parabolic Microphone
Simply enter the map and point the Parabolic Microphone around and wait for a sound. You'll need to point it in the direction of the ghost/ghost room, so if you know where it is, this task should be simple.
- Find evidence of paranormal activity with an EMF Reader
- Get an average sanity below 25%
- Get the Ghost to blow out a Firelight
For this objective, you'll want to place a Firelight in/near the ghost room for the best chance of it being extinguished. Grab both a light and firelight, if you're holding the firelight and igniter in your inventory, right click when holding out the firelight to ignite it, and place it on a surface. Alternatively, place the firelight on a surface before hand, hold out your lighter, right click and press your use key ('F' is default) to light the firelight. Then leave it be and hopefully the ghost will blow it out. If it doesn't after a while, consider moving it or check if the ghost has moved rooms.
- Have a member of the team escape the Ghost during a Hunt
This objective can be slightly difficult. The one pre-requisite this objective has is the ghost must see you/have vision on you at some point during the hunt, then lose sight of you. It will lose sight of you when you hide or successfully evade the ghost. Once it has lost you, the objective will check off.
- Have a member of your team witness a Ghost event
This objective is done by witnessing a Ghost event. This can be a multitude of events such as:
- The ghost hissing at the player
- The ghost showing itself Infront of the player (which leaves EMF 4)
↪ During this ghost event, the ghost also has a chance to sing - The ghost exploding the lightbulb or changing it red
- The ghost showing itself and chasing the player Note: Ghost hunts and events from cursed objects do NOT count as ghost events
- Prevent the ghost from hunting with a Crucifix
Sometimes this objective can be tricky if you have a shy ghost, but will just take extra time. Your best bet is to find the ghost room and place the Crucifix where it covers the most area. For larger rooms, you may need 2 Crucifixes. For ghosts more prone to roaming/changing favourite rooms, you may need 2 Crucifixes and place one outside the current ghost room.
After your Crucifix(es) are placed, make sure you're in the map with low enough sanity (or team sanity) that allows your ghost to hunt. From there, just wait and re-position the Crucifix(es) if the ghost still hunts out of range of it/them.
- Repel the Ghost with Incense while it's chasing someone
This objective can get tougher depending on the ghost type you have. To complete this objective you'll need to start a hunt, making sure you have BOTH a Incense and igniter in your inventory.
Your best bet is to find a longer corridor to see the ghost approaching you which also has a hiding or loop spot nearby. Now during a hunt, wait until the ghost starts approaching you. When you know it has line of sight of you and is now 'chasing you', press right click (or whatever you may have it bind to) while holding out the Incense to use it. From here the ghost will lose interest in you and you can go hide or loop it safely and complete the objective.
Doom Slayed
 -Doom Slayed:
"Get killed by a demon ability within the first minute"
-Doom Slayed:
"Get killed by a demon ability within the first minute"
Doom Slayed is one of the achievements that the developers intend for you to unlock after simply playing for a while.
If you are looking to grind this achievement out, it's not too difficult but will take time and a lot of luck to do so.
Head into a Singleplayer Lobby and select a custom difficulty. Your best bet for completing this achievement as quickly as possible is to change a few settings beforehand.
I suggest going to a custom difficulty and selecting the 'Amateur' Preset, then changing the settings I list below:
Player:
Starting Sanity: 100%
Sprinting: Infinite
Player Speed: 150%
Lose items and consumables: Off
Ghost:
Ghost Speed: 150%
Grace Period: 0s
Hunt duration: High
Contract:
Setup time: 0s
These are the only ones you need to change for this method to go as fast as possible, but don't be afraid to tweak them if you'd like. And make sure you don't enter the contract with any items!
Firstly, i suggest opening a stopwatch/1 minute timer on another device. This can be your phone, tablet, a second monitor on your PC, or even a real stopwatch. Anything would work as long as it has a stopwatch or timer! This is to track how long you've been in the house for, so that when you reach the 1 minute mark, you leave the map and retry.
Important Note: The in-game timer for this achievement starts after you unlock the door/gate to the map, meaning you want to start your 1 minute timer after you unlock the door to the map to get the full 1 minute.
The goal of this grind is to:- Start a contract with any small map (I will be using Willow Street House, but Tanglewood, Camp Woodwind etc. would work just as well) with no items.
- Enter the contract, grab the key to the map, and head to the front door.
- As soon as you open the door, start your stopwatch or timer and enter the house
- From here, stay inside the map at all times and wait for a hunt (I usually sit in the near to the middle of the map such as the kitchen in Willow Street House)
- Since you're at 100% Sanity, only Demon's will be able to hunt, so if your stopwatch or timer reaches 1 minute from after you open the front door, leave the game and try again
- If you receive a hunt before your 1 minute mark, try your best to run towards the ghost and die as quickly as possible (as the time it takes from when the hunt starts and it kills you counts to the total time spent in the house!)
- When you head back to the lobby and get past the stats and XP screen (after clicking continue), the achievement will unlock if everything was done correctly
There is a more laid back way of grinding this achievement without a stopwatch, although may take even longer as it's not as optimized.
Copy the exact difficulty settings as listed above Except:
Player:
Starting Sanity: 0%
Having Sanity at 0% means any ghost can hunt at any point when you enter, meaning you'll most likely die before the 1 minute point to every ghost in the game. This means you don't have to worry about a stopwatch or having to leave the contract and restart a new singleplayer game each time the ghost doens't hunt after a minute. As you can simply wait to die and carry on, over and over until you get a demon that hunts with its ability.
Although, as every ghost can hunt, this includes Demon's and means that they can hunt without using their ability. Rendering this achievement void if you die to it when it doesn't use its ability and does a regular hunt.
Either way, this is still a great way to grind the achievement if you would like to be more laid back, and not have to worry about a stopwatch or leaving, but may take a longer time than the previous and is completely up to you how you'd like to approach it!
Escape Artist
 -Escape Artist:
"Escape a Revenant"
-Escape Artist:
"Escape a Revenant"
Escape Artist is a relatively simple achievement, although some preparations can be made to make this achievement much simpler.
Firstly, let me explain this achievement.
To 'escape' the Revenant, you must follow these prerequisites:- The Revenant MUST have line of sight of you. You know this happens when it starts to speed up.
- You must have the Revenant LOSE your location, this is indicated by the Revenant significantly slowing down its speed.
It's important to mention that having the hunt end while you're still in its line of sight will NOT trigger this achievement, you must lose the ghost completely.
- Incense
- Ingiter
- (Optional) Tier 3 Salt
Firstly, you will want to play on any map and find the Longest corridor possible, it also helps if there is a hiding spot nearby that you can go to right after you incense the Revenant.
These long corridors could be anywhere, such as the first corridor in Tanglewood(which additionally has multiple hiding spots nearby), Willow Street House's rooms and stairs to the basement (only use these if your ghost is already down there). And honestly too many more to name. This can be done in almost every map with ease.
The strategy itself is simple:- (Optional) If you've brought a Tier 3 Salt, place it where the Revenant will come from to slow it down further, making your escape easier
- Make sure you hold out your Incense with the Igniter in your inventory.
- Lower your sanity and wait for a hunt, make sure to be in position at the end of your corridor with an escape route ready.
- As the revenant turns the corner and sees you, as it approaches you, right click your Incense, drop it on the floor, and run to your hiding spot.
- Now simply wait for the hunt to finish, exit the game via the truck, and you're done! The achievement should show up when you load out.
They're Here
 -They're Here:
"Witness a Poltergeist ability"
-They're Here:
"Witness a Poltergeist ability"
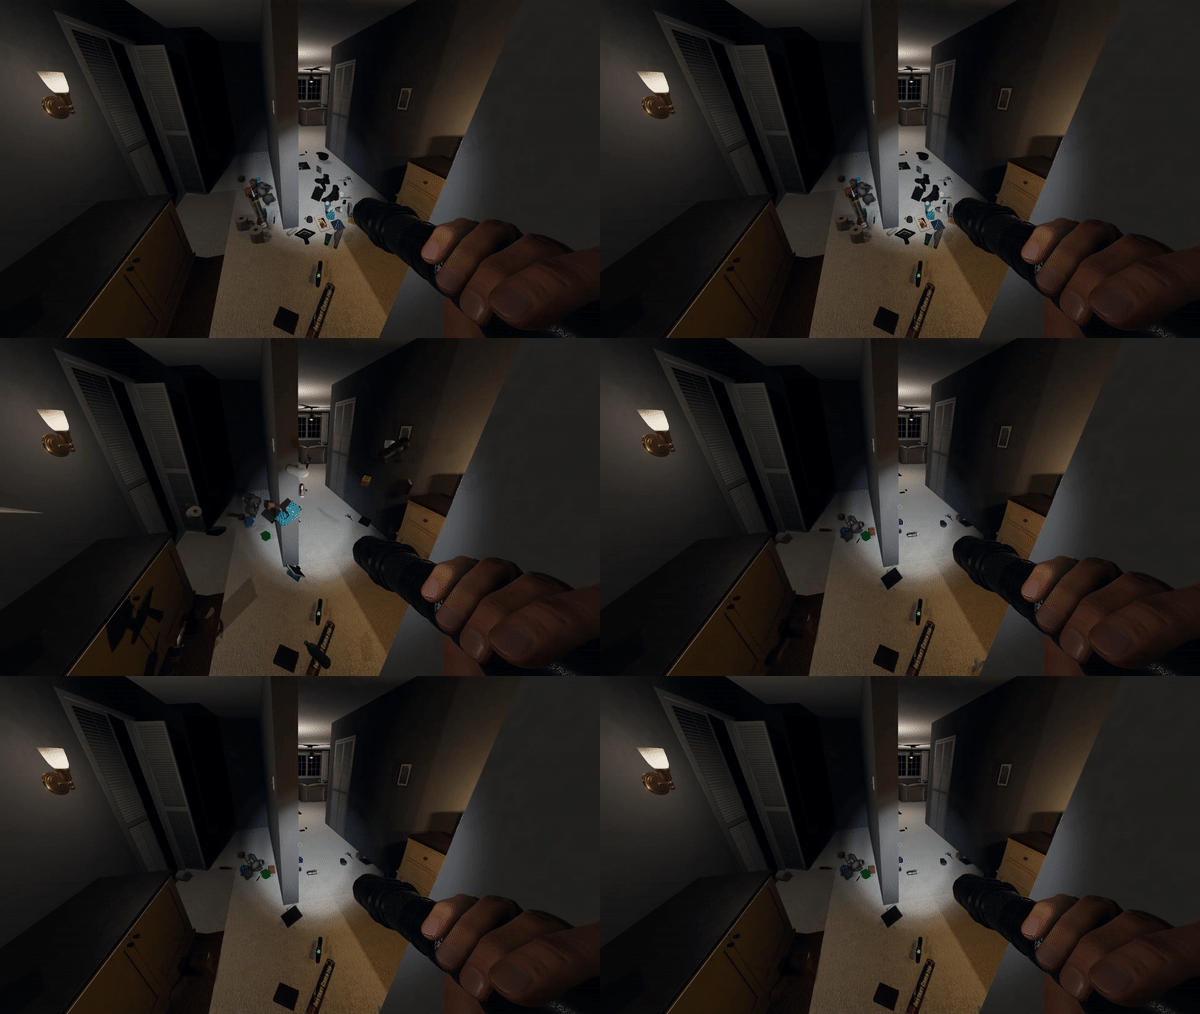
Simply later a bunch of intractable items on top of each other, near or in the ghost room. If you're dealing with a Poltergeist, sooner or later it will use its ability and throw all the items at once!
If you're going for this achievement specifically, make sure to turn up the 'interaction amount' difficulty setting to 'High' for the best chance. You can also lower other settings while you're at it, such as sanity drain to stop hunts etc.
Please see the GIF below for a visual representation. Thank you to Shuee 01 for this resource.
The Bait
 -The Bait:
"Get killed by a Banshee in multiplayer"
-The Bait:
"Get killed by a Banshee in multiplayer"
'The Bait' is again a very simple achievement. You must simply die to a Banshee in multiplayer.
To understand how the Banshee works, be sure to head down to the bottom of the guide, where I explain the banshee and how they work in detail.
In short, the Banshee will target 1/X players in your lobby. If the target is not in the house, the Banshee will hunt as normal, but based on the targets sanity. If the target is inside the house, all other players inside are safe other than the target, unless the target is killed during the hunt. If this is the case, the Banshee will choose a new target and the cycle will repeat.
If you know who the target is, either have them leave the house, or be sacrificed to have the target switched. Keep going until you are the one that's killed for the achievement!
It's important to know that going into a multiplayer game, alone, will NOT count towards this achievement. You must be in a party with at least 2 people.
'Discovered' Achievements
Note: No matter how many contracts you've completed before achievements were added, you'll need to re-unlock every one of these.
Each ghost in the game has a separate achievement for identifying the respective ghost successfully after a contract. To unlock each one, you must find and enter the correct ghost type into your journal before leaving.
All of these achievements are easiest done on Amateur Difficulty. But all difficulties will work and you will eventually come across all ghosts while playing/working towards other achievements.
Please also see the following sections to learn more about each ghost!
- To be specific, the evidence they supply, their behaviors, their tells, general information about each ghost, and how to find them in <3 evidence runs!)
 -Spirit Discovered:
"Successfully identify your first Spirit"
-Spirit Discovered:
"Successfully identify your first Spirit"
 -Wraith Discovered:
"Successfully identify your first Wraith"
-Wraith Discovered:
"Successfully identify your first Wraith"
 -Phantom Discovered:
"Successfully identify your first Phantom"
-Phantom Discovered:
"Successfully identify your first Phantom"
 -Poltergeist Discovered:
"Successfully identify your first Poltergeist"
-Poltergeist Discovered:
"Successfully identify your first Poltergeist"
 -Banshee Discovered:
"Successfully identify your first Banshee"
-Banshee Discovered:
"Successfully identify your first Banshee"
 -Jinn Discovered:
"Successfully identify your first Jinn"
-Mare Discovered:
"Successfully identify your first Mare"
-Jinn Discovered:
"Successfully identify your first Jinn"
-Mare Discovered:
"Successfully identify your first Mare"
 -Revenant Discovered:
"Successfully identify your first Revenant"
-Revenant Discovered:
"Successfully identify your first Revenant"
 -Shade Discovered:
"Successfully identify your first Shade"
-Shade Discovered:
"Successfully identify your first Shade"
 -Demon Discovered:
"Successfully identify your first Demon"
-Demon Discovered:
"Successfully identify your first Demon"
 -Yurei Discovered:
"Successfully identify your first Yurei"
-Yurei Discovered:
"Successfully identify your first Yurei"
 -Oni Discovered:
"Successfully identify your first Oni"
-Oni Discovered:
"Successfully identify your first Oni"
 -Yokai Discovered:
"Successfully identify your first Yokai"
-Yokai Discovered:
"Successfully identify your first Yokai"
 -Hantu Discovered:
"Successfully identify your first Hantu"
-Hantu Discovered:
"Successfully identify your first Hantu"
 -Goryo Discovered:
"Successfully identify your first Goryo"
-Goryo Discovered:
"Successfully identify your first Goryo"
 -The Twins Discovered:
"Successfully identify The Twins for the first time"
-The Twins Discovered:
"Successfully identify The Twins for the first time"
 -Raiju Discovered:
"Successfully identify your first Raiju"
-Raiju Discovered:
"Successfully identify your first Raiju"
 -Obake Discovered:
"Successfully identify your first Obake"
-Obake Discovered:
"Successfully identify your first Obake"
 -The Mimic Discovered:
"Successfully identify The Mimic for the first time"
-The Mimic Discovered:
"Successfully identify The Mimic for the first time"
 -Moroi Discovered:
"Successfully identify your first Moroi"
-Moroi Discovered:
"Successfully identify your first Moroi"
 -Deogen Discovered:
"Successfully identify your first Deogen"
-Deogen Discovered:
"Successfully identify your first Deogen"
 -Thaye Discovered:
"Successfully identify your first Thaye"
-Thaye Discovered:
"Successfully identify your first Thaye"
Ghosts - Spirit, Wraith, Phantom
(A lot of information here is taken from the Phasmophobia Official Discord server, in the channel #ghost-huntin-resources, and Tybans cheat sheet! Please find links to them throughout the guide and in the section 'Helpful Resources')
The aim of these next few sections is to teach you about the evidence they supply, their behaviors, their tells, general information about each ghost, and how to find them in <3 evidence runs. And a quick and easy reference for whenever you need it!
This should make finding them for the first time, and any time after that easier! Please refer back to this section at any time while playing and don't forget to use (Ctrl+F) to find the ghost you're looking for with ease.
- EMF 5
- Spirit Box
- Ghost Writing
- <50% Sanity
- 1.7 m/s (Regular Speed)
- Incensing the ghost will prevent a hunt for 180s instead of the normal 90s.
Note: Sprit is undifferentiable to other regular ghosts when using the XP/Money Grind method and Gold Apocalypse Trophy listed in this guide.
- 1) 'Increased Incense Duration'
If it hunts within 90 seconds, then you know you've either missed your Incense and have got to retry, or you're dealing with a Demon, if it's even possible (Incense only lasts 60s instead of 90s).
- EMF 5
- Spirit Box
- DOT's
- <50% Sanity
- 1.7 m/s (Regular Speed)
- Ghost will never step in salt of any tier.
- Ghost will not be slowed down by tier 3 salt during a hunt.
- Can teleport to random players, leaving either EMF 2 or EMF 5 where it teleported to.
- 1) 'Wraith Hunt Test - Refuses to step in Salt'
If you also randomly receive EMF 2 or 5 for seemingly no reason (no interaction or event near you), you may be up against a Wraith that just teleported to you, and it's worth chucking down Salt to test!
Please see this super short video by Shuee 01 for a representation of the Wraith ability
https://www.youtube.com/watch?v=4gC5lvFj2jc- Spirit Box
- Ultraviolet
- DOT's
- <50% Sanity
- 1.7 m/s (Regular Speed)
- Does not appear in ghost photo's.
- During events of DOT's state, taking a photo will cause the Phantom to disappear.
- Less visible during hunts (Blinks/Flickers in and out less often, and is invisible for longer)
- Can roam to a random player, leaving EMF 2
Phantom is a very simple ghost to check for if you don't have all evidences, or if DOT's or Spirit Box is being stubborn. If you have a feeling you may possibly be dealing with a Phantom, there is 2 approaches you can take.
- 1) 'Phantom Hunt Test - Phantom's Blinking Speed'
Right down below is a direct comparison between the Phantom, any other ghost (excluding Oni and Deogen). Notice how the Phantom is invisible for much longer, and blinks a lot less than normal ghosts. This is how to spot if you're up against a Phantom or not without a camera. This trick can also be an immediate tell even if you don't have any evidence yet!
(This image is taken from Tybayn's Phasmophobia Cheat Sheet[tybayn.github.io], credit to them for their fantastic visual representation!)
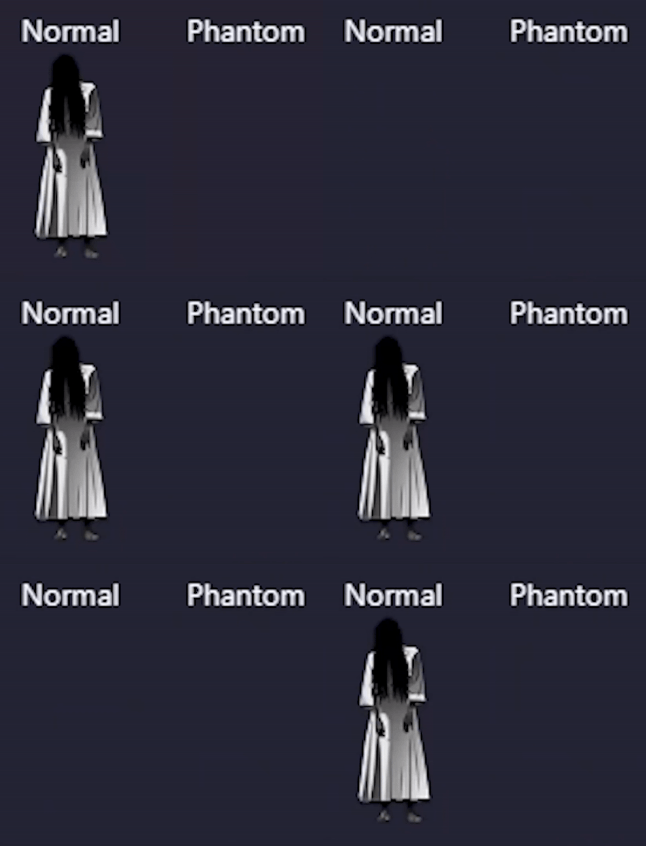
Phantom's roaming ability could also possibly be a tell that you're up against an Phantom, except there isn't much you can do regarding it. But if you notice it has roamed, keep in mind that it's roamed and left EMF 2, and from there you can be more vigilant for looking for slower and less frequent blinks in hunts, or it turning invisible after a photo.
- 2) 'Doesn't appear in Ghost Photo's'
Ghosts - Poltergeist, Banshee, Jinn
- Spirit Box
- Ultraviolet
- Ghost Writing
- <50% Sanity
- 1.7 m/s (Regular Speed)
- Can throw multiple objects at once, decreasing player sanity by 2% per item thrown.
- Will throw an item every 0.5s during a hunt
- Higher chance to throw and interact with objects
- Can throw objects faster and much further
Poltergeist is a simple ghost to distinguish thanks to its tells and behavior. Poltergeist's gimmick is that it throws objects more frequently, harder and further than every other ghost. This is especially visible during hunts.
- 1) 'Poltergeist Hunt Test - Higher chance to throw and interact with objects'
Its throws are quite easily distinguishable to other ghosts.
(I'll be creating a GIF to stick here when i encounter my next Poltergeist as a visual aid)
- 2) 'Poltergeist Ability'
Please see the GIF below for a visual representation. Thank you to Shuee 01 for this resource.
- Ultraviolet
- Ghost Orb
- D.O.T.S
- <50% Target Sanity (ignores average sanity)
- 1.7 m/s (Regular Speed)
- Banshee will scream through the Parabolic Microphone
- When hunting, it will only go after its target (unless target is outside); therefore, if its target is in the map during a hunt, all other players will be safe unless the target dies.
- Will roam towards its target, without leaving any EMF 2.
- When shown in a D.O.T.S state, it will attempt to roam towards its target.
Firstly, I should mention how Banshee's hunting sanity works. When in multiplayer, the Banshee will target one of the players at random. Banshee will then hunt based on that players sanity rather than the average sanity. If the chosen target is above 50% sanity, whether inside the house or not, the banshee cannot hunt. This means that it does not matter what everyone elses sanity is for a hunt apart from the target.
Banshee will only target one player for the entirety of the contract as long as that player is alive and inside the house. If the target is outside the house, the banshee will hunt normally (still at the sanity of the target). If the target dies, the Banshee will select a new target.
- 1) 'Banshee Scream'
I'm not able to add audio files into steam, so if you'd like to hear what the scream sounds like, please head to this video by Shuee 01.
https://www.youtube.com/watch?v=4gC5lvFj2jc
- 2) 'Singing Ghost Events'
- 3) 'Roaming/Stalking'
- 4) 'Ignoring non-targets during hunts'
- EMF 5
- Ultraviolet
- Freezing Temperatures
- <50% Sanity
- 1.7 m/s | 2.5m/s
- Ability to drop nearby players' sanity by 25% instantly, with EMF 2 or EMF 5 given at the breaker afterwards (This only occurs when the breaker is on)
- Cannot turn off breaker directly
Note: Jinn is undifferentiable to other regular ghosts when using the XP/Money Grind method and Gold Apocalypse Trophy listed in this guide.
- 1) 'Jinn Hunt Test - Hunt Speed'
- 2) 'Sanity Drain Ability'
- 3) 'Jinn is dependant on the breaker'
Ghosts - Mare, Revenant, Shade
- Spirit Box
- Ghost Orbs
- Ghost Writing
- <60% | 40% Sanity
- 1.7 m/s (Regular Speed)
- Ability to immediately turn off a light that a player has turned on (
- Cannot turn on lights (keyboard and TV excluded)
- More likely to turn off and explode lights
- More likely to wander to a room where lights are off.
Note: Mare is undifferentiable to other regular ghosts when using the XP/Money Grind method and Gold Apocalypse Trophy listed in this guide.
- 1) 'Mare Hates Lights'
You can test for a Mare simply by turning on a light every 10-15s and seeing if it's turned off immediately after.
- 2) 'Mare Hunting Sanity'
- Ghost Orbs
- Ghost Writing
- Freezing Temperatures
- <50% Sanity
- 1m/s | 3.0m/s
- Hunt speed incredibly slow (↓1m/s) until Revenant knows player location (↑3m/s)
- See 'Tells'
- 1) 'Revenant Hunt Test - Hunting Speed'
Revenant will be very slow when player location is not known. (1m/s). When the ghost finds the players location (using electronics, voices, or line of sight) it will instantly speed up to 3m/s. After reaching the player's last known location, it will slow back down gradually if its target is not found.
Revenant's footsteps are also very easy to tell apart from other ghosts, this is true for both the 1m/s and the 3m/s, although you'll mainly notice it's a revenant when you hear it speed up dramatically.
- EMF 5
- Ghost Writing
- Freezing Temperatures
- <35% Sanity
- 1.7m/s (Regular Speed)
- Does not do interactions that result in EMF 2, 3 or 5 with someone in the same room (except from Ghost Writing and blowing our firelights)
- Will never hunt when someone is in the same room.
- The lower the average sanity, the more ghost events Shade will do
- More likely to appear as a 'Shadow Form' during ghost events
- Shade is the only ghost that has a chance to appear as a shadow when summoned from the music box, monkey paw, or summoning circle.
Note: Shade is undifferentiable to other regular ghosts when using the XP/Money Grind method and Gold Apocalypse Trophy listed in this guide.
- 1) 'Least Active Ghost'
- 2) 'Cursed Object Test'
- 3) 'Shadow Form ghost events'
Ghosts - Demon, Yurei, Oni
- Ultraviolet
- Ghost Writing
- Freezing Temperatures
- <70% Sanity
- + Ability to hunt at any Sanity
- 1.7 m/s (Regular Speed)
- Incensing the ghost will prevent a hunt for 60s instead of the normal 90s
- 20s minimum hunt cool-down instead of the normal 25s
- Crucifix Range increased by 50% per tier
Note: Demon is undifferentiable to other regular ghosts when using the XP/Money Grind method but is still possible when attempting the Gold Apocalypse Trophy listed in this guide.
- 'Ability to hunt at any Sanity'
- 1) 'More Frequent Hunts'
- 2) 'Lessened Incense Duration'
If you have a feeling you're up against a Demon, simply head to the ghost room, incense the ghost room and wait 60s (note that if it hunts before the 60s, you'll most likely missed your incense and need to try again). If it hunts after 60s but before 90s, then you've got a Demon on your hands.
- 3) 'Increased Crucifix Range'
- Ghost Orbs
- Freezing Temperatures
- DOTs
- <50% Sanity
- 1.7 m/s (Regular Speed)
- Can shut a door and drop sanity of nearby players by 15% if a door is in the room.
- Yurei is the only ghost that can close or interact with the enter/exit door (such as the gate on camp woodwind) outside of a hunt or ghost event.
- Incense traps the ghost in its room and prevents wandering for 60 seconds.
- 1) 'Door Shut Ability'
This is Yurei's only tell during the XP/Money Grinding method and is pretty rare to happen, but does have a chance to happen. Other than this, Yurei is indistinguishable from other ghosts during the method.
- EMF 5
- Freezing Temperatures
- DOTs
- <50% Sanity
- 1.7 m/s (Regular Speed)
- Drains 20% Sanity on ghost events, rather than the usual 10%
- Is incapable of doing 'ghost mist' event
- More visible during hunts (Blinks/Flickers in and out less often and is visible for longer)
- More active around multiple people
- More likely to appear as full ghost model
- 1) 'Oni Hunt Test - Oni's Blinking Speed'
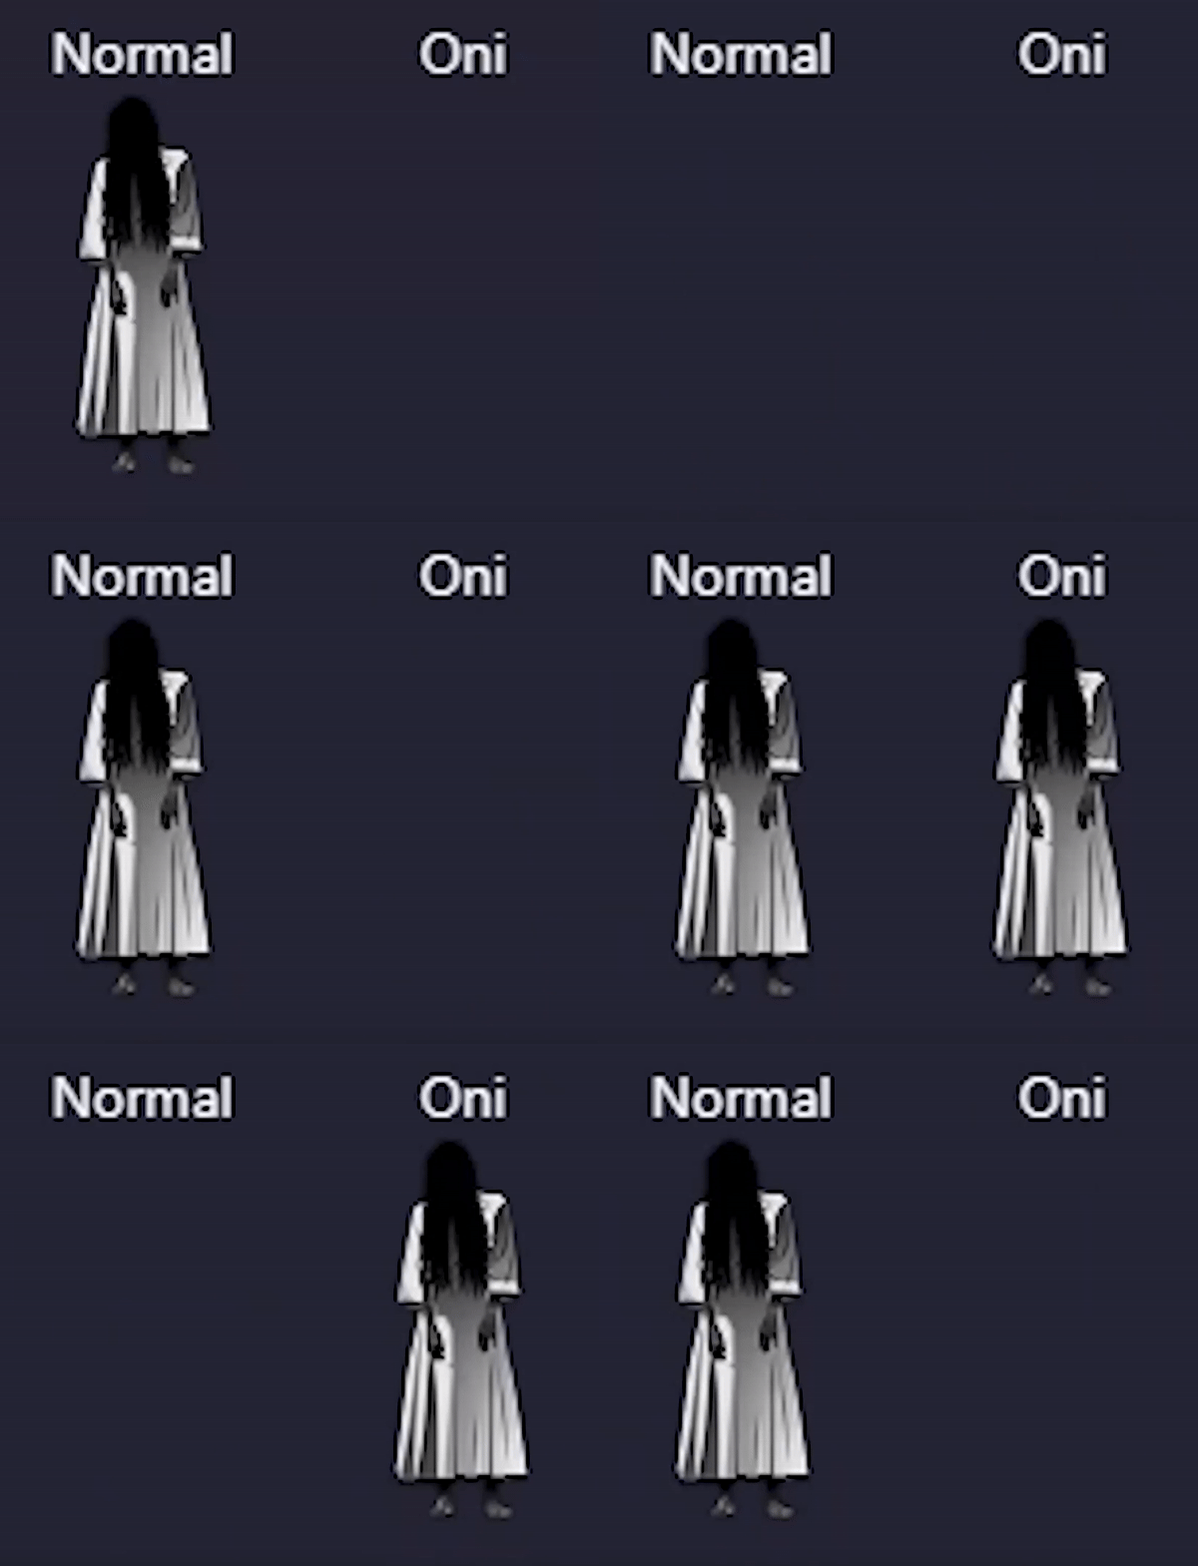
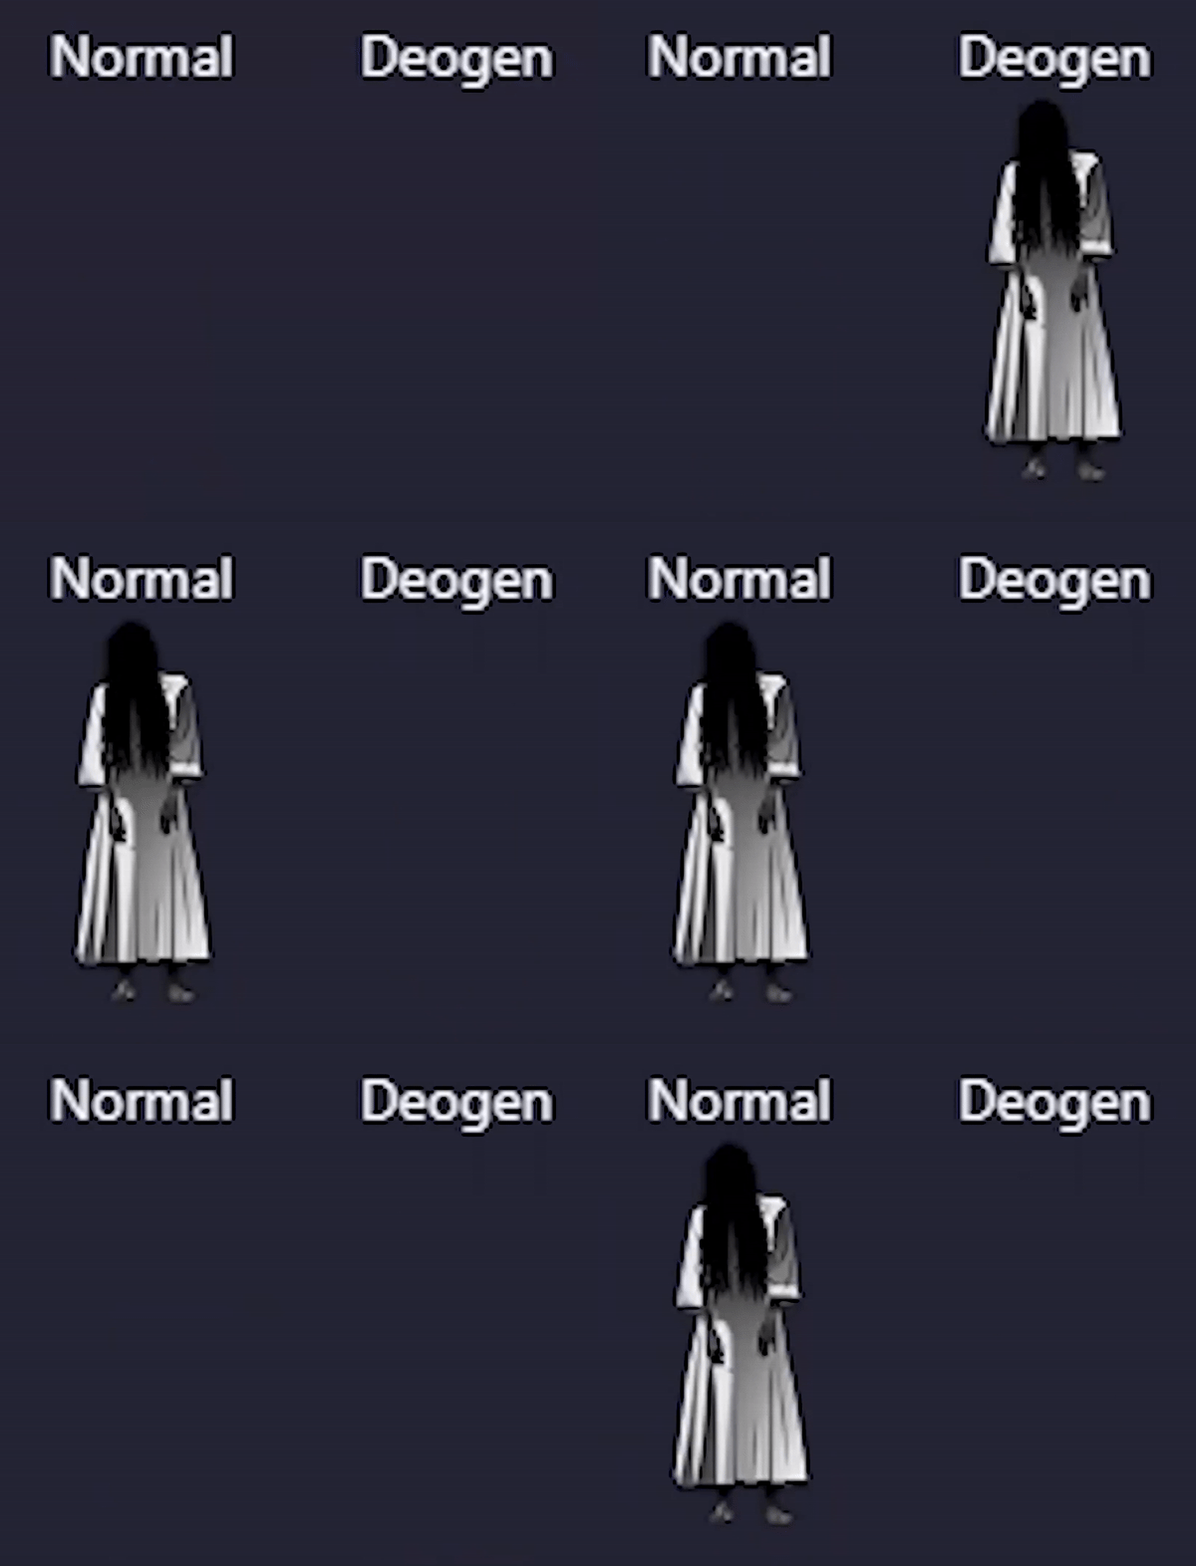
The Deogen is very similar in regards to being visible for longer and blinking less, although blinks slightly more often and is visible for slightly less time than the Oni. Yet still comparably more visible than regular ghosts.
Use this, along with the other tells (such as Deo's fast speed when far away, and snail's pace when close), to differentiate the two of these ghosts.
Right down below is a direct comparison between the Oni, and any other regular ghost (excluding Phantom and Deogen). Notice how the Oni is visible for much longer, and blinks a lot less than normal ghosts due to being more visible. This is your best bet to know if you're up against an Oni.
(This image is taken from Tybayn's Phasmophobia Cheat Sheet[tybayn.github.io], credit to them for their fantastic visual representation!)
- 2) 'Incapable of Ghost Mist'
- 3) 'Double Sanity Drain from ghost events'
- 4) 'Full Form Ghost Events'
Ghosts - Yokai, Hantu, Goryo
- Spirit Box
- Ghost Orbs
- DOTs
- <80% | 50% Sanity
- 1.7 m/s (Regular Speed)
- Cannot detect voices or sense your equipment further than 2.5m away during hunts.
- Can hunt up to 80% sanity when talking near it, otherwise, hunts at 50%
- More active when talked around
- Music box can be brought much closer to the ghost before it breaks.
- 1) 'Yokai Hunt Test - Voice/Detection radius decreased during hunts'
- 2) 'More active while talking near the Yokai'
- Ultraviolet
- Ghost Orbs
- Freezing Temperatures
- <50% Sanity
- 1.44m/s - 2.7m/s
- Ghost can have visible freezing breath in any room during hunts when the breaker is off or broken
- Cannot turn breaker on
- High chance to turn breaker off
- Guaranteed Freezing Temperatures on Nightmare/Insanity mode
- 1) 'Hantu Hunt Test - Hantu Freezing Breath during hunts'
- 2) 'Hantu Hunting Speed'
Down below is the Hantu's Speed relative to the temperature of the room:
15°C+ = 1.4m/s
12°C = 1.75m/s
9°C = 2.1m/s
6°C = 2.3m/s
3°C = 2.5m/s
0°C = 2.7m/s
Note that Hantu will never increase speed because of Line Of Sight, and only based on temperature.
- EMF 5
- Ultraviolet
- DOTs
- <50% Sanity
- 1.7m/s (Regular Speed)
- DOTs only appear on video camera and will not show if a player is in the same room, however, DOTS state can start outside of a room, and enter a room where a player is
- Cannot change favourite rooms
- Does not roam/leave room as often as other ghosts
- Guaranteed DOTs on Nightmare/Insanity mode
Note: Goryo is undifferentiable to other regular ghosts when using the XP/Money Grind method and Gold Apocalypse Trophy listed in this guide.
- 1) 'Goryo DOTs'
When playing with no evidence, there is nothing you can do to figure out you're against a Goryo, as it's simply got nothing to give you unrelated to evidence, other than knowing it can never switch favourite rooms, which is very difficult to track and usually not worth your time.
Ghosts - Myling, Onryo, The Twins
- EMF 5
- Ghost Orbs
- DOTs
- <50% Sanity
- 1.7 m/s (Regular Speed)
- Myling cannot hear footsteps and voices from more than 12m away during hunts (rather than the usual 20m)
- More frequent parabolic responses
- 1) 'Myling Footsetps'
- Spirit Box
- Ghost Orbs
- Freezing Temperatures
- <60% Sanity
- 1.7 m/s (Regular Speed)
- Will attempt to hunt at ANY sanity after extinguishing every 3rd flame on a candle.
Ghosts - Raiju, Obake, The Mimic
Ghosts - Moroi, Deogen, Thaye
Feedback & Thanks
Please write a comment if there any issues or if something is difficult to understand. And if i have made any errors, i will credit you if you do so!
This includes:- Spelling Errors
- Insufficient Details
- Parts of the guide that aren't like the rest
- Suggestions on something to add to the guide
- And many others, if you feel it could be even slightly helpful, send in a comment!, any help will be greatly appreciated, you wont just be helping me, you'll be helping many others too!
Riaxandra - Pointed out a handful of mistakes throughout parts of the guide.
Holy - Pointed out multiple Spelling Mistakes and re-wrote a few pieces of the guide to make it easier to read and understand, as well as contributing multiple ideas.
ywhs - Pointed out missing requirement (collect the bone) in all times 'Perfect Games' are mentioned.
ynto - Helped tremendously with the achievement 'Doom Slayed' and pointed out a mistake in the description of the achievement.
MacLeod - Pointed out a massive mistake throughout the entire guide with '<' and '>' being completely the wrong way round and contributed to a strategy for the 'Bronze Apocalypse Trophy Hunter'.
If you enjoyed my hard work please Follow, Like & Favorite (or even give the guide an award) as it is greatly appreciated and helps push the guide to more people that may need assistance!
Good luck ghost hunters!
Have a great Morning, Afternoon, Evening, Or Night!
Beat Phasmophobia's achievements?
Flex it — let your friends know you pulled it off.
- How to Talk to Ghosts, What to Say, What Questions to Ask★ 5 (1.9k)81k views3.2k ♥3 minUpdated 12 Jan, 2021
- Особенности призраков или как определить тип на КОШМАРЕ и ВЫШЕ★ 5 (1.2k)50k views2.8k ♥25 minRussianUpdated 25 Mar
- NO EVIDENCE CHALLENGE - Identify the ghost!★ 5 (467)36k views1k ♥42 minUpdated 16 Feb
- Ghost Handbook (Updated!)★ 5 (1.1k)31k views2k ♥12 minUpdated 28 Sep, 2025
- Phasmophobia Alan Wake Guide★ 5 (585)27k views482 ♥10 minUpdated 20 May
- [UPDATED] All Cursed Possessions (All Spawn Locations, Every Map)★ 5 (446)24k views1.3k ♥17 minUpdated 28 Oct, 2023





- Upgrading to PremiumTeam Fortress 2★ 5 (20k)1441k views11k ♥6 minUpdated May 11, 2022
- No More Room in Hell Official ManualNo More Room in Hell★ 5 (2.8k)569k views2.1k ♥29 minUpdated Apr 22, 2019
- NMRiH Community Hosting GuidesNo More Room in Hell★ 5 (526)351k views653 ♥1 minUpdated Aug 10, 2022
- Лучшие кооперативные игры SteamPAYDAY 2★ 5 (1.5k)315k views2.1k ♥56 minRussianUpdated Apr 27, 2025
- Desert Eagle Heat Treated | Blue GemCounter-Strike 2★ 5 (1.6k)292k views1.5k ♥2 minUpdated Jan 16
- Treasure Hunt Puzzle SolutionsTotal War: WARHAMMER II★ 5 (6.9k)281k views15k ♥3 minUpdated Aug 19, 2021






This guide was created by its original author on the Steam Community. Are you the author and want it removed? Request removal.