How To Create Custom Teardown Playermodels
INTRO & GUIDE RUNDOWN
- Create local copy of .vox & .xml w/ Merlin mod OR .vox & .xml of a default character within Local TD Files
- Replace file paths in your .xml with MOD/[your mod's .xml's file path] and .vox file paths with MOD/[your mod's .vox's file path]
- Open the copied .vox in Magicavoxel
- Edit or create your model
- Open .xml in Teardown editor & adjust bones, joints, add accessories, etc.
- Test in-game & screenshot (Workshop etiquiette is important)
- Publish (congrats dude)
For those with no background experience, this guide is intended to be as comprehensible as possible and go over file setup, Magicavoxel modeling, editting bones/jigglebones, error correcting .xml files and everything you need to know to make playermodels. (If anything in this guide is missing or wrong, let us know in the guide comments and we'll fix it.) For this guide, I will be making a Star Wars Battle Droid as a playermodel, with a free-moving antennae as an accessory and some small text reading "B-01".
Honestly I'd recommend that you follow the same techniques but apply them to your own playermodel so that you better understand the guide, and also finish with a cool playermodel that you're happy with. Remember that a good playermodel is a working playermodel, so don't worry about making it perfect.
This guide was designed for Windows 10, Windows 11, Arch Linux, and CachyOS Linux, so if you're using any other operating systems. good luck.
Finally, here's a (outdated) vid that you can user if you need a more visual guide, though we strongly recommend you use it in tandem with the presented guide. Alkeralex (me) is working on redoing the guide to make it easier to follow and more consistent, and I'm just about done so expect it soon. Ok cool, let's get started.
THIS GONNA BE CRAZY!!!!111one one one
File Setup & .XML Files
- Teardown. (The game. Wow, crazy.)
- Magicavoxel[ephtracy.github.io] (The voxel model editor)
- Notepad, or preferably Notepad++[notepad-plus-plus.org]
Once they're installed, you'll need the .xml and .vox files to base your model off. There's a couple of methods to get these.
Method 1Windows: Documents / Teardown / Mods
Arch-Based Linux (Enable viewing of hidden folders): Home / .local / share / Steam / steamapps / compatdata / 1167630 / pfx / drive.c / users / steamuser / Documents / Teardown / Mods
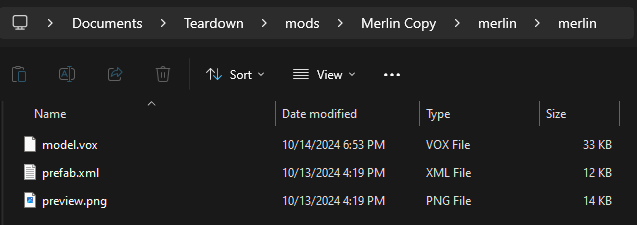 Go into your new Merlin Copy mod directory (mod paths outlined above), and delete every folder EXCEPT the folder merlin. Your root folder should now look like this (right image), regardless of OS, after you deleted the extra folders. (Click to enlarge)
Your mod's root folder directory should now have characters.txt, info.txt, preview.png (This will be your mod icon on the Steam workshop), and the folder merlin, with a second merlin folder holding model.vox, prefab.xml and preview.png; this second preview.png is the in-game icon for your model.
Go into your new Merlin Copy mod directory (mod paths outlined above), and delete every folder EXCEPT the folder merlin. Your root folder should now look like this (right image), regardless of OS, after you deleted the extra folders. (Click to enlarge)
Your mod's root folder directory should now have characters.txt, info.txt, preview.png (This will be your mod icon on the Steam workshop), and the folder merlin, with a second merlin folder holding model.vox, prefab.xml and preview.png; this second preview.png is the in-game icon for your model.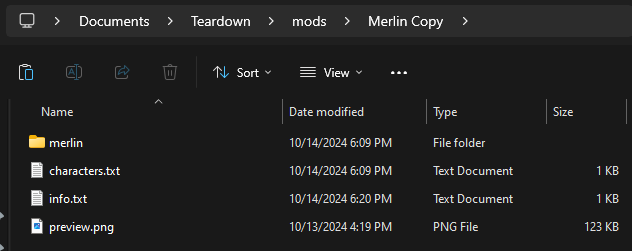
Method 2
Windows; Documents / Teardown / mods.
Arch-based Linux: Home / .local / share / Steam / steamapps / compatdata / 1167630 / pfx / drive.c / users / steamuser / Documents / Teardown / Mods.
This will be your mod's root folder. Inside your root folder, create info.txt, characters.txt, and another folder named characters (make sure it's characters, plural) and inside this, create folders named vox and prefab.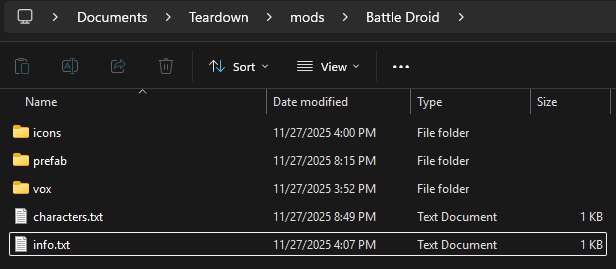 The built-in playermodel's .vox and .xml are located in the Teardown game directory. To access this, you can either:
Go to Teardown in your Steam library, and click the gear icon to the right, then go to properties, and installed files. Then click "Browse". I'd generally recommend that you use this method.
- On Windows, open your file explorer, and go to your Local Disc folder. Then go to Program Files x86 / Steam / steamapps / common / Teardown. I would recommend that you pin the common folder in your file explorer, especially if you mod games often, as it allows you to have very easy access to the directories of your Steam games.
- On Arch-based Linux, open your file explorer, and go to Home / .local / share / Steam / steamapps / common / Teardown. I would recommend that you pin the common folder in your file explorer, especially if you mod games often, as it allows you to have very easy access to the directories of your Steam games.
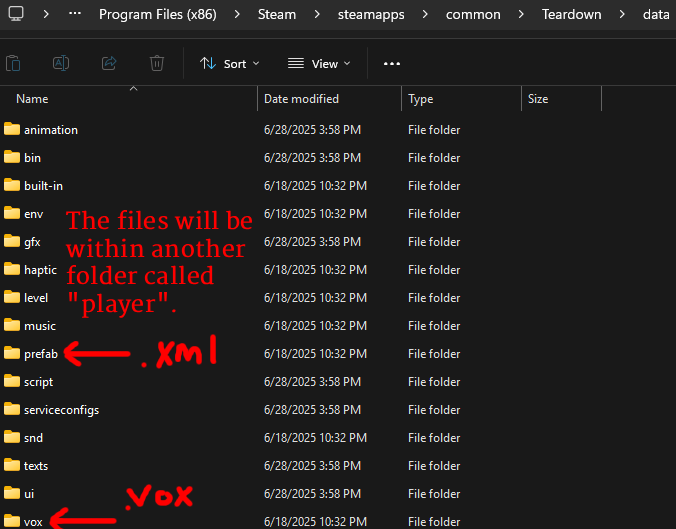 Once you have accessed the Teardown directory, find the .vox under data/vox/player and .xml under data/vox/player. Copy the respective .vox and .xml files from whichever character you want to use the animations from. For this guide, I'll be using Magnus, so I'll copy the player_magnus.vox and player_magnus.xml and paste player_magnus.vox into my vox folder, and player_magnus.xml into my prefab folder. You can now rename your .xml and /vox files, but remember the new names, as they will be important in a second. I renamed them battle_droid.vox and battle_droid.xml, but you can rename them to your character.
If renaming them you do not see ".xml" or ".vox" at the end, that's fine; if you wish to see it, on Windows, you can click View > Show > File name extensions, and ensure there is a check mark.
You then need to open your .xml file with Notepad or Notepad++. Again, I recommend Notepad++ but regular Notepad works as well. In line 1, you should see name="instance=player/player_[Character you chose].xml. For me, this will read name="instance=player/player_magnus.xml". This is the file path to the original .xml directly from within the directory, but it is NOT the path we want, so we must change it. First, add MOD at the start; the keyword "MOD" refers to your mod's directory. Then, add your mod's new .xml file path. For me, I copy and pasted the player_magnus.xml into my Prefab folder, so my path will be MOD/Prefab/battle_droid.xml.

ABOVE: Location of the .xml file.
Below: Location of the .vox file.

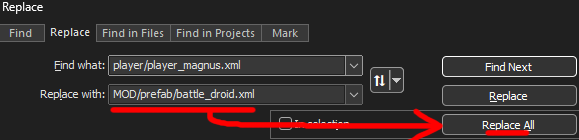 Then, on or near line 7, look for something that says player/player_[Chosen character's name].vox. For me, it will be player/player_magnus.vox. Highlight this, and press Control + H for the Replace Menu. For the replacement, you need to change it to MOD followed by your .vox's file path. For me, this will be MOD/vox/battle_droid.vox. Then, select "Replace All". Finally, lose the Replace menu, and press Control + S to save your file, and you can close the .xml.
I told you this method is more complex, but considering you're reading this, you at least READ through it, so good job.
Editing the Model
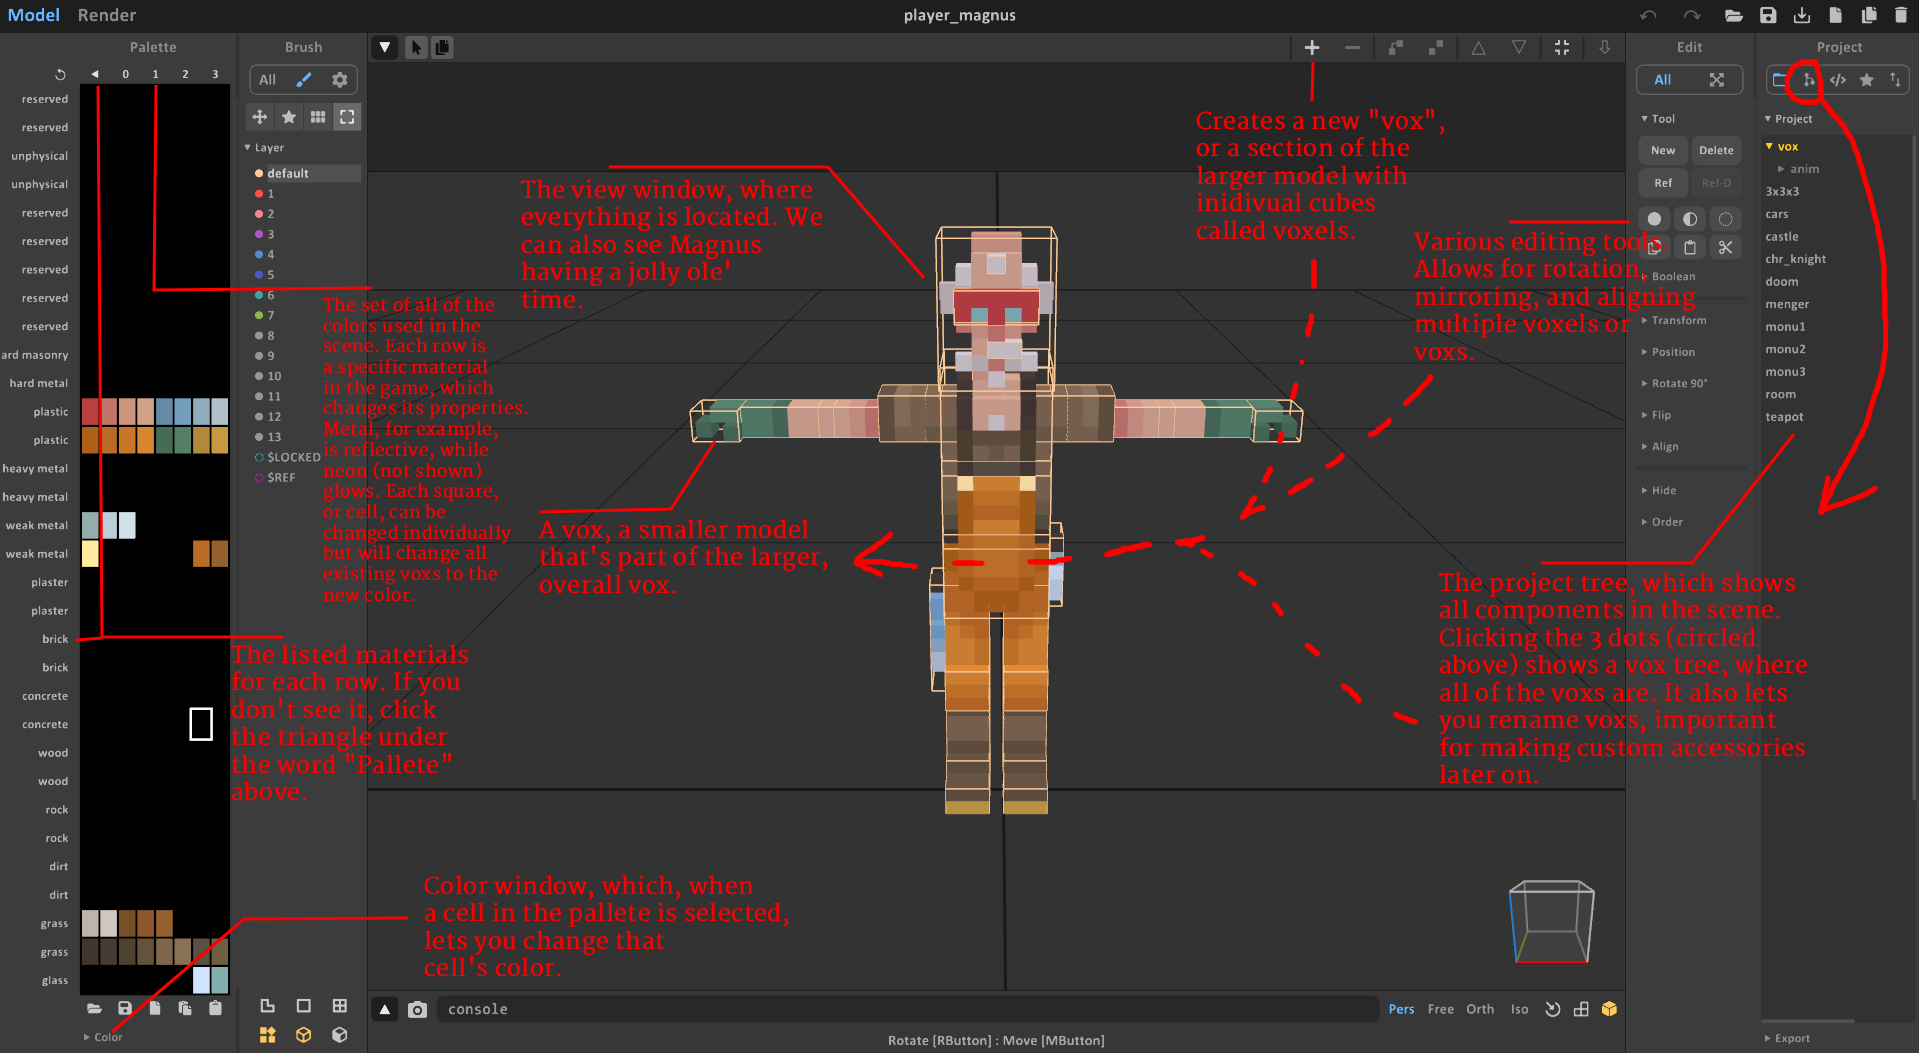
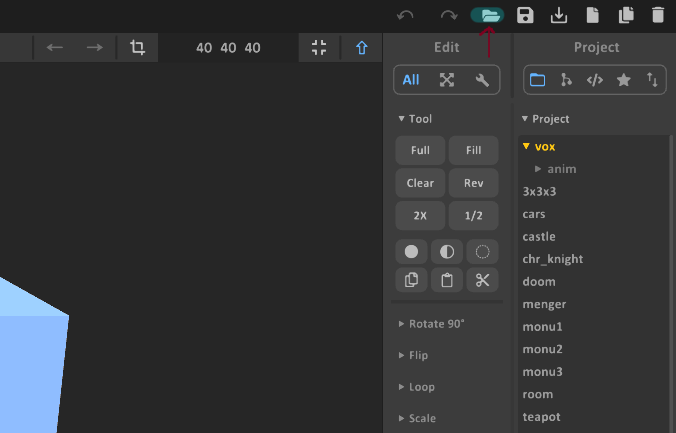 You should now see the model of either Merlin (the robot) or your chosen character; I will see Magnus since that is the character I chose to use as a base, as seen in the image below. I annotated the image sot hat you actually understand what you're looking at and know the basic functions.
Oh also, here are the mouse controls, as listed below:
-
LMB selects objects (those floating cubes around the model), and double clicking brings object into editing mode. Editing controls are in the top left, to the right of the pallette.
- Objects are named in the object tree to the right, and can be renamed by right clicking them in this object tree. Keep in mind multiple objects cannot have the same name in Magicavoxel or the Teardown editor.
- RMB moves your view around, and MMB drags your view to different focal positions.
- By default, the voxel brush in edit mode is Cube, but I recommend changing it to individual voxels, seen to the right.
- You change the color of your brush by selecting colors in the palette on the left. Changing colors in the palette will change that color applied to the model.
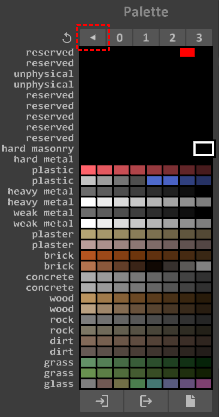 Teardown has a unique Magicavoxel palette. Each row (excluding the reserved rows) is a certain material in game, meaning materials are built-in for modding. This means that if you use a metal material for a shirt, then that shirt will appear reflective in-game, compared to using a grass texture which will apply a subtle random texture. You can preivew materials in the Render page of Magicavoxel, in the top left next to Model.
You can change colors on the palette by clicking one of the squares, or cells, and clicking Colors at the bottom of the palette, which brings up a small window that allows you to change the color manually or use an RGB (Red Green Blue) color code.
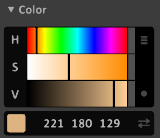 Do note that this palette applies to ALL EXISTING VOXELS, so if you change a color, any voxels that have that color will also be changed. For example, if I changed the tan color to, say, red, then my Battle Droid will have numerous red spots wherever I had used that color.
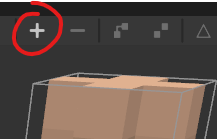 If you want to add any accessories to your playermodel, such as backpacks, hats, ears, holsters, tails, etc. then you must plan them out in Magicavoxel. Anytime you want an accessory, make a new object in Magicavoxel (Plus icon in the top right of the screen, it{s annotated in the Magicavoxel guide abov), name it, change its scale to your desired size in the top-right, and then you can model it out and move it around using the movement gizmo. Scale doesn't matter, as it can be edited once we add it in the Teardown Editor.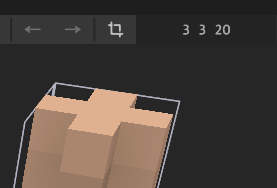
For my Battle Droid, I want an extra antennae, so I will select the plus icon and it will create a new Vox. I can set the size to 3 by 3 by 20 to make the antennae, seen in the image below, then in the project tree on the right of the screen (Also listed in the Magicavoxel Guide image, it's like I planned this or something) I can right click the selected vox and rename it to "antennae". Whatever you name your accessory, remember it, as it will be important once you actually add the vox itself.
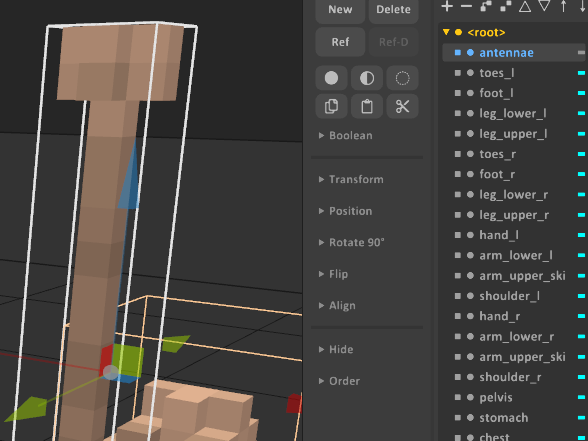 Depending on your experience with art or voxel modeling, this may take between half an hour to an hour or so. Once you're happy with your model, save your .vox by pressing CONTROL + S.
Now it's time to add joints and make the bones work (In fact, one may even say that it's Boneworks time)
Teardown Editor
Now I know that rigging seems daunting but trust me, in this case it's a lot easier than it seems. So just follow the guide and I'll show you what to do. Make sure Teardown is open and running, as we need the game's built-in editor.
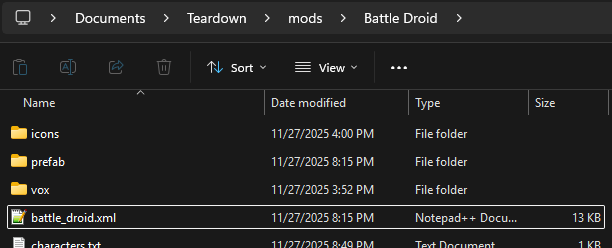 For this tutorial, the .xml file is NOT in the root folder, as it in a second folder called prefab. Therefore, we need to copy and paste it into the root folder temporarily, just to access and edit it.
It's also vital to know that whenever you want to test the playermodel by checking it in the game's cahracter selection menu, you must save the .xml by pressing CONTROL + S, and moving the .xml back into its original folder. You can avoid this weird dance by simply setting up the .xml's file paths from the start to be in the mod's root folder, but for simplicity (and to show what happens if not dont right) this guide placed it into a seperate folder (I'm two steps ahead.)
Once we've copied and pasted our /xml, we can now open it in the editor and see our (mostly) finished model. Note that custom accessories won't appear for now, but we'll add them in a second.
This guide will only cover what you need to know for playermodels, but if you're interested in the editor itself, you can watch the official Teardown modding tutorials.
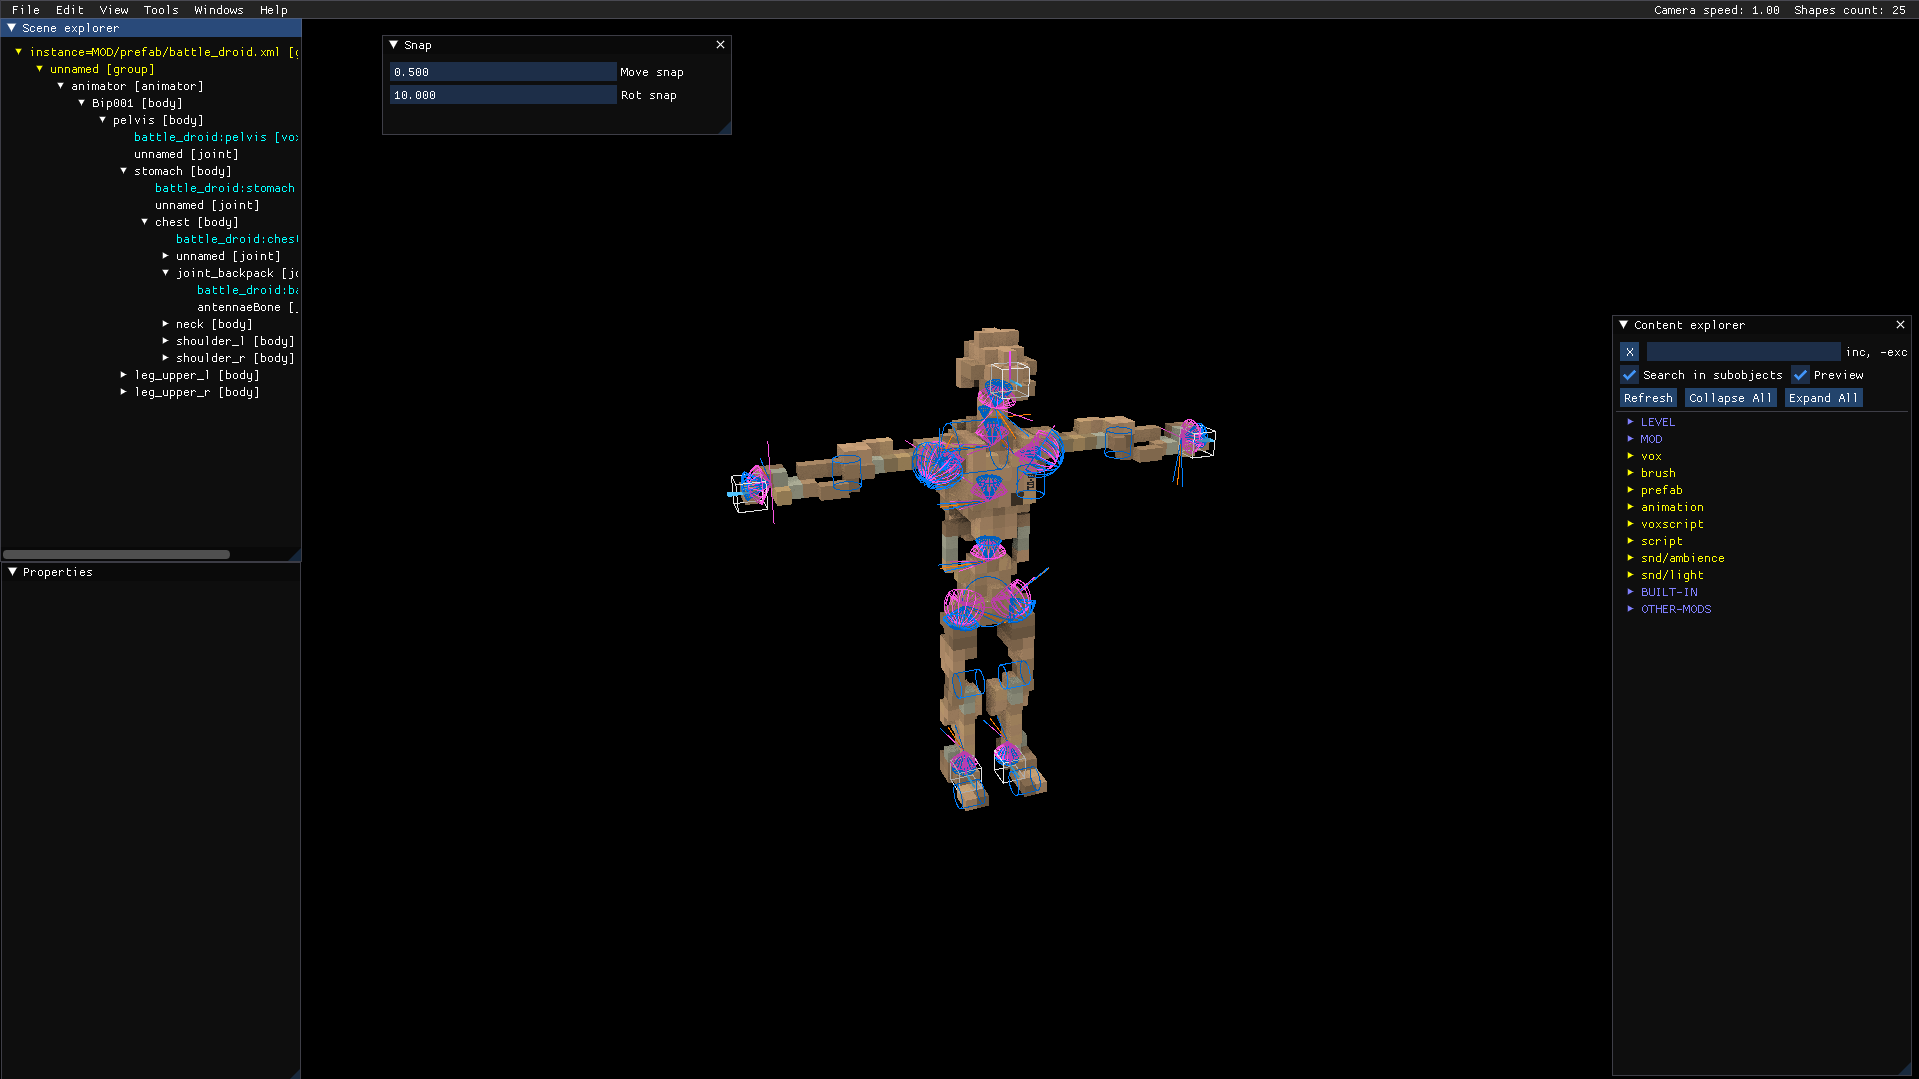 Below is an image of the editor after I opened the Battle Droid playermodel. If you don't see the scene tree on the left, just click on part of your playermodel and the stuff will appear. You can click the image to the right to see the full size.
The 4 main windows are:
Below is an image of the editor after I opened the Battle Droid playermodel. If you don't see the scene tree on the left, just click on part of your playermodel and the stuff will appear. You can click the image to the right to see the full size.
The 4 main windows are:- Scene Explorer (Top left), with scene tree of all bones, joints, and vox models.
- Properties Window (Bottom left), which when a part is clicked shows adjustable properties like joint limits, position, rotation, vox scale, and more.
- Content Explorer (Bottom right), with brushes, scripts, etc.; moreso used in map making so we're just ignoring it.
- Snap (Top, next to Scene Explorer), which allows us to adjust the snap. A value of 0.5 sets the snap to one voxel cube, and you can shrink this depending on how you need to most joints, vox models, or whatever.
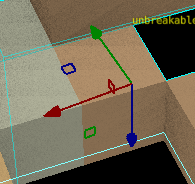 The basic controls are as follows:
- LEFT-MOUSE CLICK: Select a vox (model part) or joint on your model.
- RIGHT MOUSE CLICK + DRAG: Move camera around from single stationary point.
- MIDDLE MOUSE CLICK + DRAG: Move camera's position around.
- SCROLL: Zoom in and out.
- SHIFT: Changes the Move Gizmo (The little arrows that let you move stuff around) with a Rotate Gizmo, letting you, get this, rotate stuff (WOW :O ) The arrows will become curved lines, and clicking and dragging them will rotate the object, based on the snap amount that you set.
Method B (next section) is slightly easier, and doesn't involve joints, but is only good for static accessories like labels, stickers, or nametags. For the Battle Droid playermodel, I'll add a small label on the chest that says "B-01", which I previously modeled in Magicavoxel.
Adding Accessories: Method 1 (Dynamic)
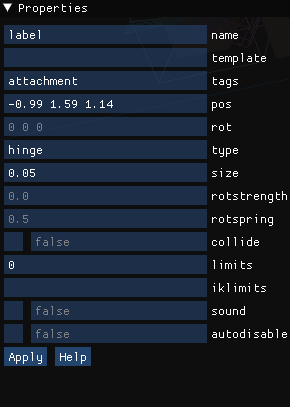 Remember when you named objects in Magicvoxel? This is why. To add an accessory, right click the vox that you will attach the accessory to, and go to New > Joint. Within the properties window and with the joint selected:
- Name the joint
- Adjust the joint scale to 0.05 (you can set it to a larger value but you'll probably only need 0.05)
- Paste attachment in Tag
- In the Type section, set the joint as one of the following:
- Ball, which freely moves in all directions
- Hinge, which move on an axis like a door; adjust how far it swings in Limits
- Cone, which acts as a ball joint in only a specific area; Limits adjust cone's radius and rotational bounds)
- Prismatic, which slides objects along an axis (Thanks MirosKov)
- Ball, which freely moves in all directions
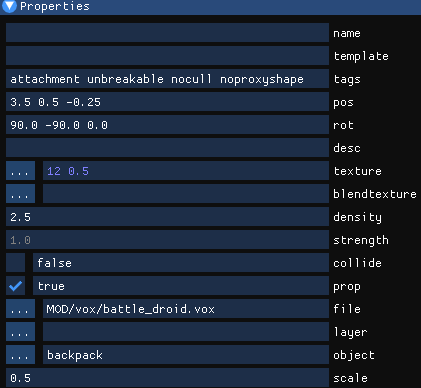 Right click the joint, and again go to New > Vox. In the properties, rename it to whatever the accessory is, then in tags put attachment unbreakable nocull noproxyshape. These tags are nescessary so that the game knows it's an accessory, it can't be destroyed, the object isn't culled (hidden), and the noproxyshape I'm honestly no sure, sorry jaja.
Then in file, select your model's .vox. You'll be jumpscared by a gigantic version of your playermodel; this is normal. In properties, set the object to whatever accessory you want to add; this is why the name is important, as it is how you'll find it. Finally, set the scale to 0.5.
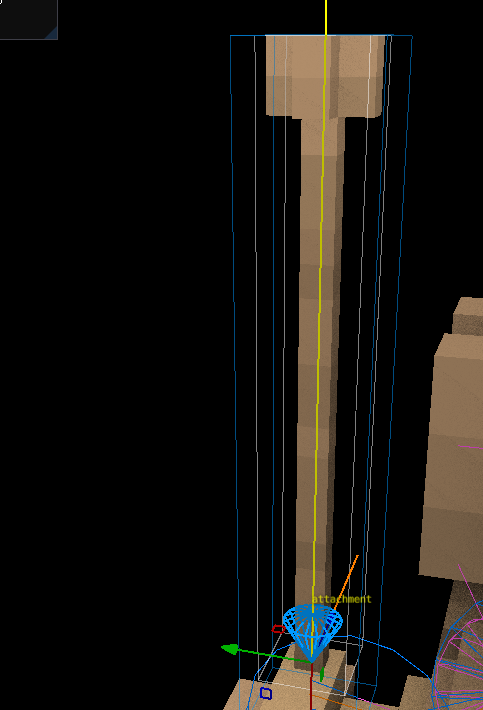
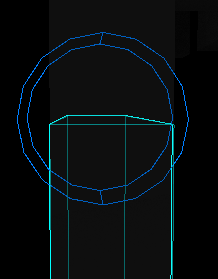 Make sure that the accesory's model is about halfway in the joint; this is a common mistake, as otherwise the accessory will simply fall into the Monogon voidway. To the bottom right is an example of a properly connected accessory joint; note how it's halfway through the parent vox (the piece above) and the child vox (the piece below). If you're curious, this is the joint of the cape in the Helldivers Suits playermodel that I made. Below is an image of my connected antennae accessory, with the cone joint connected to the Backpack vox model.
Adding Accessories: Method 2 (Static)
This method does not involve joints, and is best for minute details, as outlined previously. It's a bit easier than method A but only good for completely static accessories.
 Find the vox model on your playermodel of where you want your static prop to be. For me, I want the B-01 label to be on the chest, so I'm going to find the Chest vox in the editor, and click it. Then right click the model, go to New, and Vox. Go to properties, and go to file, then MOD, then find where you stored your playermodel's vox. You should be jumpscared (again) by a giant version of your playermodel, which means you did it right.
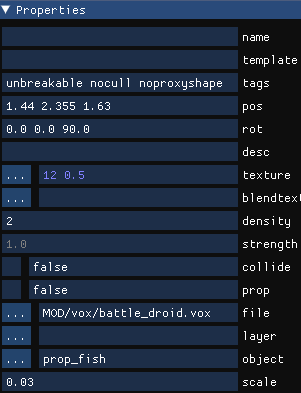 Then go down to object, and find the part. This is why it was important for you to name your object, as this is how you'll find it. If you added a new one, it's most likely going to be at the top of the list, but if not just scroll through until you see it. Then click it. Adjust the scale to what you want. Because I want a tiny text label, I'm setting the acecssory's scale to 0.03 instead of the usual 0.5.
Finally, in the Tags row, add unbreakable nocull noproxyshape. Again, unbreakable makes it, get this, unbreakable; nucull tell the game to render the accessory; and I still don't know what noproxyshape does but we need it so just add it. If you DO know what it does, please comment and let us know so I can edit it.
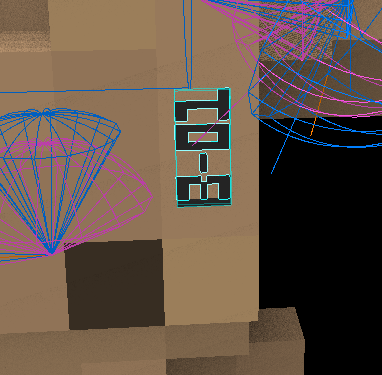 You can now move your accessory anywhere into place. Unlike using joints (Method 1), you don' have to worry about the joint being connected to the accessory and the parent Vox, so it does make this a bit easier, though you do lose the static functionality, hence we use this only for static props, usually for the minute details like text or labels. To the right is an image of my Label vox put in place and connected tot he Chest vox.
Characters.txt, Preview.jpg, & Info.txt
The character itself is now complete! All we need are the preview images, mod and character description, character name, and a couple other things.
[Name]
description=
preview=
path=
anim_speed=0.7
height=1.95
This part is easy: change the name to your character's name, and put in a description that you want to appear within the in-game character selector. For preview, put in the file path for the icon you just made, and for path type in your .xml's file path. anim_speed and height are self-explanatory: they determine the speed of the animation (0.1 to 0.9, where 0.1 is the slowest and 0.9 the fastest) and the character height, in meters. I would recommend stay with the values above if you're not sure what to use, but they depend on your playermodel's size. Finally save your file with CONTROL + S. I'm assuming you're already familiar with that at this point. Here is an example of my finished characters.txt file for my Battle Droid:
[B1 Battle Droid]
description=Roger Roger
preview=icons/preview.jpg
path=prefab/battle_droid.xml
anim_speed=0.7
height=1.95
Now create or find an image that you want to use for your Steam Workshop icon. Make sure it's a .jpg file and set the resolution to 512 by 512 pixels again. Rename the file to preview.jpg, and put it into your mod's root directory. Congrats you made your steam workshop icon, because adding that is also built-in as part of Teardown modding. How convenient. Next, open your info.txt. This will determine the text you see when you select mod within the mod manager. Within the file, paste the following info:
name=Type in your mod's name, your username, and a description of your mod (to the left of the [noupload] thing), then save the file with CONTROL + S. ok i think they get it now idiot HEY THATS MEAN IM LITERALY YOU NUH UH SHUT UP. YOU SHUTTUP
author=
description=[noupload]
The [noupload] tag is helpful since once you publish your mod, it will NOT replace the Steam descrption of your mod. This helps if you have a lot typed out in your description and don't want to lose it whenever you update your mod.
Oh wait I should show you how to publish your mod, yea that's usually important.
Making Multiple Playermodels
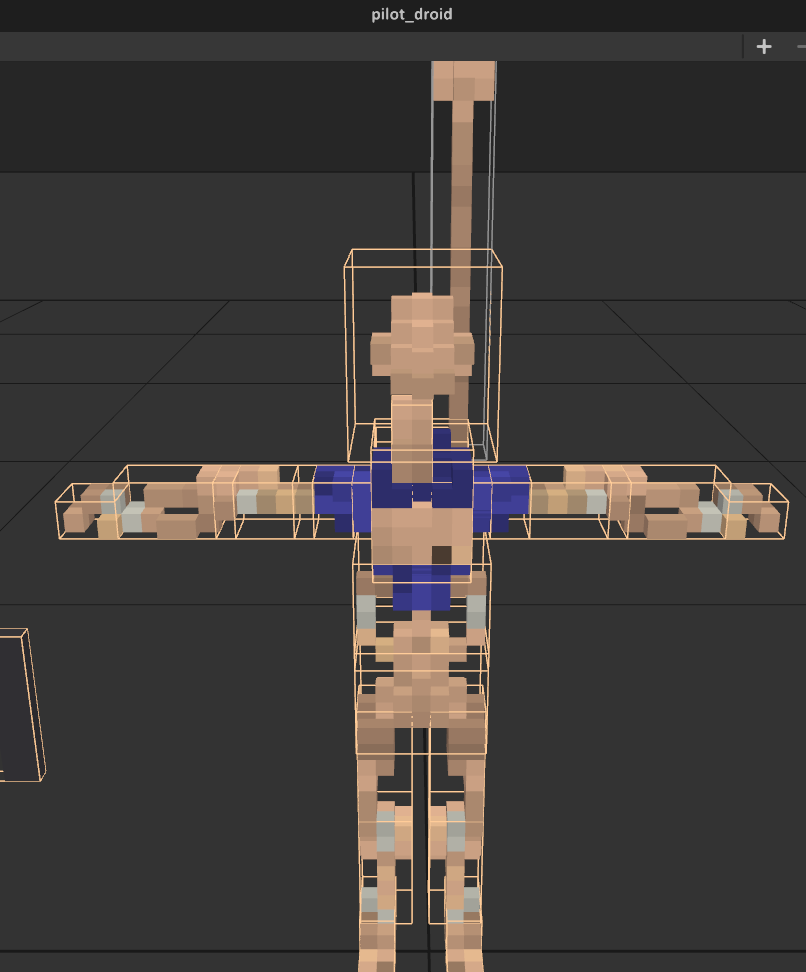 To do so is incredibly easy. First, you need to of course make another playermodel. but this time only make the .xml and the .vox, as you'll be using the same mod folder that you've already set up. If you're just making variants of one particular playermodel, then I recommend that you copy your existing .xml, and rename that one. I wanted to make a pilot version of my battel droid so I edited the existing model to add some blue, and saved it as pilot_droid.vox.
Then, edit the copied .xml file as you did before, by opening it in Notepad or Notepad++, highlighting the .xml file path, and with CONTROL + H renaming the .xml's file name to the copied .xml's file path. Do the same for the new .vox's file path. Preferably, your .xml and .vox file paths will be identical except for the names; in my case, I renamed my copied .xml from battle_droid.xml to pilot_droid.xml, so my file path in that copied .xml file will go from MOD/prefab/battle_droid.xml to MOD/prefab/pilot_droid.xml. Note how the path is the same except for the .xml. Do this same things for the .vox file path.
Finally, open your characters.txt file. Below your previous text information about your playermodel, press enter and add a line of space, then paste the required character.txt information like before:[Name 2]Once again, replace Name 2 with your second playermodel's name, and set the path to the new .xml that you just made. Do the same for the icon; I say use a different image so taht people can differentiate the playermodels easier., Put in a new description, and you're done! Your []bcharacter.txt[/b] should now have two sets of character information, one for your first playermodel and one for the second playermodel. Below is what my Battle Droid's character[txt[/i] currently looks like:
path=
preview=
description=
anim_speed=0.7
height=1.95
[B1-Series Battle Droid]You can save with CONTROL + S, and open the character selection screen to se your second playermodel. This process can be repeated as many times as you want, depending on how many other playermodels you want to have in your pack.
path=battle_droid.xml
preview=icons/battle_droid_icon.jpg
description=The classic B1-Series Battle Droid, built and designed by the Trade Federation to fight those Jedi scum, roger roger.
anim_speed=0.7
height=1.95[OOM-Series Pilot Droid]
path=pilot_droid.xml
preview=icons/bd_pilot_icon.jpg
description=A later OOM-Series variant designed for operating Trade Federation Starships and other space and aerial vehicles, roger roger.
anim_speed=0.7
height=1.95
Publishing & Updating
You've made your first Teardown playermodel, congrats dude! :D Now all you need is to publish, and this is the easiest part because this feature is also built in. Noticing a trend? No? Too bad, there is one.
 While Steam has no specific rule on how Steam workshop mods are supposed to look like, it's generally good etiquette to ensure that your mod's page has a few screenshots of the mod in-game, so that people know what it looks like and what to expect. So take a few good screenshots of your playermodel in game, and use those and maybe concept art or whatever else you want. If you don't put any good screenshots or anything, Steam won't airstrike you for it but it'll make me :steam_hateful: (See above).
Common Issues & Questions
Some solutions to common issues that people have dealt with while making their playermodel, to heopfully help you out. If you have any questions, you can ask them AS ONE MESSAGE in this guides comments.
When you put your new joints into place in the model, they need to be making full contact with both the accessory AND the main model. The best way to fix this is by moving the join around to try and make contact with as many voxels from both parts as possible, mostly through a bit of trial and error.
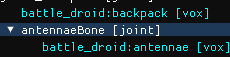 Make sure that your accessory also has the right Tag of attachment unbreakable nocull noproxyshape, and that the joint is a sibling of (or, in the scene tree, is next to) the vox you're attaching stuff to. Above is an image showing two sibling items, battle_droid:backpack [vox] & antennaeBone [joint]. The antennaeBone [joint] has a child item, battle_droid:antennae [vox].
Notice how, in the image to the right, the joint is between both the parent vox (piece above) and the child vox piece are halfway within the joint. This is generally how you want to try and align your accessories and joints. Teardown is kinda janky though, so it may take some trial and error until you get the joint properly attached.
...how many ♥♥♥♥♥♥♥ joints did you put.
Having too many joints can lag out the game, so if you're making a high-resolution, detailed model then try combining multiple vox parts together to reduce the number of joints. Again, This'll be covered more in-depth in the guide sepcifically for those types of playermodels.
CONGRATS DUDE :D (Resources)
TITLE SAYS IT ALL: YOU DID IT! YYEEEEAAAAAAA :D
You can now enjoy your custom Teardown character that you've made, or see how other people might wanna use it for, or just have it for yourself. Do whatever, it's your mod, you've put in the work and you've finished it, nice job dude.
I've uploaded the Battle Droid playermodel and will probably make some updates like adding other battle droid versions, as well as hi-res version once we make that guide.
- The Teardown Modding Guide[www.teardowngame.com]
- The Teardown playermodel-specific guide
- The modding channel in the Official Teardown Discord server[discord.com]
- Emil's modding tutorials (For the Teardown Editor)
I really hope that this guide helped you guys with creating your playermodels, and I'm excited to see the Teardown workshop expand in the number of playermodels available. :) - Alkeralex
Guide by Alkeralex and Mr McChicken, with help from fellow modders, members of the Teardown Discord server, and commenters
- hidden expensive items★ 5 (413)26k views966 ♥3 minUpdated 5 Feb, 2024
- How to create Custom Maps for Teardown★ 5 (445)25k views833 ♥6 minUpdated 5 Dec, 2021
- Teardown 100% Achievements★ 5 (477)24k views1.2k ♥3 minUpdated 18 May, 2024
- Teardown ALL valuables guide★ 5 (635)24k views1.3k ♥21 minUpdated 17 Jan, 2025
- How to make your framerate become a negative integer★ 5 (307)18k views200 ♥1 min
- TEARDOWN: Hollowrock Vault★ 4 (97)12k views97 ♥2 minUpdated 3 Nov, 2020


- Upgrading to PremiumTeam Fortress 2★ 5 (20k)1441k views11k ♥6 minUpdated May 11, 2022
- No More Room in Hell Official ManualNo More Room in Hell★ 5 (2.8k)569k views2.1k ♥29 minUpdated Apr 22, 2019
- NMRiH Community Hosting GuidesNo More Room in Hell★ 5 (526)351k views653 ♥1 minUpdated Aug 10, 2022
- How to 'Git Gud' Soon™MORDHAU★ 5 (2k)318k views3k ♥68 minUpdated Nov 16, 2024
- Лучшие кооперативные игры SteamPAYDAY 2★ 5 (1.5k)315k views2.1k ♥56 minRussianUpdated Apr 27, 2025
- Desert Eagle Heat Treated | Blue GemCounter-Strike 2★ 5 (1.6k)293k views1.5k ♥2 minUpdated Jan 16





This guide was created by its original author on the Steam Community. Are you the author and want it removed? Request removal.