How To Create Your Own Character (Casual Way)
Right Path
First of all, we need to understand where, from where, and how to find files that we will use for our custom character. We need only 2 files from the game: model ( .vox ) and prefab ( .xml ).
All paths for characters and their files here:
Models: Steam\steamapps\common\Teardown\data\vox\player\
Prefabs: Steam\steamapps\common\Teardown\data\prefab\player\
Take 2 files with the same name (in my case, it would be player_bjorn.vox and player_bjorn.xml ). Now we need to make our local mod for Teardown.
Your Local Mod
All of the local Teardown mods friendly existing in the Documents on disk C:.
Example: C:\Users\"Name of the User"\Documents\Teardown\mods\. Sometimes it happens they are in the OneDrive folder.
- Make your MOD folder in the \mods\, name it whatever you want.
- Make \characters\ folder in the MOD folder
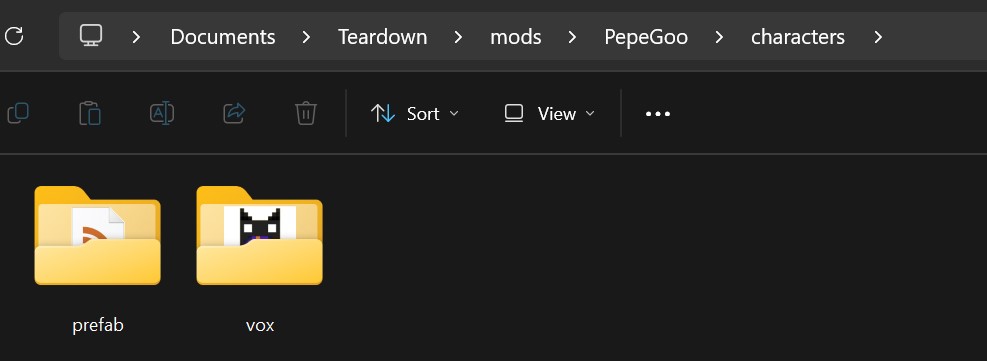
- Make 2 folders: prefab and vox in the \characters\ folder
- Put character's file .xml in prefab folder and file .vox in the vox folder
In the end it should be like this
Now let's get to editing the model!
Edit Model in MagicaVoxel
All models can be created and edited in MagicaVoxel. It's a very simple and easy program to understand. You can download the program here:
Better to watch some tutorials on Youtube. There's a lot. But here I just want to show you some easy steps how to edit your character right now. Open .vox model with MagicaVoxel and now we start edit it.
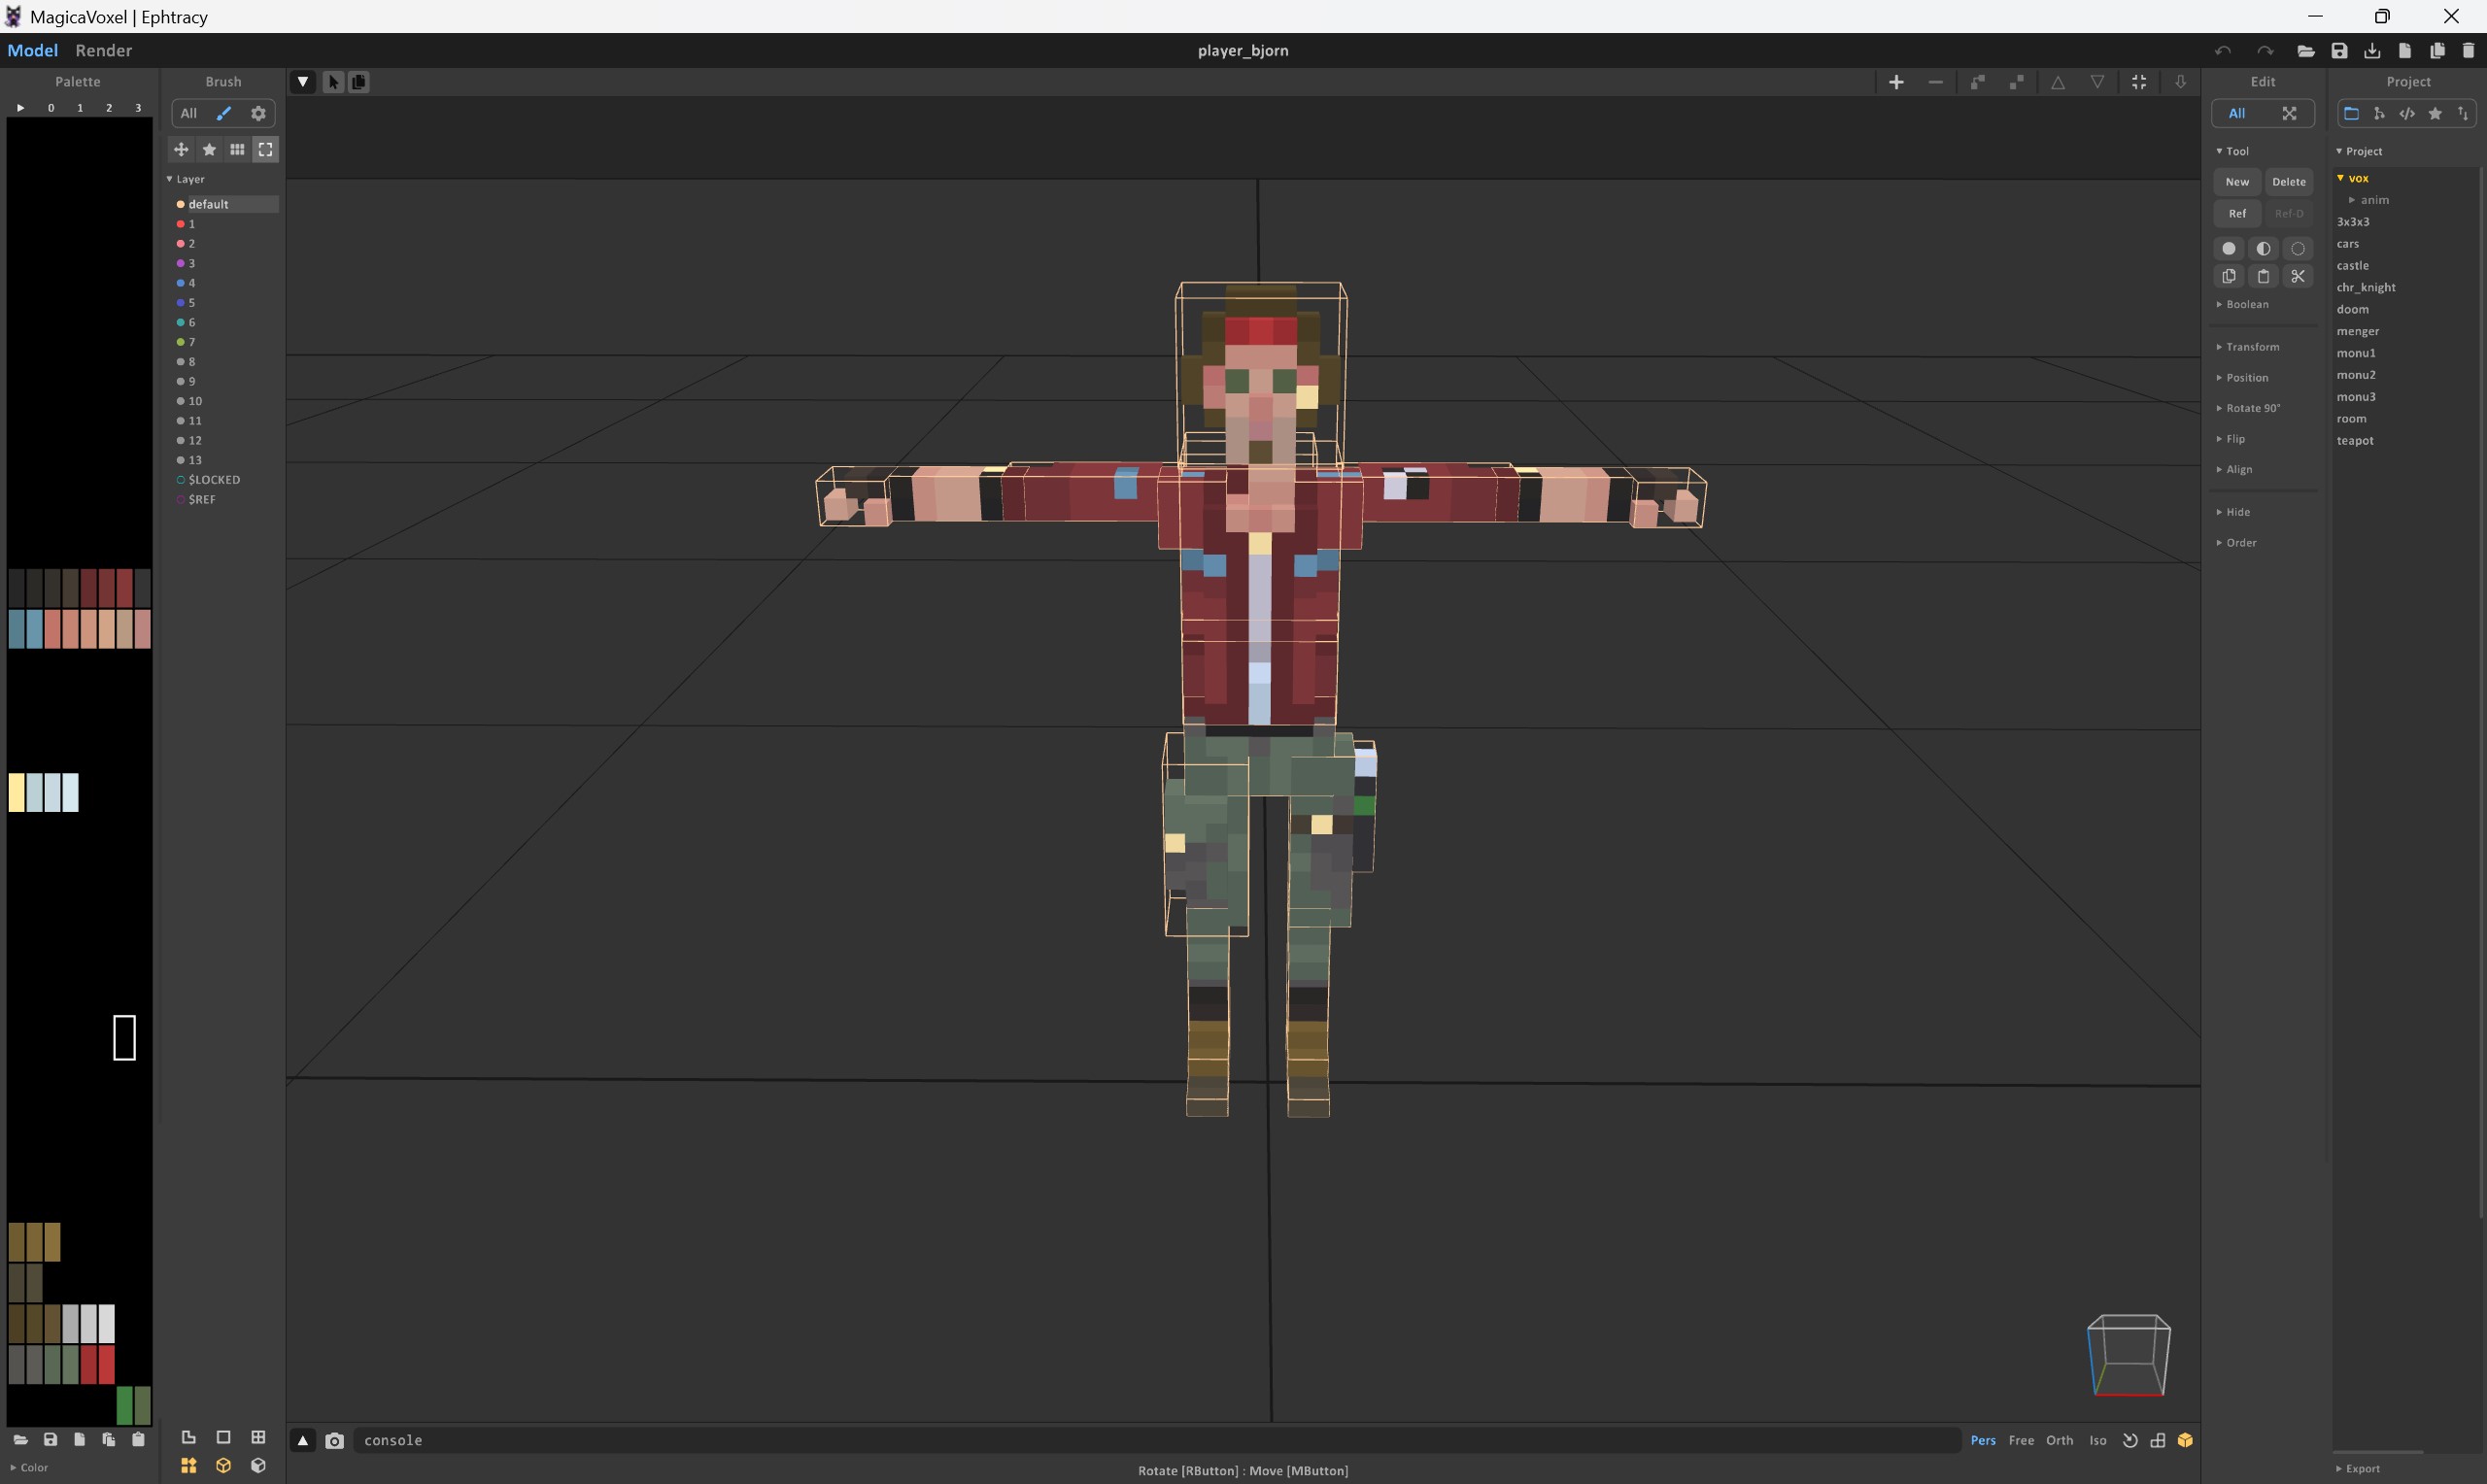
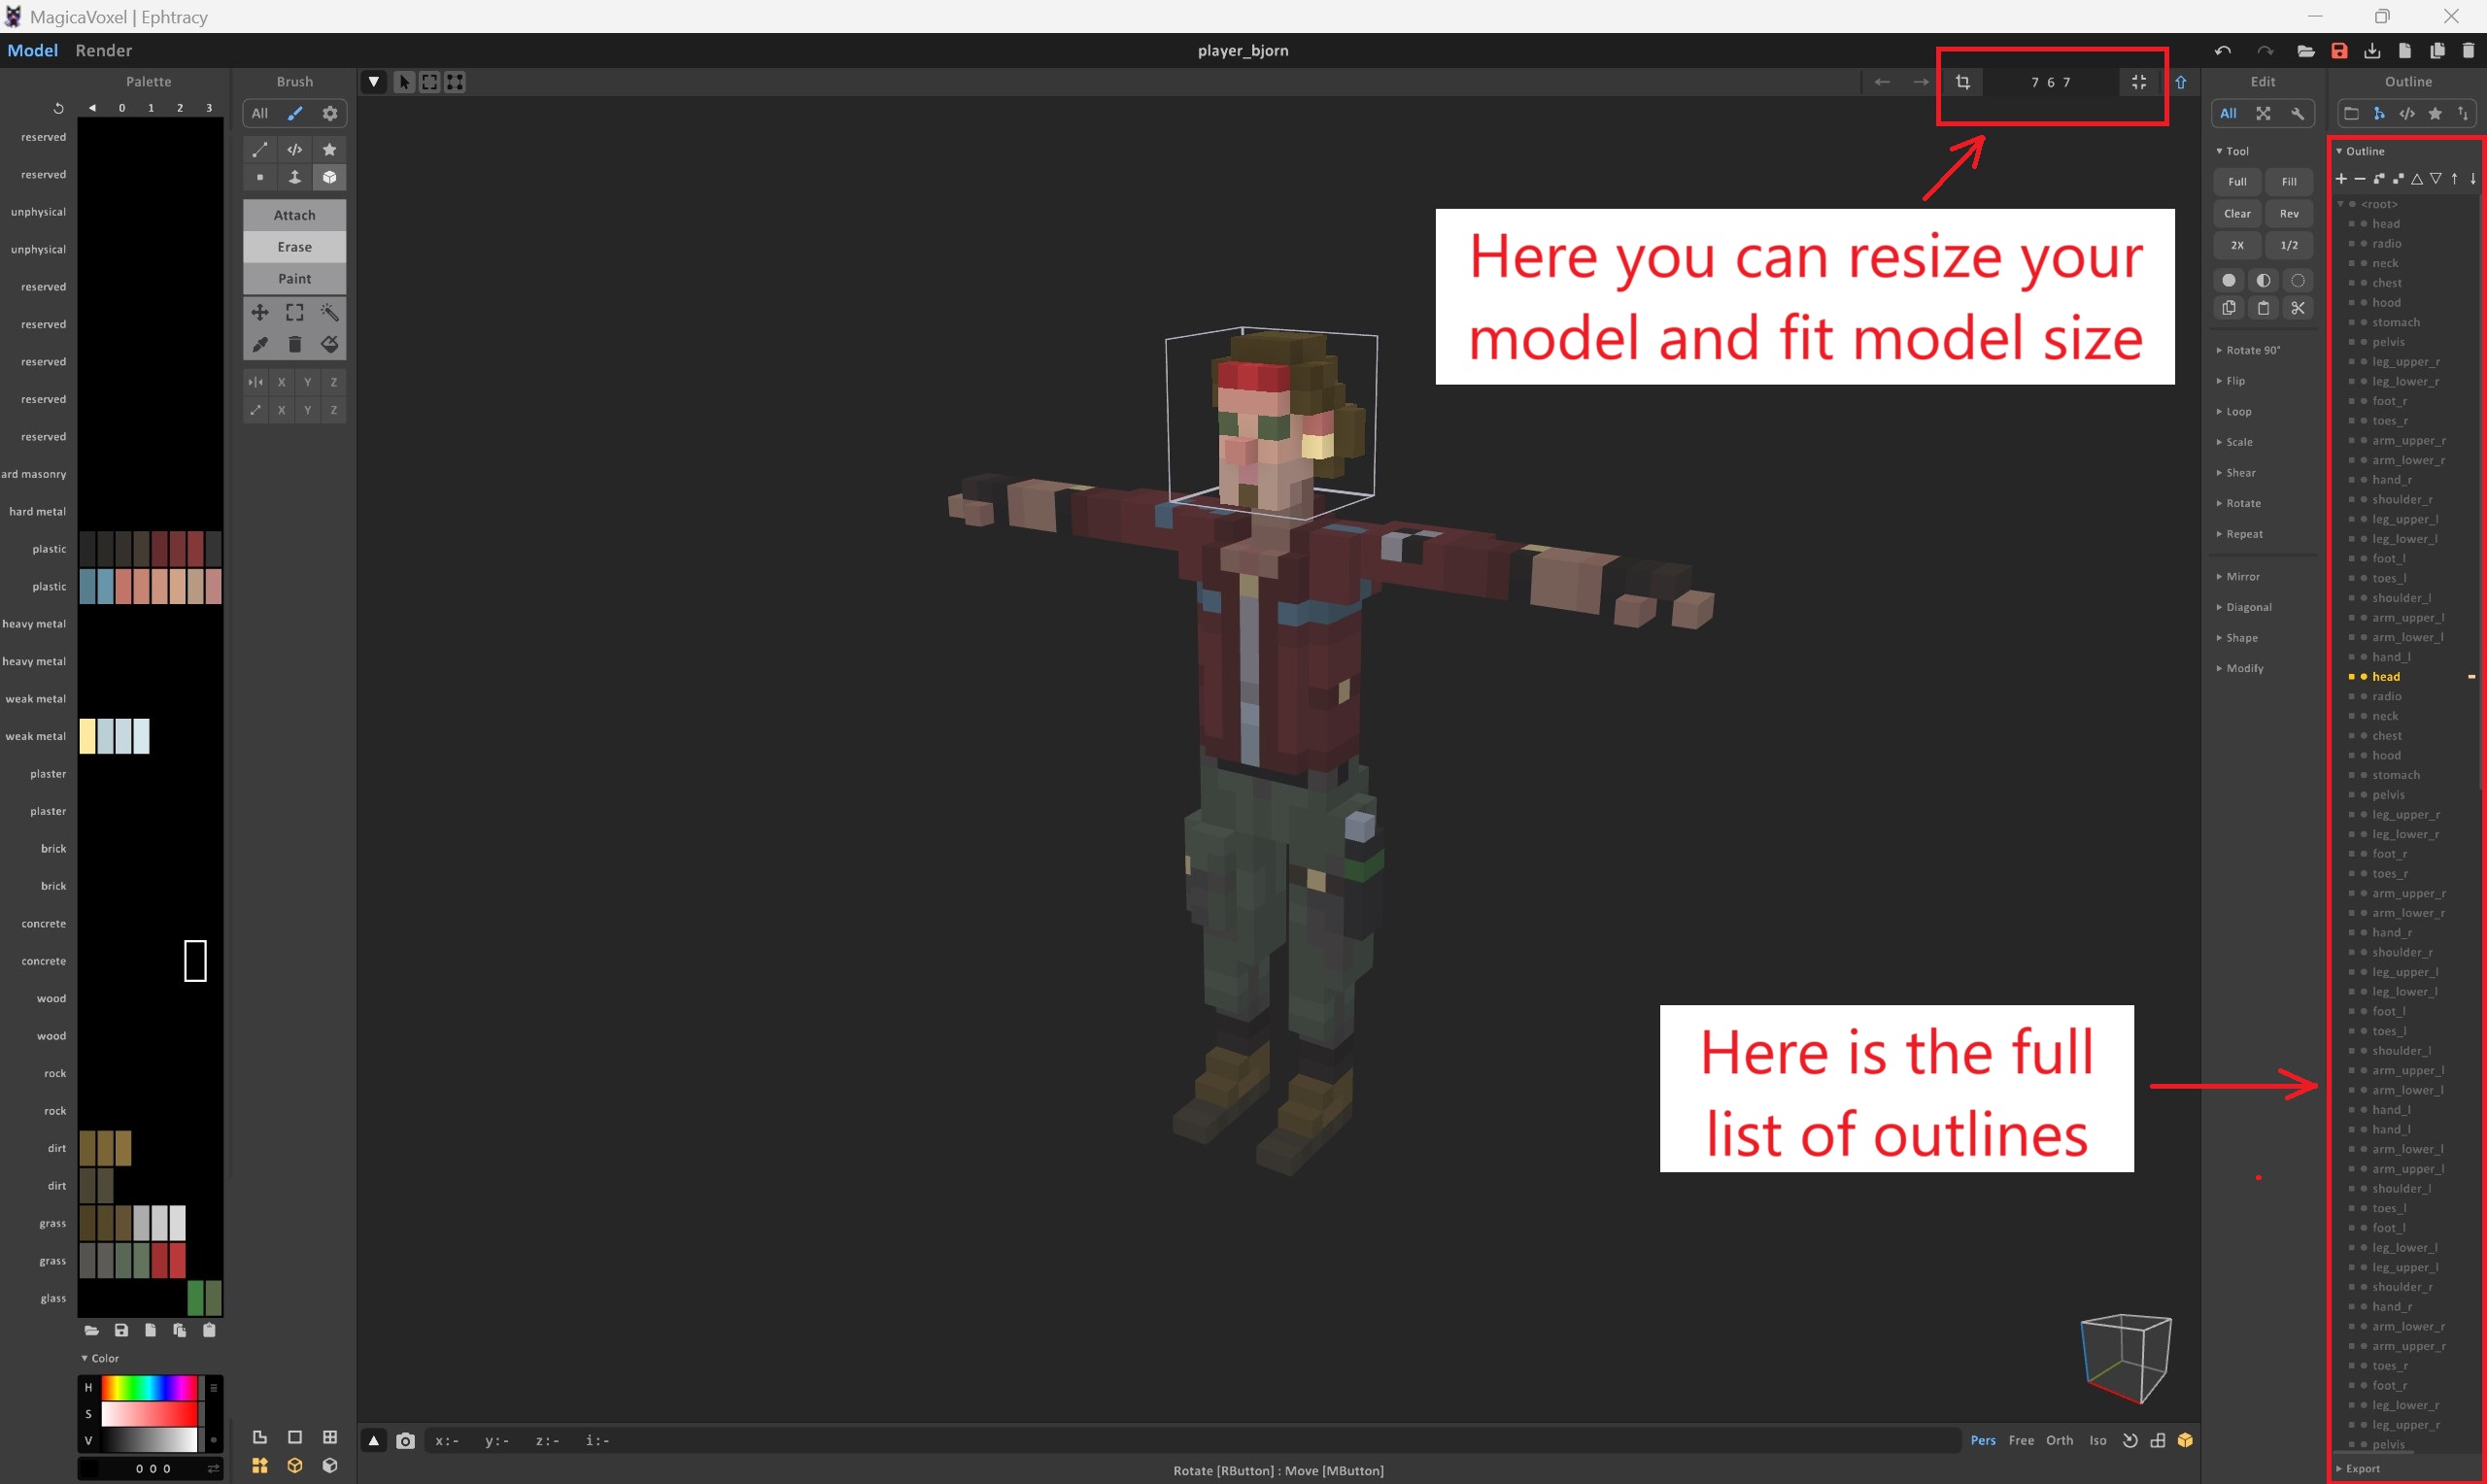
This is a main screen. You can rotate your character with RMB and move space with WMB
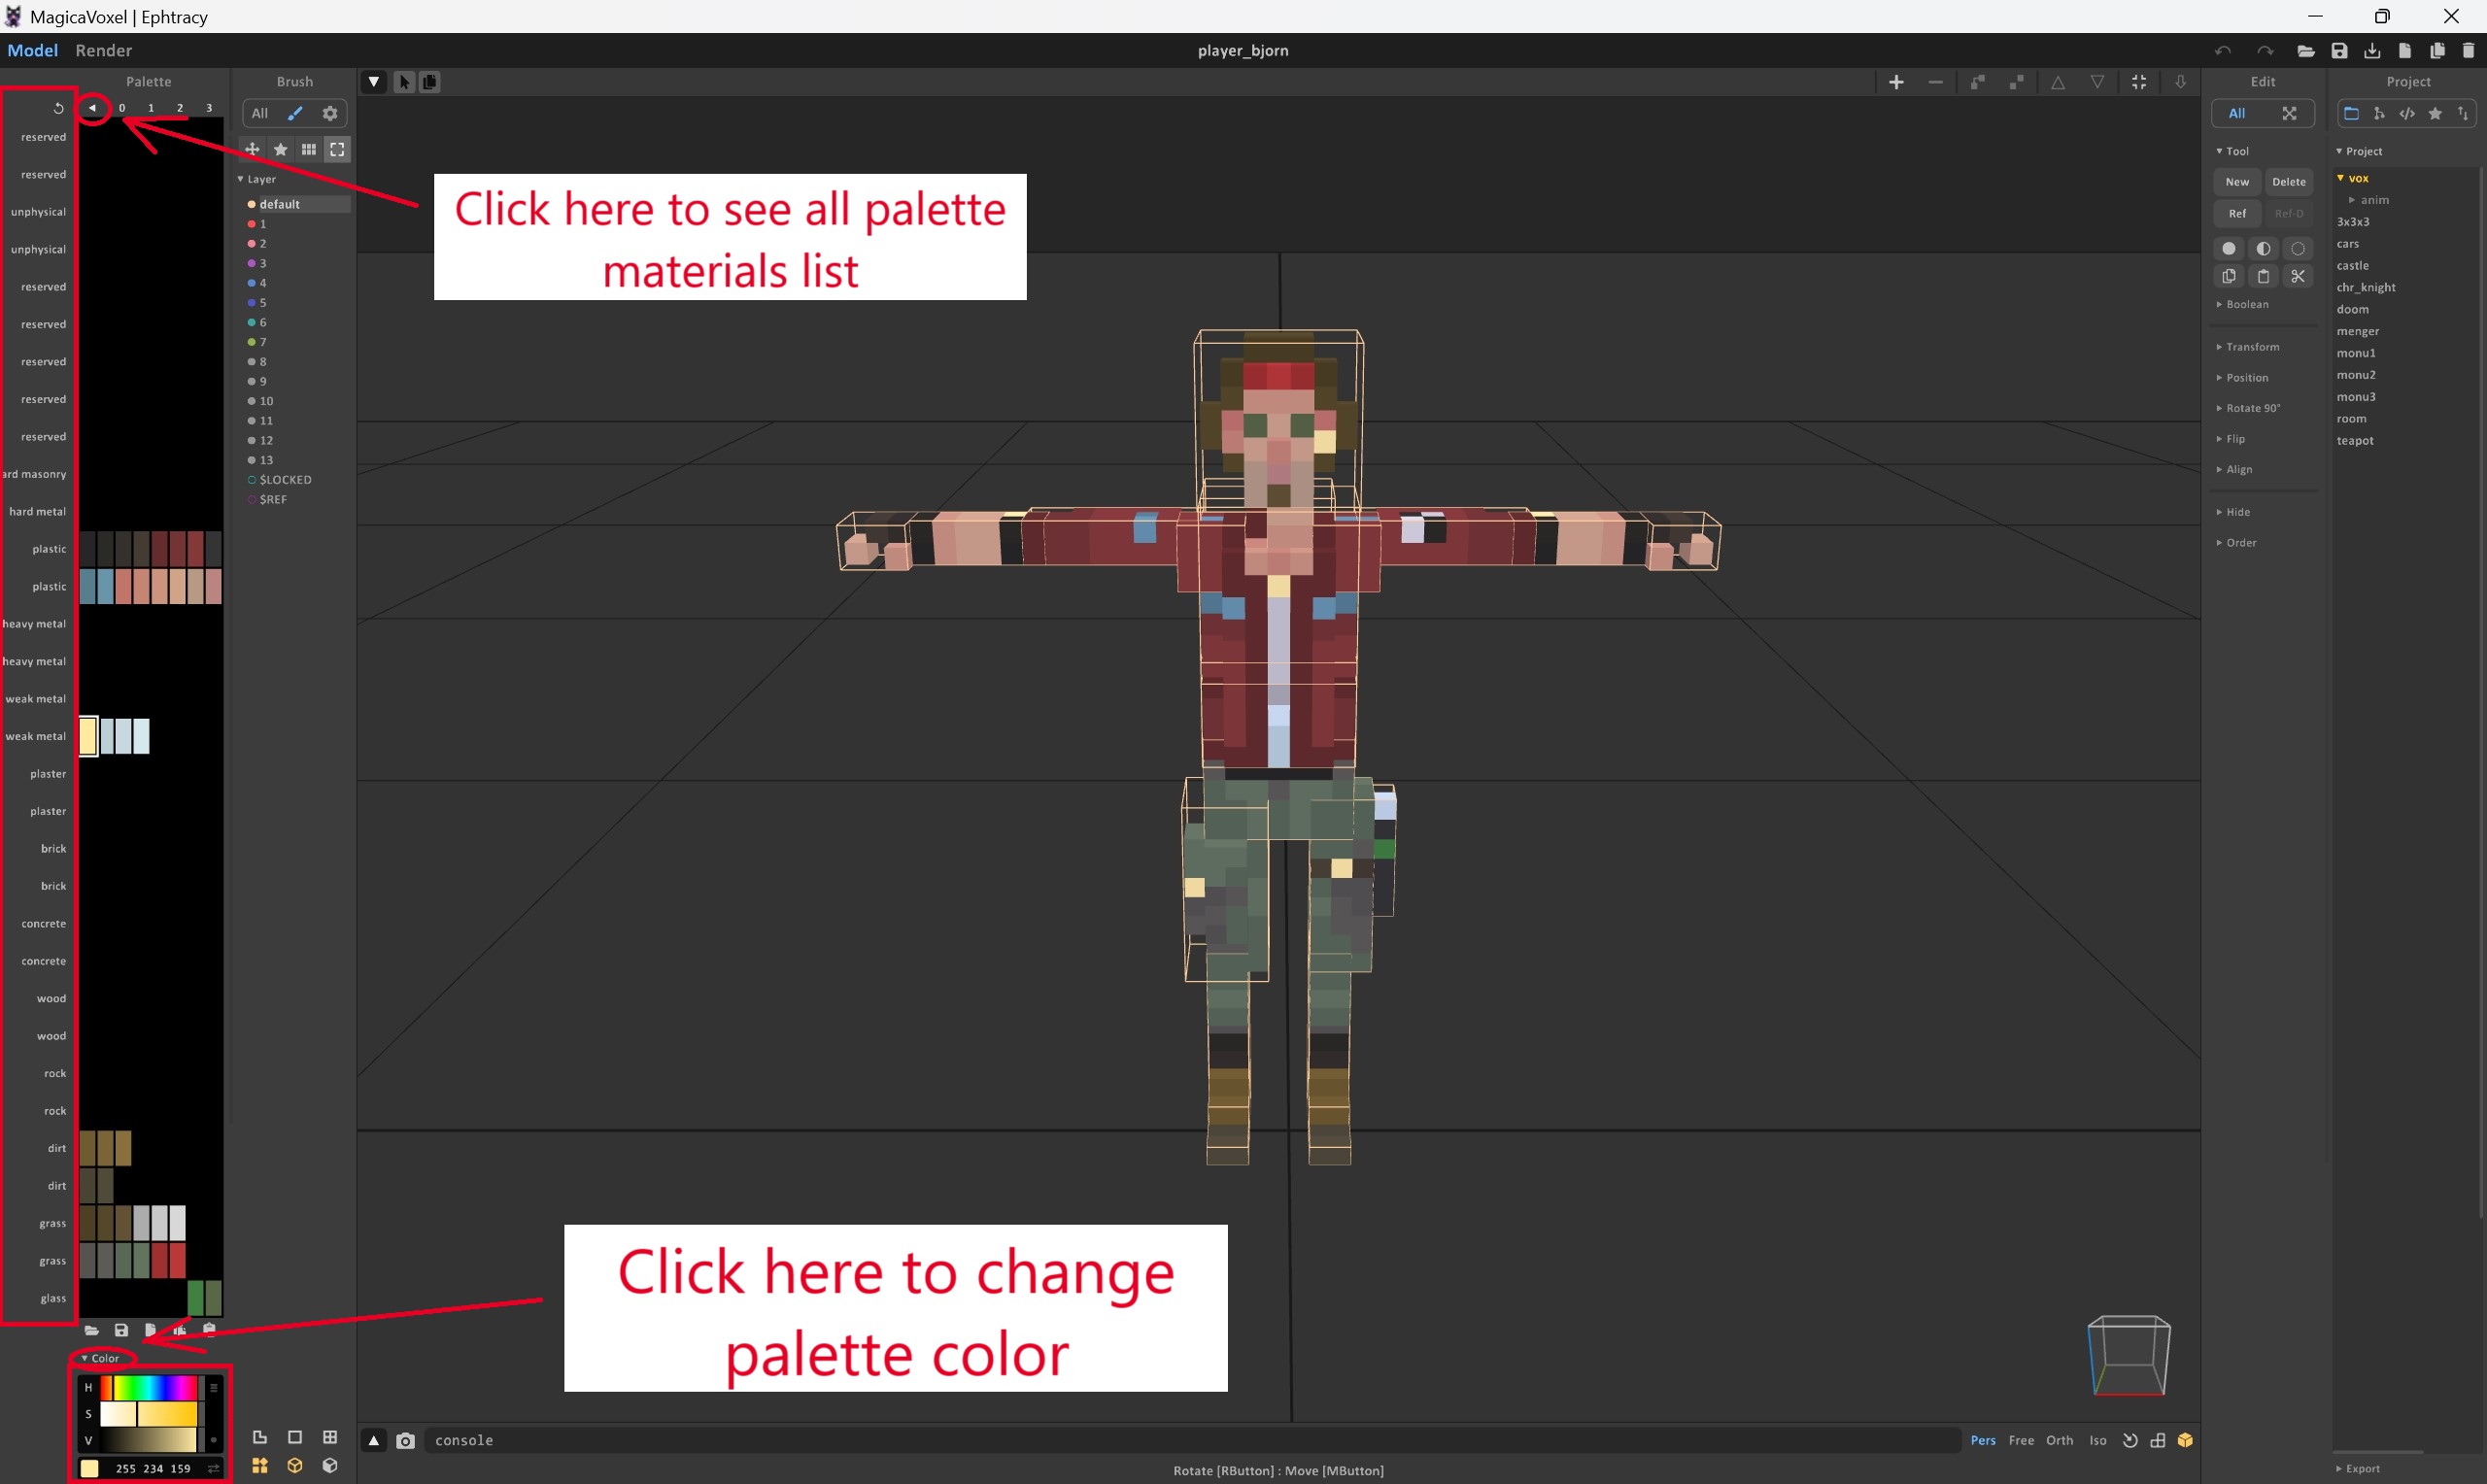
 There's material list. You can color your character only with plastic, add some metal, add glass, etc. Click on palette color and change color whatever you want.
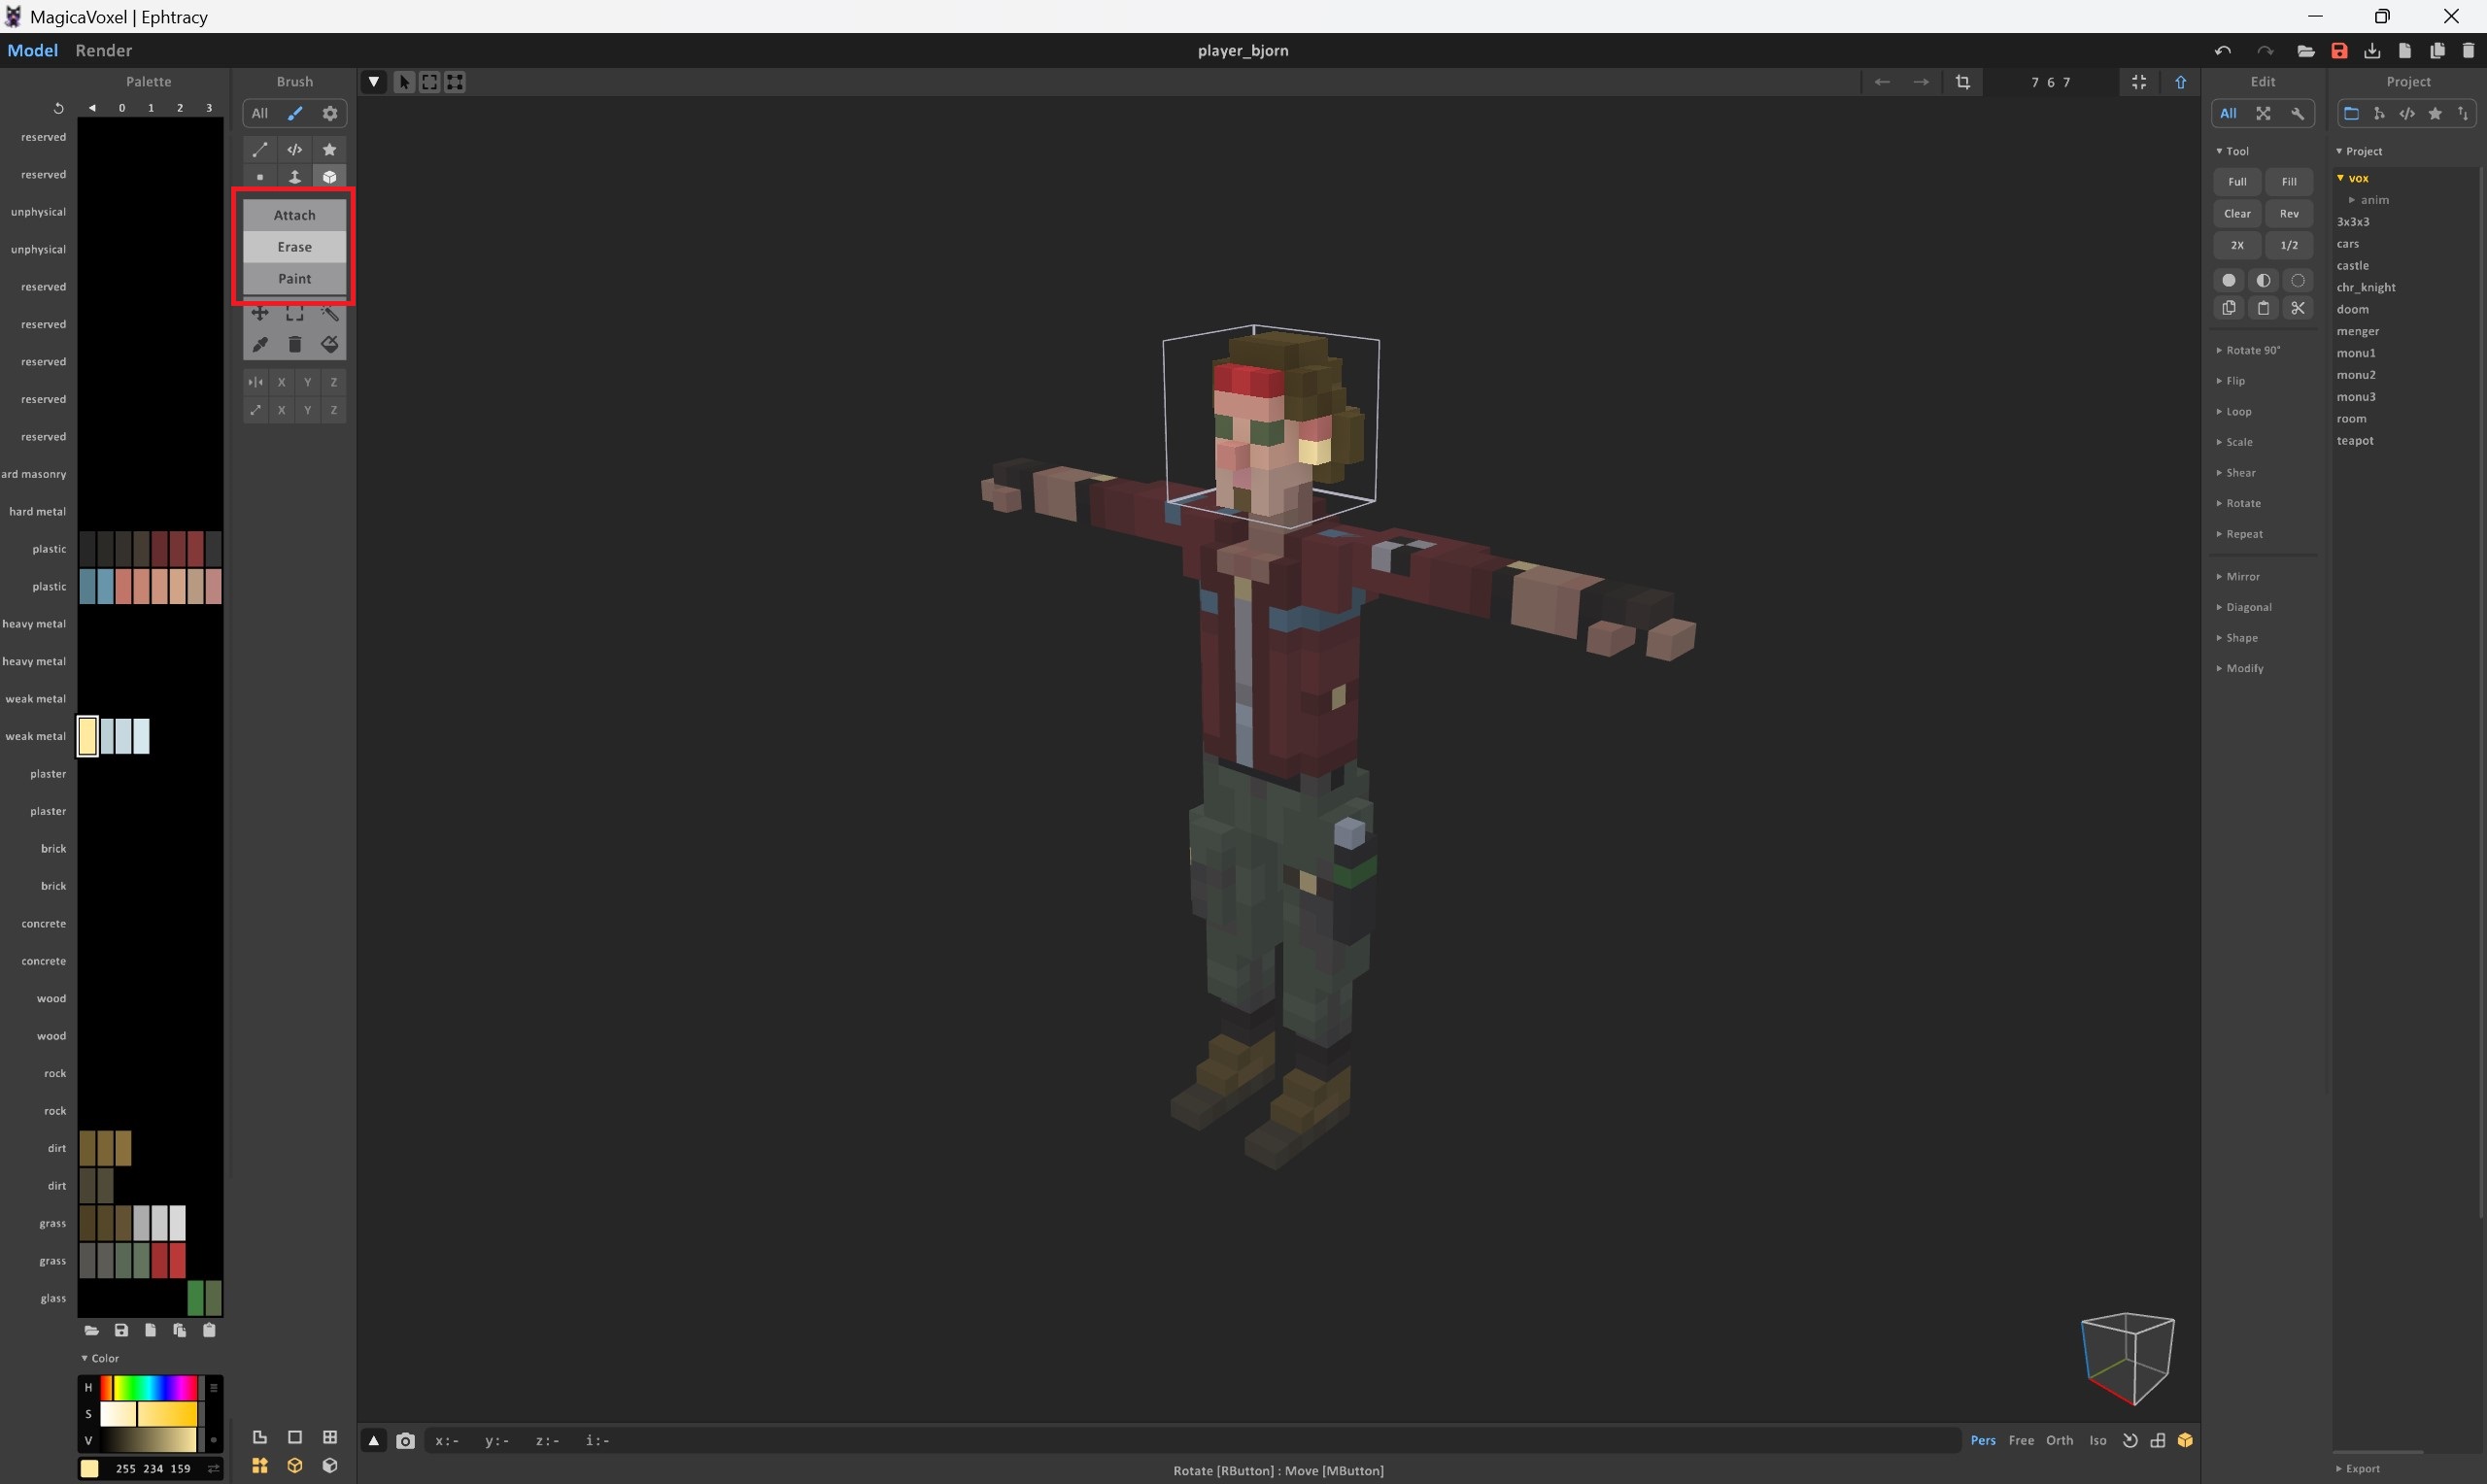
 Double click on the part of the model (a.k.a outlines) and start edit (double click again for exit). Paint is for to change voxel color, Erase is for removing voxels, Attach is for adding voxels
 It's possible to change the size of the model's borders (just change numbers like: "12 7 12"; "8 5 8") and fit it to model size (Click on icon to the right of the numbers). On the right, there is a full list of all the parts of the model (outlines), where you can easily find them.
 In the end, you can get a character like this, which I've edited for this guide. PepeGoo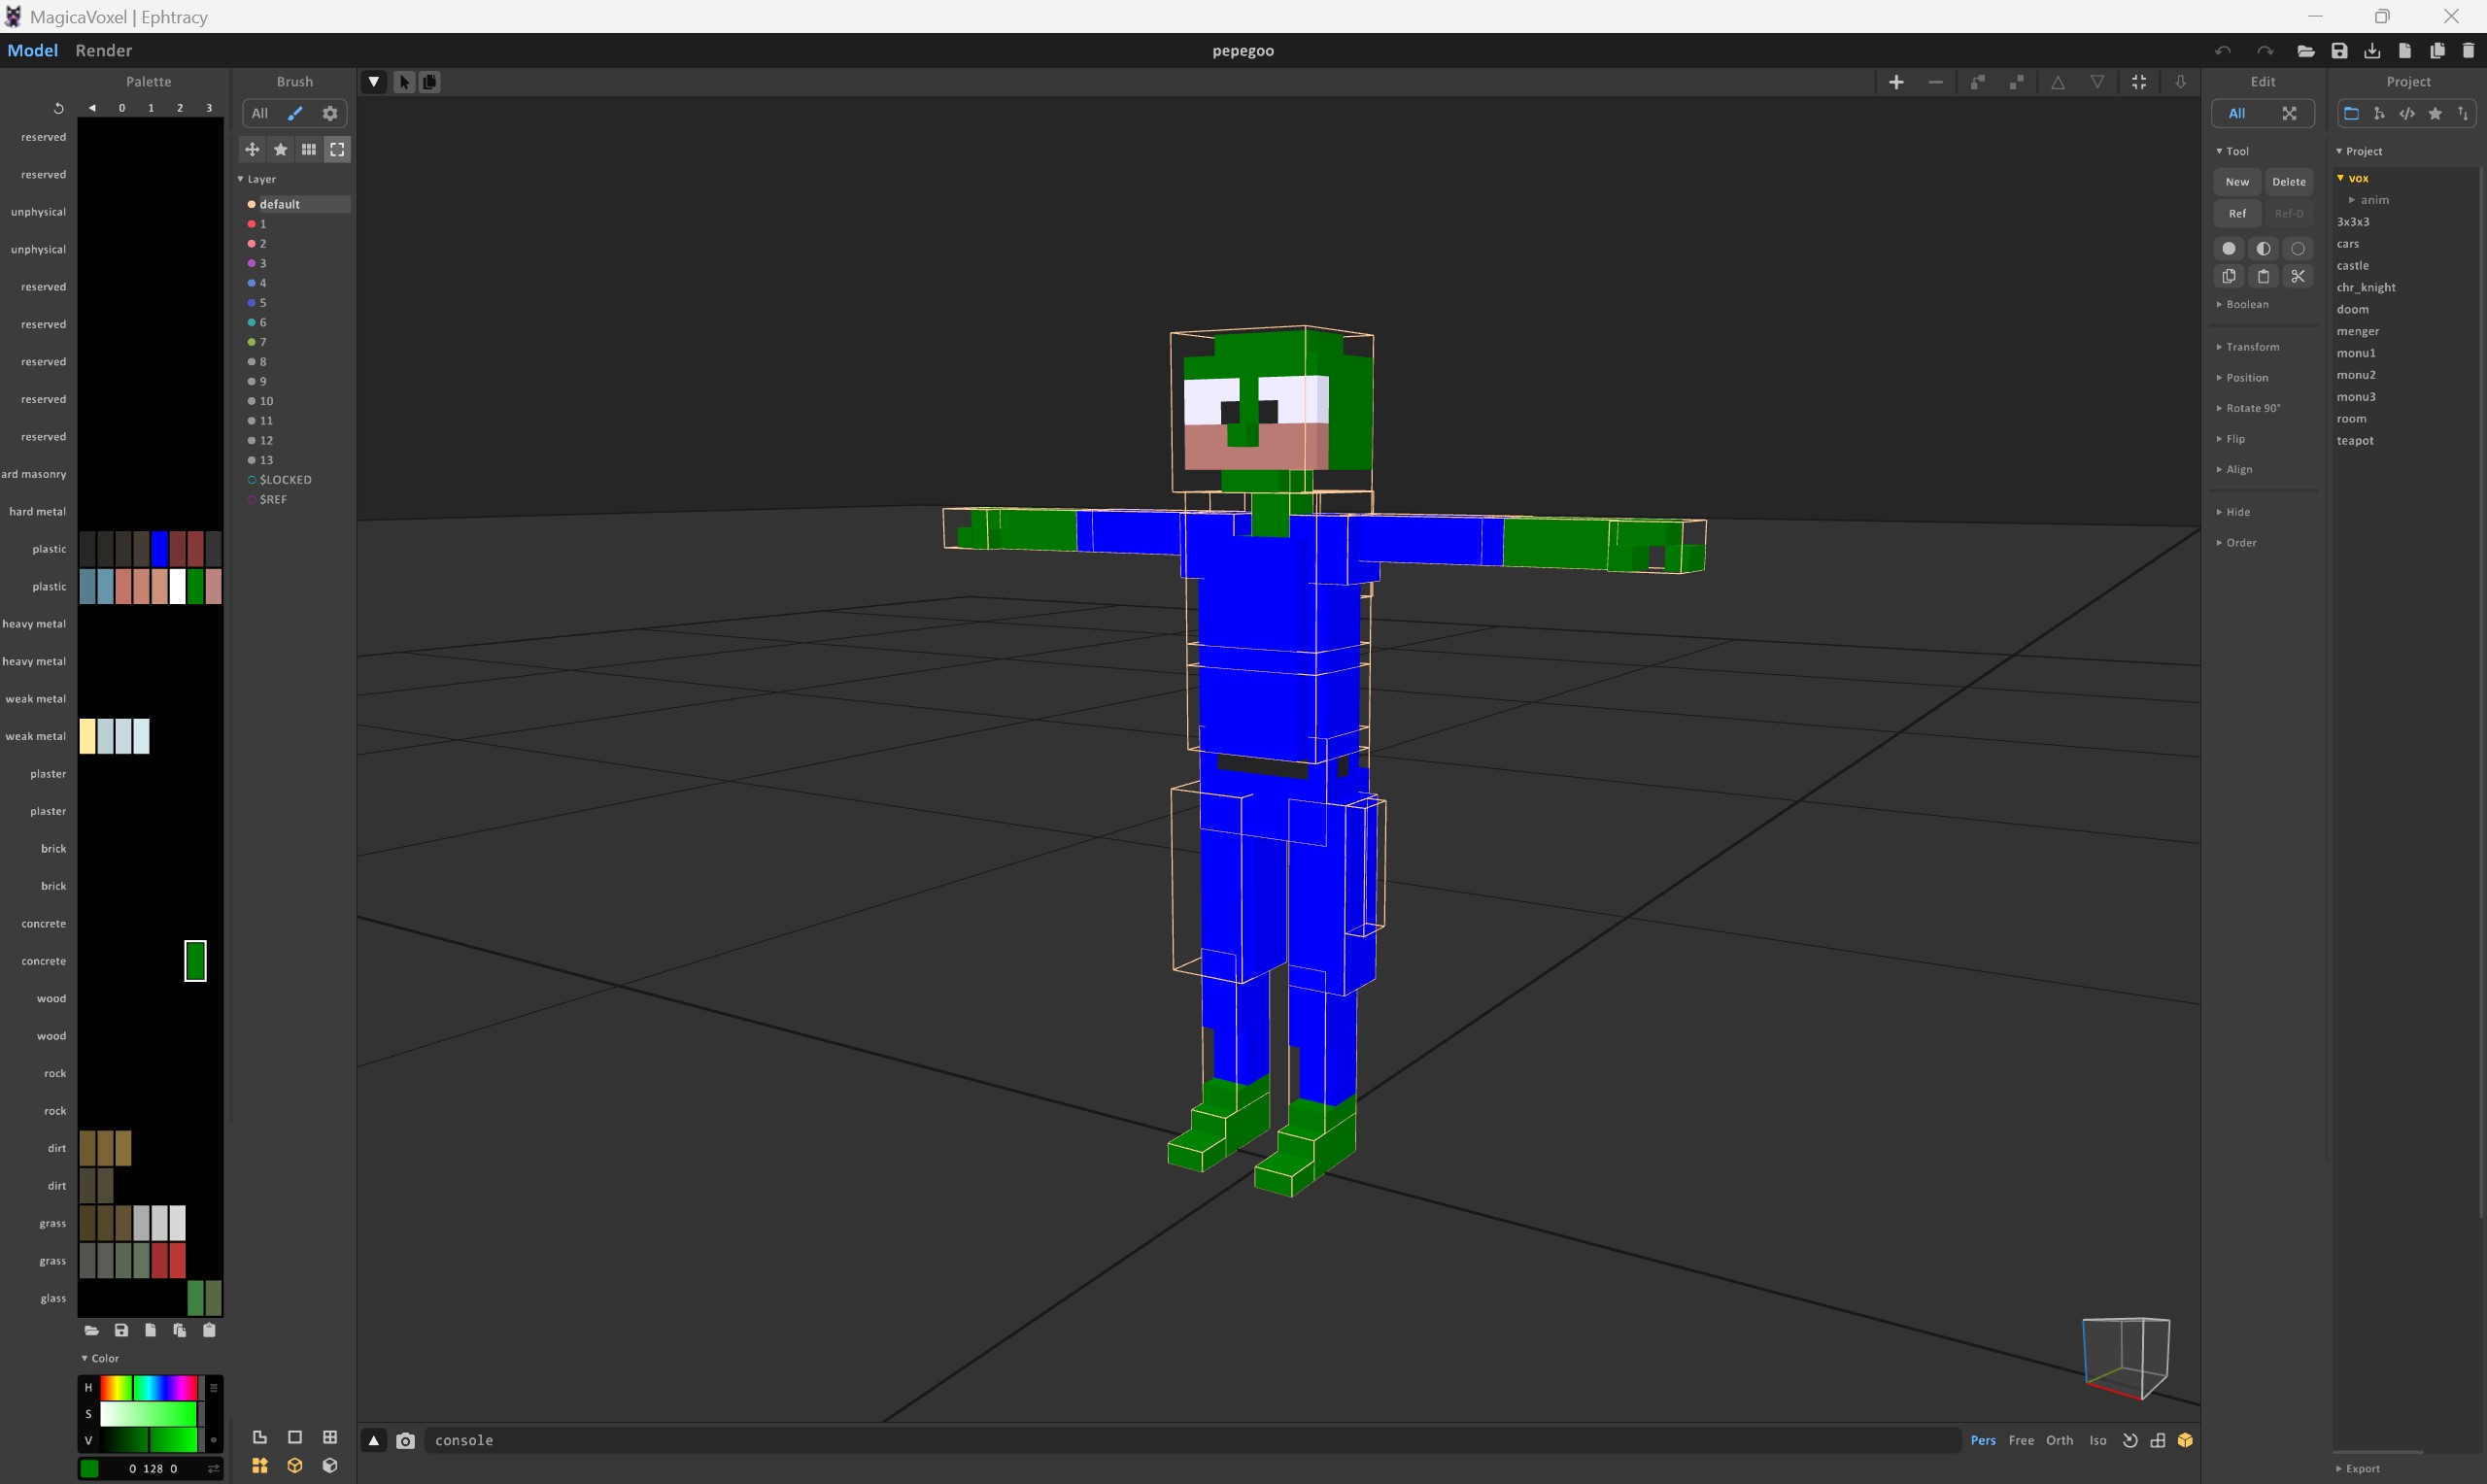
The Secret of MOD
In this section, we will touch a very difficult part to understand. Keep an eye on it and stay focus! Just need to know that your folder (where your character or your mod is located) is always specified as MOD, not as you named it. It may be called by different names, but for the game it will always be automatically defined as MOD. It's important to remember that. We need to get the right path for the .xml file to your model, so that everything works correctly.
Here is on the picture you can see that my MOD is PepeGoo (MOD = PepeGoo folder).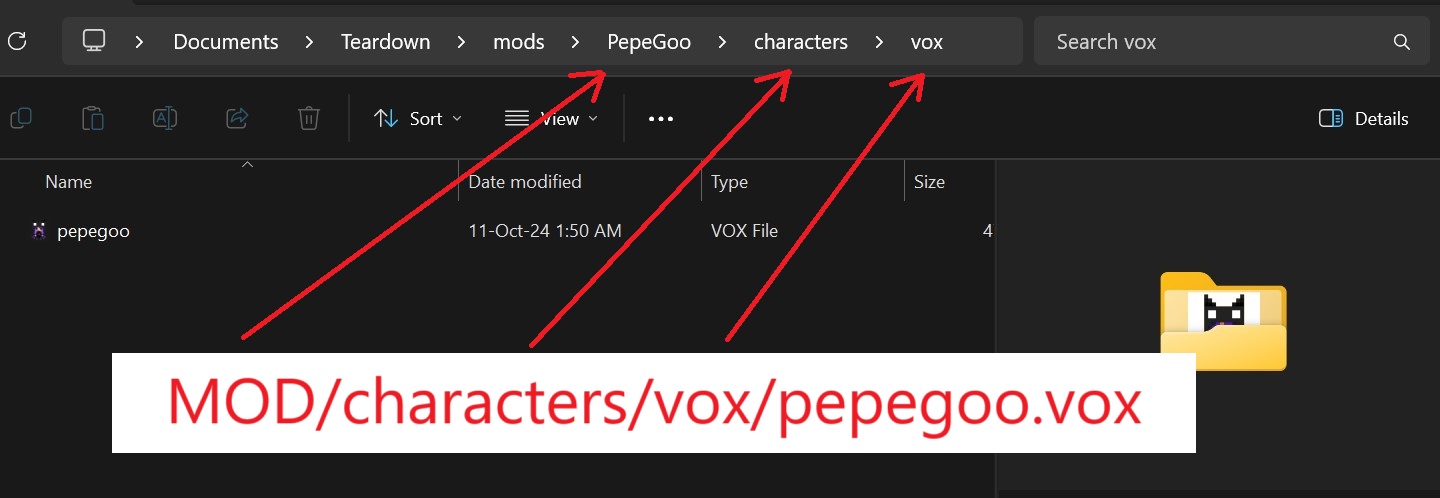
And don't confuse the slash (this "/" with this "\") when you write your path to the model. Always right slash is "/"! In my example, the path for .xml file looks: MOD/characters/vox/pepegoo.vox.
Hooray! Now we're getting to the most magical part, which is coding.
Coding .xml file
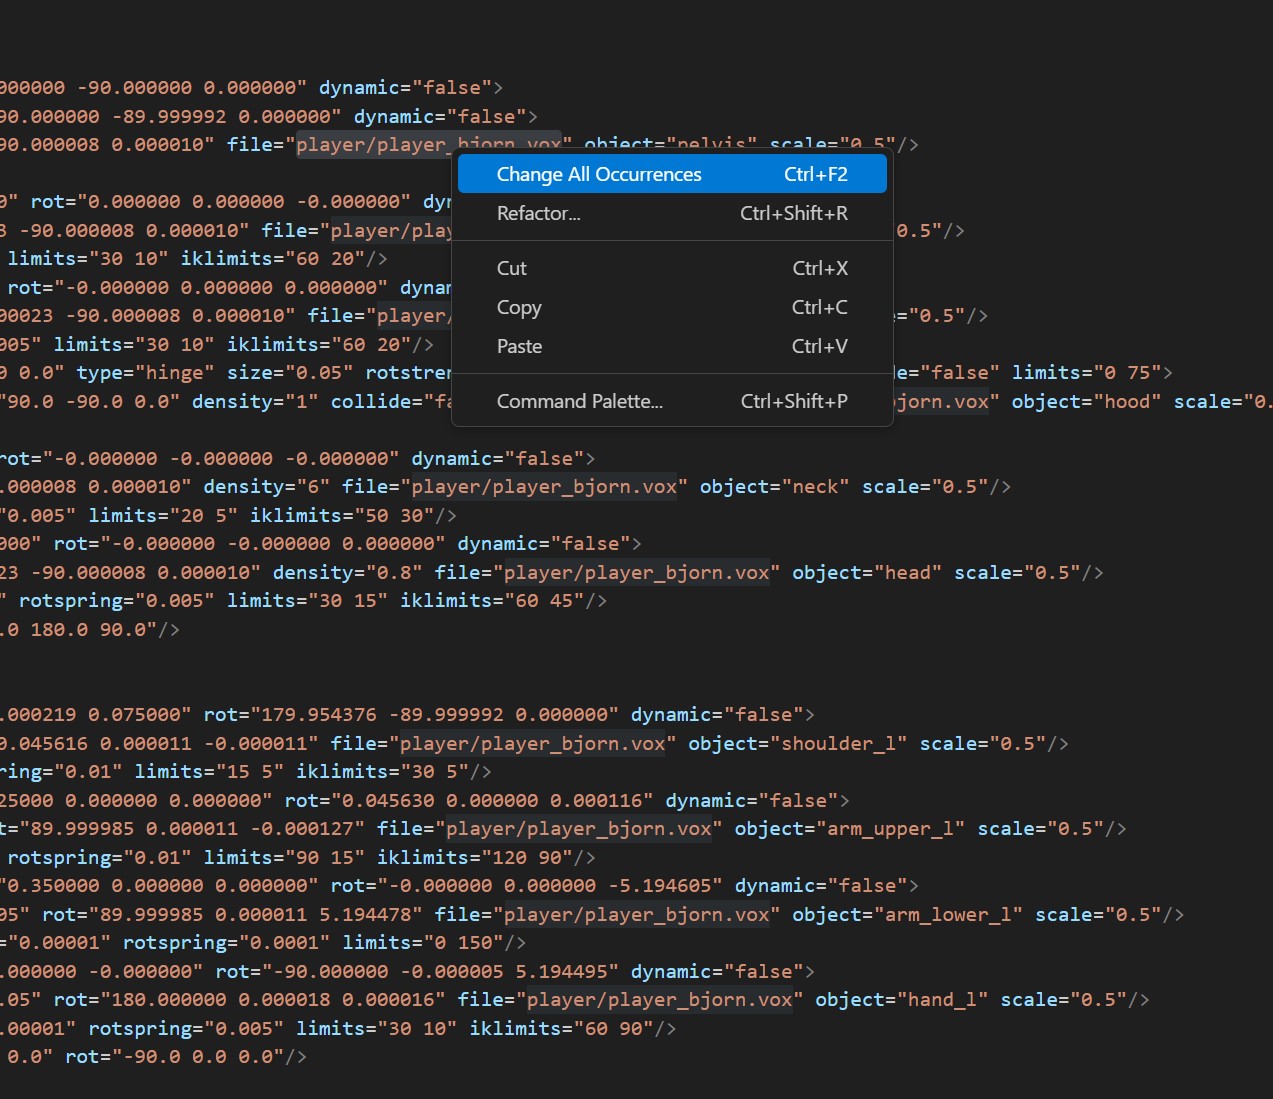 and Paste. The result should be looks like this: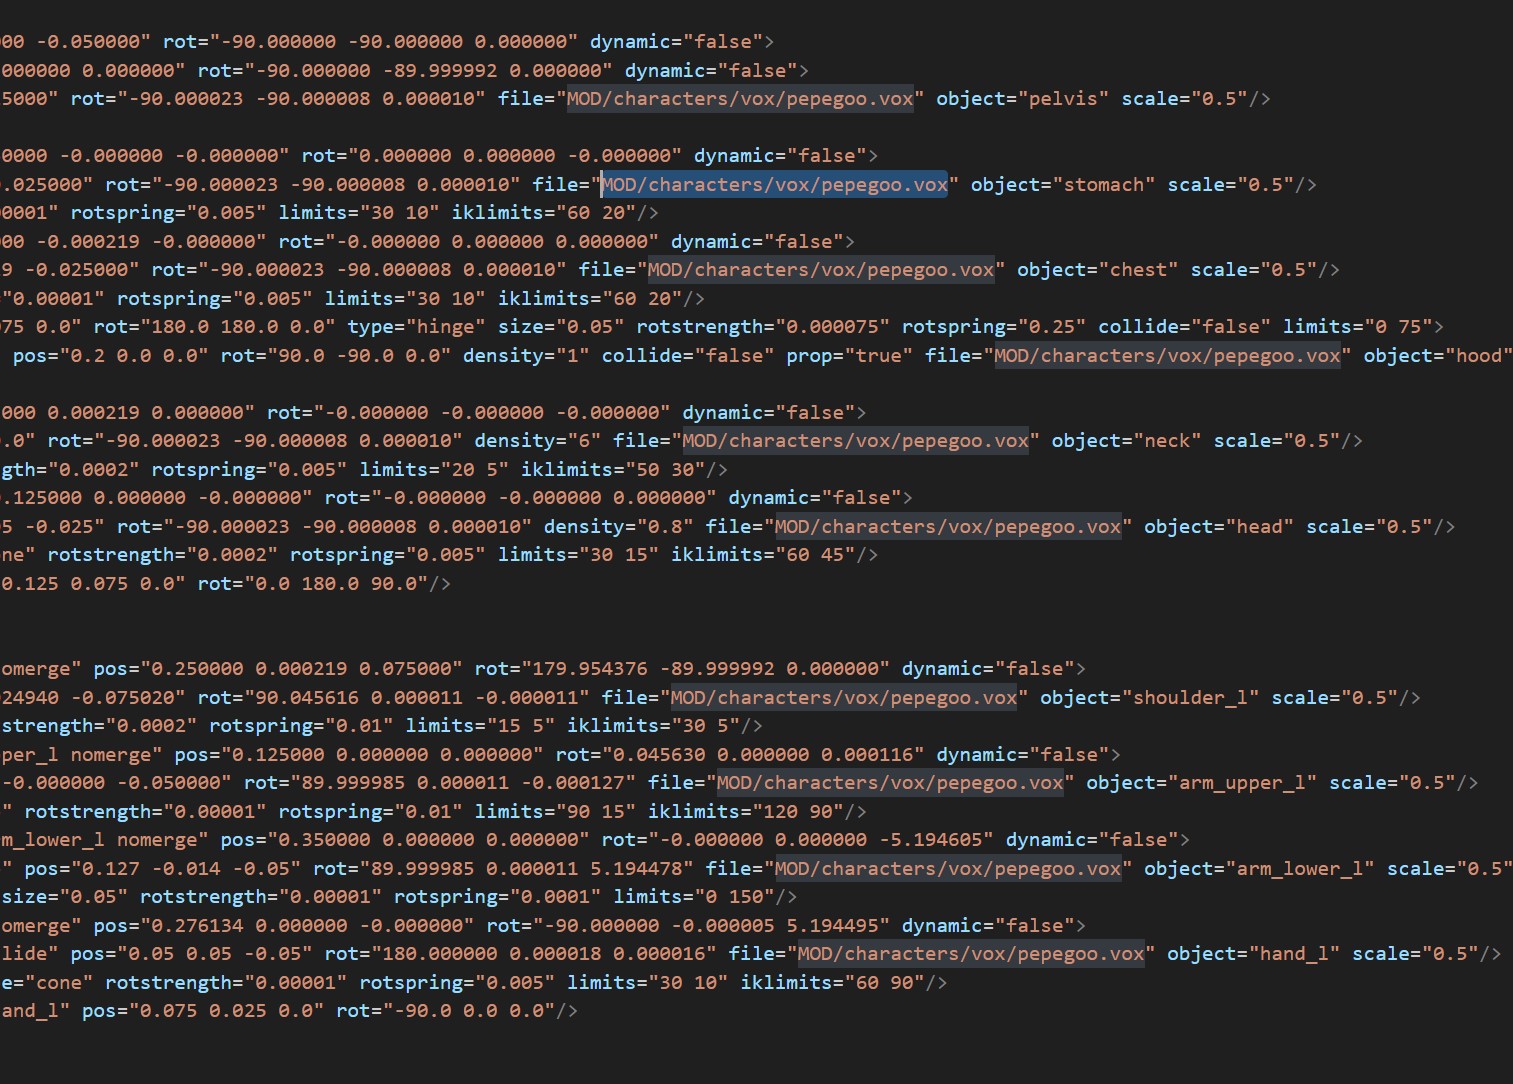
As you can see this takes us to all objects in the model: "neck", "hood", "head", "shoulder_1", "arm_upper_1" and etc. (you can see the full list in the MagicaVoxel>Outlines aswell). That's why we do this.
Don't forget to save changes in the file. Now we need to make you can see your character in the game. And it would displayed separately from Merlin.
characters.txt and info.txt
These 2 .txt files are really important. They should be placed in the MOD folder. Earlier I have told you what a MOD folder is. (for clarity I'll show you on the picture)
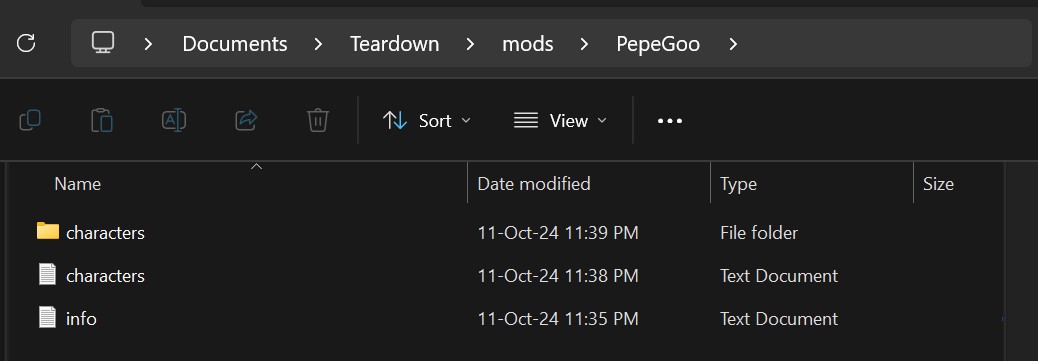
**This part is for those who want to fill out info.txt file.
By default info.txt looks like that:

As you can see, only in the characters.txt file we specify our prefab (.xml). All paths are only inside the MOD folder! So, each path must be specified without MOD
(examples: path=characters/alexcasey.xml;
path=johnwick.xml;
preview=characters/myui/passportphoto.png)
Here is another example to clearly show how I got it in my characters.txt file:

Note that you must be sure to specify your path to the .xml file. Don't forget to save characters.txt file (open characters.txt>File>Save). Otherwise you won't be able to see your character in the game.
Preview Image
For a nice preview of your character, you should use the following parameters:
Size: 512x512
Format: PNG
You don't have to make the image maximum size, you can make it smaller, for example 189x189
Character in the game!
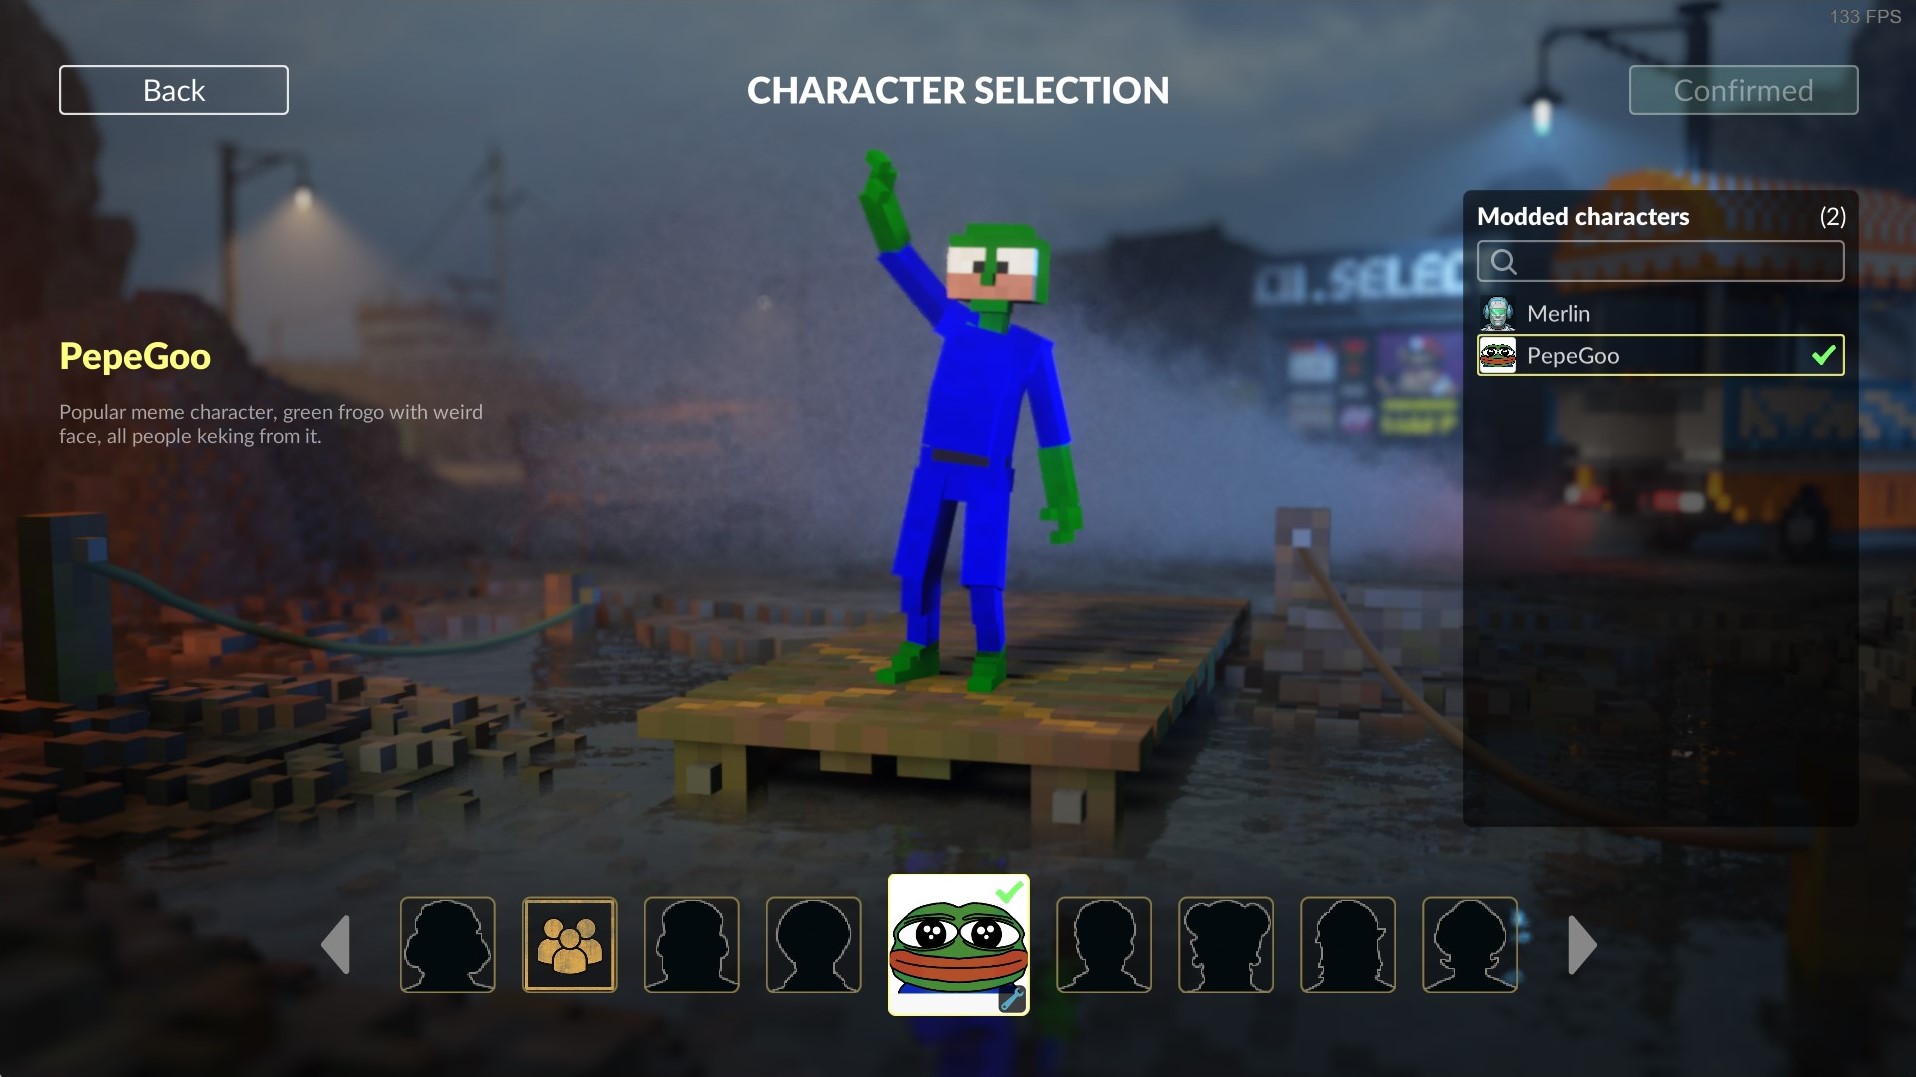
You can also use Merlin in the Teardown Mod Manager (Mod manager > Built-In > Merlin). Merlin is a default ragdoll for characters. Get local copy of that, and edit it whatever you want in the Mod editor.
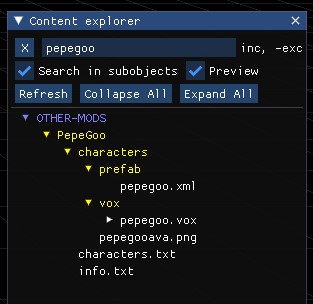 For editing your model in Teardown Mod Editor, you could find your character in "OTHER-MODS". Its name is the one you specified in the info.txt file (If your info.txt file is empty, it will display as a blank line).
I hope this somehow helped you to create and add your own character to the game, and you figured out some basic moments in modding, despite the fact that it was a casual way ¯\_(ツ)_/¯. Now the rest depends on your creativity, imagination and, of course, more extensive knowledge on this.
- hidden expensive items★ 5 (413)26k views966 ♥3 minUpdated 5 Feb, 2024
- How to create Custom Maps for Teardown★ 5 (445)25k views833 ♥6 minUpdated 5 Dec, 2021
- Teardown 100% Achievements★ 5 (477)24k views1.2k ♥3 minUpdated 18 May, 2024
- Teardown ALL valuables guide★ 5 (635)24k views1.3k ♥21 minUpdated 17 Jan, 2025
- How to make your framerate become a negative integer★ 5 (307)18k views200 ♥1 min
- TEARDOWN: Hollowrock Vault★ 4 (97)12k views97 ♥2 minUpdated 3 Nov, 2020


- Upgrading to PremiumTeam Fortress 2★ 5 (20k)1441k views11k ♥6 minUpdated May 11, 2022
- No More Room in Hell Official ManualNo More Room in Hell★ 5 (2.8k)569k views2.1k ♥29 minUpdated Apr 22, 2019
- NMRiH Community Hosting GuidesNo More Room in Hell★ 5 (526)351k views653 ♥1 minUpdated Aug 10, 2022
- How to 'Git Gud' Soon™MORDHAU★ 5 (2k)318k views3k ♥68 minUpdated Nov 16, 2024
- Лучшие кооперативные игры SteamPAYDAY 2★ 5 (1.5k)315k views2.1k ♥56 minRussianUpdated Apr 27, 2025
- Desert Eagle Heat Treated | Blue GemCounter-Strike 2★ 5 (1.6k)293k views1.5k ♥2 minUpdated Jan 16





This guide was created by its original author on the Steam Community. Are you the author and want it removed? Request removal.