Pre-planetary logistics: An organization method for starters, circular belts and sorter dynamics
Changelog
v1.10 (13/03/2021): Added reference to planet sectors, versioning and acknowledgements section.
v1.0 (06/03/2021): First steam version
Acknowledgments Section
To u/oldshavingfoam for his reference sheet and his layouts. The reference sheet is one of the best tools to play and design factory layouts.
Introduction
The scope of this guide is to help those players struggling in the early game before reaching planetary logistics. This is what you can refer to as early game, and here organization is important to reach the game goals without reworking your factory setup and rebalancing your resources.
While this guide does not focus optimized or compact layouts, it provides a framework of planetary setup that will help players consolidate their items and resources until they are able to reach comfortably the planetary logistics setup. This guide targets specifically those who:- Become a victim of the spaghetti factory layout.
- Rush the tech tree without establishing the necessary productions on the way.
- Require constant layout re-organization and re-thinking of their factory layouts..
- Over-manufacture through Mecha's Replicator (item cues of 300s or more).
- Aim to build huge factory setups when players capabilities are minimal.
For veteran players, this guide may provide an interesting view into the early game and hopefully some inspiration in the use of game elements that can be oversighted once planetary logistics kicks in. In this topic you may find uses of splitters and sorters in a few original ways.
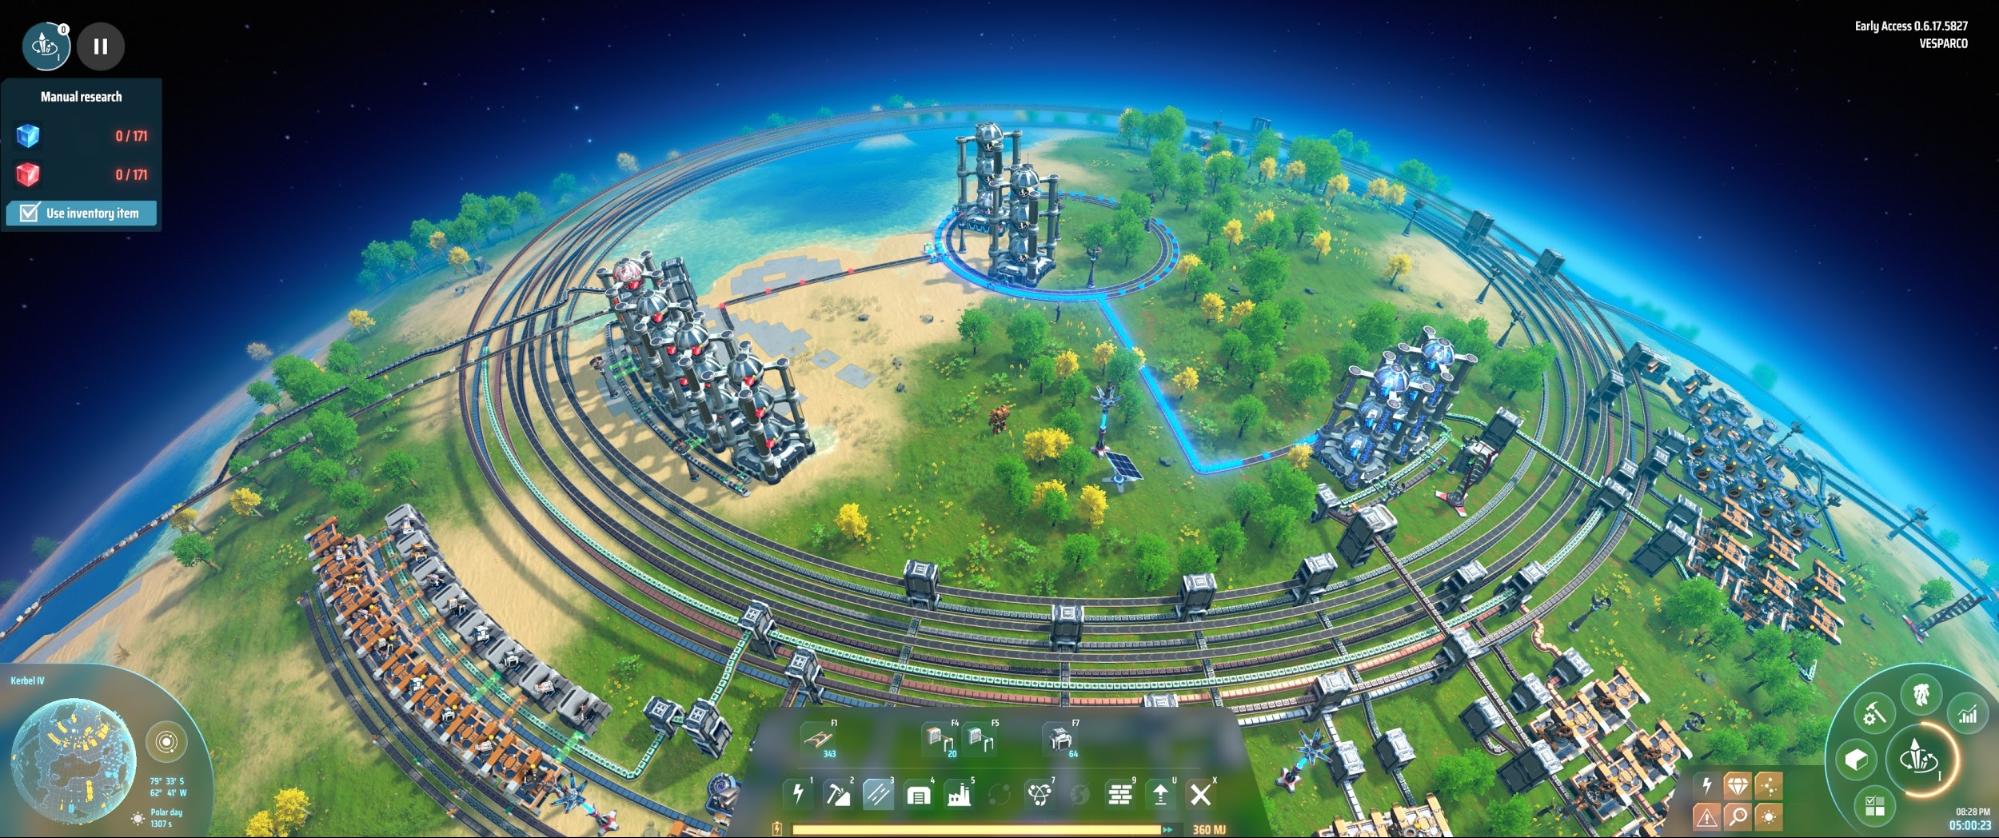
- A guideline for the coverage for the first three tech levels.
- A way to cope with the build limitations of early game
- An introduction into the “Polar-Tropic” circular belts and the dynamics derived from it.
- A production setup robust enough to provide the necessary ingredients to leap into planetary logistics without too much effort.
- A variety of setup design concerning belts and sorters.
- A detailed guide into optimized layouts.
- Discussion into planetary logistics.
Nomenclatures
- Square [sq]: Main unit, 1 tile of land ingame.
- Medium Square [Msq]: Made of 5x5 tiles.
- Big Square [Bsq]: Big square, made by 10x10 tiles.
- Sector: Region of a planet where the tile organization is coherent. There are 22 sectors on a planet.
1 - Game Start - Touch down and hemisphere selection
Take a good look on the planet for the following things:
- Water bodies distribution.
- Landmass availability (land with and without resources).
- Resources distribution.
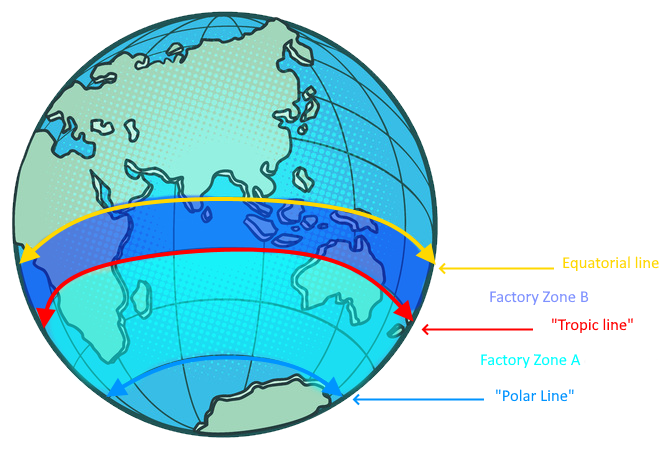
- The situation between polar and tropic radius (see picture below).
Your interest should focus especially on the polar-tropic regions of the planet, as it is your desired position to build your base. By Earth references, it should be the space between the North and south poles and their nearest respective tropics.
Once you have identified your position, consider the side of that planet your starting base perimeter. Boundaries are not mandatory, you can grow bigger if needed but this enables the following planetary organization (consider the “Active” zone your pole selection, either being North or South):- Active polar region: Logistics and initial science.
- Active polar circle: Space for your Polar circular belt.
- Active tropical region: Your factory.
- Tropic circle: Your Tropic circular belt.
- Active Equatorial region: Your factory expansion, if required.
- Equator: Most probably your space for solar setup
- Inactive hemisphere: Free space for exploitation and future planetary logistics build. It could serve as additional space for resource exploitation, soil gathering and energy setups.
For a position reference, you can see the Nilaus tutorial concerning planetary sectors and their distribution on the planet.
From the video analysis, when set in numbers, give the following table:
With these metrics in mind you will be able to assess how much more effort is required to place the circular belt between different latitude sectors.
For the Polar belt, my suggestion would be to go for the 7/16 sectors due to the fact that within the 3 Msq space you are able to fit, avoiding boundaries, 7 belts. This also leaves regions 6/17 as relatively good spaces to build within the circle (in these sectors you can add science production, provide bypassess on the belt and/or do storage/buffer).
For the tropical belt, the sweet spot should be the 9/14 sectors. They are a good compromise in terms of length and grid availability on both sides, enabling the construction of fluid setups that are quite bulky for the 6-7/16-17 sections.
Advancing a little bit on the guide for ILS (WIP), the equatorial sectors can be trimmed to 15 Msq in height by setting a 3-wide solar panel belt on the equatorial line. The trimming is ok as for the ILS setups we will aim at 5x10-20-40 Msq setups.
Going back to our test run, from our practical case we have the north side:
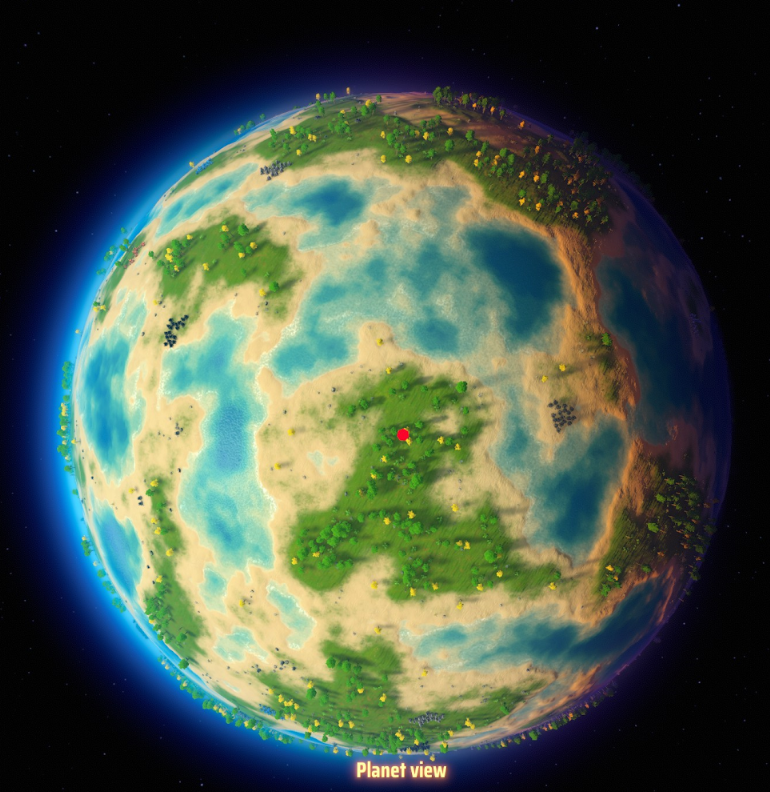
And south side:
We chose the south by the previous points, as it provided more land mass and a better setup in terms of resources.
2 - The beginning of the factory - the Polar belt and blue science.
- To prioritize iron mining, iron plates and gears smelting. Having automation of belts crafting, even as a temporary build, is quite useful.
- Set a miner for coal and a storage, in order to refuel quickly with the best available fuel (not wood or leaves). This should work until you are able to process it into graphite in the tech tree. At that point proceed with its manufacturing and storage for consumption.
- Bring the resources with belts to the zone where your factory should start (zone A).
- Build a temporary base to push a little bit blue science.
- Build small setups o fabricate intermediate products (stone derived ones is important as you most probably won’t craft them for the “jumpstart base” built).
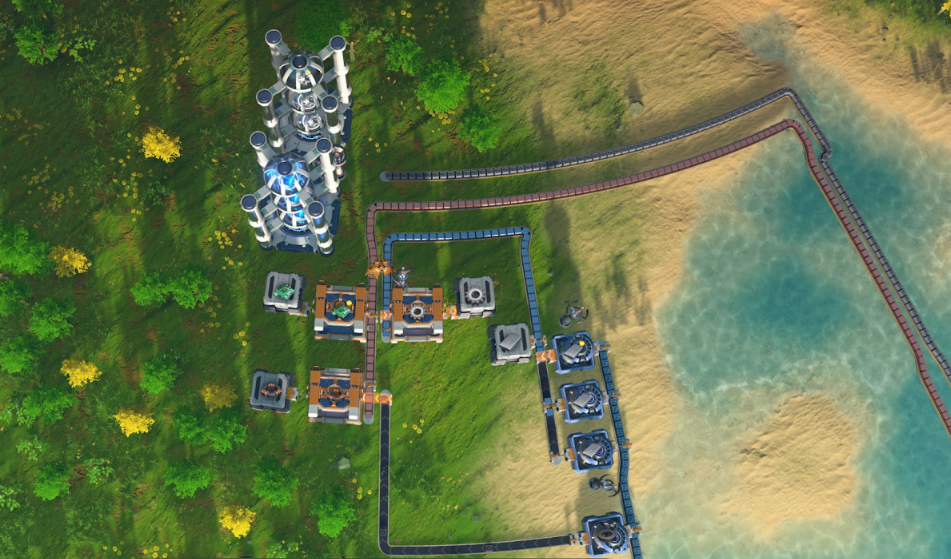
Here our example of temporary setup for blue science
The main technologies to unlock are the ones in the “first column” of the tech tree. Take consideration also to get “Improved logistics system”. The reason is that splitters are a must for the polar belt build. Also consider “High efficient Plasma Control” in order to recharge through your energy grid and not depend on the coal charging rate. This is especially important as belt building is slow and very power consuming. Coal is not enough to sustain this activity without idle periods of lowered performance. With the technologies unlocked, you are ready to start building the Polar belt.
2b - The polar belt - primary circular main bus
The polar belt uses the concept of the main bus in Factorio. For those unfamiliar with the game, the idea is to provide a set of belts that become the “core” of the factory, providing output and inputs to each one of the factory sections. This facilitates the management of resources. For example, having an initial input of “iron ingots” into the bus belt should reach all the machines that require iron ingots. Also, the output (e.g. circuits) of one factory layout can be brought back to the main bus and then be distributed to all the other machines through the bus that require circuits as inputs..
The thing is that in factorio the implementation of this approach is linear, from a starting point and expanding in one relative direction, growing the factory on each side of the bus. In DSP this approach can be done but finds a lot of issues when trying to cope with the planetary layout. This however does not mean it cannot be done, but in fact, it has to be implemented taking into consideration the DSP planetary layout and mechanics. This, to our advantage, enables the design of a circular “bus” belt. This solution on a 2D game such as Factorio has some issues in terms of scalability but in DSP works quite well and provides a lot of advantages.
To summarise the advantages:- In a circular belt there is no start or finish, so any input/output can be added at any point. The only relevance of the factory position is the point of insertion/extraction of the circular belt and the priorities set to the splitter managing its input/output. This helps a lot to cope with layout problems when designing the factory templates. Examples:
If the planetary layout is not adequate at a given latitude, you can still extend the input/output belts into a lower latitude until you find a proper space to build.
If a factory cannot be expanded, you can build a copy in another point of the circular belt.
- The compression of the belt (maximum load on the belt) has its own dynamics in the circular belt. DSP provides a lot of tools to manage it, which is a good thing. The splitters and the priority/filtering systems are the main tools on this topic.
- You can connect the whole factory setup to the belt in order to share their inputs/outputs. This helps to make your factory layouts modular.
- It scales wells until planetary logistics kicks in (so sustainable until mass production is required).
- The capabilities of the circular belt grows considerably with higher tier belts. This provides great performance upgrades in the circular belt and attached factories with minimal effort. Also, tier 2 belt is quite capable of sustaining the demands of your early factory without major issues.
- Rows of belts can stack, so you can add quite a lot of items into the bus while remaining compact. Take in consideration stacking tech lvl 1 one is necessary to reach the third row.
Despite these advantages, there are some drawback that you must consider:
- This setup works well in polar positions as otherwise the circular belt becomes humongous. With the initial production and construction capabilities of the Mecha, an equatorial belt becomes a tedious task. This is undesirable as it takes longer to build.
- Most of your factories will be able to receive one/two belt inputs of each ingredient so mass production is limited under such conditions.
- Depending on your circular belt radius, you will find some issues. Being too small (circular belt close to the pole), you will start having crooked belts due to cuadricularity mismatches and tight square patterns for building. Being too big (going near the tropic), you will have to dedicate a lot of time into finishing each circle.
- The “wider” (lateral lanes) the circular belt it gets, the more problems it brings. Due to this it is advised to not grow the circular belt more than five belt lanes.
This concept when applied, shapes like this:
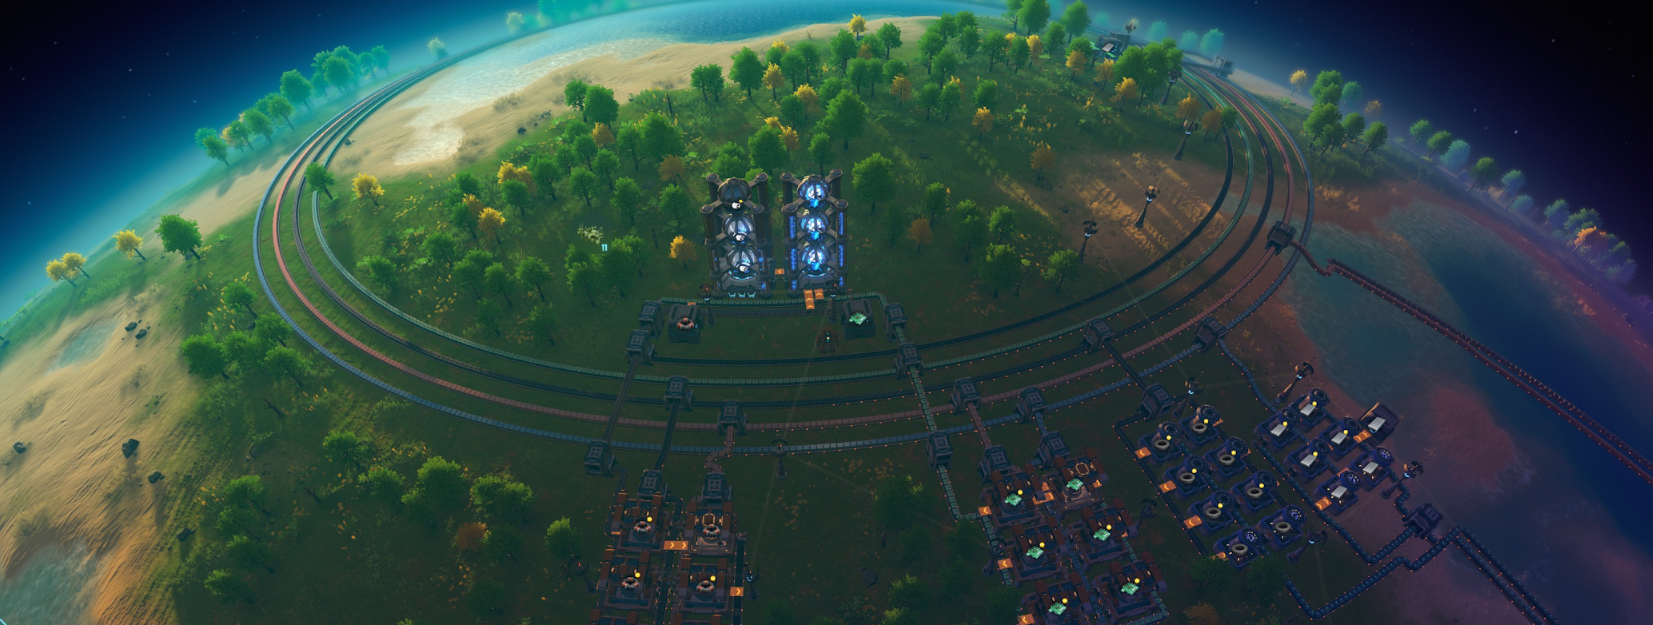
Polar circular belt, 2h in-game, blue science automation achieved. Items in progress.
2c - Our polar belt setup
In this setup, we are aiming to build a polar belt of 5x2 (10 items). We could go higher to a third row on top, but the advantages are limited w.r.t. the complexity of management.
Although, in this setup the amount of items is limited and some compromises have to be made. To our setup we will do the following table. Bear in mind that some elements will not populate the belt until they are available on the tech tree, so you can build their respective belts later:
(upper level)


(lower level)


This setup is a guideline , you can apply the circular belt setup you see fit to your needs. This one is our consideration of what can be optimized in this form factor (and it most probably are better ways to optimize it). Some considerations below, in the selection process. Order is a bit arbitrary, although some advantage can be achieved by stacking output products on top of input ingredients.


The only debatable one is the iron ore as it is used for both ingots and magnets. Still it is better to have dedicated belts for both items.


With this retup, you should be able to produce most of the items you require, including a mall to provide for the most essential items. The “Jumpstart base” from YT Nilaus can now be easily implemented by taking the circular belt items as inputs. You can also add some foundations assembly at the end to start managing small gaps of water and shores.
https://www.youtube.com/watch?v=1Db7qZp5VyE
Here our adaptation to this solution: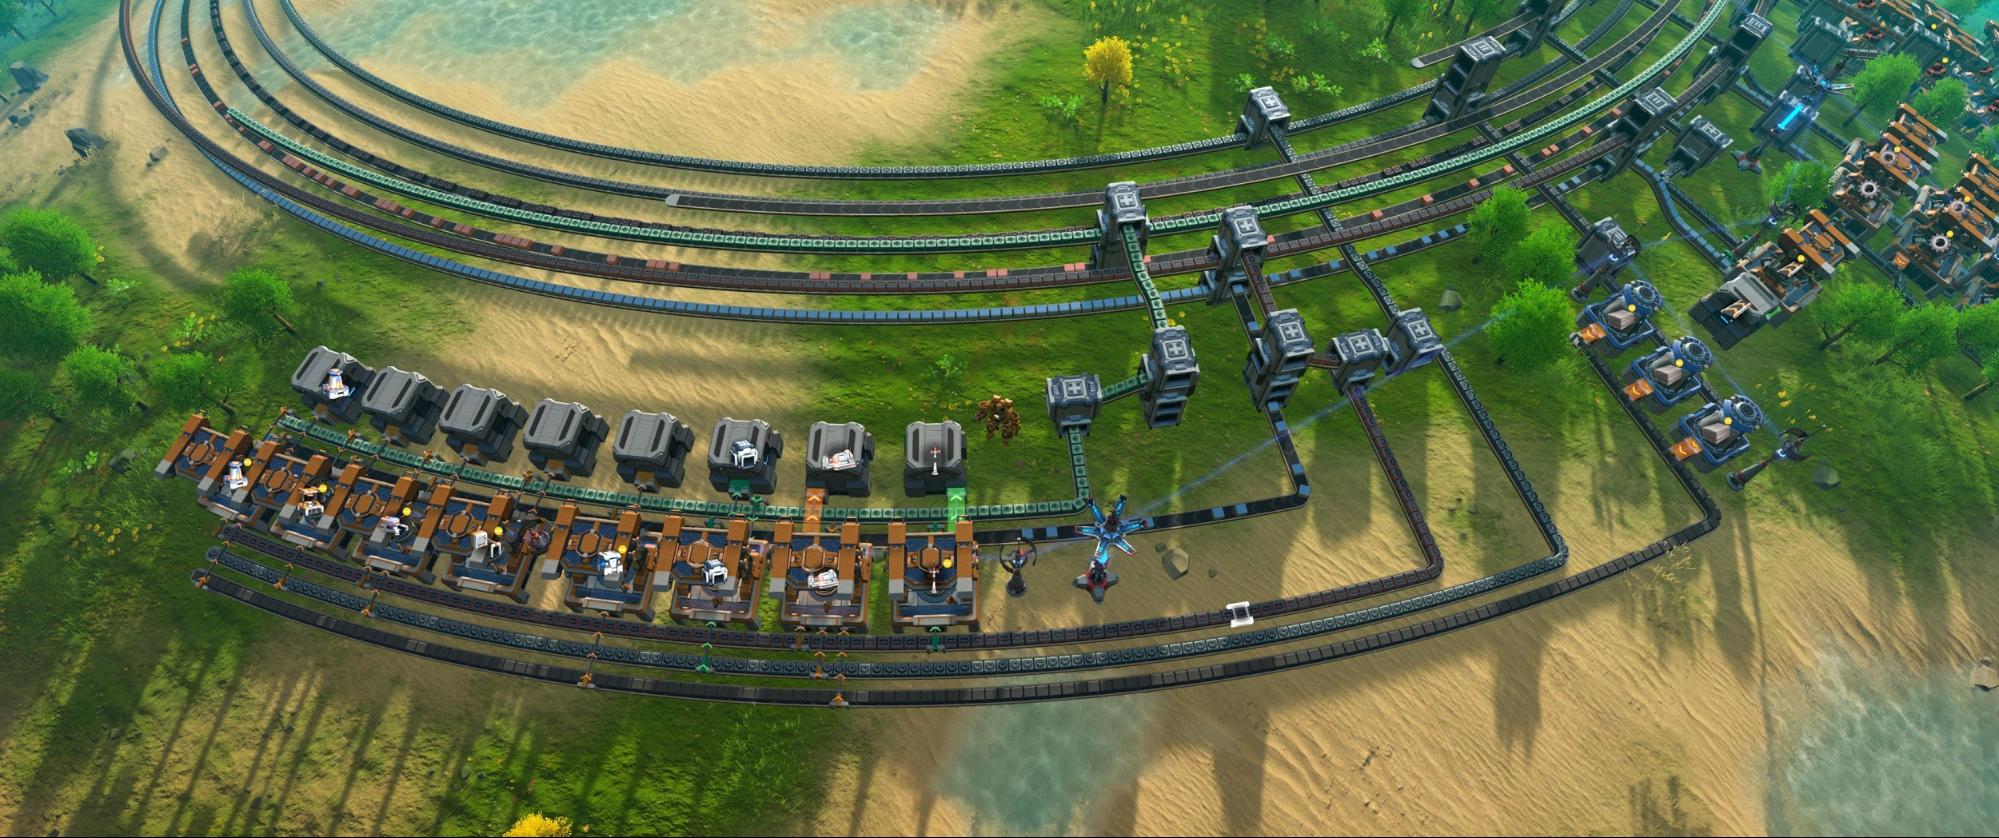
Our jumpstart base setup.
For the polar zone (the "inside" of the circular belt), it is suggested to keep it for science and belt management (buffers, bypasses and storage containers). The cardinal meridian lines highlighted in the globe (N/S/E/W from the pole) can be useful to pump science ingredients through these paths. Being clearly visible through the planetary layout, the advice should be to not build factories in these lines in order to enable the passage of “vertical” belts for red, yellow science and graphene.
3 - Expanding to the tropic - the tropic belt and red science.
Once you are more or less your factory set up in the top and toppled blue science, you can expand to the tropic belt. The tropic belt handles most of the products related to oil processing and should handle red and yellow science.
The suggested setup is the following one:
(upper level)


(lower level)


As you will see the tropical belt construction is far more time consuming than the polar one. For these reasons I would suggest for now to keep it to the bare minimum (first two rows, and not circular yet) in order to manage red science production. Light oil overproduction can be managed by tapping into the belt with liquid storage. Don't worry about saturating as you can easily reverse the connection and feed the system when the circular belt is complete and your light oil consumption will sky-rocket. To cope with energy issues some generators attached to the belt feeding from the graphite can help in the topic. Just remember to sustain the belt with the support of coal mines and to set some storage in case of power failures.
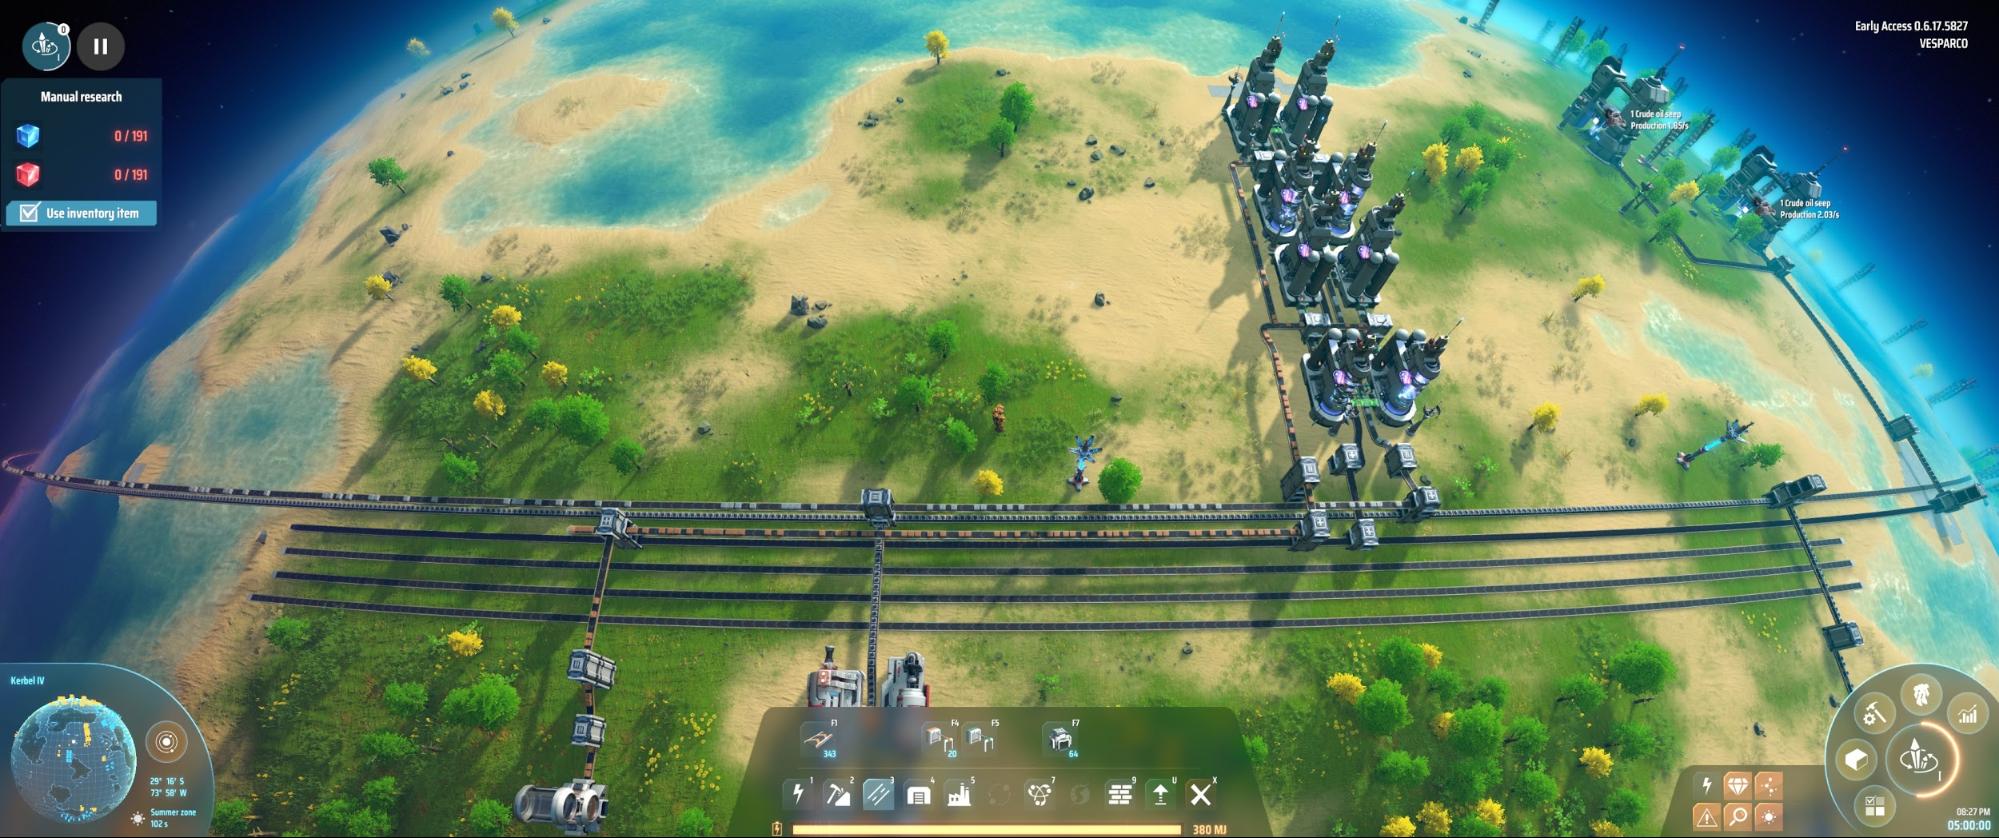
Initial tropic belt setup and oil factory.
Once you start pumping graphite and hydrogen, set up your red science on top to start unlocking some technologies. Here the priorities are upgrades and some technological unlocks. Consider “X-ray cracking” to turn some light oil into more hydrogen. Also, “Hydrogen cell rod” can be pretty useful, as this is the best use of the titanium gathered by mining rocks. The hydrogen fuel rods will help you a lot with your interplanetary trips and are powerful enough to sustain long construction periods.
Polar circular belt, 4-5h in-game, red science automation achieved.
At this point you can choose, you can continue expanding your setup on the tropic belt or you can do a fast trip to the magma planet to set up another polar belt. The order is not relevant, so feel free to continue your own way.
4 - Trip to the lava planet
- Titanium ingots (to unlock yellow science).
- High-Purity Silicon (for industry, specifically for solar panels).
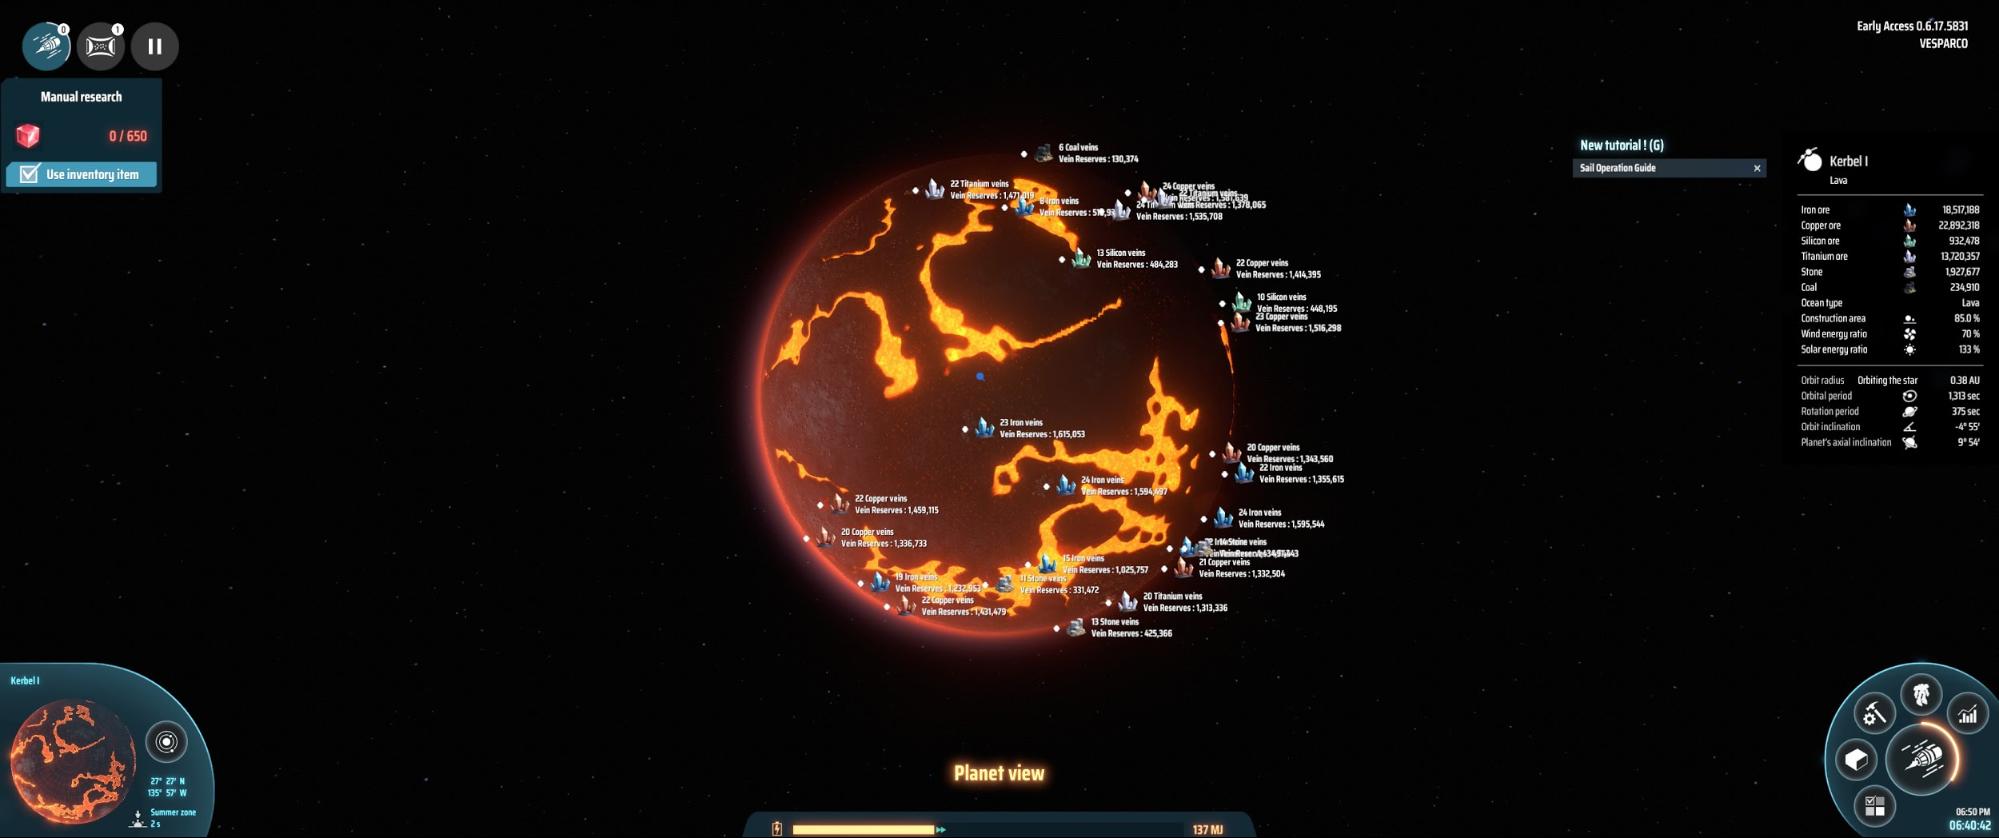
Magma planet south pole
Here we started building mining operations for the previous two resources and started laying out the circular belt setup. As it may happen, you may be interested in bringing foundations to cover obstacles or play with the belts to overcome them.
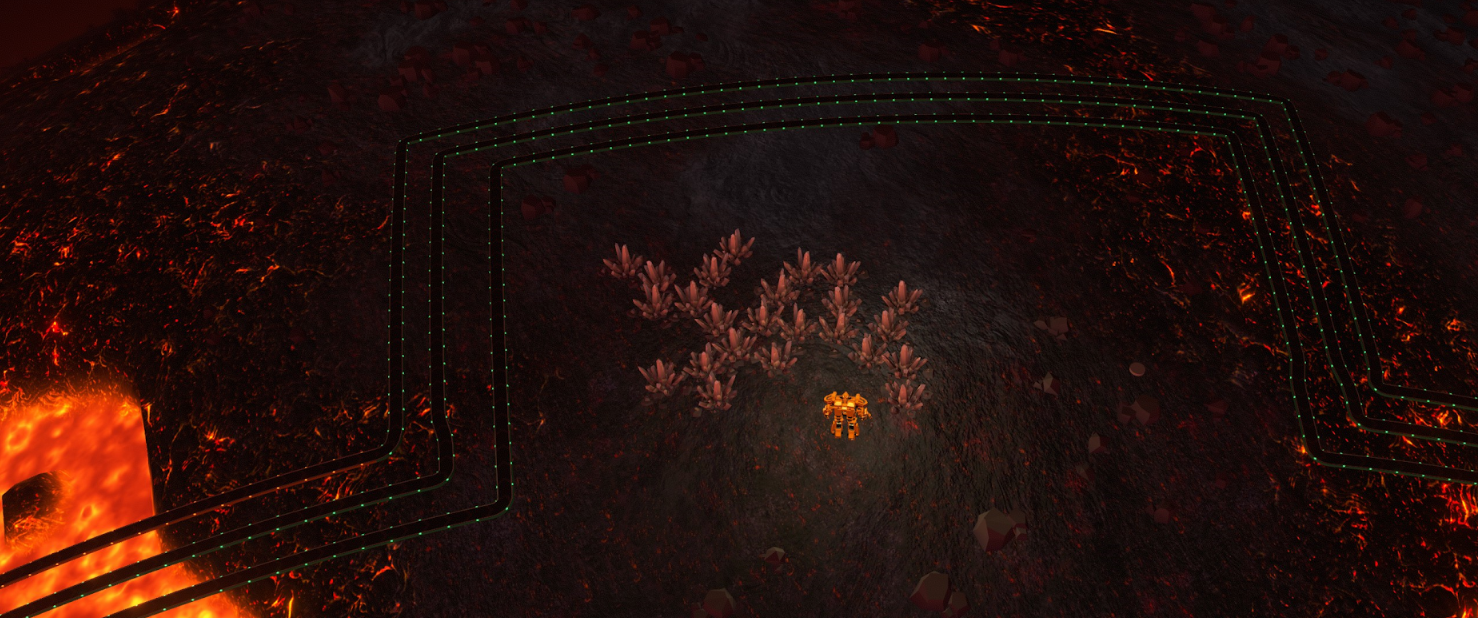
Belt deviation, one of the reasons to keep the number of lanes as small as possible. Finished at 8h30m in-game time.
Here the proposed “Magma polar belt” configuration is the following one:
(upper level)


(lower level)

Glass is considered if you want to lay additional industry that was complex to set in the other polar belt. Solar panel production is worth a lot here as you will be able to cover quickly the energy costs of your planets with them.
It is not required to build all the belts and every factory at once, and you will most probably have to do trips to gather belts. Use these trips to bring titanium back to the tropical belt.
5 - Finishing the tropical belt, starting with yellow science.
Now with the proper tech and if you set up a dedicated factory for belts lvl2, you will be able to finish the tropic circular belt in around 30 minutes. It is quite an endeavour, but once built you will be able to set up the remaining chemical factories.
You should aim for a Stone deposit near the belt in order to set up the sulfuric acid production and another one for foundations (as stone is not present in the tropical belt). In this phase you should be able to set up your yellow science and export graphene to the tropical bus.
After this, you will have a clear belt reference to decide where your factories should attach to which circular belt. Some items may fall out of the three belt configurations but they are not critical to reach planetary logistics.
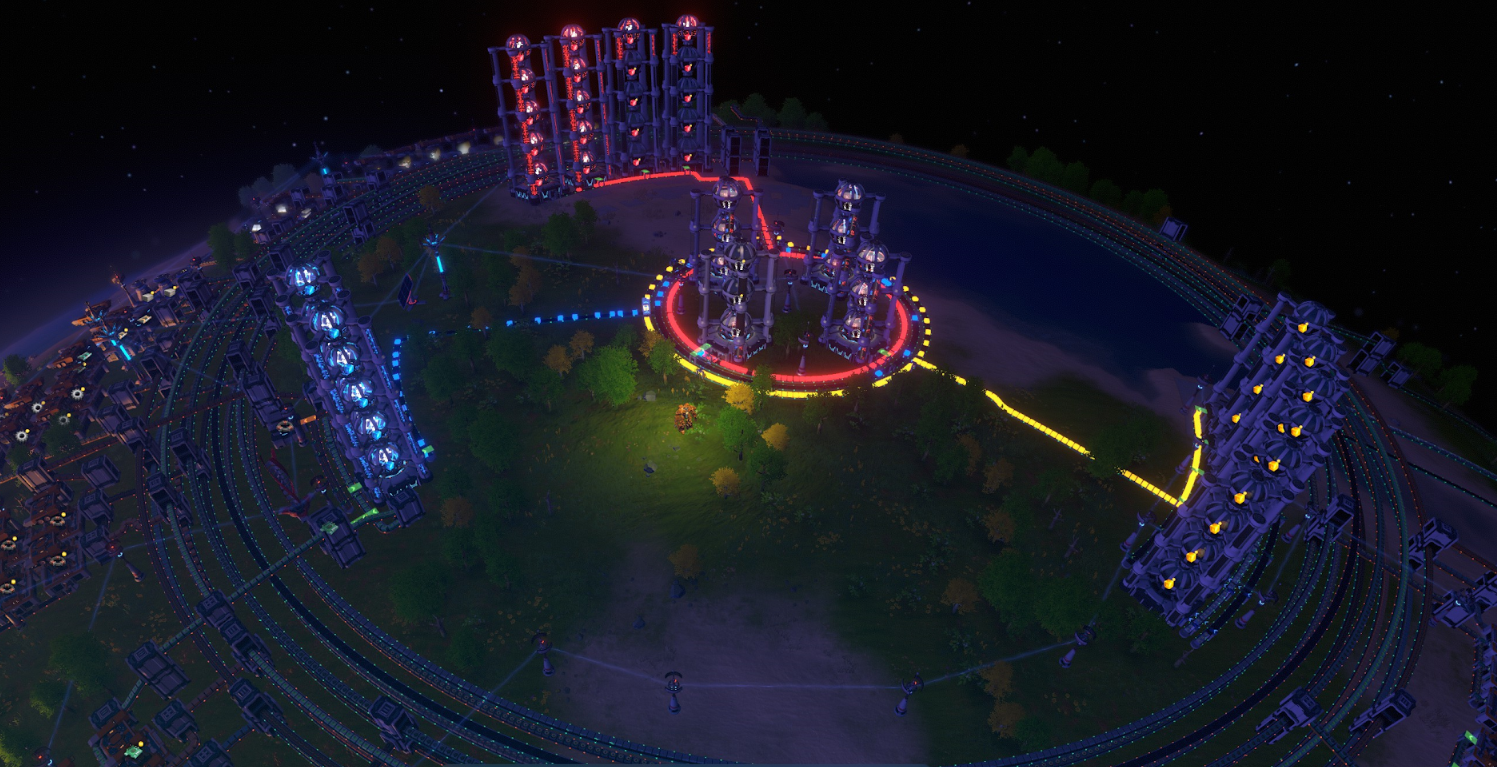
Polar circular belt, 10h30m in-game, yellow science automation achieved. High end items in the works.
6 - Last industries and integration into planetary logistics.
So at this point you will start unlocking yellow science. Take your time to set-up the remaining industries and storage for those outside the belt. With a few setups you will have ready all the ingredients to start migrating to the interplanetary logistics.
Here a list of what is expected:


Logistic drones


Interplanetary Vessels


At this point you are almost at the end of this guide. The example run took approximately 13h to reach this point. It may not be the most efficient one but is one that is very flexible to meet most of the player needs. The next step here would be sto start with the interplanetary logistics transition.
The best thing you can do here is to craft 6-12 interplanetary stations. With them you are able to integrate each circular bus to the interplanetary logistics by connecting each belt row (upper/lower) to one interplanetary logistic hub. Just remember to configure titanium ingots as supply/demand sources between the magma belt and the tropical one.
Remember also that depending on your priority to the interplanetary hubs splitters in the bus, they will:- Gather all belt resources (priority to hub).
- Gather half belt resources (no priority).
- Gather only the excess resources (priority to the circular belt).
- Go for the crafting of green science (by implementing the missing steps in interplanetary logistics).
- Start developing (and decentralizing) your belt by factories in interplanetary hub layout.
The good thing of this approach is that the layout completed so far will still be of use to support your network, being only obsolete when its resources are exhausted or when its production falls behind a more robust interplanetary network.
Annex-1 Some information about splitters
As many people find out in unexpected ways, there are three splitter models in the game.
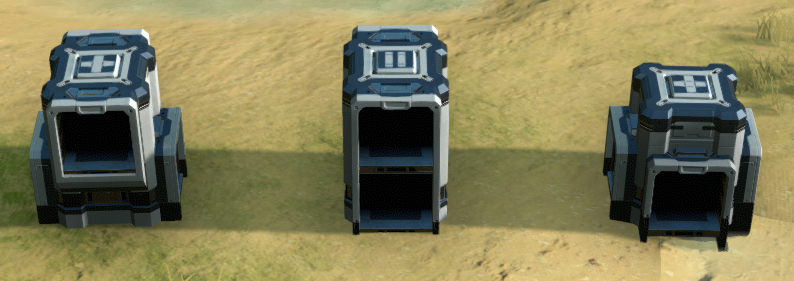
The three splitter models: We will refer them as “ X ” (left), “ = ” (middle) and “ + ” (right) When placing a splitter, you can change the model by pressing “Tab” and rotate them with “r”. This may seem silly but is really important to this setup and there are still people surprised in reddit when seeing pictures. Another important information is that they are stackable, enabling an easier management of stacked belts.
For reference, each splitter occupies a level (0,1,2,3,..) and each level has two belt heights (A,B). This reference will help when organizing connections.
Then, this is how we suggest using them:
Additionally to this, you can use them to build “one-loop smelters”. But this build is quite complex and the gain is so few so we will not cover them.
Tap into the circular belt, you can also use “=” to do so.
Use it as a “ladder” while also providing a 90 degreee turn.
Segregating inputs/outputs in complex setups (e.g. light oil in refiners).
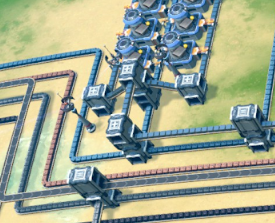
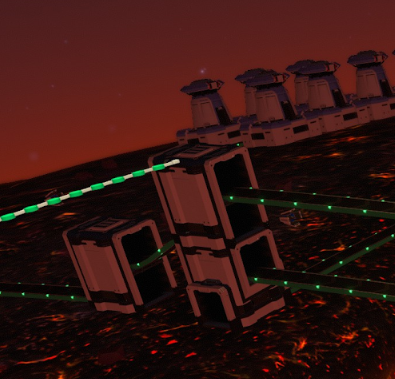
Some examples of ladders using = and X splitters.
Also, when placing belts with raised splitters, consider “up” and “down” arrows to adjust the belt height. If having problems, try to change the camera and zoom in as all configurations are usually possible but requires a precise pointing for the cursor for the game to accept.
In terms of organization, use the height “A” (0A, 1A, 2A, 3A…) as circular belt space and the height “B” (0B,1B,2B,..) as the logistical one for inputs/outputs. This organization will help in the crossing input/output belts and belt buses without major blocking points. For this matter the splitters "X" and "=" helps to control the interaction between levels A and B on a same height.
(I know this part is quite confusing, I'll try to add pictures to clarify the explanation).
Annex-2 Living with circular belt dynamics
This line has a capacity factor, associated to each belt capacity. So a tier 2 belt will have a capacity of “12”.
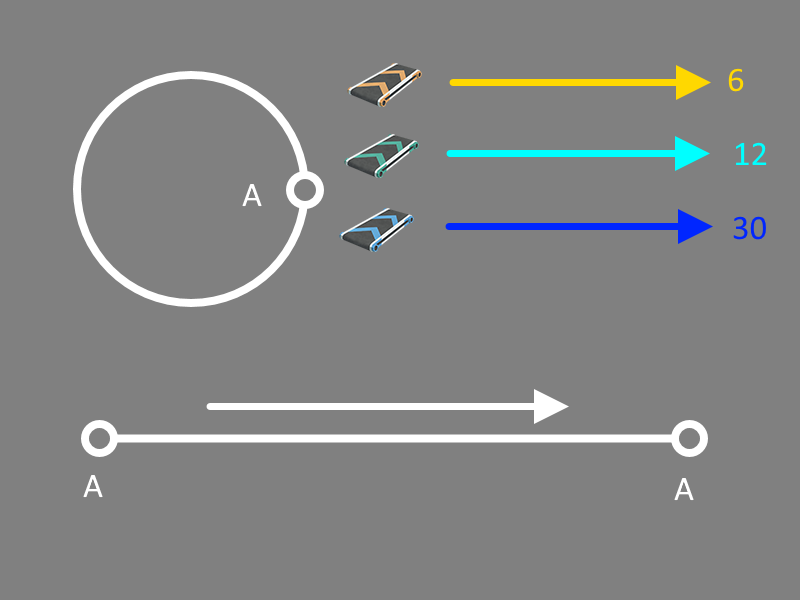
While it may seem stupid, assessing the capacity of the belt enables to analyze the impact of inputs and outputs of items. This is important as if we start to see “gaps” in the belt, we will be able to assess if it is normal or not.
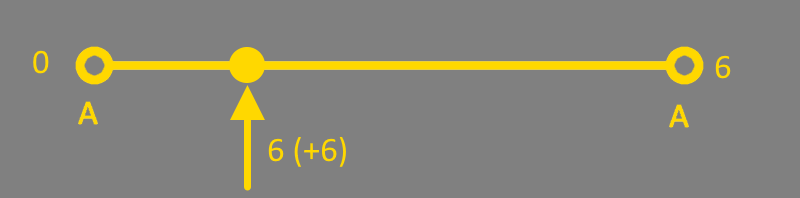
When the belt is empty you will see that all the input is absorbed by the belt. If not driven out by consumption, this input will return once it finishes a lap, so you will have a full belt.
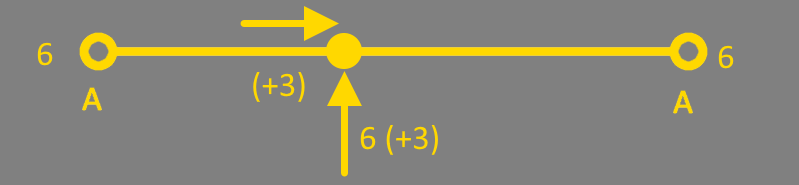
From that point, the splitter will do its job and will split the input between the one already in the circular belt and the one of your input, reducing your input to a 50%. This is of course undesirable as it is not filling the belt and part of the input is recycled. To solve that, you must prioritize your inputs, so they will always enter the belt if possible.
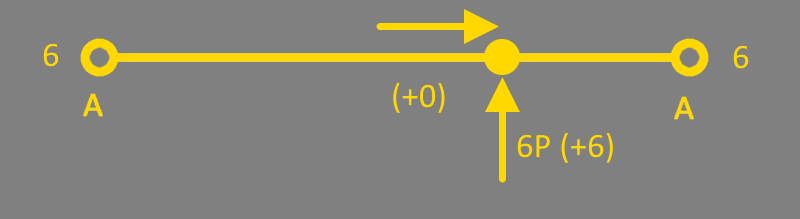
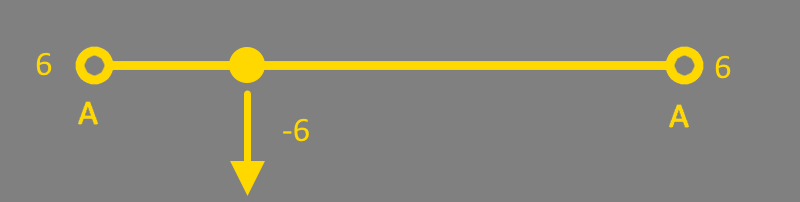
This will stay if the capacity of the belt is compensated, otherwise you will start to have a splitter behaviour. Taking half of the capacity of the belt while the other half remains in the belt. This is not a big issue as is the balanced approach. All the outputs of the belt will work even if scarcity of resources (or lack of compensation) or lack of compensation.
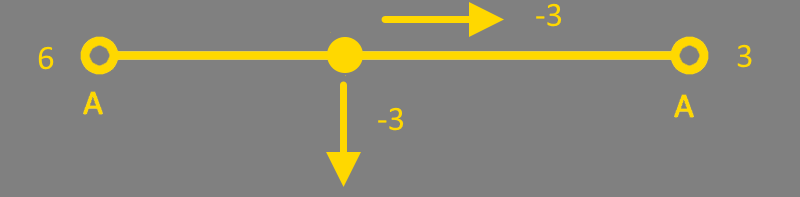
Despite that, if you want to manipulate its behavior, you can change the priorities of the outputs to have two behaviours. You can either:
- Prioritize the belt (left case) disabling that section of the factory if the belt is not at full capacity. Only the excess will go to the factory.
- Prioritize the factory (right case) the factory will absorb all the belt. Only if in excess, the remaining resources will remain on the circular belt.
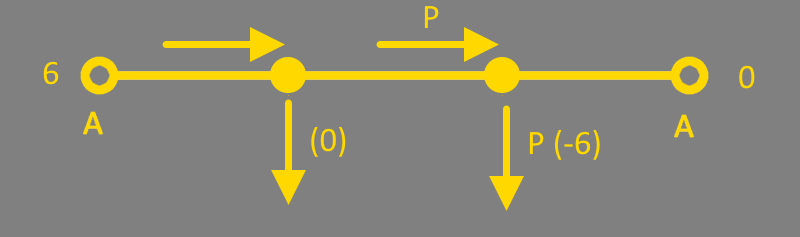
We have an iron ingot belt, we have two inputs sequentially and then two factories that take the input. It is most probably that the belt will behave like this.
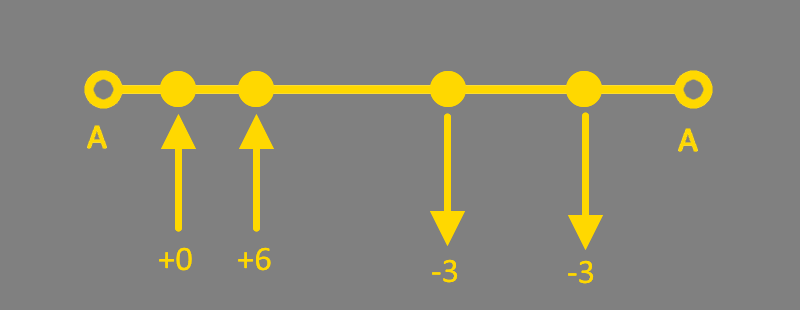
The reason is that we are working with a belt of tier 1 and its top capacity is 6. To solve this we can follow several solutions:
- Add a new input between outputs.
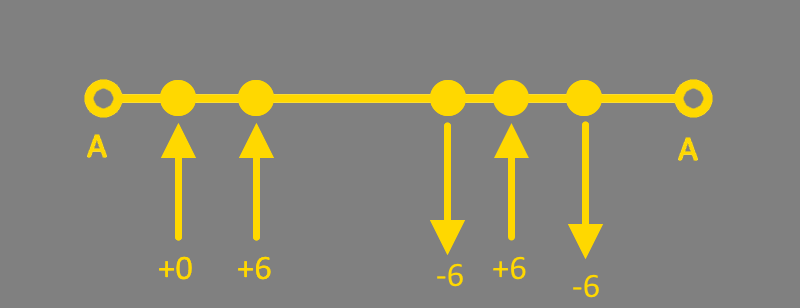
- Do a bypass
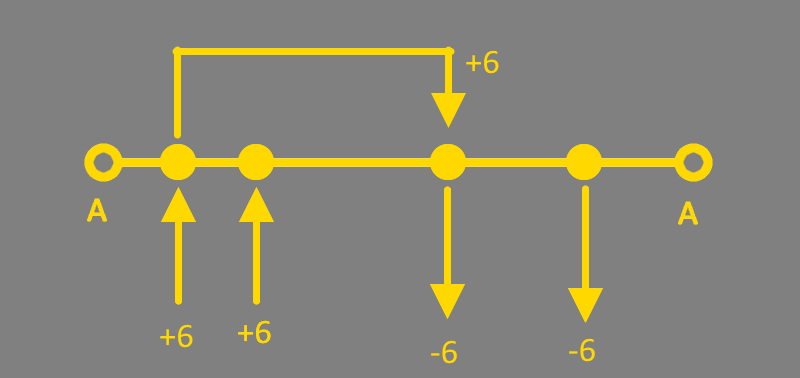
- Raise the tier of the belt.
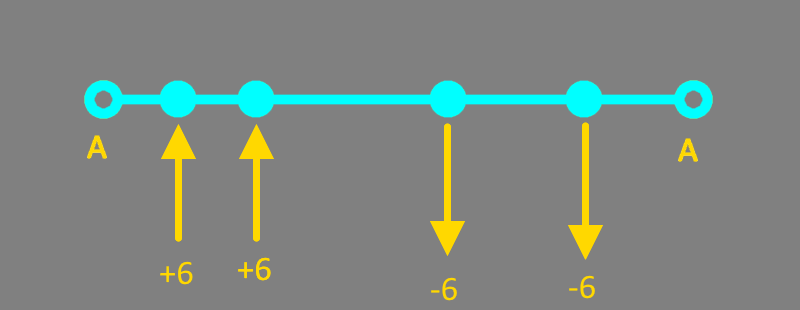
If you don’t construct in the polar region buildable space, you can use it to perform the bypass action as it is easier to do there.
Otherwise consider the addition of a new input or the upgrade of the belt. From our experience level 2 is enough to cope with normal case use. Most of the factory will saturate at a given point so the inputs/outputs will gradually balance. The only constant flow will be the chaing elements associated to science, fron belt inputs to science outputs.
With the dynamics you have seen, you can also create "buffers" at given points to mitigate the belt dynamic behaviour. The role of this buffers is to provide to the belt when under heavy stress and to substract when saturated. This is also useful as a place where you can tap to extract resources if needed. The key to set up a buffer is to always prioritize the circular belt as input/output w.r.t. to the connection of the buffer, so when full, the excess will go to storage and when empty, the storage will compensate the belt.
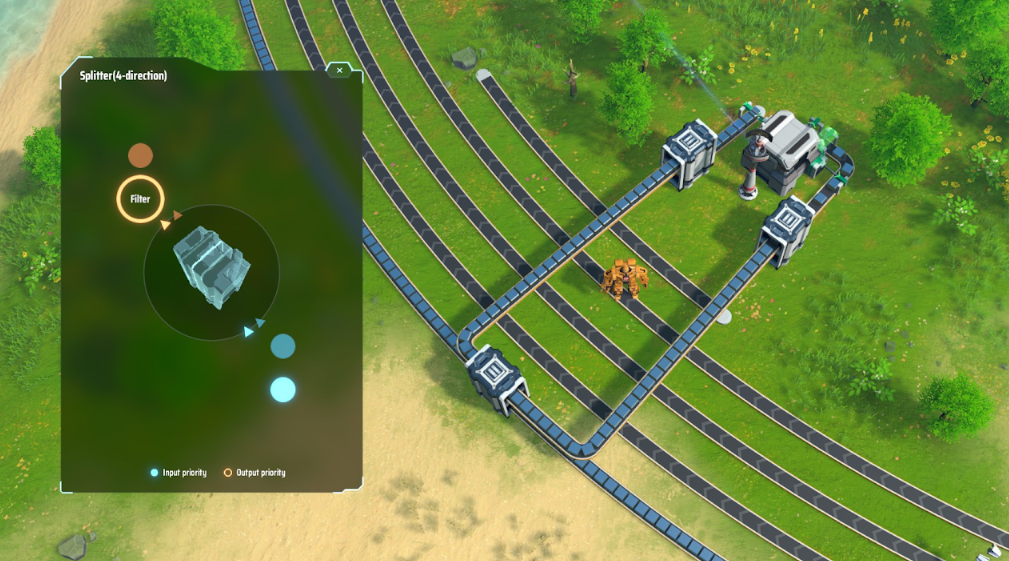
Example of iron depot/buffer.
- Dyson Sphere Program Production Chain Layouts★ 5 (1.2k)58k views2.8k ♥29 minUpdated 17 Dec, 2023
- Dyson sphere design and construction★ 5 (334)35k views761 ♥39 minUpdated 6 Feb
- A Set of Basic Factory Blueprints★ 5 (403)29k views1.1k ♥5 minUpdated 15 Sep, 2024
- Basic Basics★ 5 (322)29k views529 ♥8 minUpdated 25 Dec, 2022
- Main Bus Design★ 4 (174)27k views315 ♥3 minUpdated 25 Jan, 2021
- Plots - An orderly, flexible, resilient approach to planetary organization★ 5 (331)24k views719 ♥23 minUpdated 10 Jan, 2024


- Upgrading to PremiumTeam Fortress 2★ 5 (20k)1441k views11k ♥6 minUpdated May 11, 2022
- No More Room in Hell Official ManualNo More Room in Hell★ 5 (2.8k)569k views2.1k ♥29 minUpdated Apr 22, 2019
- NMRiH Community Hosting GuidesNo More Room in Hell★ 5 (526)351k views653 ♥1 minUpdated Aug 10, 2022
- How to 'Git Gud' Soon™MORDHAU★ 5 (2k)318k views3k ♥68 minUpdated Nov 16, 2024
- Лучшие кооперативные игры SteamPAYDAY 2★ 5 (1.5k)315k views2.1k ♥56 minRussianUpdated Apr 27, 2025
- Desert Eagle Heat Treated | Blue GemCounter-Strike 2★ 5 (1.6k)292k views1.5k ♥2 minUpdated Jan 16





This guide was created by its original author on the Steam Community. Are you the author and want it removed? Request removal.