Modding Tutorial: Icons and Leader Images
Introduction
- This tutorial uses "->" to represent choices in a context menu, such as in a right-click or drop-down list.
- Regularly hit Ctrl+Shift+s to save all when working in your project.
- For steps that are similar or identical to preceding steps, images are largely omitted.
- The method by which leader icons are added in this guide can be used to add icons for most other elements of the game, such as civilization or unit icons.
- There are several mentions of the SDK assets folder, which can be found at steamapps\common\Sid Meier's Civilization VI SDK Assets\Civ6\pantry\Textures.
Preparation: Rename Art.xml, Create Folders
A solid preparation phase means fewer—hopefully zero—broken icons or Cleopatra leader images in the future.
First thing's first, right-click your Art.xml file in your Solution Explorer -> Rename, and change any underscores to spaces (unless you actually have underscores in your project name). Otherwise, when we go to use Asset Editor later, it'll throw a hissy fit. Don't launch Asset Editor quite yet.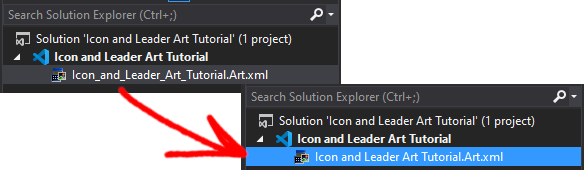
⠀
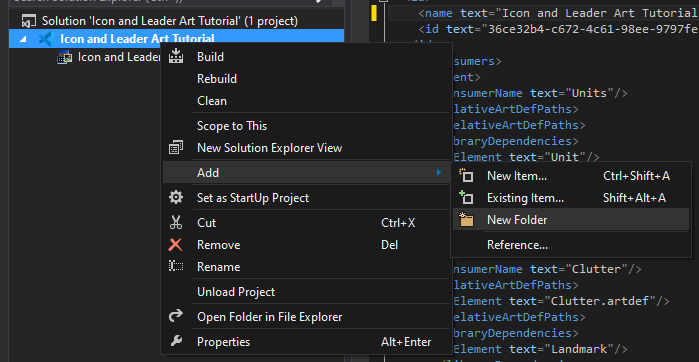
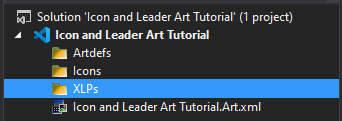
Let's yeet some folders into this project. Right-click the project name -> Add -> New Folder. We want the following folders at root level: Artdefs, Icons, XLPs.
Preparation: Project Files
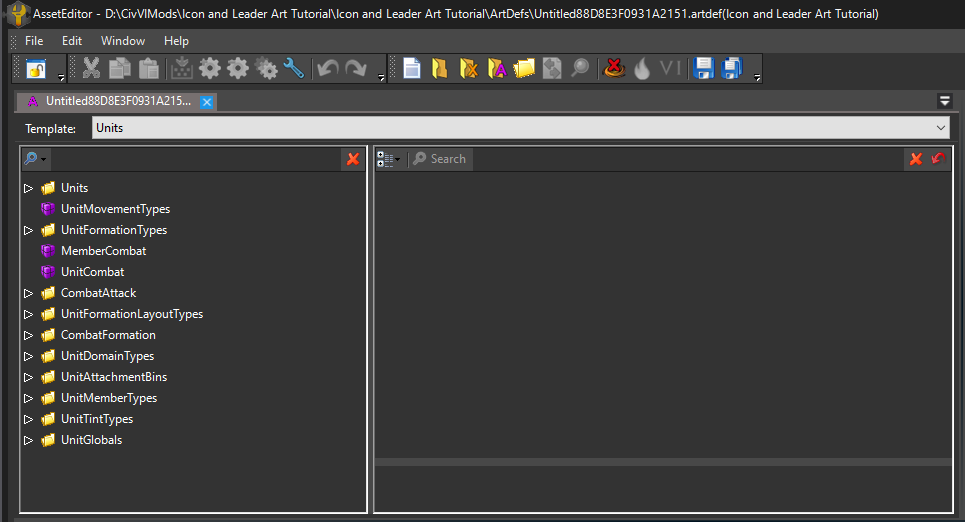 From the Template drop-down -> Leaders. Ctrl+s and save as Leaders in your project's Artdefs folder, but don't close it just yet.
Now right-click the Leaders entry in your artdef -> Add Element, and an element with a green dot should appear.
From the Template drop-down -> Leaders. Ctrl+s and save as Leaders in your project's Artdefs folder, but don't close it just yet.
Now right-click the Leaders entry in your artdef -> Add Element, and an element with a green dot should appear.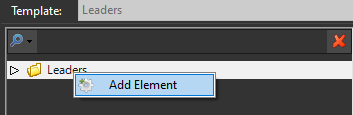 Click that element to bring up its details in the right panel.
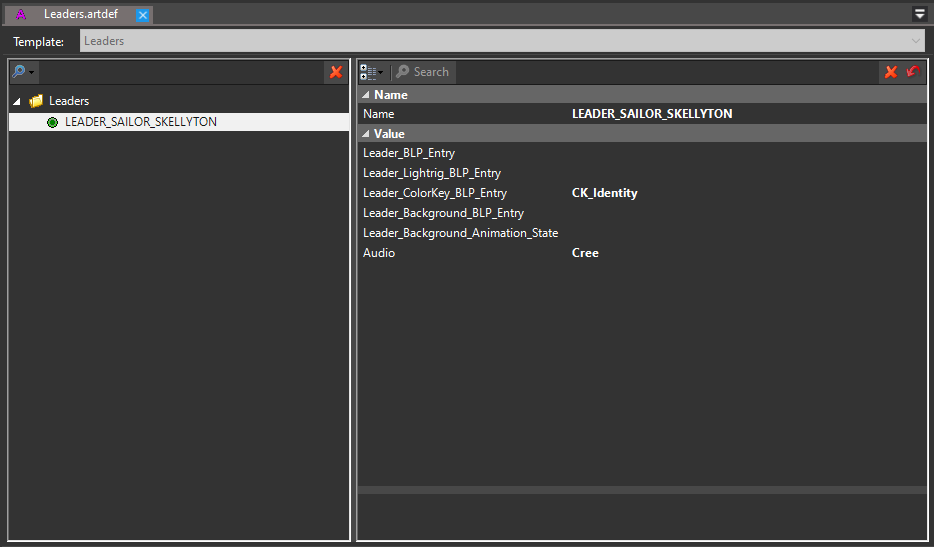 Change the Name field to your leader's LeaderType as defined in the database. In my case LEADER_SAILOR_SKELLYTON. Change the Audio field to the civilization whose music you'd like your leader to use. I chose Cree because I hate myself. Ctrl+s to save. Ctrl+w to close.
Now right-click the Leaders entry in your artdef -> Add Element, and an element with a green dot should appear. Click that element to bring up its details in the right panel. Change the Name field to your leader's LeaderType as defined in the database. In my case LEADER_SAILOR_SKELLYTON. Now right-click Animations -> Add Element, and a new line should appear in the right pane. Looking to add portraits that change depending on the leader's mood? If so, check below for a few more steps. Otherwise: Ctrl+s to save. Ctrl+w to close. We'll come back to this later. Continue to the "XLPs" section below.
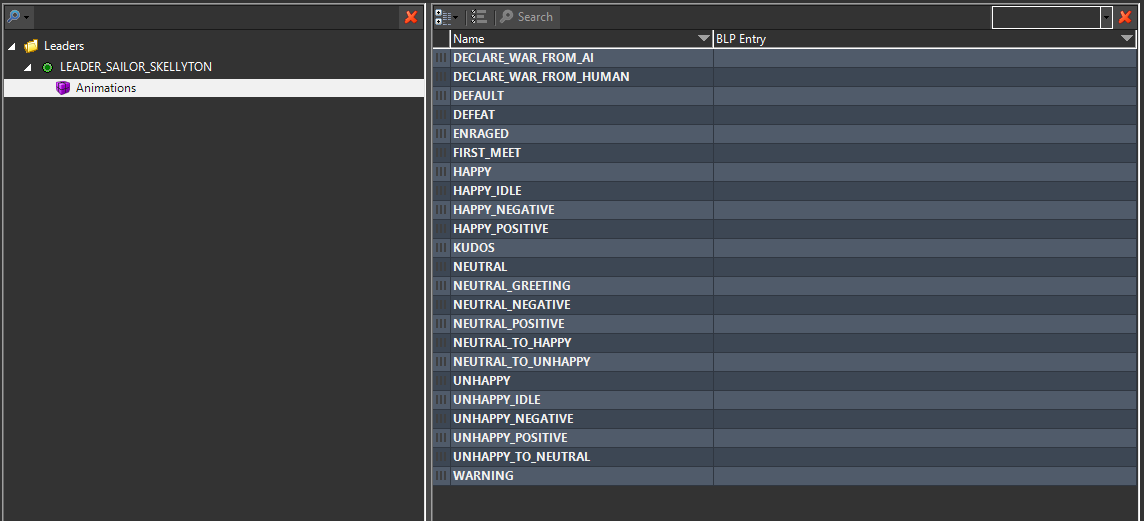
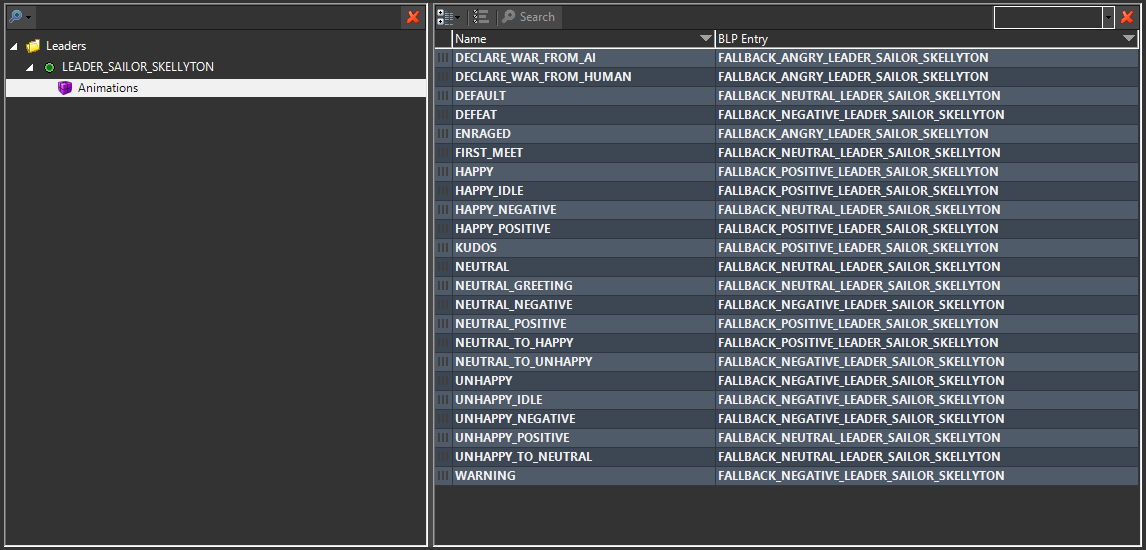
Only consult this section if you're adding multiple mood portraits for your leader. You're going to want to repeat the right-click Animations -> Add Element process until you have 23 lines. Use the following list for entries in the Name column. Each new entry is separated by a comma: DECLARE_WAR_FROM_AI, DECLARE_WAR_FROM_HUMAN, DEFAULT, DEFEAT, ENRAGED, FIRST_MEET, HAPPY, HAPPY_IDLE, HAPPY_NEGATIVE, HAPPY_POSITIVE, KUDOS, NEUTRAL, NEUTRAL_GREETING, NEUTRAL_POSITIVE, NEUTRAL_TO_HAPPY, NEUTRAL_TO_UNHAPPY, UNHAPPY, UNHAPPY_IDLE, UNHAPPY_NEGATIVE, UNHAPPY_POSITIVE, UNHAPPY_TO_NEUTRAL, WARNING. The BLP Entry column will contain the names of the files you want to use for these moods, but we'll come back to this once we've actually imported the files. For now, your artdef should look like the image below. Ctrl+s to save. Ctrl+w to close.
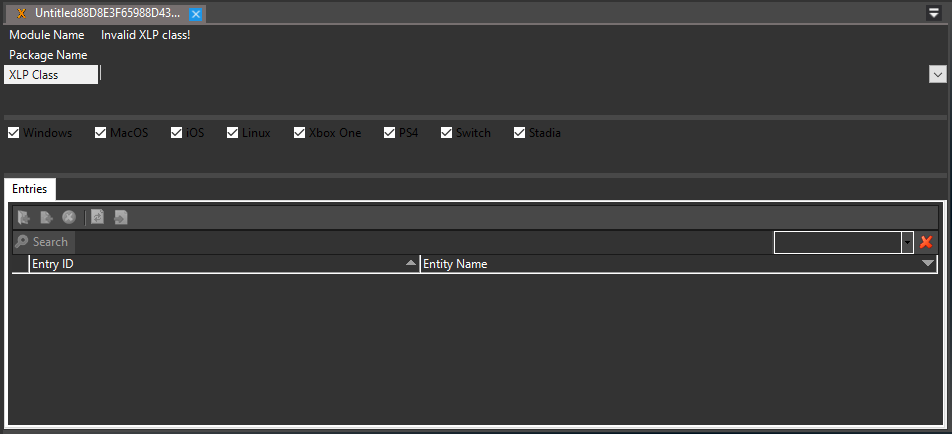 From the XLP Class drop-down -> UITexture. Enter UI/Icons in the Package Name field.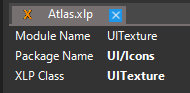
Ctrl+s and save as Atlas in your XLPs folder. Ctrl+w to close.
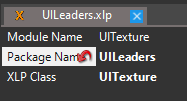
Ctrl+s and save as UILeaders in your XLPs folder. Ctrl+w to close.
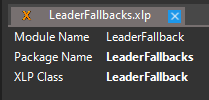
Ctrl+s and save as LeaderFallbacks in your XLPs folder. Ctrl+w to close.
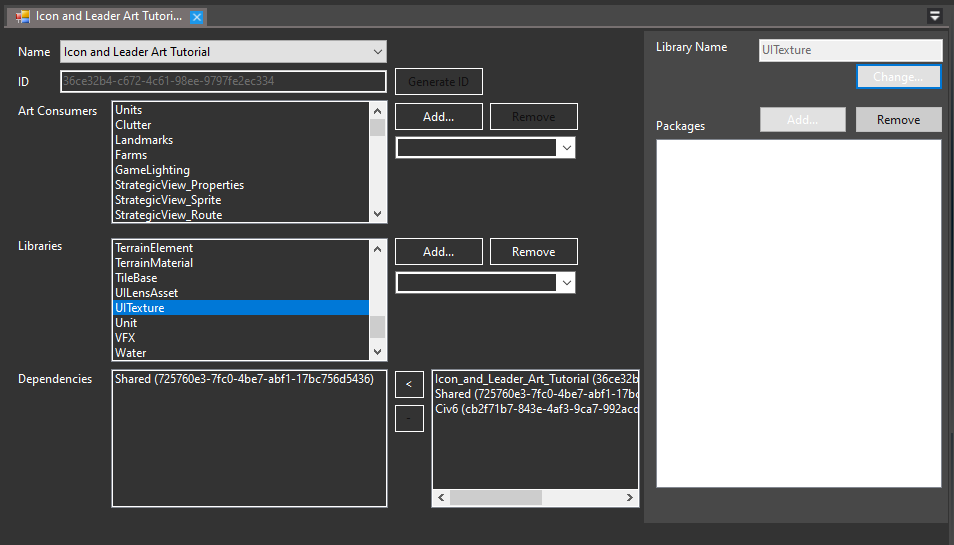
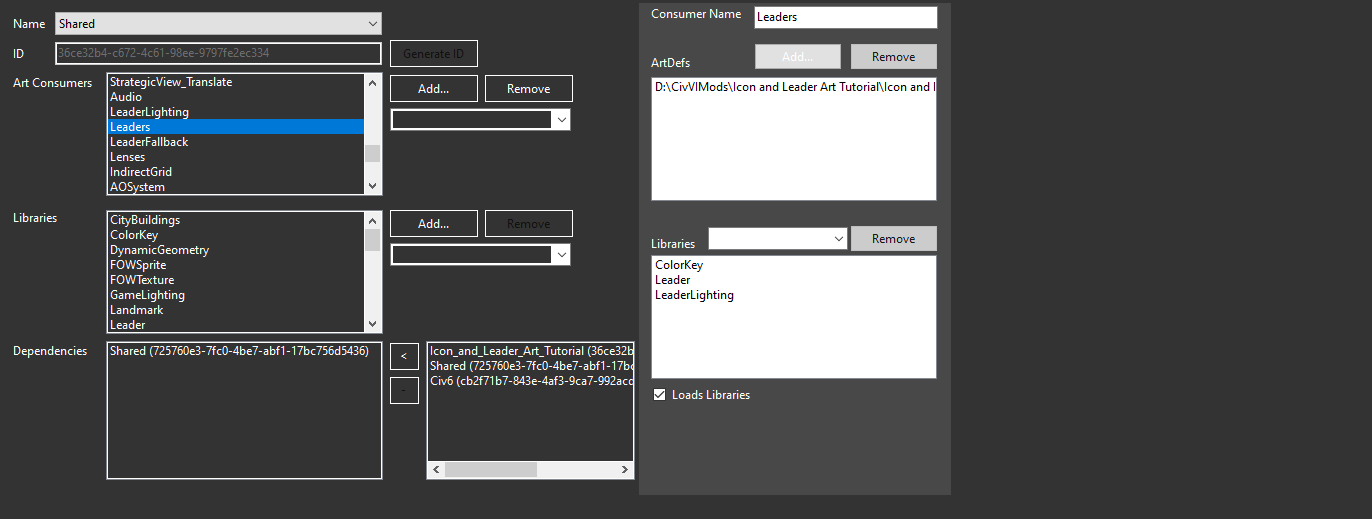
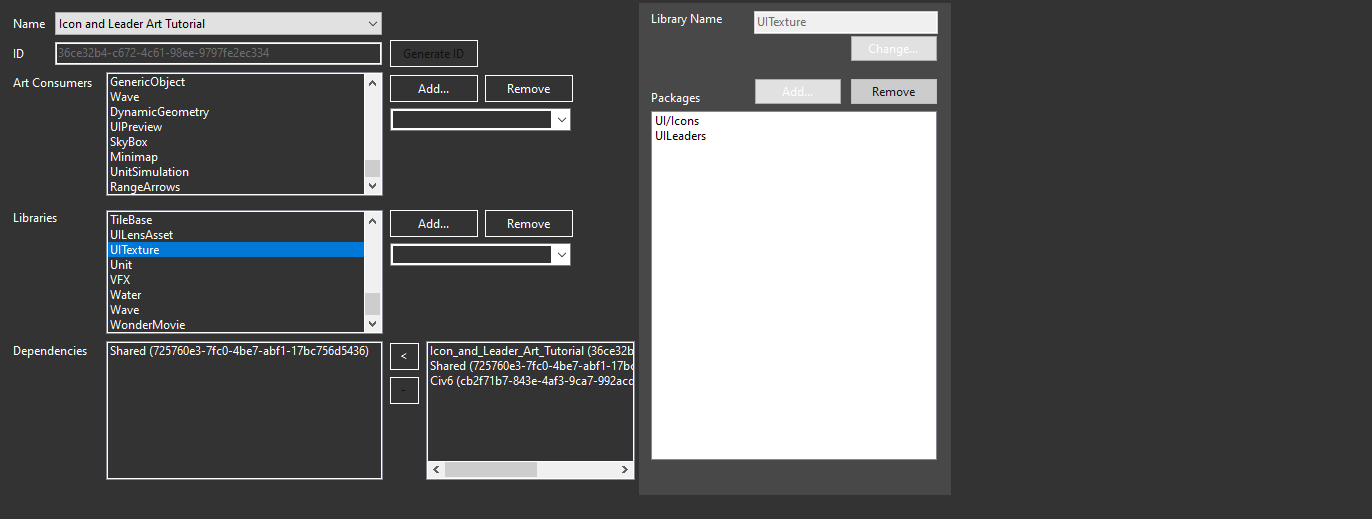
Ctrl+s to save. Ctrl+w to close.
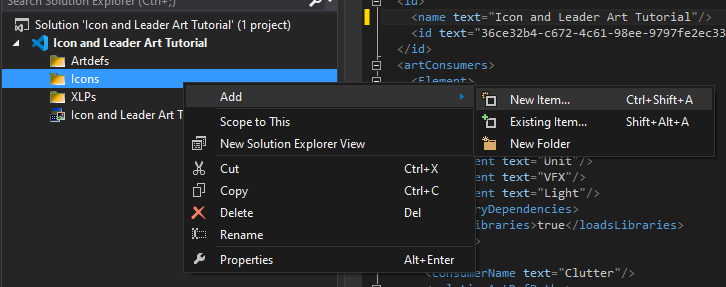
Now, switch from Asset Editor back to your Modbuddy project. In solution explorer, right-click the Artdefs folder -> Add -> Existing Item... and choose the two artdef files you created. Next, right-click the XLPs folder -> Add -> Existing Item... and choose the three xlp files you created. Your solution explorer probably won't have only these folders and files, but it should have at least these folders and files: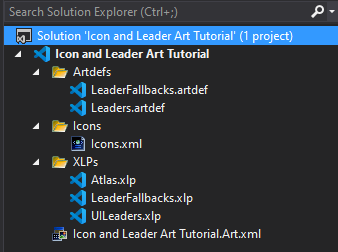
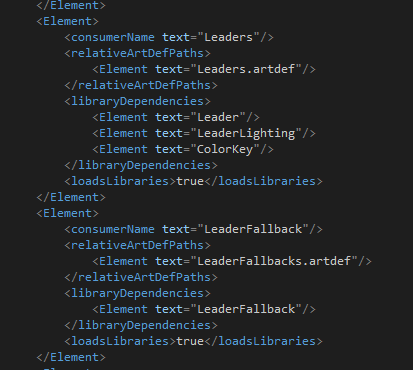
* Open your Art.xml in Modbuddy. Ctrl+f to search for Leaders.artdef in Current Document. Change it to <Element text="Leaders.artdef"/> removing the folder path. Do the same thing with LeaderFallbacks.artdef, changing it to <Element text="LeaderFallbacks.artdef"/>. Ctrl+s to save.
Preparation: Actions
 ⠀
⠀
- Switch to the FrontEnd Actions tab.
- Now click the Add Actions button. This will add an UpdateDatabase action by default.
- Click that, and it'll expand to the right with ID, Type, Custom Properties, and Files.
- Change the ID field from NewAction to Icons.
- Click the Type drop-down where it says UpdateDatabase, and choose UpdateIcons.
- To the right of the Files box, click Add. A prompt will appear with the File and Priority options.
- From the drop-down, choose Icons/Icons.xml. Leave Priority empty. Click OK.
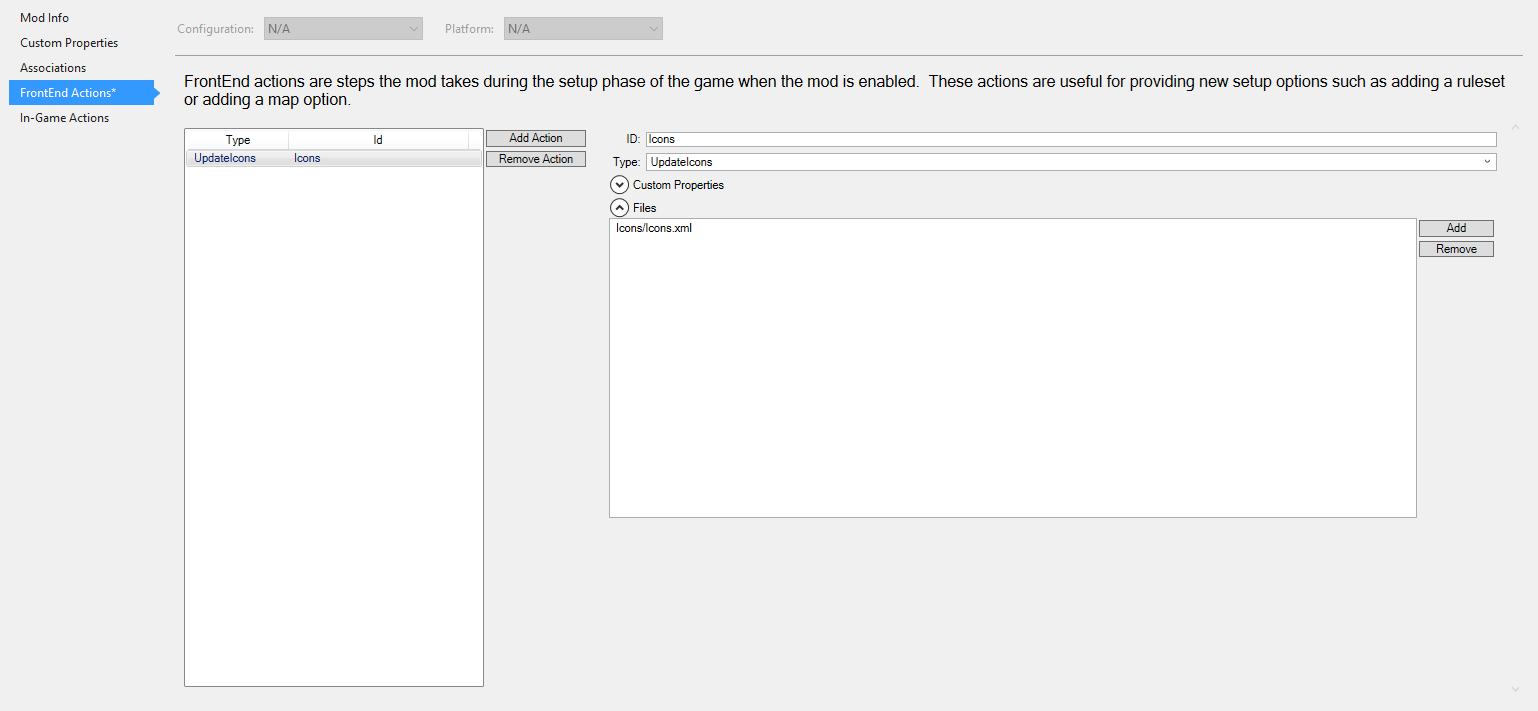
Click the In-Game Actions tab and repeat the previous instructions.
- Switch to the FrontEnd Actions tab.
- Now click the Add Actions button. This will add an UpdateDatabase action by default.
- Click that, and it'll expand to the right with ID, Type, Custom Properties, and Files.
- Change the ID field from NewAction to Art.
- Click the Type drop-down where it says UpdateDatabase, and choose UpdateArt.
- To the right of the Files box, click Add. A prompt will appear with the File and Priority options.
- From the drop-down, choose (Mod Art Dependency File). Leave Priority empty. Click OK.
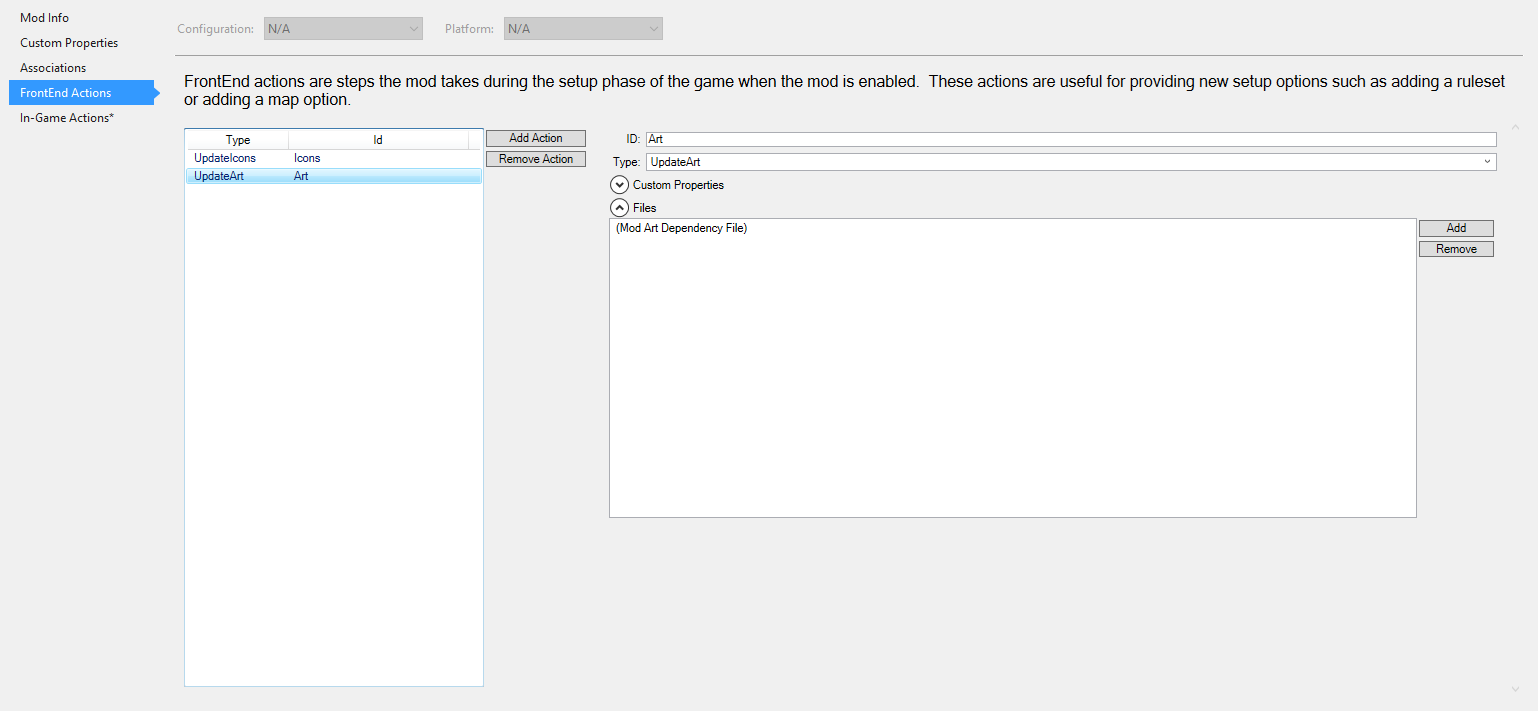
Click the In-Game Actions tab and repeat the previous instructions.
- Switch to the FrontEnd Actions tab.
- Now click the Add Actions button. This will add an UpdateDatabase action by default.
- Click that, and it'll expand to the right with ID, Type, Custom Properties, and Files.
- Change the ID field from NewAction to Config.
- To the right of the Files box, click Add. A prompt will appear with the File and Priority options.
- From the drop-down, choose Config.sql (or your config file). Leave Priority empty. Click OK.
Preparation: SQL
Tip: You can change the BackgroundImage column to a background used by an existing leader, such as LEADER_GORGO_BACKGROUND for red. More info below in the Leader Backgrounds section of Image Creation
- Portrait: This generally goes unused unless you're using a custom portrait specifically for leader selection (see Image Creation below).
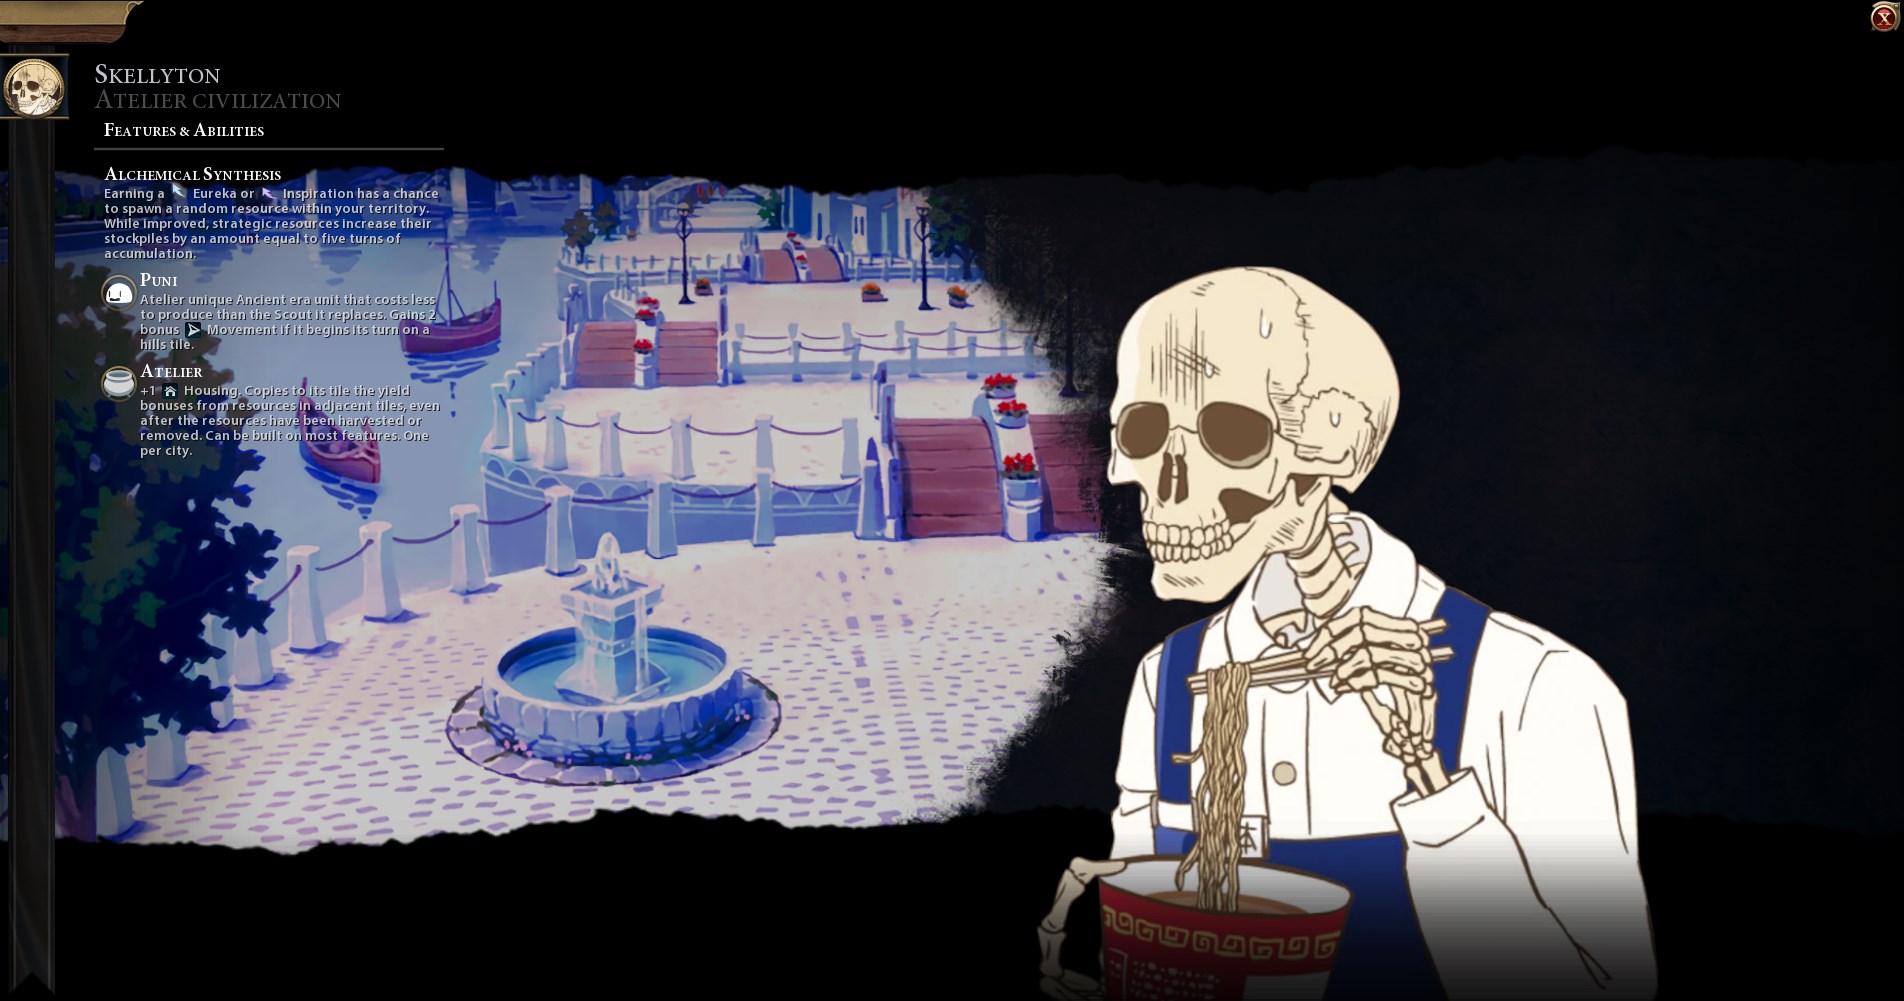
- PortraitBackground: Your leader's background. Typically uses the same background used during loading, but can be customized. (LEADER_SAILOR_SKELETON_BACKGROUND)
- LeaderIcon, LeaderAbilityIcon: Your leader's portrait icon without the size attached. Both entries are typically identical. (ICON_LEADER_SAILOR_SKELLYTON)
- CivilizationIcon, CivilizationAbilityIcon: The alpha image of your civilization's icon (white with transparent background).
Image Creation
Proper preparation is what makes all this go as it should. For image creation, just grab GIMP, Photoshop, or some alternative. Learning how to use any image manipulation software is beyond the scope of this tutorial.
Don't worry about saving as .dds. You don't need to anymore, so it isn't worth the effort. .png only. .png is seiso. All image layers should be merged before saving (only one layer!). Otherwise, don't start bawling when your art's bonkers.
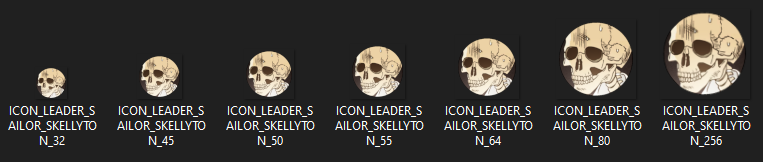
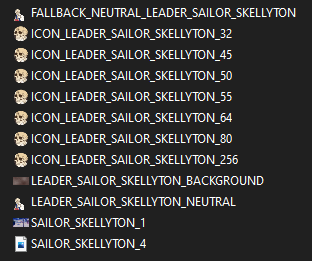
- Sizes (square): 256, 80, 64, 55, 50, 45, 32
- On a 256x256 image, your portrait icon should have empty padding of about 10 pixels on each side. One way to achieve this is to first make your portrait as a 235x235 image, then increase the canvas size to 256x256 when you've finished, centering the portrait on the new canvas.
- Naming convention:
- ICON_LeaderType_Size.png
- Ex: ICON_LEADER_SAILOR_SKELLYTON_256.png
- ICON_LeaderType_Size.png
 ⠀
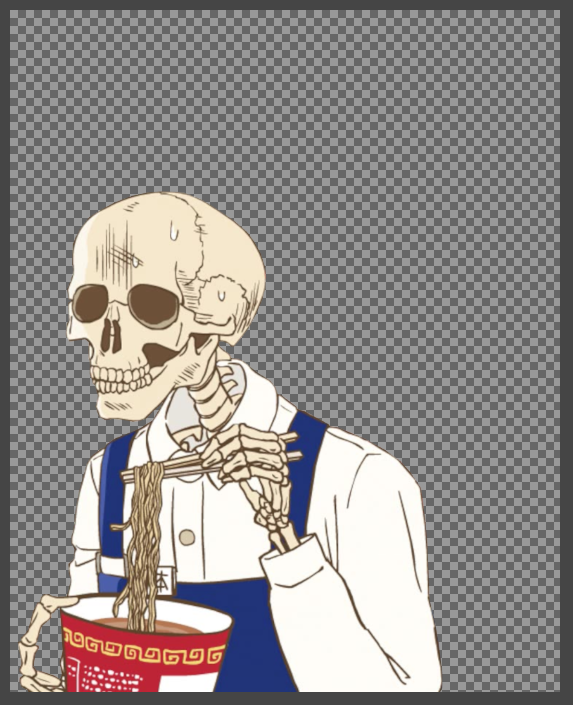
⠀- Size: 825x1024
- Your leader should be aligned to the left side of the image, completely within the frame, with about 40% of the image empty. This gives your leader some padding in relevant screens. You can fiddle with the width if you'd like more padding.
- Naming convention (save two copies):
- FALLBACK_NEUTRAL_LeaderType.png
- Ex: FALLBACK_NEUTRAL_LEADER_SAILOR_SKELLYTON.png
- LeaderType_NEUTRAL.png
- Ex: LEADER_SAILOR_SKELLYTON_NEUTRAL.png
- FALLBACK_NEUTRAL_LeaderType.png
Only consult this section if you're adding multiple mood portraits for your leader. Normally, a static leader portrait will use FALLBACK_NEUTRAL. However, if you followed the preparation step earlier for multiple portraits in your LeaderFallbacks.artdef, you can create as many different portraits as there were moods in the Name column. For each image change NEUTRAL in the filename to a mood for which you'd like to use that portrait. Examples:Example Portrait:
- FALLBACK_NEUTRAL_LEADER_SAILOR_SKELLYTON
- FALLBACK_ANGRY_LEADER_SAILOR_SKELLYTON
- FALLBACK_POSITIVE_LEADER_SAILOR_SKELLYTON
⠀
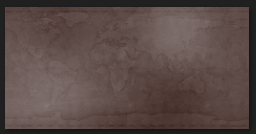
- Size: 1920x960
- Naming convention:
- LeaderType_BACKGROUND.png
- Ex: LEADER_SAILOR_SKELLYTON_BACKGROUND.png
- LeaderType_BACKGROUND.png
Tip: You can skip this step (and all further steps relating to _BACKGROUND.png) by changing the BackgroundImage column in the LoadingInfo table to a background used by a civ leader, such as LEADER_GORGO_BACKGROUND for red. Leugi made a handy reference image for exactly this, which he has kindly allowed me to use here.
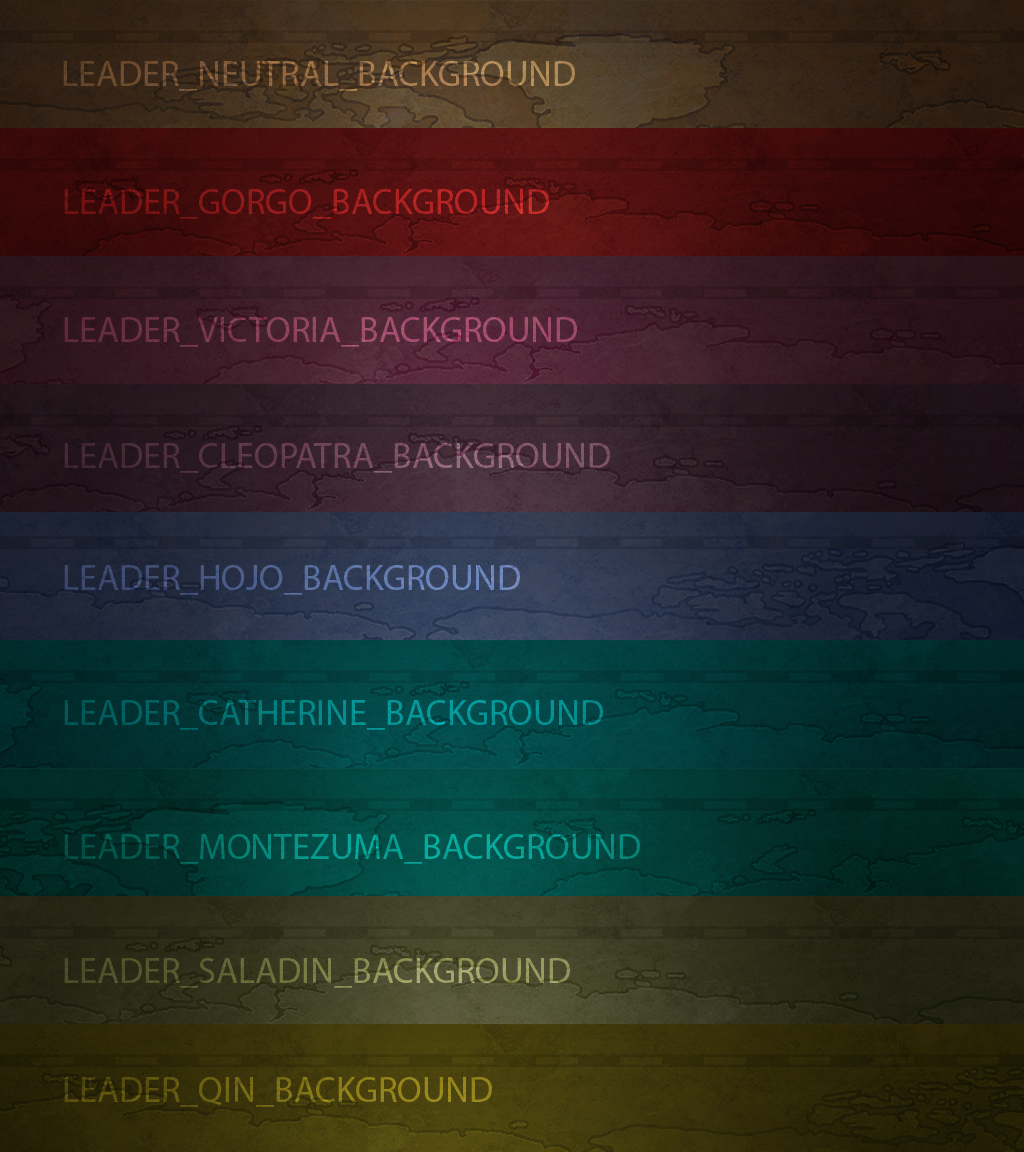
I've uploaded the stylized frame (4) here[i.imgur.com], but you can normally find it in the SDK assets folder. The frame often has a color applied to it.
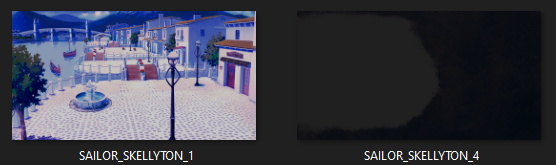
- Size: 1920x1010
- Naming convention:
- Background art: Remove LEADER from LeaderType_1.png
- Ex: LeaderType LEADER_SAILOR_SKELLYTON becomes SAILOR_SKELLYTON_1.png
- Frame: Remove LEADER from LeaderType_4.png
- Ex: LeaderType LEADER_SAILOR_SKELLYTON becomes SAILOR_SKELLYTON_4.png
- Background art: Remove LEADER from LeaderType_1.png
Tip: If you have a wide chongus leader who doesn't fit leader select all that well, you can create a tailored LEADER_SAILOR_SKELLYTON_SELECT.png in addition to _NEUTRAL.png and add it to your Config file by inserting LEADER_SAILOR_SKELLYTON_SELECT into the Portrait column of the Players table.
Tip: Ever wonder what happens between _1 and _4? Some leaders have props or layers that appear below layer _4 and move to create a more involved parallax effect. You can find examples in the SDK assets folder, and if you wish, you can add your own by using the established naming convention and using images with filenames ending in _1, _2, and _3.
Importing Images
Time to import these bad boys in Asset Editor. Tools -> Launch Asset Editor...
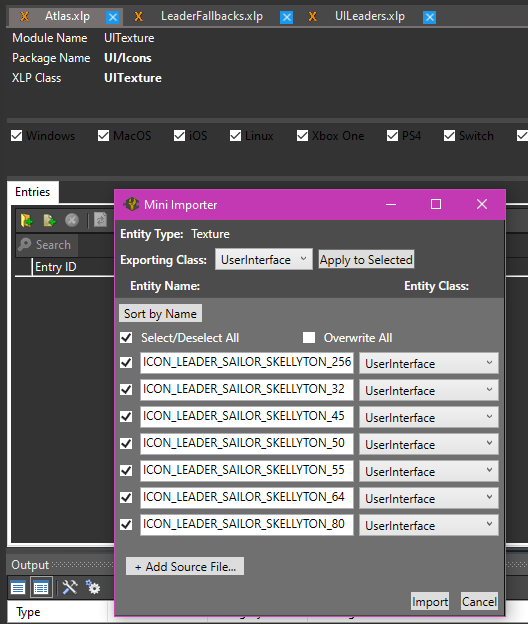
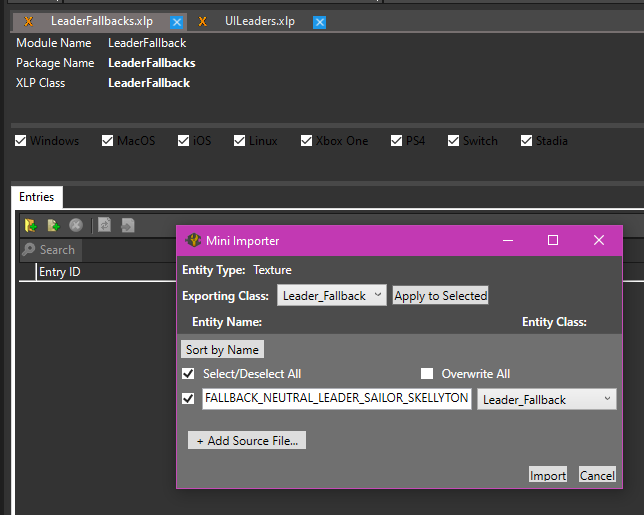
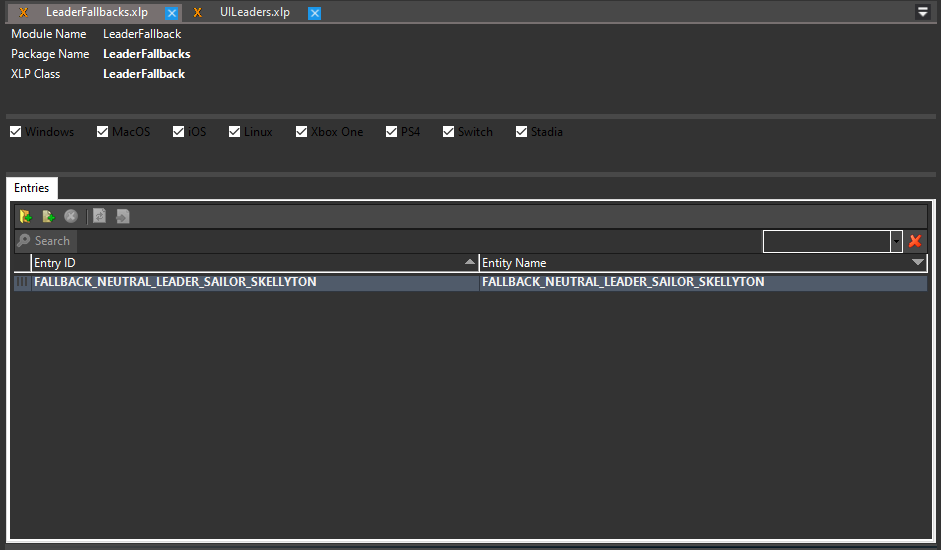
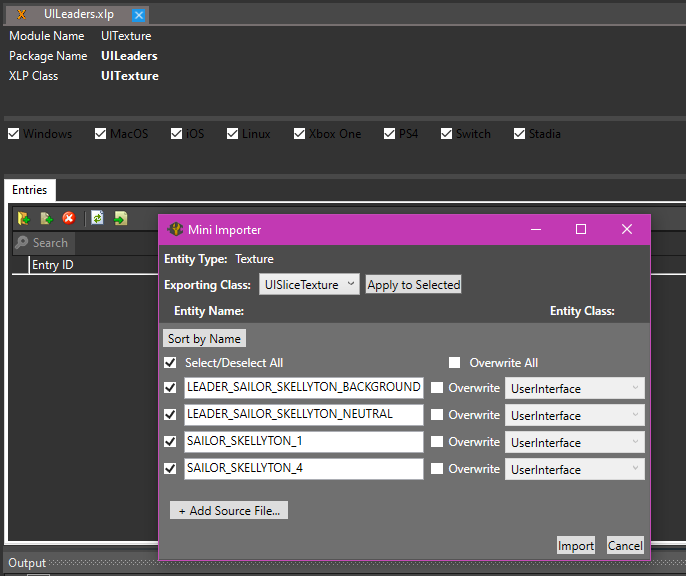
With Asset Editor open, File -> Open XLP. Open Atlas, LeaderFallbacks, and UILeaders.
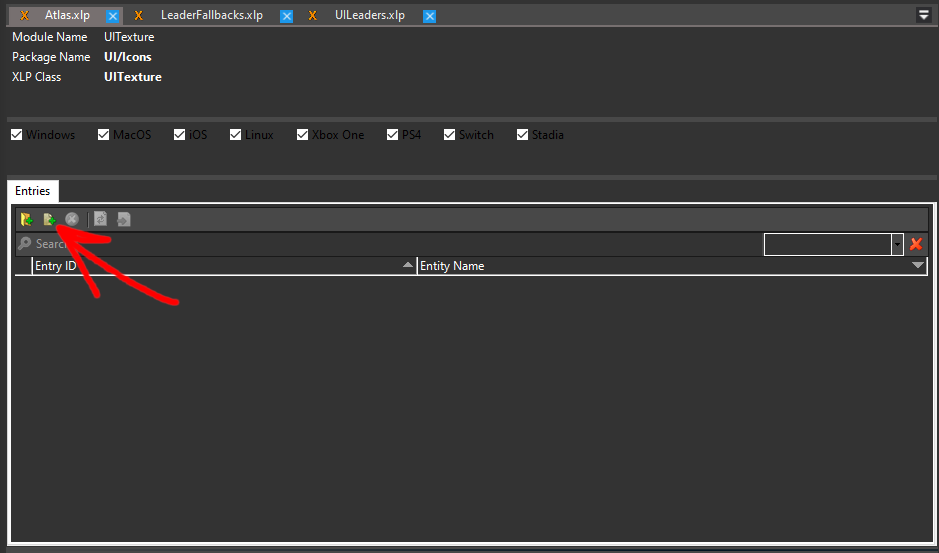 ⠀
⠀
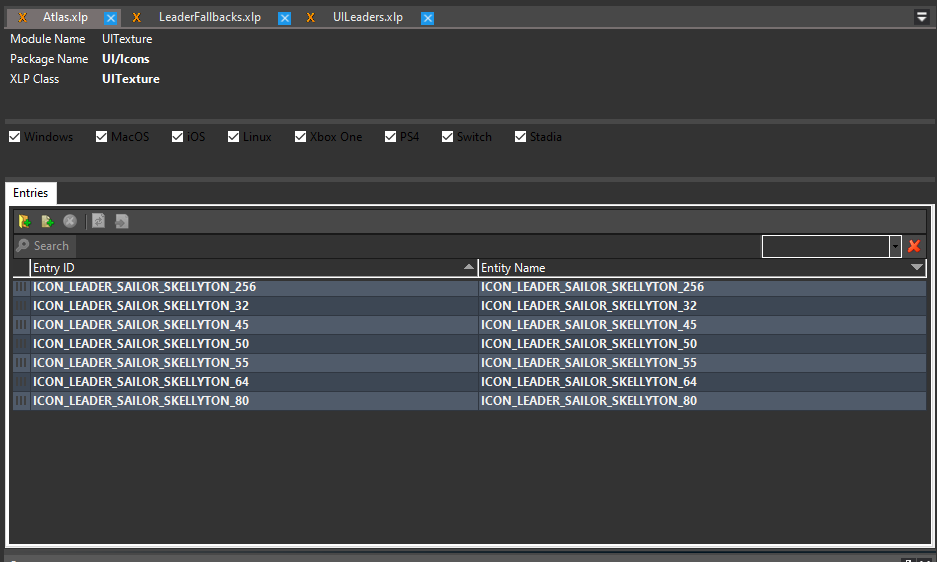
LeaderFallbacks.xlp
UILeaders.xlp
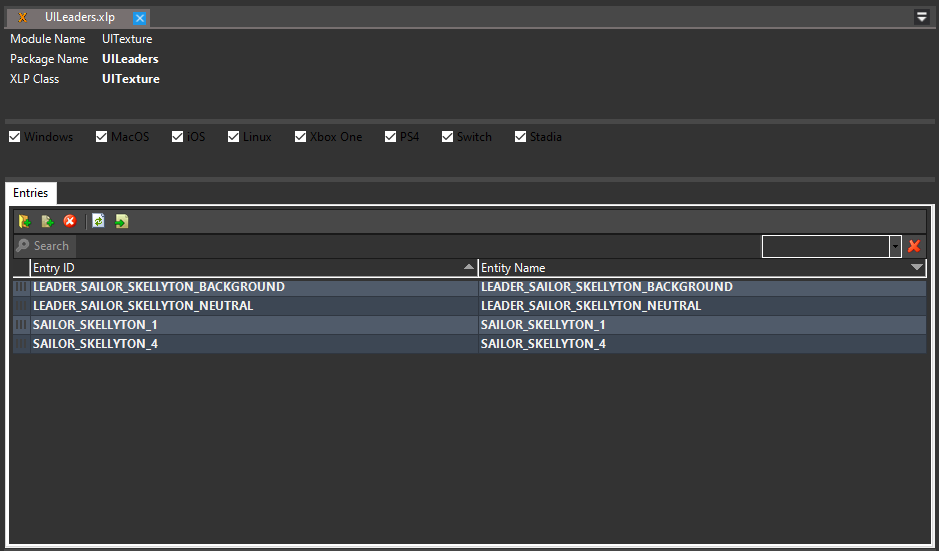 ⠀
⠀LeaderFallbacks.artdef
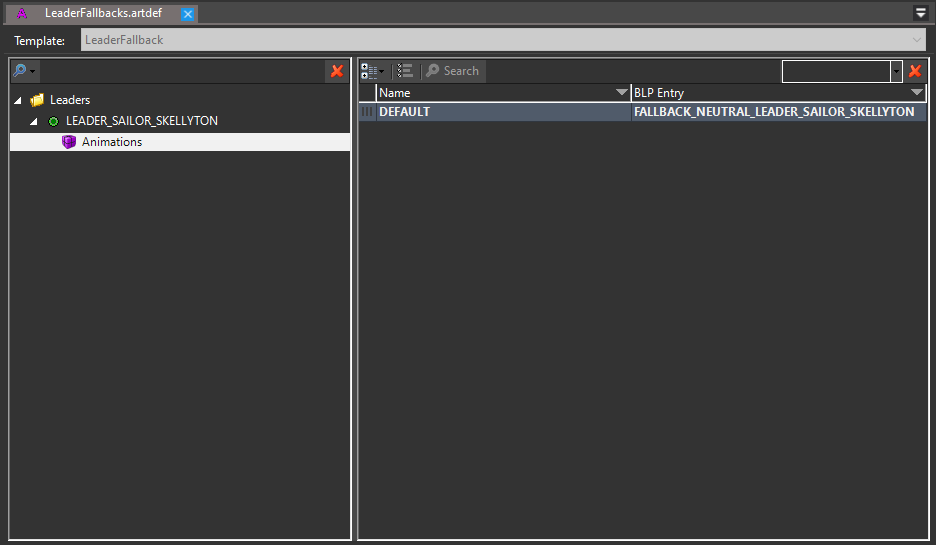
Only consult this section if you're adding multiple mood portraits for your leader. For each value in the BLP Entry column, you're going to add the name of the leader mood portrait that you want the game to use for that leader state. For example, you might want to use FALLBACK_POSITIVE_LEADER_SAILOR_SKELLYTON for the HAPPY row. When you've finished, your artdef should look something like the image below. Ctrl+s to save. Ctrl+w to close.
Close Asset Editor.
Icons.xml
IconDefinitions tells Modbuddy what texture atlas to look at for the icons for your leader. IconTextureAtlases tells Modbuddy what the files are, and where to look in them. It could be more complicated than this, but K.I.S.S.
Finished
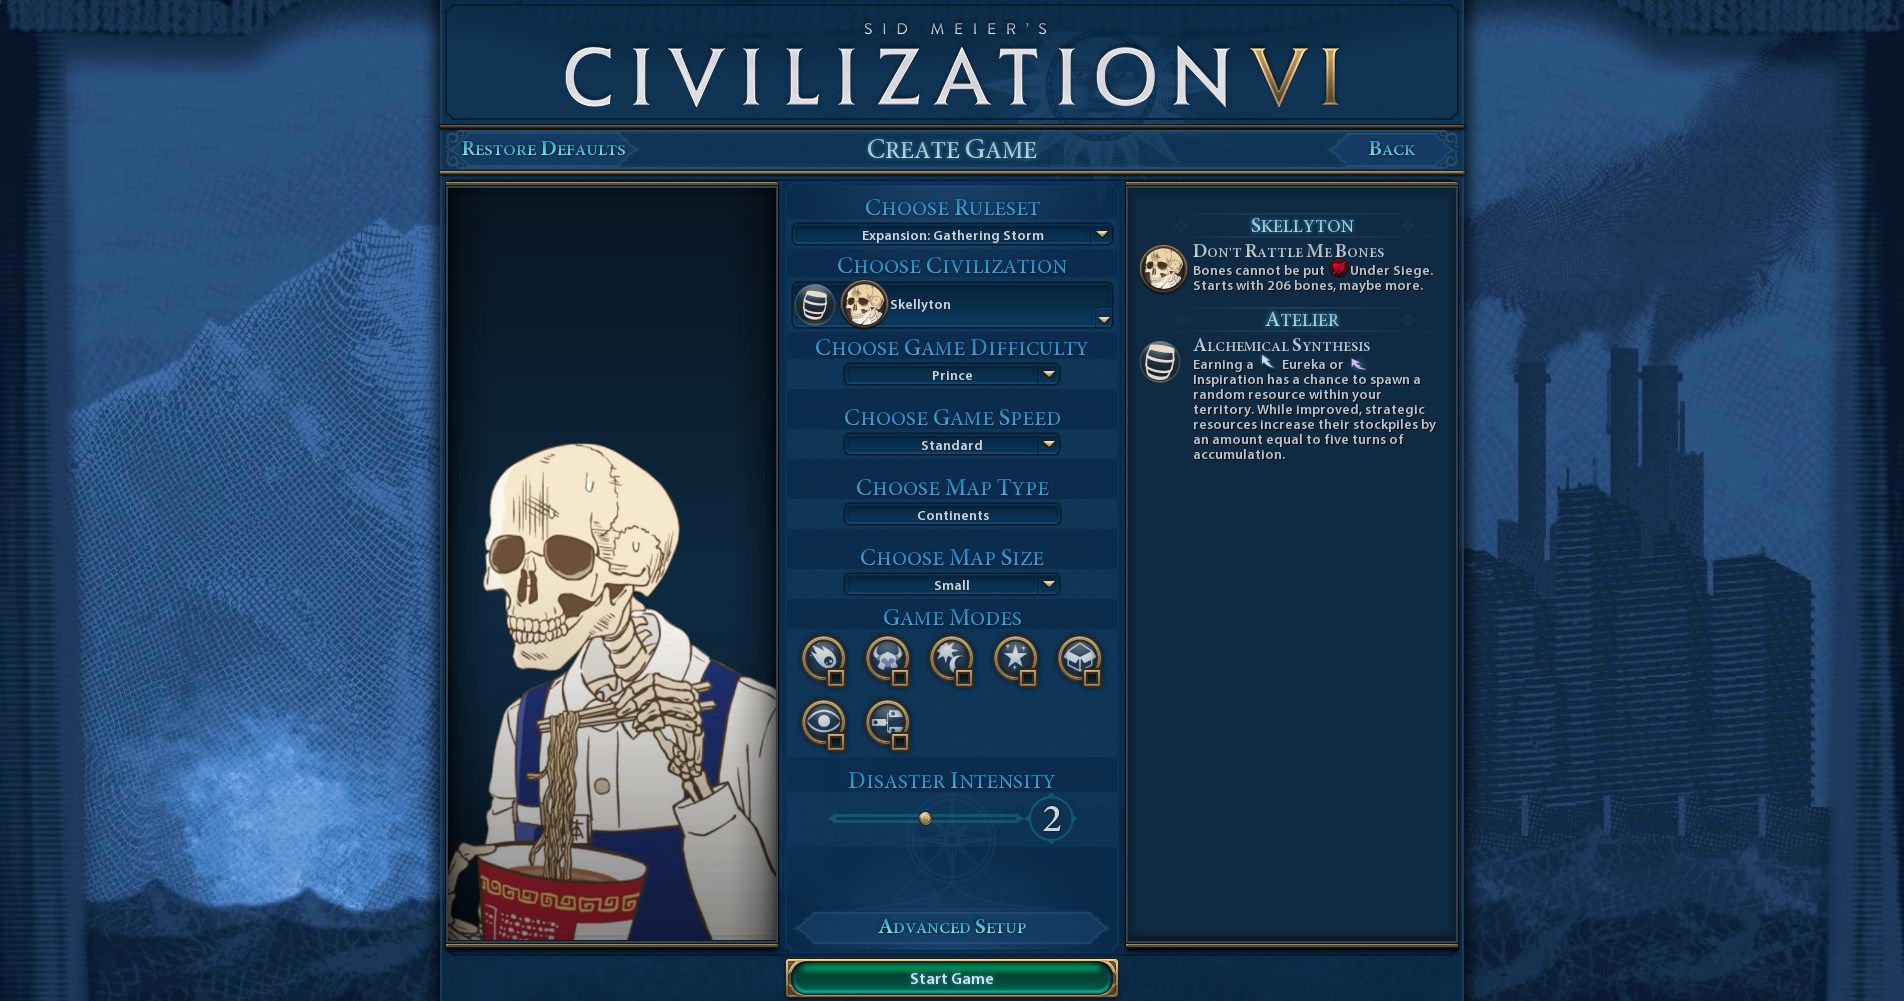
If you need help, want to help others, or simply want to take part in the modding community, you're welcome to join the Civ VI Modding Helpline Discord[discord.gg]
Addendum: Only icons?
- Better Balanced Game (BBG) Full Change Log (v6.0.x)★ 4 (120)62k views293 ♥62 minUpdated 27 Aug, 2025
- 100% achievements guide + tips & tricks (base game + all DLC's, include Gathering Storm)★ 5 (1.5k)57k views3.7k ♥146 minUpdated 4 Jan
- [EN] Early game strategy, or how not to get overwhelmed★ 5 (368)41k views1k ♥15 minUpdated 23 Jul, 2023
- All Victory Conditions and how to reach them!★ 5 (702)40k views1.2k ♥5 minUpdated Jun 17, 2020
- 新手指南 —— 从上手到上瘾! Civi-VI Game Guide★ 5 (1.7k)37k views3.2k ♥3 minSimplified ChineseUpdated 7 Sep, 2022
- Zigzagzigal's Guides - Japan (GS)★ 4 (141)34k views399 ♥67 minUpdated 2 Apr, 2023


- Upgrading to PremiumTeam Fortress 2★ 5 (20k)1441k views11k ♥6 minUpdated May 11, 2022
- No More Room in Hell Official ManualNo More Room in Hell★ 5 (2.8k)569k views2.1k ♥29 minUpdated Apr 22, 2019
- NMRiH Community Hosting GuidesNo More Room in Hell★ 5 (526)351k views653 ♥1 minUpdated Aug 10, 2022
- ULTIMATE GUIDE FOR GAME DEV TYCOONGame Dev Tycoon★ 5 (5.8k)326k views10k ♥4 minUpdated 23 Jan, 2014
- How to 'Git Gud' Soon™MORDHAU★ 5 (2k)318k views3k ♥68 minUpdated Nov 16, 2024
- Лучшие кооперативные игры SteamPAYDAY 2★ 5 (1.5k)315k views2.1k ♥56 minRussianUpdated Apr 27, 2025






This guide was created by its original author on the Steam Community. Are you the author and want it removed? Request removal.