Rogue Guide for Infinite Loops
Requirements
- Chapter 1
- None, but arsenal is helpful.
- Chapter 2
- Arsenal is required for this build to effectively infinite loop chapter 2. Outpost is required to reliably beat the boss, but it's not absolutely necessary.
- Chapter 3
- Desert/Dunes, River, Arsenal.
- Chapter 4
- Desert/Dunes, River, Smith's Forge, Arsenal.
Deck
- Cemetery, Ruins
- Spider Cocoon, Battlefield
- Not necessary, but useful or fun:
- Vampire Mansion, Bookery, Smith's Forge, Outpost
- Forest/Thicket, Desert/Dunes
- Not necessary, but useful or fun:
- River
- Oblivion
- Not necessary, but useful or fun:
- Temporal Beacon
- Arsenal
The Basics
Battlefield spawns ghosts which are great for getting cards. Ghosts can only come from monsters that have souls, which is why Cemetery and Ruins are included. Spiders don't have souls but they spawn fast which is great for trophies.
Do not overlap Battlefield areas of effect on the Wasteland. You don't want to deal with Blood Clots. You can overlap Battlefields if the overlap is on a Ruins or Cemetery, etc.
Ruins and Cemeteries grant good resources. These cards are included to give Souls-type monsters as well as good resource gain.
Desert/Dunes drop enemy health, Forests/Thickets grant attack speed. These combine to allow you to quickly dispatch groups of enemies.
Arsenal lets you use amulets to get magic health, which is critical due to the global health reduction from Desert/Dunes.
Oblivion should be used on forest villages. Watch your Forest/Thicket count. Be ready to Oblivion a village on the tenth Forest/Thicket placement.
Enhancements
Once you get the optional cards unlocked, adding them to the deck will make defeating the boss much more reliable.
Temporal Beacon makes the day bar fill faster. This makes monsters spawn faster, which gets you more trophies per loop. Cover the entire loop with the Temporal Beacon aura, but also cover the loop with the Vampire Mansions aura. The Watchers who spawn from Temporal Beacons cast shields which allow the monsters to run your magic hp strategy against you. Vampire Mansions will scare away the Watchers.
The River combo with Desert/Dunes reduce enemy attack speed. Don't bother putting Forests/Thickets adjacent to the River/Oasis. Once a Desert/Dunes is adjacent to a river, it transforms into an Oasis and no longer buffs Forests/Thickets. Instead the Oasis reduces enemy attack speed, which will reduce the rate at which the Chapter 2 boss summons.
If you have River, then try to place Battlefields on the outside edge of the loop and run your River past them. The tile transformation will give you yet another monster with a soul to kill.
Outpost makes the Chapter 2 boss a cinch. Get the campfire covered by two outposts. After that, just spread outposts around the map. They improve the reliability of your survival by giving enemies something else to hit. Due to the Rogue trophy mechanic, the Outpost will never take any loot from you.
Vampire Mansions add more souls-type monsters to your loop, granting more trophies and more ghosts. They also keep Time Watchers away. Cover the full loop with the Vampire Mansion aura.
Bookery allows you to be picky on terrain placement. You can place nothing but Thickets and Dunes to get maximum benefit. Let the Bookeries re-draw your Forests/Deserts to different cards! In Chapter 3+, the Abandoned Bookeries can be too dangerous. You may want to Oblivion them. The magic shields they cast allow the monsters to run your magic hp strategy against you.
Once the boss spawns, consider playing every single terrain card you have, even the Deserts/Forests. Get the maximum buff going into that fight.
Walkthrough
For all chapters, convert to focusing on attack speed up to +150% for the post boss looping. Getting much over 150% attack speed can cause stamina issues and other oddities. I find 150% is a sweet spot and you should get other stats like evasion or crit chance after that.
In general, my stat priority for rogue is Evasion > Crit Chance > Crit Damage > Attack Speed. I do not like counter because it is a stamina drain.
Exchanging Desert/Dunes for Rock/Mountain is a good substitute if you don't have Desert/Dune unlocked. Likewise using Meadows instead of Forest/Thicket will work. Be sure to Oblivion the Goblin Camps.
Completely surround the 8 squares adjacent to the campfire to block the boss castle spawns. This should be achievable with the arsenal, battlefields, spider cocoons, and cemeteries. Do not place a ruins adjacent to the campfire.
But consistency is going to come with the Outpost and River.
The trait that grants a Rat Wolf is good, but that is another random chance. If the Rat Wolf doesn't appear on the boss fight it's a waste.
- Drop the arsenal anywhere, don't block a good Outpost spot if you have that.
- Get two Outposts covering the campfire.
- Cover the loop in Temporal Beacon auras, but maybe don't place if you don't have Vampire Mansions ready.
- Be mindful of ruins placements. Never place one adjacent to the camp fire. Be careful about placing a ruins adjacent to another monster tile, like cemetery or spider cocoons.You do not want to have archer worms participating in adjacent battles, especially on the boss. As your power grows you can start chaining them, but be cautious here.
- If you have the River, plan out its placement. You do not need to place Forests/Thickets next to it, just Desert/Dunes. Try to run the River past the road to transform Battlefields.I run River around the border for Desert/Dune decks.
- Never overlap Battlefields auras on Wasteland tiles. You don't need to mess with Blood Clots. Focus on covering Ruins and Cemeteries with the Battlefields. Spiders can't spawn ghosts. You can place Battlefields on the outside of the loop and run a river up to them to get a different tile.
- Use Oblivion on forest villages. Be mindful to not place a tenth Forest/Thicket if you do not have an Oblivion in reserve.
- I tend to do just 2 or 3 Bookeries. like to get them covering 2 or 3 tiles so I can exchange cards rapidly, but the Abandoned Bookery can be an issue.
For the initial layout, place tiles at the end of the loop to give them time to spawn monsters. At the start, avoid placing Spider Cocoons adjacent to Cemeteries and Ruins so as to maximize the number of monsters you get. As the run progresses, you can start placing Spider Cocoons adjacent to Cemeteries and Ruins to reduce the amount of harder monsters. As spiders enter a Ruins or Cemetery, they prevent a skeleton or scorch worm from spawning, which can help you manage the difficulty.
Other than that, same as Chapter 2!
You want a Smith's Forge covering the tile immediately before the camp fire so you can armor up for boss fights.
You only need 3-5 each of Ruins and Cemeteries. Be mindful of the archer mechanic. Ruins should always be toned down by placing adjacent to them Spider Cocoons, Outposts, or Battlefields. Try to get the Scorch Worm spawn down to 2 or 3 instead of 4.
Same goes for Cemeteries but at less of a priority.
Do not let Abandoned Bookeries ruin your run, be ready to Oblivion it or make sure it is not covering tough tiles.
As a rogue, you can only afford to have 2 Smith's Forge exchanges per loop. So don't drop your Forge such that it covers more than one tile.
Explanation
Rogue gets quality gear based on quantity of trophies. You want spider and ghost spam to fill your bags.
You can easily get over -25% health to all entities (including yourself) with deserts. This does not impact your amulet magic health from the arsenal slot. Enemies will die before they can break your magic health.
High attack speed guarantees you will kill all those low health enemies before your magic health breaks.
Battlefields give you ghosts which are a great source of cards and trophies, and they spawn a treasure chest on the ruins you place them adjacent to. Chests give you lumber meta resources.
Evasion will carry you past chapter one's boss, while high attack speed (and some luck) will overwhelm chapter two's boss. Just be careful not to over do it and hit stamina issues. There is an undocumented gray stamina bar under your hero's blue action timer bar in a fight. When that gray stamina bar depletes, you act slower and cannot evade. High attack speed can deplete the stamina = (
By loop 8 you should be ending each loop with gear that is +2 to +6 over the loop level.
I found inconsistent wins versus the Chapter 2 boss until I got Outposts. Getting poor weapons and unlucky hits can make the Chapter 2 boss a pain, but the Outpost buddies seem to solve that nicely.
To conquer chapter 3 and 4 it's just more of the same but be extra mindful about tile placement. Don't put Archers next to the campfire, don't let Watchers spawn, don't overdo it with Ruins, etc.
Traits and Camp Supplies
- Picky - Top tier. You need the better gear because Arsenal nerfs your gear quality.
- Old Scars - Your only way of getting your HP up, which gives you reliability.
- Master of Fencing - Great for quick clears before your Magic HP expires.
- Lightning Fast - Great for smashing stained glass.
- Gift of Blood - Just a bit extra damage. Not great, but whatever.
- Marauder - Improves loot payout, but not as useful later in the run when you are pulling 100+ trophies.
- Fuss - Improves survivability
- Shield of Faith - Improves survivability
- Eye of God - Nice on Chapter 4, just makes it easier.
- Child of the Forest - Improves survivability
- Nothing is Sacred - Improves survivability
- Antique Shelf - Survivability
- Count's Chair - Survivability
- Alchemist's Shelf - Survivability
- Jeweler's Lens - Rogue in particular likes higher rarity items, for more buffs to buff.
- Kitchen Knife - Survivability
- Blacksmith's Hammer - Survivability
- Herbalist's Sickle - Survivability
- Cheese - Cheese the game for survivability
- Mixed Nuts - Better than nothing, makes Blacksmith's Hammer better
- Garlic - You will be fighting vampires, so this is okay.
- Old Painting - Finish the bosses!
- Brass Candlestick - You will have complete Temporal Beacon coverage, so this is an easy 5% damage buff. You can only benefit from one Brass Candlestick.
- Silver Pendant - You will be fighting vampires, so this is okay.
Completed Loop Screenshots
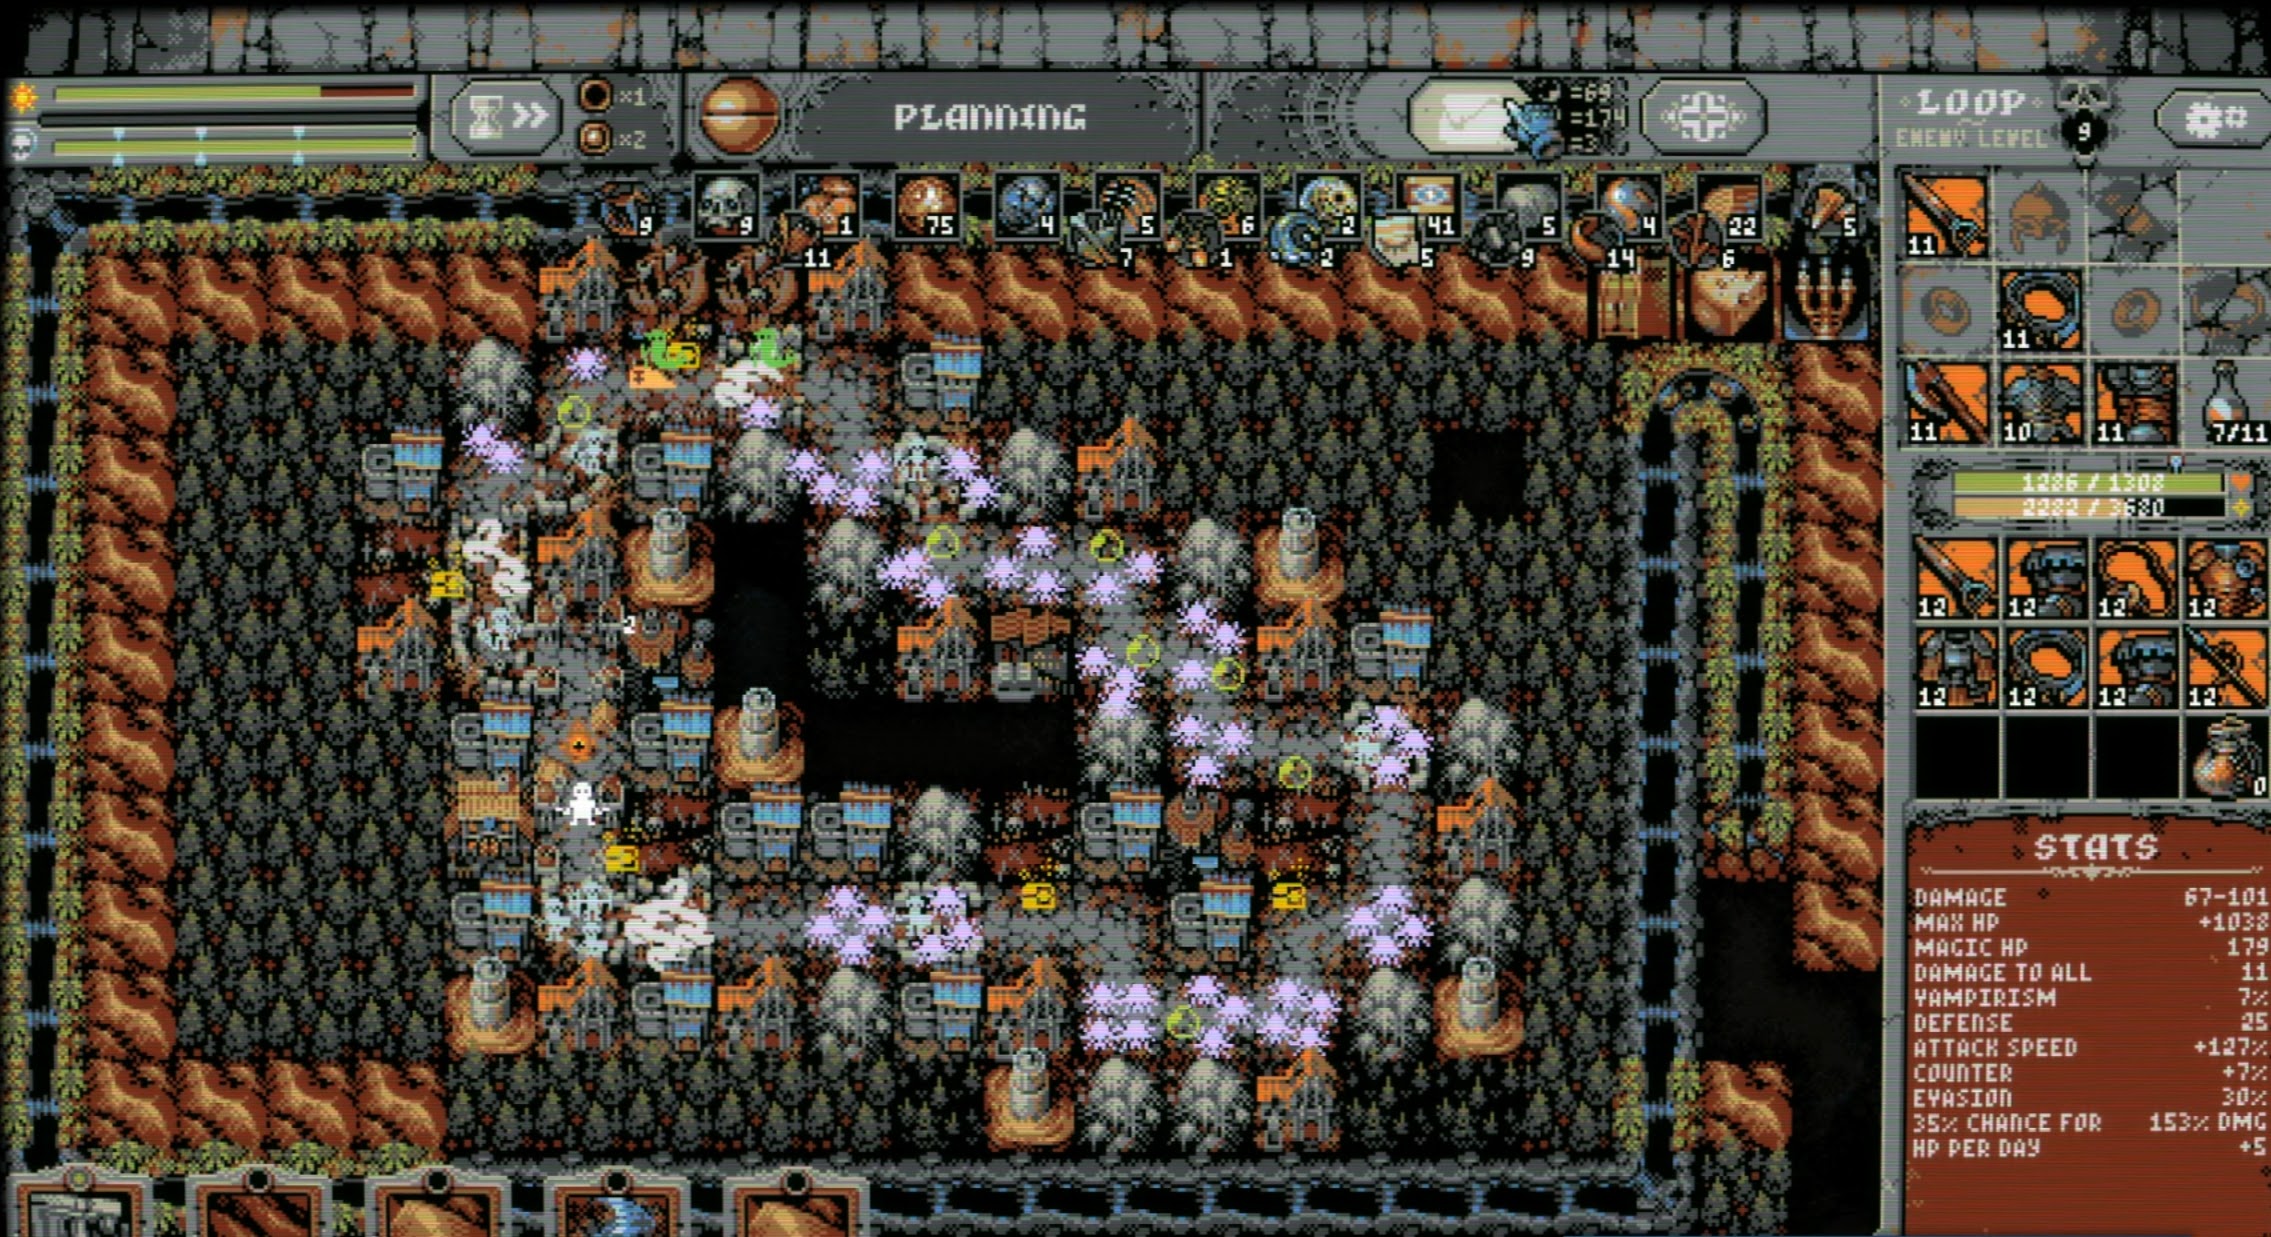 Traits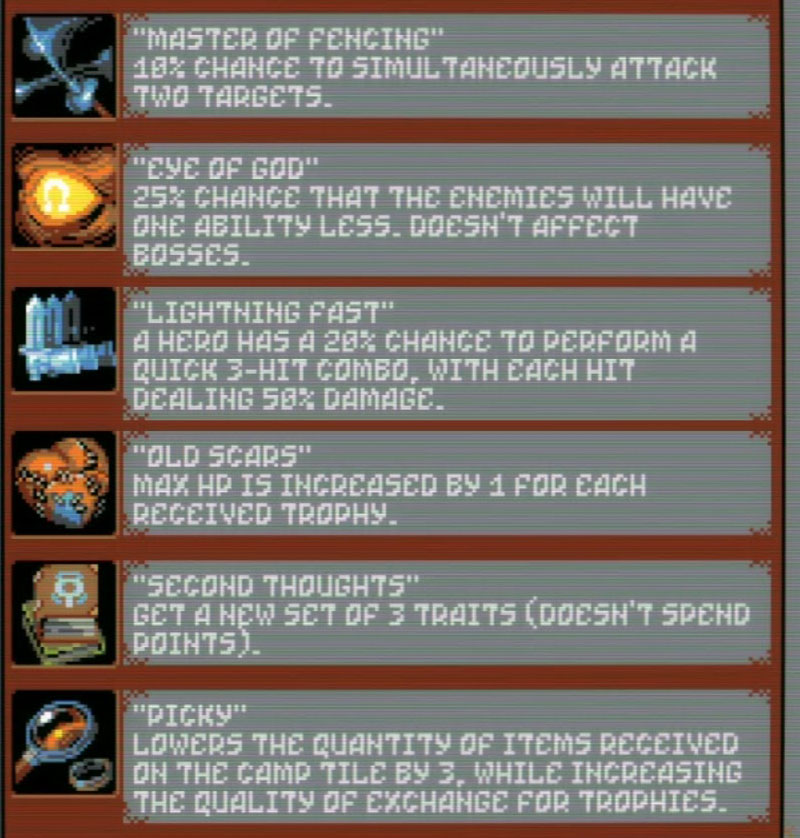
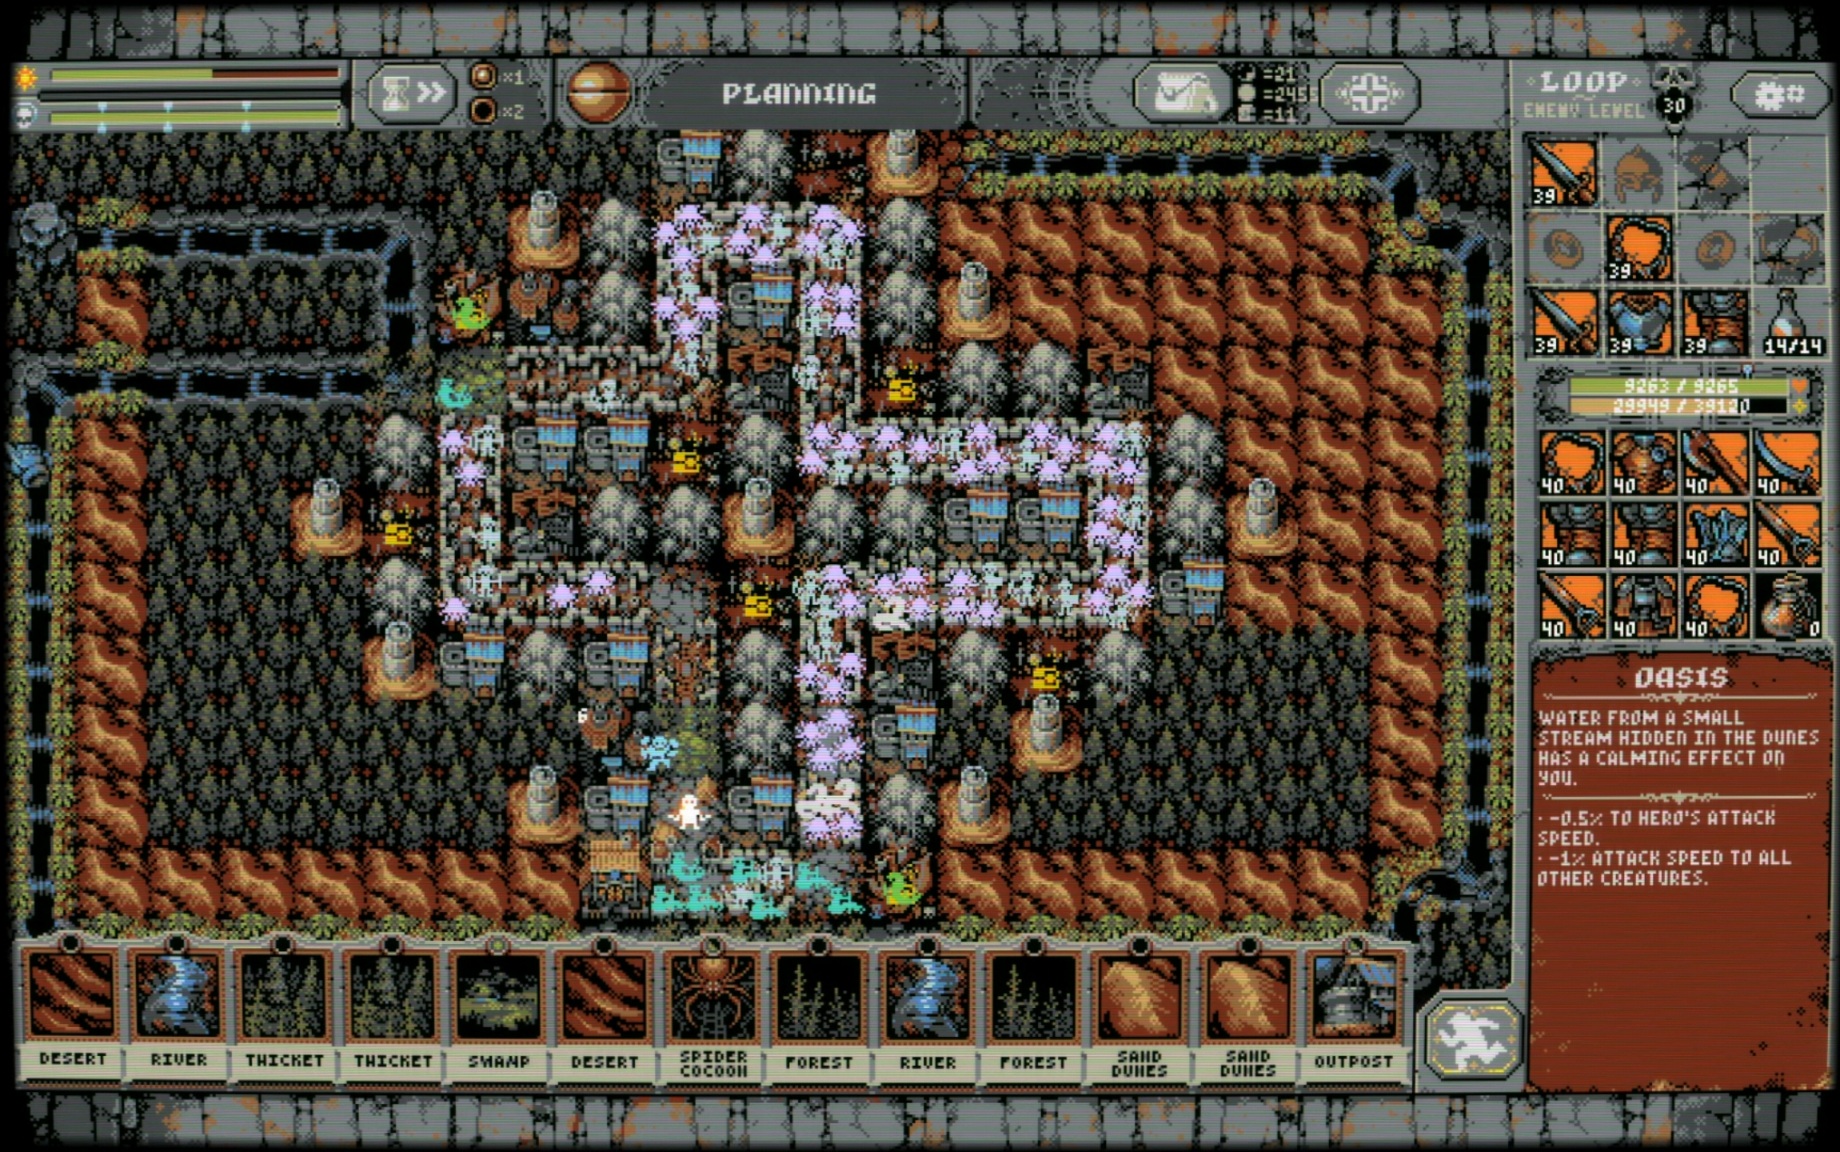
Loop 30
Infinite may be a bigger number than 30 but the game gets a bit boring 20 loops after killing the boss lol. I don't know how long you need to loop it past the boss, but this build is at loop 30 and going strong. I subbed vampire Mansion for swamp and it worked out fine. I just wanted to see some merfolk.
- An Unofficial Loop Hero Manual, Mechanics Guide + Sheets!★ 5 (557)57k views1.3k ♥64 minUpdated 31 May, 2023
- Loop Hero - a Community Knowledge Book★ 5 (1k)54k views1.6k ♥8 minUpdated 8 Mar, 2021
- Cards / Tiles combo [Update 1.102]★ 5 (556)37k views1.3k ♥5 minUpdated 9 Jul, 2021
- Warrior Guide for Infinite Loops★ 5 (311)31k views1k ♥9 minUpdated 17 Mar, 2021
- Loop Hero комбинации карт + секретные боссы★ 5 (440)24k views751 ♥3 minRussianUpdated 16 Mar, 2021
- Maximizing Attack Speed With Thickets★ 5 (540)23k views1.3k ♥2 minUpdated 2 Sep, 2025


- Upgrading to PremiumTeam Fortress 2★ 5 (20k)1441k views11k ♥6 minUpdated May 11, 2022
- No More Room in Hell Official ManualNo More Room in Hell★ 5 (2.8k)569k views2.1k ♥29 minUpdated Apr 22, 2019
- NMRiH Community Hosting GuidesNo More Room in Hell★ 5 (526)351k views653 ♥1 minUpdated Aug 10, 2022
- How to 'Git Gud' Soon™MORDHAU★ 5 (2k)318k views3k ♥68 minUpdated Nov 16, 2024
- Лучшие кооперативные игры SteamPAYDAY 2★ 5 (1.5k)315k views2.1k ♥56 minRussianUpdated Apr 27, 2025
- Desert Eagle Heat Treated | Blue GemCounter-Strike 2★ 5 (1.6k)293k views1.5k ♥2 minUpdated Jan 16





This guide was created by its original author on the Steam Community. Are you the author and want it removed? Request removal.