Space Marine 2 - Operations Mode Builds
Introduction
Success in Operations is more dependent on one's skills at the game than the build selected before starting the Operation but well-made builds in a team can provide the cushion needed to so that a series of skill issues don't lead to a failure. That leads to this guide, which suggests a multitude of builds for both classes and weapons to ensure that the boosts that the player takes advantage of will work together.
Tactical
The Tactical class, both in game and in story, is the balanced class. It can fight effectively at melee, close, mid and even long range and against enemies reliant on quantity and enemies that are reliant on quality. In addition, the Auspex Scan ability is a powerful support ability for a Tactical's whole squad, and a well-timed one can turn a dangerous situation into a cake-walk.
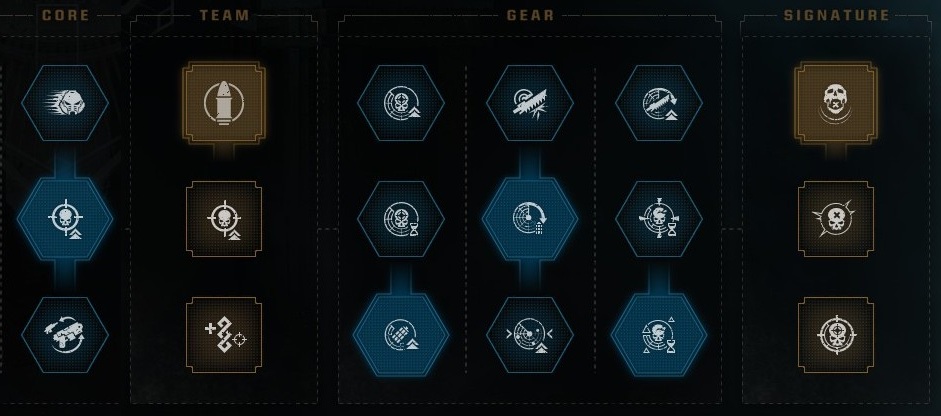 The balanced choice, just like the Tactical class itself. This choice of perks avoids leaning the Tactical's effectiveness in any particular direction. Ignoring the chosen weapons, this leaves the player effective at all ranges and against all types of enemies. This build means there's no reason to hoard your grenades, use one or two of them with every Auspex scan and even outside of Auspex scans. A thing to note is that the Concentrated Fire can be risky against more mobile enemies. Their teleportation, charges and flight can take them out of the Auspex range.
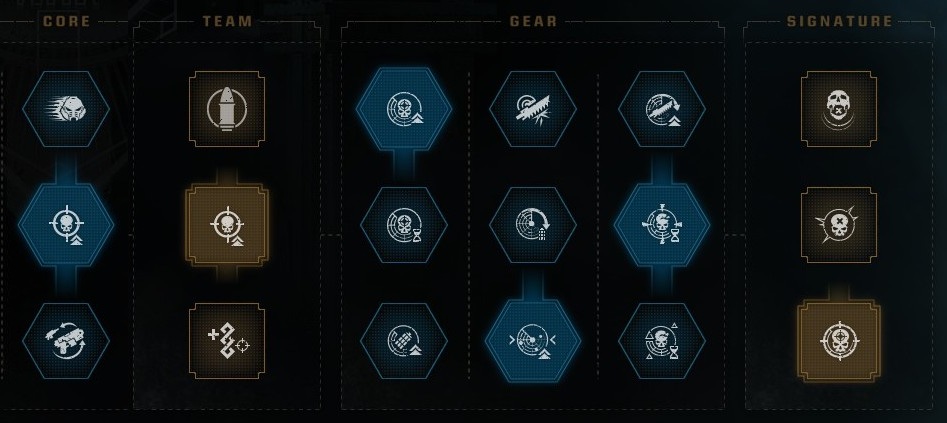 Save your Auspex Scans for Extremis and Terminus enemies. Use conventional methods to take out the Majoris and Minoris enemies. This build's usefulness increases on higher difficulties where more Extremis enemies are sent against you.
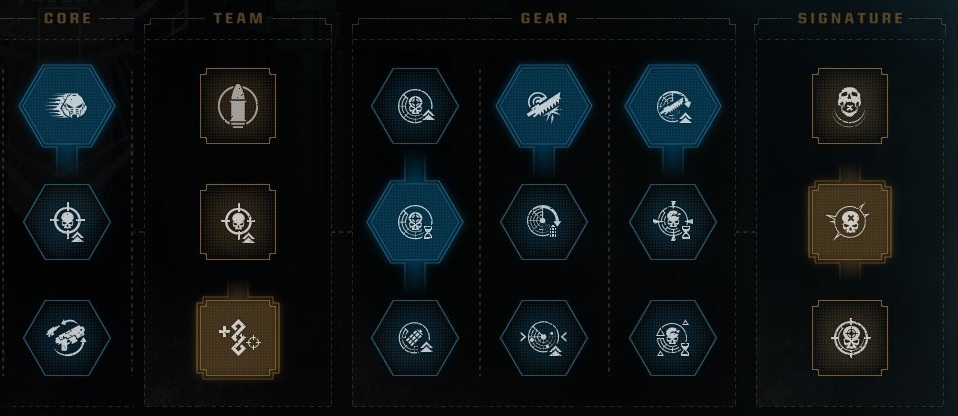 This build focuses on fighting at close range. Take a close ranged weapon as your primary (Auto Bolt Rife, Bolt Carbine, Melta Rifle, Pyreblaster or Combi-Melta) and use it to thin out Minoris swarms and soften up the stronger enemies before melee combat. Minoris enemies are weak enough that you can take them out easily with melee attacks even without getting the Close Targeting bonus so only use the Auspex on the stronger enemies and don't bother saving it for later fights.
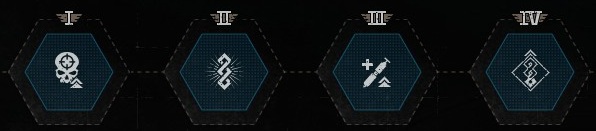 Acuity is by far the best prestige perk available to the Tactical and it's one of the first ones available as well. While it might not work with some weapons (it's questionable if it works with Melta, Pyreblaster and charged Plasma shots), it can still greatly increase the damage inflicted with the weapons that can take advantage of it. Fortitude and Resilience increase health and medicae recovery, which is always nice. The last two to choose between are Skilled Supplier and Exigency Charge. The Emperor's Vengeance perk means that weapons with bad ammo economy can have that issue negated while weapons with good ammo economy don't benefit nearly as much from Skilled Supplier, causing Exigency Charge to win out in my mind.
Column 1, 2 and 3
Every other column has combinations that you want to pick, but the Primary Weapon you take will decide what perk in Column 1, Column 3 and to a lesser extent, column 2 are most effective.Weapon
Column 1
Column 2
Column 3
Auto Bolt Rifle
Kraken Penetrator Rounds
Build Dependant
Emperor's Vengeance
Bolt Rifle (no Grenade Launcher), and Bolt Carbine
Kraken Penetrator Rounds
Build Dependant
Steady Aim
Bolt Rifle (with Grenade Launcher), Combi-Melta, Deathwatch, and Stalker Bolt Rifle
Balanced Distribution
Build Dependant
Emperor's Vengeance
Heavy Bolt Rifle and Marksman Bolt Carbine
Balanced Distribution
Build Dependant
Steady Aim
Plasma Incinerator
Plasma Boost
Versatility
Emperor's Vengeance
Melta Rifle and Pyreblaster
Balanced Distribution
Versatility
Emperor's Judgement
The Embodiment
The balanced choice, just like the Tactical class itself. This choice of perks avoids leaning the Tactical's effectiveness in any particular direction. Ignoring the chosen weapons, this leaves the player effective at all ranges and against all types of enemies. This build means there's no reason to hoard your grenades, use one or two of them with every Auspex scan and even outside of Auspex scans. A thing to note is that the Concentrated Fire can be risky against more mobile enemies. Their teleportation, charges and flight can take them out of the Auspex range.HVT Killer
Save your Auspex Scans for Extremis and Terminus enemies. Use conventional methods to take out the Majoris and Minoris enemies. This build's usefulness increases on higher difficulties where more Extremis enemies are sent against you.Close and Personal
This build focuses on fighting at close range. Take a close ranged weapon as your primary (Auto Bolt Rife, Bolt Carbine, Melta Rifle, Pyreblaster or Combi-Melta) and use it to thin out Minoris swarms and soften up the stronger enemies before melee combat. Minoris enemies are weak enough that you can take them out easily with melee attacks even without getting the Close Targeting bonus so only use the Auspex on the stronger enemies and don't bother saving it for later fights.Prestige
Acuity is by far the best prestige perk available to the Tactical and it's one of the first ones available as well. While it might not work with some weapons (it's questionable if it works with Melta, Pyreblaster and charged Plasma shots), it can still greatly increase the damage inflicted with the weapons that can take advantage of it. Fortitude and Resilience increase health and medicae recovery, which is always nice. The last two to choose between are Skilled Supplier and Exigency Charge. The Emperor's Vengeance perk means that weapons with bad ammo economy can have that issue negated while weapons with good ammo economy don't benefit nearly as much from Skilled Supplier, causing Exigency Charge to win out in my mind.
Assault
The Assault is a fast glass hammer type of class. The Assault has no primary weapon so an Assault is weaker at ranged combat than other classes, their pistol is instead primarily for performing Gun Strikes, though it can be used to stop a reinforcement call if you're unable to get close. The Jet Pack is a powerful tool, an effective way to move from place-to-place quickly, as well as allowing the player to open melee combat with a powerful alpha strike.
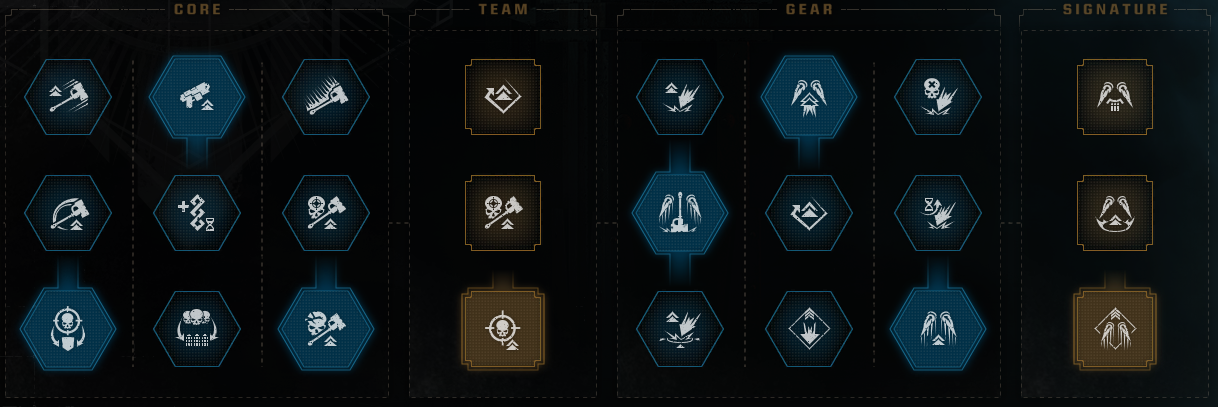 The Jump Pack can also be used to dodge. This function is almost always overshadowed by the ground pound but by maximising Gun Strike damage and making it that Jump Pack Dodges grant a variety of bonuses, the Jump Pack Dodge becomes the preferred use. Note that the Wings of Flame perk is misleading, you have to strike the opponent with the dodge to make it a perfect dodge (dodge into the enemy). It can take some getting used to, but this will allow the Assault to rack up a lot of single-target damage on enemies. The preferred Secondary weapons for this build are either the Heavy Bolt Pistol (maximises single-target damage) or the Plasma Pistol (hurts enemies around the main target). For your melee weapon, take a Fencing weapon (or Balanced if you're really confident in your parrying) so that you can use your powerful Gun Strikes with parrying.
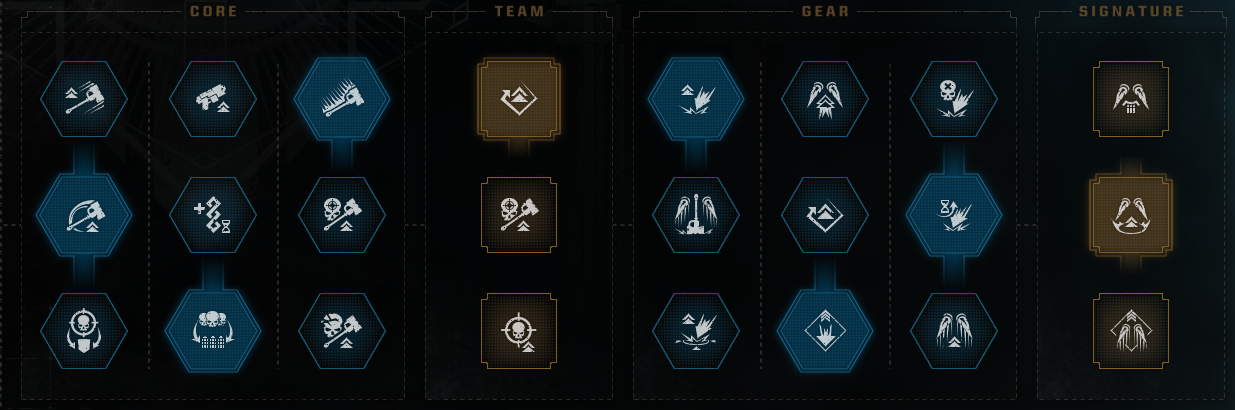 Be as close to Mario as a Space Marine can be. During a fight, use your Jump Pack whenever it's available. A ground pound counts as a charged attack so the Overcharge and Perseverance perks will be in effect when charging one up. This will mean that not even a Venom Cannon can knock you out of the air, giving you time to fully charge your ground pound. Aim for the spot where you'll hit as many enemies as possible, especially if those are Minoris enemies, which will get you back both ability charge in order to make more jumps and grenades to throw for even more carnage. The damage inflicted by a Ground Pound is affected by the damage per hit of the Assault's melee weapon so pick the variant that has the highest damage. The Weapon doesn't matter as much, because modifiers were implemented so that the different melee weapons would inflict around the same damage with Ground Pounds.
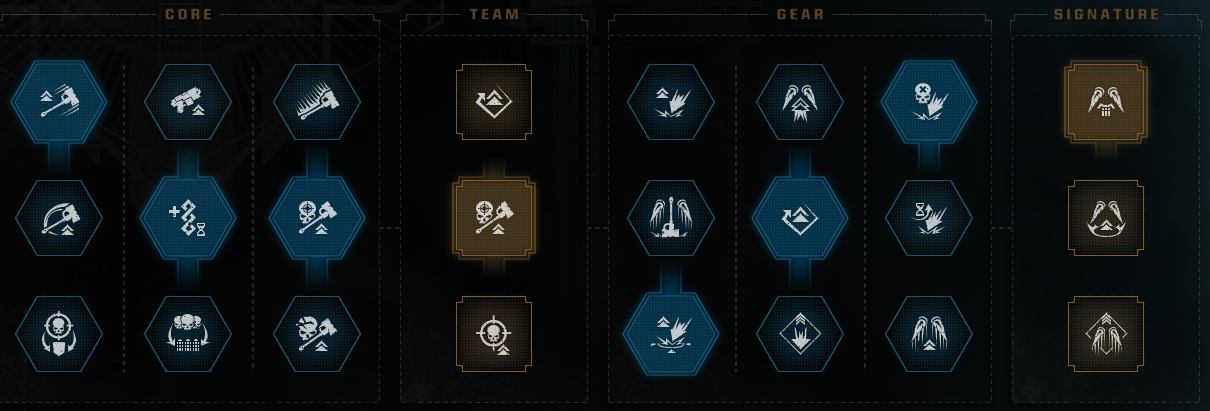 The simplest of the three builds where behaviour is the most standard. The Jump Pack is used to open fights and the rest is just shooting and melee. The Ample Ammunition perk makes it more difficult to lose Momentum, the bonuses to melee damage make it easier to effectively melee your way through foes without any equipment or ability tricks, Pride in Duty means that once you make the last finisher in a melee, your Ground Pound to join the next melee will be even stronger and in the event that your momentum is broken, the Defense Mechanism perk will make it easier to partially or fully recover.
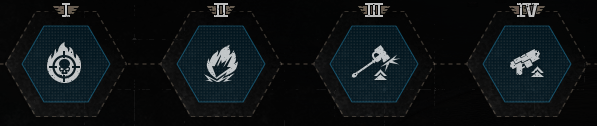 The best perk among these is Adrenaline Boost, especially after it was buffed to also work when Blocking. Always take that perk. Second best is the Hammer of Wrath perk, which was formerly a class perk and it shows. The other two perks are around the same quality and can be taken based on personal preference. If you use a Block Weapon then Practised Aim should be last since you won't be making nearly as many Gun Strikes but improving the Assault's main deficiency is a nice boost.
Gun-Kata
The Jump Pack can also be used to dodge. This function is almost always overshadowed by the ground pound but by maximising Gun Strike damage and making it that Jump Pack Dodges grant a variety of bonuses, the Jump Pack Dodge becomes the preferred use. Note that the Wings of Flame perk is misleading, you have to strike the opponent with the dodge to make it a perfect dodge (dodge into the enemy). It can take some getting used to, but this will allow the Assault to rack up a lot of single-target damage on enemies. The preferred Secondary weapons for this build are either the Heavy Bolt Pistol (maximises single-target damage) or the Plasma Pistol (hurts enemies around the main target). For your melee weapon, take a Fencing weapon (or Balanced if you're really confident in your parrying) so that you can use your powerful Gun Strikes with parrying.Mario
Be as close to Mario as a Space Marine can be. During a fight, use your Jump Pack whenever it's available. A ground pound counts as a charged attack so the Overcharge and Perseverance perks will be in effect when charging one up. This will mean that not even a Venom Cannon can knock you out of the air, giving you time to fully charge your ground pound. Aim for the spot where you'll hit as many enemies as possible, especially if those are Minoris enemies, which will get you back both ability charge in order to make more jumps and grenades to throw for even more carnage. The damage inflicted by a Ground Pound is affected by the damage per hit of the Assault's melee weapon so pick the variant that has the highest damage. The Weapon doesn't matter as much, because modifiers were implemented so that the different melee weapons would inflict around the same damage with Ground Pounds.Momentum
The simplest of the three builds where behaviour is the most standard. The Jump Pack is used to open fights and the rest is just shooting and melee. The Ample Ammunition perk makes it more difficult to lose Momentum, the bonuses to melee damage make it easier to effectively melee your way through foes without any equipment or ability tricks, Pride in Duty means that once you make the last finisher in a melee, your Ground Pound to join the next melee will be even stronger and in the event that your momentum is broken, the Defense Mechanism perk will make it easier to partially or fully recover.Prestige
The best perk among these is Adrenaline Boost, especially after it was buffed to also work when Blocking. Always take that perk. Second best is the Hammer of Wrath perk, which was formerly a class perk and it shows. The other two perks are around the same quality and can be taken based on personal preference. If you use a Block Weapon then Practised Aim should be last since you won't be making nearly as many Gun Strikes but improving the Assault's main deficiency is a nice boost.
Vanguard
The Vanguard is similar to the Assault class (a fast glass hammer) and in-fluff, the newest type of Space Marine. The Grapnel Launcher functions quite similarly to the Assault Jump Pack but a lot more limited. It can't be used to dodge (though that usually doesn't matter) and doesn't feel as powerful as a ground pound but unlike the Assault, the Vanguard gets a primary weapon, allowing their shooting to be more versatile and effective. I like to think of the Vanguard being similar to the Tactical class, effective against all types of ranges and foes, and exchanging resilience for agility and damage potential.
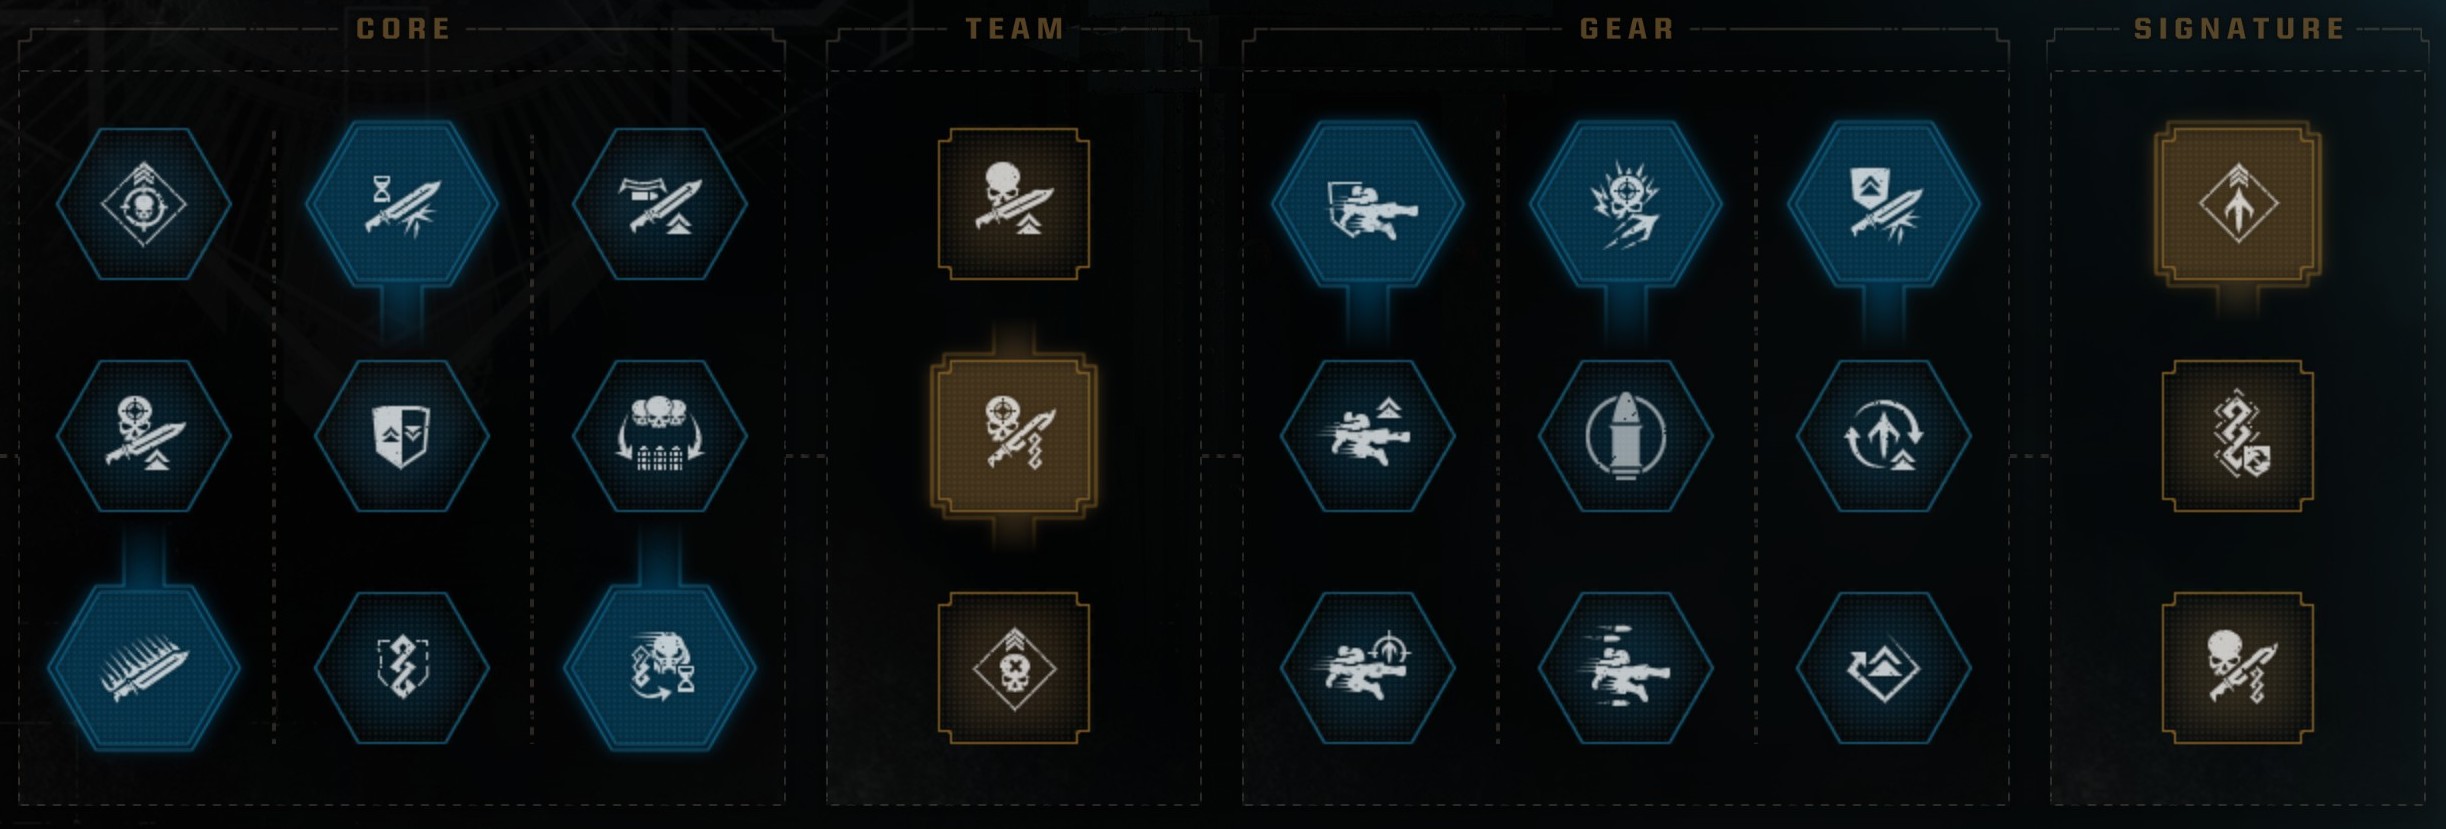 This build is meant for maximising the effectiveness of using the Grapnel Launcher for finishing moves. When you have two available, you can use it for any purpose you wish, but always keep one use in reserve. That means that, when you knock an enemy into a finisher state, you can use the Grapnel Launcher to activate a finisher on them, which will damage enemies nearby, give you a defence buff against ranged damage to keep you fighting and replenish the Grapnel Launcher for finishing the next opponent. For this build, it's preferred that your Primary weapon be something that can kill at a good range (not the regular Bolt Carbine or Melta Rifle). As for your melee, this build's Core Perks will buff your parry, block and dodge to fight your opponent defensively. Note: If you use the lock-on function on a Majoris or higher enemy, the marker that will appear on that enemy has three prongs that will vanish one by one for each third of health that enemy has lost. Use this to know when an enemy is below a third of their health and thus, can be finished off with the Grapnel Launcher.
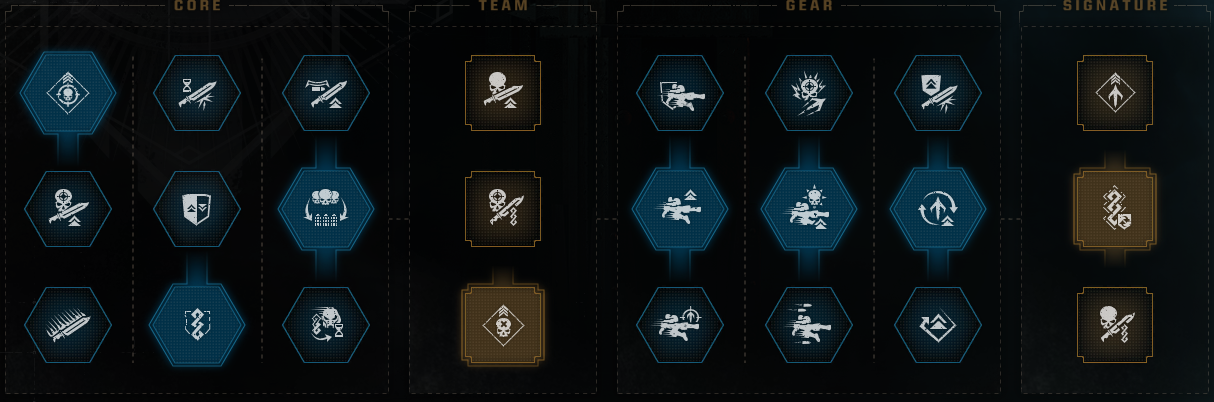 This build intends to maximise the innate power of the Grapnel Launcher. By buffing the damage that your diving kick does as much as possible, you'll be able to use it as an alpha strike or mid-battle attack to take out a large number of foes quickly, which will also give you another grenade/bomb to use. Use a decent ranged weapon to take out a Majoris level or higher enemy that's far away from you to buff your next Diving Kick Attack and then use it on the next dangerous foe. When you don't have the Grapnel Launcher available to get in close, Moving Target and Inner Fire will help you fill the ability charge. Because this build will mean that your Grapnel Launcher will be on cool-down most of the time, Grim Determination will mean that you'll cut through enemies quicker, especially after you've closed in using the last Grapnel Launcher charge you have.
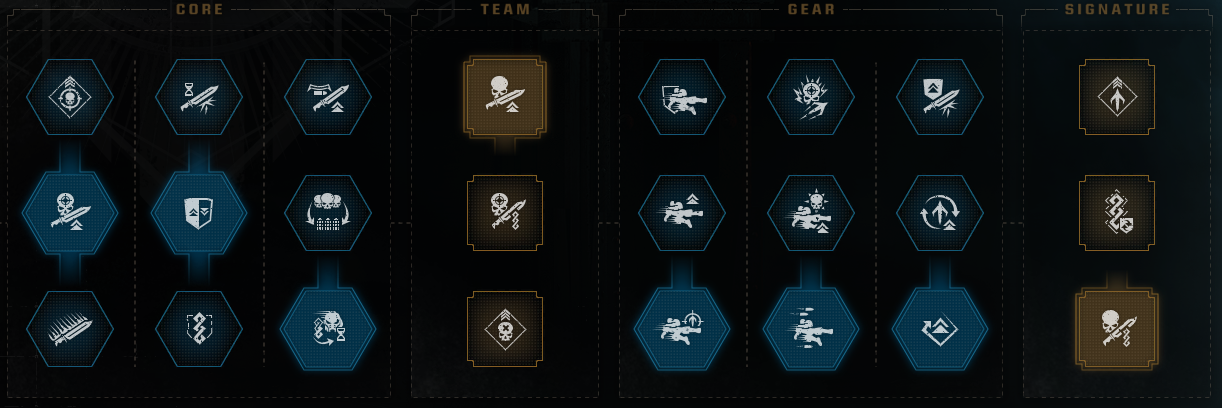 The Hunter is meant to single out a specific enemy to take out. Identify a primary target, something with strong ranged damage or a Tyranid Warrior with a lot of Terma/Hormagaunts nearby it and then use your Grapnel Launcher to get in its face. Tunnel Vision is expected to happen with the mindset that this build encourages so Close-Combat Focus helps against the ranged attacks enemies will make to try to stop your hunt, while Honed Reactions makes it more difficult for your target to fight you off. Combat Readiness make it easier for you to move on to your next mark once you finish off your current one. Collateral Damage and Tip of the Spear will allow you to hurt your mark and their guards along the way and if your allies are free, makes it easier for them to gang up on your mark.
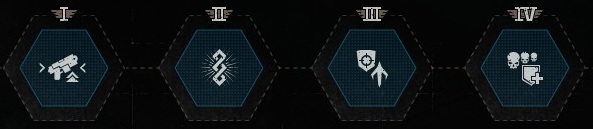 Battlefield Awareness is among the strongest of the first Prestige Perks. When enemies get close (and they will get close), being able to hit them harder will allow you to do more to burst them down. As for your next perks, Fortitude is a good first choice, as it's impossible to have too much health while Launch Restoration and Restoration allow you to avert the fact that the Vanguard is one of the more fragile classes.
FINISH HIM
This build is meant for maximising the effectiveness of using the Grapnel Launcher for finishing moves. When you have two available, you can use it for any purpose you wish, but always keep one use in reserve. That means that, when you knock an enemy into a finisher state, you can use the Grapnel Launcher to activate a finisher on them, which will damage enemies nearby, give you a defence buff against ranged damage to keep you fighting and replenish the Grapnel Launcher for finishing the next opponent. For this build, it's preferred that your Primary weapon be something that can kill at a good range (not the regular Bolt Carbine or Melta Rifle). As for your melee, this build's Core Perks will buff your parry, block and dodge to fight your opponent defensively. Note: If you use the lock-on function on a Majoris or higher enemy, the marker that will appear on that enemy has three prongs that will vanish one by one for each third of health that enemy has lost. Use this to know when an enemy is below a third of their health and thus, can be finished off with the Grapnel Launcher.Just Causeplayer
This build intends to maximise the innate power of the Grapnel Launcher. By buffing the damage that your diving kick does as much as possible, you'll be able to use it as an alpha strike or mid-battle attack to take out a large number of foes quickly, which will also give you another grenade/bomb to use. Use a decent ranged weapon to take out a Majoris level or higher enemy that's far away from you to buff your next Diving Kick Attack and then use it on the next dangerous foe. When you don't have the Grapnel Launcher available to get in close, Moving Target and Inner Fire will help you fill the ability charge. Because this build will mean that your Grapnel Launcher will be on cool-down most of the time, Grim Determination will mean that you'll cut through enemies quicker, especially after you've closed in using the last Grapnel Launcher charge you have.Hunter
The Hunter is meant to single out a specific enemy to take out. Identify a primary target, something with strong ranged damage or a Tyranid Warrior with a lot of Terma/Hormagaunts nearby it and then use your Grapnel Launcher to get in its face. Tunnel Vision is expected to happen with the mindset that this build encourages so Close-Combat Focus helps against the ranged attacks enemies will make to try to stop your hunt, while Honed Reactions makes it more difficult for your target to fight you off. Combat Readiness make it easier for you to move on to your next mark once you finish off your current one. Collateral Damage and Tip of the Spear will allow you to hurt your mark and their guards along the way and if your allies are free, makes it easier for them to gang up on your mark.Prestige Perks
Battlefield Awareness is among the strongest of the first Prestige Perks. When enemies get close (and they will get close), being able to hit them harder will allow you to do more to burst them down. As for your next perks, Fortitude is a good first choice, as it's impossible to have too much health while Launch Restoration and Restoration allow you to avert the fact that the Vanguard is one of the more fragile classes.
Bulwark
The Bulwark is the Mighty Glacier of the classes. It lacks a Primary Weapon so its ranged abilities aren't as strong as classes that have one and they lack the mobility tools of the Assault and Vanguard. However, for simple melee combat, the Bulwark is beyond that of any other classes. Thanks to their huge shield, the Bulwark can withstand more attacks than any other class. Don't forget that the shield can be used to bash enemies, both with quick attacks and charged attacks. The Bulwark's perks can be split into two sets that generally do not have direct synergy with each other. The Bulwark's special ability is placing a Chapter Banner, which creates an aura that restores the armor of any ally nearby it. At its base, it's a good emergency ability to make a group nearly impossible to shift while it lasts, but other upgrades can move it into being a long-term healing ability.
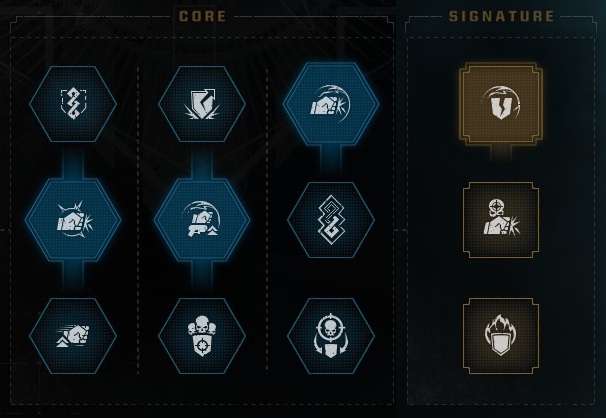 Electric Funeral makes your parrying and blocking into a powerful tool for both defence and offence. The main perk that this revolves around is Defensive Advantage, which creates a shock area that doesn't damage you whenever you make a Perfect Parry or Perfect Block. The rest of the perks are meant to compound this damage even further, as well as giving a auto-activating contingency in case of a mistake leaving you without armor. For the melee weapon, take the Fencing version unless you're extremely confident in your ability to Perfect Parry or Perfect Block. This build works very well with the Heroic Thunder Hammer, which leaves shock areas when making charged attacks.
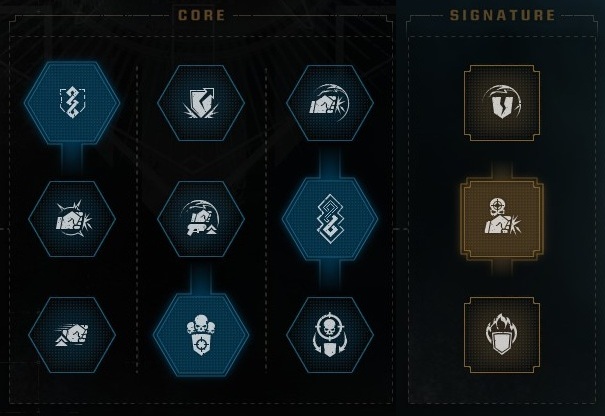 By stacking damage reduction perks, the Bulwark can become a near immovable Stone Wall that can rush towards a horde of foes, drawing their aggro so that your teammates have breathing space to kill them. A very simple idea unlike other builds, but with good coordination and a team that sticks together, a good tank will pay for themselves.
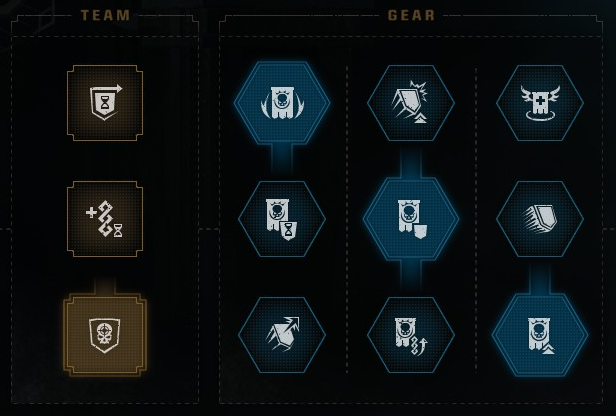 If you and your squad intend to lock yourself down into a position, the Hold Fast build is the one to pick. By making the banner last as long as possible and compounding it with other buffs that are better the longer they last, a squad under the effect of your banner becomes a nightmare for the enemy to shift.
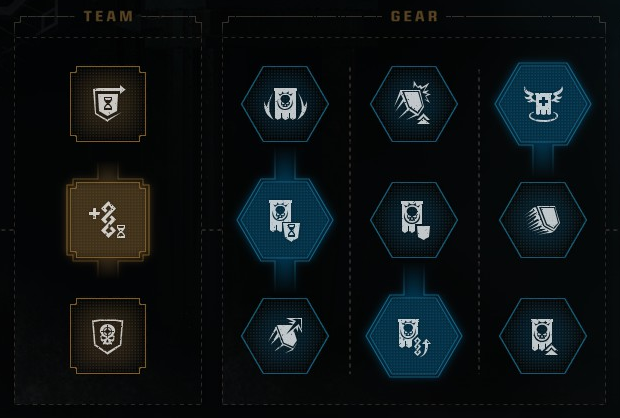 The famous Savior build turns the Chapter Banner into a potent healing tool that can bring a team up to full health with the proper setup. By putting one or more enemies in the execute state, and then placing the banner near your fellow Astartes, you can get an Astartes that is down to a sliver of health back up to full. If an ally has a mortal wound and has picked up a stim, the Chapter Banner and stim together will clear that Mortal Wound. Finally, if a downed Astartes is surrounded by enemies who won't let him be revived, just plant the banner next to the Astartes to get him back on his feet, perhaps put an enemy in the execute state first so that he can recover all his health as well.
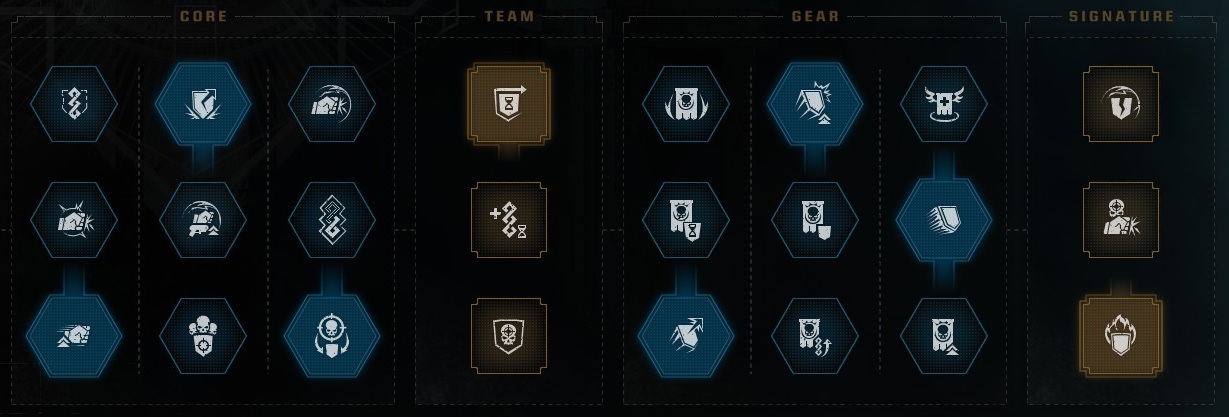 The famous Spartans didn't make their shields just for defense, but designed them to be deadly offensive weapons in their own right and this build seeks to emulate them. Taking all the perks that buff the shield and the shield bash will be able to scatter enemies, opening them up for a Gun Strike as well as giving a 45% melee buff for finishing off the rest. Since this build gives the Bulwark knockback immunity when they have armor and when they've recently done a Shield Bash, a Bulwark using this build also becomes very difficult for enemies to stop.
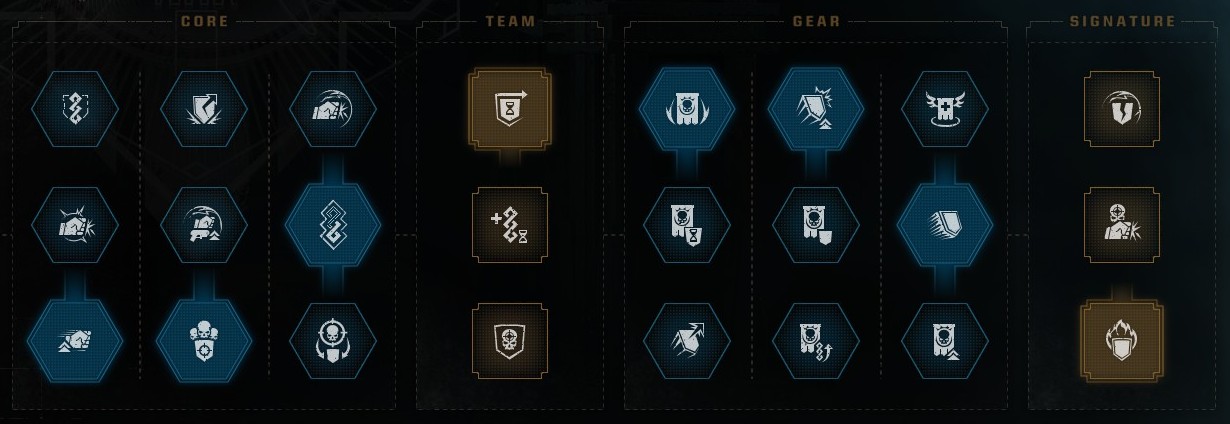 Taking the Thunder Hammer will take away the Bulwark's shield but to compensate, most of the Bulwark's shield buffs will apply to Thunder Hammer Pommel Smashes. This gives a mighty alpha-strike for the start of combat, allowing an Astartes to heavily damage single enemies and clear mobs in a single, non-charged attack.
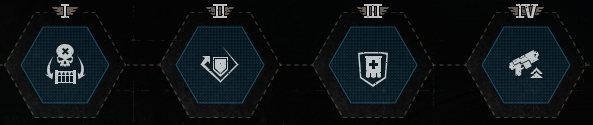 Despite being a primarily melee class, the Bulwark has a stronger need for ammo than the other classes that set up a melee build. Since he has difficulty clearing ground quickly, a Bulwark without ammo is unlikely to be able to stop a reinforcement call, or hit flying enemies with his melee which makes Auxiliary Reload the very first perk that should be picked. As for the next ones, Powerful Shot, Standard Bearer and Masterful Defence are great choices for the next picks. Powerful Shot enhances the Bulwark's main deficiency, Standard Bearer ensures that emergency Chapter Banner uses won't be interupted, and Masterful Defence is an incredibly powerful perk that can be used to help get Chapter Banner off cooldown, which it really needs because it has a long cooldown.
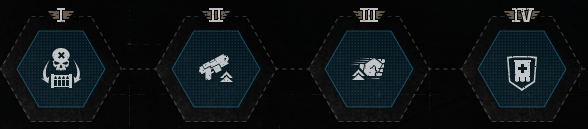 However, if you really like to use Thunder Hammer equipped Bulwarks, then skip Masterful Defence in favor of Overcharge.
Electric Funeral
Electric Funeral makes your parrying and blocking into a powerful tool for both defence and offence. The main perk that this revolves around is Defensive Advantage, which creates a shock area that doesn't damage you whenever you make a Perfect Parry or Perfect Block. The rest of the perks are meant to compound this damage even further, as well as giving a auto-activating contingency in case of a mistake leaving you without armor. For the melee weapon, take the Fencing version unless you're extremely confident in your ability to Perfect Parry or Perfect Block. This build works very well with the Heroic Thunder Hammer, which leaves shock areas when making charged attacks.The Tank
By stacking damage reduction perks, the Bulwark can become a near immovable Stone Wall that can rush towards a horde of foes, drawing their aggro so that your teammates have breathing space to kill them. A very simple idea unlike other builds, but with good coordination and a team that sticks together, a good tank will pay for themselves.Hold Fast
If you and your squad intend to lock yourself down into a position, the Hold Fast build is the one to pick. By making the banner last as long as possible and compounding it with other buffs that are better the longer they last, a squad under the effect of your banner becomes a nightmare for the enemy to shift.Savior
The famous Savior build turns the Chapter Banner into a potent healing tool that can bring a team up to full health with the proper setup. By putting one or more enemies in the execute state, and then placing the banner near your fellow Astartes, you can get an Astartes that is down to a sliver of health back up to full. If an ally has a mortal wound and has picked up a stim, the Chapter Banner and stim together will clear that Mortal Wound. Finally, if a downed Astartes is surrounded by enemies who won't let him be revived, just plant the banner next to the Astartes to get him back on his feet, perhaps put an enemy in the execute state first so that he can recover all his health as well.Shields Aren't Weapons?
The famous Spartans didn't make their shields just for defense, but designed them to be deadly offensive weapons in their own right and this build seeks to emulate them. Taking all the perks that buff the shield and the shield bash will be able to scatter enemies, opening them up for a Gun Strike as well as giving a 45% melee buff for finishing off the rest. Since this build gives the Bulwark knockback immunity when they have armor and when they've recently done a Shield Bash, a Bulwark using this build also becomes very difficult for enemies to stop.It's Hammer Time
Taking the Thunder Hammer will take away the Bulwark's shield but to compensate, most of the Bulwark's shield buffs will apply to Thunder Hammer Pommel Smashes. This gives a mighty alpha-strike for the start of combat, allowing an Astartes to heavily damage single enemies and clear mobs in a single, non-charged attack.Prestige
Despite being a primarily melee class, the Bulwark has a stronger need for ammo than the other classes that set up a melee build. Since he has difficulty clearing ground quickly, a Bulwark without ammo is unlikely to be able to stop a reinforcement call, or hit flying enemies with his melee which makes Auxiliary Reload the very first perk that should be picked. As for the next ones, Powerful Shot, Standard Bearer and Masterful Defence are great choices for the next picks. Powerful Shot enhances the Bulwark's main deficiency, Standard Bearer ensures that emergency Chapter Banner uses won't be interupted, and Masterful Defence is an incredibly powerful perk that can be used to help get Chapter Banner off cooldown, which it really needs because it has a long cooldown. However, if you really like to use Thunder Hammer equipped Bulwarks, then skip Masterful Defence in favor of Overcharge.
Sniper
The Sniper is a somewhat stealthy class, thanks to its cameoline cloak, it can be used to take out something nasty among the opponents, or rescue an Astartes that has been downed. The name is non-indicative, the Sniper class doesn't have to snipe enemies and due to the nature of the game, it doesn't operate in a very stealthy manner. This being said, whatever way the class is built, the Sniper is very good at singling out a single target and bursting it down. The third column of perks isn't particular to any build, and will be chosen to match the primary weapon and I shouldn't need to tell anyone which one. The Sniper's class ability is a Camo Cloak that makes you invisible to enemies and causes your next attack to gain a huge damage boost. The Camo Cloak works by having ability charge fill over time and when active, will drain this ability charge until it goes empty or the player does something to deactivate it. The best way to use it is to try to end it with an attack ASAP or flickering it on and off, ensuring that it can be used again.
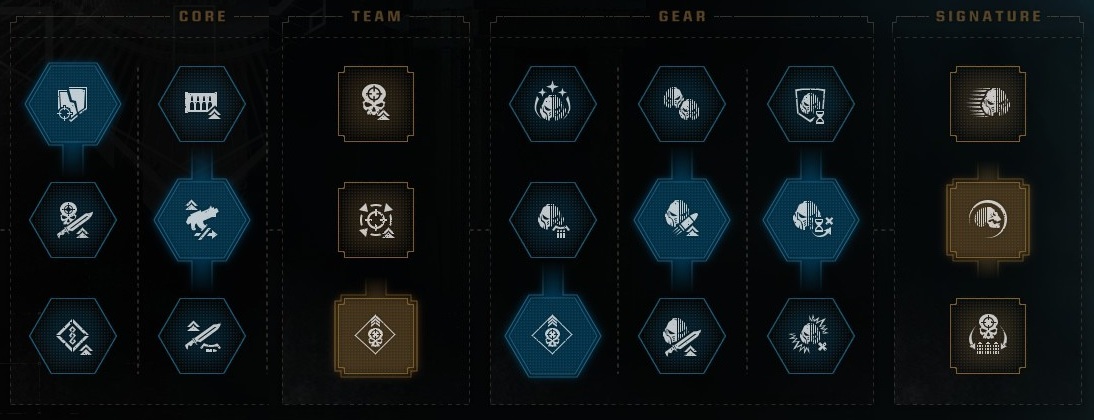 This setup matches the name of the class the most. This build combines a Bolt Sniper Rifle or Las-Fusil with big boosts to ranged damage and extra Camo Cloak recharge when getting a kill with a headshot, allowing the Sniper to deal a lot of damage to strong enemies with a single shot. Emergency Override and Lingering Concealment are some minor extra bonuses.
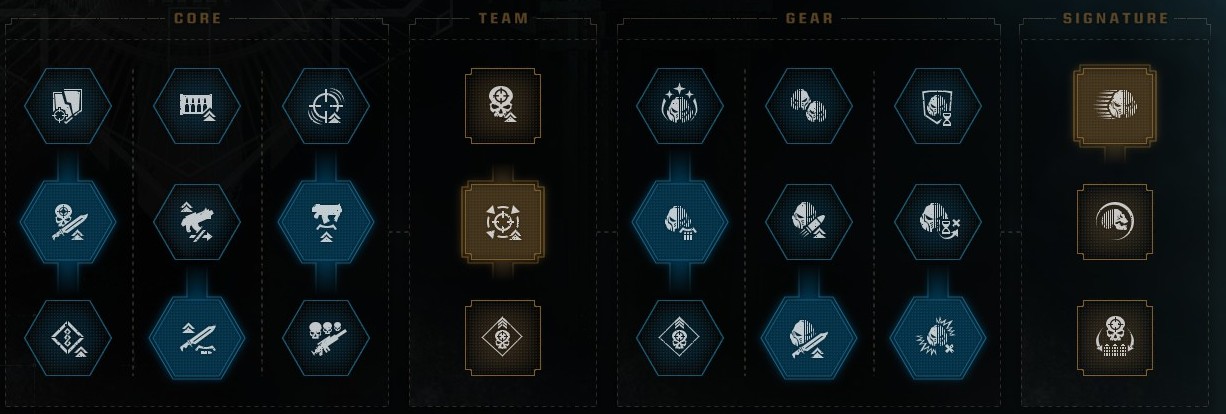 With the Assassin build, the Combat Knife is the main weapon. By using the Camo Cloak, you can quickly get close to an important enemy such as an Extremis enemy or perhaps just an important Majoris Enemy and charge up a Shadow Stab to take out most or all of their health. If that enemy has anything near them, the Ambush perk will stun them so you can inflict some additional hits against them. If you get a Perfect Dodge, then you'll have a brief window to get another free Cloaked Shadow Stab thanks to the Evasion perk. Pick the highest damage Combat Knife variant available to take advantage of the damage multipliers. The Bolt Carbine can be used in short controlled bursts to take out enemies that you can't reach, recover contested health, take out traitor guardsmen or soften up enemies if you can't start a fight with a Cloaked Shadow Stab.
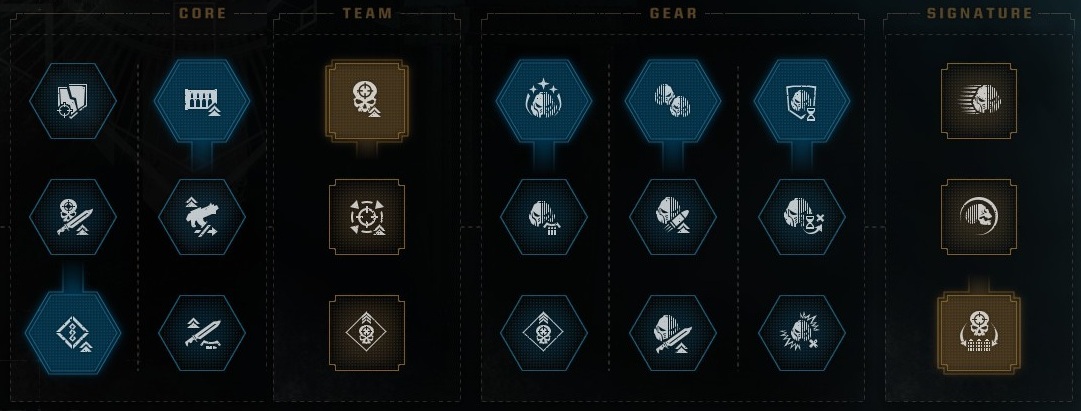 The Designated Marksman is a real life military role who is meant to operate as a part of a fireteam to provide long-range support fire to a squad. Unlike the other two builds, which play as lone operatives, a Designated Marksman will support the rest of the squad. Instead of using the Camo Cloak to inflict a heavy hit against a target, flicker it on and off when you're under a status effect or have contested health to recover. Only turn the Camo Cloak on for prolonged period if a squad member goes down, then you can go rescue them without any danger. For the primary weapon, pick the Stalker Bolt Rifle, Instigator Bolt Carbine or Marksman Bolt Carbine, which will combine extremely well with Pattern of Excellence to give you a lot of grenades to throw. Since the Designated Marksman is intended to be a distance away from the opponents, prioritize getting ahold of some Krak or Shock grenades to throw into the fray.
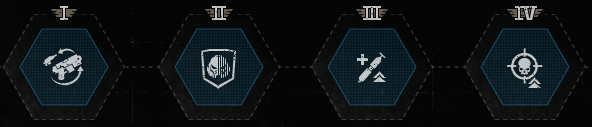 Versatile Precision makes primary weapon ammo almost irrelevant and this is especially helpful with the Bolt Sniper Rifle, Las-Fusil and Stalker Bolt Rifle which have issues with ammo economy. Just draw your secondary against a few minoris enemies whenever you're getting worried about your primary ammo. Emperor's Grace is an excellent second choice, because if you're activating the Camo Cloak in an emergency, invincibility will ensure that emergency activation works as intended. Conviction and Exacting Focus are decent extra choices among the remaining perks.
Sniper
This setup matches the name of the class the most. This build combines a Bolt Sniper Rifle or Las-Fusil with big boosts to ranged damage and extra Camo Cloak recharge when getting a kill with a headshot, allowing the Sniper to deal a lot of damage to strong enemies with a single shot. Emergency Override and Lingering Concealment are some minor extra bonuses.Assassin
With the Assassin build, the Combat Knife is the main weapon. By using the Camo Cloak, you can quickly get close to an important enemy such as an Extremis enemy or perhaps just an important Majoris Enemy and charge up a Shadow Stab to take out most or all of their health. If that enemy has anything near them, the Ambush perk will stun them so you can inflict some additional hits against them. If you get a Perfect Dodge, then you'll have a brief window to get another free Cloaked Shadow Stab thanks to the Evasion perk. Pick the highest damage Combat Knife variant available to take advantage of the damage multipliers. The Bolt Carbine can be used in short controlled bursts to take out enemies that you can't reach, recover contested health, take out traitor guardsmen or soften up enemies if you can't start a fight with a Cloaked Shadow Stab.Designated Marksman
The Designated Marksman is a real life military role who is meant to operate as a part of a fireteam to provide long-range support fire to a squad. Unlike the other two builds, which play as lone operatives, a Designated Marksman will support the rest of the squad. Instead of using the Camo Cloak to inflict a heavy hit against a target, flicker it on and off when you're under a status effect or have contested health to recover. Only turn the Camo Cloak on for prolonged period if a squad member goes down, then you can go rescue them without any danger. For the primary weapon, pick the Stalker Bolt Rifle, Instigator Bolt Carbine or Marksman Bolt Carbine, which will combine extremely well with Pattern of Excellence to give you a lot of grenades to throw. Since the Designated Marksman is intended to be a distance away from the opponents, prioritize getting ahold of some Krak or Shock grenades to throw into the fray.Prestige
Versatile Precision makes primary weapon ammo almost irrelevant and this is especially helpful with the Bolt Sniper Rifle, Las-Fusil and Stalker Bolt Rifle which have issues with ammo economy. Just draw your secondary against a few minoris enemies whenever you're getting worried about your primary ammo. Emperor's Grace is an excellent second choice, because if you're activating the Camo Cloak in an emergency, invincibility will ensure that emergency activation works as intended. Conviction and Exacting Focus are decent extra choices among the remaining perks.
Heavy
Before the Primaris Marines, the Heavy was called the Devastator, a catch-all term for the heavy support infantry of the Space Marines regardless of what weapon they are equipped with. After the Primaris were introduced, the Devastator was split up into a unit type for every heavy weapon it could have. The Heavy class has a more powerful primary weapon than any of the other classes, and thus excels at blasting enemies apart with ranged firepower. However, this heavier armanent comes at the cost of not having a melee weapon, making the Heavy more vulnerable in melee than any other. The unique ability of the Heavy is the Heavy Stance, where the Heavy aims with their weapon, increasing fire rate as well as reducing recoil and spread but increasing stagger vulnerabilty and taking away the ability to dodge. The special ability of the Heavy is the Iron Halo, which creates a damage absorbing shield shaped like an eighth of a sphere that points in the direction the Heavy faces at its base. Some builds can also use it as an offensive weapon and offensive buff. Unlike the other classes, the perk build of the Heavy is tied to what primary weapon the player has taken.
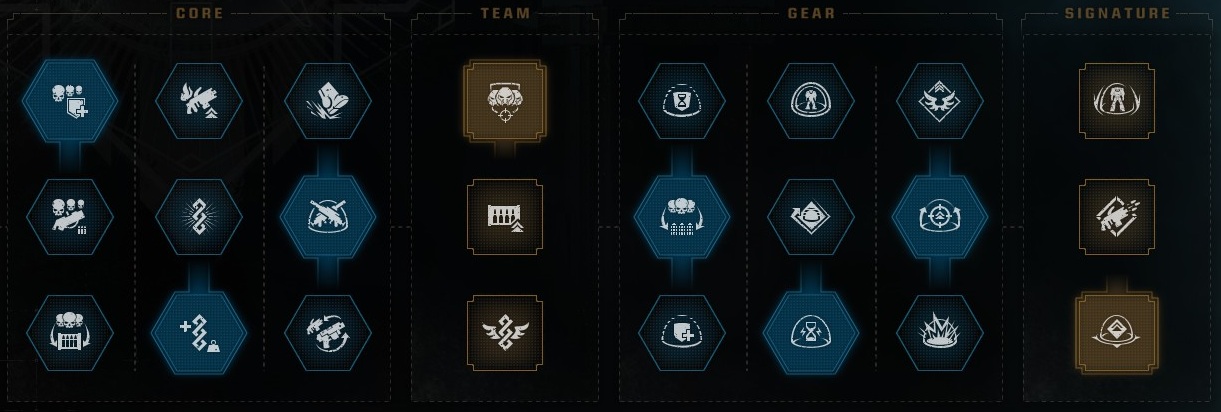 The Heavy Bolter is an excellent all-around DPS weapon for dealing with anything from hordes to heavier opponents. Because the Heavy Bolter is good at rapidly killing large numbers of minoris enemies quickly, this build takes every perk that procs when getting a kill streak. Other perks are meant to improve DPS even further and Strategic Stand means the player can choose to endure weaker attacks to continue inflicting damage and recovering health lost.
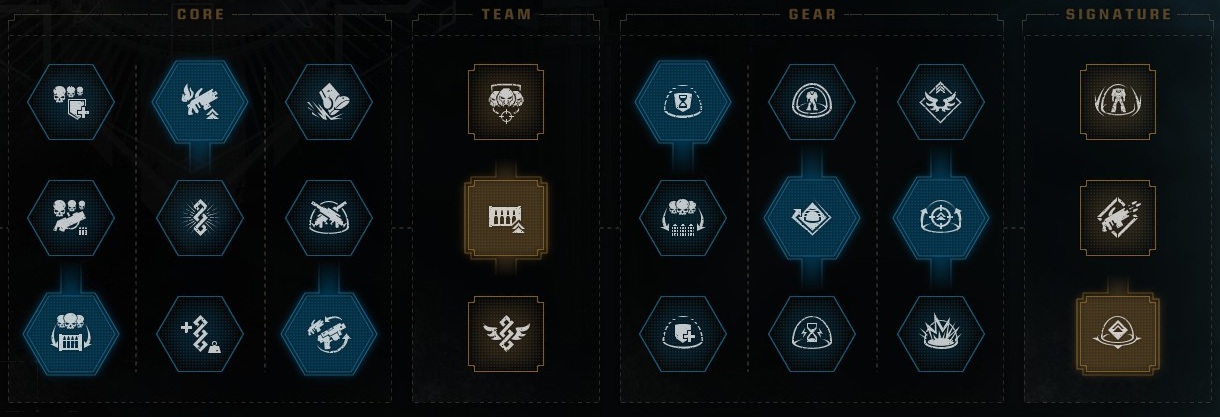 The Heavy Plasma Incinerator is the heavy cannon of the available heavy weapons. The main use of it is firing charged shots, only use the common shots against small numbers of minoris enemies. The Heavy Plasma Incinerator heats up quickly, which can be used to your advantage thanks to Thermal Boost, by pacing your shots, you can ensure the buff is active without overheating the gun. The Heavy Plasma Incinerator has issues with ammo economy, so Auxiliary Ammunition will help you get some ammo back. Finally, the Heavy Plasma Incinerator is risky to use against enemies who have gotten too close, that's where Versatility comes in, where if an enemy gets close, swap to your secondary and gun them down. The Inferno Pistol is a good secondary choice.
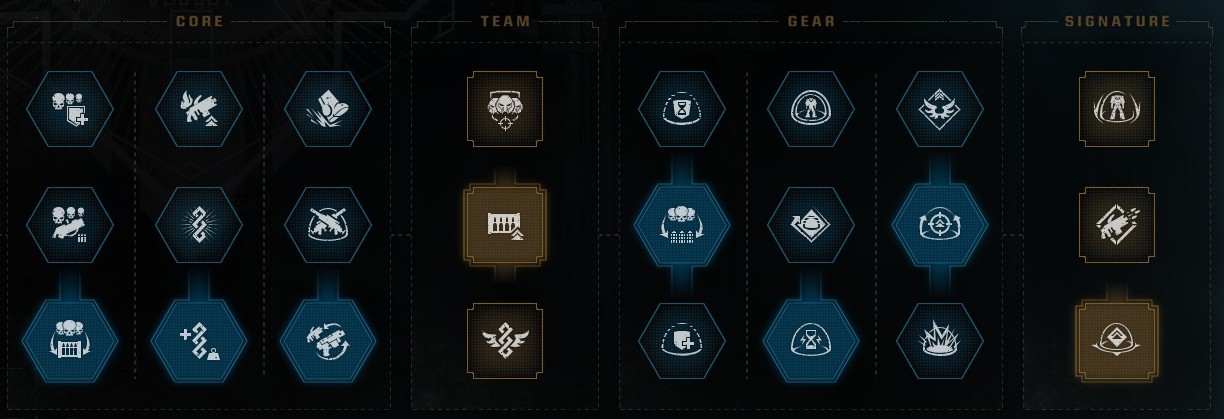 The Relic Heavy Plasma Incinerator turns the Heavy Plasma Incincerator from a cannon to an automatic grenade launcher, sacrificing damage per shot to being able to take our clumped up foes quickly. Due to this change, use the Heavy Plasma Incinerator more like how you'd use the Heavy Bolter. However, common shots still deal AOE damage that can hit yourself so remember to swap out when enemies get too close. The Inferno Pistol is a good secondary choice.
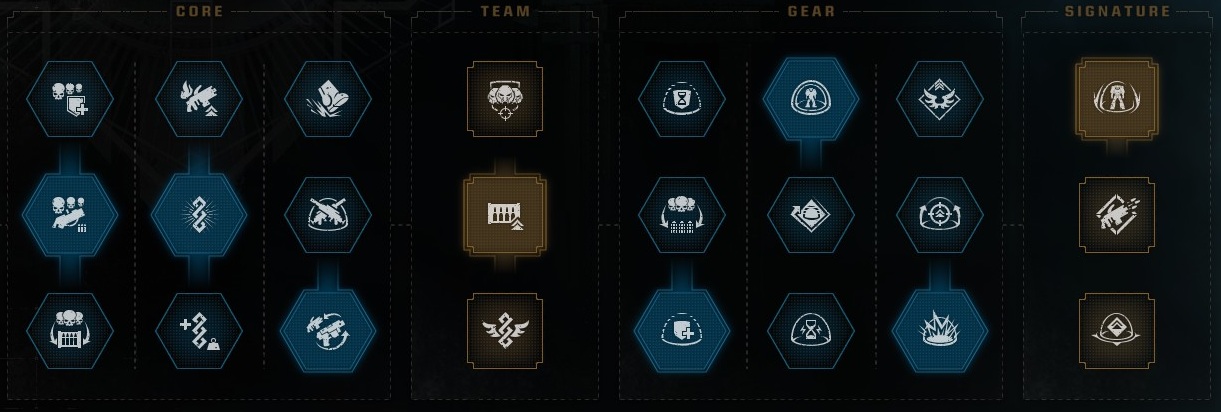 The Multi-Melta functions like an enormous shotgun so get in close to make full use of it. Fortitude will make getting close a little less dangerous and Versatility means that if there's an enemy you can't easily reach or a reinforcement call you need to stop, you can swap to your secondary (do not make it an Inferno Pistol) to shoot that enemy. The Gear and Signature perks are meant to scale with each other, unless the fight ends, let the Iron Halo drain out and generally don't hold onto a full charge. Note that that wording of Emperor's Protection and Wrath of the Imperium says "expends all its energy", which means when the Iron Halo shuts off on its own, not when shut off manually or collapses due to enemy fire.
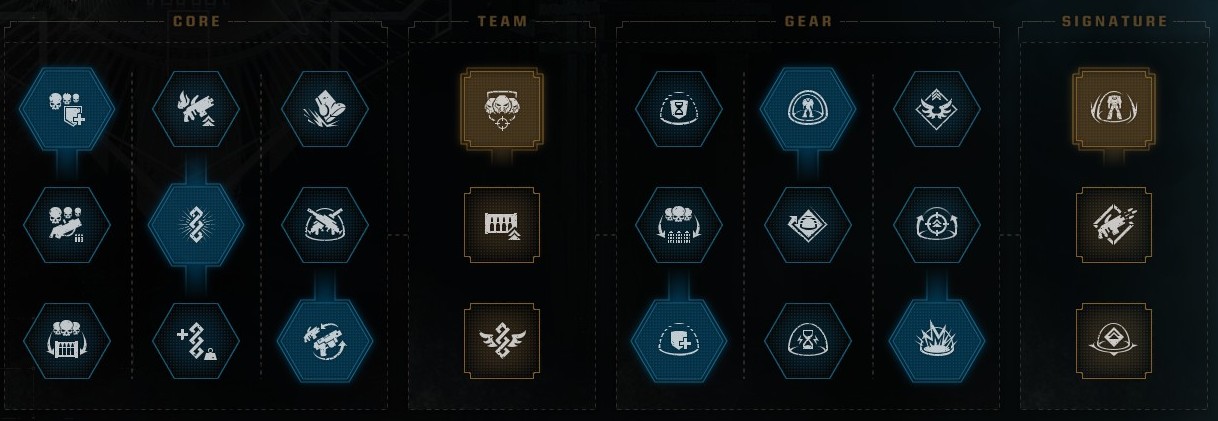 The Pyrecannon is similar to the Multi-Melta in that it's a close range weapon, however, instead of being a burst damage weapon, it's instead a DPS aerial denial weapon. Unlike most other weapons, you don't need to enter Heavy Stance to use it effectively, as the build given won't have much benefit for doing so, other than accuracy which the Pyrecannon doesn't need. You can also save some ammo by firing it in puffs so that DoT effects can take out enemy health. Read the information on Versatility and the Iron Halo from the Multi-Melta section above for additional information.
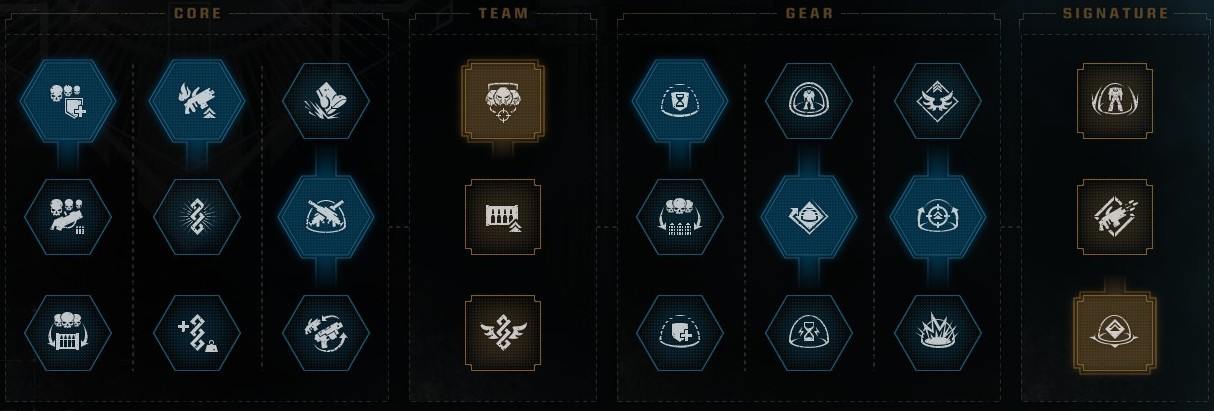 The Heavy Bolt Rifle is the odd duck among the Heavies weapons. It doesn't overheat, and it works on magazine based ammo storage. However, compared to the other weapons, the Heavy Bolt Rifle has a range advantage that allows it to take out distant opponents more efficiently than any of the other options. If using the Heavy Bolt Rifle I suggest taking the ranged option that comes with a scope in order to play towards the Heavy Bolt Rifle's main strength compared to the other primaries.
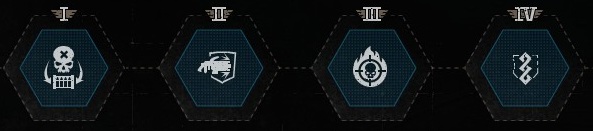 Auxiliary Reload is an excellent perk because the Heavy is a class that really needs ammo, and will help you keep that ammo up. It says it'll restore a magazine, but for weapons that don't work on magazine supply, it instead restores 20% of your full ammo. Duellist and Indomitable Spirit will help you survive if enemies get too close and Conviction will help you survive when your armor goes down.
Heavy Bolter
The Heavy Bolter is an excellent all-around DPS weapon for dealing with anything from hordes to heavier opponents. Because the Heavy Bolter is good at rapidly killing large numbers of minoris enemies quickly, this build takes every perk that procs when getting a kill streak. Other perks are meant to improve DPS even further and Strategic Stand means the player can choose to endure weaker attacks to continue inflicting damage and recovering health lost.Heavy Plasma Incinerator
The Heavy Plasma Incinerator is the heavy cannon of the available heavy weapons. The main use of it is firing charged shots, only use the common shots against small numbers of minoris enemies. The Heavy Plasma Incinerator heats up quickly, which can be used to your advantage thanks to Thermal Boost, by pacing your shots, you can ensure the buff is active without overheating the gun. The Heavy Plasma Incinerator has issues with ammo economy, so Auxiliary Ammunition will help you get some ammo back. Finally, the Heavy Plasma Incinerator is risky to use against enemies who have gotten too close, that's where Versatility comes in, where if an enemy gets close, swap to your secondary and gun them down. The Inferno Pistol is a good secondary choice.Relic Heavy Plasma Incinerator
The Relic Heavy Plasma Incinerator turns the Heavy Plasma Incincerator from a cannon to an automatic grenade launcher, sacrificing damage per shot to being able to take our clumped up foes quickly. Due to this change, use the Heavy Plasma Incinerator more like how you'd use the Heavy Bolter. However, common shots still deal AOE damage that can hit yourself so remember to swap out when enemies get too close. The Inferno Pistol is a good secondary choice.Multi-Melta
The Multi-Melta functions like an enormous shotgun so get in close to make full use of it. Fortitude will make getting close a little less dangerous and Versatility means that if there's an enemy you can't easily reach or a reinforcement call you need to stop, you can swap to your secondary (do not make it an Inferno Pistol) to shoot that enemy. The Gear and Signature perks are meant to scale with each other, unless the fight ends, let the Iron Halo drain out and generally don't hold onto a full charge. Note that that wording of Emperor's Protection and Wrath of the Imperium says "expends all its energy", which means when the Iron Halo shuts off on its own, not when shut off manually or collapses due to enemy fire.Pyrecannon
The Pyrecannon is similar to the Multi-Melta in that it's a close range weapon, however, instead of being a burst damage weapon, it's instead a DPS aerial denial weapon. Unlike most other weapons, you don't need to enter Heavy Stance to use it effectively, as the build given won't have much benefit for doing so, other than accuracy which the Pyrecannon doesn't need. You can also save some ammo by firing it in puffs so that DoT effects can take out enemy health. Read the information on Versatility and the Iron Halo from the Multi-Melta section above for additional information.Heavy Bolt Rifle
The Heavy Bolt Rifle is the odd duck among the Heavies weapons. It doesn't overheat, and it works on magazine based ammo storage. However, compared to the other weapons, the Heavy Bolt Rifle has a range advantage that allows it to take out distant opponents more efficiently than any of the other options. If using the Heavy Bolt Rifle I suggest taking the ranged option that comes with a scope in order to play towards the Heavy Bolt Rifle's main strength compared to the other primaries.Prestige
Auxiliary Reload is an excellent perk because the Heavy is a class that really needs ammo, and will help you keep that ammo up. It says it'll restore a magazine, but for weapons that don't work on magazine supply, it instead restores 20% of your full ammo. Duellist and Indomitable Spirit will help you survive if enemies get too close and Conviction will help you survive when your armor goes down.
Techmarine
The Techmarine has a lot of unique traits that other classes don't have. First is the Servo-Gun, which performs the Techmarine's gun strikes. The Gun-Strikes are based on the power of the Servo-Gun instead of the player's pistol. While this does mean weaker Gun-Strikes, it also means there is no animation to be interrupted. This synergizes very well with charged attacks, because it enables the Techmarine to interupt enemy attempts to interupt a charged attack. The second unique trait is the Tarantula Sentry Turrets, where the presence of a Techmarine in a team will place several Tarantula Sentries on the map that the Techmarine can activate, causing it to shoot enemies until it runs out of ammo or is destroyed. If it runs out of ammo, it can be reactivated. The Techmarines ability is to activate their Servo-Gun to gun down enemies. Very simple, but it can be made to do a bit more than that. When the Servo-Gun is active, the Techmarine will Gun-Strike like the rest of the classes, which will make the Gun-Strikes cause a bit more damage but come with an animation that can be interupted.
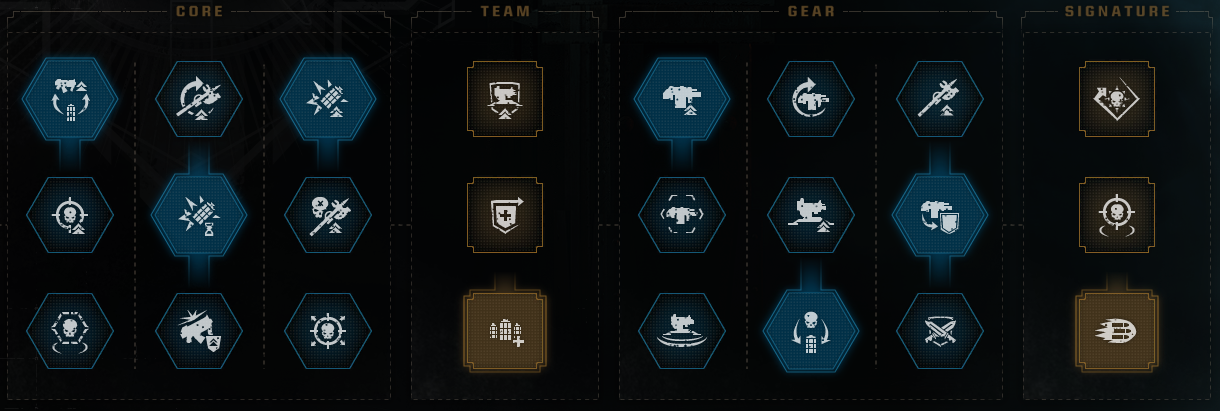 The Demolitions Expert is based around the use of Grenades. By taking every perk that buffs them (technically buffs equipment) and making the Servo-Gun replenish them, the player can throw a grenade and then activate it after it explodes to get that grenade back, as well as throwing multiple grenades in a more dangerous moment such as a massive enemy wave.
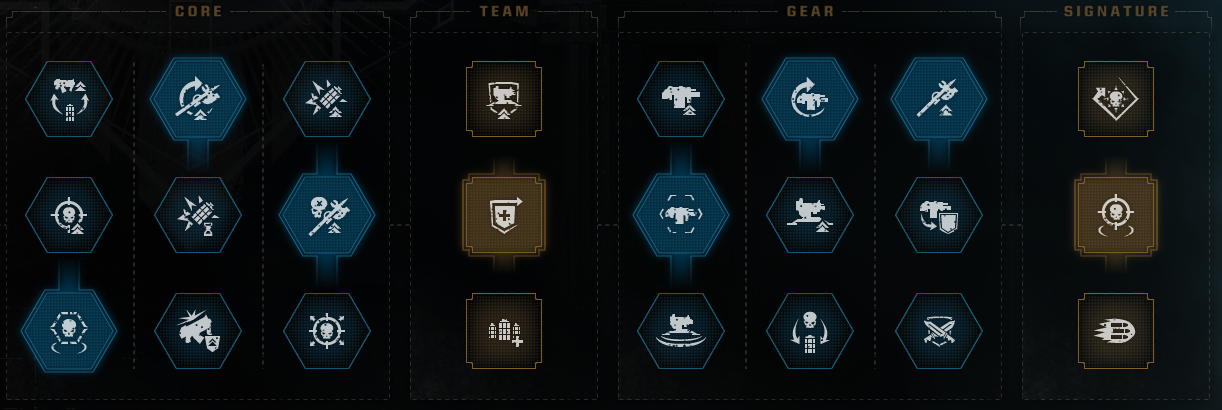 Percussive Maintenance is a melee focused build, proving that just because the Techmarine is the studious type, they are still an Astartes and can throw down with the rest. Every melee buff in the perk tree is taken, as well as Battlefield Repairs so that performing finishers is even more helpful. The last aspect of this build is how the Servo-gun is used. Inexorable Salvo means that the Techmarine can easily stay on his feet when Servo-gun is active and thanks to Plasma Enhancement, Augmented Ammunition Feed and Lethal Perimeter, that Servo-Gun will last a long time.
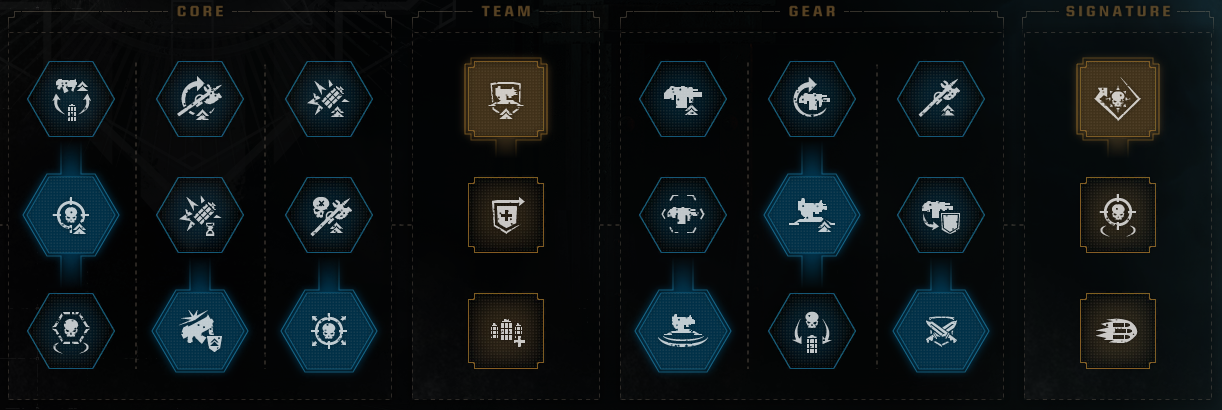 You'll be both a turret, and activating amplified turrets. This build has every Tarantula buff available and with both Servo-Gun and your own shooting, you can put the hurt on single-targets, bursting them down with a hail of gunfire. This is especially good when the enemy is at least 20 meters away.
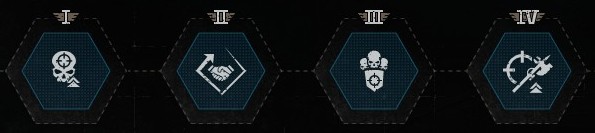 Chained Headshot is a good pick, allowing a damage buff to build with a little precision. Indomitable is an excellent perk to choose, Sentry Guns are powerful even without any perk buffs but it can be dangerous to activate one mid-combat, which is completely negated by this perk. After that, Furious Gun Strike and Defensive Stance are good third and fourth picks. Furious Gun Strike is a good offensive pick because regardless of your build, enemies will get close for melee, meaning you'll be parrying and blocking. Defensive Stance is helpful, because being swarmed is inevitable.
Demolitions Expert
The Demolitions Expert is based around the use of Grenades. By taking every perk that buffs them (technically buffs equipment) and making the Servo-Gun replenish them, the player can throw a grenade and then activate it after it explodes to get that grenade back, as well as throwing multiple grenades in a more dangerous moment such as a massive enemy wave.Percussive Maintenance
Percussive Maintenance is a melee focused build, proving that just because the Techmarine is the studious type, they are still an Astartes and can throw down with the rest. Every melee buff in the perk tree is taken, as well as Battlefield Repairs so that performing finishers is even more helpful. The last aspect of this build is how the Servo-gun is used. Inexorable Salvo means that the Techmarine can easily stay on his feet when Servo-gun is active and thanks to Plasma Enhancement, Augmented Ammunition Feed and Lethal Perimeter, that Servo-Gun will last a long time.Turret Master
You'll be both a turret, and activating amplified turrets. This build has every Tarantula buff available and with both Servo-Gun and your own shooting, you can put the hurt on single-targets, bursting them down with a hail of gunfire. This is especially good when the enemy is at least 20 meters away.Prestige
Chained Headshot is a good pick, allowing a damage buff to build with a little precision. Indomitable is an excellent perk to choose, Sentry Guns are powerful even without any perk buffs but it can be dangerous to activate one mid-combat, which is completely negated by this perk. After that, Furious Gun Strike and Defensive Stance are good third and fourth picks. Furious Gun Strike is a good offensive pick because regardless of your build, enemies will get close for melee, meaning you'll be parrying and blocking. Defensive Stance is helpful, because being swarmed is inevitable.
A Note on Team Perks
The observant will notice that these builds take no concern for the other players when it comes to the chosen Team Perk. Instead, the selfish choice is chosen that helps the player's build. When matchmaking, this isn't too much of a problem because there's no knowledge on what build is in use by whoever the game makes your teammate. However, when friends play together who know each others builds, then instead of taking the perk suggested by the build, it might be worth picking a team perk that synergies better with the whole team.
Bolt Rifles
Auto Bolt Rifle
 A jack of all stats, master of none weapon. The Auto Bolt Rifle is a low recoil weapon, so it can maintain accuracy during sustained fire and it can do decently at both close and long ranged compared to other Bolt Weapons. Because it can penetrate enemies, it can mow down hordes that the Bolt Carbine might struggle with. Don't forget to aim for the head against Majoris enemies. If you have the Emperor's Vengeance perk, take the weapon variant that has better accuracy, otherwise get a deeper ammo reserve. Taking the single instance of the Honed Precision perk makes it a smidge more accurate when hip firing than when aiming so take advantage of this to maintain situational awareness when fighting up close. Only aim when trying to take out distant cultists or spore mines.
Bolt Rifle
 The Bolt Rifle is the other jack of all stats, master of none available to the Tactical. The Bolt Rifle is accurate at all ranges and is very accurate for scoring head shots, though it struggles with getting lots of single-target damage quickly and is inaccurate during hip fire, which is an issue when getting swarmed up close. Of the variants available, one can choose between firepower, accuracy, ammo reserve and a melta attachment. Ammo economy is decent, so increasing ammo reserve might be a lacking priority. As for firepower, as long as one aims for the head, the better headshot bonus of the accuracy variant will mean more damage with it over straight firepower. That leaves accuracy and the melta attachment to choose between. Accuracy is great in all situations while the Combi-Melta attachment covers the Bolt Rifle's weakness when swarmed up close.
Bolt Rifle with Grenade Launcher
 If you choose to do so, you can forgo any improvements to the Bolt Rifle and pick a variant with a grenade launcher attachment, most of what has been said about the Bolt Rifle also applies to one with a grenade launcher attachment but the difference is how you use the grenades. Pick priority targets, and while the grenade launcher can be used against minoris swarms, it's not worth it unless you're hitting majoris or higher enemies within the swarm. When some majoris enemies clump up, using several grenades is quite worth it, two or three grenades can leave three or four Majoris enemies in an execute state at once. Single Extremis and Terminus enemies are also worth using the grenade launcher on.
Bolt Sniper Rifle
 The Bolt Sniper Rifle has a limited ammo reserve that makes it very ineffective against hordes but it excels at picking out a single priority targets and tearing chunks out of its health. The relic version is an excellent choice that's arguably beyond any other, even with its low ammo reserve, landing head shots will get you a shot back, which is especially great against Tyranids because they tend to have large heads. If you've gotten the Versatile Precision prestige perk, then the low ammo of the heroic is almost negligible.
Heavy Bolt Rifle
 The Heavy Bolt Rifle is a strong battle rifle, able to accurately hit shots in controlled bursts at range and while it might not be as good at it, you can hold down the trigger against large minoris swarms or big targets. As expected, one should aim for the head to get the most out it, because if you don't, the efficiency of the weapon will drop sharply. In terms of the variants, the choices are accuracy, headshot multiplier (comes with a scope), damage and ammo reserve. Don't pick ammo reserve unless you're trying to get its perk point, the other options are decent choices though and hard to pick wrong.
Deathwatch Heavy Bolt Rifle
 The Deathwatch gives the Heavy Bolt Rifle a grenade launcher just like with the Bolt Rifle. Everything that applies to the Bolt Rifle with a Grenade Launcher applies here.
Stalker Bolt Rifle
 The Stalker is a semi-automatic battle rifle that can accurately hit heads, its many ammo regeneration perks as well as the perks granted by the Tactical and Sniper meaning it can thin out hordes at a distance. What the Stalker is best at is taking out Majoris and higher enemies with relentless head shots. If you have the Emperor's Vengeance or Versatile Precision perks, take the damage variant, if not, take the ammo variant.
Bolt Carbines
Bolt Carbine (without Kraken Penetrator Rounds)
 The Bolt Carbine has a unique trait where it deals 50% more damage against enemies 10 meters or closer. It is the premium close range single target DPS weapon, however, this comes at the cost of everything else. Since it can't penetrate at its base, it won't kill Minoris hordes as quick as other, lower fire rate weapons and at range, most shots will miss due to both inherent low accuracy and high recoil. This means that at long range, the Bolt Carbine will only be effective against Spore Mines and Cultists, and that's only if you tap the fire button. It can take some getting used to, but an interesting trait about the Bolt Carbine is that taking the single instance of Honed Precision available to it will make it MORE accurate when hip firing than when aiming. Take advantage of this unique trait to maintain situational awareness when fighting and only aim when trying to take out distant Spore Mines or Cultists. While the Bolt Carbine's variants have no headshot bonus, several perks will give it a headshot bonus so keep aiming for the head. The variant to take is based on personal preference, accuracy helps a bit with the ranged weakness, while the ammo variant will mean that DPS is less likely to be interrupted by a need to reload.
Bolt Carbine (with Kraken Penetrator Rounds)
 If you have the Kraken Penetrator Rounds perk, then there is no need to aim for the head when using the Bolt Carbine. All the Bolt Carbine's head-shot perks together will give a 55% headshot bonus and that's only when below 30% health, otherwise it would be a 30% headshot bonus. This is less than the 50% bonus of Kraken Penetrator rounds. Instead, mag-dump your shots into the body.
Marksman Bolt Carbine
 The Marksman Bolt Carbine is a re-fitted Bolt Carbine, turning it into a easily controllable and accurate weapon that fires as fast as you can mash the fire button. Its most direct point of comparison is the Stalker Bolt Rifle, where it has better ammo economy and horde clear abilities, at the loss of ability to aim at enemies from a distance. Once again, the choice between variants is choosing either accuracy or ammo supply. The accuracy variant increases the Headshot Multiplier, meaning less shots to take an enemy out so it's the better choice.
Instigator Bolt Carbine
 The Instigator is a good DPS, mid and long range weapon for single enemies thanks to high headshot damage, and being a very controllable weapon due to being burst-fire. What the Instigator does struggle with is Minoris hordes, because it's burst-fire nature will overkill minoris enemies unless you sacrifice accuracy to try sweeping and should those swarms get close, it'll be really hard to gun them down since there is no automatic option. In terms of variant, I'd pick the Accuracy variant. The increased headshot damage outweighs the damage increase of the damage variant, which means you can get more damage and more accurate shots instead of just more damage. The Heroic option suffers a lot in terms of long-range, but it will get more damage per burst at close range.
Occulus Bolt Carbine
 The Occulus is most directly comparible to the Instigator, sacrificing some Majoris and higher damage ability for being more efficient and effective at minoris hordes. Similar to the Instigator, the easy headshot ability makes the Headshot variant the best choice.
Heavy Weapons
Heavy Bolter
 The Heavy Bolter is an excellent all-around DPS weapon for dealing with hordes at any range. It can even recover contested health so quickly that you can outheal the damage dealt to you. Against heavier targets, ammo availability does become a concern though, especially when those targets are distant. In terms of variant, the choice is between accuracy, damage, venting speed, ammo and the Relic version that has even higher DPS and increases the Perfect Parry window at the cost of overheating quicker. The accuracy is pretty bad, so you'll feel forced to use the accuracy variant.
Heavy Plasma Incinerator
 The Heavy Plasma Incinerator is the heavy cannon of the available heavy weapons. The main use of it is firing charged shots, only use the common shots against small numbers of minoris enemies. It can one-shot elites on lower difficulties and take out most of their health at higher ones. Once you've heated it up to half, you can discipline your shots to avoid overheating completely. If enemies get too close, swap to your secondary, the AoE won't damage allies to counteract griefing, but it will hurt the player firing it. The Heavy Plasma Incinerator is not ammo efficient, so pick the ammo variant.
Relic Battle-Worn Heavy Plasma Incinerator
 The Relic Battle-Worn Heavy Plasma Incinerator turns the Heavy Plasma Incincerator from a cannon to an automatic grenade launcher, sacrificing damage per shot to being able to take out clumped up foes quickly. By firing and venting at the same time, this weapon can fire for a long time without overheating. Once again, swap to your secondary if enemies get too close.
Multi-Melta
 The Multi-Melta functions like an enormous shotgun so get in close to make full use of it. Nearly everything about this is the same as with the Melta Rifle. Unlike the Melta Rifle, the Multi-Melta does benefit from aiming because its perks will provide bonuses other than aiming and fire rate and it can be decent against single opponents, though you still might want to pull out your bolt or plasma pistol for that. The Multi-Melta has bad ammo efficiency so the ammo variant is probably the best. Don't use this with the Inferno Pistol or you won't be able to take out unreachable enemies or stop a reinforcement call from a distant enemy.
Pyrecannon
 The Pyrecannon is similar to the Multi-Melta in that it's a close range weapon, however, instead of being a burst damage weapon, it's instead a DPS aerial denial weapon. Unlike the Pyreblaster, there's a small benefit to aiming the Pyrecannon, as it increases the range, so if you're good at judging the distance, you can aim at somewhat distant enemies and hip-fire when they get closer. You can also save some ammo by firing it in puffs so that DoT effects can take out enemy health. Due to the Pyrecannon's ammo efficiency, pick the venting speed option. Don't use this with the Inferno Pistol or you won't be able to take out unreachable enemies or stop a reinforcement call from a distant enemy.
Miscellaneous Primary Weapons
Las-Fusil
 The Bolt Sniper Rifle may be better at taking out single targets, but the Las-Fusil is deceptively versatile. It's a long-range anti-Majoris and higher weapon and if you've gotten the Lethal Efficiency perk, it becomes an anti-everything weapon. The weapon does have some ammo efficiency issues so until you've gotten the Versatile Precision prestige perk, use the ammo variant and when you've gotten it both the fire rate and damage variants are both good choices. The Fire Rate version has a hidden bonus in that it reduces shot charge time, meaning a lower window for the enemy to dodge out of the way.
Melta Rifle
 The Melta Rifle functions like a traditional shotgun, firing a close range blast that deals low damage to everything in front of it. It can take some getting used to, but you only need to hip-fire this weapon. While it can insta-kill most minoris enemies and rack up a lot of damage against higher threat enemies that have clumped together, it is terrible against single targets. An entire magazine or more could be emptied dealing with a single Majoris enemy or higher so you need to swap to something else against them. All this being said, clearing the hordes will give you freedom to deal with the stronger stuff, meaning it can be worth spending one of your slots just for that. Pick the range variant if you have the Emperor's Vengeance perk, otherwise take the ammo variant.
Plasma Incinerator
 The Plasma Incinerator is used for elite killing and terminus DPS. It can also be used to quickly regain contested health. A lot of the same rules that apply to the heavy version apply to this version. However, since the Tactical has the Emperor's Vengeance perk, the ammo variant doesn't need to be taken. Instead, take the firepower variant.
Pyreblaster
 The Pyreblaster is similar to the Melta Rifle in that it's a close range weapon, however, instead of being a burst damage weapon, it's instead a DPS aerial denial weapon. Like with the Melta Rifle, there's little benefit to aiming it. You can also save some ammo by firing it in puffs so that DoT effects can take out enemy health. The Pyreblaster is very ammo efficient so pick the venting speed variant.
Secondary Weapons
Bolt Carbine
 The weapon isn't ammo efficient so take the ammo variant. The Bolt Carbine is a Master of None weapon. It can do close range damage, horde clear and contested health restoration effectively, but other weapons can do one or two of these better. It's especially hampered by being a close range secondary in classes that don't have primary weapons. It would have worked far better in classes with primaries to cover the lack of long range like the Heavy and Techmarine.
Bolt Pistol
 The Bolt Pistol is best at clearing minoris enemies nearby. Against stronger opponents, it can soften them up. The Honourific Relic is the best variant to choose from, its 3-round burst is great for procing perks that grant benefits for getting consecutive headshots.
Heavy Bolt Pistol
 The Heavy Bolt Pistol can rival some primary weapons in terms of damage output. Compared to the Bolt Pistol, it exchanges ammo reserve for higher damage and headshot bonus. The Heavy Bolt Pistol has the strongest damaging gun strikes in the game. As for the variant to pick, the heroic, accuracy and firepower choices are good ones. If you primarily use your pistol with the Assault or Bulwark to stop reinforcement calls or are using a gun-strike build, then the Retribution's Bequest Heroic is the best choice.
Inferno Pistol
 A mini-melta, it can kill a swarm of minoris enemies or stagger some larger threats. A good idea is to fire the single round in the magazine and then fight in melee. One of the unique drawbacks of the Inferno Pistol is that its Gun Strikes have a maximum range, and leaving this range will make the gun strike marker disappear (getting back in range won't make it come back). The Inferno Pistol pairs well with long range, low fire rate weapons or weapons that can hurt you at close range like plasma weapons, sniper rifles and the stalker bolt rifle. It pairs horribly with classes that don't have a primary (assault and bulwark) or other close-range weapons (melta and pyre).
Neo-Volkite Pistol
 The Neo-Volkite Pistol is an unusual weapon. It fires a continous beam with no spread or recoil so there's no need to aim it against nearby enemies, though it might be worth doing against distant ones where the zoom could help with hitting. The beam also heats up the target until it undergoes an explosion, damaging the target and anything nearby. It's also an efficient weapon for destroying spore mines, strangler brambles and cultists due to the low health of all of these. The Volkite Pistol struggles a lot against minoris enemies, requiring constant weakspot hits to bring them down (though if you pull it off, that makes it extremely efficient) but it can really drop the heath of stronger enemies who won't die before exploding. The Neo-Volkite Pistol is bad at restoring contested health, restoring it very slowly. An explosion will give a big burst of health recovery, but this can be very difficult to pull off. I would advise taking the damage variant.
Plasma Pistol
 The Plasma Pistol is a good weapon against ranged elites and for interupting reinforcement calls, as well as taking out minoris swarms via charged shots. Once again, only use the common shots against minoris in few numbers. It has the second strongest single-target damaging gun strike in the game, but it will also damage enemies nearby the target, so for a gun strike heavy build, this weapon can compete with the Heavy Bolt Pistol. The best variant choice for classes without a Primary is the ammo capacity one, the Heroic will be too inefficient against small numbers of Minoris, cultists and Spore Mines. For classes with a Primary, the Heroic variant becomes an excellent choice for dealing with Majoris and higher enemies, since the Primary can be used to deal with small numbers of Minoris or particularly weak ones like Cultists and Spore Mines.
Melee Weapons (In General)
Melee weapons have three Defence types, Block, Balanced and Fencing. Balanced and Fencing weapons will stun enemies around you when making a Perfect Parry and open the enemy that was parried to a gun strike. Fencing weapons have a larger Perfect Parry window while Balanced will stun enemies in a larger radius and have the highest base stats. Block weapons will apply a buff when performing a Perfect Block. One instance of the buff makes the next melee hit give a temporary melee damage boost. Two instances of the buff makes the next melee hit create an explosion, restore an armor bar and also gives a temporary melee damage boost. In terms of weapon variants, Fencing is the more defensive style, while Block is more offensive while Balanced is well, balanced. High-level players tend to prefer Block and Balanced, but that's because they know the inside and out of attack timing. In regards to the Block weapons, a weakness is when getting swarmed by minoris enemies, but combining it with a neutral dodge can help reduce the damage taken. Note that the timing for a Perfect Parry is around half-way through the enemies attack animation, not before the enemy strikes, while the timing for Perfect Dodge is right before the attack strikes.
Melee Weapons (Unpowered)
Chainsword
 The Chainsword is a middle ground weapon in nearly every way, and its use feels similar when fighting a swarm of minoris or dueling a terminus. A simple and efficient weapon. It has no specific quirks of its use. The Double-Edged Heroic is largely considered worse than the Relic options. Most of the Heavy attacks are good for quickly breaking an enemies guard, the exception is the Stomp, which is an excellent way to clear hordes. End your combo with another light attack against single opponents, and with a Stomp against hordes.
Combat Knife
 The Combat Knife has the unique trait of being endlessly comboable. The unque trait in the controls is that it can be used when tapping to make both light attacks and heavy attacks. By holding the button, one can swap from one combo to the other, making it that until you hold again, you'll keeping doing the same attack you made when holding. For example Light (tap) -> Light (tap) ->Heavy (hold) -> Heavy (tap) -> Light (hold) -> Light (tap). The combat knife is billed as a dueling weapon, but it can be surprisingly good against hordes due to how fast you can swing it. Its biggest weakness is the lack of reach, giving enemies more chances to attack. The Power Gladius can potentially get the highest single attack damage in the game, but it's not practical to pull off and I would suggest taking other options. Ardent Edge maximizes the Combat Knife's dueling abilities, though this eliminated the earlier mention of it being good against hordes, meaning some other way to clear hordes that have managed to close in will be necessary.
Heavy Melee
The Heavies melee attacks are likely to be far weaker than the melee attacks of any other class, even if they are using starter weapons, which is to be expected because it's just the Heavy using their gun as an improvised weapon, with some stomps to go with it. It's because of the Astartes shear physical power that allows this to be of some level of effectiveness. In terms of the attacks themselves, they are only effective against Minoris enemies at best, knocking them about so they can be finished off with a Gun Strike. Against small numbers, regular attacks can be used, while against large numbers of opponents, a stomp can be used to scatter enemies to get some breathing room. Against Majoris or greater enemies, the Heavy will struggle in melee and be reliant on parries and then Gun Strikes to get single target damage. If you can, try to use melee attacks to stun these enemies so that you can get some distance to continue shooting instead of using melee to inflict damage.
Melee Weapons (Powered)
Omnissian Axe
 The Omnissiah Axe is exclusive to the Techmarine and this is because it's meant to be used in combination with the fact that the Techmarine has no animation when making Gun Strikes. Use your parry and then a Gun-Strike to interupt enemies so that you can make charged attacks without being interupted in turn. For this conventional weapon use, the Balanced Relic variant is considered the most effective variant, though if you're not confident in your parrying, use the Fencing Relic.
 Instead of traditional heavy attacks from neutral, the Omnissiah Axe has a special ability called the Omnissian Rush where the player will charge forward with it like an on-foot lance charge. The Omnissian Rush is slightly faster than a sprint so use it to cover distance as well. Just keep charging when dealing with Minoris enemies while against Majoris and higher, use the attacks that can be used to end an Omnissian Rush. Ultima Ratio is the better option of the two Fencing variants available, and works extremely well with this build.
Power Axe
 The Power Axe's unique trait is that after performing a Perfect Parry or Block, the Power Axe will get a buff to its abilities (called the Power Stance in-game), including the ability to make the powerful Power Backstep by holding the attack button, however, if using a Fencing or Block weapon, you'll be forced to choose between doing a Gun Strike or performing the Power Backstep. Generally, the Power Backstep will be better against multiple foes, while a Gun Strike will deal more damage against a single opponent. Outside of this unique trait, the Power Axe is a very fast and chainable weapon whose light attacks can rack up a lot of damage against individual targets while the heavy attacks clear out hordes.
Power Fist
 The Power Fist's most unique ability is the wave of pain it sends out with each charged attack. This is especially good when opening a fight where enemies rush at you in a column. However, this will suffer a bit if you let the swarm surround you, reducing the effectiveness of the cone attack. The light attacks are too sluggish for anything other than single opponents. Knowing when to make charged attacks (either partially or fully) is the most important part of using the Power Fist and sometimes, you'll find that neither are possible and you'll just have to dodge cancel your charge up. If using a Gun Strike based build (such as Gun-Kata), then the Death's Grasp relic is an excellent choice.
Power Sword
 The Power Sword uniquely has two modes with different combos, that are changed by holding the melee button as well as some more complex means to swap mode. The default mode is speed stance, which makes quicker, but narrower attacks. This makes the speed stance a high DPS weapon against single targets. The last attacks in its combos cause a shockwave with extended range. The other mode is power stance where the sword gains a stronger glow on it and results in slower but wider swings that will cleave through large swarms of enemies and stagger many of them, this can leave minoris enemies sprawling, allowing a gun strike to restore an armor bar. These two modes make the Power Sword a highly versatile weapon and if the active mode is well controlled, will give you a great way to deal with anything. A thing to note about the Power Sword is that its light attacks have pretty poor damage, leaving heavy attacks as the choice to use. As for the variants, the Fencing variant has fallen off a bit. The Xenophase Blade is the best of the balanced versions, but the Block variant is also a solid option.
Thunder Hammer
The Thunder Hammer may be slow, but as its size would tell you, few things won't break from being hit from it. This weapon has effective light attacks and heavy attacks. A good player should use them both as the situation calls for, but inevitably, a player will have a leaning towards the light or the heavy. The light attacks are relatively slow swings compared to other weapons, but they can devastate numerous or singular opponents in repeated devastating swings, and can easily be swung into ones blind spots. The only downside is the low reach of the swings. The build above plays to the light attacks.
 If allowed to fully charge the Aftershock heavy attack (swung from neutral), it will devastate anything it hits in a single mighty swing. If the enemy isn't giving you the time to reach stage 3 charge, earlier stages can still be done to put the hurt on them. The other charged attack is the Ground Slam which can be done after a light or sprint attack. Minoris enemies in the impact area will be crushed and the rest sent sprawling for gun strikes, while Majoris enemies will get their guard broken and suffer a lot of damage, especially if you follow up with another strike. This second build plays to the heavy attacks. If using the Storm's Dominion Heroic, then use this build.
More Warhammer 40,000: Space Marine 2 guides
- Fully Optimized PVE Builds for Every Class★ 5 (1.5k)55k views3.8k ♥36 minUpdated Apr 30, 2025
- Cosmetics Compendium★ 5 (323)43k views487 ♥17 minUpdated May 14, 2025
- [W40k: Space Marine 2] All dataslate locations★ 5 (1.2k)33k views2.4k ♥3 min
- Armory data / Gene Seeds Locations: WIP★ 5 (632)27k views1.6k ♥12 minUpdated Mar 12
- 100% ACHIEVEMENT GUIDE | Warhammer 40,000: Space Marine 2 👑★ 5 (597)24k views1.1k ♥11 minUpdated Aug 28, 2025
- Руководство по всем достижениям | Прохождение игры на 100%★ 5 (596)24k views1.4k ♥6 minRussianUpdated Oct 13, 2024




This guide was created by its original author on the Steam Community. Are you the author and want it removed? Request removal.