The Complete Setup Guide For Hitman 2: Silent Assassin
Who Is This Guide For?
This guide is intended for players who want to understand every modification they make to the game. Rather than using an all-in-one package, we'll install each fix manually, explain what it does, and verify that it works. This approach lets you choose exactly which improvements you want, while keeping full control over your installation. If you're only looking for the fastest possible setup, other guides may be more suitable.
The guide works for both Steam and GOG versions of the game.
The guide works for both Steam and GOG versions of the game.
What is Covered?
We will fix the most common issues with Hitman 2: Silent Assassin.
- Fix the grey intro screen
- Fix broken cutscenes, black-screen hangs, and the first mission failing to start
- Fix characters appearing as black silhouettes
- Restore correct animations and engine physics
- Enable widescreen support
- Optionally play in windowed mode
- Optionally remap mouse and keyboard controls
- Optionally enable freecam
- Optionally install ReShade for enhanced visuals
1. Essential: Install DxWrapper
When starting the game, the opening video may not play, cutscenes may hang on a black screen, and you may notice graphics glitches during gameplay such as characters appearing as black silhouettes. DxWrapper solves all these problems. Coincidentally, DxWrapper also comes with a built-in asi loader for loading scripts. We will use this later to install a widescreen resolution plugin.
https://github.com/elishacloud/dxwrapper/releases/download/v1.7.8400.25/dxwrapper.zip
Download
Download DxWrapper from the official webpage. Version 1.7.8400.25 works well with the game:https://github.com/elishacloud/dxwrapper/releases/download/v1.7.8400.25/dxwrapper.zip
Copy The Relevant Files
From the zip file, you only need the following files:- dxwrapper.dll
- dxwrapper.ini
- d3d8.dll (found in the "Stub" folder)
Configuration
Edit the following values in dxwrapper.ini (leaving everything else as it is):LoadPlugins = 1
D3d8to9 = 1
AnisotropicFiltering = 1
AntiAliasing = 1
EnableVSync = 1
Finally, ensure the game actually uses the Direct3D rendering engine, otherwise none of the above fixes will work. This is the default, but just in case, you can check it by verifying that you have the following line in your Hitman2.ini file:DrawDll RenderD3D.dll
⚠️
Important: If instead you see RenderOpenGL.dll, change it back to RenderD3D.dll.
Expected Results
- The intro video plays when launching the game.
- Starting a new game no longer hangs on a black screen, and the opening cutscene plays.
- Characters render with the correct textures.
- Game has anti-aliasing.
2. Essential: Limit The Frame Rate
The game engine may exhibit various bugs if the game is run at a high FPS:
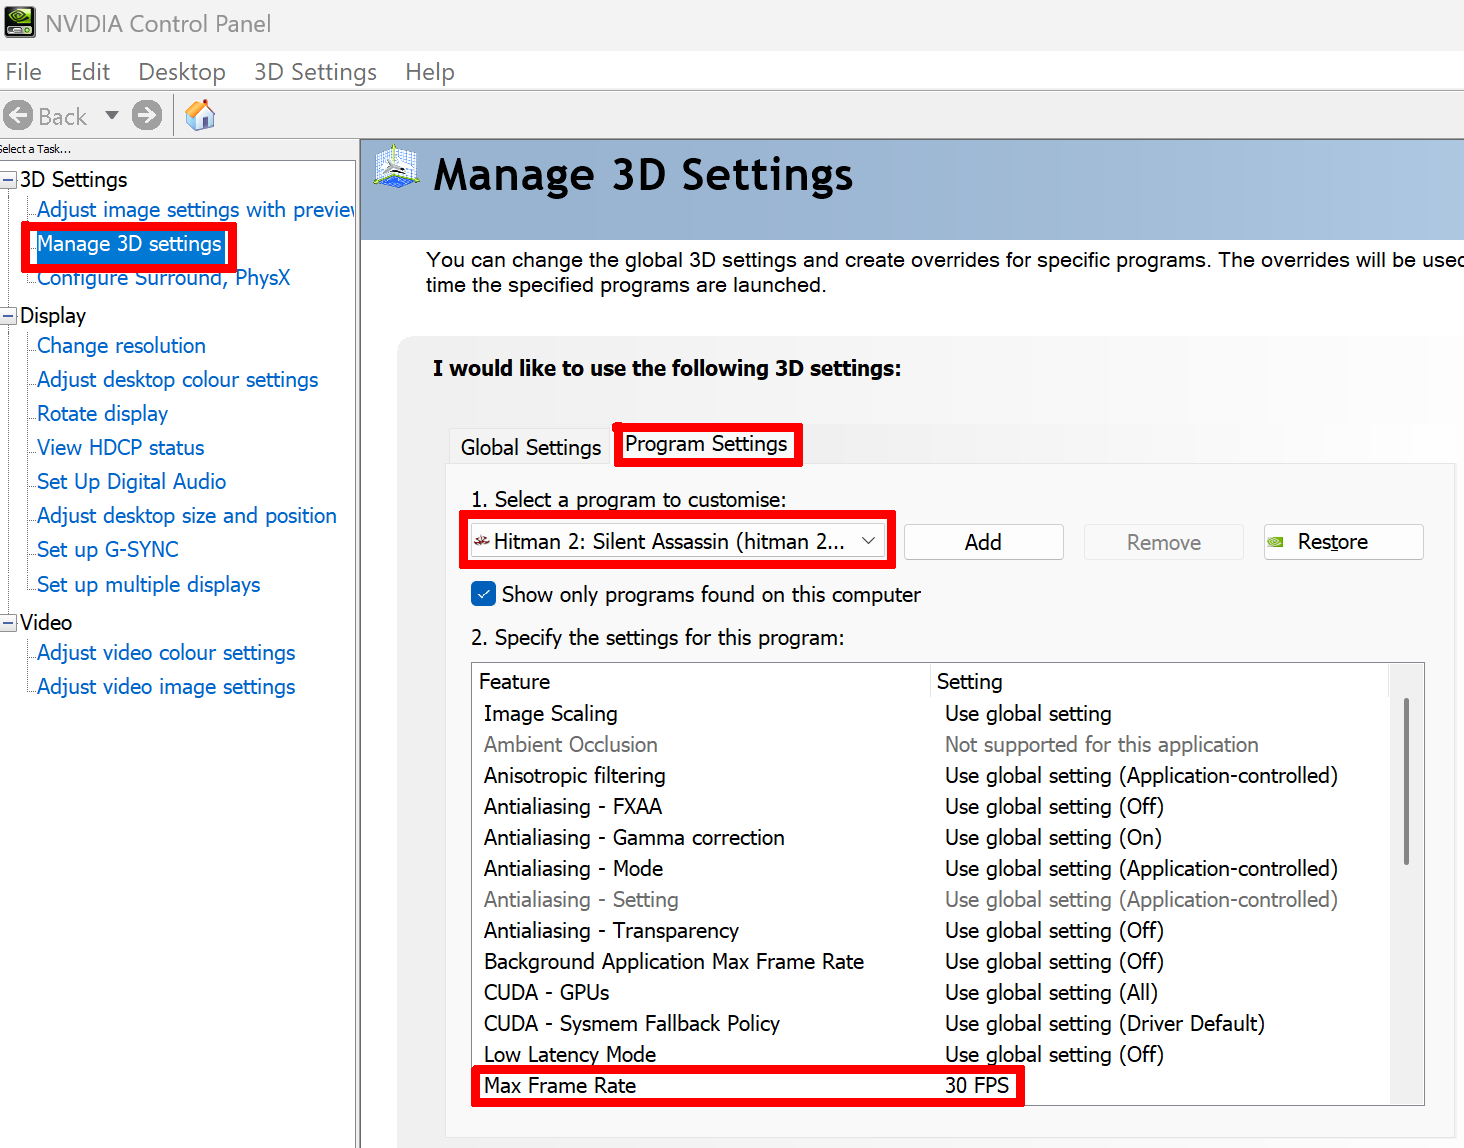 If you have an NVidia GPU, you can limit the frame rate using the NVidia Control Panel. This will permanently lock the game's frame rate.
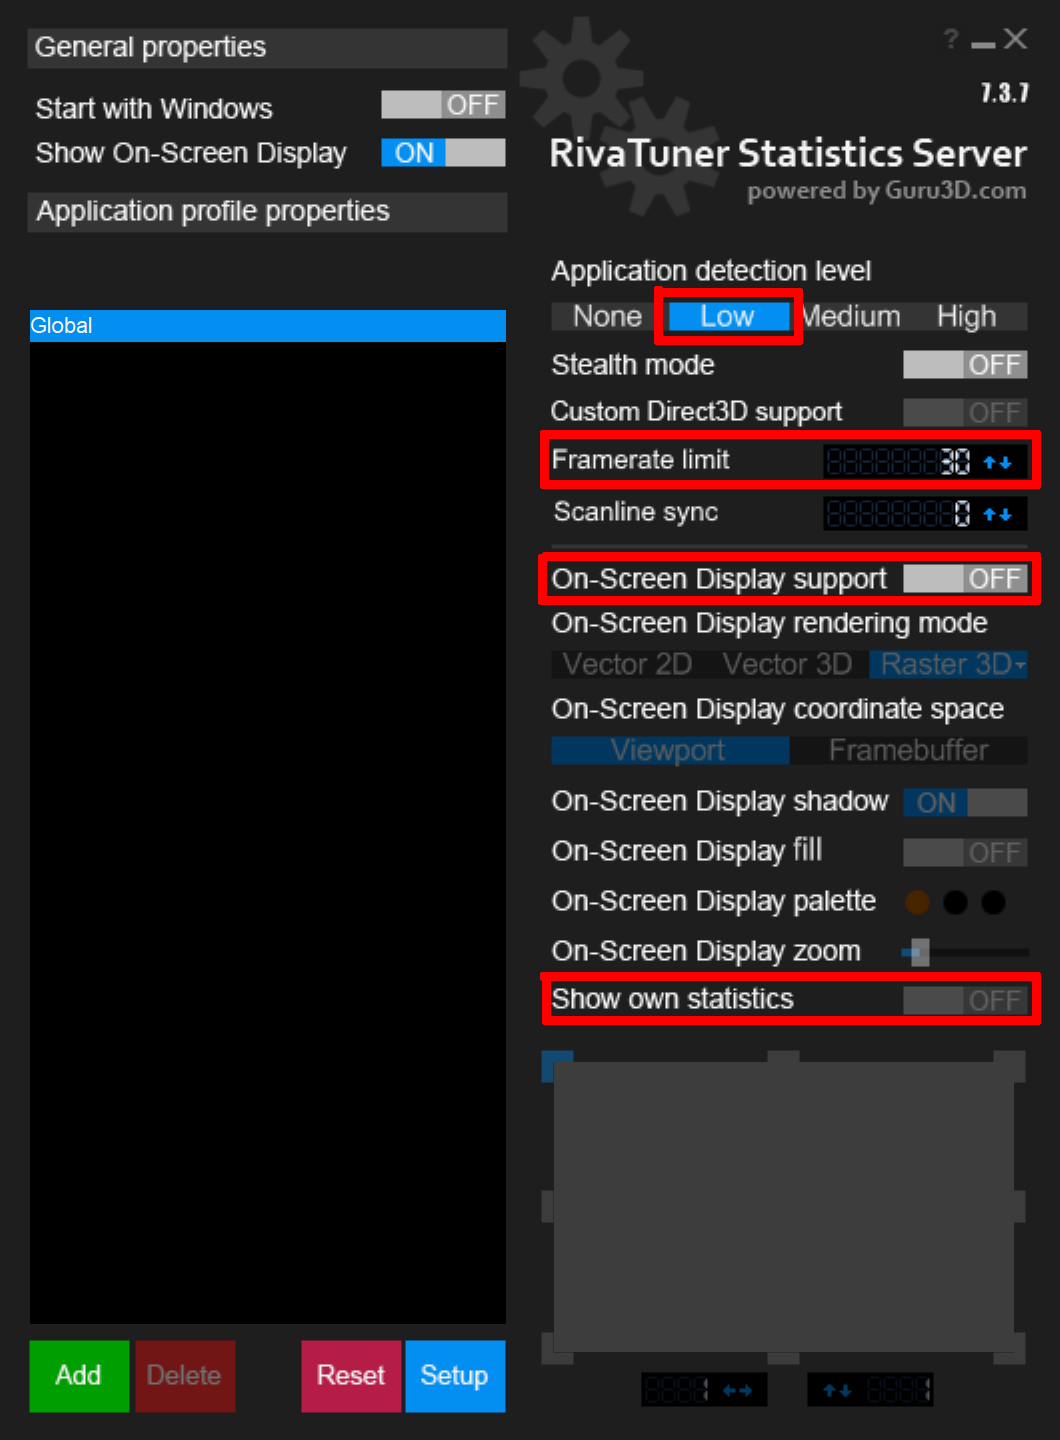 You can use RTSS Rivatuner Statistics Server[www.guru3d.com] to limit the frame rate. This works with all GPUs. After installing and running the application (by running the RivaTuner Statistics Server app from the search bar, or by launching RTSS.exe from the application folder), open the RivaTuner window from the system tray (it looks like a blue screen with a small red square in the top left), set Application detection level to Low, and then set the Framerate limit to 30. The Rivatuner application must be running for the limit to work.
Alternatively, in RivaTuner, enable On-Screen Display support and Show own statistics in Rivatuner, which will display the fps in-game. Alternatively, use steam's performance monitor, via Steam -> Settings -> In-Game -> Show performance monitor.
- Items bouncing around excessively when dropped from the inventory.
- Enemies T-posing or getting randomly stuck.
- Enemies detecting you from across the map due to incorrect vision range.
💡
Tip: You can also try 60 FPS, however some people have reported that their game still goes haywire at 60 FPS. If you experience any strange issues, dropping down to 30 FPS is recommended.
Option 1: NVidia Control Panel
If you have an NVidia GPU, you can limit the frame rate using the NVidia Control Panel. This will permanently lock the game's frame rate.Option 2: RivaTuner
You can use RTSS Rivatuner Statistics Server[www.guru3d.com] to limit the frame rate. This works with all GPUs. After installing and running the application (by running the RivaTuner Statistics Server app from the search bar, or by launching RTSS.exe from the application folder), open the RivaTuner window from the system tray (it looks like a blue screen with a small red square in the top left), set Application detection level to Low, and then set the Framerate limit to 30. The Rivatuner application must be running for the limit to work.Option 3: DxWrapper
DxWrapper comes with a LimitPerFrameFps setting to limit the frame rate. However, this does not work consistently in my experience.Verification
To verify that the fps limit is in effect, use steam's performance monitor, via Steam -> Settings -> In-Game -> Show performance monitor.Alternatively, in RivaTuner, enable On-Screen Display support and Show own statistics in Rivatuner, which will display the fps in-game. Alternatively, use steam's performance monitor, via Steam -> Settings -> In-Game -> Show performance monitor.
Expected Results
- Items behave correctly when dropped from the inventory.
- Enemies display correct animations and no longer T-pose.
- Enemies no longer get randomly stuck.
- Enemies have normal vision and detection behaviour.
3. Recommended: Install The Widescreen Plugin
Next, we'll install a plugin that enables custom resolutions not available in the game's menu—including widescreen resolutions.
At this point, I suggest starting the game again to check that the new resolution takes effect. When you do so, it is possible that you get the following error:
Installing The Plugin
- Download nemesis2000's widescreen fix from:
https://community.pcgamingwiki.com/files/file/2787-hitman-2-silent-assassin-widescreen-fix/⚠️Important: The archive also contains an old version of DxWrapper. Ignore those files. We only need the files in its scripts folder:- h2.ini
- h2w.asi
- h2.ini
- Copy h2.ini and h2w.asi from the archive into the game folder.
Verification
You should now have the following layout in your game folder (along with any other game files):...
d3d8.dll
dxwrapper.dll
dxwrapper.ini
...
h2.ini
h2w.asi
...
hitman2.exe
...
If your folder structure matches the above, continue to the next step.Configuring The Resolution & Draw Distance
Edit h2.ini to match the following:[MAIN]
Width = 1280
Height = 720
[MISC]
LOD_Distance_Multiplier = 1.0
Draw_Distance = 1.2
FOV_Multiplier = 1.0
You can replace 1280x720 with any other values that suit your needs.💡
Tip: Running the game at 720p keeps the user interface at a readable size.
💡
Tip: Keep LOD_Distance_Multiplier at 1.0. Higher values have a noticeable performance cost especially on lower end hardware, but provide little visual benefit.
⚠️
Important: In full screen mode, you must specify a resolution that is supported by your monitor.
⚠️
Important: Do not use the plugin's Draw_Distance value of 2.4. Set it to 1.2 to avoid a crash when climbing the church stairs to the sniper position during the Kirov Park mission.
At this point, I suggest starting the game again to check that the new resolution takes effect. When you do so, it is possible that you get the following error:
Direct3D: Unable to create device. Try changing resolution of color depth.
If this happens, you can try one of the following things:- Edit h2.ini to set another resolution that you know is supported by your monitor. For instance, most monitors with a 16:9 aspect ratio will support 1280x720.
- Run the game in windowed mode instead i.e. move the h2w.asi file out of the game folder, run the game again without the plugin, follow the instructions below to set up windowed mode, then move the h2w.asi file back into the game folder.
- As a last resort, run the game without the widescreen fix (i.e. remove the h2w.asi file) and instead use the in-game options to pick a resolution.
Expected Results
- Game launches in widescreen.
- User interface is readable.
- Game does not crash when climbing the church stairs during the Kirov Park mission.
4. Optional: Enable Windowed Mode
🛈
Note: You can skip this section if you are happy to run the game in full screen mode, as this is the default.
⚠️
Important: On lower end hardware, the game runs much more smoothly in full screen mode.
Switch Off Full Screen
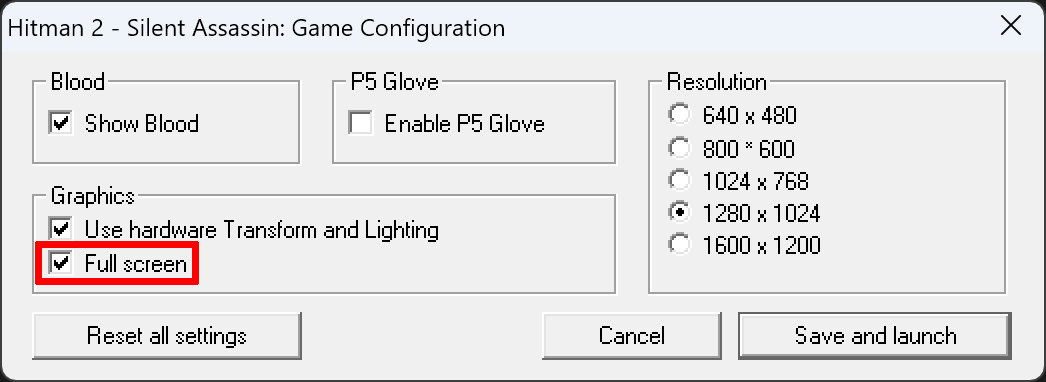 You can switch between full screen and windowed mode using the configuration utility (it's not in the in-game menu). Run config.exe in the game's root folder, and disable Full screen. Click Save and launch.
On steam, you will get the following error:
Failed to find Steam.
This is expected and you can ignore this. For some reason you can only run the game directly from steam.The game should now run in a window located right in the centre of your screen. Unfortunately, you cannot grab the window to move it.
Verification
You should now have the following line somewhere in your Hitman2.ini file, on a separate line (this is how the game stores the configuration):Window 1
Moving The Window
⚠️
Important: Make a backup of the Hitman2.ini file, so you can restore it in case you accidentally make a typo.
If you wish to adjust the window location, open Hitman2.ini in the game folder, and add the following line (anywhere, as long as it is on a separate line):
StartUpperPos 0,0
The values after StartUpperPos represent the x and y coordinates. You can modify them to reposition the window anywhere on your screen. Zeros will put the window in the very top left corner.⚠️
Important: Make sure the Hitman2.ini file still ends with a blank line. The game rewrites this file whenever you change the game configuration, and without a trailing blank line the file may become corrupted.
Restart the game to check that the position is as desired.
If you have a high resolution monitor, the game window may appear too small. We will fix this next.
Expected Results
- The game launches in windowed mode.
- The game window is at the location you want.
- If playing on a high DPI monitor: window is too small (will fix next).
5. Optional: Enable High DPI Scaling
🛈
Note: You can skip this section if you run the game in full screen mode.
If the game window appears too small on a high-resolution monitor, you can enable high DPI scaling. In this way, the game's user interface is still appropriately sized, at the expense of some pixelation.
Enable High DPI Scaling For Your Monitor
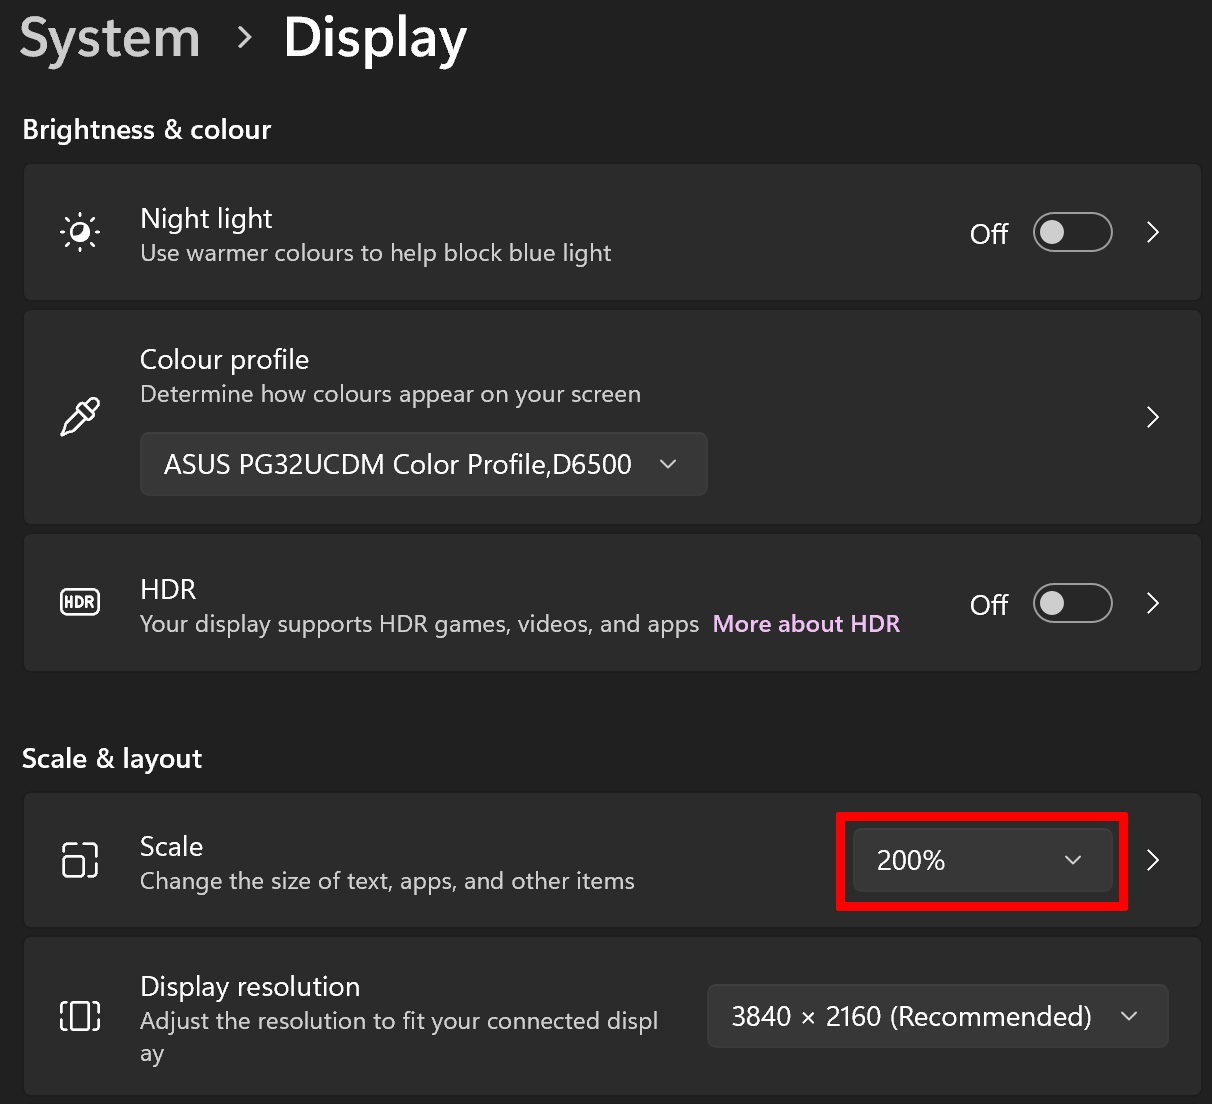 First, you need to have appropriate high-DPI scaling enabled on your monitor. You can check this in your system settings under Display. To enable, pick any appropriate value larger than 100%. I have it at 200% but the correct setting highly depends on your hardware and preferences.
Override High DPI Scaling For The Game
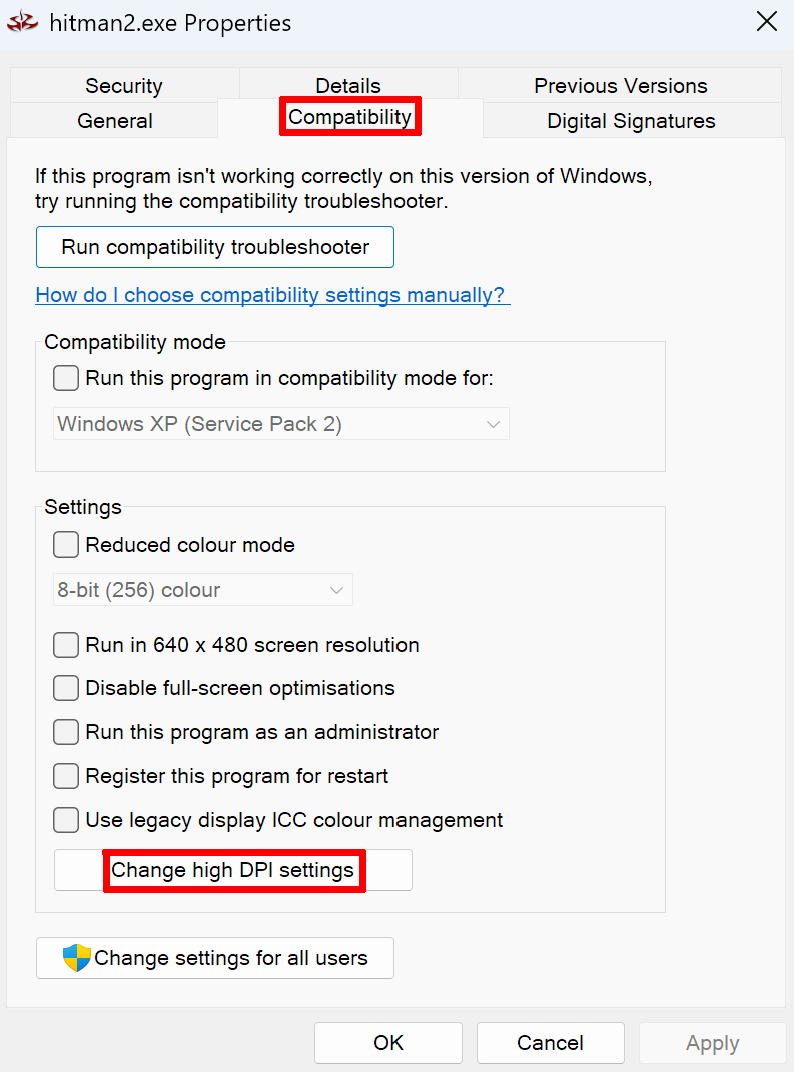
- Right-click hitman2.exe.
- Select Properties.
- Open Compatibility.
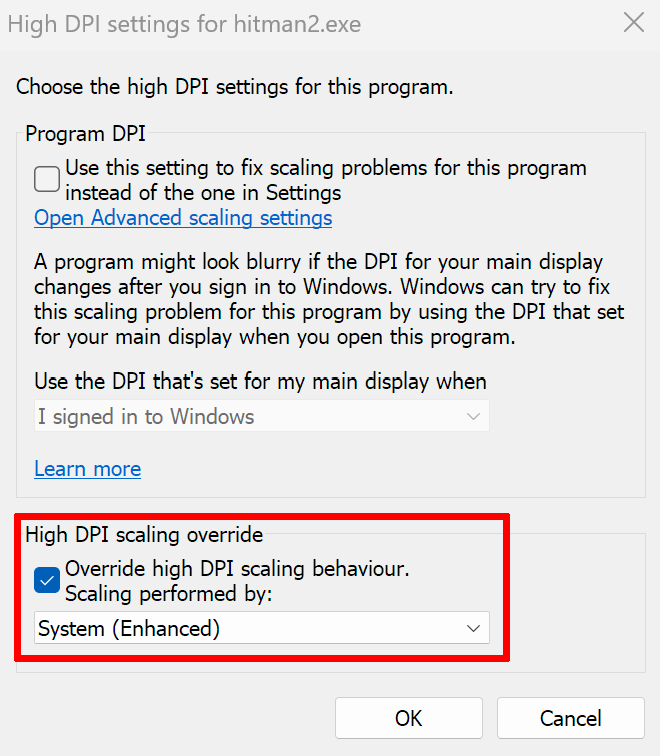
- Select Change high DPI settings.
- Enable Override high DPI scaling behaviour.
- Select System (Enhanced) from the drop down menu.
- Click Ok, then Apply.
⚠️
Important: Do not forget to click Apply or the setting will not take effect.
Expected Results
- Game window is now larger and appropriately scaled.
6. Optional: Remap Mouse & Keyboard Controls
🛈
Note: This step is optional and can be skipped if you are happy with the default controls.
The default controls in the game are slightly dated. You can remap them from the main menu via Options -> Control setup -> Button configuration. Here are some controls that resemble modern Hitman games. Obviously you can reassign these however you want.
Move forward
W
Move backward
S
Strafe right
D
Strafe left
A
Run
SHIFT
Always run
CAPSLOCK
Crouch
C
Sneak
SPACE
Lean left
[
Lean right
]
Fire weapon
Left mouse button
Reload weapon
R
Drop item
Z
Open inventory
Right mouse button
Perform action
E
Holster/inventory
---
Equip close combat weapon
---
Equip pistol
---
Equip submachine gun
---
Equip rifle
---
Equip binoculars
B
Equip night vision goggles
N
Equip lockpick
G
Open map
M
Open briefing
F1
Change camera mode
V
Zoom in
Mouse wheel up
Zoom out
Mouse wheel down
The justification for using G for Equip lockpick is that it is the closest thing to the extremely useful "Empty hands" action from Codename 47. It's very useful to safely unequip your gun if you are carrying one, and the lockpick is not an illegal item to hold in the open. This is preferred over the Holster/inventory action which will equip whatever you had equipped before if you are not carrying anything, so it is not safe in case you accidentally press it.
Use of the right mouse button for the inventory menu makes it similar to the controls in Hitman Blood Money, where it is awkward to use any other key for the inventory menu.
7. Optional: Enable Freecam
🛈
Note: This step is optional and can be skipped.
The in-game free camera mode can be a very helpful tool for screenshots, for developing strategies, and for fun. To enable freecam, add the following to your keyboard.cfg file.
<Mapping Action="ToggleFreeCam" Activation="None">
<Key SCode="K_K" Device="Keyboard"/>
</Mapping>
Note that you cannot just put these lines anywhere! Put then along with the other Mapping entries, i.e. right before the </Controls> tag should be fine. The last few lines of the file should look like this:...
<Mapping Action="ToggleFreeCam" Activation="None">
<Key SCode="K_K" Device="Keyboard"/>
</Mapping>
</Controls>
</Settings>
The keyboard.cfg file will get overwritten whenever you reconfigure the controls in-game, in which case you will need to redo this edit.Press K to toggle freecam. Use the mouse to look around and the arrow keys to move forwards/backwards. Hold SHIFT for tilting, and hold CTRL for strafing.
8. Optional: Install ReShade
🛈
Note: Most players can safely skip this section. The game is fully playable without ReShade. However, if you enjoy experimenting with post-processing effects or want to customize the game's appearance further, the notes below should help you get started.
- Install ReShade[reshade.me] only after DxWrapper has been configured. (This is because DxWrapper translates the game's DirectX8 renderer to DirectX9 and ReShade does not support DirectX8.)
- Select DirectX9 during ReShade installation.
- Configuring ReShade is beyond the scope of this guide, as it depends heavily on personal preference. The official ReShade website[reshade.me] has detailed installation instructions and guides.
Final Checklist
If everything went correctly, your game should now have:
- Working intro screen
- Working cutscenes
- Missions start normally
- Characters appear normally
- Readable user interface
- Stable 30 (or 60) FPS with correct animations and engine physics
- Optional freecam support
- Optional enhanced visuals
Closing Thoughts
Additional resources:
Thanks for reading!
If you notice anything outdated or have suggestions, please leave a comment. I try to keep this guide updated, and feedback helps improve it for everyone.
Finally, if this guide helped you, a thumbs up is always appreciated. It helps other players discover it too!
- PC Gaming Wiki[www.pcgamingwiki.com]
- DxWrapper Wiki[github.com]
- Widescreen Fix on Nexus Mods[www.nexusmods.com]
Thanks for reading!
If you notice anything outdated or have suggestions, please leave a comment. I try to keep this guide updated, and feedback helps improve it for everyone.
Finally, if this guide helped you, a thumbs up is always appreciated. It helps other players discover it too!
More Hitman 2: Silent Assassin guides
- Proper widescreen (NEW FIX)★ 5 (462)26k views423 ♥2 minUpdated Jul 4, 2019
- Полный русификатор Hitman 2: Бесшумный убийца★ 5 (311)14k views335 ♥1 minRussianUpdated Nov 2, 2024
- Hitman 2: Silent Assassin Windows Fix★ 4 (153)13k views188 ♥1 minUpdated Jul 5, 2024
- Uncensored Hitman 2 Silent Assassin for Steam★ 4 (155)11k views178 ♥1 minUpdated Aug 27, 2023
- Black screen and resolution fix★ 4 (87)8.6k views94 ♥1 min
- Hitman 2 - Perfect Silent Assassin Guide★ 4 (147)8k views235 ♥68 minUpdated Jun 13, 2014



This guide was created by its original author on the Steam Community. Are you the author and want it removed? Request removal.