Complete guide to properly make a music/sound mod, and put it on the workshop.
What you will need:
Step 1: Find the file you would like to replace
Open your hl2 directory.
In your steam library, right-click hl2>manage>browse local files.
For base game sounds, open the folder called hl2. For ep1, open episodic. For ep2, open ep2.
DO NOT OPEN THE SOUND FOLDER, there is nothing useful there.
Copy the filepath by clicking here and hitting CTRL+C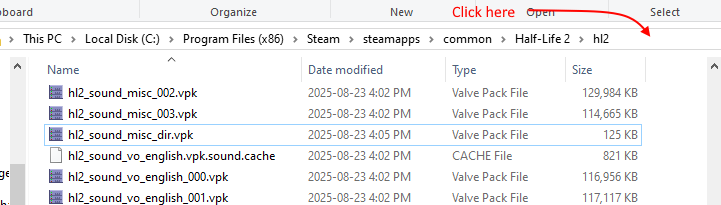
Open GCFScape, in the top right go to file>open then paste the filepath you copied before
For base game: Select "hl2_sound_misc_dir.vpk" and hit open.
For ep1: Select "ep1_pak_dir.vpk" and hit open
For ep2: Select "ep2_pak_dir.vpk" and hit open
Browse till you find the file you want. Sound effects should be fairly easy to find, just open the folders associated with whatever sound you want. Music is located in sound>music. None of them have nice names so you will have to play each one to find what youre looking for. Luckily they're all mp3s so any music player in the world will open them.
Step 2: Prepare the filepath.
Before you upload to the workshop, you need to make sure the mod works. To do this, were going to make a mod from days of old. The pre workshop days.
In that same directory you found the dir.vpk file, create a new folder called "custom".
Copy the directory in GCFScape that leads to your sound, starting with "root"
In the case of hl2 music, the filepath should look like this:
hl2/custom/root/sound/music
Step 3: Prepare the file
We dont actually need to extract the original file from GCFScape, we just need its name and type. Sound effects are .wav and music files are .mp3
You next need to ensure the filetypes are matching, I usually just google (filetype) to (filetype) converter, but if you want to use ffmpeg:
"ffmpeg -i input.mp3 -ar 44100 -ac 2 -c:a pcm_s16le output.wav" should convert input.mp3 to a wav (saved as output.wav)
To use the command, open whatever folder contains your sound file, and paste the command in to the file path (where you clicked earlier to copy the filepath) ensuring the file is named input.mp3
Next, it's a good idea to strip the file of any metadata, you can use the command:
"ffmpeg -i input.mp3 -map_metadata -1 -c:a copy output.mp3"
to strip any data from input.mp3 and make a new, clean file called output.mp3.
"ffmpeg -i input.wav -map_metadata -1 -c:a copy output.wav"
is for a wav
Importantly, the files must be encoded to 44100hz. This is the main reason for ffmpeg, although you can probably get away with searching "encode (.wav or .mp3) to 44100 hz online" and use some random website.
Run the command:
"ffmpeg -i input.mp3 -vn -ar 44100 -ac 2 -b:a 192k output.mp3"
or
"ffmpeg -i input.wav -ar 44100 -ac 2 -c:a pcm_s16le output.wav"
for a wav
REMEMBER TO RENAME YOUR OUTPUT.MP3/WAV TO INPUT.MP3/WAV AT EVERY STEP OR NOTHING WILL HAPPEN
Step 4: Stick the file in and test
Place your file in the directory in /custom/root/whatever filepath is needed for your sound, launch the game then open it. Play whatever release your mod is for, and load into a map. Run the command:
play "(filepath/file.mp3)"
Replacing (filepath/file.mp3) with the filepath to your sound. Note: custom/root/sound should not be included in the command. Use the filepath starting with /music/.
For example, to play song3, use play "music/hl2_song3.mp3"
Your sound should play, if not, then check console for errors. the only one I am aware of is the error indicating your file is not encoded to 44.1kHz.
If the original sound plays, chances are your filepath is wrong.
Step 5: Share your creation with the world
You dont have to do this one, but its nice. Plus your mod will remain even if you uninstall the game.
In the main menu, select "extras>workshop>my items>new item".
Choose a preview image, make it 1x1 so it looks nice, and change item type from "campain" to "content". visability will be locked to private, and if you cared to read what it says you'd know why. Give it a title and description, then hit the 3 dots beside the empty bar underneath "content folder".
Navigate to your "custom" folder and select "root", then hit "select folder". Now hit upload and you're done!
Almost.
Close the game and go back to file explorer. Go to the custom folder and move "root" including its contents into a new folder called "disabled" to temporarily disable your mod.
In steam, go to the workshop and check out the page where your uploads are. Subscribe to the newly created mod, launch the game and test it out using the same command from before. If it works, Change the mod's visability to public and you're done. If it doesn't, then fix it.
Ya done
- Half life 2 Cheats & commands (works for other source games too)★ 5 (1.5k)152k views2.9k ♥13 minUpdated Dec 4, 2024
- Lambda Locator★ 5 (8k)117k views9.3k ♥14 minUpdated Feb 25, 2016
- Half-Life 2 — Чит коды и консольные команды★ 5 (831)62k views1.5k ♥58 minRussianUpdated Dec 29, 2024
- Half-Life 2 100% Achievement Guide★ 5 (1.1k)40k views1.6k ♥5 minUpdated Nov 16, 2024
- 100% Achievement Guide: Half Life 2★ 5 (1.3k)24k views2.6k ♥103 minUpdated May 13
- 🏆 Lambda Locator - All Locations Detailed★ 5 (1.9k)24k views2.9k ♥17 minUpdated Aug 19, 2021





- Upgrading to PremiumTeam Fortress 2★ 5 (20k)1441k views11k ♥6 minUpdated May 11, 2022
- No More Room in Hell Official ManualNo More Room in Hell★ 5 (2.8k)569k views2.1k ♥29 minUpdated Apr 22, 2019
- NMRiH Community Hosting GuidesNo More Room in Hell★ 5 (526)351k views653 ♥1 minUpdated Aug 10, 2022
- ULTIMATE GUIDE FOR GAME DEV TYCOONGame Dev Tycoon★ 5 (5.8k)326k views10k ♥4 minUpdated 23 Jan, 2014
- How to 'Git Gud' Soon™MORDHAU★ 5 (2k)318k views3k ♥68 minUpdated Nov 16, 2024
- Лучшие кооперативные игры SteamPAYDAY 2★ 5 (1.5k)315k views2.1k ♥56 minRussianUpdated Apr 27, 2025






This guide was created by its original author on the Steam Community. Are you the author and want it removed? Request removal.