Fixes and Tweaks - Bully: Scholarship Edition [UPDATE]
Update After One Year: 7/17/25

I saw that several people were having issues with the Fixer: "SilentPatch". From crashing save files, to getting stuck in certain sections, to the game not launching at all.
So, after a year since I created this guide, I’ve decided to update it with real solutions that actually fix the game. I apologize to everyone for whom it didn’t work — I tried to reply to all of you, but sometimes I simply didn’t have an answer.
Originally, I had just ported the GitHub page of the creator of this tool (SilentPatch) over to Steam to make it more accessible, but I hadn’t foreseen all the errors.
However, I won’t delete the section in case the creator of SilentPatch ever decides to update/fix/solve the compatibility issues.
If you're still having issues with the tool, please consult the original creators on GitHub[github.com]. Thank you.
Below are the steps to fix Bully: Scholarship Edition and thanks for the Supp♥rt.
And please support and purchase WinRAR[shop.win-rar.com].
ㅤ
ㅤ
The "Principal" Steps

Some users are having Windows compatibility issues when launching the game. Luckily, this is pretty easy to fix. Just follow these steps:
About crashes on Windows 10 or 11, do the following and the crashes should stop:
- Find the game folder: Local Disk > Program Files > Steam > steamapps > common > Bully Scholarship Edition.
- Right-click the Bully executable, go to Properties, set it to run in compatibility mode Windows XP (Service Pack 3) and also run it as administrator.
- Apply and save

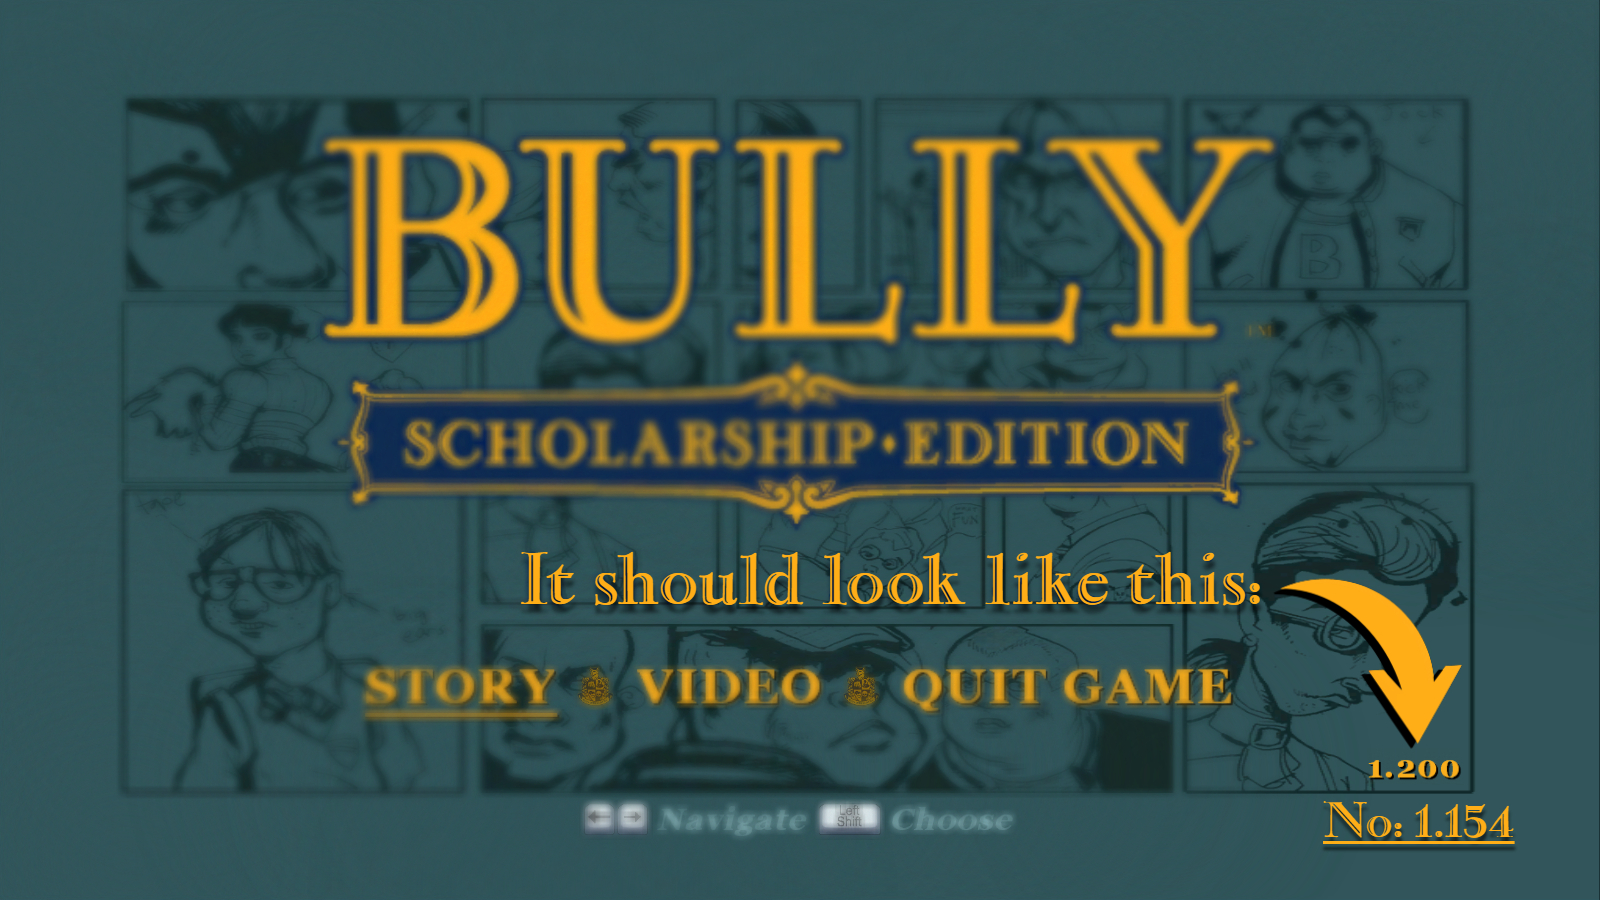
Once the game is installed, open it and check if version 1.200 appears in the bottom right corner.
If it does, you can skip this step. However, if it shows version 1.154, follow this step (it's essential for the other tools to work properly).
Previously, this step involved going to RockstarGames’ official website, but for some reason, Rockstar has taken down the page where the file was available.
So I took the time to find a working download link, thanks to the creator Badinfos:
https : / /www . mediafire . com/file/ur13zu2kc39fxtw/Bully+PC+Patch+to+v1200 .zip/file
[40.69 MB]
remove the spaces to access it (please let me know if the link is down, thank you)
remove the spaces to access it (please let me know if the link is down, thank you)
Once the file is downloaded, move it to Bully's main folder.
Run the file and wait for it to finish, then start the game.
If you see version 1.200 in the bottom right corner, you've done everything correctly.

SilentPatch is basically the essential mod for almost every Rockstar Games title, as it fixes most of the internal issues—solving problems like lag, AI bugs, crashes, etc. It essentially repairs the game's internal code. It's impossible not to download it.
Once the version has been changed, it's time to install SilentPatch manually.
To do this, go to the download link for SilentPatch[github.com] [1.65 MB] created by CookiePLMonster[www.patreon.com].
Extract the .zip file — inside, you’ll find six files.
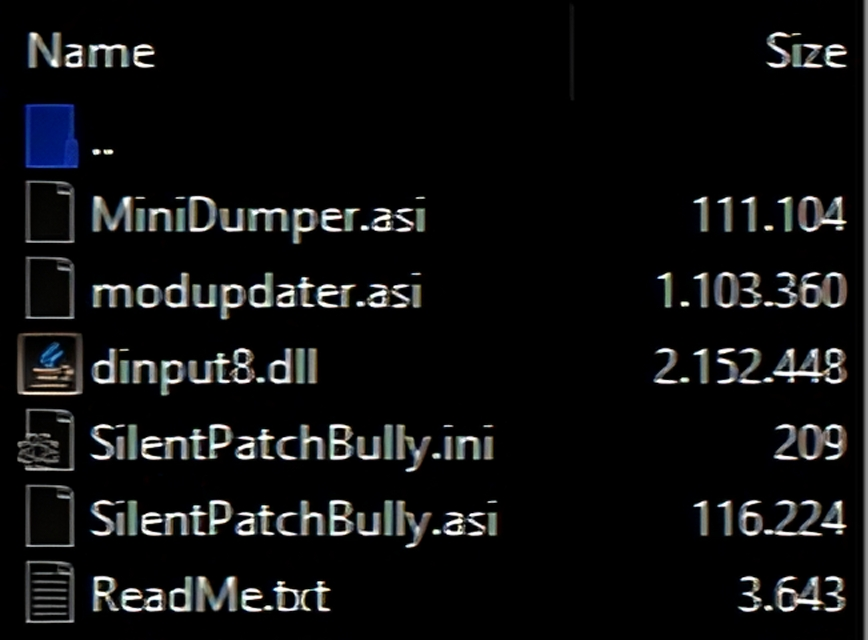
Move all of them to Bully’s main folder.
gabes-newell-booty\common\Bully Scholarship Edition
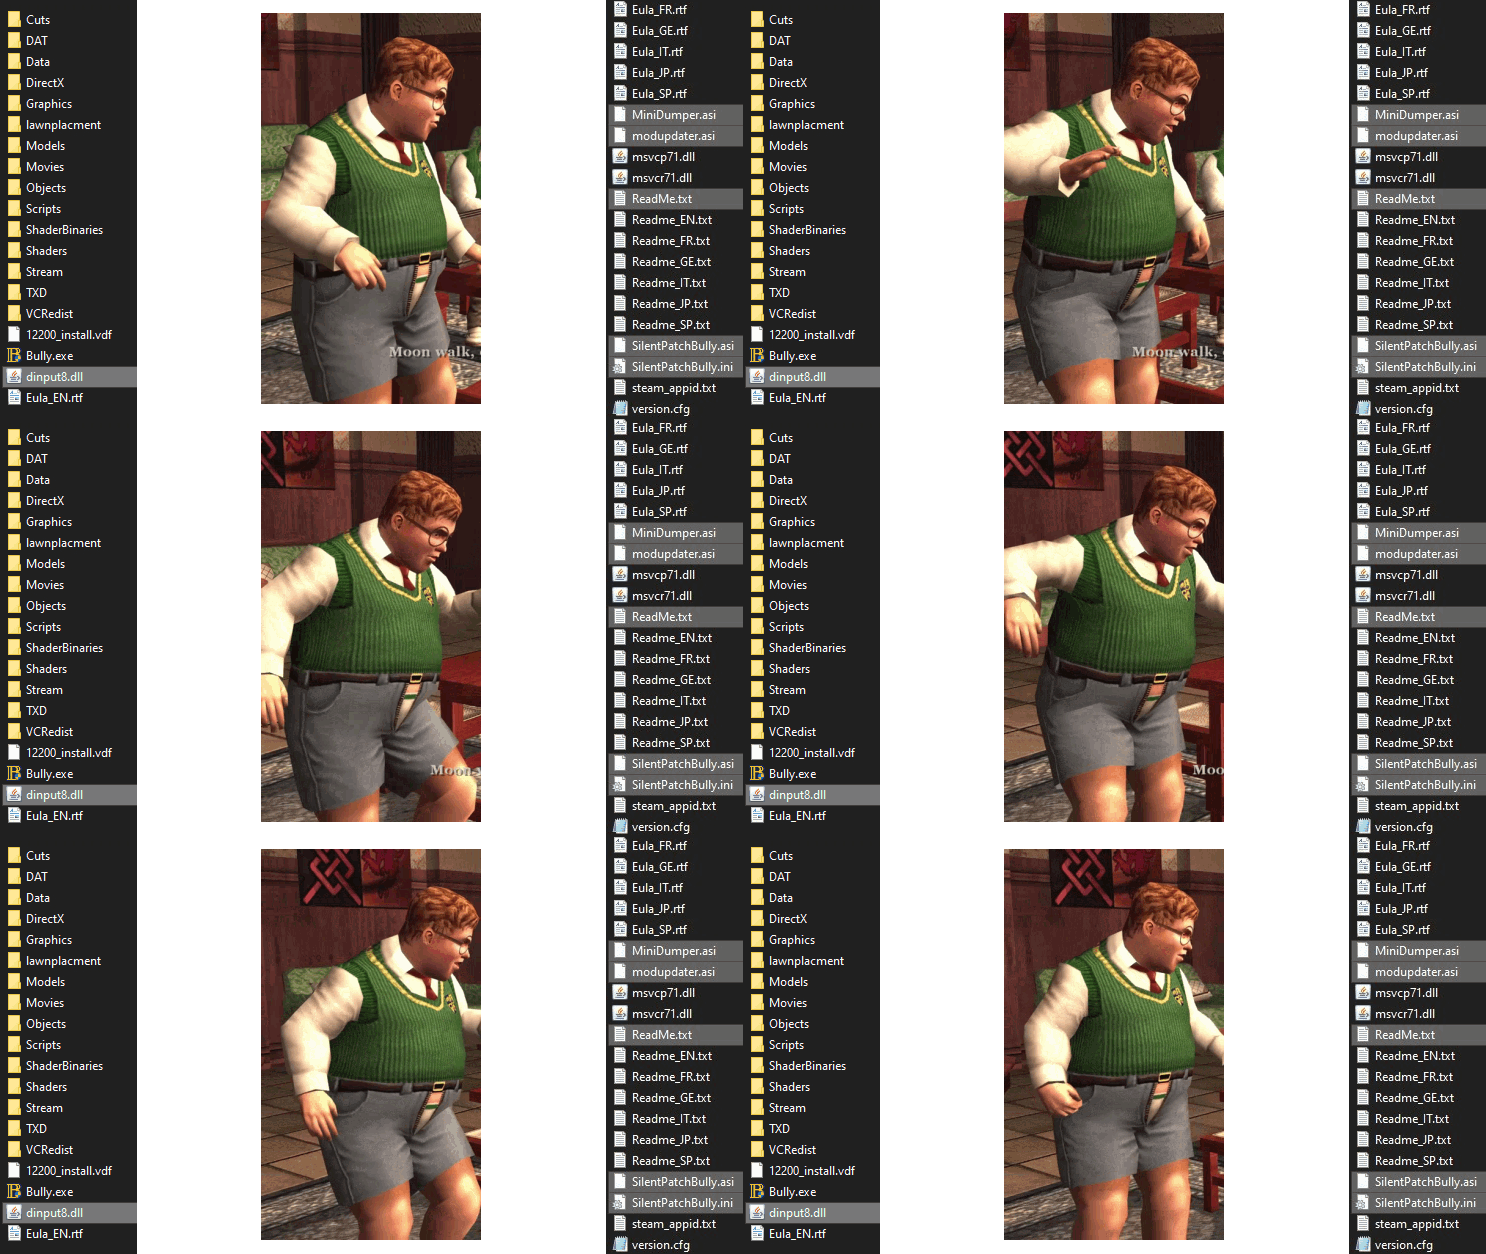
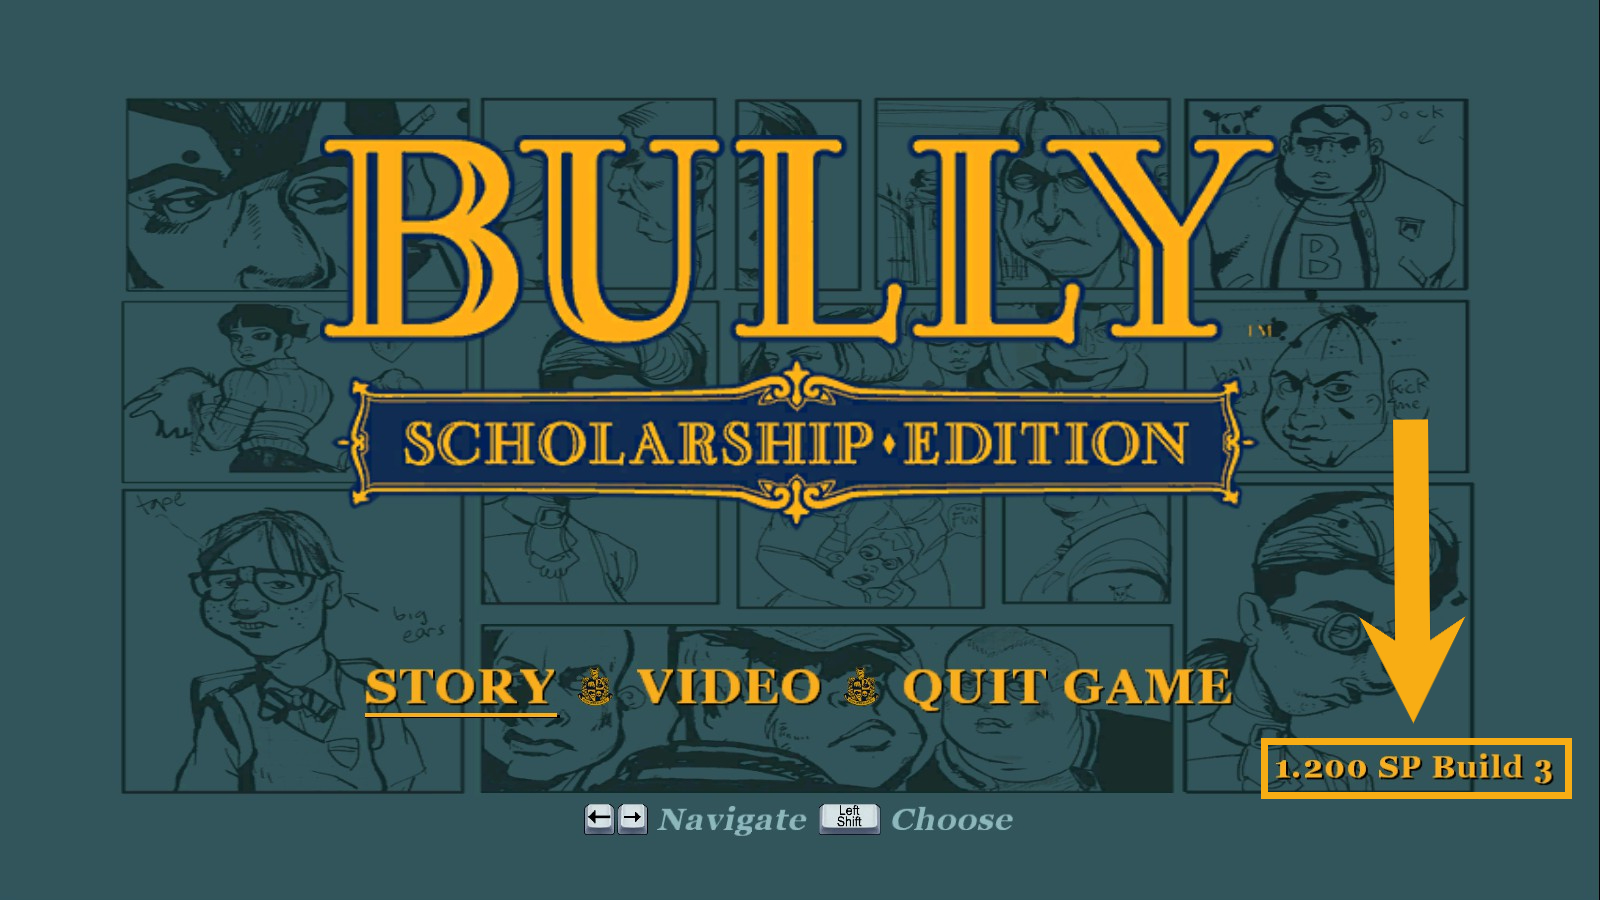
If you see version SP Build 3 in the bottom right corner, you've done everything correctly.
- Collision loading code has been improved, fixing occasional crashes on initial game load
- Fixed game's objects pool usage, fixing possible crashes
- Fixed an occasional crash when starting Nutcrackin' or Music Class
- Fixed numerous instances of memory corruption on game exit
- Fixed an use-after-free in sound streaming code, causing a rare crash when talking to people
- Fixed handle leaks in audio code, preventing handles from accumulating during the game
- Fixed several memory leaks in audio code, preventing out of memory crashes during extended play sessions
- Made memory manager workarounds toggleable via the INI file - disabled by default, to be removed in the future
- Frame Limiter has been made much more precise, so the game should lock at exactly 30FPS now (as opposed to stock limiter being prone to dropping frames a lot)
- Fixed an issue where game would use more CPU than required when minimized
Crash and bug fixes
- Optional Step:
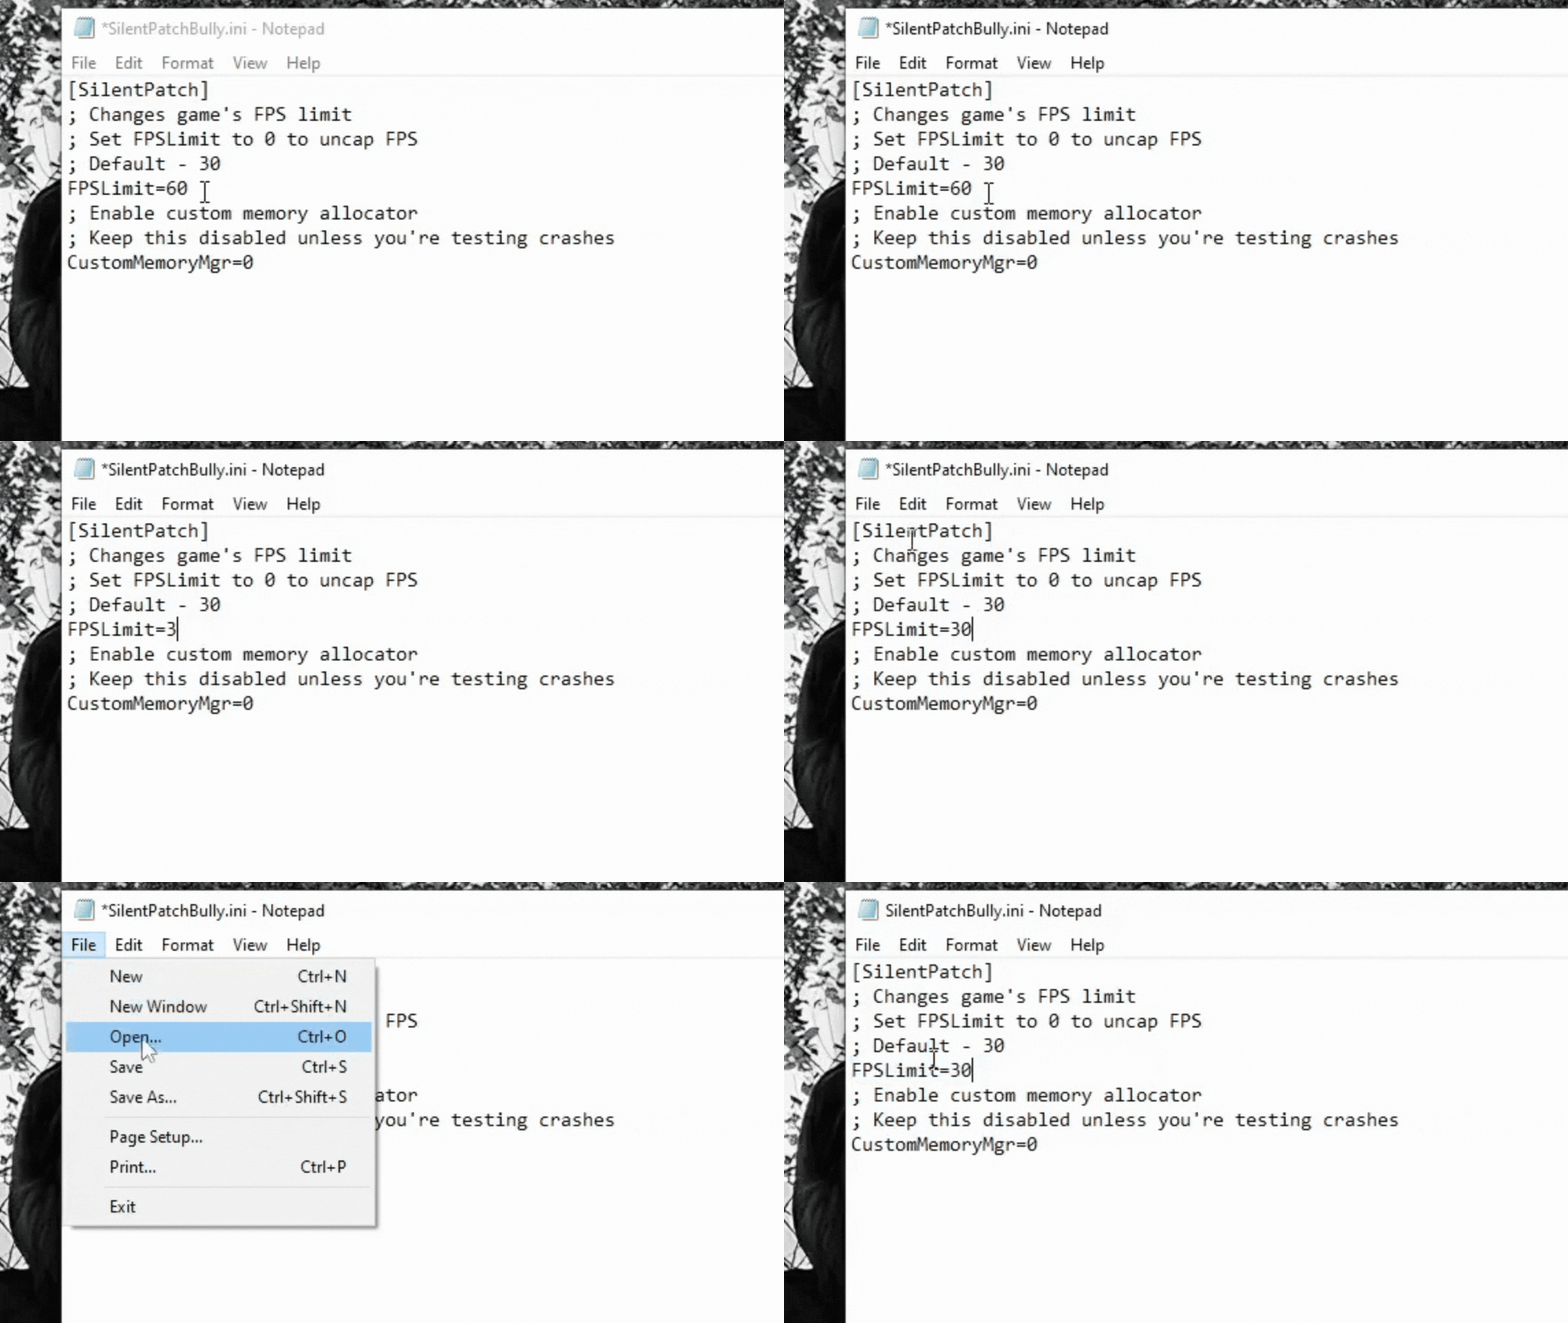
If you want the smoothest experience possible, I recommend modifying the file SilentPatchBully.ini, specifically changing the line FPSLimit = 30 to 60.[SilentPatch] CustomMemoryMgr = 0 FPSLimit = 30 to [SilentPatch] CustomMemoryMgr = 0 FPSLimit = 60Note: if you change the FPSLimit value
- Since the game was designed to be played at 30 FPS and not 60 FPS, it may present some bugs or glitches at these missions.May bug out or become unplayable at high framerates.
- Weed Killer in Chapter 2
- Balls of Snow in Chapter 3
- The Gym Is Burning and Finding Johnny Vincent in Chapter 5
To prevent this, before starting any of these missions, open the SilentPatchBully.ini file and change the FPSLimit setting back to 30.
Once the mission is completed, you can safely switch it back to 60 FPS for smoother gameplay. - Weed Killer in Chapter 2
1.0 Other fixes
Alright, the game already looks good, but there are still some visual aspects that can be improved — such as the DrawDistance, and a plugin that adjusts the screen to your monitor WideScreenFIX[github.com] and other fixes!!!

DrawDistance allows the game to render more objects at a distance, such as higher-quality models, distant vehicles, and NPCs.
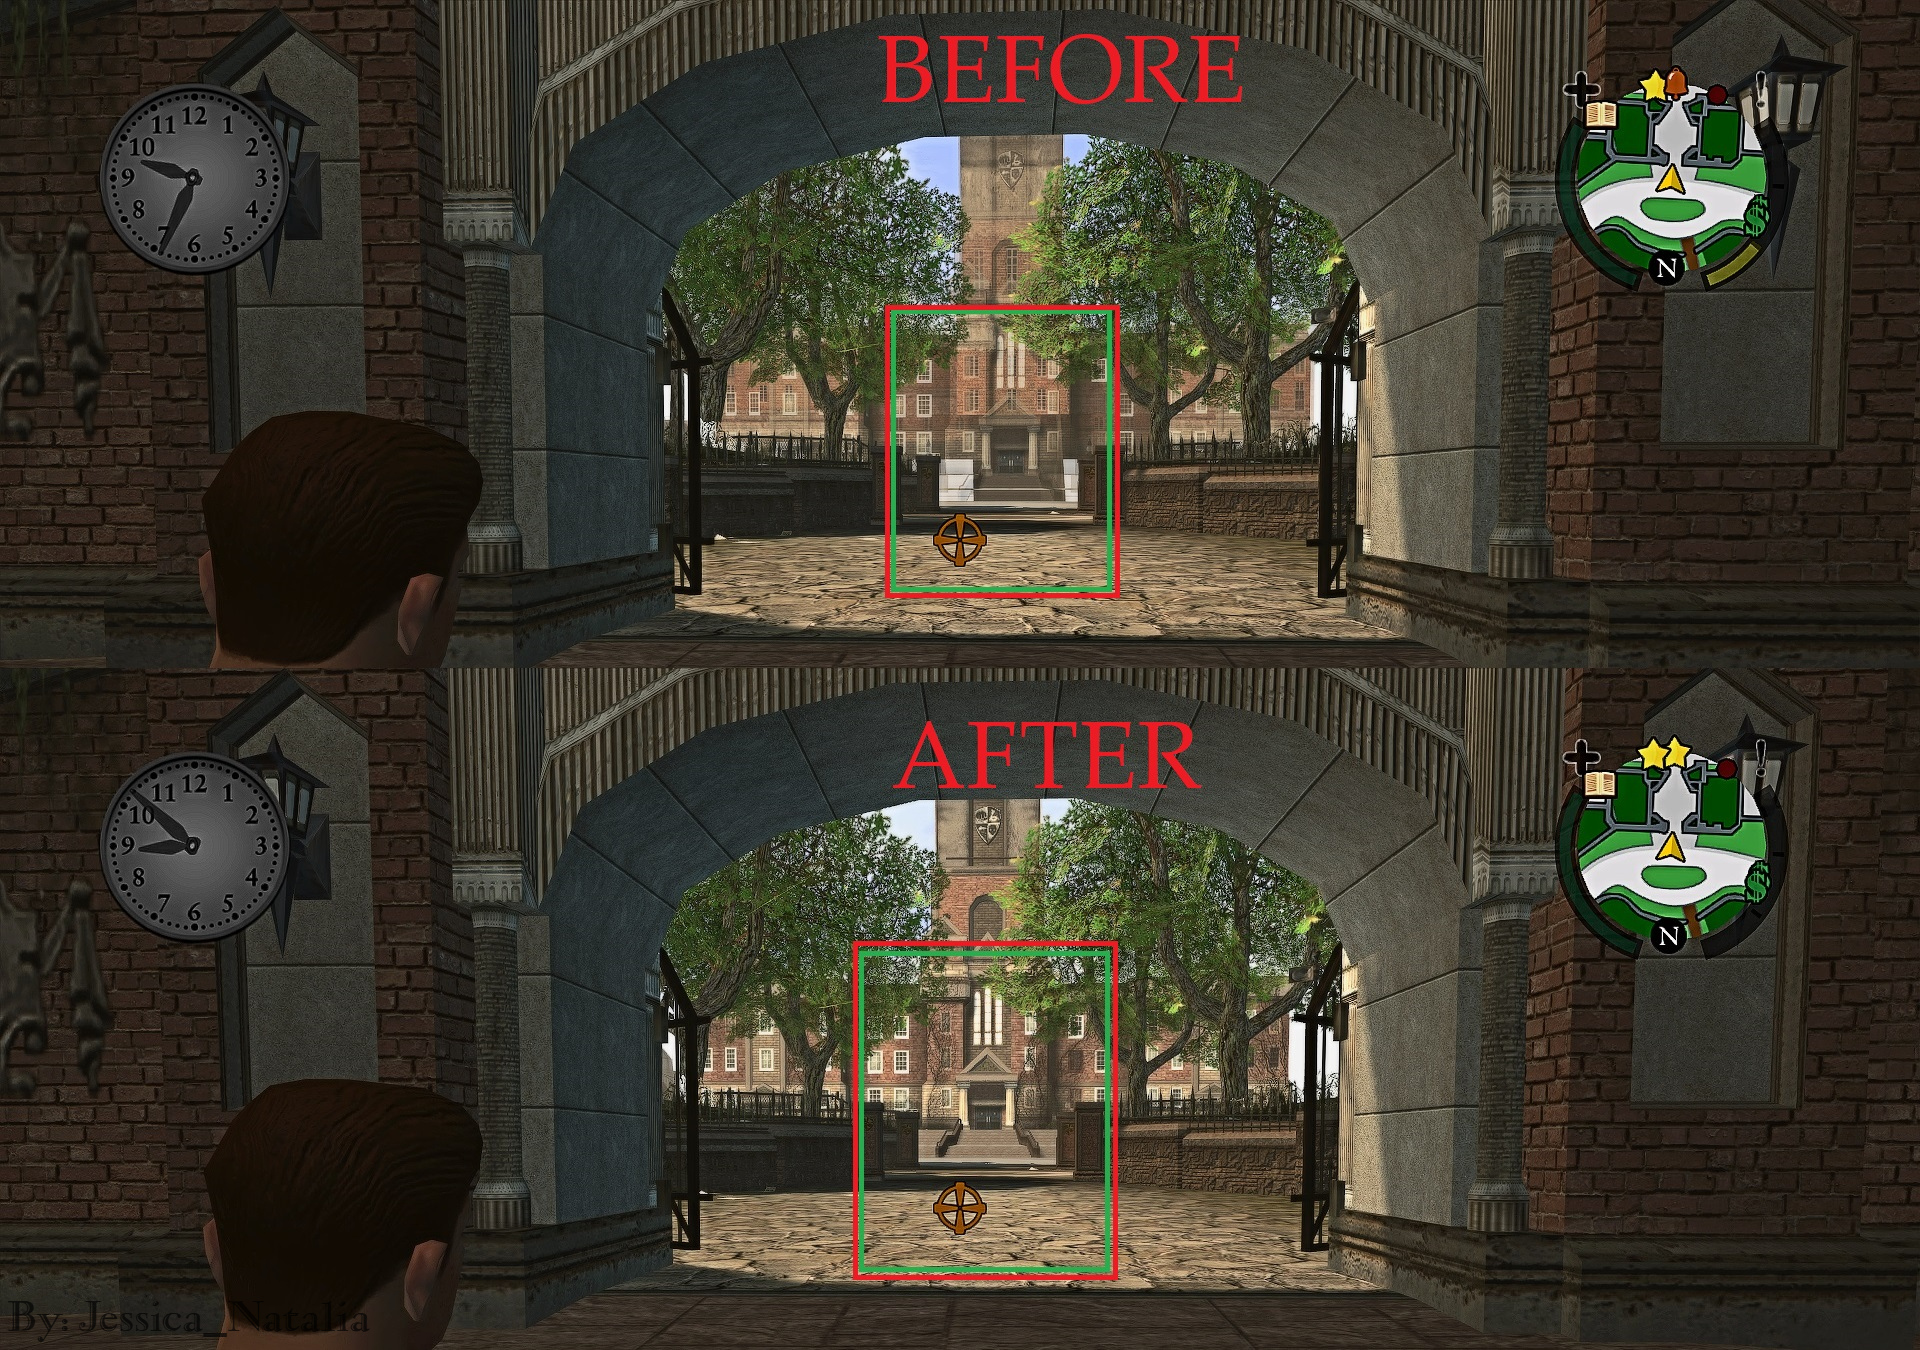
However, if your system isn’t powerful enough to handle the increased load, it may cause a drop in FPS.
Once decided, head to the mod download link by Jessica Natalia[www.patreon.com]: Extended Draw Distance [53.6 KB].
Once installed, you’ll get a file called "Bully_Extended_Draw_Distance_[version]".
Extracting it will give you a folder — open it, then go into the “Bully Scholarship Edition” folder inside, and you’ll find a folder named “Objects”.
Now go to Bully Scholarship Edition’s local files.
And move the “Objects” folder there, replacing the existing one when prompted.

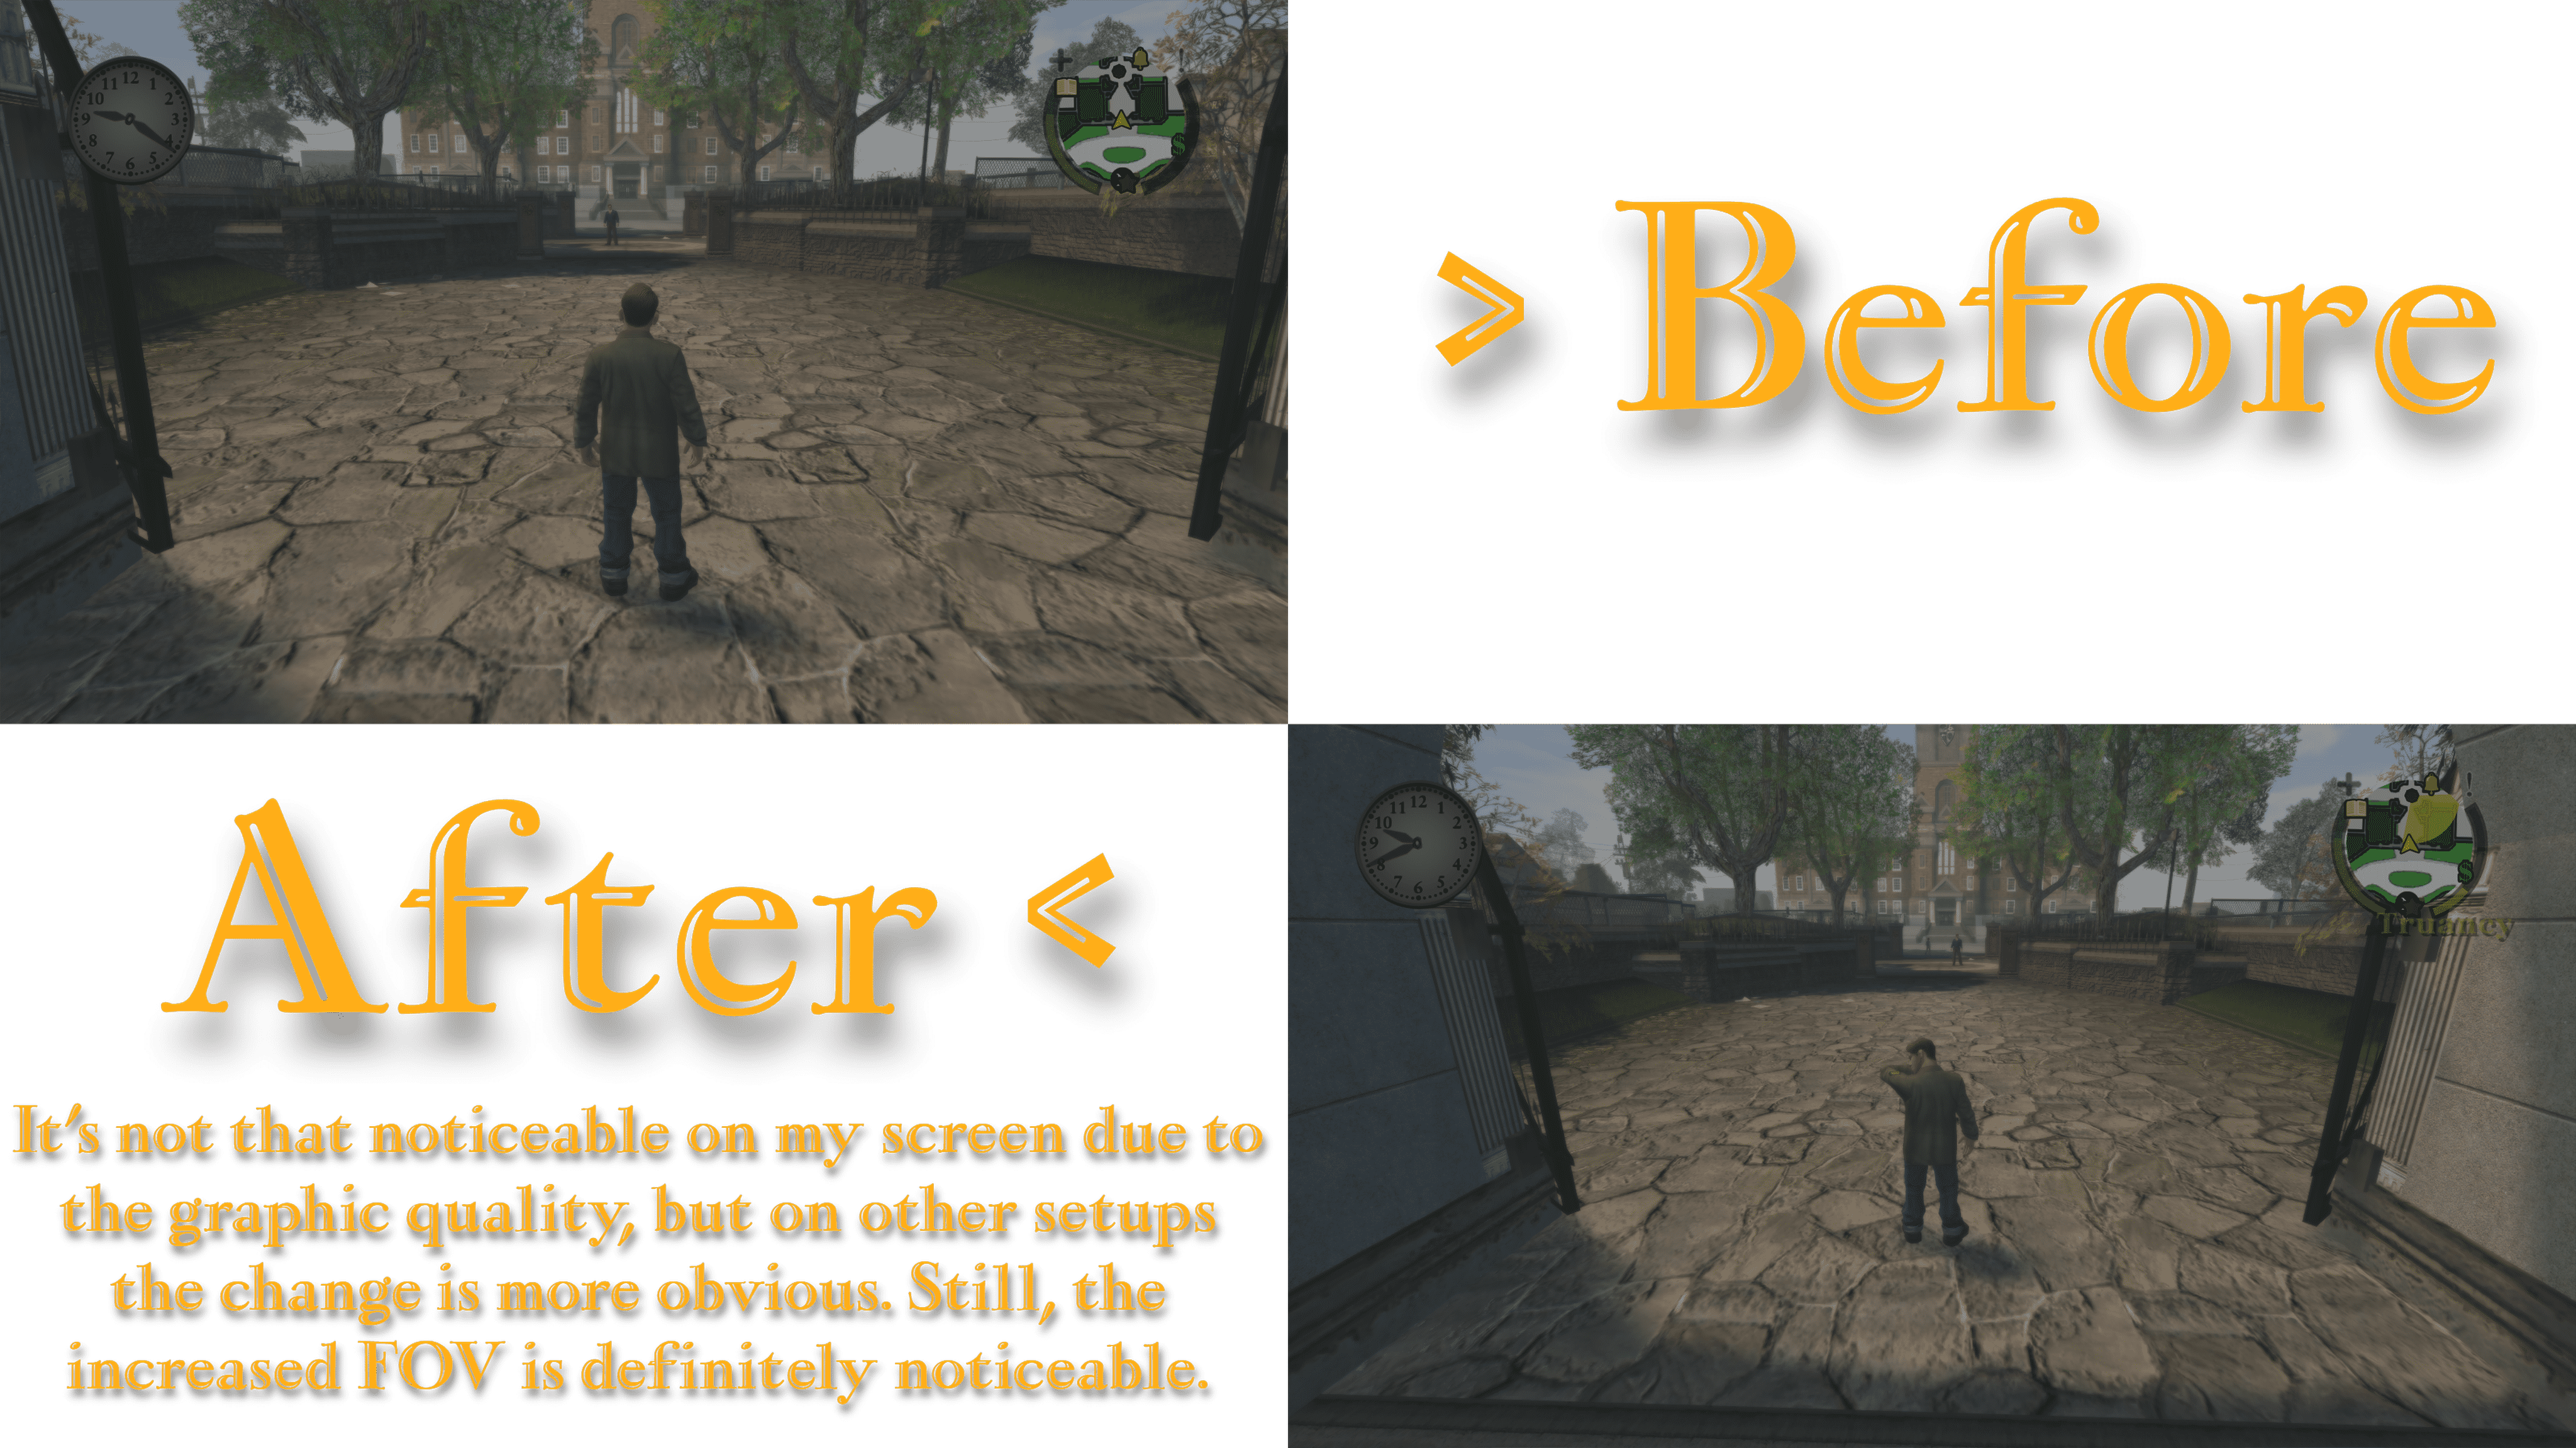
Widescreen Fix[github.com] gives you more control over what you see on screen. It allows you to customize the HUD, extend the FOV (on a .ini), and fix many other visual details that are either imperceptible or look bad on large screens without the patch installed.
If you decide to install it, here’s the link to the mod by ThirteenAG[ko-fi.com]: Widescreen Fix[github.com] [1.15 MB].
The installation is very simple. Just extract the downloaded file "Bully.WidescreenFix.zip". It will contain 2 files. Move all the files to the root folder of Bully. If it asks you to replace any files, click "Yes" or "Replace".
We can ignore the file named "dinput8.dll" and focus instead on the "plugins" folder. Inside it, you'll find two files: "Bully.WidescreenFix.asi" and "Bully.WidescreenFix.ini". We'll be focusing on the latter, as it allows you to tweak the game's FOV distance.
A value of 1.0 is the default FOV. It is recommended not to go beyond 1.5 (unless you're crazy, of course), as anything higher becomes unplayable. Below is a comparison of different FOV settings.
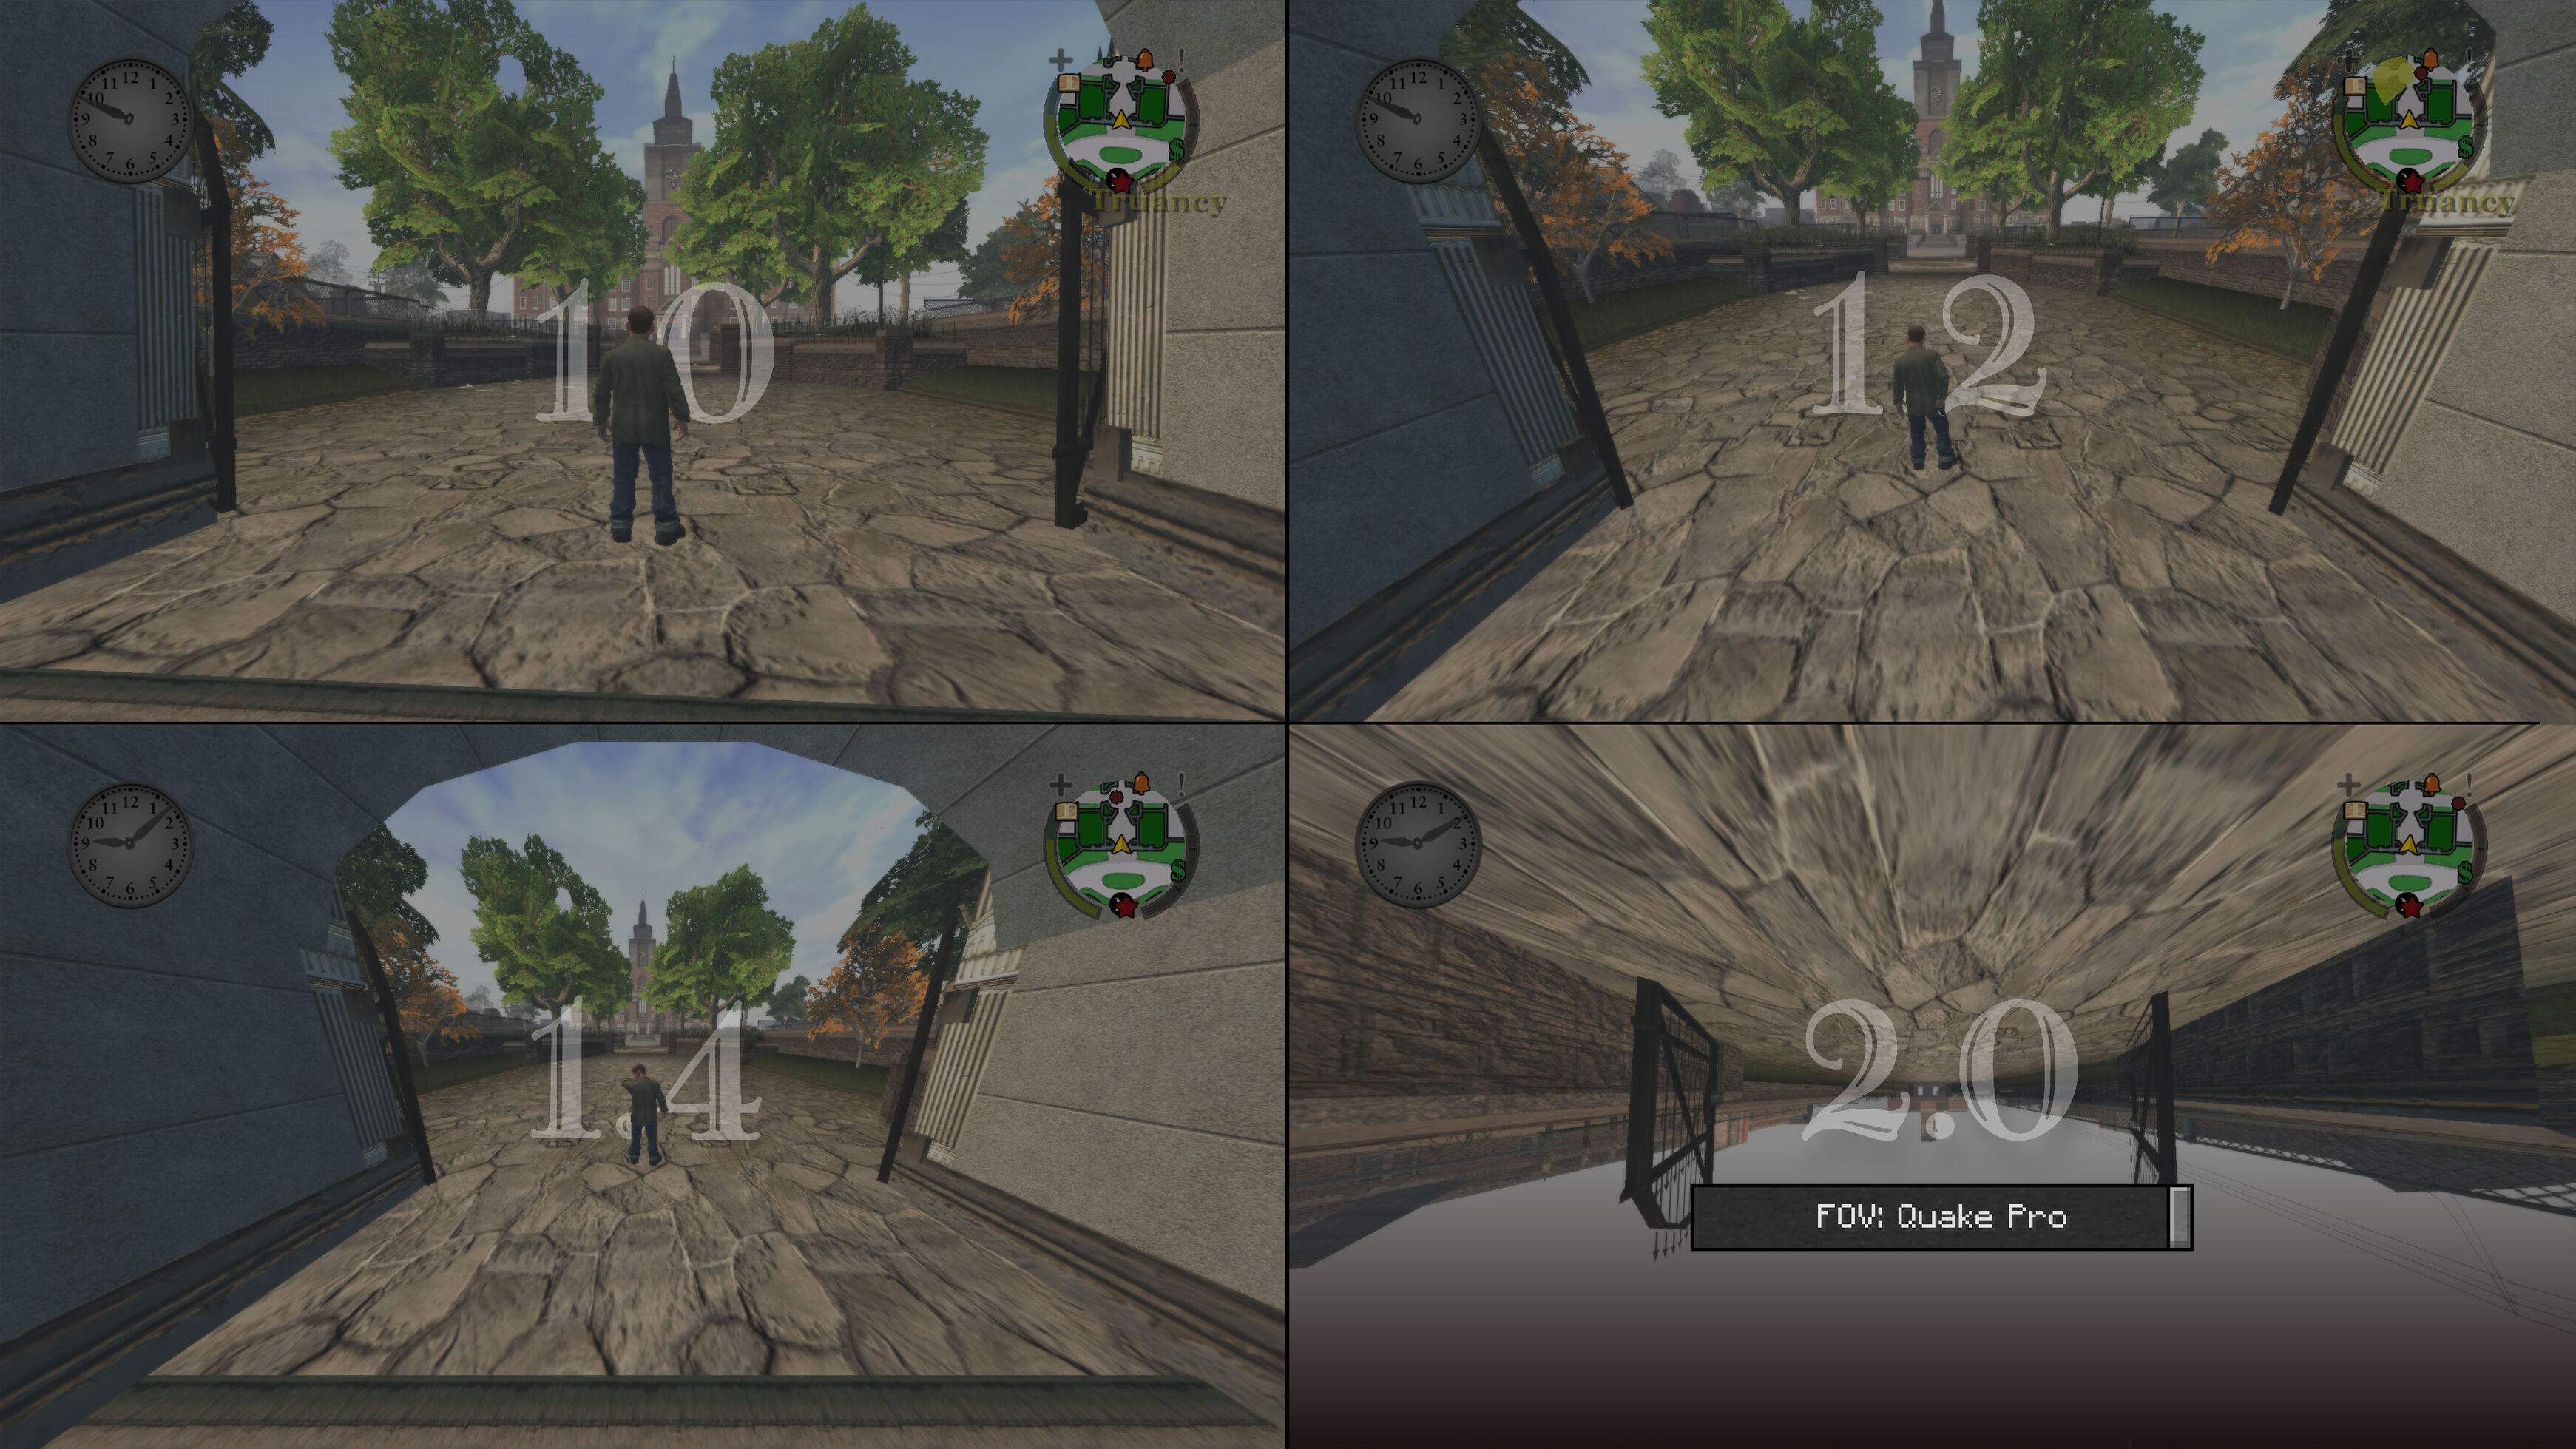
Choose the one you feel most comfortable with.

Better Sounds[www.nexusmods.com] fixes and improves Rockstar’s terrible PS2-to-PC port, addressing issues where certain audio tracks or music sound distorted. This is especially noticeable during the mission "The Candidate" [5:10] in Chapter 1 and "Carnival Date" [8:28] in Chapter 2, where voices are overdriven or screams make no sense.
Download the addon by Cos2[ko-fi.com] (it's a bit heavy, so make sure you have enough space): Better Sounds[www.nexusmods.com] [1.5 GB].
Once installed, it will leave a file named "Better Sounds - [version].rar".
You’ll need to extract it and move the "audio" folder to the root folder of Bully, replace the existing one, and wait for the process to finish.
DrawDistance allows the game to render more objects at a distance, such as higher-quality models, distant vehicles, and NPCs.
However, if your system isn’t powerful enough to handle the increased load, it may cause a drop in FPS.
Once decided, head to the mod download link by Jessica Natalia[www.patreon.com]: Extended Draw Distance [53.6 KB].
Once installed, you’ll get a file called "Bully_Extended_Draw_Distance_[version]".
Extracting it will give you a folder — open it, then go into the “Bully Scholarship Edition” folder inside, and you’ll find a folder named “Objects”.
Now go to Bully Scholarship Edition’s local files.
And move the “Objects” folder there, replacing the existing one when prompted.
Widescreen Fix[github.com] gives you more control over what you see on screen. It allows you to customize the HUD, extend the FOV (on a .ini), and fix many other visual details that are either imperceptible or look bad on large screens without the patch installed.
If you decide to install it, here’s the link to the mod by ThirteenAG[ko-fi.com]: Widescreen Fix[github.com] [1.15 MB].
The installation is very simple. Just extract the downloaded file "Bully.WidescreenFix.zip". It will contain 2 files. Move all the files to the root folder of Bully. If it asks you to replace any files, click "Yes" or "Replace".
We can ignore the file named "dinput8.dll" and focus instead on the "plugins" folder. Inside it, you'll find two files: "Bully.WidescreenFix.asi" and "Bully.WidescreenFix.ini". We'll be focusing on the latter, as it allows you to tweak the game's FOV distance.
📂Bully.WidescreenFix.ini
[MAIN]
FOVFactor = 1.0
FOV
Values
🟢 Default
1.0 | 1.1
🟢 Curious
1.2 | 1.3
🟡 Chronic Installer
1.4 | 1.5
🔴 Debug Insomniac
1.6 | 1.7
🔥 QUAKE PRO GAMER GRANDMA LEYEND
1.8 | 1.9 | 2.0
A value of 1.0 is the default FOV. It is recommended not to go beyond 1.5 (unless you're crazy, of course), as anything higher becomes unplayable. Below is a comparison of different FOV settings.
Choose the one you feel most comfortable with.
Better Sounds[www.nexusmods.com] fixes and improves Rockstar’s terrible PS2-to-PC port, addressing issues where certain audio tracks or music sound distorted. This is especially noticeable during the mission "The Candidate" [5:10] in Chapter 1 and "Carnival Date" [8:28] in Chapter 2, where voices are overdriven or screams make no sense.
Download the addon by Cos2[ko-fi.com] (it's a bit heavy, so make sure you have enough space): Better Sounds[www.nexusmods.com] [1.5 GB].
Once installed, it will leave a file named "Better Sounds - [version].rar".
You’ll need to extract it and move the "audio" folder to the root folder of Bully, replace the existing one, and wait for the process to finish.
1.1 Optional fixes [Derpy’s Script Loader]

Derpy’s Script Loader[www.nexusmods.com] lets you load mods in Bully.
Installing it is super simple. Just head to the download link mod: derpy's script loader[www.nexusmods.com] [1.4 MB].
Once downloaded, extract the file "derpy_script_loader[version].zip" and move all four files into the game’s root folder.
To install mods, just go to the folder "_derpy_script_loader\scripts" and drop the mod folders inside Scripts (folder).
And that’s it — pretty easy, right cuh?
Note
If for some reason a mod doesn’t work, it’s probably because you need to enable the DSL system access. In English, it’s a file that allows compatibility for some mods that use certain scripts to modify the game.
To enable it, go to the folder "/_derpy_script_loader/dslconfig.ini" (if the .ini file doesn’t appear, you need to launch the game at least once with Derpy installed so that the .ini gets created). Then modify these lines of text on "dslconfig.ini":
Then Save.
- Change allow_networking: true to allow_networking: false
- Change allow_system_access: false to allow_system_access: true
If you see a box like this pop up when you launch the game... ⬎⬎⬎⬎⬎⬎⬎⬎⬎⬎⬎⬎⬎⬎⬎⬎⬎⬎
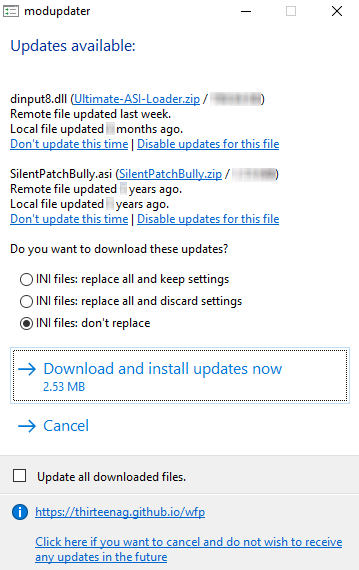
You can just ignore it and let it pop up every time you launch the game.
Or just tick the last box — 'INI files: don’t replace' (so your settings don’t get wiped) — and hit 'Download and install updates now' and wait until finish.
1.2 Optional fixes

Anniversary Edition HUD, as the name suggests, adds a higher-quality HUD along with other visual tweaks, giving the game a breath of fresh air with a nice balance between style and performance — all without requiring a high-end PC.
Once decided, head to the mod download link: Anniversary Edition HUD [508 MB]
Extract the file Anniversary_Edition_HUD_Version_[version].
It will give you a folder, and inside you’ll find 6 subfolders.
Below, I’ll go over the installation steps for each one:
- ↓
- #1 Important FilesInside "Important Files" you’ll find the main files (like the name says — duh).
Open Bully’s main folder
When prompted, replace the existing ones. - #2 Optional FilesInside Optional Files you’ll find mods that are, well, optional — you’ll need to decide which ones you want to use.
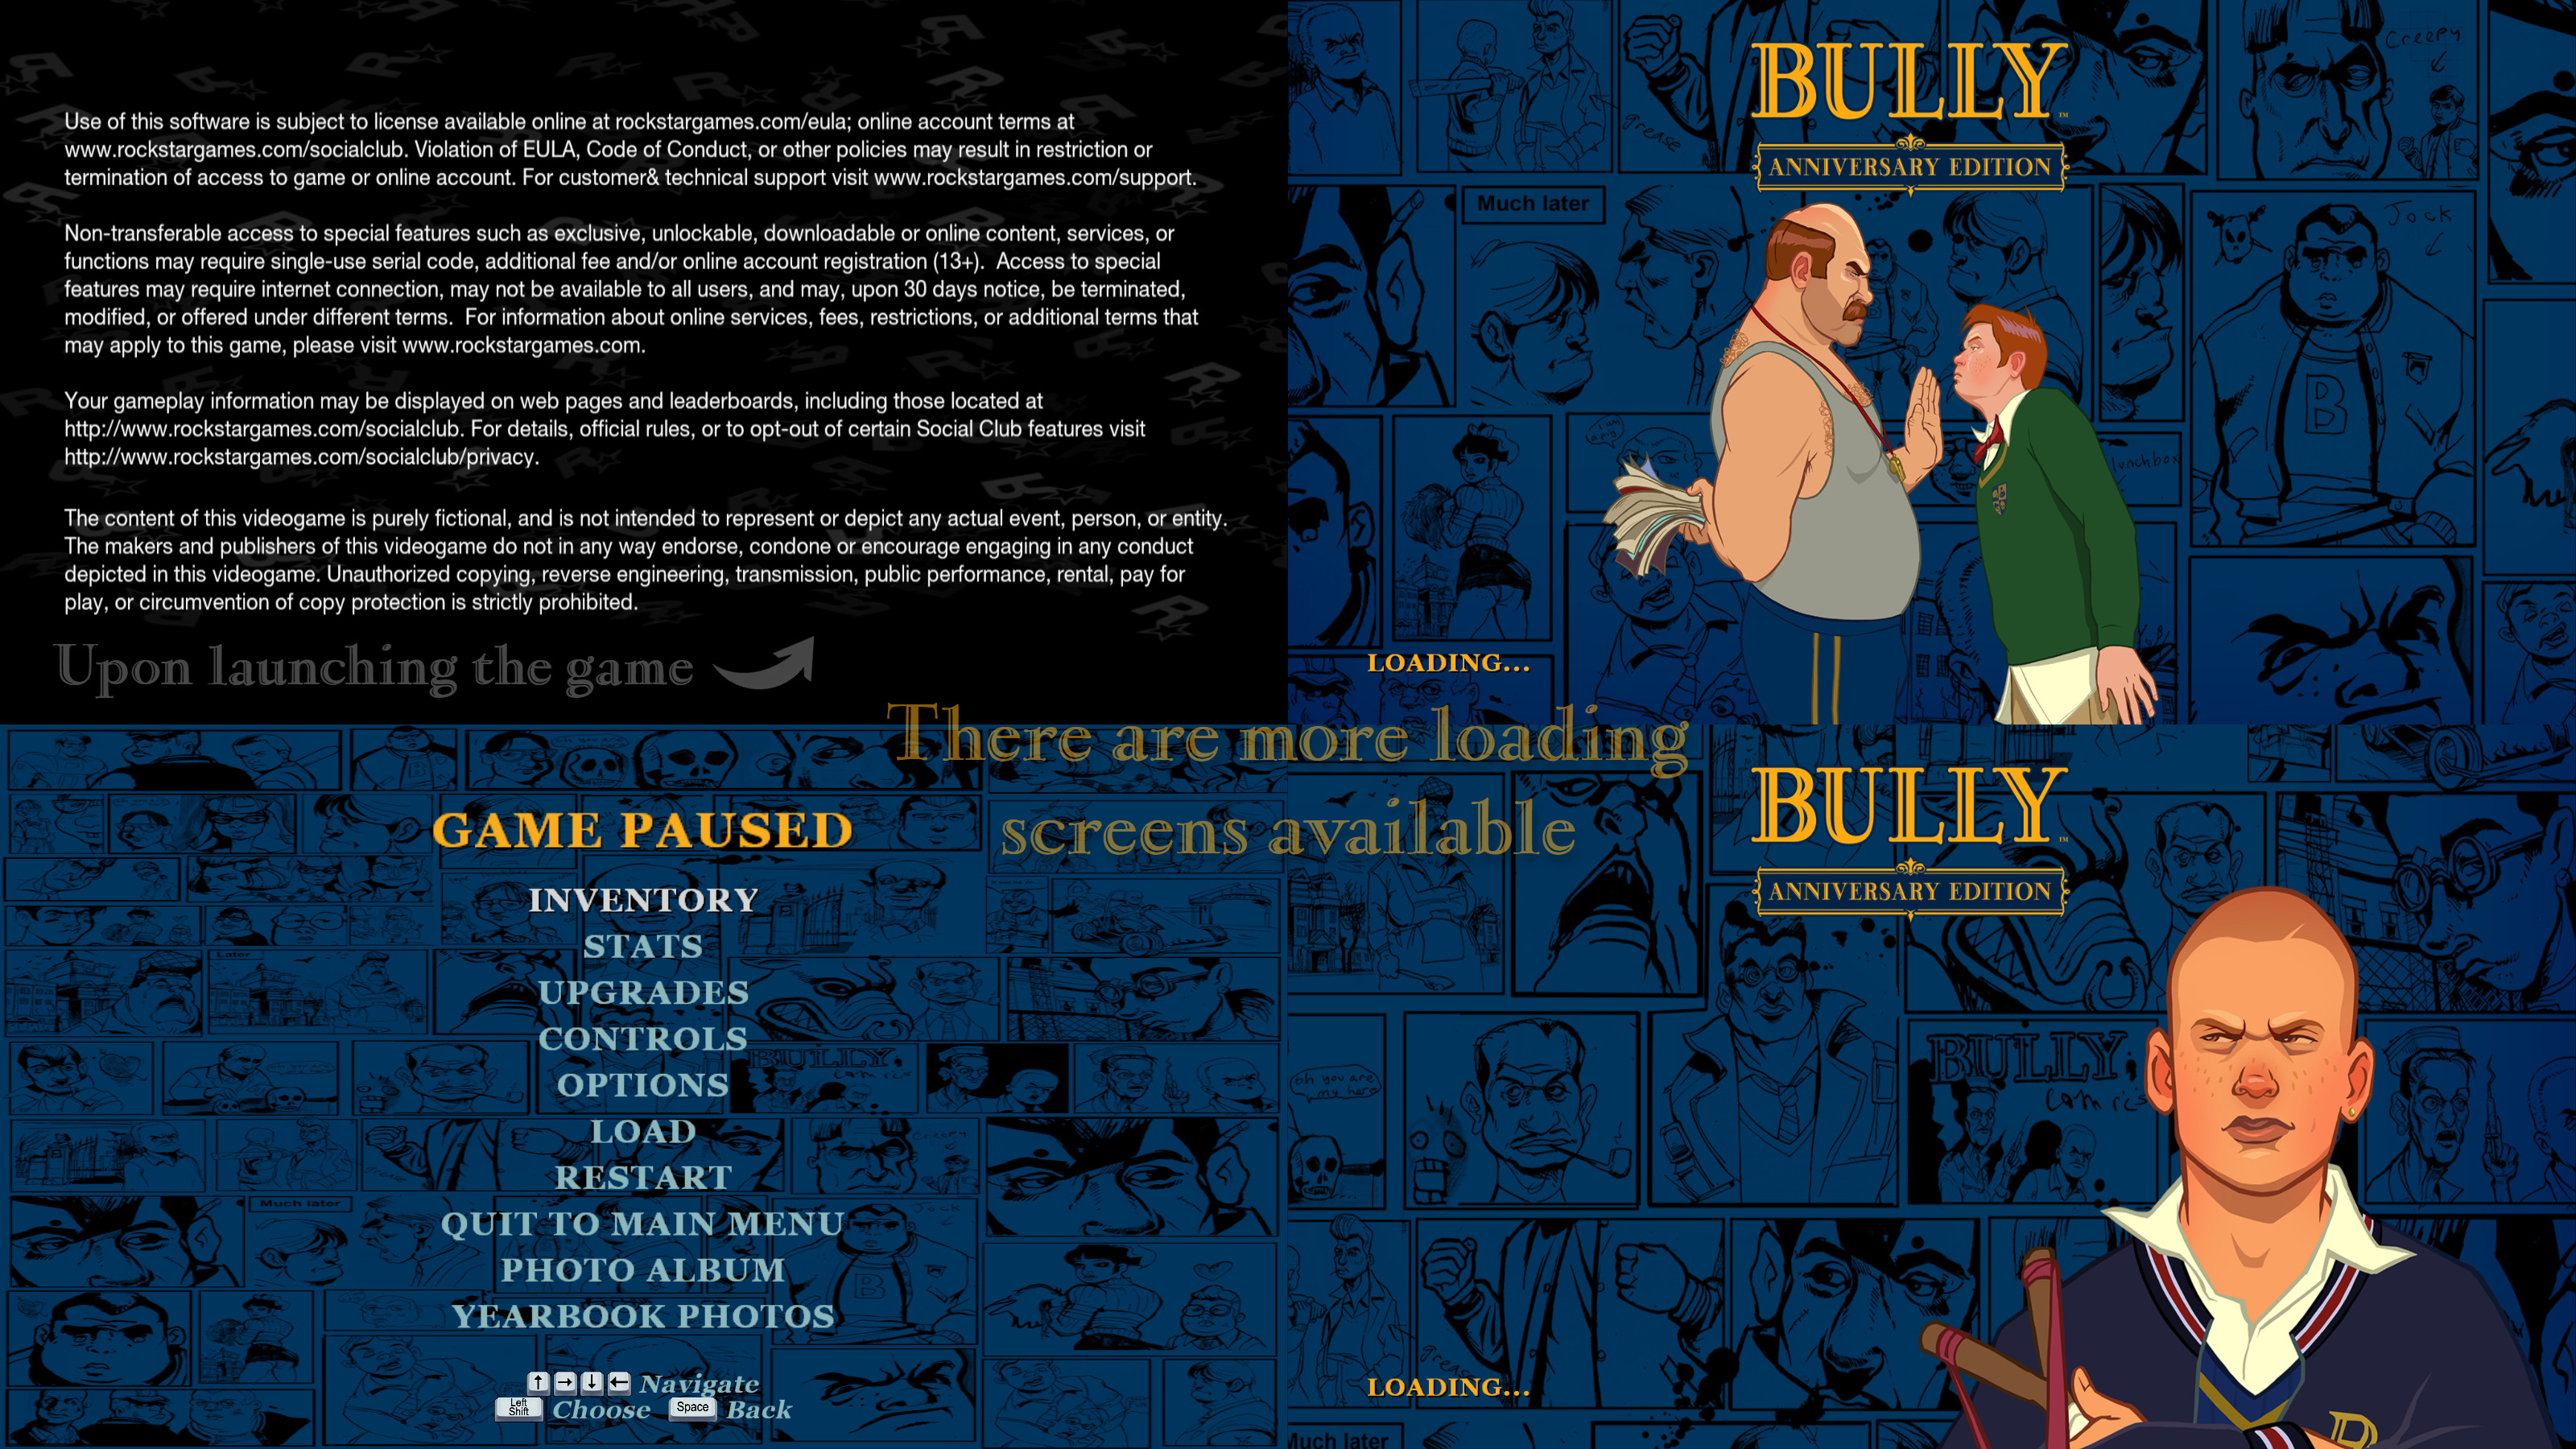
There are 6 folders inside:- 2048 1024 loading screens (Recommended for high-end computers): It simply changes the loading screens.
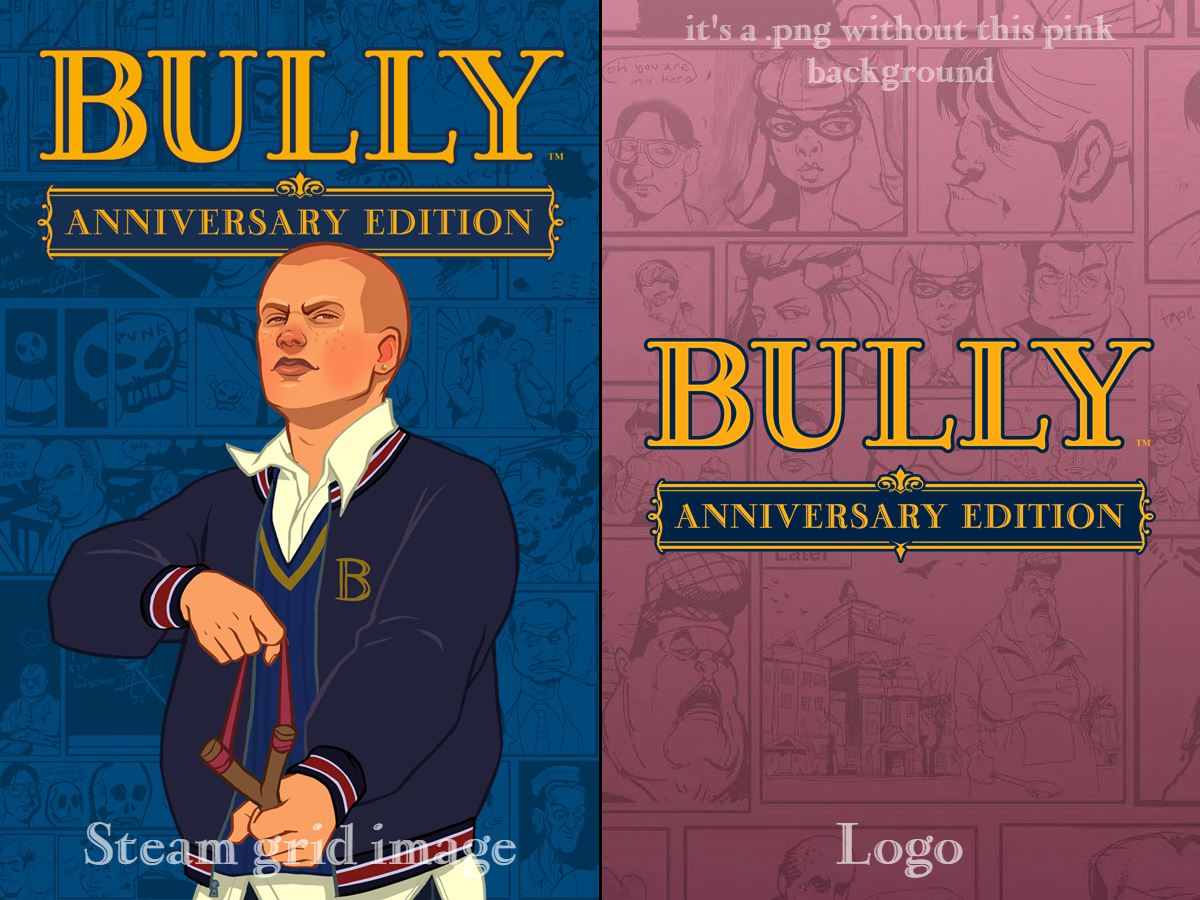
Just open the folder, move its contents into Bully’s local files, and replace when asked.Editor’s note: According to user feedback, installing this loading screen can cause the game to not load properly in some cases. If you have issues after the loading screen, consider removing this mod or simply not installing it. I’d like to fix the problem, but I’m not the mod creator. You’ve been warned. - AE artwork for steam users: This folder contains Steam covers to give the game a more modern look.
Feel free to change them if you want — it won’t affect the base game at all. - Alternate Menus: This changes the menus. This goes along with the first point... Just move the TXD folder to Bully’s root directory.
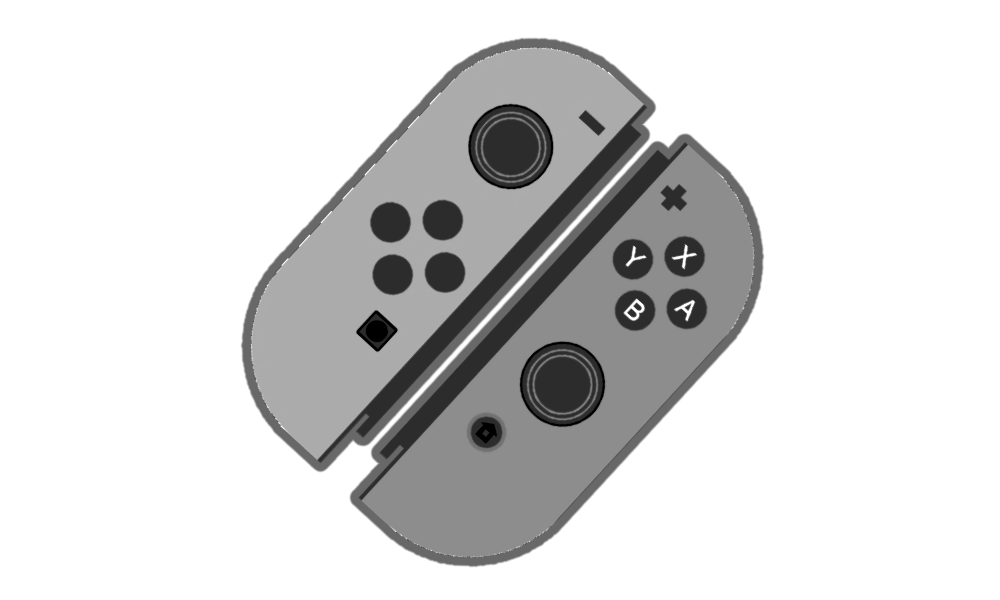
- Nintendo Switch Buttons (Joy-Con's): This replaces the in-game buttons with Nintendo Switch ones. Just replace the files inside the folder ("TXD") into Bully’s root directory.
- Playstation Buttons: This replaces the in-game buttons with PlayStation-style buttons. Simply move the files ("TXD") into Bully’s root folder and overwrite when prompted.
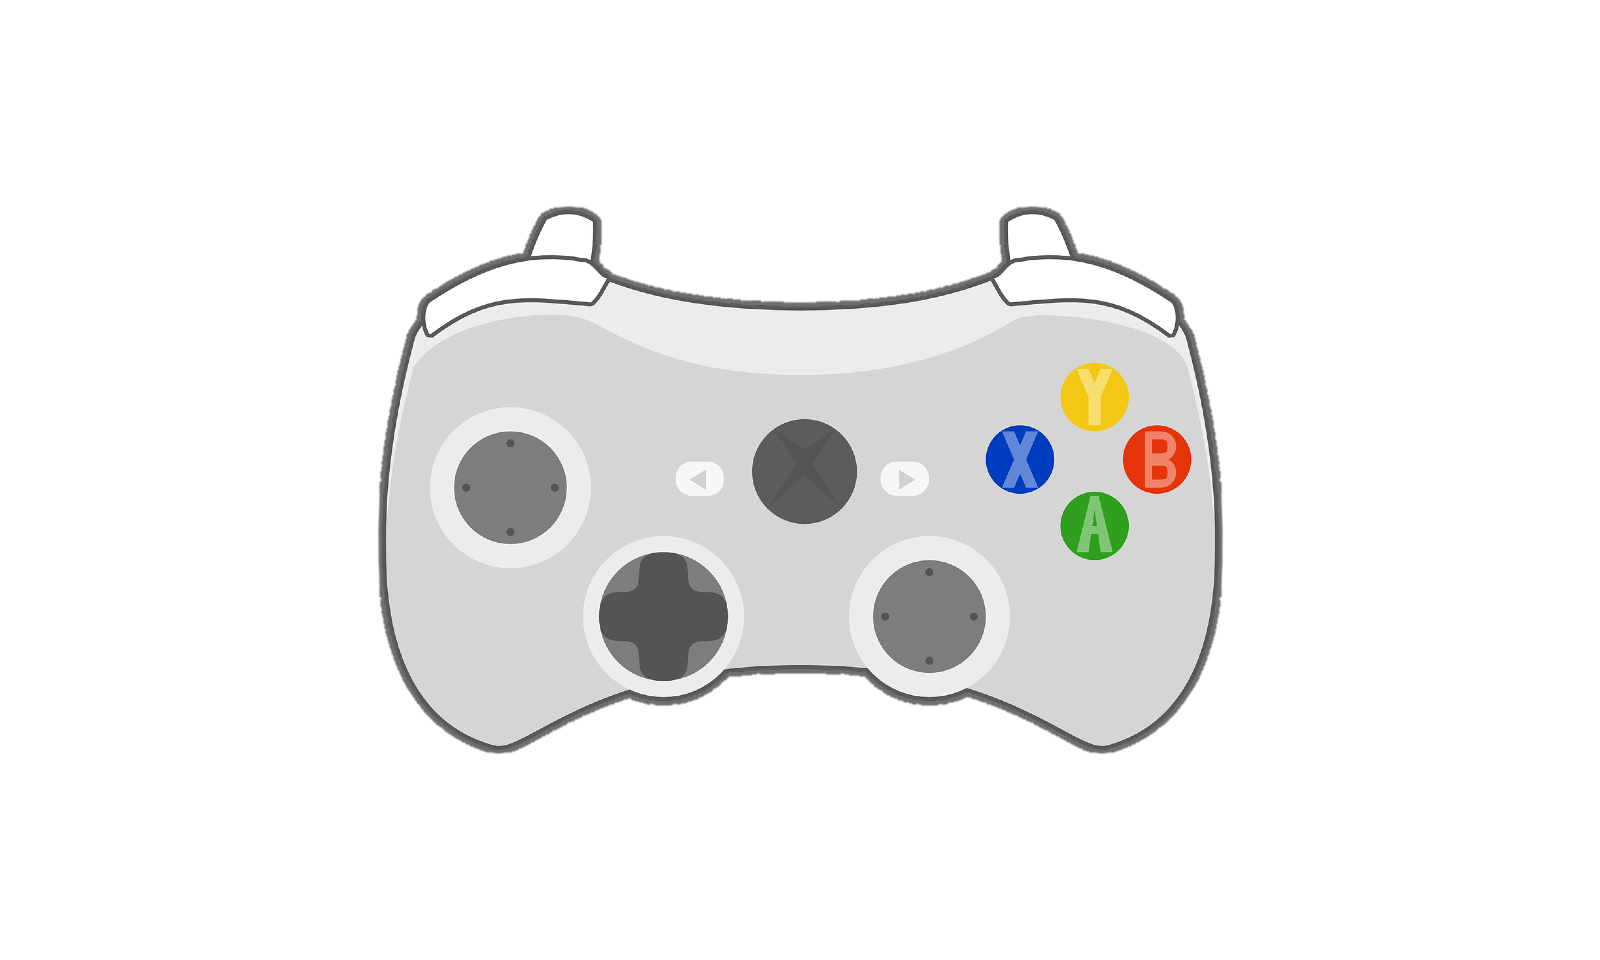
- Xbox Buttons: This changes the in-game buttons to match the Xbox layout. Just copy the files ("TXD") into the root Bully folder and replace if asked.
- 2048 1024 loading screens (Recommended for high-end computers): It simply changes the loading screens.
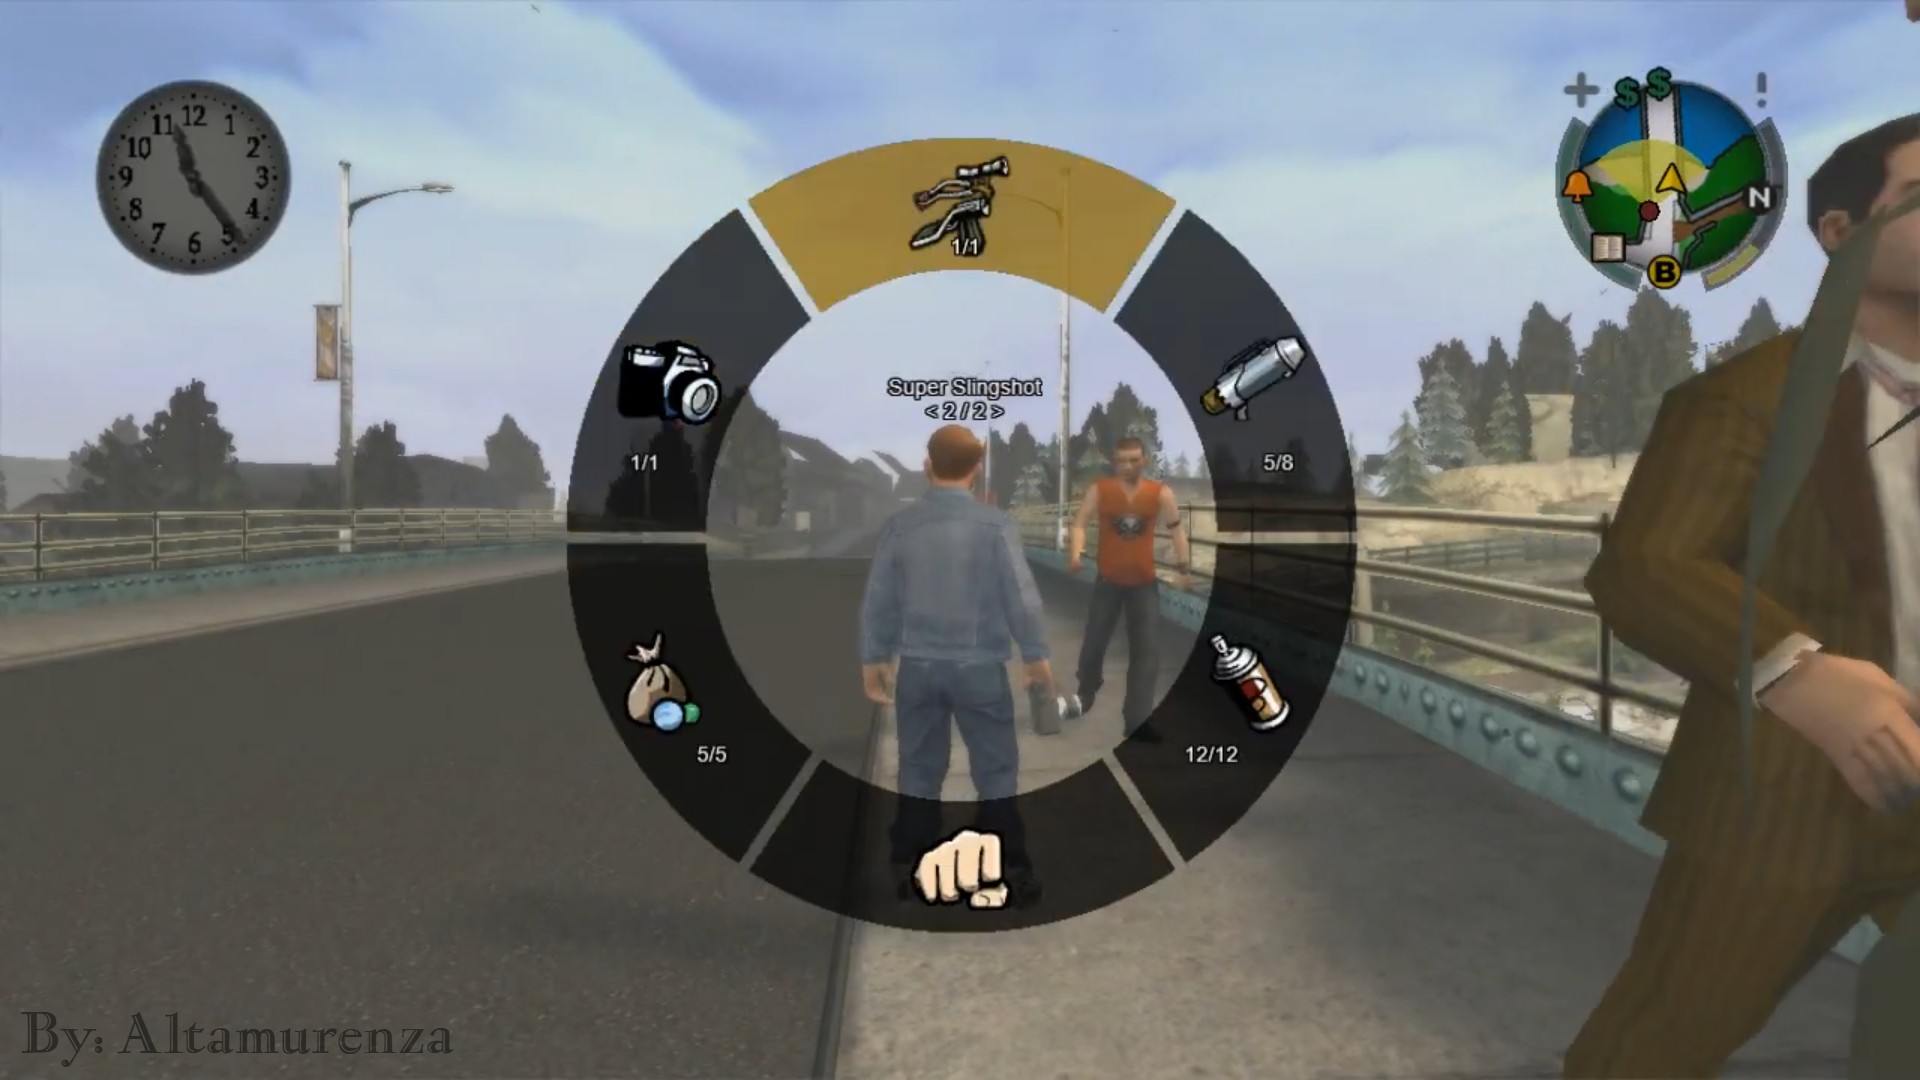
- #3 Altamurenza's Wheel Menu SupportThis is just support for the Wheel-Menu[github.com] mod, which adds a weapon selection wheel (like GTA V or RDR 2).
It opens holding the "Tab" key, so make sure you don't have anything else assigned to it (like the map, for example). It allows you to select weapons, see their speed, damage, etc. On the second page, you can change outfits, although I don't recommend messing with it too much, as it can cause the character to crash—especially when selecting items to equip in the hands, like bracelets or watches.
To download the mod, simply get it from this link: Wheel Menu[github.com] [234 KB].
Extract the folder "Wheel.Menu.1.3" — it will give you a new folder.
Now go to Bully’s root folder, then navigate to "_derpy_script_loader\scripts" and move the mod’s folder into the Scripts folder.
Once you’ve downloaded the mod, go to the folder "#3 Altamurenza's Wheel Menu Support/_derpy_script_loader/scripts", copy the Wheel Menu folder, then go back to the game’s root directory and paste it into "_derpy_script_loader\scripts". - #4 Altamurenza's Menu Overlay Support
Altamurenza's Menu Overlay Support[www.nexusmods.com] is specifically made to support a mod that changes the game's menu.
If you install it without the actual mod, it won’t do much — it needs the other one to work, duh.
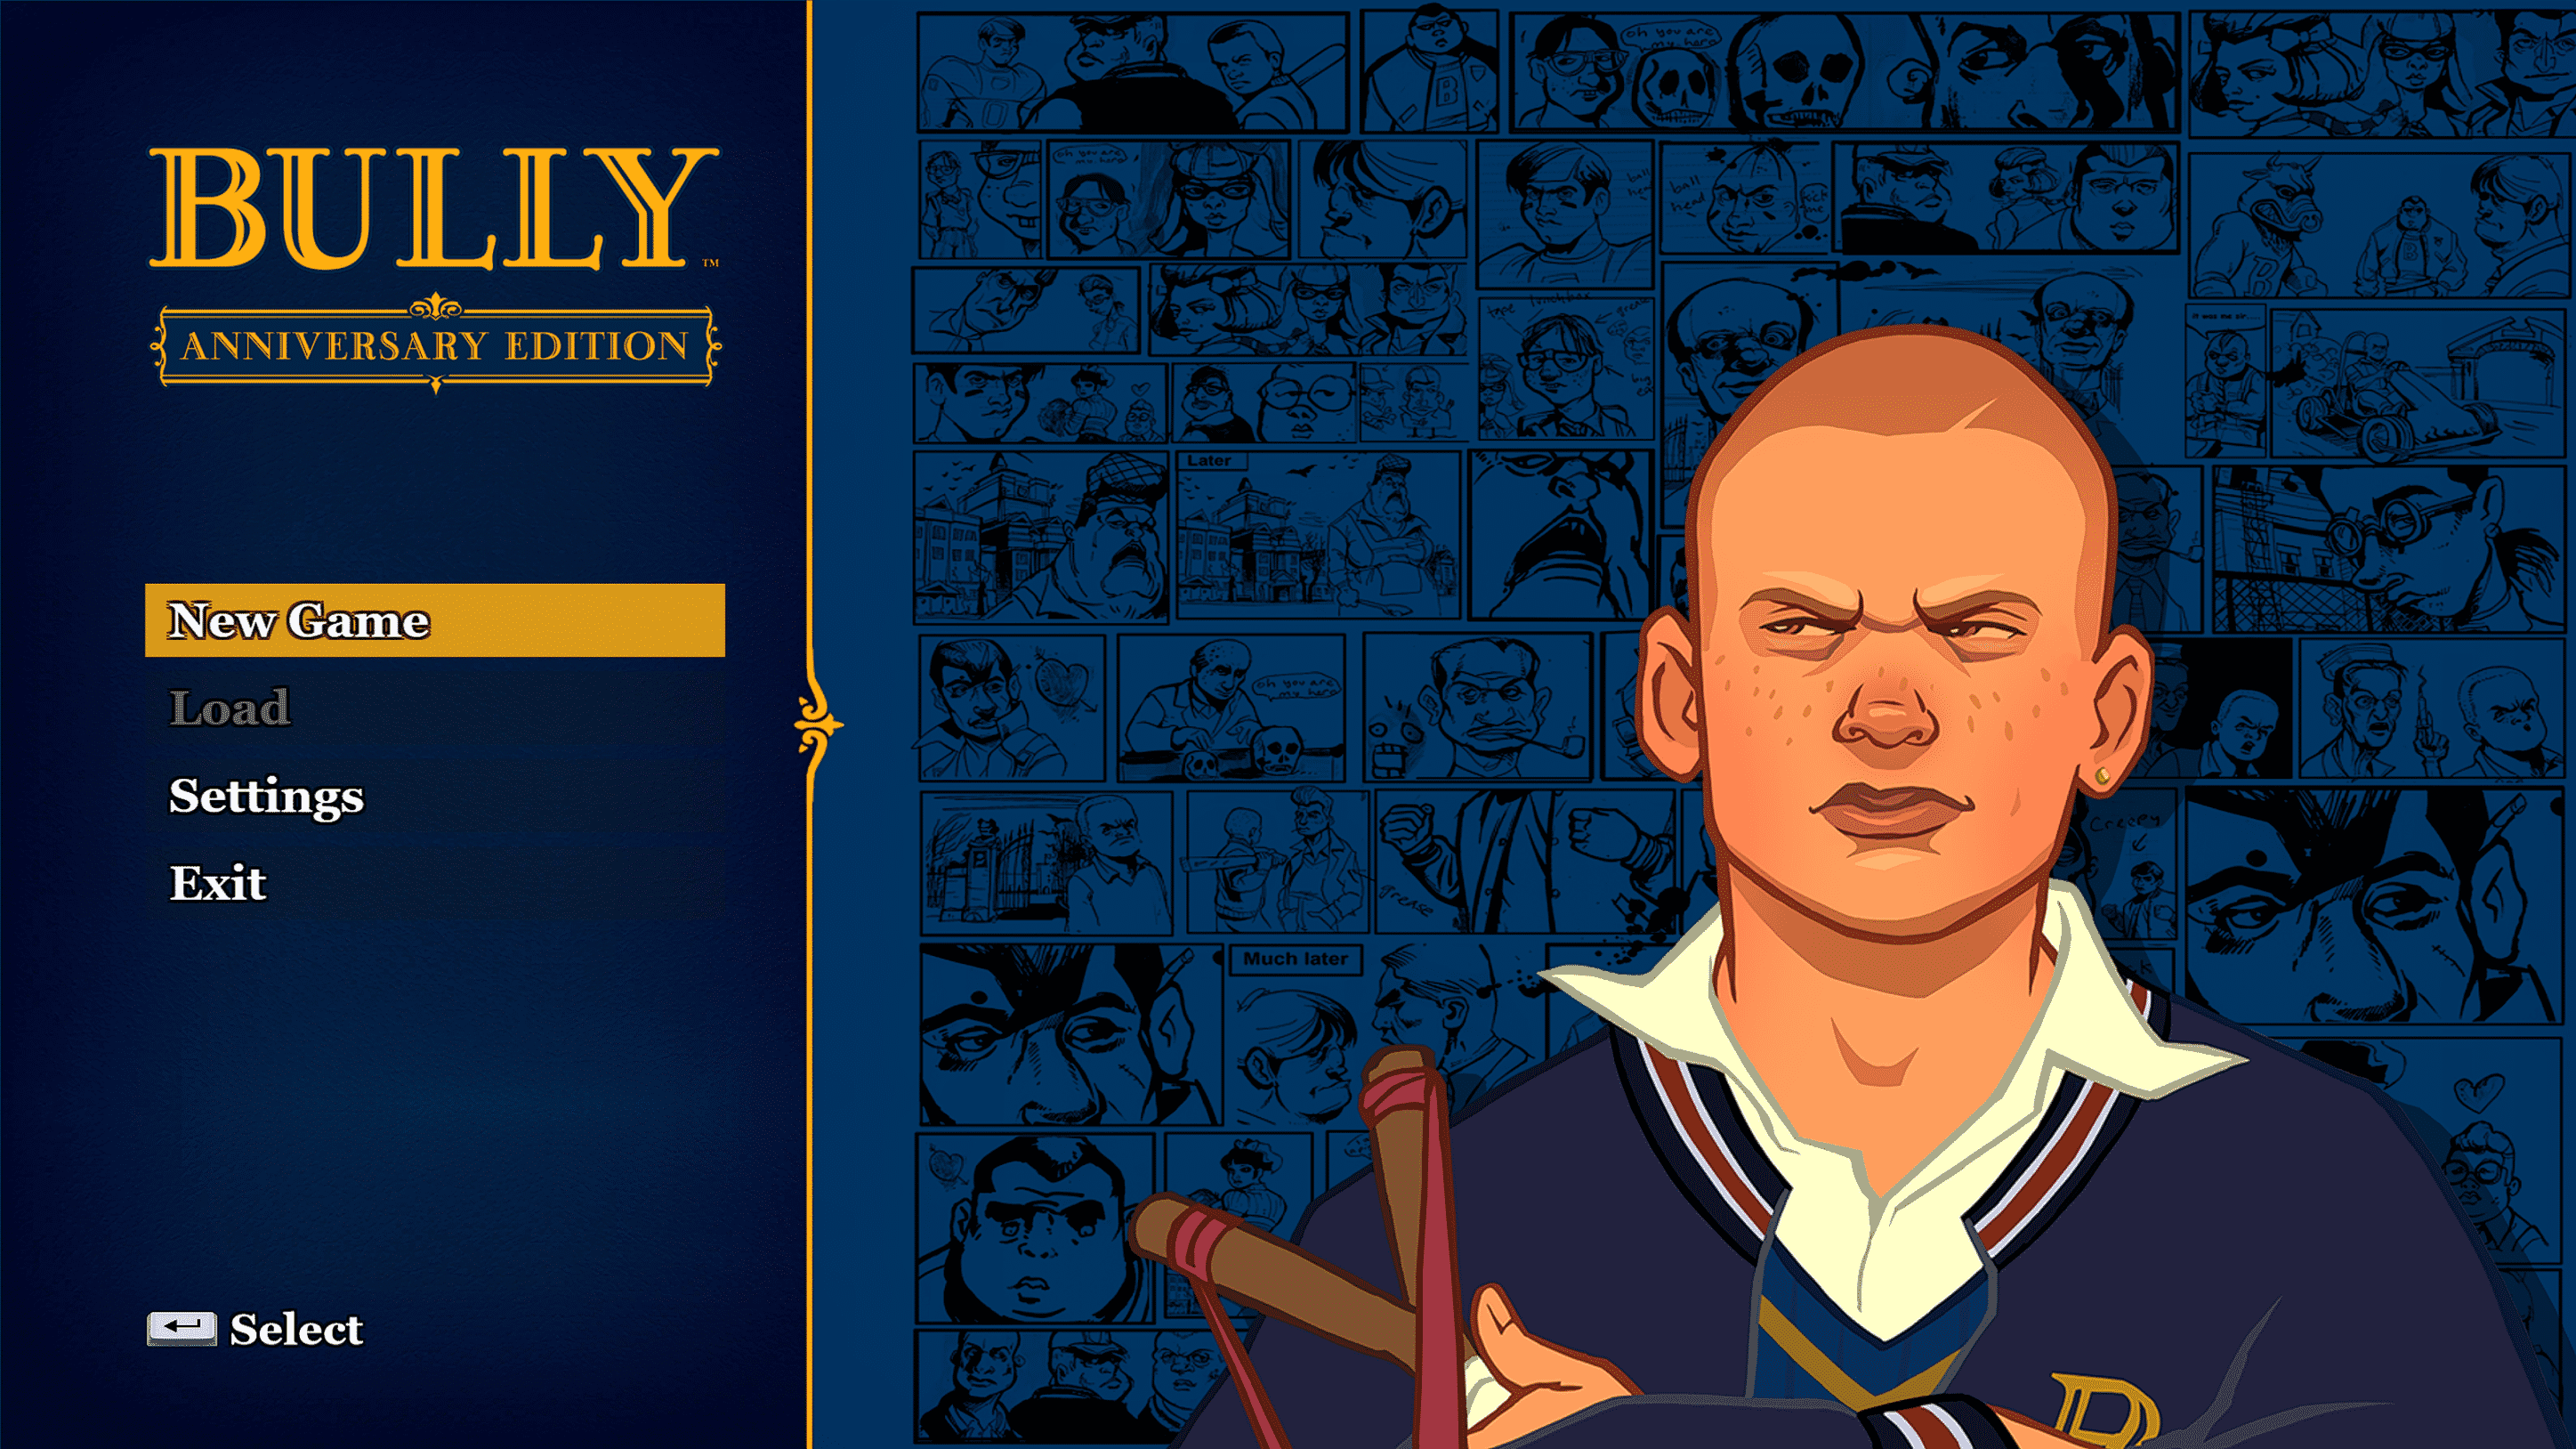
Like some of the previous fixes, this one’s optional, but it gives the game’s menu a fresher, more modern look.this is how it looks after installing the mod.
To install the mod, just go to the page for the Main Menu Overlay[www.nexusmods.com] mod created by Altamurenza and download it from the following link: Main Menu Overlay[www.nexusmods.com]
You can select whichever language you prefer — in my case, I went with English:Note: Before installing a translation, you must first install the base mod.
After that, install the desired translation. It may download as a .zip file — extract it and move the _derpy_script_loader folder to the game’s root directory. If prompted, click Replace.- 🇵🇹 Português[www.nexusmods.com] por: SmylieZ[next.nexusmods.com] [2 KB]
- 🇪🇸 Español[www.nexusmods.com] por: Sapagnaw[next.nexusmods.com]
(Español España) [7 KB] - 🇲🇽 Español Castellano[www.nexusmods.com] por: Fertlou[next.nexusmods.com] (Español Castellano orientado a Argentina) [2 KB]
- 🇺🇦 Українська[www.nexusmods.com] від: blackdot[next.nexusmods.com] [3 KB]
- 🇵🇹 Português[www.nexusmods.com] por: SmylieZ[next.nexusmods.com] [2 KB]

1.3 Optional fixes [G-IMG]
- ↓
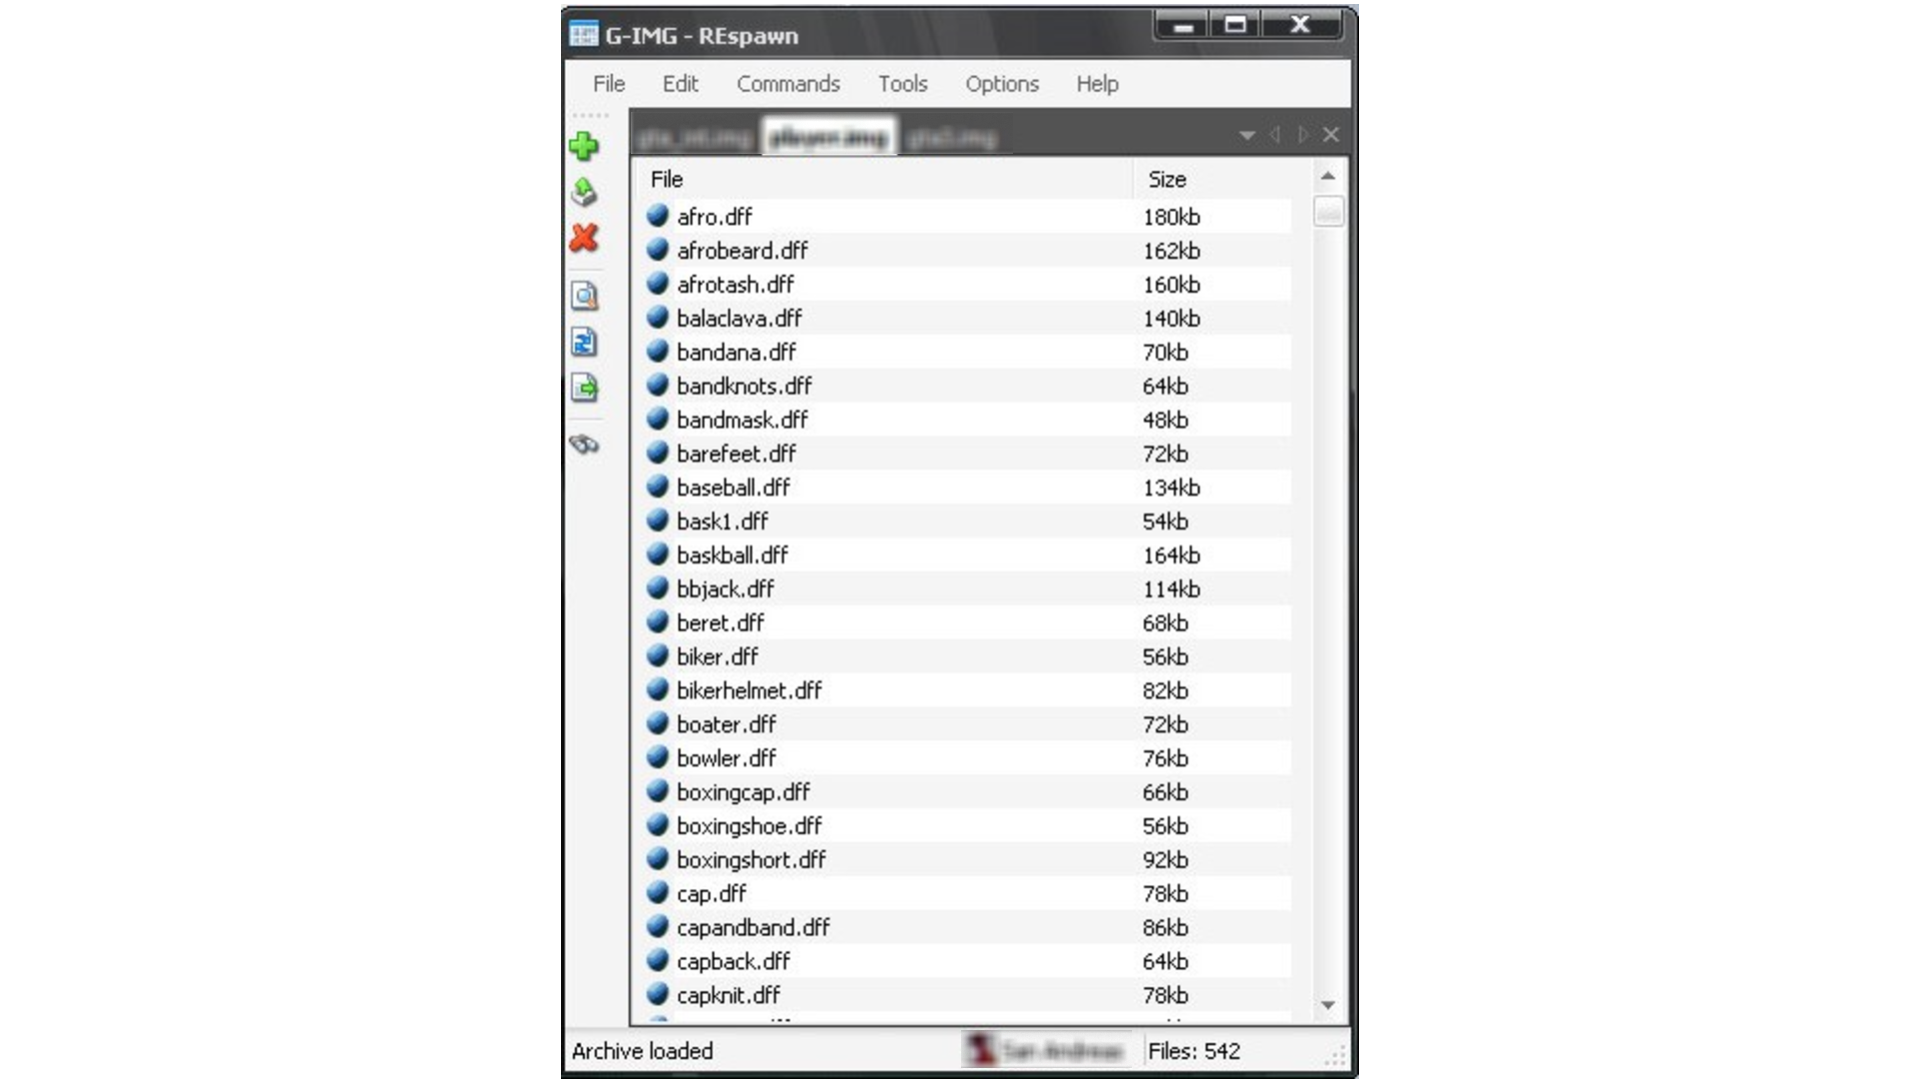
For the next two mods (Cautious' Boys Dorm 2nd Floor / School 3rd Floor), you'll need a program called G-IMG by: REspawn (I couldn't find any link to a social media page), which allows the user to modify Bully's internal files — specifically the terminal files with the ".img" extension.
For some reason, the page bugs out if I include the link in the text, so here’s the link to the site:https : / /www . gta-modding . com/area/index.php? act=view&id=18 [910.6 KB].
remove the spaces to access it At the page, just press DOWNLOAD. (please let me know if the link is down, thank you)NoteThere is a "more complete" version of G-IMG uploaded at GitHub, but honestly, I don't trust it enough, since my browser detects it as potentially dangerous. Moreover, after scanning it with VirusTotal[www.virustotal.com], it was flagged by several security vendors as malicious. So I recommend not downloading the GitHub version and instead downloading the one from GTA MODDING[www.gta-modding.com], which is the one I linked. Which is completely safe and has no malicious potential whatsoever.
Once downloaded, you'll get a file named "18_gimg.rar".
Extract it, and it will produce a folder called "gimg".
Inside that folder, you'll find the program (G-IMG.exe) that lets you edit the internal game files.
If the program works correctly, ignore the following and skip the box.IF YOU CAN’T LAUNCH G-IMG, DO THISJust a heads-up: the program might not open because it's missing some dependencies. You’ll need to download a few additional files to make G-IMG work (yeah, it’s a bit of a pain, I know — I warned you lol). Download these files:- REspawn's G-Tools Fix[almost610.ucoz.com] [0.7 KB]. Click the “Download” button on the sketchy-looking page and download the file.
It will download a file called "4_REspawn_G-Tools.zip". Extract it and open the folder.
Inside, run the file "REspawn G-Tools Fix.BAT", wait for the process to finish, and then try launching G-IMG again to see if it works now. - If you’re still getting the error, it’s because you haven’t downloaded the “DirectX End-User Runtime Web”.
Downloading it is easy and way safer than the previous step lol.
Just go to Microsoft’s official website, select your language, and click the download button: DirectX End-User Runtime Web Installer[www.microsoft.com] [288 KB].
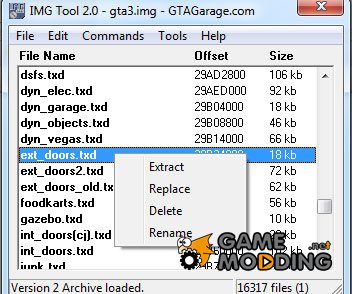
Run the file named "dxwebsetup.exe" and follow all the steps to install it. Then try launching the G-IMG program again. - Alternatively, if you're still having the issue, you can download another version: IMGTOOL 2.0[gamemodding.com] by wawilon[gamemodding.com].
It has a less polished GUI, but the process is the same in both programs. Although it's originally intended for the GTA game series, it works the same for Bully since Rockstar Games uses the ".img" compressor format in almost all their games, so you shouldn't have any issues opening it. It's extremely simple to use: just download it on this link: IMGTOOL 2.0[gamemodding.com] [229 KB].
Extract the ".zip" file, and run IMGTool.exe. That's it. - If you’re still having issues with the program, I can’t help you any further. Try searching for help online and see if you can fix the problem. I’m not a professional modder for the game, LMAO.
- REspawn's G-Tools Fix[almost610.ucoz.com] [0.7 KB]. Click the “Download” button on the sketchy-looking page and download the file.

1.4 Optional fixes
- ↓
- DisclaimerNote here: This mod consumes a lot of FPS. Download it only if your PC meets the following requirements:
- 🖥️GPU: GeForce RTXTM 3060 Ti or AMD Radeon RX 6750 XT
- 💾RAM: 16 RAM
- ⚙️CPU: Intel® Core™ 7 (10700) or AMD Ryzen 7 3700X (Zen 2)
Terms of UseThis is a standard limitation of liability clause. In many countries, including the United States and EU nations, such disclaimers are legally valid as long as the user is clearly informed and the product or service is not intentionally harmful or deceptive. Always check your local laws for specific consumer rights. Everything is the sole responsibility of the user. I am not liable for any malfunction or damage to your device. You have been warned. - 🖥️GPU: GeForce RTXTM 3060 Ti or AMD Radeon RX 6750 XT
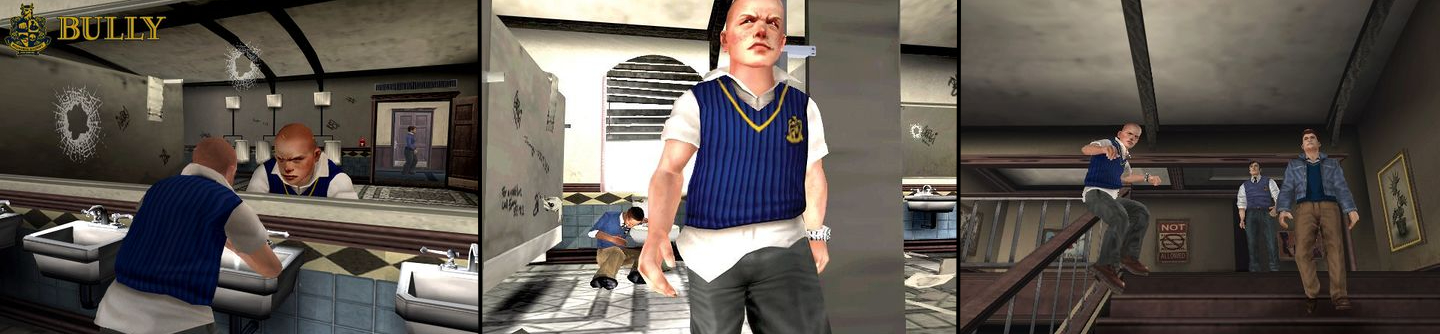
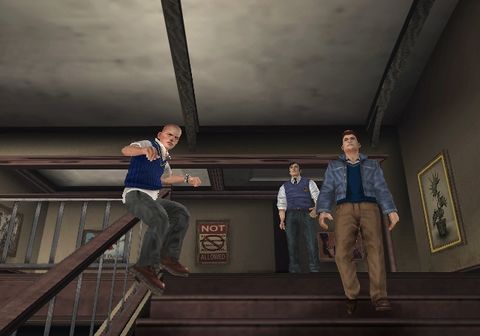
- #5 Cautious' Boys Dorm 2nd Floor SupportThis adds support for installing the Beta_Boys_Dorm_V1 (in beta) mod by CAUTIOUS, which features the second floor seen in the beta promotional images of Bully.
This is a somewhat difficult mod to install, as it requires replacing internal game models and files. If done correctly, it shouldn't cause any errors. It also doesn't add any key story content—there aren't even any NPCs spawning on the second floor. Still, it's an interesting detail. Below is a gameplay video of the mod:
Personally, I don't recommend downloading it, as it's very sensitive to other mods and can duck' up the entire game. However, here's how to install the mod:How to Download the Mod
First, download the mod by following this link: Beta_Boys_Dorm_V1[www.dropbox.com] [8.88 MB].
Download the file from Dropbox by clicking on "Files" in the top left corner, then select "Download".
Once downloaded, you’ll get a file named "Beta_Boys_Dorm_V1.rar".
After extracting it, you'll see five files.
You can move the following three files directly into your Bully root folder, and replace if prompted: Coll, Config and Graphics.
1.5 Optional fixes
- ↓
If reading this feels tedious, you can just watch the creator’s video tutorial:
BULLY Beta Boys Dorm V1 (Real Re-Creation Mod) Download!
Once G-IMG is open, click on "File" in the top-left corner and select "Open". Navigate to your Bully Scholarship Edition root folder, then go to the folder named "Stream" and open the file called "World.img". A bunch of files will show up on the screen—ignore them for now. Click "File" again, hit "Open", go back to the game's root folder, open the "DAT" folder, and open the file named "Trigger.img".
Once more, go to "File", return to the root folder, open the "Objects" folder, and select the file named "ide.img". Now, if you look at the top, all 3 files should be open.
Go back to the "world.img" file, click on "Command".
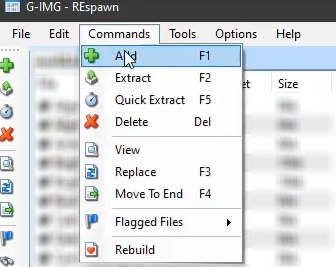
Then "Add", go to the mod's main folder, then into the "TO_IMG" folder, and open "To_World.img". If you don’t see any files inside that folder, change the filter in the bottom-right corner from "GTA Files" to "All Files". Then select all the files and click "Open".
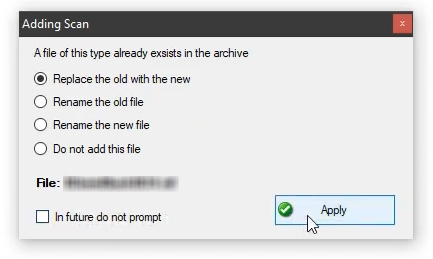
A window will pop up—click the "Apply" button several times until all files are replaced.
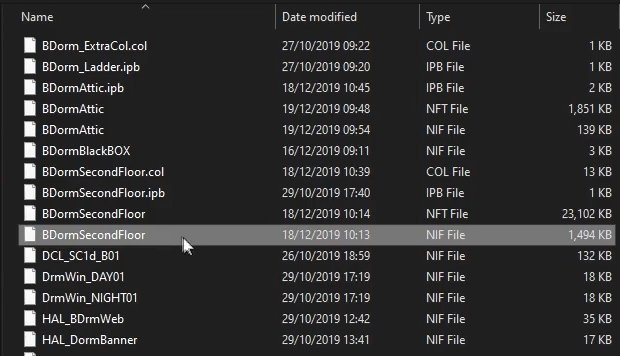
Now, for some reason, the program might bug out and fail to add a few files. So, go back to "Command", click "Add" again, and manually add the specific file called "BDormSecondFloor"—the one that’s exactly [1.494 KB]—and click "Open".
Now go to the "trigger.img" section. Select the "Commands" > "Add" option.
Go back to the "TO_IMG" folder and select the "To_Trigger.img" folder. Make sure the bottom-right dropdown says "All Files", then select all the files and click "Open".
Once the dialog box appears, click "Apply" for all the files.
Now go back to "ide.img", click on "Commands" > "Add".
Now go back to the "TO_IMG" folder and select the "To_Ide.img" folder. Make sure the "All files" option is selected again. Then select all the files and click "Open". In this case, the "Apply window won't pop up", so let's continue with the mod installation.
At this point, I've written a lot. My fingers hurt, but hey, let's keep going with the installation yaaay!!1111!!!
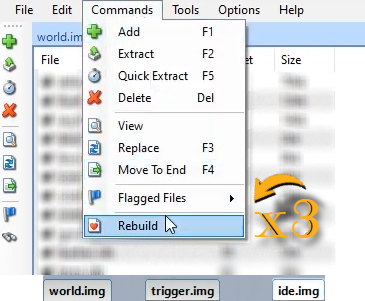
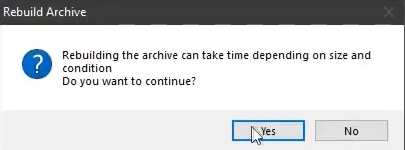
Once all the files have been added, repeat the process for the three files: click on "Commands" and then select the last option, "Rebuild" (the one with the little heart ♥ :3), and press "Yes".
Alright, the mod has been installed. Now it’s time to adapt the files inside the folder #5 Cautious' Boys Dorm 2nd Floor Support/Stream. It's quite simple:
Just run the "Install.exe" file, wait for the process to finish, and then press Enter.
Got it, now you have a completely useless second floor in the boys' dorm.
Thanks for reading this 😎👏 pog in the chat boi's ඞSome screenshots have been taken from the creator's video.




1.6 Optional fixes
- ↓
- DisclaimerNote here: This mod consumes a lot of FPS. Download it only if your PC meets the following requirements:
- 🖥️GPU: GeForce RTXTM 3060 Ti or AMD Radeon RX 6750 XT
- 💾RAM: 16 RAM
- ⚙️CPU: Intel® Core™ 7 (10700) or AMD Ryzen 7 3700X (Zen 2)
Terms of UseThis is a standard limitation of liability clause. In many countries, including the United States and EU nations, such disclaimers are legally valid as long as the user is clearly informed and the product or service is not intentionally harmful or deceptive. Always check your local laws for specific consumer rights. Everything is the sole responsibility of the user. I am not liable for any malfunction or damage to your device. You have been warned. - 🖥️GPU: GeForce RTXTM 3060 Ti or AMD Radeon RX 6750 XT
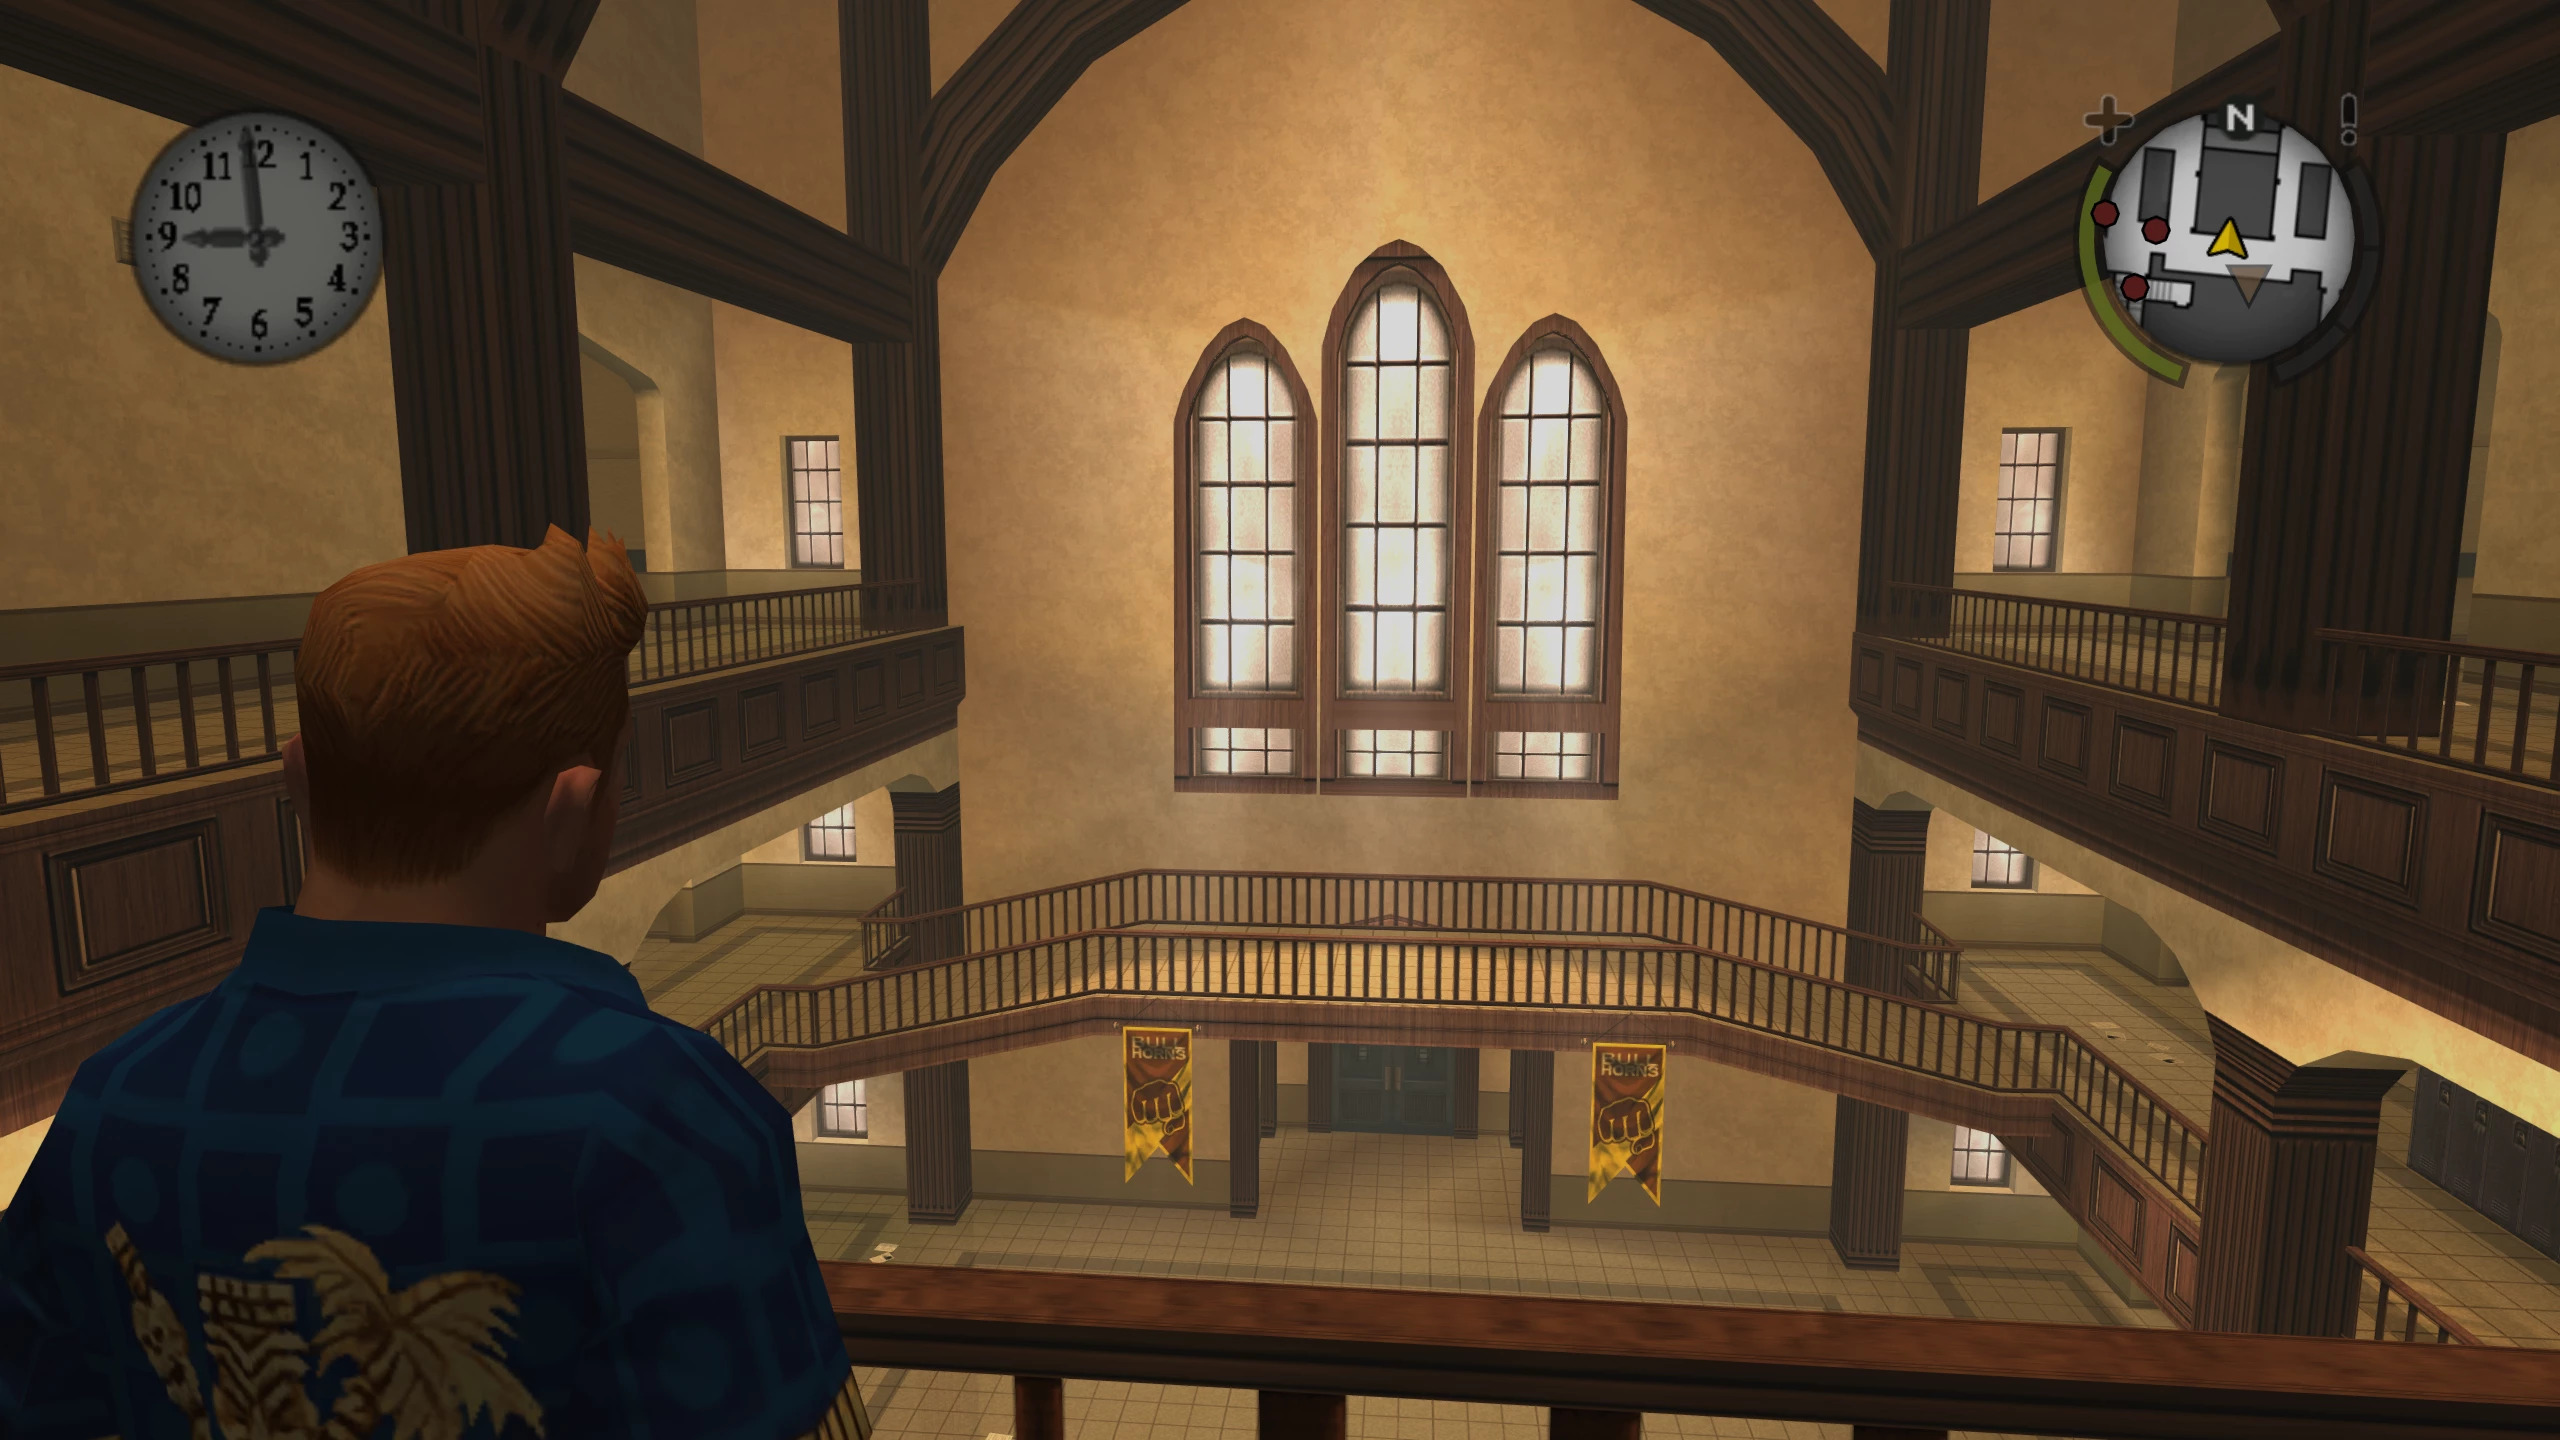
- #6 The Great Grantini's School 3rd Floor SupportJust like the previous mod, this one includes support for the School 3rd Floor[www.nexusmods.com]" mod made by The Great Grantini[next.nexusmods.com] (or SycamoreTreee, idk his real name lul). Installing it without the base mod will prevent it from working.
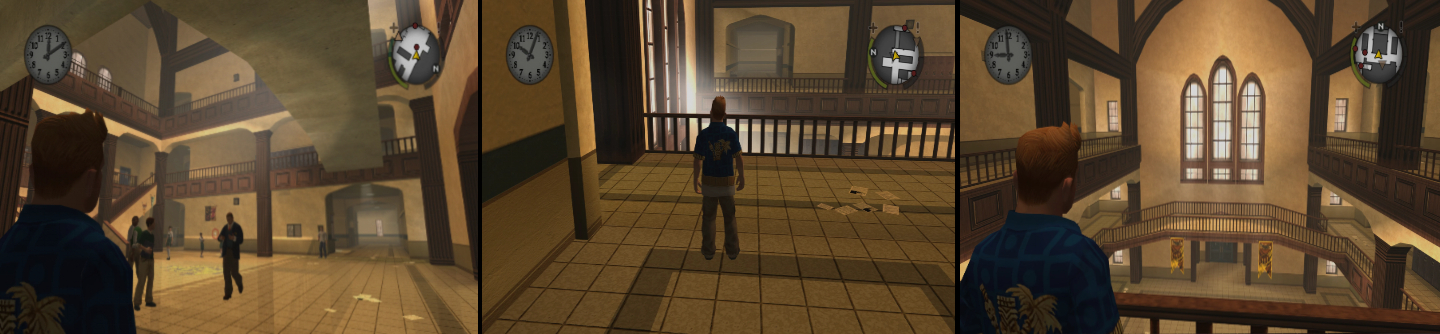
This mod provides access (with collisions) and some extra details that allow the player to go through a door next to the principal’s office and reach the third floor of Bullworth Academy.
This interior was never meant to be accessible — not even in the game's beta version. However, there are "full recreations" that add a realistic touch to the game.
Here are some screenshots of the 3rd floor:
Here’s a gameplay video showing how the mod works:
As with the previous mod, I personally do not recommend downloading this one. It may cause more headaches than provide any real fun or utility — since it doesn't include NPCs or much else to do on the 3rd floor.
The only things you can do are loot lockers, look around, escape from monitors, or throw yourself off the 3rd floor to "die". This mod is sensitive to other mods and is purely decorative.NoteThe previous mod (Boys Dorm 2nd Floor) is not compatible with this one, as both modify the game's internal files, which can cause file corruption and make the game unusable. So it's one or the other.How to Download the Mod
If you still want to install it, here is the mod installation:
In this case, I couldn’t find a video tutorial, so you’ll have to settle for a text guide :p
To begin, you must download the mod from the Nexus Mods page: BETA 3rd Floor Recreation[www.nexusmods.com] [3.1 MB].
Once downloaded, you’ll get a file named "3rd Floor - [version]". After extracting it, six folders (and you can ignore the .txt file) will appear, and from there it’s quite intuitive. Simply follow the steps indicated by the folder names.
First, move the file inside the folder named "In Config folder" to the "Config" folder located in the root directory of Bully. If it asks to replace files, accept.
Next, move the file inside the "In Graphics folder" to the "Graphics" folder in the root directory of Bully. Again, accept any replacement prompts.
Now, open G-IMG[www.gta-modding.com] (installation explained on the step: "1.3 Optional fixes [G-IMG]"). Click the "File" button in the upper-left corner, then "Open", and go to the root folder of the game in question. Enter the "Stream" folder and select the file called "World.img". Many files will appear on the screen—ignore them for now.
Then, click "File" again and once more "Open", navigate to the "DAT" folder, and select the file named "Trigger.img". After that, repeat the process of opening a new file, select the "Objects" folder, and open the file "ide.img" Then, repeat (again) the procces, open "Scripts" folder (at the main folder of Bully), then select the file "Scripts.img" and press open.
At the top, you should now see all four files open.
Go back to the "world.img" file, click on "Command".
Then "Add", go to the mod's main folder, then into the "In world.img" folder. If you don’t see any files inside that folder, change the filter in the bottom-right corner from "GTA Files" to "All Files". Then select all the files and click "Open".
A window will pop up—click the "Apply" button several times until all files are replaced.
Now go to the "trigger.img" section. Select the "Commands" > "Add" option.
Go back to the "In trigger.img" folder. Make sure the bottom-right dropdown says "All Files", then select all the files and click "Open".
Once the dialog box appears, click "Apply" for all the files.
Now go back to "ide.img", click on "Commands" > "Add".
Now go back to the "In ide.img" (at the mod folder). Make sure the "All files" option is selected again. Then select all the files and click "Open". If it asks you to replace, just smash the Apply button a few times until it closes.
Now go to "scripts.img", click on "Commands" > "Add".
Go back to the "In scripts.img". Make sure the "All files" option is selected. Then select all the files and click "Open". If it asks you to replace, just press the Apply button a few times until it closes.




1.7 Optional fixes
- ↓
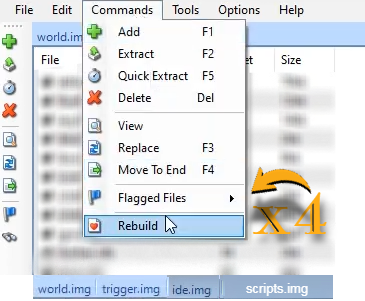
Once all the files have been added, repeat the process for the 4 files: click on "Commands" and then select the last option, "Rebuild" (the one with the little hearty), and press "Yes".
Alright, the mod has been installed. Now it’s time to adapt the files inside the folder #6 The Great Grantini's School 3rd Floor Support/Stream. It's quite simple:
Just run the "Install.exe" file, wait for the process to finish, and then press Enter.
There you go!1!!11 Now you’ve got a useless mod that doesn’t do anything — but hey, it’s decorative, so what more could you ask for 😄?
Funny Mods
In this section there are a few useful mods that can help improve the gameplay by expanding it a bit and adding or better using game features to make it more fun. It’s up to you if you wanna download them or not. They don’t make major changes and they’re lore-friendly tho.
Just keep in mind that some of these mods might not be compatible with earlier ones, especially the dorms mod.
Here are some good mods and how to install them, it’s pretty simple:

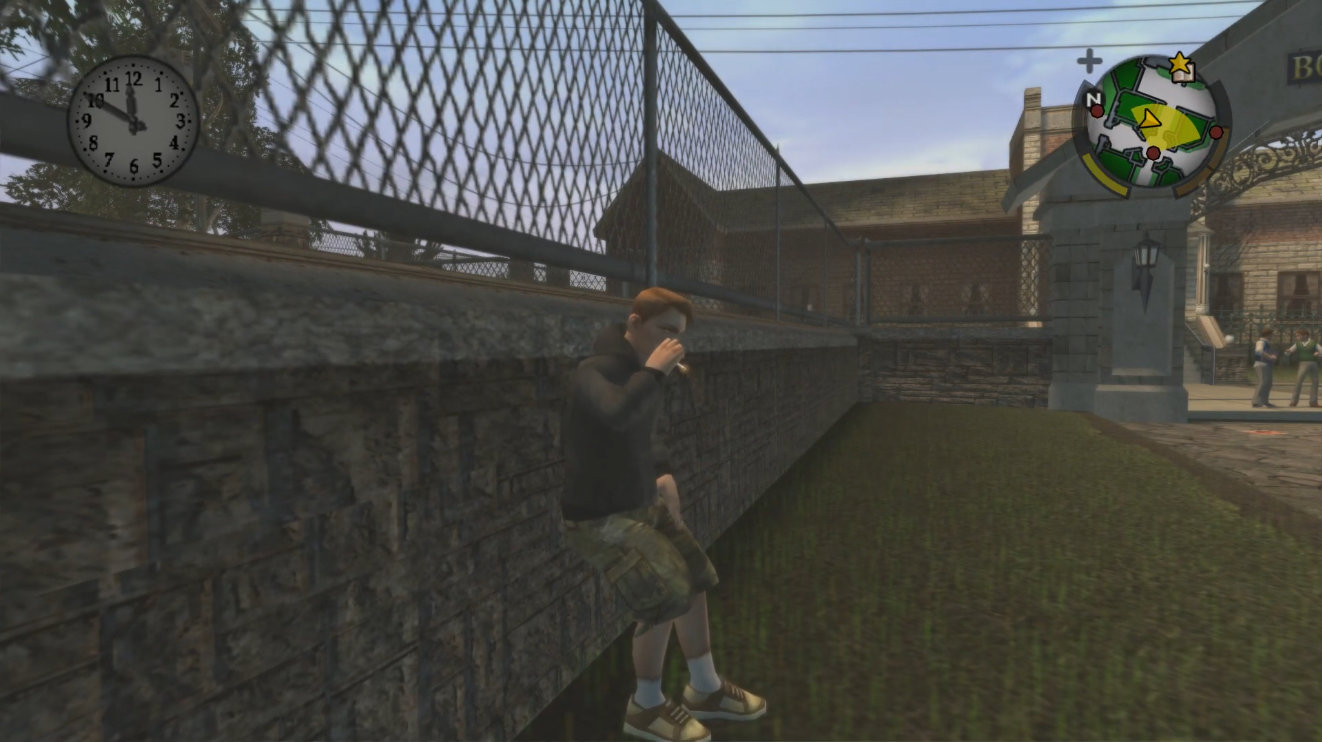
It lets you recover a bit of health by smoking while leaning on a wall, but watch out tho. This pisses off the caretakers, and if they catch you smoking, they’ll get angry and chase you. You’ll have to do it somewhere hidden.
By: tupakka1[www.nexusmods.com]
Credits to the creator’s video.
As I explained earlier how to use the required tools, I won’t go into too much detail about the mod download and installation process.
The installation is done using a program called IMGTool. Once you open it, you’ll need to select the Scripts.img file, which is located inside the game’s Scripts folder.
After loading that file, you just add the mod file into the .img and that’s it.


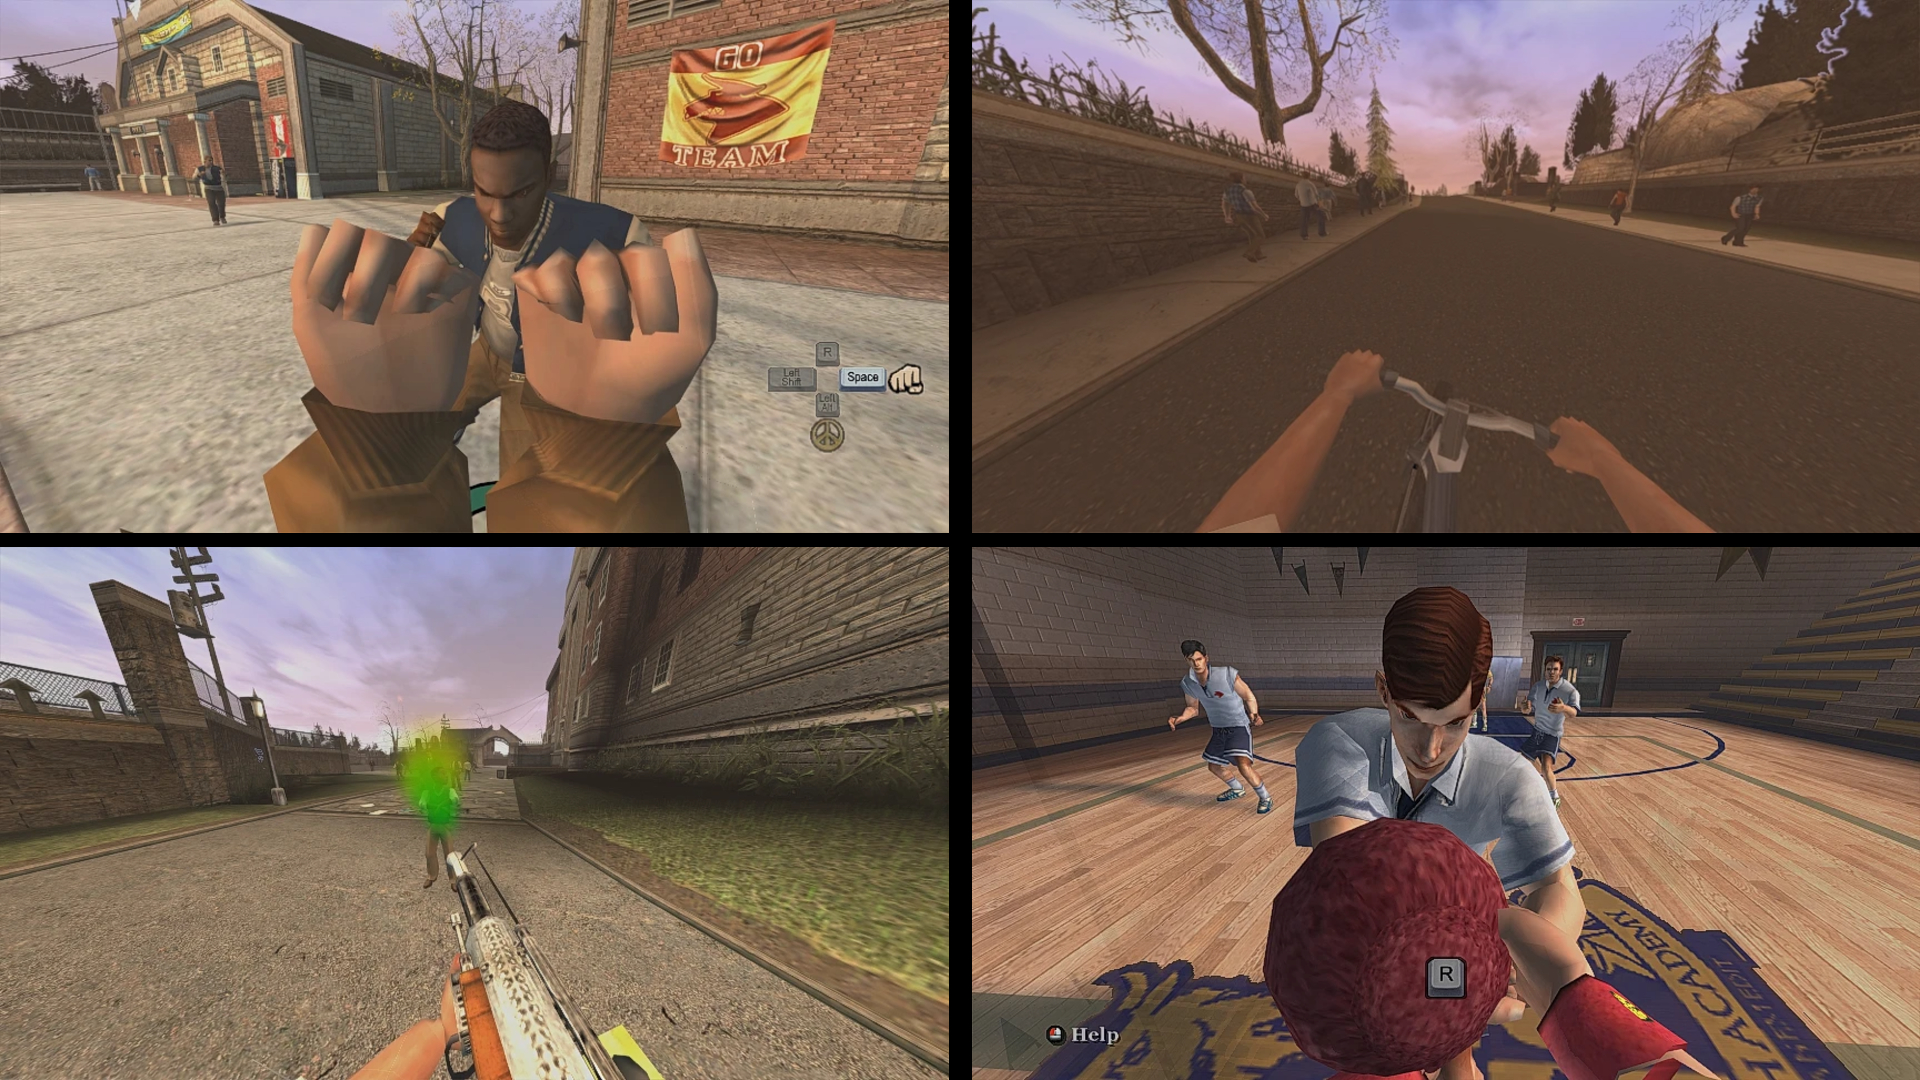
Well, it’s pretty obvious, right? This mod lets you play the game in first person.
By: rbsid[www.nexusmods.com]
Credits to the creator’s video.
As I explained earlier how to use the required tools, I won’t go into too much detail about the mod download and installation process.
Extract the archive. Then move the "SimpleFP" folder to Bully root folder/_derpy_script_loader/scripts/(here).

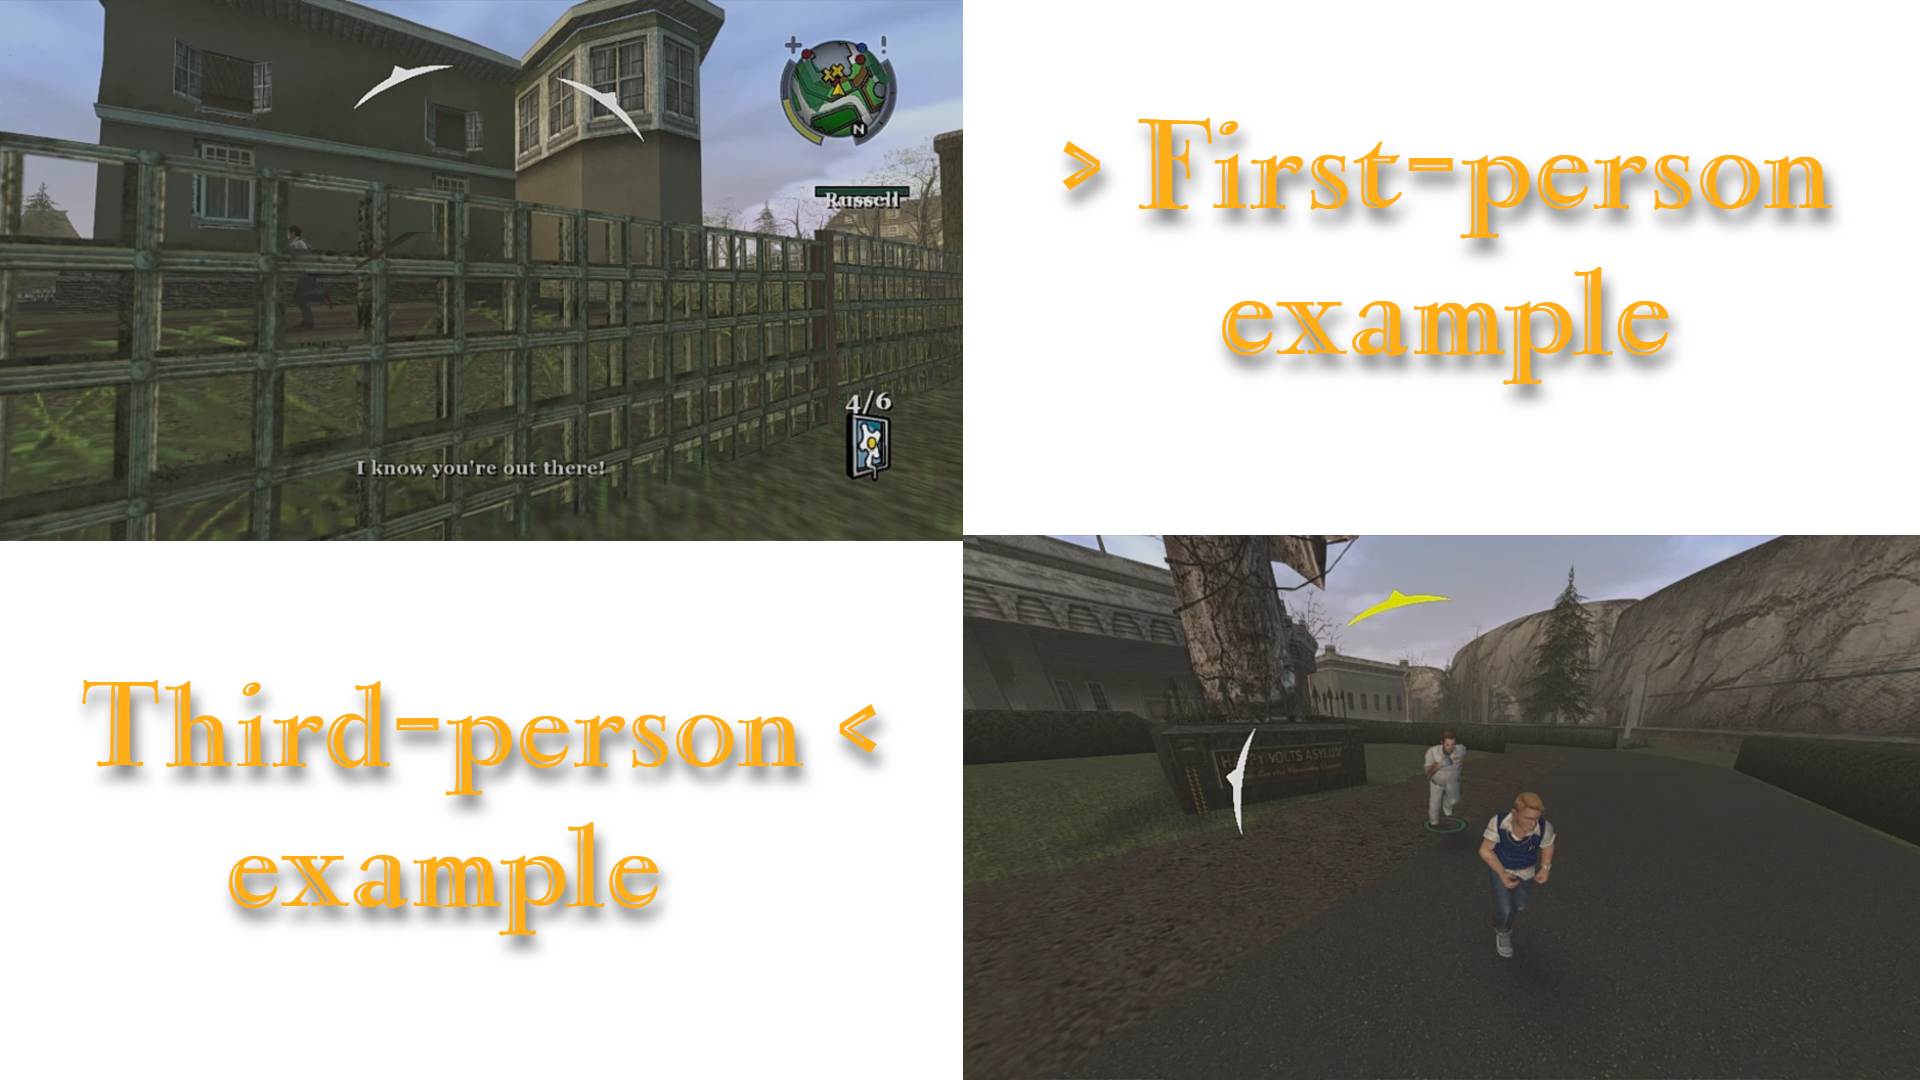
It’s a great complementary mod. The detection meter improves immersion in stealth gameplay by showing directional arrow icons that indicate nearby authorities while you’re sneaking around.
By: rbsid[www.nexusmods.com]
Credits to the creator’s video.
As I explained earlier how to use the required tools, I won’t go into too much detail about the mod download and installation process.
Extract the archive. Then move the "DetectionMeter" folder to Bully root folder/_derpy_script_loader/scripts/(here).

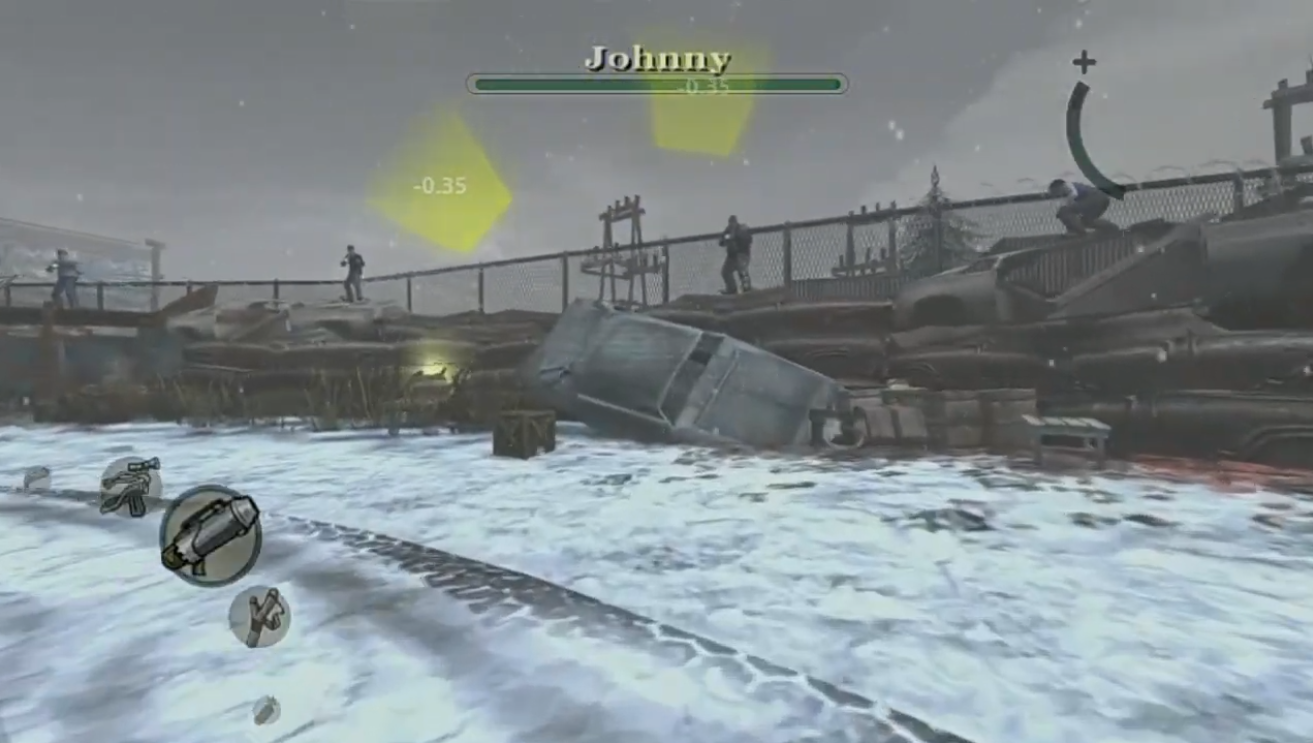
It shows directional indicators when the player is hit by enemy or NPC projectiles, improving situational awareness and the overall gameplay experience.
By: rbsid[www.nexusmods.com]
Credits to the creator’s video.
As I explained earlier how to use the required tools, I won’t go into too much detail about the mod download and installation process.
Extract the archive. Then move the "HitDirection" folder to Bully root folder/_derpy_script_loader/scripts/(here).

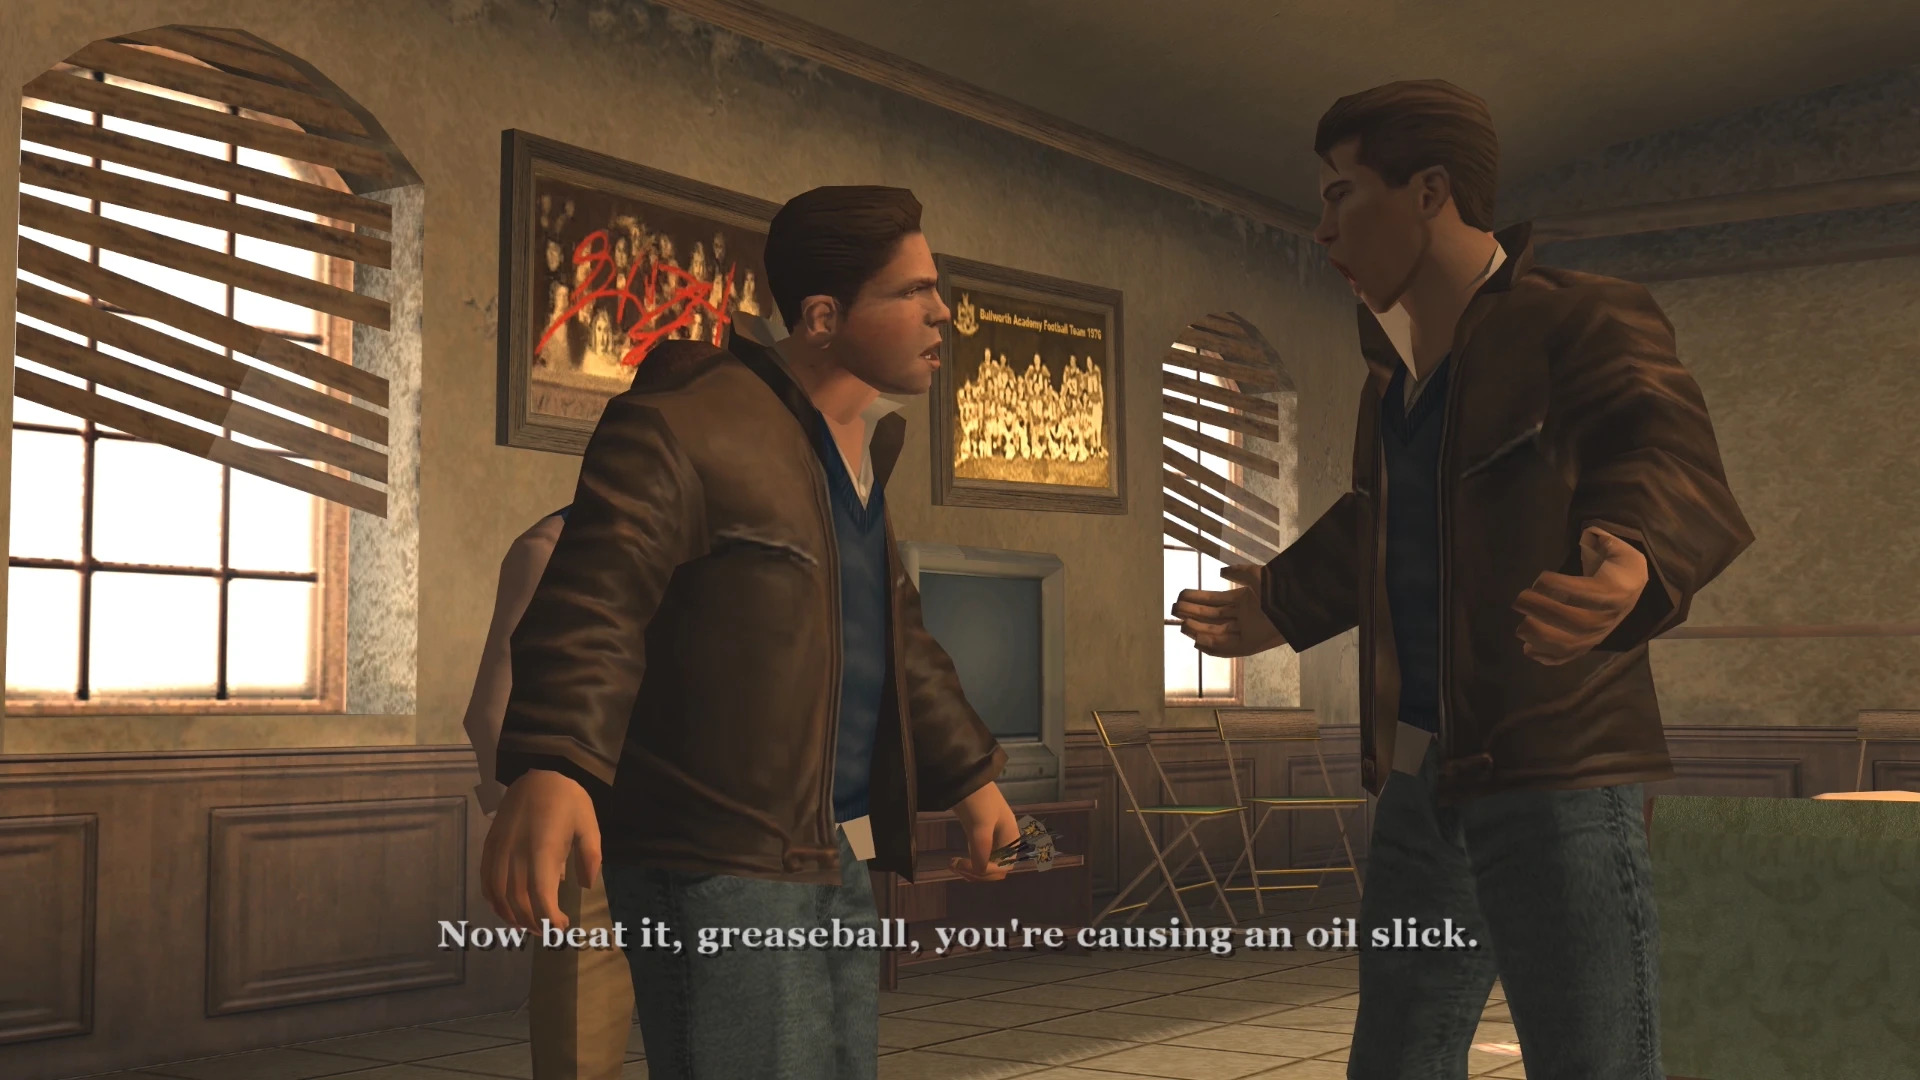
I’ve always liked the Greasers, so this mod adds Greasers clothing for Jimmy. Pretty simple.
By: AlexRK800[www.nexusmods.com]
Credits to the creator’s video.
As I explained earlier how to use the required tools, I won’t go into too much detail about the mod download and installation process.
Extract the archive. Then replace both .nft & .nif files in World.img and it should work.
Just keep in mind that some of these mods might not be compatible with earlier ones, especially the dorms mod.
Here are some good mods and how to install them, it’s pretty simple:
It lets you recover a bit of health by smoking while leaning on a wall, but watch out tho. This pisses off the caretakers, and if they catch you smoking, they’ll get angry and chase you. You’ll have to do it somewhere hidden.
By: tupakka1[www.nexusmods.com]
Credits to the creator’s video.
Smoke to regenerate hp[www.nexusmods.com]
[5 KB]
(please let me know if the link is down, thank you)
(please let me know if the link is down, thank you)
As I explained earlier how to use the required tools, I won’t go into too much detail about the mod download and installation process.
The installation is done using a program called IMGTool. Once you open it, you’ll need to select the Scripts.img file, which is located inside the game’s Scripts folder.
After loading that file, you just add the mod file into the .img and that’s it.
How to use the mod in game:
- Now in the game briefly hold "show missions" to smoke.
Editor’s note: I’m not trying to encourage anyone to smoke. This is a fictional video game, and there’s no intention to promote addictions, especially among underage players.[kidshealth.org]
Well, it’s pretty obvious, right? This mod lets you play the game in first person.
By: rbsid[www.nexusmods.com]
Incompatibility
Any mod that changes the camera fov value.
You can install the Widescreen Fix, just keep the fov on default. (1.0)
Credits to the creator’s video.
Simple First Person Camera[www.nexusmods.com]
[14 KB]
(please let me know if the link is down, thank you)
(please let me know if the link is down, thank you)
As I explained earlier how to use the required tools, I won’t go into too much detail about the mod download and installation process.
Extract the archive. Then move the "SimpleFP" folder to Bully root folder/_derpy_script_loader/scripts/(here).
How to use the mod in game:
- To enter the First Person POV, hold down "Left Shift" then press "F"
- You can customize the hotkeys in "SimpleFP/src/settings.ini" configuration file
- Toggle Jimmy head: Press "H" on the keyboard
- Toggle aiming camera by double tapping the aim button. Press it again to exit(Or hold down when it's active, then release to exit.)
- Now, two mods to complement the first-person mod:
It’s a great complementary mod. The detection meter improves immersion in stealth gameplay by showing directional arrow icons that indicate nearby authorities while you’re sneaking around.
By: rbsid[www.nexusmods.com]
Credits to the creator’s video.
As I explained earlier how to use the required tools, I won’t go into too much detail about the mod download and installation process.
Extract the archive. Then move the "DetectionMeter" folder to Bully root folder/_derpy_script_loader/scripts/(here).
How to use the mod in game:
- Color-coded arrow icon based on the player's punishment points
- Distance-based opacity adjustment, indicating your proximity to authorities
- To change the default texture, simply put your PNG image to "assets/images/(here)" and change the texture path in "src/settings.ini".
It shows directional indicators when the player is hit by enemy or NPC projectiles, improving situational awareness and the overall gameplay experience.
By: rbsid[www.nexusmods.com]
Credits to the creator’s video.
As I explained earlier how to use the required tools, I won’t go into too much detail about the mod download and installation process.
Extract the archive. Then move the "HitDirection" folder to Bully root folder/_derpy_script_loader/scripts/(here).
How to use the mod in game:
- Color-coded indicator
- To change the default texture, simply put your PNG image to "assets/images/(here)" and change the texture path in "src/settings.ini".
I’ve always liked the Greasers, so this mod adds Greasers clothing for Jimmy. Pretty simple.
By: AlexRK800[www.nexusmods.com]
Credits to the creator’s video.
Peanut Clothes for Jimmy Mod[www.nexusmods.com]
[7.4 MB]
This mod replace several of Jimmy Clothes:
- Peanut Jacket replace Black Hooded Jacket.
- Peanut Pants replace Crisp Jeans.
- Peanut Shoes replace Urban Loafers - Black.
As I explained earlier how to use the required tools, I won’t go into too much detail about the mod download and installation process.
Extract the archive. Then replace both .nft & .nif files in World.img and it should work.
ㅤ
ㅤ
[Inactive] Crash and bug fixes
7/20/2024
This game, which shares a lot of the internals with GTA games, performs fairly well in its PC incarnation as is. However, it's more than likely that you have at some point spotted the amount of complaints Windows 10 users have about the game, or maybe you have encountered crashes yourself.
Fixes featured in this plugin
- Collision loading code has been improved, fixing occasional crashes on initial game load.
- Fixed game's objects pool usage, fixing possible crashes.
- Fixed an occasional crash when starting Nutcrackin' or Music Class.
- Fixed numerous instances of memory corruption on game exit.
- Fixed an use-after-free in sound streaming code, causing a rare crash when talking to people.
- Fixed handle leaks in audio code, preventing handles from accumulating during the game.
- Fixed several memory leaks in audio code, preventing out of memory crashes during extended play sessions.
- Made memory manager workarounds toggleable via the INI file - disabled by default, to be removed in the future.
- Frame Limiter has been made much more precise, so the game should lock at exactly 30FPS now (as opposed to stock limiter being prone to dropping frames a lot).
- Fixed an issue where game would use more CPU than required when minimized.
Quality of life improvements
- An option to change FPS cap has been added to SilentPatchBully.ini file (game defaults to 30FPS).
FILE_FLAG_NO_BUFFERING flag has been removed from IMG reading functions - potentially speeding up streaming.
All this information has been extracted from the Creators Page[github.com]
[Inactive] Compilation requirements
[Inactive] Steps
1. Obtaining game folder
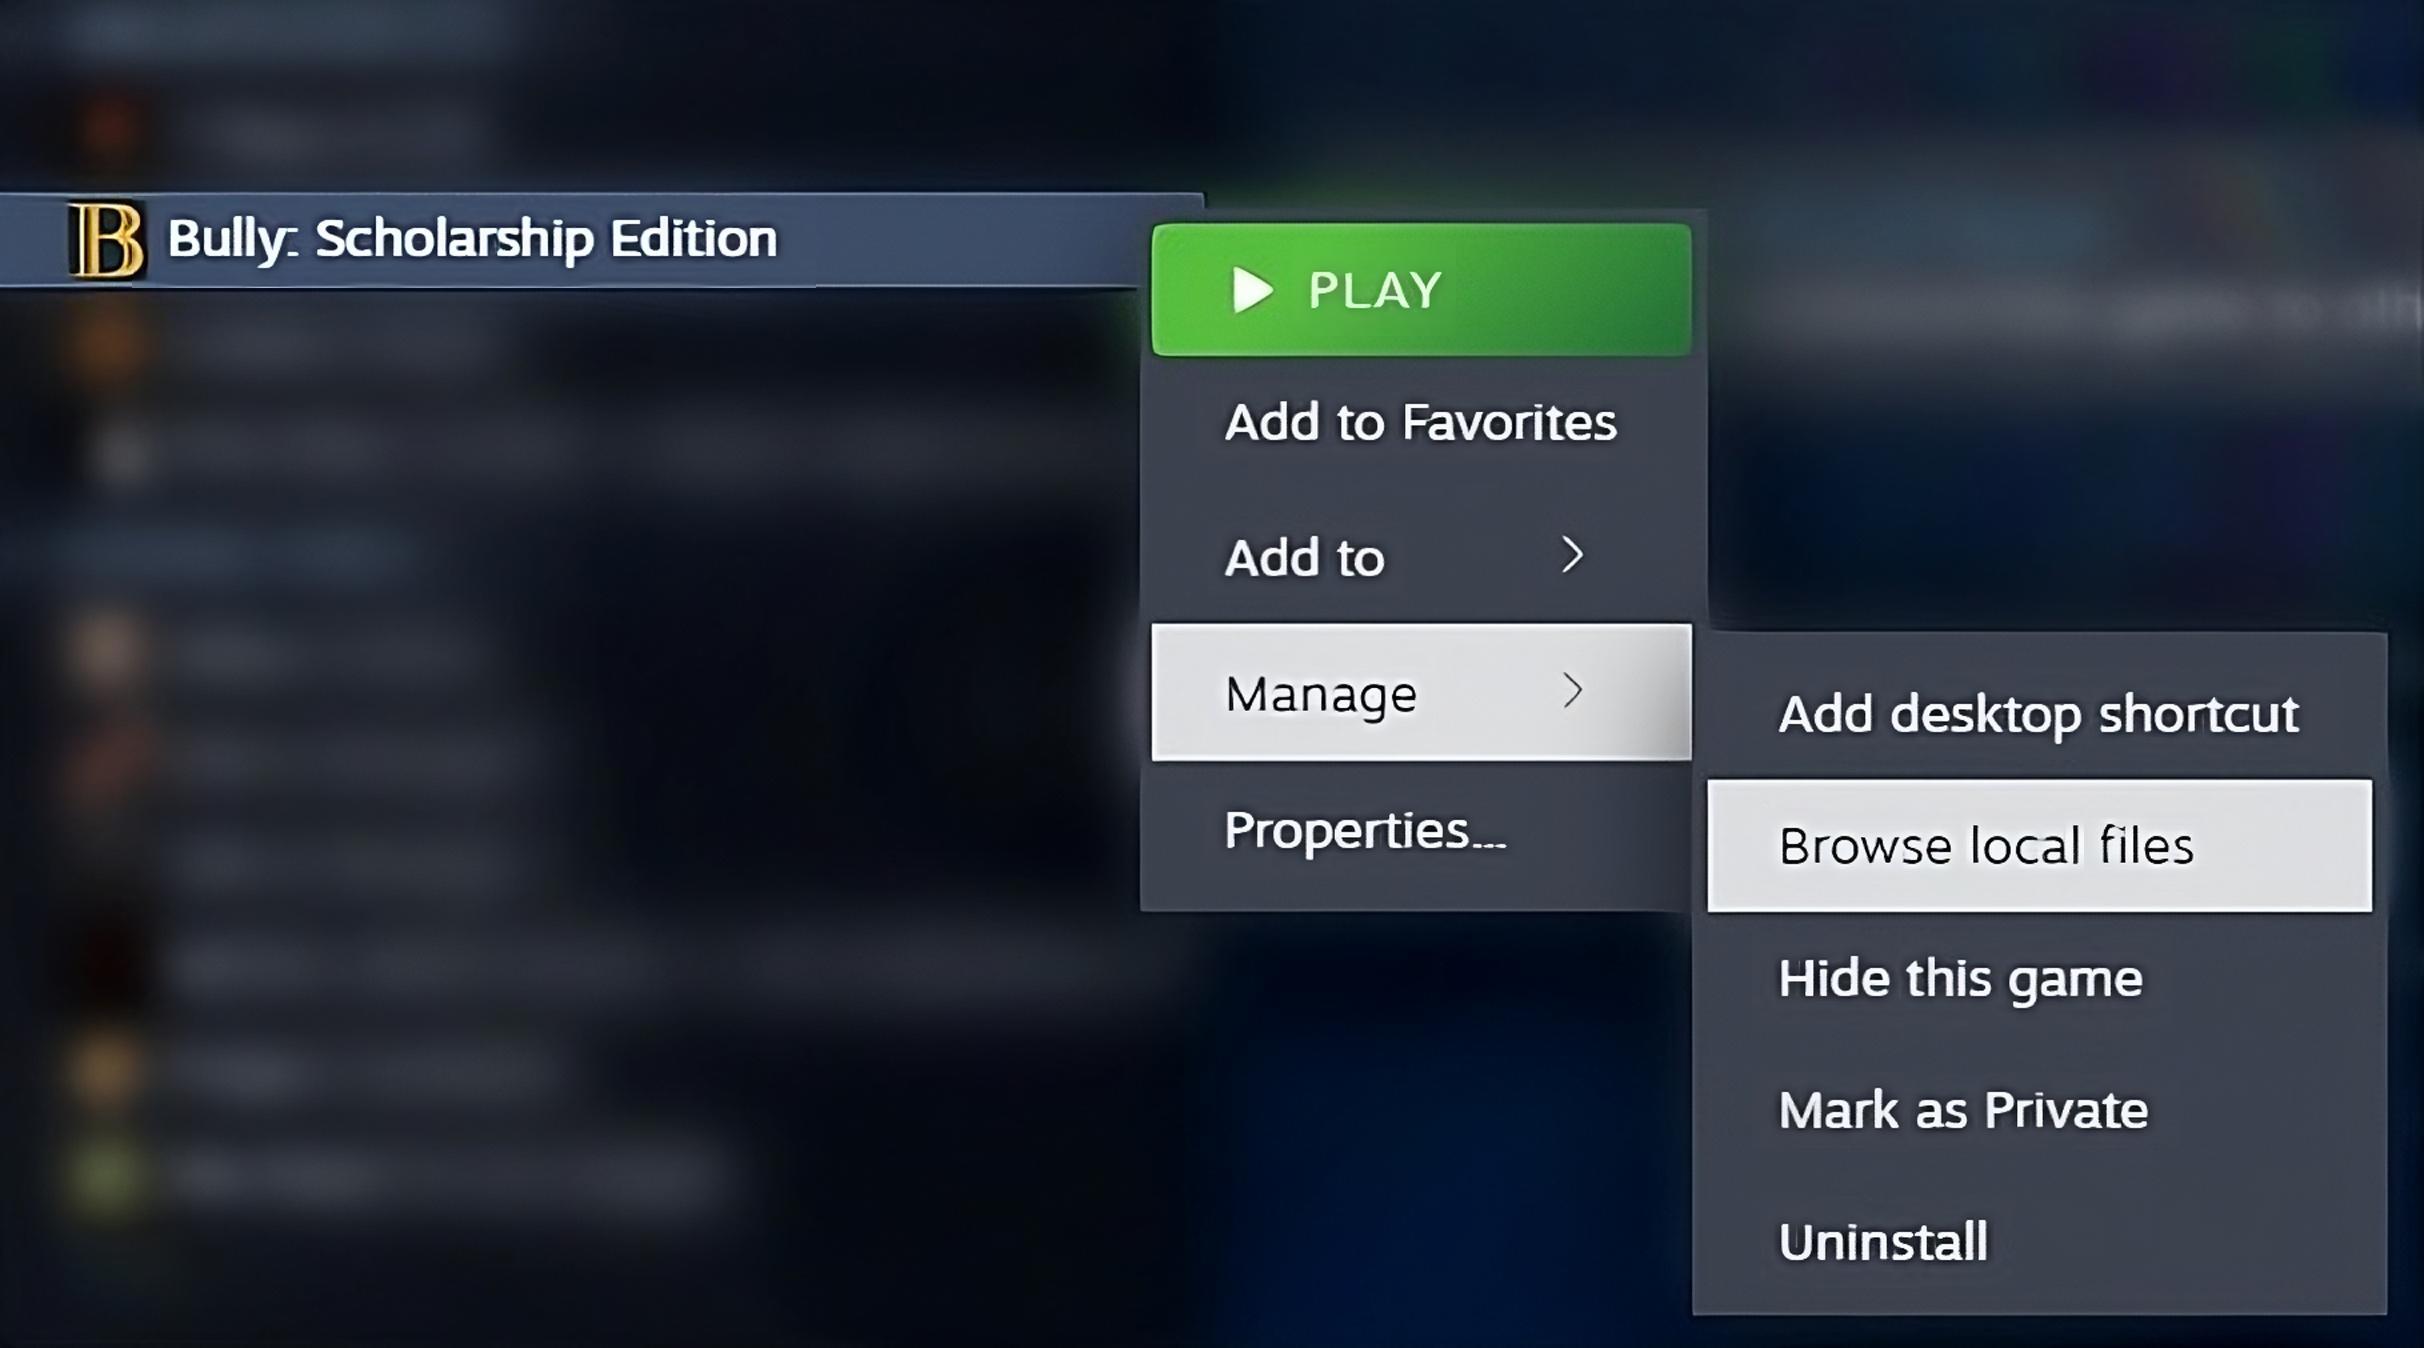
Go to your library and find "Bully Scholarship Edition". Right click on game name and select Browse local files from Manage.2. Download SilentPatch
Silent Patch
[github.com]GitHub Page
[github.com]3. Extract SilentPatch
Once you have installed the "SilentPatchBully.zip", move the ".zip" to the "Bully Scholarship Edition" folder (previously obtained in step 1) and extract it into the root folder.4. Verification
You can enter the game and notice that a small text now appears to verify that the installation has been successful.
[Inactive] FAQ
Q: Does this modify the game in any way?
A: Yes... but only technical aspects and it doesn't modify scenarios, models, characters, etc.Q: When I start Bully, it minimizes and asks me to install an updated version...
A: It's not necessary to install the updated version... SilentPatch will work anyway. If you want, you can install the most updated version... but it doesn't bring many new things and it's not necessary.Q: Some sounds or models are bugged.
A: This is because SilentPatch only modifies technical aspects and not visual (or sound) aspects... There are several mods that are not difficult to find that fix these errors.
Credits
P3ti[github.com] - co-developer
amzy[www.twitch.tv] - testing, overall support
CookiePLMonster[github.com] - developer
My Profile :D
amzy[www.twitch.tv] - testing, overall support
CookiePLMonster[github.com] - developer
SUBMITTING FEEDBACK
Since this is a public beta release, you may encounter crashes. Because of this, MiniDumper utility has
been shipped together with SilentPatch. In case of a crash, a .dmp file will be created in your game directory.
If you want to report it as a bug (any feedback is very much appreciated), first ENSURE YOU HAVE AN UNMODDED GAME
(texture mods are fine, scripts - not so much). You can report a bug (.dmp file + a brief explanation on what
you were doing when the game crashes) in any of those places:
* SilentPatchBully issues page on GitHub:
https://github.com/CookiePLMonster/SilentPatchBully/issues
* #silentpatch channel in RockstarVision Discord:
https://discord.gg/VJSxY5e
SUPPORTERS
TWIST_OF_HATE
CONTACT
[email protected] - e-mail
Silent#1222 - Discord
Subscribe to my YouTube channel for more footage from my mods!
https://www.youtube.com/user/CookiePLMonster
Follow my Twitter account to be up to all my mods updates!
http://twitter.com/__silent_
Also take a look at my blog, featuring modding and programming related articles and more!
https://cookieplmonster.github.io/
My Profile :D
More Bully: Scholarship Edition guides
- Bully Crash Patch - SilentPatch★ 5 (978)79k views1.5k ♥1 minUpdated Dec 28, 2023
- BULLY PC: MUST HAVE FIXES!★ 5 (858)70k views1.7k ♥13 minUpdated Aug 11, 2025
- How to Play the Damn Game★ 5 (761)57k views1.4k ♥3 minUpdated Feb 22, 2025
- Updated Classic: Bully Scholarship Edition [ENG]★ 5 (471)28k views1.1k ♥9 minRussianUpdated Jun 22
- Русификатор БЕЗ СКАЧИВАНИЯ★ 5 (826)28k views1.1k ♥1 minUpdated Feb 25
- Unlockables and tips *Updated*★ 5 (942)27k views1.4k ♥10 minUpdated Mar 10, 2017




This guide was created by its original author on the Steam Community. Are you the author and want it removed? Request removal.