How to Play the Damn Game
Introduction
This guide is meant for people with up to date computers who want to enjoy this old classic without their eyes bleeding or game crashes getting to their sanity. Let us begin
Get the latest SilentPatch
Below you can find the latest version of SilentPatch for Bully: Scholarship Edition.
This patch mainly aims to make the game stable and smooth on PC. You can get more information about the project from the Github link.
Github Link[github.com]
Direct Download Link[github.com]
After downloading the latest release for the game, copy the zip file contents into the game folder.
SKIP TO GRAPHICAL TWEAKING IF YOU INSTALLED THIS. DO NOT USE THE UNCAPPED EXECUTABLE TOGETHER WITH THE PATCH.
Increase the FPS Cap (Optional)
You can bump up the FPS cap in SilentPatchBully.ini to 60, which should be pretty safe to do. You may still run into some bugs, at which point you should revert this change to at least get past that point in the game.
Change:
FPSLimit=30
to
FPSLimit=60
Windows 11 Crash Fix (Optional)
In case the game is crashing in Windows 11, it may help to enable the custom memory allocator. I cannot confirm whether this works or not, I don't have Windows 11 to test with.
Change:
CustomMemoryMgr=0
to
CustomMemoryMgr=1
This patch mainly aims to make the game stable and smooth on PC. You can get more information about the project from the Github link.
Github Link[github.com]
Direct Download Link[github.com]
After downloading the latest release for the game, copy the zip file contents into the game folder.
SKIP TO GRAPHICAL TWEAKING IF YOU INSTALLED THIS. DO NOT USE THE UNCAPPED EXECUTABLE TOGETHER WITH THE PATCH.
Increase the FPS Cap (Optional)
You can bump up the FPS cap in SilentPatchBully.ini to 60, which should be pretty safe to do. You may still run into some bugs, at which point you should revert this change to at least get past that point in the game.
Change:
FPSLimit=30
to
FPSLimit=60
Windows 11 Crash Fix (Optional)
In case the game is crashing in Windows 11, it may help to enable the custom memory allocator. I cannot confirm whether this works or not, I don't have Windows 11 to test with.
Change:
CustomMemoryMgr=0
to
CustomMemoryMgr=1
Get the Working Uncapped Executable(Alternative)
SKIP TO GRAPHICAL TWEAKING IF YOU INSTALLED SILENTPATCH. DO NOT USE THE UNCAPPED EXECUTABLE TOGETHER WITH THE PATCH.
**NOT SUGGESTED ANYMORE**
Removing the FPS cap on this terrible console port will introduce game-breaking bugs that will bug out at least 3 missions, making them unpassable. Also it will introduce many many many animation glitches and physics bugs. NOT RECOMMENDED
This part is quite straightforward.
Get the exe from here[community.pcgamingwiki.com].
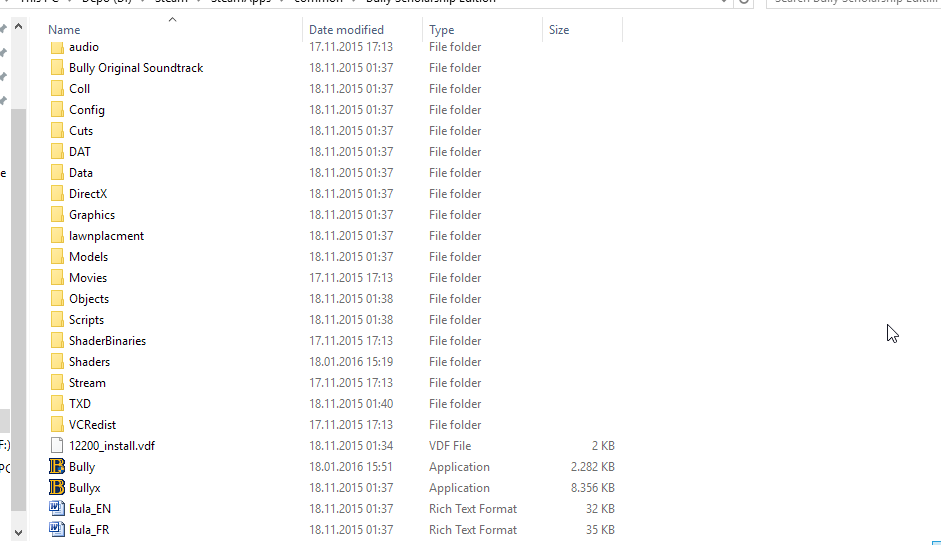
The exe is to be put where your original game executable is. For most people this will be in
"C:\Program Files (x86)\Steam\steamapps\common\Bully Scholarship Edition".
Rename the original to something else and drop this one in there.
Onto compatibility..
**NOT SUGGESTED ANYMORE**
Removing the FPS cap on this terrible console port will introduce game-breaking bugs that will bug out at least 3 missions, making them unpassable. Also it will introduce many many many animation glitches and physics bugs. NOT RECOMMENDED
This part is quite straightforward.
Get the exe from here[community.pcgamingwiki.com].
The exe is to be put where your original game executable is. For most people this will be in
"C:\Program Files (x86)\Steam\steamapps\common\Bully Scholarship Edition".
Rename the original to something else and drop this one in there.
Onto compatibility..
Compatibility Help
Now we get to the dirty part. Some compatibility settings applied here may be obsolete or unneeded. Feel free to play around with them to find whatever works best for you.
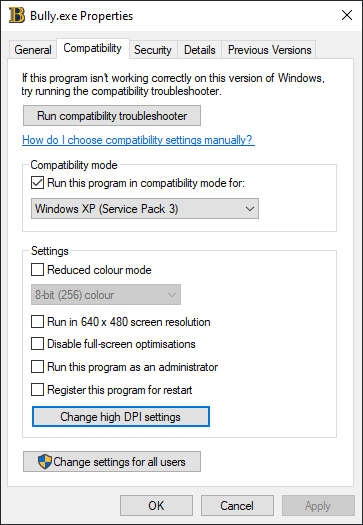
Match these settings as a baseline and you can experiment with the rest.
Window Resize Fix (Optional)
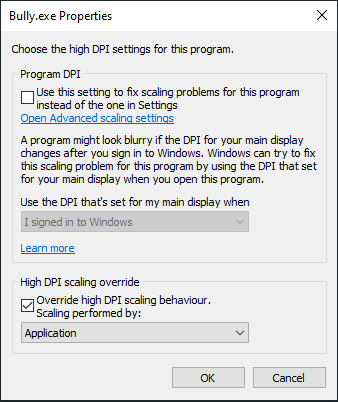
I have 2 monitors with different DPI settings and the patch did not scale properly, making the game window much bigger than the monitor resolution.
To fix this, right click Bully.exe, under compatibility, click High DPI Settings. Check the checkbox for Override high DPI Scaling Behaviour and select Application. This will make sure the window displays correctly.
Match these settings as a baseline and you can experiment with the rest.
Window Resize Fix (Optional)
I have 2 monitors with different DPI settings and the patch did not scale properly, making the game window much bigger than the monitor resolution.
To fix this, right click Bully.exe, under compatibility, click High DPI Settings. Check the checkbox for Override high DPI Scaling Behaviour and select Application. This will make sure the window displays correctly.
Graphics Tweaking - Latency
These settings can help reduce the input lag, completely optional.
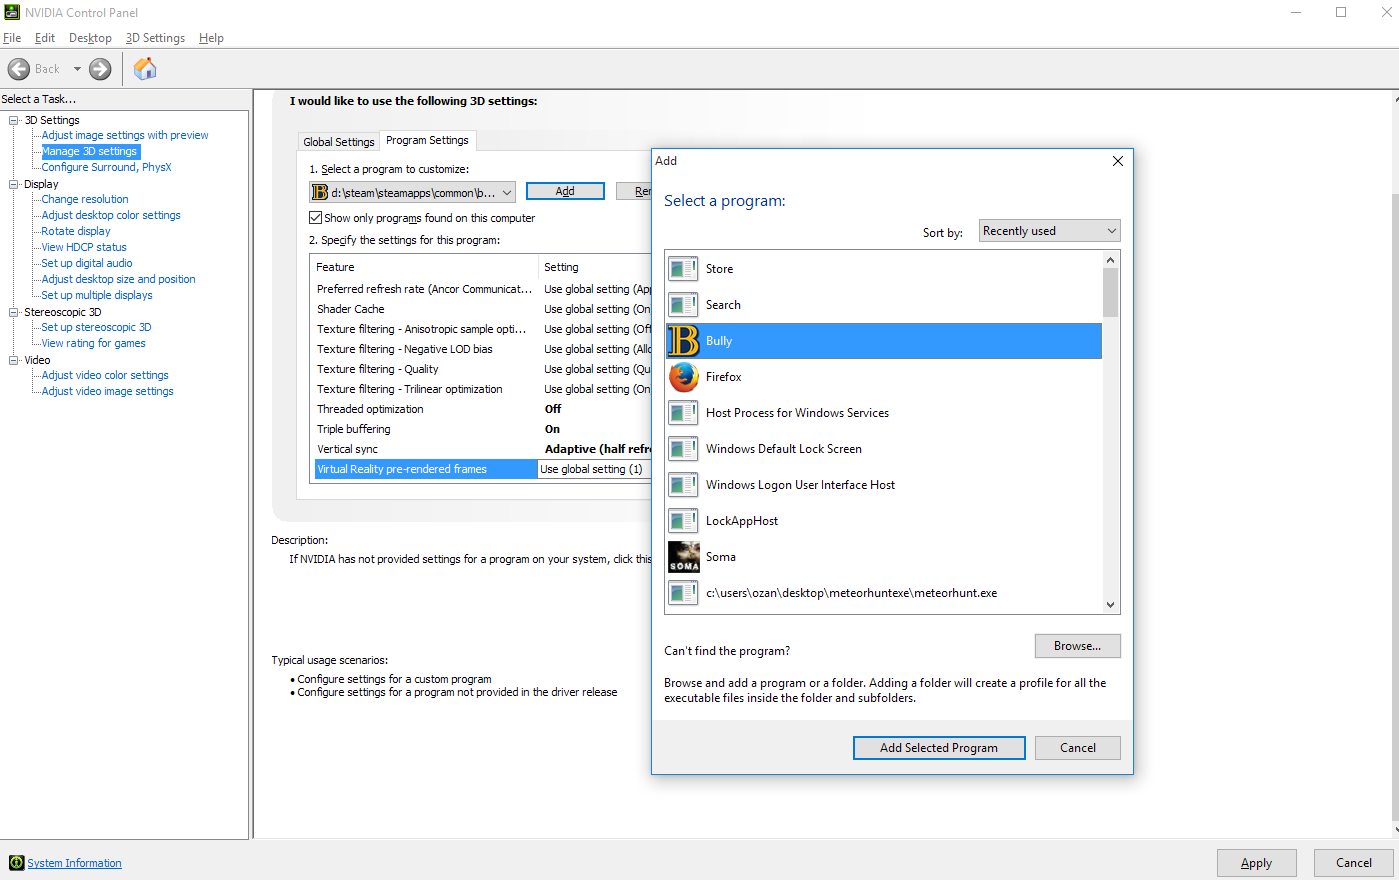
Customise the 3D application profile for Bully.exe in you GPU vendor's graphics control panel (Nvidia Control Panel, AMD Radeon Control Panel, Intel Graphics Command Center). The options I am referring to are for Nvidia, but very likely that they apply to AMD and Intel as well.
We go to the eyecandy..
Customise the 3D application profile for Bully.exe in you GPU vendor's graphics control panel (Nvidia Control Panel, AMD Radeon Control Panel, Intel Graphics Command Center). The options I am referring to are for Nvidia, but very likely that they apply to AMD and Intel as well.
- Threaded Optimization -> Off
- Low Latency Mode -> Ultra
We go to the eyecandy..
Graphics Tweaking - Eyecandy
This part is for people with beefy rigs mostly. It makes a perceptible difference, but can be costly in game smoothness if your PC can't keep up.
As we are in the control panel, lets tick a few more boxes
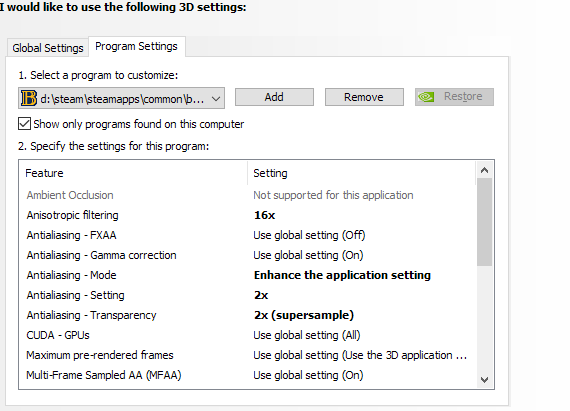
This part really depends on what you have under the hood and what you expect on visual quality. I consider AA injectors and reshades to be worthless sidegrades that ruin visual fidelity, but that is subjective. Pushing these settings *may* toll your GPU or CPU since they give small improvements at exponentially increasing cost.
Off we start the game
As we are in the control panel, lets tick a few more boxes
- Anistropic filtering -> 16x
- Antialiasing - Mode -> Enhance the application setting
- Antialiasing - Transparency -> 2x (supersample)
This part really depends on what you have under the hood and what you expect on visual quality. I consider AA injectors and reshades to be worthless sidegrades that ruin visual fidelity, but that is subjective. Pushing these settings *may* toll your GPU or CPU since they give small improvements at exponentially increasing cost.
Off we start the game
Ingame Settings
Set up the in-game settings to match your resolution and the rest according to the following picture
If you have low fps in-game, disable shadows. It is a major performance hog
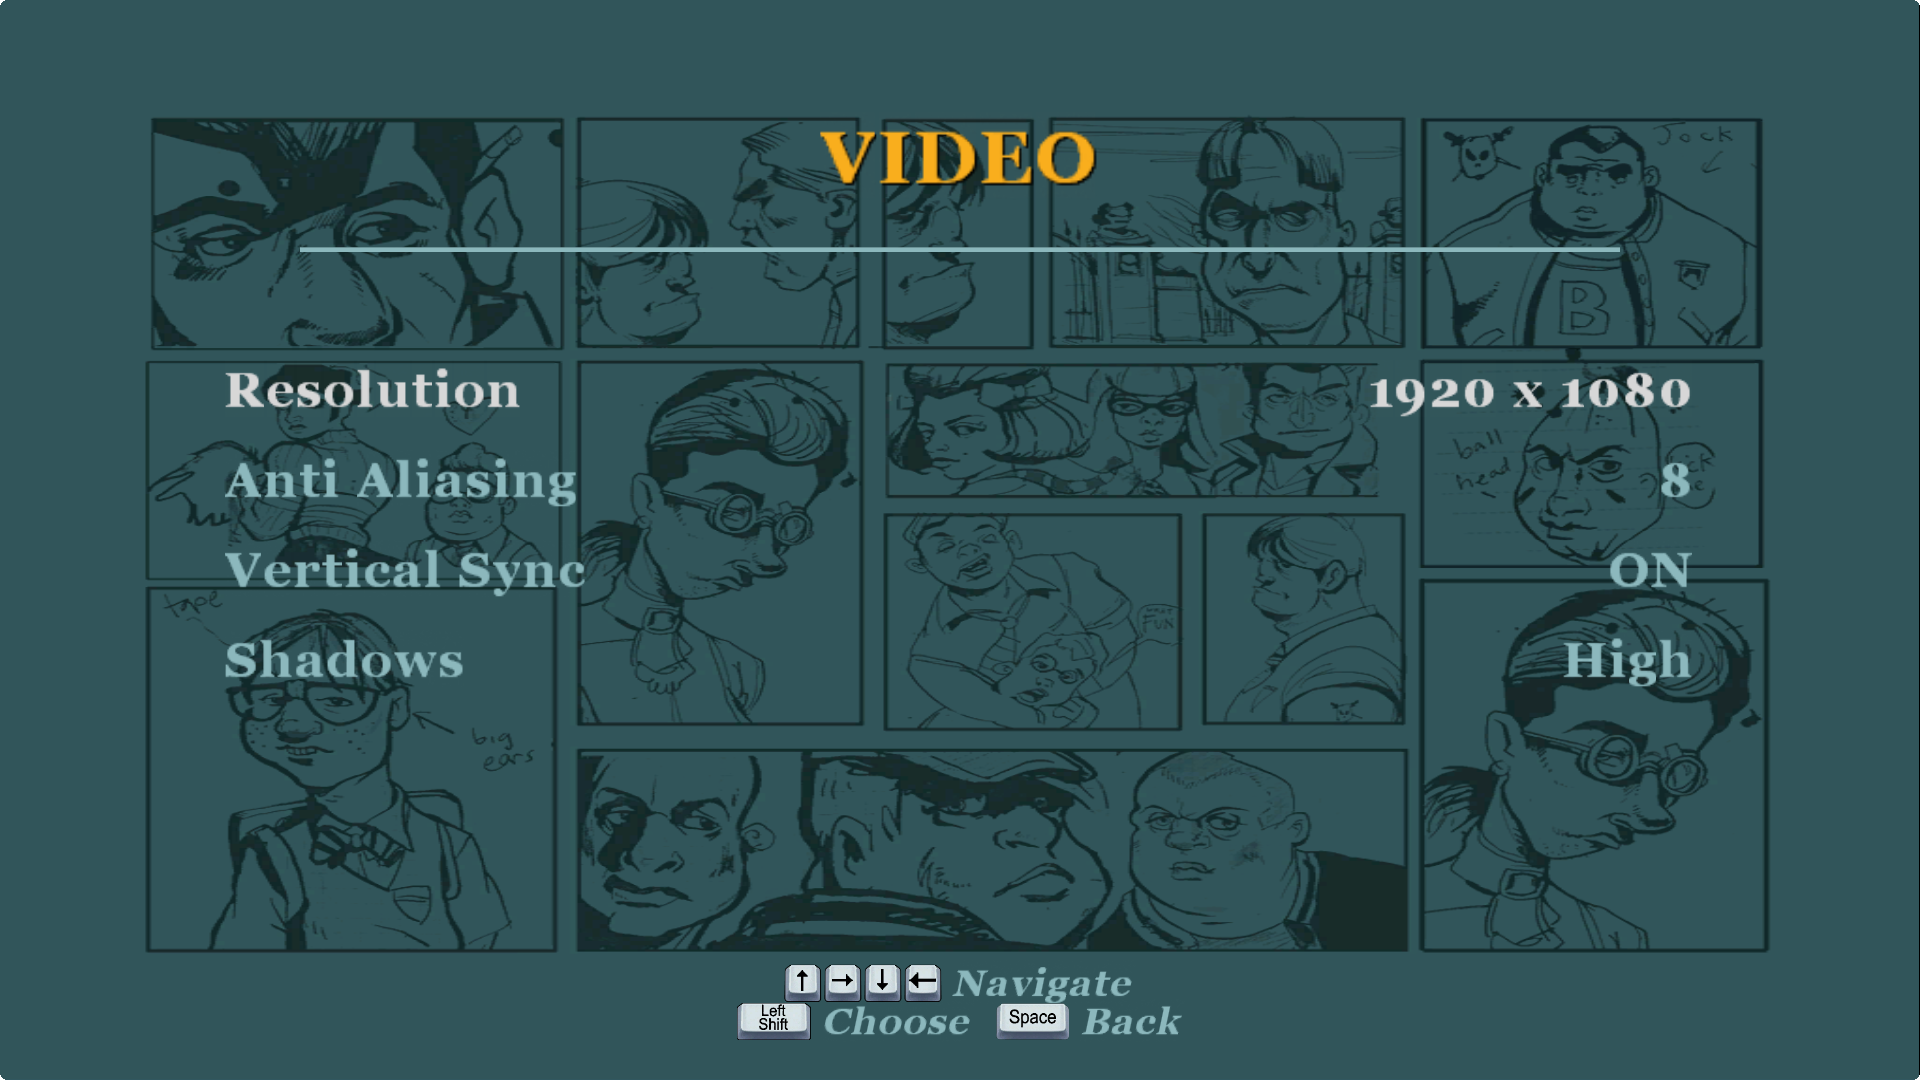
Save the settings and restart the game if you enabled shadows
If you have low fps in-game, disable shadows. It is a major performance hog
Save the settings and restart the game if you enabled shadows
Play the Damn Game
We are done tweaking this old man. Now get playing and beat gary to a pulp:)
More Bully: Scholarship Edition guides
- Bully Crash Patch - SilentPatch★ 5 (978)79k views1.5k ♥1 minUpdated Dec 28, 2023
- BULLY PC: MUST HAVE FIXES!★ 5 (858)70k views1.7k ♥13 minUpdated Aug 11, 2025
- Updated Classic: Bully Scholarship Edition [ENG]★ 5 (471)28k views1.1k ♥9 minRussianUpdated Jun 22
- Русификатор БЕЗ СКАЧИВАНИЯ★ 5 (826)28k views1.1k ♥1 minUpdated Feb 25
- Unlockables and tips *Updated*★ 5 (942)27k views1.4k ♥10 minUpdated Mar 10, 2017
- Full English Class 1-5 Guide /MAY 2026★ 5 (238)25k views476 ♥3 minUpdated May 11





This guide was created by its original author on the Steam Community. Are you the author and want it removed? Request removal.