[FPS] Disable black outlines, disable bloom/glowings, reduce stutters and more
File with all editable graphic settings
The file name is GameUserSettings.ini and it contains almost every settings related with graphic of the game.
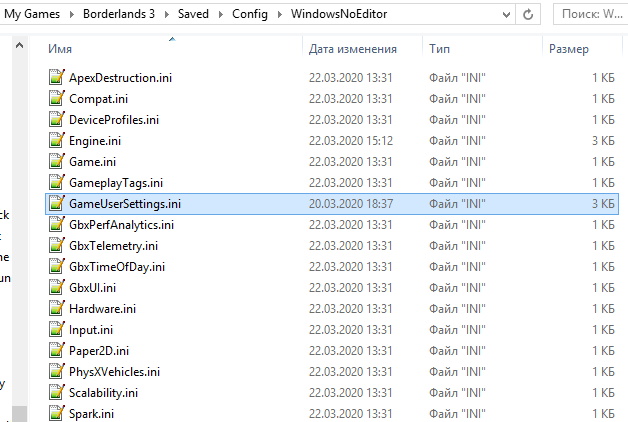
Open it with notepad (i am using notepad++).
- Lower black outlines(NOTE: it wont completely turn it off, but make it nearly inisible and less fps consuming)
Just look for the line:EdgeDetectionTexelOffset=-1and change it's value between -1 and 1.99. I personally recommend 1.3.EdgeDetectionTexelOffset=1.3 - IF YOU WANT TO COMPLETELY DELETE BLACK OUTLINES AND GET HUGE FPS BOOST (DX11 ONLY) (Check those screenshots in the end of the guide) :
Download archive below, and extract its contents into BL3 assets, dont forget to backup if you would like to revert everything back.Archive link:
...and move its content into this folder, path is:
https:// mega. nz/#!gglmTIRL!p7z6PU_IWBdgoh0pVZpfX7apb8kVfRpwv-rpwXodbJESteam\SteamApps\common\Borderlands 3\OakGame\Binaries\Win64
You can make a backup if you want and easily change everything back.
In case if you didn't do backup, replaced files and now you want everything back - simply delete new files/entire folder and open steam - right click BL3 - properties - check game files integrity. It will automatically scan missing original files and redownload it. - BRIGHTNESSScroll down a bit and set brightness and dark level to these values to compensate low gammaBrightness=100.000000 BlackLevel=10.000000
- TEXTURES, SHADOWS, EFFECTS AND FOLIAGEIn [ScalabilityGroups] section
Change the "sg.RsolutionQuality=100.00" value from 100.00 to 75.00 (medium fps with decent picture quality or 50.00 (max fps boost, less quality). Going any lower will make the game look very uncanny.Set the remaining values to 0.
Feel free to edit all these values to your liking for experiments and find your best comfortable setup.
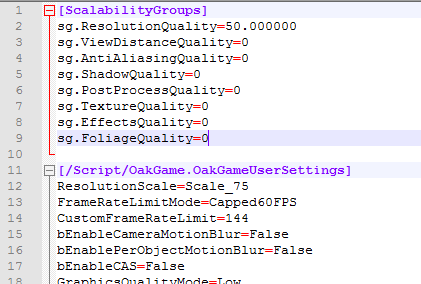
Naturally the game tends to change all these values back to original, to prevent this you need to right-click the file, go to properties, and check the "read-only" state.
Keep in mind that while this file in "read-only" any changes in video settings while in-game are pointless and wont apply.
Launch options and possible stutter fixes
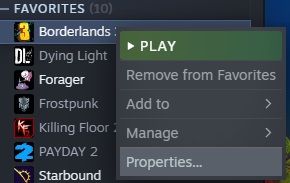
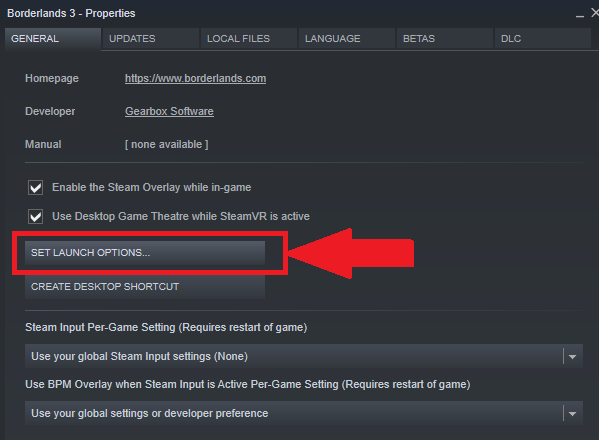
Here's the list of important commands you can use:
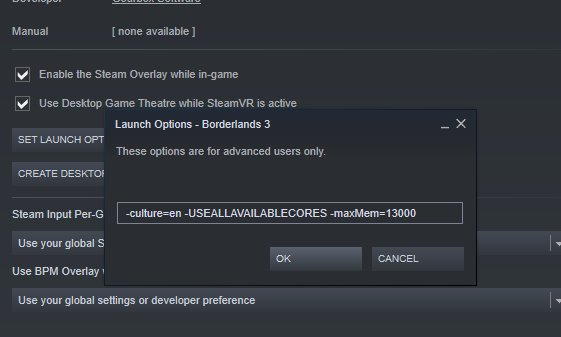
I have 16 GB RAM and i am playing on lowest possible settings (with decent screen resolution tho) and Task Manager says game doesnt usually eat more than 4-6 GB for me while i have "-maxMem=13000" command entered.
Change 13000 to:
- 3072 if you have 4GB RAM
- 5120 if you have 6GB RAM
- 7168 if you have 8GB RAM
- 11264 if you have 12GB RAM
- 13000 if you have 16GB RAM
The reason why we dont put all full 4/6/8/etc GB memory for the game is because we leave some RAM (at least 1 GB) for the Windows system. You dont want blue screens, right?
fr for French
it for Italian
de for German
es for Spanish
ru for Russian
ja for Japanese
pt-Br for Portuguese
ko for Korean
zh-Hans-CH for Chinese (Simplified)
zh-Hant-TW for Chinese (Traditional)
Disable bloom, glowings, blinding explosions on mayhem 10
How does it work:
Borderlands 3 running on game engine called "Unreal Engine 4", and just like many other game engines it has console where we can put different commands in it, and to disable bloom/glowings we need to gain access to that console, BUT in BL3 it is disabled by default and players cannot open it in game. So we are gonna force it open, and to do that we need Unreal Engine 4 Unlocker.
The good thing about this method is that it works 100% on any version of the game on any PC/potato.
The two bad things about this method are:- You have to do this every time you run BL3 (i mean launch UUU and hook it to BL3 every time you play it), because game doesn't save these bloom/glowing settings no matter what - ive tested to put these commands in .ini files and set the file in "read-only" state but the game just ignores them. So we have to do this manually every single time we launch the game.
- Second bad thing - TAB key (character menu) and tilda (~) will be forcefully rebinded into "open console" button. Reminder, TAB button by default opens character menu, so you can't open character menu with TAB key while UUU is hooked. Workaround - you can go in game - options - keyboard settings and rebind "open character menu" to another key (like N or any other button you like, i personally use middle mouse button).
If you OK with it, follow these steps:
- Step 1. Download Universal Unreal Engine 4 Unlocker (UUU)
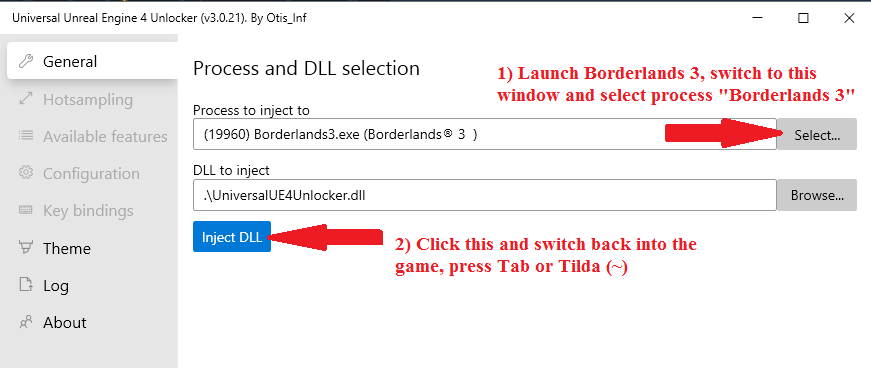
https:// framedsc. com/GeneralGuides/universal_ue4_consoleunlocker.htm - Step 2. Run borderlands 3. While in menu or in game, alt-tab to UUU and select game "Borderlands 3" in process selection and click "Inject DLL".
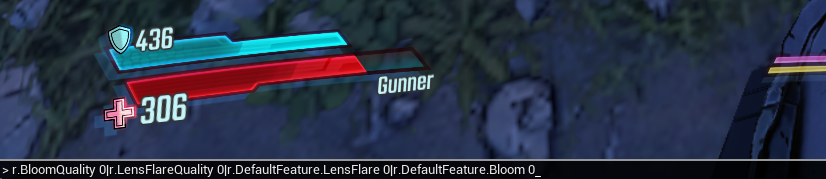
- Step 3. Ctrl+c (copy) this command line:r.BloomQuality 0|r.LensFlareQuality 0|r.DefaultFeature.LensFlare 0|r.DefaultFeature.Bloom 0
- Step 4. Switch back to game and press Tab or Tilda (~) to open console and ctrl+v the command.
if for some reason you want individual commands working separately (like to keep lens flare while disabling bloom) , here's a one-by-one list that you can edit (0 to 1 and so on)
r.BloomQuality 0 r.LensFlareQuality 0 r.DefaultFeature.LensFlare 0 r.DefaultFeature.Bloom 0
- Step 1. Download Universal Unreal Engine 4 Unlocker (UUU)
The UUU. Make sure Borderlands 3 is running.
 In game console (by pressing tab or ~). Type the one long line or separately one by one.
 RESULT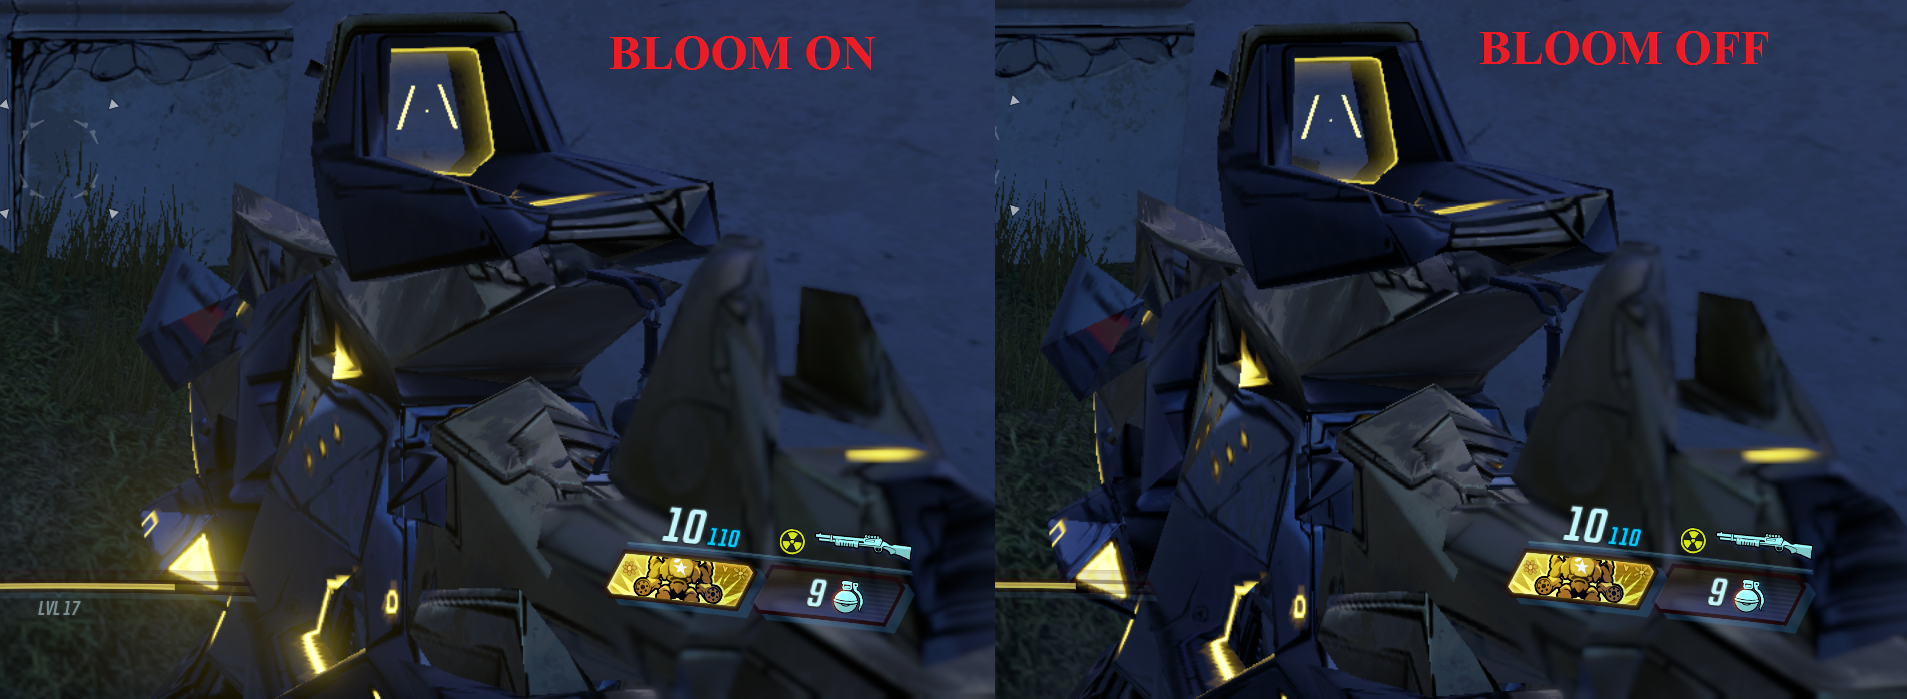
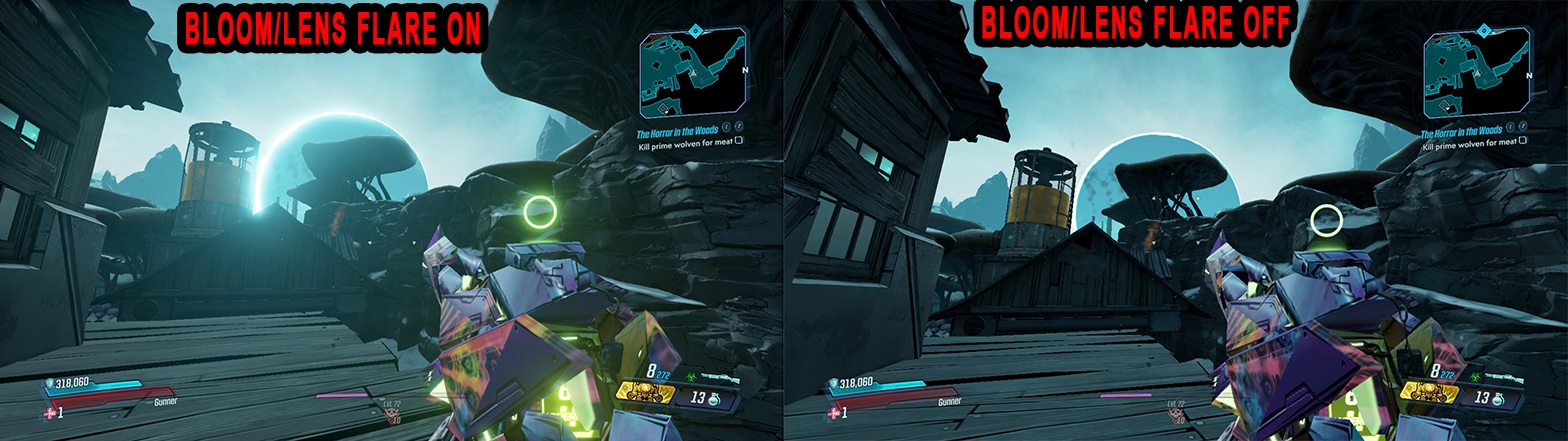
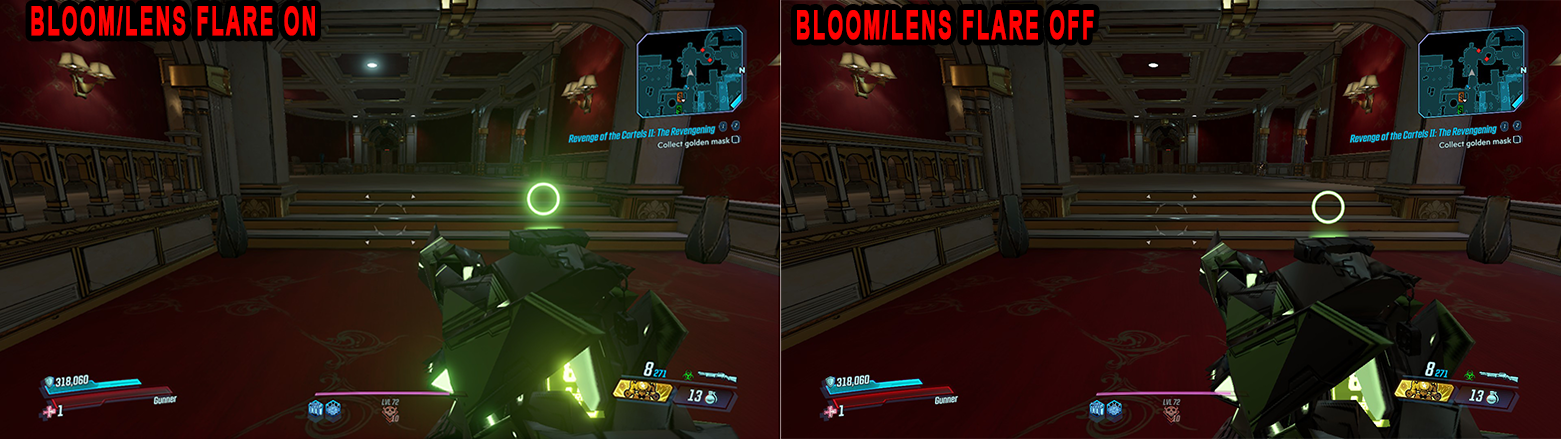
i'll post more screenshots later
MAYHEM 10 is now playable!
link:
Basically this method offers an easier solution where you simply download and put the mod inside the game's directory (see mod description for details).
You dont need to do anything in game, the settings are automatically applied on game launch, unlike method 1 with UUU.
However....
Unfortunately I personally cannot verify or guarantee if this methods works, its been a really long time since i've played BL3, and now the 2K publisher completely banned the entire game series in my region. And due to recent changes of new EULA/ToS with that spyware and modding ban drama i ain't sure i am ever coming back.
if you open that mod "posts" tab, you can see some users report its working, while some others say it doesn't work. Also its been released in 2022, and the game was updated a few times already. So you can try it if you want and check for yourself. Feel free to type in comments here if it works.
Anything else
- Most common issue causing micro-stutters today is built-in-game terrible SHIFT server running on ugandan smoke signal internet. If you see "connection lost" very often then the best way to avoid this is to simply open your steam friends - change status - go offline (not invisible). Solution is only good for solo players.
- Close/exit all unused applications that works in background (i.e. Google Chrome background process, Skype, Discord, Blizzard App, printers...).;
- (Optional) You can launch NVIDIA control panel -> 3D parameters and add Borderlands 3 if it's not on the list. Edit everything by your liking (preferably lowest settings).
- In Windows power usage plan, change power to max energy usage plan (aka high perfomance).
- If you're using win 10 then go to video option menu in game and change DX from 12 to 11. DirectX12 is experimental version and is very buggy. Switching to DX11 helped a lot of people with stutters and loading times, as well as some crash fixes.
- Anti-virus. Turn it off for better perfomance or manually switch to gaming mode.
- Disable all social notifications in game. Very nice boost to fps. This can be done in option - network & social tab.
How does the game looks like
So my speccs are very simple
16 GB RAM dualchannel
i5-4460 3,2 GHz
Geforce GTX 750 Ti
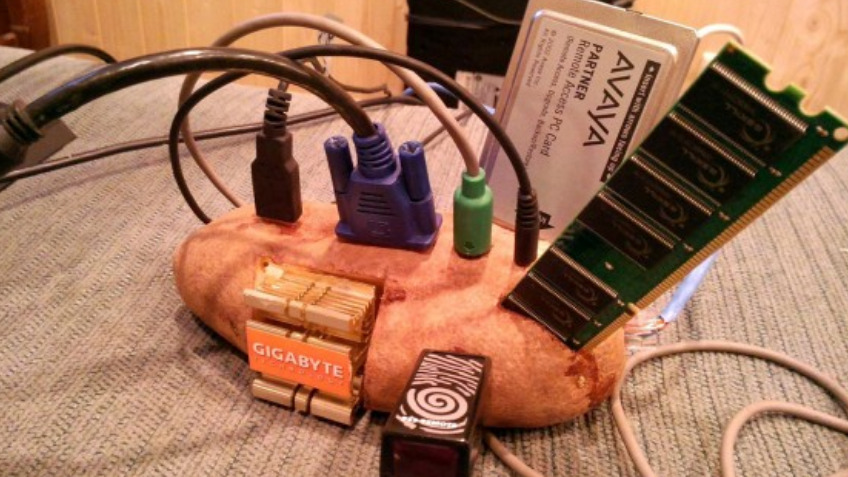
1766x992 custom resolution with 75% scale quality, everything low in settings
Before the changes:
45-60 FPS when wandering areas and having micro-stutters
30-40 FPS in combat
<30 FPS in multiplayer combat (slaughterhouses and stuff)
After, with edited config and everything set to possible minimum, launch options, no bloom stuff and no lens flares:
75-90 FPS in wandering areas, stutter appear only for a few seconds when changing levels
60-75 FPS in combat
45-60 FPS in multiplayer combats
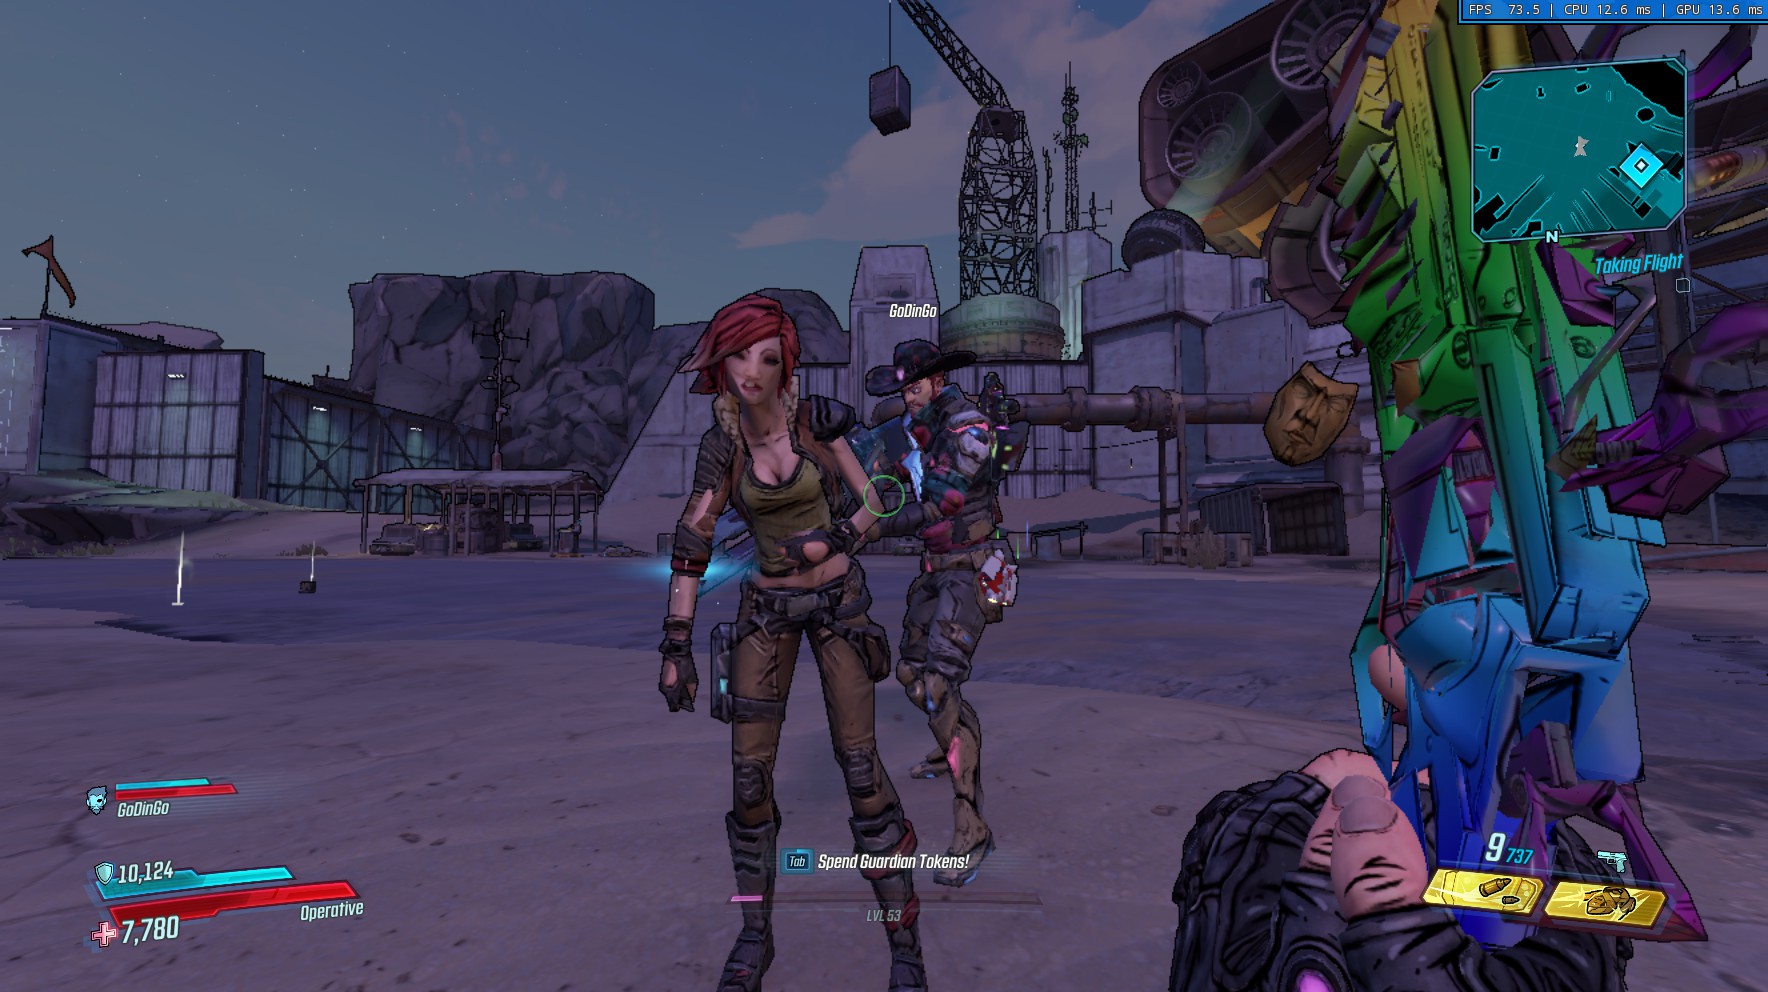


It looks just like in real life.
2025 update - improve FPS with Lossless scaling, CPUcores
I would like to introduce you another way to increase FPS without sacrificing much of image quality
Note: This app is best recommended for those who already have decent or mid-tier PC, as it generates more frames based on your current FPS and overall GPU perfomance. In other words, the more FPS you currently have, the more extra FPS and picture smoothess (+no stutters!) you can get from it. You can make it target generated FPS to match your 144 Hz monitor (or higher), and starting with new 3.2 version you can now also have perfomance mode to reduce your GPU usage and extend its lifetime.
Also LS is famous for making the old games look more fancy and decent-looking.
If the game have a hard-coded restriction of 30 fps (like diablo 2 or strategy games like LOTR:BFME) then this app makes it more than 90+ FPS and the image becomes extremely smooth and pleasant to eye. Also people say it works for films and cartoons as well, as it has its own filter.
To make this happen just make sure to run the game in Windowed mode (go into game settings - video - resolution type "windowed") and then switch to LS and press "scale" or use hotkeys which you can also edit. The game screen will automatically expand to fullscreen-windowed mode.
If you set your .ini files (guide step 1) in read-only then either uncheck read-only or change the resolution type inside .ini lines from fullscreen to windowed and set custom resolution.
The first time you launch LS you'll see a lot of settings and might get confused, but don't worry most of them are for specific PC's with different OS restrictions (like some functions will only work if you have win 11 and so on) so i recommend you to check youtube videos about LS or look in steam guides to set this app right.
https://store.steampowered.com/app/993090/Lossless_Scaling/
The bad things about this app are:- No existing presets, so you have to manually setup everything for every different game, but you can create profiles to quickly switch between settings;
- You have to experiment to get the best result. Of cource LS offers better and smooth picture but the wrong settings that are intended for high-end PC's can increase load of your GPU and thus make your FPS even lower, or make the picture look worse.
- People report that this app works best if you already have an average of 40+ FPS in windowed mode. IF you have something less than that, it might not give much result after rescaling.
https://store.steampowered.com/app/384300/CPUCores__Maximize_Your_FPS/
Another solution that boosts FPS by automatically shutting down useless background processes that you cannot access elsewere and isolates your OS enviroment.
You can also reallocate priority of apps and games to focus on specific tasks or games you want to play.
The bad thing about this app is how some stuff is locked behind the paywall, especially the RAM clearing tool that they made as separate DLC called "ClearMem Lite"
Also one thing i want to notice, is that this app doesn't leave much resources for other apps. Once you optimize the game - everything else "shrinks" in usage, leaving max pc resources output to your main game.
So this app works best if you want to focus only playing your target games, and nothing else, no alt-tabing and no listening to music.
- SHiFT Codes (updated: September 5, 2025)★ 5 (1.4k)56k views2k ♥3 minUpdated 5 Sep, 2025
- БЕСПЛАТНЫЕ SHIFT-КОДЫ, ЗОЛОТЫЕ и БРИЛЛИАНТОВЫЕ КЛЮЧИ!★ 5 (551)45k views990 ♥18 minUpdated 31 Dec, 2024
- Borderlands 3 - 100% Achievements Guide★ 5 (1.7k)43k views3.3k ♥17 minUpdated 4 Jul, 2022
- Squeezing out those fps - Graphics Optimization for BL3★ 5 (844)41k views1.5k ♥15 minUpdated 31 Mar, 2020
- SHIFT Codes Golden Keys 2026★ 5 (1k)40k views1.6k ♥1 minBulgarianUpdated 30 Jan
- Безлимитные золотые ключи (つ◕_◕)つ🔑🔑🔑★ 5 (396)26k views579 ♥1 minRussianUpdated 31 Aug, 2025



- Upgrading to PremiumTeam Fortress 2★ 5 (20k)1441k views11k ♥6 minUpdated May 11, 2022
- No More Room in Hell Official ManualNo More Room in Hell★ 5 (2.8k)569k views2.1k ♥29 minUpdated Apr 22, 2019
- NMRiH Community Hosting GuidesNo More Room in Hell★ 5 (526)351k views653 ♥1 minUpdated Aug 10, 2022
- How to 'Git Gud' Soon™MORDHAU★ 5 (2k)318k views3k ♥68 minUpdated Nov 16, 2024
- Лучшие кооперативные игры SteamPAYDAY 2★ 5 (1.5k)315k views2.1k ♥56 minRussianUpdated Apr 27, 2025
- Desert Eagle Heat Treated | Blue GemCounter-Strike 2★ 5 (1.6k)293k views1.5k ♥2 minUpdated Jan 16





This guide was created by its original author on the Steam Community. Are you the author and want it removed? Request removal.