Combat Width & Terrain: Data Analysis EN (v1.19) 07/2026
Why this guide is different
Thanks to u/lillelur and u/Emzatin from Reddit — if it weren't for them, I wouldn't have put in this much effort!
https://steamcommunity.com/sharedfiles/filedetails/?id=3766078597
Almost every division guide hands you a ready-made "meta": copy this template, use this width, done. The problem is that nothing in HOI4 is exact — what exists is what performs well or badly in each situation. This guide doesn't give you a single answer; it gives you the numbers so you can decide.
Everything here was extracted straight from the game files (Operation Postern, v1.19) — combat width, each unit's terrain modifiers, attrition, supply. It's not guesswork or a wiki copy: every value comes from a game file and can be checked. On top of that, I built views that answer practical questions:
- Which division width fits best in each terrain (and why 14, 15, 18 or 25 show up so often).
- How each unit type performs in each terrain — why armor struggles in the mountains and a mountaineer shines there.
- The cost of operating in each terrain outside of combat — attrition and supply, the logistics side almost nobody looks at.
Where the data comes from
The idea here is simple: give you (or anyone) a base to build divisions however you want, looking at what's good and what's bad in each situation — not to follow an exact meta. Nothing in the game is exact; the difference is in the effectiveness.
Every number comes straight from the game files (not from a wiki, not from memory), on version Operation Postern v1.19.1. Every value is traceable by file:line. Three files do the heavy lifting:
This data was placed into a star model (dimensions + facts). With it, I refined the data into separate tables:
Every number comes straight from the game files (not from a wiki, not from memory), on version Operation Postern v1.19.1. Every value is traceable by file:line. Three files do the heavy lifting:
File
What came from it
common/terrain/00_terrain.txt
Combat width and support width per terrain; and the attributes: movement_cost, attrition, units attack, enemy air-sup factor, supply flow penalty, truck attrition and sickness.
common/defines/00_defines.lua
Overstack (excess width) and stacking (piling up divisions) constants.
common/units/*.txt
Terrain modifiers of each unit type (attack / defense / movement) — infantry, cavalry, armor, support, etc.
This data was placed into a star model (dimensions + facts). With it, I refined the data into separate tables:
Table
What it's for
Dim_Terrain
8 terrains + 3 cross-terrain (river/amphibious/fort), with all the terrain attributes.
Dim_WidthGroup
The 4 groups that share the same width (e.g. mountain and marsh = 50/25).
Dim_Unit
Unit types + category and base modifiers.
Dim_Direction / Dim_Width
Attack directions (1–4, with weight) and the width axis (5–50).
Dim_Constants
The overstack/stacking defines, for reference.
Fact_UnitTerrainMod
The heart of it: each row = unit × terrain → atk/def/mov.
Fact_BattleWidth / Fact_FitPenalty
Battle width per group×direction, and the fit penalty per width×group×direction.
A rule that applies to everything in the views: separate FACT from INDEX
- Fact = raw number extracted from the game (width, attrition, unit modifier). Those numbers point to a reality — that's why it's called a fact: "This costs 5 horses; if I buy it, I'll spend 5 horses!"
- Index = a calculation I built on top of that (Effective Score, Logistics Index). Where it's an index, it's marked as such — it's a model, not the game's absolute truth. "Right now it costs 5 horses, but two weeks ago it cost 3 — that's 20% inflation per week!"
Calculations, formulas and visions
2.1 Combat width fit
A battle's front has a width. For 1 direction it's the terrain's base width; each extra attack direction adds the support width:battle width = base + (number of directions − 1) × support
Your divisions fill up that width. If it doesn't fit evenly, you lose efficiency in two ways:- Overstack (excess): −1% per point of width that goes over, up to a −33% cap. Beyond that no more divisions join (reinforcement stops at 1.33× the width).
- Stacking (piling up): starting at 5 divisions in the combat, −2% per extra division, with +3 slack per attack direction.
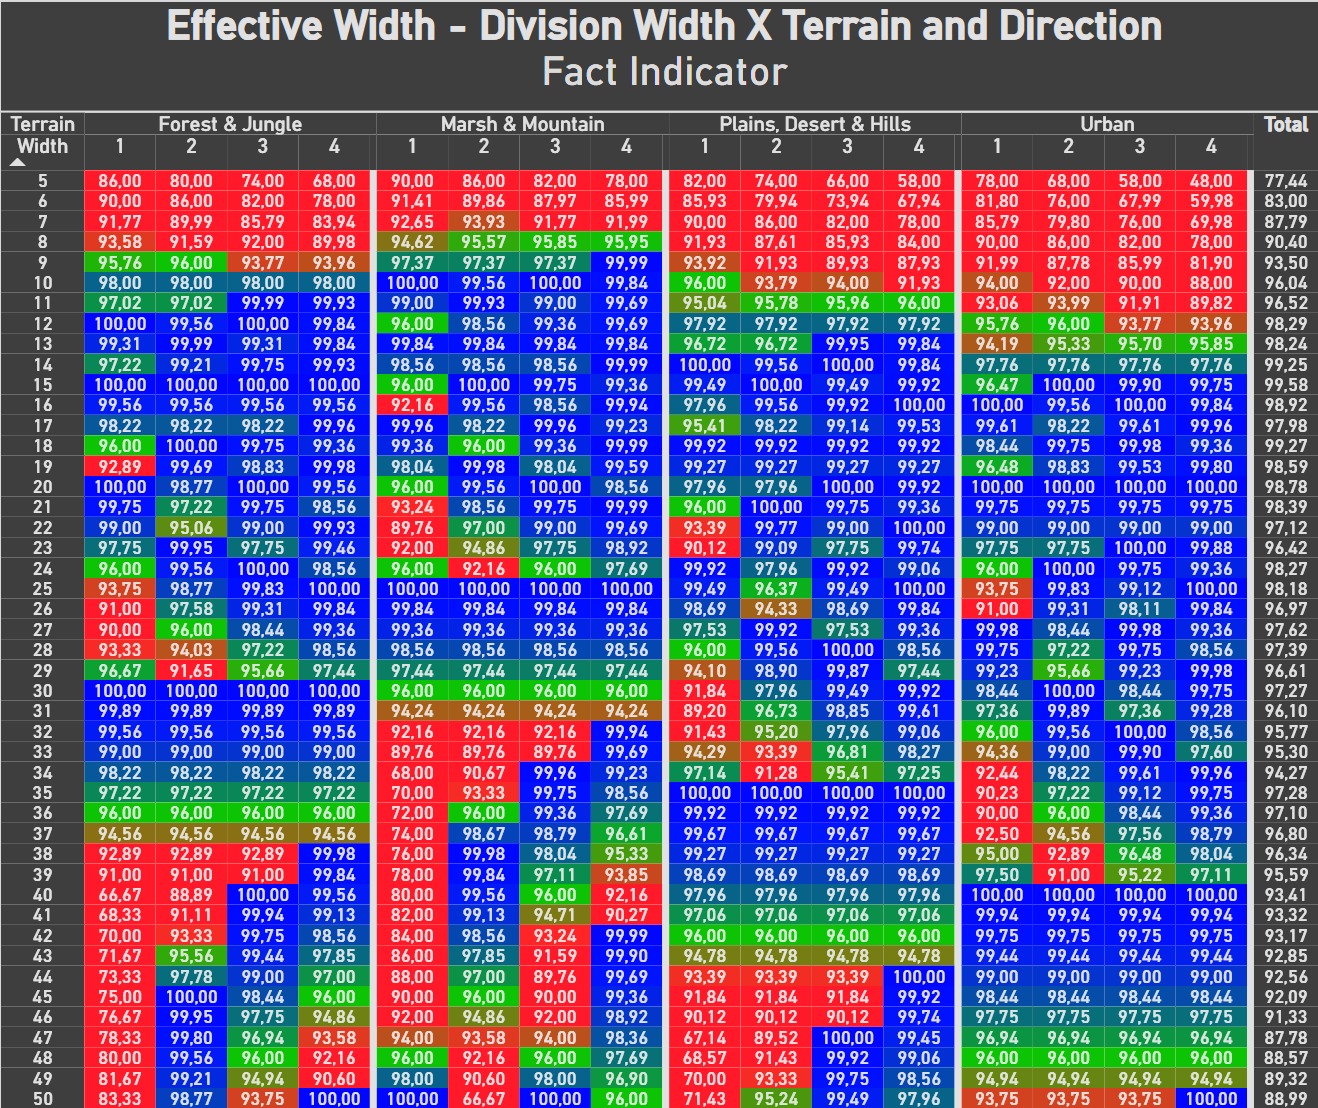
2.2 Terrain suitability (atk / def / mov)
It's how well/badly each unit fights in a terrain. Take the unit's real modifier (from its own file) and add it to 1:Suitability = 1 + (unit's modifier in the terrain)
1.0 = neutral; above = bonus; below = penalty. A terrain with no modifier comes in as 1.0. In the total it becomes an average (not a sum) — that way you get a "beacon/thermometer" of how well that unit type does in each type of terrain.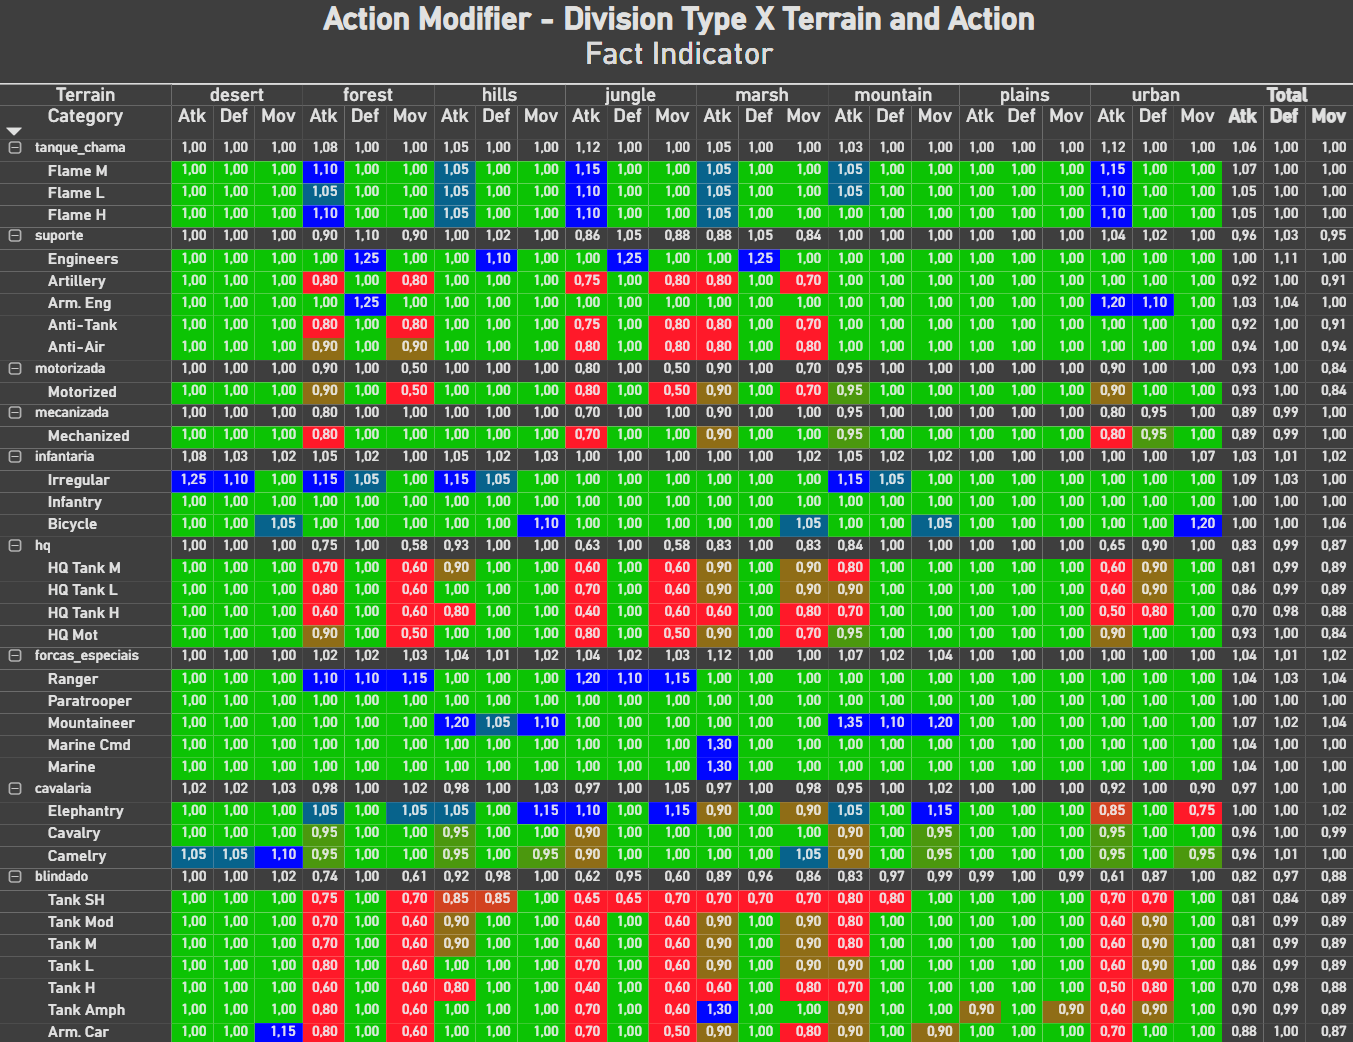
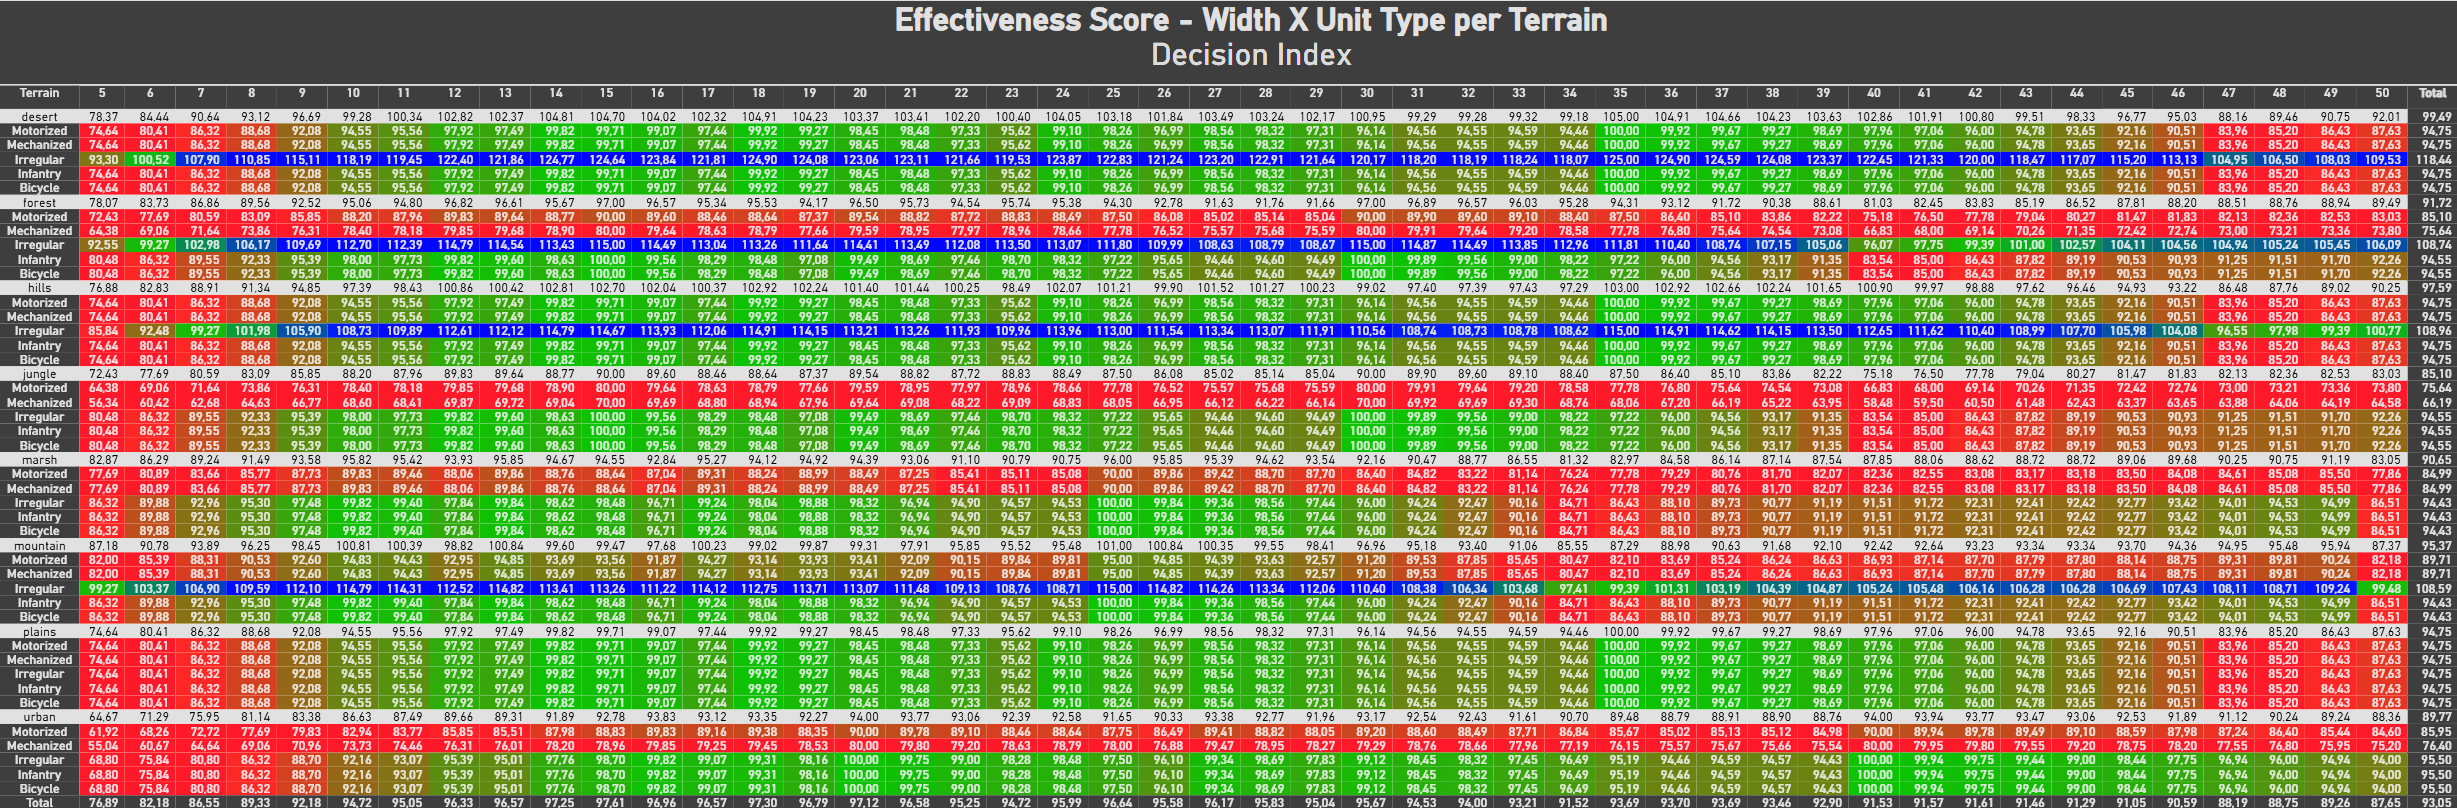
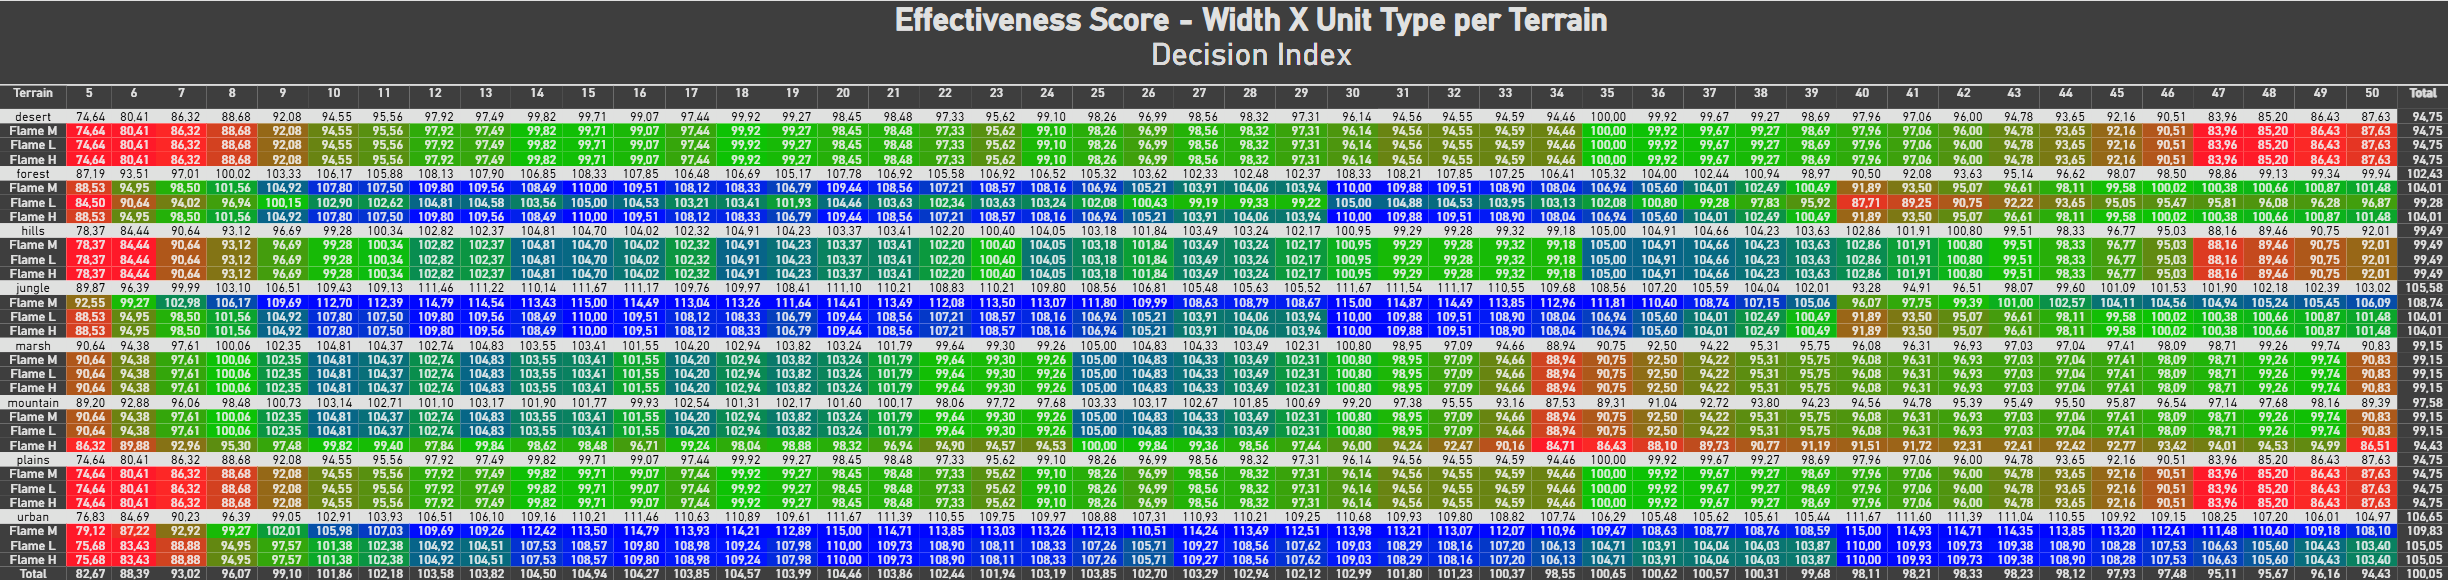
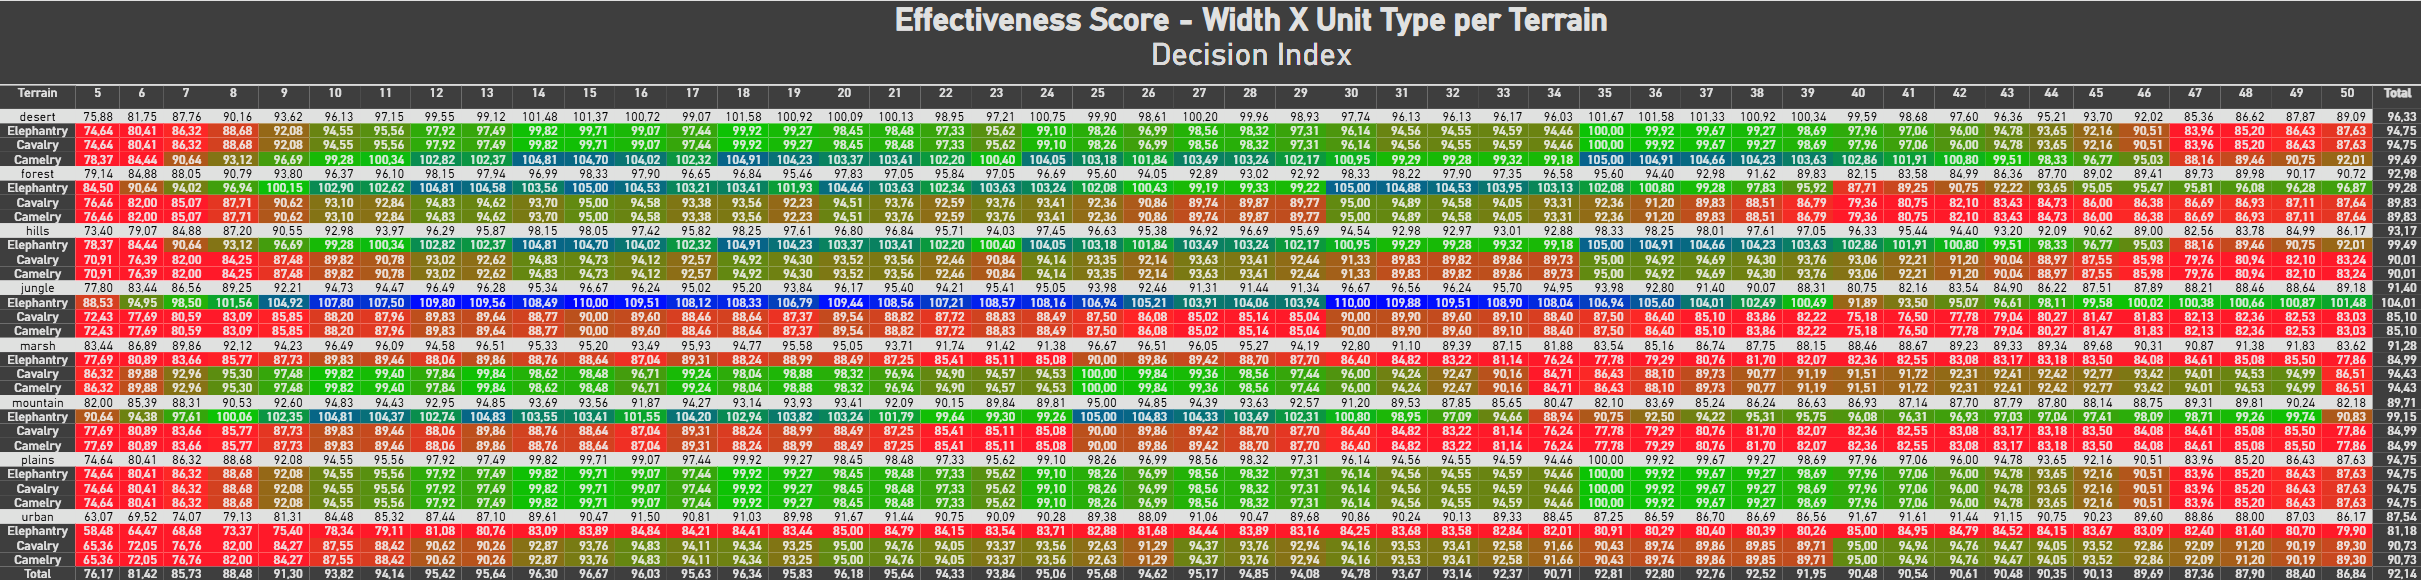
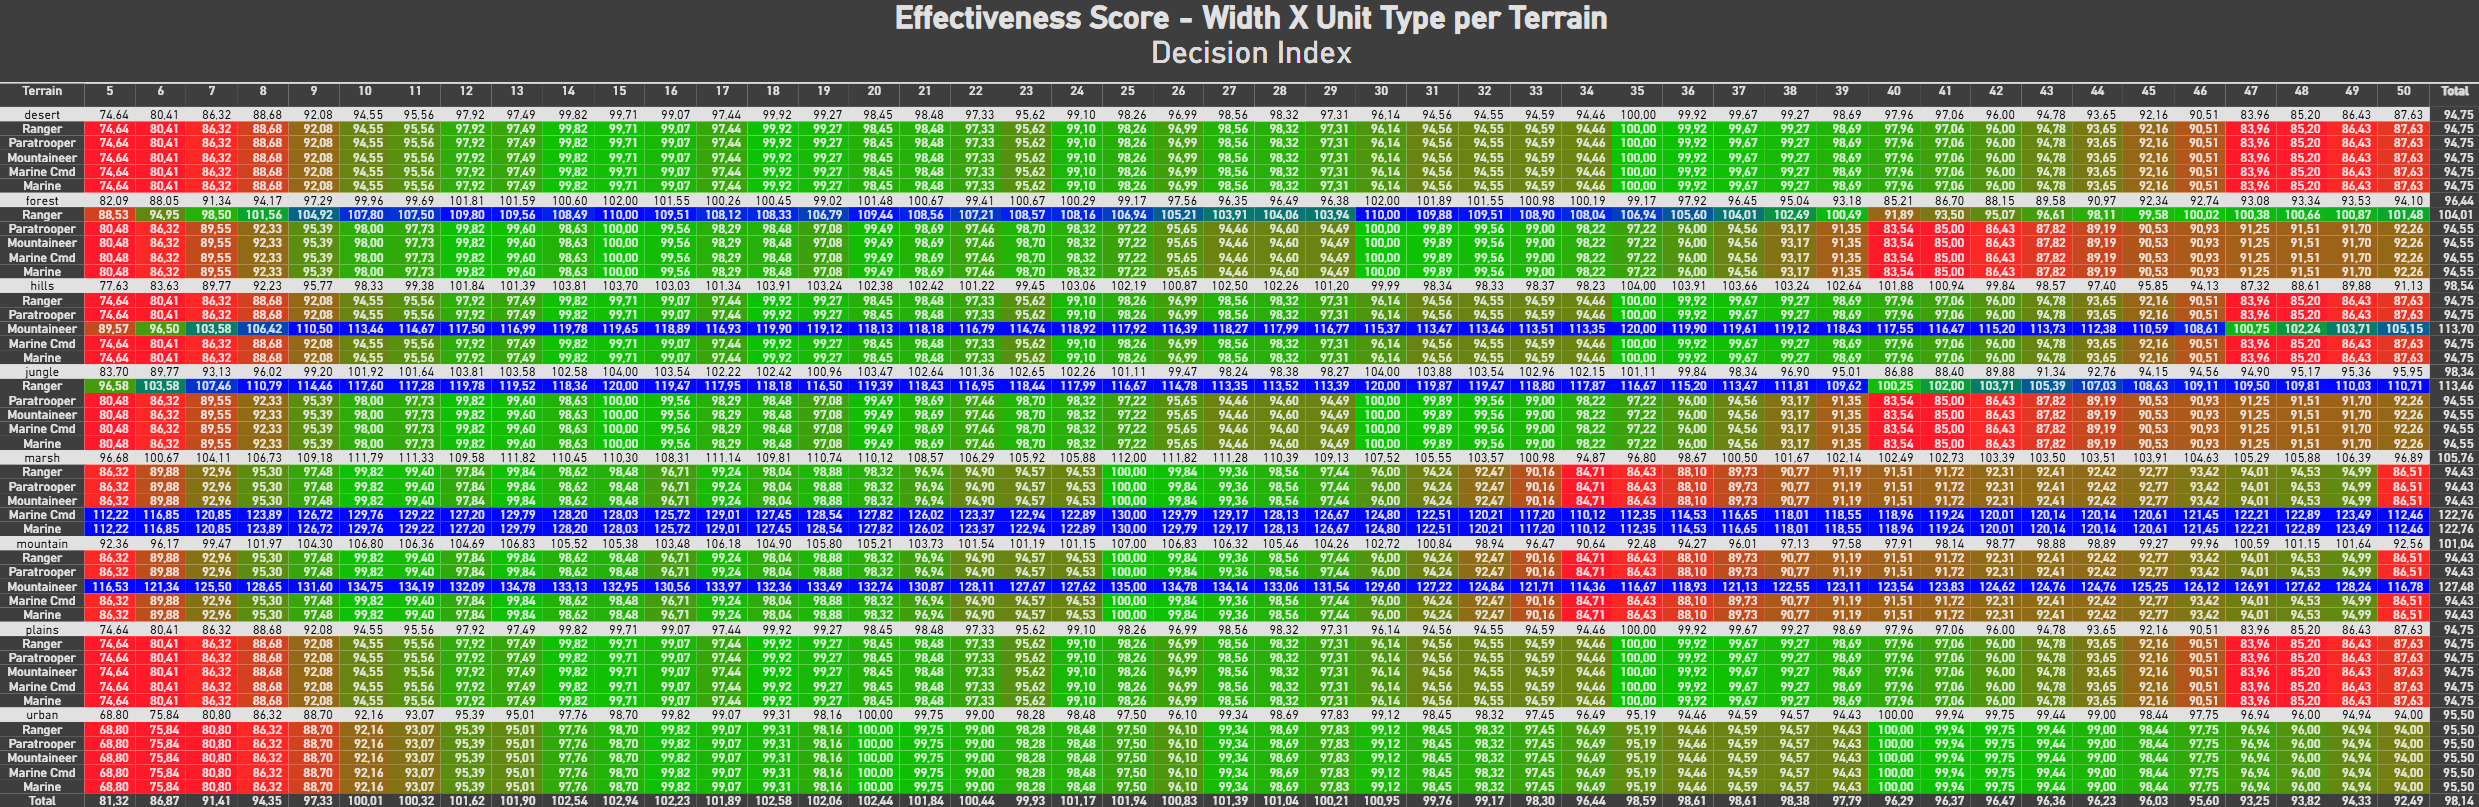
2.3 Effective Score
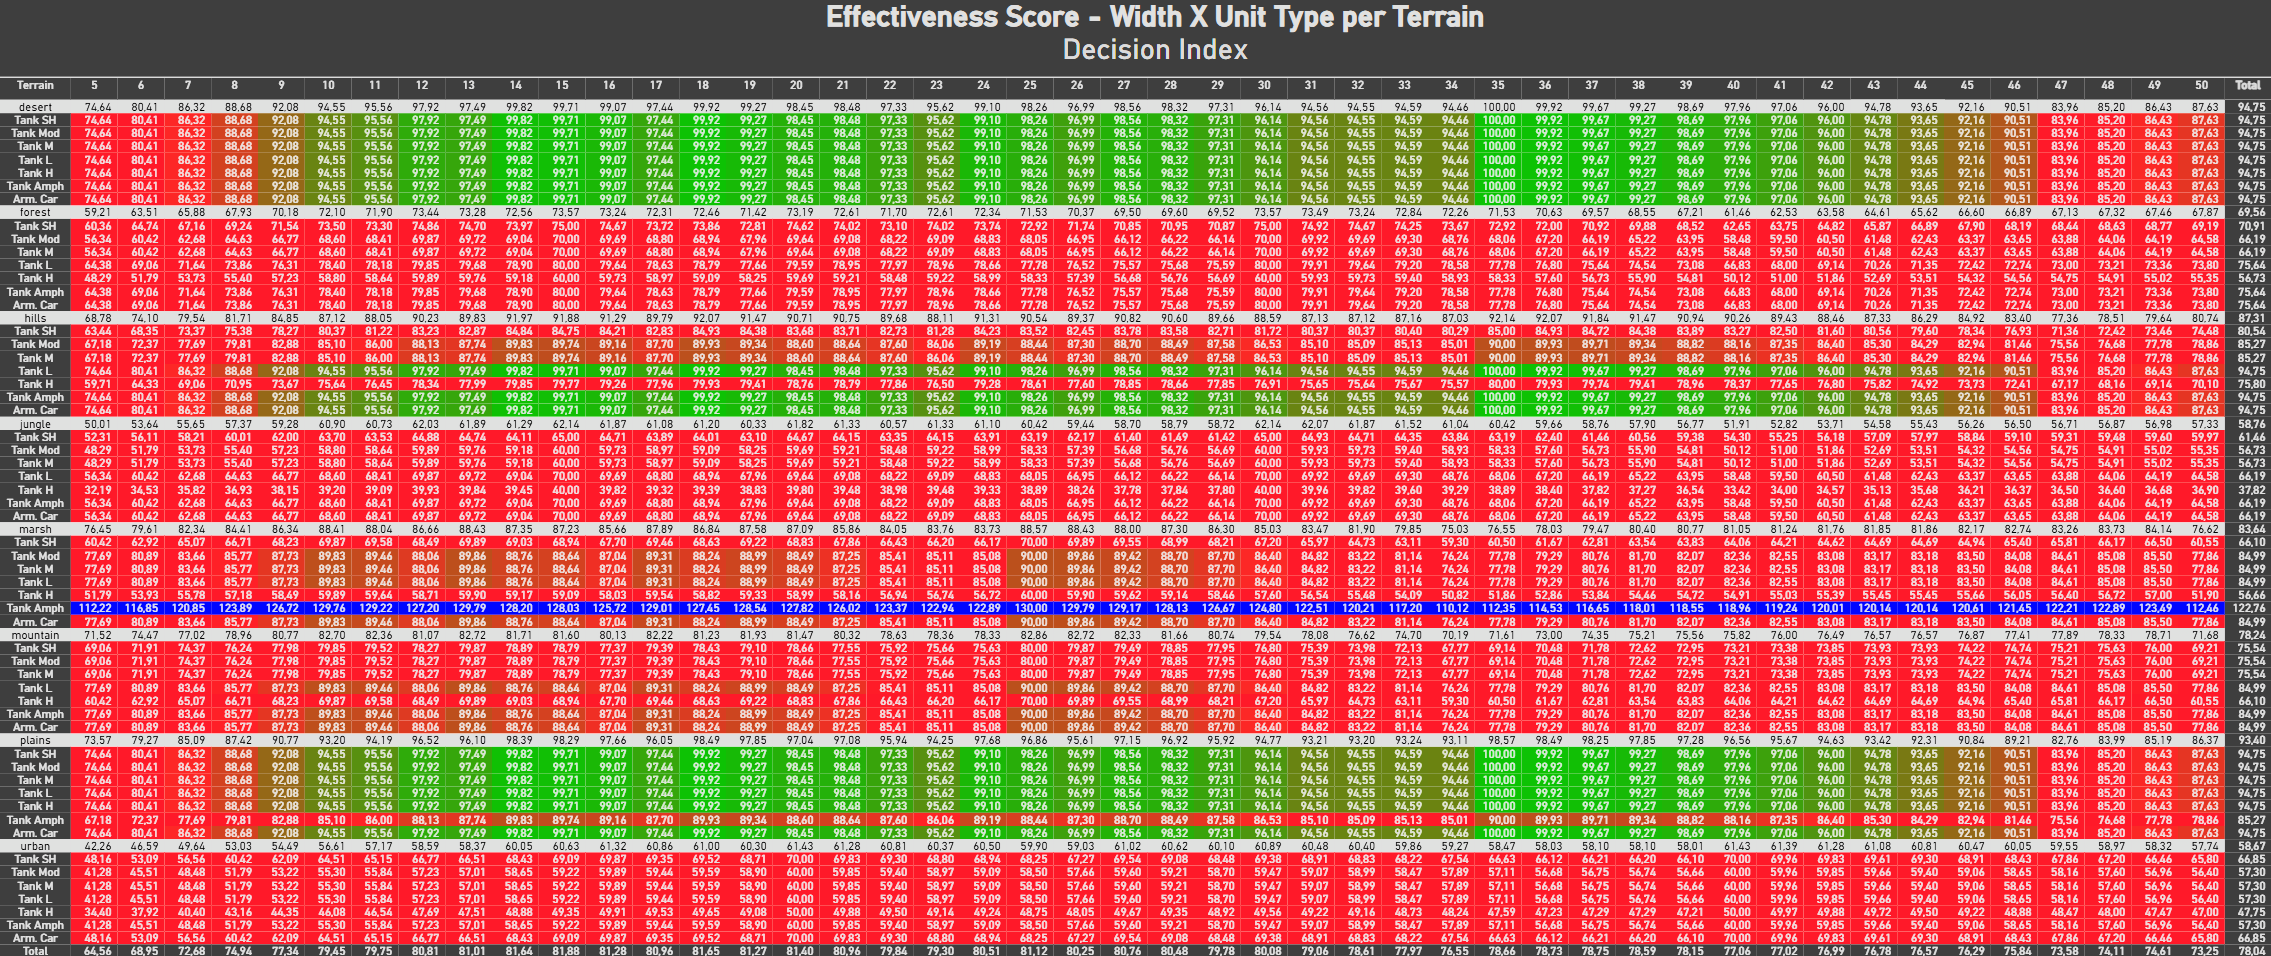
It joins the two halves above into a single number — "for THIS unit, in this terrain, which width delivers the most real power?":Score = Suitability × (1 − penalty/100) × 100
100 = neutral terrain + perfect fit. Above = the unit shines there; below = it's losing power (bad terrain, bad width, or both). It's a decision index: great for comparing and ranking, but the number is not "% of damage" — it fuses two different mechanics (terrain power × frontage efficiency).This vision became HUGE, but very rich
I filtered to show the most used divisions, I can add the others in the future! And I put it to show only the Attack Index of the units, but I can filter and show it by Defense and Movement Index too!Infantry, Motorized and Mechanized
Armored
Cavalry
Special Forces
2.4 Divisions that fit
A whole number, 100% exact: how many divisions of that width enter the battle (per terrain and direction). It's not "good or bad", it's just density — useful for deciding width from another angle (more divisions on the front vs. a perfect fit). "I think Leonidas was pretty good at calculating this."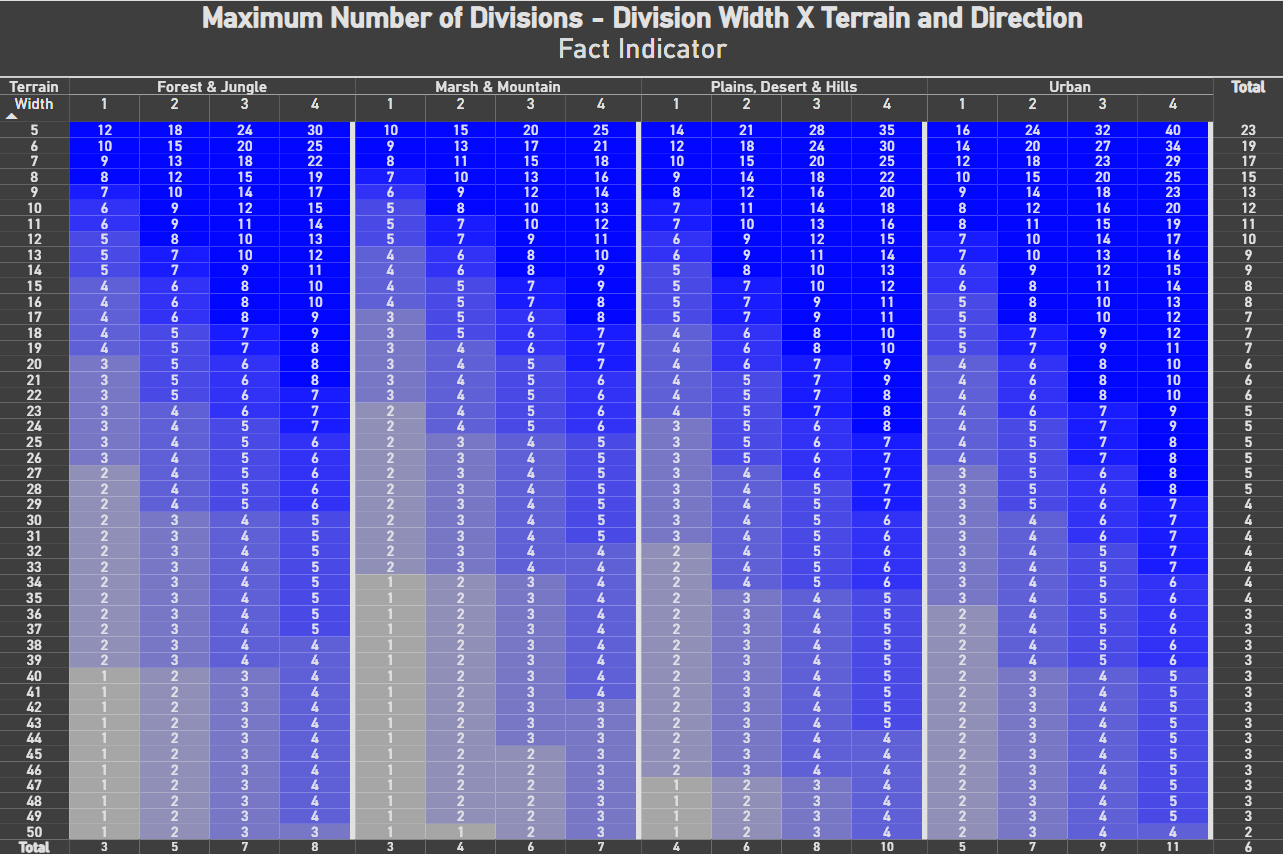
2.5 Terrain logistics
Three terrain numbers almost nobody looks at, from a player's view:- Attrition — passive wear on the troops just from being/moving in that terrain (losing equipment without combat).
- Supply flow penalty — how much the terrain chokes the supply passing through it (negative = it helps, as with urban).
- Truck attrition — wear specific to the supply trucks; bad terrain burns your trucks (marsh/jungle are brutal).
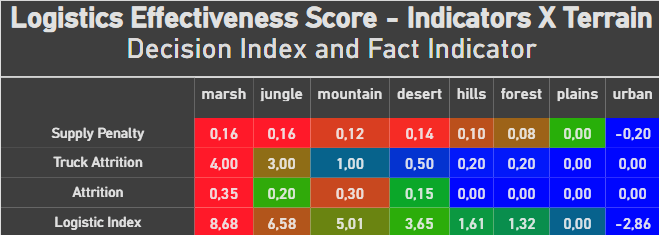
2.6 Logistics Index (normalized)
Adding the three straight up would be unfair: truck attrition (reaching 4.0) would crush attrition (0.35). The statistical solution is to normalize by the mean — divide each indicator by its own average across the terrains, which brings them all to the same order of magnitude (they become "how many times the average", dimensionless):Index = Attr/avg(Attr) + Supply/avg(Supply) + Truck/avg(Truck)
- The higher, the worse — more logistical pain. Marsh and jungle at the top; plains at the bottom.
- Urban goes negative (supply is a bonus there) — negative = terrain that helps logistics.
END
I'm Brazilian and I reworked this guide by putting it in English. So I might have translated something wrong.
And I only have around 117 hours played in HOI IV. It's not my intention to say what's right or wrong — it was never about that. I just got intrigued by how much division-building gets discussed in the community: "Which division is best?", "What's the 2026 META?"
Anyway, I had a lot of fun using my passion for Data Science — the same one I've used to survive in the world since 2020 — working on this game I'm so addicted to. I hope something good came out of this "guide": something you used to do without understanding why and now get, a question answered, or data and feelings carried into a more abstract world.
If a discussion comes up that makes sense, I'd love to bring more views and/or more data that hasn't been looked at/extracted from the game yet.
(I'll try to keep the numbers updated if anything changes in a future update!)
And I only have around 117 hours played in HOI IV. It's not my intention to say what's right or wrong — it was never about that. I just got intrigued by how much division-building gets discussed in the community: "Which division is best?", "What's the 2026 META?"
Anyway, I had a lot of fun using my passion for Data Science — the same one I've used to survive in the world since 2020 — working on this game I'm so addicted to. I hope something good came out of this "guide": something you used to do without understanding why and now get, a question answered, or data and feelings carried into a more abstract world.
If a discussion comes up that makes sense, I'd love to bring more views and/or more data that hasn't been looked at/extracted from the game yet.
(I'll try to keep the numbers updated if anything changes in a future update!)
More Hearts of Iron IV guides
- Division Templates, Tank Designs, Aircraft Designs, and Metas (Bolivar 1.14+)★ 5 (3k)173k views8.7k ♥29 minUpdated Apr 30, 2025
- The Ultimate Guide to Division Templates, Aircraft and Tank Designs (Updated 15-06-2026)★ 5 (3.3k)134k views11k ♥54 minUpdated Jul 6
- Выполняем достижения в Hearts of Iron 4★ 5 (3.2k)69k views7.9k ♥326 minRussianUpdated Jul 19
- The Ultimate Guide to Navy; Ship Templates and Fleet Composition (Updated 24-3-2026)★ 5 (1.2k)61k views4.9k ♥33 minUpdated May 17
- HOI4. Большой гайд★ 5 (738)58k views2k ♥101 minRussian
- Лучшие шаблоны в HoI IV (1.15v.)★ 5 (612)49k views2.2k ♥6 minRussianUpdated May 20



🔥 Popular guides
- Upgrading to PremiumTeam Fortress 2★ 5 (20k)1441k views11k ♥6 minUpdated May 11, 2022
- No More Room in Hell Official ManualNo More Room in Hell★ 5 (2.8k)569k views2.1k ♥29 minUpdated Apr 22, 2019
- NMRiH Community Hosting GuidesNo More Room in Hell★ 5 (526)351k views653 ♥1 minUpdated Aug 10, 2022
- Лучшие кооперативные игры SteamPAYDAY 2★ 5 (1.5k)315k views2.1k ♥56 minRussianUpdated Apr 27, 2025
- Desert Eagle Heat Treated | Blue GemCounter-Strike 2★ 5 (1.6k)292k views1.5k ♥2 minUpdated Jan 16
- Treasure Hunt Puzzle SolutionsTotal War: WARHAMMER II★ 5 (6.9k)281k views15k ♥3 minUpdated Aug 19, 2021






This guide was created by its original author on the Steam Community. Are you the author and want it removed? Request removal.