FF7 PC 2013 Steam Version - Xbox Controller Fix v2
Requirements
- XInput Plus[0dd14lab.net]
- Xidi v5.0.0+[github.com] (According to the repo, it only works for Windows 10 and above)
- Xidi SDL3 Plugin[github.com]
Steam Input must be disabled.
- Xidi v5.0.0+[github.com] (According to the repo, it only works for Windows 10 and above)
- Xidi SDL3 Plugin[github.com]
Steam Input must be disabled.
Method 1: XInput Plus
Only works for XInput/Xbox controllers or with XInput wrappers (DS4Windows, DSHidMini, XOutput, Padforge)
- Open the Run dialog (⊞ Win+R) then enter "joy.cpl" and click "OK".
- Click Advanced... > set Preferred Device > select the controller.
- Download XInput Plus.
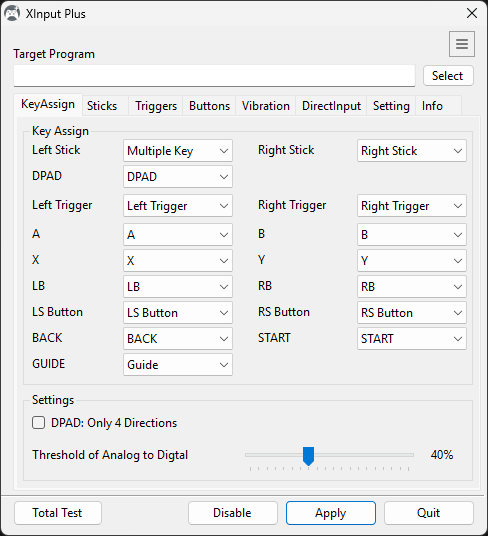
- Run XInput Plus as Administrator, click Select on Target Program and select FF7_Launcher.exe.
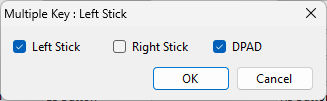
- While in the KeyAssign tab, set Left Stick to Multiple Key and enable both "Left Stick" and "DPAD" then click OK.
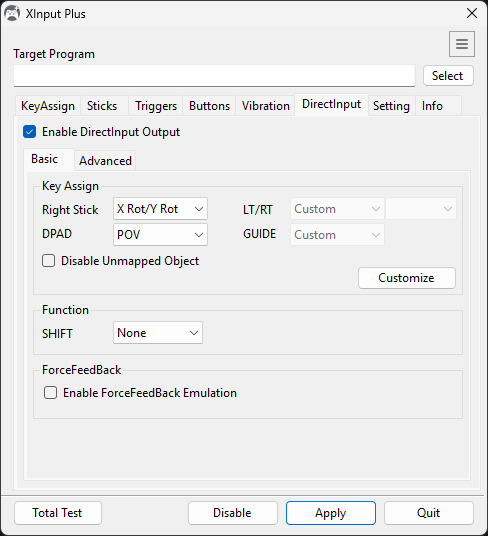
- Go to the DirectInput tab and tick the Enable DirectInput Output.
- Click Customize.
- Set the following:Left Trigger -> Button7 Right Trigger -> Button8 A -> Button2 B -> Button3 X -> Button1 Y -> Button4 BACK -> Button9 START -> Button10 LS Button -> Button11 RS Button -> Button12 Guide -> Button13
It should look like this:OPTIONAL: Click Setting tab then go to Others tab and disable the Enable Init Beep.
- Click on Apply button, confirm everything and close XInput Plus. New files will appear in the game folder. (dinput.dll, dinput8.dll, XInput1_3.dll, XInputPlus.ini)
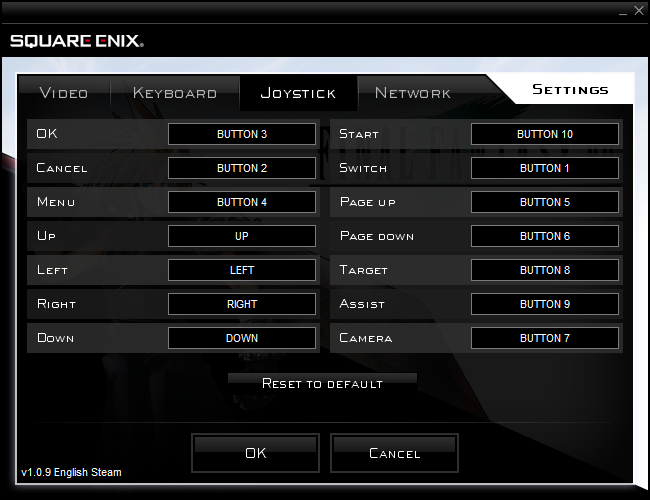
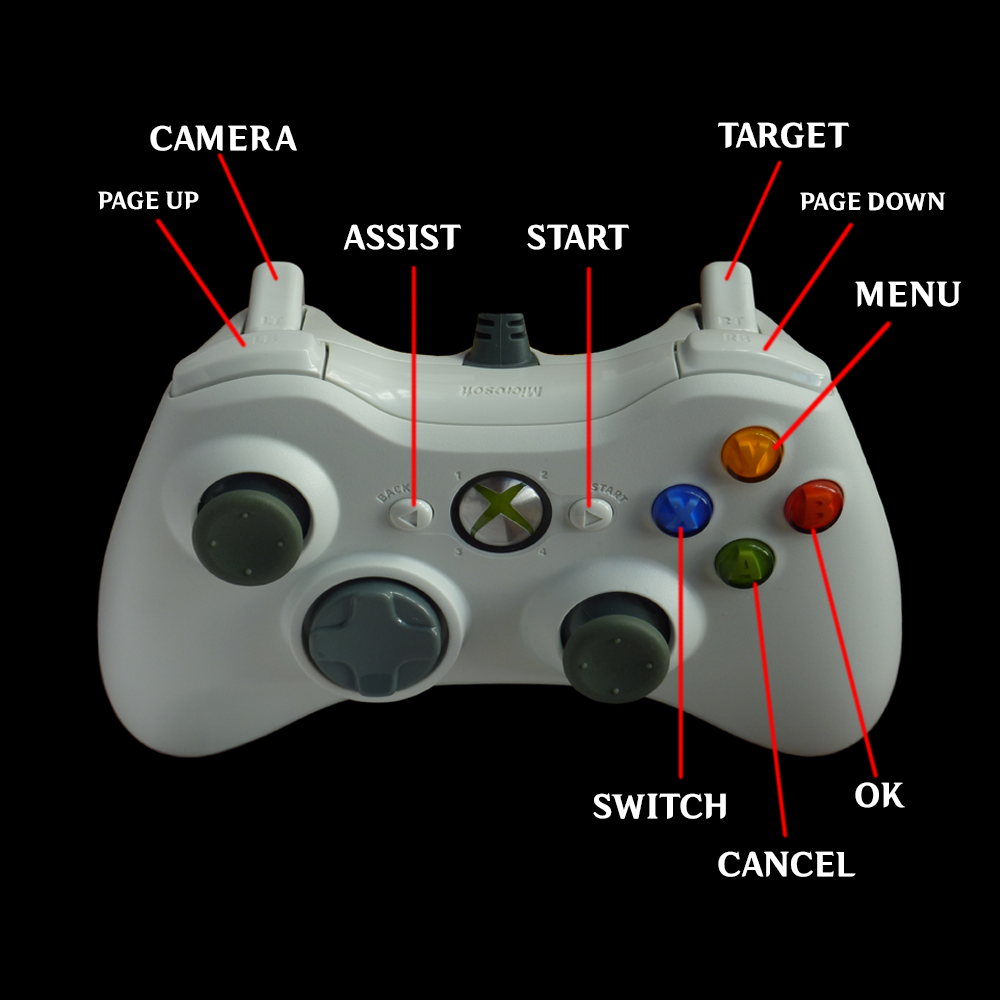
- Run the game launcher > Settings > Controller and set the following keybinds for the controller:OK = B (BUTTON 3) CANCEL = A (BUTTON 2) MENU = Y (BUTTON 4) START = Start (BUTTON 10) SWITCH = X (BUTTON 1) PAGE UP = LB (BUTTON 5) PAGE DOWN = RB (BUTTON 6) TARGET = RT (BUTTON 8) ASSIST = Back (BUTTON 9) CAMERA = LT (BUTTON 7)
- Click "OK" to save the configuration.
- Click "Play" on the launcher to test the controls.
NOTE:
- Still need to press X on the keyboard to get past the blue "Keyboard" prompt.
Video Tutorial:
Method 2: Xidi
This guide uses SDL3[github.com] so any controllers that are saved in their database will be compatible. Tested on XInput/Xbox, 8BitDo, GameSir, PS3 (via DsHidMini SXS, DS4Windows, XInput mode), PS4 and PS5 Controller.
- This method allows you to use the D-Pad and skip the blue "Keyboard" prompt by pressing B on your controller.
- Open the Run dialog (⊞ Win+R) then enter "joy.cpl" and click "OK".
- Click Advanced... > set Preferred Device > select the controller.
- Download Xidi and inside the Win32 folder, extract all DLL files to the game folder.
- Download the Xidi SDL3 Plugin and inside the Win32 folder, extract SDL.XidiPlugin.32.dll and SDL3.dll to the game folder.
- Open Notepad as Administrator (only do this if you cannot save the file in the game folder) and copy/paste this config:Plugin = SDL ControllerBackend = SDL3 [Mapper] Type = FF7 [CustomMapper:FF7] Template = DigitalGamepad ButtonA = Button(2) ButtonB = Compound(Button(3), Keyboard(X)) ButtonX = Button(1) ButtonY = Button(4)
- Save the file as Xidi.ini to the game folder.
- Run the game launcher then head to Settings > Joystick and set the following keybinds like the image of the "Joystick" settings above.
- Click "Play" and test the controls.
NOTE:
- This configuration uses the PlayStation 1 controls.- This method allows you to use the D-Pad and skip the blue "Keyboard" prompt by pressing B on your controller.
Controller Layout
This might help if you're confused with the button prompts.
More FINAL FANTASY VII (2013) guides
- Final Fantasy 7 Full Guide★ 5 (2.7k)51k views7k ♥137 minUpdated Jul 10, 2018
- Permanent Missable Content related to Achievements★ 5 (1.3k)39k views3.3k ♥15 minUpdated 3 Mar, 2019
- Remaster your FF7 - Essential Modding Guide★ 5 (623)38k views1.7k ♥23 minUpdated 24 Feb
- Materia Overlord Achievement Guide★ 5 (1.3k)35k views2.4k ♥18 minUpdated Jan 7, 2017
- Final Fantasy 7: Enemy Skill Guide★ 5 (690)34k views1.7k ♥17 minUpdated 12 May, 2016
- FINAL FANTASY VII STEAM 100% ACHIEVEMENT★ 5 (701)28k views1.8k ♥18 minUpdated 3 Jul, 2023


🔥 Popular guides
- Upgrading to PremiumTeam Fortress 2★ 5 (20k)1441k views11k ♥6 minUpdated May 11, 2022
- No More Room in Hell Official ManualNo More Room in Hell★ 5 (2.8k)569k views2.1k ♥29 minUpdated Apr 22, 2019
- NMRiH Community Hosting GuidesNo More Room in Hell★ 5 (526)351k views653 ♥1 minUpdated Aug 10, 2022
- ULTIMATE GUIDE FOR GAME DEV TYCOONGame Dev Tycoon★ 5 (5.8k)326k views10k ♥4 minUpdated 23 Jan, 2014
- How to 'Git Gud' Soon™MORDHAU★ 5 (2k)318k views3k ♥68 minUpdated Nov 16, 2024
- Лучшие кооперативные игры SteamPAYDAY 2★ 5 (1.5k)315k views2.1k ♥56 minRussianUpdated Apr 27, 2025






This guide was created by its original author on the Steam Community. Are you the author and want it removed? Request removal.