Dimension of the Machine Secrets
Useful Information



Quake Secrets Guide Contents
- Quake Secrets
- Scourge of Armagon Secrets
- Dissolution of Eternity Secrets
- Dimension of the Past Secrets
- Dimension of the Machine Secrets
- Horde Mode Secrets
Introduction
 This guide will help you find all the secrets in the 4th Quake expansion pack: Dimension of the Machine.
This expansion has a total of 70 secrets across 14 levels, as well as several unmarked secrets (which don't count as official secrets but often have interesting rewards).
Dimension of the Machine features a hub level that connects to five mini episodes. They can be completed in any order but this guide lists them in the following sequence:
- Episode 1: Realm of Machinists
- Episode 2: Realm of Blacksmiths
- Episode 3: Realm of Stonemasons
- Episode 4: Realm of Cultists
- Episode 5: Realm of Astrologers
- End: Chthon's Vengeance
Items
Like Dimension of the Past there are no new weapon or items in this expansion:Weapons

Axe

Shotgun

Double-Barreled Shotgun

Nailgun

Super Nailgun

Grenade Launcher

Rocket Launcher
Thunderbolt
Ammo

Small Shells

Large Shells

Small Nails

Large Nails

Small Rockets

Large Rockets

Small Cells

Large Cells
Powerups

Green Armor

Yellow Armor

Red Armor

Small Health

Large Health

Megahealth

Quad Damage

Pentagram of Protection

Ring of Shadows

Biosuit
START: The Gateway
To find the Nightmare Difficulty portal start by moving forward in to the large room. Take a right ( ) to head towards the Hard Difficulty portal but don't enter it.
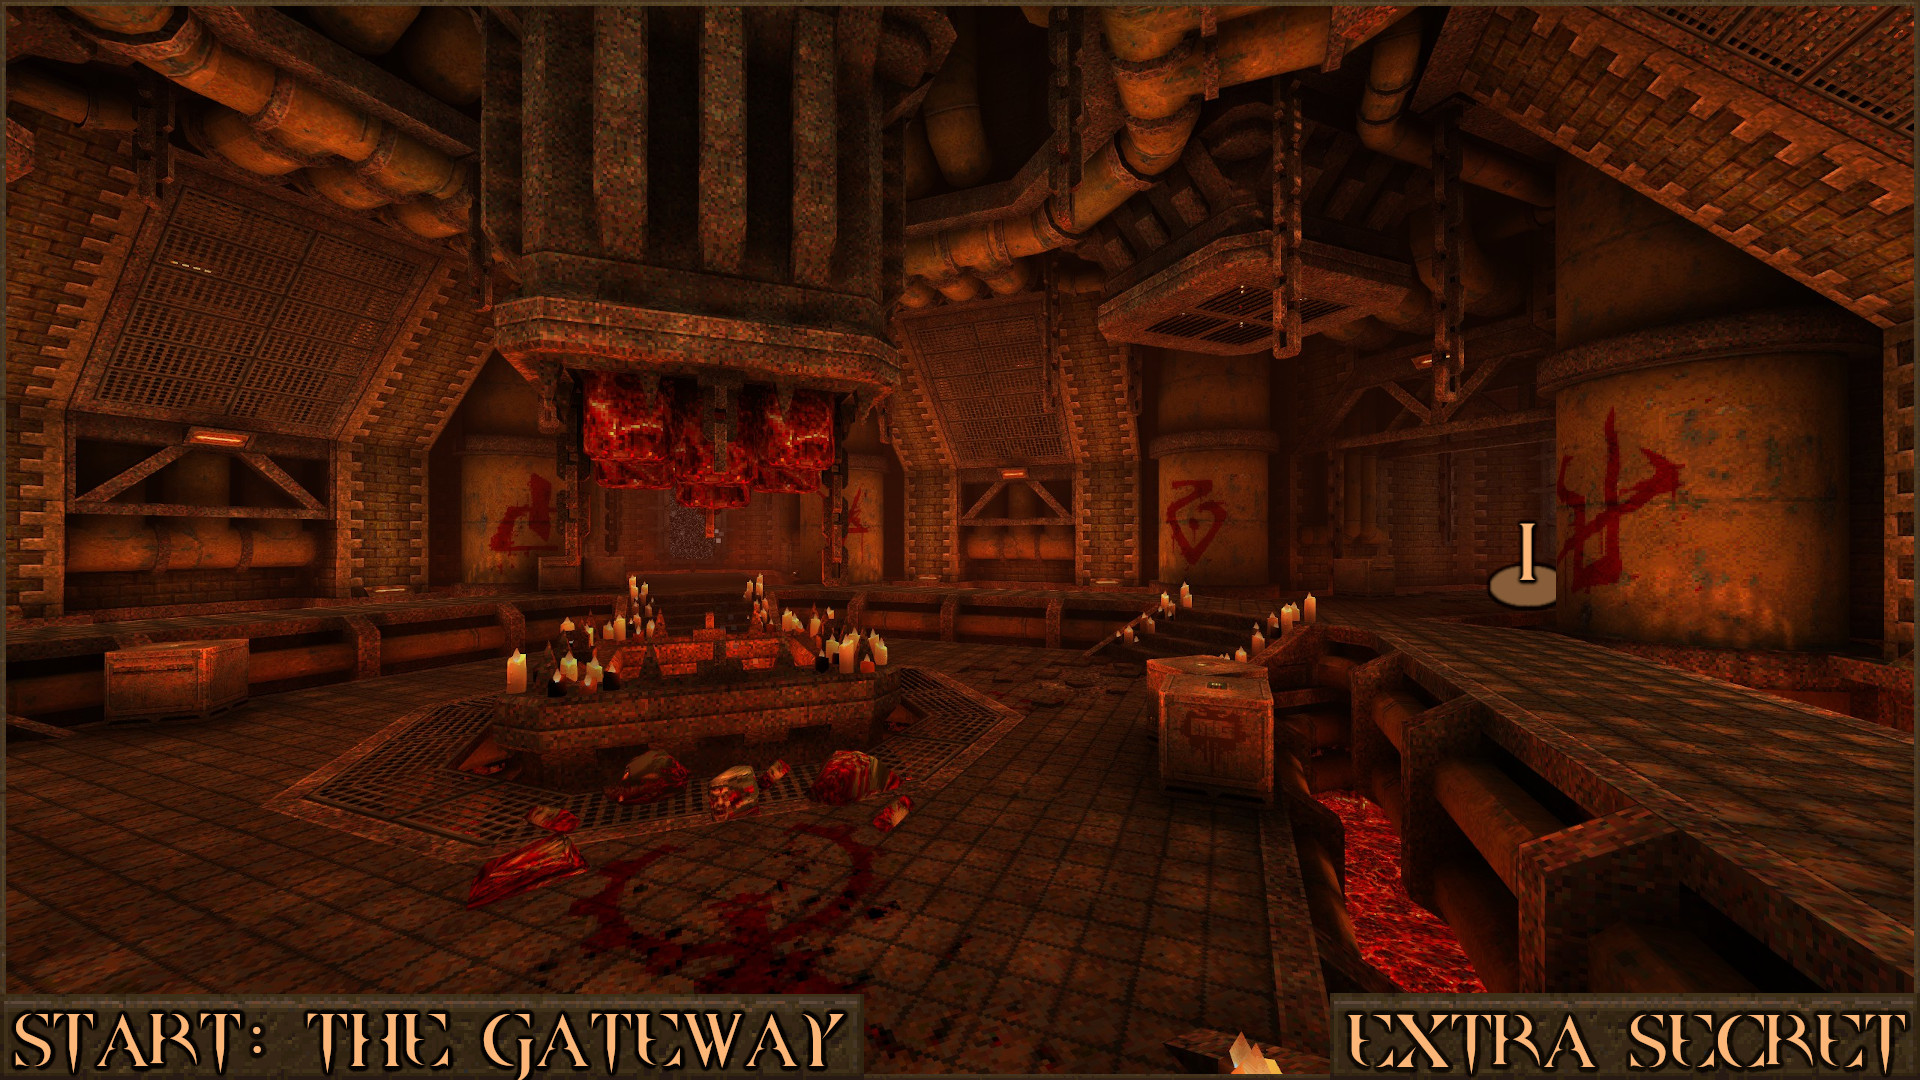
Look closely at the wall to the right of the Hard Difficulty portal and you will notice a hole in the wall ( ) shrouded in darkness. Make a very careful jump in to the hole and proceed through this dark area.
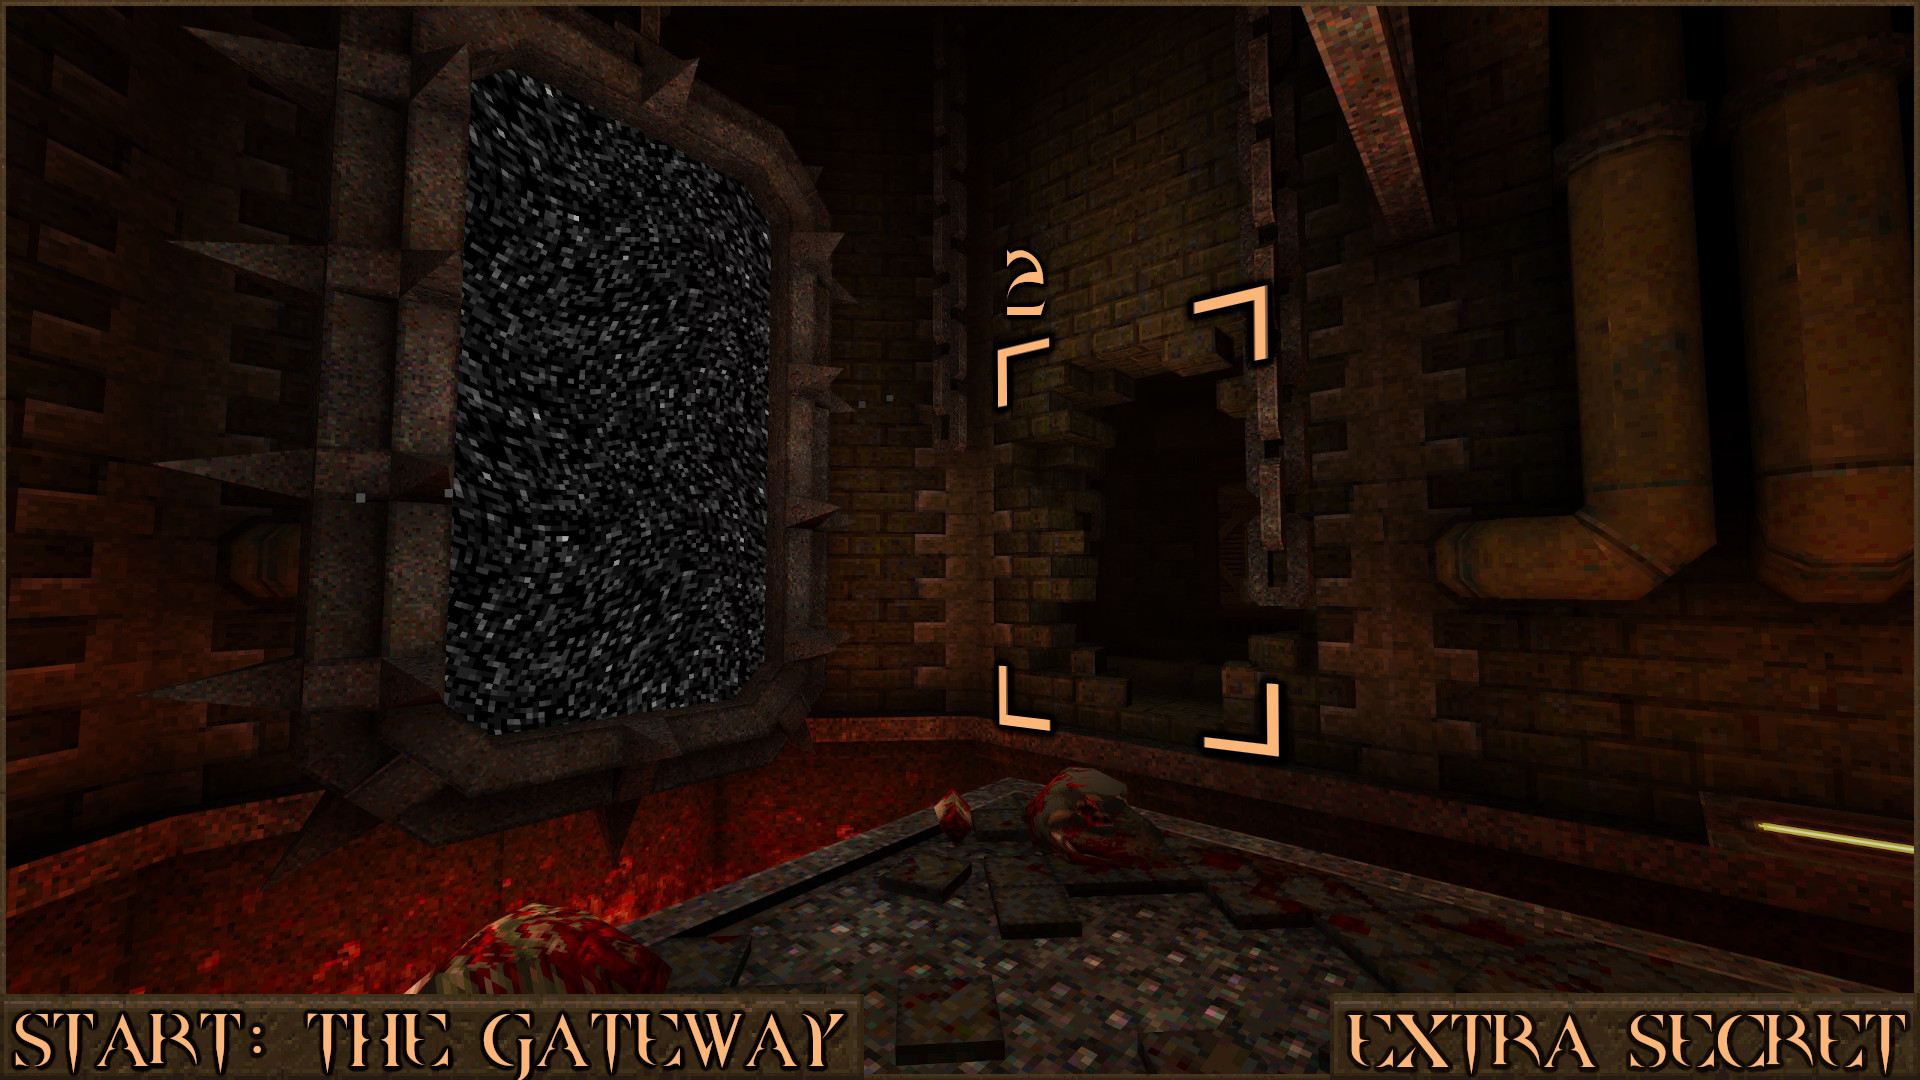
Ahead you will be able to see the Nightmare Difficulty portal ( ) so carefully run forward to land on the nearby platform and then make a large running jump over the lava pit to reach the portal.
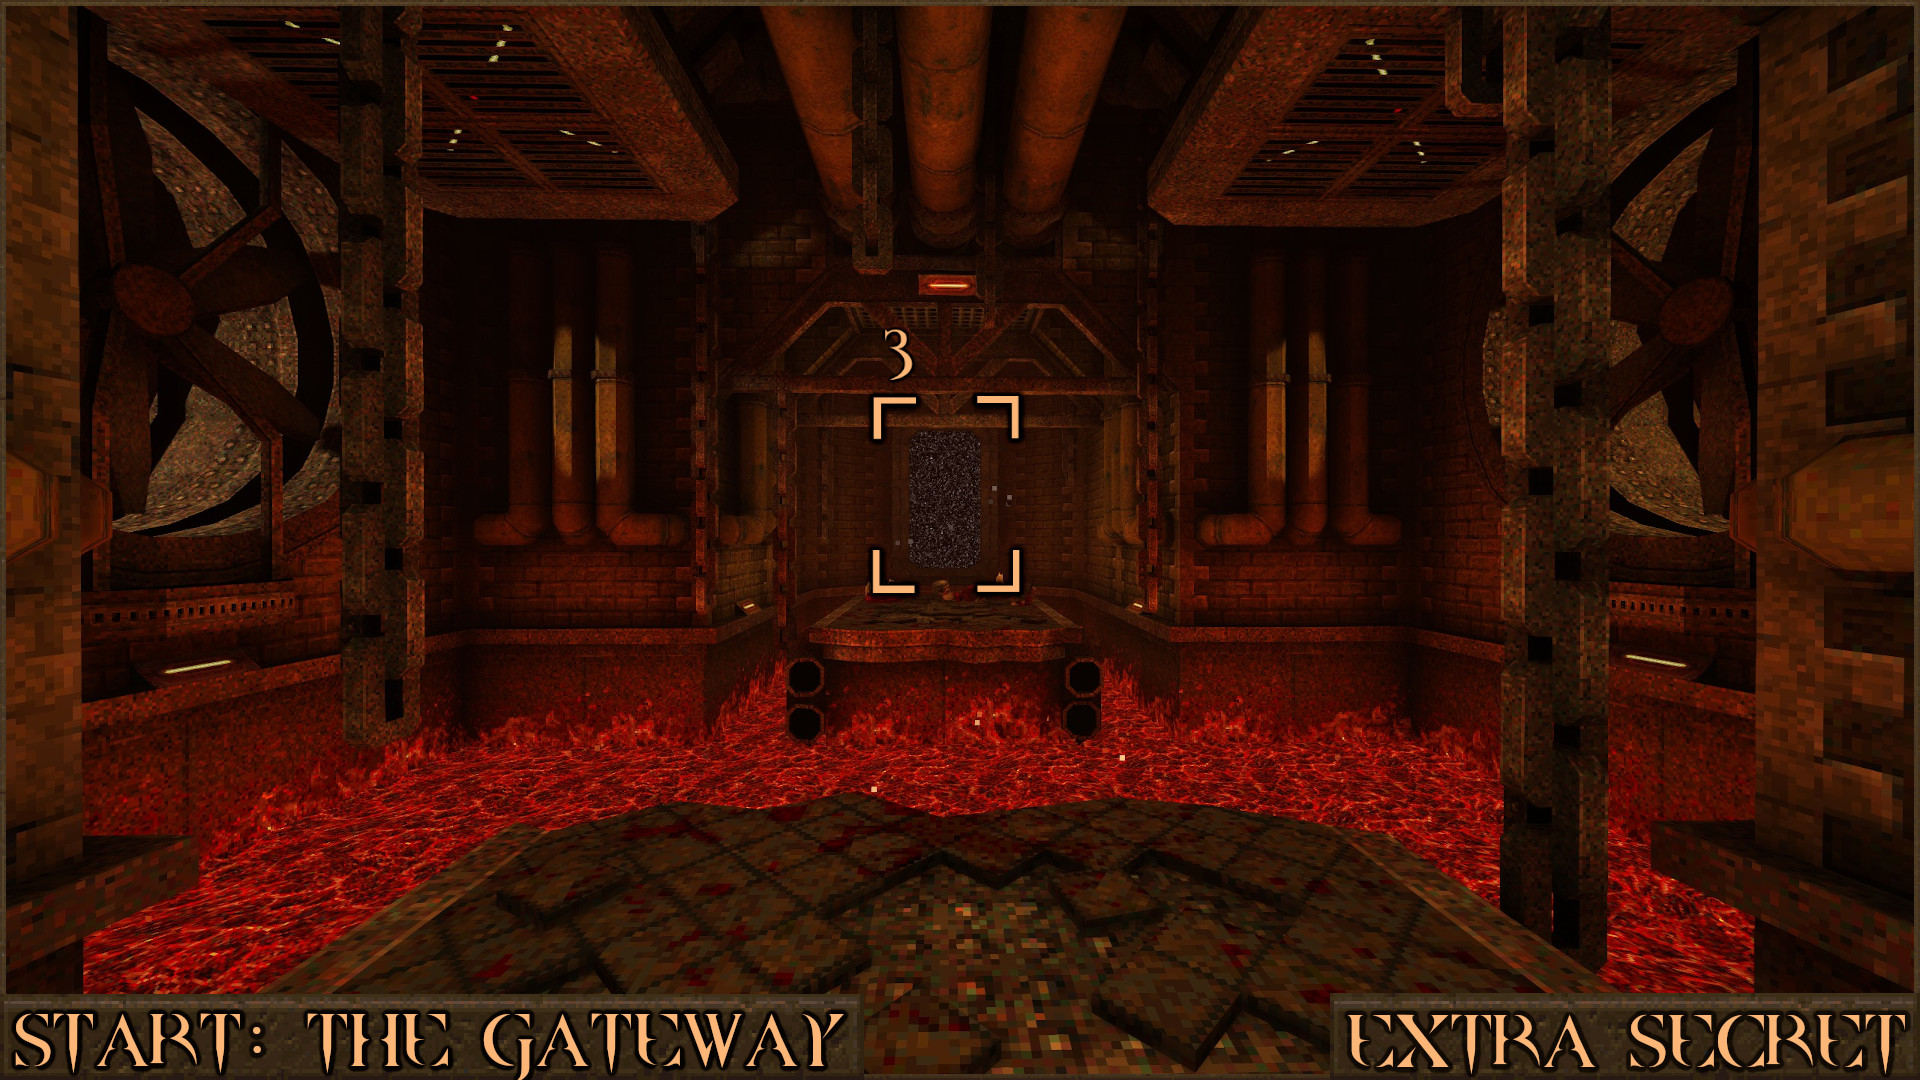
Reward: Nightmare Difficulty
) to head towards the Hard Difficulty portal but don't enter it.Look closely at the wall to the right of the Hard Difficulty portal and you will notice a hole in the wall (
) shrouded in darkness. Make a very careful jump in to the hole and proceed through this dark area.Ahead you will be able to see the Nightmare Difficulty portal (
) so carefully run forward to land on the nearby platform and then make a large running jump over the lava pit to reach the portal.Reward: Nightmare Difficulty
HUB: The Machine
NOTE: There are no secrets in this level.
MGE1M1: The Pain Drain
Secret 1 of 5
When you enter this area look to your left to see a large pool of slime on the other side of a railing. Carefully jump over the railing () to land on some floating crates and you will pickup a Biosuit. Now that you're immune to the slime, quickly swim through the slime around the corner () to find a secret platform with a Megahealth and a red button that is used in Secret 2.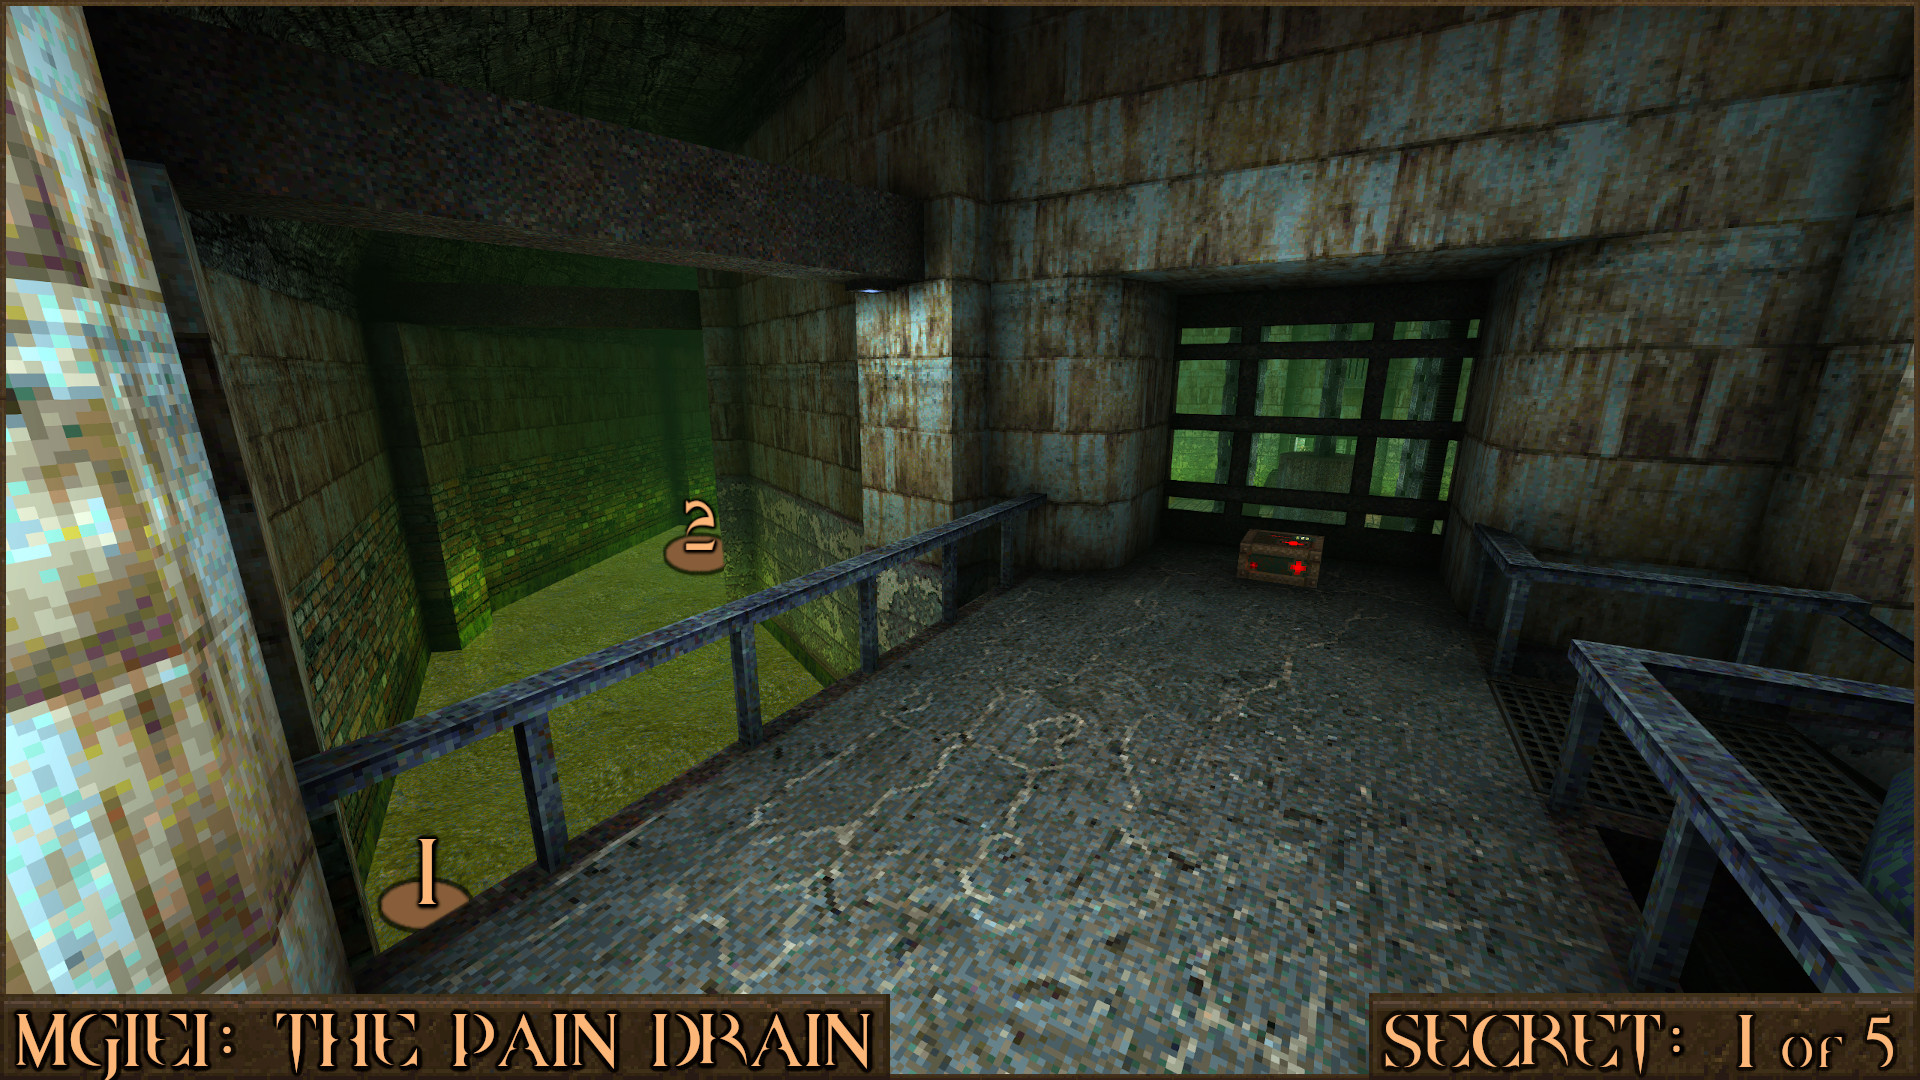
Reward:
Secret 2 of 5
After picking up the Megahealth from Secret 1 press the nearby red diamond button () and the text "A door has been opened." will appear. Continue swimming through the slime and you will surface behind some enemies. Kill them and continue forward down the corridor.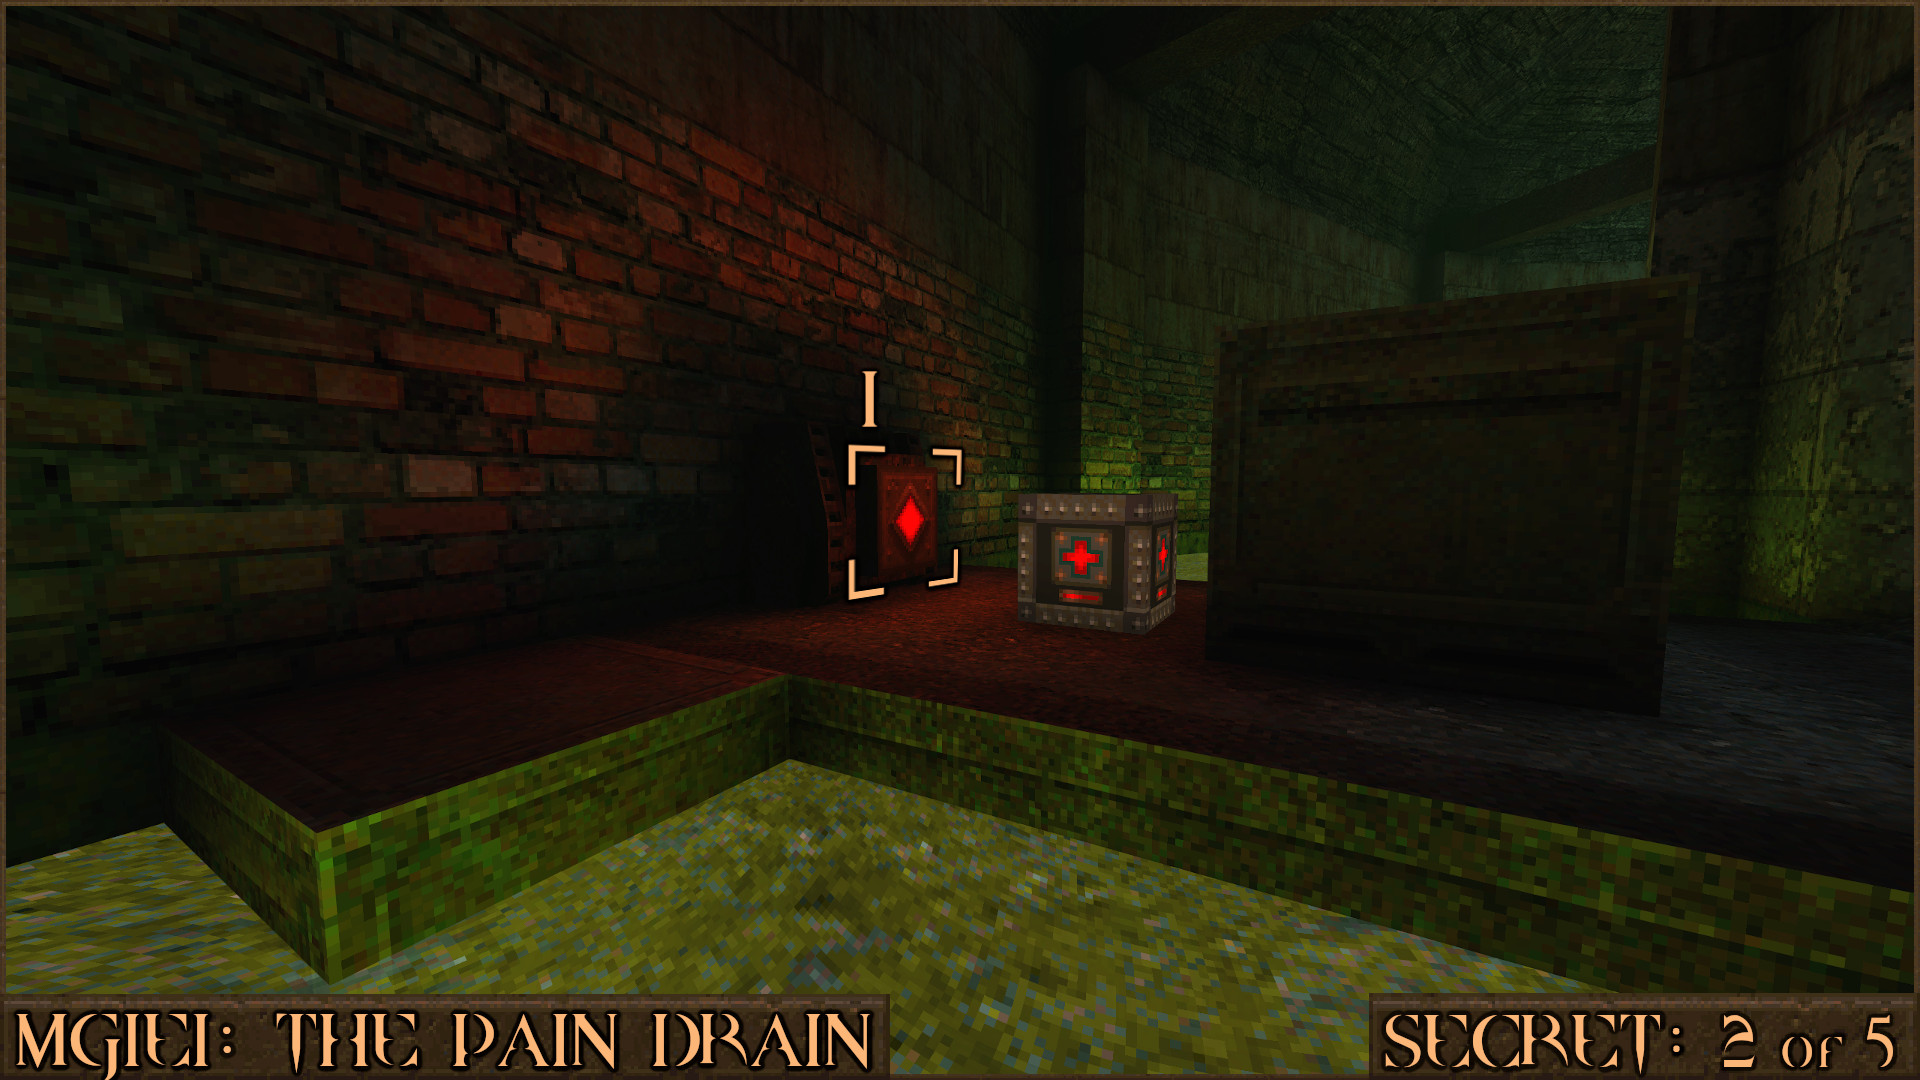
When you see the Gold Keycard Door on your right you will see a doorway on the opposite side (
). This is the door that the red button has opened so head inside to find the secret.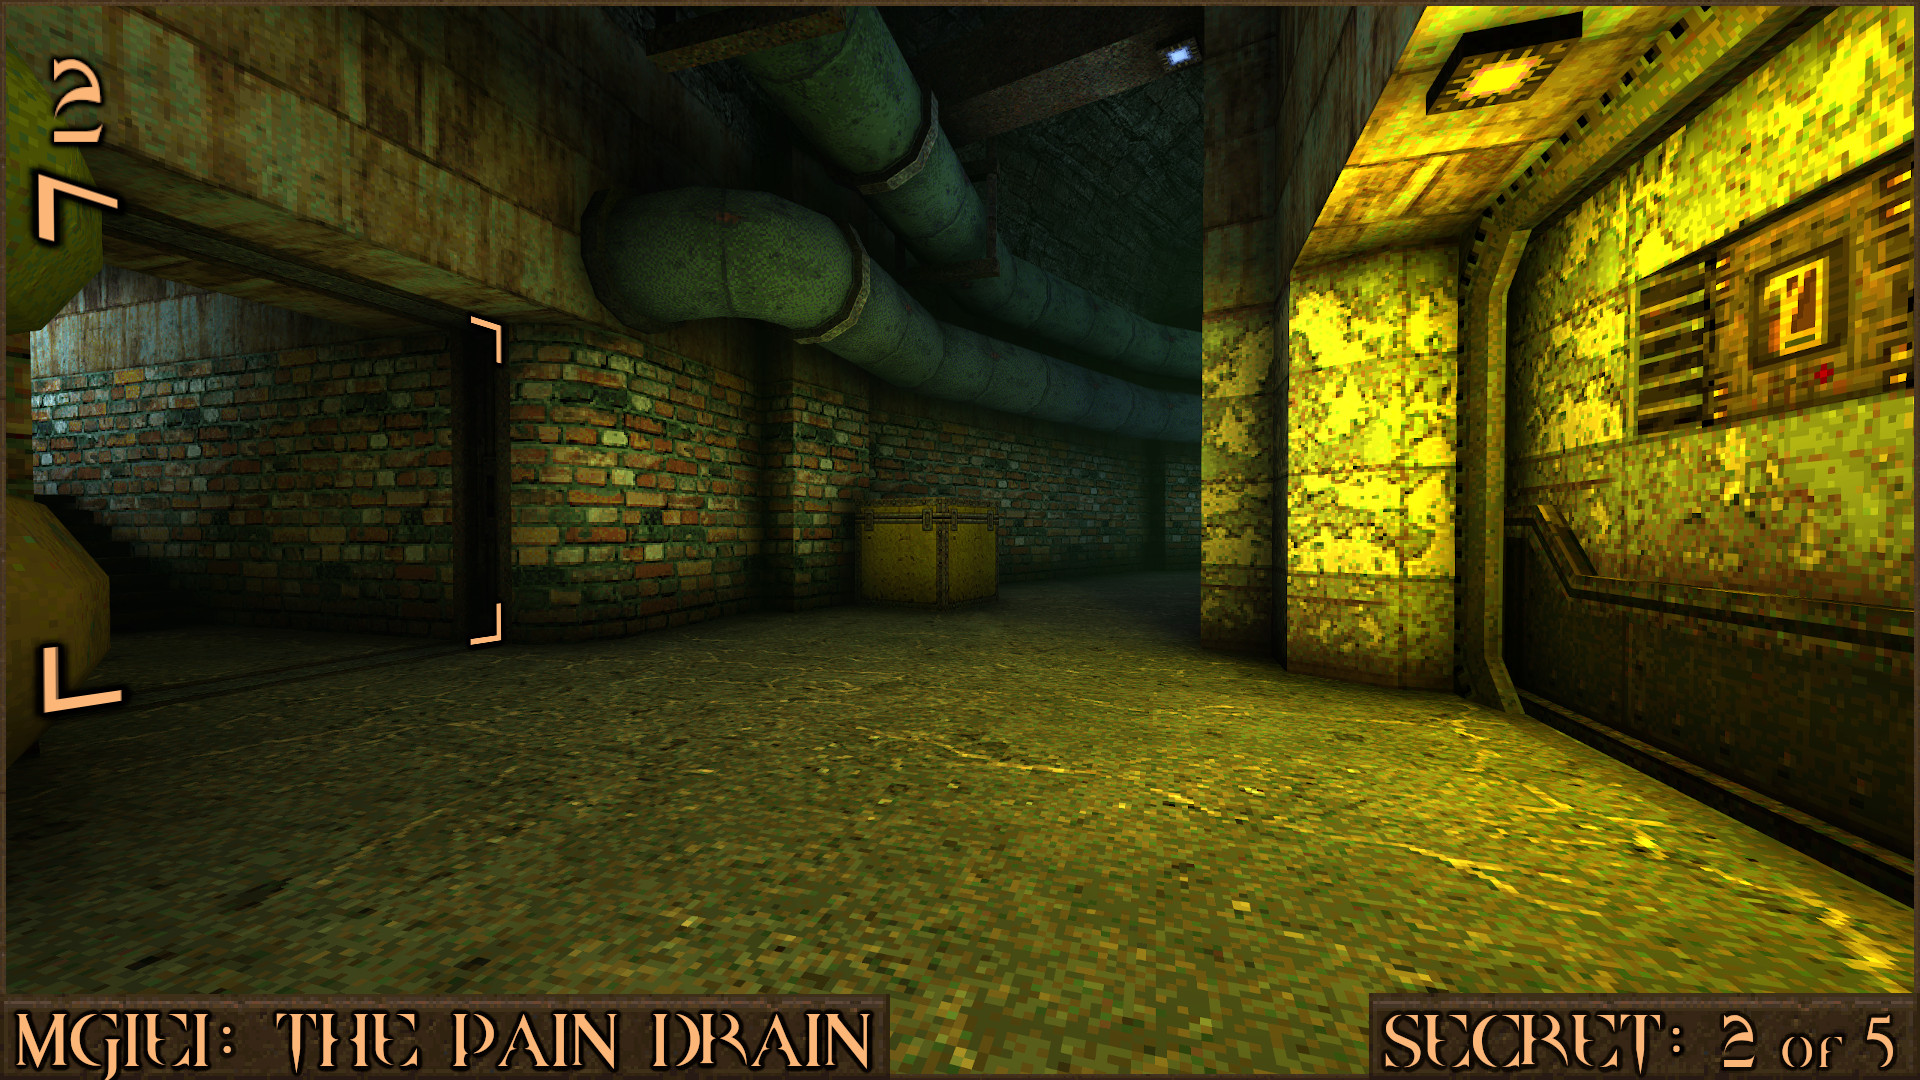
Reward:
Secret 3 of 5
In the room where you pick up the Silver Key you will notice one of the doors is slightly open and you can see a Green Armor inside. Look straight above the door to see a very faint red shootable switch () embedded in the ceiling behind some wooden planks. Shoot it to open the door () and reveal the secret.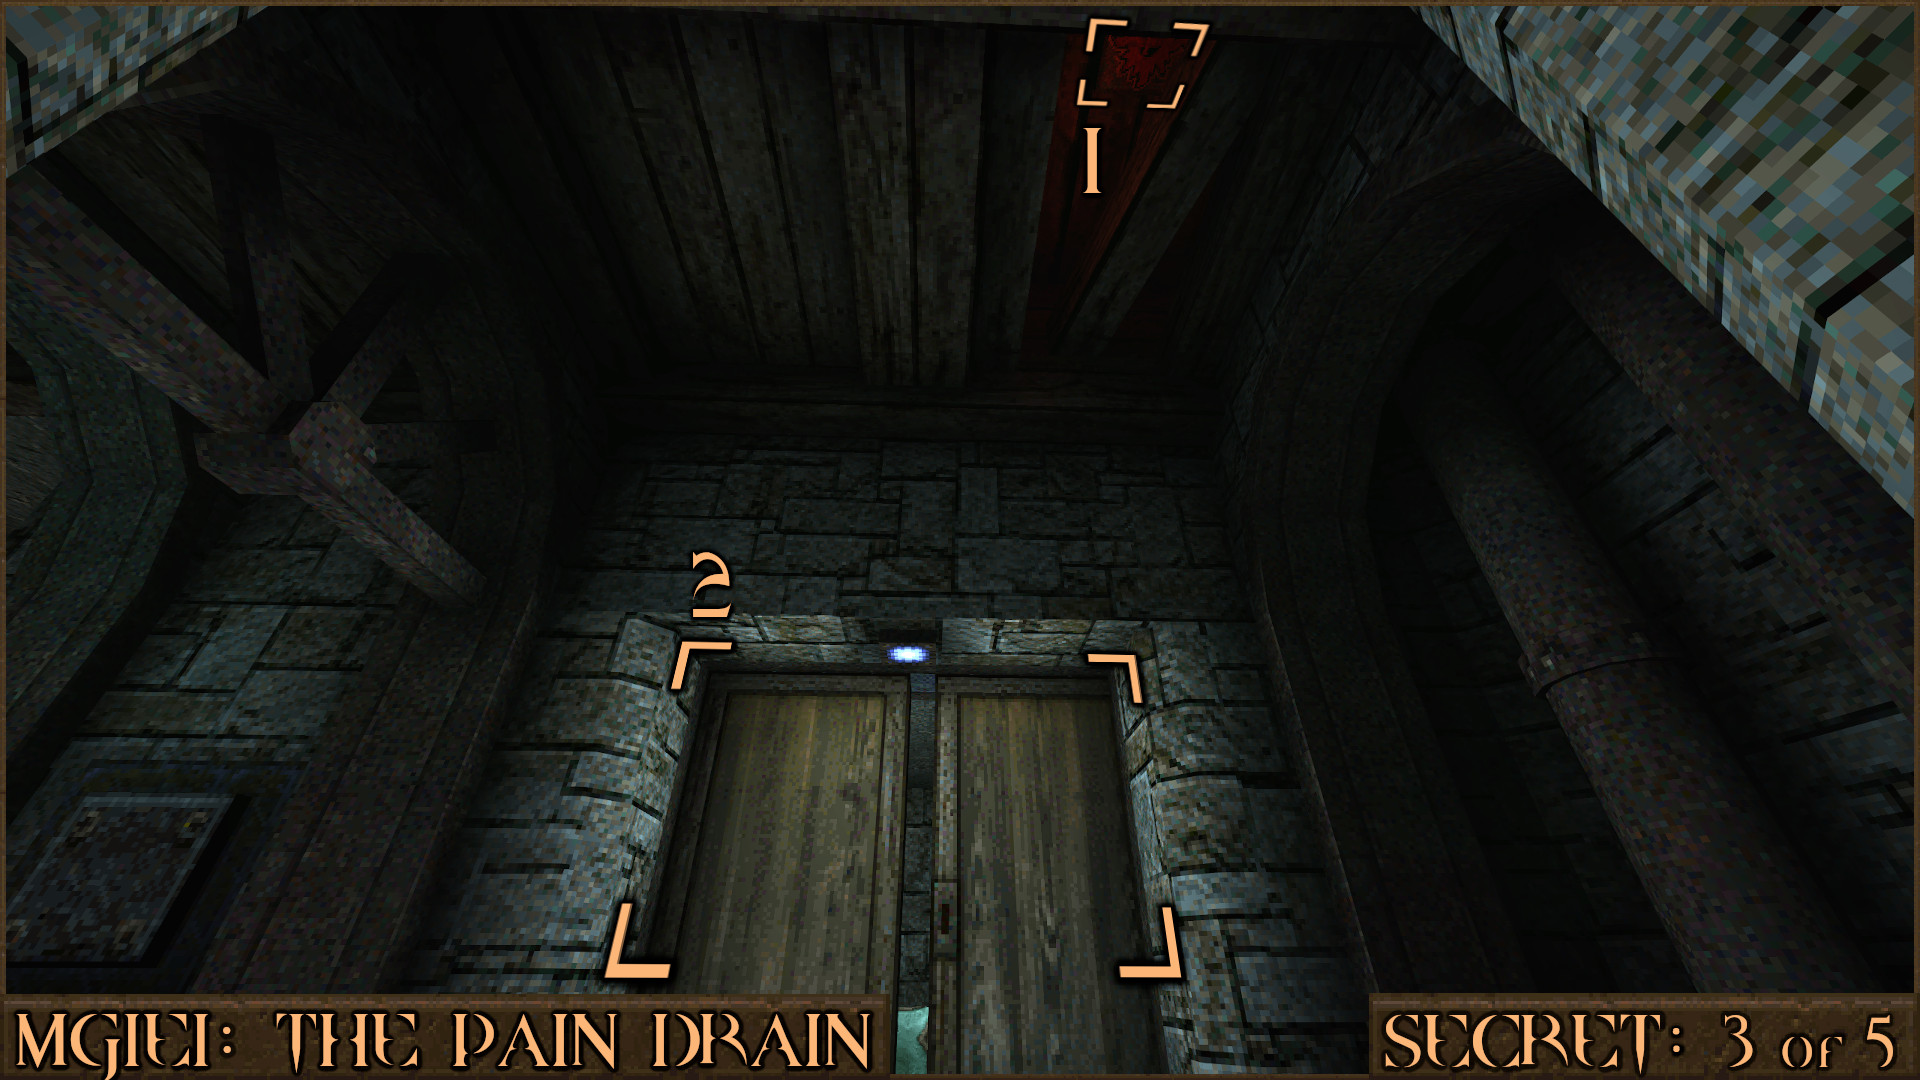
Reward:
Secret 5 of 5 (Part 1)
In the same room as Secret 3 look closely at the blocks on the walls as you want to find one with a rune symbol on it (). Shoot it to turn it red and activate it. This is the first of four hidden rune blocks that need to activated.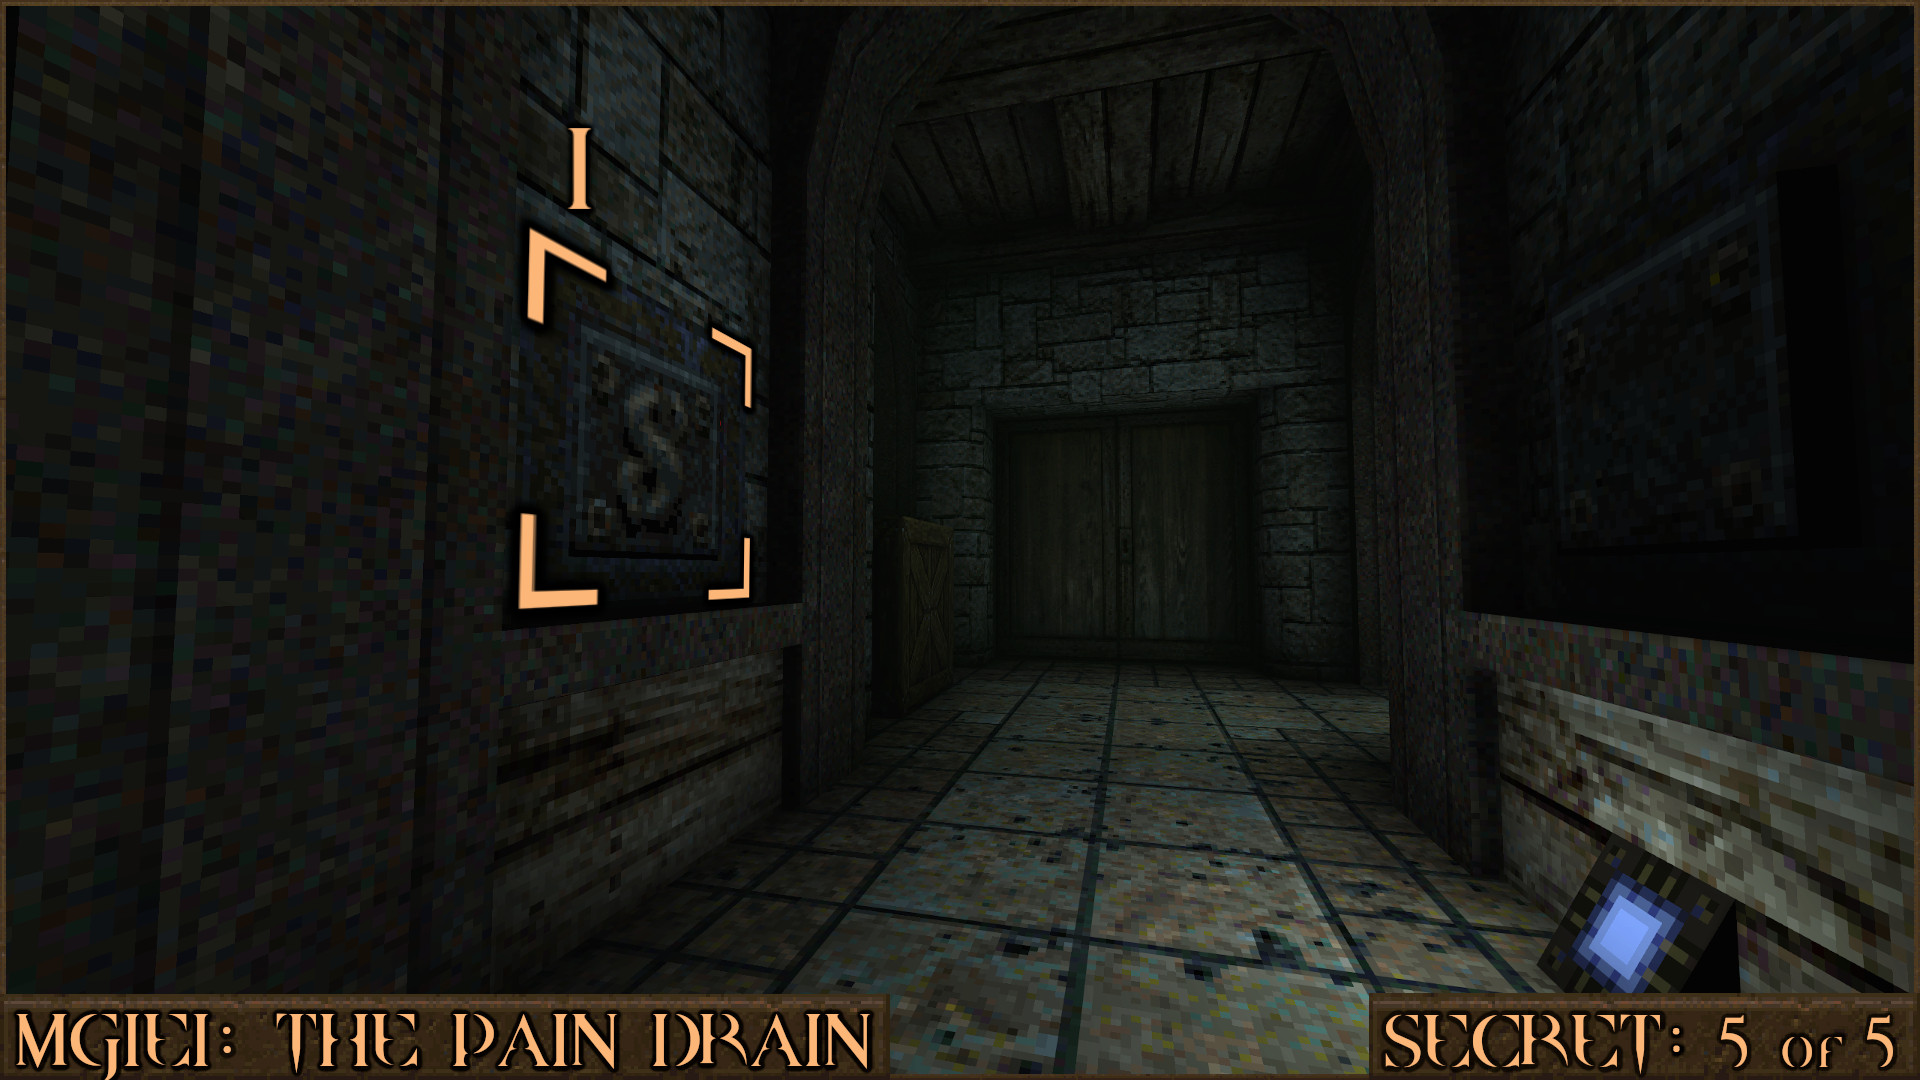
There is a second rune block on the opposite side of the same room (
). There are several plain looking blocks that can be ignored so find the second rune block and shoot it to activate it and then pick up the Silver Key if you haven't already.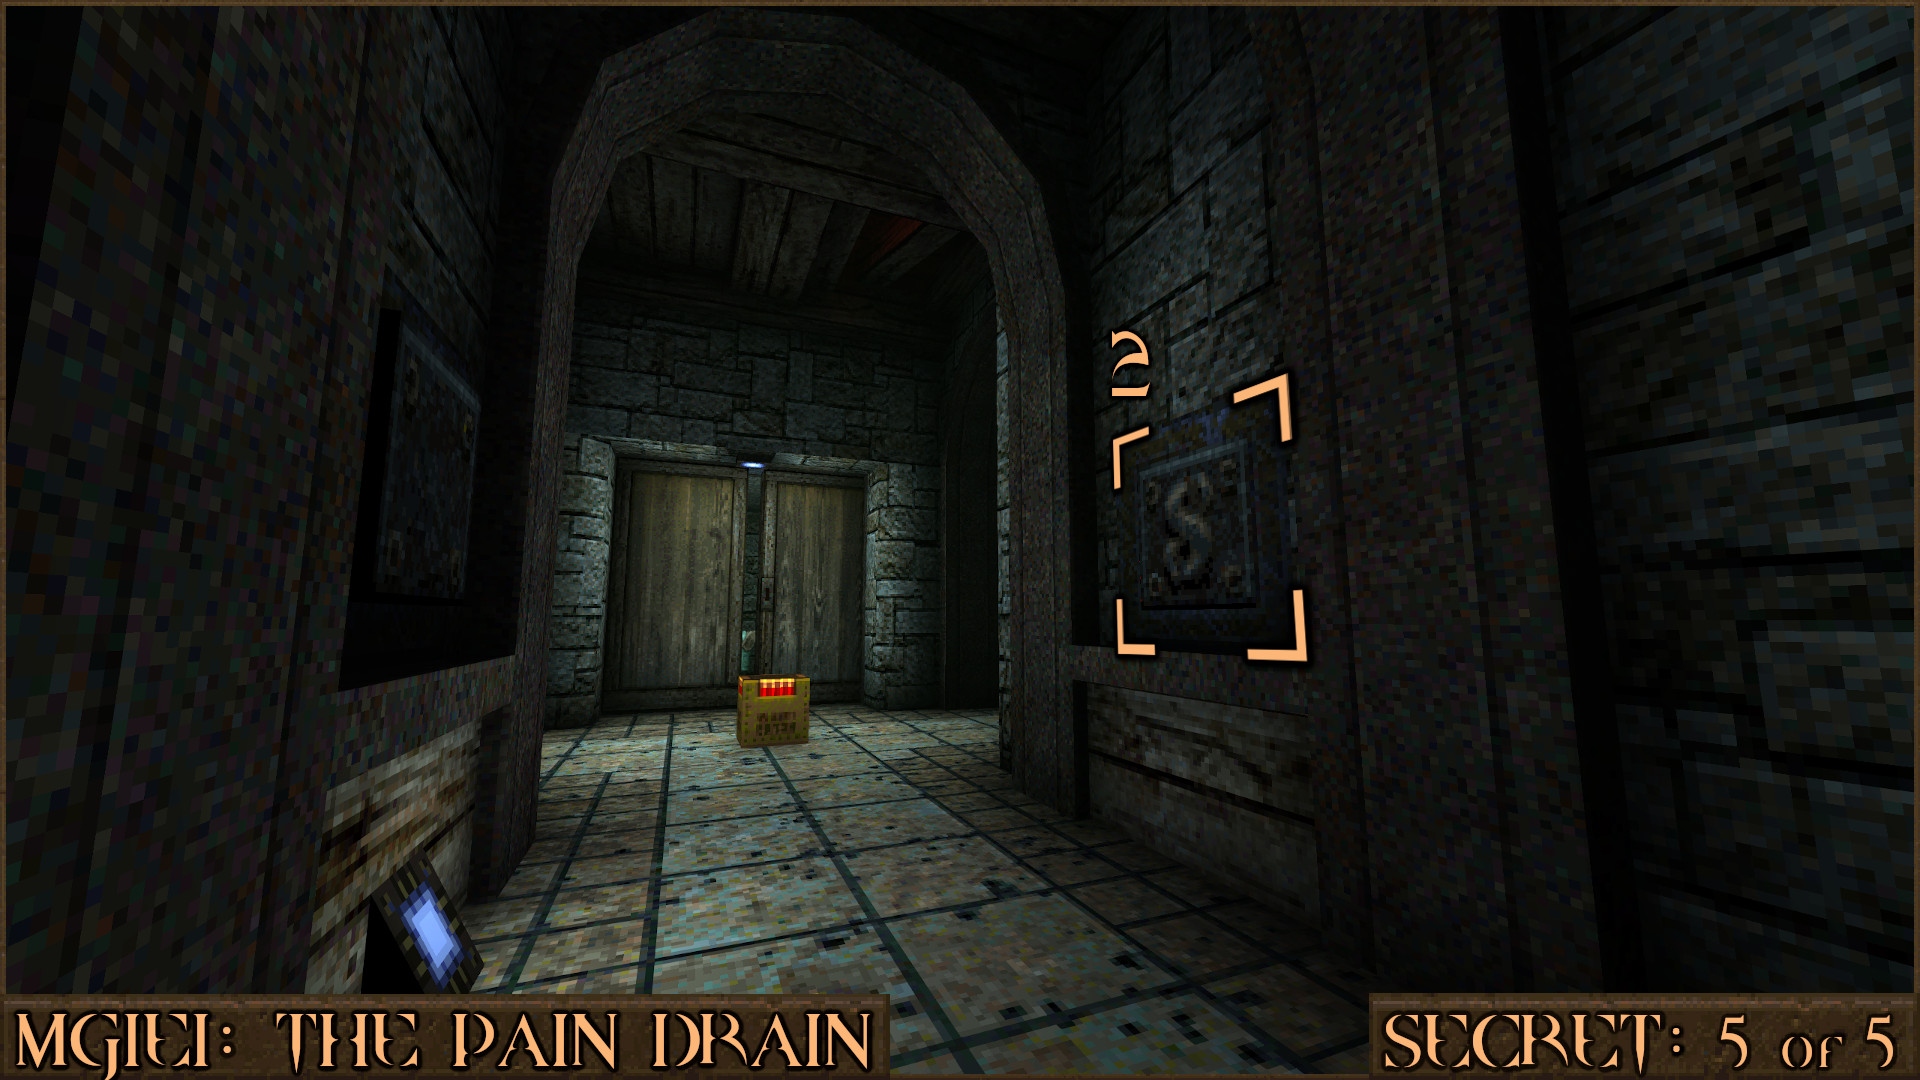
Head back to the circular lift and you will probably notice that two of the four rune blocks here have also turned red. Drop down to the ground floor, open the Silver Key Door and head in to a large green room. As you enter this large room keep to the left and you will see a pack of Shotgun Shells. Just above this is another rune block on a wall (
), shoot it to activate the third rune block. The text "A door has been opened." will appear.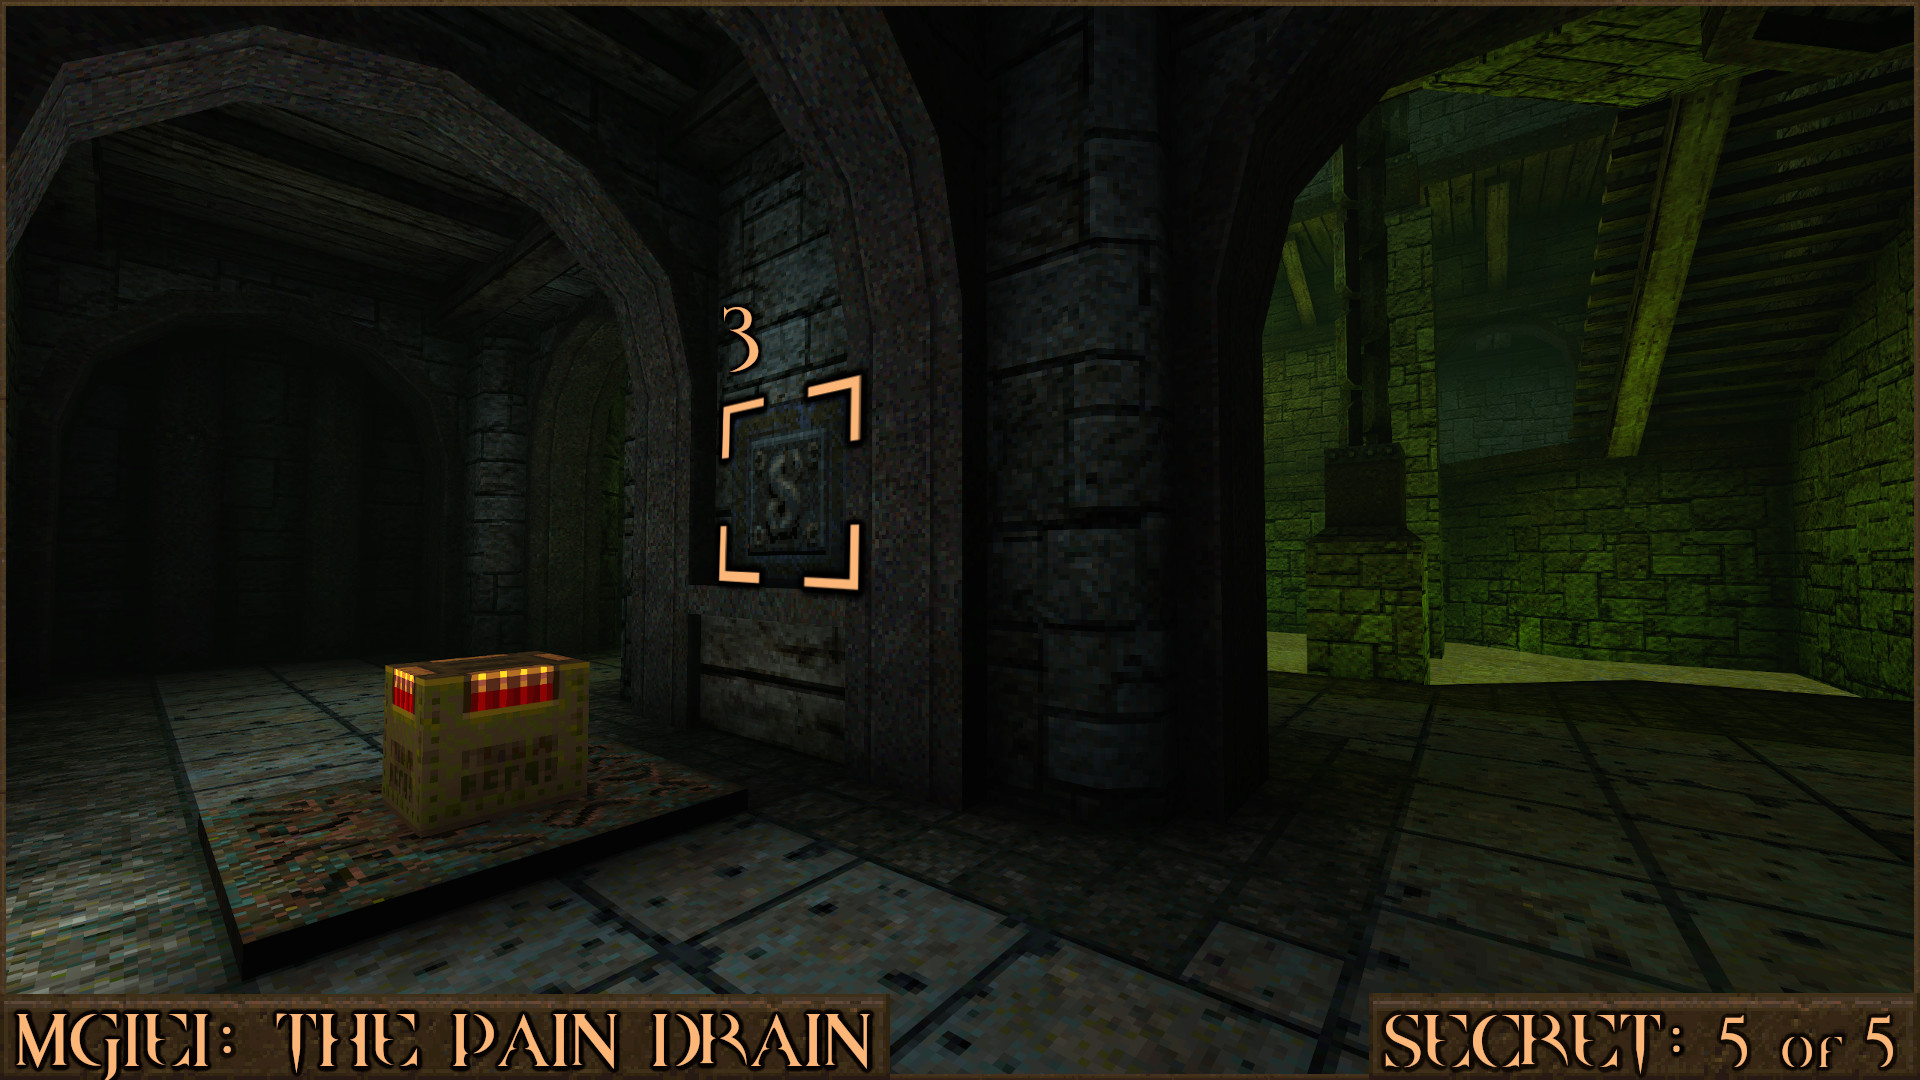
From here head up the stairs and in to another little nook to find the final rune block on the wall (
 ). When all four rune blocks have been shot then the message "A door has been opened." will appear. You will continue with this secret later on but for now continue with the level.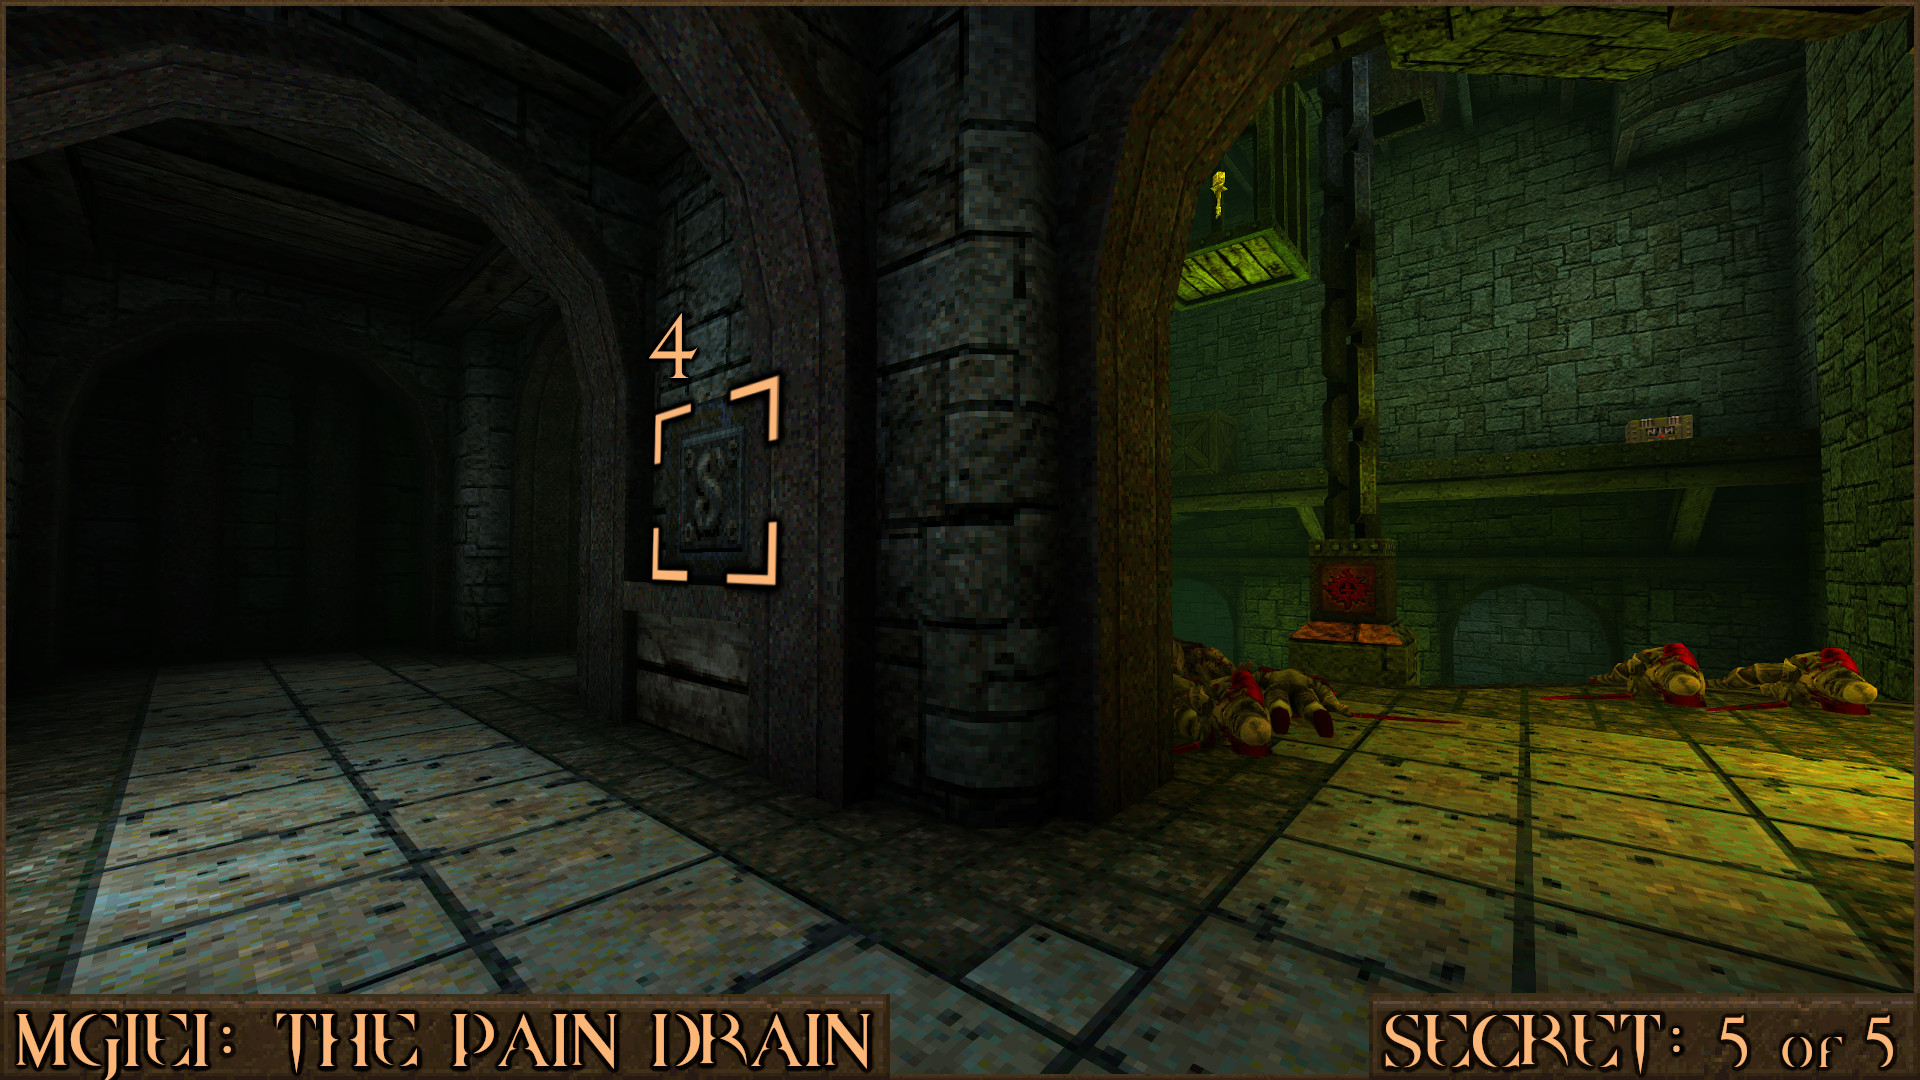
Secret 4 of 5
After opening the Gold Key Door head up a few stairs and then look towards the end of the room. You will see several beams between some pillars. Jump on to the nearest beam () and then make a very tricky jump around the pillar to reach the beam. This jump can be difficult but try to shift your movement direction towards the beam after jumping past the pillar to land on the beam. Doing so will claim the secret and grab the Green Armor ().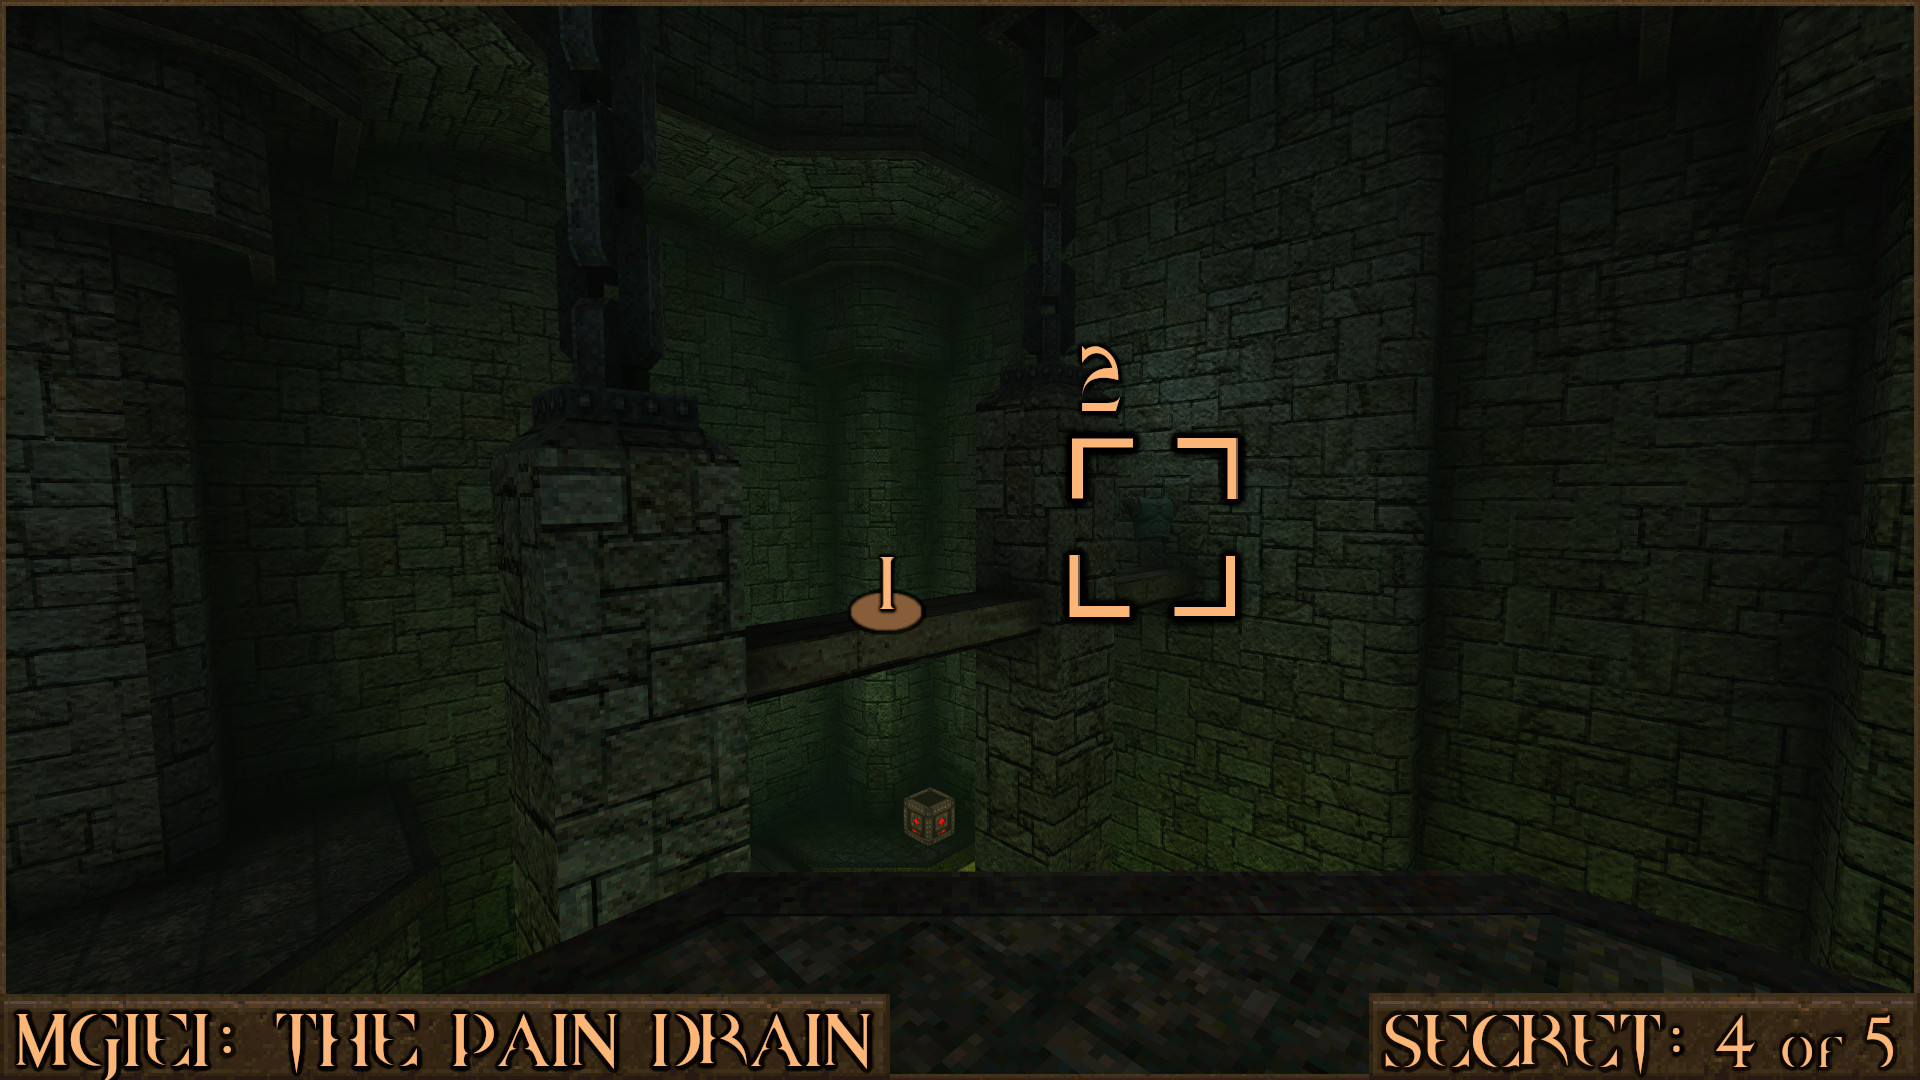
Reward:
Secret 5 of 5 (Part 2)
Once you have finished with the rest of the level it is time to finish finding the secret exit. Head back to the circular lift again and ride it up to the upper floor (the same floor you found the Silver Key). If you have shot all the rune blocks from Secret 5 (Part 1) you will see that a door has opened to reveal a pressure plate switch and a Biosuit ( ). Grab the Biosuit, press the pressure plate switch and the message "An underwater gate has been raised..." will appear.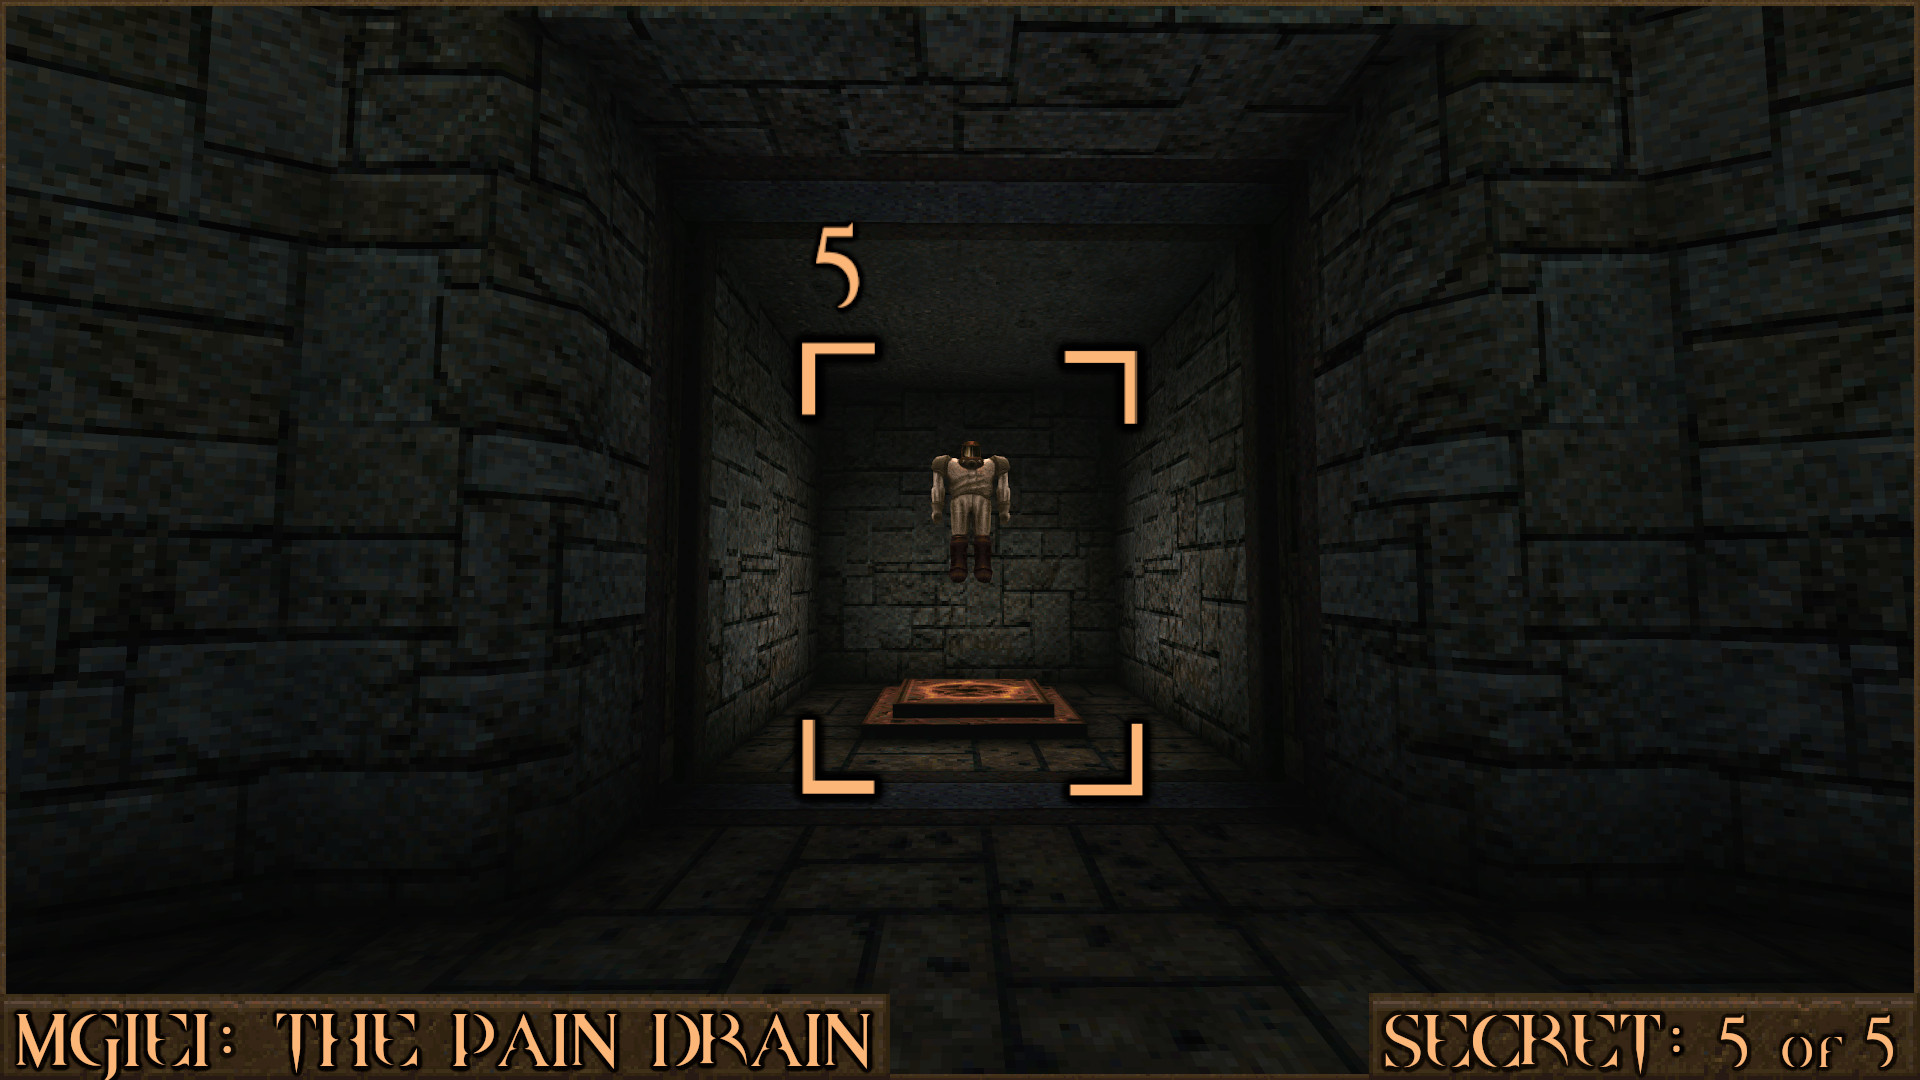
Jump back down to the ground floor and jump off the side in to the green slime. Swim around this area (your Biosuit will stop you taking damage) and quickly find the large hole in the side of this slime pit (
 ). When you approach it the message "Exit to the secret level." will appear. Go through it to be taken to the secret level: MGE1M3: Sandy's Room.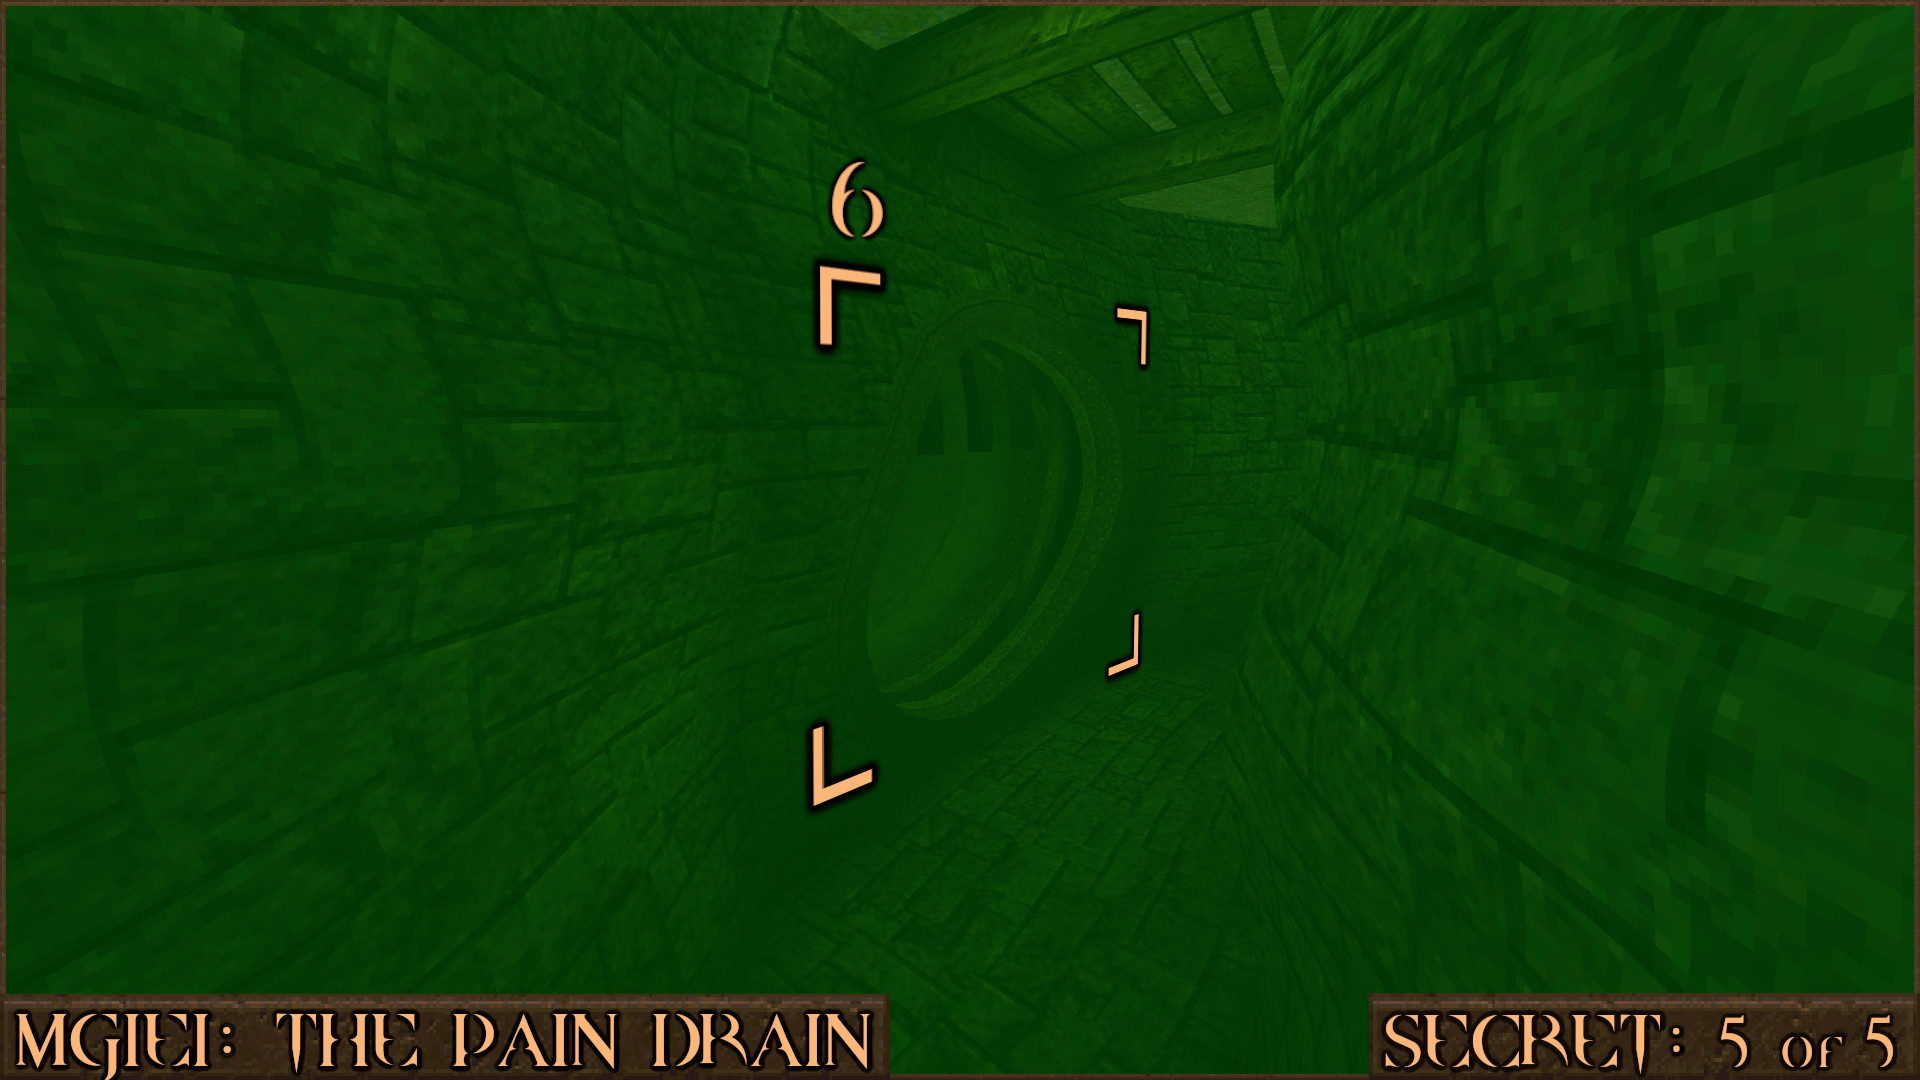
Reward:
SECRET LEVEL
MGE1M3: Sandy's Room [Secret Level]
Secret 1 of 4
Near the start of the level look for the Silver Key Pipe as next to it is a bloody monster face panel. Shoot it to reveal a secret area.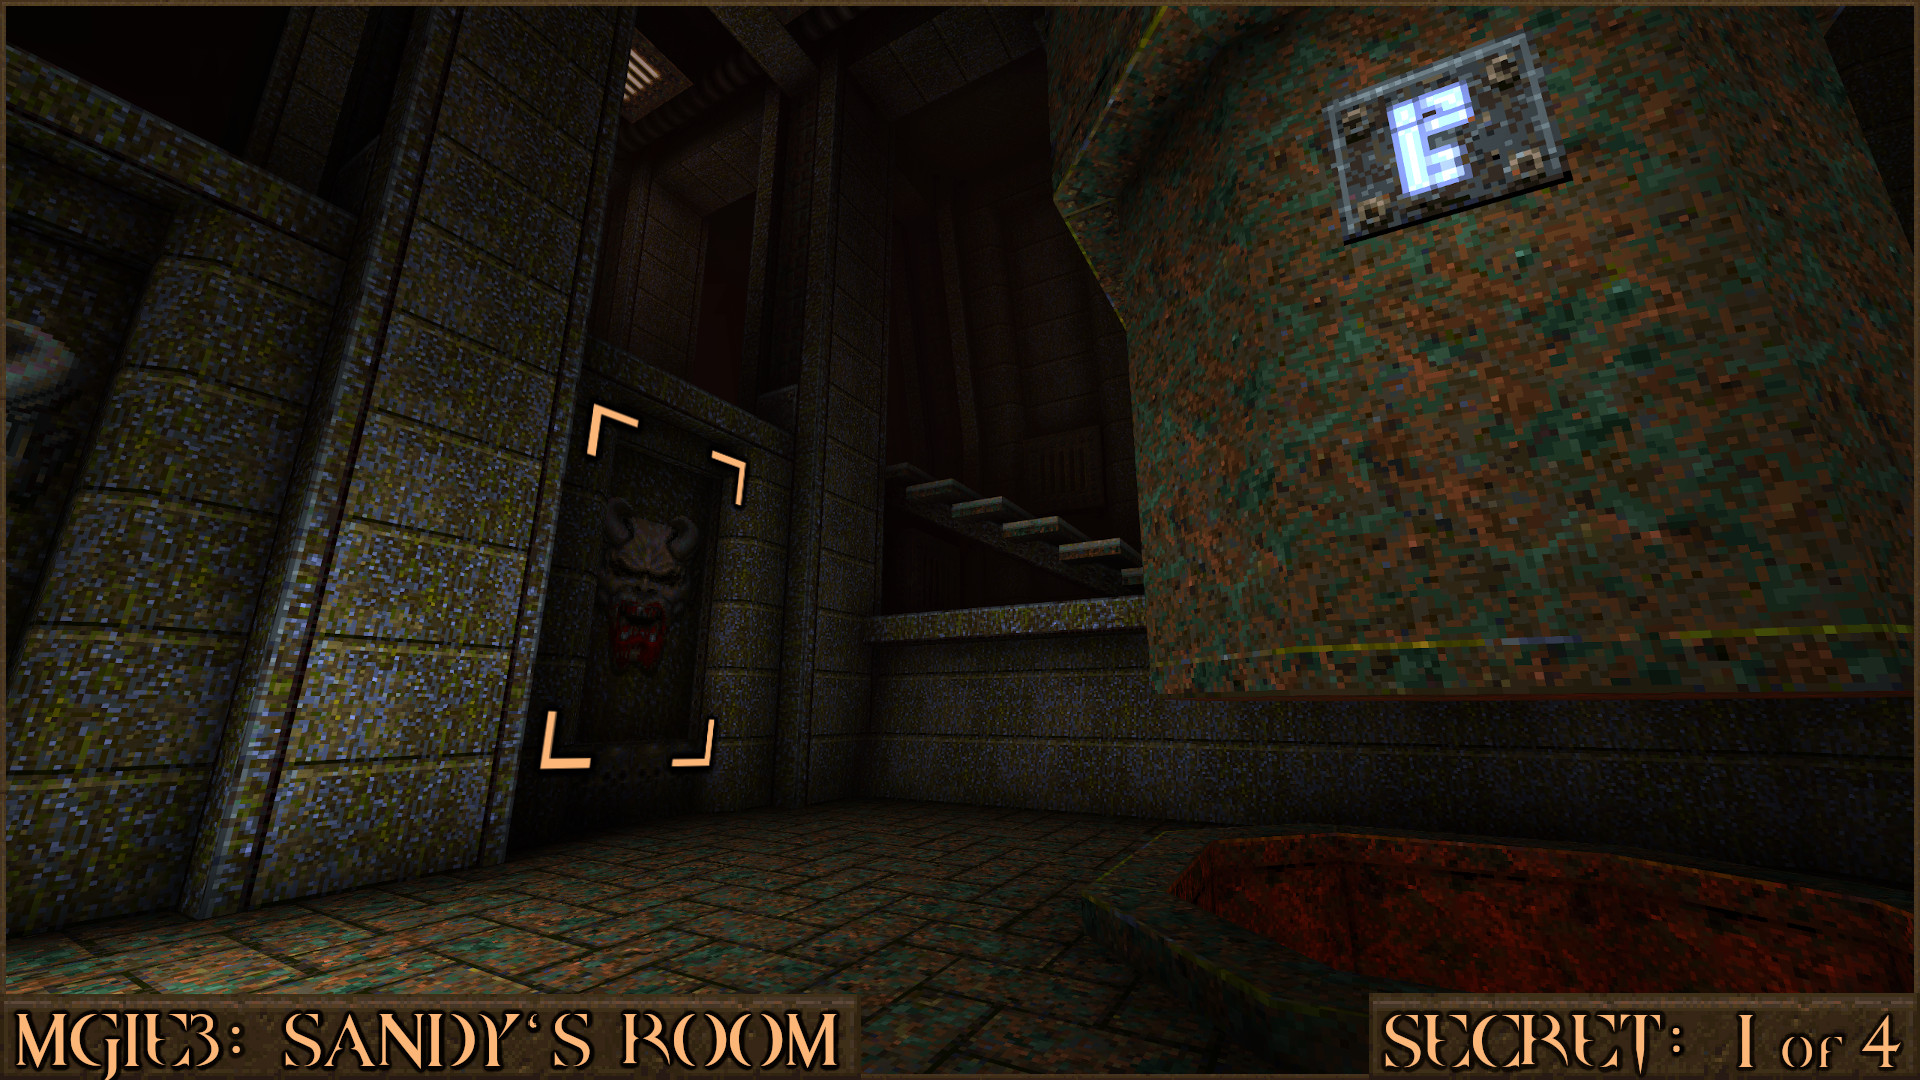
Reward:
Secret 2 of 4
Shortly after Secret 1 you will enter a room with lava falling behind the walls. Look under the small bridge in this area to see another bloody monster face panel. Shoot it to reveal another secret area.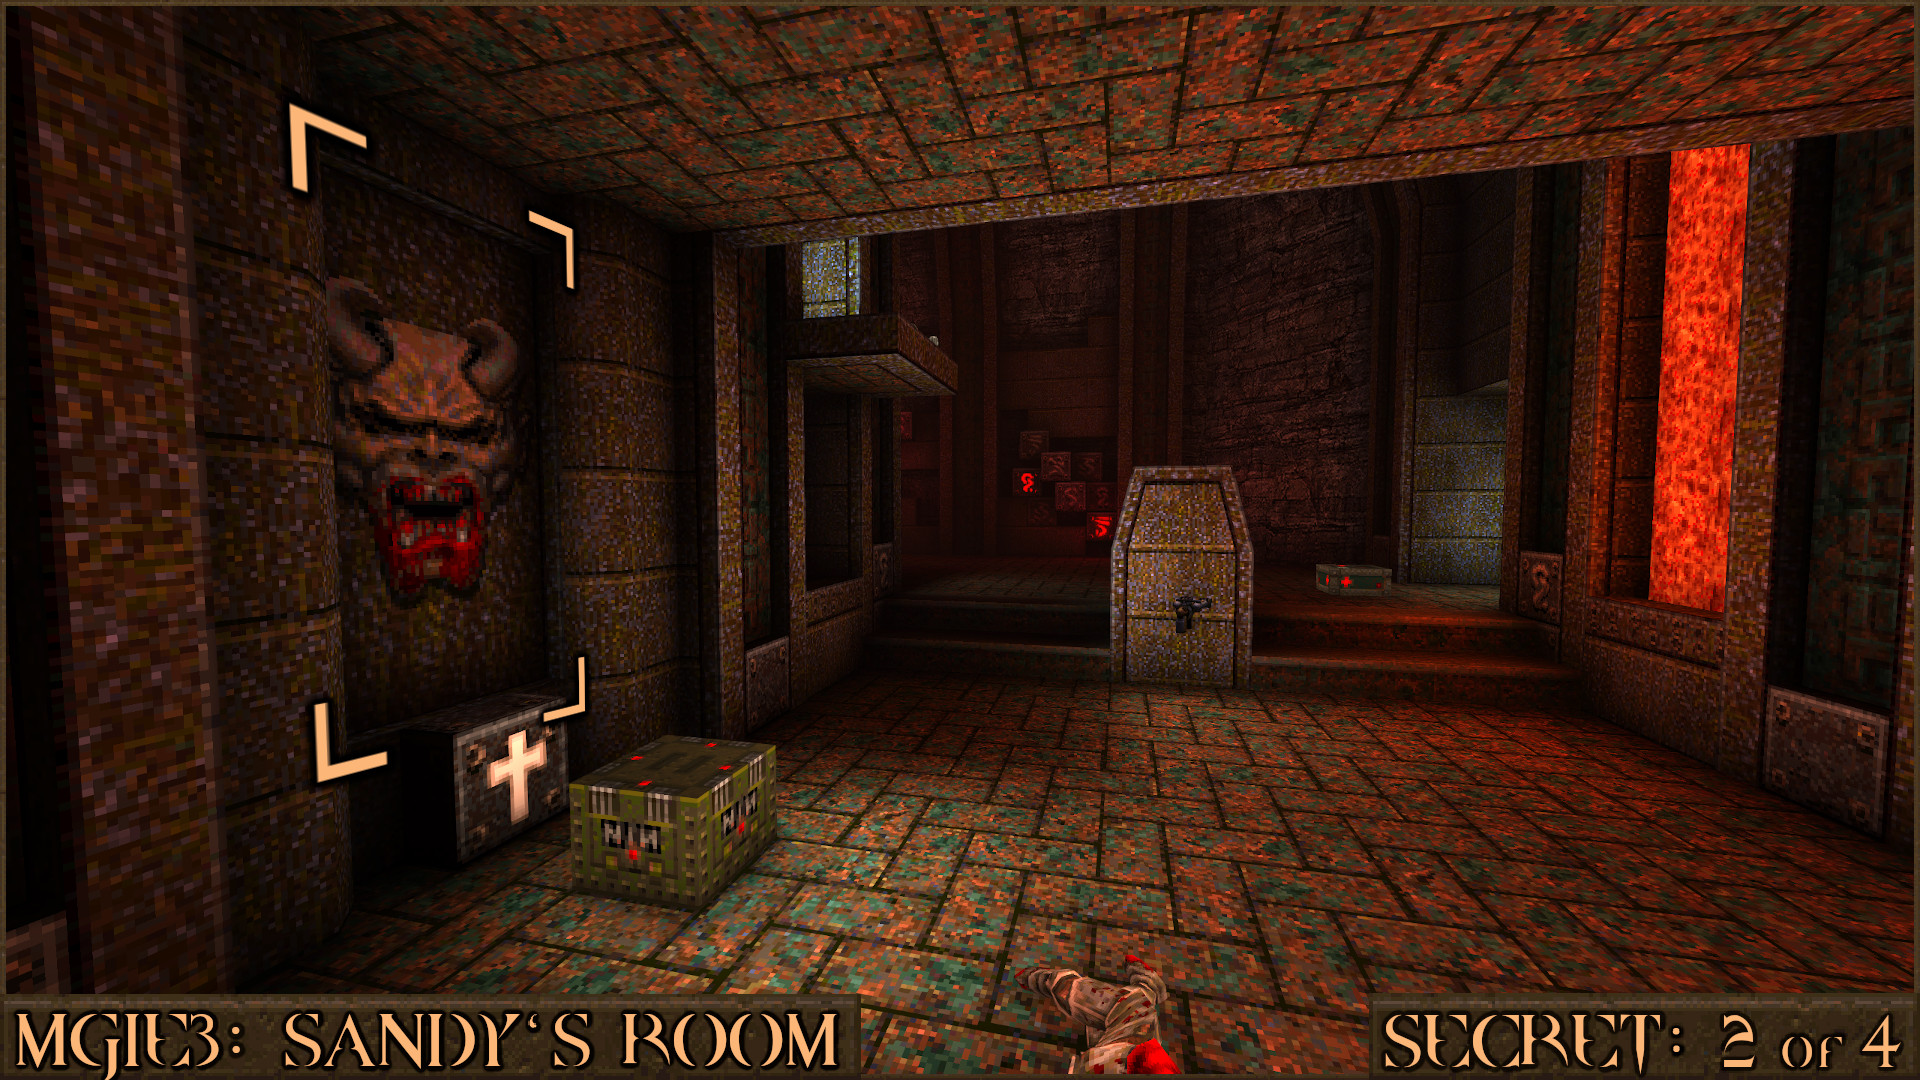
Reward:
Extra Secret
In a room with lots of falling lava get to the bottom of this room. Look carefully at the underside of platforms to see two shootable triggers (+). Activating them both will reveal a secret teleporter behind a door () that will let you return to a previous part of the level.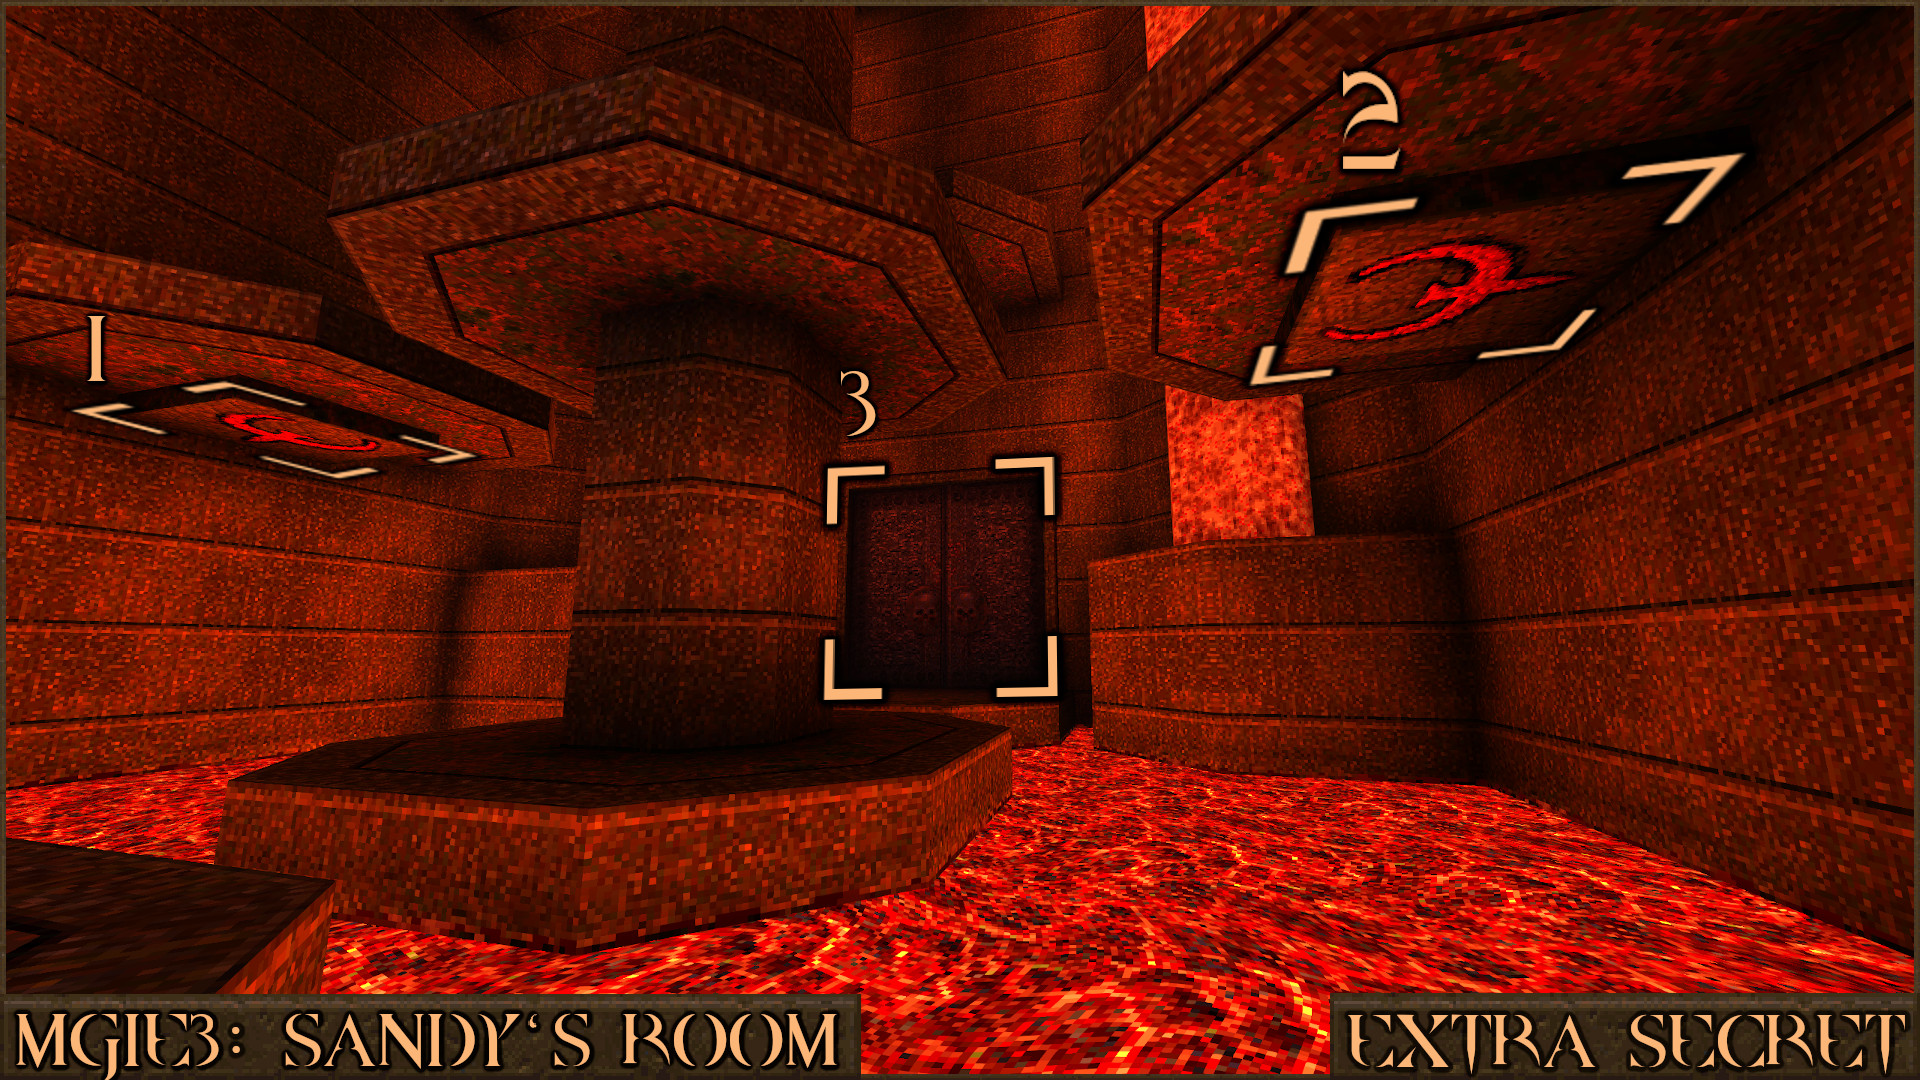
Reward: NONE
Secret 3 of 4
Later in the level you will enter a large room that contains the Gold Key Door. Look in the centre of this room to see another bloody monster panel that can be shot to reveal a secret area.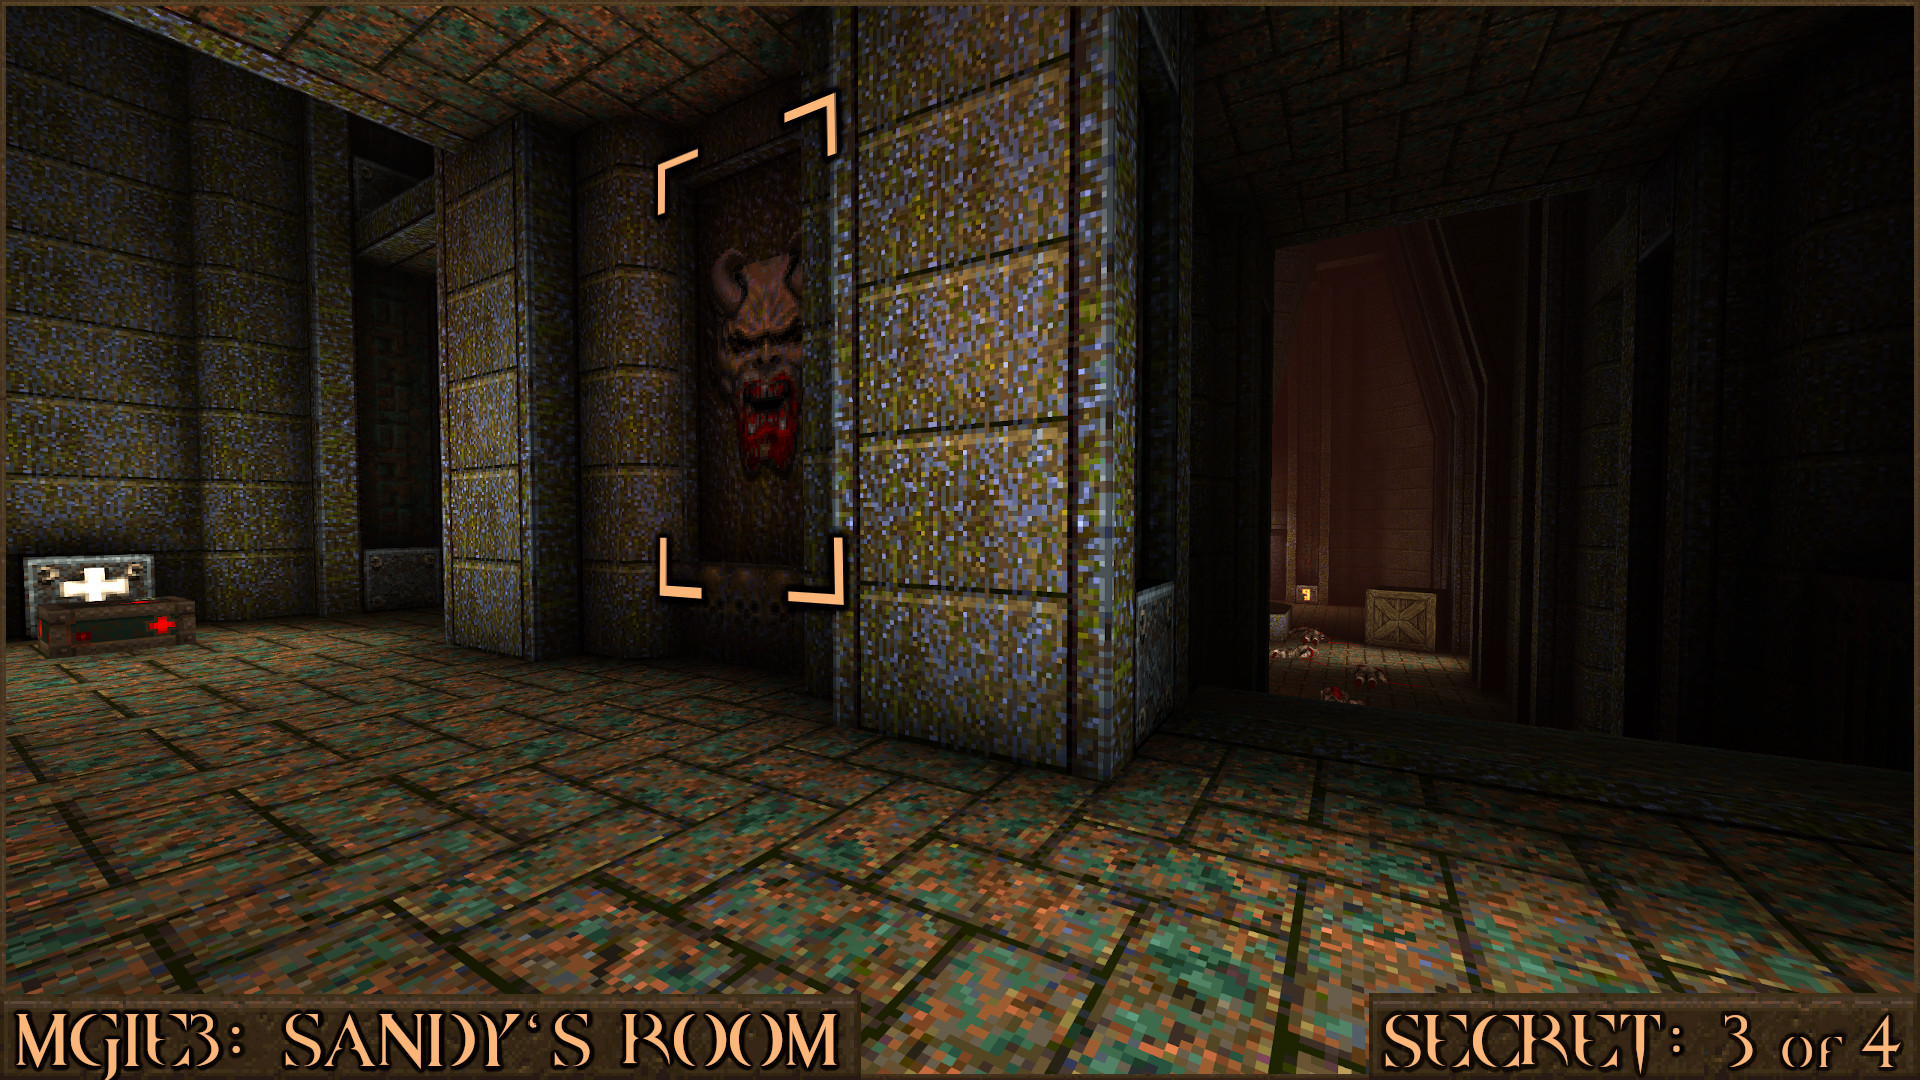
Reward:
Secret 4 of 4
In the room next to the one from Secret 3 you will see a bridge with a lava cascading down either side. Jump over the side of the bridge () to find a hidden area underneath.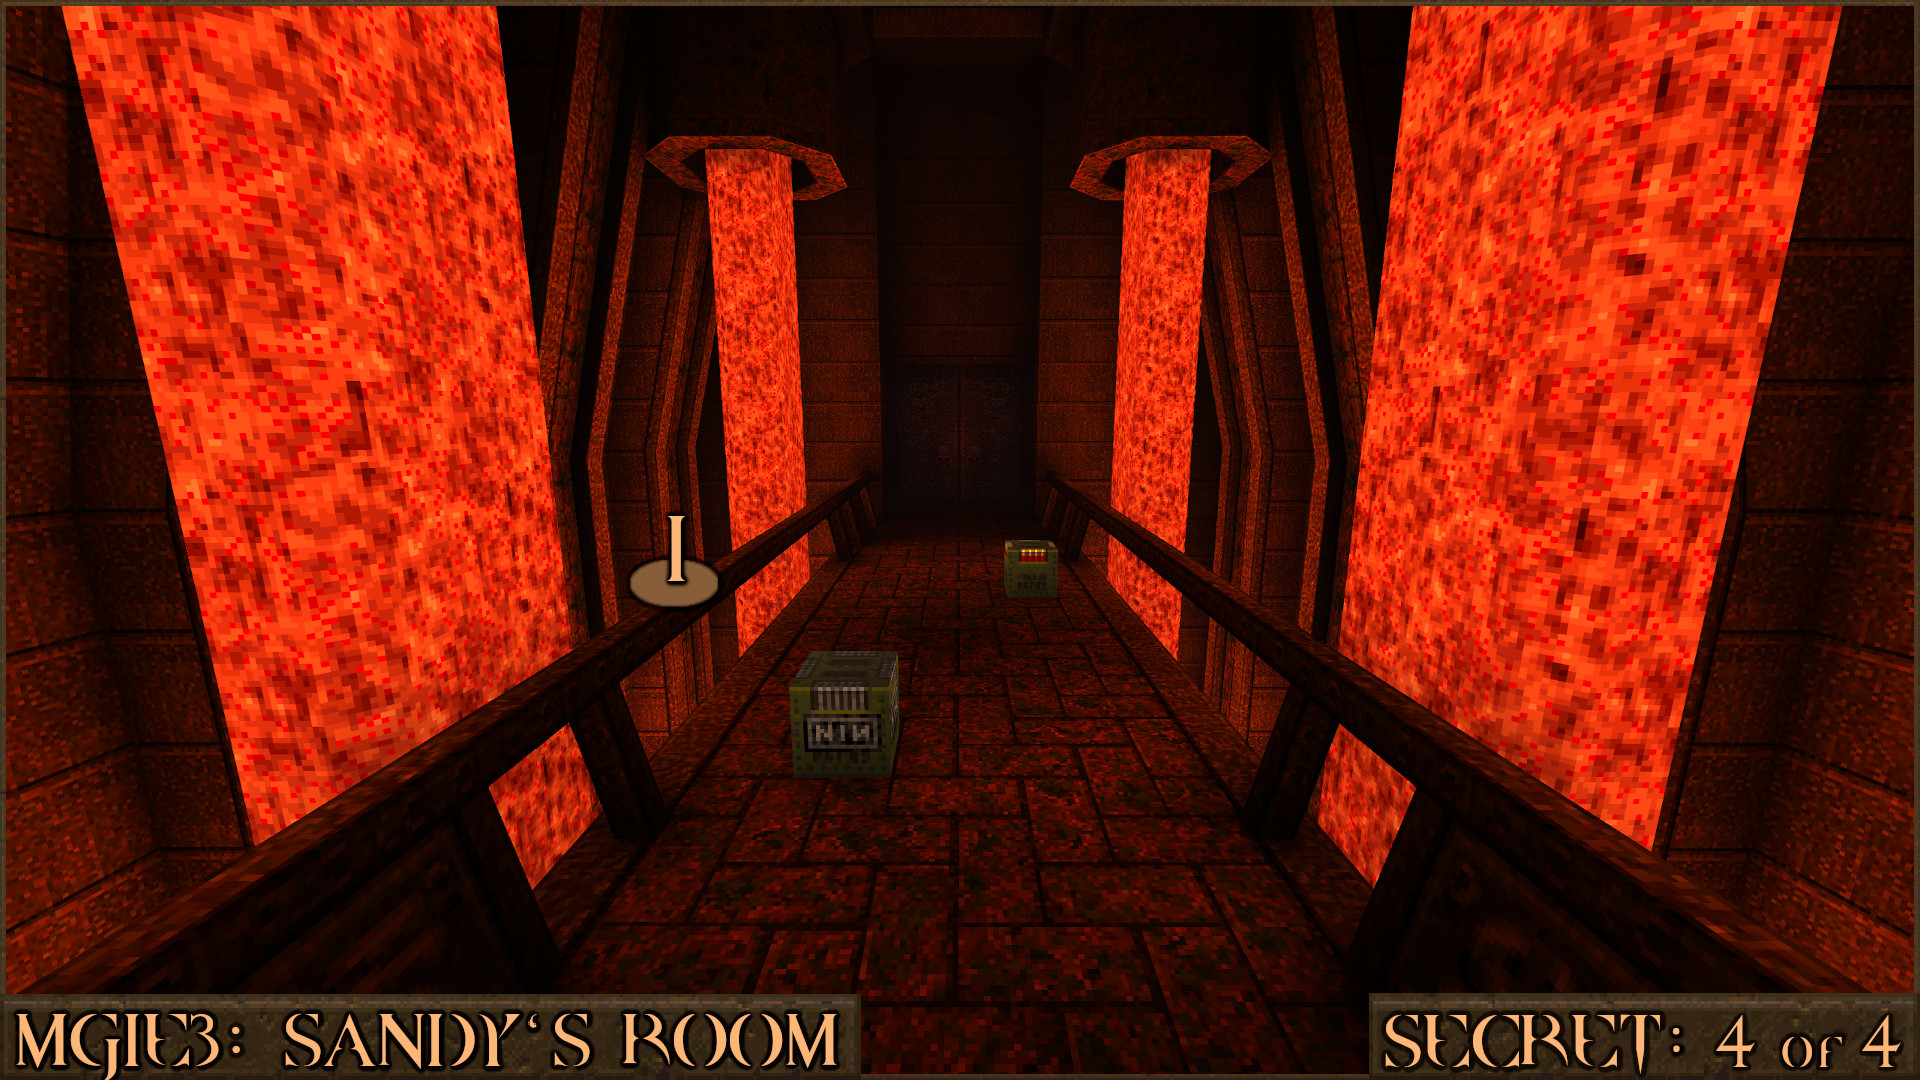
Reward:
MGE1M2: The Wishing Well
Secret 1 of 6
At the start of the level look when you see the green slime look to the left. Shoot the vent to reveal a secret.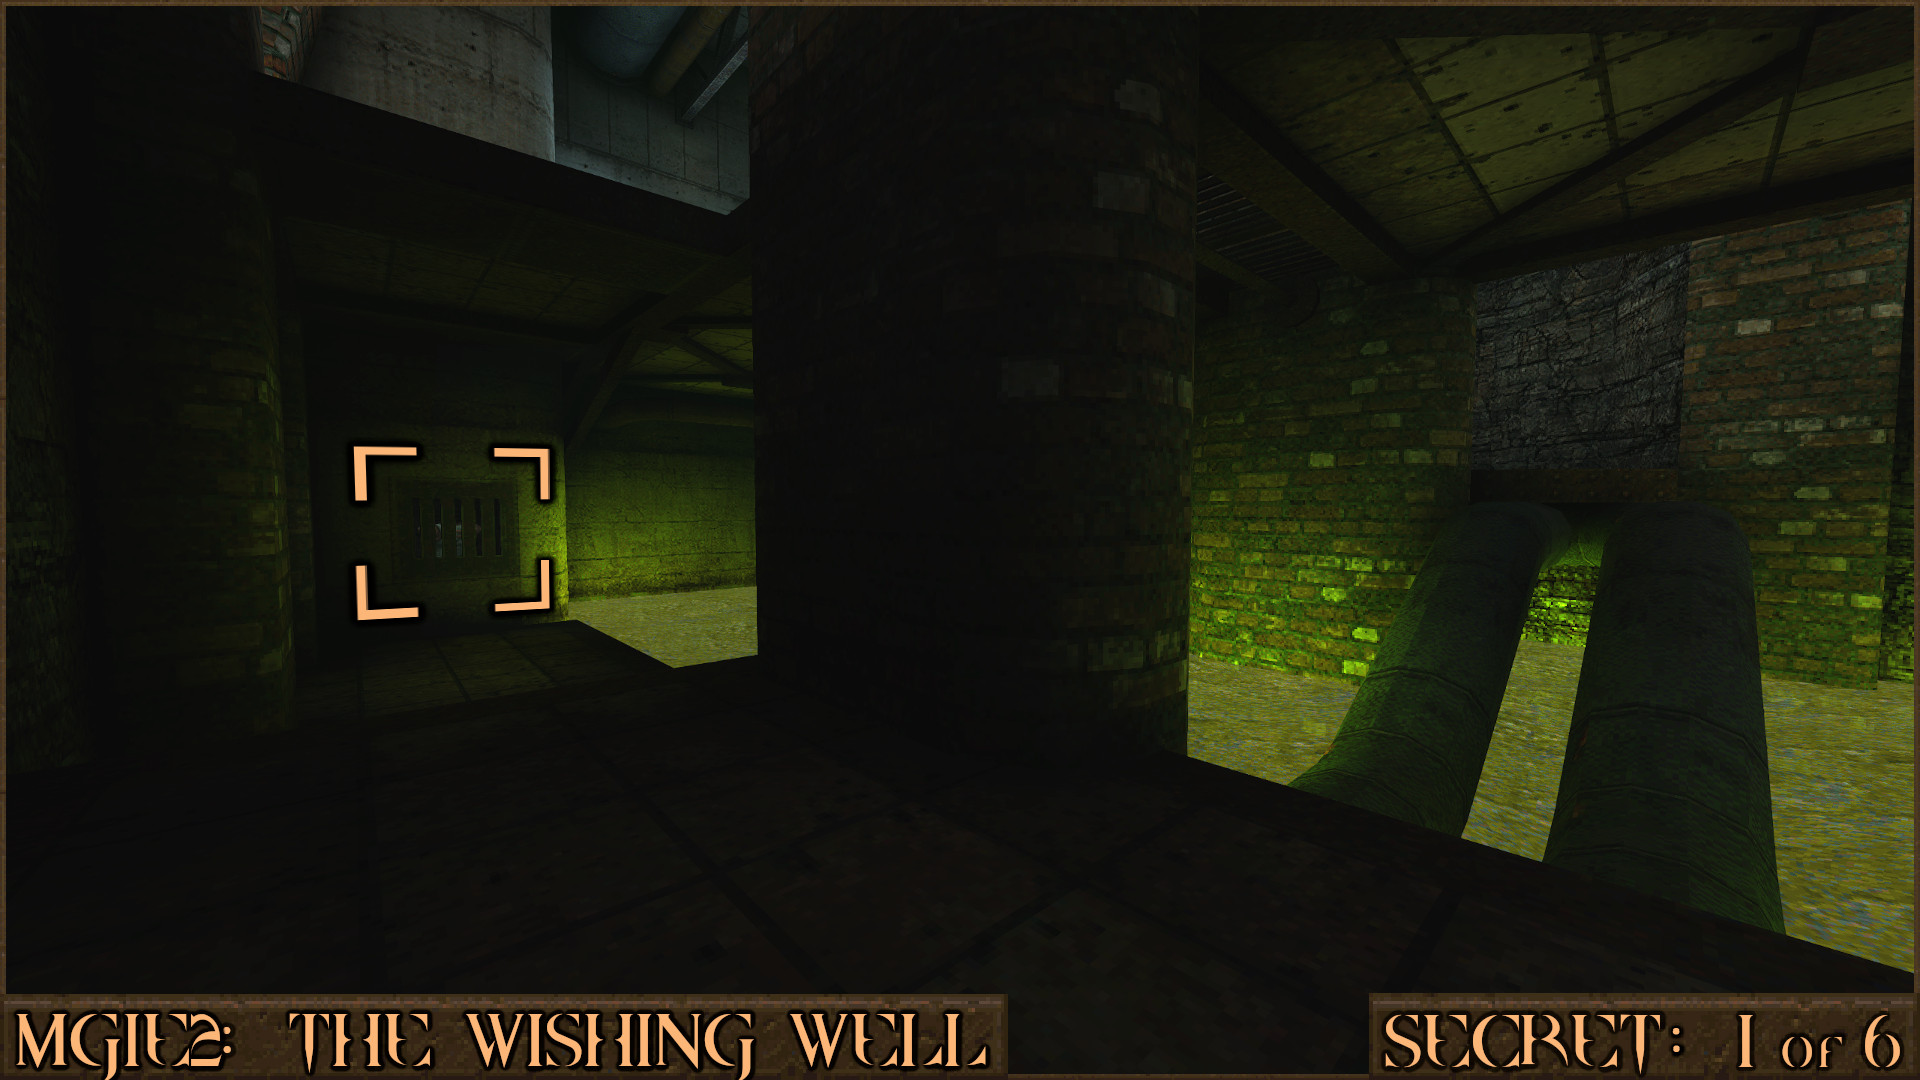
Reward:
Secret 2 of 6
In the room with the Gold Key Door look behind a yellow crate to see another vent. Shoot it to reveal another secret area.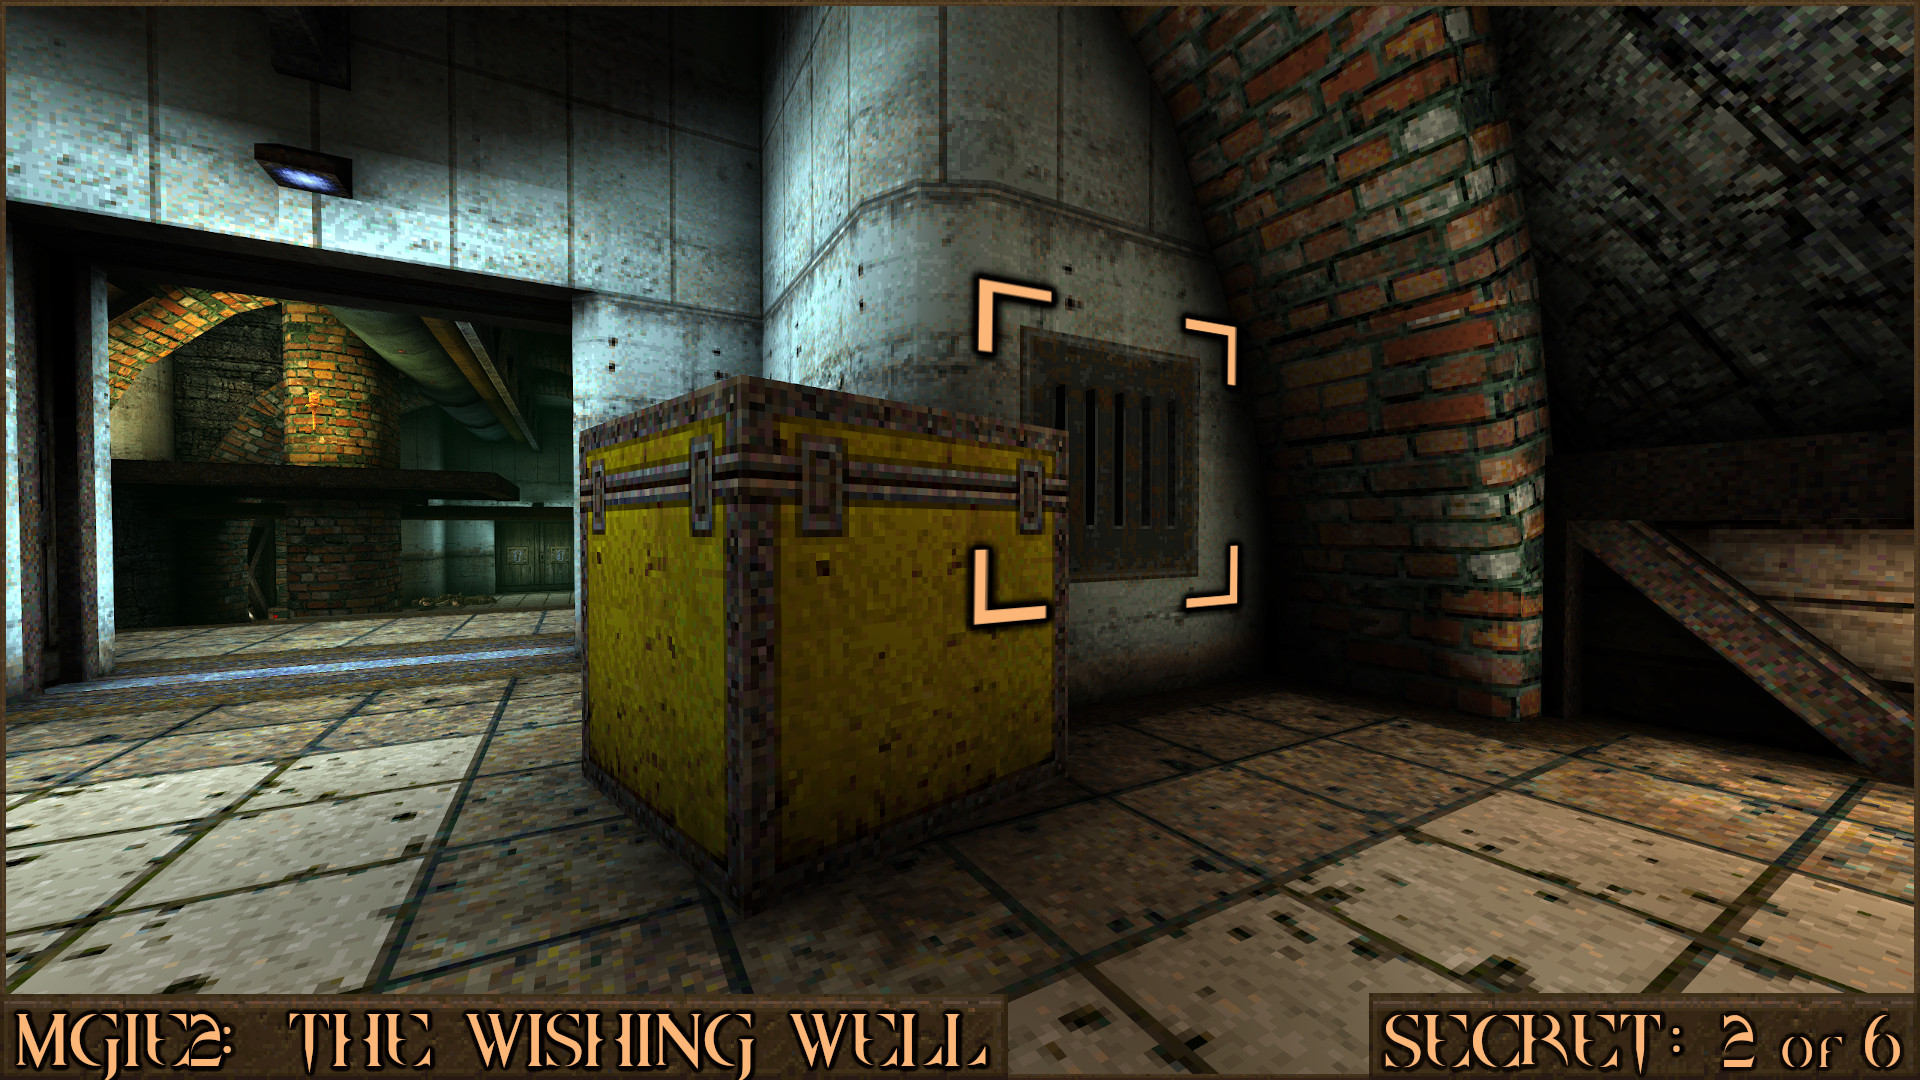
Reward:
Secret 3 of 6
In the same room as Secret 2 look for a door that is slightly covered in leaves. Look behind the planks to the left of this door to see a faintly glowing red shootable switch () that when shot will open the door (). Inside are several enemies but approaching the Yellow Armor triggers the actual secret.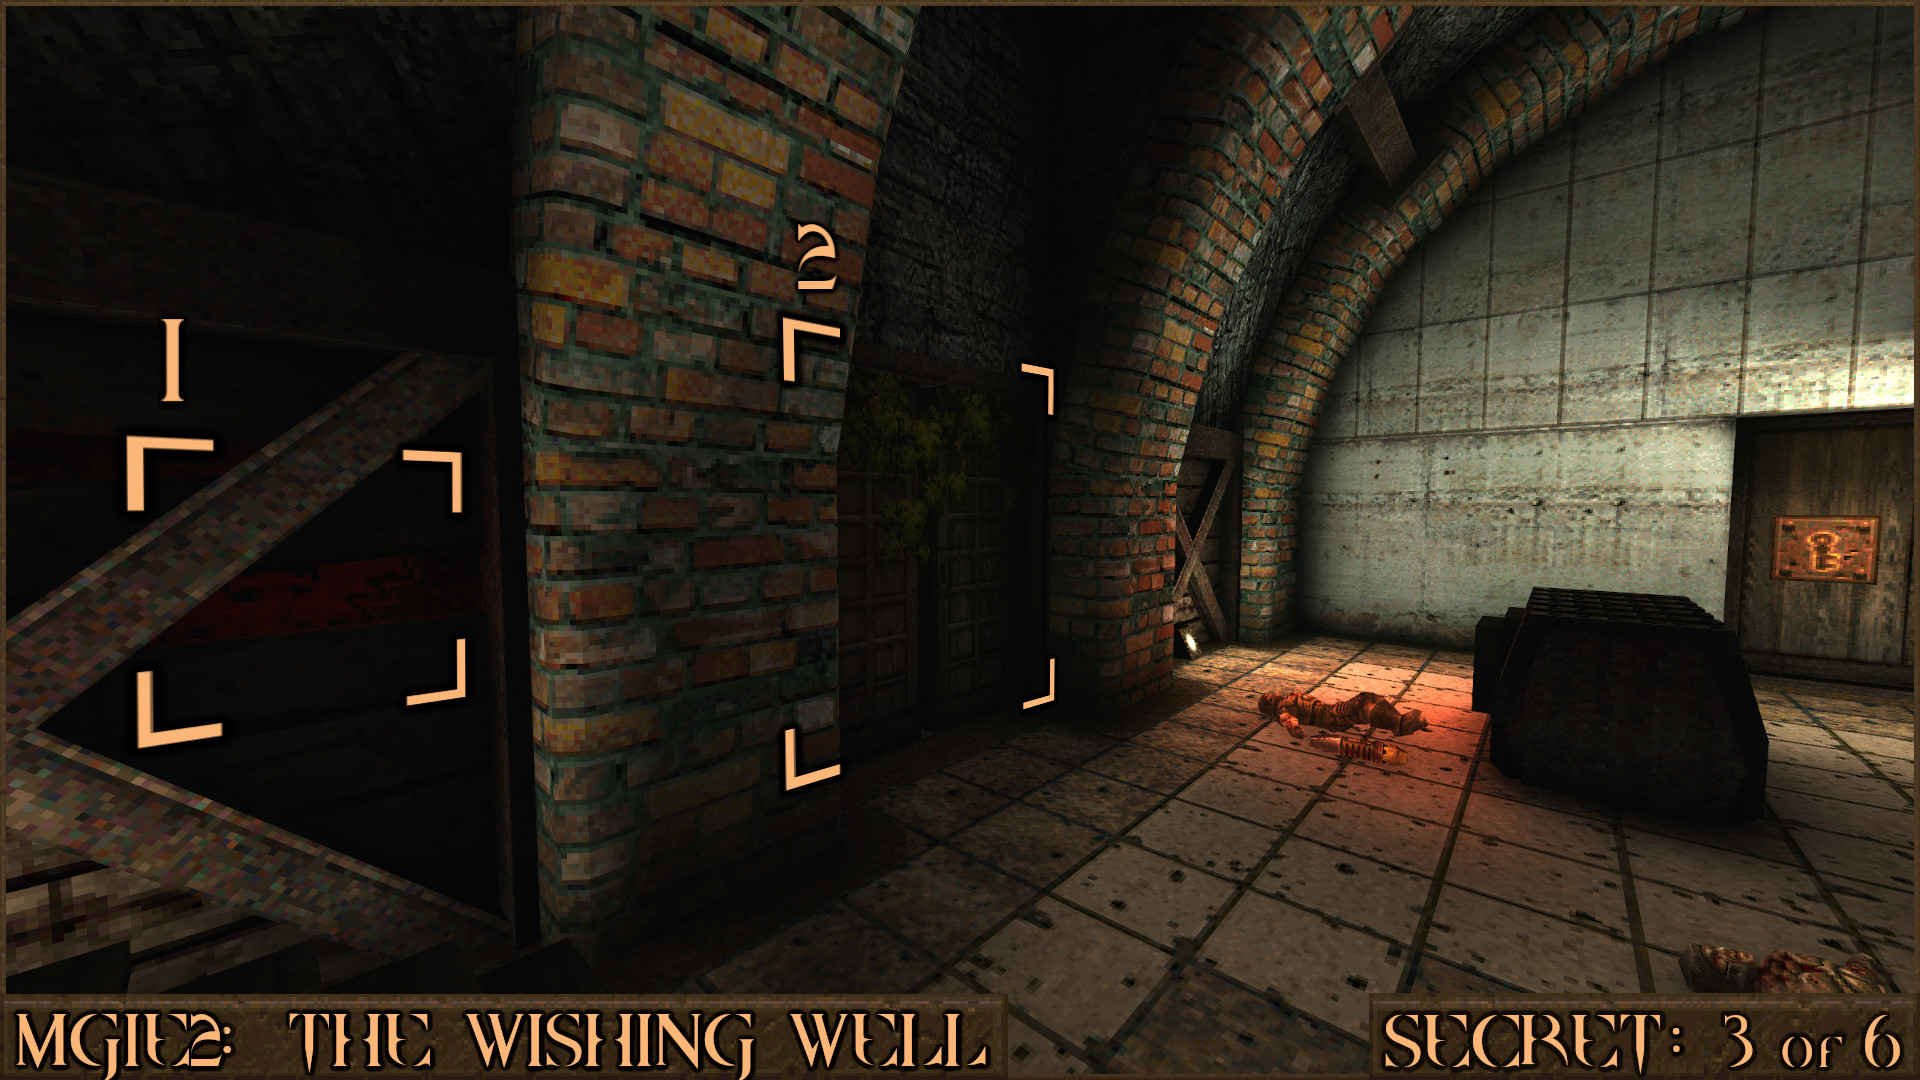
Reward:
Secret 4 of 6
After dropping down to the lower levels with several rivers of slime, look behind a crate to see an orange pressure plate (). Walk on to it to trigger it.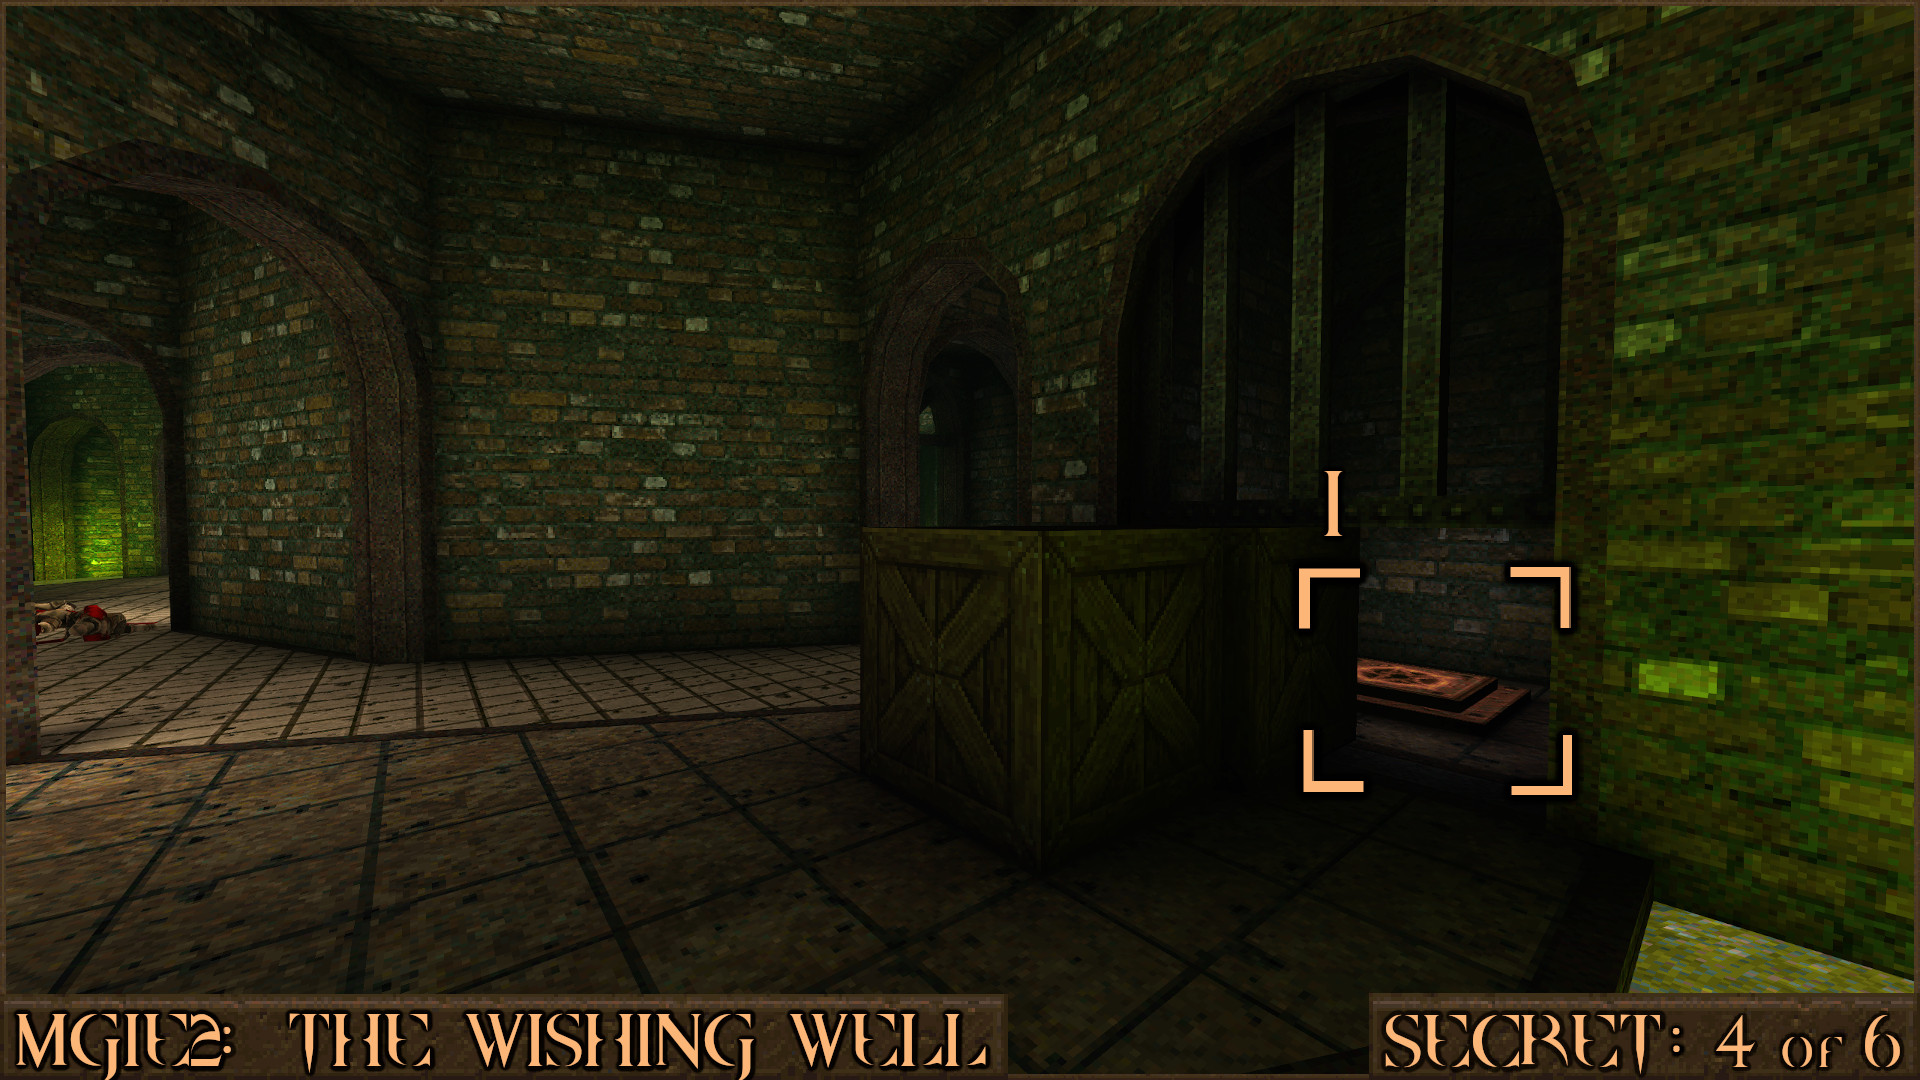
Now follow the river of slime all the way around to the other side of the room to see that a grate has moved (
) allowing you access to this secret.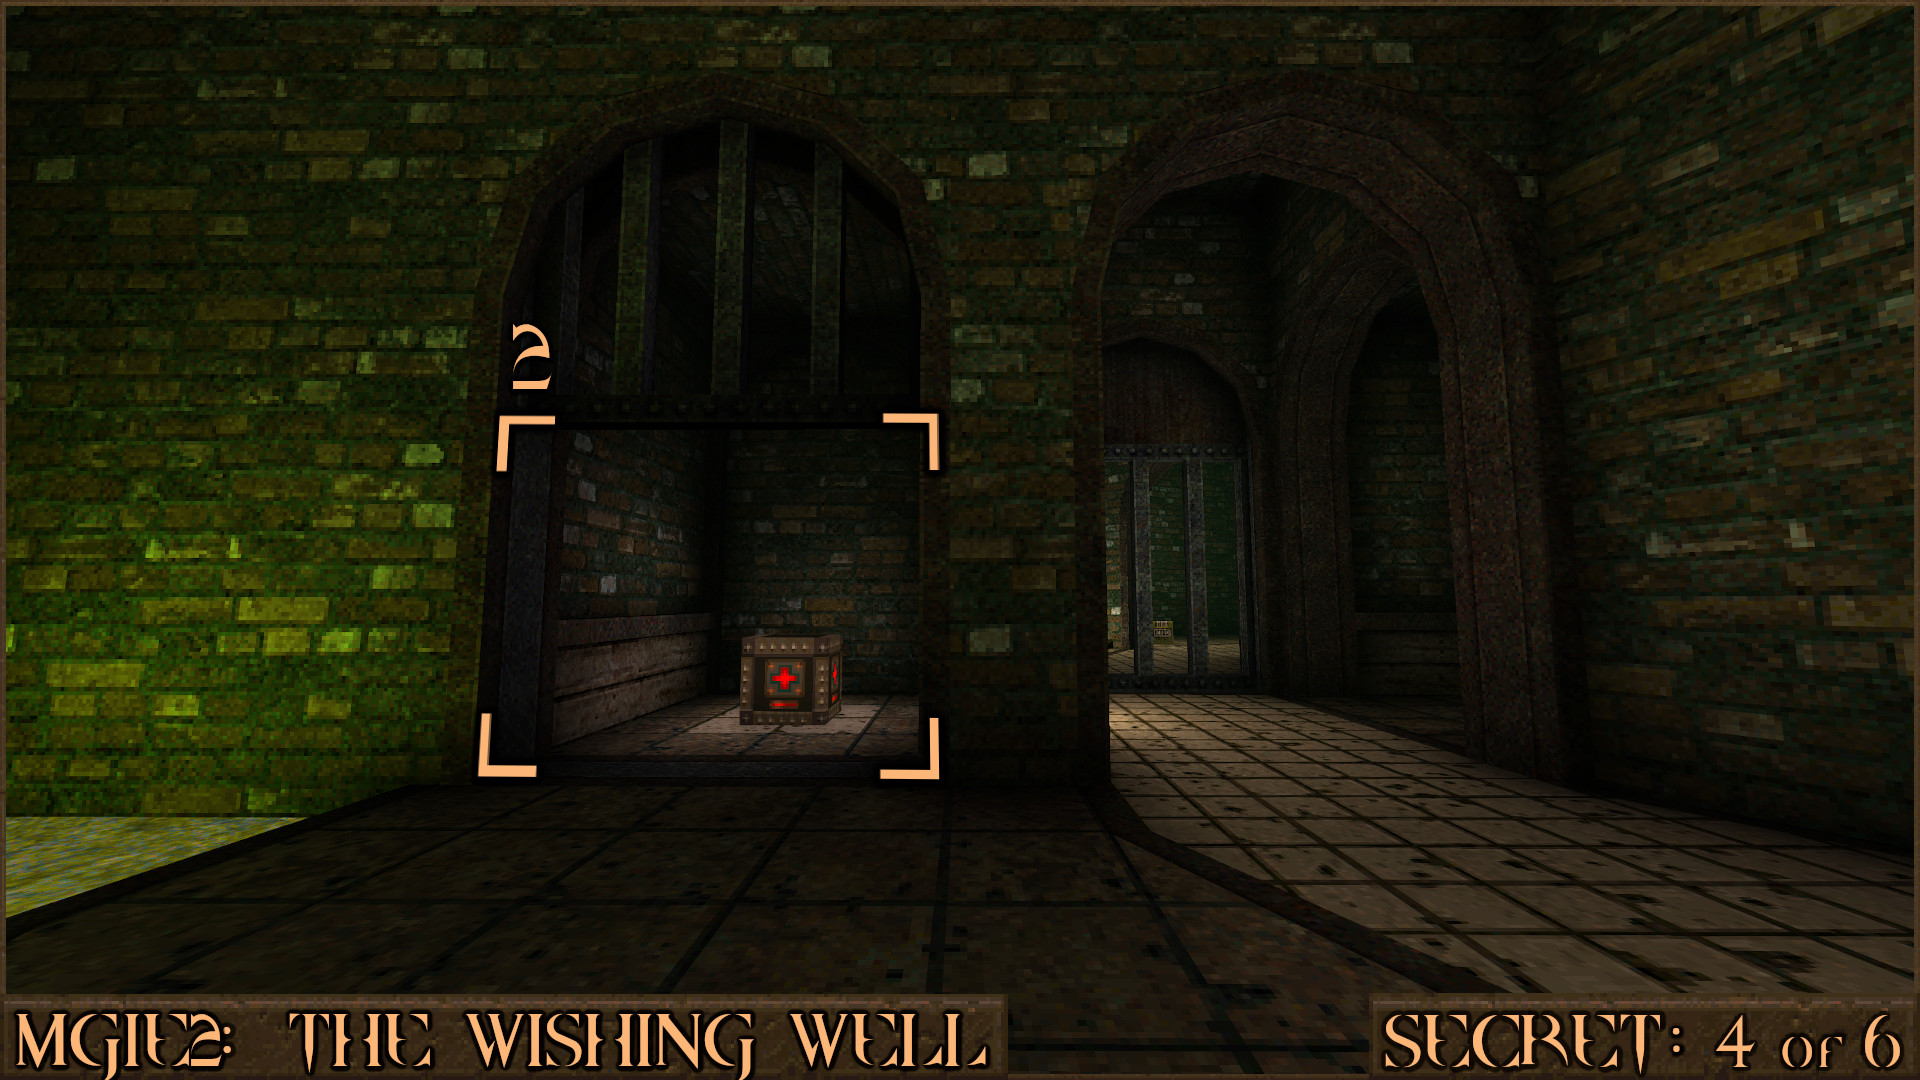
Reward:
Secret 5 of 6
After opening the Silver Key Door move to the back of the room to see some steps () to take you under the floor.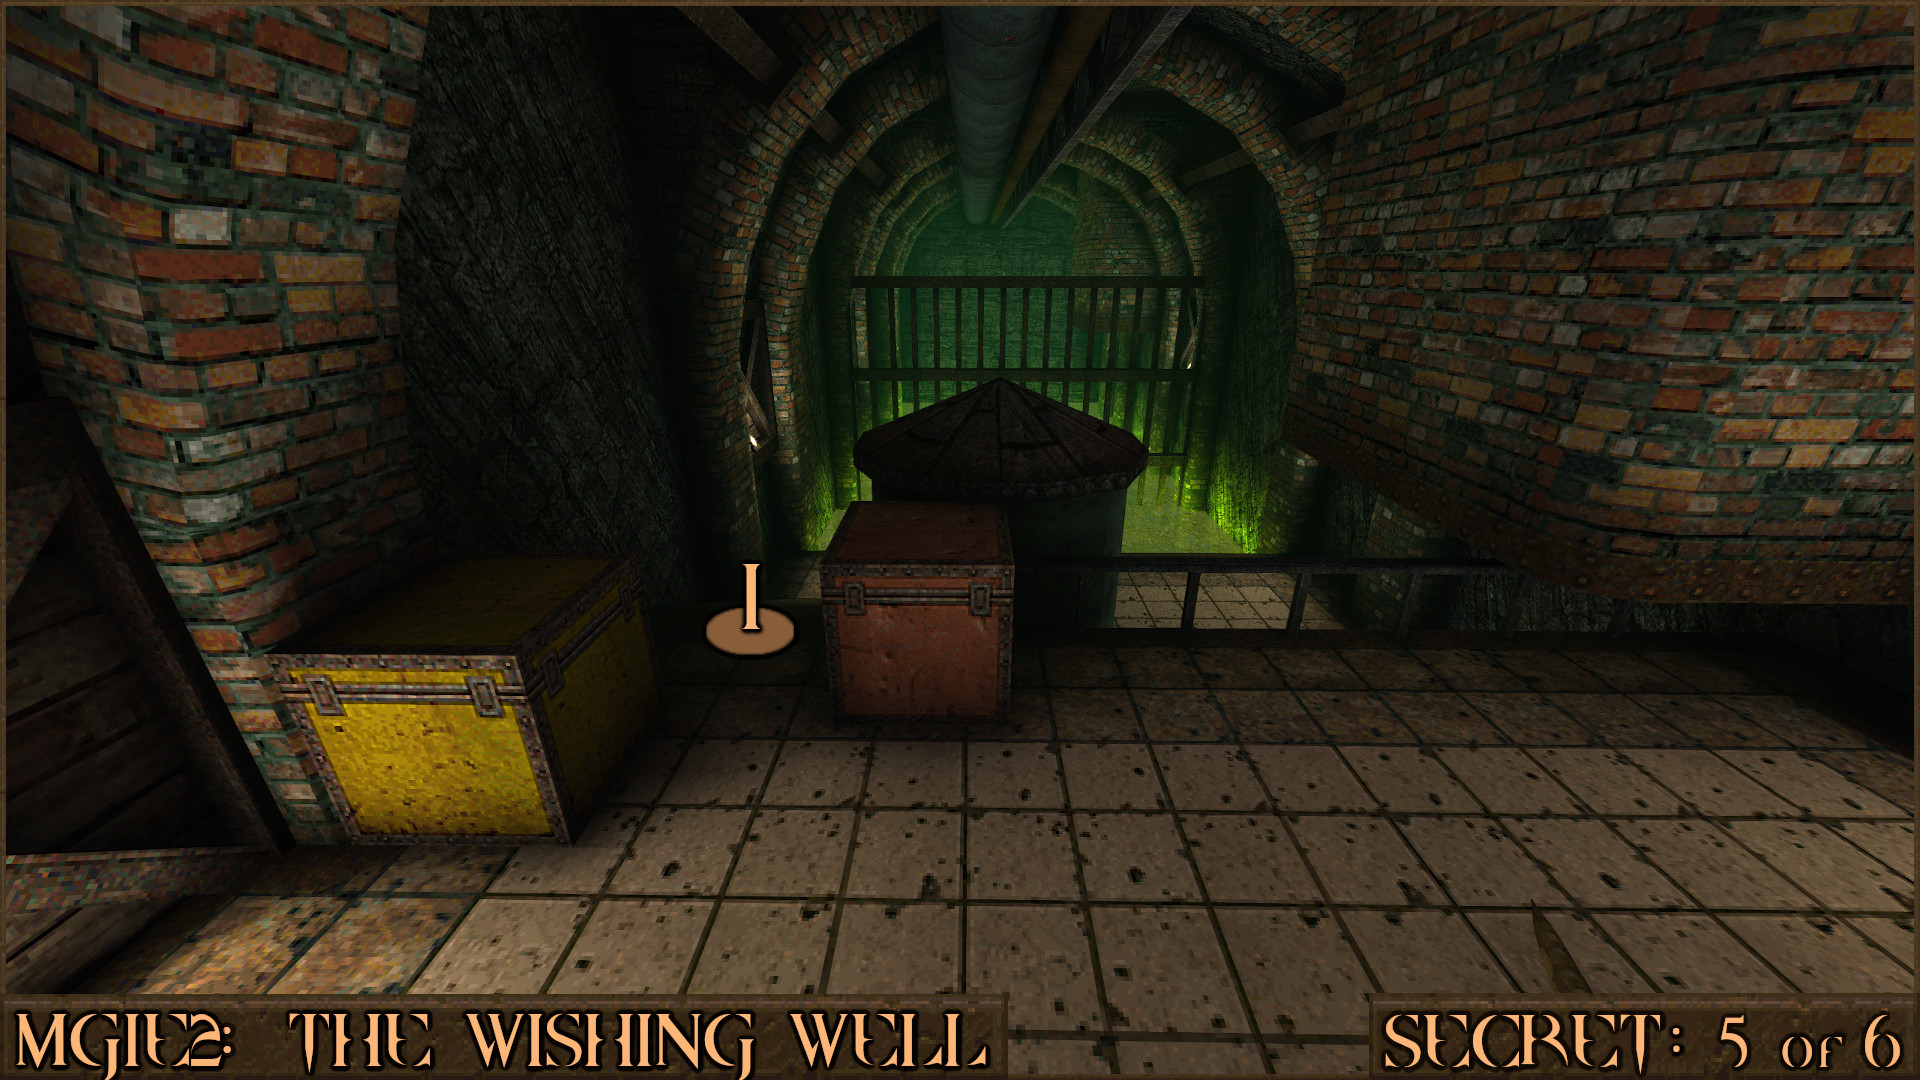
There are two red diamond switches (
), one on each generator down here. Press them both to make the nearby door () open and allow access to the secret room.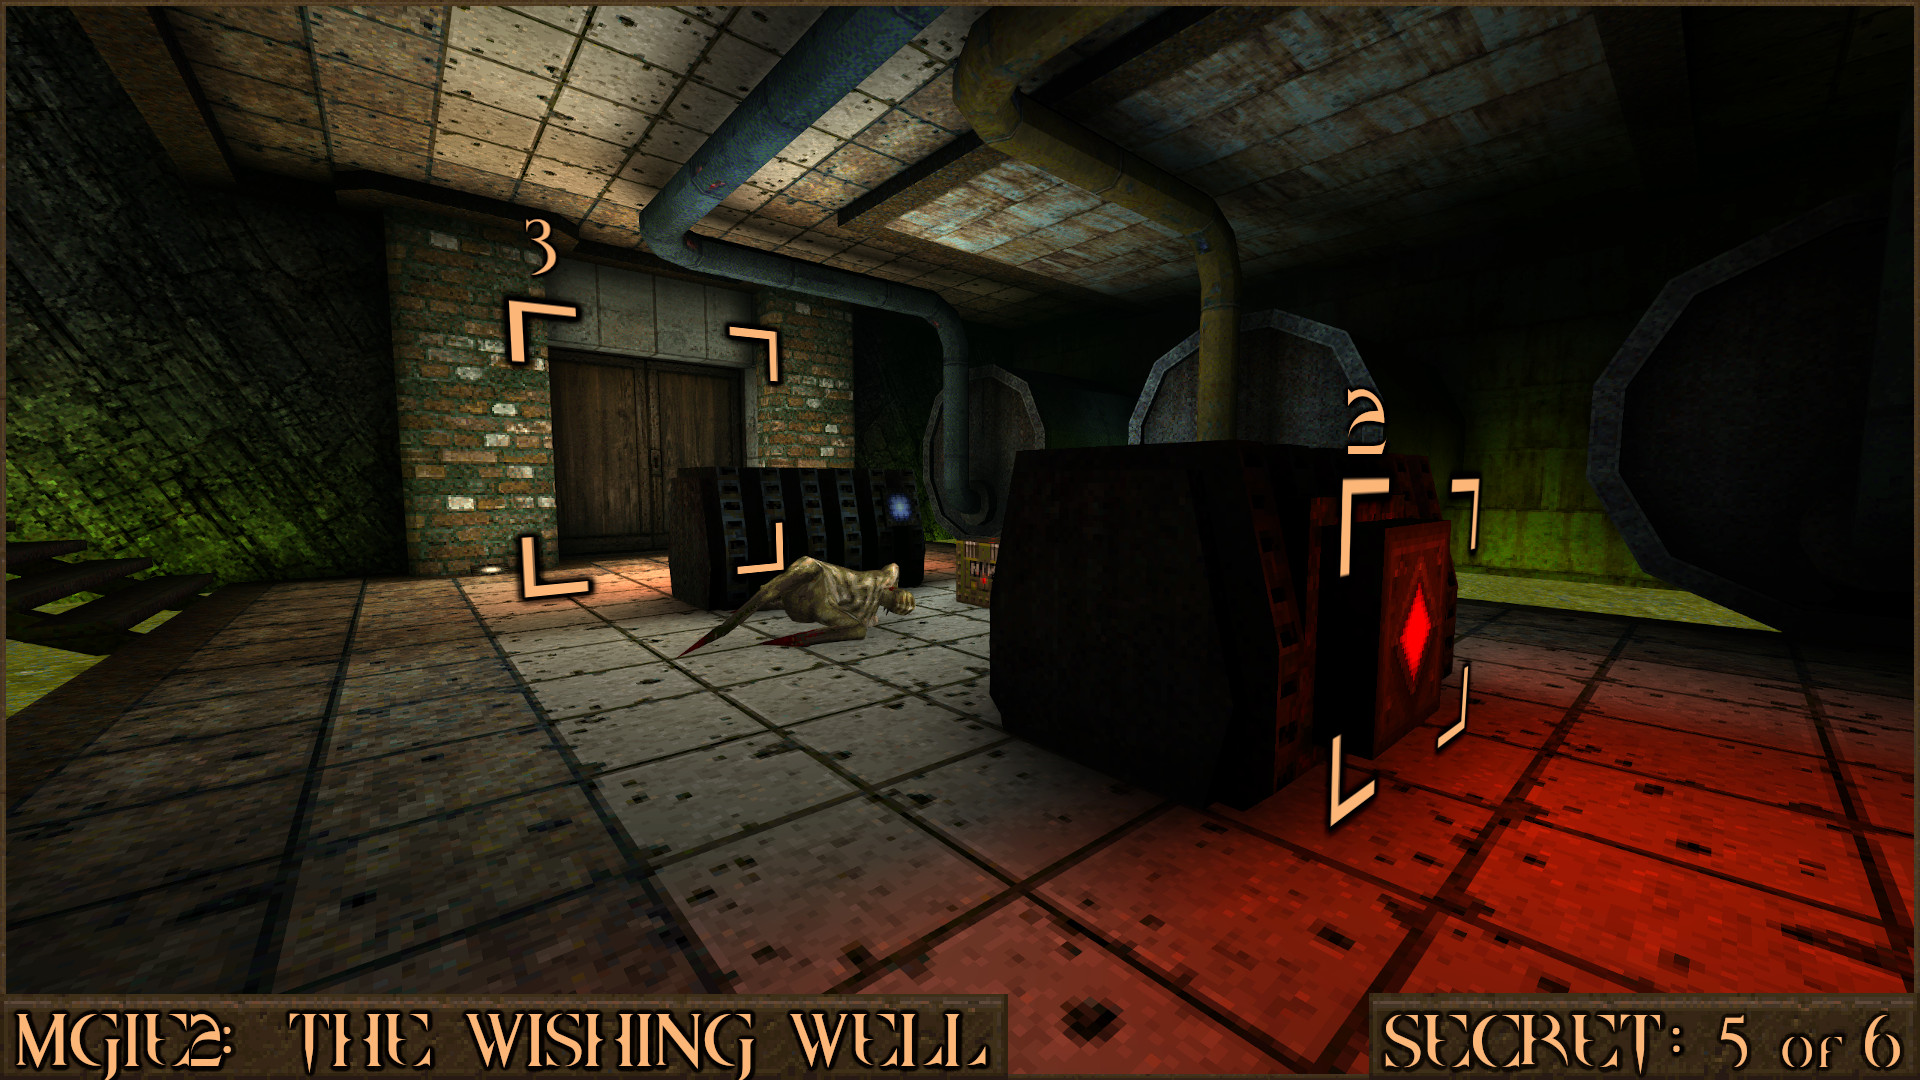
Reward:
Secret 6 of 6
Later on in the level you will come across the Gold Key on a platform. Follow some pipes that are connected to the back of this platform () to find to a secret area with a Megahealth.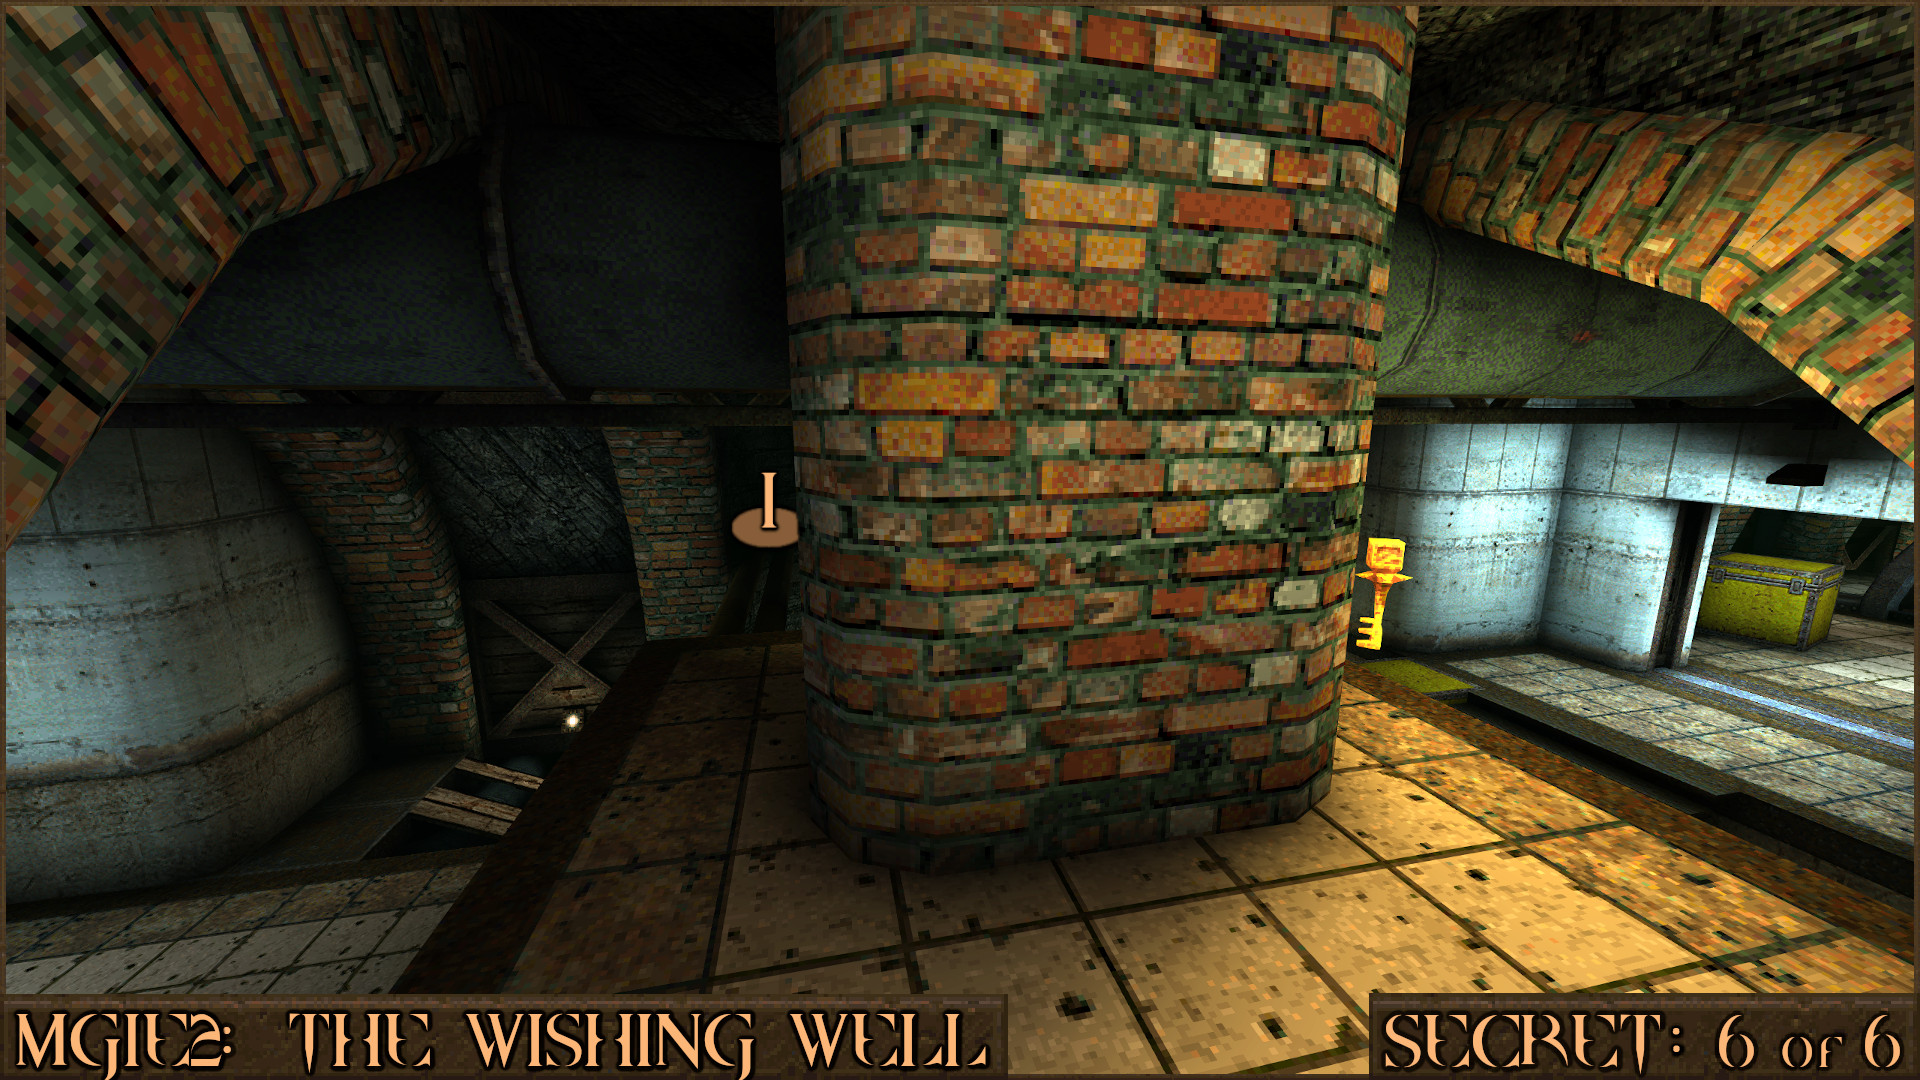
Reward:
MGE2M1: Acid Sanctuary
Secret 1 of 10
At the start of the level explore down the side of the starting teleporter structure to find a secret behind it.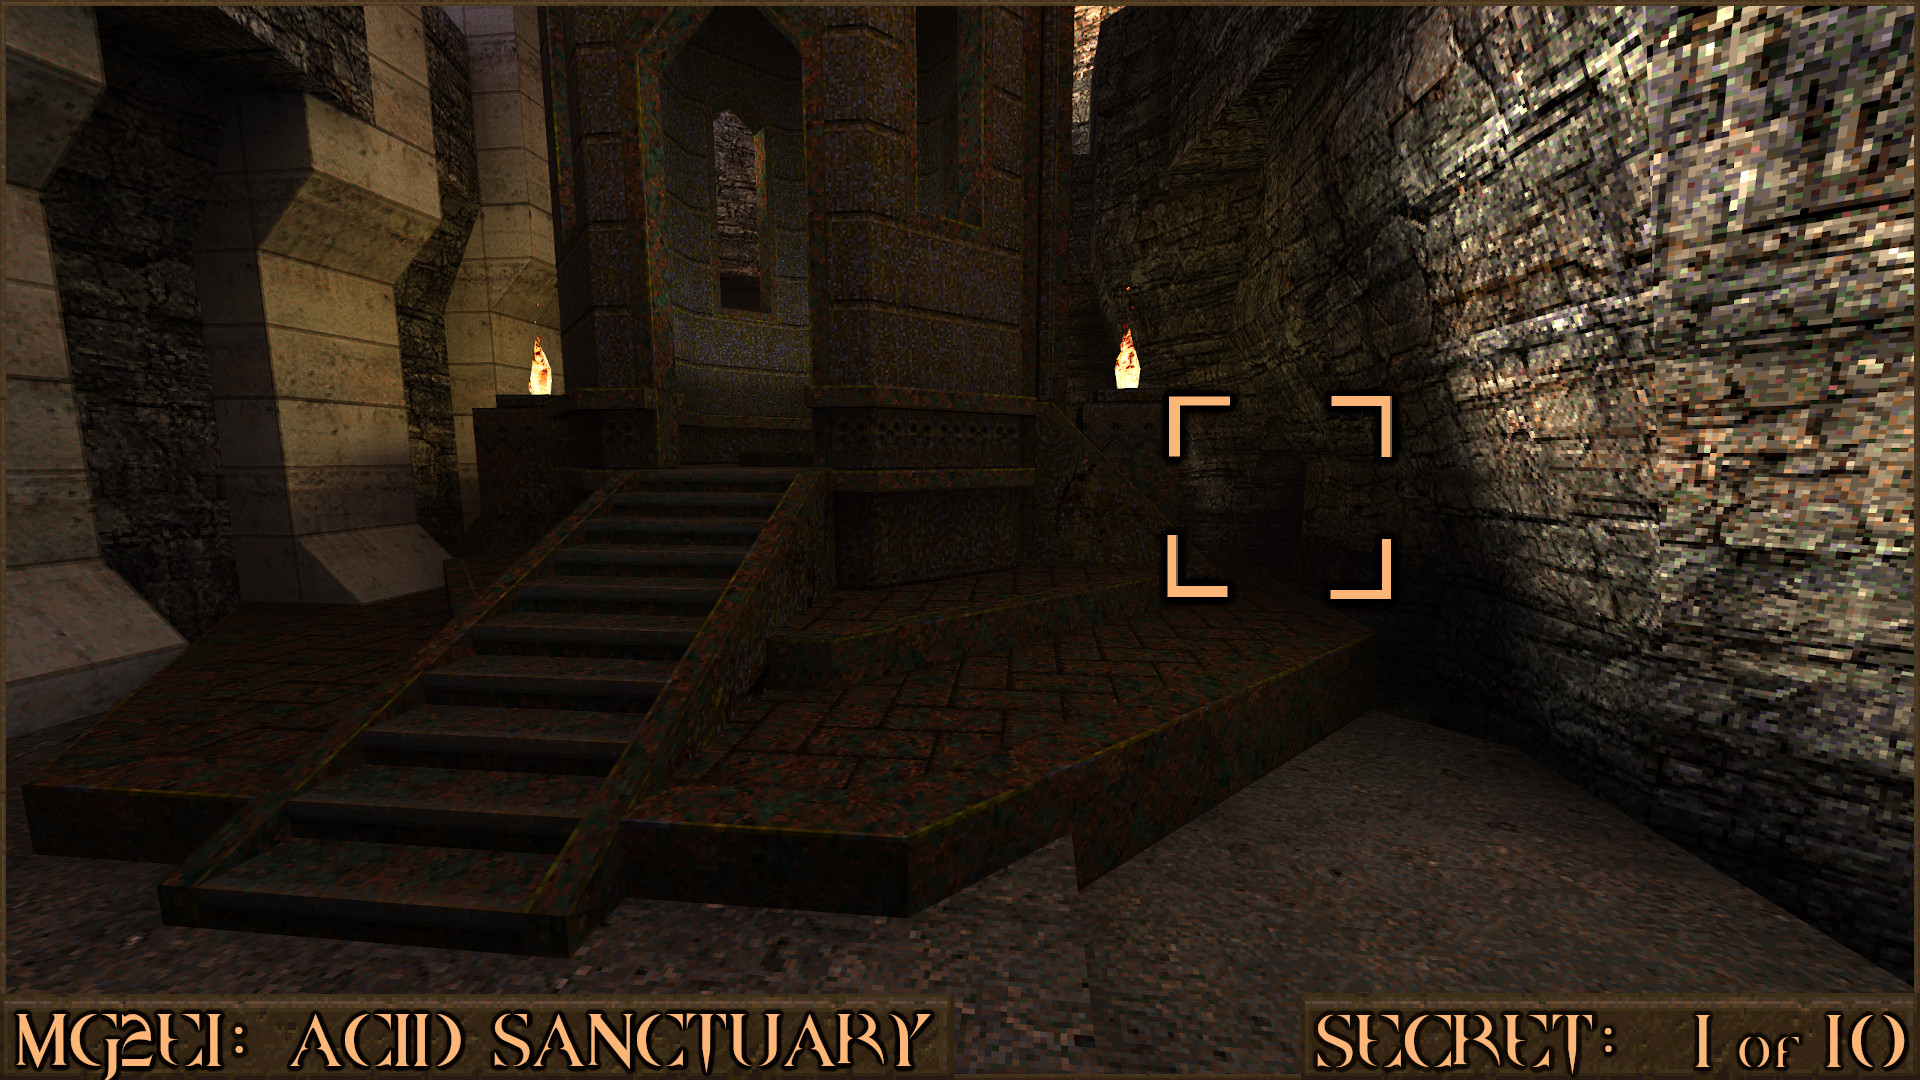
Reward:
Secret 2 of 10
After exiting the large building you will be on a bridge facing the two key columns. Look to the left of the bridge to see a small ledge you can jump down to (). Follow the ledge to find a secret stash of ammo.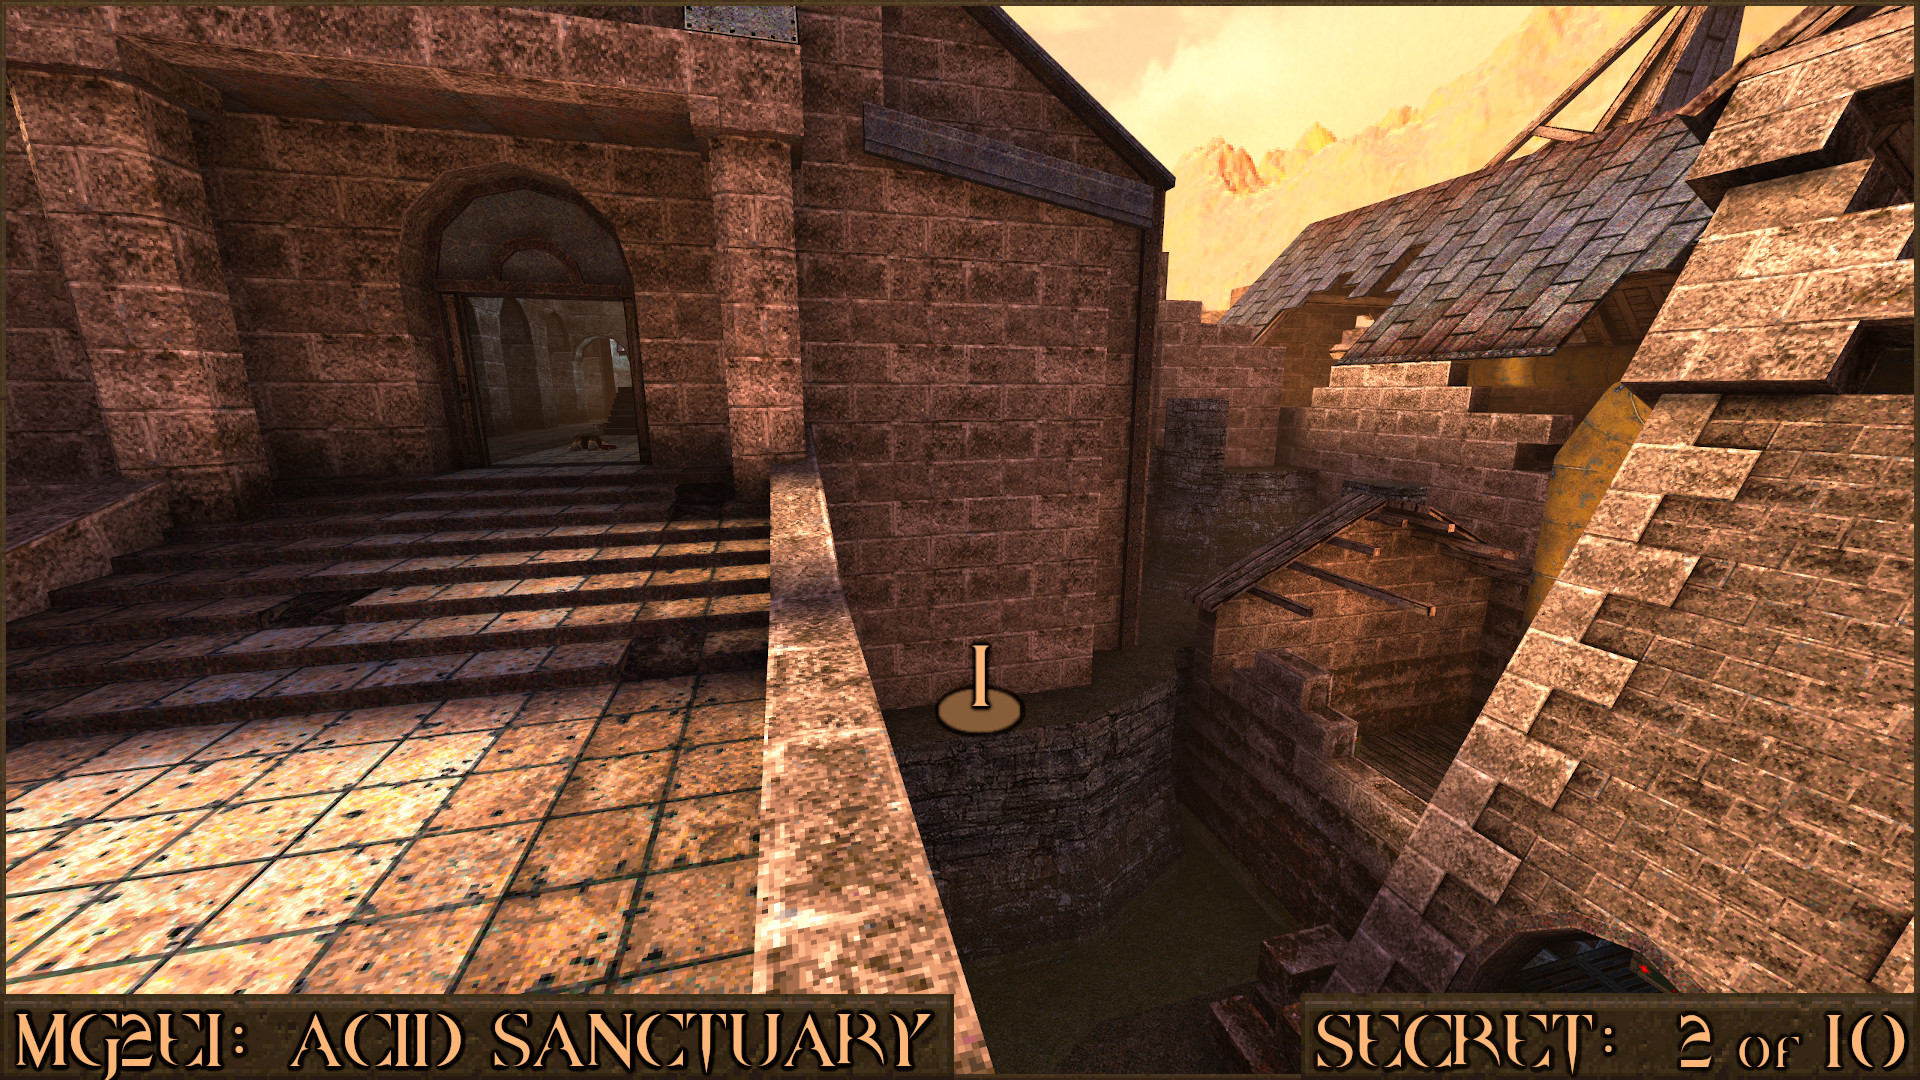
Reward:
Secret 3 of 10
After dropping down from Secret 2 you will enter another ruined building which has a large metal block covering the exit. The upper floor of this building has a broken ledge (). Jump from this ledge over to the other side () with a large running jump. Look in the dark corner here to find the secret Yellow Armor.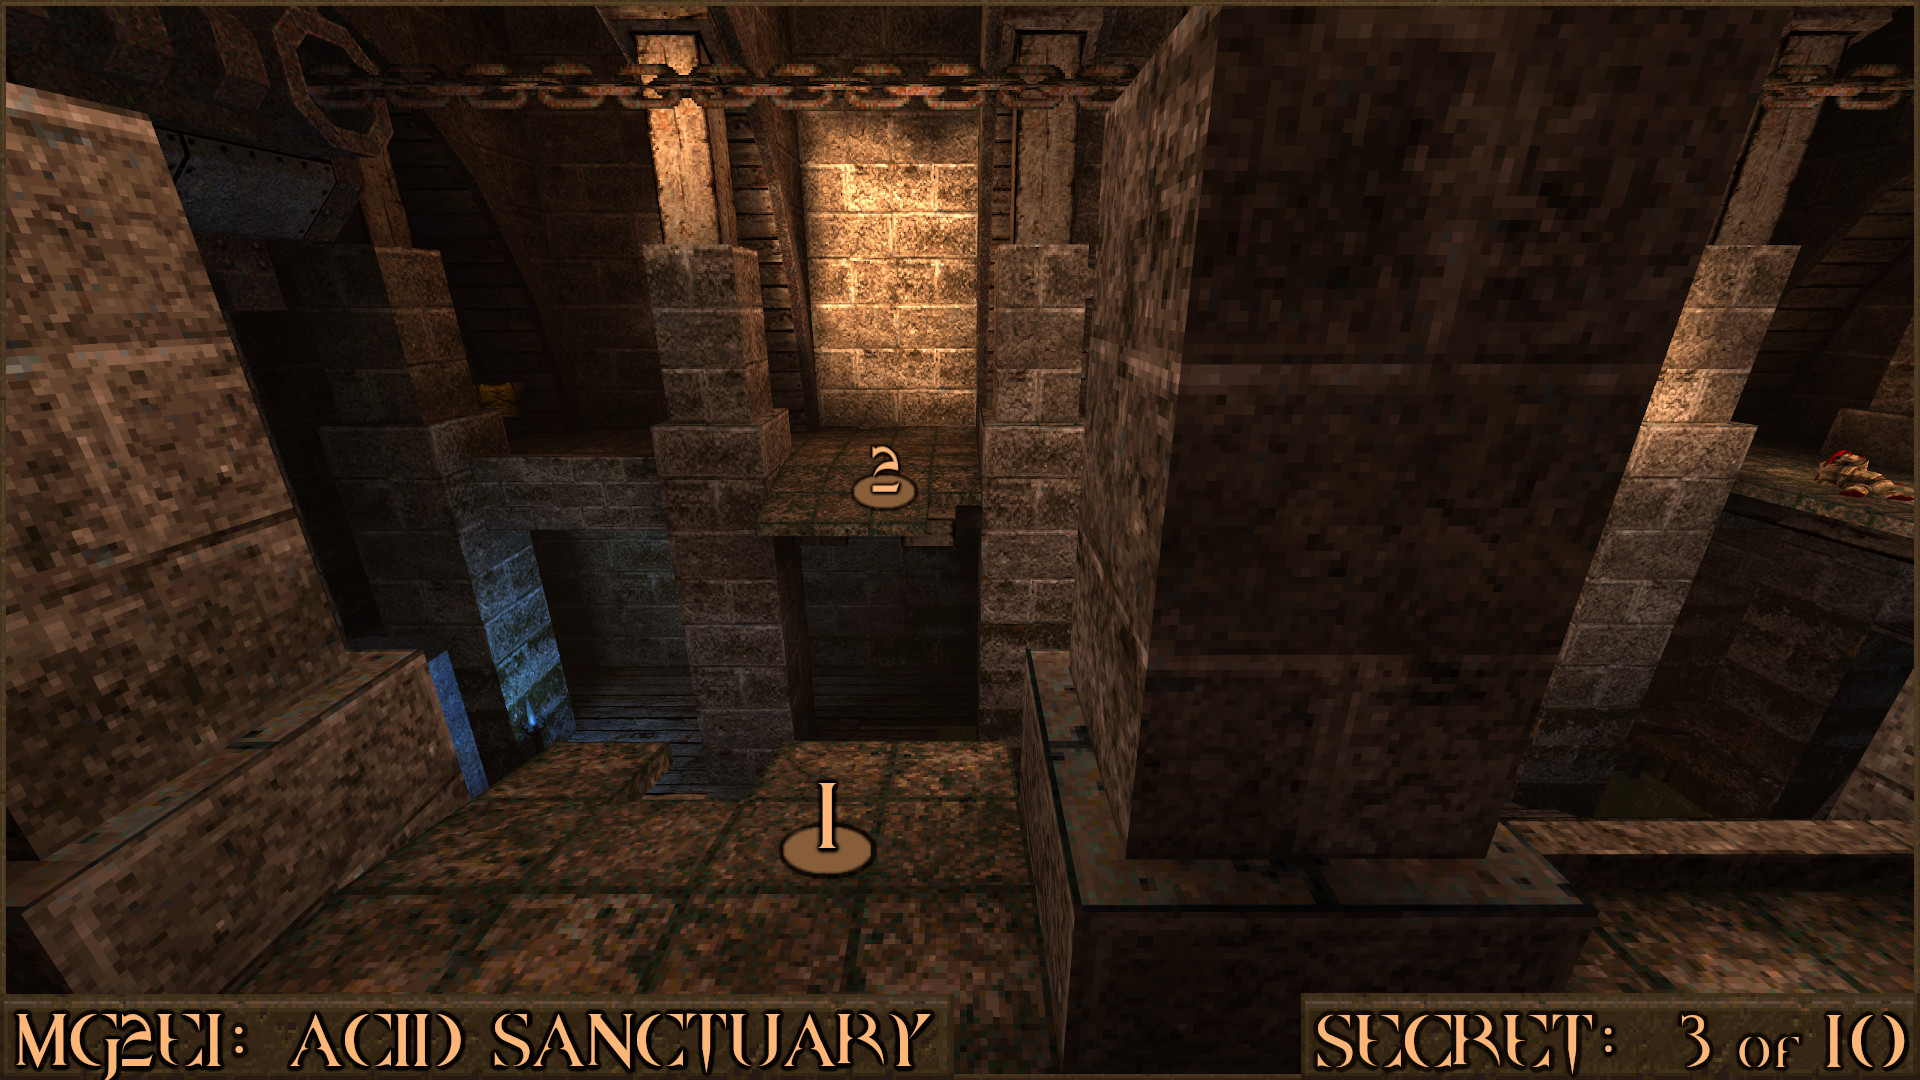
Reward:
Secret 4 of 10
Further in the level you will make your way up a large thin wall that ramps upwards. After this you will enter another building ().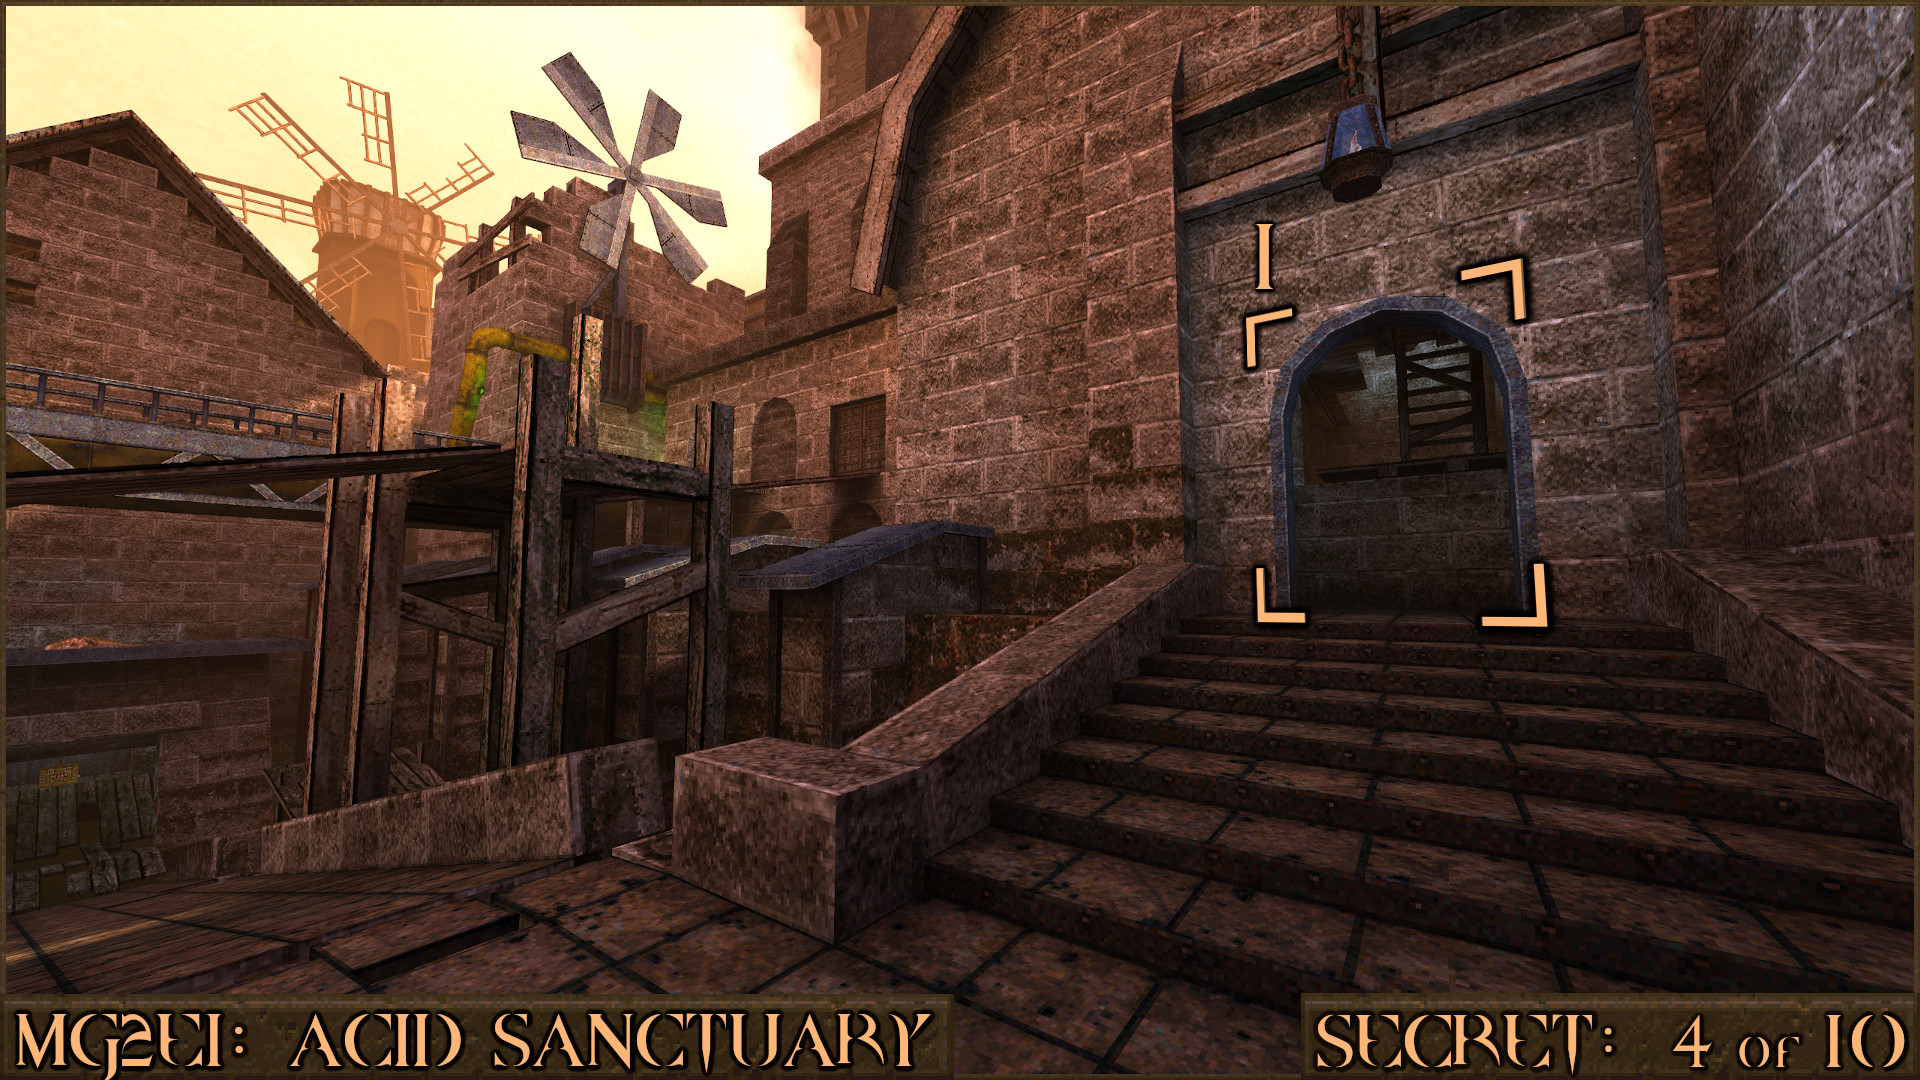
In this building go up several ladders to reach the top floor with the orange switch and look carefully at a corner covered in wooden planks. There is a gap above the planks you can jump in to (
) to find the secret.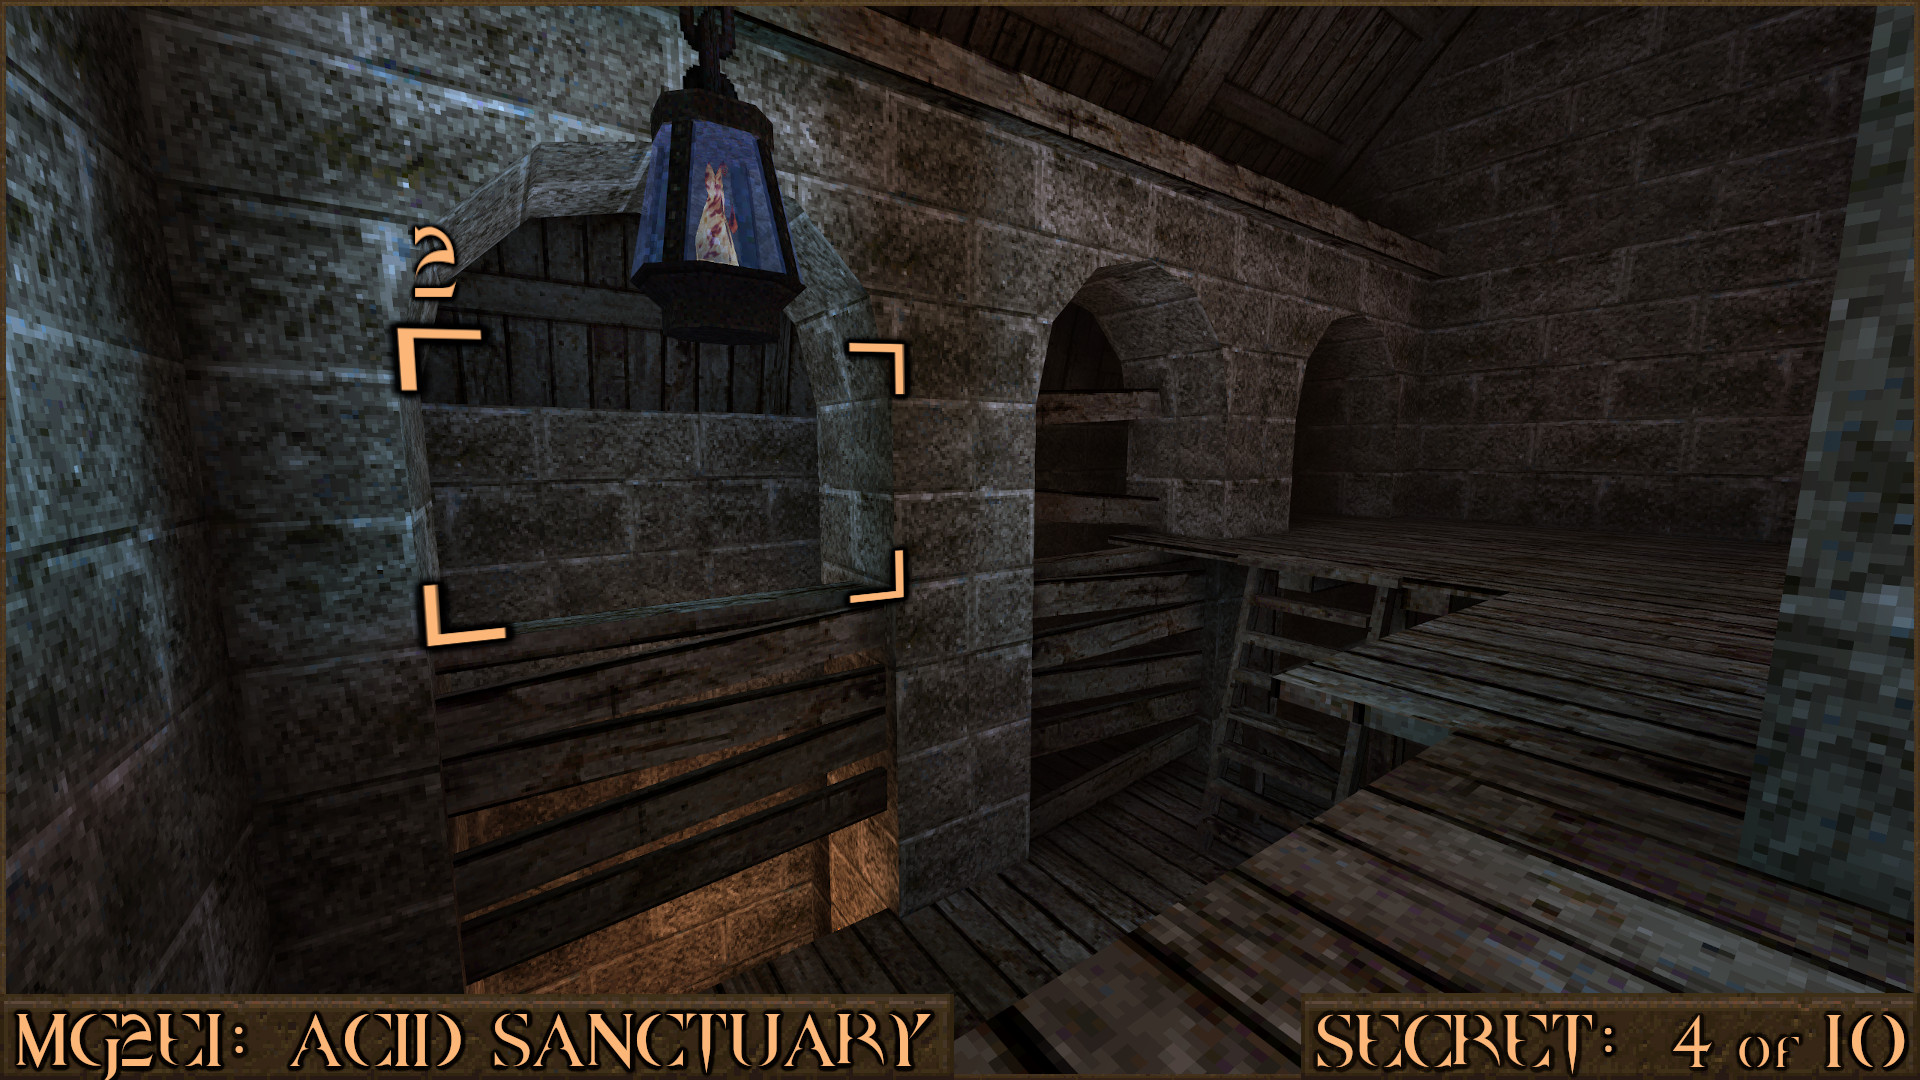
Reward:
Secret 5 of 10
After exiting the building from Secret 4 you will find yourself high up on some platforms. Move over to this railing () and look over the side.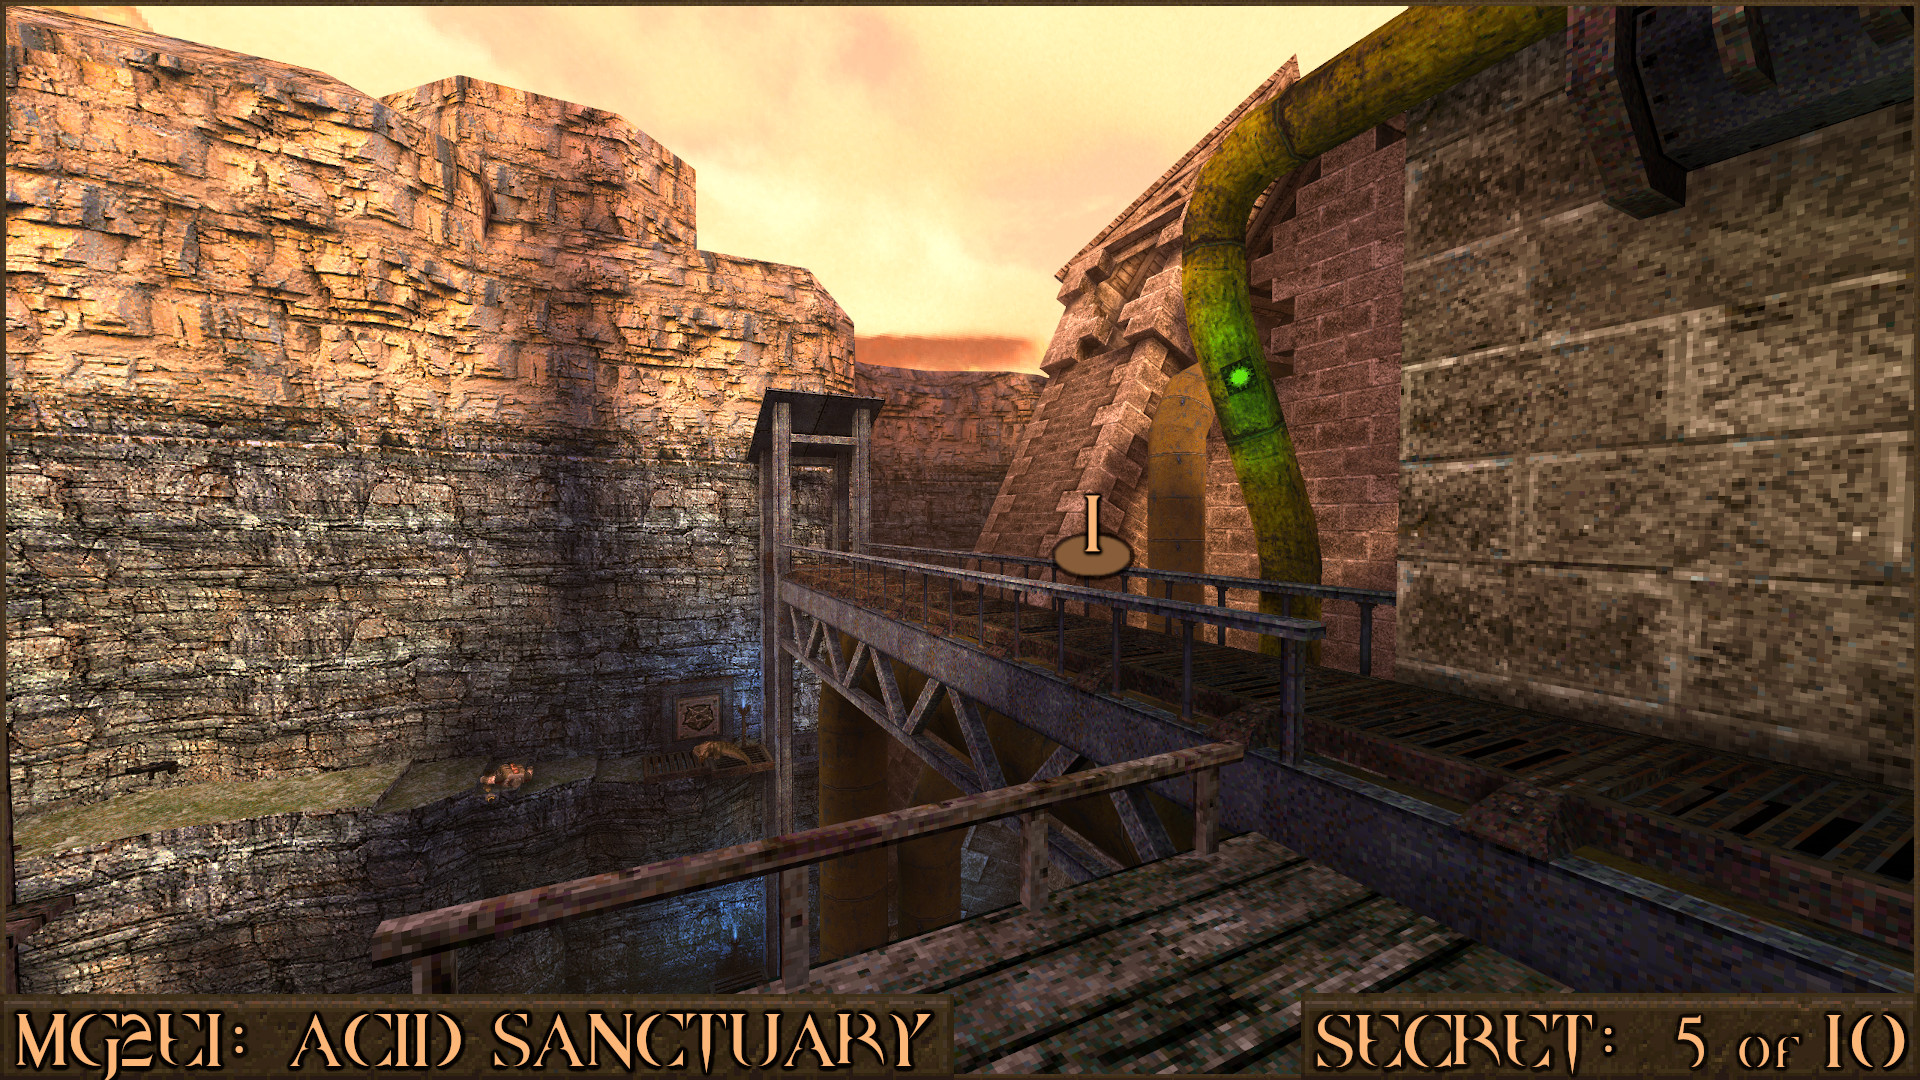
You can see the blue roof (
) over the side of the railing. Jump down to it then take a left to enter a small broken hole in the wall () to find the secret.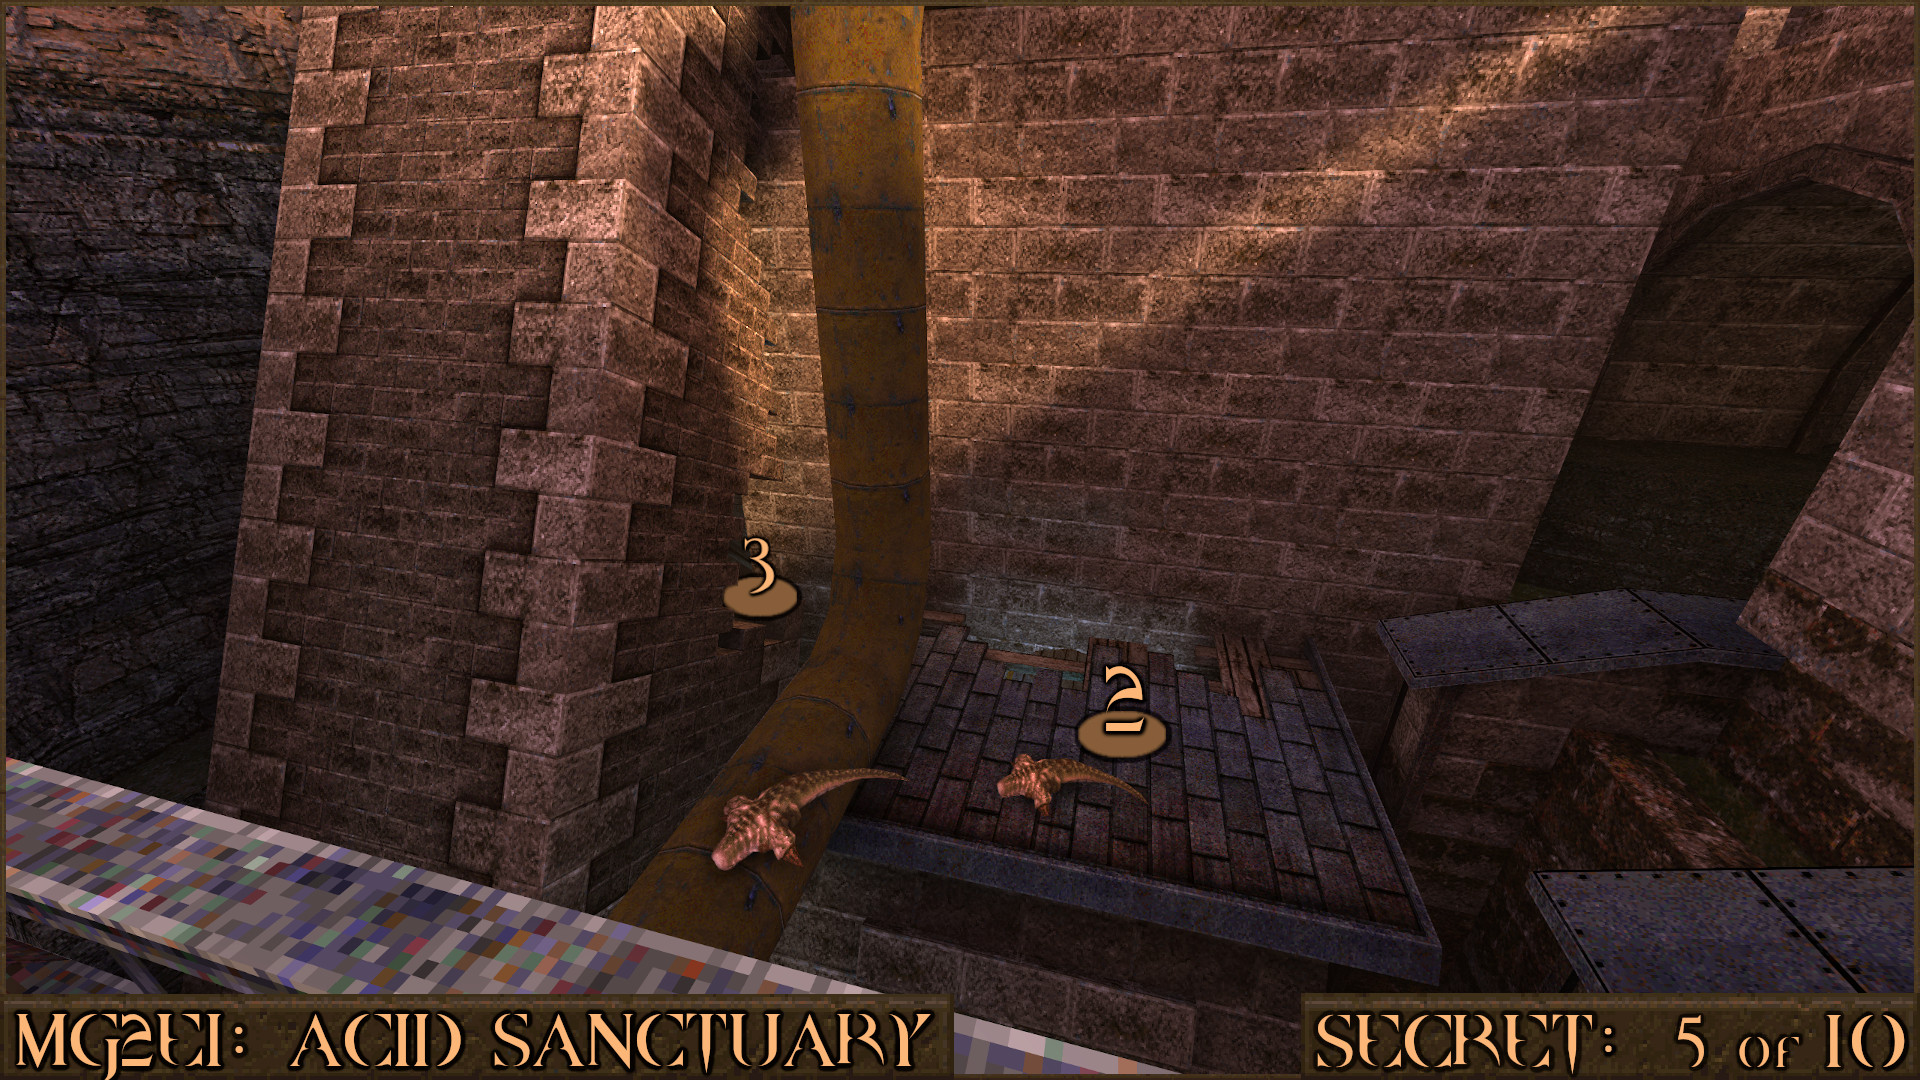
Reward:
Secret 6 of 10
After reaching the top of the tower you will see a metal wind turbine directly in front of you and a roof to your left. Drop down the small hole just in front of the roof to find another secret area.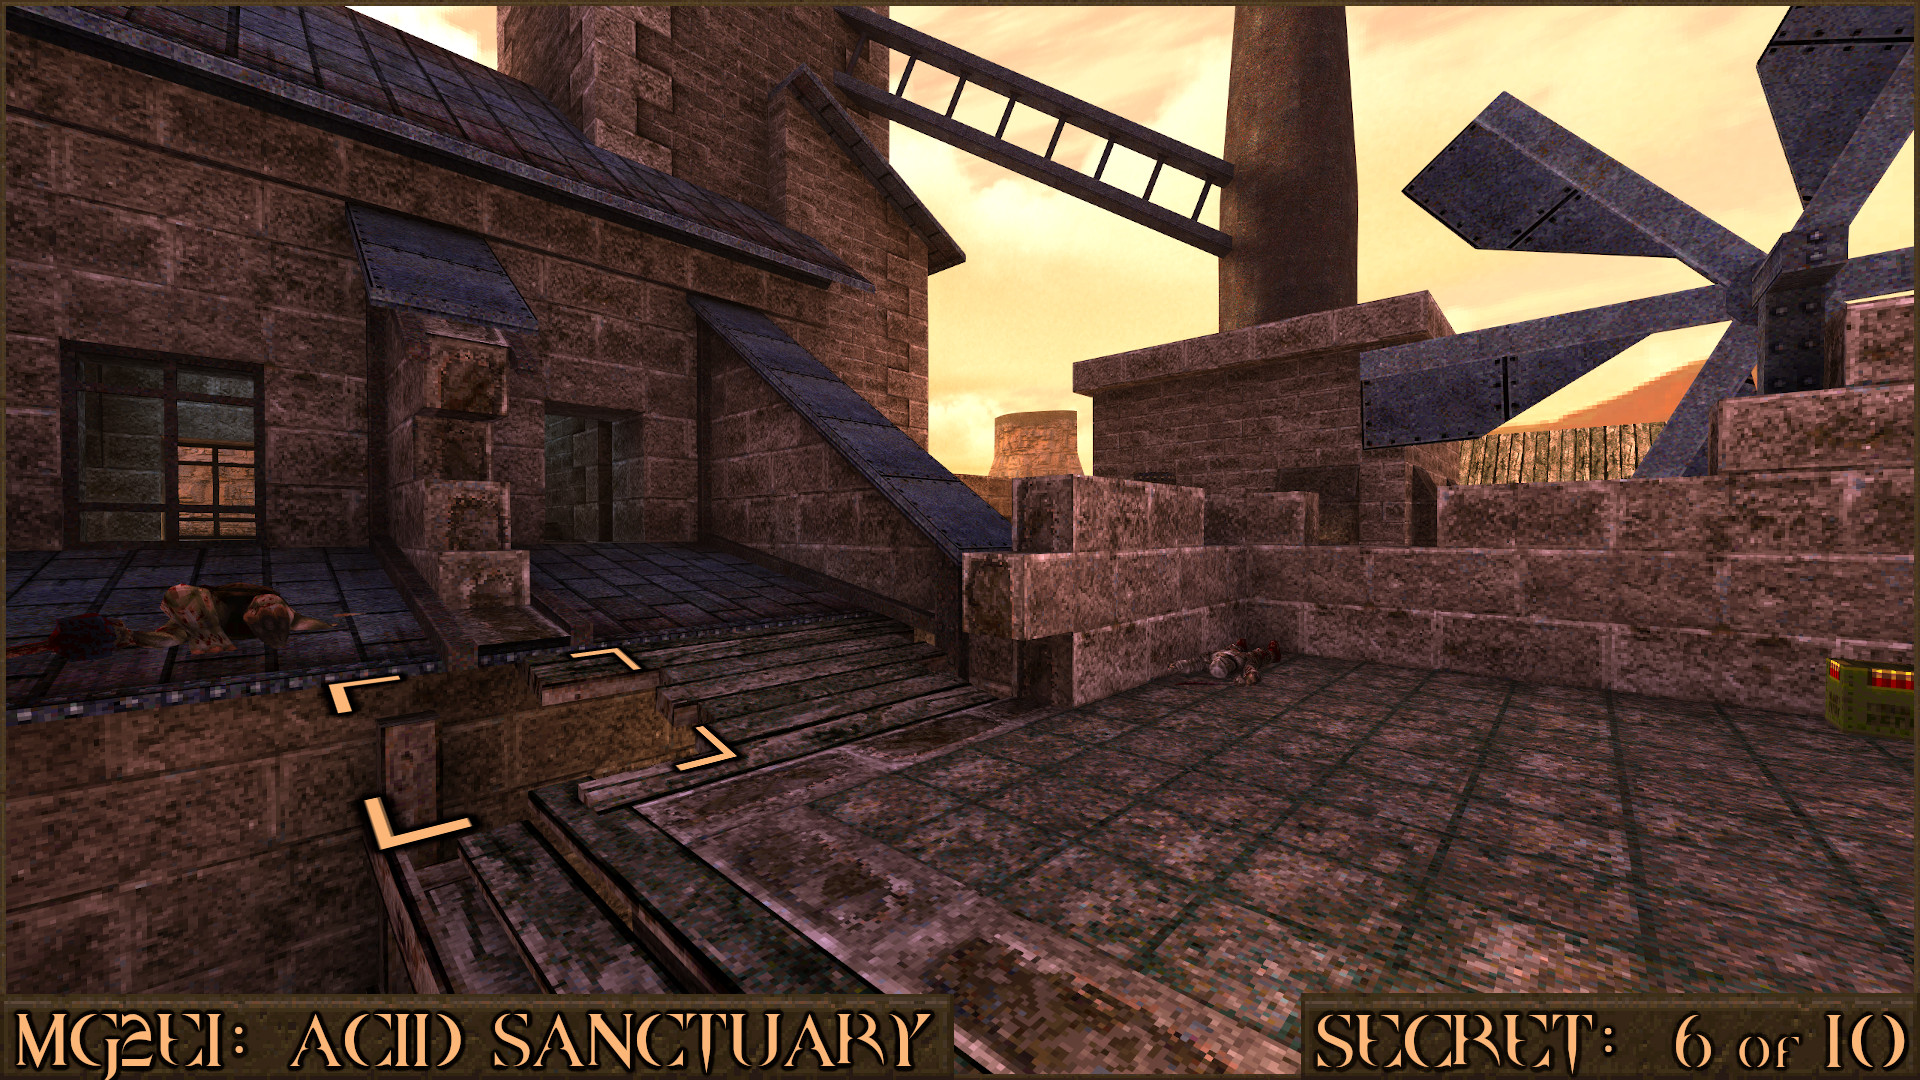
Reward:
Secret 7 of 10
After activating the Gold Key Column you will drop down in to an area with Zombies. You will come to a large out door area with a big metal block next to a large fan. Make your way up to the top of this area and look for a ledge on the cliff (). Jump over to it.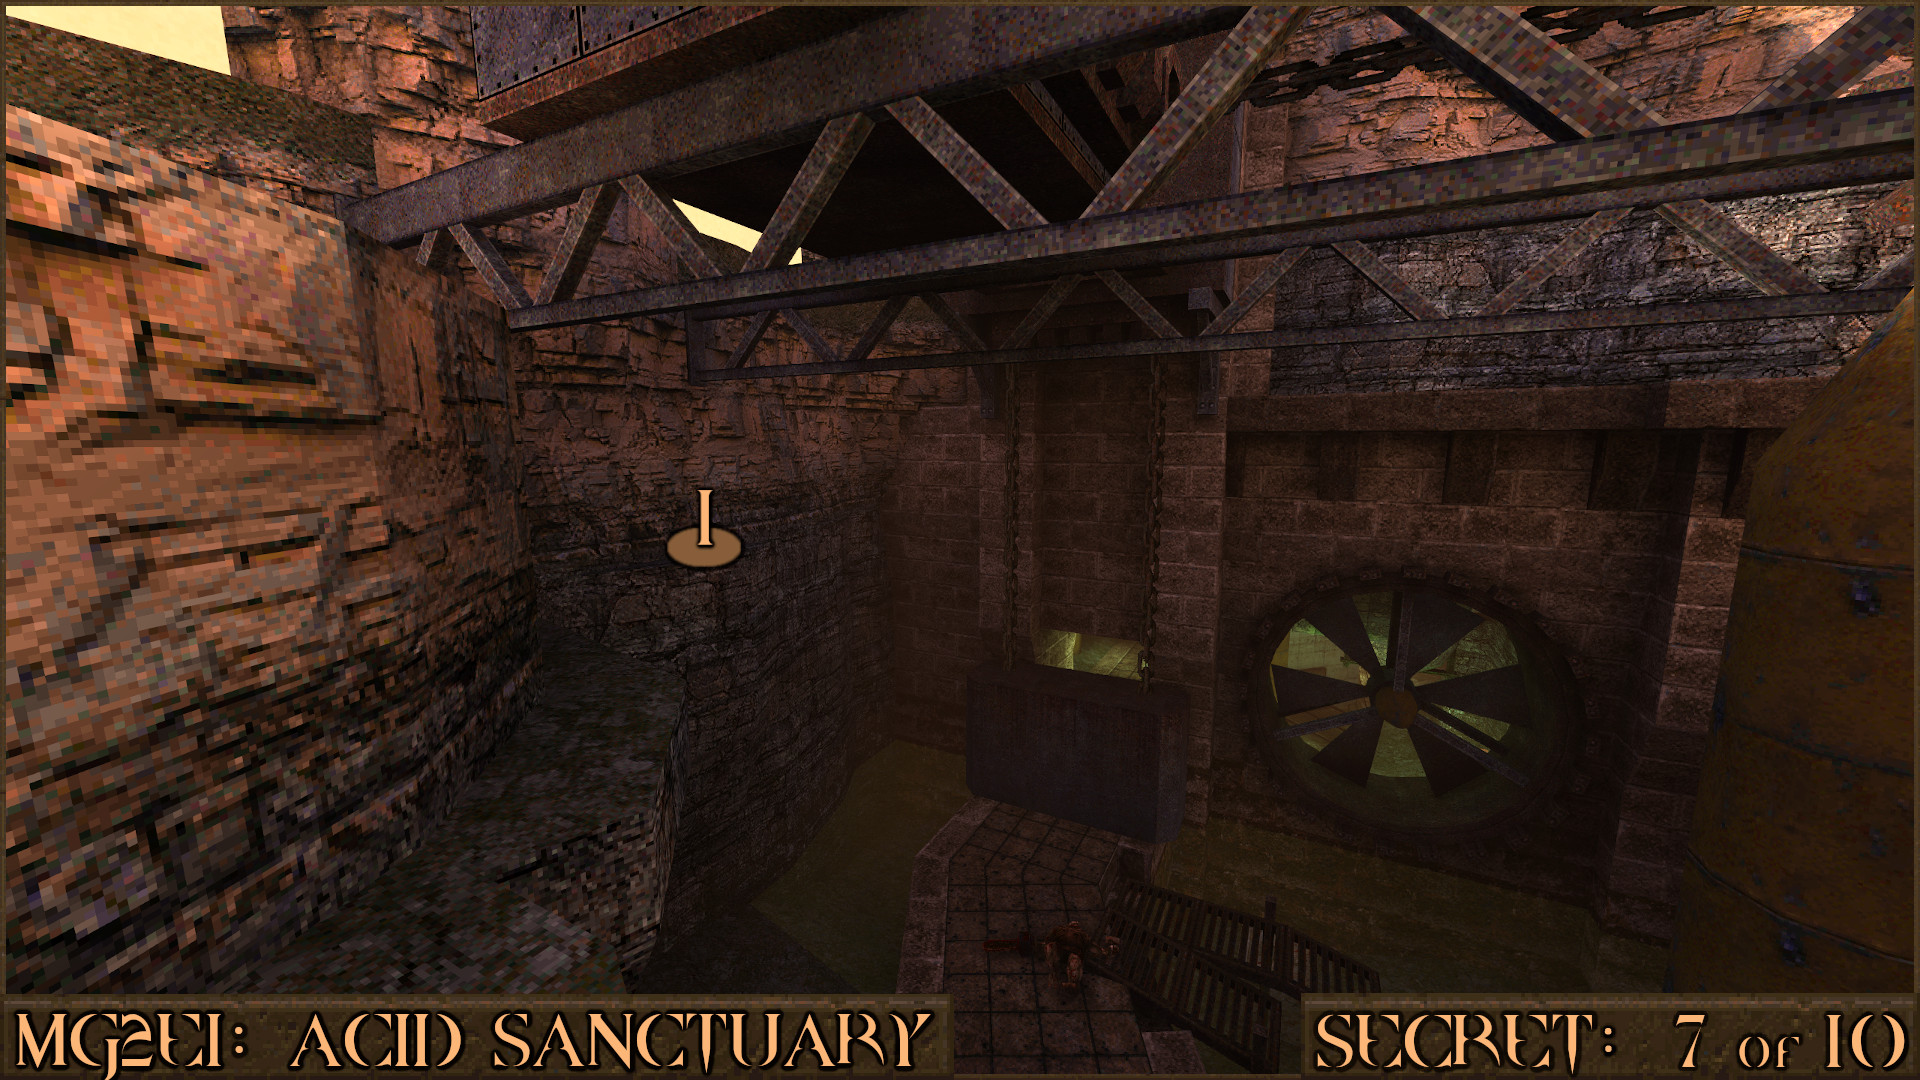
When you're on the ledge turn around to see a small cave built in to the cliff (
). Make another jump over to the cave to claim the secret.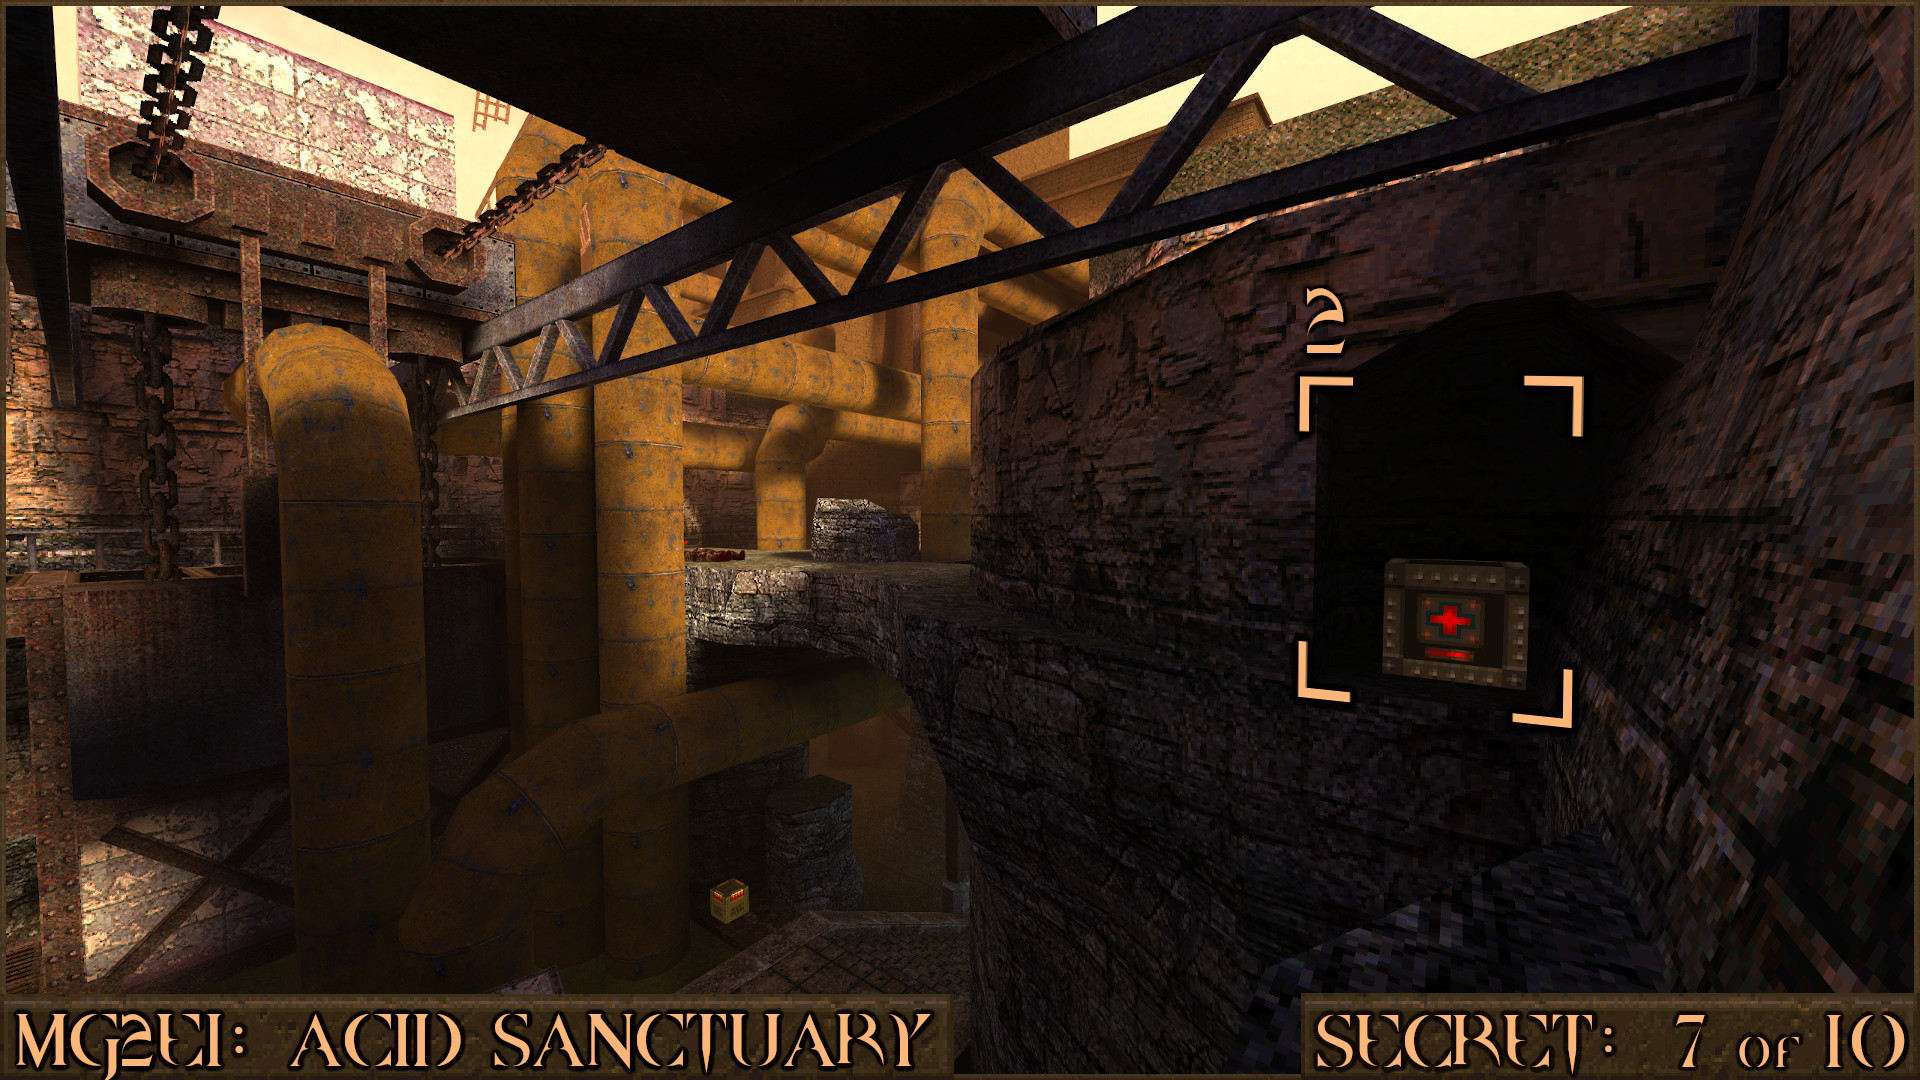
Reward:
Secret 8 of 10
Later in the level you will come across a large tower that has tilted over and now rests at an angle. Before entering this tilted tower look to the right to see a dark corner and you can just see the shadow of a Rocket Launcher on a rock. Explore this dark area to find several bricks you can use to jump on to reach the Rocket Launcher. Jump in to the water on the other side to also find some Yellow Armor and a one-way door you can use to enter the tilted tower.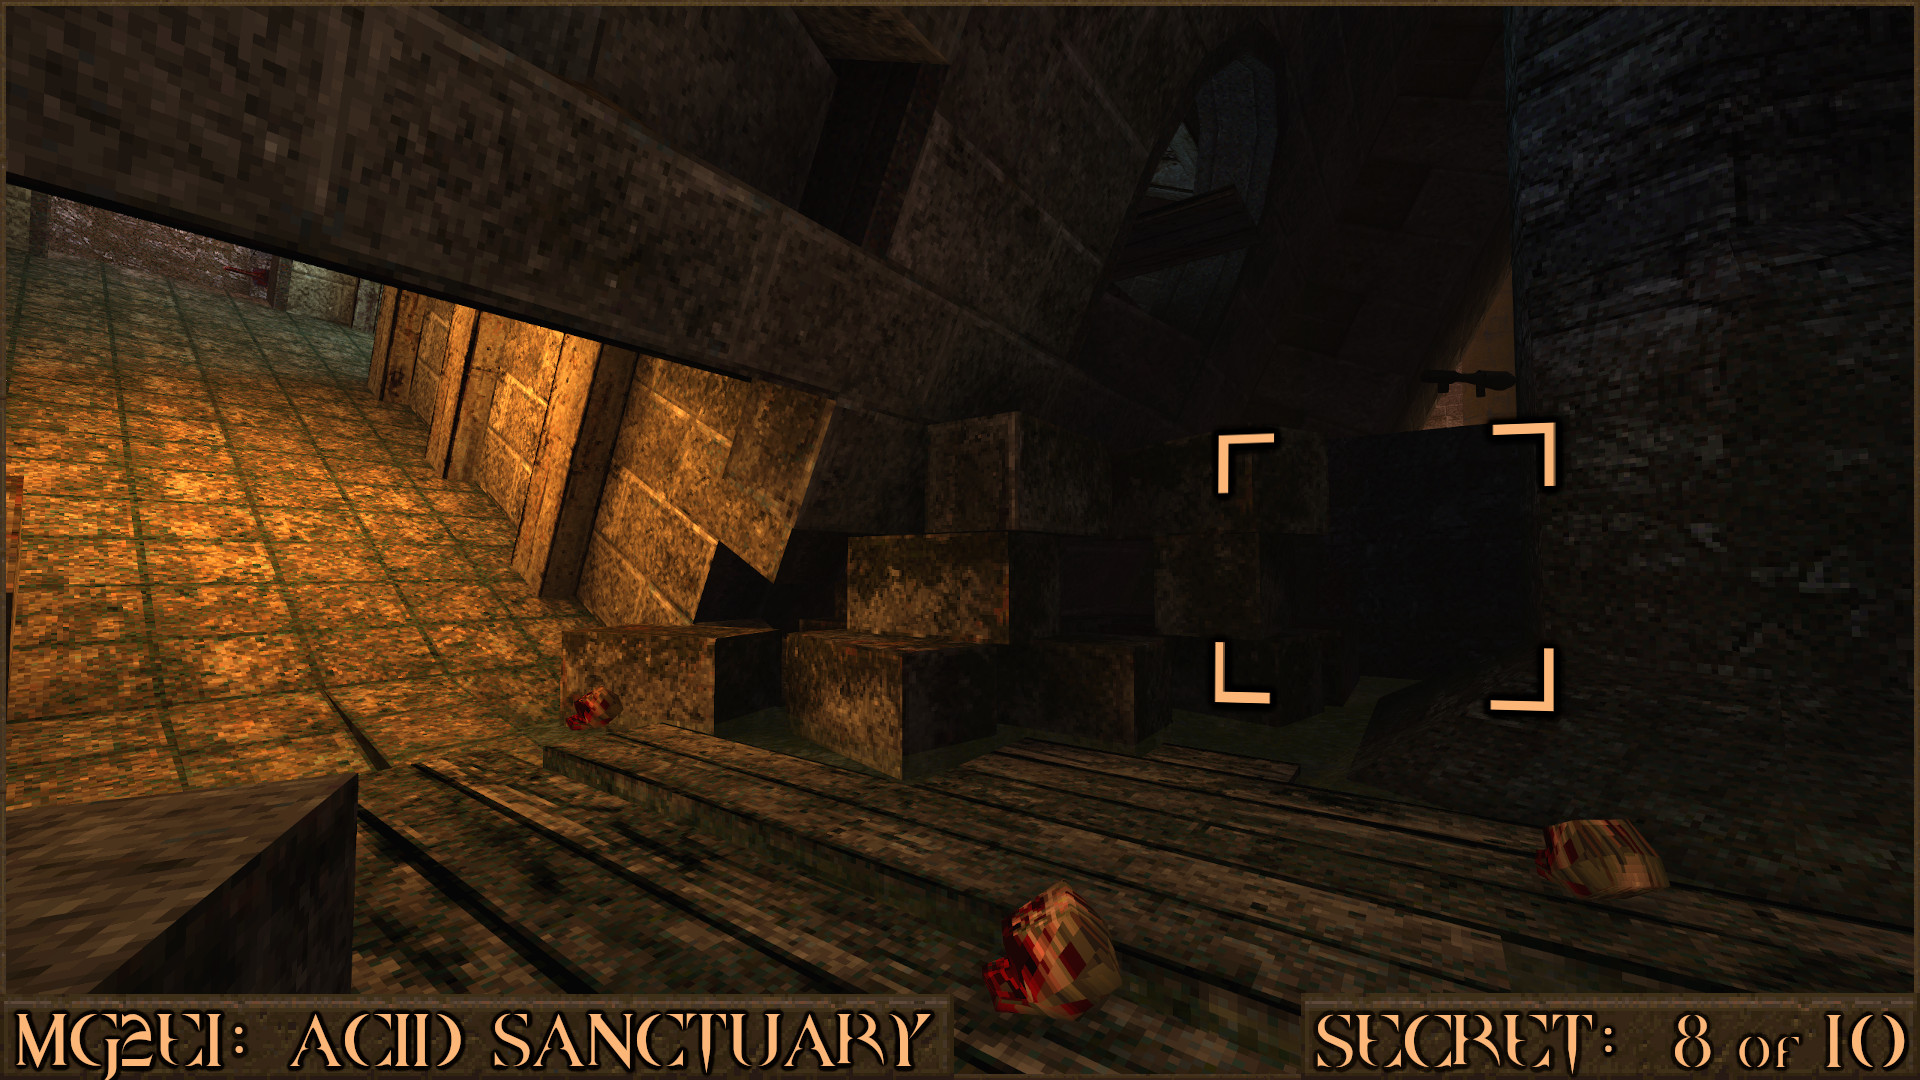
Reward:
Secret 9 of 10
Make your way up to the roof of the tilted tower. Look carefully over the side to see a dark area one floor below you. Drop down in to it to find a secret Red Armor.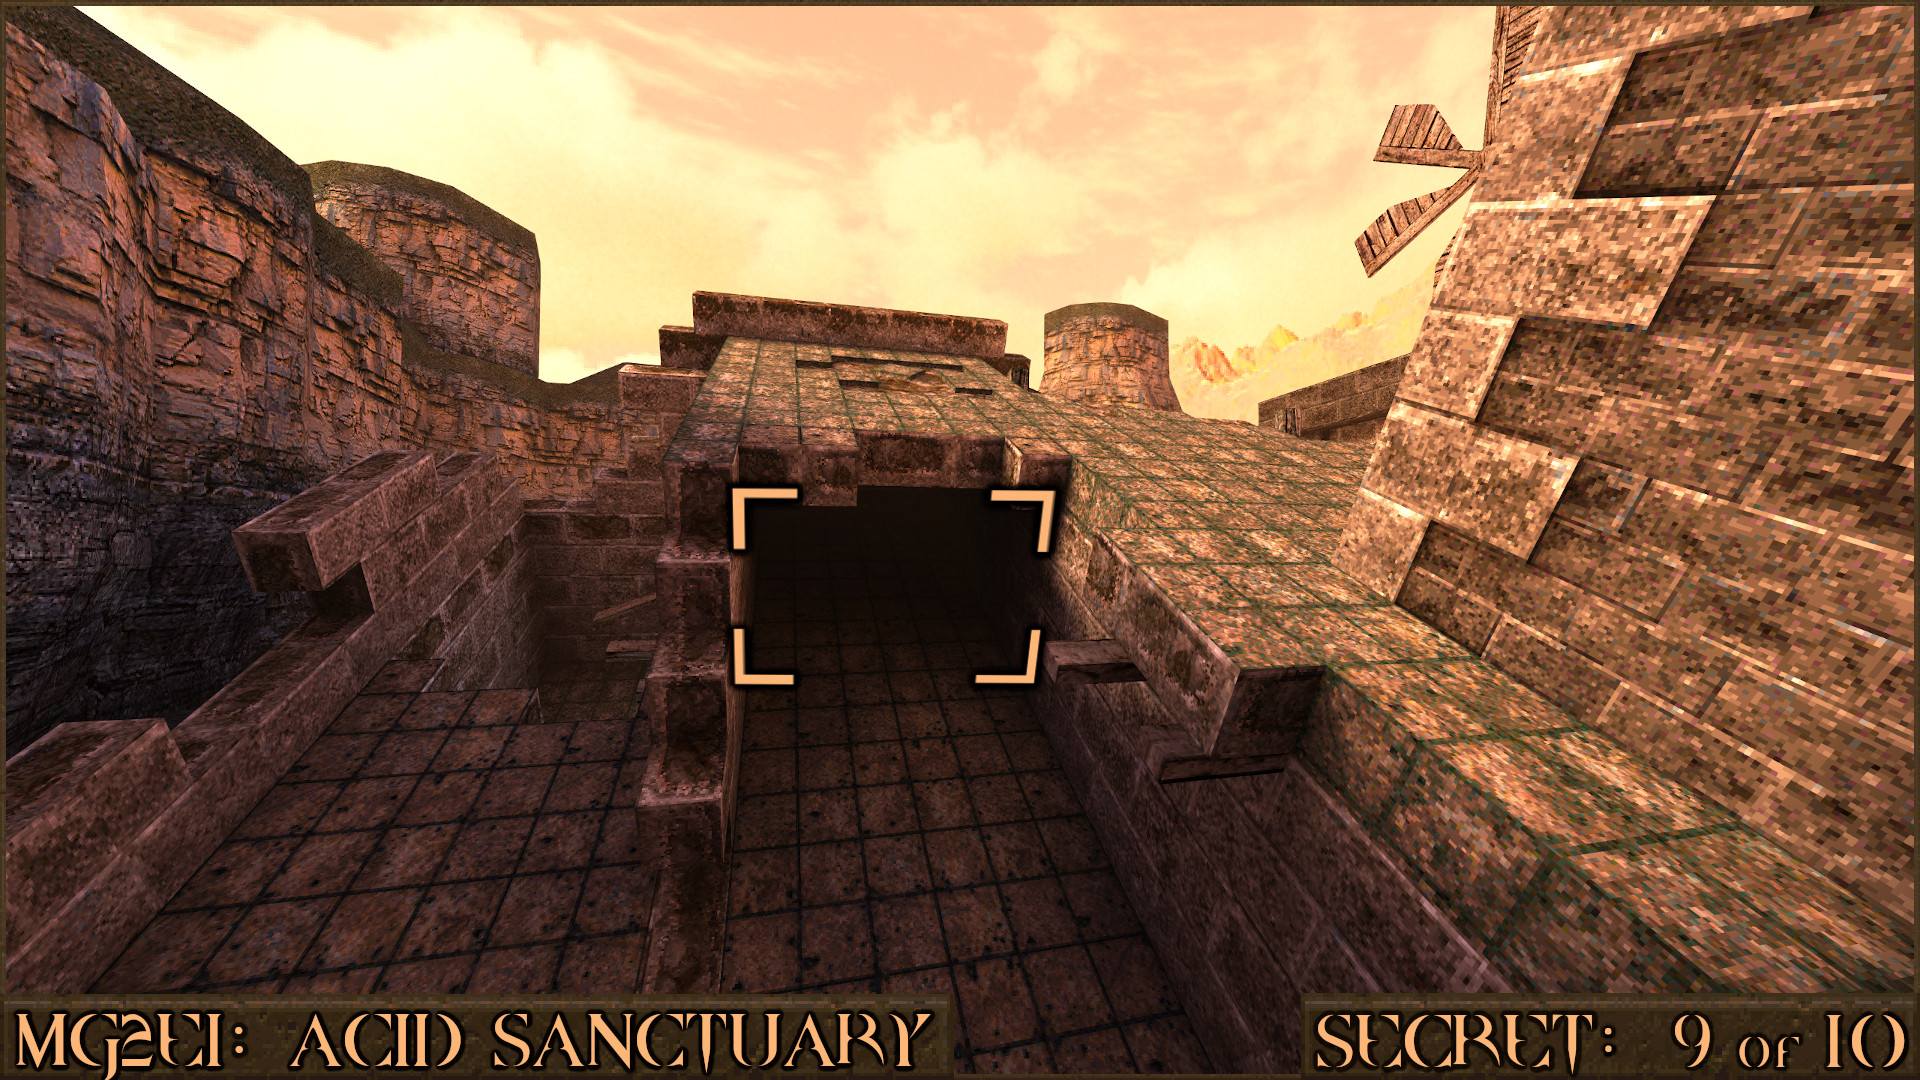
Reward:
Secret 10 of 10
This secret can be found at any point in the level but since it contains a Quad Damage it may be best used at the end, ideally right before you activate the Silver Key Column due to the tough enemies that ambush you. Jump on to the edge of the bridge () and do a running jump over on to the broken brick wall (). From here jump on to the top of a column () then make another jump over to the corner of the area that contains a teleporter (). This teleporter will take you to the roof of the large building and you will discover the secret.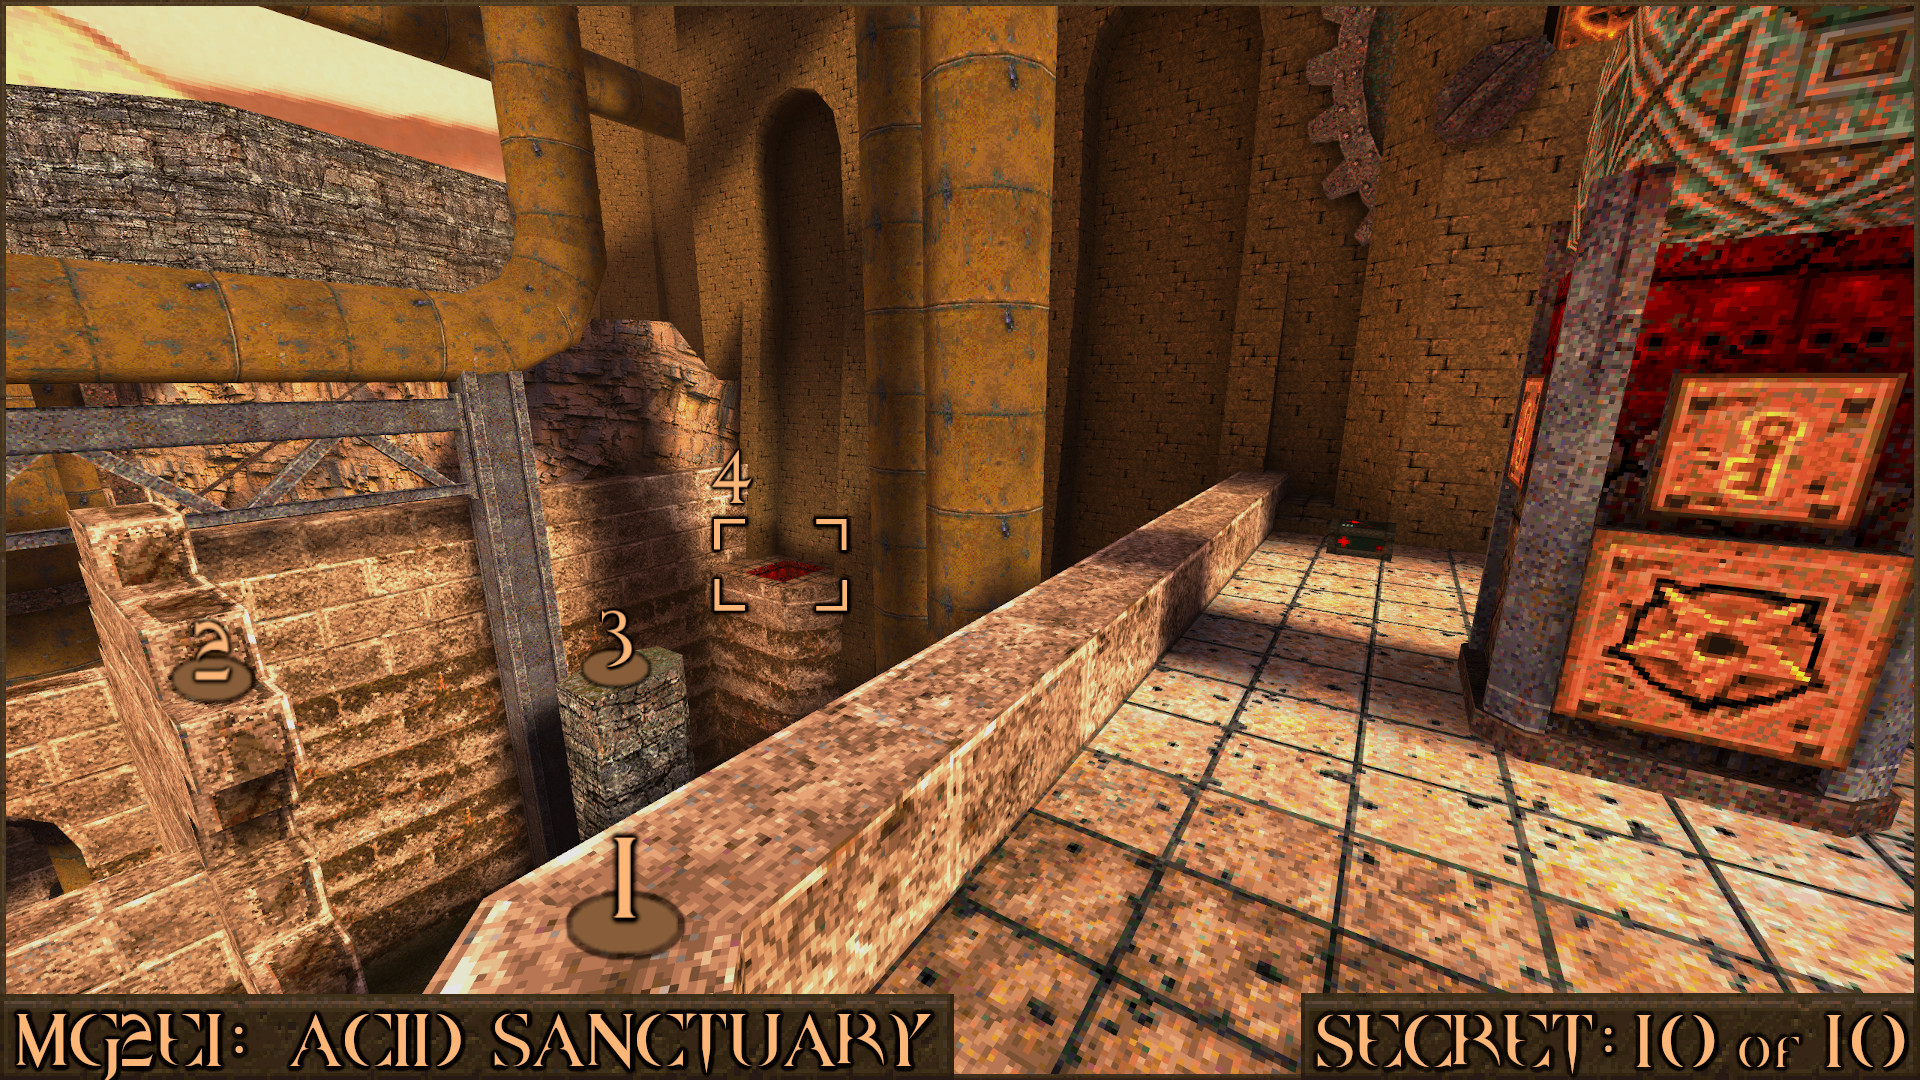
Reward:
MGE2M2: Fading Embers
Secret 1 of 8
You will come across a Green Armor on a lift (). Walk on to the lift then quickly jump off it and drop down the gap underneath the lift platform to find the secret.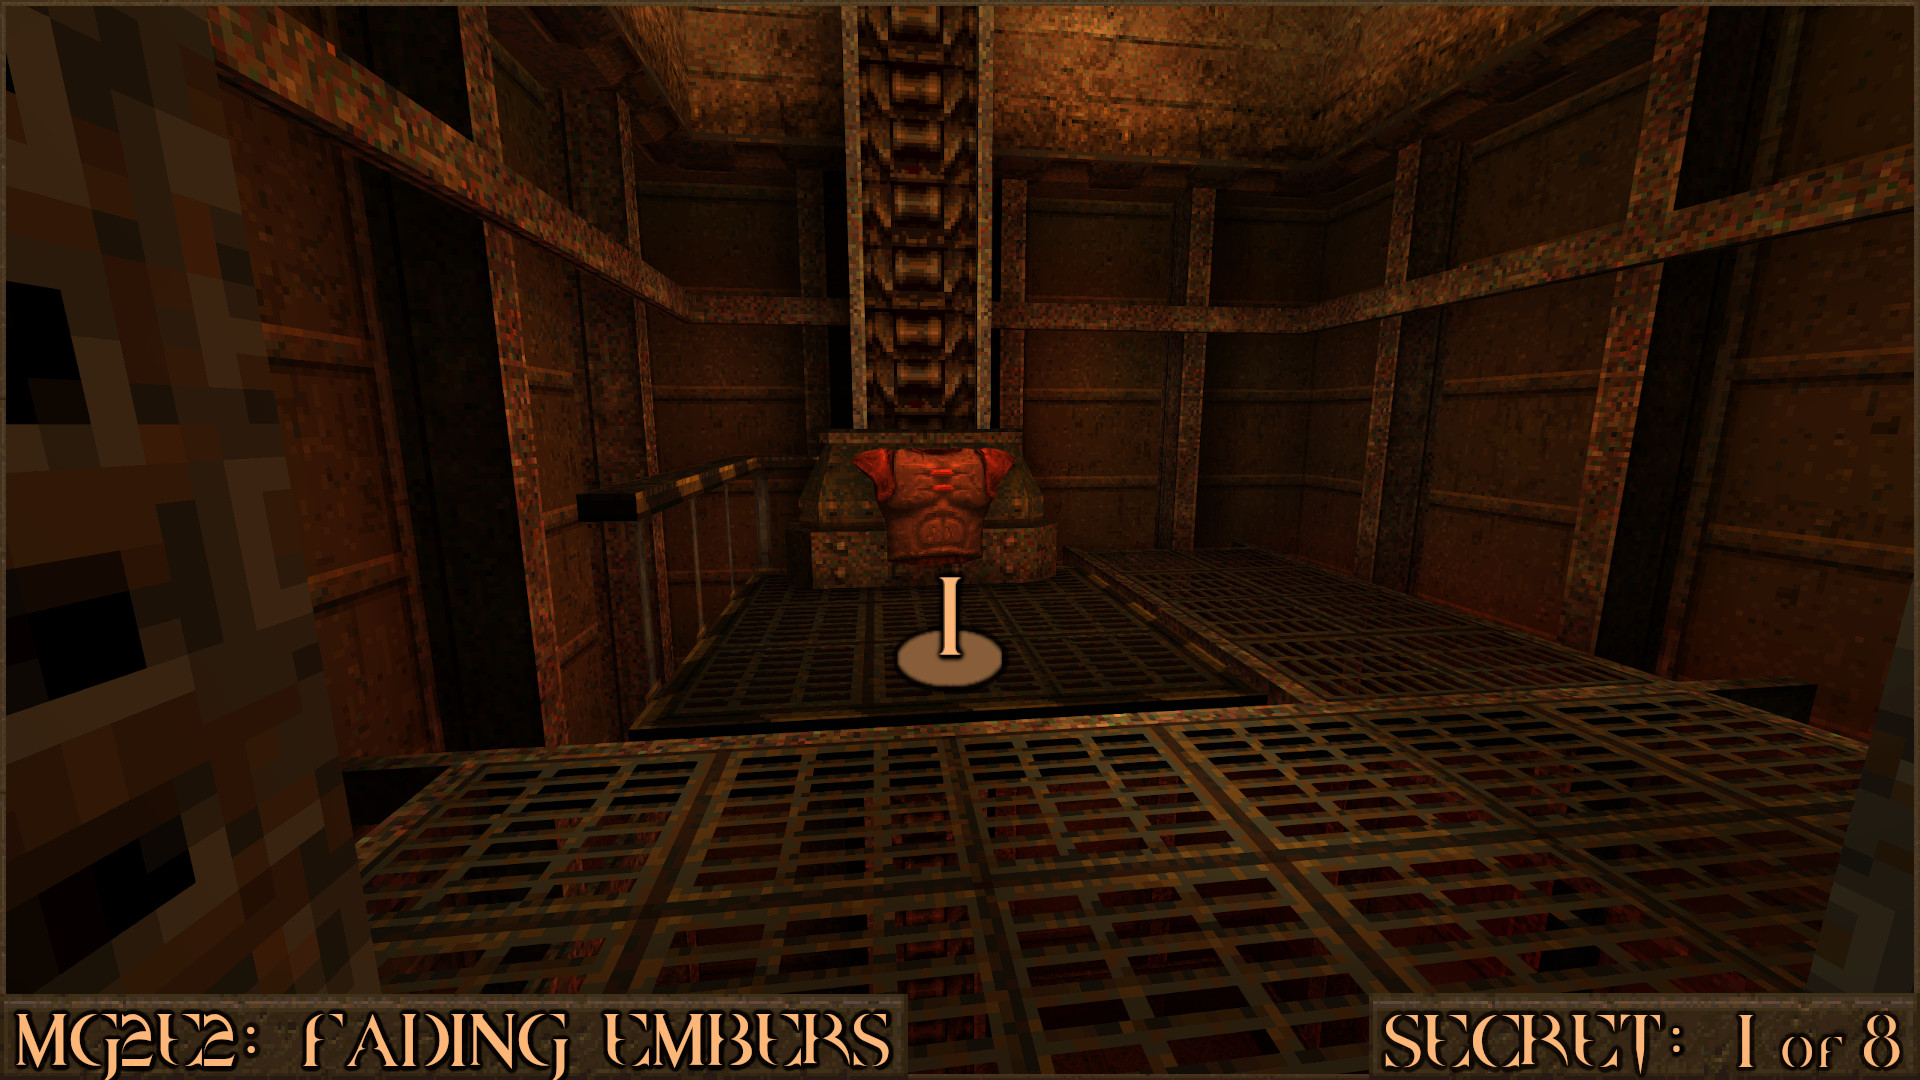
Reward:
Secret 2 of 8
Return to the lift from Secret 1 and look a small gap next to a white crate. Squeeze through and follow the corridor to find the secret.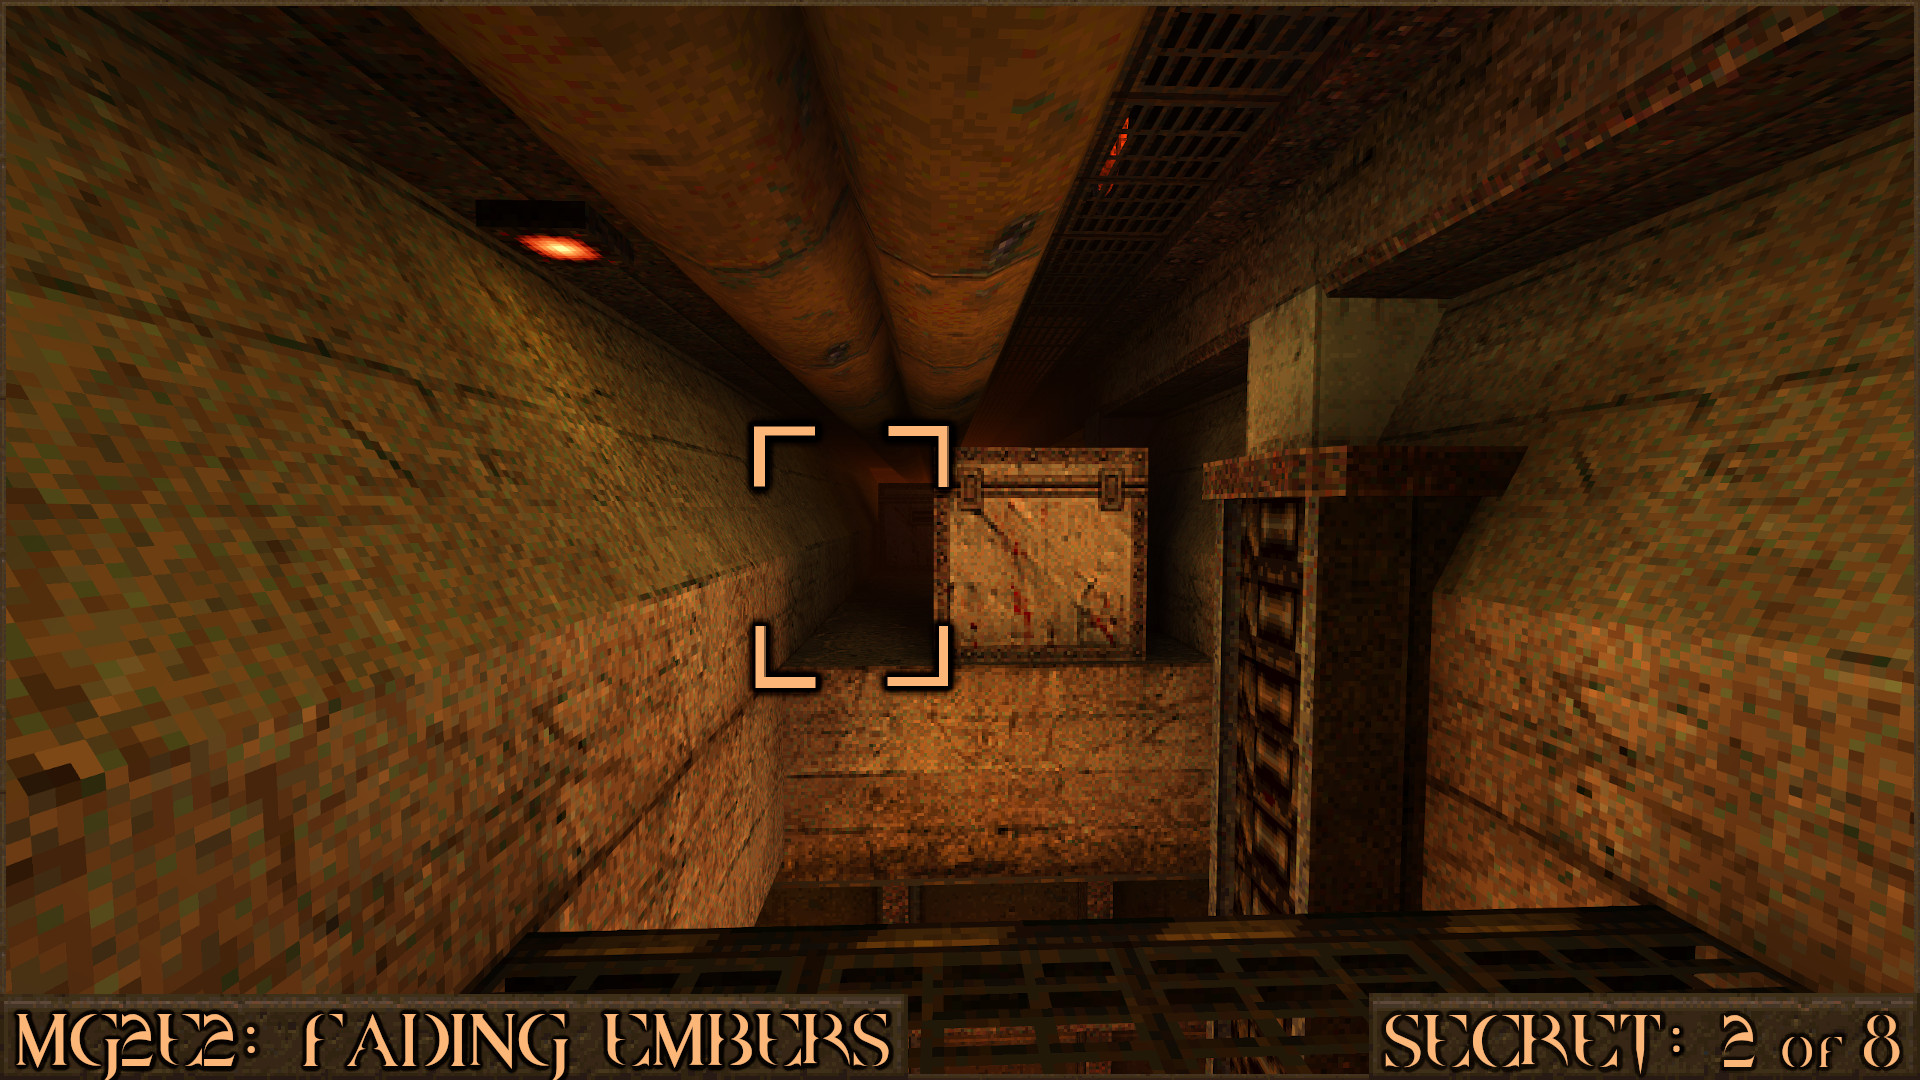
Reward:
Secret 3 of 8
Later in the level you will enter a large cavern with a huge lake of lava down below. When you come across some metal stairs leading up to a platform don't go up them yet, instead carefully look over the edge. You will see several ledges jutting out of the cliff () that you can drop down to. Follow them across and go around the corner () to find the secret.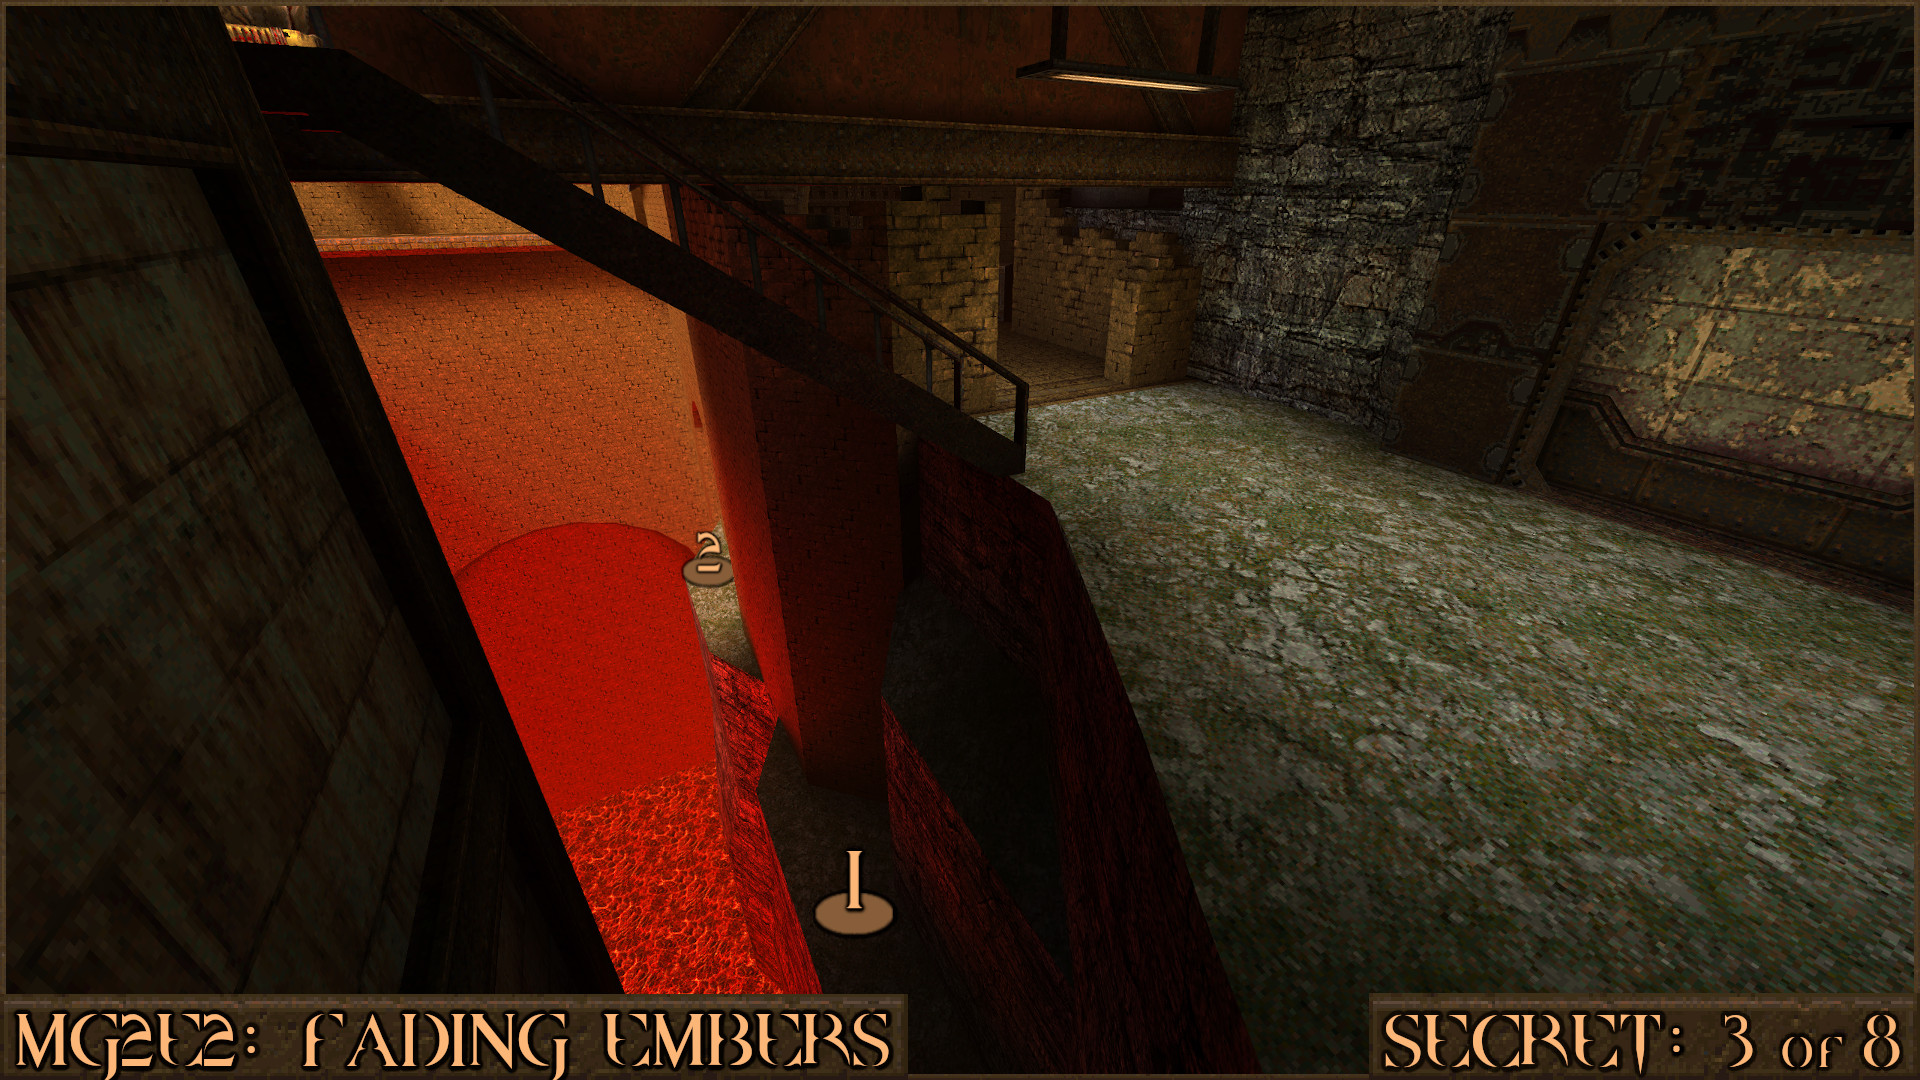
Reward:
Secret 4 of 8
Make your way back to the metal stairs from Secret 3 and you will go across several metal platforms. Before jumping on the pipes turn around and carefully look around the side to see a Thunderbolt on a platform. Make a jump over to it to claim the secret.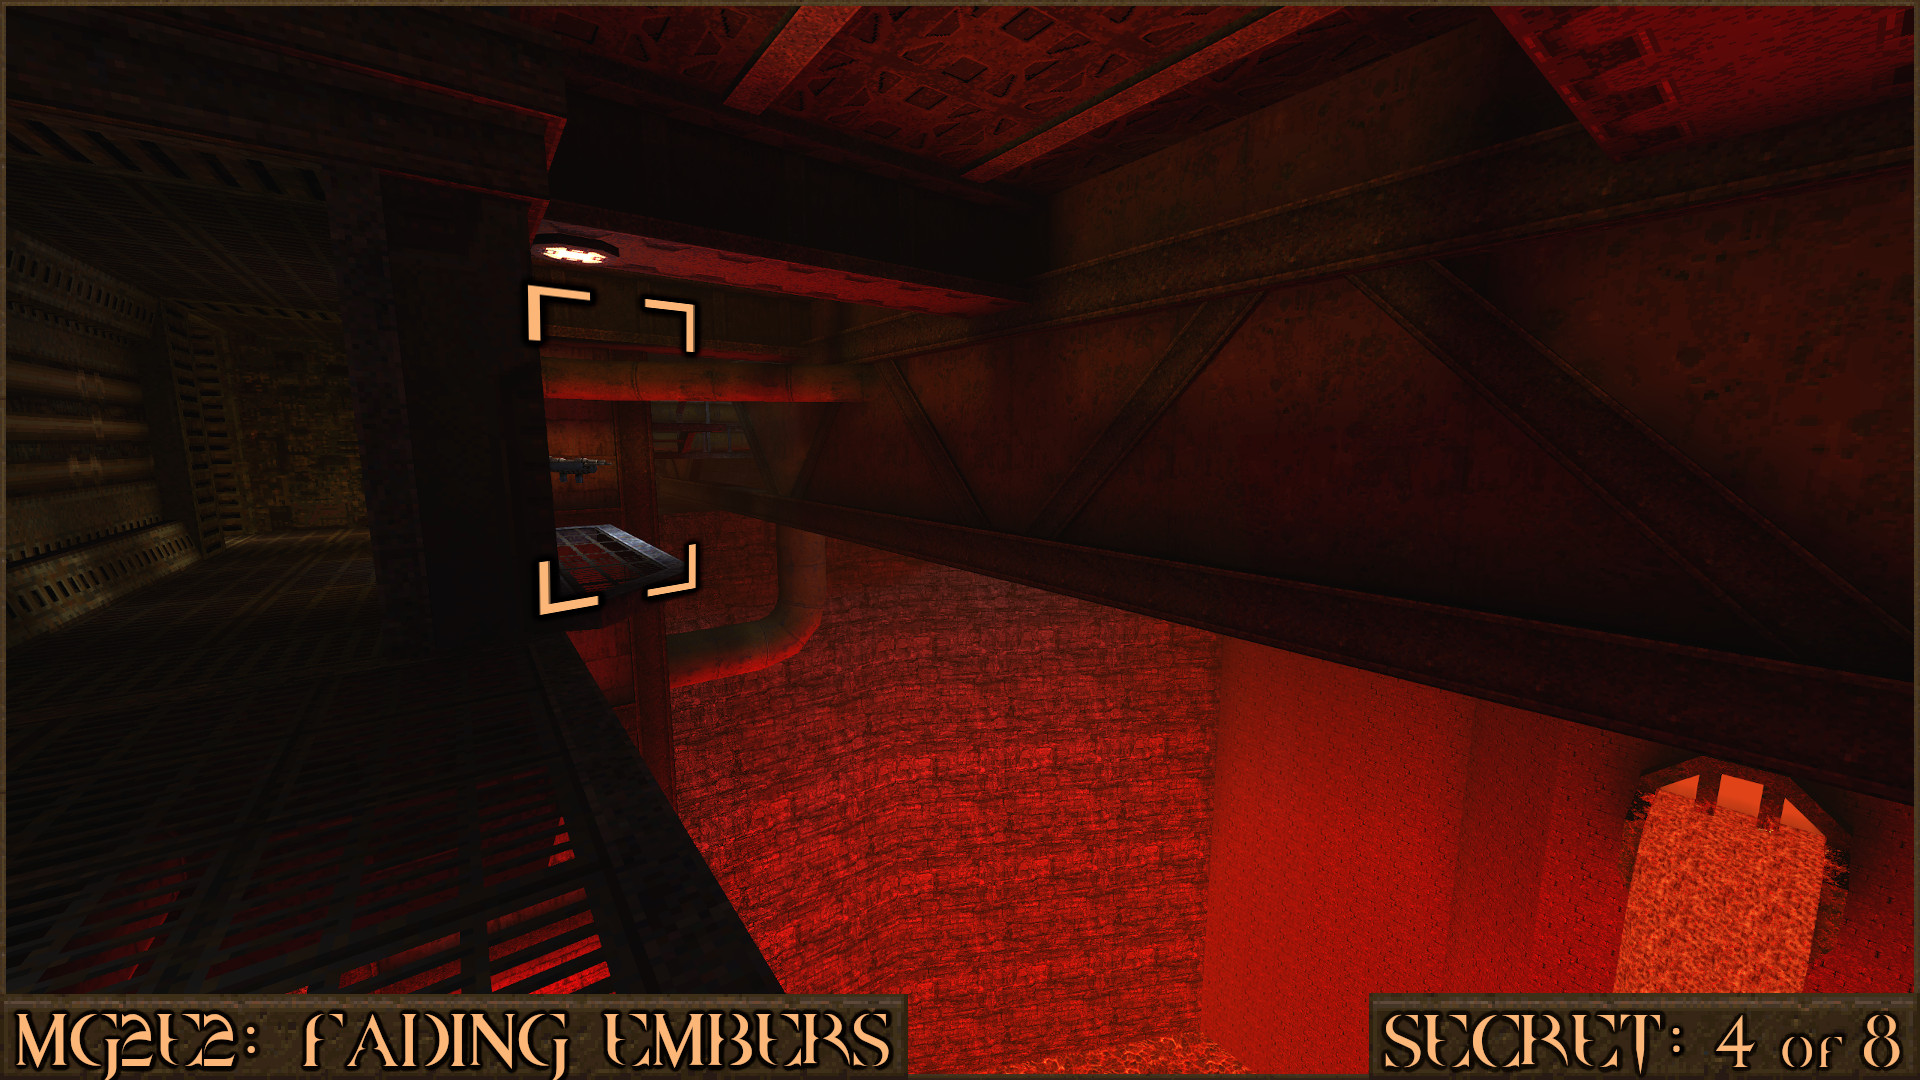
Reward:
Secret 5 of 8
Shortly after the previous secret you will cross some pipes then drop down in to a room. Look in the top left corner of this room to see a red shootable switch (). Shooting it will make a nearby wall move () and allow access to the secret.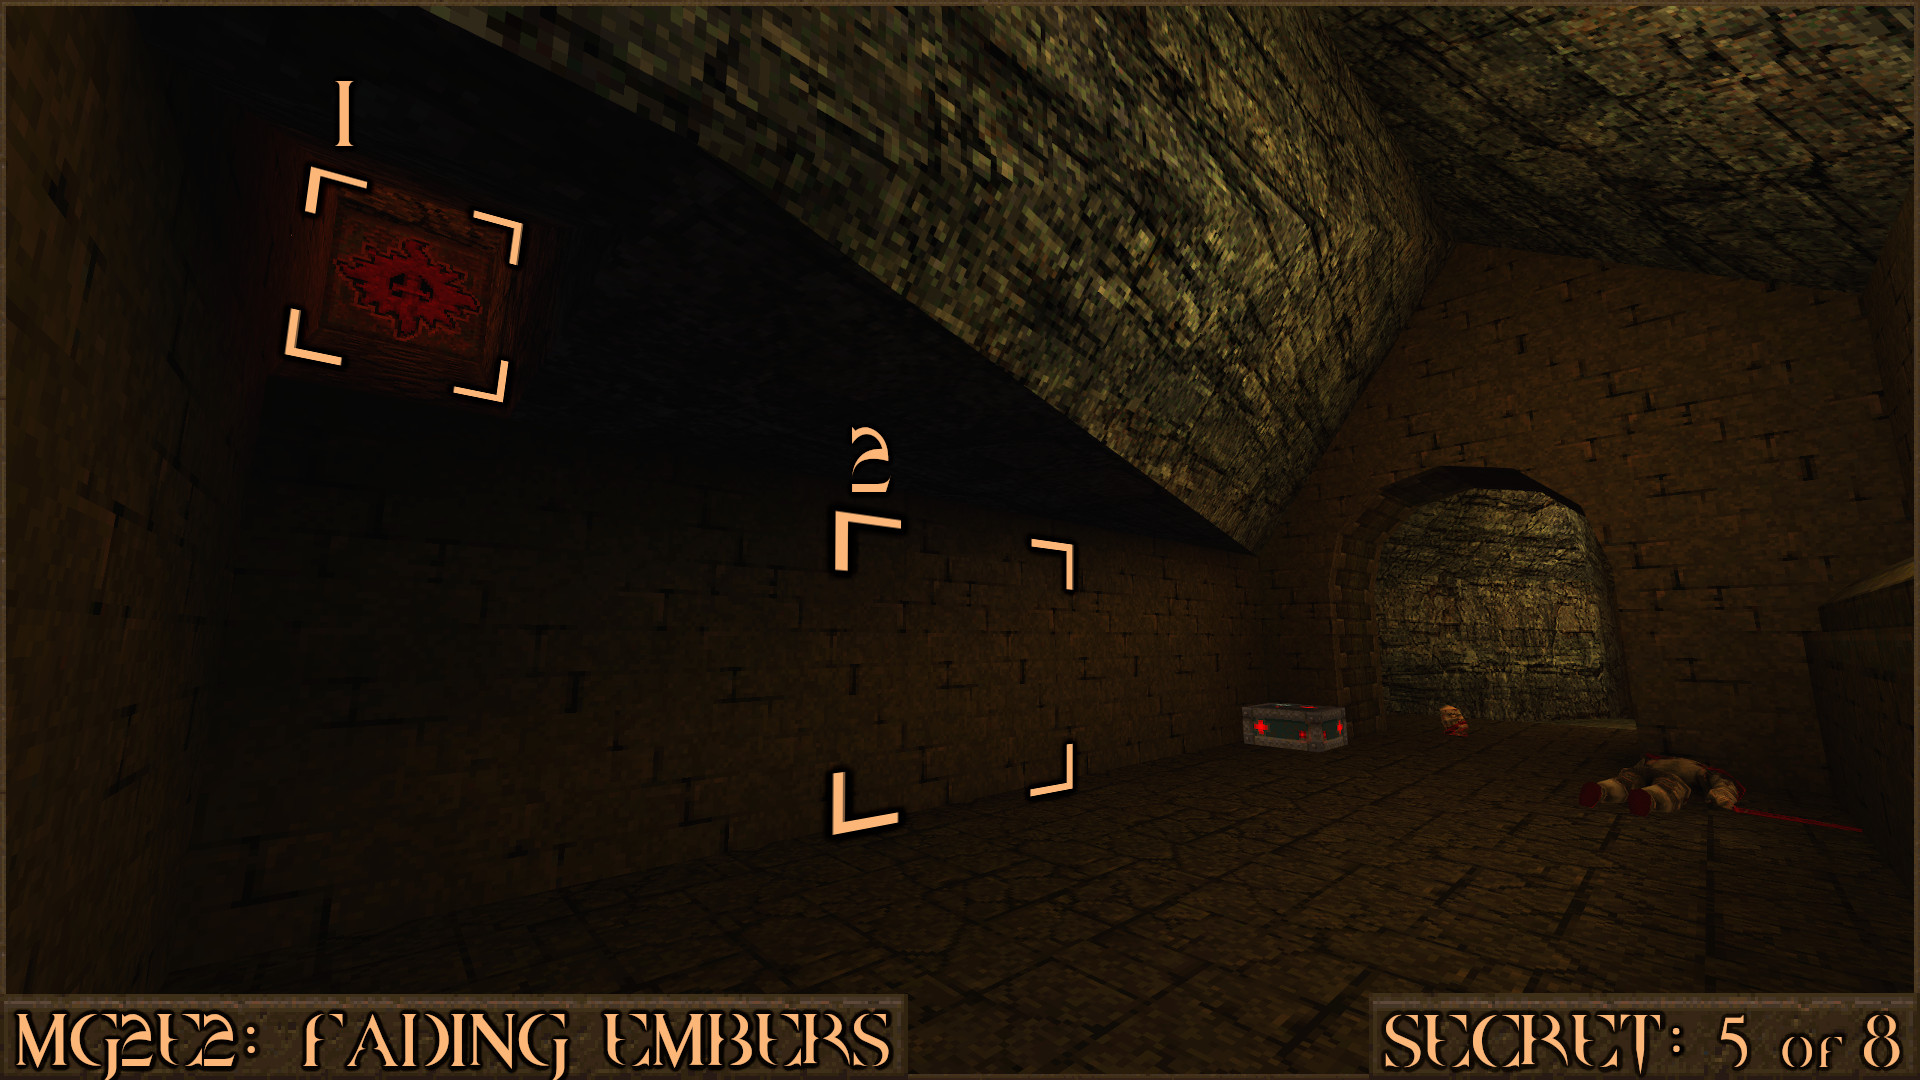
Reward:
Secret 6 of 8
Shortly after opening the Gold Keycard Door you will come across some metal stairs that lead up to a lightning machine that contains the Rune. Before going up the stairs jump to the ledge just to the right of them () and follow it around.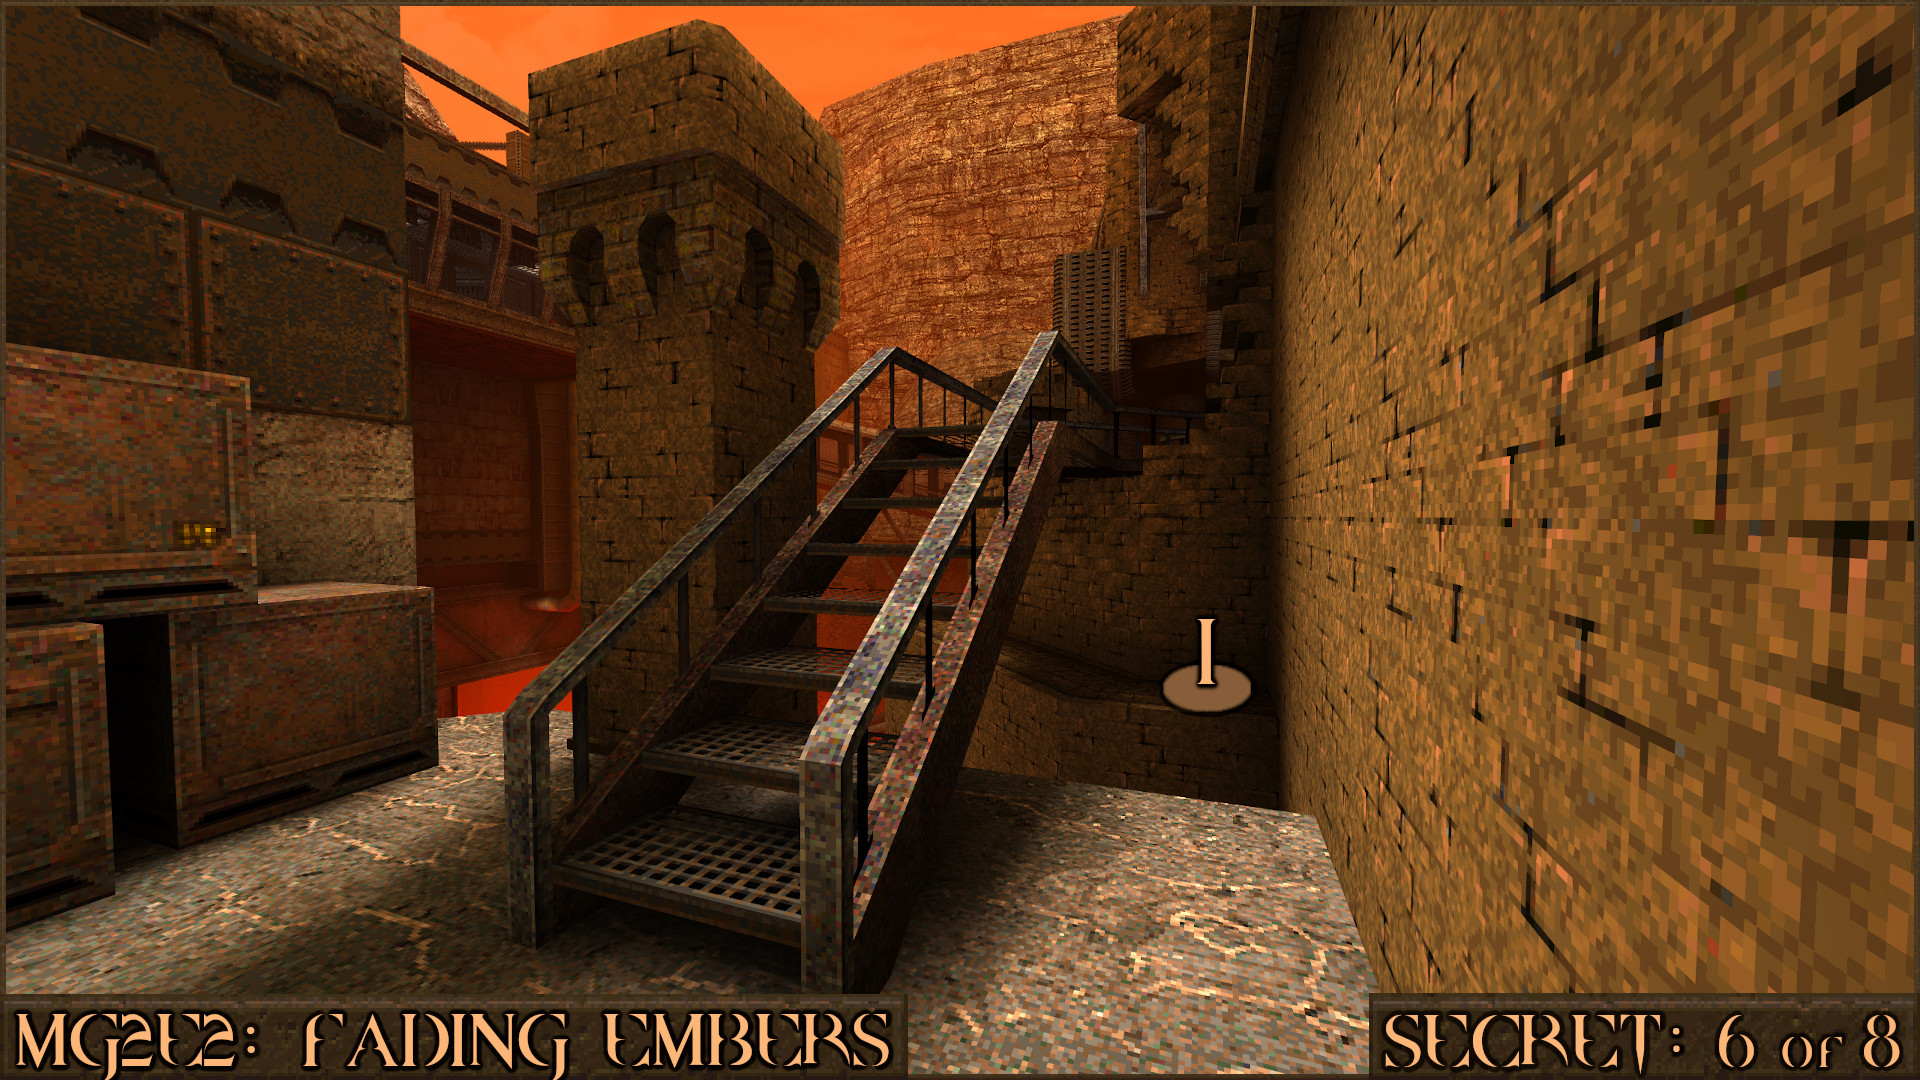
Keep going across the broken brick wall and round the corner (
) to find the secret.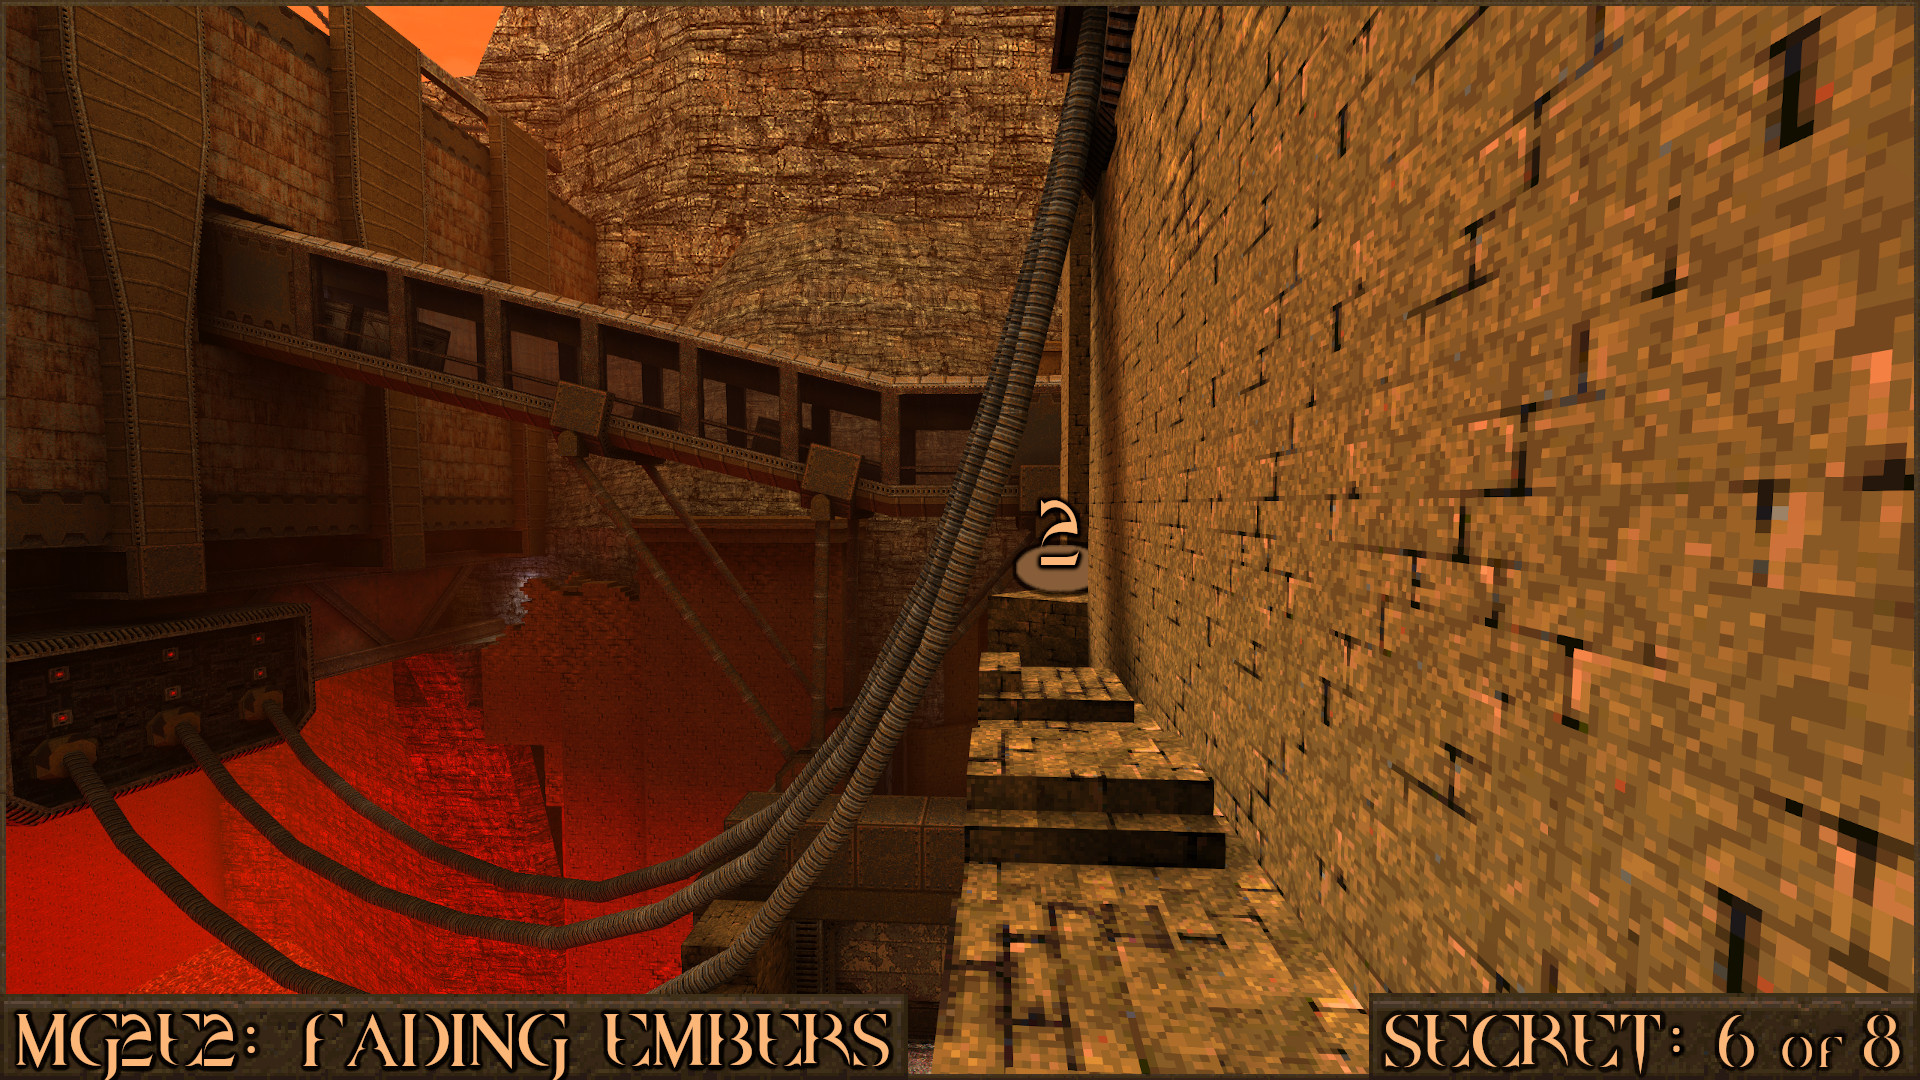
Reward:
Secret 7 of 8
Keep progressing through the area that contains the electric rune machine until you reach a metal platform overlooking this area. Look over the railing to see the roof of a skybridge (). Jump on the roof and look under the platform to find the secret ammo stash.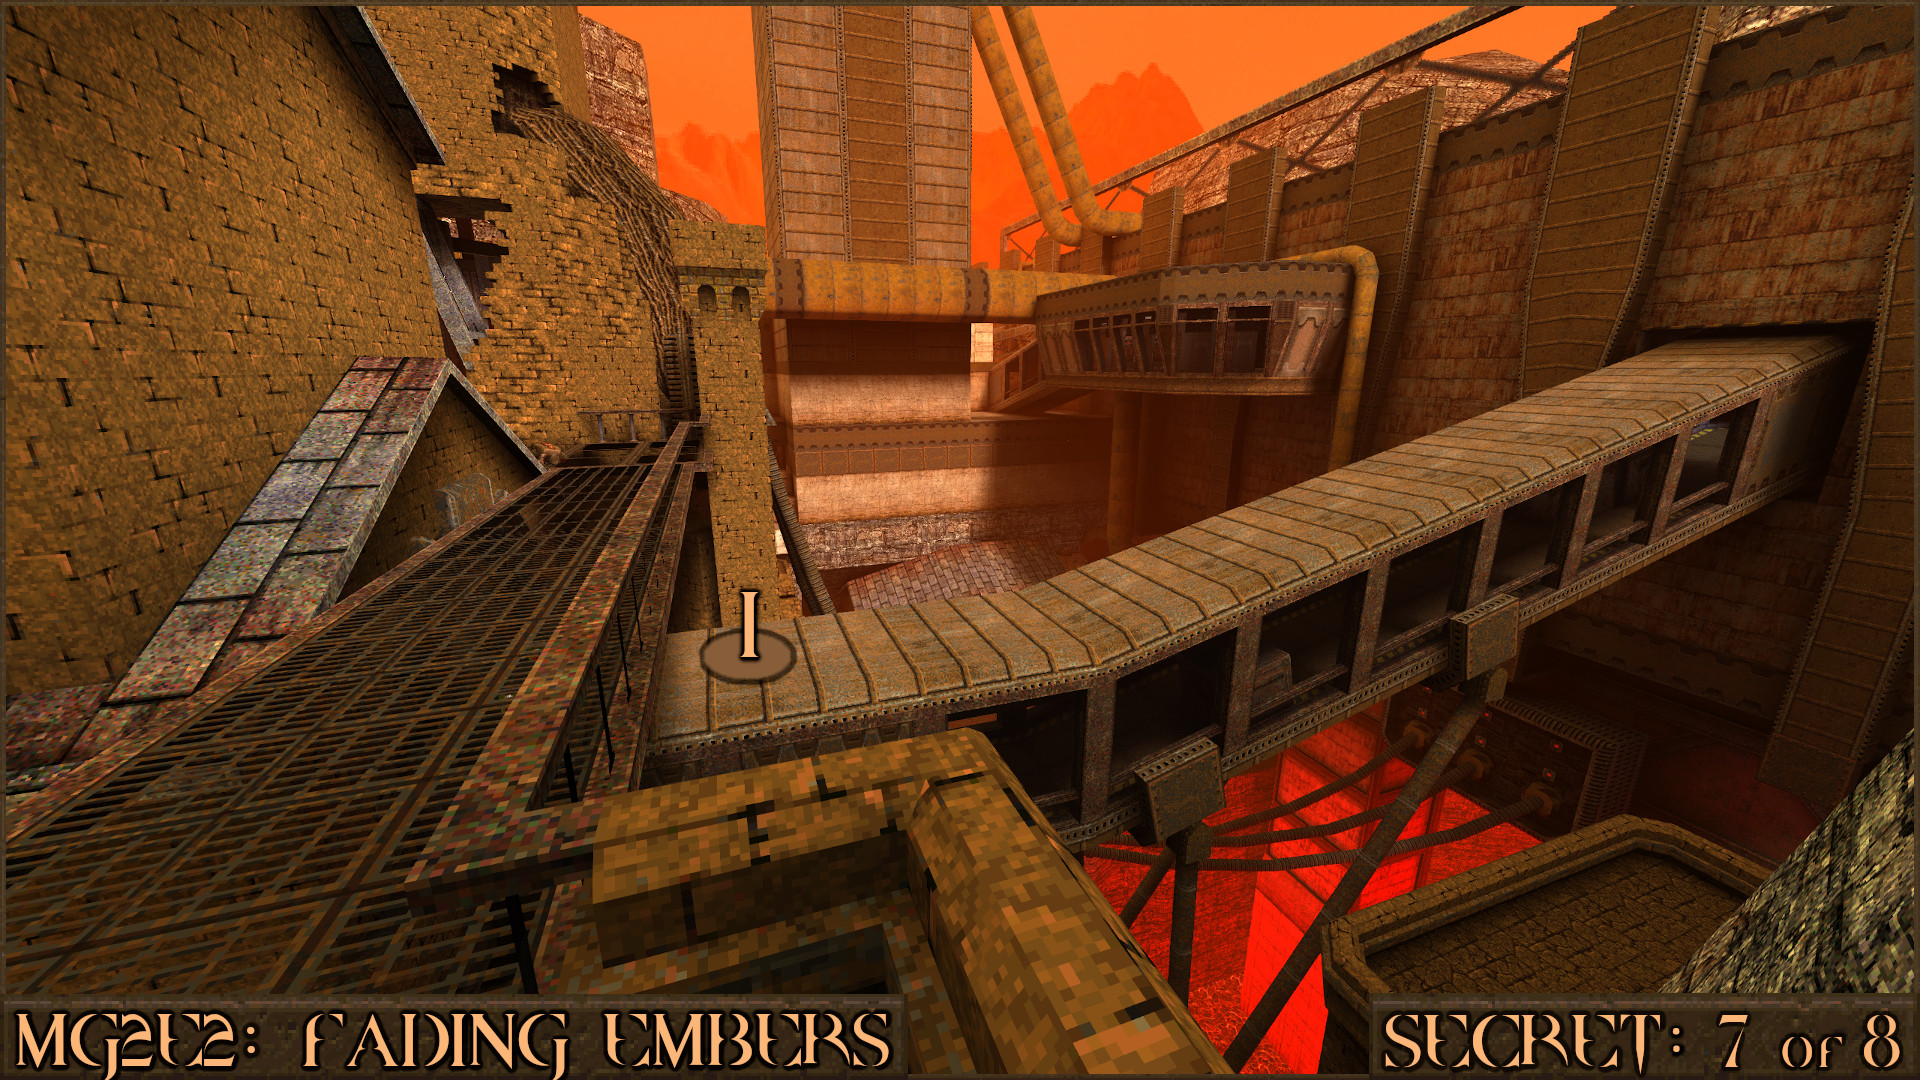
Reward:
Secret 8 of 8
Make your way back up the building to the metal platform from Secret 7. Just around the corner you will see some Green Armor on top of a roof. Turn around to look at the nearby building and shoot the dark part of the wall to reveal an entryway. Go inside to find the secret.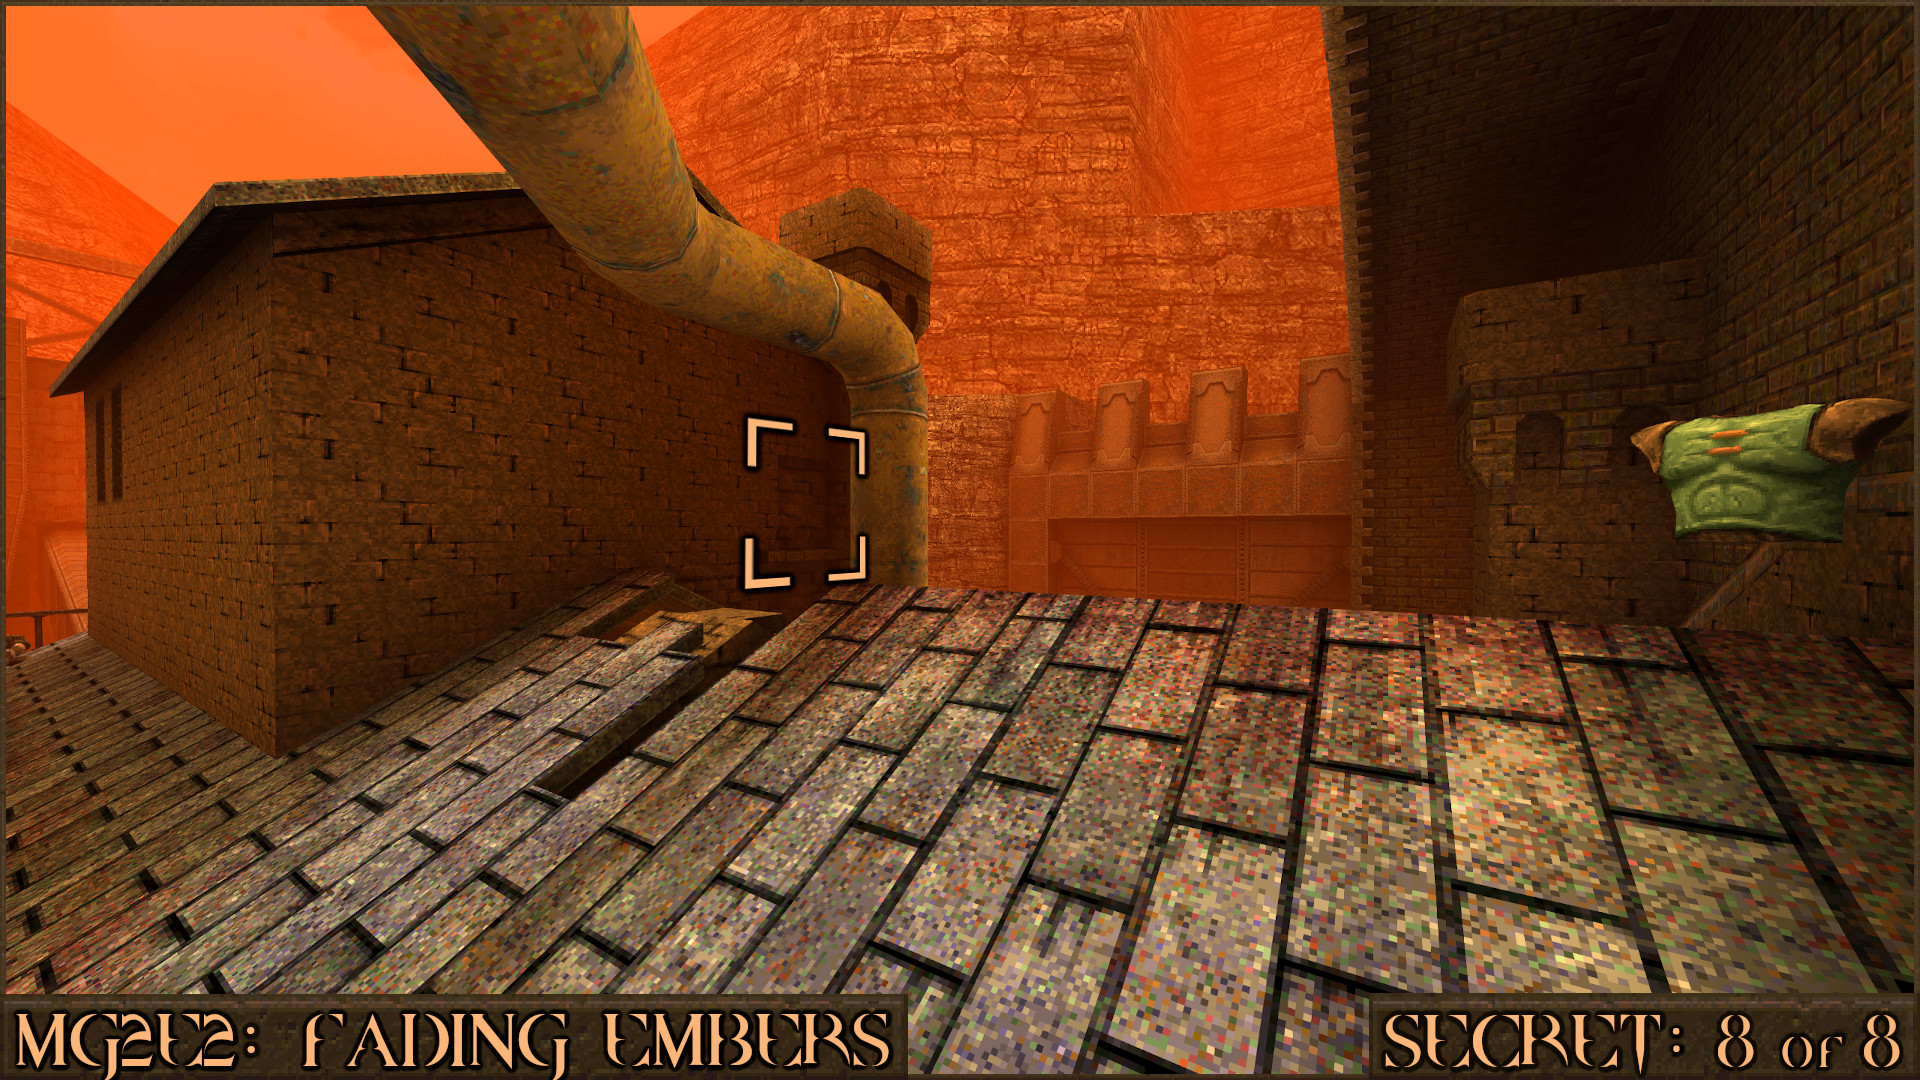
Reward:
MGE3M1: Down the Waste
Secret 1 of 11
You will come to a large area that contains the Gold Key Door. Head to the ledge opposite the door and look over the edge to see a bloody wooden door embedded in the wall below. Shoot it to make it move out the way and reveal the secret area.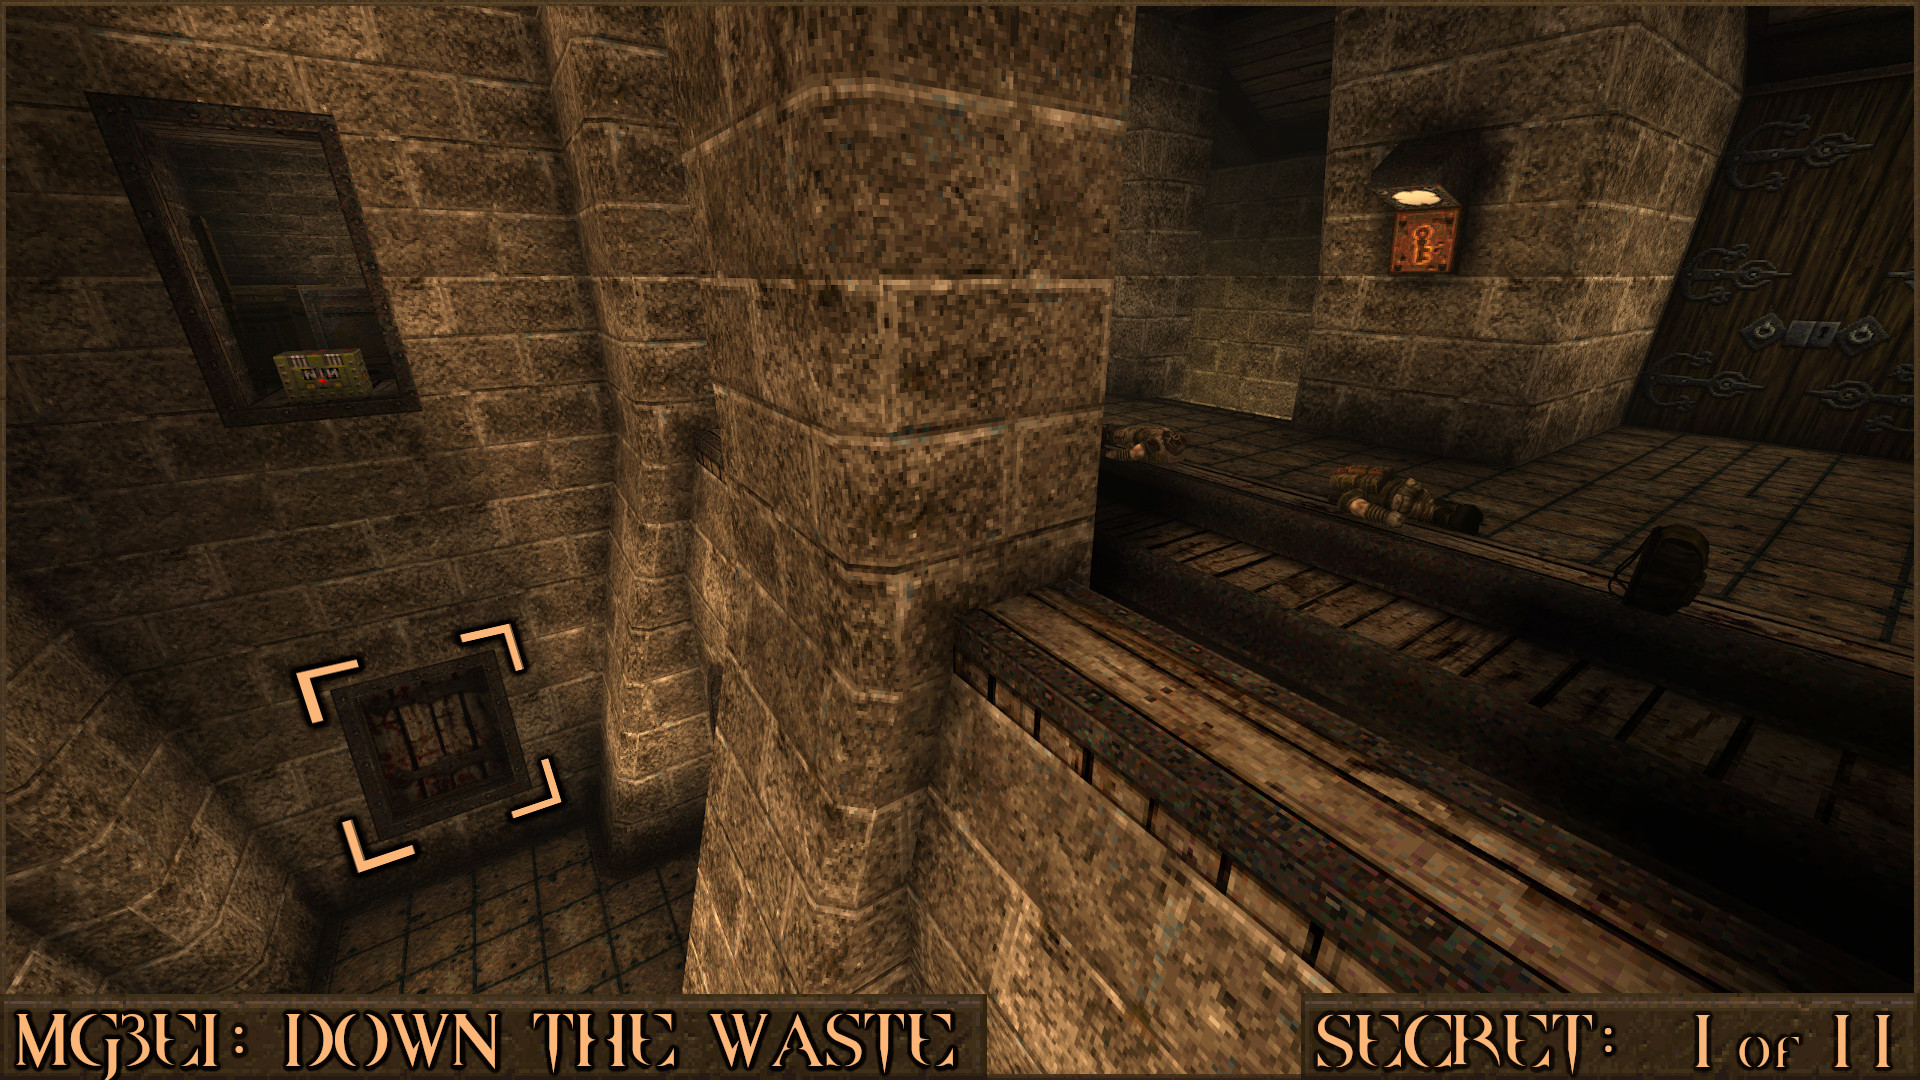
Reward:
NOTE: Soon after this you may come across Secret 10 which contains a Quad Damage and the message "Pick up now, or save for later?" will appear. It is best to take their advice and leave that secret for when you come back this way later due to the harder enemies you'll fight.
Secret 2 of 11
In the room with a large slime pit and several floating crates jump across and make your way to the left ().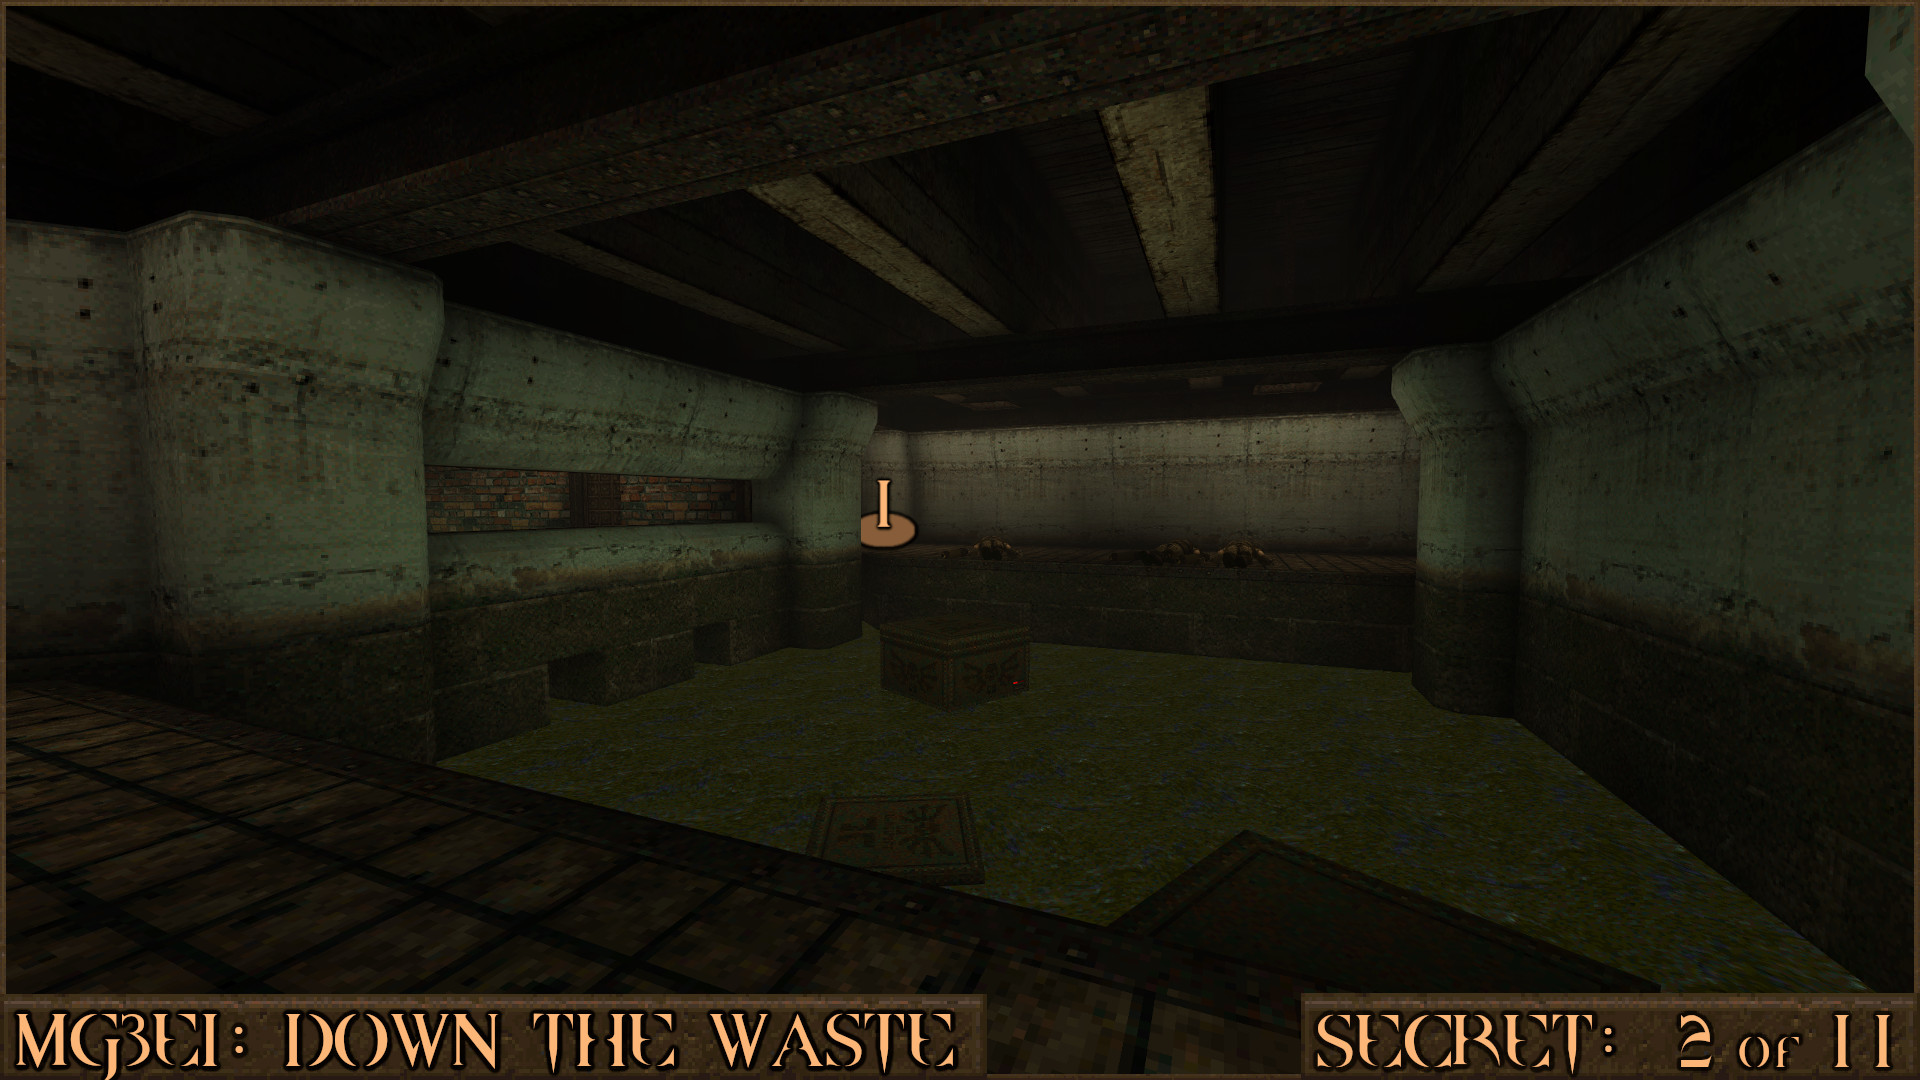
Look carefully past the crates blocking your path to see a Yellow Armor and just above it a red target switch (
). Shooting this opens a nearby door () but you'll have to go back over the slime to reach it.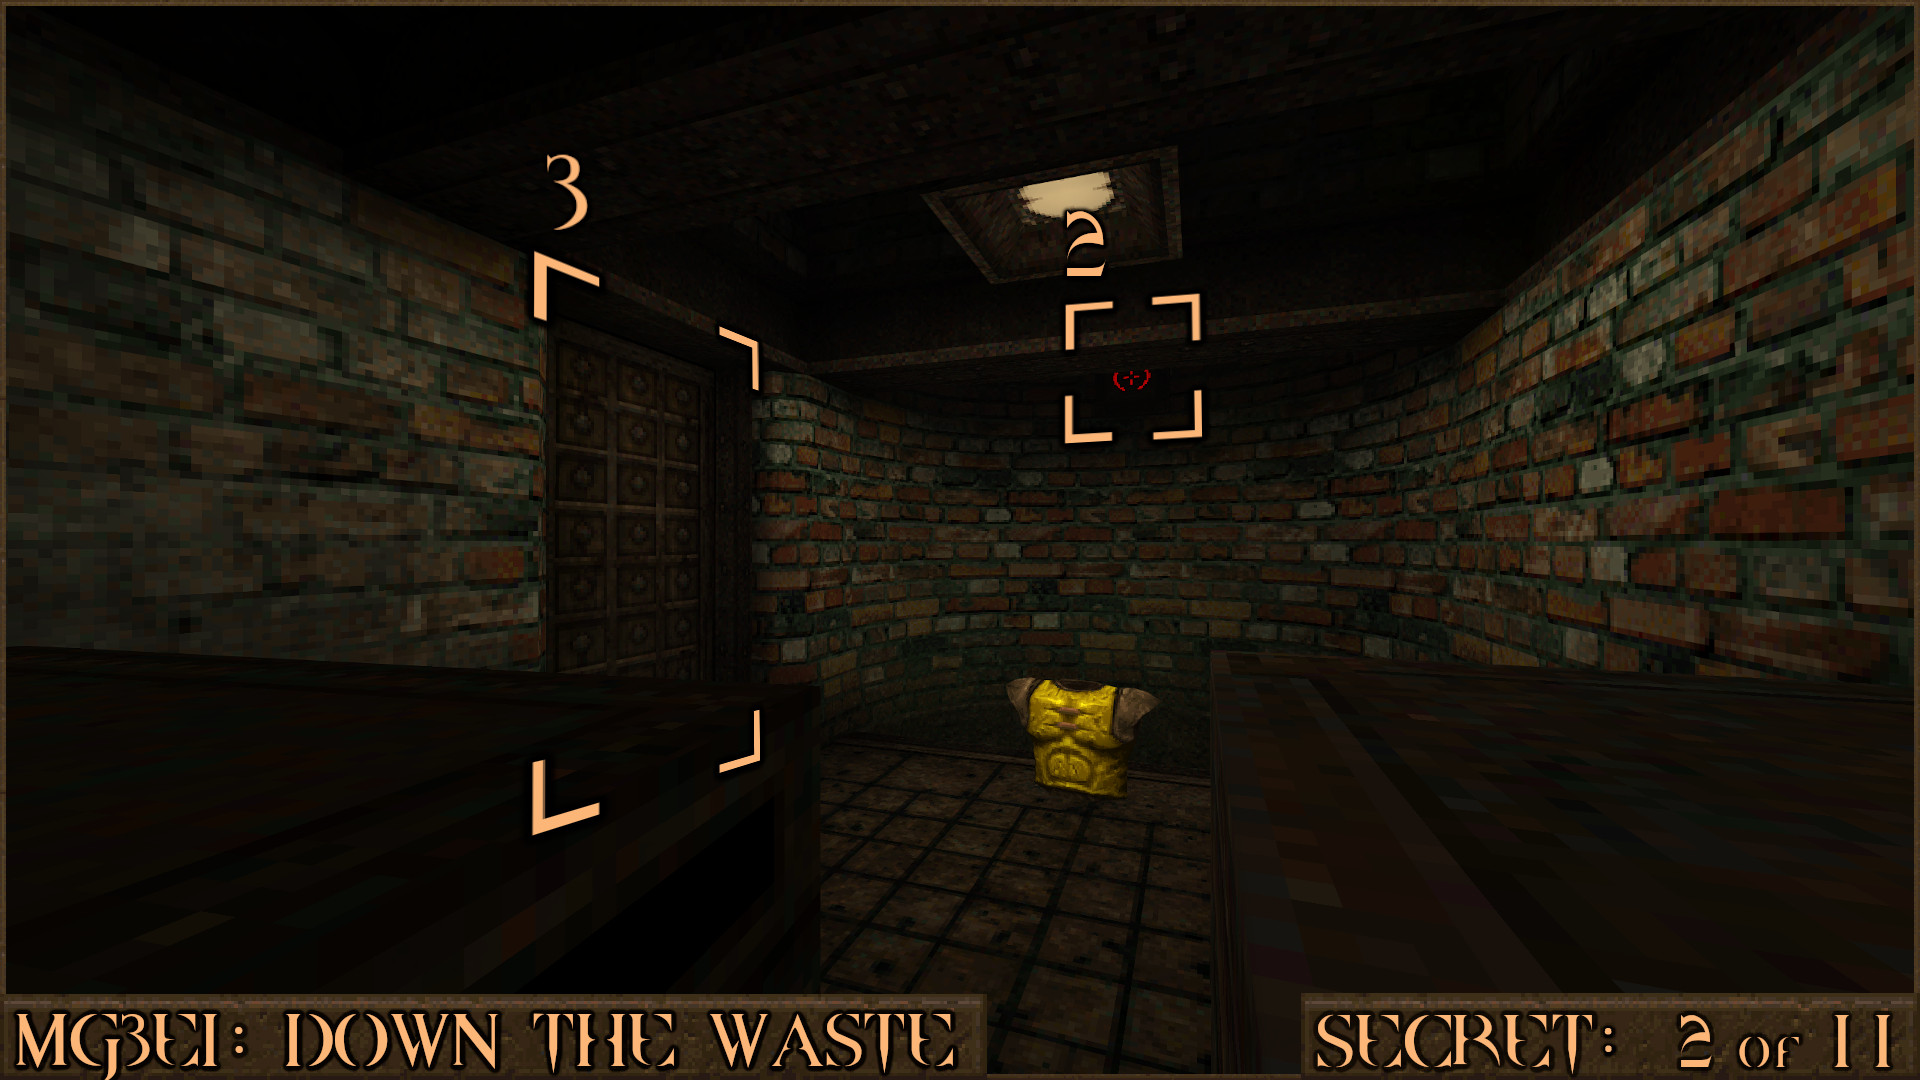
Reward:
Secret 3 of 11
You will drop down in to an area with white walls. Pick up the nearby Biosuit and jump down in to this open hatch ().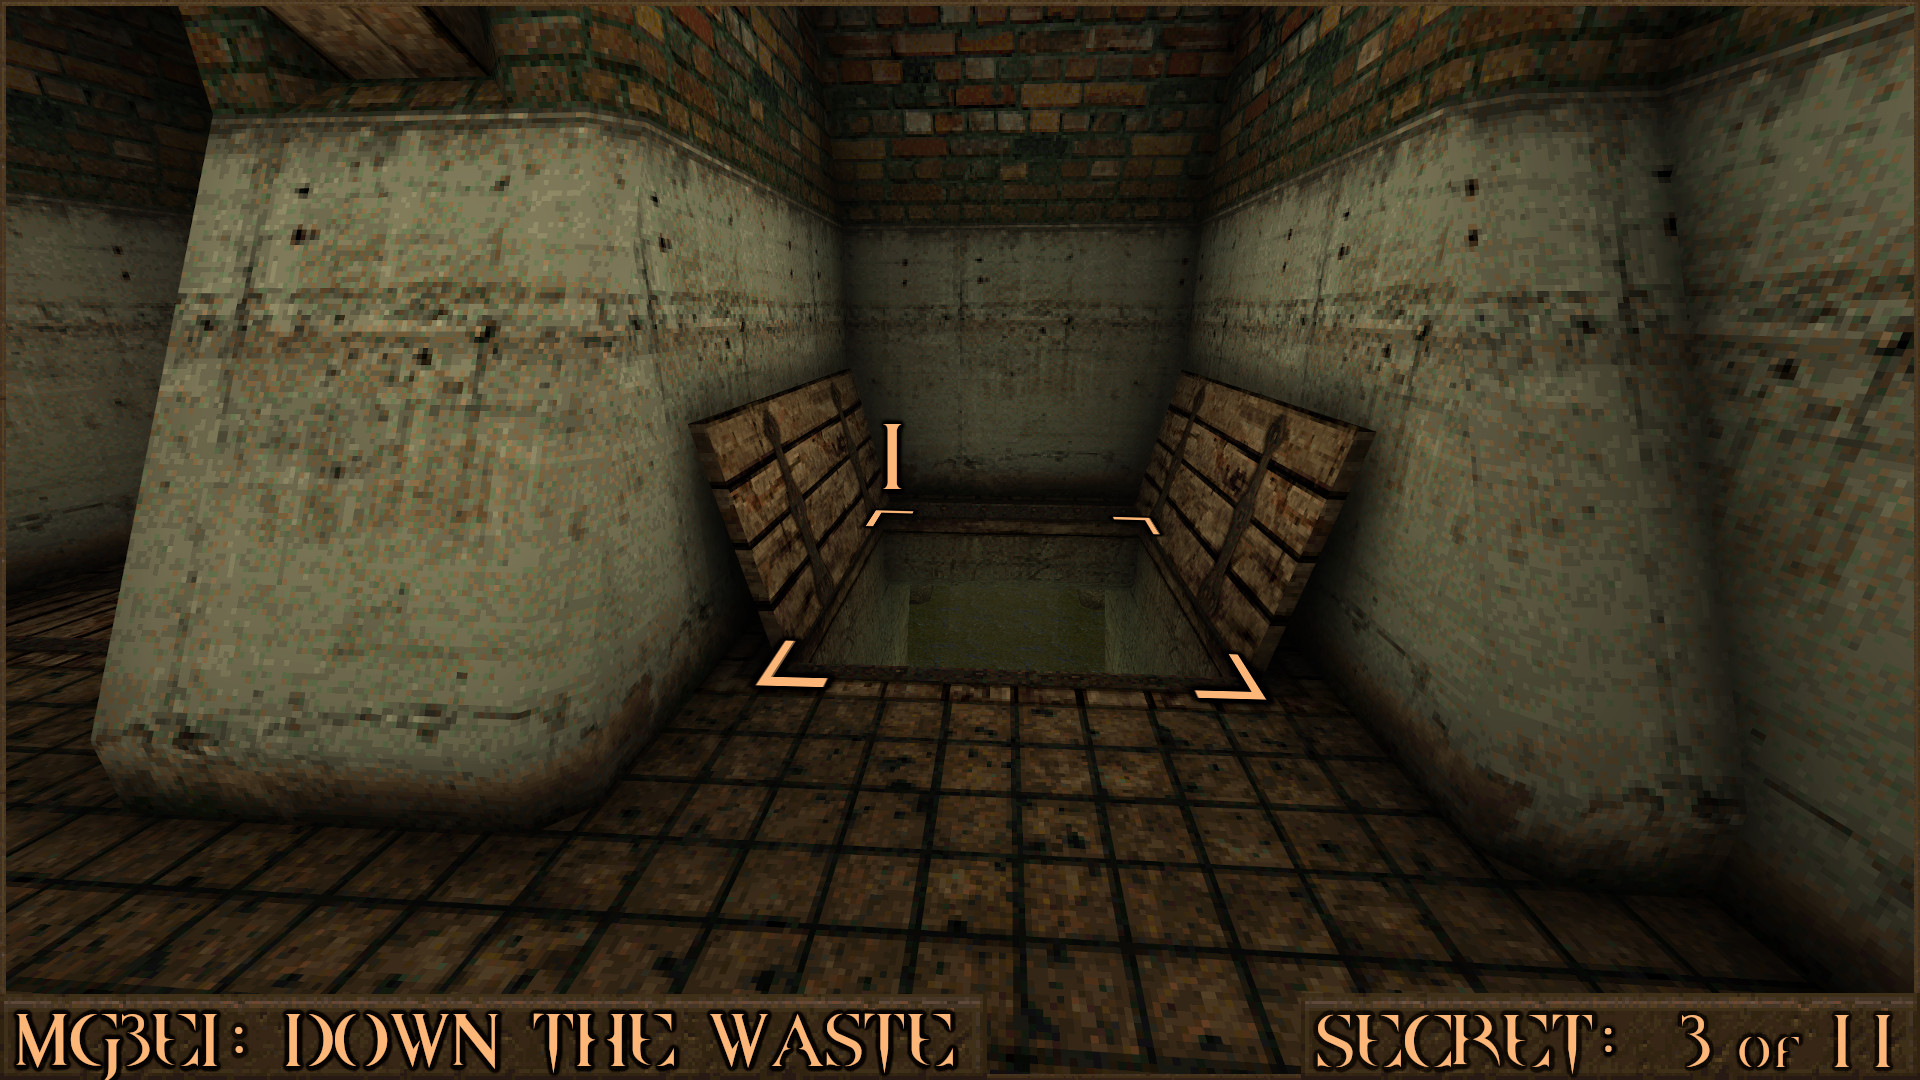
Quickly kill the Rotfish in the slime and head through a broken hole in the wall. Immediately look to your right to see another smaller gap (
) that you can swim through. Surface and climb the steps to find the secret.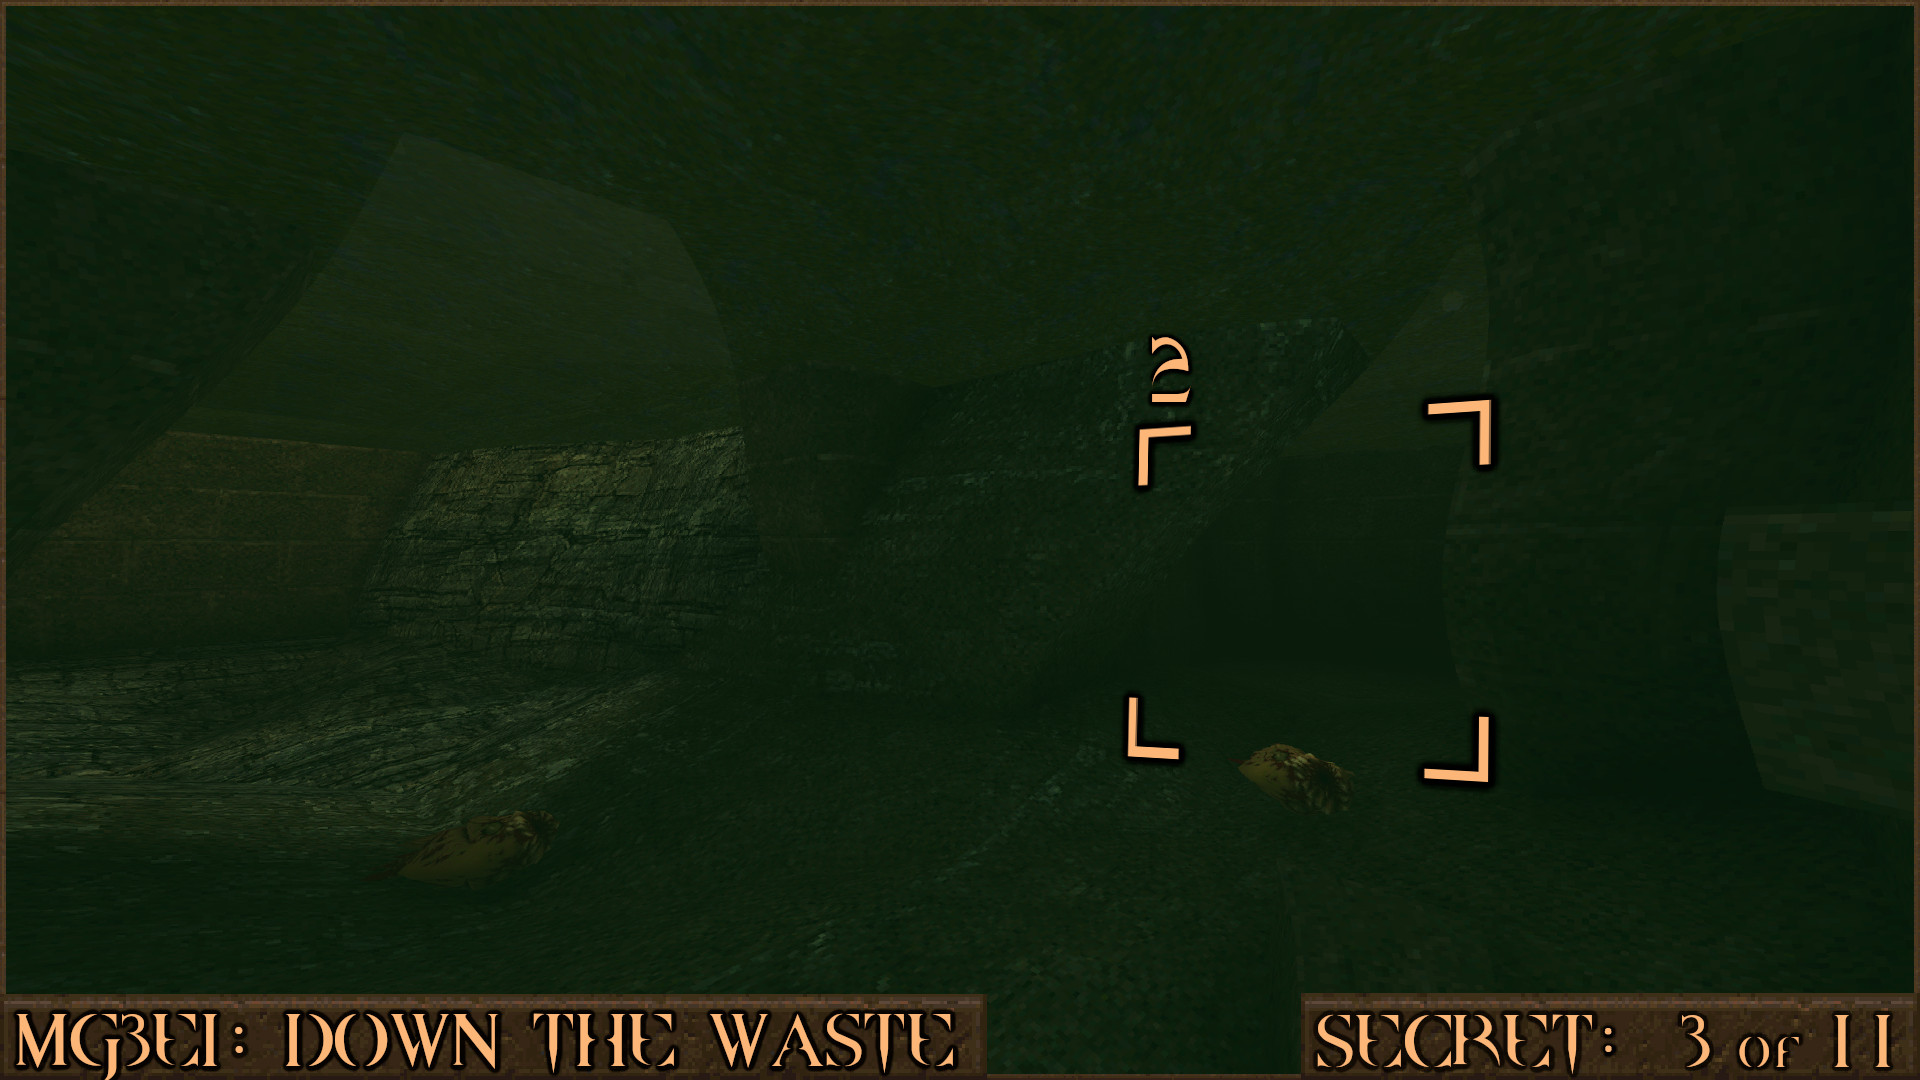
Reward:
Secret 4 of 11
Later in the level keep an eye out for a Yellow Armor next to a broken door and rune pillar. Head up the stairs to the left of them ().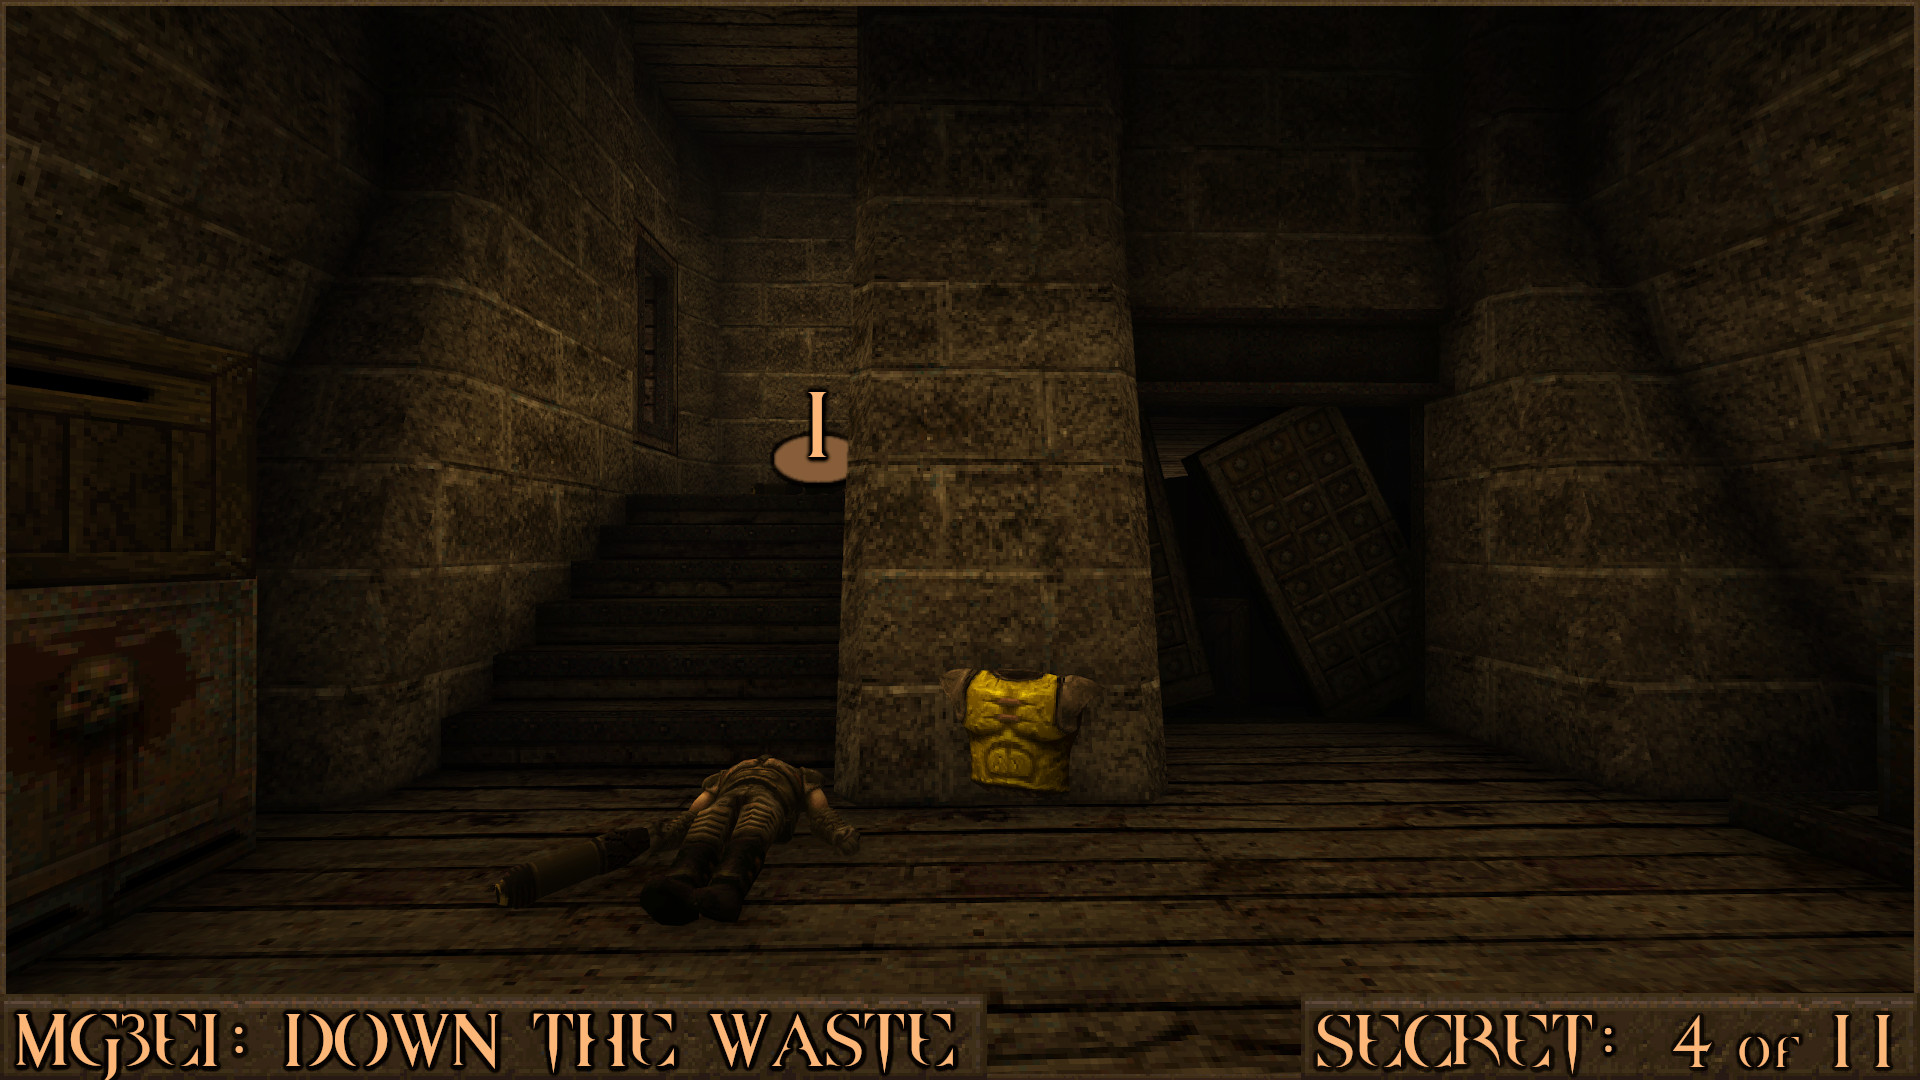
You will see a very dark recess in the wall over two vents. Shoot the right vent (
) to reveal a hole you can use to drop in to the secret area.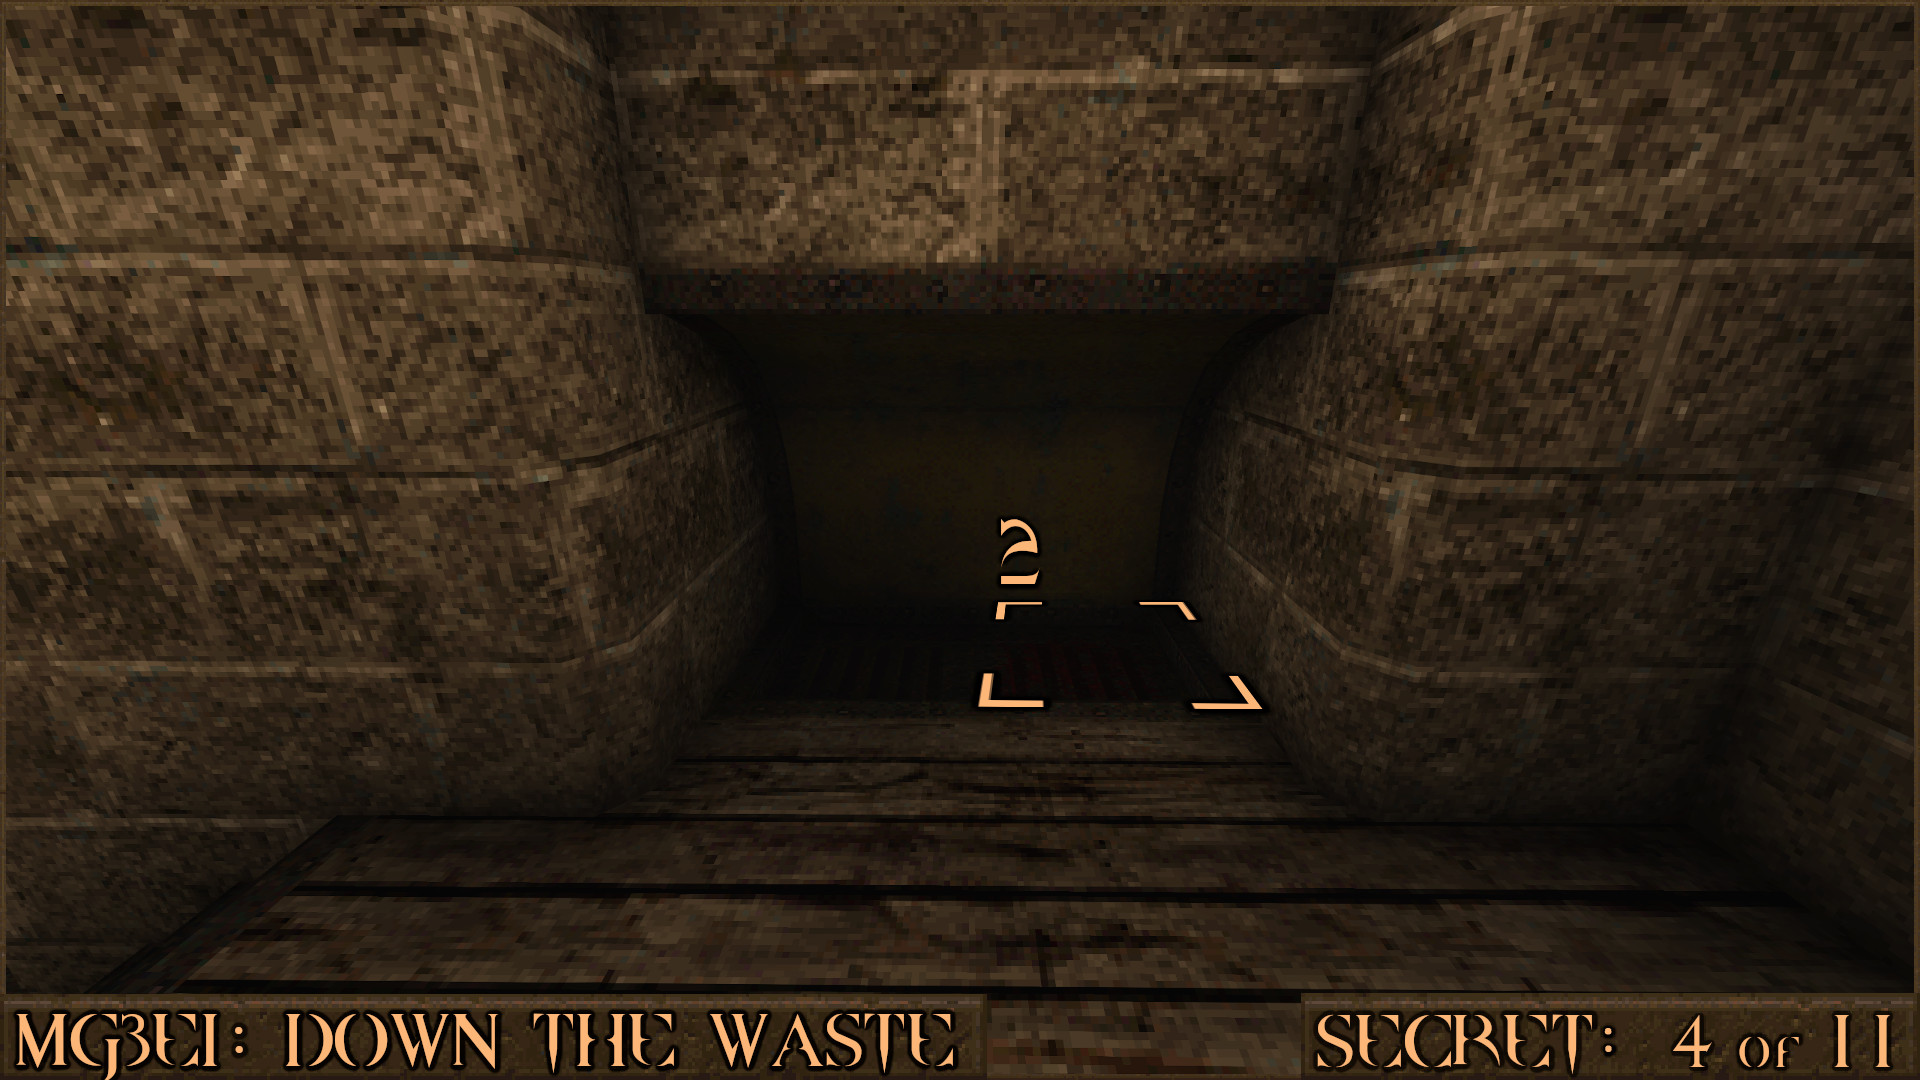
Reward:
Secret 5 of 11
After picking up the Silver Key you will drop down in to a slime pit filled with Zombies. After escaping this area you will come across a large yellow crusher device (). Step in front of it () to activate it then pull back and jump behind the crusher mechanism to find the secret.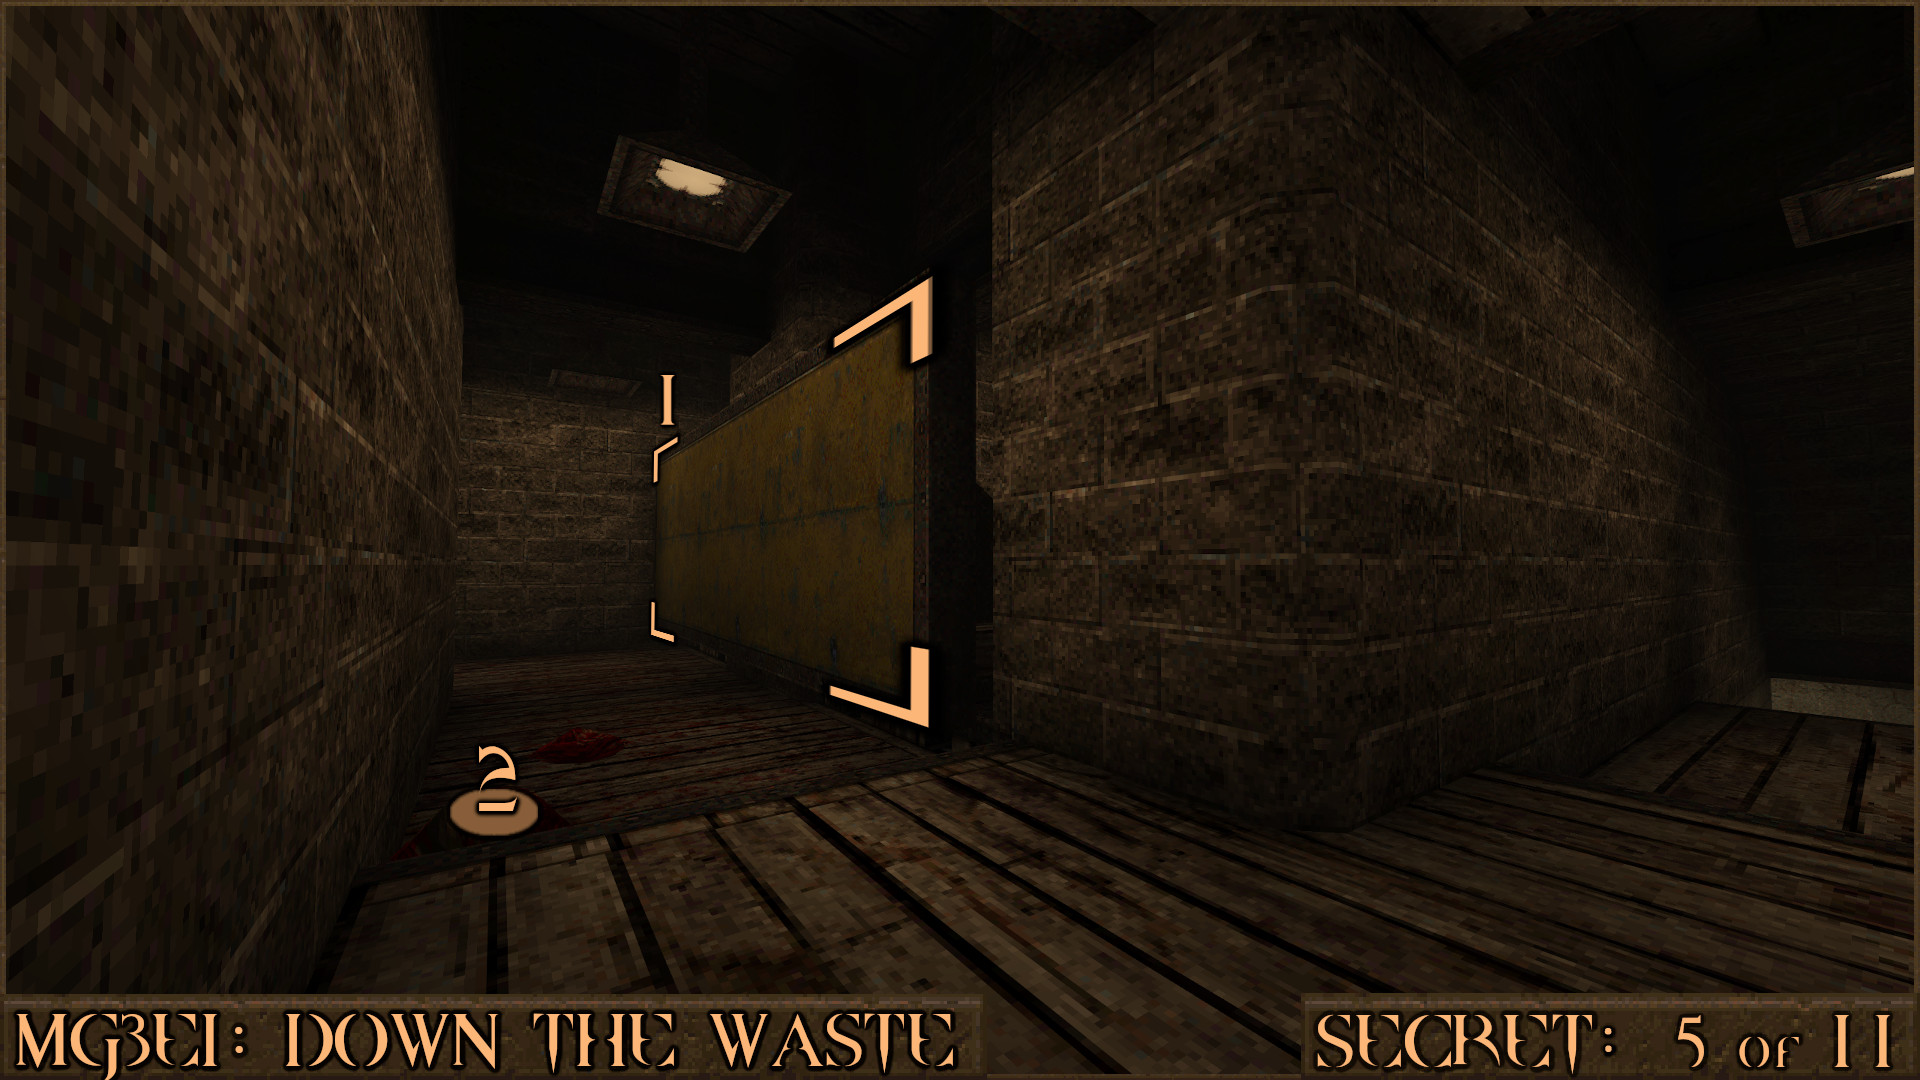
Reward:
Secret 6 of 11
Immediately after opening the Silver Key Door look to your right to see a pile of crates. Jump up and through this gap to find another secret.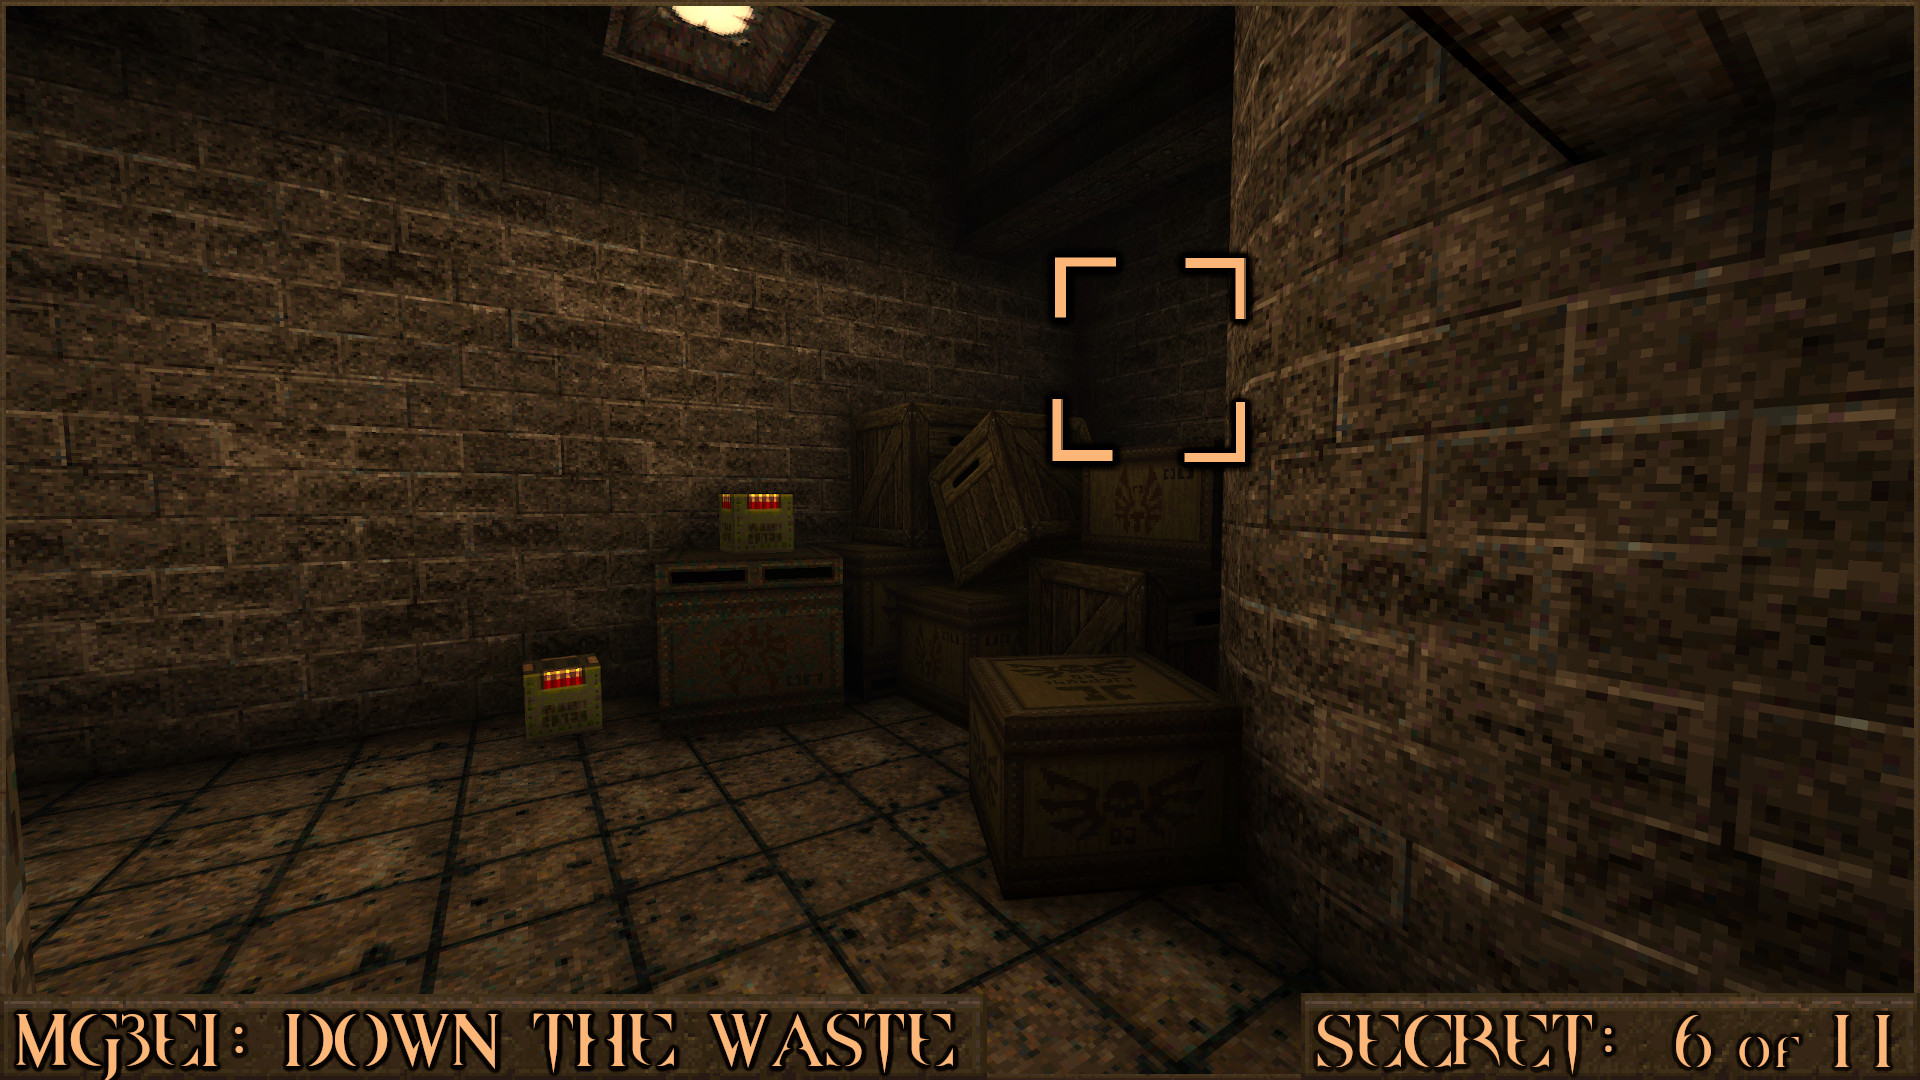
Reward:
Secret 7 of 11
After exiting Secret 6 you will drop down in to a large room. Look in the corner of this room behind some crates to see a red target switch (). Shoot it to activate some nearby stairs.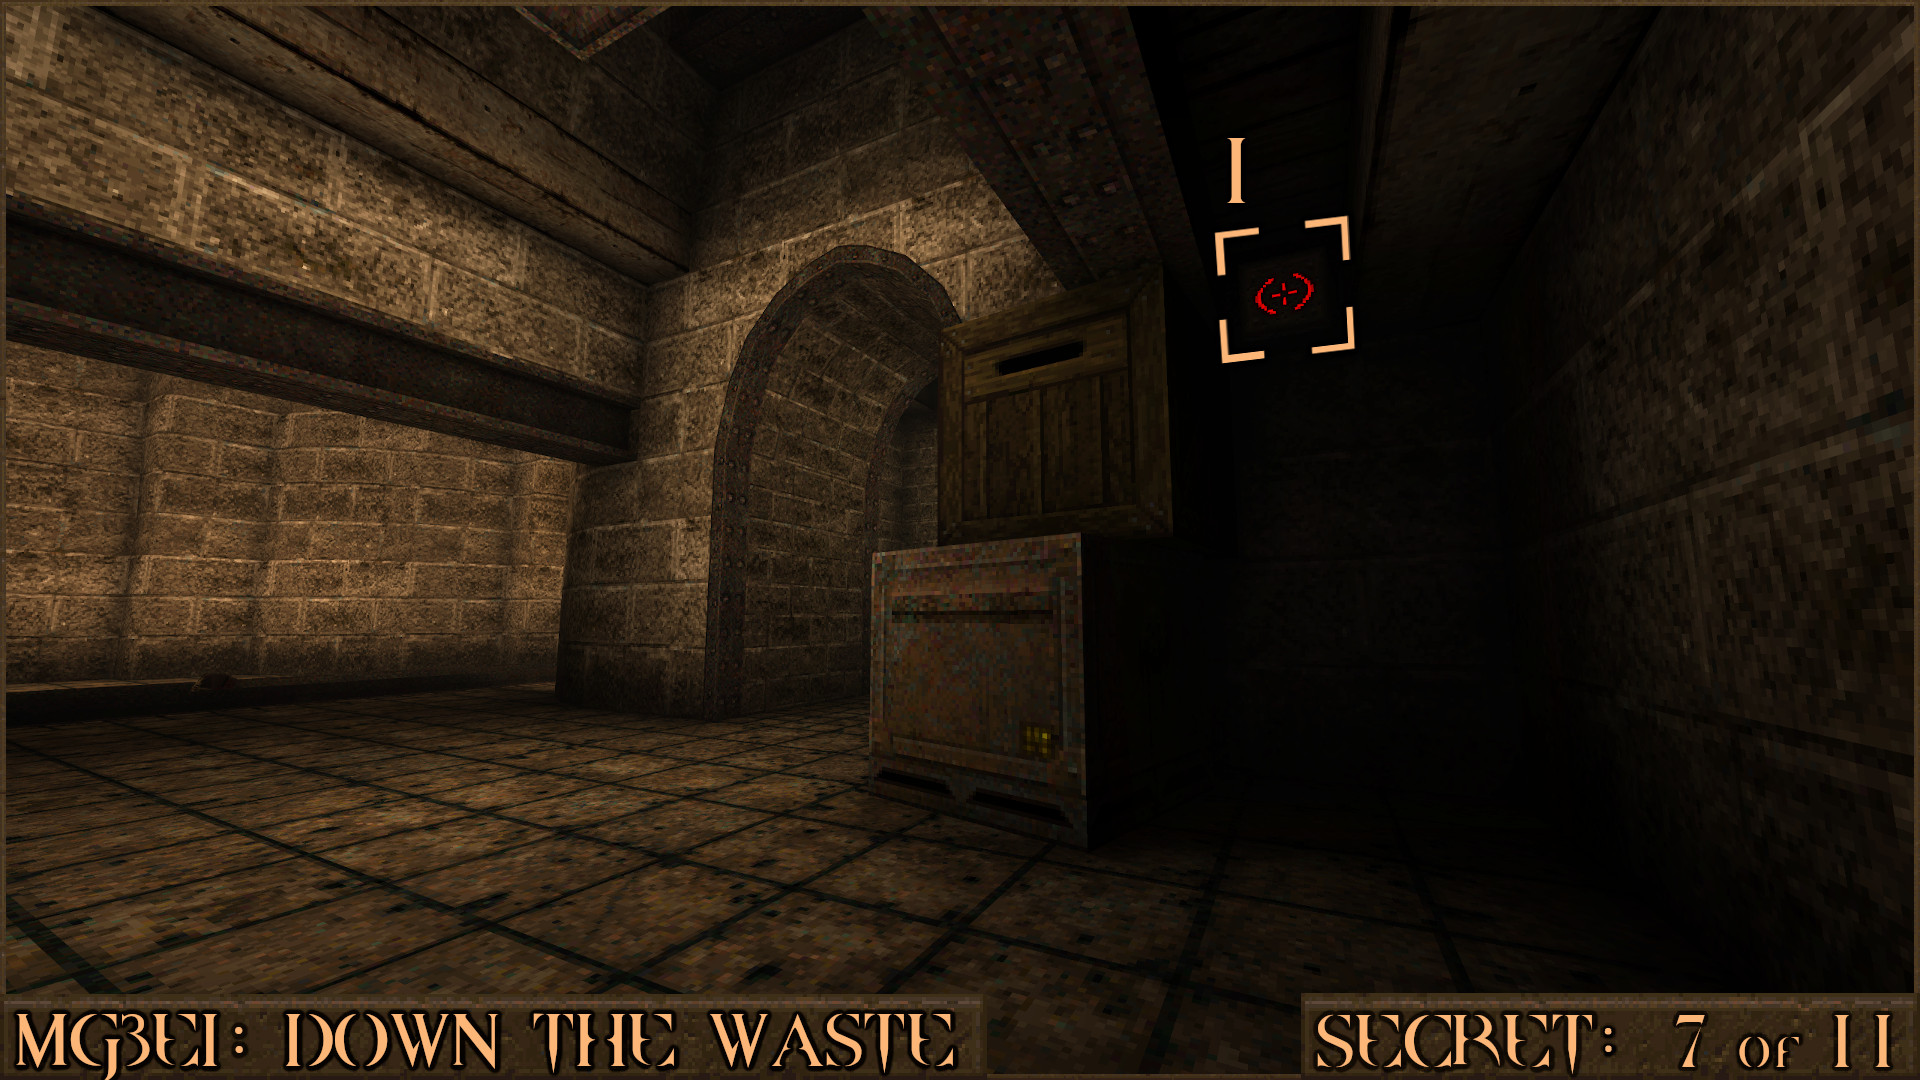
Head just around the corner and quickly climb the stairs (
) that have appeared.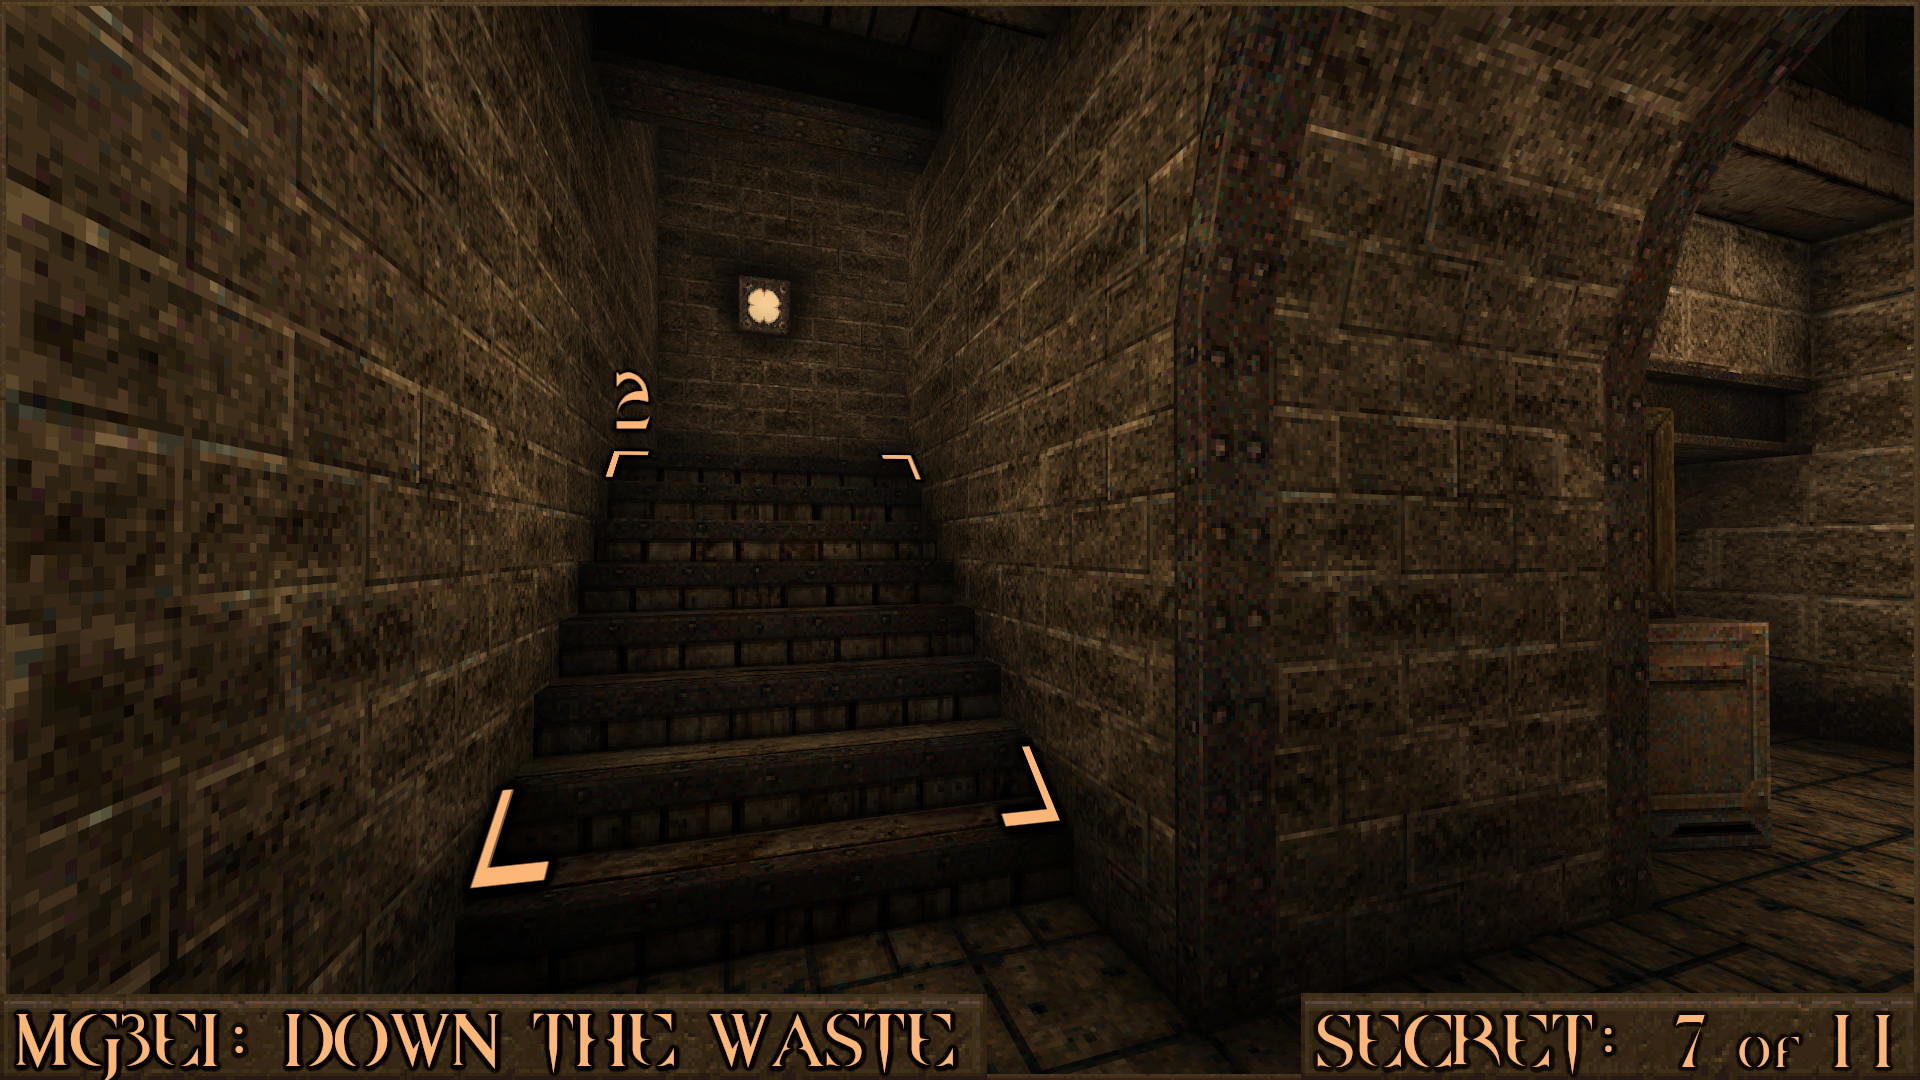
When you're at the top of this dark area jump on the nearby bricks and crate (
) and then shoot the nearby bloody wooden door () to reveal the actual secret area.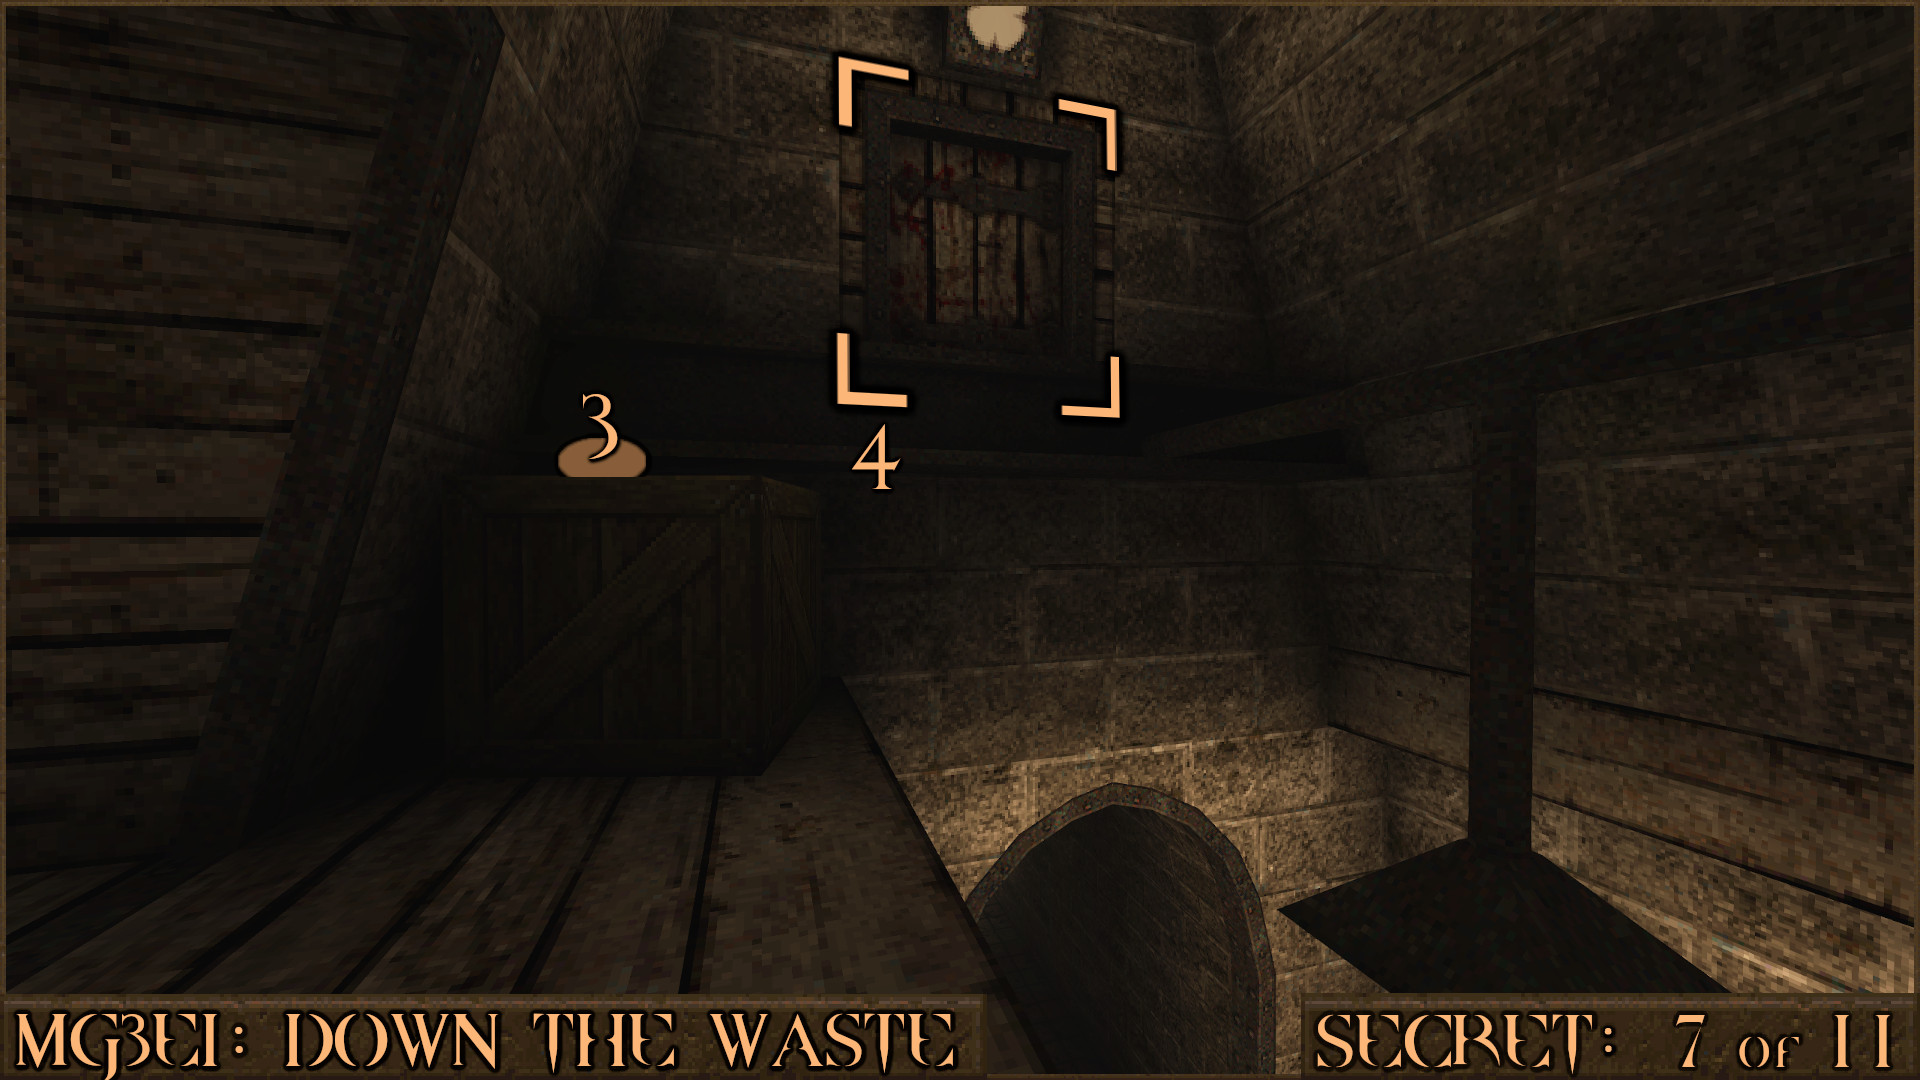
Reward:
Secret 8 of 11
Shortly after the previous secret you will see a lava filled room with two platforms on either side. Look behind the crates on the right platform to find a secret.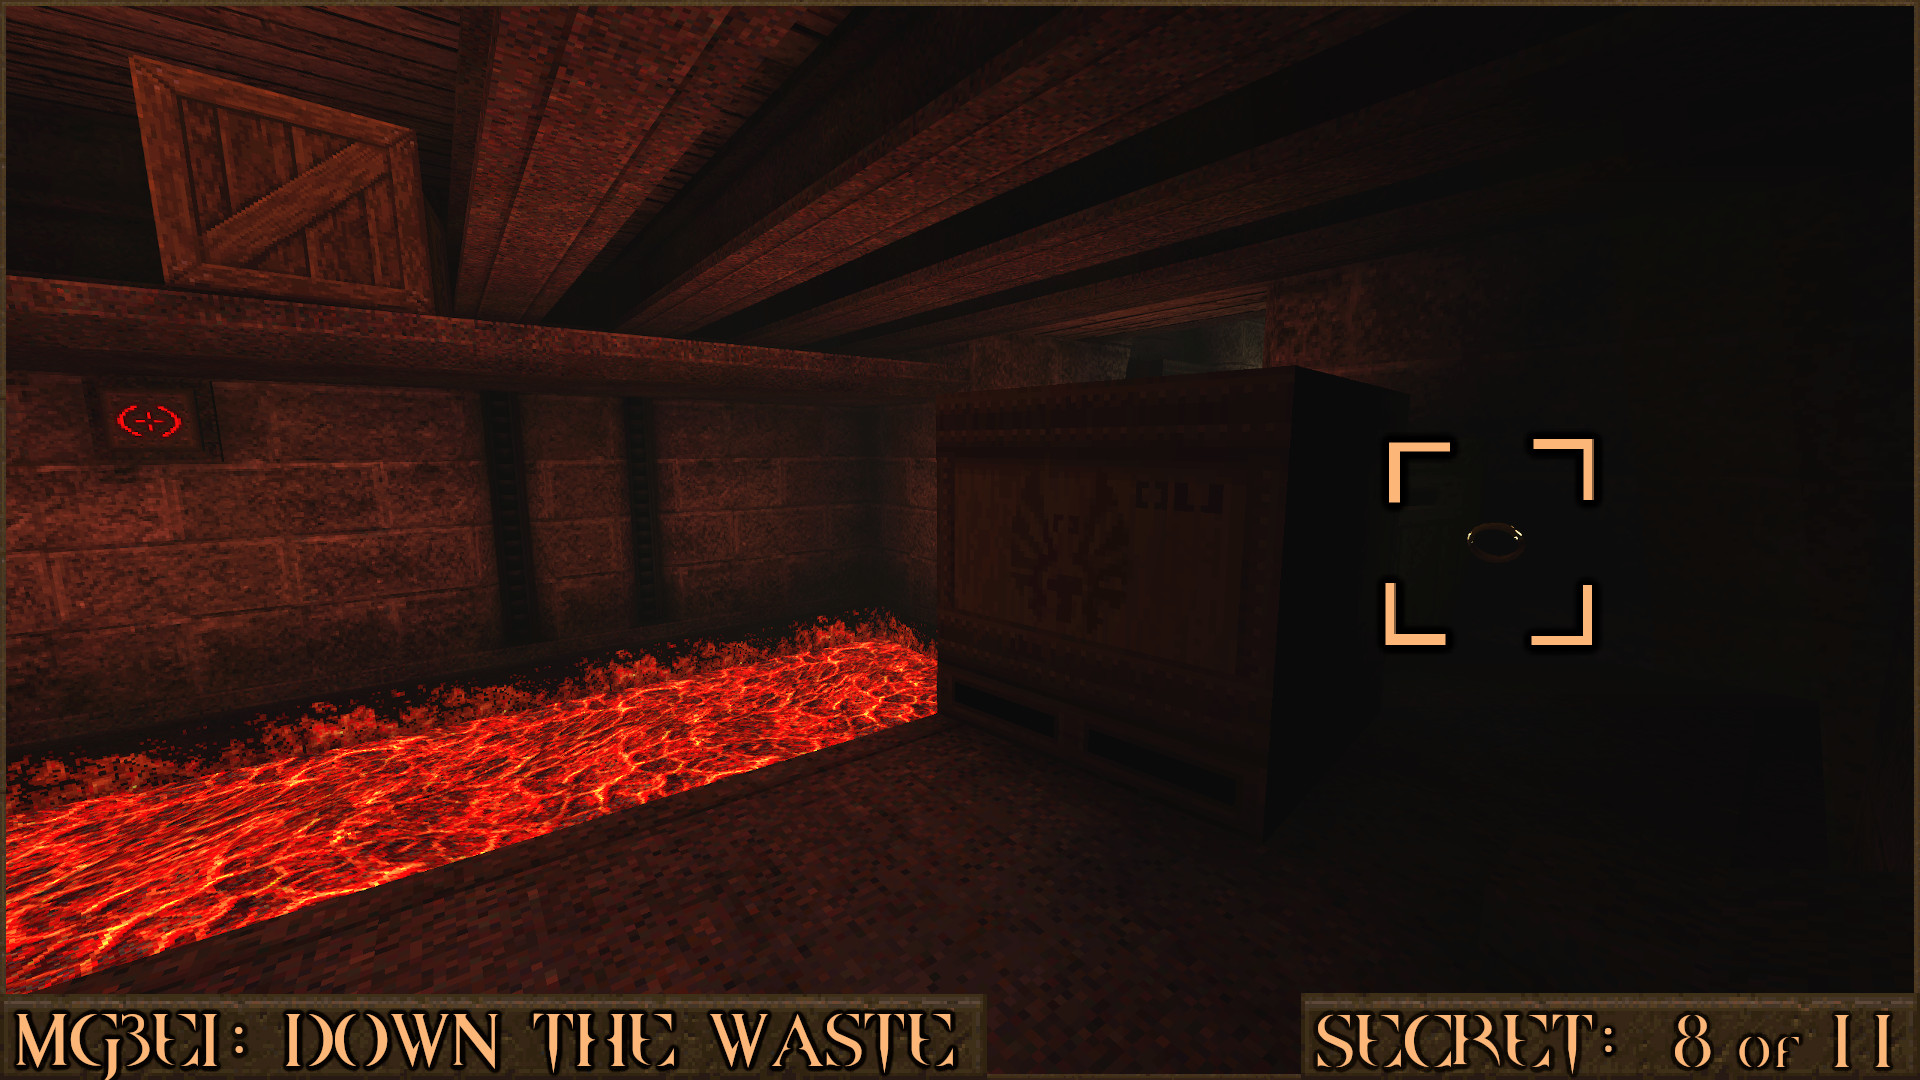
Reward:
Secret 9 of 11
After dropping down in to another slime room with floating crates look to the right of this room. Behind some crates you will find a secret Green Armor.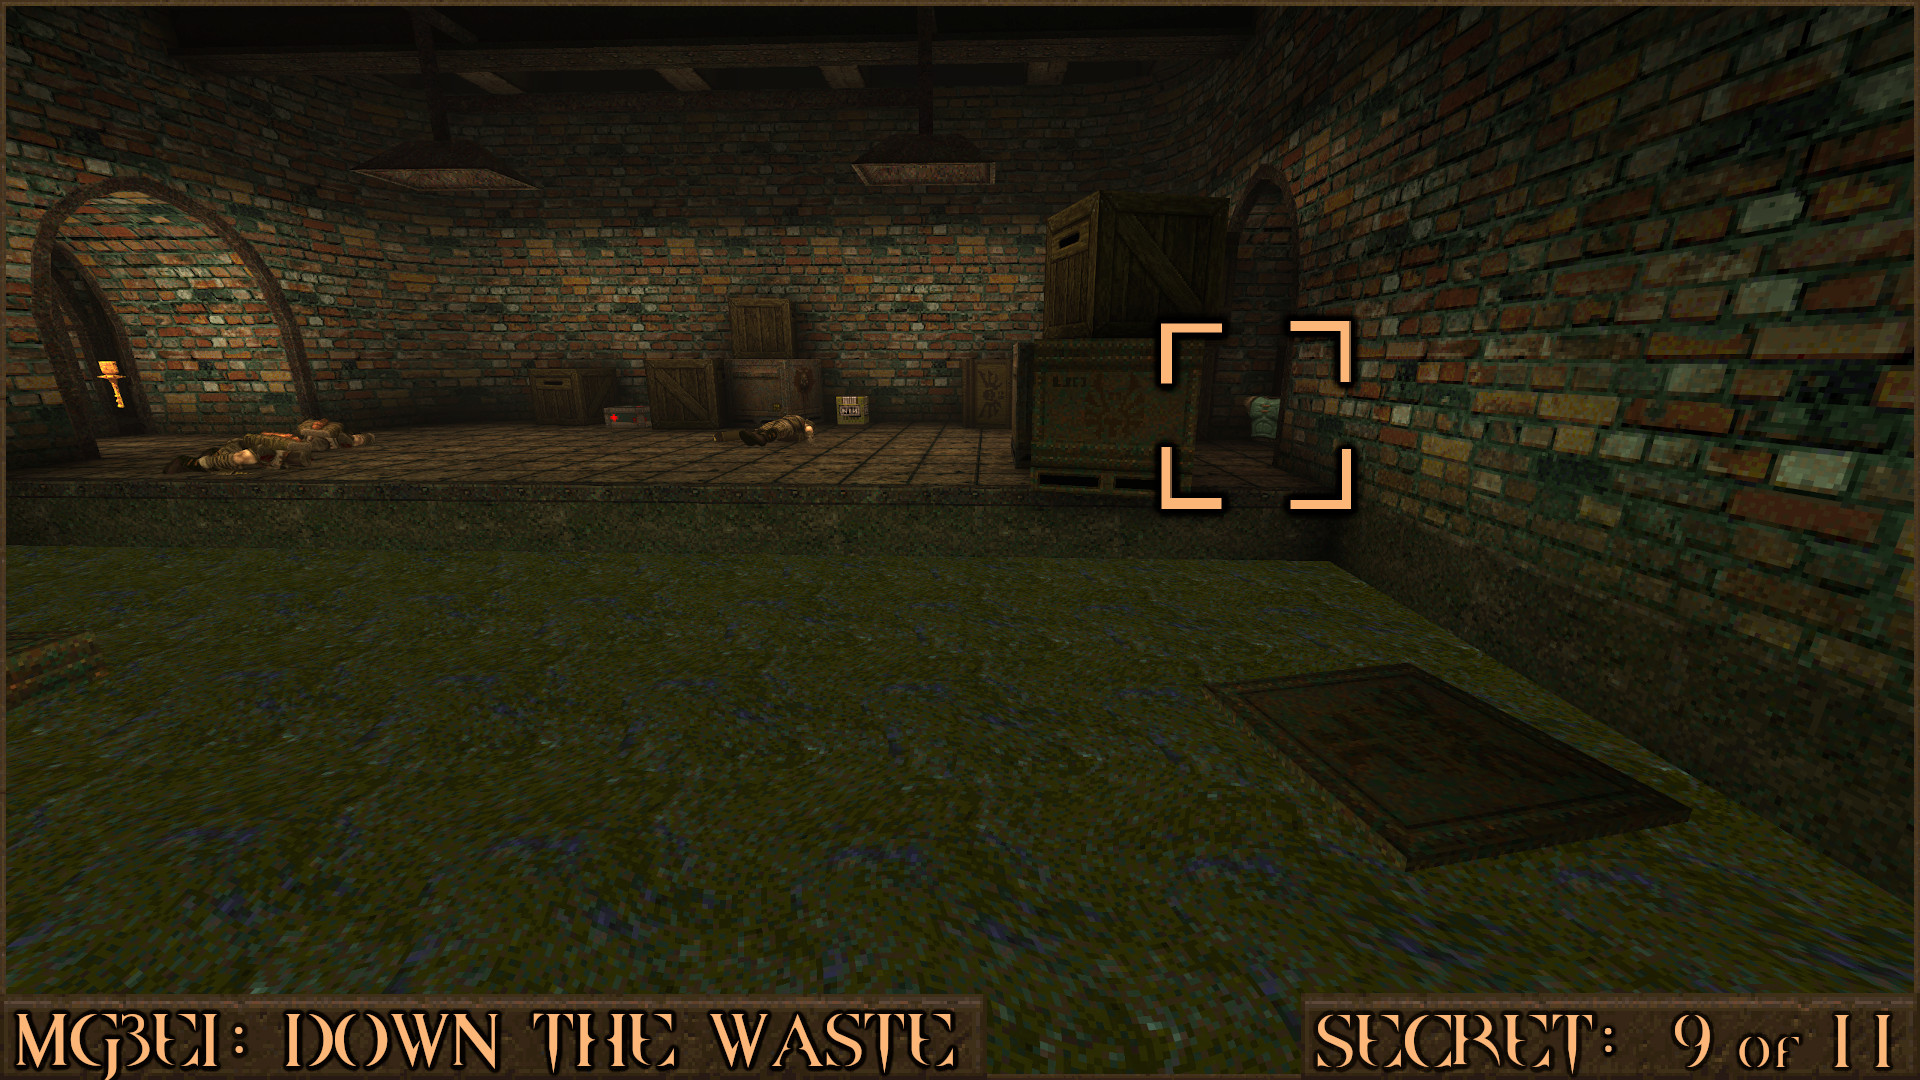
Reward:
Secret 10 of 11
Now is a good time to find the secret you might have skipped over earlier in the level. After picking up the Golden Key you will find yourself looking at a tipped over crate. Jump up the crate and in to the hole to find the secret Quad Damage which will be useful against some upcoming tough enemies.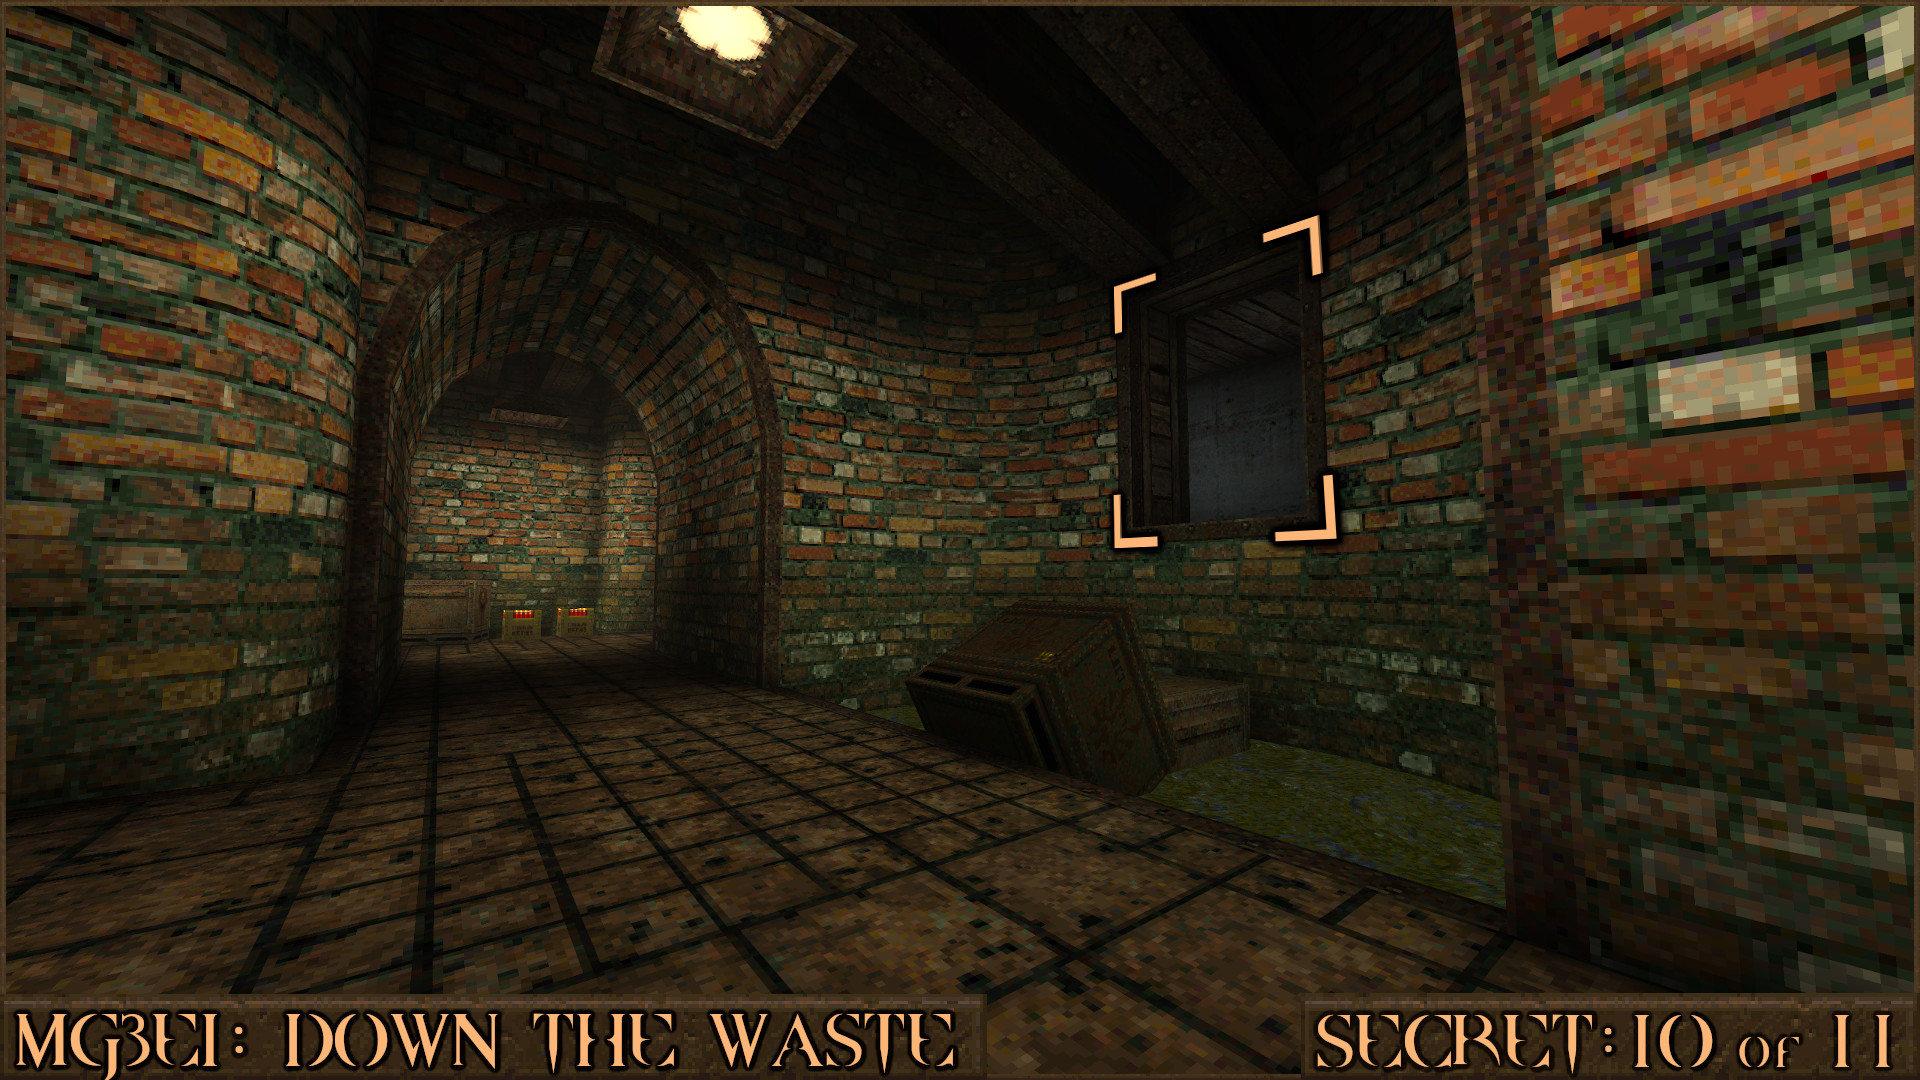
Reward:
Secret 11 of 11
After opening the Gold Key Door make a running jump from the top of the stairs () over to the large crate on your left (). From here jump up to the platform.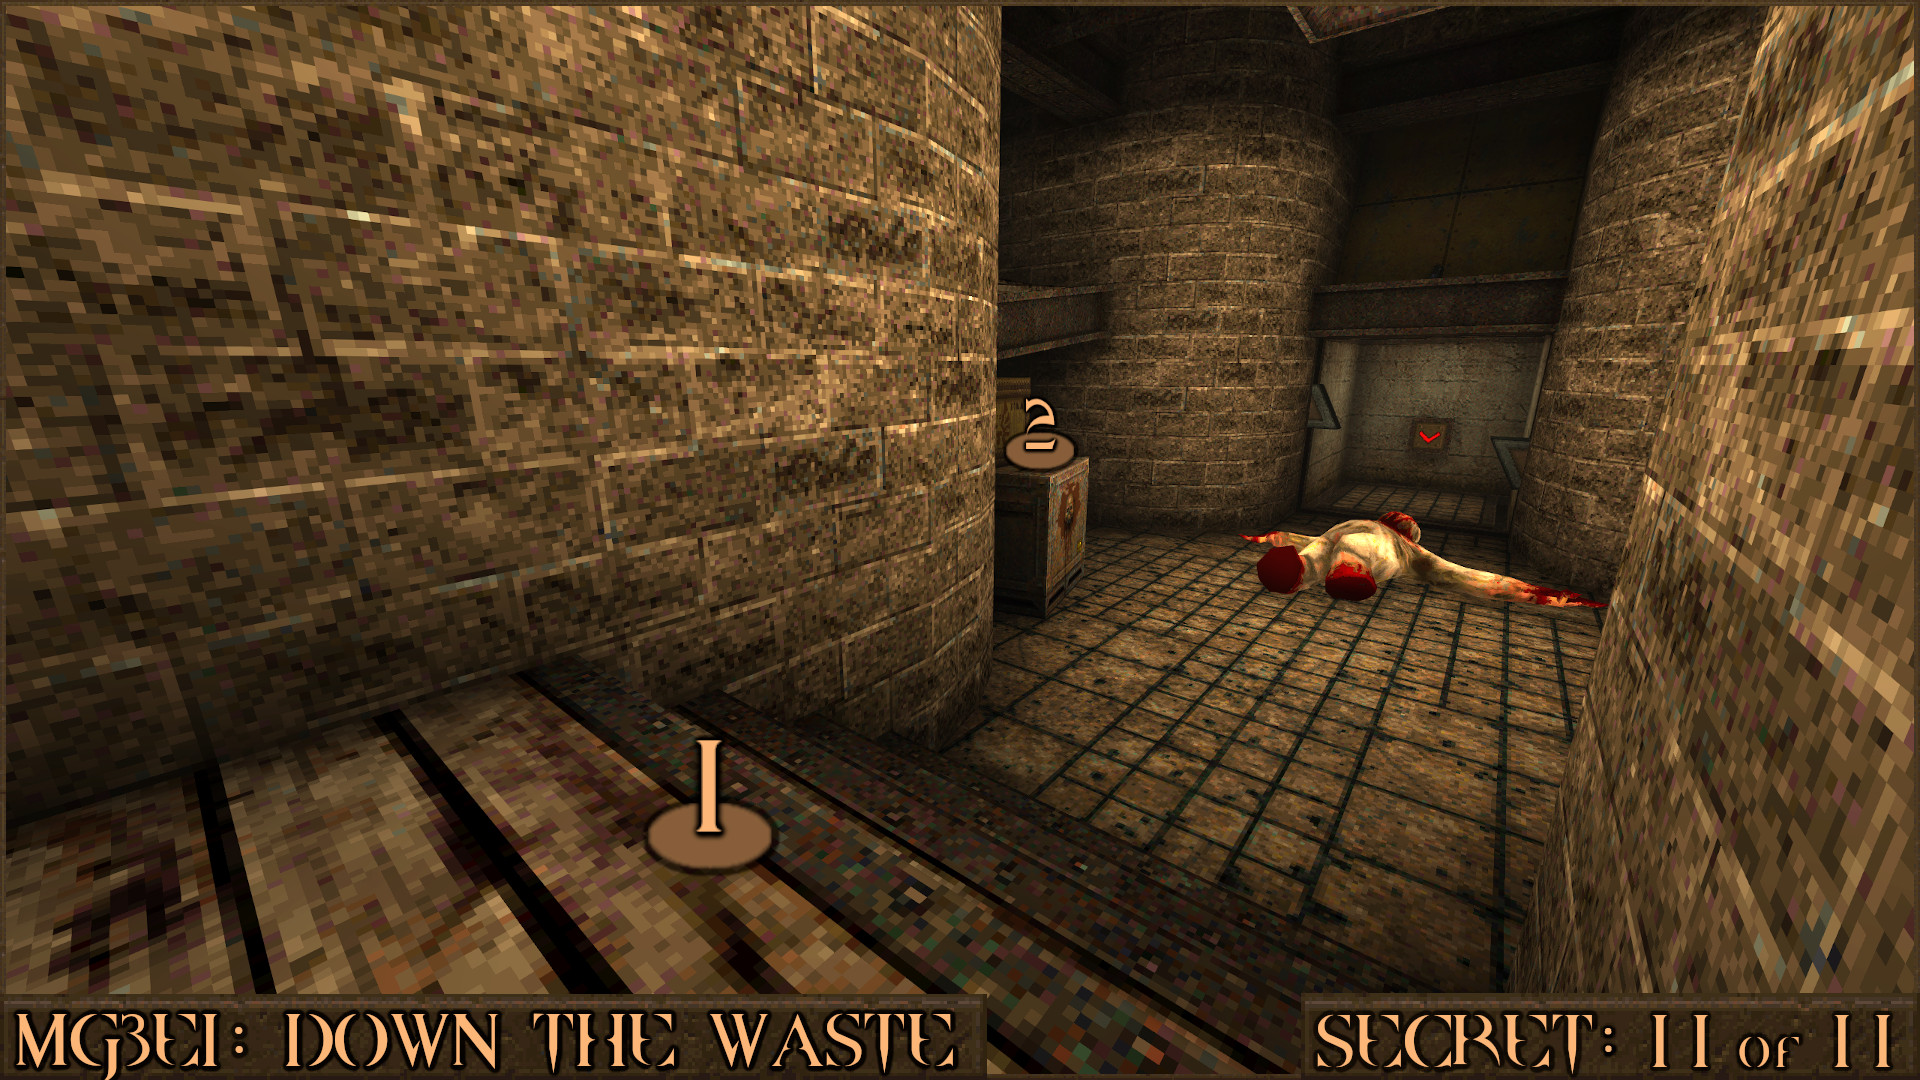
From the top of this platform make a running jump over to the other side and you should land on the MG crate. Jump up on to this platform (
) to discover the secret.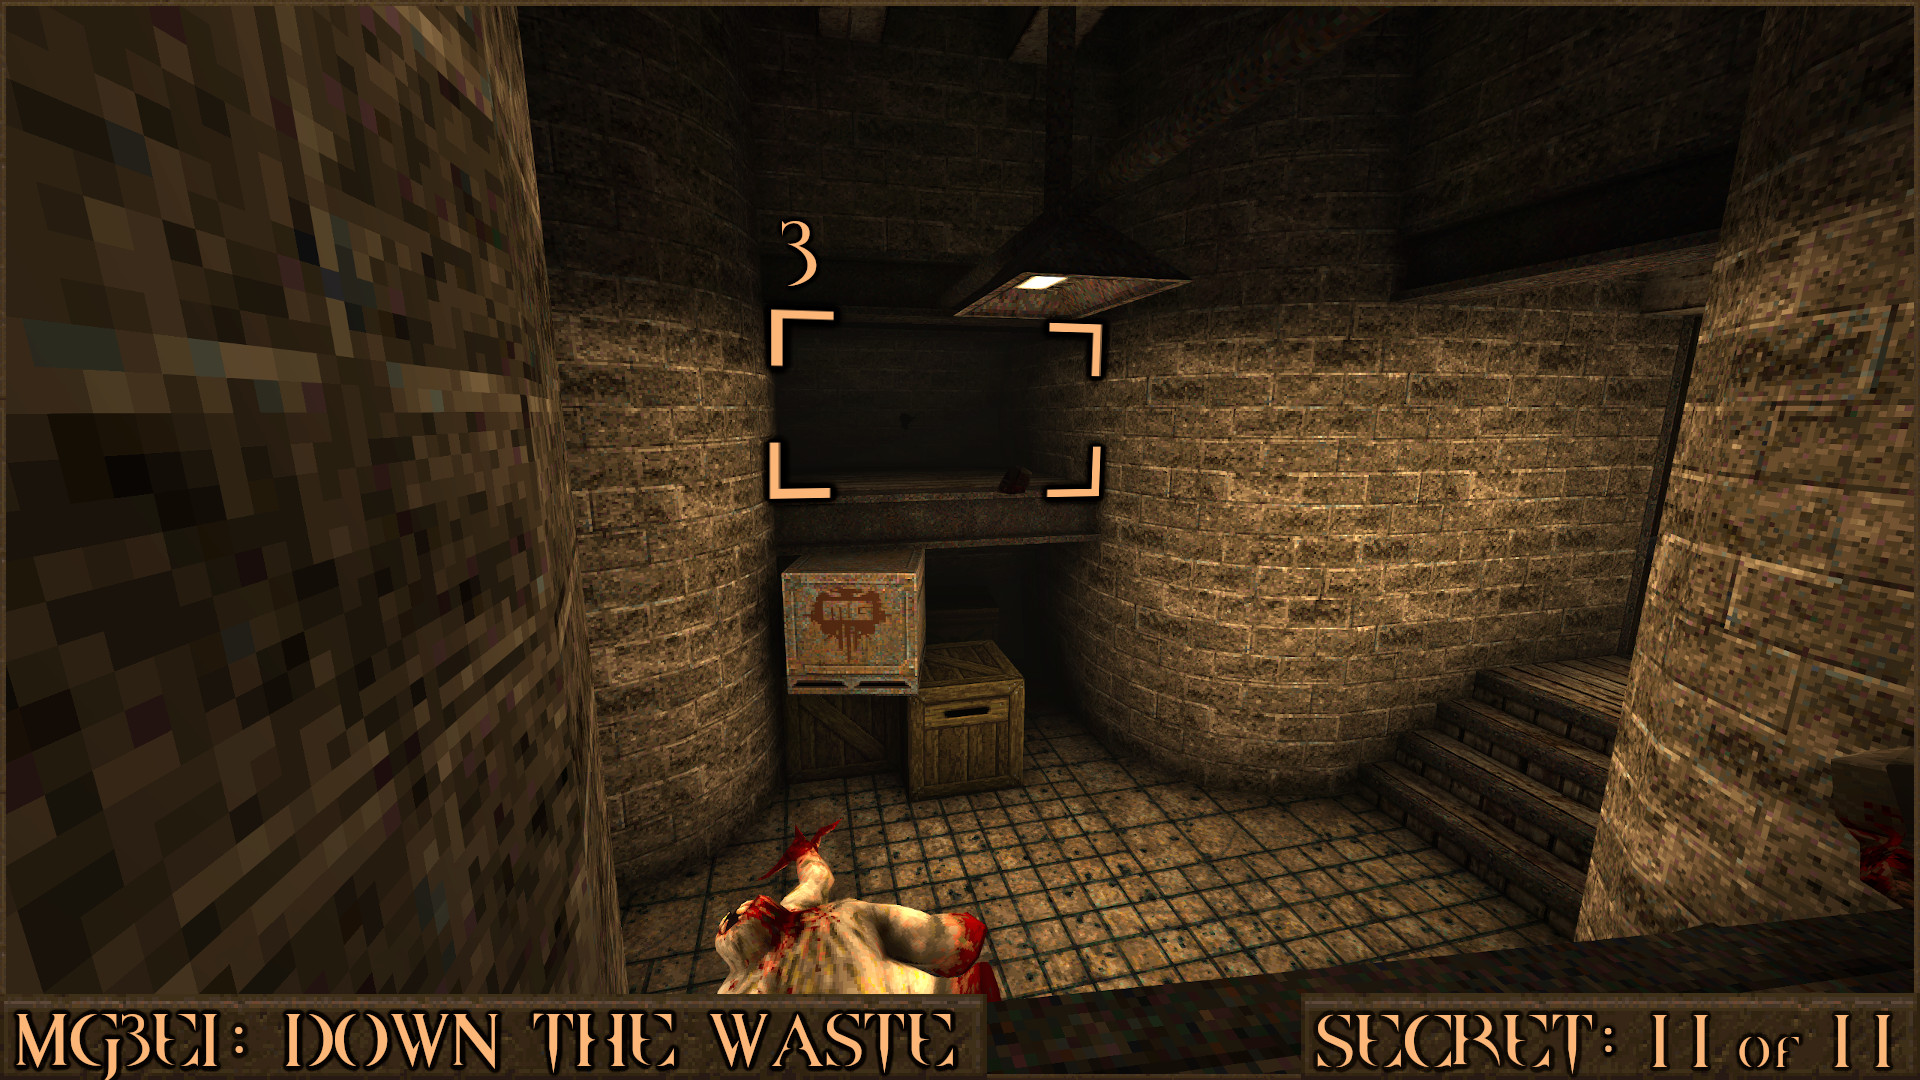
Reward:
MGE3M2: Hell or Dark Water
Secret 1 of 8
Near the start of the level you will be in a large white room with several flatbed carts. Look for a section of the wall with extra horizontal lines on it and shoot it to reveal a hidden tunnel.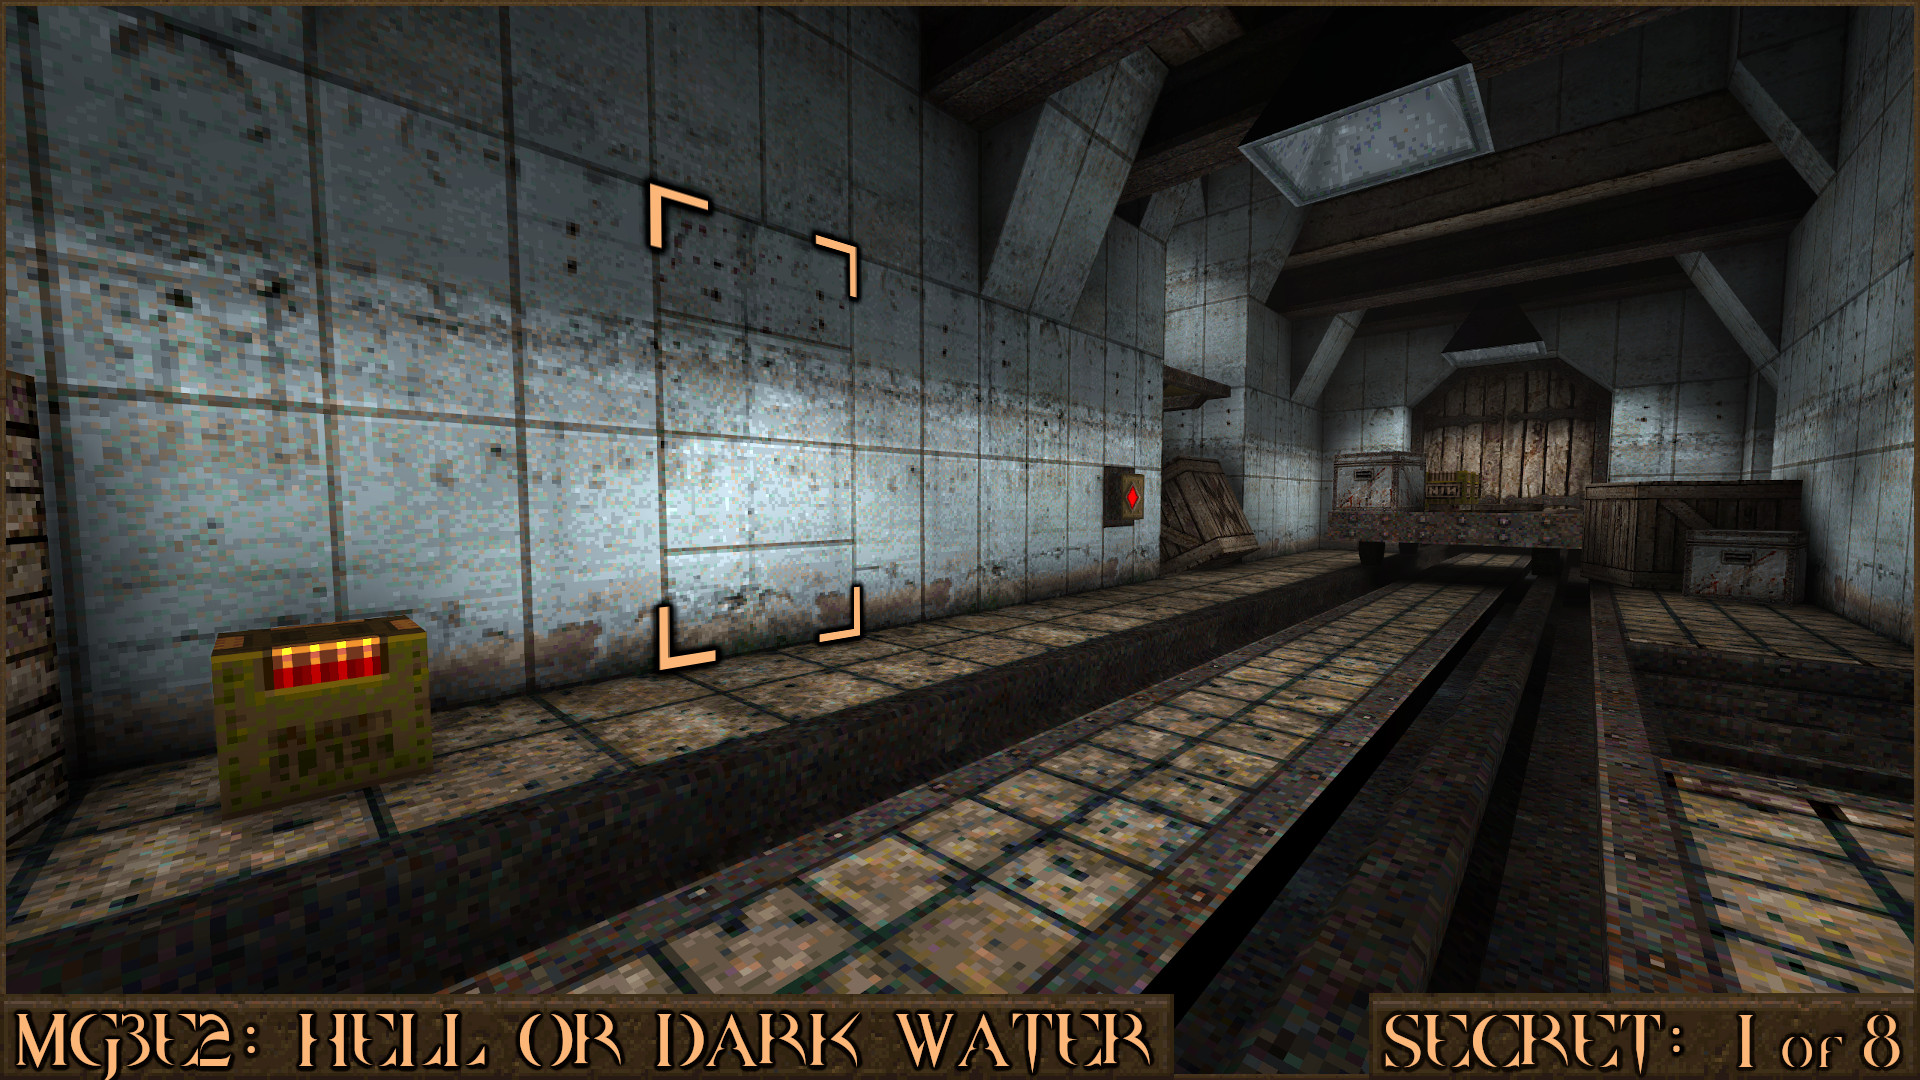
Reward:
Secret 2 of 8
After swimming through some water tunnels you will surface in to a room filled with Vores and a Rocket Launcher. At the far end of this room is a tunnel that drops you back in to the water. Don't go down, instead look above to see a red target switch (). Shoot it and the message "A secret door has been raised..." will appear.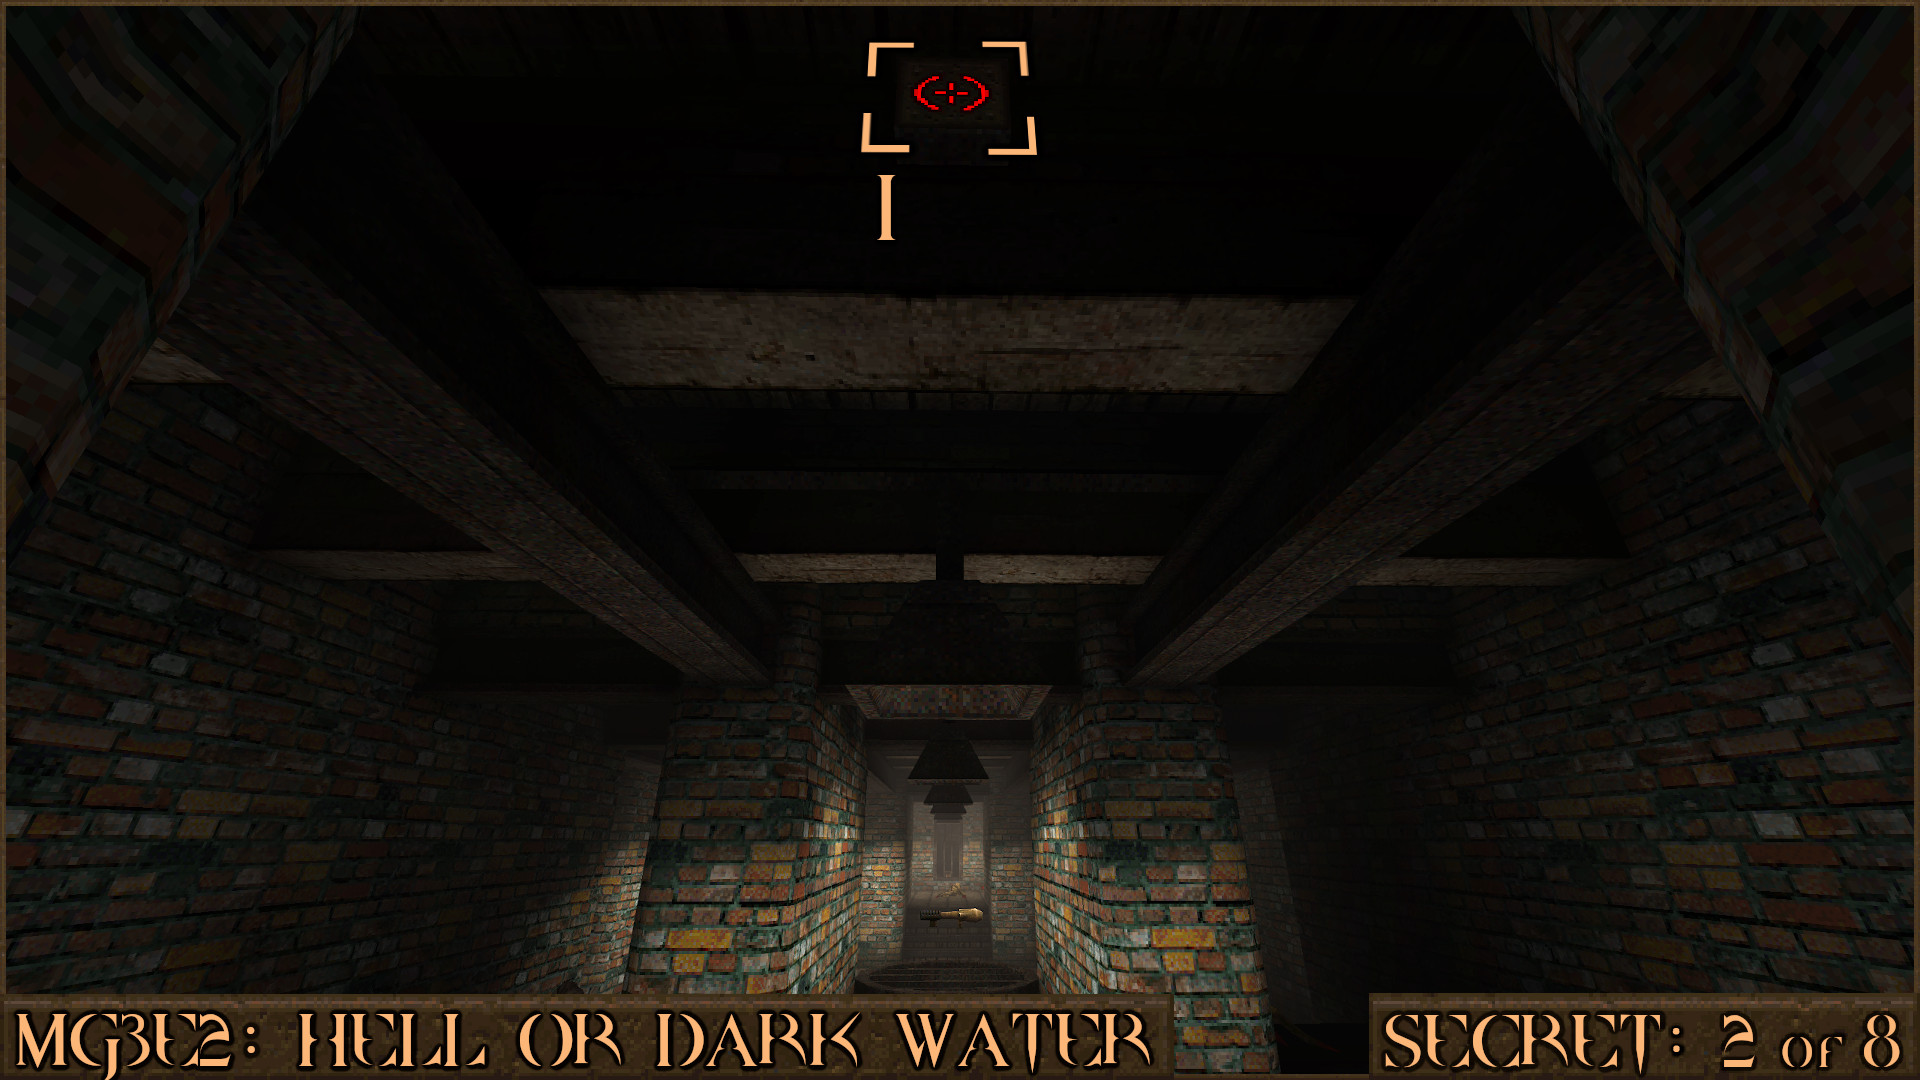
Head over to the opposite side of this room and you will notice a monster face panel to the right of the stairs (
) has moved to reveal a secret area.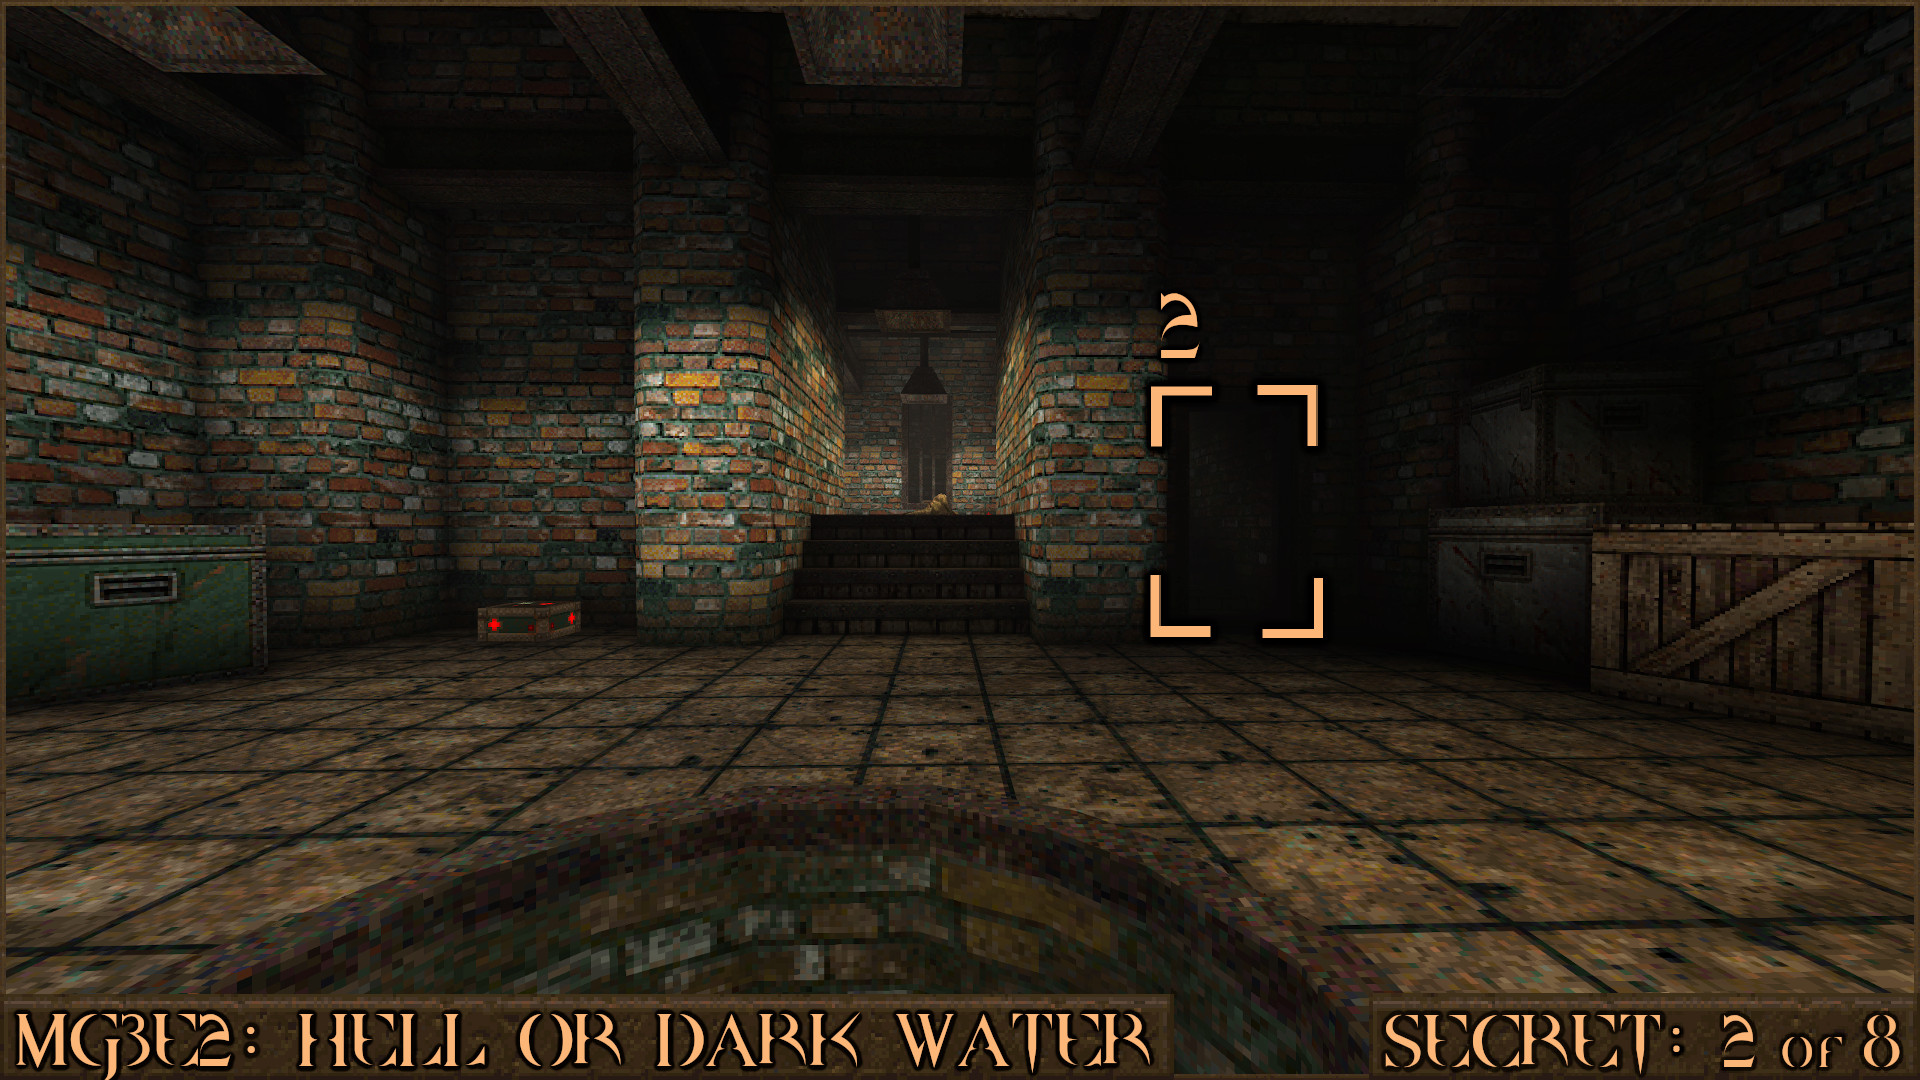
Reward:
Secret 3 of 8
In the dank tunnels you will pick up the Silver Keycard and a grate will immediately shut down behind you (). Look around the corner and head forward to drop down in to some water () that contains the secret. Swim around and explore this underwater area as not only is there a Quad Damage but there is also a Ring of Shadows behind some crates too.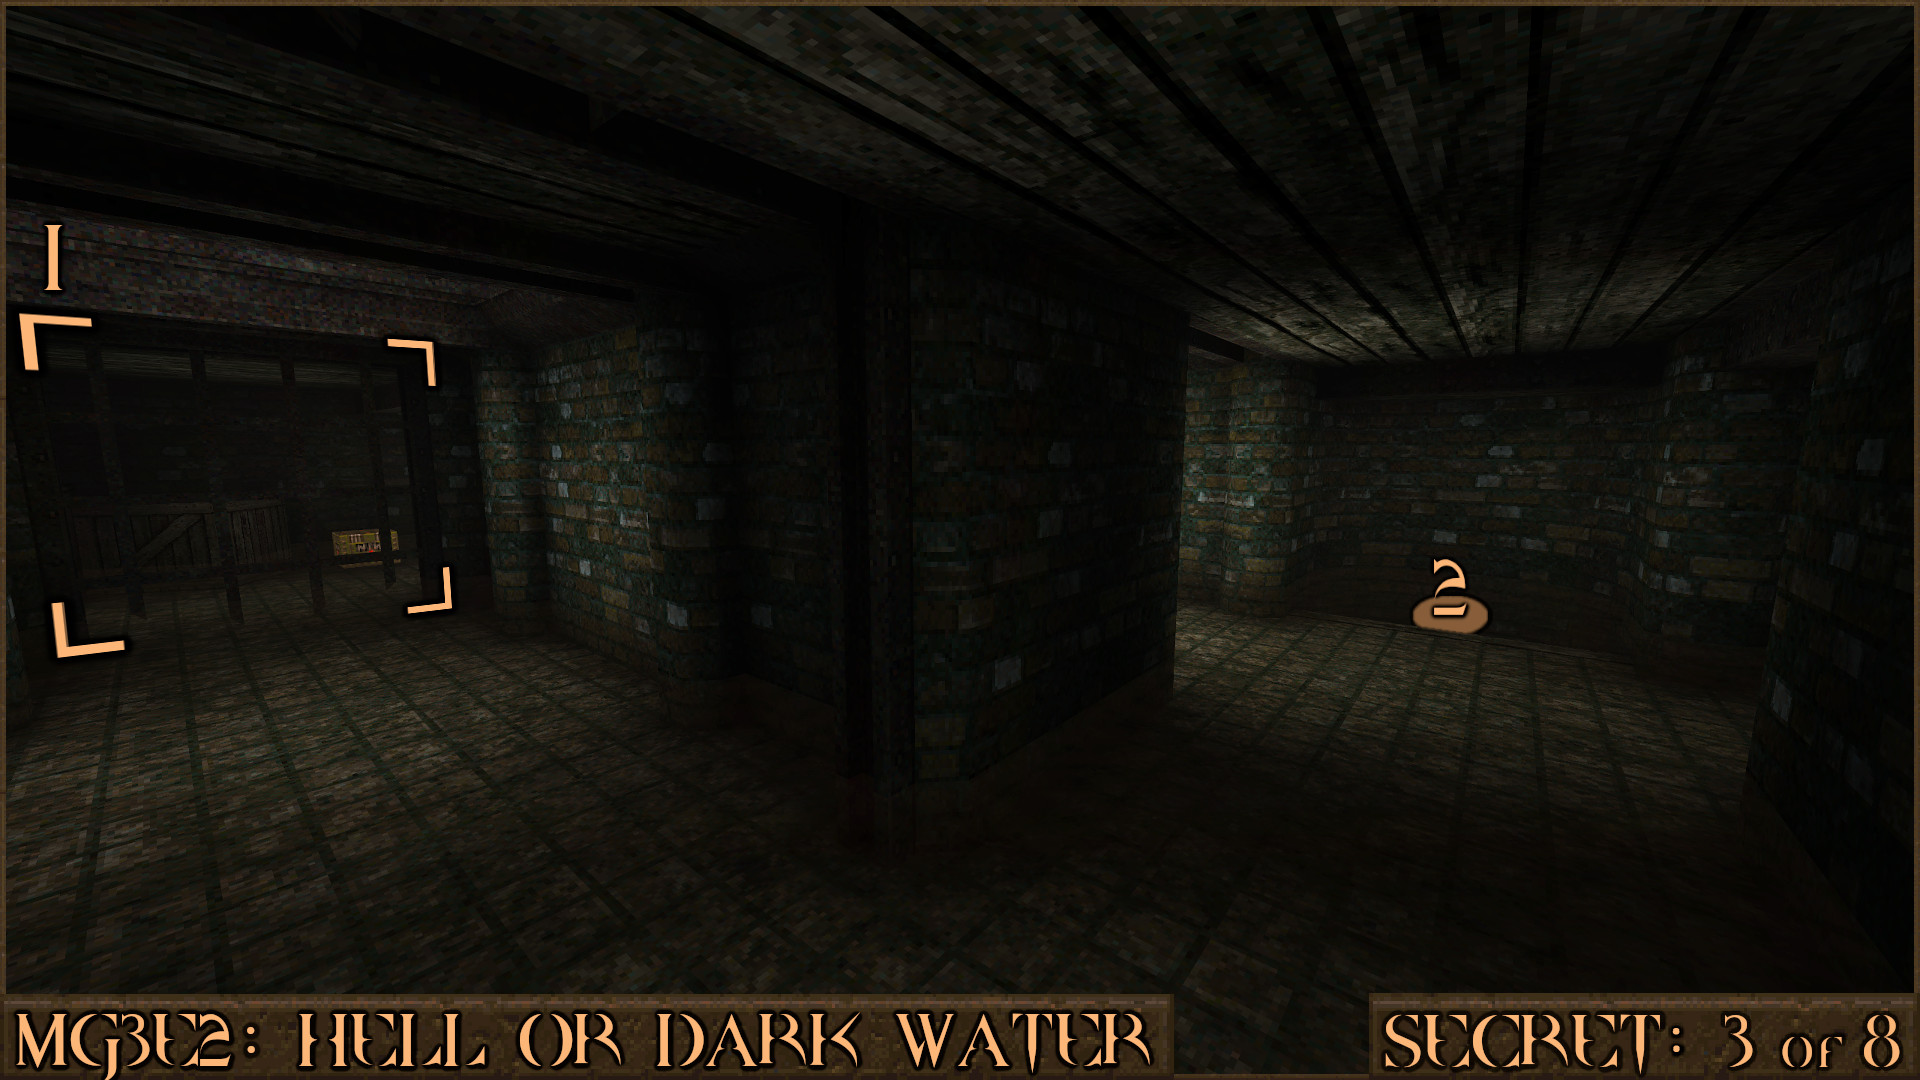
Reward:
Secret 4 of 8
As you are heading back to the Silver Keycard Door you will notice a pack of Large Cells and Large Rockets behind some metal grates (). Take a left here and jump in to the water () and you will find that a barrier has moved when you picked up the Silver Keycard earlier. Surface in to the area that contains the items to find the secret.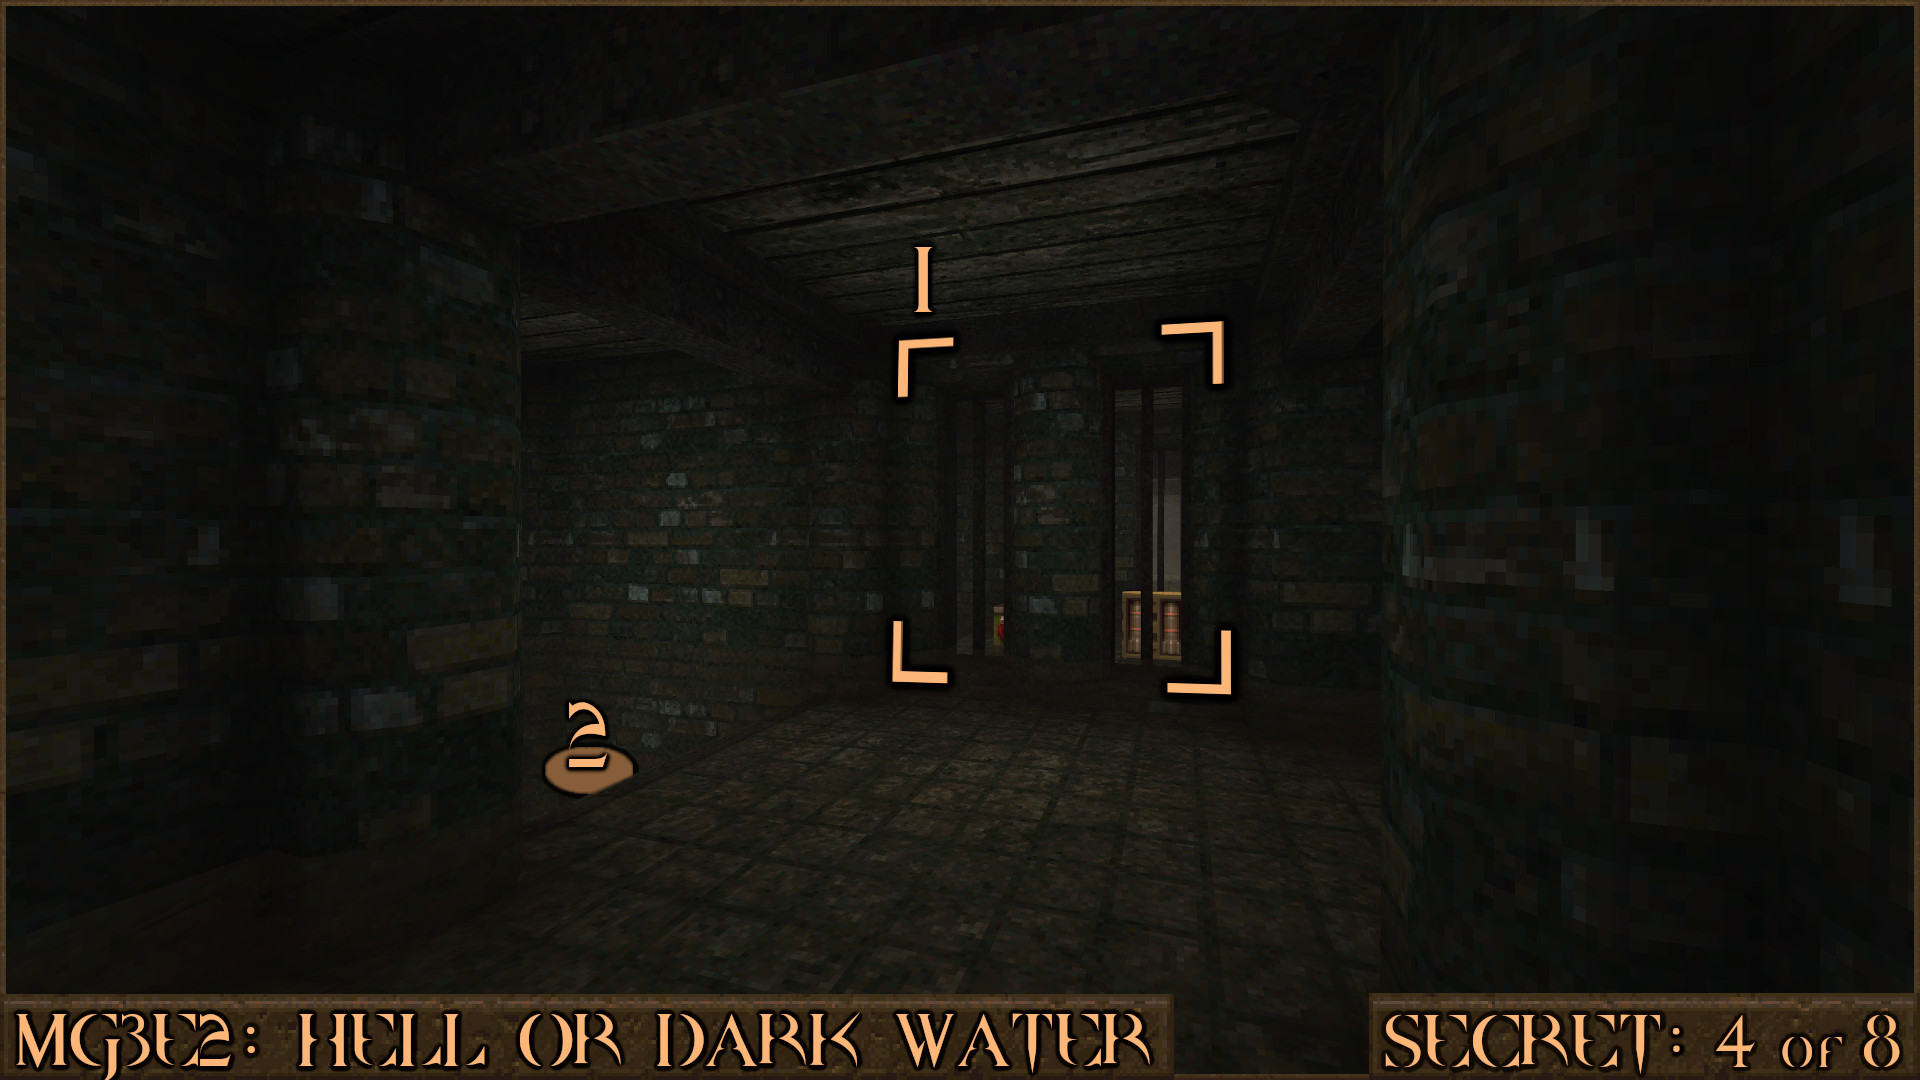
Reward:
Secret 5 of 8
After exiting from Secret 4 you will find yourself in front of the Silver Keycard Door that contains an elevator. Don't activate the lift, instead look through the small windows either side and you will see a red target switch () that will temporarily open the door. Quickly head through it and down the steps.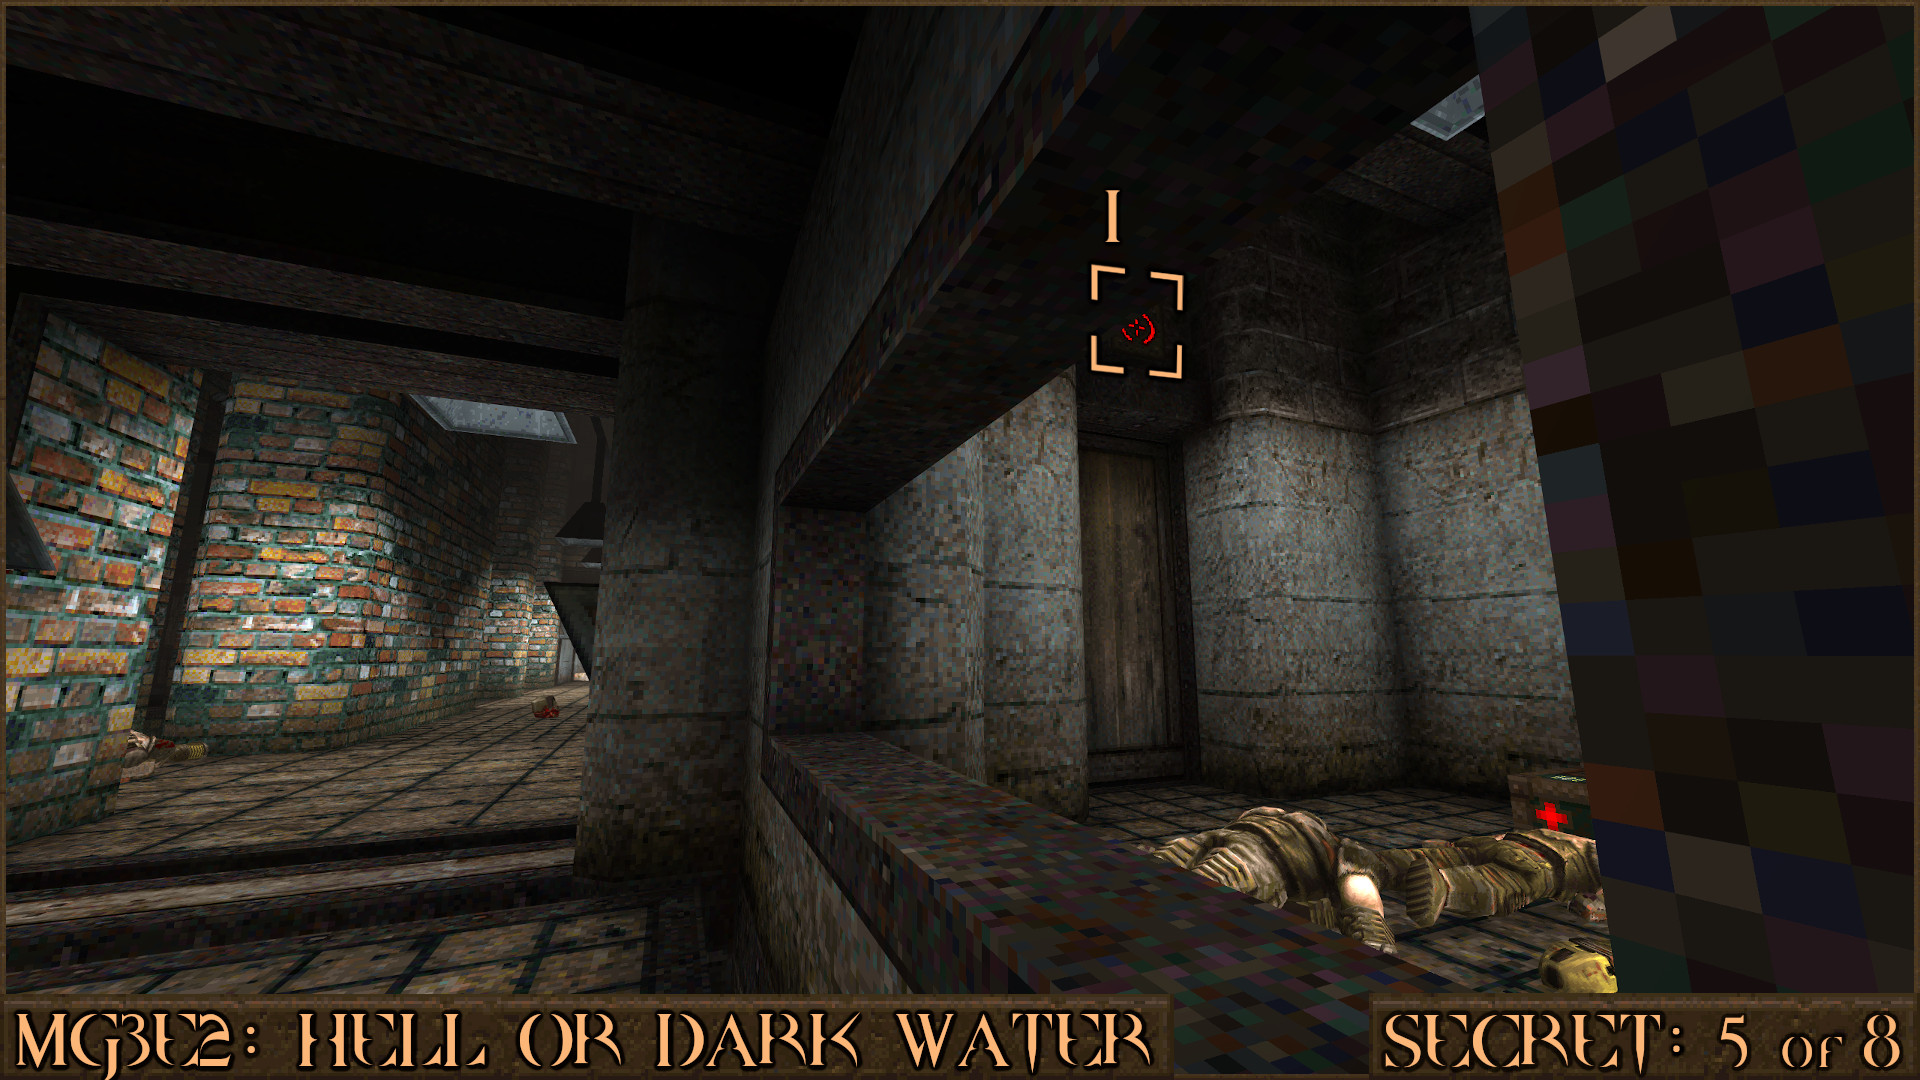
Round the back of this area you will notice a suspicious looking panel (
). Shoot it and it will reveal a vent. Drop down the vent to find the secret.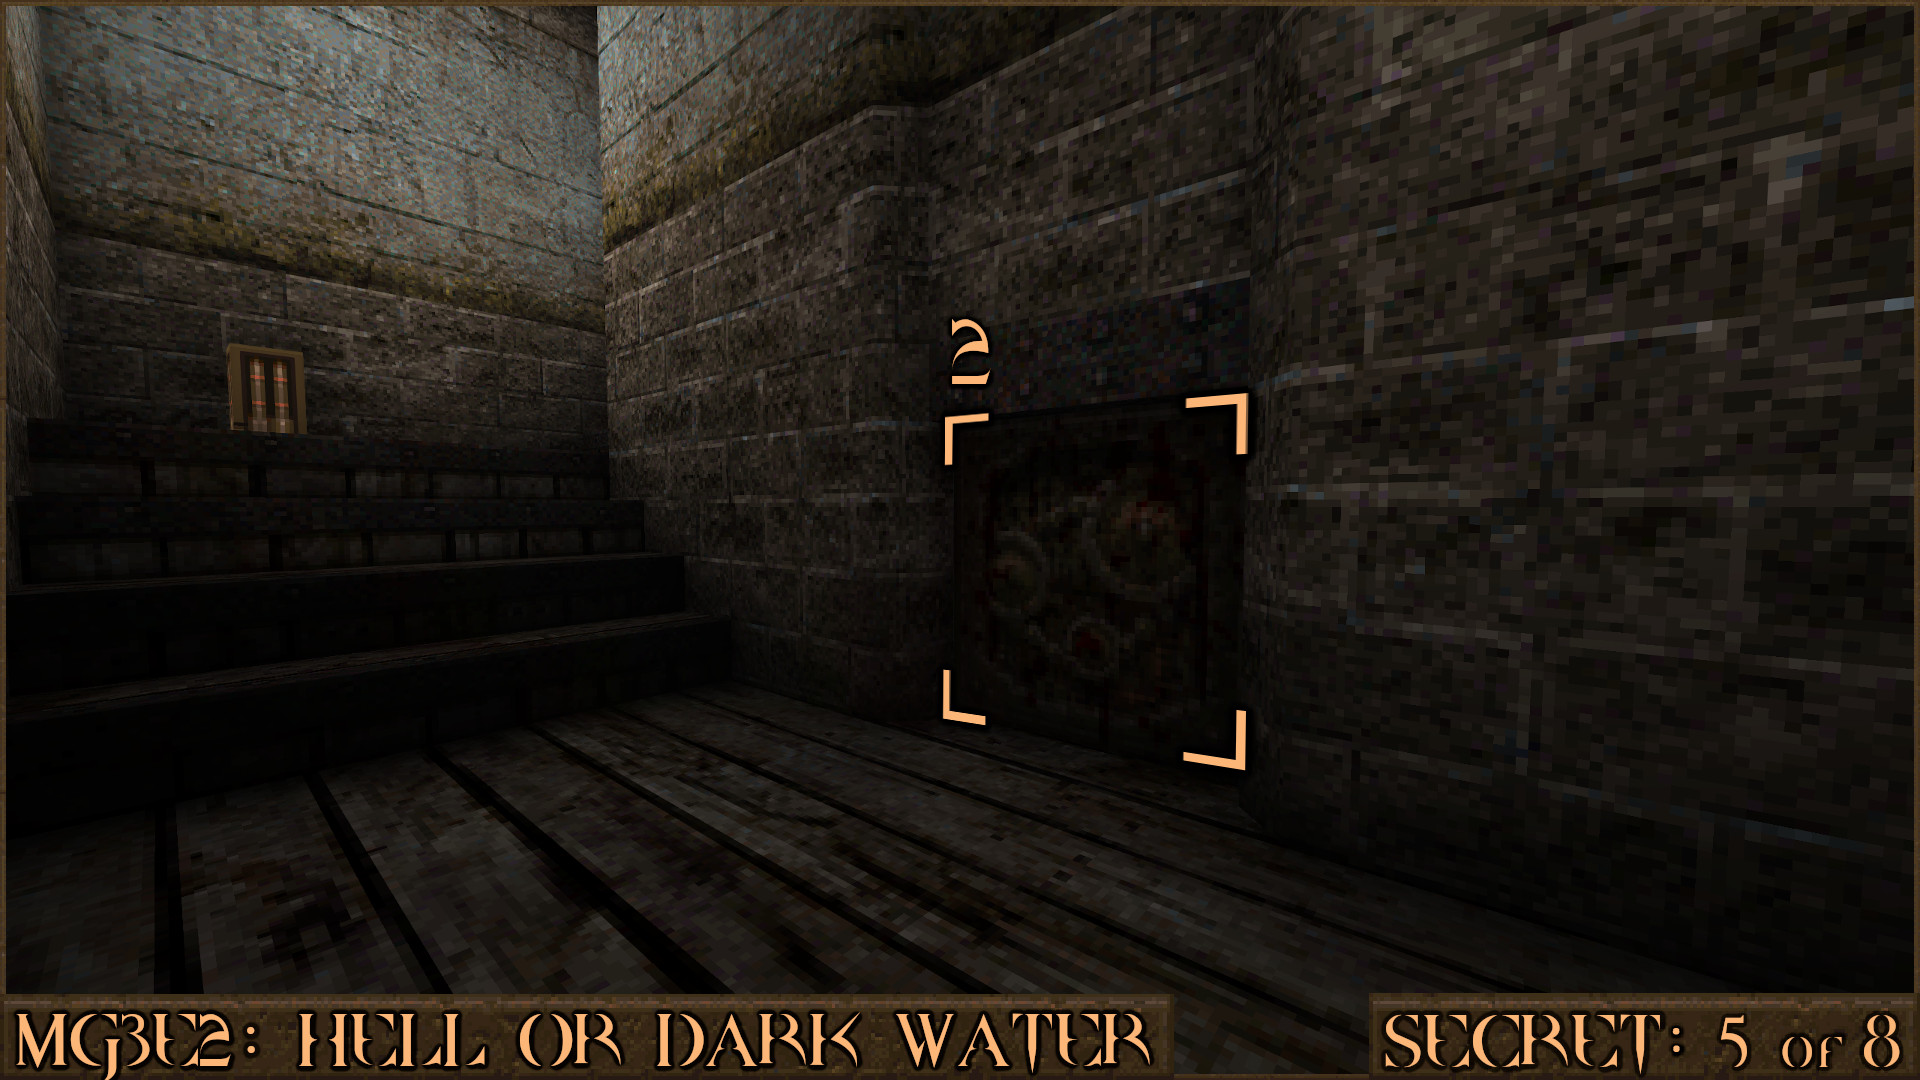
Reward:
Secret 6 of 8
After the first set of horizontal crushers you will notice a bloody monster face panel. Shoot it to reveal a secret area.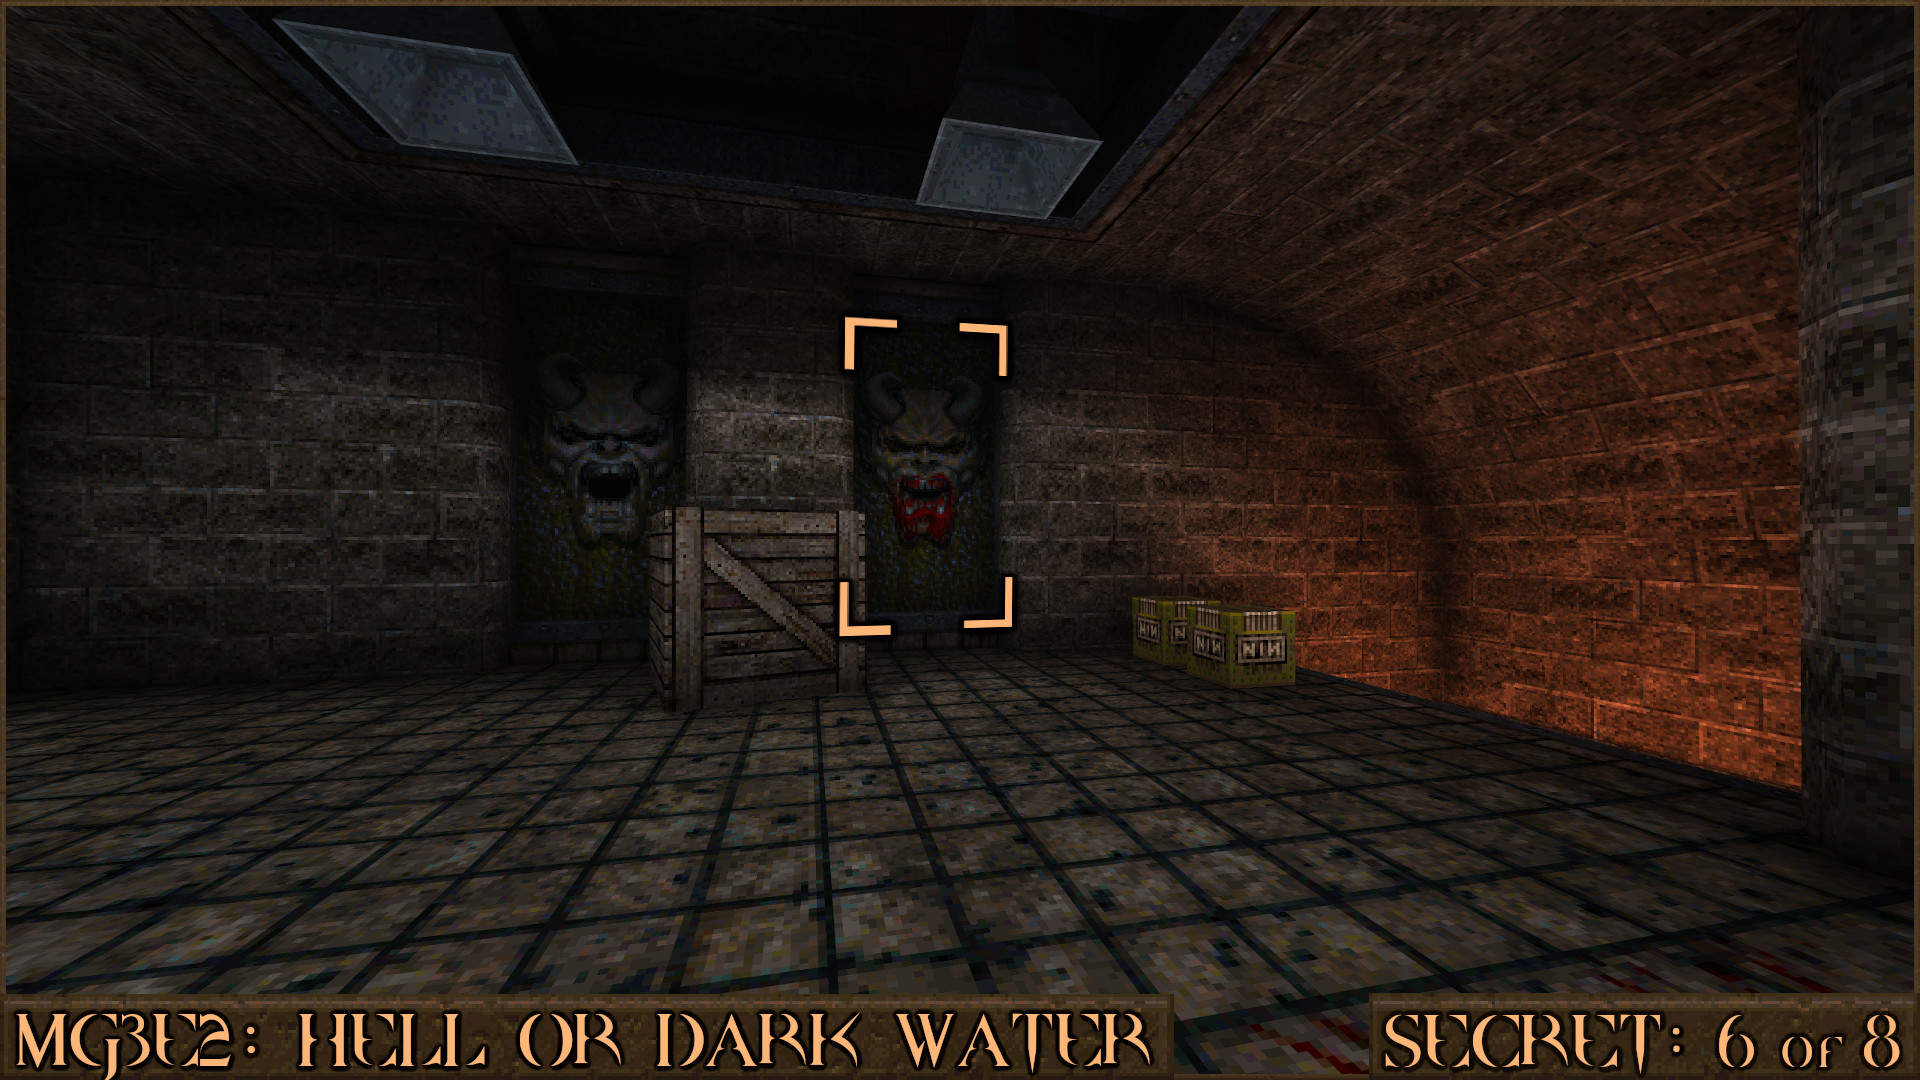
Reward:
Secret 7 of 8
After the second vertical crusher you will jump up some crates. Look for another bloody monster face panel that will reveal a secret area when shot.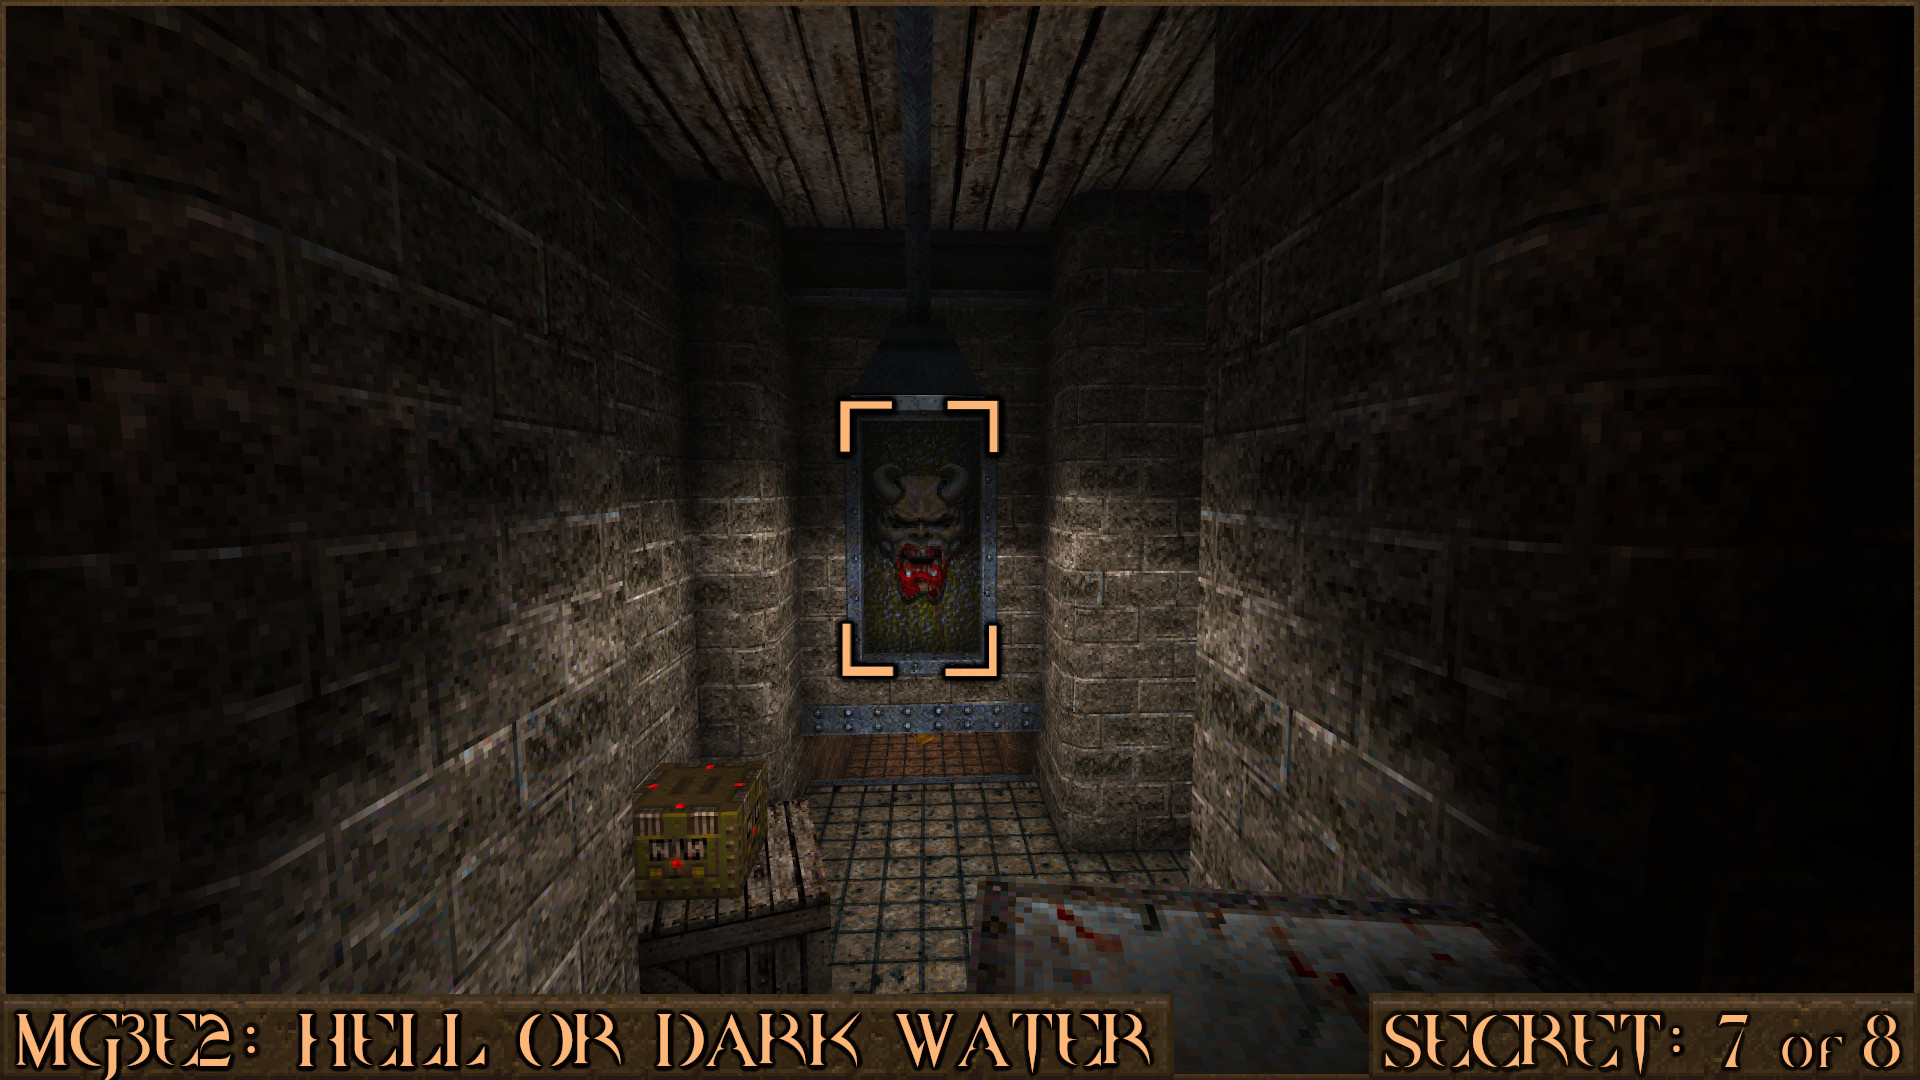
Reward:
Secret 8 of 8
In this dangerous room with several moving platforms take note of the two pillars in the room. There are red target triggers at the top of both columns. You should shoot them both to make navigating this room easier but one specifically () opens a door below it () to reveal the Megahealth that counts as the secret.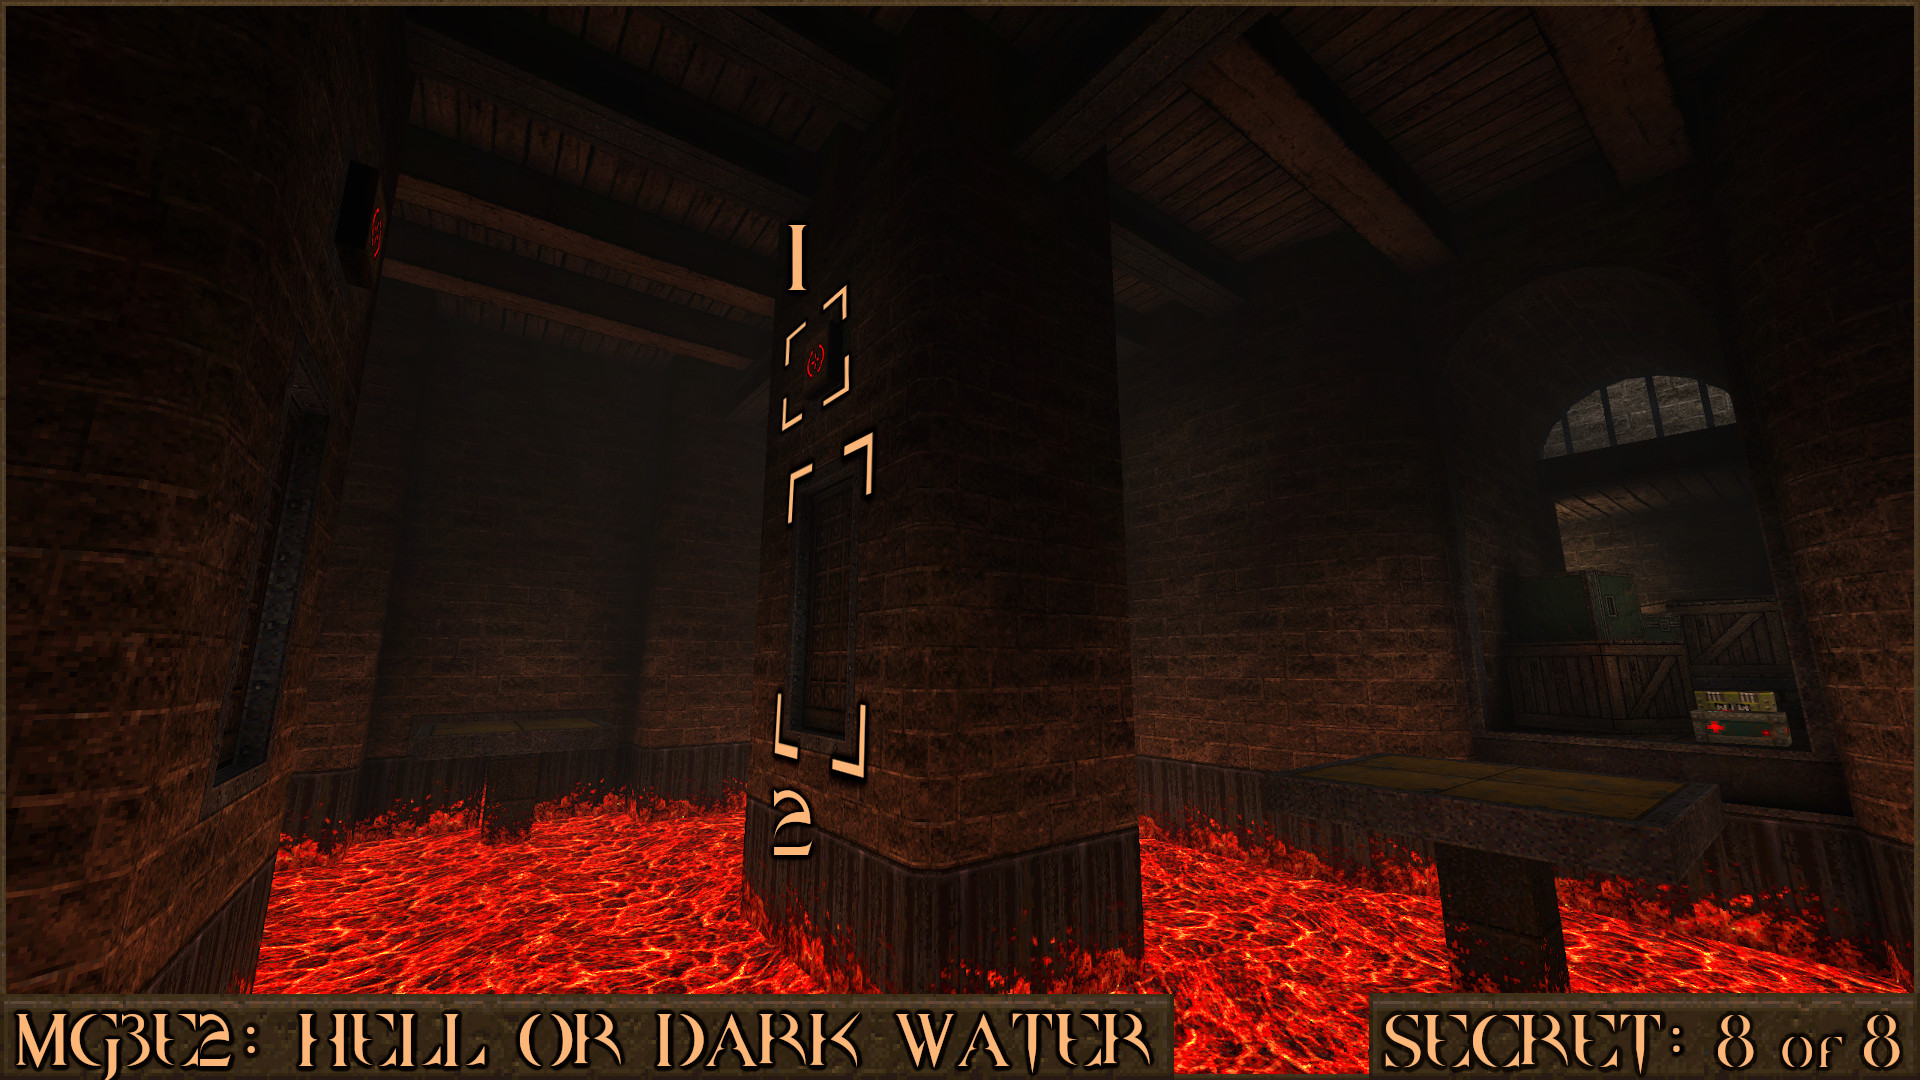
Reward:
MGE4M1: Grave Machine
Secret 1 of 3
Head to the right side of the large white cathedral to find a graveyard and crypt. Look carefully at one of the tomb covers to see a cracked one with some skull decorations on it. Shoot it to access the small burial vault and you will find a dead Ranger and the secret.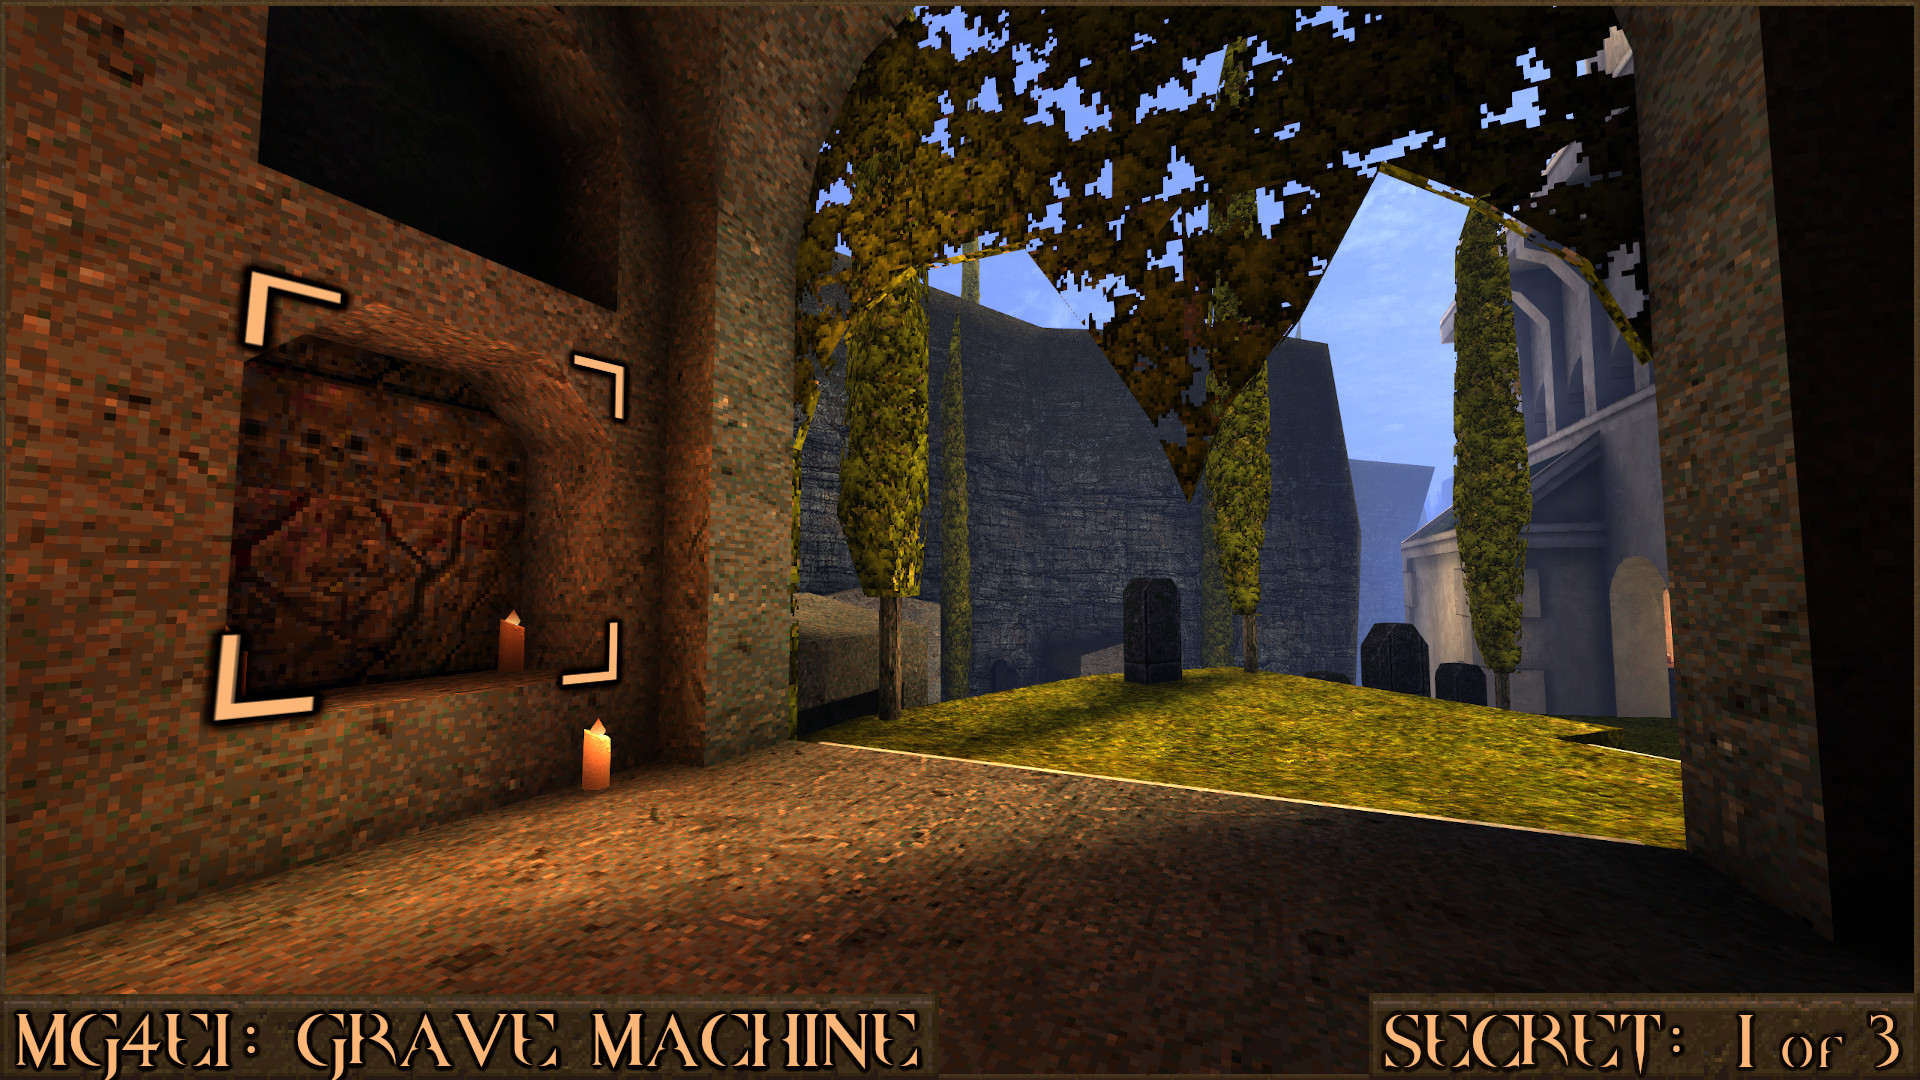
Reward:
Secret 2 of 3
After falling down in to the basement with the Zombies you will go through a dark room with a torch at its centre. Go through the door in to the next corridor and then turn around to see a red shootable switch (). Shooting it will make a nearby section of the wall move () to reveal a secret.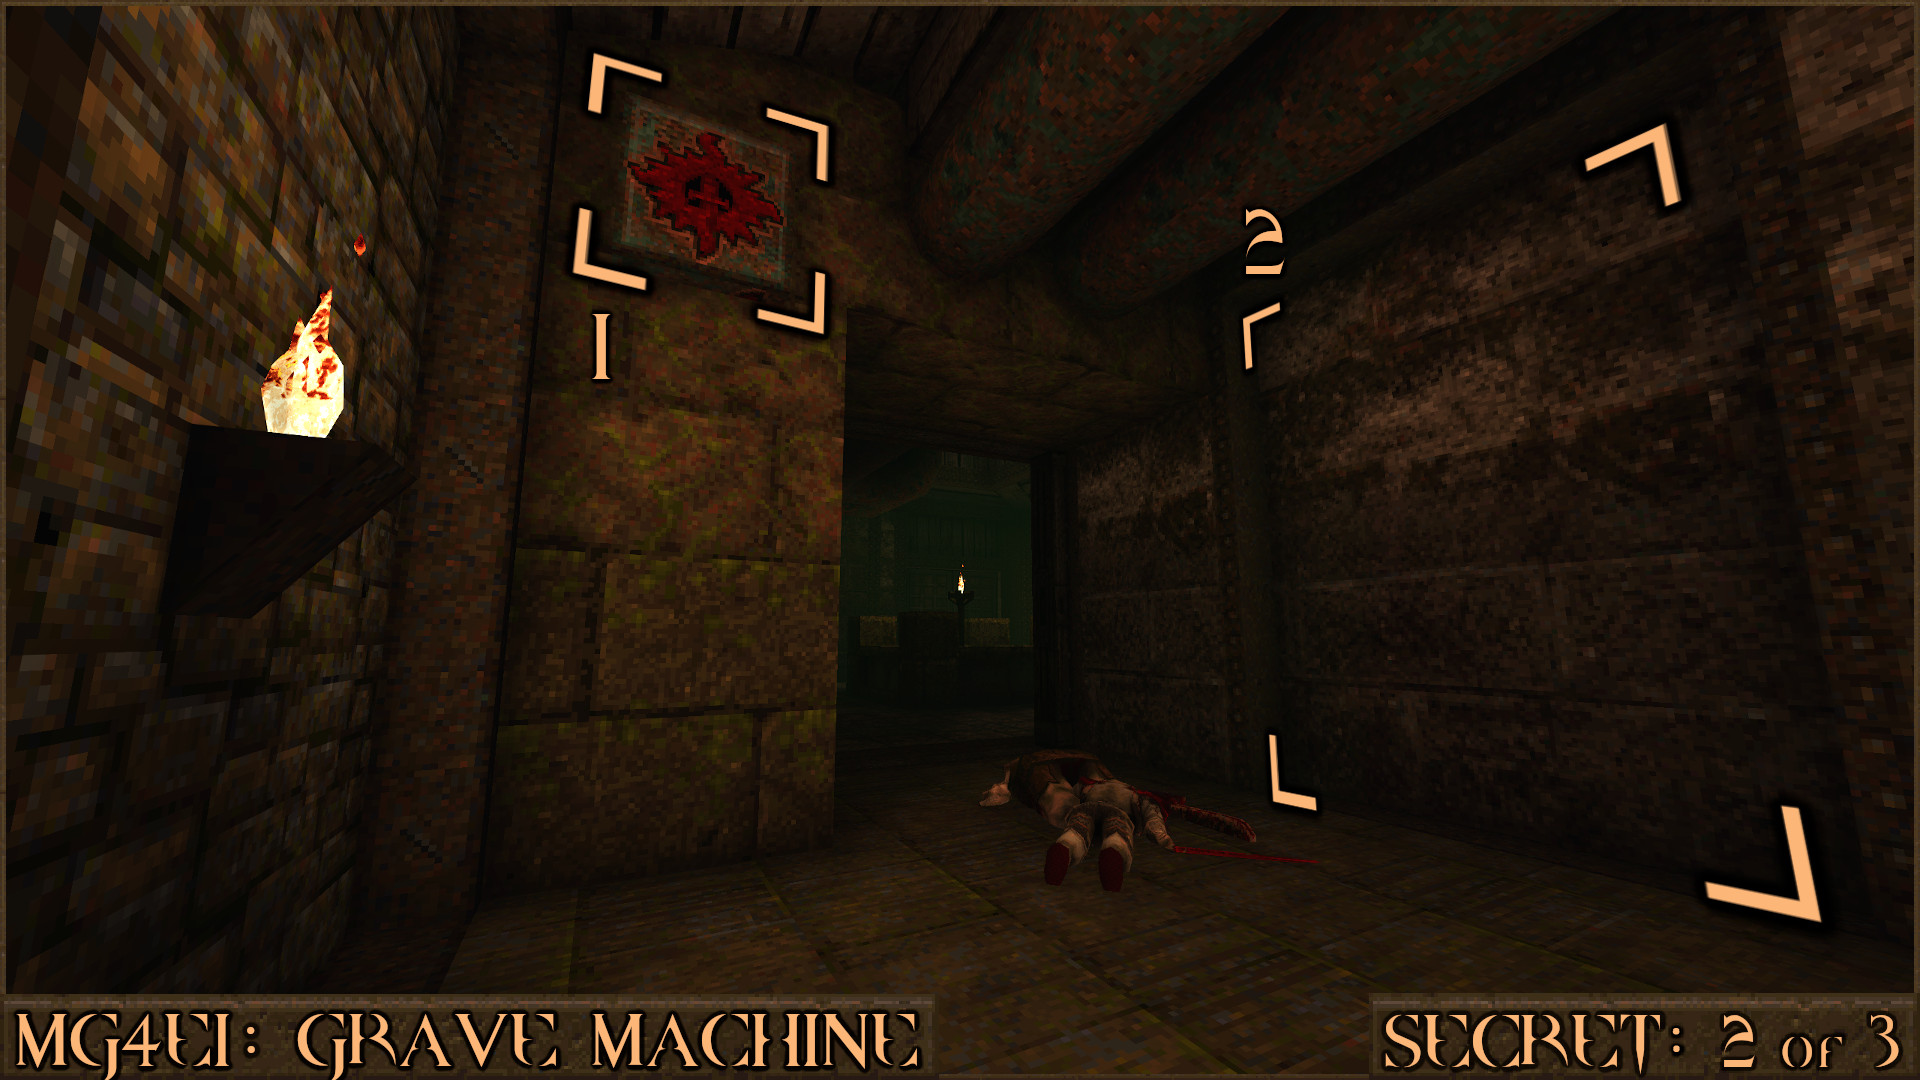
Reward:
Secret 3 of 3
You will walk down several ramps in a room with several metal pipes. When you get to the bottom with the orange switch jump in to the water and swim under the platform to find the secret.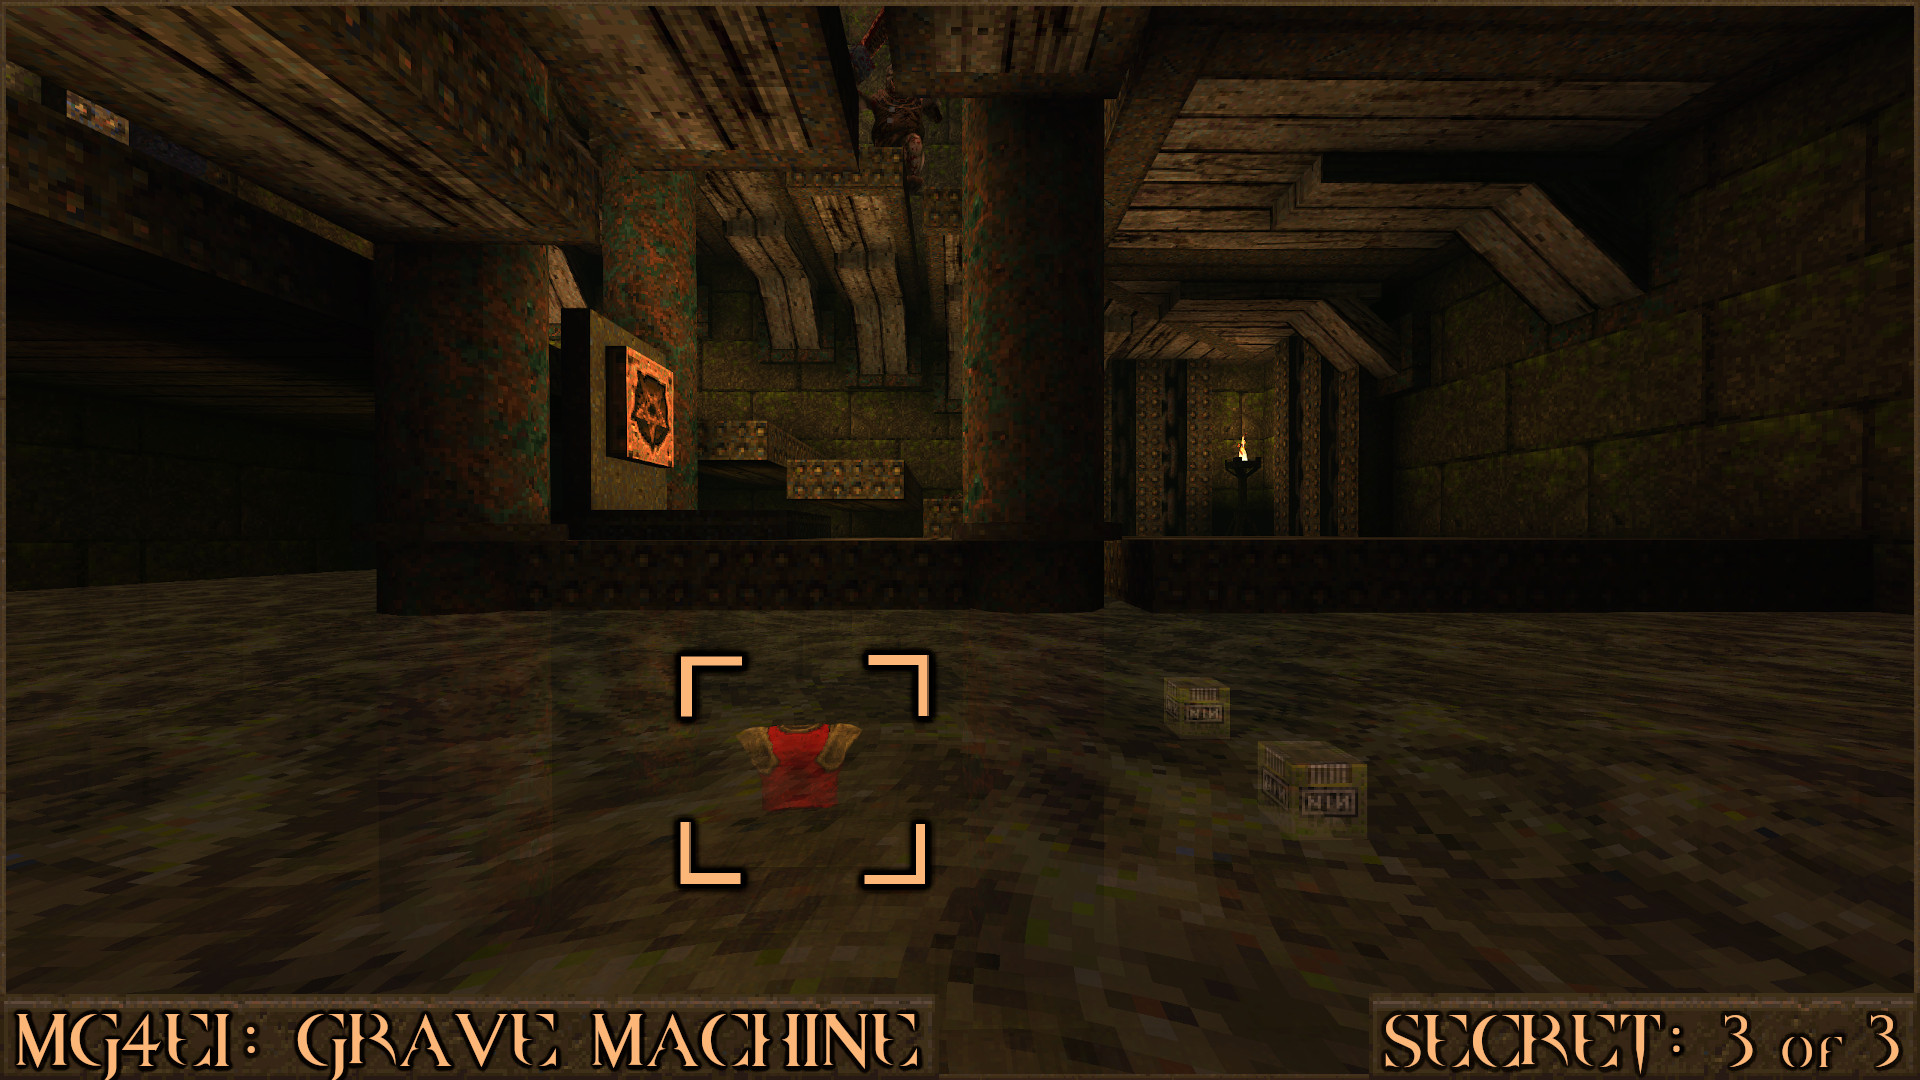
Reward:
MGE4M2: A Grave Mistake
Secret 1 of 3
After coming to a four-way intersection with pipes on the ground, take a left here ().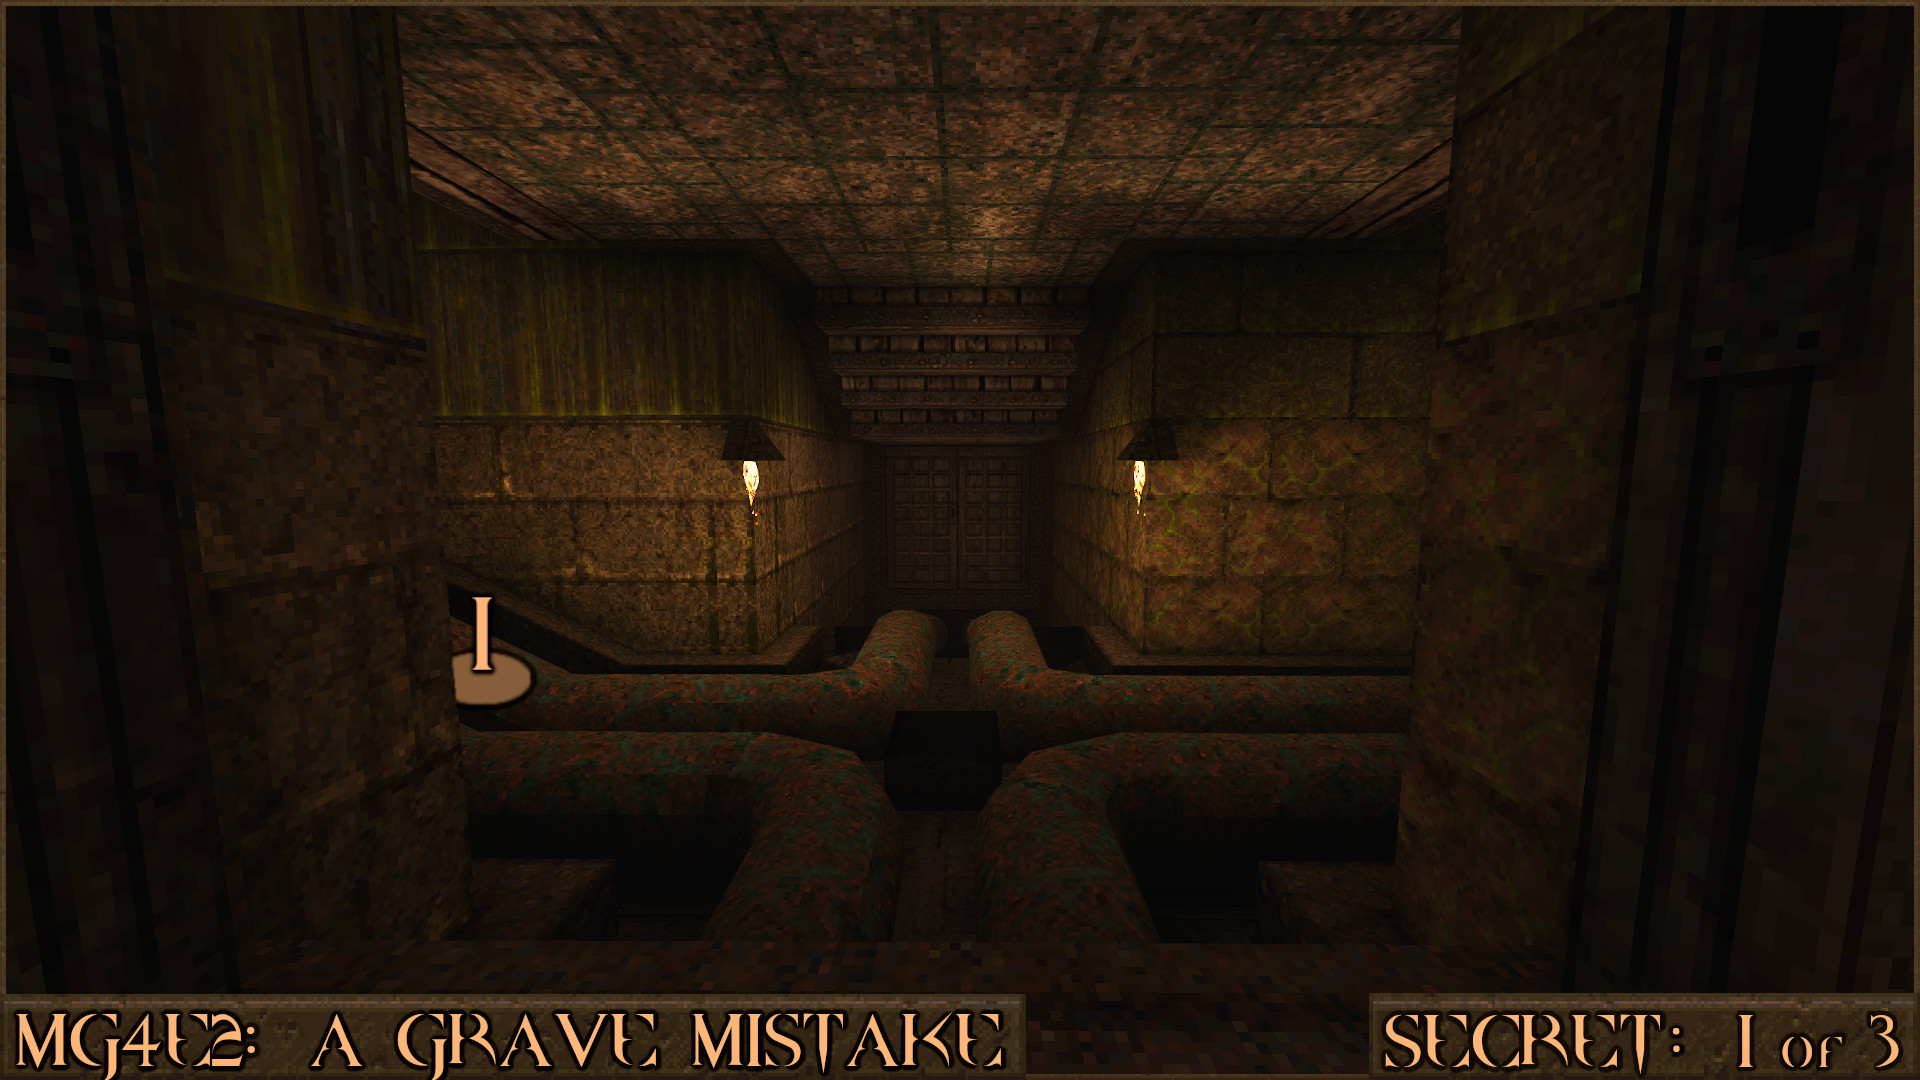
In this large, dark room with the slime pits head to the back of the room and then turn around and look up. You will see a faint red shootable switch (
). This is the first of three switches you need to shoot.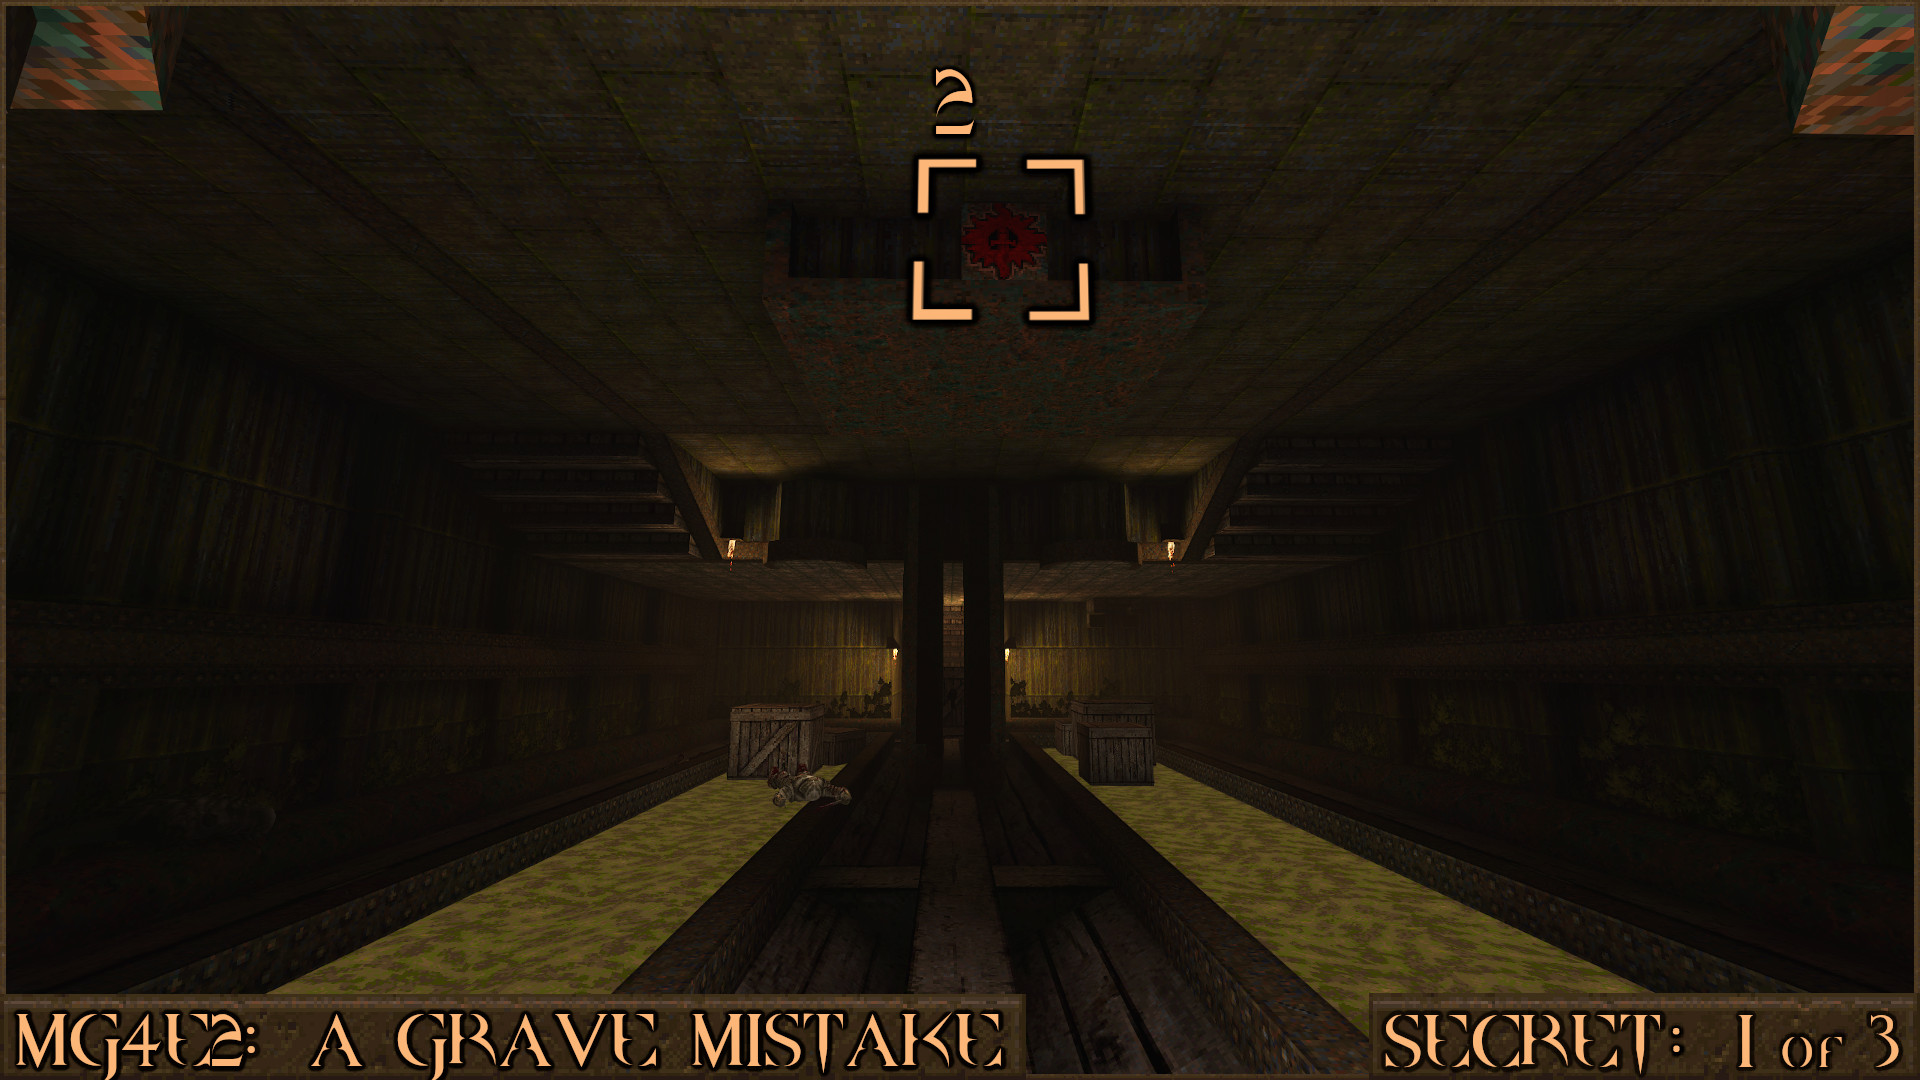
Go to the middle of the room, turn around and then look very carefully at the distant corners to find two more shootable switches (
+). Now that you have activated all three switches a wall will move to reveal the secret ().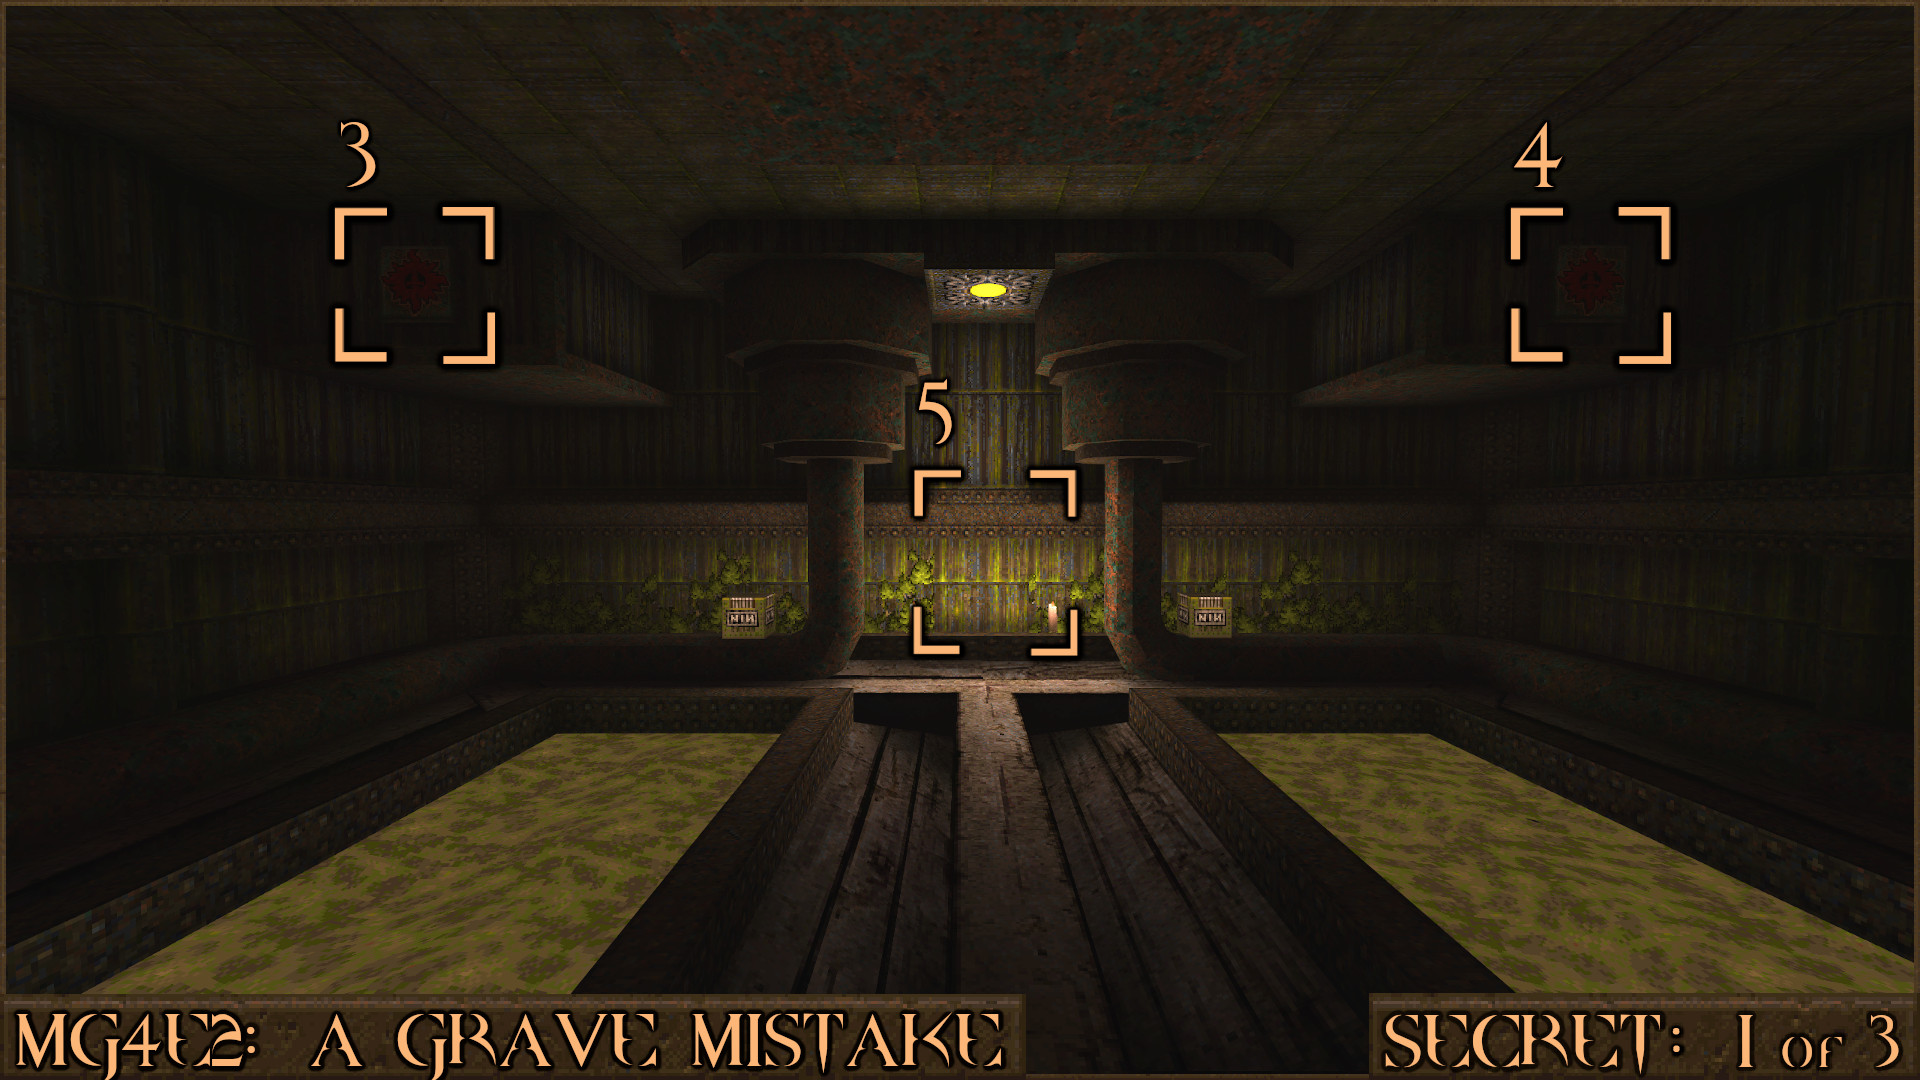
Reward:
Secret 2 of 3
Shortly after Secret 1 you will enter another corridor. Look carefully at the ceiling to see a red shootable switch () that will shift a nearby section of wall () and allow access to the secret.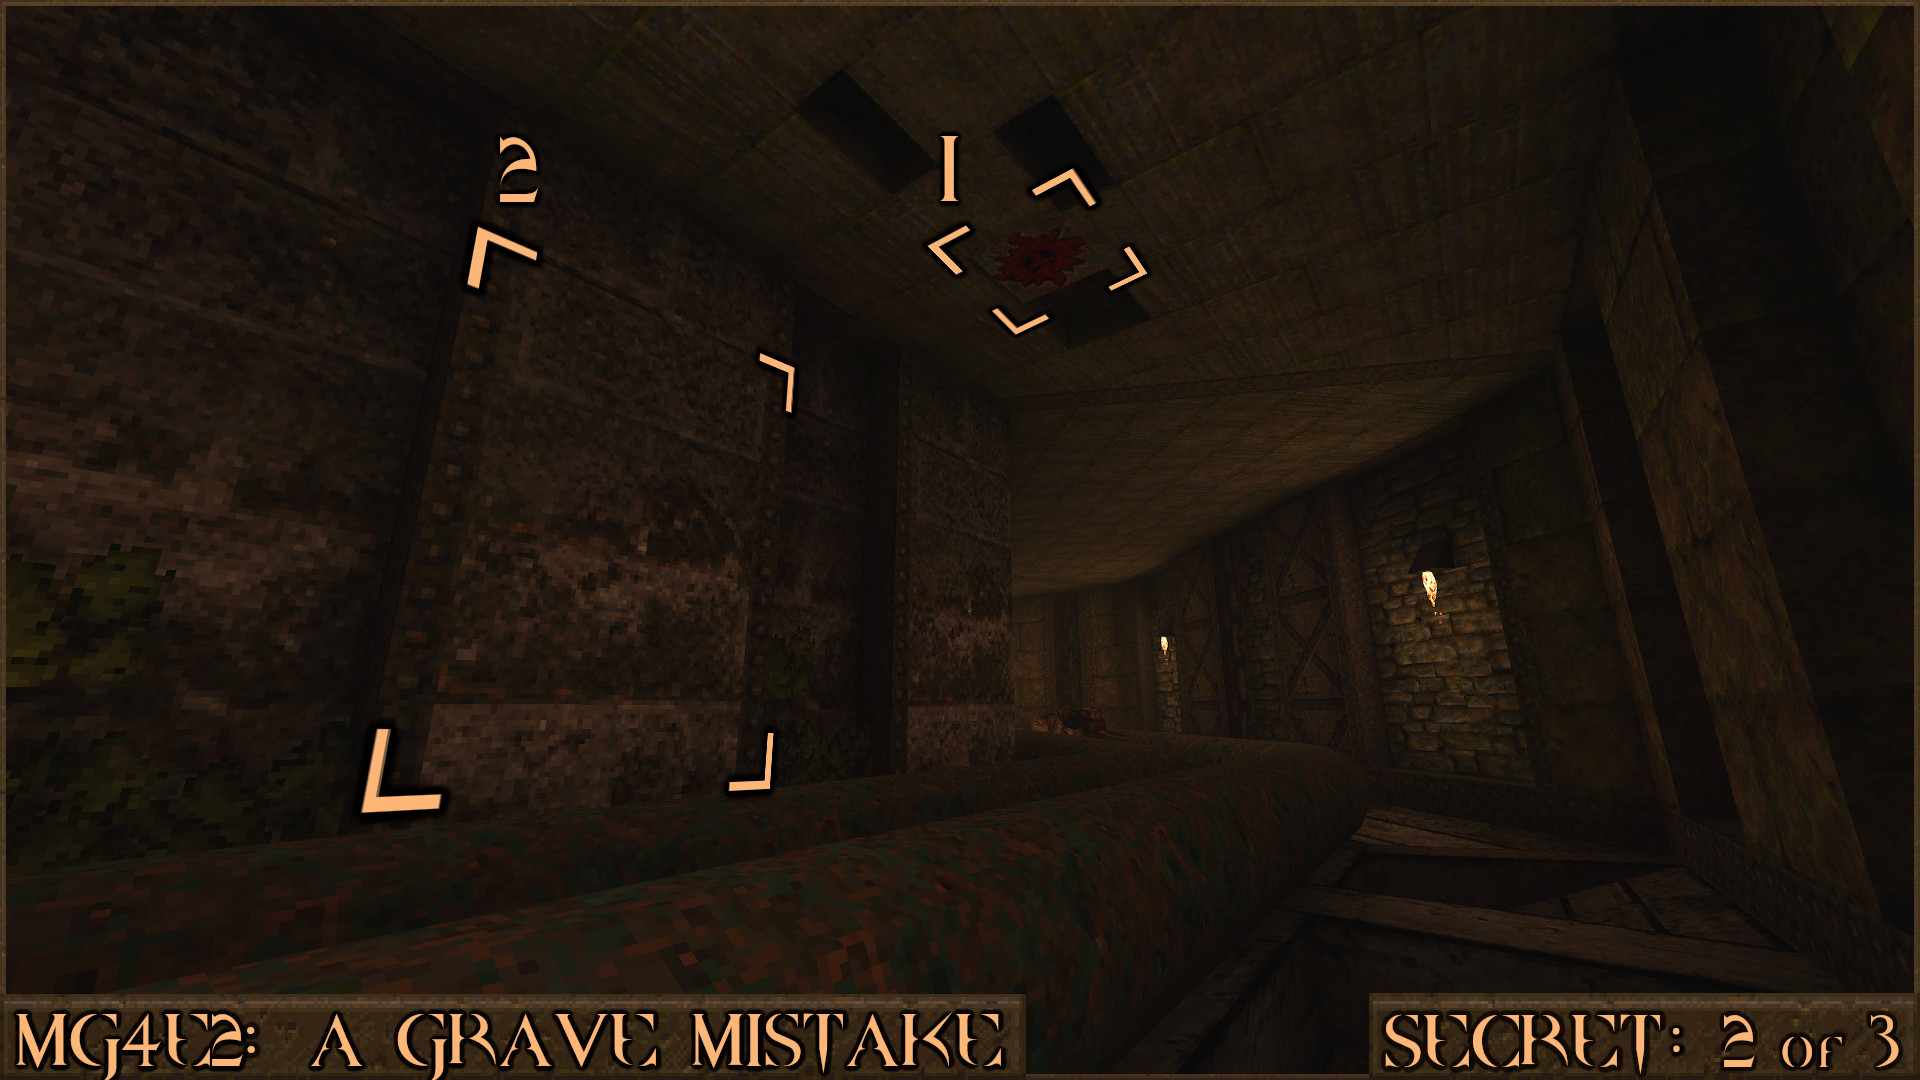
Reward:
Secret 3 of 3
When you reach the inverted white building keep an eye out for this large red cracked stained-glass window. It can be destroyed with a few shots and you can drop down on to a ledge below to find the secret.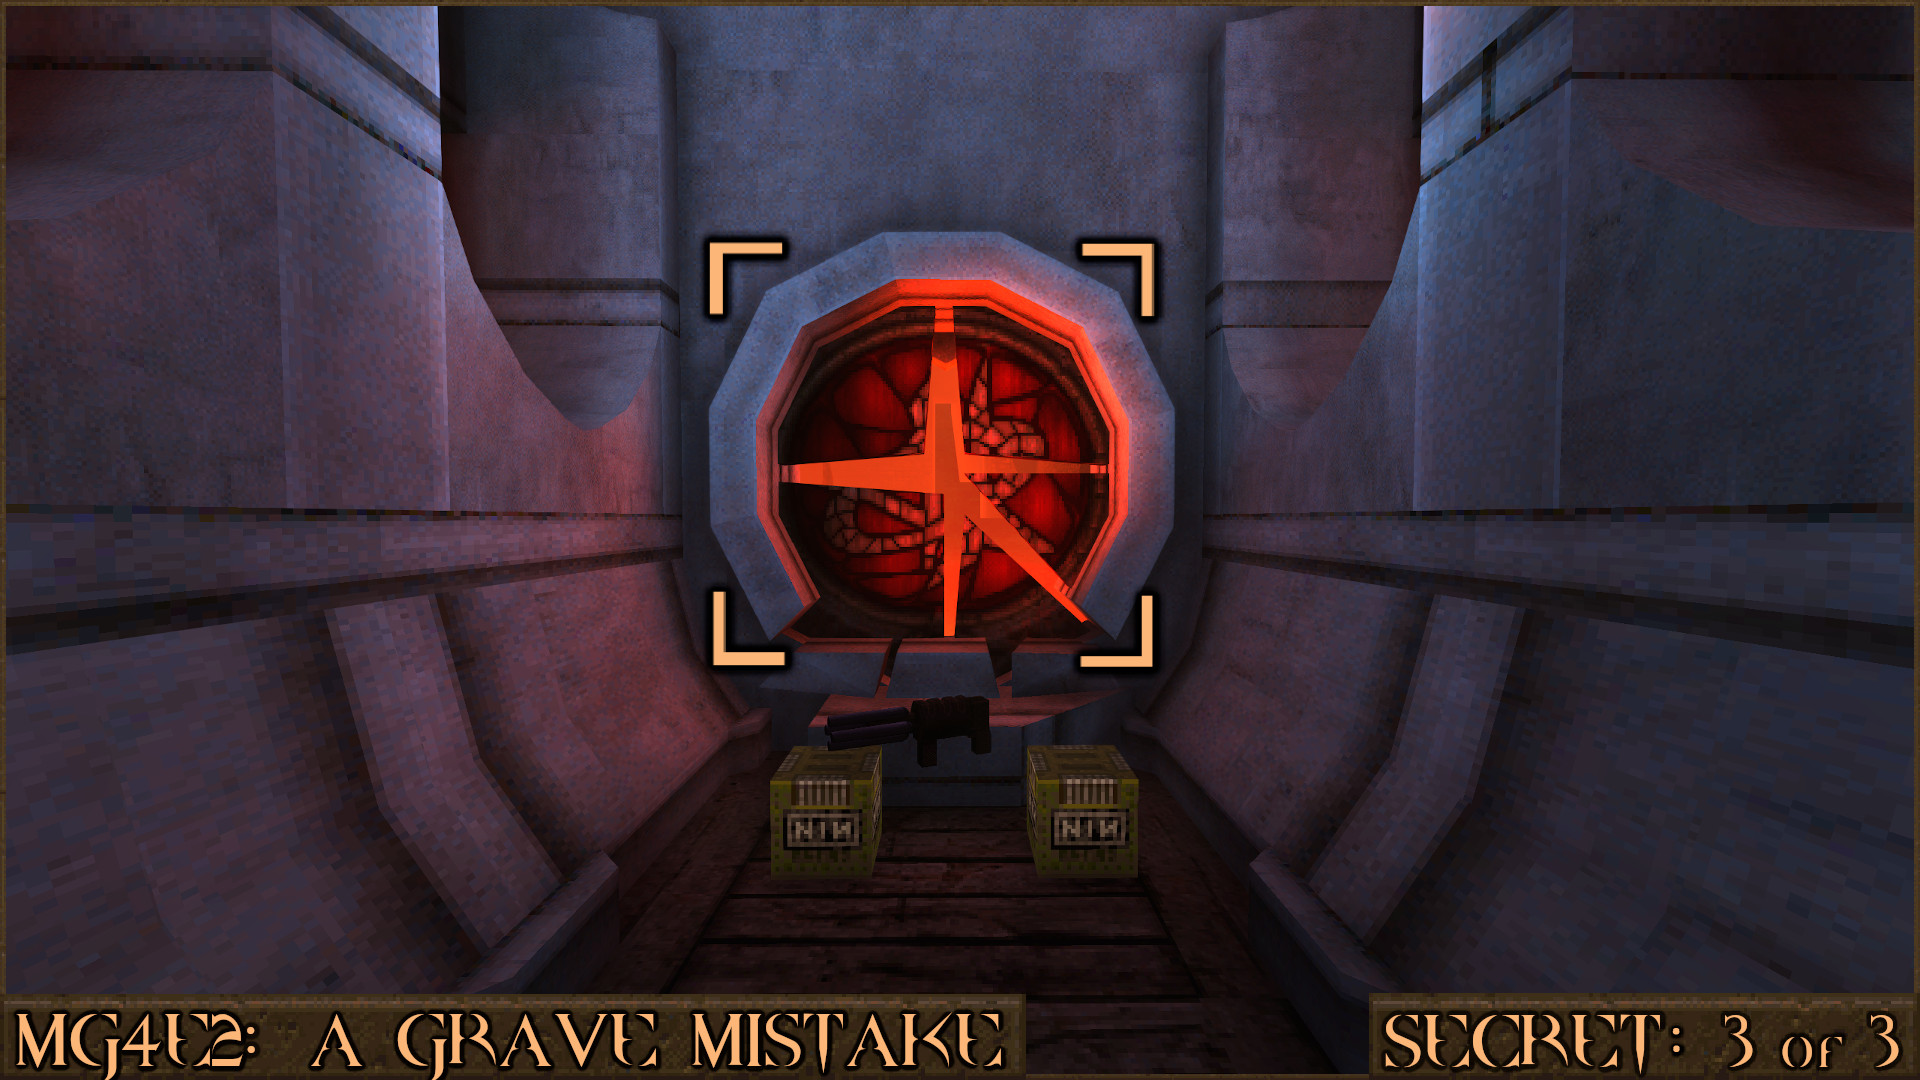
Reward:
MGE5M1: Nazard Terminal
Secret 1 of 4
At the start of the level check out the nearby structure. Shoot the bloody monster face panel in here to reveal a secret area.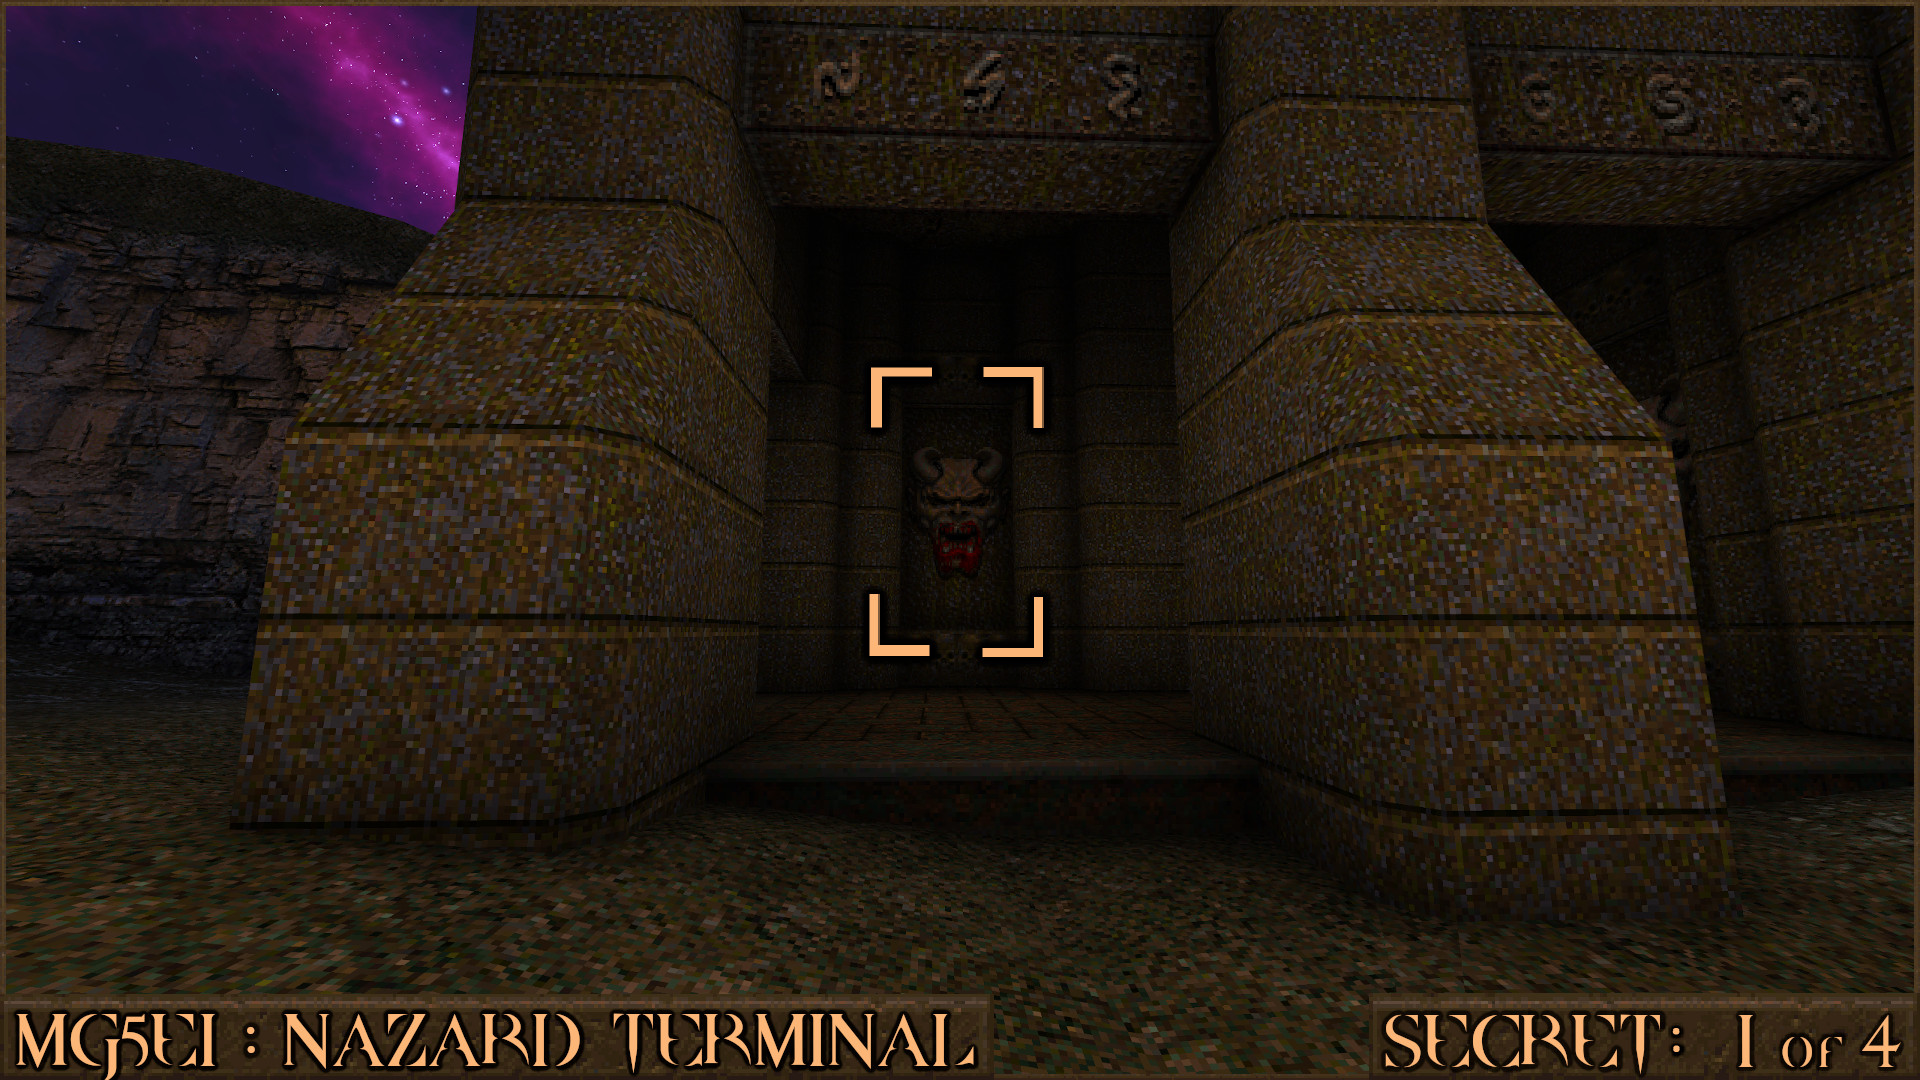
Reward:
Secret 2 of 4
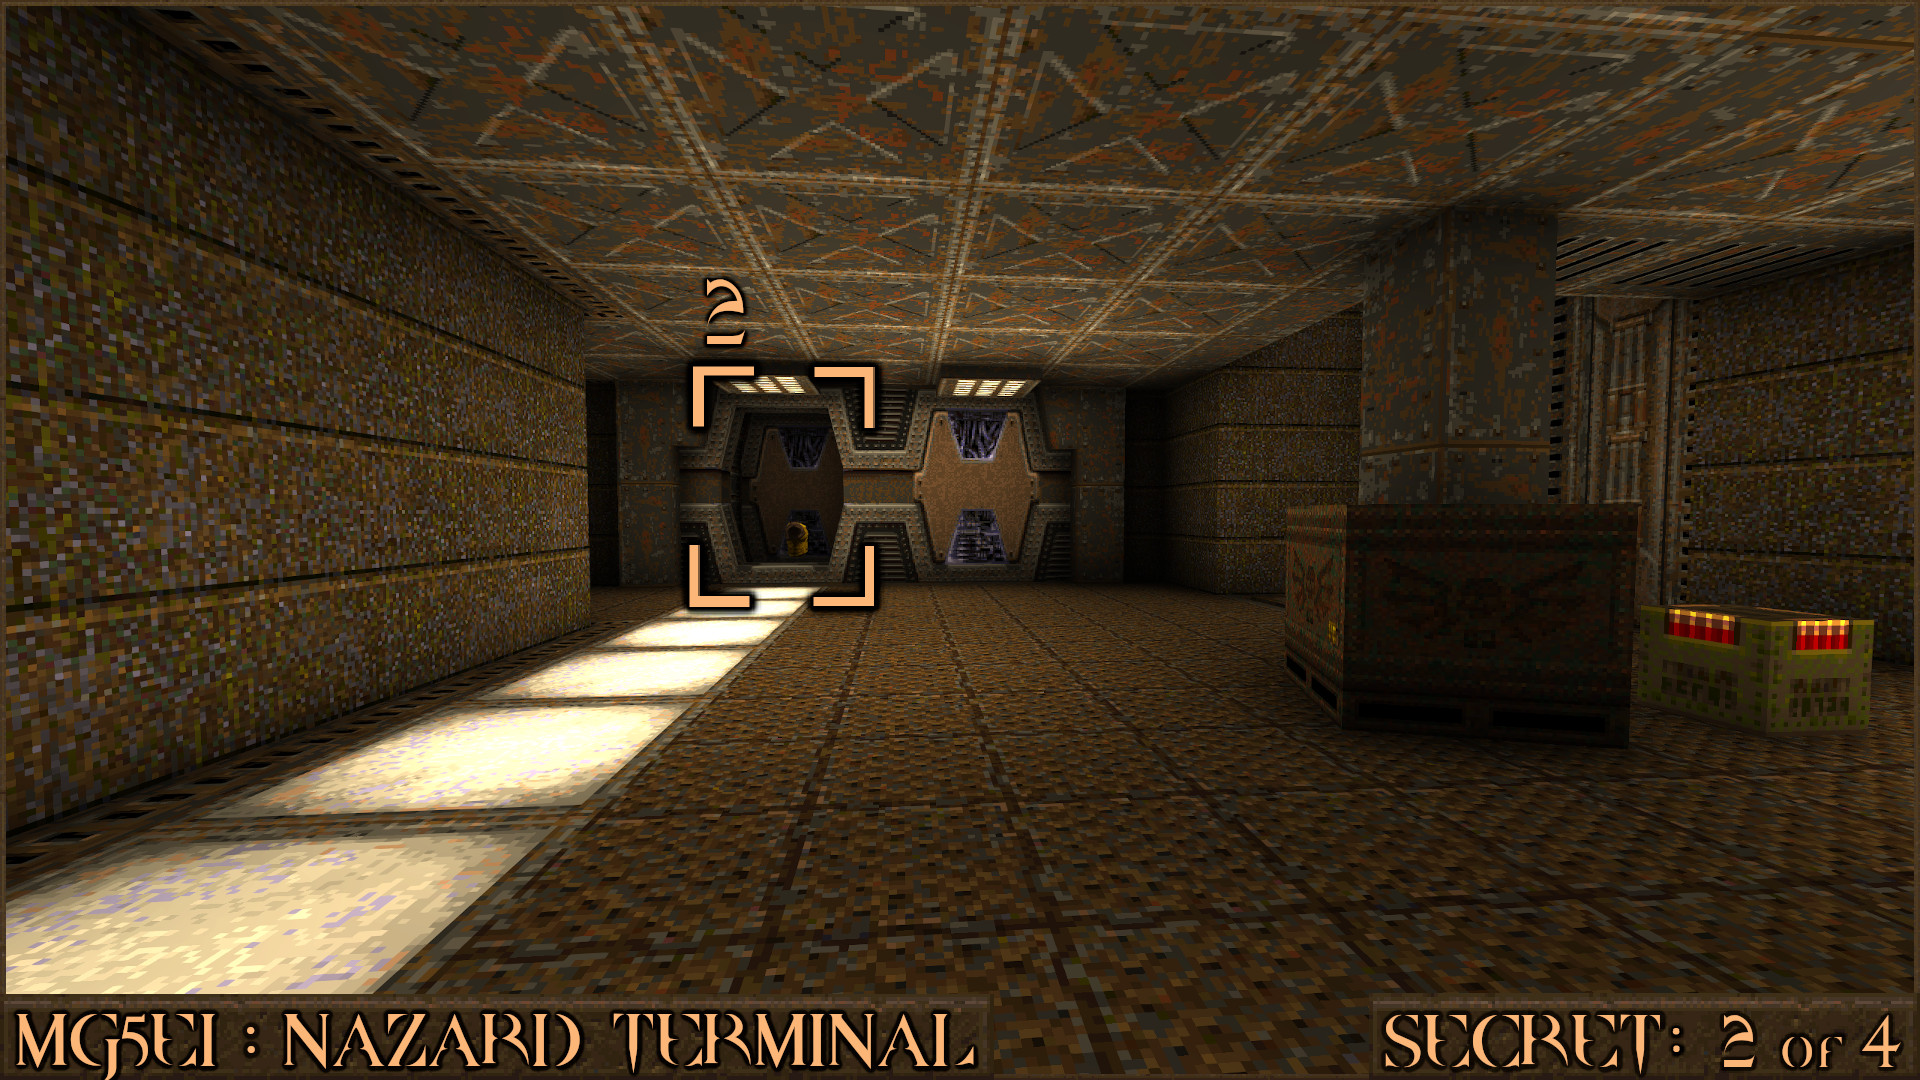
In the spaceship you will find a large room that contains the Gold Keycard behind a forcefield, as well as several large cannons pointing out of the ship. Head to the lower floor of this room and look in a dark corner behind some crates () to find a red diamond button.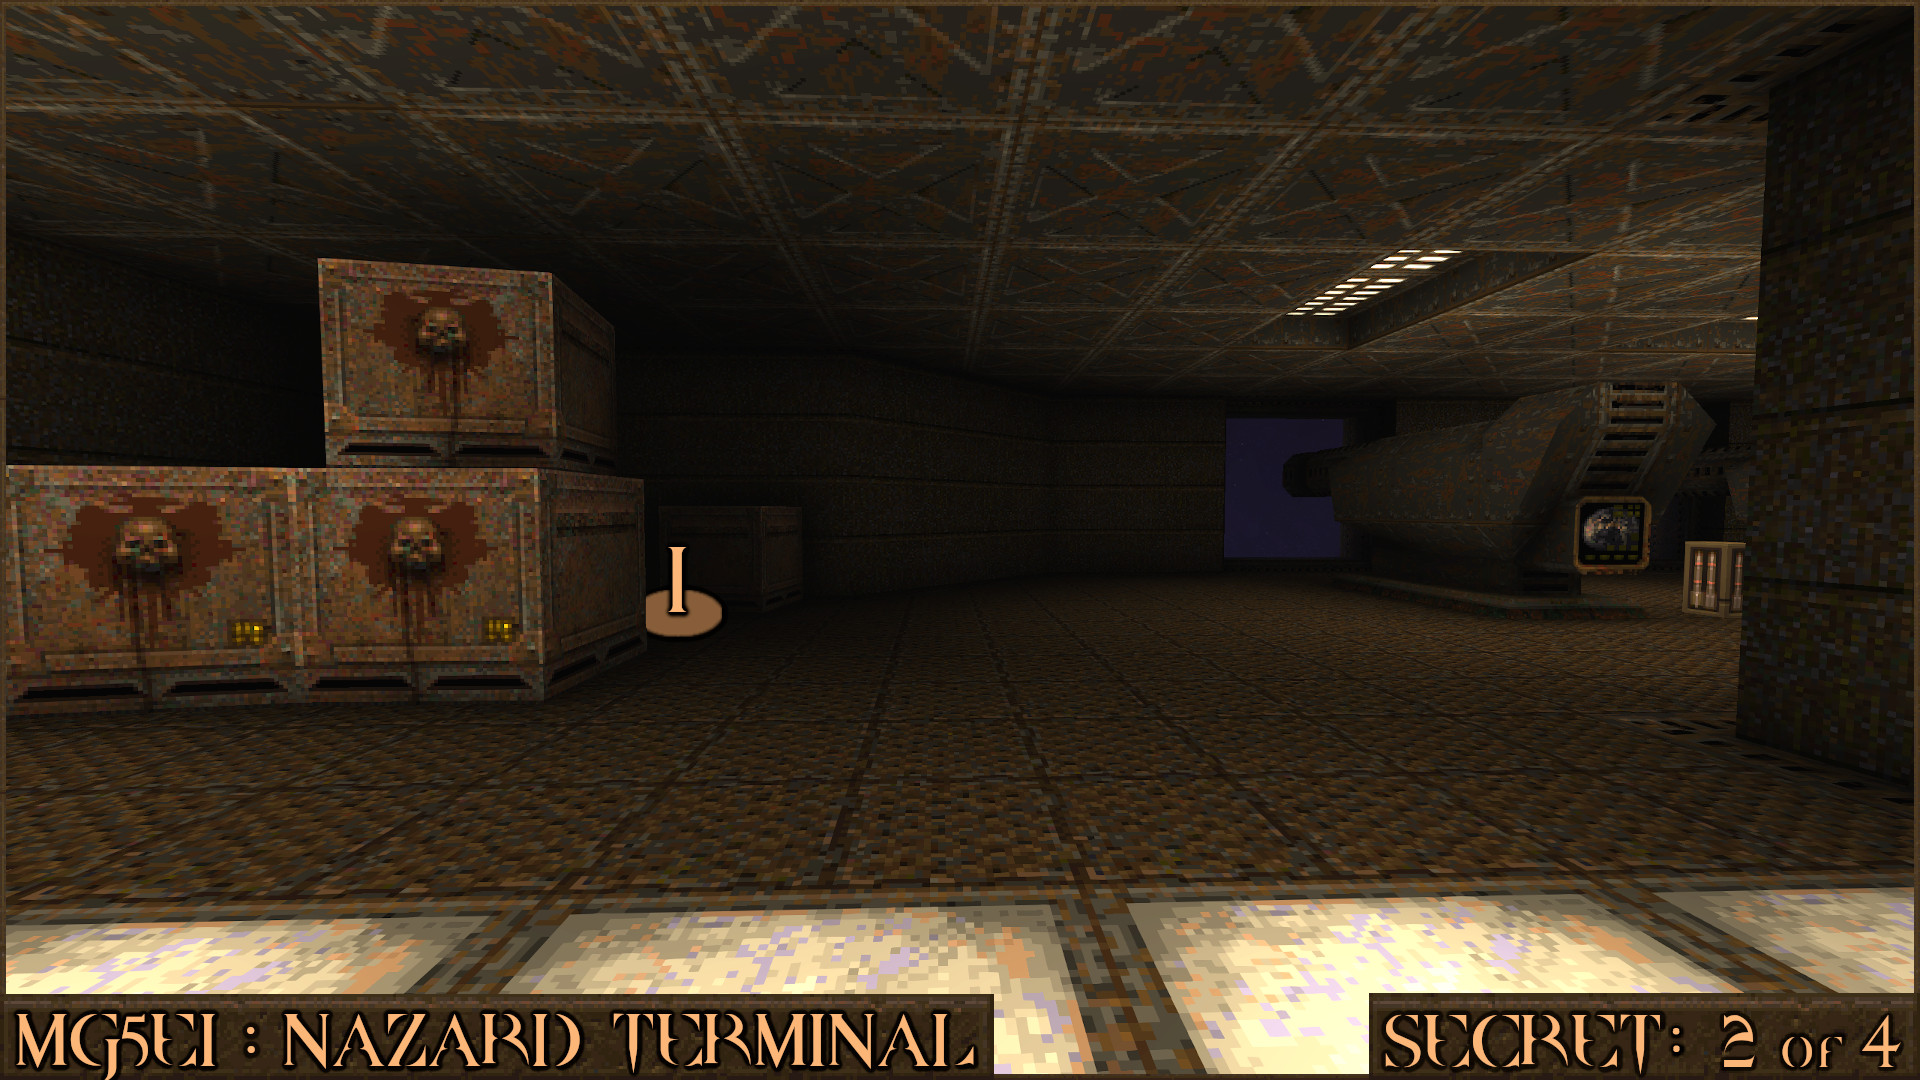
After pushing the button turn around and head to the opposite side of the room and you will see a panel has moved to reveal a secret storage compartment (
).
Reward:
Secret 3 of 4
Shortly after opening the Gold Keycard Door you will enter a security area. Keep an eye out for three red target switches around here. The 1st is found above a door that is next to a ramp ().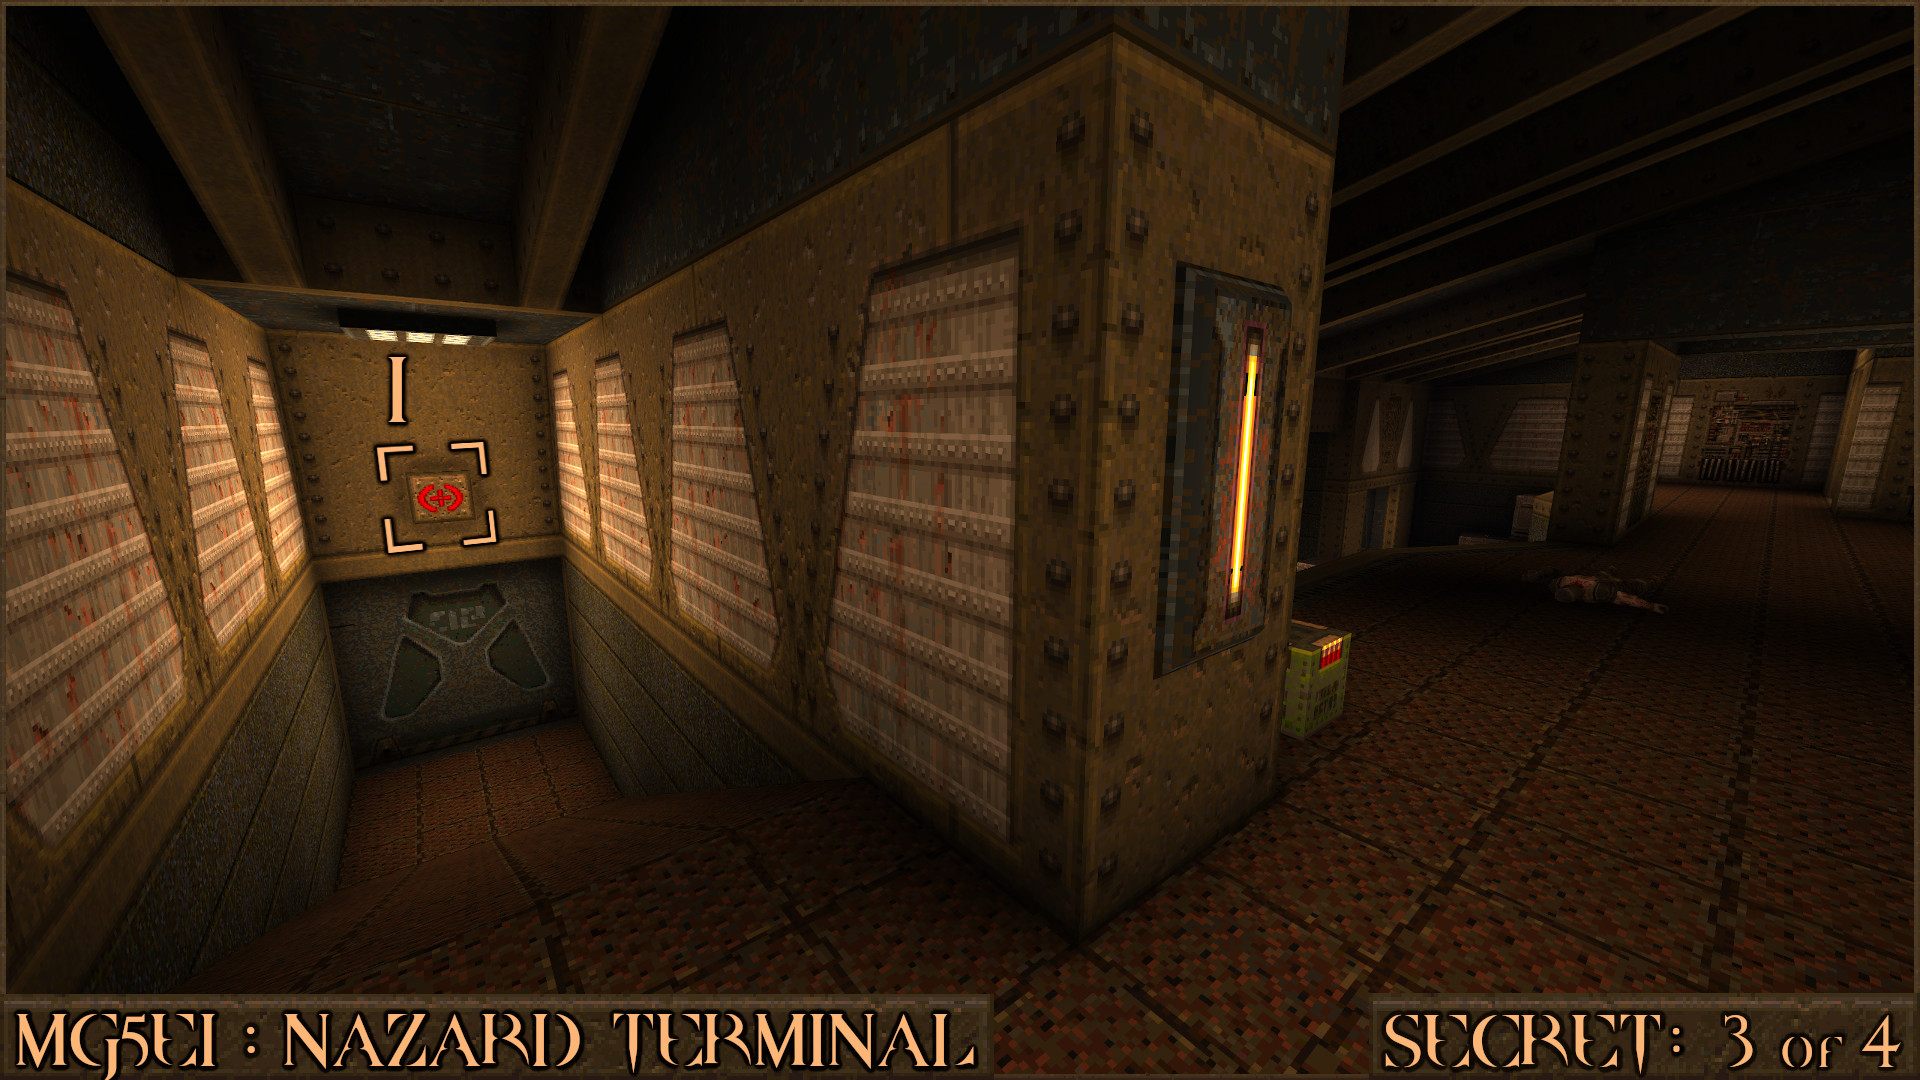
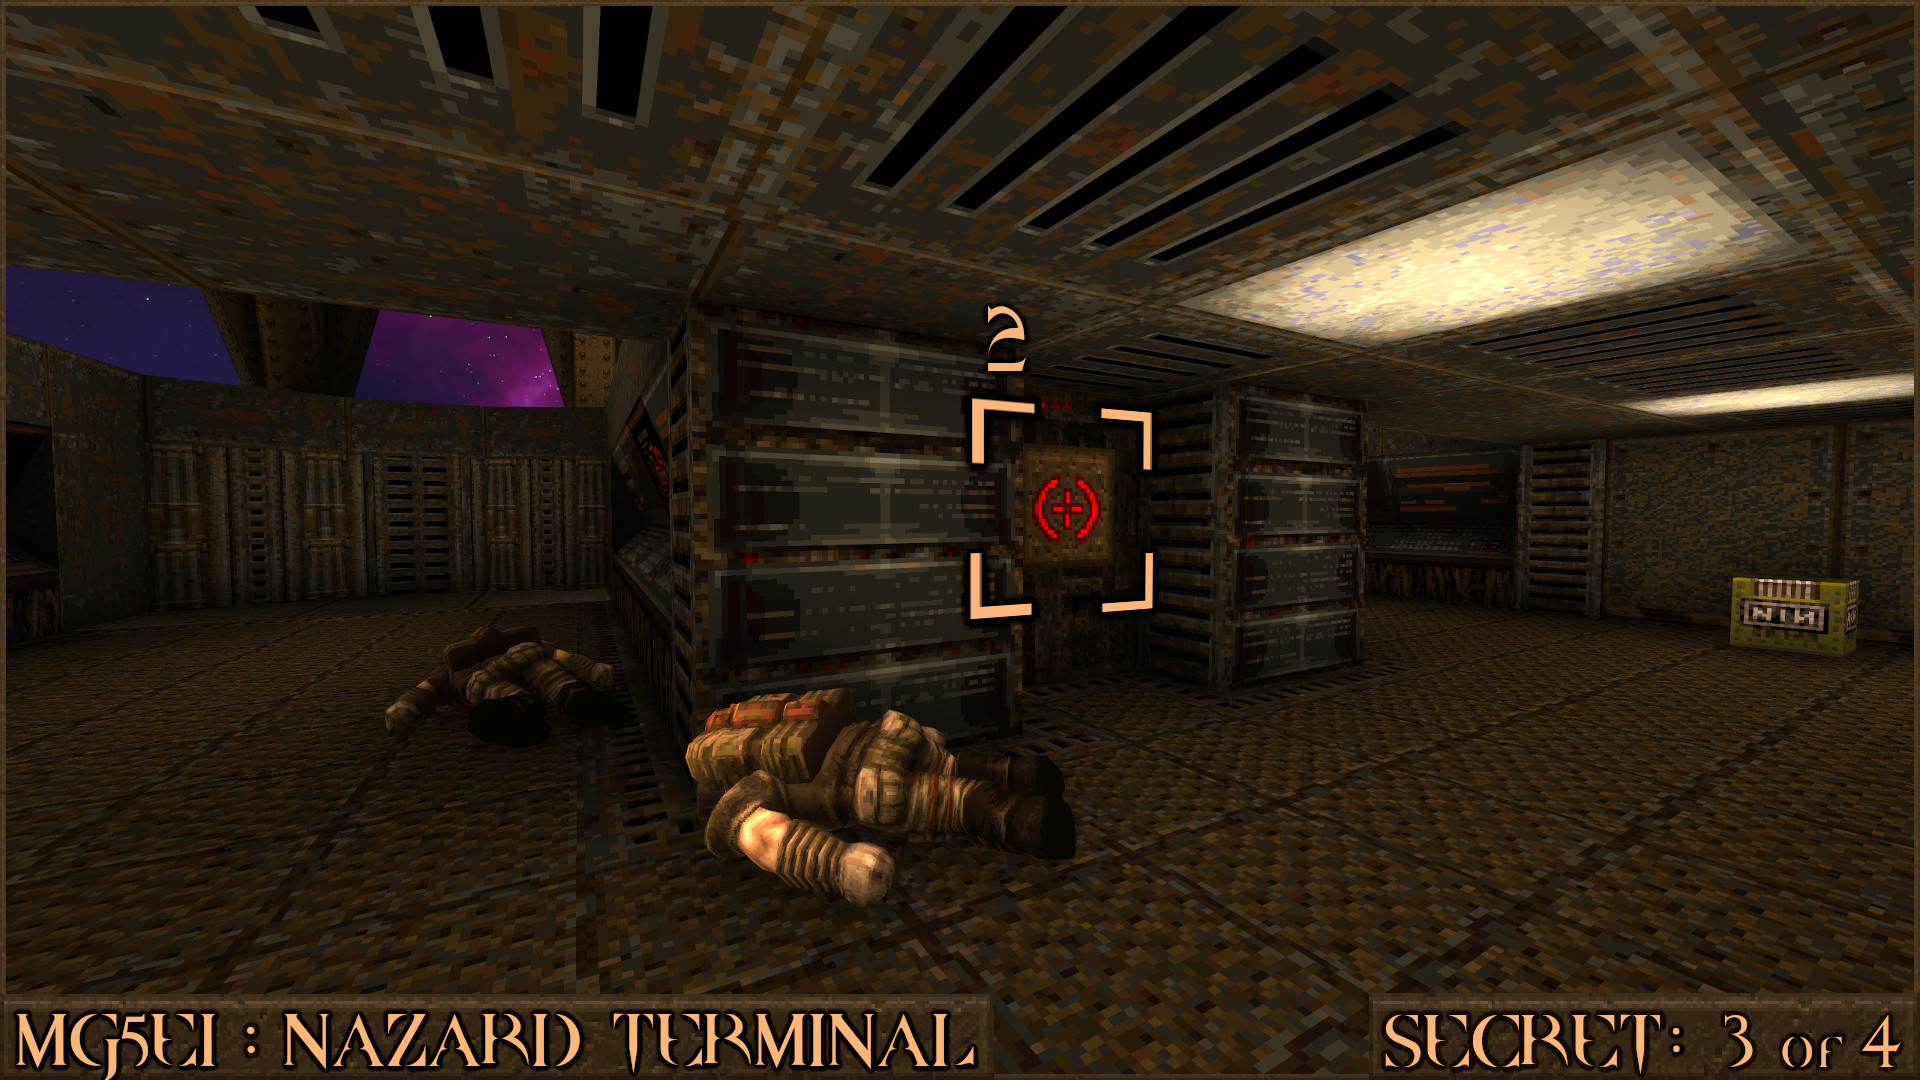
After heading through the door underneath the 1st switch you will be in a large security room. Drop down to the lower part of the floor to find the 2nd red target switch (
).
Head back up in to the room that contained the 1st switch and you will see a large forcefield door. Above this is the 3rd switch (
) that when activated will deactivate the forcefield () and allow access to the secret.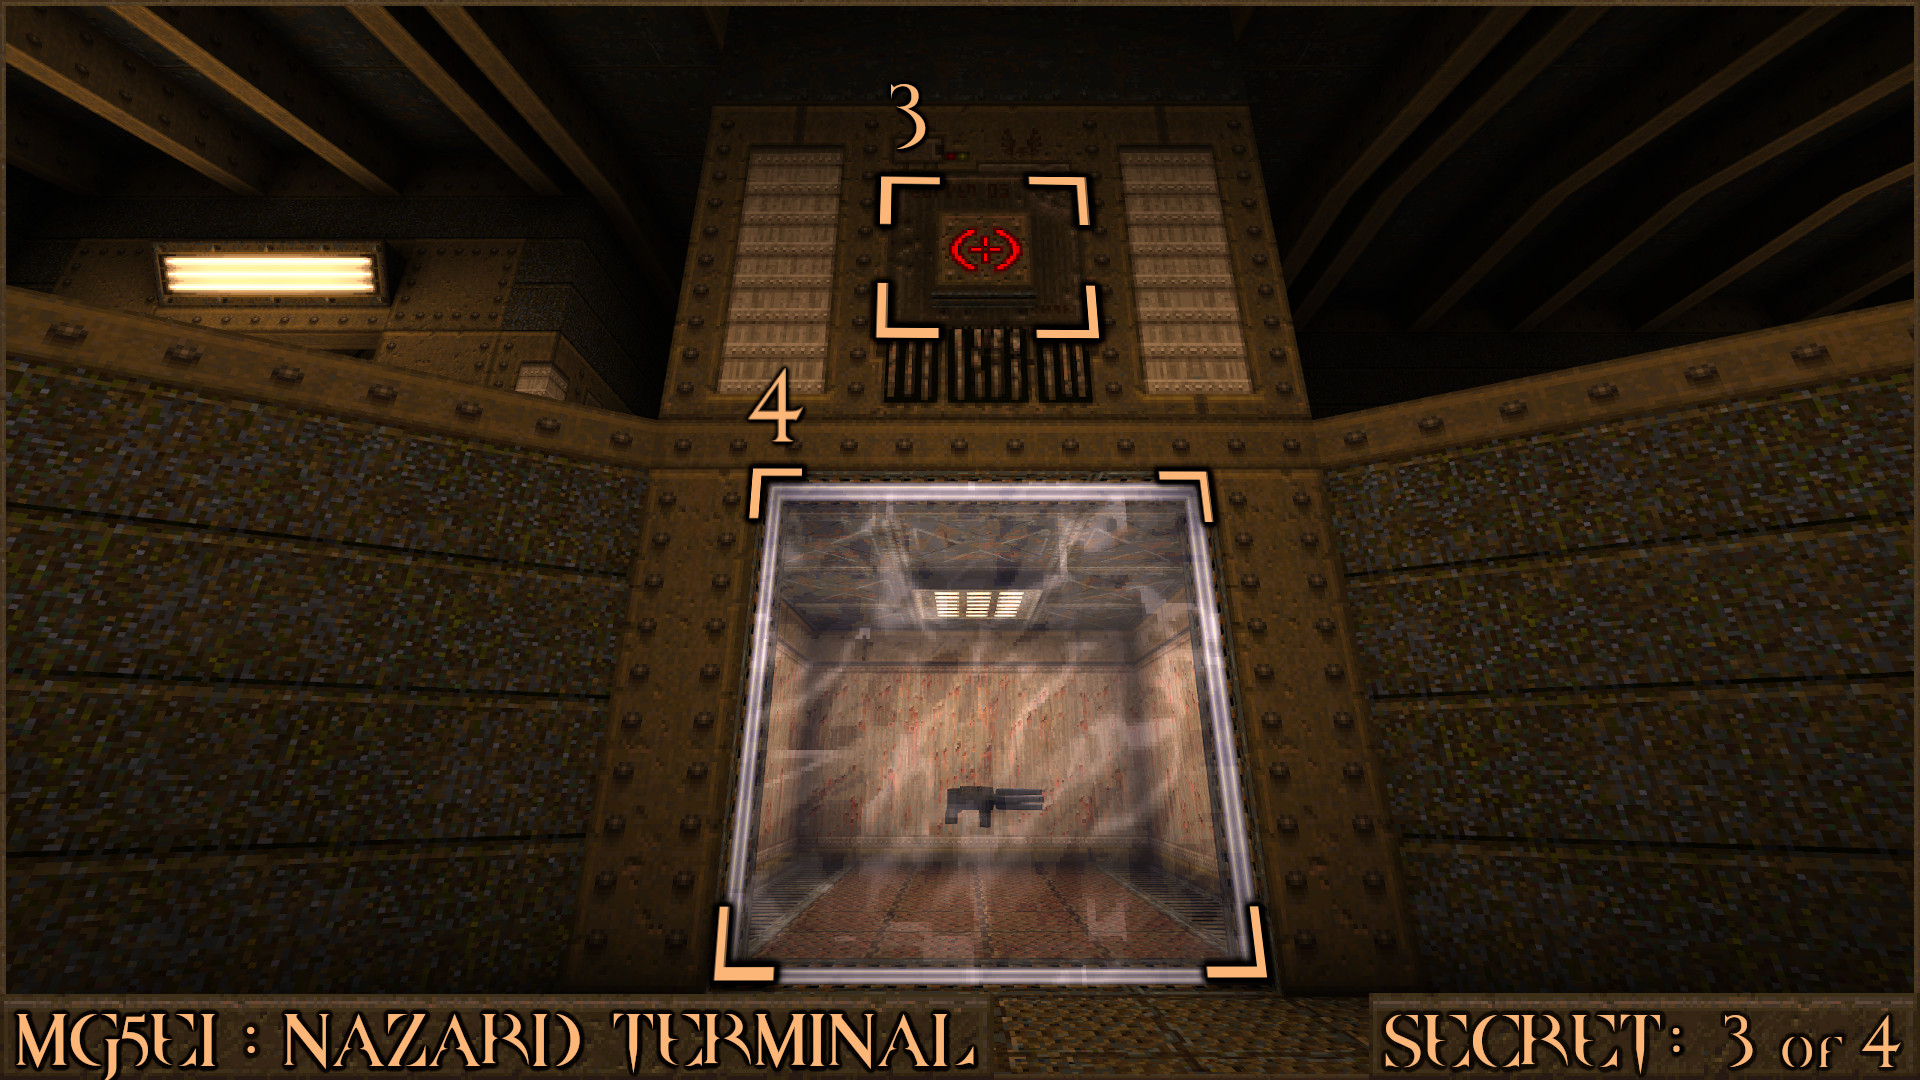
Reward:
Secret 4 of 4
In the final room of the level several red slipgates will explode, apart from the last one that will let you exit the level. Don't exit yet, turn around and look in the dark corner to see a suspicious panel. Shoot it to allow access to the secret and another slipgate. This slipgate will teleport you back to the start of the level so only use it if you missed something and need to return there.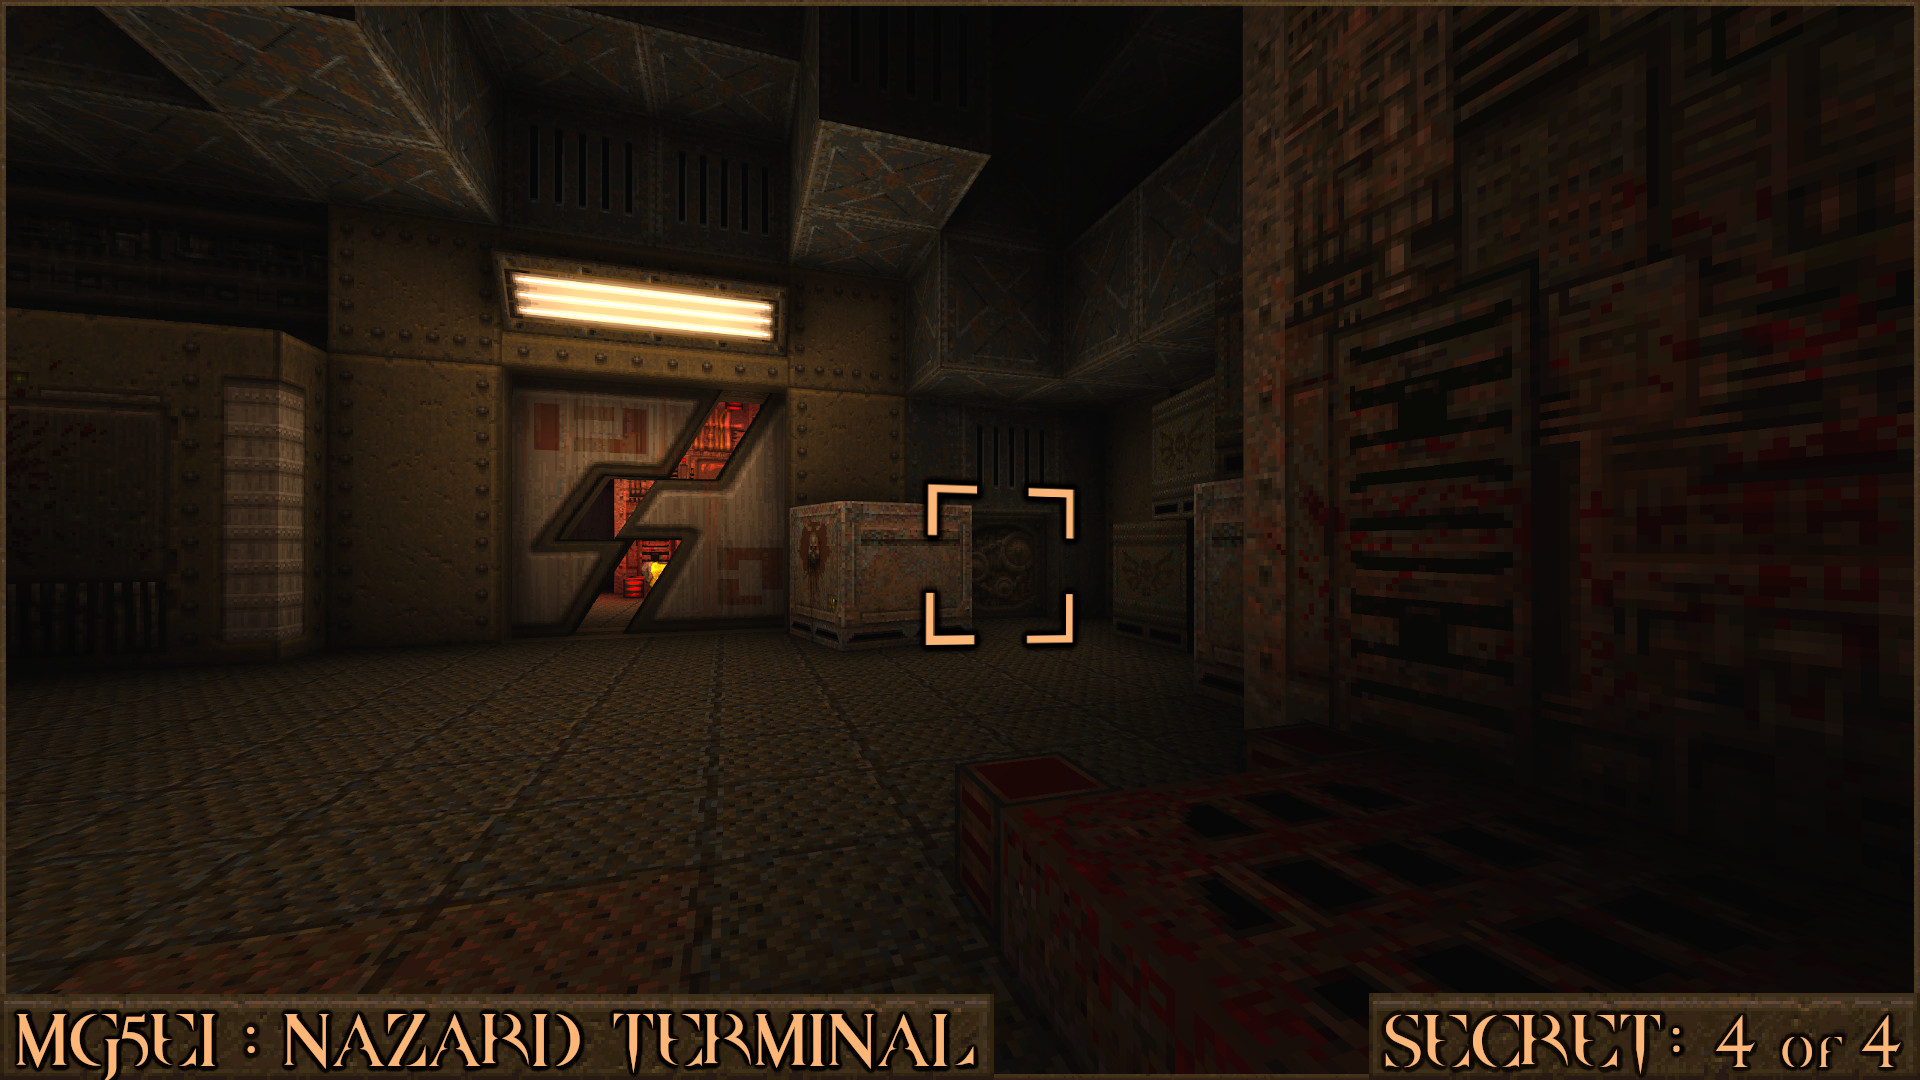
Reward:
MGE5M2: Too Deep, Too Greedy
Secret 1 of 7
At the start of the level enter the broken tower and go up some planks. Turn around and jump up some bricks on the side () then jump over to a platform nearby (). Go through this window () to drop down in to the secret.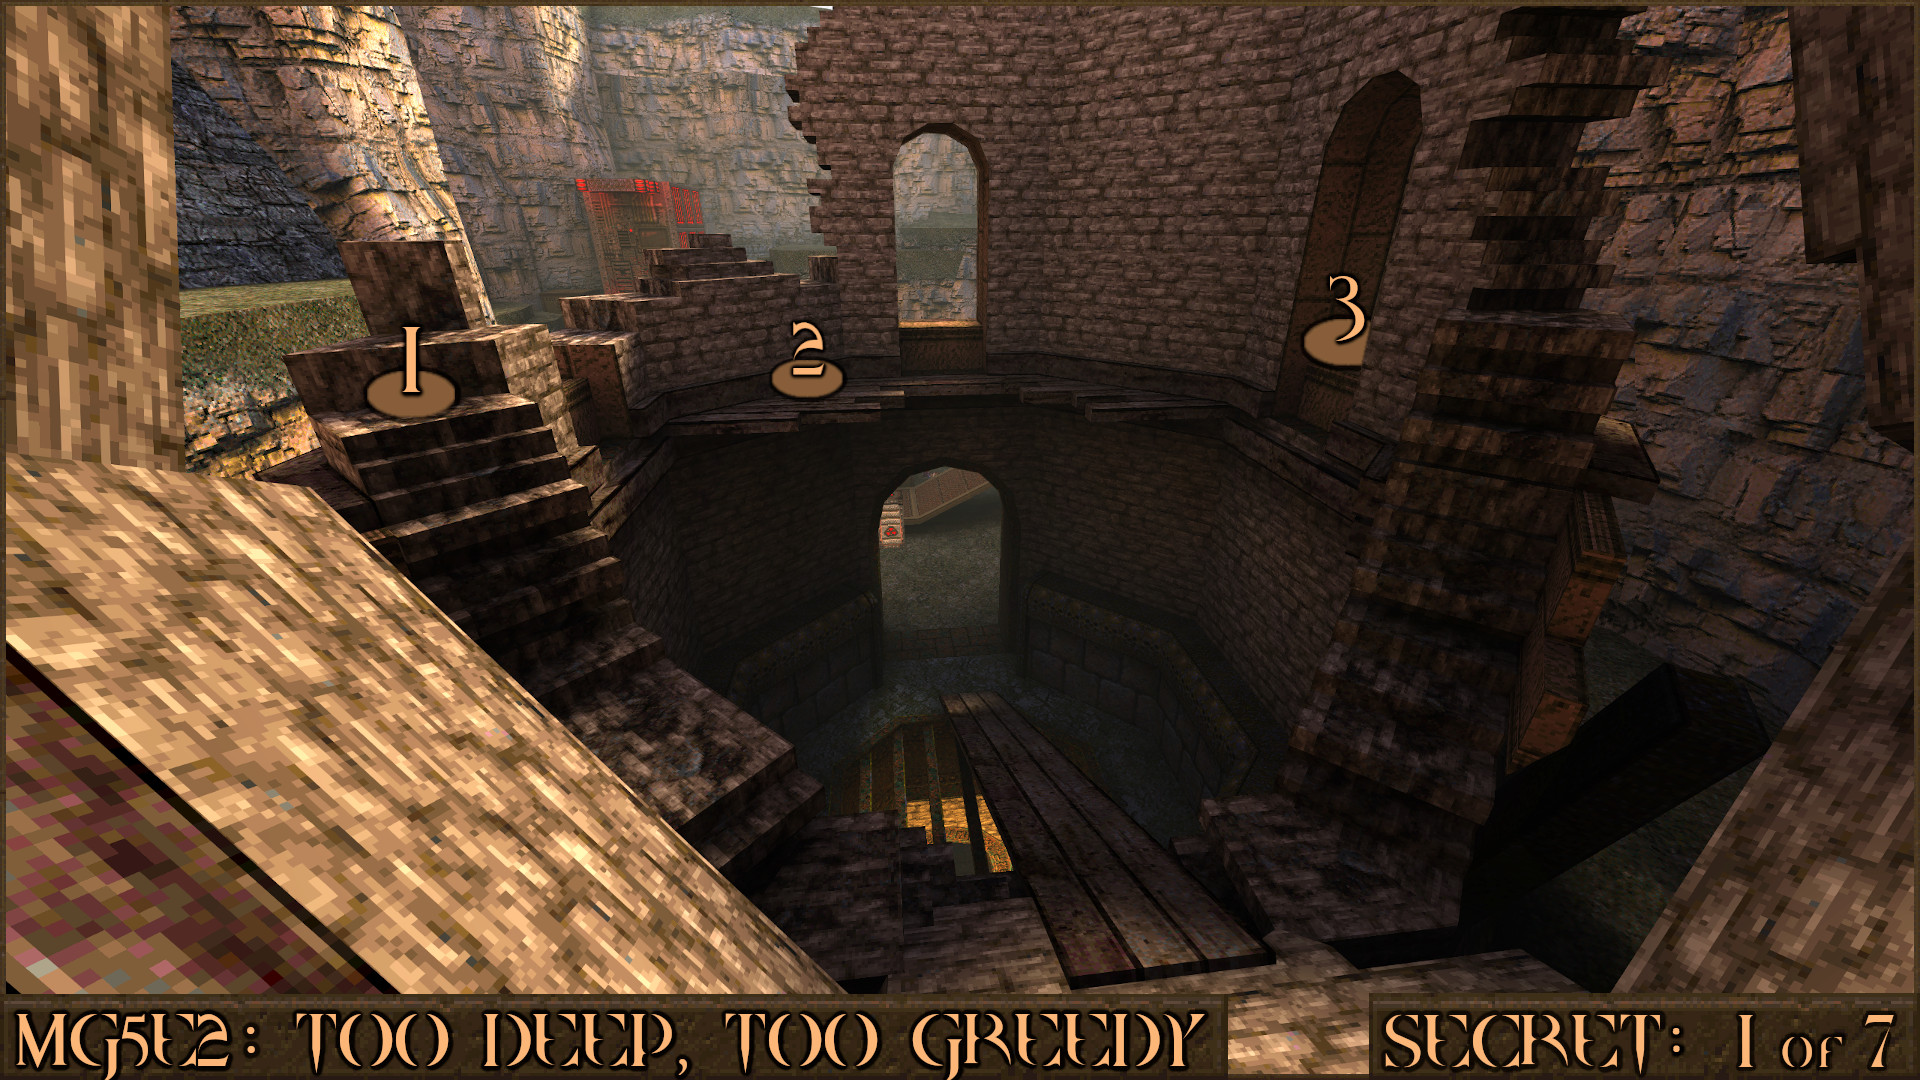
Reward:
Secret 2 of 7
Shortly after Secret 1 keep to the right as you go up this grassy ledge (). Make a jump up on to another ledge on the cliff () and then jump over to the wooden platform on the broken tower ().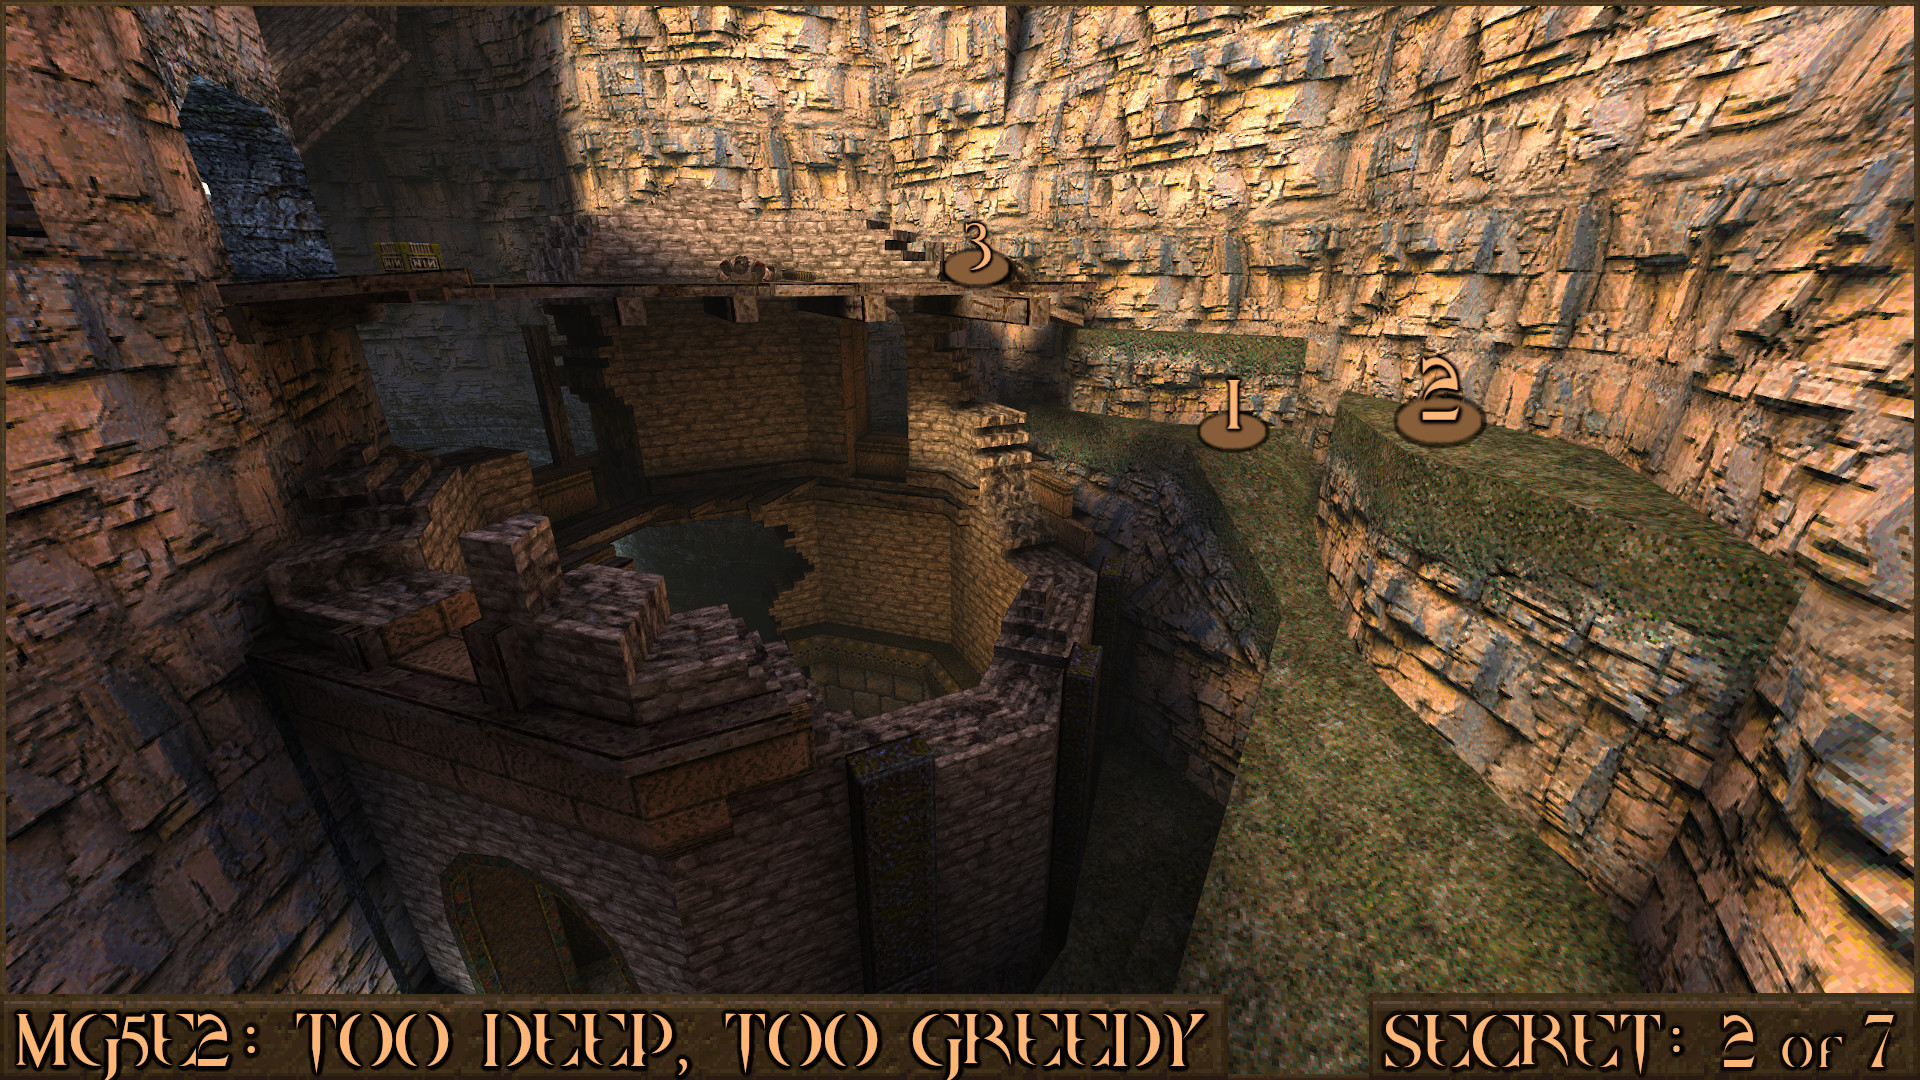
From this wooden platform make your way over to this piece of the tower (
) and then go around the wall to find the secret.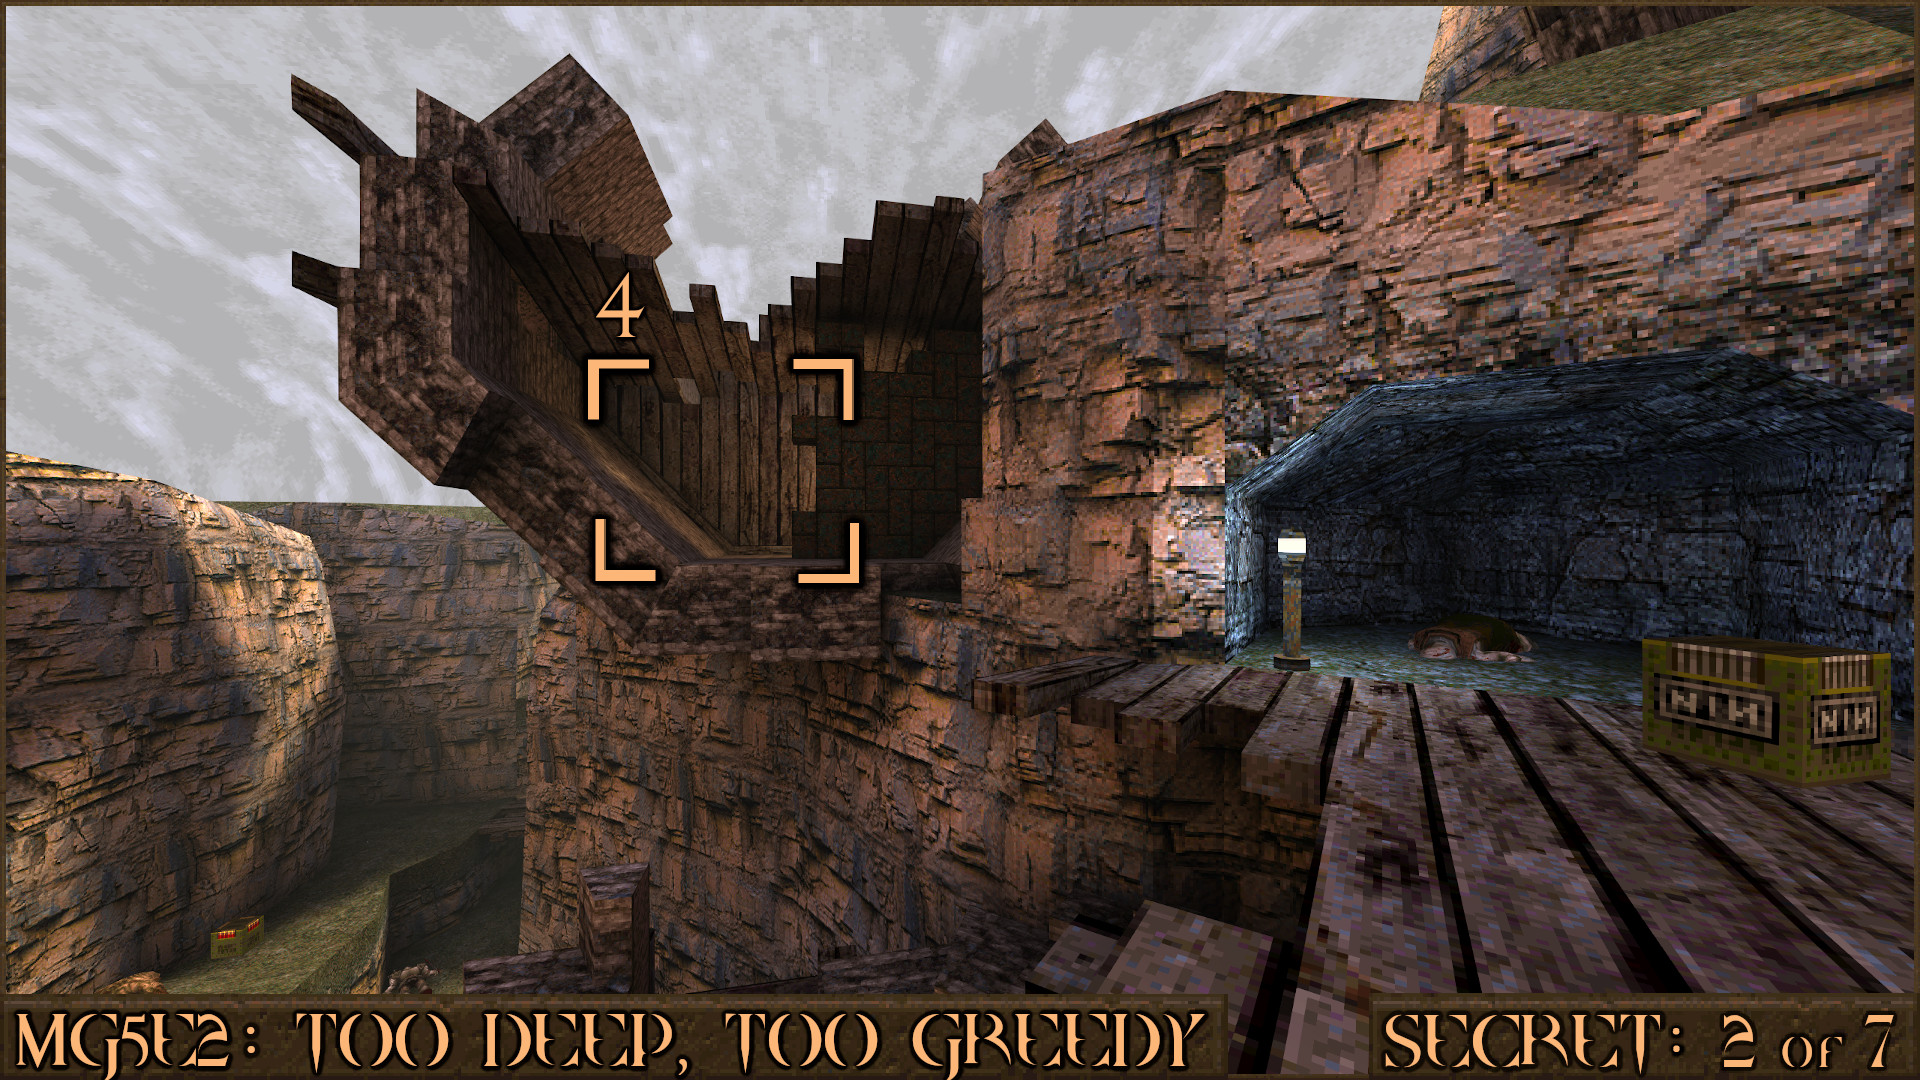
Reward:
Secret 3 of 7
In front of the large facility you will see a large piece of rubble in the middle of the area. Head down to the right of this to pass through a small cave entrance which has some leaves in front of it to find the secret.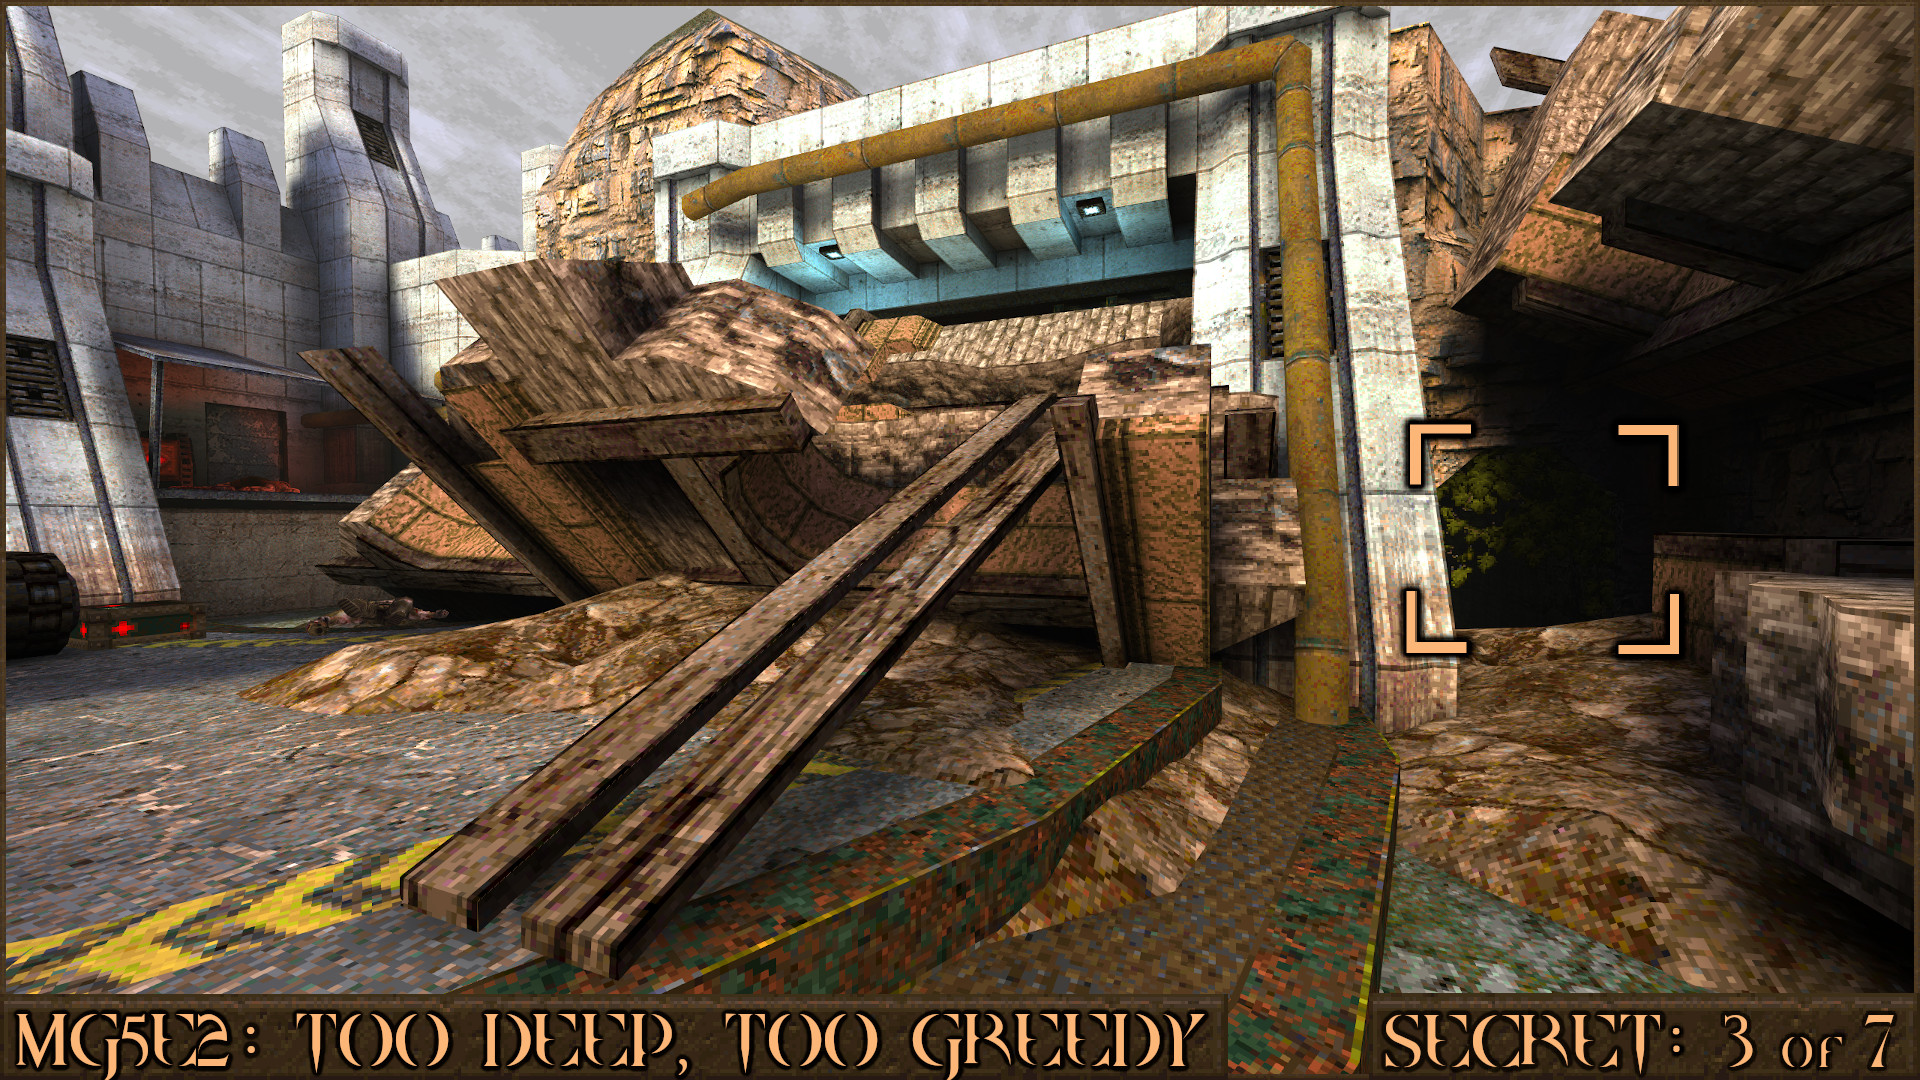
Reward:
Secret 4 of 7
As you enter the large facility you will see many enemies and some explosive boxes. Resist the temptation to shoot the boxes as you can jump on them () to reach this secret Yellow Armor (). Don't worry if you accidentally destroy the boxes, later on in the level you will visit the upper part of this room and can simply jump down to the Yellow Armor.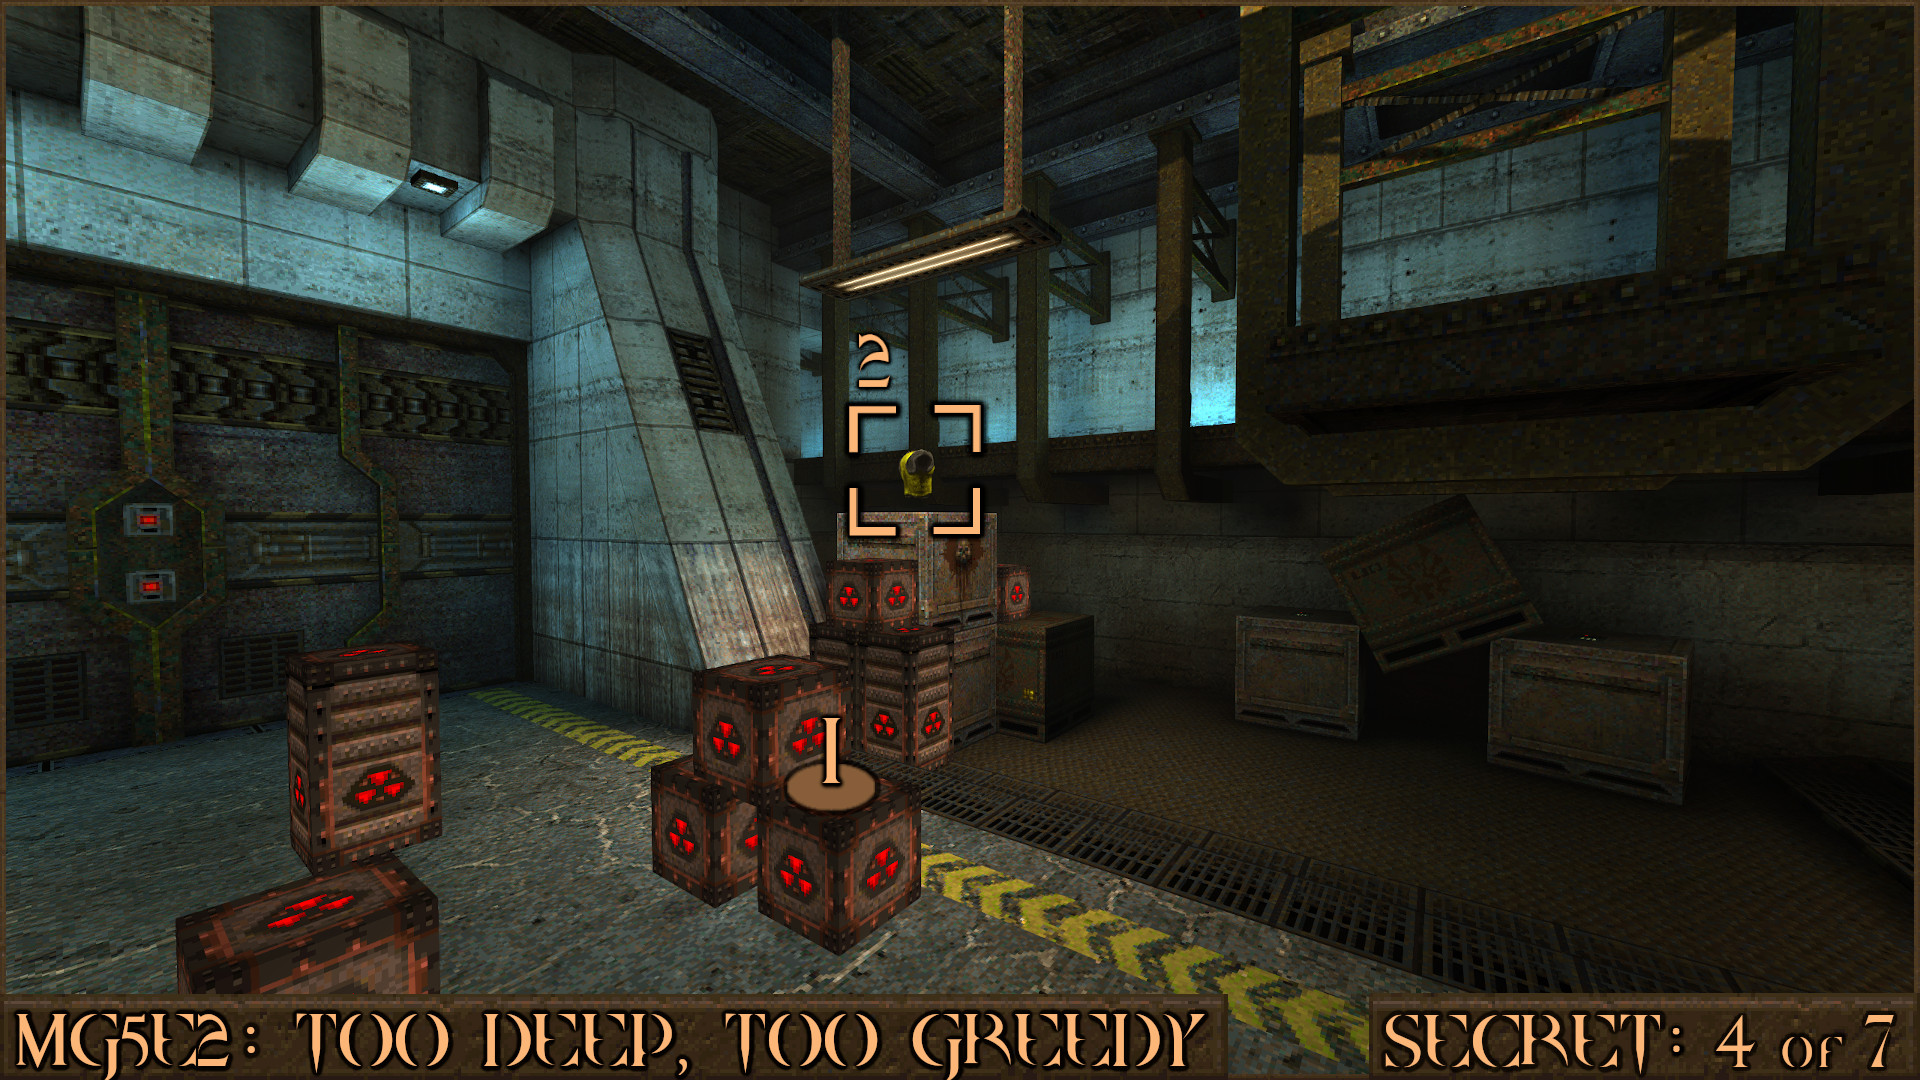
Reward:
Secret 5 of 7
After taking an elevator up look for some text on a wall that says "THE MEAT LOCKER". Jump over the nearby counter and look behind it to see a red diamond button (). Push it to open the door to the meat locker () which contains the secret.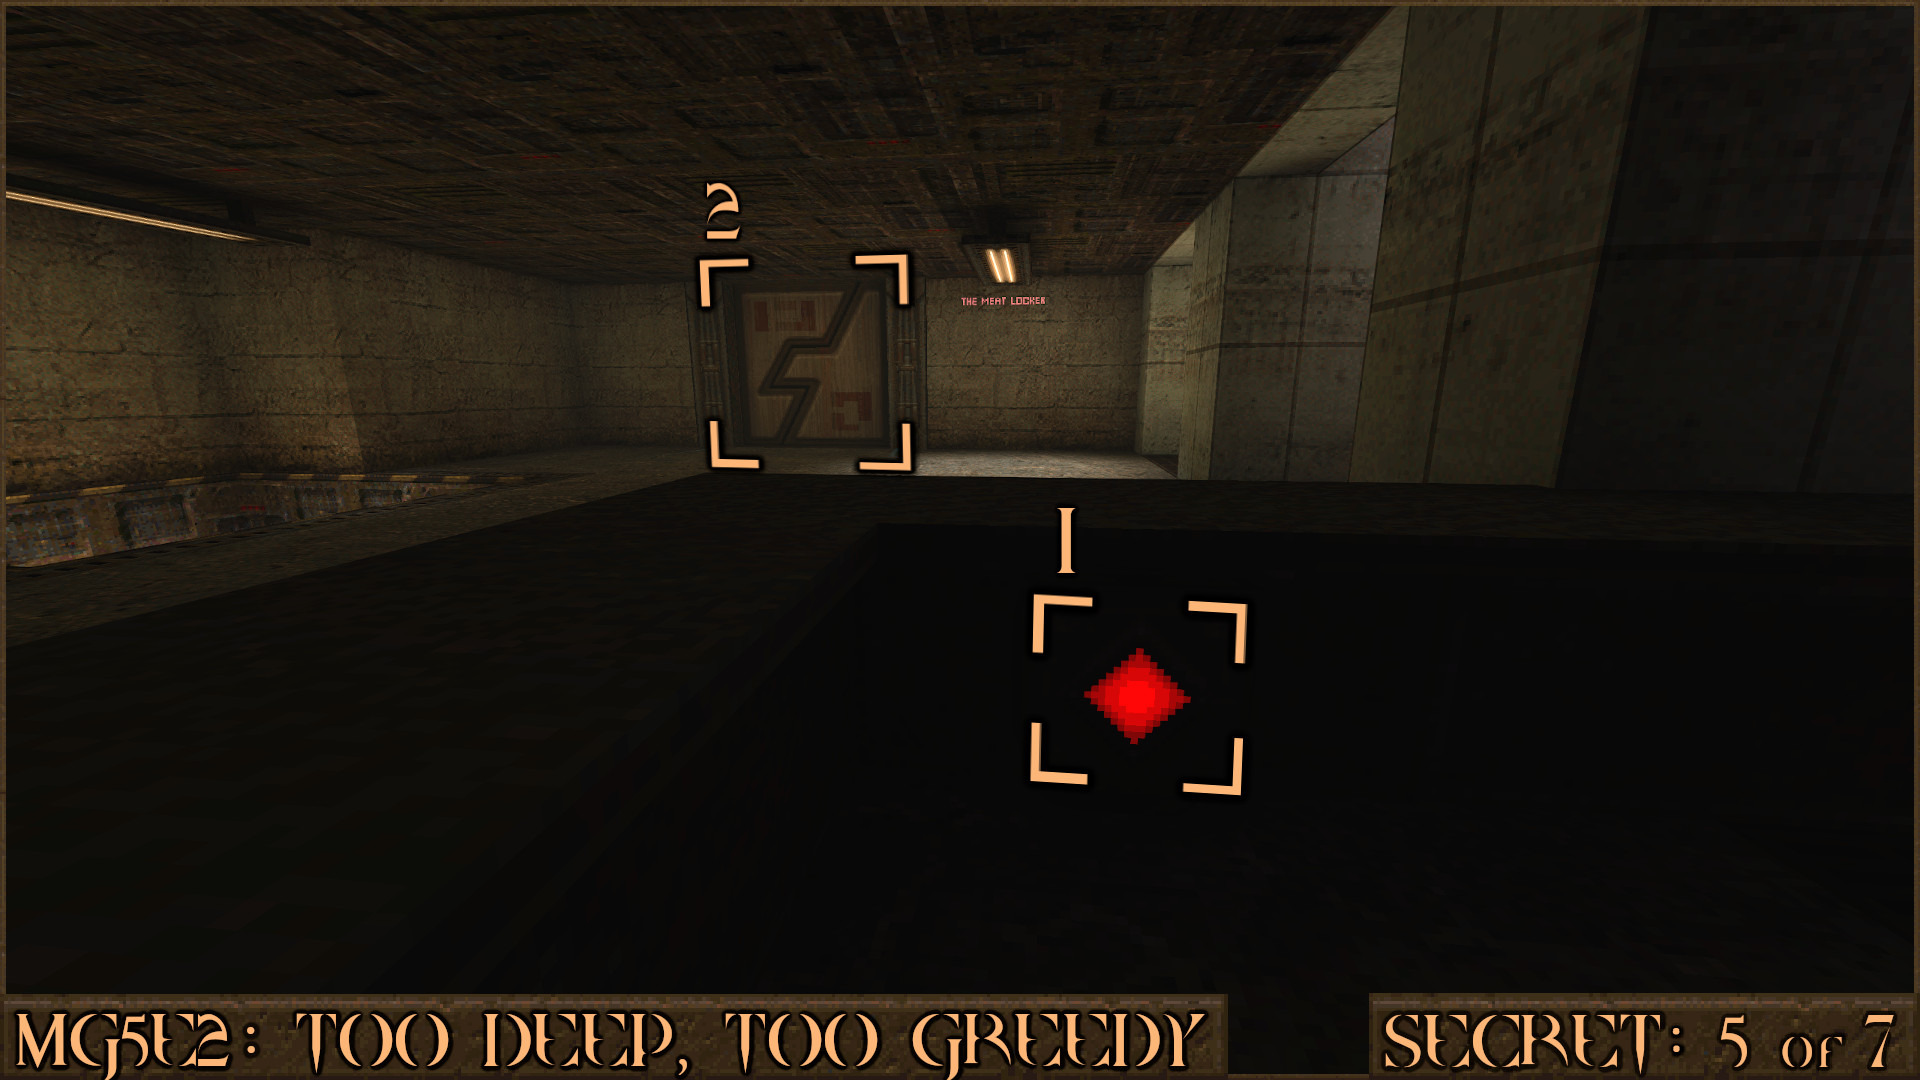
Reward:
Secret 6 of 7
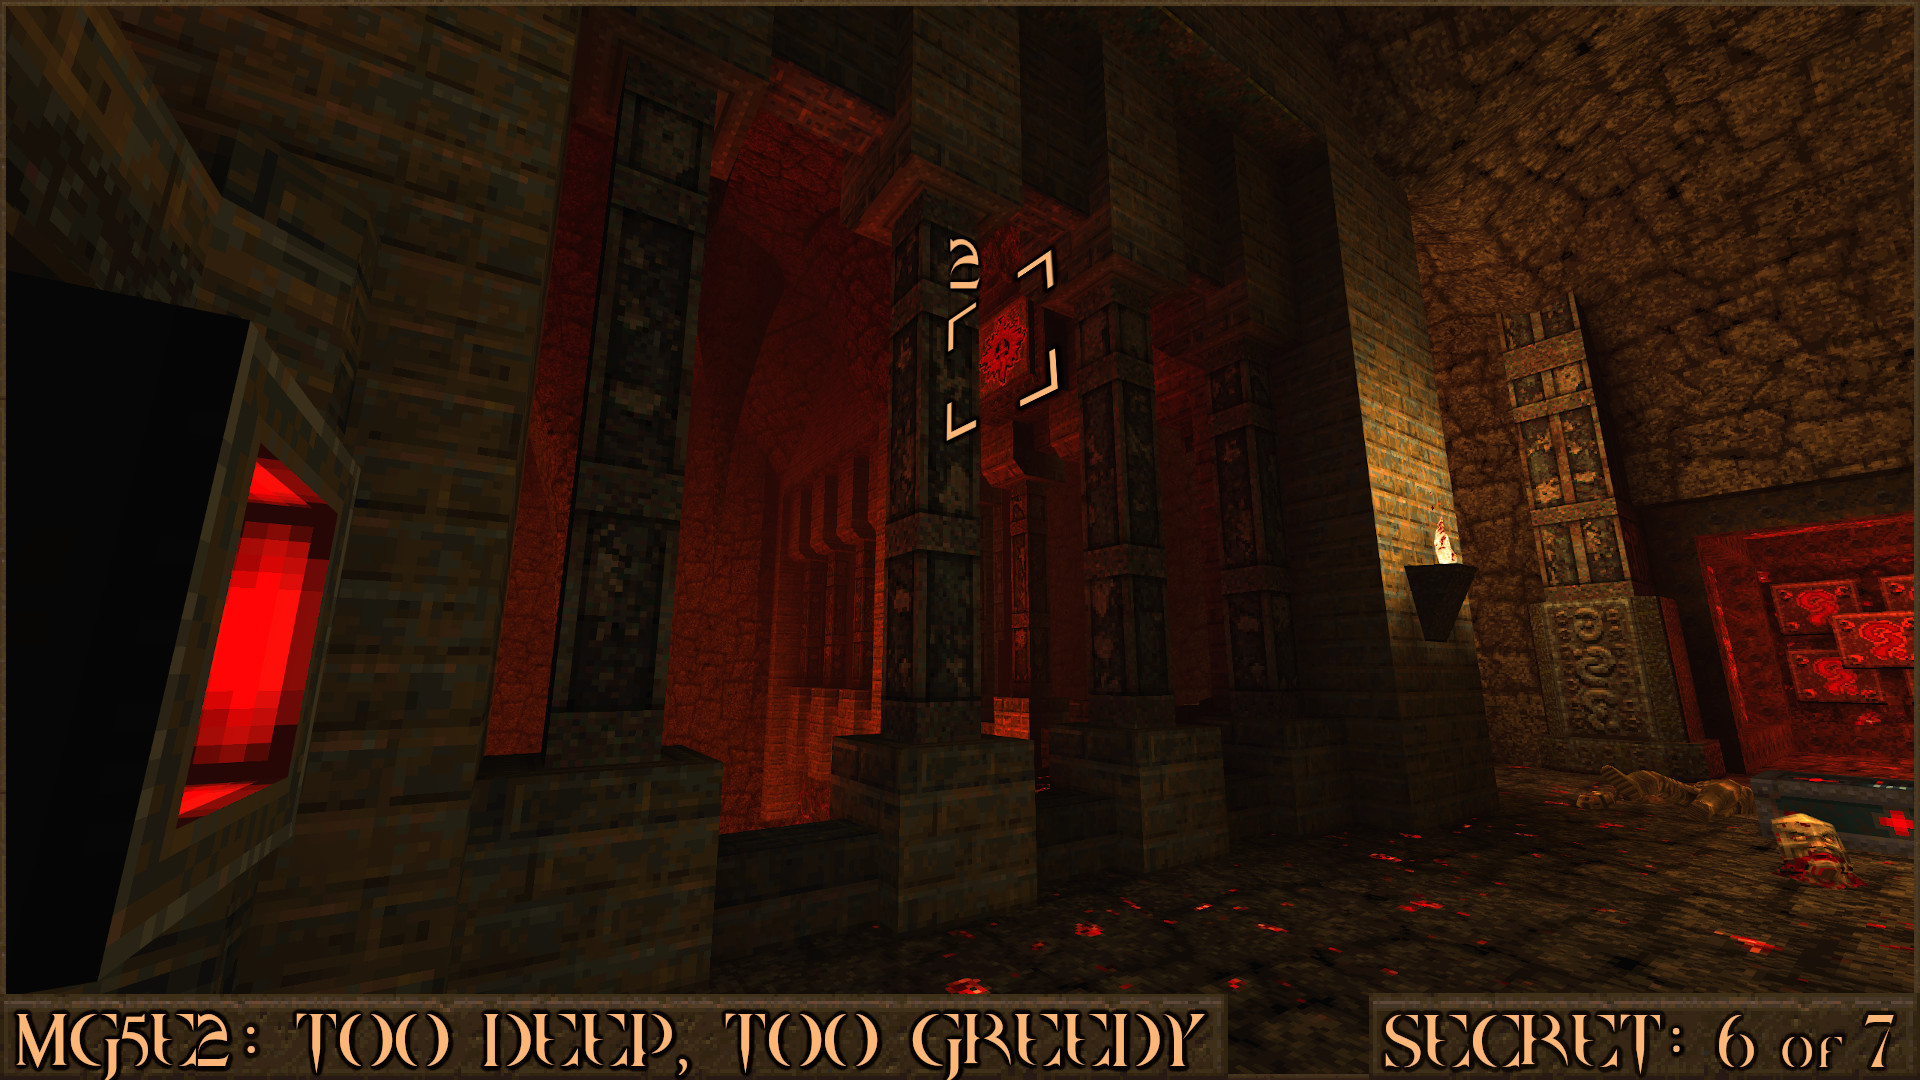
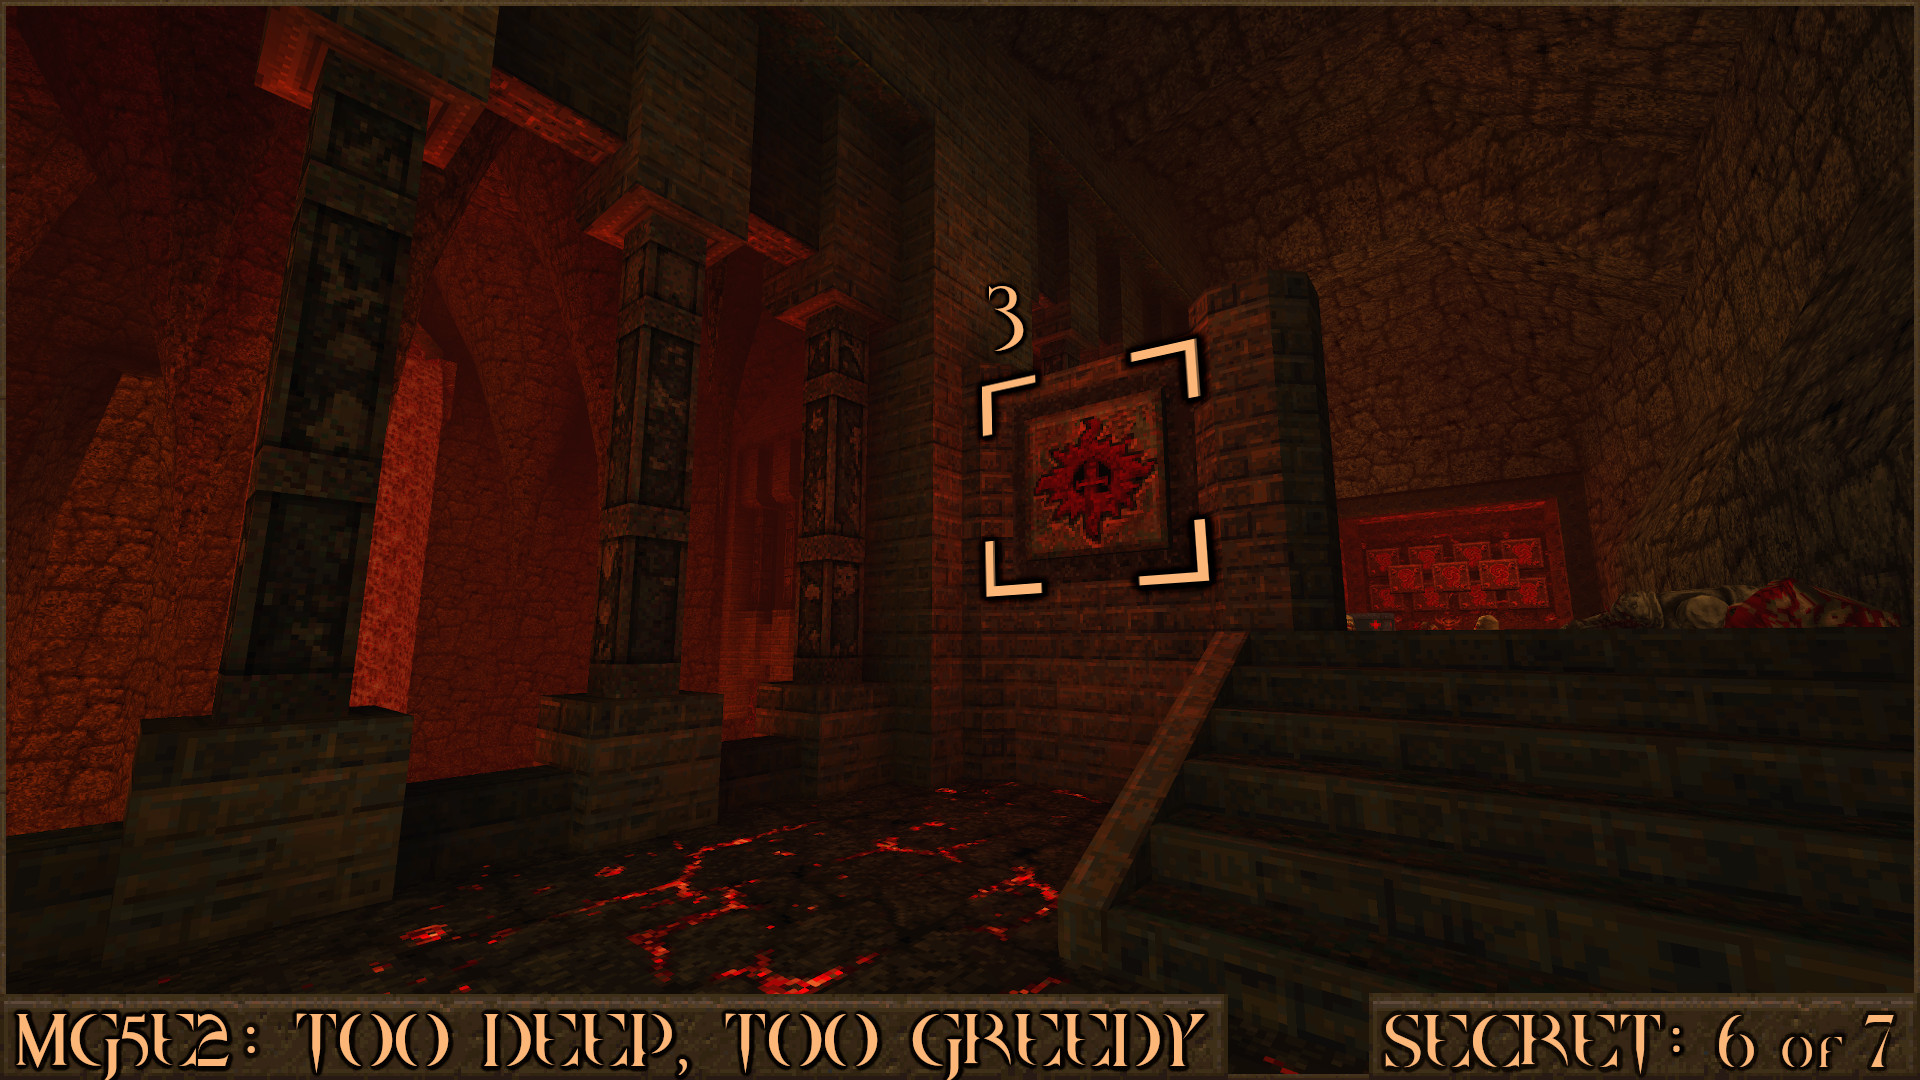
Later in the level you will enter a large lava cavern. Around this cavern are six red shootable switches that all need to be shot to reveal the secret. The first switch can be seen behind the lava waterfall ().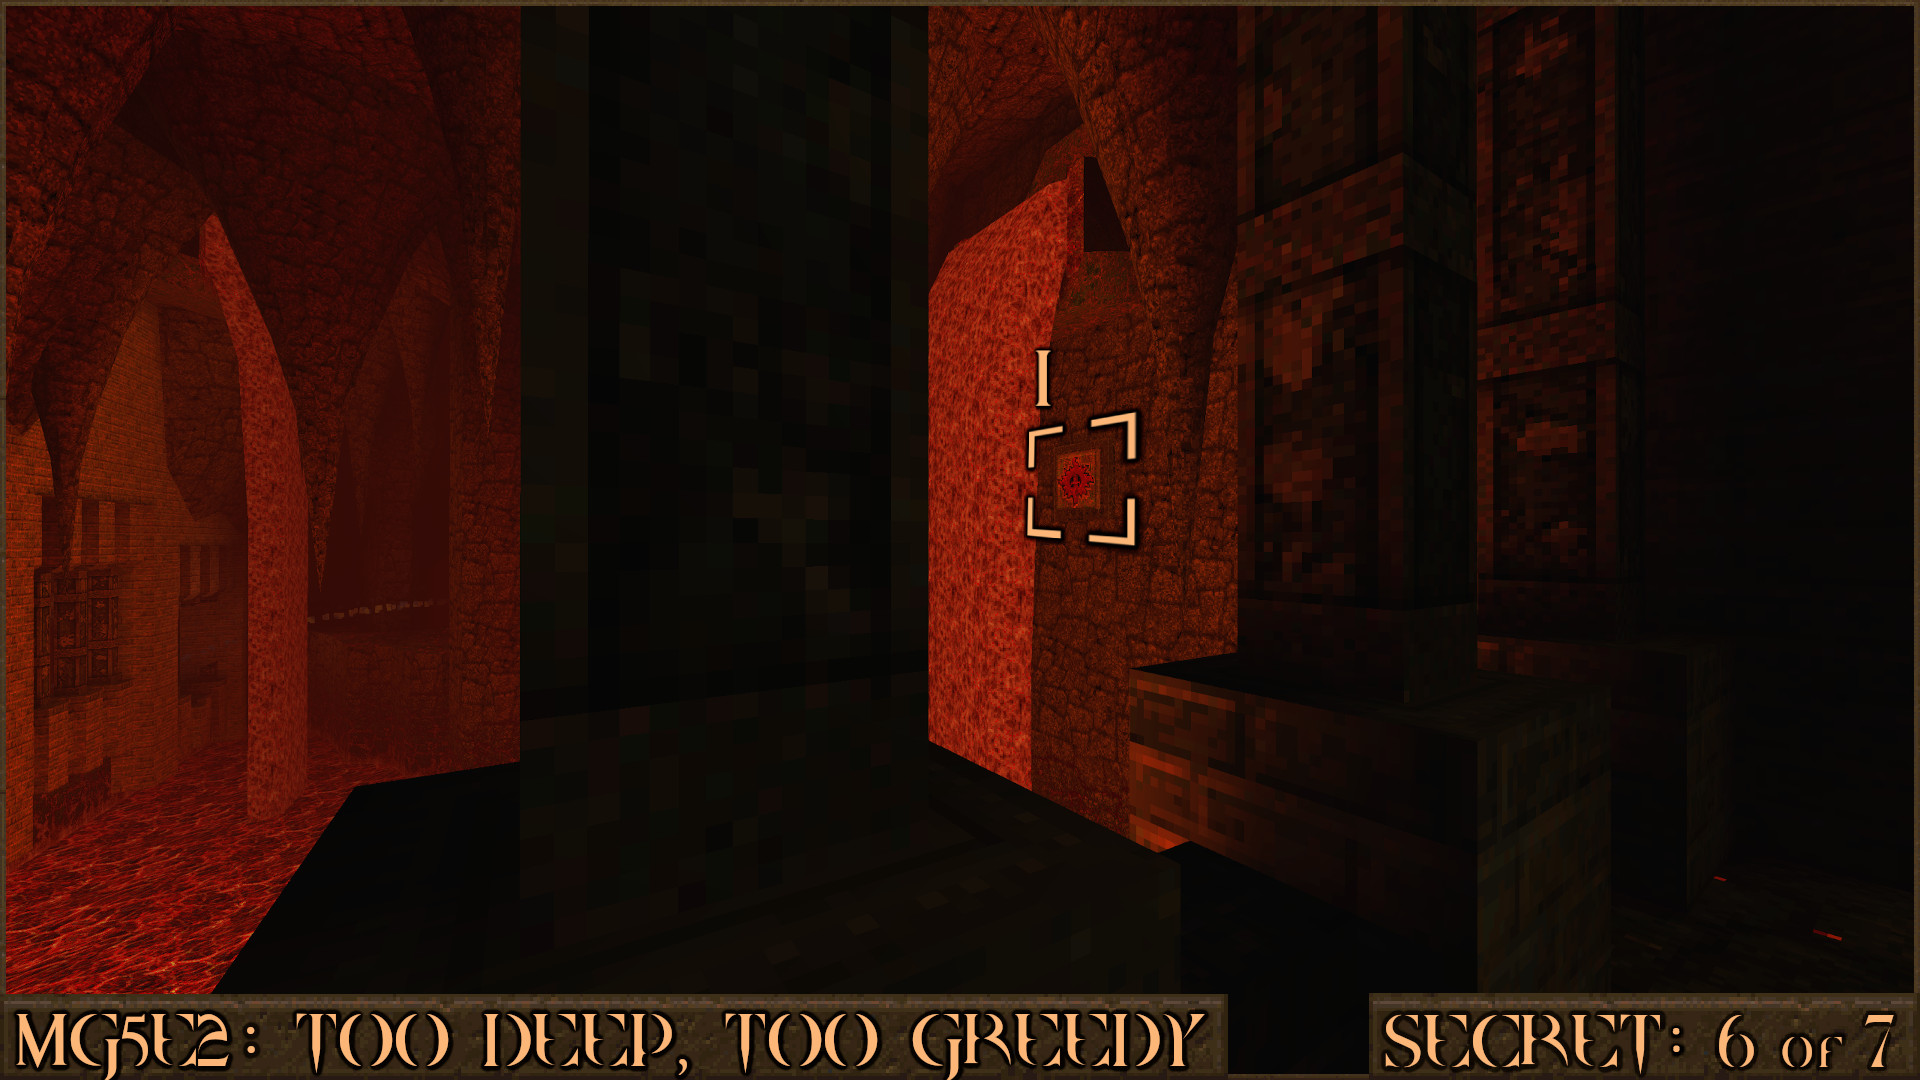
As you turn the corner several fireball traps will start shooting at you. Look through the bars near the first fireball trap to see this switch high up on the wall (
).
Behind the same fireball trap you can find another switch (
).
After walking past the Gold Key Door you will come across another set of fireball traps. Look behind the first fireball trap here to find another switch (
). Then look up to see another switch above it ().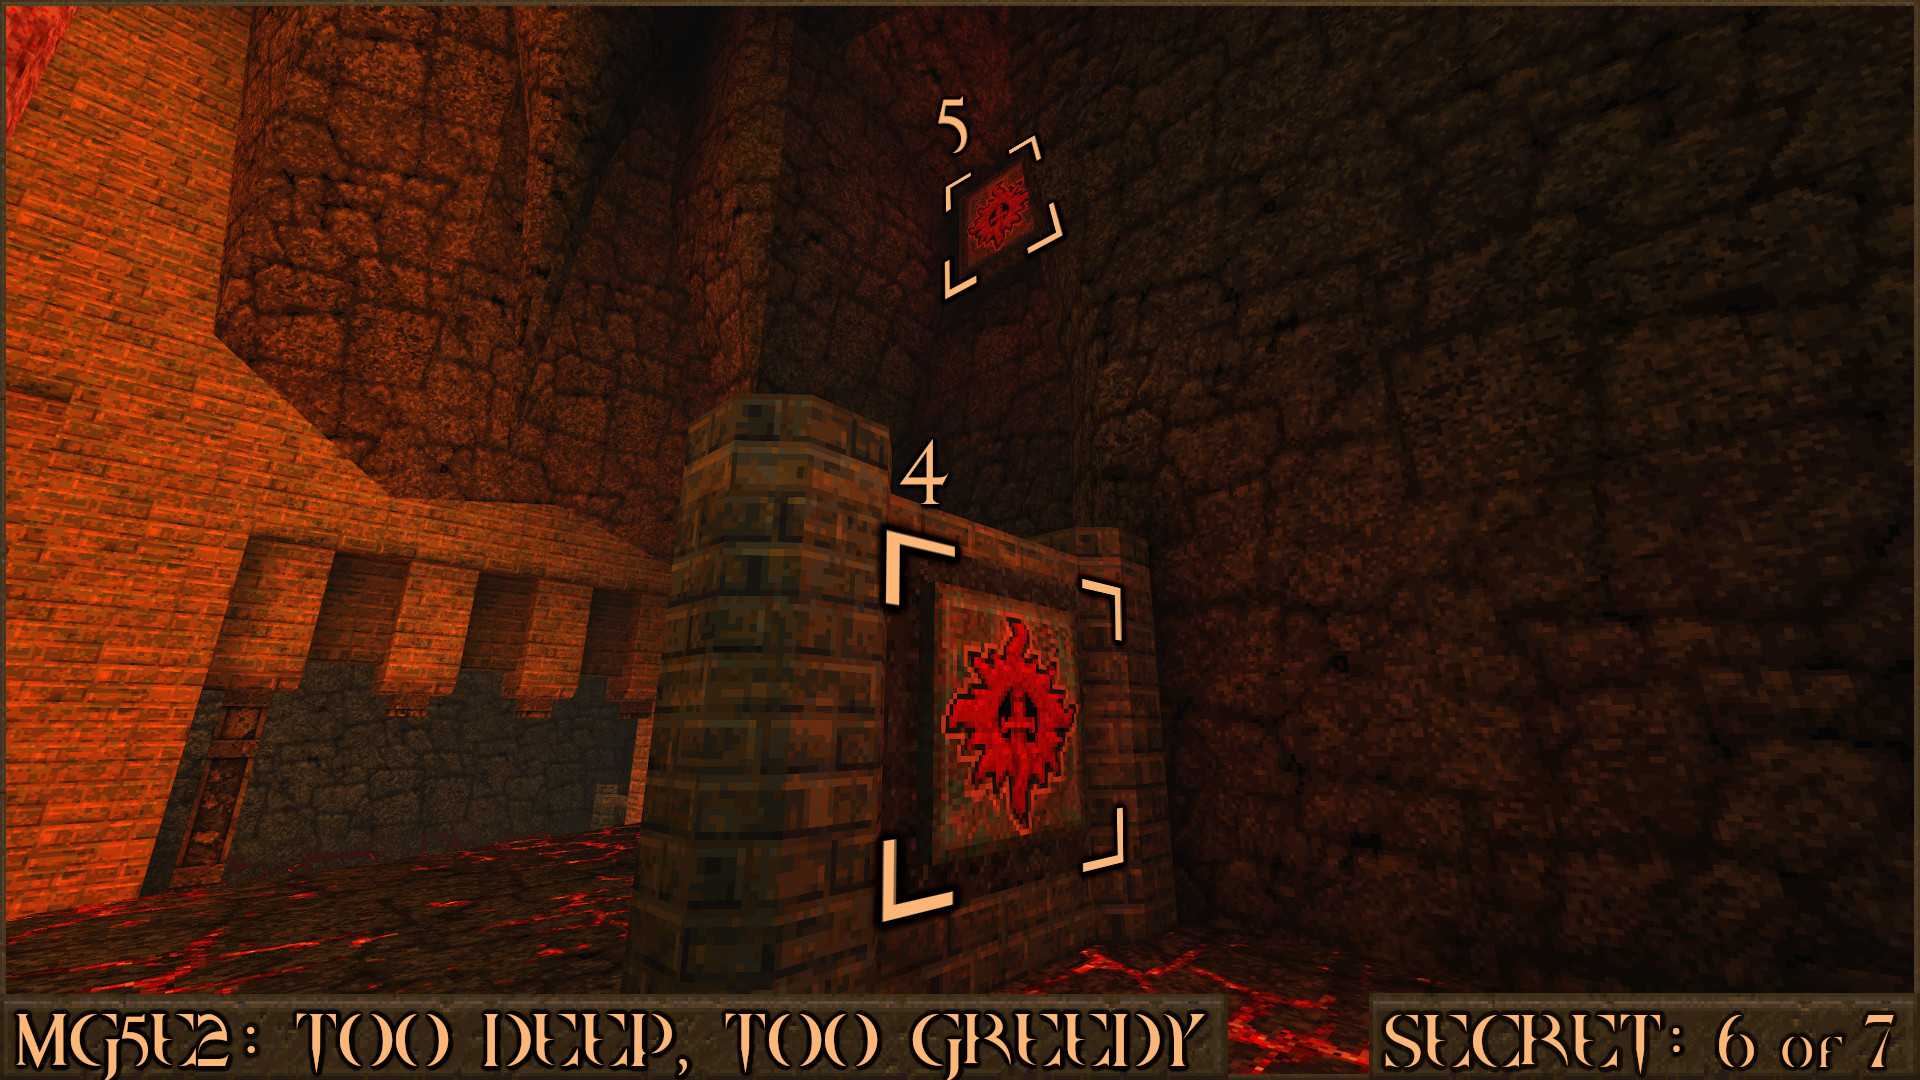
The final switch is easy to find (
) as it is right next to the Gold Key. If you have shot all the switches then several lava platforms will rise up near the Gold Key and you will discover the secret.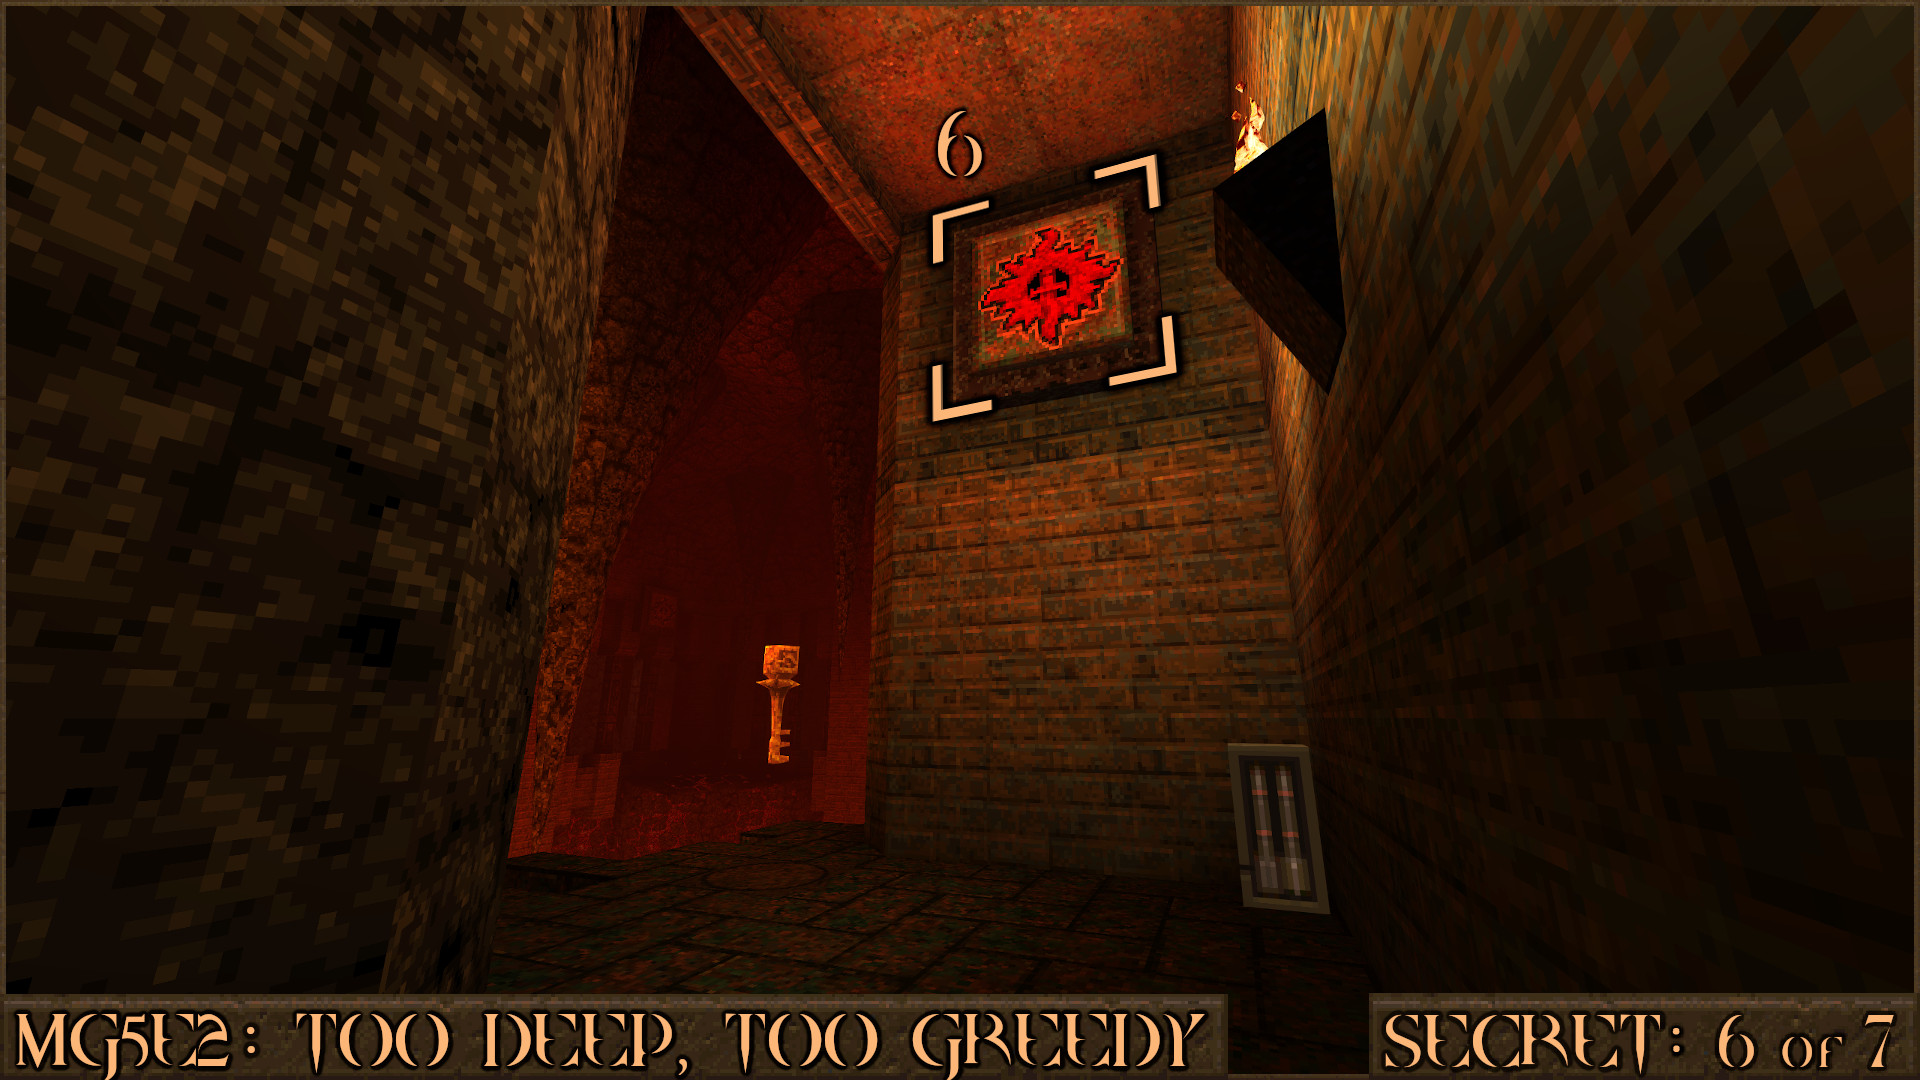
Reward:
Secret 7 of 7
Near the end of the level you will enter a room shrouded in darkness and will pick up the Rune for this episode. Shortly after this you will have to jump between two circular lifts that float up and down. Use them to jump up to this platform ().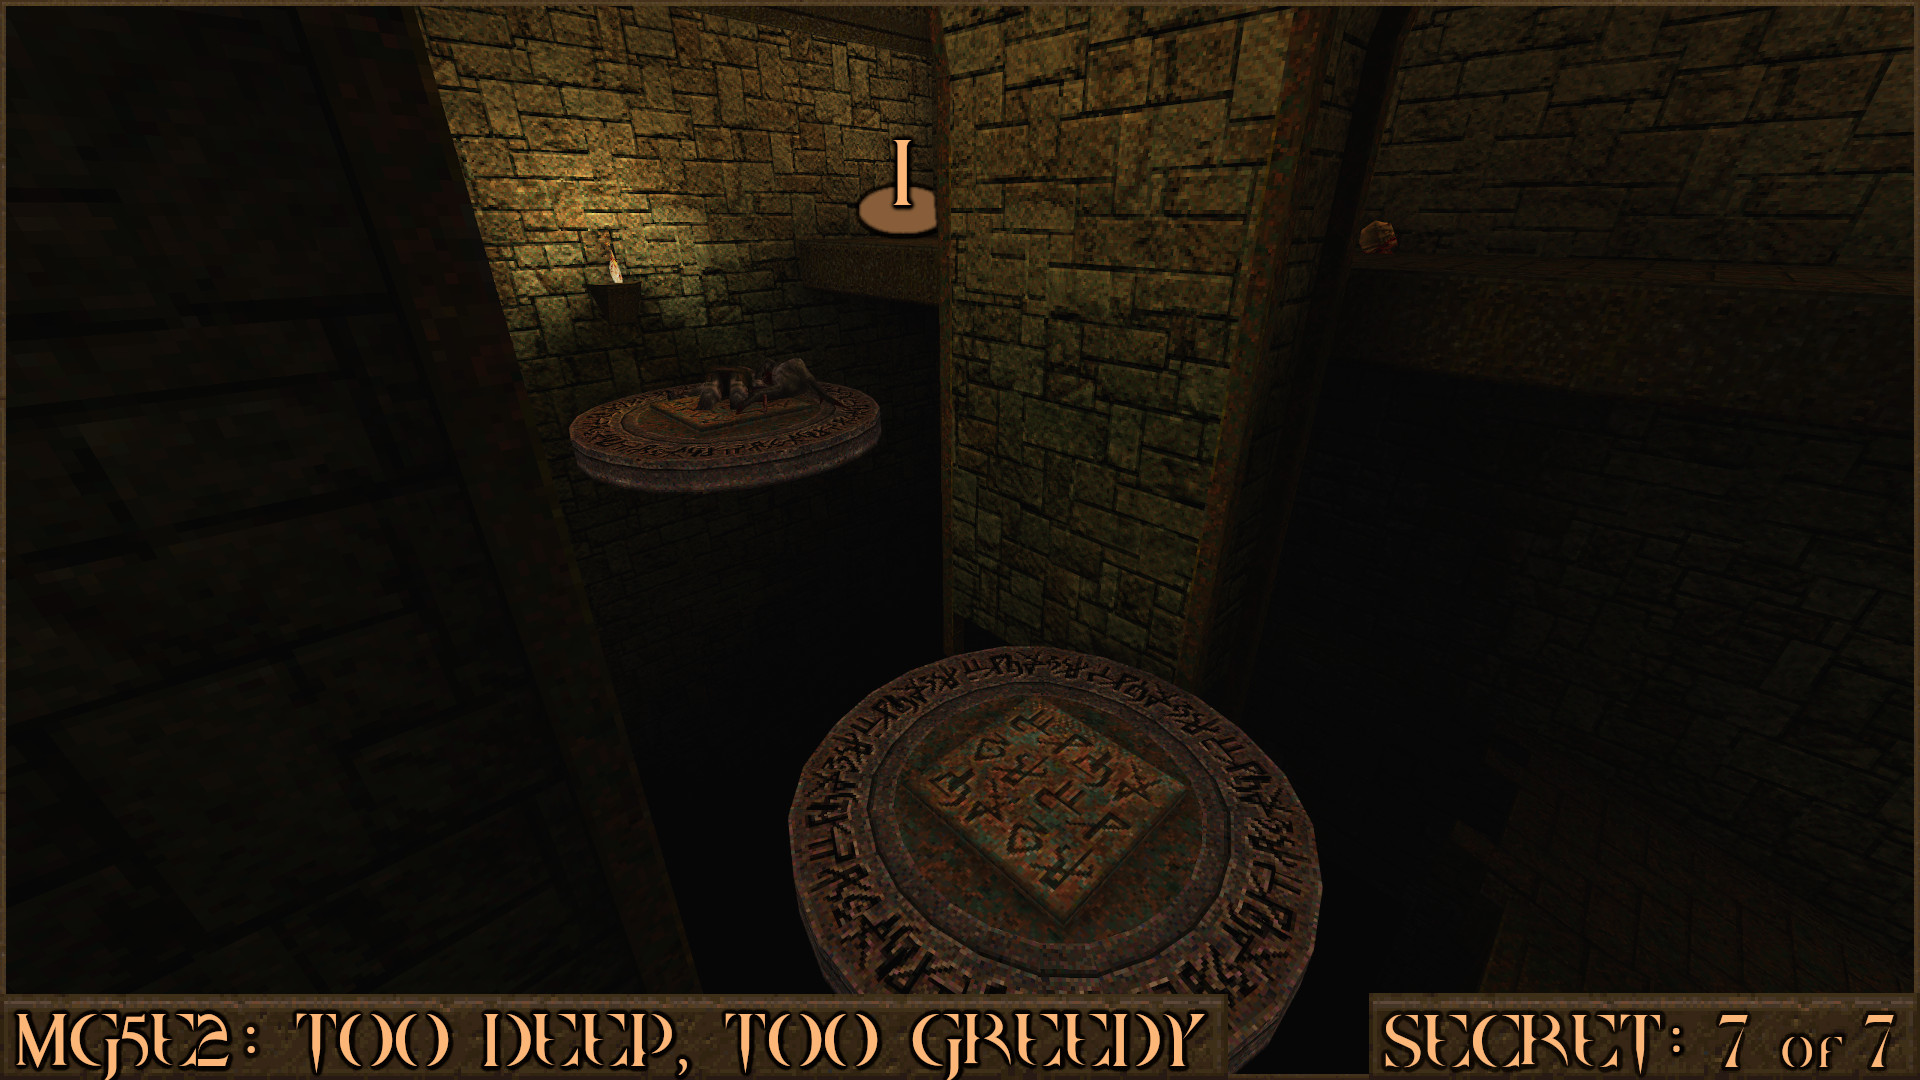
Continue forward and look to your right to see a Red Armor through a window in a tower (
). Make a running jump towards it and you should land in to the tower and claim the secret.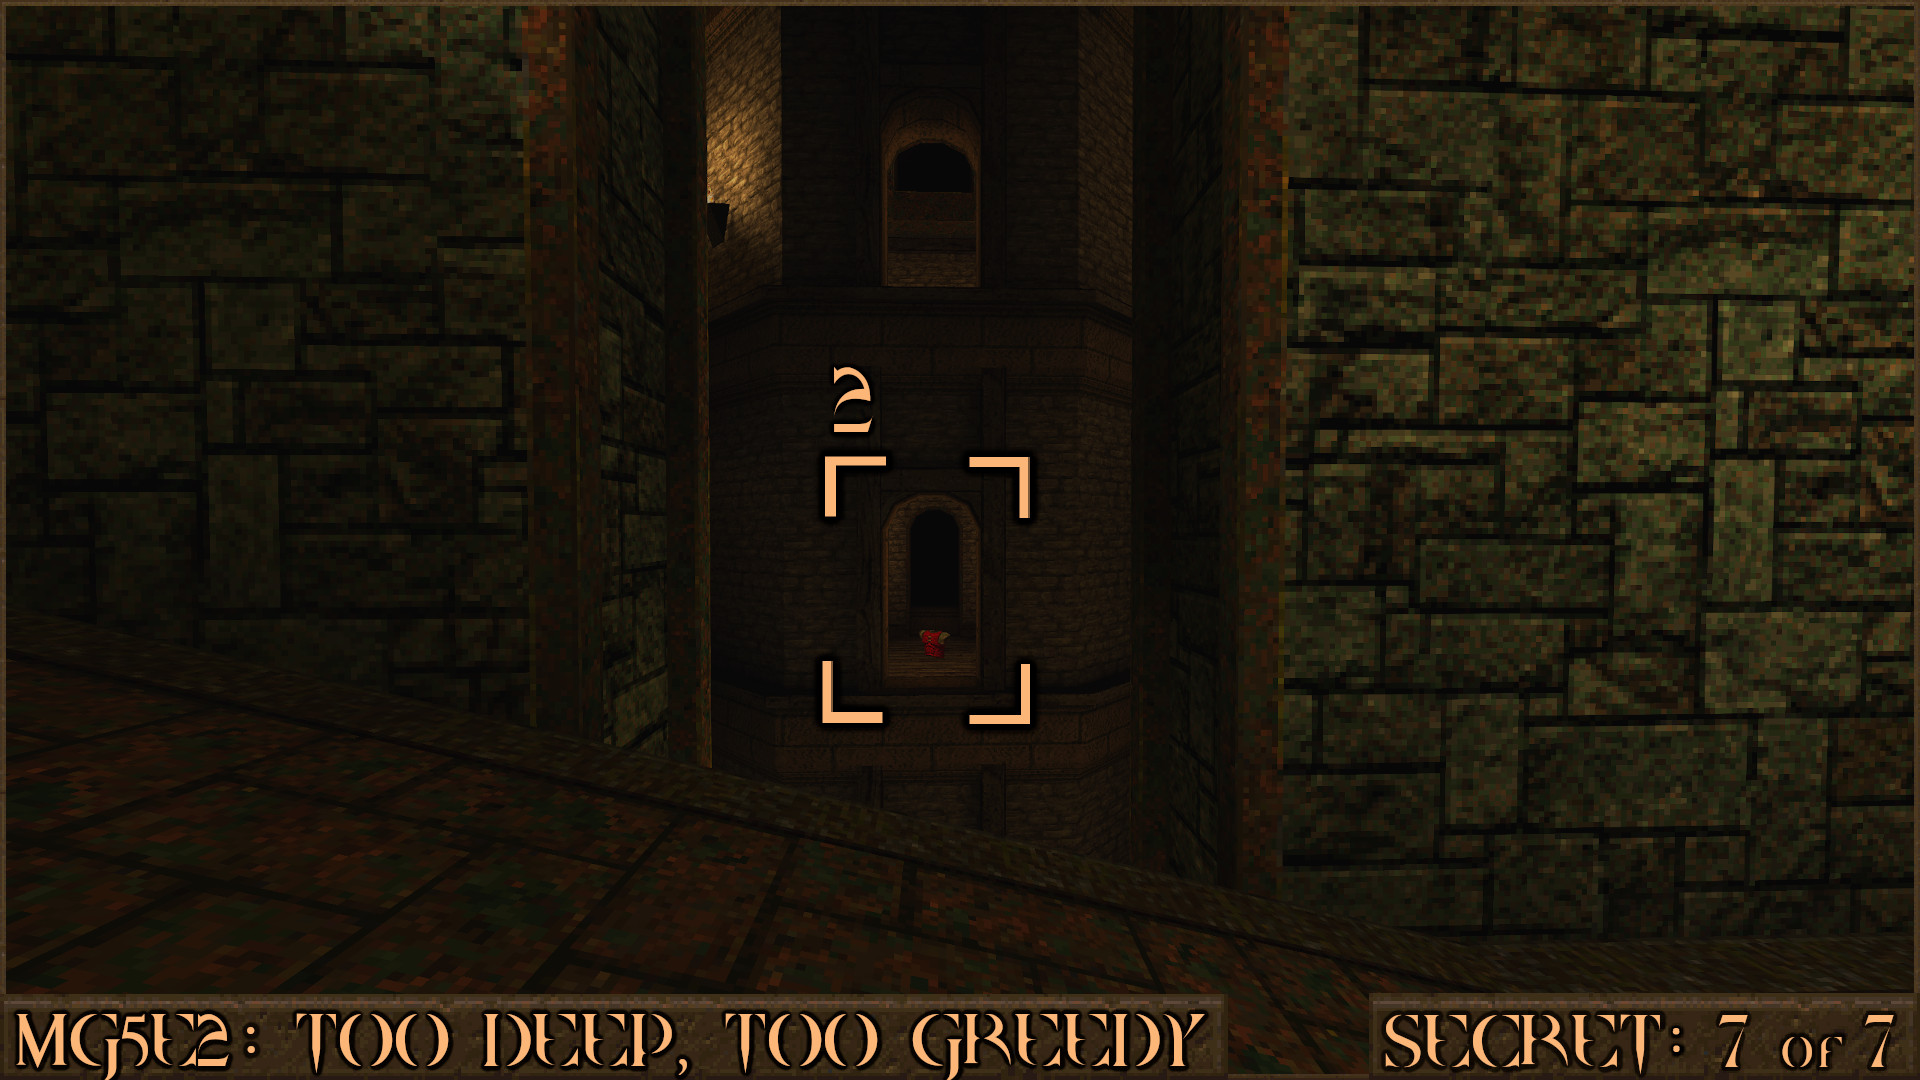
Reward:
Extra Secret
There is one more super secret to find in this level. Don't go in to the exit portal yet, instead press this orange button () to lower a lift. Jump on it () to go back to the start of the level.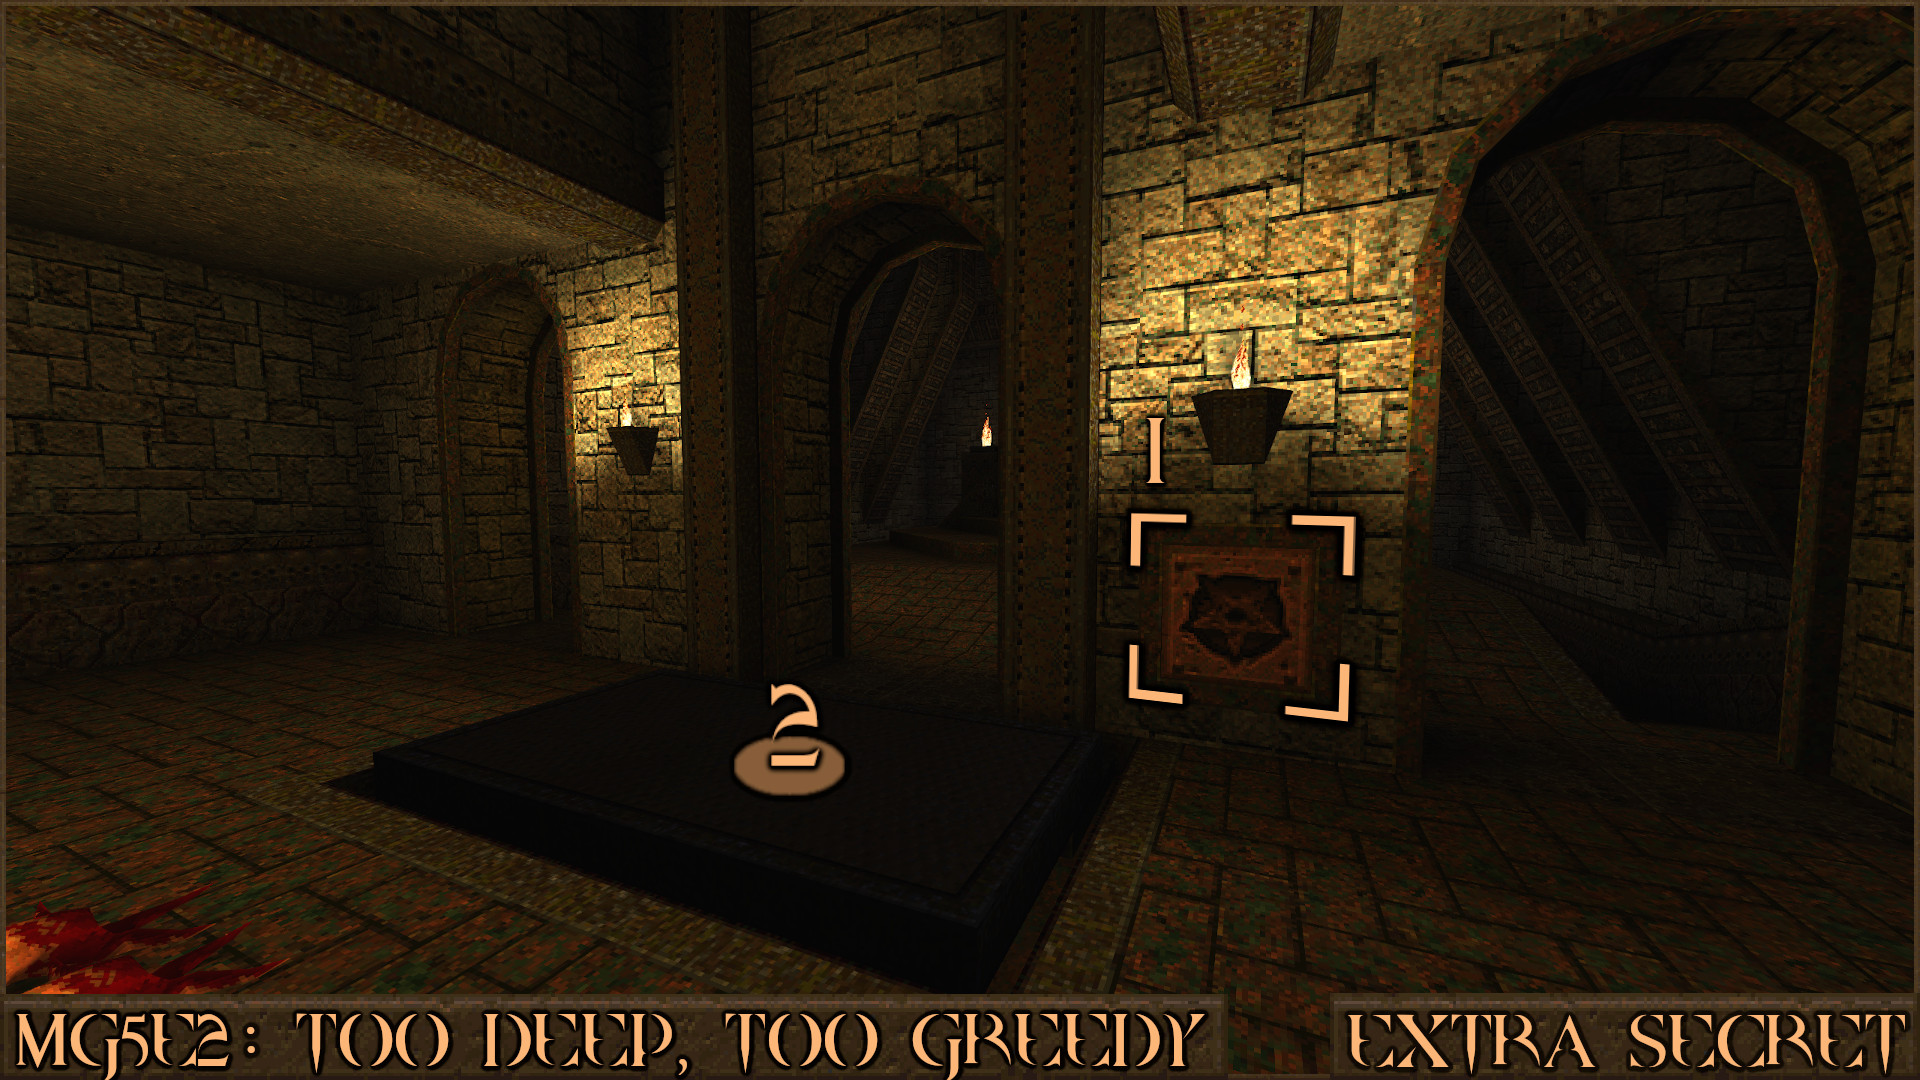
You need to have found all seven secrets in this level to find this extra secret so now is a good time to check you have found them all. Once you have, head back to the area where you found Secret 3 and jump up the rubble. Look through the gap in the blocked off doorway and you will see a red trigger switch (
) that only reveals itself after you have found all seven secrets. Shoot it to activate a hidden doorway.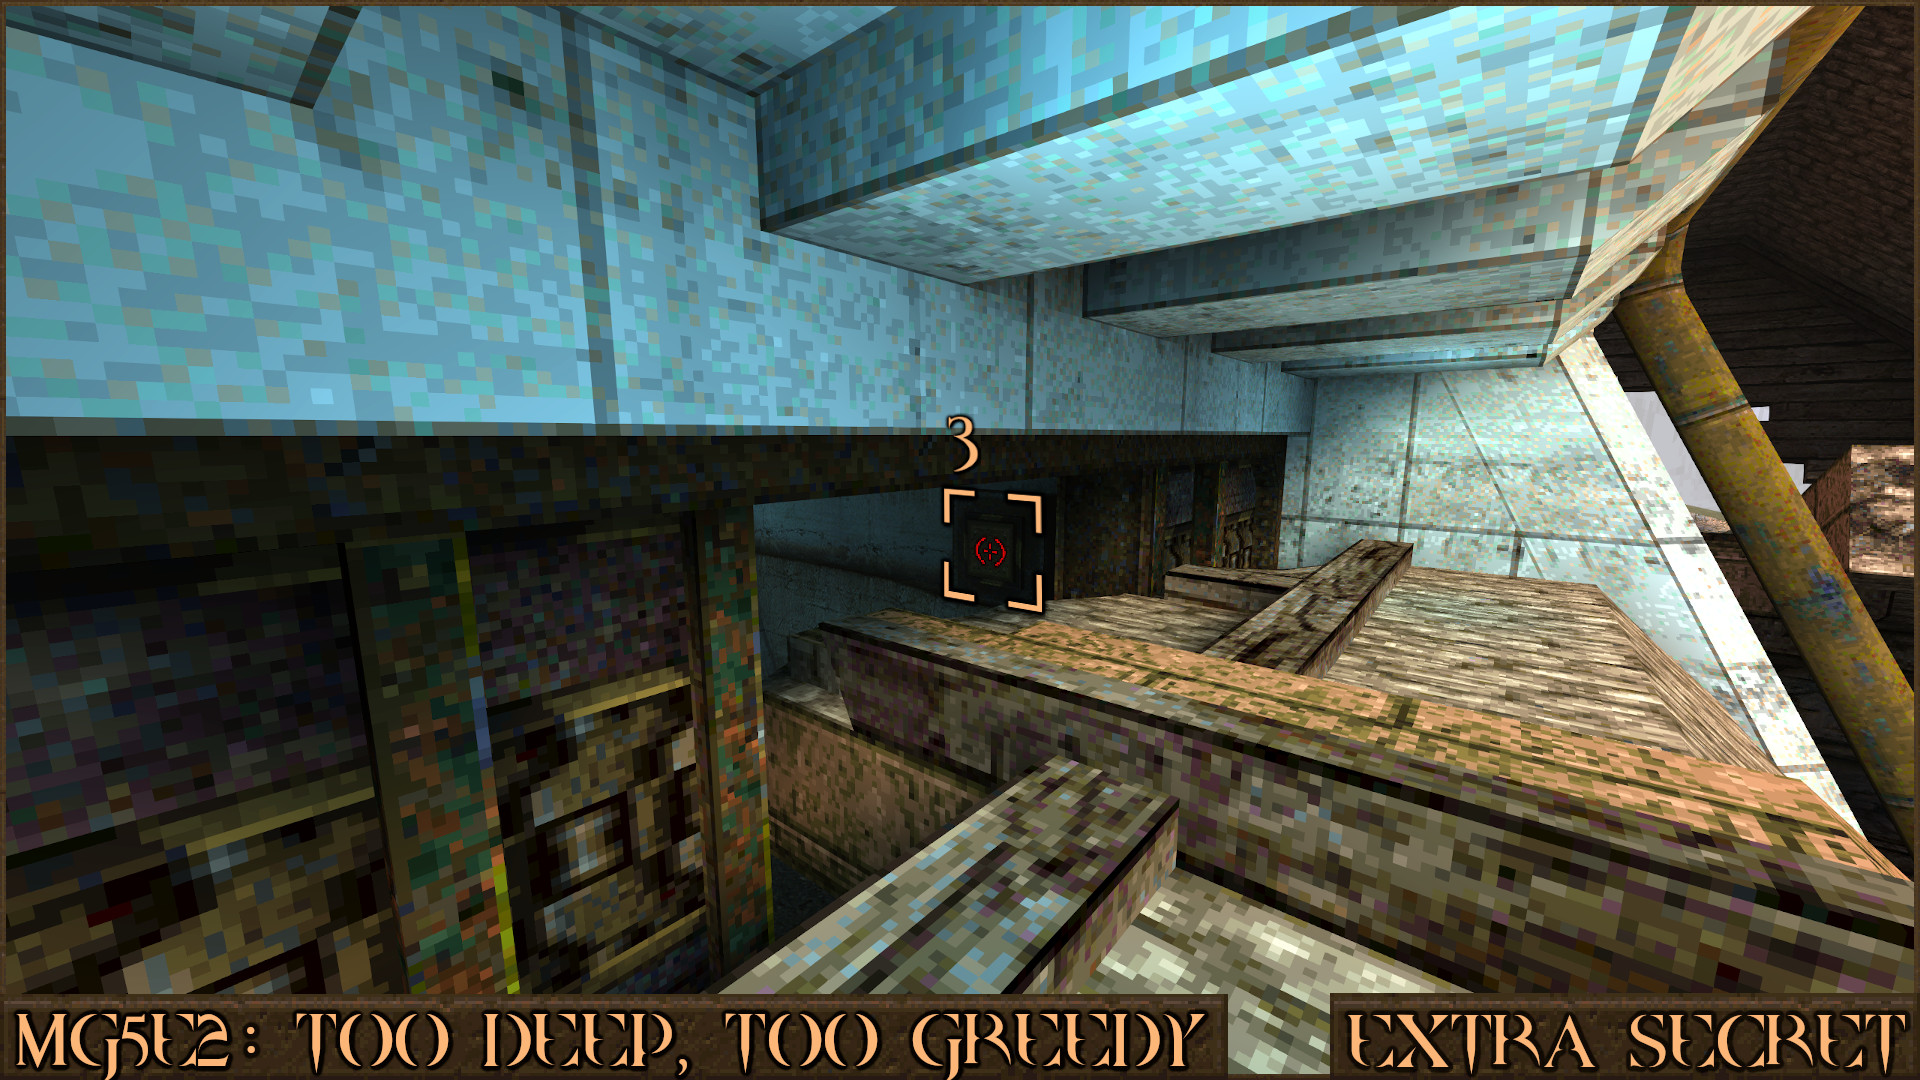
Head around the side of the rubble and investigate near the leafy cave entrance from Secret 3 to see a new doorway has opened (
). Step inside and press the button to cause some lightning effects and prepare yourself for the return of the most fearsome creature in all of Quake.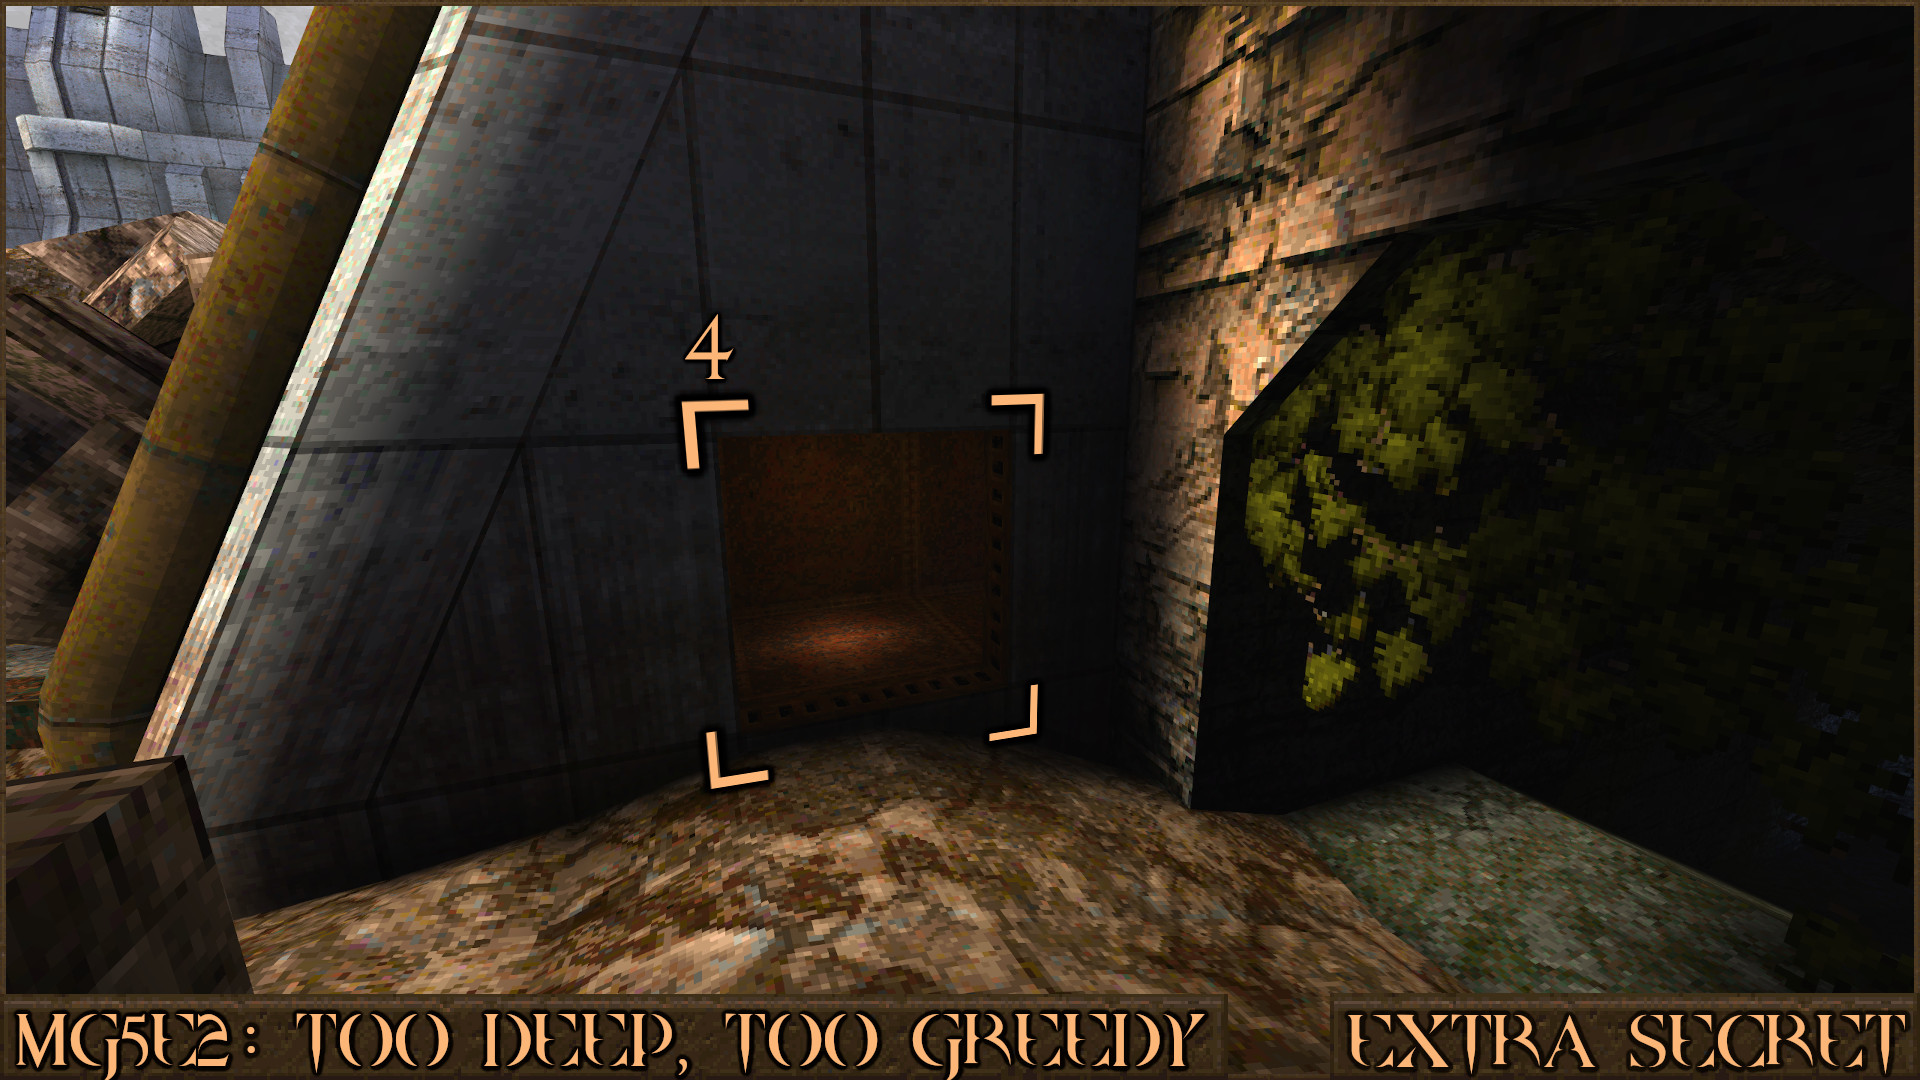
Reward: NONE
MGEND: Chthon's Vengeance
Secret 1 of 1
During the fight with Chthon you will need to electrocute him to make him retreat in to the lava. After the first time he does this a door on the left side of the level will open ().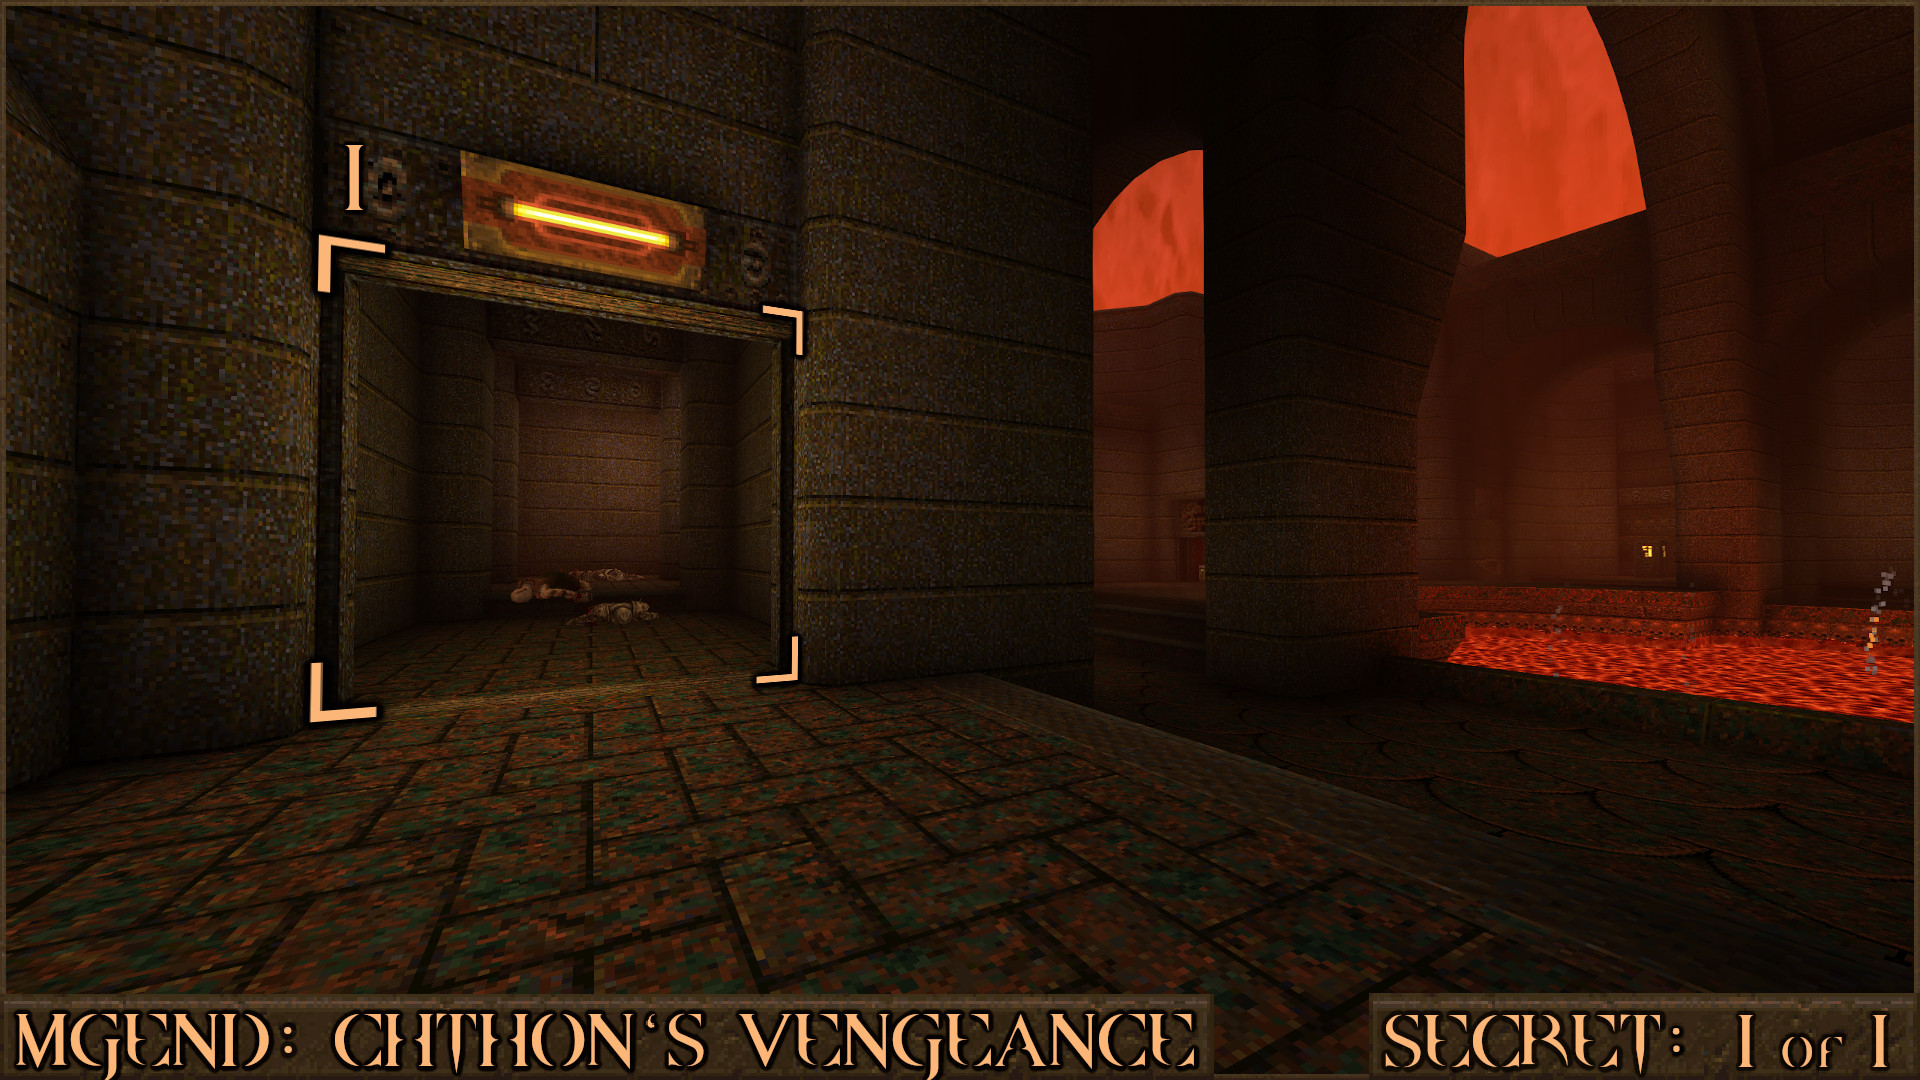
After going down the corridor you will notice on the right there is an elevator that takes you up to the Silver Rune Key. To the left of this is a pile of crates and a thin gap (
) you can go through to find the secret.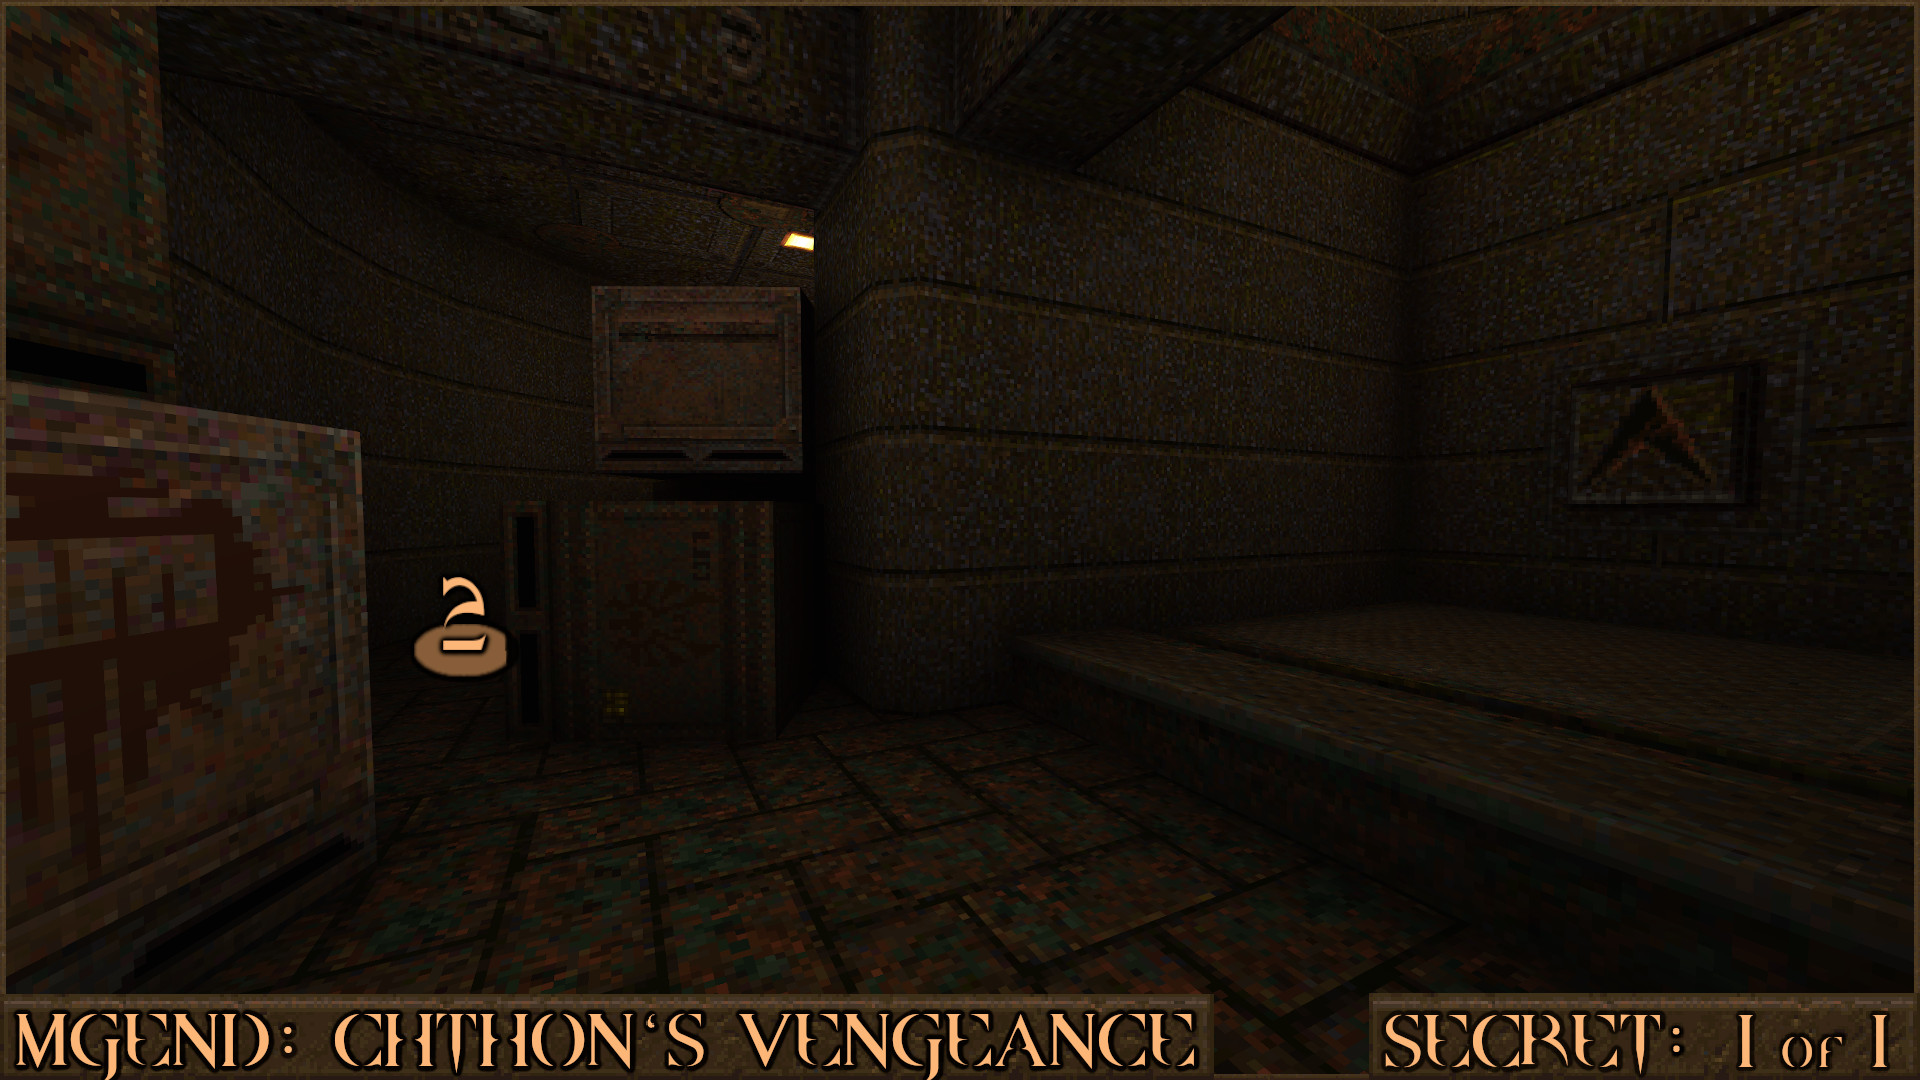
Reward:
More Quake Secrets Guides

You've explored every area of the Dimension of the Machine but more secrets await in the sequel to this expansion pack available in Quake II :
https://steamcommunity.com/sharedfiles/filedetails/?id=3014747962
These guides cover the rest of the secrets available in Quake:
https://steamcommunity.com/sharedfiles/filedetails/?id=620893331https://steamcommunity.com/sharedfiles/filedetails/?id=2585506034https://steamcommunity.com/sharedfiles/filedetails/?id=2585506770https://steamcommunity.com/sharedfiles/filedetails/?id=2585507550https://steamcommunity.com/sharedfiles/filedetails/?id=2803162869
There are more secrets to be found in the sequel Quake II:
https://steamcommunity.com/sharedfiles/filedetails/?id=3025659929
More Quake guides
- Quake Soundtrack Solutions★ 5 (822)34k views1.1k ♥15 minUpdated Apr 2, 2020
- How I play Quake in the Current Year (2023 update: Use Ironwail or Quakespasm-Spiked instead of Quakespasm)★ 5 (903)23k views1.3k ♥8 minUpdated Nov 12, 2023
- List of Quake 1 clones on the Steam store★ 5 (457)20k views854 ♥2 minUpdated May 20
- Quake Achievements★ 5 (1k)16k views1.5k ♥29 minUpdated Nov 4, 2025
- Quake Secrets★ 5 (1.1k)14k views1.8k ♥39 minUpdated Feb 23
- Quakespasm: How to activate CHUNKY MODE★ 5 (303)9.6k views357 ♥2 minUpdated Sep 23, 2023




This guide was created by its original author on the Steam Community. Are you the author and want it removed? Request removal.