Linux Dedicated Server Guide (CachyOS)
Setup!
Note im using CachyOS
this is not for non ARCH os's
Open Konsole.
check for updates, so the OS has the most uptodate program list
then install SteamCMD (this what will update your server and download your files)
and Y to any other prompts (it will install any dependancys required) once install lets run it once, so it can download the rest of Steam CMD
now you want to make a new text file so open any text editor (Kate is the default program)
and type:
replace "LOGINNAMEHERE" with your users account name
(the one you used to login with) save it as
(witch is /home/LOGINNAME) then back in konsole where going to type
it should make a folder in your home directory called Zomboid and start downloading the server files, you should run this command every time you need to update your server. now run the server once to generate the server setting files
you can log in as admin by using the account name " admin " and that password you just setup.
once it finished type
Server Config!
now that you have downloaded the server files its time to modify the config files!
if we navigate to "/home/LOGINUSERNAME/Zomboid" there should be file called "Server"
in that folder you will have to Edit "servertest.ini" and you should give "servertest_SandBoxVars.lua" a good look as well.
and you must add a name to your server here at this line:
and a public description at this line right blow it;
set your servers port
and remember to set a password for your Rcon weather you use it or not
i very much recommend read and going threw the files in the server folder and setting them up the way you like. once your done, open terminal and type:
then type this:
Mods!
now to add mods to your server, remember to make sure there the right version before you add any mods, becuase you will have to delete them manualy.
https://steamcommunity.com/app/108600/workshop/
this is the workshop to find any mode for your server on steam
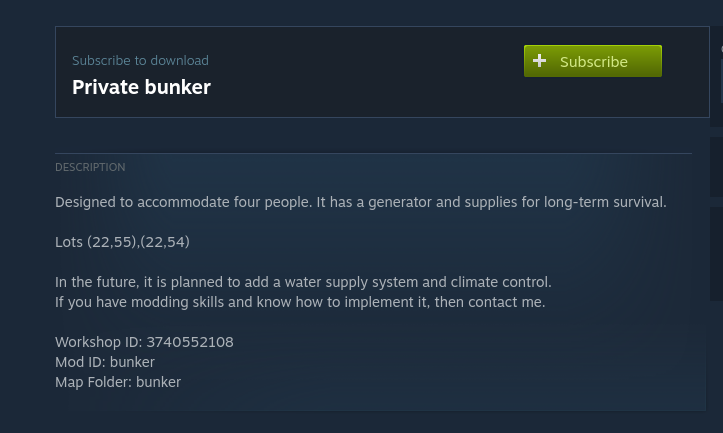 Normaly found in the mod description
copy each number and add it to servertest.ini at the line
Workshop ID:Map mods are a little different form normal mods
after adding the Workshop ID and Mod ID to "servertest.ini" you also need to find the line and add the Map Folder ID to it
(Optional) spawn location for modded maps (not necessary if do not plan on players spawning there)
this will require you to download the mod first, so run your server with the Workshop ID, Mod ID and Map Folder ID, run the server once to download the files
the "spawnpoints.lua" is not always in the same spot and not all map mods have one
we can add line after
spawnpoints.lua if the map mod has one here
using the "Mod ID" as the "name" it should look like this
- Modding Policy★ 5 (397)133k views208 ♥9 minUpdated Nov 8, 2022
- 80 tips and tricks for Project Zomboid (If you have over 100 hours in this game some of these will probably be new to you too)★ 5 (1.6k)82k views3.1k ♥28 minUpdated Aug 29, 2021
- Топ 100 лучших модов на "project zomboid"★ 5 (415)68k views1.1k ♥10 minRussianUpdated Jul 28, 2024
- [B41] Лучшие места для базы★ 5 (477)61k views1.3k ♥6 minRussianUpdated Nov 30, 2025
- Первая помощь ❤★ 5 (628)49k views1.4k ♥5 minRussianUpdated Jan 20, 2025
- The Basics of Base Building★ 5 (704)48k views1.5k ♥17 minUpdated Dec 24, 2021





- Upgrading to PremiumTeam Fortress 2★ 5 (20k)1441k views11k ♥6 minUpdated May 11, 2022
- No More Room in Hell Official ManualNo More Room in Hell★ 5 (2.8k)569k views2.1k ♥29 minUpdated Apr 22, 2019
- NMRiH Community Hosting GuidesNo More Room in Hell★ 5 (526)351k views653 ♥1 minUpdated Aug 10, 2022
- ULTIMATE GUIDE FOR GAME DEV TYCOONGame Dev Tycoon★ 5 (5.8k)326k views10k ♥4 minUpdated 23 Jan, 2014
- How to 'Git Gud' Soon™MORDHAU★ 5 (2k)318k views3k ♥68 minUpdated Nov 16, 2024
- Лучшие кооперативные игры SteamPAYDAY 2★ 5 (1.5k)315k views2.1k ♥56 minRussianUpdated Apr 27, 2025






This guide was created by its original author on the Steam Community. Are you the author and want it removed? Request removal.