Definitive Guide to Fortunes of War
Call-outs & Location Names
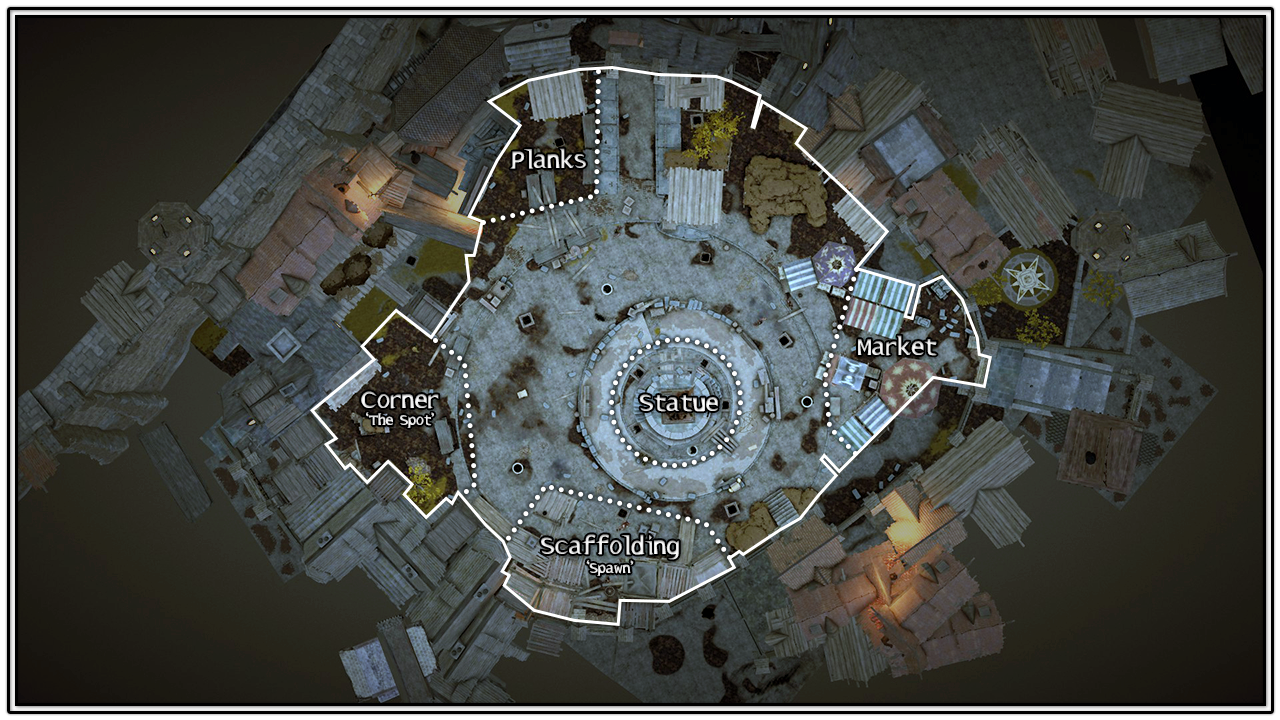
Some of the prominent areas in Fortunes of War. Every group uses different call-outs or refers to these areas by different names, but this is what I use.
I will be referring back to these locations so it would be a good idea to familiarise yourself with these call-outs, or have this image open on the side as you read through the guide.
Locations of Supplies
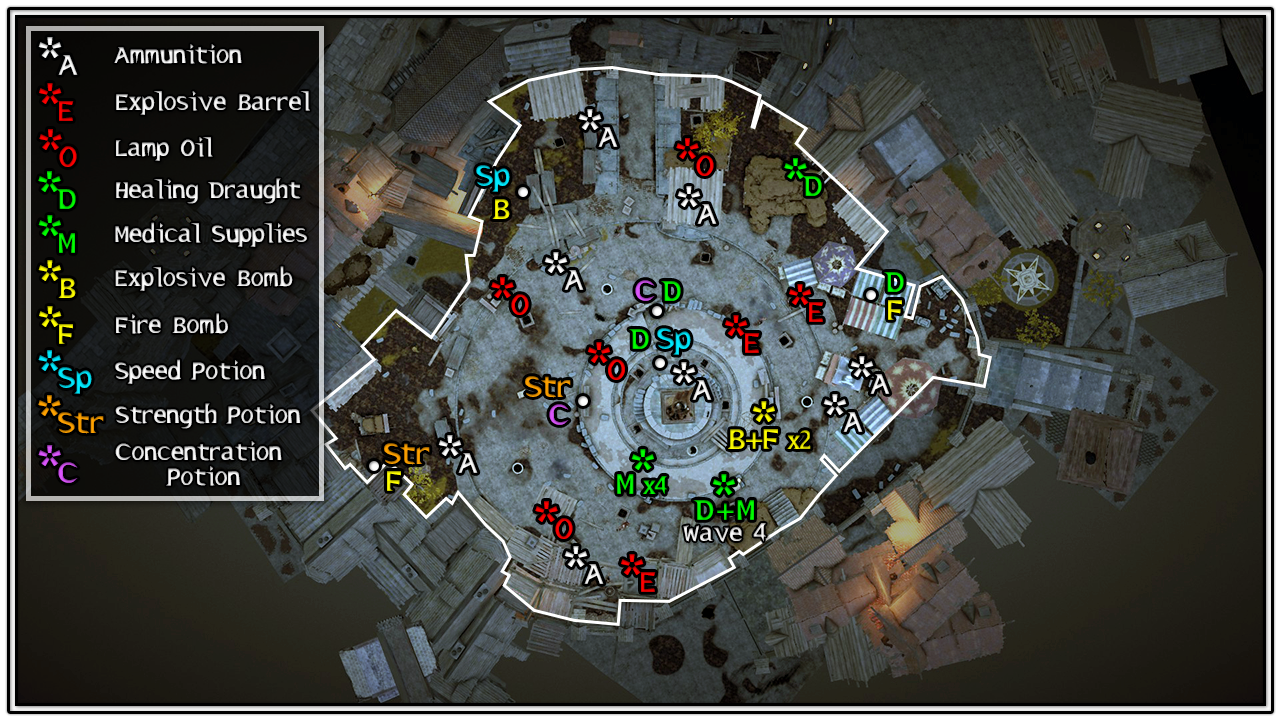
I recommend using the items on the outer-edge of the map first. Leaving the items around the Statue for later allows for quicker resupplies mid-wave, and also makes it easier for a player to restock if things go wrong and a kite or clutch is required.
Use medical supplies first and save the healing draughts for later. This is a good rule-of-thumb for Vermintide in general, but for Fortunes of War specifically you don't have that time to bandage whilst you're dealing with large amounts of Elites and Specials, and potentially doing quite a bit of kiting and repositioning
Suggested Routes
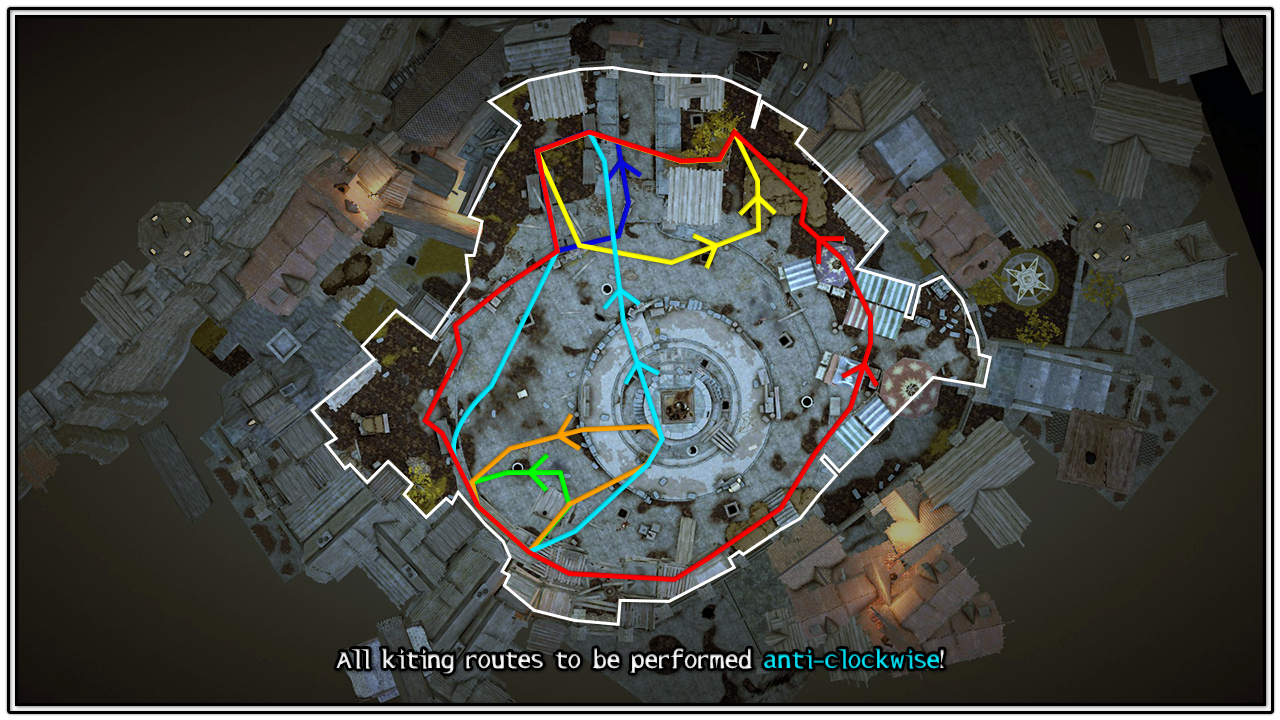
The smaller routes up north (yellow & purple) are recommended for one player on your team to use to kite a Monster, or enemies, if more time is needed to DPS. This is especially useful in Wave 8 with the two double-Monster subwaves.
Kite if you get overwhelmed and need a safe option to escape and stabilise.
Note: If multiple players need to kite it's ideal for everyone to move in the same direction, otherwise there's a high chance of cutting each other off and getting surrounded with enemies.
Locations of Enemy Spawns
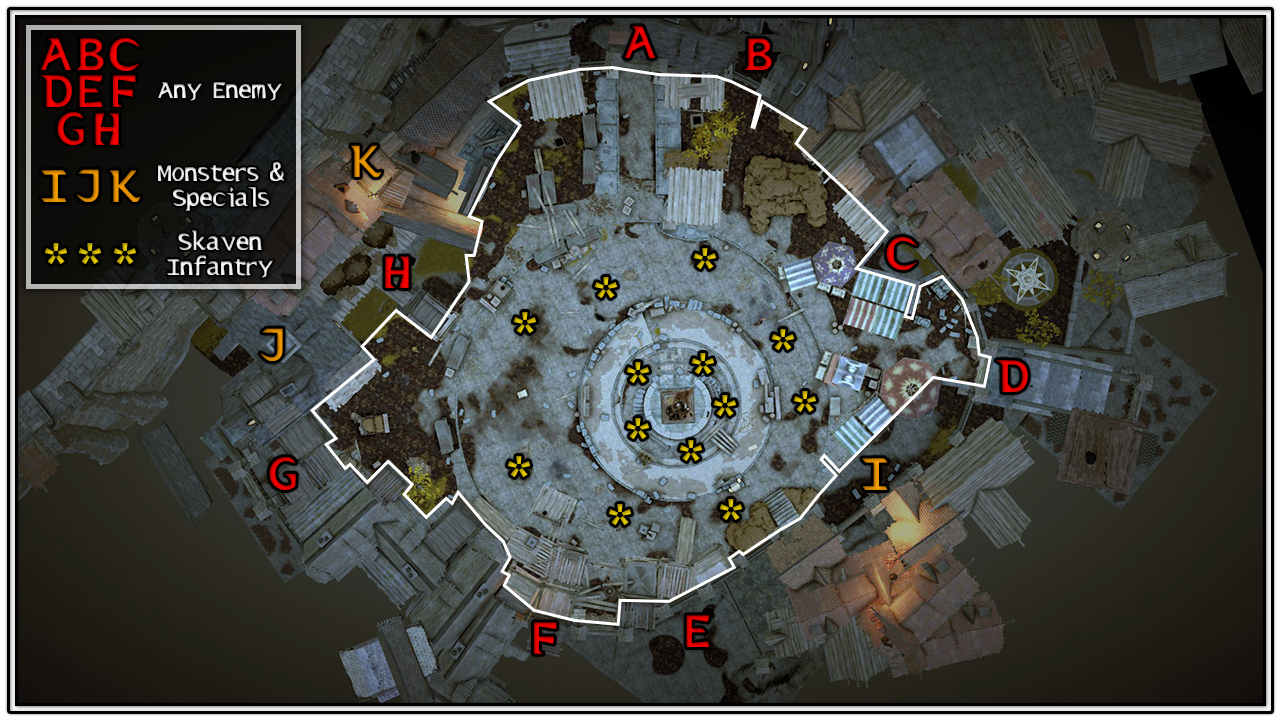
Skaven Infantry (*** spawns) only consists of Slave Rats, Clan Rats, and Shield Clan Rats.
List of all Enemy Spawns & Waves
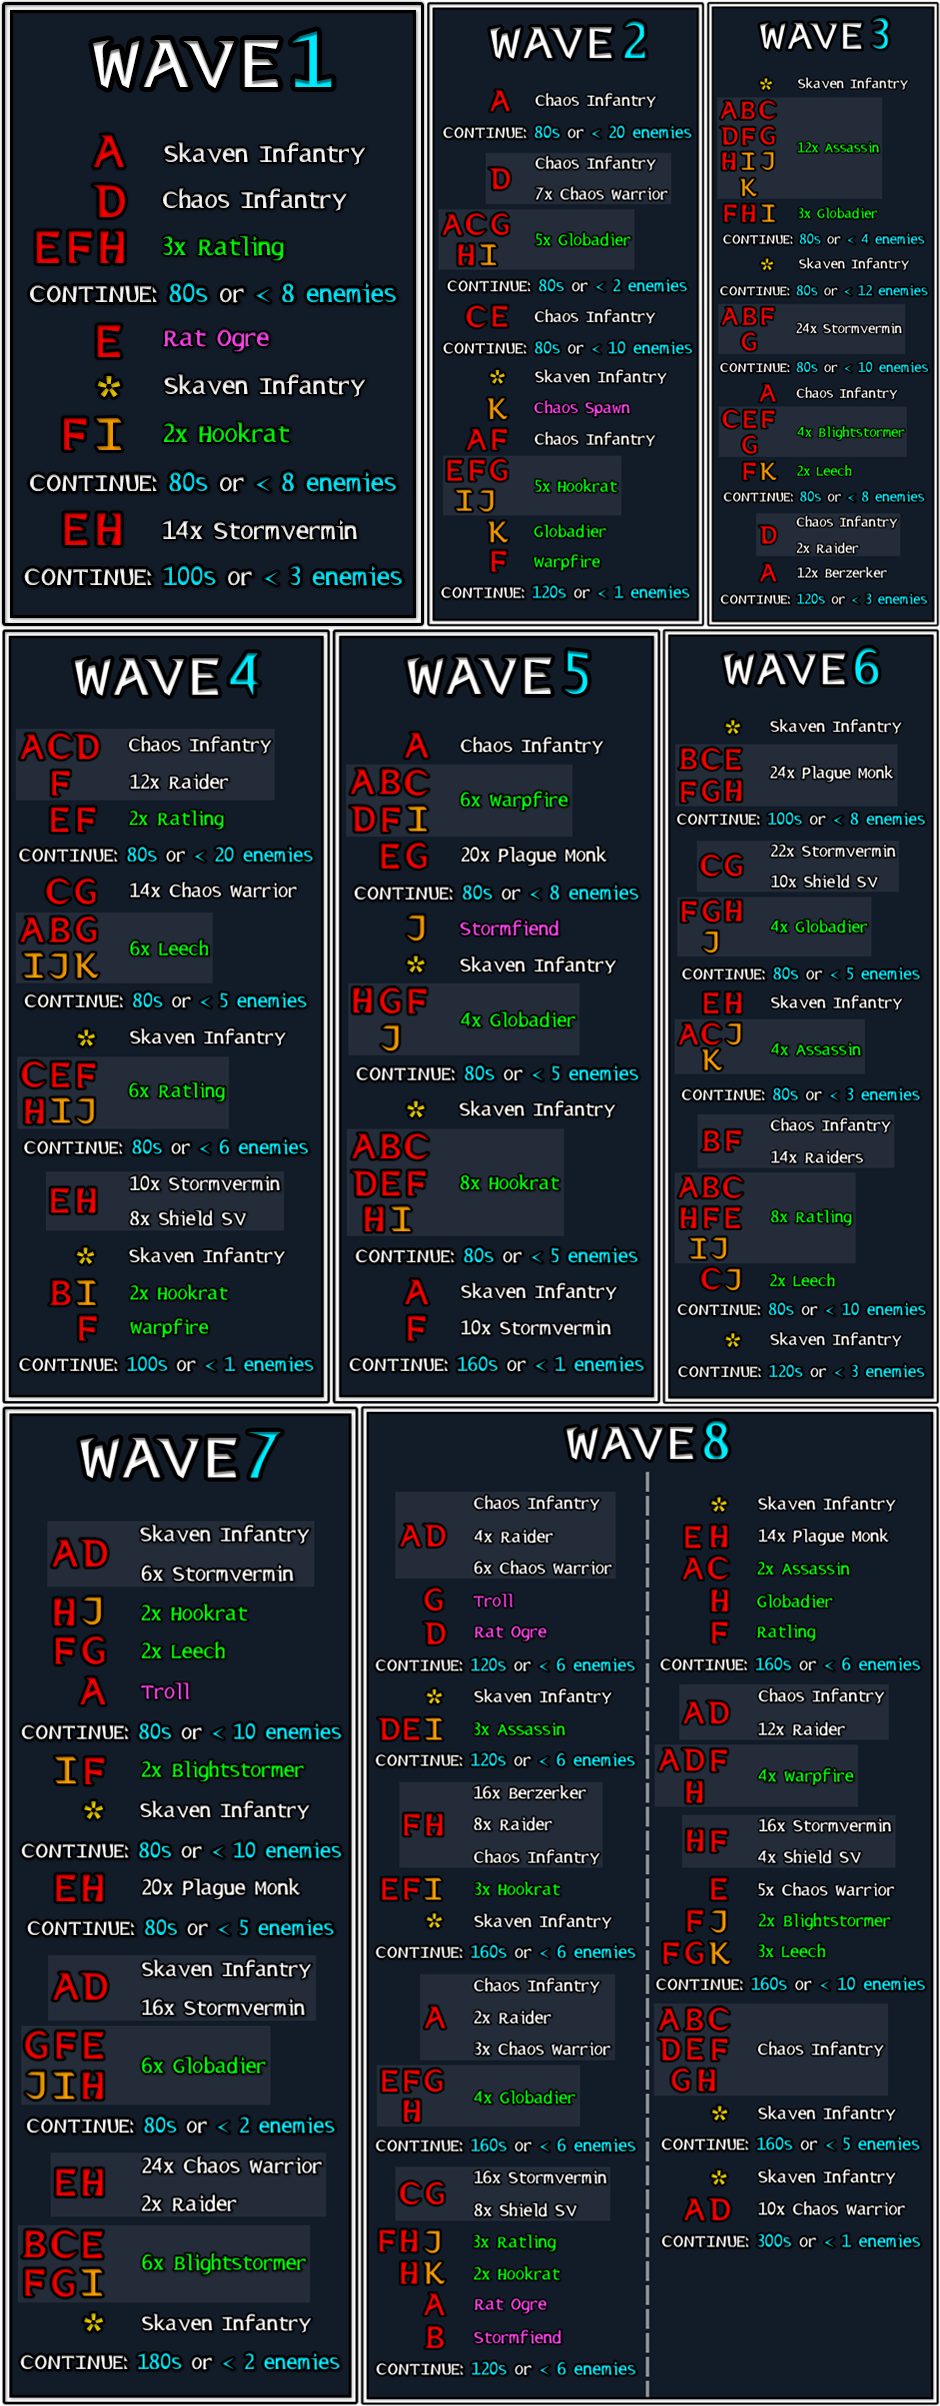
Note: Enemies are sorted in the order they spawn in.
Skaven Infantry and Chaos Infantry listings represent horde units, respective to their faction. This includes: Slave Rats, Clan Rats, Shield Clan Rats, Fanatics, Marauders, & Shield Marauders.
The amount of horde units spawned vary in every wave. Exact numbers are irrelevant and should be fine to manage if you deal with Elites and Specials quickly.
Check out the diagrams below for a better visualisation and breakdown of all the waves and subwaves.
Wave 1
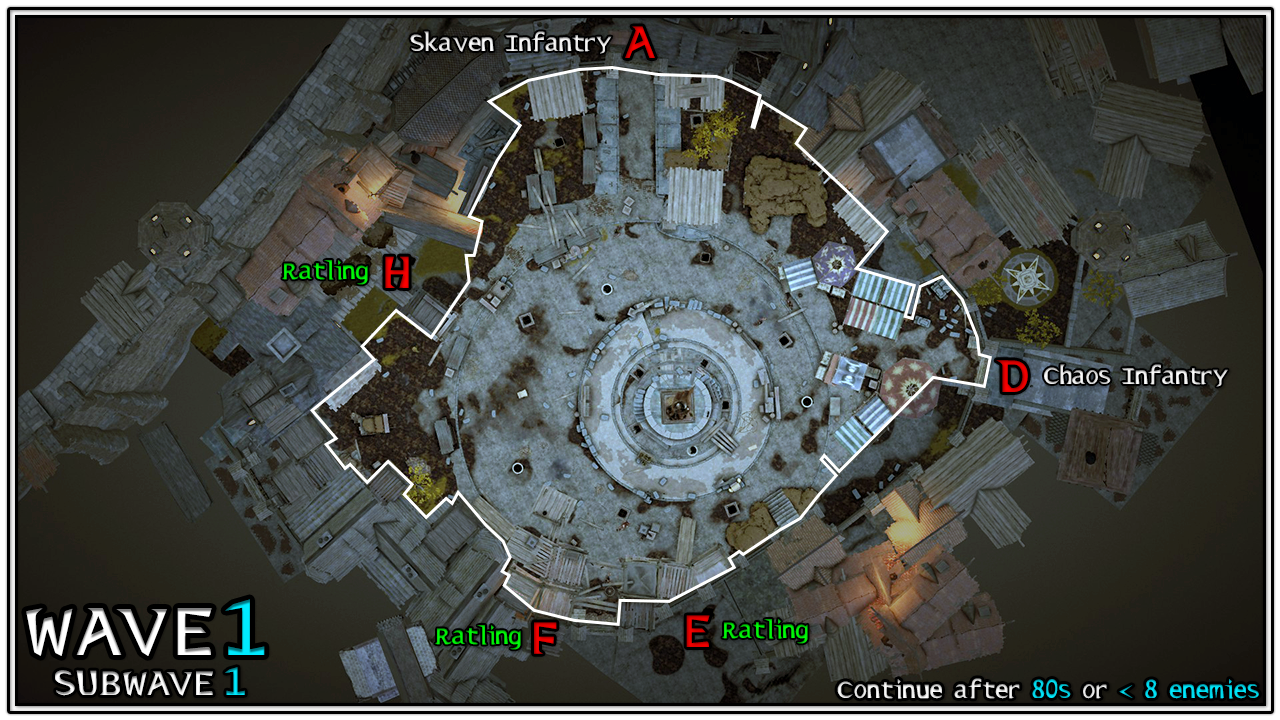
- Wave 1.1 (Subwave 1)
Strategy
A player that can special snipe can position at the Statue. This will provide a line-of-sight to all the Ratling Gunners.
The rest of the team can meet the Skaven Infantry at A, and then turn around and kill the Chaos Infantry.
- Wave 1.2 (Subwave 2)
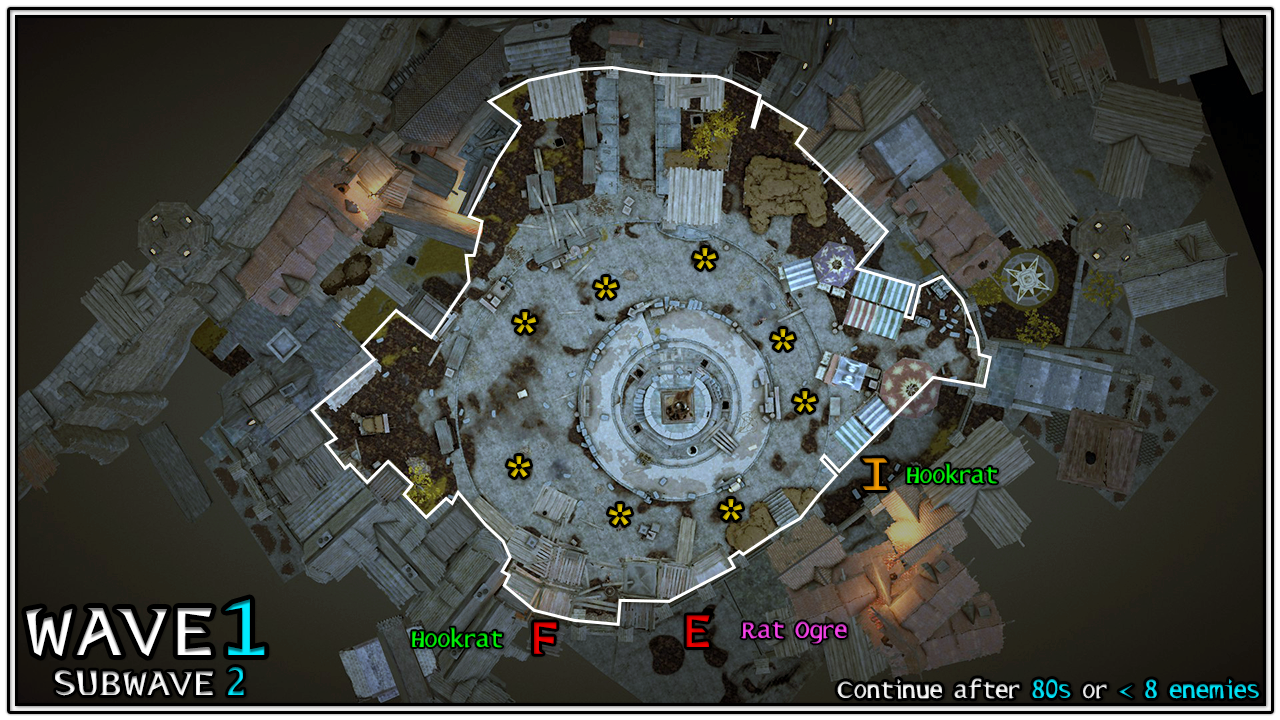
Strategy
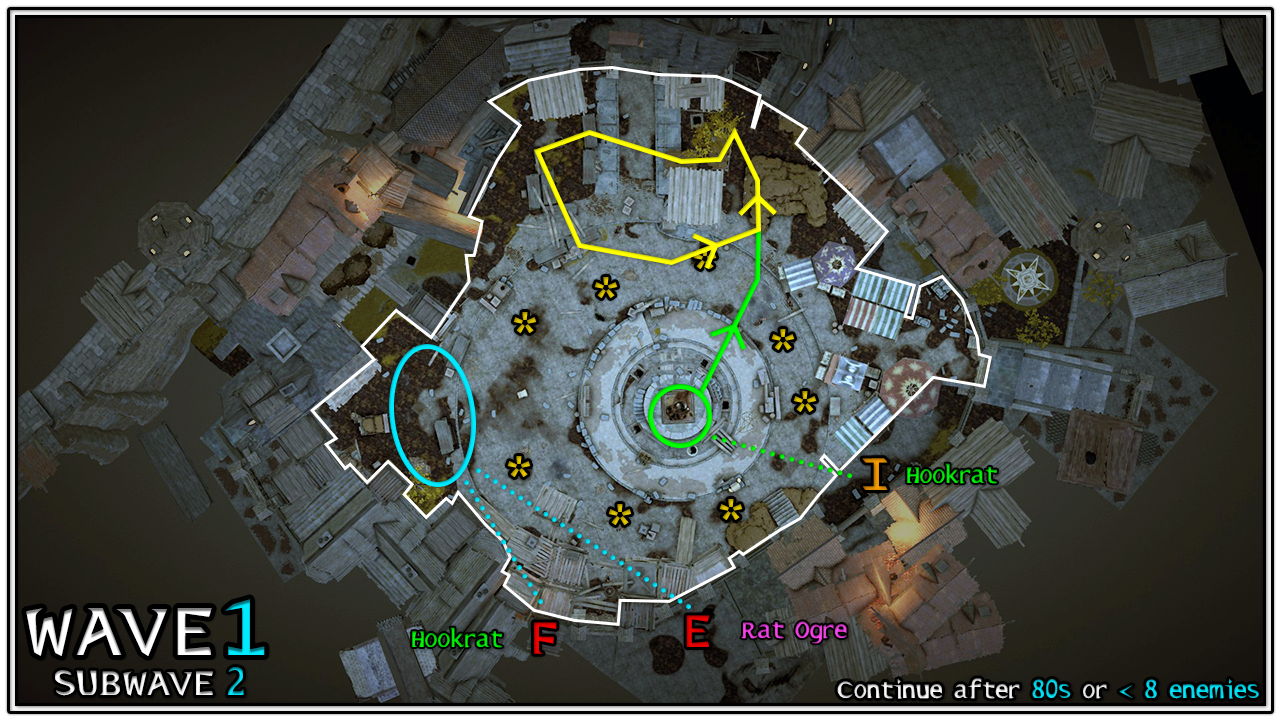 Blue:
Blue: - 3 players, start at the Corner.
- Kill the Hookrat from F, and the nearby Skaven Infantry.
- Damage the Rat Ogre with a ranged weapon to get aggro, then kill it. Make sure it doesn't chase your teammate kiting (green).
- 1 player, start at the Statue.
- Make sure the Hookrat from I is killed immediately. Otherwise it will cause a lot of trouble.
- Run north and kite the Skaven Infantry by using the yellow kite route. This will give the rest of your team as much time as possible to DPS the Rat Ogre.
- Wave 1.3 (Subwave 3)
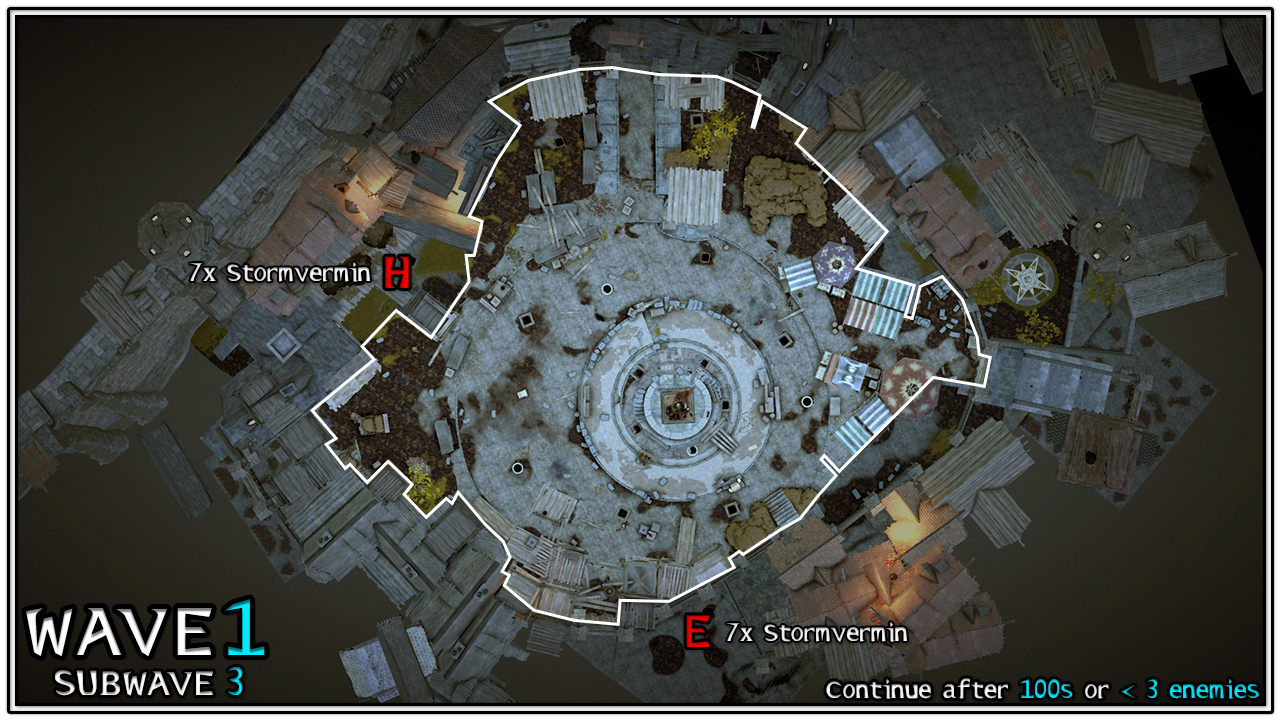
Strategy
Everyone regroups at the Corner. Kill the Stormvermin at H first, then turn around and kill the rest coming from E.
This is the final subwave for Wave 1. If you are wounded let the Stormvermin kill you and have the rest of your team complete the subwave. This will reset your wounds when you respawn at the start of Wave 2.
Wave 2
- Wave 2.1 (Subwave 1)
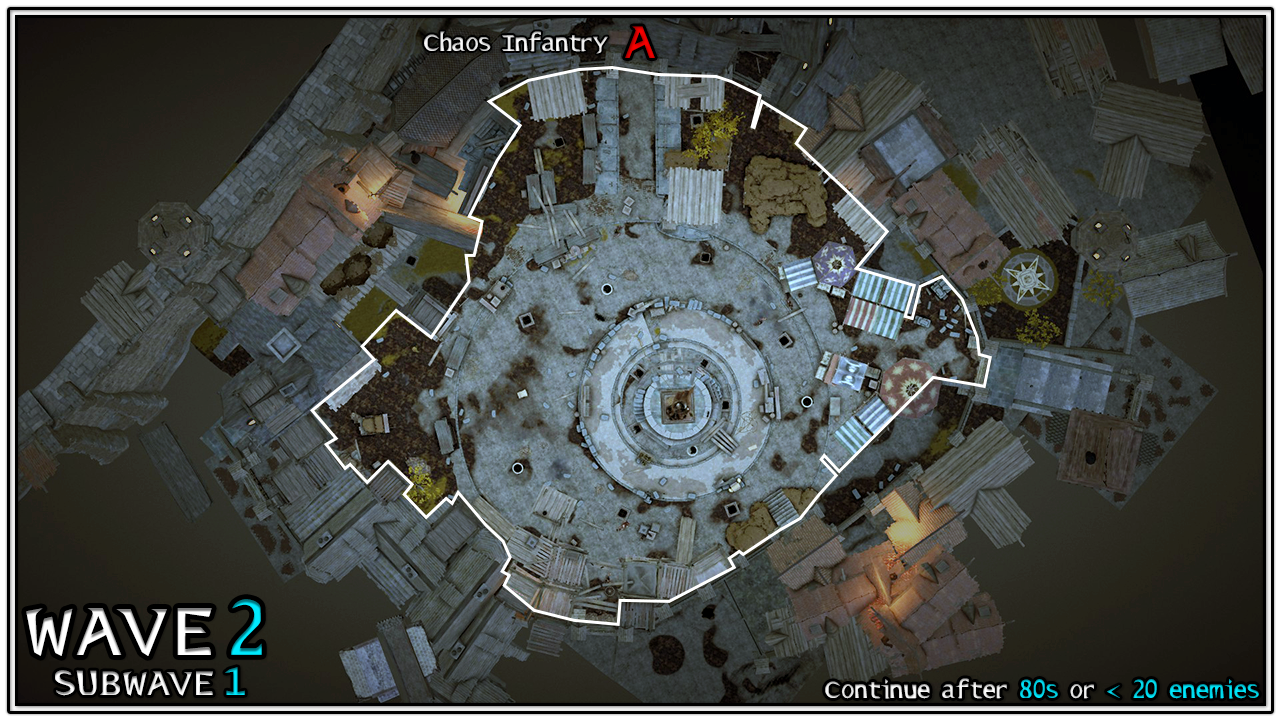
Strategy
Hold at the Corner until Subwave 4.
There's probably a lot of adjustments you can make to positioning to really optimise Wave 2, but it's not really that big of a deal since it's fairly straightforward.
- Wave 2.2 (Subwave 2)
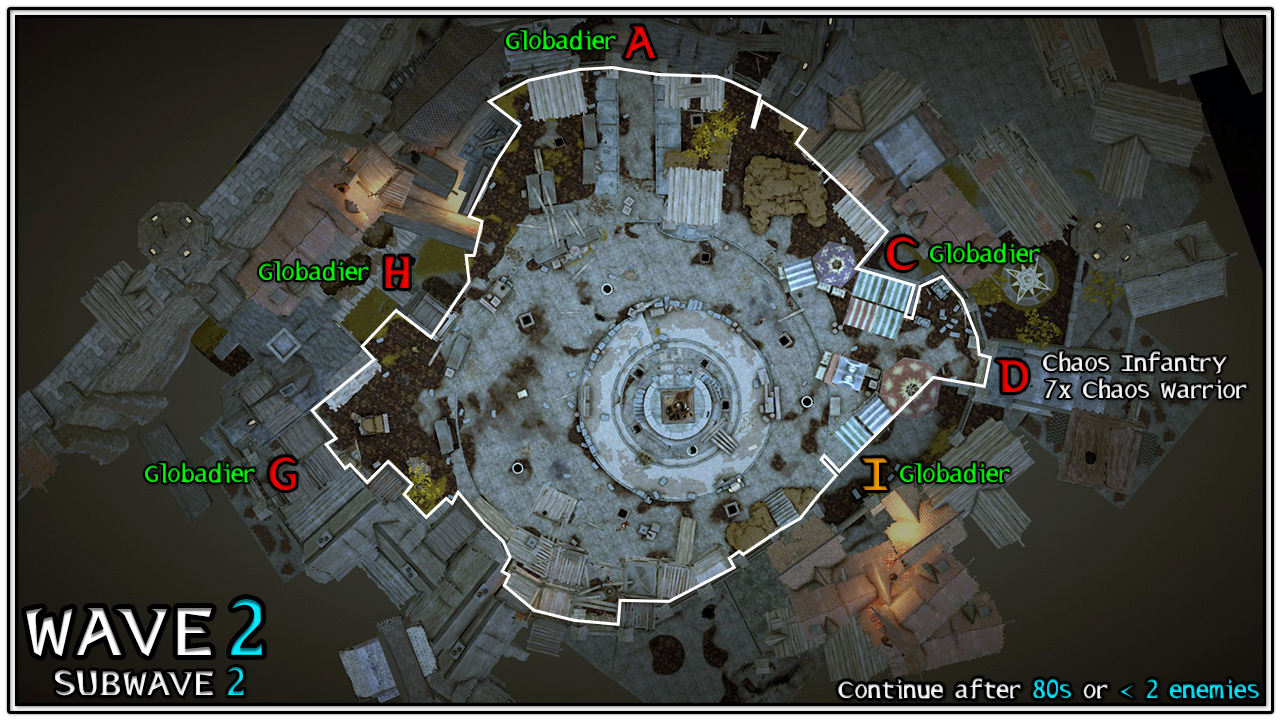
Strategy
Continue holding at the Corner.
Someone can position at the Statue to snipe the Globadiers, and then move back to the rest of the team as the Chaos Infantry show up (if they don't have stealth).
- Wave 2.3 (Subwave 3)
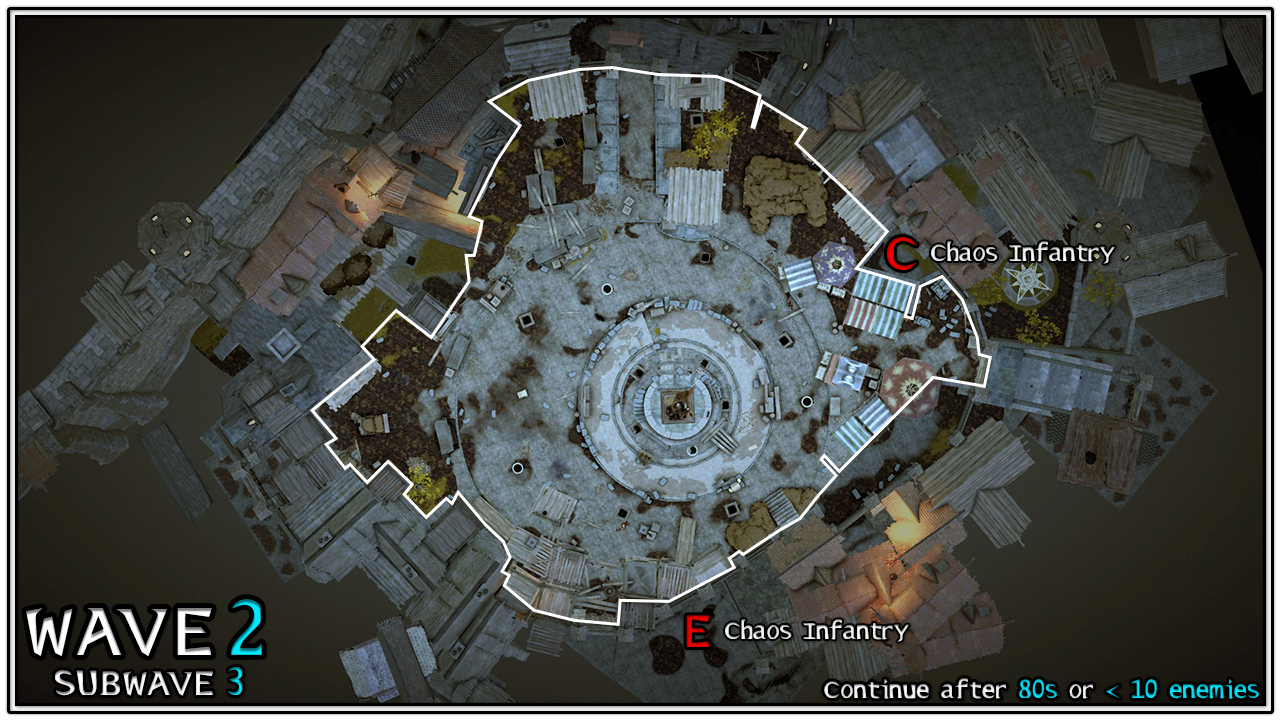
Strategy
Keep holding at the Corner.
The player that will be kiting in the next subwave should make their way towards Planks as the subwave starts thinning out.
- Wave 2.4 (Subwave 4)
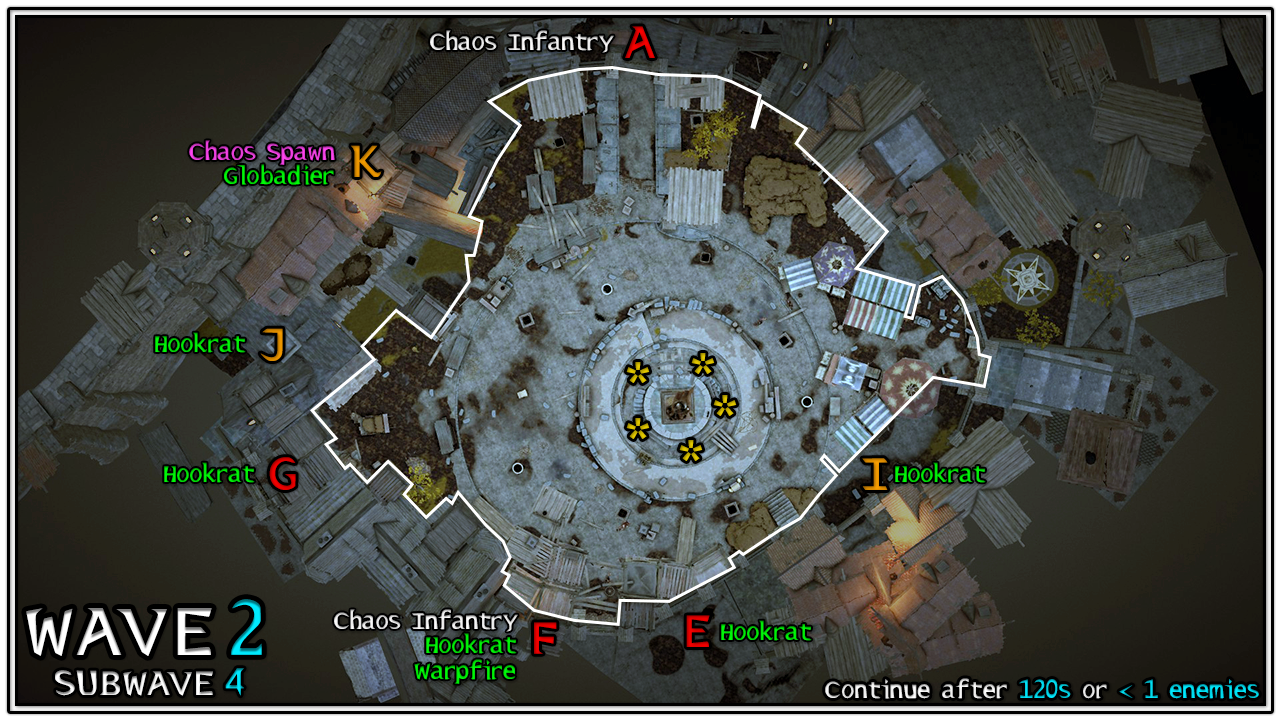 Strategy
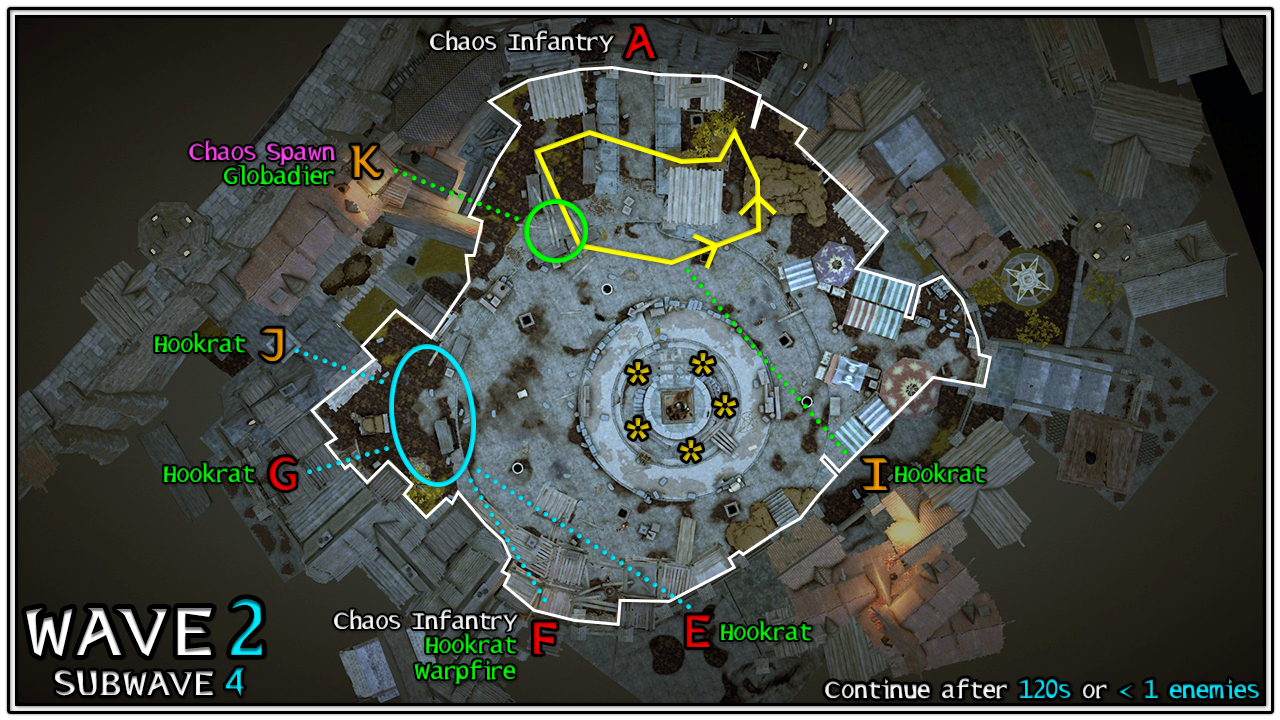 Blue:
Blue:- 3 players, hold at the Corner.
- Focus on killing all the Specials and Chaos Infantry before dealing with the Chaos Spawn.
- 1 player, start at Planks.
- Immediately damage the Chaos Spawn coming from the rooftops at K to get aggro.
- Start to kite using the yellow kite route, it's important that you kill the Hookrat from I on the move. This Hookrat is your biggest threat so it's important to not forget about it.
Take your time with this Subwave. You have 2 minutes, and the Chaos Spawn can be left until last since the wave won't progress prematurely until everything is eliminated.
Players can intentionally kill themselves when the Chaos Spawn is the last enemy left. They will respawn once the wave is completed, which can be a good way to reset wounds without consuming healing items.
Wave 3
- Wave 3.1 (Subwave 1)
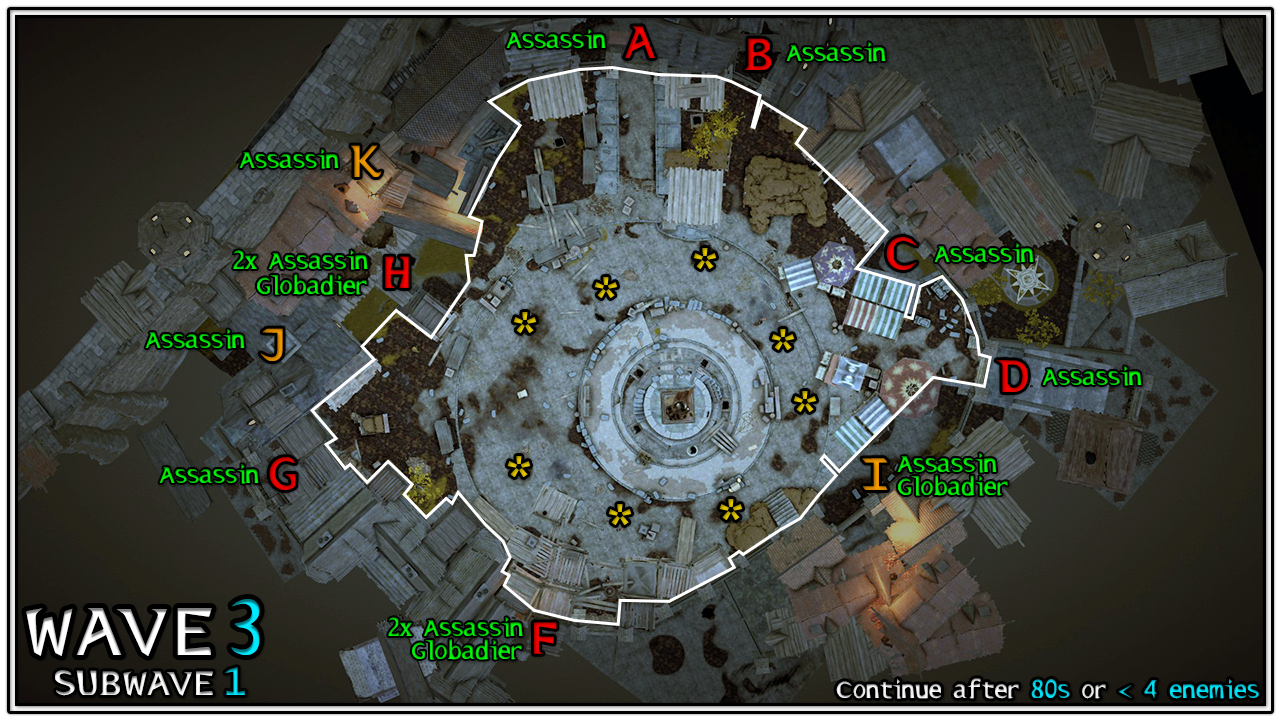 Strategy
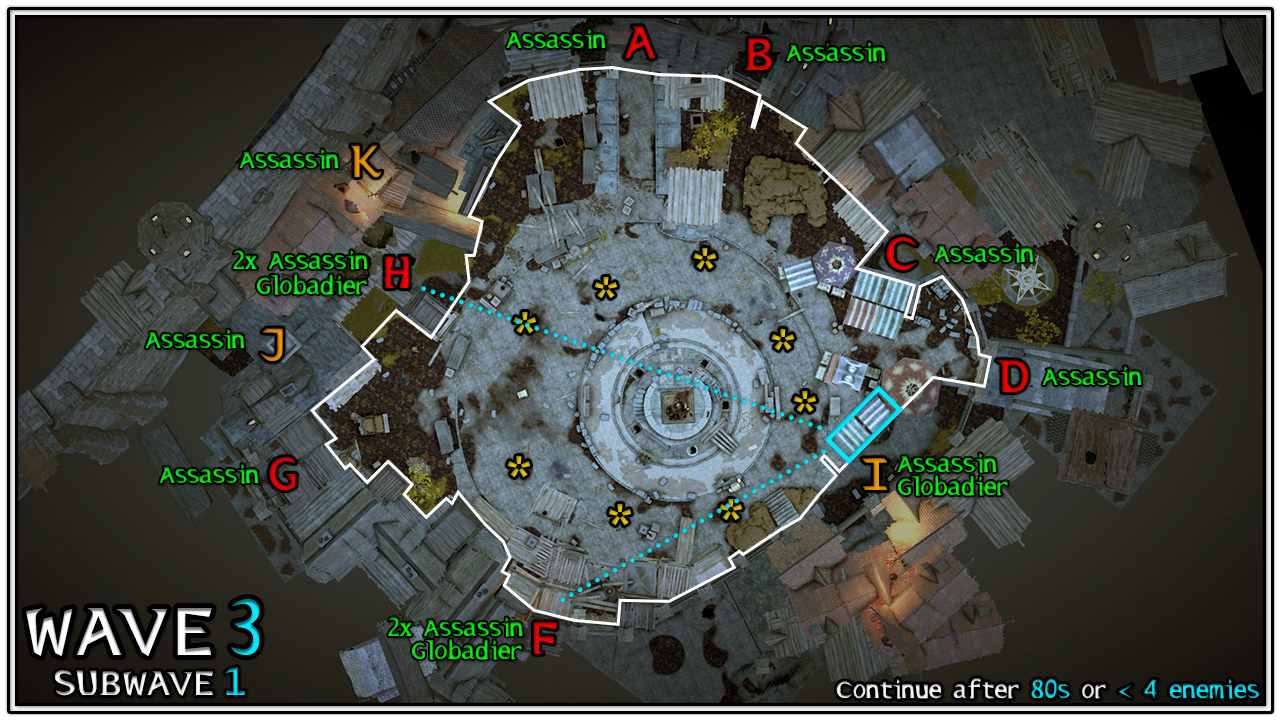 I recommend holding in the Market (specifically, the area marked in Blue).
It's incredibly important that the 3 Globadiers are dealt with since they're going to cause strife if left unattended. A character with stealth is ideal to handle the Globadiers to avoid getting jumped by the Assassins.
- Wave 3.2 (Subwave 2)
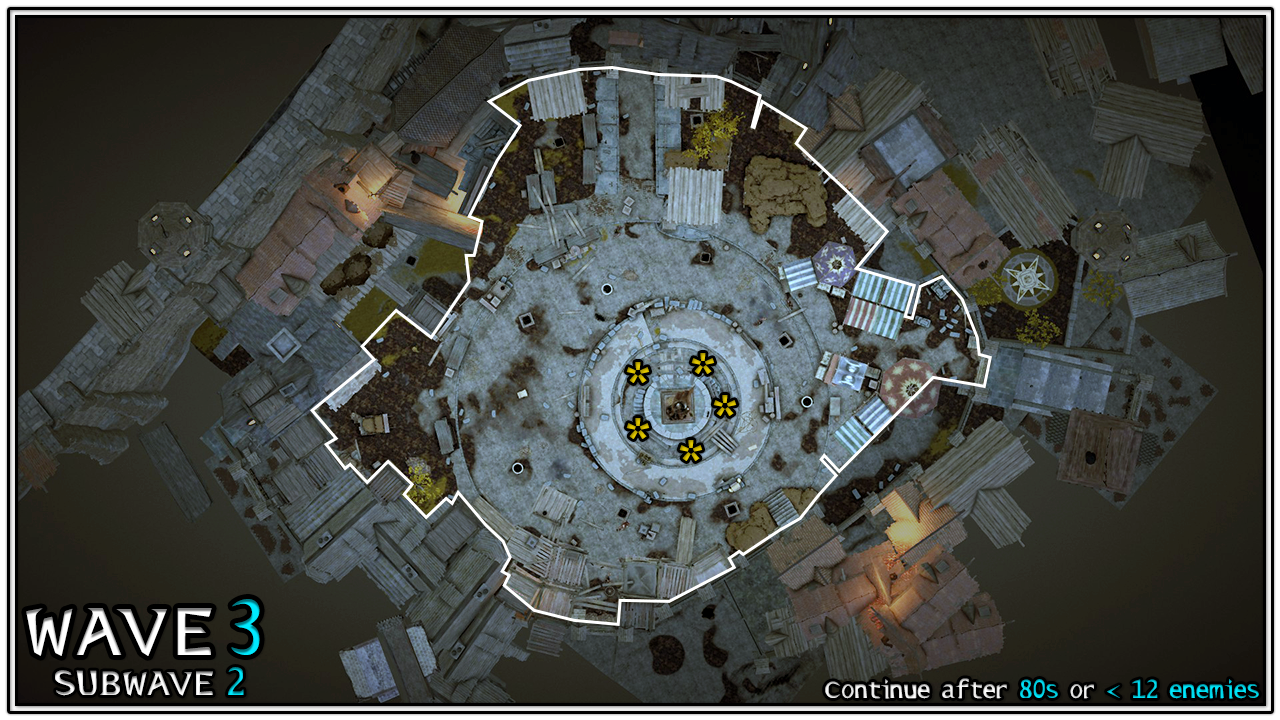
Strategy
Use this wave to position appropriately for Subwave 3. Move to the Corner, or Planks, as a team.
- Wave 3.3 (Subwave 3)
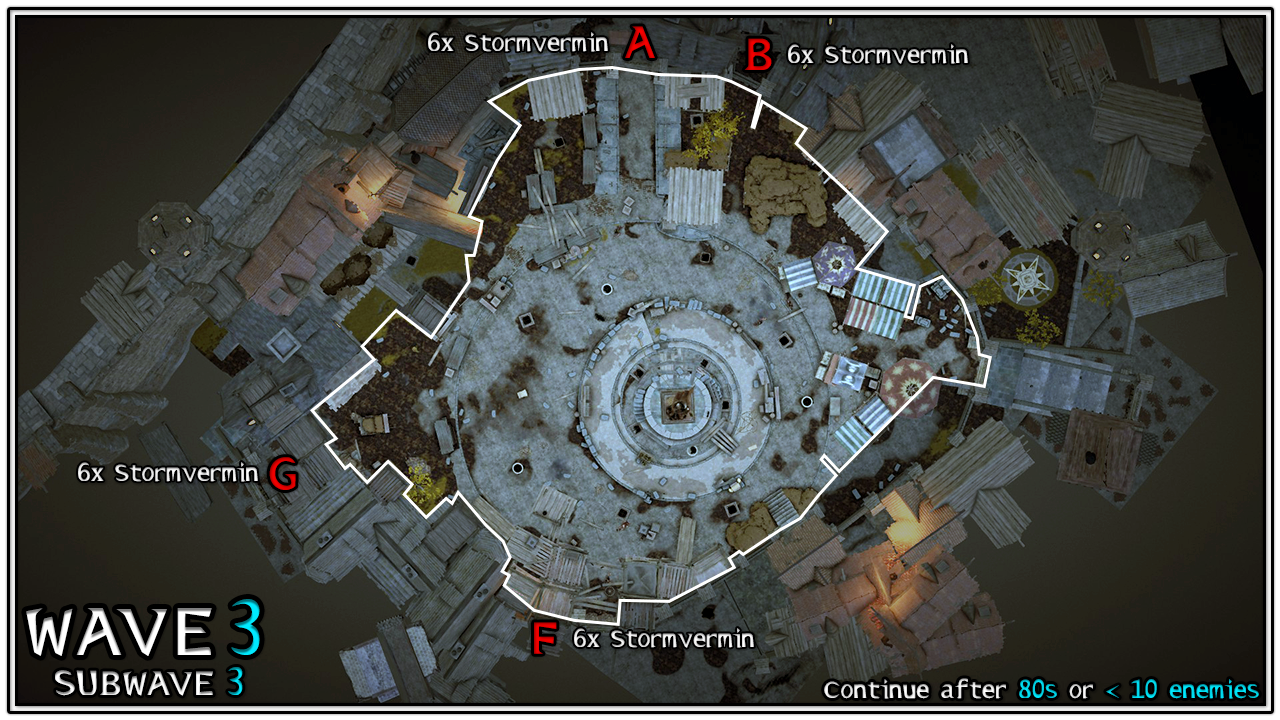
Strategy
Hold at the Corner or Planks. The idea is to meet 12 of the Stormvermin first and kill them all before the other 12 show up.
- Wave 3.4 (Subwave 4)
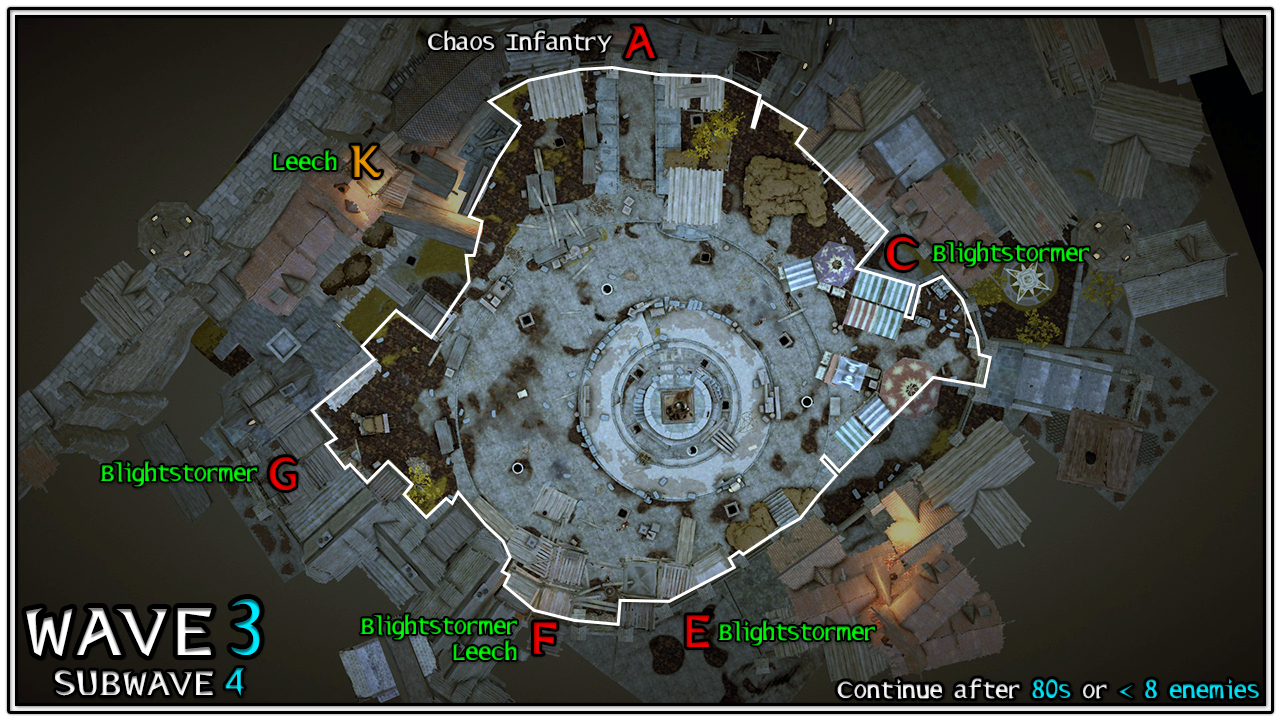
Strategy
A player that can special snipe is recommended to begin the round at the Statue. They will have good sight-lines on the Blightstormers before they start casting.
- Wave 3.5 (Subwave 5)
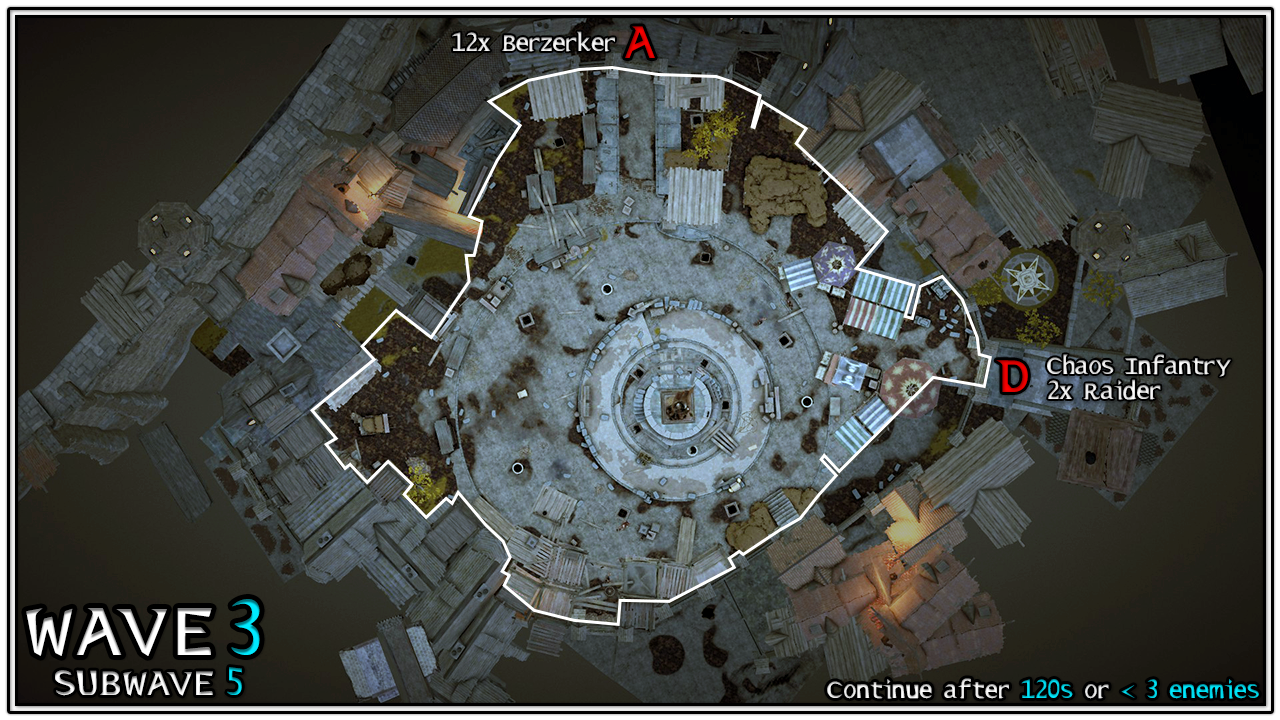
Strategy
Make sure everyone is grouped up and kill the wave normally. Keep holding however you decided to in the previous subwaves.
This is the final subwave for Wave 3, feel free to die to reset your wounds by respawning in the next wave.
Wave 4
- Wave 4.1 (Subwave 1)
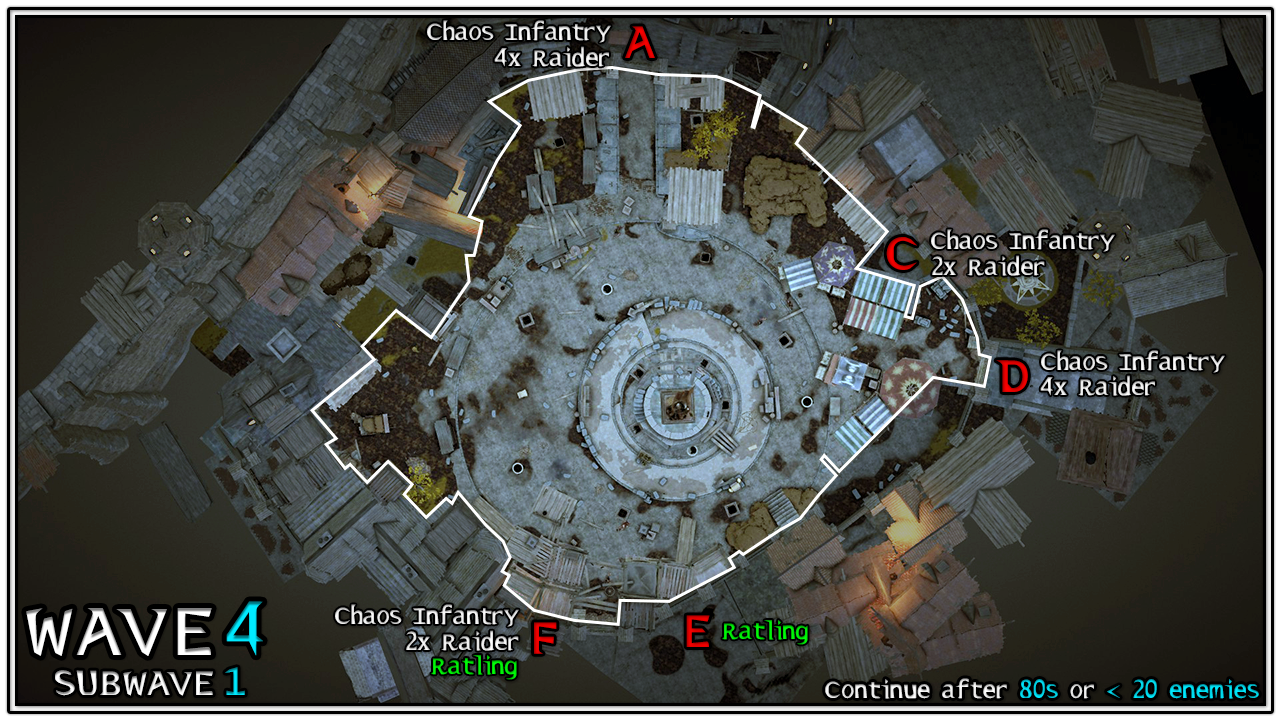
Strategy
The entire team should hold at the Corner. This will set you up nicely to kill the Chaos Warriors in the next subwave. It might make this wave a bit spicy since the spawns at A, C, and D will reach you at the same time.
- Wave 4.2 (Subwave 2)
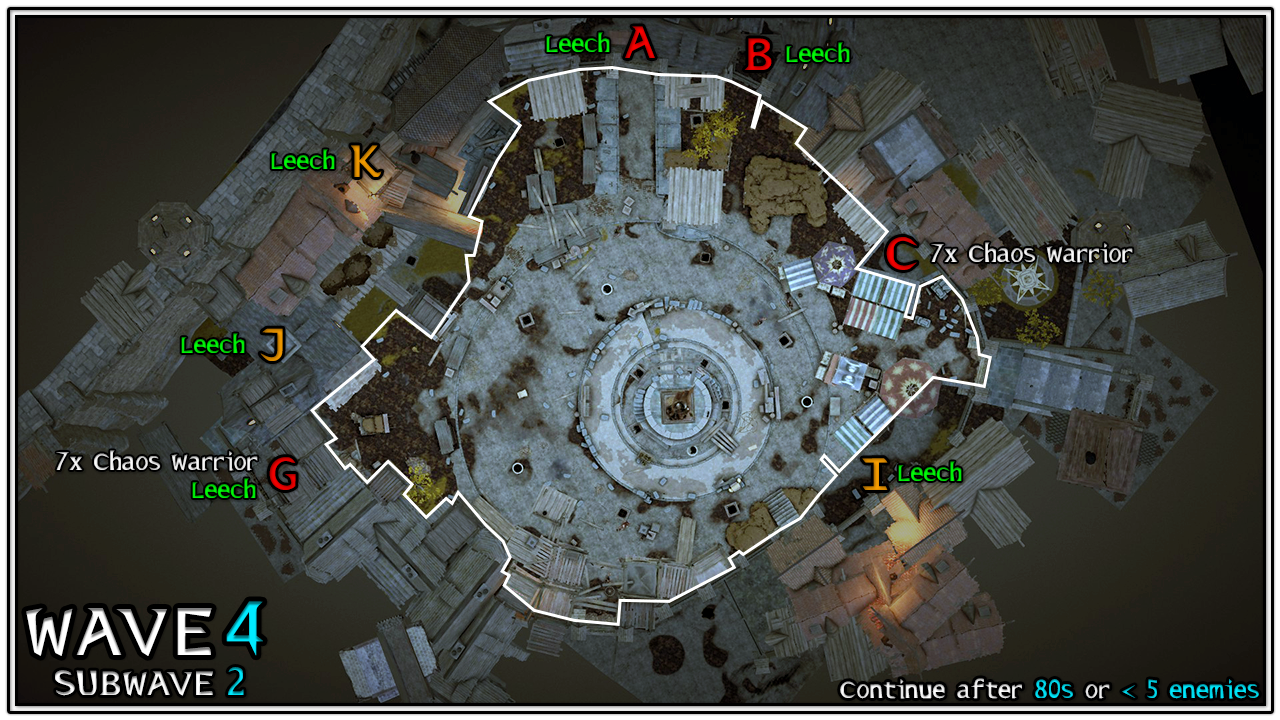
Strategy
Continue to hold at the Corner. It's important to kill the nearby Chaos Warriors as soon as possible so you only have to face 7 at a time, instead of all 14 at once.
- Wave 4.3 (Subwave 3)
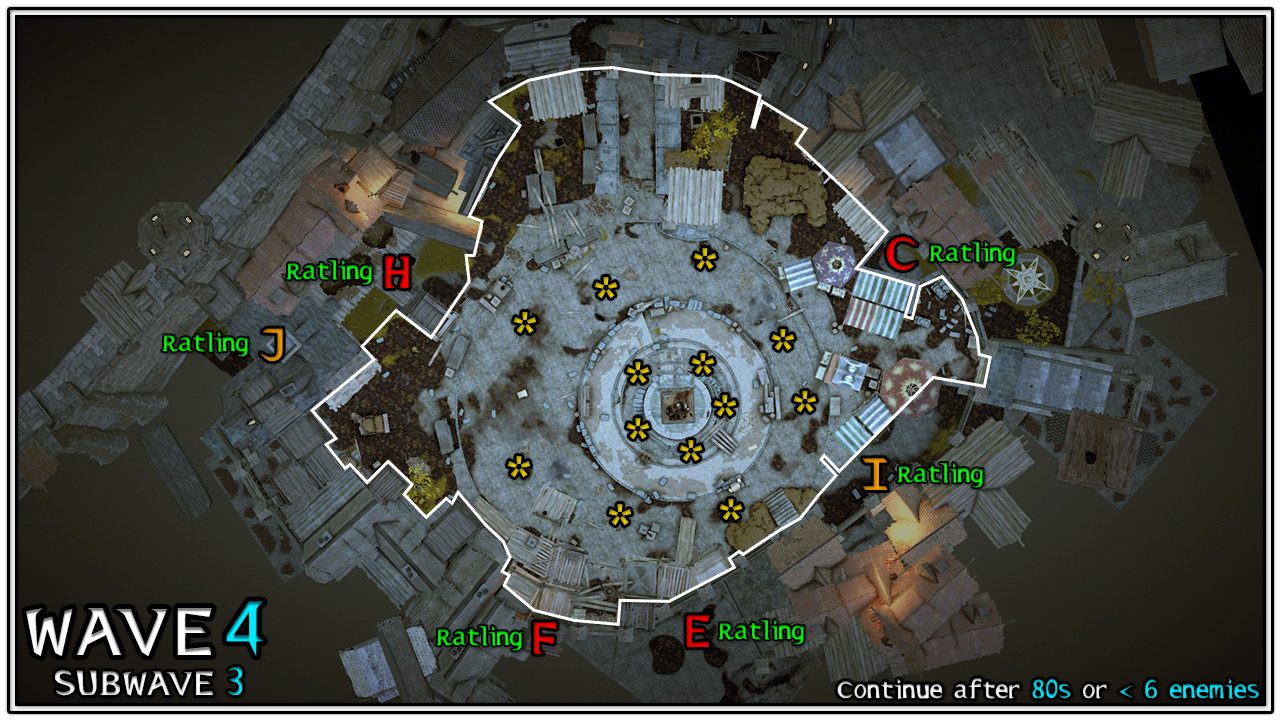
Strategy
As long as you have decent special snipers, and a frontline capable of keeping the horde off of them, you can make anything work here. Holding at Planks can break a lot of Ratling Gunner sightlines, so positioning up there could be worth trying out if you're struggling.
- Wave 4.4 (Subwave 4)
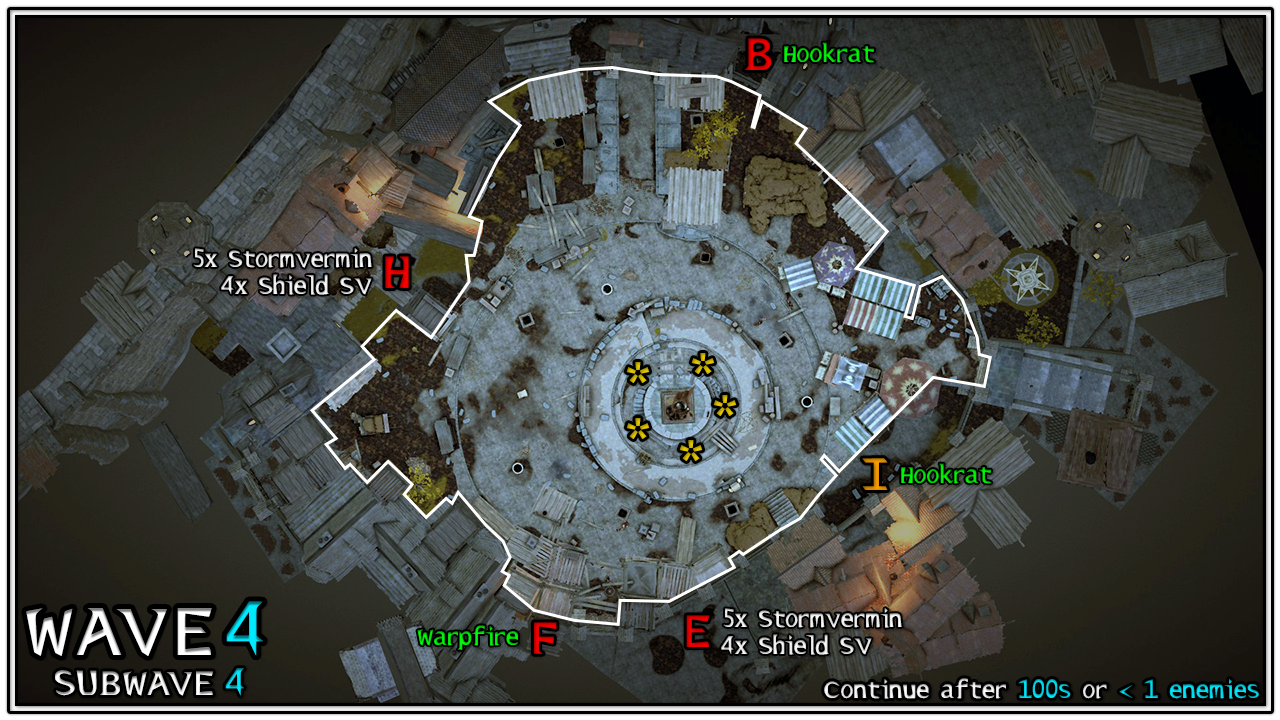
Strategy
Same as some of the previous subwaves, divide and conquer. Eliminate the Stormvermin coming from H first by positioning at the Corner or near Planks.
Final subwave for Wave 4. Players are able to reset their wounds by intentionally dying now and respawning in the next wave.
Wave 5
- Wave 5.1 (Subwave 1)
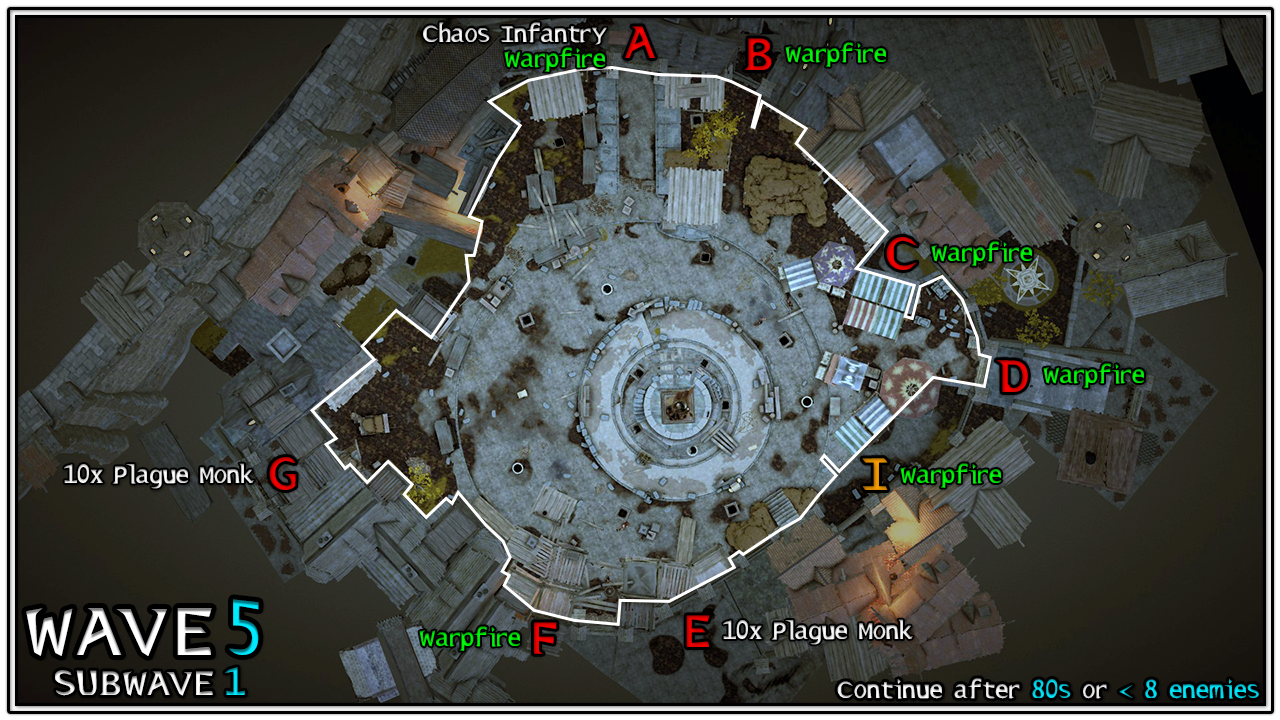 Strategy
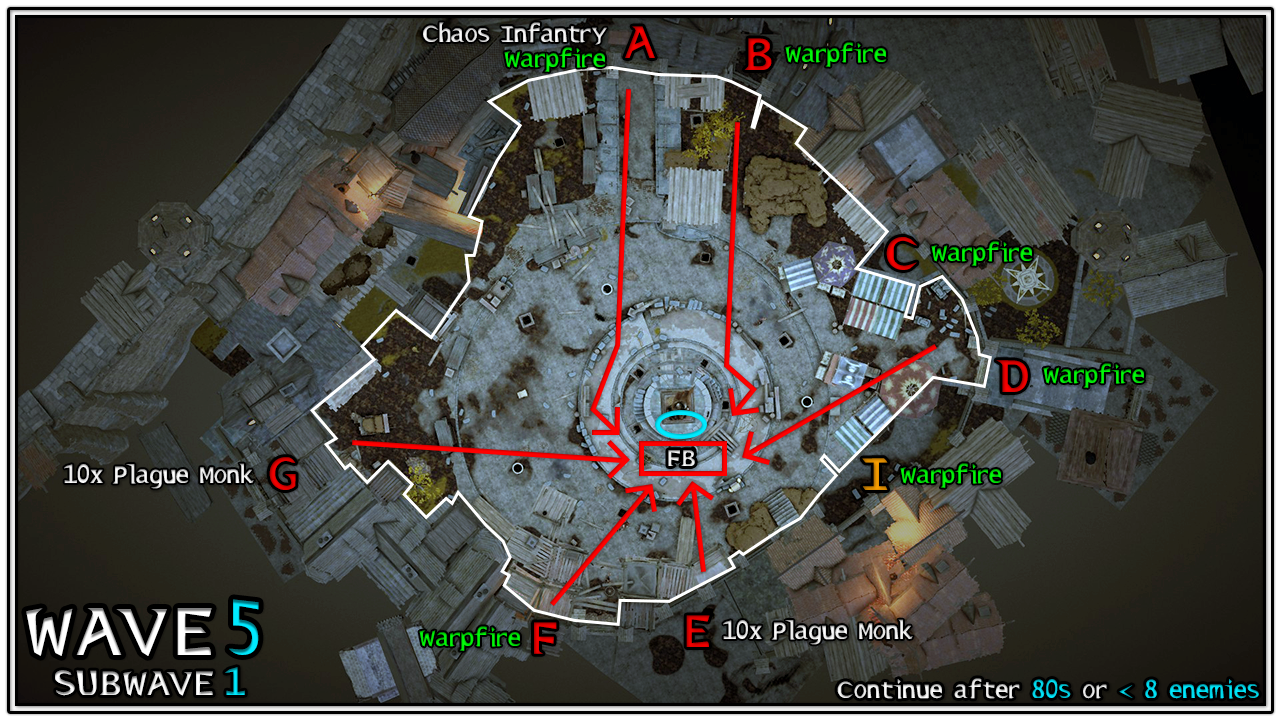 This entire subwave can be killed with a single well placed firebomb (as indicated by FB on the map).
The whole team should move to the southern edge of the Statue (the side without the glyph) and hold (see: blue circle on the map). No enemies can path there, but they can still hit you so make sure to block! This will pool the enemies in front of you, which happens to be perfect for a firebomb.
It's important to have a special sniper kill the Warpfire's since they can still melt you whilst you're in this spot.
- Wave 5.2 (Subwave 2)
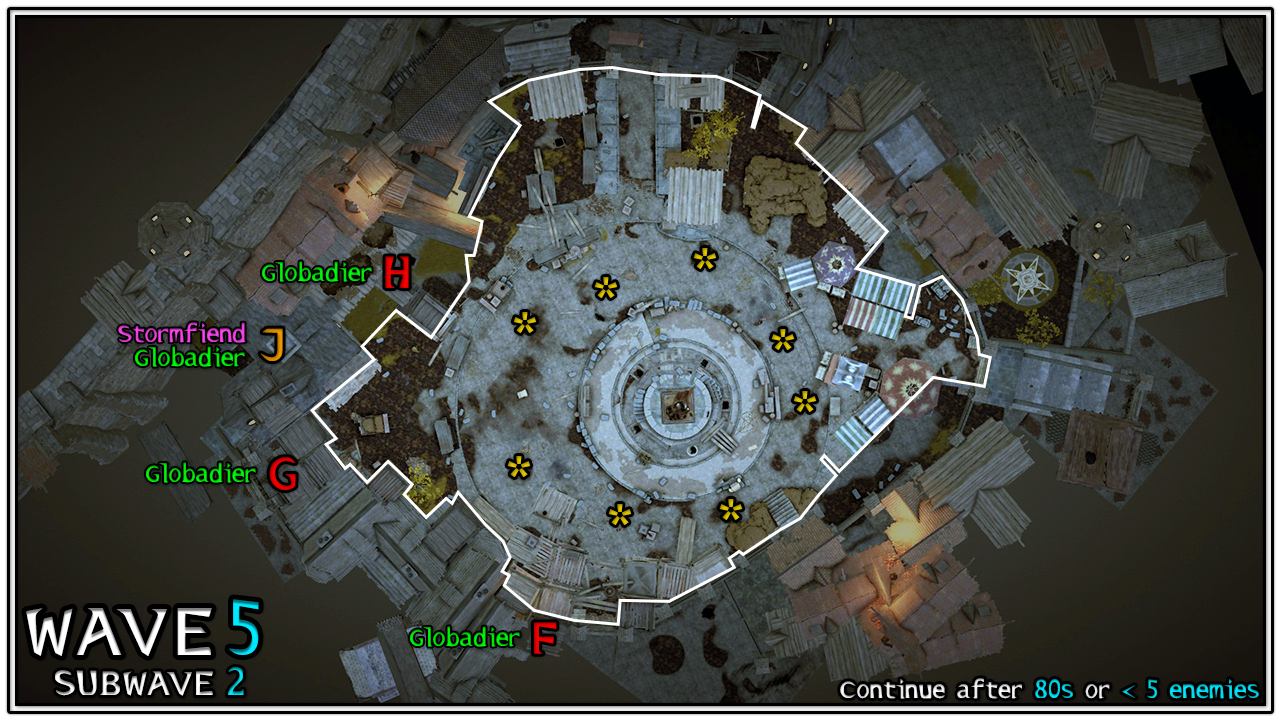 Strategy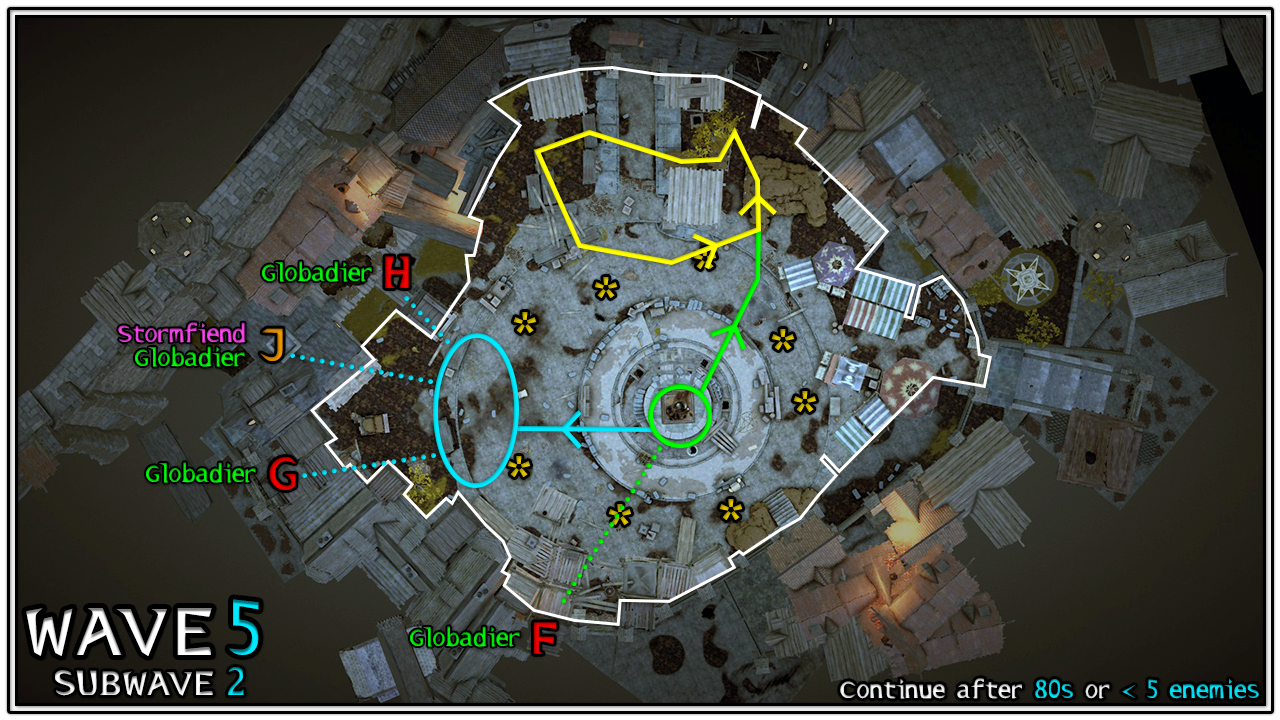
This strategy is essentially the same as Wave 1 Subwave 2 (the Rat Ogre wave), and continues immediately on from the previous subwave once everything has been killed by the firebomb. Blue:
- 3 players, move to the Corner.
- Deal with the Skaven Infantry on the way, whilst also quickly dispatching the Globadiers at G, H, and J.
- Kill the Stormfiend.
- 1 player, stay at the Statue.
- Kill the Globadier at F.
- Run north to start kiting the Skaven Infantry with the yellow kite route. Keeping them alive will provide your team with tons of time to handle the Stormfiend.
- Wave 5.3 (Subwave 3)
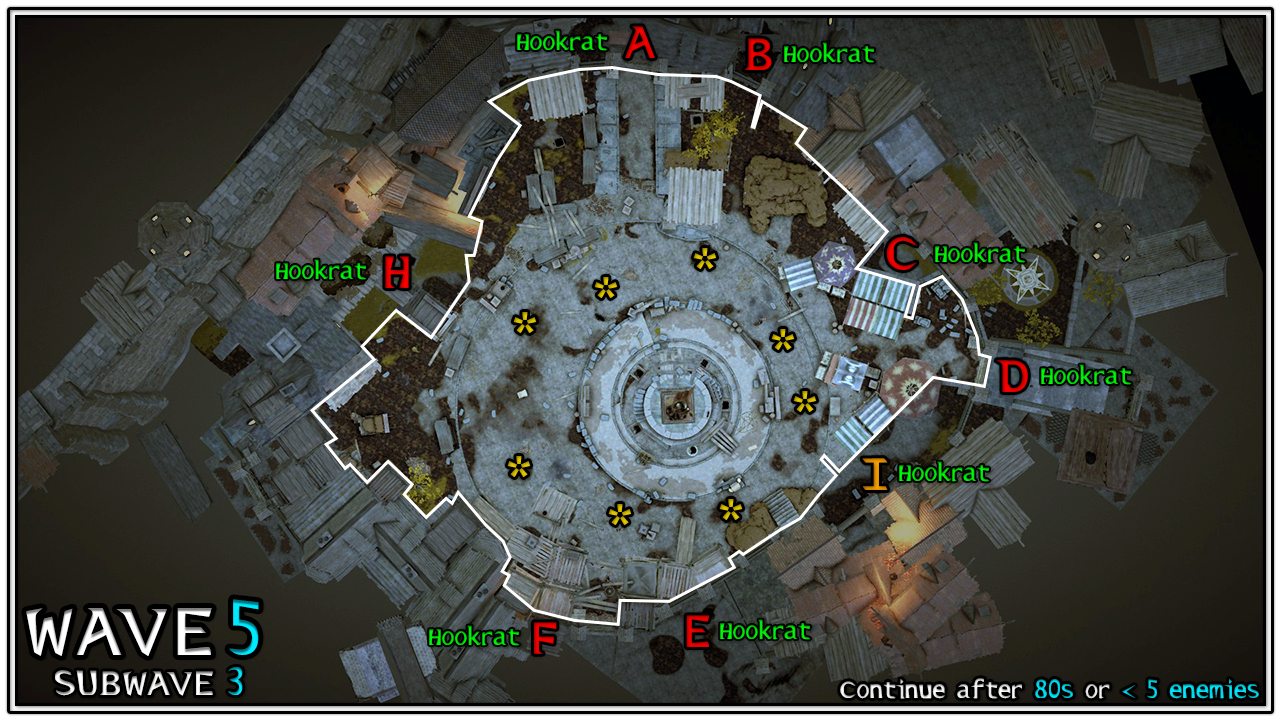
Strategy
Everyone regroup at the Corner and hold. You should be able to deal with the rest of Wave 5 quite comfortably here.
- Wave 5.4 (Subwave 4)
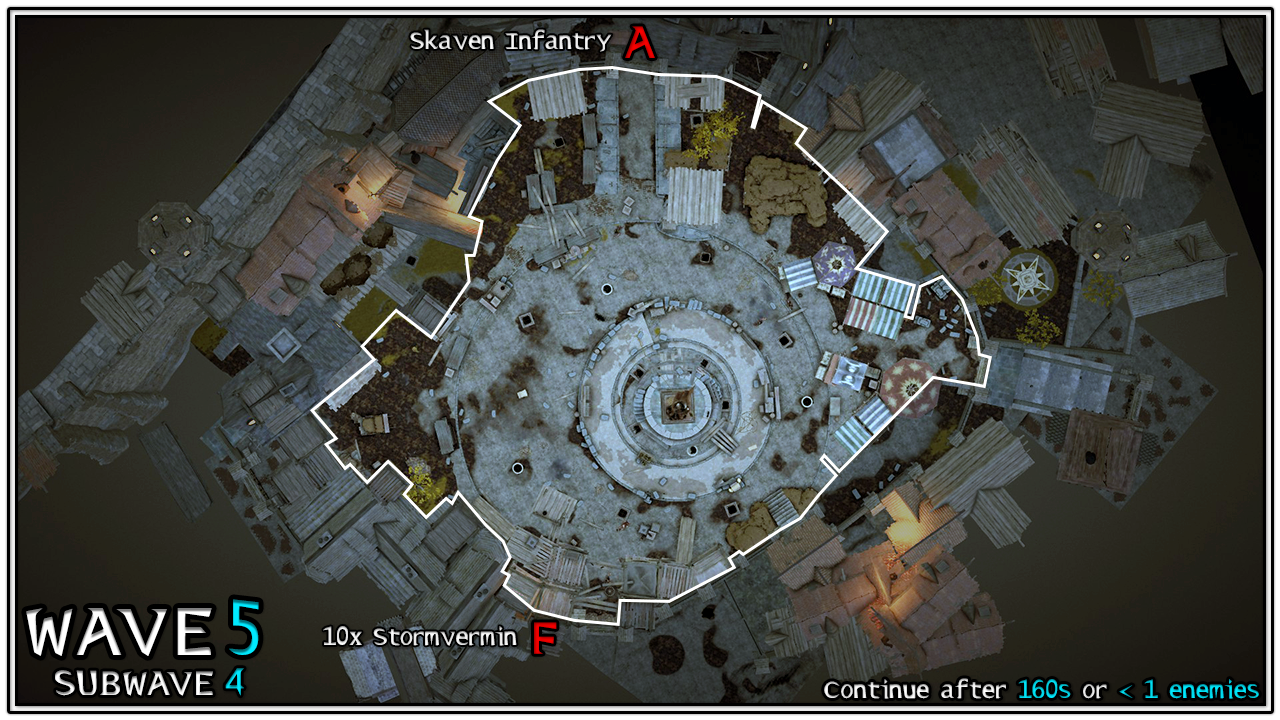
Strategy
Continue holding at the Corner.
Players can intentionally kill themselves, when there's only 1 Stormvermin left, to reset their wounds by respawning at the start of the next wave.
Wave 6
- Wave 6.1 (Subwave 1)
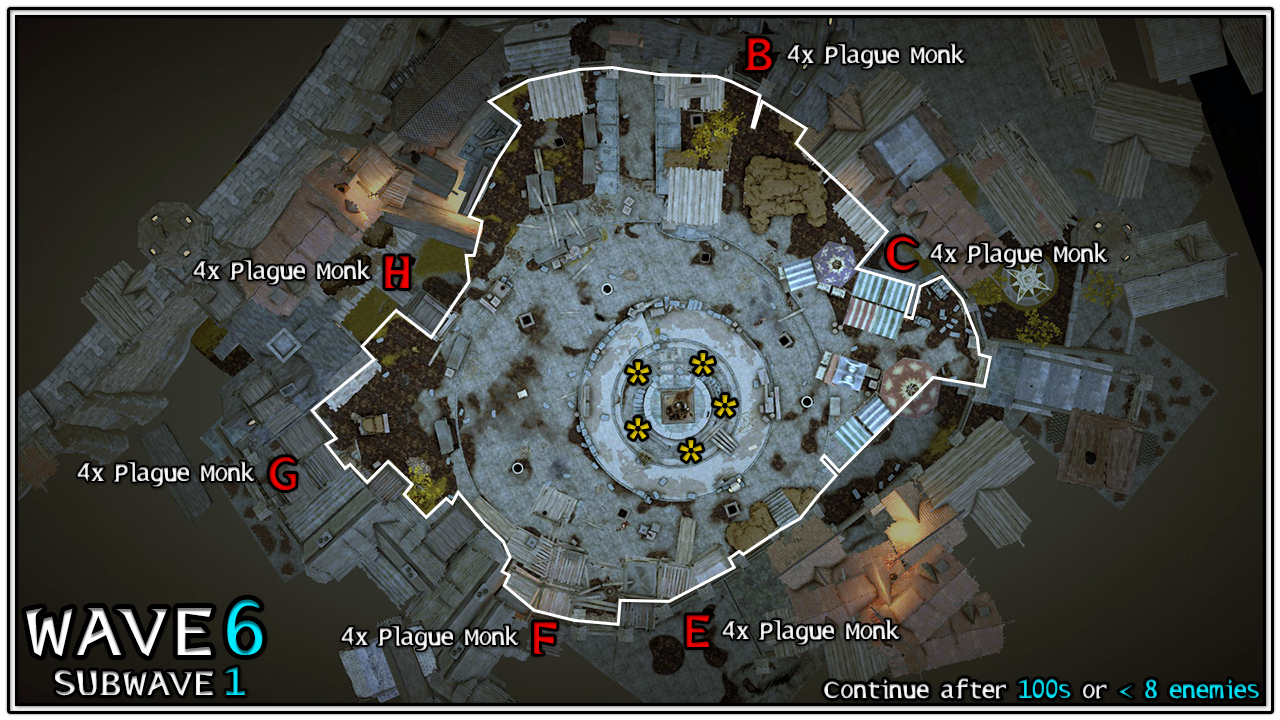
Strategy
As long as everyone on the team is together, this subwave shouldn't be a problem. A single firebomb will kill everything if they're grouped up, but using supplies shouldn't be necessary.
Holding at Planks will set you up nicely for a firebomb, otherwise holding at the Corner is fine too.
The Statue firebomb strategy from Wave 5 Subwave 1 can be used here as well, and is recommended if players had to respawn.
- Wave 6.2 (Subwave 2)
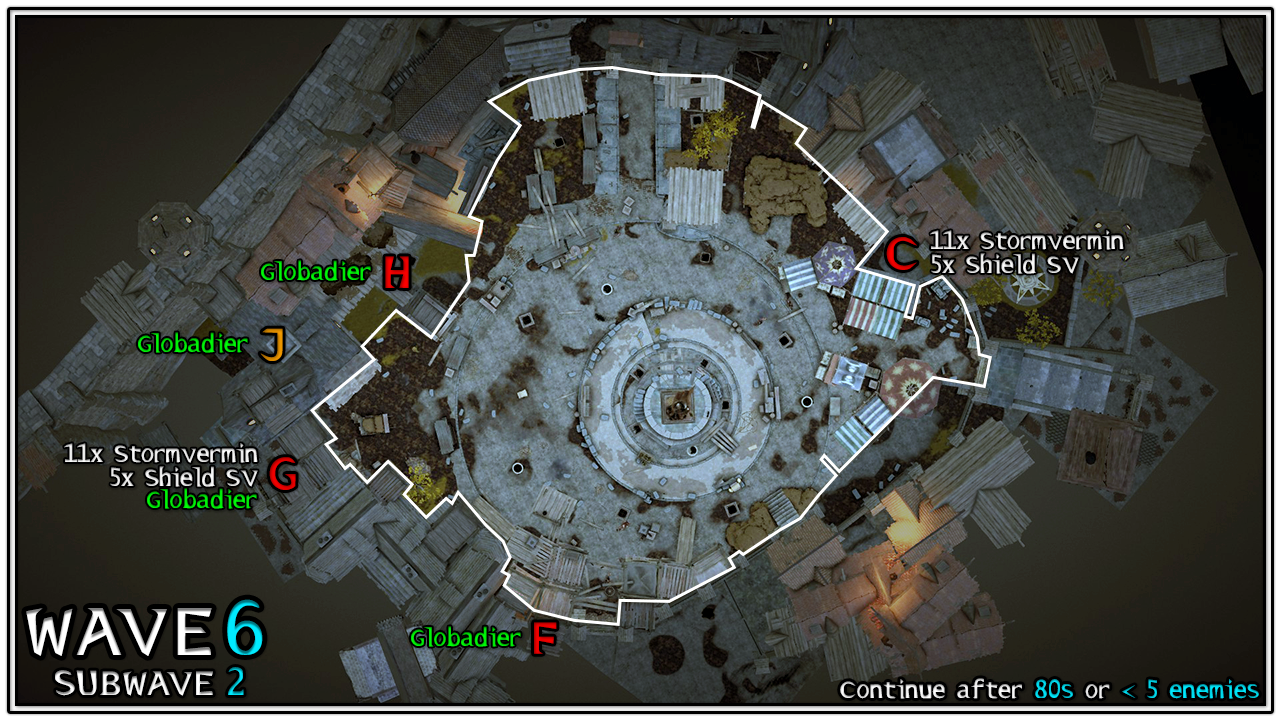
Strategy
Holding at the Corner makes the most sense to quickly deal with half of the Stormvermin, but the Globadiers will spice things up a bit so keep that in mind.
- Wave 6.3 (Subwave 3)
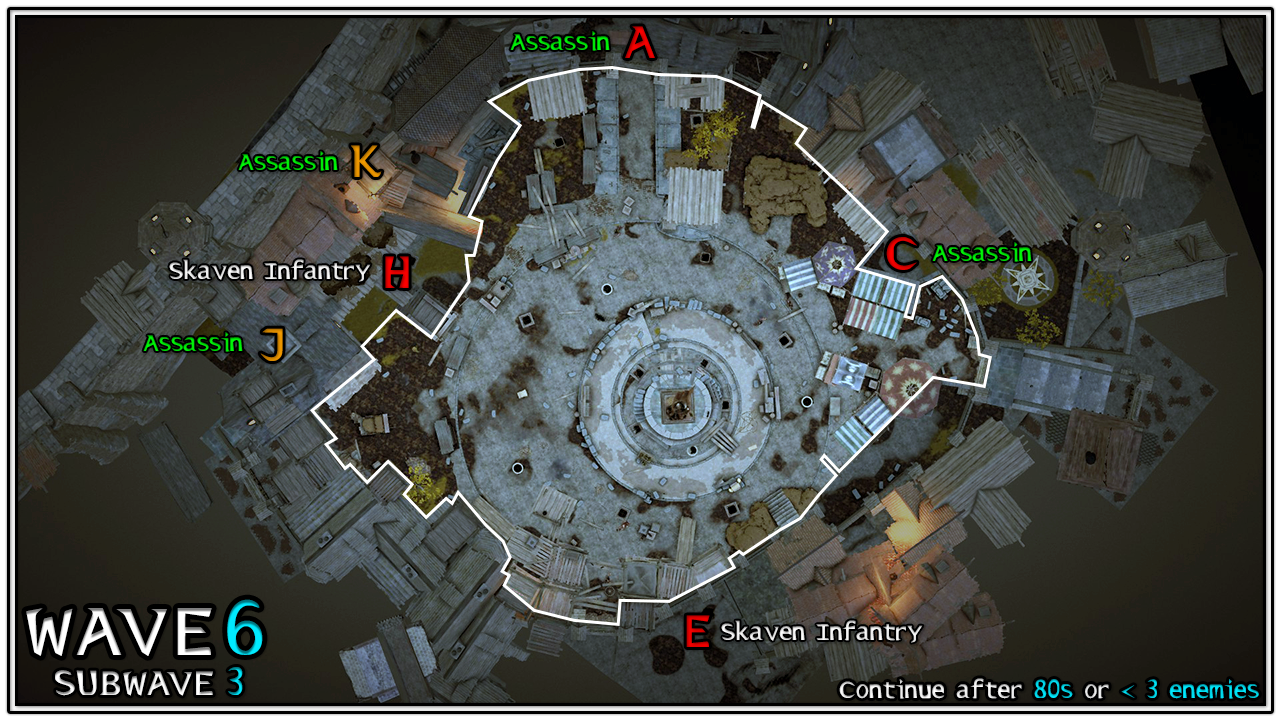
Strategy
Holding at the back of the Scaffolding, behind/below the drop-down for enemies coming from F, is ideal for the rest of Wave 6. This breaks line-of-sight for the Assassins in this wave.
- Wave 6.4 (Subwave 4)
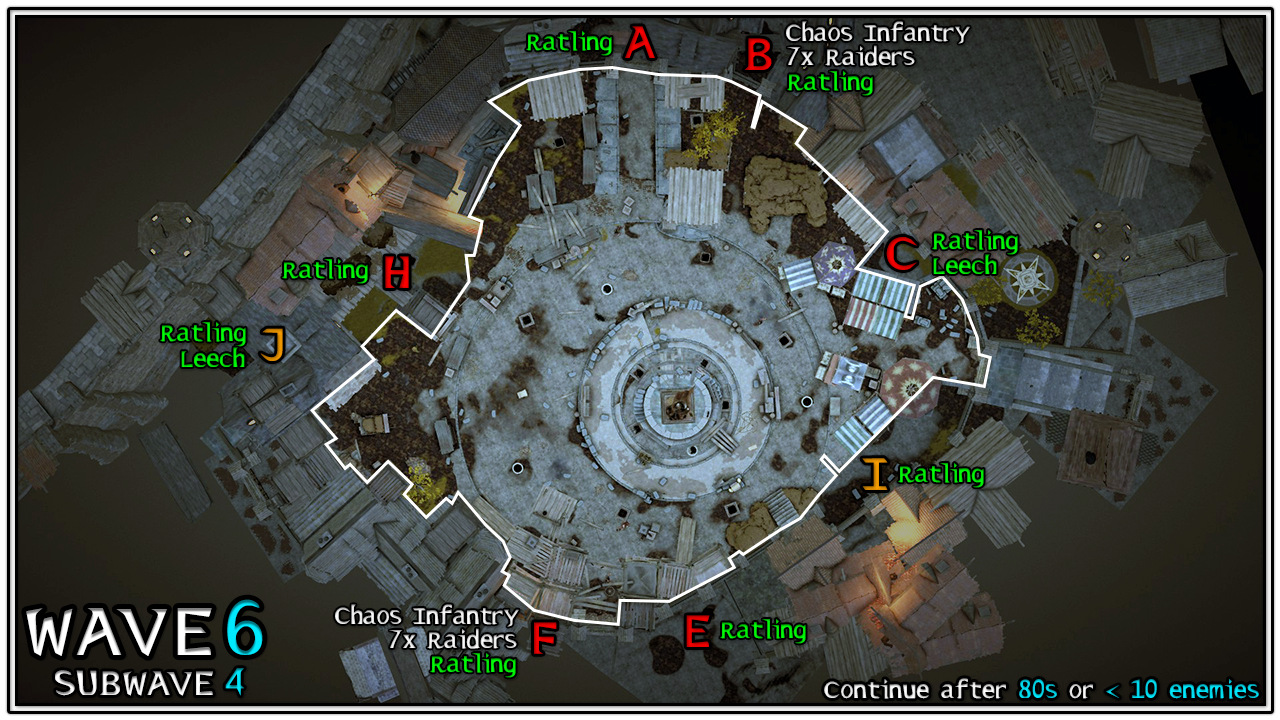
Strategy
Continue holding at the back of the Scaffolding just like Subwave 3. This breaks line-of-sight on the Ratling Gunners. Not enough Elites and Chaos Infantry are thrown at you for DPS-ing to be a concern either, but a single bomb or potion should make it a breeze if you're not confident.
- Wave 6.5 (Subwave 5)
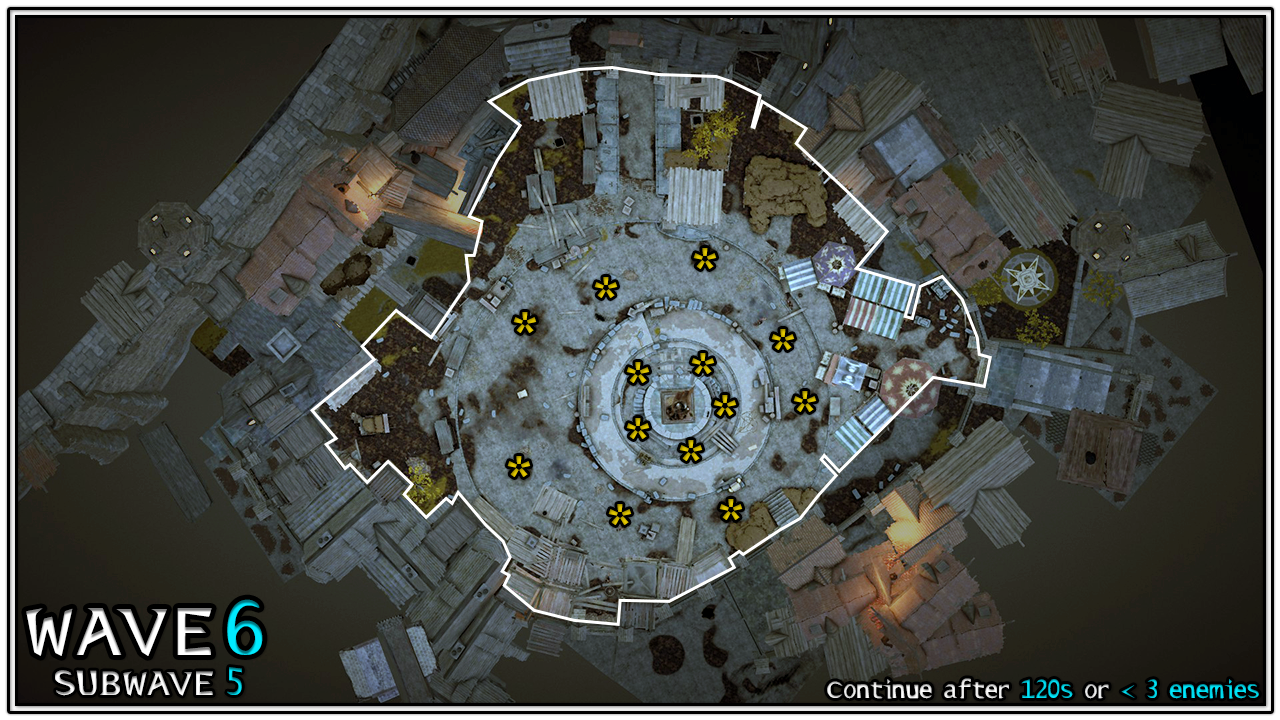
Strategy
It's just Skaven Infantry, you should be able to get away with doing anything in this subwave.
This is the final subwave for Wave 6, feel free to die to reset your wounds by respawning in Wave 7.
Wave 7
- Wave 7.1 (Subwave 1)
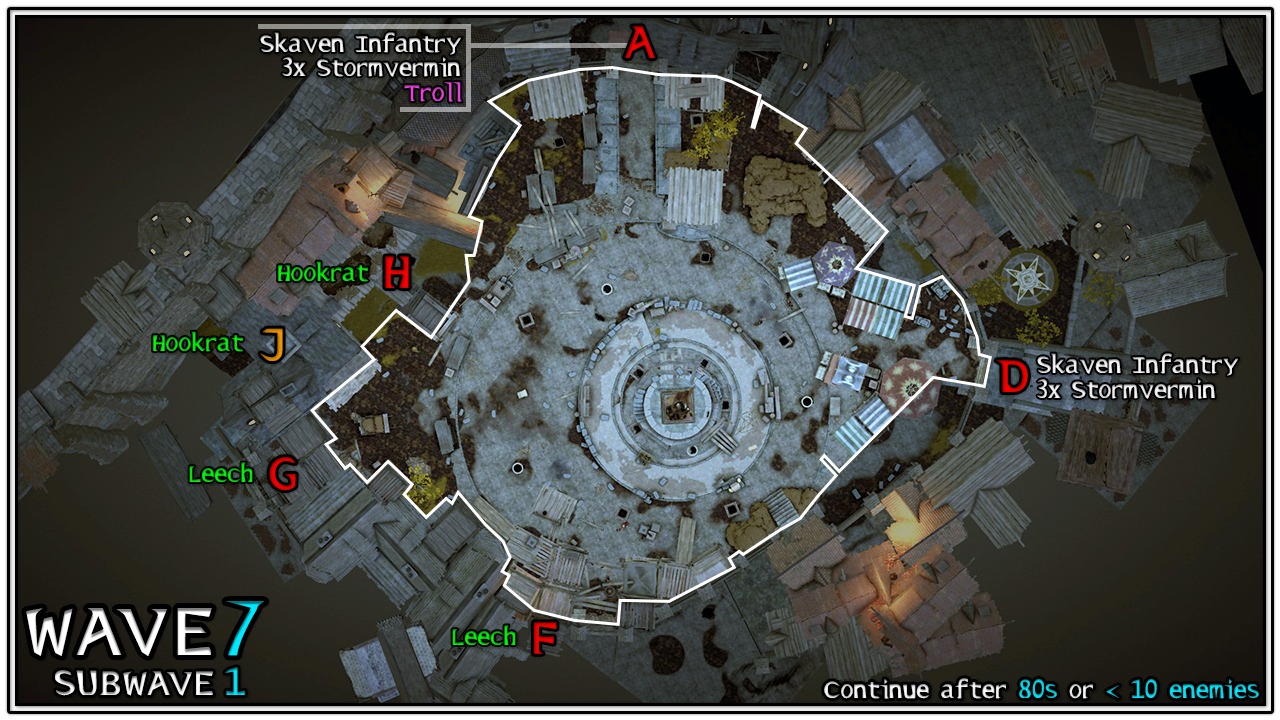 Strategy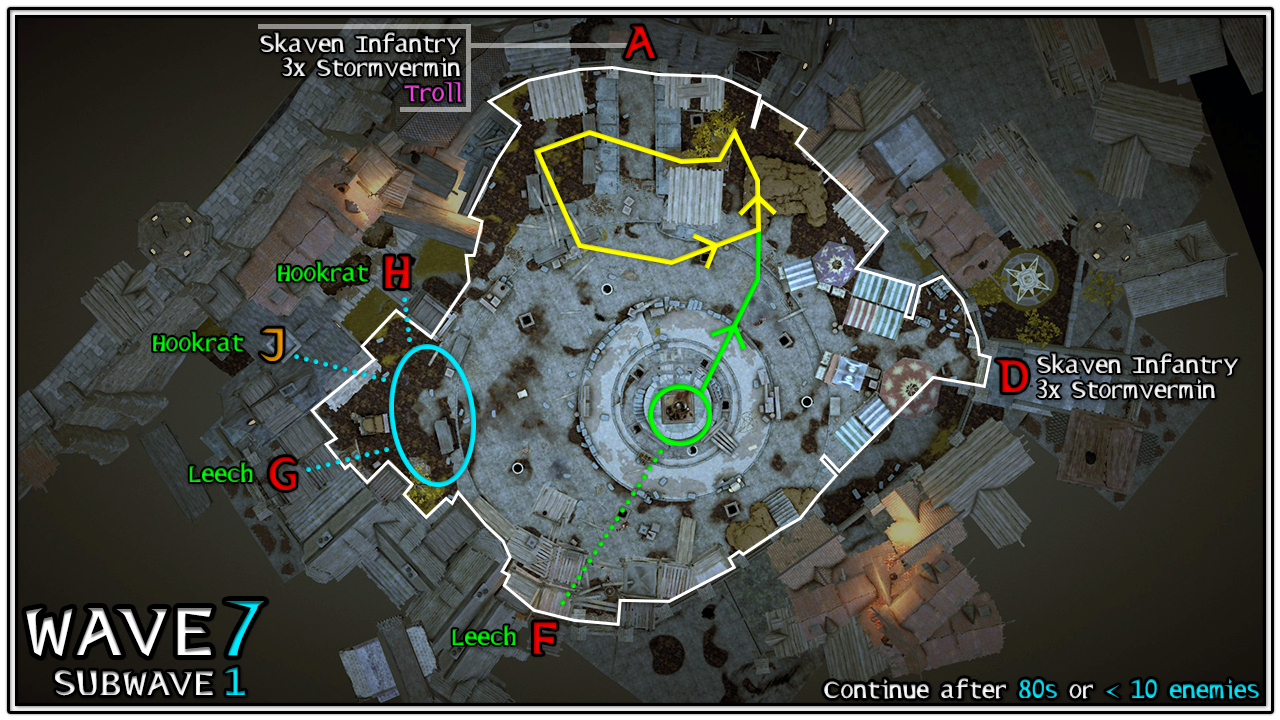
Very similar strategy to Wave 1 Subwave 2 (Rat Ogre), and Wave 5 Subwave 2 (Stormfiend). Blue:
- 3 players, hold in the Corner.
- Kill the nearby Special spawns.
- Pull aggro of the Troll and kill it.
- 1 player, start at the Statue.
- You should be able to kill the Leech at F when the subwave begins. Not a huge deal if you can't because the rest of your team should be able to manage it.
- Move north to kite the Skaven Infantry and Stormvermin coming from A and D, keeping them alive so your team has as much time as possible to DPS the Troll safely.
- Wave 7.2 (Subwave 2)
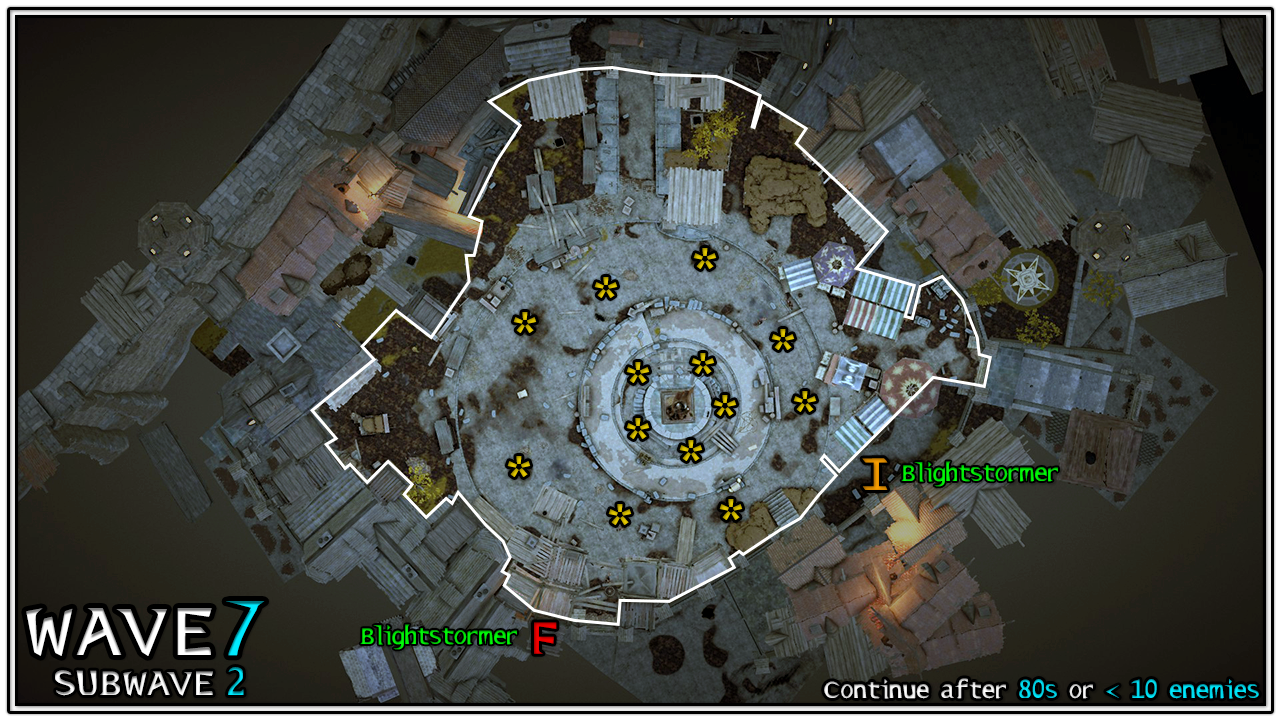
Strategy
Hold at the Corner. This will set you up nicely for the next subwave.
- Wave 7.3 (Subwave 3)
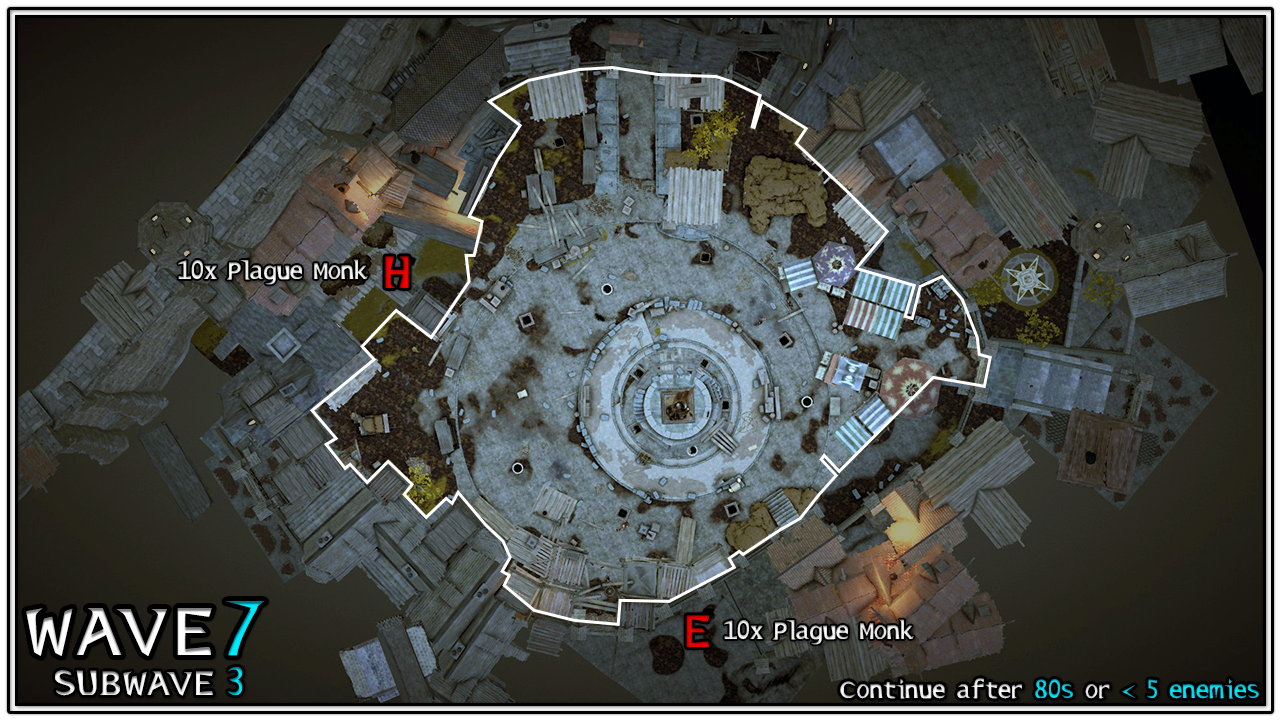
Strategy
Hold at Planks near H. This will allow you to kill half of the Plague Monk spawns early before the rest coming from E arrive.
- Wave 7.4 (Subwave 4)
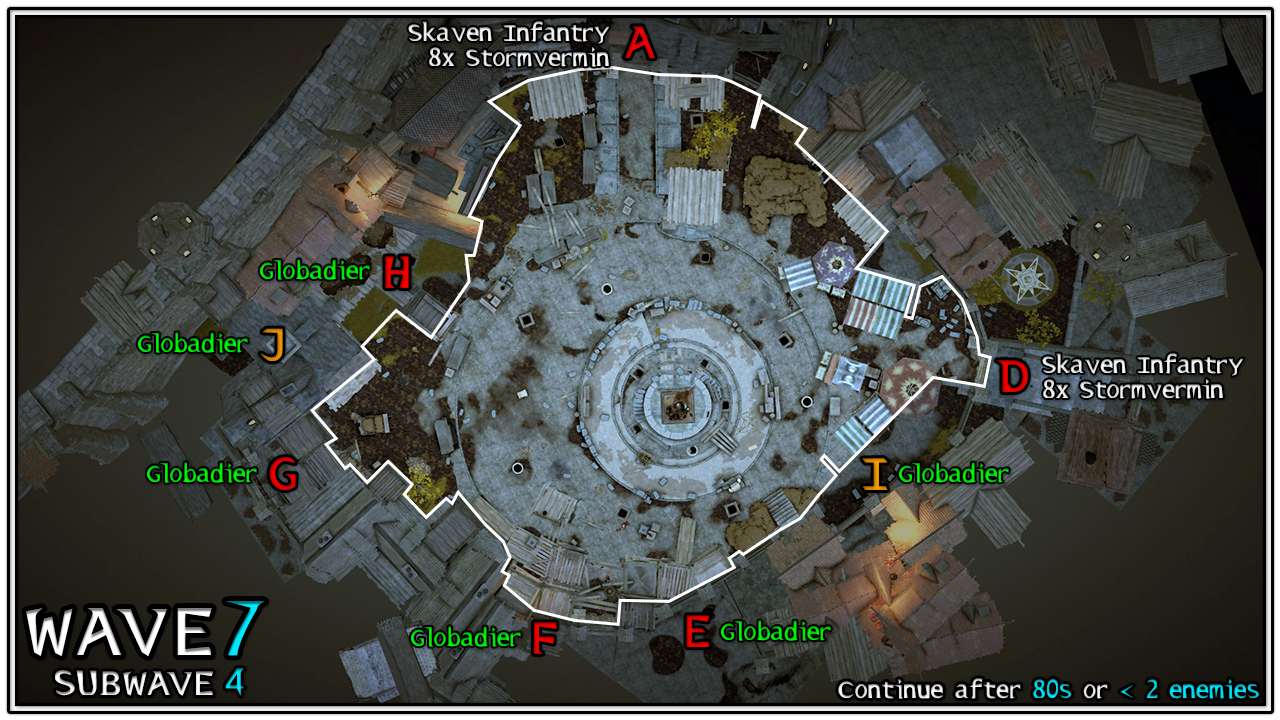
Strategy
Continue holding at Planks. Try and meet the Stormvermin coming from A to kill them before the rest spawned at D turn up.
One player (special sniper with stealth) can start moving towards the Statue to start preparing for the strategy explained in Subwave 5. It could be worthwhile doing this at the start of this subwave to make it easier to deal with the Globadiers.
- Wave 7.5 (Subwave 5)
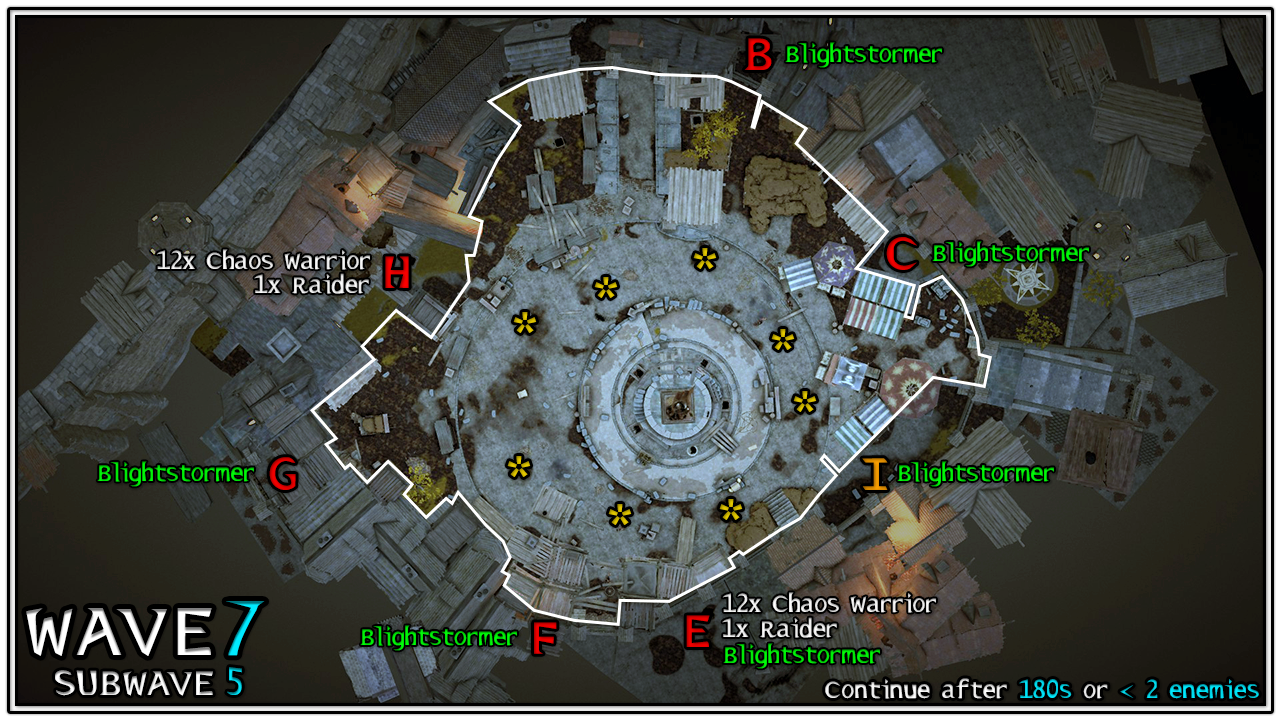 Strategy
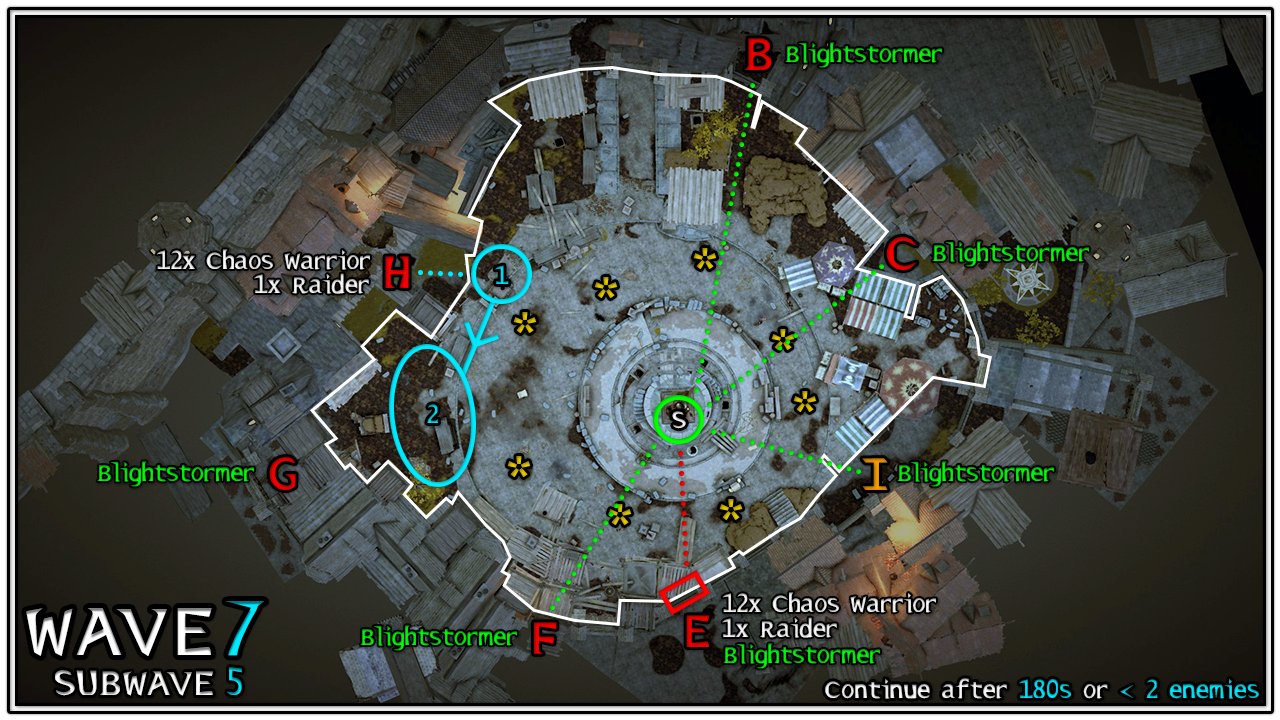 This wave is where having a Ranger Veteran comes in clutch, since an experienced player can essentially solo all the Blightstormers and Chaos Warriors.
Green:
This wave is where having a Ranger Veteran comes in clutch, since an experienced player can essentially solo all the Blightstormers and Chaos Warriors.
Green: - 1 player, hold at Statue.
- A stealth hero (S) will have line-of-sight on pretty much all of the Blightstormers in this wave, and stealth allows them to kill them fairly hassle free.
- The Chaos Warrior wave that spawns at E can be killed with a single Strength Potion and Bomb by throwing it at the wall highlighted in red once you hear movement. It may take some practice since the enemies don't spawn immediately, but even if all of the enemies aren't killed it will make the subwave much easier for your team.
- 3 players, continue to hold at Planks (1).
- Kill the spawns coming from H as quickly as possible. Using a potion can help with DPS.
- Move to the Corner (2) and hold the rest of the wave there. It's also where you'll want to be for the beginning of Wave 8.
Final subwave for Wave 7. Players are able to reset their wounds by intentionally dying now and respawning at the start of the next wave.
Wave 8
- Wave 8.1 (Subwave 1)
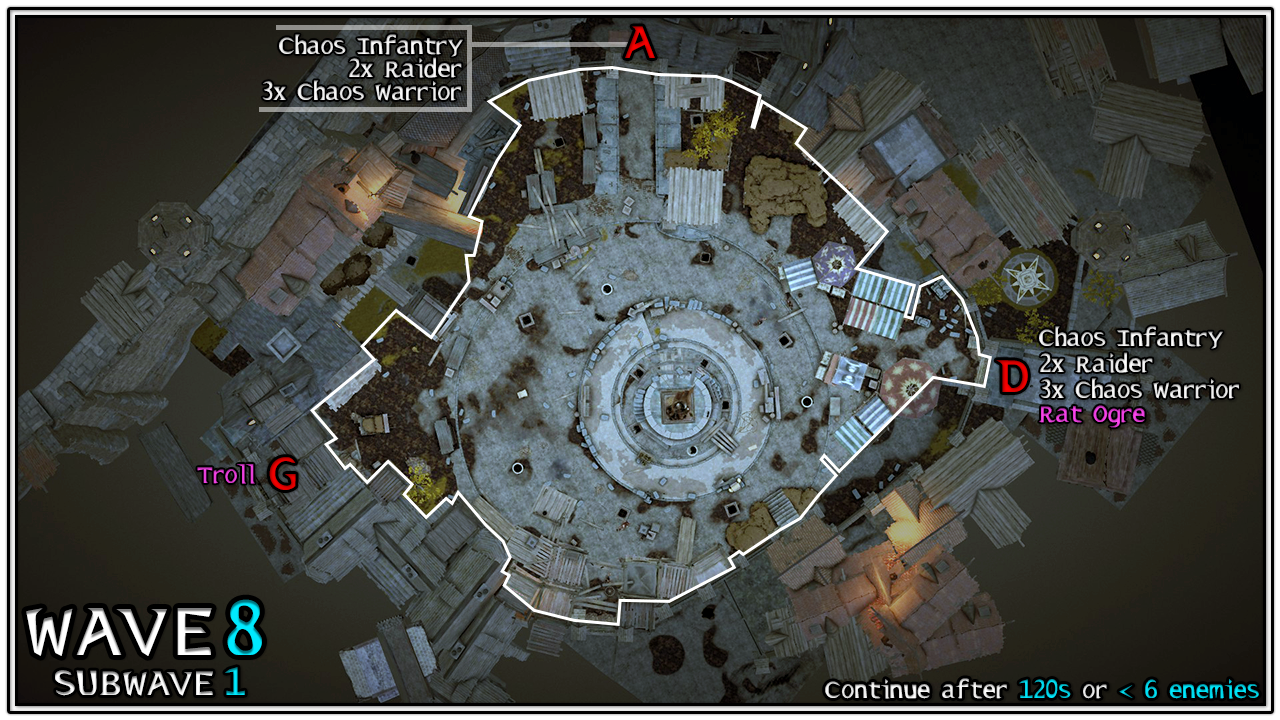 Strategy
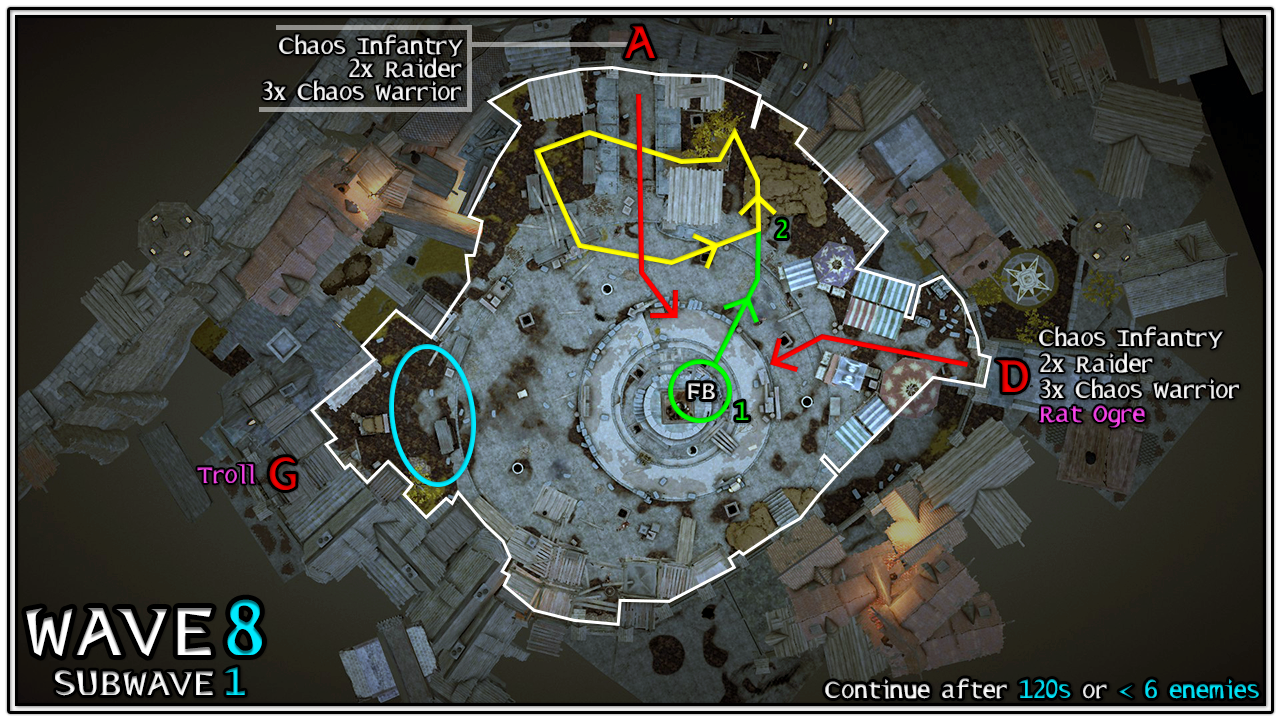 Similar strategy to Wave 1 Subwave 2 (Rat Ogre), Wave 5 Subwave 2 (Stormfiend), and Wave 7 Subwave 1 (Troll).
Blue:
Similar strategy to Wave 1 Subwave 2 (Rat Ogre), Wave 5 Subwave 2 (Stormfiend), and Wave 7 Subwave 1 (Troll).
Blue: - 3 players, positioned at the Corner.
- Kill the Troll.
- Once the Troll has been dealt with, use ranged weapons to damage the Rat Ogre to grab aggro and pull it into the Corner to kill it safely.
- 1. Hold at the Statue until the enemies from A and D close in on you. Let them pool up very briefly, then throw a firebomb (FB) at the ground and it should kill the majority of them. This should leave the Chaos Warriors alive to kite.
- 2. Make sure the Rat Ogre is aggro-ed to you and start to kite using the yellow kite route. This will give the rest of your team enough time to safely DPS the Troll, and then eventually grab aggro of the Rat Ogre, whilst you continue to kite the Chaos Warriors.
Make sure everyone is together when both of the bosses are dead.
- Wave 8.2 (Subwave 2)
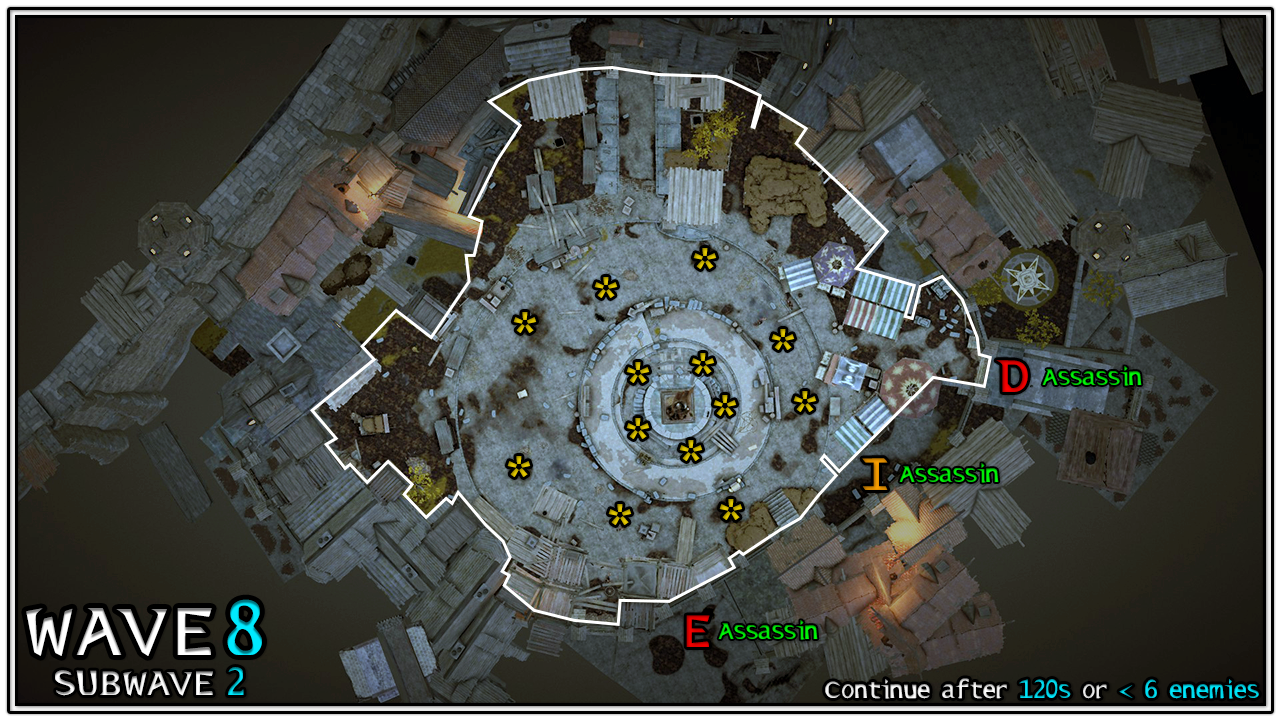
Strategy
I'd suggest holding at Planks since that will set you up well for the next subwave.
- Wave 8.3 (Subwave 3)
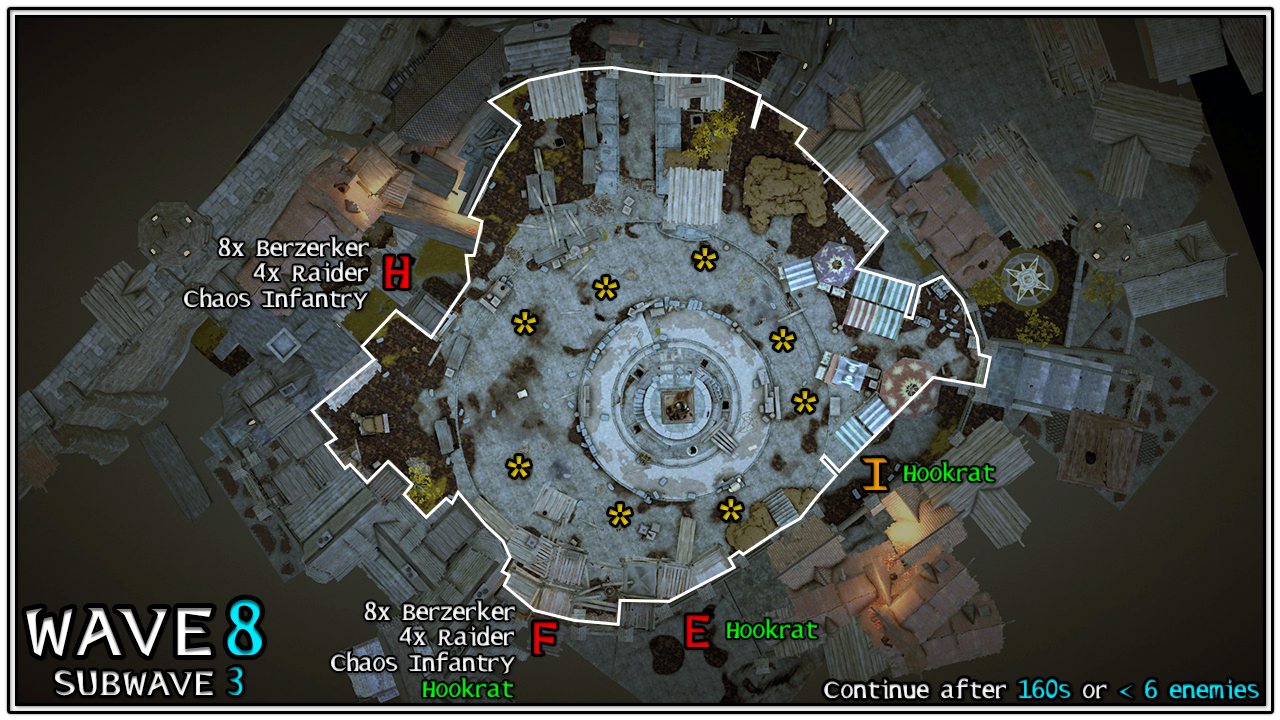
Strategy
Hold at Planks, near H, because it will allow you to kill half of the Berserker and Raider spawns before the rest coming from F arrive.
This also gives you a good line-of-sight on the Hookrats since they spawn on the opposite side of the map. One player can sit on top of Planks and snipe them as they get closer.
- Wave 8.4 (Subwave 4)
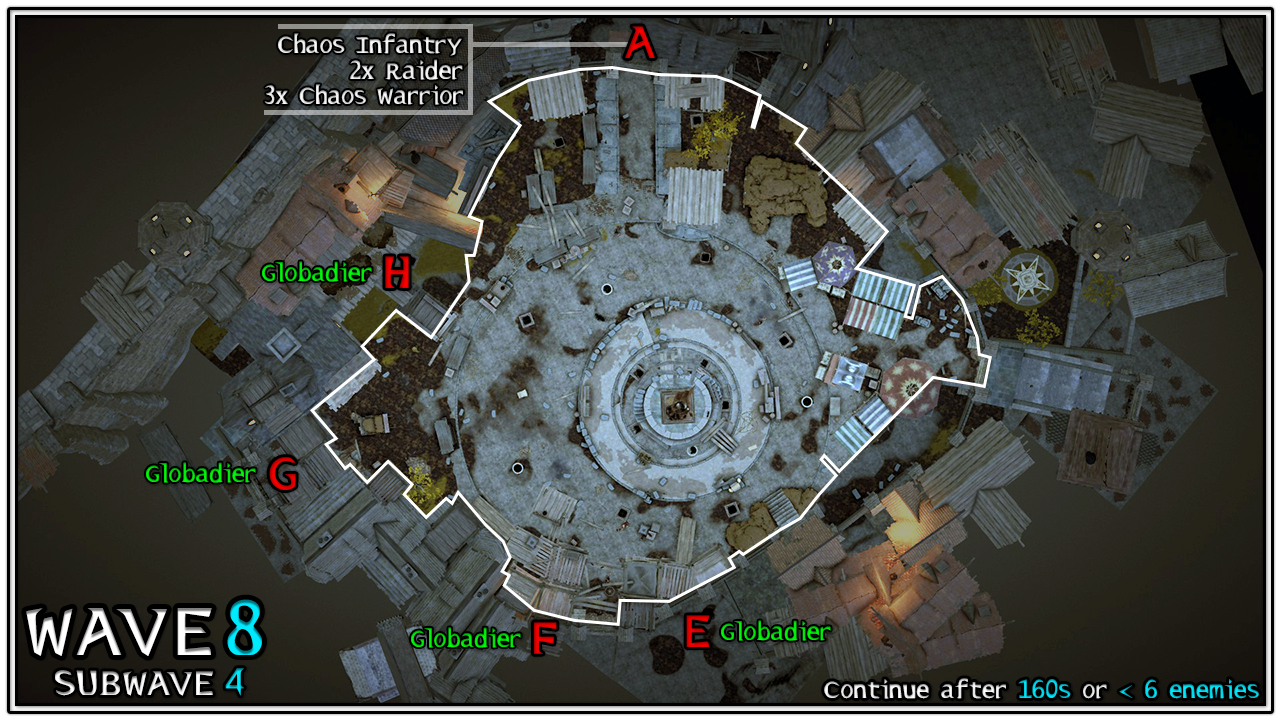
Strategy
The entire team can hold at Planks and meet the enemies spawned at A to kill them. These players should then make their way towards the Corner in preparation for Subwave 5.
One player can sit on top of Planks, or the Statue if they are going to kite in Subwave 5, and kill the Globadiers.
- Wave 8.5 (Subwave 5)
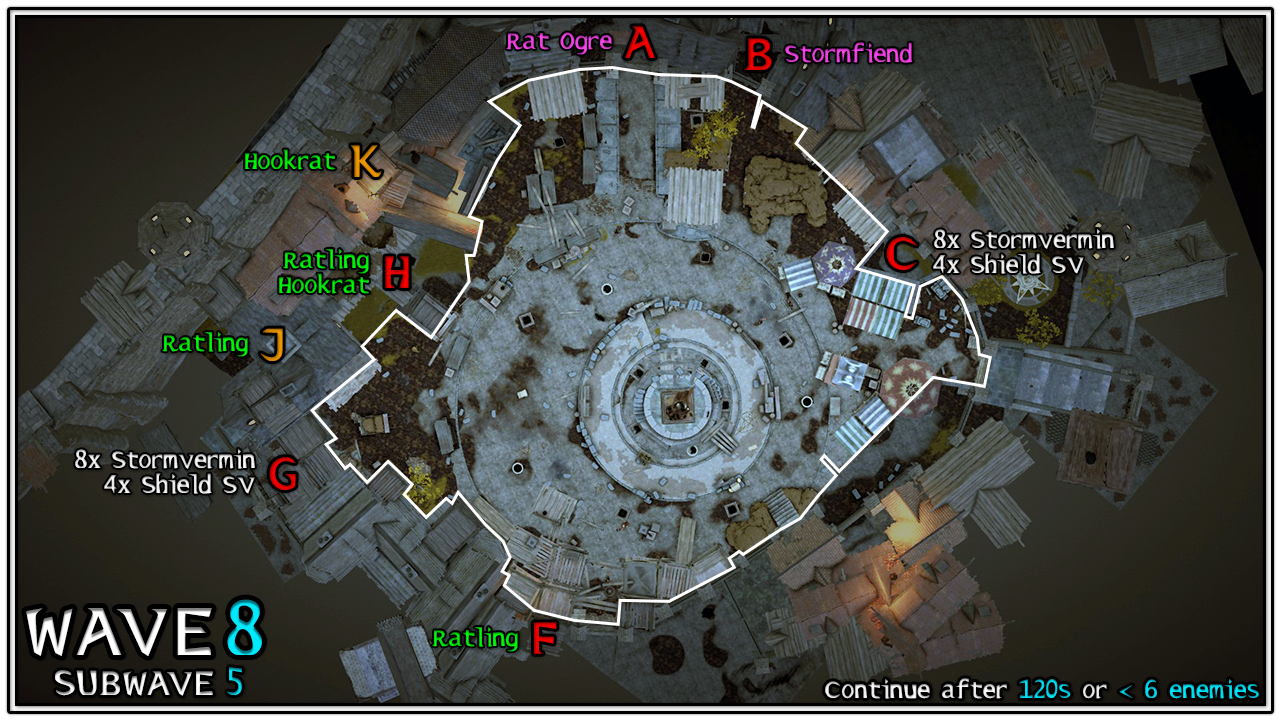 Strategy
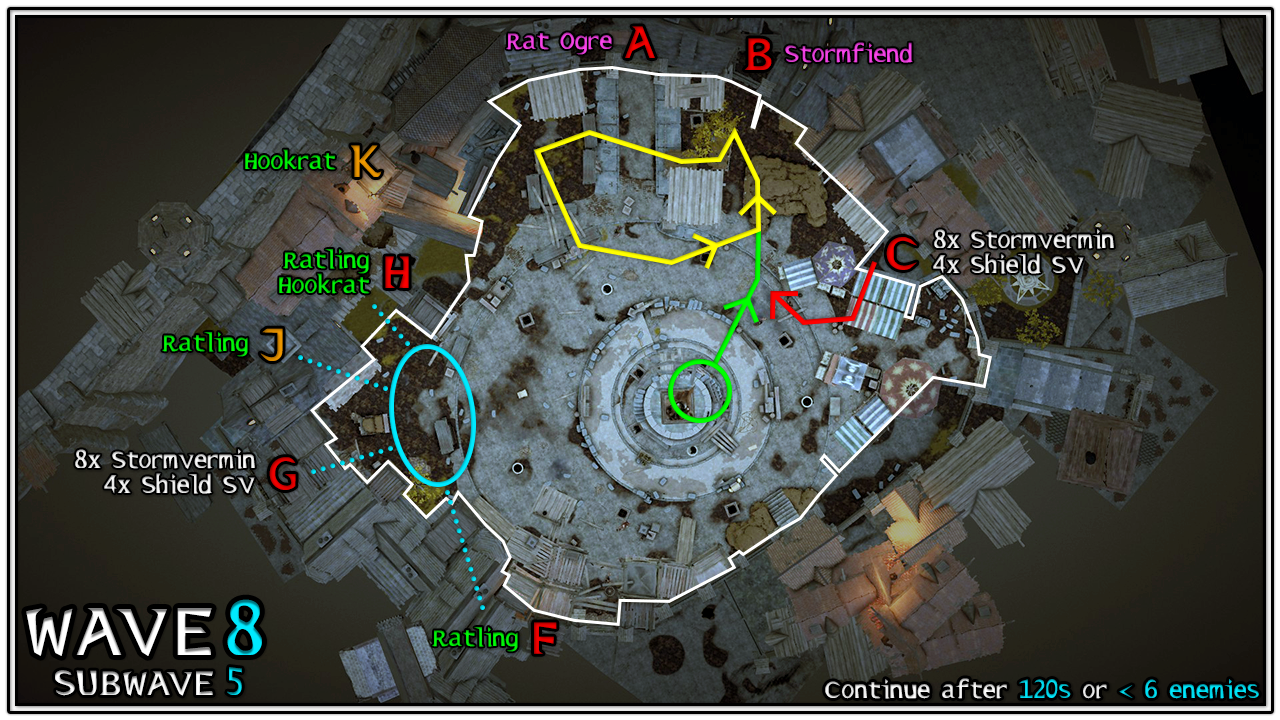 Pretty much the same strategy used in the first double-Monster subwave in Wave 8.
Blue:
Pretty much the same strategy used in the first double-Monster subwave in Wave 8.
Blue: - 3 players, hold at the Corner.
- Kill everything that spawns nearby (F, G, H, J, and K). Use supplies if you struggle to kill the Stormvermin quickly. It's very important all the Specials are elimitated as soon as possible, especially the Hookrat that spawns at K so it doesn't disable your teammate kiting the Monsters and Stormvermin.
- Pull the Rat Ogre, and kill it.
- Kill the Stormfiend.
- 1 player, start at the Statue.
- Essentially the same strategy as the first double-boss subwave, except don't use a firebomb. Start to kite when you see the Stormvermin coming from C.
Both monsters can be dealt with at the same time if the team is confident and have the DPS, since the Stormfiend might kill some of the enemies being kited.
- Wave 8.6 (Subwave 6)
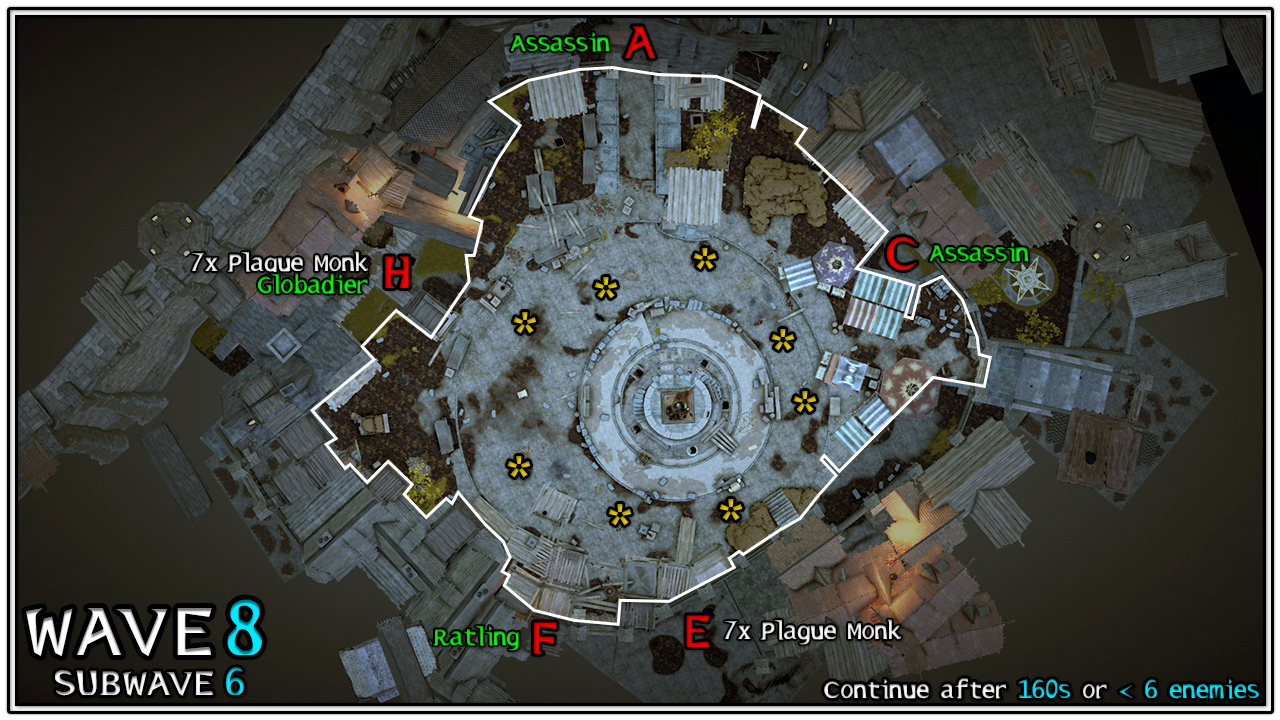
Strategy
At this point it's fairly smooth sailing, just hold as a team in the Corner and kill everything that comes your way.
If you've managed to clear Subwave 5 with everyone alive (or even if you've lost 1 player) then all you need to do is play Vermintide how you always have. DPS and stay on top of Specials and Elites to make sure your frontline doesn't crumble.
- Wave 8.7 (Subwave 7)
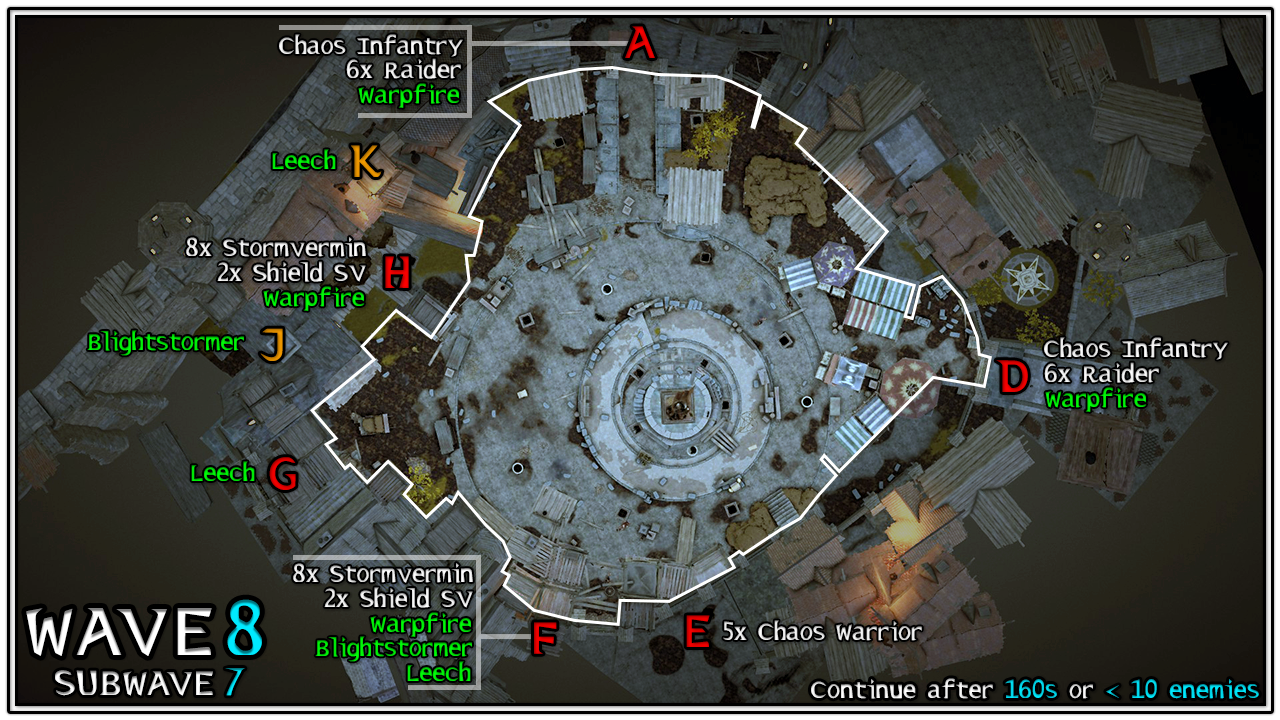
Strategy
This subwave might catch you off-guard. Use supplies if you still have them left.
Holding in the Corner can work, but you might get overwhelmed if you're not doing enough damage.
Planks might work better as a hold spot since that will limit Special sight-lines. You can even hold on-top of Planks, which is where I'd suggest a special sniper to sit anyway. Keep in mind the Chaos Infantry from A and D spawn before everything else.
Sitting on-top of Planks should make it easier to group up all the enemies to firebomb them as well.
The Statue can also be used for special sniping, similar to a lot of the previous waves.
Holding at Planks should set you up well for the next subwave.
- Wave 8.8 (Subwave 8)
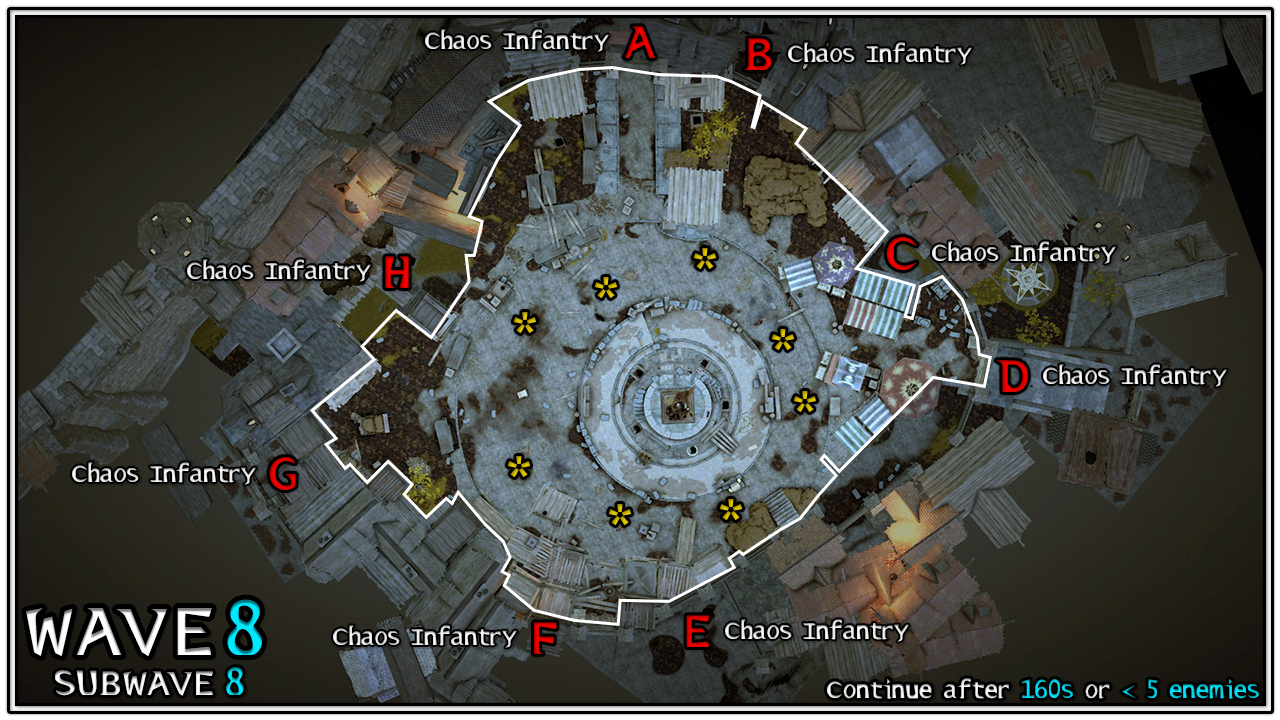
Strategy
Holding near A will leave you in a good position for the final subwave.
- Wave 8.9 (Subwave 9)
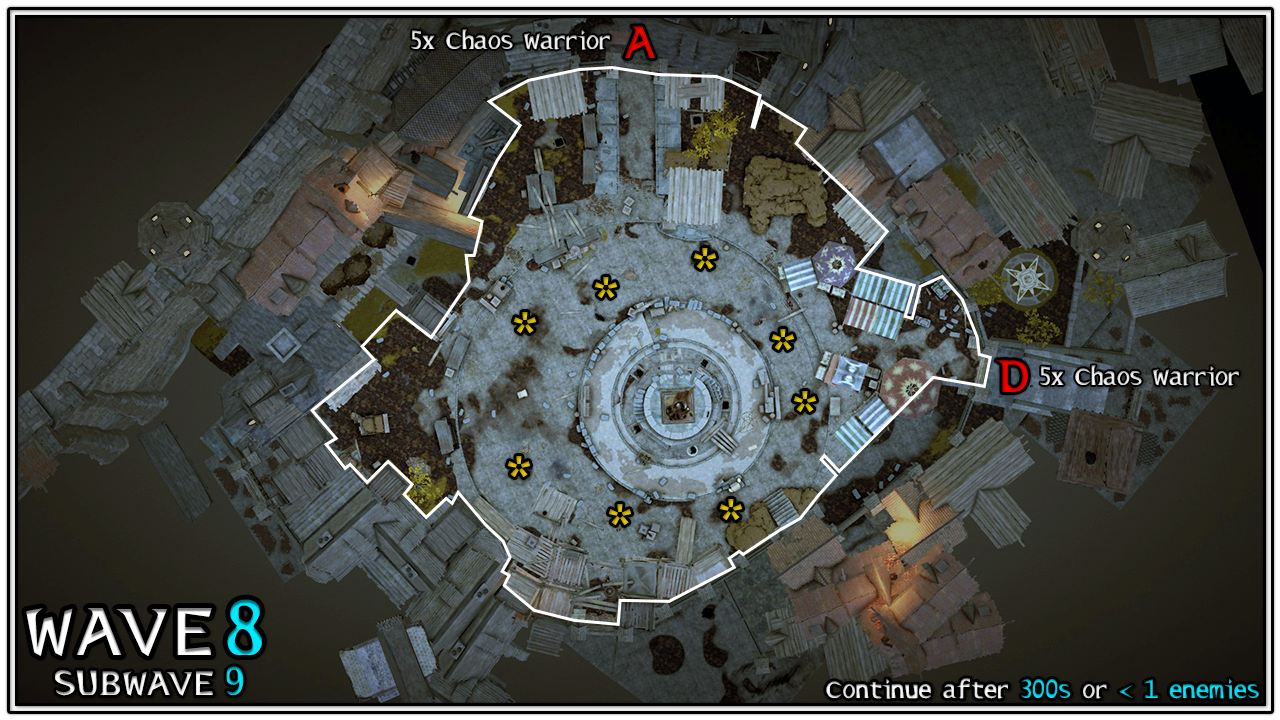
Strategy
If you were holding near A in the previous subwave, move to meet the Chaos Warrior wave that spawns there. Kill them while they're climbing.
Use the rest of your supplies on the Chaos Warriors if you have anything left.
That's it. Congratulations if you managed to get this far and complete Fortunes of War on Cataclysm!
Team Composition
- Ranger Veteran is an S tier pick because of the Scavenger talent. He can solo a ton of waves with well placed bombs and firebombs, whilst still providing good special sniping and Monster DPS with the Masterwork Pistol. His stealth is quite clutch at times as well. Every strategy shown in this guide suits the Ranger Veteran perfectly (the player separated into the Green group), and also guarantees enough supplies with Scavenger so you can use potions and bombs whenever there's a difficulty spike.
- Grail Knight is another good choice because of the Strength Potion quest, providing even more supplies. He can do a lot of DPS because of this, and running Proxy will provide a lot of value to your team throughout the run. Concoction is another good choice if you need more burst DPS, but in general you don't get as much value compared to Proxy. Value isn't really a huge concern for Cataclysm 1, so just use whatever works for you.
- Shade is one of the best DPS careers in the game. If you have a good Shade on your team you will be blasting through the monster waves very quickly. Her Elite DPS is incredibly valuable too, especially considering how stacked some of the later waves are. Stealth is also nice for special sniping too. Very versatile class because her DPS, and stealth enables the elf to get away with some absurd plays.
- Battle Wizard absolutely pumps DPS and provides incredible Special and Elite sniping with the Bolt Staff. The Coruscation Staff literally melts bosses, and considering just how small the Fortunes of War map is it performs alright with special sniping too.
- Witch Hunter Captain is the best Saltzpyre. His frontlining is very strong because his ability provides some good crowd control, whilst also enabling him to do some insane DPS with the increased crit-chance (and even your team if the Unending Hunt talent is chosen). This synergises very well with his passive that immediately kills man-sized enemies with crit-headshots. His tag also allows your team to do 20% more damage, which is invaluable for Monster DPS and can allow a Battle Wizard to hit specific breakpoints with her Bolt Staff (if built around the tag). Crossbow is a good special sniping weapon as well, but you will get completely shut-down in the Ratling Gunner waves later on.
Every career suggested here will redirect you to Royale w/ Cheese's Cataclysm builds. These are fantastic resources if you're unfamiliar with what to use for each career.
It's important to keep in mind that these are just my suggestions for which careers to use for Fortunes of War. I'd say these options are among the most optimal for the challenge, but that being said you can make anything work if you're good enough. There's also a lot of utility some other careers can bring if you're struggling in a particular field. For example, Sister of the Thorn and Foot Knight are good options if you're getting overwhelmed and need more crowd control to compensate.
Final Advice
- If you are ever in doubt of what to do in given moment, generally everyone holding at the Corner will get you through a majority of waves if you're able to keep up with special sniping and horde/elite DPS. If someone is playing a stealth hero and can special snipe, having them start at the Statue each wave can be handy to snipe a lot of Specials or transition into a kite if Monsters show up. This is very rule-of-thumb advice, your best bet is going to be to try and familiarise yourself with a lot of wave compositions so you're prepared in advance.
- Players can intentionally kill themselves at the end of every wave (again: Wave, not Subwave) since they will respawn when the next wave starts. This is a very good way to reset wounds without consuming items. You also respawn with half of your ammunition, so if you're completely out you can use this method to save on using ammo packs.
- It's important you manage Monster aggro properly. Generally have 1 person call that they're going to pull Monster aggro by damaging it at range. This should make it a lot more consistent in trying to figure out who the Monster is chasing.
- Leaving a certain amount of enemies alive, which is especially important in Wave 8, will prevent the subwave from progressing prematurely. This will give you the most time to DPS Monsters and Elites.
- A good way to practice your combat mechanics is to use the Modded Realm. I recommend checking out some of the mods in this Collection. Use the Helpers mod to make yourself invincible (/invincible_toggle), use VerminTrainer to disable enemy spawns (/training), open up Against the Grain on Cataclysm (or any modded difficulty) and start spawning enemies in the first field with Creature Spawner. Using Hitbox Debugger is incredibly helpful too, because it will show you exactly how Elite and Monster attacks work. You'll be surprised with how aggressive you can play if you time your dodges properly, and occasionally mix in some blocks.
- Assuming all players have decent combat fundamentals, it should be a breeze to get that win.
Closing Thoughts
This was meant to be a far more definitive guide that would show off a lot more strategies to really streamline the process to getting a Fortunes of War (Cataclysm) victory. There was going to be a video accompanying most sections as well. If anyone decides to make some quick videos demonstrating some of these strategies then I can add them into the guide and you'll be credited appropriately.
Unfortunately, I can't be bothered going through with that original vision. Mainly because I'm quite busy with other projects, but also because Fortunes of War (Cataclysm) isn't that bad to tackle if you're familiar with a lot of wave spawns and position accordingly.
Despite all of this, I hope the guide helps. Good luck!
Credits
- Myself
Created all the diagrams, theory-crafted some strategies, and put together the guide. - Vermintide 2's Source Code[github.com]
Provided all the data so I could create this guide with accurate information. - Pestilence
The Fortunes of War man himself. Shared all of his strategies and kiting routes, most of which made it into this guide. - mr_chen
Created the Fortunes of War - Complete Spawn Guide (All Difficulties) that helped with my first Fortunes of War Cataclysm victory. For some last minute adjustments I also used his Cataclysm Spawn List[github.com]which saved me the hassle of digging through Vermintide's source code again. - deekee and slav knight gael
For proof-reading and providing feedback.
- 【Updated to Patch 6.10】【All Careers】Legend Builds Collection★ 5 (2.6k)99k views7.6k ♥87 minUpdated Mar 10
- 【Updated to Patch 6.10】【Cataclysm Builds】Kruber all careers★ 5 (1.8k)60k views5.7k ♥33 minUpdated Mar 10
- 【Updated to Patch 6.11】Optimal Melee Weapon Combo★ 5 (1.9k)58k views5.2k ♥26 minUpdated Jun 11
- 【Updated to Patch 6.10】【Cataclysm Builds】Saltzpyre all careers★ 5 (1.7k)57k views5.6k ♥36 minUpdated Mar 10
- 【Updated to Patch 6.10】【Cataclysm Builds】Bardin all careers★ 5 (1.8k)57k views5.6k ♥33 minUpdated May 12
- 【Updated to Patch 6.10】【Cataclysm Builds】Sienna all careers★ 5 (1.7k)57k views5.4k ♥37 minUpdated Mar 10



- Upgrading to PremiumTeam Fortress 2★ 5 (20k)1441k views11k ♥6 minUpdated May 11, 2022
- No More Room in Hell Official ManualNo More Room in Hell★ 5 (2.8k)569k views2.1k ♥29 minUpdated Apr 22, 2019
- NMRiH Community Hosting GuidesNo More Room in Hell★ 5 (526)351k views653 ♥1 minUpdated Aug 10, 2022
- ULTIMATE GUIDE FOR GAME DEV TYCOONGame Dev Tycoon★ 5 (5.8k)326k views10k ♥4 minUpdated 23 Jan, 2014
- How to 'Git Gud' Soon™MORDHAU★ 5 (2k)318k views3k ♥68 minUpdated Nov 16, 2024
- Лучшие кооперативные игры SteamPAYDAY 2★ 5 (1.5k)315k views2.1k ♥56 minRussianUpdated Apr 27, 2025






This guide was created by its original author on the Steam Community. Are you the author and want it removed? Request removal.