Skyrim: Vanilla ENHANCED (FOV, 240 FPS, Graphics & Lighting, Bug Fixes, + remove stupid Creation Club from menu)
Introduction
- Enhanced Lighting
- Countless Engine, Stability, & Bug Fixes
- Enable High Framerates (240 FPS+)
- Custom FOV
- Quality of Life Fixes
- All vanilla-friendly changes that make the default experience better, not add stupid things that make Skyrim into a completely different game.
Installing Skyrim Script Extender 64 (SKSE64)
Skyrim Script Extender is a vital tool for using mods that expands Skyrim's scripting capabilities and adds additional functionality to the game. It's the foundation that the things you install later on in this guide will run on.
MAKE SURE you download the "Current Anniversary Edition build" of SKSE64 EVEN IF YOU ONLY BOUGHT SKYRIM SPECIAL EDITION. The Skyrim.exe file in Special Edition was updated when the Anniversary Edition released, so even if you didn't buy the Anniversary Edition, you still need to use the Anniversary Edition build of SKSE64.
Install SKSE64 by first unzipping the file you just downloaded. Then just copy and paste the 6 folders/files inside it to the main Skyrim installation folder:
C:\Program Files (x86)\Steam\steamapps\common\Skyrim Special Edition.
Installing Mod Organizer 2
Mod Organizer 2 is a popular application for managing Skyrim mods, and is what we will be using in this guide.
Step 1
Before you install it, make a new folder in C:\Program Files (x86)\Steam\steamapps\common\Skyrim Special Edition called "Mod Organizer 2 - Skyrim" (without the quotation marks).
Double click the Mod Organizer 2 .exe file you downloaded to begin the installation. When it asks you "Where should Mod Organizer be installed?" click "Browse.." and find the "Mod Organizer 2 - Skyrim" folder you just made so it will install to that one. Then click "Next" twice and check the box next to "Don't create a Start Menu folder". Click "Next" another two times and then click "Install". When it's done installing, click "Finish".
Step 2
If Mod Organizer 2 did not automatically start upon you clicking "Finish", just go to the "Mod Organizer 2 - Skyrim" folder you made and double click "ModOrganizer2.exe". It will come up with a window asking you to create a new instance. MAKE SURE YOU SELECT "Create a portable instance". On the next page, scroll down until you find "Skyrim Special Edition". Click it and then click "Steam". Then just click "Next" a few times and then click "Finish".
Once Mod Organizer 2 has started up, it should have already detected that you installed SKSE (you will see it on the right, to the left of the "Run" button).
Installing Address Library for SKSE Plugins & SSE Engine Fixes
The Address Library is needed for SSE Engine Fixes (and many other mods) to work correctly. SSE Engine Fixes fixes many issues with Skyrim's game engine, making the game more stable and it also re-enables Achievements, keeping them enabled even if you use console commands or other mods.
Step 1Download the "Address Library - All in one (all game versions)" version. Press "Manual Download" and then just click the orange "Download" button. Ignore that it says you require Skyrim Script Extender since you already installed it at the start of this guide.
Once it has downloaded, go back to Mod Organizer 2 and press the "Install a new mod from an archive" button (it's the 2nd button from the left on the top, the one with a little disc in the corner). Select the "All in one...zip" file you downloaded and then press "OK".
Step 2Manual Download the "Main File" AND the "Preloader". Install the "Engine Fixes - Main File...zip" file using Mod Organizer 2 like you did with the Address Library above and MAKE SURE you select the "SSE v1.6.1170 ("Anniversary Edition")" DLL when prompted, EVEN IF you only have Special Edition bought on Steam (because again, the Special Edition .exe was updated when Anniversary Edition released).
To install the Preloader, unzip the "Engine Fixes - SKSE64 Preloader...zip" file and just copy the 2 files within it to C:\Program Files (x86)\Steam\steamapps\common\Skyrim Special Edition. Only install it that way, DO NOT install it using Mod Organizer 2.
Next, check the empty boxes to the left of the 2 mods listed in Mod Organizer 2 so that they are now "active" and then press "Run". If your game launches properly you have installed everything correctly up to this point.
Installing SSE Display Tweaks
SSE Display Tweaks is a fantastic mod that lets you run Skyrim at higher FPS without it screwing up the game. Originally, Skyrim's physics was tied directly to the framerate, so unless it ran at exactly 60 fps the game would start messing up, causing game-breaking bugs (objects flying across the room, erratic NPC behavior, etc). SSE Display Tweaks raises the framerate cap so that you can play Skyrim at high framerates (default settings for the mod is 240 fps cap, V-Sync enabled), but fixes it so that the physics will not start to bug out.
There is also a "High performance configuration" listed but you don't need it. After you download the .zip file, install it using Mod Organizer 2. Right click the mod in Mod Organizer 2 and click "Open in Explorer". Then go into the SKSE --> Plugins folder and open "SSEDisplayTweaks.ini" file using Notepad.
Press CTRL+F and find the following values. Change them to what I have listed below:
#Fullscreen=true
#Borderless=false
#Resolution=2560x1440 (or whatever your monitor resolution is)
#ResolutionScale=1.00
EnableVSync=false
EnableTearing=true
DisableActorFade=true (Stops enemies and other characters from disappearing when the camera gets too close to them. More immersive).
DisablePlayerFade=true (Stops the player character from disappearing when the camera gets too close. More immersive).
When you are done, press File --> Save and close Notepad.
.INI Edits - Improving Graphics, Custom FOV, & More
Editing Skyrim's .ini files will let you further enhance the graphics and change other things like your FOV. The program BethINI is commonly used to edit Skyrim's .ini files for it's very useful preset & recommended settings that you can pretty much just set and forget since it's the best all-around settings. Make sure you've launched the game at least once so it actually generates the .ini files.
Step 1
Firstly, click the "Configure profiles" button in Mod Organizer 2 (the one that looks like an ID card) and make sure you check the box next to "Use profile-specific Game INI Files". Otherwise, the game will not use the .ini file you are about to edit and will just use the default values.
Extract the .zip file and double click "BethINI.exe". When it ask you to choose a game, choose "Skyrim Special Edition". Close Mod Organizer 2 before continuing further.
It will launch into the "Basic" tab. Go over to the "Setup" tab and change the "Mod Organizer" path to C:\Program Files (x86)\Steam\steamapps\common\Skyrim Special Edition\Mod Organizer 2 - Skyrim (navigate to the Mod Organizer 2 - Skyrim folder, select ModOrganizer.exe, then click "Open"). Then change the "INI Path" to "ModOrganizer > Default" and let the application restart. When it asks if you want it to modify the game's Custom INI files just click "No".
Now with it properly set up, do the following:
"Basic" tab:
- Click the "Ultra" preset button (any modern computer can handle this just fine)
- Check "Recommended Tweaks"
- Make sure that "BethINI Presets" is selected.
- Make sure "Resolution" matches your display's resolution
- Check the box next to "Always Active" (lets game continue running even when tabbed out; is more stable)
DON'T CHANGE ANYTHING ELSE like the FPS or VSync or anything because SSE Display Tweaks is overwriting these settings anyways.
"Interface" tab:
- Uncheck "Bethesda Modding Platform" and "Mod Manager Menu" (this will partially rid your beautiful Skyrim menus of Bethesda's Creation Club crap. You will fully remove them later with the ReCleaned Menu mod)
"Detail" tab:
- Change the field of view to whatever you want (personally, I use 110.00)
When you are done, go back to the Basic tab and click "Save and Exit".
Mods: Engine Tweaks & Patches
Install all following mods using Mod Organizer 2, like you've been doing. If any mods say they are only compatible with Anniversary Edition 1.6.629, 1.6.640, etc or higher that's fine, just choose that option because 1.6.1170 is actually a LATER version even though the number makes it seem like it would be an earlier version than 1.6.640 (unintuitive, I know—blame Bethesda). If you get confused on where to place them in the load order, I've provided a picture at the bottom of this guide.
- Most comprehensive bug fix mod out there. Fixes countless bugs like those involving quests/progression, graphical bugs, missing or lore inaccurate features (like Forsworn Briarhearts missing a heart), and many other issues.
Full list of changes here: CHANGELOG[www.afkmods.com]
Note: The main problem with this mod is that Arthmoor, the guy in charge of it, also added some controversial changes the community didn't want and instead of making them a separate mod he included them in USSEP. These changes step outside the bounds of just being bug fixes and enter the realm of straight up changing the game to however he sees fit (look up the now infamous Redbelly Mine, “Dovahkiin, no!”, and Ragged Flagon bedroom changes for example). So, if the changes are bad, why doesn't he just revert them? Because Arthmoor is completely unable to handle criticism. He is literally banned from the r/skyrimmods subreddit because anytime people would criticize his changes he would go on there and start harassing and personally attacking them. You can't even speak negatively about the changes on the USSEP Nexus Mods page because Arthmoor will ban you from being able to comment on the page if you do. Luckily, a patch has been made that reverts the controversial changes, which is listed below.
If you want to see more about Arthmoor, grab some popcorn and watch this video: https://www.youtube.com/watch?v=q6OqJOSmDrY- The most comprehensive mod for reverting the many controversial changes introduced by Arthmoor in the Unofficial Skyrim Special Edition Patch (USSEP). Fixes Redbelly Mine, “Dovahkiin, no!”, the Ragged Flagon bedroom + many more changes made in USSEP that needlessly alter the game from the original intended vision.
Full list of changes here: CHANGELOG[www.nexusmods.com]
The next three mods are similiar and include various script and bug fixes (but for different bugs so install all three of them):
- Automatically sets Skyrim to be marked as "High Priority" in Task Manager every time you launch the game, making it so your system prioritizes running Skyrim over other processes; increasing your FPS and reducing input latency.
Mods: Quality of Life
DOWNLOAD - MCM HELPER[www.nexusmods.com]
- A new UI for Skyrim, but we don't care about that. The reason you need this is for the Mod Configuration Menu option that SkyUI adds to the Pause menu. Some mods you will be installing later put their settings in that menu so you can adjust them. MCM Helper is required for some mod's settings to show up in the menu and it also saves mod settings to an .ini file, so your settings will persist between characters.
- Restores the vanilla menus while you have SkyUI installed (that way you can keep the vanilla menus, but still use the Mod Configuration Menu that SkyUI adds). I recommend the "SkyUI Full Vanilla Menus" version since the standard version still leaves some of the menus (like the little Favorites menu you can bring up) in the SkyUI style. Of course, if you like the look and added functionality of SkyUI then you don't have to install this. Try it out and see how you like it, it's your game.
Note: Right click the mod in Mod Organizer 2 --> Open in Explorer. Go into MCM --> Config --> Nyr_SkyUIVanillaMenus --> open "settings.ini" in Notepad. Change "bVerboseMode = 1" to "bVerboseMode = 0" and then press File --> Save. This will disable an annoying notification that pops up letting you know the menu is resynced after every time you load up a save.
- Removes the annoying "Available Now: Skyrim Anniversary Edition Upgrade!" banner from the main menu, the annoying news panel on the top right, and also removes the Creation Club/modding related main menu and pause menu buttons. Bethesda can inhale a fart for ruining the main menu with that piss poor excuse for a mod manager. I don't even want to look at it. Mods are, and should always, remain free.
- Allows you to switch between using keyboard & mouse or controller on the fly, changing the in-game buttons prompts to match as it detects which method of input you are using (by default you can only use one input method at a time and have to toggle the controller on and off in the Settings in order to switch between it and keyboard & mouse which is very annoying).
- Lets you jump while sprinting (by default you have to stop sprinting first before you can jump). This seems like a small change but it makes movement much more intuitive, especially playing with keyboard & mouse.
- Makes the camera height in line with your actual player model's eye level. Adjusts based on how tall you made your character.
- This mod lets you adjust your FOV and hand FOV separately, so you can use a higher FOV without seeing the untextured ends of your hand/arm models (personally I use 110 FOV and 90 hand FOV). Also fixes a bug with the Tween Menu (that menu that brings up the 4 arrowed directions for Magic, Skills, Items, & Map) where after it zooms it kind of snaps the camera around.
Note: Install the required SKSE Menu Framework it says you need and put it above this mod in the Mod Organizer 2 load order. PRESS F1 IN-GAME TO OPEN THE MOD'S MENU TO CHANGE THE FOVs.
- Stops arrows you've shot from disappearing after 10 seconds (very unrealistic and immersion breaking). Also increases the amount of arrows that can be in the world space at any one time from 15 to 50. I recommend the "V1.0B" version since it keeps the chance of you getting the arrow back at the default 33% chance. Choosing the other option (50% chance) kind of ruins the balancing since it makes the "Hunter's Discipline" Archery perk less of an upgrade (the perk increases the chance to recover arrows from dead bodies from 33% to 66%).
- More detailed & accurate map to how the different parts of the world really look, rather than the whole map being white-ish and hard to read like it is by default.
Mods: Textures & Meshes
- Okay, so you may be looking at this mod and wondering: "Why am I about to download 40.5 gigabytes of textures?". Because they're that damn good. This is THE BEST looking vanilla texture mod for Skyrim. Trust me, I've spent literal days looking. The mod author has taken all the textures from the game and upscaled them, greatly increasing the quality of the graphics without actually changing the aesthetic of the game like waaay too many texture mods do. This is one of those where you install it and you just start gawking at everything. Dragons especially look much more impressive. Once you install it, it's hard to play without.
Note: You can activate the free trial of Nexus Mods Premium Membership to make the download go way faster. If you don't feel like doing that or just don't have much storage space, you can install the Vanilla Remastered (Optimized)[www.nexusmods.com] version of the mod which has a smaller overall size (14.5 GB).
- Fixes an issue with tree LODs in mods that come with them (like Vanilla Remastered) where trees will display the wrong LODs (for example, a tree that is actually green will look white from far away because the wrong LOD is being displayed).
- Removes various objects that cannot be seen at all anyways since they are under terrain or other objects. Gives a decent FPS boost (people in the comments report 10-20 fps boost on average).
The next 9 mods listed all deal with fixing and improving many various objects and meshes in Skyrim. They increase the quality of the objects and fix issues like broken seams in the textures, objects having the wrong sounds assigned to them, objects not making any noise/impact effect when you hit them with a weapon, things not casting shadows properly, etc. Put them in your load order in the order they are shown here:
- Makes hanging signs and lanterns respond to wind. Also fixes a bug with physics at higher framerates where after you walk into a sign the sign would freeze at an angle and never return to hanging vertically (as gravity is supposed to make it do).
Note: When installing, change the following options from what they are to what I have listed below. Leave everything else at what it is by default:
Skyrim Version: Skyrim Special Edition
Sign Weight: Heavy
Hanging Lantern Design: SMIM Lanterns
- Higher quality textures for the road signs in Skyrim, making them actually readable. I recommend the 4K version since it's higher quality.
- Greatly improves the look of blood and makes combat more bloody in general. An improvement over the base game's blood where you can brutally kill someone with a giant warhammer and there is no blood on the ground.
Note: When installing I recommend scrolling down and changing the Screen Blood option from "Default" to "Vanilla" because while the new blood textures look better, you will likely prefer the look of Skyrim's original screen blood. You can leave everything else default. In the SkyUI Mod Configuration menu, I recommend turning all the different chances for Spasms to 0 to disable them, since the enemies will shake after they die if they are on which looks less vanilla.
Mods: Water & Snow
- Makes the water in Skyrim look much better. When you install it you can choose between Flow Maps or no Flow Maps (flow maps make the water flow realistically; making rivers actually flow downstream, stopping large waves from forming in places they shouldn't like ponds, making it so water sits relatively still if it's in a pool by itself rather than still appearing to flow like it does by default, etc). You can also choose between changed colors (more realistic/accurate colors for the type of water it is, like for example muddy rivers appear much more brown) or Skyrim's Vanilla Colors if you prefer the more blue original look. Personally, I use the 4K "Include Water Tweaks - Vanilla Colors" install option so I get the Flow Maps but retain that original beautiful Skyrim water color. Go to Cradecrush Rock and walk South until you're overlooking the waterfalls and do a before and after, you won't want to play without this mod ever again.
Note: It says you need Cathedral installed but you don't at all, it just says that because it's compatible with it.
- A fix made by the same author of Simplicity of Sea that fixes issues with Skyrim's default water (reflection issues, animation bug fixes, being weirdly bright at night & other weird lighting, etc).
- A fantastic snow mod made by the same author as Simplicity of Sea. Makes the game's snow textures display much more realistically, making it so snow no longer appears in areas that don't make sense (like under covered bridges, under covered entranceways, etc). Makes snowy areas much more immersive.
Note: It lists "ENB Terrain Blending Fix" and "Word Wall Transparency Fix for ENB" as required mods but since you aren't using ENB if you're following this guide, you don't need them.
- Adds footprints to the player, NPCs, and animals in snowy environments and when walking on ash. More immersive, especially if you enjoy hunting as you can now track animals if you are hunting in a snowy area. Configurable using the SkyUI Mod Configuration menu.
Mods: Shaders & Lighting
- Greatly enhances Skyrim's lighting without making it look like a different game (like too many lighting mods do) and removes some lighting limitations of Skyrim's engine (like only being able to display four shadow-casting light sources at a time). Has additional features you can install (check the mod's description for links). Of the additional features, I highly recommend installing:
Screen Space Global Illumination (SSGI)[www.nexusmods.com]
Terrain Blending[www.nexusmods.com]
Terrain Variation[www.nexusmods.com]
Wetness Effects[www.nexusmods.com]
Note: Ignore the requirements, as all the ones you need have already been installed if you are following this guide.
PRESS THE "END" KEY on your keyboard to bring up the configuration menu for this mod.
I recommend going to the "Advanced" tab on the left, finding the "Shader Debug" tab, and unchecking "ImageSpace". This will fix the overly bright bloom-ish effect on the sky/sun. Make sure to press the "Save Settings" button in the top right when done.
- Makes light sources/fires that previously did not actually emit light actually emit light (like for example, the braziers next to the front stairs in Dragonsreach). This is how Skyrim's lighting should have been by default. Configurable using the SkyUI Mod Configuration menu.
Note: Skyrim's engine has a limitation that makes it so it only displays a maximum of four shadow-casting light sources at one time. If there are any more than that, they will just disappear and reappear based on which ones you are closer to. Since this mod adds light sources, if you didn't install Community Shaders (which removes the light source limitation) then you will get the pop-in effect.
I recommend going to the SkyUI Mod Configuration menu and unchecking Weapon Trails --> "Display Trails" and Hitstop --> "Enable Hitstop" for a more vanilla experience.
Mods: Animations
- Fixes multiple problems with animations in the base game, like your left hand's spell floating above your hand instead of being in it when you have a staff equipped in the right hand, issues with the torch flames animation, and issues with characters not properly holding some two-handed weapons.
Note: When installing, make sure you select the "Two-Handed Female Alignment Fix". For this specific fix to work, you also need to install:
Animation Queue Fix[www.nexusmods.com] (requirement for Open Animation Replacer)
Paired Animation Improvements[www.nexusmods.com] (requirement for Open Animation Replacer)
Open Animation Replacer[www.nexusmods.com] (requirement for Assorted Animation Fixes)
Place them in that order, with Assorted Animation Fixes right below them in the load order.
PRESS SHIFT + O to open the menu for Open Animation Replacer. I recommend opening it and clicking on Settings, then UNCHECK "Show Welcome banner" near the top and "Enable" under the Animation Que Progress Bar Settings. This will stop the unnecessary messages this mod displays from showing up when you load the game.
- Fixes the vanilla movement animations and makes them look smoother (fixes broken animation loops & jitter). If you watch some animations like the default male running animation closely you will notice a slight jitter every time it loops (look around the right shoulder where it's most noticeable). Once you see it, you can't unsee it. This mod fixes that.
- Fixes a bugged animation with drunk characters where their head will clip down into their neck/the top of their body.
DOWNLOAD - Precision Creatures[www.nexusmods.com]
- Adds physically accurate collisions for melee attacks and physics-based hit reactions. Enemy's bodies will now physically react to blows, your weapon will now recoil off of solid surfaces you hit (instead of just swinging/clipping straight through them), etc. Read the mod description for more info.
- Precision Creatures adds Precision functionality to Werewolves and Vampire Lords. Fixes the longstanding bug with werewolf animations where they will just completely freeze for a few seconds before resuming. Also fixes some issues with Draugr.
Note: Precision is a more complicated mod to install but it's not that hard, just follow these directions:
Step 1:
Install the Animation Motion Revolution[www.nexusmods.com] mod listed as a requirement and place it above Precision and Precision Creatures in the load order. Next, download and install these 2 mods + the WereWolf Addon for the second one:
Nemesis Unlimited Behavior Engine[www.nexusmods.com]
Nemesis Creature Behavior Compatability AND the WereWolf Addon[www.nexusmods.com]
In Mod Organizer 2, right click on "Nemesis Unlimited Behavior Engine", click "Rename Mod...", and rename it to just "Nemesis" (if you don't do this step, you will get an error later saying "Changes in file detected. Engine update is required to be performed").
Step 2:
In Mod Organizer 2, click on where it says "SKSE" to the left of the "Run" button, and then click <Edit...>. Click the little + sign near the top left on the window that pops up and then click "Add from file...". In the File Explorer window it brings up, navigate to:
C:\Program Files (x86)\Steam\steamapps\common\Skyrim Special Edition\Mod Organizer 2 - Skyrim\mods\Nemesis\Nemesis_Engine
Left click the "Nemesis Behavior Engine.exe" file once and then click "Open" at the bottom right of the File Explorer window. Then click Apply and then click OK. This will add Nemesis Engine as a .exe that can be run from within Mod Organizer 2, which we need to enable Precision.
Step 3:
Click the little wrench and screwdriver button near the top of Mod Organizer 2 (the smaller "Open list options..." button, NOT the Settings button). Then click "Create empty mod" and name it:
Nemesis Unlimited Behavior Engine - Output
Next, go back to the window that comes up when you click <Edit...> and click Nemesis Unlimited Behavior Engine on the left. Check the box that says "Create files in mod instead of overwrite (*)" and in the box on the left, scroll down and select the "Nemesis Unlimited Behavior Engine - Output" mod you just made. Then click Apply and then click OK.
Step 4:Choose Nemesis Unlimited Behavior Engine from the options in the drop down menu next to Run:
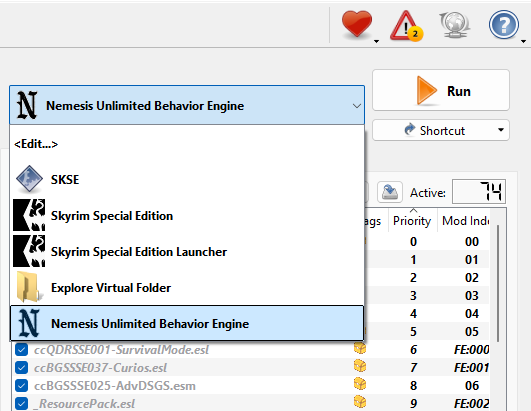
Make sure the boxes next to Precision and Precision Creatures are checked so they are Active, then click Run.
In the window that comes up, check the boxes next to Precision and Precision Creatures. Then click "Update Engine". Once it completes, press "Launch Nemesis Behavior Engine" and wait for it to complete. Once it's done you can just close the Nemesis window.
So, what the hell did you just do all that crap for?
Basically, in order to get the mods to work you have to launch Nemesis, check the boxes next to the mods you need, and then launch the behavior engine which will load the selected mods into the engine. That blank "Output" mod you made? That's where Nemesis will send the mods that are loaded into it's engine, so now that they are loaded you can switch the Run button back to SKSE and launch Skyrim. Skyrim will read that "Output" mod and they will be working.
Mods: Audio
- Weirdly, the PC version of Skyrim's audio is actually lower quality than the PS4 version's (what the hell, Bethesda??). This mod aims to bring the higher quality audio files of character dialogue to the PC version of Skyrim. GREATLY improves voice audio quality of NPCs.
Note: Download Part 1 and Part 2 of the voice files for your language. DON'T download the Music part of this mod because the next mod we are going to go over has even higher quality music.
- Lossless, highest quality versions of the in-game music available, straight from the lossless version of the official soundtrack. You'll hear things in the music you've never noticed before. Even higher quality than the PS4 audio, which is why you should use this mod instead of the Music portion of the above mod.
Note: Download the regular, non-BSA version.
- A vanilla friendly audio overhaul. Adds many features like increasing the range you can hear sounds (now you can finally hear when your Fireball spell explodes), an enhanced reverb system (reverb is also now enabled in all outdoor locations, enhancing the soundstage), sounds for weapons have been retouched making it so different weapon types sound more distinct from each other, etc. See the full list of changes on the mod page. Overall increases the variety of sounds and makes Skyrim's soundscape much more immersive.
Note: Install the Sound Record Distributor[www.nexusmods.com] mod listed in the requirements and place it above Audio Overhaul for Skyrim in the load order.
DOWNLOAD - Reverb Interior Sounds Expansion[www.nexusmods.com]
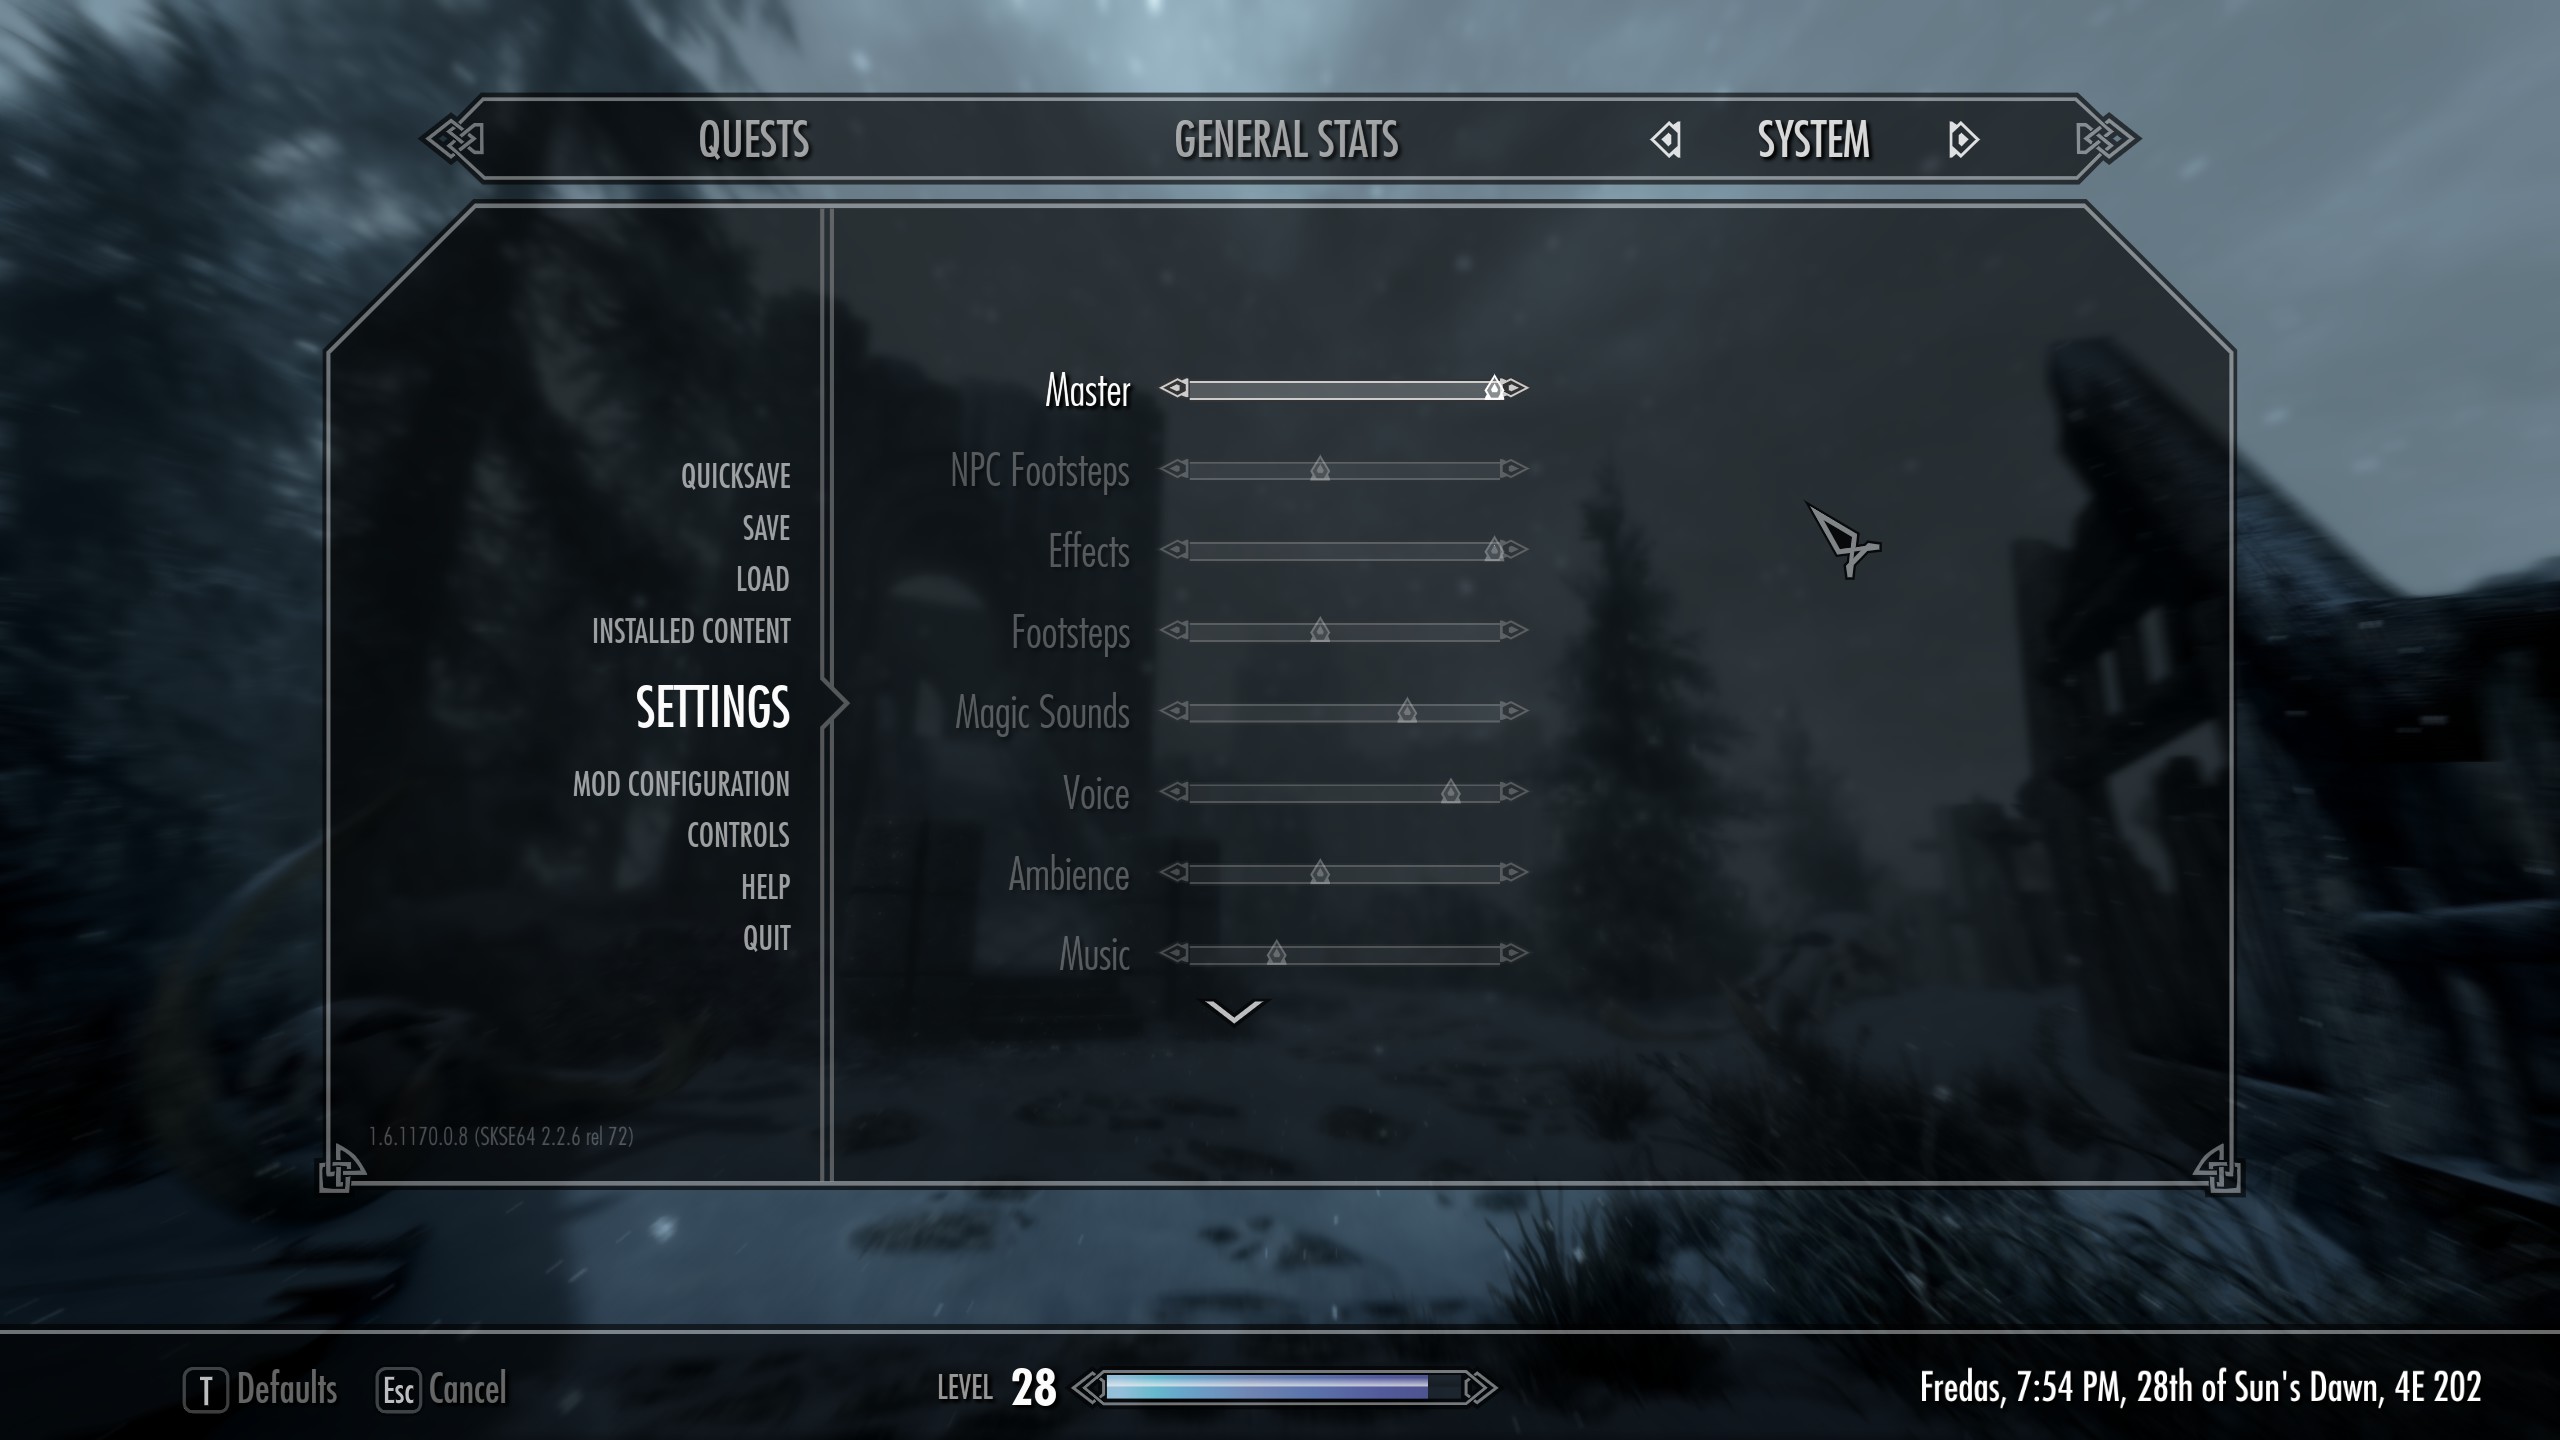
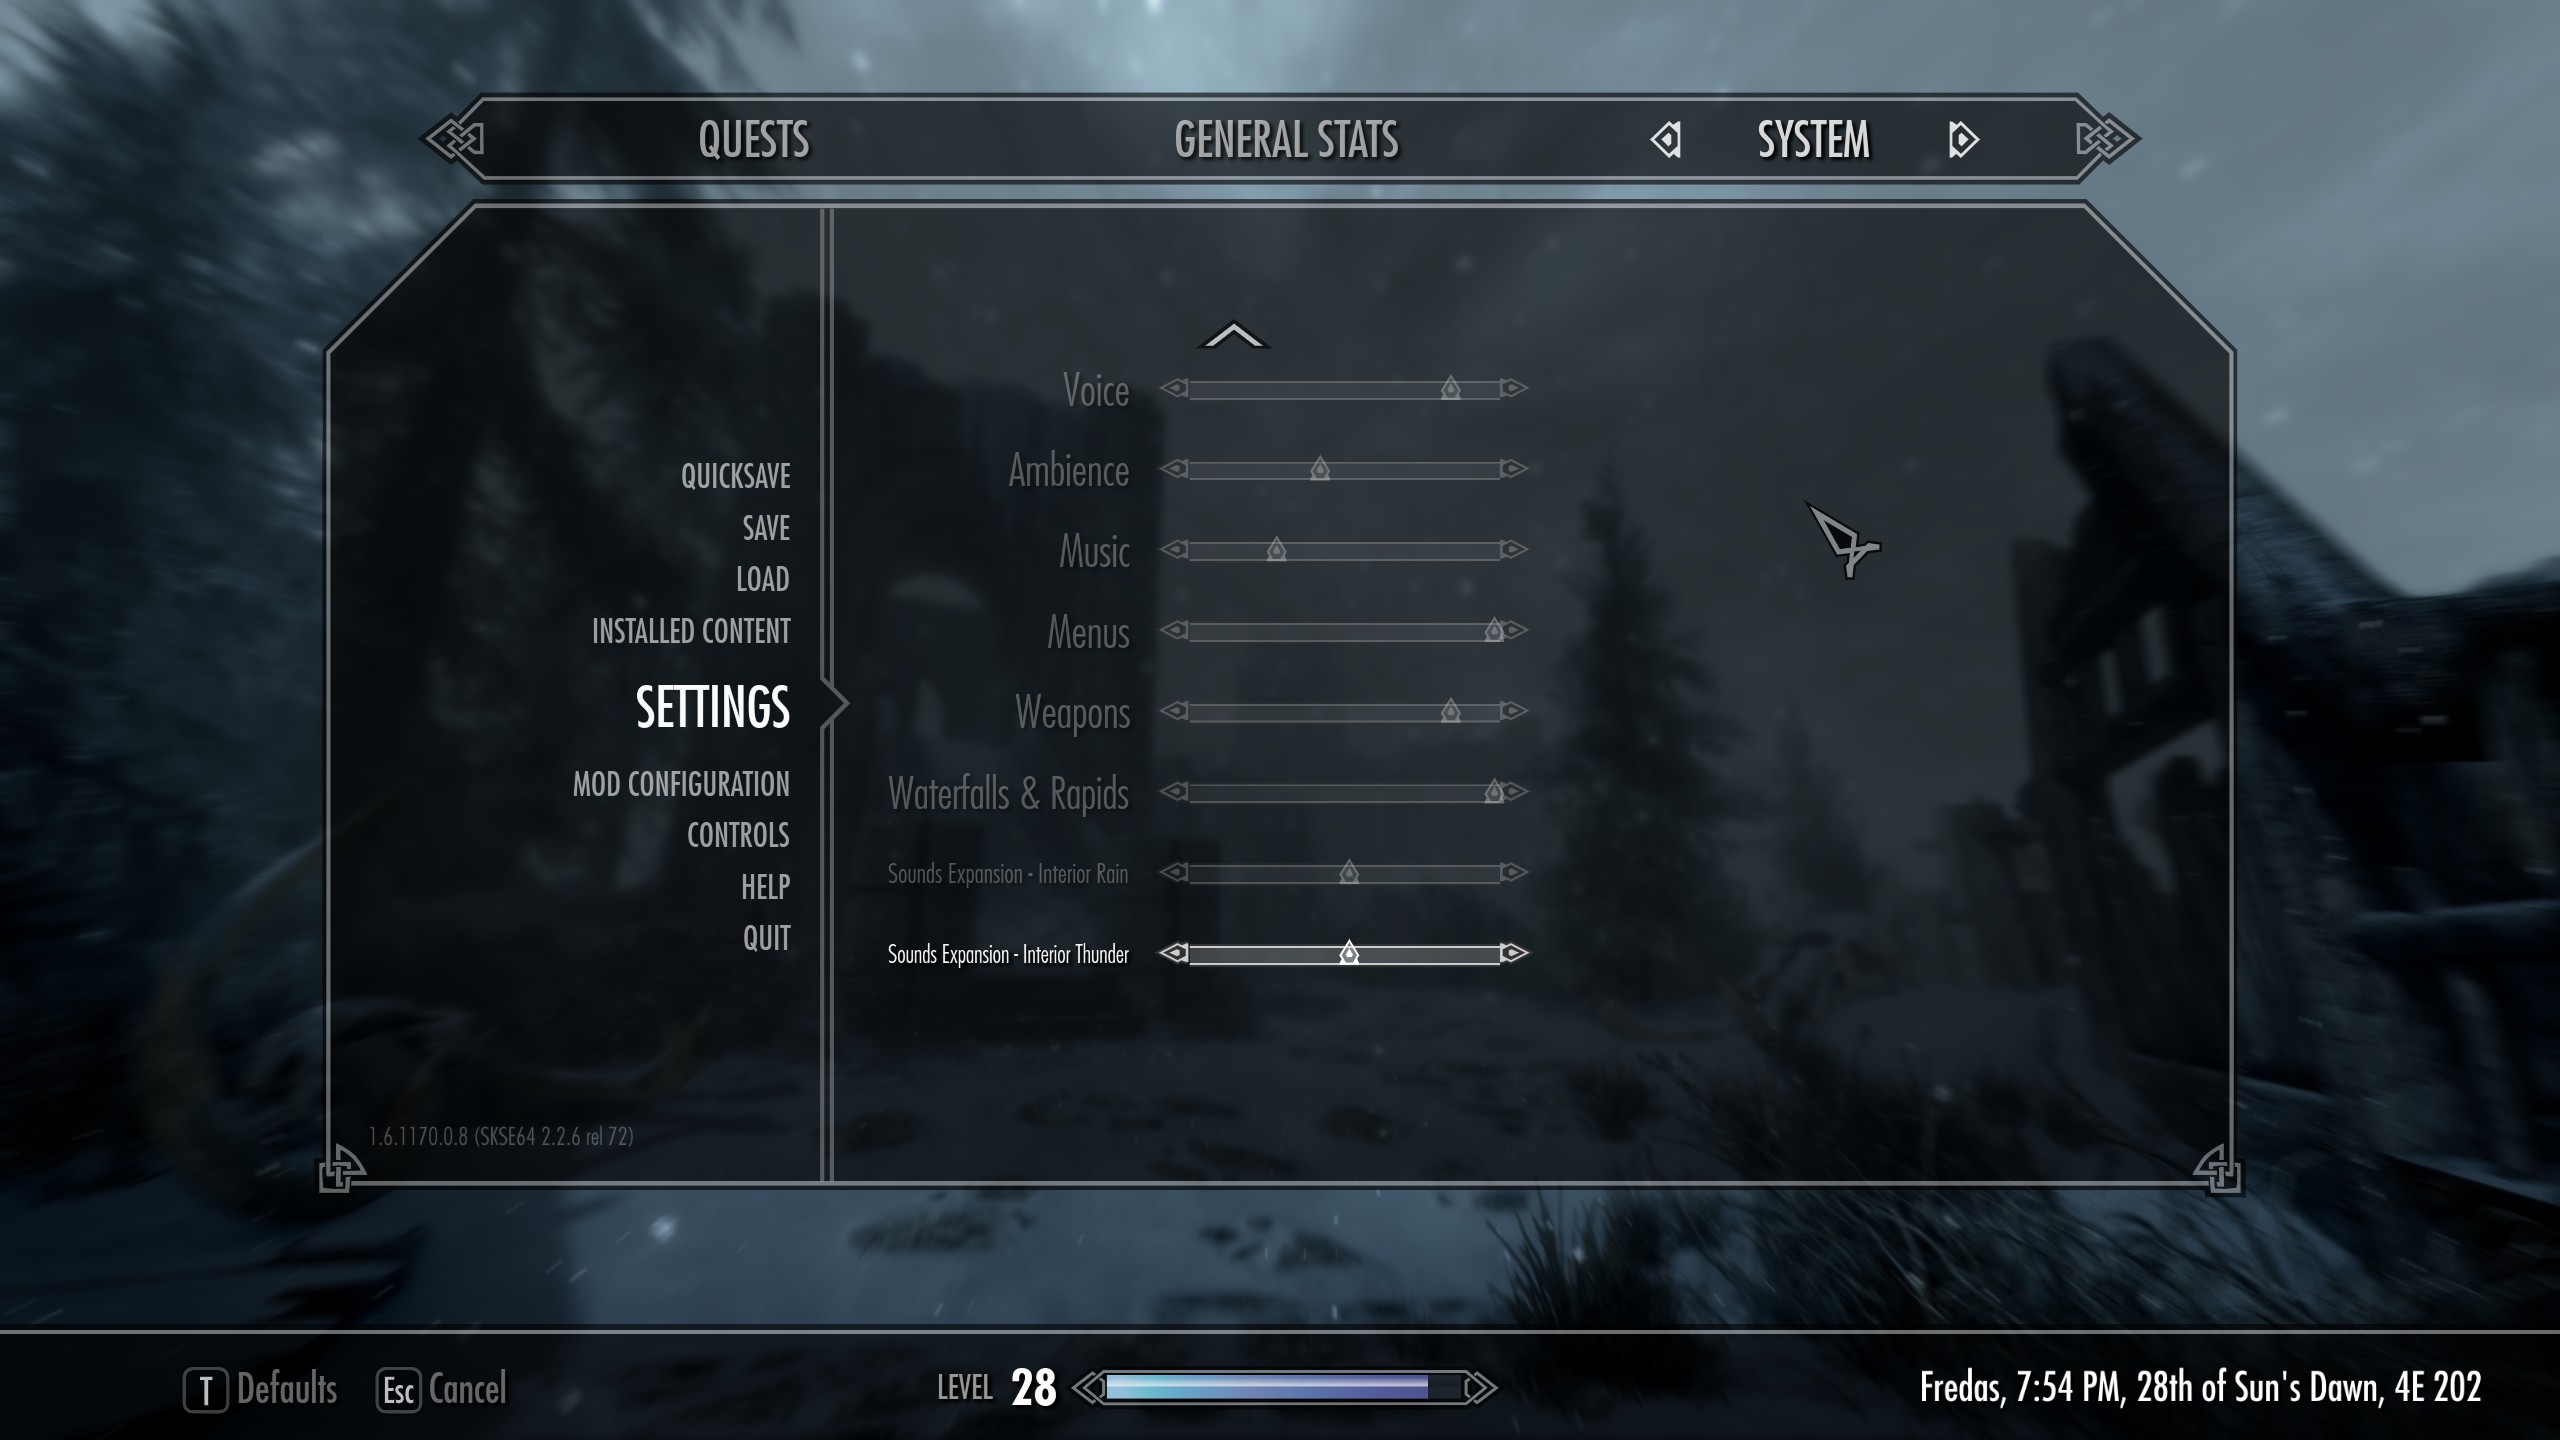
- These two mods improve the vanilla reverb models, which helps make Audio Overhaul for Skyrim's reverb sound even better. Reverb Interior Sounds Expansion also lets you now hear weather sounds while inside buildings (like rain hitting the rooftop, greatly increasing immersion).
Note: Download the SkyPatcher version of Acoustic Space Improvement Fixes and Skypatcher - AE[www.nexusmods.com] placing it above Acoustic Space Improvement Fixes in the load order. When you install it, check the box on the Patches page for the "Reverb Interior Sounds Expansion" patch. Place Reverb Interior Sounds Expansion below the other two in the load order.
________________________________________________________________
Load Order
When you're done installing everything, your mod load order should look like this:
NOTE: MAKE SURE BOTH THE LEFT AND RIGHT LISTS OF MODS HAVE EVERYTHING ORDERED LIKE BELOW
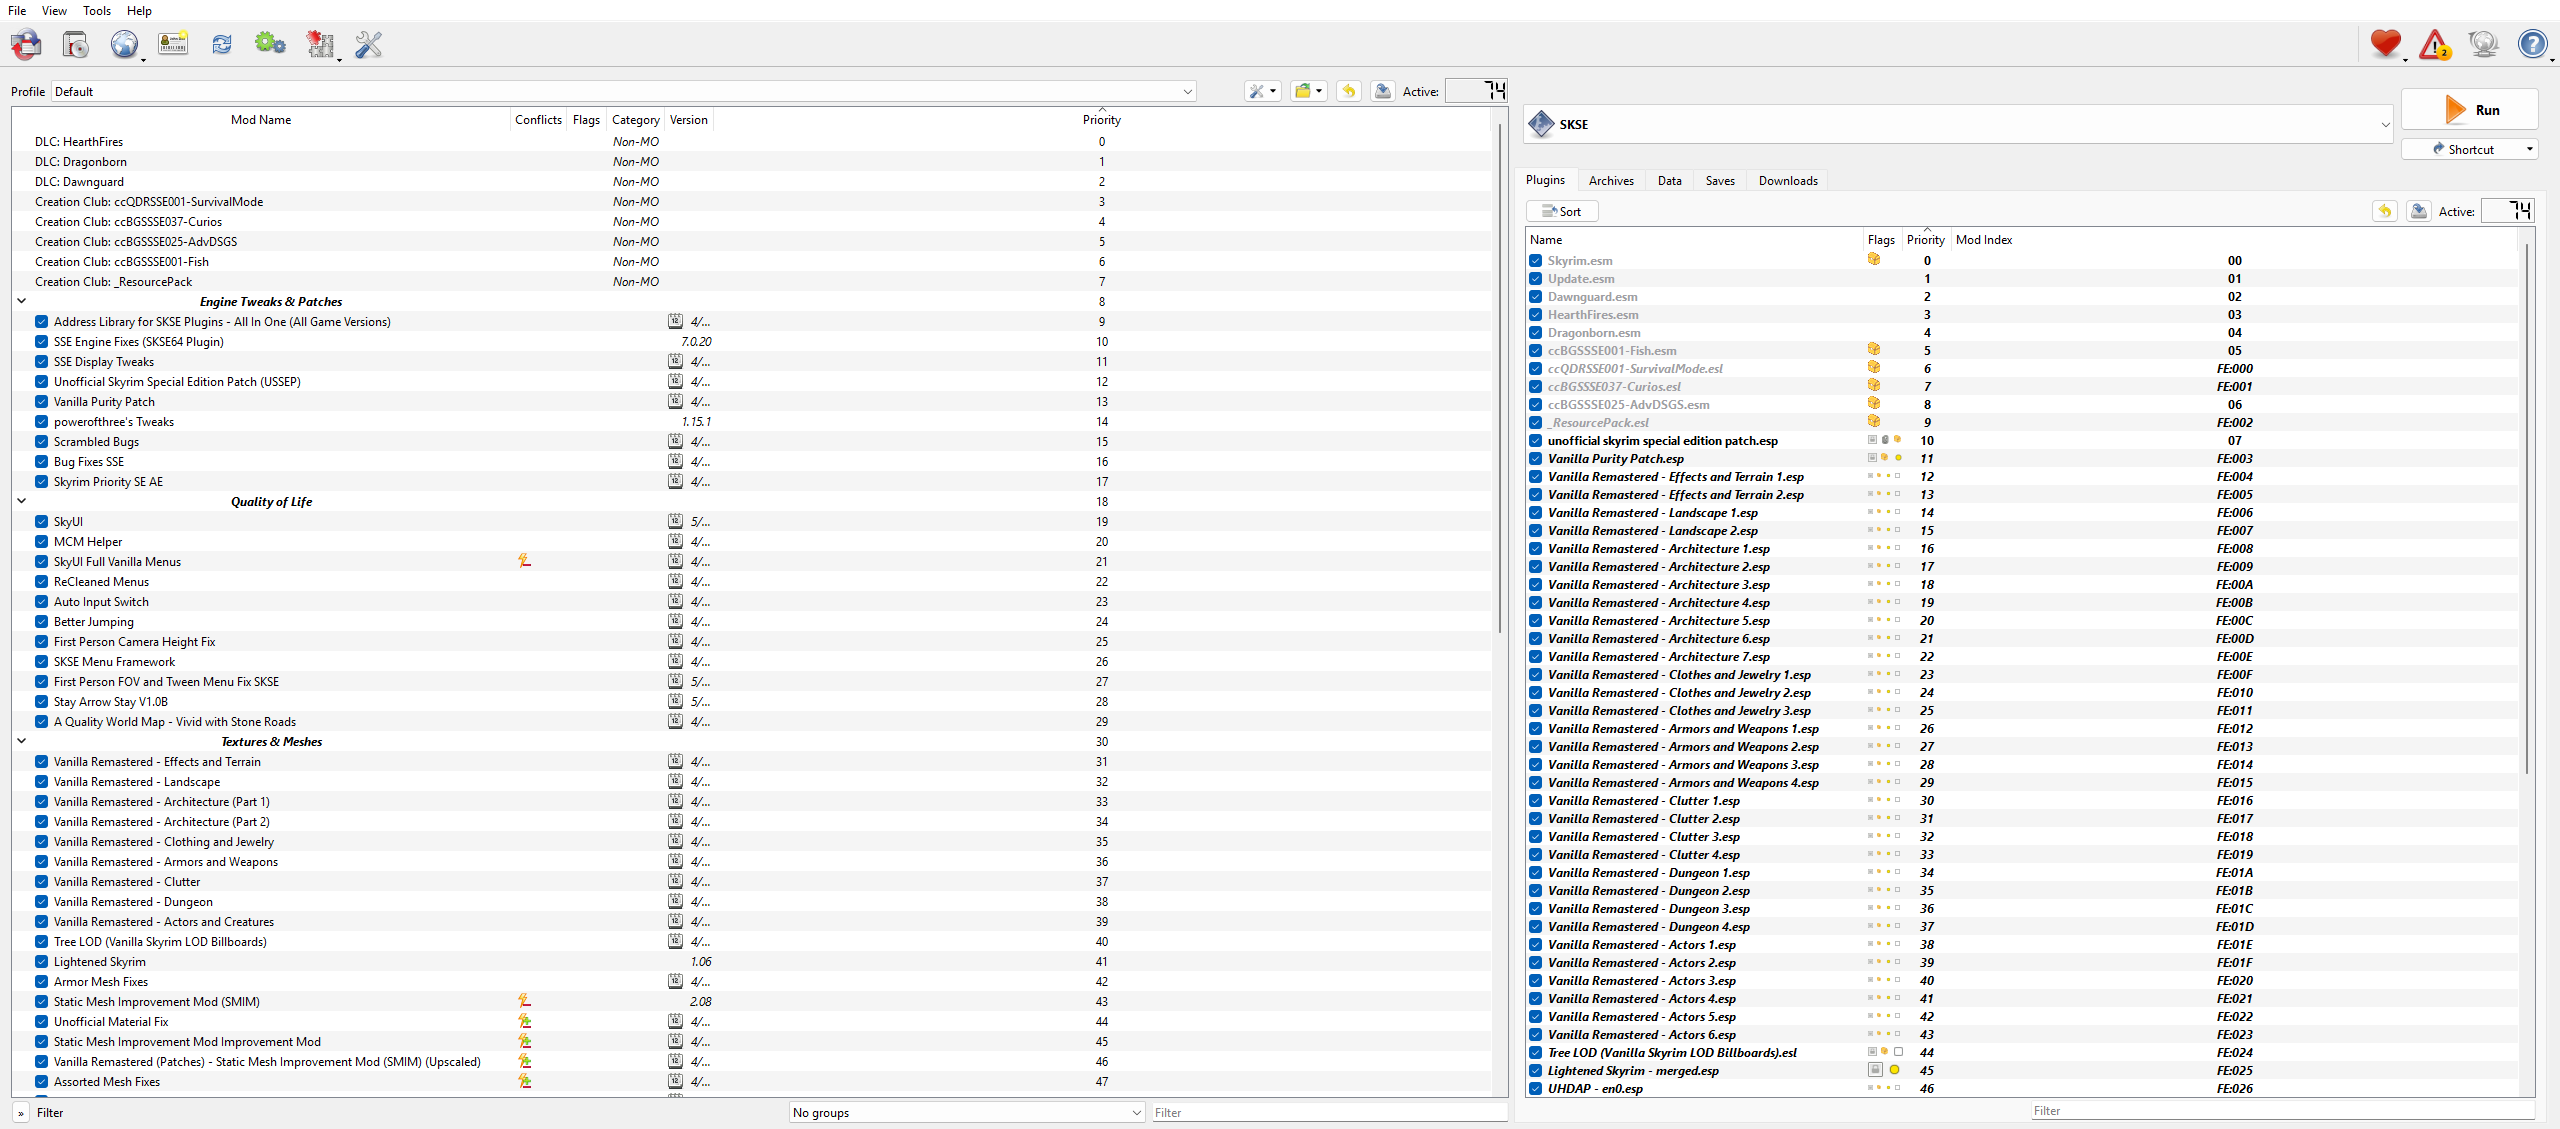
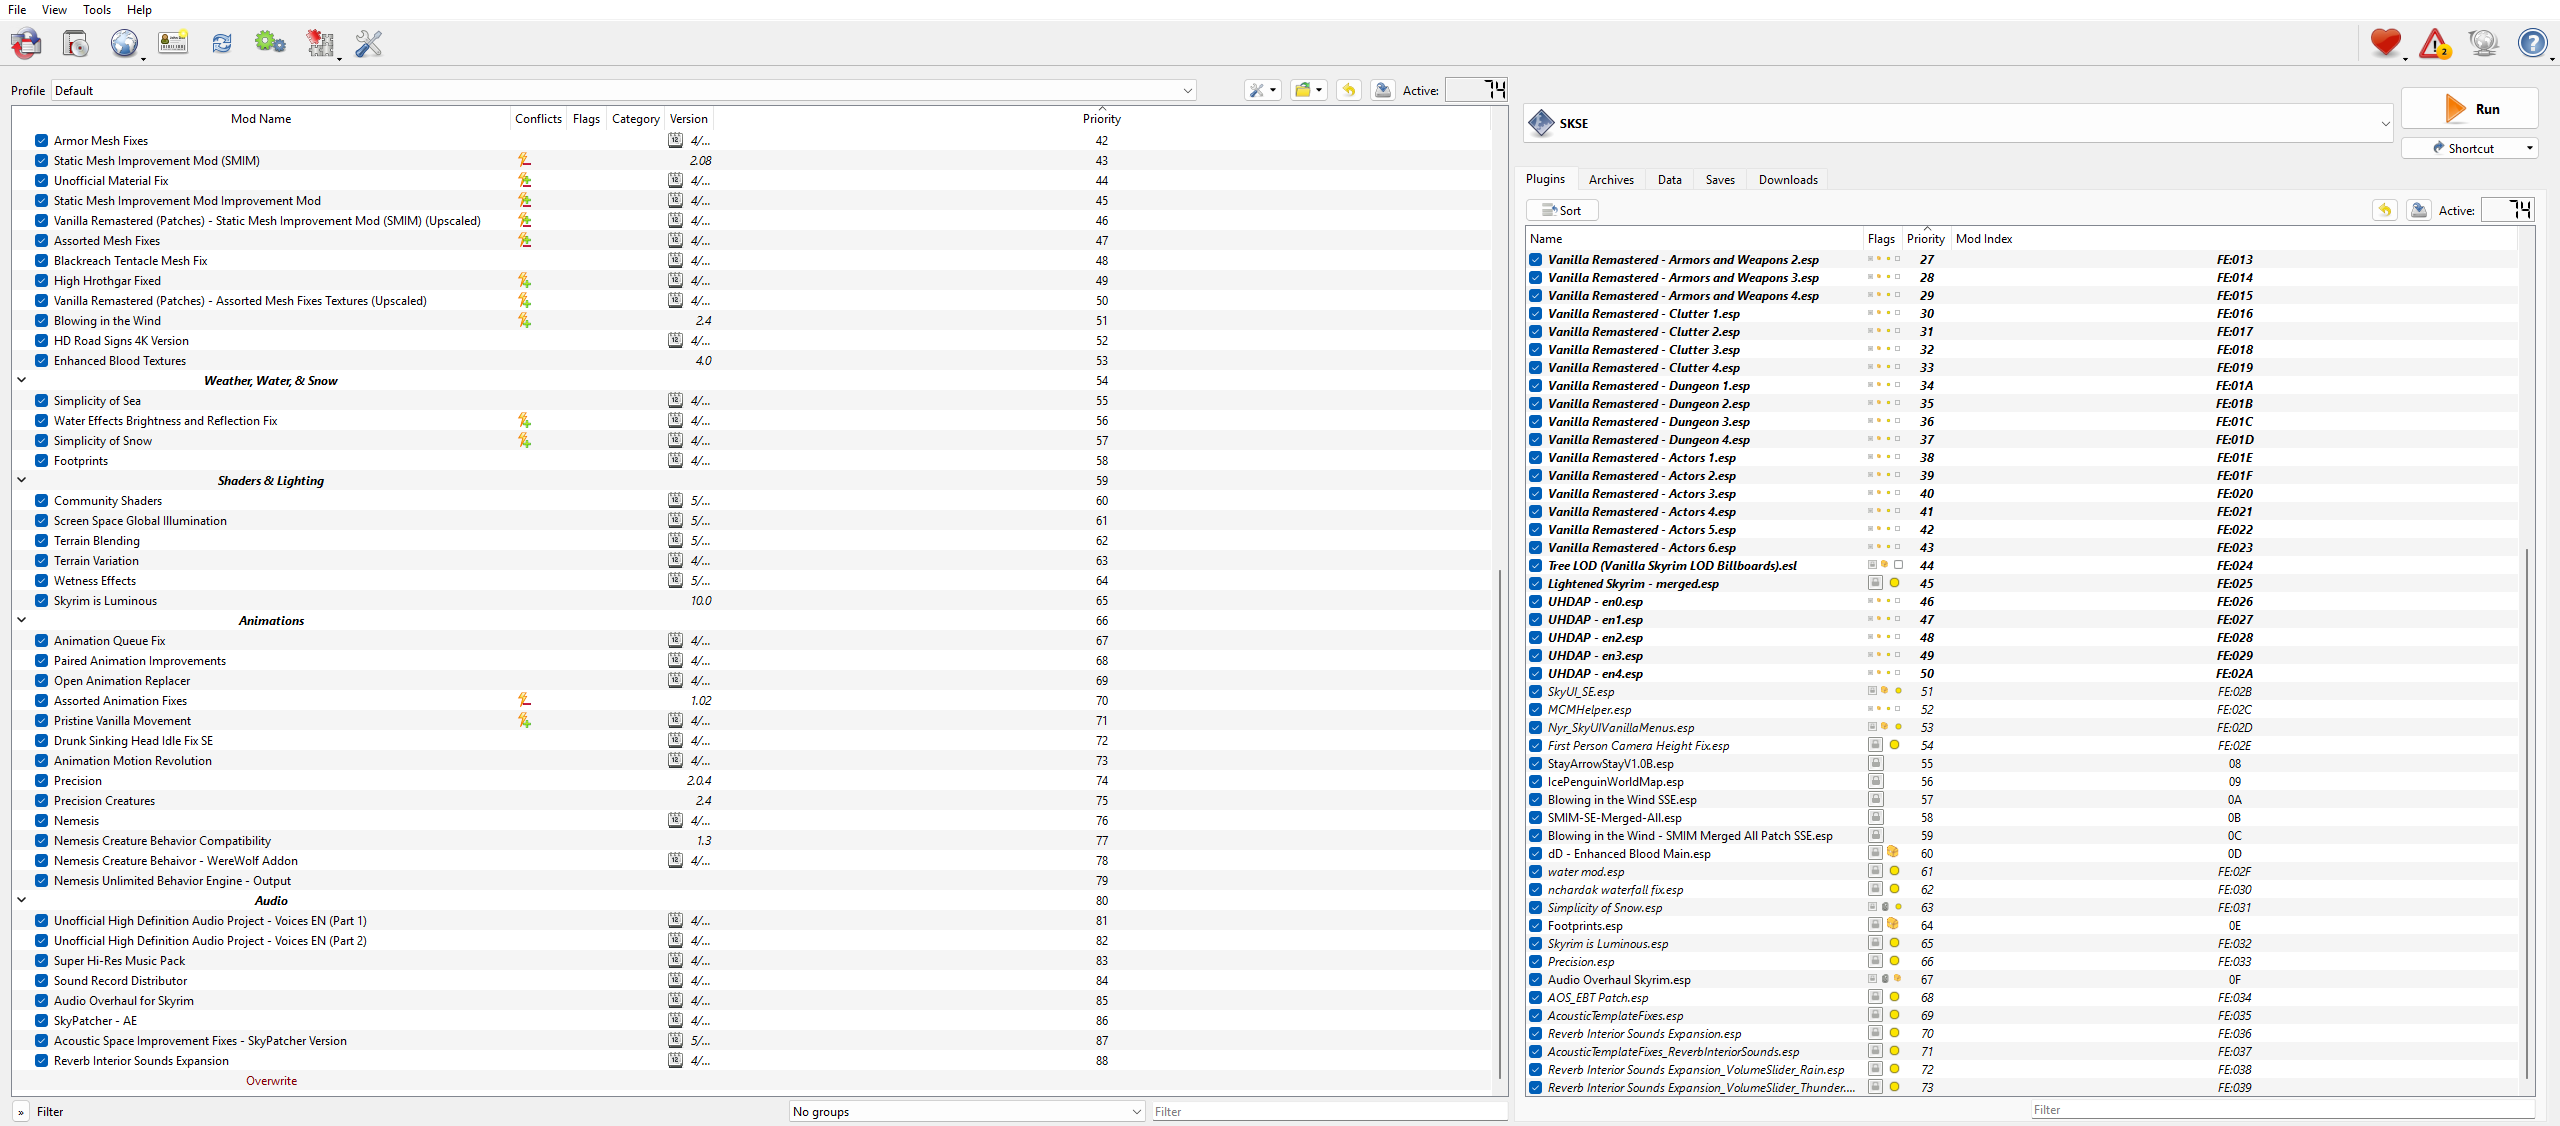
If your stuff is named differently than mine that's just because I right click mine and rename them so everything is more uniform. If you want the little dividers I have on mine, click the little wrench and screwdriver icon and click "Create separator", which you can then name whatever you want. Separators just help visually organize the mod list and won't screw anything up, just make sure you don't accidentally change the order of the mods.
I also recommend clicking one of the mods in the right mod list and pressing CTRL + A to highlight all of them. Then Right Click --> Lock load order. This will lock all of the mods on the right in their current position so they won't accidentally change positions if you do any more modding, which they have a tendency to do.
Make Modded Skyrim Launch when you press Play on Steam
Once you have all your mods set up, you don't want to have to open Mod Organizer 2 from the files and press "Run" from there every time you want to play Skyrim, so instead we will make it so the Steam "Play" button will directly launch your now modded version of the game.
Open Steam and go to Skyrim in your Library. Click the Settings cogwheel to the right of the Play button and click Properties --> General --> Launch Options --> copy and paste this into the text box:
"C:\Program Files (x86)\Steam\steamapps\common\Skyrim Special Edition\Mod Organizer 2 - Skyrim\ModOrganizer.exe" "moshortcut://:SKSE" %command%
Now whenever you press play on Steam, it will instantly launch your Mod Organizer 2 modded version of Skyrim!
Alternatively, if you want a desktop shortcut, open Mod Organizer 2 and directly under the "Run" button, click Shortcut --> Desktop. This will put a shortcut to run modded Skyrim onto your desktop.
All done!
Hey you, you're finally done with the guide!
That's everything! Now you can enjoy a Vanilla ENHANCED Skyrim experience that greatly improves the game while retaining Skyrim's original aesthetics and charm!
If you have any questions or need any help, free to ask in the comments below and if there are any issues with the guide let me know so I can update it. :D
If you enjoyed this guide, be sure to check out my similar guides for Oblivion and Morrowind here:
https://steamcommunity.com/sharedfiles/filedetails/?id=3718355944
https://steamcommunity.com/sharedfiles/filedetails/?id=3066419058
- How to get lvl 50 Archery in 30 minutes after starting a new game★ 5 (842)90k views1.5k ♥5 minBulgarianUpdated Aug 13, 2020
- How to get an GF while playin The Elder Scrolls V: Skyrim★ 5 (1.4k)69k views538 ♥1 minBulgarian
- Кооперативный мод на Skyrim★ 5 (435)52k views1.1k ♥6 minRussianUpdated Jul 8, 2025
- The Basics: Modding Skyrim SE Properly in 2025 (All versions)★ 5 (1.5k)46k views2.2k ♥83 minUpdated Mar 19, 2025
- Skyrim SE 2024 Essential Modding Guide★ 5 (431)42k views1.2k ♥40 minUpdated Jul 31, 2024
- The Elder Scrolls V: Skyrim - Complete Achievement Guide (Inc. DLC)★ 5 (1.5k)40k views3.9k ♥29 minUpdated May 19





- Upgrading to PremiumTeam Fortress 2★ 5 (20k)1441k views11k ♥6 minUpdated May 11, 2022
- No More Room in Hell Official ManualNo More Room in Hell★ 5 (2.8k)569k views2.1k ♥29 minUpdated Apr 22, 2019
- NMRiH Community Hosting GuidesNo More Room in Hell★ 5 (526)351k views653 ♥1 minUpdated Aug 10, 2022
- Лучшие кооперативные игры SteamPAYDAY 2★ 5 (1.5k)315k views2.1k ♥56 minRussianUpdated Apr 27, 2025
- Desert Eagle Heat Treated | Blue GemCounter-Strike 2★ 5 (1.6k)292k views1.5k ♥2 minUpdated Jan 16
- Treasure Hunt Puzzle SolutionsTotal War: WARHAMMER II★ 5 (6.9k)281k views15k ♥3 minUpdated Aug 19, 2021






This guide was created by its original author on the Steam Community. Are you the author and want it removed? Request removal.