Hidden Mechanics
Introduction
CoH2 has a lot of mechanics and does a decent job at teaching new players the general rules of the game; however, things are not as black and white as the game presents it. This guide serves as a collection of statistics and mechanics that are either not immediately obvious or are hidden from the player.
It is useful to know that the standard sandbag has a length of 5m.
Individual unit stats can be found at https://coh2.serealia.ca/
Terminlogy
For newer players, here is a list of useful terminology and slang used by the community:
Here are the mainline infantry (Grenadier reinforcement cost goes down after T4):
Manpower upkeep is calculated as:
Each surviving model contributes one population. So, losing one model of a seven pop squad reduces the upkeep from 10.5 to 9 manpower per minute. In cases where the upkeep is not a whole number, the UI will round up, but is internally computed in decimal format.
Cover
Some units have unique cover bonuses, and each cover type has it's trade-offs in effectiveness. Here are all of the cover types with their corresponding bonuses/penalties:
You might immediately notice that light and heavy cover lose their effectiveness after a minimum distance is reached, whereas garrisoned units will always receive the cover bonus regardless of distance. Also note that garrisoned units cannot be suppressed. This does not mean that garrisoning your squad is always the best move. Heavy cover has the advantage that any incoming damage is reduced by half!
Furthermore, flame weapons deal additional damage to garrisoned units. And if the building is destroyed, then all garrisoned units will die instantly (except for trenches). The maximum firepower a garrisoned squad has in any given direction is also determined by the number of windows in that direction. That means a full squad of conscripts in a little shack with one window will be no more effective than a conscript squad with one surviving model. Therefore, heavy cover is arguably the best choice in most situations.
That does not mean heavy cover is without it's drawbacks. If it isn't obvious, heavy cover will also loses its effectiveness when the unit is flanked. And the cover acts as a backstop for tank/AT rounds. So, shots that would otherwise miss suddenly have something to hit, giving AOE damage.
There is one situation where buildings will always be better, and that is with Rakentenwerfers. The small size of Raks means they have a high chance of accidently hitting the ground, but garrisoning them in a building will elevate them off the ground.
Trenches, especially the UKF trench also deserve some attention. Unlike buildings, when destroyed, garrisoned units will not wipe. For UKF trenches, the units will pop out unharmed, whereas, 1-2 units will die for Axis trenches. And unlike normal buildings, where the effective firepower out one side is determined by the number of windows, trenches will utilize the full firepower of the squad from any direction. Trenches are also free and build quickly.
Heavy cover (such as sandbags) placed on top of negative cover will negate the negative effects of the otherwise negative cover. Negative (source).
All garrisoned team weapons (HMGs and Rak) have the same setup/reposition time of 4s.
The light cover provided by craters is omnidirectional.
It should be noted that in the case of Osttruppen and Infantry Sections, being behind cover isn't so much as a bonus as really the game penalizes them for being out of cover.
Intel Bulletins
Let's start with the age old question: "Accuracy, cooldown, or reload?" There is an objectively correct answer (source):
Accuracy translates 1:1 with DPS simply because you are increasing the probability of any shot hitting. All other events in the combat process (i.e. reload, cooldown) take up a very small portion of the combat loop. That said, the increase is not significant enough to make a difference (source):
if you have a couple of squads of stormtroopers that fire 3000 bullets through the match just to say a number, without bulletins they'll land 2430 shots, and with the bulletins they'll land 2552, which is enough to kill an extra 7 more models (152 to 159)so sadly, yeah, accuracy bulletins have at most as big of an impact as it says on the tin, about 3%, if the match is long enough to have a statistically significant amount of bullets fired
Therefore, it is advisable to use other bulletins that may contribute more significantly. Bulletins like build time on units that take a long time to build and cost reductions on expensive or frequently built things (i.e. mines).
I have the numbers for grenadiers at hand, and it's an average of about 2 seconds reloading for about 10 seconds of shooting, at best (that is, point blank). This means, a 100% decrease in reload time only gives a 20% increase in DPS at best.Also, in a show of hilarity, turns out British Tommies get 10 rounds per reload because of their Lee-Enfield rifles, and reload in about 1.25 seconds. So the effect is even more extreme...
However, the reload time for HMGs is quite significant and the intel bulletin has hidden benefits. The 10% reload reduction to HMGs also reduces the setup time and building repositioning time by 10% (source[www.coh2.org])!
The officers, themselves, are not classed as grenadiers; however, their groupies are Assault Grenadiers. In theory, Assault Grenadier bulletins can also be used on OST officers, though I haven't found any sources to back this.
Mines
Discovered mines cannot be set off. So if your minesweeper detects a mine, don't feel rushed to defuse it since your units can pass freely anyways.
A pair of closely place AT mines from most factions will kill most medium tanks (noting that the explosion of one AT mine will trigger the other).
Each quadrant of an S-mine Field cost 15 munitions to place. After placing a singe mine, canceling the placement of a minefield will refund the cost of the remaining quadrants. The placed signs will still cover the entire area of the minefield. This can be used to confuse players and even customize the spread of the minefield by placing 1-2 mines at a time (source).
Recrewing and Reinforcing
Believe it or not, recrewing team weapons and reinforcing squads deserves its own section because there are a number of unique behaviors and ways to exploit these behaviors.
Reinforcement time increases by +75% when a FRP is active. This applies to all reinforcement points (source).
Reinforcing a recrewed team weapon will give it additional models of whatever unit was used to recrew it. It will also inherit the reinforcement cost. All Soviet team weapons (even stolen) will have a crew of six.
Now let's get into the interesting mechanics around this:- Osttruppen, which are famously intended for recrewing team weapons, have a number of large penalties for being out of cover and for simply existing. All of those penalties will carry over. On the flip side, the recrewed weapon will inherit the cheap reinforcement price of Osttruppen.
- Shock Troops have +25% armor and the insane PPSh-41. Use them to recrew an HMG that can never get pushed or an AT gun that is difficult to kill.
- Pathfinders have extended visual range. A recrewed team weapon with them will inherit the visual range to make the most out of its weapon range.
- Fallschirmjägers and USF Paratroopers can reinforce remotely while the Airborne Assault ability is active (Falls) or they are near a Pathfinder beacon (Paras). So can team weapons manned by them.
Similarly, note that while conscripts merged into Shock Troops will obtain the PPSh-41, they will not be given the additional armor.
So if you have a 4% penetration bulletins equipped for atguns as ostheer, an allied (or raketenwerfer, doesn't matter) atgun you steal will also have +4% penetration.
Same applies to the models that are used to recrew team weapons. If you are using a 3% accuracy increase bulletin for your mainline infantry, then mainline infantry models recrewing the team weapon will also have the accuracy increase. This only applies to the models not using the weapon, itself.
Shared Veterancy
XP gained by snipers does not contribute to shared veterancy; however, XP from vehicles does. Units and vehicles with shared veterancy can share their XP with each other, as long as the contributing vehicles are not the same (i.e. two Universal Carriers). Since the M16 Half-Track and ZSU M17 MGMC are technically M5 Half-tracks, none of these vehicles can share veterancy with each other.
Suppression
Suppression is a squad value and will accumulate whether a shot hits or misses. Suppression on a targeted squad will be applied as an AOE effect to nearby squads for each registered hit on the targeted squad. Thus, if a targeted squad that is out of cover is taking hits from an HMG, then a nearby squad in cover will accumulate suppression as if it were out of cover (source[www.coh2.org]).
For suppressed targets:
For pinned targets:
When pinned, any models not using a team weapon cannot fire or move. All models (team weapons included) cannot capture points. HMGs lose the ability to suppress (except DSHK) and take upon the following effects:
After 10s of being pinned, all models will take +400% received accuracy.
Weapon Slots
Most infantry have two weapon slots, but there are some exceptions:
Notice that Penal Battalions receive three PTRS rifles but only have two weapon slots. That does mean that they must lose two of the PTRS models before they can pick up another weapon.
Similarly, Royal Engineers converted to Heavy Engineers receive a Vikers-K, but it does not use a weapon slot. That means you have can triple Vikers-K death squads.
Take special note that all of these weapons consume a weapon slots. So Panzerfüsiliers with the G43 upgrade cannot pick up additional weapons!
The IR StG 44 negates most of the cover bonus.
Miscellaneous
- Allied HMGs generally have higher DPS while Axis has somewhat heighted suppression (source)
- Fog of War penalty: Firing into the fog of war incurs a 25% accuracy penalty. This applies to barrage and "attack ground" commands that are in the fog of war. The ISU-152 has a 150% FoW penalty. Curiously, mortars autofiring into the FoW (i.e. OST counter barrage) do not incur a FoW penalty (source[www.coh2.org]). The FoW penalty for firing AT guns can sort of be subverted by aiming at the ground slightly past the intended target.
- Destroying fire pits gives XP. EDIT: An XP kicker appears, but no XP is applied to the squad.
- Bofors fire in bursts that must complete. This means that as long as a Bofors starts shooting at a fleeing target before it moves out of range, it will continue to fire at it until the burst is completed. Goodbye, 222.
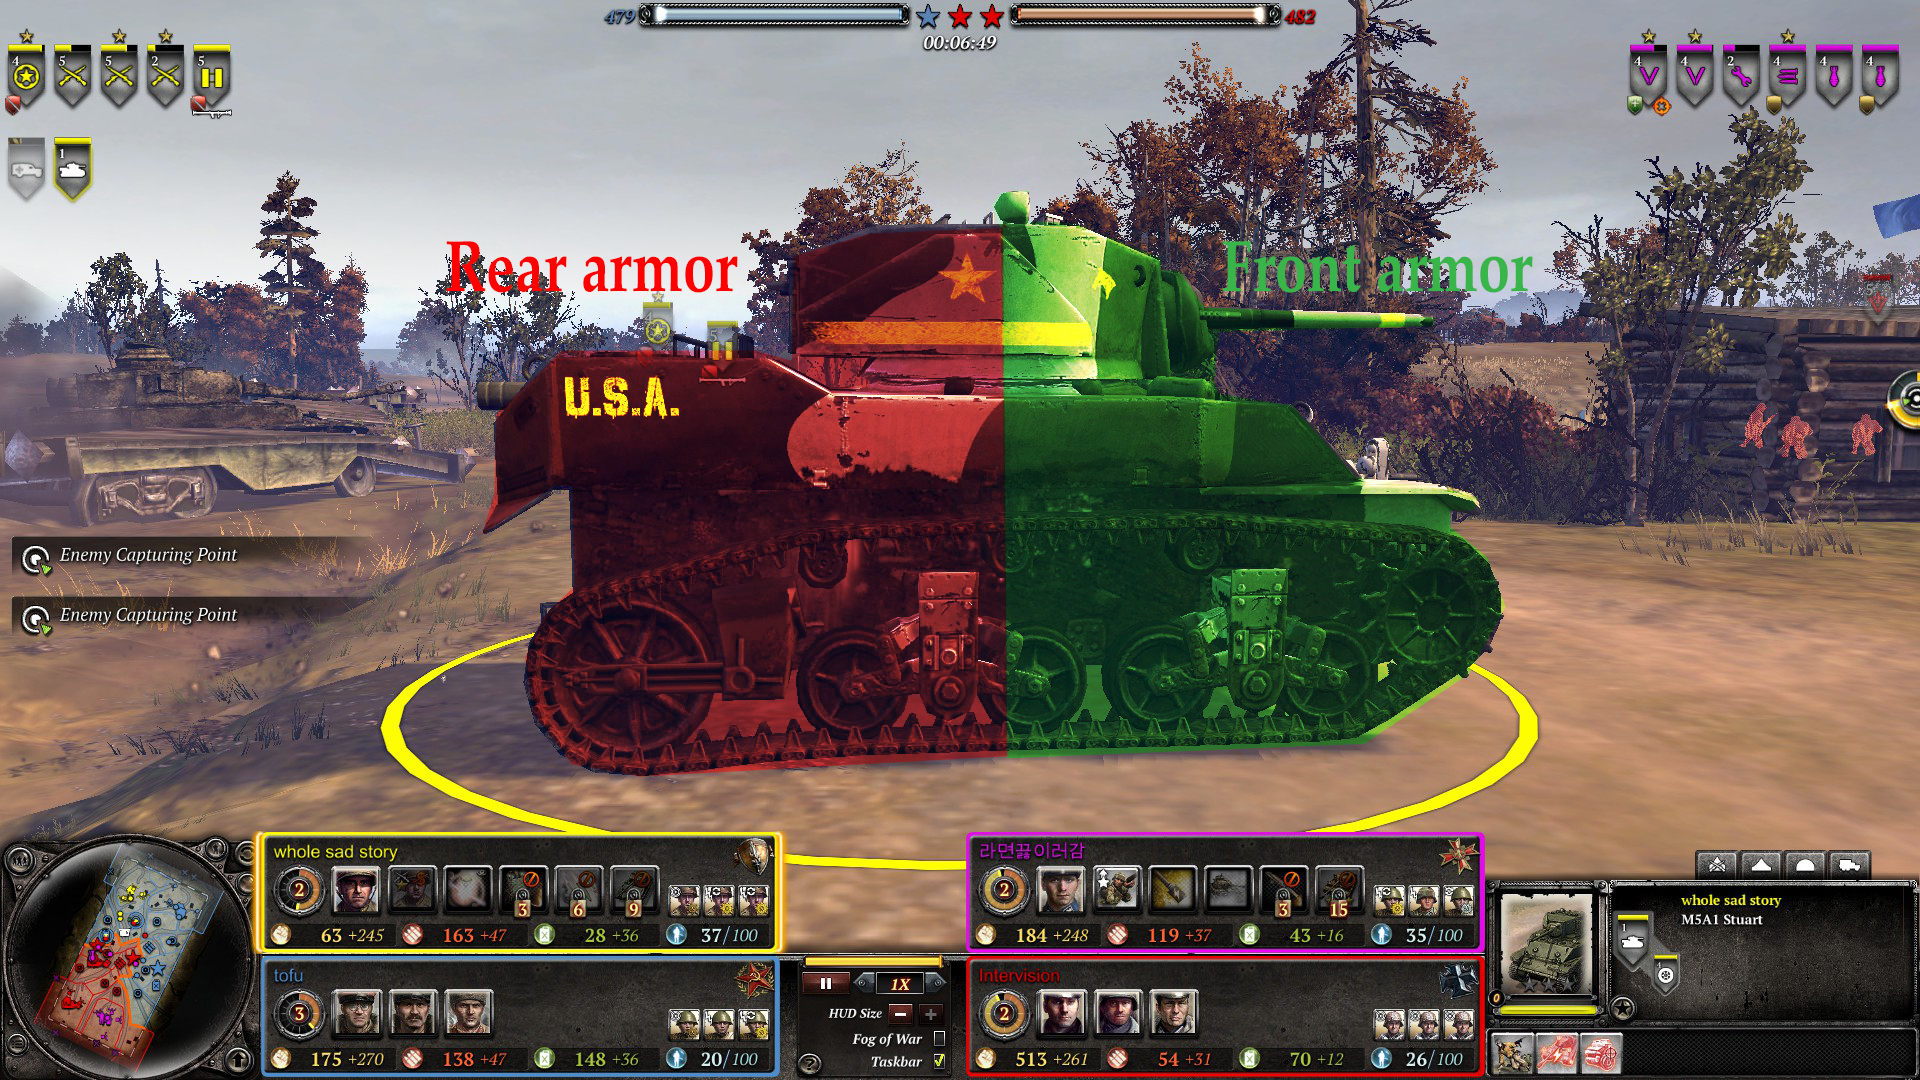
A vehicle's side armour is split into one "front" part and one "rear" part; by using the attack ground command when attacking enemy tanks and aiming at the rear part of the side armour, you will score a rear armour hit with a higher chance of penetrating (source[www.coh2.org]).
- Artillery emplacements ignore their range for the OST Artillery Field Officer's Coordinated Barrage to fire at all corners of the map; the range of mortars will double; and rocket arty will automatically drive until the target is in range (so watch out!).
- Most snares are not RNG based and have a set criteria: the vehicle's health must be below 75% after the damage of the snare has been applied.
- The gunshield of AT guns (including the OST Field Gun, excluding the Raketenwerfer) protects the crew from some damage as heavy cover, albeit, unreliably (source[www.coh2.org]).
Conclusion
There are a lot of unique units and weapons in the game. I'm certain I've missed some things like unique cover bonuses and weapon mechanics. If you'd like to see something added to the guide, please comment below.
Thanks for reading!
- How to increase FPS?★ 5 (1.2k)43k views1.1k ♥4 minUpdated Jun 20, 2015
- COH2 Console cheats/commands★ 4 (181)23k views412 ♥2 min
- Руководство по всем юнитам и постройкам Company of Heroes 2★ 5 (1.1k)23k views1.2k ♥77 minRussianUpdated Dec 15, 2024
- How to use and apply military strategy in COH2 (All factions/commanders) #REVISED EDITION# BASICS & EARLY GAME★ 5 (521)21k views742 ♥9 minDutchUpdated Jul 13, 2015
- Все, что вы хотели знать об этой игре, но боялись спросить★ 5 (331)13k views390 ♥14 minRussianUpdated Dec 10, 2021
- Compilation of broken achievements & solutions★ 5 (288)13k views471 ♥2 minUpdated Aug 8, 2022



- Upgrading to PremiumTeam Fortress 2★ 5 (20k)1441k views11k ♥6 minUpdated May 11, 2022
- No More Room in Hell Official ManualNo More Room in Hell★ 5 (2.8k)569k views2.1k ♥29 minUpdated Apr 22, 2019
- NMRiH Community Hosting GuidesNo More Room in Hell★ 5 (526)351k views653 ♥1 minUpdated Aug 10, 2022
- Лучшие кооперативные игры SteamPAYDAY 2★ 5 (1.5k)315k views2.1k ♥56 minRussianUpdated Apr 27, 2025
- Desert Eagle Heat Treated | Blue GemCounter-Strike 2★ 5 (1.6k)292k views1.5k ♥2 minUpdated Jan 16
- Treasure Hunt Puzzle SolutionsTotal War: WARHAMMER II★ 5 (6.9k)281k views15k ♥3 minUpdated Aug 19, 2021






This guide was created by its original author on the Steam Community. Are you the author and want it removed? Request removal.