Halo Modding Tips - Getting Started
Setup & Resources
First thing, is that this original news post about the release of the Halo 1 modding tools will get you up to step 1: Finding the tools, downloading them, then going into their installation folders and extracting the zip files containing all uncompiled data for the pre-existing mp/sp maps/levels/missions/data (H2EK.7z/HCEEK.7z etc), all into that tools folder, so you should have say common/HCEEK/tags/levels or characters etc, not HCEEK/tags/tags, same with data and the rest.
https://steamcommunity.com/games/976730/announcements/detail/3007823106801144959
Modding tool storepages:
H1EK, H2EK, H3EK, H3ODSTEK, HREACHEK, H4EK, H2AMPEK.
Also the Steam Workshop Mod Uploader tool can be found here on Steam as well: MCCModUploader.
Now, the main source of a bunch of information about modding the trilogy, entries for the different tools and tags and such, is going to be the site c20 dot reclaimers dot net. It's a wiki, however it's a bit unclear sometimes about some things, and if you're starting up then knowing where to begin or what to look for can still be a bit abstract in your mind, so that's why my guide won't stop here with just saying go there, and I'll give some ideas about other things.
https://c20.reclaimers.net/
You can also post questions in the steam modding subforum, sadly it's not that active, and most people these days use discord for almost everything, and Halo modding is no different:
Discord Channel: Halo Modding Reclaimers
(Under Discord Home, type it into the upper left "find or start a conversation" field)
As of 23rd of November 2022, 343i have made an official documentation about modding MCC
https://steamcommunity.com/games/976730/announcements/detail/3481873895640384261
https://learn.microsoft.com/en-us/halo-master-chief-collection/
So you now have even more resources to consult when modding!
https://steamcommunity.com/games/976730/announcements/detail/3645131284590860010
Guerilla Part 1
Across all the games, they have pretty much the same underlying engine and tools as well. So I'll be showing examples of each of the 3 almost interchangeably, though there will be differences, obvious evolution, but you'll spot them on your own.
Because of the nature of a guide, it's easier to show the photogenic stuff, so Guerilla sections are dominated by my visual tweaks for demonstration purposes, but there's a lot that you can do with Guerilla, and once you open up a few things and just glance around, I'm sure you'll start to form mental models of how it all is structured.
Your folder by now should look a bit like this: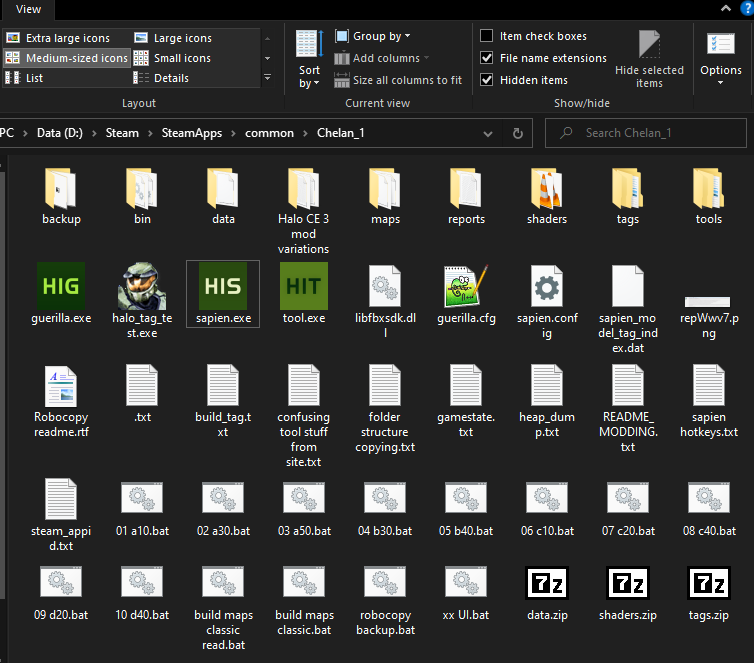
And opening Guerilla, will first appear blank, but you can just in the top left corner open up tags:
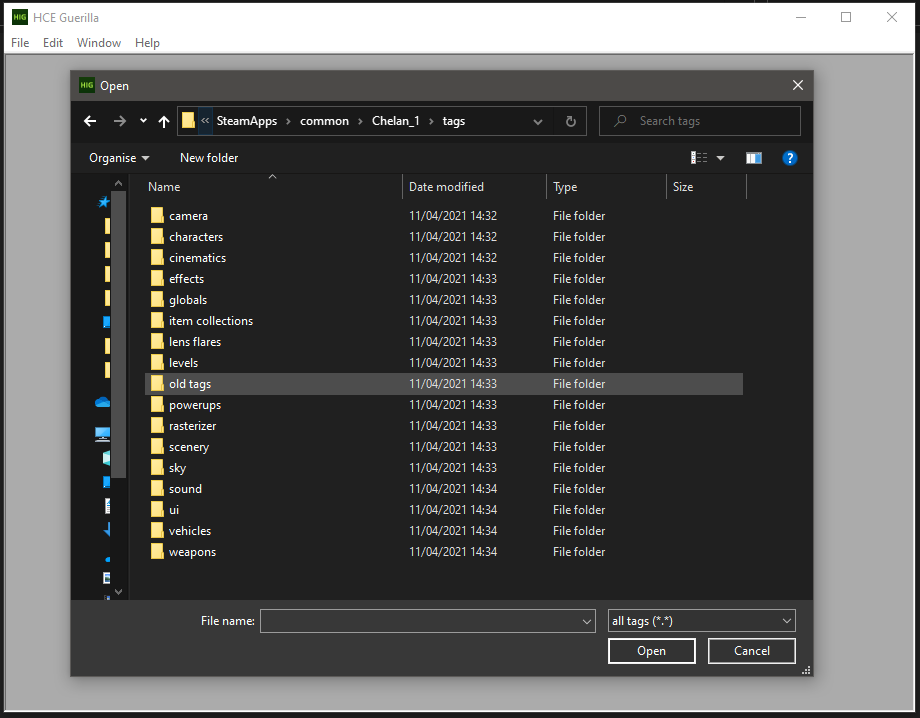 --------
Now "tags" aren't a specific file extension, they are the chunks of data that the game nicely for us compartmentalize into a hierarchy. These include basically everything, stats in weapons, AI, textures, models-- You can even open up the level scenario chunks, though you can't do with Guerilla as much with them as you can with Sapien.
You can also create new tags from scratch, put them somewhere into the tags folder, properly refer to them within sections, and then manually place them or script them into your maps if that's how you made them.
Here's a view you'll see with tags open:
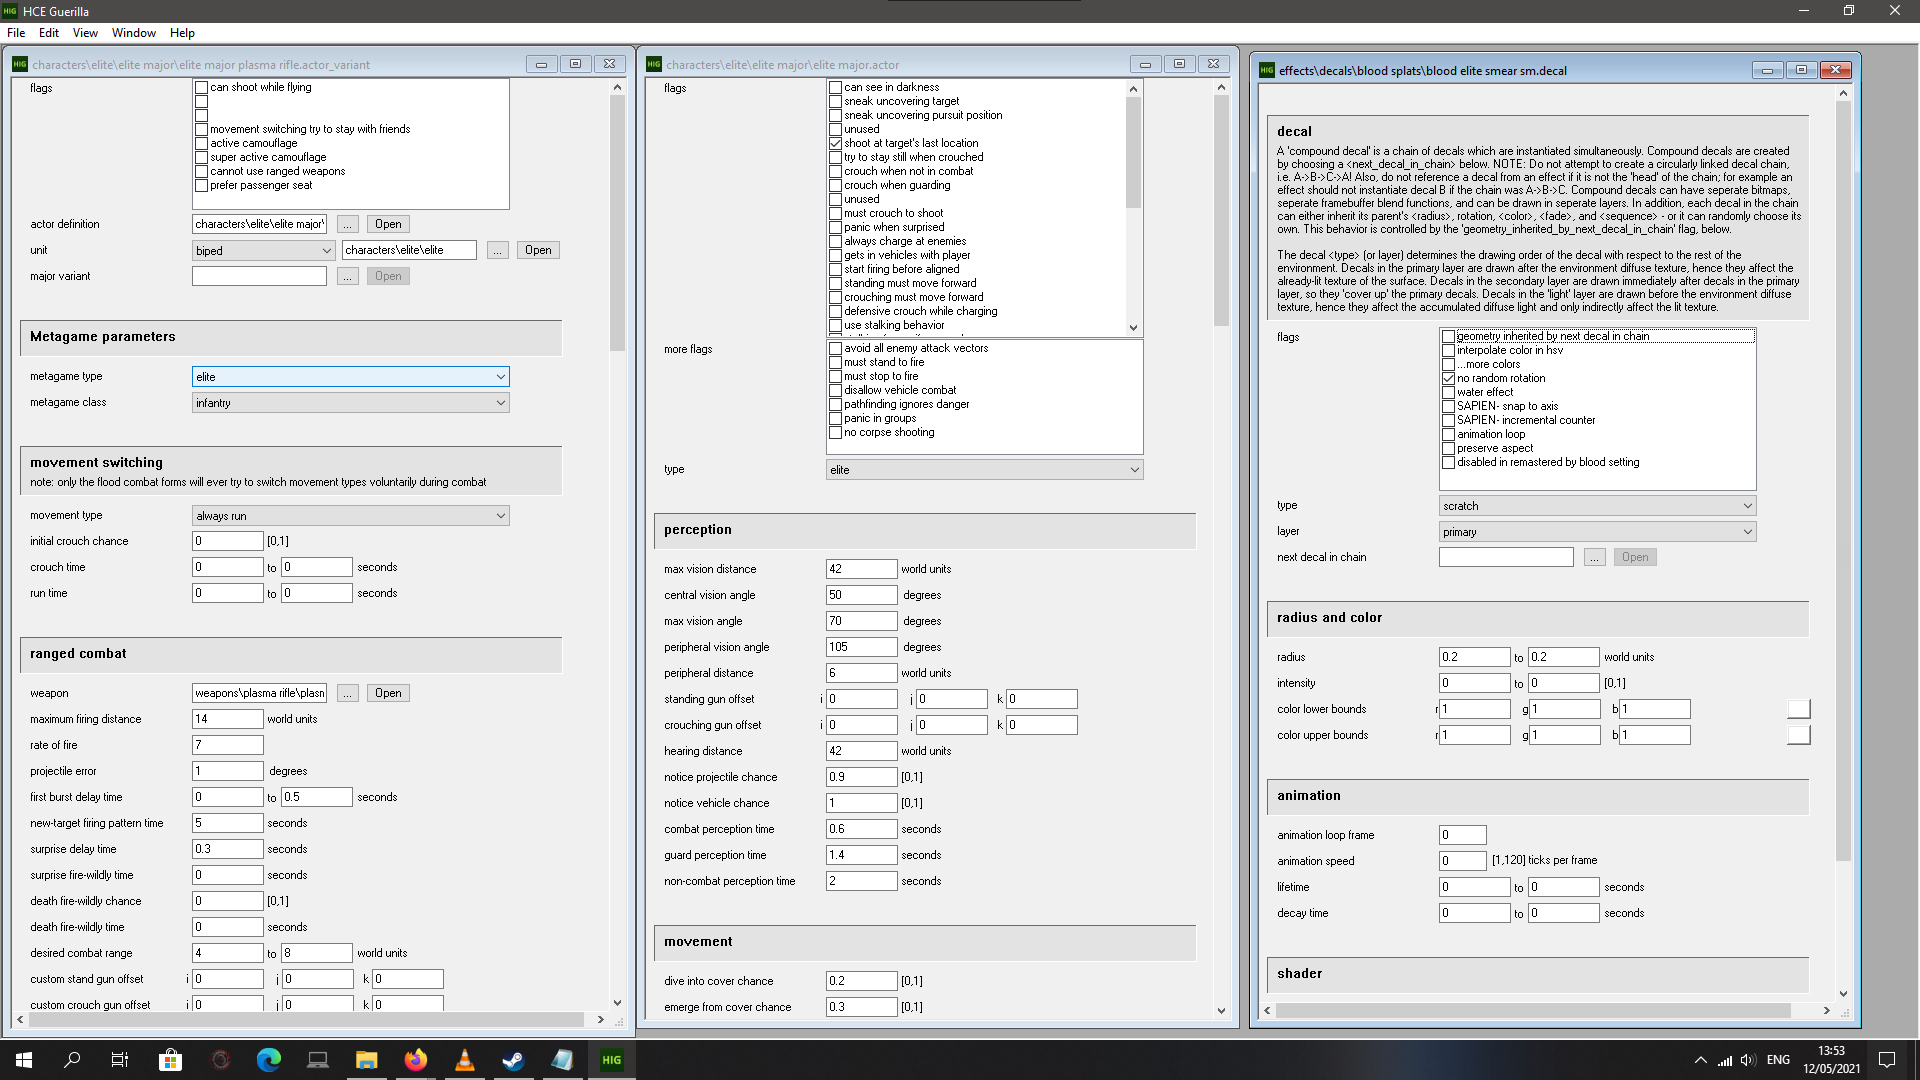
---------
An example of one thing I've done across all the trilogy titles:
I tweaked muzzleflashes to be flashier, impact effects, added projectile lights to plasma weapons, all to make combat look more hectic.
For projectile lights, I went and made a copy of a weapons light file and renamed it to say bolt dot light, just so that I didn't have to manually recreate the same light color of that weapon, tweaked it. Then I opened up the plasma weapons bolt projectile file, and simply under attachments referred to it as a light:
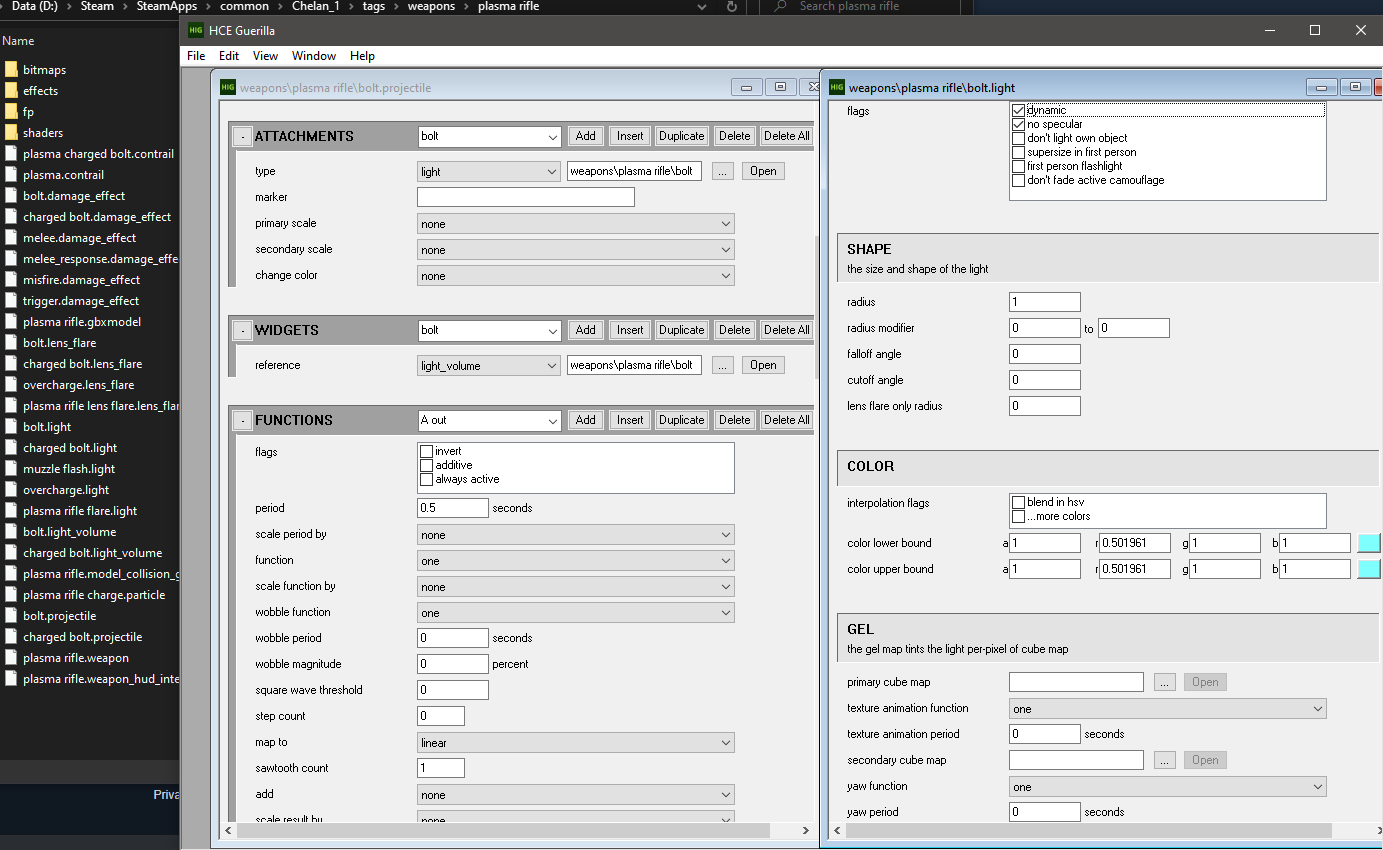
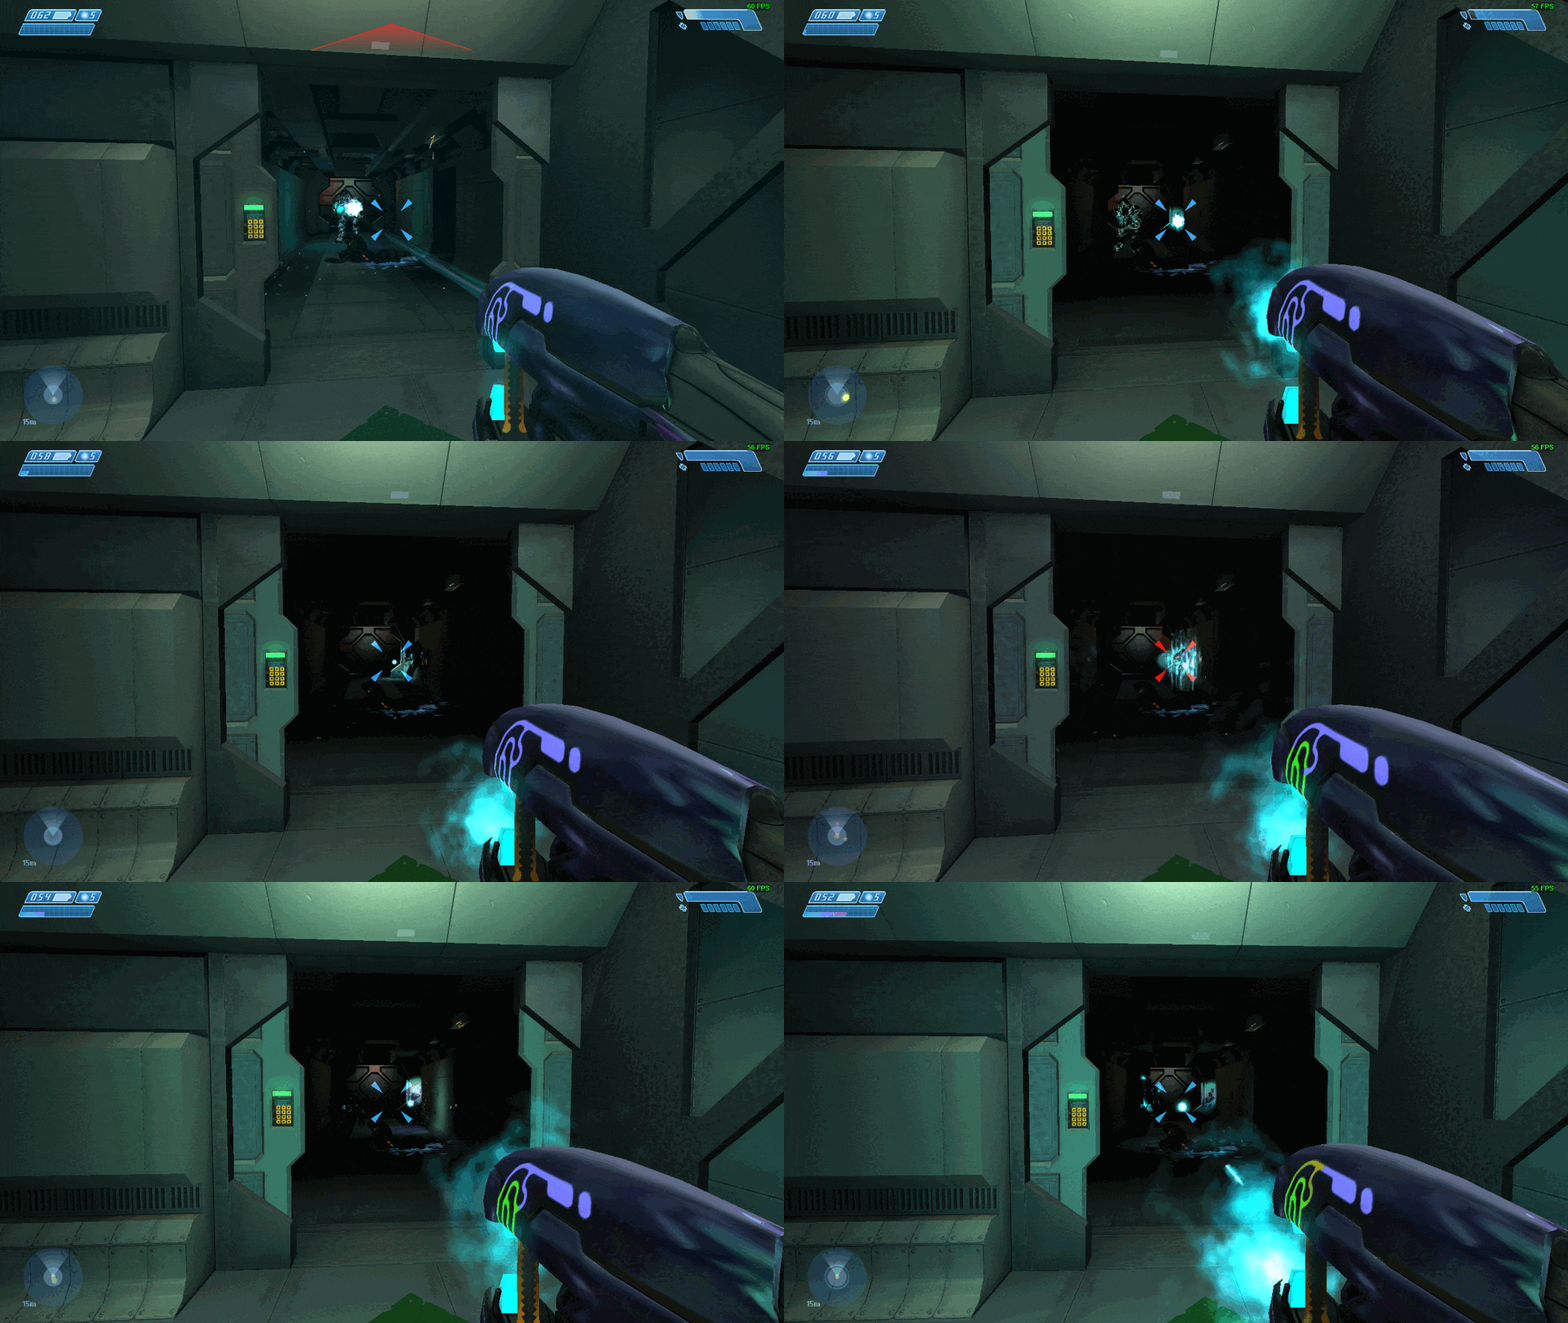
(Not the best capture of what I did, but hopefully gives an idea of the changes in question.)
Across all three games, creating a new effect like this was pretty much as simple as it looks.
The only thing that tended to make things complicated were when the games had messier hierarchies, relevant files not neatly in folders you'd expect, and if a file was used by an unexpected effect.
For instance in Halo 2 I heavily tweaked the plasma rifle muzzleflash. Little did I know that the same file was somewhere in an obscure section used for Ghost & Wraith hovering glow, even though normally you can't see it. In that case I just made a duplicate PR MF file, tweaked that, and referred that one specifically for the plasma rifle alone, leaving the original untouched for the others.
I suggest everyone do the same in some cases, if you heavily edit some file without knowing if it's used by something different, if you just want it specifically for a single file to be used, just make a duplicate to edit, reducing headaches.
Halo CE is pretty simple, no cheeky flags, specularity is cool but remember that it's costly and the engine has a limit to rendering onscreen effects and will start to cull stuff making things look glitchy.
Halo 2 you need to be more careful of. If - like me - you want to make muzzleflashes, impact lights, projectile lights more flashy, you should basically untick every flag at the top, only leave no specularity and no shadows for stuff like hits and projectiles (left for MF on/unticked cause they look cool, engine can still handle that - you might need to add the lights, even MF, to an effect file like firing effect instead of the usual weapon file attachment place, make sure weapon attachment has a primary scale field written with "illumination".)
Halo 3 again untick pretty much every flag for your custom light file for best results, distance diffusion is I think tied to how intense the light is, the bigger the diffusion with too little intensity means the light is spread out too thin, too dim to even notice, but I too small a distance diffusion value will mask the other effects then.
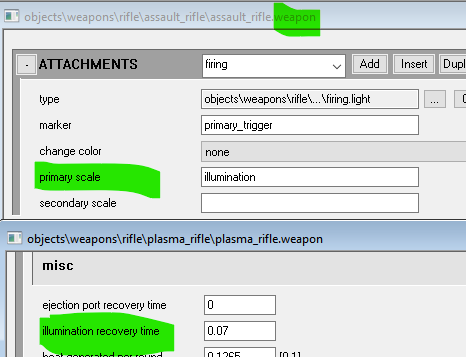
--
Another thing I did which I want to share, is that I made all weapon projectiles in H2&3 use their corresponding impact effect, to further boost their flare in combat.
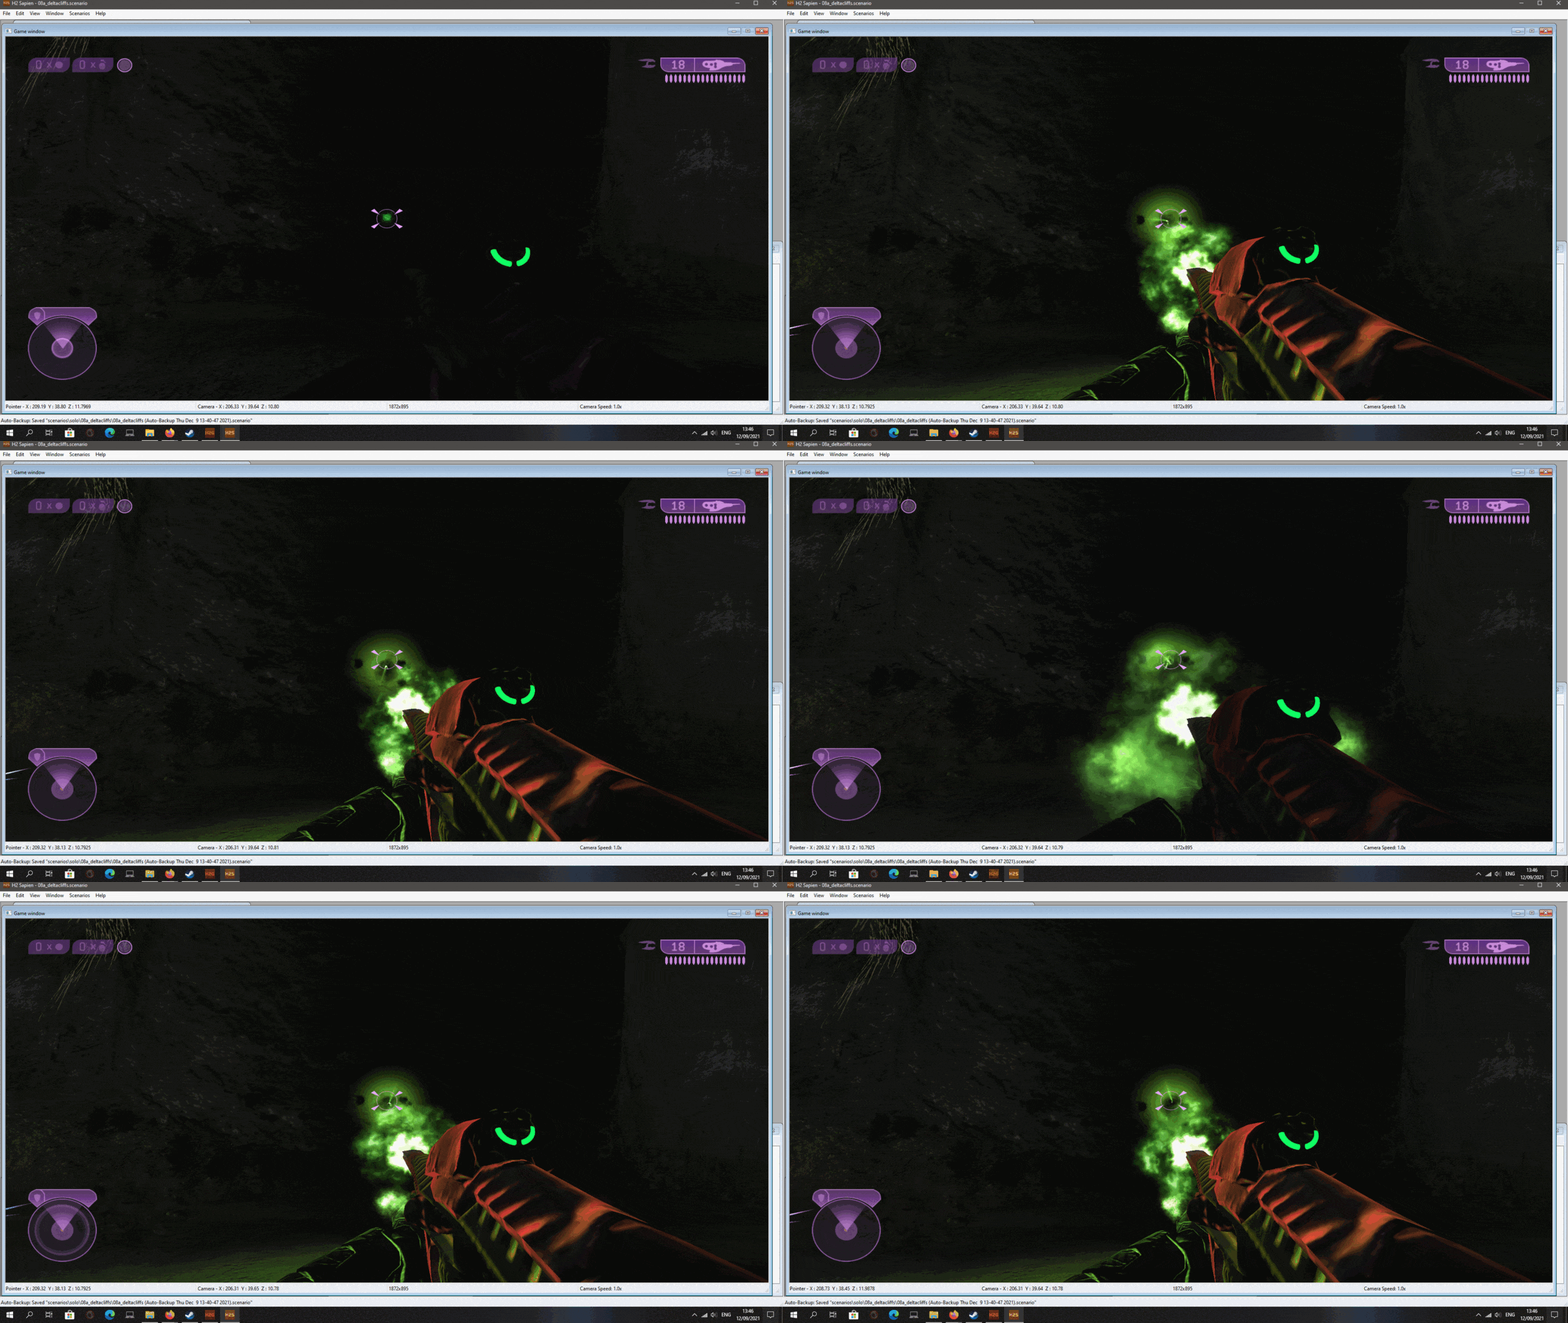
You would see that, normally in the flyby/impact section of a projectile file, the impact effect field is empty, but if you then refer the impact effect file there, usually located in the weapons' fx folder, you'll see ingame much more, well, impactful hit effects leaving decals more consistently. This doesn't mess with material specific hits, shooting water or dirt still have their specific splashes and dust and only for those situations, not on every surface. Note on the left, Guerilla open (can save edited tags in realtime and swapping back to Sapien will reload updated tags) shooting with impact effects filled in the field, next field empty, how the shooting looks.
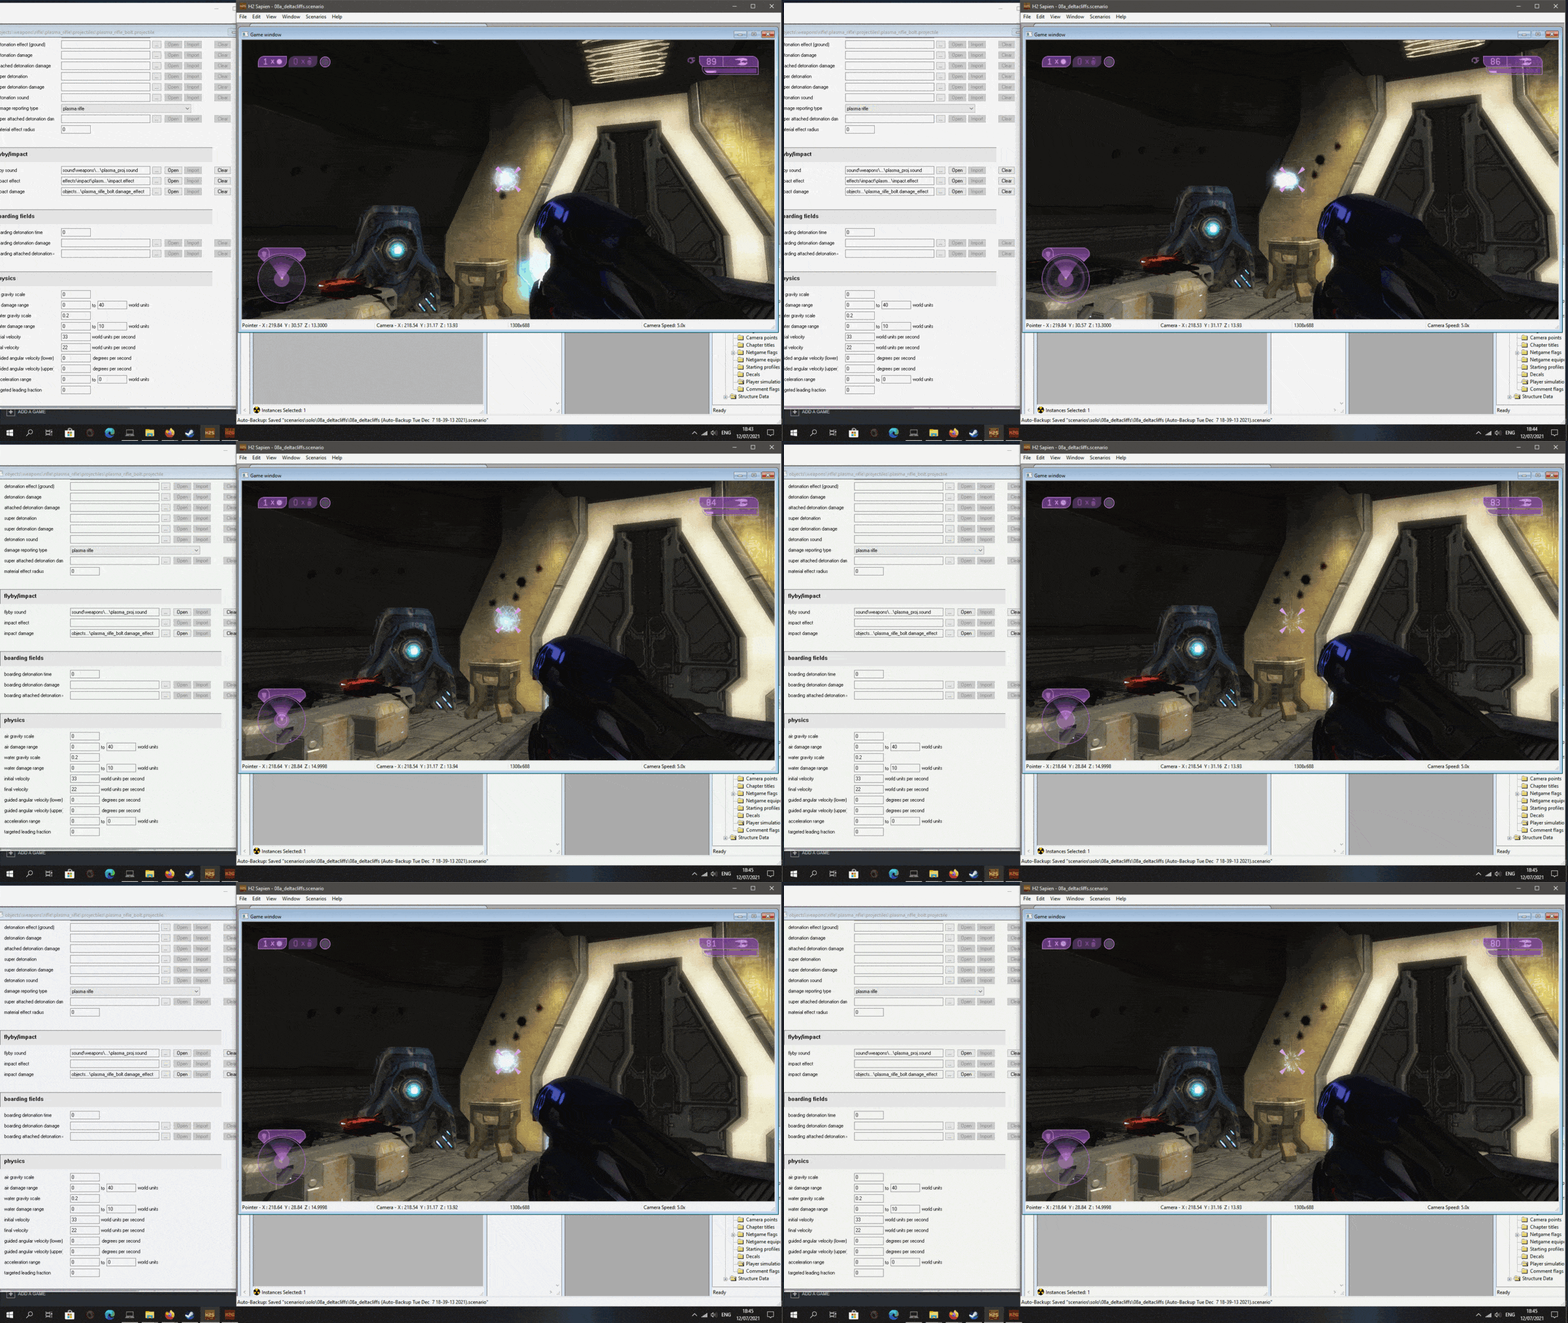
With some weapons I was a bit lazy, like if a machinegun turret or warthog turret didn't have its own files, or an automag didn't have it's own files, then I referred to the other, like with automag using the magnum files in these types of entries. (H2 Rocket launcher interestingly was lacking its rocket_detonation effect in the detonation effect airborne/ground section, and there too adding it improved explosion quality.)
In an impact effect file you can add a hit light (again like projectile light, copied a light file, renamed, edited, then added into impact.effect in the event->parts section, location forward/up/normal, and offset away from geometry). Meaning when a bullet or plasma bolt hit a surface, a light will flash in the impact with all the sparks.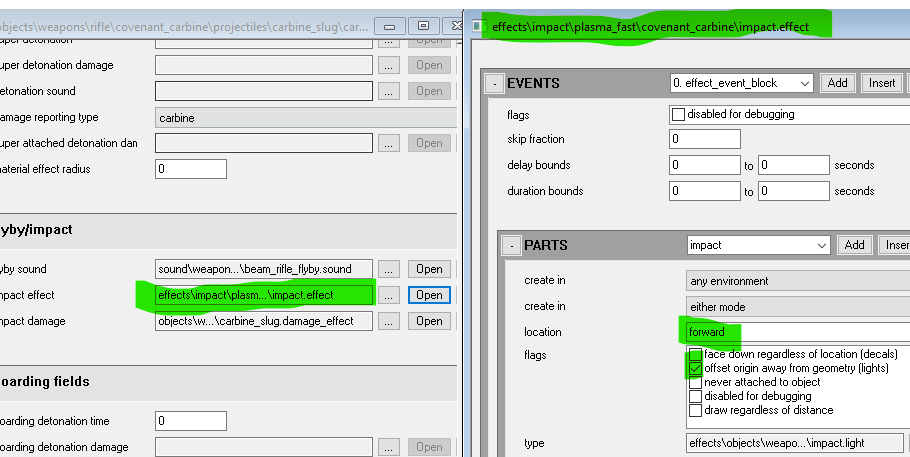
 And in an educating moment, in H3's case, it had an undesirable consequence; it doubled impact effects ingame- Where I decided to go over every impact effect file, create a duplicate, renamed it impact_noreflection, deleted inside them the "reflection" part in the top "Locations" part, referred that one in the projectile file, and that was it, now it just played the hit, and still referred to the normal impact file in it's own specific situations, without duplicating a hit effect.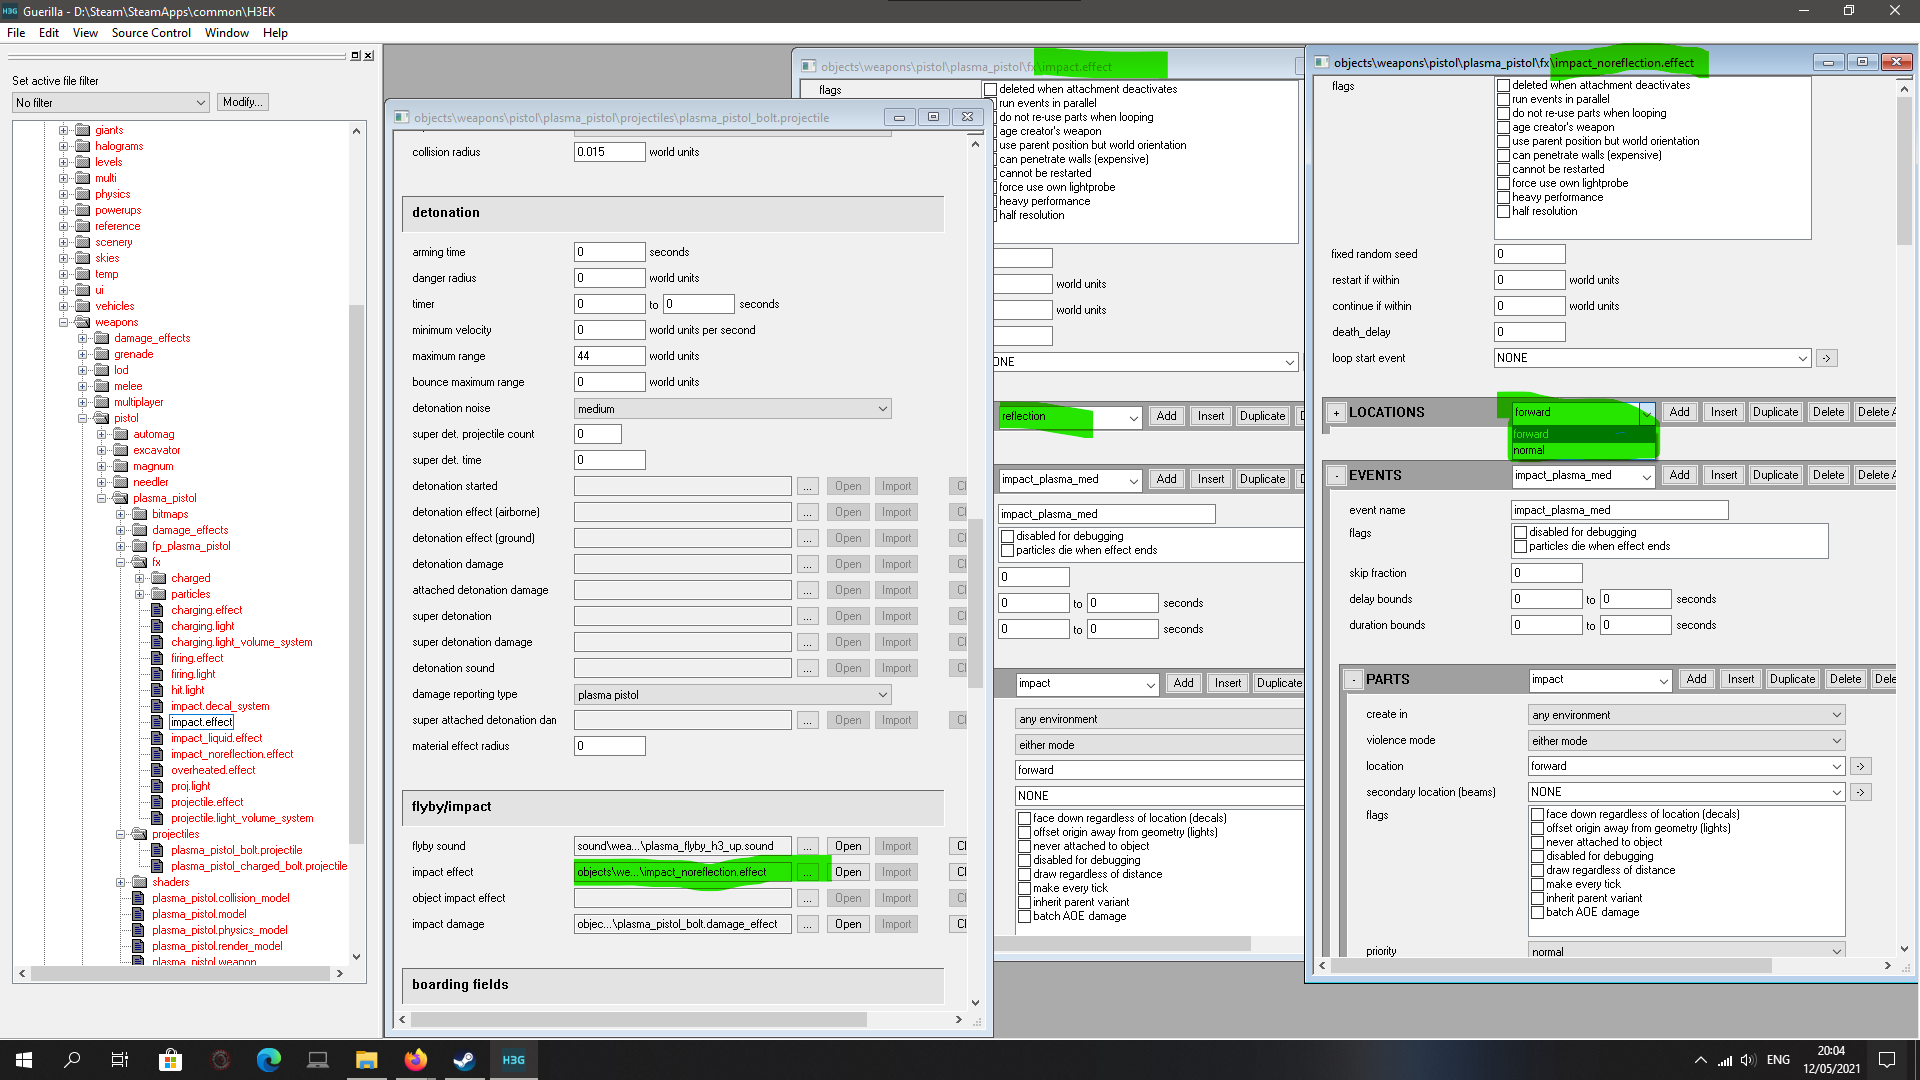
(Though with testing in H3 it didn't seem to need this impact-addition-treatment as much as H2 did, bit of a wasted effort in my part. Still, an educating moment once again in how you should keep in mind the importance of leaving base files alone and making separate ones for edits.)
Duplicates might at first seem to require more effort, but again, do you want to go through the work of creating a tag from scratch and filling out a bunch of fields and adding under them entries (not to mention editing an existing one without knowing where exactly that tag is used elsewhere?), or pick an existing one which has most of what you already need and only want to alter, and just make a copy that you rename and then just have that referred in a smaller handful of places?
Guerilla Part 2
(Again duplicating an existing one there so that I didn't have to individually create the subsections with shoulders and heads and torsos, I made a "com" with a basic minor_scl foundation, but tweaked torso to be "spec_ops" and one shoulder to be "spec_ops").
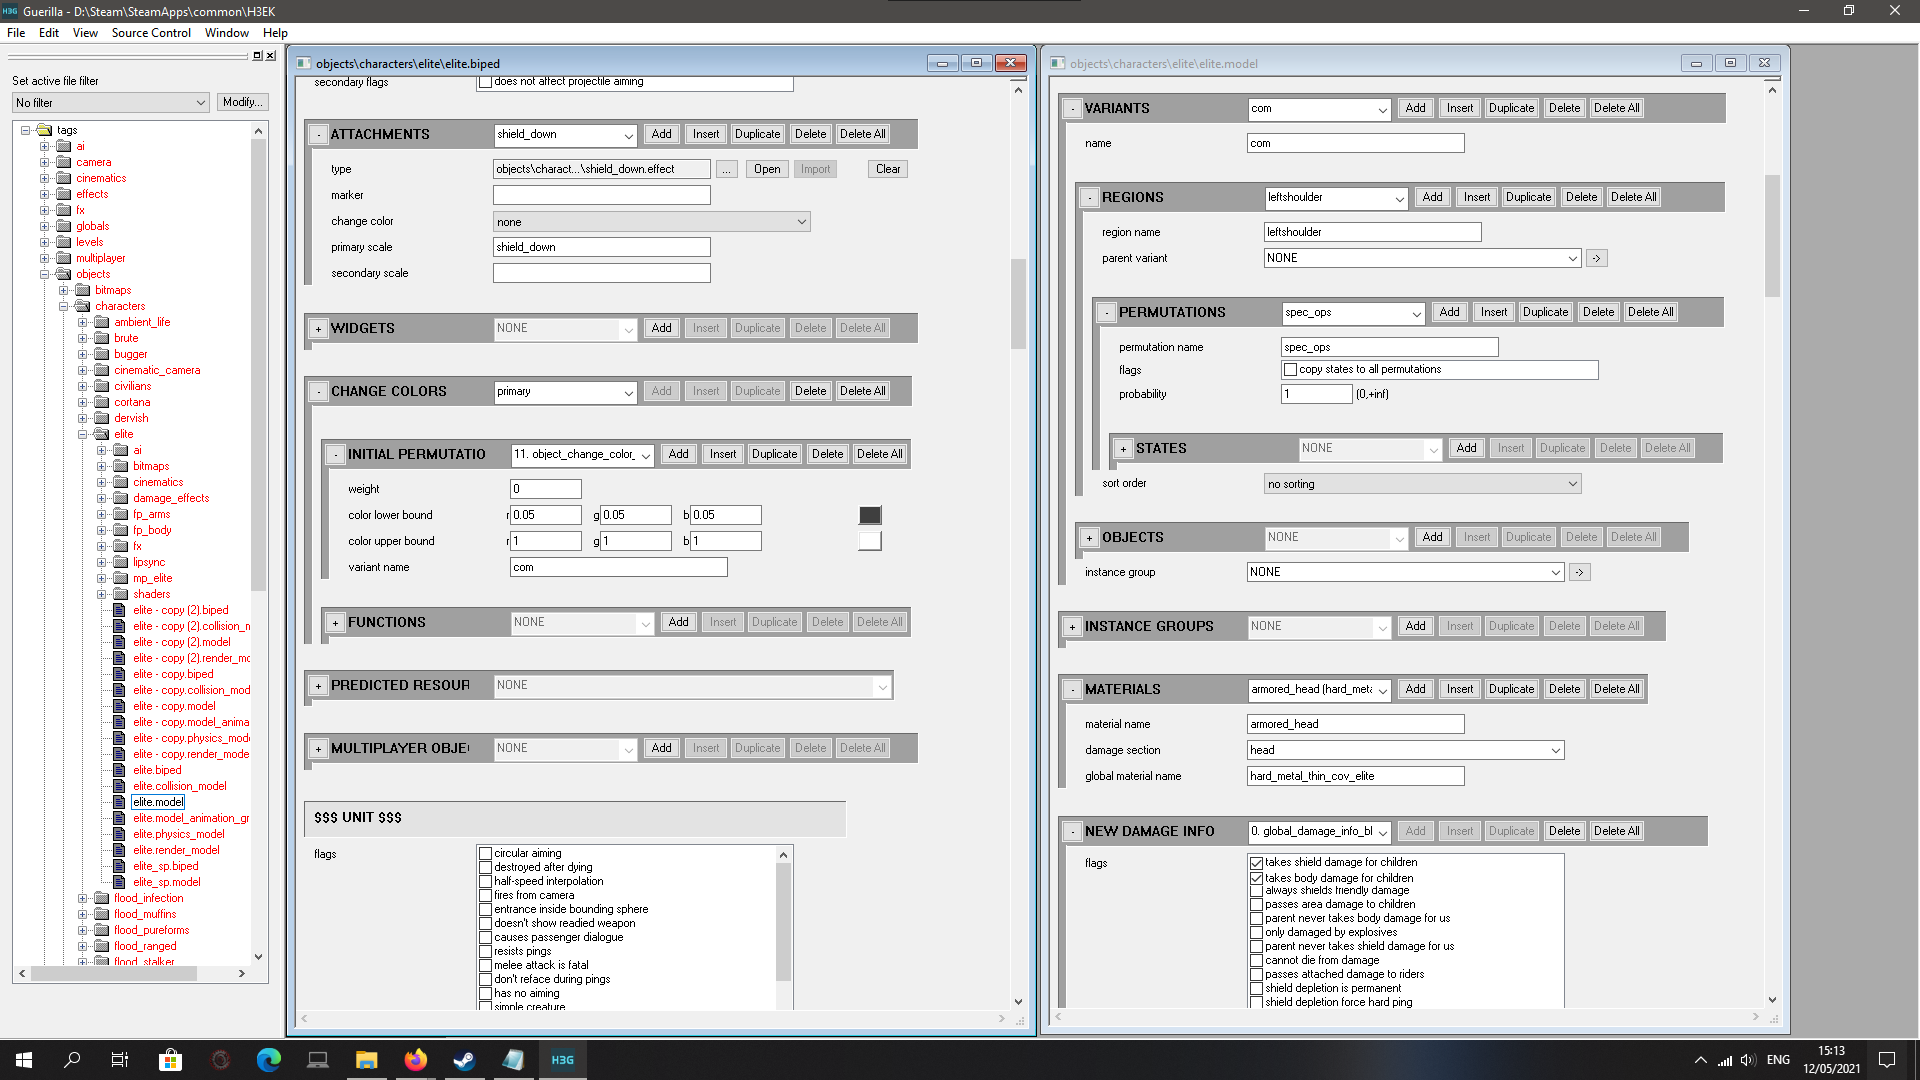
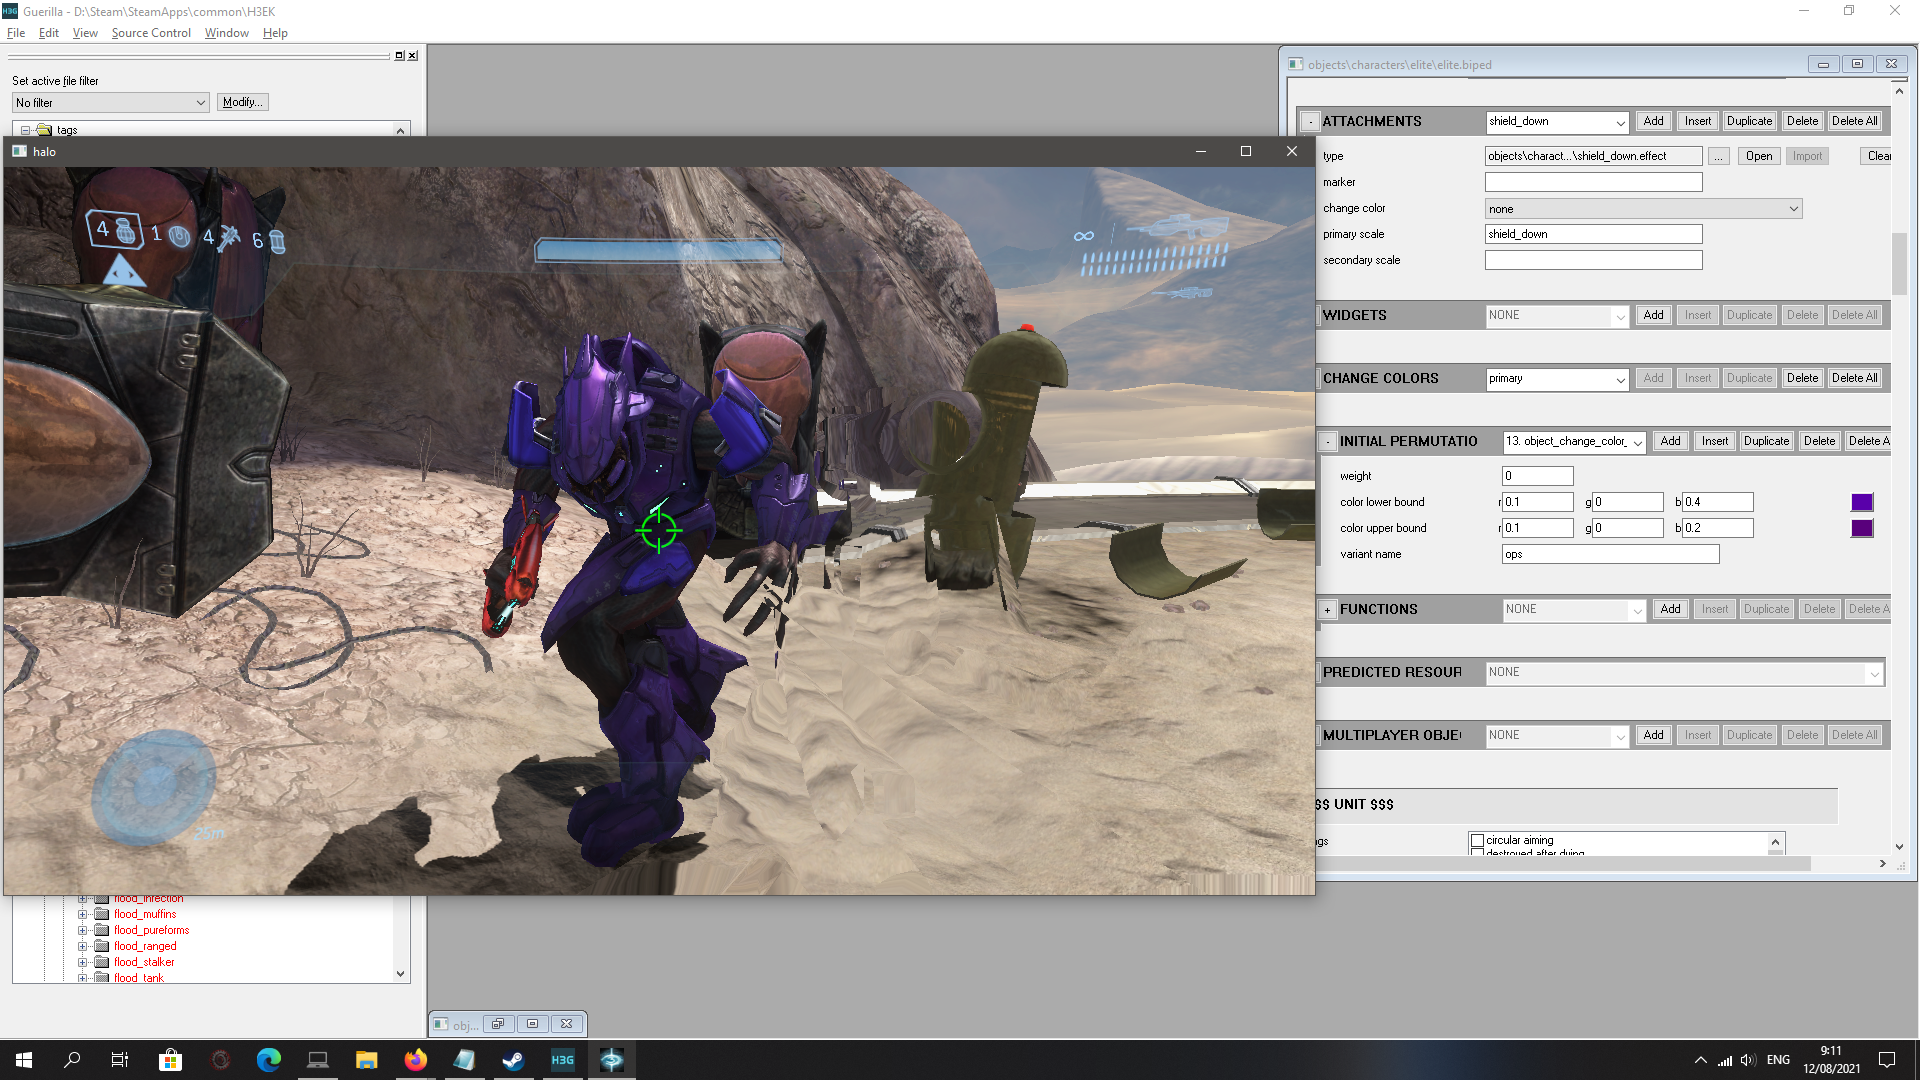
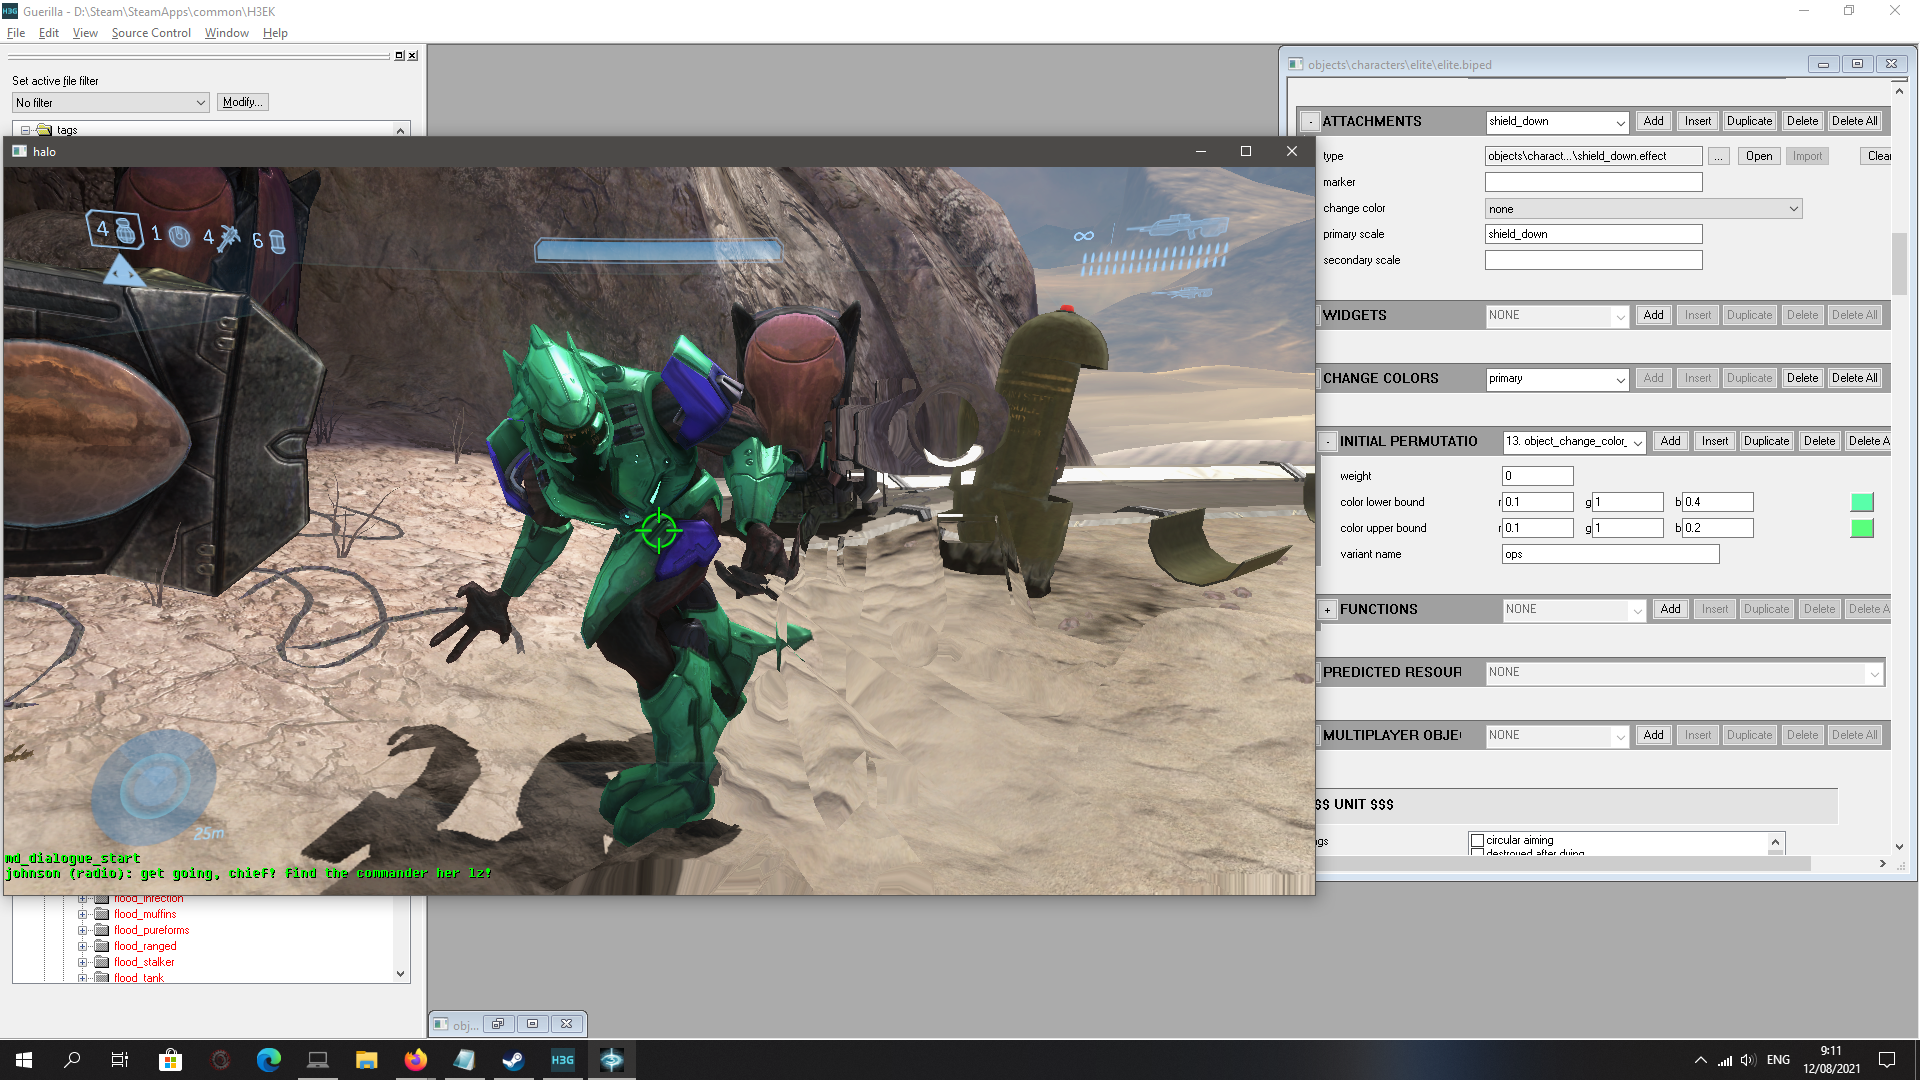
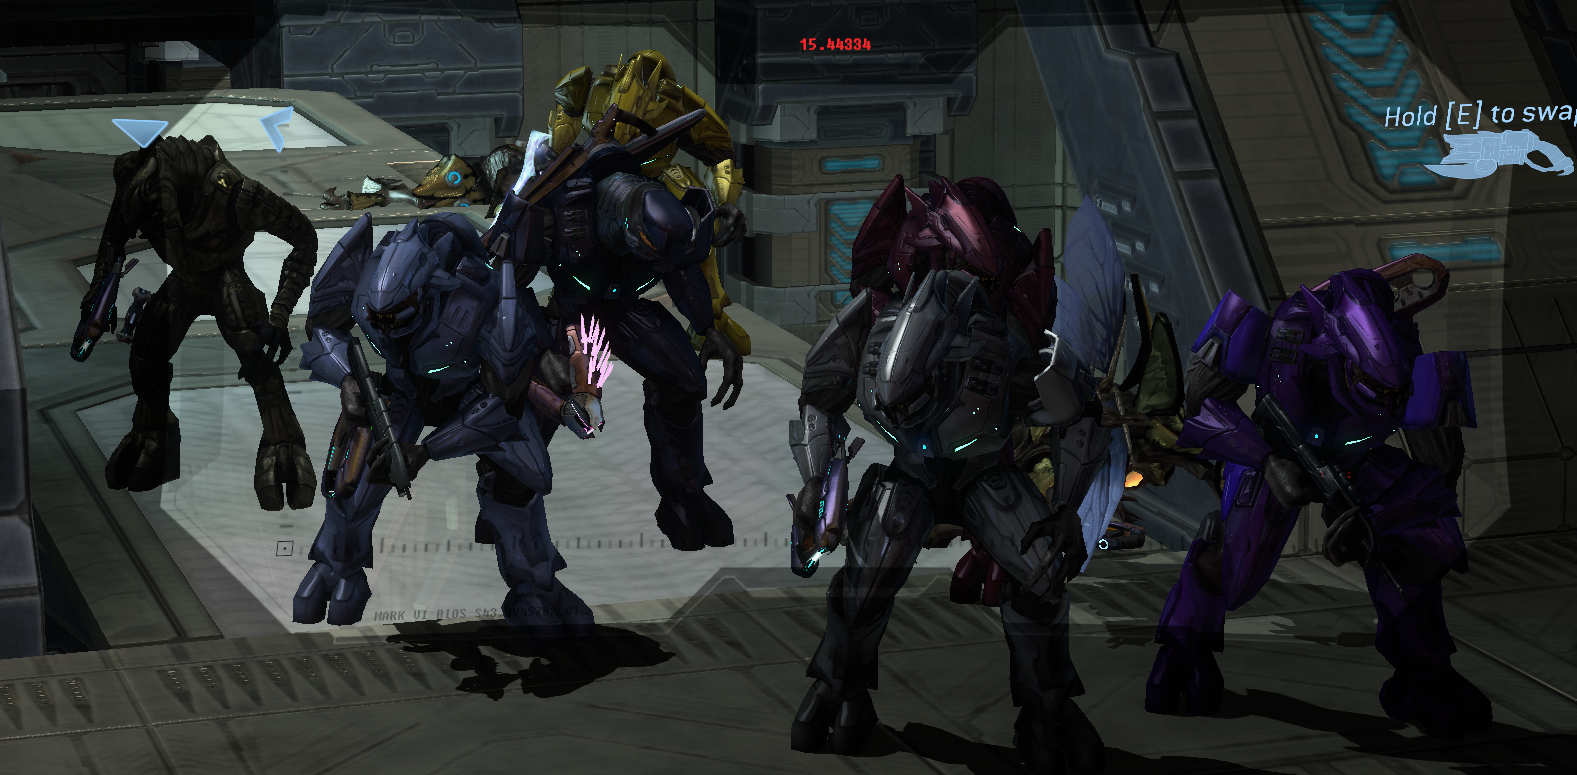
You can also tweak tag files and then in real time examine the new saved changes being updated in a map you have open in Sapien, like tweaking the Elite colors and seeing how they look like in the game:
----------
I want to repeat that: You can ALT+TAB to guerilla, change a value like one of those colors, or a shoulder or torso or helmet piece, save, then alt+tab back to your Sapien or even Standalone, and see that change being updated immediately.
Doesn't seem to work for H1 Sapien, tag_test had mixed results. Works for H2 Sapien, not tag_test. Works for both Sapien & tag_test with H3.
Big thanks to a member in the Reclaimers Discord for telling about this, it's been really helpful for getting a realtime impression of changes.
----------
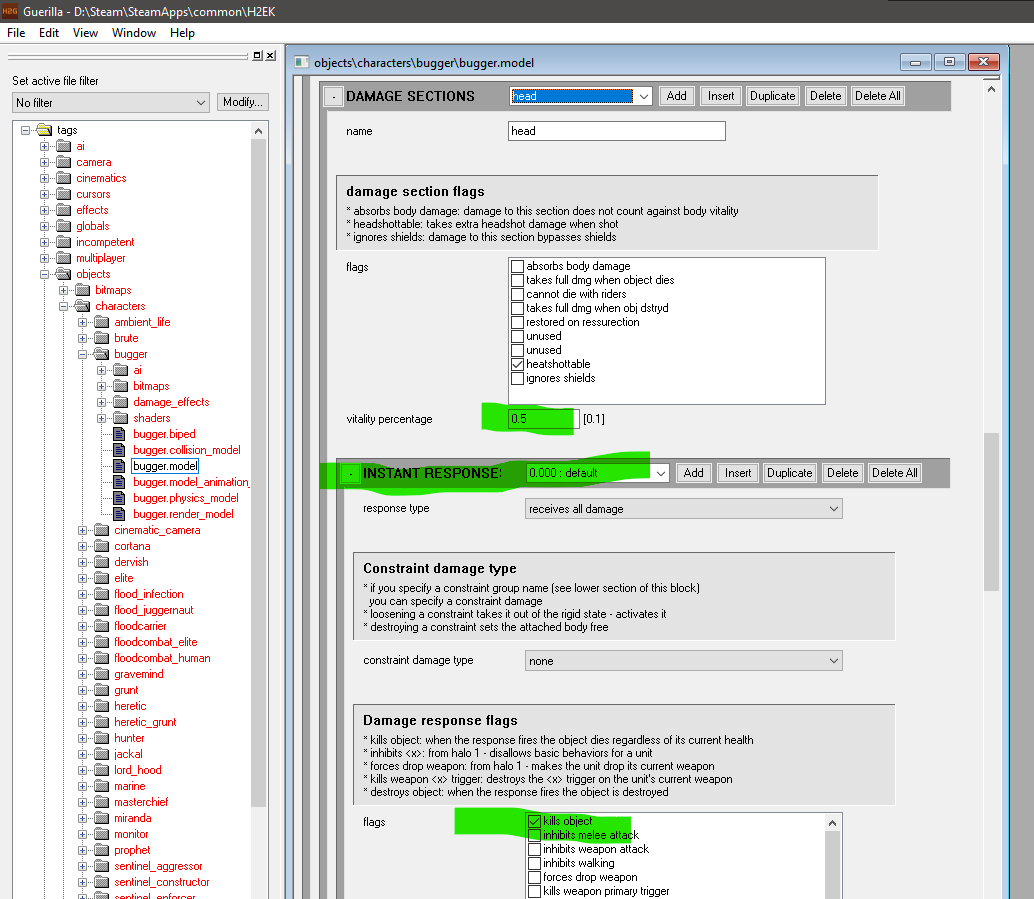
Want headshots to count for something with more weapons than just the ones that one-hit-kill with a headshot?For Halo 2 & 3, you'll want to open up a characters model file, then select the head part, put the vitality percentage to be lower than 1, it basically means what percentage of the characters total health "resides" in the head section, then add or edit an instant response to the head section below it, and just tick the "kills object" flag, with a damage threshold at zero (I think defaults to it), you don't really need to edit any of the other fields there.
This means, with less health in the head section, and depleting it, it takes less shots to kill a target (0.5=2.0x dmg multiplier).
Now headshots are more efficient no matter the weapon you wield.
 For Halo 1 it's a bit simpler. You open up a characters model_collision_geometry file, scroll down to materials, select head for the top down menu, and just increase the body damage multiplier.
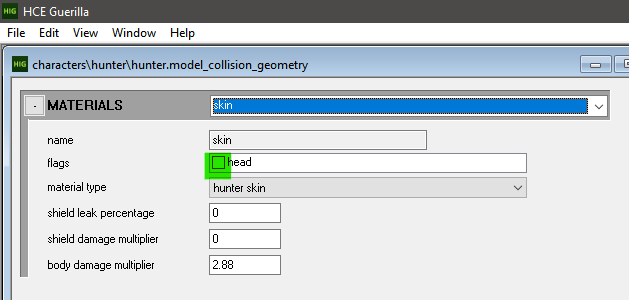
I'm going to show how to remove the one-hit-kill for hunters in the unarmored parts.
You'll want to open up that model_collision file, go down to that materials section, select "skin", and untick the "head" flag.
I still suggest maybe increasing the body damage multiplier a bit to make it more vulnerable (and decrease it a tiny bit more for armor), and you can under the damage_effects file dmg modifier section still have certain weapons like AR and Magnum bullets do more damage to hunter skin than plasma if you want to keep that classic Halo rock-paper-scissors balance of what weapons work on what.
------------- I have also made different AI. For instance in Halo 2, I wanted Arbiter missions to have their own unique Elites with their own stats and behaviours, distinct from the Elites you faced against as Master Chief.
I admit it was a bit to make them better (though I also tweaked enemy elites to still be a challenge, just not more tanky, which I wanted ally elites to be-- Made allies deal less damage by giving them their own generic character file where I made the damage modifier lower for each weapon down in the firing patterns section.)
Made duplicates of the model, biped files, renamed them to elite_ally, in ai folder copies of base character file, again renaming them, opening them up, cross-referencing them, then editing them-- In the Arbiter-specific levels in Sapien, I edited types to add their biped and character files, and replaced every AI squads that were your Elites (not heretics) with my new ones- Worked like a charm.
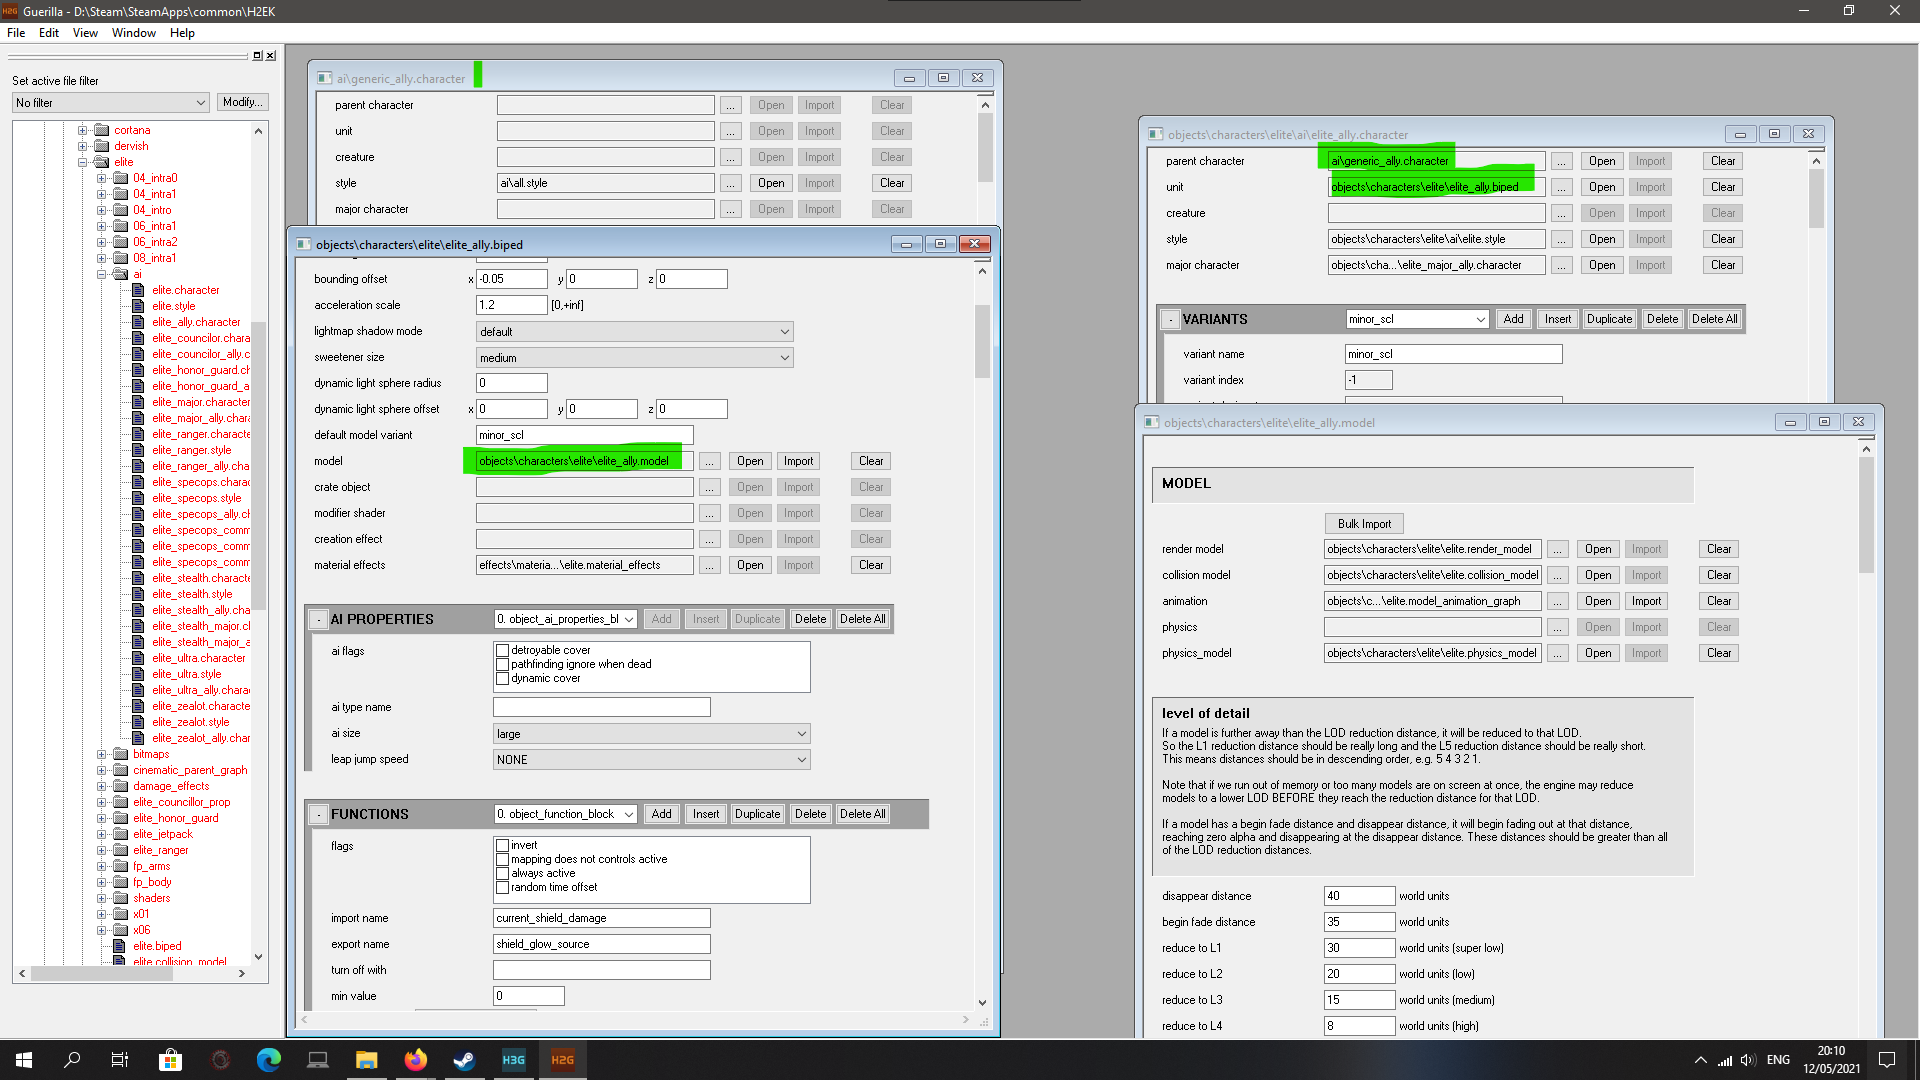
Cross-referencing is always important and easy to miss when a field pops up that requires some file you want it to refer to. Those are then characters who's types you can then insert into a map with Sapien, and place (or in my case just replace old squads with).
--------------
There's so much more you can do with Guerilla, but these I hope will give an idea of some variety, and opening up different tags will just have (mostly) plain English in clear sections.
Sapien Part 1
With Sapien, you'll be editing . scenario tag files. located in tags/levels or tags/scenarios/solo etc folders.
Using Sapien, sometimes I've placed new scenery in maps-- Especially in Halo 1, because I wanted to hide pickups behind cover that might not have been present. My favourite pickups being active camo in places you'd have to look into, to encourage exploration more. I've also placed weapons that weren't present originally, like Flamethrowers & Plasma Cannons in H1 and Red Plasma Rifles, Automags & Silenced SMGs in H3. I've placed new AI squads, I've edited AI orders and firing positions, placed vehicles and weapons and items I felt were underutilized, edited script files in Data/levels/solo/ tweaking mission scripts to add AI squads into zonesets and their orders and then compiled those changed scripts into a scenario in Sapien from the top left.
This is just the tip of the iceberg. If you've ever seen the creations people have done with the original Halo Custom Edition editing kit (HEK), know that these tools, Guerilla, Sapien, Tool, are pretty much highly related with those.
Some Sapien hotkeys, I copied these from c20 Reclaimers wiki: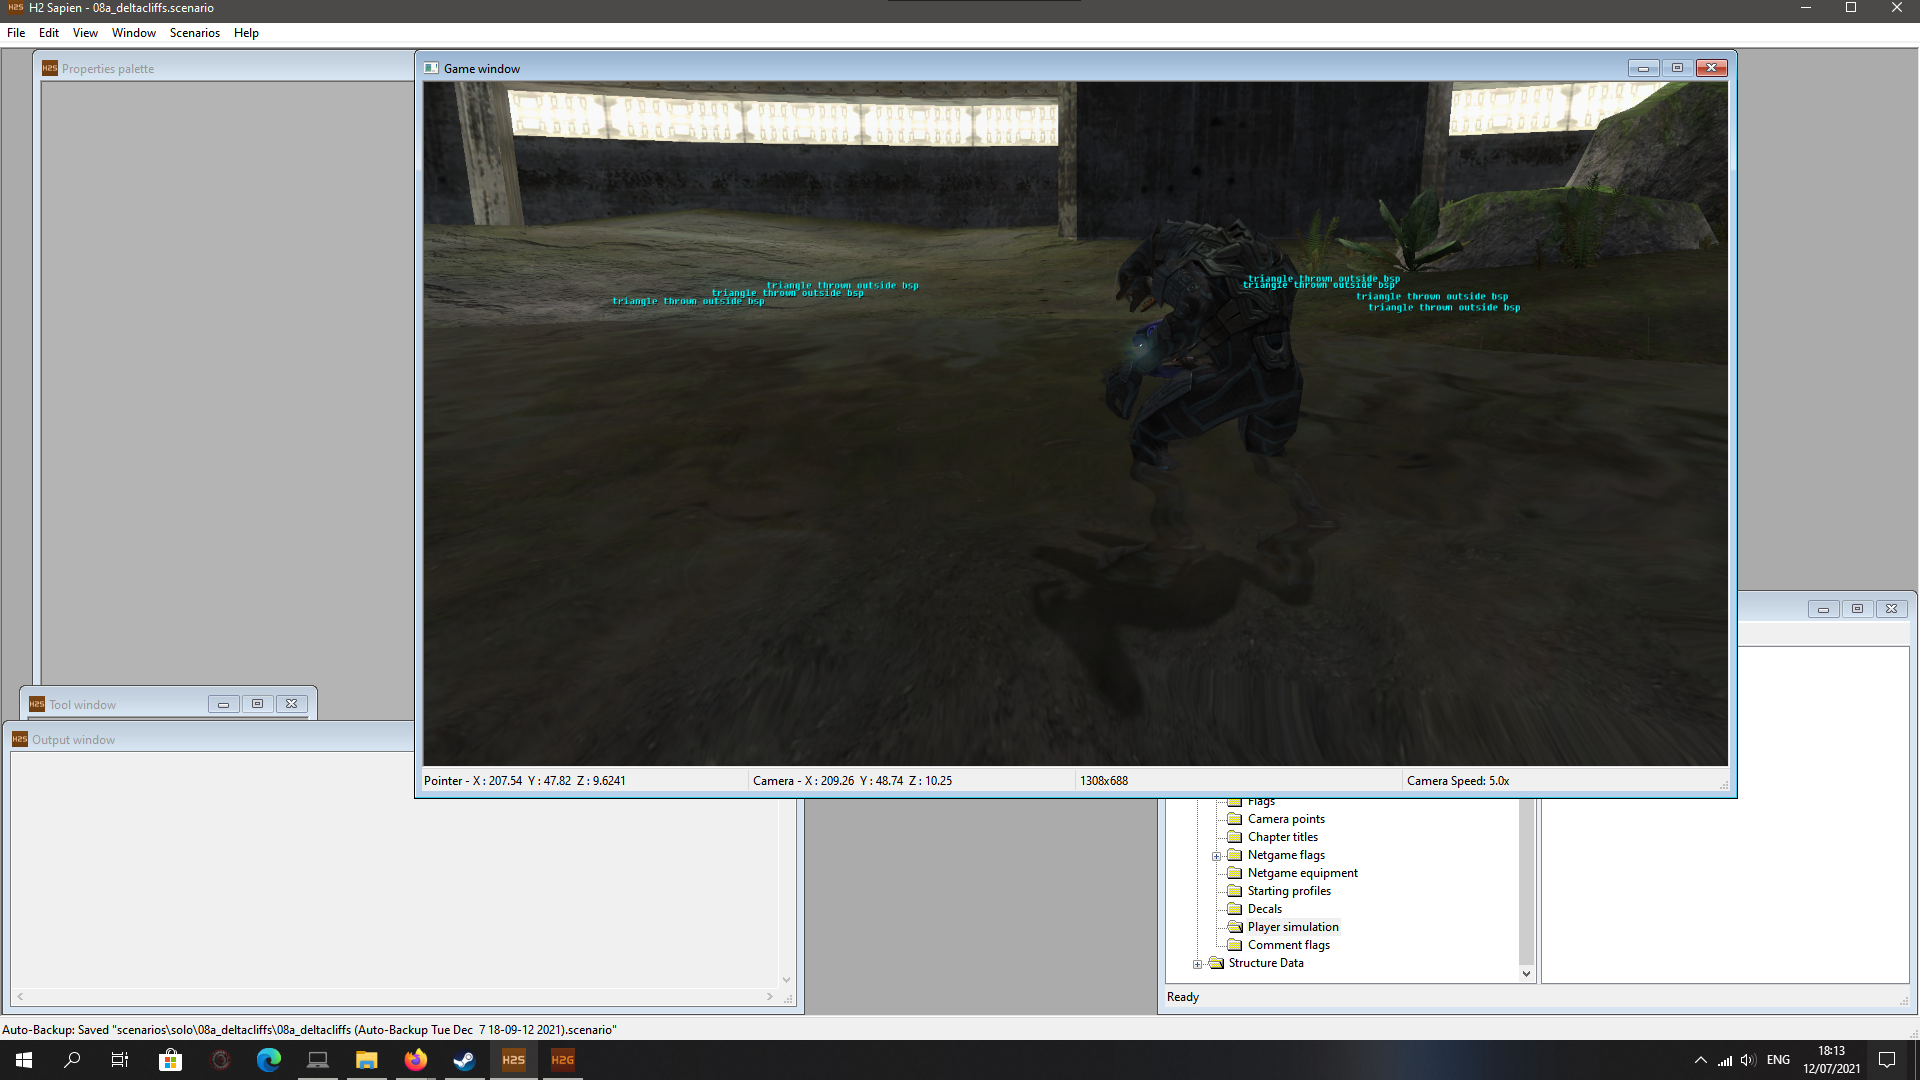
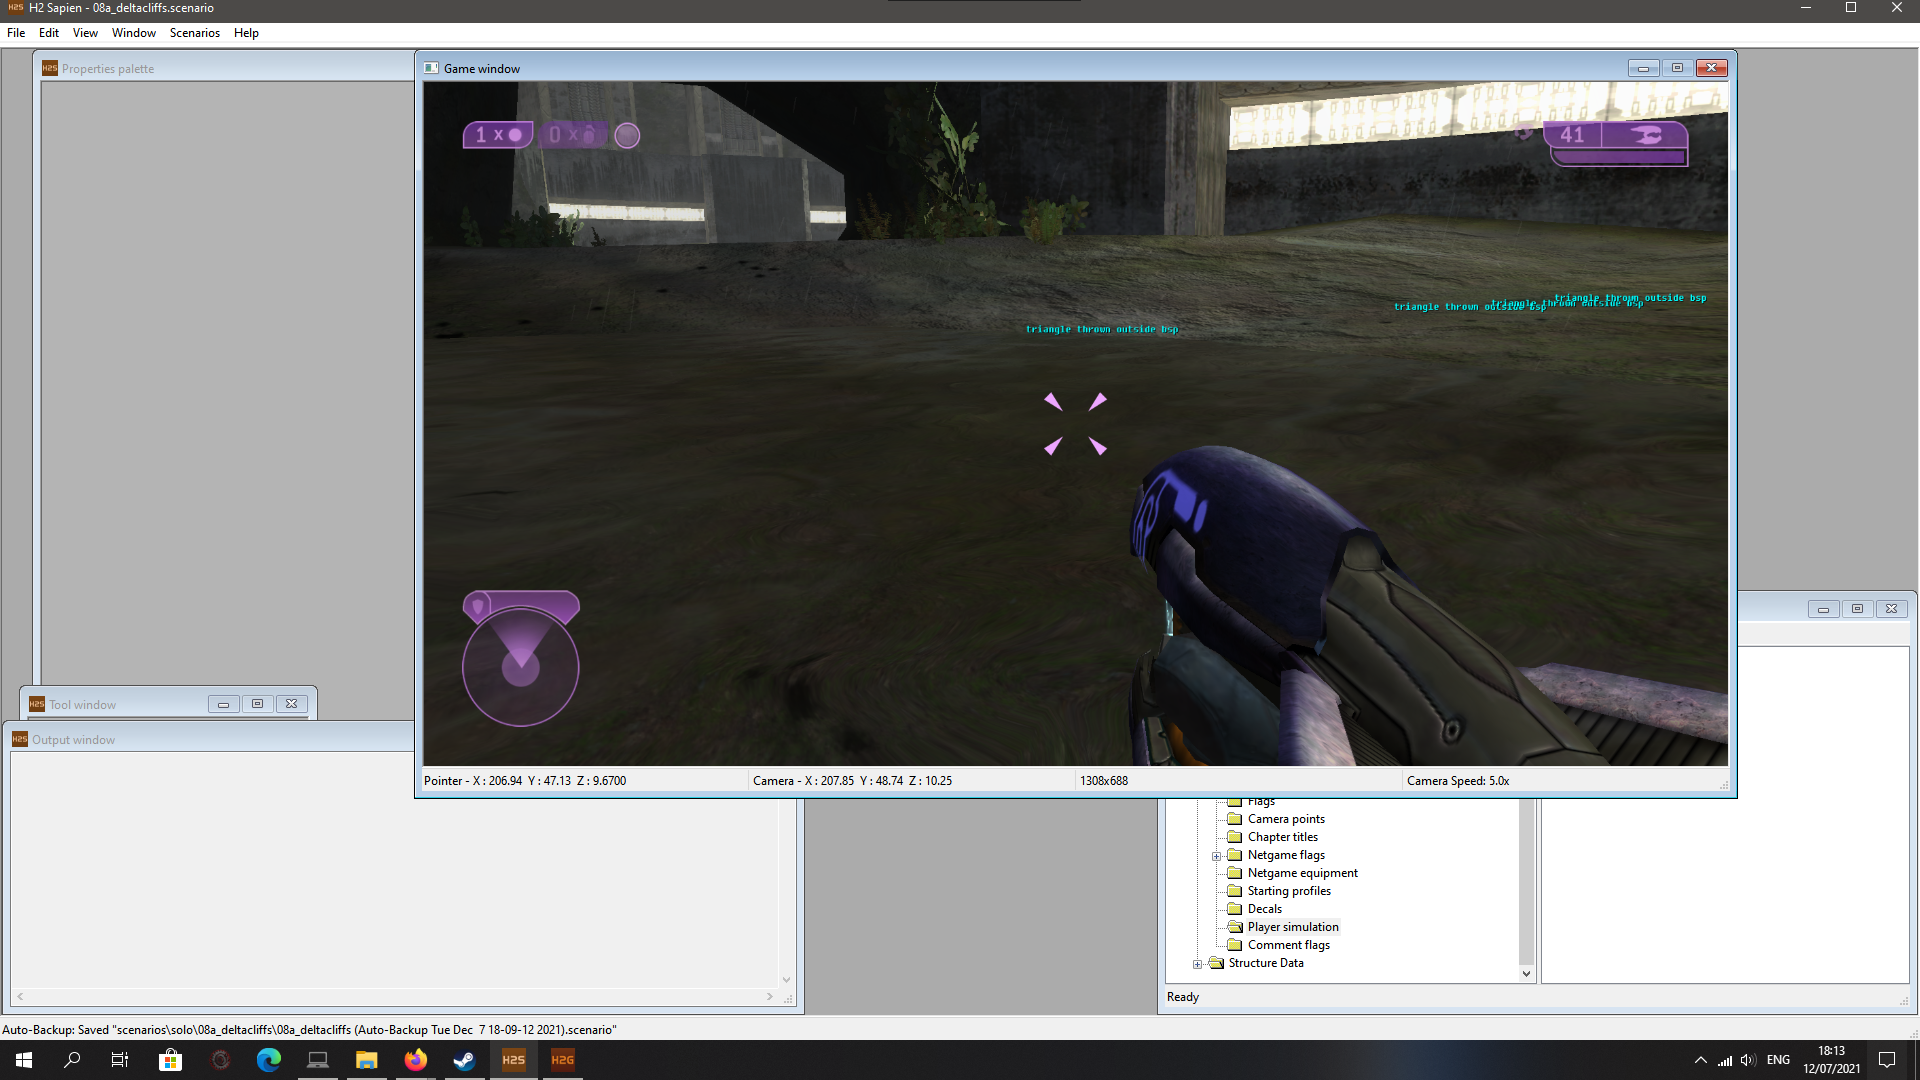
Another method of spawning your character in Sapien (at least H3) is when you have the game window selected, press CTRL+Q and your character will spawn where your camera/view is, instead of say at the starting bsp which it does with TAB.
(Oh, and DEBUG menu also works in Sapien, the HOME key) I mentioned placing weapons that weren't originally present in a map. I opened up the first Halo 1 level, edited types to add it as a thing you could now use in the map, placed a flamethrower towards the end, also a gunrack to somewhat hide it, and that was it, saving, it's there.
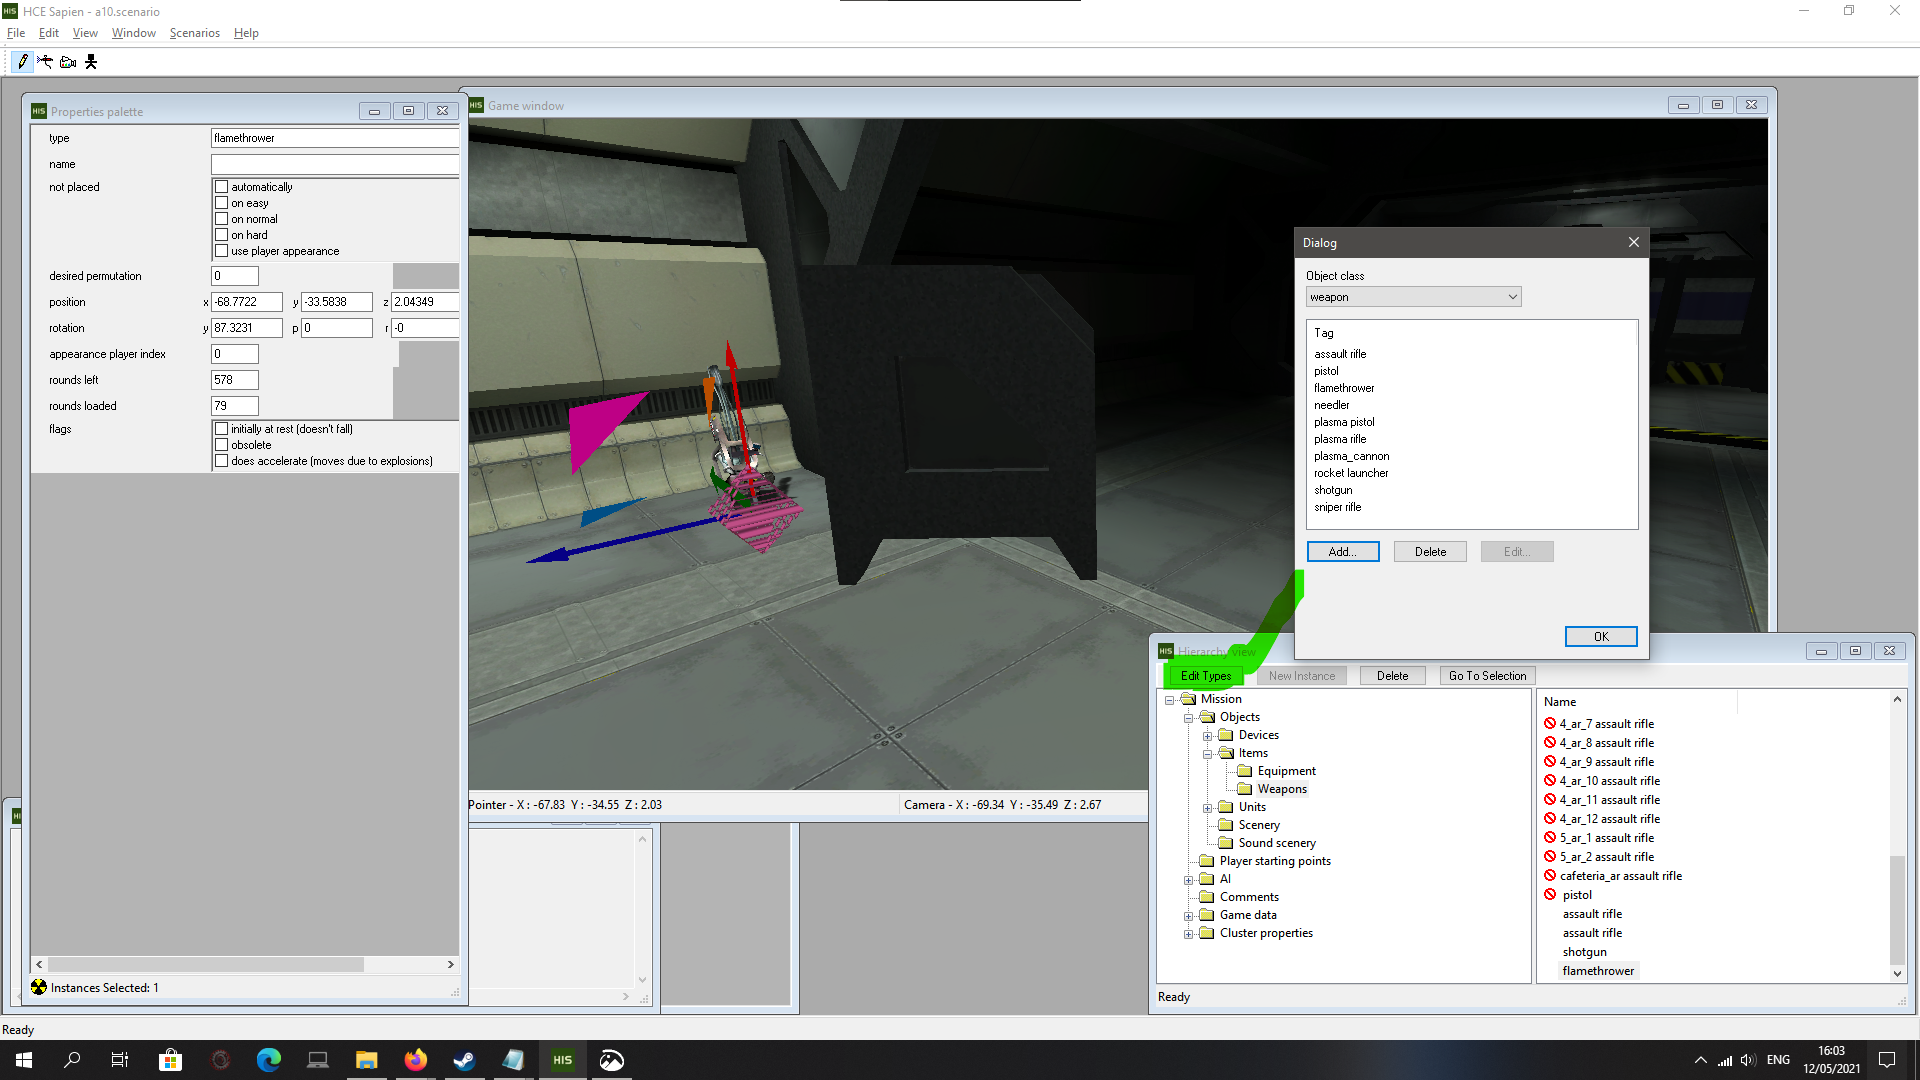
Same principle across H1-2-3EK.
Sapien Part 2
In Halo 2, I was always slightly peeved with the unfinished AI pathfinding towards the end in Arbiters Uprising & Great Journey levels. In them it makes inworld sense that the Elites you run across would be just as passionate as you are to charge, continue on assaulting through every Brute you encounter. But in many sections, the Elite AI would just kind of stop, not continuing (Great Journey it was the pair of Hunters you meet which always stopped at the bridge before the holding cells room).
What I did to slightly fix it, was to open up the \Steam\SteamApps\common\H2EK\tags\scenarios\solo\08a_deltacliffs scenario file in Sapien, go over different orders, especially ones towards the end when you're back outside, hopefully with a squad of elites, there are multiple orders of the type e#_cov_etc, and many don't need to be as lax as they are by default. Many also have very limited firing positions, and - though I'm not exactly sure if it's essential - it seemed safe to make a few more of the appropriate areas numbers, especially further towards the end of that order, overlapping a bit with the beginning of the next order in line.Another thing I found worked for H2, was to force their combat status to combat, and the whole "follow player" flag.
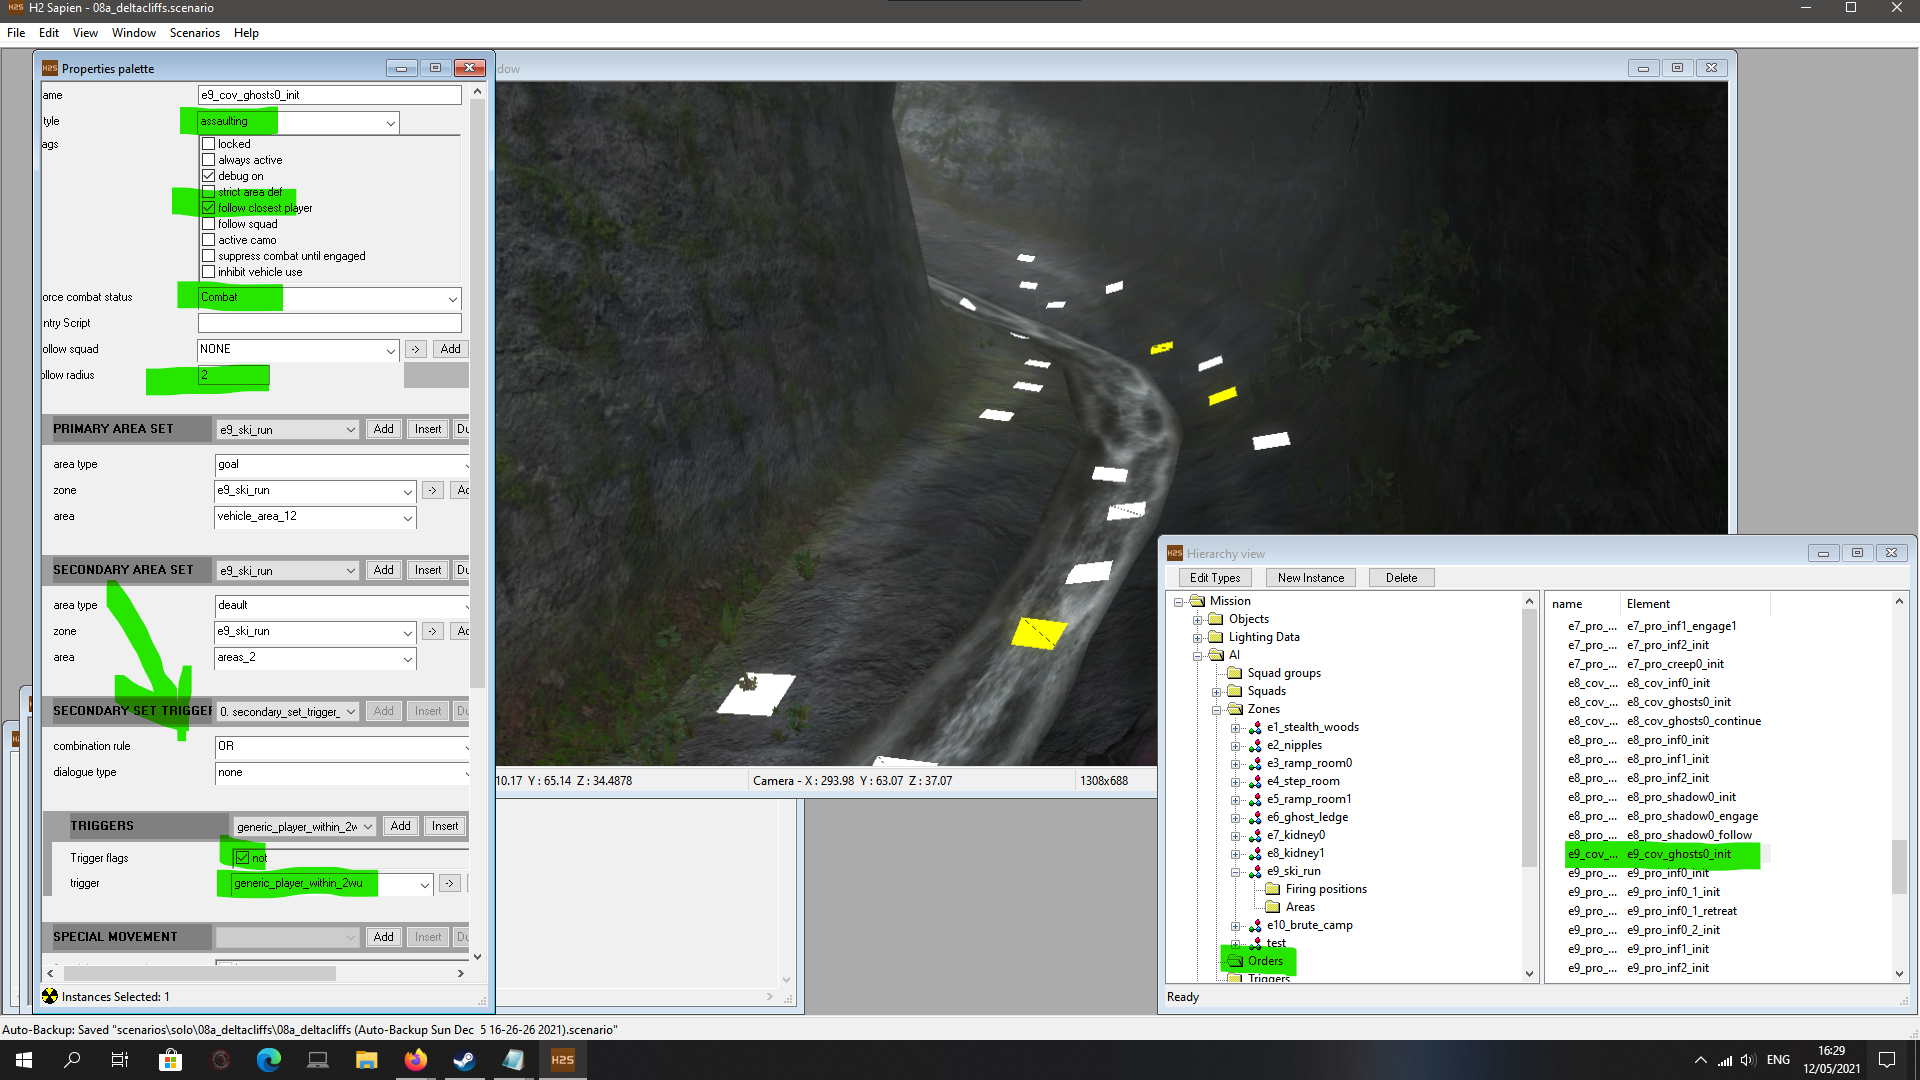 You can add "secondary" firing areas, with firing positions further along, with a trigger for when the AI will move to it, in the picture I made the trigger to be when the player is not within 2 world units of them.
Also, I edited the triggers to force the AI to change orders instead of lingering in the same one for too long, with triggers like if all the prophet forces were dead in that specific section.
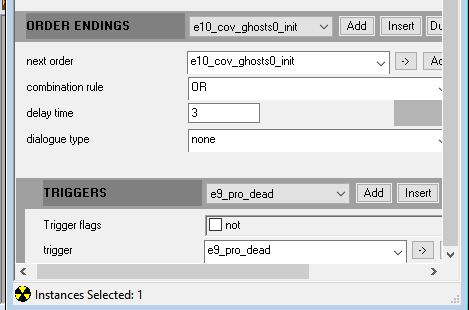 You can create new triggers as well.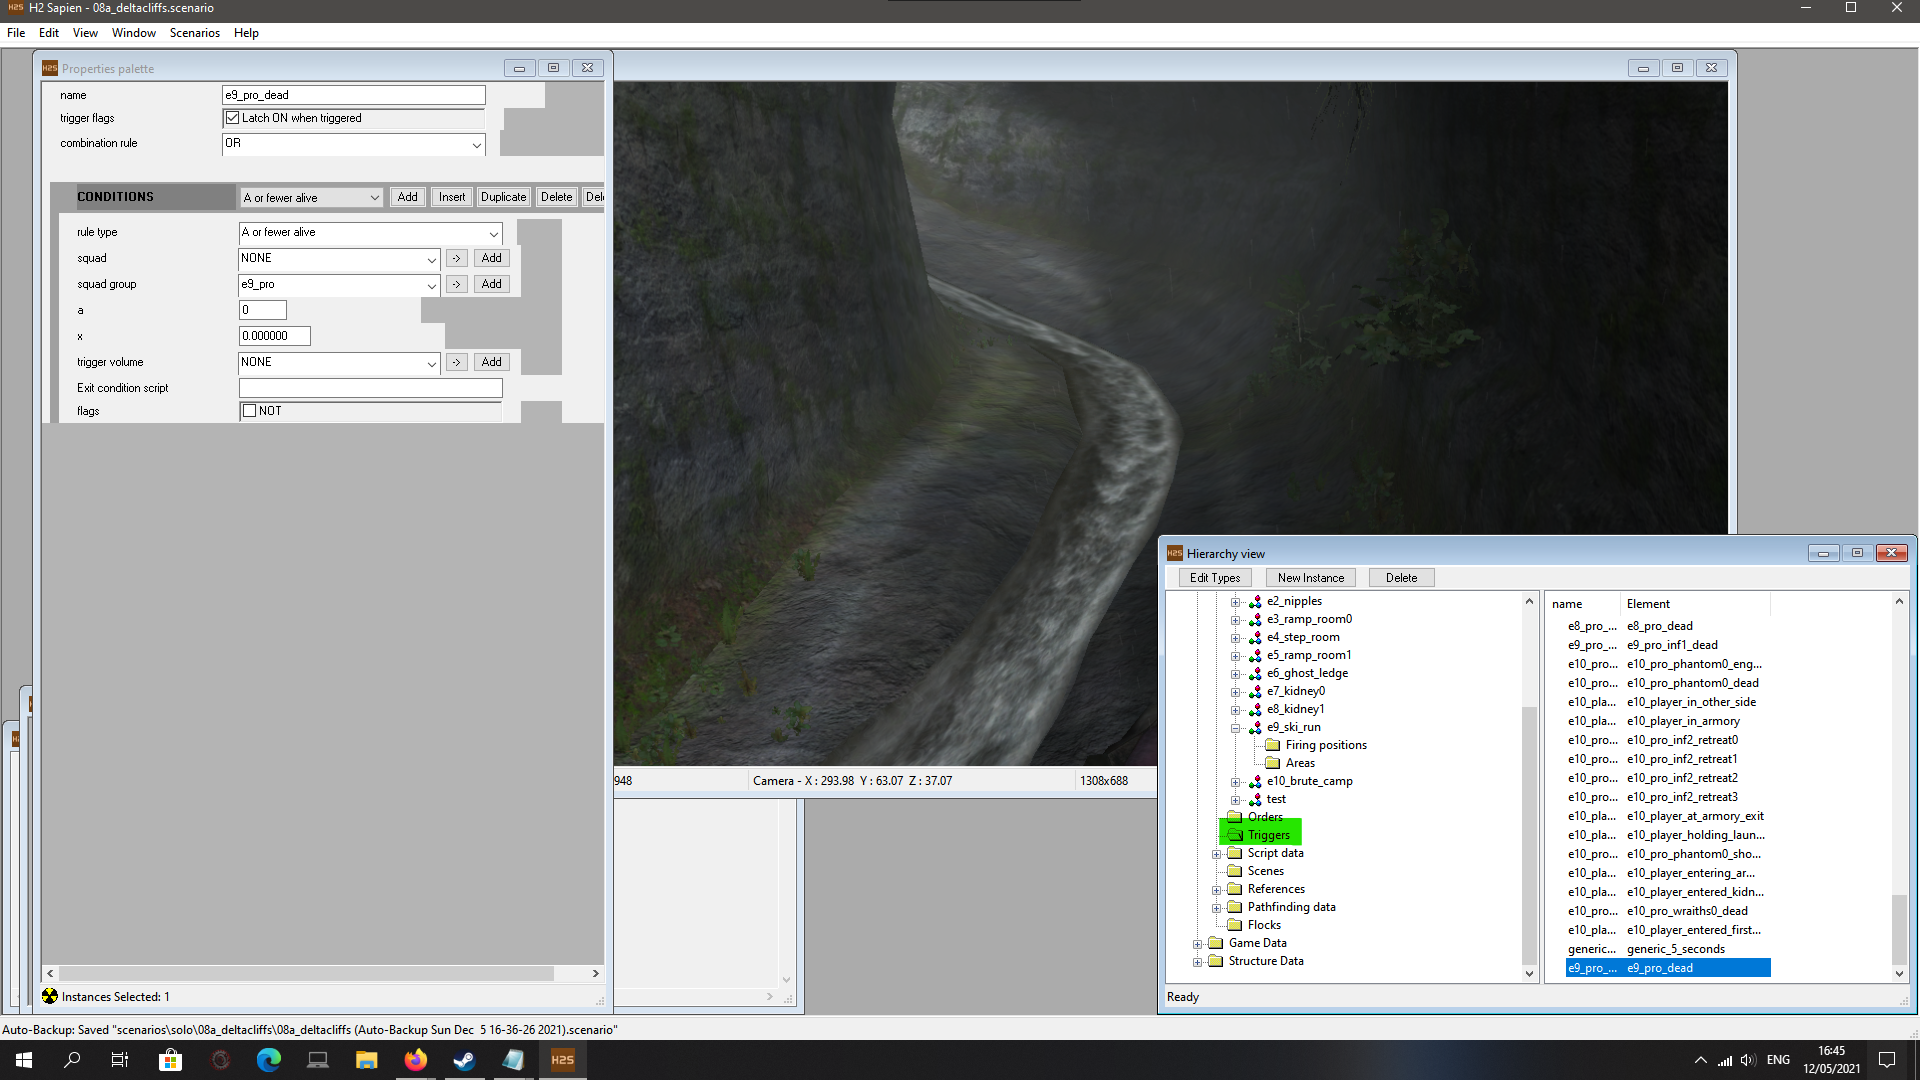
I made a New Instance of a trigger, looked at another trigger with a similar rule, copied its homework, so in that picture the trigger is if that squad (e9_pro, it's an overarching parent group of other squads within that) has A or fewer alive, the "a" below being zero. Meaning in the previous picture the next order will be triggered when that group of enemies are all dead.
(BTW my edits on deltacliffs/Uprising worked better in a compiled map than in standalone, so even when you might feel that something doesn't work when testing in the tag_test, it might actually work in the final product.)
-------
In Halo 3 I made novel Elite buddies to follow you in many missions.In Floodgate, I placed at the start a new Elite buddy. For Floodgate it was technically a bit easy, as I just made a duplicate of the Arbiter squad, in every AI->Squads->enc_workertown or enc_warehouse etc, placed starting locations close to where the Arbiter AI would start in different zones, I had the same initial zones and orders, I changed the Parent to be gr_allies because if it were the Arbiter one, then if you'd play coop it would remove the arbiter AI squads. For parity I kept the character, weapons etc the same in each squad in each enc_ subsection.
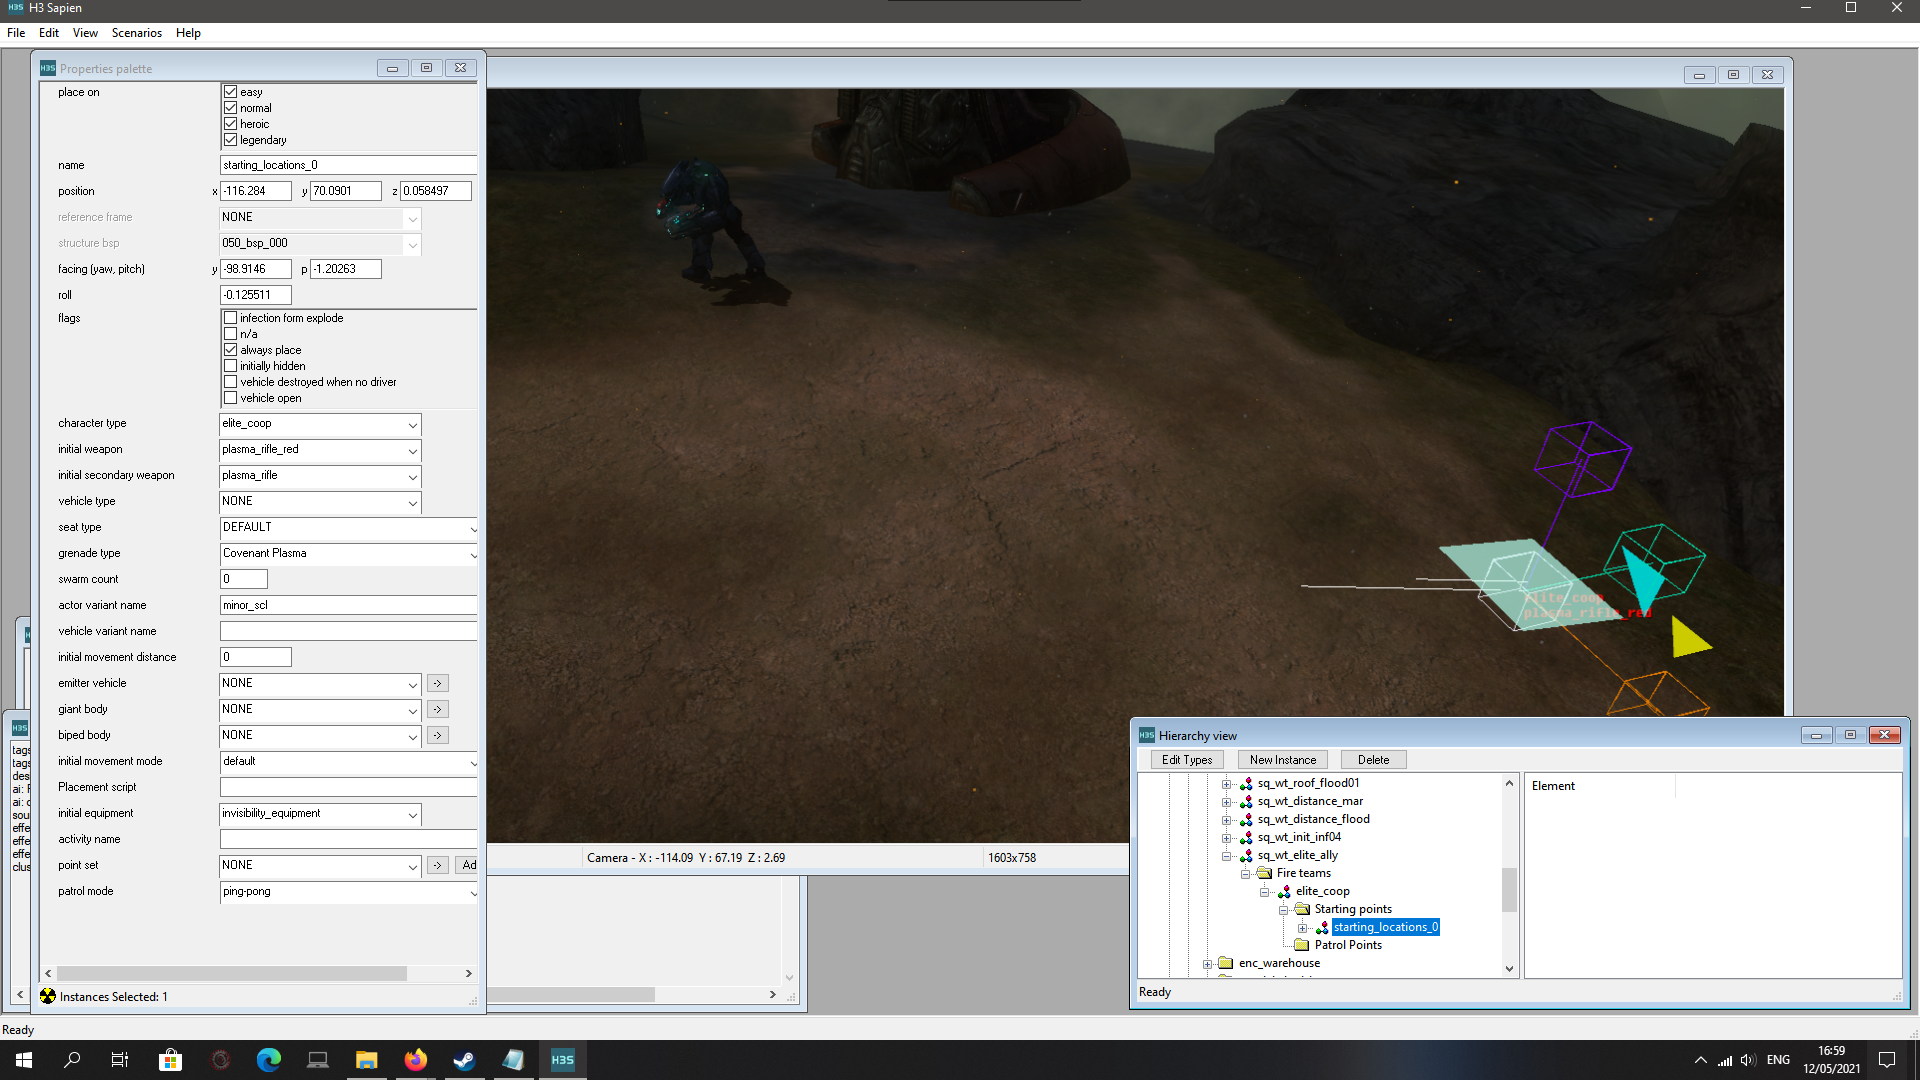
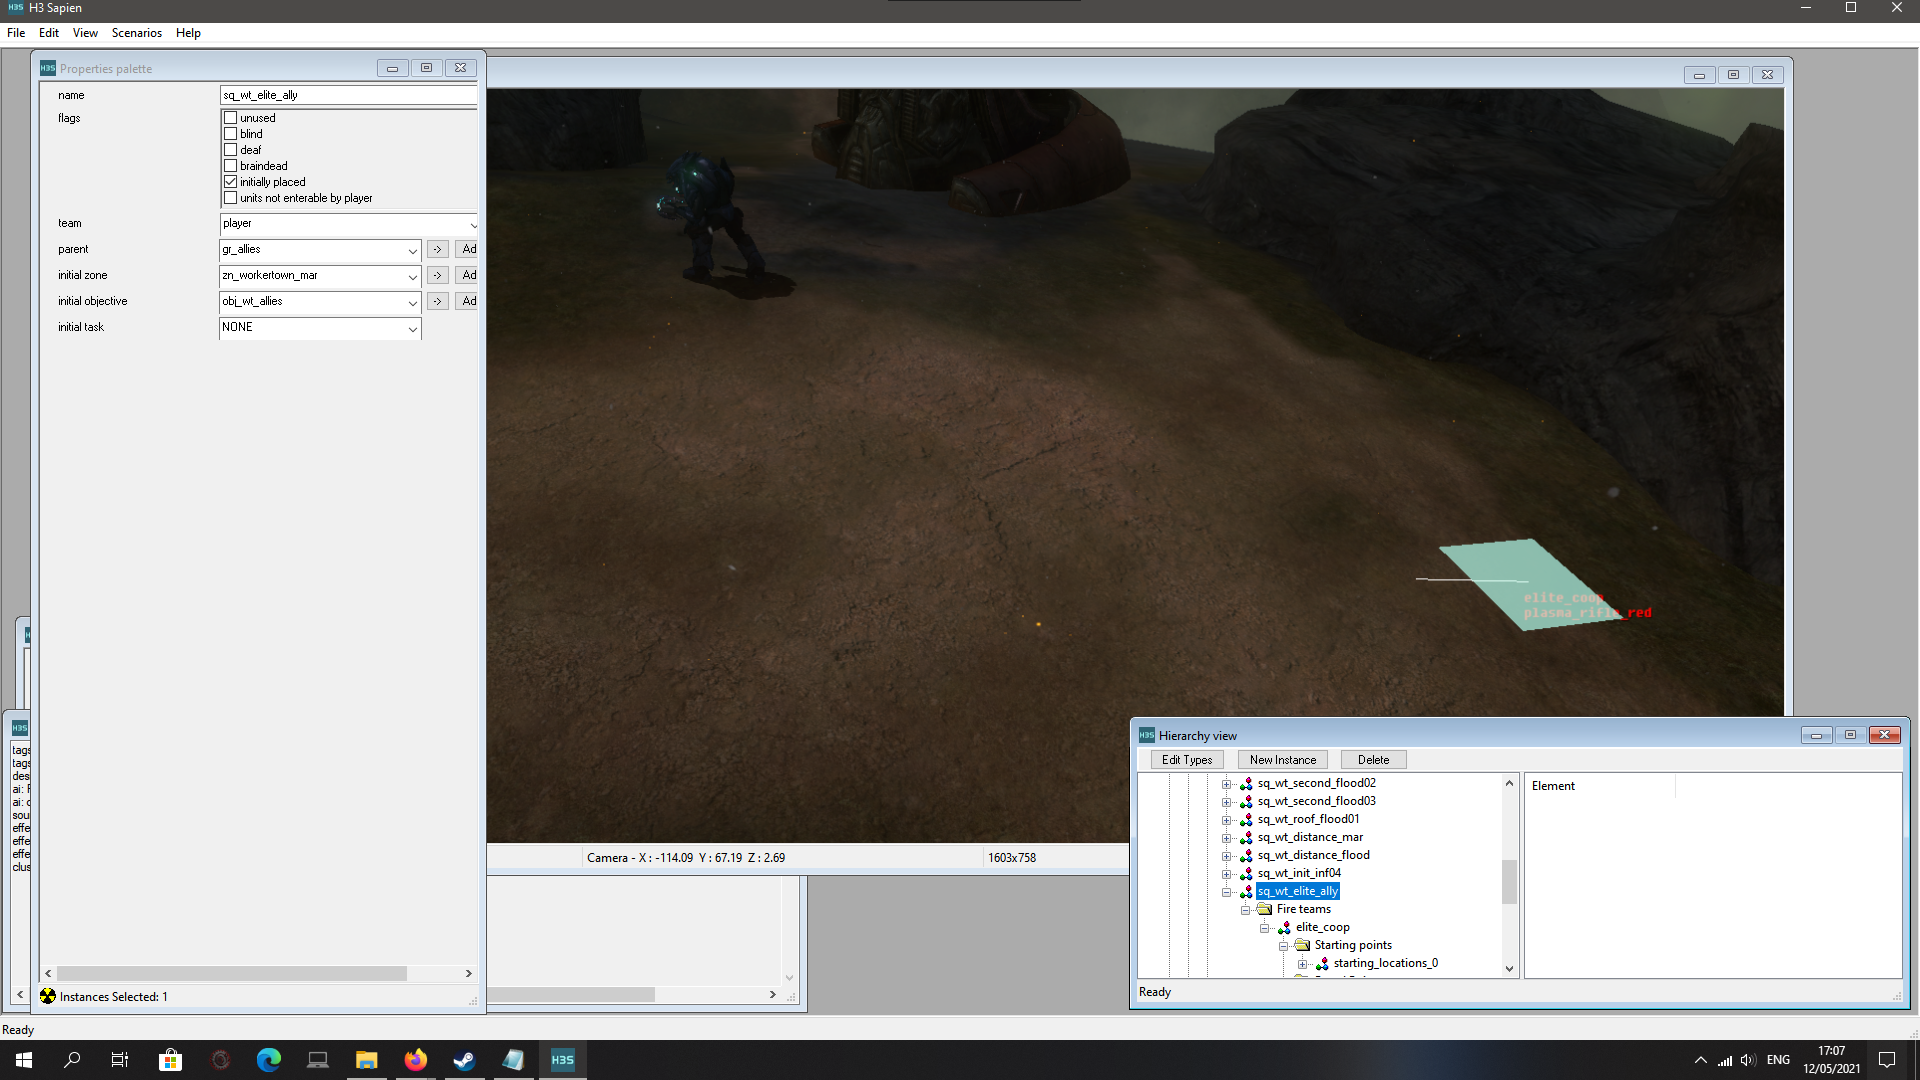
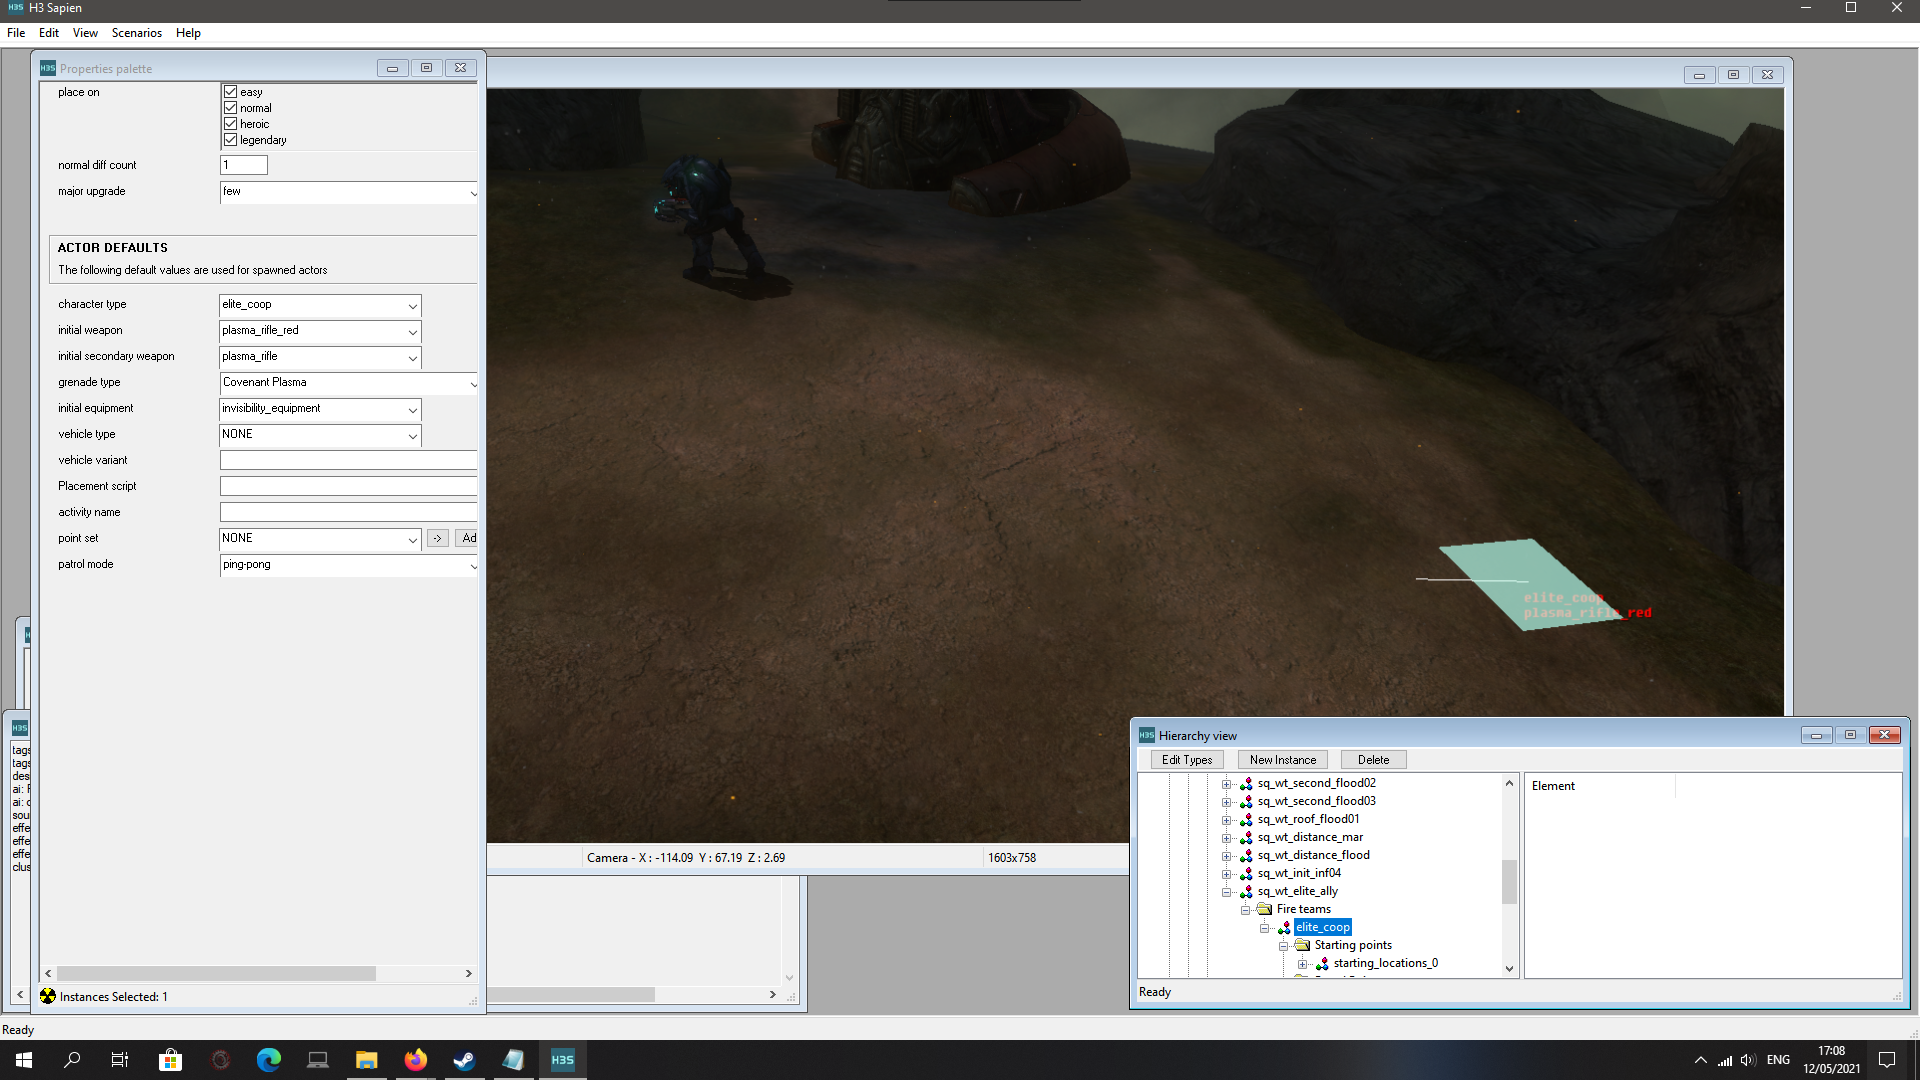
BTW, it says that I have the Elite "Initially Placed" in a picture above. That was my crude way to force it in the level to show up, but the "proper" way which may look better, instead of having an AI just sitting there from the start (works for Floodgate), is to edit the script file, have (ai_place sq_wt_elite_ally) etc in the beginning sections of what zone or point in time you want it. Now, on this level it was pretty easy (For other levels, like Ark, or Covenant, I often just placed an elite into an existing marine squad, but sometimes a new one), but my experience with the Floodgate level brings me to another wrinkle worth sharing.
With the November 3rd Hotfix, my simple solution hit a wall, it didn't function correctly anymore. The Elite would follow you like the Arbiter all the way up to the warehouse, but then it wouldn't continue into the warehouse, migrate to that section and those orders (amusingly also there was another elite, duplicate then in that starting point).
Worked before, why not now?
Presumably the hotfix tweaked the floodvoi mission script file in \Steam\SteamApps\common\H3EK\data\levels\solo\050_floodvoi\scripts (you can edit these with notepad++ easily enough), and after some looking and thinking about the specific places in the game, the orders, the transitions, I found what I needed to do was check the ai_set_objective parts, and make sure my elite was being migrated into its proper objective, for this I just placed under the sections like
Compile scripts in Sapien, save, and testing to Standalone.
A Bit on Scripts 1
... Well, I guess I should elaborate a bit more on script files before moving on to the tag_test tool.
Script files, .hsc files, exist in the data folder inside your Chelan_1/H2EK/H3EK folders, you don't use Guerilla or Sapien to edit them, you can use notepad, though I still suggest notepad++ just in case, a better free alternative.
After you've edited a hsc file, say as I did with Floodgate in Steam\SteamApps\common\H3EK\data\levels\solo\050_floodvoi\scripts, the mission file, you then open up that scenario file in Steam\SteamApps\common\H3EK\tags\levels\solo\050_floodvoi, with Sapien, and in the top left corner you use the "Compile Scripts" option, and then save the scenario, and you can check your changes in Standalone or a compiled map.
Editing script files as been a bit volatile from my experience. One reason is that you need to be much more mindful when editing, paying attention to the structure of all the lines, simply just forgetting a "(" or a " or a command in one single place will easily result in the game just loading up to a black screen and sitting there, and you need to go back and hunt for where you broke the logic.
The other reason is because these tools aren't perfect, and I'm not sure if these script files are 100% as they should, since they seem like they can get updates as well.
Luckily, blood and flesh human beings sat down to write the scripts originally, so they are in plain english, with some funny commentary here and there. Unluckily, in some cases that's exactly where weird behaviours and broken scripted sequences derive from as I suspect some of my H2 frustrations arose from.
-----------------
I'll expand the Floodgate elite transition I was dealing with, though my experience with Halo 2 scripts might be more informative.
Most sections have a clear distinction for areas. Floodvoi/gate the warehouse section just has a big;=============================
;=========WAREHOUSE=========
;=============================
Telling you that now it will deal with warehouse scripts.
A Zone, area, usually start with a bunch of generic commands, wake this, place that, set objective, so it was easy for me to spot that in the warehouse
Halo 3 has those Cortana & Gravemind flashes which slow you down to a crawl.
How would you increase your speed, or as it were, input rate in general?
-------
In Halo 2, I investigated the script files for Uprising (deltacliffs) and Great Journey (deltacontrol) the most, and did some heavy-ish tweaks, though they weren't always impactful, but still worth sharing because they are commands and should give an image of what works.
The Hunter Bridge in Great Journey has the most of it all even when it didn't work as well as in Uprising for me, but I'll share my story of the bridge here.
\Steam\SteamApps\common\H2EK\data\scenarios\solo\08b_deltacontrol\scripts
Opening up the 08b_deltacontrol_mission hsc file, well, first thing I noted, was the weird order, start of the level stuff is at the bottom of the file, and then it works upwards to the top being the end.
Opening and closing a specific area is helpfully delineated by a ;- Init and Cleanup - section an a ;= ENCOUNTER # = section, so you can see inbetween those sandwiched the scripts for that linear part in the game.
Just reading the script tells enough to know where you're going in the location and events of the mission, it almost narrates the flow of the mission.
First, a weird thing that I don't know why Bungie did but resulted in me always playing a dumb dance in vanilla.
When your Hunters & dual wielding needler Elite would move from the cave up the ramp to wait for you, and then the bsp loading would change to the bridge, the allies would not migrate here, BUT, if you'd go a bit to the bridge to spawn the prophet forces there then go back towards to the cave and cause it to reload that bsp, then just immediately go back to the bridge to load that bsp again, then suddenly the allies would wake up and go to the bridge.
... What?
Look at this part with the start of that bridge encounter:
I replaced those with:
They are migrated to the next squad. In the games the same units are often in a different squad when you continue on. There are cases where, if the game has problems migrating the original characters to the next squad in the next area, it ends up creating duplicates. This happened to me with the Elite in Floodgate, and it happened with my Hunters with them getting from the bridge to the cell rooms.
A Bit on Scripts 2
Just like with Uprising, in Sapien I placed more firing positions on the bridge, closer to the corridor transitioning to the Holding Cells room where Brutes are holding Elite Councilors and another pair of Hunters. I made their orders follow closest player and added triggers for them to move to the next order.
Didn't work in this case, but good ideas on the paper.
One problem which I solved, was that there wasn't exactly a clean way to have another pair of hunters in the hunterroom with the scripts that control how the hunters in the holding cells would behave. They have scripts to keep them passive behind the bars and look at you, and only start to attack when they are freed. It seemed to mess with the free hunters' behaviours even when I got them there (I literally physically pushed and punched them through the bridge door and up the ramp!).
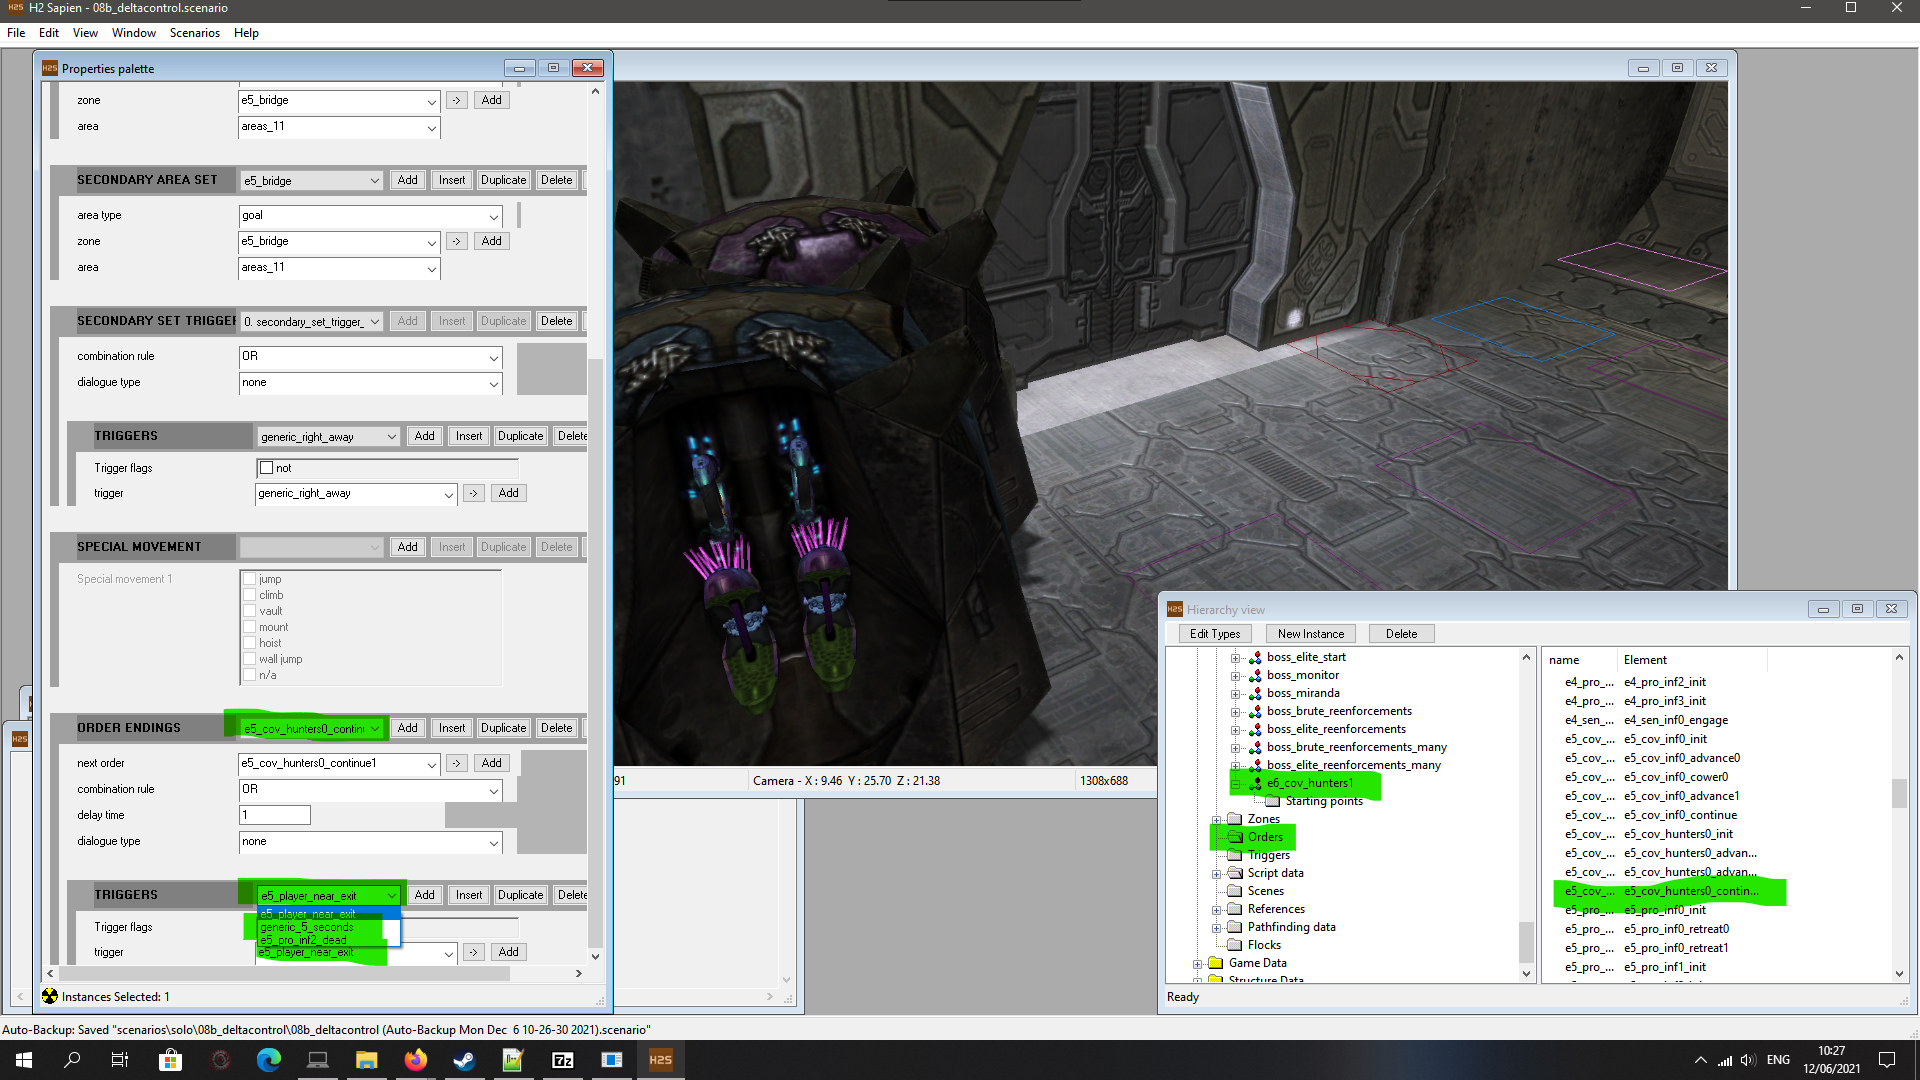
The init order below, is the only one where I made the assault style to guarding and forced combat status to NONE, the continue1 & engage are assault and combat, still following the player, and debug on if it does anything.
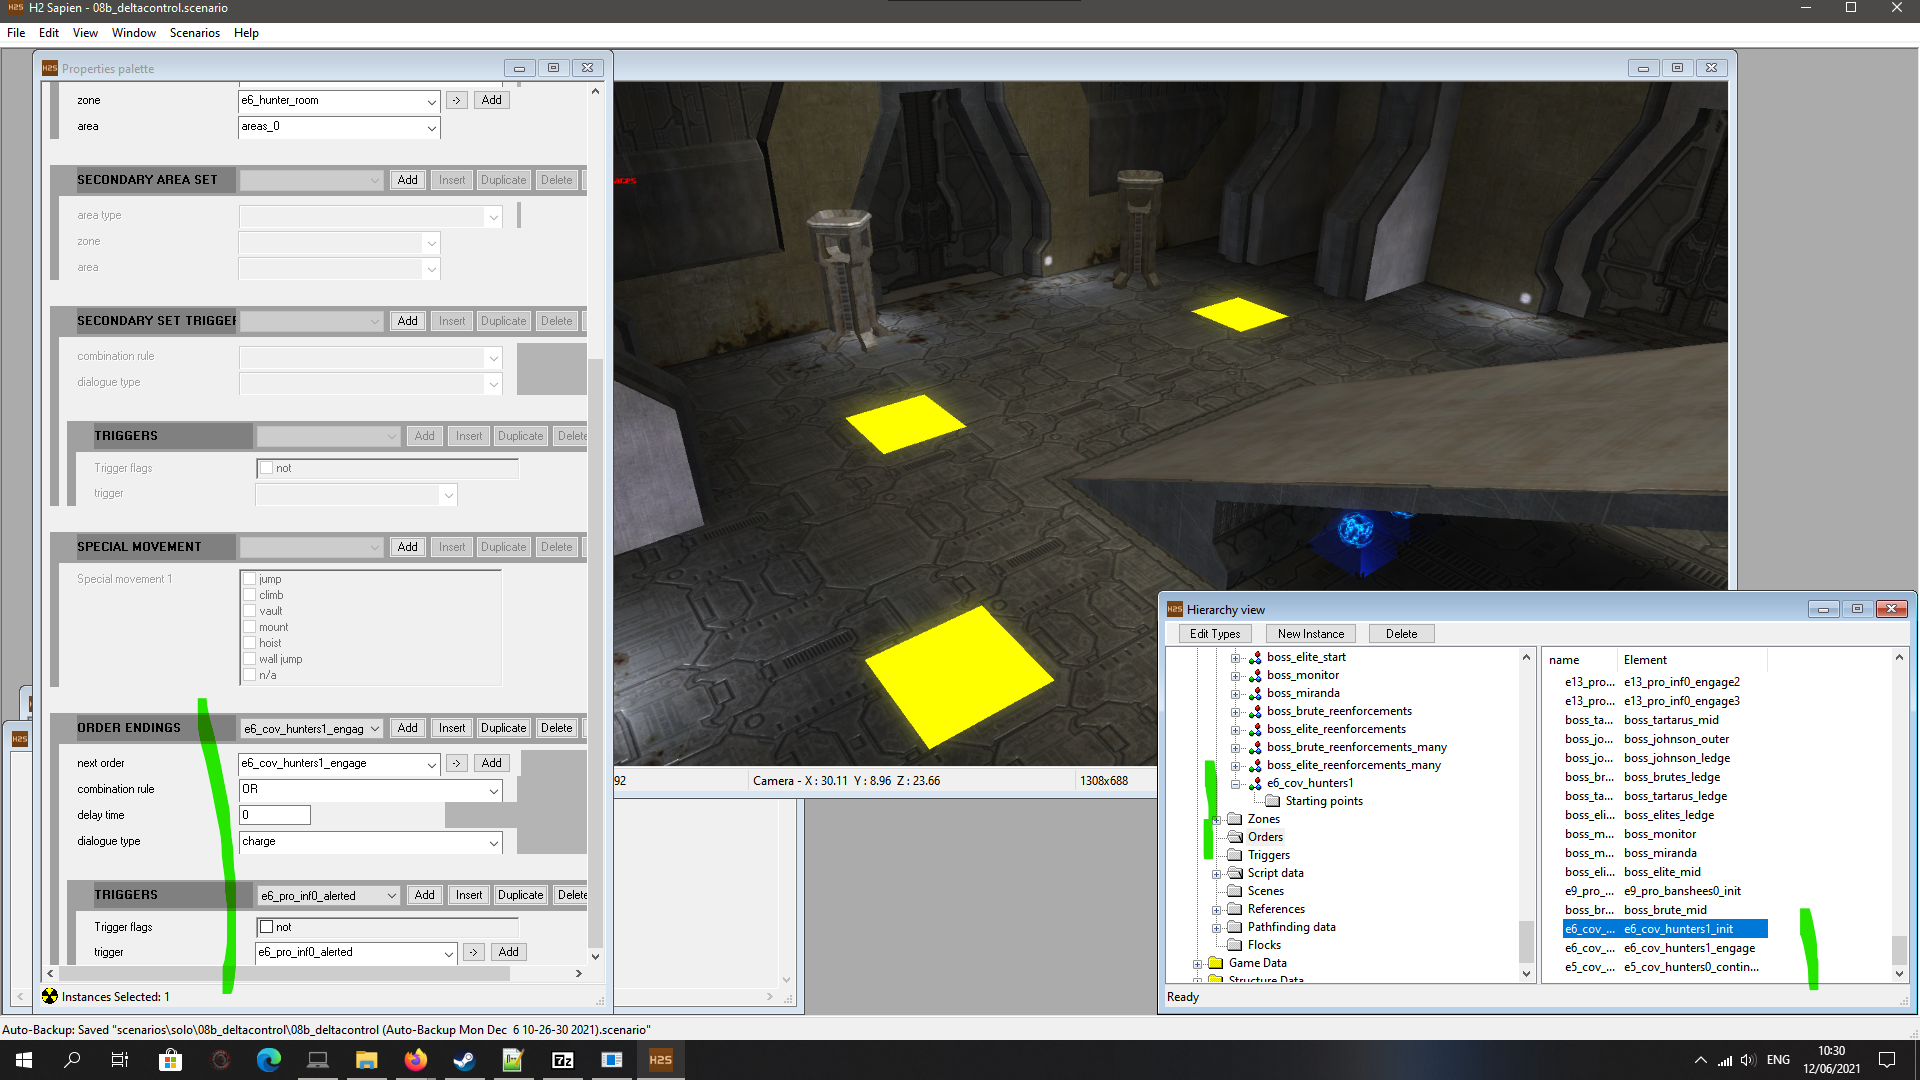
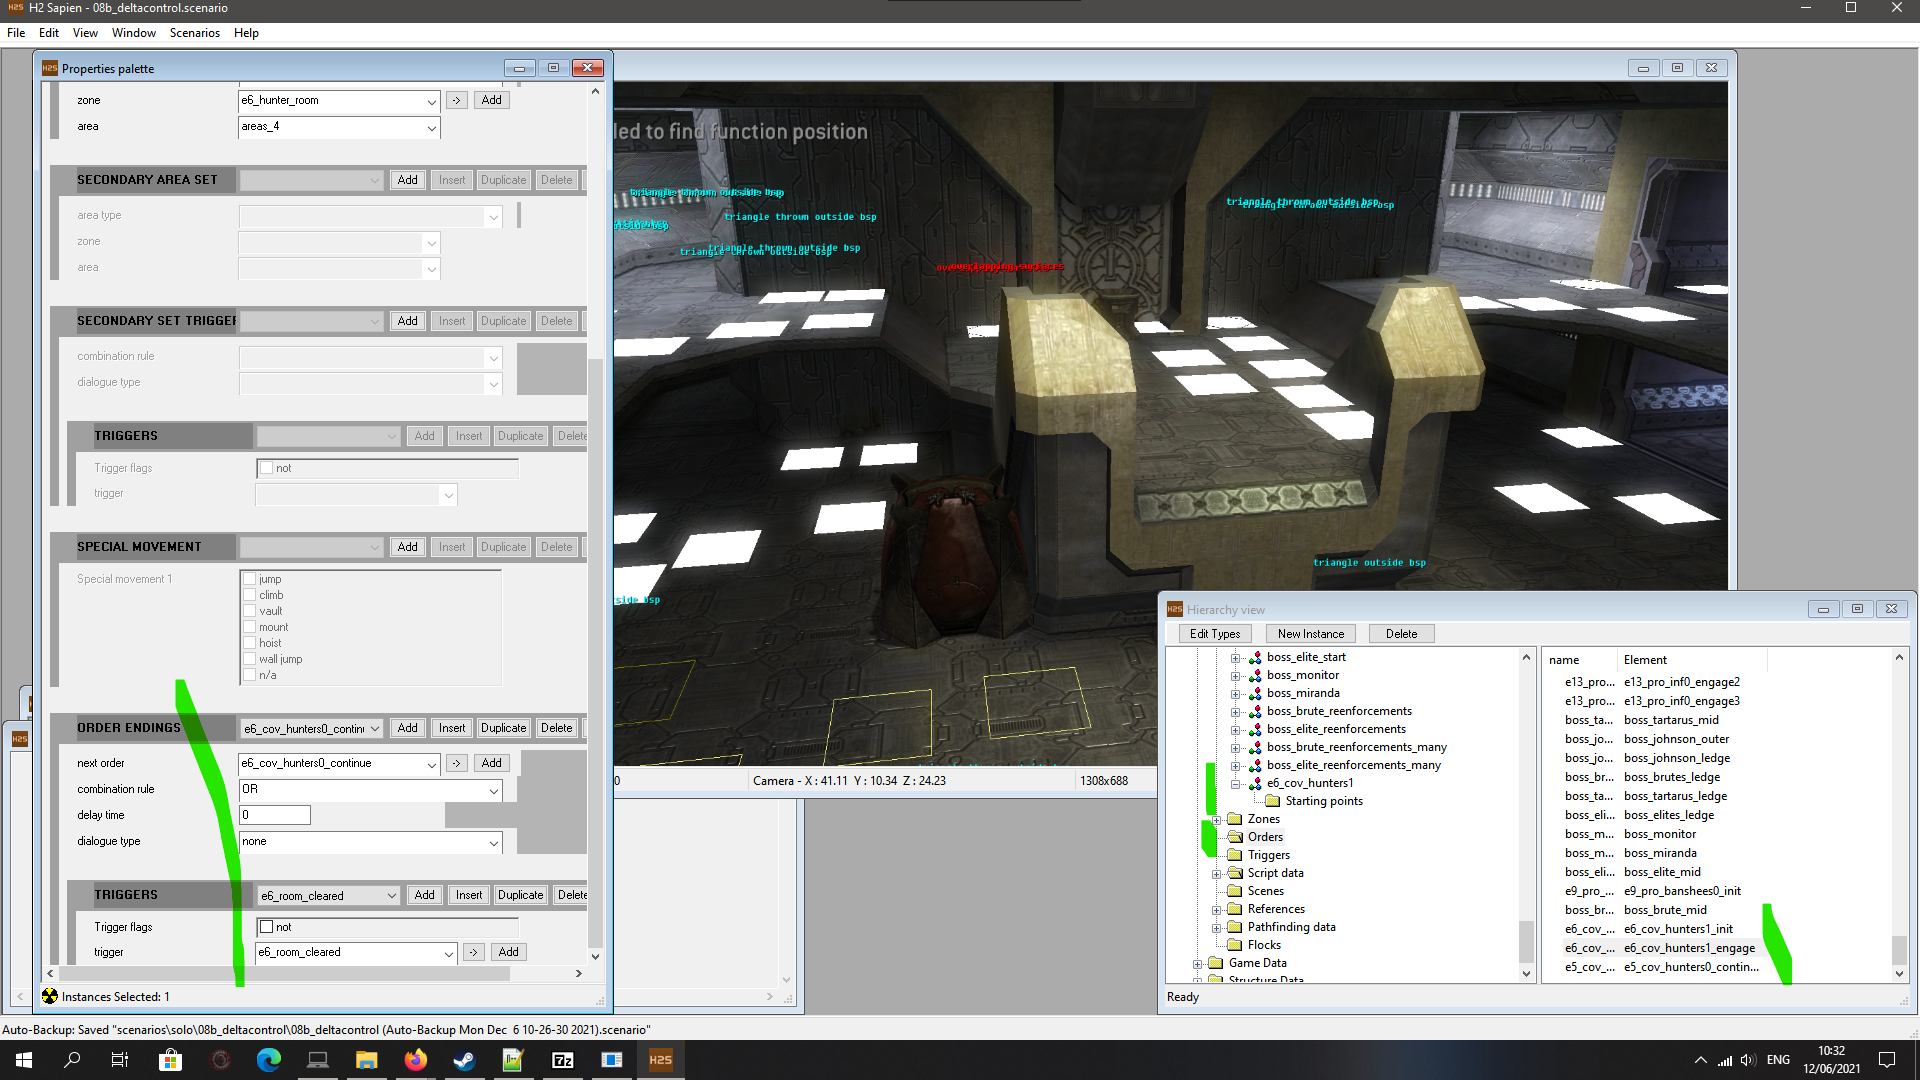
In the script file, for the transitions from e5->e6, their areas, encounters:
;- Order Scripts -----
;- Squad Controls ----
[...]
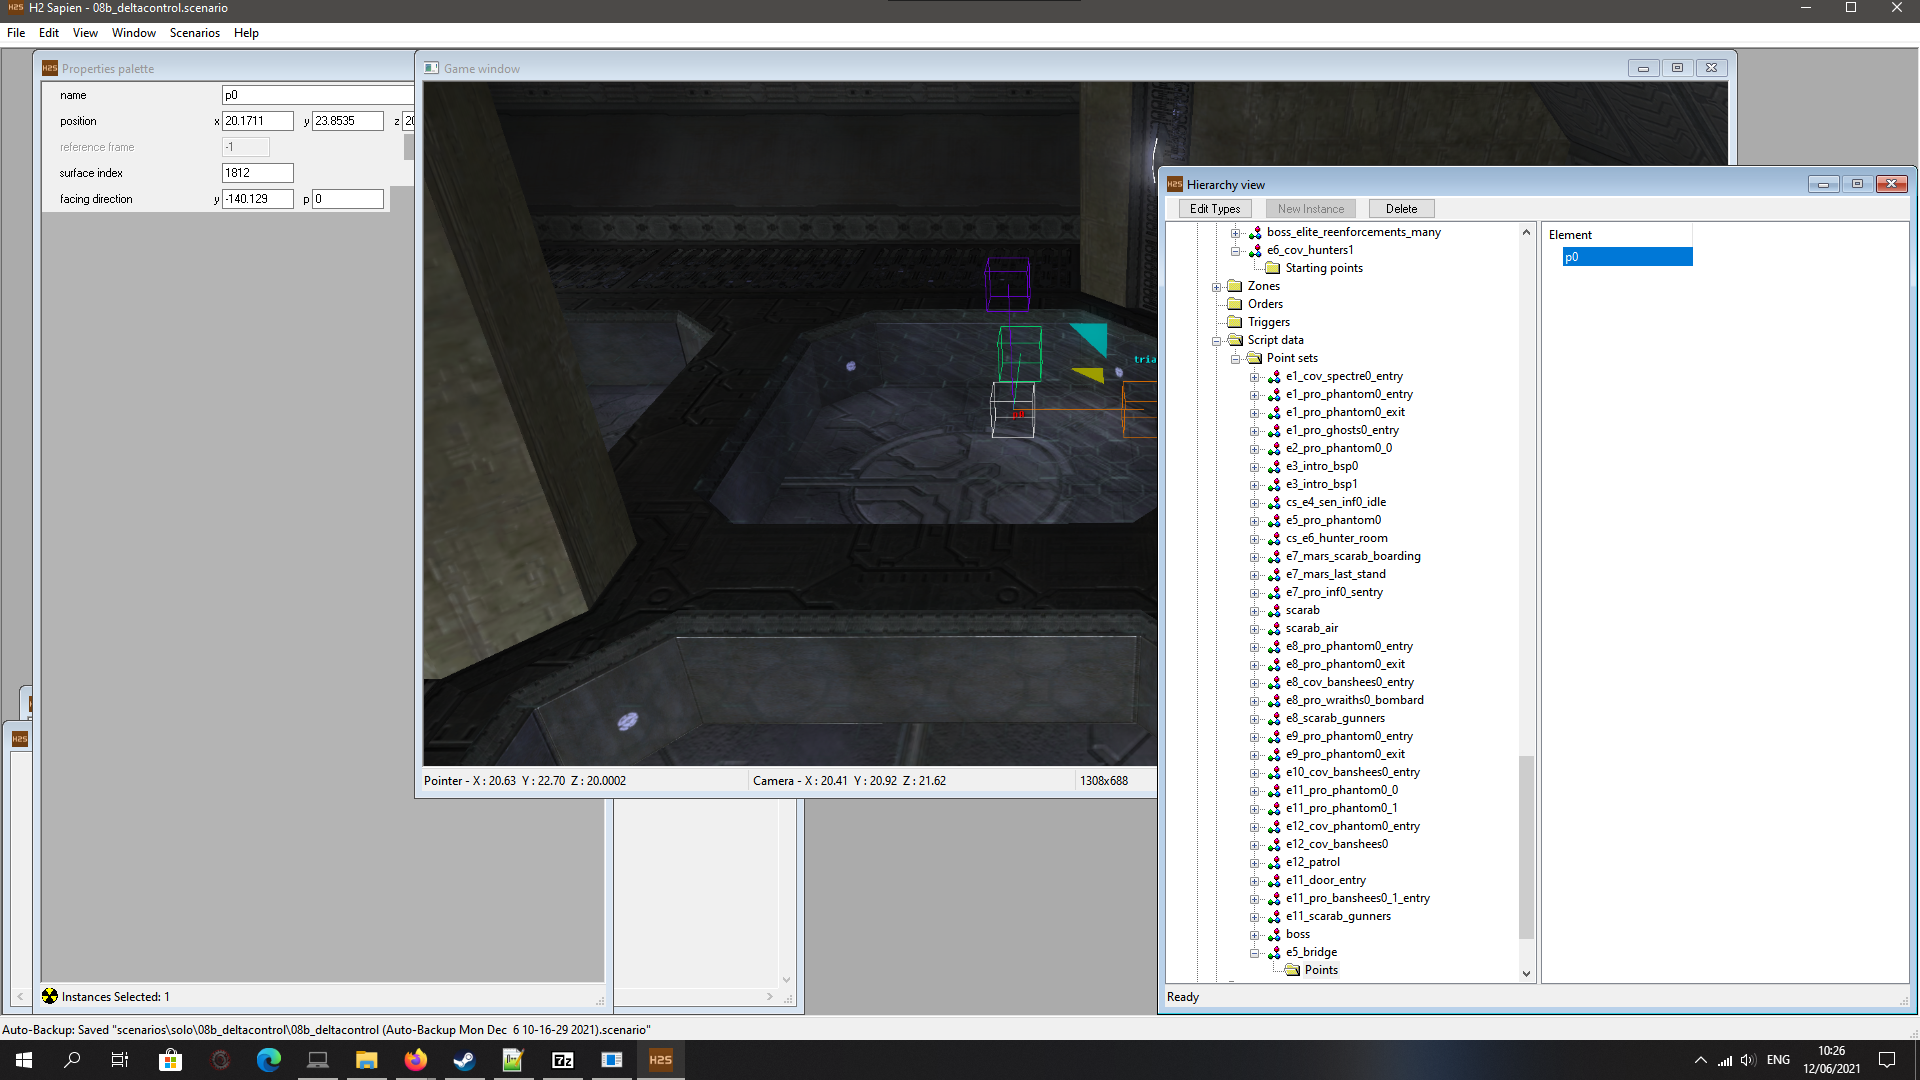
For e6 init & cleanup and the squad controls and encounters:
Sadly, the (ai_teleport_to_starting_location_if_outside_bsp e6_cov_hunters1) was the main one to force the hunters to crudely teleport from the bridge into the cell room bsp. As long as you're not running backwards when you're crossing into the next bsp, you won't notice this trick.
Scripts...
But in the end, scripts are a bit finicky, the engine is finicky, and none are a guaranteed fix for frustrations, especially bsp transitions can still mess with the best laid plans.
Standalone
The Halo_tag_test executable is basically a way to simply play a level, having it load up the tags directly, instead of having to compile it all into a map file that you then move to the MCC map directories and play the modded map in the game.
They aren't perfect, but you can do so much with them.
Developer consoles work with them, having a ton of commands you can use for testing, probably best listed in the c20 Reclaimers wiki (You'll want to look for Scripting, like H1 Scripting page on c20).
The key to open the console can vary depending on your keyboard, usually it's tilde, the wavy symbol, button below your ESC and above your TAB and capslock keys. But for me, with a skandinavian keyboard, it was ö.
Halo 1 and Halo 2 standalones look pretty much just like how their original PC versions looked like (in menus and stuff, ingame you don't have the broken shaders and effects and s**t, unless you've messed up).
None of these are as stable as the MCC main game, they are fragile, finicky, prone to crashing, for instance editing some menu customizations like graphics options can often crash them.
Halo 3 Standalone suffers from having no audio, and the main menu is pretty much pointless functionally, but more on how to use the Halo3_tag_test below.
In Halo 2 & 3 you also have a debug menu, the HOME key, which can be navigated with your arrow keys, up, down, left and right can change a setting, and enter of course. Not sure of any other way to close the debug menu again but toggling with HOME.
If you are bothered by lots of error messages on your screen when playing, then in the debug menu for instance the error geometry hide all option is what you want if you want to ignore those which probably won't even show up to be an issue in the game itself. Or the Events Suppress one as well to reduce text clutter on screen.
I highly recommend the first one, loading all tags, helps to reduce issues (huge thanks to a user on the Halo Modding Reclaimers Discord for the load_all_tags suggestion).
As you can see, I've chosen to just hide the errors with geometry taking up screenspace on my monitor, same with events, and load up a mission skipping the main menu which is just extra time loading wasting your time. This way I also save time not having to always open up the debug menu when I've loaded a map and individually edit each setting every time I might just want by default and later choose to turn on/off if I want.
Check the debug_menu_init txt file inside the H3EK/bin folder for more commands you can copy into your init txt file. (Again thanks to discord user!)
You can place an init txt file into the H2EK folder for the Halo2_tag_test to read, and from my testing the scenario_load_all_tags true line does seem to work for H2 also, as I had a few things fixed in a playtest. So again a recommended first line to add for H2EK init txt.
No harm in creating an init txt into Halo 1's chelan_1 folder as well and place your desired commands there.
As I said in a previous section, I have tried in real time with both Guerilla & Standalone open at the same time, alt+tabbing back and forth, tweaking a few tags, then switching to standalone, test the result, go back, tweak again, and so on.
That works excellently, for H3.
Sadly H2 Standalone crashes when you try and edit a tag in realtime, BUT, Sapien doesn't crash and reloads edited tags instantly.
H1 Standalone does sort of work, I had trouble making it reload a tag again though, but could be user error, still, didn't crash and it did reload a tag the first time. Sapien I didn't see a change, but didn't crash.
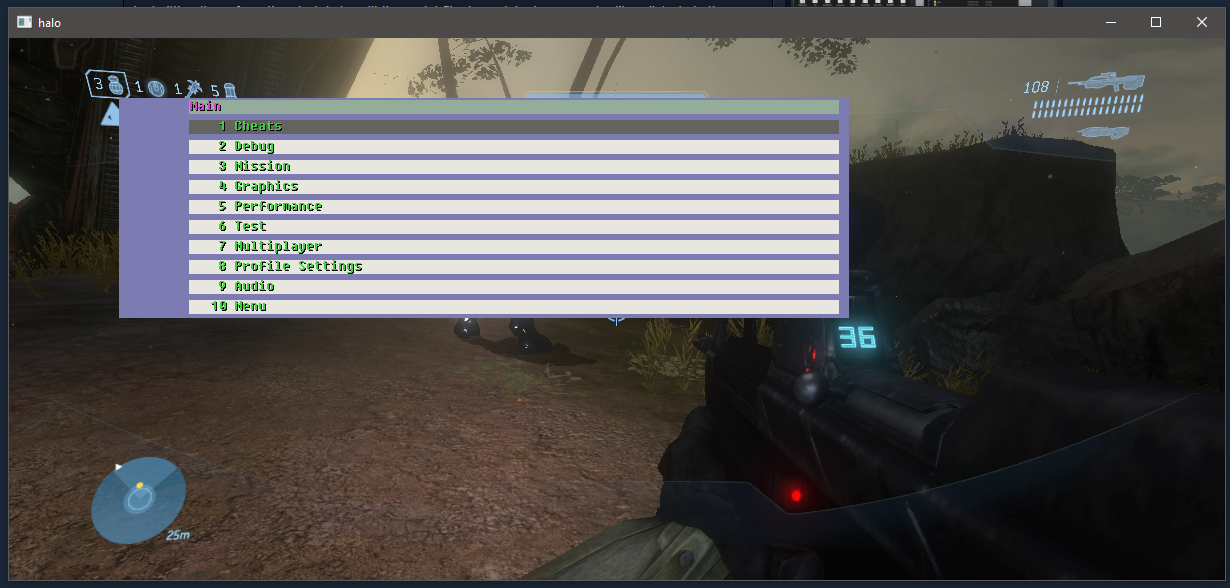
Debug menu in question.
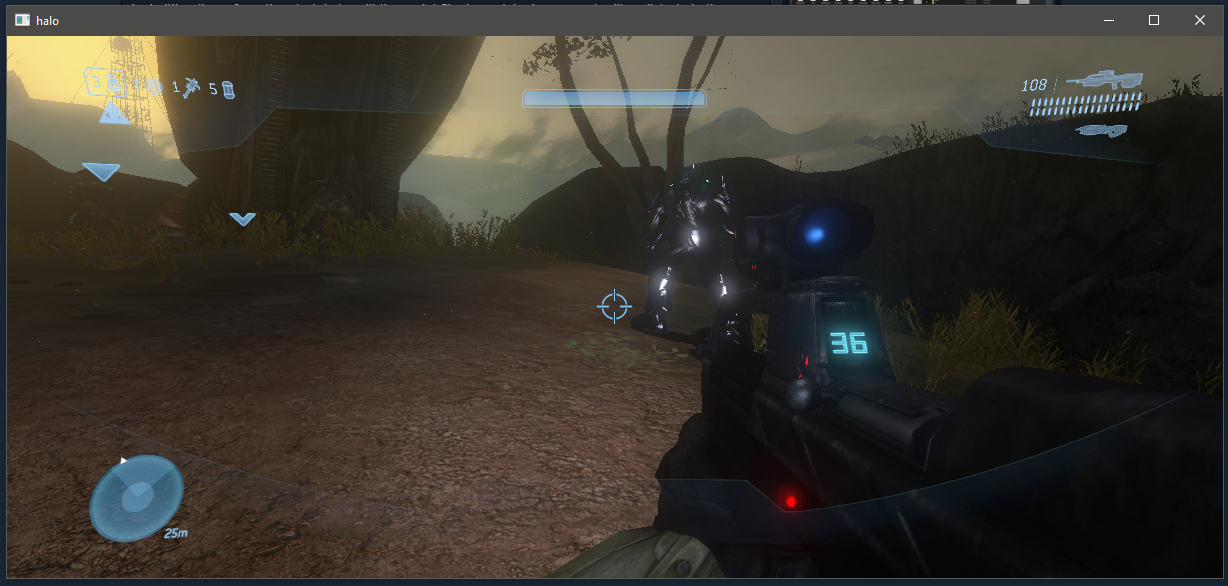
The starting Elite.
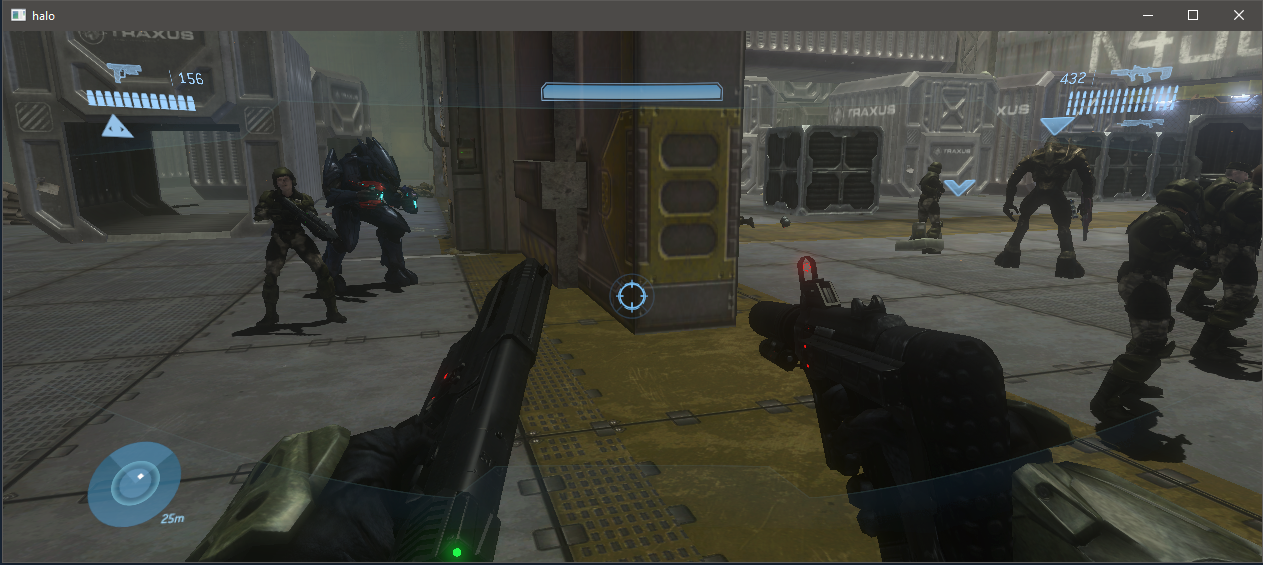
Showing how the Elite now follows into the warehouse, & an Automag & Silenced SMG I picked up that I hid in a few corners, dual wielding, and I updated the chud_definition files for the automag & silenced smg in ui/chud in guerilla to have entries for dual wielding in the left hand, copying the homework of something like the magnum & smg, but then tweaking to also mirror their own right hand info.
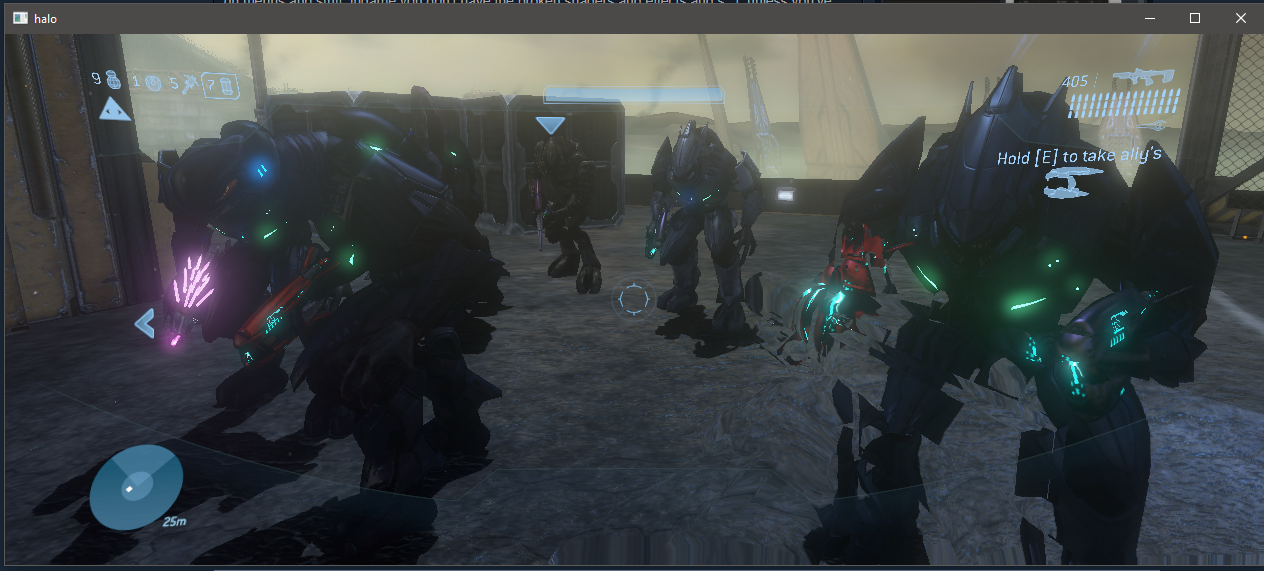
I edited the weapons of the insertion pod spec ops elites, and I made the commander (the one the Arbiter talks to when they meet), from a red major into my custom light-grey one, which has its own character and style files I made to be a bit more aggressive and more easily prone to berzerking.
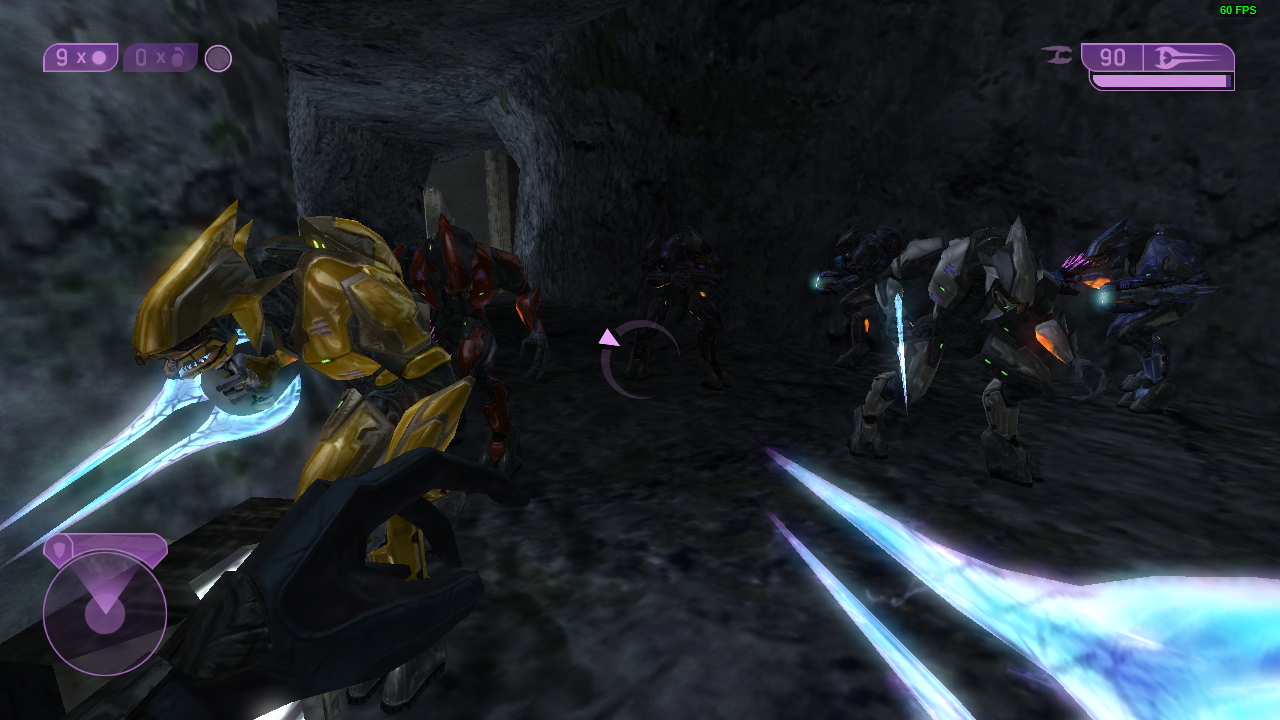
Bonus picture, from testing a compiled map of Uprising. I changed some elites for more variety, in weapons and look, and here they are (didn't place any new ones, those are all elites that existed in the squads already), followed me all the way to the end of the level, without having to do complicated tapdances or physically pushing them towards the next area, thanks to the above-mentioned Sapien & Script changes.
Backups
When you're modding things, you probably will want to make backups of your edits, so that you can revert a change you don't like, or have the backups for when the tools get updates - And you should probably extract the data and tags zips again if they were updated as well (recommended clean, deleting the old folders just in case, but it's safe most of the time to then overwrite them with your modded backups).
Now how would you simply keep backups of only the subset of files you've tinkered with (or created from scratch), in folders containing hundreds of subfolders with thousands of files?
Create a bat file in the main installation folder, next to the tags folders and the tool exe etc, you can create a txt text document file there, then when renaming it just replace the last txt part with bat (if you click "view" in the top bar of your windows explorer folder window, you'll see a "File Name Extensions" box you'll want to tick, the first picture in the Guerilla section shows it), and edit the bat with notepad, and add into it for instance:
First file path is what folder you want the command line to examine, second is where to copy, and MAXAGE determines how new the file must be to copy, and only those, examining subfolders and copying their format as well. The date I placed there is simply a crude working one as each original tag will be pre-2020 (Halo 3 being newest at 2007).
This will of course work generally, create bat files into the other trilogy folders, replace the folder fields above with their respective ones and where you want them to create the backups.
(Having simply "tags" is because you don't need the whole folderpath since your bat file is in the same folder where the tags folder is in.)
You can double-click the bat to run the copying whenever and how many times you want to keep your files up to date.
I suggest zipping your backup folders every once in a while before updating them, in case you want to use an older one but not be forced to just wipe the slate clean with an unmodded one, should you find your latest edit ruining the result.
Compiling the Results
When you've modded something and want to compile all your work into a working map file that you can place inside your MCC folders (\Steam\SteamApps\common\Halo The Master Chief Collection\halo1\maps, /halo2/h2_maps_win64_dx11 or /halo3/maps), you might want to again make a bat file (or multiple, I have one bat file for each map in the games, and another bat file for compiling all at once) to make it more automatic with a double-click. The bat file should be inside the mod tools installation folders (Chelan_1, H2EK, H3EK)
Halo 1:But if you're compiling a single map that you just want to try out, then definitely remove the resource_sharing, the line should only be used when making a mod for the entire campaign, and you should then also have those intro maps as well as it adds their resources into it and is then compatible with the shared resources files. Halo 3:
Double click the bat file, and let the command line thingy do its thing.
After the maps are compiled, you can just copy them from the new maps folder that showed up there (or in Halo 2's case, a folder named h2_maps_win64_dx11), and paste them inside the MCC install folders, overwriting the existing maps (as the game doesn't - yet at least - recognize maps with different names, which means you might want to back up the original).
But you can do a LOT of testing with the Standalone tag_test exe before going through the compiling process to play in the actual game itself, though that should be your final testing ring.
-------------------------
(The "tool" executable is used for that compiling process, but it is also used for a LOT more, I haven't dabbled into those other functions, but if you visit the tool pages on the c20 wiki, you'll see all kinds of commands you can use with it, if you plan on expanding your horizons with more modding areas.)
--------------------------
When you want to play your modded maps in the game itself, you'll need to play with Easy Anti Cheat (EAC) disabled. To do that, go to your steam library, and either right-click Halo MCC and click play, or just hit play from the main page of it (no desktop shortcut), you'll get a prompt asking you if you want to launch with EAC disabled or just normally.
Misc (In Progress)
Figured I'd add a cool thing I learned recently.
Thanks to the help of members on the Halo Modding Reclaimers Discord (not sure if I should shout them out if they'd be okay with it), I ported the Halo 1 soundtrack into Halo 2, and I'll later add here on how to go about then adding music in key places in missions.
I'm also hoping to eventually get around to recording some tutorials and put the videos here, what's holding me back is the effort required, I hate my own voice and have been sick for the most part of this year, and I really can't be bothered with getting specialized software, though native recording software has been surprisingly decent from minor testing. But Youtube hasn't allowed me to upload anything above 480p, which will also be an issue if I need to show details, text and such.
-----
Halo 1 music to be able to use in Halo 2.
You'll need: Tags from Halo CE (not the ones from MCC, if you use their music tags, they will be exported as OGG, and you'll need WAV files to be able to import them into Halo 2) - A member on Discord shared a rar in the H2-mcc-modding-help subchannel as we went through the steps.
With the H1CE tags, you'll be exporting the music tags with a program called Mozzarilla, easy to find on google, I got the ready package, no python needed, from
-- https // github com / Sigmmma / mek_essentials / releases / tag / v2.0.0-alpha2
- Run the MEK updater, ignore errors, just run it and close it after it's done.
- Open Mozzarilla, from settings set the CE tags directory where you've extracted the folder.
- Under Tools, select "Tag Data Extraction"
- By default everything for me was selected ("select which tag types to extract from", they were all green), so you'll want to unselect everything until only sound is selected, green.
- Personally, I didn't want to extract all sounds, dialogue, SFX etc, so I also set the Directory to Extract From to be specifically the music folder, and next to that browse button then used the extract button.
- It should do its thing!
- After that, the folder where your newly extracted WAV files will be is a data folder next to wherever the extracted tags folder is.
From the wiki, the command you'll want to use is:
# sounds-single-layer <source-directory> <type> [compression]source-file - A local data path to the root of a directory or child directories containing sound files. Supported extensions are WAV saved as 16 bit PCM and AIFF. type - Set the sound class compression - Set the compression. The list of valid options is as follows. uncompressed adpcm opus
tool sounds-single-layer "sound_test" projectile_impact adpcm
Run it, and now when you open Guerilla you can find under the sound/music folder tree all the new Halo 1 music folders!
You can even listen to the music within Guerilla! Scroll down to the Permutations section near the bottom of the sound file, and you can from the drop down menu select which snippet to listen to, and you'll see a Play button right there! (This feature exists in the other Guerillas too).
-----
Next time I'll try and walk through some ways to approach adding music, tweaking the way it plays in a mission. Will require Script editing.
**** I apologize for the lack of pictures to demonstrate things, but last time I edited the Guide I seemed to have already hit a limit for how many I could add, will think of workarounds later, though I still think maybe a video would be clearer in walking through steps ****
Conclusion.
The Halo tools are just some of the best things I've messed around with, bordering on its own chill out zone where I endlessly tweak and see my changes.
I feel that their structure is rather intuitive, the way information is clumped into tags, how the tools present all of that information, and just how flexible they can be.
We have them for 3 games, they are right here on steam, you can have a subforum to talk at, easy place to link the tools with, hopefully in the future Steam Workshop as well which have still been mentioned in the newer dev posts-- Halo already has an impressive infrastructure in its engine, easy blueprints to adopt and build upon, with possibilities to create and edit excellent AI with many different behaviours, new levels, effects, weapons, the inherent vehicle mechanics and mixed dual wielding, on top of the crazy stuff veterans have done in the past with HEK...
Say what you want of what 343i have done with Halo 4, 5, Infinite, or the initial launch of MCC, but this, MCC on Steam, Halo 1-2-3-ODST and the rest, with fixed legacy issues for H1&2, expansive customization in accessibility, keybinds, mouse, graphical elements, Hud elemens-- And Modding tools, not buried in some github, but here on Steam.
This is some of their best work, and it's a great time to be a Halo fan.
----------------------------------------------------------------
Remember to check out c20 dot reclaimers dot net, the Halo Modding Reclaimers Discord, and some posts on the Steam Modding Subforum for MCC, 343i people like postums sometime read the pinned feedback threads there for the different titles, so suggestions and reports of issues can be posted there.
And I want to thank again members of the Reclaimers Discord, users on the Steam subforum, who have talked with me through troubleshooting, and helped iron out a few details!
I hope this guide was of some help to people interested in dipping their toes into the wonderful world of modding Halo!
- Halo Reach: Collectibles★ 5 (1.2k)33k views2.3k ♥9 minUpdated Jul 4, 2021
- Halo: Reach - Full Achievement Guide★ 5 (823)28k views1.7k ♥12 minUpdated May 9, 2025
- MCC - Master Achievement Guide (Complete)★ 5 (479)19k views1.2k ♥5 minUpdated Aug 8, 2020
- Halo Combat Evolved: Collectibles★ 5 (1k)17k views2k ♥8 minUpdated Nov 20, 2020
- Halo: Combat Evolved - Full Achievement Guide★ 5 (504)16k views1.1k ♥7 minUpdated Jun 2, 2022
- Golden Moa Location Guide★ 5 (476)13k views878 ♥13 minUpdated 28 Nov, 2021




- Upgrading to PremiumTeam Fortress 2★ 5 (20k)1441k views11k ♥6 minUpdated May 11, 2022
- No More Room in Hell Official ManualNo More Room in Hell★ 5 (2.8k)569k views2.1k ♥29 minUpdated Apr 22, 2019
- NMRiH Community Hosting GuidesNo More Room in Hell★ 5 (526)351k views653 ♥1 minUpdated Aug 10, 2022
- ULTIMATE GUIDE FOR GAME DEV TYCOONGame Dev Tycoon★ 5 (5.8k)326k views10k ♥4 minUpdated 23 Jan, 2014
- How to 'Git Gud' Soon™MORDHAU★ 5 (2k)318k views3k ♥68 minUpdated Nov 16, 2024
- Лучшие кооперативные игры SteamPAYDAY 2★ 5 (1.5k)315k views2.1k ♥56 minRussianUpdated Apr 27, 2025






This guide was created by its original author on the Steam Community. Are you the author and want it removed? Request removal.