How to Get Better At ONI
Why this guide?
We're fortunate here in that ONI has built-in tools and gives you a lot of great information right in its interface. It's just that it's all a little overwhelmingly dense, so I want to help point a player's mind to the right ideas to zero in on. We're going to start from the very basics, and move through each step of a problem-solving process, giving example colonies as thought experiments and to test if you like with some exercises. My hope is that a new-ish reader with some experience up to the mid-game will be set up for success in their future colonies through a general problem-solving approach rather than a particular solution to a particular problem.
How to Solve It
This guide owes a great deal to a little book called "How to Solve It" by George Pólya, a mathematician. My problem-solving approach is taken directly from there, adapted for ONI.
Pólya says, in the preface to the first printing of his book:
"A great discovery solves a great problem but there is a grain of discovery in the solution of any problem. Your problem may be modest; but if it challenges your curiosity and brings into play your inventive faculties, and if you solve it by your own means, you may experience the tension and enjoy the triumph of discovery."
It is in this spirit that I'd like us to proceed.
Pólya's approach to problem-solving consists of 4 main steps: Understanding the Problem, Devising a Plan, Carrying Out the Plan, and Looking Back. We'll go through each of these in turn.
Understanding the Problem
What are the basic short-term needs of a colony? Breathable air and calories. Our basic enemy is entropy. No solution will be permanent. This gives rise to an ever-shifting array of sub-problems, such as disease, heat, etc. that take place on a longer timeline. In this way, ONI is a kind of maximizer problem, one where we are attempting to maximize the length of time a colony survives with at least one duplicant.
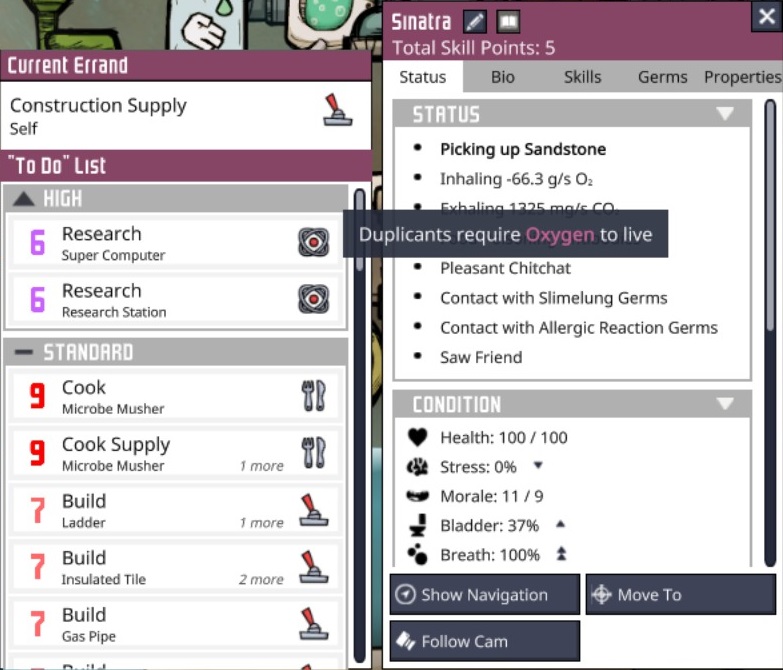
By mousing over many parts of the interface, we can get a tooltip explanation of most in-game concepts. Clicking on any highlighted purple term will bring us to a database entry, like this one for "power":
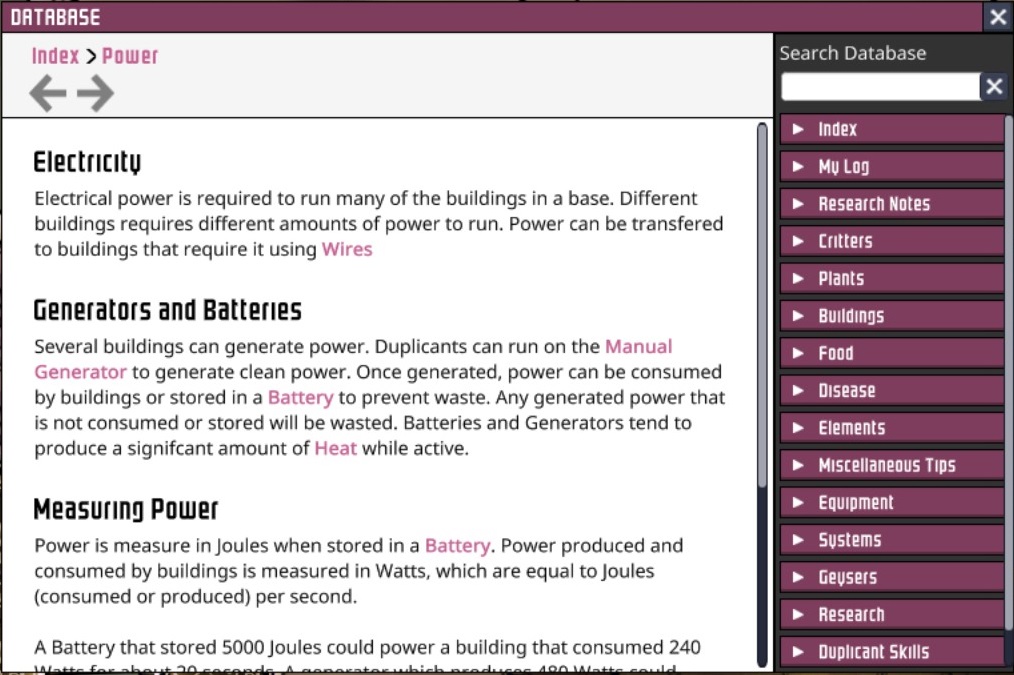
Though the database is still sadly incomplete even after release, it still contains a wealth of information. Our first step when we come across something we aren't familiar with should be to pause the game, mouse over anything we can, and read the database entries on anything we can. Never charge ahead even one second until the new sub-problem is fully understood.
Maybe it's intuitive that such a colony will fail, or seems too obvious. But this kind of information is crucial to have when planning food and oxygen supplies, as well as managing waste, the main sub-problems faced in the early days. Waste management, in turn, gives rise to disease management. As task complexity and number increases, we need to know about prioritization. It's also good to know that a colony can survive for quite a while doing absolutely nothing, provided its input requirements are kept low.
Devising a Plan
Since both digging and running in the wheel require time and a dupe's attention to a task, and we only have 3 dupes at the start, we see another sub-problem: that of prioritization or task management.
However, the Diffuser requires 550 g/s algae, essentially a net loss of 50 g/s matter (for simplicity's sake, ignore heat for now). Assume algae is stored in tiles at a mass of 300kg/tile. 300kg = 300,000g. Therefore, assuming 100% uptime on the Diffuser, it will run for 300,000g / 550g/s = about 545 seconds on one tile's worth of algae. 1 Cycle is 600 seconds, so this is just under a day's worth of oxygen.
We can easily see that with very low input of algae (digging one tile of it per cycle), we have solved our oxygen problem for even as many as 5 dupes! With 3 dupes, we even have enough so that one can run in a wheel to power the diffuser, one can mine algae, and one can deliver algae, and all tasks will have 100% uptime.
However, eventually the duplicants' CO2 output (2g/s) will fill up the space, as will the polluted water. In practice, also, the diffuser does not run constantly, as it can only output so much O2 before the tile is overpressurized and it stops. We will also, even at this slow rate, eventually mine all the algae in the starting biome. Though it's not possible to calculate exact survival time for a colony like this (in the absence of a food requirement), due to the variance in algae in the starting biome and its arrangement (what if you got a colony where all the algae was below you, leading to a natural place for polluted water and CO2 to gather?), it is interesting to think about just how long a colony like this could potentially survive, if we didn't have to worry about starvation or stress.
What I want to stress here is that these are the kinds of things you can think about and even roughly calculate ahead of time when figuring out your colony's needs. It's not necessary to literally run all the numbers for everything you do, obviously, that bogs things down and is (in my opinion) less fun. But it's possible to find solutions to these things in more unusual circumstances.
Any time you find a new potential input, before you break through that last tile and incorporate it into your existing colony's system, pause the game for a bit and ask yourself what its handling will require of you. What additional inputs will arise? How about task complexity; does it require dupe intervention? Have you handled a similar input before? Do you already have the infrastructure for it, can that infrastructure be repurposed?
Remember, in most cases, provided you have even a single oxygen source and you can dig for muckroots, your colony is likely stable in the early game. Don't be too hasty, use the pause function, think about new potential inputs and how it will change your existing system. Use the database and tooltips.
As this is a section with many exercises, I should stress that they are (here, and elsewhere in the guide) intended to help stimulate the right kind of thinking to get better at the game. All of these questions have "known" answers in the community. The point is to think through it yourself.
Carrying Out the Plan
Here, we urge the reader to slow down, pause while building and double-check their plan. Verify inputs and outputs. Make sure that dupes can get to where they need to go. Don't be afraid to deconstruct existing buildings (resources are refunded) or cancel build plans and re-do them, using the pause function extensively to get it right before letting anything happen.
If you notice that a build isn't being done in a timely manner, or that a building is routinely unsupplied, you can click into the ordered task or building and go to the "errands" tab. See where it lies on which dupes' to-do lists, then go to the dupe and check their priorities.
You can also check the global "priority" overlay (press P). You may find that you accidentally set digging priority lower than the surrounding construction priorities (or vice versa), which holds up large builds at times, so check that. Check to make sure everything is accessible. If not, ladders spaced one tile apart can allow dupes to climb to things with minimal time and resource investment. Use the filters to check different kinds of tasking in the priority overlay, rather than looking at them all at once. Things like door-state-change or potted plant fertilization can obscure other tasking unless you filter.
Looking Back
This core cycle is present at different levels, as well.
Without going into the complexities of the tree of tasks generated and resolved over time by these actions, we can look at it strictly in terms of input and output of sandstone. We spent time, calories, and priority to "free" sandstone from a tile and incorporate it into "the colony" in the form of storage, cots, and "loose" stone in storage. The amount of sandstone in the world stayed constant, but we gained the ability to offset a negative penalty for dupes sleeping on the ground by "re-binding" some of it into constructed cots. No heat was generated apart from duplicant body heat, which at this stage of the game is negligible. Sandstone can be used to build a variety of other things, all of which light up in the tabs on the lower left when available for construction. It increases the decor value of anything we use it to build, and it has certain properties related to heat etc. that we can check in the interface as well. Various overlays will reveal other properties.
This all seems perhaps too obvious. But the same thought process and thoroughness will serve us very well when thinking about how to incorporate, say, Magma or Hydrogen into our system. We can't hope to maximize survival time if we instead just blunder through blindly hoping for the best.
A Final Caveat
As thorough as the in-game guidance and information can be in ONI, it is also important to realize that you are not intended to be able to complete everything it has to offer on your first, or even your twentieth, attempt. There is a certain amount of information withheld, that will absolutely cause chaos in your colony the first time you attempt to do particular things.
For instance, building an early "self-powered oxygen module" as soon as you notice that hydrogen generators can be powered by electrolyzers, but before you've likely found wheezeworts or an Anti-Entropy Thermal Nullifier, which have to be found randomly in the world and aren't dependent on the tech tree at all. You will inevitably try to piece one of these together and overheat yourself. The game also doesn't tell you that the oxygen is output at 70 degrees Celsius, you have to just build an electrolyzer and find that out after you've already done it, then throw up your hands when the gas cooling buildings don't actually cool anything down except the gas itself.
Or the first time you break into a slime biome, thinking you can control the spread of the germs, and then you check the germ overlay and find that you've basically infected every square inch of your base because dupes will just blithely carry stuff past the intuitive sanitization methods.
These are but two common early-midgame situations that will get you. Think of all the restarts waiting for you the next time you try to build that fancy new building down at the end of the tech tree!
Basically, while I encourage you to go slow, think through what you're doing before you do it, and read everything you can in game about materials and buildings, inputs and outputs, it's also important to realize that this is not a solvable or stable system you're in charge of. Entropy makes fools of us all. When it happens, laugh it off and restart. You'll do better next time.
- ONI - Surviving the Early Game★ 5 (2.4k)83k views6.3k ♥54 minUpdated Aug 6, 2019
- Useful Construction Patterns★ 5 (1.8k)74k views5.2k ♥66 minUpdated Aug 29, 2020
- 10* things I wish I knew sooner...★ 5 (754)58k views1k ♥4 minUpdated Oct 6, 2017
- ONI - Surviving the Mid-Game★ 5 (1.3k)44k views3.8k ♥150 minUpdated 6 Sep, 2019
- Not Quite Beginner's Guide★ 5 (361)32k views1.1k ♥91 minUpdated Mar 26, 2023
- Руководство для начинающих. (ОСНОВЫ)★ 5 (629)32k views1.2k ♥21 minRussianUpdated 20 Apr, 2019




- Upgrading to PremiumTeam Fortress 2★ 5 (20k)1441k views11k ♥6 minUpdated May 11, 2022
- No More Room in Hell Official ManualNo More Room in Hell★ 5 (2.8k)569k views2.1k ♥29 minUpdated Apr 22, 2019
- NMRiH Community Hosting GuidesNo More Room in Hell★ 5 (526)351k views653 ♥1 minUpdated Aug 10, 2022
- ULTIMATE GUIDE FOR GAME DEV TYCOONGame Dev Tycoon★ 5 (5.8k)326k views10k ♥4 minUpdated 23 Jan, 2014
- How to 'Git Gud' Soon™MORDHAU★ 5 (2k)318k views3k ♥68 minUpdated Nov 16, 2024
- Лучшие кооперативные игры SteamPAYDAY 2★ 5 (1.5k)315k views2.1k ♥56 minRussianUpdated Apr 27, 2025






This guide was created by its original author on the Steam Community. Are you the author and want it removed? Request removal.