SkinMaker: How to Create Skin Mods
Basic Overview
Note that it is a command line interface tool. A graphical user interface for the tool is something I'm considering for the future, but unfortunately won't have time for anytime soon.
You can get the tool here[drive.google.com]
You can find the following files in the link:
- SkinMaker.jar - the tool itself
- GlobalProperties.json - file used for basic configuration of the tool, more on it in Using the tool - Commands and Configuration section
- modelColorPropertiesConfig.json - more about this in Models section
- Example Skin - folder containing all the sprites and configuration for an example skin, to serve as a reference when making your own
You can see examples of mods created with the tool here: https://steamcommunity.com/sharedfiles/filedetails/?id=2513727857
Using the tool - Commands and Configuration
As mentioned in the previous section the tool uses command line interface. In case you have no experience with using command line, we will go over how to find it and make it ready to run the commands mentioned in this section.
To open command line (Windows) you just need to search for the "cmd" or "powershell" (either of them will work) application and launch it. This will open a window where you can enter commands. Now we only need to switch to the directory where you have the SkinMaker tool. The command for this is cd, followed by a path to the directory. Like this:
As an alternate option you can press the shift key together with right clicking in the folder where you have saved the SkinMaker tool. Among the provided options you should see something along the lines of "Open command window here" or "Open PowerShell window here". This will open the command window already set to the directory you launched it from.
Once you have set the proper directory you can launch the tool. The command required to run the tool is fairly simple.
The beginning of the command java -jar is simply saying to use java to run the tool.
Next we have specified the name of the tool to run which is SkinMaker.jar followed by the arguments.
-dynskins is used to tell the tool to run skin creation, without this argument the tool will do nothing. This is followed by a single, or multiple paths to your skin configuration files, separated by spaces. Example of path: "C:\Files\MyProject\MyProjectConfiguration.json". Make sure to include the quotes "" around your path, especially if the path contains any spaces.
There are additional optional parameters that can be used, most of which are intended to simplify testing of skins. You can learn more about these in the Using the tool - Optional Parameters section later on.
You might've noticed that with the SkinMaker was bundled a GlobalProperties.json file. This is a global configuration containing some basic information like where the game is installed and where to find the expanded game files.
GlobalProperties.json has the following structure:The gamePath property is required, if it's not configured properly the tool will not be able to access the game's resources and Mod Tools. You can get your gamePath by going to properties of the game on Steam, then go to Local Files section and select Browse Local Files. This will open up the game folder, simply put path to this folder into the gamePath.
The rest of the properties resPakPath, cdbPath and atlasPath are optional and a default value will be used if they are not present in the GlobalProperties.json file.
What remains is to create the Project configuration file and your sprites. As the configuration file can get quite complex, it will be detailed in multiple sections, starting with the section Creating a Project.
Using the tool - Optional Parameters
This section will introduce optional parameters that the tool supports. Most of these are intended to simplify testing of skins by skipping parts of the process.
-only
The -only parameter can be used to build only a few animations instead of all 500 or so of them.
To use it, the -only parameter needs to be followed by an equal sign (=) and a list of animation names separated by commas.
This parameter significantly reduces the time it takes for the tool to finish processing, which makes it one of the most useful testing parameters. It allows you to preview your skin on a handful of animations and only build the entire animation set after you are happy with how it looks.
-skipCollapsing
This parameter is used to skip the collapsing of resources using the provided ModTools. Collapsing of resources is one of the last steps of the whole process. The collapsing of atlases (spritesheets) takes an especially long time due to the size of the player character atlas.
An important note is that you cannot test your skin in-game if you use this option since you won't get a final res.pak file.
-skipBuildingDir
One of the first actions the tool does is prepare files and directories necessary for the processing. This includes cleaning up any remaining files from previous runs, creating copies of required resources (res.pak, data.cdb, etc.), and preparing the output directories.
As we are working with quite a large amount of files (lot of animation frames, cdb entries) it can take a bit to clean up/prepare everything for use.
Once again this speeds up the testing process a bit though nowhere near as much as the previous two options.
An important note is that the tools still requires all the directories to exists, so you shouldn't use this parameter when making any given skin for the first time. Also, I would not recommend using this when creating the final mod file, to avoid any issues related to old files remaining in the folders.
-skipSpriteIndexing Dead Cells uses a combination of indexed sprites with color palettes to allow for color variations of skins without the need for each of them to have their own spritesheet. The indexed sprites look like this:
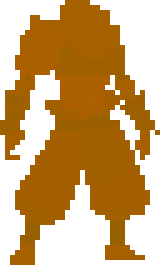
This parameter will simply skip the indexing part of the sprites, making them appear with their intended colors. Similar to the -skipCollapsing parameter, you cannot test your skin in game if you used this parameter (the colors will be one big jumbled up mess).
Its usefulness lies in being able to see the skin sprites with the proper colors without launching the game. Once again saving some time during testing as you won't have to launch the game to check every small tweak you make.
I'd recommend using this parameter in combination with the -skipCollapsing parameter.
-forceExpand
With this parameter, you can force the tool to expand all game resources required for your skin/skins. If some of the resources are already expanded it will first delete them and then re-expand them.
This is useful mostly when a new update drops and you want to make sure the tool uses the most recent game files.
This parameter will increase the processing time as some resources can take quite a bit of time to expand (mostly atlases/spritesheets). By how much the processing time increases will depend on the skin configuration which specifies the atlases that need to be expanded, and whether any old files have to be deleted.
It's important to note that the tool will always expand any non-expanded resources it needs. This parameter is used to re-expand even the ones that are already expanded.
Example command with the -forceExpand parameter:Creating a Project
A project is a json configuration file representing the mod you're about to make. It contains just some basic information and a list of skins that will be part of the mod. Each Project can have one or more skins in it (these will all be bundled together in one res.pak file that can be uploaded to the workshop)
A project file has the following structure:outputPath - path to a folder where you want outputs stored, this is where your skin mod will be once the tool has finished building it
skins - list of skin objects, each representing a skin that will be created (more on structure of skin objects in their own section)
All paths inside the Project file can be either absolute (example: "C:\Files\MyProject\Output") or relative (example "\output"). This applies to the outputPath in the Project but also all path in it's underlining skins.
When using relative paths, the tool bases them on the directory of the Project json file as the "working directory".
Our project json file is "MyProject.json" is stored in the following location:
Creating a Skin - skin object
The skin object has the following structure:
name - name of the skin
inputPath - folder where the sprites of the skin are located
builderSettings - list of BuilderSettings objects (more in it's own section)
customModel - true/false but honestly in most cases this should use the true option
models - list of models to edit, only applicable if customModel is false (can be ommited if customModel is true)
disableHead - true/false determines whether the original smoke head should be disabled ot not
skins - option to modify any properties of the skin file and it's related item file in the game's data.cdb
colorProperties - list of paths to properties files containing colors that are used within the skin. These are then used to create color palettes the game uses (more in it's own section)
customAnimations - allows to use custom animation sprites for certain animations, replacing the default ones (more in it's own section)
scarfColors - allows to change the colors of the scarf trailing behind the player character
BuilderSettings - Overview
Because of this it's also one of the more complex objects in the configuration.
There are three different types of BuilderSettings, each with different attributes. Which type is used is defined bz the type attribute. The available types are:
- Dynamic - used to specify which sprites are to be used in your skin creation and where they are to be placed
- Original - used to add parts from existing skins into your skin
- Line - used to draw lines between Joints
Aside from the type attribute, each BuilderSettings also share the drawingMode and drawingOrder attributes (more on them in their section)
BuilderSettings - drawingMode and drawingOrder
drawingMode
The drawingMode indicates how the individual sprite should be drawn into the final frame with the rest of the sprites.Supports the following modes:
- OVERWRITE - the sprite will be placed over anything that's already in the frame
- DONT_OVERWRITE - the sprite will be placed only on transparent pixels in the frame, will not affect any previously placed body parts/sprites
- TRACKS_BASED - uses extra information from the animation files to determine the mode OVERWRITE/DONT_OVERWRITE. Sprites with this option should be among the last in the drawingOrder. Useful for body parts that can often appear in front of and behind other sprites (for example arms). This option does not work for BuilderSettings with type Original.
drawingOrder
The drawingOrder determines when the sprite should be drawn into the final frame. This is an optional parameter. If not specified, the sprite will be drawn after all the default builders (or builders with specified drawing order).
The drawing order has two main attributes mode and builder.
mode can be BEFORE and AFTER. It indicated whether the sprite should be drawn before or after the builder specified in the builder attribute.
builder is used as a reference to any other BuilderSettings object.
Each builder reference has to have a type attribute. The rest of the attributes will be different for each type.
"type": "Dynamic"
References a BuilderSettings (Dynamic) object. Contains additional attribute spriteName which is used to reference a BuilderSettings object with the same spriteName.
"type": "Original"
References a BuilderSettings (Original) object. Contains additional attributes model and bodyPart which are used to reference a OriginalBodyPartBuilderSettings object with the same model and bodyPart attributes.
"type": "Line"
References a BuilderSettings (Line) object. Contains additional attribute builderRef which is used to reference a BuilderSettings (Line) object with the same builderRef attribute.

BuilderSettings (Dynamic)
Dynamic BuilderSettings are used to specify which sprites are to be used in your skin creation and where they are to be placed.
Before we move onto the structure of the Dynamic BuilderSettings detailed in the next section, we will go over some existing default options that may simplify your configuration file.
There's number of "sprites" or "body parts" the tool can automatically detect and place on the proper place without you needing to specify it in the BuilderSettings. All you need to do for this to take effect is to name your sprite in the proper way, so the tool can recognize it. (More on sprite naming in Creating Sprites section)
The sprite names that have a default BuilderSettings attached to them are:The names of the sprites should be fairly self explanatory as to which body part do they reffer. But to avoid any possible confusion we will go over each of them.
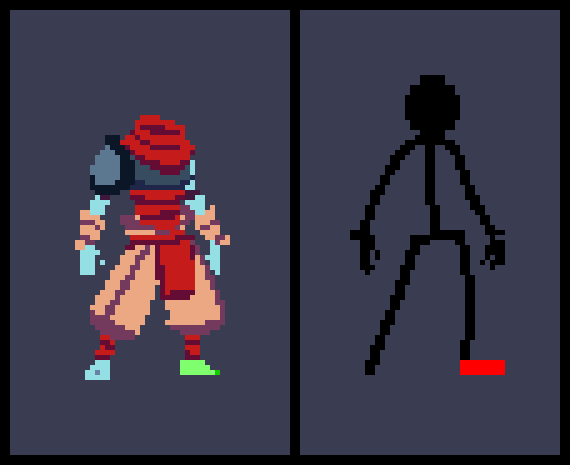
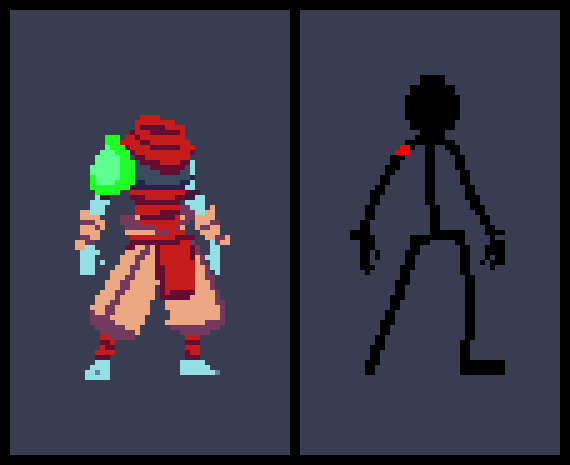
Following is a visual explanation of what each of above mentioned body parts represent.
body - area between neck and pelvis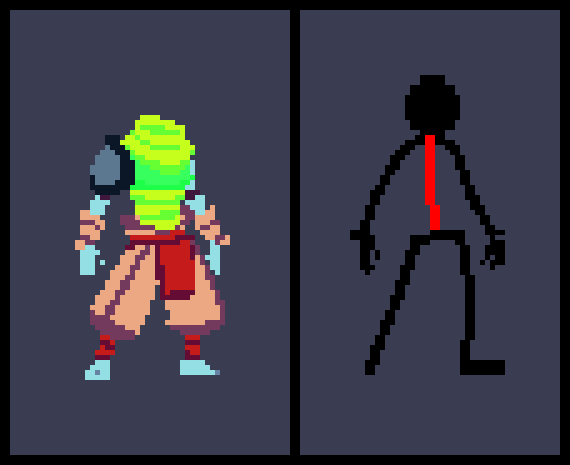
bodyUppper - chest area (should be used with bodyLower, it's an alternative to body)
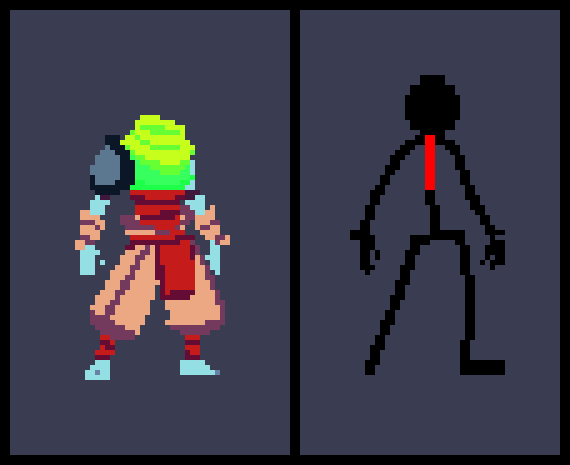
bodyLower - midriff area (should be used with bodyUppper, it's an alternative to body)
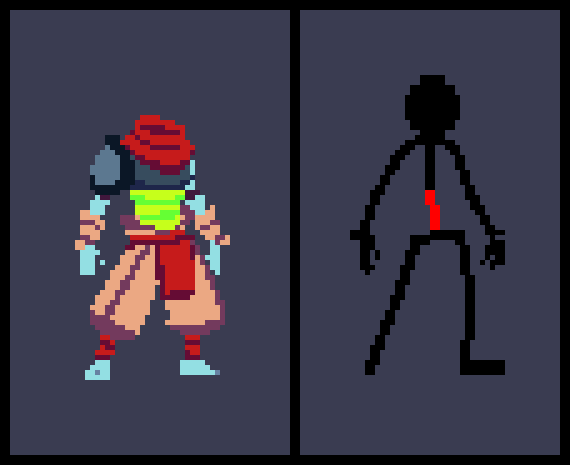
upperLeftArm - area between shoulder and elbow
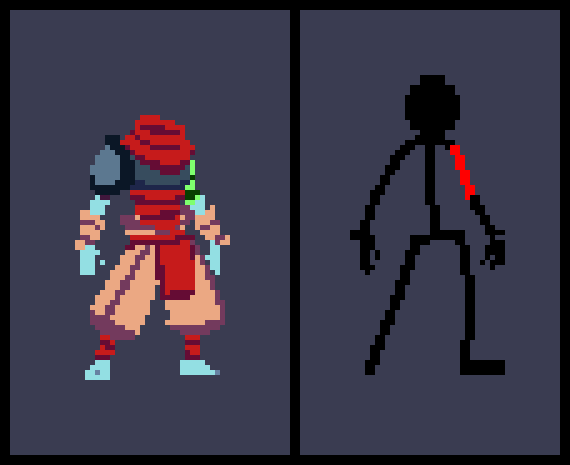
lowerLeftArm - area between elbow and wrist
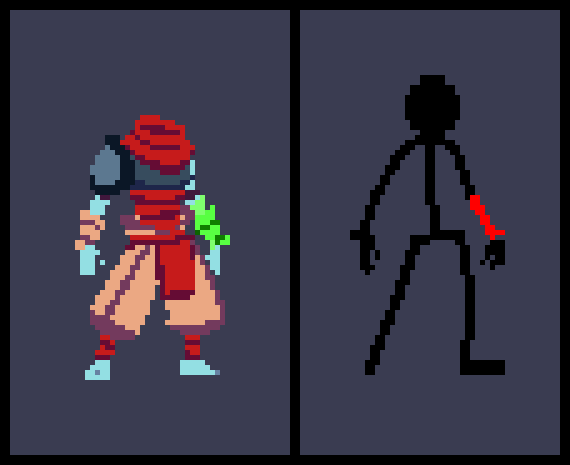
pelvis - pelvic area
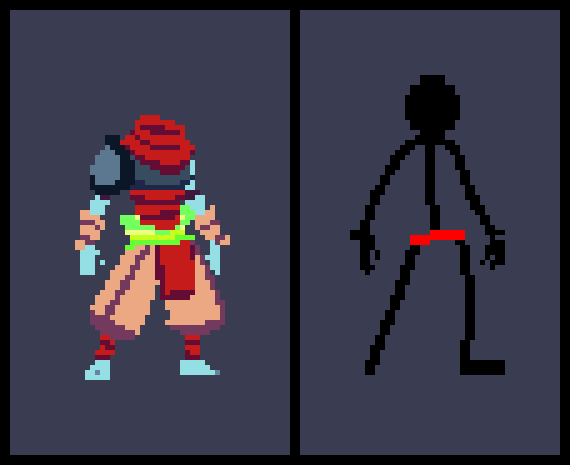
upperLeftLeg - area between hip and knee
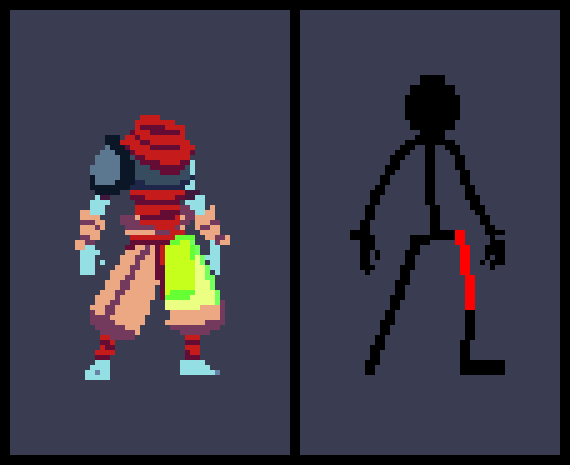
lowerLeftLeg - area between knee and ankle
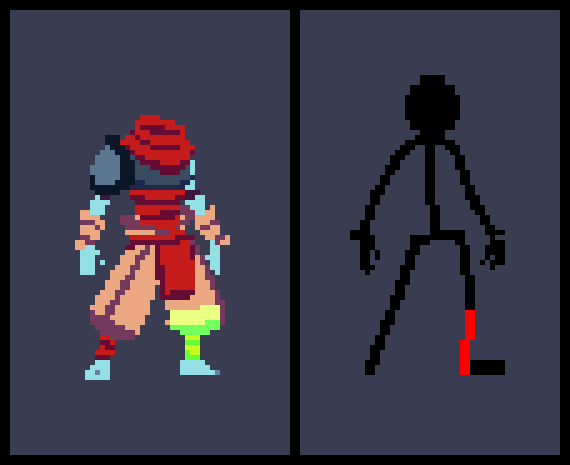
leftFoot - foot
rightShoulder - shoulder
BuilderSettings (Dynamic) - Structure
The BuilderSetting object has the following structure:
spriteName represents the name of the sprite the BuilderSettings apply to.
We will go over the rest of the options in detail in their own sections.
BuilderSettings (Dynamic) - position
The position object represents where the sprite will be placed. The position always represents where the center of the sprite will be placed.
Each position object has to have a type attribute. The rest of the attributes will be different for each type.
"type" : "SinglePointPosition"
For this type the sprite's position is defined by a single joint in the character's skeleton (for list of available joints visit the Joints section)
- position - the name of the joint
- offsetX - offset to the X coordinate of the position
- offsetY - offset to the Y coordinate of the position
Example SinglePointPosition object:
"type" : "MiddlePointPosition"
For this type the sprite's position is defined by a middle point between two joints The additional attributes for MiddlePointPosition are:
- joint1 - the name of the first joint
- joint2 - the name of the second joint
- offsetX - offset to the X coordinate of the position
- offsetY - offset to the Y coordinate of the position
Example MiddlePointPosition object:
BuilderSettings (Dynamic) - rotation
The rotation object indicates how the sprite should be rotated if necessary.
Each rotation object has to have a type attribute. The rest of the attributes will be different for each type.
"type" : "TwoPointsRotation"
For this type the sprite's rotation is defined by two positions: the center of the rotation and the target of the rotation.
- rotationCenter - the rotation center position (same position object as defined above)
- rotationTarget - the rotation target position
- rotationOffset - offset in degrees added to the rotation
Example TwoPointsRotation object:
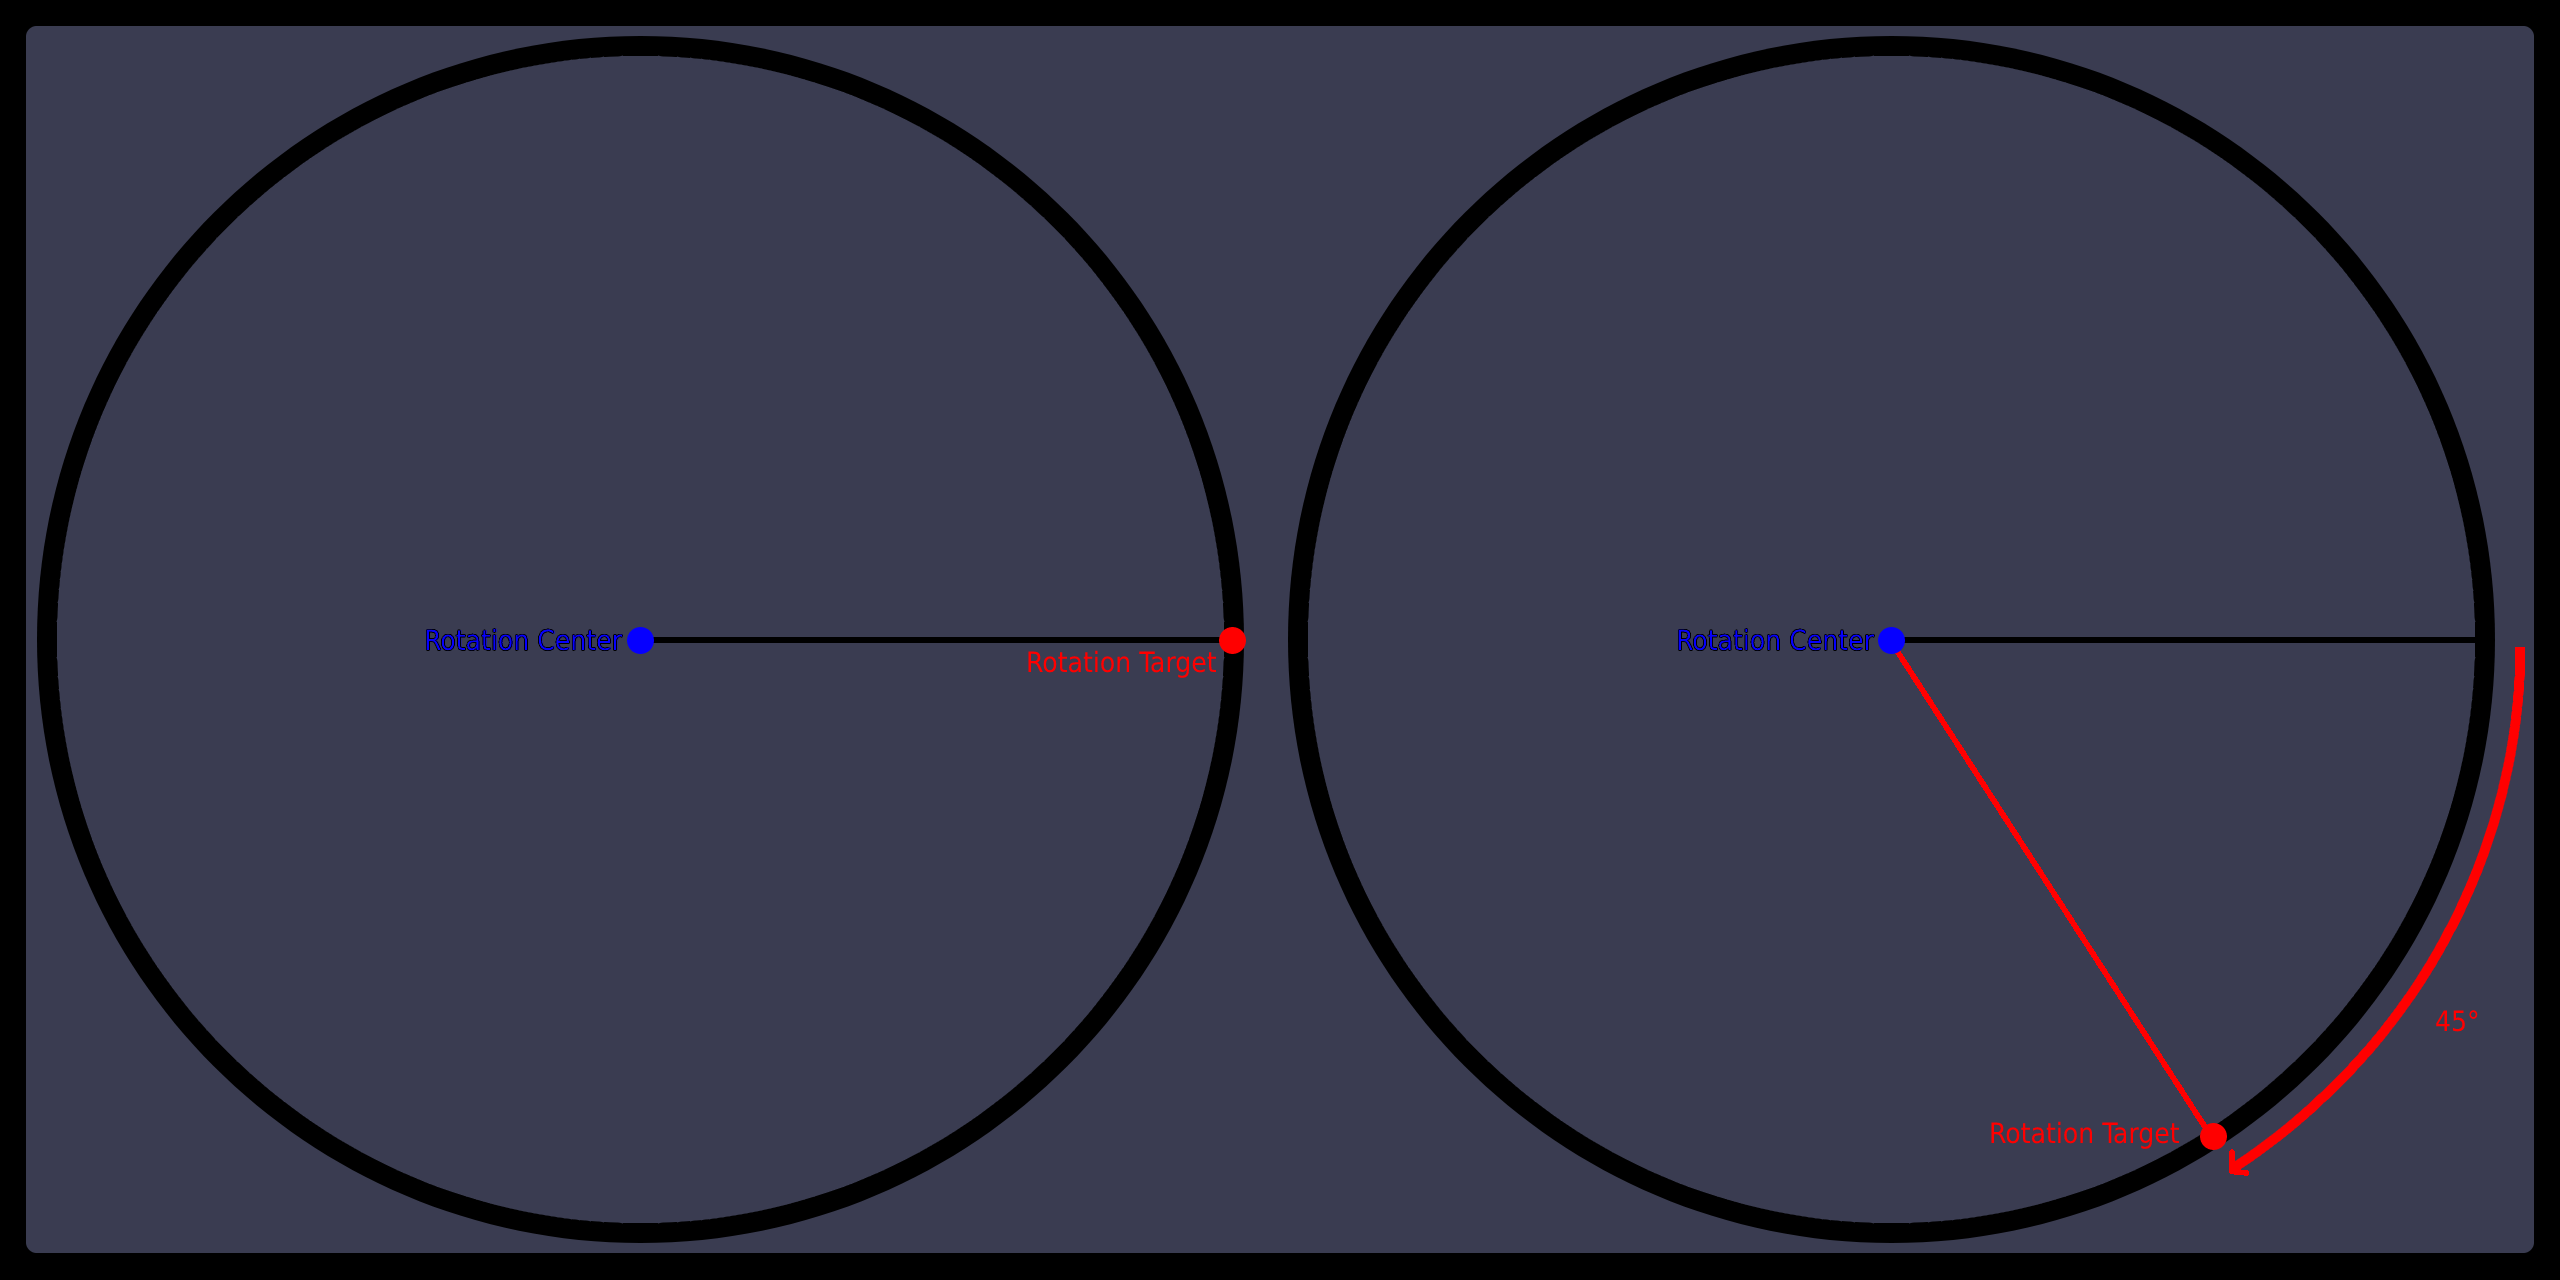
Following is a visual example of rotationCenter and rotationTarget, and how they are used to calculate the angle of rotation.
On the following images rotationCenter is represented as the blue point and rotationTarget as the red point. The image on the left shows a state of 0° rotation angle, this is when the rotationTarget is directly to the rigth of the rotationCenter.
The image on the right shows a 45° rotation.
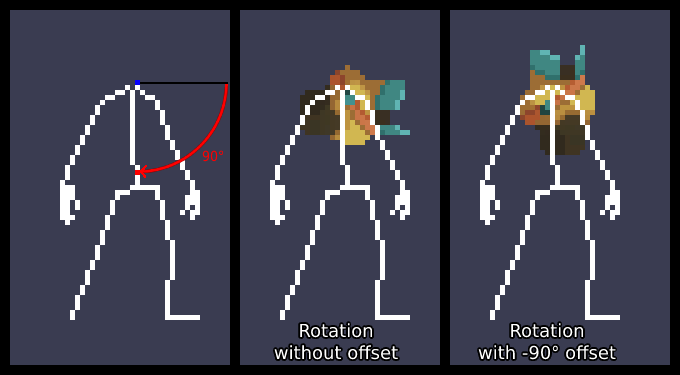
On the next image we see this demonstrated on the body sprite from the Example skin. As the rotationCenter we use the NECK_TOP joint and as rotationTarget we use LOWER_SPINE joint.
The image on the left shows the two points and the rotation angle calculated from the two points.
Image in the middle shows what it looks like when the rotation is applied to the body sprite. We can see that this looks wrong. We would like for the body to not be rotated in this case, in a way we would want out default 0° rotation to be when the rotationTarget is directly underneath the rotationCenter, instead of when it's to the right as demonstrated above.
This can be easily adjusted with the rotationOffset attribute. In the image on the right we see the rotation after applying rotationOffset of -90° (negative rotation angle rotates counter clockwise, while positive clockwise). With the offset applied our sprites is rotated the way we want it to be.
"type" : "NoRotation"
This type indicates that the sprite will not be rotated. No additional attributes are used with this type.
BuilderSettings (Dynamic) - flip
The flip object indicates how the sprite should be flipped if it necessary (horizontal flipping/mirroring of the sprite).
Each flip object has to have a type attribute. The rest of the attributes will be different for each type.
"type" : "LineAndPointFlip"
For this type the decision whether to flip/mirror the sprite is based on the relative position of one point to a line (defined by two points). If the point is located to the "right" of the line, no actions is performed. If it's located to the "left" of the line then the sprite is flipped/mirrored.
- linePosition1 - the position of the first point defining the line
- linePosition2 - the position of the second point defining the line
- pointPosition - the position of the point used for determining whether to flip the sprite
- supportingPointPosition - the position of the point used for determining whether to flip the sprite, in case pointPosition lies directly on the line (optional)
Example LineAndPointFlip object:
"type" : "NoFlip"
This type indicates that the sprite will not be flipped. No additional attributes are used with this type.
BuilderSettings (Dynamic) - warp
The warp object specifies a transformation/warp that will be applied to the sprite.
Each warp object has to have a type attribute. The rest of the attributes will be different for each type.
"type" : "TwoPointsWarp"
For this type the sprite's height will be adjusted to match the distance between two points.
- position1 - the position of the first point
- position2 - the position of the second point
- lengthOffset - offset applied to the distance between the two points
Example TwoPointsWarp object:
"type" : "NoWarp"
This type indicates that the sprite will not be warped. No additional attributes are used with this type.
To ilustrate the usefulness of this feature let's look at the following images. First we have a frame from the idle animation, on the left is just the skeleton of the player character, with highlighet area between the left elbow and wrist. In the middle is lowerLeftArm sprite from the Example skin while using the NoWarp option. And finally on the right is the same sprite but using the TwoPointsWarp option.
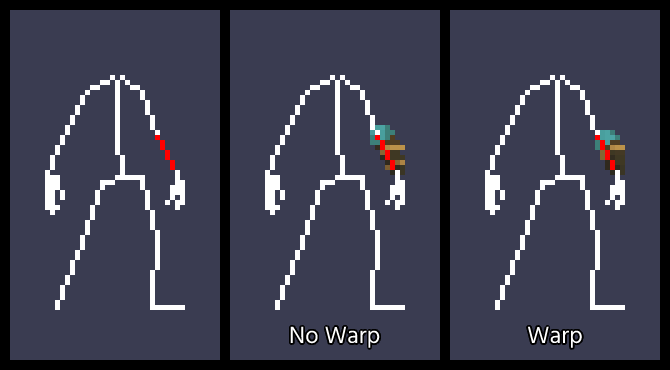
From this example the difference is not that noticable, the sprite using the TwoPointsWarp is slightly shorter, and the details are a bit different because of it but both options look alright.
So let's look at a different example, this time from the run animation.
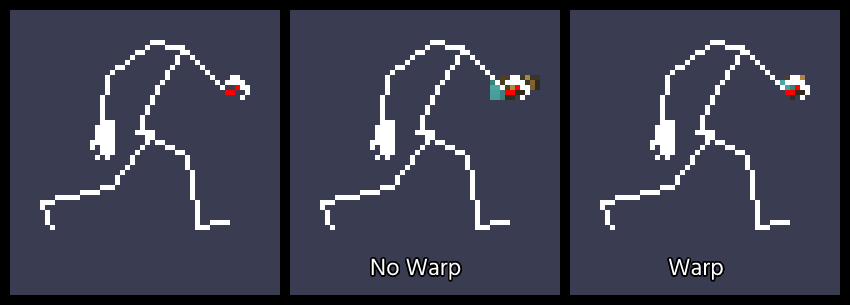
Immediatelly we can see that the highlighted area between elbow and wrist is much shorter. Most of it is hidden as the arm is pointing nearly directly at the cammera. Now the difference between the NoWarp and TwoPointsWarp options is much more visible. While using TwoPointsWarp the sprite's length is adjusted to match the distance between the elbow and the wrist. While with the NoWarp option the sprite retains it's full length, which it this case means that the sprite extends noticably beyond the elbow on one side, and beyod the wrist and even the entire hand on the other. The TwoPointsWarp option is used in default BuilderSettings (Dynamic) for all the limbs
BuilderSettings (Dynamic) - normalMapMode
Supports the following modes:
- BLANK - the normal map for this sprite will be blank (this is the recommended option if your sprites already have shading)
- CUSTOM - the normal map for this sprite will use a custom sprite. The normal map sprite needs to exist alongside the color sprite and have the same name plus the _n suffix
- ORIGINAL - the normal map for this sprite will use the same normal map as the default skin (beheaded)
BuilderSettings (Dynamic) - frameMultiplication
This is an optional parameter that is used only for animated sprites. It's primary use is to slow down the animation of the sprite by duplicating it's frames.
Example: let's say we have animated sprite with 3 animation frames (0, 1, 2)Without frameMultiplication the frames will be applied in the following order
Example of different frame multiplications applied to my Hornet skin
https://steamcommunity.com/sharedfiles/filedetails/?id=2863403314 From left to right, no frame multiplication, 2 times frame multiplication, 3 times frame multiplication
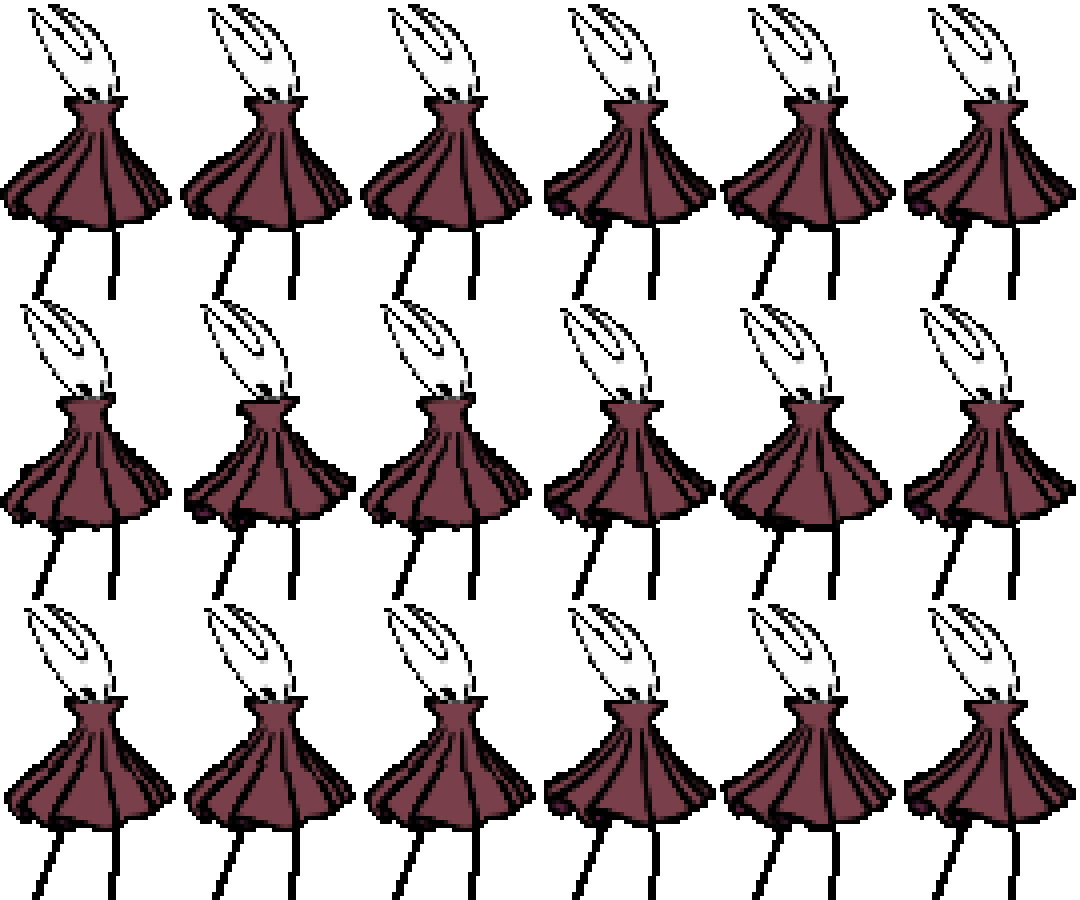
As you can see, the animation is playing way too fast without any frame multiplication. By applying it we can reduced the speed of the animation to better suit our needs. The final skin uses frame multiplication set to 2 (middle image).
BuilderSettings (Dynamic) - Overwriting Defaults
As mentioned in the BuilderSettings (Dynamic) section, there are multiple default BuilderSettings (Dynamic) the tool can automatically apply based on the sprite names. In some cases, however, the default settings may not fit your needs, but you may want to keep the names recognized by the default BuilderSettings.
In this case all you need to do is specify a BuilderSettings (Dynamic) object with spriteName matching the default BuilderSettings (Dynamic) you wish to overwrite. You can overwrite default BuilderSettings (Dynamic) completely by specifying all attributes of the BuilderSettings (Dynamic) objects (refer to BuilderSettings (Dynamic) - Structure section) or partially by specifying only the attributes you wish to change, keeping the rest of the attributes with the default values.
To provide some examples, we will look at couple of BuilderSettings (Dynamic) from the Example skin.
BuilderSettings (Dynamic) - lowerRightLeg
Here is an example of the BuilderSettings (Dynamic) for lowerRightLeg sprite. As you can see we are only changing the drawingMode of the BuilderSettings (Dynamic). Everything else will be kept as default.BuilderSettings - pelvis Here is an example of the BuilderSettings (Dynamic) for pelvis sprite. In this case we're changing a couple more attributes. We changed the position of the sprite, its drawingMode, and its drawingOrder.
Creating Sprites
In this section I'll show some examples of how the input sprites used by the BuilderSettings (Dynamic) might look like and some naming conventions the tool expects when it comes to the names of the sprites. This is not a tutorial on how to make pixel art.
As you know by now, the tool works with sprites of individual "body parts" which it than places on the proper place based on the BuilderSettings (Dynamic). As such each "body part" you wish to include should have it's individual sprite or multiple sprites in some cases.
Here we can see a body sprite from the Example skin included with the tool: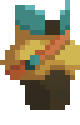
This sprite is named body_0_0.png the sprite name contains 3 parts separated by _
- The sprite name (body) - is the identification of the sprite. This sprite name is specified in the BuilderSettings (Dynamic) to know which settings to use for which sprite. The sprite name cannot contain _ character as it's used as a separator for the parts
- side (0) - the side is a numeric value indicating which "side" is the sprite from as in front/back. It is used during animations where the player character turns either completely or partially in order to allow the sprite to change with turning. More details and example can be found a bit later in this section.
- animation index (0) - represents the sequence of animation frames if the sprite is animated, starting from 0
Side
As mentioned briefly earlier, the side represents which side of the body part the sprite represents.
The numbers starts from 0 which represents a sprite from the front and increase as the character turns. You can have any number of sides, the only requirement is that number of sprites from the front needs to match number of sprites from the back (exception is if you have only 1 side). For odd number of sides, the middle one should represent looking at the body part directly from the side.
We will once again demonstrate it using the Example skin, this time including all the sides for the body:
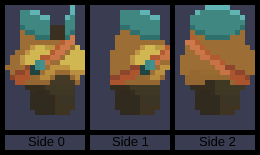
I would recommend using at least 3 sides (as demonstrated above) for body parts like body and head. Rest of the body parts can often go without sides, but it highly depends on the specific skin.
Using more than 3 sides can provide a smoother transition, based on some small testing I found 5 to be fairly nice spot of not having too many side sprites and being smooth. Anything beyond 7 is most probably not worth doing due to the limited resolution of the game.
Animation index
This should be pretty self explanatory. The animation index allows for having animated sprites. It can be anything from the character blinking to clothes swaying in the wind or anything else you want. The animation index then simply indicates the order in which the frames will be used, starting from 0.
As an example, I will use my Hornet skin which has an animated body/dress
https://steamcommunity.com/sharedfiles/filedetails/?id=2863403314
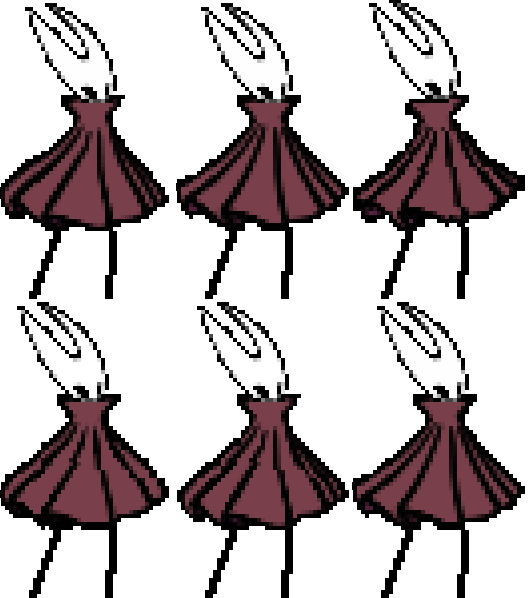
It uses 6 animation frames (animation index 0-5) and frameMultiplication of 2 (doubling every frame to make the animation play slower.
BuilderSettings (Original)
Similarly to the previously described BuilderSettings (Dynamic), the BuilderSettings (Original) object is used to add body parts into the skin. But instead of adding custom sprites, it adds a body part from an existing skin.
What's important to know is that the tool differentiates the body parts purely based on color. Some skins have multiple body parts using the same color (for example the default skin uses the same color for arms and feet), and as such they will always be added together.
The structure of the BuilderSettings (Original) object looks like this:The drawingMode and drawingOrder behave the same as in BuilderSetting (Dynamic) object so I will not go over them again. Refer to the relevant sections in BuilderSettings.
The only difference is that drawingMode TRACKS_BASED is not supported for BuilderSettings (Original) object.
Here's short explanation of the attributes, more details on each further in this section:- model - name of the spritesheet of existing skin
- bodyPart - name of the body part (for list of available bodyParts, refer to the Models section) every model also supports ALL option which will add all the body parts of the model
- colorMapping - object specifying what colors should the body part use in the skin (more on structure later on in this section)
- skinColorMapping - name of the skin from data.cdb to use for color mapping (the body part will have the same colors as it has in the specified skin)
- supportingBodyPart - optional attribute used to help add body parts that share colors with other body parts
- drawingMode - same as BuilderSettings drawingMode (except TRACK_BASED)
- drawingOrder - same as BuilderSettings drawingOrder (optional)
model
model is the name of the spritesheet/atlas of a particular skin (for example the default skin's atlas is called beheaded)
It is specifying from which model to add the body parts. (For list of configured models and their bodyParts visit the Models section)
colorMapping
colorMapping object contains all the colors from a body part, and what colors (in hexadecimal format) they should be changed to in the custom skin.
Example structure:Either colorMapping or skinColorMapping must be specified in the BuilderSettings (Original) object. In case both are present, colors in colorMapping take priority.
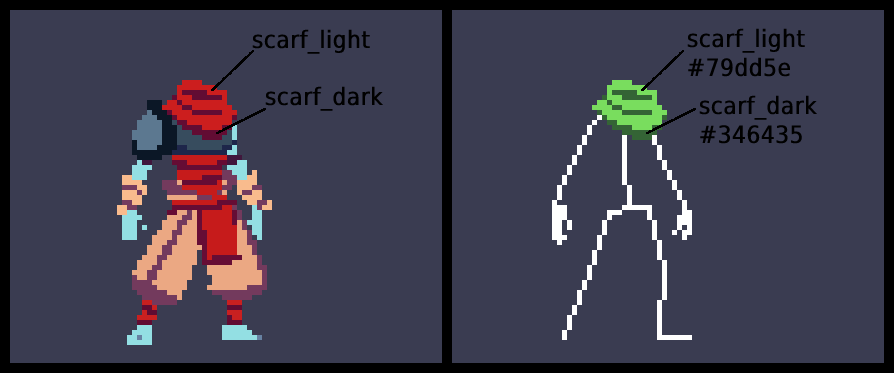
So let's say we have the following BuilderSettings (Original) to add SCARF from the beheaded model into our skin:In the following image we see how the colorMapping sets the color of the bodyPart. On the left we see the beheaded sprite, with the SCARF bodyPart colors highlighted.
On the right we see the SCARF bodyPart applied to our skin, with the colors specified in colorMapping. (For list of configured models and their bodyParts visit the Models section)
supportingBodyPart
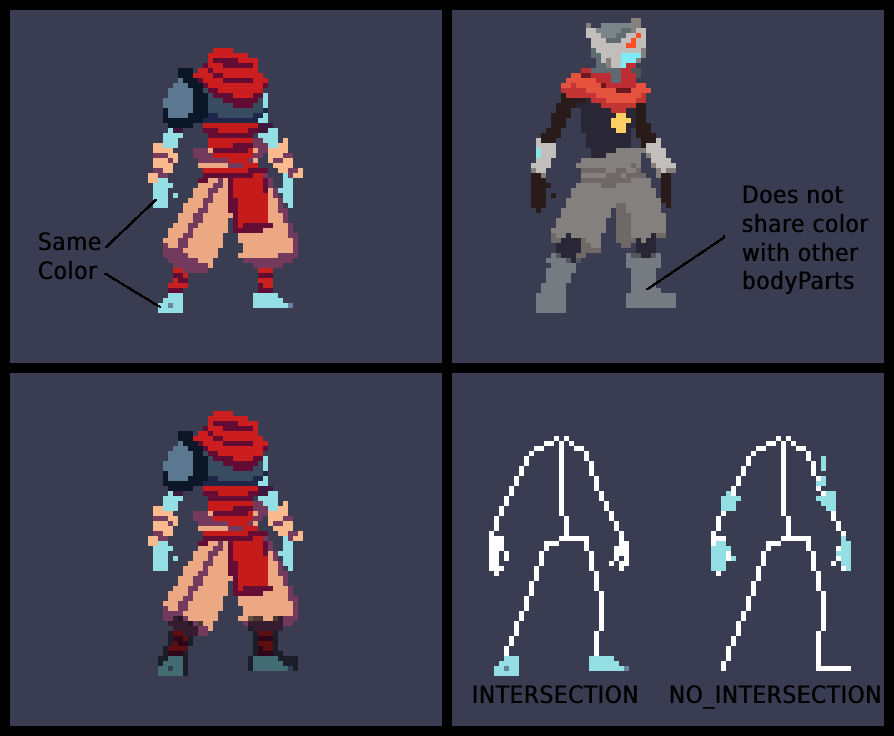
This optional parameter is useful in some specific situations when you are trying to add a bodyPart that shares colors with some other bodyPart (and thus you wouldn't be able to add them separately). Example of this is FEET body part from the defaul beheaded model shares color with the ARMS body part.
With supportingBodyPart we can specify an aditional body part from a different model that can help with the separation.
- model - the model from which to take the bodyPart
- bodyPart - the bodyPart to use
- mode - can be INTERSECTION / NO_INTERSECTION, determins how the extra check should behave
If the mode is INTERSECTION it means that only that part of bodyPart will be added, which matches also the supportingBodyPart.
If the mode is NO_INTERSECTION it means that only that part of bodyPart will be added, which does not match the supportingBodyPart. Example of supportingBodyPart using the Hyper Light Drifter FEET body part:
Let's demonstrate the above mentioned example. We will be using BuilderSettings (Original) to add bodyPart FEET from model beheaded.
Top left image shows the issue, the beheaded model shares the same color for the FEET and ARMS and as such the tool would add the ARMS into our skin as well.
Top right image shows the beheadedHyperLightDrifter model, and we can see that it's FEET bodyPart does not share color with any other bodyPart
Bottom left shows the FEET bodyPart from beheadedHyperLightDrifter overlayed over the beheaded sprite (The darkened area of the sprite). Here we can see how the supportingBodyPart works.
Bottom right is our final results, the left image shows our skin if we use the INTERSECTION mode. While the right image shows our skin if we use the NO_INTERSECTION mode.
The INTERSECTION mode added everything from the FEET bodyPart of beheaded model that was within the overlayed beheadedHyperLightDrifter FEET bodyPart. And the NO_INTERSECTION mode added everything that wasn't in the overlayed area.
Example of complete BuilderSettings (Original) object:
Models
Models represent the unique skins in the game, and is used to access the proper spritesheet. The tool has--by default--configured only 6 models (beheaded, beheadedTickR5, beheadedSanta, beheadedServante, beheadedSonic, beheadedHyperLightDrifter) but it supports user configuration for more.
Each model has a different set of body parts that can have one or more properties. I hope most of the names will be self explanatory.
Configuration for the models can be found in modelColorProperties.json file included with the tool. I won't go over the individual model configurations as it's a long file. Anytime you need to know what body parts exist in a model, you can reference the file itself.
Each model configuration starts with the model name, containing an object with the configurationThere's 3 properties for each model.
- deindexingSprite - frame of animation that is used to deindex the configuration properties, this is usually the first idle frame
- properties - contains the list of properties that exist in the sprite, each is usually a unique color. Each property has a numerical value indicating it's index/position in the palette
- bodyParts - body parts are basically a group of properties that form some part of the sprite. Each property can be part of multiple body parts if needed.
BuilderSettings (Line)
BuilderSettings (Line) has the follwing structure:
- lineStart - the position of the first point in the line
- lineEnd- the position of the second point in the line
- color - the color of the line in hexadecimal format
- thickness - the thickness of the line (higher number means thicker line)
- drawingMode - refer to BuilderSettings - drawingMode and drawingOrder
- drawingOrder- refer to BuilderSettings - drawingMode and drawingOrder
Example of :
Skin Object - skins
The skins part of the skin object is used to indicate the existing outfit that is to be replaced by your skin. Optionally, you can also made any desired changes to the data.cdb files of the outfit (such as the in-game name and description).
The structure of the skins object is as followsEach skin is referenced by its name, this should match the name of the skin file in data.cdb. As mentioned earlier, it can contain the item and skin objects that can be used to change any part of the relevant data.cdb entry.
If no changes are desired, this can be left empty.
The structures of the item and skin objects should match their respective structures in data.cdb. You only need to include those attributes that you wish to change, the rest can be omitted.
We will not be going over the structure of these objects, as the purpose of this guide is not to explain the structure of the game's files.
colorProperties
colorProperties contains a path to colors.properties files. Which is used to create color palettes for the skin.
A colors.properties file contains a list of property name and color pairs.
property name can be either the color property of a body part from the default(beheaded) model, or an aditional_color, which simply adds a new color to the palette.
aditional_colors should be numbered starting from 0 in ascending order. All colors included in your skin need to be present in the color properties file.
Example of what a color.properties file looks like:The colorProperties attribute can be left empty, which will make the tool generate the properties on it's own from the skin's sprites. This can save some work in the case that you don't want multiple color variations of the skin.
Global settings
In case you have multiple skins specified in the skins section and want to make a change to their respective skin and item parts or use a single color.properties file across all of the skins, you can do it trough specifying a "Global" skin by using "Global" as the skin name.
It follows the same structure as all the other skins. It has one extra property mode which can be either REPLACE_EMPTY or REPLACE_ALL.
REPLACE_EMPTY means that it will replace only the properties, defined in the Global skin settings, of the skin/item CDB file that are not present, null or empty (in case of array elements).
REPLACE_ALL means that it will replace all properties, defined in the Global skin settings, of the skin/item CDB.
If mode is not provided it will use the REPLACE_EMPTY option.
Skin Object - customAnimations
In case you want to make some animations of your skin more unique, you can use the customAnimations option. If not, just keep the object empty "customAnimations": {}.
The customAnimations object has the following structure:- model - refers to the model being used to create the skin, this is kept as beheaded mostly
- animation name - the name of the animation to replace
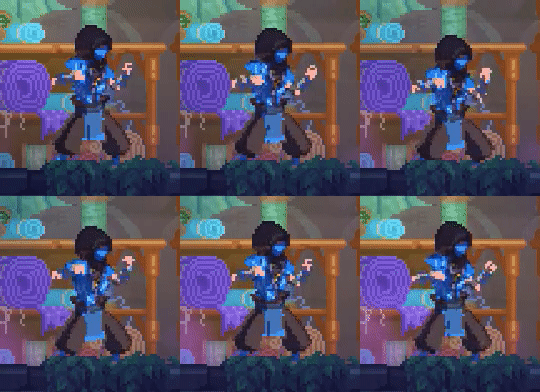
When using customAnimations, each frame of the animation has to be named the way its respective frame is named in the atlas. Otherwise, the tool will not recognize them, so make sure the names are correct. Example of using customAnimations to change the idle animation into a fighting stance:
Skin Object - scarfColors
It has the following structure:
skin name is the name of the skin file in data.cdb (the name used in the Skin Object -skins section). It's followed by a list of colors in decimal format that will be used to replace the existing ones. If a skin has more scarfs than the colors specified, it'll go back to using the colors from the start again, repeating until all scarf colors are replaced.
Joints
Step-by-Step of the Tool's Process
In this (and the next) section we will go over what the tool does once it's launched. The tool will send basic progress updates to the console, but in this section we will go more in depth into what's happening. This is merely to shed some light on the internal workings of the tool, you don't have to read this section to understand how to use it.
First the tool checks the first argument provided. As mentioned in section Using the tool - Commands and Configuration this should be -dynskins. If there's no arguments or the first argument is invalid the tool will just end it's processing as it's considered invalid action.
When the -dynskins argument is identified it starts the processing of Project files.
First it loads the GlobalProperties.json and beheadedModHelper_tracks.json (located in the game's ModTools folder, this file contains the animation data).
Then it continues processing the arguments provided when launching the tool. These should contain one or more paths to Project json files and any optional parameters from Using the tool - Optional Parameters section.
Loading project properties
At this point the tool will report it's first progress update. This means that it started loading the Project json files into memory. The loading is finished when the next progress update is reported.
Any error encountered in this section will relate to either the specified Project json file not existing (possibly due to a typo in the path you provided) or the file not matching the structure detailed in the sections above.
Expanding required resources
Now that the Project files were successfully loaded, the tool will start validating if all the resources required to process the Projects are available.
This includes:- expanded res.pak - specified by the resPakPath in GlobalProperties.json
- expanded data.cdb - specified by the cdbPath in GlobalProperties.json
- expanded atlases - specified by the atlasPath in GlobalProperties.json and by the OriginalBodyPartBuilderSettings of each Project
Any resources not found will be expanded to the appropriate location specified in GlobalProperties.json.
In case the -forceExpand optional parameter was used, all the resources will first be deleted (if they exist) and will be re-expanded afterwards.
After all required resources are expanded the tool will load modelColorPropertiesConfig.json containing the configuration for the models, whether it's the default configured ones or the user configured ones.
Project: ProjectName
After this will be processed the individual Projects as such the following progress updates will appear for every Project. The projects will be processed in the same order they were specified in the tool's arguments.
Creating directory structure
Now the tools starts preparing directories it'll need to create the Project. First it'll delete any existing files for this Project that were created by previous runs of the tool. After which it'll create the required files, which are a copy of the expanded res.pak and data.cdb. And a copy of expanded heroSkins.atlas (this atlas is being used for the preview of skins at the Tailor).
In case the -skipBuildingDir option was used, this entire part will be skipped.
Skin: SkinName
Now we're starting to process individual skins that are part of the Project. As such the following progress updated will be happening on Skin level.
First the sprites of the skin are loaded. The tool will load all .png files from the folder specified in the Skin's inputPath. To avoid errors in this part make sure all the sprites follow the naming convention detailed in Creating sprites section.
After the sprites are loaded, the tool will start processing the BuilderSettings (Dynamic) from the builderSettings part of the Skin. It starts will loading any default BuilderSettings (Dynamic) (See BuilderSettings (Dynamic) section) based on the loaded sprites and applying any overwriting of the default settings (See BuilderSettings (Dynamic) - Overwriting defaults section). And combines them with any custom BuilderSettings (Dynamic) in the Skin configuration.
Then the tool proceeds to process the BuilderSettings (Original) or more specifically the color mapping for each body part specified in the settings. If only colorMapping property is specified then no changes are made to the builder.
If skinColorMapping is specified the tool loads the mentioned skin to get information about which palette is the skin using. And after that it loads the palette and extracts the skins colors from it.
Then it updates the colorMapping with these colors (any colors already in colorMapping are not overwritten).
Updating CDB skin files
Now the tool will make any necessary changes to the data.cdb entries for the skins that are to be replaced (see Skin Object - skins section).
In here will be applied all changes defined by the Skin Object properties (Creating a Skin - Skin object section) disableHead, customModel, skins (Skin Object - skins section) and scarfColors (Skin Object - scarfColors section).
Creating skin palettes
The tool will create color palette files for each skin defined in the skins property of the Skin Object (Skin Object - skins section) using the color properties files defined in the colorProperties property of each skin or generated automatically from the sprites if no color properties are provided.
At this point we're getting to the main part of the process, which is creating the the sprites for all the animations. We start by getting all animation names from the beheadedModHelper_tracks.json. In case the -only optional parameter was used the animation list will be reduced to just the specified animations.
After that the default drawing order is loaded (BuilderSettings (Dynamic) section) and is modified based on drawingOrder property of the configured builders.
Building animations for model: modelName - numberOfFinished / numberTotal
We're finally making the actual sprites. Here will be displayed how many animations were already completed (an animation is considered complete if all frames of the animation were successfully built) and how many animations are being created in total.
First for each animation the tool applies all builder settings (BuilderSettings (Dynamic), BuilderSettings (Original) and BuilderSettings (Line)) for each frame based on the drawingOrder.
After that the sprites are indexed using the previously created palette, if the -skipSpriteIndexing optional parameter was used this will be skipped. And at last the sprites are saved into the proper place in the output directory.
Making custom animations
Here the tool will replace any default animations (created in the previous step) with custom animations specified in the customAnimations property of the Skin Object (Skin Object - customAnimations section)
Step-by-Step of the Tool's Process (Continued)
Creating HeroSkins preview
In this step the tool will create the required files in the heroSkins.atlas (that was prepared in the Creating directory structure step) for the newly created skin, so it can be properly displayed in the preview at the tailor's.
This step is only being executed if the customModel property of the Skin Object is set to true. But as specified in the Creating a Skin - Skin object section, this should be always the case.
Collapsing atlas files
All the sprites created for the skin will be collapsed, and the collapsed atlas will be placed into the res.pak directory of the Project. This is calling the game's ModTools directly. It is one of the slowest steps in the process due to the large amount of sprites.
In case the -skipCollapsing optional parameter was used this step will be skipped.
At this point we're finished with all the steps happening at the skin level. Now if the Project contains multiple skins it'll start processing the next one, and we will see all the steps from Skin: SkinName up to Creating HeroSkins preview repeat for the next skin.
After all skins are finished processing the tool will make some final actions for the entire Project.
Collapsing CDB
Using the game's ModTools, the tool will collapse the expanded data.cdb of the Project and place it into the res.pak directory of the Project.
In the case that the -skipCollapsing parameter was used, this step will be skipped.
Collapsing heroSkins atlas
Using the game's ModTools the tool will collapse the expanded heroSkins.atlas of the Project. And place it into the res.pak directory of the Project.
In the case that the -skipCollapsing parameter was used, this step will be skipped.
Creating pak file
The final step for each Project. Using the game's ModTools, the tool will create the final res.pak mod file in the output directory specified by the outputPath property of the Project.
In the case that the -skipCollapsing parameter was used, this step will be skipped.
If multiple Projects were specified in the input, the tool will move onto the next one. So you will see all the Project level steps repeating for the next project.
Once all specified projects finish processing, the tool will conclude.
Changelog 2023-03-07
Changes:
- Updated working with ModHelperSkin.json to reflect change in the file in update 3.3
- Updated "skins" property in the skin object to reflect changes in the skin files in data.cdb in update 3.3
- additional properties added for glowData section
- additional properties added for scarfs section
- additional properties added for glowData section
Changelog 2023-03-31
Changes:
- Fixed issue in the process of expanding game resources when not all required resources were expanded
Changelog 2023-09-24
Changes:
- Fixed issue in generating default palette when colors from BuilderSettings(Line) were not included in the palette file
- Updated how the tool works with CDB files for skins and items. This makes the tool up to date with changes to the structure of the skin CDB files in update 3.4. This change will also ensure that further changes to teh structure of the CDB files will not impact the tools functionality in the future.
Changelog 2024-08-27
Changes:
- Minor updates to align with some structural changes to ModHelperSkin, this version will be needed to create skins with the lates ModHelperSkin for update 3.5 but this new version will still support even the old format
Changelog 2024-08-28
Changes:
- Fixed "scarfColors" option (Skin Object - scarfColors section) having no effect
Changelog 2024-08-29
Changes:
- Fixed an issue when ModelColorProperties (described in the Models section) was initialized incorrectly in some cases. Which caused BuilderSettings (Original) to not function properly for some models.
- [How to] Dead Cells★ 5 (1.1k)50k views1.1k ♥19 minUpdated 3 Jan, 2019
- Секретные чертежи и их местонахождение★ 5 (1.1k)44k views2.2k ♥9 minRussianUpdated 23 Oct, 2023
- Complete Achievements Guide★ 5 (674)35k views1.3k ♥18 minUpdated 21 Jul, 2020
- [EN/FR]Dead Cells Biome Map - V3.5★ 5 (436)25k views961 ♥1 minUpdated 20 Aug, 2024
- [Beginner Guide] New Game Routing (a.k.a.: Going to the correct maps)★ 5 (394)22k views1k ♥3 minUpdated 24 Jul, 2024
- Ultimate Guide - Everything you need!★ 5 (389)17k views578 ♥1 minUpdated 27 May





- Upgrading to PremiumTeam Fortress 2★ 5 (20k)1441k views11k ♥6 minUpdated May 11, 2022
- No More Room in Hell Official ManualNo More Room in Hell★ 5 (2.8k)569k views2.1k ♥29 minUpdated Apr 22, 2019
- NMRiH Community Hosting GuidesNo More Room in Hell★ 5 (526)351k views653 ♥1 minUpdated Aug 10, 2022
- ULTIMATE GUIDE FOR GAME DEV TYCOONGame Dev Tycoon★ 5 (5.8k)326k views10k ♥4 minUpdated 23 Jan, 2014
- How to 'Git Gud' Soon™MORDHAU★ 5 (2k)318k views3k ♥68 minUpdated Nov 16, 2024
- Лучшие кооперативные игры SteamPAYDAY 2★ 5 (1.5k)315k views2.1k ♥56 minRussianUpdated Apr 27, 2025






This guide was created by its original author on the Steam Community. Are you the author and want it removed? Request removal.