VNV VH HC Ironman build
Foreword
This guide aims to showcase a build for playing the real hardcore version of New Vegas, with base Viva New Vegas modpack along with Dead is Dead (ironman) mod.
If you are reading this, I will assume you know all of the aforementioned and are very familiar with the game to even attempt this run.
As I found no Ironman guides, I wanted to pitch in and provide a rough layout for people who might wish to try this out.
I believe ironman provides a challenge and high enough stakes to make the game enjoyable even for the biggest of veterans of this game.
Without further delay, let us set out into the wasteland.

If you are reading this, I will assume you know all of the aforementioned and are very familiar with the game to even attempt this run.
As I found no Ironman guides, I wanted to pitch in and provide a rough layout for people who might wish to try this out.
I believe ironman provides a challenge and high enough stakes to make the game enjoyable even for the biggest of veterans of this game.
Without further delay, let us set out into the wasteland.
Mod setup & game start
No settings in Viva New Vegas will be changed, if you´d like you can further limit your experience gains or do some little tweaks in the menu.
For Dead is Dead, pick the ironman mode aka single life run. No gaining lives from drinking nuka colas.
If you get folded, the game and all your saves are gone. Dead is Dead also by default removes your ability to load up a game during gameplay. If you do manage to mess something up - for instance quest outcomes, you will have to quit the game entirely and then load it back up.
Additionally, the way Dead is Dead works - it only triggers when a character name is chosen, if you leave it empty to make your character and then choose a name during rebuild, it will activate then.
No duplicate names are allowed for the Mod, if your character John Fallout dies with the mod on once, you cannot make another character with the same name as long as the mod is active.
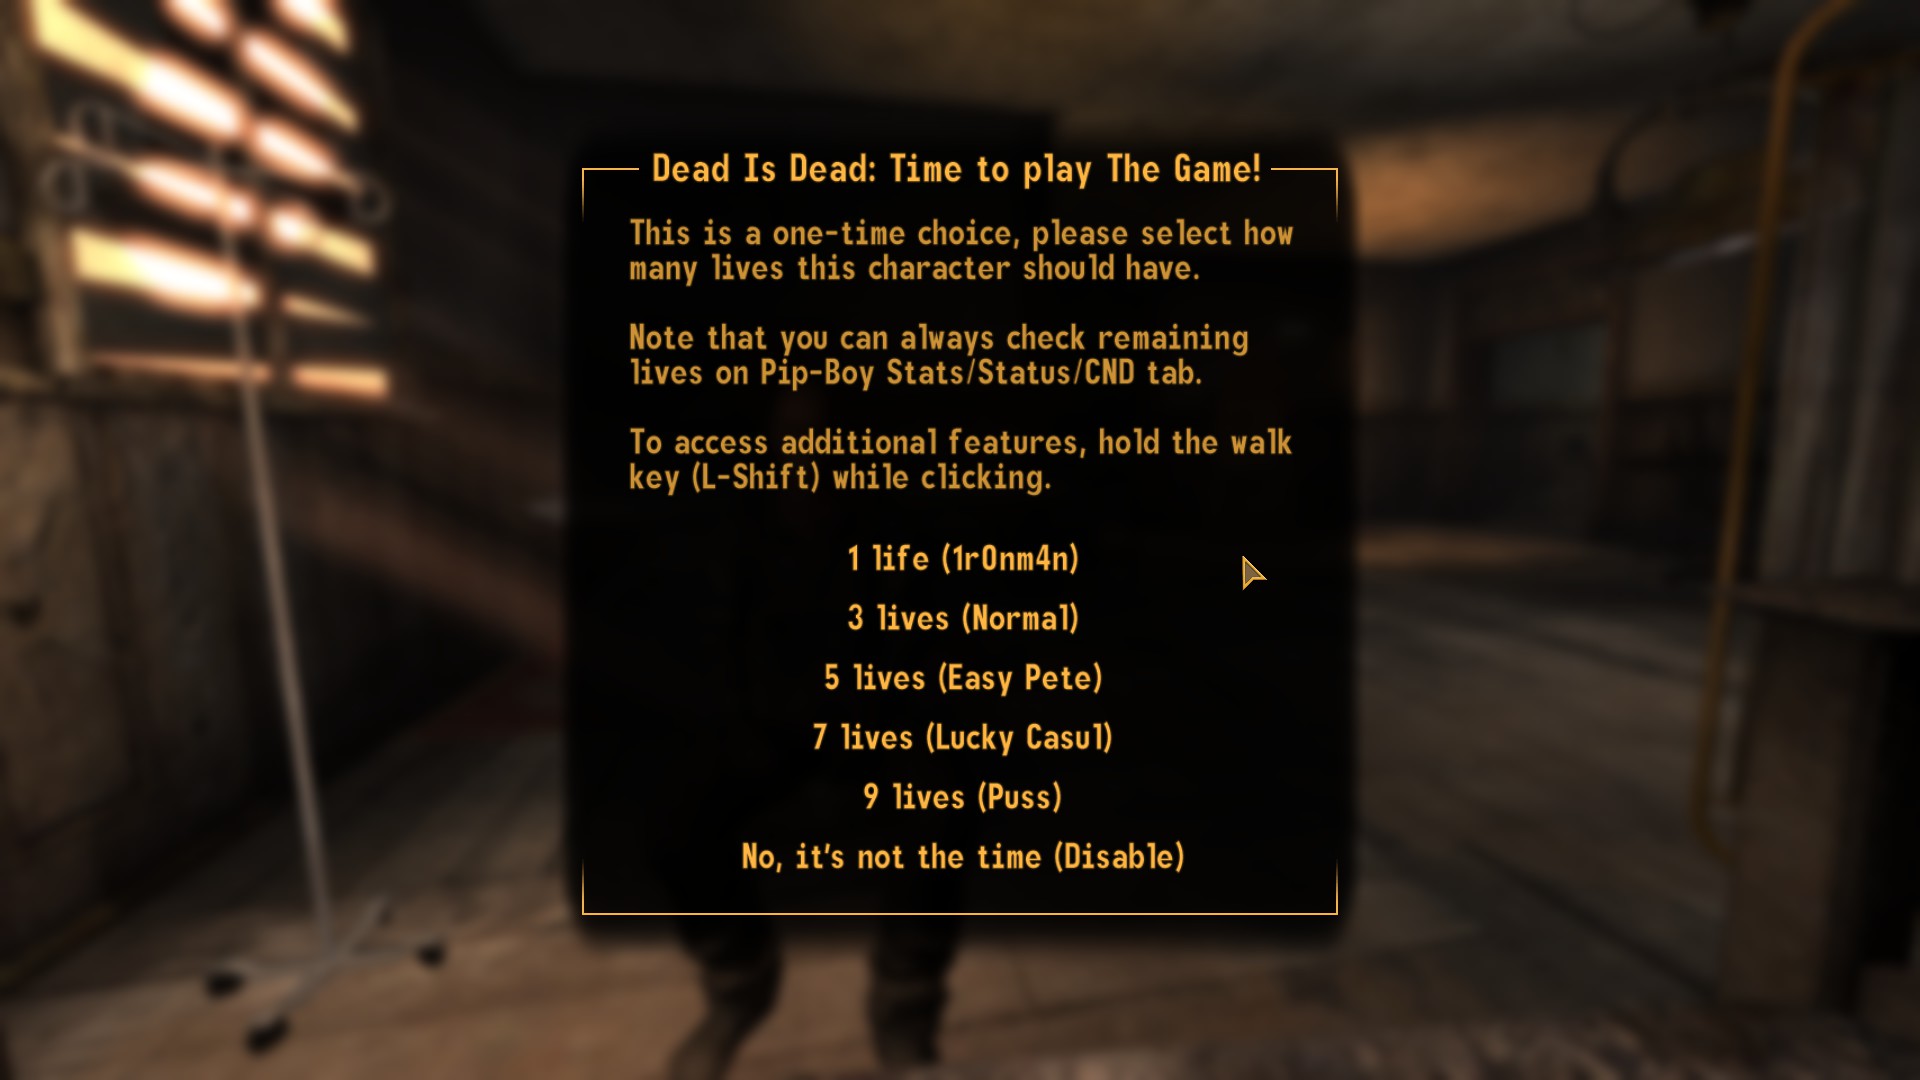
For Dead is Dead, pick the ironman mode aka single life run. No gaining lives from drinking nuka colas.
If you get folded, the game and all your saves are gone. Dead is Dead also by default removes your ability to load up a game during gameplay. If you do manage to mess something up - for instance quest outcomes, you will have to quit the game entirely and then load it back up.
Additionally, the way Dead is Dead works - it only triggers when a character name is chosen, if you leave it empty to make your character and then choose a name during rebuild, it will activate then.
No duplicate names are allowed for the Mod, if your character John Fallout dies with the mod on once, you cannot make another character with the same name as long as the mod is active.
Understanding the stakes
To completely understand the difficulty we will be taking, I wish to clarify once again all of the modifiers.
Ironman mode was explained above.
Very Hard difficulty can be changed to via options menu - this means all your damage becomes 50% of its normal value, while all enemy damage to you becomes 200%. This is no small number, as a plasma grenade and anything with a flat damage close to 100 or more becomes your worst nightmare (enemies can crit).
Hardcore is chosen when you leave Doctors house in the beginning - this is further made harder due to Viva New Vegas weight reduction to 100 by default at 5 Strength - you will have very little space initially on.
Ironman mode was explained above.
Very Hard difficulty can be changed to via options menu - this means all your damage becomes 50% of its normal value, while all enemy damage to you becomes 200%. This is no small number, as a plasma grenade and anything with a flat damage close to 100 or more becomes your worst nightmare (enemies can crit).
Hardcore is chosen when you leave Doctors house in the beginning - this is further made harder due to Viva New Vegas weight reduction to 100 by default at 5 Strength - you will have very little space initially on.
Overall concept of strategy
I will not be telling you how exactly to play your game, everyone makes their own adventure, however I will advise few general points to keep in mind.
Before I delve into this, let me remind you of how DT and DR works again - DT is flat damage reduction, while DR is % reduction and is applied before DT. This means our way of surviving is stacking as much DR as possible. DT is good initially on against starter weapons but falls off greatly as you level up. 25 DT means nothing against trail carbine enemies that can crit you for about 200.
The main points to keep in mind:
Prepare, prepare, prepare - Never engage any fight if possible without Med-x and Turbo (and ideally buffout) in your inventory. Most fights with decent enemies are a death sentence without Med-x. If you ever get hit for more than 50% of your health (which will happen), immediatelly tab into your pip-boy, pop Turbo as well as all your defensive tools and healings.
If you were not aware - Slasher and Med-X can be stacked together for a total of 50% DR, which is how you will survive the tougher encounters in the game on higher levels. This means you should get to Red Rock Canyon asap for your steady supply of these meds.
As mentioned above DR is our holy grail, which means the armour you should be choosing becomes a choice between Medium or Heavy, personally I prefer medium as the best ones like the lonesome road ranger armour provide decent DT as well as DR. For helmets I suggest running 1st recon beret with lucky shades, as the amount of stats these items provide (especially with four-eyed trait) far outweigh the few points of DT an actual helmet has.
________________________________________________________________
Choose your fights (and know when to fold them) - There is no loading. Once you engage a fight, you either win, lose or disengage. You should always know what you are up against before you go in. If you have to go into rooms with unknown amount of enemies or you do not know their gear, pop a turbo to check it out. If you ever start taking too much damage, always back off. Remember enemies can crit you, which later on in the game becomes near death sentence with certain guns. Thin out enemy lines, set up mines, lure them into close quarters, anything to get an upper hand, since otherwise enemies usually have an advantage, especially with greater numbers.
Remember most animals have very high attack damage (Deathclaws, Radscorpions, Cazadors), this is why you need as much DR as possible. Only engage these if you a can either neutralize them before getting hit, or if you are confident in surviving at least one hit.
________________________________________________________________
Optimal routing - if you are attempting this challenge, I imagine you know how to play efficiently, but just in case I will mention your first spendings and early levels should be spent breaking the casinos and buying all the implants. Every single point of stats gives you an advantage you will need if you want to survive.
Before I delve into this, let me remind you of how DT and DR works again - DT is flat damage reduction, while DR is % reduction and is applied before DT. This means our way of surviving is stacking as much DR as possible. DT is good initially on against starter weapons but falls off greatly as you level up. 25 DT means nothing against trail carbine enemies that can crit you for about 200.
The main points to keep in mind:
Prepare, prepare, prepare - Never engage any fight if possible without Med-x and Turbo (and ideally buffout) in your inventory. Most fights with decent enemies are a death sentence without Med-x. If you ever get hit for more than 50% of your health (which will happen), immediatelly tab into your pip-boy, pop Turbo as well as all your defensive tools and healings.
If you were not aware - Slasher and Med-X can be stacked together for a total of 50% DR, which is how you will survive the tougher encounters in the game on higher levels. This means you should get to Red Rock Canyon asap for your steady supply of these meds.
As mentioned above DR is our holy grail, which means the armour you should be choosing becomes a choice between Medium or Heavy, personally I prefer medium as the best ones like the lonesome road ranger armour provide decent DT as well as DR. For helmets I suggest running 1st recon beret with lucky shades, as the amount of stats these items provide (especially with four-eyed trait) far outweigh the few points of DT an actual helmet has.
________________________________________________________________
Choose your fights (and know when to fold them) - There is no loading. Once you engage a fight, you either win, lose or disengage. You should always know what you are up against before you go in. If you have to go into rooms with unknown amount of enemies or you do not know their gear, pop a turbo to check it out. If you ever start taking too much damage, always back off. Remember enemies can crit you, which later on in the game becomes near death sentence with certain guns. Thin out enemy lines, set up mines, lure them into close quarters, anything to get an upper hand, since otherwise enemies usually have an advantage, especially with greater numbers.
Remember most animals have very high attack damage (Deathclaws, Radscorpions, Cazadors), this is why you need as much DR as possible. Only engage these if you a can either neutralize them before getting hit, or if you are confident in surviving at least one hit.
________________________________________________________________
Optimal routing - if you are attempting this challenge, I imagine you know how to play efficiently, but just in case I will mention your first spendings and early levels should be spent breaking the casinos and buying all the implants. Every single point of stats gives you an advantage you will need if you want to survive.
The Build
I will list my personal preference down here, as well as outline the major perks that should be taken on each level up.
For SPECIAL starters, we start with:
Strength: 5
Perception: 5
Endurance: 8
Charisma: 1
Intelligence: 9
Agility: 5
Luck: 7
Intelligence 9 at start allows you to get maximum amount of points per level up while leaving a single point to be filled by an INT implant, ideally on level 2-3. This will net you maximum points per level up (15).
Luck 7 allows you to already influence casino outcomes, however at level 2 we will be raising this to 8 as no otherwise significant perks are at our disposal at the time. Luck 8 raises all your stats by 4. With an implant from the clinic we get to 9, which we can cap to 10 with Naughty Nightwear which can be freely stolen from Mick and Ralphs (requires 30 speech). This means after you win a few games at the Atomic Wrangler, you can be capped on luck before entering the Strip. We are leaving the Luck 9 to be capped by Lucky Shades (Legion safehouse) which caps our main concern: Crit chance at 10 by default.
Endurance 8 increases your maximum health points and also allows you to buy all but one implant at the clinic. However I suggest investing another perk option to cap your endurance to 10 and taking the Monocyte Breeder as well (every stat matters).
Other stats to focus one are Strength - Ideally get to 8 by default which will be capped by reinforced spine in Old World Blues (+2).
You will also need to level up Perception to 6 along the way for Better Criticals, which is imo very optimal perk for this challenge.
________________________________________________________________
Gear focus - As aforementioned, DR and DT is essential. My personal prefference is:
Elite Riot Gear - Lonesome road - Decent DT and DR, +10 guns, +5 crit (huge) and +1 Charisma.
1st Recon Beret - +5 crit (huge), +1 Perception and as a bonus, never has to be repaired.
Lucky Shades - by default +1 Luck, however with Four Eyes it also gives +3 Perception.
You will not be able to see Lucky Shades or Elite Riot Gear for quite some time ingame after you start. You can find Medium Combat Armour in Cassidy Caravan wreckage on the east of New Vegas, you will also receive reinforced one for breaking Gomorrahs casino.
________________________________________________________________
Initial Traits:
Skilled is pretty much the top choice, for the secondary one, it comes down to either Four Eyes or Wild Wasteland. If you wish to get a golden pip boy 3000 or alien blaster or several other unique items from Wild Wasteland, take it first and after acquiring them, switch Wild Wasteland to Four Eyes in Autosink in Old World Blues.
If you do not care for Wild Wasteland items or shenanigans, pick Four Eyes with Skilled initially.
Logan´s Loophole is also viable, check next section below for more info at the bottom.
For SPECIAL starters, we start with:
Strength: 5
Perception: 5
Endurance: 8
Charisma: 1
Intelligence: 9
Agility: 5
Luck: 7
Intelligence 9 at start allows you to get maximum amount of points per level up while leaving a single point to be filled by an INT implant, ideally on level 2-3. This will net you maximum points per level up (15).
Luck 7 allows you to already influence casino outcomes, however at level 2 we will be raising this to 8 as no otherwise significant perks are at our disposal at the time. Luck 8 raises all your stats by 4. With an implant from the clinic we get to 9, which we can cap to 10 with Naughty Nightwear which can be freely stolen from Mick and Ralphs (requires 30 speech). This means after you win a few games at the Atomic Wrangler, you can be capped on luck before entering the Strip. We are leaving the Luck 9 to be capped by Lucky Shades (Legion safehouse) which caps our main concern: Crit chance at 10 by default.
Endurance 8 increases your maximum health points and also allows you to buy all but one implant at the clinic. However I suggest investing another perk option to cap your endurance to 10 and taking the Monocyte Breeder as well (every stat matters).
Other stats to focus one are Strength - Ideally get to 8 by default which will be capped by reinforced spine in Old World Blues (+2).
You will also need to level up Perception to 6 along the way for Better Criticals, which is imo very optimal perk for this challenge.
________________________________________________________________
Gear focus - As aforementioned, DR and DT is essential. My personal prefference is:
Elite Riot Gear - Lonesome road - Decent DT and DR, +10 guns, +5 crit (huge) and +1 Charisma.
1st Recon Beret - +5 crit (huge), +1 Perception and as a bonus, never has to be repaired.
Lucky Shades - by default +1 Luck, however with Four Eyes it also gives +3 Perception.
You will not be able to see Lucky Shades or Elite Riot Gear for quite some time ingame after you start. You can find Medium Combat Armour in Cassidy Caravan wreckage on the east of New Vegas, you will also receive reinforced one for breaking Gomorrahs casino.
________________________________________________________________
Initial Traits:
Skilled is pretty much the top choice, for the secondary one, it comes down to either Four Eyes or Wild Wasteland. If you wish to get a golden pip boy 3000 or alien blaster or several other unique items from Wild Wasteland, take it first and after acquiring them, switch Wild Wasteland to Four Eyes in Autosink in Old World Blues.
If you do not care for Wild Wasteland items or shenanigans, pick Four Eyes with Skilled initially.
Logan´s Loophole is also viable, check next section below for more info at the bottom.
Perk and stat selection
In here I will highlight the best perks you can choose from on each level up, as well as my personal favourite I use in this build mentioned above.
As for stats, all options are viable, however keep in mind ranged combat is prefered, unless you have heavy amounts of turbo to navigate the melee combat. Most enemies are easily dealt with by melee as you can sprint and strafe behind them, you can easily take out the Giant Radscorpions even with a bat at level 1 without ever getting hit, however the risk is still very significant. At some point you will be risking hours upon hours of your gameplay to a minor mis-step (Bighorners for instance can ram knockdown you which is pretty much gg).
With that out of the way, the levels:
Level 2 - Best choice: Intense Training (Luck)
Honorable mentions: Rapid Reload, Hunter
Level 4 - Best choice: Educated, nothing else should ever be taken at this point.
Level 6 - Best choice: Intense Training (Endurance)
Honorable mentions: Demolitions expert, The Professional
Level 8 - Best choice: Pack Rat - this makes Hardcore and inventory management far less of a headache.
Level 10 - Best choice: Finesse
Honorable mention: Animal Friend
Level 12 - Best choice: Intense Training (Perception)
Honorable mentions: Hit the deck (would have been top spot but 70 explosive at this level without running specifically this build is not conceivable), Life Giver
Level 14 - Best choice: Jury Rigging - no competition whatsoever, the most overpowered perk in the whole game.
Level 16 - Best choice: Better Criticals - a top choice, since we have specced into Finesse and are running crit.
Honorable mention: Light step from level 14 otherwise if you do not wish to run crit build.
Level 18 - Best choice: Light step or intense training (Strength)
Level 20 - Best Choice: Intense training for Strength
Honorable mentions: Ninja, Atomic
Level 22 - Best choice: Final intense training for Strength (8)
Honorable mentions: Laser Commander
Level 24 - Since we have covered the major perks, this will come down to preference and your own build at this point (more damage defenses and so on, whichever you need)
Honorable mentions in here: Grunt, Bloody Mess, Toughness stacking, alternatively Intense training for Agility (More VATS shots, more sprinting).
At this stage you should be able to kill almost everything in the game, if you have gotten this far and are still alive, congrats. As you can see the major perks can all be taken below level 30, which is why Logan´s Loophole as trait in general is also viable.
If the perk was not mentioned in here, it is most likely not worth taking - anything related to accuracy and VATS for example, as you can easily use rebound and steady instead of wasting perk slots.
Additionally, this is personal preference in terms of this specific build. However the choices would still be very good regardless of what build you are running, you might opt for more gun, explosive or energy damage instead of the Strength trainings, I just prefer to be capped on as many SPECIAL stats as possible.
As for stats, all options are viable, however keep in mind ranged combat is prefered, unless you have heavy amounts of turbo to navigate the melee combat. Most enemies are easily dealt with by melee as you can sprint and strafe behind them, you can easily take out the Giant Radscorpions even with a bat at level 1 without ever getting hit, however the risk is still very significant. At some point you will be risking hours upon hours of your gameplay to a minor mis-step (Bighorners for instance can ram knockdown you which is pretty much gg).
With that out of the way, the levels:
Level 2 - Best choice: Intense Training (Luck)
Honorable mentions: Rapid Reload, Hunter
Level 4 - Best choice: Educated, nothing else should ever be taken at this point.
Level 6 - Best choice: Intense Training (Endurance)
Honorable mentions: Demolitions expert, The Professional
Level 8 - Best choice: Pack Rat - this makes Hardcore and inventory management far less of a headache.
Level 10 - Best choice: Finesse
Honorable mention: Animal Friend
Level 12 - Best choice: Intense Training (Perception)
Honorable mentions: Hit the deck (would have been top spot but 70 explosive at this level without running specifically this build is not conceivable), Life Giver
Level 14 - Best choice: Jury Rigging - no competition whatsoever, the most overpowered perk in the whole game.
Level 16 - Best choice: Better Criticals - a top choice, since we have specced into Finesse and are running crit.
Honorable mention: Light step from level 14 otherwise if you do not wish to run crit build.
Level 18 - Best choice: Light step or intense training (Strength)
Level 20 - Best Choice: Intense training for Strength
Honorable mentions: Ninja, Atomic
Level 22 - Best choice: Final intense training for Strength (8)
Honorable mentions: Laser Commander
Level 24 - Since we have covered the major perks, this will come down to preference and your own build at this point (more damage defenses and so on, whichever you need)
Honorable mentions in here: Grunt, Bloody Mess, Toughness stacking, alternatively Intense training for Agility (More VATS shots, more sprinting).
At this stage you should be able to kill almost everything in the game, if you have gotten this far and are still alive, congrats. As you can see the major perks can all be taken below level 30, which is why Logan´s Loophole as trait in general is also viable.
If the perk was not mentioned in here, it is most likely not worth taking - anything related to accuracy and VATS for example, as you can easily use rebound and steady instead of wasting perk slots.
Additionally, this is personal preference in terms of this specific build. However the choices would still be very good regardless of what build you are running, you might opt for more gun, explosive or energy damage instead of the Strength trainings, I just prefer to be capped on as many SPECIAL stats as possible.
Closing word
If you follow this guide you should be fairly safe in navigating the ironman challenge. However do keep wary of explosives and plasma ones especially. No amount of damage reduction will make you safe from plasma grenades, if you hear a grenade drop somewhere nearby and are unsure where it is, either sprint the heck out or pop all your defenses and pray to Mr. House that you will survive.
Good luck out there soldier.
Good luck out there soldier.
More Fallout: New Vegas guides
- Simple Guide to Setting up New Vegas in 2026★ 5 (2.9k)122k views8k ♥9 minUpdated May 6
- New Vegas 2024 Essential Modding Guide★ 5 (1.4k)112k views3.9k ♥37 minUpdated Jan 19
- Fallout:NV Console Command List / Weapons / Armor / NPC's and World Objects★ 5 (948)67k views2.4k ♥33 minUpdated Aug 6, 2025
- 100% Achievement Guide: Fallout - New Vegas★ 5 (1.5k)37k views4.6k ♥98 minUpdated May 9
- Interactive Map★ 5 (614)27k views957 ♥1 minBulgarianUpdated Jan 30
- Complete Achievement Guide (Includes DLC)★ 5 (808)23k views2.1k ♥26 minUpdated Aug 5, 2025


This guide was created by its original author on the Steam Community. Are you the author and want it removed? Request removal.