Fail-Safe Electrolyzer / SPOM Design
0. Disclaimer
Wow, this guide is over a year old! That's both good and bad. The good is that I still actually use this design in my colonies today. Between Halloween and New Year of 2022 I ran two colonies to over 1000 cycles each, one with a fail-safe triple SPOM and one with a quad. Aside from some piping issues during initial construction, both ran perfectly and were "set and forget" once I got them running.
And that brings us to the first of the bad things. In one of the patches several months ago something changed about pipe routing logic and I now have issues getting these started every time I build them. The O2 doesn't want to leave correctly out the top on at least half the pipes, which stops half the pumps. With half the pipes blocked up I get less H2, then run out of power and the whole thing dies. I've been able to fix this each time with a combination of adding pipes, adding bridges, deconstructing pipes and bridges, and using dupe plumbing skill, but honestly the solution always seems finicky. Once I get it running this design continues on forever perfectly, but getting it running in the current ONI version is just more trouble, and the "fix" isn't clear enough to be worth updating the guide for.
All of that brings us to the second of the bad things. The ONI meta has moved strongly towards "submerged" electrolyzer designs, such as the infamous "hydra". These designs were very new when I originally published, they were finicky to build and get running, and a large chunk of the player base considered them an exploit. Times have certainly changed. Submerged electrolyzers are now well understood and basically bulletproof to get running. They're so much more efficient and for the most part "fail-safe" by default. In my opinion, unless you're hyper-sensitive to infinite storage as an exploit, there's really no reason to build an standard electrolyzer like the one in this guide anymore.
For that reason, I don't intend to update this guide and instead I've published a new one with what I think is a unique submerged electrolyzer design. There are still some good design concepts in this guide, and the test data on other electrolyzers is still worthwhile, so I'm not taking the guide down. Even the step by step build is still functional once you get the pipes to flow, I just think I'm going to move my future colonies towards a simpler submerged design. Thanks for reading!
1. Introduction
If you’re careful, or a better base planner than I, either of those builds will serve you well and run your colony essentially forever. In my case, I often had trouble consuming the outputs fast enough, leading to backups in the pipes and the inevitable mixing of gases. Next thing you know my atmo suits are taking damage from hydrogen and my hydrogen power plant across the map is burning down in a flood of oxygen. Those problems can be avoided altogether with a variety of “infinite storage” tricks, but some find that makes the game too easy. Additionally, there are other ways these electrolyzers can fail which gas storage alone cannot prevent.
In Kharnath's guide there are electrolyzer designs which are not subject to these problems, notably “partially submerged” and “hybrid” (diagonal displacement) builds, but those are considerably more challenging to construct. Particularly in Spaced Out! you don’t always have the luxury of dropping a “perfect” electrolyzer on a new planetoid for your 1-2 dupe survey team.
2. Objectives
- “Fail safe” - The electrolyzer must not allow mixing of output gases to occur during or after any of the following failure conditions. Once the failure is cleared, the electrolyzer must resume normal operations without user intervention.
- Loss of power input
- I’ve never actually seen an electrolyzer fail when it loses power, but it might be possible, so we’ll list it as a requirement
- Loss of water input
- Blockage of oxygen output pipe(s)
- Blockage of hydrogen output pipe(s)
- Loss of power input
- Should be relatively easy to build, no tricky order of operations or dupe pathing
- Should be a scalable design pattern that can work for any number of electrolyzers, 1-9
- Should be capable of running as a Self-Powered Oxygen Machine (SPOM)
- I don’t often use these, but we might as well try to please everyone
- Should fit within a standard 4-tile height room layout
- Should be as compact as possible, in the same ballpark as the Kharnath designs
- Should not prevent oxygen output pipes from exiting the top of the system
- In Spaced Out! I tend to build my electrolyzers just under the super cold biome that borders space, running my pipes up into it for the free cooling. I don’t want a design where the pipes can only exit the bottom, for example.
3. Initial Testing
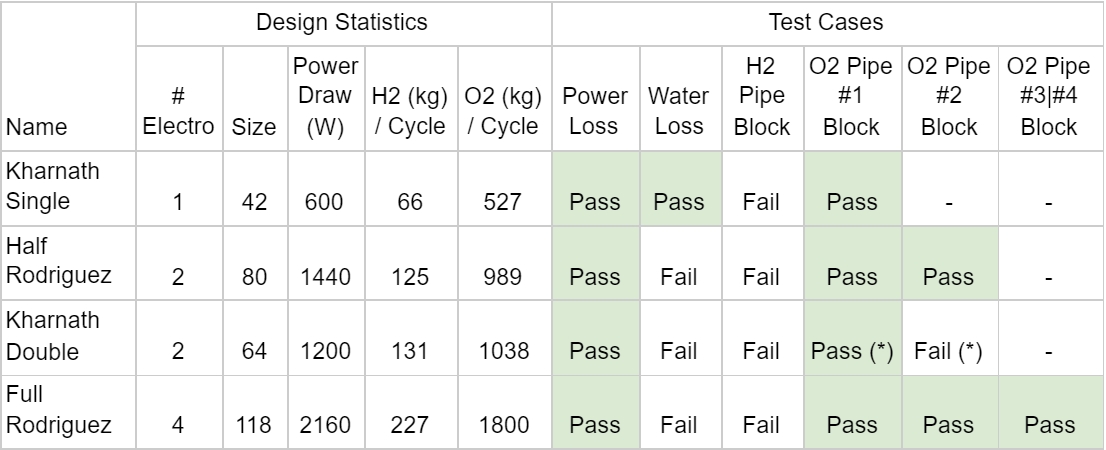
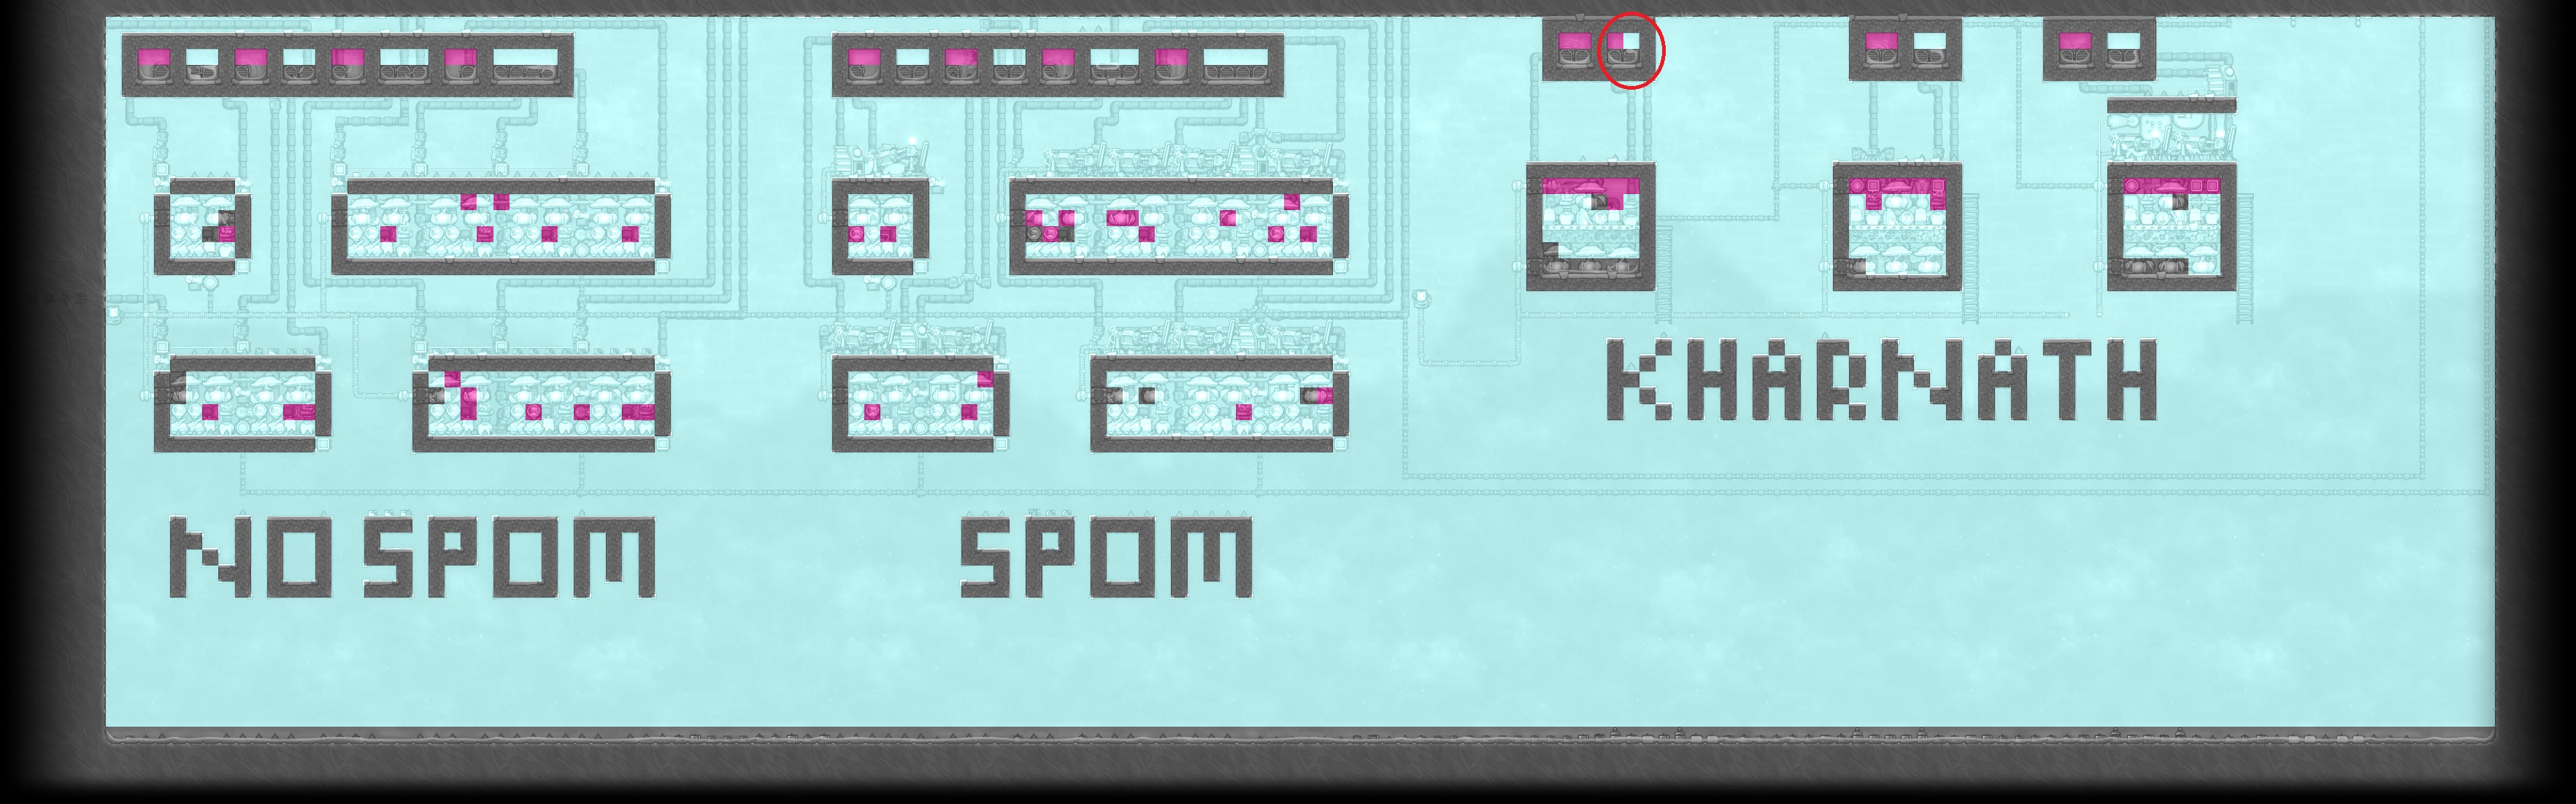
(*) - Kharnath’s design fails if the oxygen output connected to the top and left pumps (#2 in table) becomes blocked. In this case hydrogen builds up and mixes into the second oxygen output. If the other output (#1), connected to the bottom right pumps backs up, the top pump continues to evacuate hydrogen and no gas mixing occurs.
All four designs produce enough hydrogen to power themselves, reinforcing the idea that my design should do the same.
The Kharnath Single is a surprisingly great design. I’d never used it in-game, but it passed all but the one test and has great output stats. It was also the only design resilient to losing its input water, which thankfully I’ve yet to experience in-game. Adding a simple hydrogen pipe block sensor would allow this design to meet just about all of my goals, but where’s the originality in that?
As popular as the Half Rodriguez is, it scored surprisingly poorly. The best thing it has going for it is that it won’t fail if the oxygen outputs get blocked, unlike the Kharnath Double. Otherwise, the Kharnath designs are smaller, cheaper, consume less power and produce more output.
4. Bottom Line up Front - Final Test Results
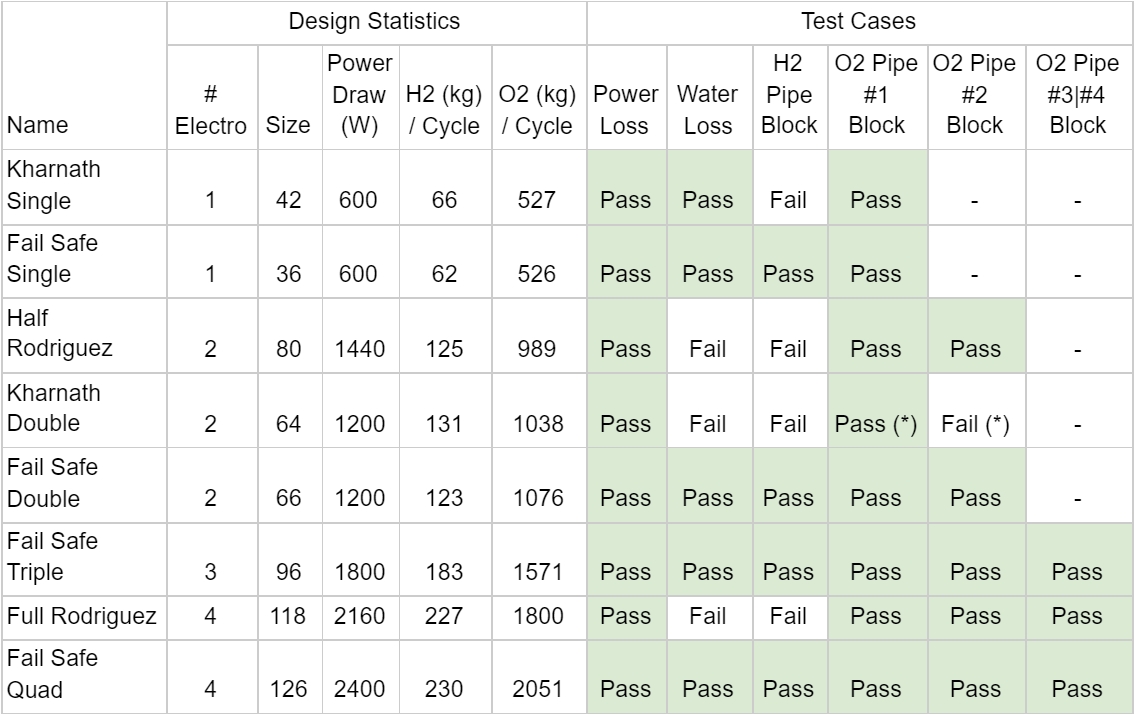
In general my design tends to produce 6-7% less hydrogen and 0-4% more oxygen than Kharnath’s, for a similar footprint and power. The loss of hydrogen is due to not maintaining a static layer of hydrogen above the electrolyzers, which would prevent gas deletion. Fortunately there is barely enough hydrogen output to support self-powering, though that adds significant complexity to the “fail safe” design.
As shown in the table, my design is modular and can scale to any number of electrolyzers, including odd numbers like 3. Each expansion module adds 30 tiles to the base 36-tile design, and each module provides enough oxygen to support 5 dupes. It’s even possible to build a larger unit than you currently need, and simply not run pipes to the outputs of some of the modules. Those modules would safely shut down, consuming no power/water and being ready to go (with no gas mixing) whenever you connect up their pipes.
5. The Fail Safe Design
- Initial Construction
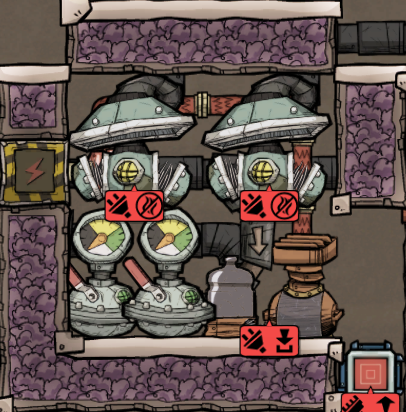
Additional modules are built side by side with a one tile gap in between (in place of the shared wall segment) to allow for gas pipe routing. The screenshots below will show how to construct the single, double, triple and quad variants. Extrapolation to larger systems should be intuitive, but I have not tested the gas output statistics for the larger designs.
If these builds are intended to be self-powering, some modifications must be made to retain “fail safe” operation. I will note below where the regular design and SPOM design diverge.
- Preparing to Prime
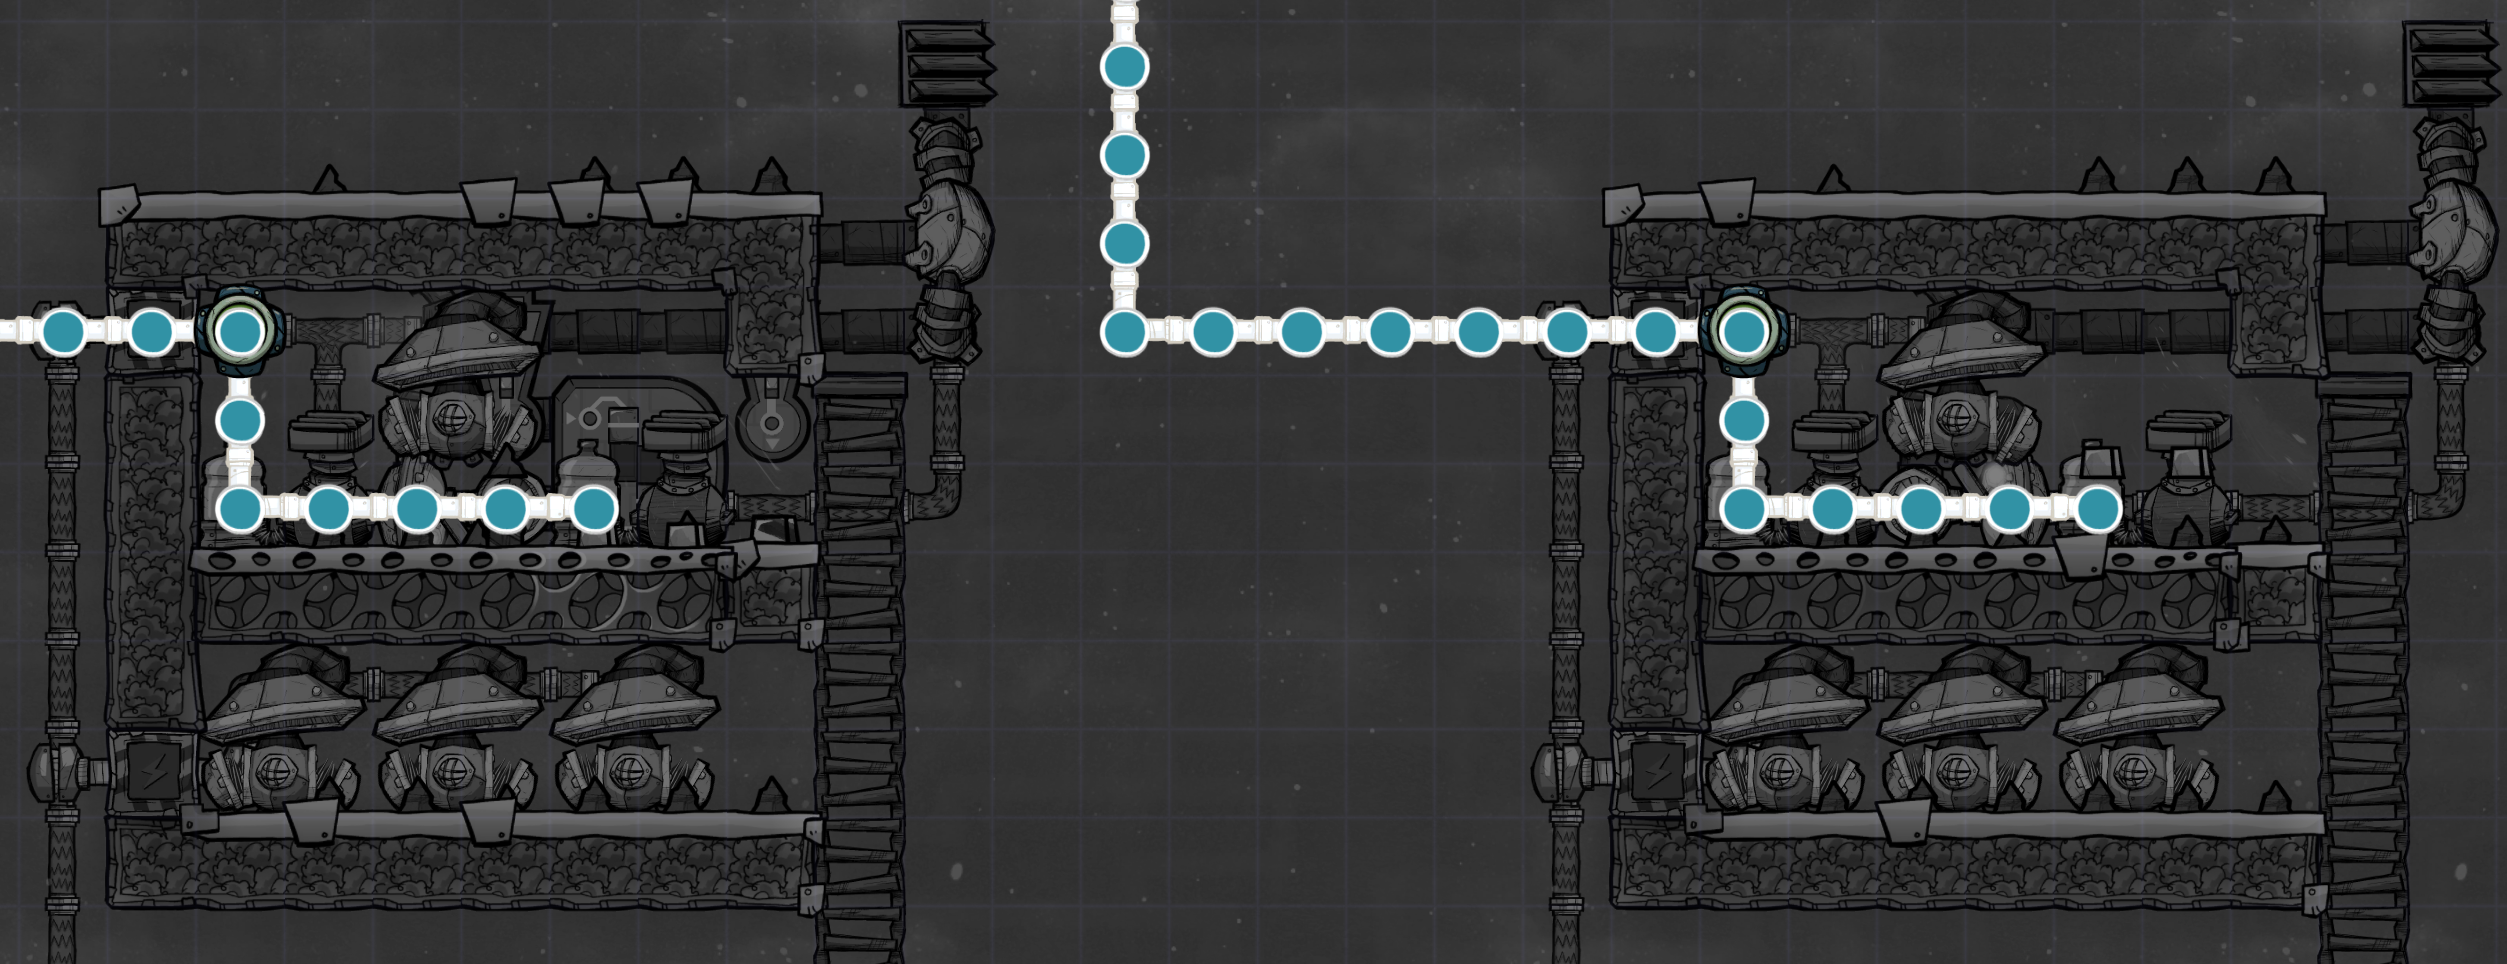
This build uses mechanical filtering of the output gases to decrease power consumption, thus the filter loops need to be primed before operation. The following overlays show the initial construction required to support priming.
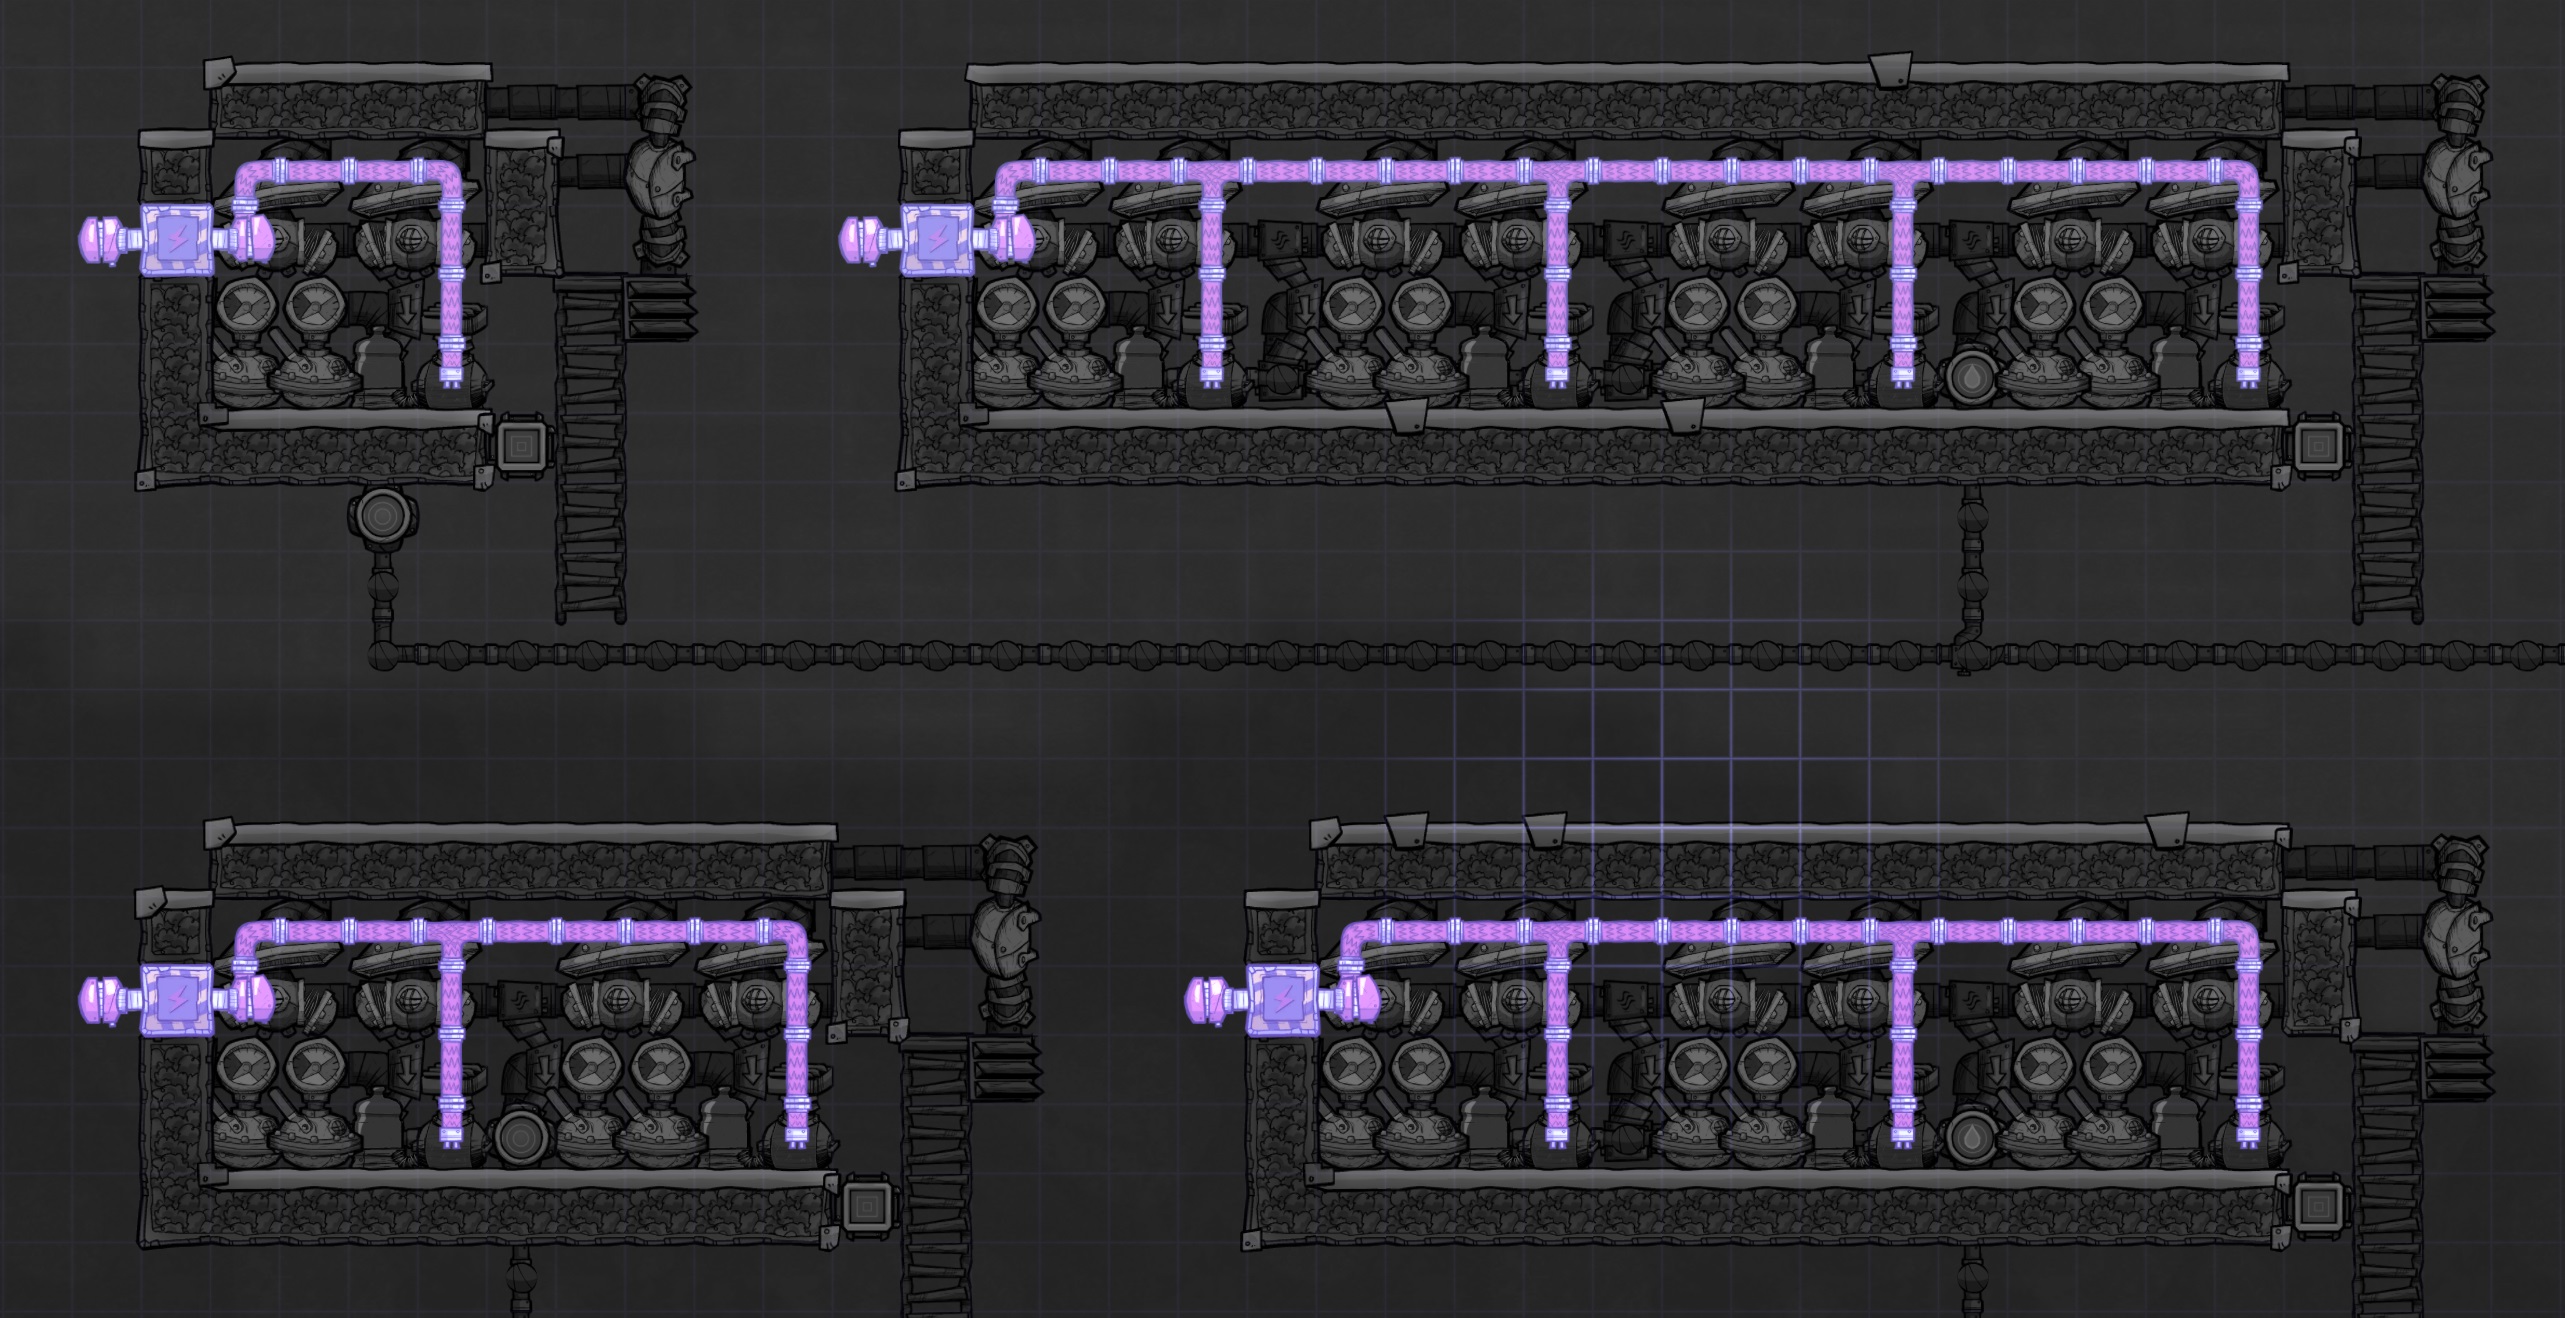
Don’t forget that the temporary electrical gas filter on the right also requires power. I don’t show that above as it’s not part of the final design.
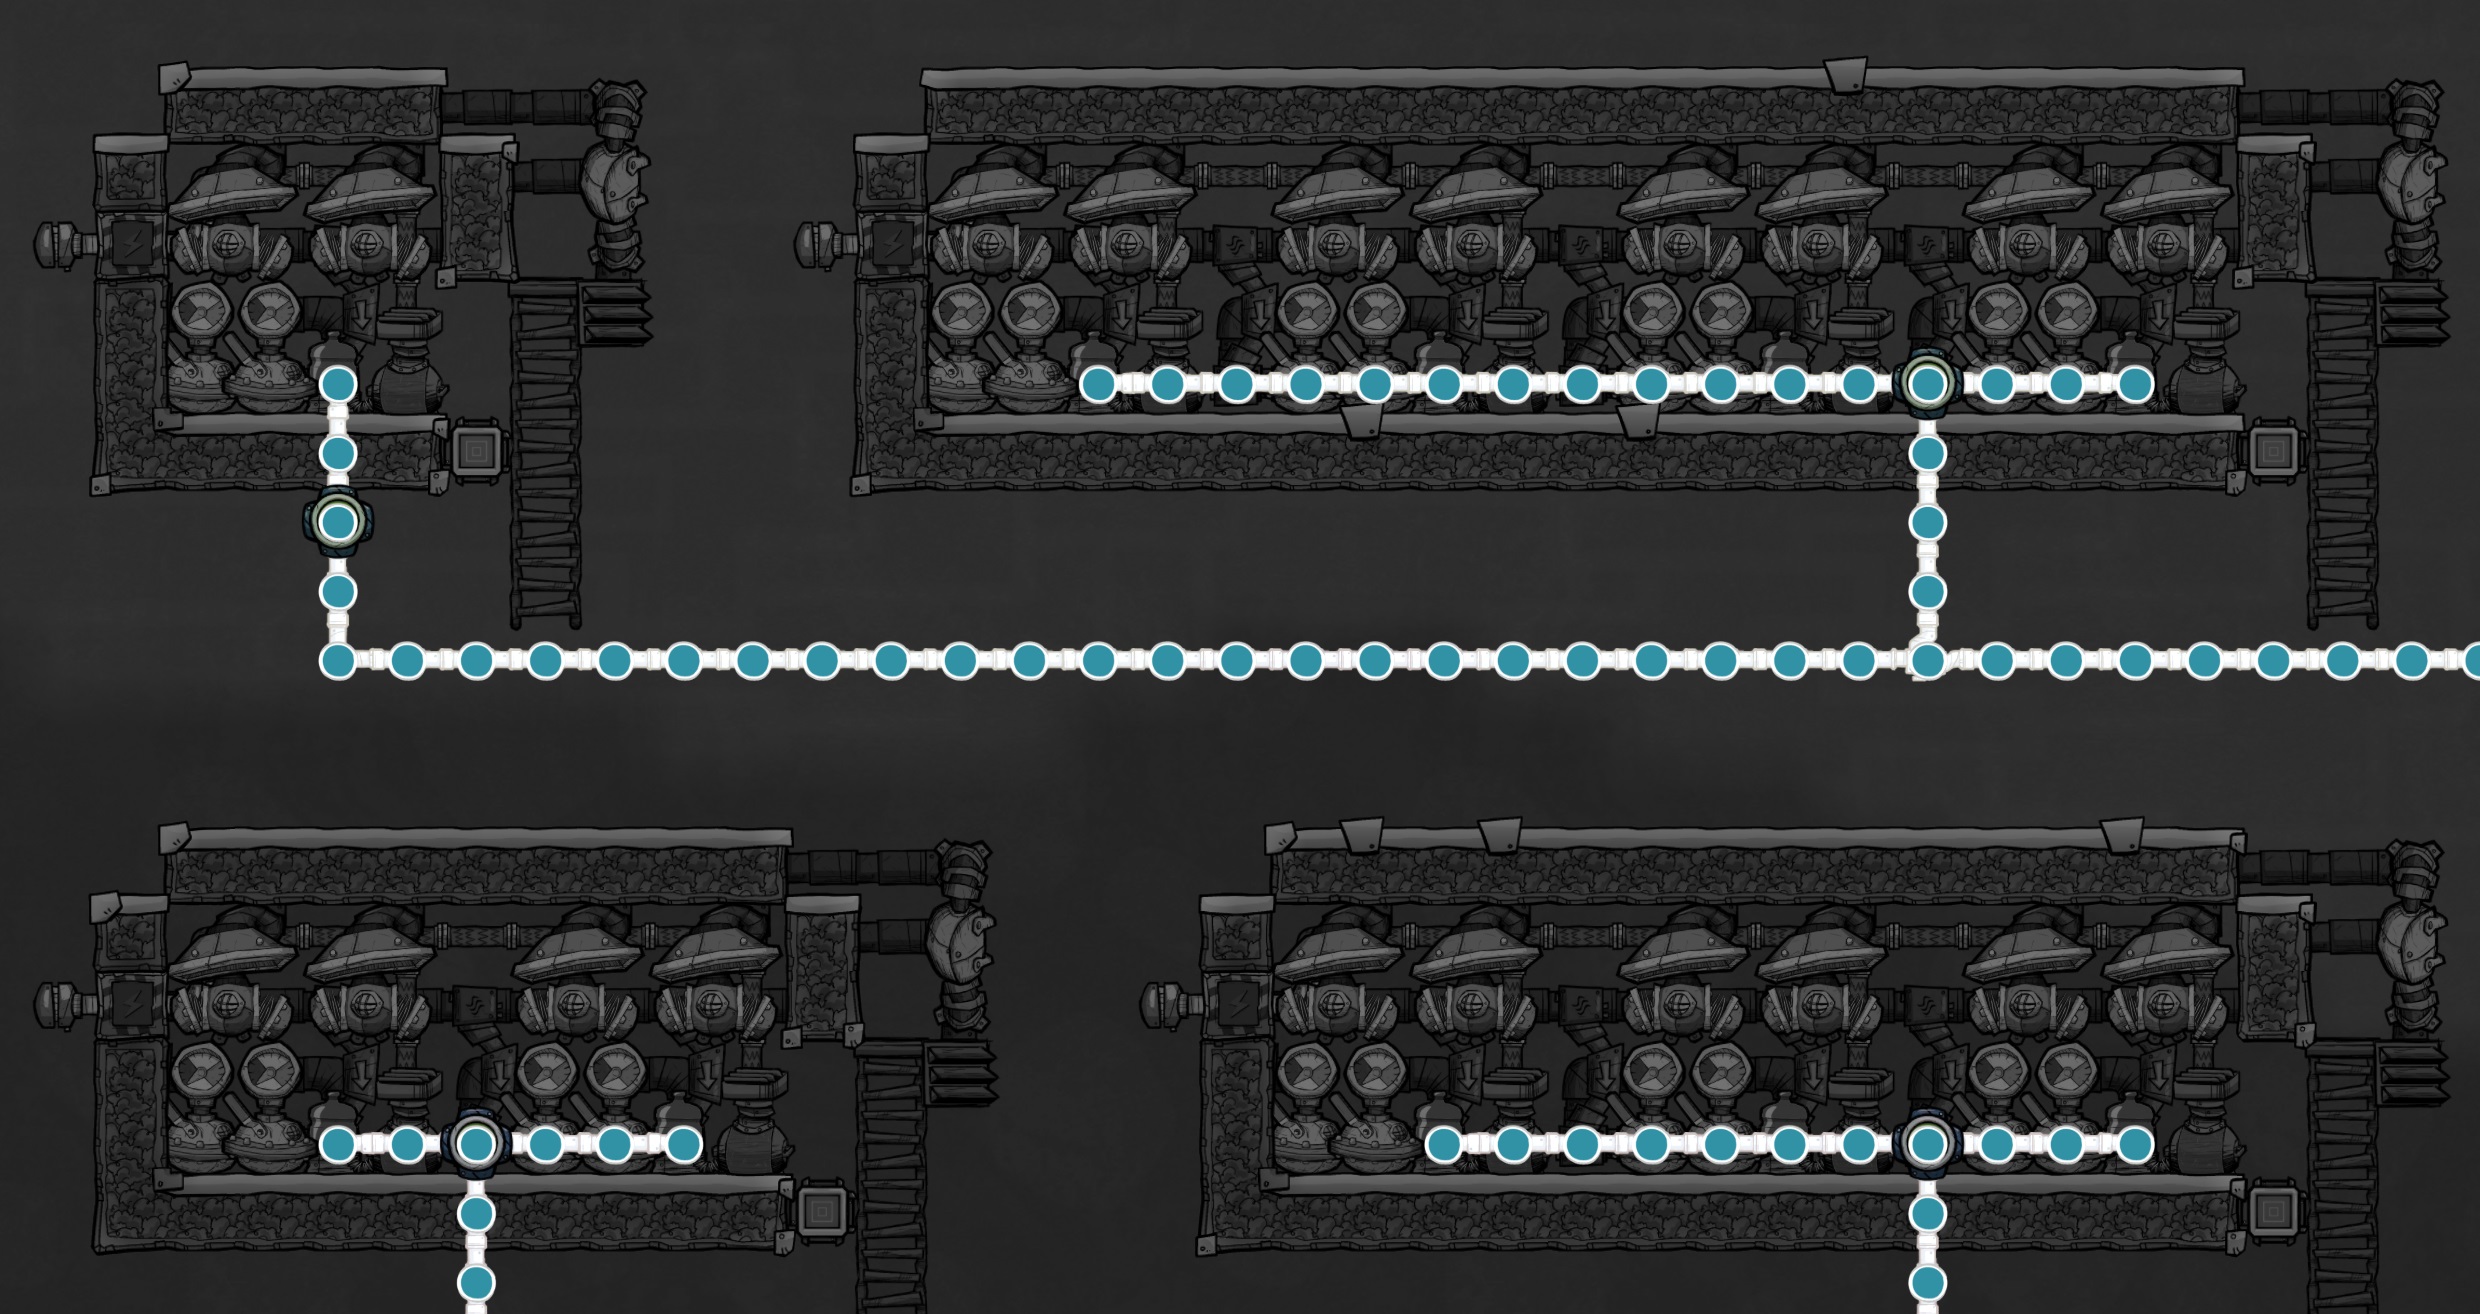
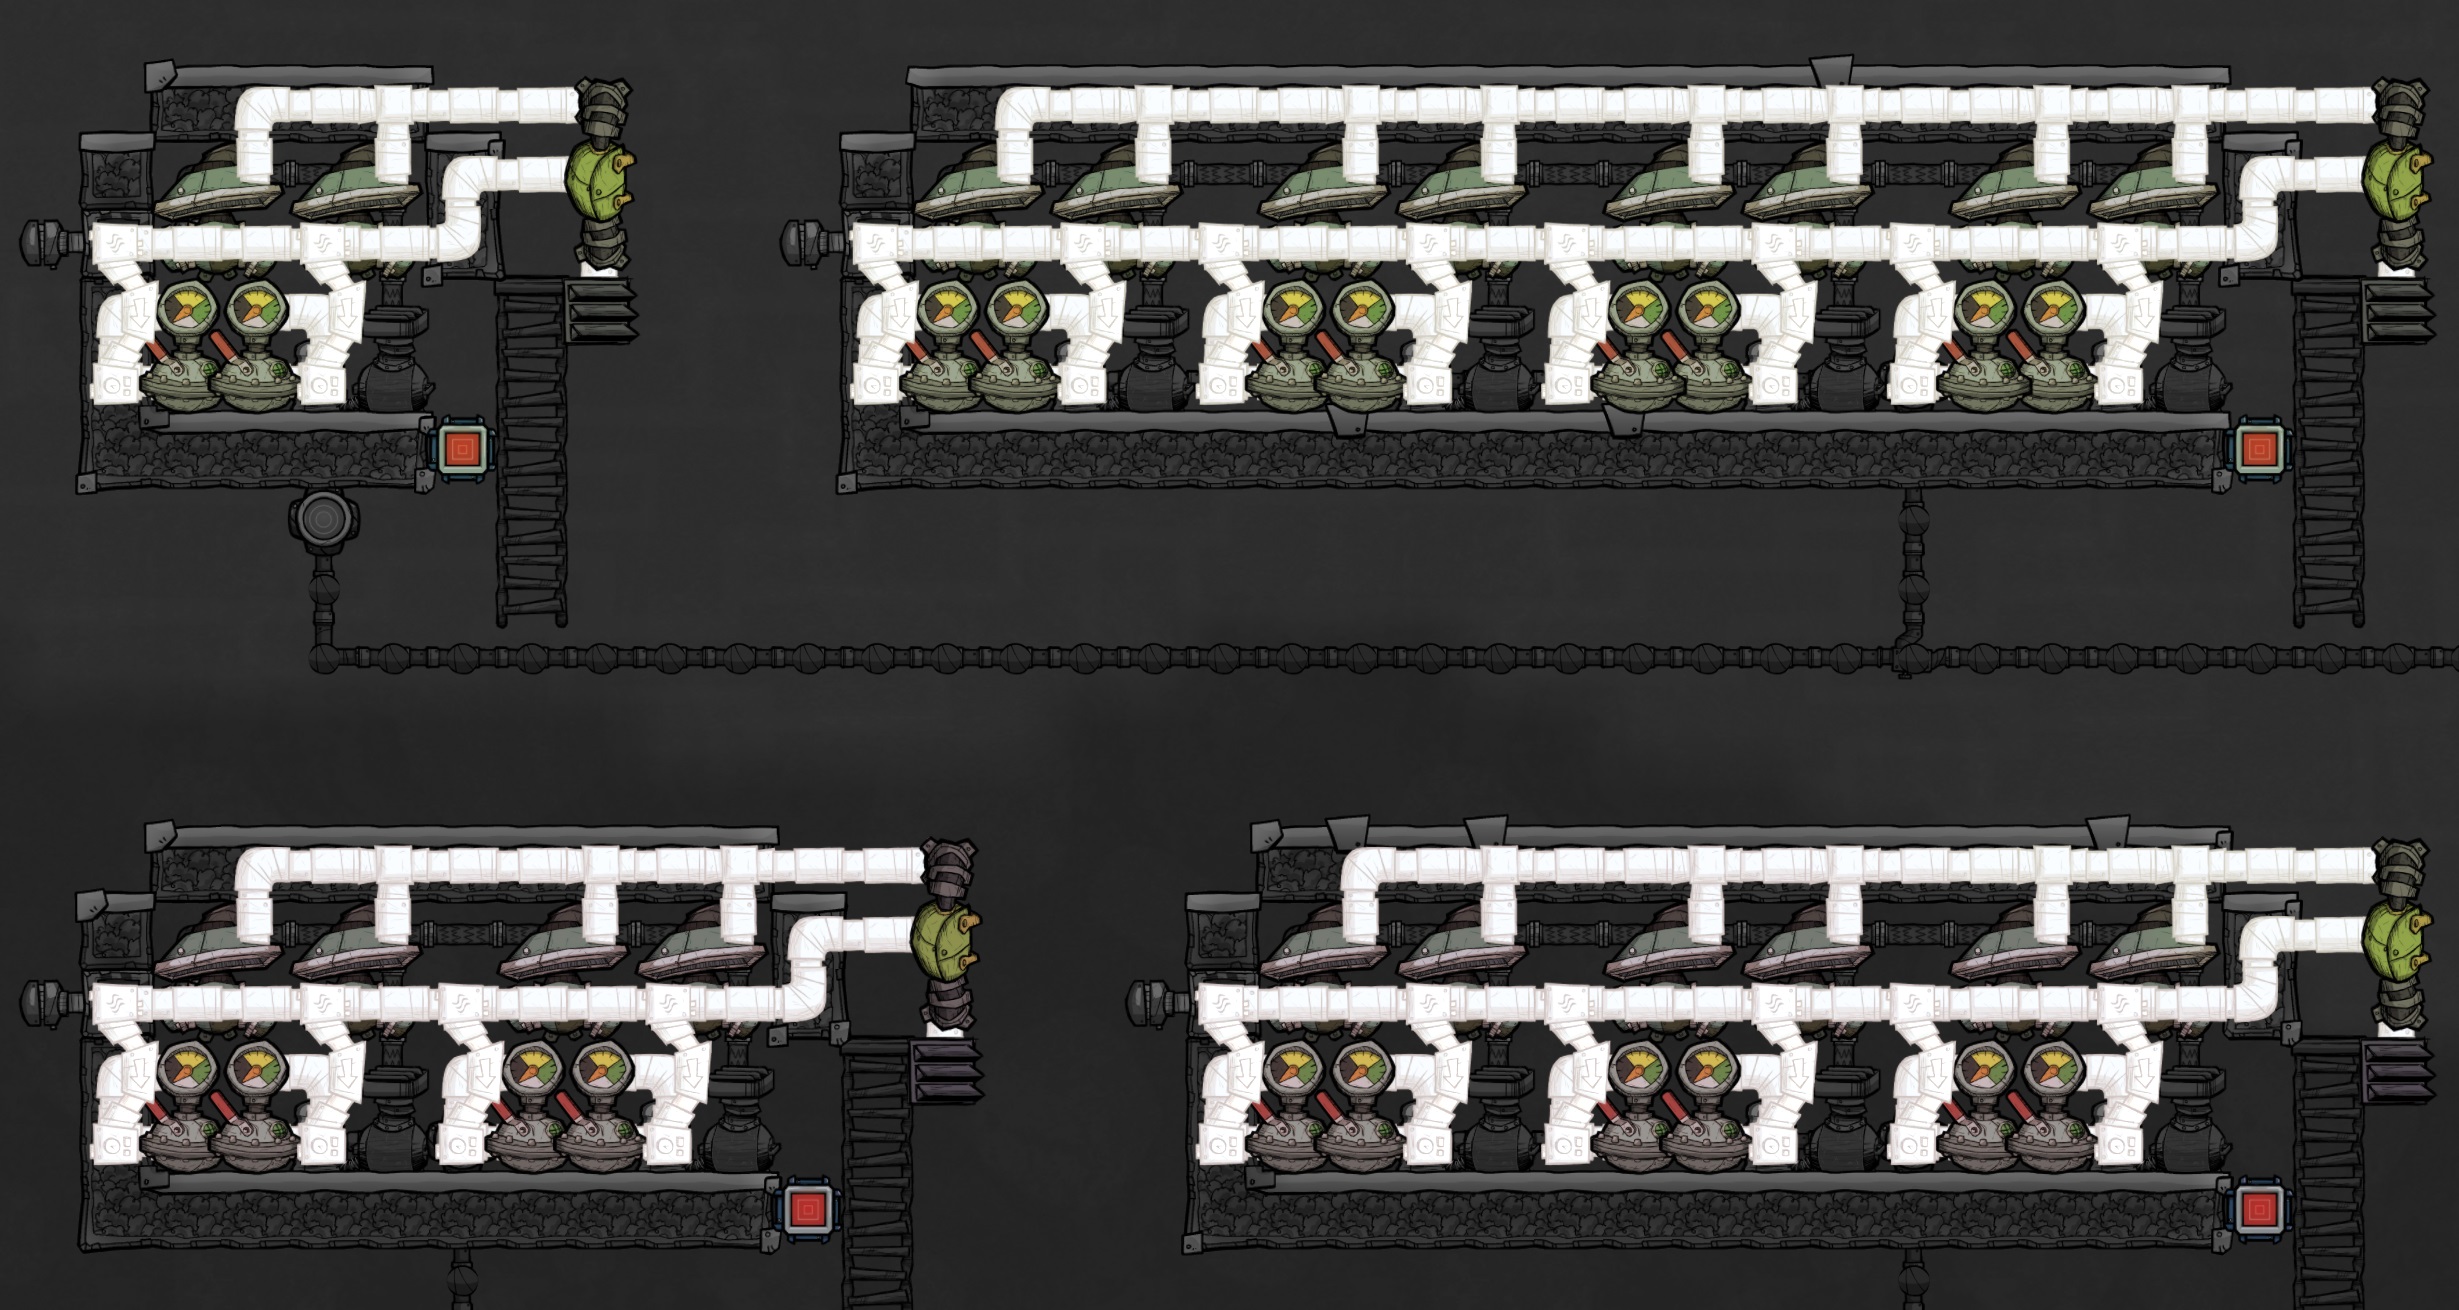
Before continuing, all gas filters must be set to 1g/s and both the temporary electrical filter and the gas pipe element sensor must be set to hydrogen. The sensor is not used at this stage, but you might as well set everything while you’re thinking about it.
At this point the system can be powered on and allowed to run until all of the gas valve loops are full.
- Continuing Construction
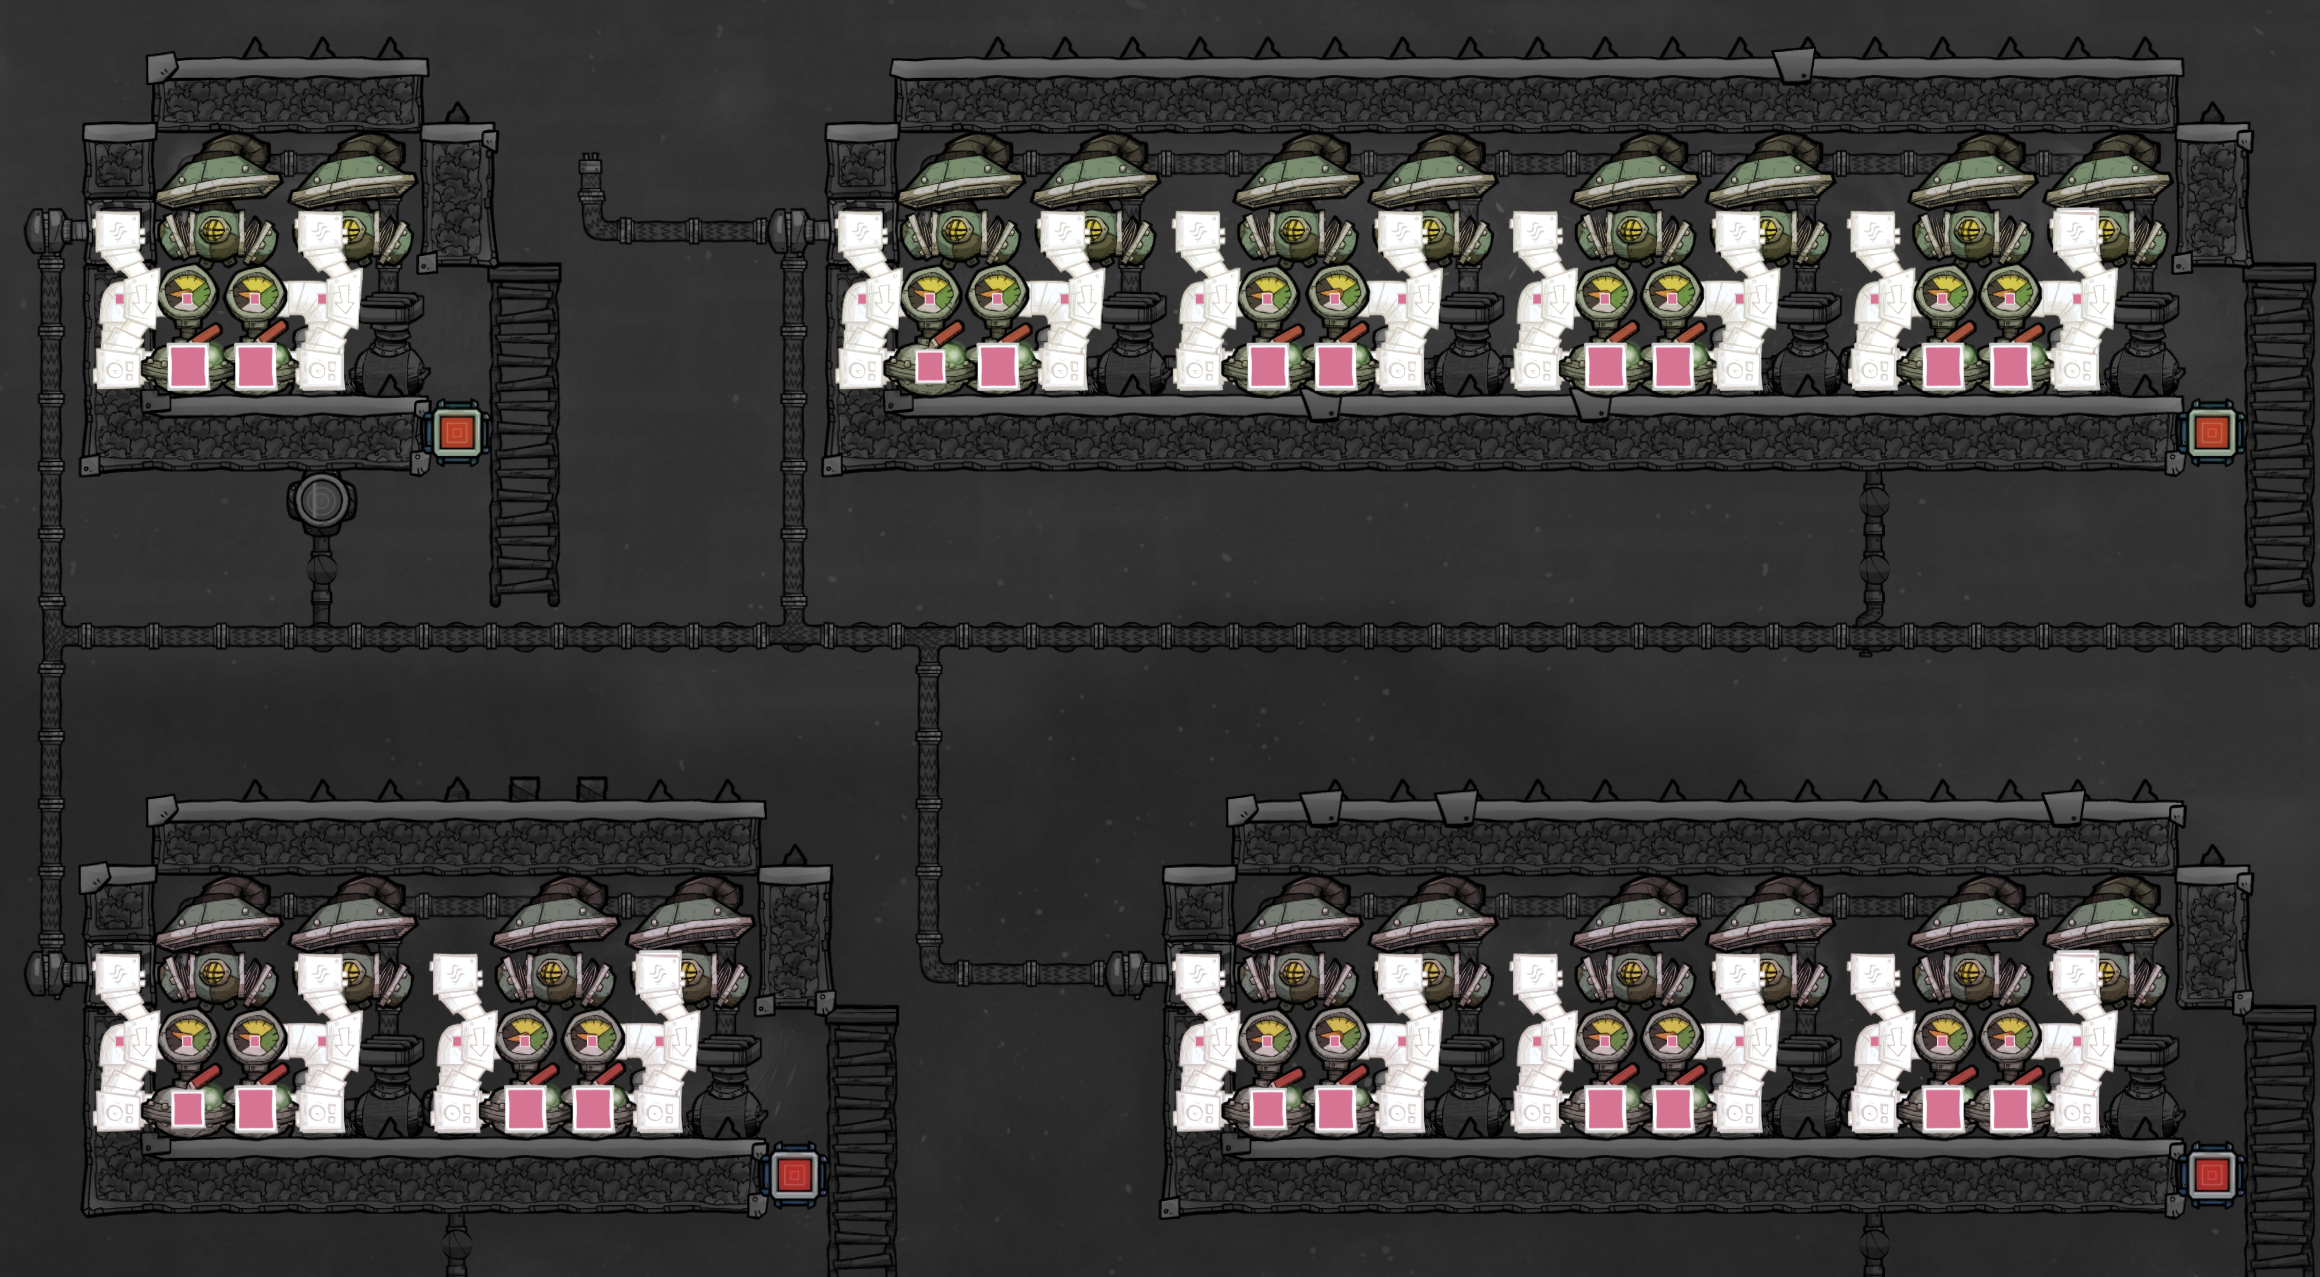
There are now two ways to complete the gas piping. I prefer the first way because it is much cleaner looking during regular gameplay, and it also makes future conversion into a SPOM much simpler. Unfortunately the game sometimes gives me problems with the first method and gas gets stuck in the pipe on first power up. I could build 10 identical modules right next to each other and one of them might block the pipe while the others worked great. I’ll note that if you build it and it works I've never seen it fail later, even on loading saves. It seems to be an issue at initial construction time only, and if the gas flows at the start it should continue flowing forever.
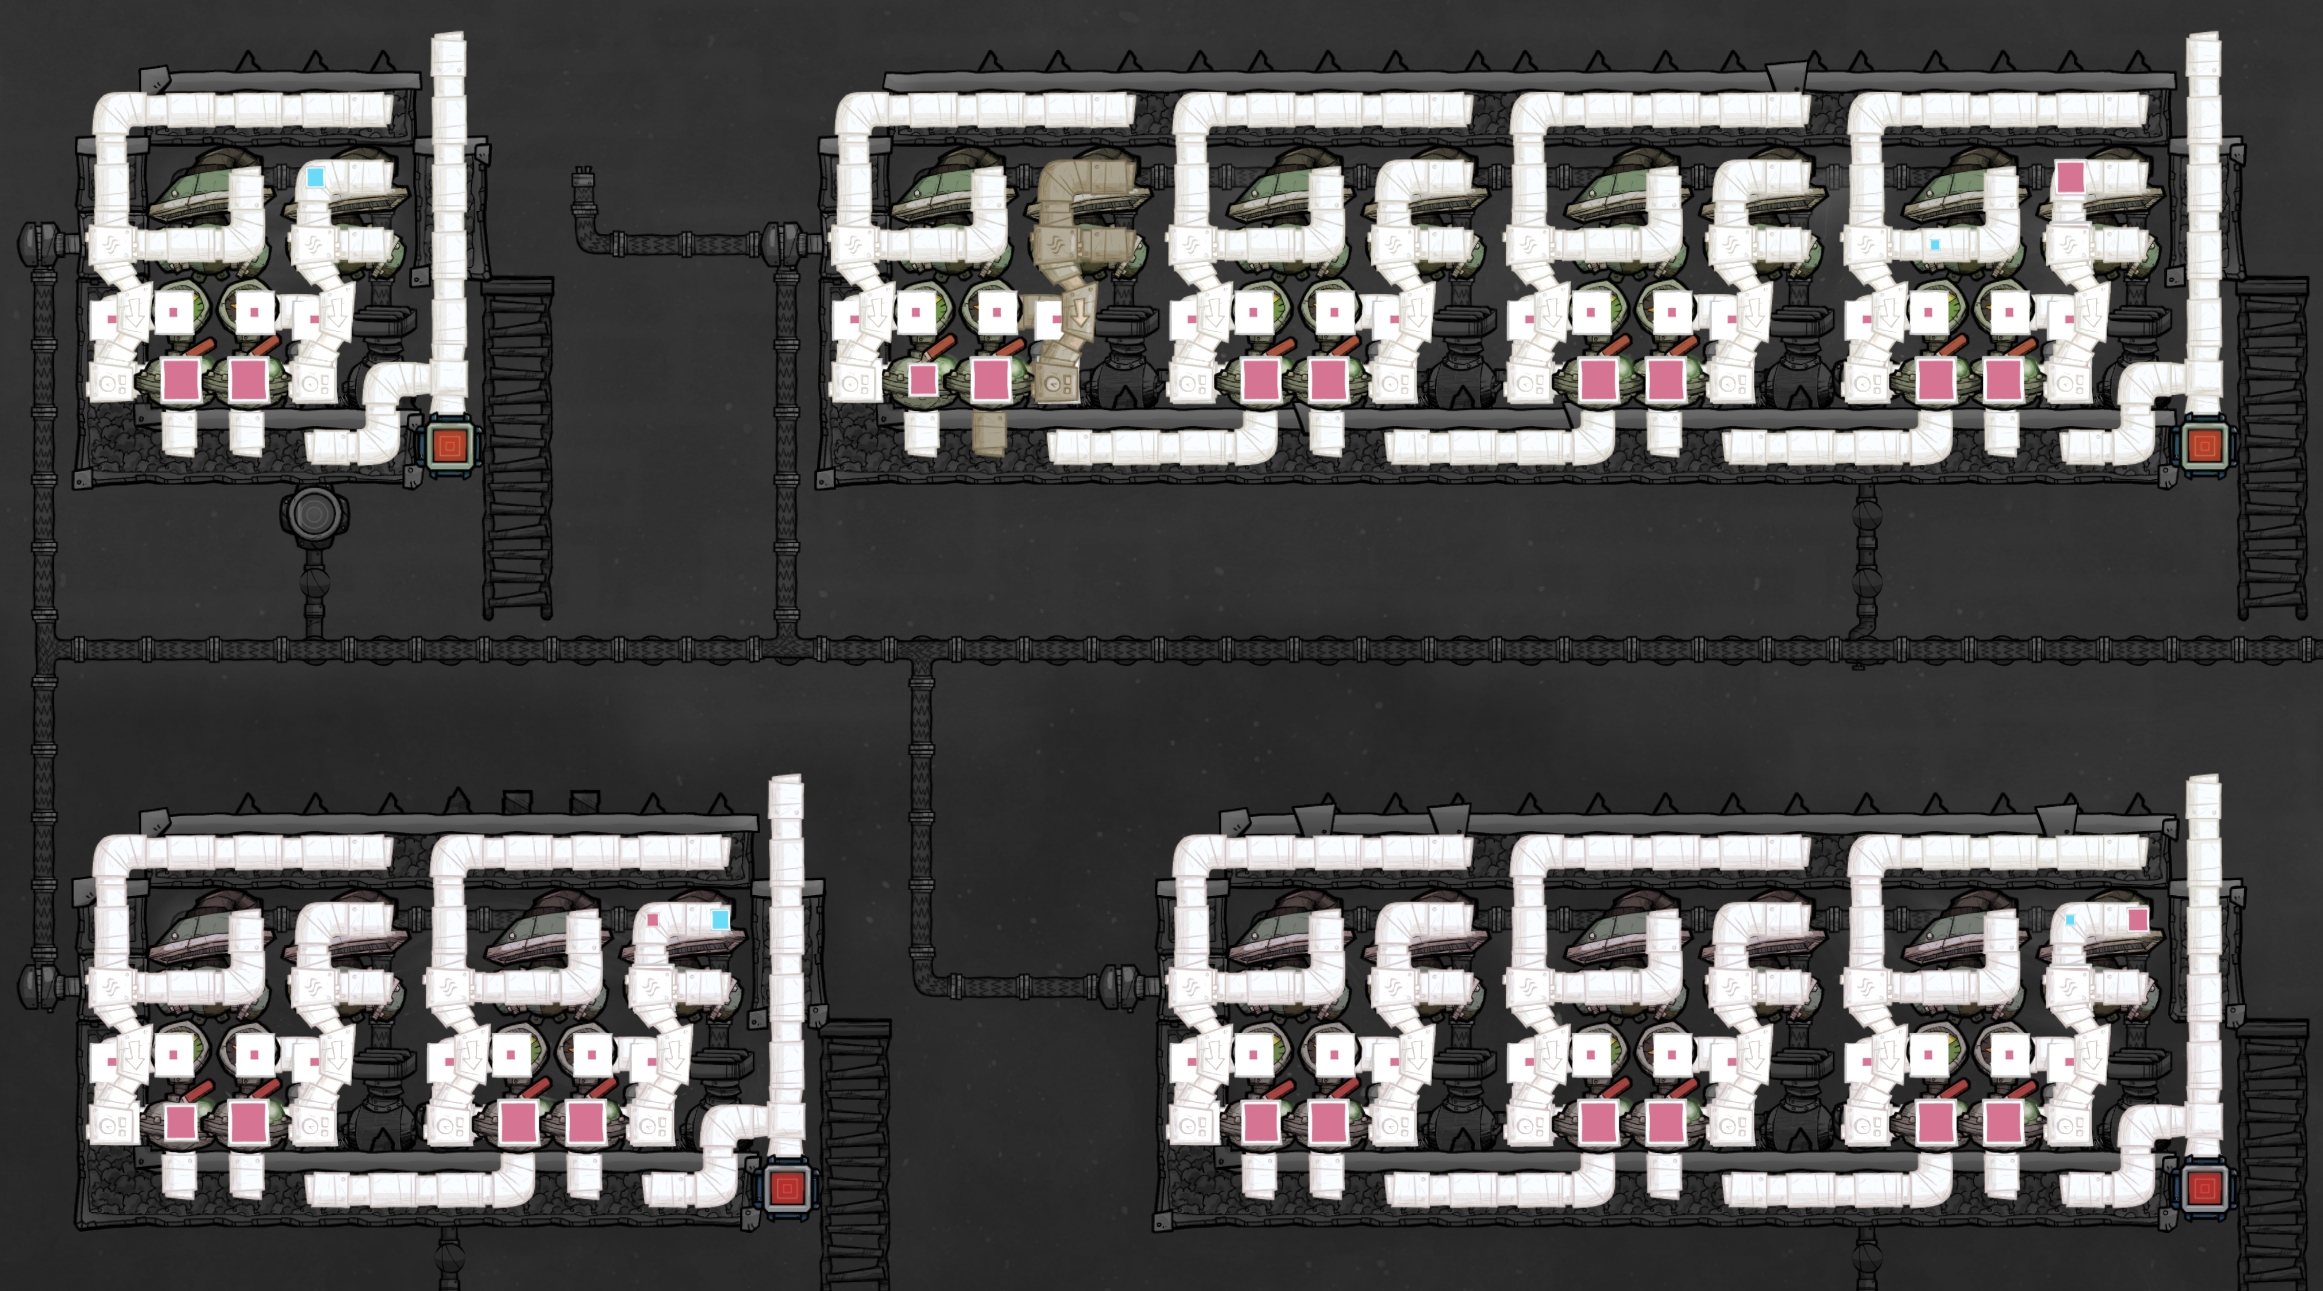
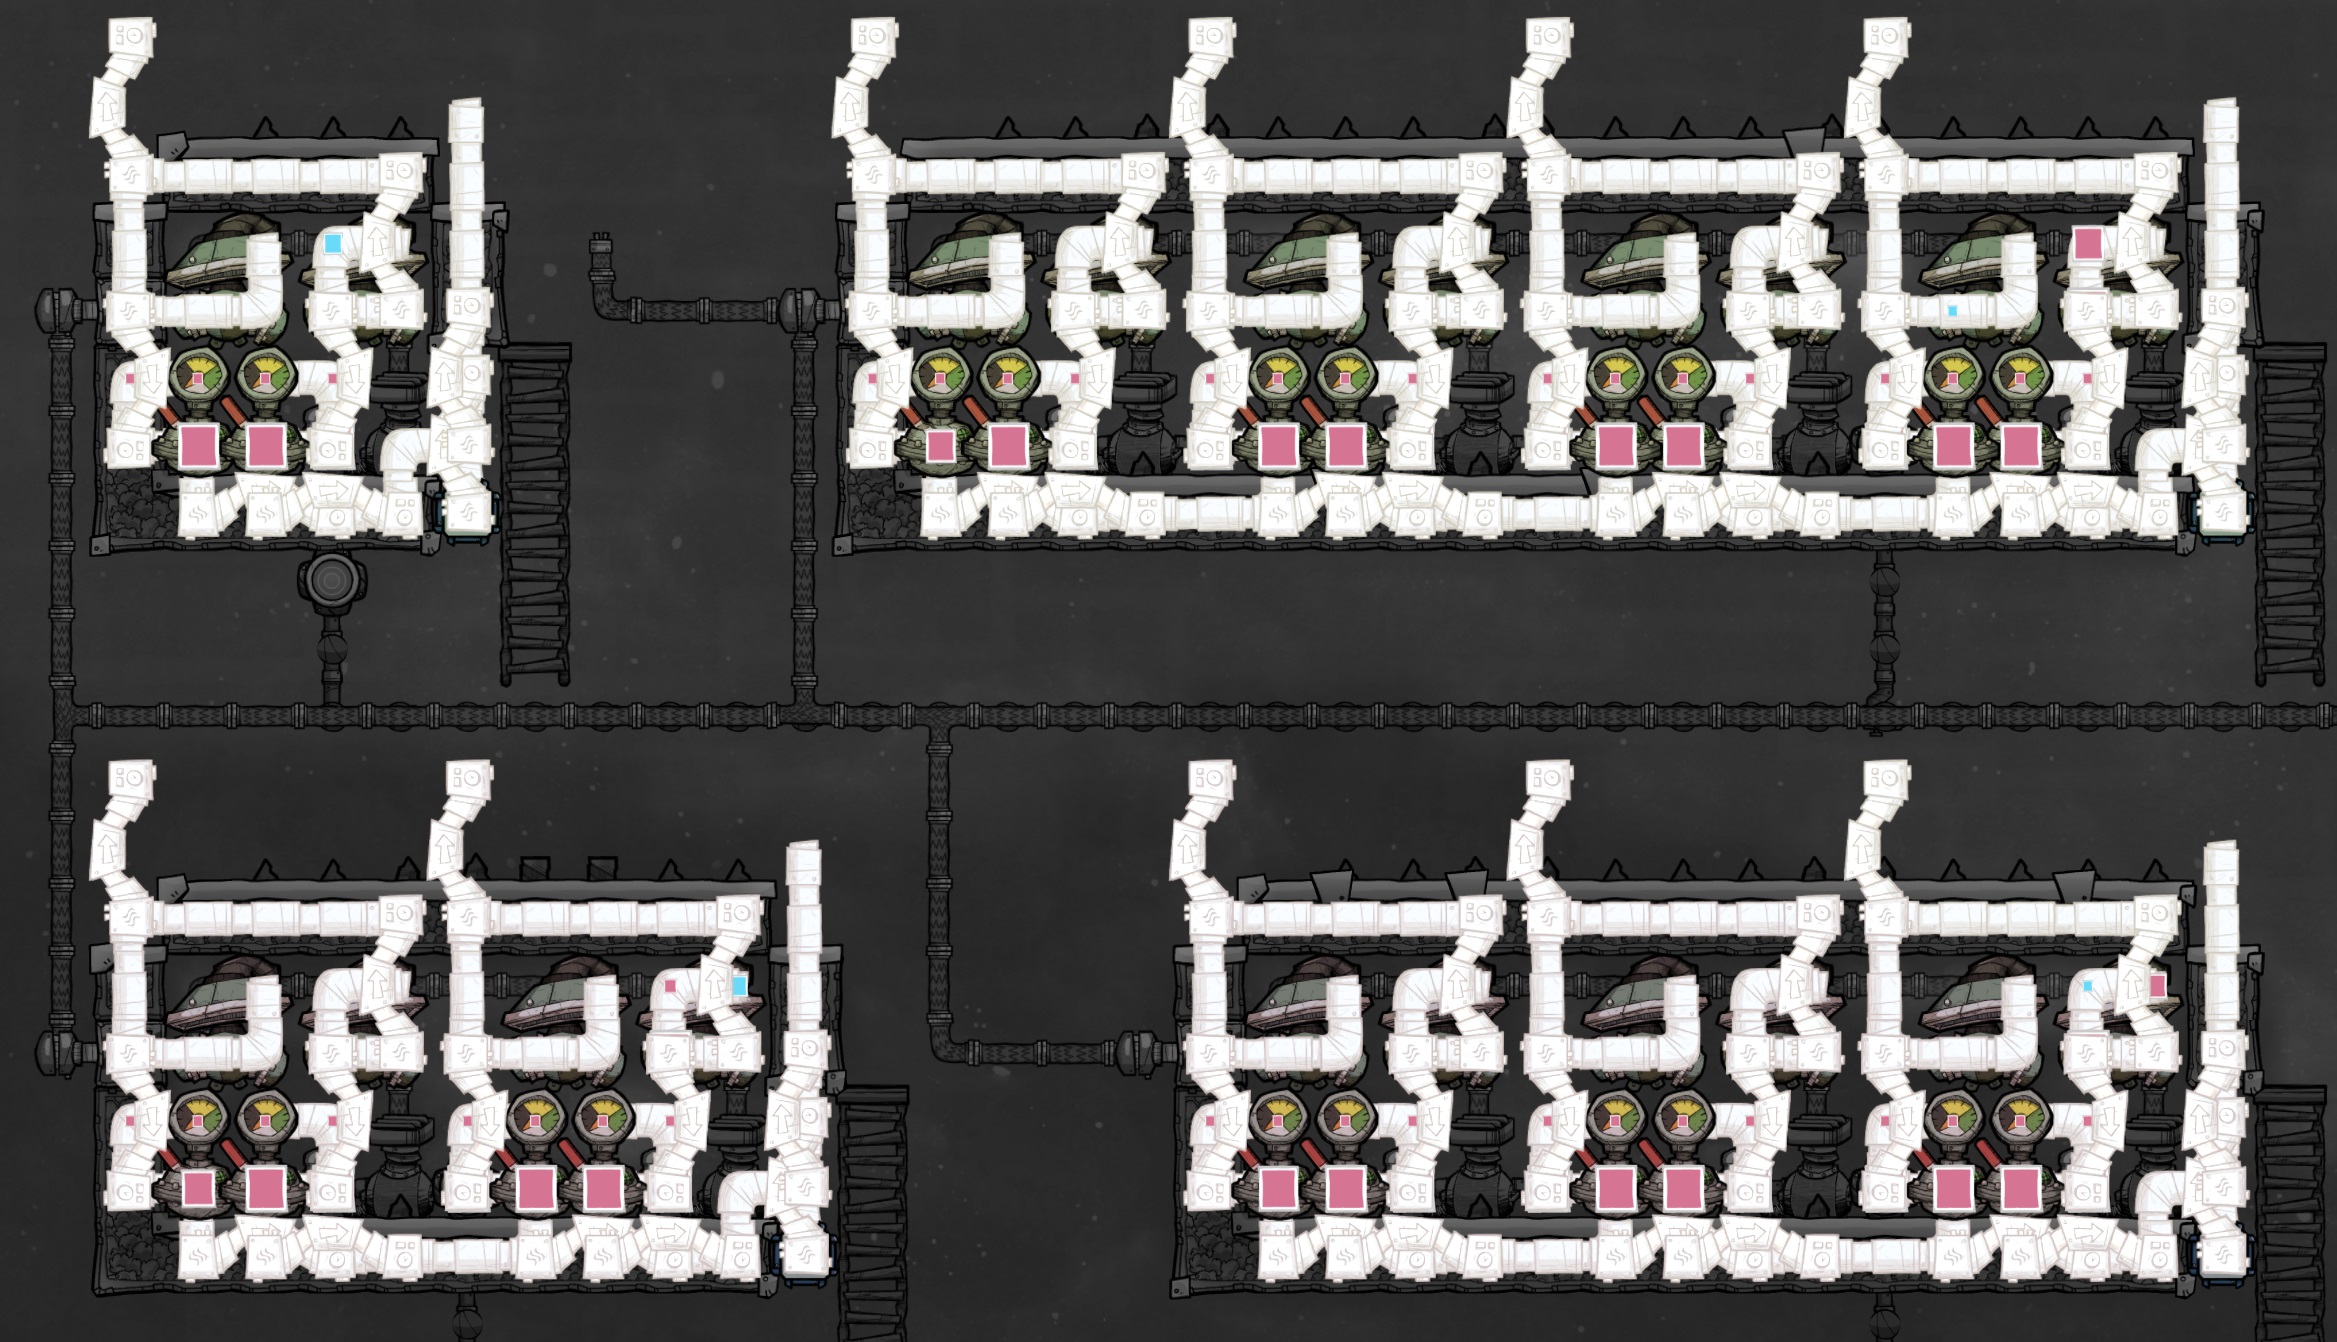 The two places this piping layout sometimes gives me trouble are
- A packet of oxygen will sometimes sit in the 1-tile pipe between the bridge going up and out of the module (where I want it to go) and the bridge going down onto the hydrogen loop (where it can’t go). I have not been able to figure out what causes this to happen. I generally just deconstruct and reconstruct some pipe sections until it clears up. I rarely see this at all and once the gas is flowing properly I’ve never seen it get stuck again.
- In some of the pairs of gas valves, one of them will sometimes refuse to push its packet down onto the bridge. The landing tile to the right of the bridge can never be blocked, so again I’m not sure what causes this behavior. I haven’t found a great solution here, deconstructing and reconstructing pipes hasn’t seemed to work for me. The one thing that seems to clear it up is drawing a pipe segment across the two gas valves, between their two white inputs. This allows the trapped packet to flow through the other valve and down the other bridge, and once the packet is gone it won't get stuck again. I’ve had some of these electrolyzer modules run for hundreds of cycles without issue, but I’ve also seen the blockage pop up enough times (especially during first power-on) that it’s probably just worth drawing that extra pipe across the valves to be safe.
In the creation of this guide I was lucky and neither of the two issues above popped up on any of the 20 modules I built. Only 10 are pictured, but I had 10 more for converting to SPOMs which you’ll see later. I recommend turning on power just long enough to see if all gas outputs are flowing freely, and then correcting issues as above if necessary. Once it’s confirmed neither blockage problem exists in your build, power should be cut to finish construction. I ran the gases to some infinite storages for testing and data collection before moving on, but this is definitely not required.
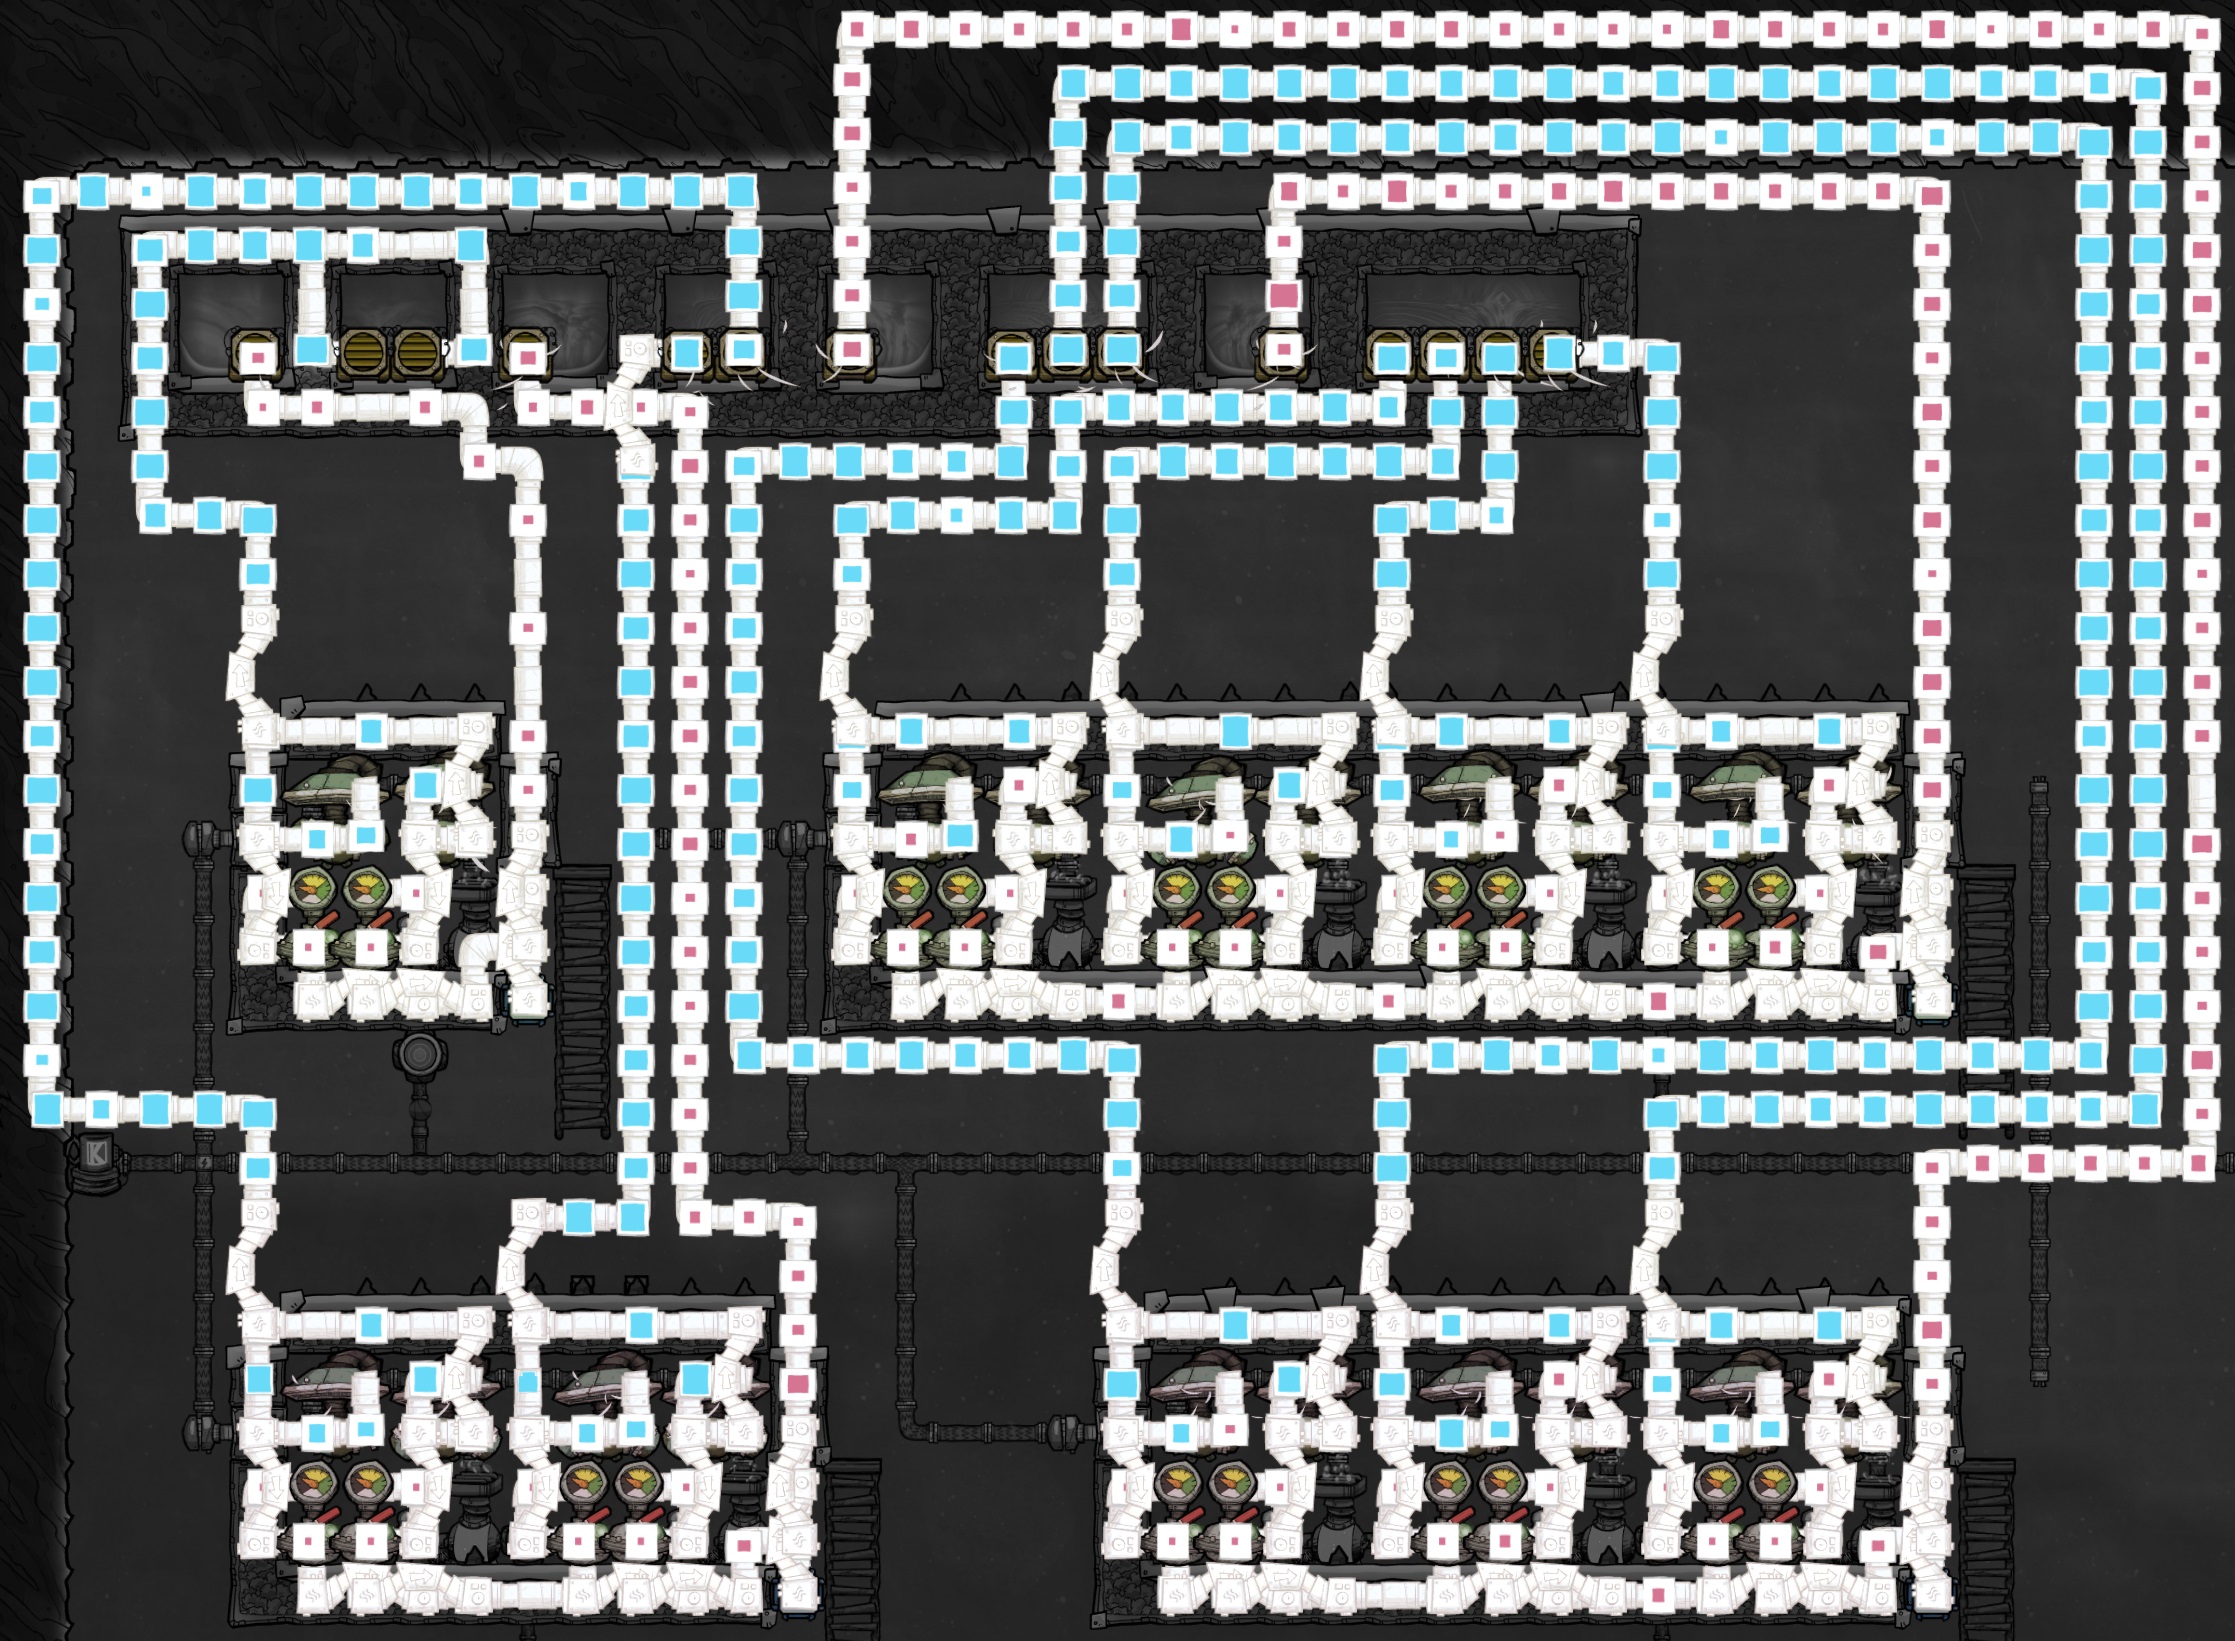
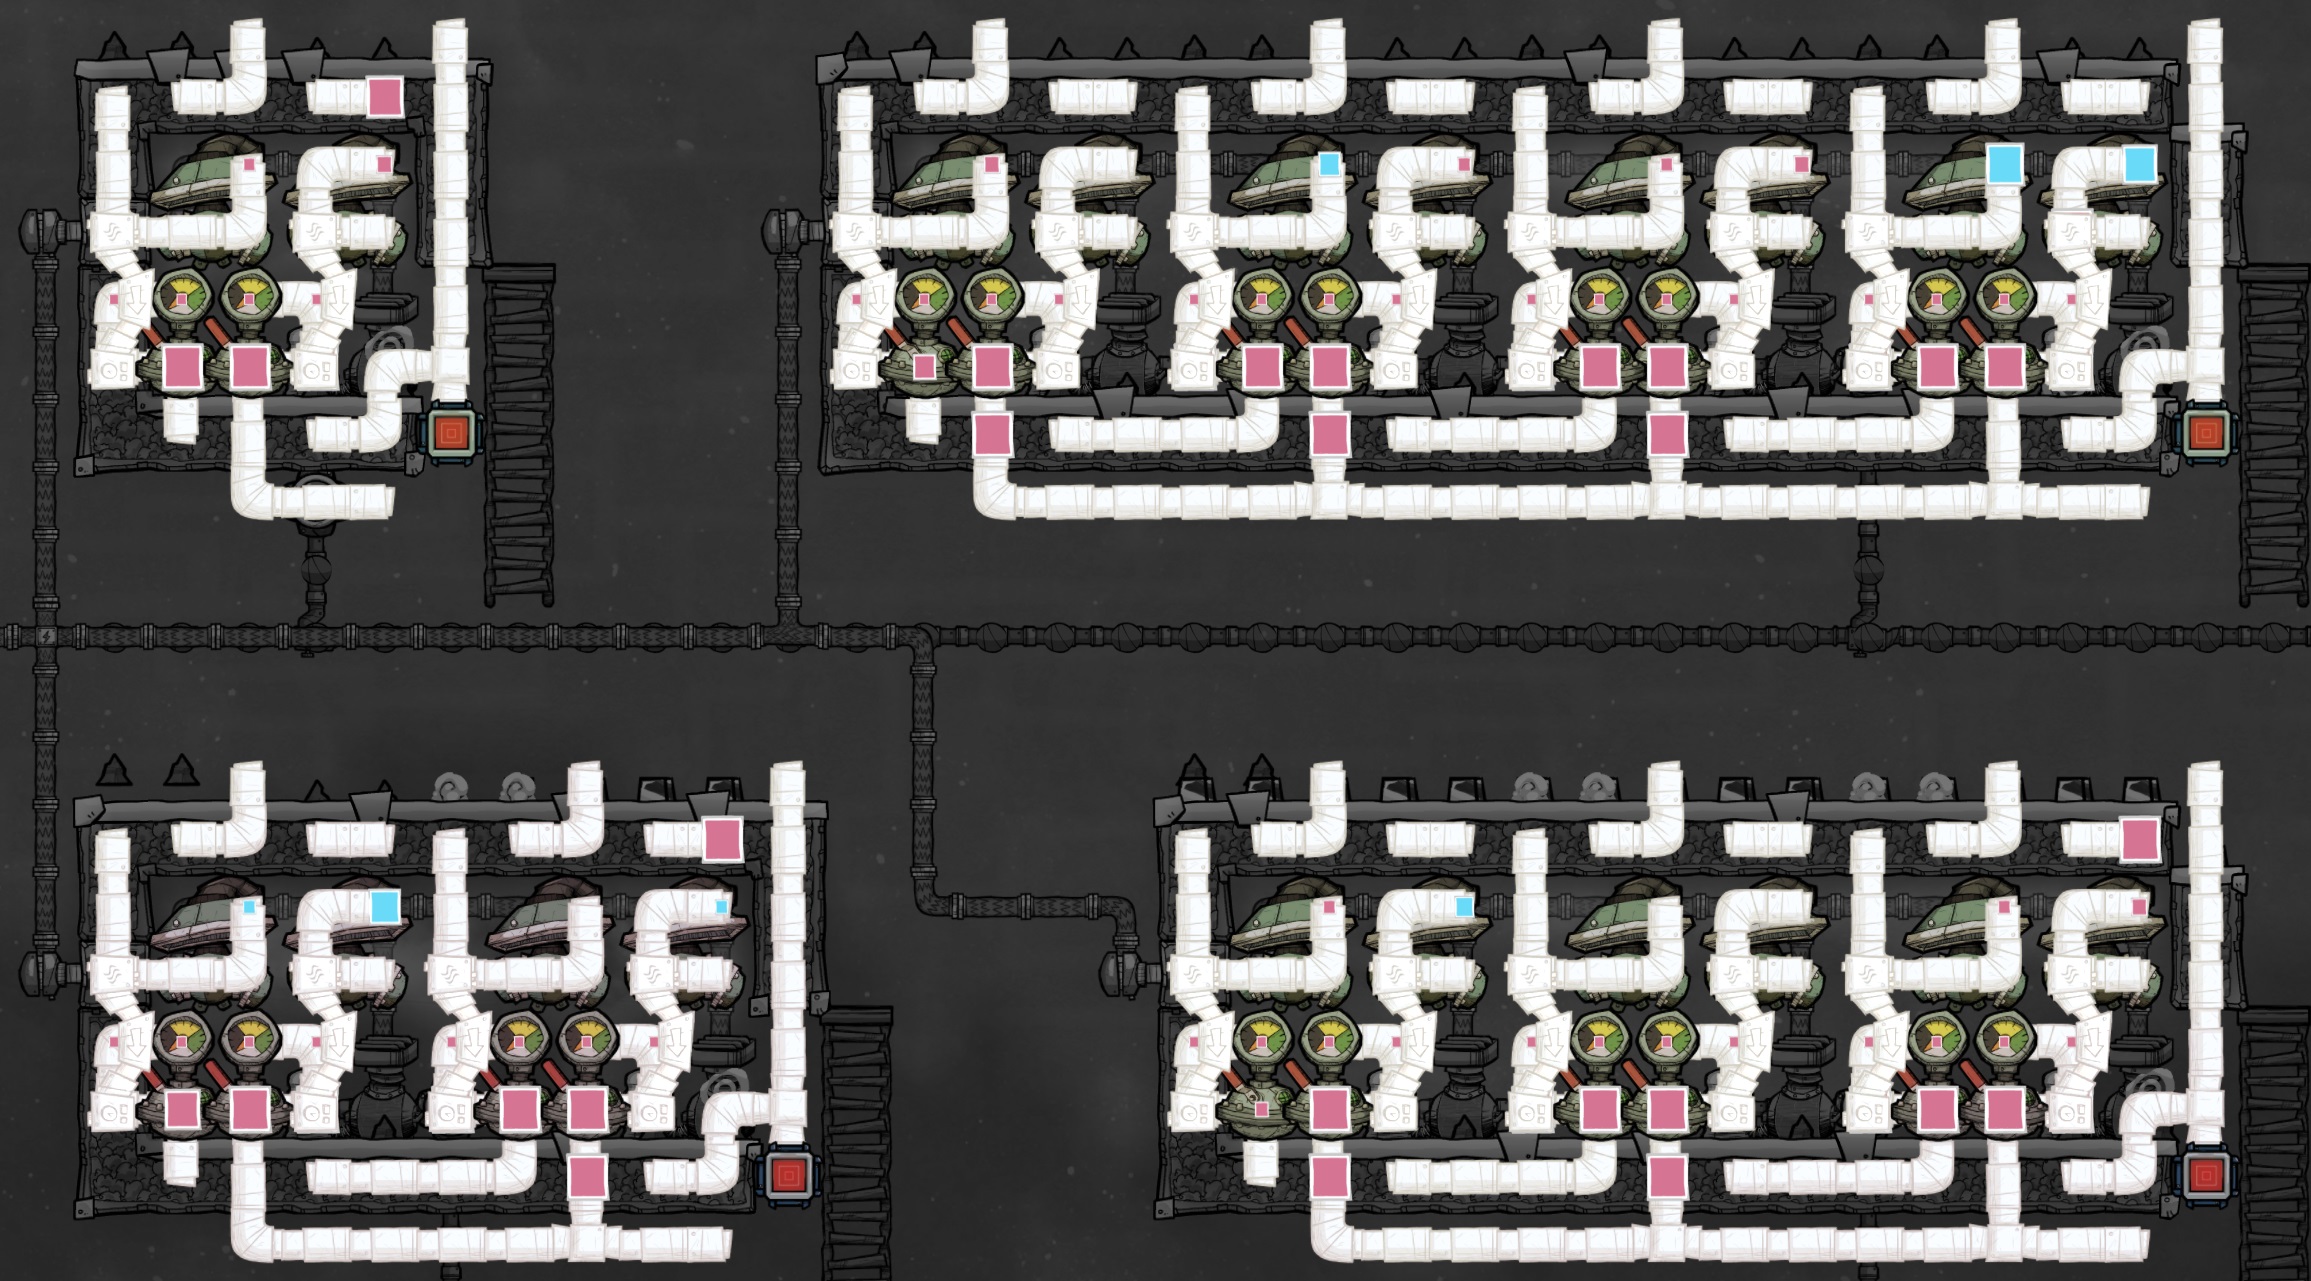
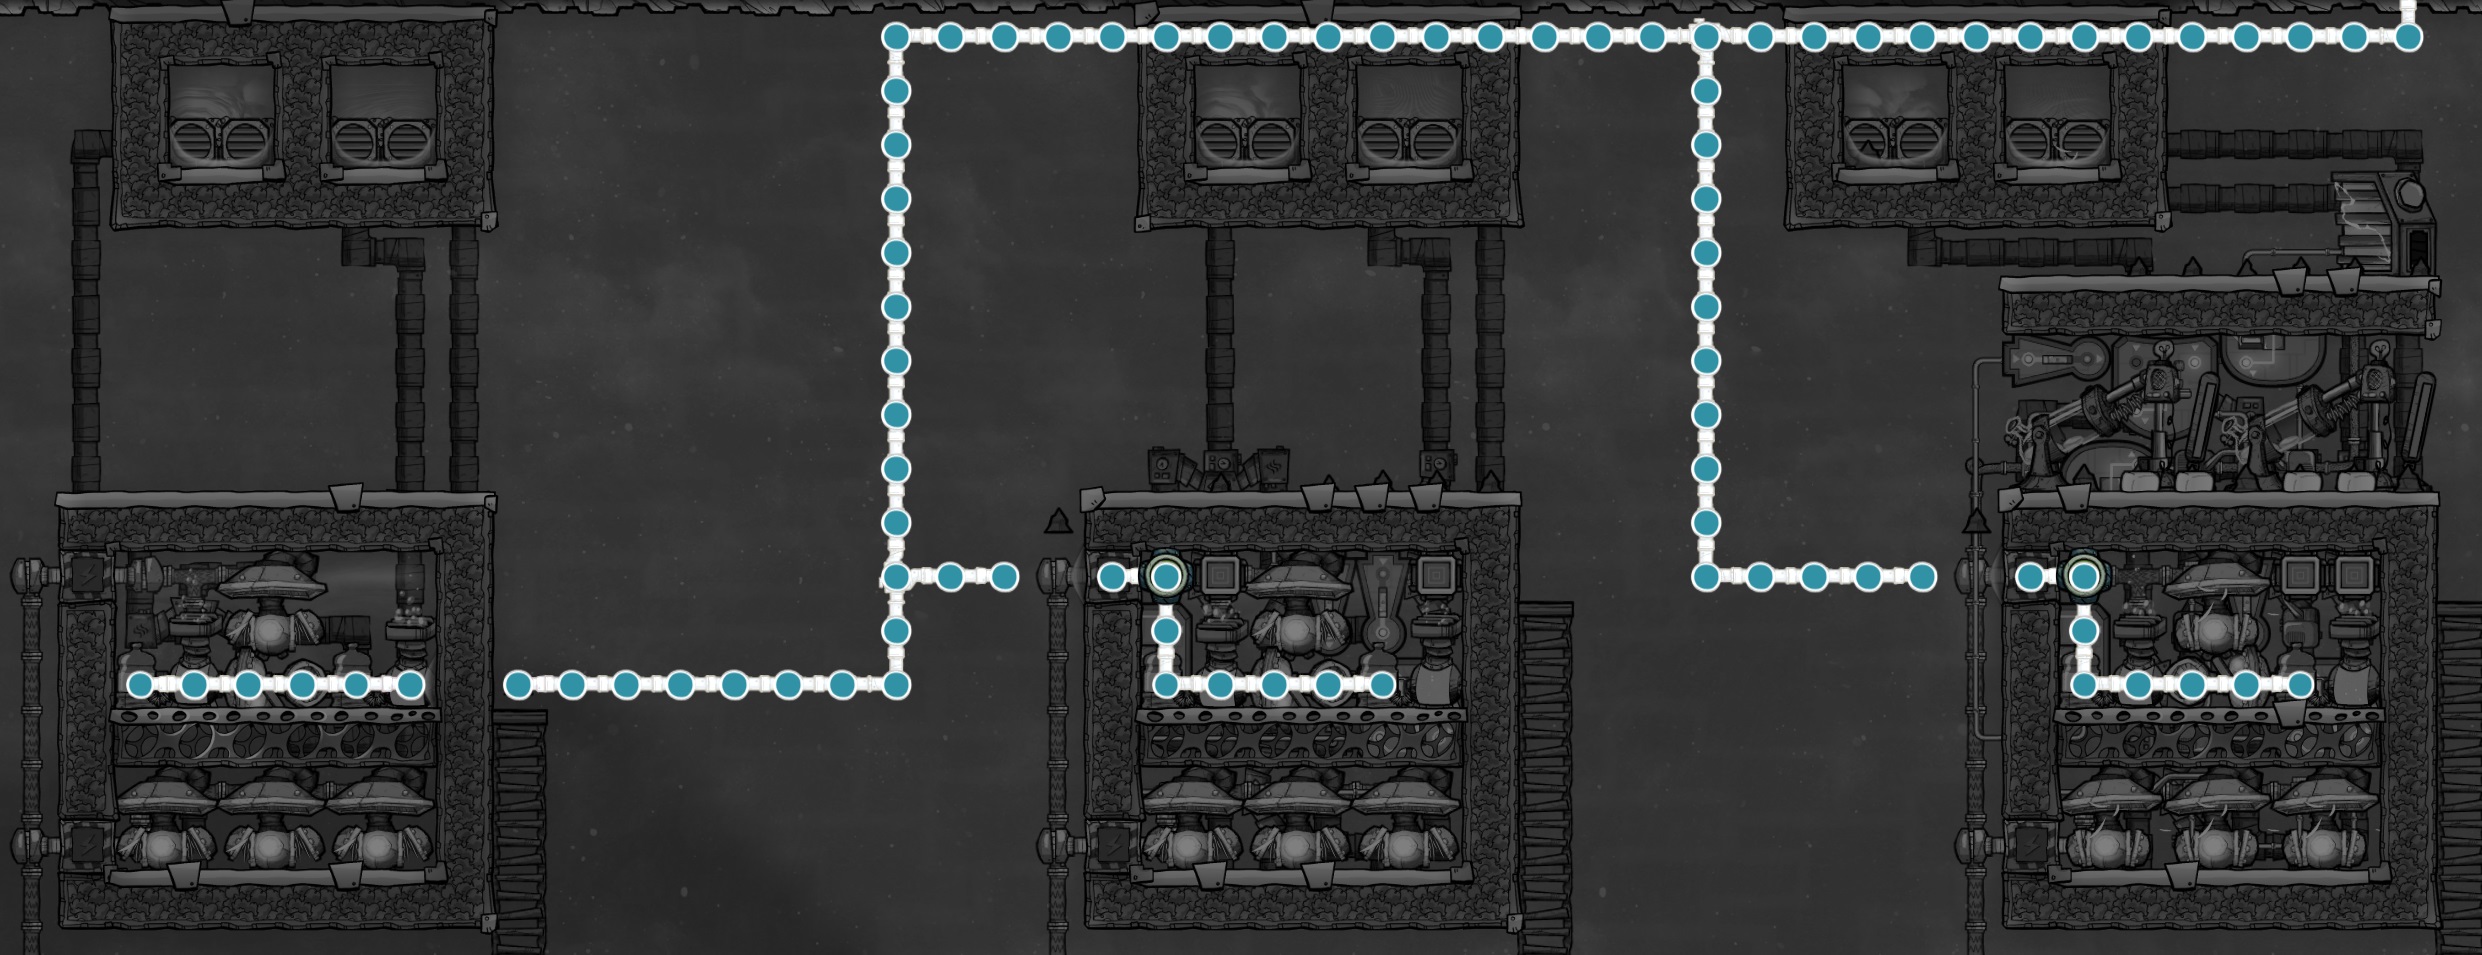
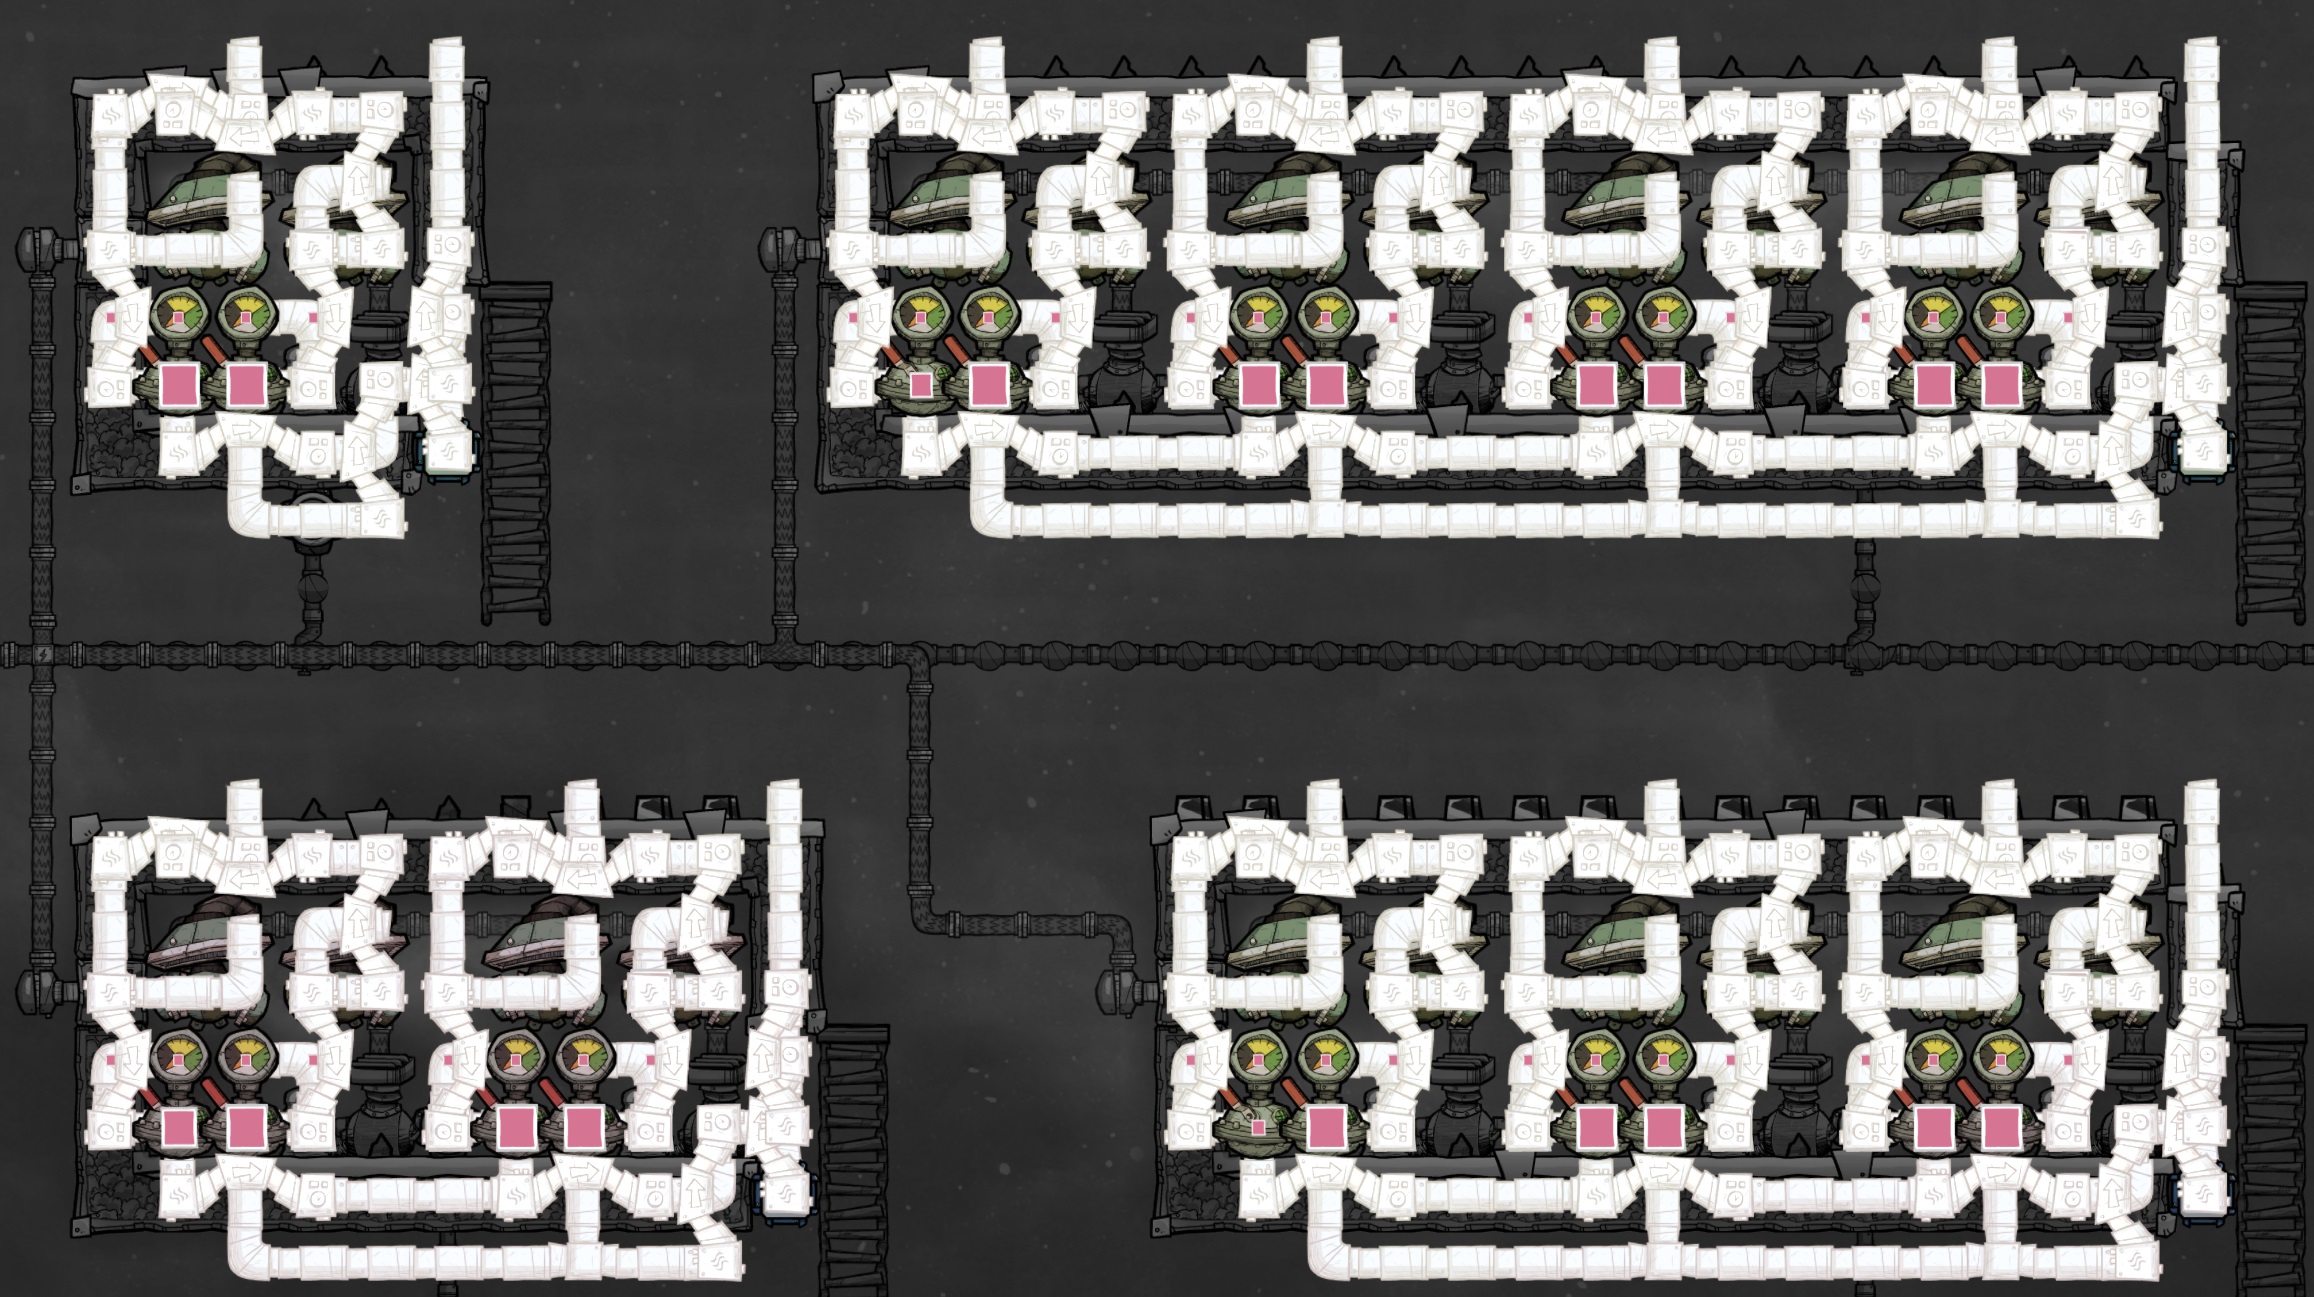 Since I’ve never seen issues powering on with this pipe layout, you can probably just skip to finalizing the build without a gas flow test. I went ahead and ran them to some infinite storages just like the other set for testing purposes: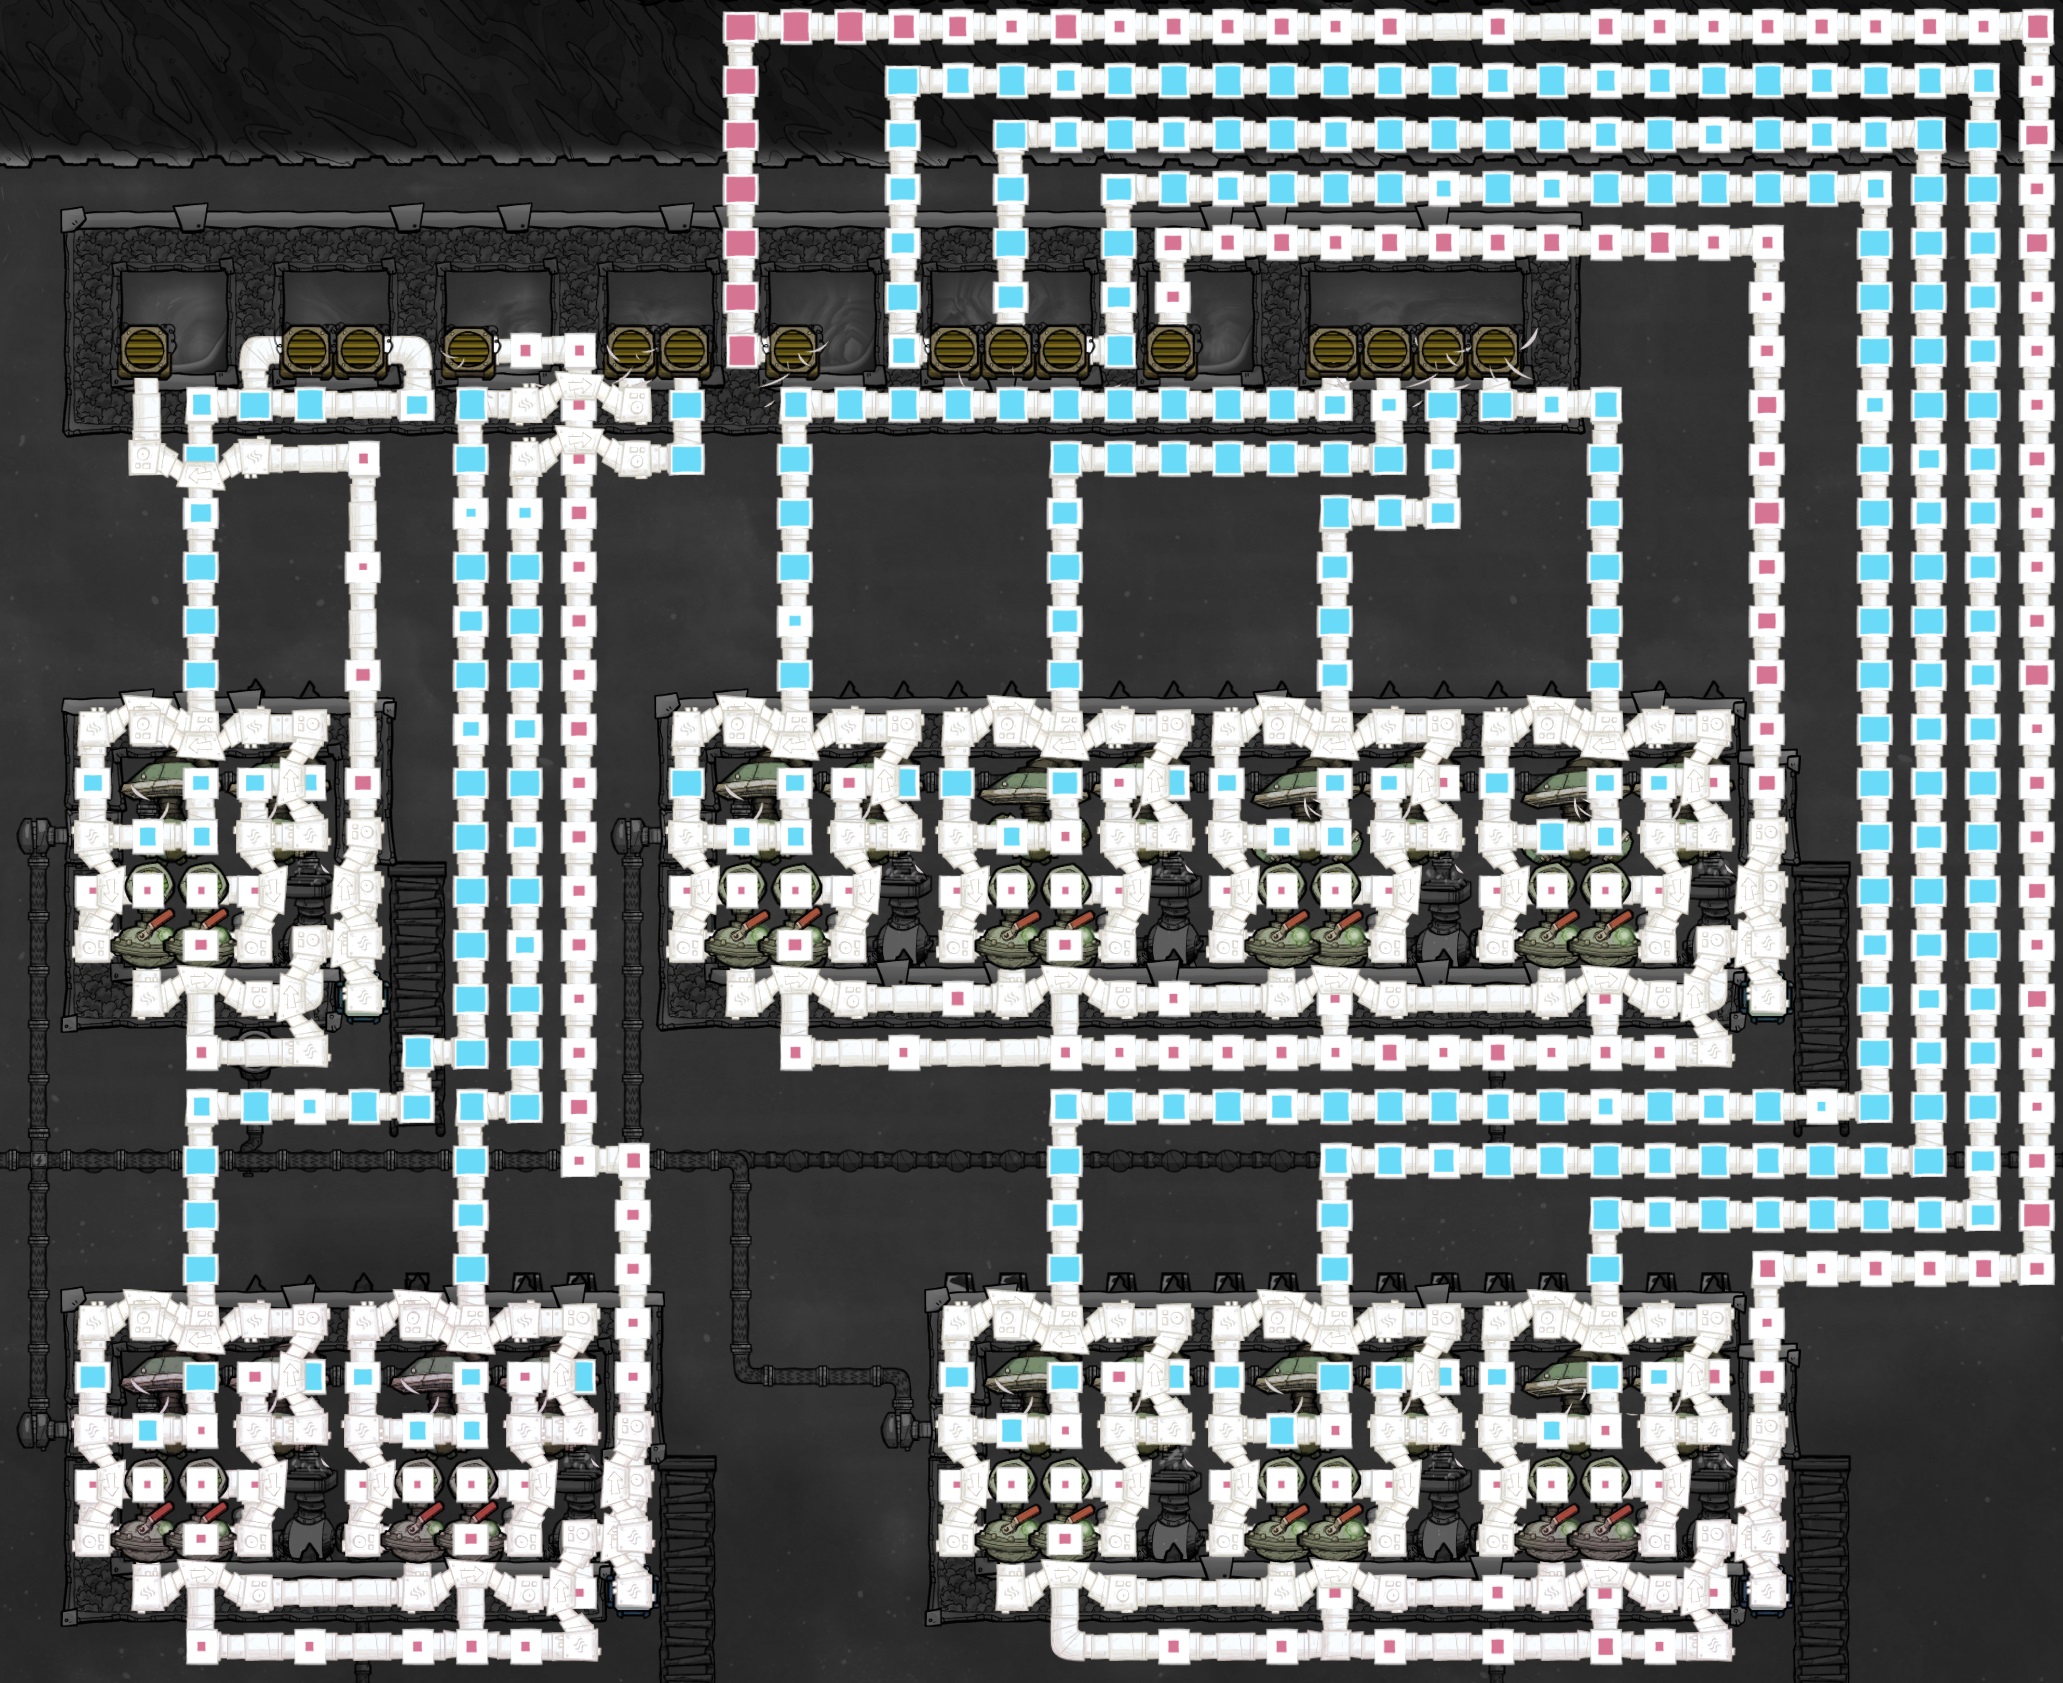
- Finalizing the Build
Now we’re ready to add automation to prevent the system from mixing gases. Up to this point the SPOM and non-SPOM variants have been essentially identical, but here they’ll begin to diverge. Running a SPOM introduces multiple additional failure modes so the automation groundwork to support it needs to be put in place now to retain “fail safe” operation later. If you plan to ever convert your electrolyzer to a SPOM, ensure you follow that section of the build below.
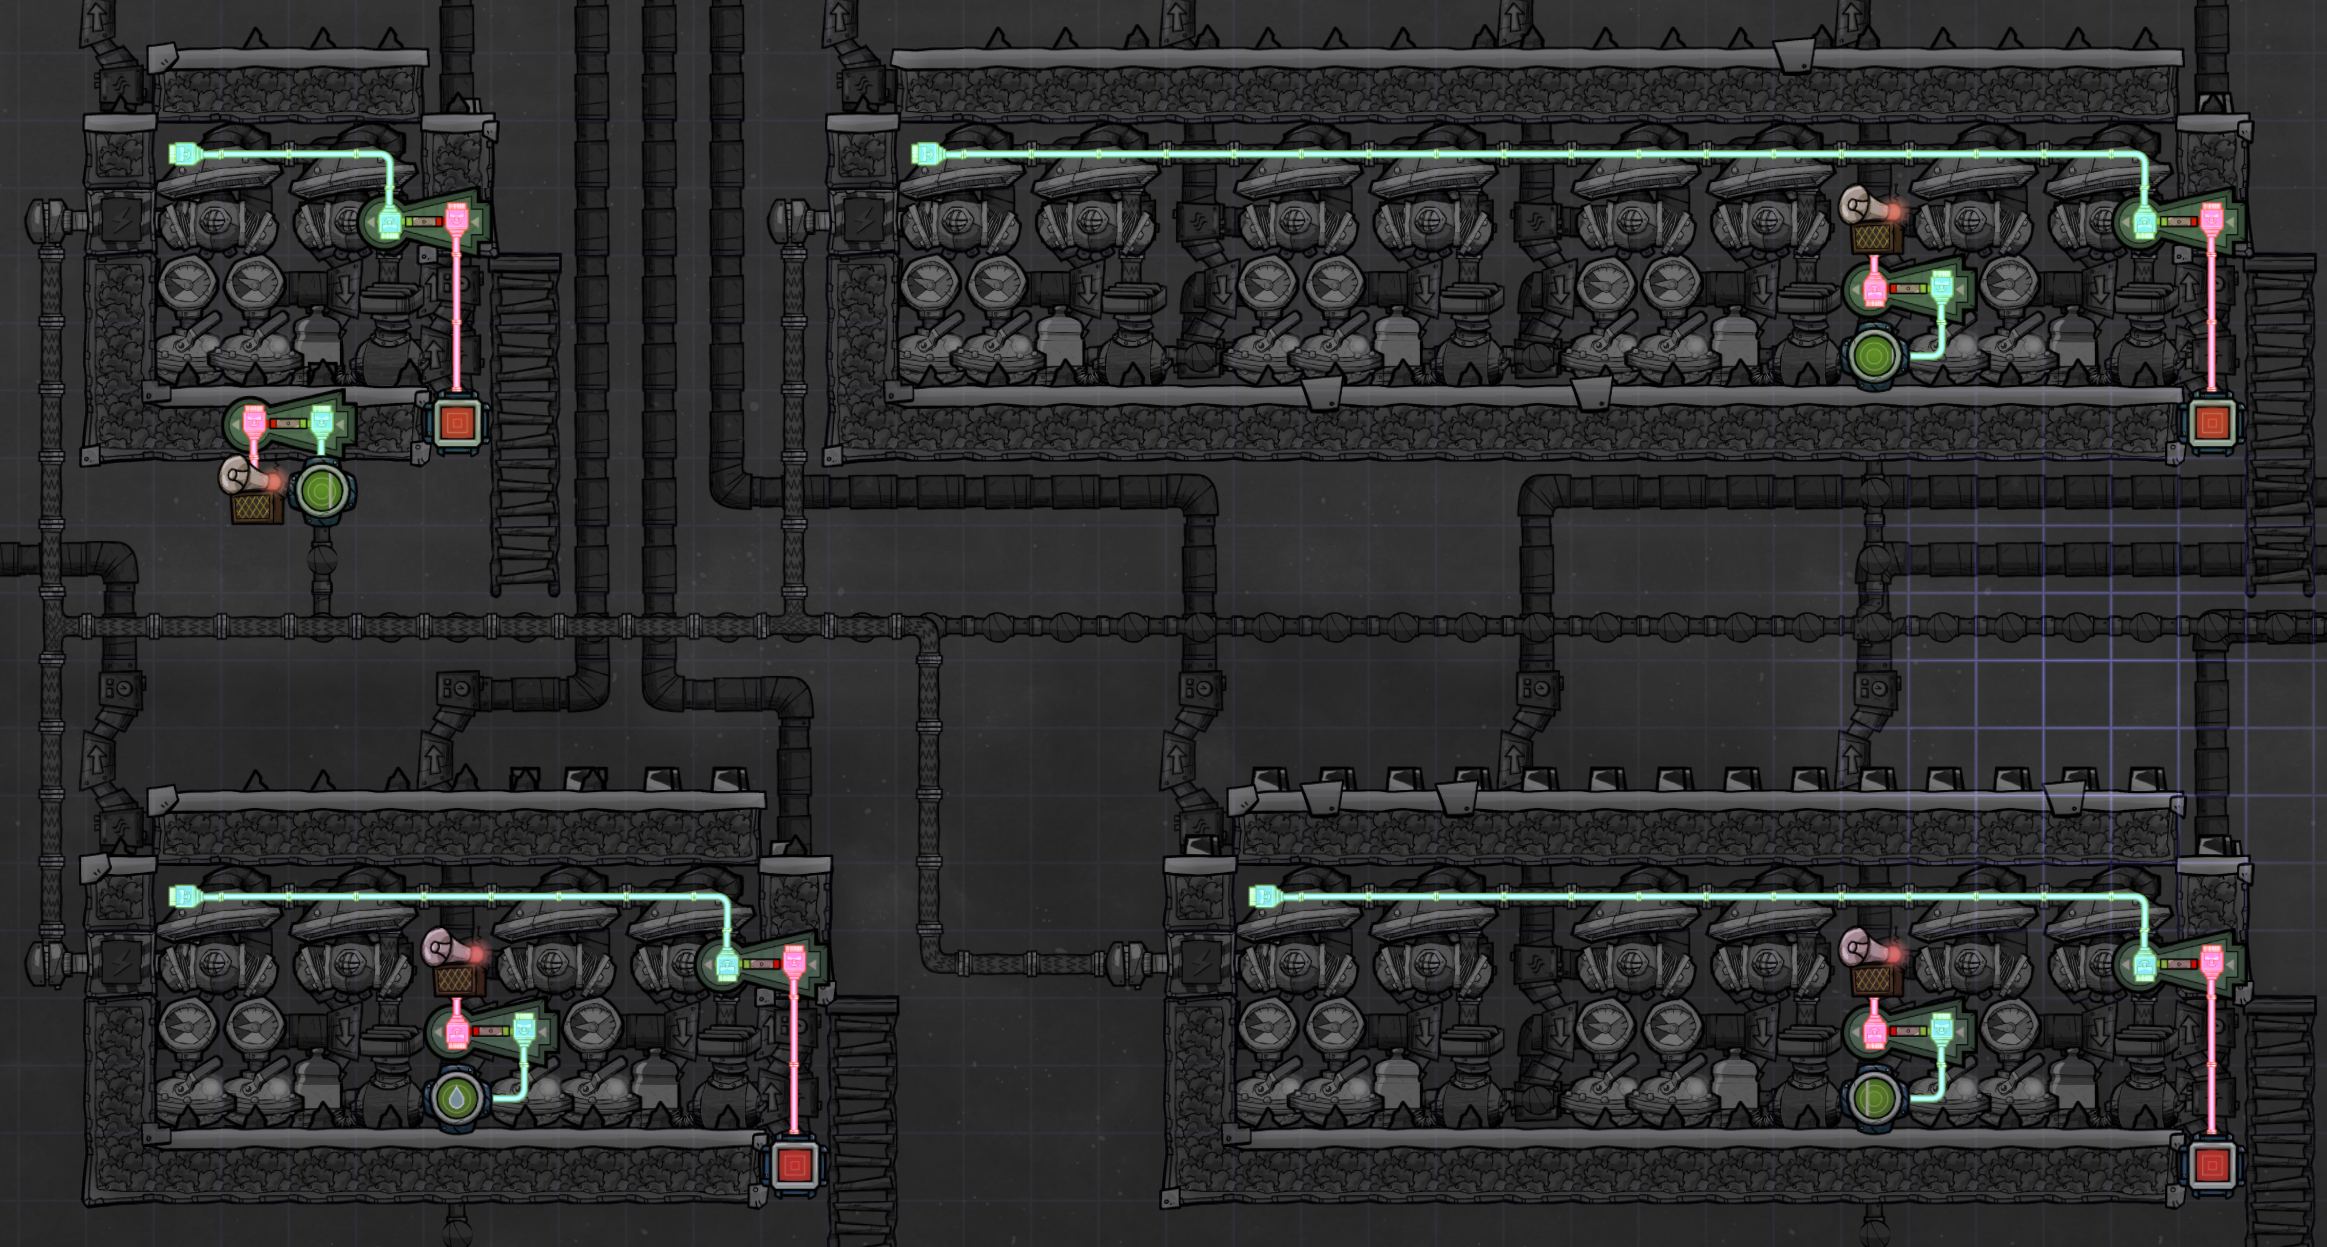
There are two additional options you may consider installing. Since we already have the hydrogen pipe blockage sensor, you can wire that to a second alarm in the upper right corner tile which we left empty. Since the pumps are shut down in this scenario you won’t be generating oxygen, so I believe it’s worth alerting on both this and the water input at a minimum.
Additionally, you could install pipe blockage sensors onto each of your oxygen lines and run those to a third alarm to inform you when any of those pipes get blocked. The construction is identical to the hydrogen sensor in the bottom right, just add a second bridge to pull oxygen off the sensor tile. There’s no need for OR gates, as any one green output will override the other red outputs on a shared cable. This option is less useful in my opinion, since the electrolyzer will still be running and presumably you have too much oxygen in your base causing the pipe backup. The only real use case I can see for this is when you accidentally deconstruct an oxygen pipe crossing the map on the way to your base (forgot to change that deconstruct tool to ‘buildings only’, didn’t you?), so the pipe backs up while your base is suffocating. It’s up to you whether that risk avoidance is worth the extra metal.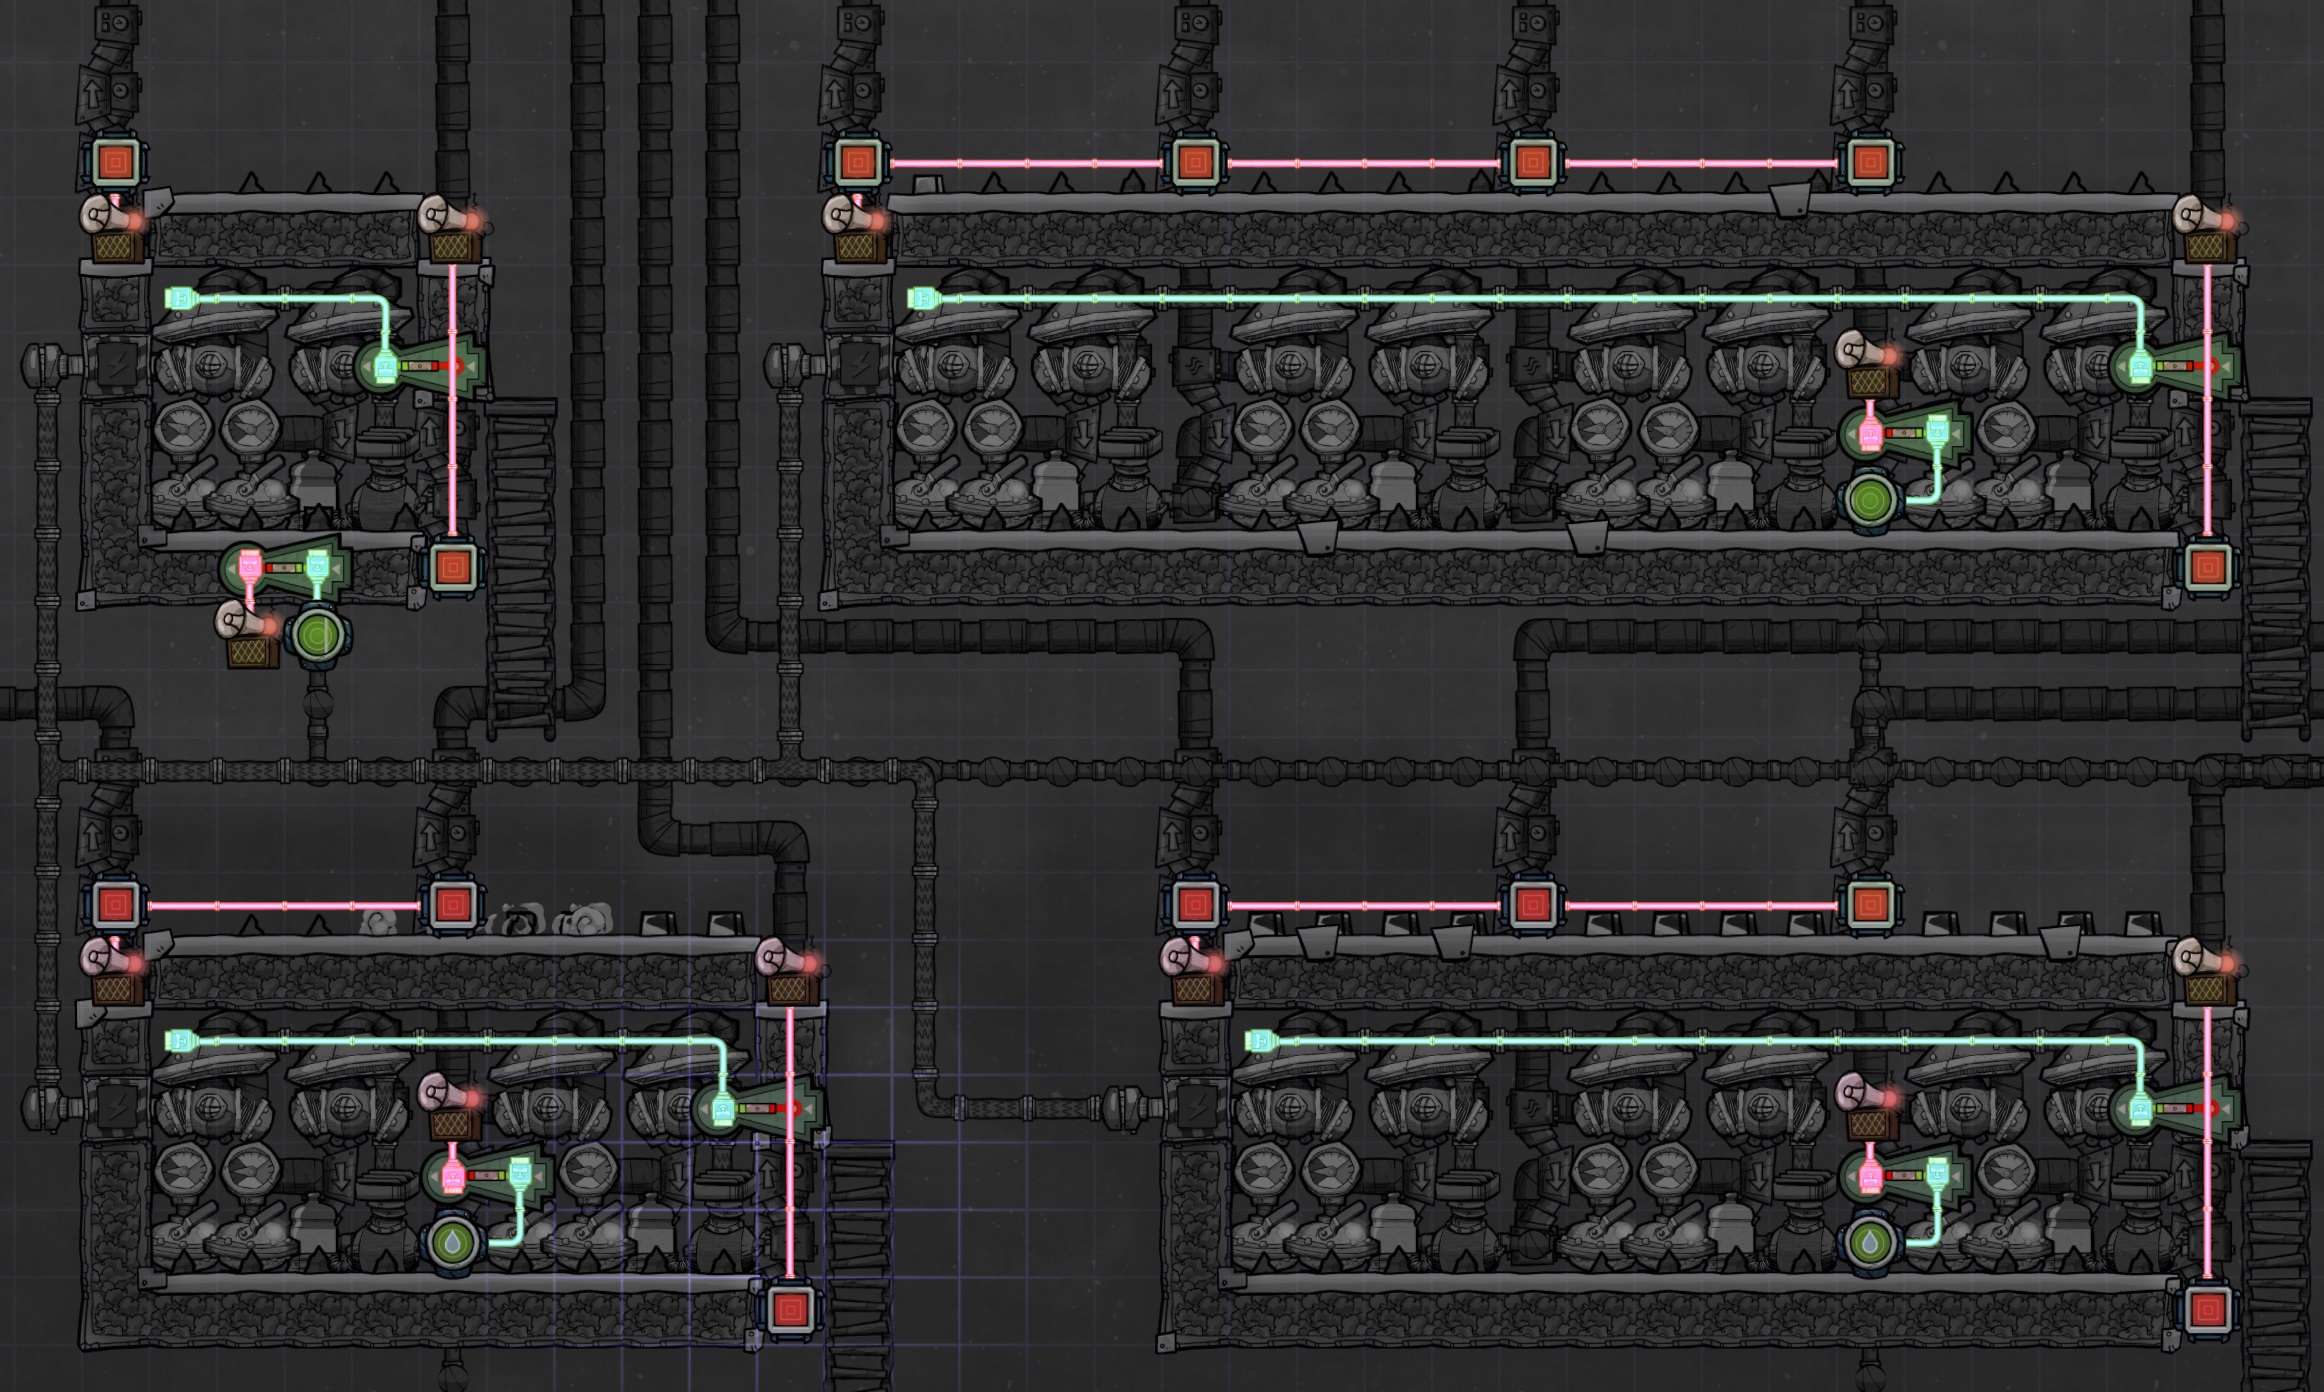
If you choose not to install one or more of these options, you should complete the outer wall corners with insulated tile.
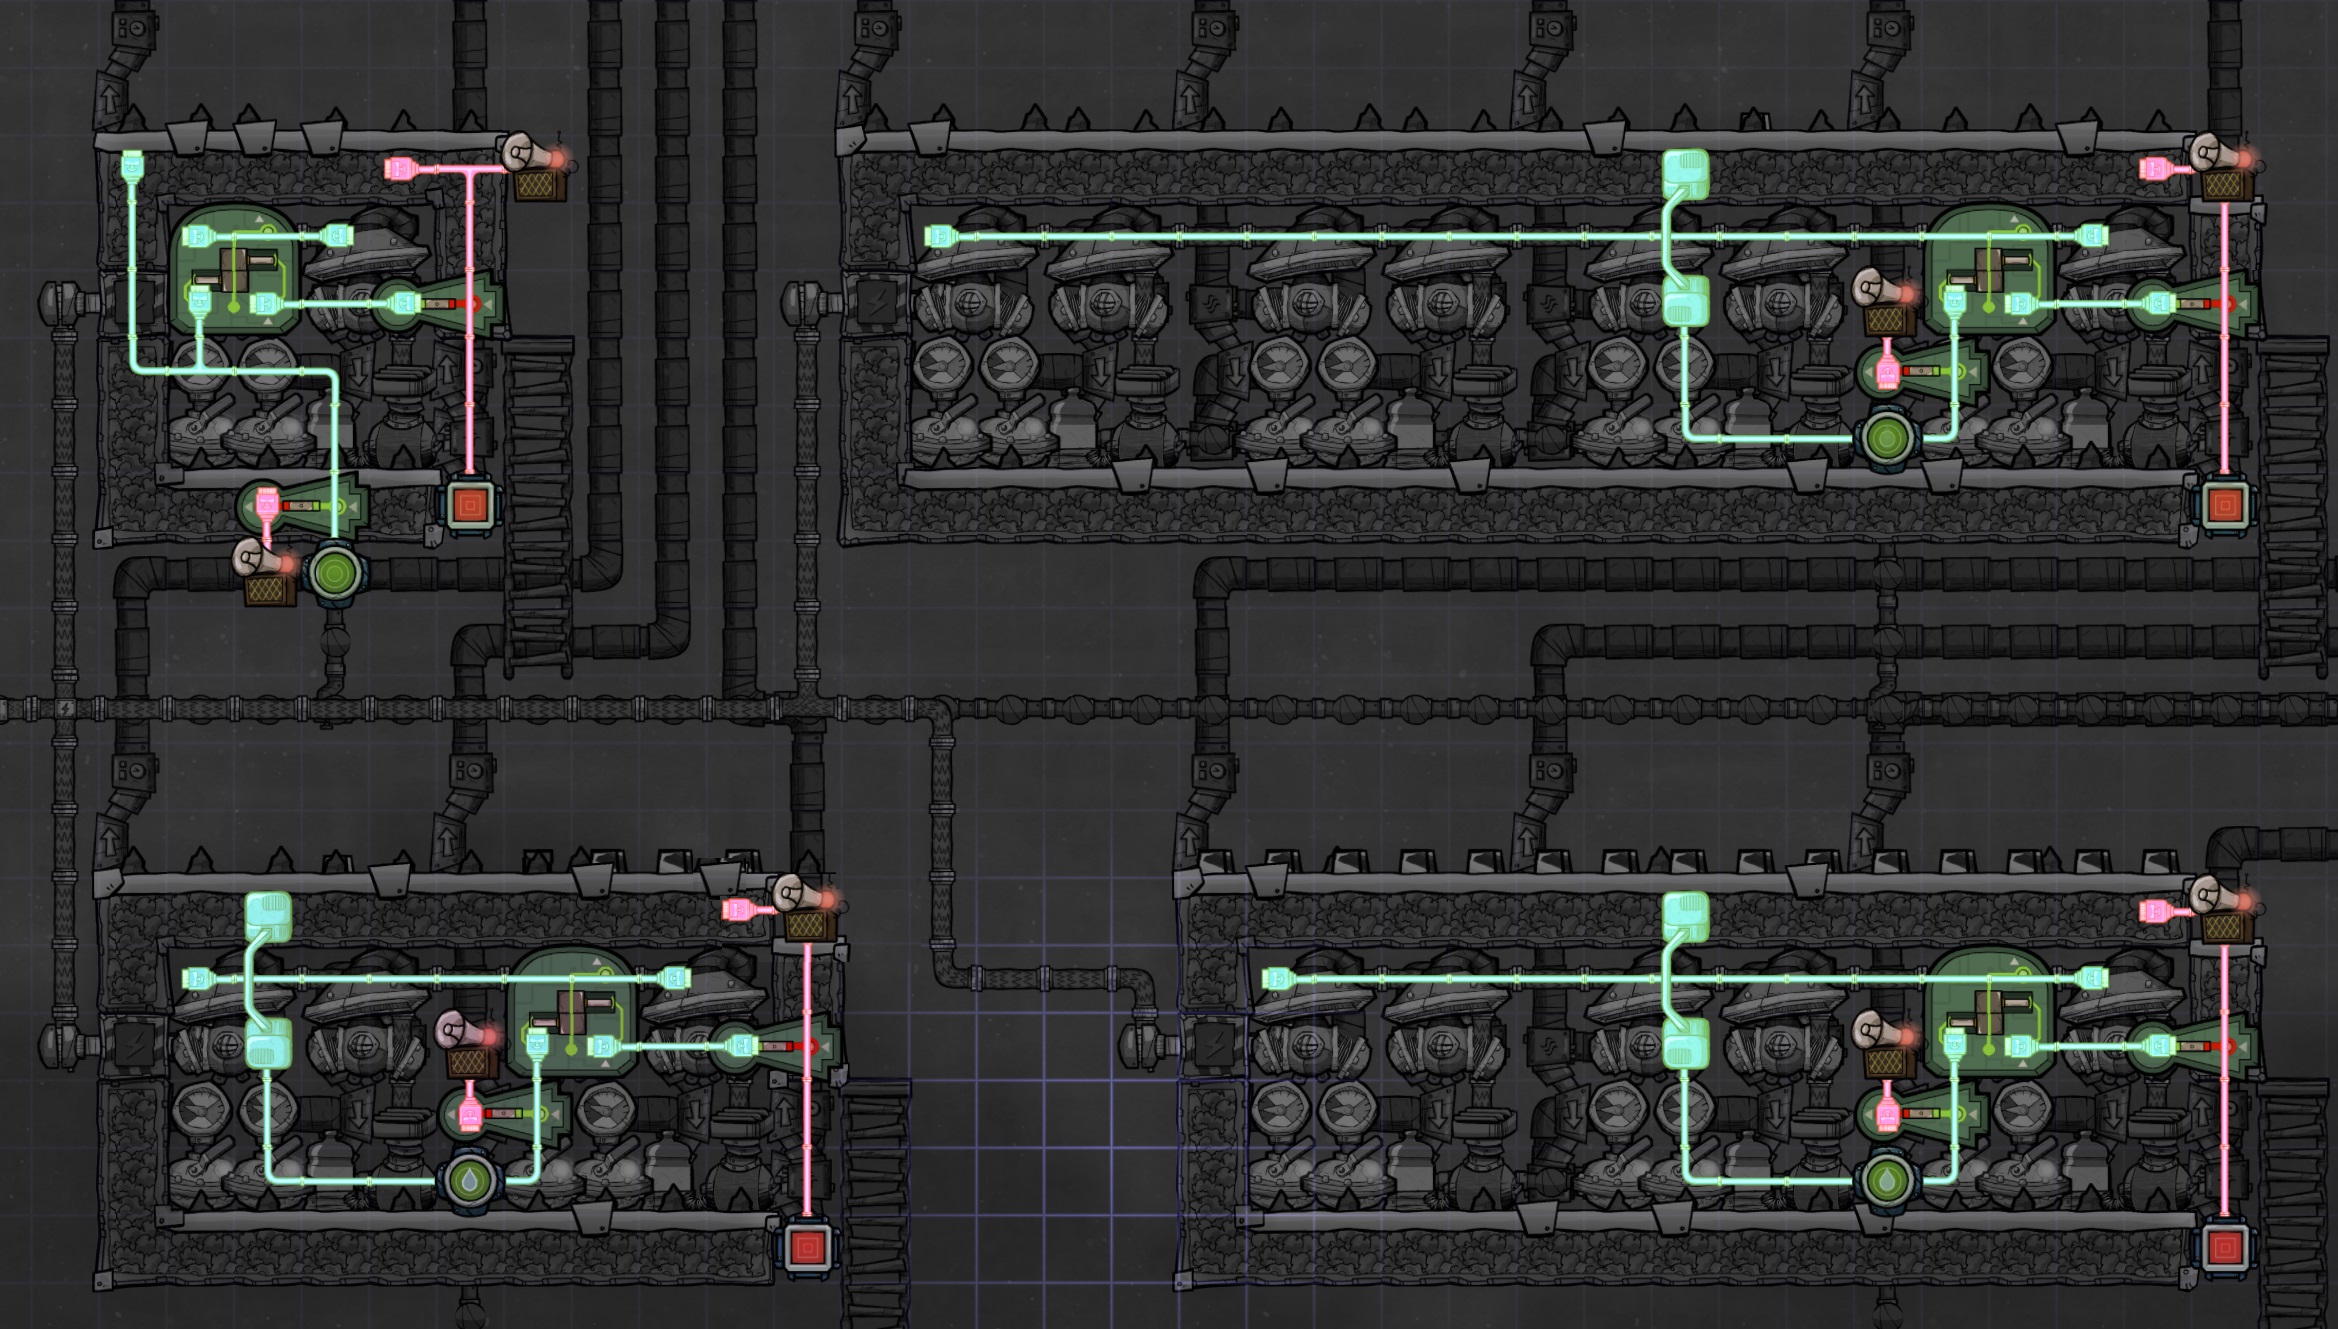 Once that’s complete two more gates are added to finish the logic: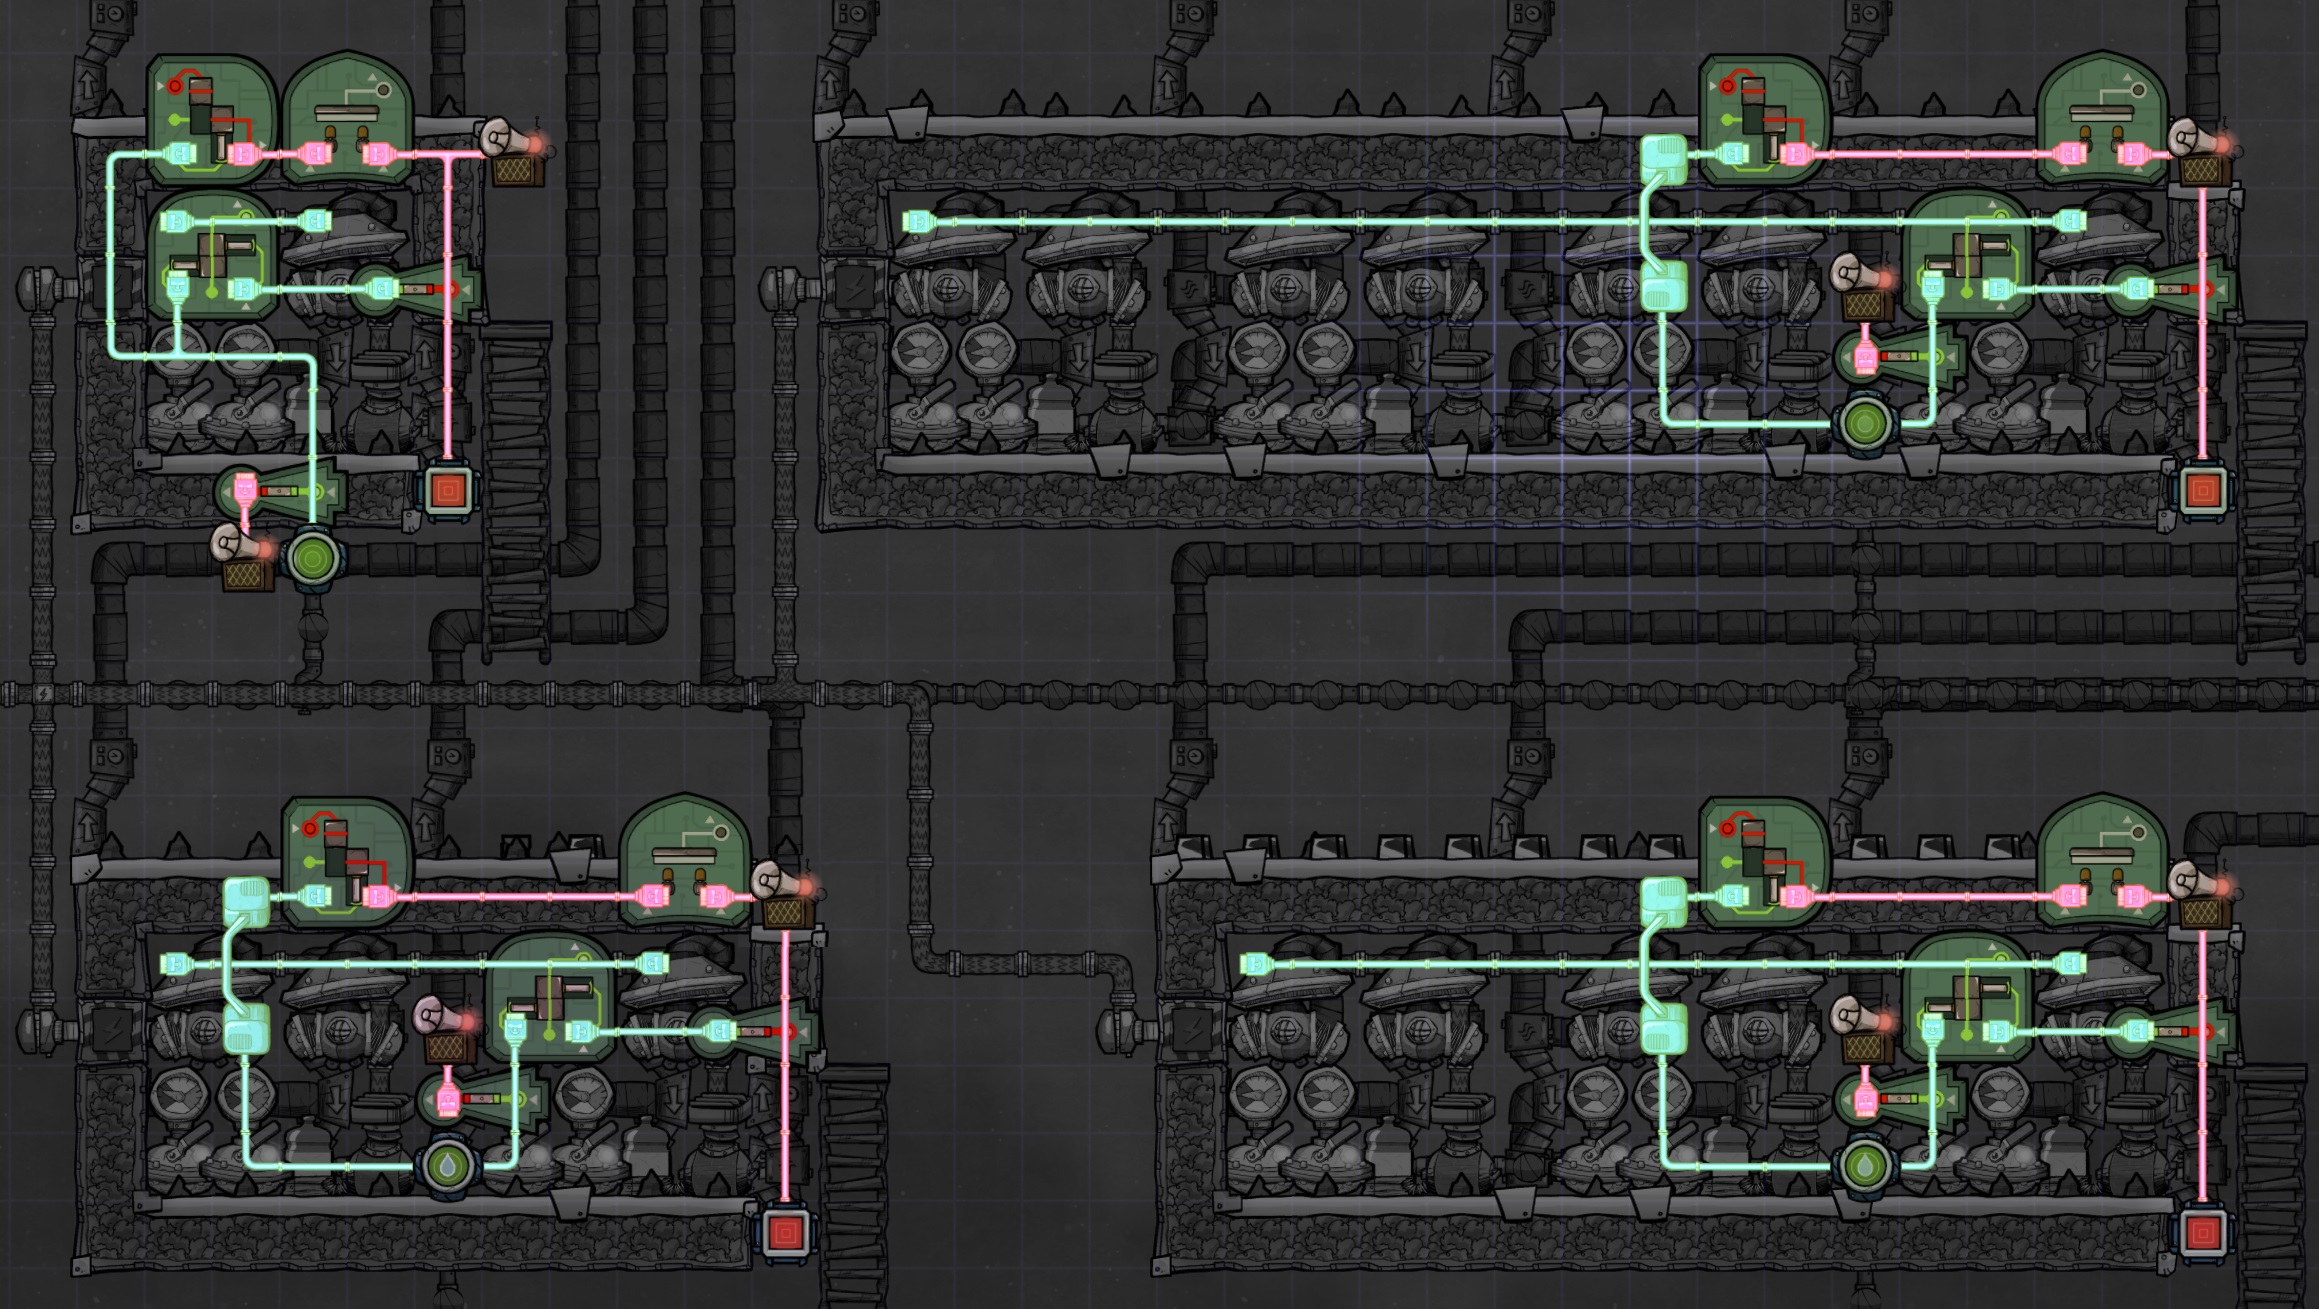
The AND gate on the left will be connected to a smart battery later, outputting a green signal only when the battery needs charging and there is water available at the input sensor.
The OR gate on the right receives that output from the AND gate and uses it to toggle the hydrogen generators on and off. The other input to the OR gate is our hydrogen pipe blockage sensor, as if that pipe is blocked we want to continuously burn hydrogen to try and clear it. We can’t generate oxygen with a blocked hydrogen pipe, so wasting the energy is a good trade against potential suffocation.
With all of these elements in place you’ll be able to convert the electrolyzers into a SPOM any time in the future.
6. Fail Safe SPOM Conversion
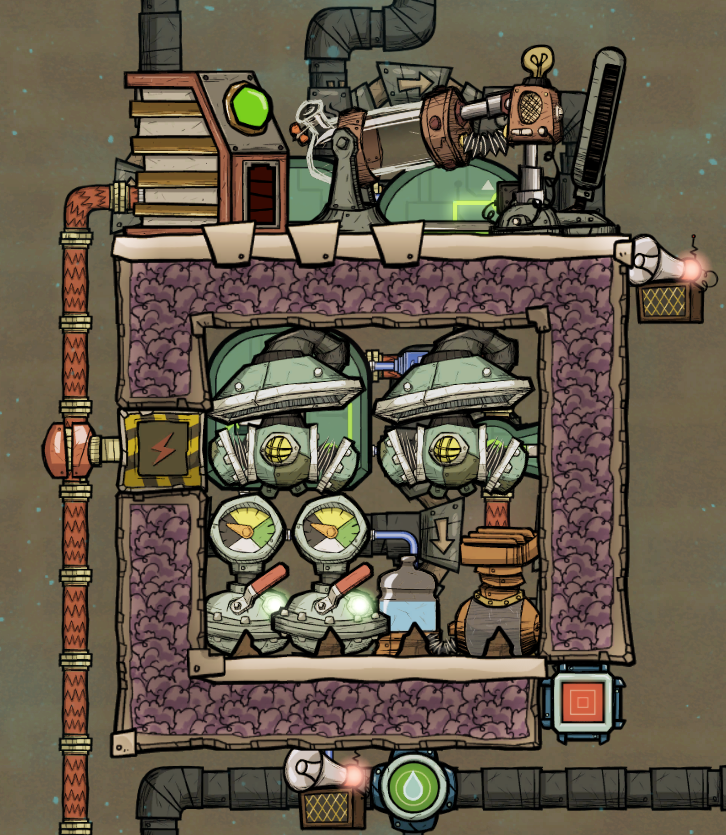
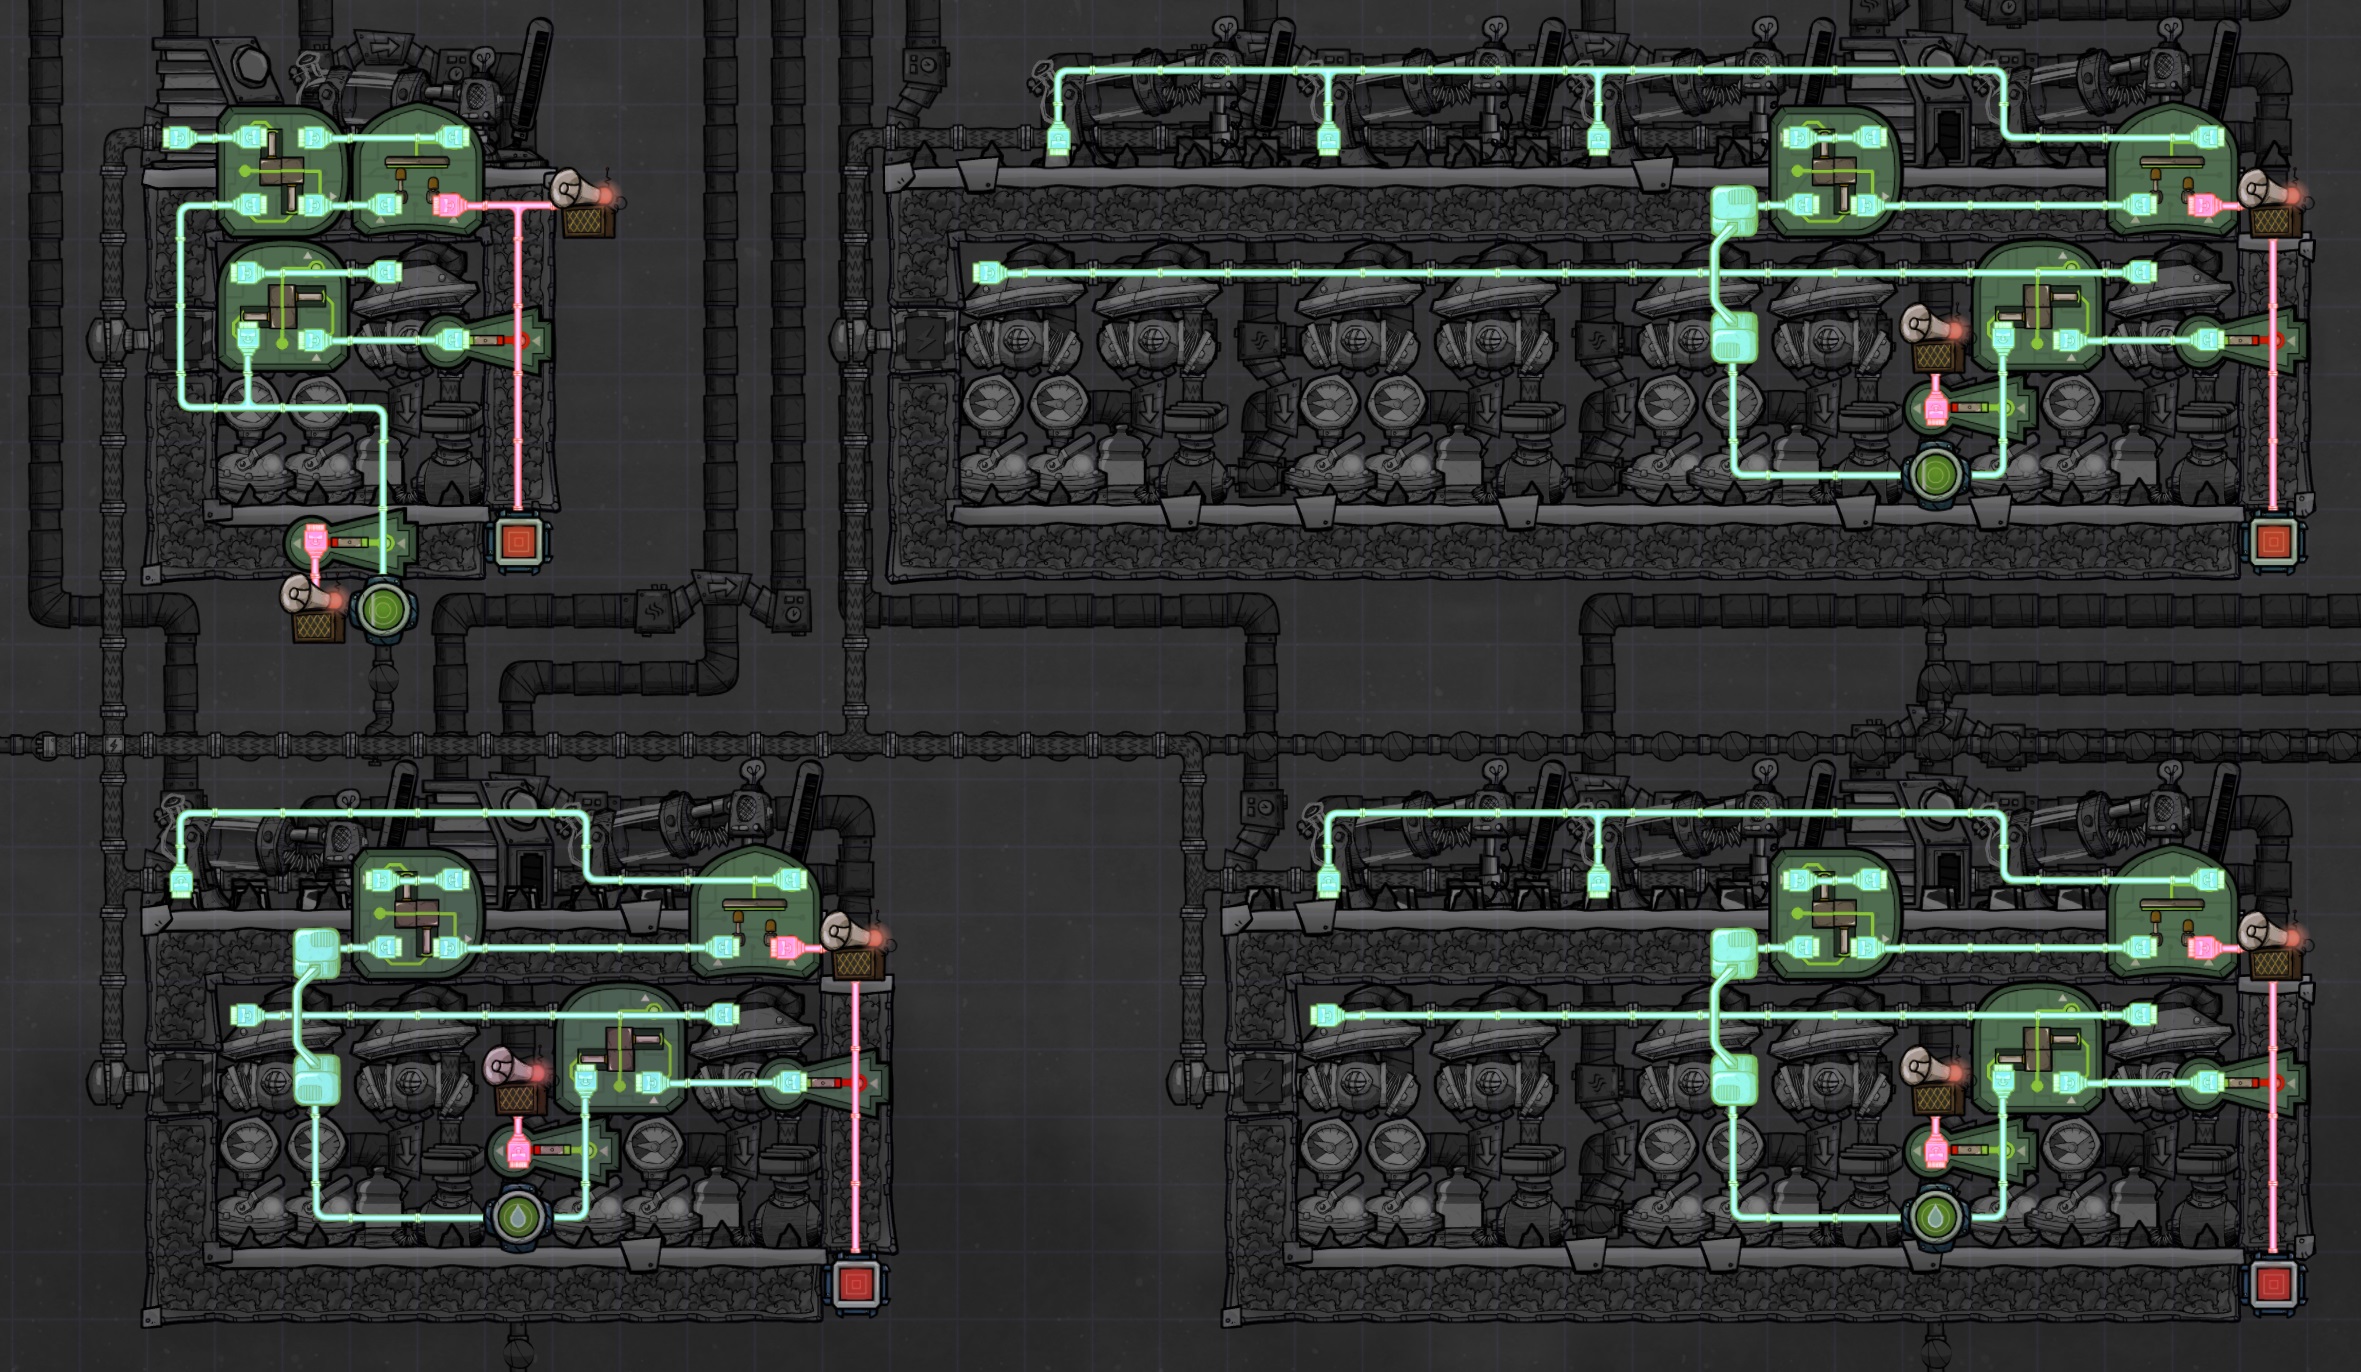
The battery should be set to as wide a range as possible without allowing it to run out of energy completely before the generators kick back on. I use 6 and 98 as the limits which seems to work well, but 5-10 for the low setting and 95-100 for the high should be fine.
Where the hydrogen pipe currently comes out in the upper right corner it will now turn left and run right through all the hydrogen generators. This is where the “Option 1” for oxygen output piping really helps as there are already bridges in place to hop over it.
The key part of this piping is that the hydrogen can’t just exit the final generator and carry on to wherever you’d like to store or dispose of it. It’s important that it loop back on itself, using the pipes to create local hydrogen storage. This idea is seen clearest in the single electrolyzer design, but the others are all doing the same thing with additional bridges to jump over oxygen outputs. Once the loop is completely full, excess hydrogen will be sent up and out of the loop by the right-most bridge. There are a number of reasons this extra storage is important:- Unlike the Kharnath designs, my electrolyzers experience gas deletion and put out barely enough hydrogen to run a generator full time. Each generator requires 60kg/cycle and I measure my output around 61.5kg per module vs. Kharnath’s ~66kg. The smart battery will help with this, shutting down the generators for short periods of time, but we still won’t have that much excess hydrogen.
- Each hydrogen generator can only store 2kg of gas internally, which is enough for ~20 seconds of game time. There will be random fluctuations in the amount of gas output over short time periods, so a larger storage will help average out those fluctuations and ensure we don’t lose power. Each tile in the loop adds an additional 1kg of storage, so a loop holding an extra 8-9kg per generator will give you a total hydrogen reserve of ~100 seconds.
- Without some local hydrogen storage you won’t have enough energy to restart after an interruption in input water. This was the reason for the extra water sensor in the SPOM design as well, but having extra hydrogen stored helps a lot.
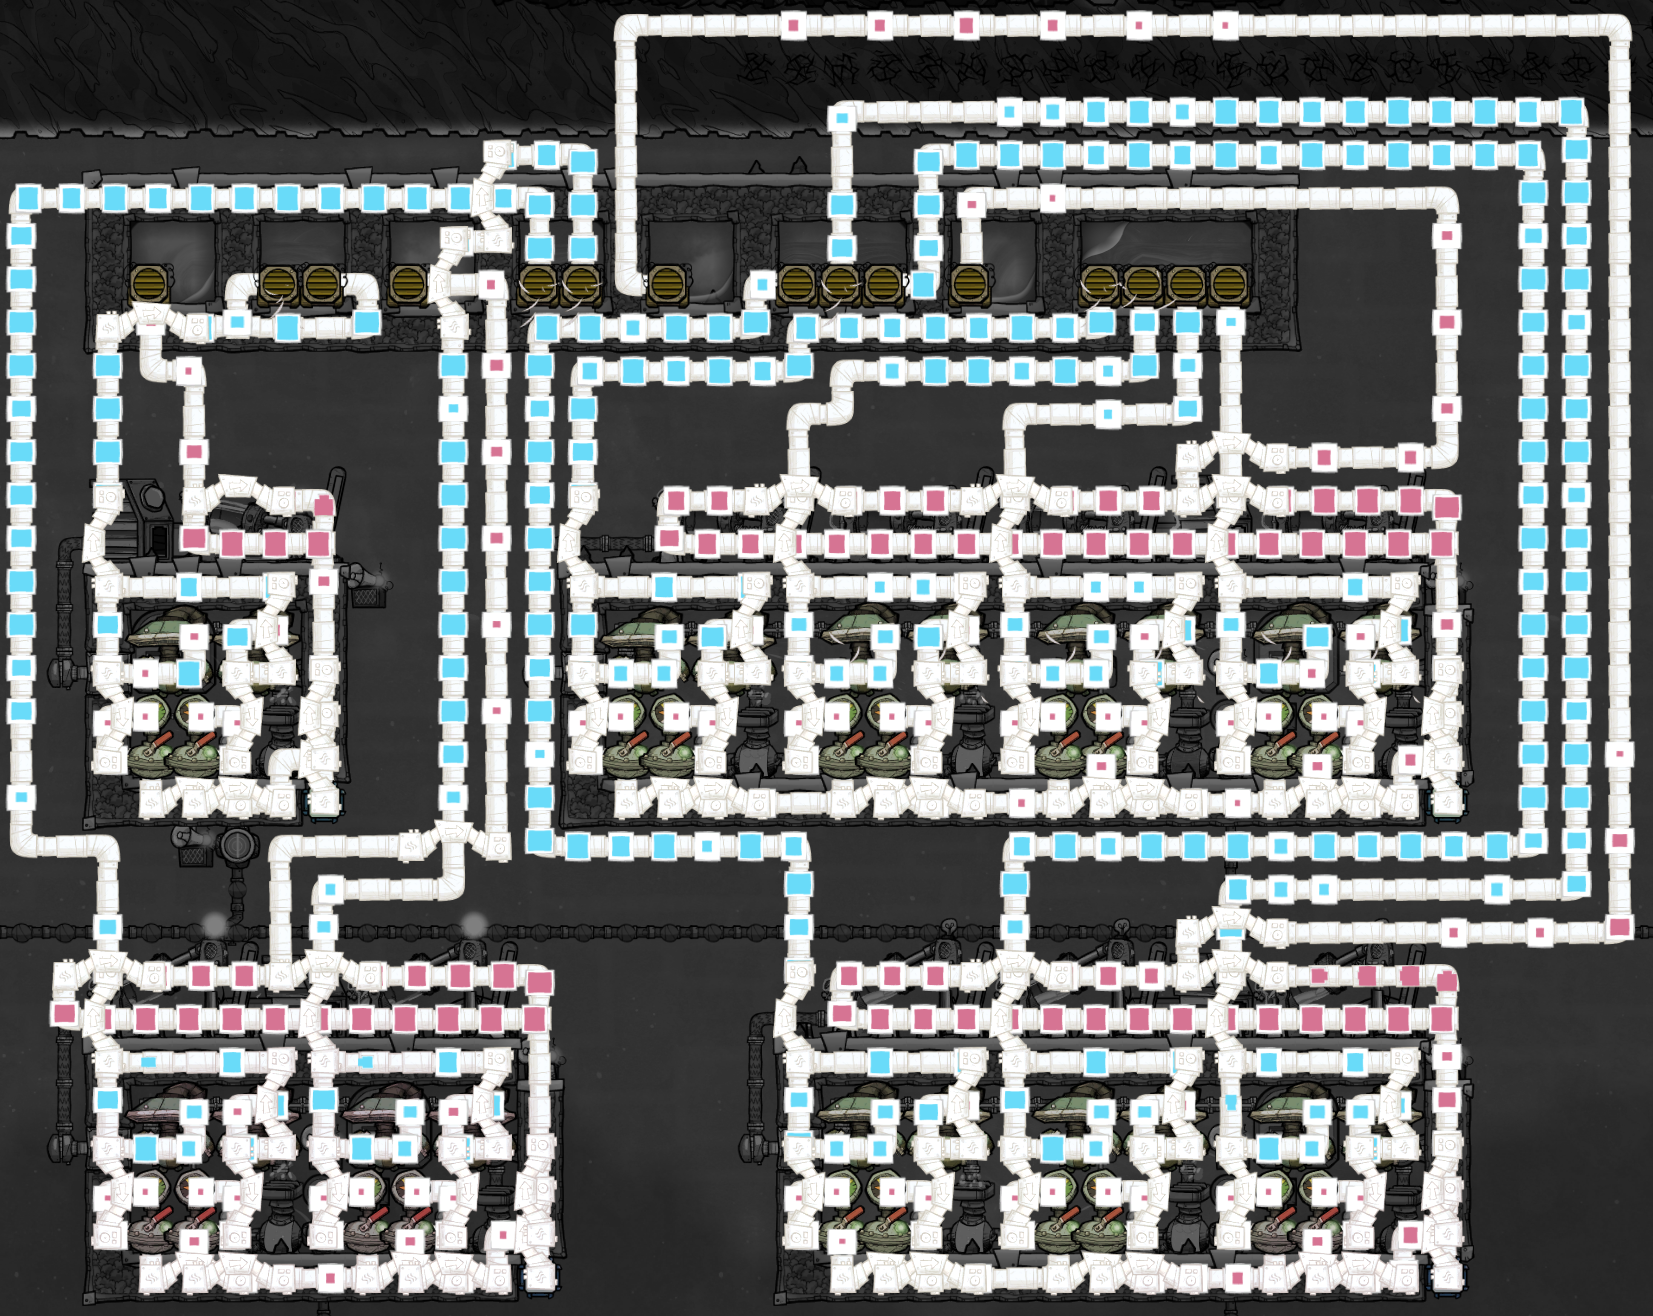
7. Failure Testing
This section demonstrates the design's behavior under various failure modes.
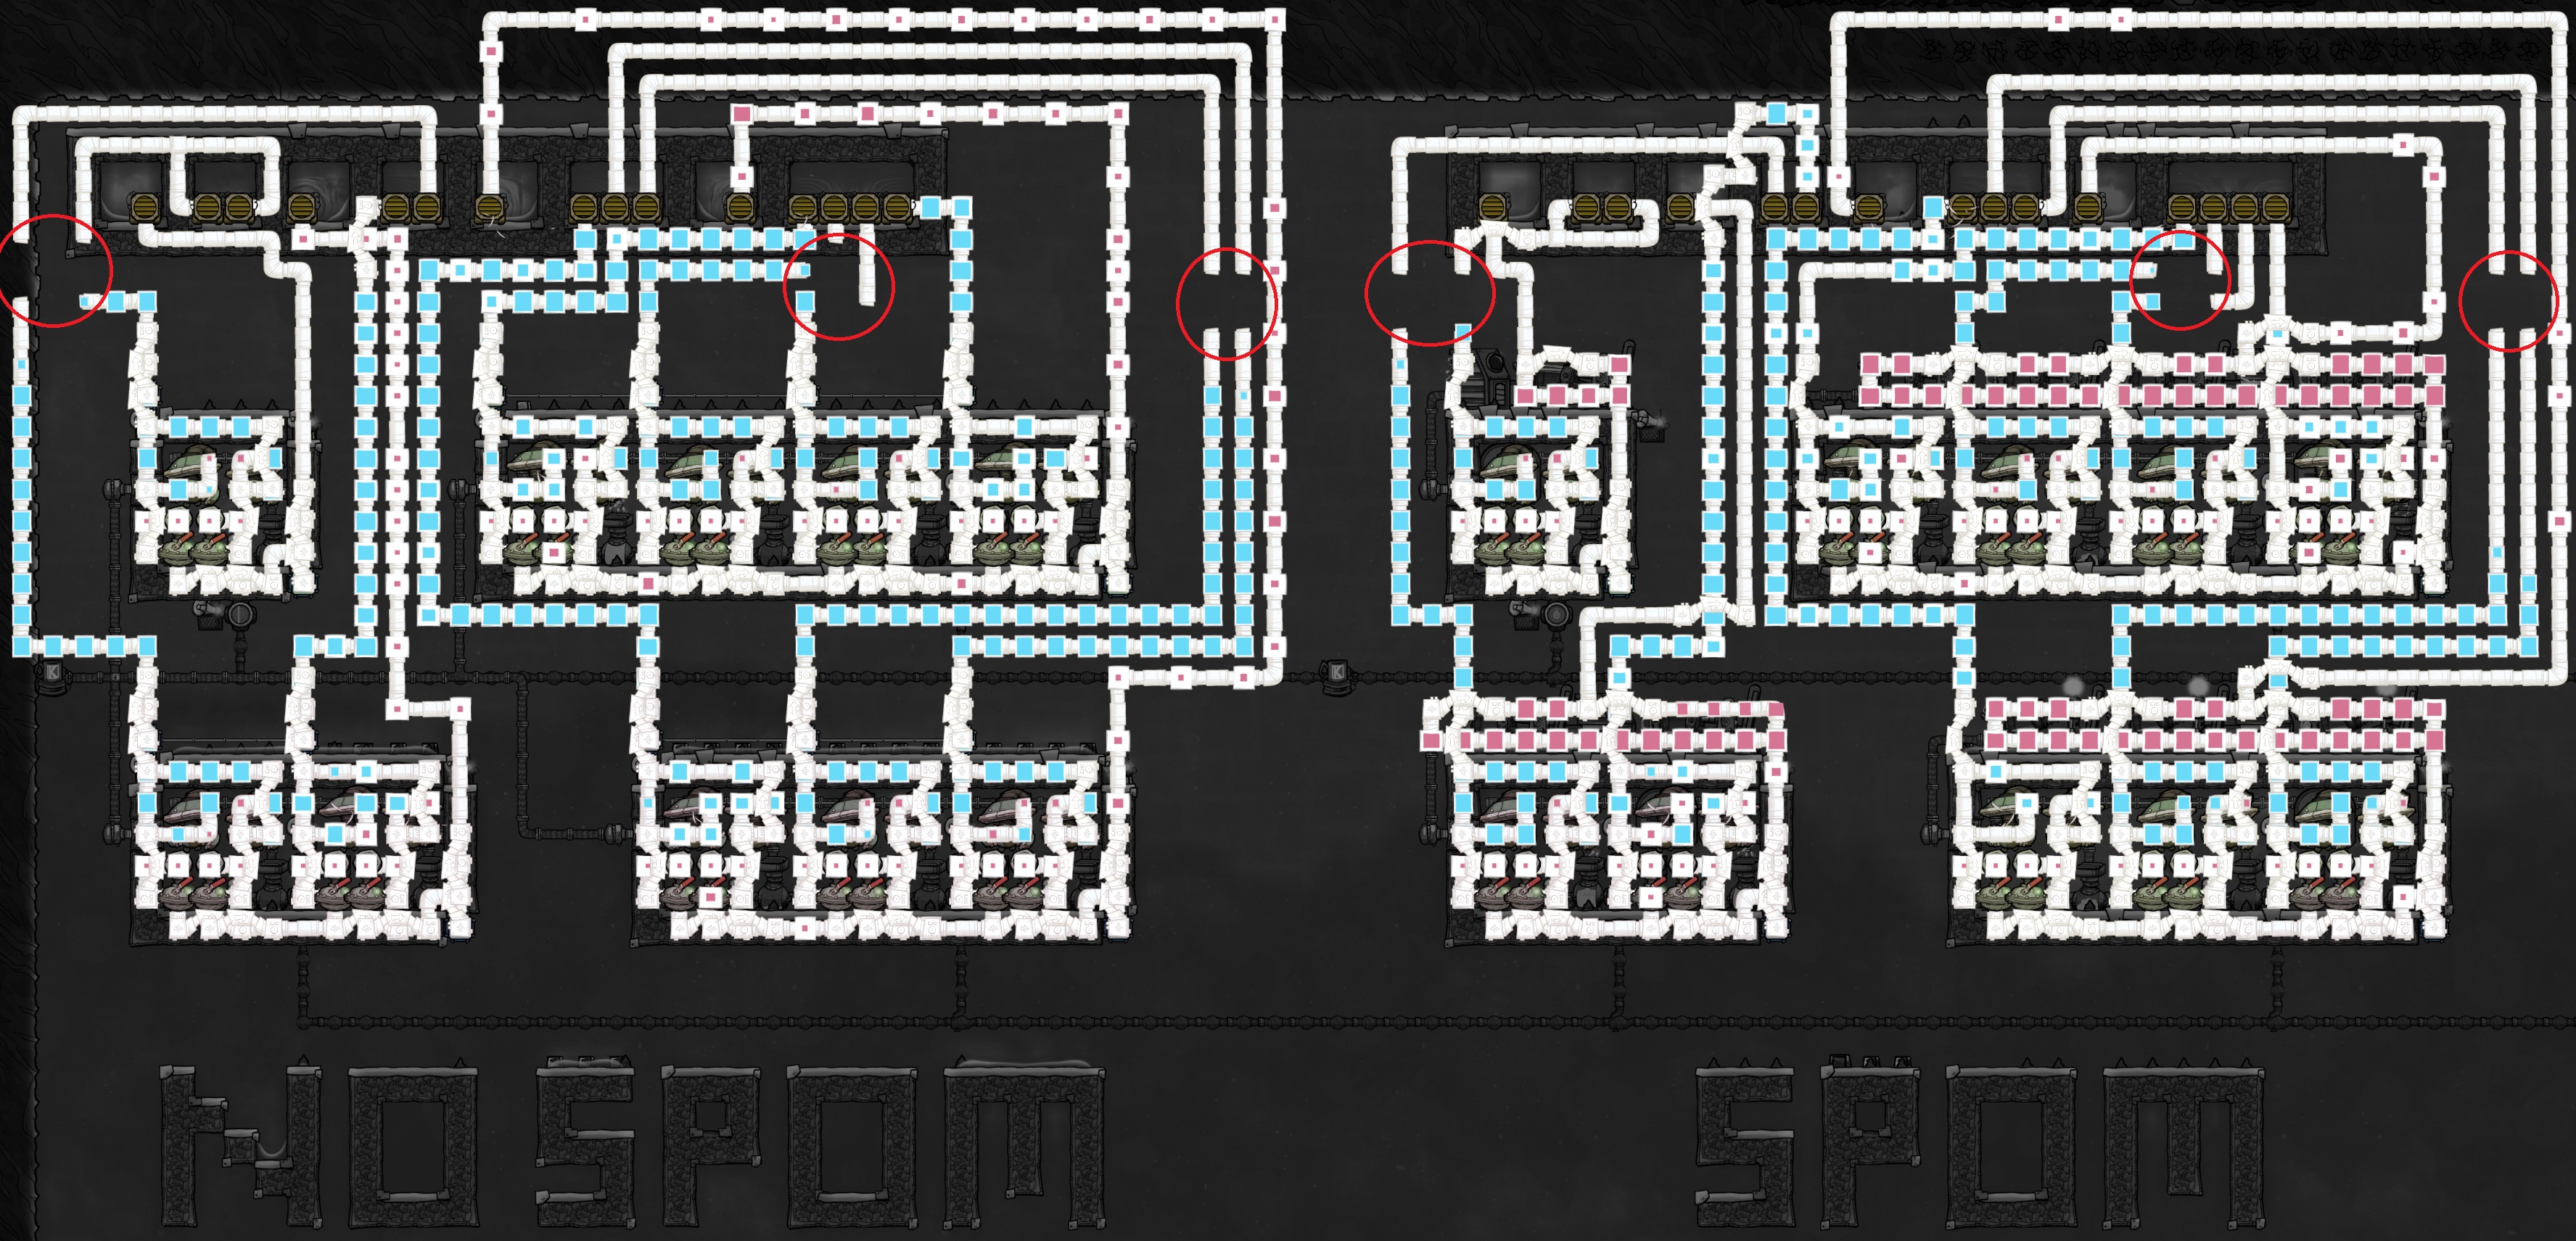
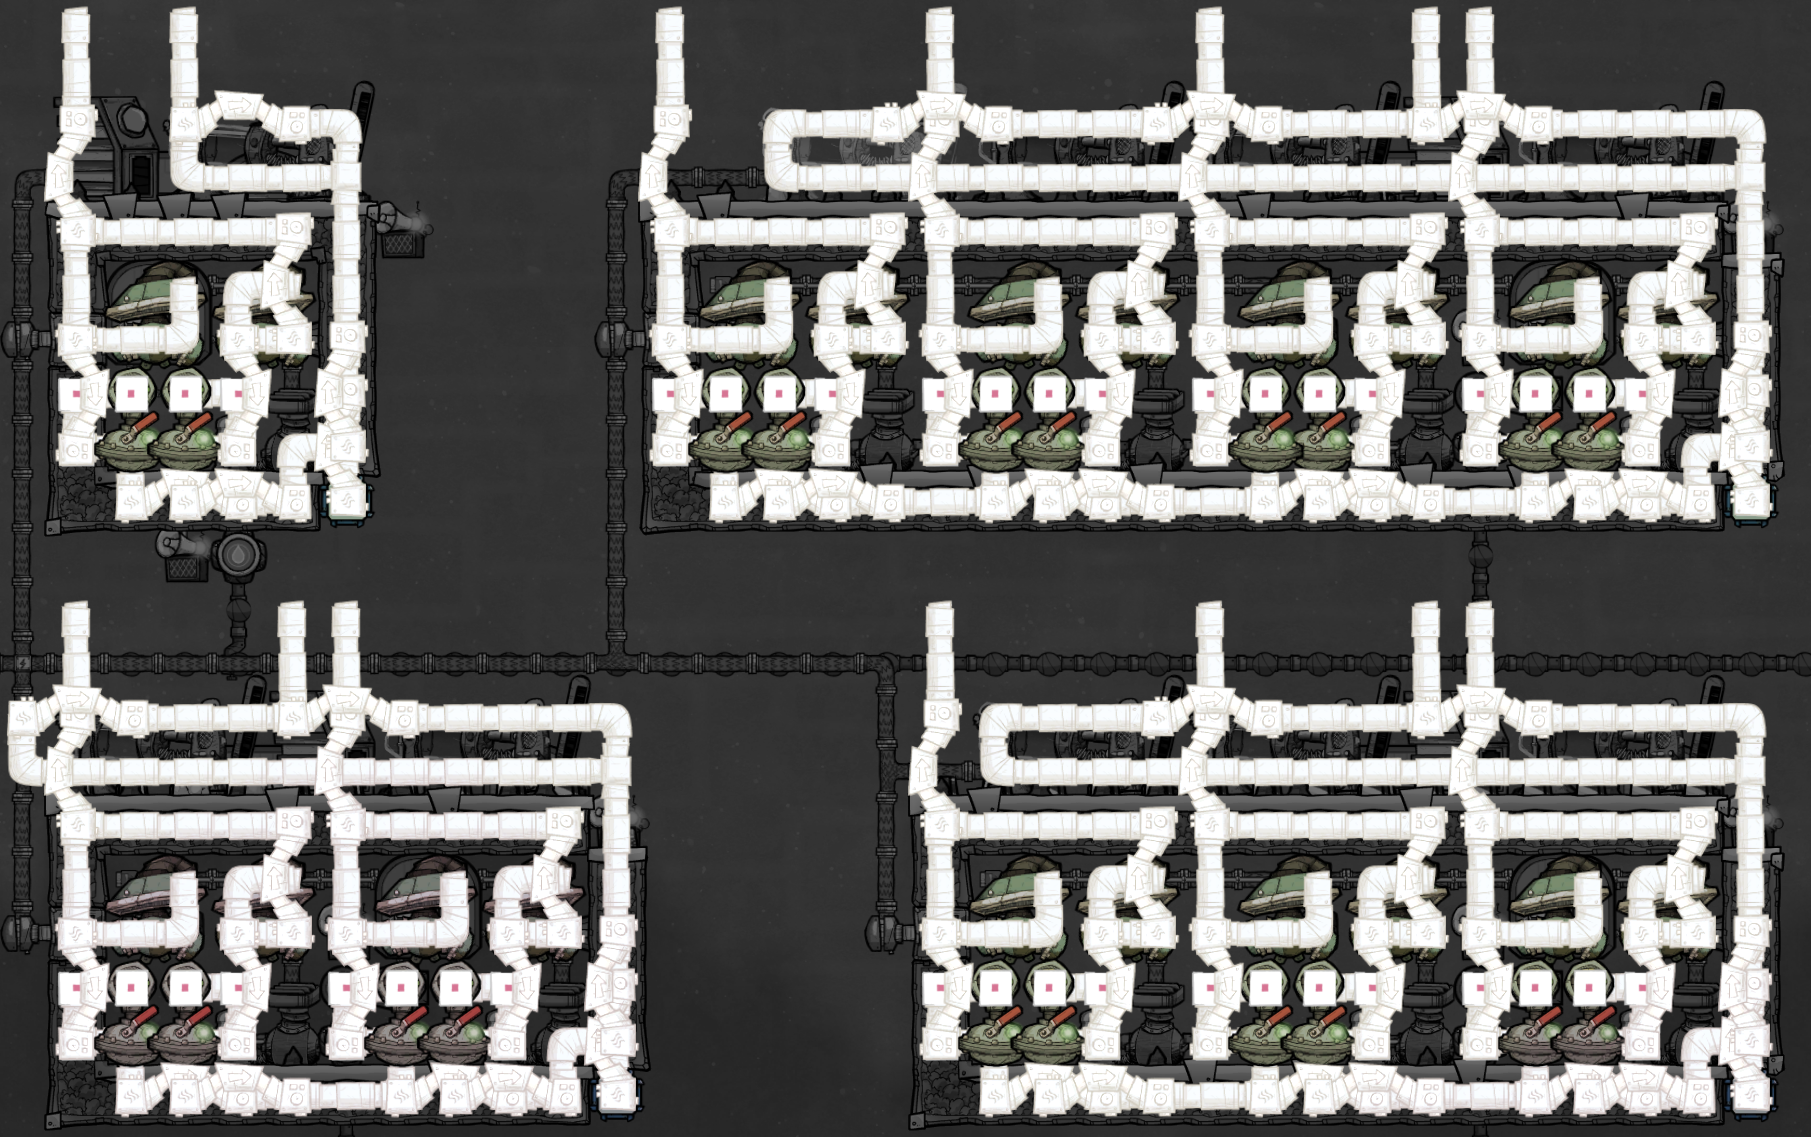
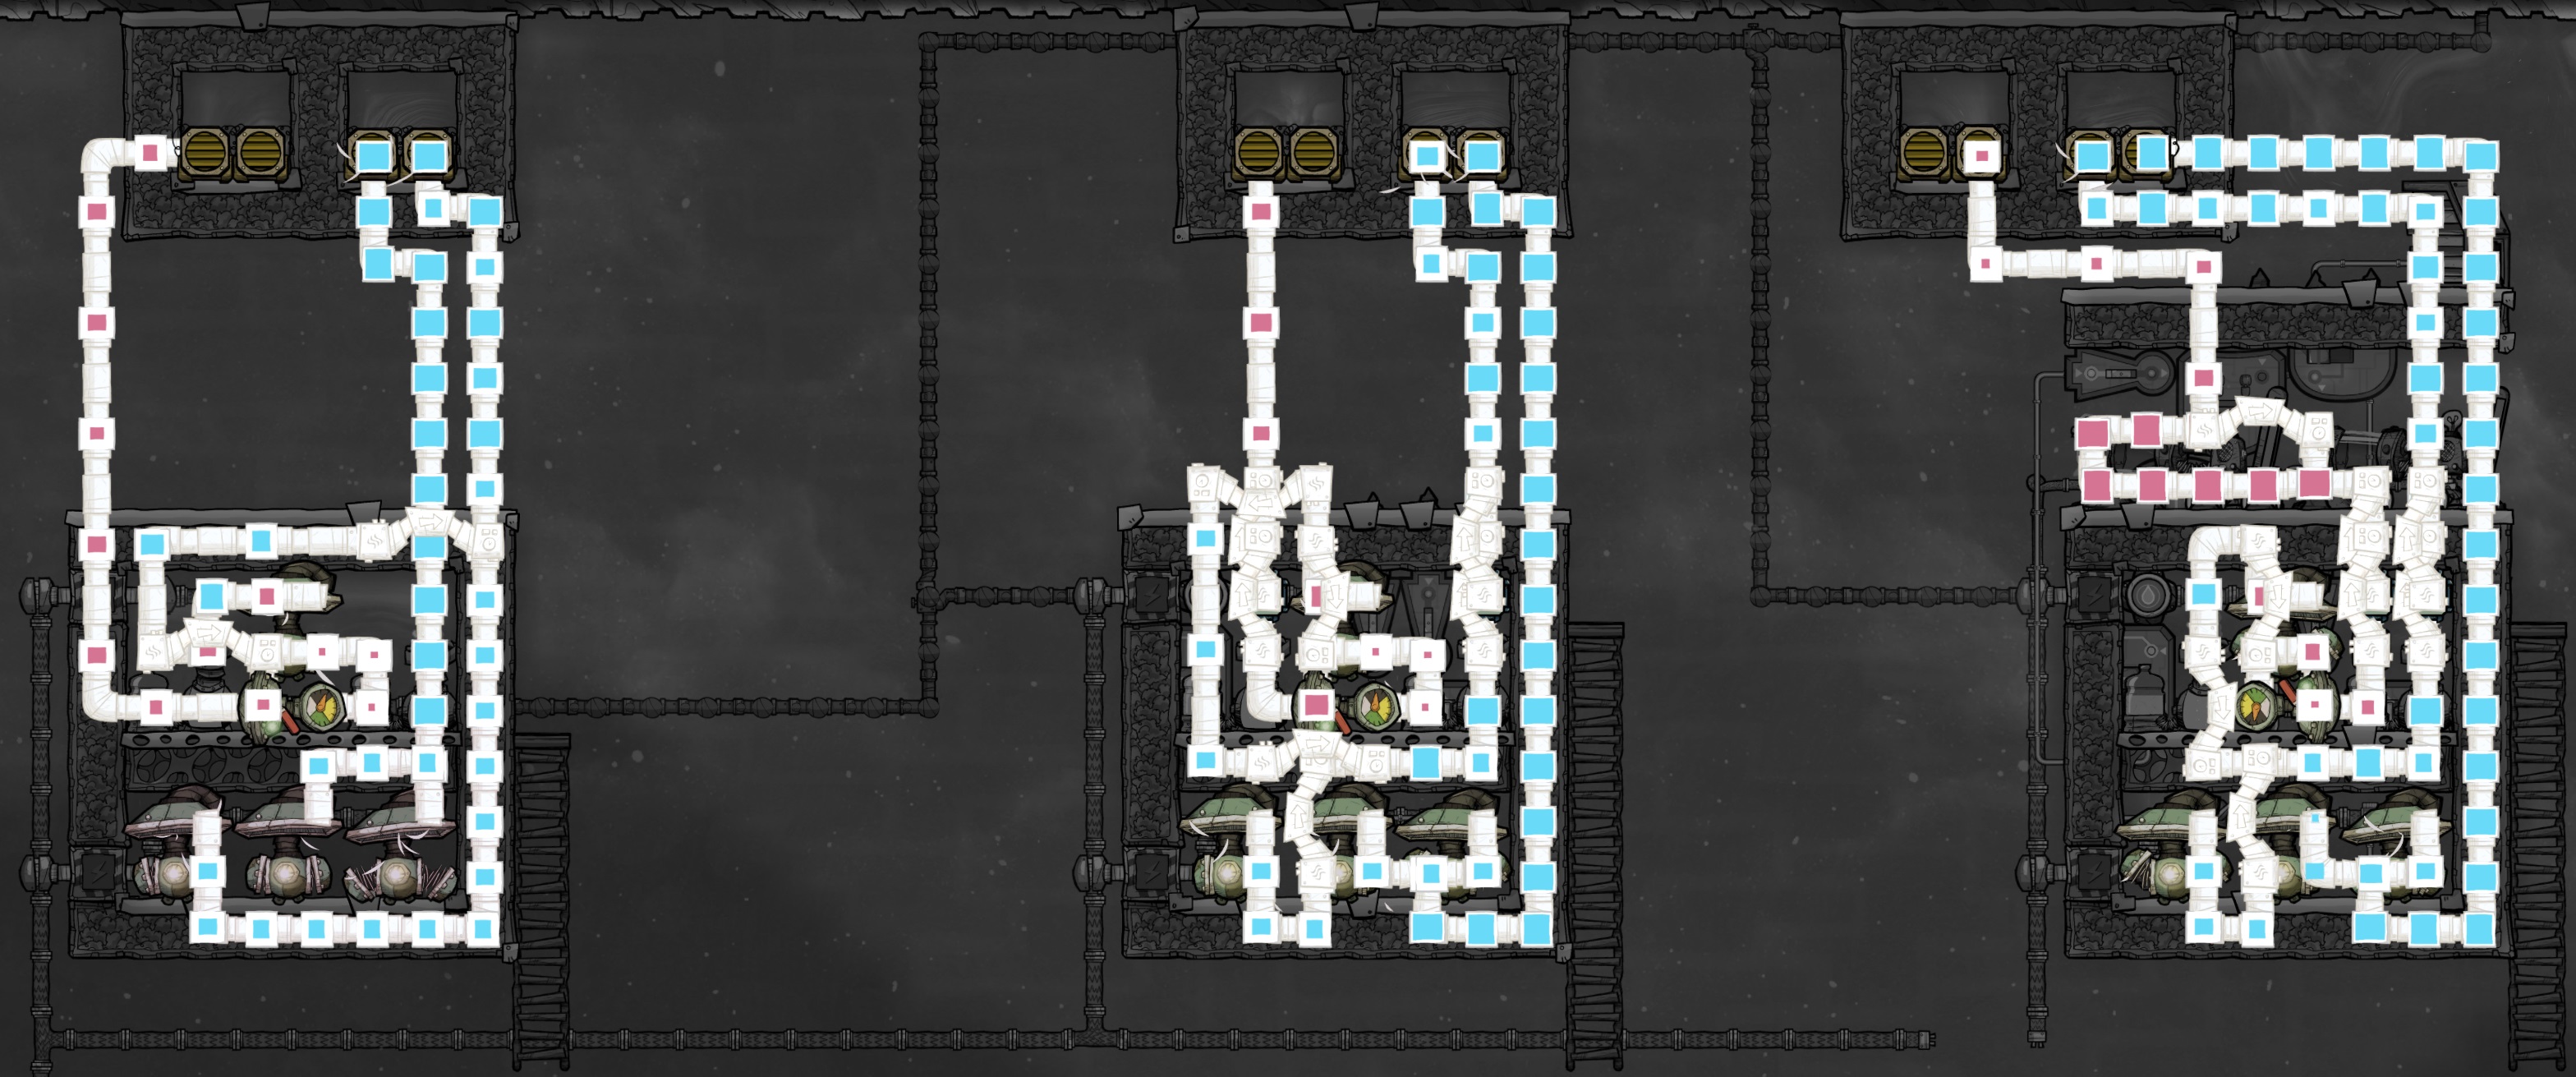
The modules with cut pipes have stopped all operation, while the other modules continue on normally. This works just as well no matter which or how many oxygen lines back up, or even all of them. Once the line(s) clear the affected module(s) resume operation and most importantly no gas outputs are ever mixed.
I should mention that in this scenario hydrogen production will be reduced somewhat as the electrolyzers will eventually overpressurize from extra oxygen. I haven’t measured exact numbers, but this is yet another reason having a local hydrogen storage for the SPOM configuration is a good idea. It’s also another reason to add the optional pipe block sensors on the oxygen outputs, at least if you’re planning to use the SPOM implementation.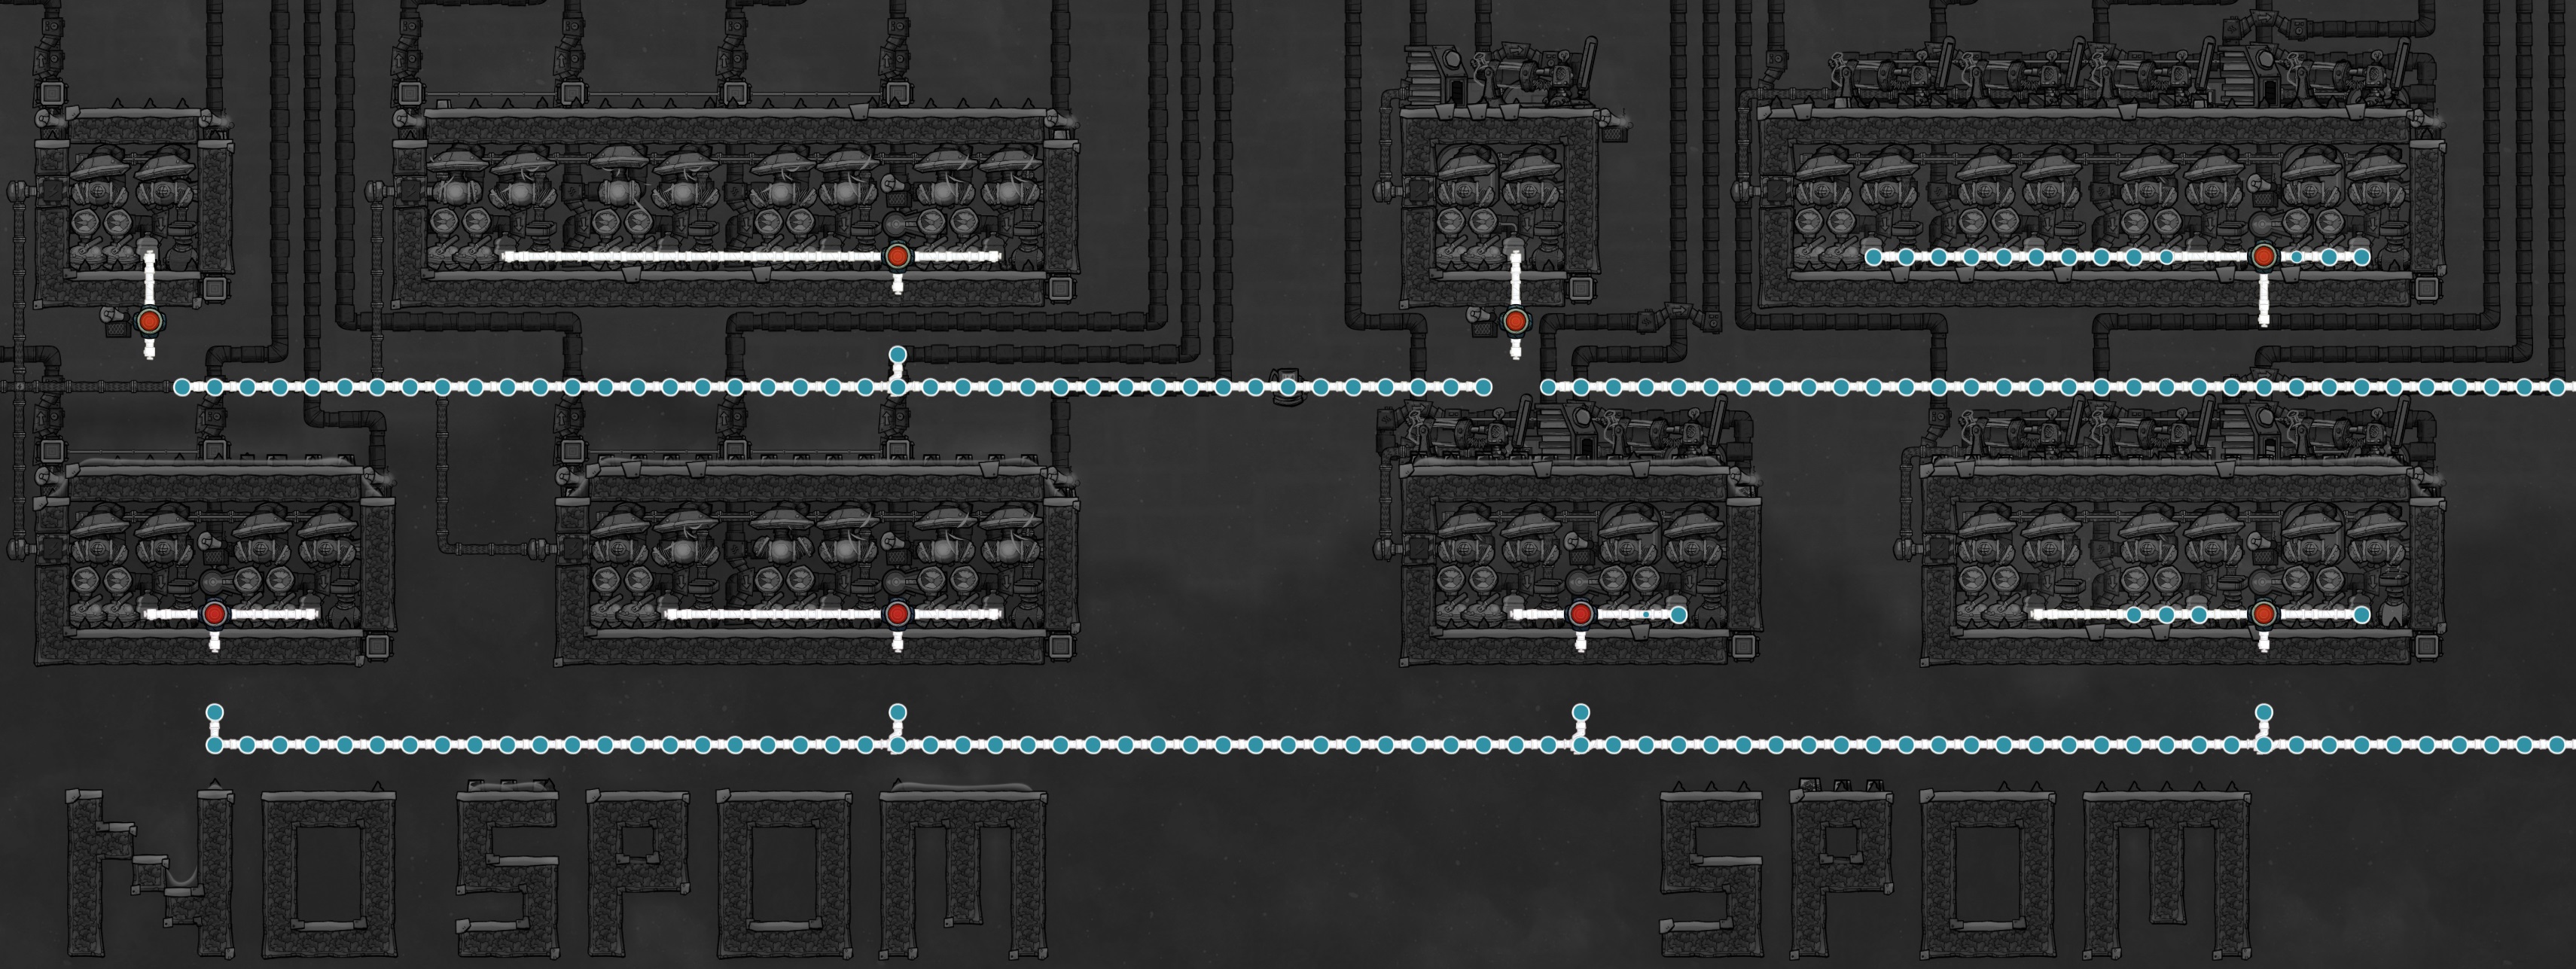 As seen in the gas overlay, the non-SPOM implementation continues to run normally, until it eventually reaches a vacuum and has nothing left to pump. This is why the water loss sensor was optional in the non-SPOM design, and only used to alert you to this condition. When the water input is restored, it resumes creating gas and the pumps resume pumping. Most importantly, output gases are never mixed during or after the loss of water.
 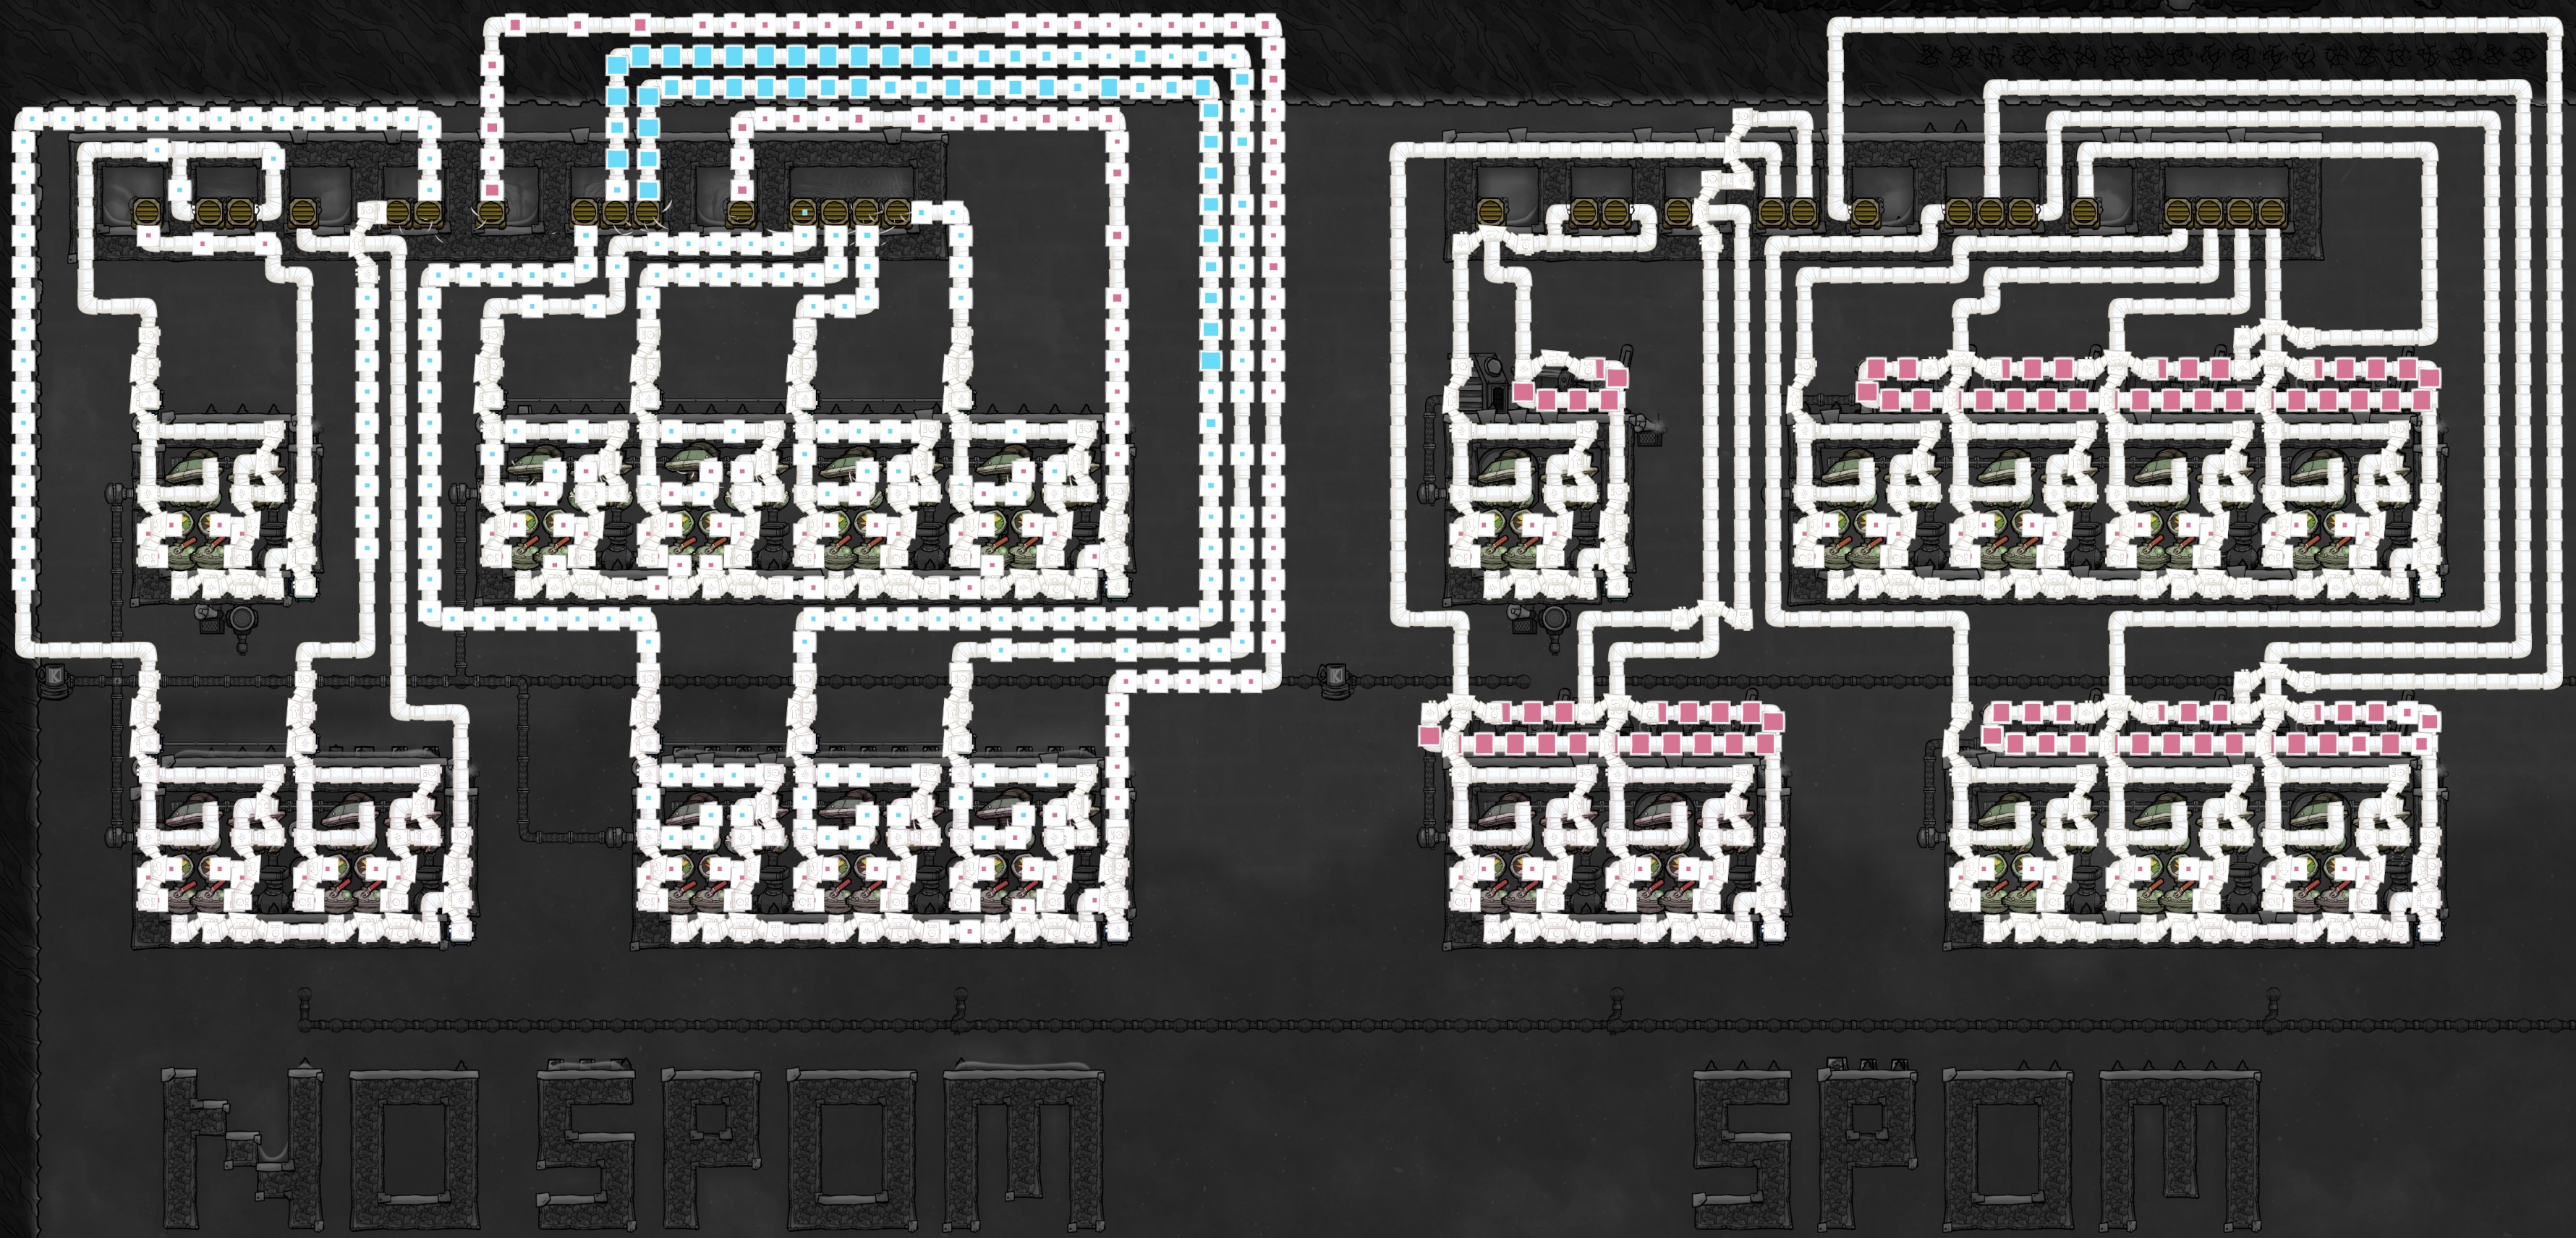 The SPOM implementation responds much differently, immediately turning off the entire machine to conserve power. It waits until water input is restored and then resumes normal operation. The extra storage of hydrogen we created ensures there is plenty of power to run everything until the electrolyzer’s hydrogen production gets back to normal levels to sustain the generators.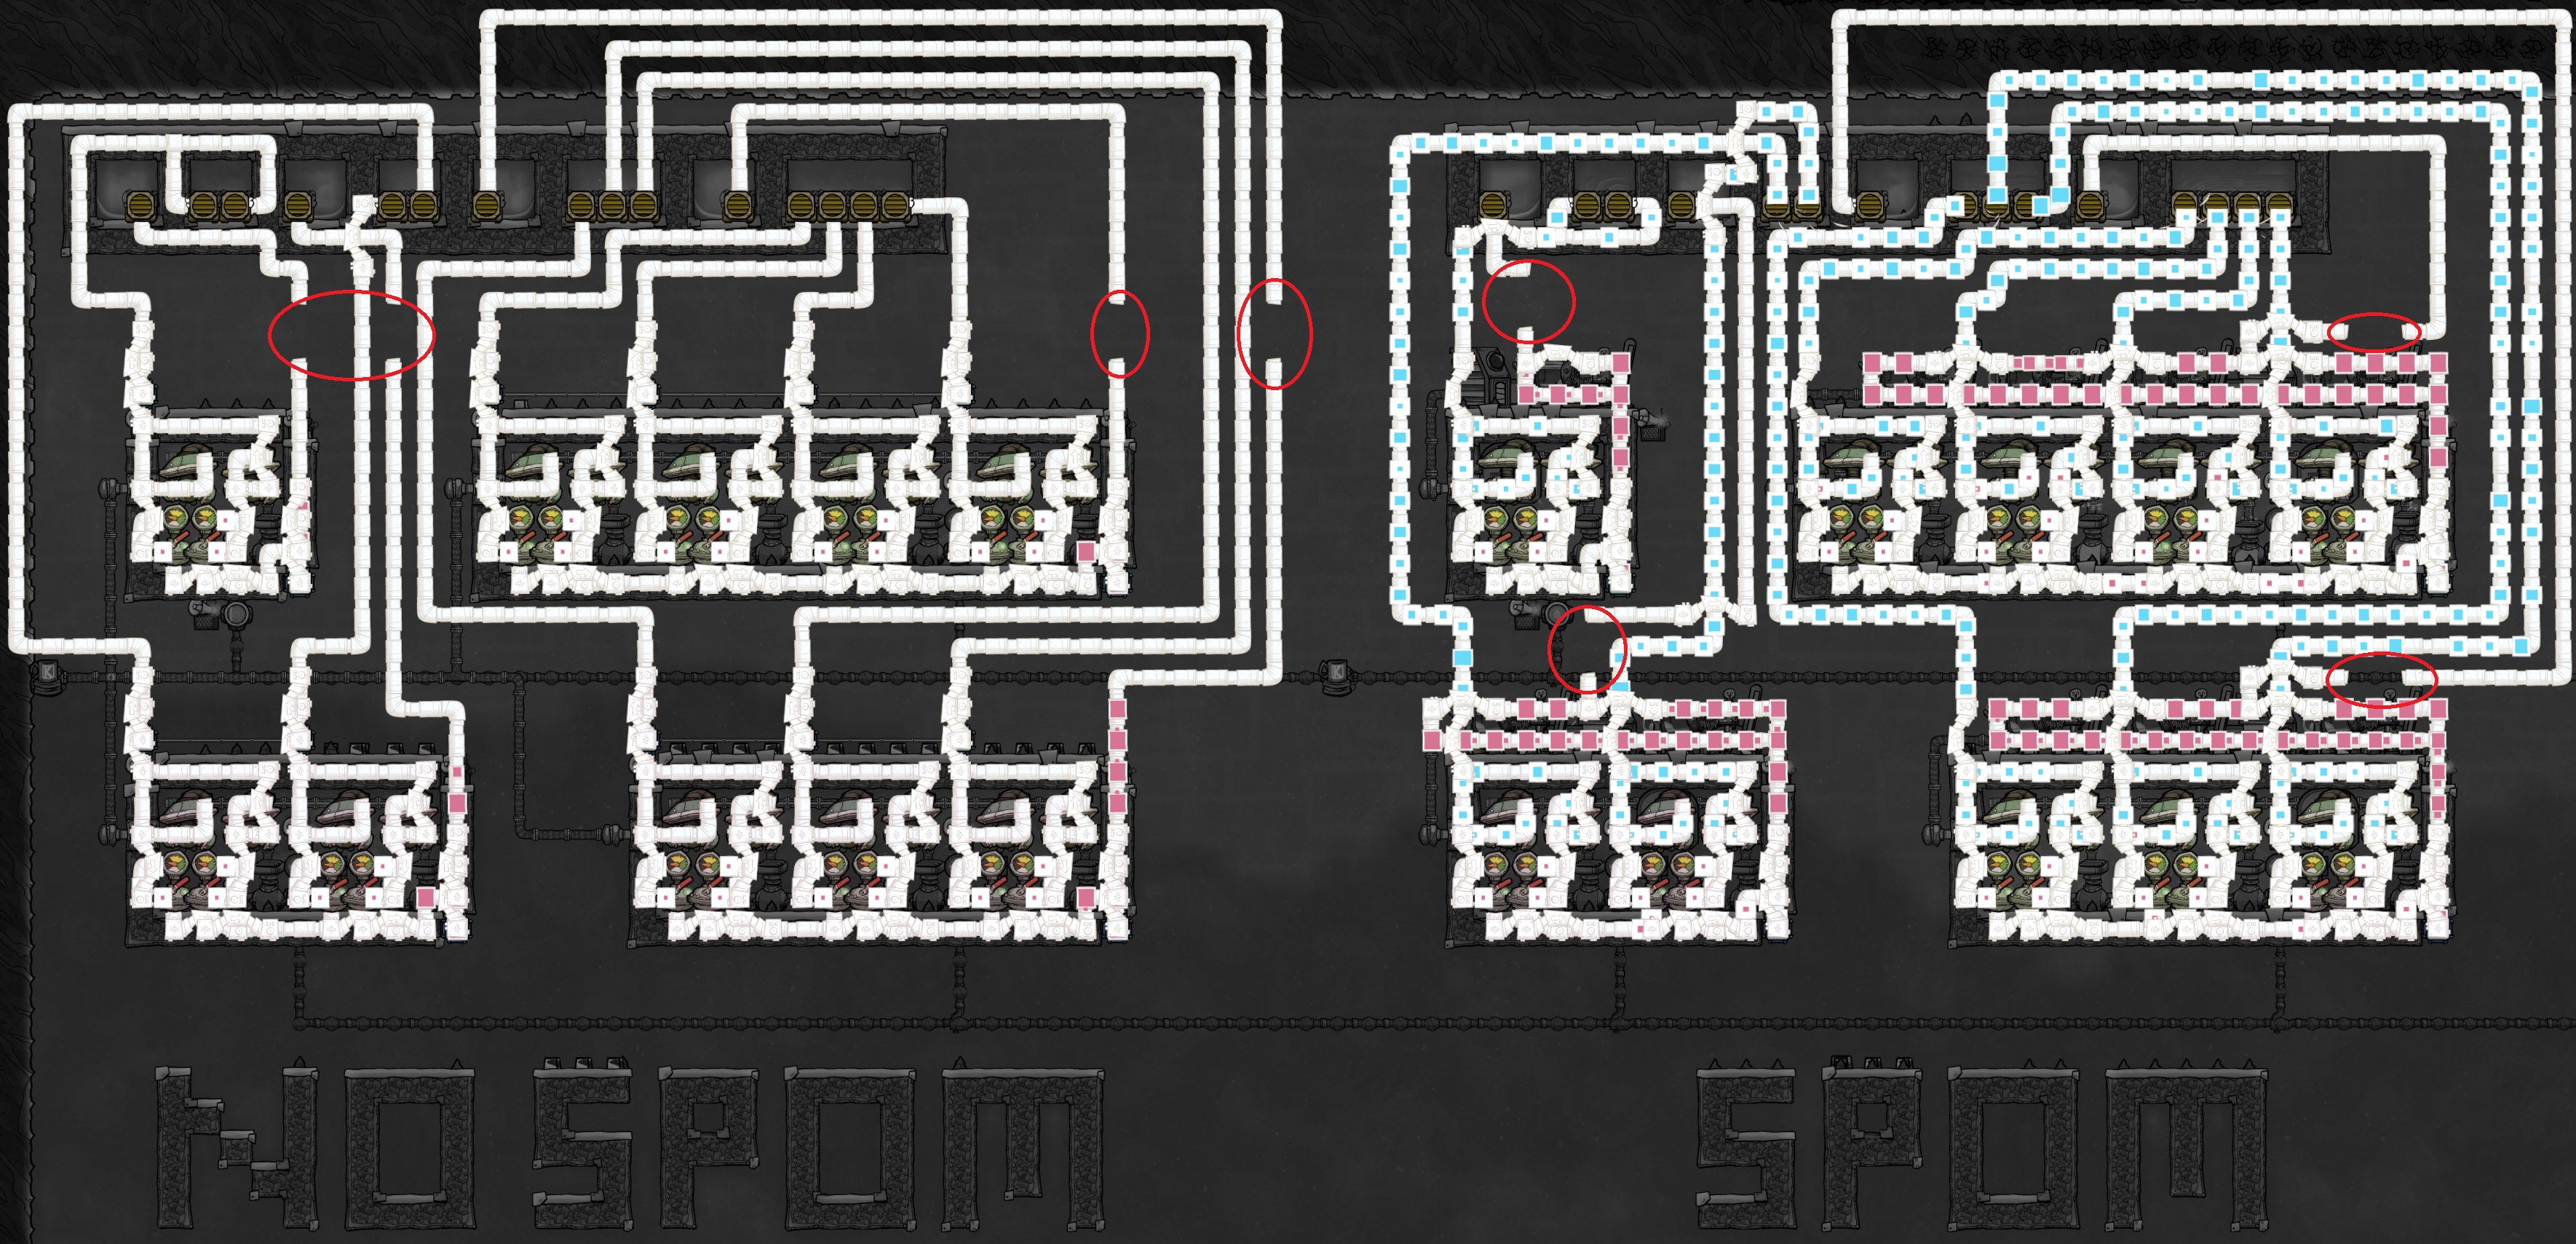
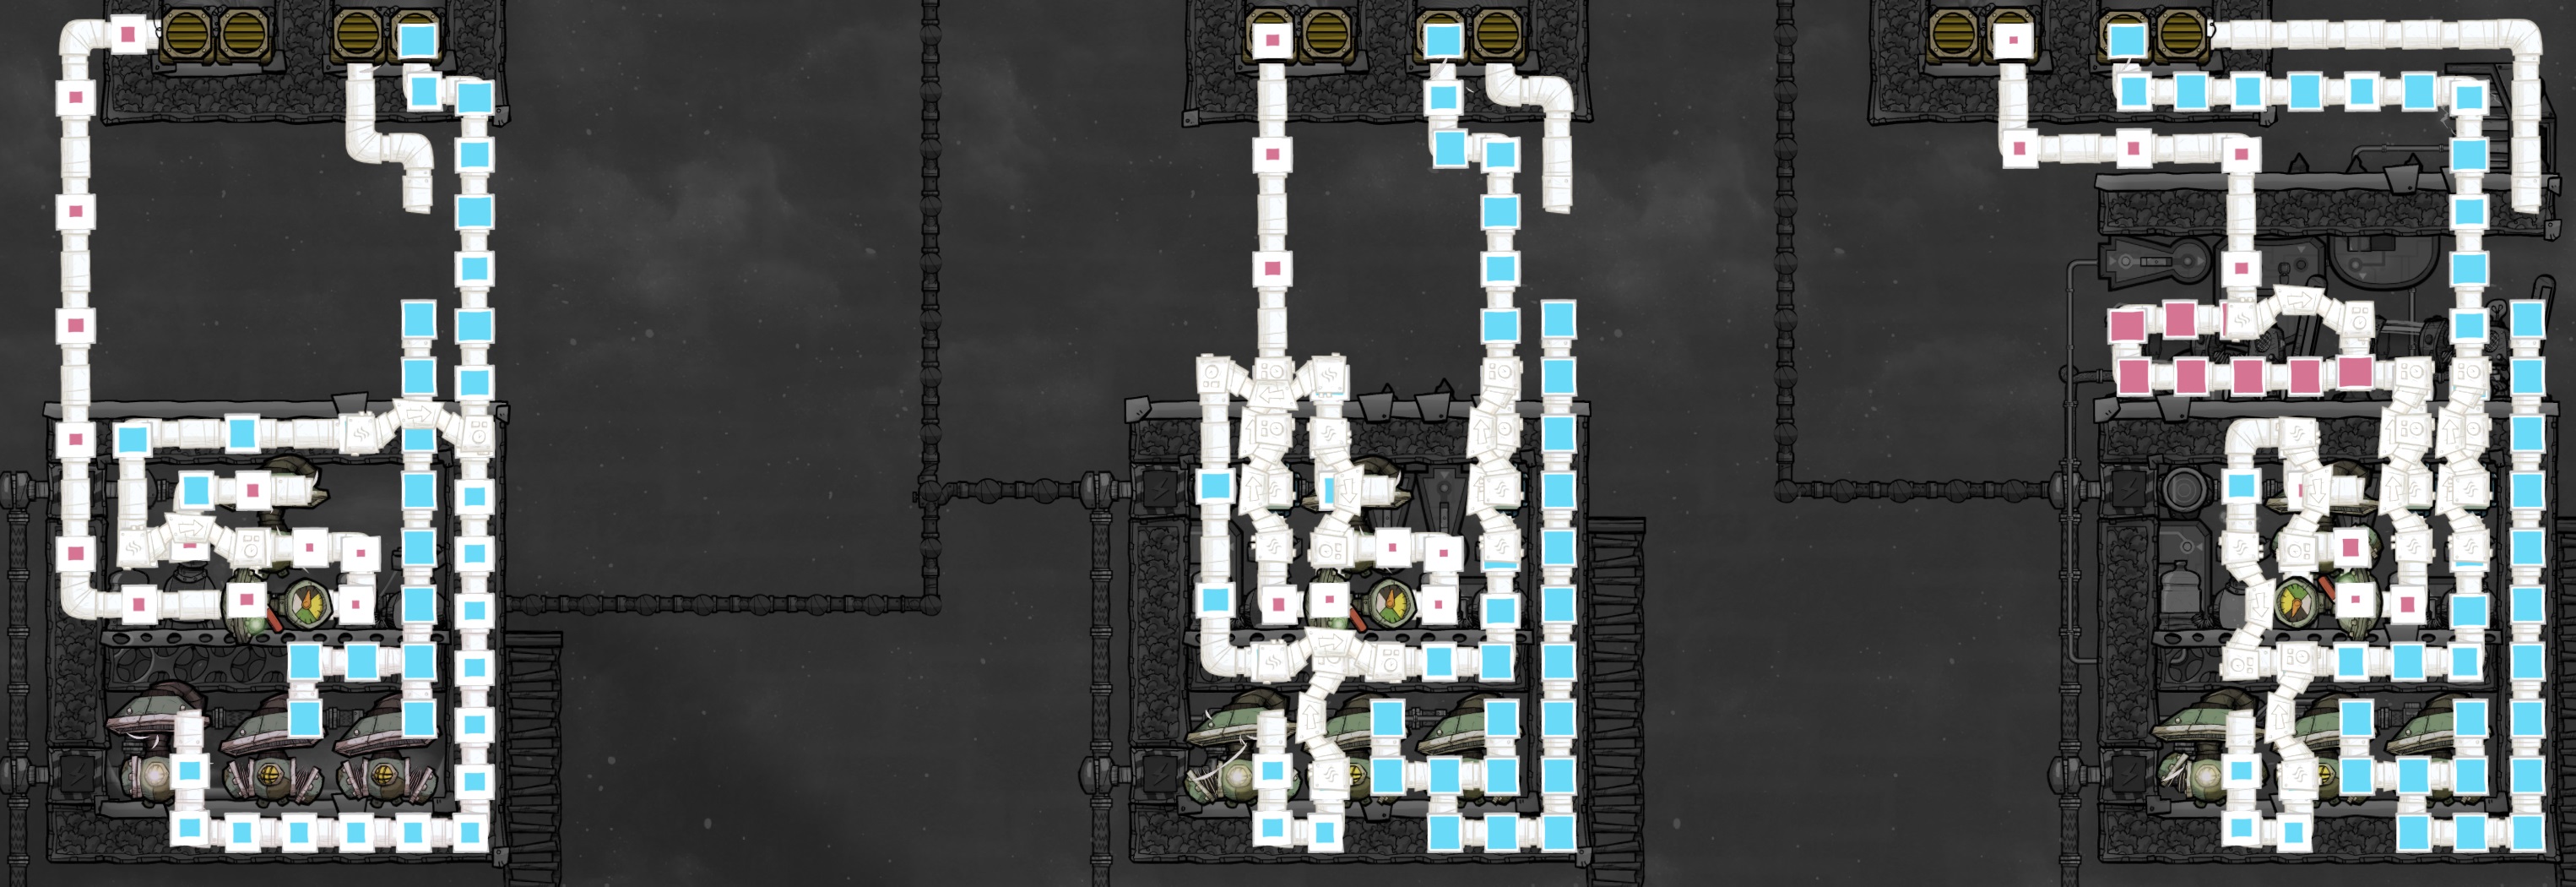
Some might argue that for an actual colony it’s better to continue operating and output mixed gases vs. shutting down completely, but that would violate the entire purpose of what we set out to achieve. I’d rather shut down, pause and alert the user, and let them figure out what went wrong to cause the hydrogen backup in the first place.
The SPOM design takes a different approach and performs remarkably well in this test. Because the hydrogen generators are forced to run constantly whenever a hydrogen backup is detected (remember that OR gate?) the backup condition will not last for long. Essentially the whole machine will toggle between blocked and not-blocked states, with the pumps switching off and on, respectively. Because of this the production of both hydrogen and oxygen is reduced as long as the intermittent blockage condition remains, but it does continue production and does not allow mixing. You can see evidence of this in the screenshot, as the oxygen packets being carried are much smaller than usual.
Even with the reduced gas output, this is still a far better outcome than the non-SPOM design. I think there are situational advantages to both the non-SPOM and SPOM variants, but the SPOM turned out better than I ever expected in this test.8. Modifying the Kharnath Double
- Preparing to Prime
The beginning of these builds start out almost identical to the original Kharnath design. Note that the gas valve orientation is reversed from Kharnath’s design in the SPOM variant. I found that this minor change made my gas piping significantly cleaner when attempting to add additional sensors to the design.
As we go along, the amount of extra automation required by the SPOM variant will cause it to diverge more and more from the original design. My screenshots will show the non-SPOM build on the left and the SPOM build on the right.
In the SPOM build the mechanical filter loop is a little smaller, as we need all the space we can get for sensors. Also, as noted above, the gas valve orientation is reversed.
As before, the gas valves need to be set to 1g/s and the temporary electrical filter needs to be set to hydrogen. Once the filter loop is fully primed we can deconstruct the support piping and move on to the next steps.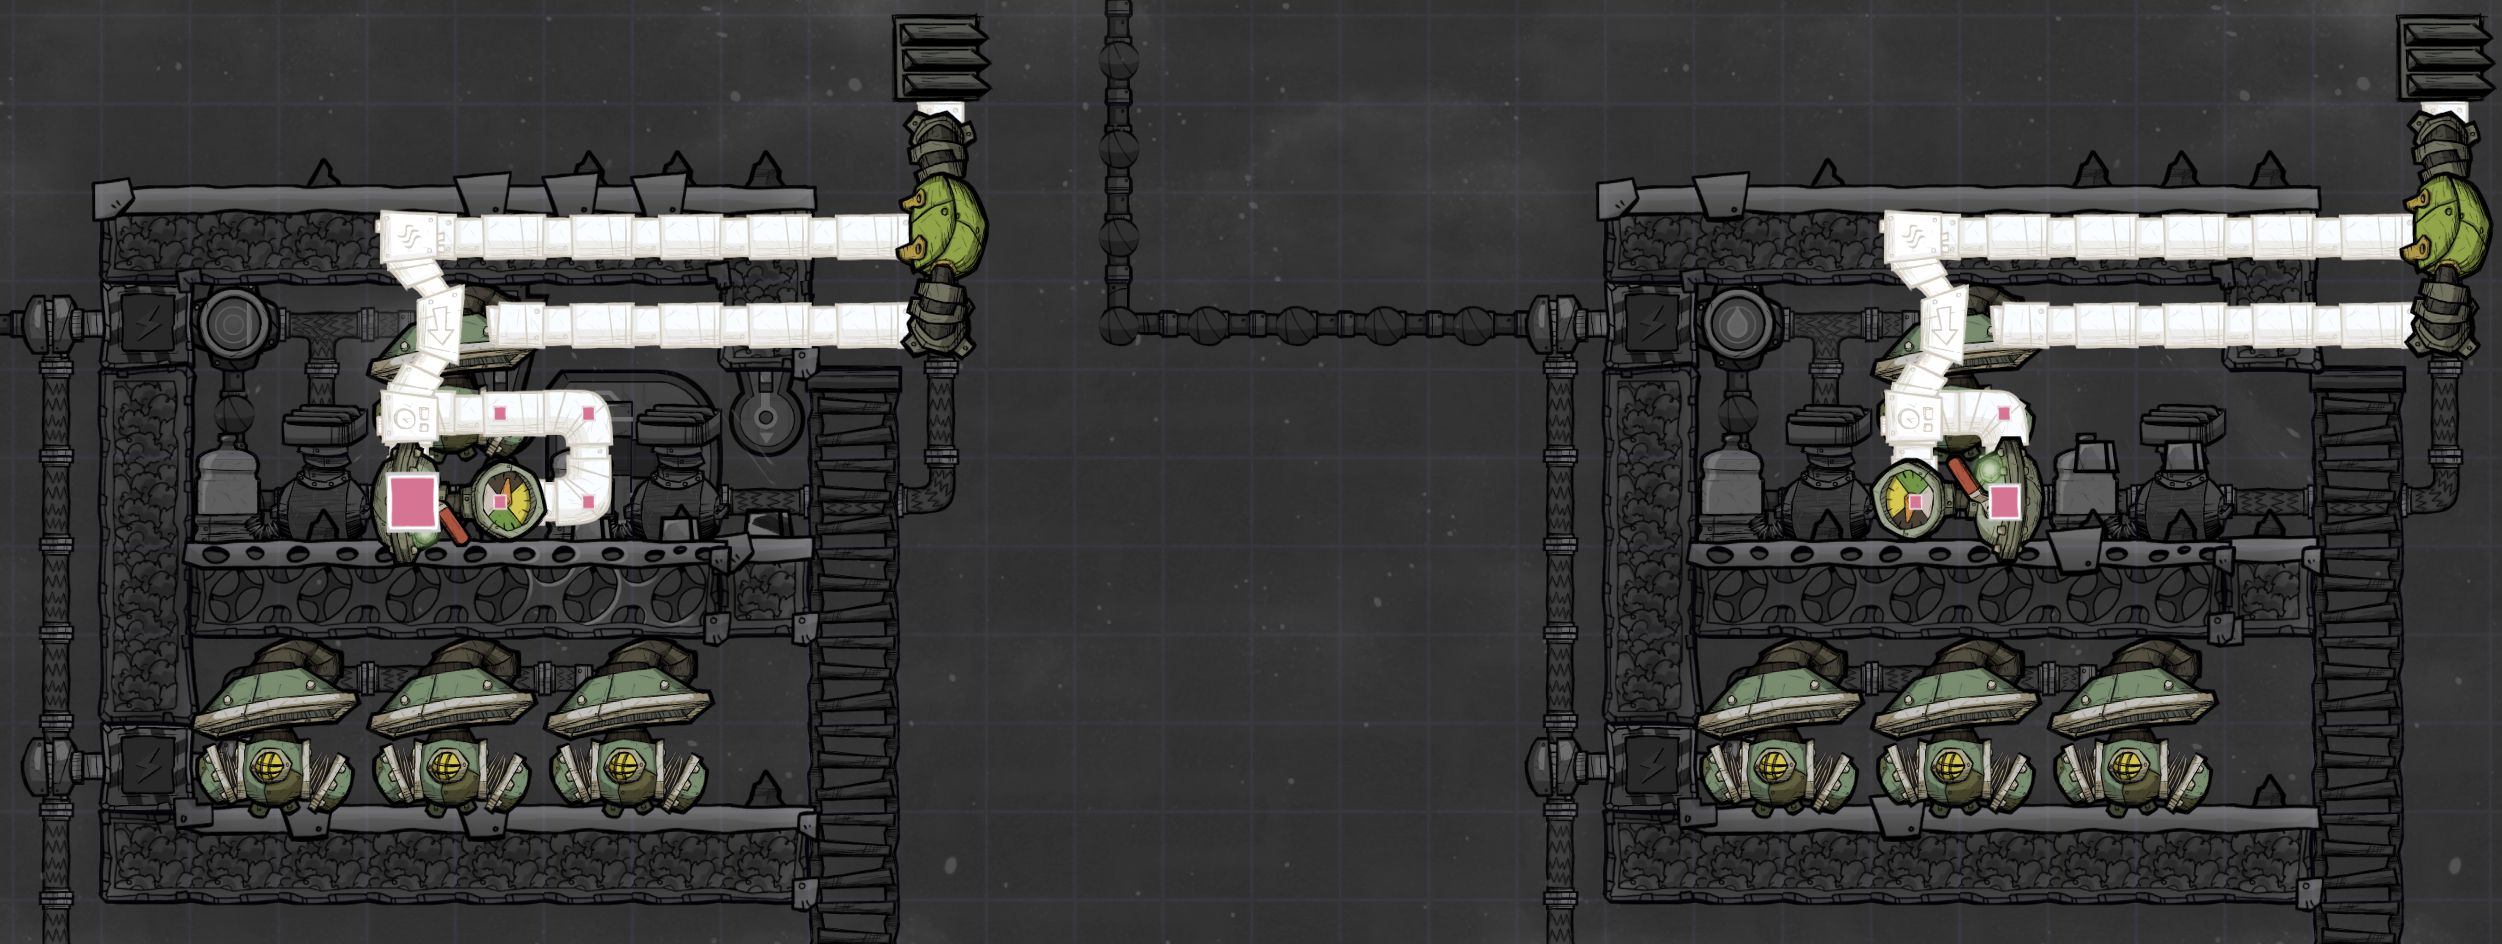
- Finalizing the Build
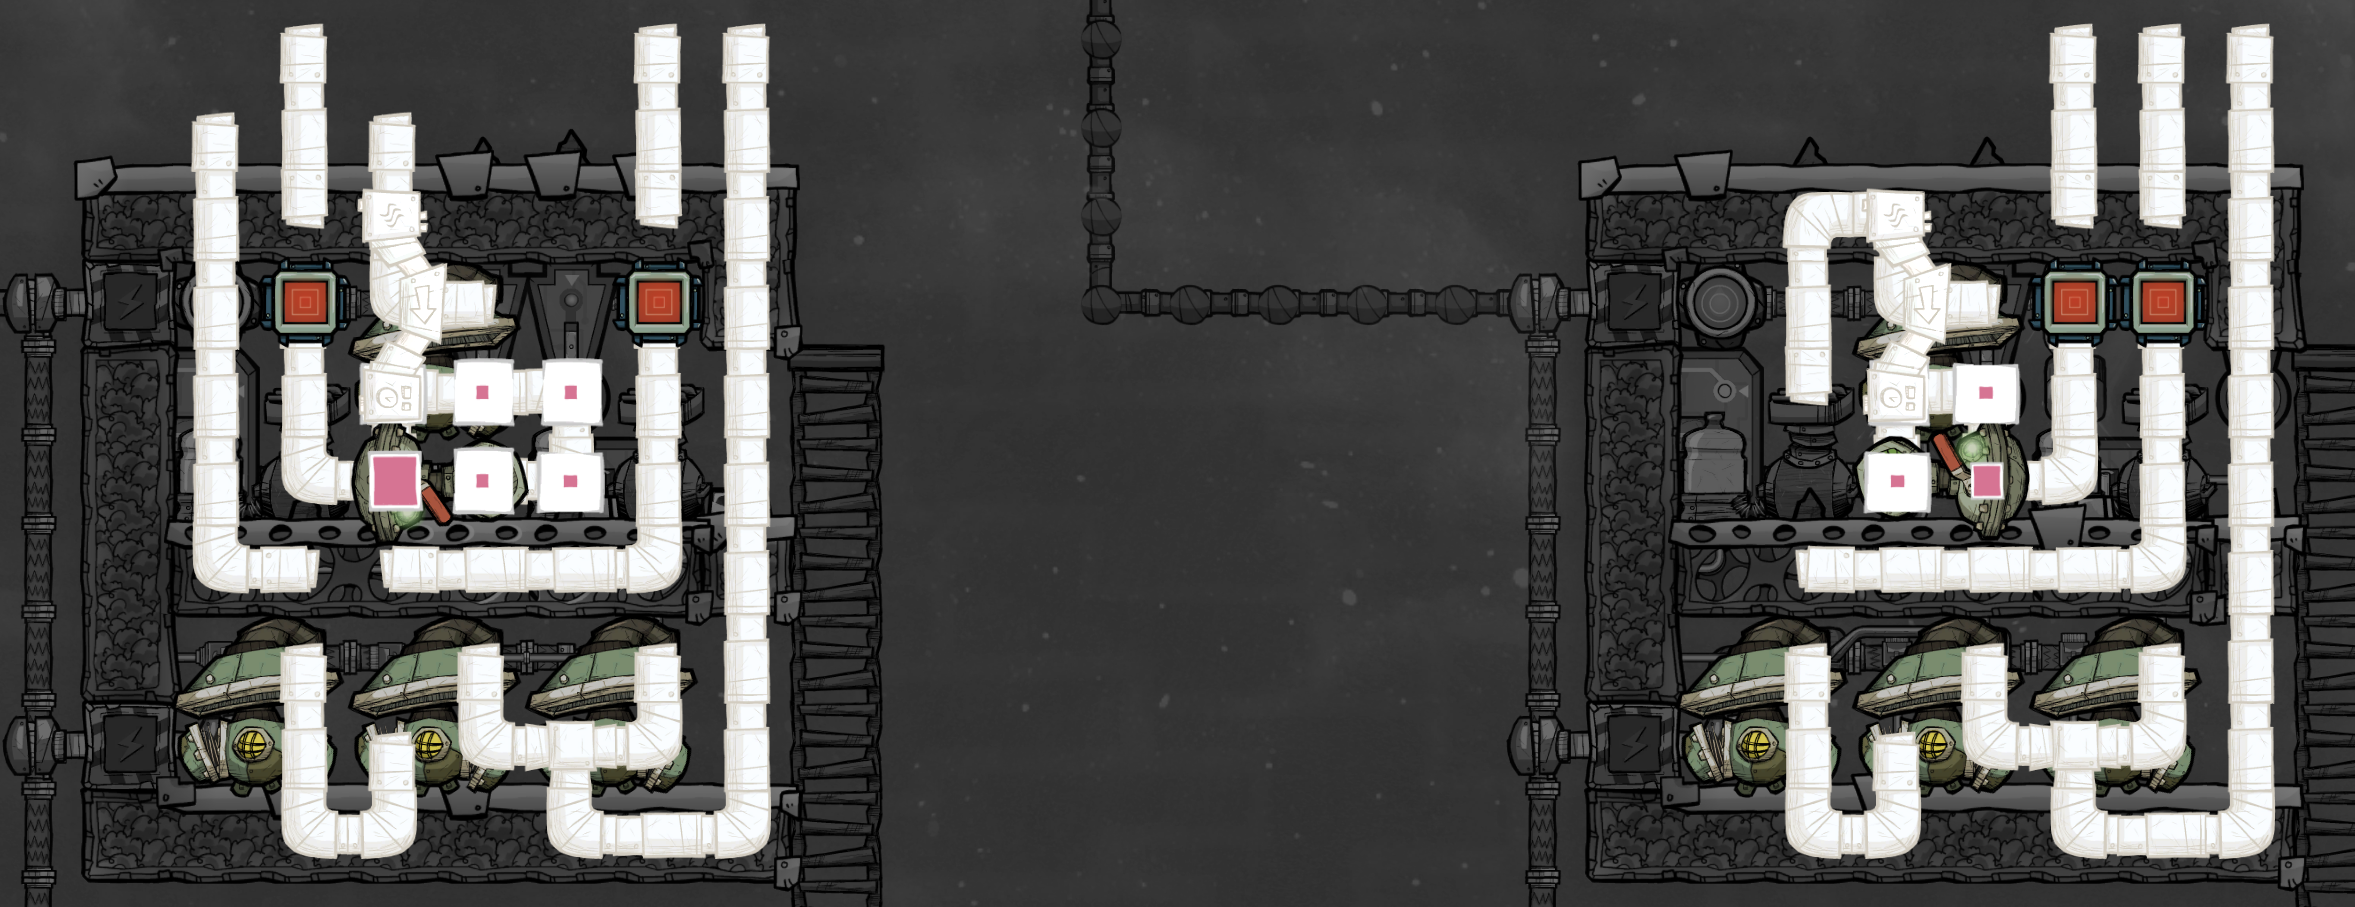
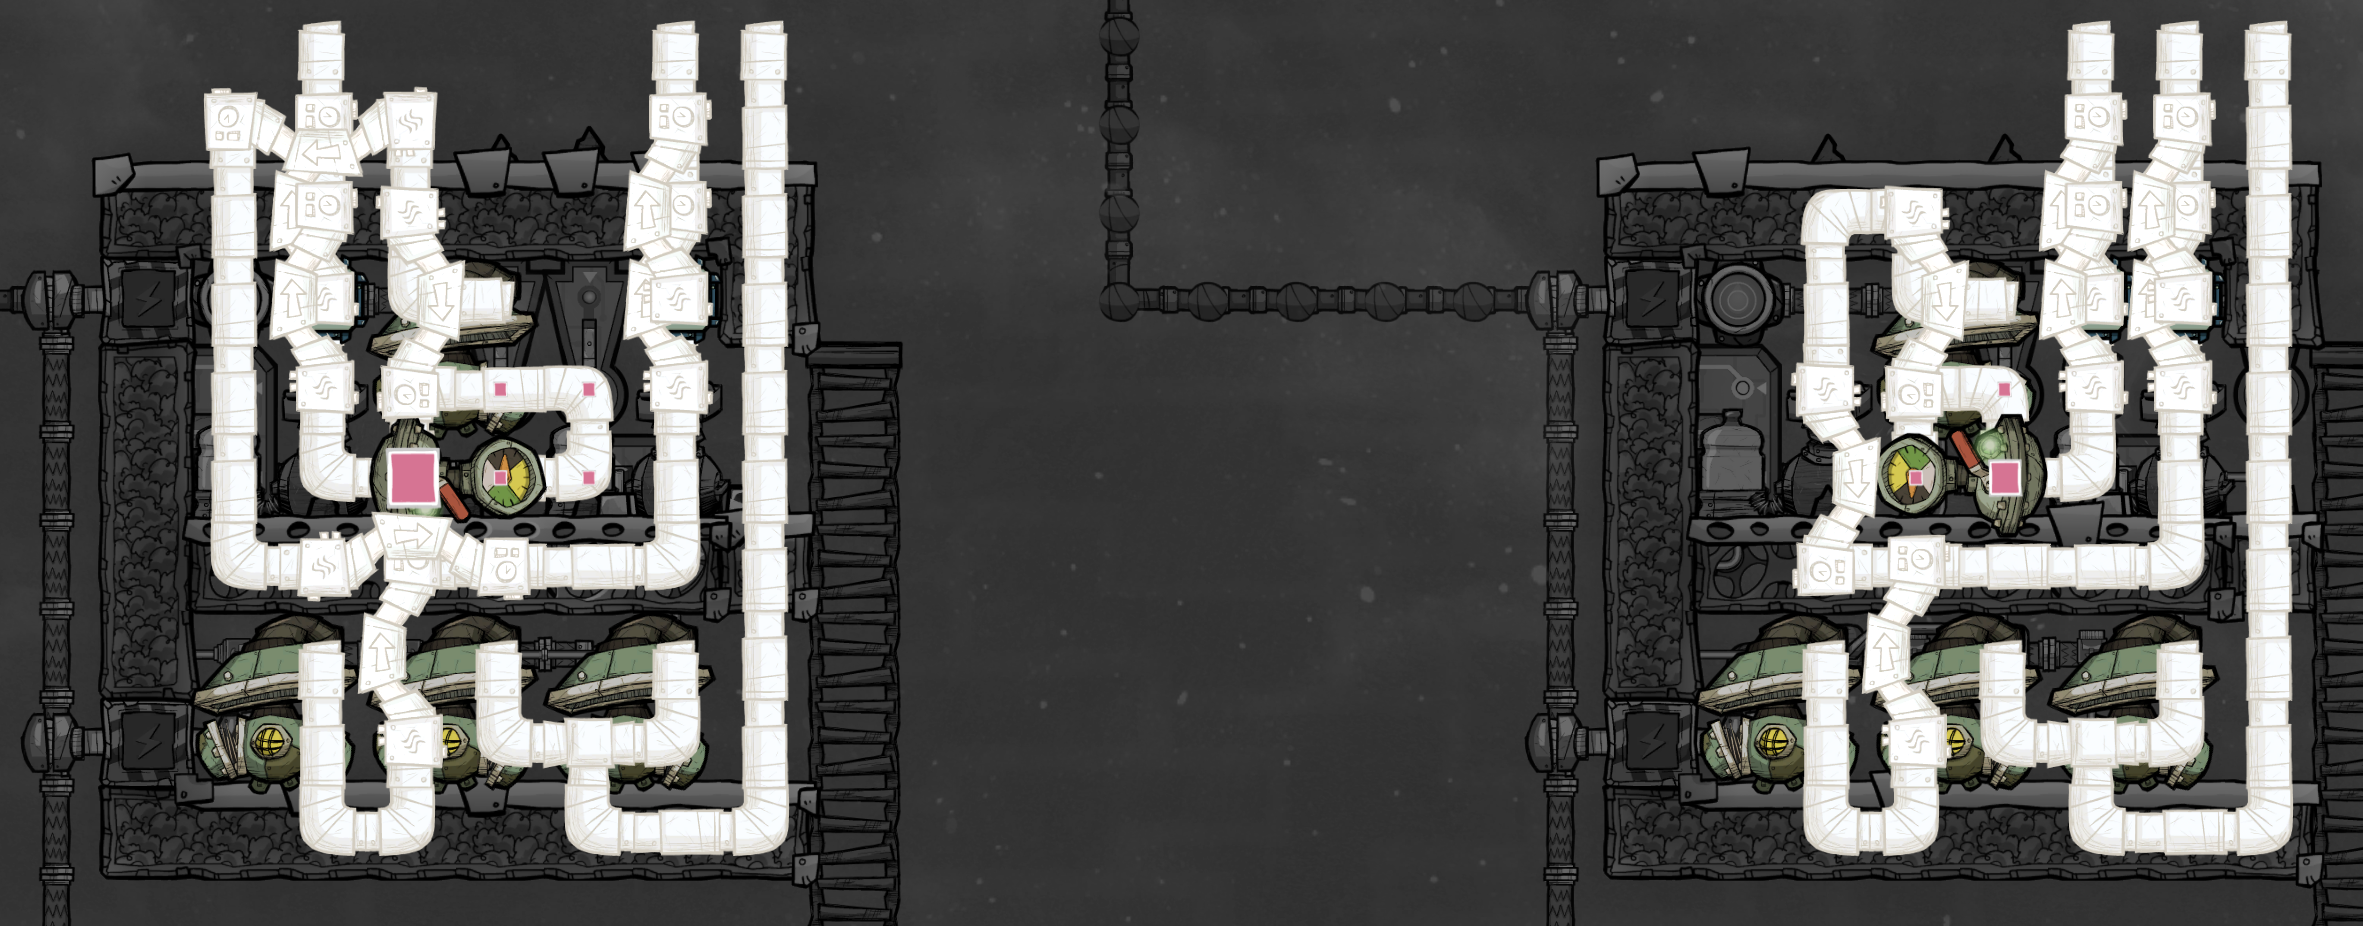
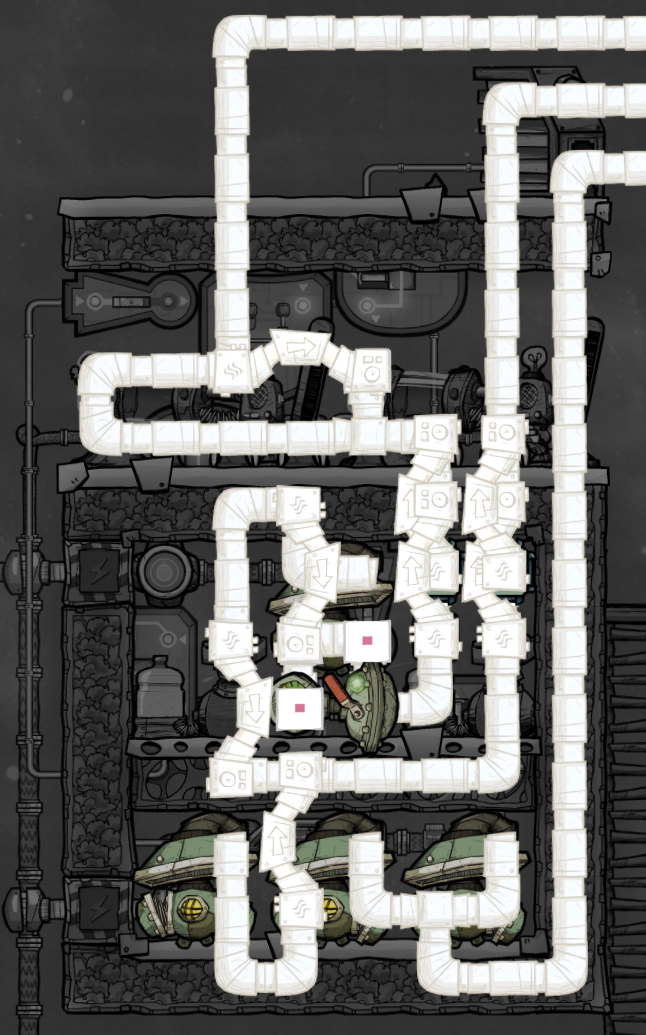
The piping was rearranged to accommodate two new gas pipe blockage sensors, one for the hydrogen output and the other for the oxygen output that failed this test (top and left pumps). The design is fine if the bottom right pumps get blocked, so we run that output up the wall without a sensor.
In the SPOM variant the hydrogen output is moved to the right hand side which keeps the whole upper left clear of pipes. This will be convenient later when we add hydrogen generators to the top.
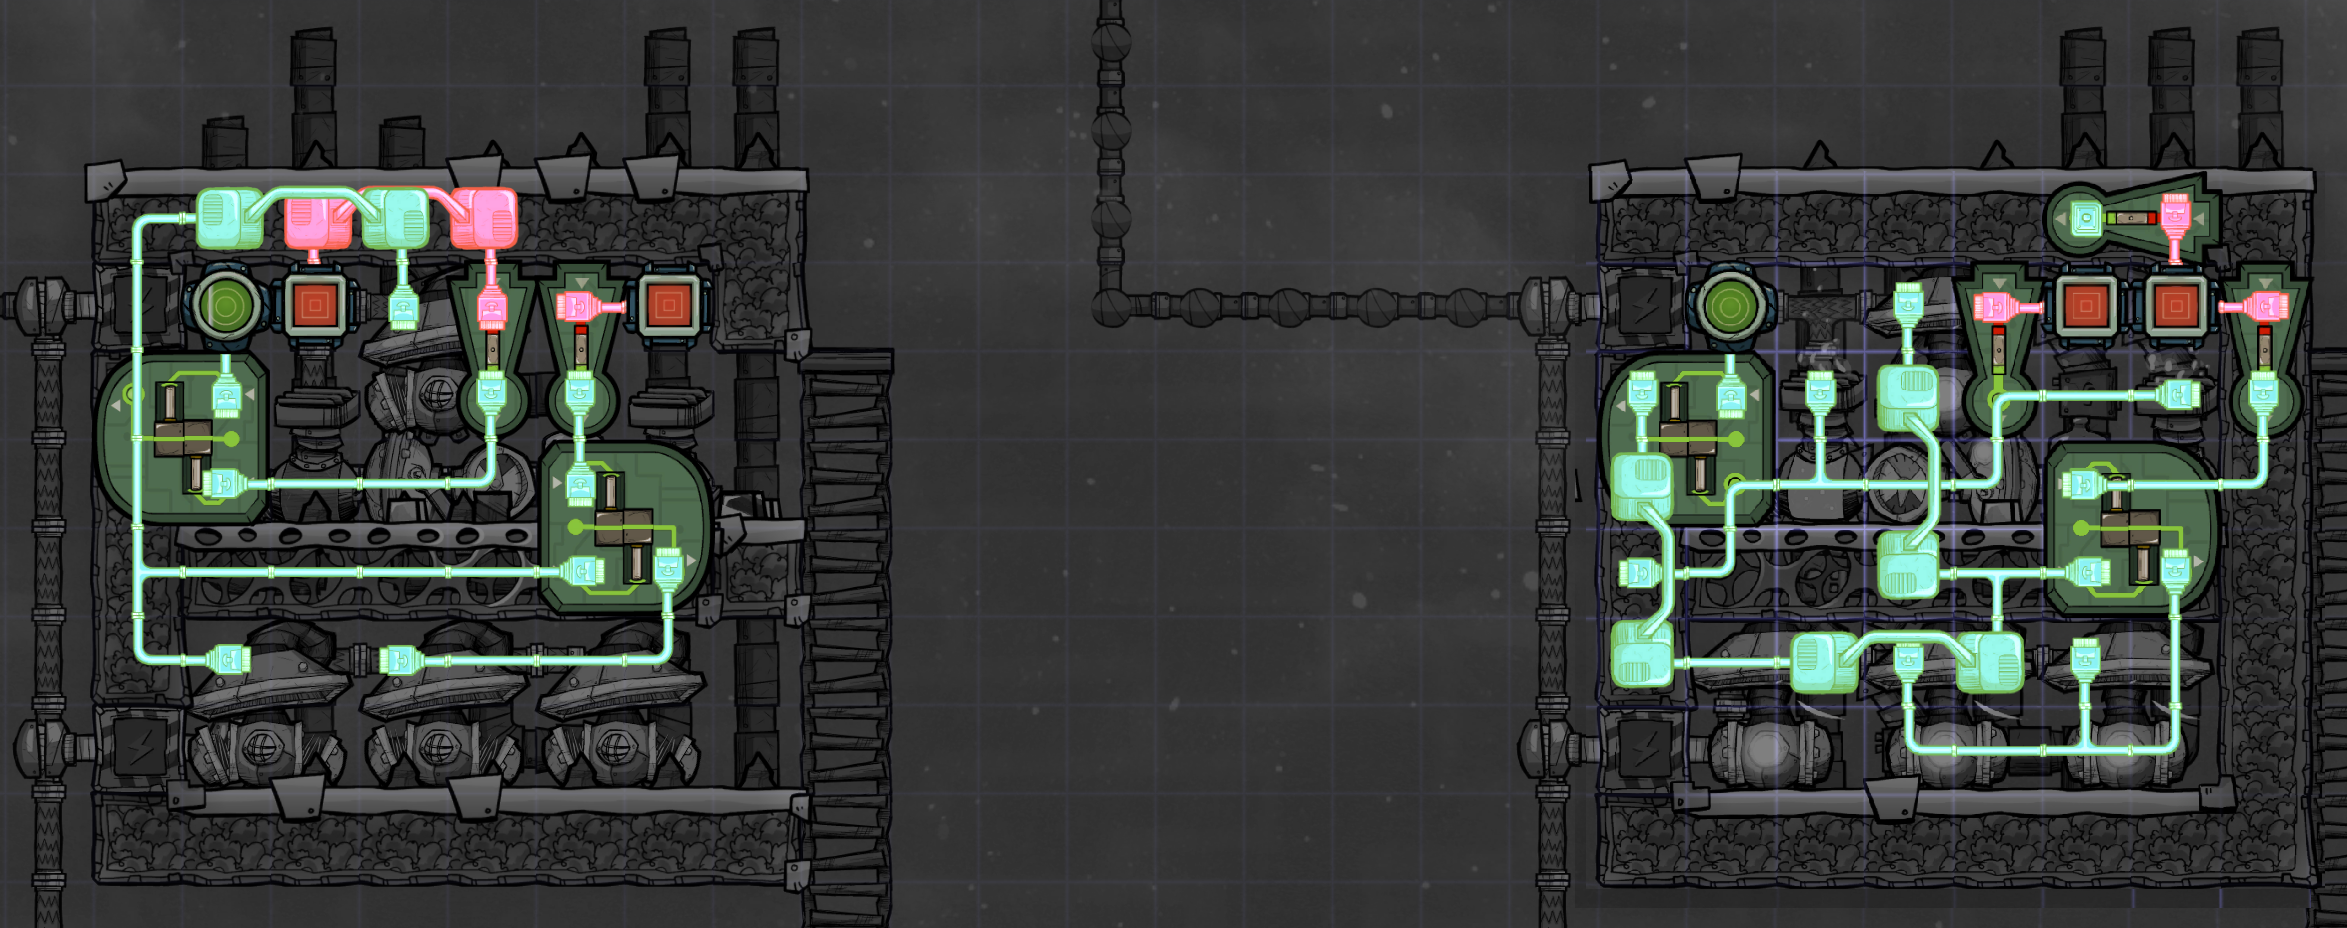 Starting on the non-SPOM side the logic is fairly easy to follow. We have four pumps, and all four need to be disabled if either of the following occur:
- Loss of water input
- Blockage of hydrogen output pipe
The second AND gate takes its other input from our oxygen output blockage sensor, allowing us to shut off the two bottom right pumps if either of the first two events occur or if the oxygen output gets blocked.
The logic on the SPOM side is almost exactly the same, with the addition that we’re connecting both electrolyzers to the hydrogen blockage sensor. None of the previous designs required disabling the electrolyzers during fault conditions, as they would simply run to overpressure and then stop. I noticed that the way this design reacts to a blocked pipe can lead to overproduction of hydrogen and very small amounts of mixing. The best way to stop that is to shut down hydrogen production completely while the pipe remains blocked.
In addition to the above, we have to pull out two of our sensor signals for later use on the SPOM. These are the hydrogen blockage sensor on the left side and the oxygen blockage sensor in the top right. We’ll already have access to the water input sensor in the top left, so that’s everything we’ll need to control the future generators.
Note that I did not show installation of any automated alerts for our sensors. There isn’t a single free space inside the non-SPOM variant, but the SPOM variant has an opening right next to the input water sensor which would be convenient for a water loss alert. Other alerts could be installed in either of the bottom corners, or just outside the electrolyzer. Just don’t try to install them in either top corner like we did before, as we need each of those tiles for our future generators.
- SPOM Conversion
On the SPOM side we can now add our smart battery, hydrogen generators, and quite a bit more required automation. The smart battery should be set to a very wide range again, 5-10 to 95-100. This is less critical than with my design, since Kharnath’s produces much more hydrogen. Just make sure the battery doesn’t completely lose power before the generator animation starts creating power.
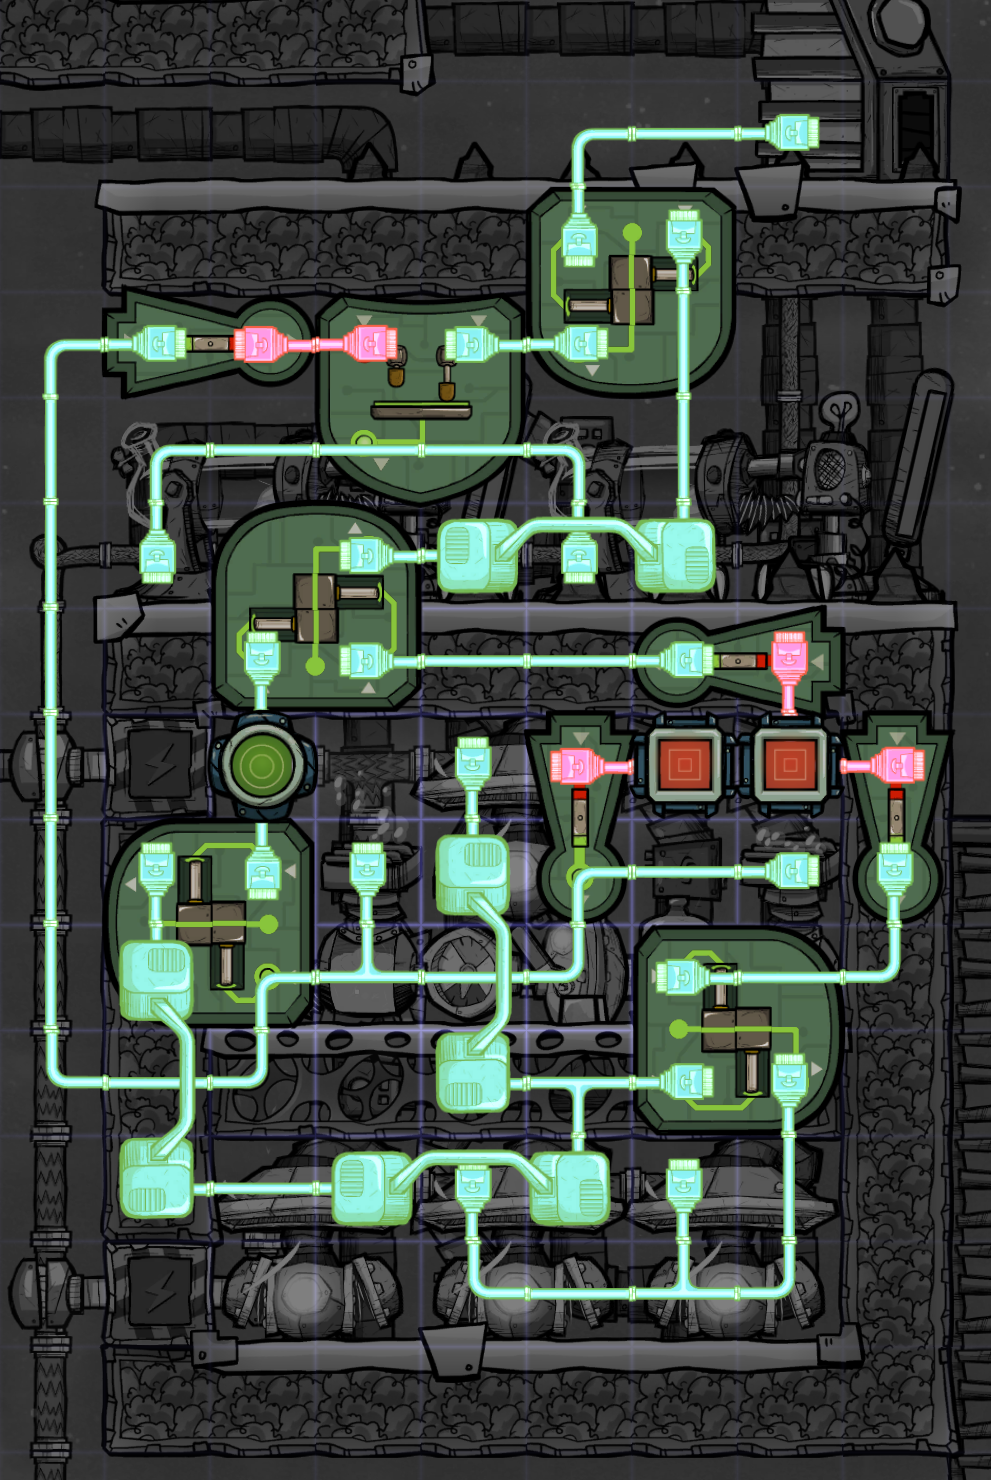 Starting with the generators, they receive their signal from the output of an OR gate. The first condition which will turn them on is a pipe blockage detected by our hydrogen output sensor. This will help burn off extra hydrogen and get the pipe unblocked. The other condition is a combination of two AND gates, and will only turn on the generators if all three of these conditions are true:
- Water is available at the input
- The oxygen output is not blocked
- The smart battery needs charging
It’s the same logic used in my earlier design, it was just more of a challenge to fit everything into this layout.
- Failure Testing
 When the other oxygen pipe becomes blocked, the modified designs shut off the two pumps in the lower right to prevent them from mixing hydrogen onto the output line. The original design continues to pump, leading to mixed outputs.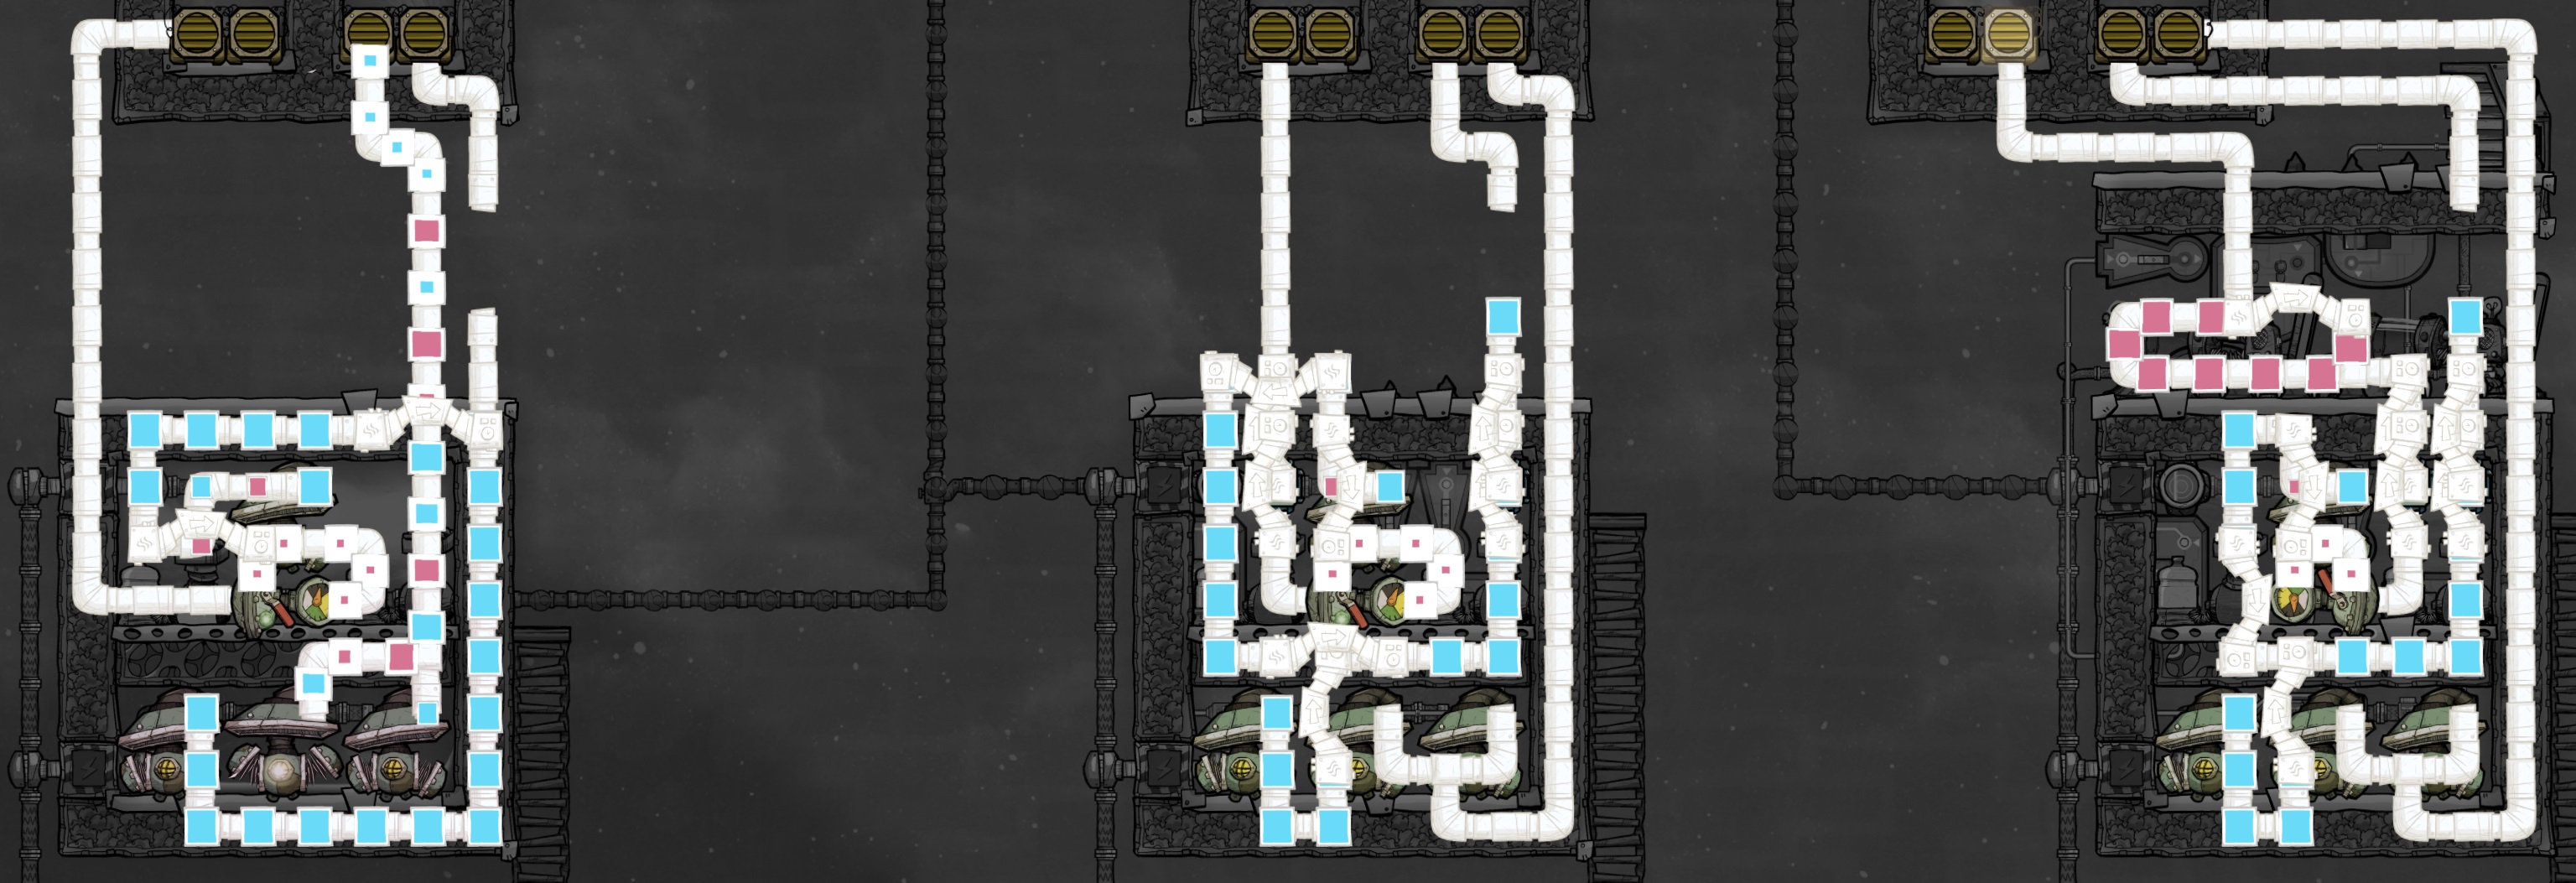
 The modified designs both shut down the pumps until input water is restored. Meanwhile the original design attempts to keep pumping to a vacuum state, and eventually there’s nothing in the chamber but hydrogen coming out of all three outputs.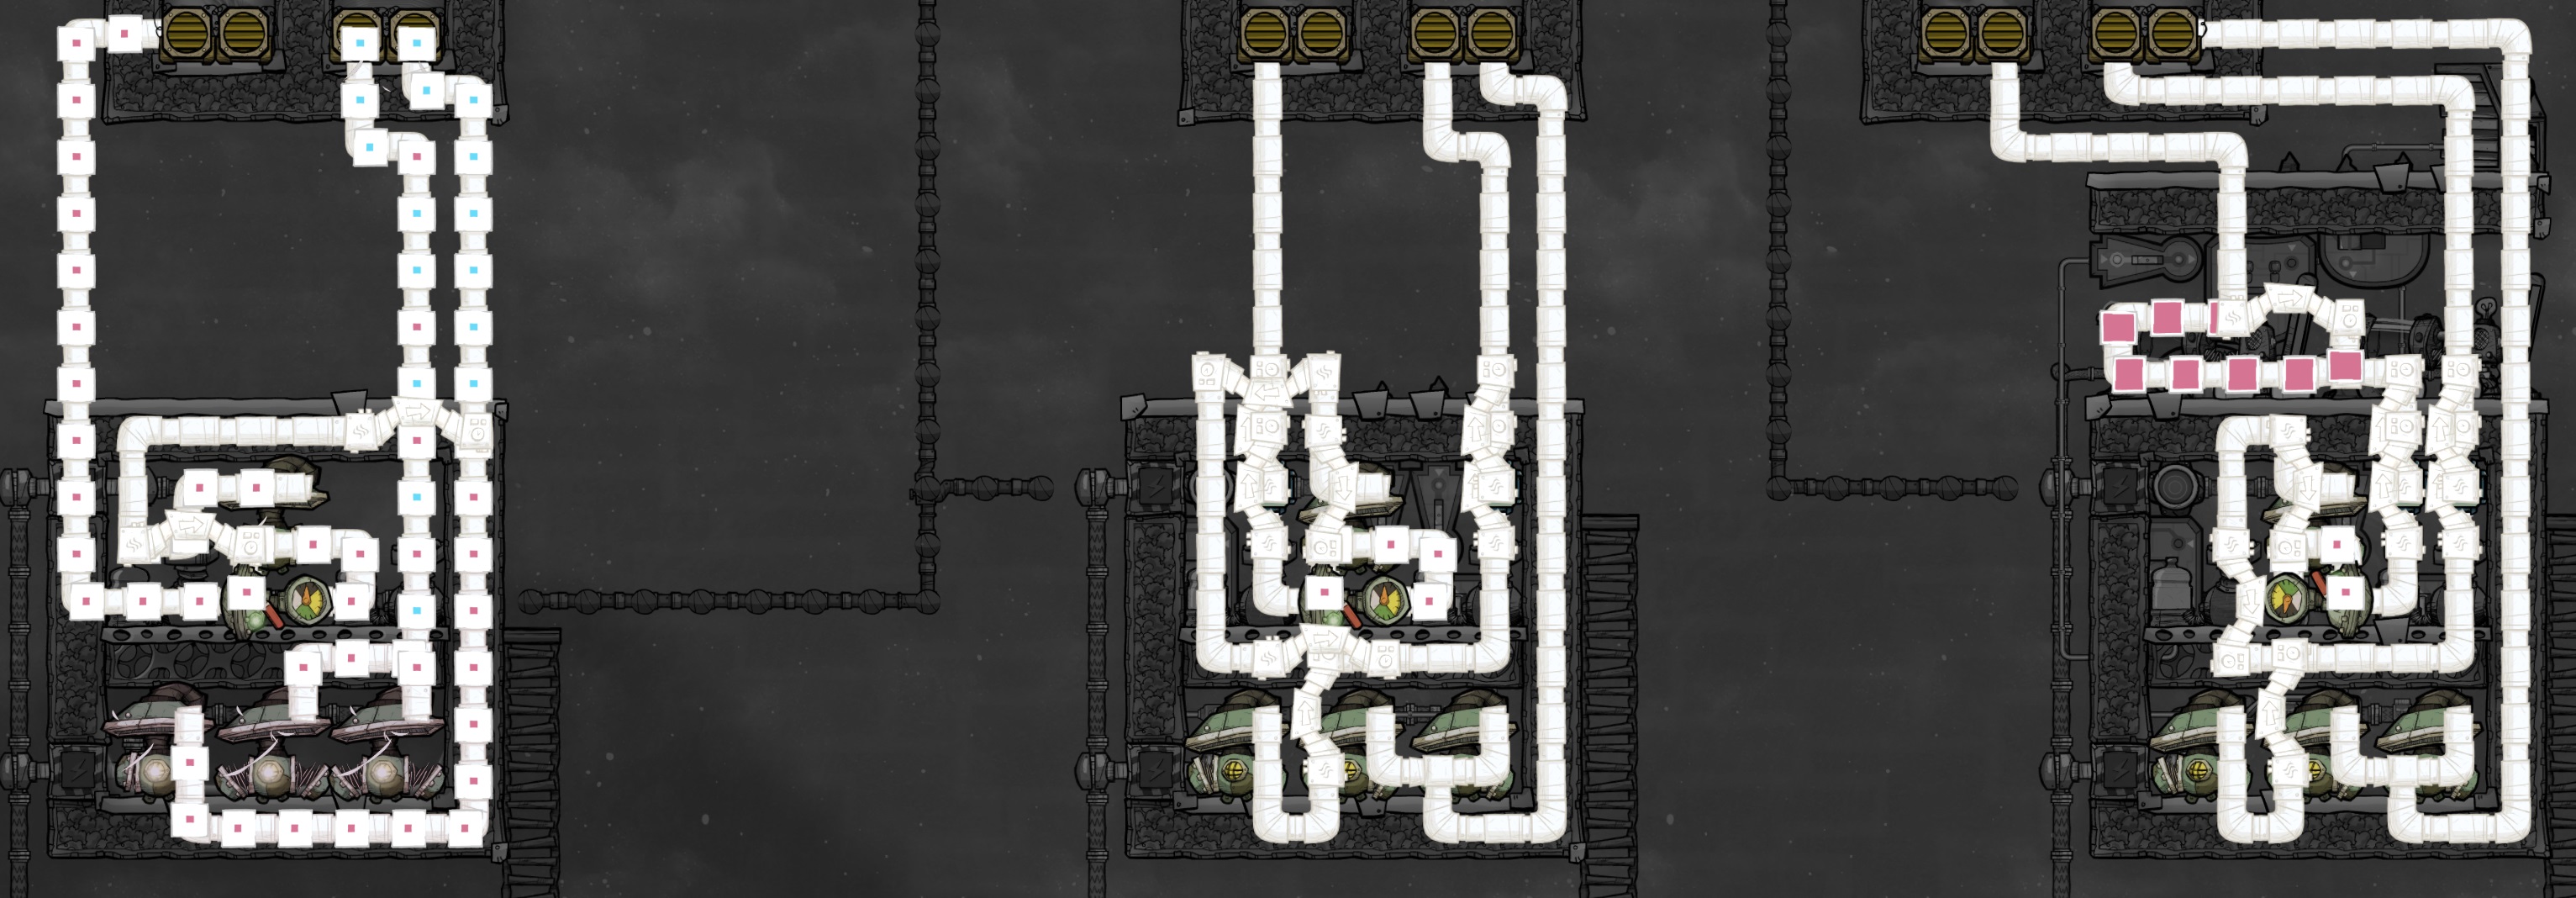
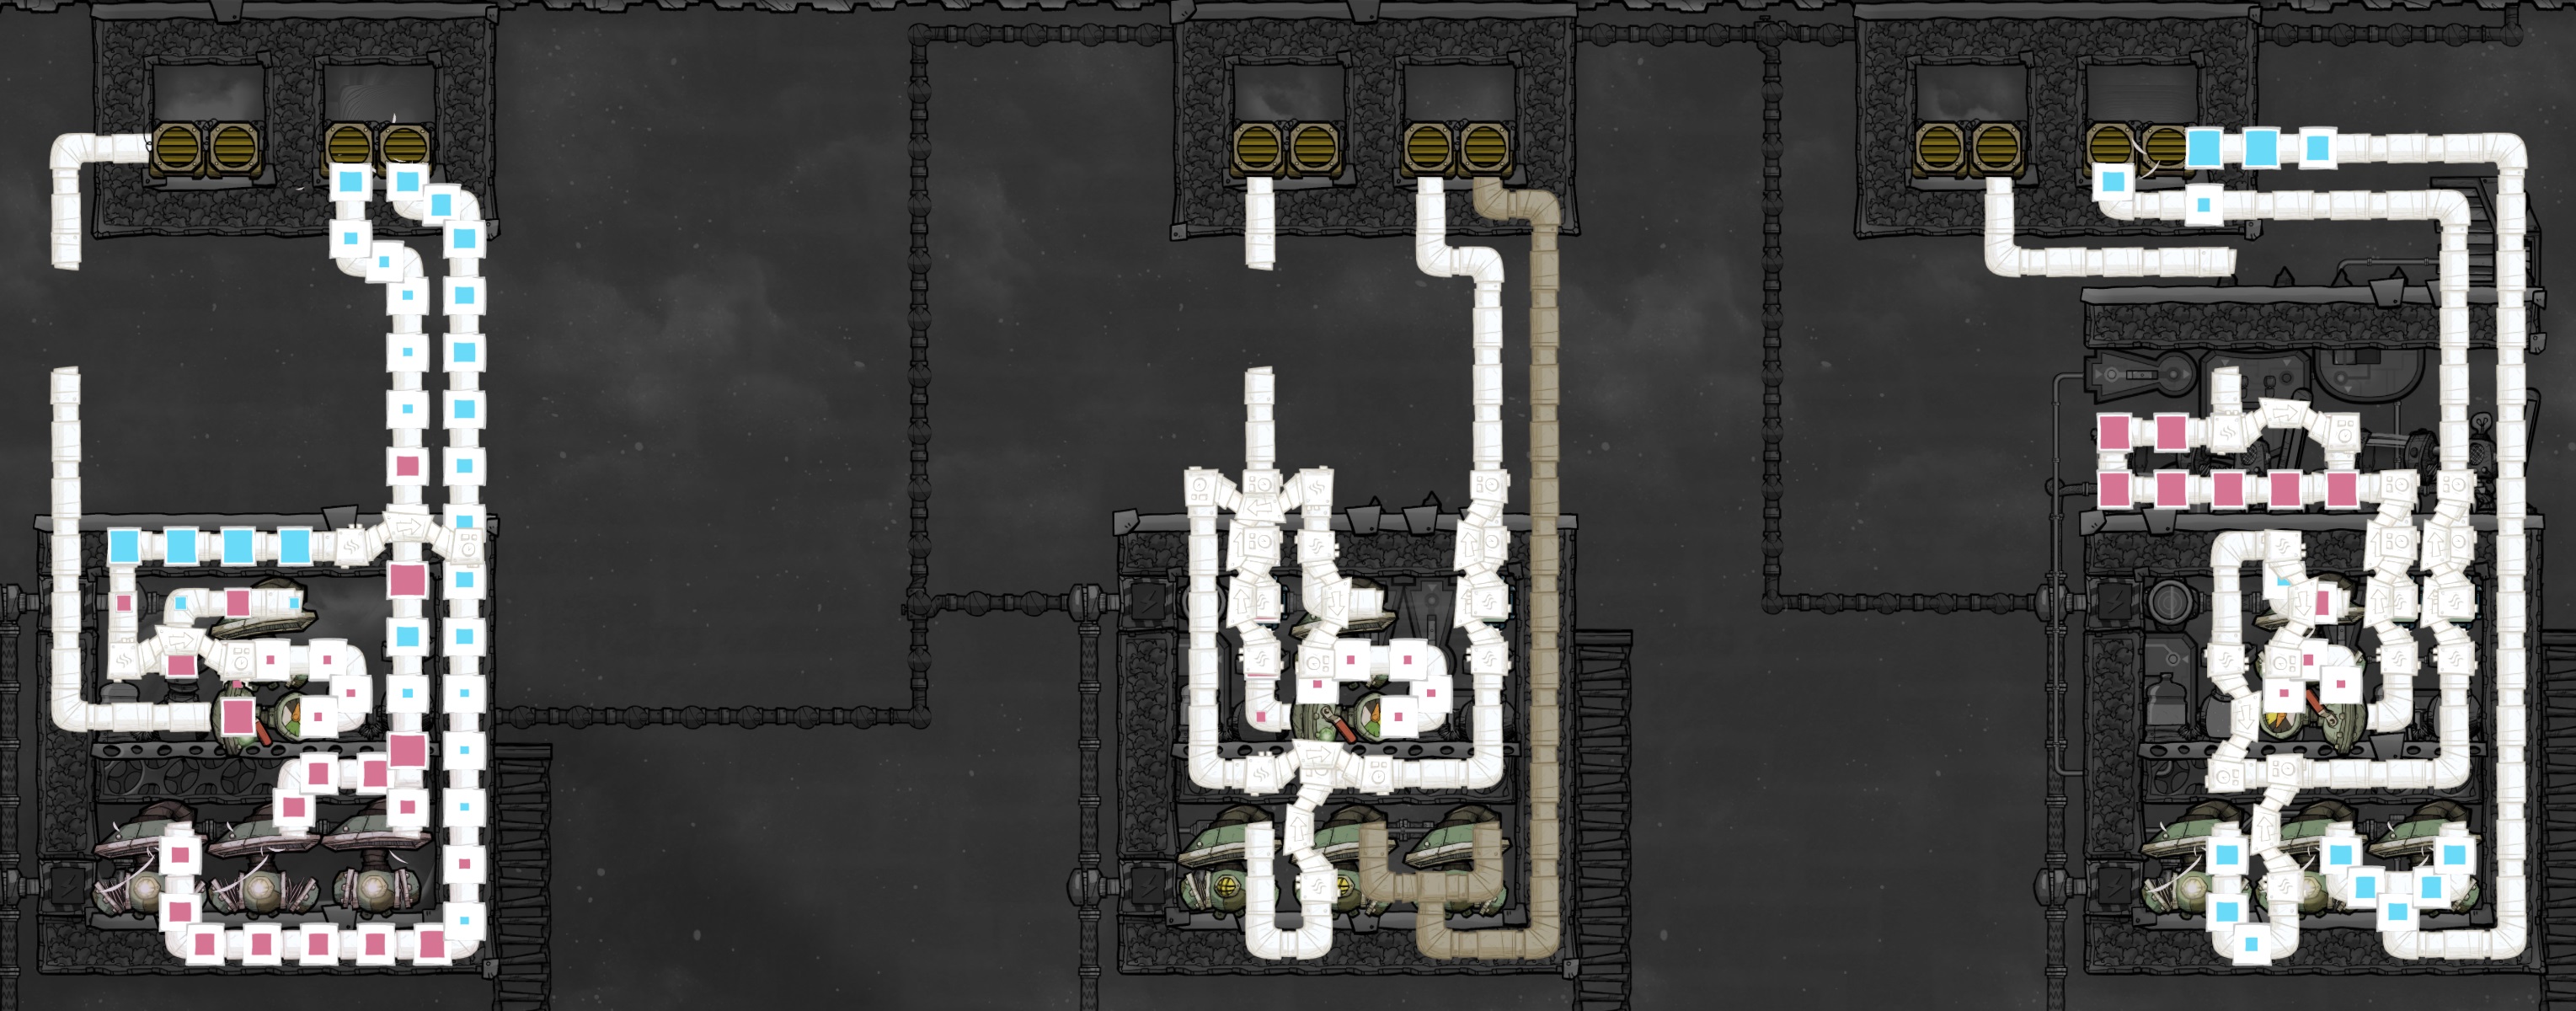
The two modified designs operate very similarly to the “fail safe” designs described above. The non-SPOM version shuts down and waits for the blockage to clear, while the SPOM variant cycles between on and off as the hydrogen is burned off and then re-blocked. One major difference is that while the fail safe SPOM pulsed rapidly between blocked and unblocked states, the modified Kharnath SPOM turns on and off for 15-20 seconds at a time. This can be seen in the screenshot, where there are ~20 empty pipe tiles in between pulses of ~20 tiles of oxygen. In either design, the oxygen output is drastically reduced as long as the hydrogen output remains blocked, one just produces constant smaller packets while the other produces periodic larger packets
This test is particularly difficult on the original Kharnath design, as unlike all other test cases it cannot simply recover itself automatically once the blockage is removed.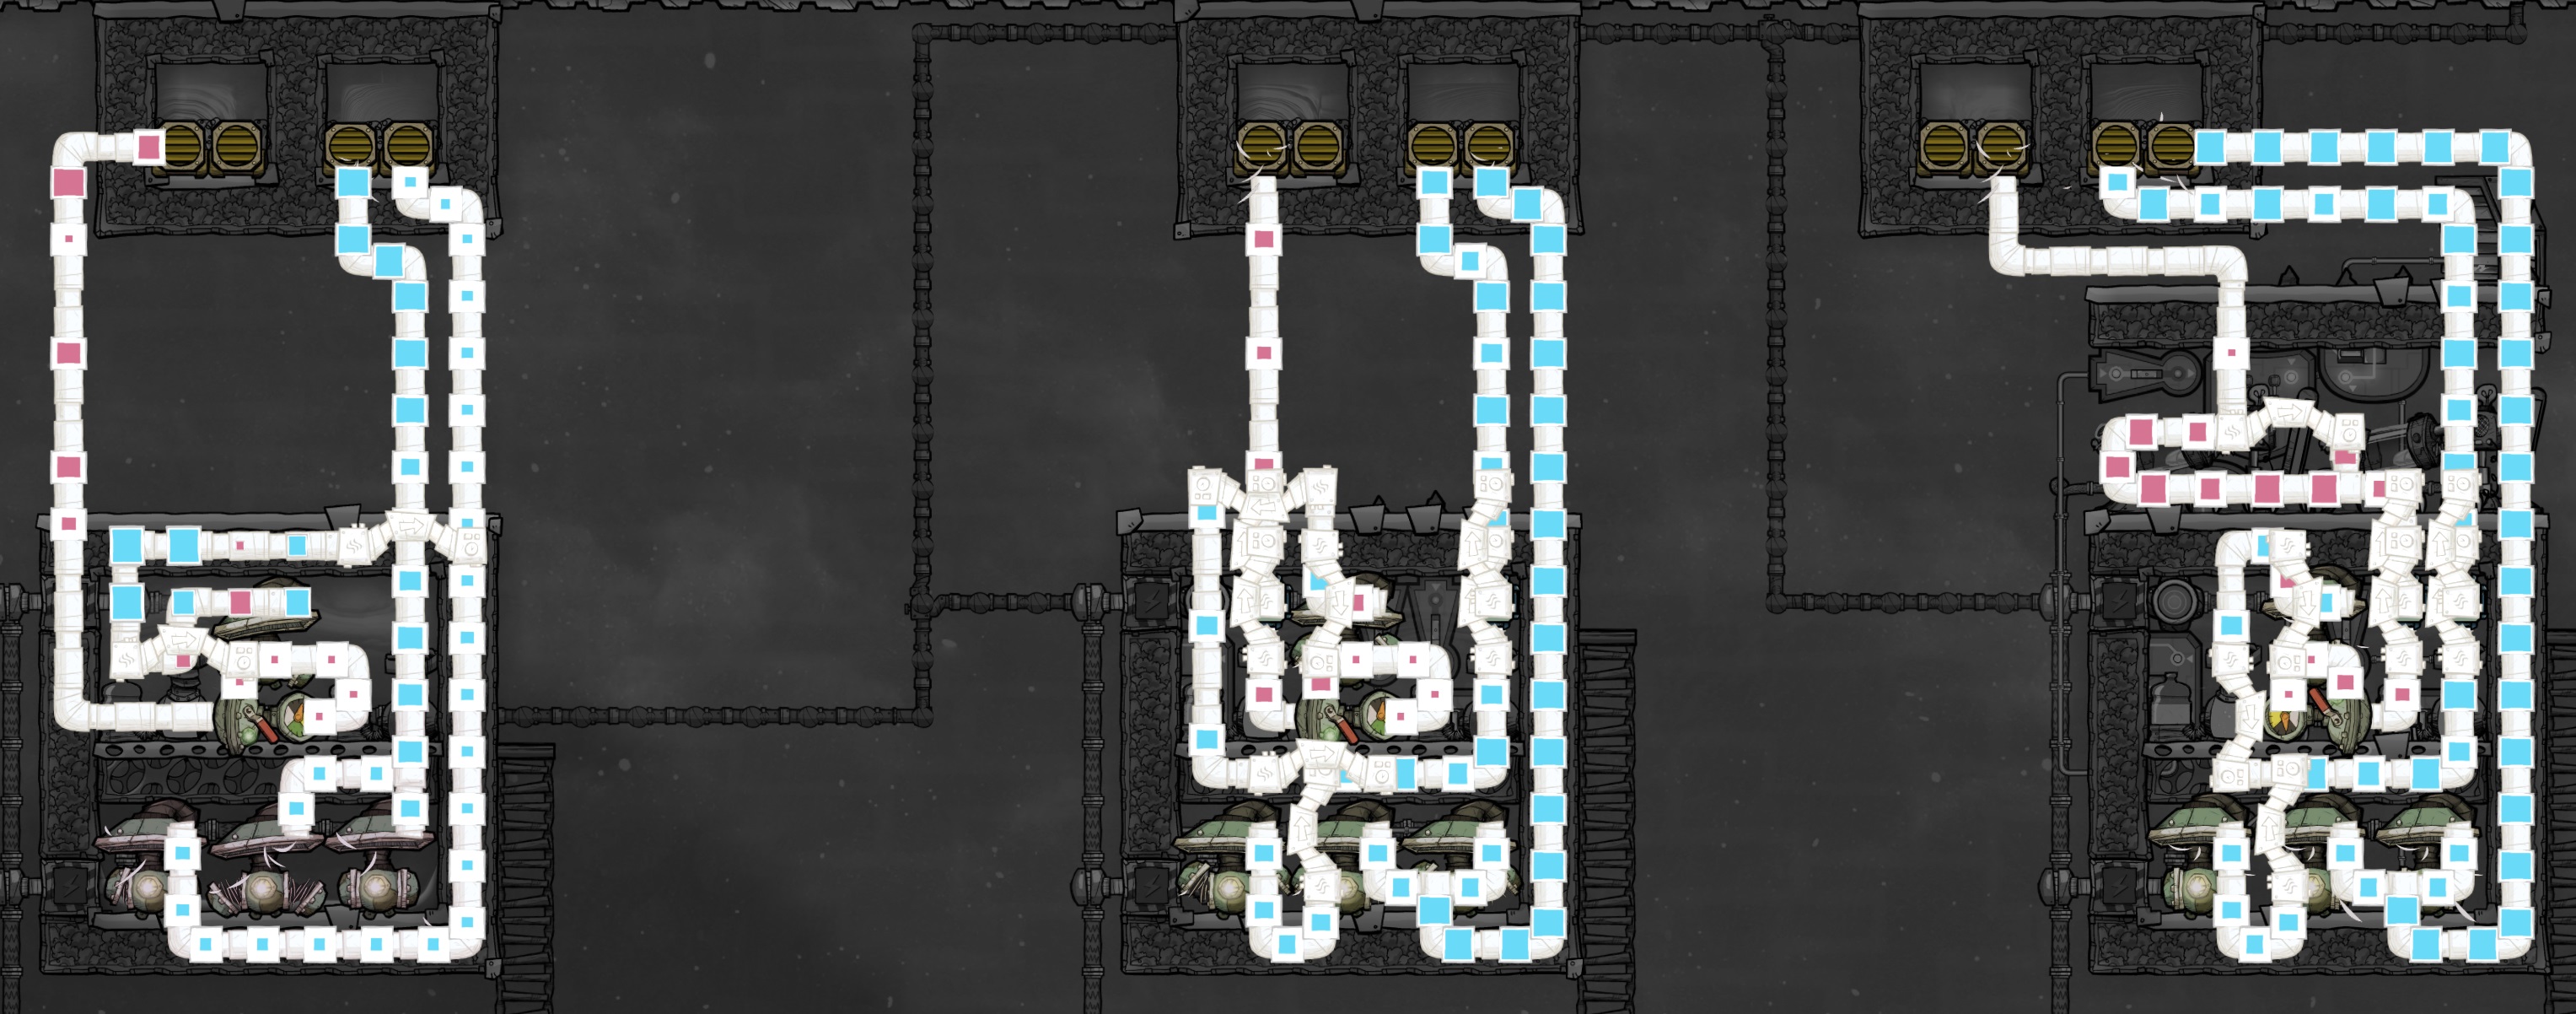
In the screenshot you can see that the pipe blockages have been removed and all three designs are outputting gas again. If you look closely at the original design on the far left, however, there is still some hydrogen trapped in the top horizontal pipe. A hydrogen packet that you can’t see is trapped at the entrance of the bridge, and can never get out until the other side of the bridge (the oxygen pipe) contains a hydrogen packet for it to fuse with. This has stalled the hydrogen output again, which leads to a self-propagating cycle.
The hydrogen packet on the bridge will stall the hydrogen output until it backs up and floods the oxygen output, which will unblock the bridge, but now the oxygen packet behind it can’t enter the bridge until the hydrogen in the oxygen pipe clears. Behind that packet you can see another hydrogen packet waiting, so we’ll repeat the process. It’s down to sheer luck whether the right random order of gas packets being pumped will ever clear this situation on its own, and my recommendation is to deconstruct and rebuild the pipes with hydrogen trapped in them. This was my Achilles heel when using the original Kharnath design in my real colonies, and was the reason I eventually learned to use pipe blockage sensors on the outputs of my electrolyzers. In a not-insignificant way, this singular annoyance ultimately led me to the investigation of a “fail safe” electrolyzer design.9. Final Thoughts
If you’re willing to accept the occasional mishap leading to mixed gas outputs, you might as well stick with the Kharnath design. It’s a simple, solid build, does not suffer from hydrogen deletion, and therefore puts out more total gas than my own. The only significant weakness is that it has difficulty recovering from a blockage of the hydrogen output on its own, but that problem is easily mitigated by a single pipe blockage sensor.
Besides the obvious failure mode protections, some of the smaller niceties I like about my fail safe design are the standard 4-tile room height, and the fact that regardless of the number of modules used, each build is wide enough to hold the required components on top of it for easy SPOM conversion.
Regarding SPOMs, if you are considering relying on one it should have been clear above that the additional complexity adds even more failure modes than a standalone electrolyzer. If you care about ensuring your SPOM will run correctly, unattended, for a long time, then some form of a fail safe design approach should be on your radar. In that situation, either my own design or my modified Kharnath design should suit you well. For this specific use case, I believe that my dual electrolyzer layout is simpler and cleaner, as shown in the images below.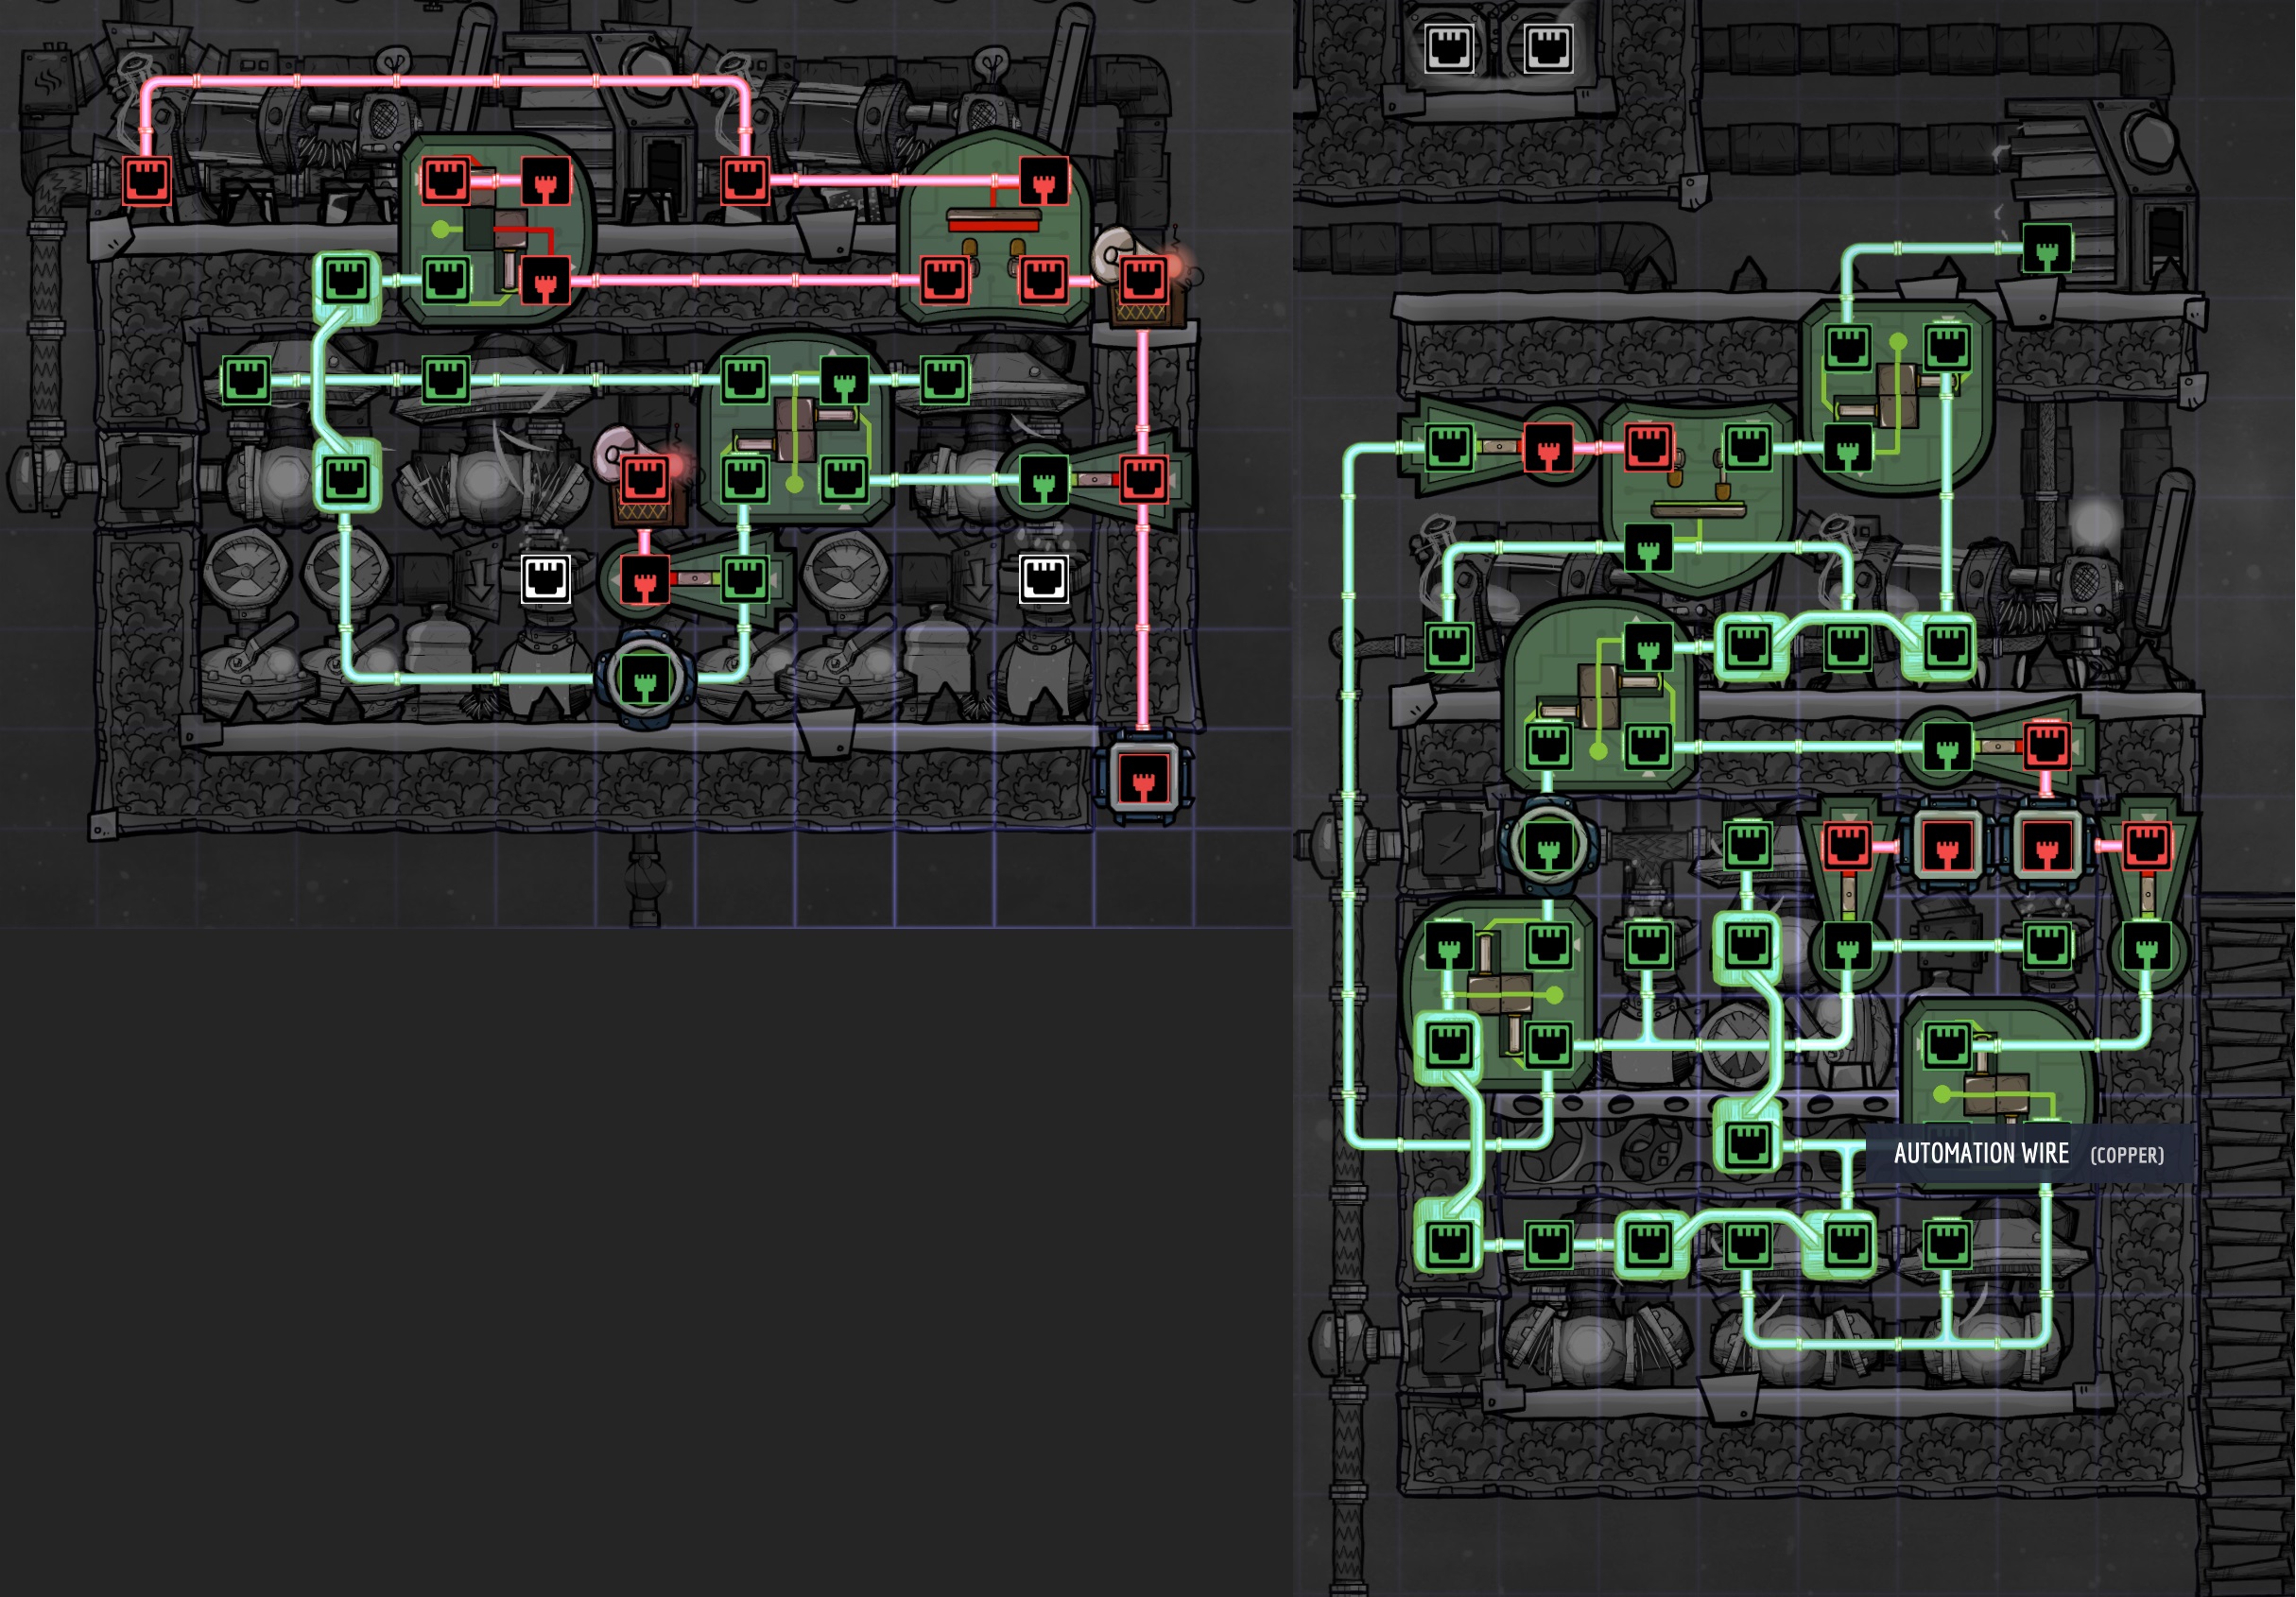
My design (left) is 9 tiles high by 11 wide and only requires two sensors, two inverters and three gates to safely control. This allows for fairly straightforward automation wiring and uses quite a bit less refined metal.
The Kharnath design, modified to provide the same fail safe functionality, is 14 tiles high by 8 wide (or alternatively 11 x 10, if you place the battery to the side of the generators) and requires three sensors, four inverters and five gates to safely control. This causes a rat’s nest of automation wiring, but at the end of the day accomplishes the same goal.
- Output pipe blockage sensors are cheap and easy. When in doubt, throw one on every output pipe and use them to shut down pumps.
- Water input sensors are even cheaper and easier, there’s really no reason to build an electrolyzer without one, at least to alert you to the failure.
- Automation alerts connected to your sensors will let you know immediately when a problem forms, so you can fix it before it becomes an emergency. Shutting down an electrolyzer to prevent gas mixing is no good if your colony suffocates 20 cycles later.
- SPOMs are fun but they add a high level of complexity and often require checking multiple logic conditions before deciding whether to run or shut down. Inability to restart after a loss of water is usually their biggest problem.
- If you are running a SPOM, you can give it a huge leg up with a hydrogen storage loop, as shown in all of the above designs.
The biggest semi-normal event left to watch out for is contamination of your input water supply. If this somehow sucks in polluted or salty water, your electrolyzers will break down and require repairs. This might be likely to happen if the heat from the electrolyzers melts some nearby polluted ice that you might have been using for cooling, and the runoff gets into your water supply. Or of course, when your dupes get home from work late, don’t have time for dinner, and randomly decide to pee in the pool… This issue could be mitigated by adding a liquid filter just before the water input sensor; a mechanical filter (built like our primed gas loops) should work fine.
I’m sure there are several other scenarios the ONI gods (Randy?) could throw at us, but for now I took the design just as far as I thought necessary and no further.
10. Thank You!
I also want to thank Kharnath in particular for their fantastic compendium of designs, and specifically for their high performance electrolyzer designs which I consider the gold standard and thus used as the basis for all my comparisons.
- ONI - Surviving the Early Game★ 5 (2.4k)83k views6.3k ♥54 minUpdated Aug 6, 2019
- Useful Construction Patterns★ 5 (1.8k)74k views5.2k ♥66 minUpdated Aug 29, 2020
- Compendium of Amazing Designs★ 5 (2.9k)66k views6.5k ♥77 minUpdated May 29, 2025
- 10* things I wish I knew sooner...★ 5 (754)58k views1k ♥4 minUpdated Oct 6, 2017
- ONI - Surviving the Mid-Game★ 5 (1.3k)44k views3.8k ♥150 minUpdated 6 Sep, 2019
- Not Quite Beginner's Guide★ 5 (361)32k views1.1k ♥91 minUpdated Mar 26, 2023



- Upgrading to PremiumTeam Fortress 2★ 5 (20k)1441k views11k ♥6 minUpdated May 11, 2022
- No More Room in Hell Official ManualNo More Room in Hell★ 5 (2.8k)569k views2.1k ♥29 minUpdated Apr 22, 2019
- NMRiH Community Hosting GuidesNo More Room in Hell★ 5 (526)351k views653 ♥1 minUpdated Aug 10, 2022
- ULTIMATE GUIDE FOR GAME DEV TYCOONGame Dev Tycoon★ 5 (5.8k)326k views10k ♥4 minUpdated 23 Jan, 2014
- How to 'Git Gud' Soon™MORDHAU★ 5 (2k)318k views3k ♥68 minUpdated Nov 16, 2024
- Лучшие кооперативные игры SteamPAYDAY 2★ 5 (1.5k)315k views2.1k ♥56 minRussianUpdated Apr 27, 2025






This guide was created by its original author on the Steam Community. Are you the author and want it removed? Request removal.