How to get Pax Romana Aeternum without losing cities.
Greetings.
I apologize in advance for possible mistakes and typos, English is not my native language.
I know, that it is a bit late to post guide like this, but better late, than never.
I also hope that this guide will help you win this match and will save you from most troubles on your way to the Achievement.
1. Scenario overview.
As you have noticed, the situation is dire in this scenario. Your empire is unhappy, you have no money, you have no army, but you have enemy armies at your borders. Policies give you penalties, and it gets worse every time. But you should always keep in mind, that everything is fine. If someone managed to get this achievement, then you can do it also. But there are several thing you need to know, prior to starting.
The first thing is, that winning this scenario as Western Rome is nearly impossible on Diety. Period. Choose Byzantium. Otherwise, you will lose 4 cities in five turns with no way to possibly defend them, or reclaim them (seriously, 1 legion to defend four cities in France is not enough).
Second thing you need to know: you don't have to reclaim all allied cities. But combined Victory Points of your team must be greater, than those of every other player (separately, of course). So, if you have 4400 points, Western Rome has 1400 points and Sassanids have 5000 points (likely the most of your enemies), you will win, although the loss animation will still be played. Sad, but true.
To claim victory, however, you need to meet several requirements:
- good PC, because you will need to load often
- large amount of free time, because you might have to go back several turns, or even restart
- determination, because this scenario gets boring and frustrating after the first week
- luck, because reasons.
You will also need to save at the start of every turn, because to win without losing any of your cities means to keep all your units alive. I managed to keep it this way only until 38 turn, and then freaked out and started to ram clibanarii with composite bowmen. But cities didn't fall, at least.
My point is, that when you reach 35 turn you will already know, that winning this scenario is entirely possible, and you could finish it even without much planning. All you need to do, is to get your empire out of the mess at the start.
2. Start and overall strategy.
2.1. Preparation.
One of most dangerous parts of this scenario is culture.
Always keep in mind, that you will receive Policy penalties at 7, 12, 25 and 45 turns. If you manage to defend all your cities, you will only get four of them, and you are free to choose the least horrible. It should always be Rise of Serfdom, Barbarian Conscript, Usurper General and Neglected Infrastructure. Fighting with large rebel force will be difficult, but hopefully, it will appear somewhere, where it can be handled easily. But taking Neglected Infrastructure prior to this is not an option, because this way you will lose large amount of gold, which could've been spent on buying units.
First, you need to adjust food, production and gold income of cities, and choose, what they will build. You should completely stop city growth, or else unhappiness will reach it's deadly -10, and your units will receive 33% damage penalty. Also there is always a chance, that enemy will get to one of your luxury recourses and pillage them, taking away that precious happiness.
Byzantium can be virtually divided in sections, each of which will face it's own problems and have it's own duties:
Northern Greece: Sirmium, Naissus, Adrianapole, Thessalonica, Dyrrachium;
Southern Greece: Nicopolis, Athens, Mistra;
Cyprus: Attalia, Seleucia, Iconium, Ephesus;
North-East: Trebizond, Amaseia;
East: Theodosiopolis, Melitene, Edessa, Antioch, Damascus, Palmyra;
Middle: Constantinopole, Sinope, Amastris, Dorylaeum;
South: Cyrene, Ceasarea, Alexandria.
Southern Greece, Cyprus and South will have to deal with Vandal fleets, Northern Greece will be attacked by Goths, North-East is targeted by Huns and East - by Sassanids. As it has been told, you have no army, but you can actually create it from nothing in time.
Production:
(check "Show queue" checkbox in production panel to adjust queue )
South.
Cyrene - catapult (or circus), catapult, cataphract, marketplace, wealth
Alexandria - dromon, catapult, catapult, marketplace, wealth
Ceasarea - marketplace, wealth
Ceasarea doesn't have enough production to make units quick, so letting it build marketplace for future income is much better. Keep in mind, that if you will work sea tiles, the city will starve, once Vandal fleet blocks the sea.
You should build catapults in southern cities only if you intend on attacking vandal cities. Otherwise, you should build bowmen instead, or proceed directly to marketplaces and wealth.
East.
Theodosiopolis - bowman, marketplace, bowman, bowman, bowman, bowman
Damascus - cataphract, marketplace, wealth
Antioch - swordsman, marketplace, bowman, bowman, bowman, bowman
Edessa - spearman, bowman, marketplace, wealth
Melitene - spearman, bowman, marketplace, bowman, bowman, bowman
Palmyra - marketplace, wealth
North-East.
Trebizond - bowman, circus, bowman, bowman, bowman, bowman
Amaseia - cataphract, marketplace, wealth
Middle.
Constantinopole - swordsman, swordsman, bowman, bowman, barracks, dromon
Sinope - cataphract, harbor, marketplace, wealth
Amastris - cataphract, harbor, marketplace, wealth
Dorylaeum - cataphract, marketplace, wealth
Cyprus.
Ephesus - dromon, harbor, dromon, dromon, dromon, dromon
Attalia - scout, marketplace, wealth
Seleucia - scout, dromon, marketplace, wealth
Iconium - scout, marketplace, wealth
Southern Greece.
Nicopolis - dromon, dromon, dromon, dromon, dromon, dromon
Mistra - marketplace, dromon, dromon, dromon, dromon, dromon
Athens - marketplace, dromon, dromon, dromon, dromon, dromon
Northern Greece.
Sirmium - warrior, scout (or bowman), bowman, marketplace, bowman, bowman
Naissus - warrior, bowman, marketplace, bowman, bowman, bowman
Adrianapole - cataphract, bowman, circus, bowman (marketplace), bowman (wealth), bowman
Thessalonica - cataphract, cataphract (dromon), dromon, dromon, dromon, dromon
Dyrrachium - dromon, dromon, dromon, dromon, dromon, dromon
After you adjust production and work tiles, make new save (name it like Theodora_preparatio), so that you won't have to do all this hard and boring work in case you will need to restart.
Your main strategy for the whole game is to hole up in your territory and let none get inside. But in different regions it will look somewhat differently.
2.2. Strategy and tactics.
Several Hints:
Melee attack on city gives 7XP, on another enemy - 5XP, defense from distant city attack - 3XP, from another unit - 2XP. Keep that in mind, as it is useful not only in this scenario.
Also, if your defending unit gets promotion, you should consider using heal, if that unit is under 80% health, and increase in power for tile type, on which he stands, otherwise.
Next important thing is, that enemy melee warriors will usually stop advancing if there are no allies around, and they are damaged more than one turn walking from the city. They will heal for a long time, or even won't do it completely, so you have a good chance to stop some enemies in the middle of the field, if you injure them but don't overdo it.
Always prioritize units, that can deal large damage to cities, such as catapults, but, if you can surely obliterate melee unit, which is likely to capture city, then deal with him first.
Don't forget, that there is such thing as a Flanking Bonus. If you have two units near one enemy, each of them have 10% damage bonus, when attacking him. Use this in your advantage, when placing living walls, and also when making traps or advancing on enemy force. Trap example: If you place several units in line next to the city, but leaving gap between warriors and the city walls, enemies will try to squeeze there, to encircle the city. Then you will get (number you your units adjacent to that enemy - 1)*10% Flanking Bonus for every your unit (possible maximum is 50%).
When leveling up your ranged units keep adding bonuses to the same type of terrain: when you get three promotions, you could add bonus shot, or one tile to distance of attack. The same goes for ships, but they can get distance bonus at two same promotions instead of three.
Remember, that barbarians are getting points only when they capture city of any empire. Empires get points for controlling cities of any empire, cost also rises for having larger population in cities. Sassanids get 1.5 more points for city control. This all mean, that sassanids are your greatest threat, but also a possible source of bonus points, if you manage to capture any of their cities.
Remove unimportant roads. Harbor costs 3GPT, each tile of road - 1GPT. By removing roads and replacing them with harbors, you can win about 70-80GPT in this scenario.
Strategy:
South:
Defending Seleucia is much harder and somewhat strange. You don't have anyone to defend it, and the closest dromon, which is near Alexandria, will be destroyed instantly, if it goes straight north. So order it to go west, and around deep sea part back to Seleucia. At the same time, Iconium, Seleucia and Attalia must build scouts, who will act like a gapholders. Sadly, those three are destined to die in several turns, but their noble sacrifice will save the city, because Vandal units tend to run aimlessly, if they can't encircle and attack city at first turn. This tactic will give you enough time to build dromons in Attalia and Seleucia and Ephesus, and lead them and Alexandrian one to finish off already damaged Vandal fleet.
East:
Important thing: at 7-th turn you will receive your first policy, which takes away 2 production from every city with walls, including Melitene. You must adjust city production to build spearman at the same moment, as it was meant before, because otherwise he won't occupy needed tile (first northwestern hill, and then back to the city), and Sassanids will encircle Melitene and destroy it. At about tenth turn cataphracts from all over the middle will start to hatch, giving you that numbers you need. When they reach the city, use some hit and run tactics, targeting catapults or melee units, if they get to close to the city. Around this time you should also receive Great General, - put him inside the city. After the main storm subsides, you must place all your units on the road, forming the actual Theodosian Wall, and also blocking all small gaps between mountains in the north. If at some point of time enemy assault becomes completely unbearable, try to put Citadel in the eastern desert right next to Melitene. This place is ideal for Citadel, as enemies will lose all their movement, while crossing the river, and couldn't pillage it in one turn. But you should do your best to keep Great General intact, in case you will need to place Citadel at another place later.
North-East:
Both cities must build bowmen, when cataphract from the middle will be finished, send couple of them here, to provide further protection against sassanids.
Middle:
Another worker from Constantinopole should go to Amaseia and build road over the river, to let cataphracts advance without penalties.
Dromons must advance, as specified above: one goes to Trebizond, another - to Mistra.
Cyprus:
Southern Greece:
The only worker in Greece should run to Constantinopole, and start removing road to Attalia.
Northern Greece:
This formation will result in separation of gothic army to four parts:
- western, that circles around mountains and hills, getting to Dyrrachium,
- northern, that attacks Naissus,
- eastern, that attacks Adrianapole,
- middle, that attacks Thessalonica.
It is much more preferable, than having them all at Naissus. In time, Naissus and Sirmium will build bowmen, and deal with gothic threat with relative ease. But eastern part is much worse: after first heal, you will have to move legion out of the forest and hide him south from the city. About this time Adrianapole will finish cataphract, and Constantinopole - swordsman. Both of them must get to Adrianapole and fortify there, while sometimes attacking catapults, if they dare to cross the hills. In fact, despite the great numbers of goths attacking this city, it have the best position for defense, because enemies will lose their turns to move in hills, enemies can be attacked almost at any tile around the city by both city and bowman, that is stationed inside, and tiles, occupied by your units are usually out of reach for distant attacks. When pressure will be lowered, you must move your forces to the middle part of gothic army, to make them turn north, instead of attacking completely undefended Thessalonica. Be advised, that goths might not only pillage luxury resources, but also roads, loading to complete separation of Greece from Constantinopole, which will lead to loss of happiness and gold income. Keep that in mind when attacking enemies, and also that goths heal to 100% health for pillaging. But, if you play all your cards right, you can push enemy away.
3. Conclusion on strategy, more hints and further description.
First: sometimes enemy units will completely ignore support units, such as Great Generals and workers. if you won't put them right in the way of enemy army, they might get out unnoticed.
Second: you can adjust the Great General's city of birth. Not directly and not completely, true, but you can make him appear in more preferable place than, for example, Alexandria. Choice of city, where GG is born, depends on several factors:
- total amount of experience gained by land units (7xp for melee attack on city, 5xp - melee on enemy, defense from distant city attack, or distant attack on city - 3xp, from/on another unit - 2xp),
- which unit deals the last blow,
- where last blow was dealt,
- amount of living enemies.
So, if you have several enemies, that might get killed by last city shot, consider waiting until GG is born in Antioch. Yes, you need at least two GGs on eastern front, because sassanids don't like to circle around, like goths, and will start to brutally ram your forces after some time. The sooner Great General gets inside Melitene, the better.
But, even knowing all this, it will still take a lot of time to get proper tactic of moving your units around to both save them and cities, so I'll post the log of their movement in first 17 turns here. Enemies are always trying to play their own way, but this log is sure to help anyway. But to understand it, first I'll explain some abbreviations and notation keys.
(Of course, if you wish to figure out how to play first 20 turns by youeself, feel free to ignore this description and table below.)
Each city can be shown as a field of 24 tiles. There are 5 rows, from north to south, each consist from 4 to 6 tiles (1st and 5fth has 4, 2nd and 4th - 5, and 3rd - 6). Center is tile 3.3, where center of coordinate is placed. Center of coordinates is specified by it's name: city name for cities, abbreviation for units.
For example, western hills right next to the Adrianapole are placed at Adrianapole3.2.
Units abbreviations:
l - legion,
b - bowman,
c - cataphract,
d - dromon,
w - worker,
s - spearman,
t - scout,
C - catapult,
W - warrior,
S - swordsman,
G - Great General.
Every unit has a number. They were named in sequence in which they first acted as I played, but it might be another way in your playthrough. Anyway, in table they will be named from top-left to bottom-right, to make it easier to perform in case everything happens the same way.
Table:
Gothic front will be separated in east and north in this table.
If city attack is written with attacks on any front, or normal unit description order is disturbed, it means, that all actions must be done in this exact order for maximum effect.
If any newly created unit's movement is not specified, then: send all dromons and units from Cyrene and Alexandria to the west, put all bowmen on hills behind front lines to defend.
Alexandria dromon (d2) - straight left and 1 tile up
Alexandria worker (w1) - towards Ceasarea
Melitene legion (l2) - to Theodosiopolis 5.0
Theodosiopolis legion (l3) - to Trebizond 3.4
Constantinopole worker (w3) 2.1 - Adrianapole 3.4
legion (l4) - Adrianapole 3.4
bowman (b1) - Adrianapole 3.3
dromon (d3) Constantinopole 3.2 - left, left-down, left, left-down
dromon (d4) Constantinopole 2.3 - right-top, straight right
worker (w4) Nicopolis - 5.0
legion (l6) Naissus 3.3 - 3.2 fortify
d5 - do nothing
d3 - rd 3ld
d4 - 3ru r
l3 - fortify
l2 - Theodosiopolis 3.2
w1 - Ceasarea 5.1
w3 - Adrianapole 2.1 build fort
l4 - Adrianapole 2.1 build fort
l6 - x
w4 - Thessalonica 3.4
Theodosiopolis - a2.1
Seleucia - a5.1
Cyrene - a2.1
d5 - a Mistra 4.1
d3 - 4ld
d4 - 2lu 2ru
l3 - heal, f
l2 - Theodosiopolis 3.4
w1 - Ceasarea 1.3
w3 - build fort
l4 - build fort
l6 - x
w2 - ru r ru r
w4 - Adrianapole 3.2
Trebizond - a2.2
Theodosiopolis - a2.1
Edessa - a2.4
Seleucia - a4.2
Mistra - a4.1
Ceasarea - a3.1
Cyrene - a1.1
d5 - Mistra 4.3 a Mistra 5.2
d3 - rd ld l a Mistra 5.2
d4 - ru 3r
Theodosiopolis a2.1 (ram)
l3 - a Trebizond 5.4 (ram) (should kill it)
l2 - heal f
w1 - Damascus 2.2
w3 - Constantinopole 1.1
Swordsman1 Constantinopole 3.3 - Adrianapole 3.4
l4 - build fort
l6 - x
t2 Attalia 3.3 - Seleucia 3.2
t3 Iconium 3.3 - 5.3
w2 - r ru r rd
w4 - Adrianapole 5.2
Naissus a3.5
Melitene a4.3
Edessa a2.3
Seleucia a5.1
Mistra a5.2
Trebizond a 2.2
Ceasarea a2.2
Cyrene a2.2
d5 - a Mistra 3.2
d3 - a Mistra 5.2
d4 - 3ru a Attalia 5.4
l3 - Theodosiopolis 2.0
l2 - x
w1 - Antioch 4.3
w3 - build fort
S1 - f
l4 - f
Warrior1 Naissus 3.3 - Naissus 4.3
l6 - x
t2 - f
t3 - dead
w2 - 4rd
w4 - Constantinopole 3.2
Sirmium a2.3
Trebizond a2.2
Theodosiopolis a 1.3
Naissus a1.2
Adrianapole a1.3
Melitene a4.3
Iconium a5.3
Edessa a4.4
Attalia a5.3
Antioch a2.1
Seleucia a3.4
Ceasarea a3.2
Cyrene a2.3
Naissus b bowman
d1 - Mistra 4.2 a5.2
d5 - a Mistra 5.2
d3 - a Mistra 3.2
d4 - 3r a Seleucia 4.2
d6 Alexandria 3.3 - lu 3l
l3 - f
l2 - heal, f
spearman1 Melitene - a3.4
General1 Antioch - Melitene 5.0
l1 - heal, f
w1 - Edessa 4.2
b1 - a Adrianapole 2.3
S1 - Adrianapole 4.3
l4 - x
W1 - upgrade to S2
l6 - x
W2 Sirmium 3.3 - Sirmium 4.4
t2 - dead
w2 - road (for cataphracts)
w4 - Constantinopole 4.2
Sirmium a2.4
Trebizond a5.3
Adrianapole a2.4
Naissus a2.3
Theodosiopolis a3.5
Edessa a4.4
Seleucia a4.2
Ceasarea a3.1
Cyrene a2.3
d1 - f
d5 - 4l
d3 - a Mistra 3.2
d4 - Seleucia 5.2 a Seleucia 4.3
d6 - 4l
Trebizond a4.4
l3 - heal a Trebizond 4.4 (after d2 and Trebizond attacks)
l2 - x
s1 - a Melitene 3.4
G1 - Melitene 2.1
l1 - f
w1 - Edessa 3.3
Edessa a2.3
s2 Edessa 3.3 - a Edessa 2.3
w3 - rd build fort (or go to Naissus tobuild forts under defenders)
S3 Constantinopole 3.3 - Adrianapole 4.5 f
S1 - heal f
l4 - x
S2 - f
l6 - x
W2 - upgrade to S4
w4 - remove road
Adrianapole a3.4
Naissus a1.2
Theodosiopolis a4.4
Iconium a5.3
Attalia a3.4
Mistra a3.2
Ceasarea a2.1
Cyrene a2.2 (one, that just healed)
d7 - rd ld 2l
d1 - a Mistra 5.0
d5 - a Mistra 5.0
d3 - a Mistra 5.0
Seleucia a 4.3
d8 Seleucia 3.3 - Seleucia 4.2 a5.1
d4 - a Seleucia 5.1
d6 - 4l
Catapult1 Cyrene 3.3 - a Cyrene 2.2
b2 Trebizond 3.3 alert
l3 - Trebizond 3.4 (better if there is empty) f
l2 - heal f
s1 - heal a Melitene 2.2
G1 - Melitene 3.4
l1 - Melitene 3.3
w1 - x
Edessa a2.3
s2 - a Edessa 2.3
w3 - x
S3 - a Adrianapole 4.4
S1 - x
l4 - heal f
S2 - x
Naissus a2.2
l6 - x
S4 - Naissus 2.2
w4 - ld
Seleucia a3.4
Theodosiopolis a2.3
Adrianapole a4.4
Dyrrachium a2.3
Iconium a4.2
Attalia a4.3
Damascus a3.1
Cyrene a1.3
Table part 2.
d7 - 4l
d1 - f
d5 - ru f
d3 - f
d8 - ld l lu a Attalia 3.4
d4 - r a Seleucia 4.4
d6 - lu 3l
b2 - a Trebizond 2.4
l3 - x
l2 - x
cataphract1 Amaseia 3.3 - Melitene 2.1 (before s1)
s1 - a Melitene 2.2 (after c1)
G1 - Melitene 3.3
l1 - x
c3 Damascus 3.3 - Antioch 3.4
S5 Antioch 3.3 - Edessa 3.2 f
w1 - x
Edessa a1.2
s2 - heal a Edessa 2.2
G2 Antioch 3.3 - Edessa 3.2
c2 Adrianapole 3.3 - a Adrianapole 3.4 f
w3 - Adrianapole 3.3
Adrianapole a 3.4
S3 - Adrianapole 3.5 a Adrianapole 3.4
S1 - x
l4 - Adrianapole 4.2
t4 Sirmium 3.3 - a Sirmium 2.2
l5 - x
S2 - Naissus 3.3 - a Naissus 2.2
l6 - a Naissus 2.2
S4 - a Naissus 2.2
w4 - remove road
c4 Dorylaeum 3.3 - Iconium 4.1
Attalia a4.2 (or 3.4, if it will surely kill enemy)
Melitene a2.2
Dyracchium a2.4
Trebizond a2.4
Theodosiopolis 2.4
Seleucia a4.4
d7 - lu 3l
d1 - 4l
d5 - x
d3 - x
d8 - a Attalia 3.4
d4 - f
d6 - Cyrene 2.4 - Cyrene 3.3 a Cyrene 2.2
b2 - a Trebizond 2.4
l3 - x
l2 - x
c5 - Amaseia 4.4
c1 - a Melitene 2.2 - Melitene 3.2
c6 Sinope 3.3 - Amaseia 5.3
s1 - a Melitene 2.2
G1 - x
l1 - x
c3 - Antioch 3.4 - Melitene 5.2
S5 - Edessa 3.2 - Edessa 1.1 f
w1 - Edessa 1.1 build fort
s2 - f
G2 - Edessa 3.3
Adrianapole a2.3
c2 - a Adrianapole 2.3 - Adrianapole 3.4
w3 - Adrianapole 3.4
S3 - heal f
S1 - x
l4 - Adrianapole 5.3
l5 - x
S2 - Naissus 3.3 f
l6 - f
S4 - f
w4 - ld
c4 - Attalia 3.3 a Attalia 4.2
Sirmium a3.2
Naissus a5.2
Theodosiopolis a2.4
Edessa a1.2
d7 - 4l
d1 - lu 3l
d5 - x
d3 - x
d8 - 2l 2ld
d4 - x
d6 - Cyrene 3.1 a d6 4.1
b2 - a Trebizond 2.4
l3 - Drill I f
b4 Theodosiopolis 3.3 a Theodosiopolis 2.2
l2 - x
c5 - Melitene 1.0 a Melitene 1.1 Melitene 1.0 (after c6)
c1 - a Melitene 2.2 f
c6 - Melitene 1.0 a Melitene 1.1 Melitene 2.1
s1 - f
G1 - x
l1 - x
c3 - a Melitene 4.3 f
S5 - a Edessa 2.2
w1 - x
Edessa a2.2
s2 - a Edessa 2.2
G2 - x
c2 - a Adrianapole 2.3 - Adrianapole 3.4
w3 - build fort
S3 - x
S1 - x
b3 Constantinopole 3.3 - Adrianapole 4.4
l4 - f
l5 - x
S2 - x
l6 - x
S4 - heal f
w4 - remove road
c4 - a Attalia 4.2 Attalia 3.3
Trebizond a2.3
Naissus a5.2
Theodosiopolis a2.2
Adrianapole a4.2
Attalia a1.2
d7 - ld 2l lu
d1 - 3l ld
d5 - 4l
d3 - x
d8 - 4l
d4 - 4l
d6 - Cyrene 2.1 a Cyrene 4.0
b2 - a Trebizond 1.3
l3 - x
b4 - a Theodosiopolis 2.2
l2 - a Theodosiopolis 2.2
Melitene a2.2
c1 - a Melitene 2.2 Melitene 3.3
c6 - a Melitene 2.2 Melitene 2.1
s1 - Melitene 3.2
G1 - x
l1 - x
c3 - f
S5 - f
w1 - x
s2 - f
G2 - x
c2 - Drill I a Adrianapole 2.4 Adrianapole 3.4
w3 - x
S3 - heal a Adrianapole 4.2 (after b3)
S1 - x
b3 - a Adrianapole 4.2
l4 - x
l5 - x
S2 - x
l6 - Shock I f (better Drill I, if he will ever leave)
b5 Naissus 3.3 - a Naissus 2.2
S4 - Naissus 3.4
Ephesus G3 l
w4 - ld
Attalia a 2.4
c4 - Attalia 3.4 a Attalia 2.4 Attalia 3.3
Naissus a2.2
Trebizond a1.3
Theodosiopolis a2.2
Adrianapole a1.3
Edessa a2.4
d7 - 4l
d1 - 4l
d5 - 4l
d3 - x
d8 - 4l
d4 - lu 3l
d6 - f
Cyrene c7 rd 4ld
b2 - a Trebizond 1.3
l3 - x
b4 - a Theodosiopolis 3.5
l2 - f
c1 - Melitene 2.1
c6 - heal a Melitene 1.1 Melitene 2.2
s1 - f
b6 Melitene 3.3 a Melitene 2.4
G1 - x
l1 - x
c3 - x
S5 - x
w1 - x
Edessa 2.2
s2 - a Edessa 2.2
G2 - x
c2 - a Adrianapole 2.3 (after b1 and b3)
w3 - x
S3 - f
S1 - x
b3 - a Adrianapole 2.3
l4 - x
l5 - a Sirmium 4.3
S2 - a Naissus 1.2
l6 - Naissus 5.1
b5 - a Naissus 1.2
S4 - a Naissus 2.4
Ephesus G3 l
w4 - ld
c4 - a Attalia 3.4 f
Trebizond a1.3
Theodosiopolis a3.5
Sirmium a4.3
Naissus a1.2
Amaseia a3.5
Thessalonica a1.1
Melitene bMarket
Policy Barbarian Conscription
d7 - 4l
d1 - 3lu l
d5 - ld 3l
d3 - lu 3l
d8 - 4l
d4 - 4l
d6 - 3ld a d6 5.3
Cyrene c7 rd 4ld
b2 - a Trebizond 2.3
l3 - x
b4 - a Theodosiopolis 2.4
l2 - x
c1 - f
c6 - Melitene 4.1
s1 - Melitene 3.1 a Melitene 2.1 (after c5)
b6 - a Melitene 3.4
G1 - x
l1 - Melitene 4.3
c3 - x
S5 - a Melitene 5.3
w1 - x
s2 - Edessa 3.3 aEdessa 4.2
G2 - x
c2 - a Adrianapole 2.3 (after b1, b3) Adrianapole 3.3 f
w3 - Adrianapole 3.5 repair
S3 - x
S1 - Adrianapole 3.2 f
b3 - a Adrianapole 2.3
l4 - Adrianapole 4.2
l5 - Sirmium 3.5
S2 - Naissus 3.2
l6 - f
b5 - Naissus 4.2 a Naissus 4.4
S4 - heal Naissus 3.3 f
Ephesus G3 l
w4 - remove road
c4 - x
Adrianapole a1.2
Thessalonica a3.4
Edessa a4.2
Theodosiopolis a2.4
d7 - 4l
d1 - 4l
d5 - 4lu
d3 - 4l
d8 - 4l
d4 - 4l
d6 - 3lu l
c7 - 2ld 2l lu l
Trebizond a4.4
b2 - a Trebizond 4.4
l3 - x
b4 - a Theodosiopolis 2.4
l2 - a Trebizond 4.4 (kill)
c1 - x
s1 - heal Melitene 3.2
Melitene a3.4
b6 - Melitene 4.2 a Melitene 3.4
G1 - Melitene 3.4 Citadel
c6 - Antioch 3.3 f
l1 - Melitene 3.4 (after c3)
c3 - Melitene 3.3 a Melitene 3.4 f
S5 - Shock I f
w1 - s
s2 - heal a Edessa 2.2
G2 - x
c2 - a Adrianapole 2.4 Adrianapole 3.3
w3 - x
S3 - Adrianapole 4.1
S1 - Adrianapole 3.2
b3 - a Adrianapole 2.4
l4 - Adrianapole 2.1
Naissus a1.1
l5 - a Naissus 1.1
S2 - f
l6 - Naissus 4.3
b5 - a naissus 4.4
S4 - x
G3 - 2l 2lu
w4 - rd
c4 - x
Theodosiopolis a2.4
Adrianapole a3.4
Antioch a1.3
d7 - 4l
d1 - 4l
d5 - 4l
d3 - ld 3l
d8 - lu 3l
d4 - 4l
d6 - 3l lu
c7 - lu l lu l 2lu
b2 - alert
l3 - x
l2 - Drill I build fort
b4 - Barrage I alert
c1 - a Melitene 2.2 Melitene 3.3
s1 - a Melitene 2.2
Melitene a2.3
b6 - a Melitene 2.3
l1 - a melitene 2.3
c3 - heal a Melitene 2.2 f
S5 - a Edessa 2.2
w1 - Edessa 2.2
s2 - Edessa 3.2
G2 - x
b7 Edessa a Edessa 2.2
c6 - f
Adrianapole a3.1
S1 - a Adrianapole 3.1
c2 - Drill II f
w3 - Adrianapole 3.2 build fort
S3 - Adrianapole 2.1 f
b1 - Barrage I Adrianapole 3.2 a Adrianapole 1.0
b3 - Adrianapole 2.3
l5 - f
S2 - Naissus 2.2
l6 - f
b5 - a Naissus 4.4
S4 - a Naissus 3.4
G3 - 4lu
w4 - remove road
c4 - x
Naissus a4.4
Ceasarea a2.1
Thessalonica a1.2
Table part 3.
d7 - 4l
d1 - 4l
d5 - 4l
d3 - 4l
d8 - 4l
d4 - 4l
d6 - l lu 2l
c7 - lu 5l
b2 - x
l3 - x
b4 - x
l2 - x
c3 - f
l1 - Melitene 2.1
s1 - f
c1 - Shock I f
b6 - a Melitene 3.4
S5 - f
w1 - remove road
s2 - f
G2 - x
b7 - Edessa 3.4
c6 - x
S1 - f
c2 - x
w3 - x
l4 - f
b1 - a Adrianapole 1.1
b3 - a Adrianapole 1.1
l5 - x
S2 - Naissus 2.2 f
l6 - x
b5 - Barrage I Naissus 3.2 a Naissus 1.2
S4 - f
G3 - Adrianapole 3.1
w4 - ld
c4 - x
Melitene a3.4
Thessalonica a1.1
Adrianapole a1.1
Edessa a1.2
d7 - 3l ld
d1 - 4l
d5 - 4l
d3 - 3lu l
d8 - ld 3l
d4 - lu 3l
d6 - 4lu
c7 - 2l 4lu
b2 - a Trebizond 1.3
l3 - x
b4 - x
l2 - x
l1 - f
c3 - a Melitene 2.2 (after b6, c1) Melitene 2.1
s1 - x
c1 - a Melitene 2.2 f (after b6)
b6 - Barrage I a Melitene 2.2
S5 - Melitene 6.2 f
w1 - Edessa 3.1 build road
s2 - Melitene 6.1
G2 - x
b7 - alert
c6 - x
S1 - Naissus 4.5
c2 - Naissus 3.6 a Naissus 3.5 Naissus 3.6 (must kill move last time after Northern army's moves)
w3 - x
l4 - Adrianapole 3.0
b1 - Adrianapole 2.1 a Naissus 3.5
b3 - Barrage I Adrianapole 1.1
b8 Adrianapole 3.3 - Adrianapole 2.1 a Naissus 5.4 (must kill)
l5 - a Naissus 1.2
S2 - Naissus 2.3
l6 - aNaissus 3.4 (after b5, S5)
b5 - a Naissus 3.4
S4 - a Naissus 3.4
G3 - Adrianapole 1.0
b9 Sirmium 3.3 - Sirmium 3.4 a Sirmium 1.4
w4 - remove road
c4 - x
Damascus a3.1
Melitene a3.4
Naissus a3.4 (must kill)
4. Into the Beyond.
After this you can finish it by yourself. All you need to do, is build two more swordsmen and one cataphract in Constantinopole, and then continue making large numbers of dromons there, while also making new bowmen in all eastern cities and in Greece. Build marketplaces, circuses and stoneworks anywhere you can, to increase happiness and gold income, and play the same trick, as with Great Generals, when choosing where to spawn army of Usurper General.
Your main strategy for the rest of the game should be this:
Southern Greece, Thessalonica, Edessa, Dyrrachium: build dromons. Lots of them.
East and North of Greece: build bowmen.
Finish anti-goth wall, putting two more swordsmen in the fields to the west from Sirmium (tiles 3.2 and 4.1).
Send some troops to Salonae, to stop franks and goths from advancing further.
Send all your dromons to the west: four to Ravenna, eight to Genua and 4-6 to Iol Ceasarea. After that all further dromons must be separated equally between last two directions. Also take one cataphract to each fleet, so that it could deliver decisive blow on the city and reclaim it. And if you see approaching vandal fleet, don't try to destroy it completely, just focus on defending Iol Ceasarea, and reinforcements will finish the rest on their way here. Recapture Ravenna at the first possibility, to make franks fight for it instead of advancing, but be careful: city must have 0 hp to be captured by embarked unit. Also try not to lose that cataphract, and send him back to sea under protection of dromons at first signs of danger. Don't worry, if franks will recapture Ravenna after that, you will still have about 2000 victory points more than them at the end.
Attacking franks by land is almost useless, especially to reclaim Mailand. Franks have huge bonuses in hills and with adjacent allied units, so breaking through this is almost impossible, especially without fully leveled up ranged units (which will have +1 distance and +1 attack).
There are also many places on map, where it is most preferable to construct citadels,
and place bowmen, especially in the east, and north of Greece.
Green crosses - good places for melee units.
Red crosses - good places for archers.
Blue stars - good places for citadels.
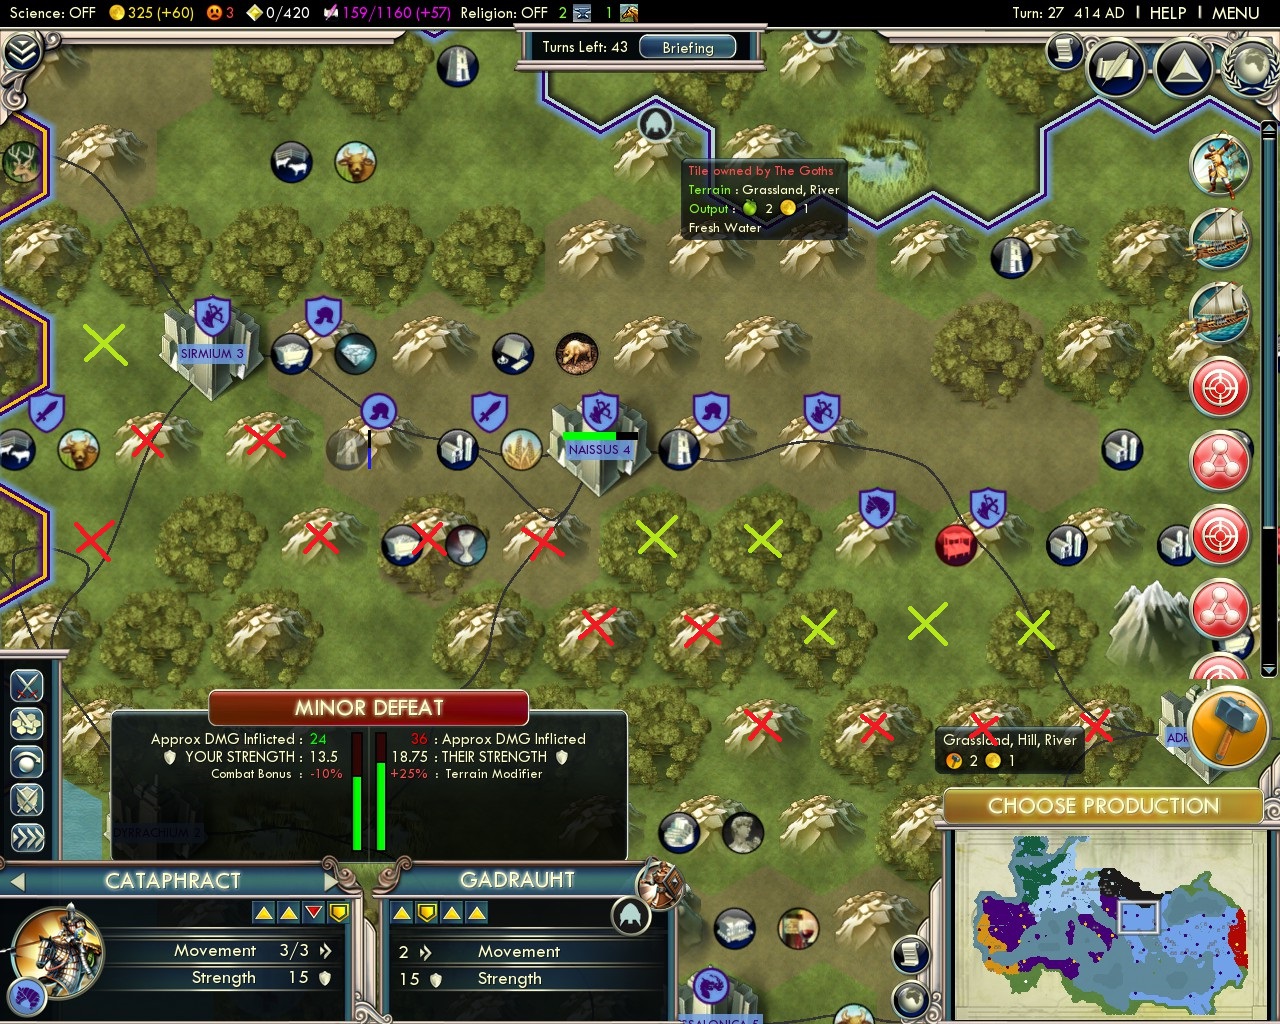 Northern Greece.
And yet, I prefer to keep units on the road to increase their mobility and decrease the pressure on Naissus: this way it can be melee attacked only from 2 tiles.
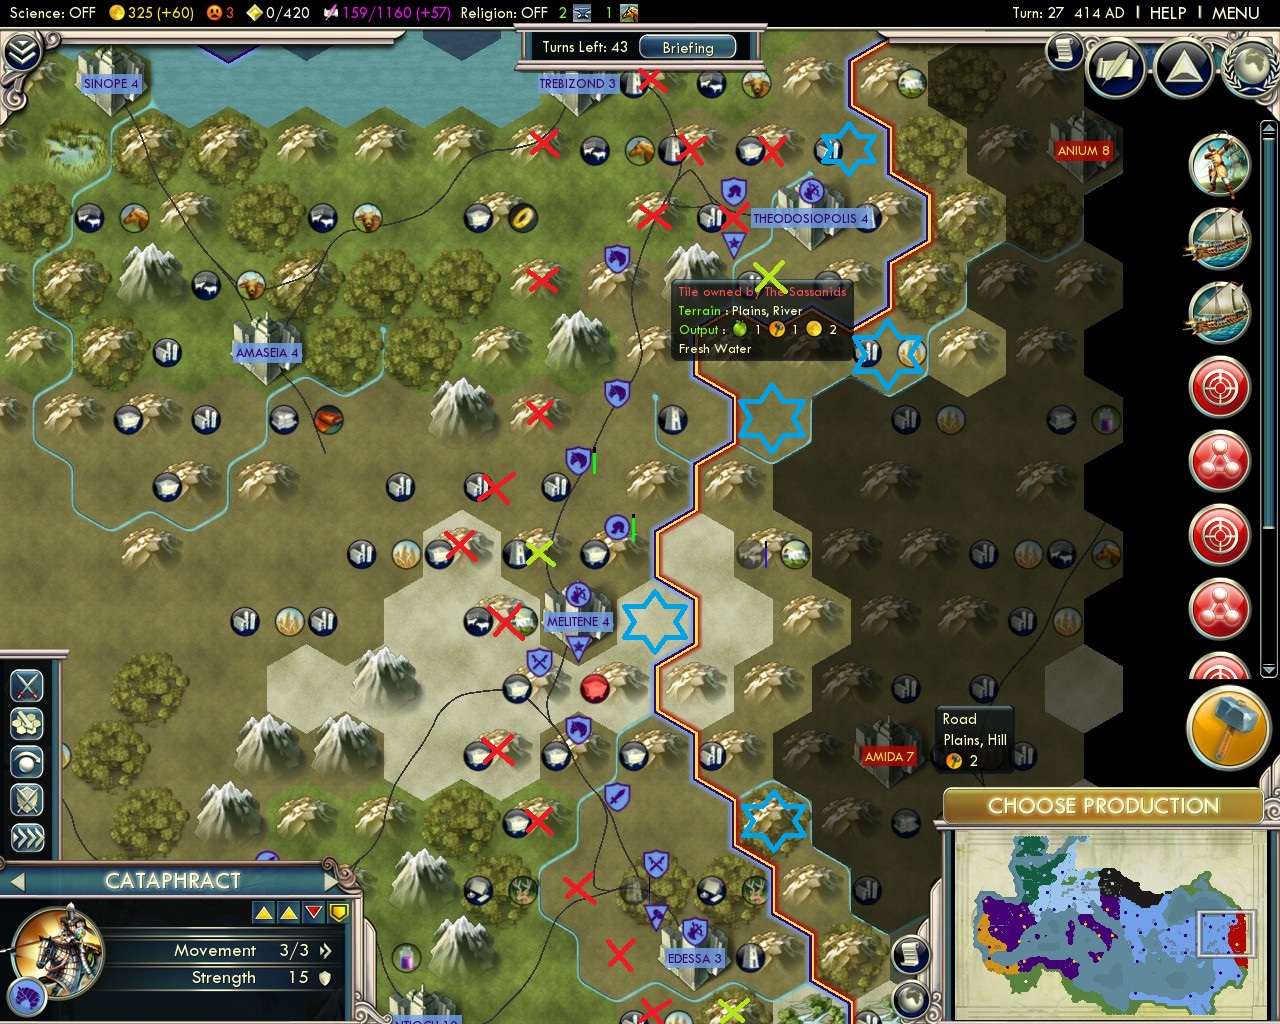 East.
East.
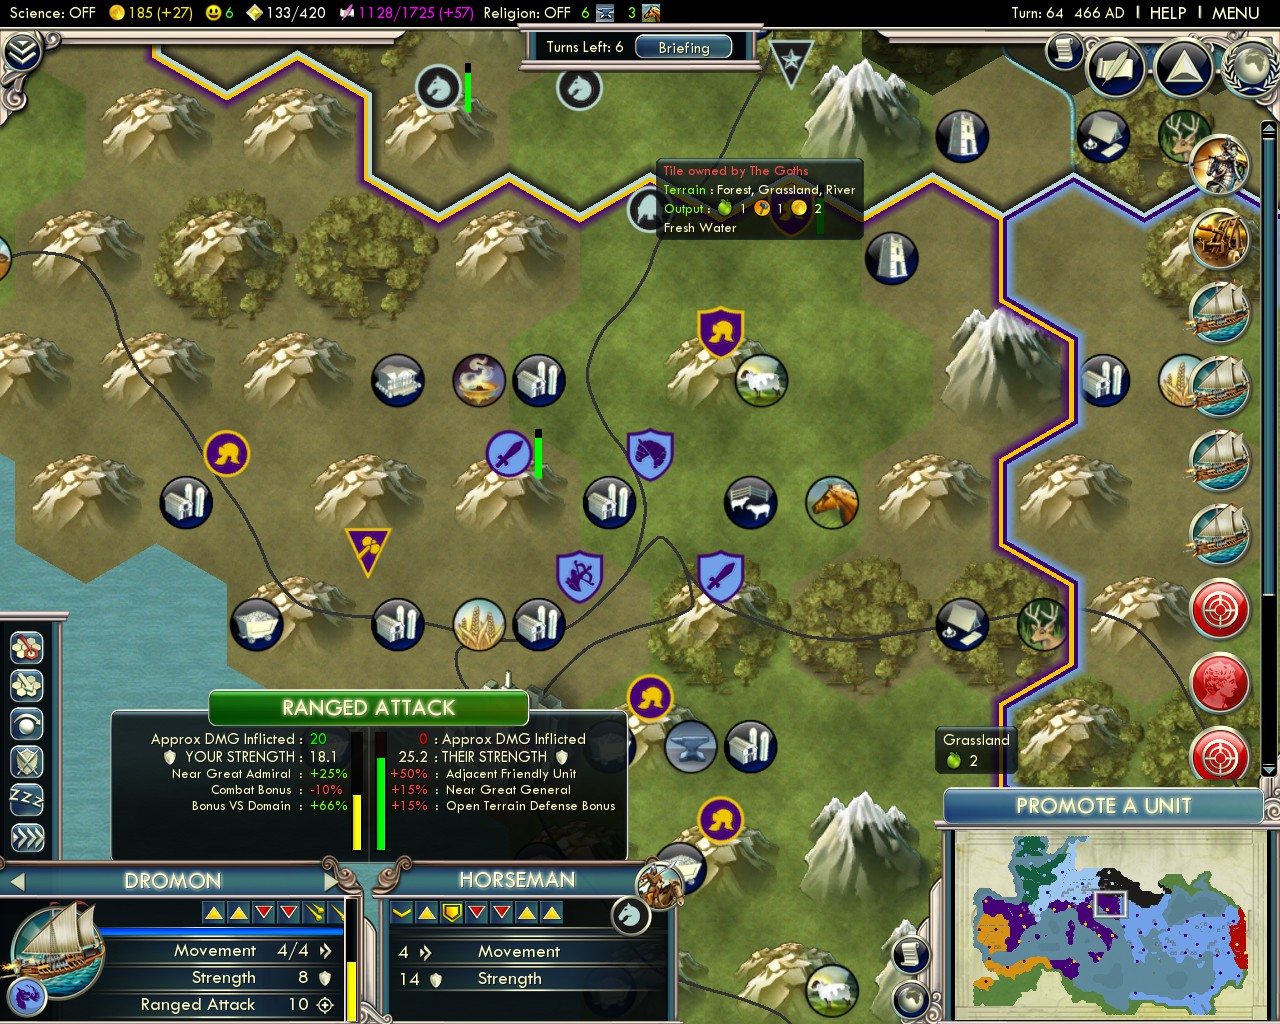 Salonae defence force; it stood like this for about 30 turns.
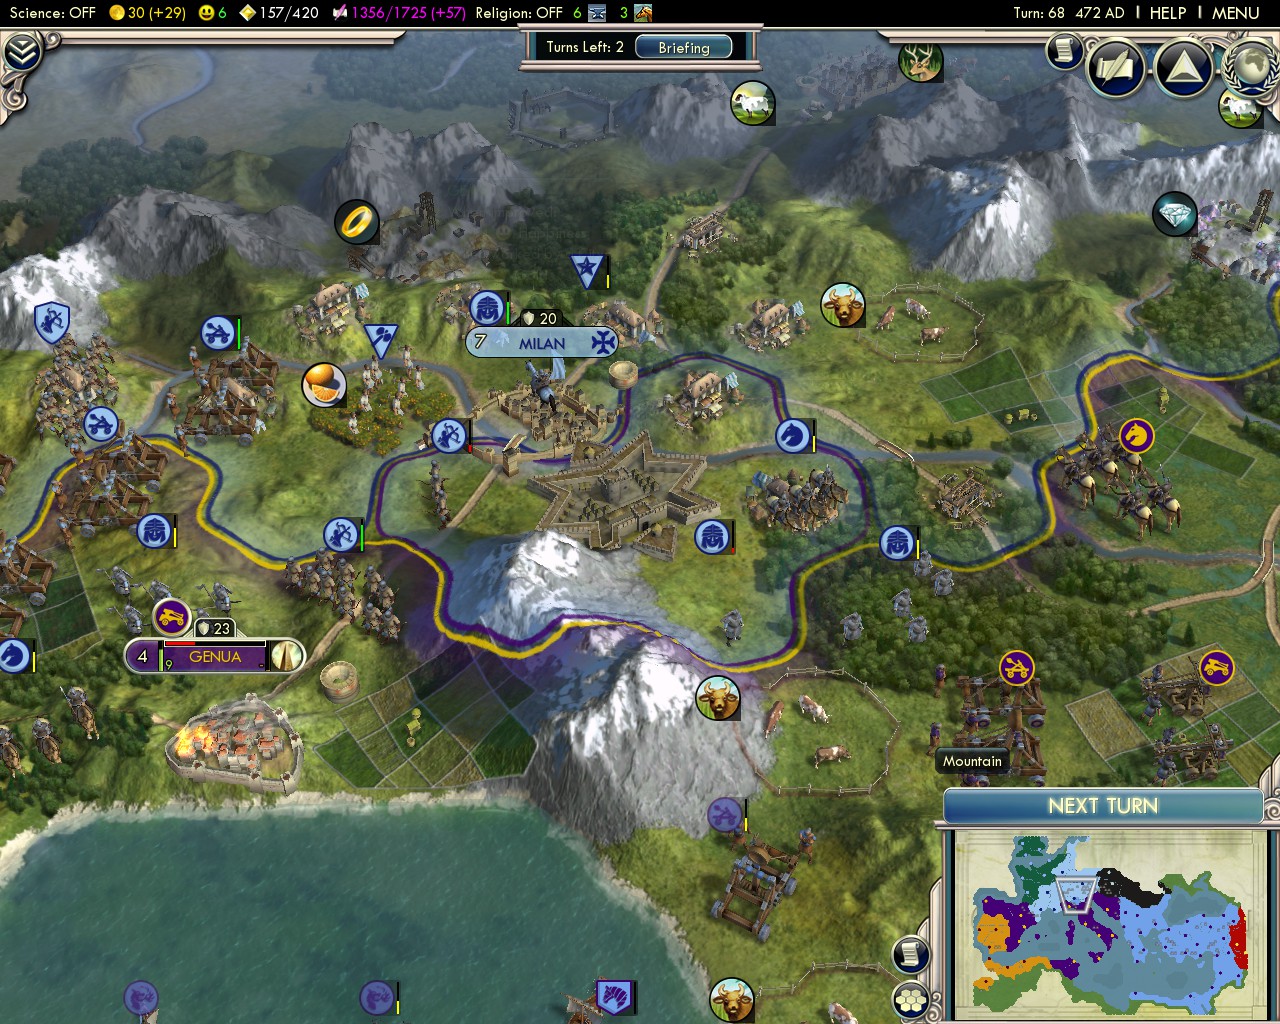 Also a good place for Citadel.
There is also one secret strategy: diversion. If you start attacking instead of defending, enemies will send their huge armies to destroy your attacking force instead of capturing cities. In my successful playthrough I didn't attack Sassanids, and they launched last 40-turn assault on Thessalonica, but I remember once that they attacked Melitene after I placed citadel near Amida:
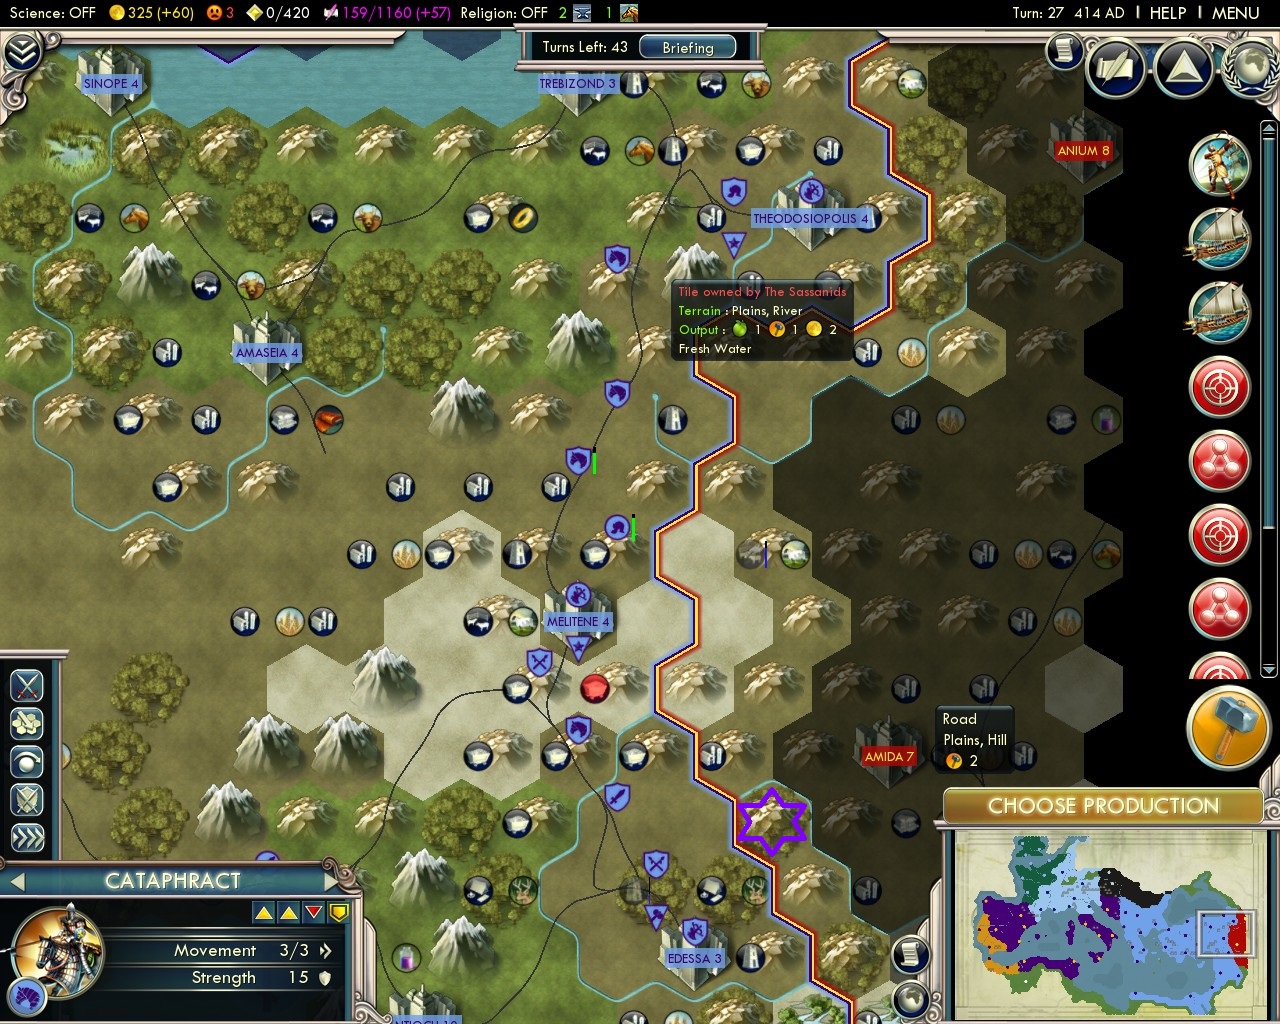 The Spot.
The greatest thing about this hill is, that enemies can't see your units that are stationed there, and you can bombard city with catapults without them fighting back. Hint: you can place citadel in the tiles adjacent not only to your own, but also to ones owned by your allies; then they will be attached to your closest city (Sirmium in case of almost all northern part of Western Roman Empire).
Another good examples of diversion tactics are assault on Olbia and failed assault on Thagste. Latter one failed, and enemies destroyed 3 out of four catapults, but then their whole army got in the desert to find one cataphract. Olbia was bombarded by 7 dromons and captured, and then whole gothic army, that first started to attack Northern Greece at about 35th turn, turned east and reclaimed the city for some time.
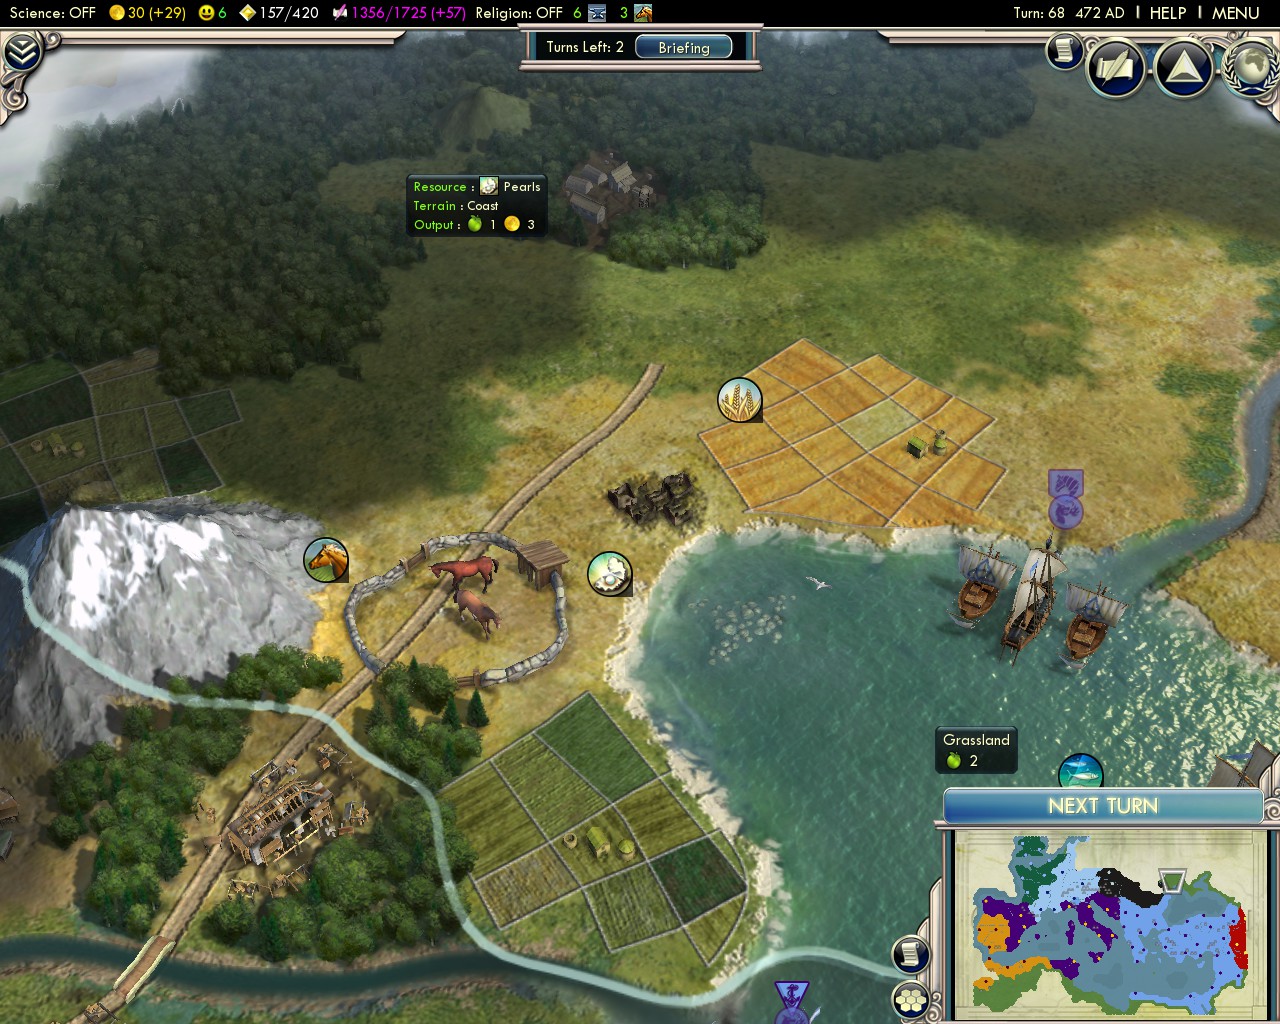 Olbia.
5. The End.
Sincerely,
realGuybrush.
- Real Populations★ 5 (1.2k)79k views1.2k ♥2 minBulgarianUpdated Aug 31, 2017
- Civ-specific tricks, secrets and clarifications (BNW)★ 5 (1k)53k views2.2k ♥96 minUpdated Jun 30, 2019
- Zigzagzigal's Civ Summaries (BNW)★ 5 (1.5k)49k views3.9k ♥134 minUpdated Jun 30, 2019
- Who to Trust and Who to Avoid in Civ V★ 5 (570)41k views802 ♥12 minUpdated Jul 8, 2016
- How to win the Korea Scenario as Korea on Deity in 16 turns★ 5 (532)41k views828 ♥15 minUpdated Apr 1, 2016
- Drunk Civ★ 5 (1.1k)39k views1.2k ♥2 minUpdated 17 Jan, 2020




- Upgrading to PremiumTeam Fortress 2★ 5 (20k)1441k views11k ♥6 minUpdated May 11, 2022
- No More Room in Hell Official ManualNo More Room in Hell★ 5 (2.8k)569k views2.1k ♥29 minUpdated Apr 22, 2019
- NMRiH Community Hosting GuidesNo More Room in Hell★ 5 (526)351k views653 ♥1 minUpdated Aug 10, 2022
- ULTIMATE GUIDE FOR GAME DEV TYCOONGame Dev Tycoon★ 5 (5.8k)326k views10k ♥4 minUpdated 23 Jan, 2014
- How to 'Git Gud' Soon™MORDHAU★ 5 (2k)318k views3k ♥68 minUpdated Nov 16, 2024
- Лучшие кооперативные игры SteamPAYDAY 2★ 5 (1.5k)315k views2.1k ♥56 minRussianUpdated Apr 27, 2025






This guide was created by its original author on the Steam Community. Are you the author and want it removed? Request removal.