Marksman Guide: Defeat the Misconceptions
i - Overview
Welcome to the Marksman Guide for Squad.
First, let me give a little backstory to myself. I started playing Squad before HABs existed. This was even when the only way to have an optic, was to be SL if I am remembering it correctly. I have taken a few small breaks here and there. The vast majority of my hours in Squad over the past 1-3 years have been as playing Marksman.
Even though I typically only play Weekends now, I average 10-30 kills and 1-5 deaths each match, and I have been averaging that for quite a long time. That is also with more than 50% of those matches with at least one radio spotted & dug down, and somewhere around 3-5 revives as well. Hell, I would average that at least 30-60% of my bandages used in a match are used on other players. I think my top games were over 50 kills and less than 8 deaths as Marksman.
With that said, you need to understand some basics before picking the kit and also have the correct mind-set. The most obvious one is that if you don't have a mic or do not feel like talking, act like the kit doesn't even exist. If you are a new player, I would also strongly recommend only playing Rifleman until you have at least 100 hours under your belt or as long as it takes you to become proficient at the basics of Squad and knowledgeable about kit-independent mechanics.
When communicating through voice. Remember K.I.S.S or "Keep it simple, stupid". Be clear, concise but also brief. You are not trying to narrate a novel here. If you spot an enemy BTR moving East to West at 180 ... really all you need to say is "BTR spotted, moving East to West at 180". If you don't know what the name of the enemy vehicle is or are unsure, just say "Enemy vic" or "Enemy armor" in place of "BTR" in the first statement.
The primary staples or Tactics & Maneuvers I utilize at any given time are what I consider the "Golden Three". These are Flanking, Overwatch, and Recon (or Recce). These different tactics and maneuvers are what you should be utilizing at any given time, and when you become proficient, a combination of all three at all times. Be the FORce multiplier.
If you wanted to summarize the way I play in chart from by percentage of utilization (average match) of those "Golden Three":
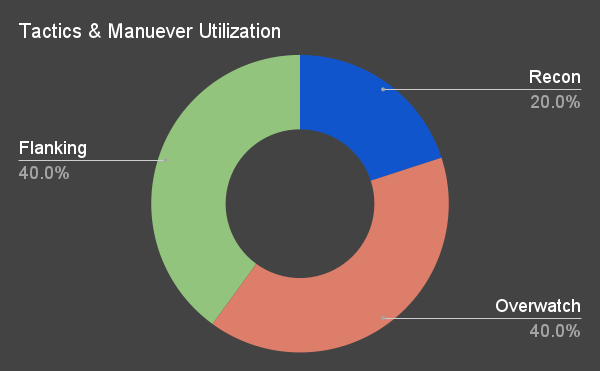
I will go in-depth about each of the "Golden Three" in later sections of this guide....
Here are some more basic "tips"...
- If you pick Marksman and are not clamoring for FTL.
You are already doing something wrong. - If you pick Marksman and are not calling out enemy positions & movement.
You are already doing something wrong - If you pick Marksman and are sitting very far away from your squad, the defensive objective, or the offensive objective for a long period of time.
You are already doing something wrong. - If you pick Marksman and eliminate a called out target without vocally informing the squad that the target was eliminated.
You are already doing something wrong.
There are very few exceptions to those. For example, if the SL specifically tasked you to go/sit very far from the squad for whatever reason.
This guide will not go in depth for the Canadian/Insurgent Sniper but many of the tactics described in this guide are also most effective with those kits as well. This guide is purely for the Marksman kit in the Fire Support role.
ii - Kit Contents
- Primary: Designated Marksman Rifle (DMR)
- Secondary: Pistol / Knife
- Grenades: 2x Smoke (+1 Fragmentation for Insurgent & Irregulars)
- Medical: 2 Field Dressings
- Misc. Equip: Shovel and Binoculars
The Primary and Secondary weapons different between each Army/Faction with Insurgents and Irregulars being the only exception which both share the SVD (DMR) and TT33 (Pistol).
The Primary weapon, or DMR, is what you will be using 95% of the time or more. The Pistol Secondary will likely have the least amount of use out of all weapons available. Now the pistol would certainly have more use if it was given a suppressor. Most of the time, if you are caught in a situation where your pistol is your only option, you have already made quite a few mistakes and are likely going down. It is still noisy and puts you at an extreme disadvantage. I use my knife far more than my pistol.
Speaking of noise... I also strongly recommend becoming strongly acquainted with the different weapon sounds and memorize what those sounds belong to. This alone can allow you to better adapt to the situation as it presents itself.
Hear the sound of an enemy Marksman rifle ahead? Put a lot more effort into staying concealed as you move and move slow, with small periods of moving fast if they are taking consecutive shots as the noise of their own rifle will likely cover the sound of your movement. Also try to use the sounds to figure out which direction the enemy Marksman is firing towards and position yourself at another angle from them when you approach.
Hear mortar fire from the compound ahead or a lot of enemy fire directed at other friendly elements? Good opportunity to move fast to a different angle of attach from those friendly elements to get in a really good position to eliminate the entrenched enemy or eliminate the mortar team if that is the case.
Another key point to note here is that not all DMRs have bipods available. Again, the SVD is lacking here (Insurgents and Irregulars). The Bipod on the DMRs greatly aid in precise fire down range by steading the rifle and removing your need to use the Steadying key. Additionally, when you are injured to a certain point, the Steadying feature is no longer available, so bipods can be of good use here as well. With that said, it is recommended that you are only using the bipod in specific situations that call for it, and not rely on it like a crutch for every shot. You are far more valuable in being flexible.
Next, not all DMRs have optics that allow you to dial your range, and forces you to rely even more on the range-finding markers within the rifle scope and your own instincts.
Lastly, Smoke Grenades are your friend. In every match I play I am always finding useful situations to for these. The tactical use for these greatly exceed that of just covering a push or to help pick up a downed teammate. With that said, they can also have serious drawbacks depending on the situation and can ruin a push just as much as they can aid it.
iii - Rating by Army/Faction
I would like to start this off by saying this my own personal opinion. You may rate the Marksman kit of the different Army/Faction differently and this primarily applies to the DMR. I base these ratings on a multitude of reasons. One influence here is also the most obvious. Which one am *I* the most effective with, or which ones have netted me the best performance consistently. Another influence will be which ones offer the most range and situational flexibility. This flexibility means the capability of the DMR to be not only effective but fluidly effective when a wide range of situations are possible.
A good example of this is when you just eliminate a target 250m out and then you hear someone sneaking up on you and you can turn around and put enough rounds in quick succession, and accurately, to better ensure you down the enemy target with the least amount of time for them to react. Not all DMRs are equally effective in this regard.
Whilst in many cases these two influences will be correlative. I would say they are still independent. The below ranking starts at #1, and what I consider the best.
- U.S. Army - M110 SASS
- U.S. Marines - M38 DMR
- Australian Defense Force - HK417 <tied> British Army - L129A1
- Middle Eastern Alliance - G3SG/1
- Russian Ground Forces - SVDM <tied> People's Liberation Army - QBU88
- Insurgents & Irregulars - SVD
Why did I chose the U.S. Army Marksman kit as the best? The M110 SASS offers a near perfect balance of the flexibility I mentioned above and the rifle scope is one of the best in the game for a combination of target acquisition at range, field of view, and quality reticle. It also offers zeroing capability (range dialing), and has a bipod.
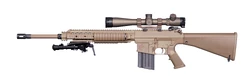
The U.S. Marines M38 DMR (ranked second) however, is simply lacking punch and accuracy from taking the top spot. This rifle is an absolute machine otherwise. There is no better DMR for when you have multiple targets at an array of mid to close ranges or when you need to CQB. It also has a really nice rifle scope, can be zeroed (range dialing), has a bipod and great round velocity. The weaknesses listed above merely hinder this rifle from taking out many mid to long range targets in a single magazine before they can just hide or escape. It should however be noted that this DMR comes with more magazines compared to the rest of the DMRs.
As for the third tanking. ADF and British Army. The stats of these DMRs are almost identical. These rifles have a good damage profile, but are greatly hindered by their poor optics.
iv - Camouflage and Cover
Now I would say this one should be pretty straight forward but I have seen so many players completely discounting how effective cover is as is being camouflaged by certain environmental elements. Obvious the latter is certainly arguable as completely situational with the amount of cheat activity going on in Squad, but that is a different discussion all-together.
This doesn't even apply to Marksman alone, as all kits should generally be sticking to cover or camouflaging elements of the map environment as much as possible. Obviously the exceptions here are that if in doing so it would take an excessive amount of time and destroy initiative or a player/squad is intentionally trying to distract enemy forces. Just keep in mind that "slow is smooth, smooth is fast" in most situations. You can run full-send into every situation and cost your team tickets, achieve little to nothing, and still have to spend more time waiting for re-spawn compared to someone who took it slow and methodical.
Now obviously there are extremes to everything. This isn't saying that you or anyone should play overly careful and take forever to complete any objective. However, learning the correct instinctual balance between aggressiveness and carefulness can come with experience and learning from mistakes along the way.
COVER
This can be almost anything in the map environment that puts any sort of protective mass between you and the enemy target or areas where enemy soldiers could inhabit. This doesn't even have to require something that fully covers or protects you. It could even be something that offers partial protection. Even something as small as a small mound of dirt or a shallow ditch can still be used to your advantage. Even smoking vehicle wrecks are effective.
- Basic protection. It is a high risk situation to be in the open and having to reload or even take a hit and need to bandage.
- Many types of cover in game also give you the ability to use your bipod, but be forewarned. This should only be used in situations mostly where the attention of known enemy positions is on other friendly soldiers. Deploying your bipod on cover is a very easy way to get headshotted yourself. Sure you are making follow up shots easier but you are also exposing a lot more of your silhouette or player model.
- Full Cover -> Peak -> Take 3-8 shots -> Back to Full Cover . There are also many situations when firing from a type of cover that can at least cover your entire model, whether standing or crouched, is to set a shot limit that you fire before crouching back to being completely in cover. This little tactic can actually achieve its effectiveness by Suppressing, Confusing, and Distracting enemy forces from friendly elements pushing the objective or the enemy position from another angle. When you return to complete cover after a few shots into an enemy position they may have difficulty in pin-pointing the exact source of fire, not only giving you more time before accurate return fire is presented but also more time the enemy spends presenting a lower threat to the rest of your Squad. Multiple Squad members, not just the Marksman, utilizing this behavior can easily turn the tide in a heavily outnumbered engagement.
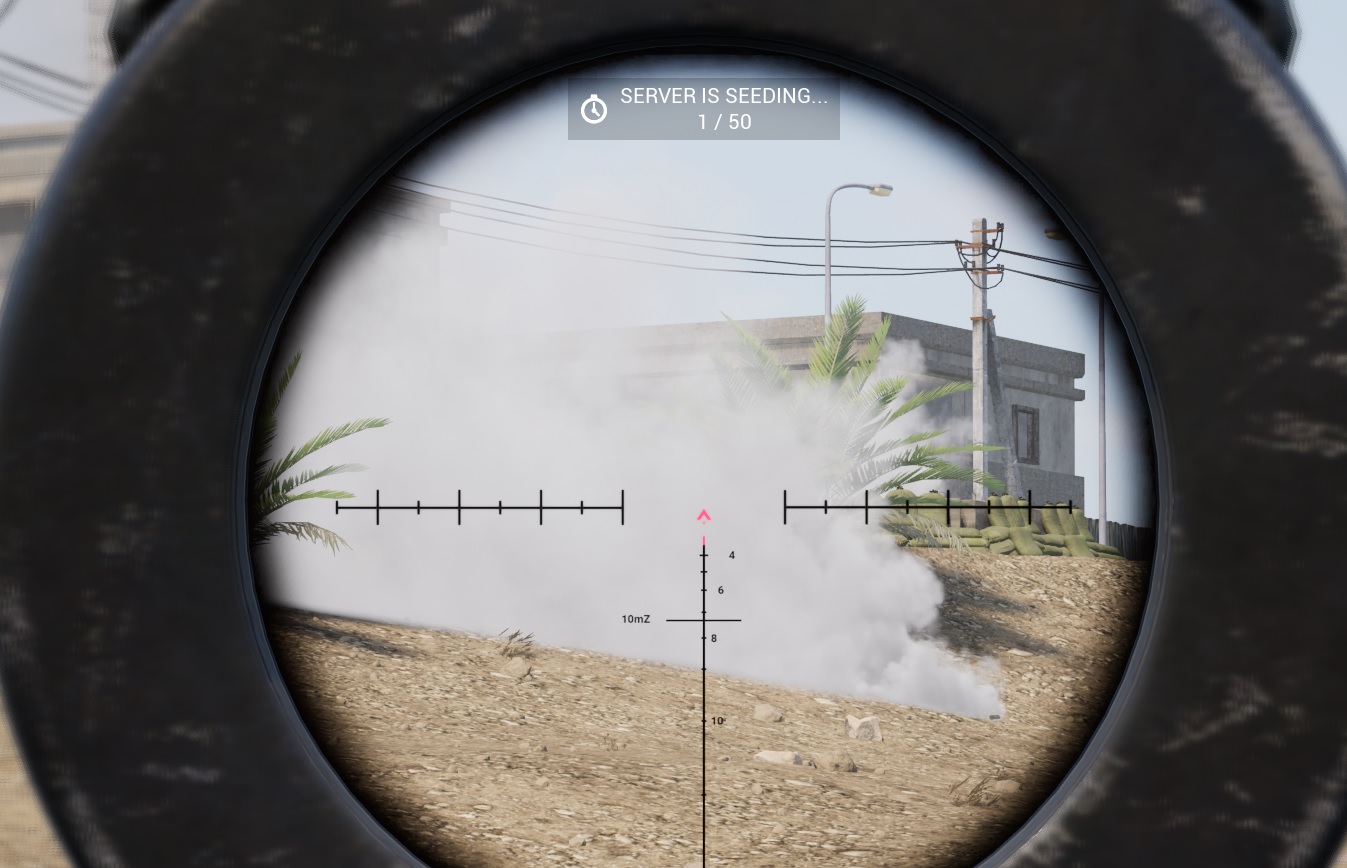
- In times where you are utilizing cover, the enemy knows you are there, and you are being constantly suppressed. In these cases is where your smoke grenades come in great use. If you have have one of your smoke grenades available, throw one at the cover you are behind, towards the ground. If you also have the second available, throw it in the direction of the enemy position as best as you can without exposing yourself to fire. Do this in quick succession. Once the smoke begins to be thick, wait 2 seconds and then lean and take multiple shots towards the enemy position. Then turn and run away towards to next complete cover, with a minor zigzag in your path, from the enemy position. The shots towards the enemy position should at least present some suppressive effect on the enemy soldiers combined with the smoke obscuring most or all of your tactical retreat.
Smoke thrown at cover
Lean to Fire
What the enemy sees (but will also have suppression effect)
------------------------------------------------------------------------------------------
CAMOUFLAGE
Camouflage and the ability to keep yourself hidden from the enemy for as long as possible is a very, very effective tool. Again, this isn't limited to the Marksman but should be utilized by ALL players of all kits.
- One of the fundamental skill-sets that affect your ability to camouflage yourself is being able to read the terrain.
- There are even parts of the environment that can be used both to camouflage yourself and also some form of cover in case you are spotted.
- Camouflaging yourself is not just limited to camping, or sitting still, or even moving slowly. Being able to properly read and utilize the terrain as well as elements of the map environment, structures, and even vehicles wrecks can even camouflage fast movements. Imagine the difference in effect if a full squad is able to push all the way to the next objective and into the cap-zone without being seen versus a Squad that gets spotted 200m out from the objective. For the latter situation, now the enemy has time to pivot their defense, lay down fire, and pin that squad down.
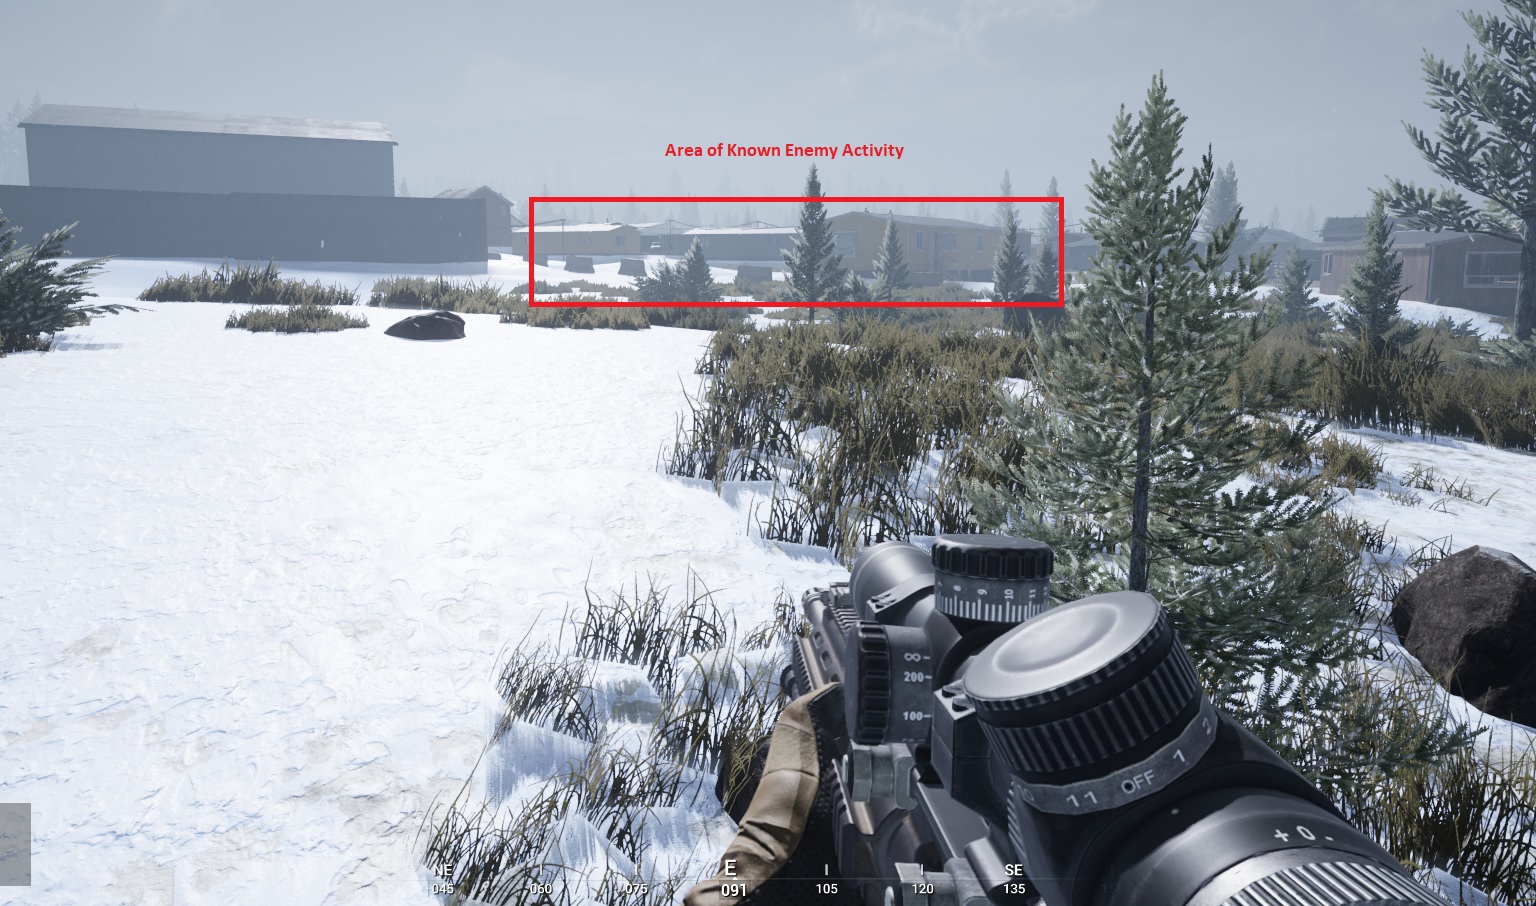
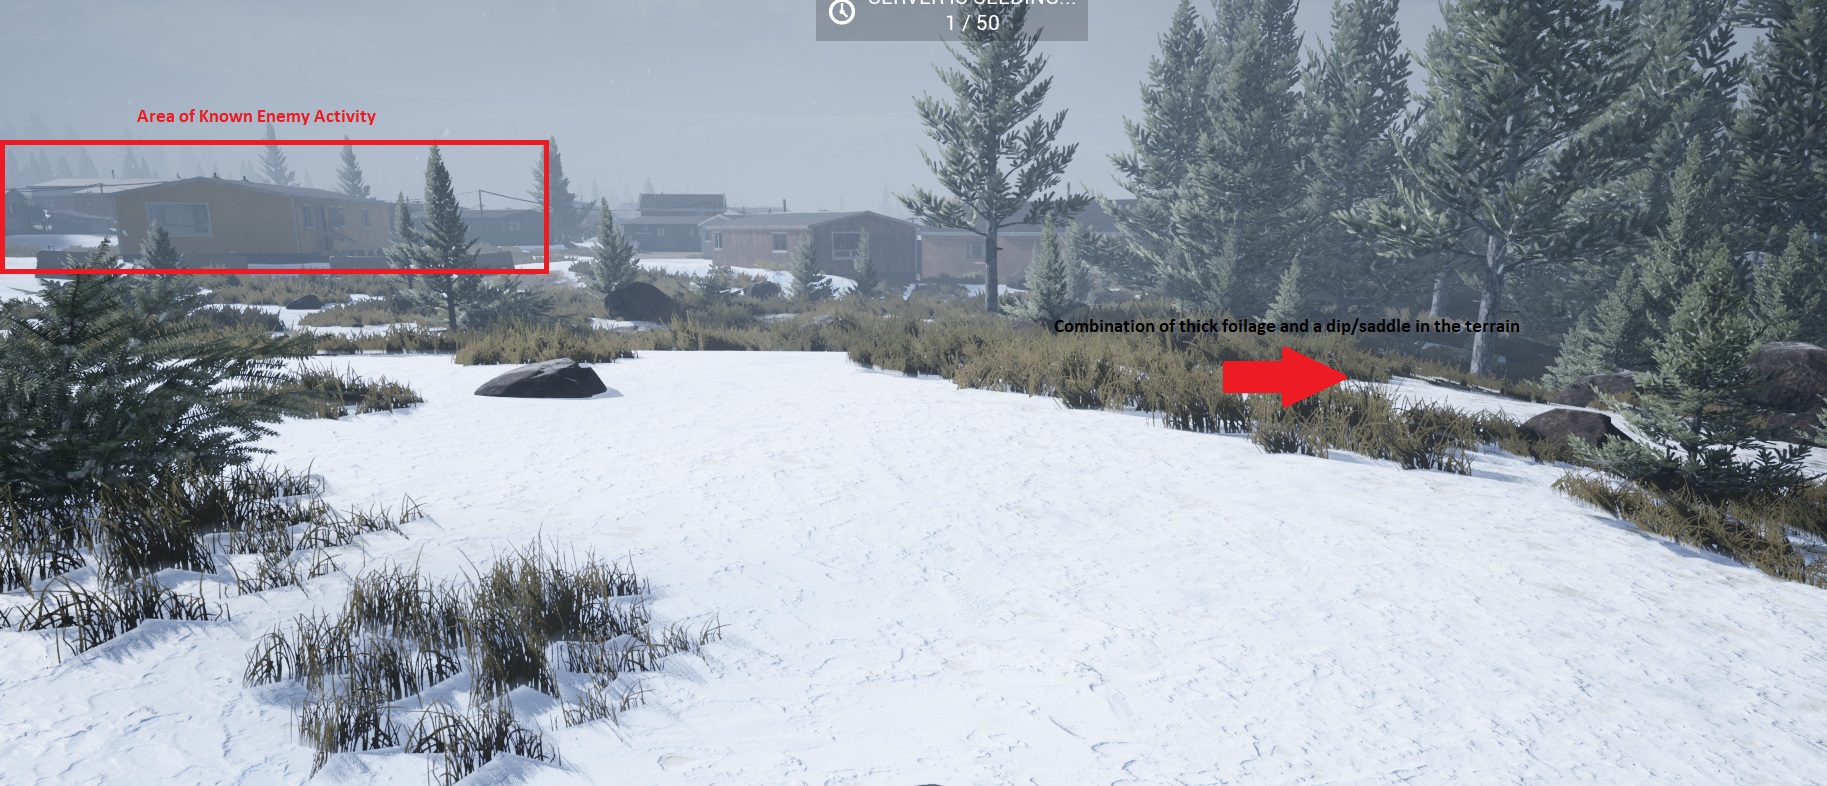
Here is an example of an objective where enemies were spotted and there is even an enemy HAB marked on the East (opposite side from your location) side of the objective.
Now, notice the terrain to your side. This is where you should be. Not out in the open. This area has not only thick foilage and a dip in the terrain to camouflage your movements but also the trees can provide some cover.
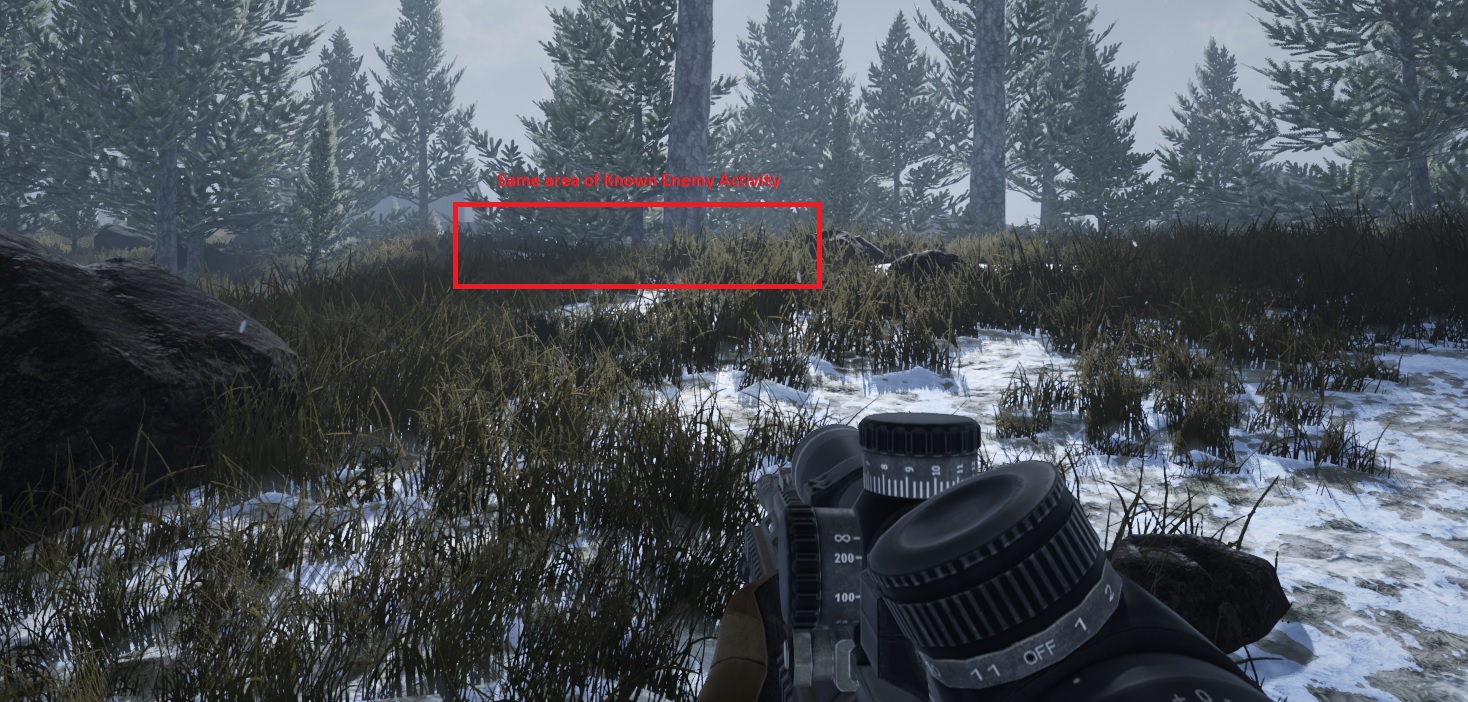
As you can see by this next screenshot. The same direction and area of spotted enemies is noted. However, I am almost completely protected from being spotted, even if I was sprinting throughout the saddle/dip. The difference in elevation, combined with the trees and rocks also provide cover... I can now dictate the engagement completely.
One last "basic" tip I will give that is also very important and surprisingly an action NOT performed by a lot of players I come across. If you are utilizing any form of cover, or simply firing from a stationary position. When it comes time to reload your weapon. Do not stay in the same position and posture that you were when you were firing. You should go to complete cover or go prone as you are performing the reload animation or do it as you move to a new position but are not taking any enemy fire..
v - Situational Awareness and Positioning
SITUATIONAL AWARENESS
A lot of players are lacking this skill-set unfortunately. However, those willing to learn and adapt can gain the knowledge and experience to formulate better instinctual responses.
Headset
This is also why a good headset works wonders in games like Squad. Being able to notice enemy footsteps can really help your performance, especially if you are alone on a flank or ahead of your force. It also is very useful in urban environments, if you are in a multi-story building, being able to hear an enemy in a lower floor or on the stairs ahead of time can give you ample chance to prepare yourself.
Tunnel-Vision
Another importance here as a Marksman is that you do not get caught up in tunnel-vision when using your optics. It is very easy to lose your sense of the space surrounding you when you are completely focused on searching or even eliminating targets at range. This is why just like as I described in the earlier section for Camouflage & Cover. Setting a shot limit. This is mentally setting a number of shots (a number <50% of your magazine), before you leave your optics and take in a more broader understanding of anything transpiring in closer proximity to yourself and also taking a quick look at the map before returning to use your rifle scope. It can have a great effect in reducing the amount of times you are killed and at the same time, by looking at the map there is always a chance that an enemy was marked closer to your position that you didn't know about before.
Another potential benefit to this method is that when you are firing a bunch of shots from the same position, there is always a chance that there is an enemy you don't know about that is about to line up a shot on you. If you drop behind cover or hit the dirt (go prone) after firing X amount of shots, it gives at least some chance that they now move on either to aim at someone else or change position completely instead of dialing in on your head. They may even assume someone else took you out.
Memorizing Sounds
This also goes back to being acquainted with the different sounds in game and what they belong to. Another part of being situationally aware is knowing what to do with that awareness.
For example, if I am engaging enemy soldier at mid to long range and hear the sound of an enemy Logistics truck and the loudness tells me it must be closer than those enemy soldiers I was engaging or maybe even driving around me, I will immediately disengage and run hard and fast in an intercept direction to kill the occupants. Stopping a logi from reaching its destination is worth far more and has far more effect on the outcome of the battle/match than getting a few infantry kills. I experience this situation quite often and there have been cases where said logi was moving an entire squad, which I proceeded to wipe before disabling that logi. Increasing the effect on the match outcome that much more.
Side Note
Interestingly enough, being more situationally aware has also given me the ability to catch more cheaters as well. Unfortunately these are becoming more and more common. Like the speed hack users or the ones that are able to pop in and out of the terrain like a pop-tart. There has been quite a few times I have heard a friendly soldier go down in the same forested area as me only for me to look in that direction and see a prone enemy soldier crawling at like 40mph, and with only ever stopping to fire. Some times I am even able to down them first.
POSITIONING
The importance of positioning. This is one of (if not the) most important skill-set for any player in Squad, regardless of role/kit. Proper positioning not only increases your offensive capability in completing the objective, but also surviving and therefore sacrificing less tickets to complete said objective.
- Field of View
- Range of Unhindered View
- Capable Cover
- Escape Routes
Field of View. Pretty self explanatory. This is how much of the environment and and your surroundings can you see. For example, if you are positioning up against a large bolder, the area on the other side of the bolder is now outside your field of view and can be an area of risk for you to be flanked.
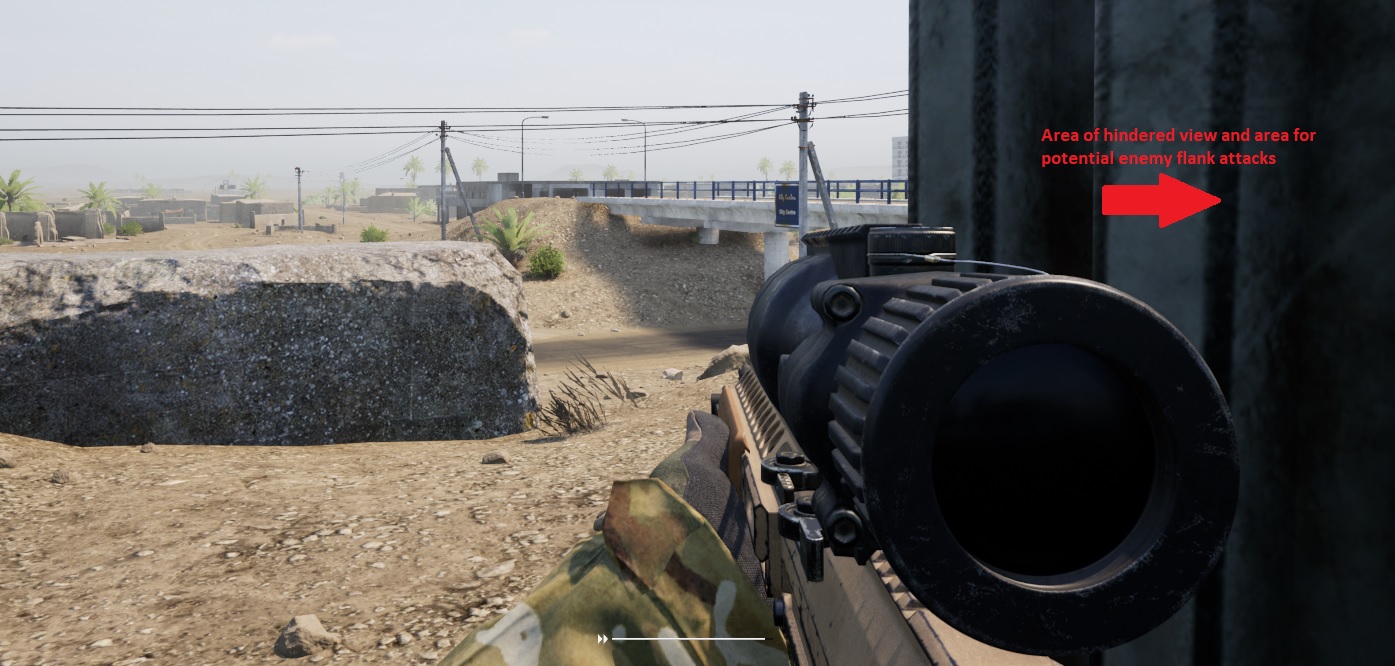
This brings us to the next fundamental.
Range of Unhindered View. This is more to do with how much of the area in your field of view is not blocked by terrain or obstacles. Now this is obviously a balancing act. How much of yourself do you expose <versus> how much of your view is hindered. How to better balance this comes with experience and practice.
It should also be noted that going prone can often reduce your range of unhindered view.
Compare the last screenshot to this next one below.
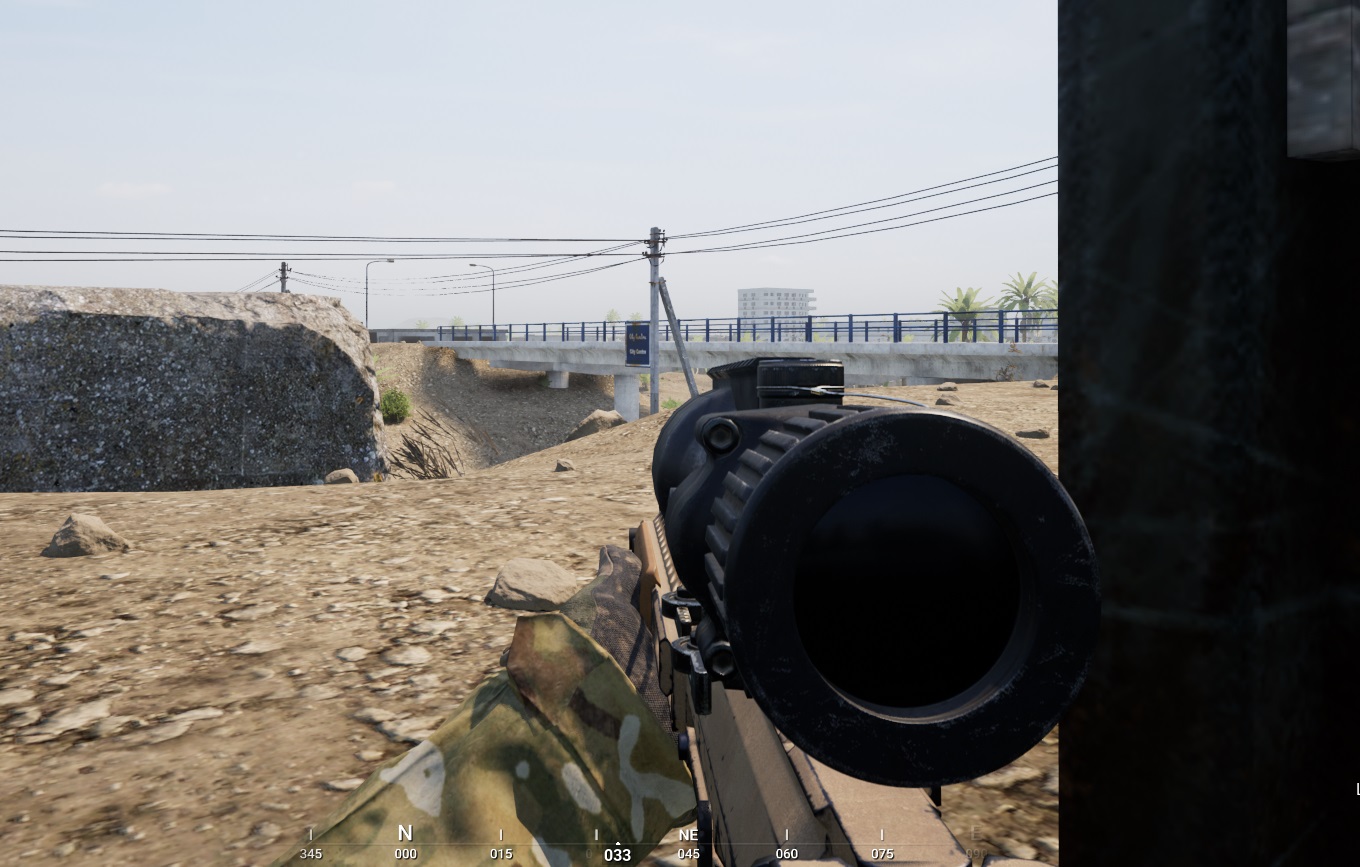
see the difference?
You lost your ability to see all of the area beyond that short rock wall, a portion of under the bridge, and a few other areas as well just by going prone.
Hindering your view and also have other negative effects as well.Lets say you are in a multi-story structure and are firing shots from one of the windows.
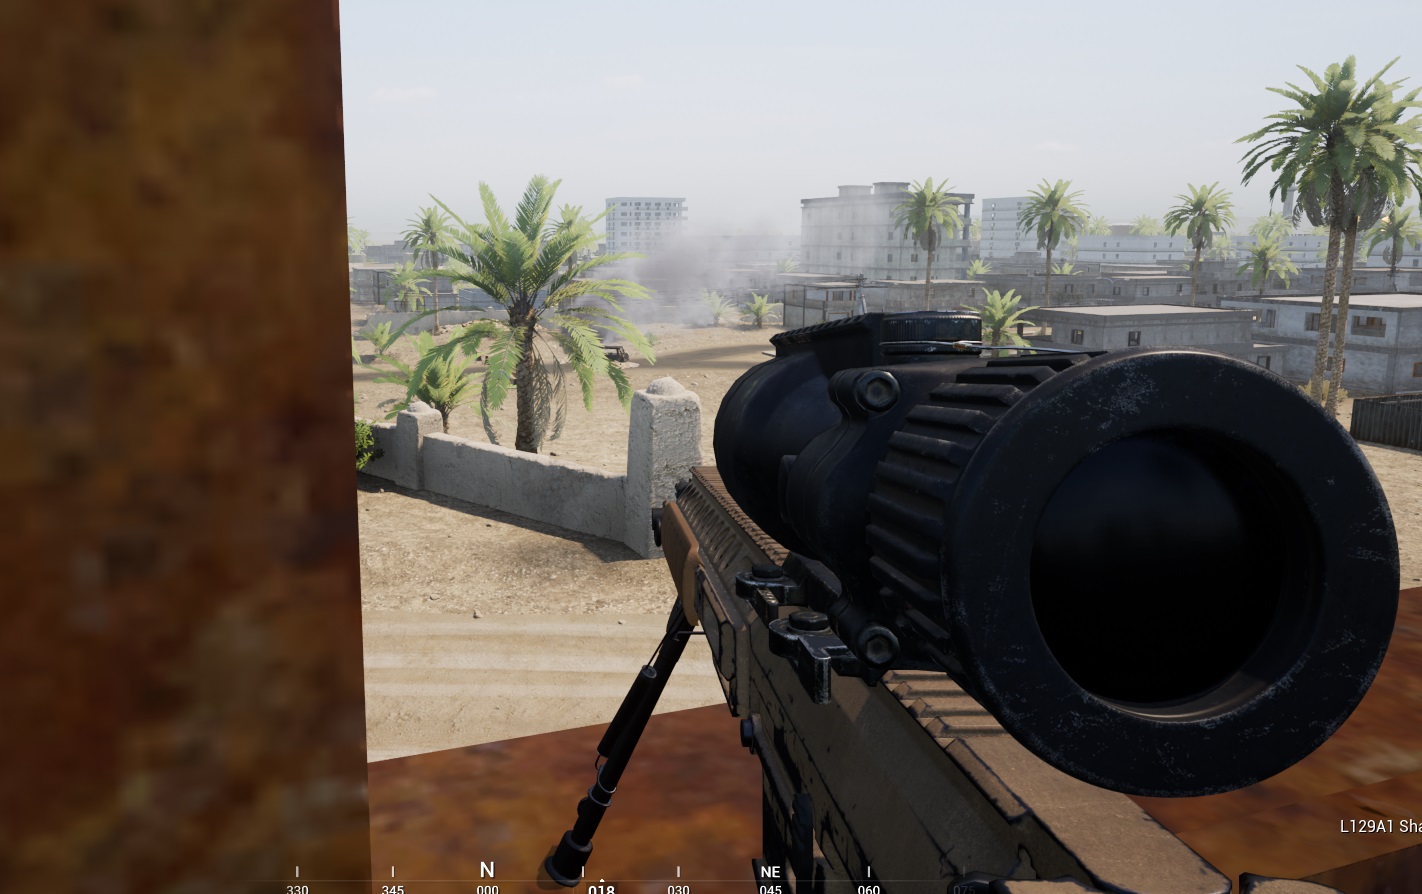
You do have a lot of cover, but at the same time you have to also think what the enemy can see.
For one, it is much easier for the enemy to get positive ID on you after hearing your shot(s). It is also easier for a player of any skill to dial in on you with their shots as well. Ever heard of "aim small, miss small"? Believe it or not it is a lot easier to hit someone posted in a window than it would be if they were... say prone in an open field. You are also more likely to get a LAT round or GL through your window as well. In situations where you want to use a window, it is better to alternate between the corners and take an angle on the window, without using the bipod.
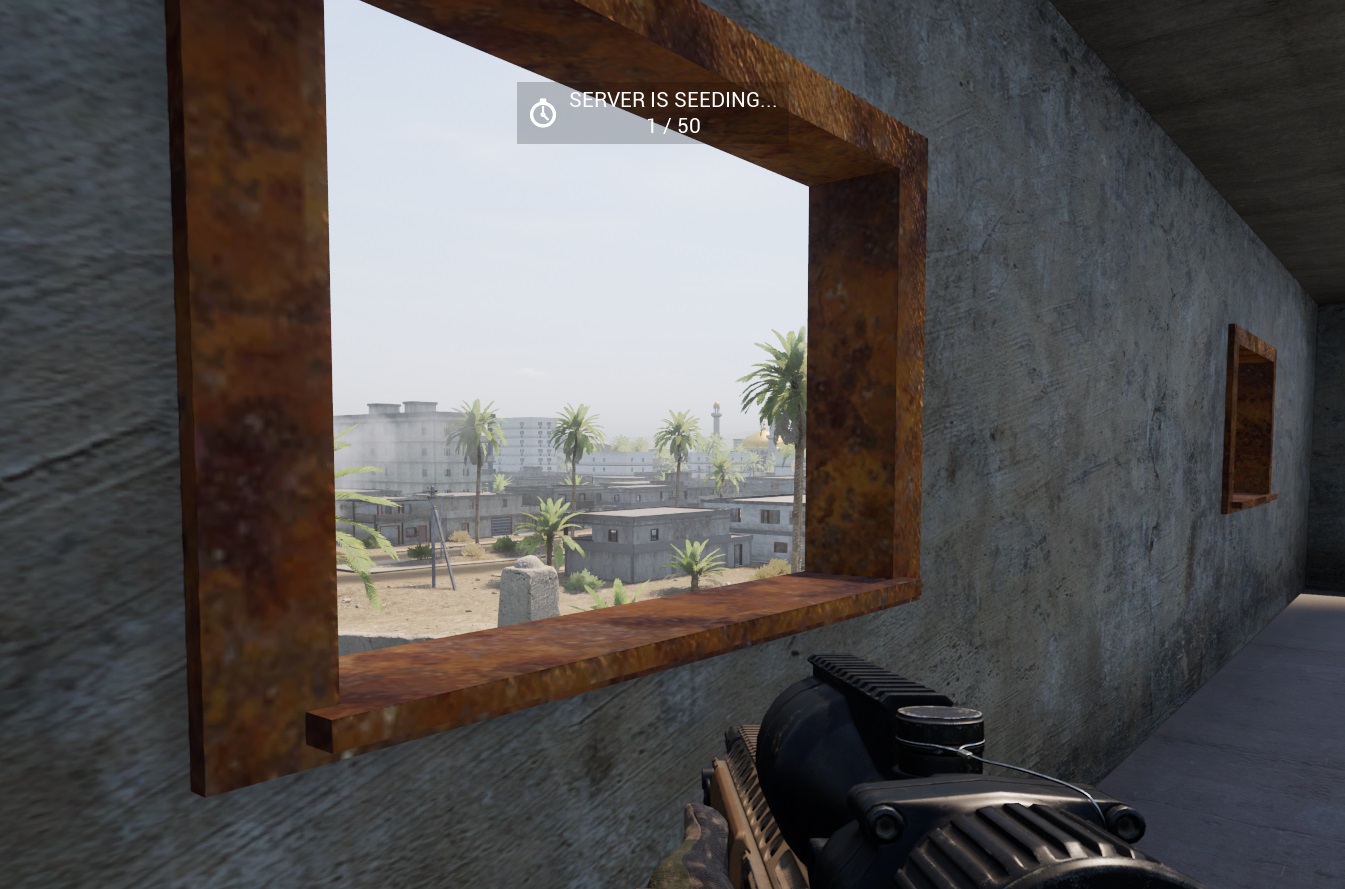
At least this way, less of your body is visible, you are rotating, and if a rocket or GL hits the window you are more protected.
Capable Cover. This one was partially covered in the section Camouflage & Cover. Where you position yourself, you should be aware of all potential cover in and around your position. At the same time, having too much cover can have a large negative effect as well which effects view as previously described. There is also two types of cover, there is purely visual cover, and then there is functional cover.
Fences are a good example here. Take the corrugated metal ones you see on multiple maps.These can certainly act as a visual cover, but they are NOT a functional cover. It is quite easy to penetrate and hit the user on the other side.
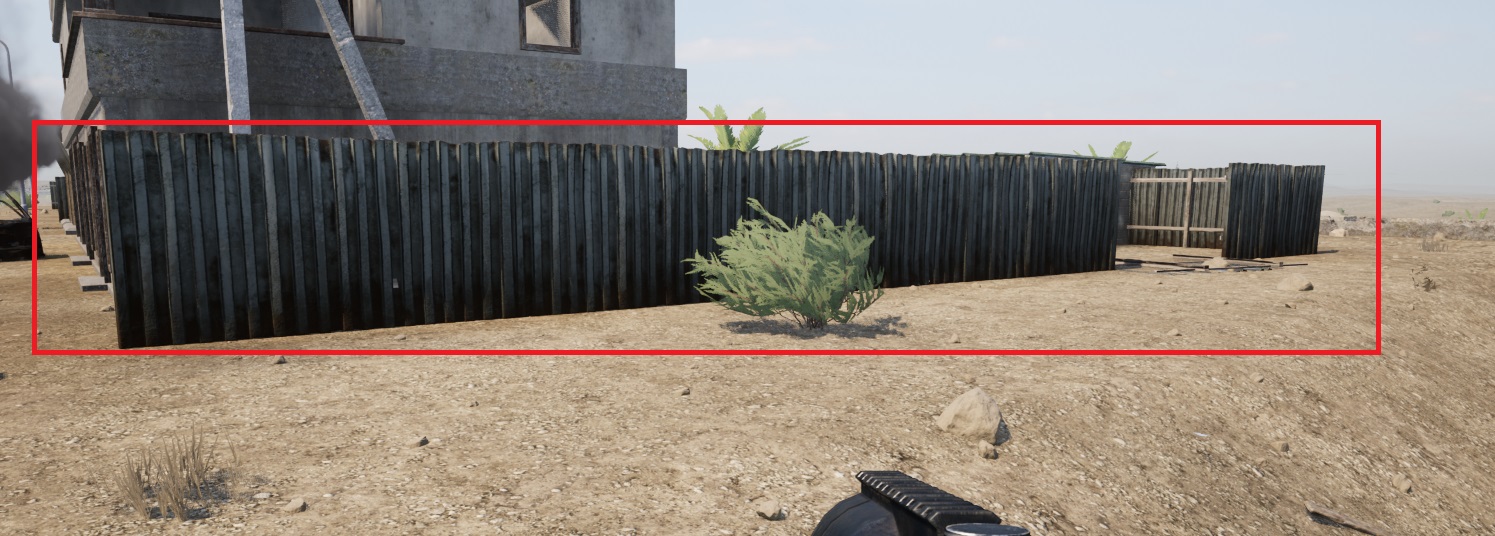
There are many examples that fall into the same category like the buildings/shacks made of clay and even wooden structures as well.
Functional cover would be more of the stone, concrete, sandbags, thick metal structures like shipping containers, vehicles, hesco, and even large rocks. This will block enemy rounds.
Escape Routes. This refers to how many effective paths of escape are there in any given position. Remember that only the lemming players are charging straight in to every situation. You have to assume that the enemy team will have as much, if not more, skilled players than your team as well. Skilled players will NOT charge straight in to every situation. So for all of those enemy lemming players you see walking into your shots, there is likely 1-2 squads of enemy soldiers at any given time attempting to create a pseudo pincer attack with that primary lemming charge.
A good position will always have at least one area of viable escape.
vi - Aiming and Weapon Discipline
AIMING
I won't go too much in depth about aiming in this guide as there are already a few guides out there about aiming, leading, and even using proper range-finding.
Examples:
https://steamcommunity.com/sharedfiles/filedetails/?id=2216631570
https://steamcommunity.com/sharedfiles/filedetails/?id=1381964066
Also improving your aiming skill, especially at range on moving targets, simply needs practice..practice...and practice. You need to make it as much of muscle-memory as possible. The same goes for rangefinding and dialing in your range on DMRs that allow it.
When I am playing Marksman and have a DMR that can dial its range I will always immediately set it to 200 as a default. I almost never decrease it from 200. In some cases I will raise it as needed for long range shots.
Why? For multiple reasons.
- The difference in zero between 100 and 200 is extremely negligible considering the average range of engagement you will experience as an effective Marksman.
- In most situations I try to remain around 200 (sometimes more depending on map) from all known enemy positions at any given time. Exceptions here are cases that require high aggression or where I am confident I can knife the target without getting killed myself and it makes sense to do it.
- In situations where I am in a firefight closer than 200... say 100-150... I can easily set my typical aim point to around center mass and headshots are now common without aiming for the head.
Please also keep weapon sway in mind when playing Marksman. Since your rifle has a magnified optic, weapon sway will be more exaggerated. This is where either the steadying key or the bipod come in handy. These will stop the sway of your rifle. The steadying key is a a temporary effect but the bipod will steady your rifle for as long as you have the bipod deployed.
When you are out of stamina, and if you are injured to the point of being unable to regain stamina, it can have a large effect on your precision especially when you are not prone or using a bipod. This is due to the fact that you are no longer able to steady your weapon as well using the steadying key. Being out of stamina, especially when you cannot regain it also affects your ability to tactically retreat or reposition.
Weapon Discipline
This is another one that should be utilized by ALL players of all kits except for situations that call for a distracting element.
Unless you have an actual target that you can feasibly engage (you are fairly confident you can hit), you shouldn't be firing your weapon. Same even applies to vehicle gunners.
I have been in cases where another player decides to post up next to me and starts unloading on everything they see, giving away our position and immediately resulting in return fire from the enemy position. They will also likely net zero kills. Now I have to abandon the position completely.
I have also seen cases where my squad is sneaking around the objective in a logi to setup an offensive HAB only for some player in the squad popping off shots for no good reason and absolutely nothing completely giving away our position and grabbing the attention of enemies in the general area. Now the HAB location is immediately compromised.
As a Marksman if you utilize proper weapon discipline you may find yourself in situations where you lose the chance to kill/trade with a single enemy target for the ability to get into a position where you can dictate the engagement and net multiple kills.
vii - Overwatch & HVT
OVERWATCH
In its basic, most simple form. If you are in an elevated position, with a wide/long view range, you can support friendly units below as they advance or retreat. Support does not just mean killing targets as they present itself. This needs to also include calling out targets, including troop and vehicle movement, as well as potential HAB locations if they are not already marked. One way I do the latter is when I see a general flow of enemy infantry contacts that seem to originate from the same area. In those cases there, 9/10, going to be a HAB or Rally in that area (or direction).
When you are in a overwatch position and are presented with multiple enemy targets at the same time or a flow of enemy targets you need to think of each enemy soldier as a coin (money). Coins can have different value, different worth. In a very quick yet calculated matter, I am talking real brain power here, you need to set those values to each target.
How should that value be calculated?
Which enemy infantry target presents the highest risk to ticket loss. Remember, you are not always just going to be providing overwatch to squad mates only, but blueberries (friendly soldiers not in your squad) as well at times. These blueberries cannot hear you on voice warning them of targets and may not be constantly looking at their map to see target spots.
Example #1
For example, You have a mix of 3 enemy infantry targets within your sights while on overwatch. 2/3 of the enemy soldiers are moving in a direction to make direct contact with friendly infantry on the ground. 1/3 of the enemy soldiers is a HAT and moving to intercept a friendly logi coming down the road. That HAT is now the High Value Target or HVT. This should be your first target to eliminate.
Example #2
In this example you still have a mix of 3 enemy infantry targets in your sights while on overwatch. However, in this example 1/3 of the enemy infantry soldiers are moving in a direction to make direct contact with the same friendly infantry, 2/3 of the enemy infantry soldiers are clearly moving to flank the friendly infantry and possibly even surprise them. Those 2/3 soldiers attempting to flank your friendly units are now HVT and should be eliminated as soon as possible.
Example #3
In this example you have an entire squad in your sights and they are moving together. You can clearly make out which of the enemy soldiers are the SL. If you are unable to identify a medic in the enemy squad, the SL of that enemy squad is now the HVT. If you are able to identify the medic, the medic is also an HVT. Why? Well the SL is the one player in that squad that has a direct line of communication to the rest of his team. If he goes down, he now loses personal visibility (for the majority) of what is going on around him beyond what his squad members communicate to him. Also, when a SL goes down, it is more likely some/all of the squad will stop their advance and try to get him back up whereas if it was a normal squad member that went down, often times they will continue their advancement. Also consider the chance that the SL is the enemy commander as well.
Calculating and Eliminating High Value Targets is not just limited to overwatch. However, it is just that due to the visibility offered in such a position, you are more likely to have the information necessary to make that calculation.
Overwatch doesn't mean that you need to be sitting in the same position for a long period of time either. If you are supporting the rest of your squad and they are continually advancing, you need to consider your own effective range and ability to support them deteriorates the farther they get from you beyond a certain distance. As you gain experience you will be able to better evaluate exactly when it is time to abandon your overwatch position.
If you squad has reached that X distance from you, you should quickly scan for enemy targets, then move out from your overwatch position and also notify your squad on voice that you are coming off overwatch to head their way. After you begin to catch up to your squad, find a new overwatch position if any of the below criteria are met:- Suspected/Marked/Known enemy contact ahead
- Squad is closing in on the objective
- Squad is closing in on the SL move-mark
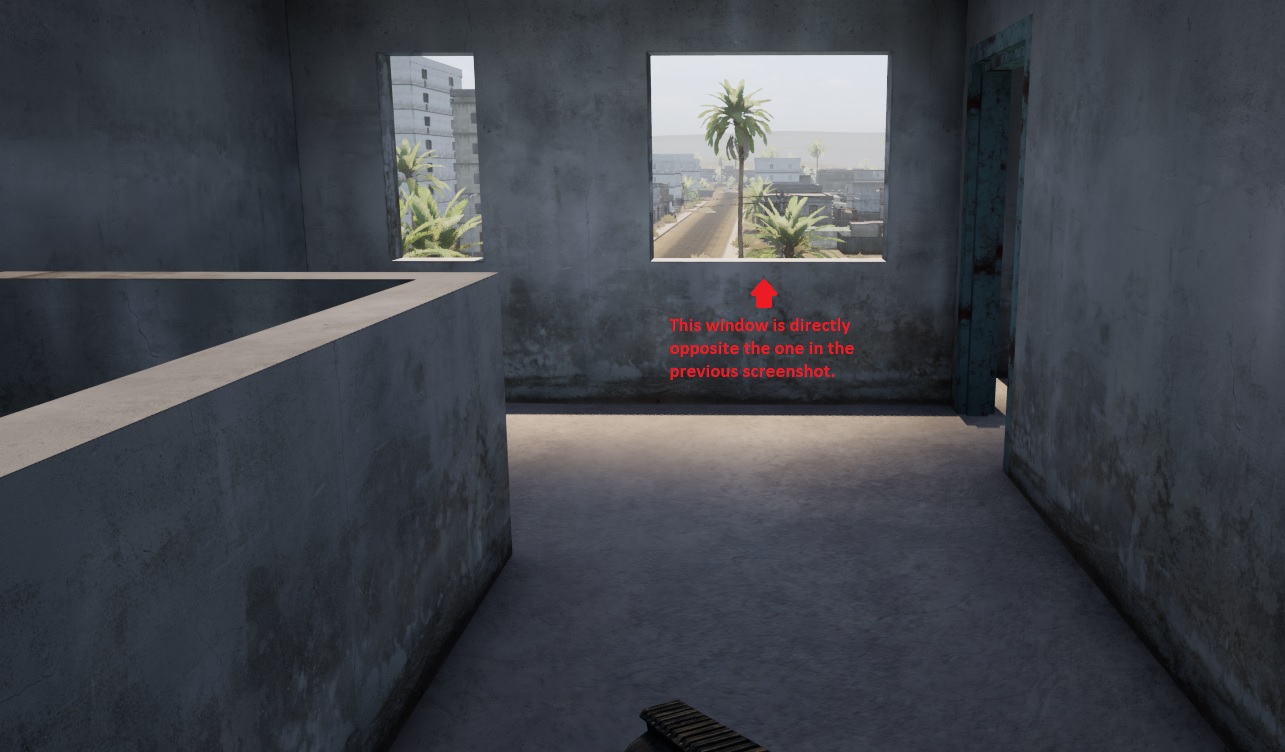
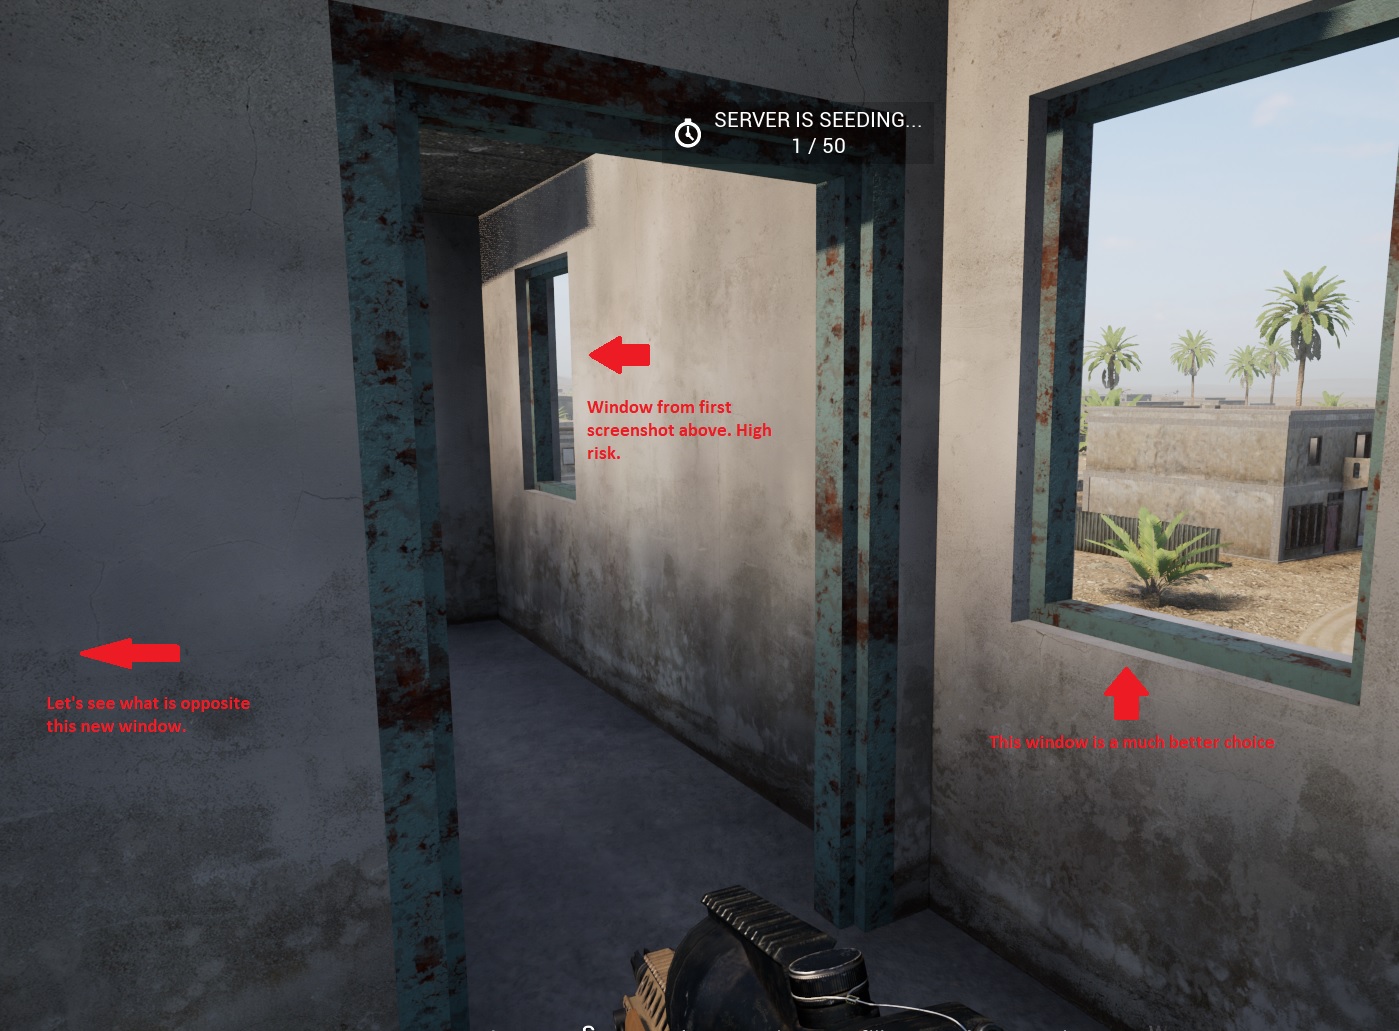
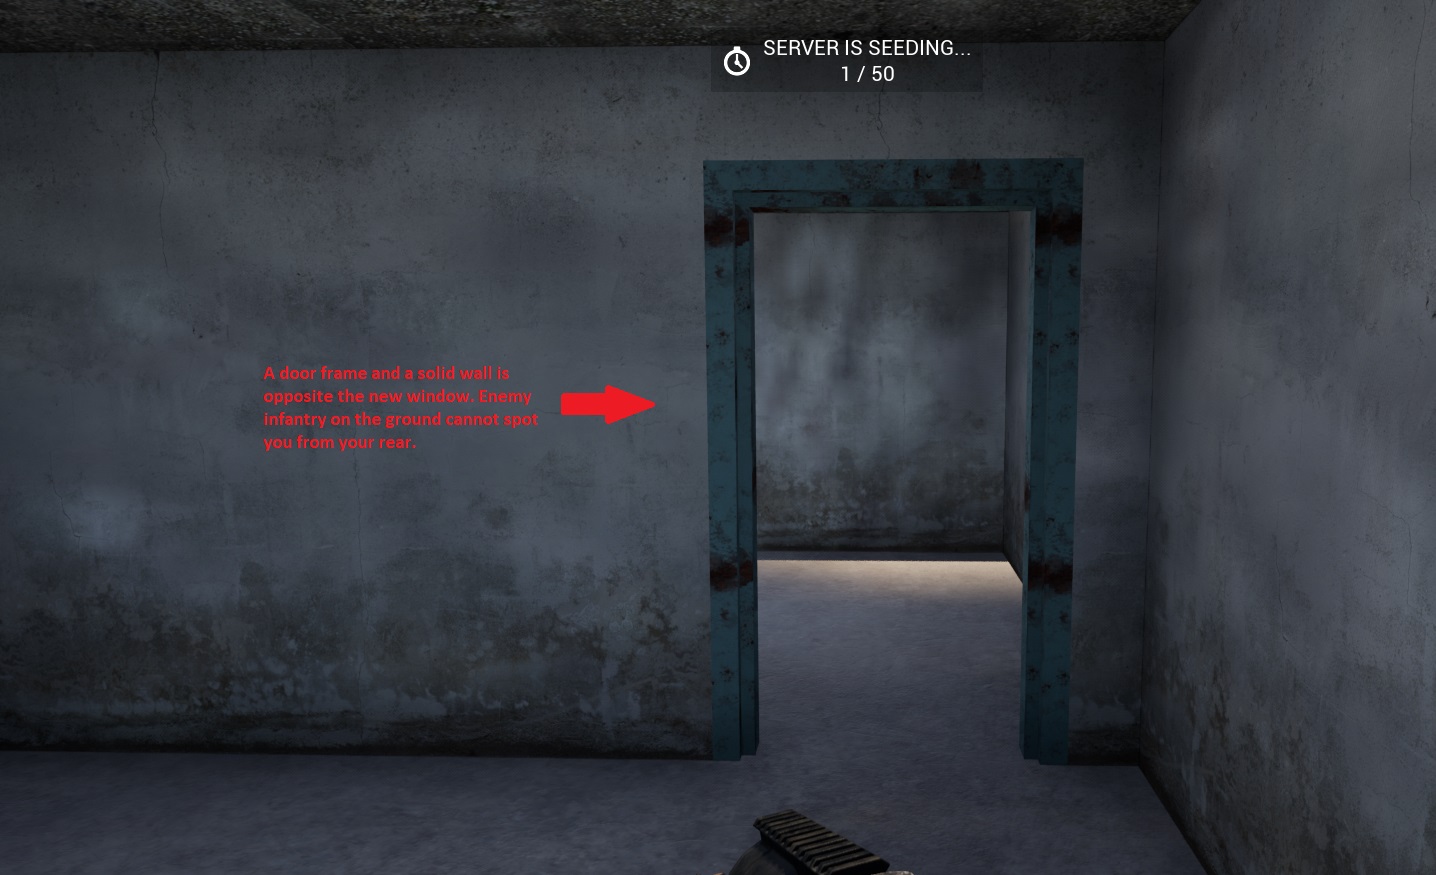
Lastly, I will provide this one final tip for basic overwatch. When choosing where to post up, be sure to take note of any directions behind you where the enemy on the ground could get an easy line of sight of you. For example, in a building, firing outside of a window. Is there also a window directly behind you? Perhaps enemies even on the ground at a certain distance can easily make out your silhouette.
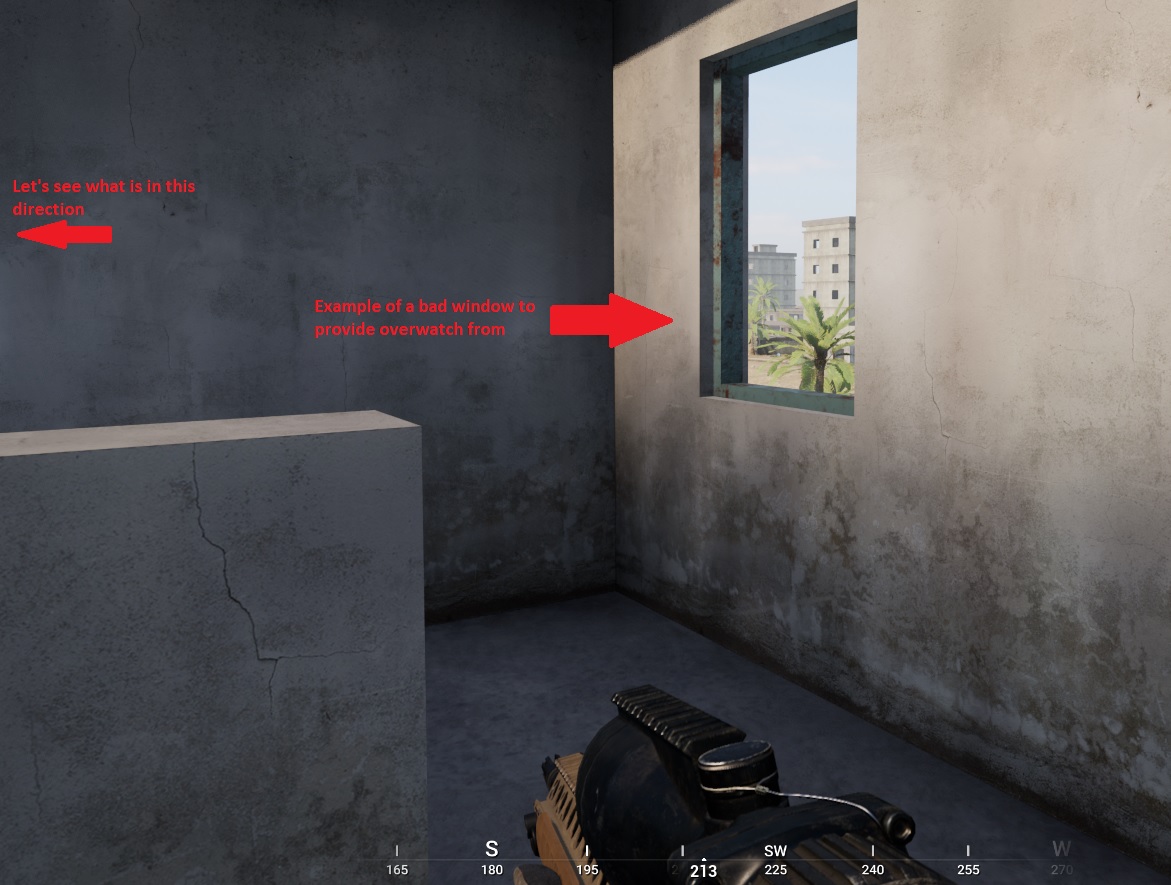
_____________________________________________________
vii - Flanking
FLANKING
or Flanking Attack/Defense
It its simplest form,
Attacking or Defending the typically weaker sides of a fighting element.
If you remember from the graph I included in the Overview, flanking makes up a large portion of my average gameplay.
This is also directly related to positioning as also described into an earlier section of this guide and utilizes the fundamentals of camouflage as well as cover as much as possible. Whether you are defending or attacking, your squad as well as any friendly force, is going to have a weak side(s). The enemy will as well. Typically wherever the capture objective, or enemy spawn points (e.g. HABS), or known enemy contacts are is going to have a high probability that there are multiple players at least facing and/or moving in that direction.
Take the enemy squad for example, if they get eyes on the rest of your squad, the majority of their element will most likely be facing where they believe or know the greatest concentration of your squad is. They might visually scan to a certain degree but more often than not there will still be blind spots affecting both forces. They may even chose to push your squad, or hunker down in defensive positions.
A good starting position
Whether your squad is moving, or simply in a defensive position, as Marksman you want to be roughly 1/2 to 3/4 a grid square (squares on the map) to your squad's flank. This gives you the capability to not only serve as a means to protect one of your squad's flank, but also increase the chance you can move into the position required to successfully attack the flank of the enemy unopposed. Whereas if you stayed in tight formation with the rest of your squad, it greatly increases the chance that your squad is spotted, you are spotted, and now the enemy can track your movements.
Deadman's alarm
Additionally, when you are moving in parallel or even slightly ahead to the flank of your friendly force, even if you are ambushed and killed just the event of you going down alone can easily serve as a warning to the rest of the squad that they are about to be attacked from that side which gives them time to pivot as necessary.
HABs/Radios/Rallies
You would also be surprised in how many previously unknown enemy HAB/Radio locations I just happen to find by staying to the flank of my Squad and moving in parallel. It is quite a lot.
Overlapping field of fire
Another added benefit to the above positioning described is being able to effectively overlap the field of fire with your squad. Creating a confusing element to the suppression. Now instead of the enemy forces simply taking fire only from a more concentrated area, they are now taking fire from a completely different angle as well. This will greatly restrict their freedom to pivot and react to the situation. In most cases here, letting the rest of your squad or other friendly forces take the first shots, can improve the situation to your benefit as a Marksman on the flank. While the enemy is trying to react to your friendly forces firing on them, some may try to change positions to get a better shot on those same friendly forces. This position change opens them up for you to eliminate them that much easier.
Retreat / Regroup Denial
This is one of my favorite maneuvers
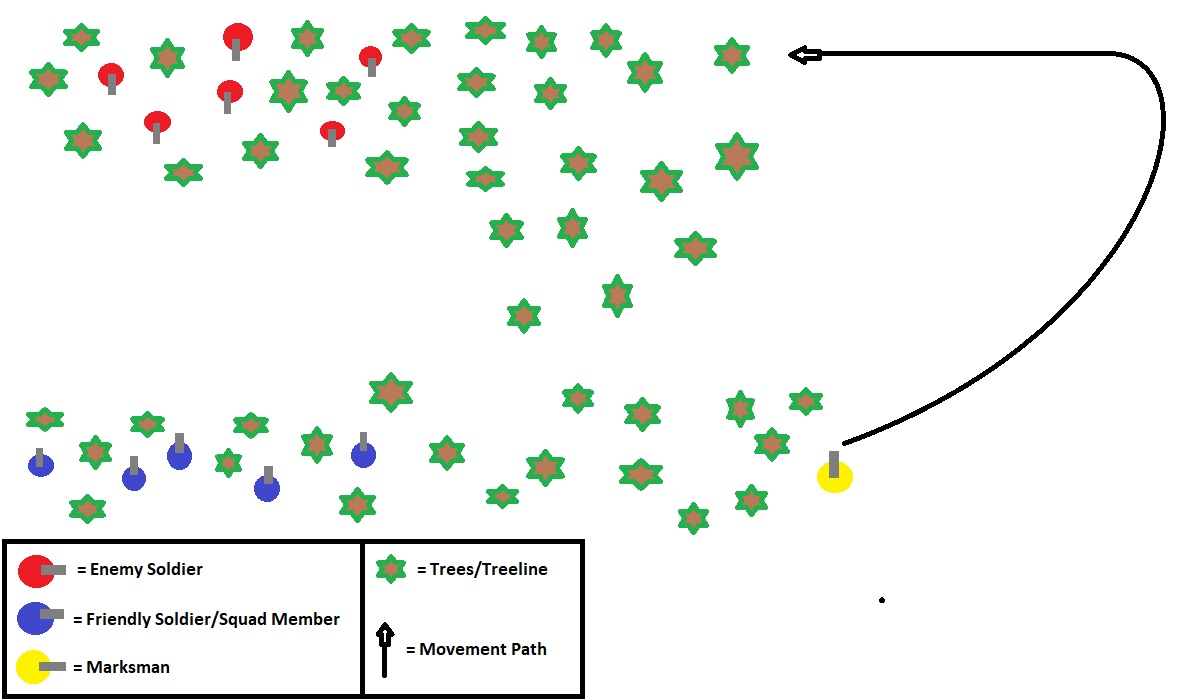
In more drawn out firefights or situations where you know the position of an enemy squad, you as the Marksman should try to methodically wrap wide around the enemy flank and position yourself to the side of the enemy force, if not slightly behind them. As it is likely the enemy squad will have originated from some type of HAB or Rally, if any of them go down completely or even if other enemy forces decide to join in on the action many of them will likely try to regroup with their own friendly forces from the rear as well. In this flanking position, you are able to eliminate as well as distract any enemy forces attempting to regroup the forces your squad is already engaged with. Additionally, if any of that enemy squad tries to retreat from the firefight with your squad, they will open themselves up to being easily eliminated by you. The added benefit here is you are also able to provide better intelligence on the situation in this position. If it looks like the enemy squad engaged is being reinforced enough that it will overwhelm your squad or maybe even armor is rolling up to support them, you can give your squad ample warning to react.
I have even experienced many cases where I was performing this type of flank attack and had clear view of the enemy Rally where I proceeded to camp them as they spawned. This gave my squad ample time to eliminate the force and push with minimal casualties.
Here is a really rough example of these types of situations, and exampled movement path using my excellent Paint skills.
viii - Recce
Recon
This is the shortest and simplest section of this guide. Why? Well for one, Recon is pretty straight forward and Marksman is not always the best choice for it (most of the time it is though because of the binoculars and rifle optic). Depending on the map and Army/Faction you are playing... Combat Engineer, or even Rifleman (with good optic) can do a better job.
Recon or Recce is all about intelligence gathering. The more details your forces know about the upcoming battle, the better they can plan. Be proactive rather than reactive. If you can put yourself in a position where you have a better view of the enemy forces and/or potential pathways of attack, you can completely be one of the main factors for the enemy losing an engagement without even requiring you to fire a shot. In many cases, just by firing a shot can inhibit your ability to gather that intelligence. There is a right and wrong time for everything.
Binos
As a Marksman you have binoculars in your kit. Now these are situational because your optic is generally still has good magnification for the same purpose. Although some of the poorer optics out there for the Marksman for certain Army/Faction choices, then I will typically get more use out of the binoculars. The of view on the binoculars is also amazing.
Like everything their use is also map depending. On maps where there is lots of tree and thick vegetation, the binoculars will get little to no use. However, on the more open maps, with flat desert, rolling hills, or large canyons... they will get much more use. Some of the maps with urban environments with tall buildings can get some use out of binoculars as well if you find yourself in the upper floors of one those tall buildings.
Now this isn't telling you to just stay far ahead of your squad for some extended period of time. That needs to be clear. You may be able to provide intelligence, but it is just as likely that you won't be able to support your squad if they get in contact just as it is likely you get ambushed and killed. Essentially, you are out of proper position.
ix - Advanced Tactics (Part 1)
Desperate Situations
There are definitely still times that I find myself in desperate situations. How you react to these situations could mean that even if you ultimately go down, you can take a lot of enemies with you. In a lot situations where you are are likely trapped our about to be pushed by an overwhelming force that you cannot escape, remember that you do have a very effective tool. That tool is smoke grenades (given that you haven't used them already). I will give you an example of a desperate situation where smoke grenades let me down a lot of enemies when I normally would have been eliminated quickly.
Situation #1
It was on Al Basrah and the objective was in the city area. I was in a high-rise on the second floor from the top eliminating enemies from behind their defensive lines and as they spawned on a HAB that was visible from my window. Eventually, I eliminated so many that I was down to 4 rounds in my last magazine when they started to push my building. I camped the doorway that led to the stairs and killed the first one that decided to go up alone. As soon as he was down I threw a smoke grenade at the stairwell and ran back around into my original room. His next buddy comes up and I can hear him proceed to try and revive the downed soldier which I could tell from the field dressing sound. I proceed to run in and knife him before he can pick the guy up then again run back into my original room.
Less than 20s later two enemies are rushing up the stairs and one stops to pickup their buddies and the other pushes to me where I dump a full pistol mag into him as he breaches the doorway and then push past his body to knife the next guy again.... Now I am down to a single pistol mag for ammo. I retreat to my original room and throw the second smoke grenade at the hallway leading to the stairs.
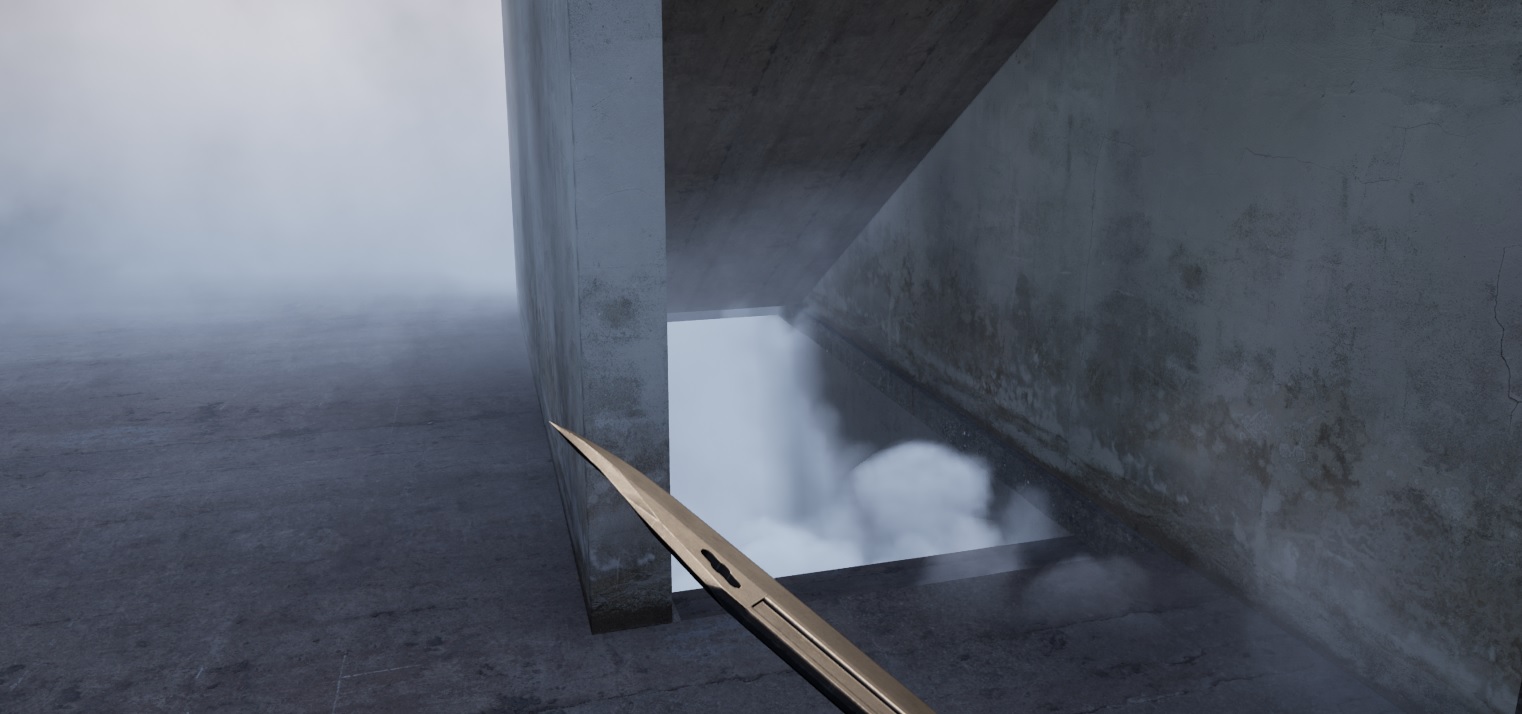
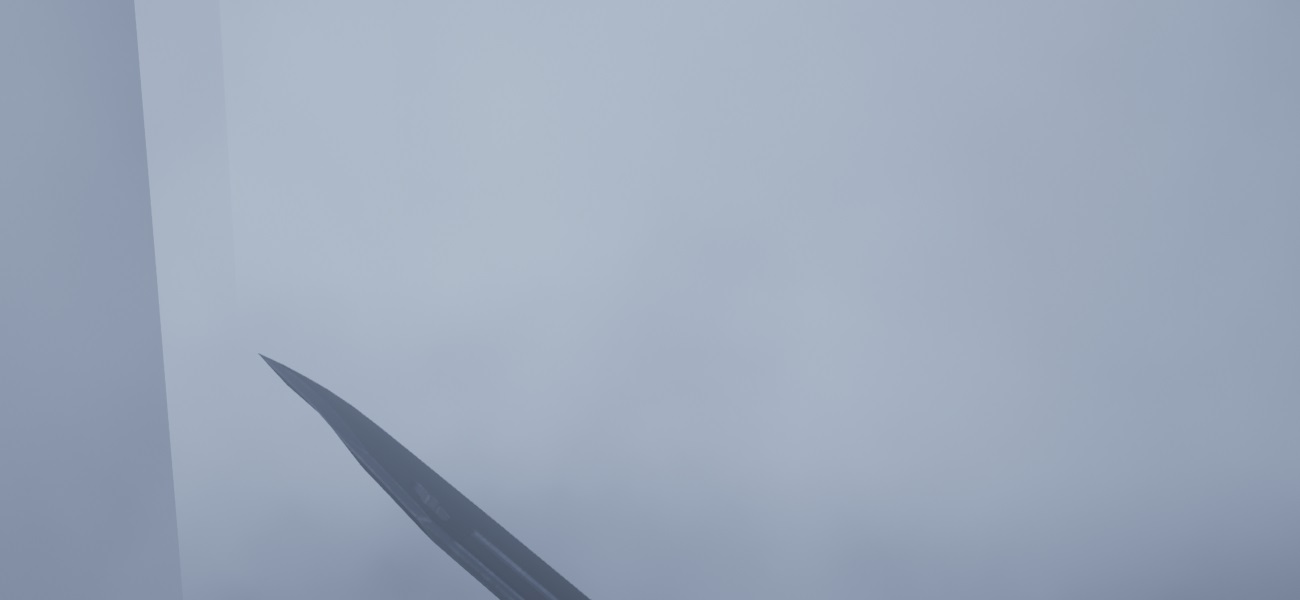
.......
I can hear another solo enemy soldier run up the stairs and start reviving the only friendly that hasn't given up at this point. Before I can run in and eliminate him I hear 3 more soldiers pushing up the stairs as well. They all run into the smoke-filled hallway where I knife 2 and pistol the last but take enough rounds myself that I am unable to bandage fast enough and bleed out.
I would have likely never been able to achieve that without an intuitive use of smoke grenades and not only did I down quite a few, when that squad decided to devote themselves to taking me out, it gave my friendly forces the freedom they need to overrun the enemy HAB.
In these types of situations, especially indoors, smoke grenades can easily alter the enemy player's mindset. They see the smoke on a friendly soldier and may feel safety in reviving them. Perhaps they even think I have vacated the building at this point or that I traded with the enemy soldier. Smoke filling a hallway or stairwell can also give the enemy far less time to react and in such a small space, the smoke is very thick making it easy for enemies to run right past you for an easy knife.
Finisher
What makes this one advanced is in knowing when to use it and when not to use it.
Let's say you down an enemy soldier and one of his buddies comes to revive him. Should you immediately eliminate the buddy? Well that depends. Do you have any reason to believe there are more enemy soldiers close around that relative position? Is the buddy dragging the downed soldier to safety before attempting the revive? Did the buddy go prone to revive the downed soldier?
If you have reason to believe there are enemy soldiers close around that position AND the buddy is NOT dragging the downed soldier to safety it may be more impactful to let the enemy soldier be revived. Why? Just keep your sights on the downed enemy soldier. The moment he is revived, put a round into him and finish him completely. This will count as a full kill and that player will be unable to be revived again and will have to completely respawn. After that, go for the buddy. If he was prone it should be even easier to eliminate both as he will be much slower to escape from the prone position. If there are more of their friendly forces in close proximity, you may even be able to repeat this action. The Marksman is the best kit for using this tactic.
Hook, Line, and Linger
This advanced tactic is psychological in nature and requires a bit of luck as well you could say. If the enemy is hunkered down on a defensive position, could be the objective itself or could even be their HAB. Move yourself to a relatively exposed position and take a bunch of decently placed shots in quick succession and then move from that position in an "L" shaped path away, then post up in a new position that has clear sights on the original position where you fired the shots.
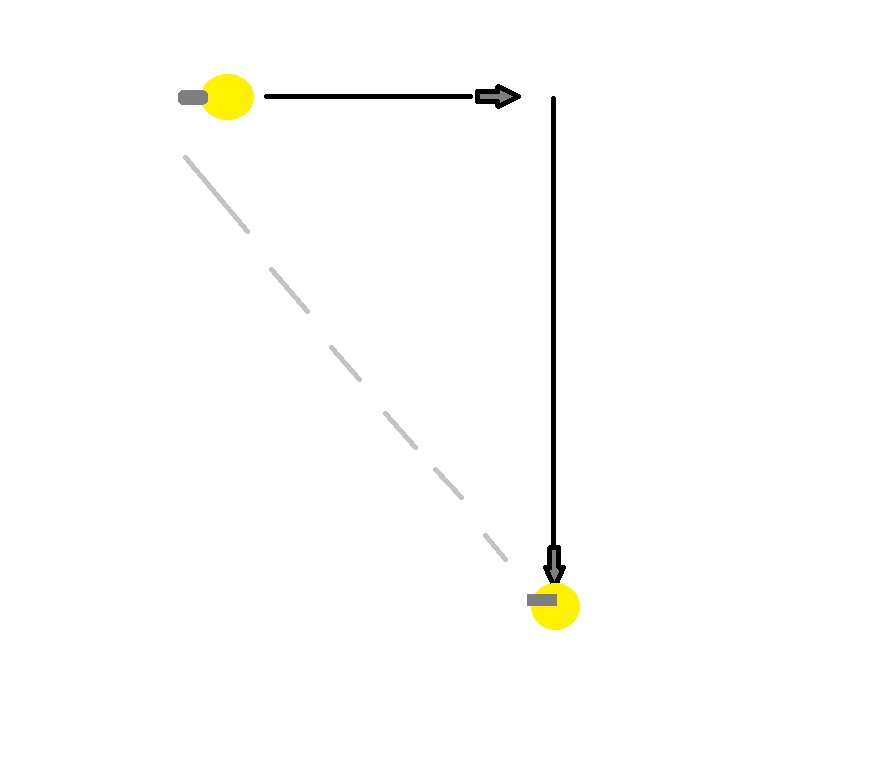
I would say that 70% of the time you get a few enemy soldiers that will always push to investigate the original location of the shots. Now they are away from their main forces, exposed and easy to eliminate. Also by moving in an "L" style path, you also are at less risk if enemies that come to investigate try to flank the original shot location instead of directly push it.
This tactic also works with enemy radios. If you can get to the enemy radio but the enemy HAB is not proxied by friendly forces, it is very likely you will be killed off that radio before you can dig it down, much less for it to bleed out. It is far better to dig it down partially and then perform this same tactic to draw in and eliminate enemy forces as they attempt to repair it.
Radio Protection & Fortifications
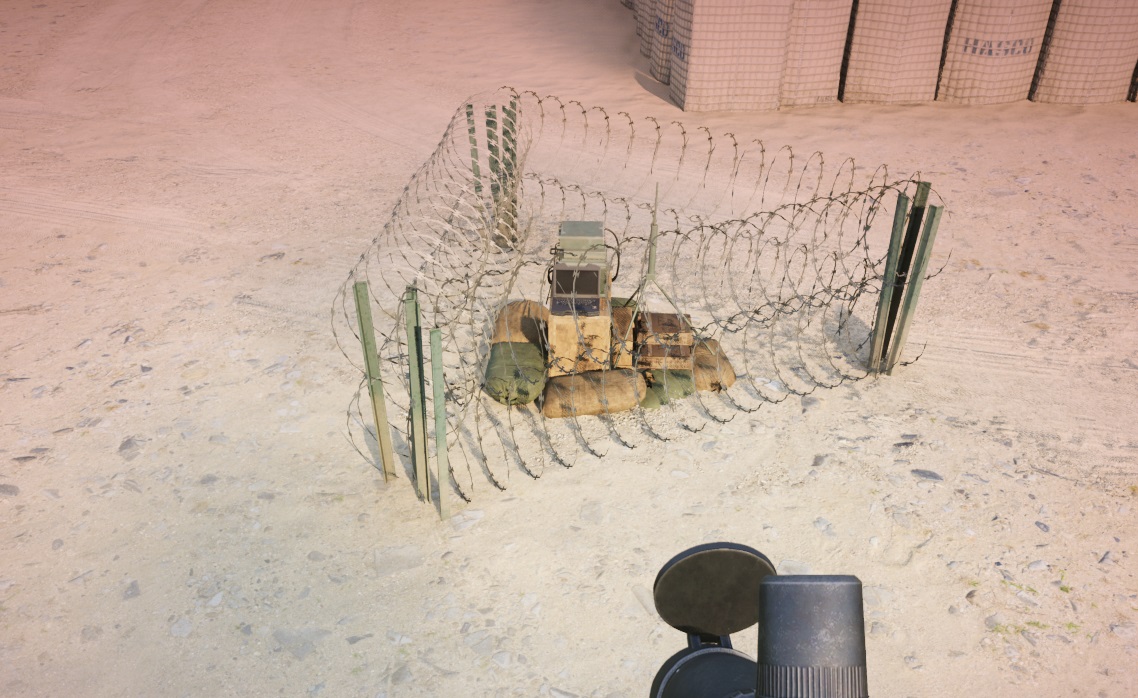
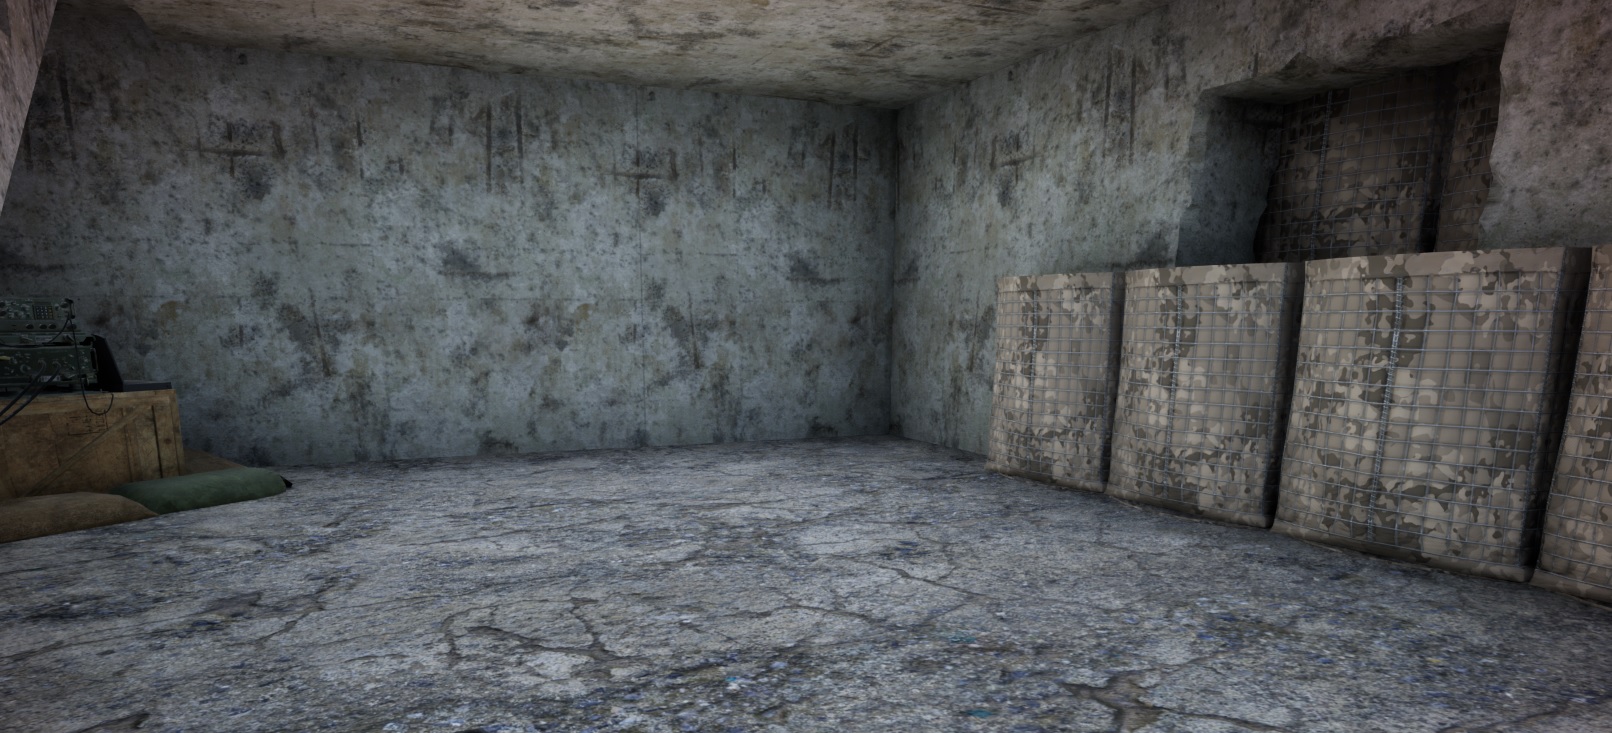
For situations where; Whenever your squad sets down a HAB, isn't planning on setting up another with the same supply availability, and there is build left to be used. This is a good time as FTL to build simply fortifications available to the FTLs to protect the radio itself. If the radio was placed in the open or next to a bush/tree.. just build three razor wire placements in a triangle, without any gaps, for the most efficient use of build supply. If the radio was placed indoors, and enough build supply is available, build HASCO walls to block off all entry points to the room where the radio is located. Make sure you do not build anything until you are certain that the HAB & Ammo crate have already been placed, and that the SL isn't planning to use the remaining build supply for something specific.
If the position is or expected to be highly contested and has a lot of excess build, you can even build extra layers of razor to protect the radio. Also, with a lot of excess build, if there is a place where you could have a great view of the direction of known enemy paths or even angles of attack, build an observation tower. With an observation tower you will have an elevated position where the occupants of the tower are generally camouflaged. When in the tower, take a similar approach as you would a normal window for overwatch. Try and stick to a corner or, if you can, slightly away from the opening itself. Being able to use your bipod is nice but it will also cause your rifle barrel to stick out of the camouflage in many cases, essentially defeating the purpose.
x - Advanced Tactics (Part 2)
Bounding Overwatch
The concept of this is easy to understand. However, the instincts of when to move and when not to move take experience and awareness. It is also not useful in every situation on every map/layer. Typically the maps with the most forested areas and less urban environments.
Consider this tactic as being a "leap frog" of sorts. This works absolutely best if your squad is split into two fireteams and you can coordinate between the fireteams. If not, you can still do this with yourself (as the Marksman) acting as a lone element with the rest of the Squad acting as a separate element. In Squad this will work a bit different than it would in a real infantry unit but the methodology is very similar. You can even use this tactic in Squad without the rest of your squad really knowing about it, but sharing information will also add cohesion.
As the Marksman, if your squad to going to advance to an objective, move-marker, or otherwise enemy position, try to position yourself and move to be in advance of the rest of your squad.
Keep a good lead on the rest of your squad for a short period of time during their advance and then halt once you have been out of stamina for a period of time. Now, take a knee (Crouch) in a position with good sight lines and scan the area ahead and the flanks for enemy contacts with your rifle optics. Let the rest of your squad catch up and pass you. As the rest of the squad passes you, you should now act as if you are on overwatch. Protect them as much as possible, communicate enemy movements, and suppress if you are unable to eliminate. Once the rest of your squad is getting to around 150m ahead of you. Abandon the overwatch position and advance towards them as fast as possible.
Be sure to let the squad know, short and quick, in voice that you are moving to regroup with them.
By this time they should either be out of stamina and moving slow, or if they are truly coordinated they will stop altogether and cover ahead as you advance past them just as you covered them when they passed you previously. If they fail to stop or slow down, simply ask in squad voice if they can hold for a few seconds so you can scout ahead and cover them when they move to catch up with you.
A repetition of this behavior during on-foot advancement in squad will increase the lethality of that squad multi-fold.
Countersniping
Most DMR and Sniper rifles are very easy to identify by their sounds. You can also tell by how loud the shots are as to how close they are as is with all sounds in game. If you hear an enemy DMR or Sniper rifle going off and it sounds like its within 300-400m, you may even save your team quite a few tickets if you at the very least investigate and attempt a counter-snipe. If the enemy Marksman or Sniper is in a very good position, it may be difficult to counter them at range without being at high risk yourself. In those cases try to flank them wide to wrap around behind and when you get within 100m or so, only sprint for a few seconds when they fire and then stop sprinting all-together when within 30-50m. At this point, make sure your stamina is full and you have two choices.. The next time they fire, full on sprint to their position when their shots sound very close and eliminate them. That is the riskier move. If you want the least risk, continue to move slow and methodical, and go in for either a pistol elimination or a knife.
With that said, most enemy Marksman or Sniper encountered are likely going to be in a not-so-good position and typically go prone on a ridge line where they can be shot from many angles and easily spotted... OR... they are going to be camping a window or rooftop without ever repositioning. These are typically easy to counter-snipe from range. Sneak into a position that equal or higher elevation. Once you have identified a position where you could fire on them, stay in cover as much as possible until reaching that position. If you are just running around through open streets or fields to get to that position, you risk the enemy Marksman or Sniper spotting you or one of their friendlies spotting you.
If you find yourself in a situation alone where you have been spotted by an enemy Marksman or Sniper who is taking shots on you and cover options are very limited. Get to cover, face the general vicinity of where the shots are coming from and throw one of your smoke grenades you have to your right OR left but aim towards the ground rather than up in the air so it is not easy to ascertain their origination point. Once the smoke has billowed out well enough, run into the smoke (do not crawl), as fast as possible and run in a zig-zag pattern NOT a straight line. Go prone once you are in the smoke and immediately throw your remaining smoke grenade on the ground back at the original cover you were behind. Once you have thrown your second smoke grenade, fire half of a magazine worth of shots from your rifle in the area where you believe/know the enemy Marksman/Sniper is located. Now, the second smoke should be billowed out well. Run back behind that cover. Perform these steps well, and your movements should be completely blocked to the enemy. Dump the remaining half of your magazine into the same position and then run back again into where you threw the first smoke, go prone, and then reload. At this point, it is very likely that the enemy Marksman/Sniper will have been taking shots into the smoke blindly. Use these shots wisely to dial in more precisely where the enemy is located so once that first smoke dissipates, you will be able to eliminate them before they eliminate you. This is achieved because typically when you are forced behind a cover it is now a really small area that the enemy Marksman/Sniper has to sit his sights on and camp. With the alternating smokes, and firing inside the smokes, you create a much larger area where the enemy Marksman/Sniper has to scan. When you are firing you are also more likely to spook them into trying to at least take some pot shots back at you.
If you don't feel confident in using this tactic, or do not have smoke grenades left, you are better off sitting tight and being patient. Wait him out, eventually the enemy will either get bored completely and leave or find new targets. If you hear them firing again, there is your chance to peak from cover and eliminate them.
Checking Corners and Tucking in
Now this mainly applies to urban maps or maps that have an urban section. When you find yourself navigating an urban environment, you need to make sure your style of movement is more tactical as well. When you are going through alleyways, proceeding down streets or even crossing streets. You need to make sure to check your corners, check elevated positions that could have a view on you when you traverse, and stick to one side of the road or alleyway as best as possible.
Corner Checking. Move up against the corner where the cross section of roads or alleys intersect and lean quickly but long enough to spot-check for any enemies that could easily eliminate you. These would be not only what you can see on the ground but also in windows and rooftops as well.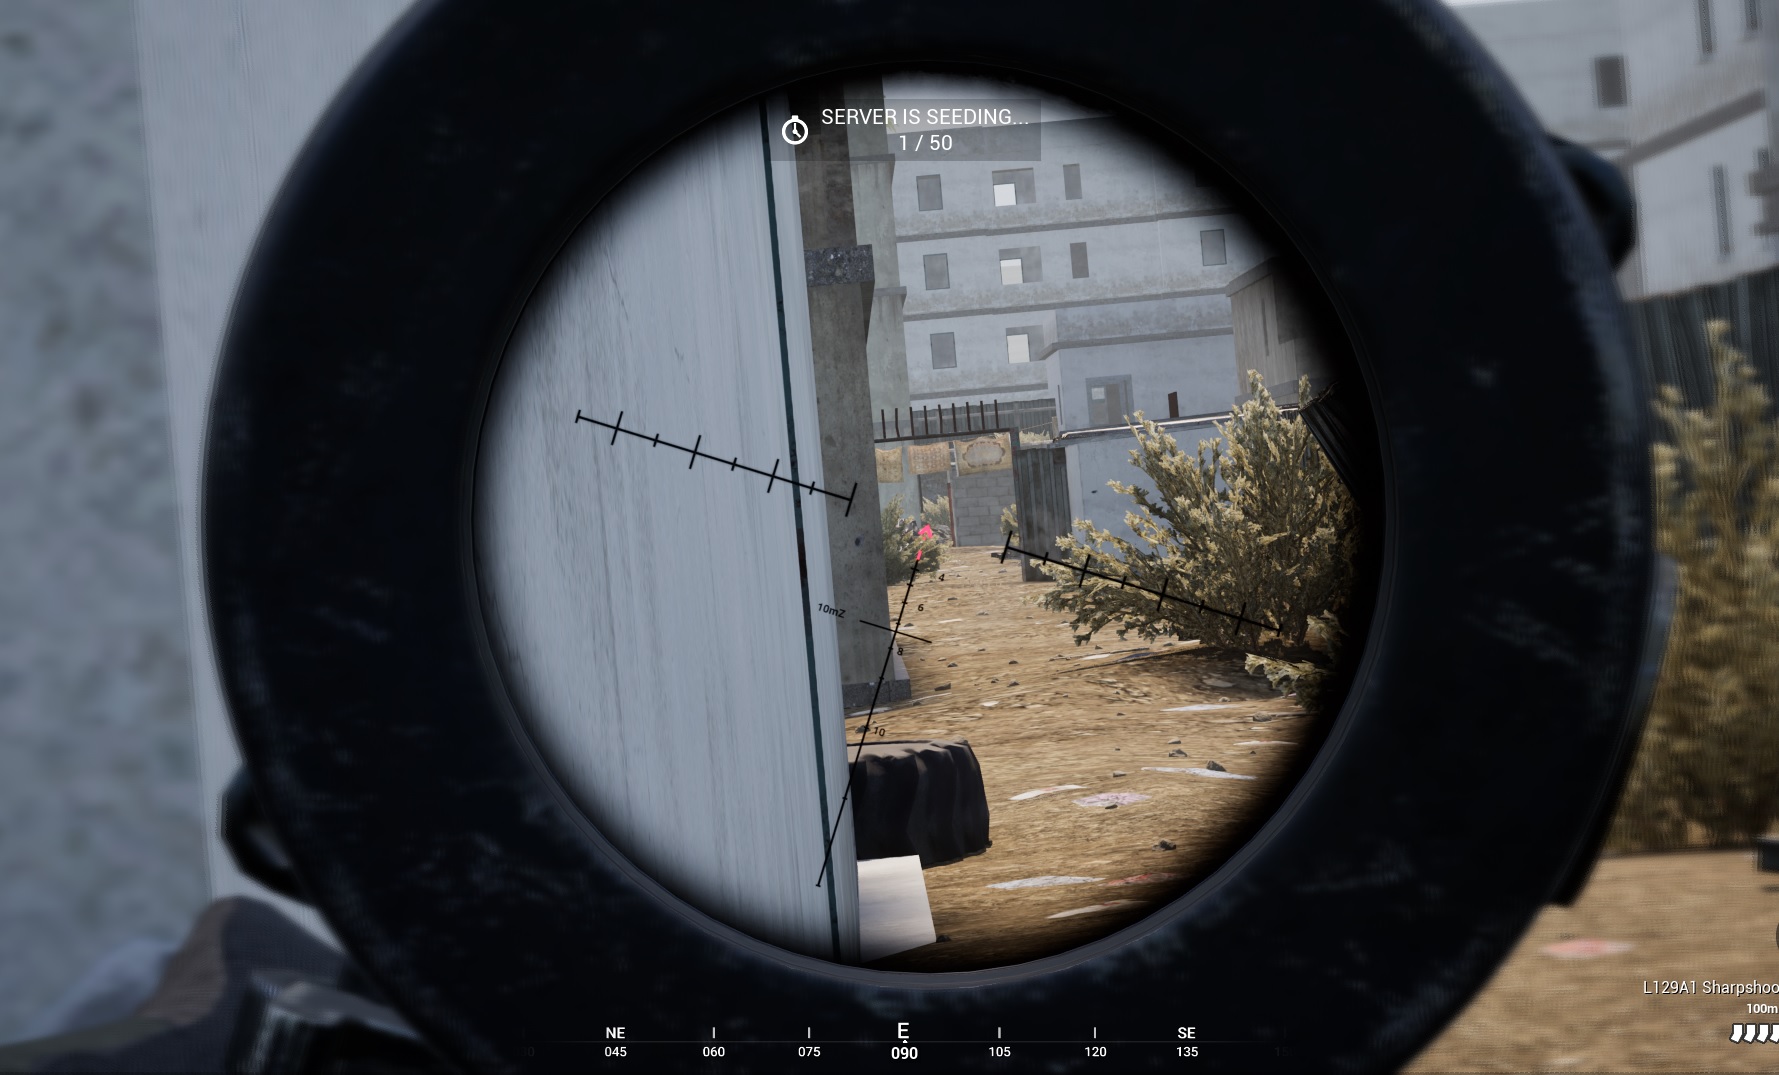
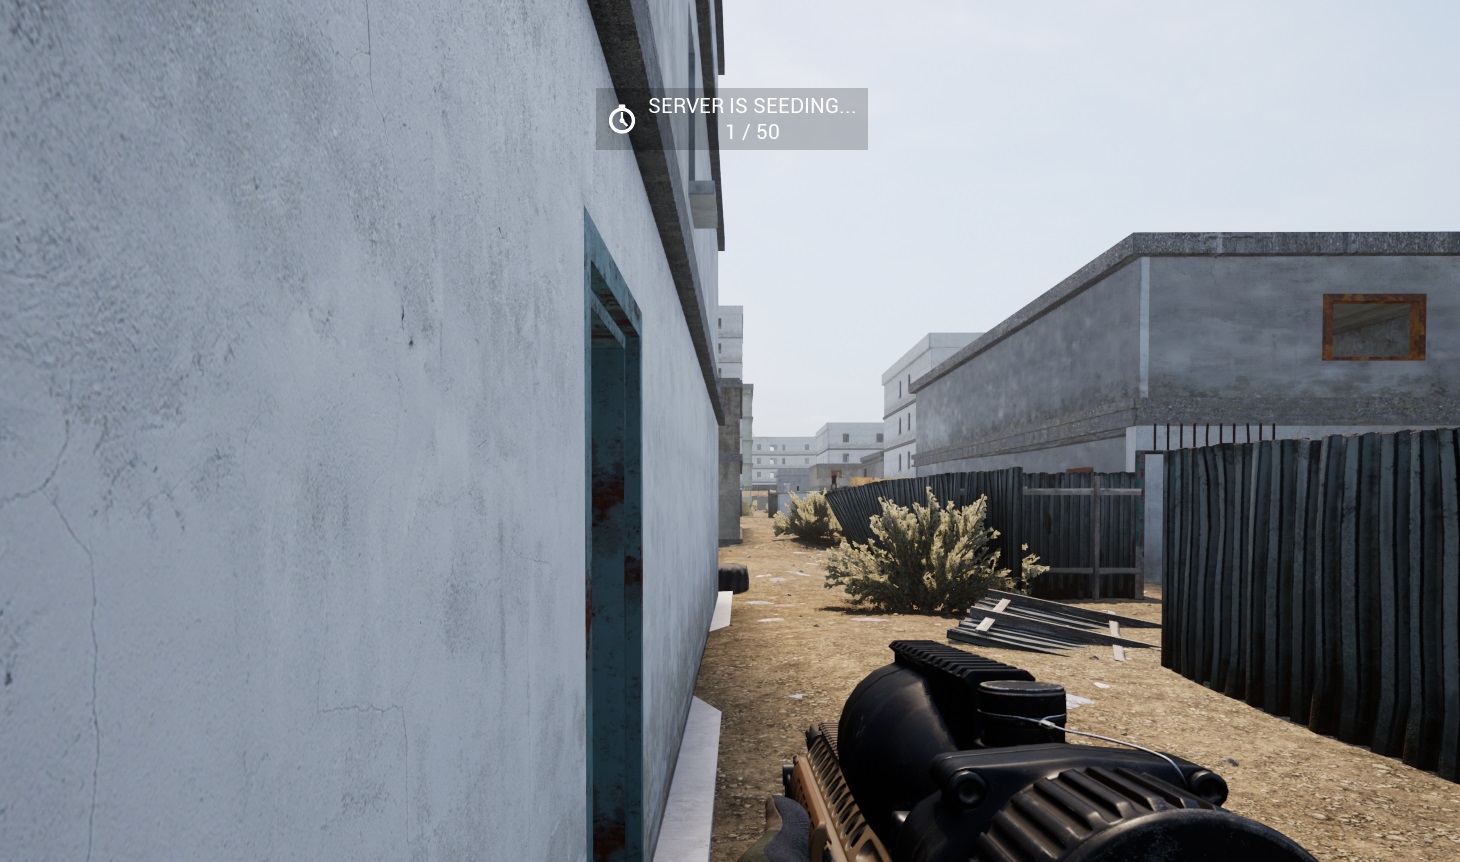
Tucking in. When moving up and down alleys or streets, stick to one side. There could be an enemy in one of the buildings you are unaware of. Do NOT run in the middle.
xi - Conclusion
I do apologize for all of the reading required for this guide. It is a lot of text and knowledge to take in. I do admit it would have been a lot easier to communicate through video recordings but to achieve a lot of what was described here in a real, in-match situation, would have destroyed my fps enough to also affect my ability to perform many things described in this guide as well. This is likely due to a combination of my specs and the poor optimization of the game itself.
I could have also likely made a guide 4x larger with other tips and tricks but I wanted to go over the basics and the "most used". If you have some Marksman experience, perhaps you even have your own unique style or tricks to excelling. What I described in this guide can simply be an addition to your arsenal.
There are also many cases where Marksman is taken, I want to take a break from the kit, or the kit is otherwise unavailable to use. In those cases, I would say I am typically going to try and play Engineer, Grenadier, or Rifleman. I mostly stay away from AT kits only because I acknowledge there are far better players of those kits than me. I also stay way from Automatic Rifleman and MG as much as possible as well because I find them to cumbersome and not agile enough.
I hope you all enjoy what I presented in this guide as readers, and find it useful.
Thanks!
- Подробный гайд для новичков★ 5 (764)61k views1.1k ♥20 minRussianUpdated 28 Sep, 2023
- Squad Leader 101★ 5 (884)29k views1.5k ♥60 minUpdated 22 Jul
- Как убрать мыло на экране | 100% Способ★ 4 (113)26k views355 ♥3 minRussianUpdated 1 May, 2023
- SQUAD - raising FPS together! / SQUAD - поднимаем FPS вместе!★ 3 (31)19k views75 ♥4 minUpdated 8 Jan, 2024
- Руководство по пилотированию вертолётов★ 5 (199)18k views446 ♥32 minRussianUpdated 20 Feb, 2022
- [Squad v10.5] [EN/РУ] / Where to shoot to penetrate? / Куда стрелять чтобы пробить?★ 5 (220)15k views606 ♥1 minUpdated 17 Jun




- Upgrading to PremiumTeam Fortress 2★ 5 (20k)1441k views11k ♥6 minUpdated May 11, 2022
- No More Room in Hell Official ManualNo More Room in Hell★ 5 (2.8k)569k views2.1k ♥29 minUpdated Apr 22, 2019
- NMRiH Community Hosting GuidesNo More Room in Hell★ 5 (526)351k views653 ♥1 minUpdated Aug 10, 2022
- ULTIMATE GUIDE FOR GAME DEV TYCOONGame Dev Tycoon★ 5 (5.8k)326k views10k ♥4 minUpdated 23 Jan, 2014
- How to 'Git Gud' Soon™MORDHAU★ 5 (2k)318k views3k ♥68 minUpdated Nov 16, 2024
- Лучшие кооперативные игры SteamPAYDAY 2★ 5 (1.5k)315k views2.1k ♥56 minRussianUpdated Apr 27, 2025






This guide was created by its original author on the Steam Community. Are you the author and want it removed? Request removal.