Mortar 101
Intro
All weapon systems on the battlefield have strengths and drawbacks. Some might call the battlespace a big game of rock paper scissors.
For example armored vehicles destroy regular infantry, AT troops counter vehicles and regular infantry counters AT.
Due to the multitude of different platforms out there and their varying requirements, others might prefer rock paper scissors lizard spock or further evolution thereof.
It should be noted these people are nerds and should be ignored and belittled at every opportunity.
Digressing to my point, competent fighting forces attempt to identify these weaknesses and compensate for them with other units working in tandem.
This can be analogised as fielding the scissor, paper and rock at the same time. As you may be aware, this is referred to as 'combined arms'. Pay attention because that's the closest most of you virgins will get to holding hands.
Despite what your favourite guntuber and first person shooter may lead you to believe, small arms (eg. rifles, pistols, machine guns) are not the most effective weapons on the battlefield.
They are merely a compromise between lethality and what is capable of the human body. If humans were physically capable, every single one of them would be decked out head to toe in 100mm of composite armor and carrying a 25mm chaingun.
But since we are but feeble meatbags, we have decided that armor covering only our vitals and a rifle firing projectiles the size of a pinky finger is the most one can reasonably field in a combat scenario without herniating a disc in your back.
This drawback of seeing bad guys over there and not being able to make them dead enough is covered by indirect fire.
In fact the single largest producers of casualties on the battlefield is indirect fire. Direct fire means you physically see the target you are aiming at, aim your weapon at them and fire intending to score a direct hit.
In contrast indirect fire, which you may be able to extrapolate (good job buddy), is when you cannot see the target you are shooting at. These weapons are aimed instead at a specific point or area on a map with high school level trigonometry, or nowadays with some computerised GPS fire control system.
While rifles shoot a few grams of lead and hand grenades contain a few hundred grams of explosives, these systems can deliver several kilograms of explosives to an enemy, same day delivery.
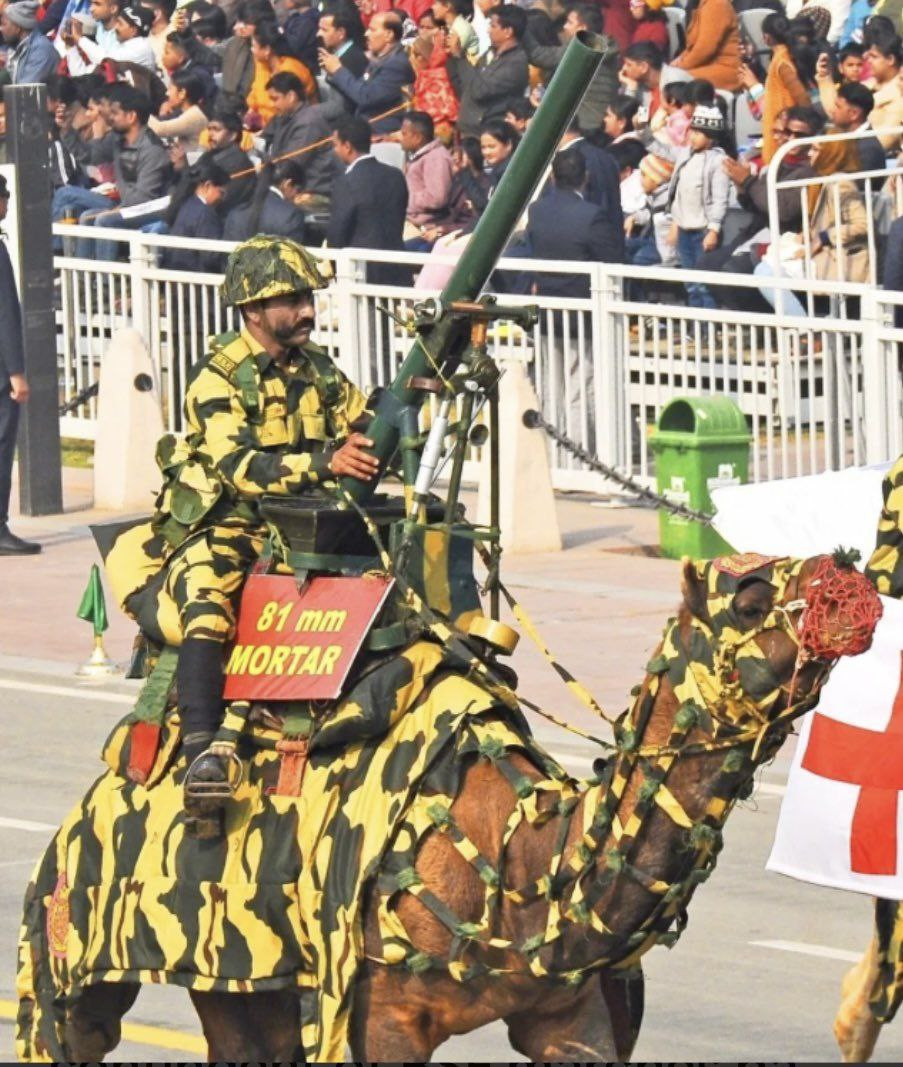 (you)
(you)Nerd ♥♥♥♥
Be advised, this chapter is long and lame as hell. If you just want your k/d to go up feel free to skip ahead.

Before we go any further, let's get some things straight. Milliradians and degrees are both systems for dividing a circle into equal sections.
There are 360 degrees in a circle, which can be further divided into 60 minutes each (hence Minute Of Angle or MOA) and each minute can be divided into seconds if such accuracy is necessary. The same circle can also be divided into 6400 milliradians, which is a rough military approximation for 1000 * 2 * pi.
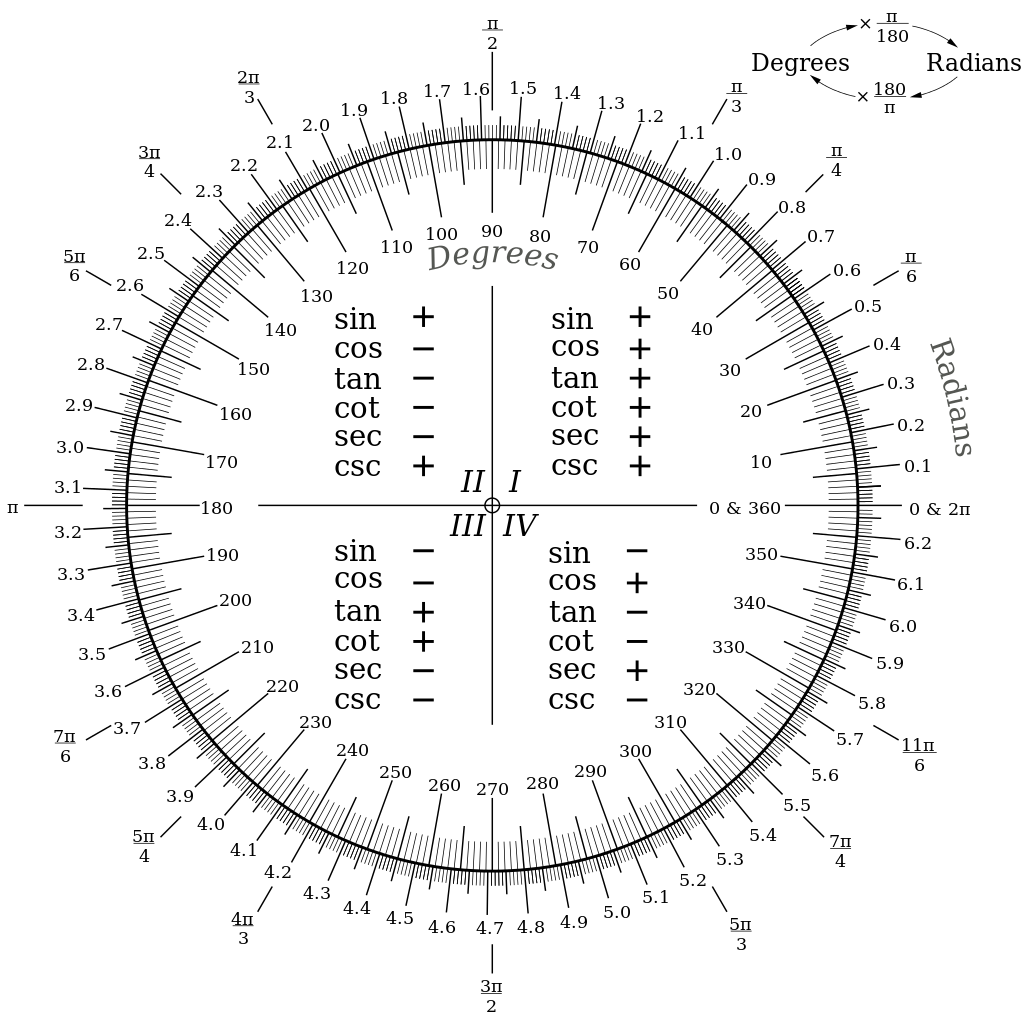
Milliradians are usually preferred for applications where precision is needed rather than degrees and minutes, despite a circle containing 21600 minutes and thus a higher precision, because degrees can also be expressed as decimals which can cause confusion.
In real life you can add propellant charges to mortar rounds to achieve different trajectories and further ranges, but according to the Squad wiki the muzzle velocity of the mortar round is fixed at 110m/s. This is further corroborated with the following calculations and the known max range of the mortar.
Assuming Squad doesn’t model air resistance for mortar shells or such forces are negligible we can graph the travel of the mortar shell with the function

Here is an animation showcasing the path of the mortar shell in game within the mortar's elevation limits. The mortar also has an inaccuracy of 50MOA or 5/6°, which is represented by the two additional arcs either side of the orange arc:
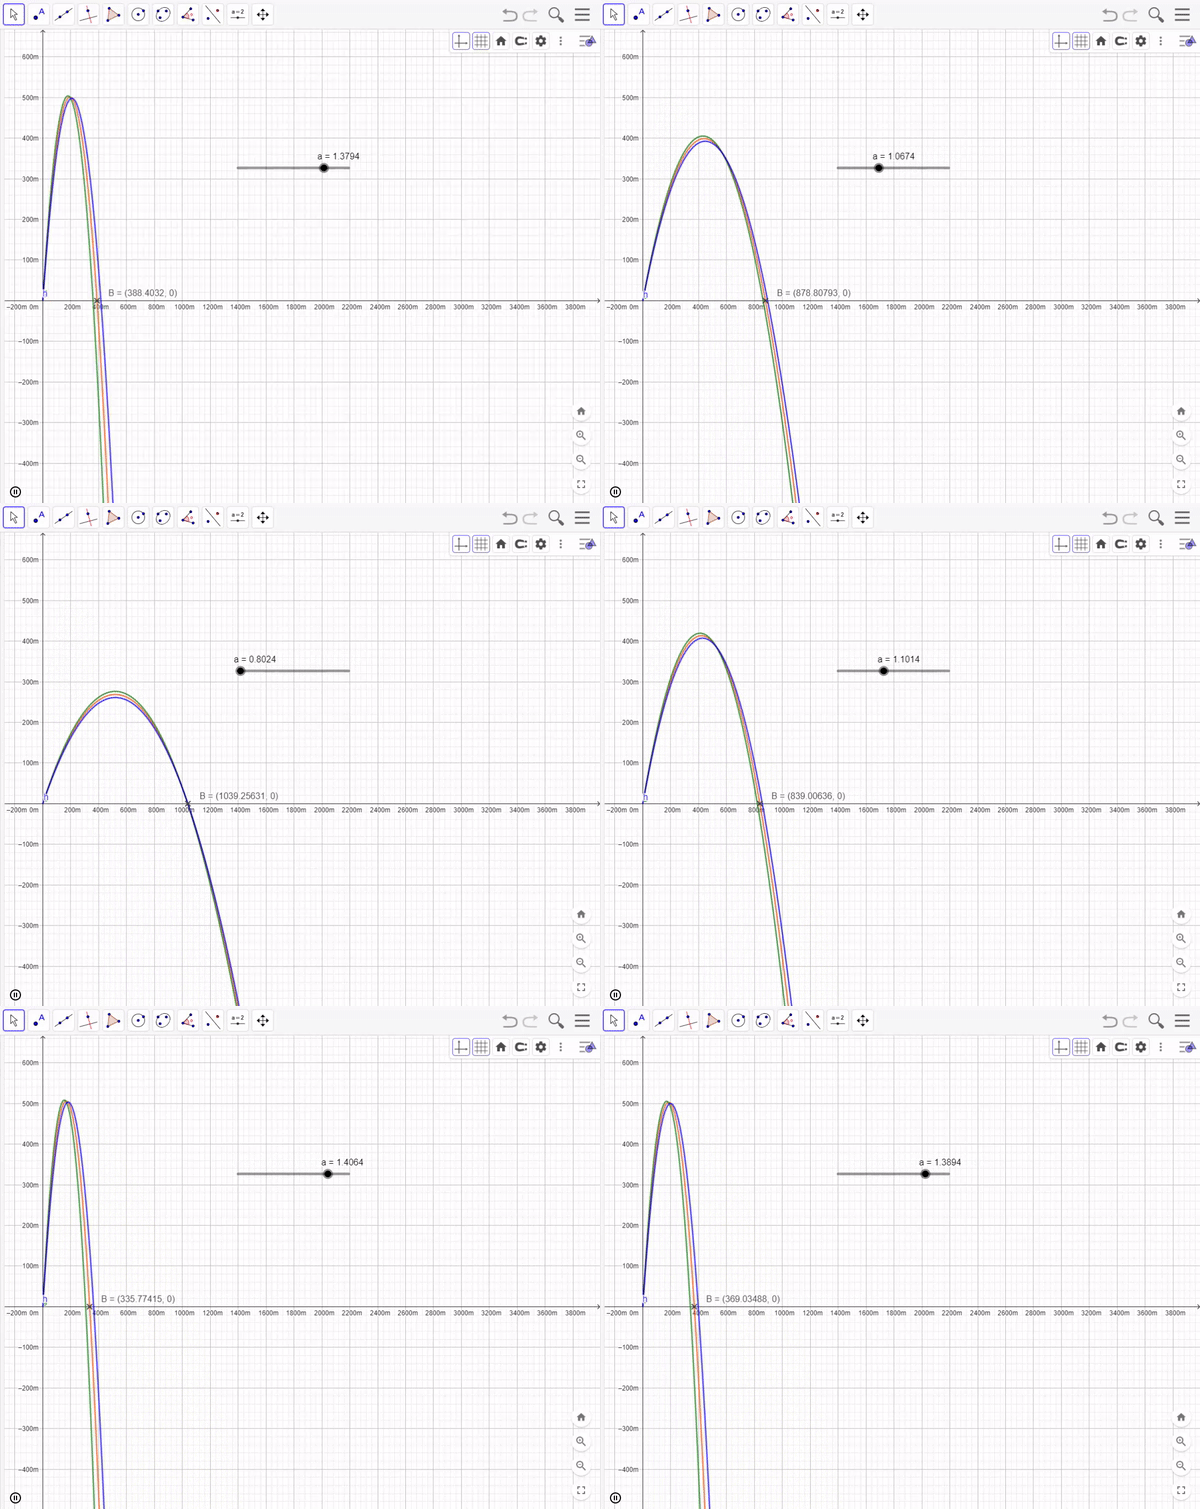 The slider in the animation is in radians, so you can roughly convert it to the milliradians found in the mortar sights by multiplying the number by 1000. Note that the higher the launch angle and the higher the milliradians are, the closer the shells land to you.
The relationship between milliradians and horizontal range can be thought of as linear up to about 600-800m. The slope is -0.43, which means that if you want to change your point of impact by +10m within that envelope you need to go down 4.3 milliradians. If you want to add 50m, you need to subtract 21.5mills, etc. You can also think of it the other way, that one mil is equal to 2.3m, 5 mils is about 11.5m etc.
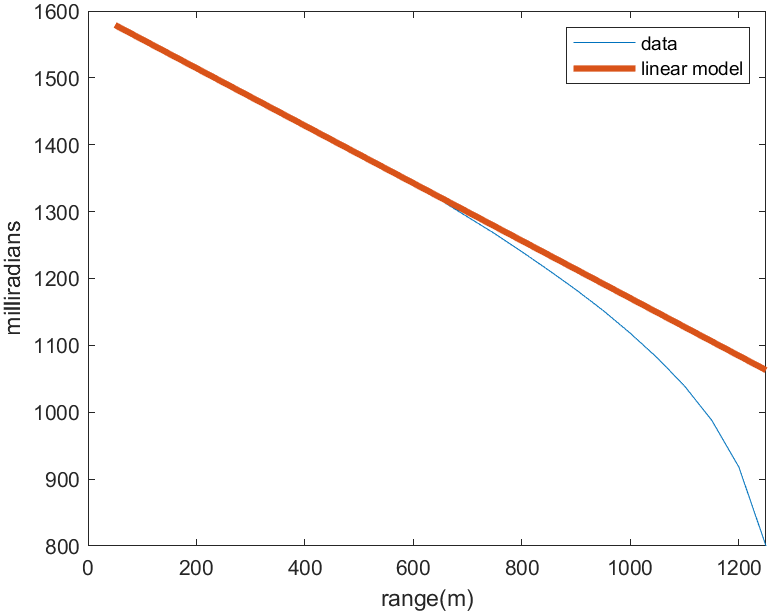 Beyond that range you need to start adding more milliradians to shift your point of aim the same amount.
Also keep in mind that somewhat counterintuitively lowering the milliradian reading adds to your range and vice versa. You don't want to accidentally shift your fire towards your friendlies. But between you and me fellow intellectuals here, it's not like we could ever commit such a blunder right?
Note that the the spread pattern changes more in the vertical direction than horizontally, since in that case the launch angle changes and gravity affects the rounds differently. This means that when shooting shells at extreme close or long ranges the impact zone stretches and squashes into an oval.
 This inaccuracy in the vertical direction varies ranges from a diameter of 35m up close to approaching 0m when firing at the upper limit of your range. The lateral dispersion is solely determined by the 50MOA inaccuracy and the length that they travel through the air.
We can form a thin sector to find that the lateral dispersion only varies from 18m to 21.5m, a negligible amount.
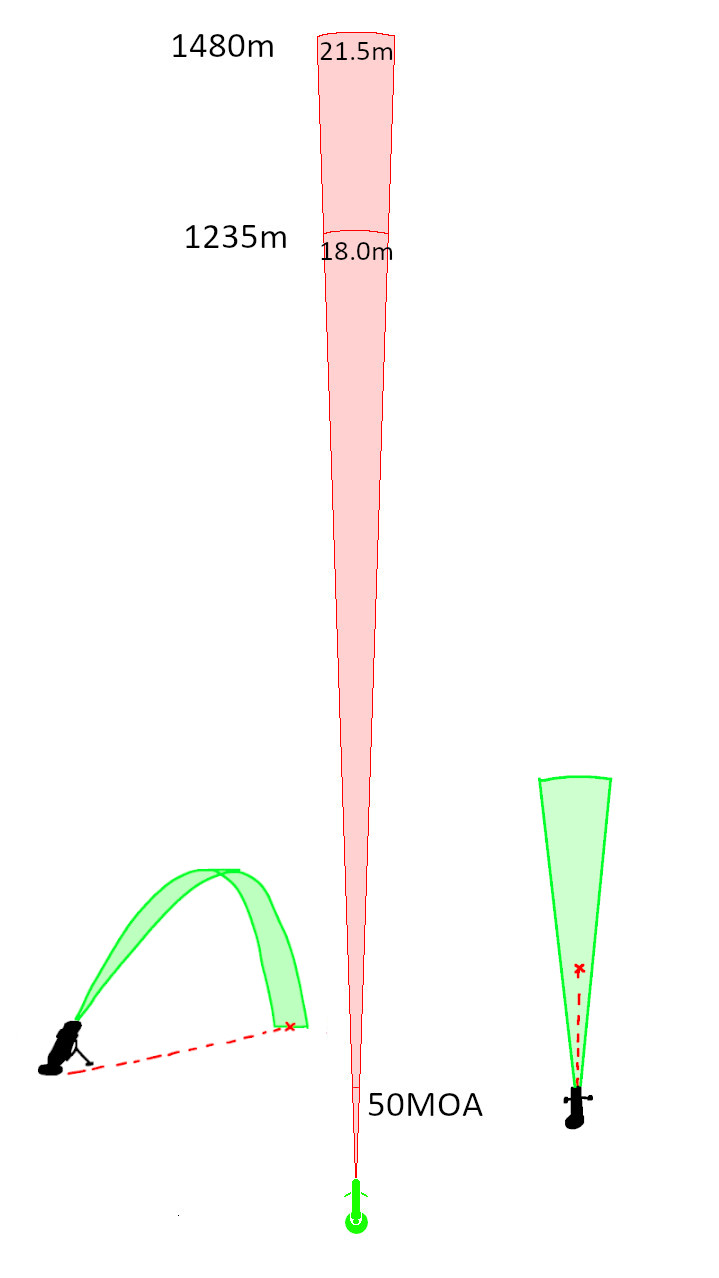 Note that the distance the shell travels is not just the distance from point A to point B, but the length of the parabolic arc through the air that terminates at point B according to the formula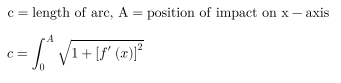
The length of these arcs is typically between 1235-1480m, although they can be longer.
For instance, if you are elevated 200m above your target you can reach up to 1400m, where the shell travels 1670m and can spread horizontally in a 24m wide area.
We can also find the time the round takes to land from the formula
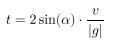
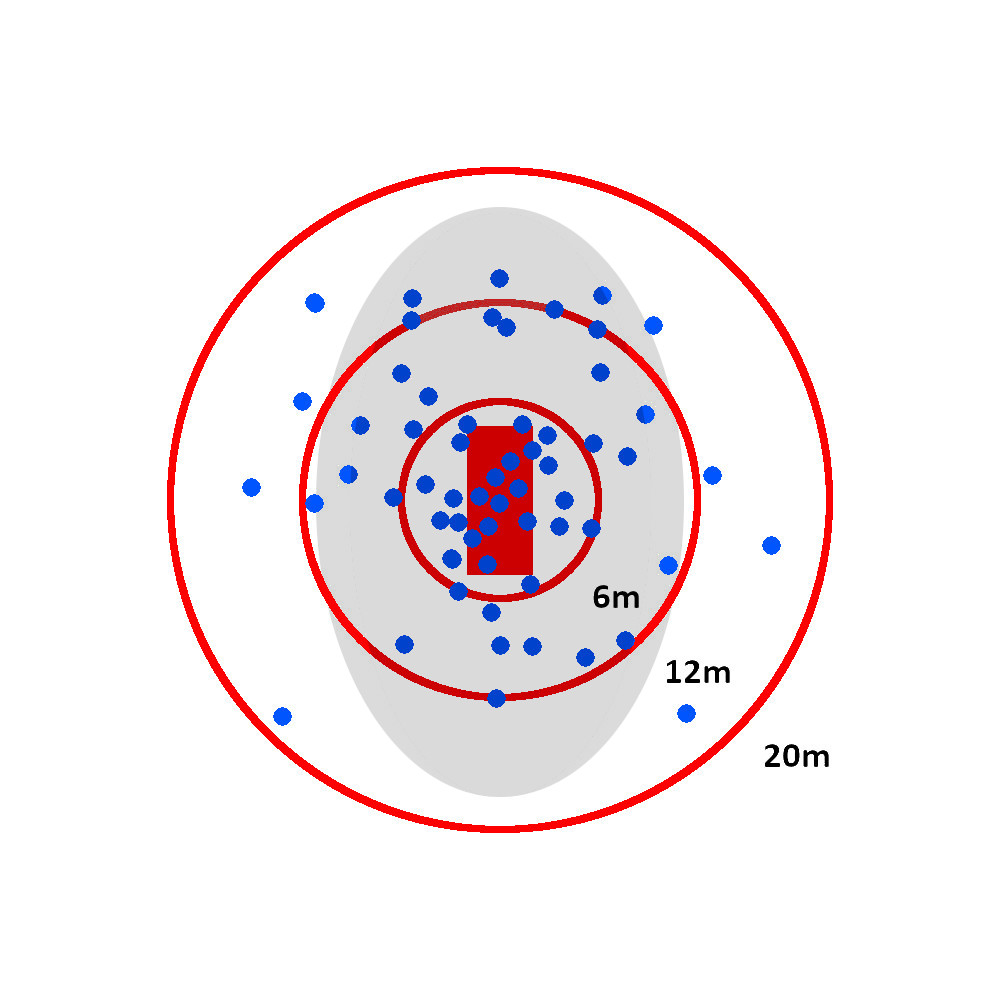
and obtain numbers from about 16 seconds at lower angles up to 22 seconds up close. I decided to rig up a test to study the dispersion of the mortar rounds. I set sandbags in concentric circles around a HAB at 6, 12 and 20m and fired 60 shells in total at the HAB in the middle from a distance of 200m. According to my results 25 of the 60 or 41,7% of the mortar shells landed within a 6m radius, 24 or 40% landed between 6m and 12m and all 11 remaining shells or 18,3% landed within the widest 20m ring. In addition around 12 of the impacts or 20% were direct hits on the HAB. I have documented these impacts in the embedded video and roughly marked them down in a to-scale image. Mathematically the impact zone should be a 22.0m x 35.4m oval (the grey area) that stretches out lengthwise or vertically in the picture, but there seems to be an excess of lateral dispersion. There are several possibilities for this discrepancy. Maybe the 50MOA value is insufficiently rounded, maybe my documentation is sloppy or maybe my hand subtly moved side to side between shots.
The damage decreases from a maximum of 350 at the epicenter to 100 damage or a lethal radius at 6.5m, and then to 0 at 22m according to the wiki and Alpha 13 release notes in May 2019. I have searched squad's official website for mention of the word "mortar" and have found no changes or mention of these values since then.
We can graph this data and tell that the damage falloff is not linear.
We can fit a curve to the data, which appears to be an exponential function
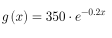
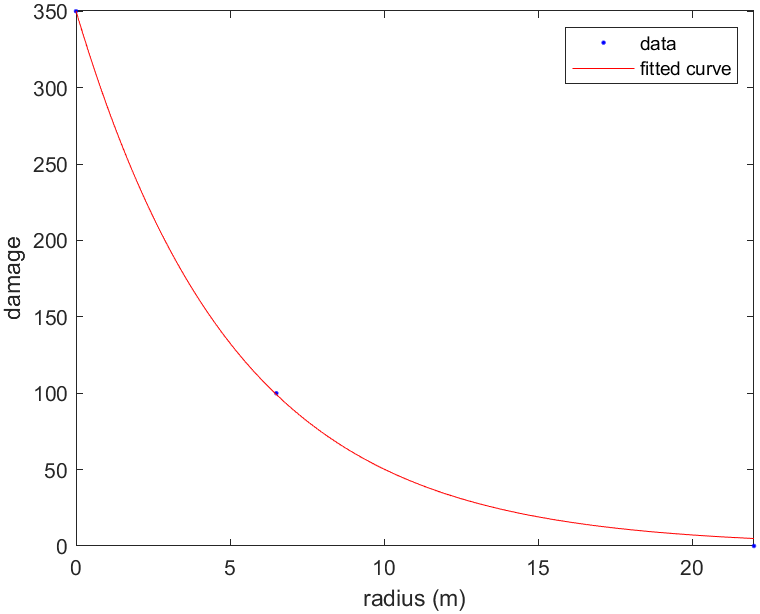 From there we can find that the range for 33 damage, around 12.4m or a 483.1m² area and the range for 50 damage is 10.2m, or 326.9m²
 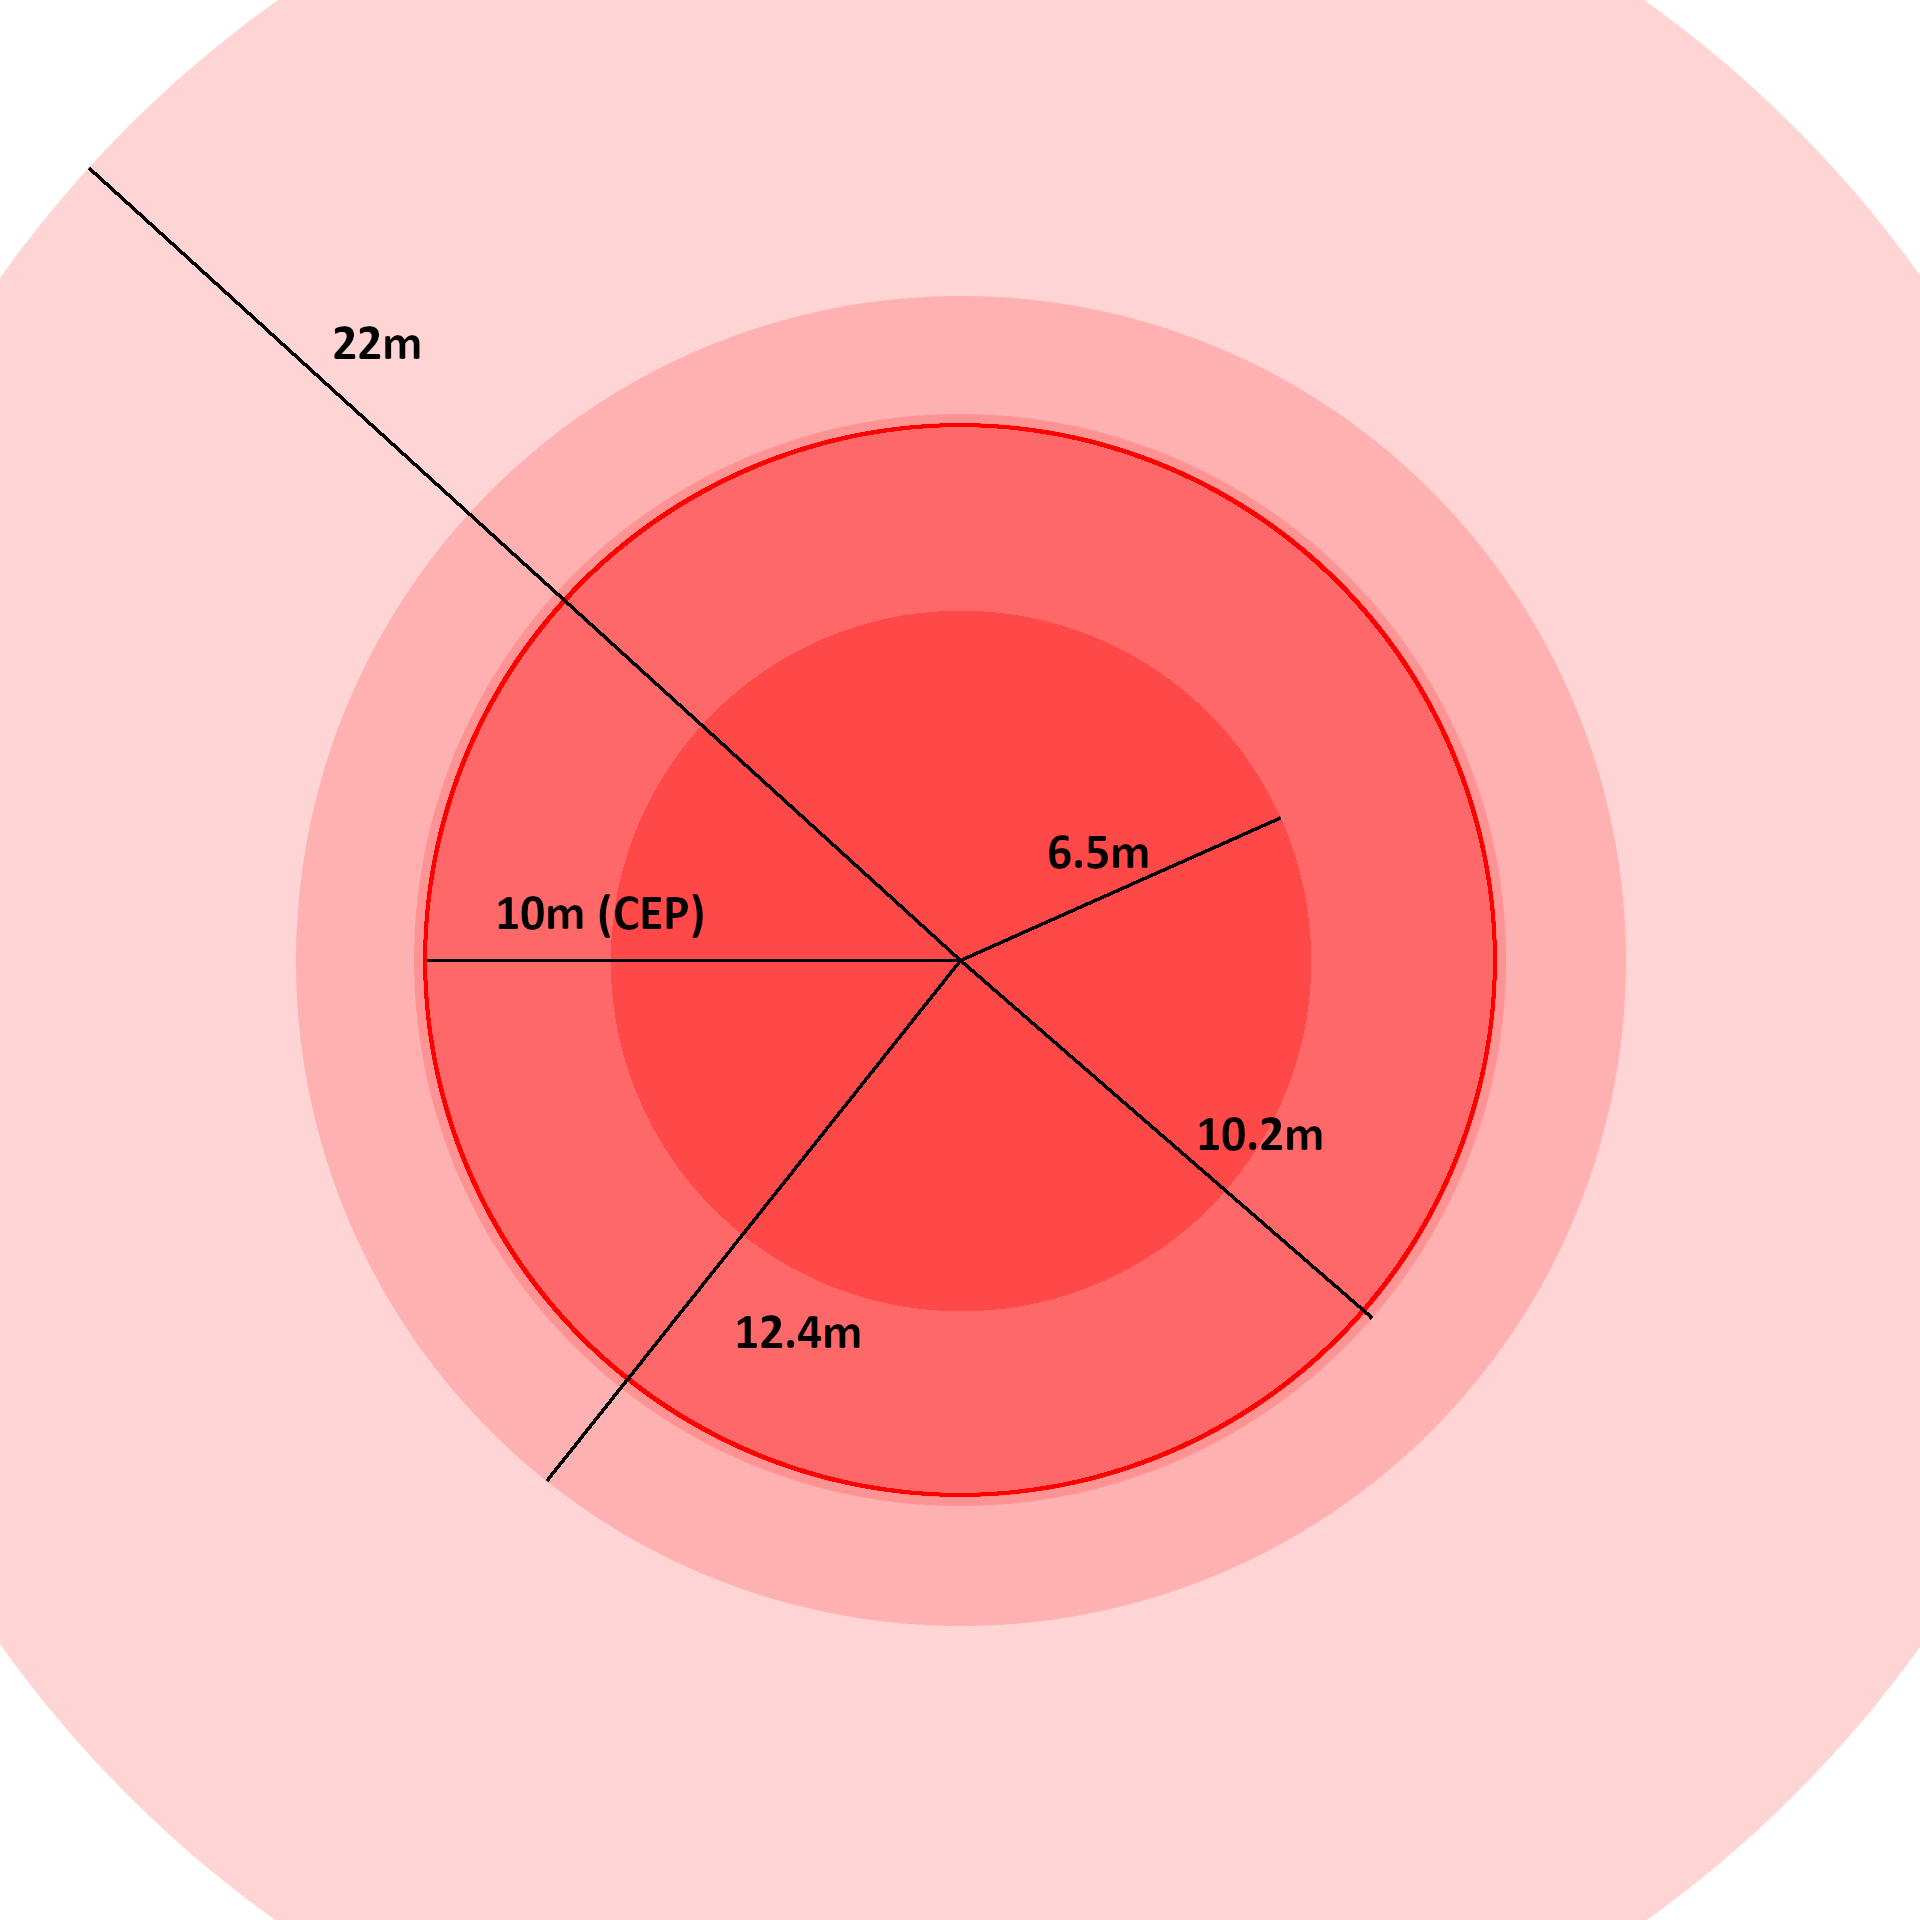 Say for example you're shooting a mortar at a point target, such as an enemy position. This means that the shells would have to land within a 6.5m radius around to score a kill (disregarding cover). Otherwise as long as you happen to be aiming exactly at an enemy based on my empirical test the shell will land within 12m ~80% of the time and deal a minimum of 35 damage, which is enough to kill with a full salvo of 3 rounds. Incidentally the probability of all 3 rounds landing within 12m is 51.2%.
What are you aiming at?
 now the math is over and we're moving to the good stuff: How to body fools with one hand while scratching your nuts with the other.
 For ranging your mortar I recommend using an external application, but to the people who insist on using analogue methods or who can't easily alt-tab I'll give you a few tips for that as well.
The mortar inherently has a 50MOA inprecision which you can't affect, but you can maximize your odds of hitting your target by getting the center of that circle as close to the target as possible. To do this you need two pieces of information: range and bearing. You need to know what direction your target is, and how far it is from you. Unfortunately Squad simply doesn't give you the tools in game to do this effectively.
You can use the in game SL markers up to 300m, after which the distance only changes at 50m increments. It might seem logical that the range marker rounds to the nearest 50m, so you can only get up to 25m off target. The situation is actually even worse. The marker rounds down to the nearest 50m, which means if your marker is 349m away it still reads only 300m. If you were to fire your mortar based on that reading, with the dispersion included the mortar shells you fired could land up to 70m away from your actual target.
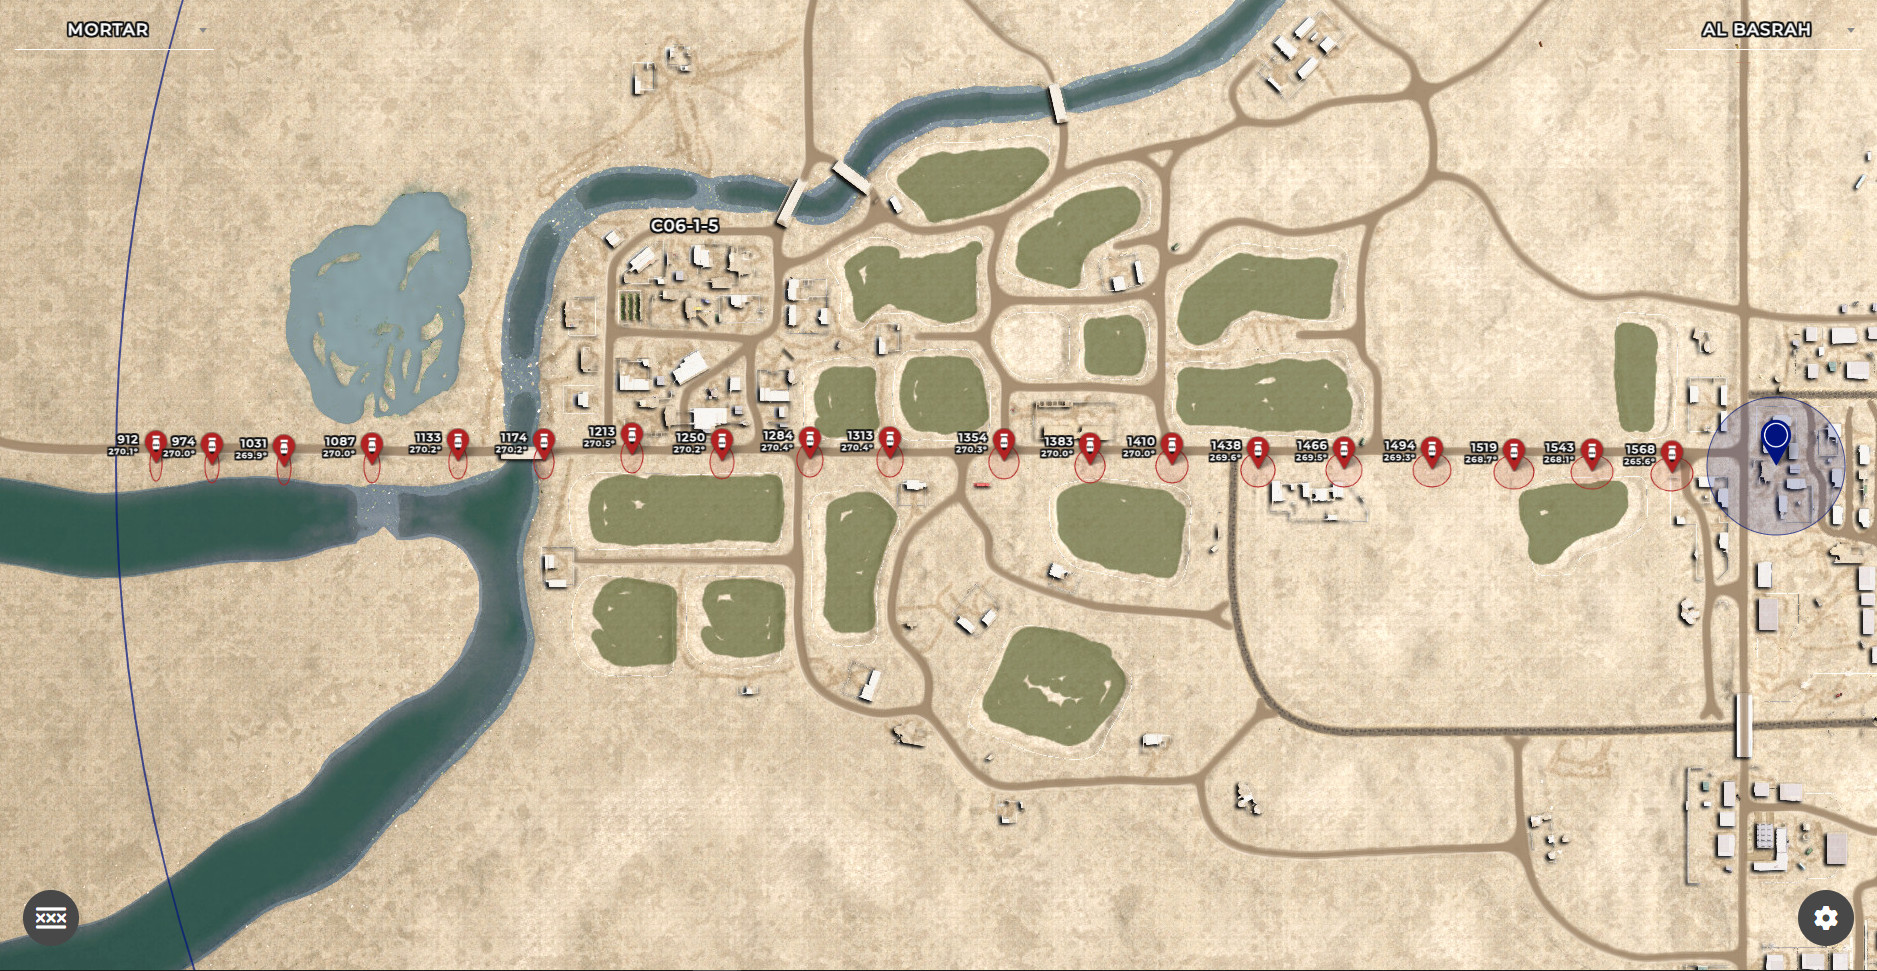
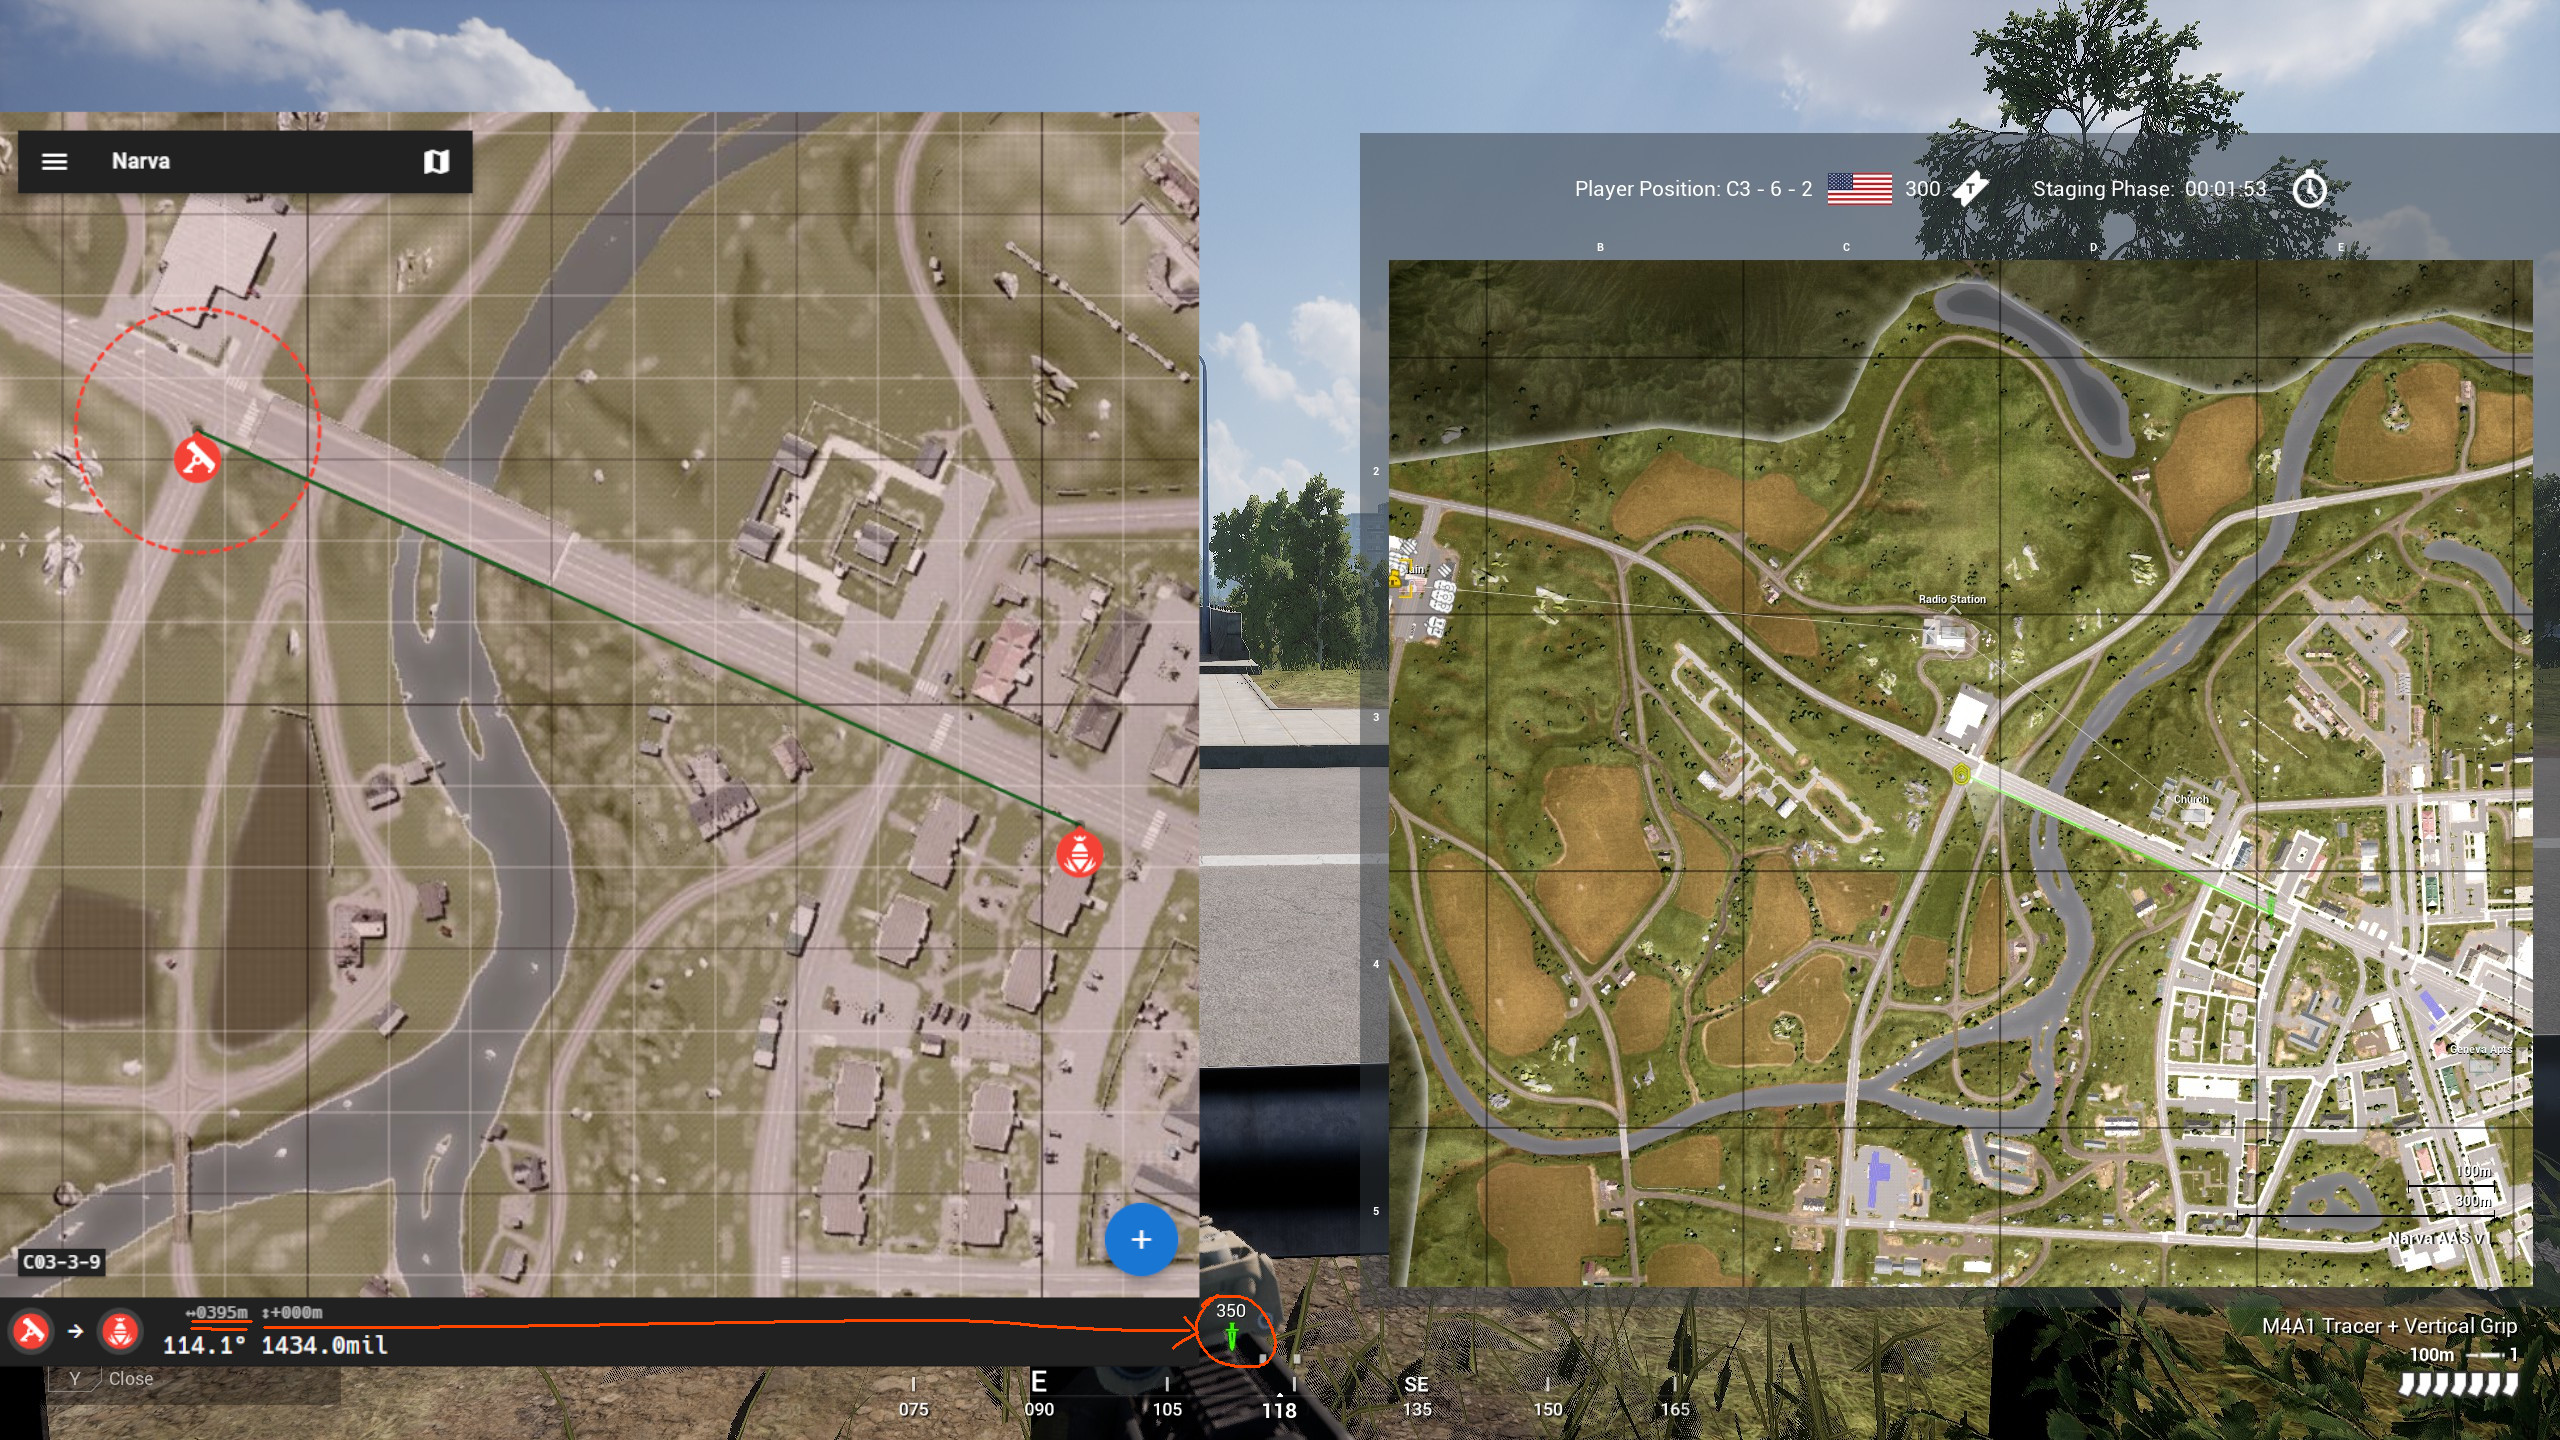 You can use the range markers at the bottom right corner of the map as well as the squares on the map to make a ruler. Each thick square is 300x300m, each thin square is 100x100m and grey squares are 33.33x33.33m. Take a piece of paper and mark these lines out, and hey presto, you can physically use it as a measurement stick on your monitor to figure out a more accurate range to your marker. As a bonus you can also now pretend your hog is 900m long. Be careful of scratches on your monitor though. And paper cuts.
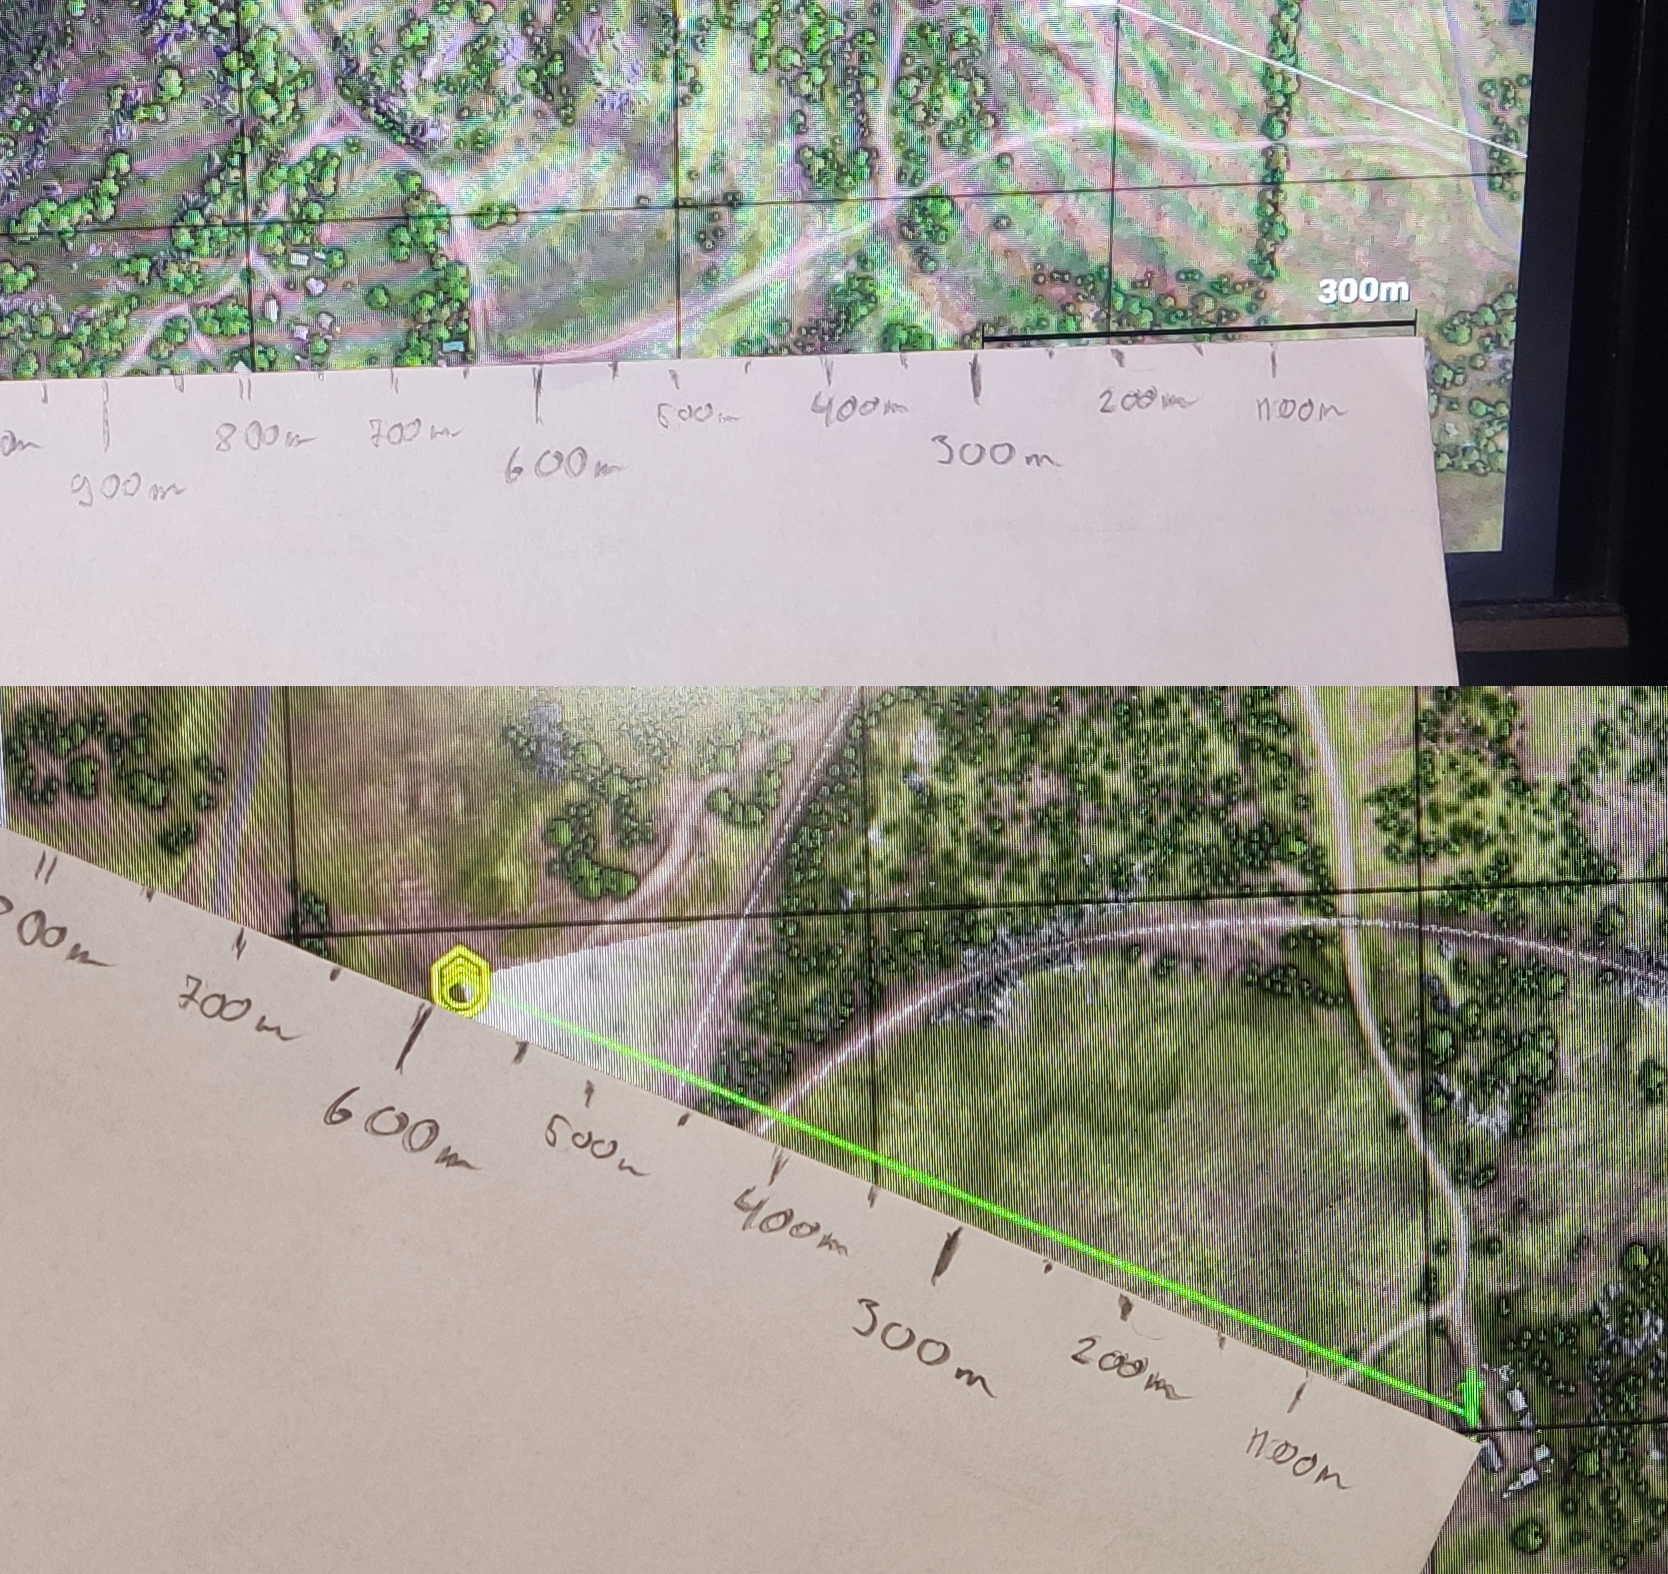 This method is not ideal since you're still basically just eyeballing it, but you can definitely get better estimates than to the closest 50m. Plus with this method you don't even need the squad leader's attention, you can look up the range to any building, helmet mark, HAB, fire support request or FTL mark on the map. Just make sure the size of your map is correctly calibrated so 100m on the map corresponds to 100m on the measurement card. If you get a FTL role you can use those markers to reliably figure out the bearing as well. Make sure you're using the mortar to access the high accuracy compass at the bottom of your screen. While you’re not doing anything else you can start jotting down the most probable areas enemies could be in: flags, popular FOB spots, helmet marks on the map etc- so you don’t have to waste time figuring these numbers out later when you’re in a hurry.
Unfortunately there is no way to account for elevation changes in-game, so if the map you're on has a lot of hills you'll either have to take this L and use a calculator, or waste some rounds zeroing your target in with adjusting fire. For those of us not stuck in the stone age the most effective system for calculating firing solutions is a dedicated tool, such as https://squadcalc.app. Even if you don't have a second monitor you can just press shift + tab and open the webpage in the web browser from the steam overlay. The advantages a calculator gives you are numerous.
You can find not only the range but also the bearing to any point on the map automatically accounting for elevation change, you can visually see your mortar's max range, you can set presighted targets onto probable enemy flags or positions, as well as change between different weapon systems on the fly such as the hell cannon or UB-32 rocket pods.
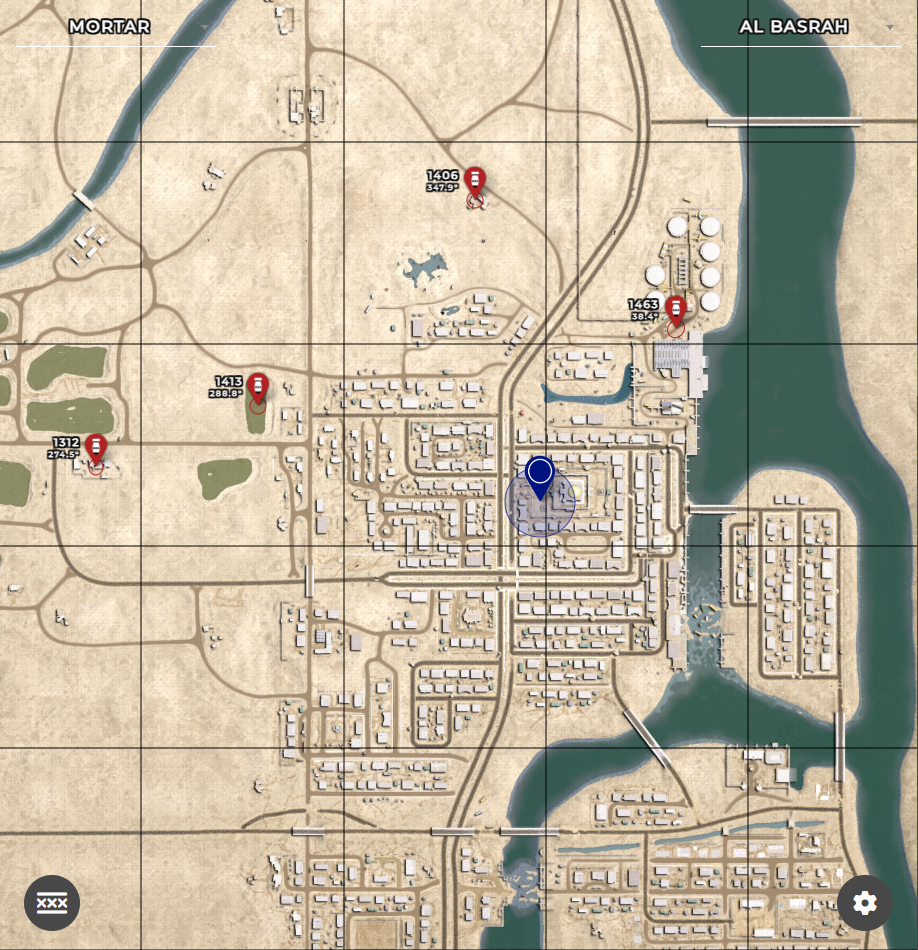
Tactics
Even if the enemy HAB is inside of a building they usually only have a few exits that you can keep pinned down.
Most of the time the mortars can aim themselves pretty well radially thanks to the SL markers, so the more uncertain variable is range. As an observer if you can tell that the direction is correct, quickly let the mortar crews know how much they're over- or undershooting. Otherwise communicate the error in the west-east and north-south axes to avoid confusion: your left isn't necessarily the mortar's left. The mortars know what they want to shoot at, so just let them know where the rounds are actually impacting and let them figure out the difference with a marker on the map if possible.
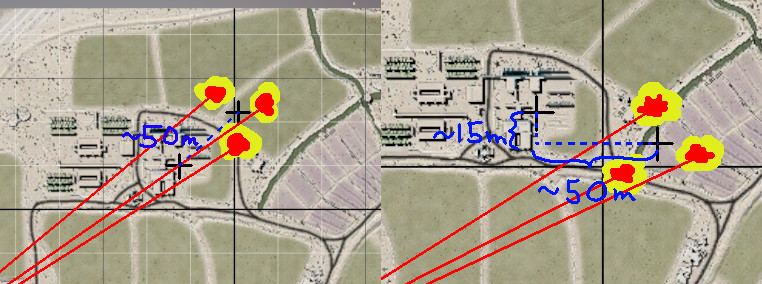
There are three kinds of fire missions: Destroy, suppress and harass. You’re unlikely to completely destroy anything that isn’t stationary, so this is mostly used for emplacements such as FOB radios, HAB spawn bunkers, heavy weapons etc. If you can get an accurate marker for an enemy radio out in the open, it’s pretty much over for that FOB. You start accurately shelling it and the enemy can’t even get close enough to the radio to save it or destroy it themselves. The second best target is the HAB. FOBs don’t always have enough construction to replace the HAB if it gets deleted, which means you’ve managed to neutralize the most important function of the FOB. Lastly heavy weapons, observation towers and other fortified positions can cause big problems for friendly infantry trying to push. Thankfully they aren’t known for being very mobile, so as long as the information gets its way to a mortar crew they can be swiftly dealt with. The largest amount of casualties in an engagement are inflicted in the first few seconds, when the enemies haven’t reacted to the threat and aren’t seeking cover yet. To maximize the damage you deal in these first few seconds wait until all of your tubes are aimed at the same target and launch at the same time using a countdown.
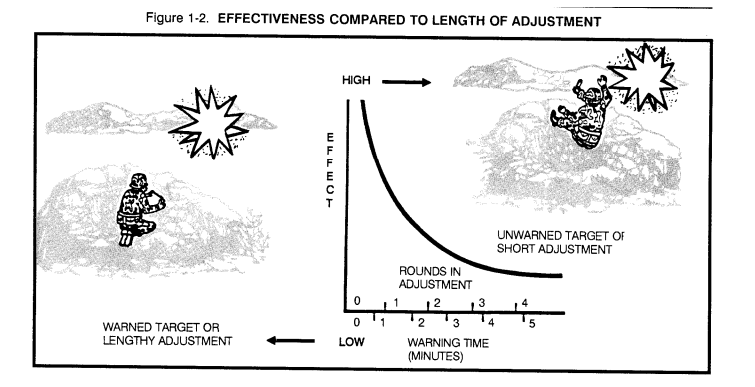 Source: Field manual 6-30
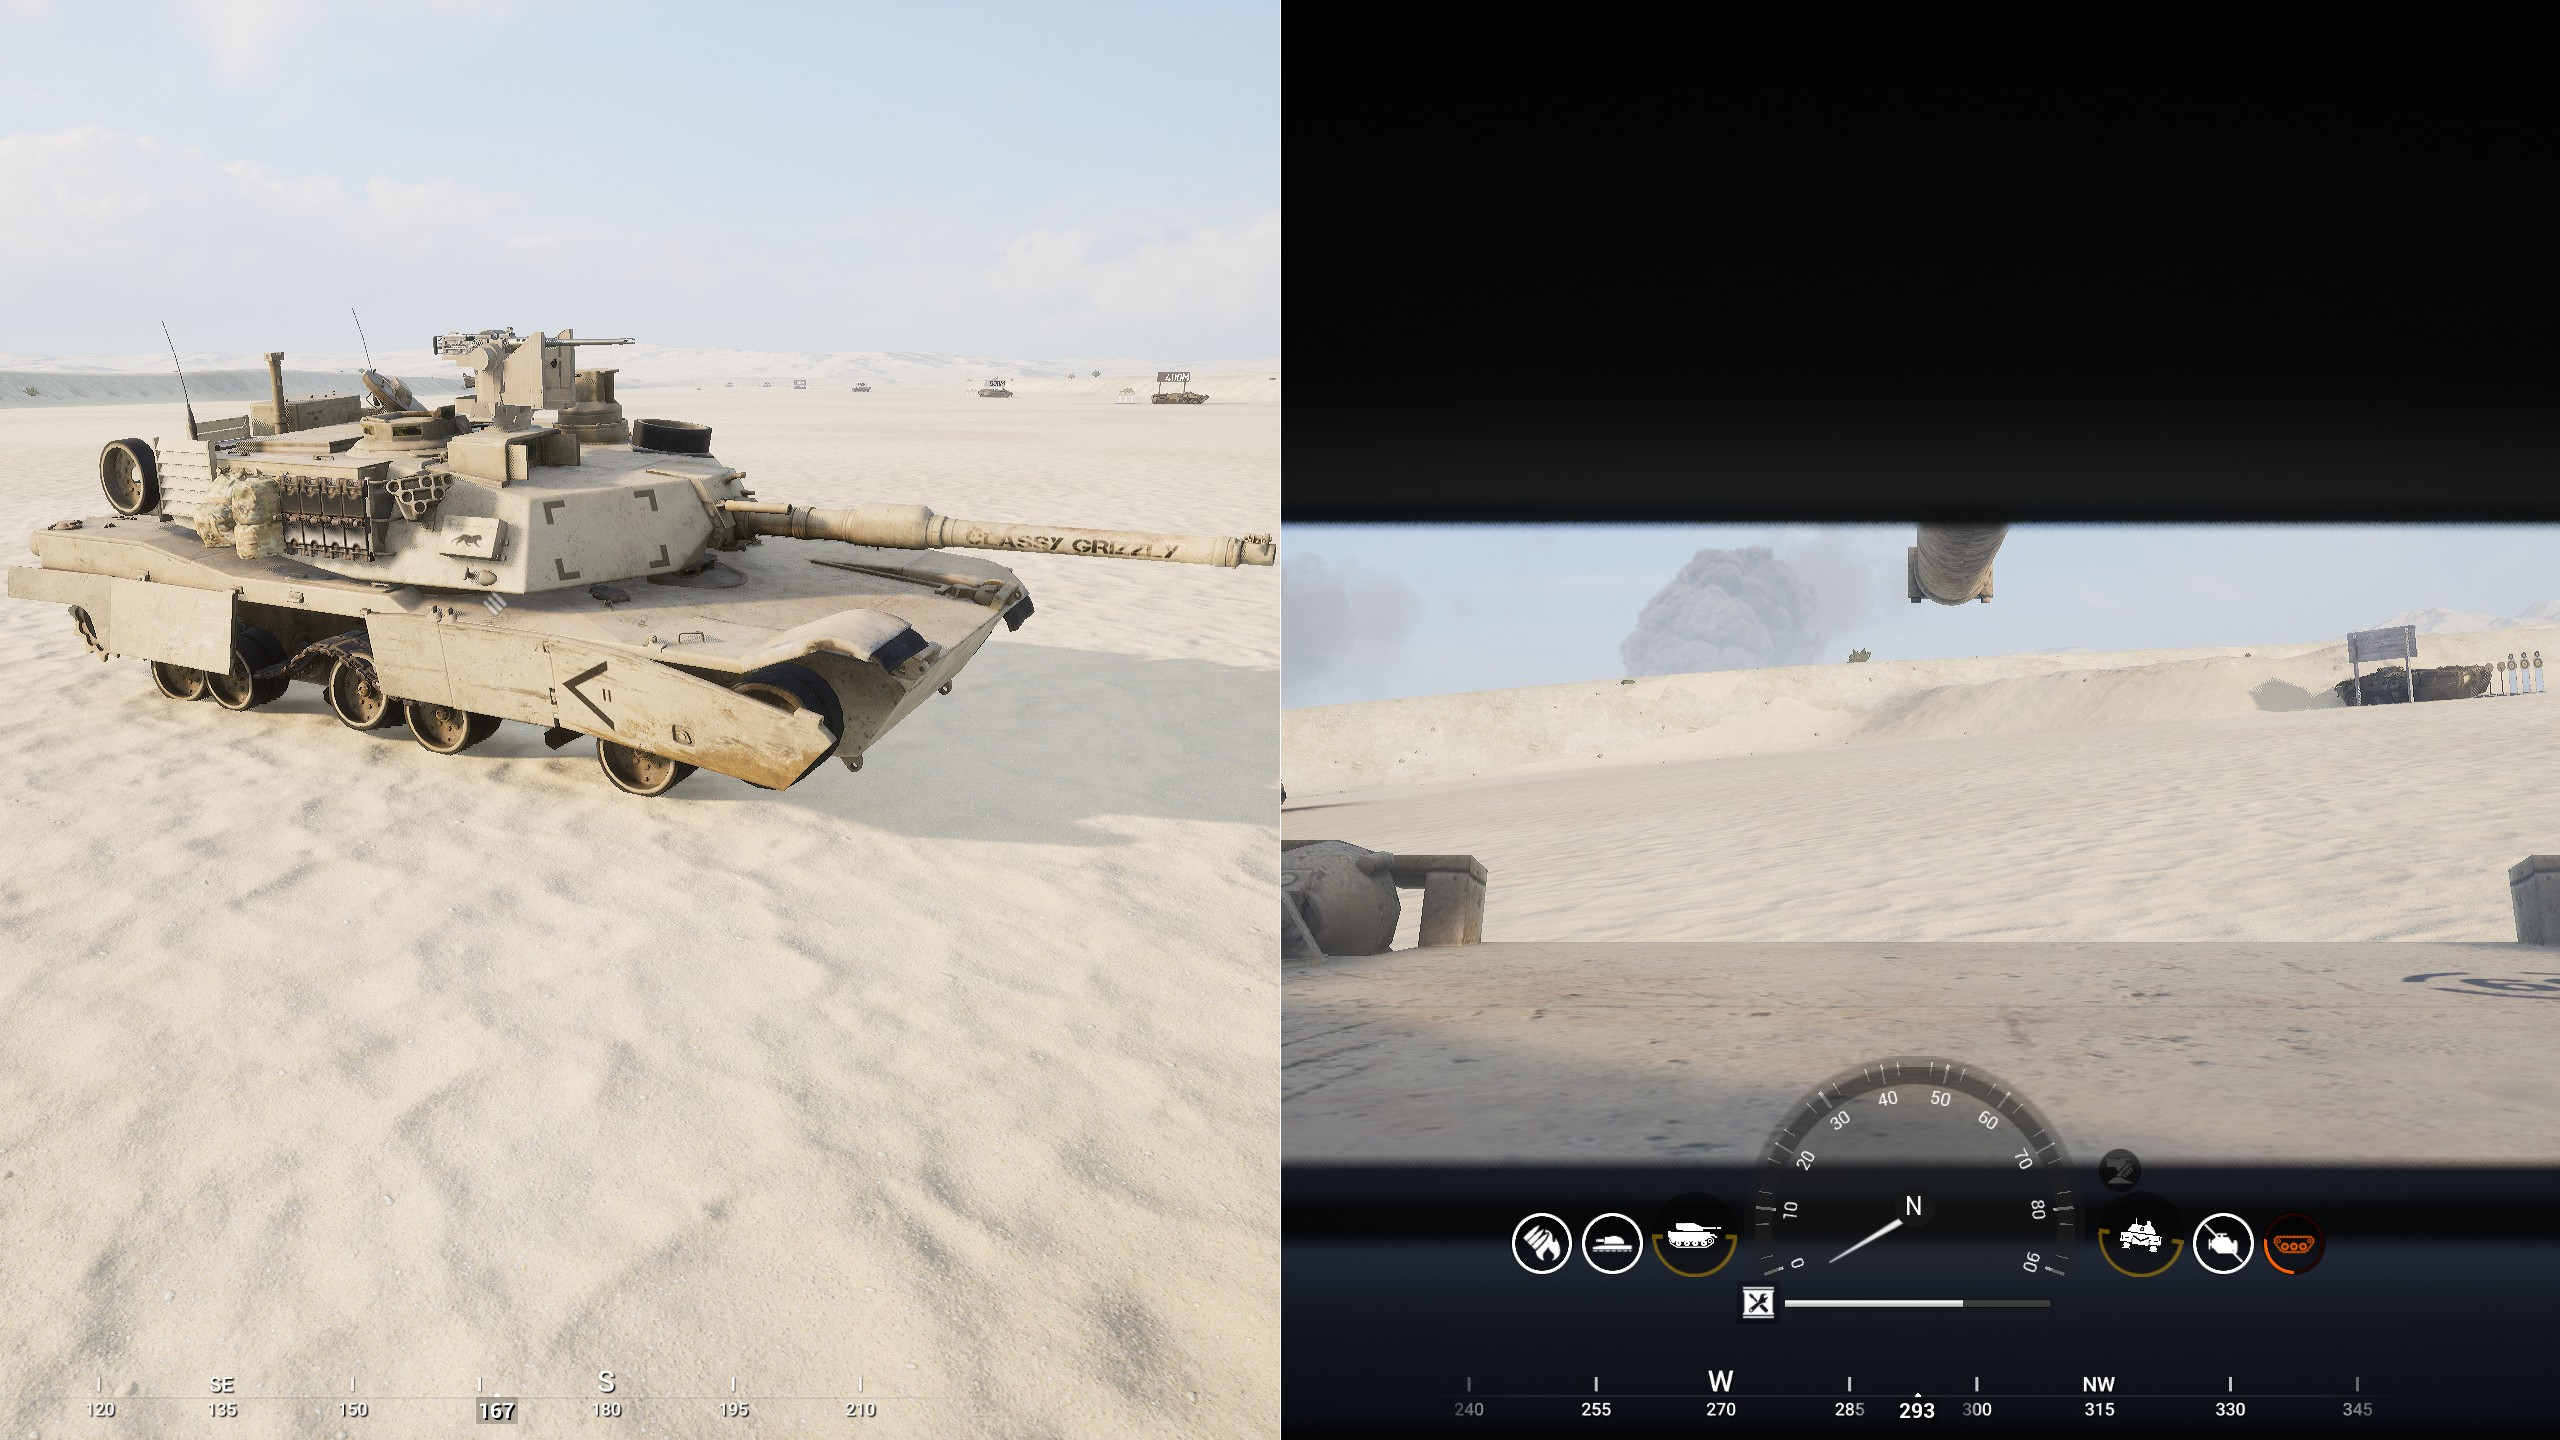
After the first salvo alternate the tubes so that one fires while the other one reloads to avoid gaps in your fire where enemies could sprint from cover to cover. Note that you can shoot three rounds before you need to reload. Surprisingly armoured vehicles can also be damaged with mortars if the shells land within a 1.5m radius. During testing with an M1A2 Abrams a mortar round can deal up to 250 damage with a direct hit (from a total of 3000hp), and destroy the tracks within a few salvos. If the tank crew have their monitors turned on they'll likely drive off within the first few shells, but if they're tracked you can keep them pinned down to stop them from repairing, or even destroy them completely. Even if you don't completely destroy them you're still forcing them to relocate and giving your team some room to breathe
 Next is suppression. Due to the lag between an enemy being spotted, the information going through the channels to the mortar team, aiming the mortars and the flight time of the shells it’s unlikely you’re able to engage and kill singular enemies on the move. When observing for targets use your gamesense: Get a look at the terrain, the frontlines and the movements of the enemies. Pay attention to reports from friendlies. You might only be able to get a visual on the rough area an enemy squad is in, in which case just shooting at a single point on the map is not enough. Besides, if you keep shooting at a certain area after the first few shells land enemies will begin to simply avoid that area instead of walking into the explosions if they have a say in the matter. If you keep moving your point of aim you’re more likely to catch an enemy off guard. To do this you can use several markers to establish a sector of fire (pretend I’m using alpha and bravo fireteam markers for the left and right limits in the example here). Next, add lower and upper bounds to this sector to create a somewhat rectangle-shaped area that you can spread your mortars within.
 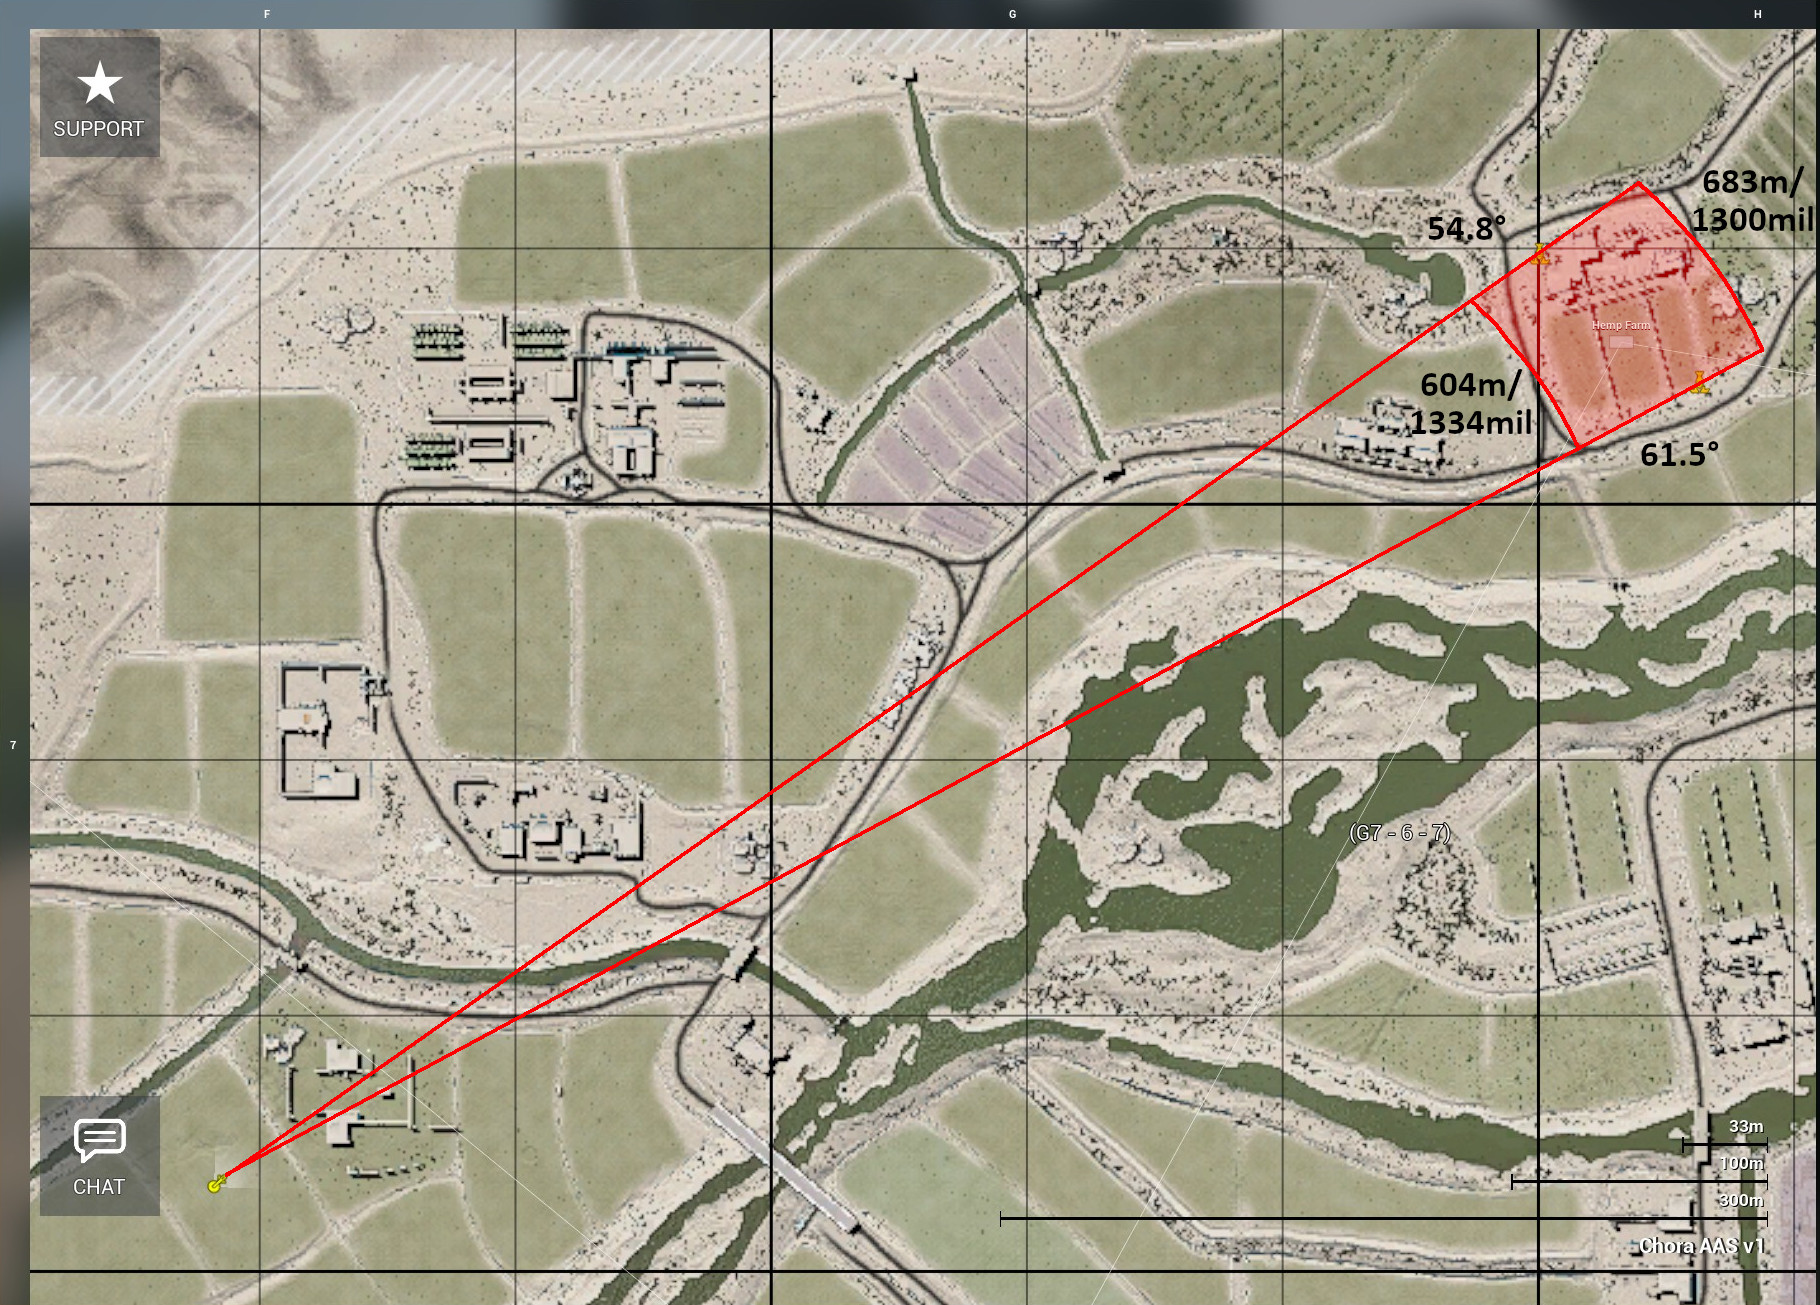 If the target area isn’t this convenient you’ll need to designate several targets to conform to its shape. Like a riverbed, for example. Be careful not to bite off more than you can chew though. If your target area is too large the effect of your suppression will be weaker.
 While suppressing you may be lucky and get some kills here or there, but what you’re attempting to do is make the enemy hesitant to move from their cover and suppress their ability to shoot accurately. While the enemy is too busy keeping their heads down your friendly forces gain some breathing room to move in and finish them. Make sure to communicate with them on when you should cease fire to allow them to close in, and remind them that even if you stop firing there might still be shells in the air that can take up to 22 seconds to land. You can also press ‘2’ on your keyboard to switch to smoke shells to block the enemy’s line of sight without risk of harming your teammates. Shoot these between friendlies and the enemy, as close to the enemies as possible.
The last is harassment, and not the kind you do to minorities on the internet. This is practically the same as suppression but with a lower tempo. Enemies will begin expecting mortars and start avoiding open areas, but if you fire more sporadically enemies are more likely to get complacent and get you some more easy kills on enemies out in the open. This doesn’t have the same effect as suppression, but you’re still causing problems for the enemy and slowing them down. You can use this when friendlies are only getting into position to assault or when you have low priority targets and don’t want to waste ammo.
Strategy
Before you get your mortars set up evaluate if you really actually need them. Do you have the resources to spare to keep the mortars supplied with ammo? Does the map have too much cover for mortars to be effective? Can you get the job done without them? If you do need mortars, next you have to decide whether to build them in conjunction to an active FOB, or if you’d rather have a dedicated FOB just for the mortars. In the former case you have protection from friendlies spawning on the HAB with the downside of having to share ammo with them and being more likely to take commander strikes or enemy mortars. In the latter case you can be more discreet but you risk getting taken out by enemy scouts if you don’t have reinforcements.
When placing your mortars make sure there's nothing blocking them. If there's a tree, a wall etc blocking your shots they obviously won't get to their targets, but the blast can also damage the mortars depending on how close they are. The tubes can aim from around 45 degrees to almost vertical, so anything above 45 degrees in front of you is in danger of being hit. Keep this in mind when scouting for positions.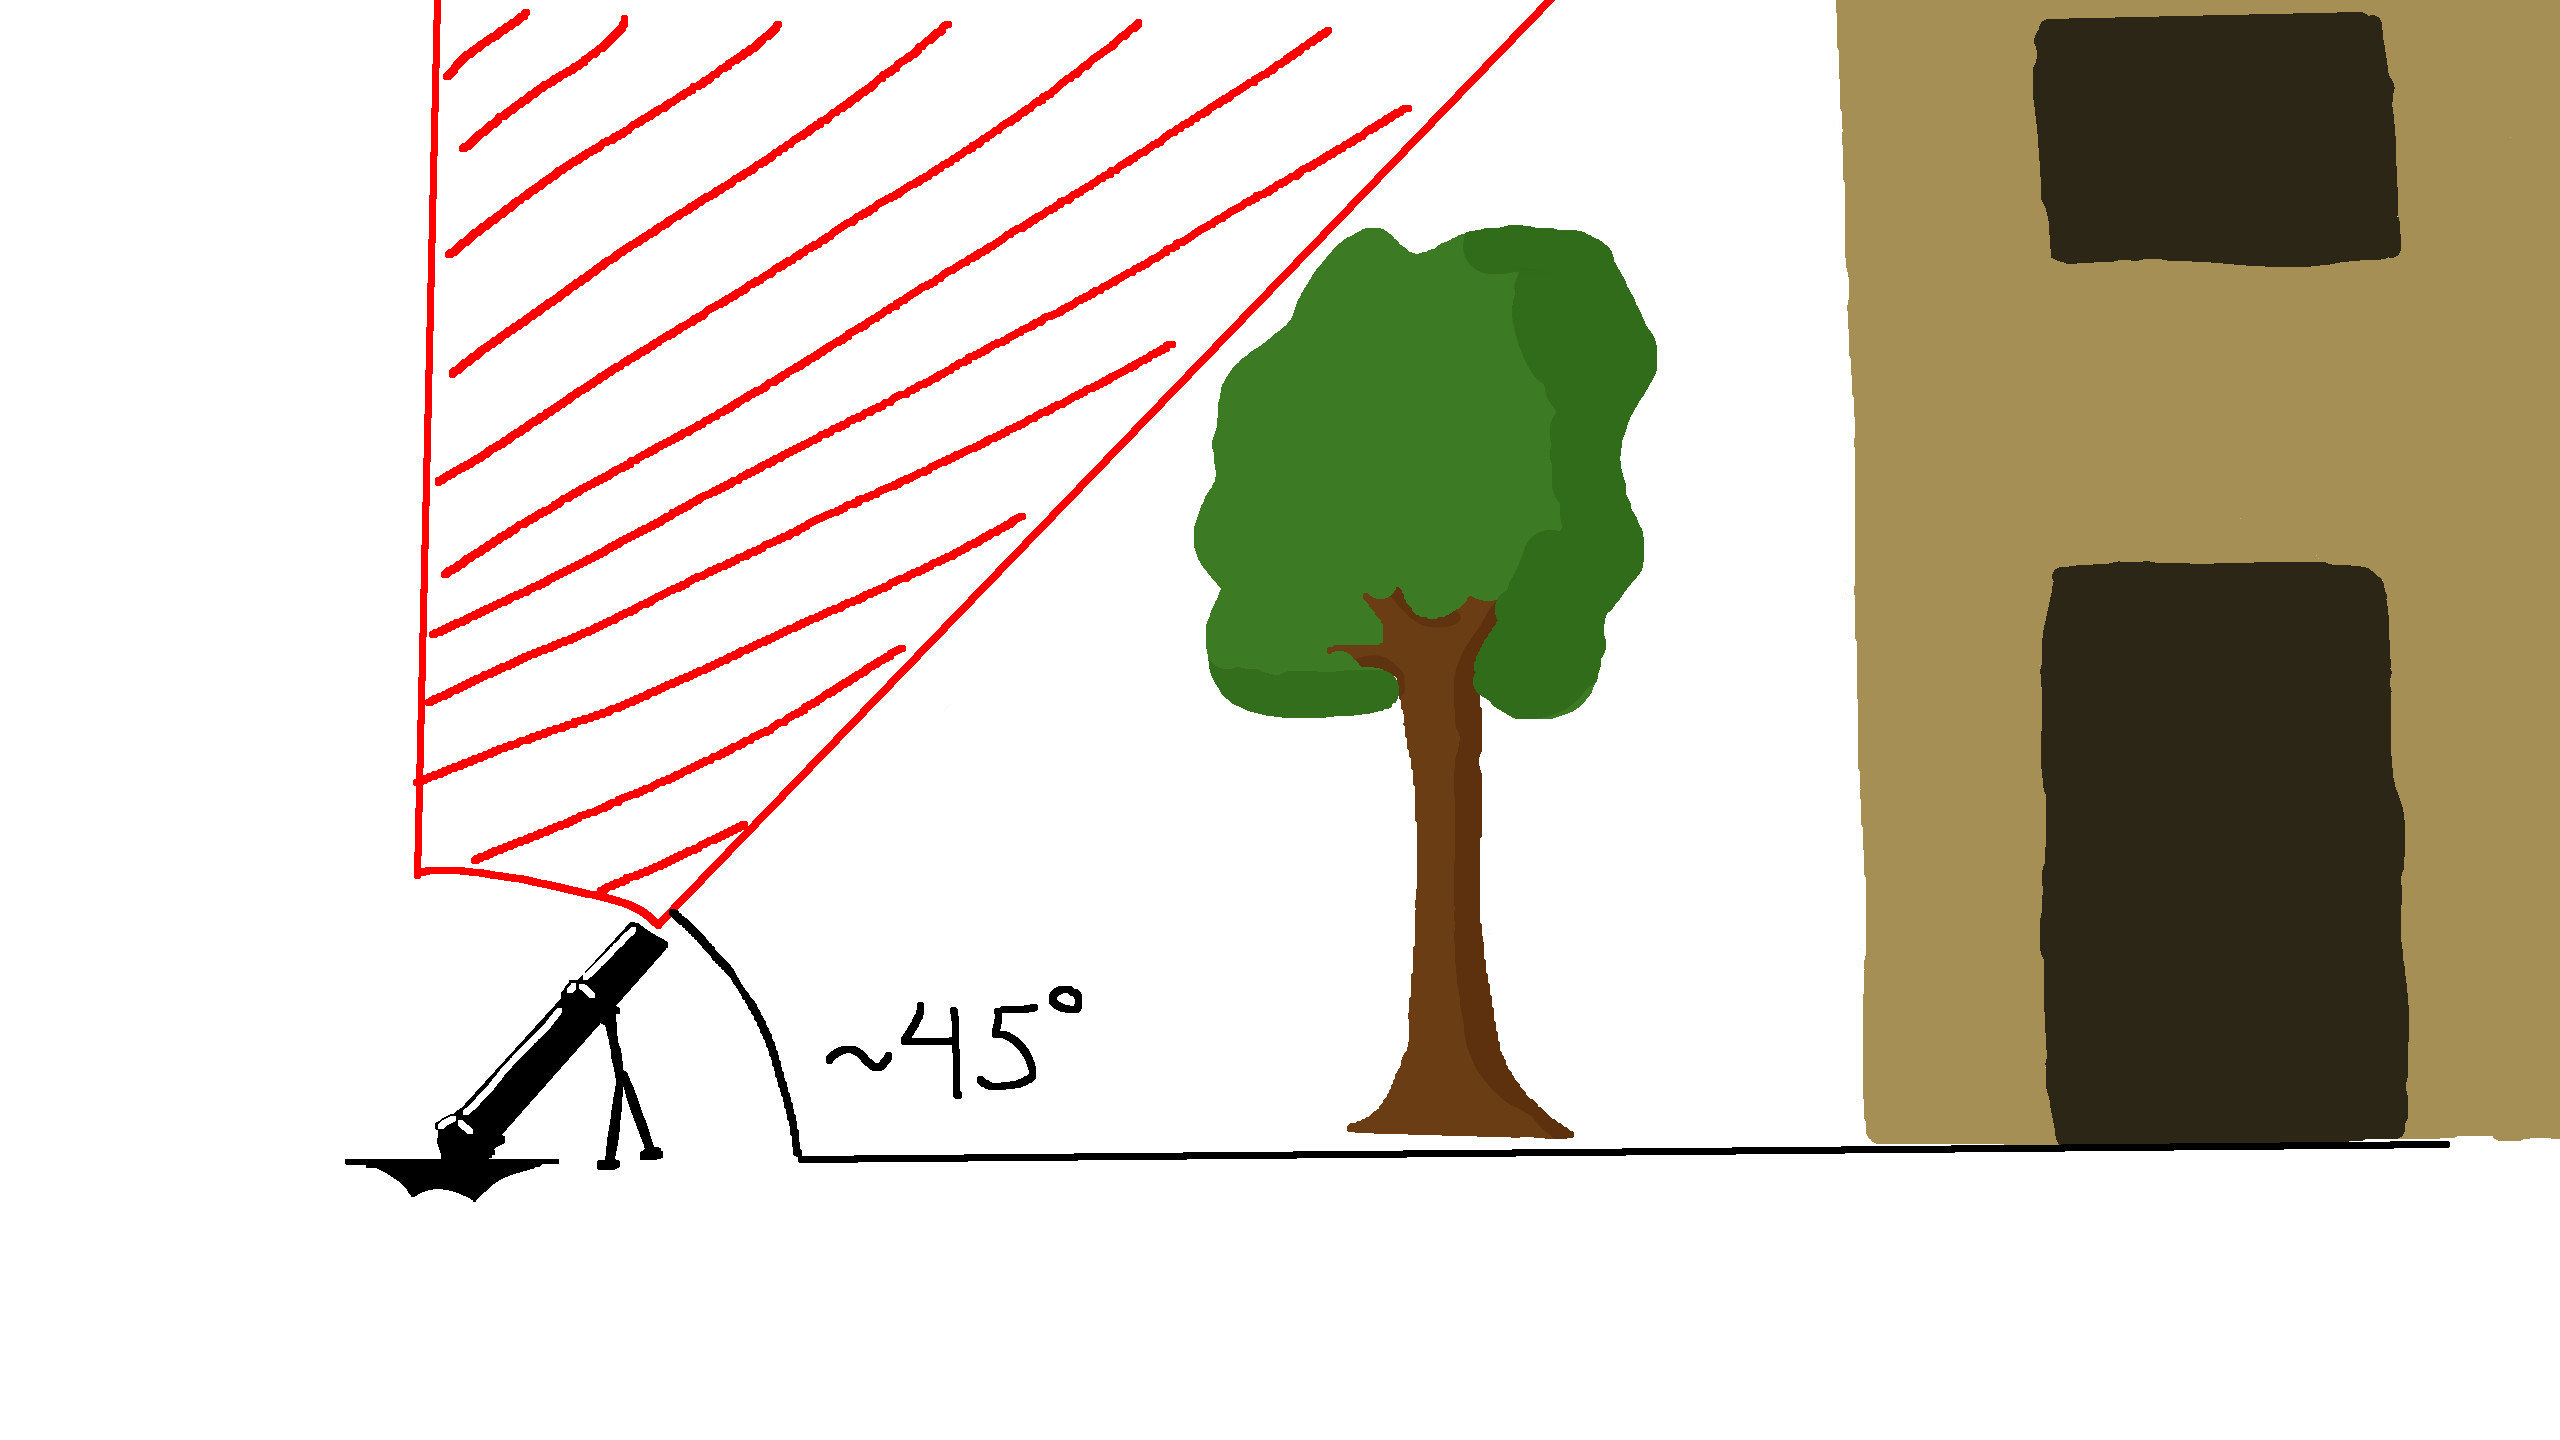
Additionally you can place 2 mortars next to each each other even on maps that only allow 1 mortar per FOB, you just need 2 radios to do so. Create a yellow FOB creation mark on the position where you want to place the mortars, and you can use the inner yellow perimeter as a guide where to place the radios. Place the first, place the second as close as possible and build the mortars where the two FOB radiuses are at their closest. Placing mortars next to each other lets you use one set of directions for both tubes.
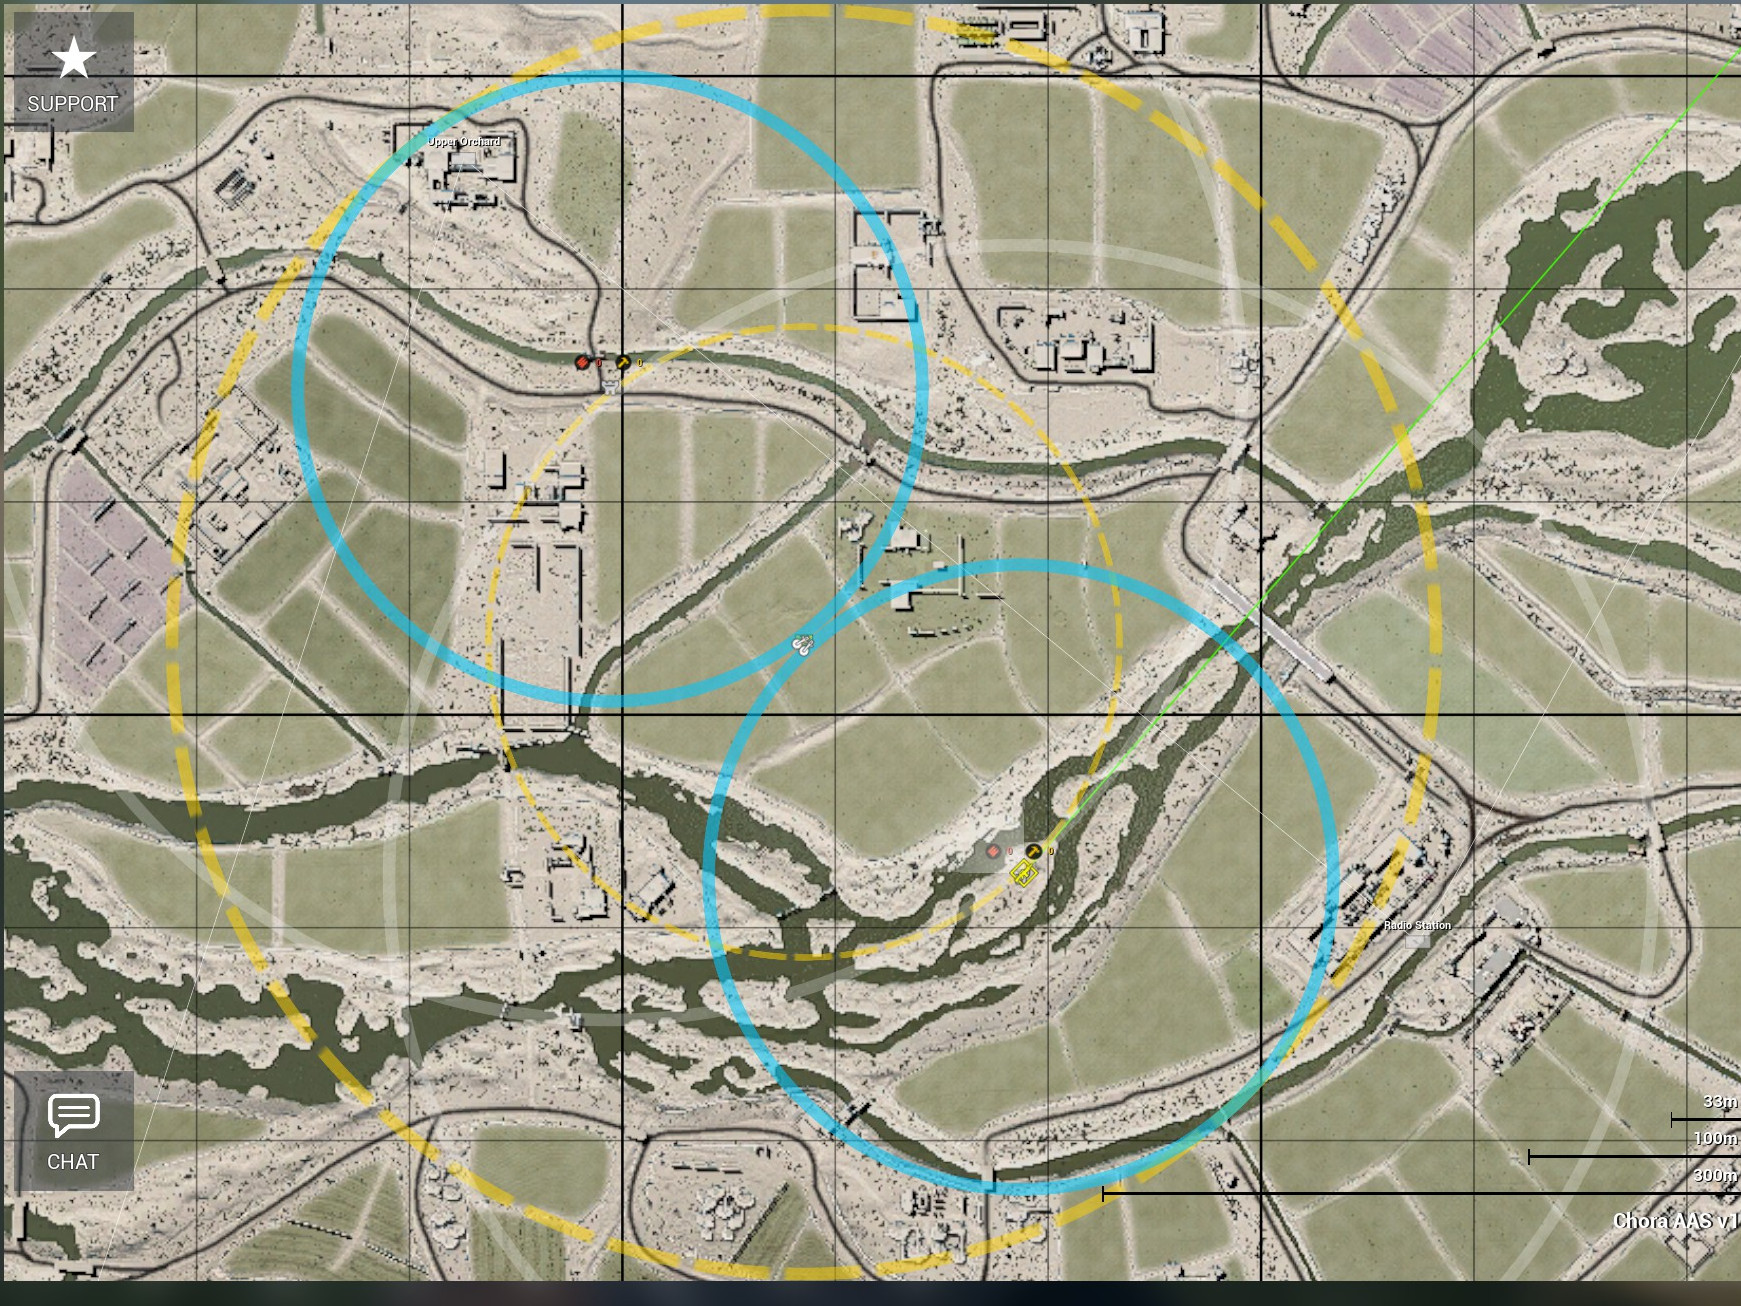 You can also use this method for placing 4 mortars in close proximity on regular maps, although you now have twice the demand for ammo, manpower and two radios to defend.
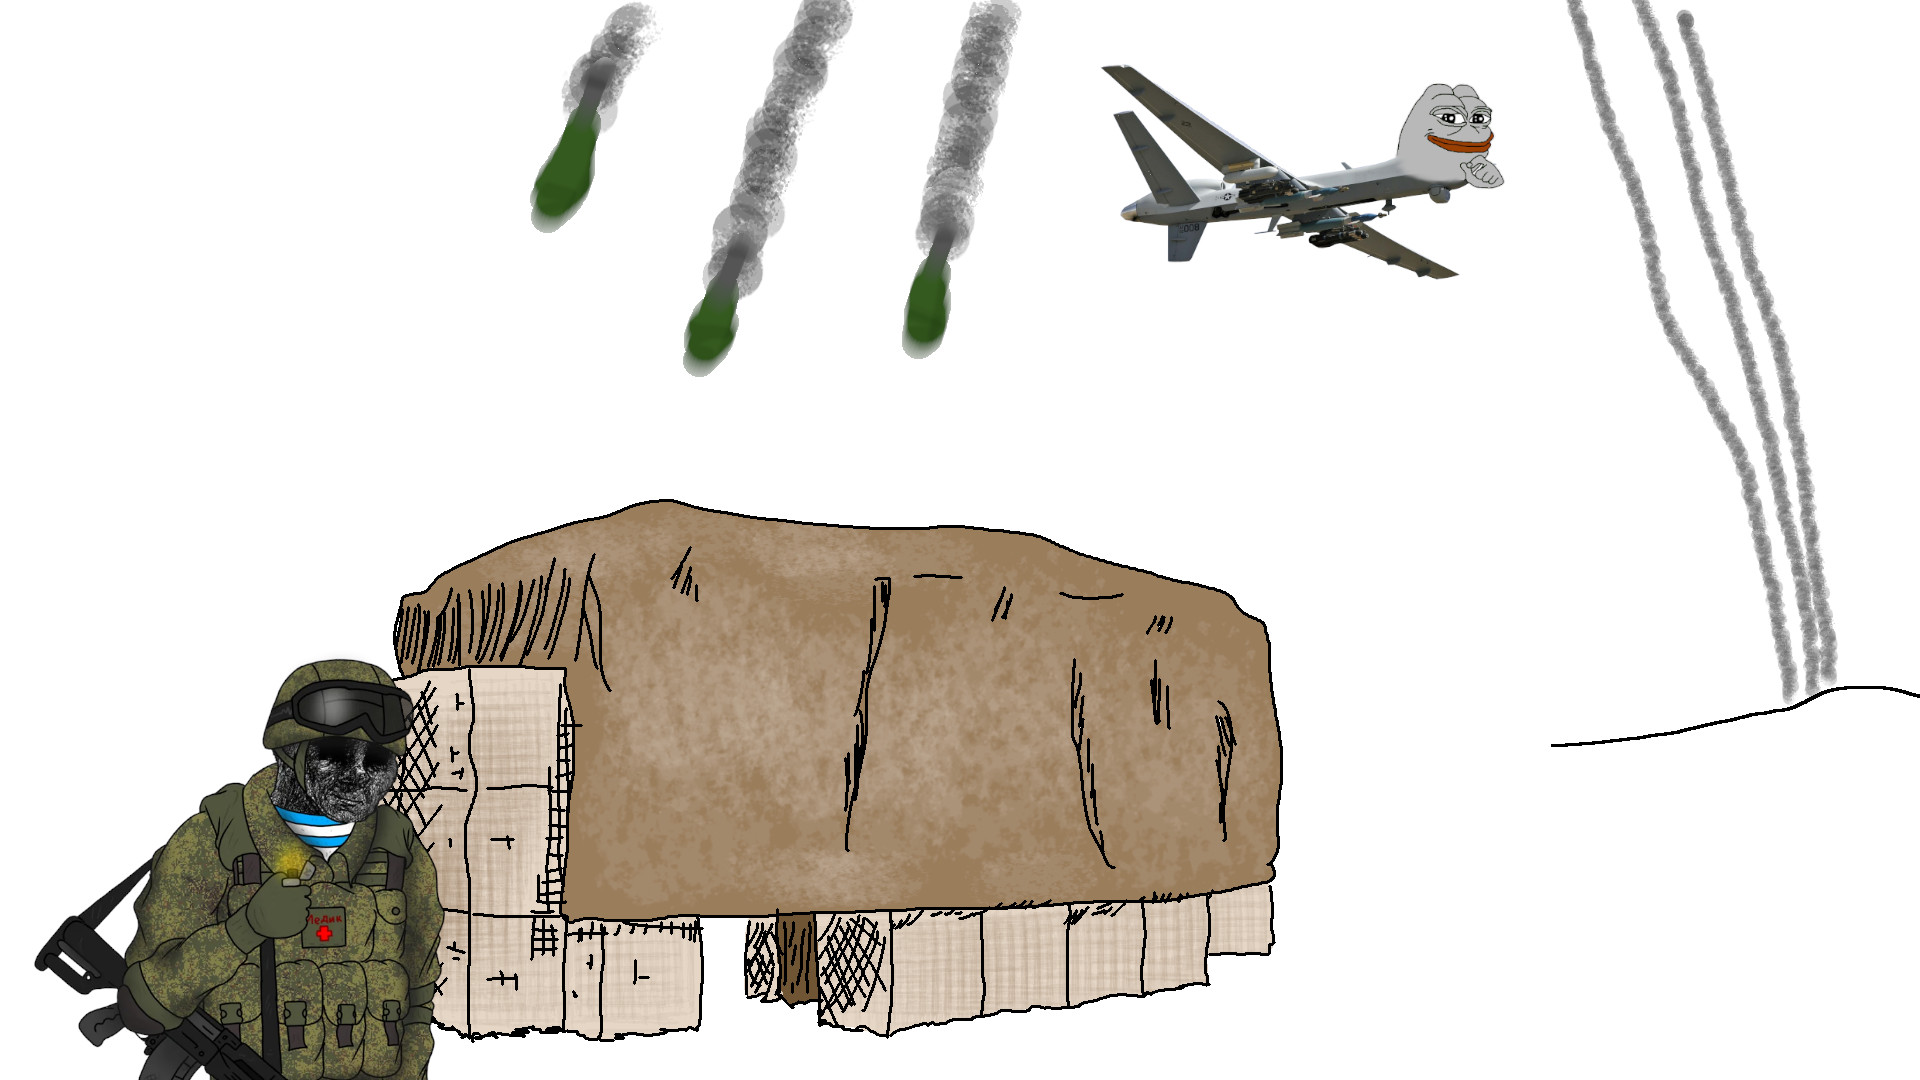
Each mortar firing at its max fire rate goes through 40 ammo in around 7 seconds. This means that a pair of mortars spamming at a point non-stop will need a full logi of ammo every 4.3 minutes. So prioritise where and when you use your mortar rounds to make the best use out of them, unless you want to end up like this guy:
You can also use this method for placing 4 mortars in close proximity on regular maps, although you now have twice the demand for ammo, manpower and two radios to defend.
Each mortar firing at its max fire rate goes through 40 ammo in around 7 seconds. This means that a pair of mortars spamming at a point non-stop will need a full logi of ammo every 4.3 minutes. So prioritise where and when you use your mortar rounds to make the best use out of them, unless you want to end up like this guy: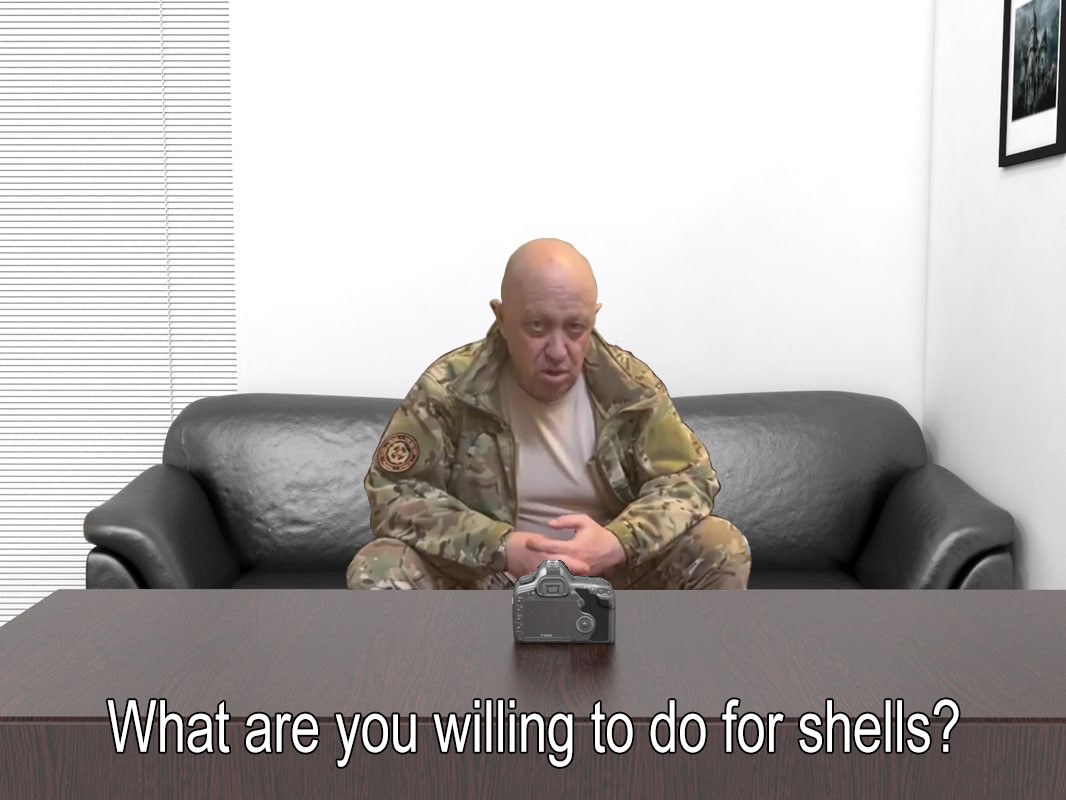
You don’t need to make a squad specifically for mortars, they’re just a weapon like any other. For example if you’re assaulting an objective and you’d like a little more firepower place a mortar on your attack FOB and coordinate your attack with that. Or if you’re defending and you notice a spot where enemies are gathering behind cover you can build a mortar to shoot over the cover. But if the situation or map calls for it you can also choose to make a dedicated mortar squad with 3-4 members so you have enough manpower to crew the mortars and to keep them supplied and defended, but you’re not taking too many guys from the front lines. In this case it’s a good idea to claim the commander role as well since you’ll be hanging back to coordinate fire support anyway and you can best make use of the UAV.
Fin
If you feel I've missed something or left something unexplained go ahead and leave a comment.
Now get out there, hang that round and fire away.
- Подробный гайд для новичков★ 5 (764)61k views1.1k ♥20 minRussianUpdated 28 Sep, 2023
- Squad Leader 101★ 5 (884)29k views1.5k ♥60 minUpdated 22 Jul
- Как убрать мыло на экране | 100% Способ★ 4 (113)26k views355 ♥3 minRussianUpdated 1 May, 2023
- SQUAD - raising FPS together! / SQUAD - поднимаем FPS вместе!★ 3 (31)19k views75 ♥4 minUpdated 8 Jan, 2024
- Руководство по пилотированию вертолётов★ 5 (199)18k views446 ♥32 minRussianUpdated 20 Feb, 2022
- [Squad v10.5] [EN/РУ] / Where to shoot to penetrate? / Куда стрелять чтобы пробить?★ 5 (220)15k views606 ♥1 minUpdated 17 Jun




- Upgrading to PremiumTeam Fortress 2★ 5 (20k)1441k views11k ♥6 minUpdated May 11, 2022
- No More Room in Hell Official ManualNo More Room in Hell★ 5 (2.8k)569k views2.1k ♥29 minUpdated Apr 22, 2019
- NMRiH Community Hosting GuidesNo More Room in Hell★ 5 (526)351k views653 ♥1 minUpdated Aug 10, 2022
- ULTIMATE GUIDE FOR GAME DEV TYCOONGame Dev Tycoon★ 5 (5.8k)326k views10k ♥4 minUpdated 23 Jan, 2014
- How to 'Git Gud' Soon™MORDHAU★ 5 (2k)318k views3k ♥68 minUpdated Nov 16, 2024
- Лучшие кооперативные игры SteamPAYDAY 2★ 5 (1.5k)315k views2.1k ♥56 minRussianUpdated Apr 27, 2025






This guide was created by its original author on the Steam Community. Are you the author and want it removed? Request removal.