Multiplayer Strategy Guide & Quick Reference Sheet -- Grand Strategies, Economy, War
Preface
Do you play Civilization V to win, have friends that are always first place in multiplayer, or just want to bully the AI during a LAN party on a Saturday night? If any of this sounds exciting, this just might be the guide for you.
"''You miss 100% of the shots you don’t take.'
- Wayne Gretzky'
- Michael Scott"
- RBNOW
This guide aims to alleviate any woes you experience in those categories, aiming to be a comprehensive guide that will help you not only improve, but also point you to additional resources that you can use to attain mastery. This guide spans from before you start the game until victory, and also has an optional section on how to properly set up a multiplayer game, followed by the Quick Reference Table and a thank you.
We will assume you already have a decent baseline knowledge of how to play Civilization V singleplayer. For general strategy guides, please see a tutorial such as this one or this one (neither are affiliated or made by us). Note that this guide aims to not only be a “one and done” tome, but also a real-time doctrinal handbook. The ideal way to use this guide is to both read it in its entirety before playing, and to use the last section as a quick reference guide during real-time play. Finally, this guide will assume that you will be playing with all DLCs enabled.
The guide is written to be mostly chronological from early to late game as you read it through, apart from the war section, which will cover all eras. As such, general strategies and ideas will be combined with more tactical walkthroughs. Although plenty of this guide is applicable in single player as well, and expert single player players may already know a good portion of this, the goal is to bring attention to those strategies that may or may not be needed in single player, but are necessary to win in multiplayer. This is in addition to plenty of multiplayer exclusive strategies such as diplomacy and strategies for fighting human opponents.
Before You Start
How is Multiplayer Different?
The most important consideration in any game going from single to multiplayer is considering how the addition of other human players changes the way it’s played. The three biggest differences can be summed up as follows: Technical differences, unpredictability, and the need for speed.
Technical Differences
Unlike what one might expect, multiplayer has some different gameplay mechanics, most of them being minor alterations. The most obvious difference in gameplay is that diplomatic actions from other human players will not display as animated diplomacy screens, but as in-game notifications. One can either left-click them to access the diplomacy screen, or right-click to dismiss them. This makes it imperative to check the notifications on the righthand side of the screen. Furthermore, notifications can stack up past the top of the screen later in the game, which means one should always make a habit of dismissing irrelevant notifications.
Although it may not be immediately obvious, the AIs in Civ 5 are programmed to be more passive in multiplayer than in singleplayer. While they still perform all of the same diplomatic actions, including surprise attacks, they will do so far less frequently. This is most noticeable in that they will request far fewer trade deals of you, which is probably a nice perk. They’re most likely programmed this way to speed up the game, as they make their requests in between player turns.
Unpredictability
Human players are not entirely rational, nor do they follow predetermined rules. While this is in a sense obvious, it will throw off the intuition of strong singleplayer players in many ways. For instance, those experienced with singleplayer will have a sense of how quickly certain wonders get built by the AI. However, these are somewhat hard-programmed, and do not reflect how important they actually are. Another key aspect of unpredictability is in warfare and specifically sneak attacks. Human players (naturally) will perform sneak attacks, commonly from unexpected directions. Although the AI can do these as well, they are usually blindly obvious and take the shortest route to your city. See sections Common Early Game Scenarios and Common End Game Scenarios for more on diplomatic strategy.
Prioritize Speed
“Slow is smooth, smooth is fast.”
- The Navy SEALs (allegedly)
No one likes a Civ player who takes forever each turn, so speeding up your gameplay is essential. Not only will your friends love you more, but you’ll be a more efficient player with more time to think. One of the best ways to improve your speed is to begin to learn the hotkeys. While of course memorizing these all at once would be a waste of time, if you start with just a few and slowly work your way up practicing them, soon enough you’ll be lightning fast at Civ. The camera and mouse movement hotkeys, as well as space (skip unit turn), enter (next turn), and D (alert) alone will likely save you several seconds per turn.
General ControlsWorkers
Combat
City management/ Diplomacy
Begin With the End in Mind
No, you have not accidentally scrolled too far and ended up reading Stephen Covey’s 7 Habits of Highly Effective People, as this idea holds true in Civ the same as in real life. On the game setup screen, already be considering how your selected civilization and others’ will impact each person’s strategy. This is especially important for civilizations that have a clear strength for certain victory types. Note that unlike in single player, time victories essentially never happen in multiplayer, as the overall game pace is faster.
This same principle is true once you start the game, as you may have to pivot away from your civ’s strengths or change plans based on the situation. Knowing when to pivot is key to avoid wasting resources. Likewise, you should always have a working general strategy for expansion, victory types, which resources to prioritize, and the like. As Eisenhower famously said “Plans are useless, but planning is indispensable.”
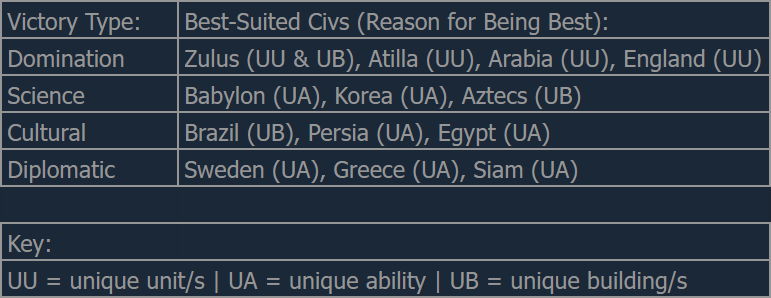 Civs Most Specialized to Each Victory Type
Note: These are not necessarily the “best civs” overall, but rather the ones best-suited to a particular kind of victory, and that will more predictably be played with a single victory type in mind. For an overall leader tier list, check out this video. Also, while the Aztecs may seem better suited to a domination or cultural victory at first glance, their floating gardens are typically much more impactful, providing food, which means science (see section Civilizational Management).
Opening Moves
First Steps
At the start of the game you’ll usually spawn in a good location to found your starting city already. This means that you can found it on the first turn, which is the best play the majority of the time. Delaying settling by 1-2 turns max is okay if there’s a vastly better city spot close by however. Before settling you should always move your warrior first to scout any important features or resources nearby, such as rivers, luxury resources, and coastline. You can move your settlers closer to these resources if you want to claim them, but still ideally get your capital founded on your first turn regardless. If you don’t have the values memorized, turning on the resource and yield icons (see section Finding In-game Information) is highly recommended.
First Techs
In almost every game, researching pottery is considered the best opening move, as it unlocks granaries and shrines. Likewise, getting your luxury technologies as well as writing should be your earliest priorities.
Scout, monument, or worker first?
This question is as old as Sid Meier himself (71 as of 2025) and has started many lengthy discussion forums in online gaming communities, so here we’ll break down the general arguments for each choice.
Scout: Since exploration is such an important part of Civ5, building a scout early is crucial, and is almost always a smart choice unless you’re trapped in a small space.
Monument: If you don’t plan to go down the tradition tree to get legalism, building a monument can also be a strong choice. Otherwise, building them first is overkill or in the realm of preference.
Worker: If you have a lot of resources around your starting area you may want to start off with a worker to take advantage of them. Note here that you won’t be able to improve many of these resources until you unlock certain technologies.
Below are some common build orders and their use cases for the early game:
Scout → scout/monument → shrine → worker → settlers & military
Useful if you have poor granary resources
Scout → scout/monument → shrine → granary → settlers &military
Useful if you have good granary resources
Scout → scout/monument → shrine → granary → worker → settlers &military
Leads to a slow rolling expansion for very plentiful and/or very uncontested lands
Note “settlers and military" means something specific. As a rule of thumb, one should not build settlers until city population 4. However, you will need to pump out all of your settlers in rapid succession after that. Therefore, once you’re able to build them, build all of the settlers you’ll use in a burst, punctuated by any military units only as needed to escort them or clear encampments on the way. In your subsequent cities, building a granary first is almost always preferable for early growth. Ensure that you can also get libraries up in time to build the national college ideally by turn 100 on standard speed, or turn 66 on quick.
Founding More Cities
Exploration is Key
Exploration is important in early game Civ because before you’re going to want to found all of your cities generally before turns 40-60 on quick speed (60-90 on normal). There are other advantages in exploration, such as ancient ruins and finding other civilizations, but as you explore, be on the lookout for resources that other players will want to claim, such as luxuries, natural wonders, rivers, and coastline. Eventually you’ll want to take advantage of these features yourself, or deny them from your opponents to stay on top.
Second City
Ideally between turns 25 and 40, but definitely before turn 50, you should have founded your second city. Hopefully at this point you’ve explored enough of the surrounding area that you’ve had a few locations in mind. As stated above, before committing to building a settler unit, make sure you have at least 4 population in your capital city. Rushing out settlers too early can lead to overall slower growth in your empire. Settlers are unique in that your city can neither grow or starve when they’re being built. Thus, using manual citizen management (see section Advanced City Micromanagement), one should allow the city to starve and maximize production when building settlers as there is no cost and only benefit, as it will not affect your population but will build them faster. However, always remember to immediately switch the citizens back once settlers are complete.
Once you have a settler unit, look around for a good spot to found a city. Pay attention to key terrain features such as rivers, luxury resources, and coastline. If you haven’t founded a city on the coast yet, having at least one is a high priority for cargo ships and exploration. Placing your city in an area with high production and food is obviously most important because this means that your city will be able to grow faster and produce more. Tiles like tundra and desert generally have low yields so it’s best to stay away from those. You should also look to protect your settler units before sending them out. Escorting them with a warrior/archer unit can help fend off barbarians and other players who might be looking to get a free kill. Bringing a worker over to begin working on turn one is also extremely powerful if possible. Likewise, if you are low on workers, you can settle directly on top of a luxury resource to instantly gain the happiness benefits as long as the requisite technology is unlocked.
Tips on City Expansion
3-5 cities is considered optimal with tradition. When founding a city, it's best to aim for fresh water, hills, and at least one luxury resource. All of these provide long-term growth potential. Ideally, try to found cities with at least 6 tiles between each city center so that their workable tiles don’t overlap. Placing the city near or on hills or rivers provides various advantages, because a hill provides a permanent +1 production as well as a defensive bonus, and fresh water gives you a growth bonus and access to important buildings like water mills and gardens. Mountains also unlock buildings like the observatories (which are absurdly powerful), certain wonders, and will create natural defensive barriers against other players.
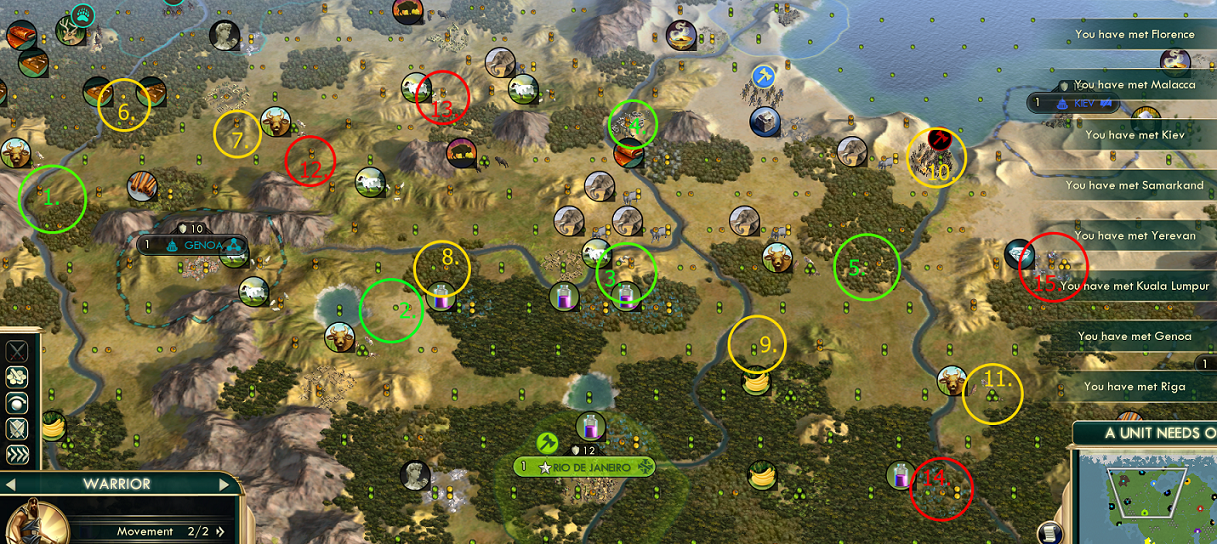 Better and Worse City Locations (ranked by color, not order)
Pros: 2 luxuries, high food and production, river, mountain, hill, highly defensible. Cons: Too many mountains closeby.
Pros: 1-2 luxuries, high food and production, fresh water. Cons: No river, flat land.
Pros: Many luxuries, high food, decent production, river, hill. Cons: Middling production.
Pros: Many luxuries, high production, river, hill city, mountain. Cons: Low food, flat desert nearby.
Pros: 2 luxuries, high food, decent production, river, hill city. Cons: middling production, luxuries are far, flat, open (not-defensible) terrain.
Many luxuries, good food and production, river, hill. Cons: few hills, relatively flat and open terrain.
Pros: 2 luxuries, high food, relatively high production, hill city. Cons: no fresh water, hills are relatively far, relatively open terrain.
Pros: many luxuries, high food, decent production, river. Cons: middling production, flat land.
Pros: 2 luxuries, very high food, river. Cons: Low production, flat land.
Pros: 2 luxuries, decent production, river, coastal. Cons: Low food, flat land, flat desert nearby.
Pros: 2 luxuries, very high food, river. Cons: low production, flat, somewhat open flat.
Pros: 1 luxury, decent food, high production, hill city, mountain. Cons: No fresh water, too many mountains, middling food.
Pros: 1 luxury, high production, hill city. Cons: Low food, no fresh water, a few mountains.
Pros: 1 luxury, very high food, river. Cons: Almost no production, flat city.
Pros: 1 luxury, good production, hill city. Cons: low food, no fresh water, lots of flat desert.
Technological Progression and Religion
Technological Progression
These images are not hard rules, but rather a guide to selecting technologies based on which are considered the most “meta” in multiplayer.
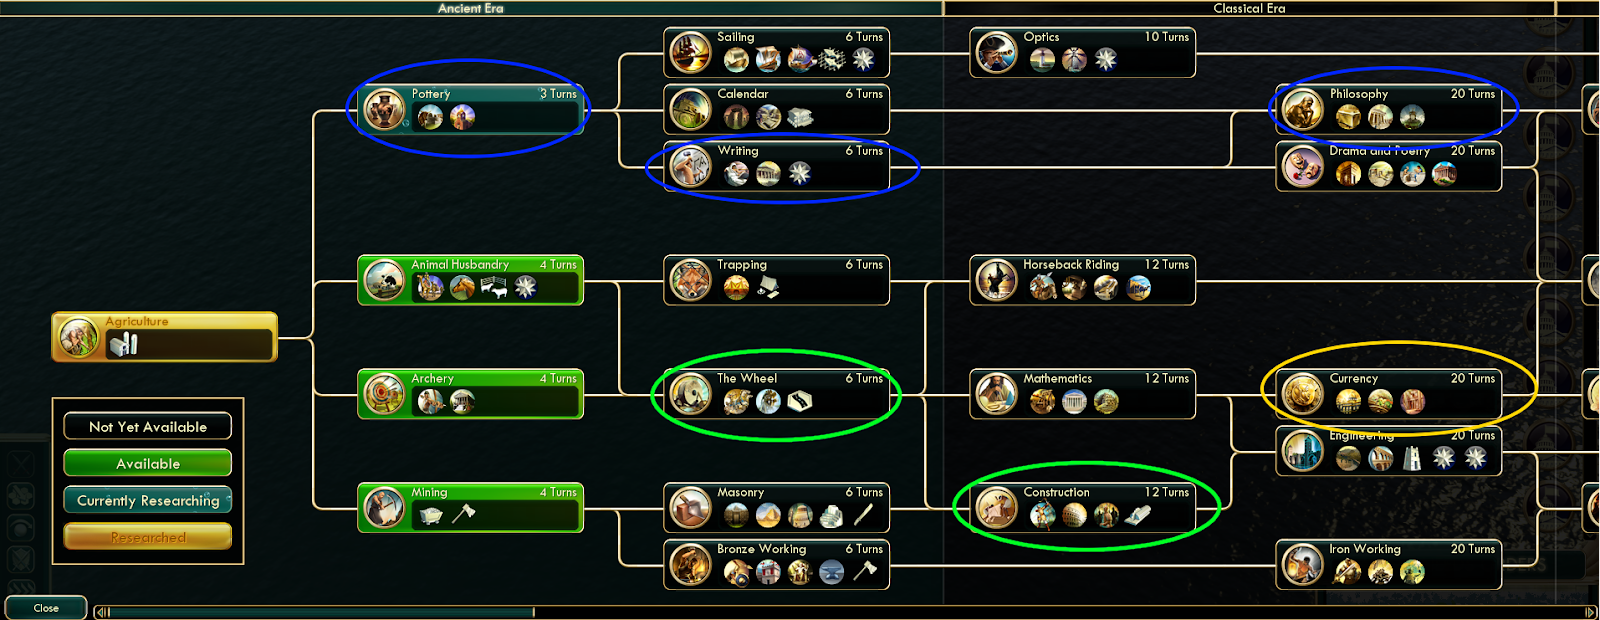
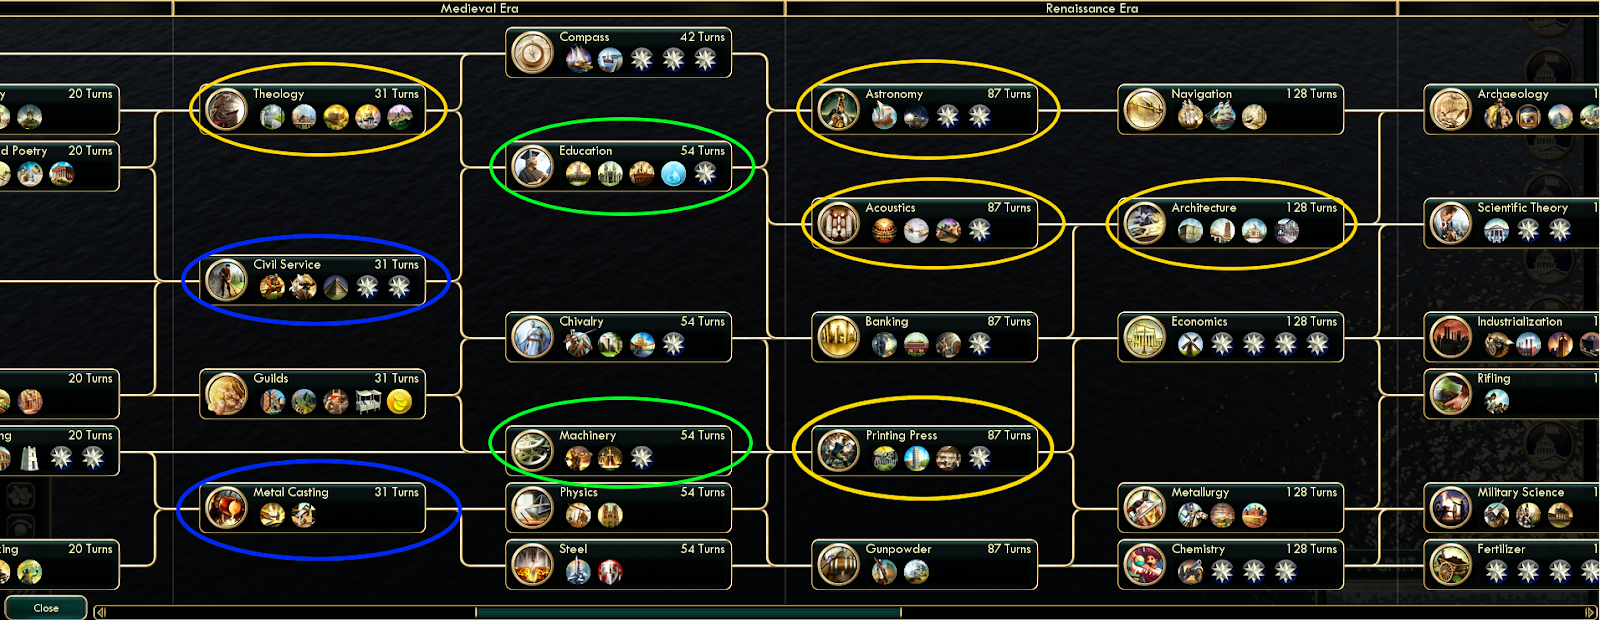
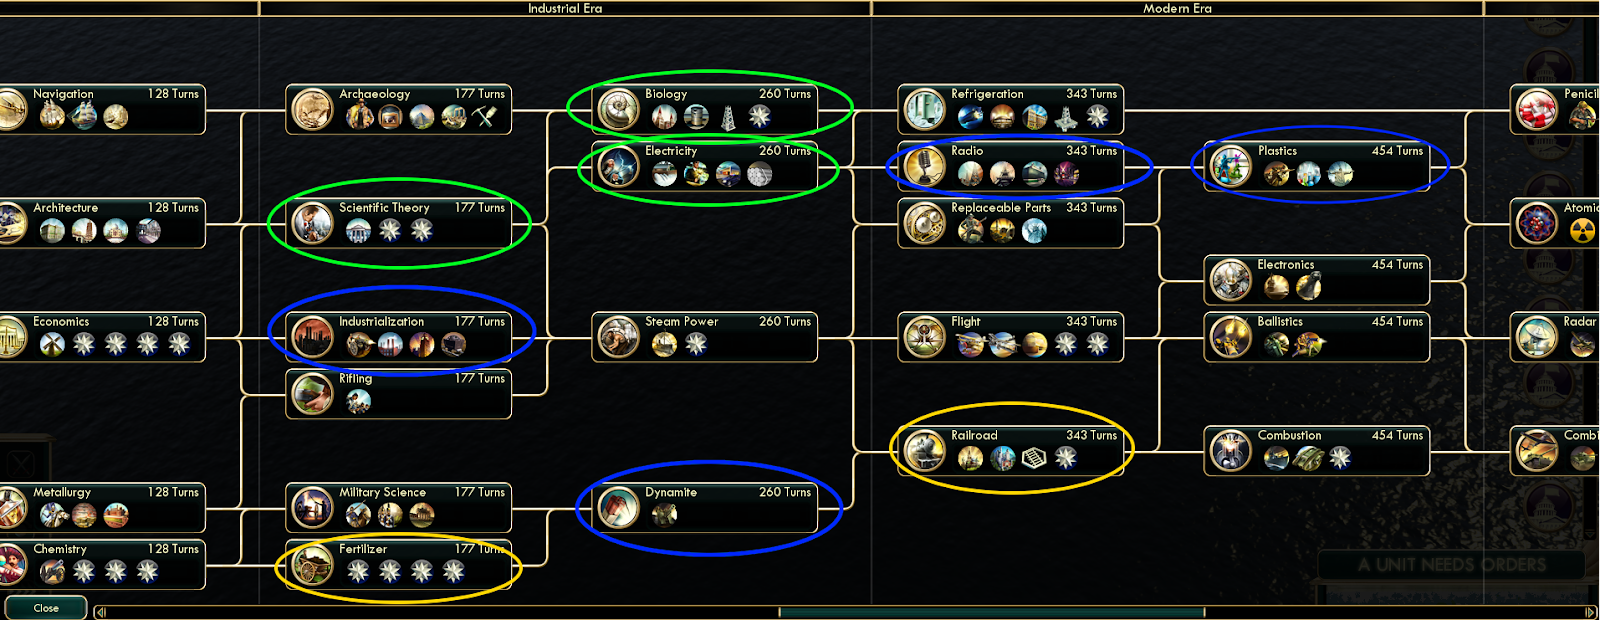
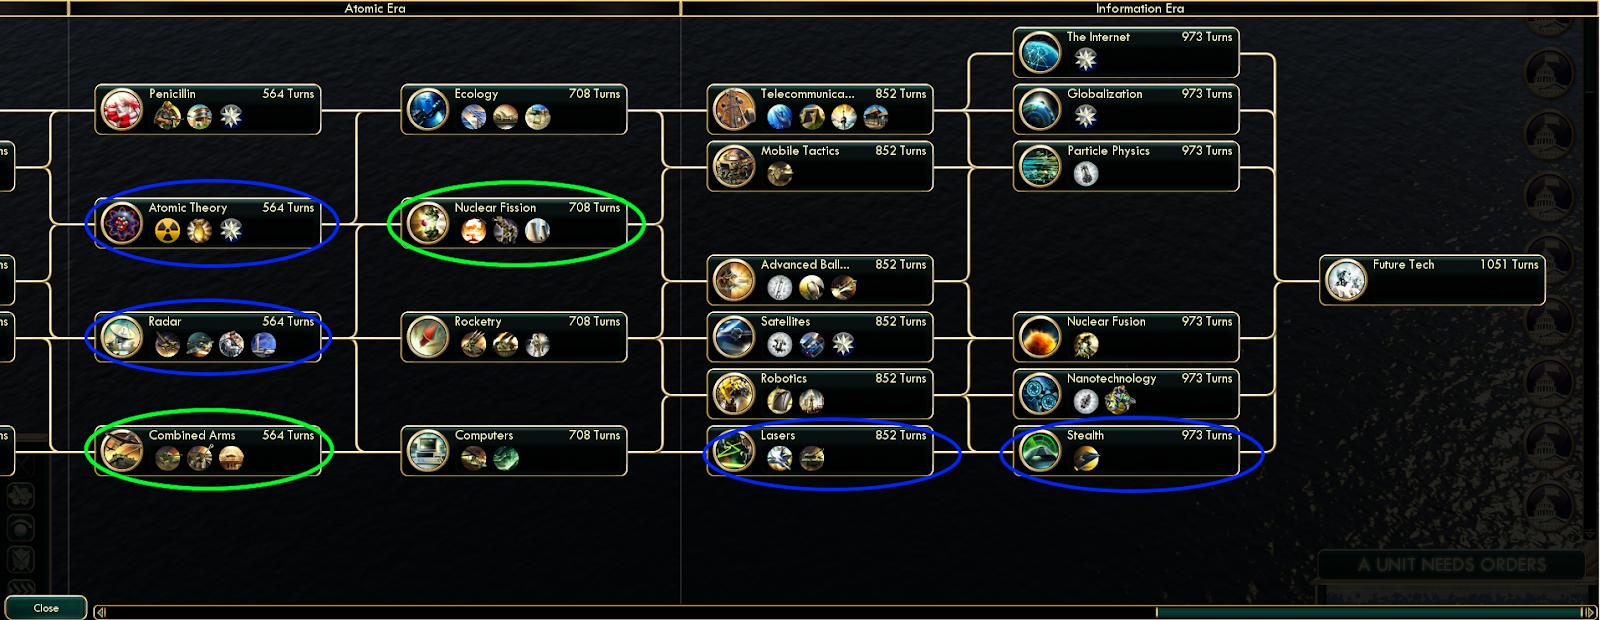 General Most Important Technologies
 (Yellow, green, blue = more, very, most important)
Social policy meta
Completely filling out one of tradition or liberty followed by all of rationalism is generally considered the “correct” strategy. The “4 city tradition meta” is firmly established and it has like Civ 5 (as demonstrated by you and I still playing a game released in 2010) has stood the test of time. A “wide” (meaning more cities that are less developed) liberty game is a legitimate strategy, but is difficult and situational, and so will not be covered in this guide. For such a guide, see this[forums.civfanatics.com] forum thread.
Ideologies
"I already am eating from the trash can all the time. The name of this trash can is ideology”
- Slavoj Zizek, The Perverts Guide to Ideology
This part will be somewhat brief. In general, autocracy is considered the strongest ideology, followed by order, and freedom a more distant third. Autocracy is best-suited to all victory types but science, order is best-suited to all victory types except diplomatic, and freedom is best-suited to all victory types but domination. Autocracy is also by far and away the best for cultural victories due to the futurism tenet.
Note that ideologies can provide a happiness penalty if they have a low “public opinion” in your empire, which is based on your culture versus the tourism exerted by other ideologies. If players with different ideologies become culturally influential over you, you can sometimes suffer crippling happiness penalties, and so this is a consideration for selecting your ideology too.
Founding a Religion
"He's not the Messiah. He's a very naughty boy!"- Monty Python’s Life of Brian (1979)
Although religion is not a win condition in Civ 5, it’s still very important for supplementing your playstyle, and so building a shrine in your capital earlier is generally important. This will give you plus one faith per turn, which will be enough for a pantheon. When you found a pantheon, as you’ll likely only be producing one faith per turn from the shrine, you should take something that’s going to provide you with more faith. Desert folklore is considered particularly powerful if you have a lot of valuable desert tiles. Likewise, Sacred Path and God of the Open Sky are two very powerful non-faith pantheons. Now that you have some more faith you need to wait again until you get enough faith to summon a great prophet. If you don’t have a strong faith pantheon, you’ll certainly need more faith and should consider more religious buildings. Make sure to go to additional information -> religious information, and change the “remind me later” dropdown box to “wait for great prophet” so that one will automatically be purchased when you have enough faith (see section Finding In-game Information).
When founding a religion there are a few things to keep in mind. The first is the founder belief, which is a perk that only you receive from founding a religion. The second is the follower belief. These are perks that all followers (including your opponents!) receive upon adopting that religion. The follower belief also allows you to build religious buildings such as cathedrals, mosques, and synagogues. Each of these buildings provides a unique faith, culture, and happiness bonus, and are considered very strong religious tenets. Tithe, religious community, church property, and the religious buildings are usually considered the best religious tenets. The buildings especially can really get you ahead. Buying religious buildings allows you to gain more culture and happiness which keeps your empire stable and brings you closer to adopting new social policies. Advancing down these policy trees is important when it comes to winning the game through any means.
When your religion is just starting out, you’ll still want to focus on faith generation. However, since there is no religious victory, you’ll want to begin diversifying and using religion to generate other resources. This is because another thing that religion allows you to do is purchase Great People for faith. Once you’ve completed a social policy tree, you can use faith to purchase Great People related to that tree. Completing Honor allows you to purchase great generals, while completing Rationalism allows you to purchase great scientists.
Understanding Common Early Game Scenarios
During the early game, there are a few very common scenarios that players ought to keep in mind:
Sneak Attacks
A militaristic or boxed-in player will commonly attack early game seeking to gain a decisive advantage. As early game war tends to be very costly, it’s best not to employ this strategy yourself unless you have a decisive military advantage, or have no other choice. These attacks happen usually from desperation, or as the result of a “timed push,” where a player will rush a certain military technology and use having this tech earlier as the linchpin of the attack. See section The Eras of War for the most important units in each era, which are likely to be the basis of timed pushes. Three civilizations in particular stand out as most likely to perform a successful sneak attack early game:
The Huns - They are the single most threatening civilization early game. Both of their unique units of battering rams (replacing spearmen) as well as horse archers (replacing chariot archers) are extremely strong. A single battering ram can sometimes take a city on its own. While horse archers are simply stronger chariot archers that don’t use horse resources, battering rams have multiple weaknesses. First, they can only attack cities, and so can be countered by blocking them with any military unit. Second, they replace spearmen, so the Huns typically have few good blocker units until pikemen are unlocked. The Huns are most dangerous from turn 1 until the late classical era.
The Zulus - Their impi unit (replacing pikemen) are strong to the point of being overpowered. Whereas the Huns are situationally extremely lethal, but have definite weaknesses, the Zulus are consistently dangerous militarily from the late classical to early renaissance era. As the impi retain the anti-mounted unit bonus of spear units, they can be better countered by focusing on melee and ranged units instead of mounted units.
Arabia - Their camel archer (replaces knight) is generally considered overpowered. It is a ranged unit with a huge amount of HP, making it function well as frontline units, being comparable to a gatling gun with a two tile range. They pose a great threat through the medieval and renaissance era. Unlike horse-mounted units, spear units do not have a bonus against them. Due to their high health and ranged attack, counter them with strong melee units.
Boxing in Opponents
This situation is where a combination of natural terrain and other players’ borders traps a player in a small area of the map. If you are trapped by this, it might be tempting to try to take a city blocking you as soon as possible. However, this is not only risky, but a very obvious play that most players will prepare for. A better play would be to develop as well as you can, and build up an attack force later in the game, typically by aiming for a strong timed push.
While a completely boxed-in opponent is rare, the concept of “forward settling” can be used to effectively claim large tracts of land with a single settler. This is where instead of simply settling the next best city spot, one settles a slightly less desirable “blocker city” closer to an opponent to deny the preferred lands. This then allows you to backfill the more desirable areas with settlers later on. See the illustration below:
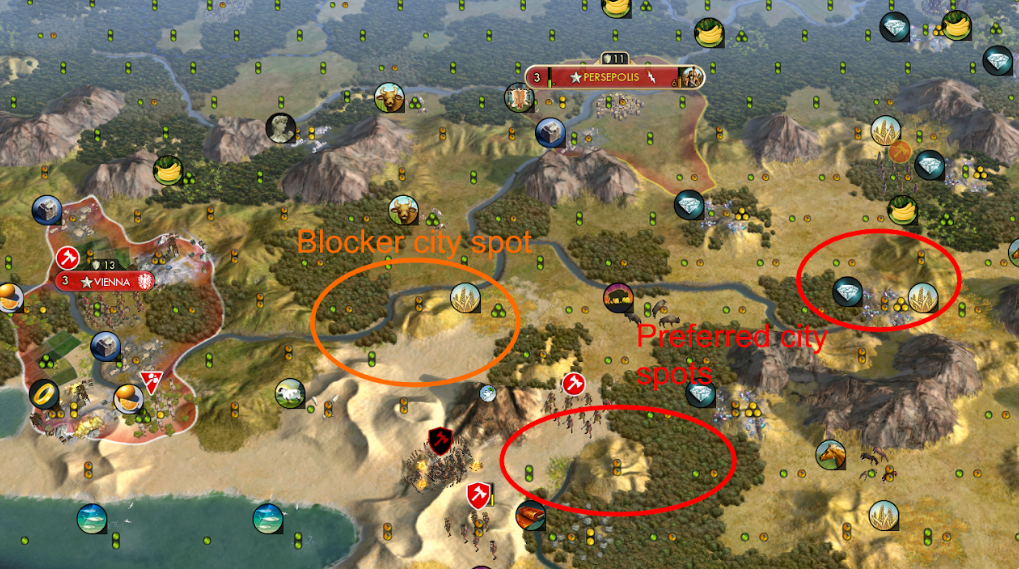 Blocker cities
In this example, if Persia settled one of the preferred spots first, Austria could easily contest some of the area in the middle of the image. However, if Persia instead settles in the blocker spot first, both of those preferred city spots would be all but uncontested by Austria. While forward settling is a key strategy, it’s important to make your forward cities defensible from very early on. Some degree of forward settling is essentially common practice, but aggressive forward settling or boxing in will be seen as threatening by human players.
Both boxing in or avoiding boxing in someone can be an effective strategy. If you’re afraid a given player will overtake you and you’re in a position to do so, you can purposefully box that player in regardless of whether or not it’s “forward settling” to weaken them long term. Likewise, as it will make the opponent’s position much more desperate, it can also lead to war, and so can be risky to employ as well. Therefore, watch out for being boxed in, and opportunities to box others in, as well as if forward settling is a viable option.
Unit Assassinations
Workers, settlers, and great people are common targets of aggressive players seeking to gain an edge. Unlike the AI, human players will often attack just to kill one of these units and immediately sue for peace. While always vulnerable, these “assassinations” will be more impactful or even game-changing in the early game. Therefore, always keep these units safe from attack, stationing them in areas far away from other players, not to mention barbarians. Likewise, always protecting settlers is even more key in multiplayer.
Although less common, city connections and trade routes may also sometimes be surprise-plundered by other players. Guard any long, lone stretches of road and be mindful of your trade routes, especially during wartime.
Advanced City Micromanagment
To Win at Civ, Learn How to Play “Simcity”
Compared to the AI, real players are far superior at managing their cities. A way to significantly level up your skill is through manually managing citizens.
Manual Citizen Management
The Dilbert Principle:
“The most ineffective workers are systematically moved to the place where they can do the least damage - Management.” - Scott Adams
This is a skill that separates the good from the great Civ player. The way tile improvements work is that only the tiles that the city selects to “work” will actually yield any gold, food, production, etc. (luxury and strategic resources are always yielded no matter what). However, this automatic process is poor at actually choosing the best tiles. To significantly increase your cities’ productivity, you can control this manually. To do this, open the city screen and find the option “citizen management,” in the top right. Below is an explanation of how citizen management works and how to best use it:
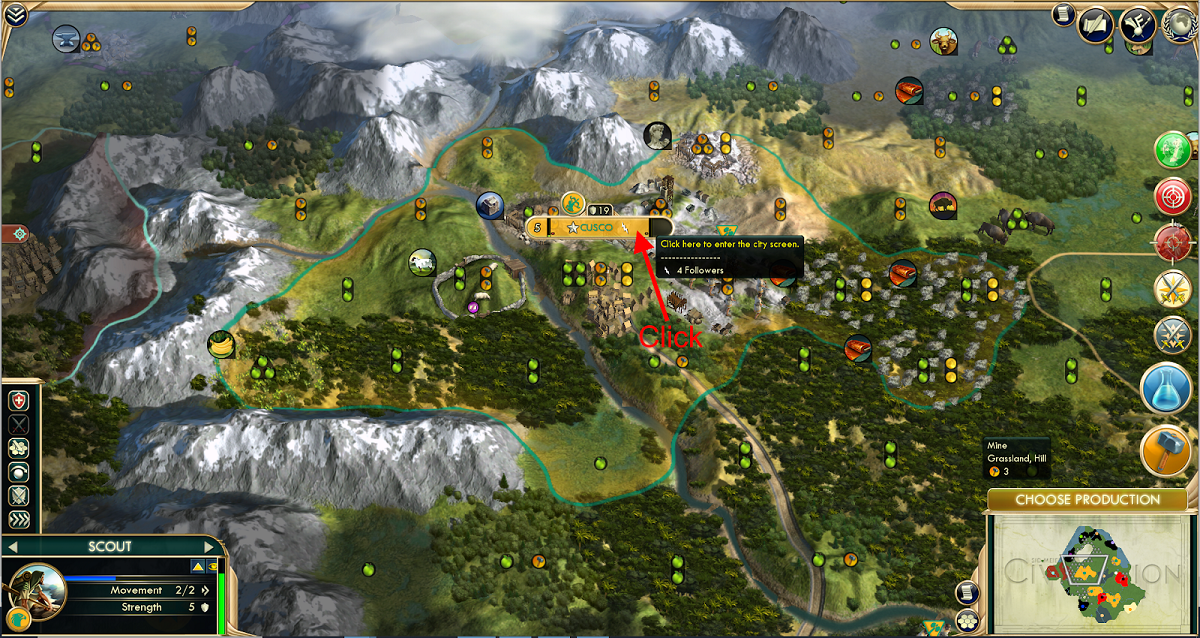
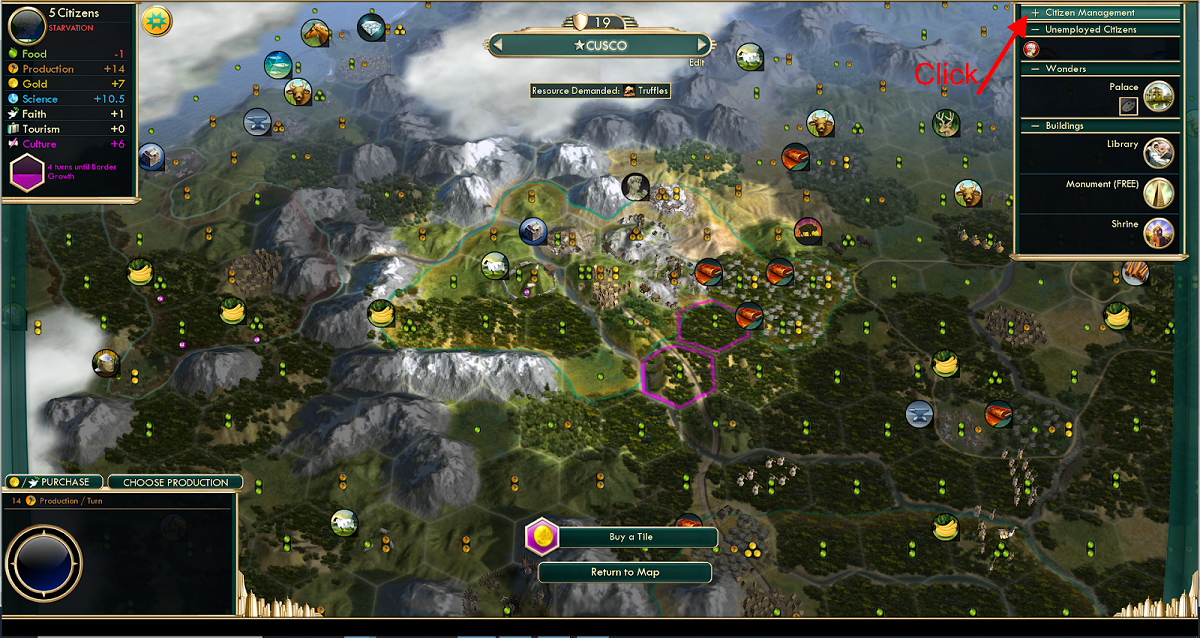
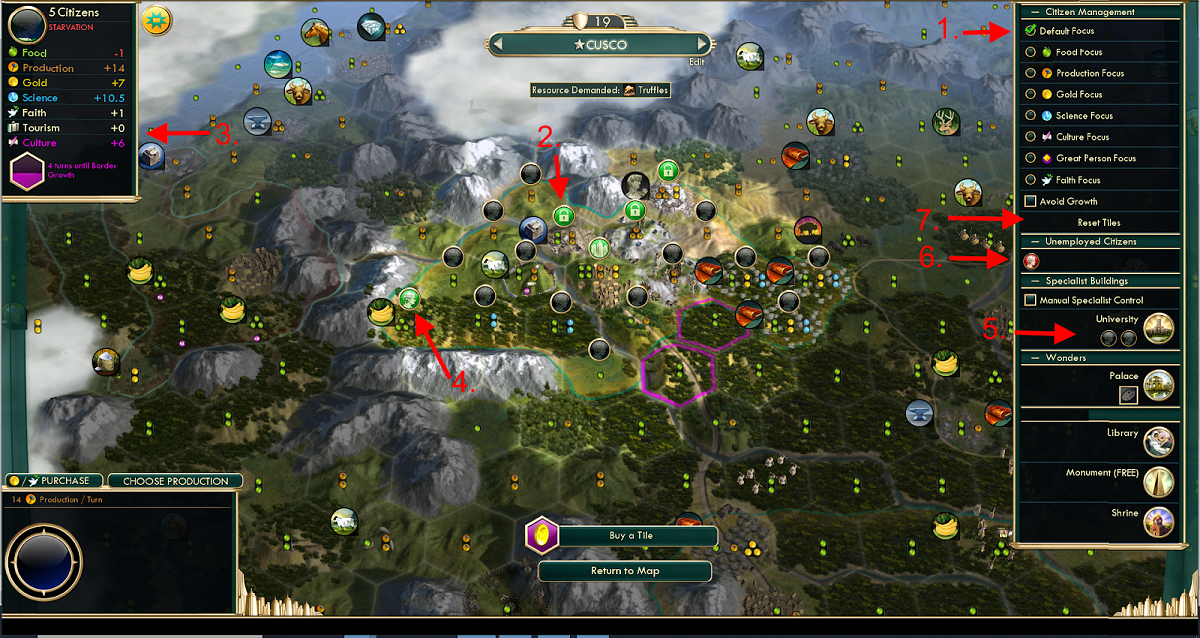 Citizen Management
1. This is the city’s “focus.” The city AI will tend to prioritize working tiles with the selected resource when new citizens are born.
2. This is a tile that has been manually locked by the player (by double-clicking). This tile will always be worked, no matter what the city AI decides.
3. The city resource panel displays how much of each resource the city is producing a turn.
4. This tile is being worked automatically by the city (not locked by the player).
Some buildings have slots for citizens called “specialist slots.” You can assign citizens to also work in these slots instead of tiles, they typically produce more resources, but usually only of one or two types. Hover over them to see what these slots produce, working science-yielding specialist slots is critical, see section Great People for more.
5. These citizens are unemployed, producing nothing, and can be assigned to a tile by clicking on it.
6. “Reset tiles” will unlock every locked tile, and switch the citizens back to what the AI would decide given the “focus” selected above.
As you can see, only the tiles with a green bubble are yielding any resources. Note that the city center has a special green icon, as it will always be worked. Thus, given the inefficiency of the city AI, one must manually assign citizens to work the best tiles. As a general best practice, simply lock the very high food, production, etc. tiles, and leave the city focus on default or production focus.
Resource Prioritization
To win, science is king, and food is the key to science. Science is what allows you to improve your ability to gain every other resource. However, unlike most other resources, science directly scales with the number of citizens you have, and only a smaller amount is gained from tiles or buildings directly. Other resources such as production, gold, culture, faith, and tourism are more so functions of tile and building yields rather than the strict number of citizens. While more citizens will mean more tile improvements can be utilized, the benefit of working one more tile is much more incremental compared to say a science building that yields something like +1 science for every 2 citizens. Therefore, to win, focus on science, and therefore much of that focus means prioritizing food and long-term population growth.
Production is straightforward, it's used to produce things, and after food and science is definitely the next most important resource. Gold is usually the next most important and is a very interesting resource, as it essentially functions as a secondary source of production. Purchasing rather than building things is instant, but generally is far less efficient, as you not only generally produce more production than gold, but gold costs are always higher than production “hammer” costs: Compare a 40 production monument to a 280 gold monument. However, gold is also essential in its own right, as almost anything you build has a maintenance cost. Therefore, still highly prioritize gold, but you can make best use of it by playing to its strengths: Save your gold, and think of purchases as paying a premium to get instant, time-sensitive results, or to avoid the opportunity costs of delaying an existing production. Exceptions to this are gold-granting buildings and units. Both building or purchasing these are good strategies, however, as these will most of the time pay for themselves, buying them with gold can save you some opportunity cost, and is instead like a “leveraged” investment. So unlike in real life, you can beat the market.
If there are no urgent problems like looming unhappiness or war, food, science, and production buildings are generally the highest priority (more often in that order than not). After these, generally prioritize happiness, followed by the other resources. However, it’s worth noting that food can be easily created with tile improvements as well, so with many high-food tiles, the city center can prioritize other things. Below is a general graphic for the relative importance of each resource:

The Relative Importance of Resources
Queuing Production
Another way to utilize city production more efficiently is by using the production queue. This allows you to automatically build multiple things consecutively, instead of assigning a new production each time your previous one finishes. This can be used to great effect in a few ways:
Saving time: If you know you will be building things in a given order, or building multiple of the same unit, it decreases the manual clicking imposed on you. This gives you more time to think, and is easier.
Better sneak attacks: If you begin to build a large army, your “soldiers” score will continue to increase, not to mention you will visibly have more units. However, if you build units, but use the queue to build a new unit ahead of that one once it’s one turn from being completed, you can then finish all of the units in the last few turns. Keep in mind the production progress will begin to decay after 10 turns of being in the queue for units, and after 50 turns for buildings. This makes it easier to hide your army buildup, and it will save you a small amount in gold maintenance.
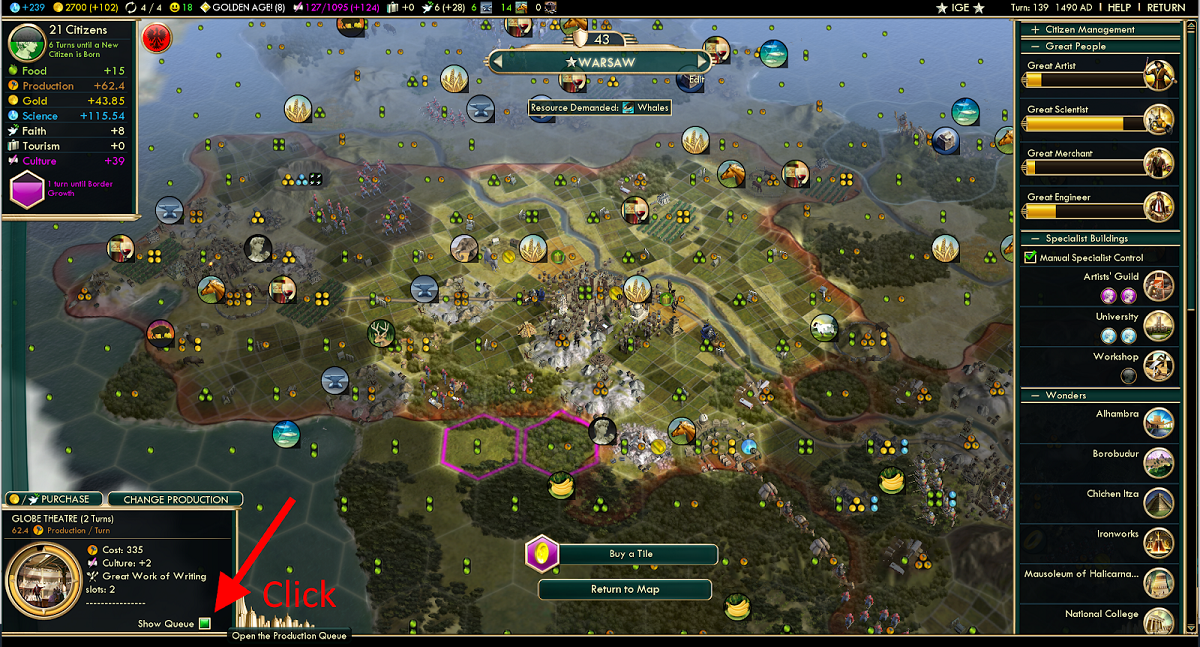
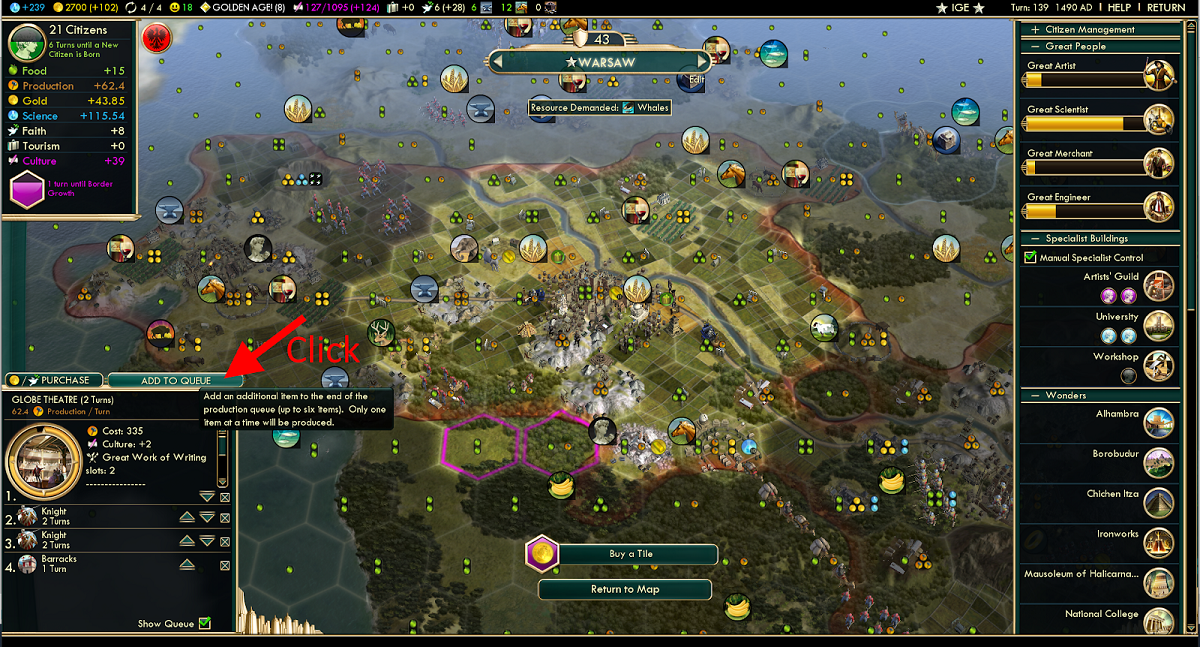 How to Use the Production Queue
Wonders, Tile Improvements, and Roads
World Wonders
“Don’t be such a… [wonder] hog.”
- Michael Bluth, Arrested Development
Wonders are obviously a high priority as well, and many can be game changing. Rushing a wonder’s technology and switching the production queue to immediately produce it is a common situational strategy. While it can be tempting to hog wonders, trying to do this at most points in the game will likely stunt your food, science, or production. Wonder hogging is best reserved for if you have an appreciable technological advantage. As they are usually hotly contested, picking specific, critical wonders to beeline for and immediately produce is a good approach. With the exception of the Great Well, You can also spot wonders as 3D models on the game map as they’re being built in an incomplete form. Check out this video to learn how to do it for each wonder. Below are some of the most powerful wonders in multiplayer:
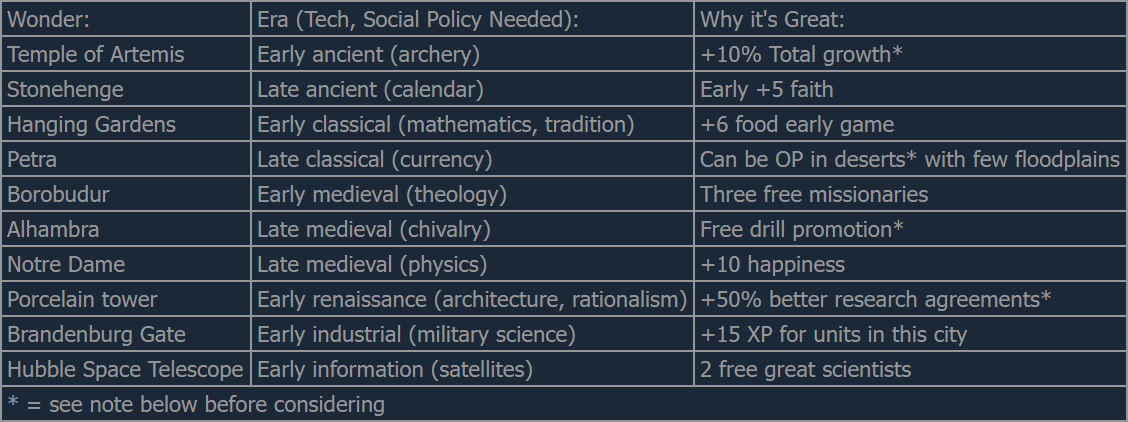 Some of the Most Powerful Wonders in Multiplayer
Some Notes on These:
Temple of Artemis: Unlike other growth bonuses such as the “feed the world” religious tenet, this affects total food rather than excess food, so it’s actually extremely powerful.
Petra: While only useful for certain desert cities, it can sometimes be extremely overpowered, which also makes it often the single most highly contested wonder in the game. Players with a good Petra city location in sight will often beeline straight to currency, even from turn 1.
Alhambra: Other “free” promotions still increase the cost of the next promotion. However, Alhambra does not, making it truly free. This is extremely overpowered when stacked with other military buildings. This is often considered the single best wonder overall.
Porcelain tower: While this is very powerful, experienced players will refuse to do research agreements with you if you get it. Therefore, it’s powerful but not generally recommended.
Great library: While not on the list, this wonder is still very good. However, it can be a “noob trap,” as many players will beeline to it from turn 1 and immediately build it. This is a severe opportunity cost, as it’s built around when one normally builds settlers. Build it only when you can get it really early, it’s remained unbuilt and you can “snag” it later than normal, or have low opportunity costs to delaying your expansion such as having lots of uncontested land.
Tile Improvements
The first rule of choosing better tile improvements is to ignore the “recommended improvement” pop-up. The way this system is programmed significantly overestimates the value of trading posts and lumber mills. This also means automating your workers is strongly not recommended for the same reason.
Fundamentally, a good strategy is to simply try to balance and maximize your tile yields. However, as a certain purple guy once said, one ought to keep tile yields “perfectly balanced: as all things should be.” - William Afton (others may share in this sentiment too). Try to create a good mix of food and production, but err to the side of production. Pasture resources and minerals on hills are generally considered the highest priority to improve, aside from luxury resources, which are of course critical for happiness.
Farms and mines: These are the bread and butter of most cities. While an all-hill city will not have enough food unless you’re playing as the Inca, remember that farms can still be built on hills if need be.
Lumber camps: These are good for low-production cities. While lumber camps of course produce more production than farms, they are not quite as strong as either farms or mines. If you’re not in need of production, a much better early game strategy is to chop the forest on good tiles for farms, which creates a one-time production boost in the city.
Trading posts: These are unique in that they can be built in plain desert or jungle tiles. These are not particularly powerful until your city has universities. Once universities are built, each jungle tile produces +2 science. Therefore, these become extremely strong, but only in this situation. Aside from jungles, they are mainly useful as a filler building when you have free workers, but mainly for low-yield tiles like flat tundra or desert.
Great Person Tile Improvements: A good rule of thumb is to only use your first great scientist, engineer, or merchant to build a building (the first of each one). While these improvements are highly valuable, their value in being built diminishes as the number of future turns go down. Keep in mind that academies and manufacturies can also improve strategic resources, so these are great places to put them. Great people will be discussed more in the next section.
Roads
The use of roads improves many things, such as mobility, earring gold through city connections, and extending the range of caravans. Keep in mind that rivers are still going to slow your units down until you research engineering since that’s when “bridges” for roads are unlocked.
However, roads can also be used offensively during a military campaign as w. Building “war roads” means building directly towards enemy cities to speed up your own army or your reinforcements. However, note that enemies can also see those roads and plan accordingly.
Roads are most valuable when placed on rough terrain and hills, since they remove any movement penalties you may have had and are more defensible in those tiles. It's also better to have any roads deeper in your territory rather than on the border, that way invading armies can't as easily use your roads against you.
Prebuilding Tile Improvements
Prebuilding is an advanced strategy for managing your workers, but has a different meaning when applied to tile improvements or to roads.
First, you can reap the rewards of tile improvements faster by "prebuilding" them. If a tile improvement such as a farm only has one turn left, it won’t actually be built until the end of the turn. Thus, any improved yields won’t actually be calculated until the subsequent turn. However, by clicking the build improvement icon in the worker’s panel, you can effectively build every improvement a turn early.
Likewise, when constructing a road network, if when a road has only one turn left, you move off of it and begin constructing the next road before it’s finished, you can then build one road per turn in a succession all at the end. This can take longer and is very tedious, but can also save in gold maintenance.
Great People
Great people are significantly more important in multiplayer. This is primarily as the AI does not use them efficiently. This means that modifiers to great person generation, as well as great people points (GPP) need special attention. After a great person is generated, the GPP cost to generate the next one of that type doubles. However, great scientists, engineers, and merchants are special, as when any of these three are generated, the cost for the next one of all three of them is increased. Therefore, these three great people can be said to compete with each other.
Great people are generated by buildings that produce GPP and via working their specialist slots (see Advanced City Micromanagement). While all are useful, great scientists are unequivocally the most important. One should work specialist slots that generate great scientist points (universities, public schools, research labs) as early as one can. Likewise, once any GPPs are being produced in a city, great person progress bars will appear in the top right of the city screen, which can be hovered over to see their time remaining. As great scientists, engineers, and merchants “compete” for generation, one should actively check the progress bars in your cities once one is born to ensure the most desired type will generate next, usually great scientists. This means early great engineer or especially merchant points can be detrimental, as you don’t get great scientist points until later. Therefore, keep this in mind when choosing which early wonders to build.
Note that great people can either use their instant ability “bulbing,” or can be used to place a unique tile improvement. The amount gained from bulbing is calculated based on your last ten turns of accumulation of that resource. Below is how to best use each one:
How to Use Great People
Great scientist: These should be your main focus. Work their specialist slots early, use the first one to plant an academy on a strategic resource or a low-yield tile. Subsequent ones should be saved. Wait 10 turns after you’ve built research labs in your cities, and then bulb all of them. This is considered the “meta” strategy, and will maximize science gain in a critical window. Bulbing individual ones situationally for a key technology is also a good strategy.
Great engineers: These are powerful but less so than scientists. Your first one can either build a manufactory, or you can save them to rush production for a critical wonder. Subsequent ones should also be saved for grabbing wonders.
Great merchants: Creating these should be actively avoided unless part of a purposeful strategy. Their abilities are fairly weak, and they’re best used to conduct a trade mission or as a gift to city states, in both cases to gain city state influence.
Great artists, writers, musicians: These should generally be used for their great works, as these provide culture and later tourism. However, if you have a bonus to golden ages from your ability or buildings, saving great artists to chain golden ages together in the late game (similar to how scientists are saved) is extremely powerful. Great artist golden ages are also useful during war due to their production and gold bonuses, but should be used very situationally or during a desperate defense.
Great generals: These are very useful, not only providing a combat bonus, but their citadels are both very defensive, and can be used to steal territory from another city. The tile stealing feature is great, but will be seen as extremely aggressive if against another human’s city.
Great admirals: These are weak and infrequently generated. They provide a buff to neighboring ships, and can perform fleet repair.
Great prophets: These should be used to found a religion, then enhance, then subsequent ones should build holy sites (earlier game), or spread religion (later game or when needed).
Finding In-Game Information
Menumaxxing
In Civ 5, much of the most advanced information is hidden behind more obscure menus. It’s worth perusing all of these menus located in the top right, especially the small scroll called “additional information” to be familiar with where information is located before a game begins.

Be Familiar with These
The “map options” menu contains multiple key settings needed to be a competitive player. Enabling the resource and yield icons is paramount to be competitive. Without them, you are essentially in the dark on how valuable each tile is, which you need for both managing workers and founding cities. Compare how much information is shown with them enabled to before:
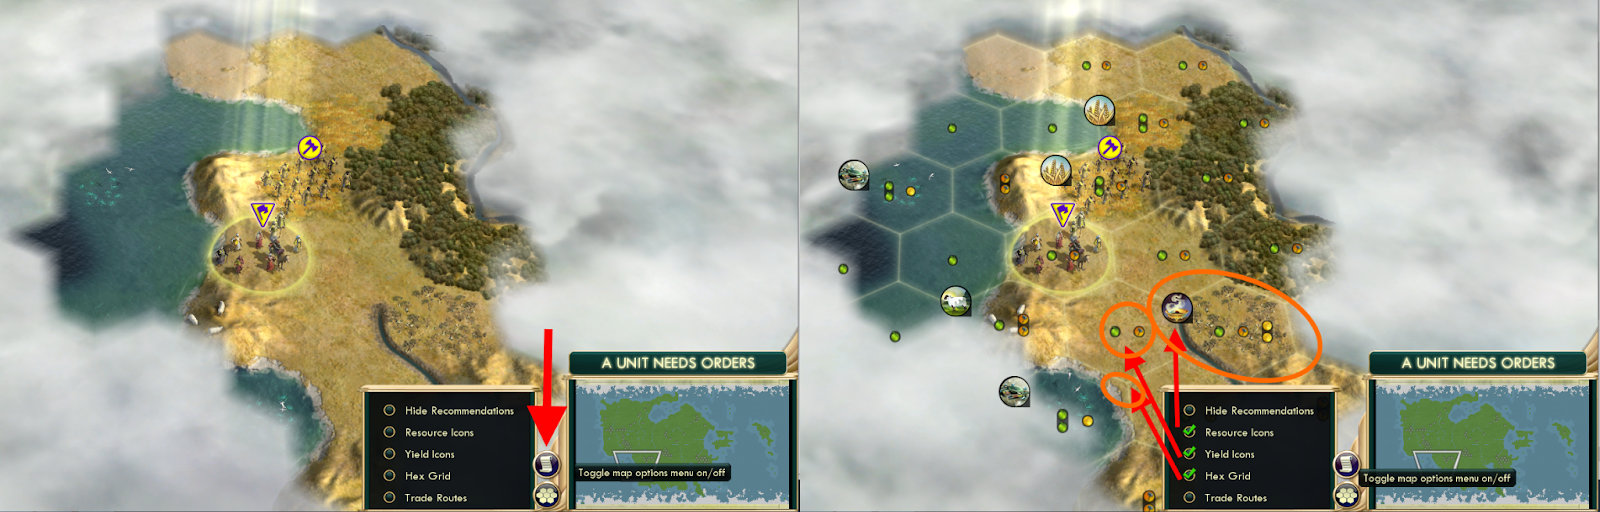 Map Options Menu
While the hex grid is not needed like the other two are, it’s very helpful if you still can’t always tell how tiles connect. As it can be unsightly, the goal should be to get good enough at reading the map so that you can eventually turn it off. The same can be said for the other two options.
Another key menu is the diplomacy menu, which tends to be overlooked in singleplayer. This menu is critical, as it shows the available resources to trade with every civ (your relationships), when deals expire (deal history), and the diplomatic states of each civ (global politics). Deal history is especially important for research agreements (so that enough gold can be ready to renew them once they expire), and friendships (as players sometimes will attack right when friendship declarations end to avoid a diplomatic penalty with the AI)
Another critical menu is the demographics menu, which will display statistics for the best, worst, and average civ as well as for you across various categories:
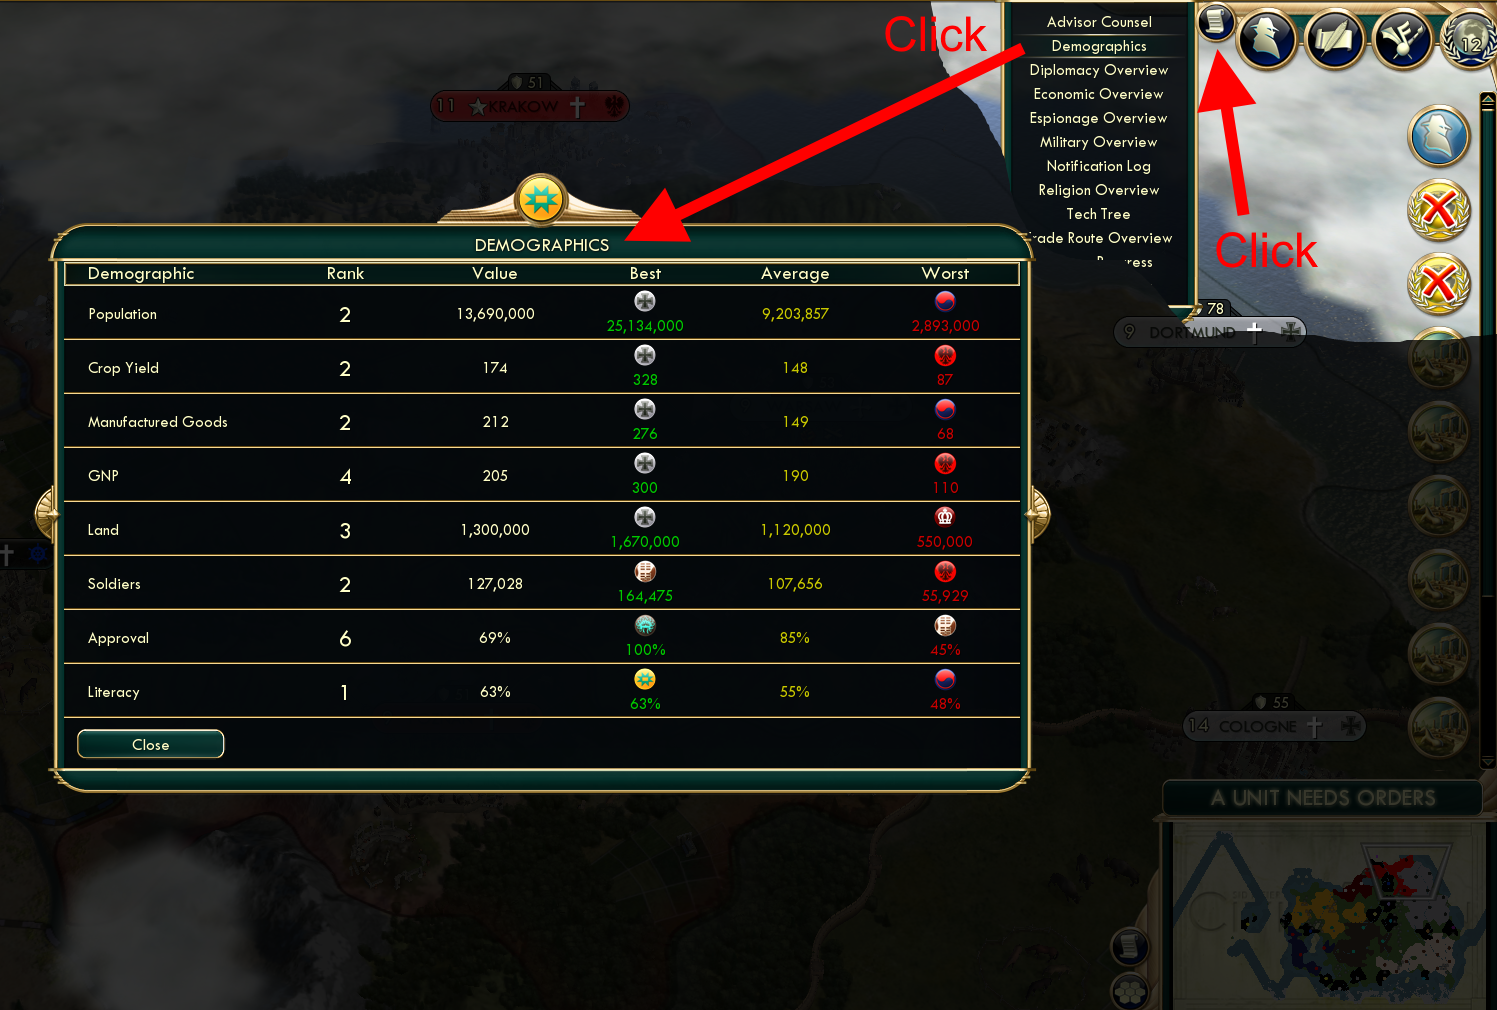 Demographics
While some of the categories may sound arcane, they are all fairly straightforward:
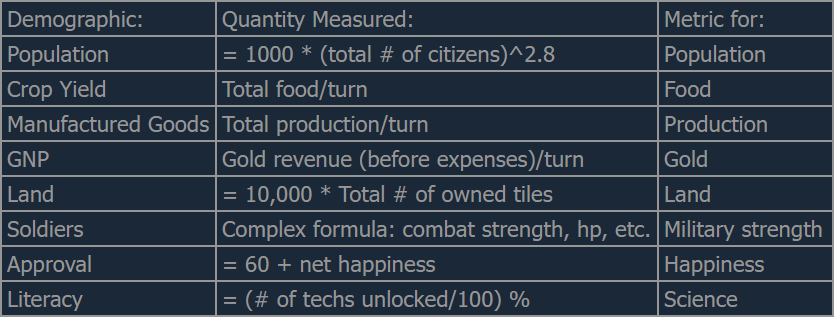 Meanings of Each Demographic
This is invaluable for determining your relative strengths and weaknesses throughout the game. Here are a few tips:
While population is very important, having a higher crop yield will allow you to outpace other civs in long-term population growth.
Regularly check the soldier scores. Large spikes for a specific player usually mean that that player is imminently going to war. Large changes in the averages can show information as well.
While literacy shows the total number of technologies, someone with a lopsided tech tree may have fewer technologies, but actually have more science. In practice, large science gaps tend to appear fairly small in the literacy row for this reason, as people ahead in science often rush certain technologies.
Other Key Menus in “Additional Information:”
Victory progress overview: This tracks the progress of each civ towards each victory type. Checking this later in the game is critical for determining late game strategies, as well as protecting against “surprise” victories.
Trade route overview: This shows a list of current trade routes, and lets you sort available trade routes by the amount of gold yielded. This will let you pick the most profitable trade routes each time instead of guessing.
The Eras of War
“War. War never changes.”
- Fallout: New Vegas
War Introduction
War generally revolves around a frontline of high HP blocker units to absorb damage and capture cities, while more fragile ranged units sit in the rear to bombard enemies. Likewise, fast mounted or armor units are used to hit targets and retreat in powerful hit-and-run-style attacks. The bulk of your damage dealt should come from ranged attacks (and aircraft later on). Fast units are best used to attack any potential flanks or exposed targets. At times, some military units are so strong that they can define entire eras, so it's important to understand which units dominate at each stage of the game.
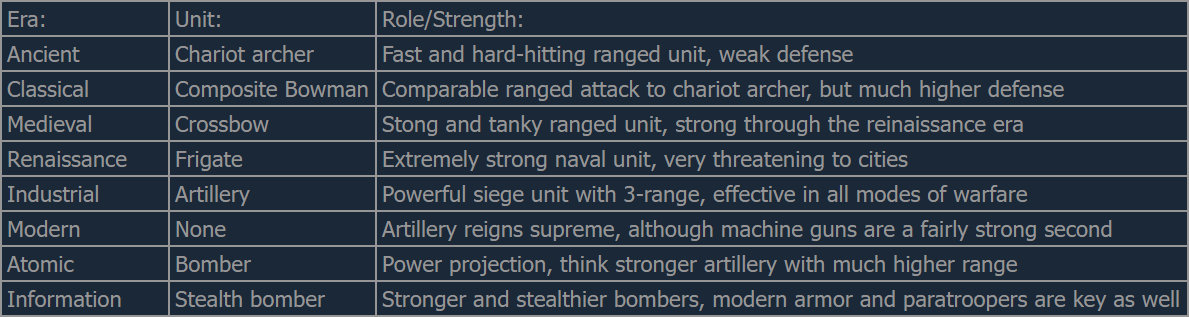
Table: Most Important Units in Each Era
In war, focus fire on enemy units until they have been killed, as even a unit at 1 hp can deal 50% of its original damage. Always try to kill an opponent’s ranged units quickly, as they tend to be your biggest threat. An exception to this rule can be if the opponent is very short on melee units, you can kill all of those to prevent your city from being taken even if it’s at 0 hp. The outcome of wars is also heavily influenced by the surrounding terrain. High ground, forest, jungles, rivers, and citadels all give defensive advantages, making chokepoints and rough terrain be ideal places to hold a line. Keep permanent recon or sentry units watching vulnerable places in key territory so you’re never surprised by sudden enemy movement. Note that keeping a melee mounted unit it reserve as your “city taker” can be a great strategy given their higher mobility.

Terrain Combat and Movement Modifiers
Early Game War
War in the Ancient and Classical eras is fairly high mobility, making speed sometimes more important than just raw power. Chariot archers and composite bowmen are the two standout units of the era. Chariot Archers often create an early meta of ranged mobility, letting players kite or pick up slower units. With most cities being underdeveloped and weaker in these eras, fast units can punish unprepared opponents as well as pick off workers and pillage improvements. Early war tends to revolve around overwhelming mobility and controlling open terrain rather than heavy frontline brawling.
Medieval
Medieval-era war becomes more balanced and tactical as anti-cavalry units grow stronger and begin to check the mobility dominance of earlier mounted units. Pikemen and crossbowmen are the bread and butter of this era, with crossbowmen offering high damage and defense. Armies in the era remain fairly mobile, but positioning becomes more important at this stage of the game. Ranged units can shred unprotected melee units, and mounted units can no longer dive safely into enemy lines. Medieval war often centers around protecting your crossbowmen, using the terrain to your advantage, and leveraging anti-calvary units to control flanks and deny enemy mobility.
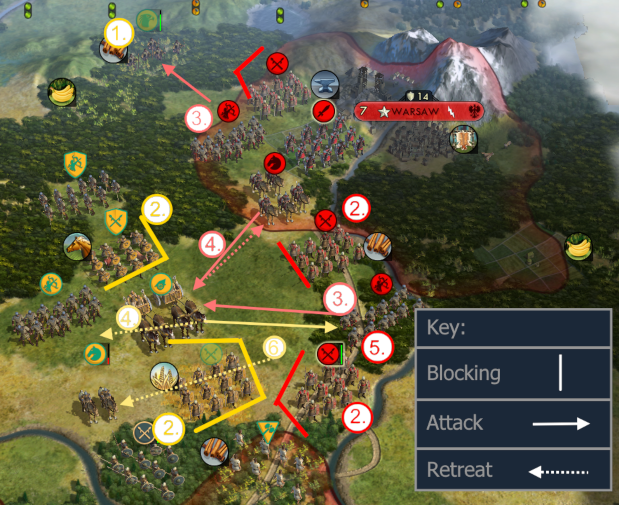
Early Game War
- Reconnaissance with a scout in rough terrain. Reconnaissance is key in all eras.
- Blocker units protect ranged and mounted units in open terrain. Keep at least one melee unit in reserve to take cities.
- Ranged units bombard the enemy, these are the primary damage-dealers.
- Mounted units perform hit-and-run attacks in open terrain.
Roads are used for war and Poland makes sure its city connection is well defended.
“Artillery Era”
The Artillery era completely transforms warfare in Civ 5, shifting the game into a WW1-style battlefield where mobility matters far less in return for raw firepower, positioning, and attrition. Artillery outranges everything on the ground and can safely bombard cities or units from behind the front lines given their 3 range attack. Great War Infantry and Gatling guns form thick defensive walls that slowly grind against each other with melee units seldom making attacks themselves. Great War Bombers are threatening yet not very powerful, and air combat is still underdeveloped at this stage. The Artillery Era is defined by static lines, long-range bombardment, and slow pushes rather than fast cavalry flanks or skirmishing.
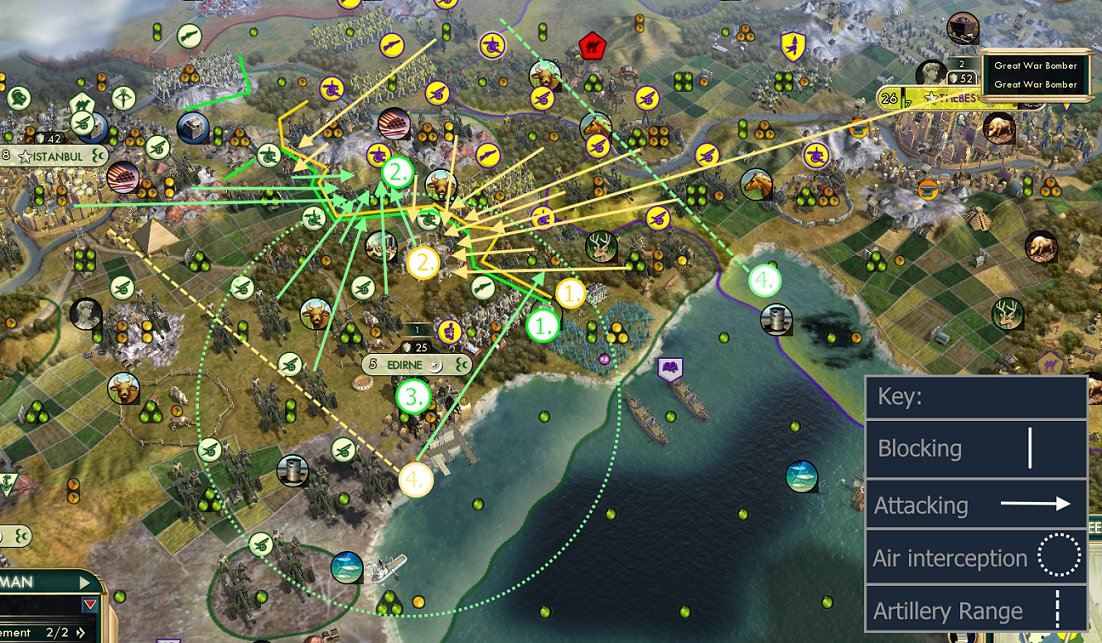
“Artillery Era” War
- Large, static frontlines of infantry and Gatling guns prevent quick movement or flanking attacks.
- Fire is focused on individual targets by artillery.
- Triplanes defend units and cities from great war bombers, which are fairly weak.
- Far-reaching artillery can hit nearly everything, bombard a city outside of its range, and further prevent flanking attacks.
Modern Era
The modern and especially atomic Era brings Warfare back into a highly mobile, breakthrough-focused style as tanks and modern armor start to take over the battlefield, functioning like fast and strong cavalry that can punch through front lines and exploit gaps. Because these armored units are so powerful and mobile, traditional artillery becomes effective by the end of the modern era, often too slow and fragile to survive tank pushes. At the same time, air dominance becomes a central pillar of warfare. Bombers are incredibly powerful and can devastate units and cities rapidly, often determining the outcome of the war. Making anti-aircraft weaponry essential for both protecting your grounded armored units and maintaining air superiority. As the era progresses, bombers become increasingly more important, while tanks serve as the fast finishers and city-killers that can capitalize on the destruction created from the sky.
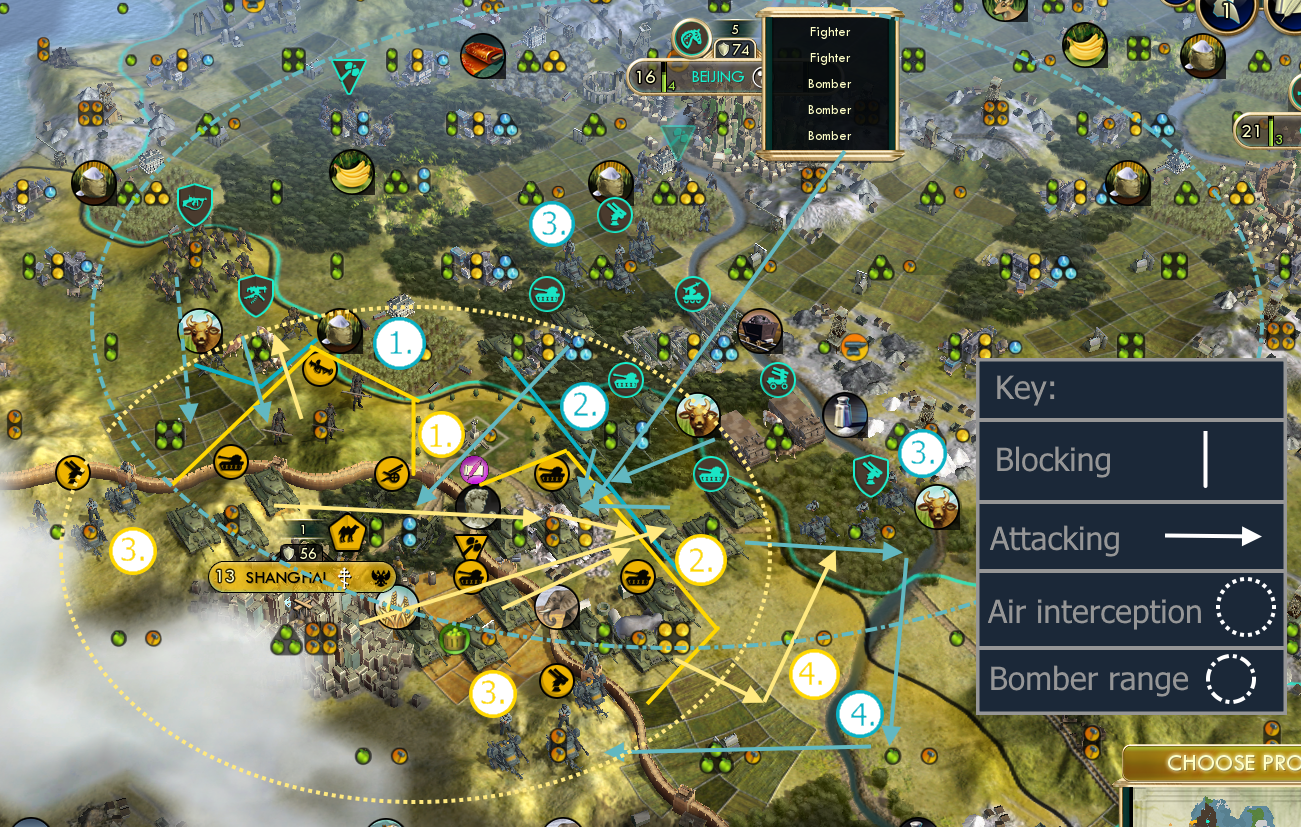
Atomic Era War
- Mobile, armor-heavy frontlines dominate, with fewer ranged units present.
- Focused attacks done mainly by armor and bombers.
- Anti-aircraft guns and fighters defend friendly units.
- Large armored flanking maneuvers take out antiaircraft guns and ranged units.
Late Game
Late-game war becomes more destructive and based around advanced airpower and weapons of mass destruction. Nukes are complete game-changers, capable of destroying armies, erasing city defenses, and immediately reshaping the frontlines, often forcing the enemy into a panic or even peace if they choose not to take any further damage. Stealth bombers become the single most important conventional unit in the game, enabling you to strike anywhere within a vast range, and ignoring interception more effectively. Rocket Artillery and mobile
SAMs help counter modern armor by hitting from extreme range or denying airspace, making tank armies less effective than in the atomic era. The late game becomes a contest of air superiority, nuclear deterrence, and long-range firepower, where mobility still matters but is slightly less important.
Apart from what was already mentioned for the late game, there are other metas that you could also take advantage of or come across. XCOM squads are incredibly powerful very late game units used to perform a sudden, long-range paradrop attack. XCOM squads can paradrop up to 40 tiles away, letting you instantly place infantry nearly anywhere you have vision. Because of its massive range and strong combat stats, it easily becomes one of the most effective late-game tools for surprise attacks. Navies likewise mostly consist of missile cruisers and nuclear submarines.
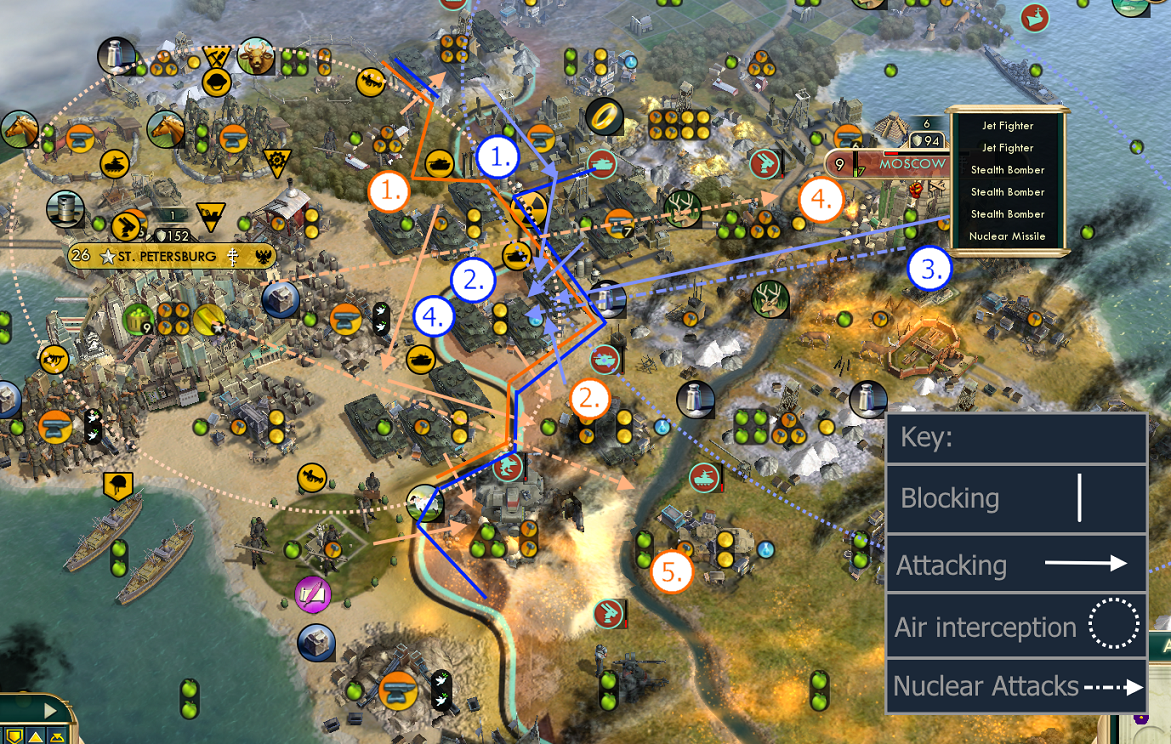
Late Game War
- Highly mechanized yet more cohesive and static frontlines.
Concentrated armor and mechanized attacks. - Heavy reliance on stealth bomber attacks for damage-dealing.
- Nuking cities is used to destroy population and production, potentially denying victories.
- Tactical nukes are deployed against against large concentrations of forces.
Economic Warfare, Zones of Control, and Promotions
Economic Warfare
“An army marches on its stomach.” - Napoleon Bonaparte. Warfare is not all about pointy sticks and shiny guns. One can break city connections to great effect, shutting down gold income and isolating the enemy’s cities, while pillaging improvements both heals your units and starves cities by damaging their tiles. Likewise, tiles occupied by enemy units cannot be worked. One can even further disrupt the enemy’s economy by plundering caravans and trade ships, denying them key resources. Tactics that slowly but surely weaken your opponents without committing to full city sieges can often force them into defensive positions or peace deals just by heavily damaging their economy and infrastructure.
Zone of Control
Zone of Control (ZoC) is a mechanic where any military unit prevents enemy units from freely moving through the hexes surrounding it. If a unit starts in a tile adjacent to an enemy unit, all remaining movements will be used up for that turn if the unit then attempts to move to another tile adjacent to an enemy unit. Likewise, ZoC can be ignored by first moving backwards onto a tile with no enemy unit adjacent to it. This mechanic makes defending troops slow the enemy’s advance, allowing a stronger defense. ZoC applies to all adjacent tiles around the unit, except in cases where the unit has a special ability such as the lightning Warfare tenet of autocracy, which removes any enemy ZoC for your own armored units, allowing them to slip between enemy lines and ignoring blocking formations. This is extremely powerful, allowing deeper flanking attacks and city-sniping maneuvers that would normally not be possible.
The Promotions Meta
The promotions that cause units to passively heal every turn are by far the strongest, those being march for land units, supply for naval units, and air repairs for aircraft. Other very good promotions would include logistics/blitz, both of which grant two attacks per turn, and range, allowing 1 additional attack range for ranged units. To unlock high-end promotions, a unit needs to climb the promotion line, meaning it must take three of the same kind of the early promotions, such as drill I -> drill II -> drill III before becoming strong enough to access the better promotions. Because unit promotions require more XP as they level up, using an instant heal in the place of a promotion is only a good idea if the unit will otherwise die since it will set back the progress to further promotions.
Further Notes on Promotions
Barbarians are very valuable in the early game for leveling up units, and rather than clearing an encampment, high level players will often post up next to one with military units to “farm” barbarians. However, barbarians will only get most units to around the third promotion level, as after a certain point fighting them yields no further xp. Also, note that supply (the naval equivalent of march) is especially important as ships cannot heal outside of friendly territory.
When picking between accuracy and drill (bonuses against units in open and rough terrain respectively), most players pick drill for most units, as it applies based on the tile of the enemy unit, and rough terrain is generally preferable for its defensive bonuses. However, mobile units that fight in open terrain may be exceptions to this, as well as other situations where most of the fighting will happen in open terrain.
Late Game Strategy
Understanding Common Endgame Scenarios
Unlike earlier in the game, late game multiplayer is less about specific tactics and more about general strategy. By this time, it should be clear who the winners and losers are likely to be. However, that doesn’t mean you can’t work to turn the tables.
Thucydides Traps and Runaway Players
“It’s a trap!”
- Thucydides (probably)
A Thucydides trap is a scenario in diplomacy where there’s a more powerful hegemonic nation and a less powerful ascendant nation. The trap comes in where the more powerful nation will want to attack while they still have the advantage in order to crush the rising nation. Likewise, a “double Thucydides trap” can occur if the rising nation also feels that they have a long term disadvantage, but a short term advantage such as greater military strength, causing the lesser nation to want to make an attack as well. These scenarios will likewise often occur in Civ games. By nature of the scenario, this usually only happens to the top two players in a game.
Typical Thucydides traps occur due to an effort to stop a runaway player or specifically to deny a player an eminent victory. The latter case will often look like attacking spaceship parts to stop a spaceship from being assembled (preventing a science victory), or invading city states allied to the civ with the most delegates (preventing a diplomatic victory). However, to prevent a cultural, military, or time victory, a civ’s cities themselves will have to be attacked or destroyed, rather than attacking specific other targets. With that being said, as one would imagine, attacking or destroying cities generally works well to stave off all types of victories.
Runaway Players
Runaway or “snowballing” civs, who are significantly outperforming all other civs, can occur in most of the game, but their urgency is exponentially heightened during the late game, when victories can occur. Throughout the early and mid game, the demographics screen is key to monitoring for runaway players, as well as the “score” panel, albeit this is a much more indirect indicator. Watch out especially for significantly higher literacy and production values.
Runaway players are significantly easier to attack once artillery or modern armor is developed, as suddenly building a large, maneuverable army is much more difficult than before then. However, this is also the time when their advantages will be maximized for the same reasons. The key to dealing with runaway players is not in military, but in diplomacy skills. One must identify the runaway player as early as possible, persuade other players of the danger, and form coalitions. A preemptive strike can be planned far in advance, although keep in mind a timed push will be harder against a superior opponent.
If you yourself are the runaway player, this is a blessing and a curse. As a coalition will likely form against you in the late game, you need to preempt this. The best way to do this is to identify a key kingmaker, a player whose allegiance to either side of this conflict will be decisive, and try to form an alliance. This is usually the second or third most powerful player. A common mistake is to try and maintain uniformly good relations with every player even when it’s obvious you will eventually be attacked. This is a mistake as your overtures won’t really change any facts on the ground for all of the players past second or third place, as they have no chance of winning with or without cooperating with you. However, a second place player may find the idea of a “guaranteed second place,” typically by partnering with you to bully the other civilizations, appealing.
World Wars I, II, III+
"I don't know what weapons World War III will be fought with, but World War IV will be fought with sticks and stones"
- Albert Einstein
Starting from the advent of artillery, the likelihood of war greatly increases due to the power and effectiveness of late game military technology. During the “artillery era,” human players will likely rush to “capital snipe” any remaining AI players by taking their capitals and suing for peace. This is effective and generally easy, as humans can greatly outpace AI with science. This is something to keep in mind, as any appealing AI cities will likely be captured by humans by the atomic era.
Wars between players will also become more common, both for the reasons mentioned above, and due to the increased importance of strategic resources, particularly of oil, aluminum, and uranium. For whatever reason, the generation of aluminum seems to be particularly random and sometimes sparse, as is the case in a “classic low-aluminum game.”
Like in real life, nuclear weapons are a decisive factor in late-game wars. They’re best used against major cities to “bomb them back to the stone age” (as Curtis Lemay would likely describe this Civ 5 strategy), but also can be used tactically against critical concentrations of units. Just one or two nuclear weapons against cities can easily deny a player the culture, science, or production to win. The leading player may also be subject to a random nuclear attack from a desperate opponent with little chance to win, even if this will lead to the utter defeat of that player. These kinds of attacks stem from the geopolitical principle known as “vindictiveness.”
Negotiated Ending
When a game has gone on for too long, or neither “side” wants to fight a grueling end-game war, sometimes players will call it quits or declare a tie. If a game appears to be stalemating, a decisive measure like a surprise nuclear or trade route attack can be used to prevent or ensure this possibility by causing a massive economic loss to the opponent. This kind of game ending is most typical when players are in a protracted, costly war, or likewise when the leading players are too far away to attack each other.
Surprise Victories
Less experienced players can oftentimes be caught off guard by a sudden non-military victory. This is most often the case with a diplomatic victory, as having many city state allies is a less visible statistic than cultural or scientific advancement. To track and prevent each victory, see section Winning and the End Game.
World Congress Shenanigans
There are a few strategies exclusive to multiplayer with regards to the world congress. Whereas in singleplayer, the world’s fair, international games, and international space station resolutions are seen as uniformly beneficial, this is not the same in multiplayer. These measures all disproportionately benefit the first place winner, often the player already in the production lead. Therefore, view them with some suspicion. Likewise, players will oftentimes switch all of their production into these for their entire duration, which can be a good strategy to guarantee a high placement.
Several resolutions also can be used to directly target certain players, and may be seen as highly aggressive depending on the situation:
Nuclear non-proliferation: Gives a permanent military advantage to the current nuclear states
Standing army tax: Penalizes militaristic players
Banning luxuries: Mostly used to target the happiness of a dangerous player
Arts funding: Aids a future culture victory, delays a future science victory
Sciences funding: Aids a future science victory, delays a future culture victory
Winning and the End Game
Seizing Victory from the Jaws of Defeat
"At the end of the war if there are two Americans and one Russian left alive, we win!"
Thomas S. Power
Playing Civilization 5 is not just about having fun, it’s also a competitive experience. As such, understanding and tracking victory LINK as has already been discussed above is very important. While this section is essentially a single table, it’s hard to understate the value of having a clear path to victory in mind.
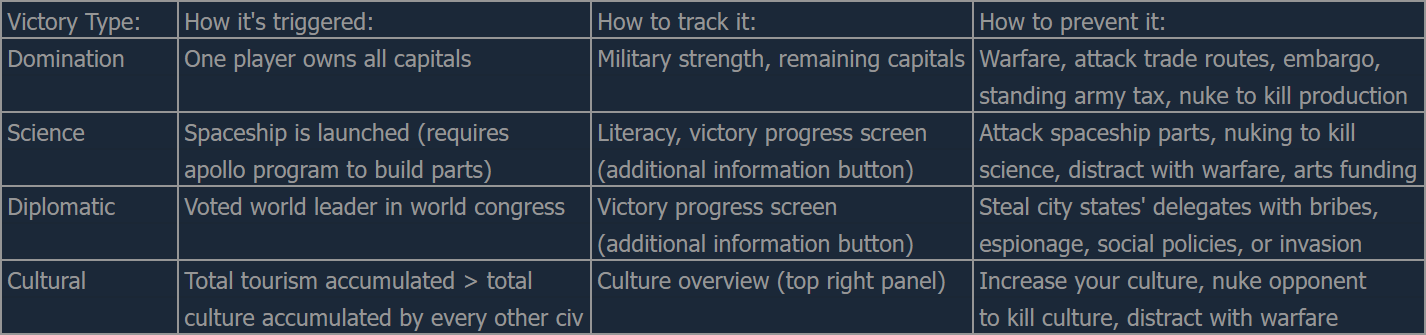
Tracking and Preventing Victories
As with many problems in Civ 5, nuking the opponent’s capital is an effective solution. However, this will not prevent a diplomatic victory, or stop a domination victory by itself. However, this is relatively effective for preventing science, culture, and time victories.
OPTIONAL Setting Up a Multiplayer Game
This optional section shows how to set up a multiplayer player game for the best experience. For the multiplayer community, there are a few key settings that are commonly employed to improve the experience. All settings are changed on the host setup screen, and the most critical ones are detailed below:
The Turn Setting: Critical
First and most importantly, the turns setting is almost always changed to “hybrid” or “simultaneous.” The “normal” setting will make each human player play one at a time, causing the majority of the game to consist of waiting after hitting end turn, when no actions can be performed. This should never be selected and will waste literal hours of time waiting for each player. Next is the simultaneous setting, which makes for the quickest gameplay and can be the most fun. This makes it so each player plays at the same time instead of taking individual turns. This massively speeds up gameplay, however, it also means that warfare becomes somewhat real-time as opposed to entirely turn-based. If players are at war with this setting, with each new turn, it will turn into a mad dash spamming left and right click to move units. This is very exciting, but creates a greater gulf in skill levels while fighting, and requires a good internet connection.
Last is hybrid, which is the most balanced and fair setting for players, at the expense of speed. This makes the gameplay simultaneous, but it reverts to being turn-based for players at war. This removes the fast, high-skill “real-time” warfare, which creates a more level playing field. However, as players need to wait for their turns during warfare, it can feel annoying and slow. Overall, opt for hybrid if newer to multiplayer, and opt for simultaneous only with experienced players and for a more real-time warfare dynamic.
Combat and Movement Settings: Critical
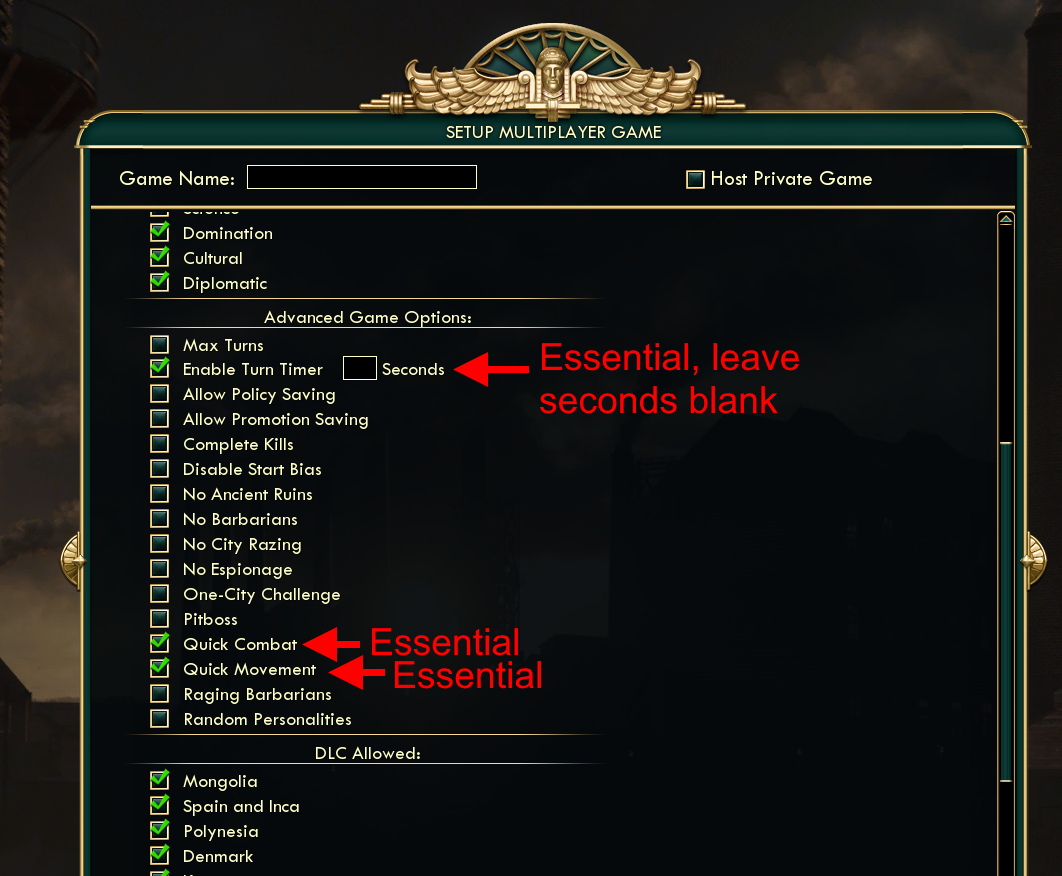
In multiplayer, quick combat and quick movement are essentially always selected, which eliminates those respective animations. If those settings are not selected, several times more animations will play, which will cause large amounts of waiting for each player. It’s highly recommended to enable both of these. Furthermore, quick game speed is standard, as Civ 5 games already take a very long time, although sometimes normal speed is used. Finally, enabling a turn timer is highly recommended too, as there’s no way to force a player taking too long to end a turn aside from kicking the player from the game. However, leave the “seconds” box blank, as it will dynamically select an appropriate amount of time based on the game state, and the dynamic timer is generally very fair.
Map and Resource Settings: Important
Map settings are just as important in multiplayer mode as with singleplayer. However, the pangaea map type is usually considered much better suited to multiplayer. This is because smaller landmasses (continents if there are fewer players, archipelago, etc.) introduce more luck, as you may have your own landmass, or get stuck between several other players in the middle of a continent. Therefore, pangaea minimizes this random luck. Furthermore, it’s often seen as more fun because it’s easier to have contact with your friends’ empires for much of the game, as ocean travel is not unlocked until the renaissance era. Pangaea plus and continents plus are also good options. Additionally, under the strategic resources settings, “strategic balance” is relatively frequently used. This setting guarantees a copy of each strategic resource where your first settler spawns. This also makes the game more fair, although it can be less fun as there will be less resource conflicts. While neither the map type or strategic resource settings are make-or-break, they are important to consider.
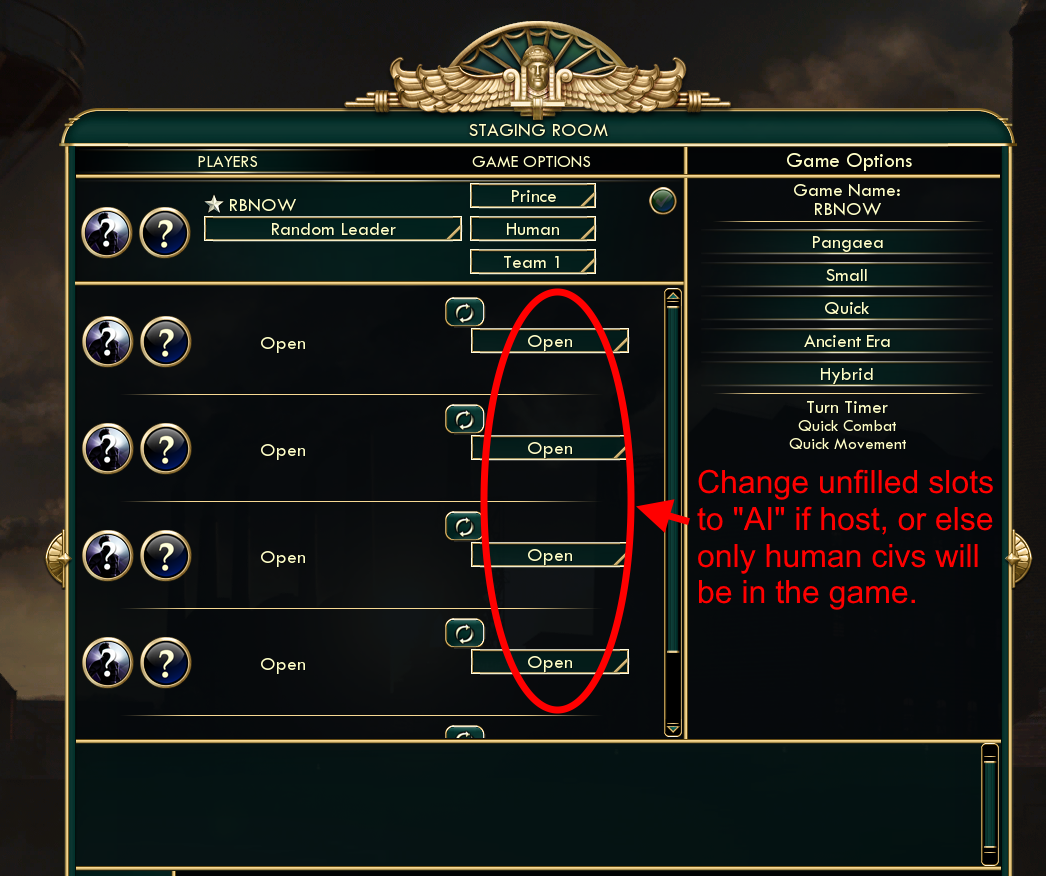
Last, on the actual hosting screen, make sure that empty player slots are given AI opponents (unless you want no AI civilizations). As the default option is not “AI,” only the human players will be on the map if this isn’t changed.
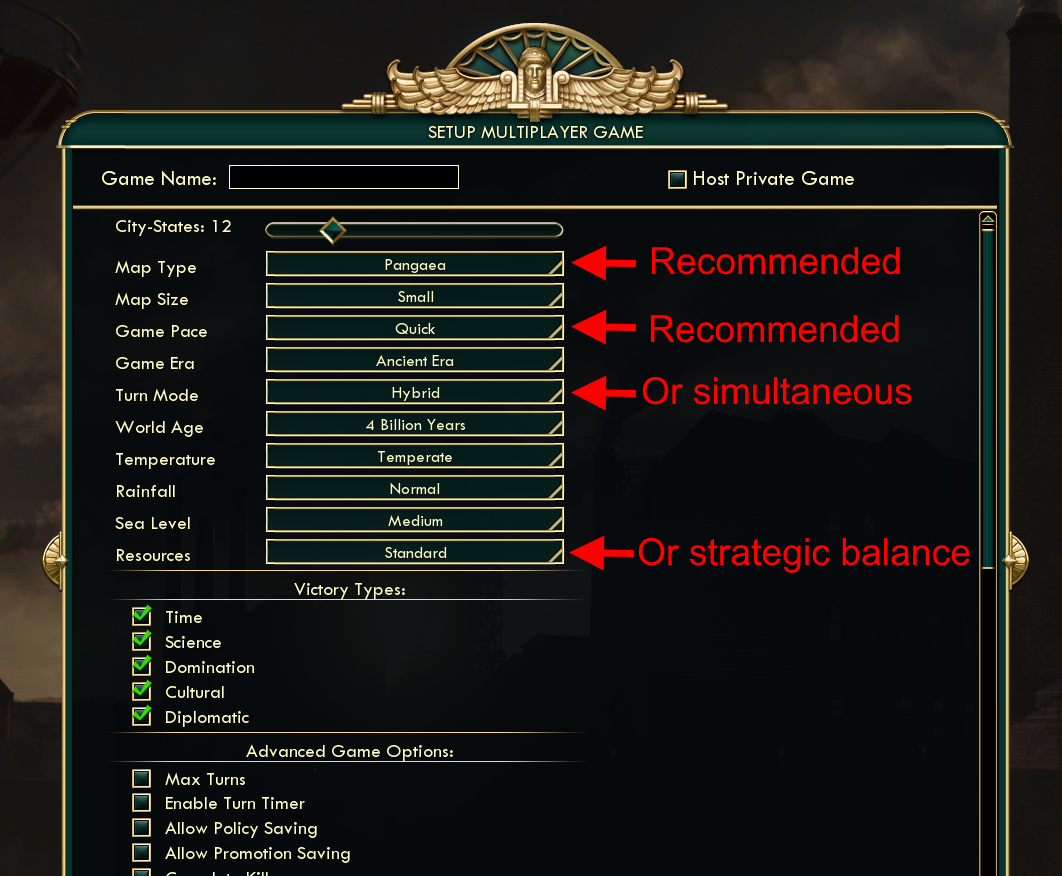
Setting Up a Multiplayer Game
Other Resources Referenced in this guide
Congratulations, you’ve made it through our guide (or skipped to the good part). Below are good resources we’ve used or make reference to in this guide:
Civilization 5 Tutorial - The Basics Guide (Tips 4 New Players) | Food, Production, Gold and Science
Infinity City Sprawl (ICS) Multiplayer Guide [Complete][forums.civfanatics.com]
Civilization 5 - Filthy's Civilization Tier Guide 2.0
Civilization 5 - Wonder Spotting
Note that we did not make any of these nor are we affiliated with these people.
Quick Reference Guide
After the multiplayer game starts, keep this section open and use it for quick reference in-game. This is so you can have access to key information without having to have to memorize yet. Under each title also has the name of the section the image is found in. We believe and hope that this will give you a decisive edge.
Civs Most Specialized to Each Victory Type(Early Game Strategy)
Most Important Technologies Yellow, green, blue = more, very, most important
(Expansion)
The Relative Importance of Each Resource(Civilizational Management)
Some of the Most Powerful Wonders in Multiplayer(World Wonders and Tile Improvements)
The Meaning of Each Demographic(Finding In-game Information)
Most Important Units of Each Era(The Eras of War)
Terrain Combat and Movement Modifiers(The Eras of War)
Early Game War(The Eras of War)
“Artillery Era” War(The Eras of War)
Atomic Era War(The Eras of War)
Late Game War(The Eras of War)
Tracking and Preventing Victories(Winning and the End Game)
A Final Note
Your partner in victory,
RBNOW
- Real Populations★ 5 (1.2k)79k views1.2k ♥2 minBulgarianUpdated Aug 31, 2017
- Civ-specific tricks, secrets and clarifications (BNW)★ 5 (1k)53k views2.2k ♥96 minUpdated Jun 30, 2019
- Zigzagzigal's Civ Summaries (BNW)★ 5 (1.5k)49k views3.9k ♥134 minUpdated Jun 30, 2019
- Who to Trust and Who to Avoid in Civ V★ 5 (570)41k views802 ♥12 minUpdated Jul 8, 2016
- How to win the Korea Scenario as Korea on Deity in 16 turns★ 5 (532)41k views828 ♥15 minUpdated Apr 1, 2016
- Drunk Civ★ 5 (1.1k)39k views1.2k ♥2 minUpdated 17 Jan, 2020




- Upgrading to PremiumTeam Fortress 2★ 5 (20k)1441k views11k ♥6 minUpdated May 11, 2022
- No More Room in Hell Official ManualNo More Room in Hell★ 5 (2.8k)569k views2.1k ♥29 minUpdated Apr 22, 2019
- NMRiH Community Hosting GuidesNo More Room in Hell★ 5 (526)351k views653 ♥1 minUpdated Aug 10, 2022
- ULTIMATE GUIDE FOR GAME DEV TYCOONGame Dev Tycoon★ 5 (5.8k)326k views10k ♥4 minUpdated 23 Jan, 2014
- How to 'Git Gud' Soon™MORDHAU★ 5 (2k)318k views3k ♥68 minUpdated Nov 16, 2024
- Лучшие кооперативные игры SteamPAYDAY 2★ 5 (1.5k)315k views2.1k ♥56 minRussianUpdated Apr 27, 2025






This guide was created by its original author on the Steam Community. Are you the author and want it removed? Request removal.