Putting the Rome back in Pax Romana Aeternum: A Guide to Winning as Western Rome
Introduction
Pax Romana Aeternum is one of the most difficult Civ 5 achievements to master. To achieve it you need to “to win the game as Eastern or Western Rome on Deity and have all your original cities under your control in the Fall of Rome scenario.” Many people on many internet chatrooms have claimed that to do so as Emperor Honorius (pictured above) of Western Rome is simply impossible.
That makes historical sense. Civ 5’s tag line for the scenario is “Choose your side, gather your courage, and fight to decide the next thousand years of history.”
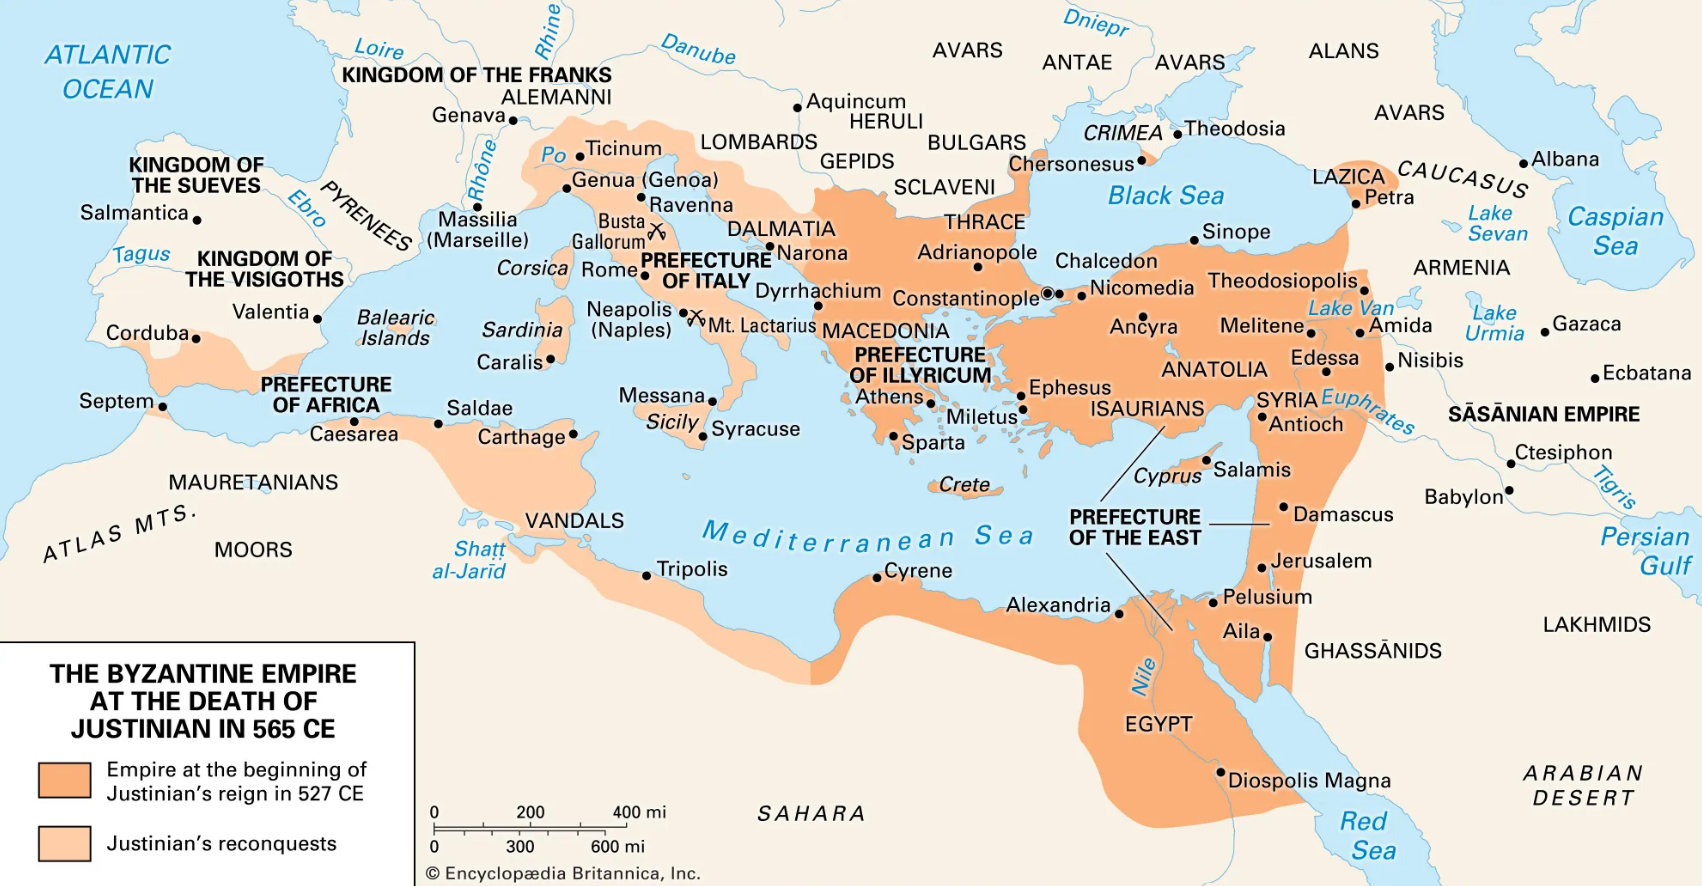 The Byzantine Empire (eastern Rome) in reality achieved a form of the Pax Romana Aeternum (though the phrase would be in Greek, google translate suggests Αιώνια Ρωμαϊκή Ειρήνη). The Byzantine Empire maintained its borders for another few hundred years and in the sixth century under Emperor Justinian embarked on several campaigns to liberate huge swaths of western Rome (including all of Italy). It survived as an empire for another thousand years.
As we all know, western Rome did not. It ceased to function as a political entity around the time the game ends (turn 70 is 475 AD, and Romulus Augustus, the last Roman Emperor, was deposed in 476 AD).
The cards are stacked against you with four aggressive and large opponents, a Sassanid Persia in its golden age, and a series of social problems in your empire (major inflation will make money worthless).
As a history afficionado, there’s a lot of interesting things this scenario gets right and many others it gets wrong. Like, seriously, scenario developers. One of the major problems with the western Roman Empire in the 4th century AD was its large, expensive, and rebellious army[en.wikipedia.org] on its frontier! Instead, the deity level scenario has western Rome start with almost no army at all… The focus only on barbarian invaders is also a tired historical trope, and there could have been more room for civil war[en.wikipedia.org] and social unrest (the Usurper General social policy hints at it, but in a very light way).
That said, getting the Pax Romana Aeternum as western Rome has been a white whale of mine for years. The available guides for eastern Rome all make it more than doable as an achievement, and Holysword's guide absolutely dominates the AI opponents (it's a great read and play). https://steamcommunity.com/sharedfiles/filedetails/?id=2142341852
Western Rome is a different picture. The one deity guide by Stonetorl that does exist is not about doing well enough to achieve the Pax Romana Aeternum achievement. It's very much worth a read, however, my overall strategy has turned out different. https://steamcommunity.com/sharedfiles/filedetails/?id=293423354
As a good Roman emperor, I should honor my debts before I cancel them, and note that the strategy developed here owes a lot to the advice in both guides, but is also original to the situation presented here.
I don’t plan on reviewing all the mechanics of the Fall of Rome at deity level. In particular, the info provided in Holysword's fantastically detailed guide for eastern Rome (linked above) is worth reading closely before attempting this as western Rome.
For more info on the scenario see here: https://civilization.fandom.com/wiki/Fall_of_Rome_(Civ5)
And Kalle's guides: http://www.kalle-online.net/blog/civilization-5-fall-of-rome-scenario-strategy-and-achievement-guide/
For a full map (very useful) by Kalle, see here: https://steamcommunity.com/sharedfiles/filedetails/?id=2230506916
Instead, this guide will share a detailed strategy for winning as western Rome. We all know that we need to hold off our aggressive invaders, but the key to winning here is stopping the Sassanids from running away with the point total. We will not only humiliate our neighboring invaders, but we will out-sass the pesky Sassanids. Final score: western Rome (3470) + eastern Rome (4193) = 7663 vs. Sassanids at 7227
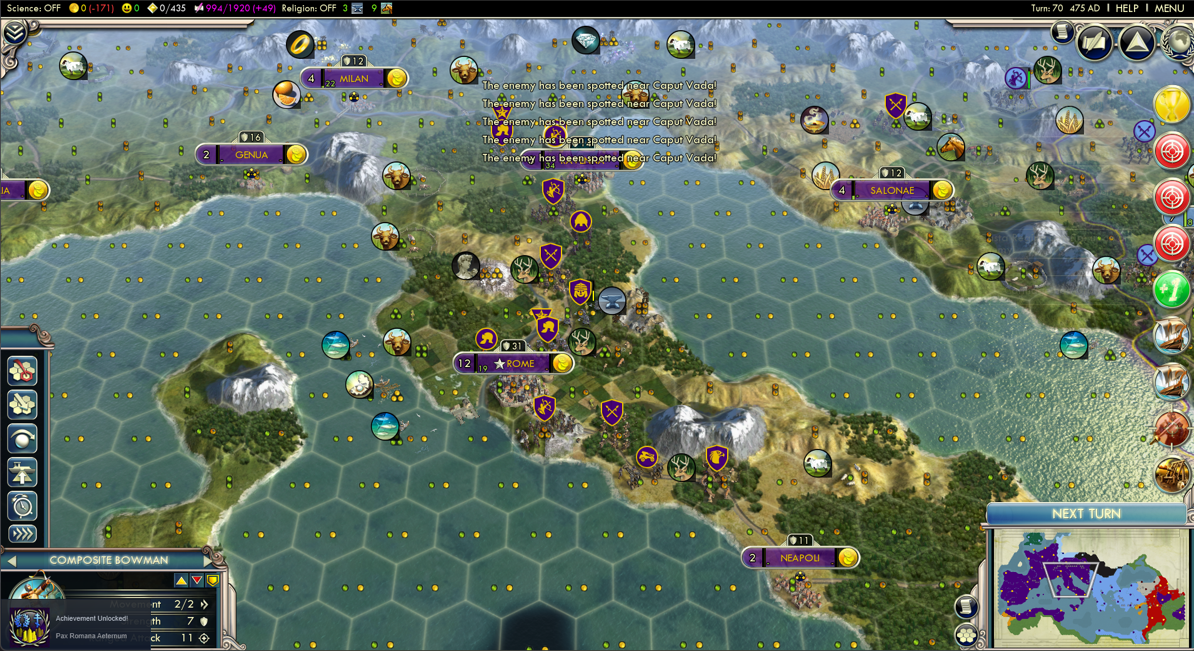
Overall Strategy
Everything is aimed at three goals: 1) reconquering & securing the entirety of western Rome, 2) launching a massive invasion of the Sassanid empire in order to destroy their victory point production, 3) keeping the combined victory point production of the eastern and western Roman empires at a high level
- The Defense (1-11): The first 11 turns are among the toughest. It’s an all-out assault and you will lose seven cities (Coriallum, Gades, Gesoriacum, Lutetia, Portus Namnetum, Rusadir, and Trier). But you will bloody your enemies, confuse them into making mistakes, and only lose ground slowly. There’s no need to build city walls or many forts. Your first set of reinforcements and first great general will change the game as you finish off the first wave.
- Imperial Growth (12-30): This phase is mostly a quiet period of growth. Max out your economy, grow your army, reinforce your traps, skirmishing/enrolling what comes around, and retaking the Byzantine Balkans. By the end, your larger and more productive empire will be on the cusp of a golden age. Your frontier will be well defended against the pathetic second wave (starting turn 25). Your crusaders will set out for the Holy Land.
- The Empire Strikes Back (31-46). Your advance in this period is a slow grind. Nothing is too tough, but you will be liberating Antioch, Damascus, Gades, Lutetia, Palmyra, Portus Namnetus, and Rusadir; starting your siege of Trier; conquering Caput Vada; and sneaking up on Ctesiphon and Nisibis. Keep your troops advancing, but at all times in formation
- The Sassanid Crusade (47-56). Taking Ctesiphon, Nisibis (temporarily), and Singara are no easy tasks. Your army in Persia cannot be reinforced and you cannot face many losses. Up North, you'll take Trier and Celtic assaults will hit you on your north front. Your navy will sail from Gibraltar to the English channel. At the end of this phase, victory is in sight
- Pax Romana Aeternum (57-69). Your Mediterranean fleet will flood the English Channel as you retake Coriallum & Gesoriacum. You'll humiliate the Persians at Amida with an honorary achievement. Your enemies will be cowed, your defense strong, and you will celebrate a triumph in honor of the reconstituted Roman Empire
You have to cheat. You will need to save/reload ALL THE DAMN TIME. As in Holysword's guide to eastern Roman domination, there are key periods where you need to maximize your damage by paying attention to RNG (mostly turns 2-8 and a few periods between turns 45 and 55). You'll need to take notes on hits, and plan them out to maximize damage on crucial attacks (on key units to enroll/kill, and siege hits on cities).
For more on RNG lists and how it works in Civ 5, read this guide (also by holysword): https://steamcommunity.com/sharedfiles/filedetails/?id=2136936176
Note the RNG list also impacts your opponents. In early game you can play with not making a pointless city defense hit (eg, at Gades or Gesoriacum) as omitting an attack can lessen (or increase) key future hits by opponents or you next turn.
IMPORTANTLY, most attacks you make with a legion should enroll your opponent (you can even enroll with an amphibious assault). Advancing and breaking formation is a big no no. Taking troops is a big oui oui. Even if your enrolled unit dies next turn, that's fine. It slows down your invaders or occupies your opponents when you're attacking. This is a necessity. I often just save/reload before attacking with a legion and do something else until a unit is enrolled. If you're checking out the RNG in detail, I believe negative values enroll. So, while a melee attack will use three numbers in the RNG list, an attack with a legion that kills an opponent will use four numbers, and if the final number is negative, you'll enroll the unit.
 The odds seem heavily stacked against you at the start. Since the damn eastern Romans don’t really do much, it’s basically one against five (I didn’t fight the Huns beyond a short defense of Amastris). And given starting troop counts, the odds are even worse. But odds don’t matter. You’re the Roman Empire. The reputation of the Roman legions is enough to drive fear into the hearts of your enemies. Every move you make will impact the AIs decisions in where to move its armies.
For example, don’t drop back for defense, that’ll only encourage your opponents to take your first cities quickly. And descend on you in a horde. Defend stiffly. Buy a turn at Trier. Save Casta Regina. Bloody the Celts at Coriallum. These maneuvers add up
The Advantage of a Small Army
Since your army is so small, the location of each unit has a disproportionate impact on the AIs decision making. If given a choice, they’ll move towards an unprotected city to take first. If the city your one or two units are in is in their path and necessary for them to take (Casta Regina for the Franks and Coriallum for the Celts), they’ll attack it more aggressively.
Another advantage is the AI is mechanistic. If you do the exact same moves in a region, they’ll do the same thing too. It's easier to test with a small army. This strategy doesn’t just involve your units, but early game can depend on the strength of your attacks. That means you can observe the moves and hits that work best to move their armies where you want. Make them fear you.
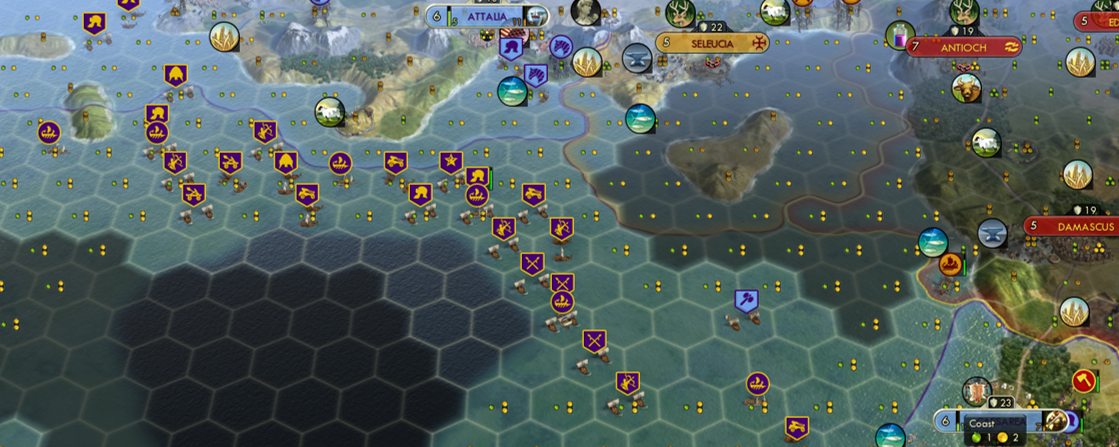
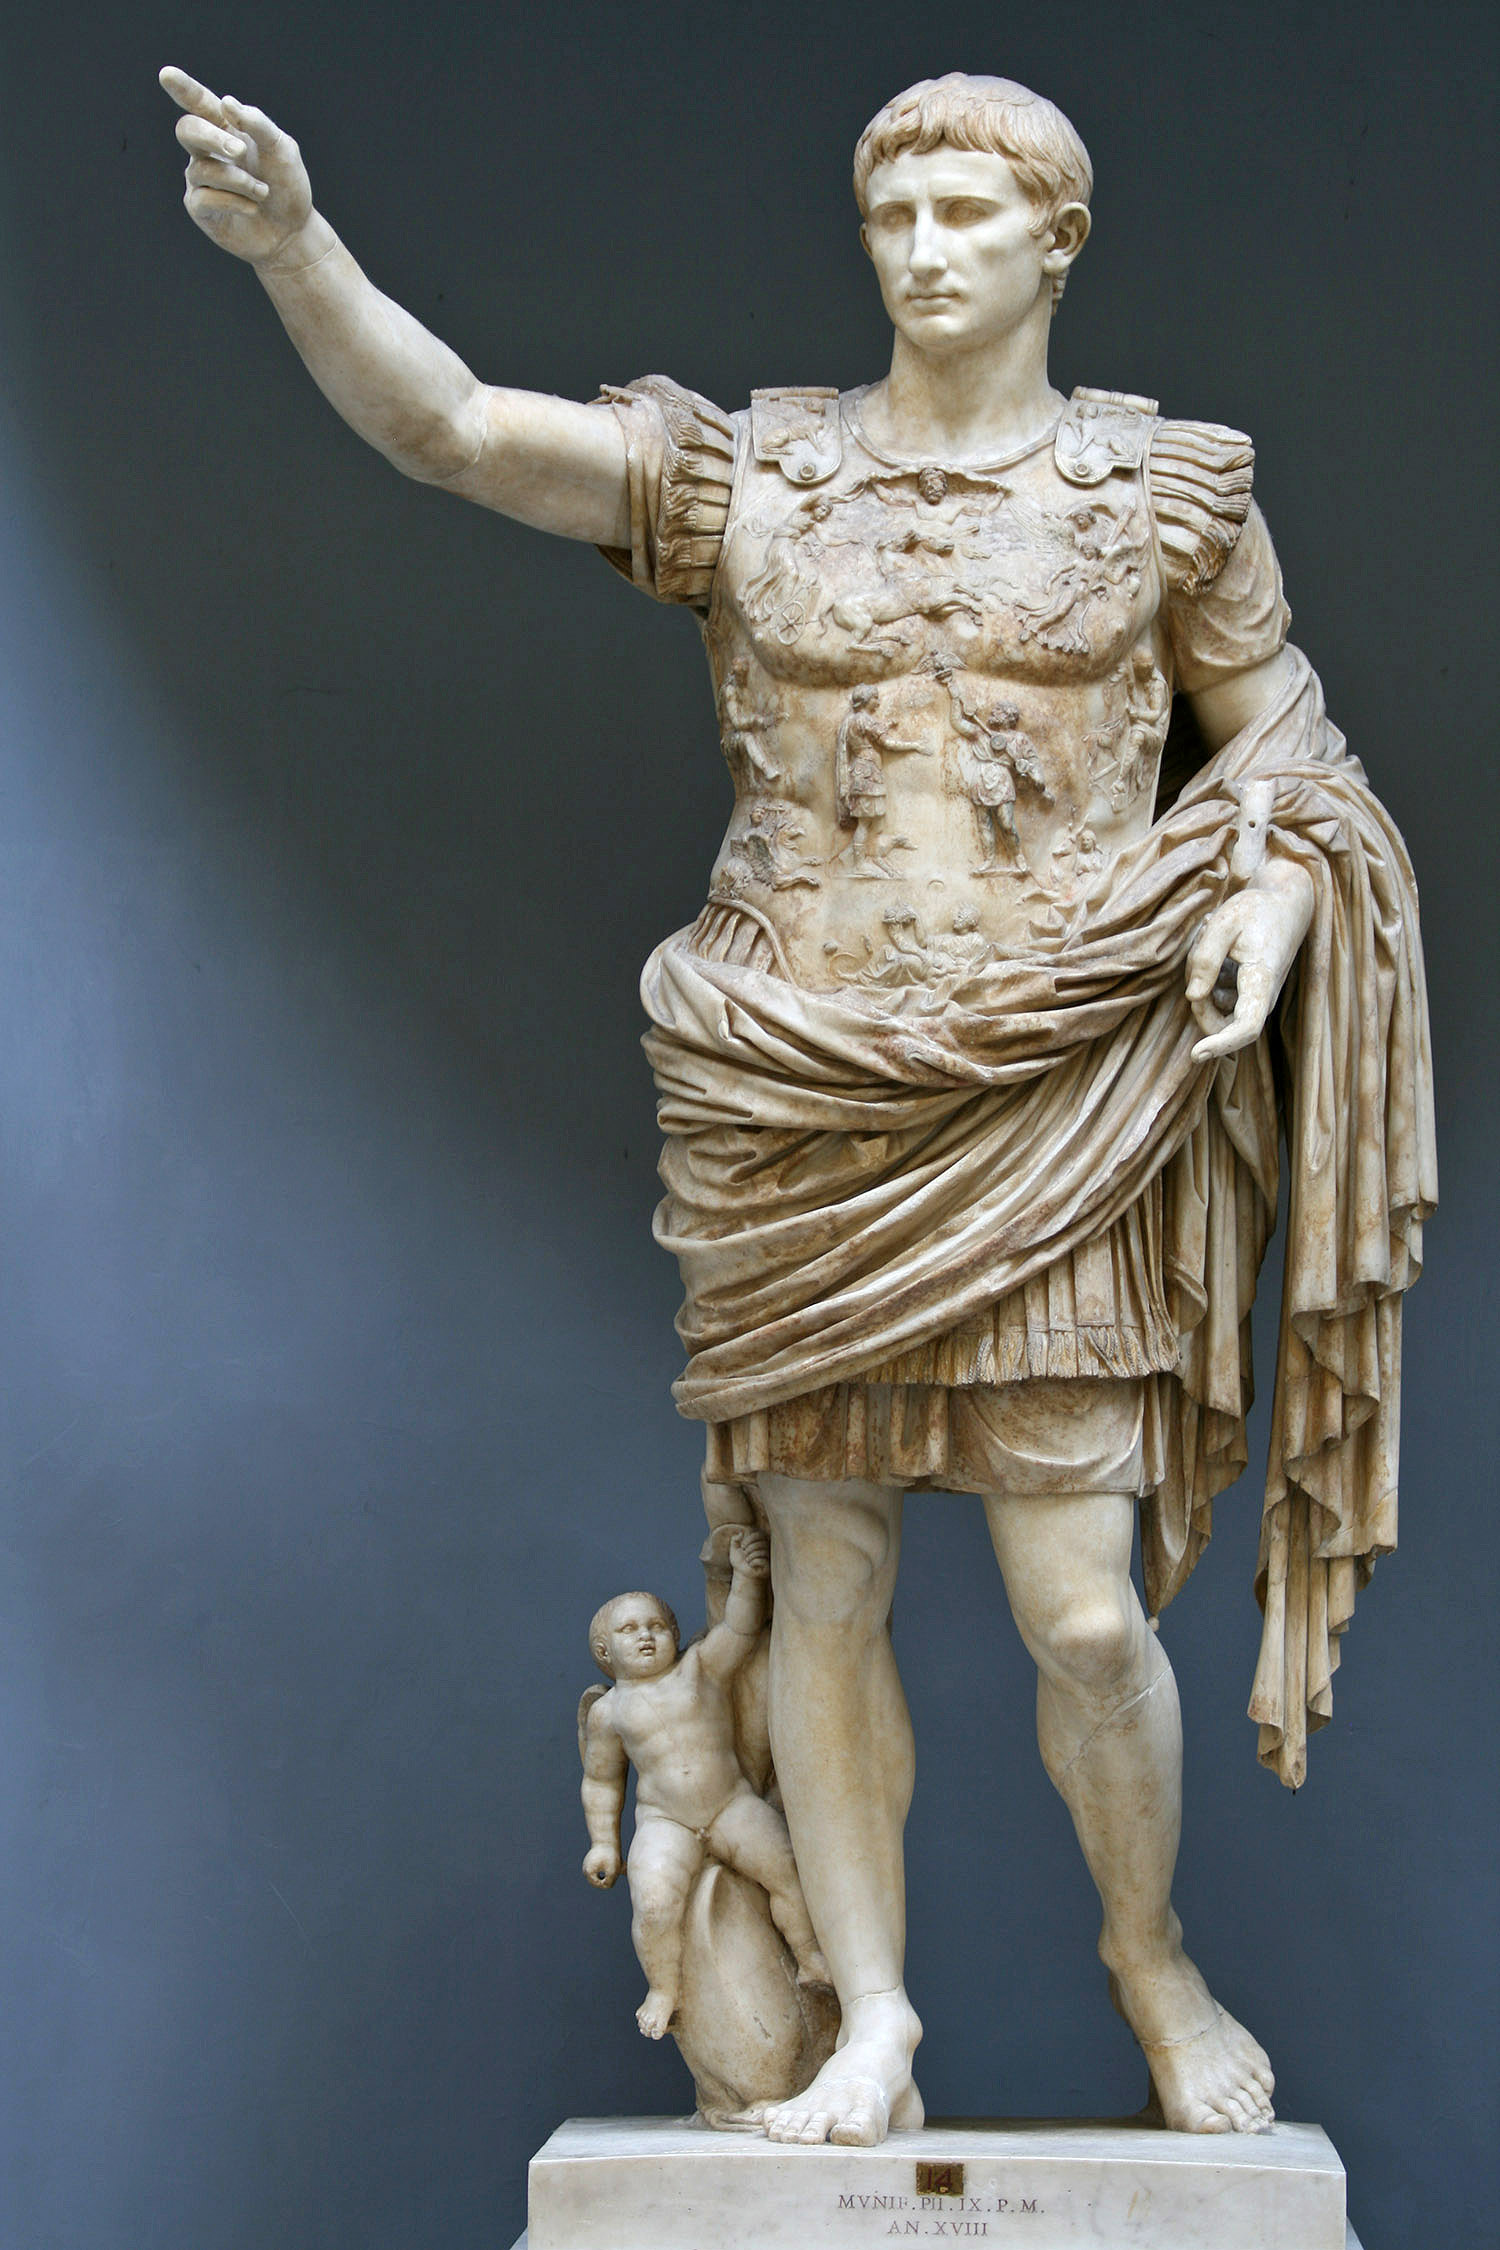
Build your fleet. Make the sea a dangerous place for any floating Vandals and Celts. Your triremes will be used throughout to protect your sailing troops, to strike at enemy embarked troops and to block off passages. In general, the Civ 5 AI is worse at naval situations than land situations. Use that to your advantage. Like Augustus, you will conquer by both land and sea.
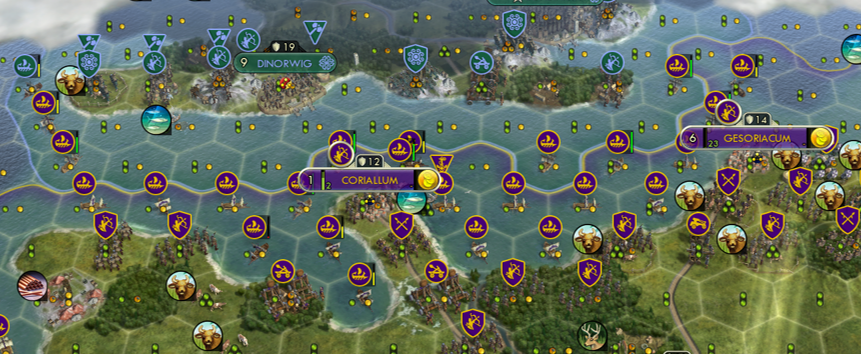
- Early on, don't lose your troops (only scouts, enrolled enemies, one trireme max)
- Stay in formation. Melee in front, ranged behind. ALWAYS
- Know your terrain and lure enemies into death traps
- Do your best to stop your enemy from recharging/healing with a promo
- Kill enemies with legions. Reload until you enroll them. Slows your enemies & stays in formation
- Trick your enemy. Visible troops can cause them to move in one direction, while you hit another
- Zone of control. Slow down enemies moving towards a target. Naval units have ZOC on coasts
- When sieging cities, purposefully damage triremes or spears so they are targeted.
- Save/reload save/reload save/reload
It's the Economy, Stupid
OK, before we break down the military strategy, let’s tackle the economy. Since your predecessor left you with no troops, all you really want is an army. No chance to buy one. The treasury is empty, and you're running a deficit. But, your people are happy and well fed. That’s the sign of a good ruler.
 This is not the time for taxing worthless currency nor allowing full bellies to lead to fornication. The barbarians are at the door. You can’t buy an army and gold is worthless due to massive inflation (social polices). Just ignore gold from start to finish. My deficits regularly hit 350-370 gold a turn. Deleting roads, maximizing gold, ain't gonna pay for your 200+ units.
I actually tried building markets in all my cities, setting all my cities to gold, and disbanding my army on the last turn just to end with a surplus. But I got bored after deleting 100 or so units and gave up...
In terms of social policies, it’s the full right side to start. You’re already running a deficit, so debase that coinage. Fool the debt collectors beating on your Palatine doors by ensuring that it is mostly scouts, not legions that get disbanded every few turns. Your reputation’s good for it. You won’t build any walls until late game, so take the middle walls after that. Delay taking the left 10% damage to your troop strength as long as possible. Don't harm your happiness!
 On turn 0 you need to get into each city and maximize production. Don’t just tick the box, individually check out each city and maximize production as much as possible without starving your people (see Holysword's guide for good advice that I won’t repeat here).
There’s no need for anyone to starve (yet). But most cities should be set to zero surplus food and zero growth. However, if all things are even, production and a small surplus of food is better than the same production with gold. Gold is worthless. You have extra happiness, so slow growth in some cities is fine.
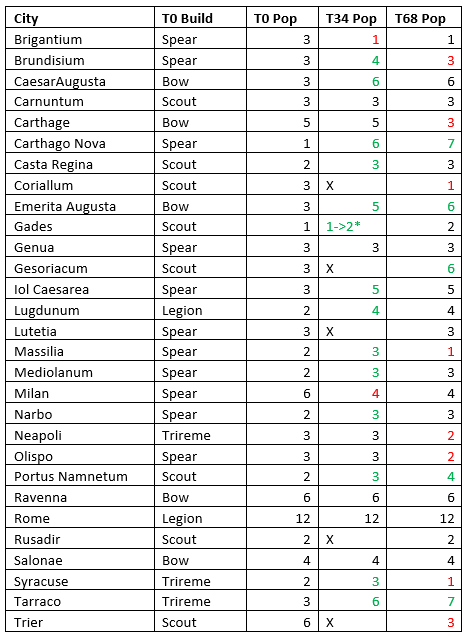 In general, your people are happy (after the initial defense, you'll have 17 happiness), and you’ll want to starve as few people as possible. The first time I played through to the end, I had sacked Ctesiphon, Nisibis, and Singara, yet I still lost to the Sassanids by a few dozen points. If your game is close, you’ll need the extra victory points that population brings (ca. 0.5VP per population each turn)
In Lutetia and Iol Caesarea (which I eventually grew a bit), it’s possible to gain a small surplus of food then eat it as you starve your population to rush out a spearman unit to help with your initial defense
Around turn 10 you’ll shift to grow many cities by a single population (e.g., Narbo, Lugdunum, Brundisium etc) or so to maximize your production and victory points). After pumping out two units, I built granaries in Carthago Nova and Tarraco. They and Emerita Augusta and Iol Caesarea can grow by several population.
In the 20s, your goal will be to slow your growth and plan your happiness to hitting a golden age around the time your full productive population maxes out (in the early 30s). To speed up happiness growth to hit this target you can build circuses (Narbo is best, but options also in Emerita Augusta and Salonae). Also you can starve some of your non-productive population (two in Milan and Brigantium each). A golden age around that time will help reinforce your counterattack
Finally, you'll need to starve some population before conquering some Sassanid cities at the end.
 I built very little infrastructure throughout this game. In the 20s, a circus is worthwhile in Narbo as things calm down and you want to speed your golden age. In the 40s, circuses in Emerita Augusta and Salonae and a quarry in Ravenna will help ease the happiness hit of your conquests.
Granaries are very useful for Carthago Nova and Tarraco. Granaries were my third build in these cities, and I improved the grain/deer near them to help them grow. They can build troops for Spain, triremes for your navy, and the direct road north even means their troops can get north fast enough to make a difference.
I only built walls in the late 40s/early 50s in Carnuntum, Casta Regina, and Trier. These will help (slightly) with any final offensives lobbed your way. Though, to be honest, they weren't needed to deal with them, as I held overwhelming troop superiority.
I did build one worker in Spain. Invest in food and production improvements for Carthago Nova and Tarraco. Afterwards, send all your southern workers north to Gaul to chop.
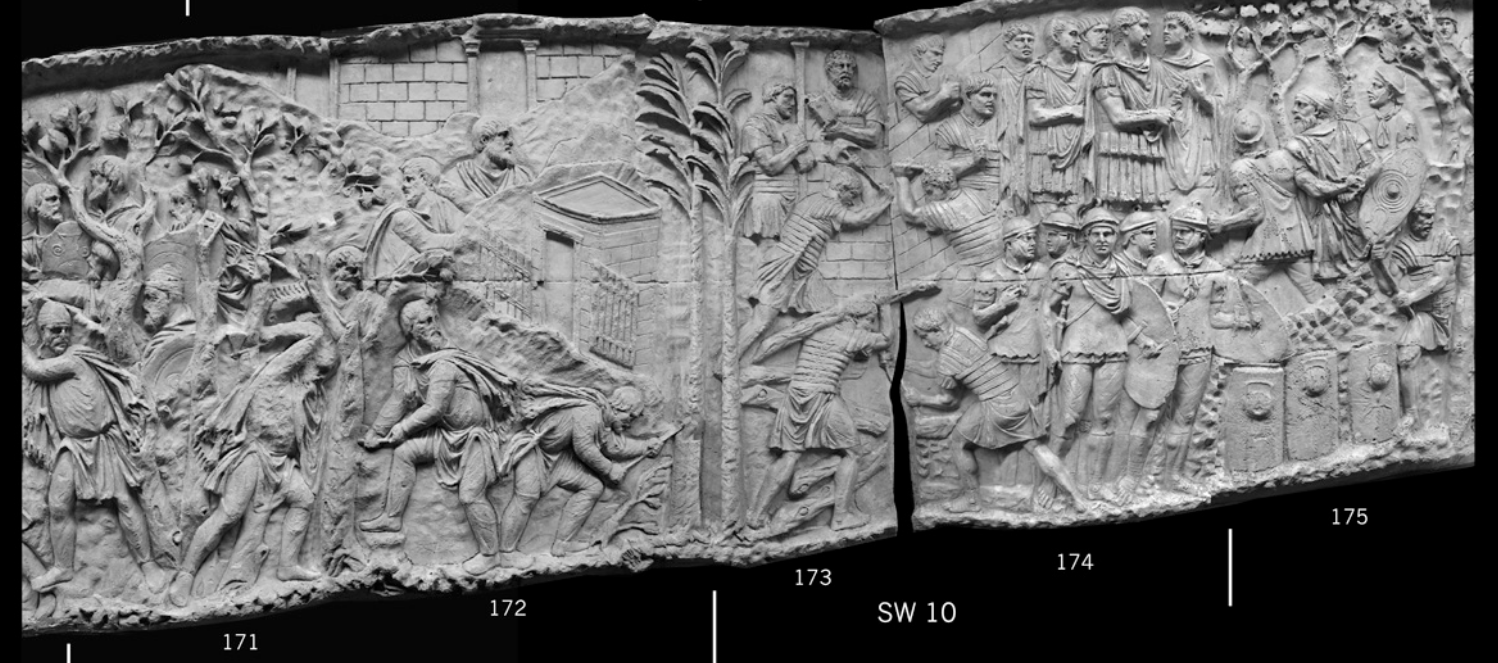
The final push in the 40s onwards in Gaul will require lots of wood chopping. It's a slow advance from Lutetia to Gesoriacum if the Celts have their Destiny's Army +50% improvement. You'll need to chop the forests to give sight to your archers. Lots of workers needed. After this wood is chopped, they can head west to chop wood to speed triremes. You need control of the English Channel to take and hold both Coriallum and Gesoriacum.
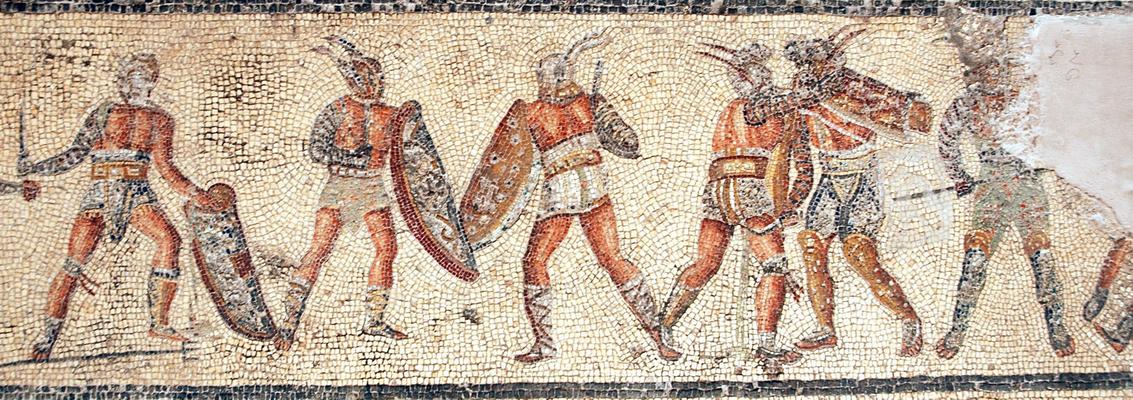
You’ll need troops on all fronts, and a large, growing navy near the straits of Gibraltar. By mid game you'll also need a sizable navy in the Eastern Mediterranean (6-7 ships), a growing north Atlantic navy (2-3 ships at this point) and a small navy on the southwest coast of Spain (2 ships).
Most cities that are on the front-line should start with building scouts (except Lutetia who can rush a spear). These will come in handy to cut supplies and slow down your enemies. You'll need to allocate some trireme producers (Syracuse and Naples are key, supplemented at times by Tarraco and Carthago Nova, sometimes even Rome and Carthage).
Horsemen become more useful as the mid-game approaches. Especially in Africa to scout out Vandals approaching Rusadir from the southwest and in the Balkans to scout out and pillage Gothic territory.
Hold off on ballistae and don't. You'll need several early to go East to reconquer the Balkans and launch your Sassanid crusade. Otherwise, you'll need them for mid-game to reconquer your cities from the invaders. Capturing catapults helps ease the need to build ballistae, so don't hesitate to capture some, they're worth it!
Always have a couple scouts to fool the debt collectors. At 1st, you'll throw 'em into builds where you can. By 2nd half, useless cities (Syracuse) can do it.
The Defense (Turns 1-11): Part 1, Gaul and the Alps
You and your ally are facing a massive invasion. You’re both gonna lose several cities. Your goal is to make sure they're the right ones while you set up a defense. Your trickiest situation is the double armies of Celts & Franks bearing down from the North. Winter is here. The Frankish troops are better, so make sure the Celts take more. Hold the Franks to Trier and massacre them at Casta Regina. Bloody the Celts and slow them down as they take Coriallum and Portus Namnetum. You will massacre their first wave and enroll some troops at Mediolanum.
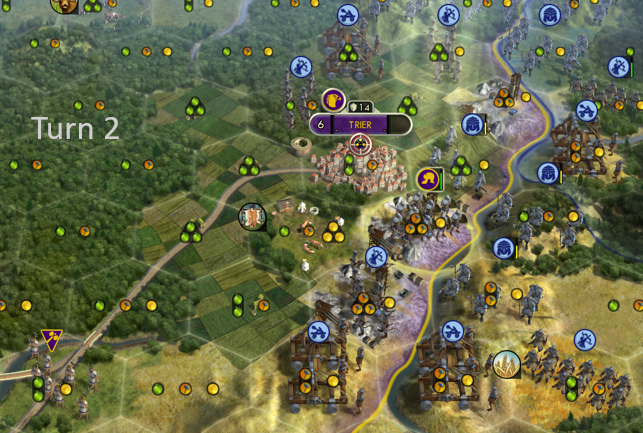 Trier is a goner, but you have time to build a scout (play with citizens and starve one). Retreat the worker 3 hexes to chop the wood on the road to Lugdunum; he'll be safe. You need a legion there. Move your legion one hex to the SE of Trier and hold him till turn 2. On turn 2, recharge the legion and move him west to the furs, and move scout one hex west. Trier falls.
Turn 3, legion pillages furs retreat one hex SW towards Lugdunum. Scout double pillages to take out the road. His sacrifice will protect Lugdunum from the Frankish army and disperse them west towards Lutetia and Southeast towards your valiant stand at Casta. The Franks heading to Casta willl not stop to fight, so use your legion on turn 4 to slow their advance with his zone of control. Afterwards, he'll head to Lugdunum to fight and enroll troops
Casta Regina is where you defeat the Franks. You'll need to play with RNG to win.
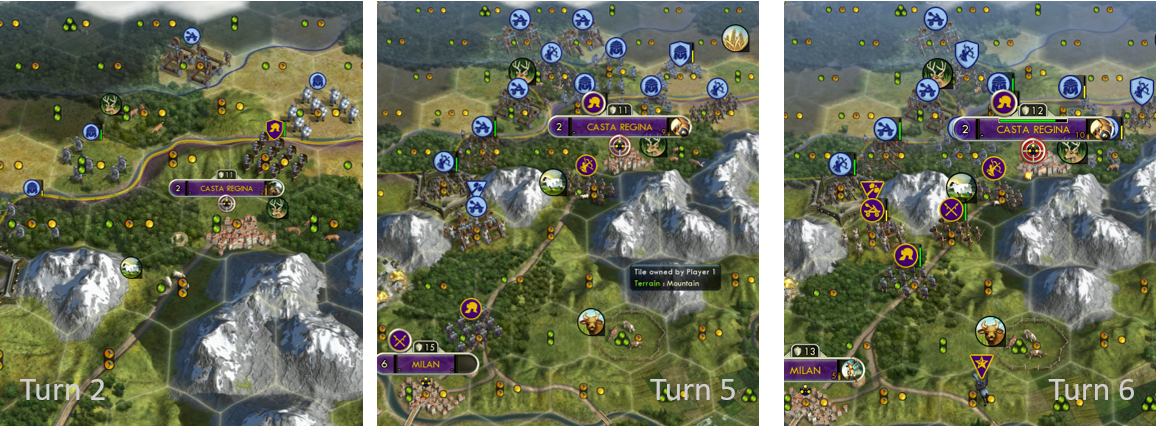
You need immediate reinforcements. Get archer near Rome up to Casta. The first legion built in Rome and first spear built in Milan should also immediately march to Casta.
March up worker at Rome to build a road in the Alpine pass (if he's captured temporarily, that's OK, you'll get him back right away). With roads built before you move through the Alpine hills, you'll have full mobility to rotate your growing army around and strike, kill, and enroll them.
At Casta, start off by building a scout and moving the legion one hex northeast of the city. Your city defense should hit Frankish seaxmen with STRONG hits. Pay attention and don’t let one recharge (2 hits on one & 2 on other). On turn 3, legion either needs to sit strong and heal or sometimes he can enroll seaxman to west before retreat into city to later enroll/kill more seaxmen.
On turn 4, reinforcements arrive. Don't let Casta be surrounded. Your scout will be built and archer from Rome will be in the hills south of Casta to fire on nearby enemies. T5, you'll have 1st legion built in Rome there and T6 spearman from Milan.
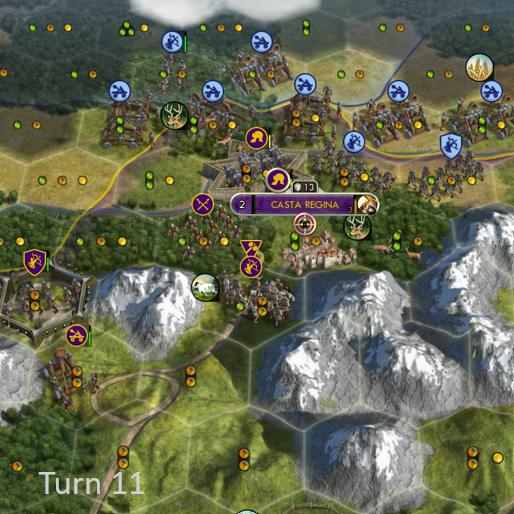
Finally, using RNG make sure your first great general appears in Rome, Ravenna, or Milan. As soon as the general is there (turns 6-9), with a healthy legion, get a citadel placed northwest of Casta. That will secure it. Without Lutetia, the Franks won’t have a large border with Lugdunum. They’ll be programmed to try to keep going after Casta. Troops will try to skirt the Alps, but you can slow, strike, hopefully and enroll them. In the end, the Frankish corpses will pile high around your mighty citadel.
Gesoriacum is a goner (turn 5). Don’t bother protecting it. If Franks are in range, hit them with weak RNG shots.
Lutetia is also a goner (turn 8). In general the city defense and your first built spear should hit/slow the Franks with weak shots. You want the Celts to take Lutetia. I've never successfully saved the spear, but he's a useful buffer.
Coriallum is where you give the Celts a bloody nose. You'll need to fiddle with placement of troops and strength of hits (or not hitting in some cases) to make it happen. In fact, if you hit them too hard, their army spazzes and the Franks will end up with both Gesoriacum & Lutetia. So, strike a balance. The AI spazzing has something to do with total damage (another important reason to hit the Franks when they are in range of both Gesoriacum and Lutetia even if Celtic targets look enticing).
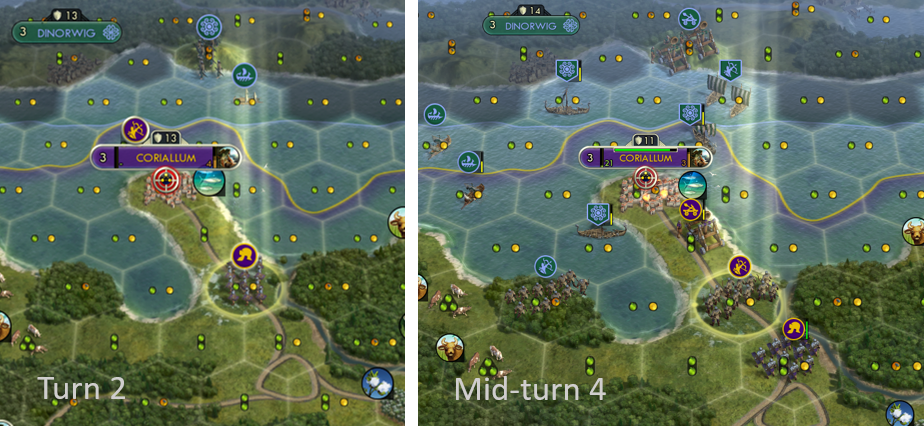
That said, this bloody nose tactic at Coriallum is key to slowing down the Celts so they won’t take Portus until ca. turn 12 and won’t show up at Mediolanum until you have your trap set with reinforcements.
Turn 1, the bowman near Lutetia should go into (or next to) Coriallum, inside it by turn 2. Play with how you fire at triremes on turn 2 as it impacts their decisions. On their move for turn 2, the Celts will try to trap your archer with a catapult directly southeast of Coriallum. But it’s YOUR TRAP, not theirs. On turn 2, you should position your legion 2-3 hexes away from Coriallum to outflank the incoming catapult. On turn 3, you should enroll the catapult.
This series of events will provoke the Celts. They need to take this city. So, on turn 3 in response, they will amphibious attack Coriallum with three Pictish troops, floating unprotected.
Turn 4 is your chance to strike. Once I max RNG to kill all three Picts and held Coriallum an extra turn. That’s a bad idea, it causes the Celts to spaz, giving Franks an opening to take both Gesoriacum & Lutetia. That's bad. Note: killing two Picts and hitting Celts instead of Franks hard with city defenses at Gesoriacum can also cause a spaz. Again, bad.
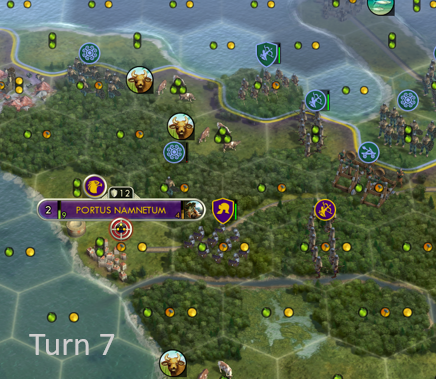 Instead, move your legion one hex southeast to protect retreat, move archer out of Coriallum two hexes to southeast. With the city defense, the catapult, and the archer (the strongest of them), you can max RNG to kill two floating Picts.
Turn 4 Coriallum falls. Catapult better off firing again, I haven't been able to save him.
Sometimes you lose archer and Coriallum doesn't fall till turn 5. It's ok because then you can take out an extra Pict.
Portus Namnetum has a useful forest for guerrilla warfare. Your scout built here can also slow the Celts. Retreat your bowman and legion from Coriallum to the forest, out of sight for delaying fights & hopefully enroll a Pictish warrior. But be sure to retreat them to set up trap at Mediolanum. Portus fell on turn 12 in my game.
Mediolanum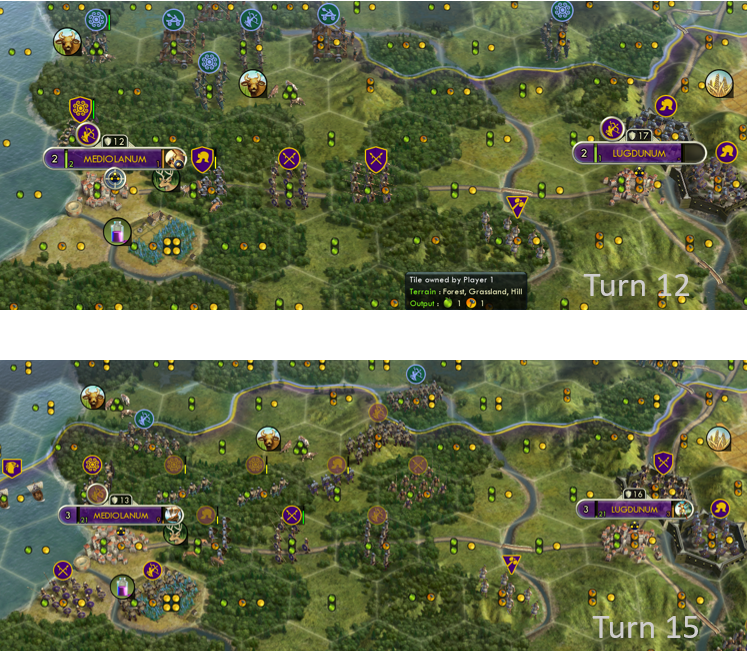 is your trap for the Celts to kill and enroll them. The screenshot below shows the trap at Mediolanum. Technically, this is after turn 11, but it’s the tail end of the first Celtic wave. With bowman, spears, and a legion, you can keep enticing the final push of the Celtic first wave to move into the woods northeast of the city and your job is to enroll, enroll, and enroll troops until they’re all dead or have run away. Hopefully you'll keep a couple.
After the wave is finished, you’ll want to keep strengthening this trap, it’s useful in the 2nd wave, and expand it as the Celtic front encompass Lugdunum.
Lugdunum
If you follow the above, Lugdunum is never under serious threat. Keep chopping wood. Use a legion to build a fort in the hills. But any stray Franks that wander this far south are open game for enrolling.
The Defense (Turns 1-11): Part 2, The Southwest and East
Outside of Gaul, things are dire but not nearly as bad. We'll walk through quickly how to defend and take advantage of these situations.
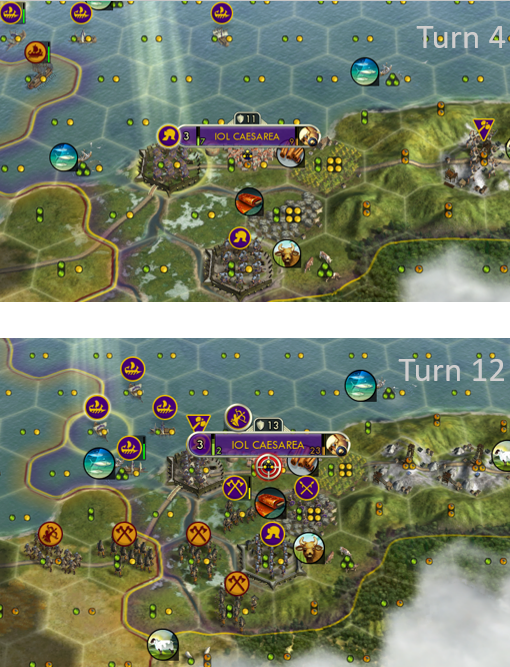 Rusadir is a lost cause (turn 2). Get the legion out on turn 0. Have him to build a fort in the grassland two hexes south of Iol Caesarea. You can protect Caesarea with this legion and the legion and bowman built in Carthage. The worker at Carthage should head west as well to improve Iol Caesarea, which is much closer to the front than Carthage. Carthage will be obsolete much sooner.
Gades is also a lost cause (turn 4). Your main goal here is to build an army and navy quickly. You’ll need a spearman in Carthago Nova followed by a ship. Tarraco is ship followed by bowman. Spearman in Olispo and bowman in Emerita Augusta. The last bowman will either stay put or move towards Olispo or Carthago Nova to ward off the Vandals.
The Straits of Gibraltar
The important action happens on sea. Get your four ships there immediately and camp them just southwest of Carthago Nova with one or two next to sea border. They can explore the straits and start striking at unprotected Vandals. Hit the floaters hard, even if it means losing a trireme (you should be building reinforcements). This is key. It will confuse the Vandals and they won’t really go strong against either Spain or North Africa, but muddle around and send out small and late forays in either direction.
Another key. Don’t stretch out your ships in a blockade and don’t place them near Iol Caesarea. If you do that, then the Vandals will sense the Roman military presence is strong in North Africa and weak in Spain and they’ll go all out in Spain. That said, once they move on Iol Caesarea by land and sea (ca. turn 10, you'll need to move the navy south and hit them hard, especially floating units, don't waste city shots on them, so you can enroll axemen.
Set up your cordon in the hills of southern Spain and your forts and archers in the swamps and rivers around Iol Caesarea to last out the intermittent attacks and second wave. Build up your navy! For most of the first half of the game I built triremes in Syracuse and Naples to reinforce here (though eventually they were key to form the core of an Eastern Mediterranean fleet).
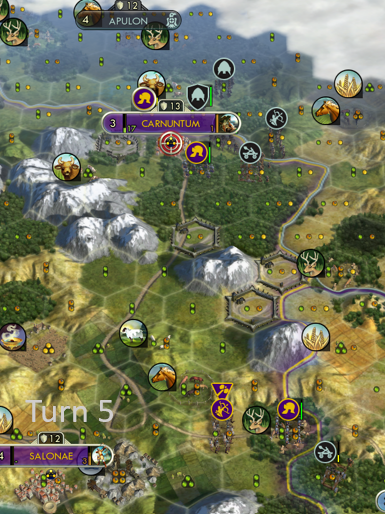 The Eastern front is the easiest in this first segment.
Carnuntum is more than defendable with your legion from Ravenna hurrying up there and building a scout followed by spear followed by an archer. Your legions will enroll as many Gothic troops as possible (fiddle to do it). When you are secure send one of your legions and any extra troops south to the Balkans.
The Byzantine Balkans are key to your strategy moving forward. I send my initial legion in Rome here supplemented by archer built in Salonae. The Goths here can be tricky, but you don’t want to advance too fast. If you hammer the Goths too hard too quickly, they will spaz and shift to the East hard. This will look good at first as several of them end up in the Black Sea and shot down by a few Byzantine dromoi. But, it’s not good. They’ll eventually overwhelm Constantinople, and you do not want that!
Instead, it’s better to build your army, lay back along the hilly border with Byzantium, enroll what troops you can from the Goths,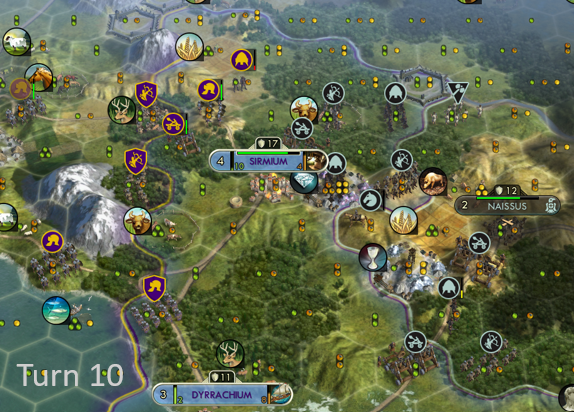 and set a trap around Sirmium. If they start trying to take Sirmium around turn 8 or 9. Let them hit it for a couple turns and then move in and start your full-scale attack in the Balkans.
That said, if Goths hit Sirmium hard at start, then hit back. They'll head to Dyrrachium next and you can trap them there.
Except for the first legion produced in Rome, which is needed at Casta, almost all the troops produced in Rome, Ravenna, Salonae, and Brundisium should head East. You’ll need a successful, mixed army in the Balkans. I ended up with five legions (one from Carnuntum), several spears, archers, ballistae, and any enrolled troops you can (catapults are fantastic).
Neither Mediolanum nor Lugdunum should be in any real threat. Your citadel (or imminent citadel) should have Casta locked down. Carnuntum should be safe and the Goths should not be moving towards Constantinople. The Vandals should have Gades and Rusadir. There will be threats on Iol Caesarea and one of your southern Spanish cities, but nothing you can’t handle. And you should have an army ready to liberate the Balkans. If some of these are off, figure out what you did wrong and redo it. This early phase is essential.
Imperial Growth (Turns 12-30)
During this phase, most of your fighting will amount to small skirmishes in the west. The important action will happen in the Balkans. It’s a fairly quiet period with few stressful situations. Your key efforts will mostly be building up your population, maxing out your production, setting up a golden age, and making sure you have the necessary troops in all regions to defend and advance. A fairly easy second wave will hit starting in turn 25. You should wrap it up by turn 30 in Spain and in Gaul and start advancing. It will continue after that period at Casta and Carnuntum, but you can hold them off.
 Around turn 11/12, I started growing cities quickly. Granaries in Carthago Nova and Tarraco, alongside some worker improvements make those cities grow into real powerhouses. I also grew Emerita Augusta, Iol Caesarea, Caesar Augusta, Narbo, Massalia, Lugdunum, and Brundisium. As the empire grows, pay attention to your happiness. You’ll want to hit a golden age in the early 30s (for me turn 32). The golden age really helps speed up troop production, particularly if you save up a bit of food in some cities (sacrifice a production per turn in the late 20s/early 30s to use it during golden age when its buffed). To hit the golden age in time, I built a circus in Narbo and starved two population (in the late 20s) in Milan and Brigantium. I wouldn’t build the quarry until your Crusaders have left for the Holy Land. Every unit counts.
In general, just keep producing units. No need for buildings (except for one circus). Again, mostly spears and archers to get into formation, but a couple horsemen are useful in Africa and you’ll need siege weapons to start advancing. At first, mostly in the Balkans, but certainly by the late 20s, you’ll need them in Africa, Spain, and Gaul to quickly turn the next wave into an advance. Most importantly, you’ll need to start building an eastern fleet, a west Spanish fleet, and a northern fleet. Brigantium and Mediolanum started producing triremes after one spear each for a north Atlantic fleet. Olispo should switch to triremes as quickly as it's safe to so you have some ships on the west coast of Spain.
For your crusaders, you’ll need around six to seven triremes in your eastern fleet by the early 30s. After my army in the Balkans wrapped up fighting and started embarking, I accomplished this with a trireme each from Carthage, Syracuse, Naples, Brundisium and three from Rome.
I ended up with 5 legions in the Balkans (to join the Crusade), 4 in Gaul, 2 in Casta, 2 in North Africa, and 1 in Carnuntum. Almost all were built in Rome.
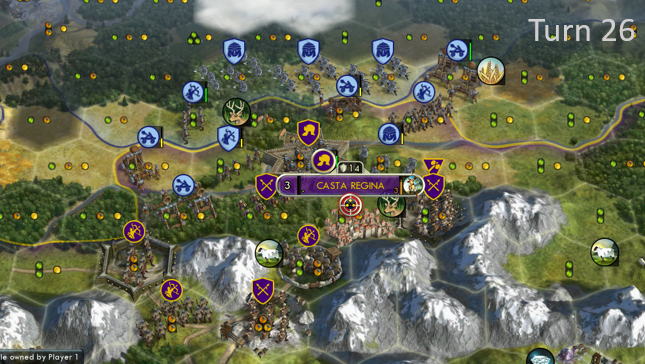 The Franks are easy in this period. They'll keep coming at Casta Regina and be massacred on the citadel. You’ll enroll many Franks, but they’ll die. Nothing is really too complex here. My legion in the citadel kept leveling up (take rough promotion then cover then as many roughs as you can. By the end he had the march promo).
With the pathetic wave at turn 25, Franks will try to move around the Alps. Make sure to defend the fort in the Alpine pass, even if it means moving the legion in the city of Casta to there. Any Franks that try to skirt the Alps entirely and pass east of Lugdunum are fair game for enrolling with a legion or two and keeping.
The Celts
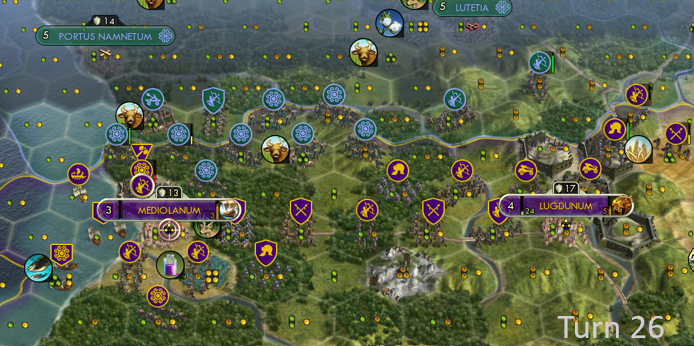 As noted above, you’ll need to defend Mediolanum from the tail end of the Celtic first wave at the start of this phase. Enroll everyone you can. You’ll be skirmishing around Lugdunum against both Franks and Celts. Kill them and try to enroll what you can to add to your forces.
Strengthen the trap around Mediolanum to defend the somewhat pathetic second wave that will hit on turn 25. The Celts will try to strike Mediolanum. But with your strengthened trap, it should be a simple procedure to take them out. Use embarked troops to keep the hex directly northwest of the city. Also, be careful because they'll expand the front a bit towards Lugdunum, so make sure you have enough forces to cover the whole front.
By turn 30, the Celtic forces will dry up and you should immediately start advancing towards Portus.
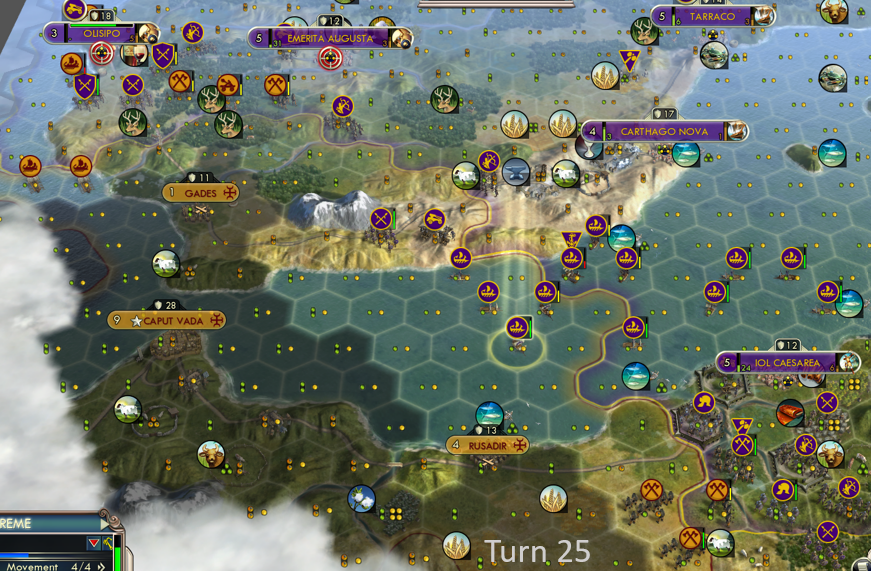 As you skirmish, you’ll start to cordon off the edges of the hills around Gades. Don’t advance too far, as there will be a small second wave. Make sure to keep building triremes to catch any floating Vandals unawares. Slowly push your navy further into the straits, hugging the Spanish coast.
In Africa, you’ll slowly push from Iol Caesarea towards Rusadir. Enroll as many axemen as you can. Start pressing your army into the hills southwest of Caesarea. This is key, as Vandals will eventually come up from the southwest, and you need to be prepared to stop them. A big help will be a horseman or two built in Carthage for scouting and surprise attacks on unprotected units.
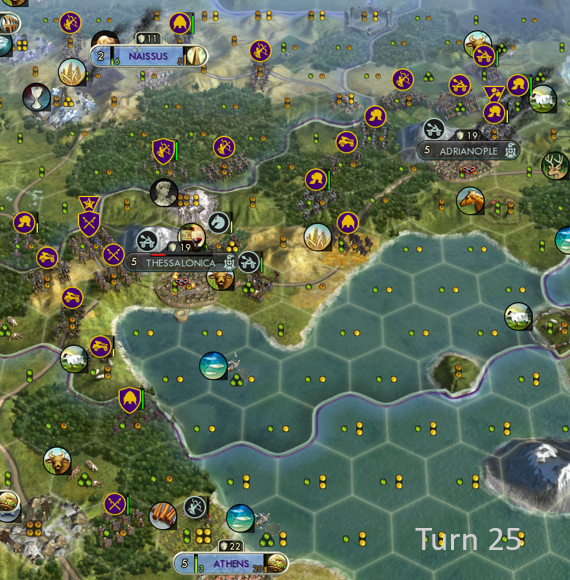 Now that the Goths have engaged with Sirmium, it's time to quickly wipe them out and enroll what you can (hopefully for keeps). At this point, you’ll need a strong, mixed army in the Balkans with fresh reinforcements arriving quickly. Advance as quickly as you can (in formation) to retake Naissus (turn 18), Thessalonica (turn 25), and Adrianople (turn 27). None of these are tough fights if you have the troops. Don't lose many, if any, you'll need them! The Goths are fairly quiet and don’t attack the Balkans again for a while.
You need to clear the Balkans as quickly as possible, with as large an army as possible, and start sailing to the Holy Lands immediately. To clear up the traffic jam, you can march a few troops through Anatolia, but don’t march many. The sea is a faster, more direct transportation route.
The Goths will try to hit Carnuntum hard starting in the 30s, so do keep building up your force (lightly) there (two archers, a legion, and a few additional melee are key). A few forts around it are useful, though the open hex directly to the east is a nice trap to enroll units. The Goths can be tricky in the next phase when they change tactics, so be ready to adapt. That said, you mostly need troops in the Balkans to go on your crusade. You can't reinforce the crusaders easily, but you can always reinforce Carnuntum when its closer to peril.
The Empire Strikes Back (Turns 31-46)
It's time to bring the fight to your enemies. The only points of defense are Casta and Carnuntum. Hold them. On all other fronts, advance! Be sure to stay in formation. Melee out front, ranged behind, and max hits on cities to take quickly.
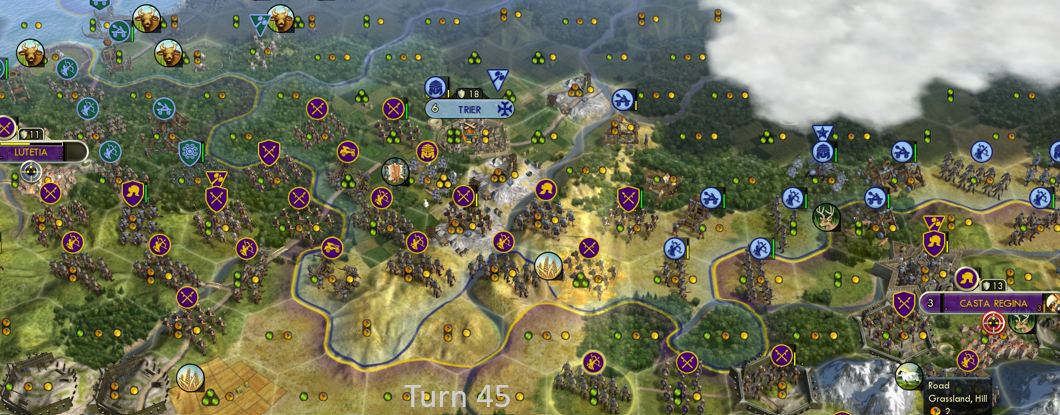 You can advance towards Trier, even before Lutetia falls. But, don’t besiege it too early. Attacking your enemies speeds up their choice of the dreaded Destiny's Army social policy (+50% combat). The Franks are TOUGH with that!
When to beseige Trier: 1) Soon after the Franks select a non-Destiny’s Army social policy. 2) Besiege Trier when there aren’t a contingent of Seaxmen sitting behind it. If you have a light army defending Casta on its east flank, they’ll keep attacking and eventually leave Trier mostly undefended. Scout out a time soon after Franks choose a social policy and when Trier is undefended and siege (turn 44 for me, taken turn 47).
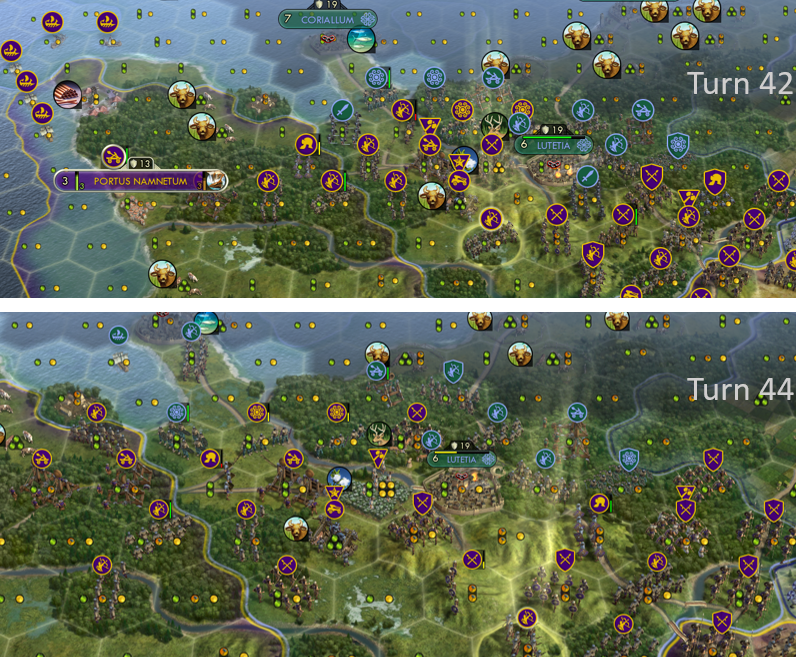 The Celts are weak by turn 30. With 2 triremes in the Atlantic, you can embark and encircle Portus (take it turn 34). Make sure to bring a worker and chop the forest south of it, so your siege weapons can fire.
Lutetia can either fall quickly or turn into a quagmire. The Celts get the Destiny’s Army promotion in the mid-30s because you are attacking them. Beware of 50% improved Celtic troops landing on north shores of Gaul, ripping into your army besieging Lutetia. Maintain formation and kill/enroll these skirmishers immediately. Get archers on the coast north of Portus to shoot triremes and floaters. Otherwise, keep pounding Lutetia until it falls (turn 44). After, it will be a slow march through the forest east of Lutetia. Workers will chop trees so your archers hit their strengthened units.
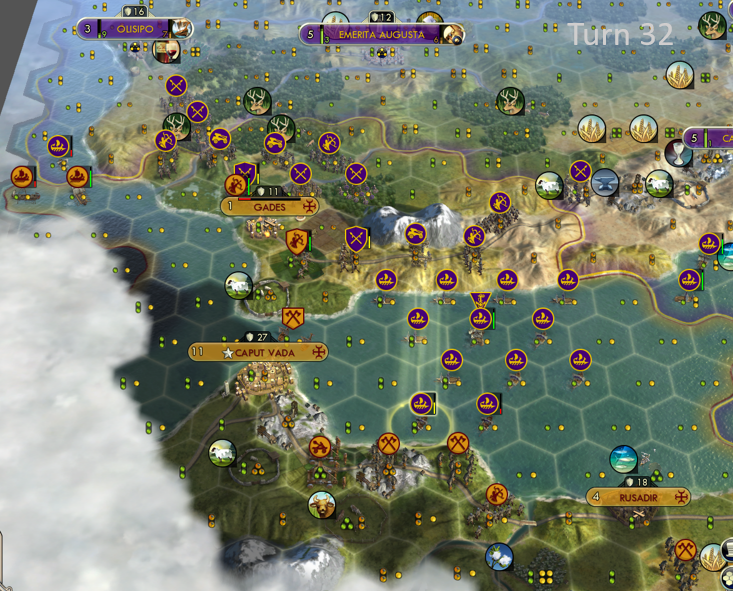 After wiping out the Vandal 2nd wave in Spain, ring and besiege Gades (taken turn 32). Protect the port. If needed, sacrifice a wounded spear in the sea to slow Vandal ships or floaters.
At this point, your navy east of Caput Vada should be strong and occupy most of the sea not in range of Caput or Rusadir. The only time to be in range is to strike troops floating to Spain or when you siege them. With Gades, healing your fleet is easier.
In my game, the Vandals took the Destiny’s Army promotion on turn 32. They'll be tough, but manageable.
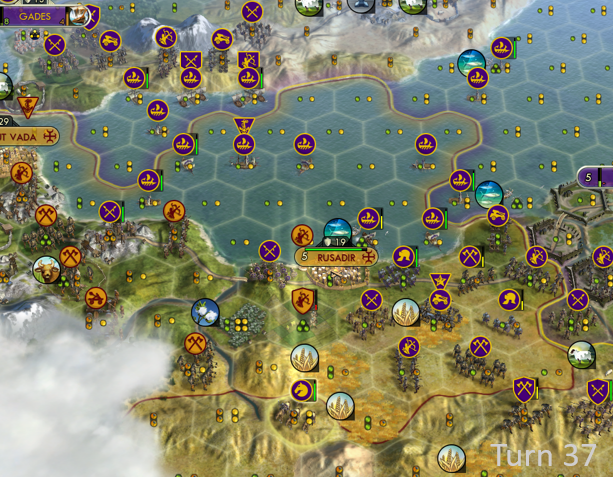 Draw the noose around Rusadir. Enroll axemen. They are fab, with a bonus against wounded units. Two horsemen in desert south of Rusadir will let you know when troops are coming from that side. Drop a couple spearmen on hilly road between Rusadir and Caput, and the Vandals will focus on them, making Rusadir easy to capture (turn 39).
You’ll need to start advancing towards Caput Vada immediately, one bloody step at a time. Keep sending troops from Spain. Keep a strong presence SW of Rusadir to handle and enroll Vandals. Advance this army slowly to pin some Vandal troops in the south.
CAPUT VADA IS HARD. But, it neutralizes the Vandal threat, and allows you to sail your Mediterranean navy to the English Channel for victory.
On turn 42, Spanish ballista & fleet move at Caput Vada. You can pound at Caput Vada from Spain. You’ll need to maximize RNG around Caput on several turns to ensure a victory. It'll be a grind. Keep formation. Get archers into position on hills to hit troops. Embark Spanish troops to take hexes. An embarked legion and a couple embarked captured axemen can enroll troops, useful for capturing Vandals in coastal hexes.
Each turn, one trireme attacks Caput so city defenses target it instead of ballistae. Each turn, sneak one trireme a hex to the west past Caput (don’t attack with it). You need triremes on west side of Caput. Don’t move south right away, you don’t want to draw the Vandal fleet north until ready.
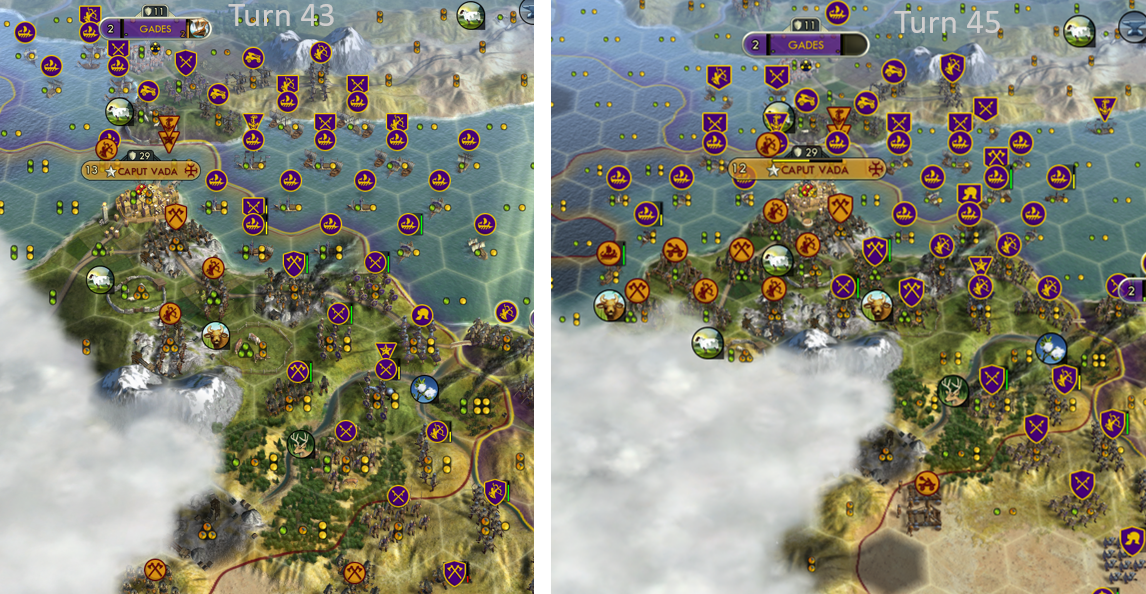
On Turn 44, I moved west Gibraltar fleet to the shallow water choke point to cut off Vandals from being able to reinforce. Hold that shallow hex & hug the coasts. Your triremes exert zone of control on coastal road, which slows down Vandal reinforcement of Caput. The choke point is defendable.
On turn 46, I took Caput. The Vandals will retake it if they have two axemen in hexes south of the city. It’s easier to take this hex after the city falls (in same turn), to eliminate GG bonus. If axemen are fortified, sacrifice a unit the turn before to an attack, removing the fortification bonus. After takeing Caput and laying a citadel, the Vandals are done.
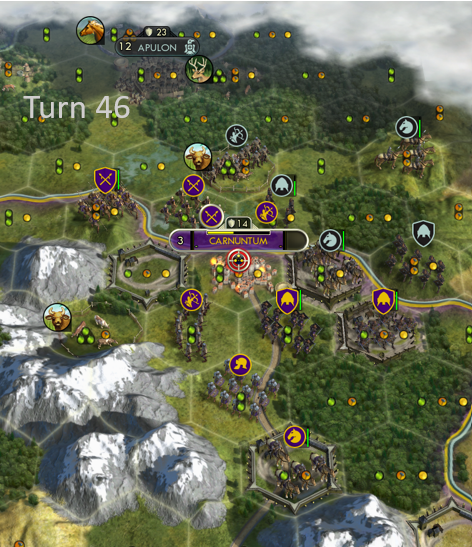 The Balkans are easy. Protect byzantine cities with a few troops. Carnuntum will keep come under fire, so reinforce it. Advance temporarily to the two hexes to north to relieve it.
After your crusaders sail, build a couple horse in Rome. These can scout into Goth territory and work to raze their horse pastures east and northeast of Carnuntum. Start surrounding Sirmium and Naissus with spears and archers to ward off advancing Goths.
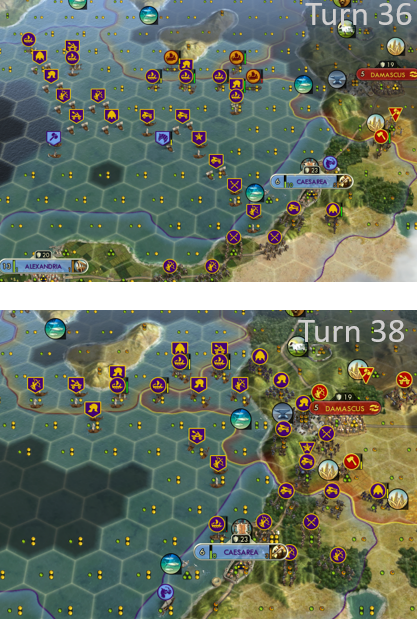 You need to land your floating crusaders safely, quickly, and in formation. The east is most important front since you cannot reinforce (other than enrollment). I recommend saving each turn before moving so you can see response and redo as needed. Enrollment attacks & siege units on cities are exceptions, which need timing with RNG.
The safest landing point is Alexandria, avoiding Vandal corsairs. But it's slow and you'll be out of formation. Instead, your eastern fleet will beat Vandal corsairs and land around Caesarea/Damascus/Antioch.
First land at Caesarea to fight off Sassanids siegers. Then, while fighting off Vandal corsairs, land around Damascus (use trireme ZOC to avoid corsairs hitting your floating troops). It will be a stiff fight by land and sea to liberate Damascus (turn 40). Protect siege engines & archers from dreaded Persian clibanarii. These horsemen will be a thorn in your foot from here on out.
Take out Vandal ships one by one (perhaps except last two). If they are next to each other, they'll get Destiny’s Army +50% bonus. Be careful not to let them capture your ships. That’s a 50% bonus on both ships.
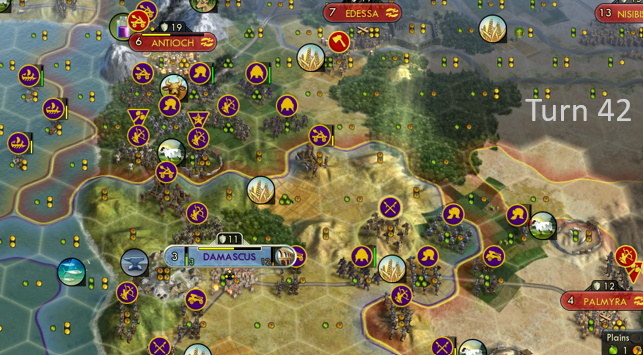 With Vandal fleet gone, sail/march some troops to Antioch. Position catapult to north & pound. Once Antioch is taken (turn 42), leave a small contingent to defend it (few spearmen, a legion for enrollment, and an archer or two). With mountains, Antioch is defensible & draw Sassanid army away from heartland. You won’t stop them from retaking it, but you will slow them (they recaptured turn 53). Save the legion before it falls
While taking Damascus, you want to start marching your crusading army east to Palmyra. It will fall easily (turn 42). Enroll any few troops there.
MOST IMPORTANTLY, do not advance beyond Palmyra north into Sassanid territory. That will draw Sassanid troops back to their heartland. You want Sassanids focused on Antioch. Instead move east & southeast of Palmyra, staying out of sight and in formation, sneaking up on Ctesiphon.
You should have a large enough army to stretch from Nisibis to Ctesiphon. You’ll want four siege engines on Ctesiphon, and three or four near Palmyra to attack Nisibis at the same time. A surprise assault is key. Ctesiphon’s city defense is strong and with even a handful of Sassanid troops, you will lose more troops than you can afford.
The Sassanid Crusade (Turns 47-56)
At this point, the biggest threat to your victory are Sassanid victory points. Even if the Celts and Franks are holding out in northern Gaul, they will be overwhelmed once your Mediterranean fleet arrives in the English Channel. At the end of turn 50, the Barbarian Conscription social policy (-10% combat strength) will sting, but won't be a deal breaker.
 You’ll need to pay attention to victory points and see whether you can achieve a victory (East + West Roman VPs vs. Sassanid VPs). If you can’t, you’ll need to build a larger and faster crusading force. If it's real close, population growth can maximize your VPs. That said, you'll need to starve some population from less worthwhile cities to buffer your Sassanid captures. Try and wait until right before you take Singara to do this (see below).
You'll start going over the unit cap, which will screw your production. You need to produce units in key areas. Sometimes you'll disband a couple units or gift them to the Byzantines (good areas are east Mediterranean fleet, army south of Rusadir, and extra troops in Balkans/Anatolia).
As you capture Sassanid clibanarii and swordsmen, you'll go over cap for horses & iron. You can disband one legion and one horse in Africa. You can disband a horse or two in Balkans region. Going over these resource caps is bad! After taking Ctesiphon, you'll have extra iron to produce more legions in Rome.
Start building circuses in late 40s in Emerita Augusta & Salonae before conquering Sassanid cities. Start building walls in Carnuntum, Casta Regina, and Trier around same time to add strength defenses.
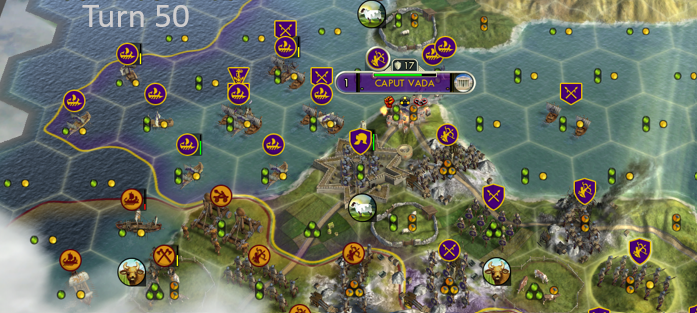 Half (or more) of your Mediterranean fleet can head north to the English Channel. I prioritized ships with promotions. Celtic triremes with Destiny’s Army are tough! Take a Great Admiral too. He can sail across deep ocean, so he’ll arrive first, which helps advance on Coriallum.
Holding Caput Vada is easy. Citadel on the hex southwest of city and fortify hills around it. Hold the shallow water chokepoint until Tricameron expands into the deep water. After, you can pull triremes back to Caput and hold there. The Vandals will cost you either a spear or a trireme each turn, so make sure to have a steady trickle of what's needed to reinforce your defense. That should only occupy a few cities, and northern Spain can supply Gaul.
Keep an army southwest of Rusadir to protect troops coming from desert. This area will also be easy.
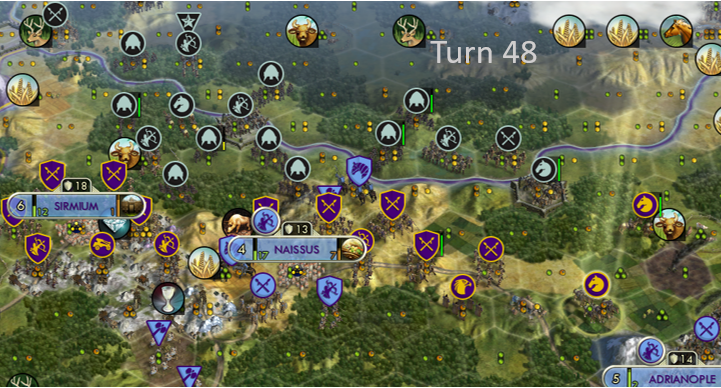 The Balkans will continue to be fairly easy. The only minor challenge is holding Carnuntum. Follow same advice as in previous section.
Surround Sirmium & Naissus with spears/archers to fight off Goths. A few horses north of Adrianople can take down isolated units. Extra Balkans spears and archers, and a horse or two can roll into Anatolia to protect against Hunnic or Sassanid incursions (a few troops each near Amastris, Dorylaeum, and Iconium).
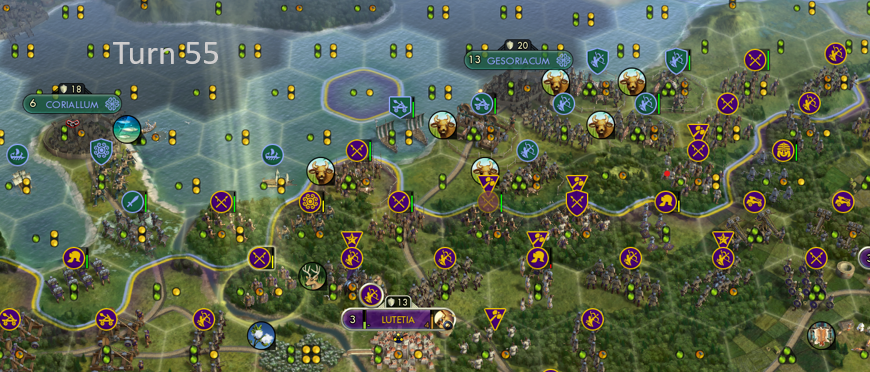 In a perfect world, the Celts don’t constantly land troops along north Gaul. In my final victory, they did. It was a constant heave-ho, back and forth, from Lutetia to borders of Gesoriacum. Plus, I had to protect my backside near Coriallum. Time and the size of your army are on your side. Keep chopping forests between Lutetia and Gesoriacum and killing/enrolling/advancing one hex at a time. There’s no need to take Gesoriacum until Coriallum has fallen and your navy has secured the English Channel. Otherwise the Celts will keep retaking it. Keeping the Celts pinned at Gesoriacum and lining up archers on the coasts to kill their triremes/floaters is your goal.
As noted above, I’d avoid besieging Trier until it’s mostly empty of Franks behind it and until soon after the Franks chose a non-Destiny's Army social policy (turn 44 for me). If these two preconditions are met, Trier is easy. Take it down (turn 47), set up a defense in the hills, and start encircling Gesoriacum to its east. If the Franks around Trier are stronger, it will be a slow, but doable slog. Merge army from Castsa north of Alps, stay in formation, keep hitting them, enroll seaxmen with legions, and advance slowly. Cutting down the trees in the furs hex southwest of Trier helps give visibility to siege engines.
 [/previewim
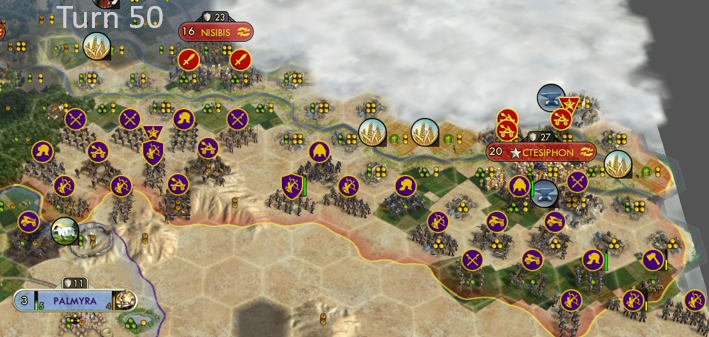
The Tigris & Euphrates rivers in Sassanid heartland are your friends. Clibanarii hit & run operations hurt. With a one hex buffer between your troops and the river, you can kill or enroll whatever tries to hit you until you advance to take the cities.
Thankfully, the developers of this map put Ctesiphon on north bank of Euphrates river and not on north bank of the Tigris (where it actually is). That makes your job easier, since you don’t have to cross the Euphrates. Sneaking around hills west of Ctesiphon is laborious, but worth it.
On turn 49, I had my army fully in position and advanced north to claim the southern portion of the Euphrates river near Nisibis (one hex away), and swiftly moving to Ctesiphon to first kill any units south of it and besiege it. There will be little to oppose you at first, but they’ll arrive soon. It’s why you want to move towards Nisibis and Ctesiphon at the same time. While you take Ctesiphon, you’ll be fighting the first Sassanid troops to arrive near Nisibis. The single hex between the Tigris and Euphrates at Nisibis traps Sassanid troops for enrollment/kills.
With a few troops and your four siege engines, Ctesiphon will fall quickly (turn 52). Try to let its big city gun only take spears. Sneak an archer spear to east of the city to damage Sassanid catapults lurking there. Taking Ctesiphon will hurt happiness, but in my case annexing it (to starve its population) only took me to -9H, which is fine. If it takes you lower, starve necessary people in less worthy cities (Syracuse, Carthage, Massalia, and Olispo are good candidates).
Your forces south of Nisibis will kill the first few Sassanids to jump across rivers. Then advance towards the city.
In my playthroughs, the turn I take Nisibis (turn 54), a huge Sassanid army appears. It's impossible to keep for more than a turn with its first capture. Plus, the happiness hit is brutal. It's best to take it and on same turn withdraw your forces to reset trap around the rivers. You'll only be below -10H for half a turn as the Sassanids retake it immediately (make sure Gaulish forces can handle the temp weakness). Slaughter the Sassanid army that advances across the rivers.
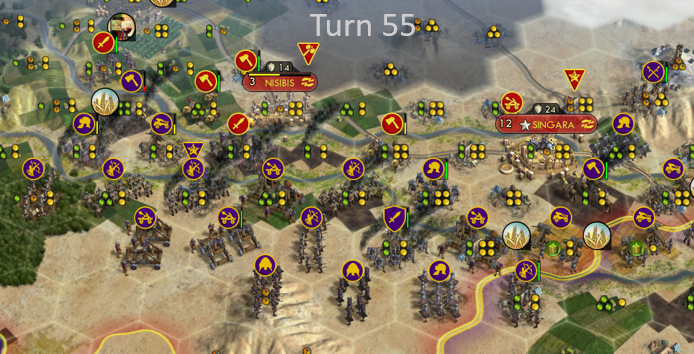
Immediately after losing Nisibis, besiege Singara with Ctesiphon forces. The Sassanids will mostly focus on troops south of Nisibis. Singara should fall easily (turn 56). Puppet it at first. Make sure to starve the necessary population to hold Singara as a puppet while maintaining a -9H. At this point, your two armies will become one unified one. Now it's easy to advance and reclaim Nisibis (turn 58), which you'll raze immediately (starve to stay at -9H or better happiness). After happiness can handle it, annex and raze Singara.
Pax Romana Aeternum (Turns 57-69)
At this point, the end should be clear. It's time to have some fun with whatever direction you wish to go. Feel free to fix your economy by disbanding troops. Or taking Tiel or Apulon. Or attacking Attila.
In my successful game, the Sassanids only surpassed the combined VP total of east and west Rome for 3 turns. After taking Ctesiphon and taking Nisibis the first time, their VP production quickly dropped off and the Roman Empires quickly retook the lead. My land and sea forces in Gaul quickly became so numerous that victory was assured. You could easily be a few turns behind me in Gaul and still won. But, if things don't look clear either in Gaul or with the VP totals, you'll need to take a long hard look at what's going on to determine if you have a path to forge or not.
In Africa, the Balkans, and Anatolia, the same strategy in the previous section holds. Ditto the Franks, they present no challenge. None of these campaigns are tough nor need much attention. The Byzantines will lose your reconquests (Antioch, Damascus, Palmyra, and Caesarea) to the marauding Sassanid army. But that's fine. They have little population and won't impact VPs much. But, you do want to make sure that no large cities in the Balkans or Anatolia are taken or that will impact VPs.
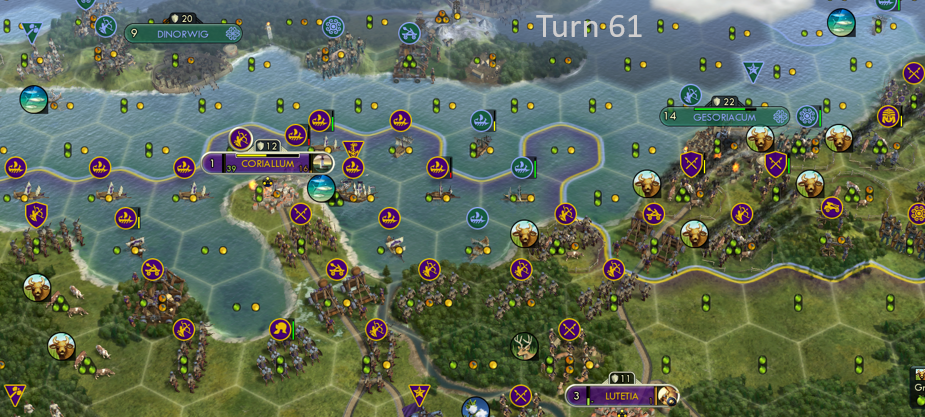 The final steps to achieving your reconquest are Coriallum and Gesoriacum. With the arrival of your great admiral to the corner of the Atlantic and English Channel, it is time to advance. It means, your Mediterranean fleet is only a couple turns back, and at this point the combined ships produced by Brigantium, Mediolanum, and Portus should be enough to advance.
The first turn to advance on Coriallum will move your fleet in (stay out of range of any Celtic cities on Britain). Attack the city with one trireme. Or if an enemy trireme is in the way, attack it. You want the city defenses to focus on your damaged trireme and not your siege engines.
Position one catapult on the forest two hexes southwest of Coriallum. Advance a melee unit into the swamp two hexes southeast of Coriallum on the road towards it. The next turn, keep it up. Fire your siege unit, keep advancing your fleet and attack with one ship. Move the melee unit next to Coriallum and move a second siege unit to the swamp.
At about this time, you can start besieging Gesoriacum. Advance up to it, place three siege units in range and start firing. Try to swing around from east, and try to have as many archers along coast as you can to shoot down Celtic ships.
Coriallum will fall quickly (turn 60), and at that point your Mediterranean fleet should have arrived. You can swarm your fleet east through Coriallum and towards Gesoriacum. If needed, surround Coriallum with ships so the Celts can't retake it immediately. You have plenty. Gesoriacum should fall around the time your ships arrive and surround it (turn 62).
You now control the English channel, a wooden wall of ships and bows. With the entire western Roman Empire intact, victory is assured.
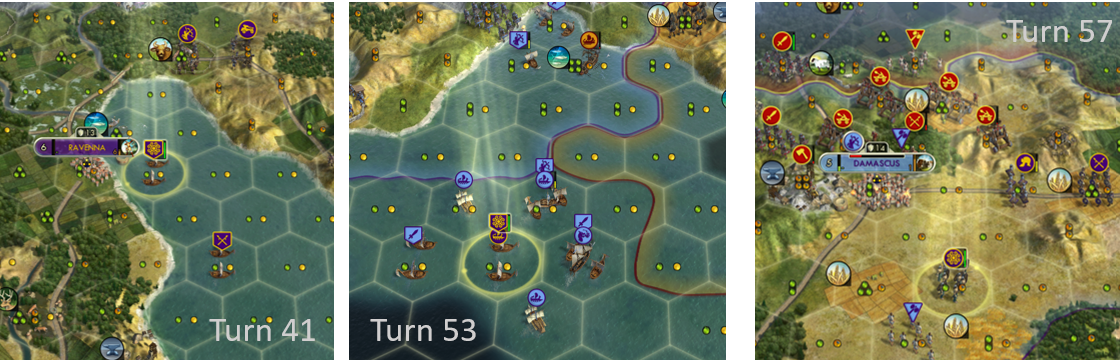
He finally landed at Damascus right after the Sassanids had retaken Antioch and were setting up to besiege Damascus. The legion who'd fled Antioch helped escort him through the danger, and the Pictish Warrior headed north to join the larger Roman army that was advancing on Amida.
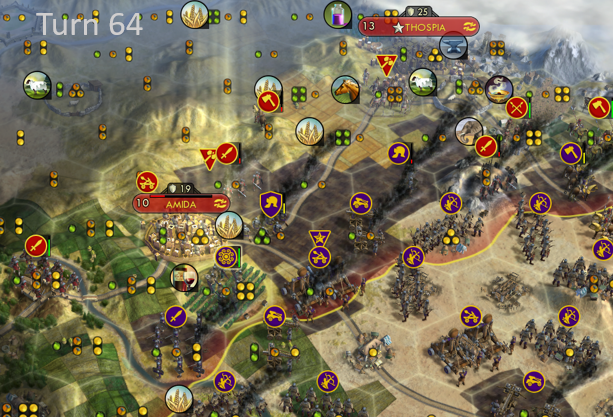 The advance on Amida is slow. The Sassanids are now fully alert to the danger of the Roman army in their heartland and will throw troops at you. That said, your army should be more than strong enough to overpower them.
However, the reserve troops near the back of the army were surprised at this newcomer. Celts in Persia!? Who'd heard of such a thing? They backed off in awe at his conviction. He quickly rushed to the front up the gates of Amida itself. Ahead of the other troops, the Celts were the first to claim the Sassanid city (turn 64). While these efforts didn't ping the Civ 5 achievement "I missed that day in history class," the Sassanids were truly in awe of the diverse army that had humiliated them time and time again.
Emperor Honorius announced that all debts throughout the empire were cleared. A relief for the small people, but also for the imperial treasury. The only dismayed cries were from those greedy debt collectors who'd been left with just scouts.
The fallen were mourned, but another 1000 years of Roman rule in the west had been assured. A hard-fought, but satisfying victory had been achieved. Pax Romana Aeternum indeed.
End Credits
As mentioned above, major credit to the two guides written by Holysword and Stonetorl. They really helped me develop this strategy.
You can download my initial turn here[1drv.ms] (the innitial pregame autosave), just to make sure you start with the exact same settings and same starting RNG list.
I've restarted from scratch and realize that initial RNG list impacts success of opening and strategy of opponents.
That said, I'm fiddling with the strategy described above and can achieve pretty much the same opening results. I'm updating above as I see tips that apply to various starts to achieve a similar trajectory. So far at turn 12, the trap at Coriallum worked but lost archer and killed third Pict (no biggie). It really delayed them at Portus where I killed four picts with legion in city (finally fled on 12). The Franks took Gesoriacum and sent a small, defeatable force at Lugdunum. And Goths took Sirmium but I killed several around Dyrrachium. They haven't taken Thessalonica or Adrianople yet. Overall the start looks to be on similar timeline and success rate. Will update when I find time next weekend to play it again.
I recommend reading Kyle Harper's book The Fate of Rome for an updated historical take on the end of the western Roman Empire: https://www.amazon.com/Fate-Rome-Climate-Disease-Princeton/dp/0691166838
The in-game screenshots are all my own.
The historical images used in this guide are photos that have been released into the public domain. Links to each below.
Honorius: https://commons.wikimedia.org/wiki/File:Diptych_of_Honorius_(head)_(2).jpg
Augustus: https://commons.wikimedia.org/wiki/File:Statue-Augustus.jpg
Amphitheater at Pompeii: https://commons.wikimedia.org/wiki/File:Pompeian_mural_depicting_the_Amphitheatre_riots.jpg
Hoard of coins: https://commons.wikimedia.org/wiki/File:Hoard_of_ancient_gold_coins.jpg
Roman Gladiators: https://commons.wikimedia.org/wiki/File:Gladiators_from_the_Zliten_mosaic_4.JPG
Roman Foodstuffs1: https://commons.wikimedia.org/wiki/File:Still_life_Tor_Marancia_Vatican.jpg
Roman foodstuffs2: https://commons.wikimedia.org/wiki/File:Pompejanischer_Maler_um_70_001.jpg
Roman food scraps: https://commons.wikimedia.org/wiki/File:Messy_floor_mosaic.jpg
Map of Justinian Empire: https://www.britannica.com/place/Byzantine-Empire/The-successors-of-Justinian-565-610
Hope everyone enjoyed reading and playing along
- Real Populations★ 5 (1.2k)79k views1.2k ♥2 minBulgarianUpdated Aug 31, 2017
- Civ-specific tricks, secrets and clarifications (BNW)★ 5 (1k)53k views2.2k ♥96 minUpdated Jun 30, 2019
- Zigzagzigal's Civ Summaries (BNW)★ 5 (1.5k)49k views3.9k ♥134 minUpdated Jun 30, 2019
- Who to Trust and Who to Avoid in Civ V★ 5 (570)41k views802 ♥12 minUpdated Jul 8, 2016
- How to win the Korea Scenario as Korea on Deity in 16 turns★ 5 (532)41k views828 ♥15 minUpdated Apr 1, 2016
- Drunk Civ★ 5 (1.1k)39k views1.2k ♥2 minUpdated 17 Jan, 2020




- Upgrading to PremiumTeam Fortress 2★ 5 (20k)1441k views11k ♥6 minUpdated May 11, 2022
- No More Room in Hell Official ManualNo More Room in Hell★ 5 (2.8k)569k views2.1k ♥29 minUpdated Apr 22, 2019
- NMRiH Community Hosting GuidesNo More Room in Hell★ 5 (526)351k views653 ♥1 minUpdated Aug 10, 2022
- ULTIMATE GUIDE FOR GAME DEV TYCOONGame Dev Tycoon★ 5 (5.8k)326k views10k ♥4 minUpdated 23 Jan, 2014
- How to 'Git Gud' Soon™MORDHAU★ 5 (2k)318k views3k ♥68 minUpdated Nov 16, 2024
- Лучшие кооперативные игры SteamPAYDAY 2★ 5 (1.5k)315k views2.1k ♥56 minRussianUpdated Apr 27, 2025






This guide was created by its original author on the Steam Community. Are you the author and want it removed? Request removal.