Basic Squad Guide (WIP)
Introduction & Overview
First off, a short introduction of me and my experience! I started playing Squad in August of 2024, and have fallen in love with the game ever since. Since then, I've picked up about 1,160 hours at the time of writing this guide. I by no means know everything there is about this game, and to be clear, there are players who have hour numbers that make mine minuscule. I do consider myself, however, qualified to write a basic guide that can help new players have a little less trouble with the learning curve of Squad. To this end, I am open to all feedback that can help make this guide better, and I will be consulting those I know in the Squad community to this end.
Why even write this? The inspiration comes from helping my very own friends into Squad, and despite completing the tutorial, they were left with several questions and confusions that I hope to address. Topics that come to mind are settings, keybinds, basic tactics, and more.
Why not use the wiki? The Squad wiki is incredible, but can be daunting to a new player, my goal is to slowly ease you into the water. That being said, you absolutely should use the wiki, and if I see the wiki already explained it, why reinvent the wheel?
Finally, I want to note this is my first time writing a steam guide, honestly, anything like this, so if a section is confusing or needs clarification, feel free to write comments. This is always a learning experience. I want the feeling of this guide to be your buddy teaching you as an equal, not a robot spitting out paragraphs.
(This is a WIP, despite my enjoyment of Squad I am unfortunately a University student with little time, so don't expect weekly installments or anything)
Healthy Mindset
That being said, it is a well known rule of Squad that friendly fire mistakes will happen. You will shoot a friendly, and a friendly will shoot you, just a feature of the genre. Keeping a level head and an understanding tone is the difference between quitting or persevering to beat the other team.
The Language of Squad
Each section will have an overall category, like "Vehicles". I also try to include gameplay terms that apply to the section, such as "Backcapping" in the "Gamemode" section.
Language (Gamemode/Structures)
Gamemode Basics
Tickets: The core of how Squad plays, tickets are the blood of the team, you run out and you lose. Infantry usually costs 1, light vehicles 5, medium 10, and heavy 15. Commander costs 2. Note that being incapacitated does not lose a ticket, but giving up or bleeding out does. Getting shot by a rifle will give a long bleed-out timer, but a direct tank shell will cause you to give up instantly.
Point/Cap: Specific location that the teams must fight over. Points that are inactive have the icon of a lock over them when viewed on the map.
Role/Kit: From the humble rifleman to the explosive combat engineer, everyone needs a role to do their job for the squad and team. This includes your loadout, with many roles having multiple kits that vary with weapons, equipment, scopes, etc.
Training Range: Every beginner should stop here at least once before joining an open match, found under the training tab. Includes a setup of all factions and their equipment, so you can practice with every weapon and combination under the sun. The value cannot be overstated.
Staging Phase: The staging phase is the beginning of the match, where the team organizes and begins to plan their strategy. This is a grace period, and the main base will have a barrier, with all vehicles being unable to turn their engines on for the duration. For defenders in Invasion, they do not receive a staging phase and must begin mobilizing immediately.
Out of position: Get back in the fight! If you're Squad Leader says this, it means you aren't where the action is, and your team is likely suffering for it.
Map Layer (Or simply "Layer"): This refers to the setup of capture points the map could contain, since there are a few possible options. You could reasonably predict the direction of the points within 1 or 2, but this isn't always true.
Backcapping: Backcapping simply refers to capturing the first few points when a match begins, sometimes boring but essential.
Invasion: By far the most straightforward game mode, Invasion has a defending team and an attacking team; the defending team gets time to set up, while the invading team prepares to attack. Usually, a game has about 5 points on the map. Defenders start on a large ticket reserve, while the attackers have to fight and gain large ticket bonuses when they capture a point.
AAS (Advance and Secure): AAS features 7 points (usually fewer on smaller maps) that are connected linearly, meaning a connected point can't be captured without the previous. In a balanced match, the teams will usually meet in the middle and then contest the 4th point. Note that capturing enemy points in AAS and RAAS will net more tickets than capping a neutral point (60 vs 20).
RAAS (Random Advance and Secure): RAAS is nearly identical to AAS except for randomized points that must be either predicted or found by capping the previous points. Adds a certain surprise element that can be quite exciting!
Fireteam: A single player or coop gamemode where you fight AI in specific missions, but frankly, unless you are really struggling, I would recommend just playing with real people.
Tech Structures, Fortifications, and SpawnsNote:Unconventional forces such as the Middle Eastern Insurgents (MEI) and Irregular Militia Forces (IMF) will have lower build costs on some buildings, especially the IMF.
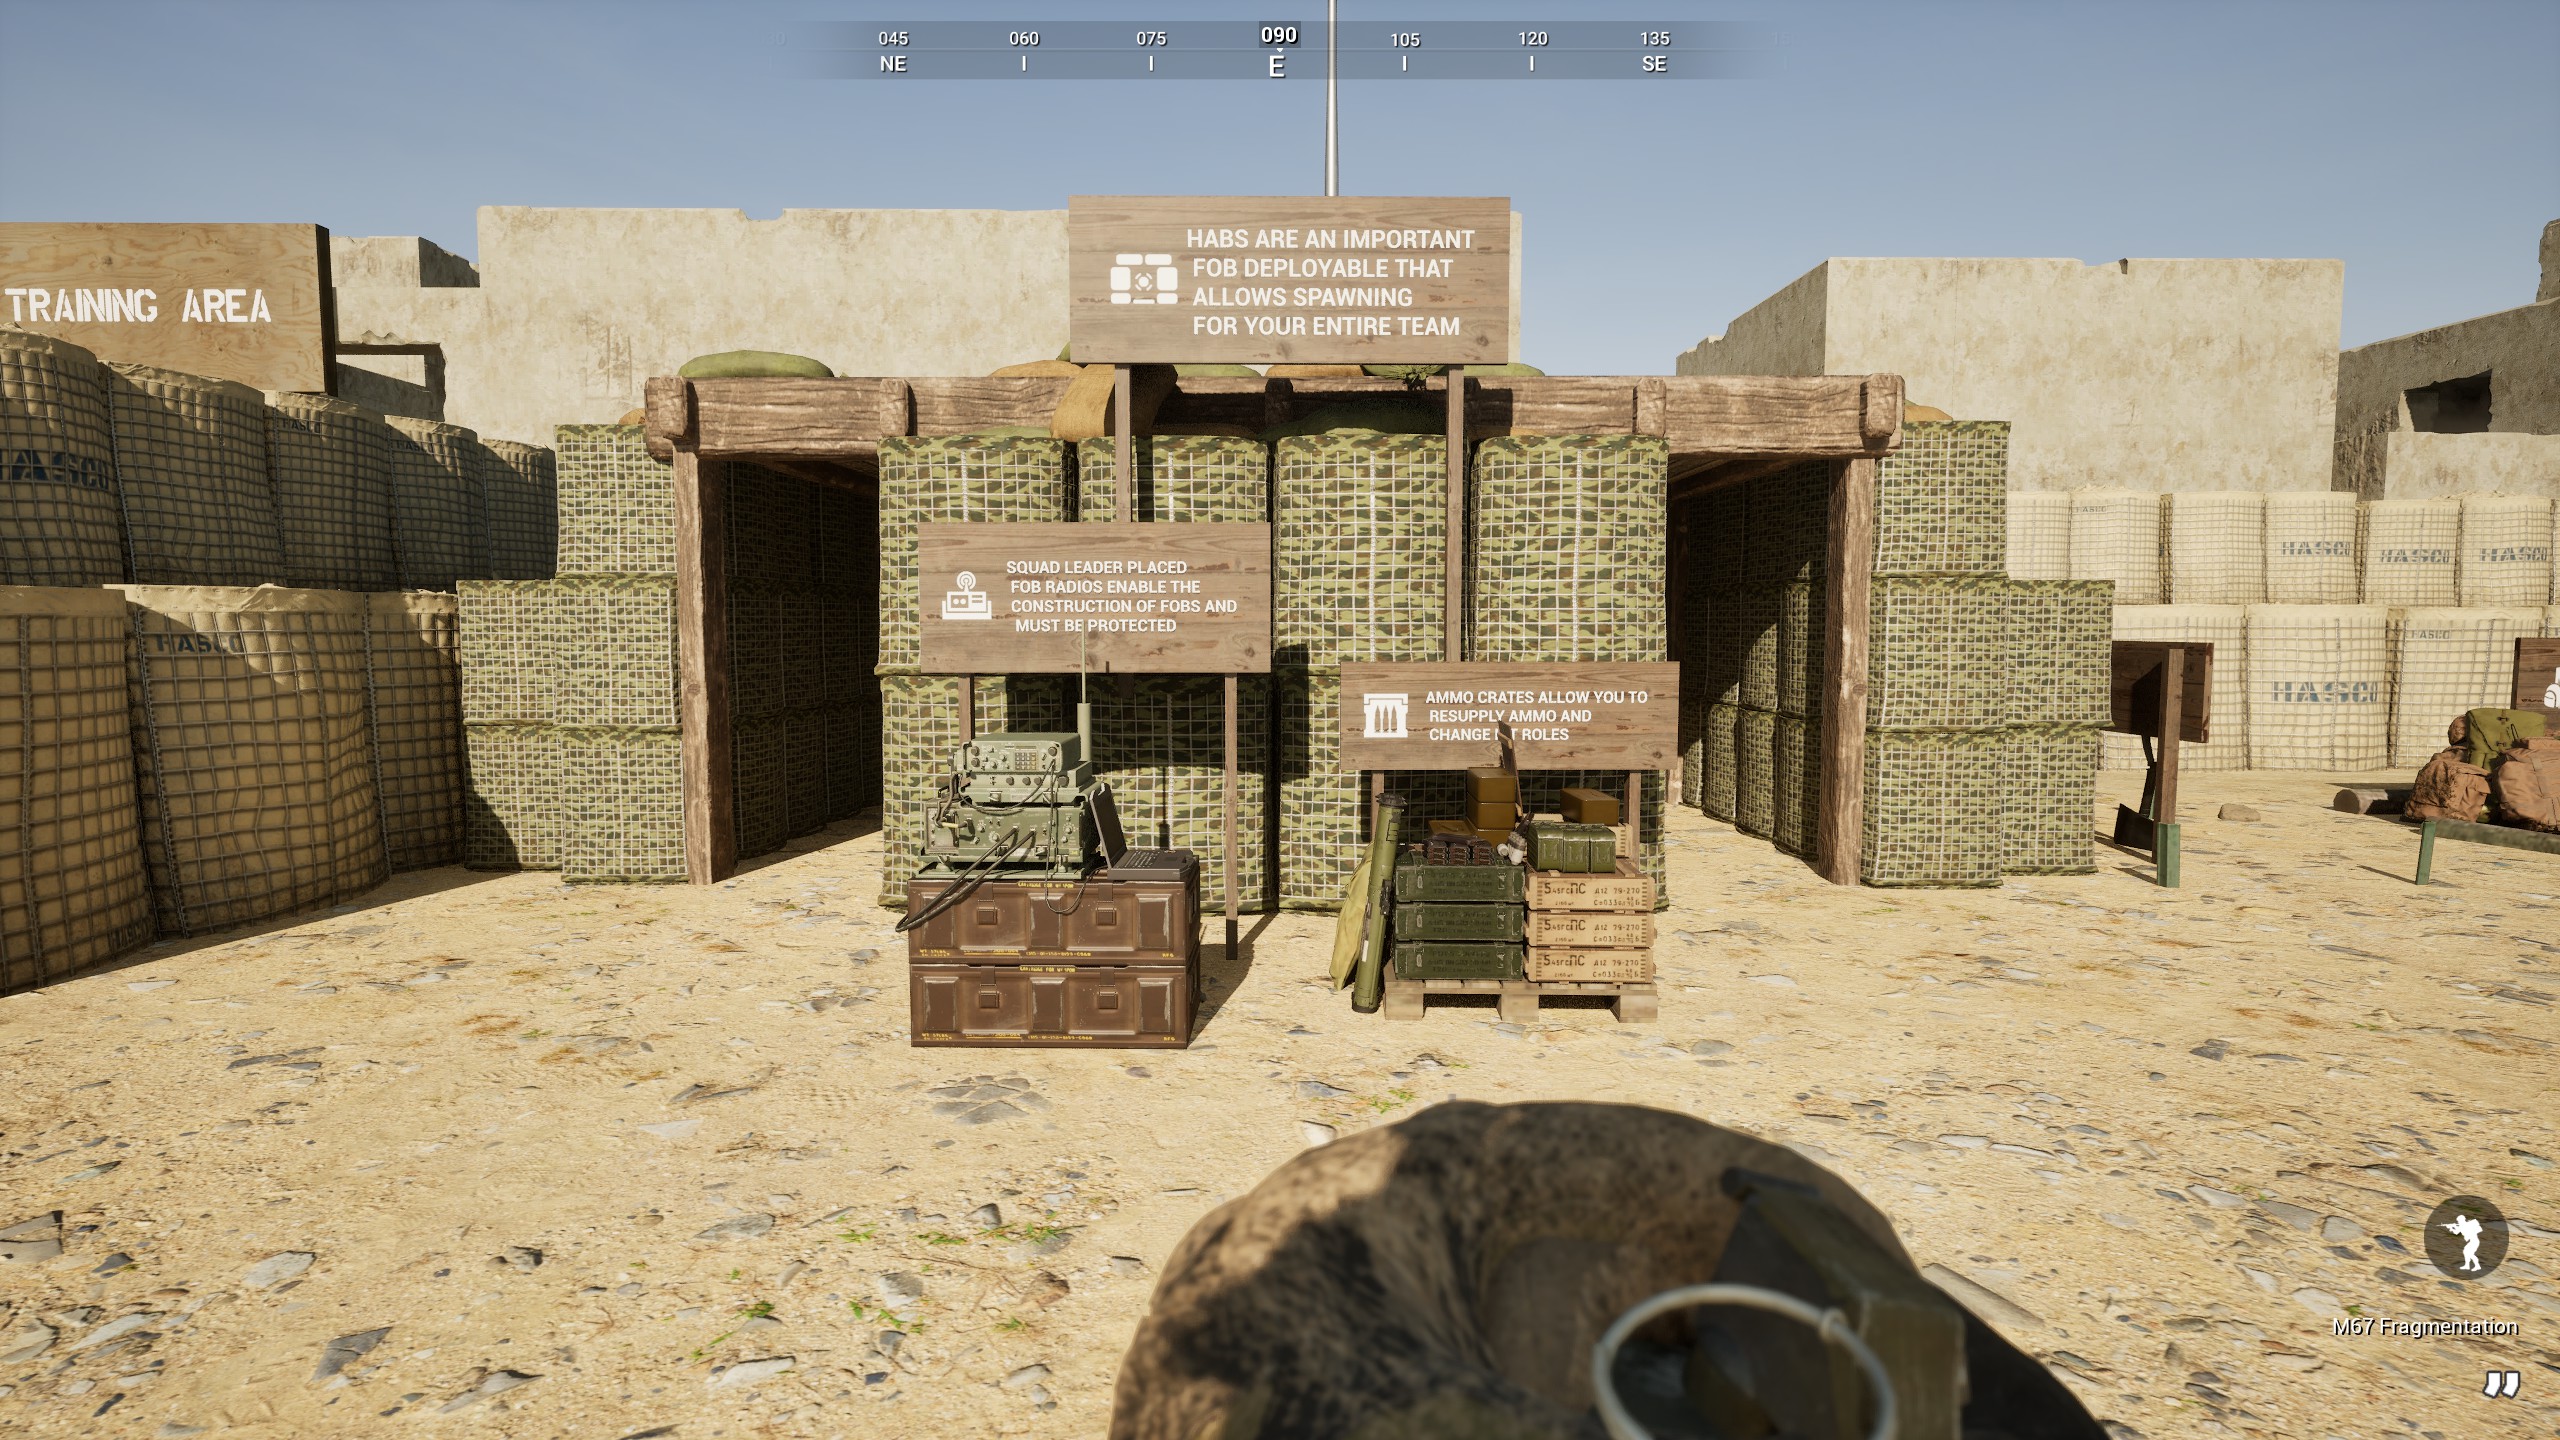 FOB (Forward Operating Base): The center point around your team and the number one target of the enemy. The FOB is a small radio that can be placed by Squad Leaders, and is the tree from which all other player-made buildings branch. When a FOB is placed, the blue circle is the area in which buildings can be placed, while the light grey border represents the FOB exclusion zone that prevents another radio from being placed inside its radius. The FOB health can be seen in the top corner of your screen, along with the ammo and construction supplies. Remember that a FOB radio has audible static that can be heard by friends and enemies.
Super-FOB: A heavily fortified and populated FOB, often used by defenders on Invasion
Ammo: Indicated by a bullet icon and reddish orange bar, this is a representation of how much your team can resupply. Costs of resupplying vary, with one magazine of a standard rifle being 2, a light rocket being 30, and a wire-guided missile being 500. All vehicles can carry some amount of ammo.
Construction: The counterpart for ammo, construction is used to build fortifications and repair vehicles. Since only a few vehicles can carry construction however, it is considerably more valuable and should be treated as such.
HAB (Infantry Spawn Bunker): Is equal in importance to the radio; when either is damaged or disabled, you cannot spawn at the bunker. Note that different factions have different appearances for structures, including the HAB. All of them follow a rectangle type shape though. Costs 500 construction for conventional factions and 100 for unconventional (usually).
Rally: Placed by Squad leaders as a mobile rally point, which will then spawn squadmates in 60 second waves. To place, enemies cannot be within 50 meters, if the squad leader does attempt to place it, then the rally will be on cooldown for 2 minutes. They can only be placed when the squad leader is near at least one squad member. Some leader roles require 2 or 3 members.
Burning a rally: This refers to a rally being destroyed by the enemy, which can only occur when an enemy, even in a vehicle, comes within 30 meters, at which point it automatically disappears. However, shooting at a rally will not destroy it, but they can be camped from a distance!
Ammo crate: Simple, the ammo crate you use to grab ammo or change your role. You can change your role by holding F and navigating the radial menu. Remember that changing your role in the deployment screen will take most of your equipment, whereas switching at an ammo box will recycle your ammo into the FOB. Costs 100 construction
Proxying a HAB/Proxying: This refers to disabling a HAB by having infantry close by, without damaging the radio or HAB itself. A HAB can be proxied by as few as 2 people, but they have to be within 20 meters to do so. This possible distance increases by 10 meters for every person however, therefore 5 can do it 50 meters, continuing up to 9.
Repair Station: The only structures that can repair and rearm vehicles, costs 500 construction and continually drains it when repairing vehicles.
Observation Tower: A large fortification that can fit multiple soldiers and allows for firing out of camouflage nets, provides a strong defensive position but sticks out like a sore thumb. Costs 600 construction
HASCO Bunker: A bunker made of solid blocks that can provide shelter and a decent firing position for defense. Allows a camo net toward the front to conceal those inside. Costs 150 construction
HASCO Block: A small block that can provide small cover, but in my experience is often used to block off roads against vehicles. Costs 50 construction
Razor wire: Barbed wire that damages infantry if they walk into it, good for setting up chokepoints, but don't get so carried away you funnel your own team into the enemy! Costs 15 construction
Sandbag Lines: Exactly as you'd expect, simple to use but won't stand up to a vehicle with anything bigger than a 50. cal. Costs 25 construction
Indirect Fire Shelter: Will save your life against artillery and mortars, but is vulnerable to anything else. Is excellent to have in a more open FOB but expensive. Costs 300 construction
Language (Squad/Infantry)
Squad Terms
SL: Squad Leader
FTL: Fire-team leader, is chosen by the SL and can be passed around the fireteam to mark targets. Able to place structures and mark on the map.
Bravo/Charlie Fireteams: Teams within a squad for easy organization, max of 2 fireteams per squad. They are able to place marks, with Bravo being purple and Charlie being light blue.
Commander: SL that was voted in by other SLs and has special commander call-ins.
Blueberries (Derogatory): Anyone who isn't in your squad, ex. "Those blueberries aren't doing anything on the point."
Mic: Microphone
Mark/My Mark: Often said by the SL and meant to focus his squad, ex. "Move towards my mark"
My Observe/On Observe: Similar to my mark, but specifically so his Squad looks at it, ex. "Squad fire on my observe". The icon is a large eye when used
Infantry Terms
Ammo bag: Refers to the ammo bag that all standard riflemen carry, and is crucial for resupplying the Squad on the go.
Mag/Mags: Magazine or Magazines, which usually hold 30 rounds, not to be confused with clips.
Clips: Clips are specifically designed for a weapon and don't hold nearly as much ammo as mags do, usually look like simple metal brackets containing bullets
Magnification: The zoom on a scope or binoculars, found on the bottom right of the screen when the weapon is equipped.
HVT: High-Value Target
AT: Anti-Tank
LAT: Light Anti-Tank
HAT: Heavy Anti-Tank
GL: Can mean Grenade Launcher or Grenadier
AGL: Automatic Grenade Launcher
Round: Unspecific name for a projectile, ex. "He shot a few rounds towards the East".
INS: Insurgent, ex. Middle Eastern Insurgents
IED: Used only by the insurgents, and an HVT, often used on suicide missions with bikes or attached to drones. Stronger than an artillery round, and multiple can easily destroy tanks
RPG: Rocket Propelled Grenade
HE: High-Explosive, usually for infantry but can be effective on light vehicles and weak spots.
HEAT: High-Explosive Anti-Tank, a lighter round that should be used on softer targets.
TANDEM: A long acronym, just remember that it's used for heavy vehicles.
FRAG: Fragmentation, anything with this attached is very good against infantry but often poor against anything but unarmored vehicles.
Contact/Tango: Referring to an enemy or target, and usually followed by a direction callout
Bearing: Compass direction, ex. "Contact bearing 230"
Cardinal Directions: North, East, South, etc. ex. "Contact Northeast"
Pinned down: Surrounded by the enemy or unable to move due to enemy attacks
QRF: Quick Reaction Force, reinforcements that are needed to respond to situations or relieve pinned-down friendlies. Often using a fast vehicle such as a Helicopter.
LMG/GPMG: Stands for Light Machine Gun and General Purpose Machine Gun respectively
Berm: A level space that is near a slope, like climbing a hill, crossing a road, and then climbing up the hill on the other side, that road would be considered a Berm.
CQB: Close Quarters Battle
I need Meds: Needs a bandage or to be healed by medics
Pick me up: Needs to be revived with a bandage or wants to enter a vehicle
Mikes/Mike-mike: Drawn from the NATO phonetic alphabet, can be used to refer to anything that starts with M, for example 40 millimeter grenade to 40 mike-mike, ex. "Shoot a 40 Mike-Mike in that building!"
Ragdoll: Gaming term for when a body goes limp and drops to the ground
Dropped: Refers to incapacitating (ragdolling) an enemy, ex. "Dropped One!"
Mils: Not to be confused with millimeters, this relates to mortars and their scope.
Walk it in: Also refers to mortars "walk it in" translating to "Slowly spread the mortars towards an area", as in start shooting mortars south of the point then slowly move your aim towards the target
Saturating/Suppressing: Similar but not the same. Suppressing is keeping enemy infantry down with an MG, making it so they can't fire back effectively. Saturating is when you hit them with so much firepower they can't even hear themselves thinking.
AOE: Area of effect
Arty: Artillery
Caliber: The diameter of the barrel of a gun, literally measuring the width of a gun barrel. Therefore a measurement of .50 Caliber just translates to .5 of an inch.
.50 Cal/12.7mm: Explained Caliber above, but specifically want to point out .50 Cal and 12.7mm are the same thing, just different measurements.
Small arms: Rifles, LMGs, GPMGs. These are weapons that can be operated by a single person.
Bushwookie: A soldier hiding in grass or bushes, often a thorn in the team's side.
PIP: Picture-in-picture, almost always refers to how scopes work in Squad.
Language (Ground Vehicles)
Ground Vehicles
Hot-drop: Driving a vehicle into a contested area and dismounting rapidly in a surprise assault, ex. "We are hot dropping onto the enemy point"
Vic: Vehicle
Technical/Techie/Tech-e: Meaning a pickup or small SUV, not to be confused with larger trucks
Transport: Large trucks that can carry an entire squad with spare room, also carry a small supply of ammo
Logi: Logistics truck, identifiable by boxes or barrels in the back, HVTs that carry lots of supplies and are needed to place down FOBs
APC: Armored Personal Carrier, fairly slower than trucks but provides much better protection, and often has MGs for defense.
IFV: Infantry Fighting Vehicle, not as armored as APCs, and is equipped with an autocannon for both vehicle and infantry combat. Also fast and maneuverable in most cases
MGS: Mobile Gun System, basically a tank cannon mounted on top of the body of an IFV, the epitome of a glass cannon
MBT: Main Battle Tank, the vehicle anti-tank roles dream of killing, equipped with heavy armor, a large cannon, and slow as hell.
Tracked: Refers to a vehicle's tracks being damaged or simply the fact it is tracked, ex. A tank crew saying, "We're tracked!" or "Get in the tracked vehicle"
Wheeled: The exact same as tracked, either meaning the wheels on the vehicle are damaged or describing a vehicle as having wheels
Engine'd: Simple slang between crewmembers to convey that the engine is damaged or broken and needs to be repaired
AP: Armor Piercing
Traverse/Traversal: Used among vehicle crews when referring to the rotation of a turret, often followed by a bearing or cardinal direction. For example, "Gunner, traverse turret to bearing 295!".
Coax: Full name coaxial, a secondary weapon found on MBT and IFV turrets, always a LMG with a smaller caliber for dealing with infantry.
CROWS: Common Remote Operated Weapons System. Fancy term for remote controlled gun. Found on Conventional faction light vehicles and on some MBT commander seats. Can be LMGs or HMGs, and is extremely strong in combatting infantry due to easy traversal and use.
Understanding The Factions (WIP)
A faction is conventional or unconventional
- Conventional: Features a standard, organized unit with common elements across the roles. Basically, the infantry will have a common weapon across the team and a cohesive vehicle structure. The United States Army, for example, has the M4 Carbine as the standard firearm for most of the basic kits. Clean, professional, and focused, these factions are proper sluggers who don't beat around the bush.
- Unconventional: As you'd expect, the exact opposite of Conventional. Dirty, rugged, and fighting with whatever they can. A clear example is the Middle Eastern Insurgents (Terrorists), who have a variety of different weapons and unconventional tools. I.E, a mix of AK and NATO weapons with makeshift explosives like IEDs, also very fun! Guerrilla tactics are often very effective for these factions.
Additionally, if factions in the same category are similar, like the United States Marines and Army, I will put them close.
Settings
- A setting is confusing or has other interactions with game mechanics that are not clear
- A setting is easily understood, but is so important that I will explain it anyway
I plan on organizing this by each tab in the settings, meaning that the "GAME" tab will be its own section, and so on. That way, if you want to come back to something specific, you can narrow it down by the tab, unfortunately Steam doesn't allow subsections for guides as far as I could tell.
Certain settings will be grouped together due to their similarity.
"GAME" Tab (Settings)
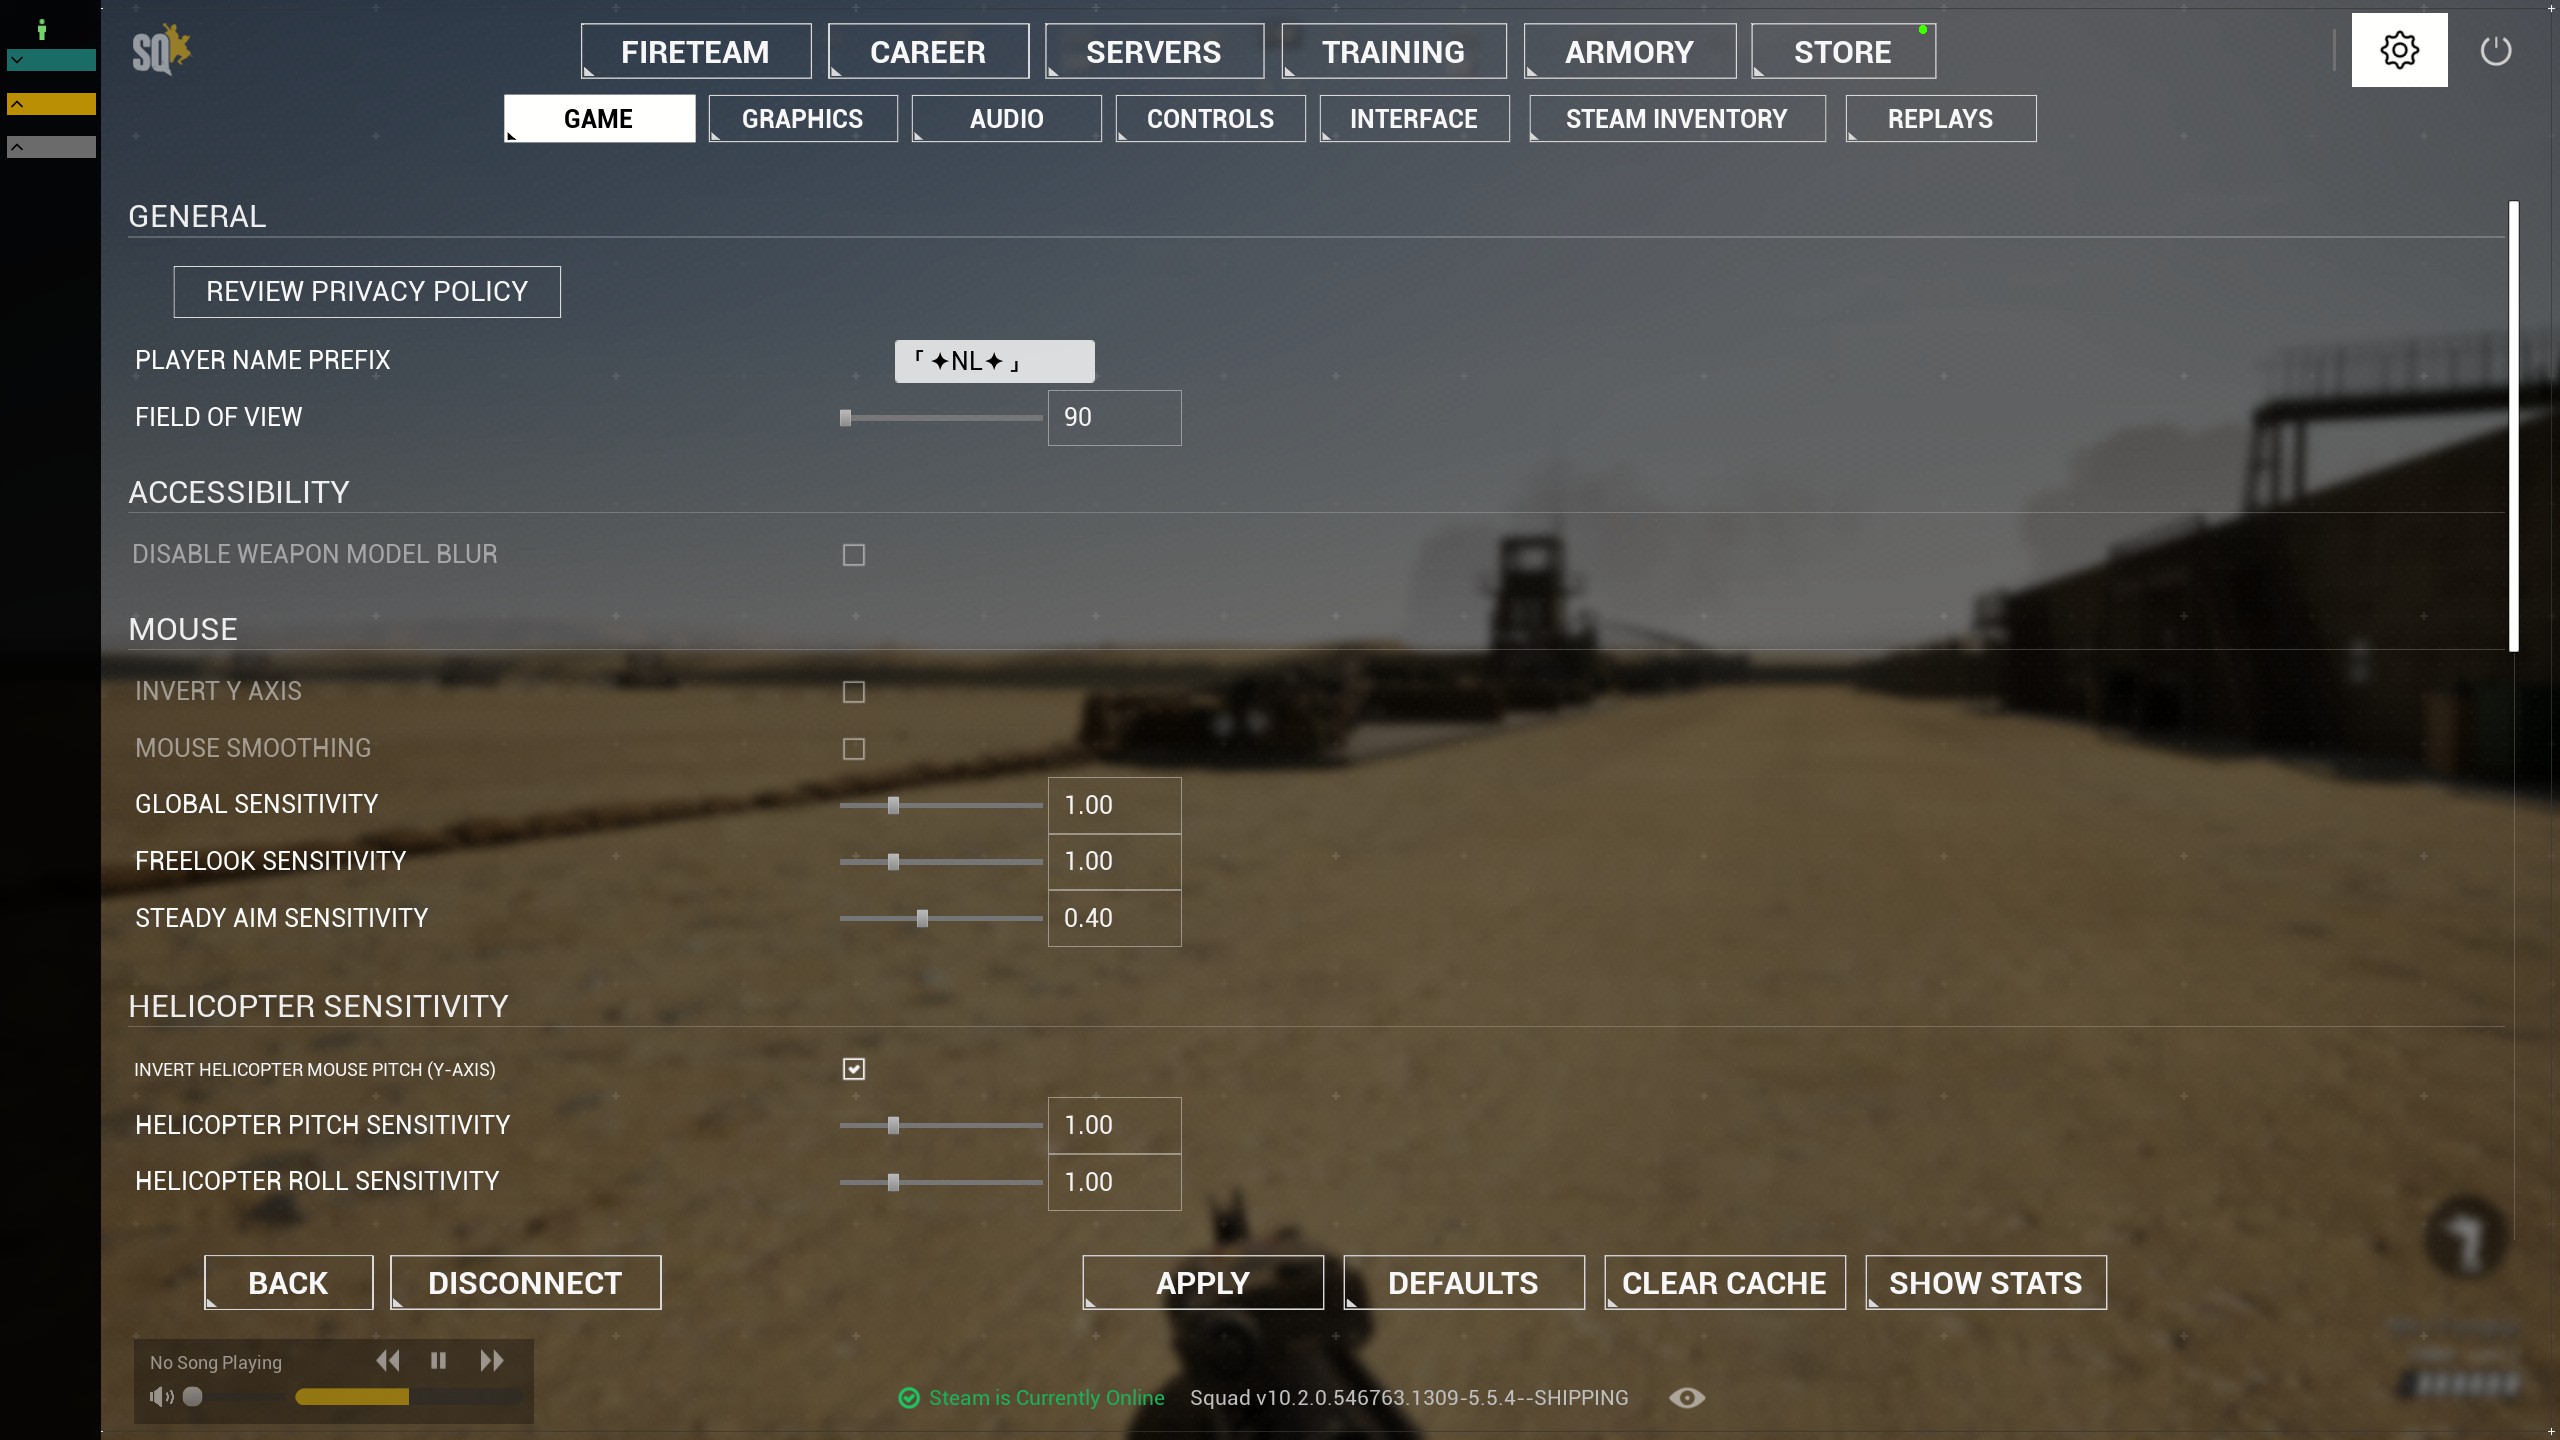
Player Name Prefix
This is basically a clan tag, for example, mine is NL because I'm part of the Northern Lights server, but there is no limit! Join with your buddies and have your own special tag for easy identification.
Field of View (FOV)
Now here is a tricky one, a smaller FOV makes seeing targets easier due to vision being tunneled, but a higher FOV can be useful for more awareness in CQB (Close quarters combat) situations. I originally played a higher FOV but switched. Higher FOV than 90 can also cause a specific bug with the recoilless rifle emplacement and vehicle, regarding the scope, messing up the range indicators, and causing you to miss. I am not aware if it causes bugs for other scopes too, so beware.
Disable weapon model blur
Anything with blur I disable, simple as. Note that the in-game tooltip says it can prevent eye strain, though.
Mouse Settings
Now, these sensitivity settings are pretty subjective, so I'll just give some tips. We will talk later in this section, but having a sensitivity where you can quickly look around while not aiming down sights is crucial. If your squad suddenly says, "behind us!" you need to be able to whip around and be ready to engage.
Helicopter settings
I play with inverted, but again, preference is king here. I also keep the default settings, and I found it easier to gain muscle memory.
Soldier Sensitivity Multipliers
This section looks overwhelming, but really isn't. For the uninitiated, "magnification" just refers to how zoomed in your scope is; for example, the ACOG has a magnification of 4X, therefore it will be governed by the "4x Magnification" slider. Again, experiment and find what you prefer. I just keep the defaults.
Vehicle Sensitivity
Same as the above basically.
Movement
Now for this, I keep everything but "Crouch mode" as a hold, because having to toggle your lean or sprint in a high stakes situation can be a pain in the ass. Having to tap the lean button to avoid being shot while peaking a corner, compared to just letting it go and automatically pulling back can be a millisecond difference between death and life. I also enable "Jump causes uncrouch/prone" as you can quickly tap it when you need to, rather than a specific key. Same principles for freelook mode.
"Graphics" Tab (Settings)
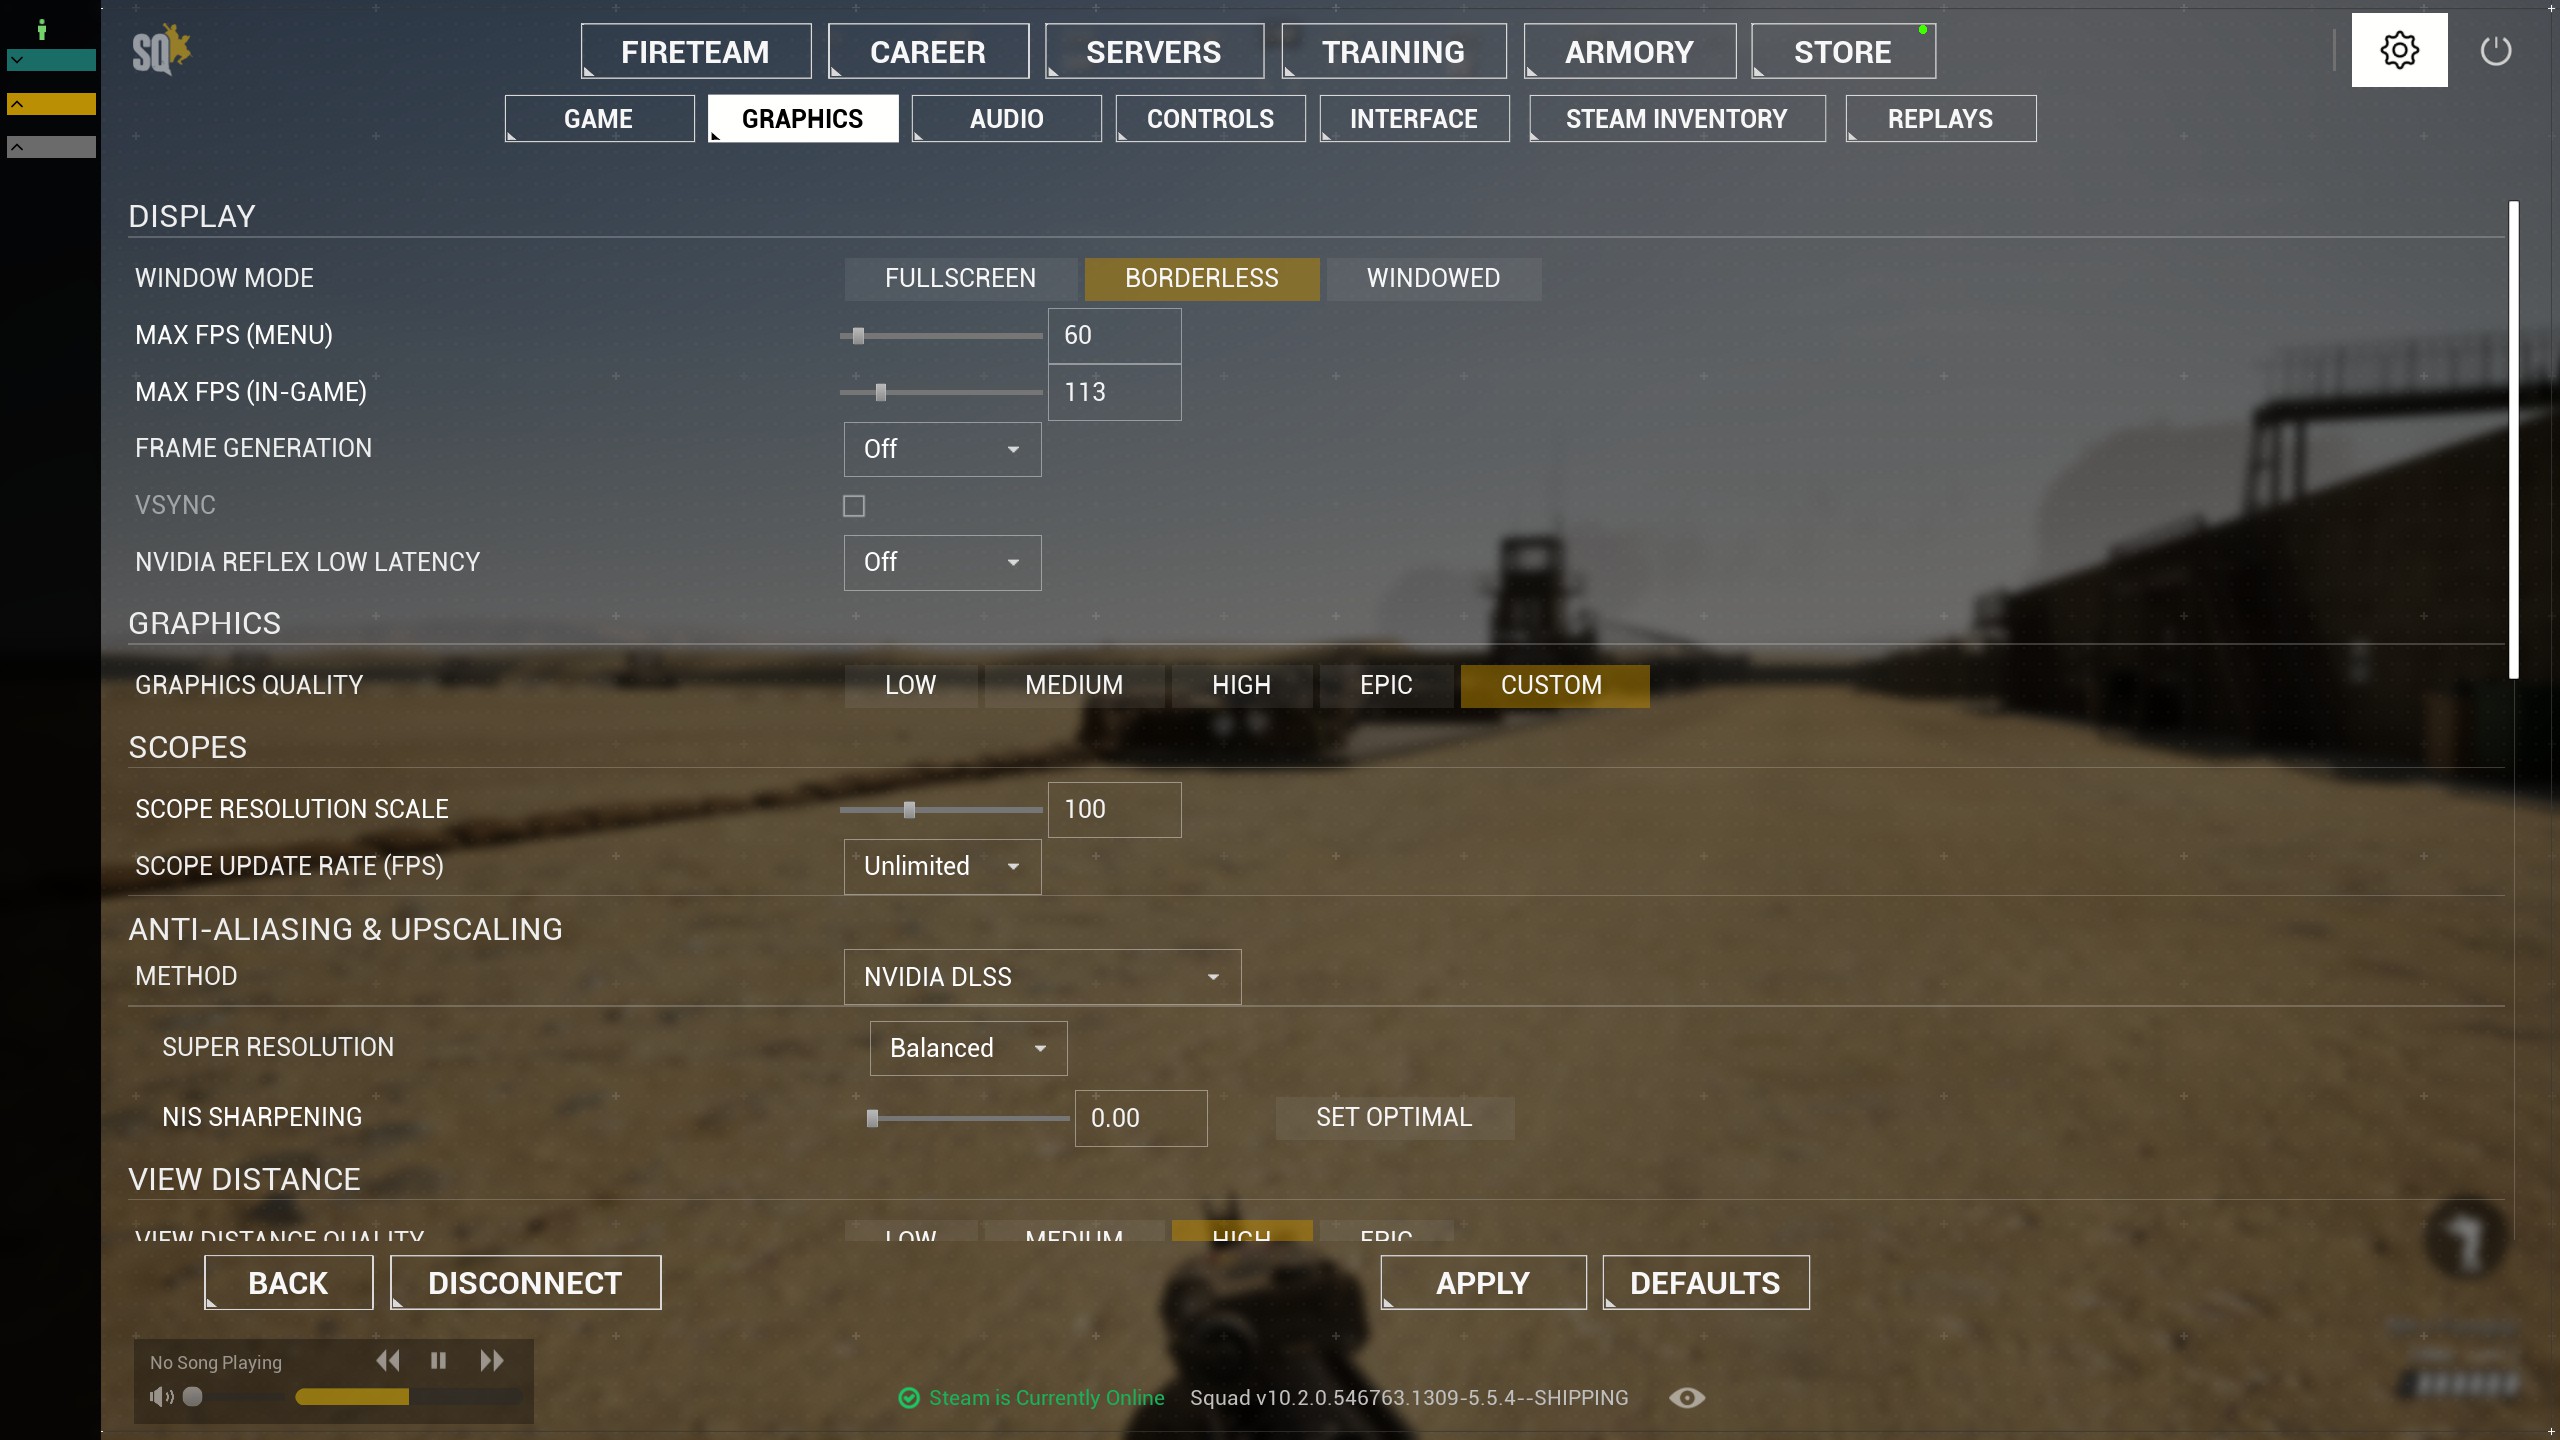 NOTE: Graphics, especially the settings governing performance, are subject to your hardware. Despite my advice and the in-game tooltips, you need to experiment and find what works for you.
 Display
Beginning with the ever-important graphics settings, we have the display section. I keep Borderless so I can tab out, although you supposedly get better FPS with Fullscreen. We don't talk about windowed. Now, I'll admit, hovering over settings such as "Nvidia Reflex Low Latency" will give a better explanation than I can, but I keep it off to keep things simple.
Graphics Quality Presets
Simply put, use these if you just want a broad setting and not mess with all the little things, otherwise yours will be custom.
Scope Resolution Scale
Scope resolution scale is extremely important. I wouldn't recommend lowering it unless you REALLY need the frames. This is because lowering the resolution will make it that much harder to see through scopes, which you will use all the time. On the other hand, I didn't see a benefit to the fidelity when I tried to raise it. Developers have said they are working on an alternative to PIP (Picture in picture) scopes, but this is what we get for now.
Scope update rate (FPS)
This is another tricky one, personally I feel that playing with anything but unlimited causes my scope to lag, while my friend says not limiting it causes it to hitch. Therefore, I recommend that if you have a lower-end PC, cap the frames, but if you run it just fine, keep it unlimited or at a high number.
Anti-Aliasing and Upscaling
Again, hovering over the in-game tooltip explains it better than I can. This goes for "Method", "Super Resolution", and "NIS sharpening", which on that last one I would just do "Set Optimal".
View distance
Now I would recommend trying to keep this high, long engagements, and spotting will happen often, especially on larger maps.
Shaders
If you can keep them high, great, if not, ain't the end of the world.
Textures
The sink of your VRAM, changing this setting will have a massive impact on game visual quality and performance, as for me, I find the game to have good fidelity on high.
Shadows and Lighting
Good to have, but less important than things like textures. Cut this if you need to grab some frames.
Particles
Now this is also important for performance, and honestly, not too needed for gameplay, but damn, they look good when turned up.
Ocean Quality
First thing to cut if you're looking for FPS, I wouldn't recommend wake simulation regardless, since I heard that it causes a bug with PIP scopes, but I could be wrong.
Post processing
Again, medium or high quality is cool, but if you really need it, go for low. Motion blur is disgusting, so that goes all the way down to 0. Tone mapper sharpening is at default.
Color Grading
Never messed with it, not really essential but if you feel like tweaking your perfect game, go ahead.
"Audio" Tab (Settings)
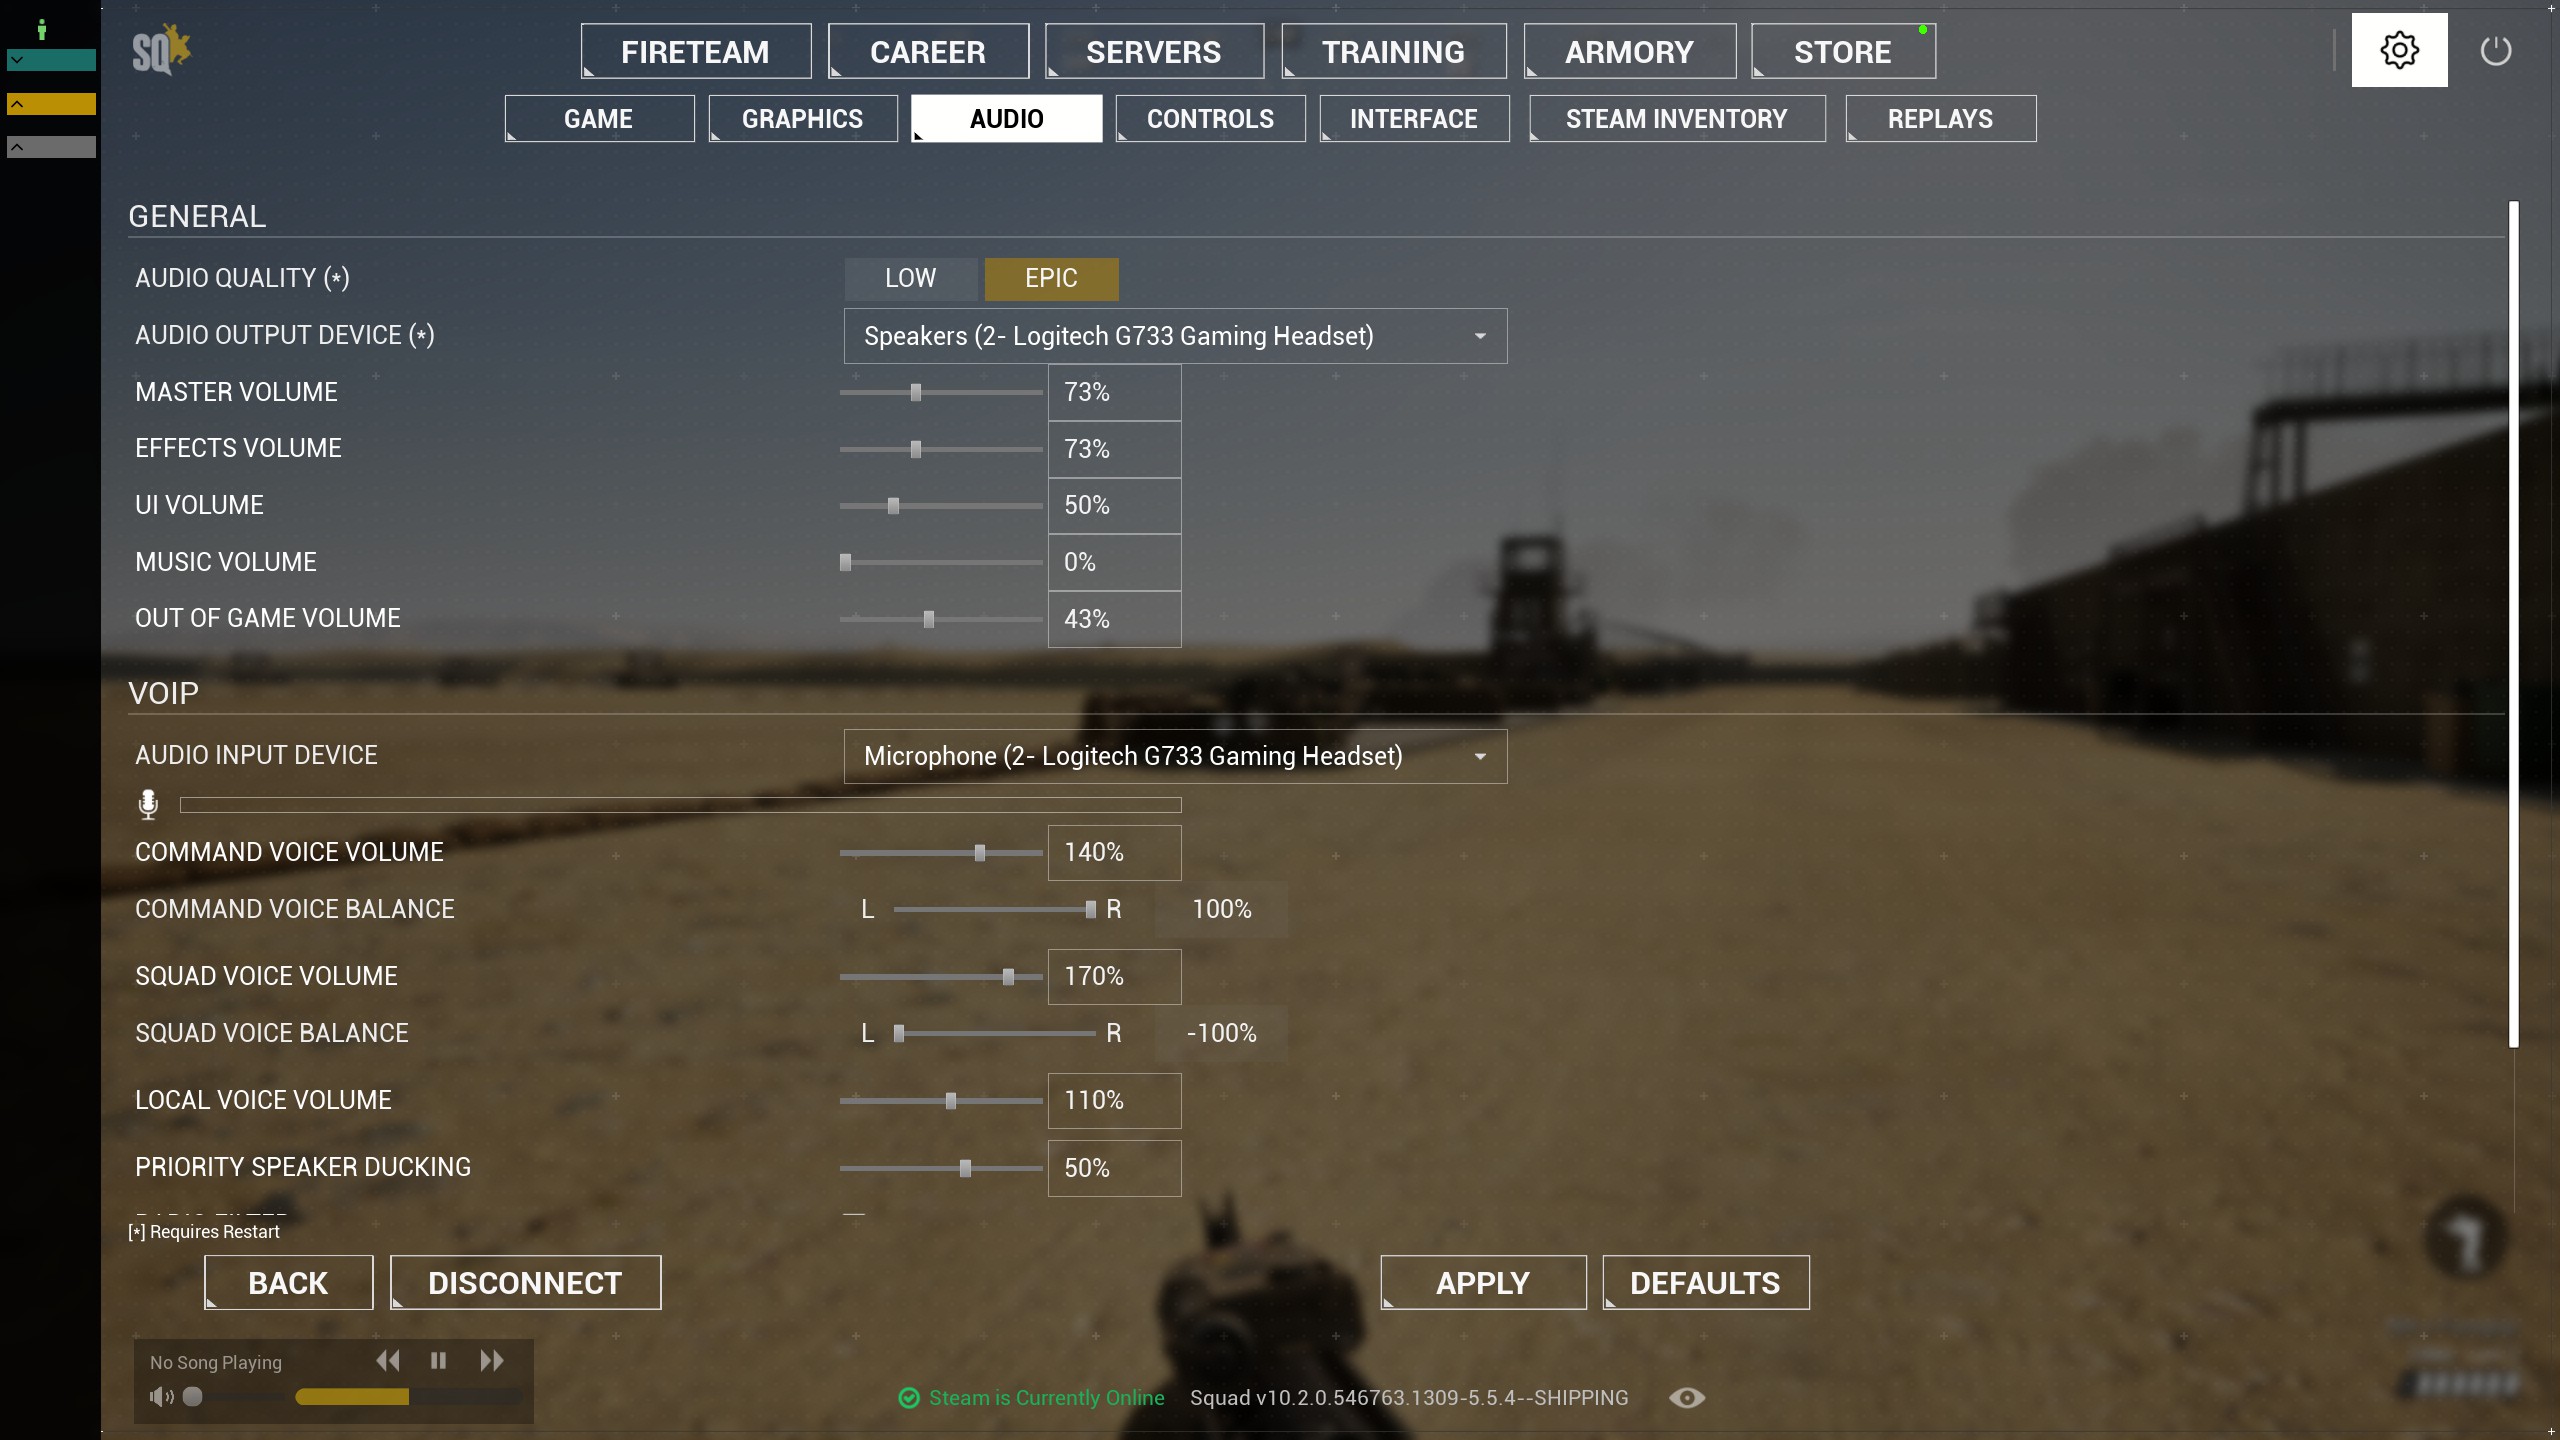 Note: Audio settings are EXTREMELY important to Squad! I will explain it further in detail in gameplay explanation, but just understand that this is just as important as graphics, if not more for Squad.
 Audio Quality
Should always be on epic; I have never seen anyone with it on low.
General Volume Settings
For "Master Volume" and "Effects Volume", I have mine a bit lower than normal, as the game can get deafeningly loud. I usually adjust my overall windows volume to keep it where I want on the fly. "UI Volume" is lower, and then "Music Volume" is at 0. The music in Squad is fine, but not at all the highlight, and I just get tired of it. "Out of Game Volume" is self-explanatory
COMMAND, SQUAD, AND LOCAL VOLUME
Perhaps the most important settings, these should be prioritized in the order of Squad, Local, and Command, with Squad being first. Your Squad is your lifeblood; always make sure you can hear them. Local is second, as having to work with those in proximity if separated is paramount. Finally, Command is third, which you are only going to use if you're a Squad Leader, and is crucial for coordination with the team. Seriously, make sure these are well-tuned.
Command and Squad Voice Balance
Allows for the focus of audio to the left ear, right ear, or both. Now, this is subject to what you prefer, but I personally have Command in the right ear and Squad in the left ear. I've noticed this makes it easier when the fighting is thick, and you need to isolate your thought process.
Priority Speaker Ducking
Reduces the voice volume of EVERYONE besides your Squad Leader/Commander when they are speaking, useful to have turned on, but don't turn it up so much that you have the commander drowning out local while you're in a firefight.
Radio Filter, Command Beeps, Squad Beeps
These are immersion features that add realistic effects to the VOIP when turned on. I honestly find them pretty damn cool, but to each their own.
Only apply balance while leading
Exactly as it says, it only turns on the specific audio balance when leading a squad. I'd recommend keeping it off.
"General" Controls (Settings)
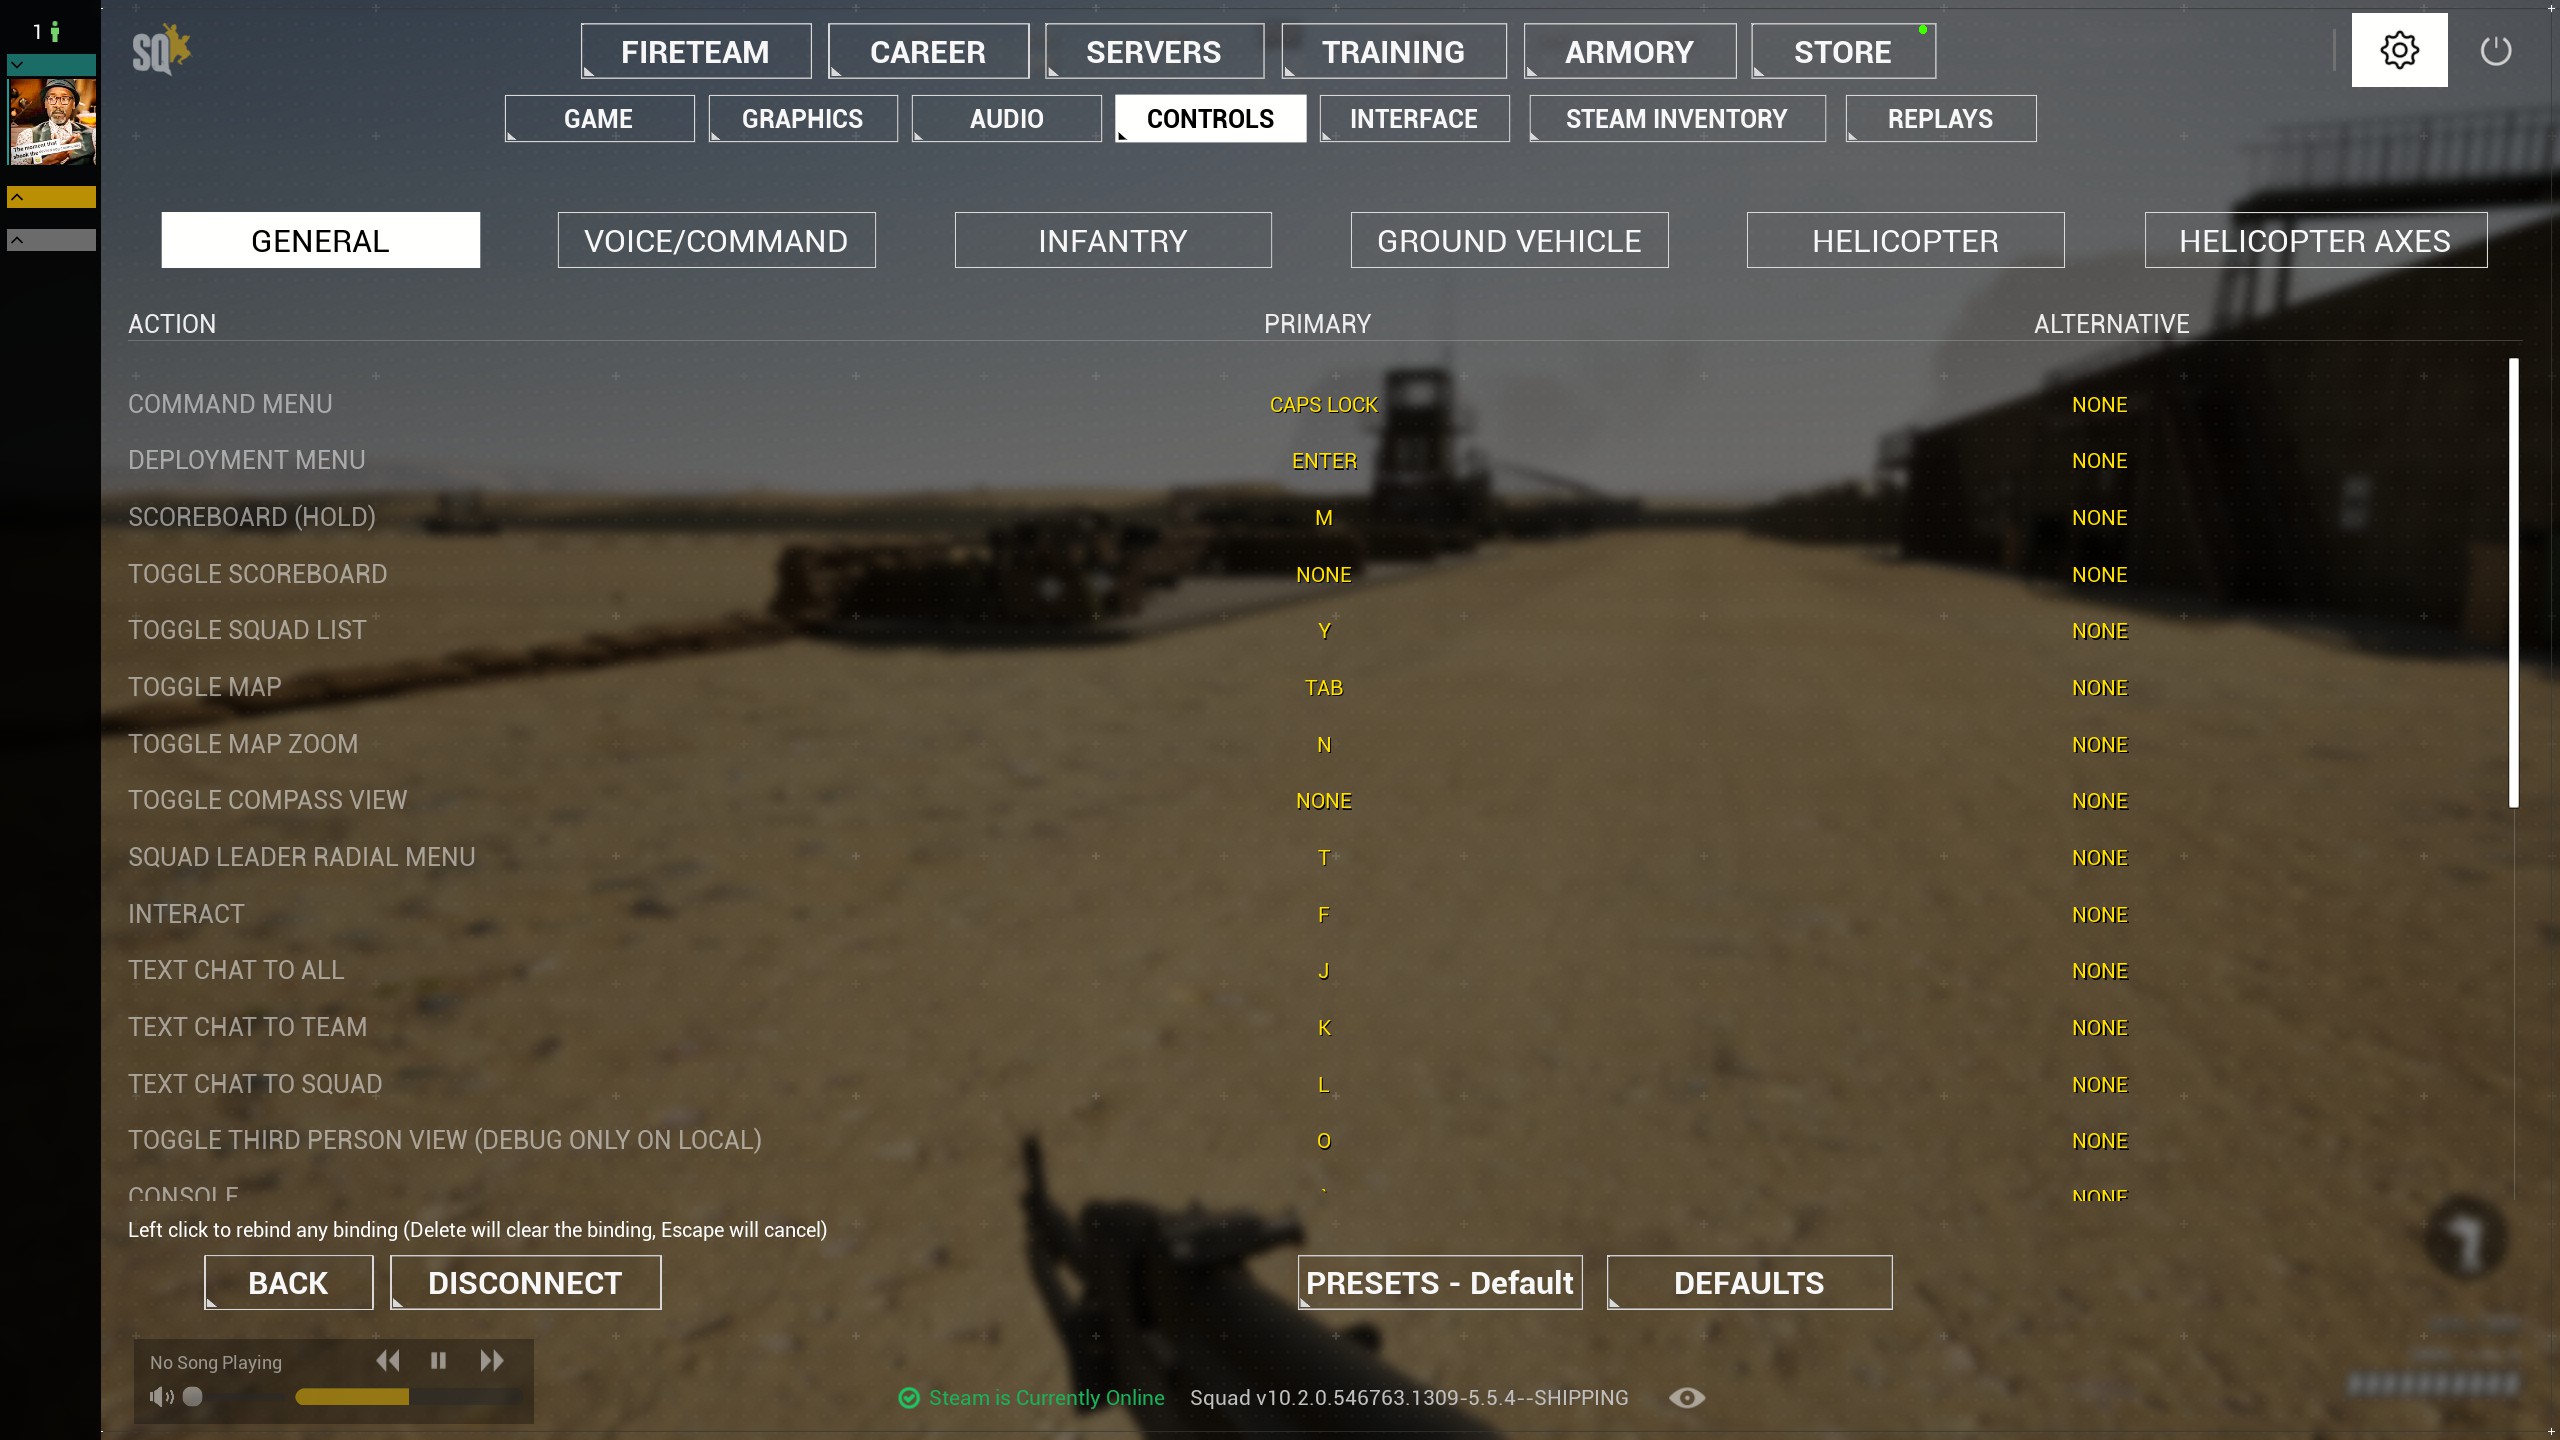 Note: For controls, I will be explaining why I have this key bind, but I don't want to bloat the section, so specific features like sight ranging won't be explained in depth here. Key binds that are very similar, like the "Command Menu" and "Deployment Menu", will be lumped together for the same purpose. I also have quite a few changes, so don't worry about not having the same. The goal here is to explain what they do, and then you can prioritize how you want to set up. I'll provide my binds anyway, just in case. I will also provide additional screenshots in this section.
 Command Menu and Deployment Menu
Right is the deployment menu, left is the command menu.
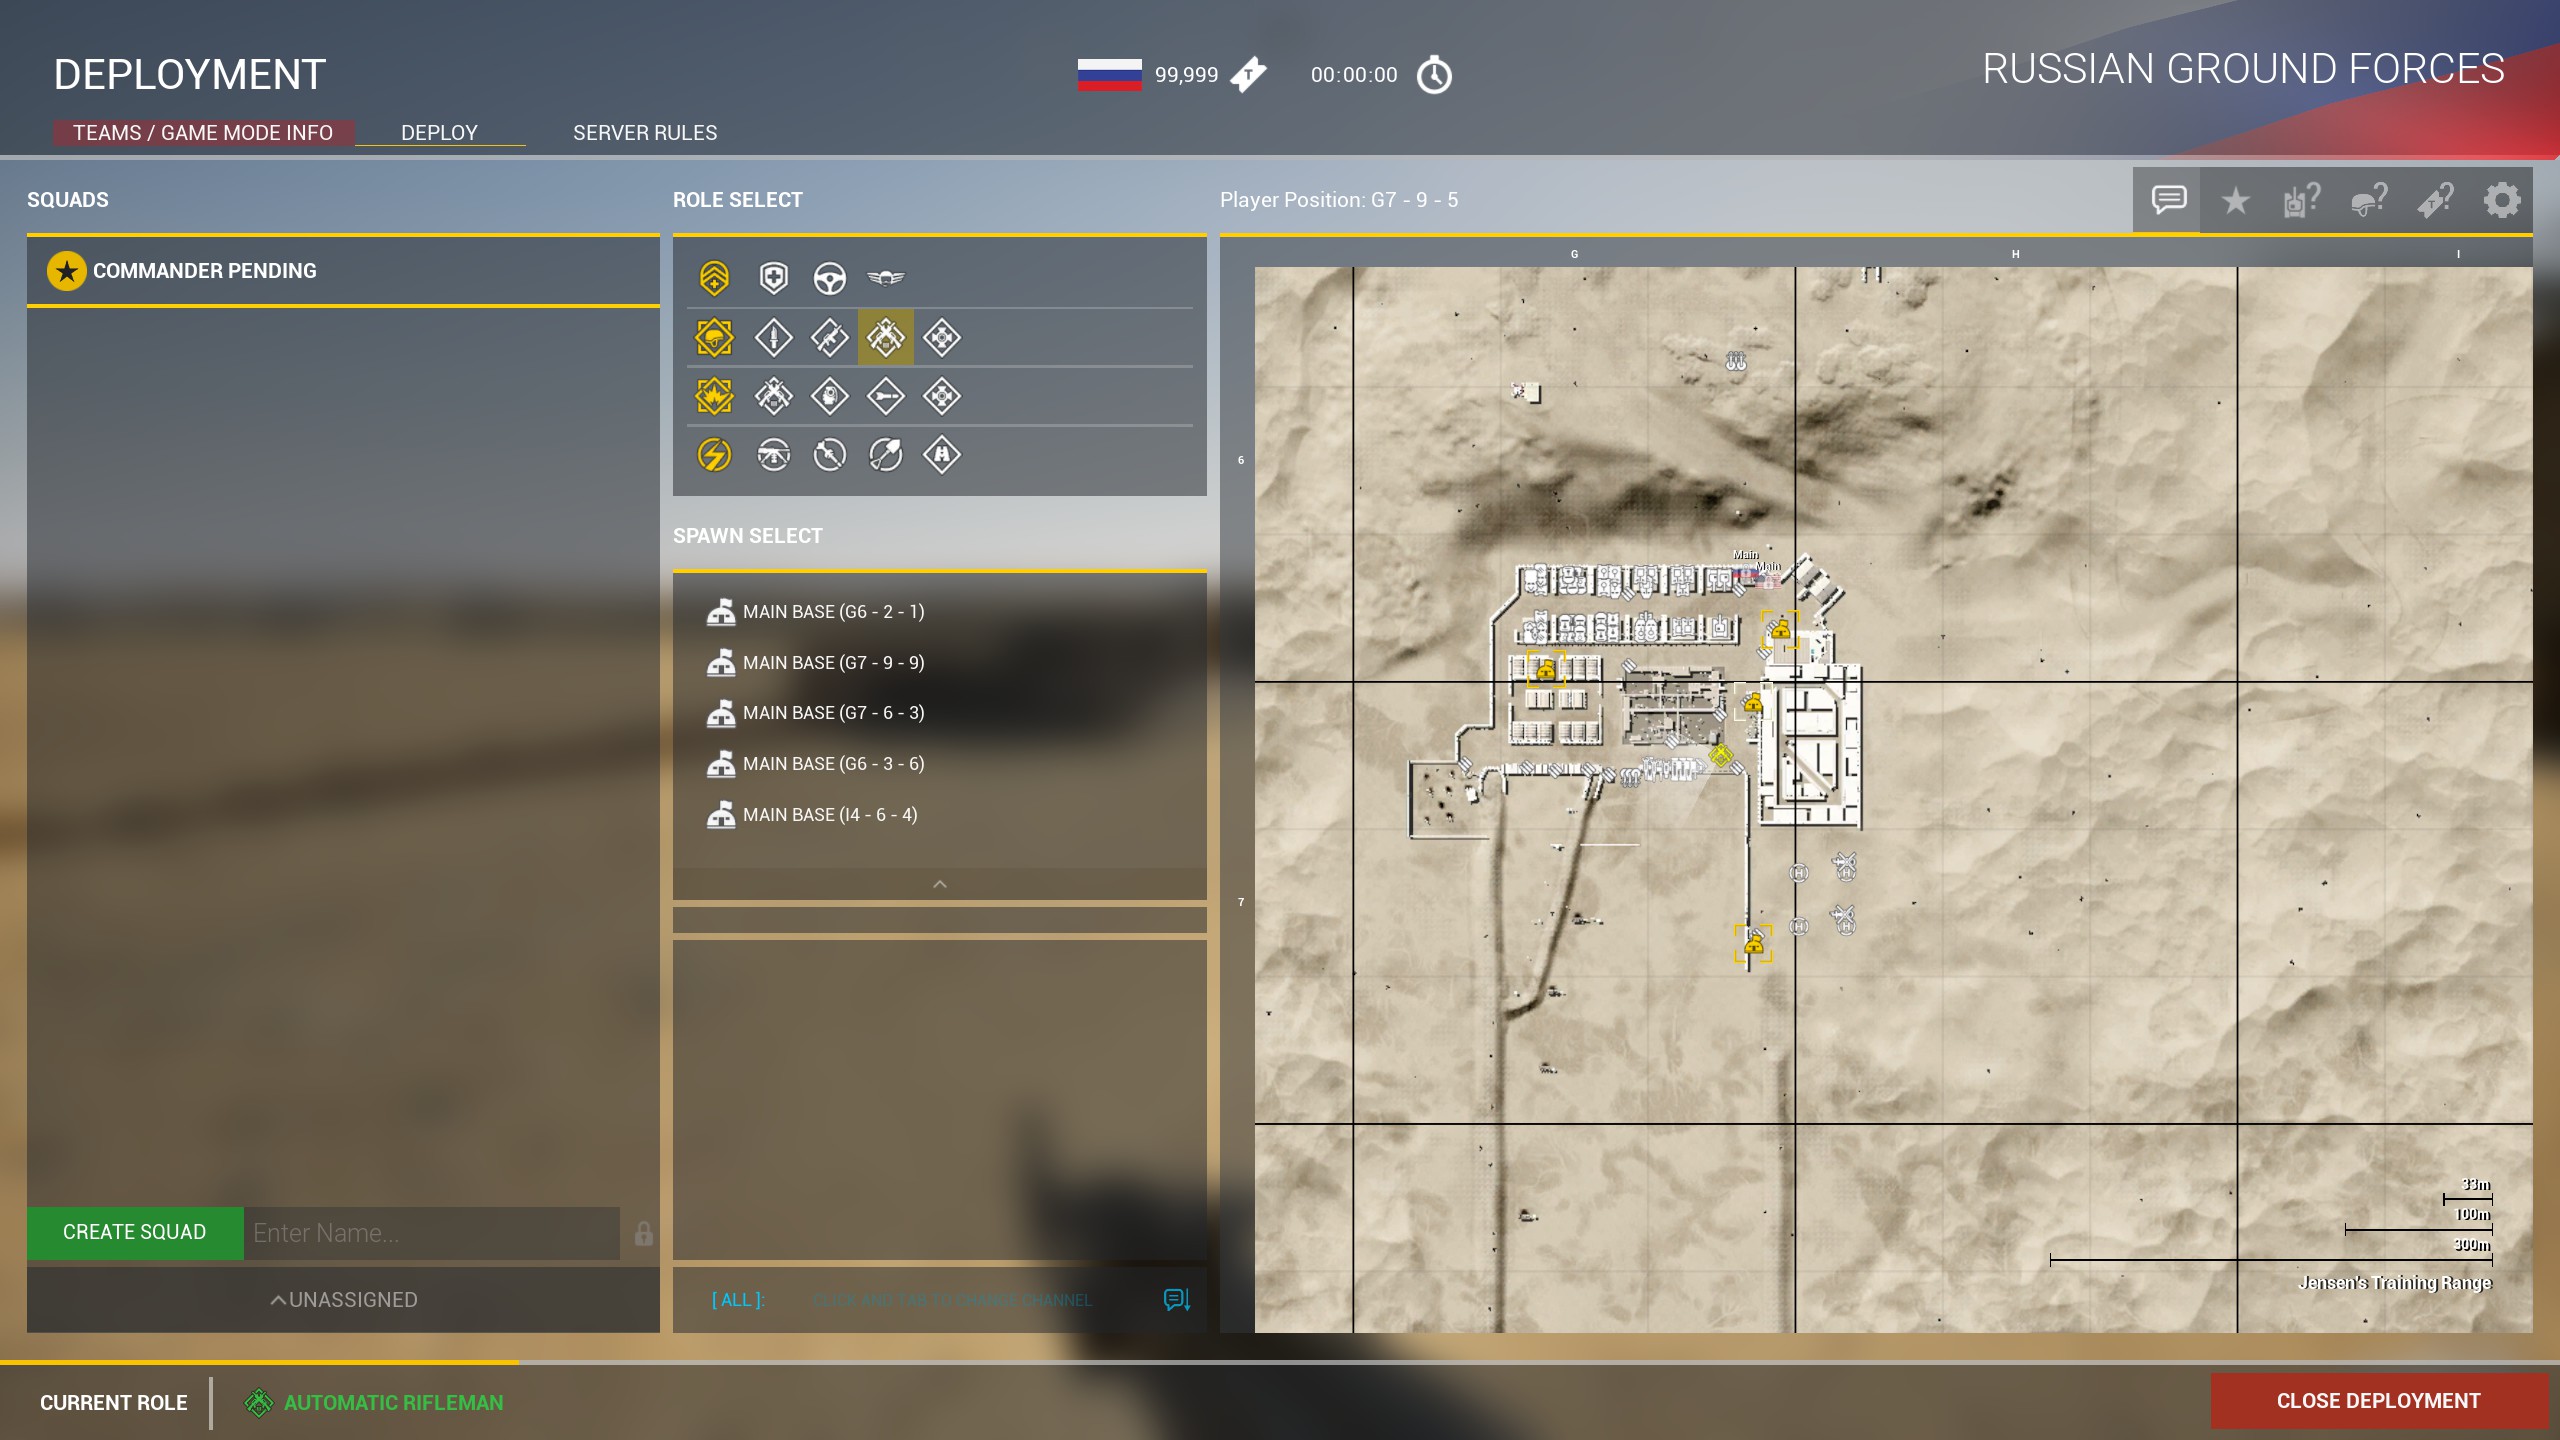
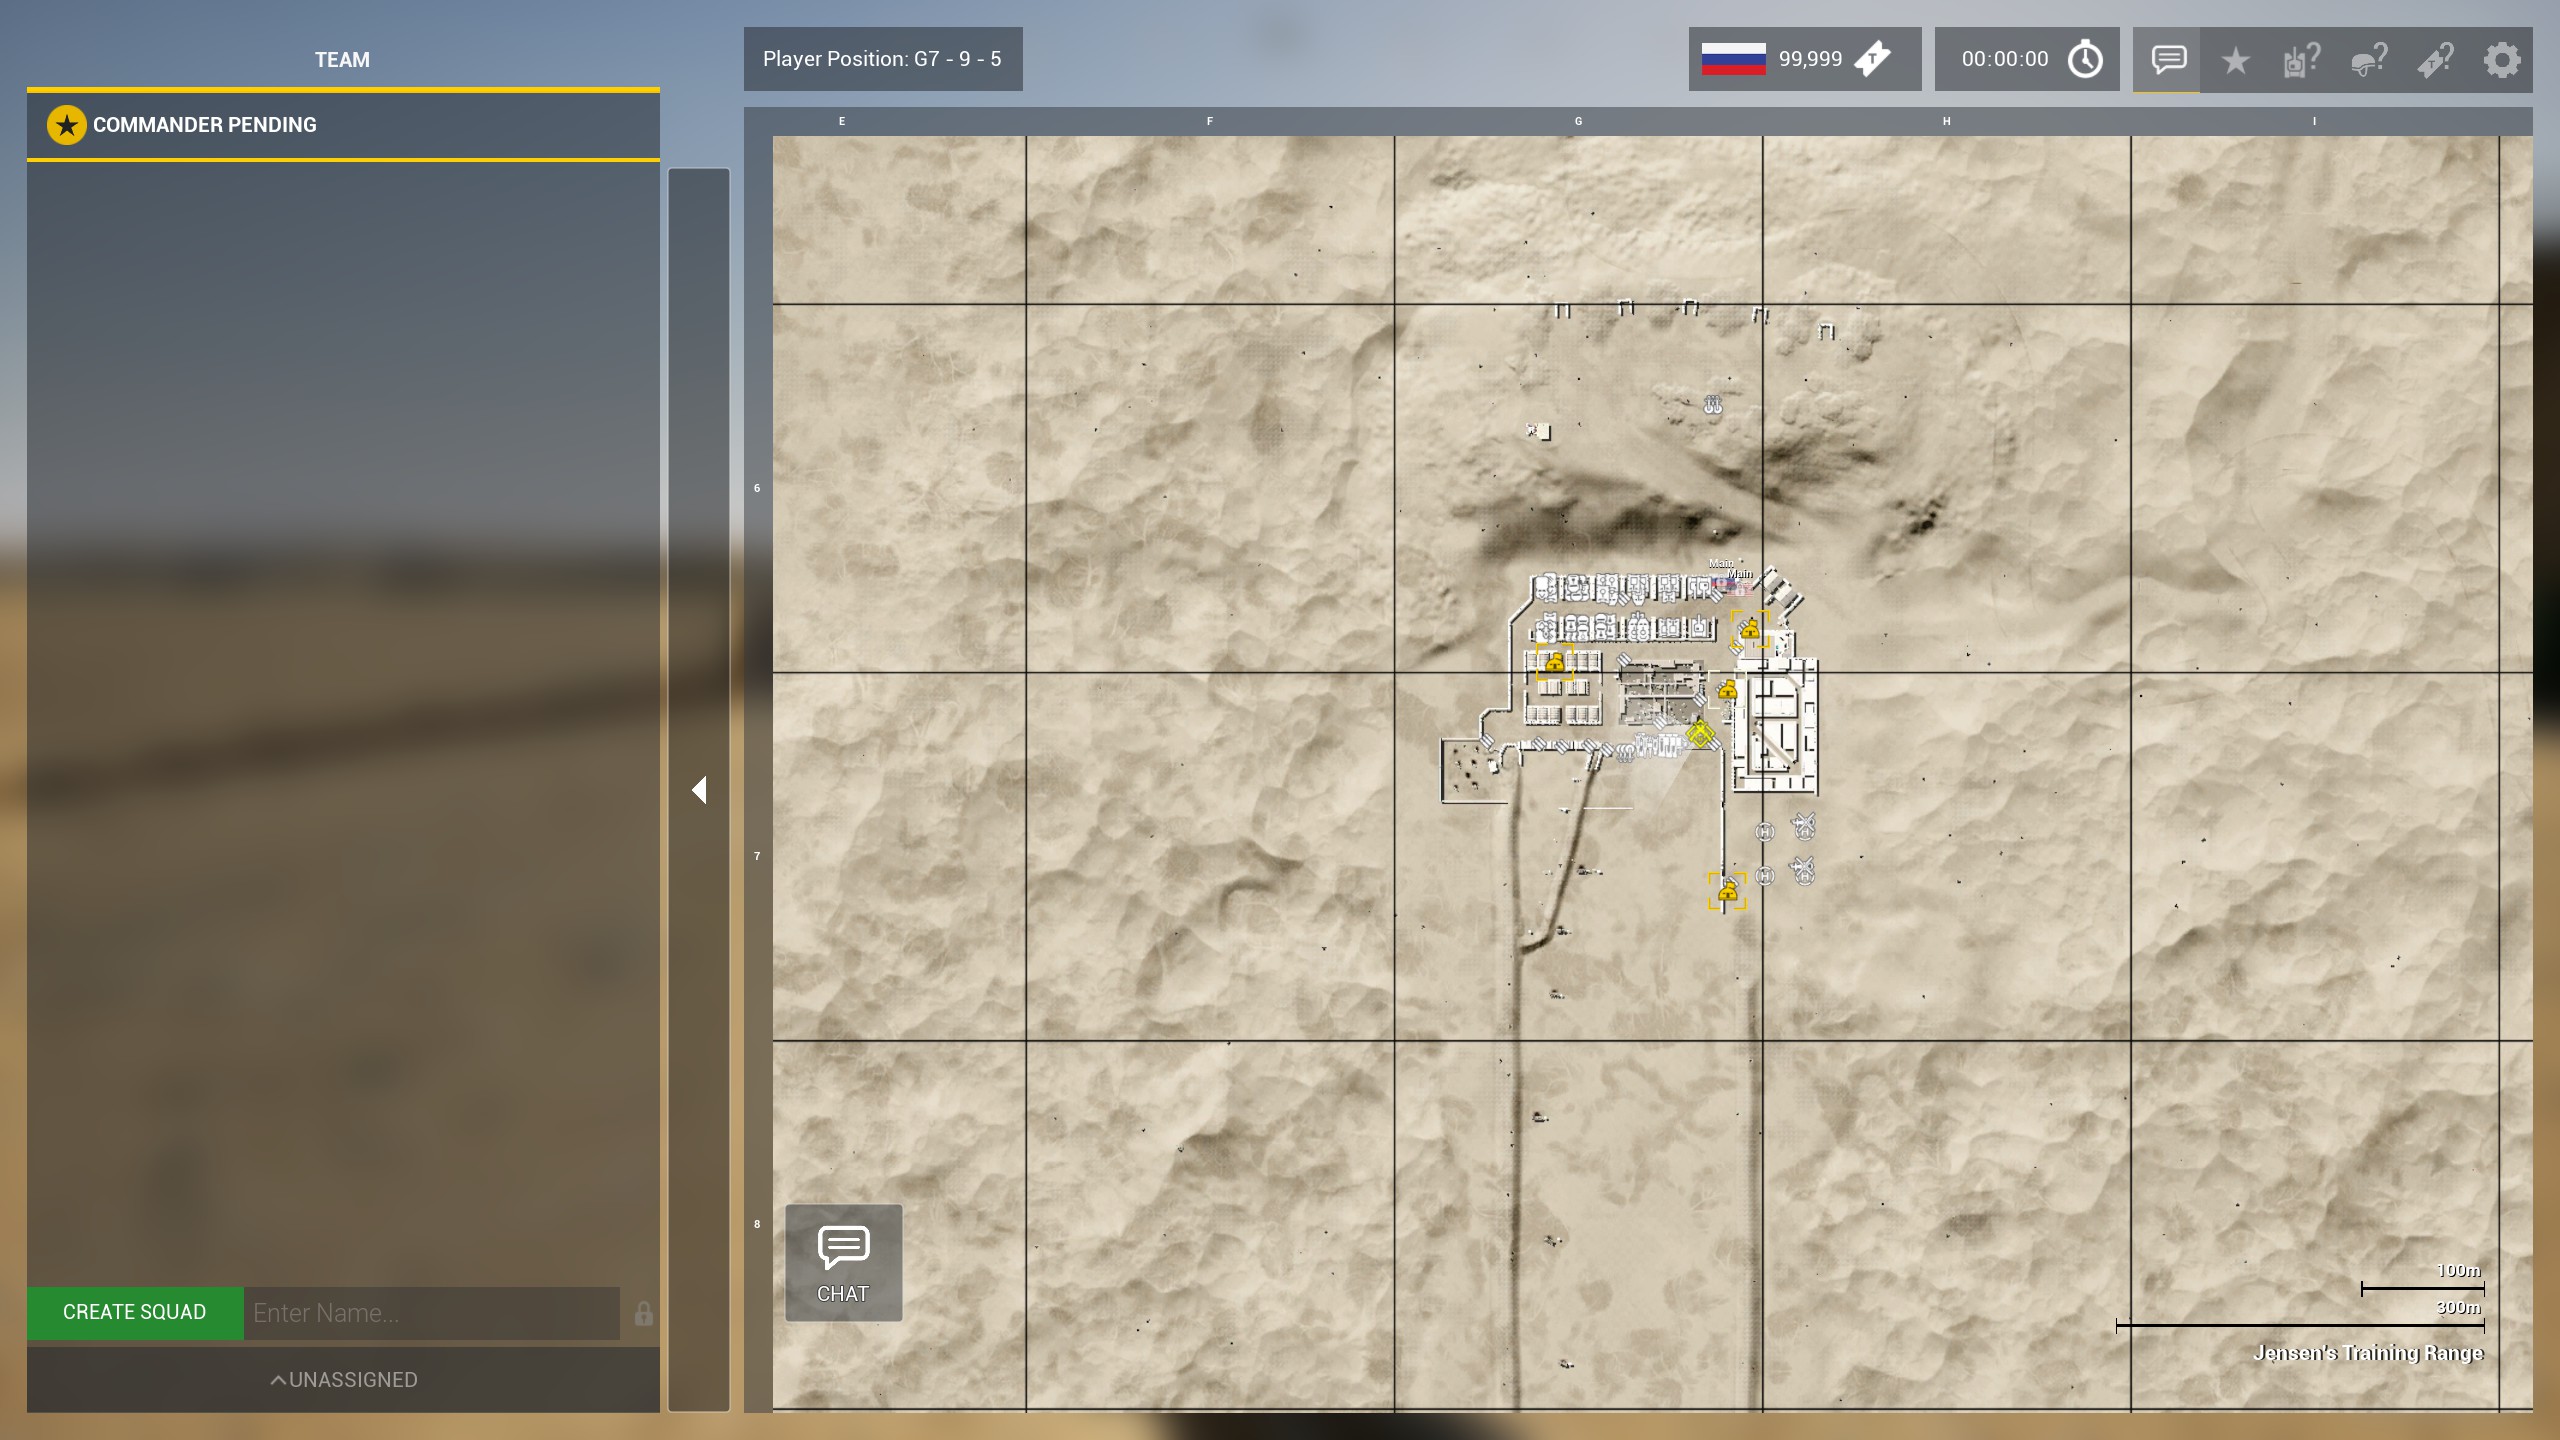 The command menu is useful for looking around the map for tactical information, but provides less overall info than the deployment menu and the bare bones tactical map. The deployment menu is good, but can be cluttered at times. You'll also notice the UI layout is different. I keep CAPS for command and ENTER for deployment, as I find it worth keeping both.
 Scoreboard (Hold)
The scoreboard is only good for checking ping or checking if your buddies are on the same team; you don't see kills till the end of the round anyway. Keybind is M
Toggle Squad List
Controls the bottom left list of your Squad and their conditions, useful for gaining quick info without opening the map. If you really need to lock in you can toggle it off, keybind is Y.
Toggle Radial Menu
Very important this is kept on a comfortable key, used by Squad Leaders and FTLs to assign markers to locations and targets, without having to open the map. Keybind is T.
Approve/Disapprove Request
Only used by Squad leaders to approve vehicles for their soldiers, Approve is PAGE UP and Disapprove is PAGE DOWN
Vote for 0 through 9
This is for voting for commander as a Squad lead, but also you can just do this from the menu anyway, kind of pointless. Keybinds are the NUMPAD NUMBERS.
Stationary Zoom
Infantry and vehicle drivers can zoom when not moving, useful in both cases, especially for drivers don't as they have no other zoom options. Keybind is LEFT SHIFT.
"Voice/Command" Controls (Settings)
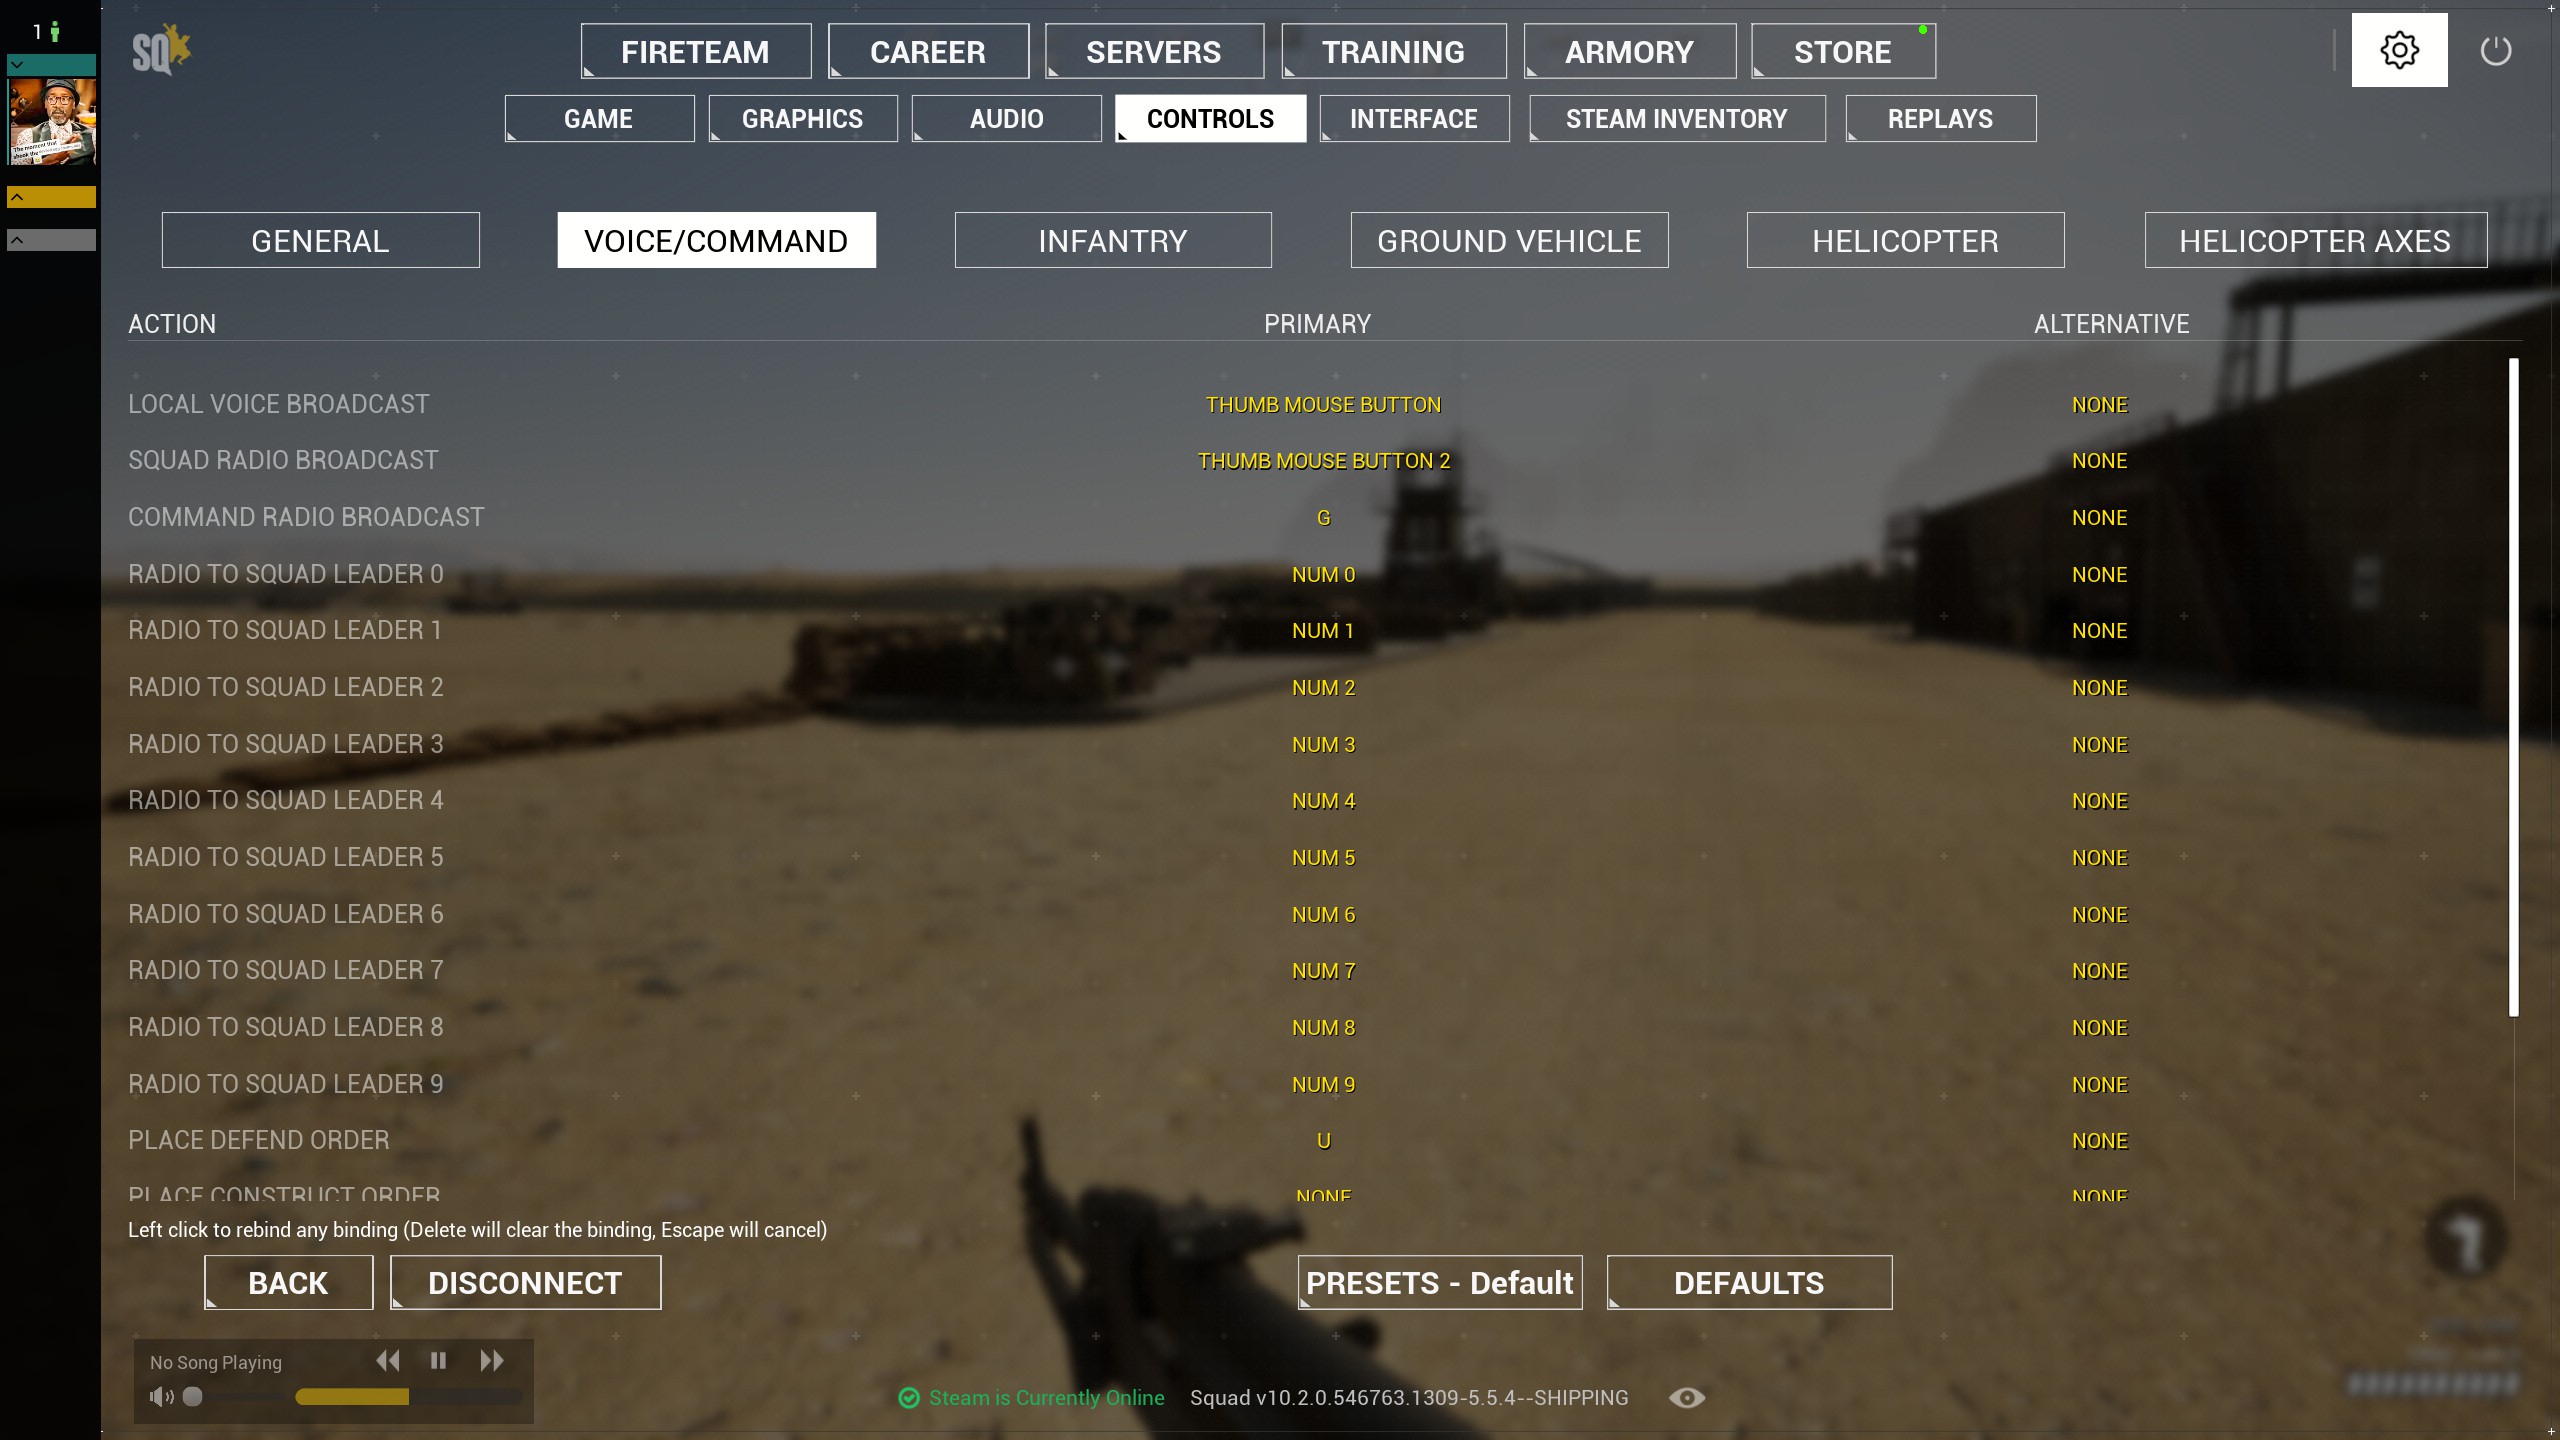 Local/Squad/Command Broadcast
 Bread and butter of communication, keep these close. Now I have Local and Squad set to my SIDE MOUSE BUTTONS, but as Command is used less often, I kept it at default G.
Radio to Squad Leader 0 through 9
Used if you want to talk to one Squad Lead specifically, but honestly? If you have something important to say, just use the command chat, unless you want to talk ♥♥♥♥, of course. Keybinds are the NUMPAD NUMBERS.
Place Orders
Just use the radial menu, unless you really want to customize the binds. No keybinds for this one.
"Infantry" Controls (Settings)
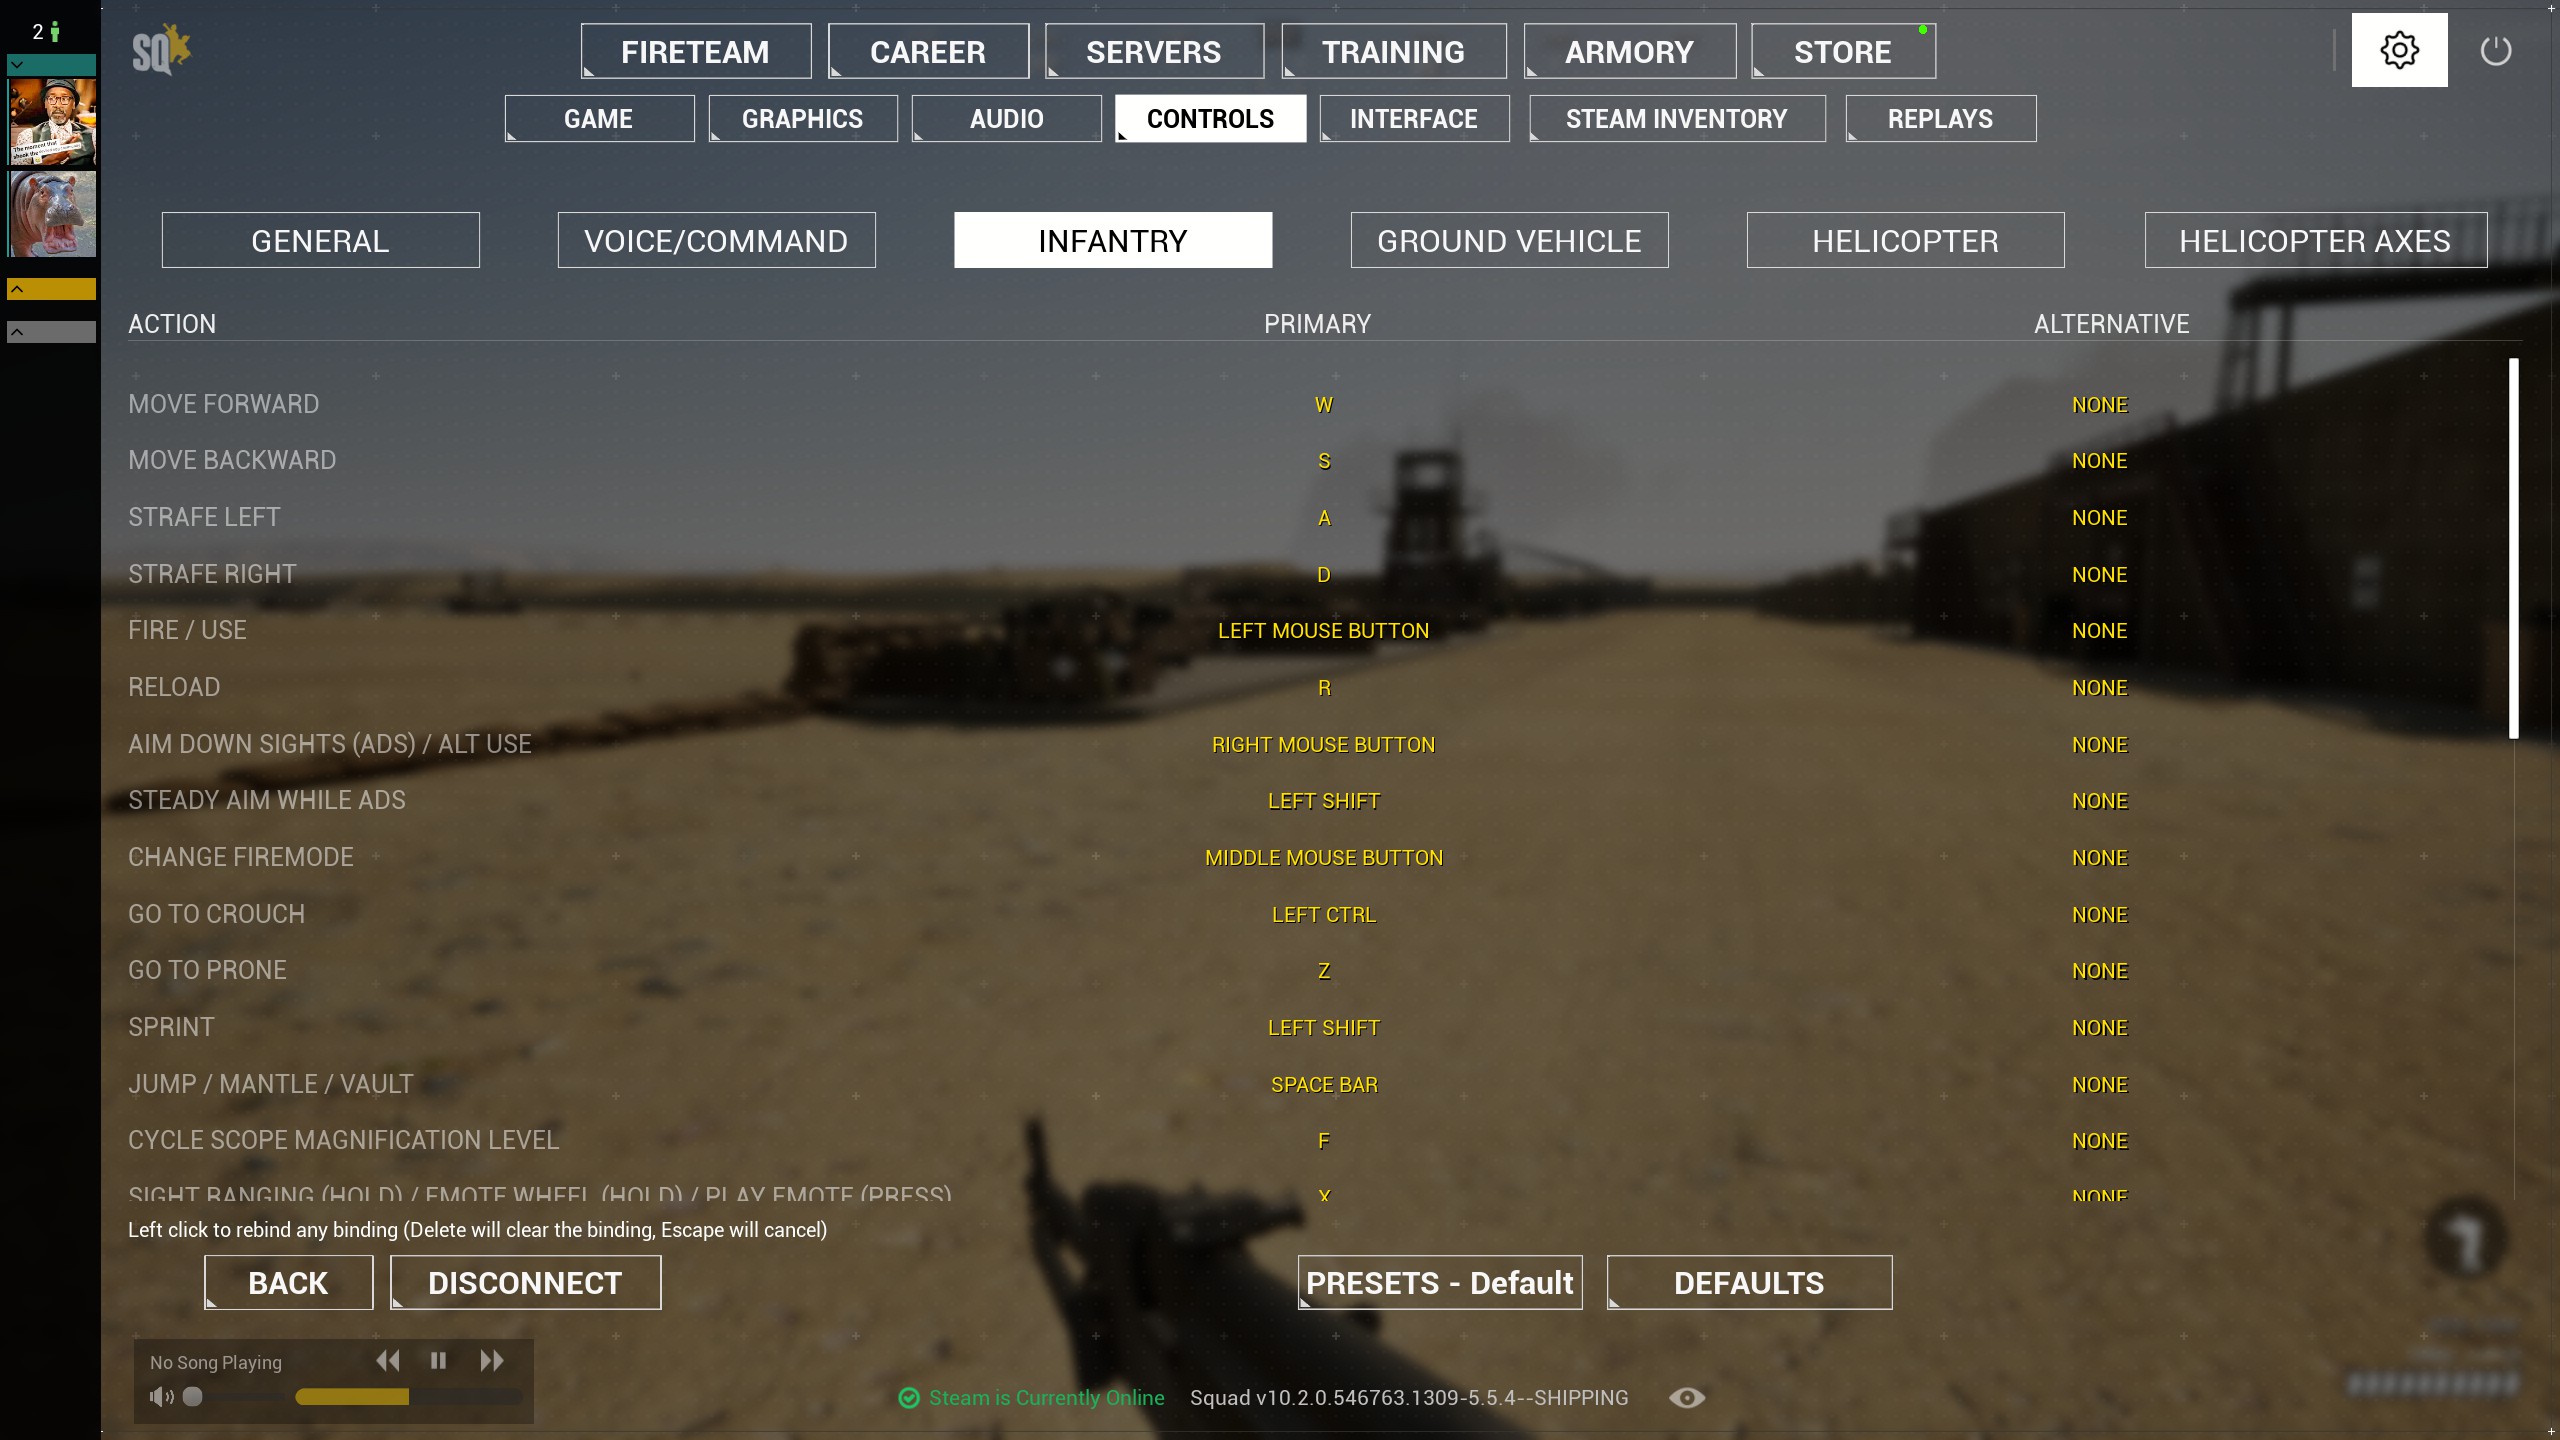 Change firemode
Single shot to Automatic and vice versa. Some might think this is obvious, but my friends actually asked this more often than I expected. To change, simply press 1, or can also bind it to MIDDLE MOUSE BUTTON.
Cycle scope magnification level
Simple but very important, to change your scope zoom press F, and remember, not all scopes have different zooms!
Sight ranging/Increase Ranging/Decrease Ranging
Again, simple but very useful, hold X WHILE aiming down sights to pull up sight ranging, then increase with SCROLL WHEEL UP or decrease with SCROLL WHEEL DOWN.
Free look
Able to move your head and look around while still or moving without facing your whole character in that direction. Useful for gathering information around you, and it also feels cinematic! Keybind is LEFT ALT.
Rotate deployable placement left/right
Rotates fortification and emplacement blueprints, used only by Squad Leaders and FTLs, keybind is Q for left and E for right.
"Ground Vehicle" Controls (Settings)
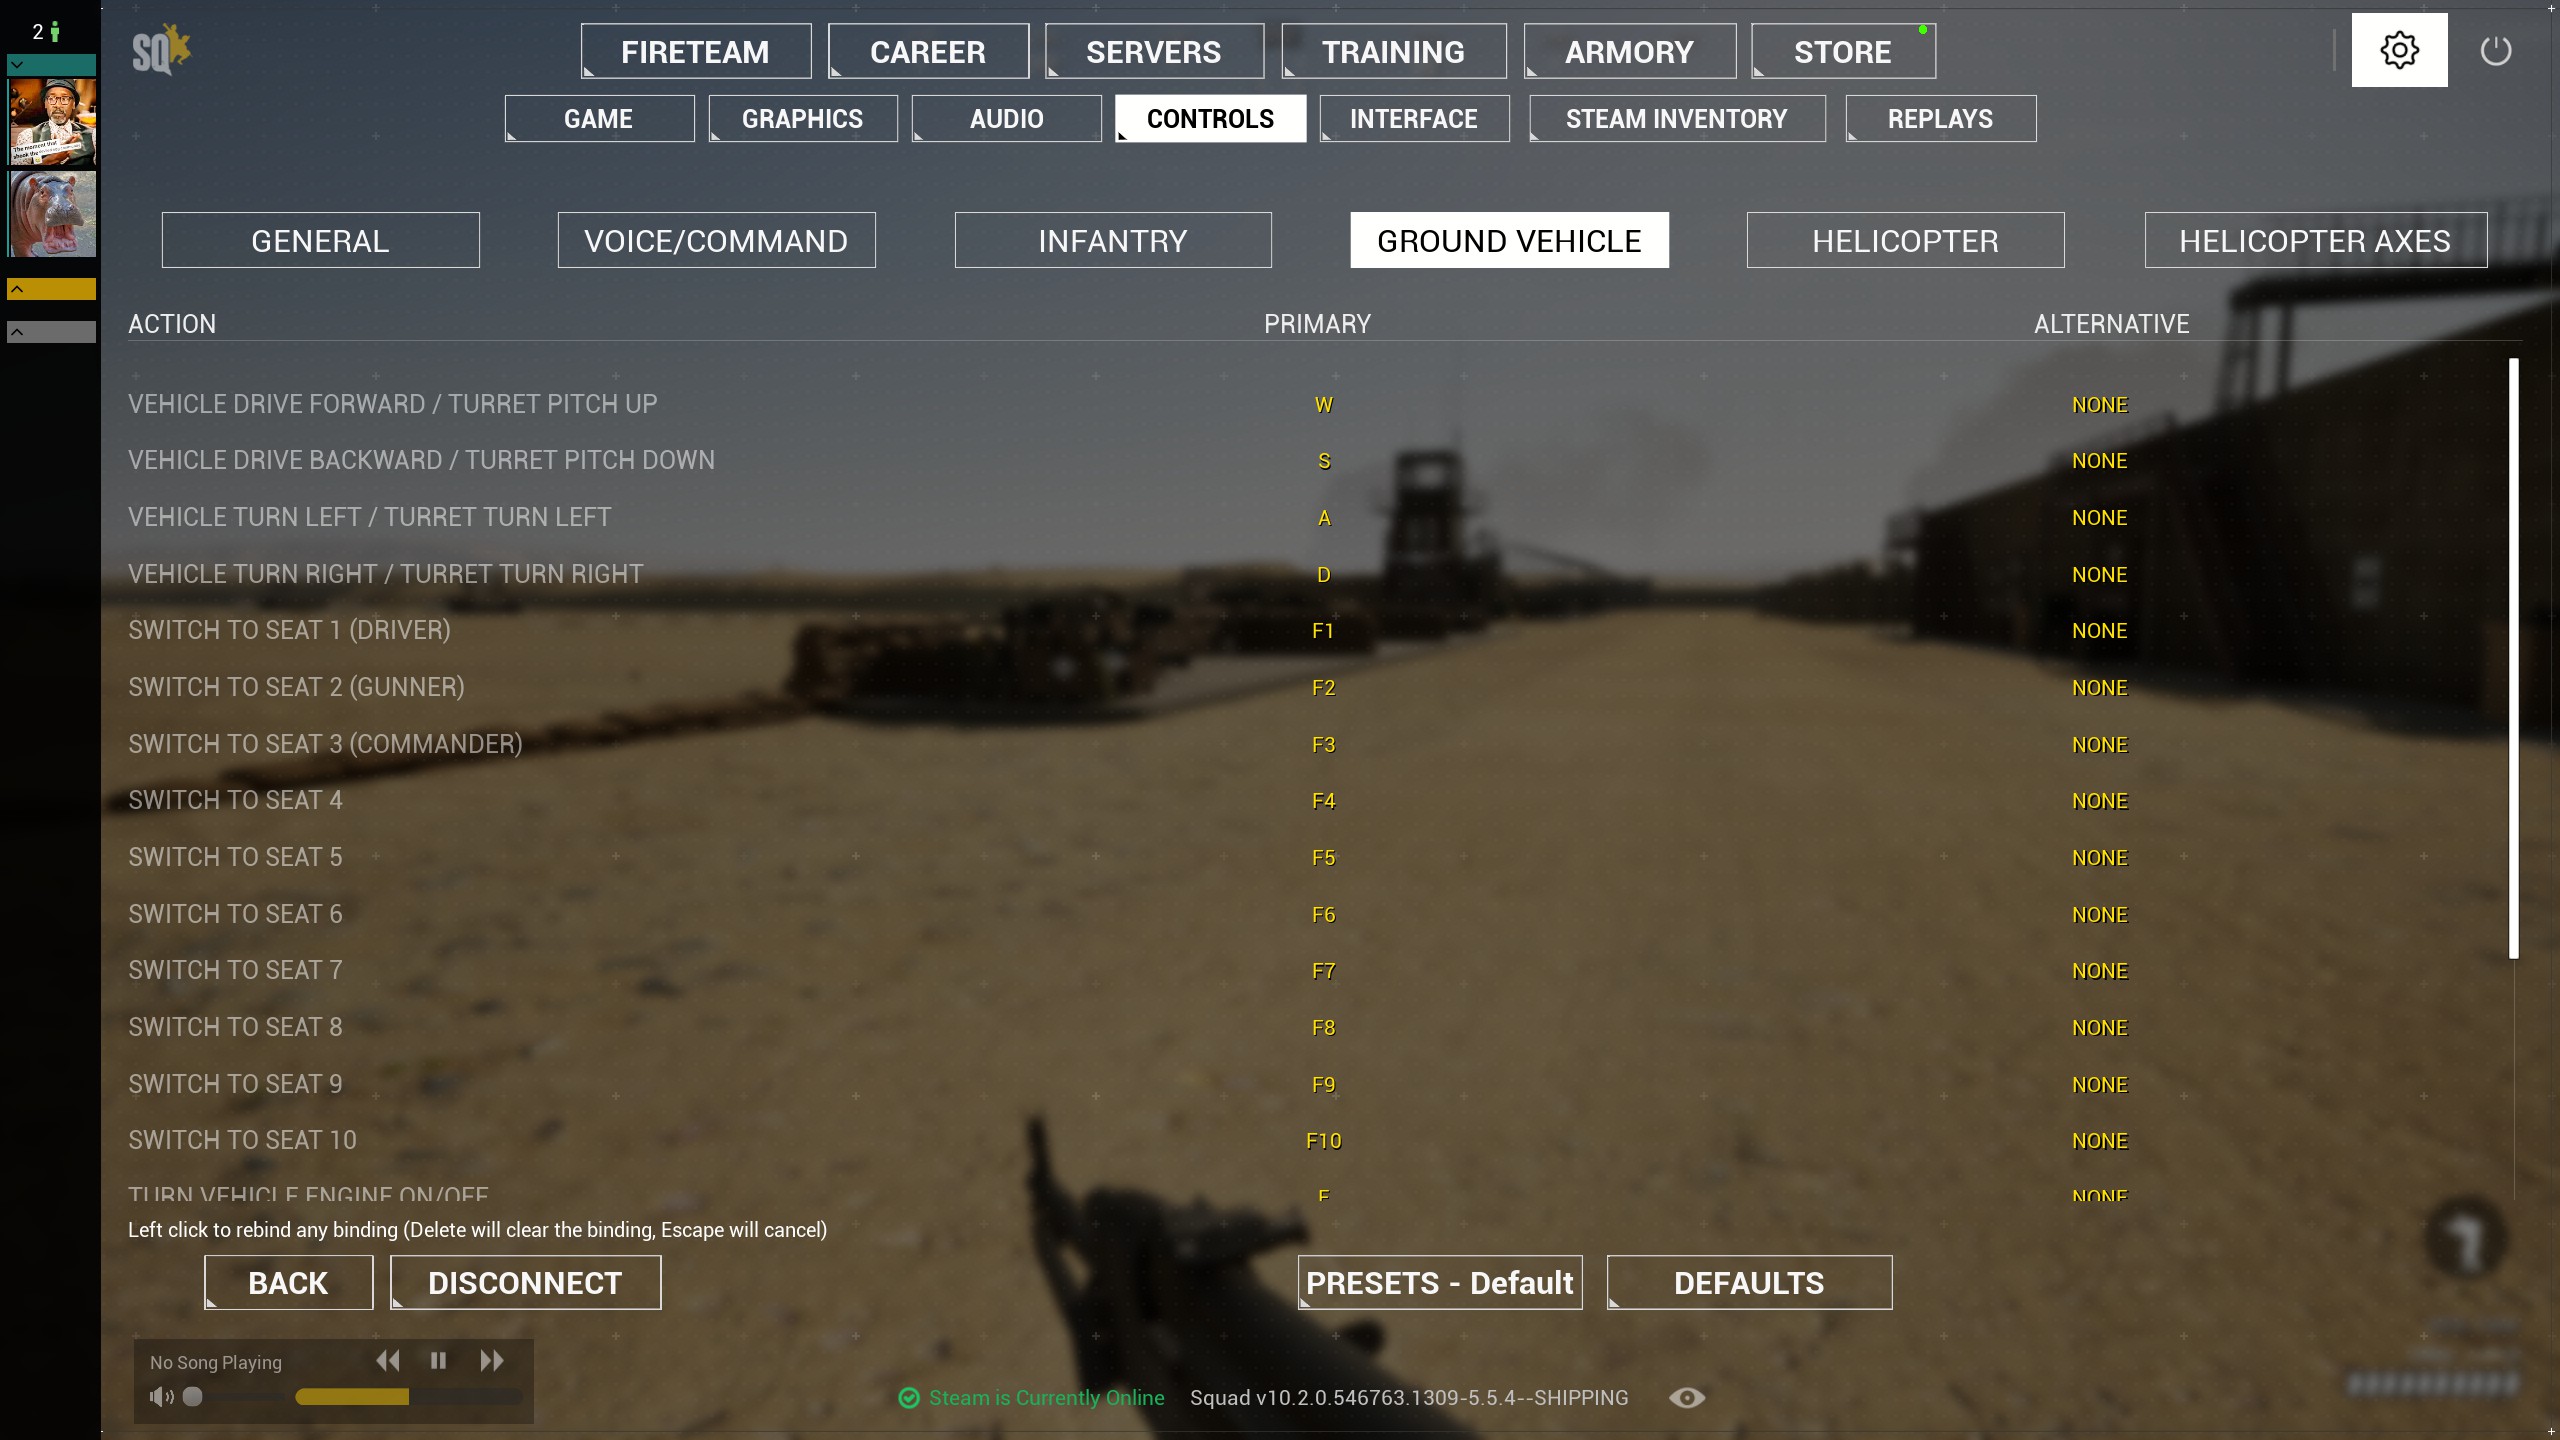 Switch to seat 1 through 10
Remember that F1 is the driver, F2 is the gunner, and F3 is the commander, these are the most important seats in the vehicle, therefore I cover these keybinds specifically. The rest of them are the various seats. Keep in mind that some vehicles do have multiple gun seats, but that isn't usually the norm.
Turn Vehicle Engine On/Off (Hold)
Basic, but obviously extremely important, keybind is E.
Apply Vehicle Handbrake
Useful for a quick stop, keybind is SPACE
Turret Optic Zoom
As it says, almost all have zoom optics, keybind is Q
Toggle turret Stabilization
Always have it on if it's available; older vehicles usually won't have this. Keybind is Z.
Designate Target For Gunner (Stabilization Required)
An extremely important keybind usable only in the commander seat of vehicles such as tanks. USE CAREFULLY, this will snap the gunner of the tank to where you are looking. You must only do this if they ask specifically to be snapped to a target, I.E "If you see an enemy tank snap me to him" or just simply put "snap me to him", doing this at the wrong time can get you and others killed. Keybind is SPACE.
"Interface" Tab (Settings)
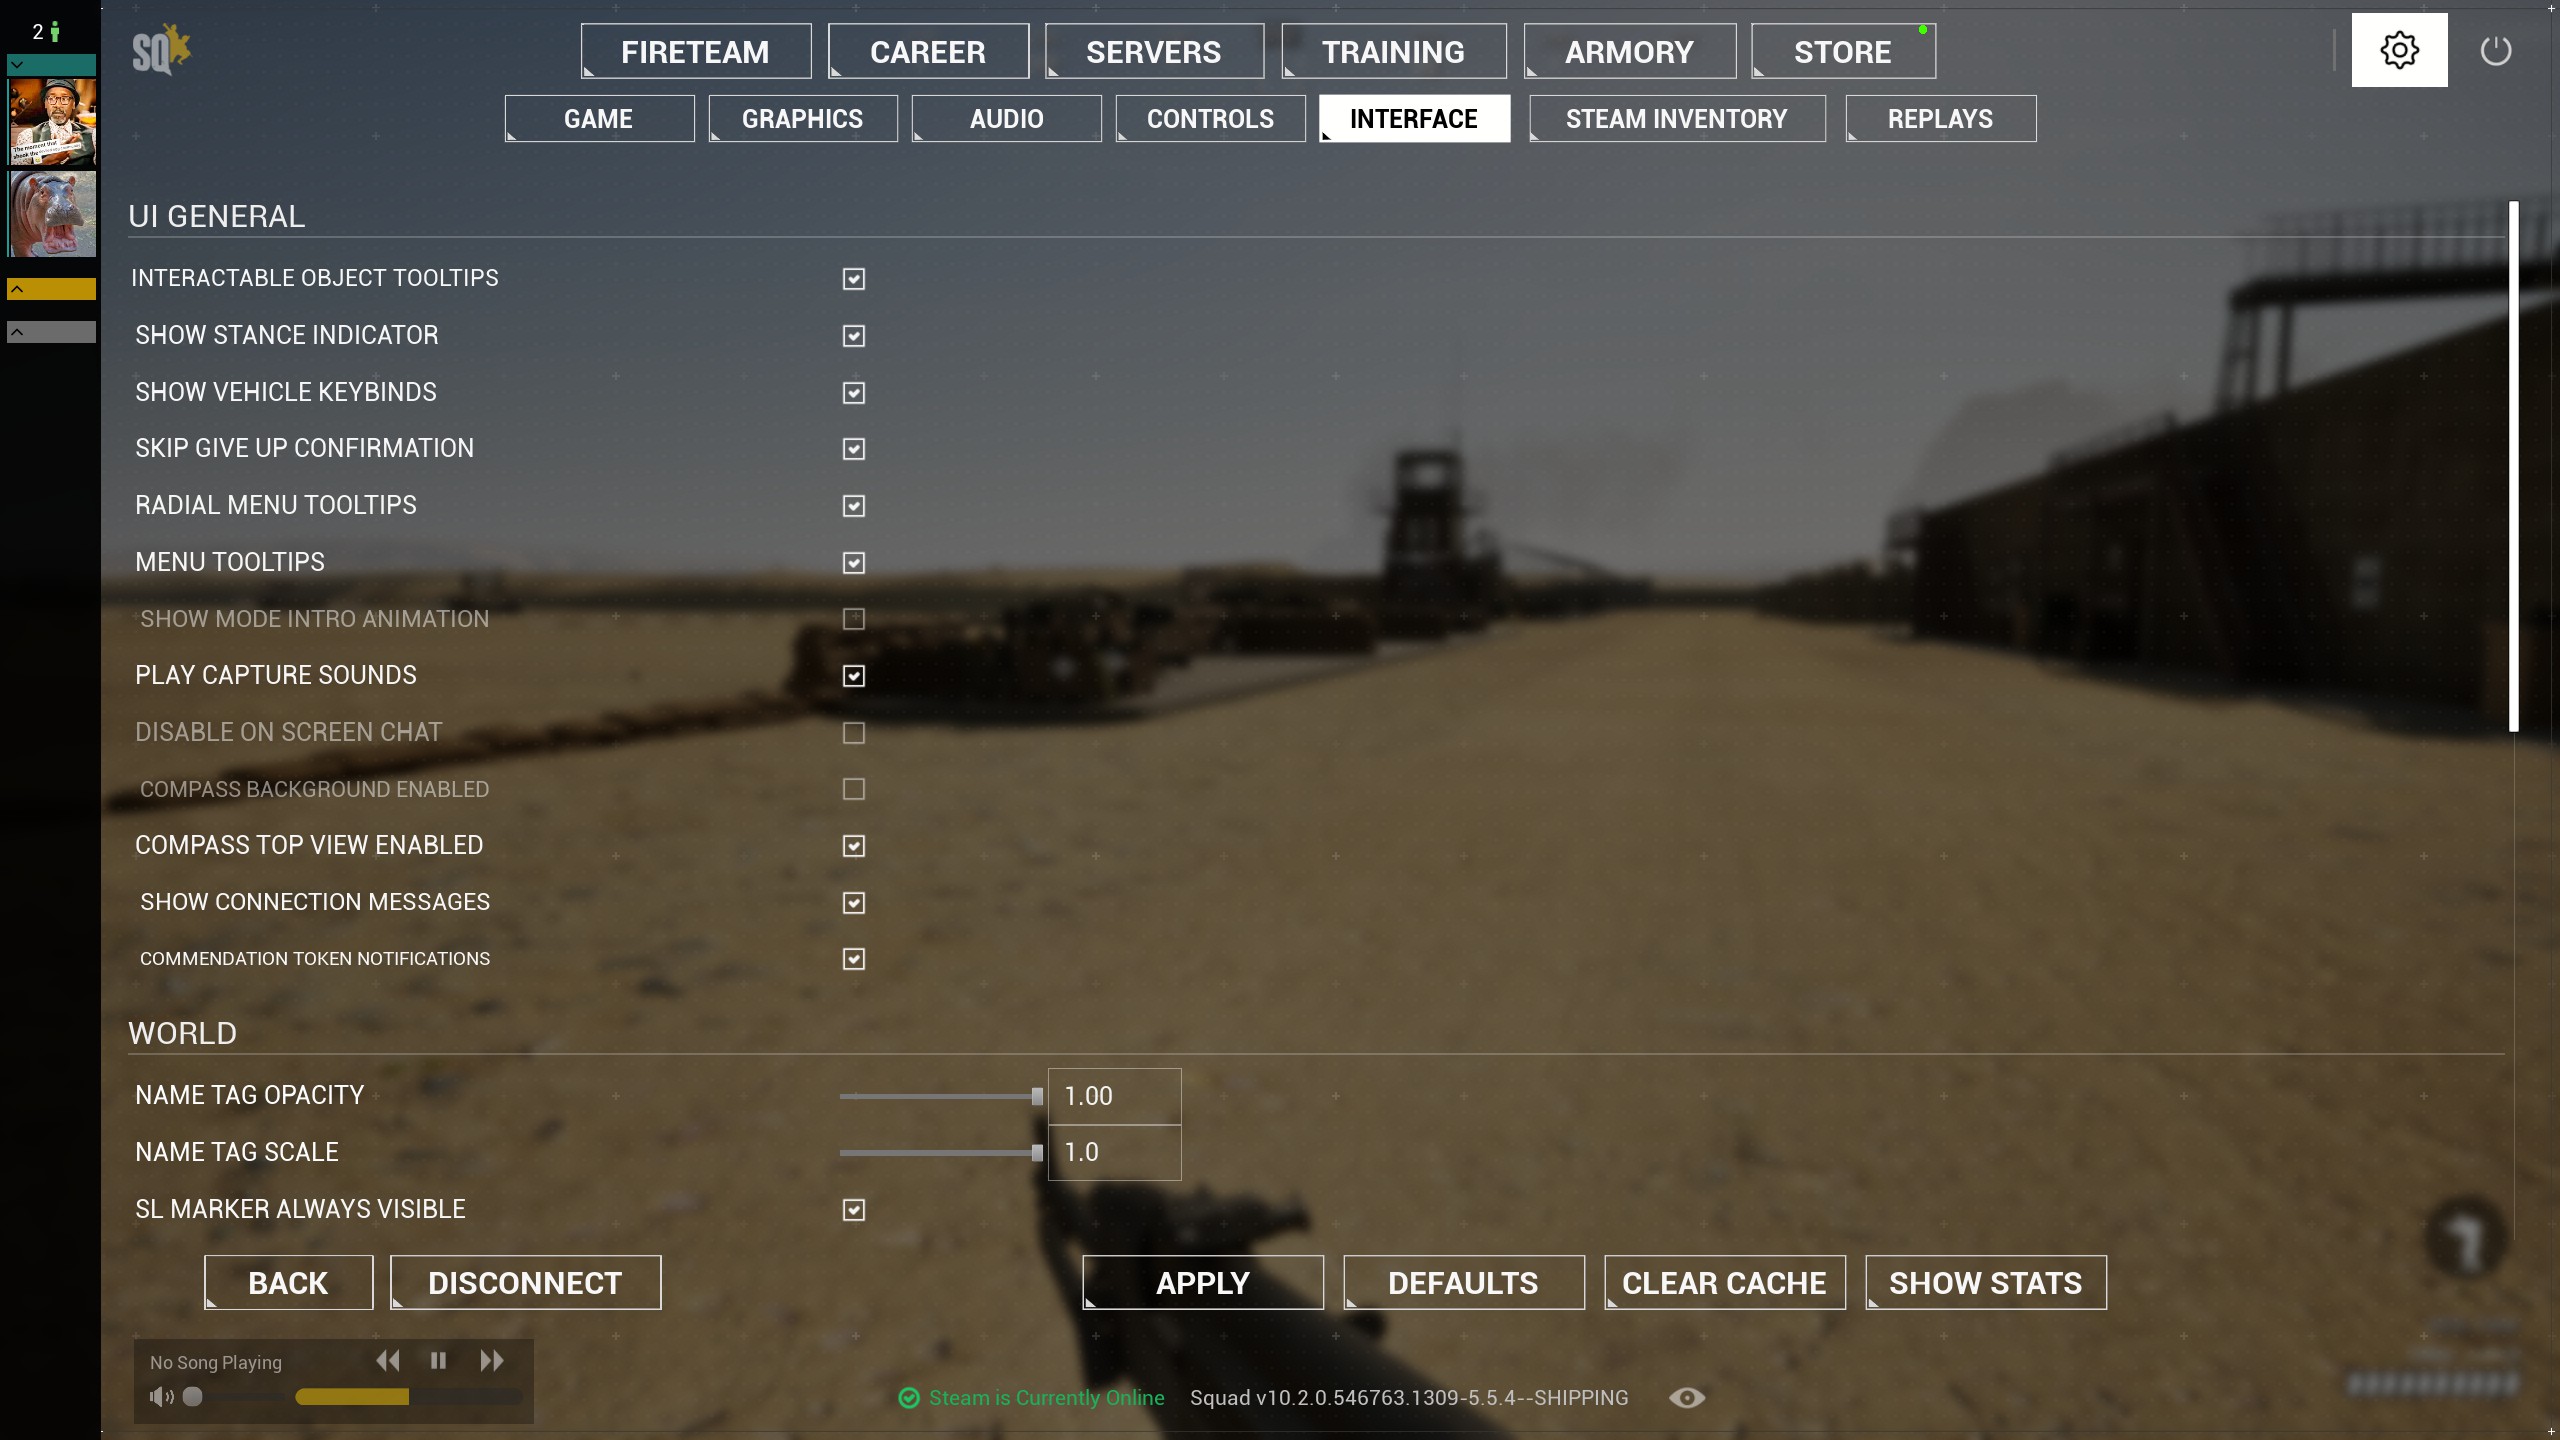
UI General
This section is broad, so I'll go through the ones I find the most important or useful. Tooltip options are excellent and should absolutely be enabled unless you feel experience has reached a point where you no longer need them. Showing keybinds is useful, and I would recommend it on. I keep skipping giving up confirmation as an experienced player, but if you're new, learning when to give up can be tricky. Leave it on. Compass background and top view are both preference-based; if you have trouble focusing on the compass, enable the background.
Name Tag Opacity/Scale
By far, some of the most important settings, these should both be set to max. Name tags are unreliable for identifying, but when they do show up, make sure that you see them.
SL/FTL Marker Always Visible
Makes the marks from Squad and Fireteam leaders always visible, very useful, and crucial for cohesion with your squad.
Show Ammo Icon On Vehicles
This shows a little bullet line icon on vehicles, useless though, all vehicles carry ammo, and it doesn't tell you if a vehicle is out of ammo.
Show Name Tag Text/Kit/Fireteams
Text is the bare minimum for this, but kits and fireteams can be disabled with experience. I can identify my teammates' kits by a look, but a beginner would do well to enable all 3.
Map and Deployment
Now I highly recommend enabling both the checkmarks, as the map is the most important tool for gathering information on your team, and this only enhances it. Scale is up to you, but I have mine at 0.8
Vehicle Weapon Classes
Useful Wiki Links
The Squad wiki has some talented workers, and can provide excellent depth to topics that I simply don't have the time to research. Here's a few I find especially helpful and want to highlight.
Weapon Archetypes and Designations
Explains all about infantry weapons and support weapons
https://squad.fandom.com/wiki/Weapons
Vehicles
Vehicles sorted by faction and with helpful info about their classes, with map icons
https://squad.fandom.com/wiki/Vehicles
- Подробный гайд для новичков★ 5 (764)61k views1.1k ♥20 minRussianUpdated 28 Sep, 2023
- Squad Leader 101★ 5 (884)29k views1.5k ♥60 minUpdated 22 Jul
- Как убрать мыло на экране | 100% Способ★ 4 (113)26k views355 ♥3 minRussianUpdated 1 May, 2023
- SQUAD - raising FPS together! / SQUAD - поднимаем FPS вместе!★ 3 (31)19k views75 ♥4 minUpdated 8 Jan, 2024
- Руководство по пилотированию вертолётов★ 5 (199)18k views446 ♥32 minRussianUpdated 20 Feb, 2022
- [Squad v10.5] [EN/РУ] / Where to shoot to penetrate? / Куда стрелять чтобы пробить?★ 5 (220)15k views606 ♥1 minUpdated 17 Jun




- Upgrading to PremiumTeam Fortress 2★ 5 (20k)1441k views11k ♥6 minUpdated May 11, 2022
- No More Room in Hell Official ManualNo More Room in Hell★ 5 (2.8k)569k views2.1k ♥29 minUpdated Apr 22, 2019
- NMRiH Community Hosting GuidesNo More Room in Hell★ 5 (526)351k views653 ♥1 minUpdated Aug 10, 2022
- ULTIMATE GUIDE FOR GAME DEV TYCOONGame Dev Tycoon★ 5 (5.8k)326k views10k ♥4 minUpdated 23 Jan, 2014
- How to 'Git Gud' Soon™MORDHAU★ 5 (2k)318k views3k ♥68 minUpdated Nov 16, 2024
- Лучшие кооперативные игры SteamPAYDAY 2★ 5 (1.5k)315k views2.1k ♥56 minRussianUpdated Apr 27, 2025






This guide was created by its original author on the Steam Community. Are you the author and want it removed? Request removal.