Infantry 101
INTRODUCTION
COVER TO COVER
C.C.M.O.
(C.) CHOOSE
Choose your next position. This position should ideally feature cover or concealment, but it may simply be a better firing position on open ground. The important thing is that you choose it - simply running forward until you make contact with an enemy (or more likely, until an enemy sees you before you realize you've made contact) leaves you on the backfoot once contact is made. Squad features a stamina bar that depletes as you sprint, and make it harder to aim your weapon the closer the bar is to empty. It takes time to bring your weapon to bear on an enemy and steady your sights, and enemies that are firing from a weapon-ready position or a completely prepared position such as a prone position behind cover or concealment have a massive advantage over targets that are spotted simply sprinting. Exhausted infantrymen that are not managing their stamina properly have to wait for it to recharge at times that are far from ideal. Choosing your position helps prevent you from being caught out in the open - the idea is to segment the traversal of a larger area into a series of manageable waypoints that feature cover and is a great way to keep your stamina high. This often turns a straight-line jog through an open street into a zig-zagging series of waypoints that either provide cover, concealment, or an ideal firing position. Peek out from cover, and choose your next position BEFORE you leave cover or concealment. Failing to do so could mean you path in ways that ignore cover and concealment around your route that you could be using to reorient yourself and catch your breath - and maintaining that sort of situational awareness and combat readiness is what the next three letters of C.C.M.O. are all about.
(C.) CHECK
After you have chosen your next position, you might be tempted to sprint straight towards it. This is not C.C.M.O. - the second letter of the acronym stands for "check" - and checking for the enemy before you leave your current cover or concealment is vitally important if you want to reduce your chances of being shot on the battlefield. What does proper checking look like? It looks like an infantryman that looks around carefully before and while he leaves his current cover or concealment. It's like how you might have been taught to "look both ways before you cross the street" - this kind of thinking is even more important in a combat situation. You want to not just be checking to the left and right, but scanning the area ahead of you carefully (perhaps with optics) and giving your rear a quick glance before you leave potentially life-saving cover or concealment - forsaking it for a new position that may be quite a risk to reach. Infantrymen that do NOT perform a check before moving to a new position are much more likely to take effective fire from the enemy. Becoming aware of threats before they become aware of you is an ideal you should strive for as much as possible in Squad. This really can't be stressed enough. If the enemy truly has the drop on you, they are much more likely to win the resulting engagement. Ensure you keep your situational awareness high by checking before you move.
You can think of cover and concealment as "magnetic." A soldier should leave it slowly and enter it quickly. This tends to look like a soldier that is sweeping his weapon around, checking the larger area he occupies as he slowly leaves cover - not just quickly checking straight ahead from behind his cover before making a break for it. By the time you are fully exposed, your checking should be done and sprinting (if necessary) can start. Remember to check AS you exit cover, not just BEFORE you leave cover. This means checking while walking - as you begin to slowly move out of your current position. Oftentimes, deadly threats are waiting for you to leave your cover or concealment, and you won't spot them until you make the attempt to leave your current position. You can return to your previous cover during this move-and-check phase if you start taking contact or find yourself in an unfavorable position regarding a newly-spotted enemy. Once you are fully exposed, you should either be sprinting towards a chosen position or using a weapons-ready stance to navigate your way to the new position. Simply blindly running along sidewalks and streets and crossing open areas in urban zones without performing checks is a fantastic way to get shot in Squad and is sadly the way many Squad players die - needlessly. Checks should involve your optic if you have one to scan far-off zones, and close-up zones can be scanned without needing to look down your sights. The important thing is to make sure that you are as aware as possible of any current threats that could contest your navigation to your next position. You may have to re-choose your next position depending on information acquired during this phase, or in some cases, call reinforcements or fall back entirely.
(M.) MOVE
This is where you actually stop checking and "just move" to the chosen position. The feeling of "just moving" is a feeling you'll have to get used to as an infantryman. The full sprint to the next position is often the best option, and it will leave you completely exposed for a period of time. There is little you can do if you're shot at during this phase except keep running, take a knee and return fire, or go prone and either return fire or crawl to the nearest available cover or concealment. This is why the first two letters of C.C.M.O. - "Choose" and "Check" are so important. You can make decisions here and do things to ensure this kind of sprint is going to go well - like killing the guy you spotted as you checked, or avoiding a killzone entirely because you remembered to choose to sprint to close-by cover instead just doing of an open ground jog that ignored and bypassed that relevant cover completely. If you are trying to cover ground quickly and keep pace with your squad, a full sprint is often the best idea. Taking a knee at some point during a longer sprint can be useful to regain situational awareness and stamina, but if the distance to your next position is short enough, closing it as quickly as possible is usually the best option. Sprinting leaves you exposed and increasingly exhausted, and moving targets are much, much easier to spot in Squad than targets that are still or moving slowly. Sprinting infantry is going to find it almost impossible to become aware of targets that are both still and in cover during the sprint - which is why waypointing your way through the battlefield to maintain situational awareness and practicing proper stamina management is so crucial. Swivel your head as you sprint to check sightlines, but don't expect to be able to spot far-off targets as you do so.
If you are working in a tightly coordinated squad, tactics like bumping, bounding, and overwatch can be used to make sure that moving soldiers are covered by friendly infantry. Just covering your squadmates when they sprint, and asking them to cover you while you do, may be all you need to say and do during your average match of squad. "Cover me, I'm moving up" and "I'm covering you, move up" are two simple and easy to use callouts that can get a squad moving more safely without requiring the entire squad to start learning tactics like bumping, bounding, and overwatch mid-game. In my long experience as a Squad Leader, most players are not prepared to learn and implement these tactics properly in your average public match. What the average player does understand are those two simple phrases. Use them, and watch your games improve. This is the easiest and quickest way to start using Fire & Maneuver in your games, a tactic which I cover in more detail in my guide for Squad Leading called "Squad Leader 101." The most important thing during the move phase, is moving. Only stop if you have to - likely because you need to regain situational awareness, or because you'll soon need stamina for an engagement - and NOT because you took contact. It's important to note that stopping a sprint towads cover to return fire from an exposed position is often not optimal or recommended. Stopping in the middle of a street makes you a very easy target for enemies - since you are no longer moving you are much easier to hit, especially if those enemies are shooting from farther away. Oftentimes, the best course of action is to NOT lay prone if you're shot at while in the Move phase - the idea is to continue until you reach your chosen position, running in zig-zag or erratic "serpentine" patterns if you are under fire. Laying down makes you an easy target if you're exposed, and even if you lay down because you're in defilade, you're making it easy for the enemy to pin you down in the defilade. Only prone in defilade if it's not going to leave you pinned. In most cases, just keep moving. Segment your navigation into short sprints that feature cover and concealment at every chosen waypoint. If you haven't been doing this, Squad might feel like a whole different game to you once you do.
(O.) ORIENT
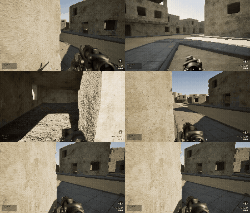
Orienting is the final phase of C.C.M.O., and occurs after you have reached your chosen position. Because the new position you are entering naturally features completely different sightlines and potential areas of contact, you will have to orient yourself once you reach it. Ideally, the enemy did not see you reach the new position, and you can surprise him with effective fire once stamina is regained. Remember to slowly peek during the orient phase, only exposing the smallest possible part of yourself as you slowly "slice the pie" and peek around more and more of your cover. Shorter sprints leave you with more stamina to use, and letting it recharge to full or close to full before or as you orient instead of immediately engaging is often important. This is the best situation an advancing infantryman can find himself in as he takes ground - safe, and in a position to catch defenders unaware. If you fail to orient after reaching your new position, you will fail to find targets that are defending the ground you just took - and make no mistake about it, it is impossible to win a game of Squad without taking vast amounts of ground on foot and engaging the enemies trying to hold it. The orient phase is much like the check phase, except you usually don't walk when you do it. You minimize movement (to minimize your chances of being spotted) and maximize your situational awareness. Use your optics, or binoculars if necessary, to acclimatize to your new sightlines and threats. After you have oriented, you can occupy your position relatively safely.
If you skip the orient phase and just occupy your newfound cover without looking around once stamina is regained, you miss the chance to take decisive engagements and evade dangerous threats. If you just ran to some bushes, you may have to crawl through foliage before you orient safely inside the concealment - but without orienting, you are essentially blind to your new zone, and will be ineffective at the position until you know what you can do there and what the enemy (if present) can do to you there. This is where you mark the map if you're a fireteam leader or squad leader - as soon as possible, oftentimes before engaging. If you shoot before marking, you miss the chance to set up ambushes with your squad and attack in an organized fashion at the squad level. Maintaining high situational awareness is ultimately what C.C.M.O. is all about, and situational awareness is your ultimate tool for not getting shot in Squad. Infantry that lacks situational awareness find themselves in losing engagement after losing engagement. If Squad feels like a death simulator to you, it is probably because you are not using C.C.M.O. properly. You can't really overuse it in Red Zone States, and Zones and Zone States are the topics we are going to cover next, so you don't find yourself C.C.M.O.'ing your way through friendly main.
ZONES AND ZONE STATES
Before you start enthusiastically using C.C.M.O., this guide will run you through the concept of Zones and Zone States. We're not referring to a killzone per-se when we refer to a Zone or Zone State - this is a new way of thinking you can adopt in Squad to make sure you tailor your movement strategy to the current danger level and engagement opportunities that the area you are currently in provides.
PAN & SCAN
MARKSMANSHIP
Practice your marksmanship. This can be done at the training range, but the best practice comes through experience. Learn to shoot by being patient about shooting in the first place. Familiarize with how to use your optics. Ineffective fire will get you killed - effective fire will save your life. Shooting at a target without meaningfully suppressing it just alerts it to your position and might be a huge factor in your resulting death. You're either suppressing, or trying to take kill shots. Either way, you are thinking about how you are using your weapon. Just spraying and praying doesn't have a place in Squad, and your shots should always be purposeful. Shooting is too noisy to justify needless gunfire - it draws enemies to your position like a magnet and gets you scoped out very quickly. Hip-firing towards an enemy as a reaction to contact that you were unprepared for is a suppression tactic and not spraying and praying - but a sniper pulling the trigger too quickly before his weapon properly steadies, is. Learning to hit your shots takes practice - and an understanding of the stamina system - but an infantryman with bad marksmanship will eagerly take fights only to lose them to enemy infantry with better marksmanship.
Patience is key. Going for headshots is crucial in some situations - such as when you are trying to maintain more stealth or outright prevent an enemy from surviving an engagement by immediately lying down. Making sure that you are ready for the kind of contact you are about to engage with is key. Do not sprint towards a close enemy HAB unless you have to. Practice moving at weapons-pace, with your gun at least up, if not already aiming down your sights as you move. I'll break down how you can (and always do) engage from three key "Weapons States" - and remembering that you are always in one of these three Weapon States is as important as remembering that you are always in one of three Zone States, whether you know it or not.
THE ROLE OF INFANTRY
The primary role of infantry in Squad is to take and hold ground. While vehicles can also do this, Flags are usually taken by infantry operating on foot and Squad itself is an infantry-centric game.
As an infantryman, you should be using C.C.M.O to take ground. Many times, you'll just be taking ground and doing little else as the fight it implies ensues. Infantry can dig in and hold positions effectively on the defense, but to actually assault properly, C.C.M.O. should be in use. Repositioning defenders should also be using C.C.M.O. as they relocate to new defensive positions or displacing. Just sprinting towards enemy emplacements and firing positions mindlessly on attack is a quick way to die ingloriously, and this happens more often than it should in Squad. If nobody is covering you as you move up, and you just sprint everywhere, the chances that the enemy simply outplays you goes up significantly. You may not always be able to choose a next position that features cover or concealment (such as if you're cresting a hill or running through smoke) but if that is the case, the position you choose should be the hilltop or the smoke you reach, even if it's exposed - further decisions can be made about getting into proper cover once you reach the position. The important thing is to choose, and not just run without thinking.
Infantry excels in urban environments - the opposite is the case with armor. Infantry can move through wooded and forested areas stealthily and effectively while armor and vehicle struggle to do the same. Anti-tank infantry is a huge threat to armor and the best protection for friendly armor is surrounding friendly infantry. Support your armor as infantry by securing it properly.
It's your job if you're playing infantry to stick with your squad and Squad Leader. Squad Leaders often truly hate having to constantly remind their squad to stick together if the SL is already on mic and dropping Rally Points, and the often best thing you can do for your squad is having it just stay together in the first place. There are instances when players have to operate away from their squad, but those instances do not in any way outnumber the instances where it's far better to have infantry mutually supporting each other in a squad environment. Use your comms, and be smart about your movement. Mark your map as a fireteam lead, and do what your Squad Leader says. If your SL is competent, do what he says. If he's not, maybe step up to lead yourself after reading Squad Leader 101.
Spawn in intelligent ways - the worst thing infantry can do is take up irrelevant fights or just wander around the map without being useful. You want to focus on the active flag, and either taking it or defending it. Infantry that's "stranded" fighting away from active points are just bleeding tickets and are not being useful to the team. Squad is an objective-based game, and playing for kills far away from the point can be highly damaging to your team's ticket pool and your chances of actually winning relevant fights as it leaves your platoon understrength in key areas and engagements.
Playing infantry in Squad is a lot of fun if you're implementing tactics like those outlined in this guide. Unlike the SL, your goal is to win firefights and not just coordinate them over comms and map. If you like feeling tacticool, Squad may be the game for you. Matches are very competitive since most players know how a match of Squad is supposed to go and what "winning teams" look and play like. The standardization of match types and the strategy-based metagame mean that you can truly shine if you know how to use infantry tactics at the infantry level. The potential for outplays in Squad is insane and going full-auto or pulling a frag out may be the difference between victory or defeat in fight after fight. Learning when to bandage, how to smoke, when to frag, what stance to take, where you should look, when to reload, when to fall back, when to push up, and how to cover your squadmates properly will come in time, but is beyond the scope of this guide. These things are going to be things you learn by playing. A great infantryman is a fearsome force in Squad and will be in the right place, at the right time, doing the right thing - winning the game for the team.
THE ONE-LIFE CHALLENGE
QUICK SUMMARY & CLOSING TIPS
Stick to cover like glue. Leaning should be used when peeking around cover and concealment, and low stances should be used if the cover does not provide adequate protection in the standing position. Cover should be "sticky," - that is, the soldier should be slow to leave it and quick to enter it, in practice moving like cover and concealment possess magnetic properties.
Use optics to "bring the picture to you" when looking at more distant areas. Optics should not be used to scan areas where targets could be acquired without optics, as the additional peripheral vision afforded by not using optics affords higher situational awareness.
A position can range from 0% to 100% cover, and each position provides a unique killzone.
A position may offer complete cover to the East and North but fail to offer any cover to the West and South. This is not a problem if there are no enemies to the West and South - but the moment there are, the value of holding your current position drops sharply. Looking through a small window at a road is closer to 80% cover, and a firing position in a small room using a murder hole is close to 90% cover. This murder hole position may offer a killzone that is highly effective if it covers a road or an intersection, or largely ineffective if its view is blocked by another building.
Learning to learn tactics by just playing Squad itself and developing your playstyle is part of the enjoyment of the game. The basics of getting an infantryman up to speed have been laid out here, but it's up to you to build on these basics using your own insights until you are an advanced player. Remember that direct application of military tactics to Squad may have varying results. Some translate beautifully, and some don't apply at all. Don't bog down your gaming and comms with military field manual stuff when fundamental logistics aren't being handled properly. Focus on these basics and your game should not only improve, but be far more fun.
Have an awesome time playing Squad!
- Vance
OTHER GUIDES BY VANCE
EPILOGUE
- Подробный гайд для новичков★ 5 (764)61k views1.1k ♥20 minRussianUpdated 28 Sep, 2023
- Squad Leader 101★ 5 (884)29k views1.5k ♥60 minUpdated 22 Jul
- Как убрать мыло на экране | 100% Способ★ 4 (113)26k views355 ♥3 minRussianUpdated 1 May, 2023
- SQUAD - raising FPS together! / SQUAD - поднимаем FPS вместе!★ 3 (31)19k views75 ♥4 minUpdated 8 Jan, 2024
- Руководство по пилотированию вертолётов★ 5 (199)18k views446 ♥32 minRussianUpdated 20 Feb, 2022
- [Squad v10.5] [EN/РУ] / Where to shoot to penetrate? / Куда стрелять чтобы пробить?★ 5 (220)15k views606 ♥1 minUpdated 17 Jun




- Upgrading to PremiumTeam Fortress 2★ 5 (20k)1441k views11k ♥6 minUpdated May 11, 2022
- No More Room in Hell Official ManualNo More Room in Hell★ 5 (2.8k)569k views2.1k ♥29 minUpdated Apr 22, 2019
- NMRiH Community Hosting GuidesNo More Room in Hell★ 5 (526)351k views653 ♥1 minUpdated Aug 10, 2022
- ULTIMATE GUIDE FOR GAME DEV TYCOONGame Dev Tycoon★ 5 (5.8k)326k views10k ♥4 minUpdated 23 Jan, 2014
- How to 'Git Gud' Soon™MORDHAU★ 5 (2k)318k views3k ♥68 minUpdated Nov 16, 2024
- Лучшие кооперативные игры SteamPAYDAY 2★ 5 (1.5k)315k views2.1k ♥56 minRussianUpdated Apr 27, 2025






This guide was created by its original author on the Steam Community. Are you the author and want it removed? Request removal.