Project Zomboid Water Independence: From Tap Shutoff to Plumbed Sinks (2025 UPDATED)
Water After the Shutoff (Project Zomboid)
Plumbing, rain collectors, boiling, and a base setup that stays easy
And yeah, the water can shut off way earlier than people expect in Project Zomboid, depending on your sandbox settings or whatever your multiplayer server owner picked. So I play like it’s going to happen soon. Every run.
And yeah, the water can shut off way earlier than people expect in Project Zomboid, depending on your sandbox settings or whatever your multiplayer server owner picked. So I play like it’s going to happen soon. Every run.
What you’re building
You want two kinds of water at your base, on purpose.- Drinking water
- Clean bottles you take on loot runs
- Also what you cook with all the time
- Clean bottles you take on loot runs
- Utility water
- Washing your character, washing clothes, watering crops
- This can be tainted and it’s still fine for those jobs
- Washing your character, washing clothes, watering crops
Step 1: Before shutoff, do a quick water grab
If town water is still running, treat every house like a refill station. Don’t just top up your thirst bar. Fill containers.
What I grab early because it stacks up fast- Water Bottle, Pop Bottle, Bourbon Bottle, anything that holds liquids
- Cooking Pot and Saucepan, these become your boiling kit later
- Water Dispenser if you can carry it without getting pinned, heavy but worth it
- One shelf or crate is “clean drinking bottles only”
- Another spot is “tainted water and random containers”
After shutoff, do the drain run
When water shuts off, sinks and toilets usually keep a limited amount stored. You’ll see numbers like 20/20 on fixtures. That is free water. Take it.Quick drain sweep plan
- Bring a stack of empty bottles, plus one Cooking Pot if you can
- Hit bathrooms first, then kitchens, then tubs and showers
- Refill and leave, don’t hang around inside tight houses if you don’t need to
Step 2: Rain collectors (your renewable source)
The common early build is Rain Collector Barrel (Garbage Bags). Build requirements vary by version. In Build 42 unstable, people often see it around Carpentry 5, In older Build 41 info, you’ll see Carpentry 4 mentioned a lot. Either way, it’s still the same plan.
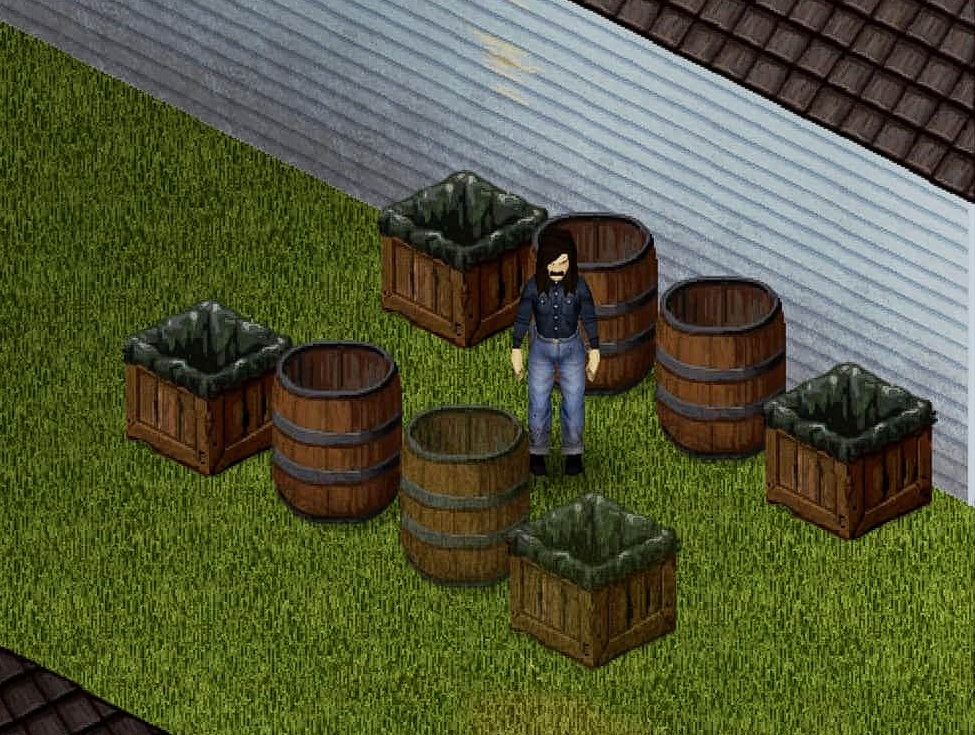 Typical stuff you’ll use
- Hammer
- Planks
- Nails
- Garbage Bags (the recipe is literally based on them)
- It must be outside, exposed to rain, or it won’t fill
- Roofs can be fake in Project Zomboid. Some tiles look solid and you can still fall
- Use the Walk To preview to check if the tile is actually pathable
- If I’m unsure, I build Wood Floor first, then place barrels on that
- Build Stairs
- Place Wood Floor where the barrels will sit
- Place 2 barrels to start, expand to 3 or 4 later if you settle there
Step 3: Boiling tainted water (clean drinking water the simple way)
Boiling is the reliable method. It’s boring. It works.
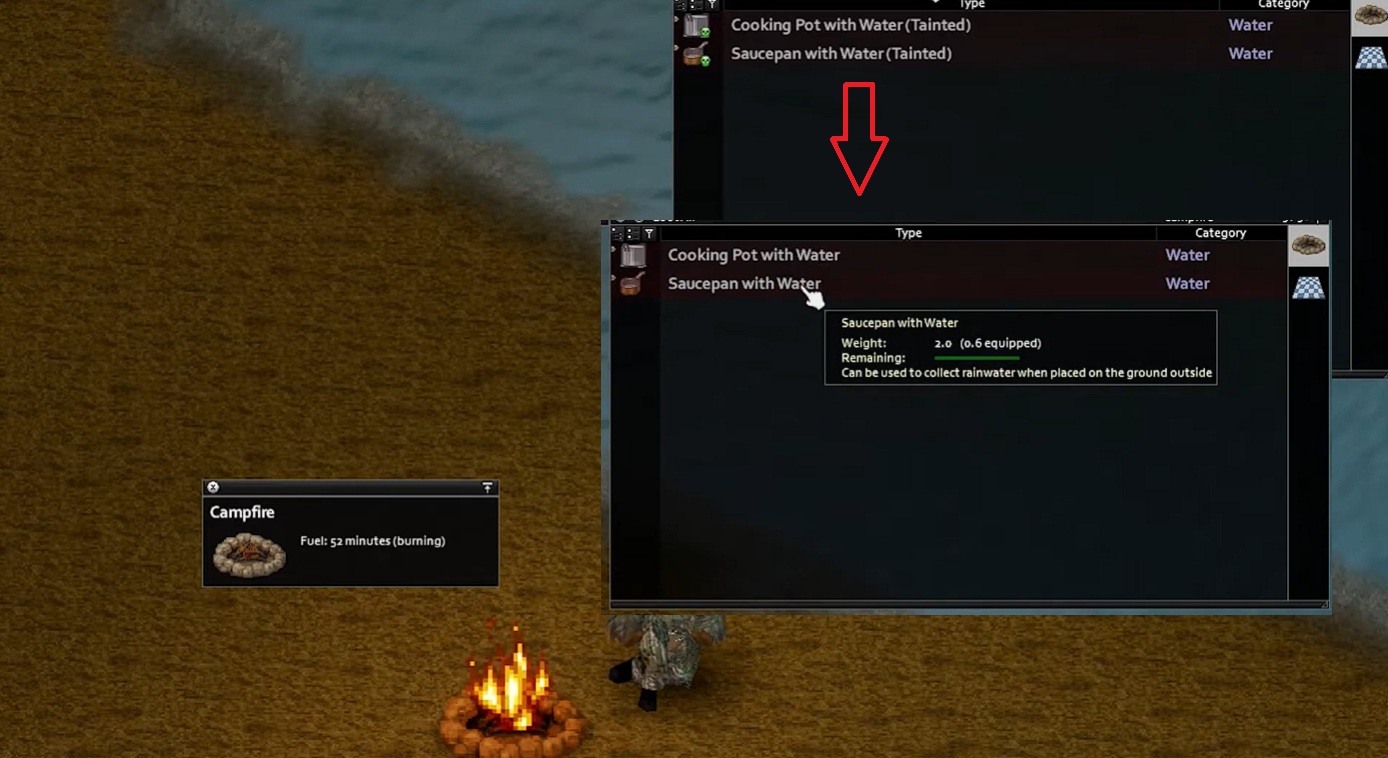 What I actually do
 - Fill a Cooking Pot or Saucepan from the rain barrel
- Heat it on something dependable
- Antique Oven is amazing if you have one
- Electric Stove is fine while power lasts
- A fire setup works too, just don’t do it in a way that burns your safehouse down
- Antique Oven is amazing if you have one
- Wait until the container shows it’s clean water
- Pour into bottles for travel, store those bottles on the clean shelf
Step 4: Plumb a sink (the quality of life upgrade)
Plumbing is picky, but once you get the rules right, it’s stable.
You need
 Rule 2: The sink must count as inside
This is the reason most people don’t even see the option.
If your base is player built or weird, do this
Step by step, no guessing
Good things to know
You need
- Pipe Wrench in your inventory
- A sink like White Sink or Industrial Sink
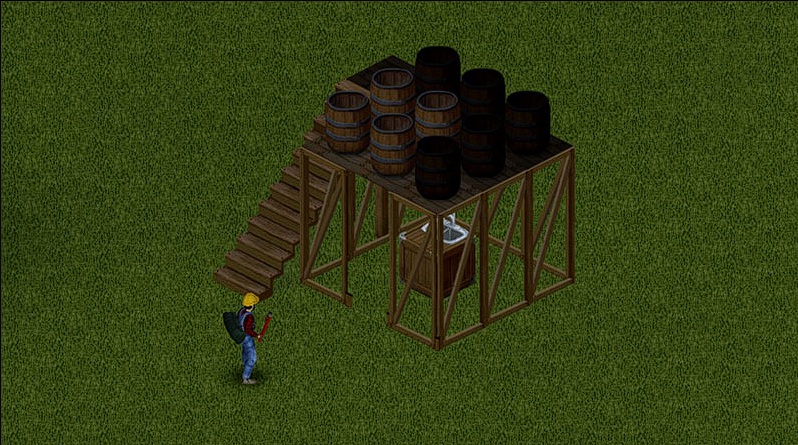
- A reservoir above the sink, usually rain collector barrels
- The reservoir must be one floor above the sink
- It must be within the 3 by 3 tile area directly above the sink
Rule 2: The sink must count as insideThis is the reason most people don’t even see the option.
If your base is player built or weird, do this
- Build Wooden Wall Frame pieces around the sink spot, even a tiny 1x1 room
- Add a Door Frame if it still doesn’t count as inside
- Plumb it
- After it’s plumbed, you can remove the frames if you want
Step by step, no guessing
- Place the sink where you want it, inside
- Go one floor up
- Place 1 to 2 rain collector barrels in the correct 3x3 area above the sink
- Go back down
- Right click the sink and choose Plumb Sink
- Once the barrels have water, test the sink
Good things to know
- A plumbed sink gives you clean water from the tap
- It works with no electricity
- You can add or remove barrels later as long as they stay in that 3x3 area
- If you move the sink, you break the setup, so place it like you mean it
Base layout that stays comfortable
Keep it practical. Water touches everything you do.
My basic layout- Plumbed sink right near your cooking area
- A small boiling corner next to it: Cooking Pot, Saucepan, spare bottles
- A utility water spot nearby: buckets, tainted containers, cleaning supplies
- Rain barrels clustered above the sink so you don’t walk across the roof every time
Troubleshooting (fast checks)
If “Plumb Sink” doesn’t show up- No Pipe Wrench in your inventory
- Sink is not counting as inside, add wall frames
- Barrel is not one floor above
- Barrel is not inside the correct 3x3 zone above the sink
- Your barrels are above the wrong tiles
- Place at least one barrel directly above the sink first, then tweak placement
- Rain collector water is tainted until boiled
- A correctly plumbed sink is the safest, easiest long run option
Quick plan for every run
- Grab bottles, a Cooking Pot, and do a few house refills early
- After shutoff, do one drain sweep of nearby homes
- Build stairs and a wood floor rooftop
- Place 2 Rain Collector Barrels
- Plumb a White Sink or Industrial Sink with a pipe wrench
- Keep drinking bottles separate from utility water, always checking what you’re drinking from
Available Translation
Optional Trainer Helpers (Use Responsibly)

More Project Zomboid Guides

Loved the guide? We have more for you here:
https://steamcommunity.com/sharedfiles/filedetails/?id=3625646827
https://steamcommunity.com/sharedfiles/filedetails/?id=3627329298
https://steamcommunity.com/sharedfiles/filedetails/?id=3627633171
https://steamcommunity.com/sharedfiles/filedetails/?id=3628432810
More Project Zomboid guides
- Modding Policy★ 5 (397)133k views208 ♥9 minUpdated Nov 8, 2022
- 80 tips and tricks for Project Zomboid (If you have over 100 hours in this game some of these will probably be new to you too)★ 5 (1.6k)82k views3.1k ♥28 minUpdated Aug 29, 2021
- Топ 100 лучших модов на "project zomboid"★ 5 (415)68k views1.1k ♥10 minRussianUpdated Jul 28, 2024
- [B41] Лучшие места для базы★ 5 (477)61k views1.3k ♥6 minRussianUpdated Nov 30, 2025
- Первая помощь ❤★ 5 (628)49k views1.4k ♥5 minRussianUpdated Jan 20, 2025
- The Basics of Base Building★ 5 (704)48k views1.5k ♥17 minUpdated Dec 24, 2021





🔥 Popular guides
- Upgrading to PremiumTeam Fortress 2★ 5 (20k)1441k views11k ♥6 minUpdated May 11, 2022
- No More Room in Hell Official ManualNo More Room in Hell★ 5 (2.8k)569k views2.1k ♥29 minUpdated Apr 22, 2019
- NMRiH Community Hosting GuidesNo More Room in Hell★ 5 (526)351k views653 ♥1 minUpdated Aug 10, 2022
- ULTIMATE GUIDE FOR GAME DEV TYCOONGame Dev Tycoon★ 5 (5.8k)326k views10k ♥4 minUpdated 23 Jan, 2014
- How to 'Git Gud' Soon™MORDHAU★ 5 (2k)318k views3k ♥68 minUpdated Nov 16, 2024
- Лучшие кооперативные игры SteamPAYDAY 2★ 5 (1.5k)315k views2.1k ♥56 minRussianUpdated Apr 27, 2025






This guide was created by its original author on the Steam Community. Are you the author and want it removed? Request removal.