Become a Lazy Billionaire Industrial Tycoon in No Man's Sky, Detailed Guide
Intro
Like most games of it's type that have a survival mode involving crafting and fueling things with resources, resource harvesting is a significant part of No Man's Sky. Even though there's not much in the way of factory automation, there are automatic options for resource harvesting.
This guide is about how to be lazy and obtain all the resources/materials you need with as little manual effort as possible.
"Lazy" doesn't mean no work, but it means you can do minimal industrial stuff while focusing on other things in the game. You shouldn't have to get out a spreadsheet to calculate anything or constantly look up recipes on the wiki, or try to create everything with lots of refiner runs starting with only 2 oxygen.
If you don't like doing industrial stuff or building bases, don't worry. The absolute most minimal resource extraction setup is covered.
If you don't really care about billions of units, resource extraction will still keep you supplied with stacks of almost everything. If you do like this kind of stuff then some of the more elaborate aspects are covered in a separate guide.
While the guide is written to be suitable for new players, experienced ones might still find some of the techniques and ideas to be of interest.
The main topics include:- What's required to survey for and extract resources, assuming you are starting with nothing.
- Which resources are most useful to start with.
- How to find and mark mineral/gas hotspots while doing other stuff and playing the game normally.
- How to build the absolute minimum mineral/gas extraction base when you you're still resource-poor.
- How to "multiply" resources with a refiner.
- How to convert one resource into another.
- How to create plants with a refiner instead of growing them. (Only use agriculture if you want to.)
- Ways to grow plants if you want to.
- How to remember key refiner recipes by learning the fake NMS chemistry rule that they're based on or using a mnemonic device.
- How to set up your crafting/refining base and manage inventory.
- How to make the Stasis Devices and Fusion Igniters that sell for 15M units each while still being lazy and sloppy about it.
- How to sell your products.
If you really don't like building industrial bases and want to stick to exploring, it's still possible to become an exploration billionaire by making millions of units scanning fauna. See this guide for more about that: https://steamcommunity.com/sharedfiles/filedetails/?id=3717353393
This guide links to the No Man’s Sky Wiki[nomanssky.fandom.com] in many places since it’s a good source of reference information which is usually up to date. So I just wanted to give a quick shout out to everyone who has helped with the wiki and also recommend it for more detailed reference (such as looking up all the recipes involving a particular item.)
Brief Sidetrack: Units and Nanites Now!
This section is here just in case you came here looking for shorter term help and need units or nanites immediately.
This guide is primarily about solving resource issues and making absurd amounts of units in the longer term, not how to get a few million right away, but I figured I'd share this guide I wrote which contains some more immediate wealth acquisition advice:
https://steamcommunity.com/sharedfiles/filedetails/?id=3679976925
(If you don't care about corvettes right now, just ignore the corvette stuff and read the sections on making money and nanites.)
Overview of Resource Harvesting
This is a quick overview of resource harvesting, mostly to explain where this guide fits in.
Resources refers to minerals, gases, and usually raw substances. Often these are in surface deposits, but some are in rocks, plants, a planet's atmosphere, or other things.
The first thing you get is a Mining Beam allowing you to harvest resources from minerals and plants, but the variety is rather limited. Still, it's usually worth upgrading the speed or efficiency of the beam to faster get more of what it can harvest.
Later you get the Terrain Manipulator allowing you to harvest Surface Deposits[nomanssky.fandom.com]. You can't make it faster, but you can set the beam size to the narrowest setting to get the maximum amount of mineral from one deposit.
You could stop there and do everything manually, but then you soon come across some other options.
Once you manage to salvage one crashed starship or otherwise get 1M units or so, minerals are cheap enough to easily afford. It can speed things up to just cheaply buy up the 500 or so of a mineral at a trade terminal when you can. This still isn't that great since limited amounts are available and only some things are available at any one terminal, but it can save time when possible. At a station or trade outpost, NPC pilots can often sell you more of whatever is at the nearby trade terminal, but quantities are still limited per purchase.
The first automated harvesting option is the Autonomous Mining Unit[nomanssky.fandom.com]. Up to three of them can be placed on a surface deposit, but they need fuel and take an hour to mine only 250 units of mineral. If you put them on multiple deposits then you can only keep track of 5 deposits per planet without creating bases. This is because you need a Save Beacon to be able to locate them and, only 5 beacons can be placed per planet.
I personally found autonomous mining units to be too much trouble to use for most things, and they are largely obsoleted by the Mineral Extractor, but they can still be useful for some specific cases. One is when a base has one or more surface deposits nearby but you don't need much of those minerals. In that case they're easier to keep track of, and less effort to deploy, but still limited to small amounts. They can still remain relevant for collecting some stuff that you don't need much of like specific stellar metals. I use them for things like Quartzite and Activated Copper.
Please do not confuse Autonomous Mining Units with Mineral Extractors. They are different devices with different limitations.
Next you might get the Atmosphere Harvester[nomanssky.fandom.com]. Only three can be deployed per planet, they require fuel, and take an hour to harvest 250 atmospheric gas (type depending on biome). While still pretty limited, at least you are now able to harvest atmospheric gas (Nitrogen, Sulfurene, and Radon) where you couldn't before. But they're very soon mostly obsoleted by the Gas Extractor[nomanssky.fandom.com].
The Atmosphere Harvester can't harvest oxygen, but there is the Oxygen Harvester[nomanssky.fandom.com] that can. This is actually not portable and can only be deployed inside a base area, but at least it can harvest oxygen. It also needs fuel, but is much faster than the others, collecting 250 oxygen in 12 minutes or so, which can be useful early on. This is still too limited for mass production, and it's also mostly obsoleted by the Gas Extractor. It's still good for making sure there's some oxygen at your base any time you need it.
Please do not confuse Atmosphere Harvester or Oxygen Harvester with Gas Extractors. They are different devices with different limitations.
So finally we get to one of the two main subjects of this guide where you obtain the Survey Device to locate the gas and mineral "hotspots" known as Concentrated Gas Clouds and Deep-Level Mineral Deposits. These allow you to use Mineral Extractors and Gas Extractors to feed entire stacks of minerals or gas to Supply Depots (tanks) for later collection.
With this kind of heavy automatic harvesting of whole stacks of resources, you can finally mass produce high-value products and have stacks of everything you need available at all times with no further work. Unlike the small options, they are not self-contained and do require some extra initial effort to place properly and build the power and storage for.
Requirements: Tech and Construction
Assuming you are starting at the very beginning, you won't be able to do surveying or mineral/gas extraction until you reach the Space Anomaly[nomanssky.fandom.com].
This is a special space station that you find relatively soon by doing the main missions. It's not much of a secret because it also serves as a multiplayer hub. But new players often get kind of sidetracked with a lot of stuff the game throws at you beforehand (like base building).
So if you haven't found that yet, just keep doing main missions. After a while the series of visiting new crash sites will end and you will find the Space Anomaly. After that you will be able to visit the Multi-Tool Research Terminal[nomanssky.fandom.com] and the Construction Research Station[nomanssky.fandom.com] to get the blueprints you need.
Below is what you need to get started with finding Deep-Level Mineral Deposits[nomanssky.fandom.com] and Concentrated Gas Clouds[nomanssky.fandom.com], and using them to gain unlimited stacks of resources.
The first thing you will need is the Survey Device[nomanssky.fandom.com] blueprint. This is what is needed to find mineral and gas hotspots. Buy it from the Multi-Tool Research Terminal[nomanssky.fandom.com] in the Space Anomaly for 320 Nanites.
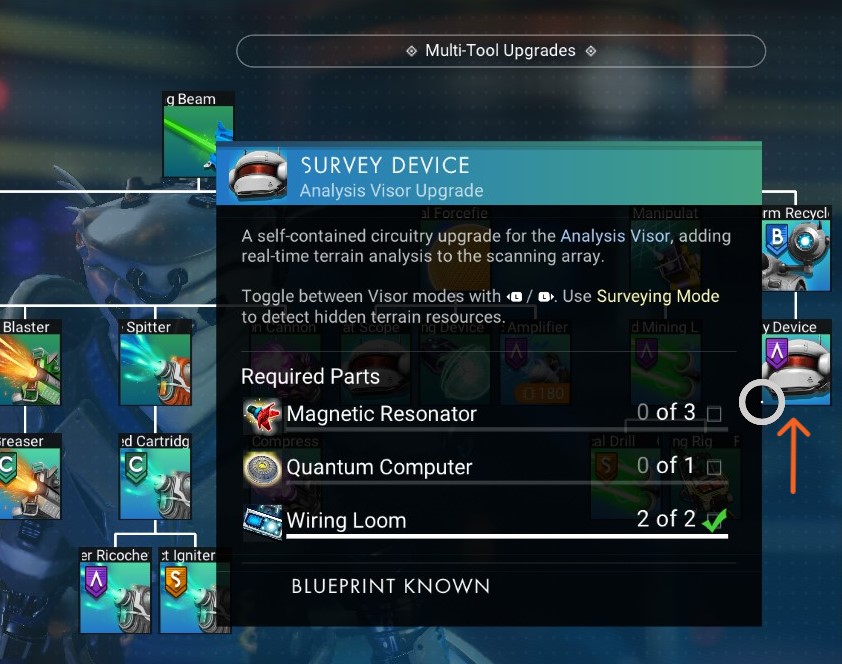
Note that to unlock this BP you need to buy the Waveform Recycler BP for 120 Nanites if you haven't already.
To get the necessary ingredients, you could buy the necessary blueprints (Magnetic Resonator and Quantum Computer) from the Synthesis Laboratory[nomanssky.fandom.com] terminal (right next to the multi-tool blueprint terminal), but you can sometimes buy these two parts from a trade terminal or a Minor Settlement. Wiring Looms are not craftable and always have to be purchased, found, or recovered by disassembling tech modules (even the cheapest most useless ones).
Another thing that's highly recommended before proceeding is that you do the Expanding the Base missions because this will give you lots of construction and other blueprints that you won't have to spend Salvaged Data or nanites to get. Just keep completing main mission objectives until another weird character tells you to talk to his “contact” about your base, then continue on that track.
This doesn't introduce any extra management burden. It only gives you some more NPCs that give you missions that reward more blueprints, and getting these blueprints this way will save you a lot of Salvaged Data and Nanites to use on other things that they don't give you.
You don't need to do all of the missions from every specialist type before continuing, but at least get the base overseer ones over with. Then you will have some more base blueprints that will come in handy for the rest of this.
Having the Survey Device ahead of time might be helpful though since you can be looking for hotspots while you do those missions, but it isn't required for the missions.
These aren't handed out by any missions and you just have to buy them.
Since these are base construction parts, you will need at least 21 Salvaged Data[nomanssky.fandom.com] to buy the Mineral Extractor[nomanssky.fandom.com], the Supply Depot[nomanssky.fandom.com], and the Supply Pipes[nomanssky.fandom.com] blueprints from the Construction Research Station[nomanssky.fandom.com] in the Space Anomaly. Notice that you can not buy these from the Construction Research Unit in your base. You have to get them from the Space Anomaly.
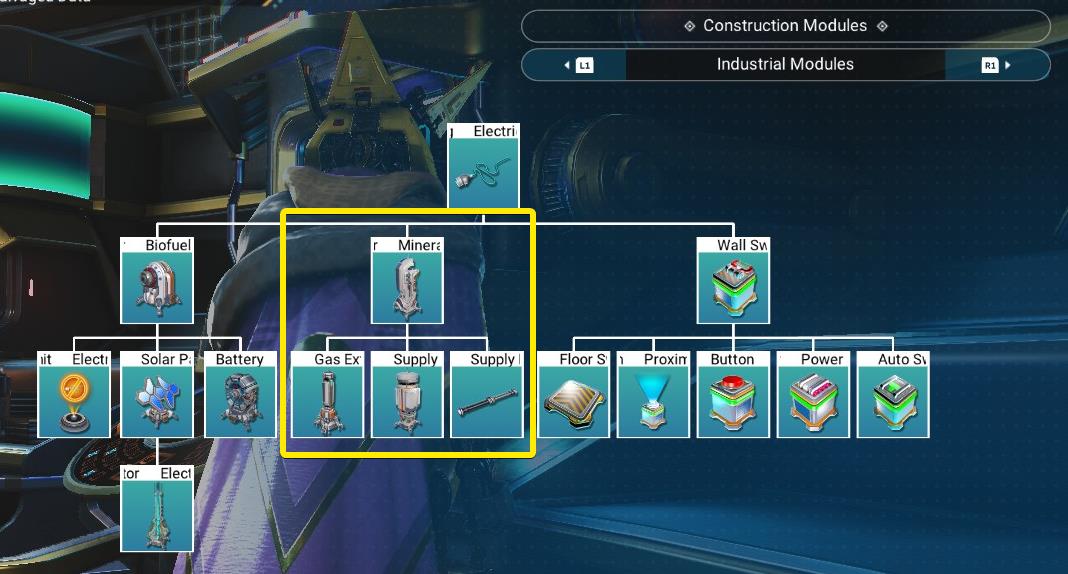
You will also want the Gas Extractor[nomanssky.fandom.com] for another 10 Salvaged Data, but you don't have to have that at first. Gas can be very helpful though and is necessary to make high value items so you will want to get into collecting gas pretty soon. The Gas Extractor works exactly the same way as the Mineral Extractor, so everything you learn setting up a Mineral Extractor will work exactly the same way with the Gas Extractor. So if you have the extra Salvaged Data for it then buy it now, but otherwise it's fine to wait and buy it later when you can.
Requirements: Crafting
Doing the Expanding the Base and Scientific Research missions will give you all of the blueprints in the Agricultural Products categories. This is why completing those is useful. Some types of POIs like Manufacturing Facilities can also have them.
As needed, buy any you’re missing from the Synthesis Laboratory[nomanssky.fandom.com] terminal (right next to the multi-tool blueprint terminal) on the Space Anomaly.
You don't need all of them to get started, but it might be useful to read this overview of what they are and what resources they use so you can decide which ones to buy next.
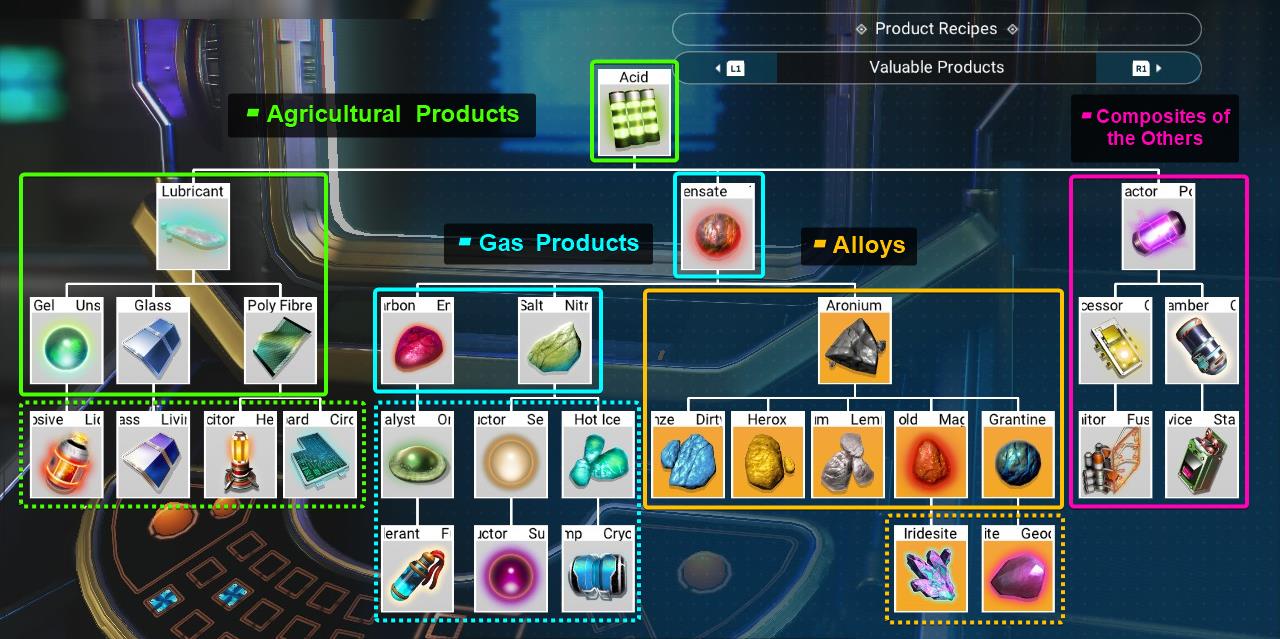
Note that this is just the blueprint unlock tree, not the crafting tree.
The ones outlined with a solid line are the first tier materials that are made from basic resources, and the ones outlined with a dotted line are the second tier products made with the first tier products in the game group.
The purple outline indicates the 3rd and 4th tier products that are made from 2nd tier products from two or three different groups, so those are the last ones to get.
The Alloys are the ones with the yellow backgrounds that I outlined in yellow. The first tier ones (solid line) are all made from a biome mineral plus either Ionized Cobalt or Pure Ferrite. By themselves they're a more profitable way of ridding yourself of excesses of these minerals than just selling the minerals.
The 1st tier ones can all be made in a refiner by adding Tritium, Silver, Gold, or Platinum to the first two elements, so you don't absolutely need the blueprint to make them.
The 2nd tier ones (the "Enriched Alloys") are crafted with different (non-overlapping) sets of 3 of the 1st tier alloys and this requires the blueprint.
As the name would suggest, you need gasses to make these. The 1st tier ones are all crafted with biome gasses and Condensed Carbon. However, you can also make them in a refiner using biome gas + (Condensed) Carbon + Salt/Chlorine.
The 2nd tier ones are crafted by combining two of the 1st tier ones, or one of the 2nd tier ones with the remaining 1st tier ones and these require blueprints. Basically, these won't be that useful for mass production until you are extracting lots of biome gas. So they aren't good options to start with.
These are all made using the Harvested Agricultural Substances (such as Gamma Root). Since you can actually make these substances using a refiner (instead of harvesting them), you don't necessarily need to be able to grow the corresponding plant to get the plant substances needed for making the Advanced Agricultural Products.
Since these can both be grown (get the blueprints for the plants from the agricultural specialist base employee) or manufactured from biome minerals using a refiner, they're good ones to get first and you can get them all from Expanding the Base and the Scientific Research branch of missions.
The 2nd tier products are made by combining two different 1st tier ones with no overlap. (Note: Heat Capacitor is actually a 1st tier, not a 2nd tier. I have it marked incorrectly in the diagram.)
Living Glass[nomanssky.fandom.com] is a good high value product to start making first. This is because the plants used to make it grow quickly, you can still make the plant substances in a refiner if you want, and the Glass[nomanssky.fandom.com] part can even be made in a refiner with other things like Silicon Powder. You can also get the blueprint for it by completing the Scientific Research (base scientist) missions. These things combine to make it one of the best products to get started with.
Circuit Boards are also good since you can get all of the required blueprints from base employee missions, but the variety of input materials is larger making it a better choice to make next.
These are the composite products outlined in purple. The 3rd tier ones are called "Advanced Crafted Products" in the game, and the 4th tier ones (Fusion Igniters and Stasis Devices) are called "Highly Refined Technologies".
The 3rd tier ones need a 2nd tier gas product and a 2nd tier agricultural product to craft. The 4th tier ones need two 3rd tier products plus a 2nd tier alloy (Geodesite or Iridesite). So these are the last blueprints to obtain since they won't be useful until you have the others.
Quantum Processors are a good place to start in this group if you already got the Circuit Board blueprint (you just need the blueprint for Superconductor and its dependencies).
Acquire at your leisure, but I'd suggest doing Expanding the Base and its branches, especially Scientific Research, to avoid having to spend any more nanites or salvaged data than needed.
Before you can mass produce all of them, just produce the most valuable thing you can and sell. More about that in a later section.
Where to Find Mineral and Gas Hotspots
With the Survey Device installed on your multi-tool, the Analysis Visor will get three new modes: one each for finding Electromagnetic Power Hotspots, Deep Mineral Deposits, and Concentrated Gas Clouds.
Deep Mineral Deposits for a particular mineral can be found on any planet where they occur as surface deposits. However, surface deposits don't seem to indicate the presence of a deep mineral deposit of the same type nearby.
Concentrated Gas Clouds of different types can be found on planets based on the planet's Biome, plus Oxygen which can be found on any planet with a "normal" atmosphere. This basically means Oxygen clouds are on any planet with an atmosphere except Gas Giants and Waterworlds (which are only around purple stars).
Both Mineral and Gas hotspots can also be found and extracted underwater.
Electromagnetic Power Hotspots allow you to place a Electromagnetic Generator to supply power to a base instead of Solar Panels. While these are useful, and can be on any planet, trying to get multiple hotspots of different types into one base is difficult and time consuming so I don't recommend trying to use Electromagnetic Generators in a resource extraction mini-base on a regular basis. Only sometimes is this worth the trouble, such as when needing to place lots of extractors for some reason or if one is close by and easy to get to.
This table shows what types of Concentrated Atmospheric Gas (Nitrogen, Sulphurine, Radon, Oxygen) exist in which biome along with which Biome Mineral (also called Biome-specific "Localized Earth Element") occurs there.
The Biome Mineral always occurs in a particular biome and it should always be shown in the planet information, but the gas isn't shown in-game. Note that there is or was a bug that caused Sulphurine to show up in the list for biomes where it isn't present. So just ignore that and go by the biome type.
These are less important to remember because anything special they have is not very critical for mass production.
These are the metals that differ by star color and either the normal or "Activated" version should be on each planet around a star of the given color. All of them refine to Chromatic Metal[nomanssky.fandom.com] and that's primarily what they're good for. While they're needed for specific tech modules, they don't have much relevance for mass production. The "Activated" version refines to twice as much Chromatic Metal as the non-activated type.
You don't need a mine for all of these because specific ones aren't needed for mass production. That is, while you might use up lots of Chromatic Metal, you only need a small amount of specific stellar metals for some specific tech modules that need them.
It's not really important to do anything special to remember these because their in game icons match the star color.
How to Remember Biomes for Gasses, Minerals, and Plants
Except for gasses you might think that this isn't that useful, but a lot of refining recipes are based on rules like "biome mineral + biome gas refines to biome plant", so it helps to remember these. If you can remember the biome for a gas, mineral, and plant it will help you not just find those things but also remember lots of refiner recipes.
The gas type is not currently shown in the information for a planet in game, but you can mostly remember it by temperature. The only one that doesn't entirely follow temperature is Radon, but remembering Radon is in radioactive biomes is pretty simple, and you just have to remember that people in cold climates have more problems with radon build up in their basements.
So for the common six biomes anyway:
These are pretty easy to figure out from their icons and names, but just in case it helps here are some other ways to remember.
Hotspot Frequency and Spacing
According to the NMS Wiki: "There are always 16-24 hot-spots available within 1050u from any location. These will include at least one of each of the following: Electromagnetic Power Hotspot, Concentrated Gas Cloud of Oxygen, (if applicable) a biome Concentrated Gas Cloud, (if applicable) a random non-biome Deep-Level Mineral Deposit, a resource dependent on the system and a resource dependent on the biome."
So within 1050u, there's always at least one power, biome gas, oxygen, biome mineral, random non-biome-specific mineral (like cobalt), and stellar metal (Copper, Cadmium, Emeril, Indium, or Quartzite).
In addition to that, the hotspots seem to occur near the vertexes of a triangular grid pattern, about 400-500u apart. So you can potentially put a base in the middle of such a triangle and get to three hotspots 200-250u away. This seems to be very rare to achieve though.
Multiple hotspots per base may not be worth the trouble since this is much more time consuming to set up than a single-hotspot base. Trying to get a mineral and a gas in the same base can be worthwhile, but it can easily take 2 or more hours to find something like silver + biome mineral + biome gas all 250u away from, or even 500u from, a center point.
Therefore, the most I'd normally try to get in one base is one mineral and one gas hotspot, and that’s only when I get lucky. Most of the time I just set up one base per hotspot with different hotspots on different planets.
Which Resources to Extract First
There's no exact one-size-fits all answer to this because different people start out in different places with different amounts of different things, plus people have more or less of a habit of going different places or shooting different things with a mining laser.
So basically just take these as guidelines because there's really no solid argument for an exact order. Instead I'll try to describe something like "most to least useful" by listing off the uses of each one.
These are the most important ones to go after first.
- Oxygen[nomanssky.fandom.com] - This has to be one of the most useful resources because of the huge number of refiner recipes that use Oxygen, and the massive amount of Condensed Carbon that you can make from it. Oxygen refines inefficiently to carbon, but with some carbon you can refine carbon + oxygen = condensed carbon (using oxygen in place of one of the carbon). But it gets even better because 2x Condensed Carbon + 2x Oxygen = 6x Condensed Carbon. So extracting oxygen means you now have tons of both Oxygen and (Condensed) Carbon and never need to shoot anything for it again. (You will need tons of condensed carbon for the gas product tree.) Oxygen will multiply: (Ionized) Cobalt, Chlorine, Salt, Faecium, Sodium (Nitrate). The (Condensed) Carbon resulting from Oxygen can multiply: Magnetized/Pure Ferrite (which can be turned into Ferrite Dust with Oxygen) and Sodium. And there are even more recipes for it. Oxygen by itself can solve several other resource needs.
- Any one of the Six Major Biome Minerals[nomanssky.fandom.com] (Phosphorous, Pyrite, Paraffinium, Ammonia, Uranium, Dioxite) - For some purposes, any of these will do because Any Biome Mineral refines into Ferrite Dust 1:1. So any of them will solve your immediate Ferrite Dust needs, and can also be used for more valuable stuff later. Uranium and Dioxite are good ones to start with because they can be used to make Gamma Root and Frost Crystals in a refiner. Those two can be used to make Living Glass which has a par value of 566,000 units, pretty good for how easy it is to make. But ultimately, the best one to start with is based on your specific situation and what you happen to need most.
- Nitrogen (or Radon, or Sulfurene)- Of the Atmospheric (Biome) Gasses, Nitrogen is a good one to start with. It is marginally more useful than others because it can be used to make or multiply Sodium Nitrate using ferrite dust or just sodium. It can also make Kelp Sacs and Marrow Bulbs which can't be grown. The Kelp Sacs and Marrow Bulbs are also other ways of multiplying Oxygen and Cobalt respectively. However, I haven't found these recipes that important so there’s usually no need to go through any special trouble to specifically get Nitrogen before other gasses. Radon might be a better choice since it can also be used to produce Gamma Root and Frost Crystals.
- All Biome Minerals - The first priority will be to get one of any of them, but eventually you will be able to use up lots of all six of them making the 4th tier Valuable Products like Fusion Igniters. Biome Mineral + Oxygen refines to the corresponding Biome Plant, and 1x Biome Mineral + 1x Biome Plant refines to 2x Biome Plant. Having all six will thus allow you to just synthetically make all six biome plant products needed for Valuable Products, including the most valuable.
- All Biome Gasses - One will be good but ultimately you're going to want all three of these because they're used with Condensed Carbon to make the three 1st tier Gas Products. These are all needed to make the 4th tier 15M Highly Refined Technology items. You can transform any of them into any other of them in a refiner by refining Biome Gas + Oxygen (consuming the Oxygen in the process) but it will save lots of time and oxygen to just be able to collect stacks of all three without having to do that.
- Silver - Arguably this should be on the “maybe” list, but it is used in a lot of crafting and especially it's the main material used for Freighter Rooms. It isn't used for mass production unless using a refiner to make alloys, and even then you don't constantly need a huge amount, but it can be convenient to just have a stack of it waiting at all times. It can be used to make Metal Alloys in a refiner more efficiently than crafting them, and can also be used to make tons of Chromatic Metal along with Gold and a Stellar Metal. Useful, but a much lower priority than biome minerals and gasses.
- Gold - This should also arguably be on the “maybe” list. This is actually very low on the list of things worth having a mining base for because you usually don't need much of it even if its required in a lot of one-off crafting. It can also be used to make Metal Alloys with a refiner, and is used in the previously mentioned amplified Chromatic Metal recipe, but it's not as great as most people assume it is. Gold + Silver can be refined into Platinum, and Gold + Silver + Platinum can be refined into Nanites, but the input output ratio is so poor that it's not worthwhile compared to other methods of obtaining nanites. Like silver it’s another low priority and extracting it is more for the sake of completeness than a need for large amounts.
Resources Barely Worth or Not Worth Extracting
These are ones that could be worth it after you get most of the ones above, but aren't strictly necessary since you can use the ones discussed above, or other means, to create more of these.
- One Stellar Metal (for Chromatic Metal) - At most it could be worthwhile to extract a single stellar metal, but with just a few pieces of Emeril or Indium this can be avoided pretty easily by replicating new stellar metal entirely in a refiner without needing any new input material. Early on, other options exist besides manual mining such as buying from trade terminals. So extracting it is mostly a matter of personal preference. See the section below on refining Chromatic Metal for more information to help decide if this is worth it to you. If you want to extract one in a yellow star system, Activated Copper would be better than Copper.
- Rusted Metal - If you couldn't just buy up the Metal Plates at any trade terminal this would easily be worth it because it's the best way to produce Ferrite Dust. However as long as you buy all your Metal Plates, the amount of Ferrite Dust you get from refining excess biome minerals into Ferrite Dust, or other sources, will likely be more than enough for you. I put up an extractor for Rusted Metal at some point but have barely used any of it. It will be worth it if you're philosophically opposed to buying Metal Plates or want to build massive structures out of Ferrite Dust.
- Cobalt - Not really needed because you can easily use whatever cobalt you have along with Oxygen in a refiner to produce a lot more Ionized Cobalt. Some of that can be refined and turned back into Cobalt as needed. Doing this is easy enough that it's not worth putting a priority on, but could save a little time later to have an extractor. You won't need to extract much though.
- Sodium - Another one that's very important yet not really necessary to extract since it can be multiplied with oxygen or carbon, and this is easy enough that extracting Sodium won't save much time over just multiplying it.
- Faecium/Mordite - Believe it or not there are some planets that have deposits of these, but you can multiply Faecium very efficiently with oxygen, manufacture it from Nitrogen and Sulfurene if needed, and Mordite can be made efficiently from Faecium. So extracting one of these deposits only saves a tiny amount of time. While they're used in mass production, the small amounts needed compared to everything else means that refiner multiplication can keep up easily.
- Methane - I would put this on the worthless list except there is one thing it can do that is sometimes worthwhile: it acts as a "wildcard gas" for efficiently making biome plants from biome minerals. True that you can take 2047 biome plants and 2047 of the biome mineral and make 2047 new plants in one refiner run, but Methane lets you take 4095 Methane + 4095 Biome Element and make 4095 biome plants in one run. So you can basically make twice as many biome plants in one refiner run which helps crank out the plants with less intervention, if needed. You can also do this by using the proper biome gas to go with the biome mineral, but it’s nice to be able to save that for the carbon gas products instead. But if you're happy being less massive with your mass production then it might as well be in the worthless category.
At least at the current time, these are used for so few things or in such tiny amounts that extracting them is almost worthless or 100% completely worthless. Note that "worthless" doesn't mean totally useless even in small amounts, it means extracting stacks of them is not worth the effort.
- Basalt - This is by far the most utterly useless mineral in the game. At the current time it is only used for crafting two items, and it can just be manufactured using (Pyrite or Phosphorous) + Magnetized Ferrite in a refiner. Do not extract this or you will be completely and utterly wasting your time in the worst way possible. It's almost a crime against Atlas nature that deep mineral deposits of this even exist. Yes I have personally wasted my time on this one before finding out that it's useless.
- Salt/Chlorine - This is one that can be really useful if you have some but you don't need huge amounts and it's easily multiplied with Oxygen in a refiner. Chlorine is the “refined" version of Salt and so multiplying Chlorine will get you as much salt as you want when you refine the chlorine back into salt. I'm not even sure how to use up the 3 or so stacks I've collected because it gets used up so slowly, and to make things worse I created an unused extraction base for it before I knew how to multiply it.
- Stellar Metals (Copper, Cadmium, Emeril, Indium, Quartzite) (Activated or Not) - You might think it odd to find these in both the maybe and worthless lists, but that's because at most you need lots of one and only a tiny bit of the others. The main use for these is making Chromatic Metal, which any of them will produce, and extracting a stack of any one of them gets you lots of Chromatic Metal. This is especially true if you refine it with Pure Ferrite, or even better, Silver + Gold + Stellar Metal. Another thing is that as long as you have some of a particular Stellar Metal, you can convert Chromatic Metal into that specific stellar metal. So with lots of Chromatic Metal, you can easily produce any of the Stellar Metals as long as you have one unit of he desired stellar metal to start with. See the full explanation for Chromatic Metal below in the sections on refining.
- Crystalized Helium, Lithium - At the current time these are totally useless in large amounts. All you can do is convert them into other more useful stuff you already have and are probably already extracting by the time you reach the purple star systems where they exist. Small amounts are needed for crafting late game items but that's it. Any excess I have I just refine into Ferrite Dust since they refine into that just like the more common biome minerals. Yes, I also wasted time setting up extractors for these (though by that time I was mostly just experimenting with base designs).
How to Use The Survey Device
Finding hotspots with the survey modes of the Analysis Visor works very similarly to finding targets with the Target Sweep Mode except that the feet of your character have to get within 5u of the center of the hotspot for you to get the "Analyzing..." and "Hotspot Discovered" messages. This is needed to get the detailed information on the hotspot. So the survey device is much more demanding about proximity than you're used to. Otherwise the process is much the same.
Unfortunately there are no real surface indications of where to start looking for a particular hotspot type, and there's not much to go on as to what other hotspots surround a hotspot you just found, so the only thing you can really do is land in a random spot on a planet with the resource you want and starting looking around with the Gas and Mineral survey modes.
About the only thing that's helpful is to do your surveying while you're out doing other stuff. Like say you just landed at a POI for whatever reason. Take a look around with the survey scanner. Then when you get to another POI or are out running around looking for hazardous flora to kill, take a look around with the survey scanner. Etc.
Since you likely already know how to do this sort of thing, here are some extra tips that are useful for the Survey modes that aren't entirely obvious.
One thing to notice is that in the upper left text when the device has determined that there's a hotspot nearby, you will see an indication of the "class" (C, B, A, S) even without knowing any other specifics. Use this to help determine if it's worth going out of your way to investigate under the circumstances.
Note that finding Class S hotspots is really not that important! Even a Class C can work fine because you can just put down more extractors to get the same output. The extra resource cost of building more extractors isn't that large, and there's a "soft limit" (with extreme diminishing returns) at 1000 resources per hour for multiple extractors no matter the class of the hotspot.
Another thing to notice is that to get the maximum (or realistically, one percent under the maximum) you have to find the exact center and place the mineral/gas extractor there.
To find the exact center, look at the Local Concentration number in the upper left.
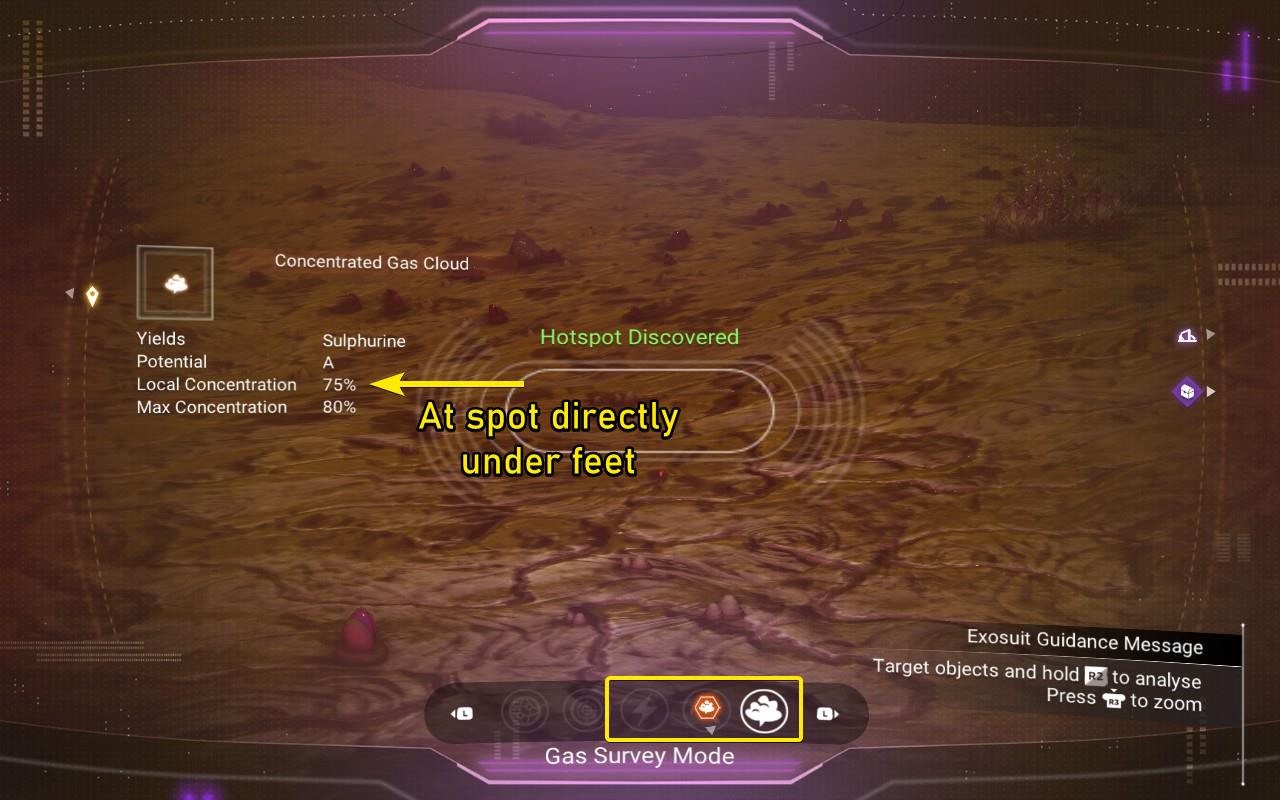
Without turning, just move left/right/forward/back and watch the number change. You will notice that it's nearly impossible to get it to the maximum since the exact center with the maximum output seems to be an infiniely small point, so I would recommend just shooting for one percent under. So if the maximum is 60%, just shoot for 59%.
Once you find this spot, move back slightly and shoot the Navigational Marker at the spot where you were standing. Go stand on the marker, check the survey scanner again to see if you got it in the right spot, and repeat if it needs to be moved. This way you can use the marker to show you where to place the extractor.
Even when the survey scanner says “No Nearby Hotspot”, you can find the direction the nearest hotspot of the selected type if you want.
You have to do this with audio since there is no visual indication. If you have audio unmuted and working, you’ll notice that you’re still hearing a slow bleep-ringing. The stereo speaker this sound is coming from will indicate what direction to turn.
Even without stereo audio, the frequency of the bleep-ring will change to a higher pitch tone when you’re pointing in the direction of the deposit. Run or jetpack about 100u in that direction, check the scanner again, and repeat until you get the distance and visual indicator.
(Unfortunately there’s no special accessibility feature for this, so using this trick without audio output will require some sort of third-party sound recognition utility.)
See the Corvette “Secrets” section of this guide for information on how to survey faster using skydiving or autopilot with a corvette: https://steamcommunity.com/sharedfiles/filedetails/?id=3679976925
Originally what I would do if I didn't have the stuff ready to build yet is to place a Save Beacon on the spot, but now I think I'd recommend that you just place a base computer nearby, claim the area, and name the base for the mineral or gas. This will also give you a HUD icon to act as a "beacon" and also it will let you name the spot so you don't forget what it was for.
If you do want to use Save Beacons for this or any other reason, always change the color of the save beacon to something meaningful to you that indicates the purpose of the beacon. This will cause the color of the HUD icon to change too. This is absolutely critical to do with save beacons because you can't name them and I remember always getting confused as to what some beacon was there for when I came back days later and had forgotten what I had been doing. Then imagine that with several beacons per system or planet for different purposes and remembering what each one was for is hopeless.
So always color code your save beacons. You can also do this with the Base Computer, but its less important since you can just name bases.
So my main recommendation is: just put down a base computer, and it's going to save a good bit of time if you can place a Teleporter and Biofuel Reactor next to the base computer so you can teleport away later. You don't need to teleport away immediately and also you can teleport to a base even if the teleporter is not powered on and even if it doesn’t exist, so don't even worry about fueling the biofuel generator until you want to teleport away. (You can even save fuel if you want by only throwing one carbon into it.)
See the companion guide about base building for more on building extraction and farming bases.
Building the Ugliest Absolute Minimal Mining Base
Eventually you're going to want something at least a little nicer, but early in the game you might be short on materials. So here are some tips on building the absolute minimum mineral/gas extraction base.
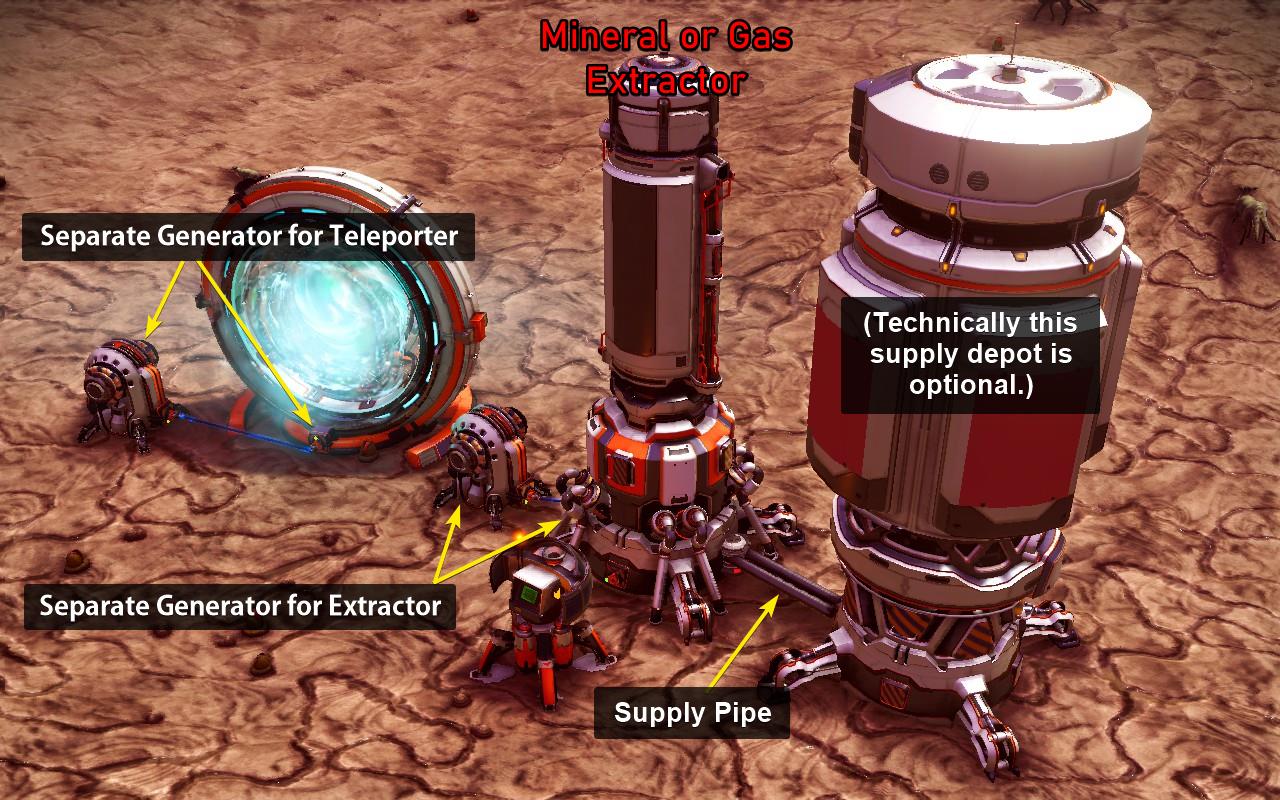
Place the mineral or gas extractor on the navigation marker you dropped as described in the previous section, then interact with it to check the density it shows. (It doesn't need to be powered to show it's density %.) If that looks lower than it should you can keep moving it around until it looks right.
Once that looks good, hook up everything as shown and put down one or more of the Supply Depot tanks. Each tank stores 1,000 units of gas or mineral, but you only have to interact with one of them to empty all of them.
That is all that is really needed at a minimum. Technically you could do without even one Supply Depot (tank) but the extractors only have an internal storage of 250. That's pretty poor considering that you'd eventually like to get a full stack or more out of one of these.
To get very close to a full stack, use 9 tanks for 9,000 units + 250 of internal storage in one extractor = 9,250. Buying the needed Metal Plates at a trade terminal will make it much less trouble to put down several tanks. Additional tanks do not require more power. Make sure they're all connected somehow with supply pipes. Assuming that all the tanks are connected to at least one other tank in the same group, the extractor only needs to be connected to one of them.
Interact with the extractor and tanks to see stats to verify the capacity and see how long they will take to fill.
Here are some important tips that still apply at this rudimentary stage.
- Avoid Flattening or Editing Terrain - This is because your save file has a very limited amount of space allocated for terrain edits, and you don't want to use all that up on crappy mini-bases. Save that for nicer stuff. Also, when the storage limit is exceeded for terrain edits, the least recently used terrain will get filled in. So constantly editing terrain in new bases can delete more important terrain edits at other bases. Build a “deck” using floor tiles if you need a flat area.
- Avoid Clearing Rocks and Plants - These will respawn inside your structures after a while. Same for anything else that can respawn. Use Solid Cubes or other parts to elevate structures above any of these respawning features if you can’t find a clear area in a good location. If you accidentally end up with one of these spawning inside your structures you’ll have to “ding” the terrain with the smallest possible terrain edit to stop it from spawning, and eventually you’ll have to re-ding the terrain when the edit disappears.
- Name The Base for the Resources Extracted - I tried cute names for a little while but it will make your life much easier if you just name your base something like "Pyrite Mine" or "Ammonia and Nitrogen" (if it has extraction for multiple resources). Otherwise it will tend to waste time. Note that shorter names will show up better in the UI than very long ones.
- Mineral and Gas Extractors Don't Have to Be on Terrain - It's important to know that the only thing that matters for the mineral and gas extractors is their 2D plane proximity to the hotspot center. They can be placed on top of floor tiles, buildings, or each other. They can be buried under dirt or underwater, or way up on a tower. It may not make much sense that a gas extractor works buried under 100u of dirt, but it works. So just worry about keeping them close to the hotspot center, and stacking multiple extractors on top of each other is a good way to do that if multiple are needed.
- Just Buy Metal Plates - The Supply Depot tanks in particular take 10 Metal Plates each to build, and you're probably going to want to build 10 of those tanks. That's 100 Metal Plates just for the tanks, and you're eventually going to want four gas extraction grids plus one mineral extraction grid for each of the six biome minerals. On top of that you probably want at least one for some other mineral. So that's an eventual 11 extraction grids, 10 tanks each, and 100 metal plates each. Getting all that ferrite dust is more trouble than it's worth, so just buy the metal plates for 1,000 units each or less. I tend to keep 100-200 in my main starship all the time, and buy more when the ship's inventory gets low.
- Adding More Extractors Doesn't Necessarily Help - Adding more only causes your tanks to fill faster, and if they're going to fill up anyway before you come back adding more extractors won't do any good. There is also a sort of "soft cap" at 1,000/hr enforced by some pretty extreme diminishing returns after that point, so if you need more than 1,000/h you will have to go through some extra trouble to create a separate extraction grid. Typically this is not needed for one person though.
- Biofuel Reactors are Sufficient (even if solar is more ideal) - This is because you can teleport to a base even if the teleporter is unpowered, and you'd only need to add one carbon or oxygen to the reactor to get it running long enough to teleport away. As long as the one powering the Mineral or Gas Extractor is full, it will be running for 2 days which is more than long enough to fill up even 10 Supply Depot tanks even if the hotspot is C class with only one extractor on it. I always switch to solar when I can but technically the biofuel reactors could work fine forever.
To expand supply depot capacity, just add more tanks. They don't require power. I started out smaller (less than a full stack of most resources) and added more tanks to each base over time depending on what I needed more of at the moment.
Eventually you will probably get sick of the biofuel reactors and just want to use solar panels as soon as you have enough resources for those. To figure out how many batteries and solar panels you need, the rule is "2 solar panels and 1 battery per 50kP power needed".
This is because one panel is needed to supply 50kP during the day, and the other is needed to fully charge the battery. After the panels shut off at night, a full battery will supply 50kP for the whole night. Thus you get a sustained 50kP from this.
I recommend just always powering things in 50kP increments to make things easy. So if you need 60kP, just round up to 100kP. If you need 110kP, round up to 150kP. In table form the numbers for solar power look like:
So to convert this single extractor + teleporter base to solar, use 4 panels and 2 batteries. If you wire up the teleporter with a proximity switch, you could probably get away with 2 panels and 2 batteries (since the teleporter won't consume power except for briefly when you're present).
Additional Companion Guide: Industrial and Farm Base Building
https://steamcommunity.com/sharedfiles/filedetails/?id=3677621728
See the above guide for more tips on building resource extraction bases and plant farms.
Fake Chemistry Rules!
The next few sections contain the major "fake chemistry rules" that make it easier to remember how to multiply or transform resources using refiners.
For the most part I only included the most important recipes that can be derived from more general rules, but there are a lot more recipes that I didn't include because they're more complicated and not as useful.
See these wiki pages for more complicated processes and more recipes:- Refining Multiplication of Resources[nomanssky.fandom.com]
- Resources[nomanssky.fandom.com] (links to all the resources with recipes)
Making Major Resources
Some resources can't be extracted or are easy enough to make with refiners that an extractor isn't really needed. This section describes how to create the most important ones, along with the fake chemistry rules that apply.
Refiners can be used to not just make a resource (like carbon) into it's more refined version (condensed carbon) but they can also be used to convert one thing into another or even increase the amount of something above the total amount of inputs.
Some things can be transformed just by putting them into a refiner by themselves, but other things require another resource. I'll refer to this additional resource as a transformer or multiplier depending on which term seems more appropriate.
Raw vs Refined:
- Many resources have both a “raw” and a refined version. Like Carbon (raw) refines to Condensed Carbon (refined), and Salt (raw) refines to Chlorine (refined).
- In a refiner, the refined version of something almost always can be used in place of the "raw" version but less of it is required. This is not usually true for crafting though.
- The refined version of something can almost always be “unrefined” back into the raw version using a refiner, if needed.
- The refined version of something can also be used to charge technology that uses the raw version.
- Oxygen[nomanssky.fandom.com] is the most used transformer/multiplier in the game. If in doubt, try adding oxygen to another refiner input to transform or multiply that input.
- Carbon[nomanssky.fandom.com] is the next most commonly used multiplier. It's mostly used to multiply ferrite.
- Chromatic Metal[nomanssky.fandom.com] is a multiplier for stellar metals and a transformer for biome gasses.
- Ferrite Dust[nomanssky.fandom.com] is a transformer that transforms biome minerals into other biome minerals, and converts stellar metals into larger amounts of magnetized ferrite.
Almost everything seems to require Carbon. You can't extract carbon, but you can make stacks and stacks of it using Oxygen. Here are some key refiner recipes.
- Start by harvesting some Carbon or if needed use: Oxygen x1 → Carbon x1
- Any Biome Plant x1 → Carbon x2 will also get you carbon.
- Carbon x2 + Oxygen x2 → Condensed Carbon x5
- Condensed Carbon x1 + Oxygen x2 → Condensed Carbon x6
- Condensed Carbon x1 → Carbon x2
It is possible to extract sodium deposits, but this isn't usually worthwhile because you can also convert Oxygen into Sodium Nitrate[nomanssky.fandom.com] and thus Sodium. So with an Oxygen extractor you can also get as much Sodium as you want.
- Start by harvesting Sodium or Marrow Bulbs (Marrow Bulb x1 → Sodium x1)
- Sodium x1 + Oxygen x1 → Sodium Nitrate x1
- Sodium x1 + Carbon x1 → Sodium Nitrate x1
- Sodium x1 + Condensed Carbon x1 → Sodium Nitrate x2
- Sodium x2 → Sodium Nitrate x1
- Sodium Nitrate x1 + Oxygen x1 → Sodium Nitrate x2
- Sodium Nitrate x1 → Sodium x2
You might think you need to extract Rusted Metal for ferrite dust but this isn't actually necessary because any biome mineral by itself in a refiner will refine to Ferrite Dust. Since you will eventually want to have an extractor for all six biome minerals, you'll have no shortage of biome minerals. I also haven't found it to be worthwhile to extract Magnetized Ferrite deposits because Condensed Carbon is a huge multiplier for Magnetized Ferrite and you'll have plenty of that from Oxygen. About the only reason to extract Rusted Metal is if you don't buy Metal Plates and want to make them from Ferrite Dust.
- Any Biome Mineral x1 → Ferrite Dust x1
- Rusted Metal x1 → Ferrite Dust x2
- Ferrite Dust x1 → Pure Ferrite x1
- Ferrite Dust x1 + Condensed Carbon x1 → Magnetized Ferrite x2
- Pure Ferrite x1 + Condensed Carbon x1 → Magnetized Ferrite x3
- Ferrite Dust x1 + Stellar Metal x1 → Magnetized Ferrite x1 to x8
- Magnetized Ferrite x1 → Pure Ferrite x2
- Ferrite Dust x1 + Oxygen x1 → Rusted Metal x1
- Pure Ferrite x1 + Oxygen x1 → Rusted Metal x2
- Refine biome minerals by themselves to get Ferrite Dust.
- Refine ferrite with (Condensed) Carbon to get lots of Magnetized Ferrite.
- To help remember the above, just remember the idea is based on "carbon steel".
- Refine Magnetized Ferrite by itself to get Pure Ferrite.
- Pure Ferrite can't be "unrefined" into Ferrite Dust directly, but you can refine it with Oxygen to create Rusted Metal then refine the Rusted Metal to get Ferrite Dust.
I originally thought it made sense to extract this but it can be multiplied so easily with Oxygen that I deleted my cobalt mine. Just start with some Cobalt or Marrow Bulbs and lots of Oxygen.
- Marrow Bulb x1 + Oxygen x1 → Ionized Cobalt x2
- Cobalt x2 + Oxygen x2 → Ionized Cobalt x5
- Ionized Cobalt x2 + Oxygen x2 → Ionized Cobalt x6
- Ionized Cobalt x1 → Cobalt x2
This is another one that can be extracted but can be multiplied easily with Oxygen just like Cobalt and you don't need much of it anyway.
- Start by harvesting some Salt or, worst case, use Di-Hydrogen x1 + Oxygen x1 → Salt x1
- Salt x2 + Oxygen x2 → Chlorine x5
- Chlorine x2 + Oxygen x2 → Chlorine x6
- Chlorine x1 → Salt x2
This is another one that can be extracted but can also be multiplied extensively with Oxygen, so extraction isn't usually needed.
- Start by collecting some from dung, damaged machines, or gutrot plants. Or use a recipe below.
- Kill creatures and: Mordite x3 → Faecium x1
- Mordite x1 + Carbon x2 → Faecium x3
- Mordite x1 + Condensed Carbon x1 → Faecium x4
- Di-Hydrogen x1 + Carbon x1 → Faecium x1
- Nitrogen x1 + Sulphurine x1 → Faecium x1
- Faecium x1 + Oxygen x1 → Faecium x3
- Faecium x3 → Mordite x2
Making Chromatic Metal, Silver, Gold, and Platinum
As a reminder, the Stellar Metals used to make Chromatic Metal are: Copper (yellow), Cadmium (red), Emeril (green), Indium (blue), Quartzite (purple). There are also “Activated” versions of each one which can’t be manufactured and only come from planets with extreme environments.
Previously I thought extracting Copper or other stellar metal was worthwhile, but I changed my opinion on that to “maybe”. This is because early on you can usually get enough Chromatic Metal by just buying it or copper from trade terminals. You can also refine copper with silver and gold in a large refiner, once you get one, to produce 5 times as much chromatic metal, and this works with Cadmium or others you happen to get early.
The main recipes are:- Any Stellar Metal x2 → Chromatic Metal 1x to 4x
- Any Activated Stellar Metal x1 → Chromatic Metal 1x to 4x
- Pure Ferrite x1 + Any Stellar Metal x1 → Chromatic Metal 1x to 4x
- Pure Ferrite x1 + Any Activated Stellar Metal x1 → Chromatic Metal x2 to x8
- Gold x1 + Silver x1 + Any (non-Activated) Stellar Metal x1 → Chromatic Metal x5 to x30
- Chromatic Metal x1 + Any (non-Activated) Stellar Metal x1 → Same Stellar Metal x2
- Stellar Metal by itself refines to Chromatic Metal with the more valuable types giving you more Chromatic Metal.
- The "Activated" Stellar Metals generally give you twice as much as the same non-Activated type.
- Pure Ferrite can substitute for one Stellar Metal when making Chromatic Metal in a medium or large refiner.
- Using one Gold and one Silver with a non-activated Stellar Metal in a large refiner multiplies the output by 5.
- If you have Chromatic Metal and at least 1 of a specific non-activated Stellar Metal, you can convert the Chromatic Metal 1:1 into that specific Stellar Metal in a medium or large refiner.
Since you can convert Chromatic Metal to any non-activated stellar metal that you have some of, and Emeril or Indium will generate more than one Chromatic Metal each, you can use Emeril or Indium to replicate new Chromatic Metal for free in an infinite loop without using up any new resources. In exact terms, the process is this:
- Start with Emeril x5
- Refine Emeril x2 → Chromatic Metal x3
- Refine Emeril x3 + Chromatic Metal x3 → Emeril x6
- Keep repeating the previous two steps. Each time you’ll end up with one more Emeril without consuming anything.
- Consuming some Pure Ferrite or Gold+Silver to generate Chromatic Metal will accelerate this.
- Lets say you find a small pile of Emeril or Indium. Divide the pile in half.
- Refine the first half into Chromatic Metal. (Optionally consume some Pure Ferrite or Gold+Silver to increase output.)
- Refine the second half with Chromatic Metal to convert some Chromatic Metal into more Emeril/Indium.
- You now have as much Emeril/Indium as you started with plus extra new Chromatic Metal left over.
- Repeat the process, generating extra Chromatic Metal each time. (You might first want to convert more or all the Chromatic Metal back into Emeril/Indium to increase the amount you can generate each run.)
Some people will use the following method to produce Chromatic Metal early on:
- Shoot up some asteroids to get at least a small amount (maybe 100 each) of Silver and Gold.
- Install and then Dismantle one or more of the following types of starship upgrade modules (any class): Pulse Engine Upgrade, Photon Cannon Upgrade, Positron Ejector Upgrade, possibly others. These (even the Class C ones that random NPC gift to you) can get you at least 100x Cadmium each without visiting a red star system.
- With half of the Cadmium: Use the Silver x1 + Gold x1 + Cadmium x1 → Chromatic Metal x10.
- With the other half: Use Chromatic Metal x1 + Cadmium x1 → Cadmium x2
- Repeat until the Gold and Silver is used up.
Sometimes you can also get lucky and get Cadmium, Emeril, or Indium from the junk you find in Buried Cache containers on planet surfaces.
Silver and Gold can be generated by making or otherwise obtaining the right T1 alloys and refining them. Platinum can be made by refining Silver and Gold together. Gold and Silver are two things I’d rather just extract just to make sure I can always go get a stack if needed, and those can be used to make the Platinum.
- Aronium x1 OR Herox x1 OR Dirty Bronze x1 → Silver x250
- Lemmium x1 OR Magno-Gold x1 OR Grantine x1 → Gold x125
- Faecium x1 + Pugneum x1 → Gold x2
- Silver x1 + Gold x1 → Platinum x1
- Ferrite Dust x1 + Oxygen x1 + Chromatic Metal x250 → Platinum x10
The weird Chromatic Metal-based recipe for Platinum is useful if you want to get rid of lots of excess Chromatic Metal and need the platinum.
Refining Alloys and Enhanced Gas Products
I don't normally need to make alloys and if I do then I just craft them, but here's the formula for how to make them in a refiner. The refining recipe is the same as the crafting recipe except: 20 less biome mineral is needed, the "Refined Random" (Pure Ferrite or Ionized Cobalt) is reduced by 20, and an extra "Agent" (for lack of a proper term) has to be added.
- Biome Mineral x 30 + Refined Random x 30 + Agent → Alloy x1
- Agent = Tritium x20, Silver x20, Gold x10, or Platinum x5
I don't consider making these in a refiner to be that useful but I wanted to include the formula for the sake of completeness.
I also don't bother to make these in a refiner, but I wanted to include the refiner formula. Its the same as crafting, but reduce the gas to x100, reduce the carbon to 1/5th, and add Salt.
- Nitrogen x100 + Carbon + Salt → Nitrogen Salt x1
- Sulfurene x100 + Carbon + Salt → Thermic Condensate x1
- Radon x100 + Carbon + Salt → Enriched Carbon x1
- "Carbon" = (Carbon x20 OR Condensed Carbon x10)
- "Salt" = (Salt x10 OR Chlorine x5)
Manually-Harvested-Only Resources
There are some resources that you can't extract or make with a refiner using things that you can extract. Fortunately these aren't required for mass production. Some can be bought cheaply but only a small amount is available at any one time in a star system.
Tritium[nomanssky.fandom.com] normally has to come from shooting asteroids, but like Di-Hydrogen it is sometimes available at trade terminals in some systems and Outlaw Stations always have a small amount for sale at the contraband dealer. Larger amounts are mostly useful for making the Frigate Fuel needed to send Frigates from a freighter fleet on frigate expeditions.
If you find a station or trade output with Tritium and you want more than is available at the trade terminal, NPC pilots landing in the same place will often have another 500 each.
Tritium is so cheap that you can even start stockpiling almost as soon as you start the game and reach a station for the first time.
Di-Hydrogen[nomanssky.fandom.com] can't be extracted and normally has to be harvested from the blue crystals on planets using the mining beam. But in many places you can buy Di-Hydrogen Jelly at a trade terminal, then put it in a refiner to turn it back into Di-Hydrogen.
Outlaw Stations always have small amounts of non-jelly di-hydrogen for sale at the contraband dealer. In a pinch you can also use the refiner recipe Tritium x5 → Di-hydrogen x1, but Tritium is usually harder to buy than Di-Hydrogen because the jelly form is pretty common. So I've never had occasion to use that recipe.
Like Tritium, you mostly need larger amounts of this to make Frigate Fuel. Even if you can't extract Tritium or Di-hydrogen, if you always buy up Di-Hydrogen (or the jelly) and Tritium at trade terminals when you see it, you will most likely always have plenty for Frigate Fuel. I've ended up with enough for frigate fuel plus two extra stacks of each that I haven't used, and I didn't have to go out of my way to buy it.
This can only be obtained by digging with the terrain manipulator. Fortunately not much is needed unless you want to build something huge from stone. Seeing it at a trade terminal is rare enough that you can't buy much that way. The only mass production thing it could be used for is making glass, but Frost Crystals can also be used for that and they're farmable.
Only comes from underwater plants, but isn't needed in large amounts and what little it is needed for is underwater-related technology anyway. You can use it with Salt to make Glass, but since you can't extract or farm it this is mostly a way to rid yourself of excess amounts.
There are some others that can only be manually harvested but you don’t need much of them and they aren’t needed for mass production.
Transforming Biome Gasses
- Nitrogen → Sulphurine → Radon → Nitrogen
- Biome Gas x3 → Next Biome Gas x1
- Biome Gas x1 + Oxygen x1 → Next Biome Gas x1
- Biome Gas x1 + Chromatic Metal x1 → Next Biome Gas x1
Technically this would be considered a biome gas, but it isn't part of the loop. Methane will convert to Nitrogen 3:1 by itself or 1:1 using Oxygen or Chromatic Metal, but requires Nitrogen x3 + Sulphurine x3 + Radon x3 → Methane x1 to make. This recipe can be useful if you only need a small amount of methane to craft something.
Transforming Biome Minerals
- Phosphorous → Uranium → Pyrite → Paraffinium → Ammonia → Dioxite ( → Phosphorous )
The recipes look like:
- Biome Mineral x2 + Ferrite Dust x1 → Next Biome Mineral x1
- Biome Mineral x2 + Pure Ferrite x1 → Next Biome Mineral x1
Manufacturing Plants: No Farm Required!
- Biome Mineral x2 + Oxygen x1 → Biome Plant x1 (easy but inefficient)
- Biome Mineral x1 + Biome Plant x1 → Biome Plant x2 (doesn't consume the transformer)
- Biome Mineral x1 + Biome Gas x1 → Biome Plant x1
- Biome Mineral x1 + Methane x1 → Biome Plant x1
The only advantage of making plant products using the biome gas or Methane is that you can get a larger batch (4096) in a single refiner run versus only half that (2048) using the plant products themselves. (The output from the biome mineral + plant recipe will still be 4096 in a maximal batch, but half of those just passed through from the input to the output. So only 2048 new plants get created this way.)
In conclusion, all of this means you can make "agricultural products" without any actual agriculture.
There are also recipes for making some other non-biome plant products.
- Cobalt ×1 + Nitrogen ×1 → Marrow Bulb ×1
- Salt ×1 + Nitrogen ×1 → Kelp Sac ×1
Growing Plants: Farm Required
It's not clear to me if it's better to manufacture plant products or just grow them by "building" plants and harvesting them periodically. Both methods require some effort, but the type of effort is a different even if the overall amount of effort is about the same.
Ultimately it may just be a personal preference as to what sort of mechanics each player prefers. So here are some tips on growing plant products.
Note that even if primarily creating plant products in a refiner, It’s usually worth growing a minimal number of plants just to use as a quick way to jump start refiner production if you use up all your plant products of a particular type.
Growing plants on terrain allows for a much higher density than hydroponics.
You can pack the plants very close together with no disadvantages. For example:
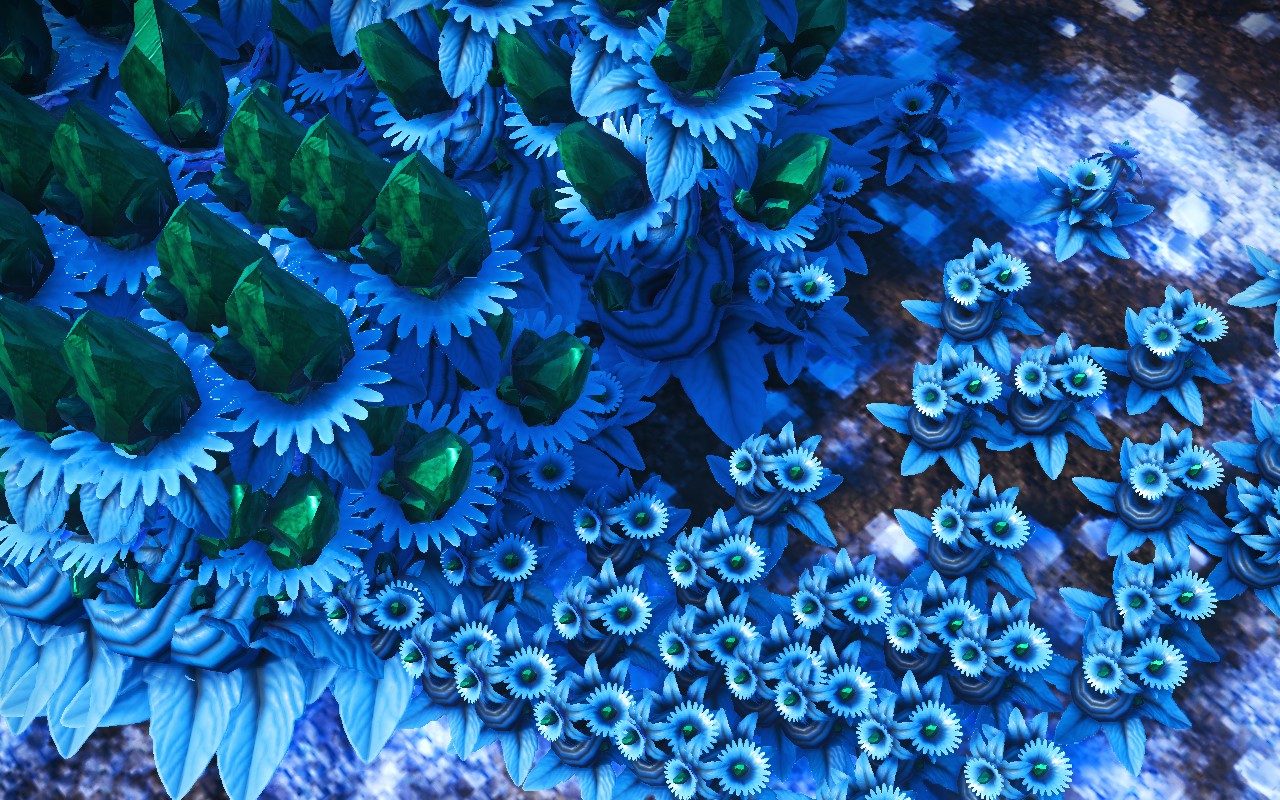
You can get something like 100 plants in the area of a large floor tile, and harvesting them takes about a minute of holding down the interact button with minimal movement.
Some players like to plant everything in 4 or so long rows so they only have to move forward while harvesting.
The Hydroponic Trays are no good! Use the Bio-Dome[nomanssky.fandom.com] or the Freighter Double Cultivation Chamber[nomanssky.fandom.com]. It's much easier to place a lot of these units, and they both have a "button" that can be activated to harvest all of their plants.
After experimenting with every method, my final conclusion is that the best way to grow plants when possible is to just plant them on terrain in a dense bunch in the required biome. You’re going to want at least one base per major biome anyway just to extract minerals, so you already have or will have bases in each biome to double as farms.
Beyond that, see below.
See the companion base building guide for more info on plant farming including a trick to use a Bio-Dome as a harvesting machine for hundreds of plants at a time.
https://steamcommunity.com/sharedfiles/filedetails/?id=3677621728
Mass Production of Valuable Products
Finally I will describe some advice on mass producing the Valuable Products for sale. This first section will focus on the base setup for doing this and what I’ve found to be the best way to do inventory management.
Freighters[nomanssky.fandom.com] have some QoL improvements that ground bases don’t have, and these are extremely helpful when mass producing stuff. Fortunately, everyone gets their first freighter for free, but it can take a while to get all of the Salvaged Frigate Modules to buy the freighter room and tech blueprints you want.
More advice on that later, but for now I’ll describe the advantages freighters have.
First off, freighters give you a Freighter inventory tab that has sub-tabs for all of your Storage Container inventories. Note that these inventories are the same for all bases, corvettes, and any other location, and when you build “storage containers” you’re actually building portals into these inventories that exist in their own universe, accessible from multiple places.
On a ground base, you can build all 10 containers to access them all, but you have to physically move to each container and interact with it to access the corresponding inventory.
On a freighter you can access them all from anywhere in the build area, and even anywhere in the same star system if you have the matter beam tech installed. This is very helpful since you can just drag things between all of your inventories without moving. You can also put all of the storage container rooms off to the side of the freighter base because you never need to physically go to them except to change container names.
Freighters also have a “core” inventory that can hold double-size stacks for some items with small stack sizes (like all of the Valuable Products).
In a ground base you need to remove all crafting ingredients from storage container inventories and put them into the exosuit or starship inventories to use them for crafting.
On a freighter your crafting ingredients will automatically get drawn from any inventory including storage container inventories. This saves you the trouble of having to explicitly remove ingredients from storage containers.
Ground bases also have some odd restrictions on how many refiners you can build near each other. (No more than two Large Refiners and three Medium Refiners can be built in a 50u area.) If you want more than three medium or two large refiners the next two or three have to be some distance away from the first set. This is rather inconvenient if you want, say, 12 of them.
On freighters you have the Refiner Room[nomanssky.fandom.com] which contains a large refiner and can be easily built as one whole prefab room. There are no restrictions on numbers, or if there are then I haven’t run into them yet. So you can build 12 refiner rooms right next to each other and start all of them running with no extra trouble.
Lastly, pretty much any freighter will be good enough for mass production. I still have a Class B freighter and am in no hurry to upgrade because my warp range is 3,400 ly and the only thing a class upgrade can really give me at this point is an even longer jump range.
The next section contains some advice on freighter setup, inventory management, and obtaining Salvaged Frigate Modules to buy new room blueprints.
Freighter Production Outfitting
The first thing to do is get a freighter if you don’t already have one. The game will inevitably offer you one for free as long as you can kill all of the pirates that it will eventually force you into an encounter with. See the Freighter[nomanssky.fandom.com] page on the wiki for full details, but even if you ignore that page you’re eventually going to run into the Space Rescue encounter that gives you a freighter for free if you defeat the pirates.
Your freighter comes with some basic technology, like a warp drive and few room types. But as usual you’re going to want more…. MORE! For freighters the blueprints are “researched” (purchased) from the upgrade terminal on the bridge using Salvaged Frigate Modules[nomanssky.fandom.com] as the currency.
These modules used to be easier to obtain, but some of the very easy ways were since nerfed. So beware that there are some out-of-date guides out there describing methods that don’t work well anymore.
For full details on where the SFMs currently drop, see the link above. But in my experience the best way to get these are:- Raise your standing with the Merchants and Explorers guilds to Level 9 by doing their missions and donating items to their liaisons on space stations. Once your standing is high enough, you will be offered Salvaged Frigate Modules for free by liaisons and can just warp from system to system looking for liaisons that offer them.
- Also keep moving from system to system looking for missions that reward Salvaged Frigate Modules. The Mission Radar on a corvette or the Nexus at the Space Anomaly may also sometimes offer them.
- Finally, clearing out a Derelict Freighter[nomanssky.fandom.com] (floating in space, not a crashed one) typically gives you 1 or 2. Use an Emergency Signal Scanner[nomanssky.fandom.com] to locate one. After you buy or obtain your first one, Helios on the anomaly will give one per week for free.
- Sometimes you get a Salvaged Frigate Module by destroying NPC freighter containers, but the drop rate is very small like 1%. Since that has been nerfed, the main reason for acting like a pirate is to get freighter fleet support upgrade tech.
First tip before anything else: If your freighter build area happens to come with any rooms that you don’t have blueprints for yet, don’t delete all rooms of that type! If a room still exists in the build area, you can use the Move or Duplicate functions of build mode on it. So move it off to the side if needed, but don’t delete the last “room” of its type when you don’t have the blueprint yet.
For example, you might want to delete all the platforms and catwalks that your freighter build area started with. Instead, delete all but one of each and move them off to the side. Then later you can duplicate them if you decide to use them for something. Same with any other rooms your freighter happens to come with that might be useful.
For blueprints and the freighter base area, here are my suggestions as to what to do in order of priority, covering only the stuff relevant in mass production:- Finish tutorials like the frigate expedition one.
- Build all 10 Freighter Storage Units[nomanssky.fandom.com] off to the side somewhere. You start with the BPs for these.
- Buy the Teleport Chamber[nomanssky.fandom.com] BP and build it so you can easily teleport places.
- Build some Refiner Room[nomanssky.fandom.com]s to use. The number is up to you but I use 12-15 myself.
- Make generous use of corridors to avoid cramped conditions.
- Build a Galactic Trade Room[nomanssky.fandom.com] in a convenient spot so you can sell stuff easily.
- Buy and install the Matter Beam[nomanssky.fandom.com] module for easier remote access.
- The Industrial and Technology expansion rooms are actually useful for making the freighter base less cramped and are not just decorative. I put a high priority on buying these.
- As an optional low priority, buy the Double Cultivation Chamber if you want to grow plants on the freighter itself.
Inventory Management
Here is how I manage storage container inventories:
- Container 0: When you use Quick Transfer and select Storage Container Inventory, this is the container that things get moved to if there is no partial stack in another container. For this reason, it’s usually recommended to use this default container as an “inbox” of stuff that needs to be sorted into other containers. However, when mass producing things you may find that half or more of what you Quick Transfer in here is Valuable Products of different tiers. So I actually recommend trying to keep this first container full of the Valuable Products that you’re saving as ingredients or haven’t sold yet, and use the remaining space as the to be sorted pile. That will reduce the amount of stuff to move elsewhere by half or more.
- Container 1: Use this one as "inbox overflow". Since Container 0 is likely to become full of valuable products waiting to be used or sold, your new default “inbox” of things to sort will likely end up being Container 1 at times or maybe all the time.
- Other Containers: For the rest the exact categorization method doesn’t matter too much as long as the categories fit the container size reasonably well. I use categories like consumables, minerals/gasses, common minerals, plants/food, special/rare items/materials, artifacts/fossils, etc.
Because the refiners only give you the tiny little pop up windows for adding input resources, you’ll also want to pick either your exosuit or starship inventory to use as a “working inventory”. This is because it only gives you tabs for “all”, exosuit, and starship. The best one to use is whichever one has the least stuff in it most of the time. I previously used my normal starship inventory, but now I have a specific hauler starship to hold refiner work.
When you want to refine a bunch of stuff, throw all the ingredients into your working inventory to make it easier to select those in a refiner. So if I’m going to make lots of plants using plants and biome minerals, I throw all the plants and biome minerals into the starship to make them easier to select. Then I throw all the resulting plants back into the starship until I’m done.
For crafting things I recommend using the Core inventory of the freighter since it can hold larger stacks of the mass production products. I normally keep the freighter core inventory mostly empty since it also receives the stuff that frigate expeditions collect. So in the core inventory I’m mostly quick transferring anything to keep to elsewhere and leaving behind only stuff to sell or that needs to stay handy.
For crafting I usually click an empty space in the freighter inventory, make a full double size stack of something (like say Living Glass), then quick transfer it to the storage container inventory. The storage containers also hold the same double size stacks so this works well. If you craft stuff in exosuit or starship inventory then you’ll end up doing more clicking due to the larger number of stacks.
I would advise against trying to craft stuff directly in storage container tabs because this is very glitchy if it works at all.
Industrial Strength Bugs!
There are a couple of long-standing bugs that I should warn people about just in case they haven't heard of them already.
This bug used to be much worse, and people would never leave the vicinity of their refiners because of it. It's much better now, maybe 99% fixed, but occasionally it still happens for unknown reasons.
Sometimes when you warp or teleport away from refiners while they're loaded and running, or quit and reenter the game, you come back later to empty refiners. This seems to be more common on freighters, but sometimes also happens to bases.
This may be happening due to a race condition in saving or loading, or something to do with where you warp/teleport to or from, or for freighters possibly something to do with summoning freighters.
If you want to report[hellogames.zendesk.com] an instance of disappearing refiner contents, it's important to try to also report the following info:- Did this seem to happen after exiting and reloading the game?
- Was anything going on to cause a delay when loading the destination? (Other activity on the same computer outside of the game etc.)
- Did you warp, teleport, or summon your freighter?
- What were the departure and destination locations?
- How many refiners are present?
- Do you have any Steller Extractor Rooms on your freighter and how many? (see below)
The Stellar Extractor Room[nomanssky.fandom.com] is a partially broken freighter room that produces a small amount of a resource that differs based on what color star system the freighter is in. This isn't very useful because the amount of the resource is limited to 350 units and these things only have their own separate internal inventories that have to be manually emptied individually.
They seem to be very buggy, do weird stuff, and having them on your freighter might also be related to the disappearing refiner contents bug. I would advise against placing any Stellar Extractor Rooms on your freighter because they aren't very useful to begin with, don't work the way they're supposed to, are inconvenient to empty, and may cause other problems beyond just not working properly themselves.
(Note that they seem to be OK if you just stay in a yellow star system, but if constantly moving the freighter around the brokenness starts.)
The Valuable Product Mass Production Tree
After all that stuff we have made it to the good part about how to make stuff to sell for millions of units. Almost the only things you can make that are worthwhile to sell are the “Valuable Products” (see Products: Tradeable[nomanssky.fandom.com]) which exist entirely or almost entirely to sell. Everything else that can be crafted seems to have a very nerfed price.
The game has been around a long time and has been continuously added to, so the category names can be a bit awkward. The Synthesis Laboratory on the Space Anomaly (where you can buy the blueprints) calls these “Valuable Products”, but elsewhere they’re thrown in with other trade goods or given one of these more specific category names:- Alloy Metal (T1)
- Enriched Alloy Metal (T2)
- Advanced Agricultural Product (T1 & T2)
- Enhanced Gas Product (T1)
- Manufactured Gas Product (T2)
- Advanced Crafted Product (T3)
- Highly Refined Technology (T4)
Here is what the whole crafting tree looks like, ending with the 15 million unit Fusion Igniters and Stasis Devices. (Original image from the wiki.[nomanssky.fandom.com])
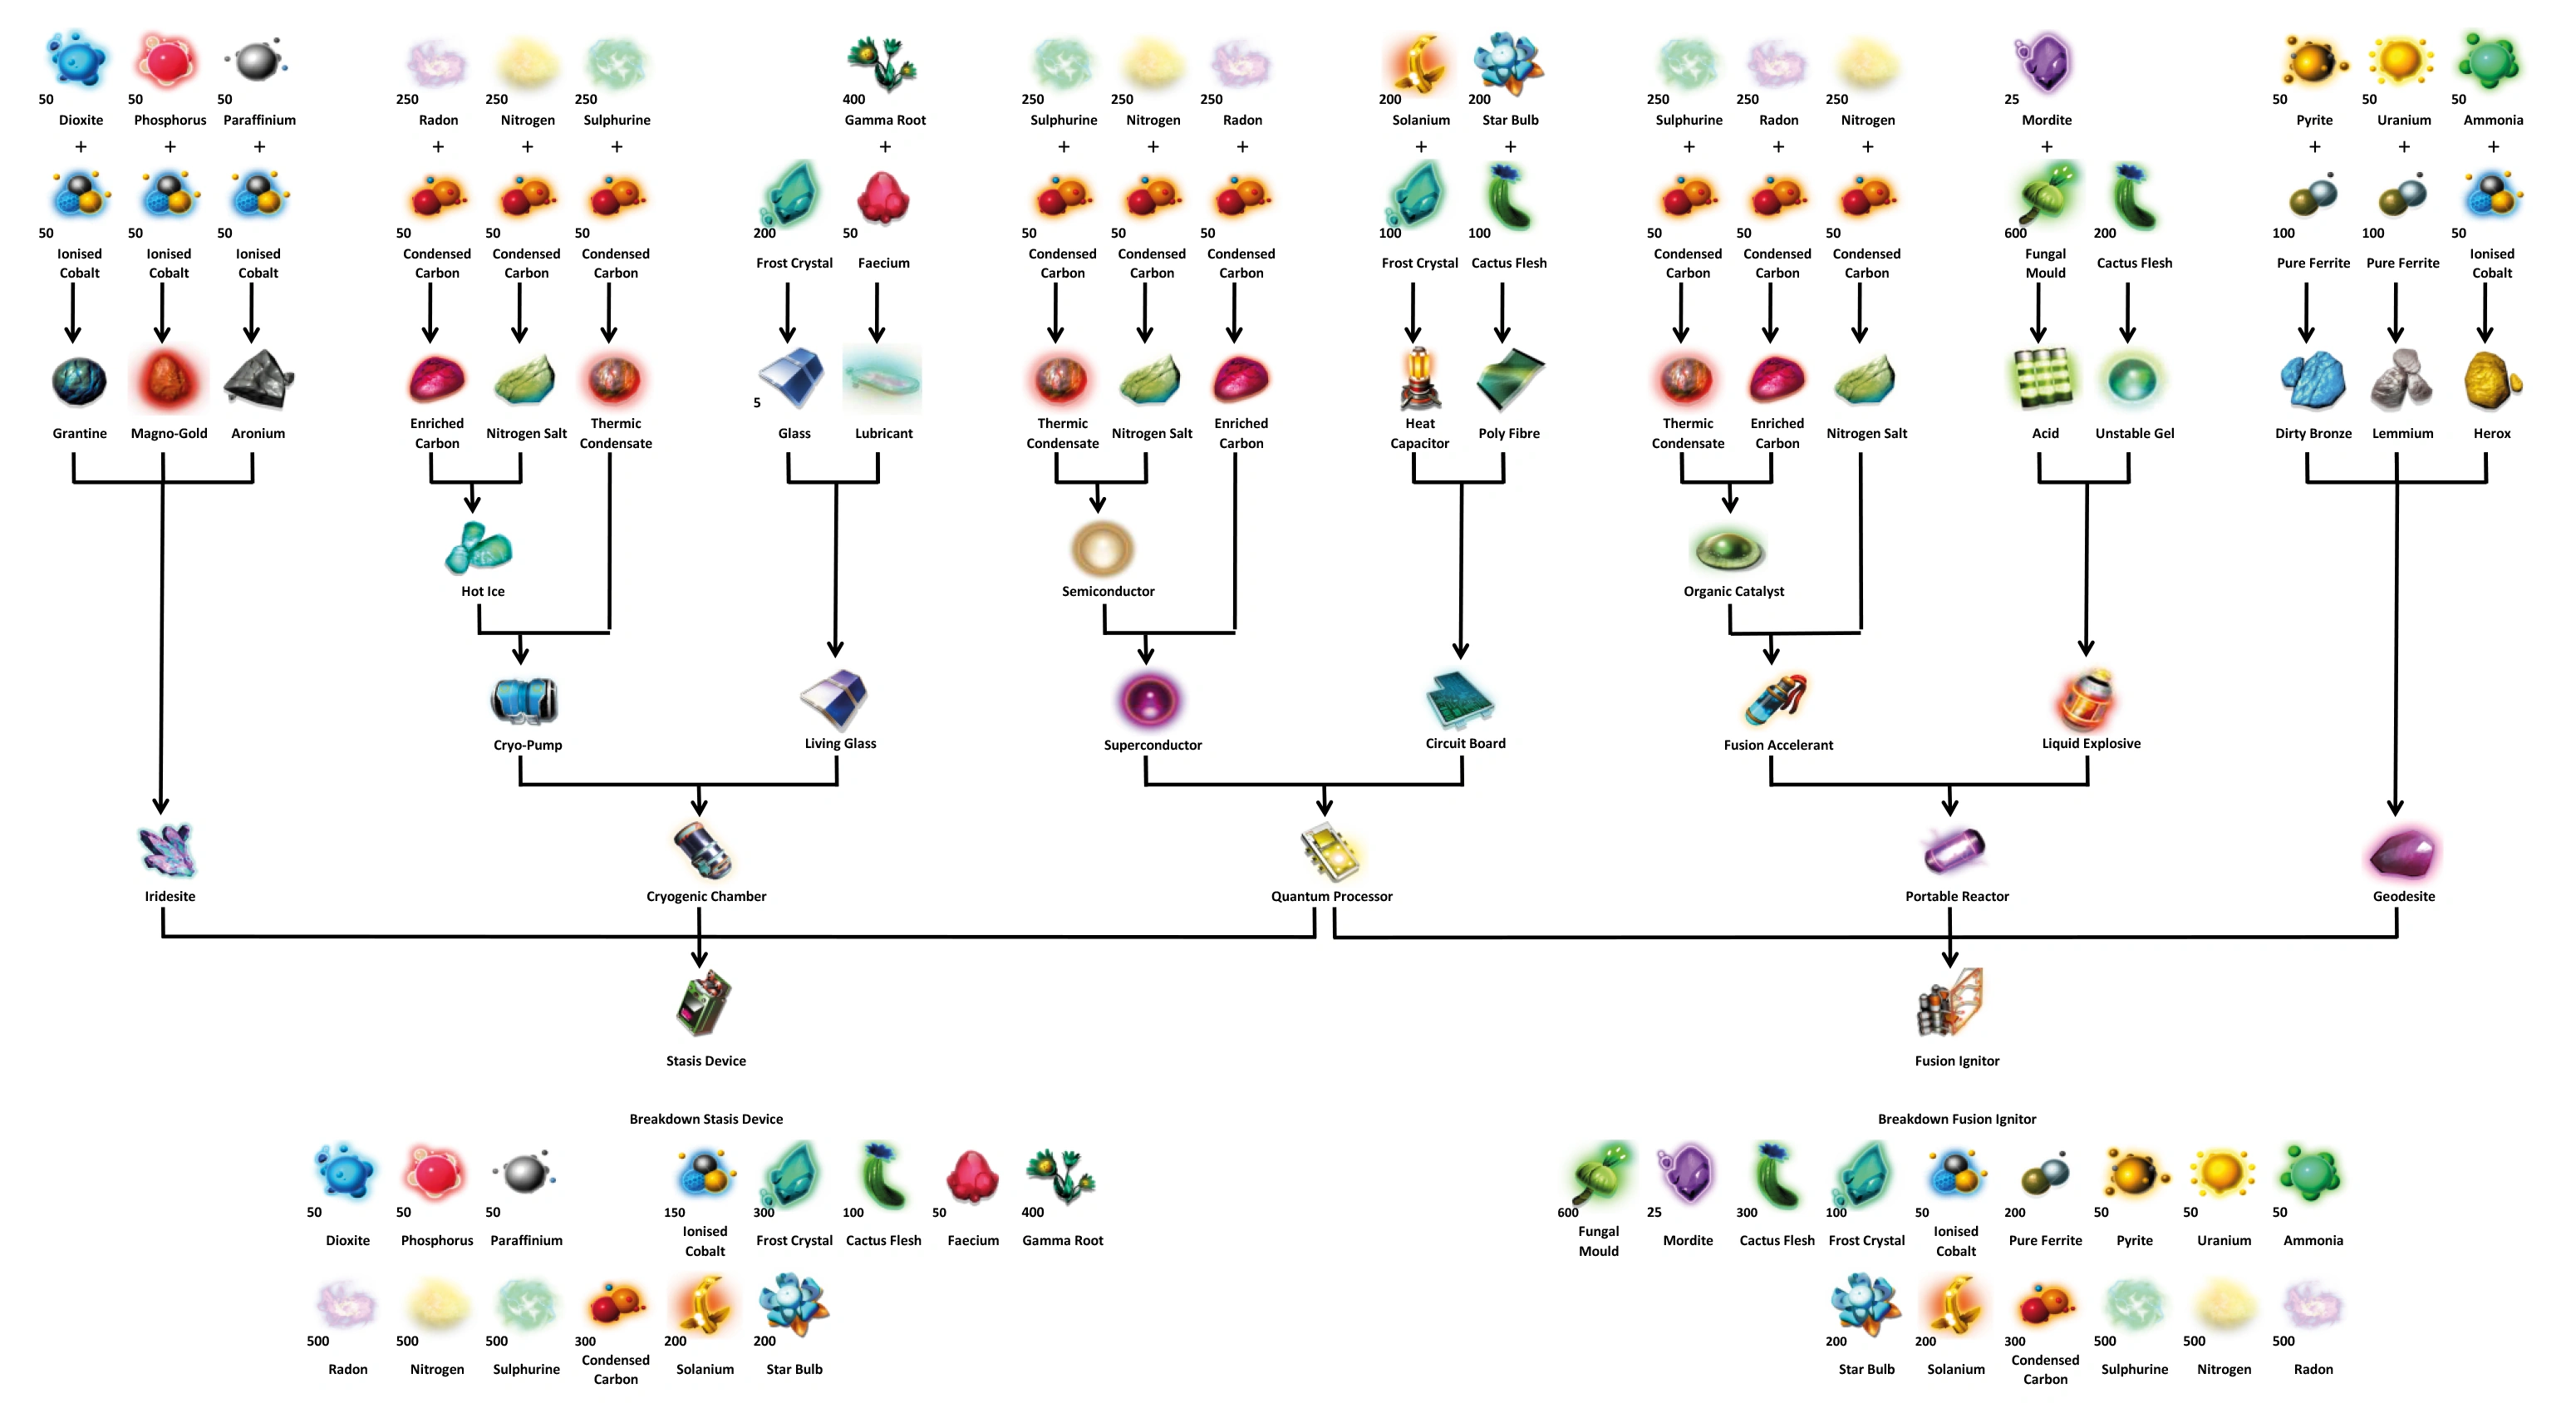
This is quite a bit to take in, so I will try to break this down into categories and the logic behind each category.
These are the ones with the yellow background. They’re the easiest to make, but you don't usually need to make them because the other sources described below.
All of the Tier 1 (T1) Metal Alloys can be crafted instantly or made in a refiner using a recipe with the previously described formula. In theory using the refiner creates these using fewer resources, but I advise against using the refiner for this because it can only produce 10 per run and the efficiency gain is very minor. It also takes more time and I’ve generally not found it to be worthwhile when the ingredients can be extracted in an automated manner or created easily.
The Tier 2 somewhat misnamed “Enriched Alloys” can only be crafted of different sets of three T1 alloys.
You don't usually need to make them yourself because Frigate Expeditions bring back tons of these T1 alloys and some T2 alloys. If you’re sending your frigates out every time you play, they’ll probably bring back enough of these that you’ll only have to craft maybe Herox and Grantine to fill in the gaps to craft the Iridesite and Geodesite. You can also buy alloys at trade terminals to fill in any gaps.
I hardly ever craft the T1 alloys due to the other sources. If I do craft T1 alloys then it's to fill in for a lack of Herox and Grantine usually. Sometimes I end up with so much of the T2 alloys that I end up selling half of those off.
The T1 alloys have essentially no purpose except to make the T2 alloys, and the T2 alloys have no purpose except being ingredients for the T4 products. So aside from the rare mission that wants one Lemmium or something, you can always free up inventory space by crafting T2 alloys out of T1 alloys, and you can always use up your T2 alloys to make T4 final products. There’s little or no reason to save stacks of this stuff.
The T1 gas products are all based on the idea of Condensed Carbon being infused with an atmospheric gas (Nitrogen, Sulfurene, or Radon). So they’re all actually “enhanced carbon”. Since carbon can be made or multiplied with Oxygen, these can all be made entirely of gases.
It’s not too hard to remember which ones goes with which gas:
These can also be made in a refiner using a recipe with the formula described in the previous section on making T1 alloys and enhanced gas products using refiners. However this has the same problem as alloys with the small stack size, extra time, and I’d rather just put down 30 Supply Depot tanks at each gas extraction base and collect three stacks of each gas each time than try to be more efficient. Having the extractor just extract more gas while I’m not playing is better than extra tedium while playing.
For the T2 manufactured gas products, all three of the T1 enhanced carbons are used to make Superconductors (for Quantum Processors), Cryo-Pumps (for Cryogenic Chambers), and Fusion Accelerant (for Portable Reactors). The only thing that differs is the order that the ingredients are consumed and the blueprints used.
Because of this overlap, it is helpful to not use them all up on the same thing every time. Try to balance out which T2 gas products you use your T1 gas-enhanced carbon for.
These are kind of a pain because they all need a large number of plant products. This means you either need plant farms or you need to do lots of refining to create the plants from biome minerals. I end up doing some of both, and since frigate expeditions bring back lots of alloys, I can basically just use up almost all my biome minerals making plants.
There isn’t much logic to the recipes per se, but there are some things to keep in mind about specific plants.
Most plants are used for only one item, but two of the plants are used for two different items:- Cactus Flesh is needed for both Poly Fibre and Unstable Gel.
- Frost Crystals are needed for both Glass and Heat Capacitors.
- Star Bulbs are only used for Poly Fibre which also requires Cactus Flesh. So without Cactus Flesh these are unusable.
- Solanium is only used for Heat Capacitors which also requires Frost Crystals. So without Frost Crystals the Solanium is useless.
Finally, Gamma Root needs Faecium to be useful and Fungal Mould needs Mordite, but these are easily produced with oxygen and not much of either is needed. If you make 2-3 stacks of these then the Faecium and Mordite will last a very long time, Make a large batch of both at one time and you won't even have to think about them except occasionally when it's time to produce another big batch.
The logic behind these can be summed up pretty easily:
- The T3 products (Quantum Processor, Cryogenic Chamber, Portable Reactor) all use one T2 manufactured gas product and one T2 advanced agricultural product.
- The T4 products (Fusion Igniters and Stasis Devices) are made using a Quantum Processor (T3), a device-specific component (T3), and a T2 Enhanced Alloy (Geodesite or Iridesite).
Notice that if you produce both Fusion Igniters and Stasis Devices you will use as many Quantum Processors as you do Cryogenic Chambers and Portable Reactors combined.
What to Make
The simple version is: Just make the most valuable things you can at the moment given what resource extraction and farming you have set up and which blueprints you have.
A good specific place to start is by making Living Glass[nomanssky.fandom.com]. There are several things that make it a good starting point:
- You can get the blueprint for it from the base Scientist employee.
- It only needs Gamma Root and Faecium to make the Lubricant ingredient.
- The Glass can be made with Silicate Powder in a refiner, and can also be made with Frost Crystals. (It's also possible to make Glass using Salt + Cyto-Phosphate in a refiner.)
- The Gamma Root and Frost Crystals can be grown on terrain, or made in a refiner.
- Gamma Root and Frost Crystals have the shortest growing times among plant products.
- The Faecium can easily be replicated in a refiner with Oxygen. If that isn't possible yet, many alternatives exist[nomanssky.fandom.com] for obtaining or making it.
Eventually plan to make both Fusion Igniters and Stasis Devices, though you don’t have to make them in equal numbers. This will require being able to make everything in the Valuable Products category.
The reason for making everything is so that you are all set up to maximize the value of all the products or resources you randomly collect (especially from Frigate Expeditions) and don’t have to sell raw materials for tiny sums of money.
Along these lines, note that it’s not a good idea to just keep emptying supply depots and putting the contents into a storage container, especially if you keep doing this with only one mineral or gas. You’ll end up with a huge amount of wasted space on only one or two resources that you can’t use and you’ll end up selling it all for almost nothing. So the best idea is only collect what you plan to make stuff with right away.
For T1 products, the multiplication in value is around 5x to 9x compared to selling the raw ingredients.
For T2 alloys, making Geodesite or Iridesite doubles the value of the ingredients.
For gas products, going from T1 enhanced carbon to the first T2 (using 2 T1s) multiplies the value by 3.2x to 4x. Making the “T2.5” product (using the first T2 + the remaining enhanced carbon) multiplies the value by 10x compared to just selling off all three T1 enhanced carbons.
For agricultural products, the sale value of a T2 is more than triple the value of the T1 ingredients.
For the T3 products, the value compared to the ingredients is around 1.8x (not quite double).
Making the T4 products gives you another multiplication in value of about 1.8x compared to just selling the inputs.
So the overall increase in value for each crafting tier looks roughly something like:- Raw: 100,000 (crude estimate of total sale price of all raw ingredients for a T4)
- T1: x8 = 800,000 (if you made all T1 valuable products needed for a T4 and sold them)
- T2: x6 = 4,800,000
- T3: x1.8 = 8,640,000
- T4: x1.8 = 15,552,000
How to Sell
Often I just sell stuff on my freighter. There doesn’t seem to be a major disadvantage to using the Galactic Trade Room on your freighter for selling things. Trade Outposts should be better, and the system's Space Station should be worse, in theory. But it seems like that only applies to the non-craftable trade commodities.
Anyway, sometimes the price of Fusion Igniters, Stasis Devices, Living Glass, or whatever else you're trying to sell is just not good where you are. Maybe it's -5% and you just don't feel like looking around because it won’t usually make enough difference for the trouble.
In that case, there is a way to ensure you can sell stuff at par value and at least ensure that it isn't at a discount.
There's an exosuit tech module called the Trade Rocket[nomanssky.fandom.com] that can help with this. After installing the module (the blueprint only costs 90 nanites at the Space Anomaly and the parts are common), you can summon a rocket to a planet surface using the Summon Vehicles submenu just as you do with a ship.
Once the rocket lands you can interact with it to open its inventory and load it with stuff to sell. Anything that can be sold for units will get carried off and sold at par value (0% discount or markup) once you launch it.
The only disadvantages are that it takes up an exosuit tech slot, needs some tritium to fuel it, and you have to be on a planet surface to summon it. These are some pretty trivial costs, so it's great for this situation where the closest trade terminal is -5% or more.
The Trade Outpost POIs on planets normally have better buy and sell prices than the station, as do the NPC pilots there. If you have an Economy Scanner[nomanssky.fandom.com] installed on your ship, you can use it in space to scan for trade outposts using the quick menu and fly to any you find. I think this is usually only worth it when looking for stuff to buy, or when trying to sell commodity trade goods.
Selling stuff at trade terminals always "floods" the market in a system to some extent and lowers the selling price on the sold item, but each transaction always completes at the current price no matter the number of items in it. The price only drops after.
So if you have 100 of something to sell, sell all of them in one transaction to get the listed price for all 100. After that, the price will drop to some degree for that item and any more you sell will sell for the new lower price.
Don't just keep selling stuff without checking your balance! You can't have more than 4,294,967,295 units and if you acquire more units beyond this limit, the extra units just vaporize. The game will NOT warn you that this limit will be exceeded by a sale transaction, nor will it prevent you from executing the transaction.
If you're wondering where this number comes from, it's 2³²-1 which is 32 consecutive 1's in binary. In other words, this is the largest number that can be stored in a 32 bit unsigned integer. Adding to this would normally cause it to wrap around starting at 0, but the game just caps it at the maximum value and that's about it.
If your unit balance is close to this limit, just save up your products in storage containers and sell after you've spent enough to bring the balance down. Otherwise you’re just throwing stuff in the trash by selling it.
How to Spend Your Billions
The real point of this guide isn’t so much about billions of units as it is just having everything you need handy at all times to do whatever you want. Even if you didn’t sell anything for units you’d still be able to get all the raw materials you want for anything.
Every time I want to build a base for example I’m never short on materials because I always have a stack of everything.
But believe it or not there are ways to spend billions of units.
The main thing that consumes billions is buying tech or cargo slots for starships and multitools. You can easily spend 4.2 billion trying to outfit a new ship or multitool quickly by throwing money at slot expansion. I usually do this when the slots are cheap then when they start to get absurdly expensive I start using the expansion modules I’ve saved up.
Aside from that, having insane units means you can just buy up any starship you see, buy the most expensive freighter easily if you want, or buy up everything that exists at a trade terminal. You can also easily afford to buy up lots of starships, salvage them for customization modules, then create custom starships with them. If it can be bought with units then you can buy it and lots of it.
So ultimately, making billions of units is inventory slot farming and making everything else you can buy with units almost seem free.
Do you know any new players who could use a few million or a few 10s of millions? Having 15M unit products means you can just give them some fusion igniters or stasis devices to sell. Otherwise handing out money would be more difficult.
Comments?
So please leave any comments about anything I forgot or possibly got wrong.
Copyright and License
This work © 2026 by NimrodX on Steam Community is licensed under CC BY-NC-SA 4.0[creativecommons.org]
Some content from the Fandom-hosted No Man’s Sky Wiki[nomanssky.fandom.com] used under CC BY-NC-SA.
Anyone who wants to translate this guide to any language is free to do so based on the license mentioned above, but please let everyone know about your translation in comments below and link to the original English guide somewhere in your translation.
My Other Guides
- No Man's Sky Access Codes★ 5 (880)43k views2.1k ♥1 minUpdated 14 Apr
- Refining – The Magic Of Alchemy★ 5 (1.2k)41k views3.6k ♥5 minUpdated 24 Mar, 2022
- How to get RICH in NMS SUPER FAST★ 5 (501)32k views1k ♥2 minUpdated 7 Sep, 2022
- Multi-Tools: Types, Statistics, Weapons, Layouts★ 5 (550)27k views1.3k ♥7 minBulgarianUpdated 3 Jul, 2025
- Starship Guide: Types, Statistics & Roles★ 5 (461)25k views924 ♥8 minBulgarianUpdated 30 May
- Звездолеты СТРАЖЕЙ★ 5 (220)24k views519 ♥7 minRussianUpdated 9 Feb, 2025





- Upgrading to PremiumTeam Fortress 2★ 5 (20k)1441k views11k ♥6 minUpdated May 11, 2022
- No More Room in Hell Official ManualNo More Room in Hell★ 5 (2.8k)569k views2.1k ♥29 minUpdated Apr 22, 2019
- NMRiH Community Hosting GuidesNo More Room in Hell★ 5 (526)351k views653 ♥1 minUpdated Aug 10, 2022
- ULTIMATE GUIDE FOR GAME DEV TYCOONGame Dev Tycoon★ 5 (5.8k)326k views10k ♥4 minUpdated 23 Jan, 2014
- How to 'Git Gud' Soon™MORDHAU★ 5 (2k)318k views3k ♥68 minUpdated Nov 16, 2024
- Лучшие кооперативные игры SteamPAYDAY 2★ 5 (1.5k)315k views2.1k ♥56 minRussianUpdated Apr 27, 2025






This guide was created by its original author on the Steam Community. Are you the author and want it removed? Request removal.