New Game to Absolute Minimal Corvette Guide
Intro
This subject has been done before, but most of the written guides seem to assume that you've been playing a while, have lots of money or know how to get it, and are otherwise more familiar with the game than new players are. They didn't really address my questions when I was just starting, so it took me longer to get a corvette than it should have.
This guide is written assuming you are a new player who has started the game and heard lots of hype about corvettes, but doesn't know much about them. Maybe you even found one corvette module and the game keeps telling you to go to the corvette terminal and build one when you can't do that with one module and no money.
Maybe your exosuit and/or starship inventories are constantly full, so you're thinking you should get a few million units somehow and trade in your starship for another starship with a larger inventory. After all, corvettes look like they must be way more expensive than a modest starship upgrade.
But as it turns out, you're probably better off in terms of hauling capacity to put that money toward a bare-minimum corvette with Storage Racks instead.
This guide is about the quickest ways to earn legitimate non-grindy money and get to where you can carry your whole packrat stash with you everywhere, plus skydive, hover, and anything else a corvette enables you to do.
Prep Work
Though you can get a corvette going sooner than you might think, you can't just start out with one. There are still some things to do to get yourself set up for basic survival beforehand.
This isn't a complete guide for that, and fortunately a lot of the missions in the game are essentially tutorials, but I wanted to mention what point you should get to before worrying about a ship upgrade like a corvette.
First, keep doing stuff and complete main mission objectives, especially The Artemis Path, until you reach the Space Anomaly. At that point you have most of the basic survival stuff worked out and can purchase some upgrades that were previously unavailable.
Also do the Base Computer Archives missions and put this track on hold when it starts telling you to warp to other star systems. These mission objectives basically give you free blueprints and only require you to build something to continue. (You can immediately remove and recover the resources from anything it requires you to build that you don’t want.)
Before reaching the Space Anomaly, though, you will encounter a Crashed Starship. See the section "Get Money: Salvage Crashed Starships" for info on how to repair it enough to fly or summon and then scrap it for at least 1M units. (If you already passed this point without claiming the ship, don't worry. Everyone does that if they weren't warned ahead of time. I missed it too. Missing it doesn't make that much difference though.)
[Tip: Once you scrap your first recovered ship, you should have at least 1M units. This is enough that you can start buying minerals at trade terminals to save yourself quite a bit of trouble having to mine stuff. Minerals are pretty cheap but only about 500 are available at a time unless you also buy from NPC pilots. This is still enough to avoid lots of manual mining.]
Once you start making millions by scrapping crashed ships and selling extra junk from Salvage Containers, you may find that you want to spend some of it to upgrade your multi-tool before you upgrade your ship. That's a perfectly fine thing to do, but I'd recommend against bothering to upgrade your starter ship with anything except tech modules that can be moved to your new ship. That is, don’t waste anything on slot expansion or class upgrades for it.
Note: If you find a corvette part early, and don't want to sell it because it's a core module, don't keep using up inventory slots on it. Take corvette modules you want to save to any space station and throw them in the Corvette Workshop Cache. Also note that you can QuickTransfer them into the cache anywhere in a station.
I started a new game with some of the difficulty settings cranked up to try to get a sense of how long this might take and to make sure I didn't forget to mention anything important. Unfortunately I didn't time it too well and ended up with lots of idle time due to family duties and such, so I'm not sure about time, but I'd estimate new players would probably take at least 5-10 hours to get to the point described above where they're ready to head for the ship upgrade.
(I opted to spend 4.5M units or so to replace my starter multitool with a Class A rifle with 30 slots before going after the ship upgrade,)
Later I'll also mention more about how my test game went, but always keep in mind that many specifics in this game depend on luck. Fortunately there are many opportunities to "get lucky", so you'll probably have some luck with something; it’s just impossible to predict what.
The Minimal Corvette
- cockpit
- habitation module
- access module (door)
- landing gear
- reactor
- main engine (thruster/booster)
- weapon
I think the easiest way to get a corvette in the least amount of time is to mostly use money and just buy the modules. This is because trying to find all the necessary parts at random is difficult due to the large number of cosmetic modules you're likely to find first, and even if you can trade those it's a lot of trouble due to their low value. So in the beginning it's better to just sell them.
Of course you can do a combination of collecting Salvage Containers to sell the stuff, saving some required parts to use yourself if you find them, plus other ways to make money like salvaging crashed starships. This is the method I'd recommend because it's hard to say what will work best in the locations where you end up.
In any case it will speed things up if you buy at least some of the modules you need. If you luck out and get tons of money immediately, you might want to just buy them all.
These are the required modules that you're able to just buy with units at the Corvette Workshop terminal. Everything else has to be found or traded for using the corvette module barter system.
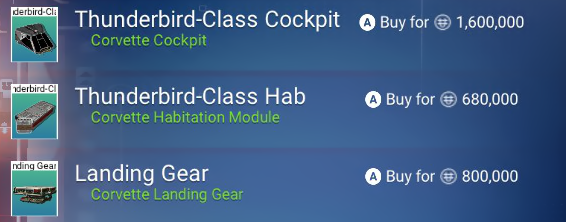




If you find one of the same type then you can hold onto it (throw it in the corvette cache) and not have to buy that type of module.
Note that just because you install a photon cannon array doesn't mean that you can only use a photon cannon. The reason at least one weapon is required is so that the game knows where to show the projectiles or beams originating from, but any other weapon module on the ship can originate from the same location(s). So Rockets, Phase Beams, etc from normal starship weapon modules will all shoot out of the same Photon Cannon position if that's all you have for a visible weapon.
Similarly, if you find a Torpedo Launcher then you can use that and not have to buy a Photon Cannon. Other weapon types will fire from its location.
This isn't the only way to put together the minimum modules, but with such a small number of modules there aren't too many variations. So whatever you construct will likely look something like this:
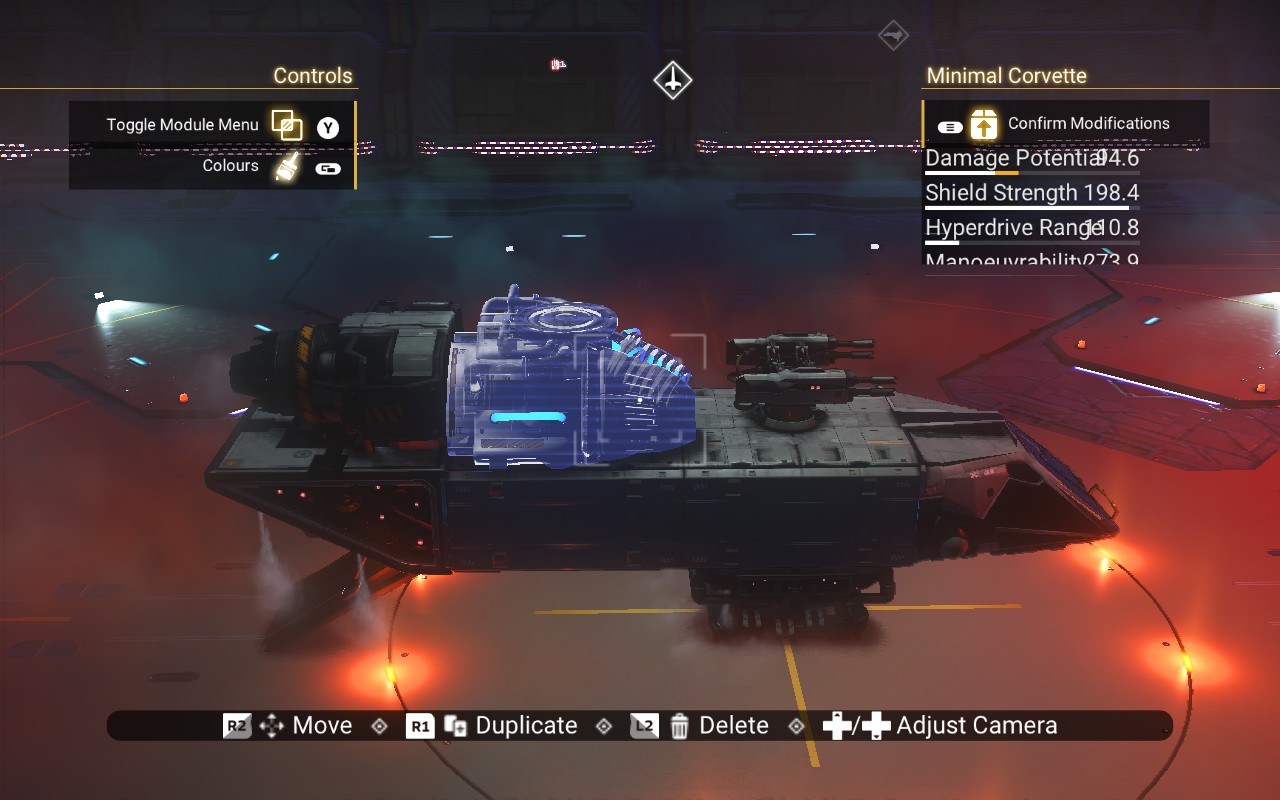
(You might actually want to put the gun turret on top of the reactor to make space to walk out of the top using an internal stairway, but it can easily be moved later if so. Some people prefer this for scanning while hovering or cruising. Others may not like the lack of a door. See the later section on corvette Tactics.)
Don't worry if this looks dumb because it won't stay this way for long. Soon you will be adding more modules to it, because if you're like most people you will want the maximum tech module bonus from adding three of each type of thing with a tech module bonus (3x each of landing gear, engine, reactor, weapon, habitat module, shield generator).
Once you get the dumb-looking minimal corvette, you can put Cargo Racks[nomanssky.fandom.com] on the inside walls and use all the storage to help you gather up more salvaged corvette modules, among other things. After that you can use, sell, or trade them and start making worthwhile customizations to the appearance and performance.
And if you happened to end up with enough extra money left over after buying the minimum required modules, you could also spend some for an extra landing gear to start with.
Obtaining 7,830,000 Units
Obtaining 7,830,000 units won't take that long even with mostly starter equipment. This is salvaging 7 crashed starships maximum (possibly as few as one), but you're probably better off doing a combination of that and harvesting Salvage Containers.
Which one works best depends on your luck since you can get unlucky and not find planets with lots of Salvage Containers, or you can get unlucky trying to find crashed starships. So I'd normally try to attempt both and go with whatever is working best.
Note that it's up to you if you want to first upgrade your multi-tool or whatever else costs money or takes time. My only recommendation is to buy a minimal corvette before wasting the same amount of money on a relatively pointless starship upgrade like I did when I first started.
Get Money and Modules: Salvage Containers
Note that corvette modules sell for between 150,000 and 2M or so units. So they can be worth collecting just to sell for the money.
When I first started playing, people would say "go find salvage containers for tons of corvette parts" but I didn't know what they were talking about. After all, every planet is littered with different containers and most of them could be said to contain "salvage" of some sort in the general sense.
To make things worse, the planets I had nearby with "Salvageable scrap" as a listed resource seemed to be only very sparsely populated with Salvage Containers. If I saw any then I didn't know what they were and may have confused them with Buried Technology Modules.
Nobody was actually telling me wrong, but I spent quite some time thinking that people were talking about crashed freighters and the containers at those sites. After all, I'd see a planet or two with "Salvageable scrap", never notice anything different about it, and end up finding crashed freighters on them before anything else. Then I wondered why the heck anyone thought those had lots of corvette parts when corvette modules are a rare drop from those.
So here's the exact thing that you're looking for:
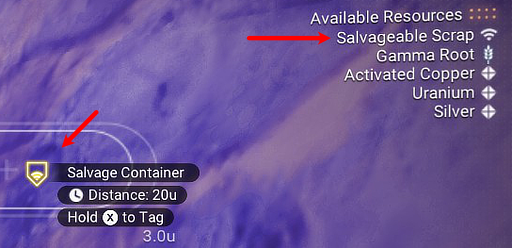
Note that these use the same icon as Buried Technology Modules, except they are very slightly orange. Unfortunately they can both end up looking the same especially if they're far away and faded out, making them difficult to differentiate without reading the label.
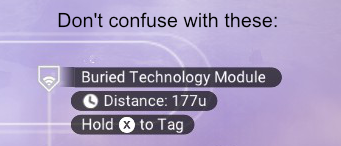
The "Salvage Containers" often have animated displays on the sides and look like either crashed satellites or unexploded "fat man" style bombs. You don't open them like the usual loot container. Instead you have to blast them with your mining beam and destroy some separate Protective Casings[nomanssky.fandom.com] before you can break the little sphere in the center. The more protective casings (2-4) around the center, the more valuable/rare stuff it will have.
So they're actually more like multi-part rocks than containers.
Different planets with "Salvageable scrap" have different densities of these containers. So sometimes you get unlucky and a planet that should have them only has a few very widely spaced apart (like 2000u or more). You may not even see any within scanner range where you land.
I’m not entirely sure, but the density may be determined entirely by the planet or moon size with smaller ones having everything closer together, so it’s probably a good idea to specifically look for a small moon with Salvagable Scrap when looking for a place with better container density. If that’s not working out then go for the smallest planet with scrap.
If you can find a moon or planet where there's one every 1000u then that's good enough, but you could luck out and find one where they are even more plentiful and spaced closer together.
Lots of people have had luck with just shooting the containers with their corvette infra knife without digging them out. The explosive radius usually seems to get far enough underground to get at all the casings. So once you get a minimal corvette, this is something else you can do with it. Get out of the seat to find and tag a container, then get back in the seat to fly to it and shoot it up with a sufficiently explosive starship weapon. Repeat until bored!
For my test game I lucked out and found a planet of the sort I've never seen before where the salvage containers were often 500u apart, but this seems to be kind of rare. (At the same time, all the crashed ships I found were really cheapo and worth only slightly more than 1M each.)
This allowed me to get lots of modules to sell for units, plus two or three required modules like an engine and weapon.
Get Money: Salvage Crashed Starships
One major way to make money that seems to work reasonably well everywhere is to salvage crashed starships.
For finding normal crashed starships, no special star system is needed. The main way is to use the consumable Planetary Chart (distress signal)[nomanssky.fandom.com] bought from the Cartographer at any space station for only 1 Navigational Data each.
To get Navigational Data, loot everything, activate navigational beacons, talk to NPCs using travel-related words, and also keep an eye out for blue or orange cubes which appear even in space stations. It also comes from black disks that emit a hologram after activation (these are harder to spot). Sometimes you might find an Ancient Data Structure, but those are kind of rare. Also, having an AtlasPass v1 can be worthwhile because those cylinder-shaped loot containers that require a v1 often have nav data.
Sometimes you can get lucky and a Trade Terminal on a planet POI or your base will have a whole stack of Navigational Data for sale very cheap. (Some special stuff like this only shows up at trade terminals on planets, so always check those or build one at a base.)
After buying charts, go to a planet and activate a chart from your inventory. What you are looking for is something with a name like “distress beacon”.
Unfortunately the distress signal charts have a large chance of finding something else like an abandoned building, crashed freighter, observatory, or a crashed starship with a live pilot. It can take using more than one to find an unclaimed crashed starship.
Note that if you find an abandoned building, crashed freighter, or observatory with a chart and want to try using another chart to find a distress beacon, just keep activating another chart and ignore any messages about “similar building already found”. You can keep activating the chart repeatedly, even when this happens, to find a different POI type.
Once you find a distress beacon, go check it out because you can’t find another one on the planet until clearing the one you found. Continuing to activate charts in this case will just find a different POI type.
Also, if you run across a Transmission Tower (one of the buildings that gives you a numeric sequence puzzle) then those can locate crashed starships.
You may also want to try finding them with distress signal charts in more than one system to see which system has the best ones. The only indicator I know to go on is the wealth of the economy in the system, so especially try the systems with a wealthy-sounding three star economic descriptor. Gek systems also have more hauler ships worth more money. Anyway, trying different systems is probably worthwhile. Gek systems and wealthy systems are the best places to start.
(Eventually you can use an upgraded Minotaur or Nautilon exovehicle scanner to locate crashed ships, making the charts unnecessary, but at first it takes less time to just get the charts.)
- Interact with the distress beacon (orb) first to check for special loot or information.
- Interact with the crashed starship to claim the starship and add it to your collection for free. For the love of all that is holy, do NOT select "Swap Starship" because you do not want to lose your existing starship!
- Enter the starship and repair the Launch Thrusters and Pulse Drive. These are the only things that need to be repaired to summon it in a station. This should only require one metal plate, one hermetic seal, a di-hydrogen jelly, and 50x Pure Ferrite. It's exactly like repairing your starter ship.
- Repairing tech slots will not increase the value of this ship! It’s a waste to do this for salvage.
- Repairing some cargo slots might be worth the gain in salvage value but it depends on the type of ship, class, and your supply of extra materials. For exact details on what is worth repairing, see these tables[nomanssky.fandom.com] but I would suggest skipping anything you don’t have the parts for on hand, or know how to get quickly, as the time to obtain them may not be worth it. Repair the easy/cheap cargo slots, and only cargo slots! Exact details of what is worthwhile are highly situational.
- Dismantle or package up and store all tech modules on the ship that you can. You will get useful materials and almost always at least one Wiring Loom for dismantling. Sometimes a crashed ship will have a working module that you'll want to use.
- Exit the starship and get back in your main ship to make it active again. It should be where you left it.
- In your main ship, get back to a station at some point (doesn't need to be immediately).
- In the station, use the Summon Vehicles submenu of the Quick Menu to Switch Docked Ship. Switch to the beat up ship you found.
- Go to the Starship Outfitting Terminal in the station (near the mission agent), select the Salvage Analysis option, then salvage valuable materials.
- Check the name of the starship before confirming! You don't want to salvage your good starship by accident.
- This will give you a bunch of scrap item stacks that you can sell at any trade terminal for the number of units quoted. Notice that it doesn't give you units directly.
- You can own several starships at once, so you can claim and repair the engines on several before returning to scrap them.
- If you claim a ship without repairing it, then lose track of its location: The ship won’t be summonable and thus will appear to be soft-locked in your list of owned starships. If this happens, go to a planet (this won’t work in a station), save the game by exiting your ship etc, reload the restore point, then summon the broken ship before doing anything else. On loading the game you get one “broken ship free summon” to prevent this situation. After the first summon it won’t work on broken ships.
My test game results were that all my scrapped starships were minimum value of 1-1.5M and I should have focused my efforts on my amazingly dense Salvage Container planet sooner than I did. I only tried finding distress signals in 2 or 3 systems though.
Get Money: Salvage Sentinel Interceptors
Note: This is not recommended as the first thing you try as a new player because you'll probably want your combat tech upgraded at least 50% of maximum, and the game even has some hardcoded rules to stop you from encountering the necessary planets too early. But I'm including some incomplete info about it just because I know some people will ask.
The only problem is, they only seem to have these accidents in star systems with the "Dissonant" tag and then only on planets with "Dissonance detected". Note that there's a hard coded rule in the game that prevents you from encountering the dissonant stuff until you've warped a certain number of times or played some amount of time or something. So if you try to travel to such a planet immediately and there's nothing unusual there then it's probably the game trying to nerf the planet because it thinks you're still too "noob" after starting a new game.
Finding a sentinel ship just involves going to one of the previously mentioned planets and exploring, blowing up anything weird, and otherwise doing what you'd probably usually do anyway. All I will say is that they are not detected by emergency signal charts as they apparently don't send out standard distress calls.
Repairing a Sentinel ship so you can claim it is more elaborate than repairing the normal ones and works differently. Just read the item descriptions and game messages carefully and you'll figure it out. Otherwise the rest of the process is the same as scrapping any other starship. Even with a corvette you'll probably want to keep one of the better Sentinel Interceptors.
The two "FAQ" issues that I'll mention that people run into and ask about sometimes:- When you find one of these, a new side mission is created and the sites are marked with mission HUD markers. These disappear if the salvage mission isn't selected. So if your crash site marker suddenly disappears, the game probably switched the active mission on you. Just go to the mission log and select the interceptor salvage mission again.
- If you don't do the mission goals in order and try to activate the device for the last part, it will seem to activate but nothing will happen. The game won't try to clue you in to what's wrong. Just make sure you have all the other stuff needed for the repair first before you activate that item. It seems like a minor bug in the scripting.
But until you're ready for the extra hazards and trouble involved it's better to just salvage a few normal starships.
For the test game I didn't try to speed run my way to recovering a sentinel interceptor and just left my combat upgrades at sub-par level for as long as possible. I wanted to test stuff that's more normal and suitable for new players to do without any detailed knowledge.
Get Nanites
Nanites aren't needed to buy corvette parts, but since corvettes also use normal ship modules, and nanites are needed to upgrade its class rating, some nanites could come in handy. So I put this section in here even though you can just ignore it until later.
There are two main repeatable ways of getting hundreds or thousands of nanites at a time, plus some others.
The first is Curious Deposits (on planets) which contain balls of Runaway Mould. When you encounter one of these, don't harvest the balls immediately with the mining laser. First, create a new base with a Base Computer, and put down a Teleporter and a Biofuel Reactor to power it. Wire them together and fuel the generator with only 1 Oxygen or Carbon when you want to teleport away. (Keep hitting Quick Split on the Oxygen/Carbon stack to quickly reduce the amount to one.) After that, place some cheap walls (such as stone or timber) downhill from the balls to keep them from rolling away. Don't edit the terrain as this is more likely to accidentally destroy some balls and also uses up your limited save file storage for base terrain edits.
Finally, harvest the balls, leave, and refine the runaway mould into nanites with any refiner. This can take a while. Go do other stuff in the meantime. An Exosuit personal refiner or corvette refiner will be helpful with this.
To get back to your tiny base, the teleporter does not need to be powered. In fact, as it turns out you can teleport to a base even if it has no teleporter, you just won't have anything to use to teleport away in that case.
Return later when you feel like it and the Runaway Mould will have respawned. Harvest again, refine again, etc. The deposits seem to spawn every time you teleport in, so if you have two of these bases you can teleport back and forth between them harvesting the mould.
It may take a while to run across Curious Deposits but when you do you can reuse them like this.
Ideally you find two decent clusters of curious deposit balls in the same system but more than 5ku apart, create bases at both, and teleport back and forth between them harvesting the runaway mould. The balls will respawn every time you arrive so you can keep harvesting the mould for as long as you can stand the boring repetitiveness.
And if you want to really put your Curious Deposit farming on steroids, check out this guide:
https://steamcommunity.com/sharedfiles/filedetails/?id=3717353393The second way to get even more nanites is Outlaw Stations, though this will cost some units. There is a mission that will lead you to one, so don't delay too long in following up on any missions triggered during pulse drive travel. The Economy Scanner starship tech can also identify outlaw star systems, with the economy type showing up in the galaxy map as “black market”. If you have a conflict scanner then the conflict level will be listed as “Pirate controlled”.
At an Outlaw Station, go to the contraband dealer and buy up all the Suspicious Packet (tech) and Suspicious Packet (arms). Unlike curious deposits, buying these will require some units but not an overwhelming amount, maybe 1-2M. (This means it's more suitable for later when you have more money.)
Open all of the suspicious packets. Most of them will contain X class tech modules of some sort, except for some that you get unlucky with. Go to the upgrade module dealer at the same (or any other) station and sell all the modules for nanites.
This can give you 1000-5000 nanites per trip, depending on your luck, but it takes the contraband dealer's inventory a while to respawn. Therefore you need multiple outlaw stations to teleport between if you want to repeat this rapidly.
Fishing is pretty easy and you can get some nanites releasing fish into the water. (Do this as an option on the fish themselves in the inventory screen.) This doesn't produce huge numbers of nanites, but it can be easier to do earlier in the game when you don't need as many. You only need to buy the (cheap) fishing rig multi-tool blueprint on the Space Anomaly, construct/install it, and find a planet with bodies of water. Spicy Chum is a good bait to use for the cost-benefit value.
Alternatively an inexpensive Automated Trap[nomanssky.fandom.com] blueprint can be bought from the construction research station, but it takes a long time to work.
If you have maximum or almost maximum faction standing with one of the races, you can go to one of their stations and buy up all the modules at a dealer with your high standing discount. Then you can immediately sell them, even at the same dealer, for full value and make a profit due to your discount. It's silly that this works, but it only works later on when your standing is sufficiently high. Warning! Achtung! Mise en Garde! DO NOT buy the Reactor modules at the Starship tech dealer for this because you CAN NOT sell those back! <— Warning! Read that again!
Creating a New Corvette
Once you have at least 7,830,000 units, or less than that plus some required corvette modules, you're ready to create your corvette.
If you found any modules of the following required types, just subtract their purchase price from 7,830,000. So like if you found a thruster of some sort, subtract 1,000,000 from the required amount since you won't need to buy that.
Go to any normal (not abandoned or Outlaw) system space station. (Note: The outlaw and even abandoned stations do have corvette workshop terminals at their landing pads but I’d discourage anyone new from using those stations for this since they lack local teleporters and are harder to get around in.)
First sell off any excess junk you have, then walk through one of those four teleporters that are on the left side of the station when coming from the landing pads. This will take you to a corvette landing pad where the Corvette Workshop and Corvette Module Cache terminals are.
First select Purchase modules and then Purchase basic modules. That will let you buy any of the ones listed above that you are missing. Don't panic if you accidentally buy one that you don't need, because you can sell it back at full value at no loss. (Also note that you can't barter trade the unit-purchasable modules.)
Then go back to the menu and select Create new corvette. This will take you into a build mode that's almost but not exactly the same as the build mode for bases using the build camera.
The order to place parts in is:- First put down a landing gear in the center of the + shape on the landing pad.
- Put the hab module on top of the landing gear.
- Put the cockpit on the front of the hab module.
- Put the landing bay (access ramp) on the back of the hab module.
- At this point you can put everything else wherever you want to try to get it to fit.
- Add any extras you found or bought.

And I put them together like this:
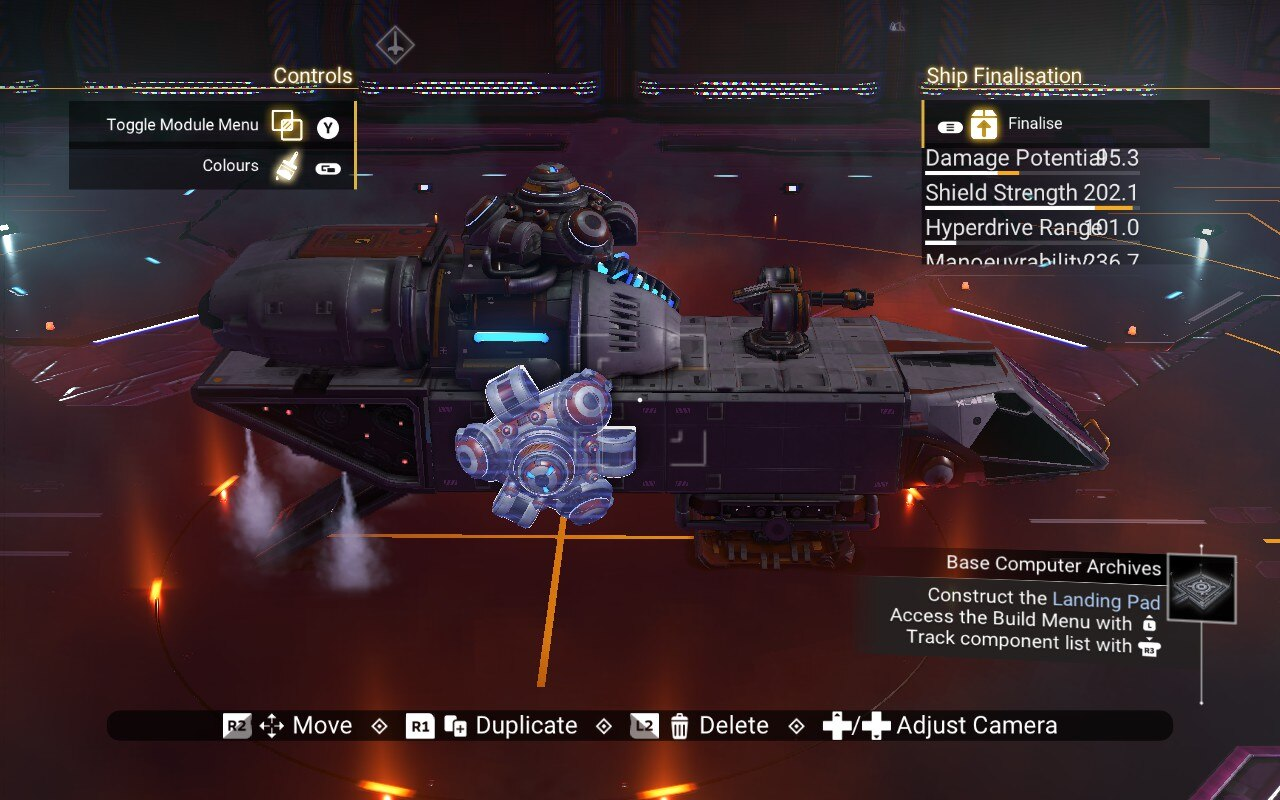
I also had enough money to buy another landing gear so I bought one and put that on.
Pick the option to exit and finalize your design.
After that it will put you through a screen with a Compare button similar to claiming a crashed starship, then you'll get a screen with a button to claim the new ship.
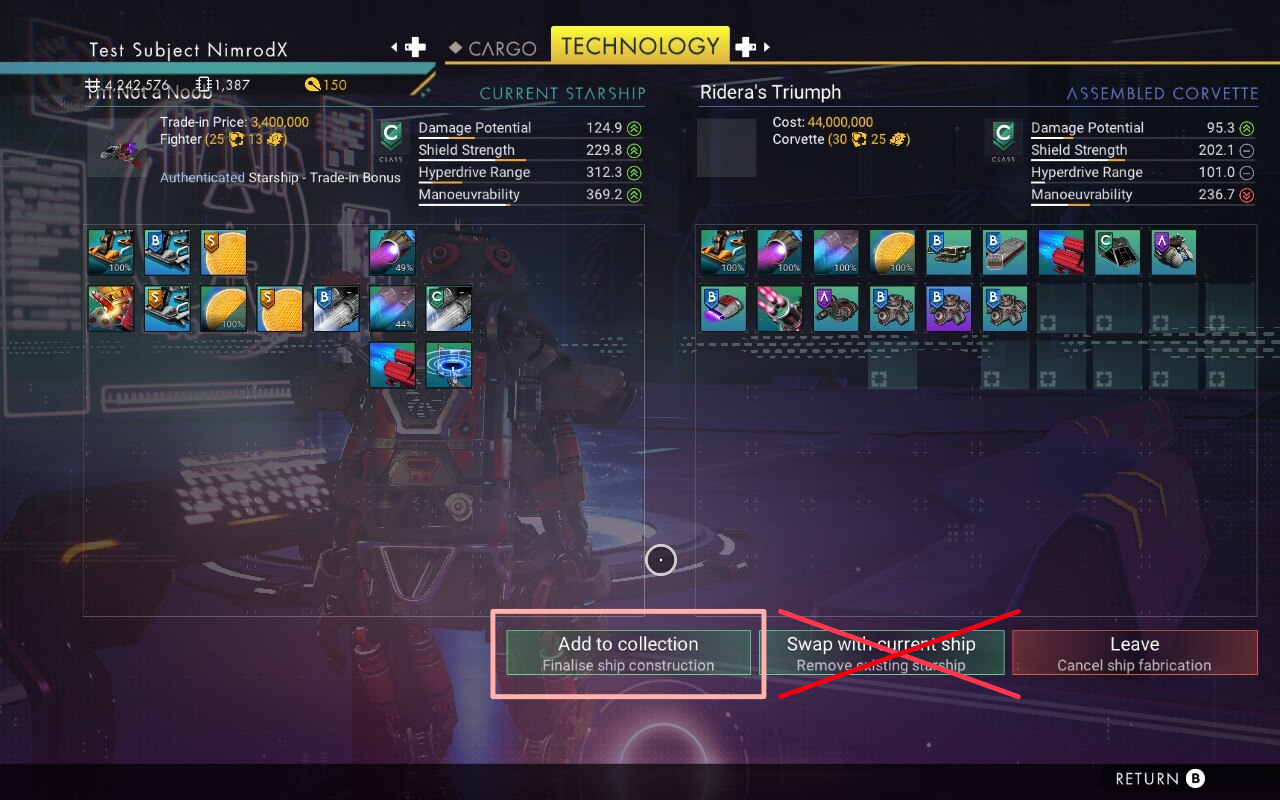
As usual, do not select Swap and throw out your existing starship ship by accident!
With only one habitat module you can still place four wall modules. The most useful ones at this point are:
- Cargo Racks - give you access to Storage Container inventories
- Refiner - a large refiner with 3 input slots
- Mission Radar - gives you Nexus type missions and lets you turn them in on completion
Just walk into the corvette, activate build mode, and you'll see the menu with the options. This works almost exactly like base building, and some base building stuff is also available if you have the blueprints.
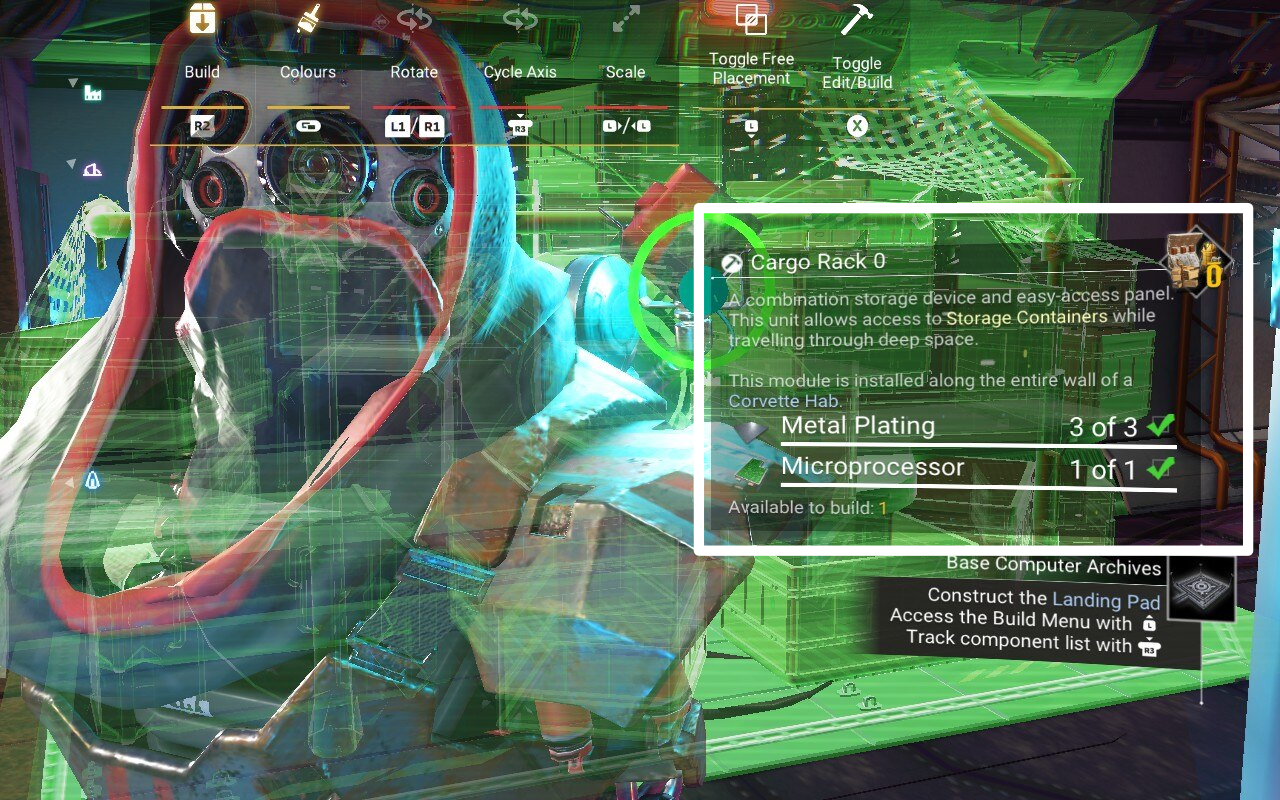
Exit build mode and you're ready to go packrat everything, hover, skydive, etc.
Of course you want to transfer your cargo and any useful modules, but even after that I would keep around at least one normal starship at all times. If you really need the money then it's not really a problem to scrap it (I mean you can always just buy more starships later) but if you don't need the money right now then I'd suggest keeping it for the time being, and using it as a trade-in on a new starship.
Corvette "Secrets" (Tactics)
These aren't really secrets, but they're some of the best tactics that are possible with a corvette. They just aren’t necessarily obvious and don't exactly have tutorial missions for them.
If you get attacked by sentinels and don’t feel like fighting you can hide in your corvette. Just don’t get in the cockpit or the sentinels will summon interceptors to attack you. This also works for aggressive creatures etc.
Since corvettes can't land on normal starship landing pads, and jumping or teleporting down may be more convenient in some situations anyway, it's pretty common to just stop the ship in midair above what you're trying to get to and either jump or teleport down. Typically you aren’t allowed to teleport down when directly over a POI, so in this case just jump. Teleporting into water and back works great though and the teleporter even has floats on it.
The option to leave the pilot seat without landing is in the quick menu.
Leaving the ship while hovering also keeps you from needing launch fuel, which might matter if you don't have a launch auto-charger.
Hover-jumping works for Trade Outposts, Holographic Comms Towers (Holo-Terminus), any place where landing is difficult or you want to start out on top of a structure anyway, etc.
The teleporter usually ends up on the ground somewhere even with a POI structure around, and it still works for boarding the ship even if it didn't work for disembarking, so typically to get back to the ship you jump down on the ground (if needed) and use the teleporter. If that doesn't work for some reason you just have to run to a sufficiently clear area and summon the ship to land.
Of course you can just land on the ground if you want, and this is especially no big deal if you have a launch auto-charger. Aquatic landing with aqua-jets is usually much worse than just hovering since the corvette will “land” too high above the water and won’t drop a teleporter, making it actually more difficult to board from the water. So the aqua-jets are really only needed if you need to summon the ship to land on water when you’d otherwise be unable to summon it.
Several people have reported good luck with just shooting the Salvage Containers with their corvette infra knife without digging them out. The explosive radius usually seems to get far enough underground to get at all the casings. (Not sure of the full list of which weapons make a large enough explosion to work well.)
So once you get a minimal corvette, this is something else you can do with it. Get out of the seat to scan for and tag a container, then get back in the seat to fly to it, hover, and shoot it up with a sufficiently explosive starship weapon. Repeat until bored!
Corvettes allow you to hover, but they also allow you to get out of the pilot seat and walk around while hovering. Walking around the ship also includes jumping off the access ramp and falling toward the ground. (You can also "spacewalk" but this is currently of limited usefulness.)
This might seem kind of frivolous at first but there are some things it comes in handy for, like using Target Sweep Mode of the scan visor to locate one of those "approximate location" mission waypoints. Because you are essentially able to fly for a limited time, this is much easier than running over the terrain to get to it.
All you have to do is enter the atmosphere over the approximate waypoint. Just fly toward the planet above it until you see the "entering atmosphere" message, then use the quick menu option "Leave Pilot Seat". The ship will automatically stop and level itself when you do this so you don't have to wait until it's completely stopped and level. Just try to be reasonably close to directly above the marker.
Open the hatch, jump out, and while falling toward the ground use Target Sweep Mode as usual. Look toward the horizon. Moving forward causes you to start accelerating forward. Unlike walking, this will accelerate you forward but you won't stop instantly if you release the forward control, so it takes some practice to get used to.
As long as you start near the top of the atmosphere and aren't ridiculously far from the target, on most planets you can find it 10 seconds or more before hitting the ground. Just always pay attention to how close to the ground you are anyway so you don't go splat, and use the jetpack to arrest your fall just before you would hit.
You can do the same thing described above with the Survey Scanner too, but it's a bit more difficult to finish completely before hitting the ground due to the required 4-5u precision and the time to analyze. I'd recommend just trying to land near the hotspot center. You're less likely to splat and it will still save lots of time vs running around on the ground.
If you see "No Nearby Hotspot" just turn in the direction you hear the slow bleeping coming from until the sound changes to a higher pitch and is coming from both L and R stereo channels (in front of you). Then move in that direction until you get a distance indicator.
But there's actually a better way to do this than jumping from max altitude in a random location.
This works best for finding a specific type of randomly occurring stuff, like a hotspot or curious deposits, and not a target in a specific "approximate location" area.
Leaving the seat doesn't mean you actually have to come to a full stop. Accelerate to a desired speed like 50-100u/s, fly at low to moderate altitude, and then under "Manage Autopilot" in the quick menu select "Maintain Current Flightpath". You will leave the pilot seat, the ship will level out, but it will keep moving the same speed forward.
(Note that it’s difficult to tag hud markers when moving too quickly, and also if moving quickly structures may not load fast enough to see them until they’re close to the ship. So you’ll have to trial-and-error find your own best speed for whatever you’re doing.)
For Survey Scanning: Go open the hatch and stand on the ramp so as to be prepared to jump. Face in the direction that the ship is moving (even if the ramp is in the back), bring up the desired survey scan mode, and watch the hotspots go by. You can jump for any of them or wait until you see a Class A or S, depending on how long you're willing to wait. Try to track the hotspot as the ship approaches, jump off the ramp before the ship starts to pass it, then glide toward the hotspot center, This can be very tricky so don't expect to land exactly on it, but you will usually end up pretty close and save a good bit of time.
For other stuff: Using the normal scanner mode, just stand near the pilot seat looking for things through the ship hull. When you see what you're looking for, try to tag it, get back in the pilot seat, and fly the ship to the tagged marker. This is most useful for things that occur infrequently like Curious Deposits. This is especially the situation where moving too quickly will make all this too difficult.
Also see this even more extreme convenience design using only the minimum parts.
Stupid Corvette Tricks
These aren’t always stupid but their usefulness is rather limited and most often people are doing them for entertainment value or just to see what they can do.
You can stop the ship in space, leave the cockpit. and go for a spacewalk. This is pretty safe because you can just use the "call recovery starship" option to instantly get back in your ship’s cockpit from anywhere in space. No need to worry about drifting out of reach, but as previously mentioned there aren't really any necessary uses for this outside of some rare situations.
You can actually spacewalk out of your ship and into a freighter base build area, but this isn't exactly seamless; the freighter base won't spawn until you're almost touching the exterior floor (lower limit) of the build area. Often this means the rooms will spawn around you and you'll instantly end up inside one, or possibly stuck under the floor. Still, I often do this as a faster way to enter the freighter base or board my corvette once I know where to go and not go.
(If you end up stuck in a wall or anything else on a freighter, use the "Options → General → Other → Reset position in freighter" UI button to get unstuck.)
You can not enter a freighter starship hangar from spacewalk, or if you can then I haven’t figured out how.
You can actually spacewalk into a system space station. Your ship will end up on the landing pad closest to the station opening you came through. There’s no advantage to doing this and if anything being further away from the facilities is just a disadvantage. So it seems to be rather pointless, but it’s pretty cool and impressive from a seamless completeness perspective. (I haven’t tried Spacewalking out of a station, but it probably works.)
You can not spacewalk into an Atlas station. Those are blocked with an invisible barrier.
You can spacewalk into a planetary atmosphere from orbit and skydive toward the ground. This doesn't have much advantage over just jumping from the ship after it enters the atmosphere, and actually it has the disadvantage that the corvette teleporter won’t be anywhere on the planet if you need it (such as when you end up in the middle of an ocean and you can’t summon a ship because none of your ships have aqua jets).
Reportedly it is possible to escape a planet with a jetpack (see comments) but I’m unsure of what technique is best. I will update when I find out.
Corvette Upgrades
All corvettes start out as Class C and this can only be upgraded at the Starship Outfitting Terminal[nomanssky.fandom.com] by spending nanites.
Upgrading class gives you another supercharged slot, though it might not show up if it ends up in a square where a slot isn't present yet. It also increases some invisible ship bonuses. Maximum cargo inventory slot capacity is also increased though you still have to obtain the slots somehow.
Corvettes can use all the same tech modules as normal starships, but some Corvette Modules[nomanssky.fandom.com] also add a corresponding tech module with a bonus when they're added to the design.
The limit on the number of corvette part tech modules of a particular type that appear in tech slots is 3. So the first three thrusters that you add also add tech modules, but after that extra thrusters are purely cosmetic or structural.
Habitat modules have a cargo slot bonus of +3 each, and walkways are only +1, so make sure to add three habitat modules to a design before walkways since they're in the same bonus category. Other things have bonuses depending on the specific variant.
Full list of corvette tech module categories:- Cockpit (one maximum)
- Landing Gear
- Thrusters
- Each Weapon Type
- Shields
- Habitats, Walkways, and some "Cargo" decorations
If there aren't enough tech slots for a corvette tech module then adding it will permanently add a slot. Because of this, you can always add new starship modules to a corvette (up to the limit of 60) by removing some corvette modules that have associated tech modules, filling the emptied slots with new tech modules, then adding the corvette modules back to the ship design.
Doing this repeatedly with "junk" modules (like extra Class C upgrades that you've collected) can expand the tech slots up to 60 even if the corvette is still Class C. After removing all the junk modules the slots will still be present. It doesn't matter if any of the modules are "overloaded" when this is done.
Tech slots can also be added by Storage Augmentations or by buying slots at the outfitting terminal, but this is kind of a waste since you can get them for free as described above.
Adding cargo slots works just like any other starship, aside from the limited bonuses provided by habitat modules and such. You can use Storage Augmentation upgrades at the Starship Outfitting Terminal or buy slots outright (though they get very expensive to buy).
Note that these are totally unrelated to the Cargo Racks that just give you access to storage container inventories. The ship cargo inventory has the advantage that it's easier to access and is local to the ship rather than shared with storage containers.
Corvette Disadvantages
- Tech modules on corvettes can get their positions swapped around, especially when adding or removing corvette parts in the workshop.
- They can't land on starship landing pads.
- They often locate their teleporter in odd locations on teleporting to a habitable base. (This seems to be based on where the base computer was placed when the base was claimed and not where it was later moved to.)
- They're much slower to dock at the Space Anomaly, and a little bit slower at stations.
- They're less maneuverable than most starships without lots of upgrades.
- More glitchy in general due to more complexity.
- Required corvette modules use up tech slots even if you don't want them to.
- You can't remove the photon cannon tech module.
- Trying to make them too big or using too many parts, even small parts, can cause performance issues for yourself and others.
Corvettes are kind of like the RV (Recreational Vehicle) of starships and end up having vaguely similar advantages and disadvantages to RVs. Even so, they are still quite deadly as their weapons and shields can be upgraded beyond those of normal starships. But they don't support most of what a habitable base or freighter does.
More Money Making
https://steamcommunity.com/sharedfiles/filedetails/?id=3647979303
Copyright and License
This work © 2026 by NimrodX on Steam Community is licensed under CC BY-NC-SA 4.0[creativecommons.org]
Some content from the Fandom-hosted No Man’s Sky Wiki[nomanssky.fandom.com] used under CC BY-NC-SA.
Anyone who wants to translate this guide to any language is free to do so based on the license mentioned above, but please let everyone know about your translation in comments below and link to the original English guide somewhere in your translation.
My Other Guides
- No Man's Sky Access Codes★ 5 (880)43k views2.1k ♥1 minUpdated 14 Apr
- Refining – The Magic Of Alchemy★ 5 (1.2k)41k views3.6k ♥5 minUpdated 24 Mar, 2022
- How to get RICH in NMS SUPER FAST★ 5 (501)32k views1k ♥2 minUpdated 7 Sep, 2022
- Multi-Tools: Types, Statistics, Weapons, Layouts★ 5 (550)27k views1.3k ♥7 minBulgarianUpdated 3 Jul, 2025
- Starship Guide: Types, Statistics & Roles★ 5 (461)25k views924 ♥8 minBulgarianUpdated 30 May
- Звездолеты СТРАЖЕЙ★ 5 (220)24k views519 ♥7 minRussianUpdated 9 Feb, 2025




- Upgrading to PremiumTeam Fortress 2★ 5 (20k)1441k views11k ♥6 minUpdated May 11, 2022
- No More Room in Hell Official ManualNo More Room in Hell★ 5 (2.8k)569k views2.1k ♥29 minUpdated Apr 22, 2019
- NMRiH Community Hosting GuidesNo More Room in Hell★ 5 (526)351k views653 ♥1 minUpdated Aug 10, 2022
- ULTIMATE GUIDE FOR GAME DEV TYCOONGame Dev Tycoon★ 5 (5.8k)326k views10k ♥4 minUpdated 23 Jan, 2014
- How to 'Git Gud' Soon™MORDHAU★ 5 (2k)318k views3k ♥68 minUpdated Nov 16, 2024
- Лучшие кооперативные игры SteamPAYDAY 2★ 5 (1.5k)315k views2.1k ♥56 minRussianUpdated Apr 27, 2025






This guide was created by its original author on the Steam Community. Are you the author and want it removed? Request removal.