Simple FPS/Stuttering Fix
TL;DR - Steps for increased stability/performance
- Locate TKGRAPHICSSETTINGS.MXML in the game's setting folder.
- Change NumHighThreads and NumLowThreads to 0.
- Make file Read-Only.
- Change game to run Borderless Windowed
- Open NMS settings folder
(usually C:\Program Files (x86)\Steam\steamapps\common\No Man's Sky\Binaries\SETTINGS, alternatively Right click NMS in your Steam Library, Select "Manage > Browse Local Files" and proceeding to "Binaries > Settings" manually) - Open TKGRAPHICSSETTINGS.MXML (Right click > "Open with" > Select "Notepad")
- Find the following lines, 12th and 13rd row from the bottom (you might have different numbers):
- <Property name="NumHighThreads" value="8" />
- <Property name="NumLowThreads" value="8" />
- Change both numbers of to 0
- Save and close the file
- Right click on TKGRAPHICSSETTINGS.MXML
- Select "Properties"
- Tick "Attributes: Read-only" at the bottom
- Click "OK"
- Launch NMS
- Go to "Options"
- Select "Display & Graphics"
- Change "Windowed" to "Borderless"
1. Prologue
The game has seen tremendous improvements in the years since its initial hardships, many revisit or pick it up for the first time bringing it a mini-renaissance, yet many might be baffled by the fact that this not-so-new game can still stutter and stumble on machines way beyond its stated system requirements from time to time.
My guide aims to help improve the performance by adjusting the game's graphics settings in a decisive manner to the detriment of some more technical information - since newer players might want a solution to try, instead of contemplating the general mechanics of modern game design. At the end I dig a bit into some of the data collection methods I used to test things for myself, which might be useful for people interested in analysing their game experience from a more data-driven perspective.
2. Graphics Settings
At the end of the guide I will give practical recommendations regarding quick and easy performance measurement methods.
First Let's go through briefly the Graphics Settings.
I am a big proponent of making things as pretty as possible while keeping things smooth.
Not every game is optimized to the highest degree and not every rig has the same bottlenecks.
One thing I would encourage everyone to accept is that even with older games, even with the newest desktop monsters, some games might have performance issues.
At that point it's up to you where will you compromise: Performance or Quality?
While the game does a great job at giving an idea what each setting might change, it might be worth noting the most prominent performance affecting options.
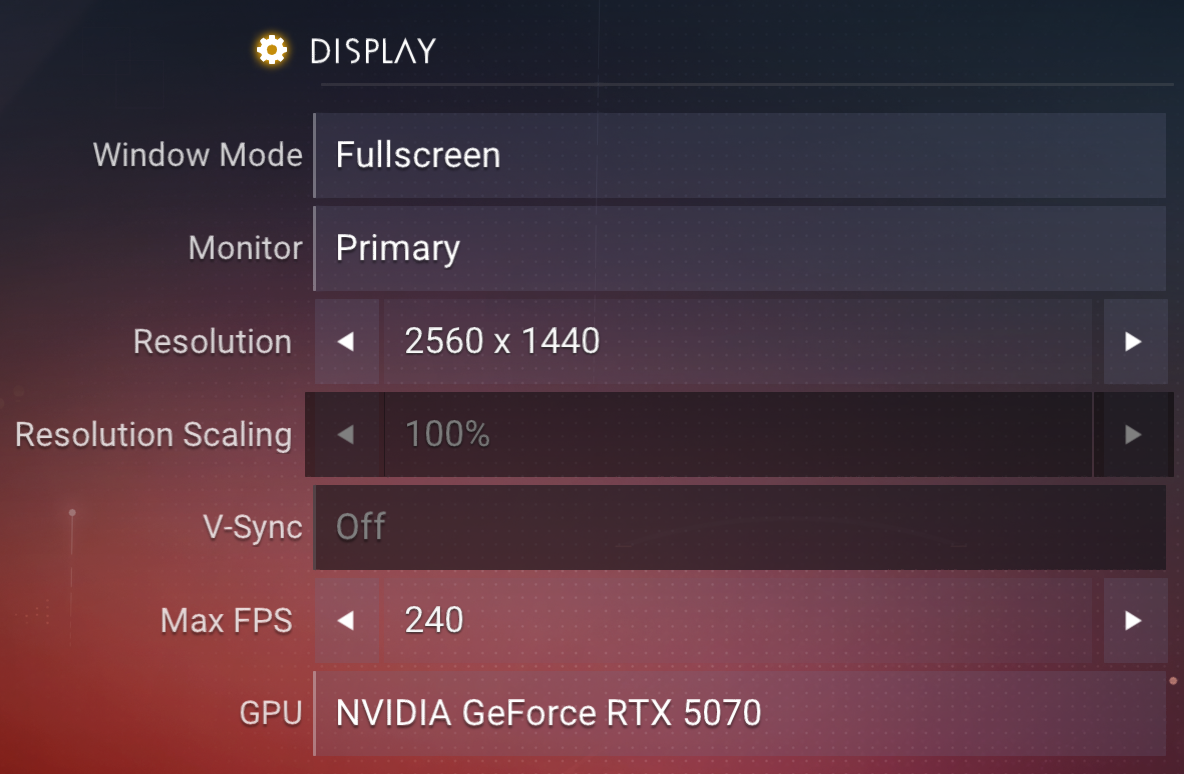
Window Mode: IF you want an easy and quick performance fix without meddling with game config files, this should be your first stop. Change it to Borderless Fullscreen if it's not there already and restart the game. See if it helped.
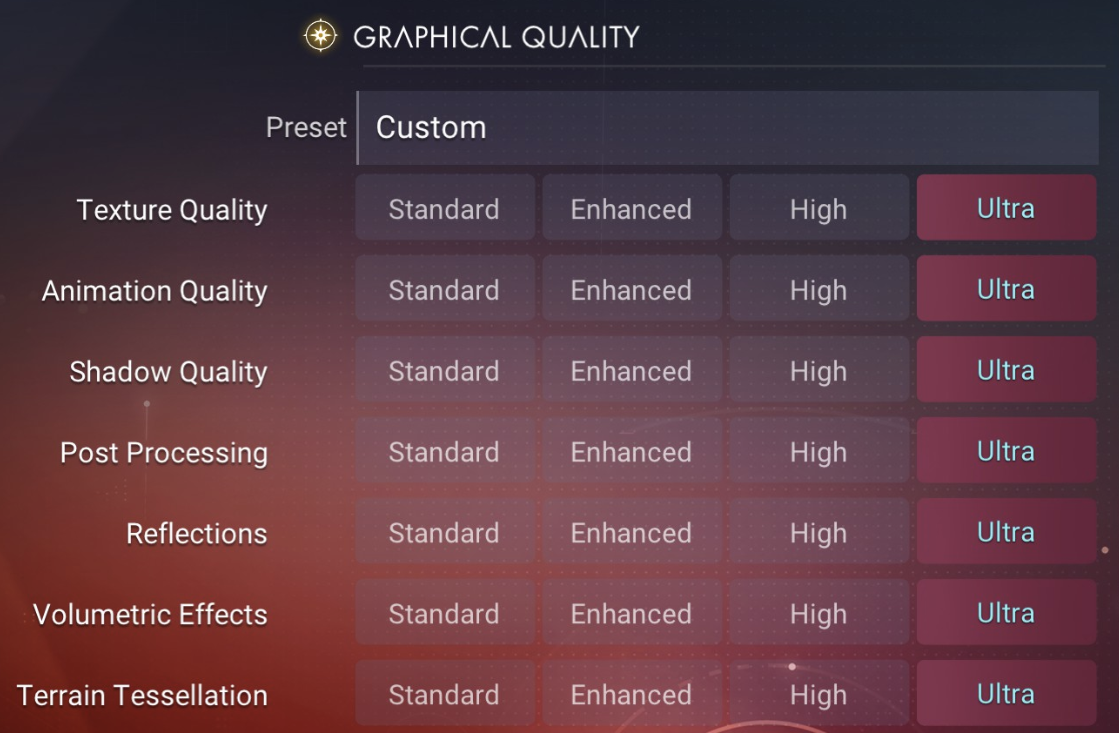
Texture Quality: The biggest VRAM killer. If you have the slightest of doubts that your VRAM might not be enough or you experience crashes every X hours, you should give lowering this to Medium or lower a try, then raising it level by level until the game runs both stable and as pretty as you'd like.
Animation Quality: This setting should be of concern to anyone suspected CPU or RAM bottleneck, although it is only of moderate effect in both cases. On the other hand, if you have no idea what to lower, it might be worth a shot since it affects multiple non-GPU systems. Worth to note, it's most beneficial for lag spikes, since general "stationary" rendering is not affected by Animation Quality for a lack of animation.
Shadow Quality: Top bang for bucks GPU and generic bottleneck option, low priority CPU performance hit. While shadows might be an important part of the visual experience, I usually don't notice much of a loss in modern games between Medium and High options. Since it's cognitively filtered out most of the time (how often one looks at shadows specifically?), I'd suggest lowering it to improve performance on GPU and unidentified bottlenecks.
Post Processing: Negligible gains and loss of cinematic imagery. On modern GPUs it should not affect performance in any major way.
Reflections: Low priority adjustment for GPU, VRAM and unidentified bottlenecks. Great bang for bucks when applicable.
Volumetric Effects: Second most impactful setting for GPU bottlenecks, moderately important for unidentified/generic bottlenecks and minimally affecting VRAM/RAM/CPU while not dumping visual experience.
Terrain Tessellation: Minimally impactful for GPU bottlenecks and slightly more so for RAM.
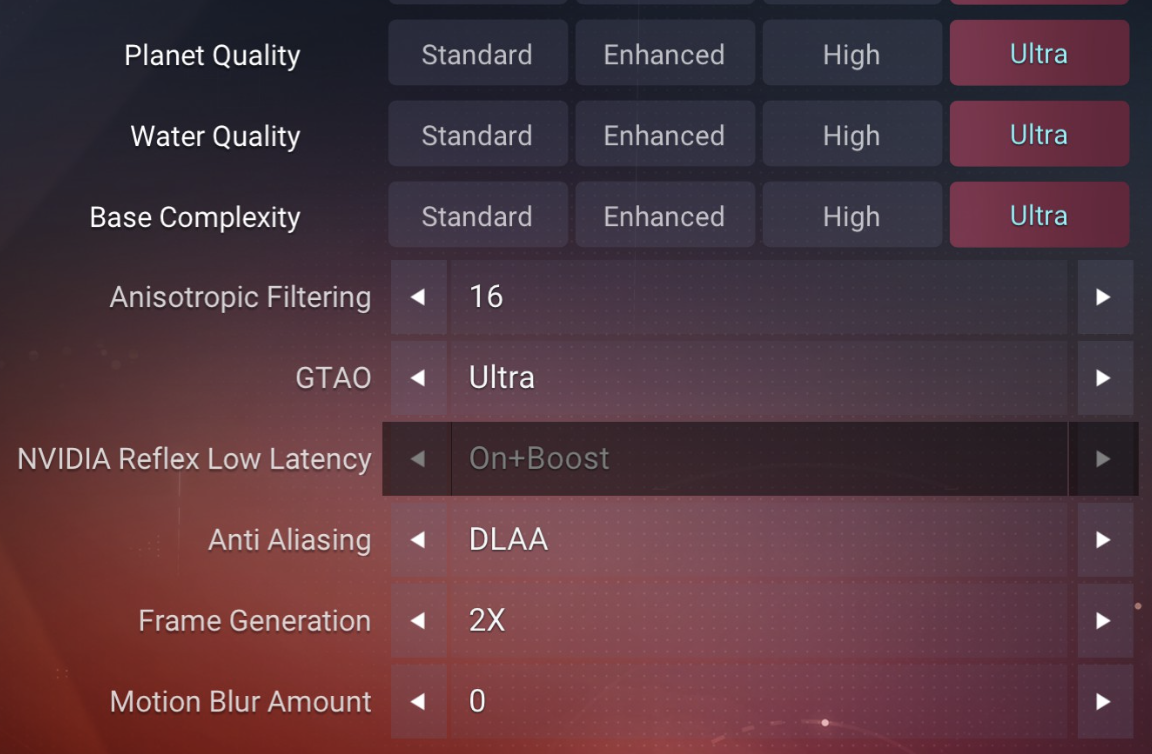
Planet Quality: Top CPU, RAM, VRAM and generic/unidentified bottleneck impact. Great way to apply Occam's razor to see if it's your GPU or something else (including VRAM). Since CPU and RAM might be helped with some out-of-game meddling with Windows performance setting, overclocking or page file adjustments, it is definitely worth a shot to lower slightly if you want want to lower system strain or don't want to lower other settings further.
Water Quality: Non-concern, unless you experience very localized lag spikes near bodies of water.
Base Complexity: Second most impactful for RAM and CPU performance. I would generally recommend touching it if Planet Quality had some impact already or in case of lag spikes or stutters near Bases.
Anisotropic Filtering: Non-concern on modern GPUs.
GTAO: As every Ambient Occlusion setting, it is a moderately GPU intensive process. I would lower it right after Shadow Quality and Volumetric Effects for GPU bottlenecks and maybe one level for general performance improvements. VRAM is ever so slightly affected by the setting.
Anti-Aliasing: Here comes the tricky part. Below are my general recommendations.Nvidia
- 10XX series: TAA with 30-40% sharpness in Nvidia Control Panel
- 16XX series: Intel XeSS
- 20XX/30XX series: DLSS Balanced/Performance for 1440p or 1080p Ultra or DLAA for 1080p
- 40XX series: DLSS Quality + Frame Gen for 4k or 1440p Ultra or DLAA for 1440p
- 50XX series: DLAA Quality + Frame Gen for 4k or 1440p Ultra or DLAA for 4k
Radeon
- RX 400/500 series & older: TAA with 40-50% Radeon Image Sharpening (RIS) via AMD Adrenalin
- RX 5000 series: Intel XeSS or FSR 2 Balanced
- RX 6000 series: FSR 2/3 Balanced/Quality for 1440p or 1080p Ultra, or FSR Native AA for 1080p
- RX 7000 series: FSR 3 Quality + AMD Fluid Motion Frames (AFMF) for 4K or 1440p Ultra, or FSR Native AA for 1440p
- RX 8000 and later series: FSR Native AA + AMD Fluid Motion Frames (AFMF) for 4K or 1440p Ultra, or FSR Native AA for 4K
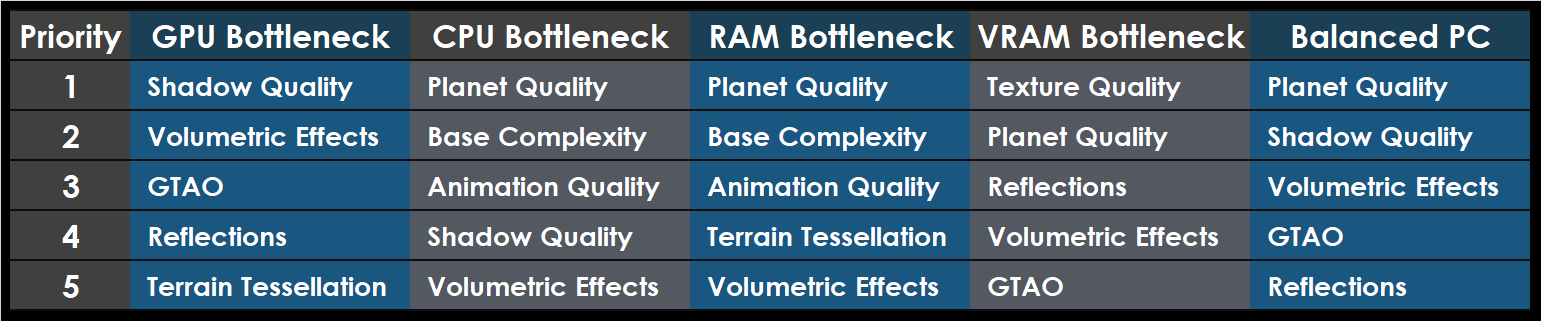
Motion Blur Set to personal preference, but I'd recommend 0. To simply summarize my recommendations please see the following table:
3. Configuring the Settings File
Since the game utilizes the CPU in major and unique ways, it stands to reason HelloGames had to implement some solutions to utilize the CPU the best they could. Since the times of great performance issues and stutters are gone, it seems they also implemented some community fixes to their own configurations, so they arrive in a more optimized fashion out of the box - yet there is still room for improvement.
There are two lines in the TKGRAPHICSSETTINGS.MXML file to be adjusted to your own system resources as follows:- Open NMS settings folder
(usually C:\Program Files (x86)\Steam\steamapps\common\No Man's Sky\Binaries\SETTINGS, alternatively Right click NMS in your Steam Library, Select "Manage > Browse Local Files" and proceeding to "Binaries > Settings" manually) - Open TKGRAPHICSSETTINGS.MXML (Right click > "Open with" > Select "Notepad")
- Find the following lines, 12th and 13rd row from the bottom (you might have different numbers):
- <Property name="NumHighThreads" value="8" />
- <Property name="NumLowThreads" value="8" />
- Change both numbers to 0
- Save and close the file
- Right click on TKGRAPHICSSETTINGS.MXML
- Select "Properties"
- Tick "Attributes: Read-only" at the bottom
- Click "OK"
- Launch the game and enjoy the stability of utilizing all your cores
To elaborate a bit on what it does (presumably, since there is no publicly shared documentation of the internal workings of the file):
High Threads (foreground/gameplay-critical work)
Things that directly affect the current frame:
Rendering preparation
Visible terrain generation
Entity simulation
Physics
Main streaming requests
Low Threads (background streaming/preparation work)
Things that can be done ahead of time:Terrain chunk generation
Flora/fauna placement
Texture streaming
Asset decompression
Prefetching nearby areas
This is simply my conclusion based on the testing I've done.
To clarify a few things, one must consider that it's not only FPS that counts, but the smoothness of the performance. For this reason, it is advised to measure some other metrics, detailed in Section 5. Frame Rate Data, Tooling & Methodology.
Standard/OotB 8 low 8 high - Worst performance
- Practically 4 cores left untouched for no reason
- 0 is possibly acting as "auto", dynamically adjusting core count of low in this case, when not utilized by "high"
- 12 high allowing for maximum utilization of core count
- With both process types having maximum access to all cores, the workload adjusted itself based on needs, with no further scheduling or assigning back and forth required between process types
- This test was the one that seemed to establish my assumptions about the function of High/Low Thread functions.
- I was certain from the get go that they didn't assume most people are running 16 core CPUs so addittive core distribution was out of the question.
- If this test produced better results than 8/8 and between 12/12 and 0/12, that would have meant that Low Threads reserve resources from High Threads, impacting performance negatively if both are set to max.
- Apparently the scheduler responsible for adjusting core allocations improved enough since launch to beat even a forced all-in thread handling approach. A surprise for sure, but a welcome one.
4. Camera & Accessibility Settings
Here I would like to raise awareness to some settings which I discovered only after a dozen hours yet they were massive Quality of Life improvements in visibility and longer sessions' playability.
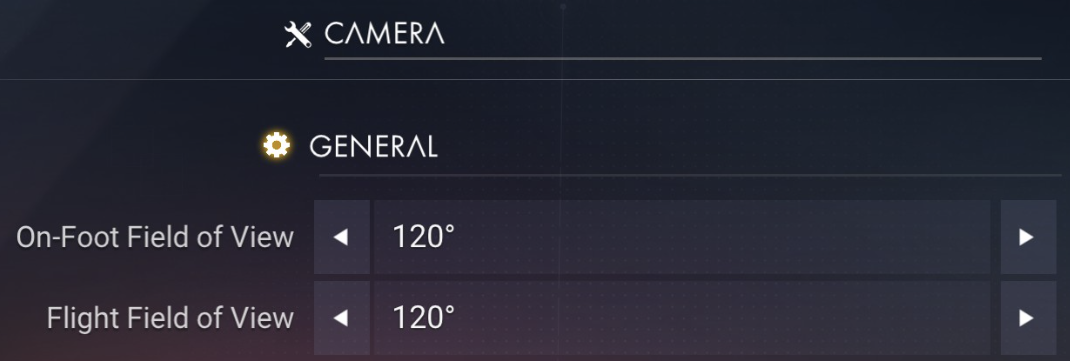
Camera Options' FoV (Field of View) - a must have for 1440p, above, and curved screens)
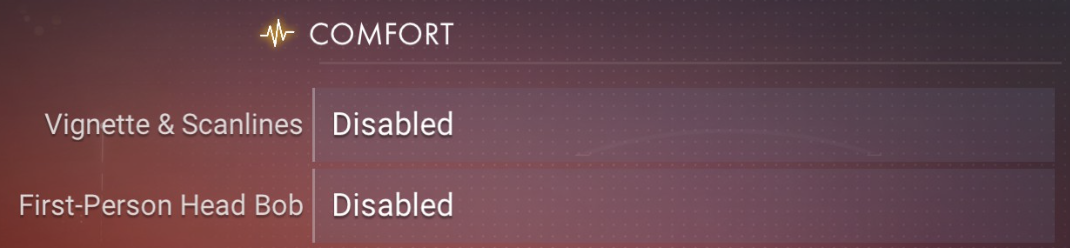
and Comfort - to remove headbob, vignette and scanline effects.
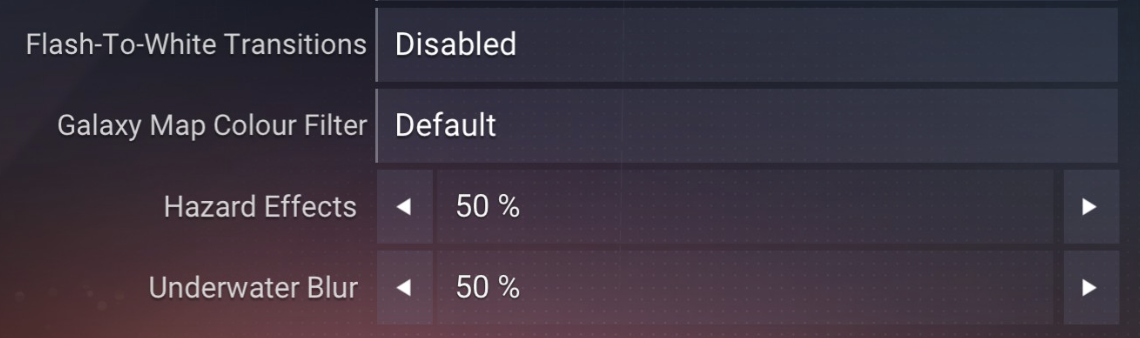
Last but not least are Flash-To-White Transitions (disabling making them black full screen instead of white, to not flashbang yourself in the face in the middle of the night), Hazard Effects and Underwater Blur (which both improve general visibility; mind you neither will increase actual sight range, just get rid of some of the environmental effect covering the screen).
5. Frame Rate Data, Tooling & Methodology
There are multiple methods to measure the impact of any changes you make to the game's settings. I will go from least effort to most effort, the quality of data is inversely proportional to said effort, yet its usefulness is not - often the first and least effort method is the most useful to measure actual impact to the gameplay experience. Don't forget, each method should be used at least twice to produce reasonable result, once for baseline, once to see if specific settings affect performance adversely or beneficially.
- Change the settings
- Play the game
- See how it feels
It is better if it feels better, simple as that.
- Change the settings
- Do a variety of activities
- See how it feels
Once you feel like there are no major hiccups, it should be good to go.
- Change the settings
- Do specific activities for at least 10 minutes each: Run in a straight line, Fight Sentinels, Fly close to planet surface, Fly through asteroid belt, Enter/Exit/Run around on Stations, Jump between your bases
- See how it feels
My recommended tool for the job is CapFrameX, available in Portable version as well:
Download CapeframeX (Portable)[www.capframex.com] and install .NET 9.0 Desktop Runtime (x64) and/or Visual C++ 2015-2022 Redistributable (x64) depending on whether you already have them and want the portable version or the regular one. Terms used by the tool for results:
- P95 - FPS cut-off value at top 5% of the performance / Lowest FPS measured at highest 5% range of FPS
- Average - Regular Average: Sum of FPS values divided by quantity of FPS values
- Median- Can be turned on by clicking on "Statistic parameter settings" under the Analysis tab. Singular middle FPS value of all FPS values measured.
- P5- FPS cut-off value at bottom 5% of the performance / Highest FPS measured at lowest 5% range of FPS
- 1% Low Average - Average of lowest 1% range of performance / How annoying will the gameplay be at 1/100 of the time.
- 1% Low Integral - Can be turned on by clicking on "Statistic parameter settings" under the Analysis tab, only including here for edge cases. I'm too smooth brain to explicitly explain, but it's practically a data point showing how much the lag spikes would have hurt your experience if you didn't just benchmark.
- Launch CapFrameX
- Set Capture time [s] to 180 aka 3 minutes
- Launch NMS
- I would advise flying over a lush planet at low altitude with autopilot as a test scenario, standing at the exit hatch is even better (ramp style ones open halfway only on autopilot conveniently)
- Press F11 to start test and don't touch it for 3 minutes
- Check results under Analysis tab
- Launch CapFrameX
- Set Capture time [s] to 300 aka 5 minutes
- Launch NMS
- I would advise flying over a lush planet at low altitude with autopilot as a test scenario, standing at the exit hatch is even better (ramp style ones open halfway only on autopilot conveniently)
- Press F11 to start test and don't touch it for 5 minutes
- Check results under Analysis tab
- Launch CapFrameX
- Set Capture time [s] to 300 aka 5 minutes
- Launch NMS
- I would advise flying over a lush planet at low altitude with autopilot as a test scenario, standing at the exit hatch is even better (ramp style ones open halfway only on autopilot conveniently)
- Press F11 to start test and don't touch it for 5 minutes
- Repeat test 2 more times
- Check results one by one under Analysis tab
- Proceed to Aggregation tab and drag & drop the three captures and select metrics to be compared to taste - hell, go through all of them if you want, you are doing this for 30 minutes at least by now
- Launch CapFrameX
- Set Capture time [s] to 3600 aka 1 hour
- Launch NMS
- Play the game
- Repeat test 2 more times
- Adjusting the settings and repeating it once more, then publish the analysis
- Wait your letter from HelloGames/Nvidia/AMD with a job offer or possibly the police for a welfare check
- Contemplate why is there a note from your wife on the kitchen counter and why is her wardrobe unusually empty...
- It's the middle of the night, you can't call any lawyers right now anyway... Adjust settings and proceed with the next 3 hours of testing - after all, you already have a baseline, let's make the most of it!
6. Epilogue
Thank you for reading this short guide. Any feedback is welcome, but unless the guide proves to be unexpectedly useful or gains popularity with time, I don't plan to update or refine it much further. Might go for a ride for a few 10 minute benchmarks at 0/0, 0/12, 12/12 thread settings for my own peace of mind, but that's to be seen.
If you would like to add your tips or info, I'm happy to include it as long as it is performance related and something I can confirm via testing or AMD/Radeon GPU related (which I can't test and have no experience with since the 500 series).
I mostly wrote this guide to reflect on my newfound bits and bobbles of technical info I learned about the game since I started playing recently for the very first time (I didn't even explore further yet than 1000LY from the first planet - mind you I struggled to move along the story to even get to the Space Anomaly at the 30 hour mark).
There might be a better and more detailed guide already which I missed, but maybe one of my takes, maybe one of the snippets of information through the eyes of a new Traveller will help someone to a smoother ride.
- No Man's Sky Access Codes★ 5 (880)43k views2.1k ♥1 minUpdated 14 Apr
- Refining – The Magic Of Alchemy★ 5 (1.2k)41k views3.6k ♥5 minUpdated 24 Mar, 2022
- How to get RICH in NMS SUPER FAST★ 5 (501)32k views1k ♥2 minUpdated 7 Sep, 2022
- Multi-Tools: Types, Statistics, Weapons, Layouts★ 5 (550)27k views1.3k ♥7 minBulgarianUpdated 3 Jul, 2025
- Starship Guide: Types, Statistics & Roles★ 5 (461)25k views924 ♥8 minBulgarianUpdated 30 May
- Звездолеты СТРАЖЕЙ★ 5 (220)24k views519 ♥7 minRussianUpdated 9 Feb, 2025




- Upgrading to PremiumTeam Fortress 2★ 5 (20k)1441k views11k ♥6 minUpdated May 11, 2022
- No More Room in Hell Official ManualNo More Room in Hell★ 5 (2.8k)569k views2.1k ♥29 minUpdated Apr 22, 2019
- NMRiH Community Hosting GuidesNo More Room in Hell★ 5 (526)351k views653 ♥1 minUpdated Aug 10, 2022
- ULTIMATE GUIDE FOR GAME DEV TYCOONGame Dev Tycoon★ 5 (5.8k)326k views10k ♥4 minUpdated 23 Jan, 2014
- How to 'Git Gud' Soon™MORDHAU★ 5 (2k)318k views3k ♥68 minUpdated Nov 16, 2024
- Лучшие кооперативные игры SteamPAYDAY 2★ 5 (1.5k)315k views2.1k ♥56 minRussianUpdated Apr 27, 2025






This guide was created by its original author on the Steam Community. Are you the author and want it removed? Request removal.