Origins Staff Guide
Intro
Hello and welcome to my guide, I hope it dosnt confuse you and lets you build the staffs without over complicating things. Enjoy :) I also did der eisendrache

How to get the gramophone and disc for staffs
To find the black disk you will need to look in these 3 locations 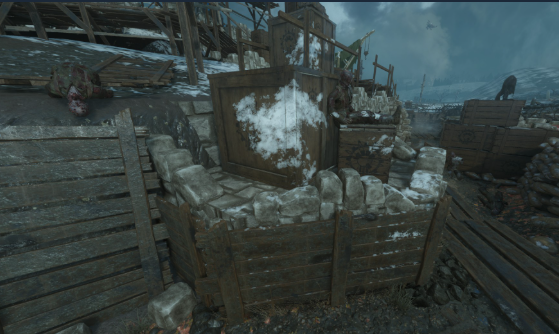
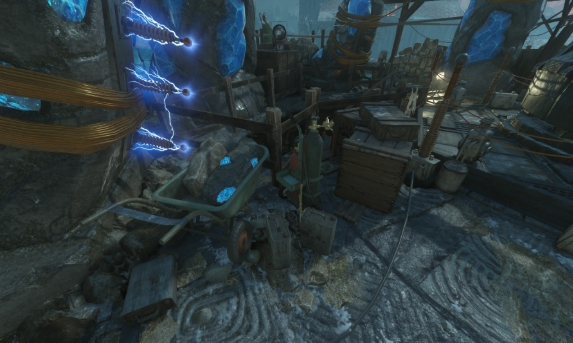
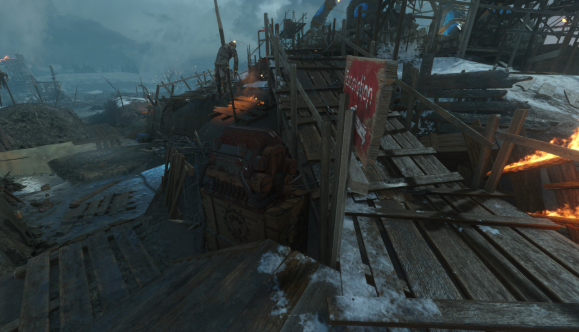
After looking in these 3 locations you will find it and need to go down the stairs into the basement and to the left of a table there will be a gramophone and you can pick it up and place it on the table to unlock the full basement
After looking in these 3 locations you will find it and need to go down the stairs into the basement and to the left of a table there will be a gramophone and you can pick it up and place it on the table to unlock the full basement
Fire Staff
1. To get the fire staff first you must get the disc. It can spawn in 3 spots inside the church
1A. first is to the left of the stairs between the tank and the stairs.
1B. The next spot is upstairs in the church on the left side on a bench
1C. the third spot is on the boxes on the entrance to gen 6
2. Now you need to go to the crazy place through the tunnel closest to gen 3 named fire. Go into the crazy place and go to the pedestal with the red base and grab the gem.
3. Next is the 3 parts of the staff. the first one can be obtained by just killing the panzer on round 8
3A. The second part can be obtained by completing gen 6. It will be inside the locked red chest.
3B. After opening the door to the church a plane will spawn and it will be glowing orange/red. Shoot it with any gun that shoots bullets. The piece will land in between gen 4 and where PAP is, on the path.
4. After collecting all 3 pieces and the gem you can craft it in the bottom of the PAP area.
5. Now to upgrade the staff you must return to the crazy place to collect souls via kills from the fire staff. You must go to the fire staff area in the crazy place and you will notice next to the fire metal floor area there are 4 stone cauldron that need to be feed with souls. You must stay on the metal area when getting these kills and must use the fire staff. The cauldrons will ignite and be on fire when full. After Filling all 4 of these you will hear a noise and the girl will talk to you.
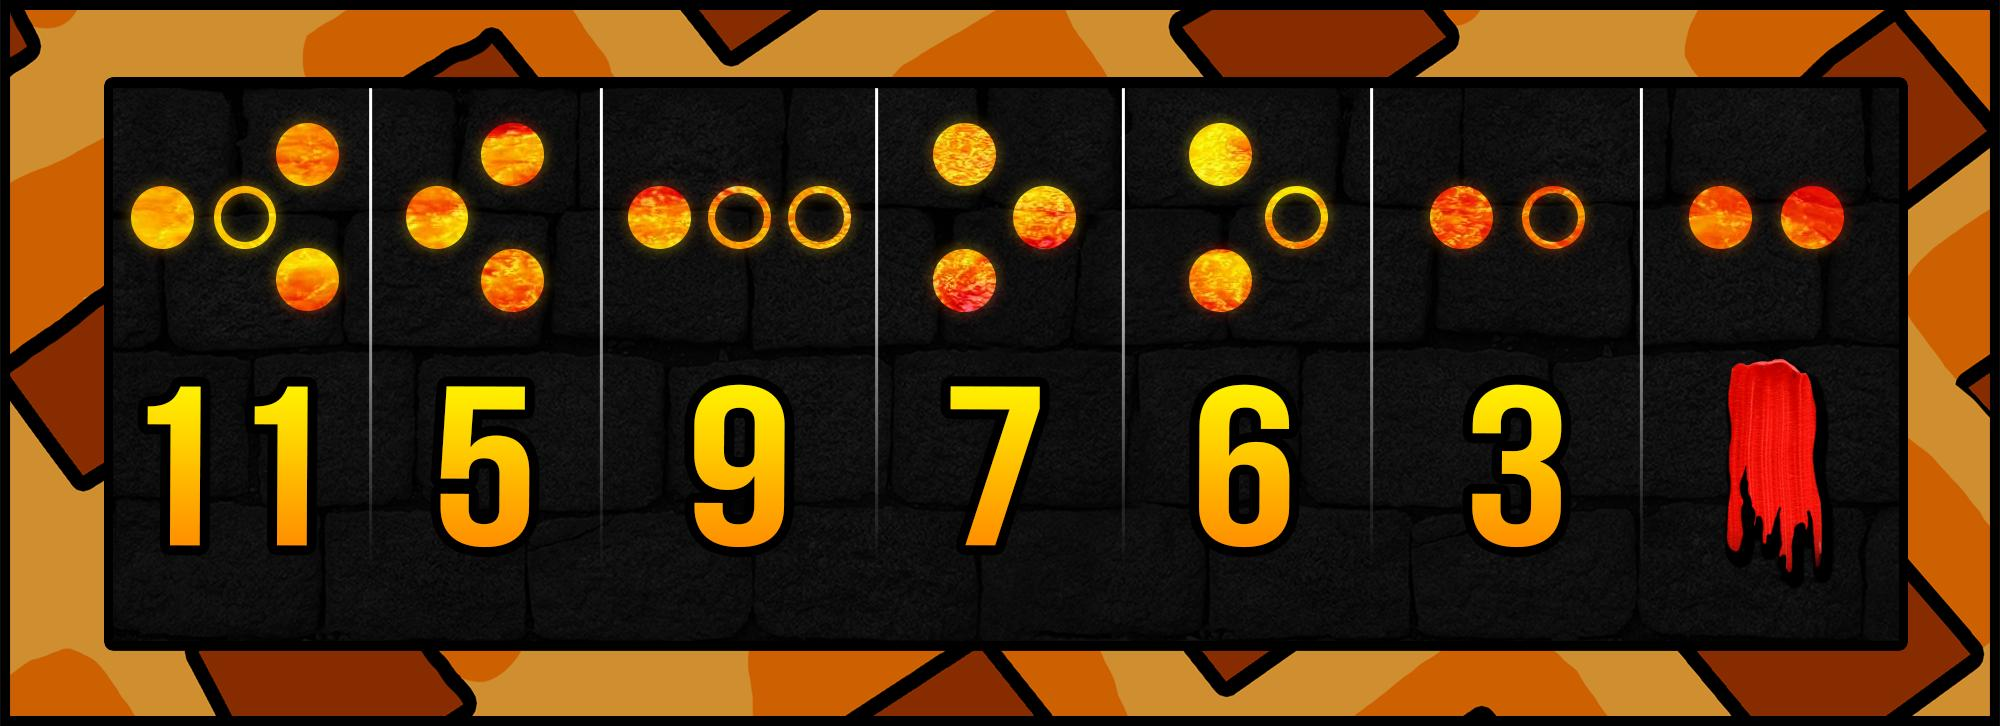
6. This last step is in the church, you must go upstairs and take note of the 4 symbols that are on fire and on the wall these 4 are random except one (the 2 full dots which is the blood stain torch downstairs). you then must go downstairs and use this cheat sheet to know what torches to shoot. You must shoot the torch with the number that correlates to the symbol upstairs. You must shoot all 4 torches in any order in a short amount of time to complete this step. You will know you completed it when they stay on fire and you hear a noise.
7. The last step is the same for every staff so go to "Last Step for every staff" using the Guide Index on the right side of this guide
1A. first is to the left of the stairs between the tank and the stairs.
1B. The next spot is upstairs in the church on the left side on a bench
1C. the third spot is on the boxes on the entrance to gen 6
2. Now you need to go to the crazy place through the tunnel closest to gen 3 named fire. Go into the crazy place and go to the pedestal with the red base and grab the gem.
3. Next is the 3 parts of the staff. the first one can be obtained by just killing the panzer on round 8
3A. The second part can be obtained by completing gen 6. It will be inside the locked red chest.
3B. After opening the door to the church a plane will spawn and it will be glowing orange/red. Shoot it with any gun that shoots bullets. The piece will land in between gen 4 and where PAP is, on the path.
4. After collecting all 3 pieces and the gem you can craft it in the bottom of the PAP area.
5. Now to upgrade the staff you must return to the crazy place to collect souls via kills from the fire staff. You must go to the fire staff area in the crazy place and you will notice next to the fire metal floor area there are 4 stone cauldron that need to be feed with souls. You must stay on the metal area when getting these kills and must use the fire staff. The cauldrons will ignite and be on fire when full. After Filling all 4 of these you will hear a noise and the girl will talk to you.
6. This last step is in the church, you must go upstairs and take note of the 4 symbols that are on fire and on the wall these 4 are random except one (the 2 full dots which is the blood stain torch downstairs). you then must go downstairs and use this cheat sheet to know what torches to shoot. You must shoot the torch with the number that correlates to the symbol upstairs. You must shoot all 4 torches in any order in a short amount of time to complete this step. You will know you completed it when they stay on fire and you hear a noise.
7. The last step is the same for every staff so go to "Last Step for every staff" using the Guide Index on the right side of this guide
Lightning staff
1. first you will need the disc which can be found in one of three spots
1A. one of the spots it can be is in a cart that's in the mud in between gen 4 and PAP
1B. one of the spots is on the table in between jugg and wonderfizz on gen 4
1C.one of the spots is down the wind tunnel by gen 4 to the right of where the portal is.
2. You will need to ride the tank found in the church to 3 locations.
2A. for the first ride, off to the right you will see a platform right before the trench to gen 2. You will need to jump on that platform, and follow the path to the staff part.
2B. After getting the part the tank will be parked in the mud past the building by gen 2, go through the building then into the mud to find the tank, this next step is best with 2 people otherwise you will have to do it twice. After activating the tank again and riding it you will notice a wooden platform extend over the tanks path off to your left right where PAP is, you will need to jump off and make sure to jump earlier than later so you can use the railing to support your landing. Once you do this you must follow the path and collect your second piece of the staff.
2C. For the third part of the staff you will have to ride the tank all around or if you have a second person once you are approaching the church after your first 2 staff parts you will notice a dirt path to the right of the church and tank, just jump off to it and follow it to get your last piece.
3. Now go to the crazy place through the lightning tunnel by gen 5 and go to the purple pedestal and grab the gem inside
4. then craft your lightning staff in the basement of PAP
5. To upgrade your staff you must return to the crazy place and go to the lightning area, you will see a bunch of purple spikes/triangles.
5A. You must shoot THE BOTTOM ROW in the correct order provided below 136 so you will shoot the 1st bottom triangle, then the 3rd bottom, then lastly the 6th.
5B. Wait a couple seconds now wait for the shock to go away then input this code on the bottom row again 357 then wait a couple seconds again.
5C. After waiting a couple seconds you will shoot the bottom row of triangles again in the order of 246
6. There are 7 metal panals you must interact with to turn the nob to the right position.
6A. inside of gen 5 in the corner it needs to be Down
6B. Head to the church and on the stone wall to the left of the entrance to the church coming from gen 5 there will be one and it needs to be Up
6C. head to the church and in the basement behind the tank it needs to be to the Right
6D. Go upstairs and by the barrier there will be on and it must be Up
6E. Go to Gen 4 and to the right of the wind tunnel entrance there is one and it must be Up
6F. Go to gen 2 and in the building back where it goes to mud next to the doorway there is one and it must be Down
6G. Lastly in the spawn building down the stairs that lead to where you started the game there is one and it must be Left
7. The last step is the same for every staff so go to "Last Step for every staff" using the Guide Index on the right side of this guide
1A. one of the spots it can be is in a cart that's in the mud in between gen 4 and PAP
1B. one of the spots is on the table in between jugg and wonderfizz on gen 4
1C.one of the spots is down the wind tunnel by gen 4 to the right of where the portal is.
2. You will need to ride the tank found in the church to 3 locations.
2A. for the first ride, off to the right you will see a platform right before the trench to gen 2. You will need to jump on that platform, and follow the path to the staff part.
2B. After getting the part the tank will be parked in the mud past the building by gen 2, go through the building then into the mud to find the tank, this next step is best with 2 people otherwise you will have to do it twice. After activating the tank again and riding it you will notice a wooden platform extend over the tanks path off to your left right where PAP is, you will need to jump off and make sure to jump earlier than later so you can use the railing to support your landing. Once you do this you must follow the path and collect your second piece of the staff.
2C. For the third part of the staff you will have to ride the tank all around or if you have a second person once you are approaching the church after your first 2 staff parts you will notice a dirt path to the right of the church and tank, just jump off to it and follow it to get your last piece.
3. Now go to the crazy place through the lightning tunnel by gen 5 and go to the purple pedestal and grab the gem inside
4. then craft your lightning staff in the basement of PAP
5. To upgrade your staff you must return to the crazy place and go to the lightning area, you will see a bunch of purple spikes/triangles.
5A. You must shoot THE BOTTOM ROW in the correct order provided below 136 so you will shoot the 1st bottom triangle, then the 3rd bottom, then lastly the 6th.
5B. Wait a couple seconds now wait for the shock to go away then input this code on the bottom row again 357 then wait a couple seconds again.
5C. After waiting a couple seconds you will shoot the bottom row of triangles again in the order of 246
6. There are 7 metal panals you must interact with to turn the nob to the right position.
6A. inside of gen 5 in the corner it needs to be Down
6B. Head to the church and on the stone wall to the left of the entrance to the church coming from gen 5 there will be one and it needs to be Up
6C. head to the church and in the basement behind the tank it needs to be to the Right
6D. Go upstairs and by the barrier there will be on and it must be Up
6E. Go to Gen 4 and to the right of the wind tunnel entrance there is one and it must be Up
6F. Go to gen 2 and in the building back where it goes to mud next to the doorway there is one and it must be Down
6G. Lastly in the spawn building down the stairs that lead to where you started the game there is one and it must be Left
7. The last step is the same for every staff so go to "Last Step for every staff" using the Guide Index on the right side of this guide
Ice Staff
1. To get the Ice disc you must go to gen 2 and it can spawn in 3 spots in the building next to gen 2
1A. It can spawn on the desk with a chair right when you walk in
1B. It can spawn to the right of the box spot on that shelf.
1C. It can spawn on the shelf that is in the back towards the door to the tanks path
This requires a shovel so either you or a friend will have to do the next 3 steps
2. Now wait for the weather to change to snow and it'll snow between rounds 3-5 and then every 4 ish rounds later. I reccoment not digging unless it is a snow round. Now you need to use the shovel on dig spots in 3 areas. It might take you multiple snow rounds.
2A. First area is near where you found the disk around gen 1-3
2B. Second area is in between gens 4-5 and near pack a punch.
2C. Third area is near the church aka gen 6
3. Go to the crazy place through the tunnel that is outside of gen 6 and pickup the stone/gem located in the blue pedastile
4. Craft your Ice staff in the bottom of the pack a punch area in the middle of the map
5. To upgrade the staff you must return to the crazy place and outside of the ice exit area there should be some floating rocks, but there should be a solid blue rock with a symbol on a wall nearby. You need to correlate the rock on the wall to a rock in the air and shoot the rock that goes with it. I will insert the cheat sheet for the rocks here: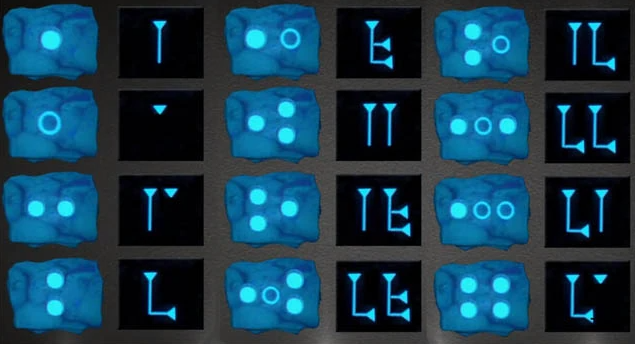
5A. you will need to do this 6 times without messing up. You will know you done it right when they all stay hidden, it makes a noise, and the girl talks to you
6. Now you will need to shoot 3 tombstones around the map. First shoot them with the ice staff then some other gun to freeze it over.
6A. First location of the tombstone is in the middle of the map near gen 4 where the robot stomps with HIS right foot, it is outside the map towards PAP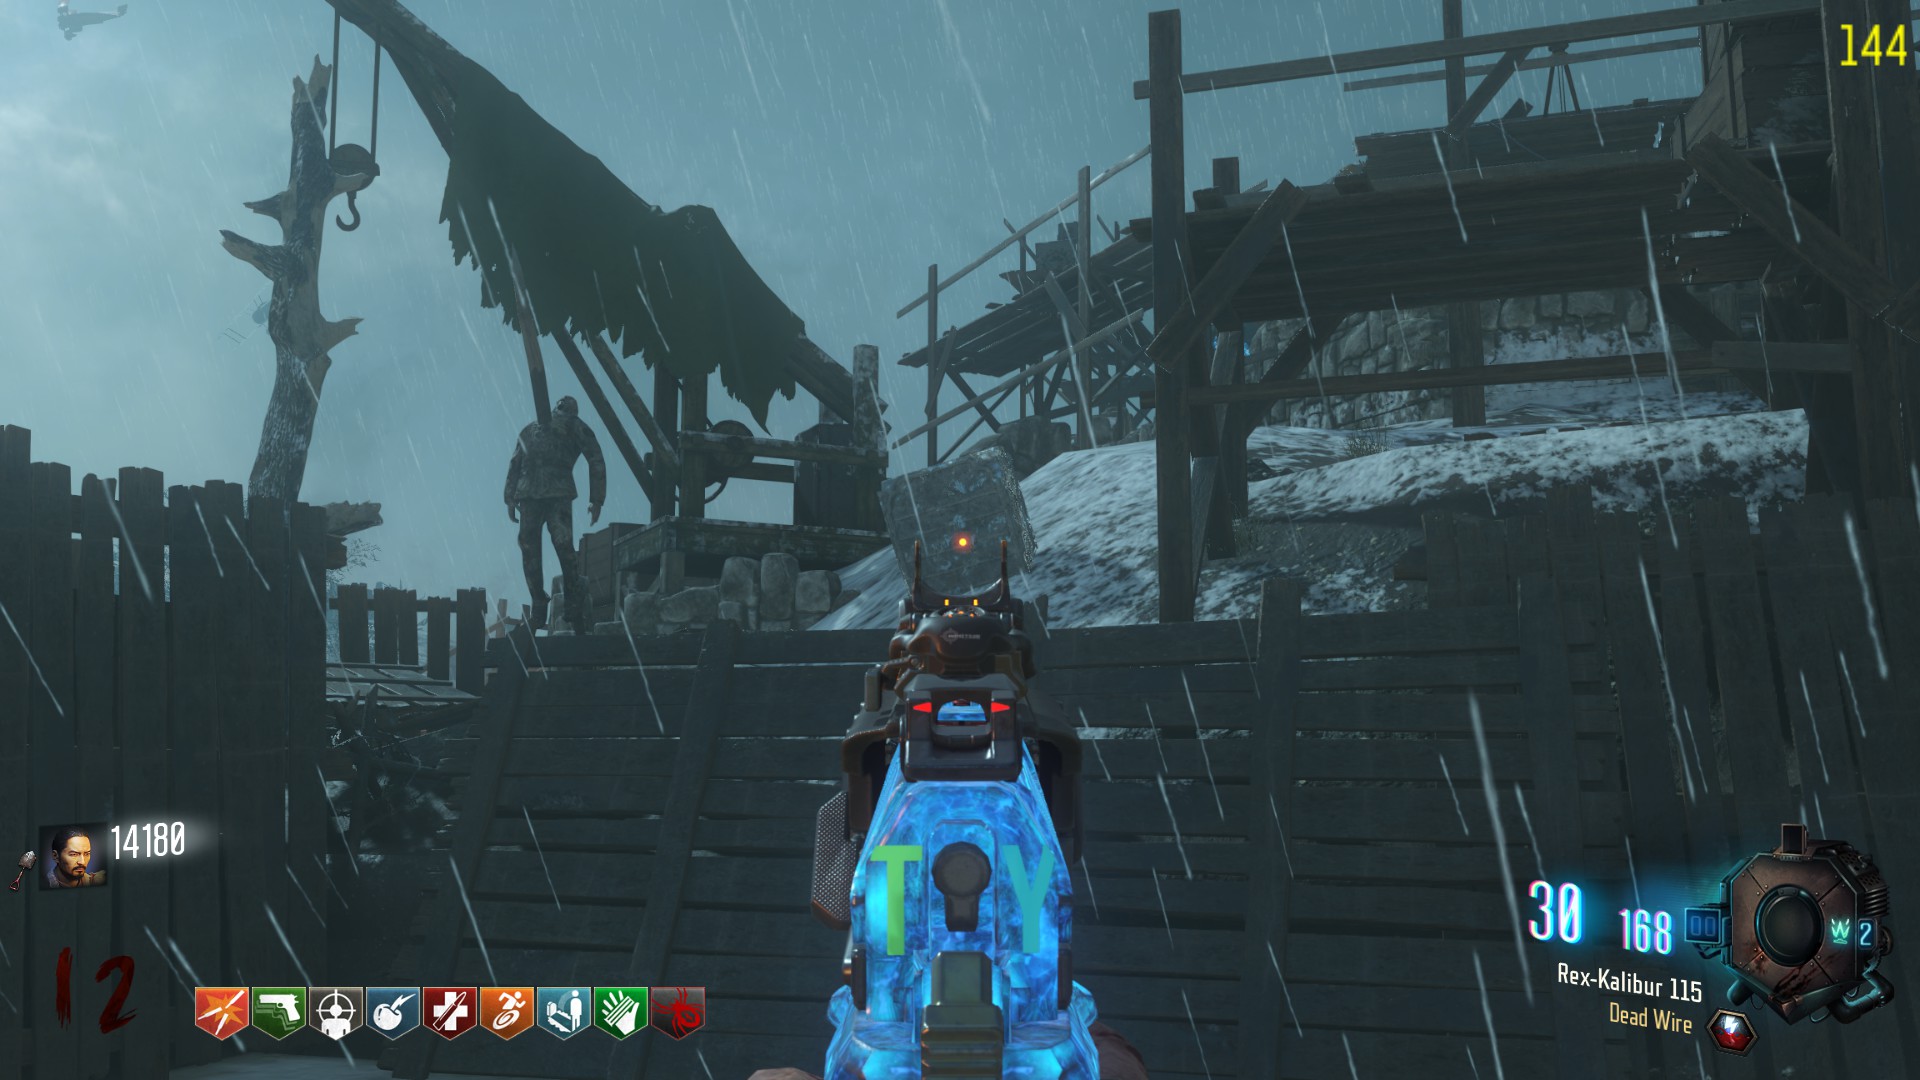
6B. Second Location is following where the robot would step next with his right foot again to the side of gen4 not the tunnel side but the other side it is easy to spot to the right of the KN-44
6C. The last tombstone is all the way by gen 2, You can take the tanks path to get here and once you go past the building where you got your disc you must go out to the mud and turn left. Up the hill you will find the last Tombstone
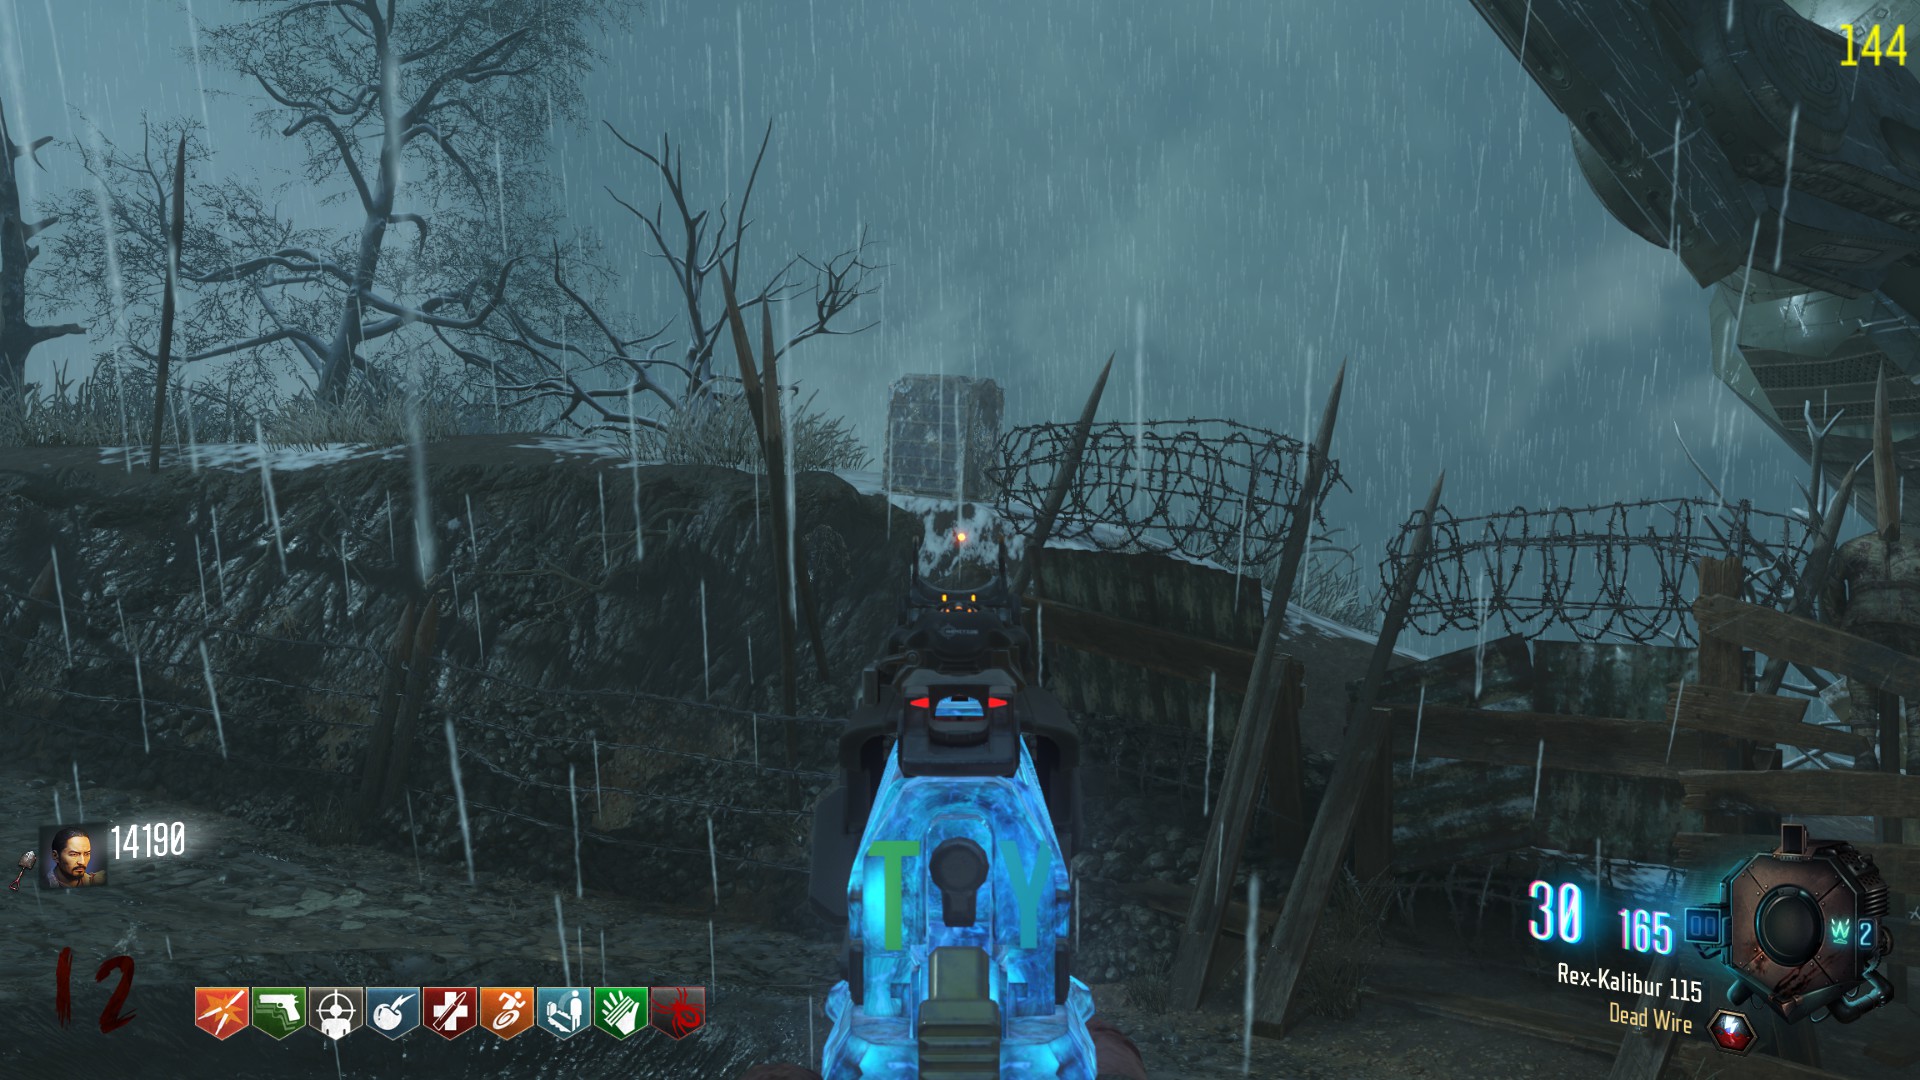
7. The last step is the same for every staff so go to "Last Step for every staff" using the Guide Index on the right side of this guide
1A. It can spawn on the desk with a chair right when you walk in
1B. It can spawn to the right of the box spot on that shelf.
1C. It can spawn on the shelf that is in the back towards the door to the tanks path
This requires a shovel so either you or a friend will have to do the next 3 steps
2. Now wait for the weather to change to snow and it'll snow between rounds 3-5 and then every 4 ish rounds later. I reccoment not digging unless it is a snow round. Now you need to use the shovel on dig spots in 3 areas. It might take you multiple snow rounds.
2A. First area is near where you found the disk around gen 1-3
2B. Second area is in between gens 4-5 and near pack a punch.
2C. Third area is near the church aka gen 6
3. Go to the crazy place through the tunnel that is outside of gen 6 and pickup the stone/gem located in the blue pedastile
4. Craft your Ice staff in the bottom of the pack a punch area in the middle of the map
5. To upgrade the staff you must return to the crazy place and outside of the ice exit area there should be some floating rocks, but there should be a solid blue rock with a symbol on a wall nearby. You need to correlate the rock on the wall to a rock in the air and shoot the rock that goes with it. I will insert the cheat sheet for the rocks here:
5A. you will need to do this 6 times without messing up. You will know you done it right when they all stay hidden, it makes a noise, and the girl talks to you
6. Now you will need to shoot 3 tombstones around the map. First shoot them with the ice staff then some other gun to freeze it over.
6A. First location of the tombstone is in the middle of the map near gen 4 where the robot stomps with HIS right foot, it is outside the map towards PAP
6B. Second Location is following where the robot would step next with his right foot again to the side of gen4 not the tunnel side but the other side it is easy to spot to the right of the KN-44
6C. The last tombstone is all the way by gen 2, You can take the tanks path to get here and once you go past the building where you got your disc you must go out to the mud and turn left. Up the hill you will find the last Tombstone
7. The last step is the same for every staff so go to "Last Step for every staff" using the Guide Index on the right side of this guide
Wind Staff
1. We will need to find the disc for the wind staff now it can spawn in 3 spots by gen 5
1a. inside the lightning tunnel on a desk to the left right when you enter
1b. On the wooden boxes in between gen 5 and the lightning tunnel.
1c. to the right of Stamina Up on the wall
2. Now you can go to the tunnel near gen 4 and go to the crazy place and go to the pedestal with the yellow base and grab the gem.
3. to get the staff pieces you must shoot the yellow ring at the bottom of the robots foot, i think it can be either foot but one of the feet will have a yellow ring on the bottom of it and you must shoot it to open it up and let it step on you. doing this you will be inside the robot and can grab one of the pieces. you must do this for the 3 robots
3A. one robot walks through gens 1-3
3B. one robot walks through gens 4-5
3C. one robot walks only near gen 6
4. Now craft your wind staff in the bottom of the PAP area.
5. To Upgrade your staff you must return to the crazy place and head to the lightning area, on the ceiling you will see a bunch of symbols and facing the teleporter back to the normal area you must shoot the 4 rings into the correct pattern. I will provide an image of what symbols need to be in what order but you shoot each ring to make it spin until the right symbols are facing towards you.
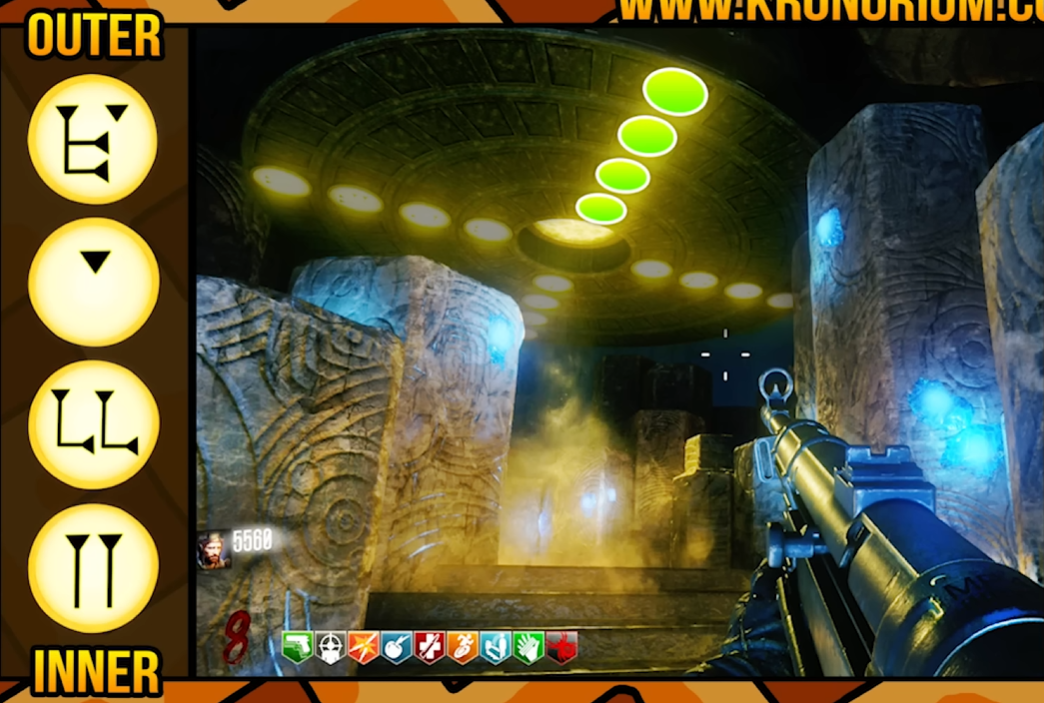
6. You will need to redirect smoke coming out of a chimney/ball towards PAP. there are 3 chimneys and you must be line it up so its like your shooting through the chimney and trying to hit PAP
6A.at gen 4 you will see smoke across of the wonderfizz
6B.. Go to the church and run in the basement follow the tanks path but backwards. you should see the smoke coming from the right side so shoot it towards PAP
6C. at gen 5 to the left of stamina up there is a hole in the wall and you will see the chimney there
7. The last step is the same for every staff so go to "Last Step for every staff" using the Guide Index on the right side of this guide
1a. inside the lightning tunnel on a desk to the left right when you enter
1b. On the wooden boxes in between gen 5 and the lightning tunnel.
1c. to the right of Stamina Up on the wall
2. Now you can go to the tunnel near gen 4 and go to the crazy place and go to the pedestal with the yellow base and grab the gem.
3. to get the staff pieces you must shoot the yellow ring at the bottom of the robots foot, i think it can be either foot but one of the feet will have a yellow ring on the bottom of it and you must shoot it to open it up and let it step on you. doing this you will be inside the robot and can grab one of the pieces. you must do this for the 3 robots
3A. one robot walks through gens 1-3
3B. one robot walks through gens 4-5
3C. one robot walks only near gen 6
4. Now craft your wind staff in the bottom of the PAP area.
5. To Upgrade your staff you must return to the crazy place and head to the lightning area, on the ceiling you will see a bunch of symbols and facing the teleporter back to the normal area you must shoot the 4 rings into the correct pattern. I will provide an image of what symbols need to be in what order but you shoot each ring to make it spin until the right symbols are facing towards you.
6. You will need to redirect smoke coming out of a chimney/ball towards PAP. there are 3 chimneys and you must be line it up so its like your shooting through the chimney and trying to hit PAP
6A.at gen 4 you will see smoke across of the wonderfizz
6B.. Go to the church and run in the basement follow the tanks path but backwards. you should see the smoke coming from the right side so shoot it towards PAP
6C. at gen 5 to the left of stamina up there is a hole in the wall and you will see the chimney there
7. The last step is the same for every staff so go to "Last Step for every staff" using the Guide Index on the right side of this guide
Last Step for every staff
You must go back into the middle where PAP is and go downstairs, there is levers around the area and you must turn them so the wheel will spin and match the color of your staff, once you have done this for all 4 wheels you must go to the bottom and shoot the glowing ball (the color of your staff) with your staff. Then go to the crazy place, put your staff where you found the gem and collect souls for it to upgrade it.
Bonus :) Shield Locations
This is from @FreeMetal
The shield is separated into three parts.
The first one can be located
-In the room on the right between the Spawn and generator 2
-On top of the tank station near generator 2 On a dead body
-At the end of the trench past generator 2
The second one might be
-Next to the Fire portal at your left when coming from the spawning area
-In a small room on your right coming from the spawn towards generator 3
-Near a dead body, bellow generator 3, before the workshop bunker's entrance
The third piece is located
-In the robot's footstep, between generator 5 and the excavation site, church side.
-In the robot's footstep, between generator 4 and the excavation site, church side.
-In the robot's footstep, behind generator 4 where stands a soul chest.
The shield is separated into three parts.
The first one can be located
-In the room on the right between the Spawn and generator 2
-On top of the tank station near generator 2 On a dead body
-At the end of the trench past generator 2
The second one might be
-Next to the Fire portal at your left when coming from the spawning area
-In a small room on your right coming from the spawn towards generator 3
-Near a dead body, bellow generator 3, before the workshop bunker's entrance
The third piece is located
-In the robot's footstep, between generator 5 and the excavation site, church side.
-In the robot's footstep, between generator 4 and the excavation site, church side.
-In the robot's footstep, behind generator 4 where stands a soul chest.
More Call of Duty: Black Ops III guides
- All Around Enhancement Mod Description And Info★ 5 (597)211k views1.2k ♥34 minUpdated Aug 10, 2023
- Black Ops 3: Console Commands★ 5 (1.1k)123k views2.4k ♥7 minUpdated Feb 13, 2020
- Origins Ultimate Guide★ 5 (562)72k views1.7k ♥17 minUpdated Jun 24, 2017
- Guide for Shadows of Evil [2020 updated]★ 5 (1.4k)67k views4.5k ♥24 minUpdated Mar 22, 2024
- Guide for Der Eisendrache [2020 updated]★ 5 (1.3k)65k views4.6k ♥30 minUpdated Feb 22, 2024
- How to download the community T7patch by Serious and play online zombies safely (also FPS Fix)★ 5 (491)62k views1.2k ♥4 minUpdated Apr 30





🔥 Popular guides
- Upgrading to PremiumTeam Fortress 2★ 5 (20k)1441k views11k ♥6 minUpdated May 11, 2022
- No More Room in Hell Official ManualNo More Room in Hell★ 5 (2.8k)569k views2.1k ♥29 minUpdated Apr 22, 2019
- NMRiH Community Hosting GuidesNo More Room in Hell★ 5 (526)351k views653 ♥1 minUpdated Aug 10, 2022
- Лучшие кооперативные игры SteamPAYDAY 2★ 5 (1.5k)315k views2.1k ♥56 minRussianUpdated Apr 27, 2025
- Desert Eagle Heat Treated | Blue GemCounter-Strike 2★ 5 (1.6k)292k views1.5k ♥2 minUpdated Jan 16
- Treasure Hunt Puzzle SolutionsTotal War: WARHAMMER II★ 5 (6.9k)281k views15k ♥3 minUpdated Aug 19, 2021






This guide was created by its original author on the Steam Community. Are you the author and want it removed? Request removal.