The Darkest Dungeon missions
The Darkest Dungeon
- There are no obstacles, traps or curios that require keys so don't spend your money on them
- You cannot escape so easily from this place, if you must you will lose one random hero unless you only have one hero left, so unequip all of your trinkets before escaping if you have to.
- Reinforcements are always on even if you turned them off.
- Heroes who complete a DD quest will no longer count to your roster limit and if you sent them on other missions they'll give everyone (except other DD survivors) 50% more resolve exp. However on Darkest and Stygian/Bloodmoon they will refuse to go back to the Darkest Dungeon, you can return them there on Radiant, but it will come at the very heavy cost of them starting with 80 stress and a 1% virtue chance. Which means everyone will only go there once.
- The maps are different than others, they are scripted which means that you can't see them all at once but instead reveal themselves as you progress in the dungeon which makes normal scouting impossible. They are also always the same which makes planning a route easier
- There are no night-time ambushes so don't spend your camping skills on them unless they benefit you in some way (Sanctuary, Zealous Vigil, etc.)
- You cannot surprise enemies nor can you be surprised by them.
- None of the fights drop loot with the exception of the Shuffling Horror battle which gives you a Shambler Ancestral trinket, if you have all of the Shambler Ancestral trinkets, it will drop gold and jewels.
- The first 3 missions have one treasure room that contains the Ancestor's Knapsack, this contains loot as well as a non-Shambler Ancestral Trinket if you don't have them all, if you do, then it will only be loot
For the enemies I will not provide the full details about them but I'll leave their wiki pages if you want to see them in more details, I'll also leave the wiki page for the Darkest Dungeon itself if you want more details in the place: https://darkestdungeon.fandom.com/wiki/Darkest_Dungeon_(location)?so=search
What to take
Take every antivenom, bandage, holy water, herbs, etc. that you are offered except shovels, keys and laudanum since there are no attacks that cause horror, no obstacles or curios that need keys. Do take a lot of food for healing purposes, there aren't as many hunger checks here as there normally would be so you can use them mostly for healing.
In other words, take as many provisions that you can stuff in your inventory because these missions are going to make you use them a lot.
Stuns are more helpful here than ever, a single stun on the right enemy can save you from a lot of problems with health and stress, so try to go for them whenever you can.
It is also important that you go into these missions as optimistically as possible to make yourself feel more confident but not too much because. Instead go in with this philosophy that I tend to use for the game, especially this part: “Hope for the best, prepare for the worst”
Without further a do, let's go in to hell itself.
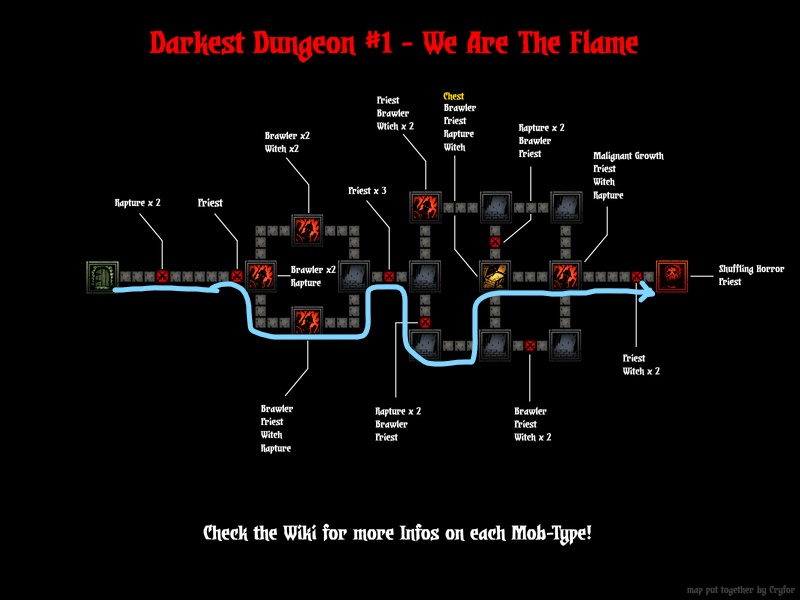
Mission 1: We are the flame
You'll be up against 3 big problems here: Heavy bleed, heavy stress and being shuffled. Take a party that can deal with all of that as well as the enemies in this place.
For enemies, there are 5 you'll fight here excluding the boss objective, I won't go into full details but rather give a summary of them:
- Ascended Brawlers:[darkestdungeon.fandom.com] They function just like the normal cultist brawlers, the only difference is that their bleed hits harder. He is human.
- Ascended Witches:[darkestdungeon.fandom.com] They function the same like normal cultist witches, the difference is that their marks stay the whole fight and stress hits much harder, they must be priority number 1 when they are present. She is human and has a lot of dodge (around 35) and is quite fast.
- Raptorous Cultists:[darkestdungeon.fandom.com] These guys are jokes, all of their resistances are at around 50% and they have no dodge. All they can do is heal and guard others, the good thing of their guard is that they don't buff themselves when performing it, I recommend leaving them last so you can patch yourself up a bit before progressing. He is unholy and human.
- Cultists Priests:[darkestdungeon.fandom.com] This guy is very scary for a couple of reasons. They're quite tanky almost having 40 hp and have 2 attacks: one will hit your front 2 people doing 5 stress and potentially lowering their bleed resistances and another one which is much more scary because it hits one person (it can be anyone) and has a chance to do heavy bleed and 15 stress, but what's scary about it is that it has a 17% base crit chance, this guy should be priority number one unless there's a witch in which case he would be number 2. He is eldritch and beast and quite fast (7 speed to be exact).
- Malignant Growth:[darkestdungeon.fandom.com] Tanky but not very scary, you'll only run into one in this mission and all it can do is a medium bleed attack (4 hp) which can hit pretty nasty and a stun attack. It is eldritch.
For the Shuffling Horror[darkestdungeon.fandom.com], the name is a hint, it has an attack that will shuffle your entire party so bring people who can put themselves back into position or don't mind being moved around and that's what makes this mission a little complicated because you'll need a team that can survive everything beforehand and this. There will also be a Priest in the back, ignore him while the Horror is still alive, otherwise it will summon another one or a defensive growth and do a lot of stress to everyone and lower the torchlight by a lot (25). The Horror is also eldritch.
Bring at least one character who can stress heal, in my opinion the Crusader is the best one here because not only can he do that, but Holy Lance and Zealous Speech will be really helpful for this mission and he's quite tanky but because of that he will be playing support mostly.
For your medic I would recommend the Occultist because he still has a lot to use if he's at the front and his debuffs are very helpful here, give him a +healing skill trinket so he can get bigger numbers with his heals.
Your other 2 people will have to be good damage people who aren't affected by their positions, the Shieldbreaker and the Grave Robber function really well together especially with armor piercing against the Horror (it has 33% prot.) Highwaymen and Bounty Hunters are also good here for additional damage against Humans, marks, riposte, etc.
Recommended people: Crusader, Shieldbreaker, Occultist, Highwayman, Grave Robber, Bounty Hunter.
The party I used here was the following:- Shieldbreaker: Pierce, Puncture, Serpent Sway, Adder's Kiss
- Graver Robber: Pick to the Face!, Lunge, Shadow Fade, Toxin Trickery
- Crusader: Smite, Holy Lance, Inspiring Cry, Battle Heal or Stunning Blow
- Occultist: Wryd Reconstruction, Vulnerability Hex, Weaking Curse, Daemon's Pull (give him Sacrificial Stab against the Horror)
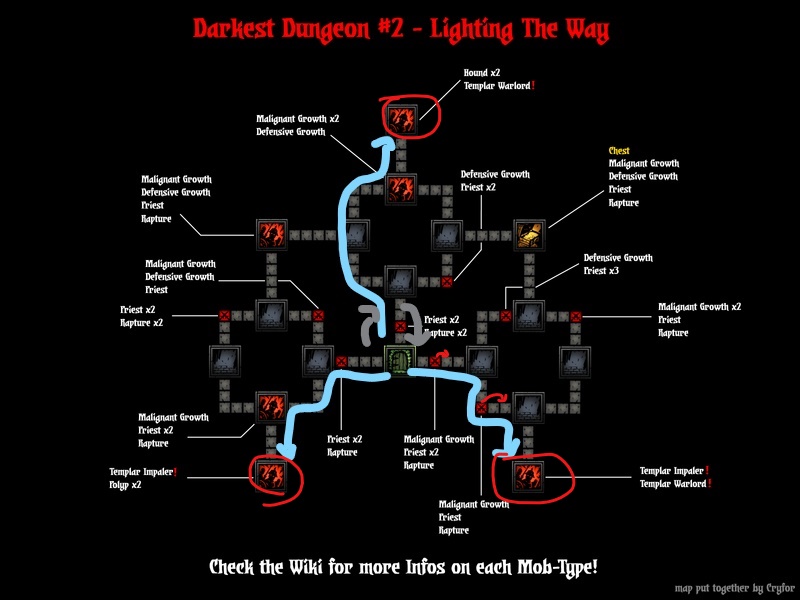
Mission 2: Lighting the Way
This is probably the toughest of the 4 because it's nearly everything thrown together: bleeds, blights, debuffs, stress, 3 mini-boss fights and a trinket handicap.
Your objective is to activate 3 Iron Crowns found in dead end corners of the map, make sure you activate them before you leave the room they're in, otherwise a bug will prevent you from interacting with them upon returning.
A lot of the enemies from the first mission return here, those being:
- Cultist priest
- Raptourous cultist
- Malignant growth
- Defensive growth:[darkestdungeon.fandom.com] Tanky like the malignant one, all it can do is guard (giving itself protection in the process), heal a lot but only to low health enemies, give an long lasting accuracy and crit buff (10% each for 4 rounds) if it's the only enemy left it will use a full party stress attack (it can also use it if only a raptourous is left). It is eldritch.
- Polyp:[darkestdungeon.fandom.com] Found only in the left crown, it can blight and mark simultaneously and move heroes back, if you force it to the very front rank it will use a very weak attack to go all the way back. It is eldritch and beast.
- Flesh Hound:[darkestdungeon.fandom.com] Found only in the top crown, it has a medium hitting attack with a 12% crit chance which also gives 5 stress and does more damage to marked heroes, it can drag heroes forward and potentially stunning them in doing so, if at the very back it will use a weak attack to go up front. It is eldritch and beast.
- Templar Impaler:[darkestdungeon.fandom.com] It has a single hard hitting attack with a chance to give 10 blight damage, a stunning and moving attack that will also move him forward, and a hard hitting attack that hits the front 2 heroes. It is eldritch and beast.
- Templar Warlord:[darkestdungeon.fandom.com] It has the same attack hitting the front 2 heroes as the Impaler, an attack that hits the entire party with a chance to blight, and a single hard hitting attack that can blight and debuff. It is eldritch and beast.
There are 2 comps that actually work pretty well for this mission and they are: The Hunting Hounds of Hell (Hellion, MaA, Houndmaster, Vestal) and Mark and Bark (Bounty Hunter, MaA, Occultist, Houndmaster) I'll explain in detail their potential:
Hunting Hounds of Hell: The Hellion is your main damage source here, and a really good one especially if you buff her crit chance then she'll one shot most enemies like that. The MaA can guard whoever goes without the trinket, his camping buffs "Weapons Practice" and "Tactics" are an absolute must go together for a lot of durability, his other buffs like Bolster and Bellow are also really helpful, Bellow in particular can help you a lot outside of the crown battles. The Houndmaster can stress heal with Cry Havoc, guard whoever goes without the talisman, his additional damage against the various beast enemies will shine a lot. The Vestal it's the healer, simple as that.
Mark and Bark: This comp relies on blowing up enemies with marks. The Bounty Hunter can take on the raptourous quite easily as well as the Templars with "Planned Takedown". MaA is for the same reasons as the other comp but Bellow shines more with the 5% crit received debuff while marked. The Occultist provides the marks and can heal, just be careful with his unpredictable single-target healing. The Houndmaster is for the same reasons as the other comp.
With 2 campfires and 3 rooms to reach, it is important that you plan your route as well as the order in which you'll take on the crowns. The left crown has an Impaler and 2 Polyps, the top altar has 2 Flesh Hounds and a Warlord, and the right altar has both Templars. I strongly recommend you leave the right altar last rather than dealing with it first.
I recommend handling them clockwise (left, top, right).
Recommended classes: Hellion, Man-At-Arms, Houndmaster, Vestal, Occultist, Bounty Hunter, Arbalest/Musketeer.
Skills for the Crown battles:Hunting Hounds
- Hellion: Wicked Hack, Bleed Out, If it Bleeds, Adrenaline Rush
- Man-At-Arms: Crush, Defender, Retribution, Bolster
- Houndmaster: Hound's Rush, Guard Dog, Cry Havoc, Lick Wounds
- Vestal: Judgement, Dazzling Light, Divine Comfort and Grace
- Bounty Hunter: Collect Bounty, Come Hither, Finish Him, (Whatever you want for the 4th skill)
- Man-At-Arms: Same as Hounds
- Occultist: Wyrd Reconstruction, Sacrificial Stab, Vulnerability Hex, (Whatever you want for the 4th skill)
- Houndmaster: Same as Hounds
- Hellion: Wicked Hack, Bleed Out, Barbaric YAWP!, Adrenaline Rush
- Man-At-Arms: Crush, Defender, Bellow, Bolster
- Houndmaster: Hound's Rush, Guard Dog, Cry Havoc, Lick Wounds
- Vestal: Judgement, Dazzling Light, Divine Comfort and Grace
- Bounty Hunter: Collect Bounty, Come Hither, Finish Him, (Whatever you want for the 4th skill)
- Man-At-Arms: Same as Hounds
- Occultist: Wyrd Reconstruction, Sacrificial Stab, Vulnerability Hex, (Whatever you want for the 4th skill)
- Houndmaster: Same as Hounds
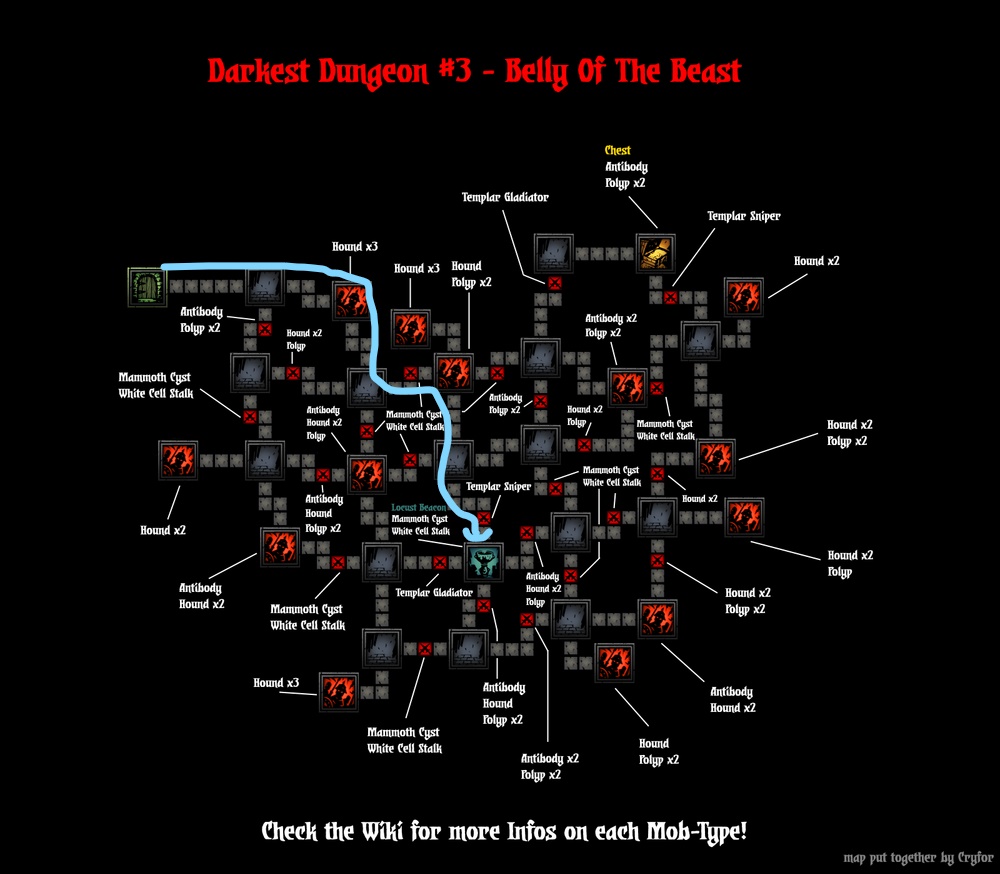
Mission 3: Belly of the Beast
The game insists that this is the hardest one of the 4 with its loading screen, a quest length of "Exhausting" and by giving you 4 campfires, but it'll only be the case if you have no idea where you need to go or how to handle the mission's main gimmick.
Your objective is to get to the center of the map where the Locust Beacon is in.
- Flesh Hound
- Polyp
- Antibody:[darkestdungeon.fandom.com] All these guys have is a stunning attack, with a pretty high chance and it also does some decent damage. it is eldritch and beast.
The main gimmick is the Mammoth Cyst[darkestdungeon.fandom.com]-White Cell Stalk[darkestdungeon.fandom.com] duo that appears throughout the map and in the objective room. The Cyst has 2 turns per round and its attacks consist of a heavy stress attack with a damage debuff and a heavy blight attack (8 DoT) that does quite a lot of base damage and can crit quite nasty but the % for that is not that high, both of those attacks can target either 1 or 2 people of any ranks. When it reaches half health it'll begin to use a self healing ability that also gives it a damage buff for 4 rounds, if a Cell Stalk isn't present it'll spend one of its actions bringing it back. The Cyst is also quite resistant to stuns and blights, but it's susceptible to about everything else. It also takes up the front 3 ranks
The Cell Stalk has a shuffling ability that also applies a speed debuff, but the shuffling chance is quite low, it also has a healing ability that it can use on either itself or on the Cyst while also applying a protection and speed buff, however, it has a really nasty ability which will teleport your party to a random room in the corner of the dungeon map, if there is a fight in that room that you haven't discovered you won't be able to retreat from it. It is also susceptible to about everything but it is a little more resistant to blight. The Cell Stalk will be at the very back rank and is eldritch and beast.
The Cyst has quite a lot of hp and also some protection to chew through, but the Cell Stalk while having some moderate hp (25 to be exact) it does have a lot of speed (8) and a lot of dodge (almost 40) and since this thing can teleport you, it must be your priority kill every time it shows up in the Cyst battles.
The party I recommend is a: Vestal, Jester, Highwayman, Leper in that order, you'll have to change some of their combat skills depending on the battle which is why I'll specify those skills at the end, for camping, I strongly recommend you do Reflection, Clean Guns and Tiger's Eyes on the Highwayman since he's on Cell killing duty.
When you're fighting the Cysts, spend your first turn buffing everyone with Battle Ballad, Revenge and Tracking Shot, you'll get through the battles quite well like that.
Skills for normal battles:
Leper: Chop, Hew, Solemnity, WIthstand.
Highwayman: Open Vein or Wicked Slice, Pistol Shot or Grapeshot Blast, Duelist's Advance, Point-Blank Shot.
Jester: Inspiring Tune, Battle Ballad, Slice Off, Finale.
Vestal:Judgement, Dazzling Light, Divine Comfort and Grace.
Skills for the templars:
Leper: Chop, Intimidation, Solemnity, WIthstand.
Highwayman: Open Vein or Wicked Slice, Tracking Shot, Point-Blank Shot, Duelist's Advance.
Jester: Inspiring Tune, Battle Ballad, Slice Off, Finale.
Vestal:Judgement, Dazzling Light, Divine Comfort and Grace.
Skills for the Cysts:
Leper: Chop, Revenge, Solemnity, WIthstand.
Highwayman: Open Vein, Tracking Shot, Pistol Shot, Duelist's Advance.
Jester: Inspiring Tune, Battle Ballad, Slice Off, Finale.
Vestal:Judgement, Dazzling Light, Divine Comfort and Grace.
Any fights with 2 polyps leave the polyps last, clear the corpses and use it as a recovery like you would with rapturous cultists.
The White Cell Stalk will not teleport you on its first turn, it starts with a base 4% chance of using that attack and every round that passes where it is still alive that chance increases by 7%, so at best, you have 3 rounds to kill it.
Mission 4: Hell is in the Heart
This is probably the easiest one of the four, a team that can hit all of the ranks, heal physical and stress damage, sustain themselves for some rounds and have 2 heroes will get through this without much of a problem.
If Reynauld and Dismas are still in your roster you can send them both along with the rest of the party to get the achievement that involves them. But because of the Never Again feature it means they cannot go to any other DD quest prior to this one.
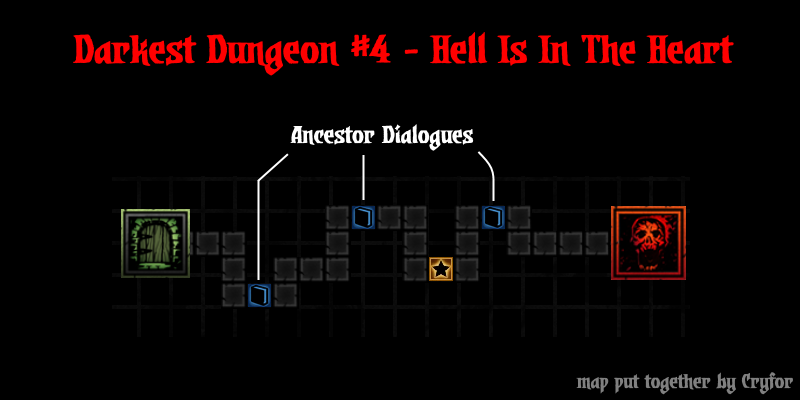
The map consists of nothing but a long hallway leading up to the final boss fight, you will encounter some dialogue obstacles from the Ancestor along the way (they do not need shovels to clear, just listen to them) there's also a secret room that I'll show in the map below. Once you get through the hallway the final combat will begin.
The final boss consists of 4 phases which I will describe below:
The Perfect Reflections[darkestdungeon.fandom.com] have a bleed attack that does a little bit of stress and does more damage to marked, and a heavy stress attack that can crit. It is also quite fast in speed.
The Imperfect Reflections[darkestdungeon.fandom.com] have a lot less health and speed compared to the Perfect ones, they have a stun and mark attack and the same heavy stress attack as the Perfect, but it does less stress.
You might be wondering how to damage the real Ancestor here, well you do so by killing Imperfect Reflections, each one killed does 1hp damage to him.
To get through this phase easily make use of marks and stuns to control the amount of attacks you receive as well as to get through the Reflections fast so that the Ancestor is more likely to summon more.
Once you get through 5 Imperfect Reflections the second phase of the battle begins.
The Absolute Nothingness functions like the Prophet’s pews in the sense that they’re just there to seperate the Ancestor from you, they have 999hp and dodge and they’re immune to everything, but if you don’t want to pass your turn or move a hero you can have them attack the Nothingness. The Ancestor himself has around 250hp and 3 attacks:
- An AoE attack that will target 2 random ranks, doing some bleed and stress.
- A full party attack that does some small bleed and stress.
- A heavy stress attack that can shuffle and debuff speed, crits and damage all at once.
The final phase will begin in one of 2 ways:
- After the Heart uses the full party attack 3 times
- If the party manages to kill the Heart before it uses its attack 3 times
However. The Heart has the hardest hitting attack in the entire game: Come Unto Your Maker which is an insta-deathblow to whoever is hit by it, there are a few things about this attack though:
- It ignores the deathblow resistance as well as dodge, I do not believe it ignores guards however.
- It will be used once when the Heart reaches 2/3 of its hp and there are 4 or 3 heroes remaining in your party.
- It will be used again when it reaches 1/3 of its hp and there are only 3 heroes left (if you got here with 3 heroes then it'll use it once, if you got here with 1 or 2 heroes it won't use it at all).
- You get to pick who dies and who lives in this attack, so pick carefully, and this is why I mentioned having 2 heroes that can sustain themselves enough to finish the heart themselves.
If you attacked the Gestating Heart or if you managed to kill it, the Heart of Darkness will actually spawn with less health, around 1/4 to 1/3 less.
Outside of that, the Heart isn't that deadly, once it uses up its insta-kills it's relatively easy to finish it off. There are some hero combos that can do so themselves like a Crusader and Leper, Crusader and Highwayman. Hellion and Flagellant, Occultist and Bounty Hunter, etc. So long as one can heal and one can attack you should do fine after that.
Recommended party: (if you want Reynauld and Dismas' achievements)- Hellion: Wicked Hack, If it Bleeds, Iron Swan, Adrenaline Rush
- Crusader: Smite, Stunning Blow, Battle Heal, Inspiring Cry
- Highwayman: Tracking Shot, Pistol Shot, Wicked Slice, Open Vein
- Occultist: Weakening Curse, Vulnerability Hex, Daemon's Pull, Wyrd Reconstruction
Victory
That's about all, I wish you the best of luck in that hellish pit.
- Curio Guide★ 5 (5.1k)96k views13k ♥10 minUpdated Feb 2, 2022
- Party Building/Composition★ 5 (2.2k)60k views5.8k ♥27 minUpdated Jun 28, 2018
- Know Your Dungeon: 15 Adventuring Tips★ 5 (2.6k)58k views4.3k ♥52 minUpdated May 31, 2020
- The Darkest Dungeon 101 - All You Need to Know★ 5 (2.1k)56k views6.1k ♥21 minUpdated Jun 20, 2022
- The Complete Guide to Provisions★ 5 (2.2k)50k views6.1k ♥20 minUpdated Jun 24, 2020
- Darkest Dungeon без боли: 100 страниц боевого опыта★ 5 (2.6k)48k views4.7k ♥179 minRussianUpdated Aug 30, 2020





- Upgrading to PremiumTeam Fortress 2★ 5 (20k)1441k views11k ♥6 minUpdated May 11, 2022
- No More Room in Hell Official ManualNo More Room in Hell★ 5 (2.8k)569k views2.1k ♥29 minUpdated Apr 22, 2019
- NMRiH Community Hosting GuidesNo More Room in Hell★ 5 (526)351k views653 ♥1 minUpdated Aug 10, 2022
- ULTIMATE GUIDE FOR GAME DEV TYCOONGame Dev Tycoon★ 5 (5.8k)326k views10k ♥4 minUpdated 23 Jan, 2014
- How to 'Git Gud' Soon™MORDHAU★ 5 (2k)318k views3k ♥68 minUpdated Nov 16, 2024
- Лучшие кооперативные игры SteamPAYDAY 2★ 5 (1.5k)315k views2.1k ♥56 minRussianUpdated Apr 27, 2025






This guide was created by its original author on the Steam Community. Are you the author and want it removed? Request removal.