Modded Class Boilerplate Generator Tutorial
Introduction & Download
Hey, Hi, Welcome! I'm Miku, I make things for funsies and this time I've made a mini-tool for modders to use that helps with quickly populating your files with numbered effects, buffs, etc.
Why did I make this? Because while working on my Hatsune Miku class mod (coming soon) I found it incredibly tedious to copy and paste a bunch of lines and edit the numbering on those lines. I also found myself forgetting to put all the pieces needed for effects or custom tooltips to actually work.
Overall there is a lot of repitition and busy work in the process of making a class mod which is the least fun part of making a mod. So I set out to make a tool to help ease that burden and remove some of the tedium.
Introducing the (patent pending) Quick Gen! (name not final)
You can download the tool here:
https://drive.google.com/file/d/1nu6IBhOMkW__Ru5x0ywQ8CRT0EVzkBVy/view?usp=sharing
(I might make this a github repo, just feels weird to have a whole github for a single file)
You may have noticed, this "tool" is actually just a single Python file. Yep, that's right, it's just a simple script that generates a bunch of text and then places it into the various files it needs to be in. The script is pretty easy to use so if you're familiar with Python scripts then you have all you need. The script is pretty well commented so you should have no issues navigating it and getting it working.
The only thing not mentioned in the script is that you need to place the file in the root directory of your mod. This is the same place your project.xml file is.
If all of that made no sense to you then no worries! That's what this guide is for. Hopefully by the end you'll be able to take full advantage of this script.
Setup
So first things first, I'm going to assume you've never used a Python script before. If you have then bare with me for a moment as I help the others get up to speed.
Basically, in order to run any Python script, you need to have 2 things. First, is the most obvious, which is Python itself. For most cases Python 3 will be the go to and this script is no different. So you can go ahead and download the latest Python version here: https://www.python.org/downloads/
Make sure to download the right Python for your system. When installing, make sure you enable the "Add to PATH" setting. It won't always be called that and it's different for each OS, but it should be similar to that.
Once you've gotten Python downloaded you are good to go and can now make and run your very own Python scripts. However most scripts you find online will also require specific modules to be installed. This generator is no different, but not to worry, adding modules is incredibly easy.
For Windows, all you need to do is press the windows key and R at the same time. In the box that pops up type "cmd" (without quotes) and hit enter. This will open a command window that you can use to execute various system level commands. This is also often referred to as a terminal. If you don't use Windows then you'll need to find the terminal for your operating system. Google is your best friend here.
Once you have a terminal open and ready for your input here's all you need to do. Type the following line:On Mac and Linux the commands might vary slightly so if neither of those work do some searching for your specific OS version on how to use "pip install"
Once that's done you offically have everything you need to use the Quick Gen. If you feel like you're good to read the comments inside the file and go from there then you can go ahead just open up the file in your favourite IDE or text editor and take it from there. But, if you want some more guidance on how to use the script and what all the settings do then read on!
IMPORTANT NOTICE
So for the rest of you, you'll also need to open up the file in a text editor of your choosing. I recommend Notepad++ for those who have not worked with this kind of stuff before. But using something like VSCode will obviously be fine and in fact much better if you have it. You can also use just plain notepad if you like pain. It's really your choice.
Once you've opened the file you will be greeted with the most important section. The big screeming letters that say IMPORTANT NOTICE. Followed by a bunch of text that has # at the start of each line.
This notice gives all the disclaimers about using this script and what it does. For the sake of redundancy I am pasting this here as well:
MAKE A BACKUP BEFORE RUNNING!
THE EDITS THIS SCRIPT MAKES CANNOT BE EASILY UNDONE!
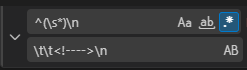
Note: '\t' indicates the tab space. Also make sure the little star icon is enabled, that's the RegEx search button. If you prefer space indenting you can replace the \t's with regular spaces to suit your file.
You can then use the reverse to replace the comments with blank lines again.
Find:The script will also dynamically search for a place to insert the xml file entries based on the name of the skill. This is not required, however, if you would like to make use of this you will need to place the following comments in the xml file. This is what the script searches for to find the starting position.
Generated XML entries will also only ever contain a "REPLACE ME" string. So you will need to go into your string_table.xml file after generation and replace that text with whatever you want your effect tooltips to say.
I am active in the #dd1-mod-discussion and #dd1-mod-help channels.
Settings Overview
So now that the disclaimer is out of the way let's dive in! After the notice you'll find the Settings section. In this section is everything you will need to alter for the generator to work for your mod. Everything is heavily commented and so I suggest you read the comments in the file as you see them. Don't worry though, I intend to go over everything in this guide too.
For pictures, I will be using a filled in version of the script that is for my own custom class Hatsune Miku in DD. That way you can see multiple examples for each setting. Many of the comments will also be removed from the images to keep things clean.
In the settings there are 3 main sections: Mod Info, Generator Settings, and Generator Data.
Mod Info is where you'll enter all the basic information regarding your mod and class. This includes the display names of your class and skills, the internal IDs (optional), and even mode ladder details.
Generator Settings contains a handful of settings for you to customize the output of the generator. These are mostly for you to set things based on your preferences such as affixes, indent style, and index starting number.
Generator Data is where you will set up the main meat of the generator. This is where you will input all the data needed to generate the multiple lines for your effects and tooltip entries. Note: The generator will not write your tooltips for you! You still have to do that part by hand, sorry :p
Mod Info
The first main section of the settings is for your mod info, This is where you'll put all the things that will pretty much stay the same every time you use the script. Only changing when you make a new mod.
These settings, as the name implies, are for the display names of things in your mod. These are referenced throughout the script and as such need to be fully filled in.
className - The display name of your custom class. Example: "Hatsune Miku"
moveSkillName - The display name of your class' move skill. In most cases this will just be "Move" however, if you have a custom move skill you can put in the name here like I have.
skillNames - The display names for all skills your class has.
Note: You don't actually need to put all your skills here if you don't want to. Only the skills you intend to make effects for using the generator need to be present. Regardless of what you want from the generator however, you must have at least 1 name in this list. Names don't need to be on separate lines but it makes it easier to read so I recommend you do it.
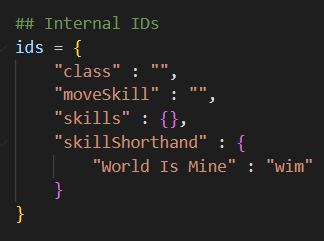
As you can see, I've left most of mine blank. However you can fill out various IDs if you want them to be different from your display names. The generated IDs are very simple, it takes the display name, strips away any leading and trailing whitespace, forces it to all lowercase, and finally replaces all spaces with underscores. So for "World Is Mine", the ID would become "world_is_mine"
Each key in the list is tied to the respective display name setting above. The exception is 'skillShorthand' which is a special key that I'll cover in a moment. First, if you want to set a custom ID for a skill, you can follow the example in your own file or use this template:The "Skill Name" needs to match one of the skills in the display name section. The "skill_id" will be what the generator uses when that skill is referenced.
Now, as mention "skillShorthand" is a special key in this section. It is completely optional however, if you have an ability with a bit of a longer name you may want it to be shortend when used in effect IDs. If that's the case you can add entries to this key the same way you would for the skills above.
What makes this different from just setting a custom ID, however, is that the entries here will only be used for other IDs. What this means is that the '.id' property in your class info file will still use the normal ID for that skill. You can see in the picture that I have a shorthand entry for "World Is Mine" setting it to "wim". Here is an example of what that would end up looking like:
To oversimplify it, a mode ladder is just a set of modes for your class that are in some kind of order. Your class, through some sort of interaction, will iterate through these modes or "climb" them. My Hatsune Miku class uses this, as does TheAwkwardHeady's custom class "The Uncrowned": https://steamcommunity.com/sharedfiles/filedetails/?id=3233465820
I'm sure there are plenty of other examples as well but those are the only 2 that I'm more familiar with.
Mode ladders are a very powerful and complex tool and beyond the scope of this guide. But if you want to know more then I suggest checking out the Darkest Dungeon official discord (which you can join from their official website) and take a peak at some of the advanced guides linked in the #dd1-mod-resources channel.
As for actually using this section, the settings are pretty simple.ladderStart - This is the number the generator will start counting from when incrementing through the mode ladder
ladderSteps - This is how many unique modes your mode ladder has. Keep in mind that '0' is also a step on the ladder so for cases like Miku, where she can stack up to 5 notes, the actual step count is 6 which includes the mode where she has 0 notes
modePrefix - A special prefix that is only used when generating the mode text for IDs
modeSuffix - Same as above but for the suffix
Reminder: Prefix is added before the name and suffix is added after.
The mode text for IDs is generated like so: {modePrefix}{modeIndex}{modeSuffix}
The 'modeIndex' is the current step of the ladder that the generator is on when it's making an ID. Notice that there are no underscore spacers here. If you want to separate the parts with underscores you will need to do what I have done and put an underscore in the suffix or prefix directly.
Generator Settings
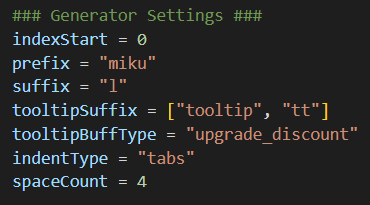
indexStart - This is the number that indexing starts from. For me, I prefer 0 indexed lists. However some people prefer 1 indexed lists. You can set this to whatever number you want and the generator will adapt accordingly. This setting only affects ID generation and has no impact on the .level property for skills
prefix - The general purpose prefix that will be placed at the start of every ID
suffix - Same as above but for the suffix. Note, the suffix is placed before the level index and is not separated from it via underscore. Examples will be shown later
tooltipSuffix - This is a 2 item list that contains the 2 different suffixes used for making custom tooltip effects and buffs. The first entry is used for Effect IDs while the second is used for Buff IDs
tooltipBuffType - This is the exact string that will be used for the "stat_type" key when making tooltip buffs. Therefore it MUST be a valid buff stat type for the game to recognize it. The 2 main choices for custom tooltips are "upgrade_discount" and "quirk_tag_evolution_duration". The differences between them are minimal but you can check this guide by Sasiji for more info on making custom tooltips (link below)
indentType - This setting is for you to choose how the generator indents your JSON and XML files. The "tabs" option uses the tab character, 1 per indent level, while the "spaces" option uses normal spacebar spaces which will use a varying amount per indent level. If you like chaos, you can set this to "none" and the files will be stripped of all indentation. All the power to ya!
spaceCount - This is the number of spaces that are used per indent level when the above is set to "spaces"
Sasiji's Custom Tooltip Guide:
https://steamcommunity.com/sharedfiles/filedetails/?id=2748453292
Generator Data
This is the belly of the beast now. This is where all the most important details live. And it's all contained inside a single list called 'effectEntries'.
The generator is capable of outputting all manor of effect entries including functional effects as well as tooltip effects. You can set which types of entries are generated for each entry in this list individually. This bit may look overwhelming but I'm gonna step through it slowly. First, here is a snippet of how I generated the bleed effect for Harmonic Blast:You may notice that all the info here is identical to the example in your downloaded file, that's because I was too lazy to come up with a different example so I just changed the name after using the script and called it a day. Work smarter, not harder ;)
So lets go through each key. To add an effect to the list you need to have a "dictionary" with 6 keys. A dictionary is just the curly brackets you see in the code. The example code has 2 entries, a full effect one, and a tooltip one. The tooltip one can also act as a blank template for you to copy and modify.
Now the keys:
skill - This is the easiest one, this is the display name of whatever skill this effect is going to be tied to. For my case, it's Harmonic Blast.
effect - This is the main key. In here you'll need to list out all the properties of your effect as you would in your normal effects.darkest file. You can see how it's structured in the example so just copy that. The only required key in this part is the "name" key. I'll go into to more detail about the effect key down below.
toggles - This key lets you control which pieces are added to the generated IDs as well as if incremented IDs should be made. For reference, this is the format for ID generation (toggles are in italics):
{prefix}_{skill_id}_{effect_name}_{modeIndexing}_{tooltip}_{suffix}{levelIndexing}
Notice that there is no underscore between {suffix} and {levelIndexing}. This is what I was refering to before when I said you will need to put an underscore in your suffix if you want one there.
- combatSkillEffects - The 'combat_skill:' line in your hero.info file that assigns the actual effect to the skill
- effects - The 'effect:' line in the effects file that lets the effect actually do things
- combatSkillTooltips - The 'combat_skill:' line in your hero.info file that assigns the tooltip effect to the skill
- tooltipEffects - The 'effect:' line in the effects file that assigns the tooltip buff to the effect
- tooltipBuffs - The entry inside the buffs.json file that acts as your custom tooltip
- xmlEntries - The actual string conversion entry inside the string_table.xml file where you write your custom tooltip
So let's talk a little about the effect key. The properties you put here will be added to the effect lines in your effects file in the order you list them here. The keys (left) are the .properties you add to an effect, the values (right) are what you put after those properties.
There are 2 important notes here. First, for the "target" property, you must encase the text in double quotes so that the quotation marks show up in the final file. Python doesn't like it when you just do that normally however, so that's why the values are in single quotes with "target" being encased in double quotes inside the single quotes like this:

Notice that the values for .chance and .dotBleed line up with the numbers inside their respective lists in the code and only change when the level of the ability changes. Where as the value for .duration only changes when the mode changes.
For the property lists, they do not need to have the exact same number of entries as there are levels or modes. If the property list has more values than there are levels/modes, the excess list values will be ignored. If the property list has less values than there are levels/modes, the last value will be repeated for the extra iterations. You can play around with this in debug mode to see what I mean.
The other function that lists have for properties is for any property that normally expects multiple values. There aren't many but there are some such as .buff_ids. In these cases, you would put all the values you want the property to have in a list, in the order you want them to appear. The generator will then place all of them after that property in the final output.
Last thing I want to touch on is the "name" key. This is the only "required" key for the generator to work. Obviously, with nothing else there, the effect won't do anything, but it also won't break anything. Whatever you put for the value of "name" will be used as is for ID generation. So with that in mind make sure you follow standard ID patterns (no spaces, no special characters other than '_', and all lowercase). Otherwise you may run into issues when trying to play with your mod.
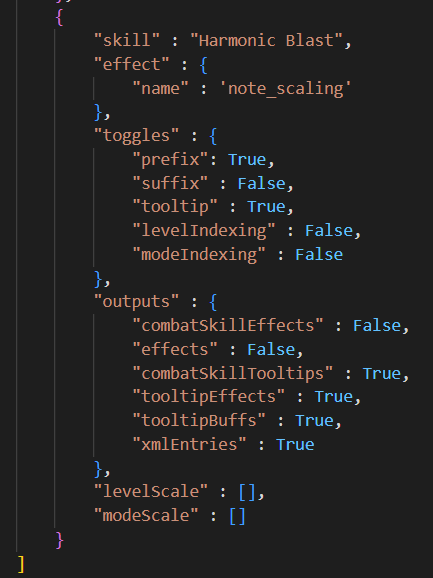
Note that with both 'levelIndexing' and 'modeIndexing' set to False, the generator will only create 1 effect for this entry. This is a bit redundant to do but it is something you can do and it does actually save a bit of hassel with regards to creating the tooltip buff and the xml entry.
Conclusion
Now, go forth! Generate thousands of effects with ease! But remember, over-confidence is a slow and insidious killer...
Output Examples
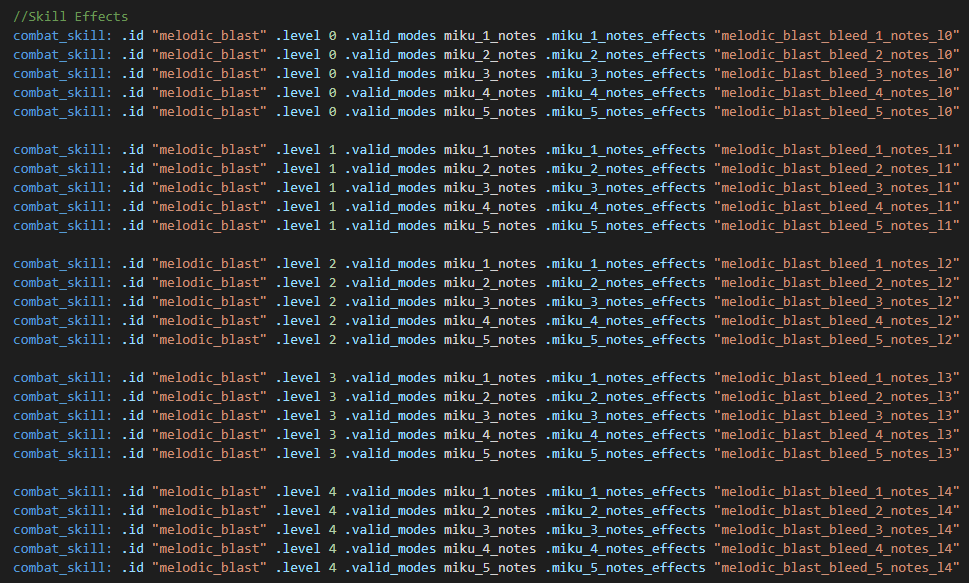

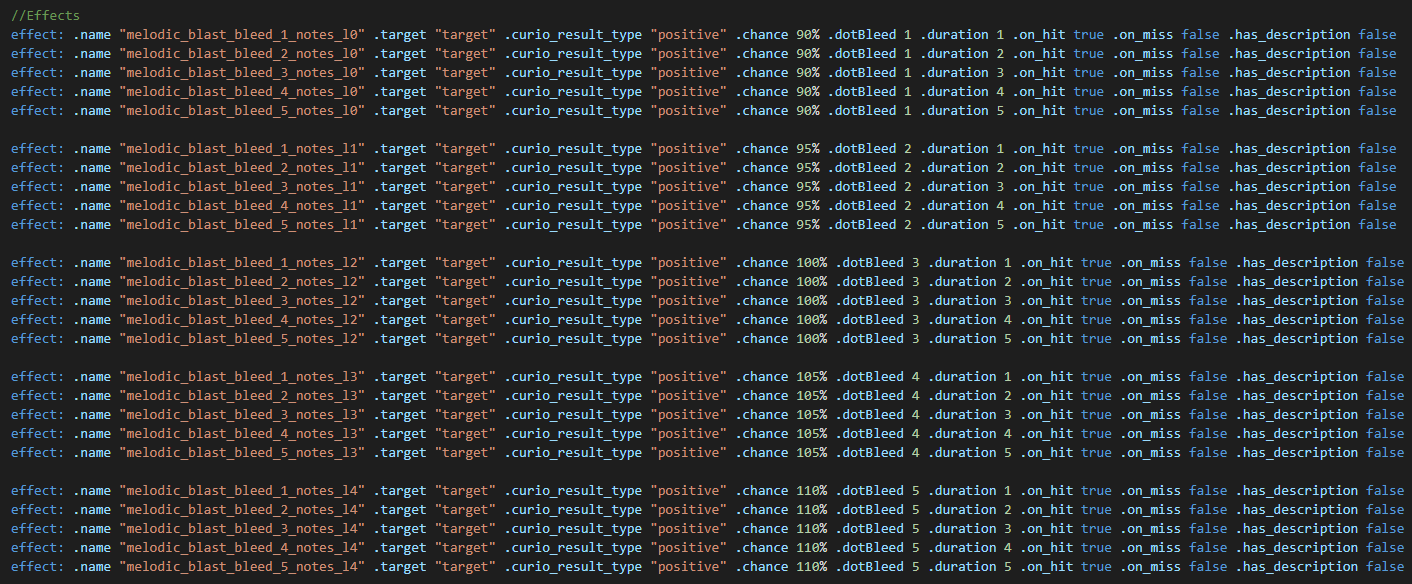

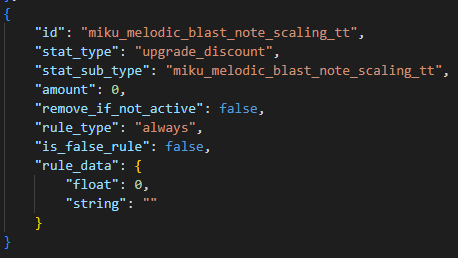
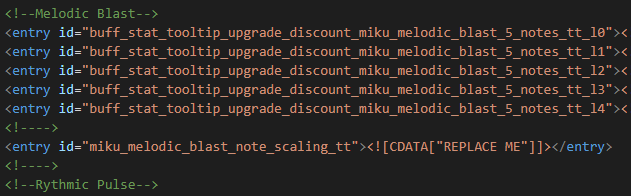
EXTRAS
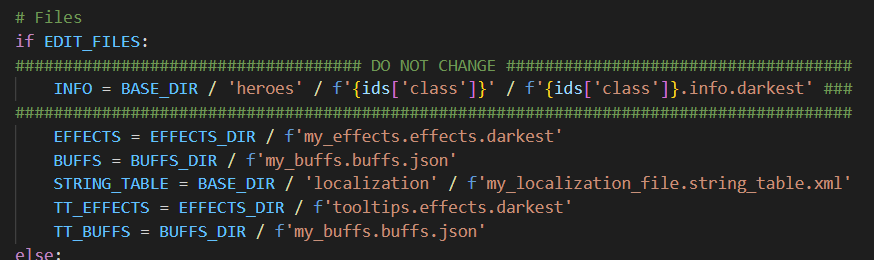
If you need to change the filenames for whatever reason you'll need to do so in the FILE MANAGEMENT section which is right in the middle of the script on approximately line 300 and looks like this:
The only thing you should edit is the file prefixes. Here's an example of what that would look like:
- Curio Guide★ 5 (5.1k)96k views13k ♥10 minUpdated Feb 2, 2022
- Party Building/Composition★ 5 (2.2k)60k views5.8k ♥27 minUpdated Jun 28, 2018
- Know Your Dungeon: 15 Adventuring Tips★ 5 (2.6k)58k views4.3k ♥52 minUpdated May 31, 2020
- The Darkest Dungeon 101 - All You Need to Know★ 5 (2.1k)56k views6.1k ♥21 minUpdated Jun 20, 2022
- The Complete Guide to Provisions★ 5 (2.2k)50k views6.1k ♥20 minUpdated Jun 24, 2020
- Darkest Dungeon без боли: 100 страниц боевого опыта★ 5 (2.6k)48k views4.7k ♥179 minRussianUpdated Aug 30, 2020





- Upgrading to PremiumTeam Fortress 2★ 5 (20k)1441k views11k ♥6 minUpdated May 11, 2022
- No More Room in Hell Official ManualNo More Room in Hell★ 5 (2.8k)569k views2.1k ♥29 minUpdated Apr 22, 2019
- NMRiH Community Hosting GuidesNo More Room in Hell★ 5 (526)351k views653 ♥1 minUpdated Aug 10, 2022
- ULTIMATE GUIDE FOR GAME DEV TYCOONGame Dev Tycoon★ 5 (5.8k)326k views10k ♥4 minUpdated 23 Jan, 2014
- How to 'Git Gud' Soon™MORDHAU★ 5 (2k)318k views3k ♥68 minUpdated Nov 16, 2024
- Лучшие кооперативные игры SteamPAYDAY 2★ 5 (1.5k)315k views2.1k ♥56 minRussianUpdated Apr 27, 2025






This guide was created by its original author on the Steam Community. Are you the author and want it removed? Request removal.