How to make models stretchable
Update
Introduction
Having some knowledge of creating models for Source engine and using Blender will help you greatly to follow along and troubleshoot possible issues though.
Useful resourses for beginners
- Pte Jack's "Practically any model to SFM via Blender 2.7x (The Hard Way) Course"
- Tjiki's "Exporting a Model from Blender to Source"
- Valve Developer Community wiki
- Blender's official fundamentals short tutorials
- Andrew Price's (aka Blender Guru) Donut Tutorial
Required software
- Source Filmmaker (duh)
- Crowbar
- The latest version of Blender[www.blender.org] (3.2.2 as of writing)
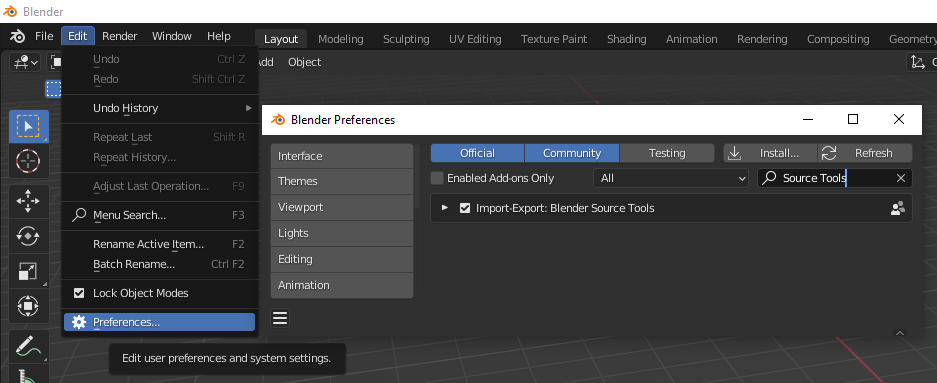
- Blender Source Tools[steamreview.org] addon for Blender
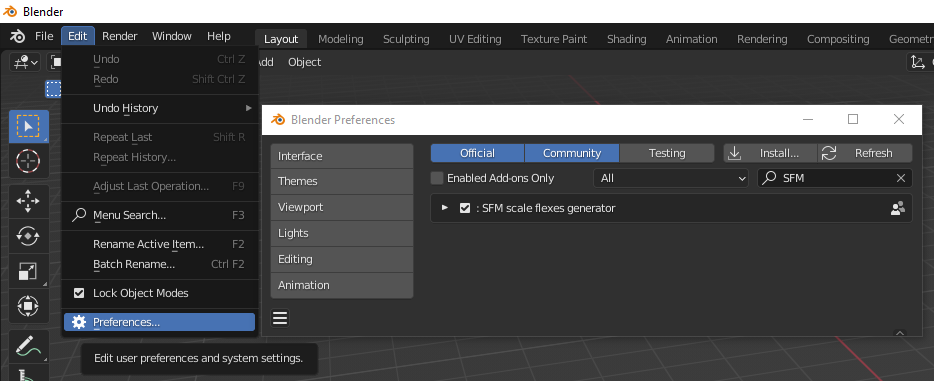
- SFM scale flexes generator[github.com] addon for Blender
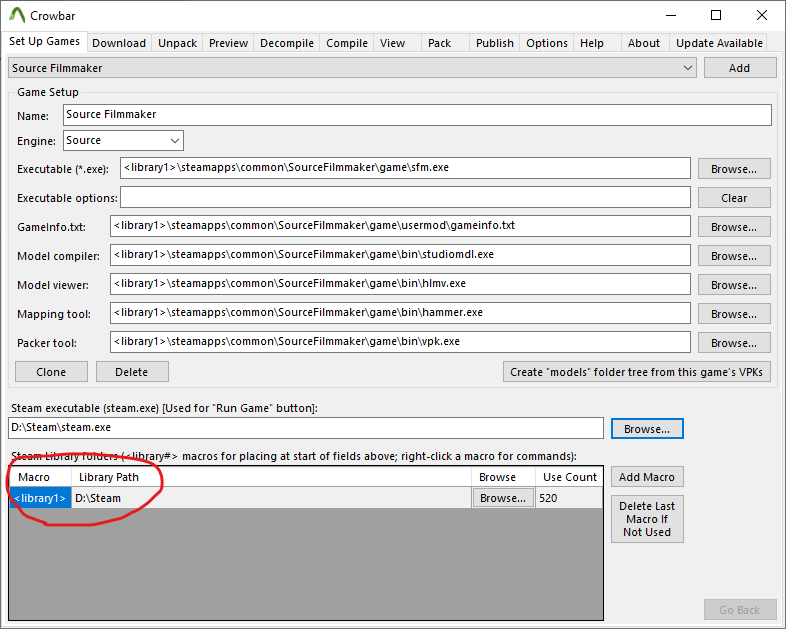
You can install Blender addons by going to Edit -> Preferences, and in the preferences windows going to "Add-ons" -> "Install...":
Making stretchable props
The glorious rock005.mdl will be used as an example here.
Decompiling the model and importing it in Blender
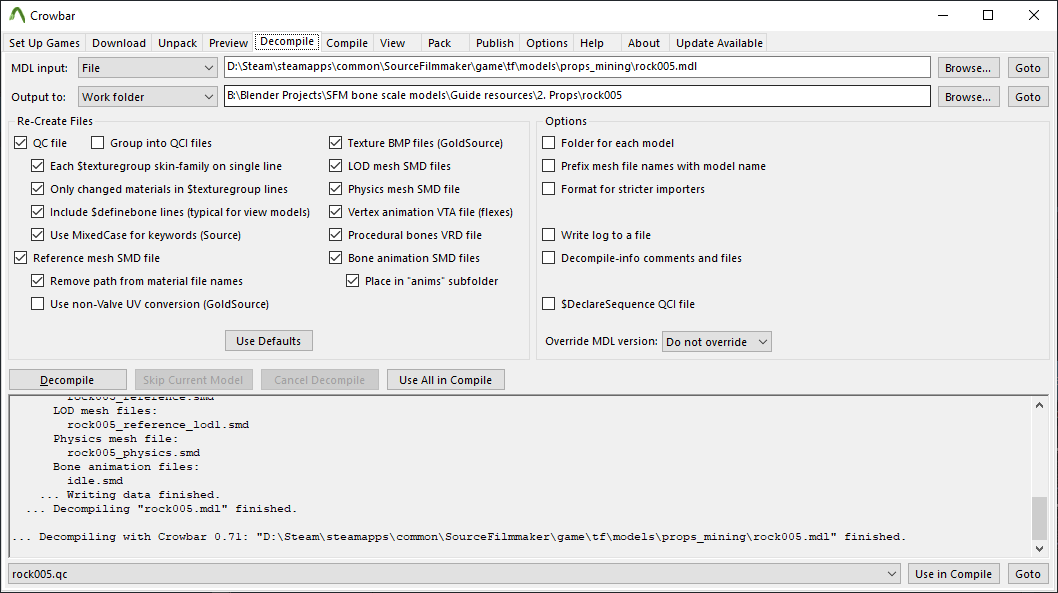 If all goes well, some .smd, .qc and other files should appear in the specified output folder: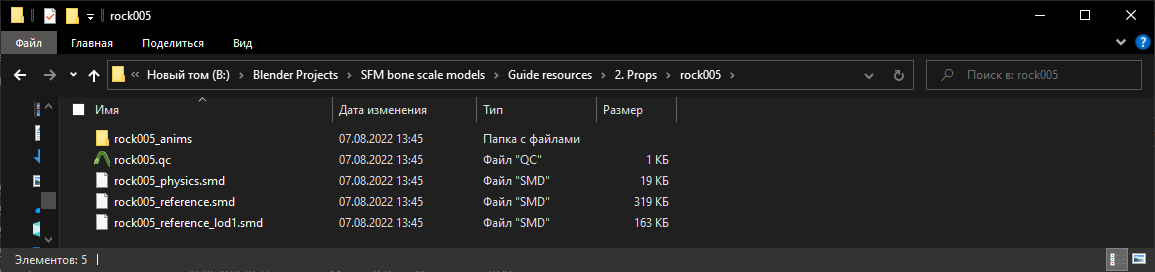
The .smd files are the actual models. I'm not going to use the physics and LOD models, so I'll be working only with the highest resolution reference model. Physics and LOD models are useful for game optimization, but since I'm making a model that's going to be used only in SFM where runtime performance isn't as important, I'm not going to put work into converting them as well. Feel free to do otherwise though, you'd only need to repeat the next few steps for these models too.
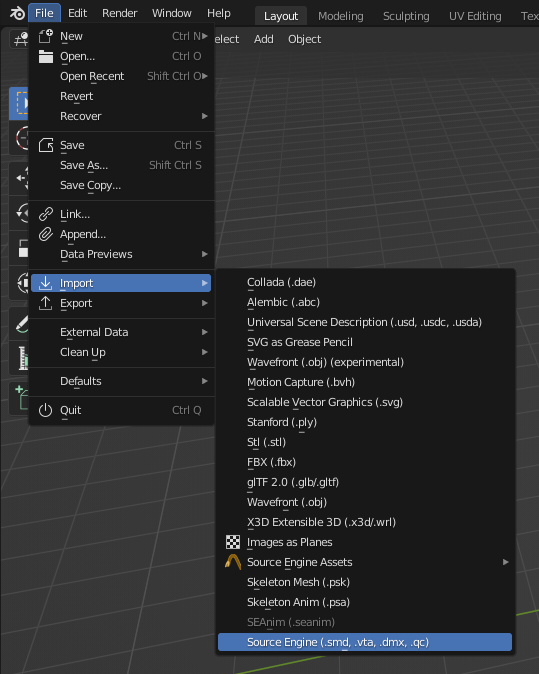
Open up Blender and import the model using Blender Source Tools (your import menu might look different because I have some other import addons installed):
If your model's orientation is wrong, rotate it to make it stand straight up. Most likely it's facing Y in this case, so you need to select the armature, press R, then X, type in "90" and press Enter. This will rotate your model 90 degrees around X axis. Don't forget to apply your rotation: hit A to select everything in your scene, press Ctrl+A and choose "All transforms" in the pop-up window.
And there it is! If the draw distance is too short to view the whole model, you can increase it by pressing the N key in the 3D viewport and under the View tab in the appeared menu increasing the Clip End value.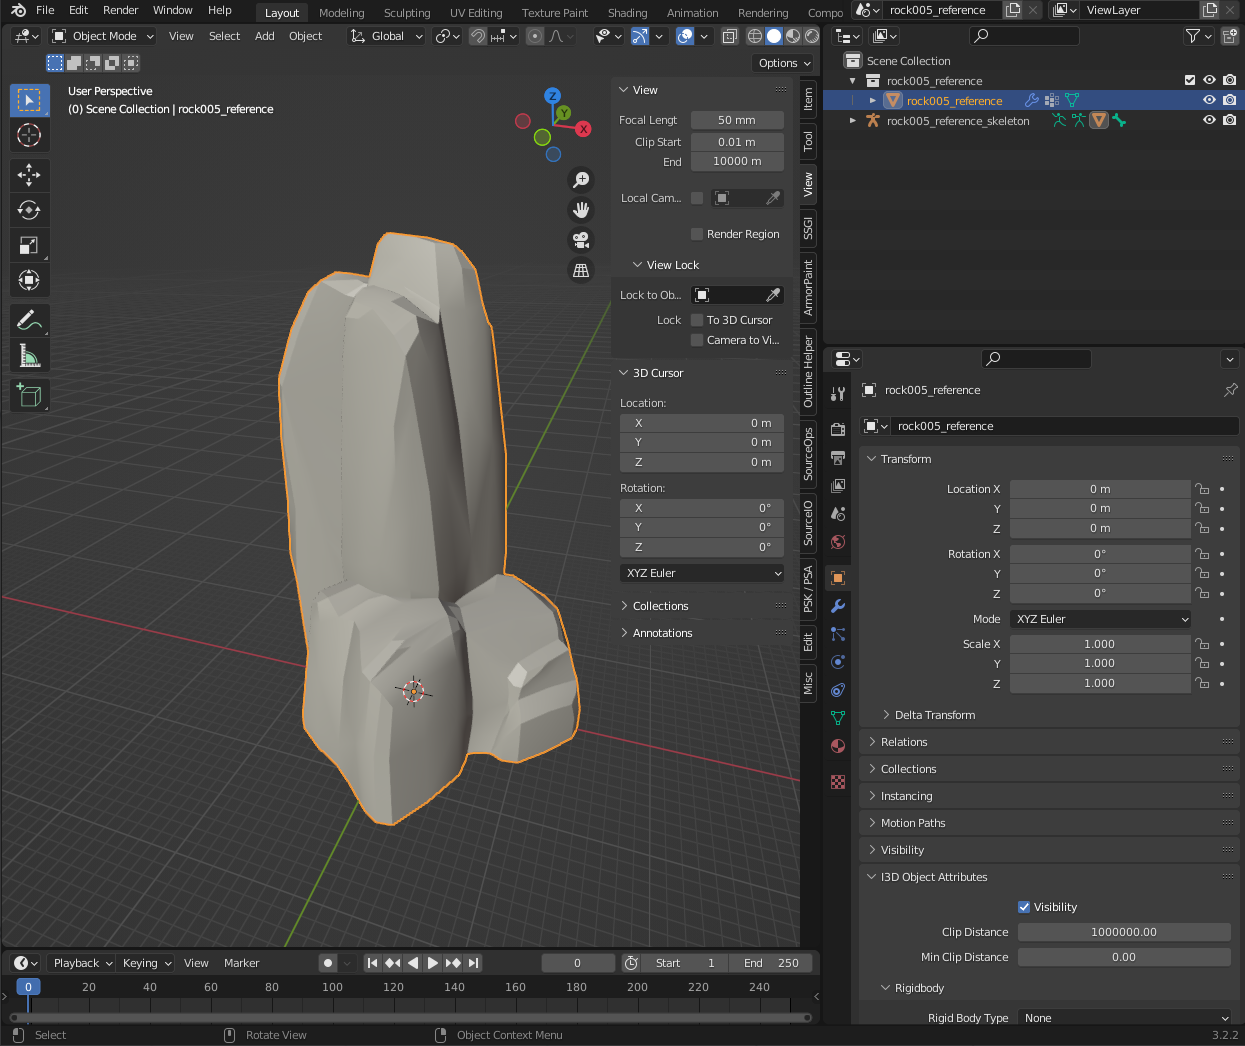
Creating object scaling shape keys
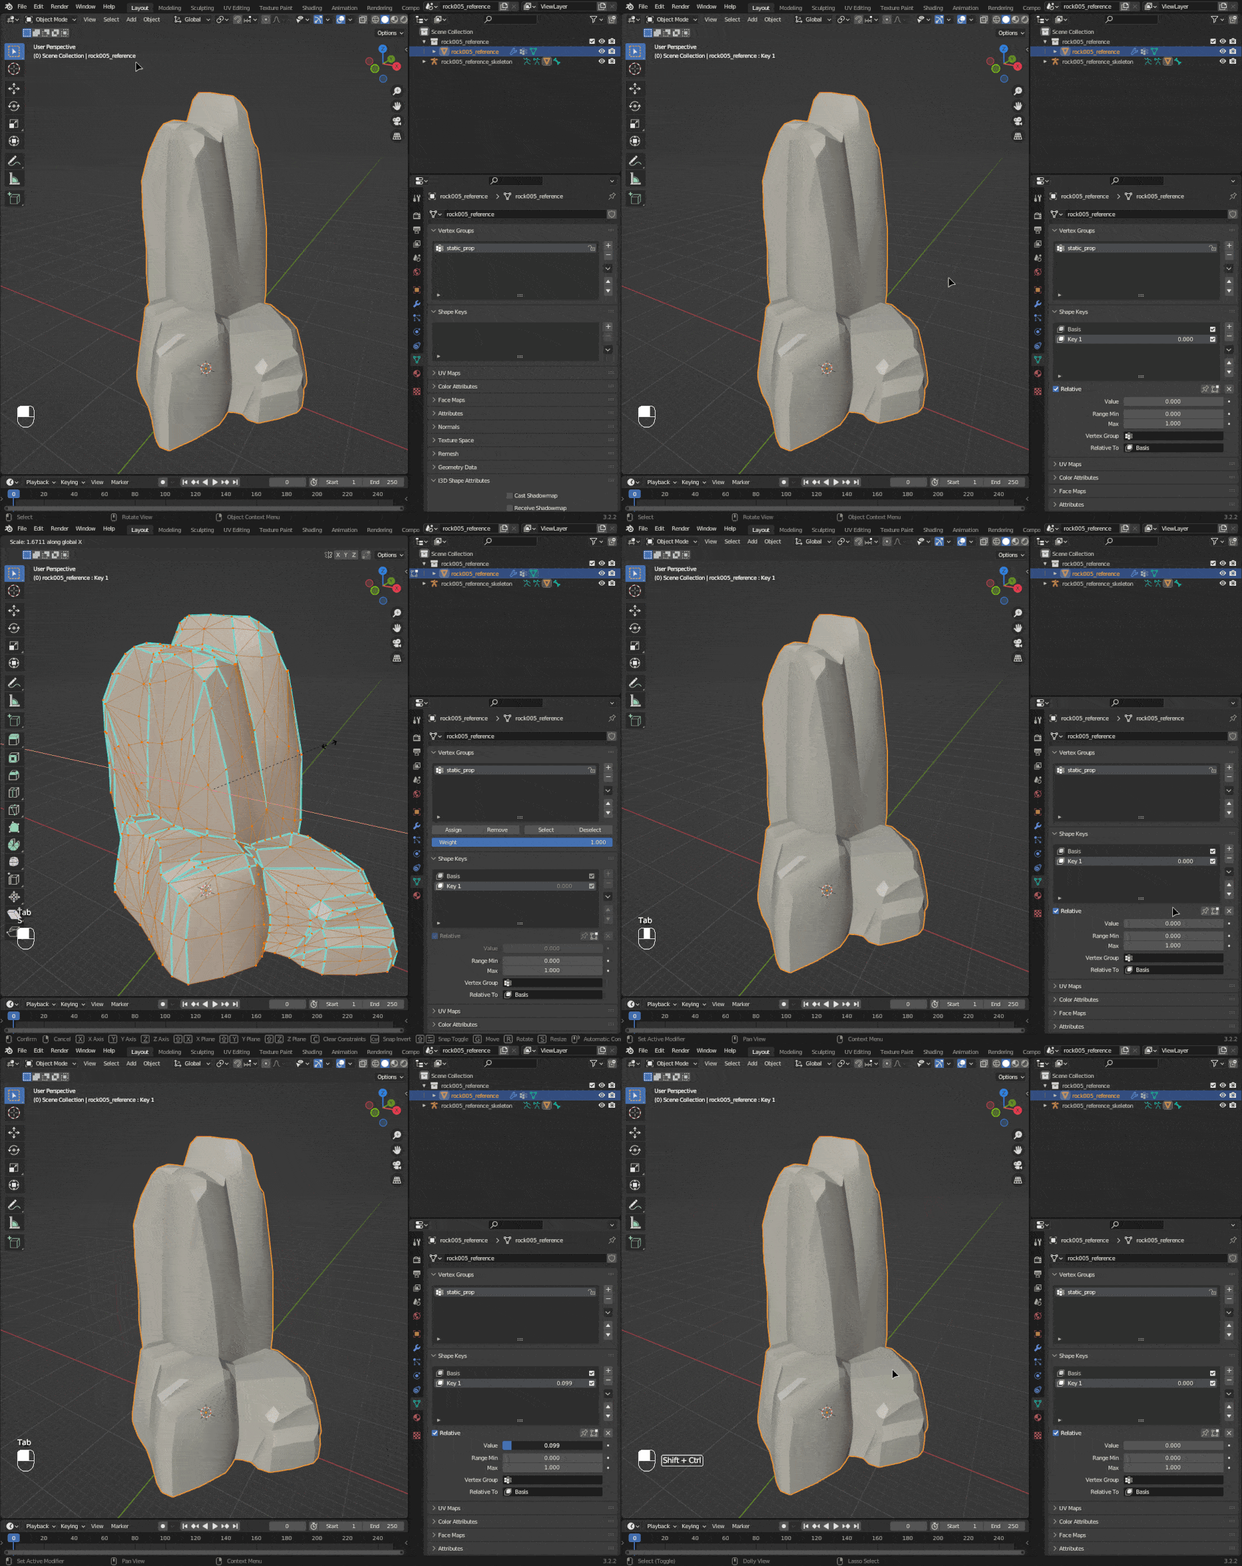
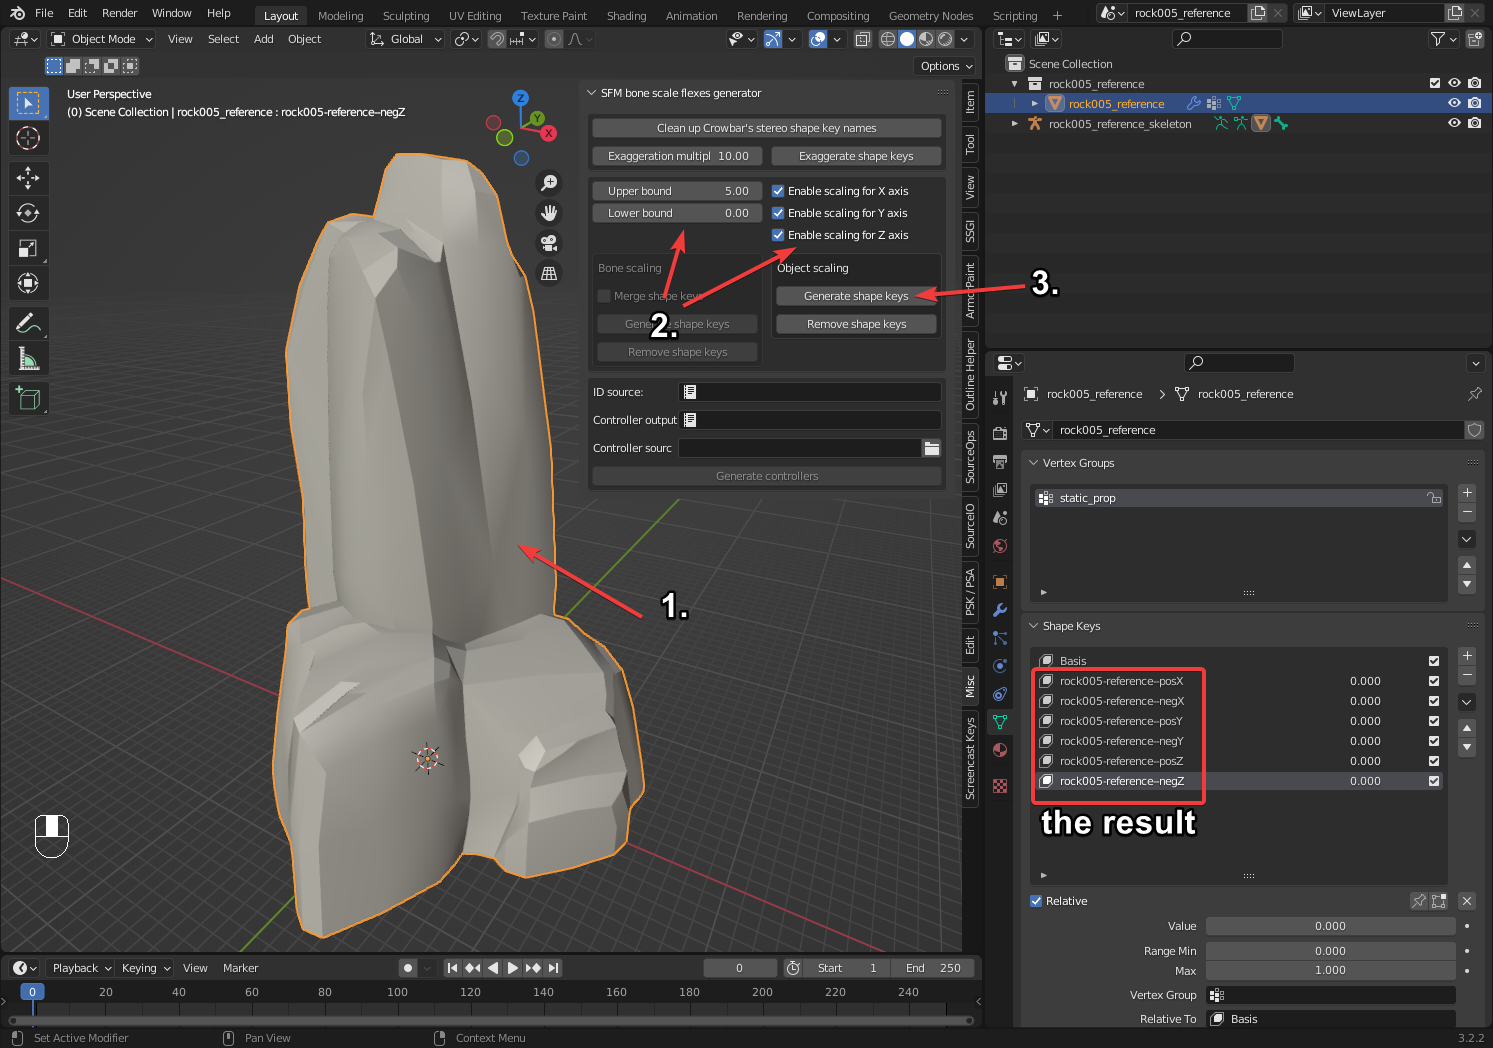
So the basic premise is to create 6 of these keys: one for each axis (negative and positive scaling).
The SFM scaling flexes generator automates this process. All you need to do is to select the mesh, set the desired scaling amount, choose the needed axis and press the "Generate shape keys" button:
Generating DMX controllers
Next we're going to generate DMX controllers. These controllers will turn our simple one-way SFM sliders into bidirectional ones.
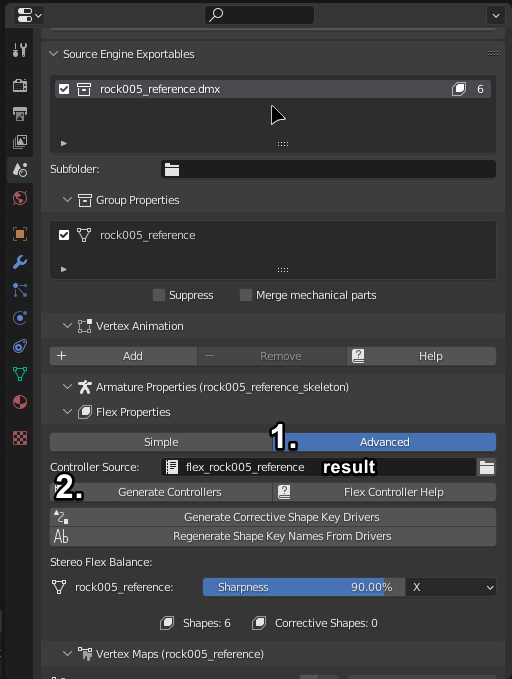
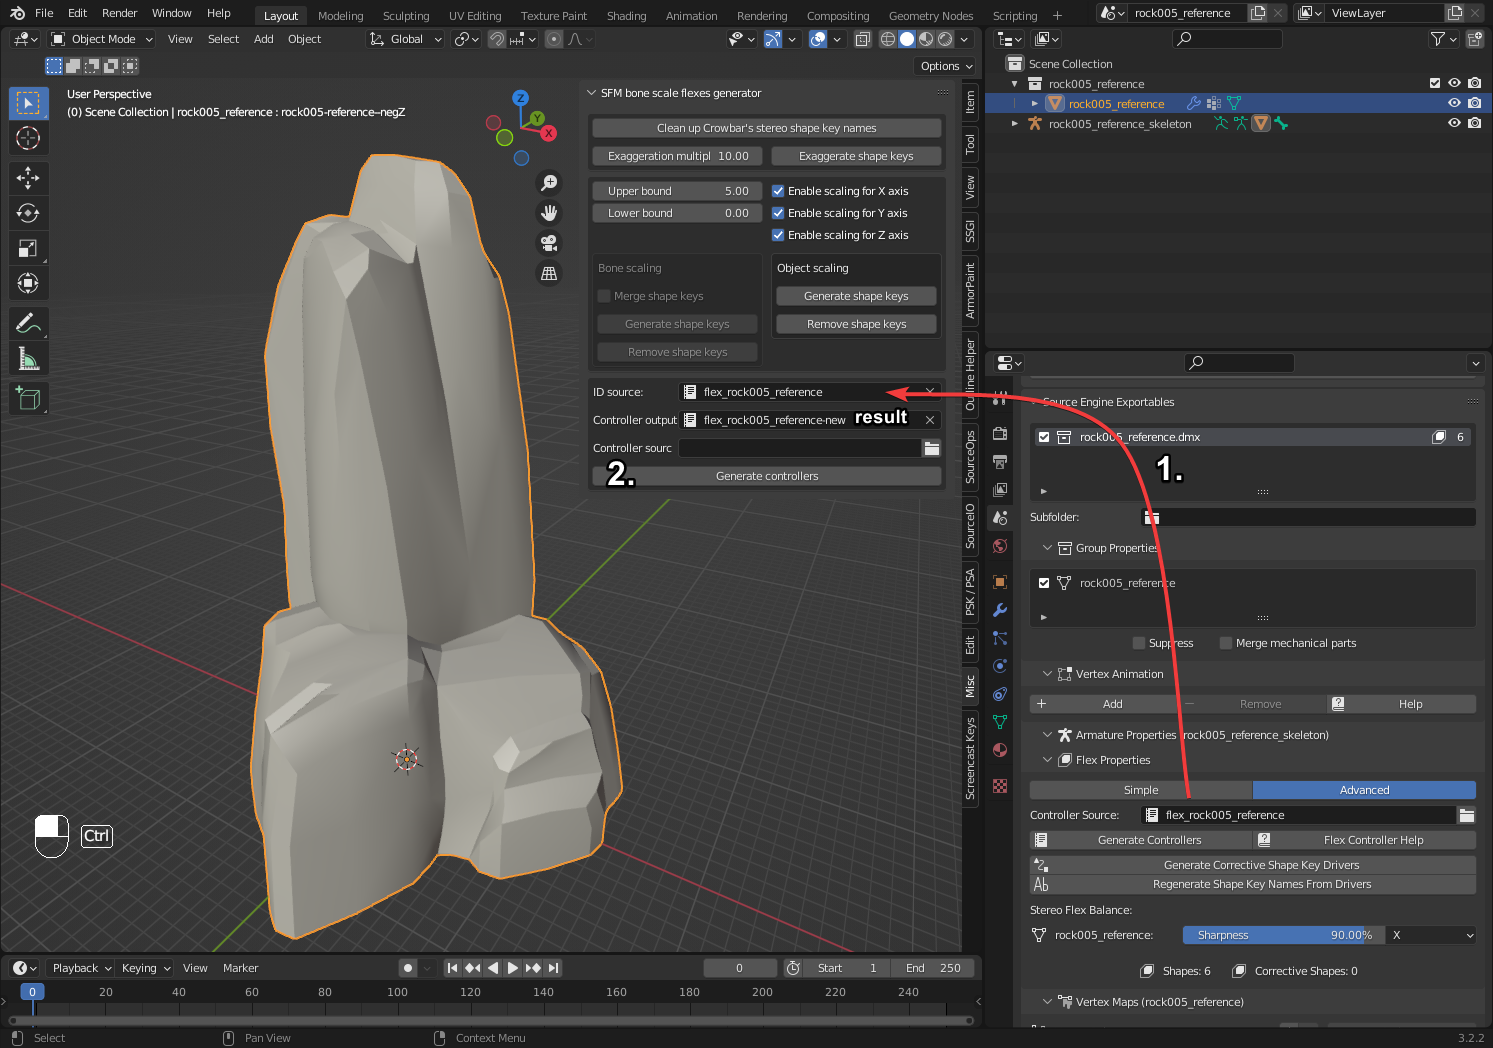
Go to the scene properties and scroll down to the "Source Engine Exportables" section. With the needed model collection selected, switch the flex properties to "Advanced" and click "Generate Controllers". This will create a new text file inside Blender. Select the newly created text file as the ID source in the addon window and click "Generate controllers". This will generate another text file inside Blender.
 As a sanity check, you can compare those 2 files by opening 2 text editors inside Blender side by side. The old controller file should have 1 scaling shape key per controller, while the new one should have 2 scaling shape keys per controller.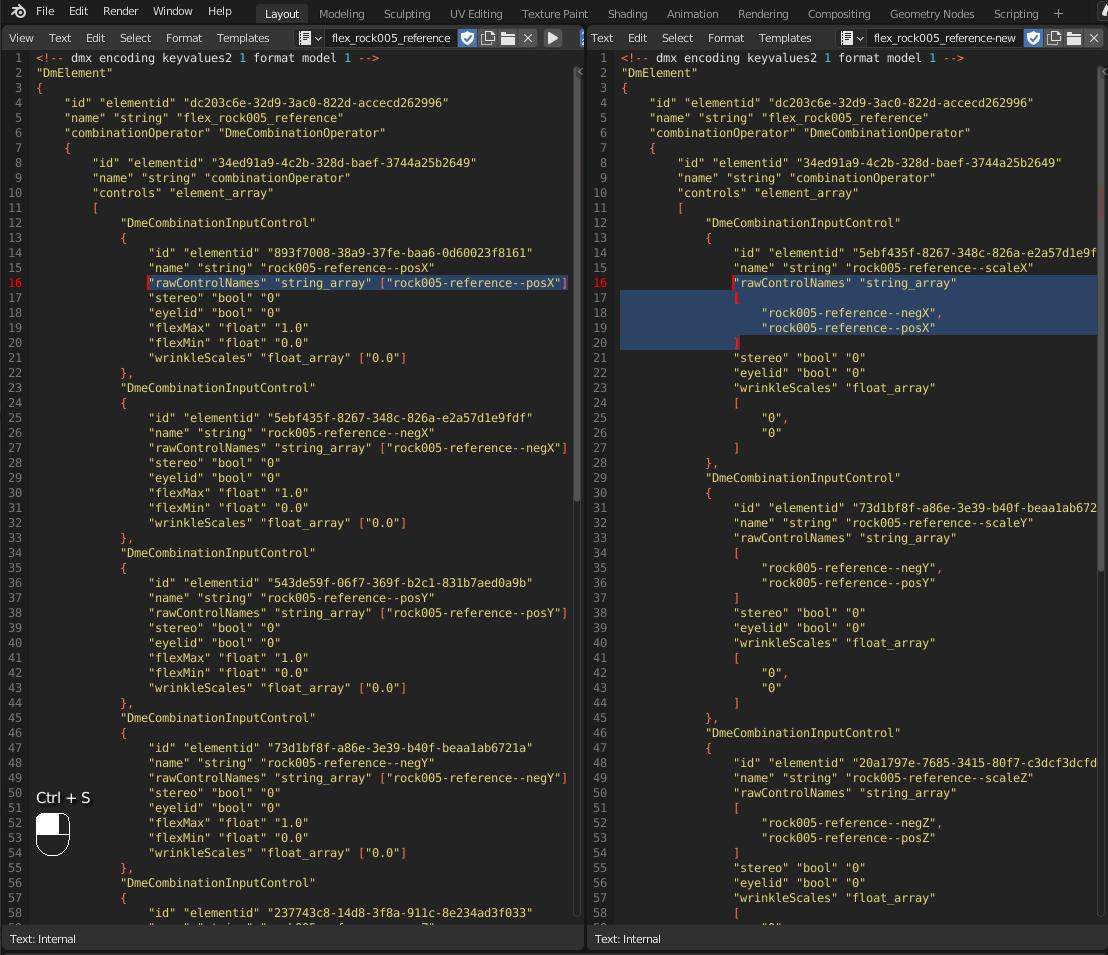
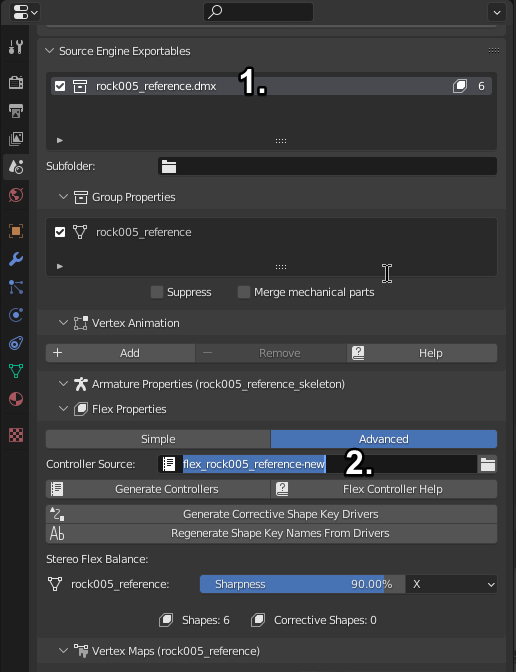
Now back in the scene properties select the model in the "Source Engine Exportables" tab and select the new controller source we've just created:
Generate new controller files when you add or remove shape keys from your model. Otherwise your controllers won't work correctly.
Exporting and compiling the model
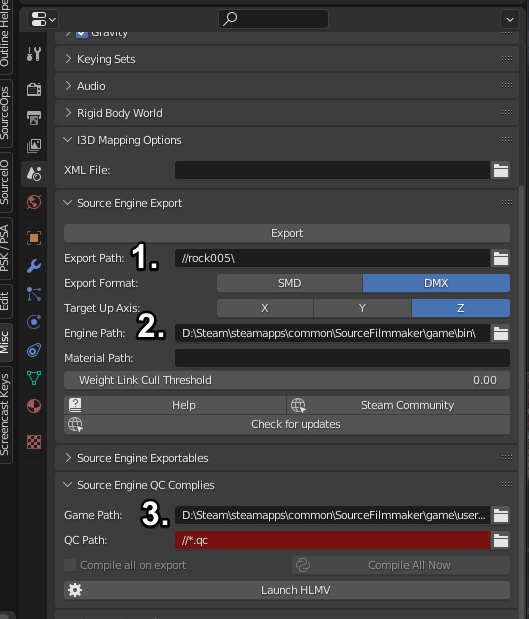
Go to the scene properties and scroll down to the "Source Engine Export" section. There you need to specify:
- The model export path - I like to export to the folder with decompiled files.
- The engine path - that's *your steam directory*\Steam\steamapps\common\SourceFilmmaker\game\bin\
- The game path - that's your usermod folder: *your steam directory*\Steam\steamapps\common\SourceFilmmaker\game\usermod\
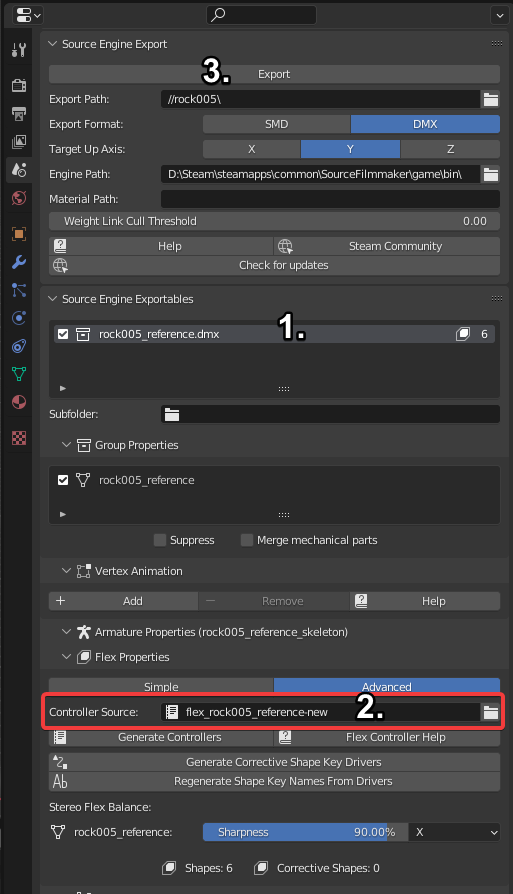 In the "Source Engine Exportables" panel, select the model. Make sure that the new controller is selected in the "Controller Source" field. Hit the "Export" button.
While the model is exporting, make a copy of the .qc file that was created by Crowbar during decompilation. Open with notepad, or any other text editing software of your liking (I recommend notepad++[notepad-plus-plus.org]).
In the "Source Engine Exportables" panel, select the model. Make sure that the new controller is selected in the "Controller Source" field. Hit the "Export" button.
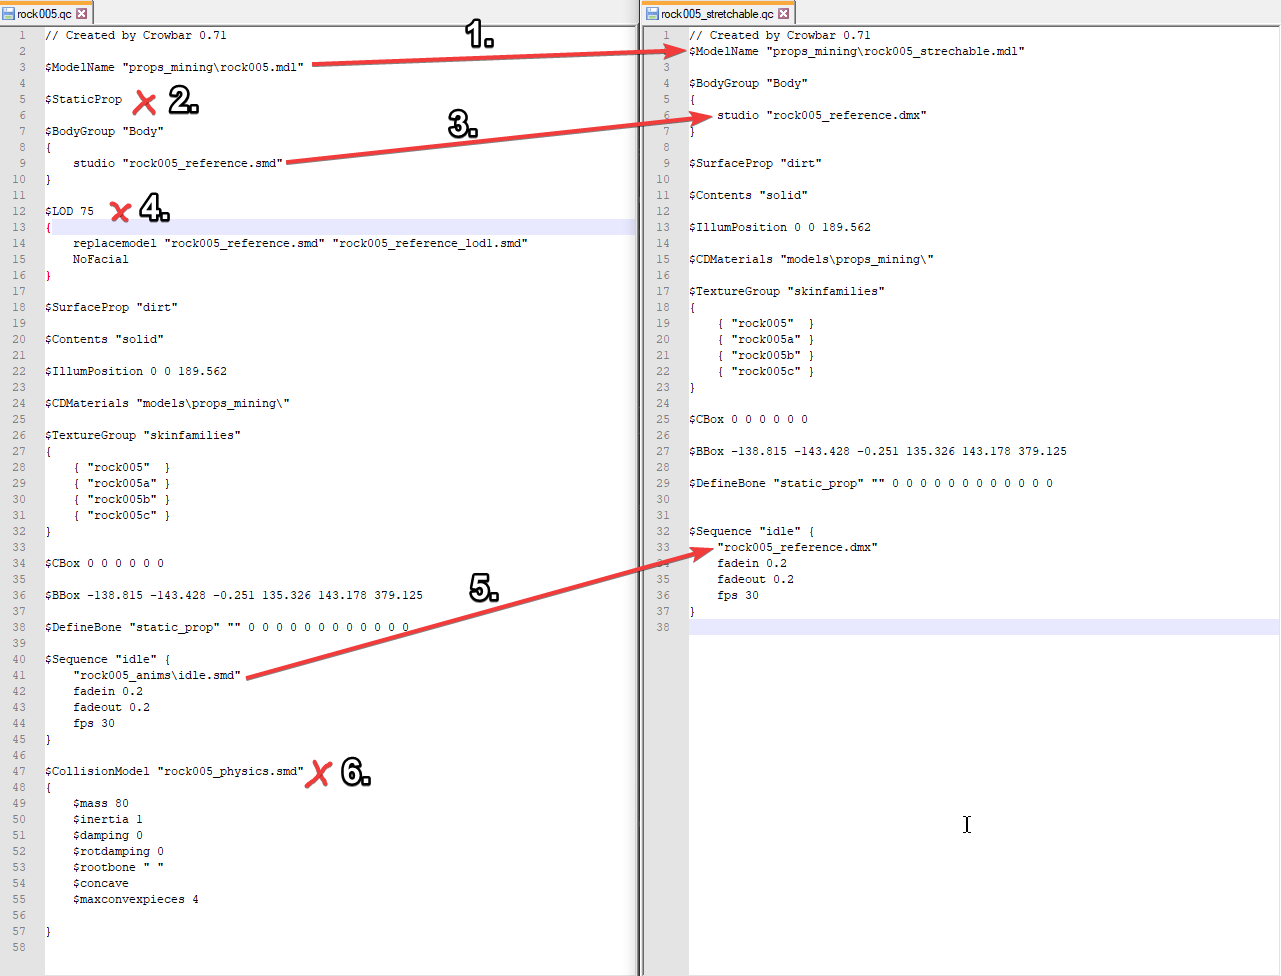
While the model is exporting, make a copy of the .qc file that was created by Crowbar during decompilation. Open with notepad, or any other text editing software of your liking (I recommend notepad++[notepad-plus-plus.org]).Here you need to:
- Change model's name (yeah I know there's a typo on the screenshot I'm not changing it now ♥♥♥♥ you),
- Remove the $StaticProp command (if present),
- Remove LODs (if you haven't made the LOD models),
- Update all references to the model that we've been working with the one we've just exported,
- Change the "idle" (it might also be called "ref") sequence file to the newly exported dmx model,
- Remove collision models.
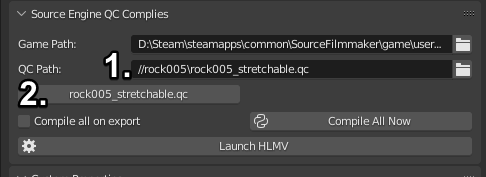
Now back in Blender under the "Source Engine QC Complies" tab we can select the path to our newly created .qc file and compile it. And now the model is done! It should now appear in the usermod's "models" folder on specified in the qc file path.
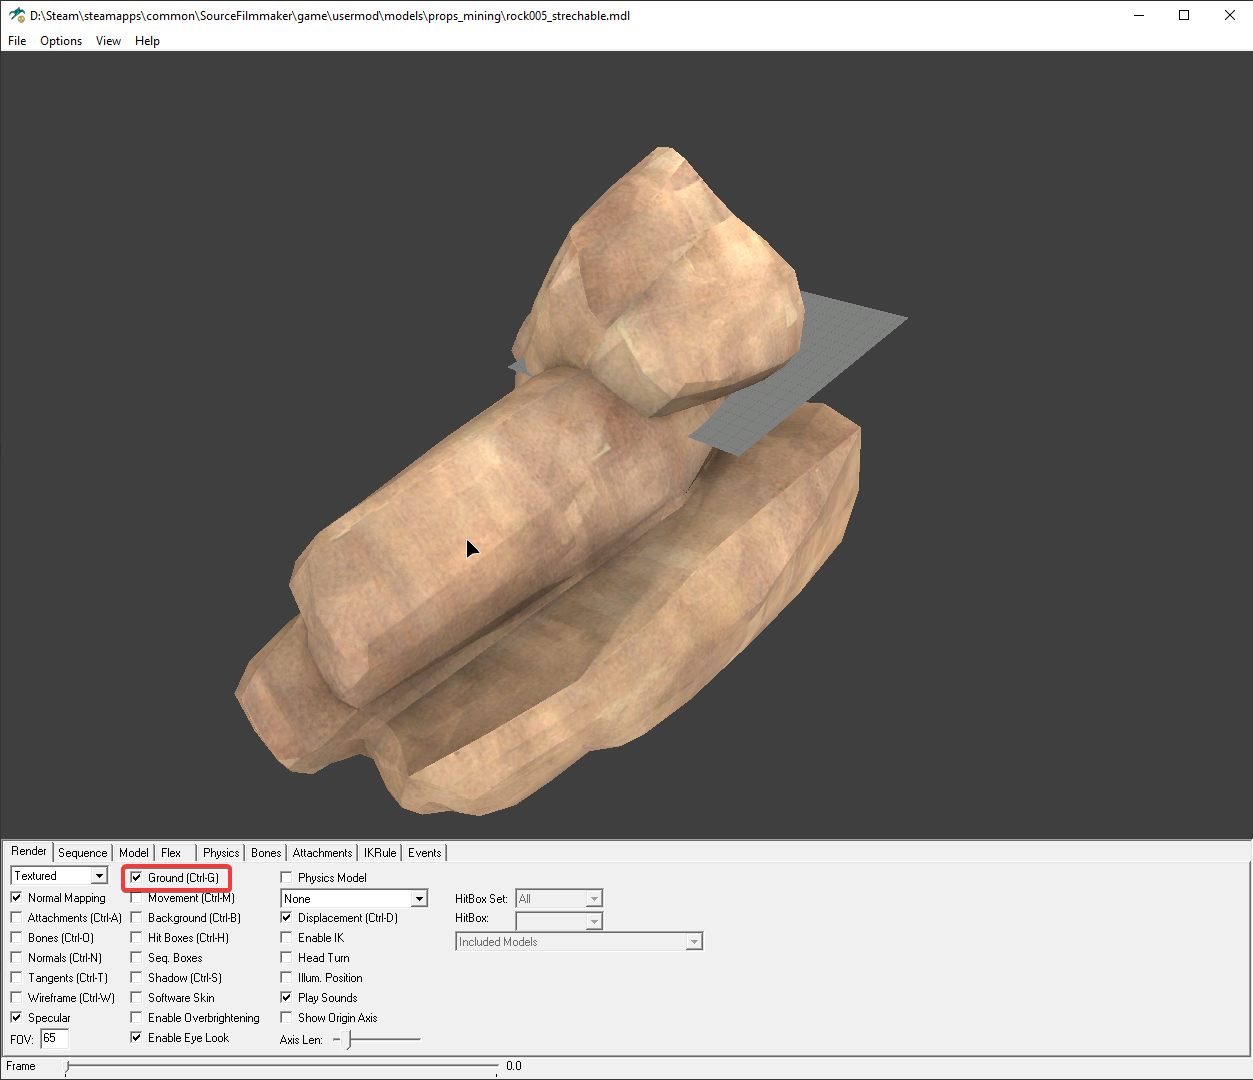 You can quickly preview it using HLMV. To do it launch HLMV from the same tab and load the model there by selecting File -> Load Model. Under the Render tab you can enable Ground display to see if the model is oriented correctly and under the Flex tab you can check if your sliders work properly.
If it's not oriented correctly (like in my case), adding the following command to the .qc file and recompiling the model should help:
You can quickly preview it using HLMV. To do it launch HLMV from the same tab and load the model there by selecting File -> Load Model. Under the Render tab you can enable Ground display to see if the model is oriented correctly and under the Flex tab you can check if your sliders work properly.
If it's not oriented correctly (like in my case), adding the following command to the .qc file and recompiling the model should help: And here's the final result:
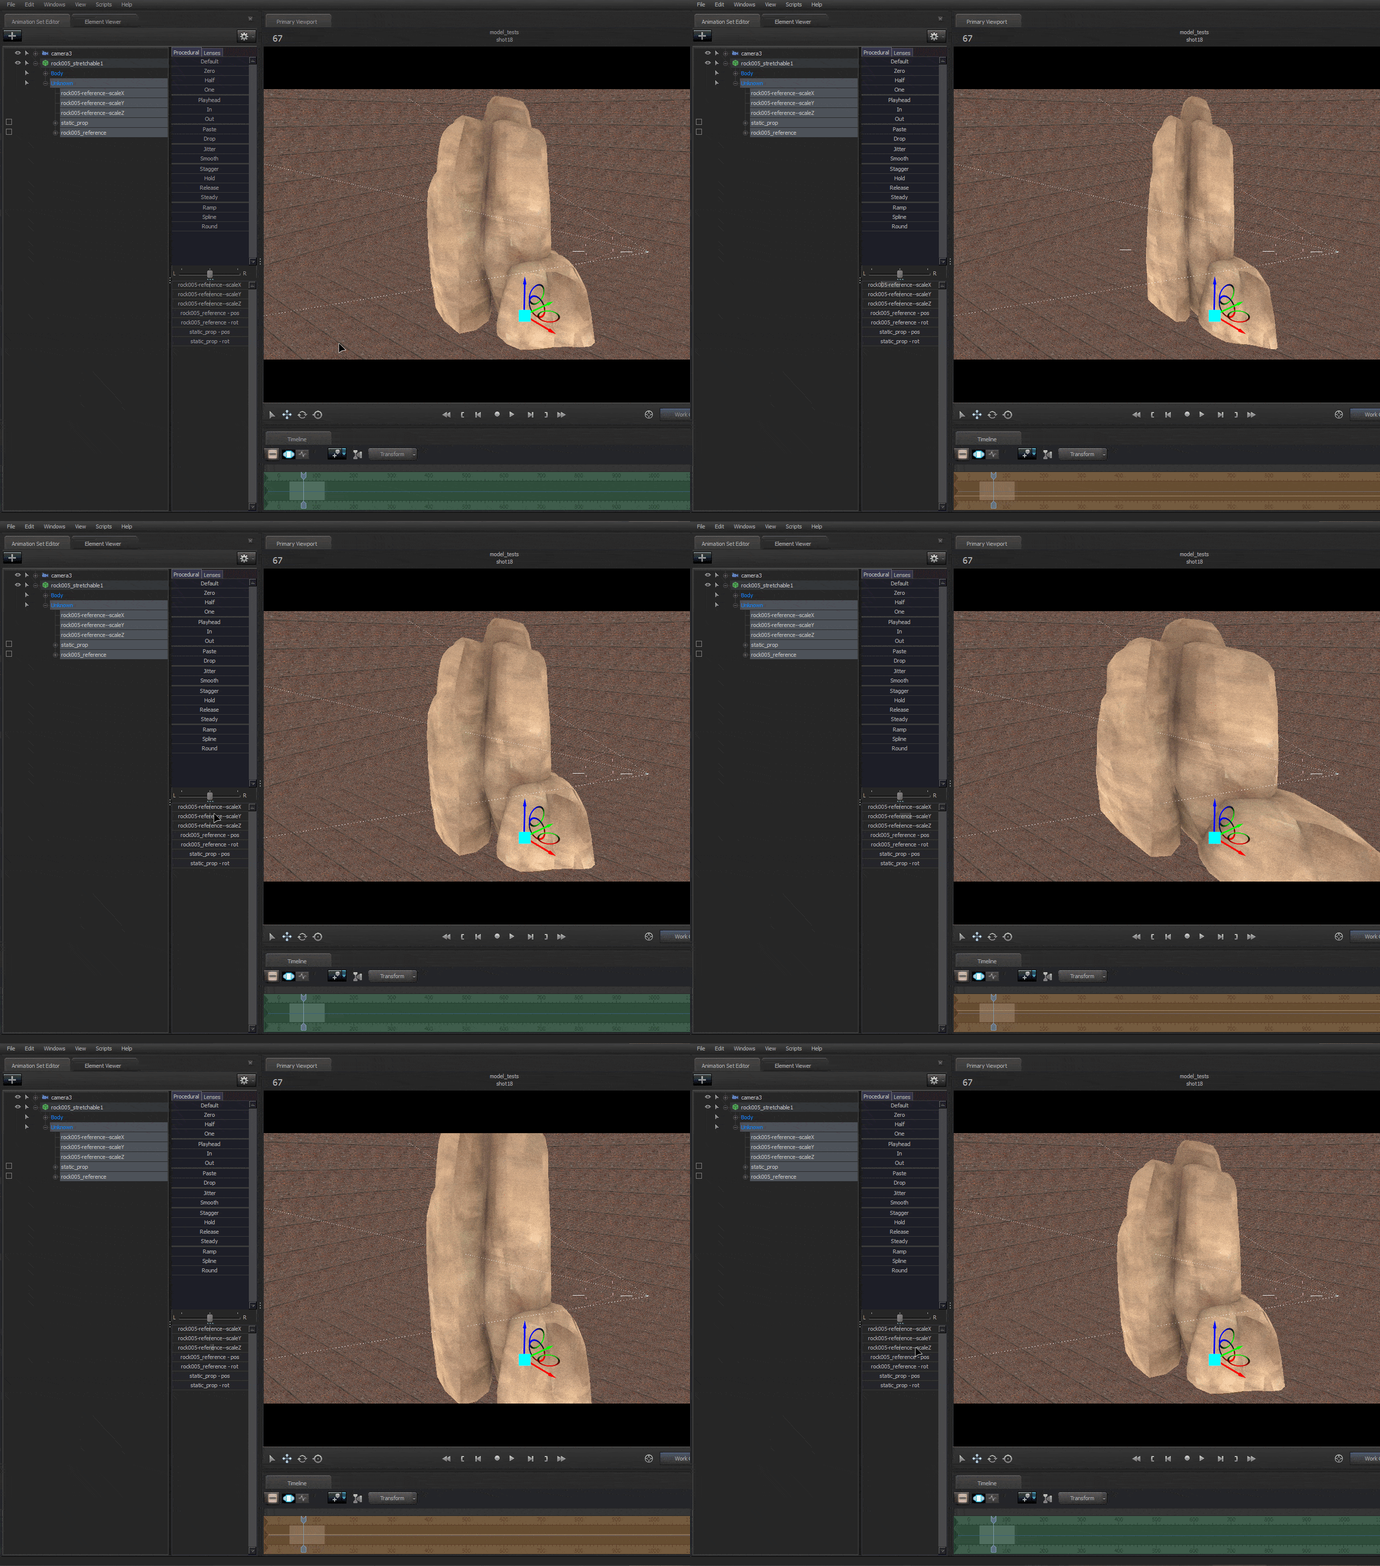
I've later noticed that this specific model has the "static_prop" bone that doesn't do anything. That's because I accidentally deleted model's armature in Blender before exporting, so the $definebone command in the qc file referenced a bone that didn't actually exist. If you followed this guide step by step this shouldn't happen to your model.
Bonus: negative scaling
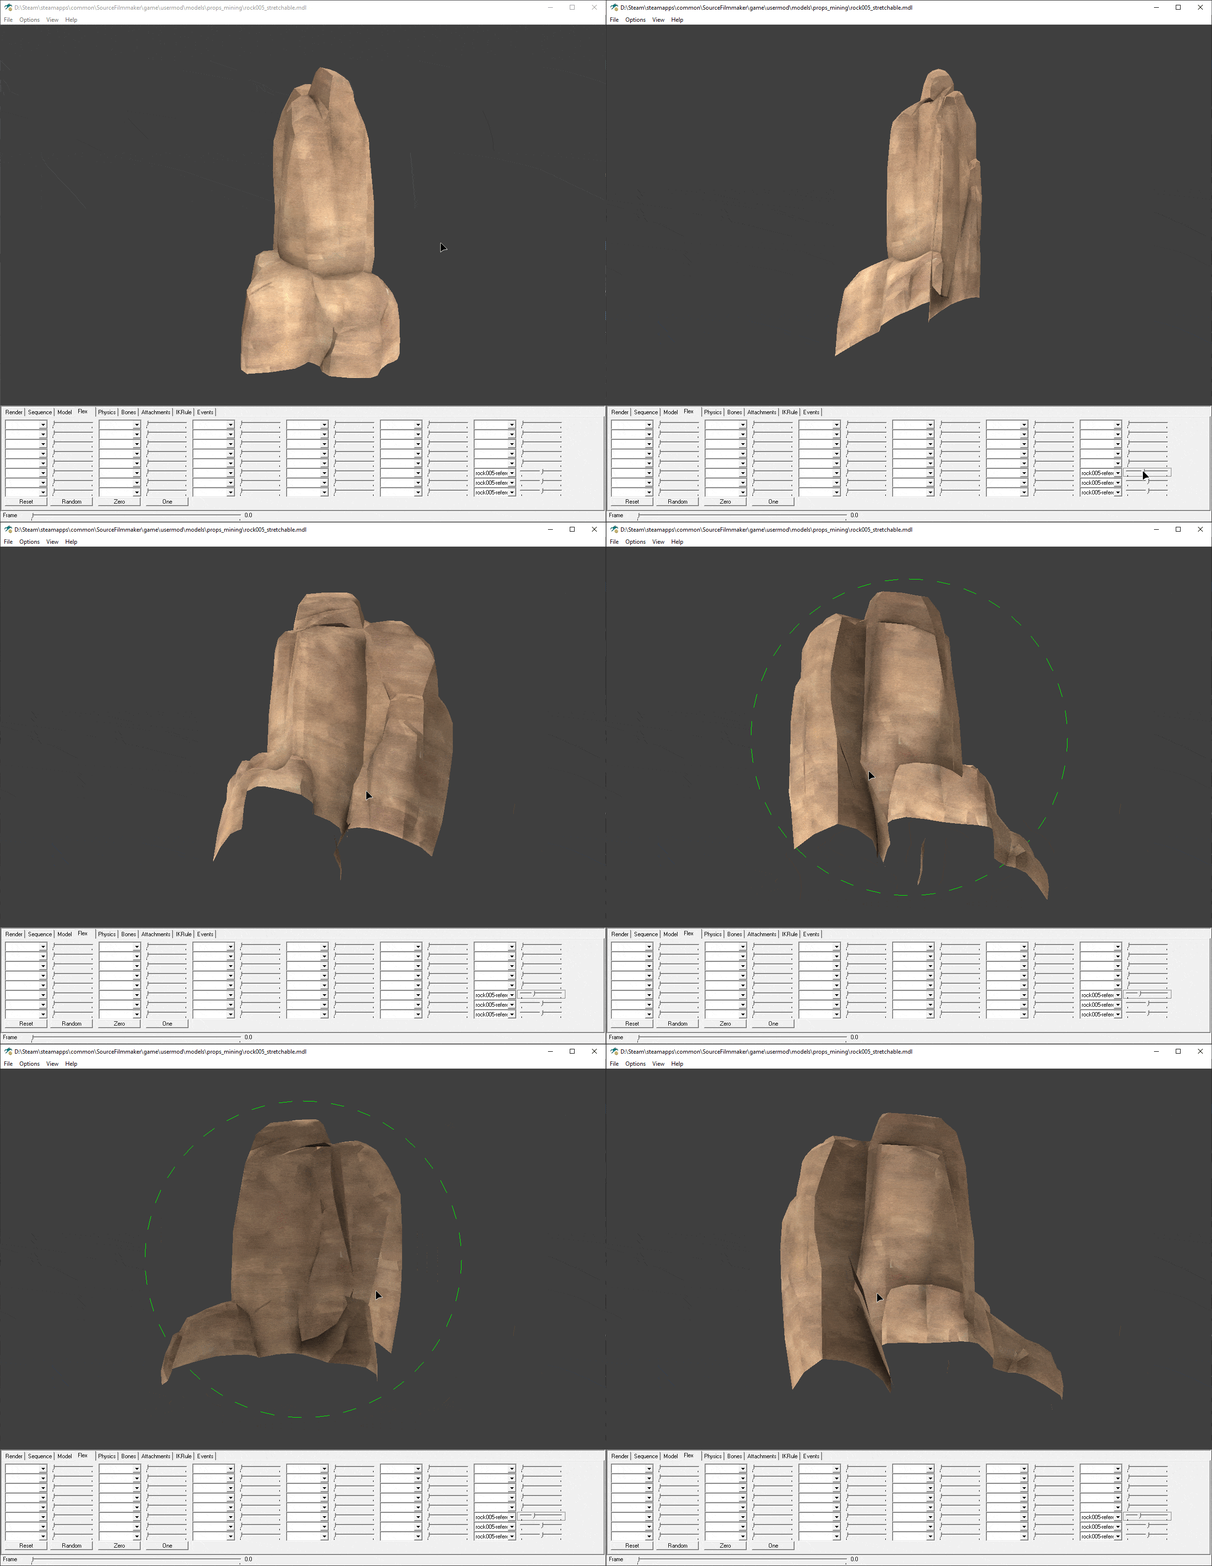
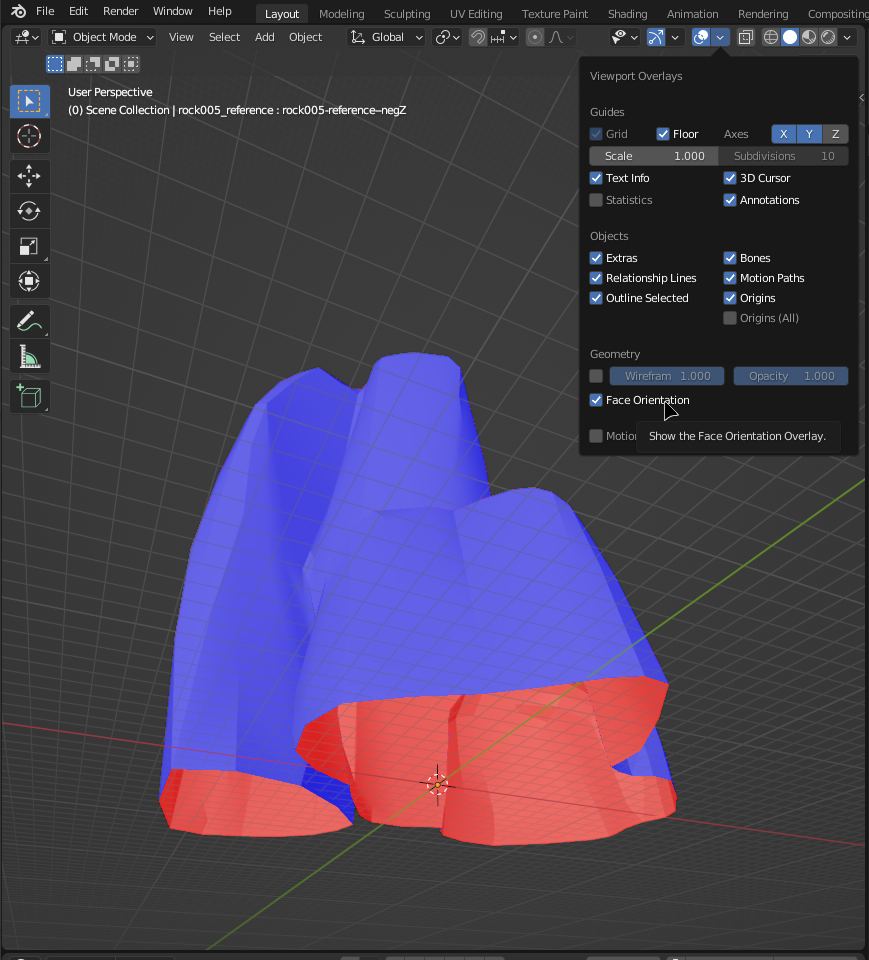 That's because each models face has an orientation to it. You can visualize it in Blender:
Source engine hides the backs of models' faces by default - this is called Backface Culling. You can disable it in the model's materials by adding the following command to all .vmt materials the model uses:
That's because each models face has an orientation to it. You can visualize it in Blender:
Source engine hides the backs of models' faces by default - this is called Backface Culling. You can disable it in the model's materials by adding the following command to all .vmt materials the model uses:The better way to do this is to make a copy of the mesh and invert orientation of it's faces, so we have a mesh that correctly receives lightning when the model isn't inverted, and a mesh that correctly receives lighting when the model is inverted.
You can easily do this by using the solidify modifier in Blender. Don't forget to uncheck the Rim Fill option, otherwise you'll get weird shading along the model's edges. You don't need to apply it, Blender Source Tools will do that for you when you export the model.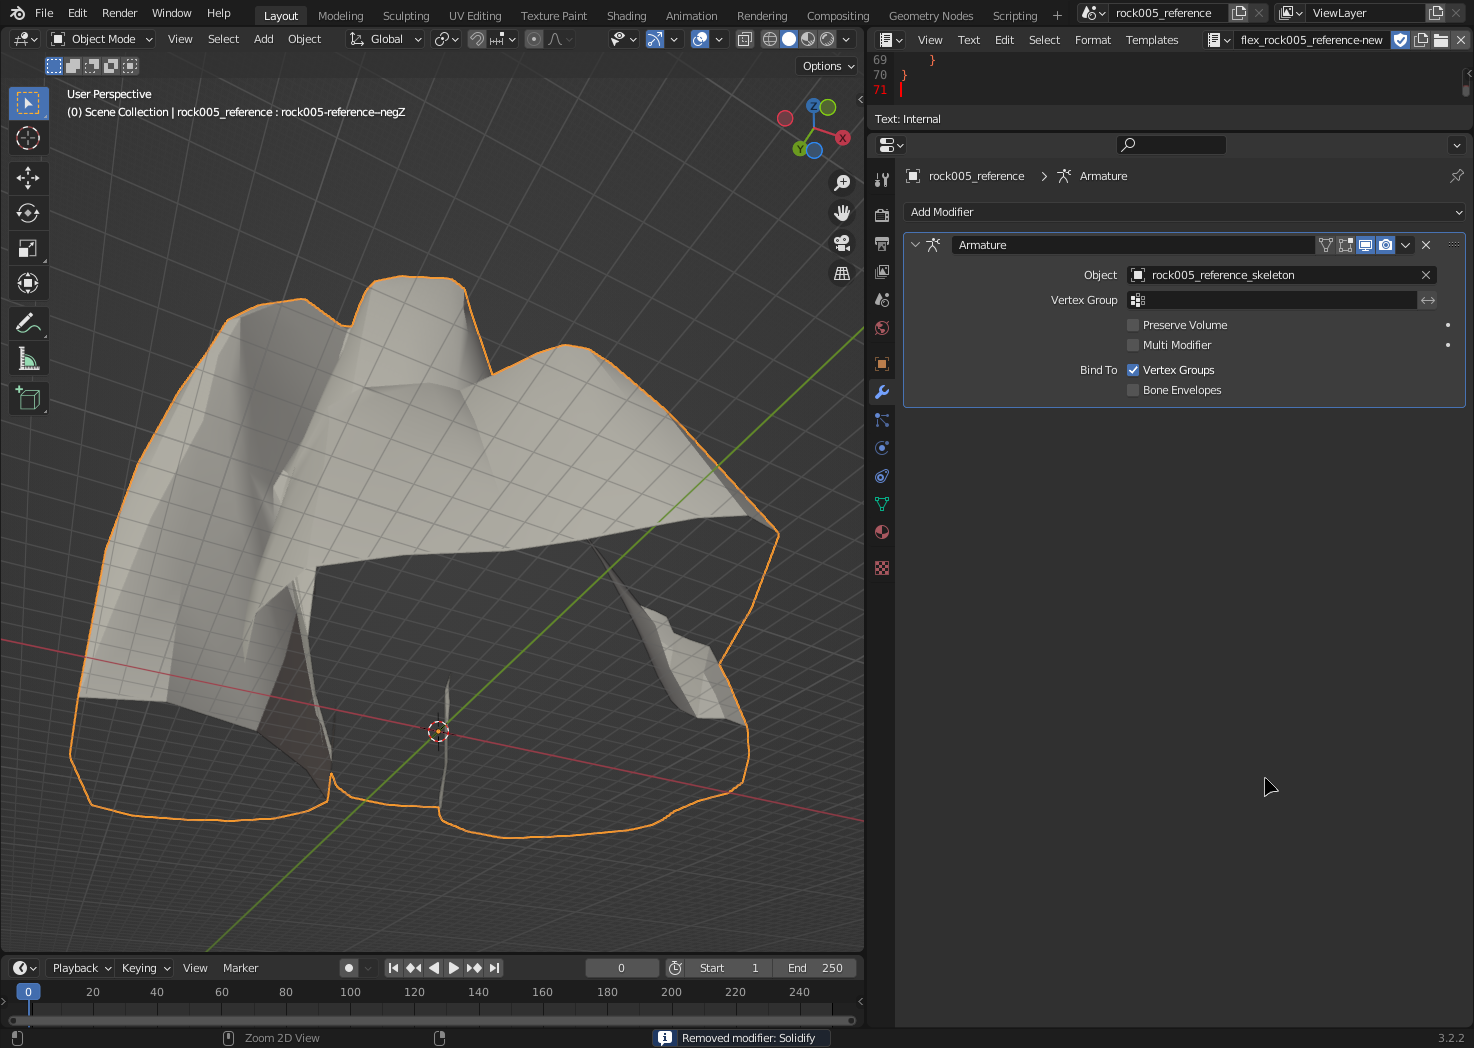
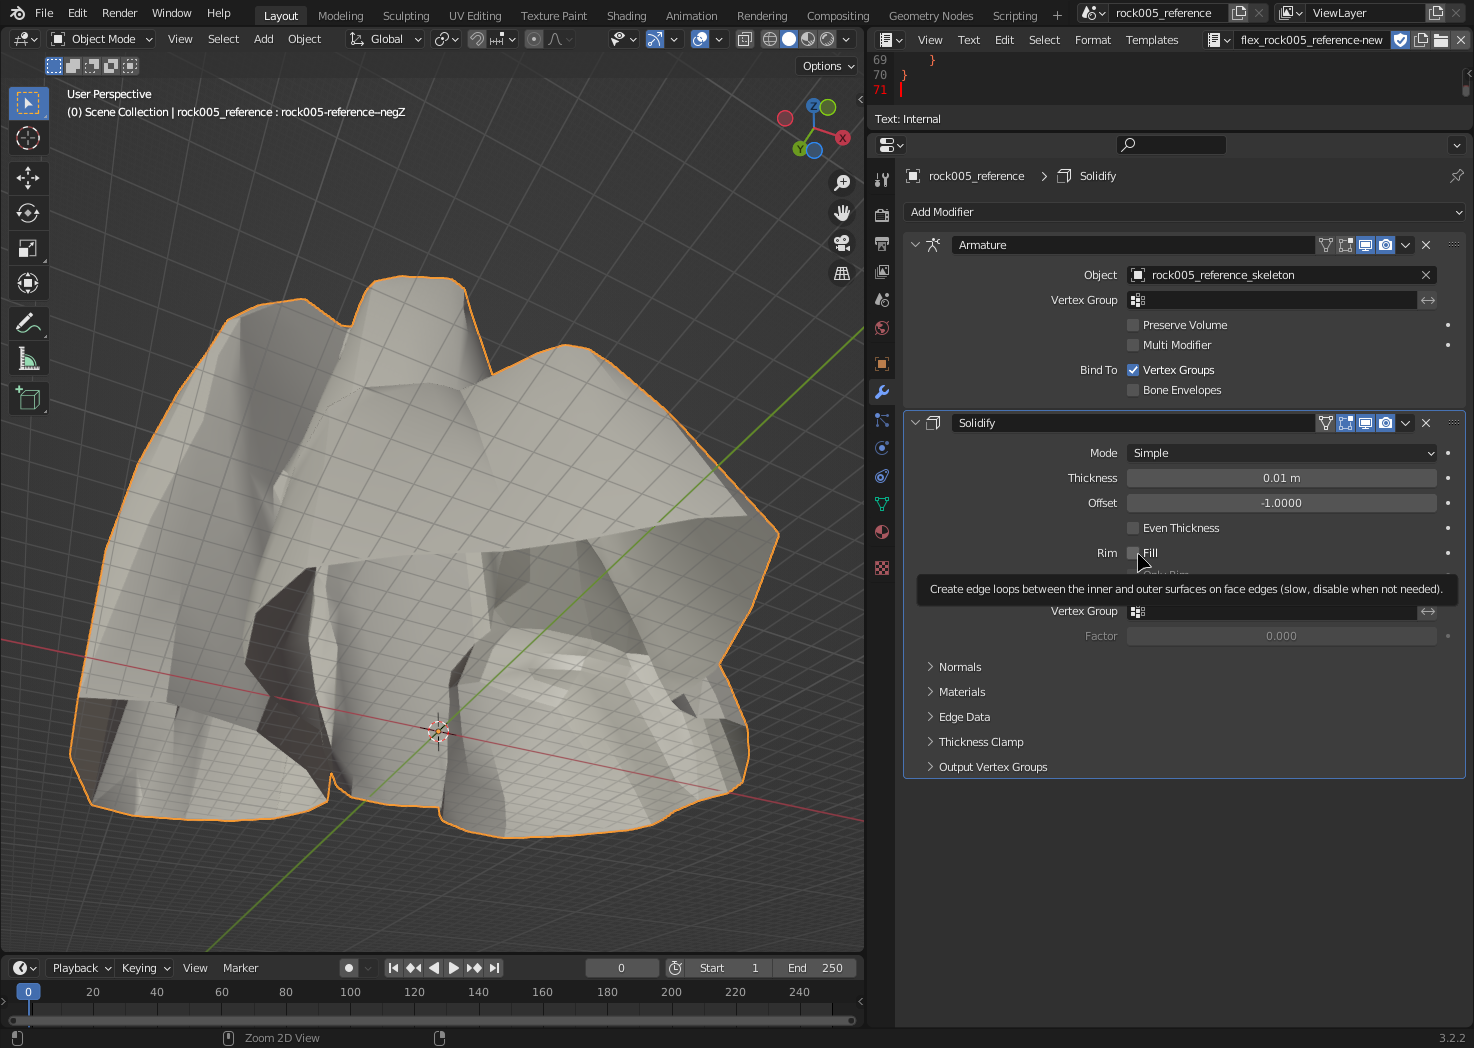
Now you just need to re-export and re-compile the model,
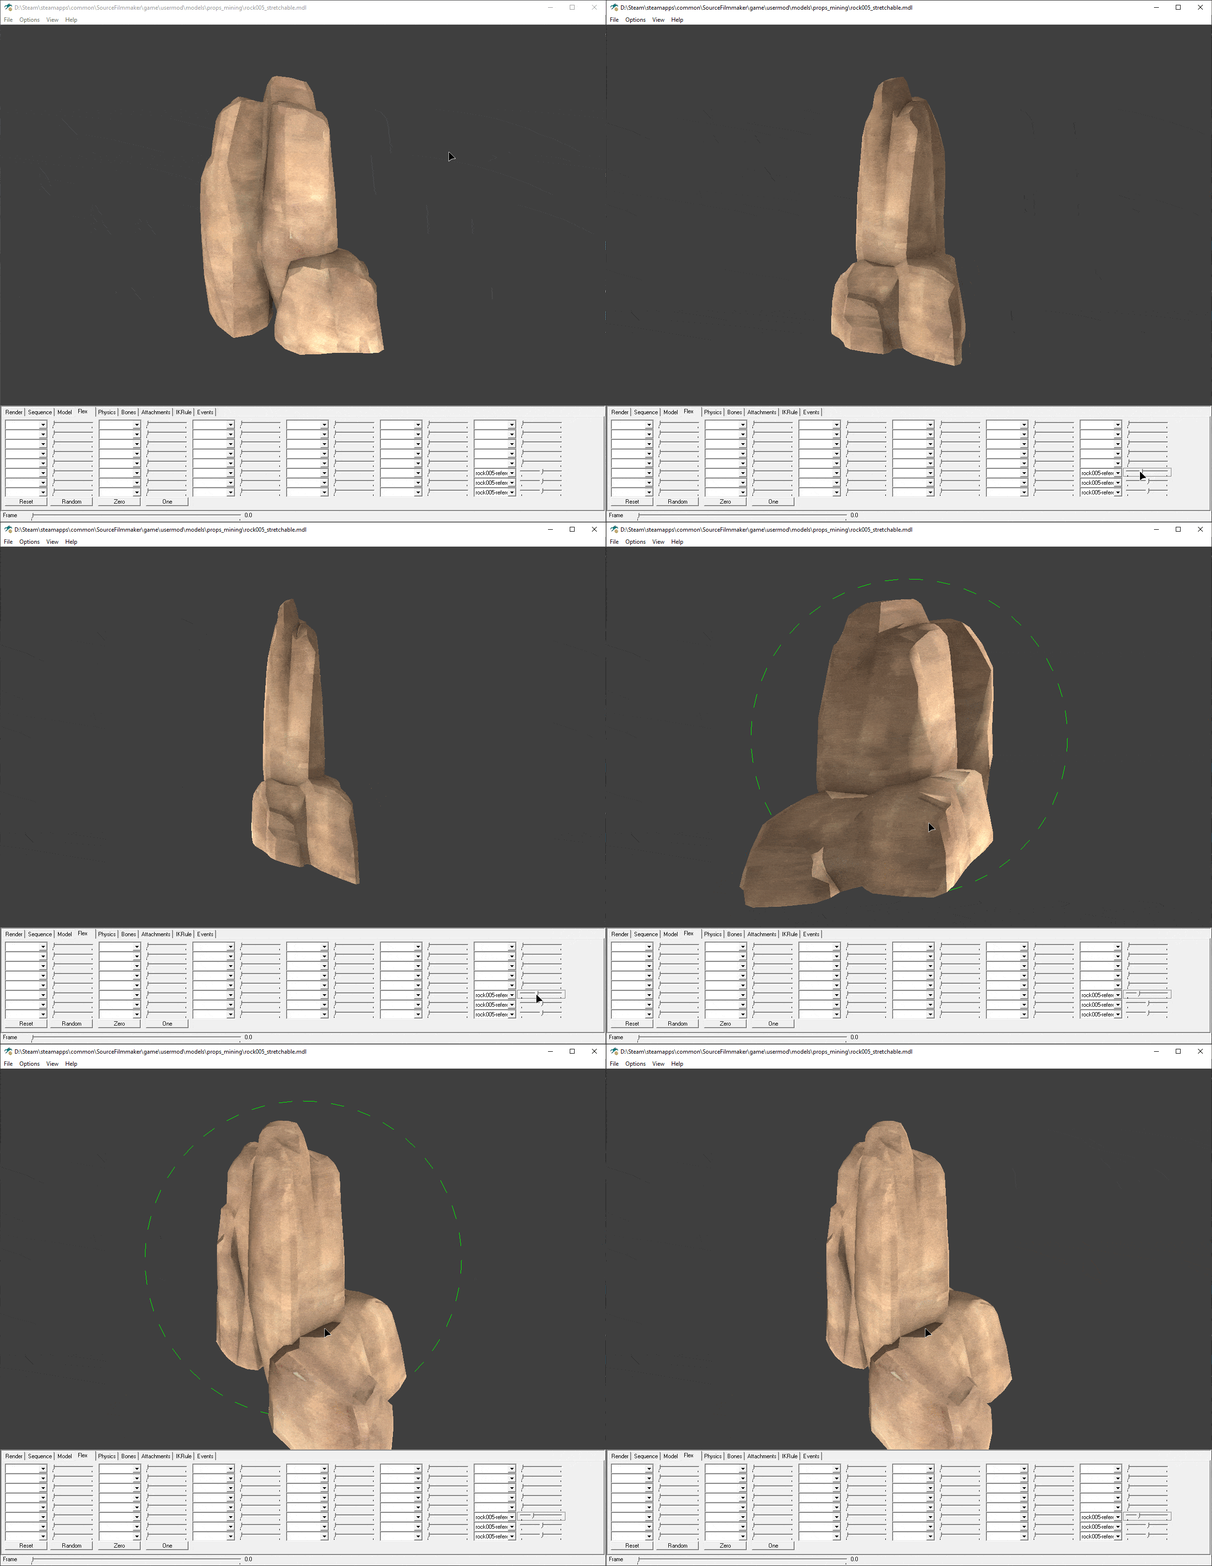
This might not work as well for more complicated models as it did for this one, you'll have to experiment.
Making stretchable cosmetics
... or any other model that has a skeleton.
Now, before we proceed I want you to remember this number:Each axis occupies a single controller, so you can have 33 bones with scaling controllers for all axis at maximum. There are number of ways to avoid this limitation - you can skip some axis when generating shape keys, you can avoid some bones or you can split your model into several. Choose and combine these tactics so you get the most out of this limit.
I'll be using Heavy's Weight Room Warmer as an example here.
I've already covered the process of decompiling the model and importing it in Blender, so I'll skip right to the shape key generation part.
Creating bone scaling shape keys
To generate bone scaling shape keys, you need to
- Make sure no shape keys are active and all bones are in their rest positions.
- Select the model
- Select the armature while holding the shift key
- Go into Posing Mode by pressing Ctrl+Tab
- Select the needed bones
- Press the Generate shape keys
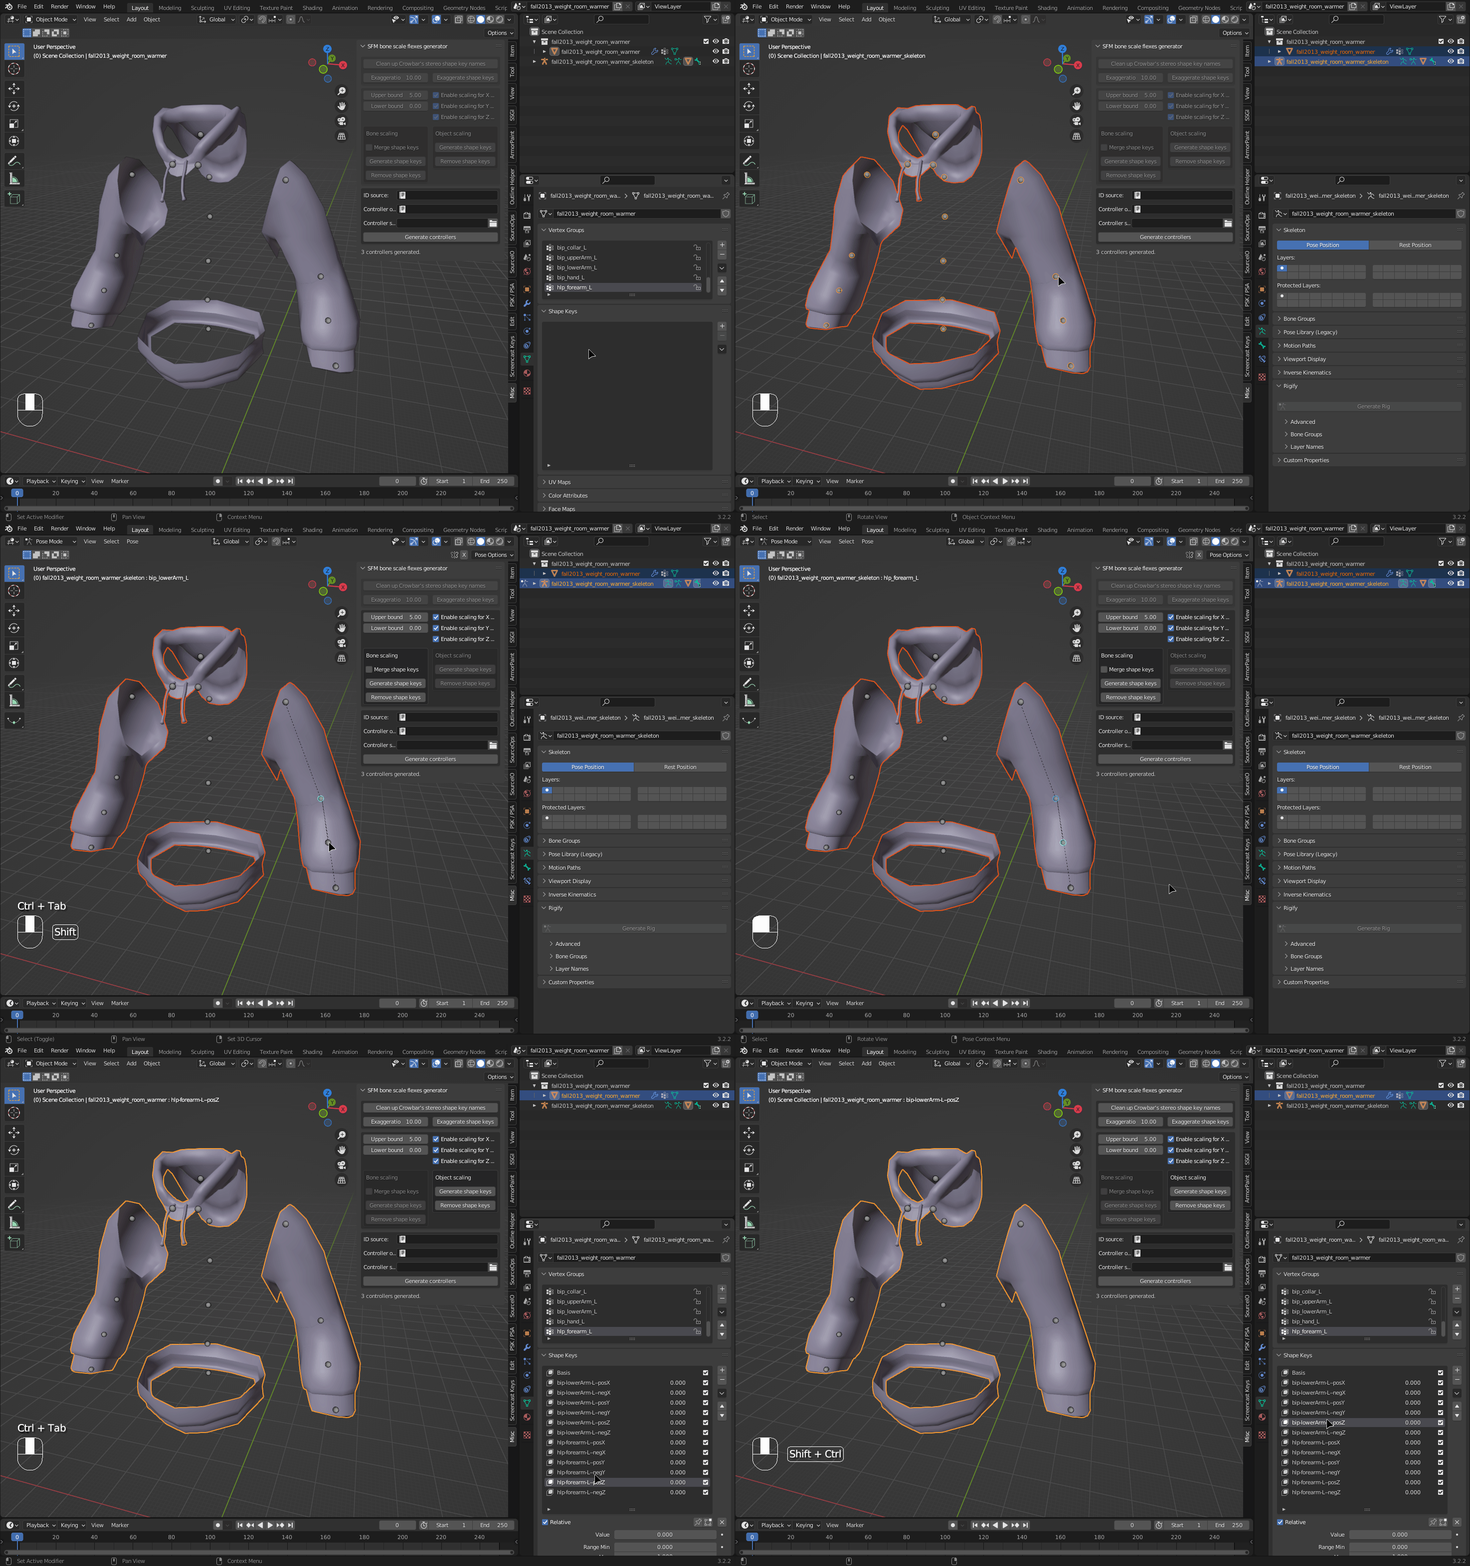
In this case all bones should have scaling controls because they all influence some parts of the mesh. But that's not always the case, so as to avoid creating unnecessary controllers you can check if the bones control any parts of the mesh by rotating them slightly by pressing the R key. To cancel the rotation you need to press RMB.
There's also an option to automatically merge scaling shape keys of selected bone into a single one. This is useful when, for example, you have multiple wrist bones and you don't want to create individual scaling controllers for all of them. The shape keys are created under name of the active bone (the last selected bone, it has a lighter outline).
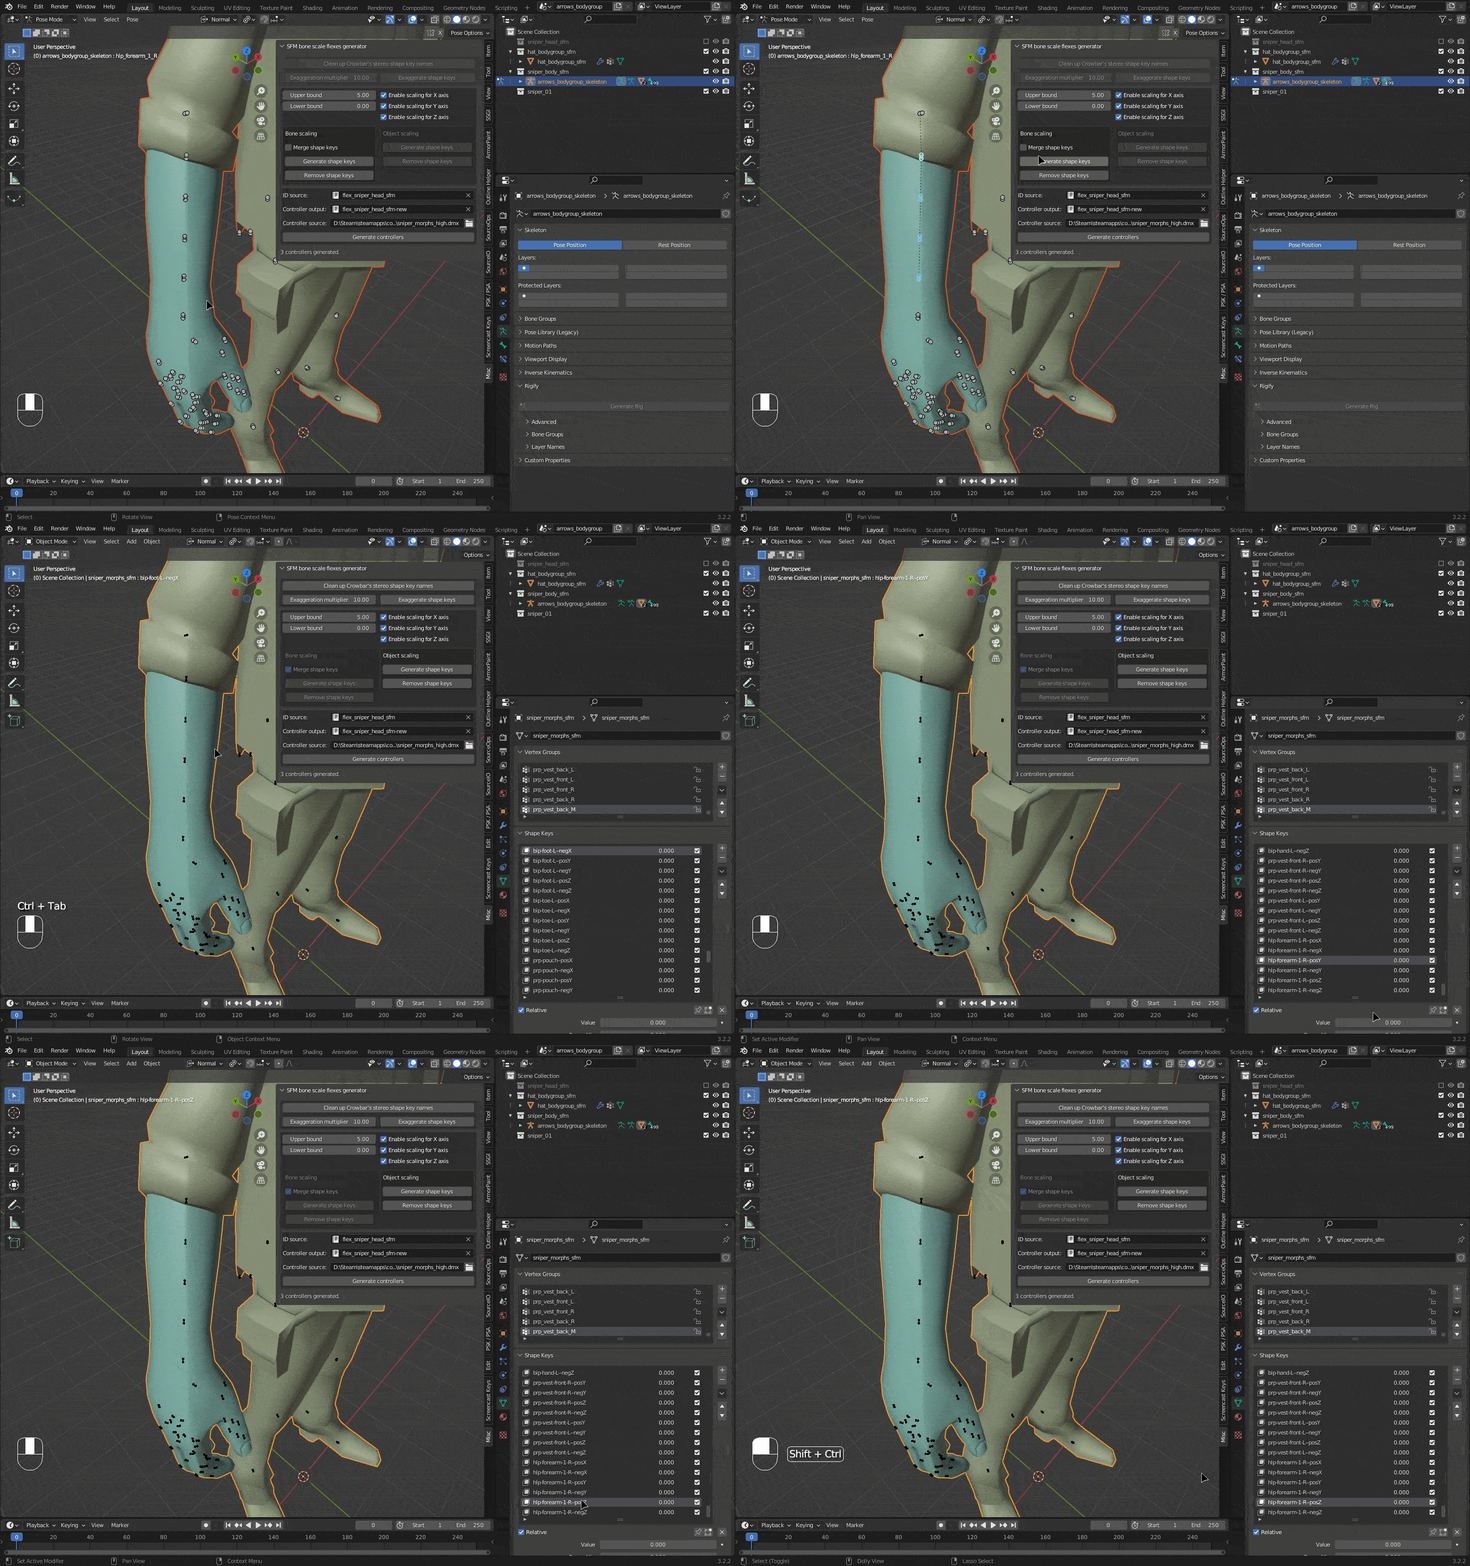
 With all needed shape keys created, we can now proceed to generate the controllers.
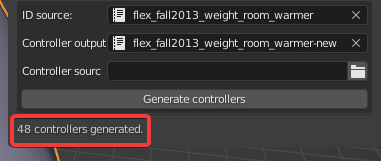
Do you still remember the number I told you to never forget? Well this knowledge comes into play now - when you generate controllers in the addon it notifies you how much there has been created from the specified file. Keep this number below 102, and if you have multiple meshes in a model (body groups, for example) with different shape keys, keep track of the total amount of controllers and keep it below 102 as well.
Exporting and compiling the model
The process of exporting and compiling the model is the same as it was in the previous section.
You only need to additionally remove all $definebone commands you might have.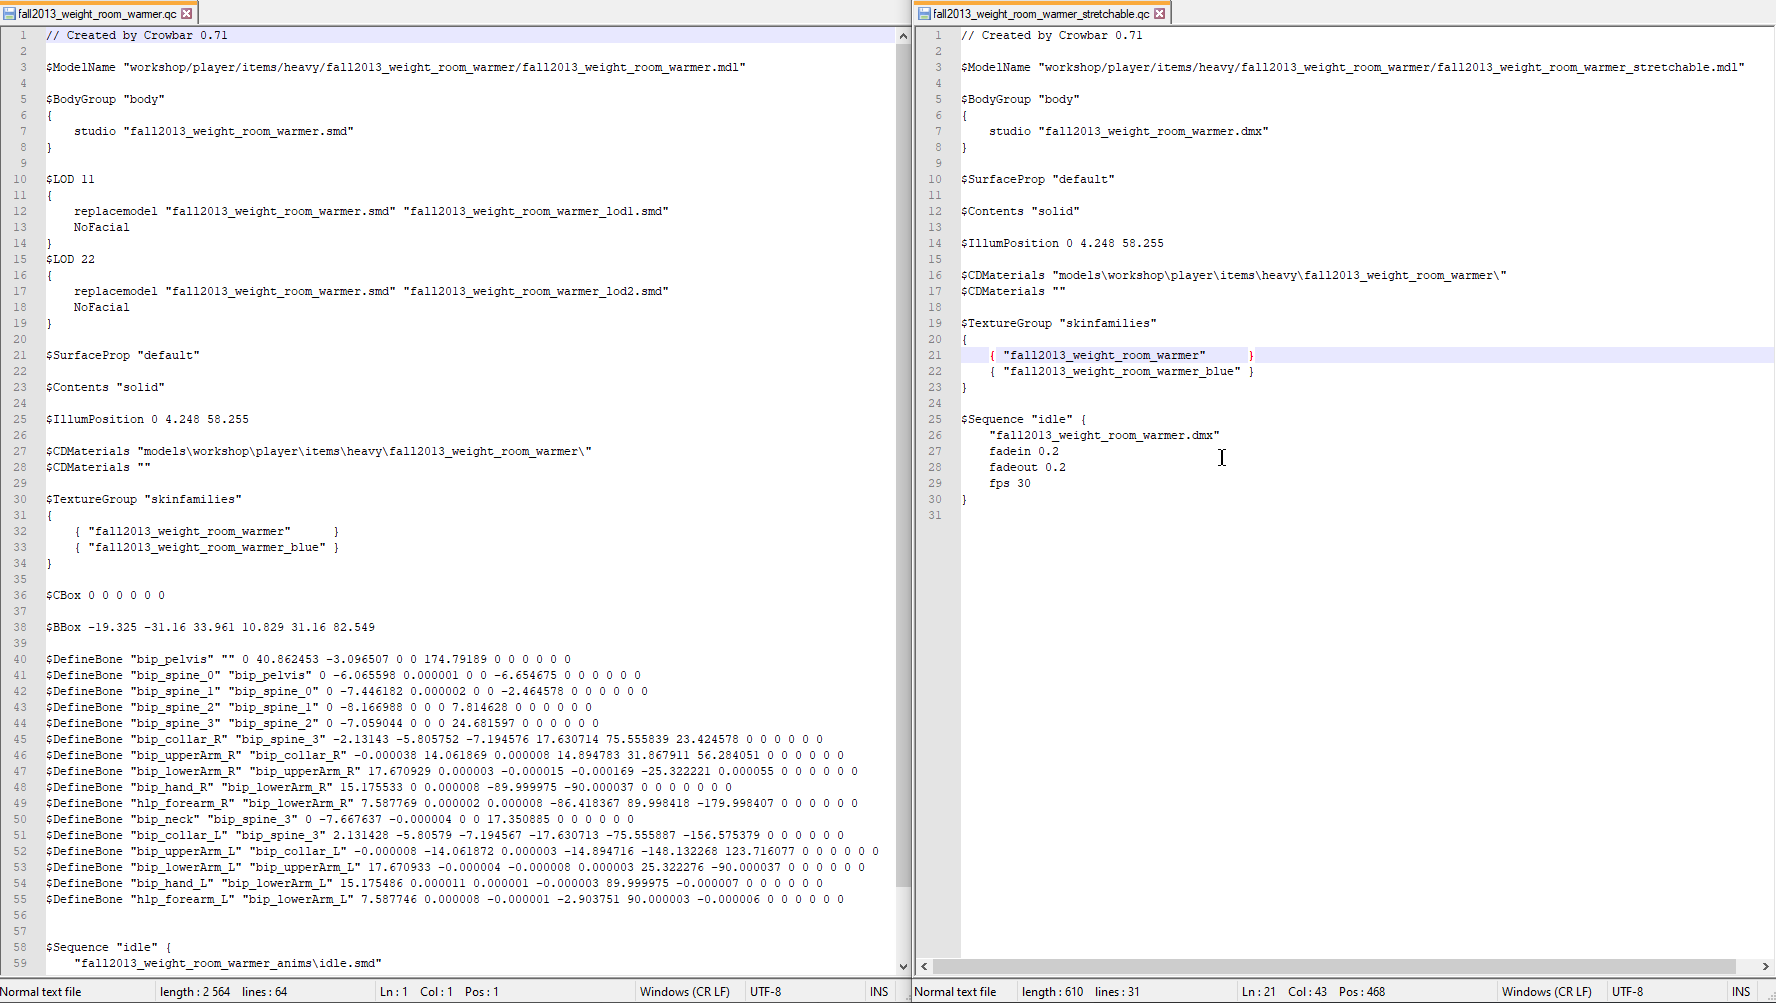
Source engine automatically removes bones that don't have anything assigned to them. If you want keep them (if you want to use them for parenting in SFM, for example), you need to add this command to the .qc file for each such bone:
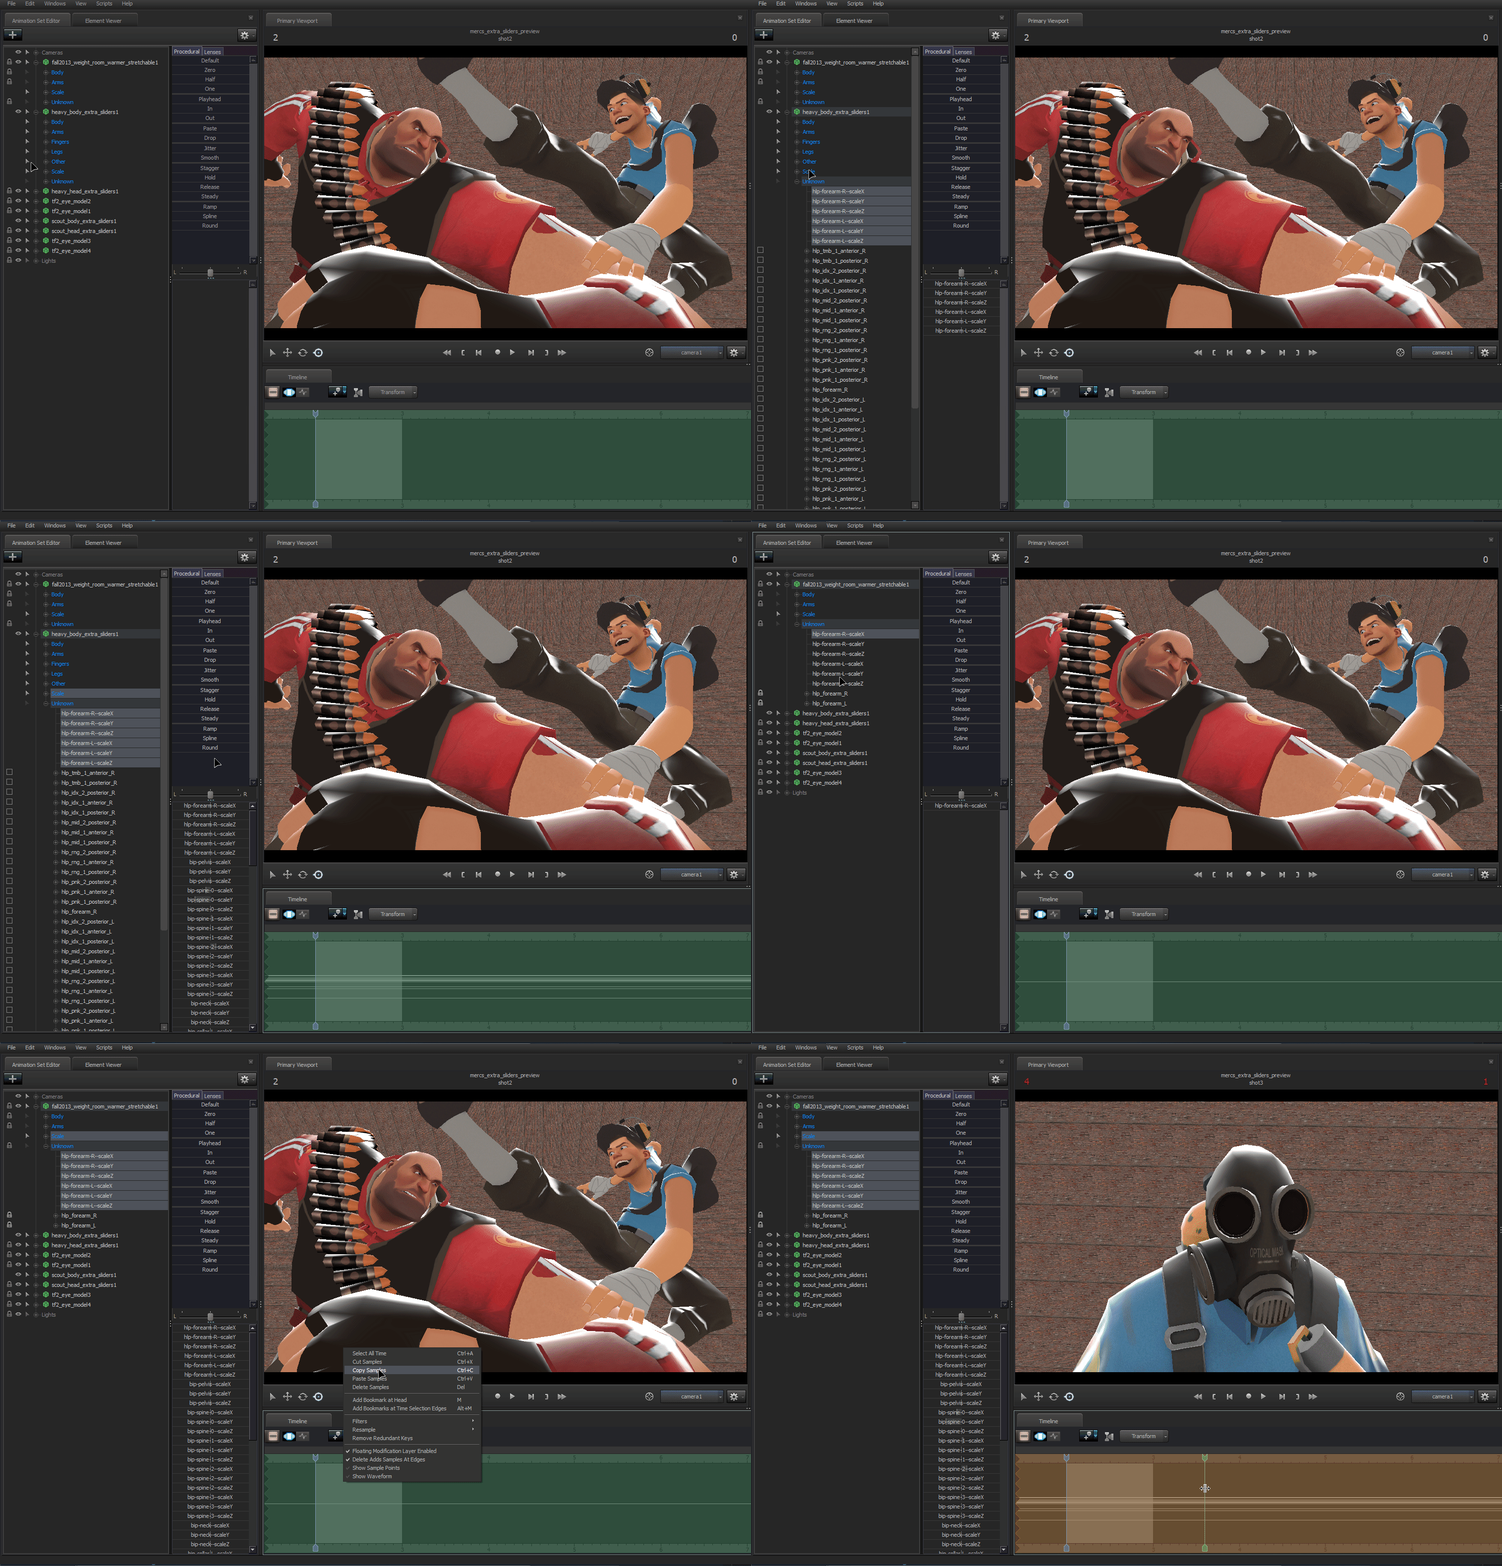
Making stretchable character models
Now we're getting into some really complicated stuff here. But if you've been following successfully so far, you should be able to follow this one without too much headache as well.
We've already covered decompilation and compilation, model importing and exporting, and all the different ways you can create scaling controllers with, so the focus of this section is working with HWM face controllers and managing body groups.
We'll be discarding some HWM features because I'm lazy we're going to make face posing very exaggerated so the model is nice and wacky, so domination rules and corrective shapes aren't really necessary and thus will be left behind. Making HWM is hard enough as it is, but if you want to dive deeper into it and restore all HWM features then Revzin's Elizabeth Pack Source Files[revzin.net] is a good place to start learning how do it.
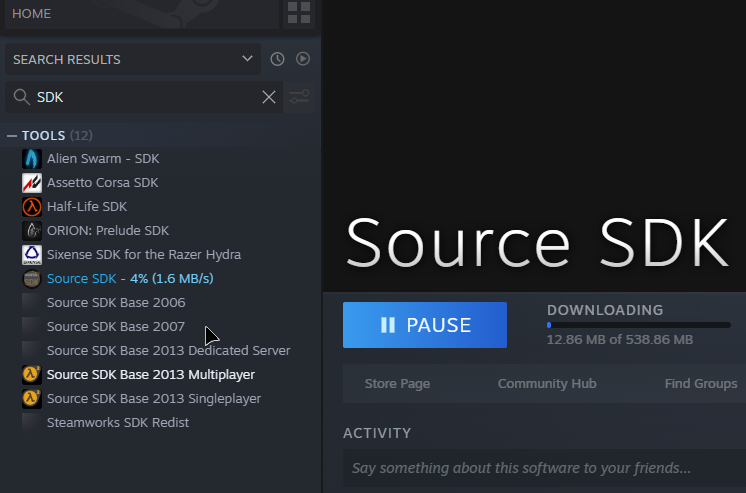
I'll be working on Crazyb2000's Miss Pauling model as an example here.
The limitations
- The aforementioned limit on the maximum amount of controllers you can have per model.
- SFM eyes are not affected by scaling controllers.
- I split head and body into separate models and don't generate scaling controllers for fingers. If the limit is still exceeded I pick minor bones to either remove a single axis controller or remove all it's controllers entirely.
- I add a shape key for hiding the eyes. Then in SFM whenever I need to scale character model's head, I hide it's eyes and replace them with an eye model.
Restoring HWM controllers
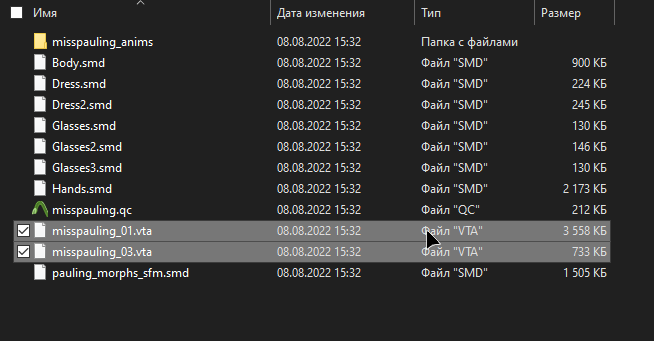 Firstly, we need to get HWM flexes in Blender. Crowbar exports them into .vta files:
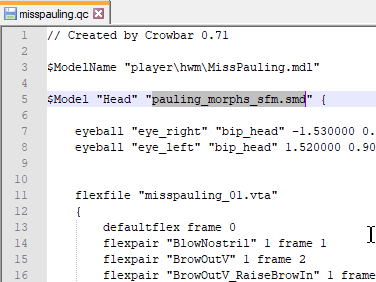 If there are multiple .vta files, choose the one that has facial flexes. It should be the one that corresponds to the head model.
Select the head model and import the .vta file that corresponds to it. Delete the vertex mesh that Blender Source Tools creates. You can check if the flexes were imported properly in the Shape Keys tab.
If there are multiple .vta files, choose the one that has facial flexes. It should be the one that corresponds to the head model.
Select the head model and import the .vta file that corresponds to it. Delete the vertex mesh that Blender Source Tools creates. You can check if the flexes were imported properly in the Shape Keys tab.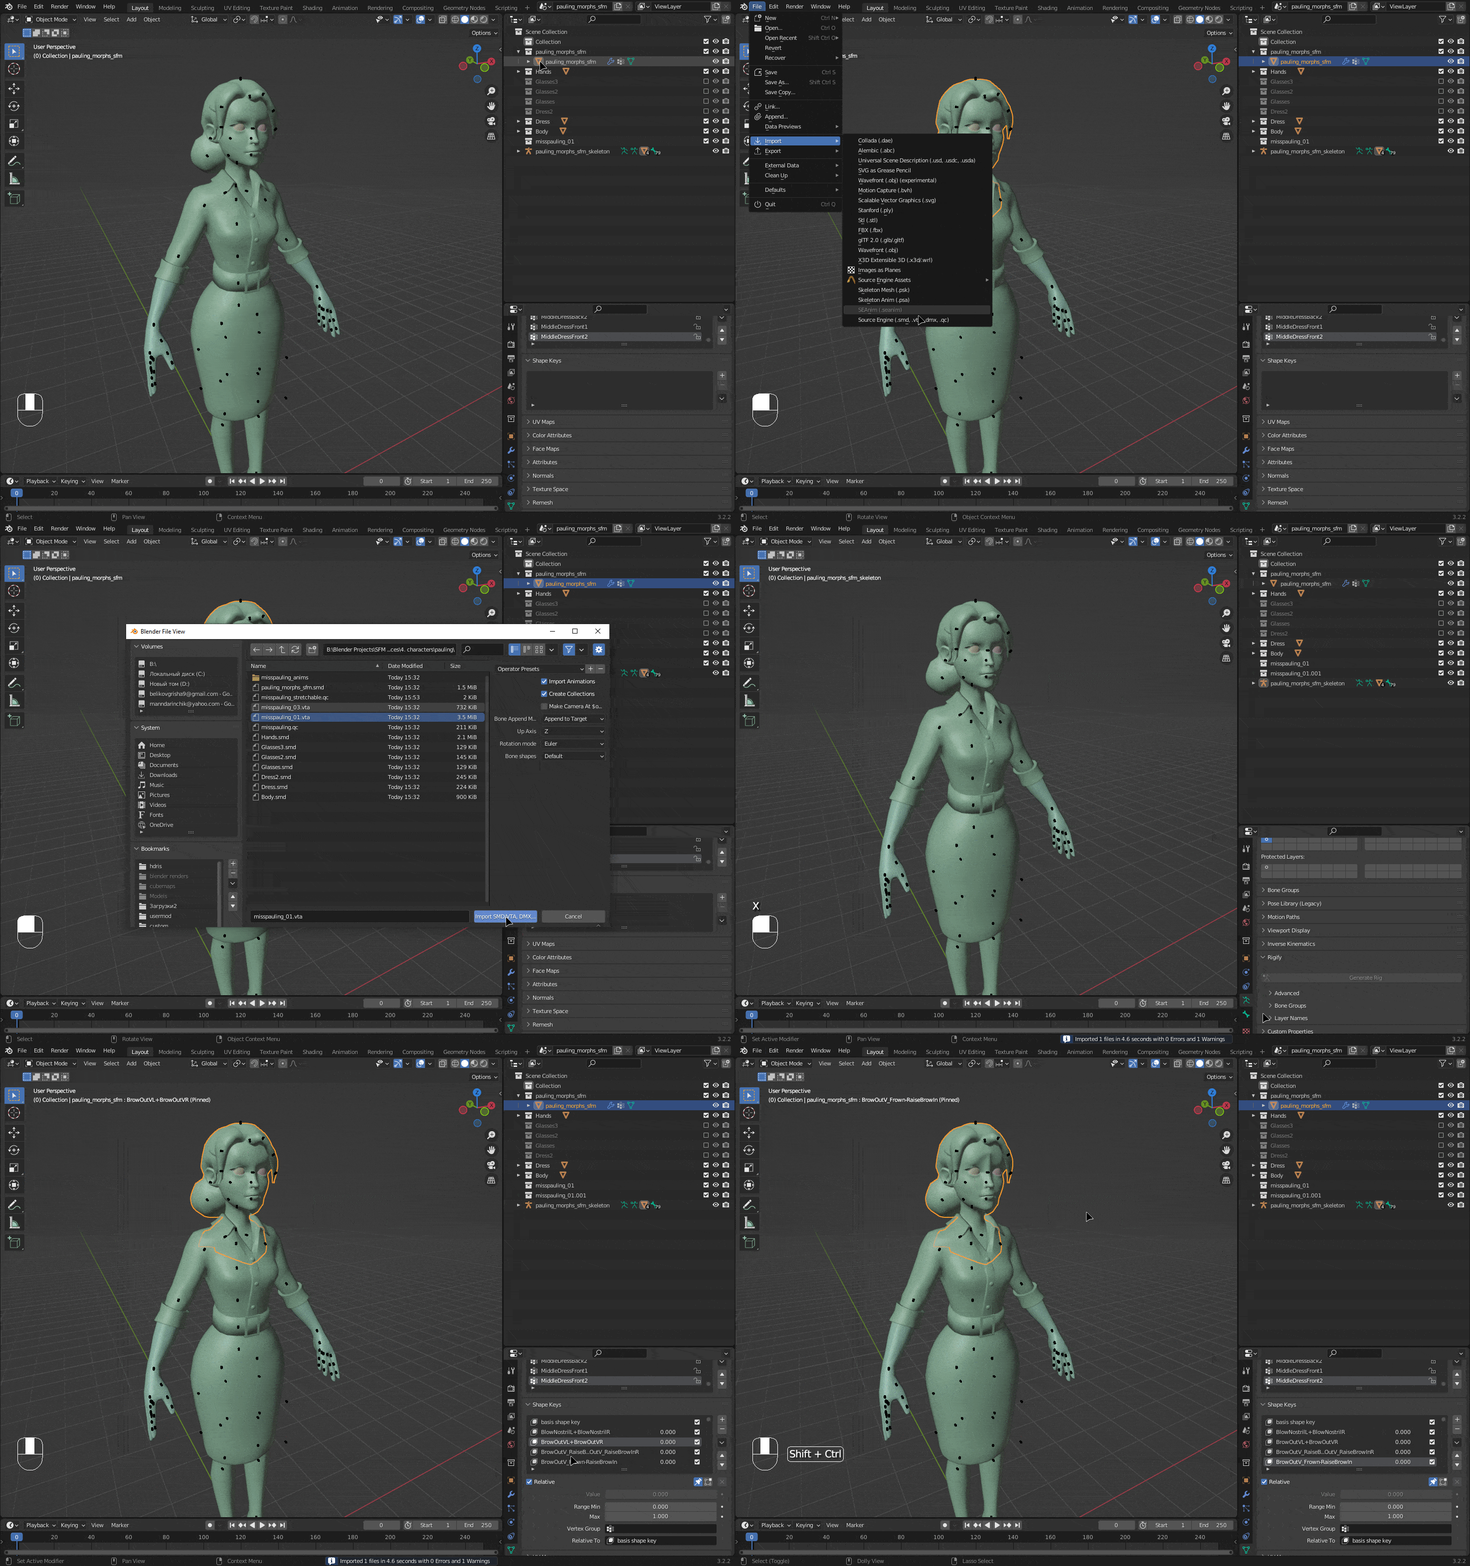
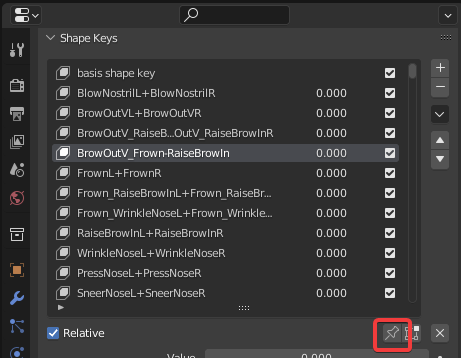 Before doing anything with shape keys, make sure the shape key lock is disabled.
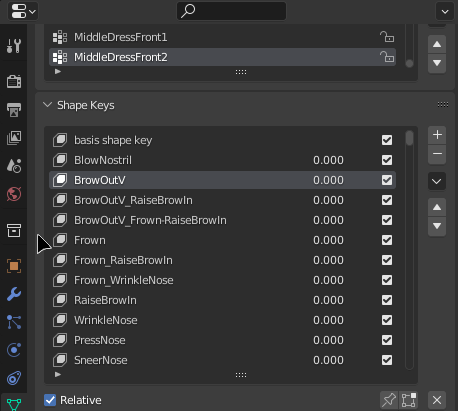 Firstly we need to clean up shape key names. So, for example, "BrowOutVL+BrowOutVR" is just "BrowOutV". This is how Crowbar decompiles stereo shape keys and I'm not sure why.
Click "Clean up Crowbar's stereo shape key names" and the addon will do that for you.
After that you can click "Exaggerate shape keys", which does exactly what the button's name implies. By default it makes all shape keys 10 times stronger, but you can change this number with the input field on the left side of the button.
Working with the head mesh
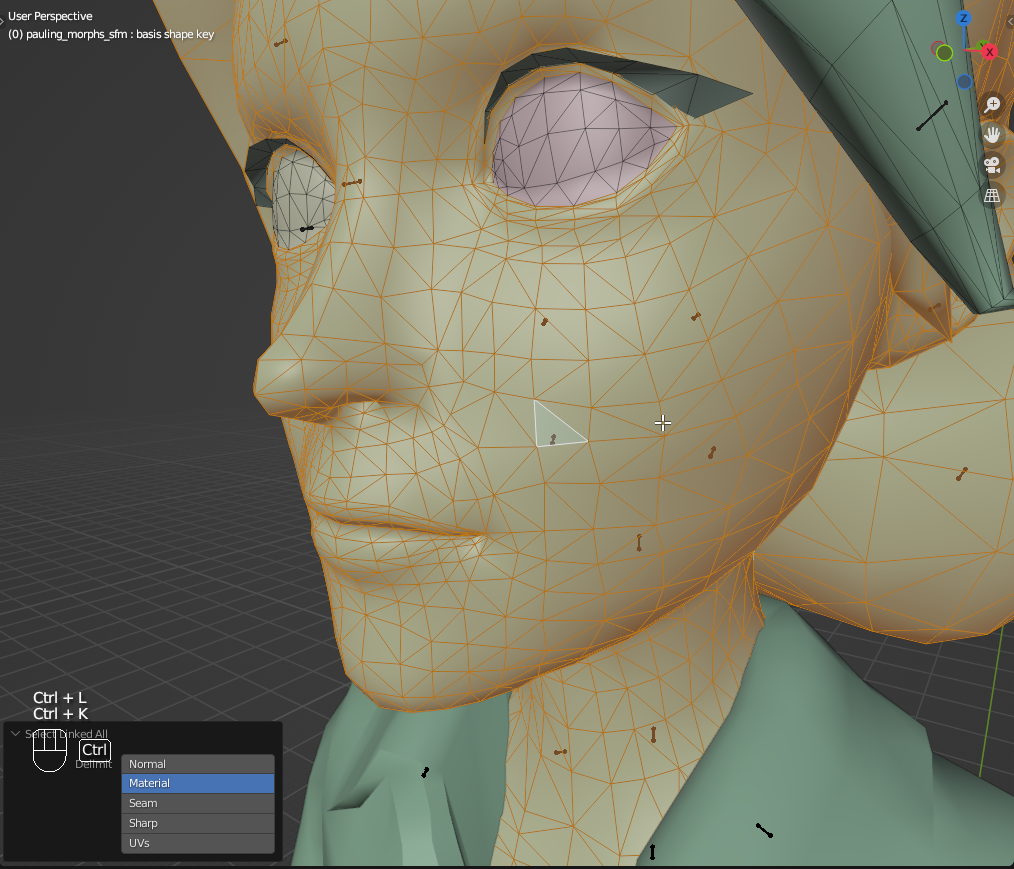 To separate model's head from it's body you need to select the head mesh in edit mode and press P and choose "Separate by selection". You can make a selection in a number of different ways, but the most efficient one is probably linked selection. To perform it you need to select a single face of the head and press Ctrl+L and choose the most fitting selection method in the pop-up screen. As you can see on the screenshot I haven't selected all of the head right away, so I need to perform the same operation on deselected regions as well.
In my case the head was already separated from the body mesh, so I'm not going to do that.
To make a shape key for hiding the eyes we need to disconnect them from the head mesh first. Select the eyes by linked selection using materials by pressing Ctrl+L, separate them from the mesh by pressing P and merge them back to the head by pressing Ctrl+J. Now where able to scale them without affecting eyelids.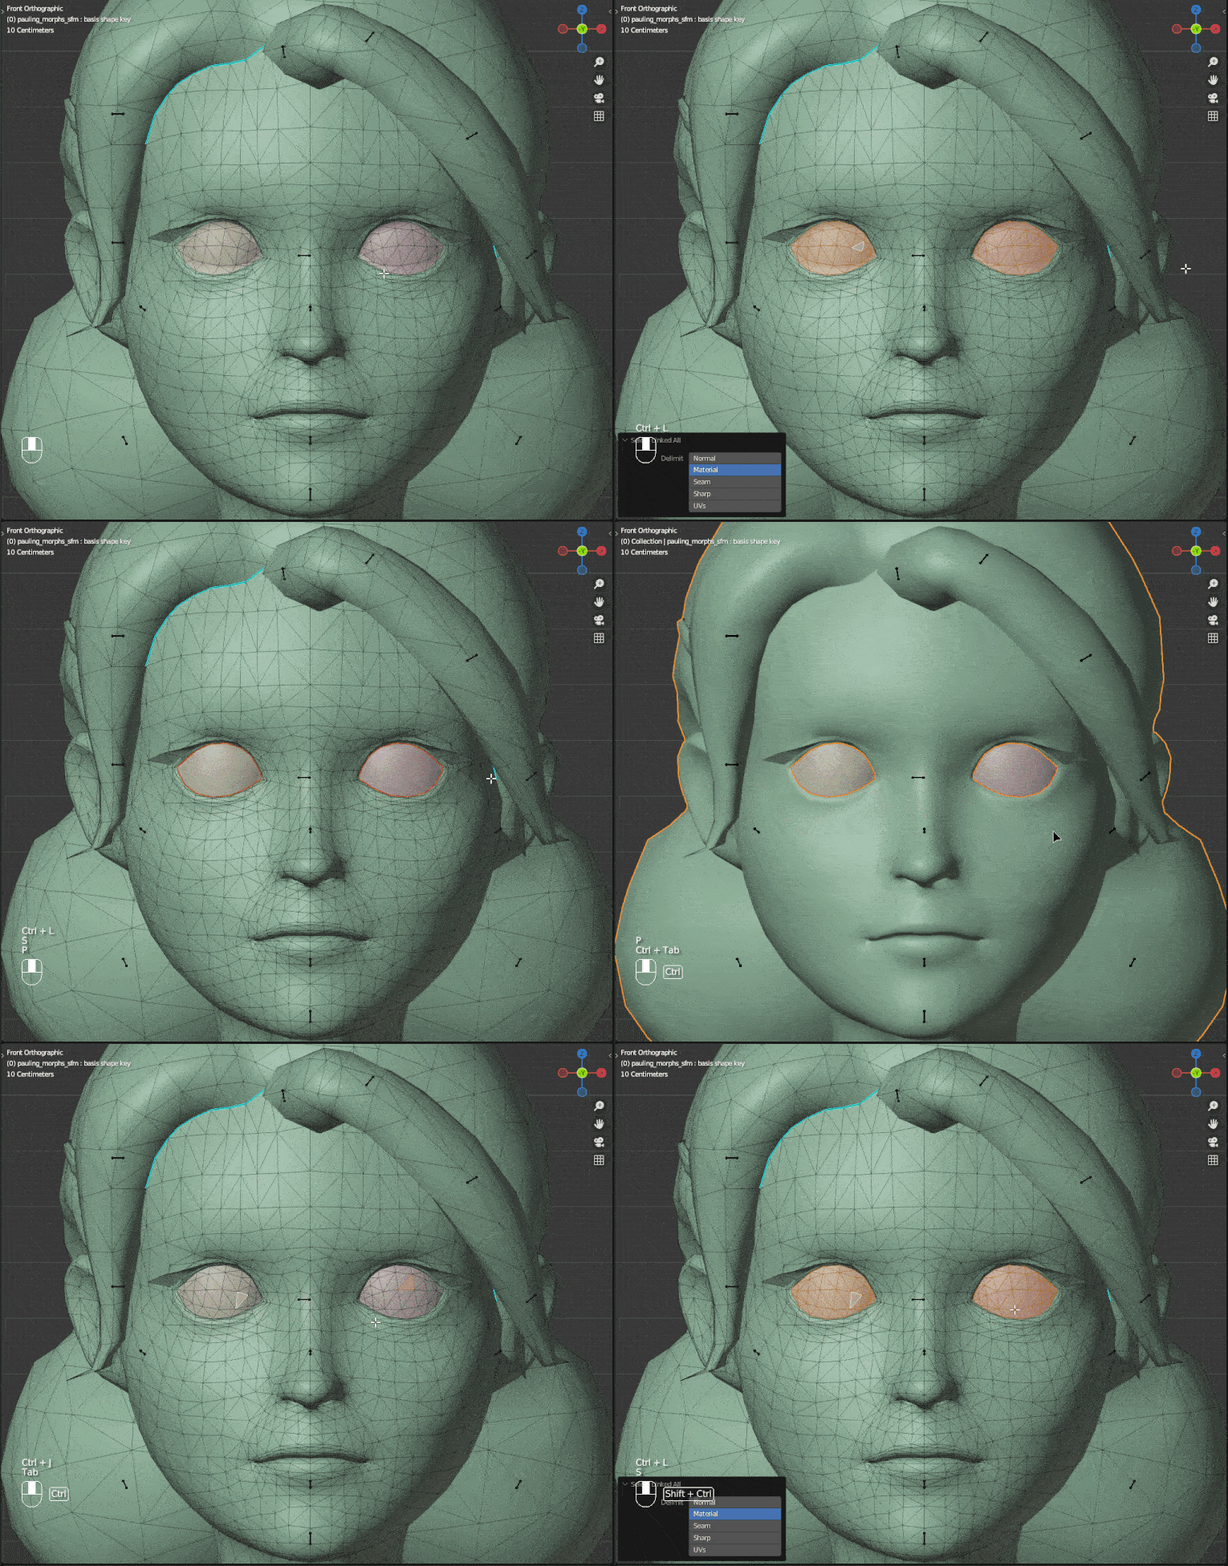
Create a new shape key and call it something like "HideEyes". The shape key name cannot contain any underscores (_) because DMX compilation treats it as an indication of a corrective shape key. Set your pivot point to "Individual origins" by pressing "." on your key board, select the eyes, press "S" on your keyboard and type in 0. This will scale the eyes into a single central point of each eye socket.
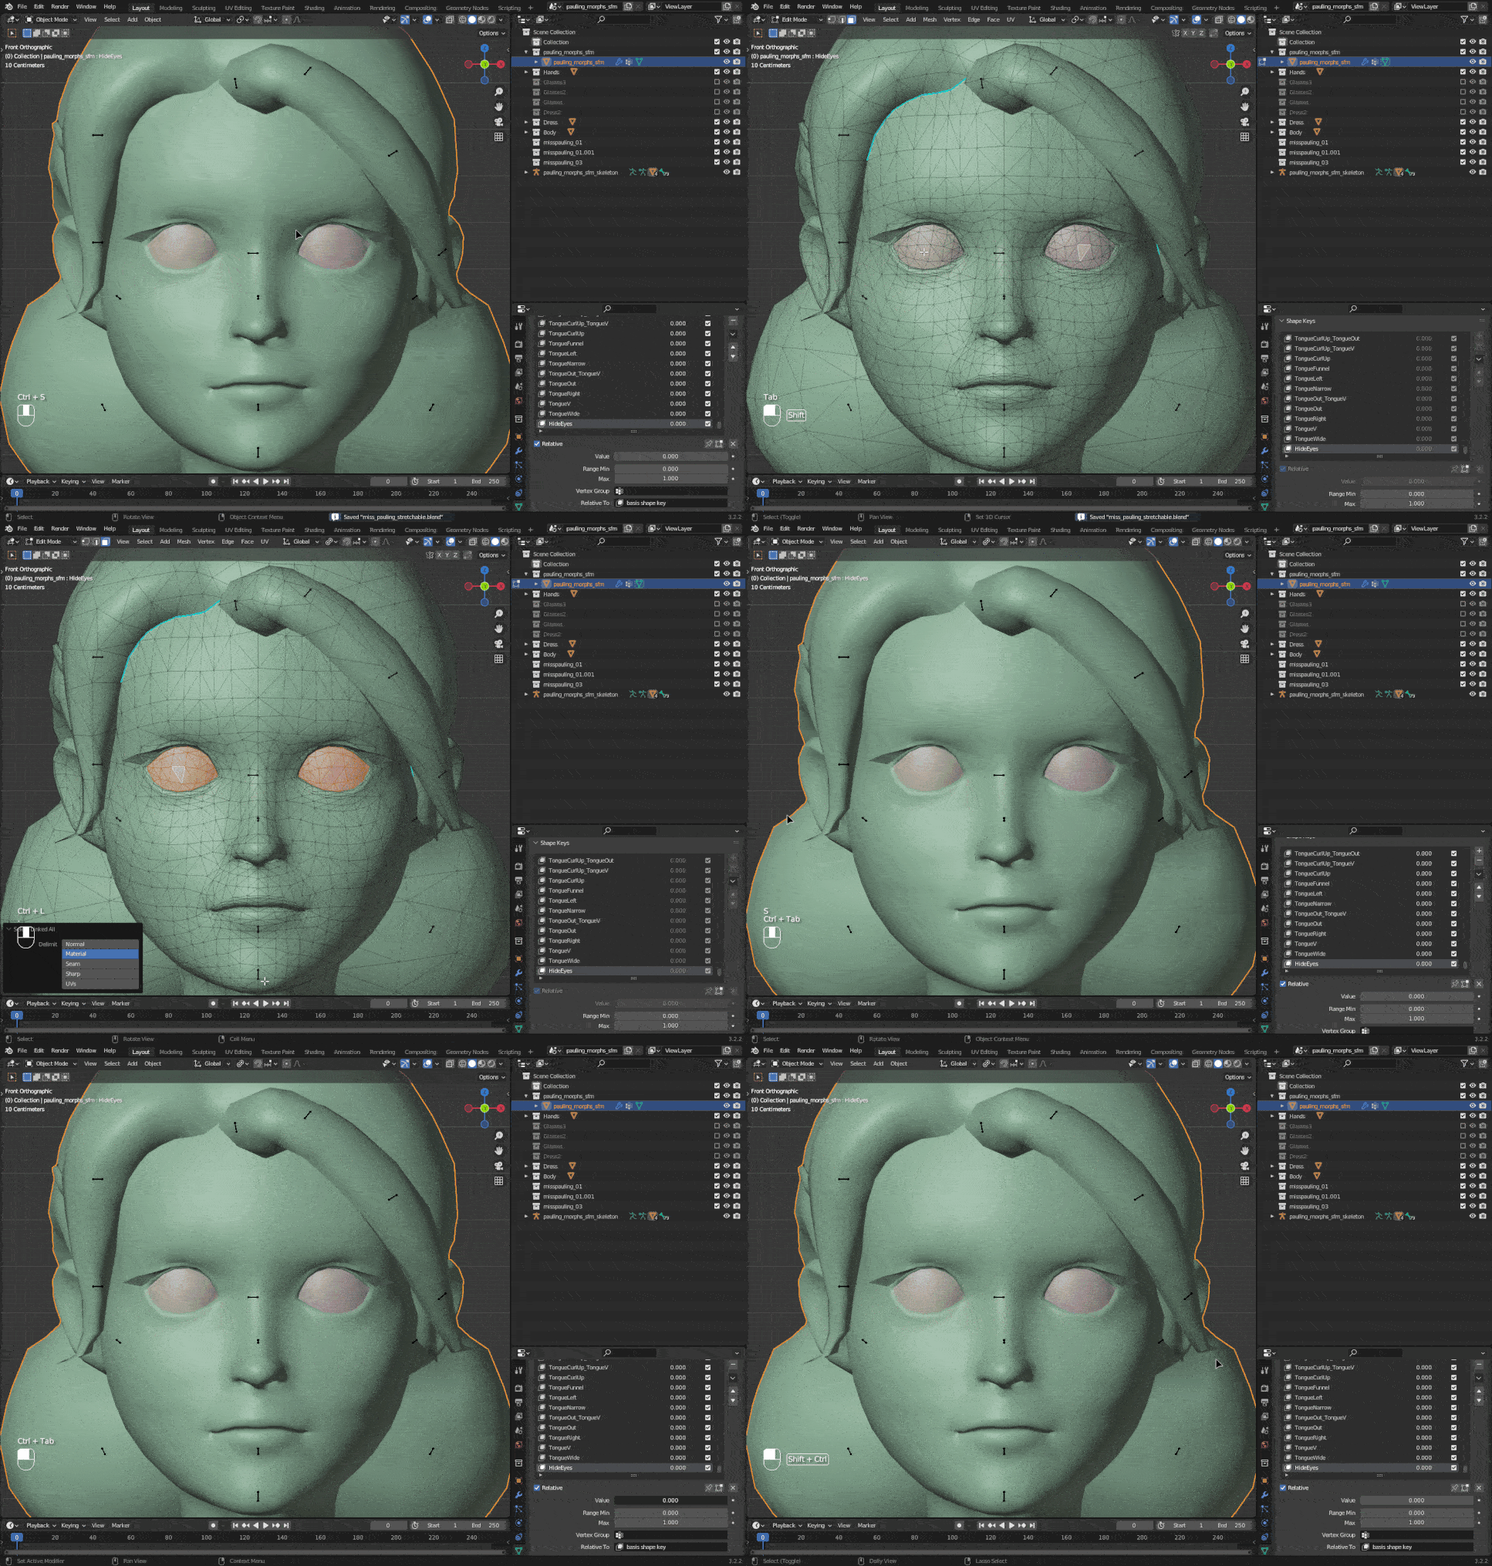 Now you can use this flex in SFM to hide model's eyes when you don't need them!
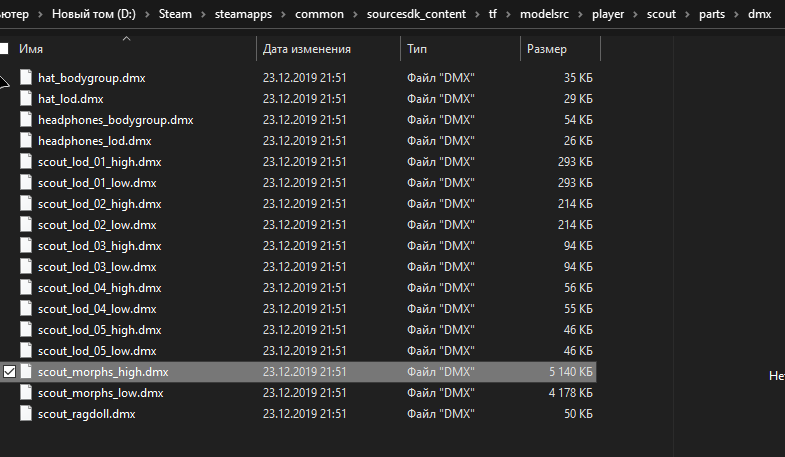
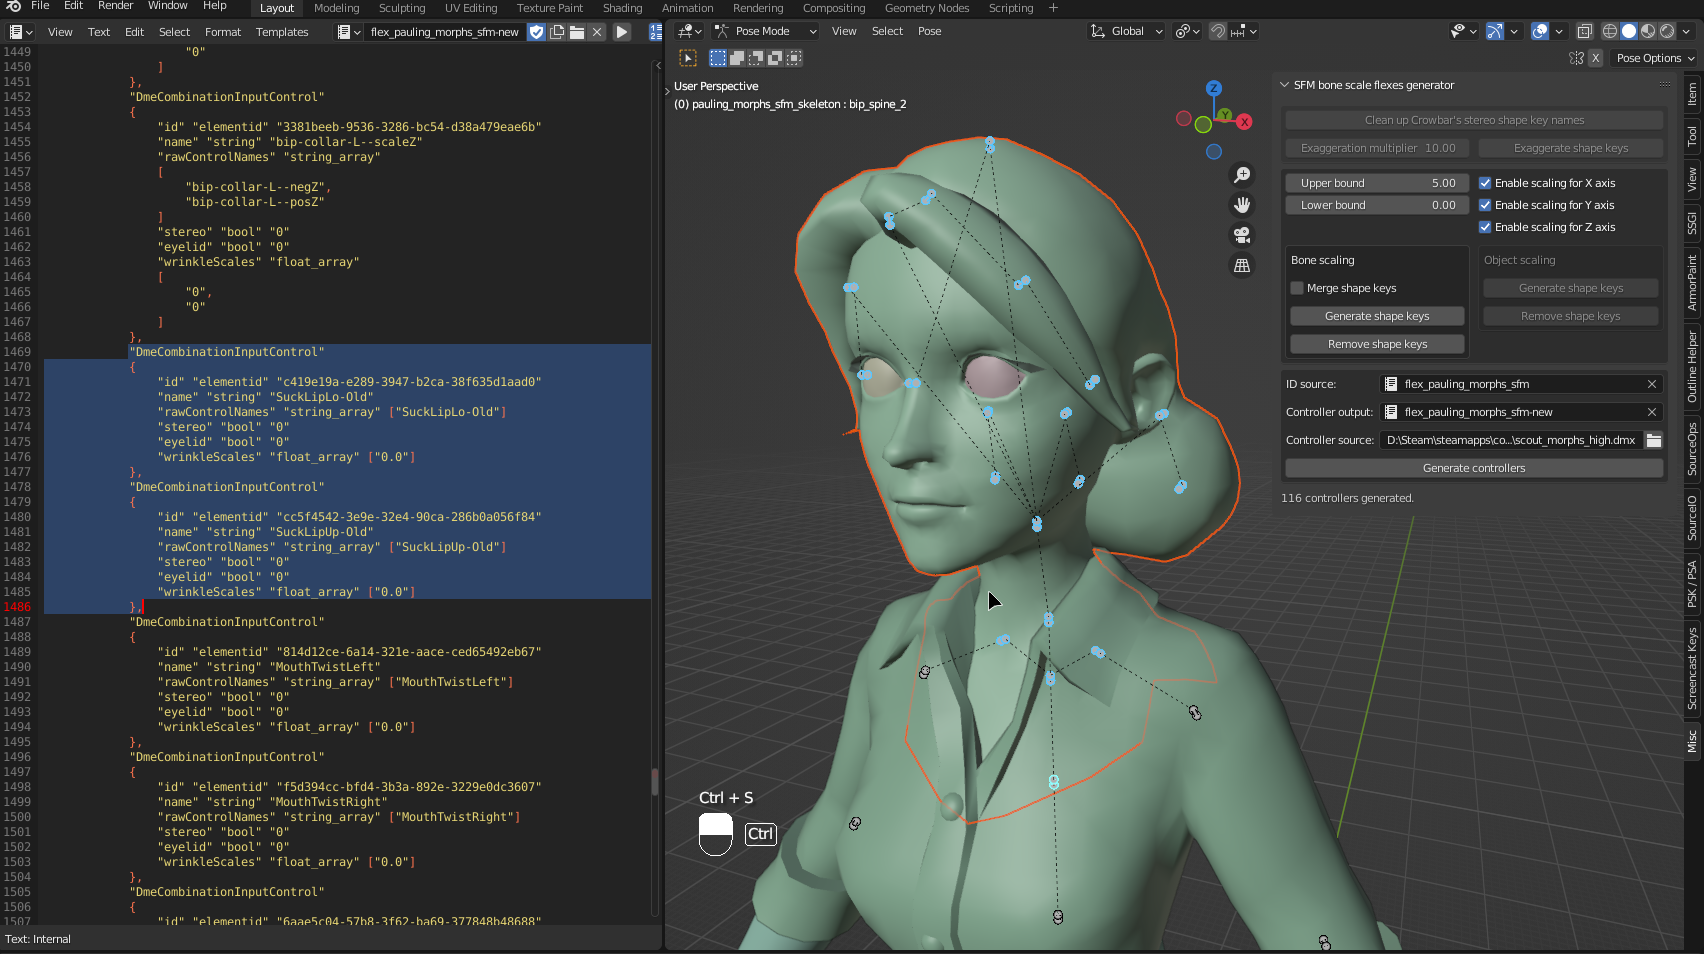 I've selected bones that affect the head and created scaling shape keys for them. I've chosen scout's morphs_high model as HWM controller source and generated new controllers. As you can see, there are more controllers then I can compile, so I have to do some optimization.
Optimizing flex controllers
So, if I had 2 separate flex controllers for "DeflateCheek" and "InflateCheek" that I wanted to merge into a single bidirectional controller, I would
- Delete the latter controller
- Append its shape key name to the "rawControlNames" list of the first controller
- Add a second zero to the "wrinkleScales" list of the first controller
With that covered, let's get back to the Miss Pauling model.
I've skimmed through the generated controllers and noticed some that could benefit from being stereo-enabled (so you can use the Lef-Right slider with it), so I changed their stereo value to "1". Also some of the controllers were obviously meant to be bidirectional, for example:
Working with body groups
if your model has body groups that share flex controllers you have to do some manual work on controller files to make the model compile.
All flex controllers of a model should be declared only once. Any body group's controller file should declare only bones unique to it. Let's go through Miss Pauling's body groups as an example.
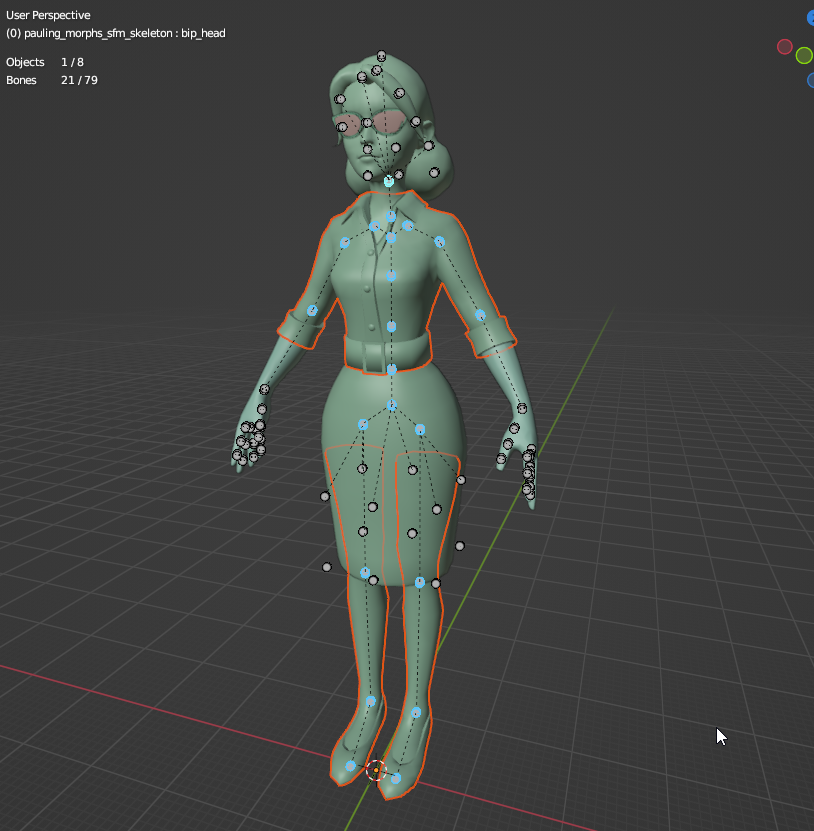 Firstly I create controllers for scaling bones that affect the main mesh of the body model: spine, leg, upper arm, forearm and shoulder bones. That's 63 flex controllers.
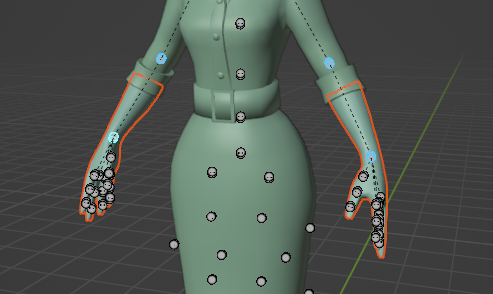 For arms mesh I want to have scaling controllers only for arm and forearm bones, so I generate controllers only for them. Since I already have generated controllers for forearms on previous mesh, I remove them from the generated controllers file. Now it only has controllers for scaling hand bones. That's 6 flex controllers added on top of the total list.
Miss Pauling has 2 dress meshes - one that's controlled only by leg bones and one that can be controlled by additional dress bones. For the first mesh I generate shape only for hip, pelvic and the first spine bones and for the second mesh I additionally generate shape keys for dress bones:
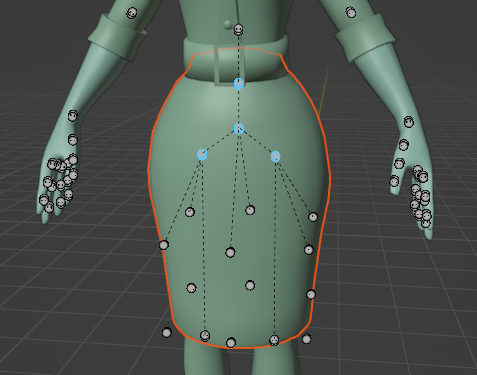
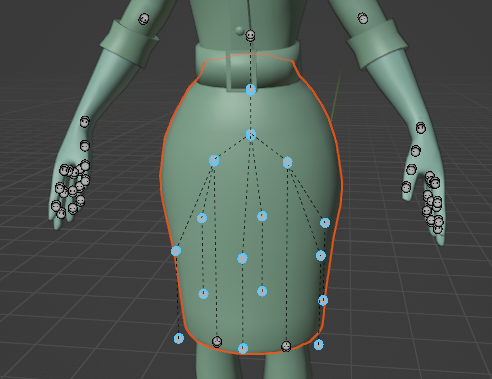 Since I already have controllers for spine and leg bones generated, I removed all controllers from the simplified dress meshes controller file. It now looks like this:
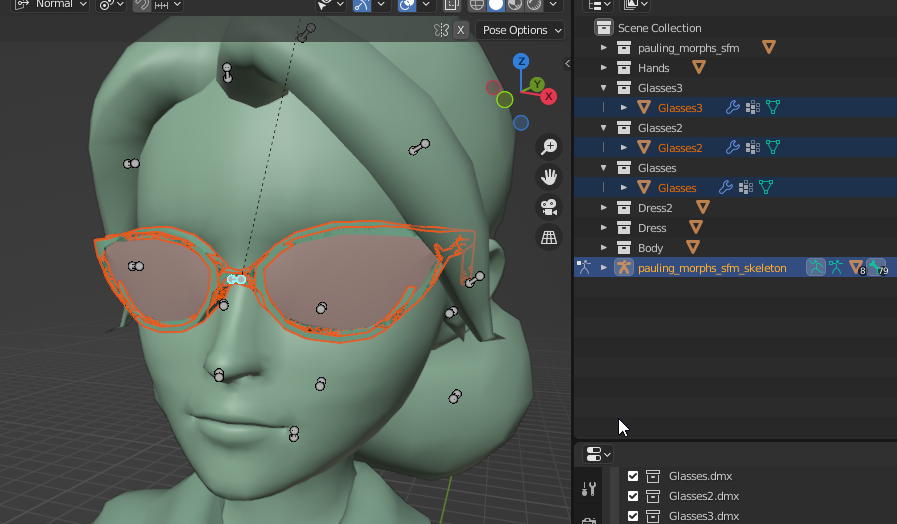 All that's left is the glasses body group. I generate scaling controllers for all 3 glasses variants, then I remove all 2nd and 3rd meshes controllers, since they are already defined on the first one. That's 3 more total controllers.
I've created 72 controllers in total, which is well below the 101 limit, so I'm good to export meshes and compile the model!
Compiling the models
Make 2 copies of the decompiled .qc file and rename them to something like "head_stretchable" and "body_stretchable". Let's start with the head one.
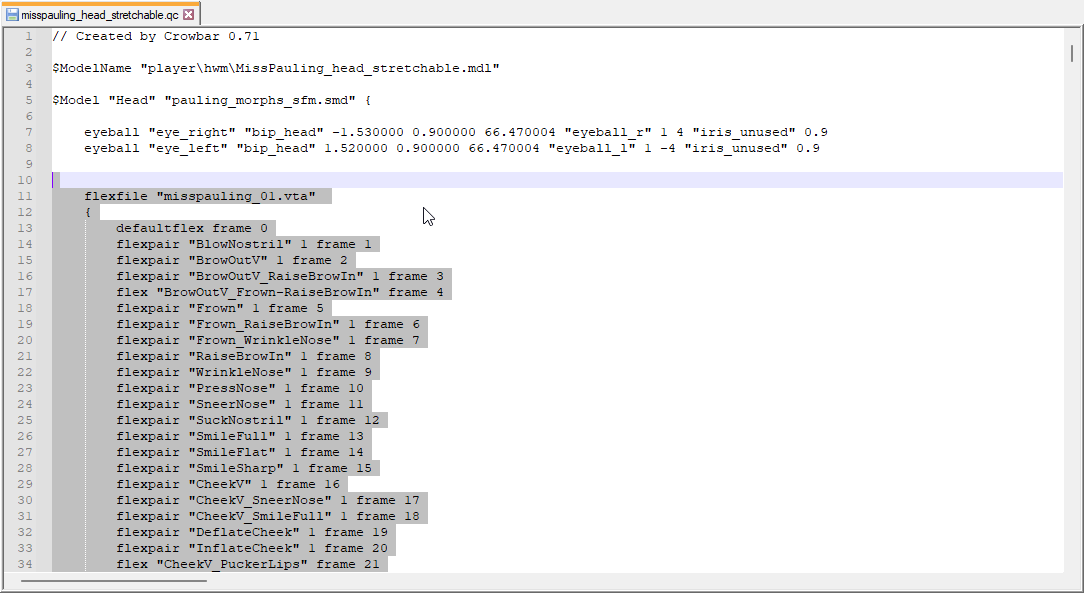
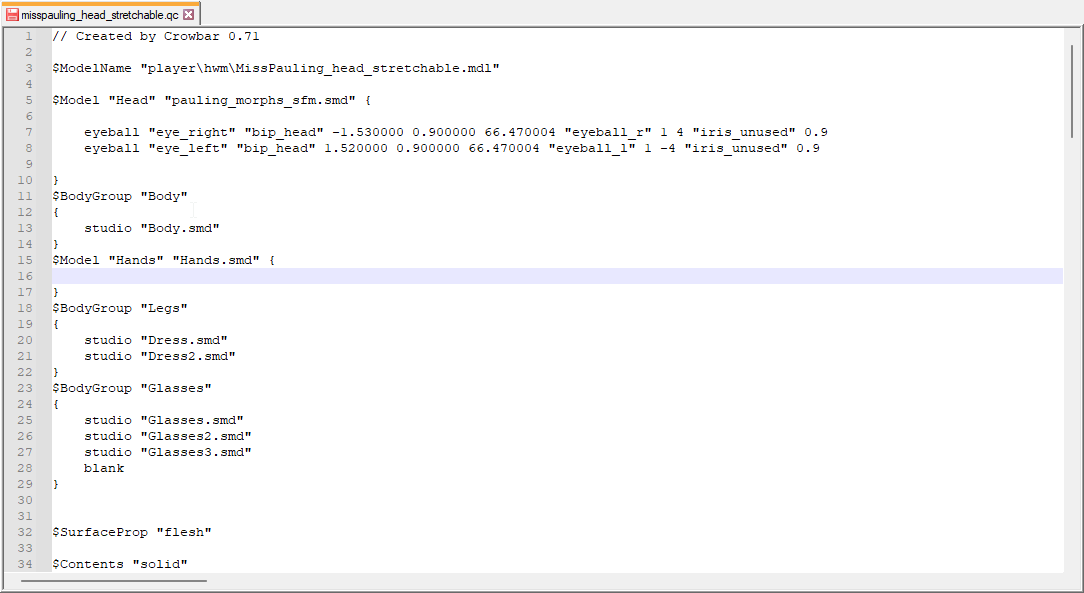
Remove all model declarations except for the head one, replace the SMD model reference with the DMX head model you've just compiled.
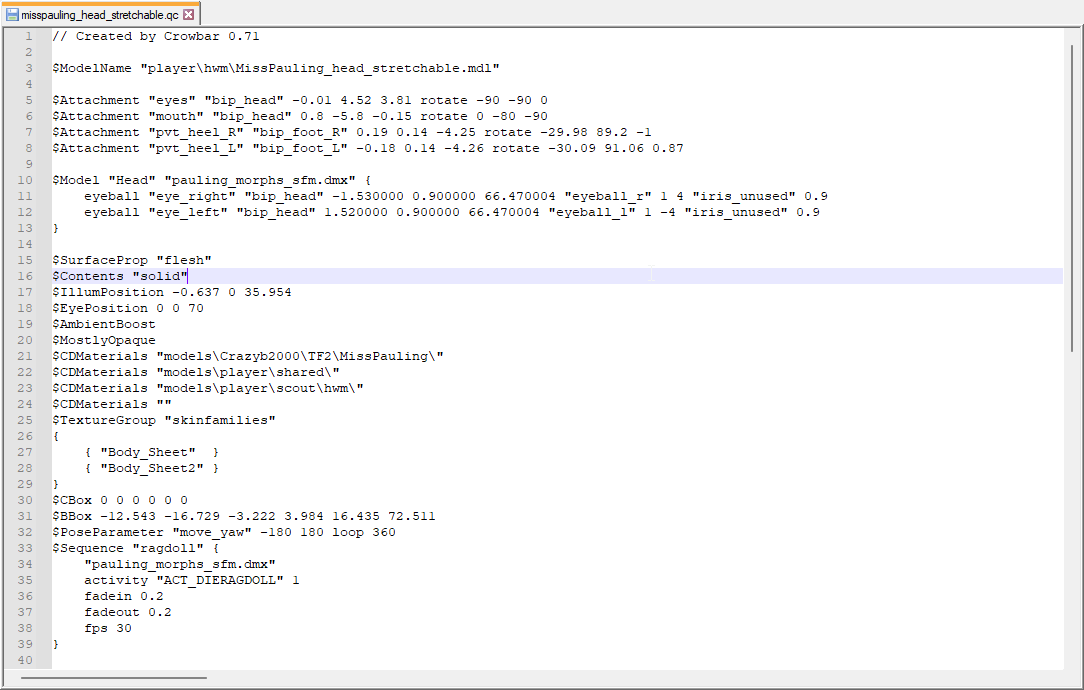
Now all that's left to do is to compile the model! You may notice that it has a bunch of bones that you don't actually need:
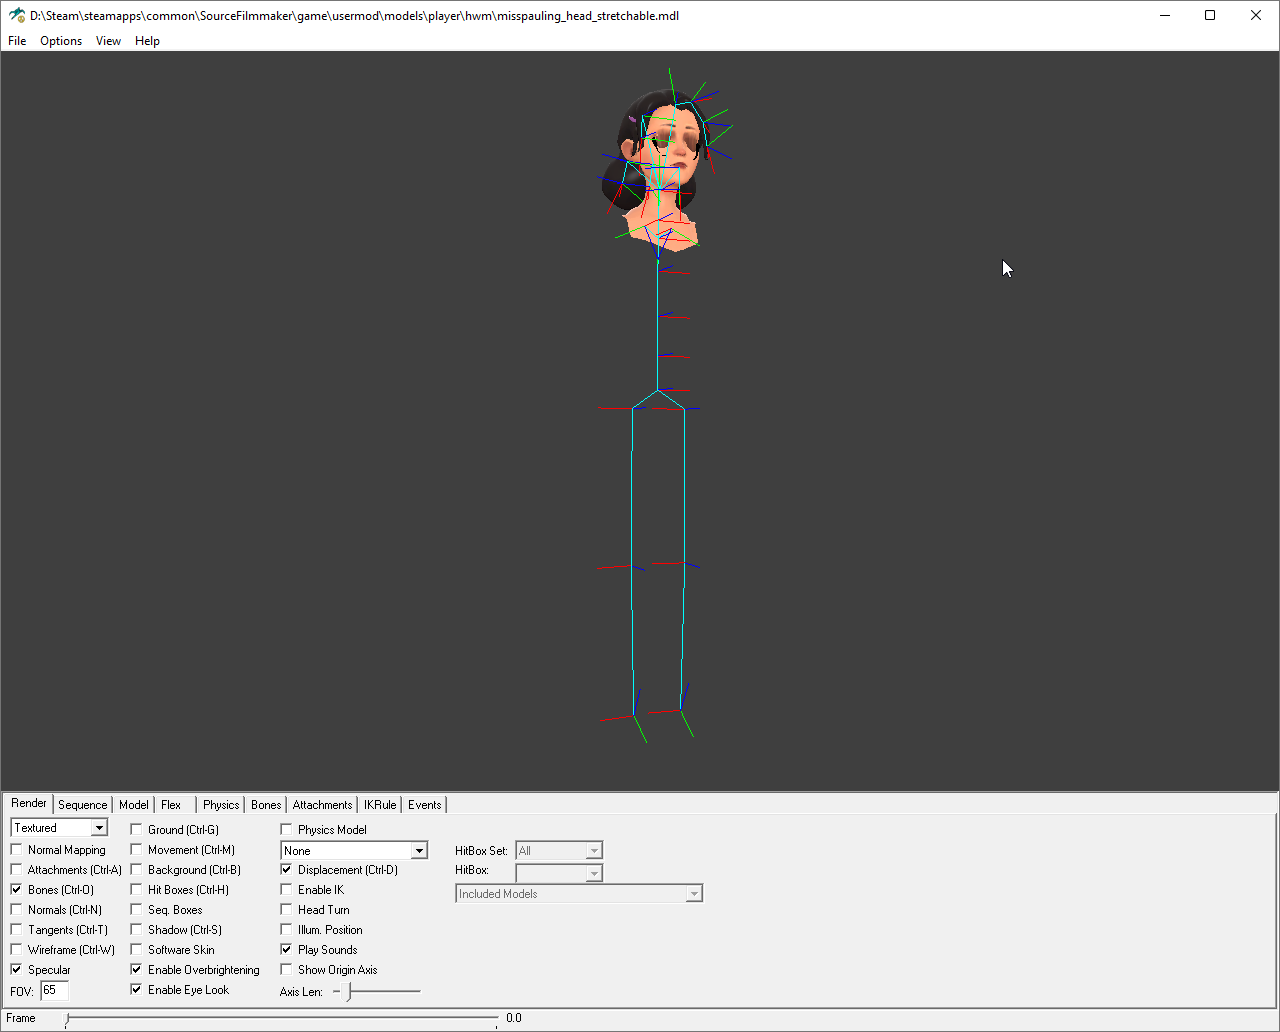
You can fix this by creating a separate copy of the armature for the head model and removing all unnecessary bones on it. Don't forget to parent the mesh to the new armature.
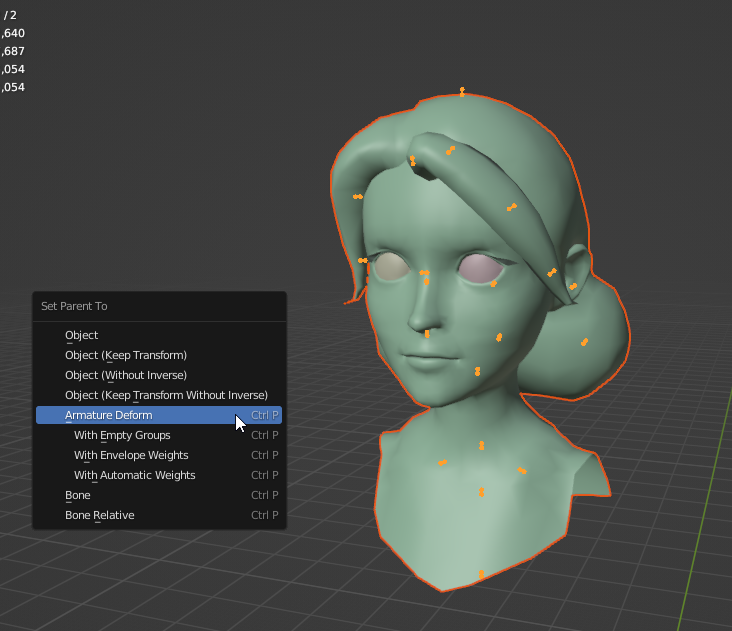
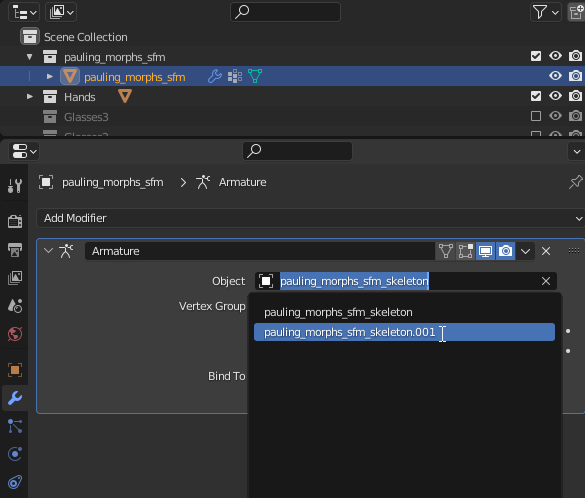 Reexport and recompile the model. You can preview your flex controllers in HLMV in the Flex tab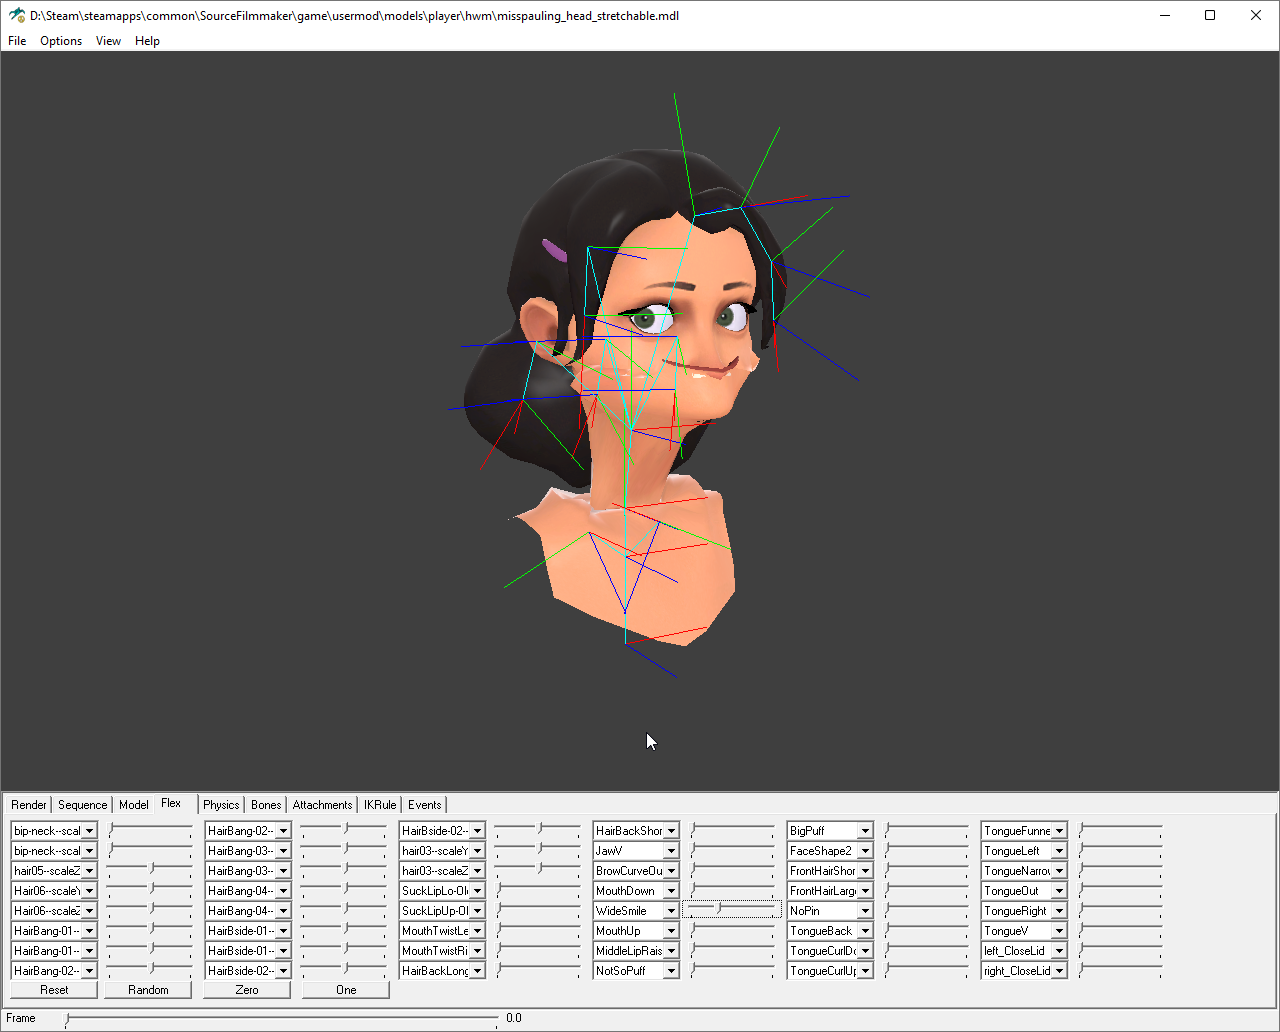
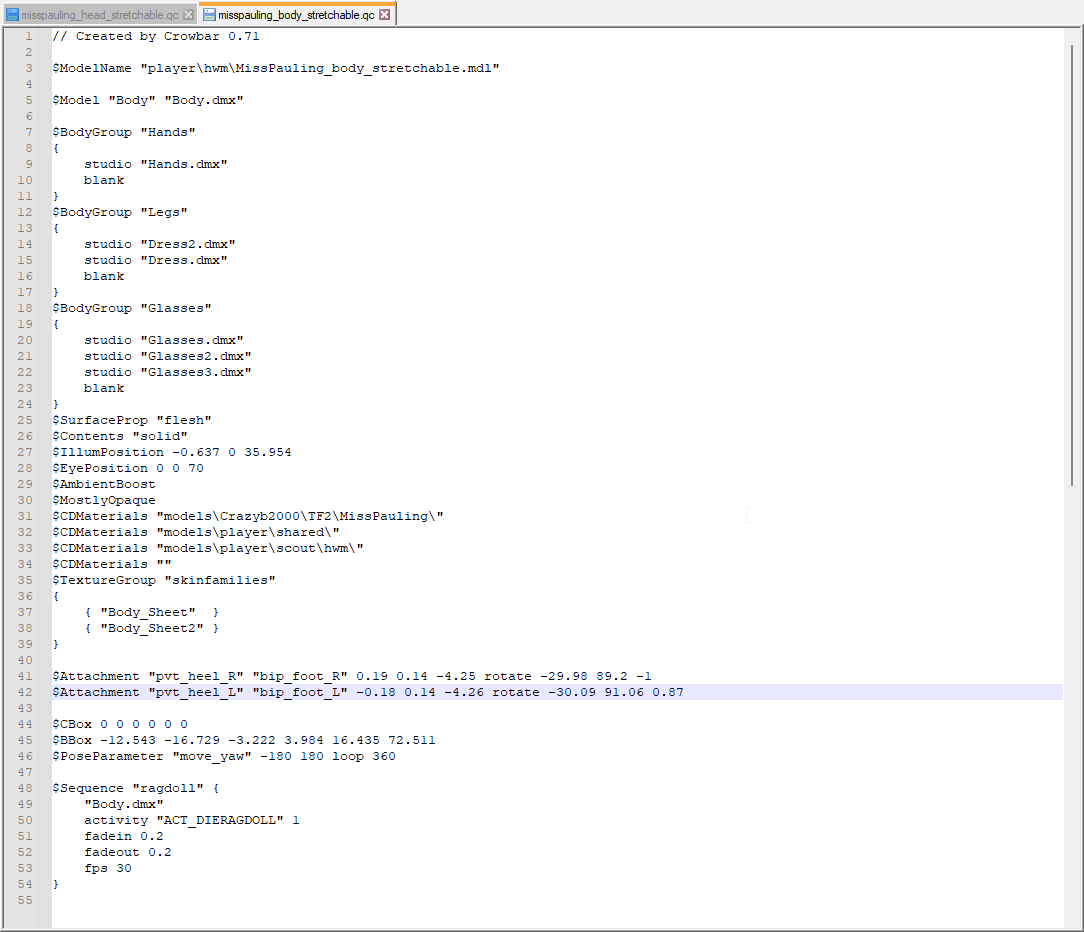 Inside the body copy of QC file, once again perform usual cleanup steps. After that, remove head the body group (if you have one), update all model references to DMX models you just exported and remove eye attachments.
Compile the model and open it in HLMV. Note that models with defined controllers should go first in multiple-choice body group lists. In my case Glasses.dmx should go first in the glasses body group list because I gave it the glasses bone scaling controllers and left Glasses2.dmx and Glasses3.dmx with no controllers.
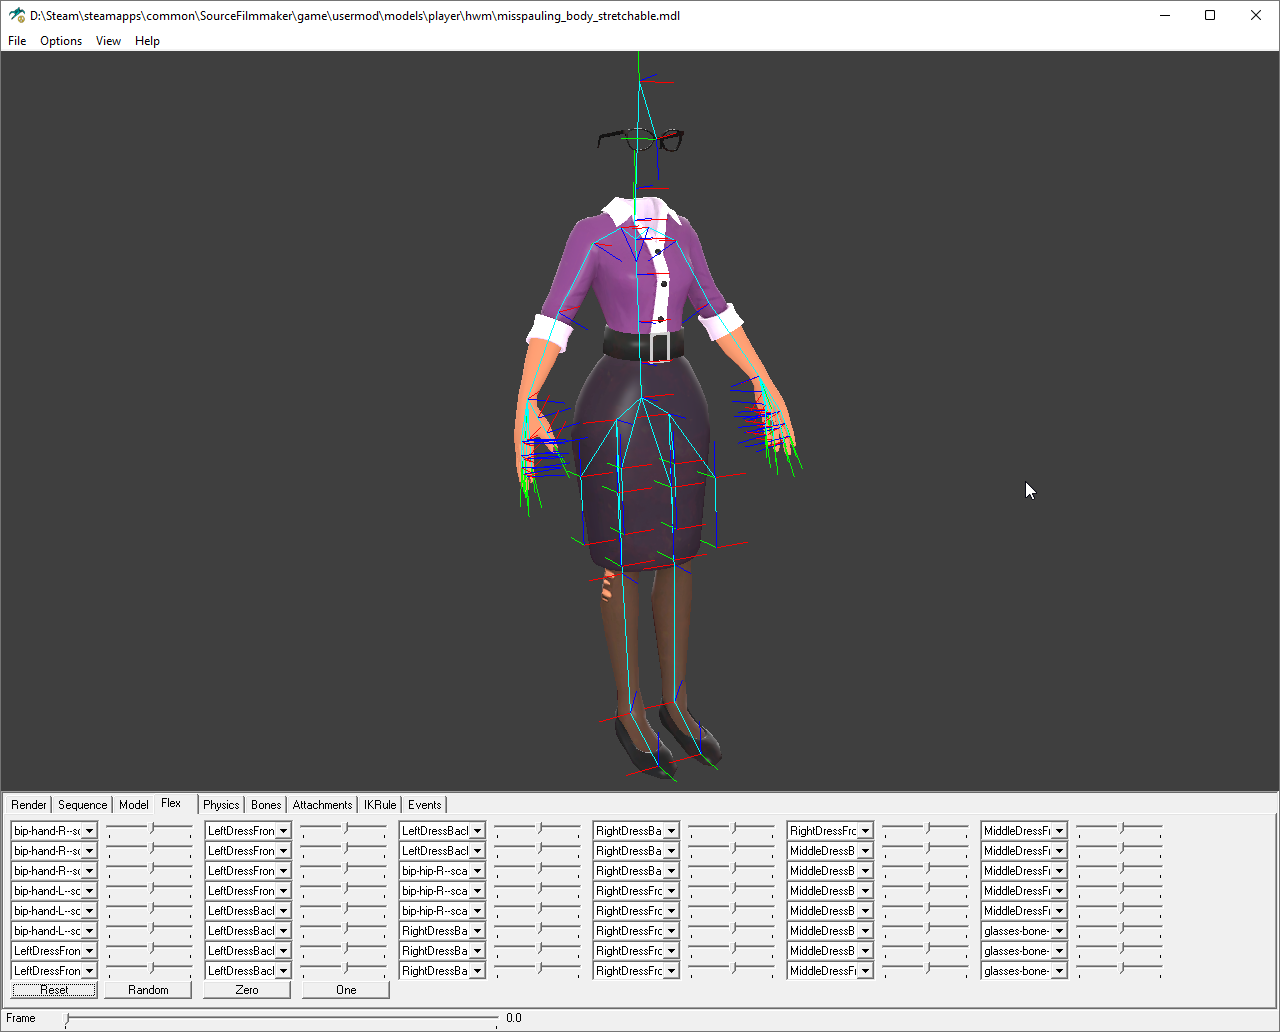 Check if head and neck bones are missing. If they do, add $bonemerge parameters to the QC file: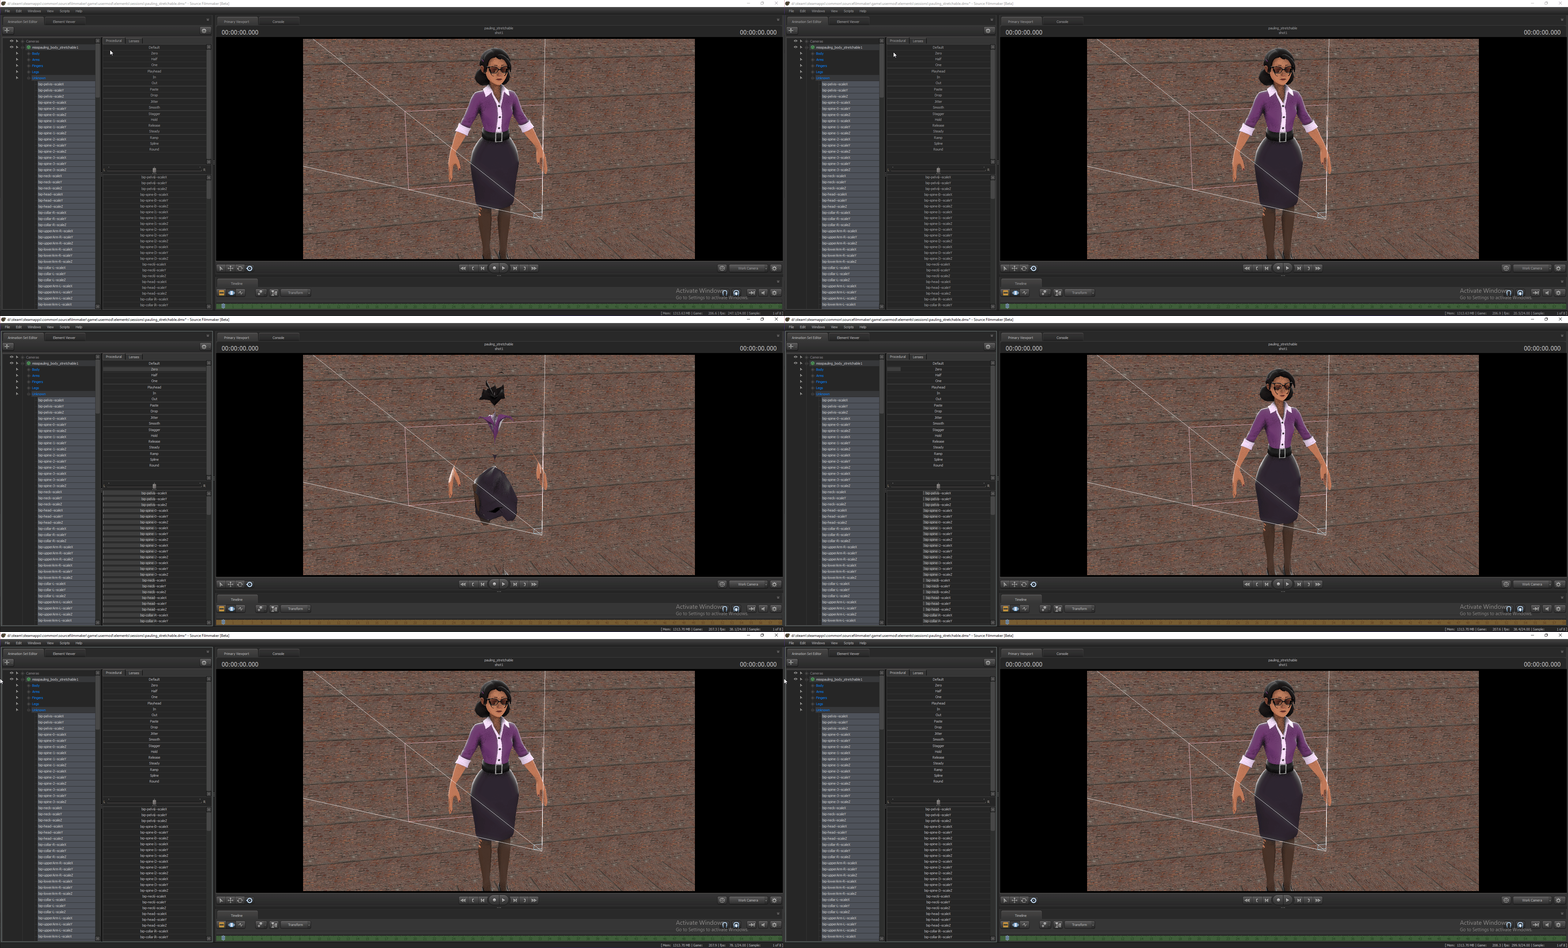
Thanks for reading
Have fun with your stretchable models!
- Changing Textures Using Material Overrides★ 5 (1.4k)41k views2.7k ♥5 minUpdated Jul 26, 2014
- Manually Updating TF2 Content★ 5 (1.3k)35k views1.9k ♥2 minUpdated Nov 26, 2025
- The Fundamentals of SFM: For Beginners★ 5 (1.3k)25k views3.3k ♥55 minUpdated Apr 29
- Ваш первый постер★ 5 (1.1k)22k views2k ♥5 minRussianUpdated Oct 22, 2024
- Getting Gmod Workshop stuff too SFM★ 5 (510)15k views1.3k ♥1 minBulgarianUpdated Aug 4, 2015
- Animation Guide★ 5 (704)14k views1.9k ♥6 minUpdated Apr 9, 2023



- Upgrading to PremiumTeam Fortress 2★ 5 (20k)1441k views11k ♥6 minUpdated May 11, 2022
- No More Room in Hell Official ManualNo More Room in Hell★ 5 (2.8k)569k views2.1k ♥29 minUpdated Apr 22, 2019
- NMRiH Community Hosting GuidesNo More Room in Hell★ 5 (526)351k views653 ♥1 minUpdated Aug 10, 2022
- ULTIMATE GUIDE FOR GAME DEV TYCOONGame Dev Tycoon★ 5 (5.8k)326k views10k ♥4 minUpdated 23 Jan, 2014
- How to 'Git Gud' Soon™MORDHAU★ 5 (2k)318k views3k ♥68 minUpdated Nov 16, 2024
- Лучшие кооперативные игры SteamPAYDAY 2★ 5 (1.5k)315k views2.1k ♥56 minRussianUpdated Apr 27, 2025






This guide was created by its original author on the Steam Community. Are you the author and want it removed? Request removal.